
:max_bytes(150000):strip_icc():format(webp)/how-to-increase-internet-speed-5181475-b6fd84098c634a04a6934302184c5b1b.jpg)
Updated Create Intro Video with Flixpress
Create Intro Video with Flixpress
Are you tired of finding the right tool to create intro videos for your YouTube channel? Fret not. Your search might end here.
No doubt, intro videos have the potential to make a first impression on viewers, and you know how they say that the first impression is the last impression. Keeping that in mind, you wouldn’t want to ruin the first impression of your videos now, would you?
Making intro videos can be an actual hassle, especially if you don’t have the right video editing tool at your disposal. What if we told you that Flixpress is the key to unlocking new doors for your YouTube channel and taking it to the next level?
So, without further ado, let’s dive in and look at the features that make Flixpress an excellent tool for creating intro videos.
The 6 Key Features of Flixpress
Listed below are the features that make Flixpress stand out among the competitors.
1. HD Downloads
It is an established fact that the quality of the video is the first factor for the audience to judge, and having a bad quality video uploaded to a YouTube channel that you wish to grow is not really a wise choice.
Flixpress offers you high-definition downloads that are perfect for viewing your video on the web and broadcasting it on television.
2. Customizable Templates
Having templates that can be customized as per your needs really makes the task easier. Flixpress offers a variety of templates that give you the option to enter text in some fields. This text is then beautifully rendered out in the final edited video.
3. Audio Tools
Adding the right audio can leave a significant impact on the overall aesthetic and impression of the video. It is perhaps one of the prime factors that decides whether the audio is edited well or not.
That said, Flixpress allows you to incorporate any custom audio file into the video. You will just be required to upload that audio in mp3 format, and that’s all. Other than that, you can add several sound elements as well.
4. Multiple Formats
If you’re someone who owns a Mac operating system and wishes to export the video in a MOV format, let us tell you that Flixpress can transcode the video to match your needs. However, along with the MOV format, you also have the option to export the video in the standard MP4 format or a WMV format as well.
5. Stock Video Library
Yes, you read that right. Flixpress is dedicated to offering you a comprehensive and affordable video product solution by providing a stock video library which means you can bid farewell to expensive stock footage sites.
It is to be noted that the team at Flixpress is fully committed to growing the Copyright-Free footage and background library, and the size of the library grows with the passing time.
6. Preview
Being one of the spotlight features of Flixpress, this one really makes it stand out. With this feature, you won’t have to wonder what your video would look like as you can render a free watermarked preview. If you’re working for someone, you can send this preview to your client or boss for approval and tweak data before the final render.
Other than that, these previews can also be used as templates if you wish to duplicate the same video with variable data.
How to Make Intro Video With Flixpress?
Creating intro videos with Flixpress is a pretty straightforward job, and the steps listed below aim to streamline the Flixpress intro making process for you.
Step1 Open the Webpage
Start off by opening the web browser on your PC or laptop and accessing the homepage of Flixpress by following the link below.
Once you’re at the homepage, you need to register your account by clicking on the Register button.

Step2 Signup
Upon clicking on the register button, you will be redirected to another page that will provide you with two options to signup on flixpress online video maker.
The first option allows you to sign up with your Google account, and if you opt for it, your Flixpress account will be linked to your Google account, and the credentials will be filled out automatically.
However, the second option asks for manual entry of your personal information that includes your first name, last name, email address, and password.
You can select either of them and then press the Register button below.

Step3 Knowing the Subscription Plans
After the successful completion of the registration process, you will get to the main page of Flixpress, where all the templates will be visible to you, and the type of your plan will also be visible.
Initially, it will be a free plan, and you will be allowed to edit a 2 min video in it. However, you have the option to upgrade to a paid plan where a lot of other features will be unlocked, and you can edit more videos of greater lengths as well.
Step4 Sorting and Filtering the Templates
When you’re on the main page, all the templates will be visible to you, and these will include paid ones. If you’ve not bought a paid subscription, you will have to sort out the flixpress free templates, which can be done in two ways.
- Click on the “Sort by” drop-down and choose the option that says “Free First”. This will put all the free templates at the top.
- Click on the “Show for plan” drop-down and select the “Free” option to only view the free templates.

Step5 Customize the Template
Once all the free templates are visible to you, you can select a template that you like. Then, you’re required to click the “Customize Now” button to customize the video.

Step6 Upload Image
Now, you will be prompted to upload an image from your PC or laptop so click the “Upload Image” button and choose the image you want to upload.
Once you’ve uploaded the image, click on “Proceed” button and crop the image to fit the subtitles.

Step7 Customize Text, Add Audio, Change Resolution & Create Preview
Even though the image subtitle will be made, you will still have the option to swap the image if you change your mind. Other than that, select the main title of the intro video and the color of the text as well.
Moreover, you can add audio as per your need and preference, and you can choose a resolution for the intro video too.
Once everything is done, create the preview to have a final look before rendering it.

What are the downsides of Flixpress?
While the Flixpress intro maker is a great choice for making intro videos, it may miss out on a few features. Other than that, individuals who have used Flixpress complained about the bad customer service that they offered, even to those who had signed up for the membership. Now, that can be quite frustrating, right?
We found a few major missing in Flixpress.
- The number of templates is limited.
- The content is rarely updated.
- The customer service they offered is poor. People can’t get help with their problems, especially when those who sign up for membership want to cancel their subscription.
What if we were to tell you that there is an even better and professional tool that Flixpress?
Filmora – An Alternative to Flixpress for Computer
As it turns out, Filmora happens to be one of the best video editing applications that allows you to make top-level and professional videos. It tends to have an intuitive interface and a great variety of advanced editing features, providing extended accessibility and ease for the users.
While there are limited templates on Flixpress, Filmora offers nearly 400 templates, therefore, providing the users with a wide range of option. That isn’t where the list of pros end as unlike Flixpress,
Filmora continuously introduces new sets of features and templates, taking the user experience to a whole new level. The filmora team is committed to solving inconveniences for users, only to bring a better experience.
Let’s move forward and look at how you can make intro videos with Filmora.
How To Make Intro Video With Filmora?
Below are the steps that you need to follow to make an intro video with Filmora.
Free Download For Win 7 or later(64-bit)
Free Download For macOS 10.14 or later
Step1 Launch Filmora and Add Background
The first step is to launch Filmora and head to the Media tab at the top. Then, select the Sample Colors category and add any color you wish to use in the background of your video.

You can upload any background image or video clip of your choice by selecting the Project Media category as well.
Step2 Add Audio
When you’ve added the background, it will be time to add audio to the intro video. For that, can you use the inbuilt audio library of Filmora and select any audio you find suitable for that matter. However, it is essential to keep the background and audio at the same duration.

Step3 Add Effects
Filmora offers you an Effects library from which you can choose any effect to add to your video as well. The playback duration can be adjusted using the right handle of the track in the timeline, and the Effects track can be double-clicked to customize the appearance as needed too.

Step4 Export
Finally, when you’re done with the editing phase, it will be time to export the video. For that, click Export from the top-centre area of the interface, opt for your preferred format and adjust other preferences such as framerate, destination location, resolution etc.

Frequently Asked Questions
Below are the FAQs related to YouTube intro videos.
1. What Is The Best Free Intro Maker?
To create an intro that impresses your audience, you will have to use the best intro maker as well. It isn’t vital for this intro maker to be paid as there are many free intro makers out there that do the job efficiently. Considering the flexibility and features that it offers, Filmora is perhaps the best intro maker out there.
2. How Can I Make a Professional Video Intro?
Making a professional video intro doesn’t require you to have top-level editing skills, as it can be made using custom templates offered by several video editing tools as well. In fact, Filmora offers a variety of templates to its users, and these templates can be customized as well.
3. How Much Does a YouTube Intro Cost?
Fortunately, a YouTube intro doesn’t cost a dime and can be made without paying anything using tools like Flixpress and Filmora.
Summing Up
All in all, intro videos play a vital part when it comes to impressing the audience and leaving an impact on them. Therefore, these videos shouldn’t be compromised and should only be made with the best tools out there. Flixpress and Filmora happen to be the best ones, and to offer you ease, we’ve listed the steps that you can follow to make your own perfect intro videos.
Free Download For Win 7 or later(64-bit)
Free Download For macOS 10.14 or later
- Filmora – An Alternative to Flixpress for Computer
- How To Make Intro Video With Filmora?
- Frequently Asked Questions
The 6 Key Features of Flixpress
Listed below are the features that make Flixpress stand out among the competitors.
1. HD Downloads
It is an established fact that the quality of the video is the first factor for the audience to judge, and having a bad quality video uploaded to a YouTube channel that you wish to grow is not really a wise choice.
Flixpress offers you high-definition downloads that are perfect for viewing your video on the web and broadcasting it on television.
2. Customizable Templates
Having templates that can be customized as per your needs really makes the task easier. Flixpress offers a variety of templates that give you the option to enter text in some fields. This text is then beautifully rendered out in the final edited video.
3. Audio Tools
Adding the right audio can leave a significant impact on the overall aesthetic and impression of the video. It is perhaps one of the prime factors that decides whether the audio is edited well or not.
That said, Flixpress allows you to incorporate any custom audio file into the video. You will just be required to upload that audio in mp3 format, and that’s all. Other than that, you can add several sound elements as well.
4. Multiple Formats
If you’re someone who owns a Mac operating system and wishes to export the video in a MOV format, let us tell you that Flixpress can transcode the video to match your needs. However, along with the MOV format, you also have the option to export the video in the standard MP4 format or a WMV format as well.
5. Stock Video Library
Yes, you read that right. Flixpress is dedicated to offering you a comprehensive and affordable video product solution by providing a stock video library which means you can bid farewell to expensive stock footage sites.
It is to be noted that the team at Flixpress is fully committed to growing the Copyright-Free footage and background library, and the size of the library grows with the passing time.
6. Preview
Being one of the spotlight features of Flixpress, this one really makes it stand out. With this feature, you won’t have to wonder what your video would look like as you can render a free watermarked preview. If you’re working for someone, you can send this preview to your client or boss for approval and tweak data before the final render.
Other than that, these previews can also be used as templates if you wish to duplicate the same video with variable data.
How to Make Intro Video With Flixpress?
Creating intro videos with Flixpress is a pretty straightforward job, and the steps listed below aim to streamline the Flixpress intro making process for you.
Step1 Open the Webpage
Start off by opening the web browser on your PC or laptop and accessing the homepage of Flixpress by following the link below.
Once you’re at the homepage, you need to register your account by clicking on the Register button.
Step2 Signup
Upon clicking on the register button, you will be redirected to another page that will provide you with two options to signup on flixpress online video maker.
The first option allows you to sign up with your Google account, and if you opt for it, your Flixpress account will be linked to your Google account, and the credentials will be filled out automatically.
However, the second option asks for manual entry of your personal information that includes your first name, last name, email address, and password.
You can select either of them and then press the Register button below.
Step3 Knowing the Subscription Plans
After the successful completion of the registration process, you will get to the main page of Flixpress, where all the templates will be visible to you, and the type of your plan will also be visible.
Initially, it will be a free plan, and you will be allowed to edit a 2 min video in it. However, you have the option to upgrade to a paid plan where a lot of other features will be unlocked, and you can edit more videos of greater lengths as well.
Step4 Sorting and Filtering the Templates
When you’re on the main page, all the templates will be visible to you, and these will include paid ones. If you’ve not bought a paid subscription, you will have to sort out the flixpress free templates, which can be done in two ways.
- Click on the “Sort by” drop-down and choose the option that says “Free First”. This will put all the free templates at the top.
- Click on the “Show for plan” drop-down and select the “Free” option to only view the free templates.
Step5 Customize the Template
Once all the free templates are visible to you, you can select a template that you like. Then, you’re required to click the “Customize Now” button to customize the video.
Step6 Upload Image
Now, you will be prompted to upload an image from your PC or laptop so click the “Upload Image” button and choose the image you want to upload.
Once you’ve uploaded the image, click on “Proceed” button and crop the image to fit the subtitles.
Step7 Customize Text, Add Audio, Change Resolution & Create Preview
Even though the image subtitle will be made, you will still have the option to swap the image if you change your mind. Other than that, select the main title of the intro video and the color of the text as well.
Moreover, you can add audio as per your need and preference, and you can choose a resolution for the intro video too.
Once everything is done, create the preview to have a final look before rendering it.
What are the downsides of Flixpress?
While the Flixpress intro maker is a great choice for making intro videos, it may miss out on a few features. Other than that, individuals who have used Flixpress complained about the bad customer service that they offered, even to those who had signed up for the membership. Now, that can be quite frustrating, right?
We found a few major missing in Flixpress.
- The number of templates is limited.
- The content is rarely updated.
- The customer service they offered is poor. People can’t get help with their problems, especially when those who sign up for membership want to cancel their subscription.
What if we were to tell you that there is an even better and professional tool that Flixpress?
Filmora – An Alternative to Flixpress for Computer
As it turns out, Filmora happens to be one of the best video editing applications that allows you to make top-level and professional videos. It tends to have an intuitive interface and a great variety of advanced editing features, providing extended accessibility and ease for the users.
While there are limited templates on Flixpress, Filmora offers nearly 400 templates, therefore, providing the users with a wide range of option. That isn’t where the list of pros end as unlike Flixpress,
Filmora continuously introduces new sets of features and templates, taking the user experience to a whole new level. The filmora team is committed to solving inconveniences for users, only to bring a better experience.
Let’s move forward and look at how you can make intro videos with Filmora.
How To Make Intro Video With Filmora?
Below are the steps that you need to follow to make an intro video with Filmora.
Free Download For Win 7 or later(64-bit)
Free Download For macOS 10.14 or later
Step1 Launch Filmora and Add Background
The first step is to launch Filmora and head to the Media tab at the top. Then, select the Sample Colors category and add any color you wish to use in the background of your video.
You can upload any background image or video clip of your choice by selecting the Project Media category as well.
Step2 Add Audio
When you’ve added the background, it will be time to add audio to the intro video. For that, can you use the inbuilt audio library of Filmora and select any audio you find suitable for that matter. However, it is essential to keep the background and audio at the same duration.
Step3 Add Effects
Filmora offers you an Effects library from which you can choose any effect to add to your video as well. The playback duration can be adjusted using the right handle of the track in the timeline, and the Effects track can be double-clicked to customize the appearance as needed too.
Step4 Export
Finally, when you’re done with the editing phase, it will be time to export the video. For that, click Export from the top-centre area of the interface, opt for your preferred format and adjust other preferences such as framerate, destination location, resolution etc.
Frequently Asked Questions
Below are the FAQs related to YouTube intro videos.
1. What Is The Best Free Intro Maker?
To create an intro that impresses your audience, you will have to use the best intro maker as well. It isn’t vital for this intro maker to be paid as there are many free intro makers out there that do the job efficiently. Considering the flexibility and features that it offers, Filmora is perhaps the best intro maker out there.
2. How Can I Make a Professional Video Intro?
Making a professional video intro doesn’t require you to have top-level editing skills, as it can be made using custom templates offered by several video editing tools as well. In fact, Filmora offers a variety of templates to its users, and these templates can be customized as well.
3. How Much Does a YouTube Intro Cost?
Fortunately, a YouTube intro doesn’t cost a dime and can be made without paying anything using tools like Flixpress and Filmora.
Summing Up
All in all, intro videos play a vital part when it comes to impressing the audience and leaving an impact on them. Therefore, these videos shouldn’t be compromised and should only be made with the best tools out there. Flixpress and Filmora happen to be the best ones, and to offer you ease, we’ve listed the steps that you can follow to make your own perfect intro videos.
Free Download For Win 7 or later(64-bit)
Free Download For macOS 10.14 or later
Top 5 Tools to Help You Know More Freeze-Frame Video Editing Skills
Best 5 Tools to Help You Know More Freeze Frame Video Editing Skills
An easy yet powerful editor
Numerous effects to choose from
Detailed tutorials provided by the official channel
The freeze-frame video editing effect is a technique used to stop the moving image of a video and hold it still onscreen. This effect aims to pause the world the video is living in and allow the audience to process the scene and gain more context fully. Note that the world around us keeps ongoing, and time never stops. But luckily for us, we can pause film and video with a simple but powerful video effect known as the freeze-frame.
In addition, a freeze-frame can be carried out in a video to showcase a specific frame in your clip by extending the length of Time that frame is displayed. For example, you can decide to freeze a frame to show the video frame where a goal is being scored in a sporting event or use it to showcase a captured reaction or a smile. When a freeze-frame applies to a video clip, the clip automatically splits at the freezing point, and the chosen frame is inserted as an image file (BMP) and displayed on screen for the duration you set. This article will teach how to use the freeze-frame editing service ideally.
In this article
01 [How to Add a Freeze-frame to Video Clips in all Tools](#Part 1)
02 [SUPER COOL Freeze-frame Effect with Filmora 11](#Part 2)
Part 1 How to Add a Freeze-frame to Video Clips in all Tools
Do you want to draw your audience’s attention to a point or for dramatic flair by stopping your video and holding on to a single frame? This section will give you the best tools for freeze-frame editing via a step-by-step guide on how to do it.
01After Effects
Here is a step-by-step guide on how to Freeze-frame in After Effects:
Step 1: Download After Effects
Download and install Adobe After Effects and open it on your desktop. This software works with both macOS and Windows.

Step 2: New Composition
Next is to open a new project or drag and drop your video and add it to the timeline. Another way is to click on “New Composition from Footage” and then browse the video you want to edit.

Step 3: Select the Frame
There is a Playhead or slider above the slide, which will help you to select the frame needed to be frozen. Press the “Space bar” to play and pause the video. Then, with the help of the slider, select the frame and pause the video at that instant.

Step 4: Create a New Layer
After you pause the video at the place you want to freeze, Press “Ctrl + Shift + D” to cut the video at that instant, then another layer of the video will add just after the moment.

Step 5: Freeze the Frame
Next is to right-click on the layer, and the settings will pop up. Go to Time> Freeze-frame, and your selected frame will get frozen.

Step 6: Save the Video
Finally, go to File > Export to save the video per your PC requirement.
02**Wondershare Filmora Video Editor **
For Win 7 or later (64-bit)
For macOS 10.12 or later
Here is a step-by-step guide on how to Freeze-frame in Wondershare Filmora:
Step 1: Import your media files
After installing the software on your PC, drag and drop all files into the primary window or click on “Import” to browse your file folder. Also, this program supports a variety of media files, including MP4, MKV, WMV, MOV, DV, AVI, MTS, TS, 3GP, M4V, etc. After uploading the video, drag them to the Video Timeline.

Step 2: Freeze video with ease
Now play the video clip you want to add freeze-frame and pause it when it comes to the correct position. Then click the “Snapshot” icon under the Viewer panel. Immediately, a picture will add to the media library. Drag and drop the Picture to the PIP track over the main video track, and set the duration of the still image.

Step 3: Save your video
When satisfied with your result, click “Export” to export your video. In the pop-up window that appears, please select the file format options to save onto your computer, or you can directly upload it to Twitter, YouTube, or Facebook, to share with your family and friends.

03Premiere Pro
Here is a step-by-step guide on how to Freeze-frame in Premiere Pro using a video frame for the duration of a clip:
Step 1: Download Premiere Pro
Download and install Adobe Premiere Pro on your PC and open it to start editing your video. Import video to Premiere Pro and drag and drop to the timeline.
Step 2: Select a clip in a Timeline panel.
To freeze a frame using other methods than the In or Out point, open the video portion in the Source Monitor, and set the Marker 0 (zero) to the frame you wish to pause in the video.
Step 3: Choose Clip > Video Options > Frame Hold.
Next is to tap Hold On and select the frame you want to hold from the menu. However, you can choose the frame based on Source Timecode, In Point, Out Point, Sequence Timecode, or Playhead position.
Step 4: Finally, specify “Hold Filters” and click OK.
Effect settings use the values at the holding frame to prevent keyframed effect settings (if any are present) from animating during the clip’s duration.

04Kapwing
Step 1: Upload and edit your video with Kapwing.
Choose to “Get Started,” upload a file from your device, or paste a video link from a third-party site like YouTube, Vimeo, or TikTok. In any case, you’ll be whisked away to your very own video editing studio.

Step 2: Give your video a freeze-frame effect.
Select the “Timing” tab in the right navigation bar and click “Freeze Frame” after uploading your video to Kapwing.
In Kapwing, you may add a freeze-frame to a video.
As you can see, clicking “Freeze Frame” instantly creates an image layer for the frame your timeline slider was on. Click on the image layer and choose from the “Duration” dropdown option under the “Edit” tab in the right navigation bar to change the length of the freeze-frame. Alternatively, you may drag the image layer onto your timeline by clicking and dragging it.
That’s all there is to it!

05Animotica
Step 1: Creating a New Project
To begin, open your video editor and select Create a New Project. Choose Empty Project, give your project a name, and click the Create a New Project button.

Step 2: Selecting the Video to Freeze
Select Add Video/Photo Clips from the drop-down menu.
You can add video clips to Animotica by navigating to where you saved your video clip, selecting it, and opening it. You’ll now return to the project window, where your video will display. You can enable a wide range of enhancing options by tapping on the video clip with your mouse.

Step 3: The Freeze Effect
To activate your options, tap on the video clip. You must now decide which segment of the video you want to freeze. To make things easy for you, press the play and pause buttons when you reach the part you want to freeze.
Take a picture of the video by dragging your pointer down to the camera icon and pressing it to take a photo while keeping the clip paused, where you want it to be frozen. When you do that, a menu of three options will appear; select Take Snapshots and Insert in Current Position. This choice will split the movie in half and insert the scene you just recorded in the middle, resulting in a freeze.

Part 2 SUPER COOL Freeze-frame Effect with Filmora 11
With no prior experience in video editing, you may get started right away.
Filmora 11 is a scalable experience built for new and seasoned content creators who want freeze-frame editing. You may start cutting and editing your videos like an expert, even if you’re a beginner, and access anything you need from the toolbar once the software launches on your computer, including media, audio, titles, effects, split-screen formatting, elements, and transitions.
Hundreds of extra alternatives are available for each of these elements, which you can drag and drop over your chosen film. You can also use the scissors symbol to cut the movie by pausing on a specific frame within your shot and clicking it. Filmora 11 also comes with pre-set aspect ratios and resolutions for your chosen media to get started right away.
● Ending Thoughts →
● This article provided users with a guide to using Mac and Windows video editor freeze-frame for your video effects. Aside from the editor listed here, Movavi video editor freeze-frame and other editors are available on the Internet.
● However, the ones listed in this blog are our top picks for the best you can use. In addition, Filmora is the best freeze-frame effect editor with a lot of effects you can use in your video editing
The freeze-frame video editing effect is a technique used to stop the moving image of a video and hold it still onscreen. This effect aims to pause the world the video is living in and allow the audience to process the scene and gain more context fully. Note that the world around us keeps ongoing, and time never stops. But luckily for us, we can pause film and video with a simple but powerful video effect known as the freeze-frame.
In addition, a freeze-frame can be carried out in a video to showcase a specific frame in your clip by extending the length of Time that frame is displayed. For example, you can decide to freeze a frame to show the video frame where a goal is being scored in a sporting event or use it to showcase a captured reaction or a smile. When a freeze-frame applies to a video clip, the clip automatically splits at the freezing point, and the chosen frame is inserted as an image file (BMP) and displayed on screen for the duration you set. This article will teach how to use the freeze-frame editing service ideally.
In this article
01 [How to Add a Freeze-frame to Video Clips in all Tools](#Part 1)
02 [SUPER COOL Freeze-frame Effect with Filmora 11](#Part 2)
Part 1 How to Add a Freeze-frame to Video Clips in all Tools
Do you want to draw your audience’s attention to a point or for dramatic flair by stopping your video and holding on to a single frame? This section will give you the best tools for freeze-frame editing via a step-by-step guide on how to do it.
01After Effects
Here is a step-by-step guide on how to Freeze-frame in After Effects:
Step 1: Download After Effects
Download and install Adobe After Effects and open it on your desktop. This software works with both macOS and Windows.
Step 2: New Composition
Next is to open a new project or drag and drop your video and add it to the timeline. Another way is to click on “New Composition from Footage” and then browse the video you want to edit.
Step 3: Select the Frame
There is a Playhead or slider above the slide, which will help you to select the frame needed to be frozen. Press the “Space bar” to play and pause the video. Then, with the help of the slider, select the frame and pause the video at that instant.
Step 4: Create a New Layer
After you pause the video at the place you want to freeze, Press “Ctrl + Shift + D” to cut the video at that instant, then another layer of the video will add just after the moment.
Step 5: Freeze the Frame
Next is to right-click on the layer, and the settings will pop up. Go to Time> Freeze-frame, and your selected frame will get frozen.
Step 6: Save the Video
Finally, go to File > Export to save the video per your PC requirement.
02**Wondershare Filmora Video Editor **
For Win 7 or later (64-bit)
For macOS 10.12 or later
Here is a step-by-step guide on how to Freeze-frame in Wondershare Filmora:
Step 1: Import your media files
After installing the software on your PC, drag and drop all files into the primary window or click on “Import” to browse your file folder. Also, this program supports a variety of media files, including MP4, MKV, WMV, MOV, DV, AVI, MTS, TS, 3GP, M4V, etc. After uploading the video, drag them to the Video Timeline.
Step 2: Freeze video with ease
Now play the video clip you want to add freeze-frame and pause it when it comes to the correct position. Then click the “Snapshot” icon under the Viewer panel. Immediately, a picture will add to the media library. Drag and drop the Picture to the PIP track over the main video track, and set the duration of the still image.
Step 3: Save your video
When satisfied with your result, click “Export” to export your video. In the pop-up window that appears, please select the file format options to save onto your computer, or you can directly upload it to Twitter, YouTube, or Facebook, to share with your family and friends.
03Premiere Pro
Here is a step-by-step guide on how to Freeze-frame in Premiere Pro using a video frame for the duration of a clip:
Step 1: Download Premiere Pro
Download and install Adobe Premiere Pro on your PC and open it to start editing your video. Import video to Premiere Pro and drag and drop to the timeline.
Step 2: Select a clip in a Timeline panel.
To freeze a frame using other methods than the In or Out point, open the video portion in the Source Monitor, and set the Marker 0 (zero) to the frame you wish to pause in the video.
Step 3: Choose Clip > Video Options > Frame Hold.
Next is to tap Hold On and select the frame you want to hold from the menu. However, you can choose the frame based on Source Timecode, In Point, Out Point, Sequence Timecode, or Playhead position.
Step 4: Finally, specify “Hold Filters” and click OK.
Effect settings use the values at the holding frame to prevent keyframed effect settings (if any are present) from animating during the clip’s duration.
04Kapwing
Step 1: Upload and edit your video with Kapwing.
Choose to “Get Started,” upload a file from your device, or paste a video link from a third-party site like YouTube, Vimeo, or TikTok. In any case, you’ll be whisked away to your very own video editing studio.
Step 2: Give your video a freeze-frame effect.
Select the “Timing” tab in the right navigation bar and click “Freeze Frame” after uploading your video to Kapwing.
In Kapwing, you may add a freeze-frame to a video.
As you can see, clicking “Freeze Frame” instantly creates an image layer for the frame your timeline slider was on. Click on the image layer and choose from the “Duration” dropdown option under the “Edit” tab in the right navigation bar to change the length of the freeze-frame. Alternatively, you may drag the image layer onto your timeline by clicking and dragging it.
That’s all there is to it!
05Animotica
Step 1: Creating a New Project
To begin, open your video editor and select Create a New Project. Choose Empty Project, give your project a name, and click the Create a New Project button.
Step 2: Selecting the Video to Freeze
Select Add Video/Photo Clips from the drop-down menu.
You can add video clips to Animotica by navigating to where you saved your video clip, selecting it, and opening it. You’ll now return to the project window, where your video will display. You can enable a wide range of enhancing options by tapping on the video clip with your mouse.
Step 3: The Freeze Effect
To activate your options, tap on the video clip. You must now decide which segment of the video you want to freeze. To make things easy for you, press the play and pause buttons when you reach the part you want to freeze.
Take a picture of the video by dragging your pointer down to the camera icon and pressing it to take a photo while keeping the clip paused, where you want it to be frozen. When you do that, a menu of three options will appear; select Take Snapshots and Insert in Current Position. This choice will split the movie in half and insert the scene you just recorded in the middle, resulting in a freeze.
Part 2 SUPER COOL Freeze-frame Effect with Filmora 11
With no prior experience in video editing, you may get started right away.
Filmora 11 is a scalable experience built for new and seasoned content creators who want freeze-frame editing. You may start cutting and editing your videos like an expert, even if you’re a beginner, and access anything you need from the toolbar once the software launches on your computer, including media, audio, titles, effects, split-screen formatting, elements, and transitions.
Hundreds of extra alternatives are available for each of these elements, which you can drag and drop over your chosen film. You can also use the scissors symbol to cut the movie by pausing on a specific frame within your shot and clicking it. Filmora 11 also comes with pre-set aspect ratios and resolutions for your chosen media to get started right away.
● Ending Thoughts →
● This article provided users with a guide to using Mac and Windows video editor freeze-frame for your video effects. Aside from the editor listed here, Movavi video editor freeze-frame and other editors are available on the Internet.
● However, the ones listed in this blog are our top picks for the best you can use. In addition, Filmora is the best freeze-frame effect editor with a lot of effects you can use in your video editing
How To Add Text In After Effects
In almost every video you come across, you will see text added to the video in different parts. There are various reasons why adding text to videos becomes a necessity. First of all, you can highlight the underlying message or key points in your video. Along with audio and video, the viewers will have another cue point in the form of text that they can retain in their memory for longer. You add animated texts to video to make the video interesting to watch and break the monotony of visual cues only.
Besides, you may have to want credits and add intro as well as outro to your video where adding text is almost a necessity. Text can help your viewer get the context of your video and make sense of the content. After Effects is a popular video editor thanks to its visual effects, text animation animations, and instant video enhancement tools. We will illustrate the different ways of adding text in After Effects in simple steps.
Part 1. Add Text in After Effects with Horizontal Type Tool
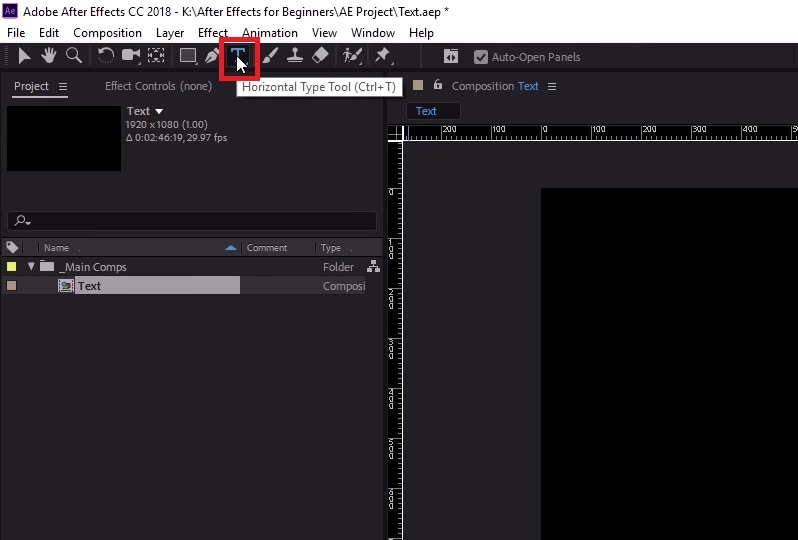
Once you have imported your video clip into the Timeline, there are several ways you can add text to your video. First of all, you can right-click on the Timeline and select New> Text to create an empty text layer and add any text you want. Similarly, you can go to Layer> New> Text option to do the same. But the easiest way of adding text in After Effects is by using Horizontal Type Tool. Here are the steps on how you can add text in AE with the type tool.
Step1Once you have imported your video into the Timeline, click on Horizontal Type Tool located in the top bar to add any text. You can press Ctrl+T(Windows) or Command+H(Mac) to get it instantly.
Step2Click on the video where you want to place the text and type your desired text there. After you are done adding your text, press Enter key in Num pad to exit out of the text field in the video.
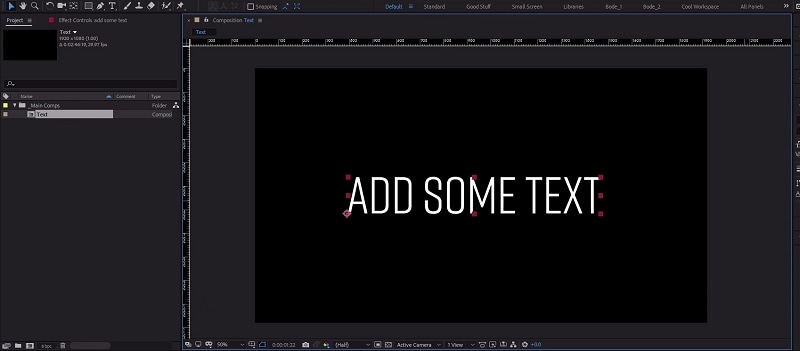
Step3This will automatically create a text layer on Timeline. You can now move the text and place it anywhere you want. You can also modify the text style and add animation which we will illustrate in the next section.
Part 2. Use the Character Panel to Edit Text in AE
When you select Type tool and add your desired text, you get a default style for the text. It is most likely that you have to modify the text style such as changing color, font, and size to fit in your video seamlessly. That is when you have to visit the Character Panel. Character Panel is where you get to edit the font of the text you have typed, increase or decrease the font size, change the font color, and much more. Apart from that, you can increase the spacing between lines when your text is a paragraph instead of a few words. Here are the steps to use Character Panel to edit text in AE.
Step1Once you have typed your text using Horizontal Type tool on the video, click on the text.
Step2Go to Character panel located in the right side of the screen. If it is minimized, click on the panel to expand it.
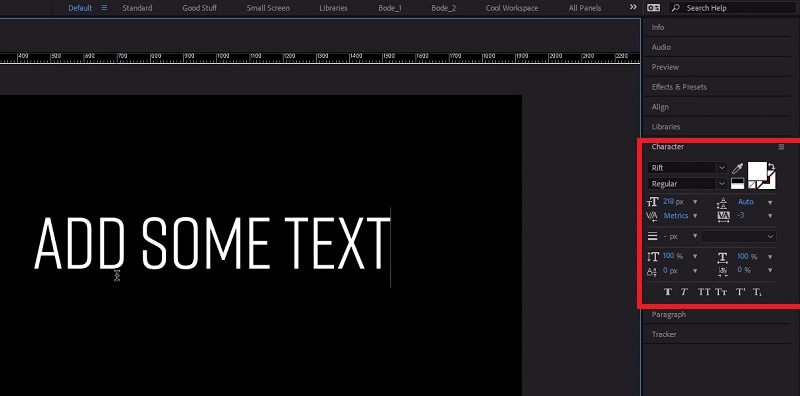
Step3The first option in the panel is the font of the text. By the side of the font is the text color. You can use the color picker tool to choose any color as per your preference.
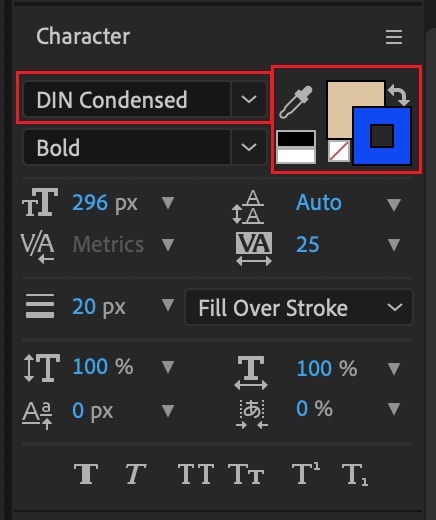
Step4Below the font, you can select the font style such as regular, bold, italics, and likewise. The subsequent part is to change the font size and adjust vertical spacing between lines and horizontal spacing between characters.
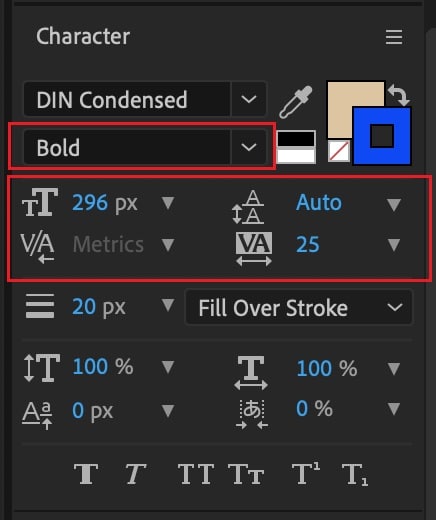
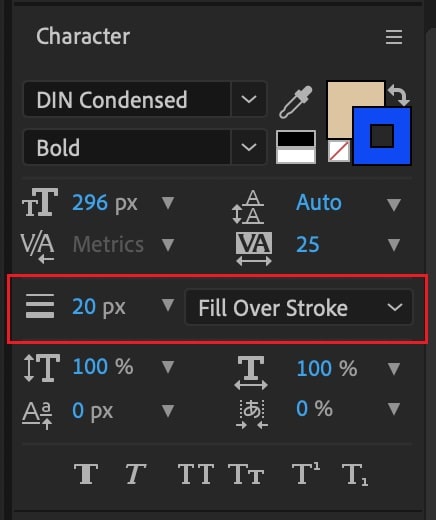
Step5The next section deals with Stroke option as well as fill the text option. You can fill the background of the text with any desired color.
Part 3. Add Animated Text to Video with Animation Presets
Now that you have added a static text and set the text format as per your preference, it is time to animate the text. A static text in a video does not look appealing, and animated texts make the video eye-catching instantly. You can use text animation presets in After Effects to add animated text to video. Here are the steps to add animated text to video with animation presets and effects.
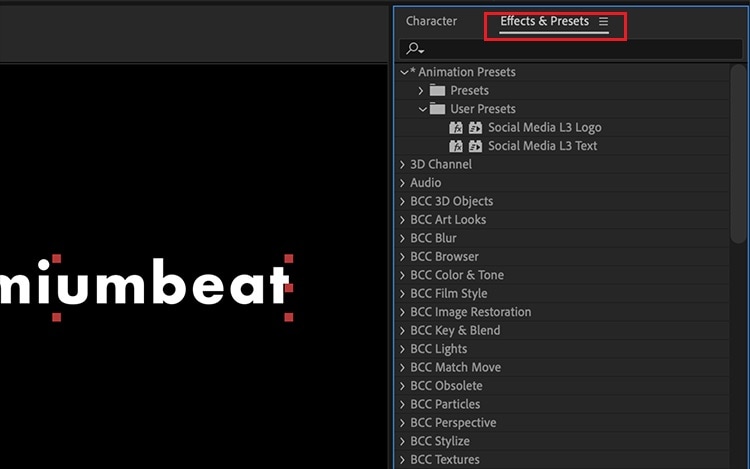
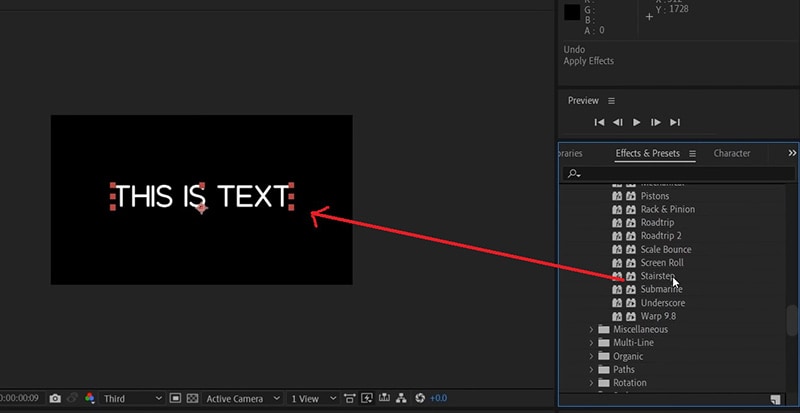
Step1Click on the text on your video that you want to animate. Go to Effects and Presets panel located on the right side.
Step2Under Effects and Presets panel, Click on Text option. This will open all the different categories of animation presets available that you can apply to the text on your video.
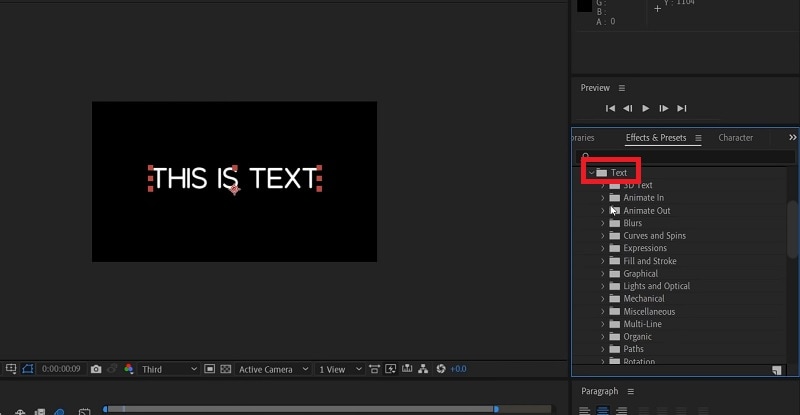
Step3Select any desired animation that you want to apply to the text and drag and drop the animation on the text in the composition window. Play the video and watch the applied animation on the text.
Part 4. Alternative Way to Add Text to Videos
If you are not comfortable with After Effects as a video editor, we recommend Wondershare as the best AE alternative. This is because the user interface of Filmora is super simple and there are loads of text effects and animations available to enhance your video content. Filmora is a professional video editor that is extremely popular among amateur and professional video editors. The application is available for both Windows and Mac users. Here are the steps for adding animated text to video using Filmora.
Step1Install Wondershare Filmora on your computer and launch the application. Click on New Project option on the welcome screen. Otherwise, you can go to File> New Project option.

Step2Go to File> Import Media> Import Media Files to import your video file. You can also drop the video file directly into Project Media folder.

Step3Drag and drop the video file from Project Media folder into the Timeline. If you have multiple video clips, you need to arrange them sequentially on the Timeline.
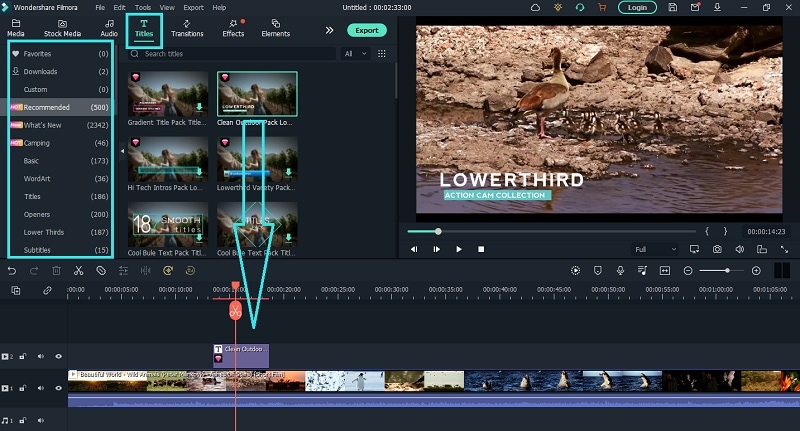
Step4To add text to your video, go to Titles located at the top bar. Check the left panel where you can see different categories of text effects. Select any desired text effect and drop into the Timeline. Make sure that the text layer is above the video layer on Timeline. You can shift the text layer on Timeline to place it where you want it to appear. You can also stretch the duration of the text effect as per your requirements.
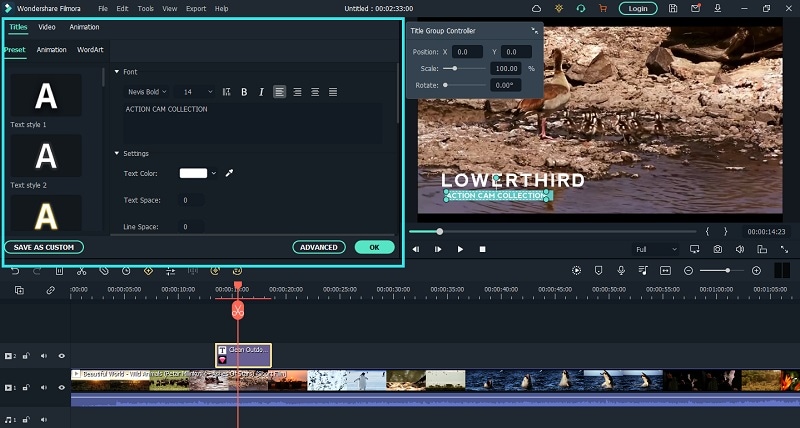
Step5You can edit the text effect by double clicking on the text layer on Timeline. Under Preset tab, you can change the text, font type and size, text color and much more. For further customization, you can click on Advanced button. At last, click on OK button to save the edits done.
The Bottom Line
If you want to add animated text to photo and video, After Effects is a great editor you can use. We have illustrated how you can add text and customize the text and finally, animate it as per your preference. However, if you are looking for AE alternative, we recommend Wondershare Filmora where you can add text to video instantly and choose from a wide range of text effects and animations.
Free Download For Win 7 or later(64-bit)
Free Download For macOS 10.14 or later
Easy Steps to Loop YouTube Videos on iPhone
YouTube videos are a great way to get information fast. But there are times when you want to watch a video over and over again without having to go back to the YouTube app. Here is how you can loop YouTube videos on your iPhone. There are 2 ways to loop YouTube videos on iPhone. One is through the YouTube app and using third-party apps.
There are many reasons why you might want to loop a video on your iPhone. Maybe you’re trying to learn a dance routine, or you want to listen to a song on repeat. You’ve probably seen those cool looping videos on Instagram and Facebook and wondered how people make them. YouTube is a great place to find videos on any topic.
The YouTube app on the iPhone is a great way to watch videos, but it doesn’t have a repeat or loop feature. This means that if you are watching a long video, you will have to keep your phone on and continue watching the video. YouTube is the world’s most popular video-sharing platform with approx. 1.9 billion monthly active users.
Part 1: How to loop YouTube videos on iPhone
Step 1: Open the YouTube app on your iPhone
Install YouTube on your iPhone after that open it. Search your desired video on the YouTube search bar.

Step 2: Tap the video you want to repeat
Click on the three dots or click on the save button to create a new playlist for your video. If you want to listen to or see the existing videos you can also add your videos to your old playlist.

Step 3: Create a playlist and start playing it
Click on New Playlist then give any name to your playlist. Give any name to your playlist and select whether you want to make it private or public.

Step 4: Click on the library
After creating a playlist click on the library which is placed at the bottom. After clicking on it you can see your all playlists.

Step 5: Play the playlist on the loop
Click on your desired playlist which you want to play after that you’ll see two options on the screen Play and Shuffle. Select the Play option, your playlist will start.

Step 6: Play your favorite video first and put the playlist on the loop
When you start playing your playlist, you can start it with your favorite video or you can also put your playlist on a loop. So that you can watch your videos on a loop.
Benefits of looping YouTube videos on iPhone
If you are a YouTube addict, then you might be pleased to know that your iPhone has a built-in feature that allows for the video to loop back to the beginning. This feature is an excellent way of saving time and maximizing your viewing pleasure. Looping videos on iPhone is a great way of saving time and maximizing your viewing pleasure.
Looping videos on your phone can be a great way to kill time. Watching the same video over and over again can be tiring, but if you do it on your phone, you don’t have to worry about that. You can change the video at any point in time, so if you find that you are getting bored with it, then just find another one.
Over a billion hours of video are watched every day. The app is available for both iOS and Android devices, which means that you can watch YouTube videos on your phone no matter where you are. This can be useful if you want to listen to music or watch a tutorial while doing something else on your phone, like checking Facebook or browsing the web.
Part 2: How to Edit Time-lapse Video on Computer
Time-lapse videos are becoming more and more popular nowadays. They are a great way to show the passage of time, but editing them on a computer is not an easy task. Editing time-lapse videos on a computer is not an easy task because it requires you to have the right software and know how to use it.
It can be quite time-consuming and tedious work, which is why we need a proper editing program that can help us through this process. It’s just about learning the basics of editing and then adding a few effects to make your video more interesting. Here are some tips on how you can edit time-lapse videos on your computer:
- The first thing you need to do is download and install a video editor for your computer.
- Import the timelapse footage into the video editing program that you have downloaded and installed, such as Adobe Premiere Pro or Sony Vegas Pro, etc.
- Now you need to trim out any unwanted footage at the beginning or end of the clip so that what remains is just what you want to show in your final video.
- The next step is to add transitions between scenes, such as fades, wipes, dissolves, or cuts between shots - this will help transition between scenes smoothly and seamlessly without any abrupt jumps in time or space between them while also adding an extra level of polish.
Time-lapse videos can help you produce stunning results, no matter what your creative goals may be. If you want to create a time-lapse video, there are many things you need to consider. Time-lapse videos are not just a series of photos strung together. And the most important thing you need to consider is the format of the video you’ll need to take.
Choosing the right editing software is also important if you’re using a camera that shoots time-lapse videos. And if you’re using a DSLR camera, there is a chance that your time-lapse videos are in MOV format. If that’s the case, then you’re in luck. Filmora can help you edit your time-lapse video with ease.
Edit Time-lapse video on Filmora software
Filmora is a video editor that lets you easily create and edit time-lapse videos. With Filmora, you can add music, filters, and effects to your videos to give them a unique look and feel. You can also trim and cut your videos, and merge them to create longer videos. Filmora is perfect for creating professional-looking time-lapse videos.
Filmora has an easy-to-use timeline that makes it easy to sequence your videos and create smooth transitions. This makes it easy to create high-quality time-lapse videos that look like they were filmed in a single take. Filmora has a built-in editor that lets you easily add music and sound effects to your videos. This means that you can create videos that look and sound like professional movies.
How to edit a video in Filmora:
Filmora’s time-lapse feature is free, which is a great start. However, you do need to do a few things to make it work. First, you need to make sure that your phone is compatible with Filmora. You’ll also need a connection to the Internet and a working camera on your phone. There are a few things that you’ll need to know to start editing videos on Filmora.
Step 1: Download Filmora and create a new project
Download Filmora on your desktop and click on the “New Project” button. This will open up a new window where you can name your project and choose a video file to start working with.
Free Download For Win 7 or later(64-bit)
Free Download For macOS 10.14 or later
Step 2: Select media and place it on the timeline
Click on the “Media” tab and select your video file. You’ll now see the video timeline on the left side of the window. Use the video timeline to drag and drop video clips into the timeline. You can also use the buttons on the timeline to change the speed, direction, and audio volume of the video clips.

Step 3: Select the speed you want the video to play at and click on the “OK” button.
You set the duration and speed of your video according to your requirements. You can edit the speed of your video individually. If you put your first video on high speed then you can slow down your second video.

Step 4: Click on the “Effects” button and select the “Special Effects” tab
You have undoubtedly seen those videos, full of special effects and transitions. These effects are the result of good video editing software, like Filmora. This software is designed to be used by anyone, from beginners to expert editors. You can add effects to your time-lapse video. Click on the Effects on the top bar of Filmora. You can also add various transitions in your time-lapse video.

Step 5: Export your time-lapse video
As a user of Filmora, you can export a time-lapse video onto your computer. This feature is one of the best features Filmora has to offer. You can export your edited time-lapse video on Filmora. When you are done with your time-lapse editing export the video on your desktop, drive, or anywhere you want

The Bottom Line
Since most people own an iPhone, it’s very useful to know some tricks to be more productive. As you have seen, the utility of looping a video is not something to be scoffed at. If you need to keep watching a video over and over again, on iPhone looping a video is one of the best ways to do so.
We hope the content above has been useful to you, and that you can see how looping YouTube videos on your iPhone could improve your iPhone experience. On the other hand, you can use Filmora software for your video or photo editing. Filmora is user-friendly software and you can easily install it from a browser. You just need a piece of basic knowledge to use Filmora.
Free Download For macOS 10.14 or later
Step 2: Select media and place it on the timeline
Click on the “Media” tab and select your video file. You’ll now see the video timeline on the left side of the window. Use the video timeline to drag and drop video clips into the timeline. You can also use the buttons on the timeline to change the speed, direction, and audio volume of the video clips.
Step 3: Select the speed you want the video to play at and click on the “OK” button.
You set the duration and speed of your video according to your requirements. You can edit the speed of your video individually. If you put your first video on high speed then you can slow down your second video.
Step 4: Click on the “Effects” button and select the “Special Effects” tab
You have undoubtedly seen those videos, full of special effects and transitions. These effects are the result of good video editing software, like Filmora. This software is designed to be used by anyone, from beginners to expert editors. You can add effects to your time-lapse video. Click on the Effects on the top bar of Filmora. You can also add various transitions in your time-lapse video.
Step 5: Export your time-lapse video
As a user of Filmora, you can export a time-lapse video onto your computer. This feature is one of the best features Filmora has to offer. You can export your edited time-lapse video on Filmora. When you are done with your time-lapse editing export the video on your desktop, drive, or anywhere you want
The Bottom Line
Since most people own an iPhone, it’s very useful to know some tricks to be more productive. As you have seen, the utility of looping a video is not something to be scoffed at. If you need to keep watching a video over and over again, on iPhone looping a video is one of the best ways to do so.
We hope the content above has been useful to you, and that you can see how looping YouTube videos on your iPhone could improve your iPhone experience. On the other hand, you can use Filmora software for your video or photo editing. Filmora is user-friendly software and you can easily install it from a browser. You just need a piece of basic knowledge to use Filmora.
Also read:
- In 2024, Add Effects to Video Online
- Updated 2024 Approved MP3 Cutter Download for Computer and Mobile
- In 2024, Best Green Screen Software for Beginner on Mac
- Updated What Slideshow Templates Can Teach You About Aesthetic
- New Mastering Video Speed Control Slow Down, Speed Up, and Edit with Ease for 2024
- How to Add Customized Transitions to OBS for 2024
- New 2024 Approved How to Use Twixtor Effect to Create Super Slow-Motion Video?
- Updated In 2024, Best Image (JPG/PNG) to GIF Converters
- Updated 2024 Approved Easy Steps to Slow Down a Video on iPhone and Android
- Using Track Matte and Tracking in Adobe After Effects Reviewing All Possibilities for 2024
- Updated In 2024, To Know How to Add Effects in Premiere Pro, You Need to Follow This Guide as It Has All You Need to Know to Add Effects in Premiere Pro. Learn More Here
- 2024 Approved Add Selective Color Effect to Your Videos Using Filmora
- You Can Make Attractive Videos by Adding Text Behind Objects. This Article Will Explain How to Use Wondershare Filmora to Create These Videos for 2024
- Updated In 2024, How to Share YouTube Video on Zoom?
- How to Add Expression in After Effects
- New How to Create Intro with Legend Intro Maker for 2024
- 2024 Approved MP3 Cutter Download
- New Top 7 Easy Ways to Convert a Video to a GIF Online for 2024
- Updated In 2024, Full Guide to Funcall Voice Changer and Its Alternatives
- New How to Add Text Behind Objects in Video for 2024
- 2024 Approved Everything About Adding Effects In Kinemaster
- Updated In 2024, Detailed Tutorial to Crop a Video in KineMaster
- Updated Adobe Premiere Pro Download and Use Guide for 2024
- Updated 2024 Approved Color Match Game Top Tips for You
- New In 2024, A Brief Review of CapCut Translate With Alternative
- How To Unlock a Samsung Galaxy M14 4G Easily?
- How to Transfer Photos from Honor Play 8T to Laptop Without USB | Dr.fone
- In 2024, How To Remove or Bypass Knox Enrollment Service On Realme 12 Pro+ 5G
- In 2024, 5 Quick Methods to Bypass Tecno Camon 30 Pro 5G FRP
- How to Show Wi-Fi Password on Oppo A2
- Looking For A Location Changer On Xiaomi Redmi Note 12 Pro+ 5G? Look No Further | Dr.fone
- How to Unlock Disabled Apple iPhone 14 Pro/iPad Without Computer | Dr.fone
- In 2024, The Complete Guide to Xiaomi Redmi 12 FRP Bypass Everything You Need to Know
- In 2024, Change Location on Yik Yak For your Realme V30 to Enjoy More Fun | Dr.fone
- 4 Feasible Ways to Fake Location on Facebook For your Nubia Red Magic 8S Pro | Dr.fone
- In 2024, How to Mirror Your Realme Note 50 Screen to PC with Chromecast | Dr.fone
- Title: Updated Create Intro Video with Flixpress
- Author: Morgan
- Created at : 2024-04-24 00:50:00
- Updated at : 2024-04-25 00:50:00
- Link: https://ai-video-editing.techidaily.com/updated-create-intro-video-with-flixpress/
- License: This work is licensed under CC BY-NC-SA 4.0.
