Updated Create the Stranger Things Upside Down Effect Video

Create the Stranger Things Upside Down Effect Video
With stranger things season 4 ending, it seems like great timing to make a stranger things style transition to the Upside Down. In the Netflix series Stranger Things, there is an opposite version of our world called the Upside Down. The Upside Down is dark, creepy, and possibly filled with aliens, monsters, creatures, and other things.
Now, you can also apply the Stranger Things Upside Down Effect to your video! This effect combines camera tricks and video editing within Filmora to transition from the normal world into the Upside Down.
How-to Guide
1) Preparation
To make this effect, you will need two footage shots: one with the camera moving down and one with the camera coming back up.
When shooting for the footage, follow the steps below:
First shot
- Find any item close enough to the ground that we can block our frame with.

- Once you have your talent lined up, rotate your camera while lowering it below the foreground item at a constant speed and leaving the camera there. The key is making sure when you go behind the object, the frame is nothing but black.

For the next scene, have your actor change positions, or you can change the set around to look like the Upside Down. For instance, adding fake plants and flickering lights.
Second shot
Start bringing your camera back up at the same speed and rotate it again in the direction it was moving.

2) Steps
After you have all the footage, you can start editing it on Filmora. If you haven’t installed it yet, you can download Filmora at their official website at https://filmora.wondershare.com .
Free Download For Win 7 or later(64-bit)
Free Download For macOS 10.14 or later
Now, launch Filmora on your PC and follow the steps below:
Step1 Take your first clip in the “normal” world and drag it down to a video track on the timeline. Trim the edge of the clip, so it ends on pure black and in a downward motion.

Step2 Drag the second clip (in the Upside Down) onto the video track on the timeline after the first clip. Trim this video, so it begins in pure black and an upward motion.

Cut the clips to get the timing right since it should be a very fast transition. You can cut in the black frames so they won’t be too apparent.
If you don’t have a perfectly smooth transition, you can add a dissolve by going to Transitions > Basic > Dissolve.

Color Grading and Effects
After the transition, you can make the clip look a lot more like the Upside Down from the show with a color grade and Filmora effects. Follow the steps below:
Step1 Double-click on your second clip, then go to Color > Advanced. For a quick edit, you can try one of the presets available, such as “cool film.” It will give you the colder blue tones that Stranger Things used for the Upside Down.

Step2 You can further edit the color grading in the white balance menu. Drag the slider to the left to get a blue, cold vibe for the Upside Down.
The “cool” or “warm” color grading technically talks about color temperature. A “warmer” look will be more orange, and a “colder” look will be bluer. You can also use the tint slider to fine-tune the look.

Step3 Next, move down to the color, lower the brightness and increase contrast. It makes the scene darker and more sinister than the normal world.

Step4 Finally, go down to the vignette and drag the amount slider a tiny bit to give a Vinnette around your clip.

3) Pro Tips
You can still make your clip look even more like Upside Down with some Filmora elements.
Go to Elements > Smoke > Smokescreen 2. Drag this element on top of your Upside Down clip and trim it, so it starts at the same time the clip leaves the black frame.

You can adjust the opacity by double-clicking the smoke effect to open the setting.
Finally, go to the Transition > Basic > Dissolve to the start of the smoke and adjust it when the smoke gradually appears.

Resources from Filmostock
You can also use filmstock effects to bring our video to the next level. Go to Elements > Fire > Large Scale 12 and drag it down on top of your clip and the smoke.

Double-click the clip and change the scale of the effect to your needs. Then, go to compositing to change the blending mode to the screen to help the effect blend in more.

Now, go to color and open the white balance menu. Drag the two sliders to change the color of the particles to match your clip.

Summary
That is all you need to make a Stranger Things Upside Down effects to your video. Let us know if there are any other effects from tv shows you want to learn how to make.
Free Download For macOS 10.14 or later
Now, launch Filmora on your PC and follow the steps below:
Step1 Take your first clip in the “normal” world and drag it down to a video track on the timeline. Trim the edge of the clip, so it ends on pure black and in a downward motion.

Step2 Drag the second clip (in the Upside Down) onto the video track on the timeline after the first clip. Trim this video, so it begins in pure black and an upward motion.

Cut the clips to get the timing right since it should be a very fast transition. You can cut in the black frames so they won’t be too apparent.
If you don’t have a perfectly smooth transition, you can add a dissolve by going to Transitions > Basic > Dissolve.

Color Grading and Effects
After the transition, you can make the clip look a lot more like the Upside Down from the show with a color grade and Filmora effects. Follow the steps below:
Step1 Double-click on your second clip, then go to Color > Advanced. For a quick edit, you can try one of the presets available, such as “cool film.” It will give you the colder blue tones that Stranger Things used for the Upside Down.

Step2 You can further edit the color grading in the white balance menu. Drag the slider to the left to get a blue, cold vibe for the Upside Down.
The “cool” or “warm” color grading technically talks about color temperature. A “warmer” look will be more orange, and a “colder” look will be bluer. You can also use the tint slider to fine-tune the look.

Step3 Next, move down to the color, lower the brightness and increase contrast. It makes the scene darker and more sinister than the normal world.

Step4 Finally, go down to the vignette and drag the amount slider a tiny bit to give a Vinnette around your clip.

3) Pro Tips
You can still make your clip look even more like Upside Down with some Filmora elements.
Go to Elements > Smoke > Smokescreen 2. Drag this element on top of your Upside Down clip and trim it, so it starts at the same time the clip leaves the black frame.

You can adjust the opacity by double-clicking the smoke effect to open the setting.
Finally, go to the Transition > Basic > Dissolve to the start of the smoke and adjust it when the smoke gradually appears.

Resources from Filmostock
You can also use filmstock effects to bring our video to the next level. Go to Elements > Fire > Large Scale 12 and drag it down on top of your clip and the smoke.

Double-click the clip and change the scale of the effect to your needs. Then, go to compositing to change the blending mode to the screen to help the effect blend in more.

Now, go to color and open the white balance menu. Drag the two sliders to change the color of the particles to match your clip.

Summary
That is all you need to make a Stranger Things Upside Down effects to your video. Let us know if there are any other effects from tv shows you want to learn how to make.
Best 8 Educational Video Websites for Teachers
The examples below are the only few that are possible to find on the internet and offer a thousand free educational videos usable in the classroom or online classroom. It’s up to you if you can use or follow all the websites I provide. Of course, the internet offers unlimited help for teachers to tap into, but it has dangers around quality, inappropriate content, advertisement, and copyrights. Double-check everything before you use in your classes and show it to your students.
Khan Academy (https://www.khanacademy.org/ )
Provides a free personalized learning resource for all ages. Khan Academy also offers different exercises and instructional videos that empower the students to study at their own pace inside the classroom or outside. For the students who want to learn something, these are the following subjects they tackle: Science, Mathematics, History, Economics, Reading & Language, Life Skills, and more.
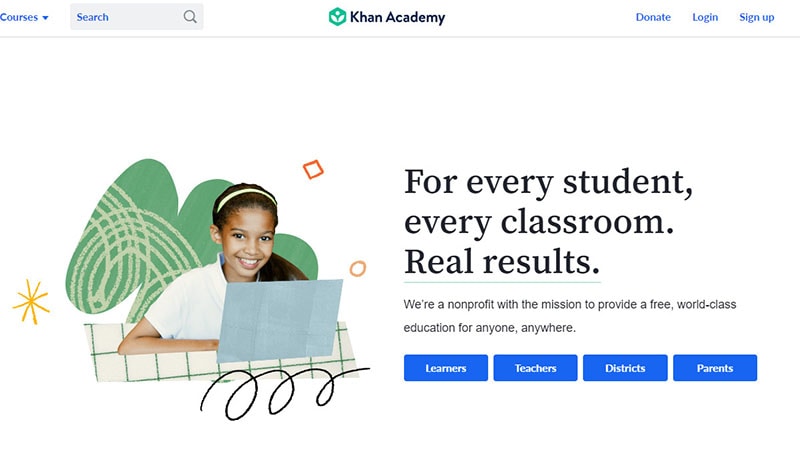
They are working hard to ensure that Khan Academy gives teachers of all stripes the tools they need to understand better the students’ activities and how to assist them effectively. The Khan Academy teacher dashboard offers an overview of the overall performance of the class as well as comprehensive student profiles. Khan Academy is free, and anyone can learn anything. They are nonprofit because, according to Khan Academy, they believe in free, world-class education anywhere.
Is Khan Academy suitable for learning?
An excellent and convenient resource for academic study is Khan Academy. Anyone who desires to study may benefit from Khan, even though it is specially designed for kids in grade school through the college level stage. The website has several fantastic features, like the ability to enable subtitles for each video and the availability of the whole Khan Academy course in at least 18 other languages.
However, it would be convenient if the text-only material could use the built-in text-to-speech feature. Students may now access all courses using the Khan Academy app, which also enables downloading for offline learning. It’s doubtful that many students will open Khan Academy and be eager to start using it because its organization and interface are both rather formal, and its activities are simple.
SchoolTube (https://www.schooltube.com/ )
- is a secure platform for sharing videos without distraction-causing side video suggestions and advertising. Teachers and students can upload a YouTube video to their SchoolTube playlist. Still, all ancillary material, including advertising that would typically be included on the YouTube website, has been stripped off.
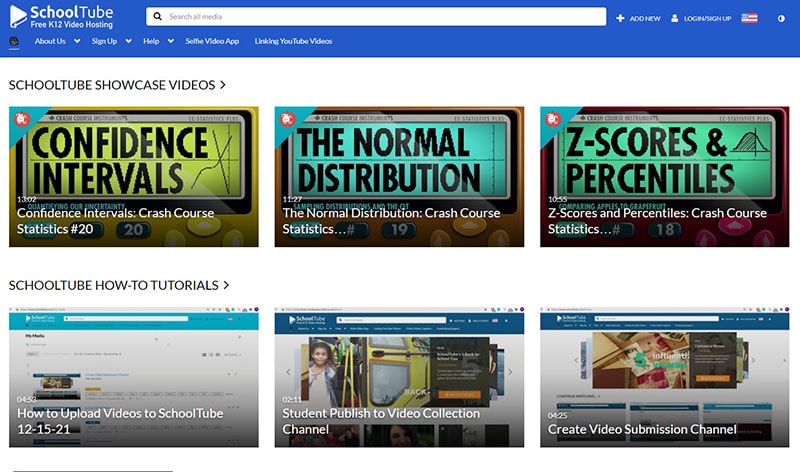
Many choices are available on the SchoolTube website, including the ability to submit movies, screenshot a device’s display, record video inside the application, add attachments to films, and add a video quiz. Further exploration of the application reveals more possibilities for the editor. SchoolTube is suitable for teachers and students since it lets them contribute or make their movies with brand-new features that encourage more interactive learning in a secure digital setting.
Is SchoolTube suitable for learning?
This product is an excellent place to submit student-made movies or to obtain videos related to your classroom topics. The subject or topic they are discussing can be used to filter channels for students and teachers. I think it is a fantastic alternative to using YouTube, a more restricted site in the classroom. When you require students to watch films related to the ideas you are discussing, SchoolTube is a terrific resource to use. It is a safer or more closely supervised website than YouTube.
TeacherTube (https://www.teachertube.com/ )
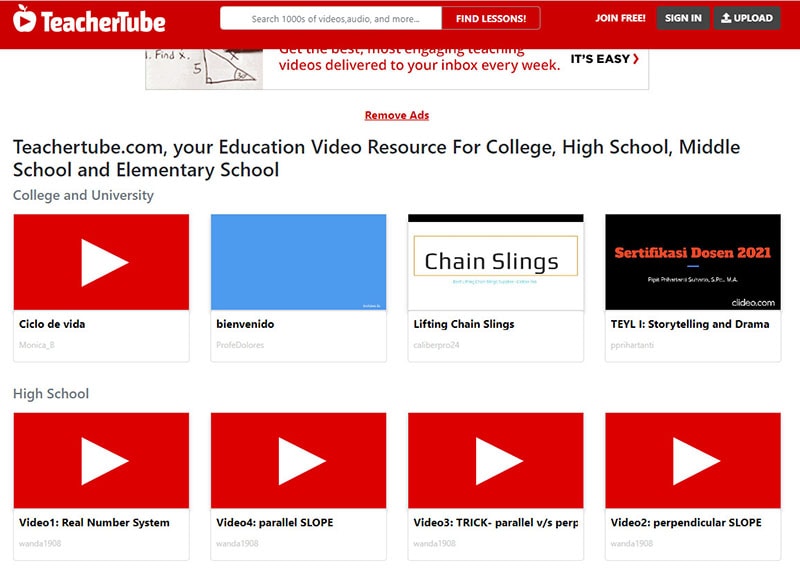
- is an online community for sharing instructional videos. They seek to offer a safe venue or site for teachers, schools, and students to access educationally focused videos. Currently, they provide an incredible 60 topics or subjects for all ages from Science, Math, History, Social Studies, Language & Arts, and more. They also have educational songs for kids and programming languages for the higher level. TeacherTube also provides anytime, anywhere professional development for teachers. And the site where teachers can post educational videos on their own designed for students to view to learn a concept or skill.
Is TeacherTube suitable for learning?
Despite being helpful in situations with no access to YouTube, this has a restricted search function. For each topic searched, there are just a few relevant search results. Results might range widely in terms of quality. If required, this would be a helpful resource, but it might be even better if it were more thorough.
TED-Ed (https://www.ed.ted.com/ )
- the videos and courses on TED-Ed may be used to supplement practically any topic by adding video learning, knowledge tests, and conversation prompts. Students are likely to get immediately engaged with the content because it is outstanding and comes from some of the top brains in the world. Videos are excellent for group viewing or use in flipped classrooms.
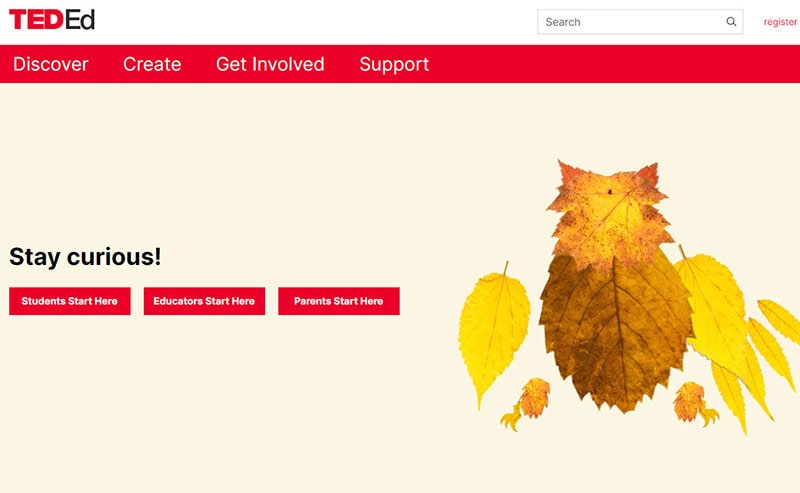
You can use TED-Ed’s videos and lessons to supplement almost any subject with video learning, basic knowledge checks, and discussion questions. Browse by topic or subtopic or search by keyword. You can filter by target age, content type, subtitles, etc. The content is remarkable and comes from some of the world’s best minds, and the students will likely engage with it immediately. Videos can be great to watch as a class or to include as part of a flipped classroom.
Is Ted-Ed suitable for learning?
TED-Ed is a fantastic tool for students and instructors searching for inspiration, knowledge, and perhaps even some fun, thanks to the high-quality videos and the vast library of lesson ideas. The cartoons and films are just as well-made and engaging as some of the most remarkable television programming. The website presents a complicated subject intelligently, while a few students may feel bored or annoyed with videos on more advanced topics.
Crash Course (https://thecrashcourse.com/ )
Can provide a free high-quality educational video on various subjects. Crash Course also alters the traditional textbook model by presenting information in a fast-paced format to enhance students’ learning experience. With the help of the Crash Course team, they created different kinds of videos on 21 subjects for high school and college learners.
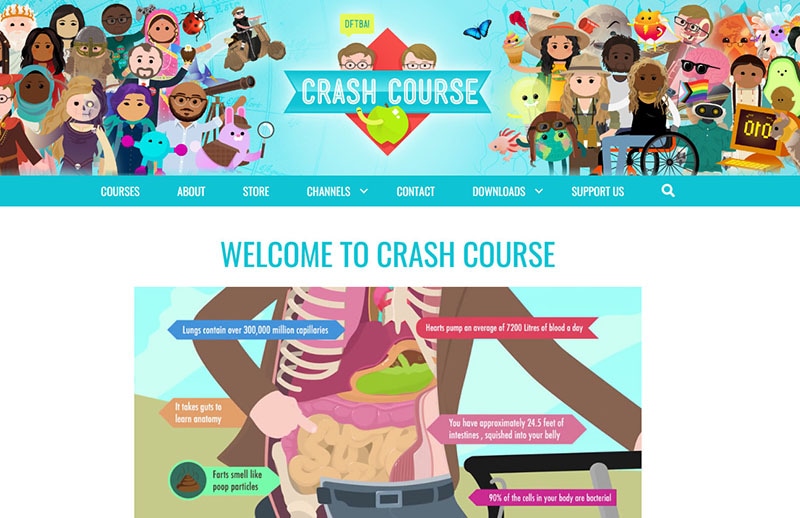
Primary and Intermediate or grade school students can also use this site. According to Crash Course, they also have hundreds of millions of views on their YouTube channel. While the show is a beneficial tool for teachers and students, it also has an extensive viewership of casual learners seeking online educational content independently.
Is Crash Course suitable for learning?
The sarcastic tone and rapid speed of Crash Course will undoubtedly keep students intrigued, but the material is often dubious, and the videos offer primarily passive learning. Each Crash Course video’s host is enthusiastic about the subject. The majority of the Crash Course videos are pretty accurate. However, in an attempt to simplify topics, several Crash Course Kids videos fall short.
National Geographic Kids (https://kids.nationalgeographic.com/ )
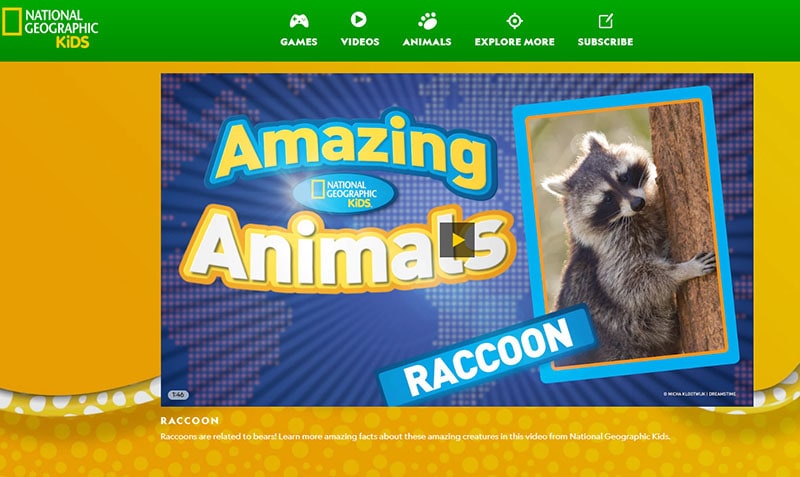
It offers educational videos, games, and other activities, especially on animals and the natural world. The students will enjoy playing games with simple instructions and a range of difficulties and frequently practice memory, logic, and other skills. They can contribute to the site by leaving some comments, taking quizzes, viewing user photos, and sharing their own.
Is National Geographic Kids suitable for learning?
The National Geographic Kids website is easy to navigate and contains exciting materials for students, while some content isn’t properly structured and may be challenging to find. Clicking on a menu choice at the top of the screen leads you to a related page, but lingering over that same option brings up extra alternatives that you wouldn’t see if you clicked. Keyword searches and links supplied by the teacher will be helpful here. For example, the site has tools such as a Homework Help section that teaches kids how to be an expert fact-checker, write an animal report, and more. Still, it’s not precisely apparent how to get there unless you search for it.
NeoK12 (https://www.neok12.com/ )
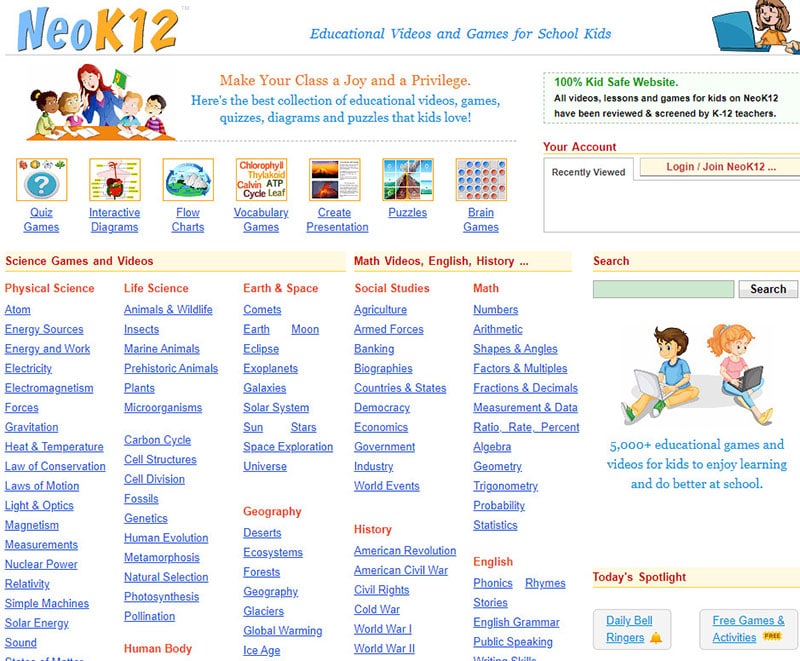
Uses educational videos and animations for the students. It is a great way to learn, allowing the students to build a visual model in their minds by watching their videos. The graphical representation of the ideas aids their comprehension, piques their interest, and promotes self-directed learning in each learner. Educational videos in NeoK12 and games are possibly one of the most effective learning tools. Even the higher levels of students will find the platform enriching and entertaining. NeoK12’s website also features tools not only for learners but also for teachers.
Is NeoK12 suitable for learning?
This platform is a rather extensive library of interesting educational tools, and the films and brain games are both free and well worth a look. Kids may augment the movie with other resources, such as interactive diagrams, flowcharts, fun, and puzzles, for a relatively inexpensive monthly charge. The films are simple teaching tools that usually contain supplementary resources that help youngsters to put what they’ve learned into practice. There are various “Universe” films, for example, under the Earth and Space area. Children who watch these films may also access relevant games, diagrams, activities, and photographs to prepare presentations.
Discovery Education (https://www.discoveryeducation.com/ )
Has made a name for itself as the top supplier of digital content, curriculum resources, and professional development for grades K–12. Discovery Education is used by almost 5.6 million students in Canada, all 50 states, and other countries. Why not give it a shot in the Philippines or somewhere else in Asia?

Teachers can use the free resources on Discovery Education to enhance their existing curriculum from the Grade School Level up to High School Level. An example of a tool with this platform is the Puzzlemaker, whose vocabulary makes crosswords and other types of puzzles. They can also be assigned specific videos or interactive activities to introduce new ideas at home.
Is Discovery Education suitable for learning?
Discovery Education is an excellent free resource. The commercial edition has considerably more resources, and after using it, I sincerely wished they would make it accessible for free or at a lower cost. The items aimed at students are straightforward and uninspiring; the website is intended for teachers. I would love to see them unlock more of the stuff that is locked behind the barrier, maybe in a cyclical manner where some films or resources are made available for free for a month at a time.
Free Download For Win 7 or later(64-bit)
Free Download For macOS 10.14 or later
Free Download For macOS 10.14 or later
How to Do Motion Graphics in Filmora
Preparation
What you need to prepare:
- A computer (Windows or macOS)
- Your video materials.
- Filmora video editor
Step 1
Visit the filmora.wondershare.com website and download Filmora . Install the program and wait for it to Run. Then, click on New Project.
Step 2
Go to File → Project Settings and set the FPS to 60. Also, ensure that the project is in Full Resolution (1920x1080). Click OK.

Step 3
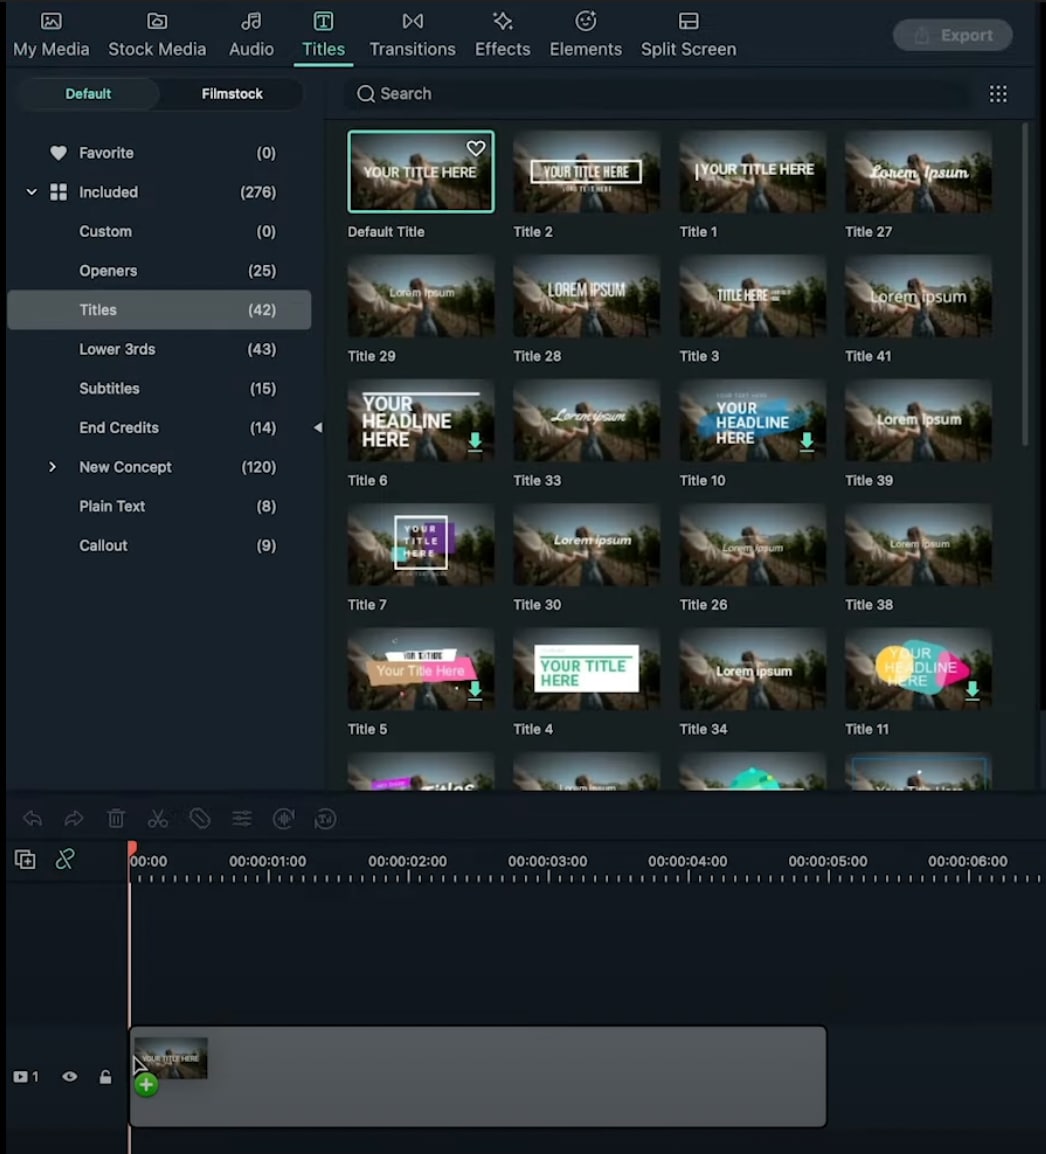
Open the Titles tab and drag the Default Title to the Timeline. Then, double-click on the Default Title and click on ADVANCED.
Step 4
From the Advanced settings panel, delete the existing text and add a Rectangle shape.

Step 5
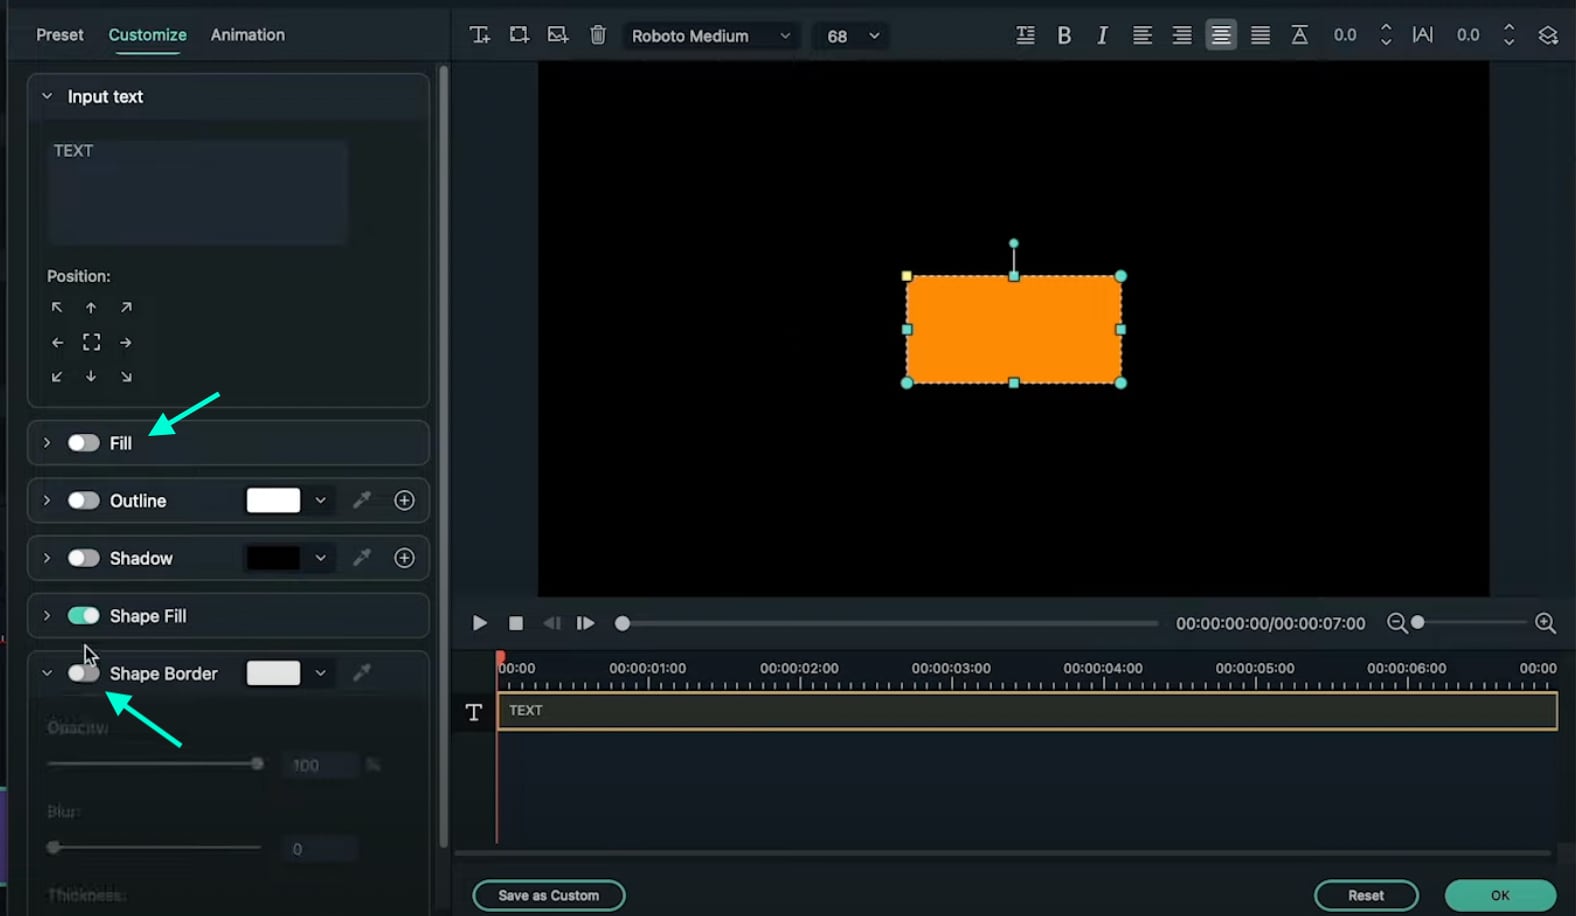
Disable the Text Fill and the Shape Border options from the panel on the left side.
Step 6
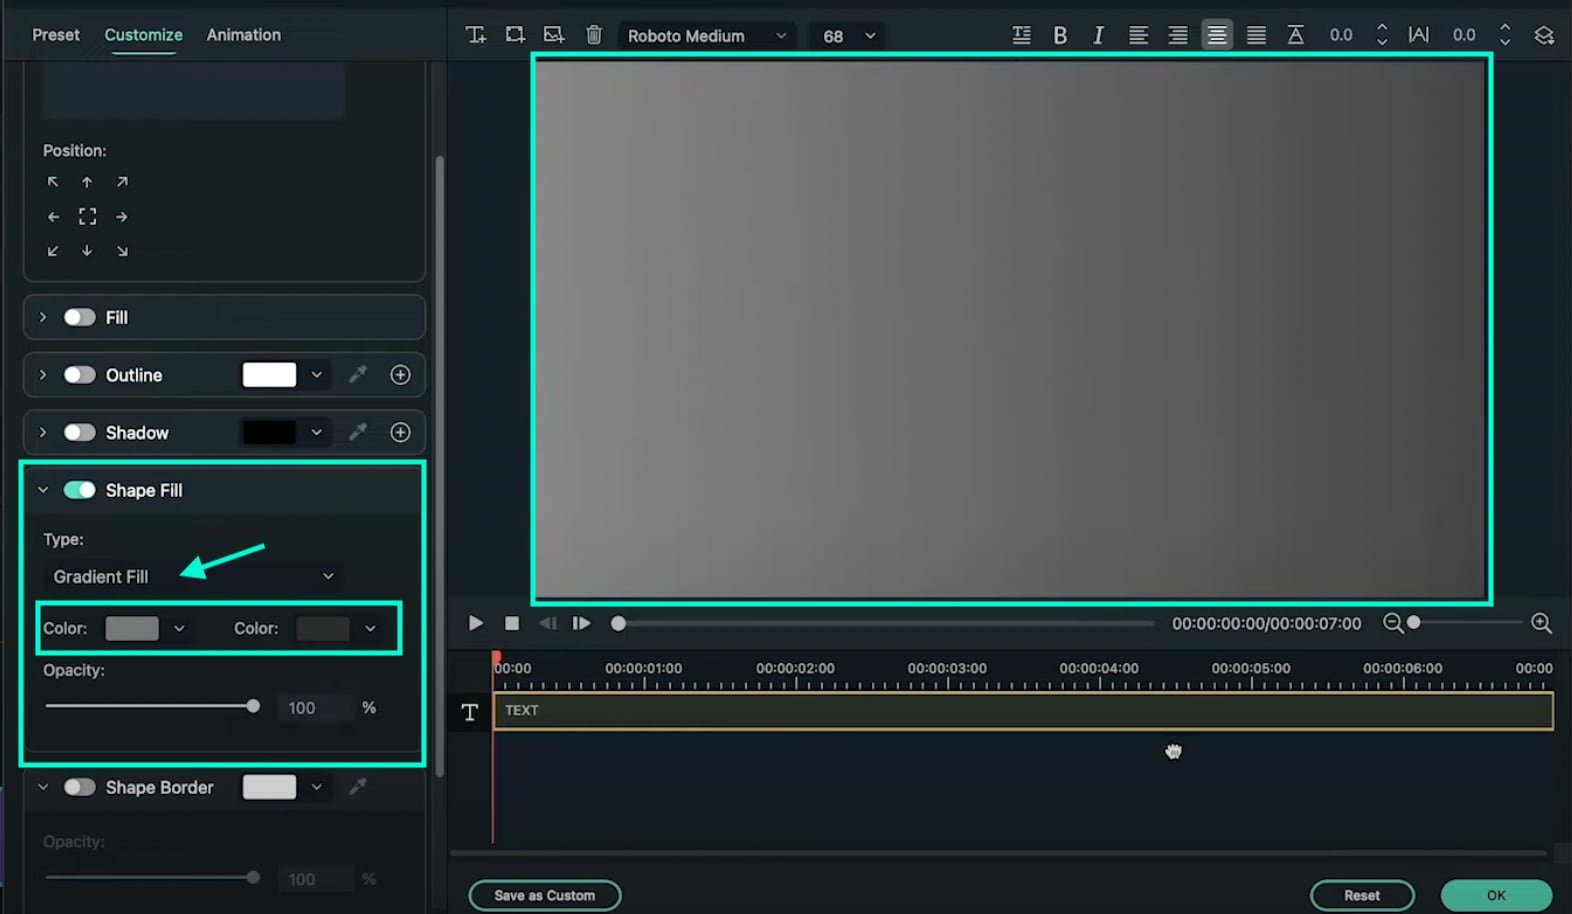
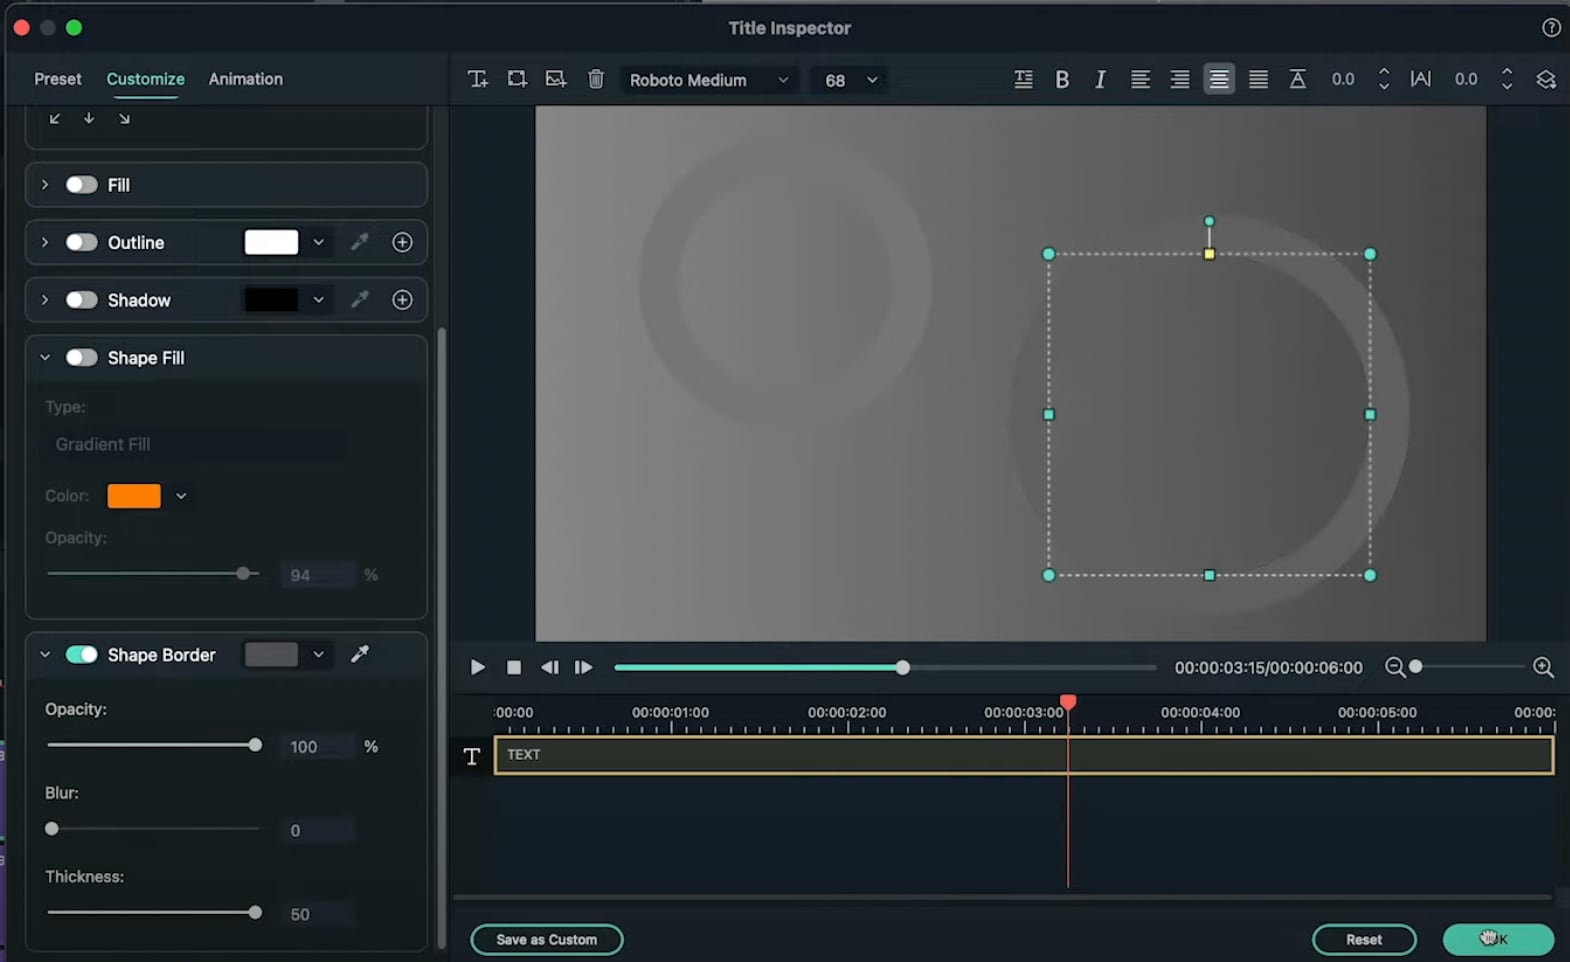
Click the drop-down arrow on the Shape Fill option and change the Type to Gradient Fill. Then, adjust the two color pallets from lighter to darker to create a gradient effect. Finally, adjust the rectangle to fit the entire screen. Click OK.
Step 7
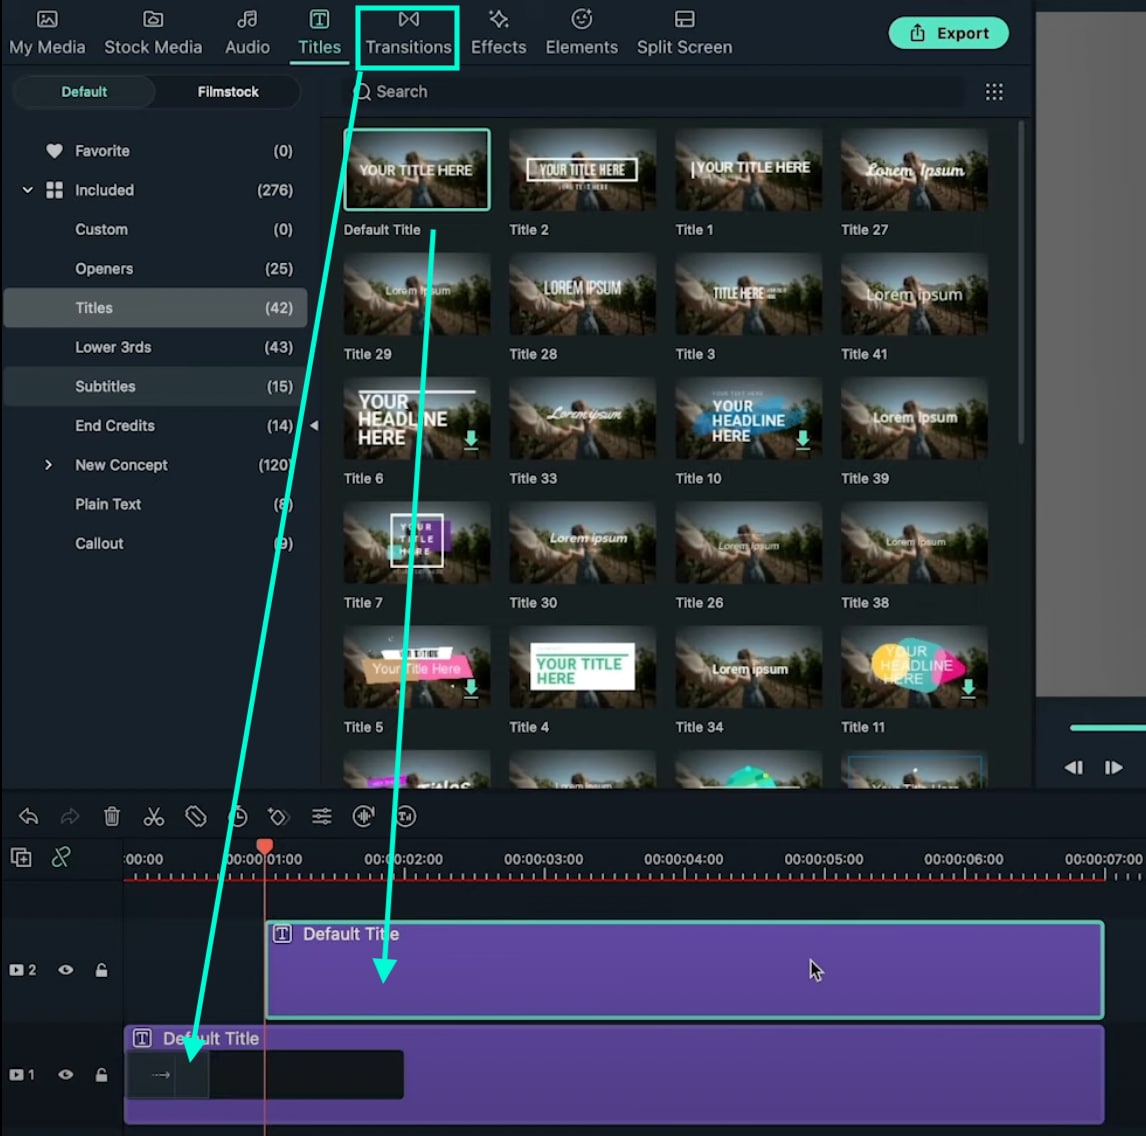
Go to the Transitions tab → search for “Push” → drag the Push transition to the Default Title in the Timeline. Then, move the Playhead to the 1-second marker and drag another Default Title to that point from the Titles tab.
Step 8
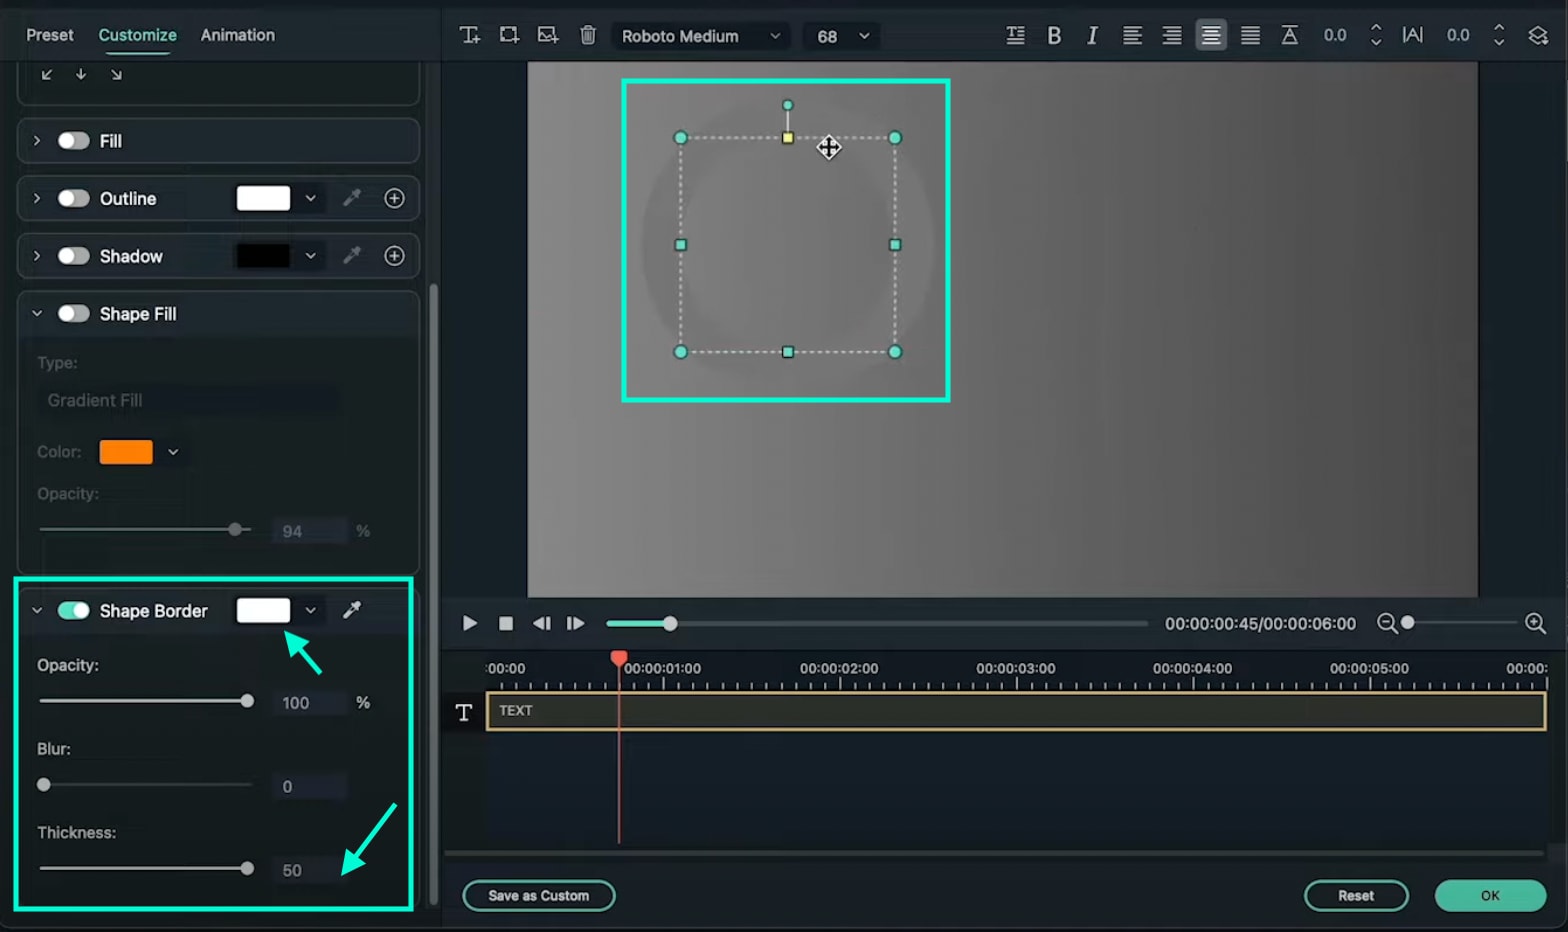
Double-click on the new Default Title → go to Advanced. Delete the default text and add a Circle shape this time instead of a Rectangle. Disable the Text Fill and Shape Fill options this time.
Step 9
Scroll down to Shape Border and increase the Thickness bar all the way up. Then, change the circle’s color to match your background as closely as possible. Click OK.
Step 10
Copy the Title you just edited and paste it into the above layer. Then, double-click on the copied Title and go to its Advanced settings panel.

Step 11
In the Advanced panel, copy the circle and paste it somewhere else on the screen. Change its size if you want, and change the shade of its color to match the background once more. You can add as many new copies of the Default Titles and copy as many circles as you want. Click OK.
Step 12
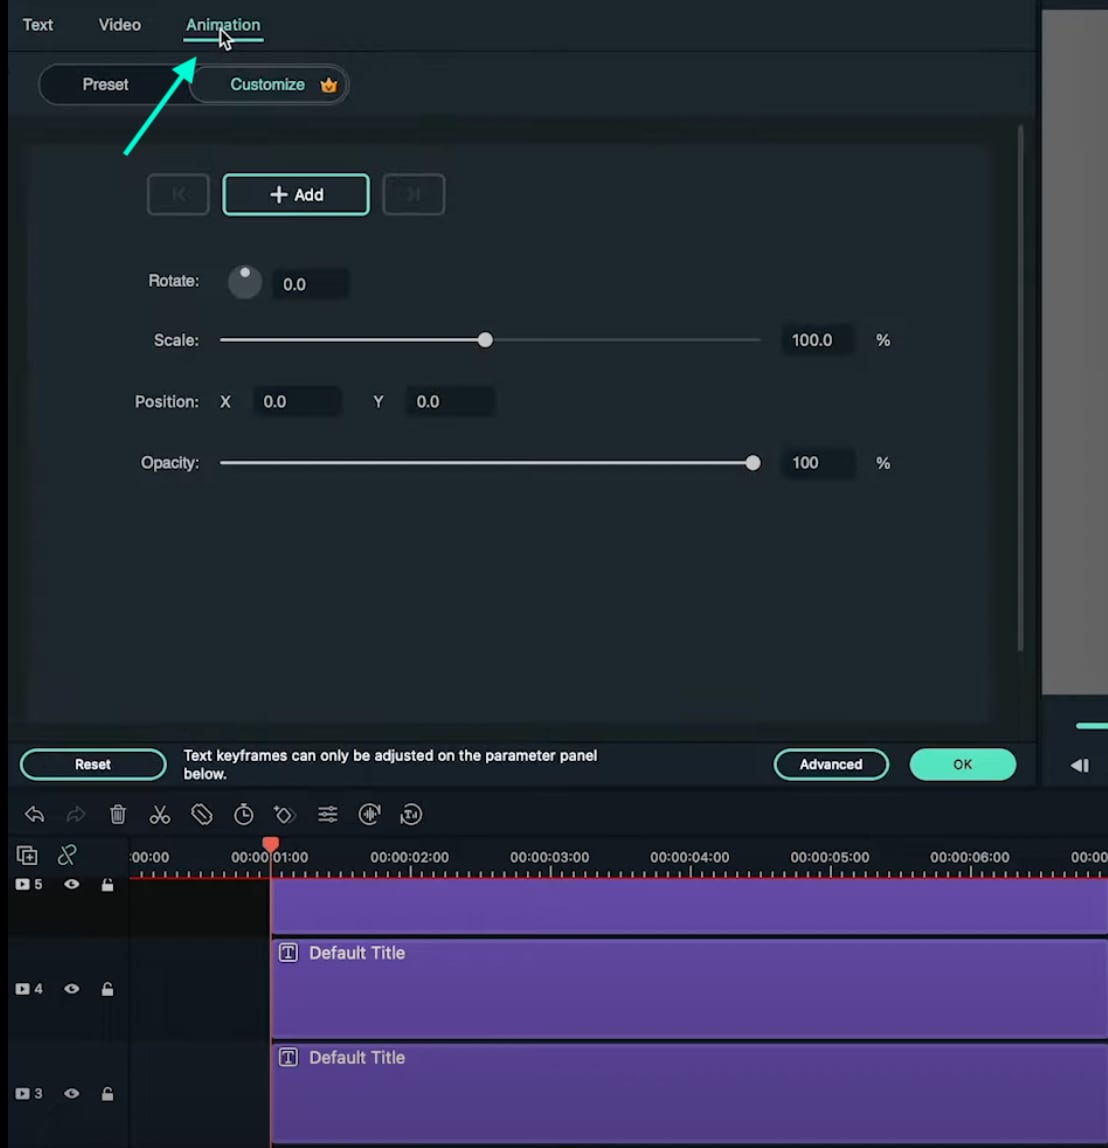
After you’re done copying and pasting more Default Titles with more Circles inside, you can start animating them. Start with the first one. Double-click on the first Default Title with the Circle inside. Make sure you place the Playhead at the beginning of that clip. Then, go to the Animation tab.
Step 13
You need to add 3 keyframes. Add the first one right now. Just click on the “**+Add” button. Then, move the Playhead somewhere in the middle and click “+Add” again. Last, move the Playhead at the end of the clip, and click “+Add**” again to add the third keyframe.

Step 14
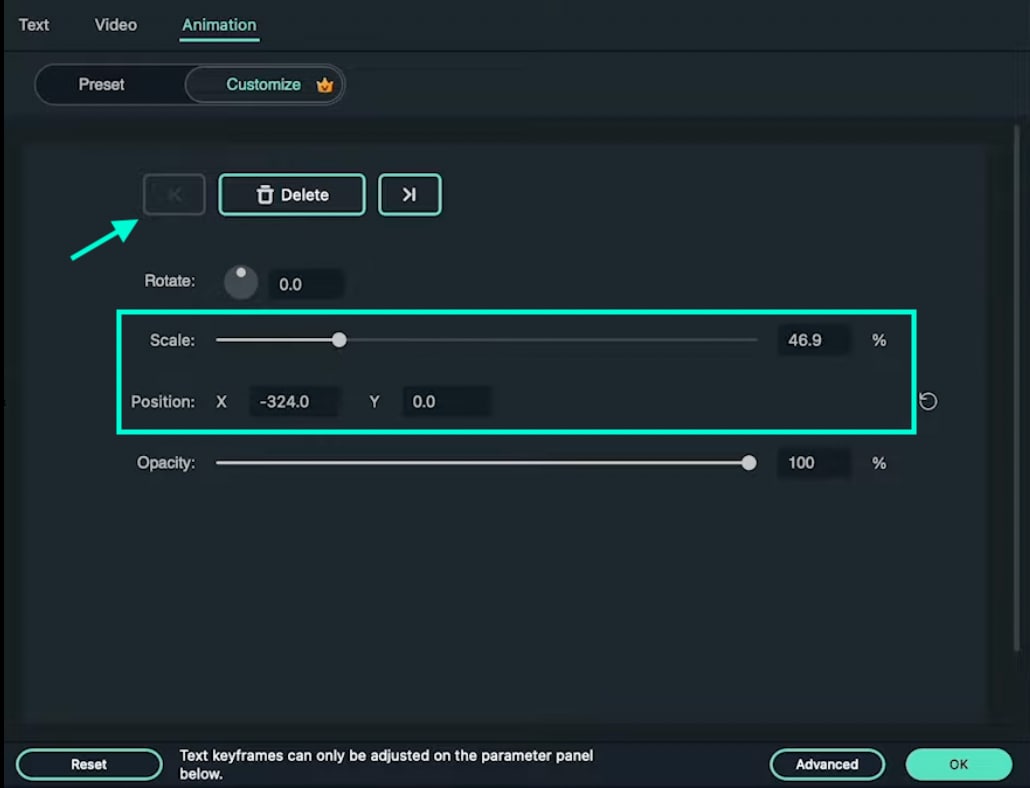
Now, go back to the first keyframe to edit its settings. Click the arrows to move between keyframes. Once you’re at the first one, start decreasing the Scale and the Position values as you move the Playhead toward the second keyframe. There are no rules here. Move each value based on how it looks best to you.
For the second keyframe, just increase the Scale and adjust the Position value based on how it looks on the screen.
Step 15
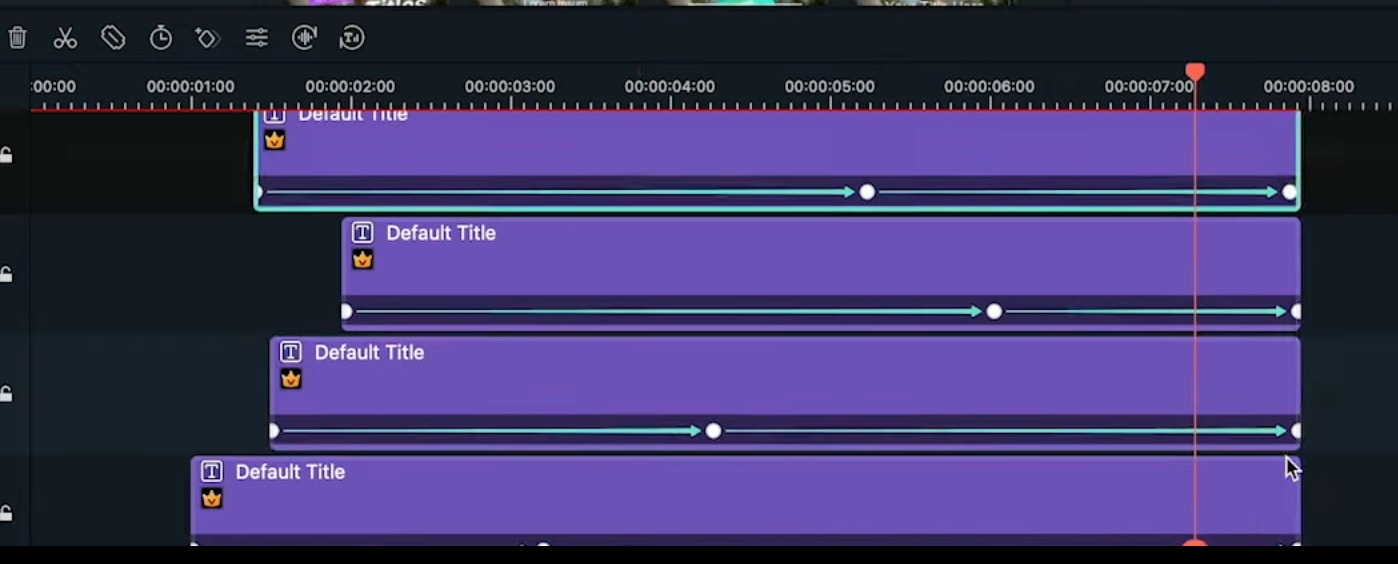
Now, apply the same method as in Step 14 to all the other circles in your video. Then, adjust the keyframe positions for all layers to create more unique movement throughout the video.
Step 16
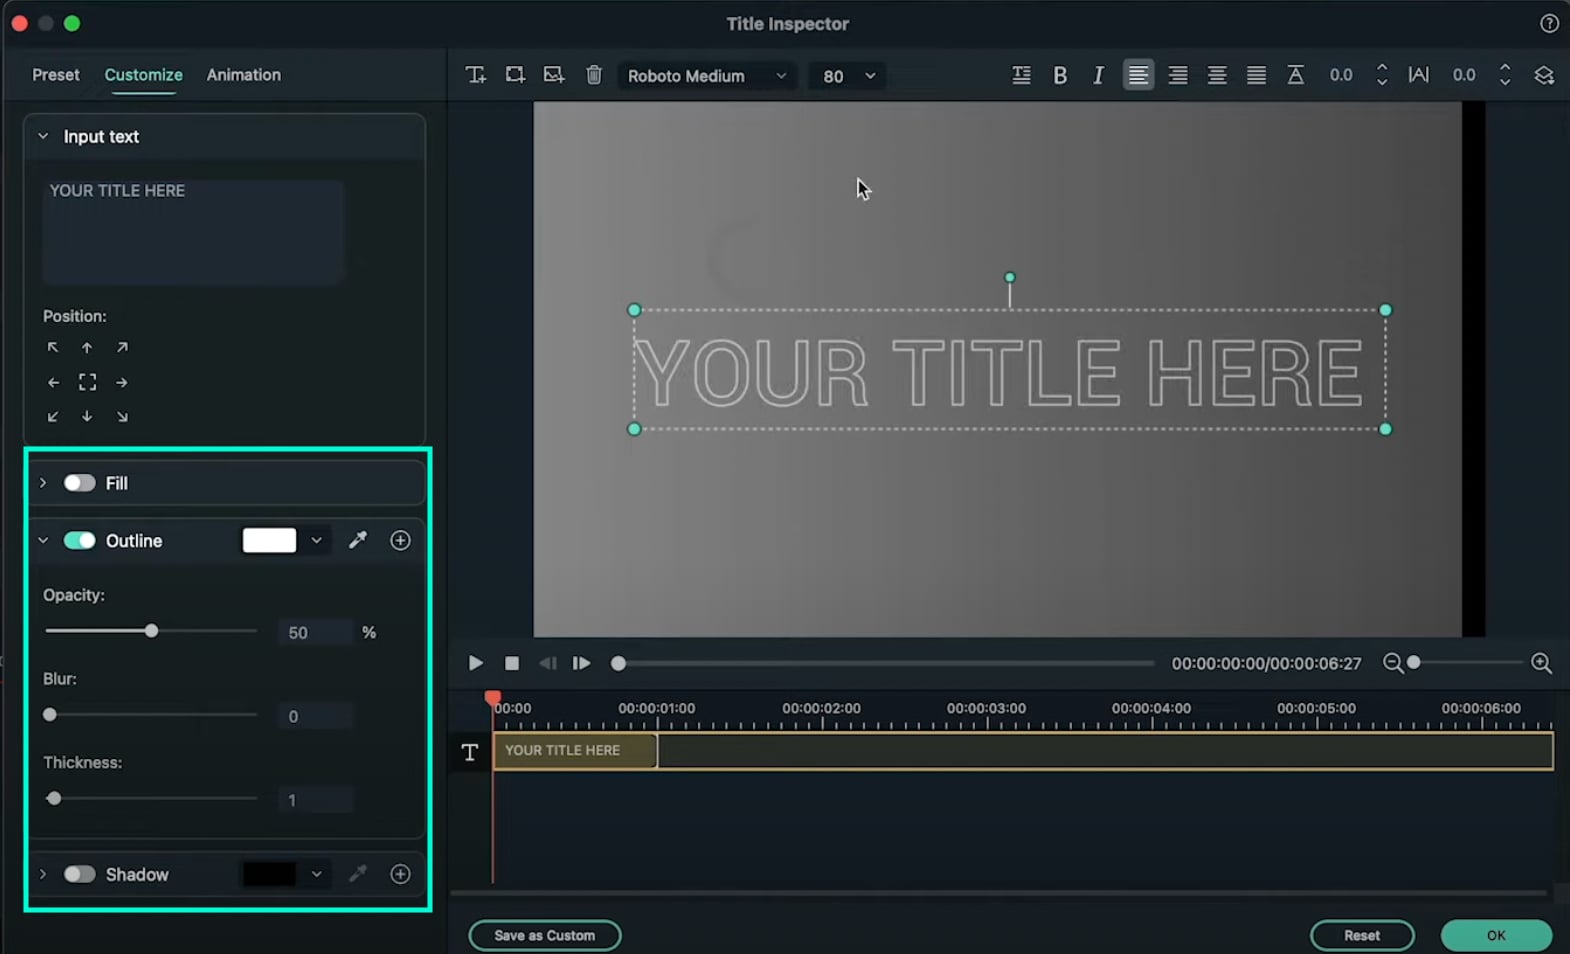
Move the Playhead to 1 second and 30 frames. Then, add a new Default Title in the Timeline and go to its Advanced settings panel. From there, Enable the Outline option and Disable the Fill option. In the Outline option, change the color to White, set Opacity to 50%, and decrease Thickness to 1.
Step 17
Next, choose your favorite font and type in your text inside the textbox. Then, change the value you see highlighted in this image to “-20”. Finally, increase the text size to almost fit the entire screen. Don’t worry about the fact that you can’t see all of it on the screen.

Step 18
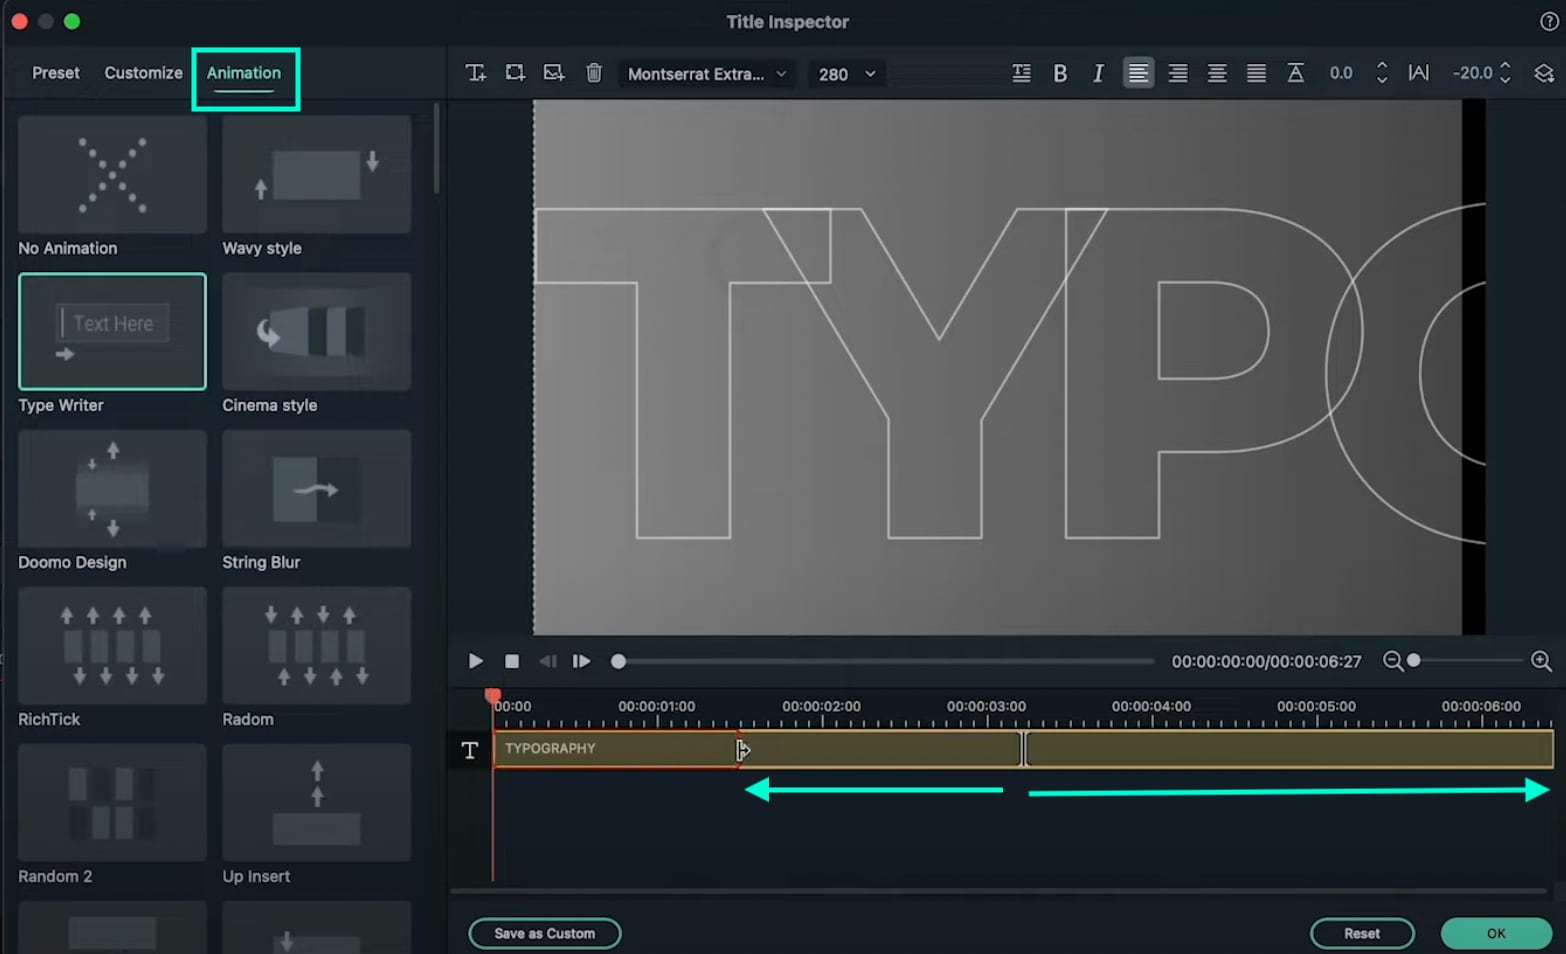
Go to the Animation tab and apply the “Type Writer” animation. Then, drag the yellow lines below just like you see in the image here. The arrows show you the length to which you need to drag these lines. Click OK.
Step 19
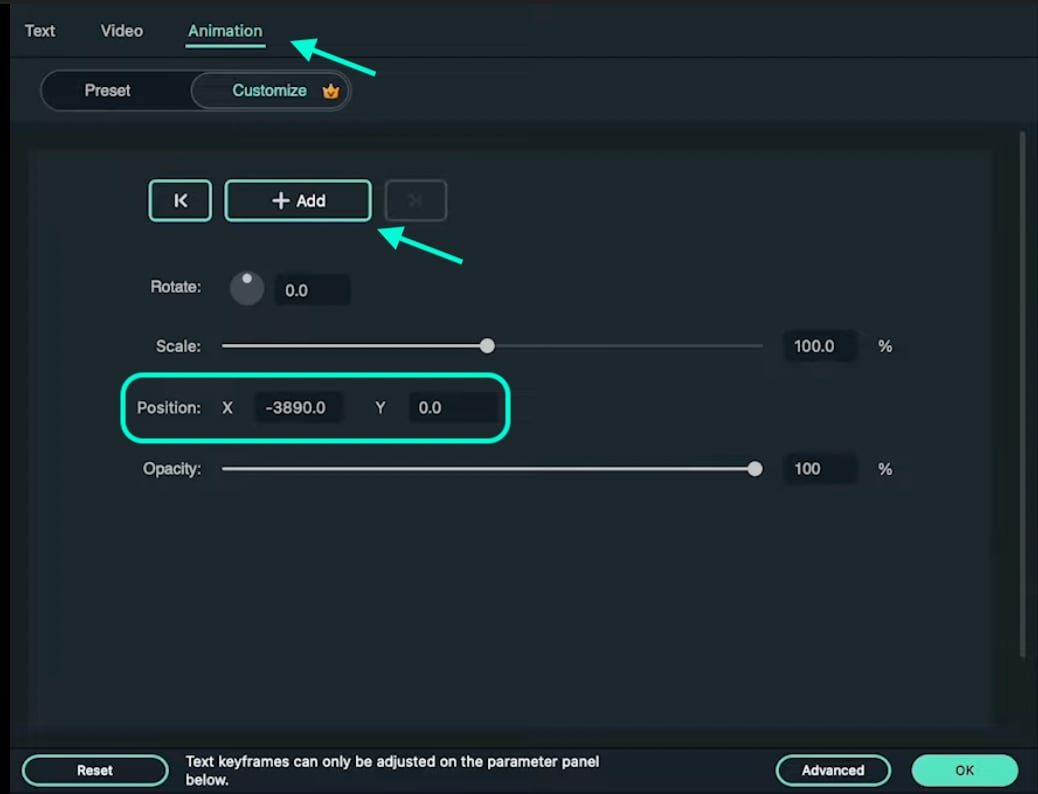
Set the Playhead to 1 second and 40 frames. Now, double-click on the last Default Title we just created and go to its Animation settings. NOTE: Don’t open its Advanced settings this time. Next, add a keyframe. Then, move the Playhead near the end of this clip in the Timeline. Now, drag the X position to the left until you see the last letter of your text appear on the screen. Click OK.
Step 20
Now, add another Default Title to the Timeline. Open its Advanced settings and type in your main text. Then, go to its Animation tab and apply the “Random 2” animation. Change its starting and end times according to your preference. Click OK.

Step 21
That’s it. You’re done! Feel free to preview the video and Render it. Congratulations on creating unique motion graphics in Filmora.
Summary
What you’ve learned:
- How to create custom motion graphics in Filmora
- How to edit and add animations to titles in Filmora
- Customize text and shapes in Filmora
What you need to prepare:
- A computer (Windows or macOS)
- Your video materials.
- Filmora video editor
Step 1
Visit the filmora.wondershare.com website and download Filmora . Install the program and wait for it to Run. Then, click on New Project.
Step 2
Go to File → Project Settings and set the FPS to 60. Also, ensure that the project is in Full Resolution (1920x1080). Click OK.

Step 3
Open the Titles tab and drag the Default Title to the Timeline. Then, double-click on the Default Title and click on ADVANCED.

Step 4
From the Advanced settings panel, delete the existing text and add a Rectangle shape.

Step 5
Disable the Text Fill and the Shape Border options from the panel on the left side.

Step 6
Click the drop-down arrow on the Shape Fill option and change the Type to Gradient Fill. Then, adjust the two color pallets from lighter to darker to create a gradient effect. Finally, adjust the rectangle to fit the entire screen. Click OK.

Step 7
Go to the Transitions tab → search for “Push” → drag the Push transition to the Default Title in the Timeline. Then, move the Playhead to the 1-second marker and drag another Default Title to that point from the Titles tab.

Step 8
Double-click on the new Default Title → go to Advanced. Delete the default text and add a Circle shape this time instead of a Rectangle. Disable the Text Fill and Shape Fill options this time.
Step 9
Scroll down to Shape Border and increase the Thickness bar all the way up. Then, change the circle’s color to match your background as closely as possible. Click OK.

Step 10
Copy the Title you just edited and paste it into the above layer. Then, double-click on the copied Title and go to its Advanced settings panel.

Step 11
In the Advanced panel, copy the circle and paste it somewhere else on the screen. Change its size if you want, and change the shade of its color to match the background once more. You can add as many new copies of the Default Titles and copy as many circles as you want. Click OK.

Step 12
After you’re done copying and pasting more Default Titles with more Circles inside, you can start animating them. Start with the first one. Double-click on the first Default Title with the Circle inside. Make sure you place the Playhead at the beginning of that clip. Then, go to the Animation tab.

Step 13
You need to add 3 keyframes. Add the first one right now. Just click on the “**+Add” button. Then, move the Playhead somewhere in the middle and click “+Add” again. Last, move the Playhead at the end of the clip, and click “+Add**” again to add the third keyframe.

Step 14
Now, go back to the first keyframe to edit its settings. Click the arrows to move between keyframes. Once you’re at the first one, start decreasing the Scale and the Position values as you move the Playhead toward the second keyframe. There are no rules here. Move each value based on how it looks best to you.
For the second keyframe, just increase the Scale and adjust the Position value based on how it looks on the screen.

Step 15
Now, apply the same method as in Step 14 to all the other circles in your video. Then, adjust the keyframe positions for all layers to create more unique movement throughout the video.

Step 16
Move the Playhead to 1 second and 30 frames. Then, add a new Default Title in the Timeline and go to its Advanced settings panel. From there, Enable the Outline option and Disable the Fill option. In the Outline option, change the color to White, set Opacity to 50%, and decrease Thickness to 1.

Step 17
Next, choose your favorite font and type in your text inside the textbox. Then, change the value you see highlighted in this image to “-20”. Finally, increase the text size to almost fit the entire screen. Don’t worry about the fact that you can’t see all of it on the screen.

Step 18
Go to the Animation tab and apply the “Type Writer” animation. Then, drag the yellow lines below just like you see in the image here. The arrows show you the length to which you need to drag these lines. Click OK.

Step 19
Set the Playhead to 1 second and 40 frames. Now, double-click on the last Default Title we just created and go to its Animation settings. NOTE: Don’t open its Advanced settings this time. Next, add a keyframe. Then, move the Playhead near the end of this clip in the Timeline. Now, drag the X position to the left until you see the last letter of your text appear on the screen. Click OK.

Step 20
Now, add another Default Title to the Timeline. Open its Advanced settings and type in your main text. Then, go to its Animation tab and apply the “Random 2” animation. Change its starting and end times according to your preference. Click OK.

Step 21
That’s it. You’re done! Feel free to preview the video and Render it. Congratulations on creating unique motion graphics in Filmora.
Summary
What you’ve learned:
- How to create custom motion graphics in Filmora
- How to edit and add animations to titles in Filmora
- Customize text and shapes in Filmora
What you need to prepare:
- A computer (Windows or macOS)
- Your video materials.
- Filmora video editor
Step 1
Visit the filmora.wondershare.com website and download Filmora . Install the program and wait for it to Run. Then, click on New Project.
Step 2
Go to File → Project Settings and set the FPS to 60. Also, ensure that the project is in Full Resolution (1920x1080). Click OK.

Step 3
Open the Titles tab and drag the Default Title to the Timeline. Then, double-click on the Default Title and click on ADVANCED.

Step 4
From the Advanced settings panel, delete the existing text and add a Rectangle shape.

Step 5
Disable the Text Fill and the Shape Border options from the panel on the left side.

Step 6
Click the drop-down arrow on the Shape Fill option and change the Type to Gradient Fill. Then, adjust the two color pallets from lighter to darker to create a gradient effect. Finally, adjust the rectangle to fit the entire screen. Click OK.

Step 7
Go to the Transitions tab → search for “Push” → drag the Push transition to the Default Title in the Timeline. Then, move the Playhead to the 1-second marker and drag another Default Title to that point from the Titles tab.

Step 8
Double-click on the new Default Title → go to Advanced. Delete the default text and add a Circle shape this time instead of a Rectangle. Disable the Text Fill and Shape Fill options this time.
Step 9
Scroll down to Shape Border and increase the Thickness bar all the way up. Then, change the circle’s color to match your background as closely as possible. Click OK.

Step 10
Copy the Title you just edited and paste it into the above layer. Then, double-click on the copied Title and go to its Advanced settings panel.

Step 11
In the Advanced panel, copy the circle and paste it somewhere else on the screen. Change its size if you want, and change the shade of its color to match the background once more. You can add as many new copies of the Default Titles and copy as many circles as you want. Click OK.

Step 12
After you’re done copying and pasting more Default Titles with more Circles inside, you can start animating them. Start with the first one. Double-click on the first Default Title with the Circle inside. Make sure you place the Playhead at the beginning of that clip. Then, go to the Animation tab.

Step 13
You need to add 3 keyframes. Add the first one right now. Just click on the “**+Add” button. Then, move the Playhead somewhere in the middle and click “+Add” again. Last, move the Playhead at the end of the clip, and click “+Add**” again to add the third keyframe.

Step 14
Now, go back to the first keyframe to edit its settings. Click the arrows to move between keyframes. Once you’re at the first one, start decreasing the Scale and the Position values as you move the Playhead toward the second keyframe. There are no rules here. Move each value based on how it looks best to you.
For the second keyframe, just increase the Scale and adjust the Position value based on how it looks on the screen.

Step 15
Now, apply the same method as in Step 14 to all the other circles in your video. Then, adjust the keyframe positions for all layers to create more unique movement throughout the video.

Step 16
Move the Playhead to 1 second and 30 frames. Then, add a new Default Title in the Timeline and go to its Advanced settings panel. From there, Enable the Outline option and Disable the Fill option. In the Outline option, change the color to White, set Opacity to 50%, and decrease Thickness to 1.

Step 17
Next, choose your favorite font and type in your text inside the textbox. Then, change the value you see highlighted in this image to “-20”. Finally, increase the text size to almost fit the entire screen. Don’t worry about the fact that you can’t see all of it on the screen.

Step 18
Go to the Animation tab and apply the “Type Writer” animation. Then, drag the yellow lines below just like you see in the image here. The arrows show you the length to which you need to drag these lines. Click OK.

Step 19
Set the Playhead to 1 second and 40 frames. Now, double-click on the last Default Title we just created and go to its Animation settings. NOTE: Don’t open its Advanced settings this time. Next, add a keyframe. Then, move the Playhead near the end of this clip in the Timeline. Now, drag the X position to the left until you see the last letter of your text appear on the screen. Click OK.

Step 20
Now, add another Default Title to the Timeline. Open its Advanced settings and type in your main text. Then, go to its Animation tab and apply the “Random 2” animation. Change its starting and end times according to your preference. Click OK.

Step 21
That’s it. You’re done! Feel free to preview the video and Render it. Congratulations on creating unique motion graphics in Filmora.
Summary
What you’ve learned:
- How to create custom motion graphics in Filmora
- How to edit and add animations to titles in Filmora
- Customize text and shapes in Filmora
What you need to prepare:
- A computer (Windows or macOS)
- Your video materials.
- Filmora video editor
Step 1
Visit the filmora.wondershare.com website and download Filmora . Install the program and wait for it to Run. Then, click on New Project.
Step 2
Go to File → Project Settings and set the FPS to 60. Also, ensure that the project is in Full Resolution (1920x1080). Click OK.

Step 3
Open the Titles tab and drag the Default Title to the Timeline. Then, double-click on the Default Title and click on ADVANCED.

Step 4
From the Advanced settings panel, delete the existing text and add a Rectangle shape.

Step 5
Disable the Text Fill and the Shape Border options from the panel on the left side.

Step 6
Click the drop-down arrow on the Shape Fill option and change the Type to Gradient Fill. Then, adjust the two color pallets from lighter to darker to create a gradient effect. Finally, adjust the rectangle to fit the entire screen. Click OK.

Step 7
Go to the Transitions tab → search for “Push” → drag the Push transition to the Default Title in the Timeline. Then, move the Playhead to the 1-second marker and drag another Default Title to that point from the Titles tab.

Step 8
Double-click on the new Default Title → go to Advanced. Delete the default text and add a Circle shape this time instead of a Rectangle. Disable the Text Fill and Shape Fill options this time.
Step 9
Scroll down to Shape Border and increase the Thickness bar all the way up. Then, change the circle’s color to match your background as closely as possible. Click OK.

Step 10
Copy the Title you just edited and paste it into the above layer. Then, double-click on the copied Title and go to its Advanced settings panel.

Step 11
In the Advanced panel, copy the circle and paste it somewhere else on the screen. Change its size if you want, and change the shade of its color to match the background once more. You can add as many new copies of the Default Titles and copy as many circles as you want. Click OK.

Step 12
After you’re done copying and pasting more Default Titles with more Circles inside, you can start animating them. Start with the first one. Double-click on the first Default Title with the Circle inside. Make sure you place the Playhead at the beginning of that clip. Then, go to the Animation tab.

Step 13
You need to add 3 keyframes. Add the first one right now. Just click on the “**+Add” button. Then, move the Playhead somewhere in the middle and click “+Add” again. Last, move the Playhead at the end of the clip, and click “+Add**” again to add the third keyframe.

Step 14
Now, go back to the first keyframe to edit its settings. Click the arrows to move between keyframes. Once you’re at the first one, start decreasing the Scale and the Position values as you move the Playhead toward the second keyframe. There are no rules here. Move each value based on how it looks best to you.
For the second keyframe, just increase the Scale and adjust the Position value based on how it looks on the screen.

Step 15
Now, apply the same method as in Step 14 to all the other circles in your video. Then, adjust the keyframe positions for all layers to create more unique movement throughout the video.

Step 16
Move the Playhead to 1 second and 30 frames. Then, add a new Default Title in the Timeline and go to its Advanced settings panel. From there, Enable the Outline option and Disable the Fill option. In the Outline option, change the color to White, set Opacity to 50%, and decrease Thickness to 1.

Step 17
Next, choose your favorite font and type in your text inside the textbox. Then, change the value you see highlighted in this image to “-20”. Finally, increase the text size to almost fit the entire screen. Don’t worry about the fact that you can’t see all of it on the screen.

Step 18
Go to the Animation tab and apply the “Type Writer” animation. Then, drag the yellow lines below just like you see in the image here. The arrows show you the length to which you need to drag these lines. Click OK.

Step 19
Set the Playhead to 1 second and 40 frames. Now, double-click on the last Default Title we just created and go to its Animation settings. NOTE: Don’t open its Advanced settings this time. Next, add a keyframe. Then, move the Playhead near the end of this clip in the Timeline. Now, drag the X position to the left until you see the last letter of your text appear on the screen. Click OK.

Step 20
Now, add another Default Title to the Timeline. Open its Advanced settings and type in your main text. Then, go to its Animation tab and apply the “Random 2” animation. Change its starting and end times according to your preference. Click OK.

Step 21
That’s it. You’re done! Feel free to preview the video and Render it. Congratulations on creating unique motion graphics in Filmora.
Summary
What you’ve learned:
- How to create custom motion graphics in Filmora
- How to edit and add animations to titles in Filmora
- Customize text and shapes in Filmora
Storyboards Are Amazing Way if You Want to Present Your Story in a Visual Way, Like Explaining Any Process or Giving Any Information. It Is a Graphic Layout to Tell You a Story
Guaranteed 10 Storyboard Creators To Make Animation Easier For You
An easy yet powerful editor
Numerous effects to choose from
Detailed tutorials provided by the official channel
In this article
01 [5 Facts You Need to Know About Storyboard](#Part 1)
02 [Best 10 Storyboard Creators to Make Your Animation Stand out](#Part 2)
03 [Storyboard Maker Q&A](#Part 3)
Part 1 5 Facts You Need to Know About Storyboard
By using a Storyboard you can represent your story visually. You can make commercials, animated movies etc. Here are some questions from which you will get to know everything you need to know:
01What is an Online Storyboard?
Online Storyboard allows you to create animation videos or films on a web based platform, which is credible in the sense that you do not need to be device specific to use the tool. A web based storyboard works in all your preferred devices and smart phones. The tool does not require a download or installation; however the tool requires a sign up for working on the platform.
02What are the components of a storyboard?
Every shot of the storyboard captures different components. Here are some main components:
● Learning purpose
● A detailed description of communication
● Informatory Strategies to teach the learners
● Format should be perfect according to the topic
● Proper information of audio with file names
● Feedback for the assessment
03Why do you need a Storyboard?
A Storyboard is a process of pre- production. It lets you know how your story is going to flow. You will get to know the mistakes in the early stages if you make a storyboard and this will help you to save your money and time. Here are some essentials because of which you need to have a storyboard.
● Is this concept is going to work? - A storyboard lets you know whether the concept is going to work out or not. A storyboard helps the client to confirm whether the concept will work or not.
● Arranging Shots - A Storyboard lets you to tell you story in a limited time frame in the best way. In commercials we don’t have much time. It is like you have 60 seconds, 30 seconds, or sometimes it is just 15 seconds. So, it is the best way to make every shot count.
● Saving Money - Before making the final product, it is better to have an accepted storyboard from your client. In complex animations, it takes a lot of time and money so it is better to have an approved storyboard. This will let you know how the final product would look like. This will let the client know what is on your mind.
● Recognizing the mistakes - On a storyboarding phase, you can recognize the mistakes related to the media, narration or any other details. This will save your energy, time and money and then you will be ready for the production phase.
● Agreement with punch lines and dialogues - When you are creating a storyboard you can check whether the dialogues and punch lines work together as you have planned before. It is very important to check that the dialogues and punches are delivered in the exact way that you have imagined.
04How to Label Storyboards?
If you are using numerous storyboards for the same shot, keeping the shots labeled is important so that everything is arranged in an order and your team can stay focused and organized. If you will use any software it will name the panel numbers automatically. In case you are not using any software and your client wants to delete, add or move a panel then you can’t name that panel.
For example: Panel_7_New_New_New. It will be very difficult to figure out and also time consuming. The correct way to do is this: Project name_ Script#_Scene_Frame_01.JPG
05Do Storyboards have Dialogues?
Storyboards have dialogues and you can include dialogues which will flow underneath the panels for each and every scene. If you want, you can save it on your drawing. You can name the angles and just specify them “OTS 1” and “OTS 2” with the corresponding dialogues.
Part 2 Best 10 Storyboards Creators To Make Your Animation Stand Out
01Milanote
Price: Free for limited number of file uploads and paid version for $9.99 per month for unlimited file uploads.
Platform: Web, Android, iPhone and IPad.
Description
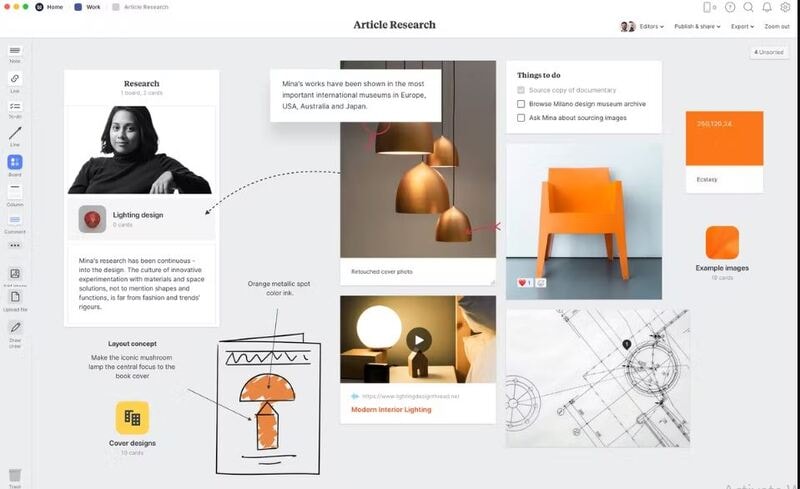
If you want to create your storyboard from scratch, Milanote is the best choice. It will make it very easy to arrange your ideas and plans you have thought for your storyboard. It is exquisite software for collecting, organizing and generating ideas. Users can create private boards and share them with their team members to get the feedback and can ensure the service quality.
Key Features of Milanote:
● Task management
● Real time editing
● File sharing
● Project management
● Status tracking
Advantages:
● It allows you real time collaboration.
● Helps you to organize your whiteboard workspace.
● Users are allowed to place a variety of images and notes.
Disadvantages:
● It does not have an offline mode
● It creates problem in shaping and moving arrows.
● Requires a seamless internet connection for smooth running.
02StoryboardThat
Price: Storyboard That’s monthly business plan will cost you $14.99 per month.
Platform: Web based
Description:
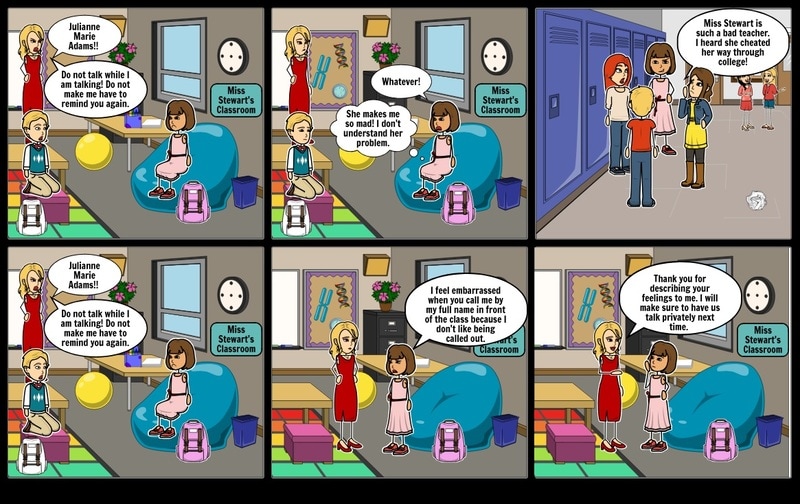
StoryboardThat is a platform from which users can make a storyboard using their desired graphics from a huge collection of graphics. StoryboardThat has everything you need like character, background or any other graphic. If you are still learning how to create a storyboard then StoryboardThat is a great choice for you. StoryboardThat gives a platform to the writers and publishers so that they can create comics and graphic novels. It can also be used by the teachers to enhance the engagement and design classroom posters.
Key Features of StoryboardThat:
● Custom templates
● Screen capturing
● Feedback management
● Drag and Drop interface
Advantages:
● It has drag and drop interface which makes it easy to use.
● It is good for sharing ideas and thought.
● It delivers exactly what it has promised.
Disadvantages:
● The images are not incredible - looking.
● It is desktop based.
● Quite difficult to use.
03Wave.video
Price: $20 per month.
Platform: Web Based
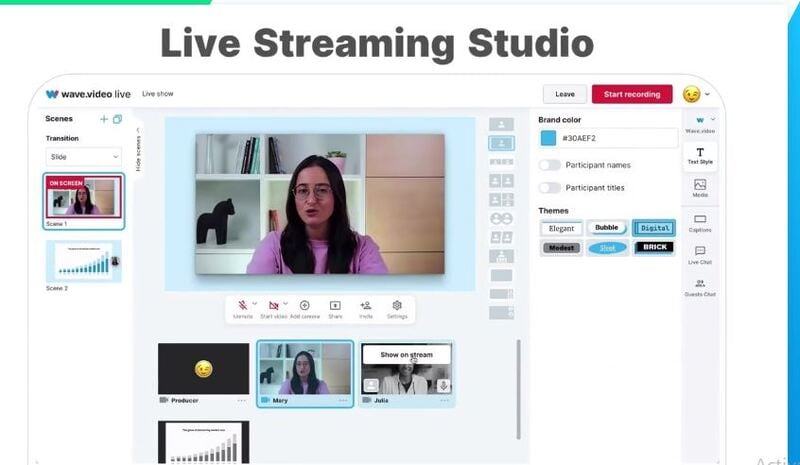
Wave.video allows you to bring your storyboard to life. It is an online video production platform. You don’t have to start it from the scratch because it comes with infinite number of templates. If you want to add text, music, or to trim video or want to edit the video’s audio then you can use Wave.video.
Key Features of Wave.video
● It has Audio tools
● Text Overlay
● It has a Media library.
● Social Sharing; you can share it to anywhere.
● You can merge the video.
Advantages:
● Intuitive interface
● It has a huge library
● It is easy to use.
Disadvantages:
● Quite slow while rendering project.
● Text animation features are limited.
● Price is bit high.
04Frame Forge
Price: $498.95 is for one time or $12.99 per month
Platform: Windows, Mac and Android.
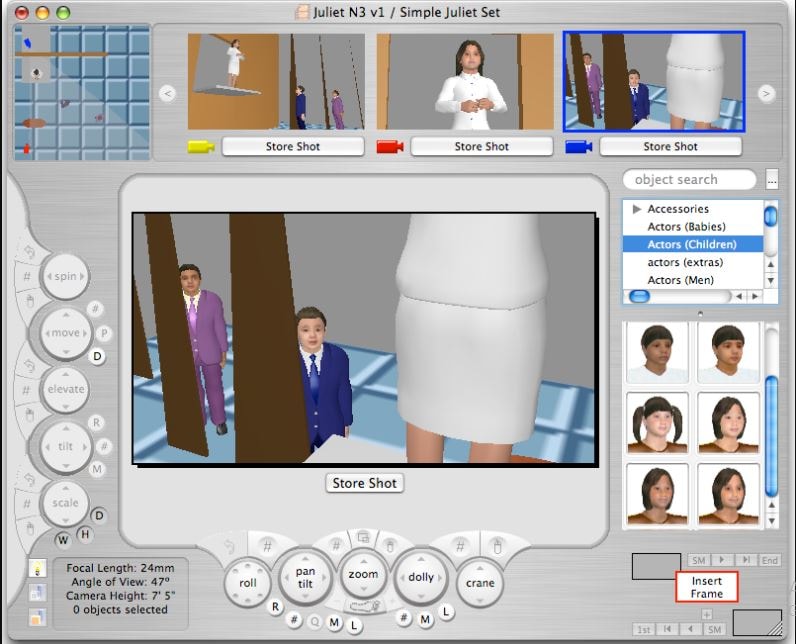
Frame Forge is an award winning filmmaking creator that helps in visualizing the scenes via storyboards. It helps the users to import scripts and will build replicate sets. Frame Forge is not an online platform you have to download it. It is the most advanced software for storyboarding. It has a lot of impressive features. It is used even in large production houses like Netflix BBC etc. It is a good option if you want to create lengthy videos for entertainment purpose.
Key Features of Frame Forge:
● It allows you to place cameras in a virtual set.
● Easy to use
● Drag and drop control
● Scripts can be imported to the shots.
Advantages:
● It is quite easy to use.
● Text which is provided by the software is easy to use.
● It is a good teaching tool.
Disadvantages:
● Dissatisfied with customer service.
● Data loss
● Numerous crashes
05MakeStoryboard
Price: $12 per month
Platform: Windows and Mac
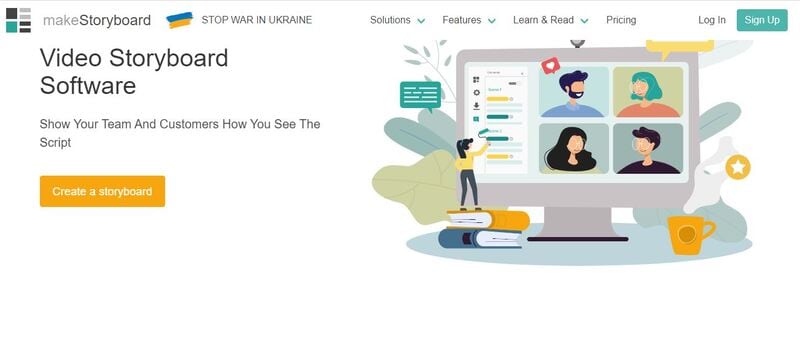
MakeStoryboard has a simple user friendly interface by which you can quickly upload the camera shots. If you want to add any informational details you can add custom text fields. The pencils, marker and pen tools will respond to any drawing tablet. It offers the free subscription tier; if your team is working on a small budget then it is a great option. When you are done, then you can export it in a PDF. Stakeholders can directly review it through the private link which means there is no need to have an account.
Key Feature of MakeStoryboard:
● Pre-built Templates
● Animations and transitions
● Drag and Drop
● Content library
Advantages:
● Easy to use and user friendly interface.
● You can control who can edit or comment your storyboard.
● You can work in real time collaboration.
Disadvantages:
● Quite expensive for educational organizations.
● Slow while downloading PDF.
● Expensive and not fit for freelancers.
06Canva
Price: Canva is free but has limited graphics and images and its single user plan is $12.99 per month.
Platform: Works on all major operating systems.
Creating a storyboard using Canva is very easy with the help of library of templates and one million stock of images to choose from. You can customize colors, select font size, and can also include headers and sub- headers. If you want a simple and easy tool for your projects, it is the best option. If you are working on a script or design with someone else you can allow access for collaboration, and when you are done with it you can share it with your team via email or in a PDF form.
Key Features of Canva:
● It has a font library.
● Drag and drop editor.
● Photo’s effect to enhance the photo
● Access to icons shapes.
Advantages:
● You can customize the items according to you.
● It is user friendly and easy to navigate.
● It has a huge library.
Disadvantages:
● It is not the best photo editor.
● Its templates appear general.
● You cannot create unique elements.
07Boords Storyboard Creator
Platform: Windows, Linux and Mac
Price: $12- $24 per month.
Boords is a user friendly web app which allows you to collaborate with your team. You can add images to every storyboard and can also create the notes for each step of your video. You can add sounds, action, camera details even if you don’t have much technical knowledge. You can simply access it and can start using it directly. It provides you an especial animatic tool and when you are ready to share you can share it online for the feedback. You can even share it with your clients to let them give their feedback within the platform.
Key Features of Boords Storyboard Creator:
● Frame editor allows you to draw directly on frame.
● You can use the overlay interface.
● Animatic features will help you make animatic with single click.
Advantages:
● Easy to use interface.
● You can create an animatic storyboard with ease.
● Share it easily.
Disadvantages:
● Security and privacy risk
● Migration Risk
● The application cannot be integrated with other platform of same functionality.
08Storyboarder by Wonder Unit
Price: Free
Platform: Windows, Mac and Linux
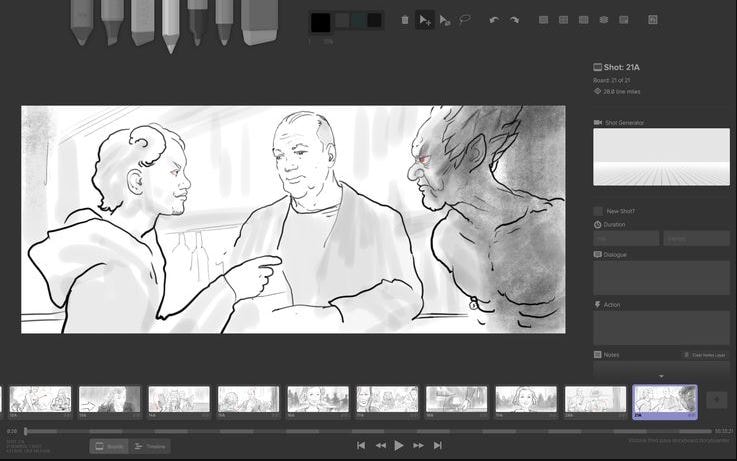
If you are working with a small budget then Storyboarder is a great option and also it is an open source platform that is free of cost. It has a simple interface which makes it easy to work. You can write and place the dialogues, shot type and also enter timing information. If has simple and smooth drawing tools which makes it easy to draw shapes and characters in it. Even if you know how to draw; still using this will be a great choice as it is a time saver.
Storyboarder works in collaboration with Photoshop so that if you want to edit your storyboard you can edit and it will automatically be updated in Storyboarder. In this you can export your file in various formats like Animated GIF, PDF, Final Cut and Premiere etc.
Key Feature of Storyboarder:
● It has simple interface.
● Simple and smooth drawing.
● Track changes.
● Collaborate with Github.
● Exports to various formats.
Advantages:
● It has a sleek interface which makes it easy to use.
● It auto saves you work which means no data loss.
● It collaborates with the Photoshop so that you can make changes from outside and it will be updated in your board.
Disadvantages:
● Shot description menu text is small.
● Its color scheme is not good.
● Its tools have not a good follow through which makes it difficult to draw specific shots.
09Plot
Price: $10 per month
Platform: Windows, Linux and Mac
Plot Storyboard helps you to make your work quick and easy as possible. You can outline your videos in seconds. Just paste your script and break it into pieces so that there is no need to copy, paste and repeat and now you can focus on your story.
A font library and other flexible options will make your image creation easy. You can upload the pictures or you can copy them from your favorite websites. There is no need to draw. You can share your work with your clients within the software. It is an online program for which you need good internet connection.
Key Feature of Plot:
● Powerful and easy to use interface.
● Customizable Drawing tools.
● You can export a PDF in one click.
● Collaborate on your storyboard from anywhere.
Advantages:
● User friendly interface.
● PDF export format
● Fast Operation.
Disadvantages:
● No way to upload GIF.
● You have to work online, offline mode is absent.
● If you want to use you have to buy the paid version.
10** Wondershare Filmora Video Editor
Price: $69.99 one time fees.
Platform: Windows and Mac
Filmora is an award winning video editor platform which will help you in creating professional videos for your brand or for your business. By using Filmora, you can create amazing storyboard as it is packed with amazing features like Keyframe animation, motion tracking, color matching and audio editing features. You can also add titles, transitions and split dual screen. You can also access to other feature like green screen.
Key Features of Filmora:
● You can export your videos in multiple formats.
● It has drag and drop functionality making it easy to import the videos.
● It has key framing features as well.
● It also has the feature of audio ducking and video transitions.
Advantages:
● Simple user interface.
● It has advanced audio editing capabilities
● It has drag and drop effect.
Disadvantages:
● Free versions contains watermark.
● You have to download the software.
● If you wanted to use all features you have to buy the paid version.
For Win 7 or later (64-bit)
For macOS 10.12 or later
Part 3 – Storyboard Maker Q&A
What things should be there in a storyboard?
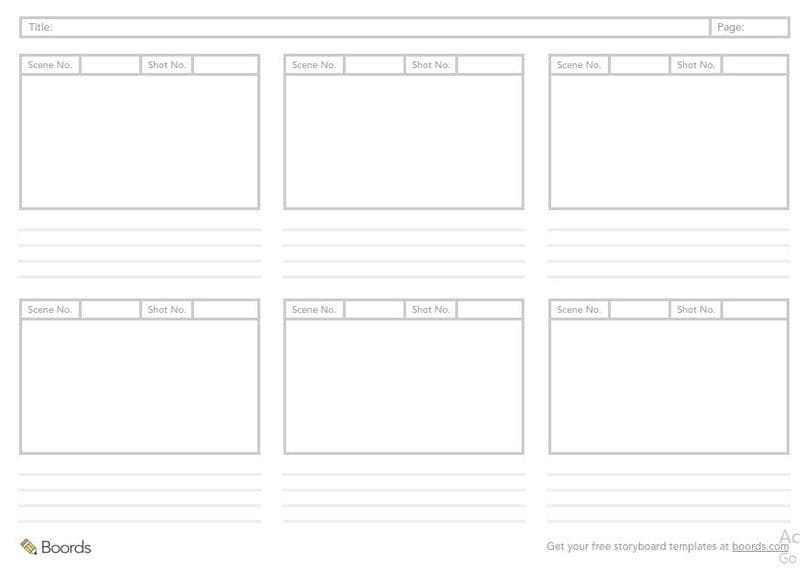
Storyboards have many squares with illustrations which represent each shot of your video, notes stating what is happening in the scenes. It creates a visual outline for your film which means you should include only those moments which are important.
Why storyboard is used and who uses it?
Storyboard is used to work out the story ideas, plans in shot set-up and sequence flow. It is used by most of the Hollywood studios and also in production houses worldwide. It is used by the Writers, Directors, Independent Filmmakers and Producers to create visual outline for their Netflix series, Cable serialized dramas and feature films etc.
How can you store your own artwork?
You can save your artwork by dragging and dropping the artwork directly in the frame from the folders which are full with the artwork. Storyboard allows you to create your own library of the artwork which can be accessed and operated immediately.
What are the best storyboard creators?
There are lots of storyboard creators from which you can choose. Some of them are:
● Canva
● Frame Forge
● Filmora
● Storyboarder
● Studiobinder
● StoryboardThat
What is the aim of creating a Storyboard?
A Storyboard is important to create before the final product because it will save your time, energy and money. It is used to illustrate a story and is created so that you can correct your mistakes if there is any available, before spending money on creating a final product.
● Ending Thoughts →
● Storyboards are important as they let you know your mistakes in an early stage and also let you know how story going to flow.
● Storyboard helps you to save your time, energy and also tells you how much each element will cost which prevents you from spending excess money.
● There are a lot of storyboard creators but Filmora will be the best option to work with as it provides you a wide variety of features to make your storyboard amazing.
Also read:
- New Top 10 Best Slideshow Makers with Music
- New 2024 Approved 2 Effective Ways to Easily Convert VTT to SRT
- New In 2024, How to Make Cool COD Warzone Thumbnail
- 2024 Approved Do You Want to Download Slow-Motion Apps that Can Edit Video Professionally? This Article Will Discuss some Slomo Makers for Both iOS and Android
- New 2024 Approved Can You Make an Fcpx Slideshow? Undoubtedly Yes, with the Unlimited Best Fcpx Slideshow Templates Available. To Know How to, Follow the Discussion Below
- New TOP 6 Online Video Speed Controller for Chrome, Safari, Firefox for 2024
- Updated Top 6 Text to Speech Generators for YouTube Videos Windows, Mac, And
- New How to Make Falling Text Effect in Filmora for 2024
- What You Should Know About Speech-to-Text Technology
- Updated Deep Learning of AI Video Recognition for 2024
- Updated Slideshow Makers Are On-Demand as They Come with Multiple Possibilities for Both Professional and Personal Uses. Gradually, the Best Software to Make Slideshows Is Always Welcomed to Save Time and Effort without Compromising the Quality
- New 2024 Approved Create Amazing Slow-Motion Videos 8 Affordable Slow-Motion Cameras
- Updated Knowing All Ways To Slow Down Video With Adobe Premiere Pro
- Updated In 2024, How to Create a Slideshow with Movavi Slideshow Maker
- Here Is a Guide on How You Can Resize Videos via Handbrake and Wondershare Filmora. The Former Is a Lightweight Tool Perfect for Batch Resizing Videos, While the Latter Is a Powerful Free Video Editing Software
- Change Background Color in After Effects for 2024
- New Premiere Pro Tutorial How To Change Video Frame Rate for 2024
- 2024 Approved How to Speed Up Video with Canva Online Tool?
- Final Cut Pro - How to Download and Install It for 2024
- In 2024, How Does the YouTube AI Algorithm Work
- Updated How to Remove or Mute Audio in Video with Android Phones, In 2024
- New 2024 Approved How to Make Censor Effects with Filmora
- New How To Quickly Create A Screen Print Effect In Photoshop Detailed Gui
- New 2024 Approved Do You Need a Royalty-Free 5 Seconds Countdown Video for Your Video but Dont Not Where to Find One? We Will Introduce You to the Best HD and 4K Clips that You Can Always Try Anytime
- Updated In 2024, Read Through This Post to Know What Frame Rate Is, the Different Variations, and Why 60FPS Is Superior. Also, Know the Tools Available to Make the Conversion
- Updated 2024 Approved Easily Cut Large Video Faster on Mac
- Updated 2024 Approved What Are The Stages Of Film Production - 2023
- Updated You Need to Follow Certain Steps to Complete Your Project. In the Section Below, We Will Discuss in Detail the Steps to Make a Movie From Windows Movie Maker
- New In 2024, Have You Tried Using a Craig Bot on Discord to Record Audio? Do You Have an Idea of Using a Discord Craig Bot Is Safe? Get Answers to These Questions and More From This Article as You Continue Reading
- 2024 Approved How to Zoom Video in VLC Media Player
- Updated What Is TS Format and How To Play TS Files? Basic Tips for 2024
- 3 Ways to Fake GPS Without Root On Lava Agni 2 5G | Dr.fone
- How To Simulate GPS Movement With Location Spoofer On Honor Magic 6? | Dr.fone
- Fix the Error of Unfortunately the Process.com.android.phone Has Stopped on Infinix Note 30 | Dr.fone
- Why Your WhatsApp Location is Not Updating and How to Fix On Realme 12 Pro+ 5G | Dr.fone
- 3uTools Virtual Location Not Working On Tecno Camon 20 Pro 5G? Fix Now | Dr.fone
- Top-Notch Solutions for Disabled Apple ID From Apple iPhone 11 Pro Making It Possible
- Complete Guide For iPhone 8 Lock Screen | Dr.fone
- How to play MP4 files on Moto G04?
- Repair Corrupt PDF v2.0 File using PDF Repair Tool
- Bricked Your Vivo S17e? Heres A Full Solution | Dr.fone
- How and Where to Find a Shiny Stone Pokémon For Honor X9a? | Dr.fone
- In 2024, Top 5 Udemy Subtitle Translation Tools for Seamless Auto Translations
- How to Unlock Vivo T2 Pro 5G Phone without Google Account?
- How to Fix the Soft Bricked Oppo Find N3? | Dr.fone
- Fake the Location to Get Around the MLB Blackouts on Apple iPhone 15 Pro Max | Dr.fone
- In 2024, Pokemon Go No GPS Signal? Heres Every Possible Solution On Realme Note 50 | Dr.fone
- In 2024, The Magnificent Art of Pokemon Go Streaming On Samsung Galaxy S24+? | Dr.fone
- How to Fix Locked Apple ID from iPhone 14 Plus
- How to Use Google Assistant on Your Lock Screen Of Xiaomi Redmi Note 13 Pro 5G Phone
- How to Track Realme C55 Location by Number | Dr.fone
- Guide on How to Enable the Text to Speech Function on iPhone for 2024
- How To Leave a Life360 Group On Nokia C12 Pro Without Anyone Knowing? | Dr.fone
- Title: Updated Create the Stranger Things Upside Down Effect Video
- Author: Morgan
- Created at : 2024-06-24 01:30:10
- Updated at : 2024-06-25 01:30:10
- Link: https://ai-video-editing.techidaily.com/updated-create-the-stranger-things-upside-down-effect-video/
- License: This work is licensed under CC BY-NC-SA 4.0.

