
:max_bytes(150000):strip_icc():format(webp)/ArtificialIntelligence-Chatbot-6921166a1d9e447eb0251f52694d919a.jpg)
Updated Deleting White Background in Photoshop Is Hard? No
Deleting White Background in Photoshop Is Hard? No
Deleting White Background in Photoshop Is Hard? No
An easy yet powerful editor
Numerous effects to choose from
Detailed tutorials provided by the official channel
Know how Photoshop make white background transparent. Learn to create transparent background in Photoshop in simple steps. How to delete white background in image?
In this article
01 [Why Shooting with a White Background Makes Sense](#Part 1)
02 [When We Need to Delete White Background and when Not?](#Part 2)
03 [How to Delete White Background in Photoshop (5 Fast Ways)](#Part 3)
04 [Which Photoshop Selection Tool is Best for White Backdrop Removal](#Part 4)
Part 1 Why Shooting with a White Background Makes Sense

Products have gone online with E-commerce and people explore the products over internet more than they pick it from the stores. So, every business needs to showcase their products in a attractive way to get more customers. This needs an attractive photography by experts. Photography for e-commerce products requires expert product photography or commercial photography. They are very important for a business to get success in long run. To do branding the product image should be accurate and attractive.
So, if your company is going online, your products photography should be attractive enough to make buyers purchase your products. Background is essential part of any photography or video making. Whether it is product catalogue, shoot, advertising or commercial videos, white backdrop and white background are always good. With white background one can pay attention to the product. Every details of the product are highlighted when a white background is used.
When you need bright and highlighted images for any commercial videos, using a right technique for background color is must. White background creates a clean and bright commercial photo. If the same is not done correctly, the white background may turn to be off white or grey. A white background is good for isolating an object in the picture.
So, let’s know why shooting with white background make sense. Here are some reasons for it:

Removal of background becomes Easy and quick:
The most important benefit of applying white background is that it can be easily removed or replaced. In place of the blank white background, one can easily apply other background color or make it transparent. The white background has a speciality that it reflects the color of the product better which makes the product image visually good. This can be done with the help of any tool or application. Thus, using a white background gives an opportunity to apply any other background on it.
Promoting product in every occasion: An image with colorful background may not be useful to present in every event or occasion. For example a simple image with colorful background will not look good in a promotional event, while a colorful background will look happening in any festival event celebration. This, a blank background has the option to change as per the need of the occasion.
An image with white background can be changed as per the occasion. This helps a business to use a single image throughout the year without any additional cost for making a different picture. You can just change the white background of any image through various application or software.
Time saving: Removing white background is easy and streamlined as compared to any other color. The reason is that it does not require much editing and work on the edges. So, the steps in removing the white background are less and thus it saves time of the artist and the editors.
Saves location and bulk shooting expenses: When shooting with a white background is done; the same picture with some changes can be reused for number of times in several occasions. Thus, it saves the cost of shooting different in pictures in different location.
Good to celebrate every special day: A picture with white background is perfect and ready to edit for any special day. Whether it I a father’s day, mother’s day or any special day, a single picture can be edited as per the requirement. It will be a great gifting idea also after changing white background of the picture as per the special day.
Part 2 When We Need to Delete White Background and when Not?

A single picture of a person or product cannot be used for a single instance or purpose. Especially when it is a promotional campaign or commercial advertisements, a product is required to be showcased in several marketing campaign for different categories of consumers. Thus, a white background image is good for several purposes while in some circumstances, it requires changes. So, let’s see when to delete white background and when not:
When a picture requires special editing: When a picture requires some special effects like reflection, highlights and shadow effects, the picture with white background is required to be changed. When improvement in picture is requires, the white, transparent and color background can be changed accordingly.
Enhancing the visual impact of the picture: A white background picture grab the attention of the customers. So, it is good for advertising and promotion. While this needs to be removed when one desire to add some visual impact on the pictures or deliver some message to the viewers. So, it requires adding colorful and visually good background in a picture.
Adding more items to a picture: A white background need to be removed when more items are required to be included in it. Special edits and enhancing the pictures requires removing or adding a white background as per the purpose of the picture.
Part 3 How to Delete White Background in Photoshop (5 Fast Ways)

Editing a picture with white background can be done in easy steps through various applications. Deleting white background in Photoshop can be done through various tools. Some of the top 5 fast ways to clear background Photoshop are**:**
With the object selection tool:
● Start Photoshop and open the picture. Select the “object selection” from the tool bar. Hover cursor over subject till it turns blue. The subject is selected.
● Press the shift key to remove the background while selecting the objects which you want in the picture.
● To invert the selection go to Select>Inverse.
● Unlock the image based on what you want in the background. It will no longer be a background. It can be also used to create transparent background Photoshop.
● Click on Erase tool and start erasing the background.
Removing background with quick action
This is the quick method for removing a background when a user is going for own purpose. It is in-built quick action in Photoshop for removing the background. Although it is good for performing work, but the same cannot meet the perfection level that any other method does. It can be done by following the mentioned steps:
● Open the image in Photoshop, right click on background layer and click Duplicate layer. Then click on OK.
● Always try to open the properties panel by going to Window>Properties.
● Click on new layer at Layer panel. Go to Quick action and click on Remove Background.
● The background gets removed with quick action.
● At this point refinements and adjustments can be made.
Using pen tool to remove the background
● Open image in Photoshop, right click on background layer and go to Duplicate Layer. Name the layer and click OK.
● Select the Pen tool from the toolbox. Zoom the area. Start at the edge of subject. Start working on the object; add anchors which will outline the subject.
● Click-hold-drag to produce a curved line.
● Use the Direct Selection tool in the toolbox if you want to adjust an anchor point or directional lines for fine tuning
● Complete the path from where you started and save it by going to Windows>paths. Go to three bar menu, click New Path to name it and then save.
● Go to path panel and right click New Path. Choose Make selection and click OK. This will give the outline of the path.
● Go to Select> Inverse if you don’t want to delete what is inside the selection. An outline can be seen around the image.
● Press delete to delete the background. It can be also done to add Adobe Photoshop transparent background.
With Magnetic Lasso Tool
● Right click Background layer and click duplicate layer on the image opened in Photoshop. Name the layer and then click OK. From the toolbox, select Magic Lasso tool. Start drawing at the edges of subject.
● Move around the subject and complete till the start point. Marching ants can be seen around the selection.
● Go to Selection>Save selection to save and give it a name.
● Select>Inverse to delete the background. Photoshop checkered background is visible now.
With quick selection tool
● Click on Duplicate Layer by right clicking on background layer of the picture opened on the Photoshop. Name the layer and click OK.
● Go to the tool box and select quick selection tool.
● Paint the subject by using tool.
● Clean up the selection path with click by holding the Option key (macOS) or Alt key (Windows).
● Go to Selection>Save selection to save and give it a name.
● Select>Inverse to delete the background. The white background can be seen now.
Part 4 Which Photoshop Selection Tool is Best for White Backdrop Removal

There are various tools available at Photoshop to turn a background white. Each one of them has great utility based on the applications. Background Eraser tool is one of the good tools if there is need of more control over removing the background in Photoshop. It is highly effective and saves time of the user. It gives the desired outcome with perfection to an image. The visualization of image becomes better when the background is turned into white with the help of Background Eraser tool.
The other application that is very helpful in making background white to any image is Filmora.
Filmora is an excellent image and video editing software which helps the users in creating some amazing images and videos. It has wide range of image and video editing tools that can make any user a professional in image and video editing. It has features to add or remove background of an image to make it more visually good. Changing background and adding special effects to images and videos can be easily done through filmora.
Wondershare Filmora Video Editor allows transformation of pictures and videos in a better way by adding filters and graphics. Availability of support, drawing tools, editing tools, special effects and sound make it a complete application for both beginners and professionals. It can be used with various other applications also. Those who wish to know how to make a layer transparent in Photoshop can learn it from Filmora.
For Win 7 or later (64-bit)
For macOS 10.12 or later
● Ending Thoughts →
● Making white background or transparent background adobe photoshop has many benefits like it highlight the picture and make it good for various applications and occasions. It saves money and cost for the image editors and video makers.
● One should also know when to use the white background for images, catalogue and video shoot. Adding and deleting white background can only be done when required as per the demand of the occasion and the category of the user like marketing, media, customers etc.
● Various tools on Photoshop make it easy for the users to add or remove white background of images. Filmora is one of the applications that is very popular for its image editing features. It can be used to give special effects to any image or video.
Know how Photoshop make white background transparent. Learn to create transparent background in Photoshop in simple steps. How to delete white background in image?
In this article
01 [Why Shooting with a White Background Makes Sense](#Part 1)
02 [When We Need to Delete White Background and when Not?](#Part 2)
03 [How to Delete White Background in Photoshop (5 Fast Ways)](#Part 3)
04 [Which Photoshop Selection Tool is Best for White Backdrop Removal](#Part 4)
Part 1 Why Shooting with a White Background Makes Sense
Products have gone online with E-commerce and people explore the products over internet more than they pick it from the stores. So, every business needs to showcase their products in a attractive way to get more customers. This needs an attractive photography by experts. Photography for e-commerce products requires expert product photography or commercial photography. They are very important for a business to get success in long run. To do branding the product image should be accurate and attractive.
So, if your company is going online, your products photography should be attractive enough to make buyers purchase your products. Background is essential part of any photography or video making. Whether it is product catalogue, shoot, advertising or commercial videos, white backdrop and white background are always good. With white background one can pay attention to the product. Every details of the product are highlighted when a white background is used.
When you need bright and highlighted images for any commercial videos, using a right technique for background color is must. White background creates a clean and bright commercial photo. If the same is not done correctly, the white background may turn to be off white or grey. A white background is good for isolating an object in the picture.
So, let’s know why shooting with white background make sense. Here are some reasons for it:
Removal of background becomes Easy and quick:
The most important benefit of applying white background is that it can be easily removed or replaced. In place of the blank white background, one can easily apply other background color or make it transparent. The white background has a speciality that it reflects the color of the product better which makes the product image visually good. This can be done with the help of any tool or application. Thus, using a white background gives an opportunity to apply any other background on it.
Promoting product in every occasion: An image with colorful background may not be useful to present in every event or occasion. For example a simple image with colorful background will not look good in a promotional event, while a colorful background will look happening in any festival event celebration. This, a blank background has the option to change as per the need of the occasion.
An image with white background can be changed as per the occasion. This helps a business to use a single image throughout the year without any additional cost for making a different picture. You can just change the white background of any image through various application or software.
Time saving: Removing white background is easy and streamlined as compared to any other color. The reason is that it does not require much editing and work on the edges. So, the steps in removing the white background are less and thus it saves time of the artist and the editors.
Saves location and bulk shooting expenses: When shooting with a white background is done; the same picture with some changes can be reused for number of times in several occasions. Thus, it saves the cost of shooting different in pictures in different location.
Good to celebrate every special day: A picture with white background is perfect and ready to edit for any special day. Whether it I a father’s day, mother’s day or any special day, a single picture can be edited as per the requirement. It will be a great gifting idea also after changing white background of the picture as per the special day.
Part 2 When We Need to Delete White Background and when Not?
A single picture of a person or product cannot be used for a single instance or purpose. Especially when it is a promotional campaign or commercial advertisements, a product is required to be showcased in several marketing campaign for different categories of consumers. Thus, a white background image is good for several purposes while in some circumstances, it requires changes. So, let’s see when to delete white background and when not:
When a picture requires special editing: When a picture requires some special effects like reflection, highlights and shadow effects, the picture with white background is required to be changed. When improvement in picture is requires, the white, transparent and color background can be changed accordingly.
Enhancing the visual impact of the picture: A white background picture grab the attention of the customers. So, it is good for advertising and promotion. While this needs to be removed when one desire to add some visual impact on the pictures or deliver some message to the viewers. So, it requires adding colorful and visually good background in a picture.
Adding more items to a picture: A white background need to be removed when more items are required to be included in it. Special edits and enhancing the pictures requires removing or adding a white background as per the purpose of the picture.
Part 3 How to Delete White Background in Photoshop (5 Fast Ways)
Editing a picture with white background can be done in easy steps through various applications. Deleting white background in Photoshop can be done through various tools. Some of the top 5 fast ways to clear background Photoshop are**:**
With the object selection tool:
● Start Photoshop and open the picture. Select the “object selection” from the tool bar. Hover cursor over subject till it turns blue. The subject is selected.
● Press the shift key to remove the background while selecting the objects which you want in the picture.
● To invert the selection go to Select>Inverse.
● Unlock the image based on what you want in the background. It will no longer be a background. It can be also used to create transparent background Photoshop.
● Click on Erase tool and start erasing the background.
Removing background with quick action
This is the quick method for removing a background when a user is going for own purpose. It is in-built quick action in Photoshop for removing the background. Although it is good for performing work, but the same cannot meet the perfection level that any other method does. It can be done by following the mentioned steps:
● Open the image in Photoshop, right click on background layer and click Duplicate layer. Then click on OK.
● Always try to open the properties panel by going to Window>Properties.
● Click on new layer at Layer panel. Go to Quick action and click on Remove Background.
● The background gets removed with quick action.
● At this point refinements and adjustments can be made.
Using pen tool to remove the background
● Open image in Photoshop, right click on background layer and go to Duplicate Layer. Name the layer and click OK.
● Select the Pen tool from the toolbox. Zoom the area. Start at the edge of subject. Start working on the object; add anchors which will outline the subject.
● Click-hold-drag to produce a curved line.
● Use the Direct Selection tool in the toolbox if you want to adjust an anchor point or directional lines for fine tuning
● Complete the path from where you started and save it by going to Windows>paths. Go to three bar menu, click New Path to name it and then save.
● Go to path panel and right click New Path. Choose Make selection and click OK. This will give the outline of the path.
● Go to Select> Inverse if you don’t want to delete what is inside the selection. An outline can be seen around the image.
● Press delete to delete the background. It can be also done to add Adobe Photoshop transparent background.
With Magnetic Lasso Tool
● Right click Background layer and click duplicate layer on the image opened in Photoshop. Name the layer and then click OK. From the toolbox, select Magic Lasso tool. Start drawing at the edges of subject.
● Move around the subject and complete till the start point. Marching ants can be seen around the selection.
● Go to Selection>Save selection to save and give it a name.
● Select>Inverse to delete the background. Photoshop checkered background is visible now.
With quick selection tool
● Click on Duplicate Layer by right clicking on background layer of the picture opened on the Photoshop. Name the layer and click OK.
● Go to the tool box and select quick selection tool.
● Paint the subject by using tool.
● Clean up the selection path with click by holding the Option key (macOS) or Alt key (Windows).
● Go to Selection>Save selection to save and give it a name.
● Select>Inverse to delete the background. The white background can be seen now.
Part 4 Which Photoshop Selection Tool is Best for White Backdrop Removal
There are various tools available at Photoshop to turn a background white. Each one of them has great utility based on the applications. Background Eraser tool is one of the good tools if there is need of more control over removing the background in Photoshop. It is highly effective and saves time of the user. It gives the desired outcome with perfection to an image. The visualization of image becomes better when the background is turned into white with the help of Background Eraser tool.
The other application that is very helpful in making background white to any image is Filmora.
Filmora is an excellent image and video editing software which helps the users in creating some amazing images and videos. It has wide range of image and video editing tools that can make any user a professional in image and video editing. It has features to add or remove background of an image to make it more visually good. Changing background and adding special effects to images and videos can be easily done through filmora.
Wondershare Filmora Video Editor allows transformation of pictures and videos in a better way by adding filters and graphics. Availability of support, drawing tools, editing tools, special effects and sound make it a complete application for both beginners and professionals. It can be used with various other applications also. Those who wish to know how to make a layer transparent in Photoshop can learn it from Filmora.
For Win 7 or later (64-bit)
For macOS 10.12 or later
● Ending Thoughts →
● Making white background or transparent background adobe photoshop has many benefits like it highlight the picture and make it good for various applications and occasions. It saves money and cost for the image editors and video makers.
● One should also know when to use the white background for images, catalogue and video shoot. Adding and deleting white background can only be done when required as per the demand of the occasion and the category of the user like marketing, media, customers etc.
● Various tools on Photoshop make it easy for the users to add or remove white background of images. Filmora is one of the applications that is very popular for its image editing features. It can be used to give special effects to any image or video.
Create Glitch Text Effect
Glitch text effect is a trending video effect whereby the texts get distorted for a few seconds. The effect is comparable to the glitch you face when your screen starts to malfunction, and the screen appears to be wavy and disoriented. A glitch text effect is better than a regular animated text effect as it helps to get the attention of the viewers immediately and get the message across clearly.
The glitch effect can be applied to the entire video as well as the text as per your preference. There are several video editors available where the glitch text effect comes pre-loaded. All you need to do is to apply it to the text and get it done in a few steps. We will illustrate how to add glitch text effect Premiere Pro. But we recommend Filmora for the best glitter text effect that you can add to your video instantly.
Part 1. Create Glitch Text in Video with Filmora
We have already stated that Wondershare Filmora is the best video editor for the best glitch text effect download and apply to your video in simple steps. Filmora is a premium video editor that is widely used by amateur and professional video editors. You can get all glitch text effect After Effects and add them to your video conveniently in comparison to After Effects.
As a matter of fact, there are literally unlimited video and text effects available, and you can find different types of glitch text effects to apply to your titles and texts. Filmora is available for both Windows and mac users. Here are the steps to create glitch text in video with Filmora.
Free Download For Win 7 or later(64-bit)
Free Download For macOS 10.14 or later
Step1 Download and install Filmora on your computer. Go to File> New Project from the menu bar to start video editing project.

Step2 Go to File> Import Media > Import Media Files to import the video clips where you want to add glitch text effect. Drop the clip into the Timeline to get started.

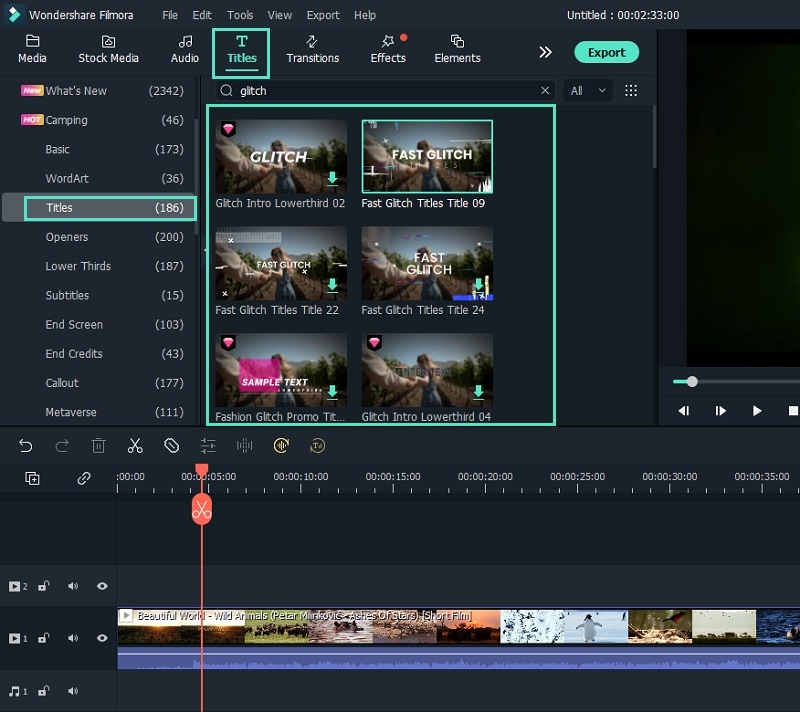
Step3 Go to Titles tab located at the top. From the left panel, click on Titles option. Search “glitch” in the search field and you will see all the glitch text effects that you can apply to the text in your video.
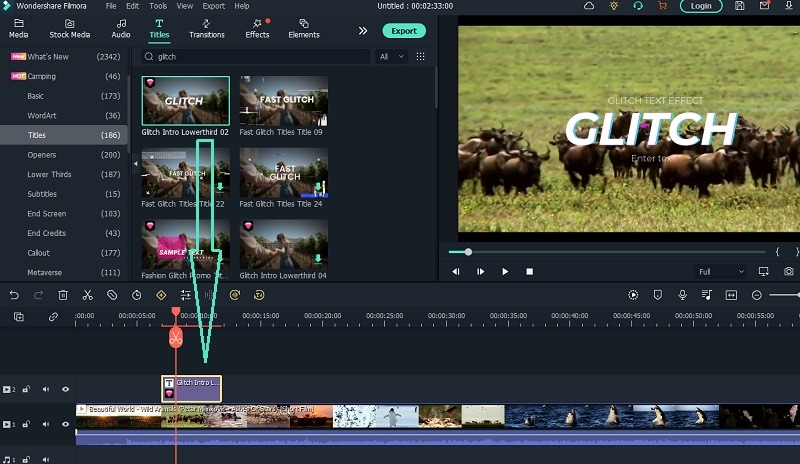
Step4 Select any glitch text effect and drop it into the Timeline above the video clip exactly where you want the text and the effect to appear.
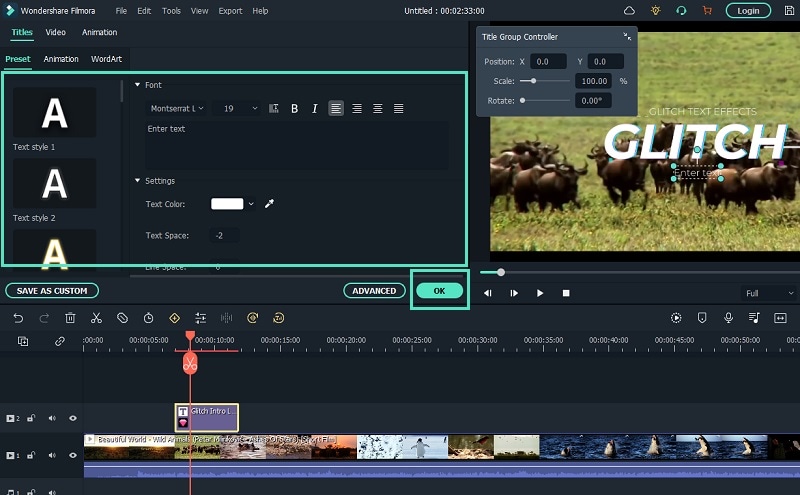
Step5 Double-click on the glitch text effect located on Timeline and edit the text, style, and other parameters as per your preference. Click on Ok and play the video to see your edited video with the glitch text effect.
Part 2. How to Make Glitch Text Effect with Premiere Pro
Adobe Premiere Pro is another renowned video editor where you can add glitch text effect to your video. Premiere Pro is strictly for professional video editors as the user interface is not as intuitive as Filmora . The learning curve is steep, and therefore, you need to go through the steps to add glitch text effect Premiere Pro. There are several glitch text effect presets available that you can apply to any text on your video to make them engaging. Here are the steps to make glitch text effect with Premiere Pro.
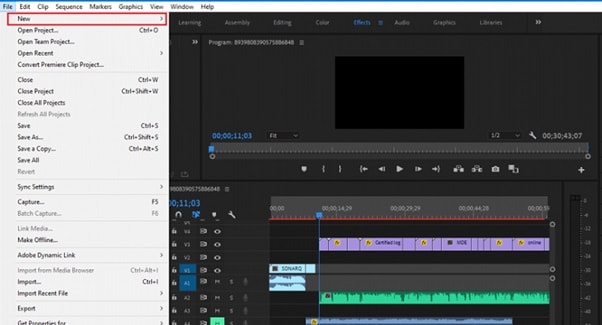
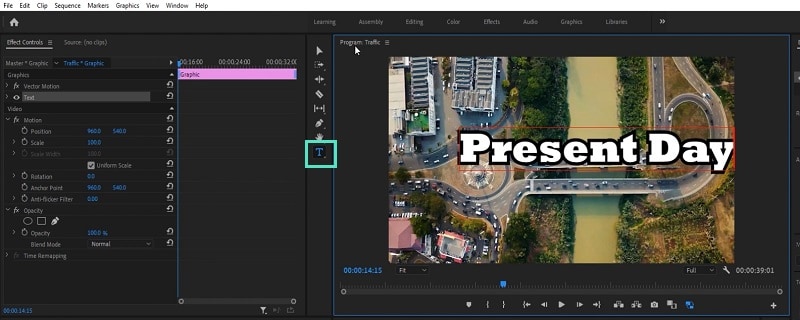
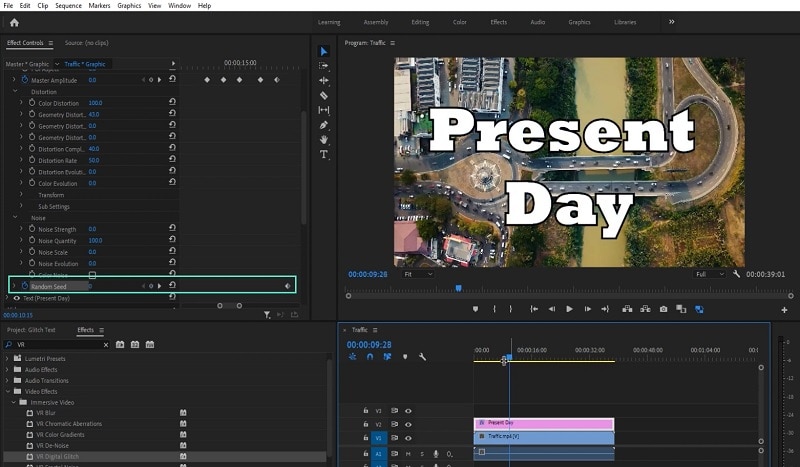
Step1 Launch Adobe Premiere Pro and go to New> Project to get started. Import your video and drop it into Timeline.
Step2 Use the Type tool to write any text on your video to add glitch text effect. You should have a text layer on Timeline.
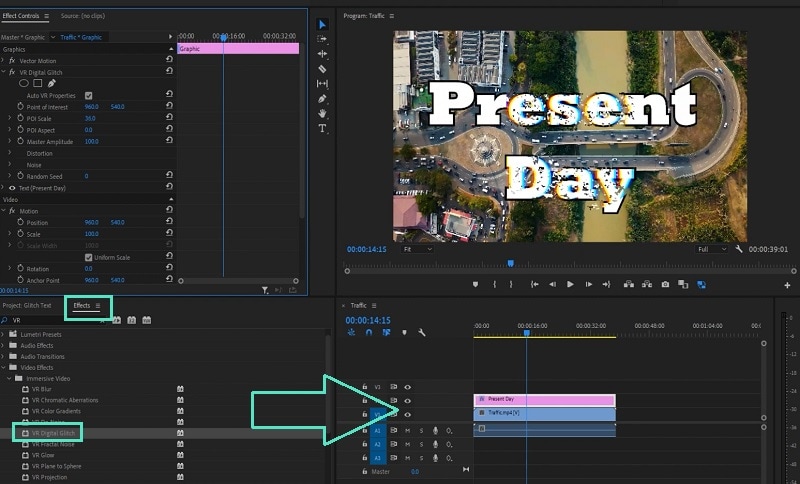
Step3 Go to Effects> Immersive Video> VR Digital Glitch option. Drag and drop the effect to text layer.
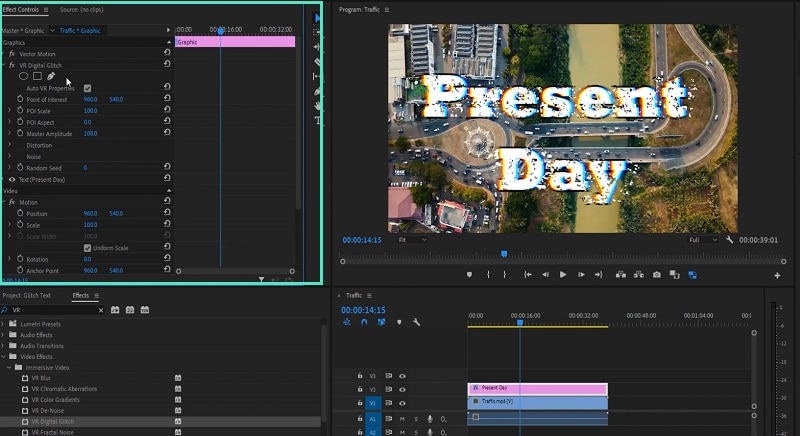
Step4 Under Effect Controls tab, you will find all the different parameters that you can adjust to get the glitch text effect perfectly.
Step5 Turn on Master Amplitude and add multiple keyframes as different points in the Timeline and change the distortion value to make the effect prominent.
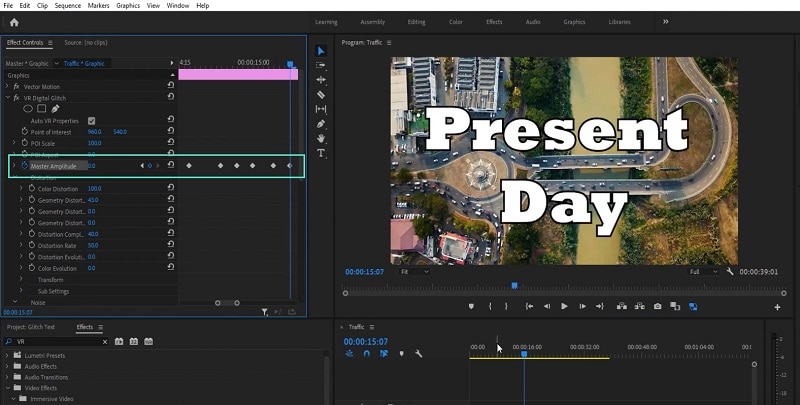
Step6 Go to the first keyframe and turn on Random Seed effect. Go to the last keyframe and turn on Random Seed effect and change the value to 75. Play the video to check the entire video with glitch text effect.
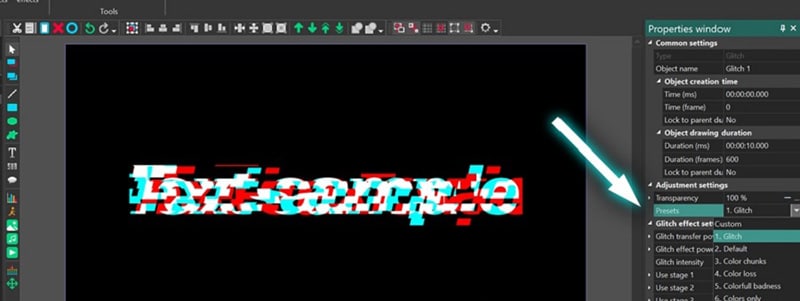
Part 3. Use VSDC Video Editor to Create Glitch Text
If you do not have any premium video editor on your computer and you do not want to purchase any premium video editor, you can still get glitter text effect free. You need to download and install VSDC free video editor on your computer. But the steps to create glitch text on VSDC video editor are slightly complicated as the user interface is not as intuitive as Filmora . Here are the steps to add free glitch text effect on your video.
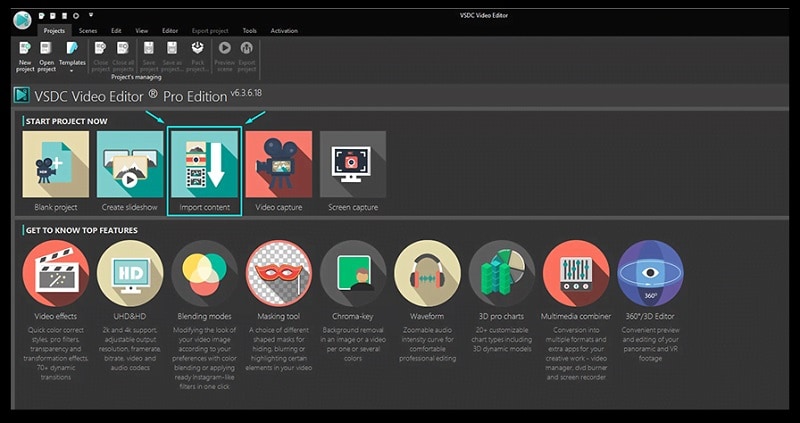
Step1 Download and install VSDC video editor. Launch the editor and click on New Project to get started. Import your video to your project where you want to add glitch text effect.
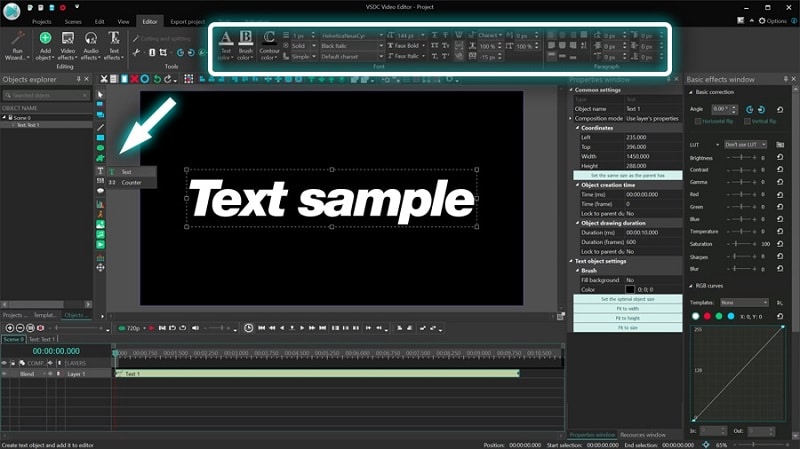
Step2 Use Type tool to write a text on the video. You can press Shift+T shortcut as well. After typing the text, adjust the text style as per your preference.
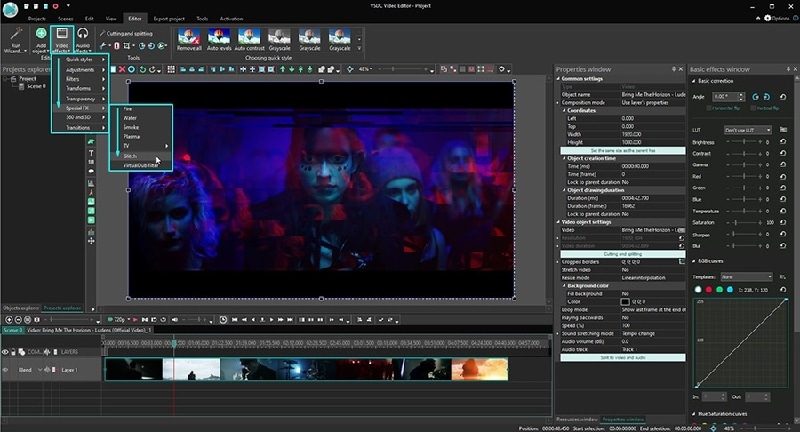
Step3 Double-click on the text layer on Timeline and go to Video Effects> Special FX and click on Glitch option.
Step4 A window will appear where you can set the starting point, duration, and different parameters. Click on Ok button.
Step5 Go to Properties Windows and click on Presets to select different types of glitch text effects. You can also adjust the intensity of the text effects and other parameters as you feel.
Part 4. Related FAQs about Glitch Text
1. How do you animate glitch text?
If you want to animate glitch text for free, VSDC video editor is ideal as you can customize the effect on any text in simple steps. If you want to use a premium video editor, we recommend Filmora as there are various glitch text effects available to apply to any text on your video instantly.
2. How do you glitch text on video?
First, you have to import your video in your video editor. Type the desired text and set the style. Thereafter, go to glitch text effect presets available on the video editor and apply it to the text instantly. You can customize the glitch text effect as per your preference to make the animation more prominent.
3. How do you glitch text on Android?
You should first install Glitch Video Effect: Glitch FX app from Play Store. Edit your video on the app to add any text, and thereafter, add glitch text effect instantly. In fact, the glitch text effect is available in almost all popular video editor apps on Android due to the effect being trendy and viral.
Free Download For macOS 10.14 or later
Step1 Download and install Filmora on your computer. Go to File> New Project from the menu bar to start video editing project.
Step2 Go to File> Import Media > Import Media Files to import the video clips where you want to add glitch text effect. Drop the clip into the Timeline to get started.
Step3 Go to Titles tab located at the top. From the left panel, click on Titles option. Search “glitch” in the search field and you will see all the glitch text effects that you can apply to the text in your video.
Step4 Select any glitch text effect and drop it into the Timeline above the video clip exactly where you want the text and the effect to appear.
Step5 Double-click on the glitch text effect located on Timeline and edit the text, style, and other parameters as per your preference. Click on Ok and play the video to see your edited video with the glitch text effect.
Part 2. How to Make Glitch Text Effect with Premiere Pro
Adobe Premiere Pro is another renowned video editor where you can add glitch text effect to your video. Premiere Pro is strictly for professional video editors as the user interface is not as intuitive as Filmora . The learning curve is steep, and therefore, you need to go through the steps to add glitch text effect Premiere Pro. There are several glitch text effect presets available that you can apply to any text on your video to make them engaging. Here are the steps to make glitch text effect with Premiere Pro.
Step1 Launch Adobe Premiere Pro and go to New> Project to get started. Import your video and drop it into Timeline.
Step2 Use the Type tool to write any text on your video to add glitch text effect. You should have a text layer on Timeline.
Step3 Go to Effects> Immersive Video> VR Digital Glitch option. Drag and drop the effect to text layer.
Step4 Under Effect Controls tab, you will find all the different parameters that you can adjust to get the glitch text effect perfectly.
Step5 Turn on Master Amplitude and add multiple keyframes as different points in the Timeline and change the distortion value to make the effect prominent.
Step6 Go to the first keyframe and turn on Random Seed effect. Go to the last keyframe and turn on Random Seed effect and change the value to 75. Play the video to check the entire video with glitch text effect.
Part 3. Use VSDC Video Editor to Create Glitch Text
If you do not have any premium video editor on your computer and you do not want to purchase any premium video editor, you can still get glitter text effect free. You need to download and install VSDC free video editor on your computer. But the steps to create glitch text on VSDC video editor are slightly complicated as the user interface is not as intuitive as Filmora . Here are the steps to add free glitch text effect on your video.
Step1 Download and install VSDC video editor. Launch the editor and click on New Project to get started. Import your video to your project where you want to add glitch text effect.
Step2 Use Type tool to write a text on the video. You can press Shift+T shortcut as well. After typing the text, adjust the text style as per your preference.
Step3 Double-click on the text layer on Timeline and go to Video Effects> Special FX and click on Glitch option.
Step4 A window will appear where you can set the starting point, duration, and different parameters. Click on Ok button.
Step5 Go to Properties Windows and click on Presets to select different types of glitch text effects. You can also adjust the intensity of the text effects and other parameters as you feel.
Part 4. Related FAQs about Glitch Text
1. How do you animate glitch text?
If you want to animate glitch text for free, VSDC video editor is ideal as you can customize the effect on any text in simple steps. If you want to use a premium video editor, we recommend Filmora as there are various glitch text effects available to apply to any text on your video instantly.
2. How do you glitch text on video?
First, you have to import your video in your video editor. Type the desired text and set the style. Thereafter, go to glitch text effect presets available on the video editor and apply it to the text instantly. You can customize the glitch text effect as per your preference to make the animation more prominent.
3. How do you glitch text on Android?
You should first install Glitch Video Effect: Glitch FX app from Play Store. Edit your video on the app to add any text, and thereafter, add glitch text effect instantly. In fact, the glitch text effect is available in almost all popular video editor apps on Android due to the effect being trendy and viral.
Some Top Methods to Create AI Slow Motion Videos
The prediction was that AI would take over the world with its advanced algorithms and efficiency. Many believe that AI can achieve task completion better than humans. Even though it hasn’t been able to replace the human race, it surpasses many fields. One such field is the media and entertainment industry for content editing. Today’s article topic revolves around AI editing and editors.
Specifically, we will dive into understanding AI slow motion in depth. We will discuss its purpose, significance, and process along the way. You can find many slow-motion AI tools to compare and choose a suitable one. The article will conclude by recommending an AI slow-motion tool that tops all.
Slow Motion Video Maker Slow your video’s speed with better control of your keyframes to create unique cinematic effects!
Make A Slow Motion Video Make A Slow Motion Video More Features

Part 1: How Does AI Improve Slow Motion Video Editing?
AI can enhance the quality of content and the mechanism of crafting slow-mo AI video. It not only contributes to task achievement but also improves various aspects. Find out about the influence that AI has in achieving a perfect slow-mo effect below:
1. Frame Interpolation
If you create an AI slow-motion video, the slow motion is often abrupt. To resolve this problem and bring smoothness to slow-mo, AI frame interpolation can help. Users must activate this function, and AI will handle all the technicalities. The AI adds extra frames to your video to ensure a smooth, slow motion.
2. Minimizing Artifacts
When you convert a video into slow motion, certain changes take place. It introduces artifacts such as motion blur or unwanted distortions. They decline the quality of content, and the view becomes distorted. Reducing these factors magnifies the slow-motion effect and brings perfection to it.
3. AI Auto Enhancement
Many slow-motion AI creators have a built-in auto enhancement feature or effect. They incorporate this function to minimize the negative elements. They increase sharpness for clarity and light settings for visual appeal. While slowing down footage, these enhancements act as a helping hand.
4. Time Remapping Option
In slow-motion AI video editors, users have the option to manipulate time at different frames. It is a video editing technique that gives you control over pacing and timing. This helps you bring precision to your slow-mo videos through detailed settings. You can manipulate video frames and speed better with this option.
5. Automated Noise Cancellation
Just when you think the AI is done for the day, it comes up with another feature. Another significance of AI in slow-motion video creation is reducing noise. Advanced AI algorithms are designed to assist in providing high-quality audio. It is because the audio track quality often declines during a slow-mo.
Part 2: Top Tools Available Online for AI Slow Motion Editing
Creating slow-motion videos enhances your video content as it emphasizes the parts of it. In addition, it contributes to creative storytelling, flashbacks, and showing emotions. In this section, discover some slow-mo AI video creators here:
1. RunwayML
Do you have a short video frame rate clip and want to convert it into a slow-mo? This slow-motion AI tool helps increase the video frames for creating a slow-mo. This tool offers an adjustable speed option to create according to your preferences. It has a Super-Slow Motion AI Magic Tool that smoothens out the video slow-mo of any duration.

Key Features
- It is a multifunctional video editor with unlimited features, so you don’t need a plugin.
- With its AI-backed algorithms, it makes rotoscoping and motion tracking easier.
- Collaborative cloud storage lets you pick from where you left editing.
Pricing
| Pricing Plans | Annual Pricing/month |
|---|---|
| Standard | $12 |
| Pro | $28 |
| Unlimited | $76 |
| Enterprise | Contact Sales |
2. Neural Love
Are you looking for an AI slow-motion tool with multiple customization options? Neural Love is the best fit as it offers naturalistic slow-mo effects and speed adjustments. In addition, the tool supports MP4 and MOV video formats to do so. You can also manipulate slow motion settings via the FPS option in it. The tool can slow down a video by 2 to 8 times and crafts realistic effects.

Key Features
- This tool offers multiple generative AI services like Avatar or Art Generation.
- It offers both audio and video enhancement functionality that you can use to enhance a slow-mo.
- You can also use its AI Face enhancement feature to improve slow-motion results.
Pricing
| Pricing Plans | Price Per 100 Credits |
|---|---|
| Subscription | $10 |
| Pay As You Go | $19 |
3. VEED.io
Creating a slow-motion video without any prior experience can be confusing. There are so many terms to learn, but with this slow-mo AI tool, anyone can do it. Whether a video clip or a GIF, it can transform both into a slow-mo. Once you upload a video, select a speed option to slow down the clip. You can start editing with this tool without any sign-up or sign-in before.

Key Features
- Users can split a clip’s frames to edit or introduce different effects and filters to a specific part.
- The editing interface of this tool to create slow motions is very easy and intuitive.
- Whether it is MP4, MOV, or AVI, it shows compatibility with all video formats.
Pricing
| Pricing Plans | Annual Pricing/month |
|---|---|
| Basic | $12 |
| Pro | $24 |
| Business | $59 |
| Enterprise | Contact Sales |
4. CapCut
With the help of this powerful AI slow-motion video generator, sit back and see the magic. Its AI algorithms analyze a clip and apply the automated slow-mo effect. Along with automated slow-motion adjustment, you can do some personalization. It has slow-motion effects like criminal investigation, cinema trailers, and smooth processing. Once you have created a slow motion, it allows you to edit it.

Key Features
- You can transform a declined video resolution to 4K with this tool.
- It also has a video resizer option to transform your video into any size.
- If you want to change a video format, this tool also offers a video converter tool to do so.
Pricing
Free
Part 3: How to Use AI Slow Motion Videos for High-Quality Edits?
Now that you have been made aware of plenty of the slow-motion AI tools, let’s move forward. Although operating all these tools is easy for proficient results, you must master them. Here is a detailed guide to two of the above AI slow-motion tools:
1. RunwayML
Editing a video from simple to slow motion is very laidback with this tool. The AI does most of the work, and you need to give a few directions. Here is a step-by-step guide to using this slow-mo AI tool:
Step 1: Once logged in and reached its editing interface, navigate towards the left panel. Then, opt for the “Edit videos” option under the “Video” section. From the display menu, locate and select the “Super-Slow Motion” option.

Step 2: In the Super Slow Motion window, click the “Upload” option and drop a file.

Step 3: Once the video has been uploaded, modify the speed of the video. You can do this by accessing the “Speed” slider at the right. After editing, click the “Process” button to finalize the slow-motion settings. The edited video will appear on the screen; play it to see if the results are satisfactory. Then, click the “Export” button at the right to download the video.

2. Neural Love
This is another slow-motion AI tool for those with little knowledge of creating slow-mo. It uses AI tech to facilitate users and automate the major editing elements. Following are the steps to operate this online tool seamlessly:
Step 1: After accessing this tool, click the “Upload Video” button to import media. Once the import progress is completed, the tool will analyze your video.

Step 2: Scroll down and set the percentage slider for slowing down the video. You can also select to upscale your video or change its frame rate. Moreover, you can select to colorize the video as well.

Step 3: Click the “Start Full Video Processing” button after setting preferences. Once you have subscribed to a plan, the video slow motion will be ready.
Part 4: Desktop Alternative: Slowing Down Videos Using AI With Wondershare Filmora
Indeed, all these tools are experts in what they do. However, they all have some drawbacks. All these slow-motion AI tools require internet access to create a slow-mo. In such circumstances, users require a desktop tool that masters this task. Wondershare Filmora is an efficient tool for creating videos slow-mo with ease. Amongst slow-motion AI, it has other AI features, a resource library, and custom setting options.
Free Download For Win 7 or later(64-bit)
Free Download For macOS 10.14 or later
Speed Ramping for Creating Slow Motion in Wondershare Filmora
This feature can do everything, whether it’s about creating slow motion or speeding up your video. You can customize the speed of your video at specific frame rates with this. In addition, there are 6 pre-assembled speed ramping presets that you can apply. All presets are popular and tailored to fit most of the video contexts.
Along with speed, you can also maintain the audio pitch to align with the speed of the video. The feature later uses AI assistance in frame interpolation to smooth the added effect. There are 3 options for AI frame interpolation, and one of them is Optical Flow. This option helps with bringing smoothness to your AI slow-motion videos. In short, Filmora offers a professional ground for making a slow-mo.
Guide to Manage Speed Ramping in Wondershare Filmora
Now that you know its speed ramping option, it is time to try it. Although Filmora rules out the technicalities, there is still much to learn. In this section, find the step-by-step guide to creating a slow-motion AI video:
Step 1Import Files and Access the Speed Ramping Option
Once you have created a new project in Filmora, use the “Ctrl + I” keys to import files. After that, bring this clip to the timeline and select it. Navigate towards the right-side panel and go to the “Speed > Speed Ramping” tab. Under this tab, choose a preset or the “Customize” option to set a speed.

Step 2Enable Optical Flow Option
Once you have set speed preferences, reach the “AI Frame Interpolation” section at the bottom. From there, select the “Optical Flow” option to add extra frames. The AI will smoothen out the slow-motion effect in your video on its own.

Step 3Enable Render Preview to See Results
Once you have enabled the Optical Flow option, go to the timeline panel and locate the respective option. Once you find the “Render Preview” icon, click it to see results.

Conclusion
Upon reaching the end, you must have gained a brief knowledge of slow-motion AI. The article discussed the advantages of AI integration in slow-motion video generators. In addition, there was a brief knowledge about some of the effective slow-mo makers. Wondershare Filmora is an AI-driven desktop tool for making such videos. If you haven’t already used it, we suggest this user-friendly tool for creation.
Make A Slow Motion Video Make A Slow Motion Video More Features
Part 1: How Does AI Improve Slow Motion Video Editing?
AI can enhance the quality of content and the mechanism of crafting slow-mo AI video. It not only contributes to task achievement but also improves various aspects. Find out about the influence that AI has in achieving a perfect slow-mo effect below:
1. Frame Interpolation
If you create an AI slow-motion video, the slow motion is often abrupt. To resolve this problem and bring smoothness to slow-mo, AI frame interpolation can help. Users must activate this function, and AI will handle all the technicalities. The AI adds extra frames to your video to ensure a smooth, slow motion.
2. Minimizing Artifacts
When you convert a video into slow motion, certain changes take place. It introduces artifacts such as motion blur or unwanted distortions. They decline the quality of content, and the view becomes distorted. Reducing these factors magnifies the slow-motion effect and brings perfection to it.
3. AI Auto Enhancement
Many slow-motion AI creators have a built-in auto enhancement feature or effect. They incorporate this function to minimize the negative elements. They increase sharpness for clarity and light settings for visual appeal. While slowing down footage, these enhancements act as a helping hand.
4. Time Remapping Option
In slow-motion AI video editors, users have the option to manipulate time at different frames. It is a video editing technique that gives you control over pacing and timing. This helps you bring precision to your slow-mo videos through detailed settings. You can manipulate video frames and speed better with this option.
5. Automated Noise Cancellation
Just when you think the AI is done for the day, it comes up with another feature. Another significance of AI in slow-motion video creation is reducing noise. Advanced AI algorithms are designed to assist in providing high-quality audio. It is because the audio track quality often declines during a slow-mo.
Part 2: Top Tools Available Online for AI Slow Motion Editing
Creating slow-motion videos enhances your video content as it emphasizes the parts of it. In addition, it contributes to creative storytelling, flashbacks, and showing emotions. In this section, discover some slow-mo AI video creators here:
1. RunwayML
Do you have a short video frame rate clip and want to convert it into a slow-mo? This slow-motion AI tool helps increase the video frames for creating a slow-mo. This tool offers an adjustable speed option to create according to your preferences. It has a Super-Slow Motion AI Magic Tool that smoothens out the video slow-mo of any duration.
Key Features
- It is a multifunctional video editor with unlimited features, so you don’t need a plugin.
- With its AI-backed algorithms, it makes rotoscoping and motion tracking easier.
- Collaborative cloud storage lets you pick from where you left editing.
Pricing
| Pricing Plans | Annual Pricing/month |
|---|---|
| Standard | $12 |
| Pro | $28 |
| Unlimited | $76 |
| Enterprise | Contact Sales |
2. Neural Love
Are you looking for an AI slow-motion tool with multiple customization options? Neural Love is the best fit as it offers naturalistic slow-mo effects and speed adjustments. In addition, the tool supports MP4 and MOV video formats to do so. You can also manipulate slow motion settings via the FPS option in it. The tool can slow down a video by 2 to 8 times and crafts realistic effects.
Key Features
- This tool offers multiple generative AI services like Avatar or Art Generation.
- It offers both audio and video enhancement functionality that you can use to enhance a slow-mo.
- You can also use its AI Face enhancement feature to improve slow-motion results.
Pricing
| Pricing Plans | Price Per 100 Credits |
|---|---|
| Subscription | $10 |
| Pay As You Go | $19 |
3. VEED.io
Creating a slow-motion video without any prior experience can be confusing. There are so many terms to learn, but with this slow-mo AI tool, anyone can do it. Whether a video clip or a GIF, it can transform both into a slow-mo. Once you upload a video, select a speed option to slow down the clip. You can start editing with this tool without any sign-up or sign-in before.
Key Features
- Users can split a clip’s frames to edit or introduce different effects and filters to a specific part.
- The editing interface of this tool to create slow motions is very easy and intuitive.
- Whether it is MP4, MOV, or AVI, it shows compatibility with all video formats.
Pricing
| Pricing Plans | Annual Pricing/month |
|---|---|
| Basic | $12 |
| Pro | $24 |
| Business | $59 |
| Enterprise | Contact Sales |
4. CapCut
With the help of this powerful AI slow-motion video generator, sit back and see the magic. Its AI algorithms analyze a clip and apply the automated slow-mo effect. Along with automated slow-motion adjustment, you can do some personalization. It has slow-motion effects like criminal investigation, cinema trailers, and smooth processing. Once you have created a slow motion, it allows you to edit it.
Key Features
- You can transform a declined video resolution to 4K with this tool.
- It also has a video resizer option to transform your video into any size.
- If you want to change a video format, this tool also offers a video converter tool to do so.
Pricing
Free
Part 3: How to Use AI Slow Motion Videos for High-Quality Edits?
Now that you have been made aware of plenty of the slow-motion AI tools, let’s move forward. Although operating all these tools is easy for proficient results, you must master them. Here is a detailed guide to two of the above AI slow-motion tools:
1. RunwayML
Editing a video from simple to slow motion is very laidback with this tool. The AI does most of the work, and you need to give a few directions. Here is a step-by-step guide to using this slow-mo AI tool:
Step 1: Once logged in and reached its editing interface, navigate towards the left panel. Then, opt for the “Edit videos” option under the “Video” section. From the display menu, locate and select the “Super-Slow Motion” option.
Step 2: In the Super Slow Motion window, click the “Upload” option and drop a file.
Step 3: Once the video has been uploaded, modify the speed of the video. You can do this by accessing the “Speed” slider at the right. After editing, click the “Process” button to finalize the slow-motion settings. The edited video will appear on the screen; play it to see if the results are satisfactory. Then, click the “Export” button at the right to download the video.
2. Neural Love
This is another slow-motion AI tool for those with little knowledge of creating slow-mo. It uses AI tech to facilitate users and automate the major editing elements. Following are the steps to operate this online tool seamlessly:
Step 1: After accessing this tool, click the “Upload Video” button to import media. Once the import progress is completed, the tool will analyze your video.
Step 2: Scroll down and set the percentage slider for slowing down the video. You can also select to upscale your video or change its frame rate. Moreover, you can select to colorize the video as well.
Step 3: Click the “Start Full Video Processing” button after setting preferences. Once you have subscribed to a plan, the video slow motion will be ready.
Part 4: Desktop Alternative: Slowing Down Videos Using AI With Wondershare Filmora
Indeed, all these tools are experts in what they do. However, they all have some drawbacks. All these slow-motion AI tools require internet access to create a slow-mo. In such circumstances, users require a desktop tool that masters this task. Wondershare Filmora is an efficient tool for creating videos slow-mo with ease. Amongst slow-motion AI, it has other AI features, a resource library, and custom setting options.
Free Download For Win 7 or later(64-bit)
Free Download For macOS 10.14 or later
Speed Ramping for Creating Slow Motion in Wondershare Filmora
This feature can do everything, whether it’s about creating slow motion or speeding up your video. You can customize the speed of your video at specific frame rates with this. In addition, there are 6 pre-assembled speed ramping presets that you can apply. All presets are popular and tailored to fit most of the video contexts.
Along with speed, you can also maintain the audio pitch to align with the speed of the video. The feature later uses AI assistance in frame interpolation to smooth the added effect. There are 3 options for AI frame interpolation, and one of them is Optical Flow. This option helps with bringing smoothness to your AI slow-motion videos. In short, Filmora offers a professional ground for making a slow-mo.
Guide to Manage Speed Ramping in Wondershare Filmora
Now that you know its speed ramping option, it is time to try it. Although Filmora rules out the technicalities, there is still much to learn. In this section, find the step-by-step guide to creating a slow-motion AI video:
Step 1Import Files and Access the Speed Ramping Option
Once you have created a new project in Filmora, use the “Ctrl + I” keys to import files. After that, bring this clip to the timeline and select it. Navigate towards the right-side panel and go to the “Speed > Speed Ramping” tab. Under this tab, choose a preset or the “Customize” option to set a speed.
Step 2Enable Optical Flow Option
Once you have set speed preferences, reach the “AI Frame Interpolation” section at the bottom. From there, select the “Optical Flow” option to add extra frames. The AI will smoothen out the slow-motion effect in your video on its own.
Step 3Enable Render Preview to See Results
Once you have enabled the Optical Flow option, go to the timeline panel and locate the respective option. Once you find the “Render Preview” icon, click it to see results.
Conclusion
Upon reaching the end, you must have gained a brief knowledge of slow-motion AI. The article discussed the advantages of AI integration in slow-motion video generators. In addition, there was a brief knowledge about some of the effective slow-mo makers. Wondershare Filmora is an AI-driven desktop tool for making such videos. If you haven’t already used it, we suggest this user-friendly tool for creation.
How Does Sony’s S&Q Feature Help Recording Slow-Motion Video
Creating slomos has become essential to videography, cinema, and content generation. However, regarding professional-grade slomos, you cannot trust just any camera. Sony S&Q is one of those professional-grade cameras that help shoot in slow motion.
This article will provide a brief review of S&Q mode and Sony Vegas slow motion. In addition, you’ll come across a professional-grade video editor performing this task. This alternative is software that provides diverse slow-motion creation options.
Slow Motion Video Maker Slow your video’s speed with better control of your keyframes to create unique cinematic effects!
Make A Slow Motion Video Make A Slow Motion Video More Features
Part 1: Capturing Slow Motion Videos with Sony S&Q Feature
Who hasn’t heard about Sony and its services in the world of videography? Along with many features, the cameras offer a Sony S&Q mode for slo-mo creation. This model can manipulate video frame rates higher than standard cameras. It offers three frame rate options to select from 25p, 50p, and 60p. Here is a chance to learn to capture a slow-motion shot using S&Q mode Sony:
Step 1
From your camera’s dial, select the “S&Q” option. Access the camera’s display screen and go to “Menu 2” from the top bar. Then, “S&Q Settings” in the featured section.

Step 2
Once you reach the Sony S&Q mode settings, click “Record Settings.” This will decide the output frame rate of your video. In PAL, you have two record options: 25p and 50p. On the other hand, in the NTSC, you’ll have three options: 25p, 50p, and 60p.

Step 3
Click the “Enter” option to finalize the Record settings.

Step 4
Upon accessing the “Frame Rate” settings, you’ll find many options there. The highest frame rate in PAL is 100 fps, while in NTSC, itit is 120 fps. You can also choose the Exposure settings for your camera according to footage. After setting these preferences, start capturing a video in slow motion.

Part 2: Different Sony Cameras Offering S&Q Feature
There is no lack of devices that help you capture any scene with perfection. Someone obsessed with videography can understand the worth of a high-quality camera. Sony launched two such products named A7iii and Sony ZV E10 slow motion. Both are high-output, professional-grade cameras to assist in slo-mo creation. Here is a brief review of these cameras for you to compare and select better:
1. Sony A7 III
Sony A7iii slow motion camera launch occurred in 2018 with a bundle of features. This camera offers 120fps video capture for creating slomos or high-speed effects. It has an APS-C size, 24.2-megapixel, and an Exmor CMOS sensor for more precise results. In addition, it possesses a 4K Ultra-High Resolution of 3840 x 2160 for videos. The camera also has an LCD touch screen, which proves productive in settings.

2. Sony ZV-E10
This is an upgraded S&Q mode Sony camera that first emerged in 2021 with a fully articulated screen. It has an APS-C size, 24.2-megapixel, and an Exmor CMOS sensor for balanced shooting. This version also has the highest video frame rate of 120 fps for the professional slo-mo effect. It captures slomos in 4K (UHD) 3840 x 1920 video resolution for quality maintenance. It has a directional 3-capsule microphone for high-definition audio.

Part 3: How to Slow Down Video in Sony Vegas Pro?
Vegas Pro stands amongst the top video editors who excel at creating slow motions. With its powerful speed manipulation, it can curate cinematic slo-mo effects. In addition, the tool offers an Optical Flow option for ultra-high-quality slomos. It offers a non-linear timeline editing, which means selective durations to apply this effect. Given below is the step-by-step guide to Sony V egas slow motion:
Step 1
After launching the software, import the video and bring it to the timeline.

Step 2
Navigate towards the editing panel where the clip and audio track are showing. Place your cursor at the finishing line of the clip and stretch it throughout the timeline. This will add a slow-motion effect to your video.

Part 4: Wondershare Filmora: Comprehending the Best Alternative for Slowing Down Videos
All the above slow-motion solutions are adequate but not reliable. This is because shooting in So ny S& Q mode declines video quality upon export. In addition, the Sony Vegas slow motion subscription plans start at more than $500. This seems expensive for someone who just started editing and is a beginner.
Wondershare Filmora is the perfect alternative to S ony ZY E10 slow motion and other devices. It offers an intuitive speed change interface at affordable prices. In addition, there is more than one method to alter its speed with optical flow. Moreover, the software offers extensive export settings to set video resolution.
Free Download For Win 7 or later(64-bit)
Free Download For macOS 10.14 or later
Step-by-Step Guide to Creating Slow Motion in Filmora
The fundamental technique for achieving slow motion in Filmora involves Uniform Speed. This method simply adjusts the playback speed of a video through a slider. The process of creating slow-motion content is mentioned below:
Step 1Import Media to Initiate Slow-Motion Creation
Initiate Filmora by clicking the “New Project” button and access the editing interface. Hit the “Ctrl + I” keys to import media and bring it to the timeline. After selecting the clip in the timeline, navigate to the settings panel. Proceed to the “Speed” > “Uniform Speed” to access the speed change slider. Drag the slider towards the left to adjust the slow-motion speed.

Step 2Access AI Frame Interpolation Settings
To achieve smooth slow motion, access AI Frame Interpolation at the bottom. Expand this section and opt for the “Optical Flow” to apply.

Step 3Enable Render Preview to Review Results
Once all adjustments are complete, select the video and return to the timeline panel. Use your cursor to access the “File” tab in the top toolbar and choose “Render Preview.” Utilize the preview options before exporting the video.

Key Features of Filmora
Filmora doesn’t just claim to be the best; there are multiple features to support this claim. If you want to explore the features of this S ony A7iii slow motio n, read this section:
AI Copilot Editing: We understand the confusion of being an amateur at editing. The unfamiliarity with a tool increases it. Hence, Filmora offers this feature. As the name suggests, it acts as your assistant to run errands in Filmora. Ask it about any feature, and it will give direction and editing suggestions.
AI Text-Based Editing: Filmora excels in cutting or trimming videos for editing. It has recently introduced text-based editing AI to convert video speech to text. Afterward, users can remove a specific text to eliminate the video section.
Remove Background: With Filmora, video editing is more accessible than ever. The AI Smart Cutout option removes the video backgrounds with precision. Afterward, you can replace it with Filmora’s pre-developed background. This includes solid colors, gradients, and other graphics.
AI Image: Can’t spare time to capture images for your new content idea? With Filmora’s text to generate AI, you can now curate images. The AI only requires you to add a prompt and craft results accordingly. Upon creation, users can also select a preferred image resolution.
Conclusion
This article has discussed the purpose of Sony S&Q and how to use it for slo-mo creation. In addition, users learned about two of Sony’s cameras, which are popular for slow-motion. Afterward, we discussed a desktop method to create slow motion. Considering all the drawbacks of these methods, we recommended Filmora. It is a desktop alternative to these tools with AI abilities to enhance task achievement.
Make A Slow Motion Video Make A Slow Motion Video More Features
Part 1: Capturing Slow Motion Videos with Sony S&Q Feature
Who hasn’t heard about Sony and its services in the world of videography? Along with many features, the cameras offer a Sony S&Q mode for slo-mo creation. This model can manipulate video frame rates higher than standard cameras. It offers three frame rate options to select from 25p, 50p, and 60p. Here is a chance to learn to capture a slow-motion shot using S&Q mode Sony:
Step 1
From your camera’s dial, select the “S&Q” option. Access the camera’s display screen and go to “Menu 2” from the top bar. Then, “S&Q Settings” in the featured section.
Step 2
Once you reach the Sony S&Q mode settings, click “Record Settings.” This will decide the output frame rate of your video. In PAL, you have two record options: 25p and 50p. On the other hand, in the NTSC, you’ll have three options: 25p, 50p, and 60p.
Step 3
Click the “Enter” option to finalize the Record settings.
Step 4
Upon accessing the “Frame Rate” settings, you’ll find many options there. The highest frame rate in PAL is 100 fps, while in NTSC, itit is 120 fps. You can also choose the Exposure settings for your camera according to footage. After setting these preferences, start capturing a video in slow motion.
Part 2: Different Sony Cameras Offering S&Q Feature
There is no lack of devices that help you capture any scene with perfection. Someone obsessed with videography can understand the worth of a high-quality camera. Sony launched two such products named A7iii and Sony ZV E10 slow motion. Both are high-output, professional-grade cameras to assist in slo-mo creation. Here is a brief review of these cameras for you to compare and select better:
1. Sony A7 III
Sony A7iii slow motion camera launch occurred in 2018 with a bundle of features. This camera offers 120fps video capture for creating slomos or high-speed effects. It has an APS-C size, 24.2-megapixel, and an Exmor CMOS sensor for more precise results. In addition, it possesses a 4K Ultra-High Resolution of 3840 x 2160 for videos. The camera also has an LCD touch screen, which proves productive in settings.
2. Sony ZV-E10
This is an upgraded S&Q mode Sony camera that first emerged in 2021 with a fully articulated screen. It has an APS-C size, 24.2-megapixel, and an Exmor CMOS sensor for balanced shooting. This version also has the highest video frame rate of 120 fps for the professional slo-mo effect. It captures slomos in 4K (UHD) 3840 x 1920 video resolution for quality maintenance. It has a directional 3-capsule microphone for high-definition audio.
Part 3: How to Slow Down Video in Sony Vegas Pro?
Vegas Pro stands amongst the top video editors who excel at creating slow motions. With its powerful speed manipulation, it can curate cinematic slo-mo effects. In addition, the tool offers an Optical Flow option for ultra-high-quality slomos. It offers a non-linear timeline editing, which means selective durations to apply this effect. Given below is the step-by-step guide to Sony V egas slow motion:
Step 1
After launching the software, import the video and bring it to the timeline.
Step 2
Navigate towards the editing panel where the clip and audio track are showing. Place your cursor at the finishing line of the clip and stretch it throughout the timeline. This will add a slow-motion effect to your video.
Part 4: Wondershare Filmora: Comprehending the Best Alternative for Slowing Down Videos
All the above slow-motion solutions are adequate but not reliable. This is because shooting in So ny S& Q mode declines video quality upon export. In addition, the Sony Vegas slow motion subscription plans start at more than $500. This seems expensive for someone who just started editing and is a beginner.
Wondershare Filmora is the perfect alternative to S ony ZY E10 slow motion and other devices. It offers an intuitive speed change interface at affordable prices. In addition, there is more than one method to alter its speed with optical flow. Moreover, the software offers extensive export settings to set video resolution.
Free Download For Win 7 or later(64-bit)
Free Download For macOS 10.14 or later
Step-by-Step Guide to Creating Slow Motion in Filmora
The fundamental technique for achieving slow motion in Filmora involves Uniform Speed. This method simply adjusts the playback speed of a video through a slider. The process of creating slow-motion content is mentioned below:
Step 1Import Media to Initiate Slow-Motion Creation
Initiate Filmora by clicking the “New Project” button and access the editing interface. Hit the “Ctrl + I” keys to import media and bring it to the timeline. After selecting the clip in the timeline, navigate to the settings panel. Proceed to the “Speed” > “Uniform Speed” to access the speed change slider. Drag the slider towards the left to adjust the slow-motion speed.
Step 2Access AI Frame Interpolation Settings
To achieve smooth slow motion, access AI Frame Interpolation at the bottom. Expand this section and opt for the “Optical Flow” to apply.
Step 3Enable Render Preview to Review Results
Once all adjustments are complete, select the video and return to the timeline panel. Use your cursor to access the “File” tab in the top toolbar and choose “Render Preview.” Utilize the preview options before exporting the video.
Key Features of Filmora
Filmora doesn’t just claim to be the best; there are multiple features to support this claim. If you want to explore the features of this S ony A7iii slow motio n, read this section:
AI Copilot Editing: We understand the confusion of being an amateur at editing. The unfamiliarity with a tool increases it. Hence, Filmora offers this feature. As the name suggests, it acts as your assistant to run errands in Filmora. Ask it about any feature, and it will give direction and editing suggestions.
AI Text-Based Editing: Filmora excels in cutting or trimming videos for editing. It has recently introduced text-based editing AI to convert video speech to text. Afterward, users can remove a specific text to eliminate the video section.
Remove Background: With Filmora, video editing is more accessible than ever. The AI Smart Cutout option removes the video backgrounds with precision. Afterward, you can replace it with Filmora’s pre-developed background. This includes solid colors, gradients, and other graphics.
AI Image: Can’t spare time to capture images for your new content idea? With Filmora’s text to generate AI, you can now curate images. The AI only requires you to add a prompt and craft results accordingly. Upon creation, users can also select a preferred image resolution.
Conclusion
This article has discussed the purpose of Sony S&Q and how to use it for slo-mo creation. In addition, users learned about two of Sony’s cameras, which are popular for slow-motion. Afterward, we discussed a desktop method to create slow motion. Considering all the drawbacks of these methods, we recommended Filmora. It is a desktop alternative to these tools with AI abilities to enhance task achievement.
Also read:
- Updated Free Drone LUTs For Perfect Drone Footage for 2024
- This Article Has a Detailed Description of How You Can Split the Videos in Lightworks Including the the Discussion of Splitting the Wondershare Filmora as an Alternative. It Is Also a Suitable Choice for 2024
- New Shotcut Review – Is It The Best Free Video Editor for 2024
- 2024 Approved 2 Methods to Cut Video in VLC on Windows
- Updated In 2024, How to Add Font Effects to Videos
- In 2024, 10 Best Text to Robot Voice Generators Windows, Mac, Android, iPhone & Online
- | How to Share YouTube Video on Zoom for 2024
- Updated 2024 Approved How To Polish Your Music Video Edits Using Filmora
- Updated 2024 Approved MP3 CUTTER DOWNLOADMP3 Cutter Download Is One of the Most Reliable Tools for Editing of Music Files in a Fast and Friendly Way
- Updated 2024 Approved Basic Introduction for LumaFusion Color Grading
- Updated 2024 Approved 5 Tips for Faster Editing in Filmora
- Updated This Article Talks in Detail About How to Export iMovie Video From iPhone, Mac, Etc. It Also Covers the Process of Using iMovie Alternative to Edit Videos on Mac. Check Out Now
- New How to Make a Super Easy Rotating Video Effect
- New 3 In-Camera Transitions Tricks To Make Videos Like a Pro for 2024
- New 2024 Approved Top Ways to Make Fast Motion Video on iPhone Solved
- Updated 10 Best Old Film Overlays to Make Your Videos Look Vintage for 2024
- Updated With the Datamoshing Effect, the User Can Damage the Video Clips to Offer a Glitch Effect. The Article Introduces Datamosh After Effects Its Workability in the Industry for 2024
- 2024 Approved Best 8 Online MPEG to GIF Converters
- Updated Step by Step to Cut Videos in Adobe Premiere Pro
- Funny Content Ideas for YouTube Videos and Funny Music Background
- New In 2024, How To Slow Down GIF Building an Understanding
- In 2024, Explore the Advanced Tools to Help You Reshape the Art of Sky Replacement in Digital Imagery. Discover Methods to Enhance Your Visual Narratives Through AI
- Updated Splice Video Editor Online - Get Your Videos Splice Easily for 2024
- The Way to Make Dynamic Video Collages, In 2024
- Wondering About How to Easily Create a Slideshow on Your iPhone? Well, Take Note of some of the Finest Apps to Turn Your Vision Into Reality for 2024
- Updated 2024 Approved How to Make Discord GIF PFP
- Mastering FFmpeg How to Merge Audio and Video with Ease for 2024
- Updated In 2024, Are You Eager to Discover All About Dynamic Videos? You Are in the Right Place because This Article Provides Insight Into Dynamic Video Collages
- Updated 2024 Approved 10 Top Free GIF Background Remover for PC and Online
- New 2024 Approved Best 10 Tools To Make Quiz Videos
- Updated In 2024, Have You Ever Tried to Remove Motion Blur From Photos? This Article Will Address How to Remove the Motion Blur Effect Using Photoshop and Its Alternatives
- Updated Turn Your Text Into a Podcast Made Possible for 2024
- 7 Ways to Unlock a Locked Tecno Camon 20 Premier 5G Phone
- In 2024, How to Change Credit Card from Your iPhone XS Max Apple ID and Apple Pay
- In 2024, How To Remove Phone Number From Your Apple ID on Your iPhone 15 Pro?
- Best Anti Tracker Software For Vivo S18 | Dr.fone
- In 2024, Planning to Use a Pokemon Go Joystick on Asus ROG Phone 8? | Dr.fone
- How to Share Location in Messenger On Apple iPhone 7 Plus? | Dr.fone
- How to Cast Vivo S18 to Computer for iPhone and Android? | Dr.fone
- Top 6 Free Talking Stock Photo Sites
- Complete guide for recovering messages files on Reno 10 Pro+ 5G
- In 2024, How To Change Infinix Smart 8 HD Lock Screen Password?
- How To Unlock A Found iPhone 8 Plus? | Dr.fone
- In 2024, How to use Snapchat Location Spoofer to Protect Your Privacy On Oppo A2? | Dr.fone
- How to Transfer Photos from Nokia XR21 to New Android? | Dr.fone
- In 2024, Step-by-Step Tutorial How To Bypass Oppo Find N3 FRP
- Apply These Techniques to Improve How to Detect Fake GPS Location On Samsung Galaxy M34 5G | Dr.fone
- How to Delete iCloud Account with or without Password from your Apple iPhone 6 Plus/Windows/Mac
- Complete Tutorial to Use GPS Joystick to Fake GPS Location On OnePlus Ace 2V | Dr.fone
- How to Unlock Realme C53 Phone without Google Account?
- In 2024, How to Intercept Text Messages on Vivo Y36i | Dr.fone
- 7 Solutions to Fix Chrome Crashes or Wont Open on Xiaomi Redmi Note 12 Pro 5G | Dr.fone
- In 2024, Change Location on Yik Yak For your Nokia C110 to Enjoy More Fun | Dr.fone
- How To Transfer WhatsApp From Apple iPhone X to other iPhone 12 devices? | Dr.fone
- How To Repair Apple iPhone 11 Pro Max iOS System Issues? | Dr.fone
- In 2024, Does Airplane Mode Turn off GPS Location On Apple iPhone 12 Pro Max? | Dr.fone
- How to Screen Mirroring Poco M6 5G to PC? | Dr.fone
- New In 2024, What Is AI Voice? | Wondershare Virbo Glossary
- In 2024, How Can I Catch the Regional Pokémon without Traveling On Realme C67 4G | Dr.fone
- In 2024, Top 5 Vivo S18 Pro Bypass FRP Tools for PC That Actually Work
- How to Fix My Infinix Hot 40 Location Is Wrong | Dr.fone
- Complete Tutorial for Infinix Hot 40i Hard Reset | Dr.fone
- In 2024, Unlock Realme C51 Phone Password Without Factory Reset Full Guide Here
- In 2024, 3 Ways to Track Apple iPhone 13 Pro Max without Them Knowing | Dr.fone
- Title: Updated Deleting White Background in Photoshop Is Hard? No
- Author: Morgan
- Created at : 2024-05-19 05:11:57
- Updated at : 2024-05-20 05:11:57
- Link: https://ai-video-editing.techidaily.com/updated-deleting-white-background-in-photoshop-is-hard-no/
- License: This work is licensed under CC BY-NC-SA 4.0.
