
:max_bytes(150000):strip_icc():format(webp)/Robothandholdinganapple-fbe6ff482ed641e188dd6650b9ac132e.jpg)
Updated Do You Like Clouds or Sky and Want to Use Them as a Video Background? Explore This Article to Learn About the Sky Change Video in Filmora for 2024
Do You Like Clouds or Sky and Want to Use Them as a Video Background? Explore This Article to Learn About the Sky Change Video in Filmora
We live in an era that has been advanced by technology and software. Along with assisting in health and customer service, it enhances video outlook. These editors enhance the colors, audio, and other elements of images and videos. One of the major applications of this software is the ability to replace or remove backgrounds. This article will discuss the sky change video background and its sources.
Sky replacement video backgrounds help in covering up the mess behind a video. These backgrounds give your videos a captivating and refreshing look. Such replacement sky video backgrounds fit most of the image and video contexts. Embark on this journey to explore the importance of backgrounds and some useful sites.
Sky Replacement A cross-platform works like magic for background removal or sky replacement photos!
Free Download Free Download Learn More

Part 1: Why Should You Consider Changing the Background of Your Videos?
There are multiple reasons for changing the background of a video . Backgrounds cover the unnecessary things behind us to enhance videos. In addition, inserting video-relevant backgrounds helps in catching the audience’s attention. Discover this section to learn additional advantages of video backgrounds:
1. Imitates Professionalism
Be it your video content for social media or a Zoom call, setting backgrounds is necessary. These backgrounds reflect the personality of the person who is recording the video. It tells viewers how serious you are about the task and reflects professionalism.
2. Consistent Brand Image
Putting product-relevant backgrounds behind your videos is an important part of marketing. They convey a consistent brand image and tell customers you put in effort. Moreover, a steady background for your videos builds and maintains brand identity.
3. Maintain Privacy and Security
If you are creating videos for a blog, removing backgrounds is compulsory. If you create videos at home, removing backgrounds will maintain privacy. They eliminate any additional people or messy surroundings in your videos.
4. Focused and Appealing Content
When you add a theme-relevant background in the video, it tells users about the product. In addition, not removing unprofessional backgrounds may distract the audience. However, adding such backgrounds keeps the audience’s focus on the product. Inserting an aligning background enhances the overall outlook of a video.
5. Enhanced Storytelling and Clarity
Adding a background with appealing colors and good quality uplifts the brand’s narrative. It immerses viewers in the video and helps them understand the theme better. Moreover, the right background complements the product or video and brings clarity.
Part 2: Best Sites for Accessing Sky Video Templates for Changing
Now that you know why we emphasized the importance of backgrounds, let’s move forward. This section will quote some of the leading sites for sky-change video backgrounds. Keep reading the below section to learn more about these sites:
1. Pexel s
Pexels is an online platform that provides stock images and videos for every context. You can join this platform to upload videos and images from your gallery. In addition, there is no limit to images and videos for content creation. You can add an image to your favorites, or you can save this image in your collection. There are trending and suggested categories for you, or you can also use the search bar.
When you go to videos and search for the sky, you’ll find 28.2k sky background videos. These sky-replace video backgrounds have distinct visual appeals. Some videos include skies, while others have both sky and landscapes. In addition, you can save, download, and share these videos with your team. You can also click on the video to see the preview of the video before downloading.

2. Videezy
Are you looking for a colorful and diverse background range to change the sky in a video online? Use Videezy, as it has a collection of 5000+ sky video backgrounds. All the backgrounds are unique in color tones and styles to serve multiple users. You can try a video before downloading it to be sure about what you’re buying. You can search for simple or specific sky images like night sky or others.
Videezy is a diverse platform for stock images and videos with AI integration. It has unlimited categories of images that you can employ in your content. However, if you don’t find what you had in mind, you can take its AI’s assistance. The AI helps you craft your imagination into an image using prompts. Along with images and videos, you’ll find music, sound effects, and templates in it.

3. Pixabay
Are you looking for royalty-free and realistic sky-change video backgrounds? Pixabay offers more than 7000 sky videos in HD and 4K resolution. In addition, you can select a video to see its preview and other properties. It supports MP4 video format, and you can download videos in 4 different resolutions. You can share these sky videos on social sites or add them to your save collection.
Pixabay does not limit itself to videos; it offers illustrations, music, sound effects, and more. You can add a keyword for what you’re looking for, and it will generate results. The images and other media have vibrant colors with realistic outlooks. In its “Explore” section, you can find out about trendy or popular media and use them.

4. Vecteezy
If you feel that the above-mentioned sites have limited collection, visit Vecteezy. The platform offers more than 90K videos related to sky change in videos. Upon clicking the video for a preview, you can explore its features. It has high-quality HD, 4K resolution videos in MP4, MOV, and other formats.
In addition, the tool has generative AI integration to bring diversity and uniqueness. Use the AI prompt section to add a video description, and AI will generate it. In addition, you can also observe the frame rate of a video in its properties. This will help you adjust the speed or duration of the video accordingly. You can customize and edit your chosen videos and images in the “Create” section.

Part 3: Wondershare Filmora: A Perfect Avenue for Replacing Sky Background in Video
Multiple tools in the market offer video background removal. However, for removing the background with precision, we recommend Wondershare Filmora . This is a professional video editing tool that offers AI integration for this purpose. The AI automates the process, and users must activate this functionality.
For a professional outlook, you don’t need to spend hours setting green screens. After that, you can sky change the video background from Filmora’s background options. It offers built-in solid, gradient, and grid options for this purpose.
Free Download For Win 7 or later(64-bit)
Free Download For macOS 10.14 or later
Video Editing Features of Wondershare Filmora
With its vast editing interface and a range of video editing features, Filmora brings diversity. In this section, we will focus on other video editing features of Filmora. Let’s dive into the process of exploring those features without further delay:
1. AI Text-to-Video
If you have no editing experience but want to generate a video, use this feature. The AI text-to-video functionality offers video generation from scripts. This feature is ideal for creating educational or explainer videos. The AI inserts the graphics and a voiceover in your video.

2. AI Text-Based Editing
Free yourself from the complexity of cutting or trimming a video in a precise manner. This functionality generates a transcript of your video, and you can use it for editing. In the relative window, removing text will also remove the video section.

3. AI Vocal Remover
Why upload videos with unclear audio when you can use Filmora’s vocal remover tool? This tool analyzes and separates the vocals of your videos from background noise. You need to enable it after selecting your video, and AI will do the rest. The separated vocals are editable and enhance audio clarity.

4. AI Music Generator
Are you unable to fit music behind your videos? Use Filmora’s music generator with AI-backed algorithms to help you. The AI enables you to set the theme, tone, or emotion of a video and create results on it. It crafts multiple music tracks for users to select a suitable one.

Steps to Remove Video Background in Filmora
In this section, users will learn a simple method to remove video backgrounds in Filmora. You can remove the background and replace the sky video with it. Here is the step-by-step guide to removing video background in Filmora:
Step 1: Import Your Media and Bring it to Timeline
First, download Filmora on your device and log in to access its features. After that, create a “New Project” using the main display options. Upon reaching Filmora’s editing interface, click the “Import” option. Following that, import media and drag and place it onto the timeline panel.

Step 2: Enable Background Removing AI
Once you have placed media on the timeline, navigate towards the right-side settings panel. In the “Video > AI Tools” tab, enable the “AI Smart Cutout” option and click “Click to start Smart Cutout.”

Step 3: Start Background Removing
In the Smart Cutout Video window, trace the background of your video. Move to the right side and click the “Click to start Smart Cutout” button. The tracking will start, and the options will appear on the screen. Afterward, click the “Save” button to add this edited video to the timeline.

Step 4: Add a Background and Export Video
Hover towards the right-side panel and access the “Video > Basic” tabs. Find the “Background” section, enable it, and choose any given background. Following that, click the “Export” button to download this video on your device.

Free Download For Win 7 or later(64-bit)
Free Download For macOS 10.14 or later
Conclusion
Reading this article has helped readers to understand the value of backgrounds. They learned about how sky change video backgrounds can enhance your content. Such backgrounds are ideal for product marketing and brand image. Moreover, users learned about how to change video backgrounds in Filmora. With its AI integration and diverse tools, one must explore it to upgrade their content.
Free Download Free Download Learn More
Part 1: Why Should You Consider Changing the Background of Your Videos?
There are multiple reasons for changing the background of a video . Backgrounds cover the unnecessary things behind us to enhance videos. In addition, inserting video-relevant backgrounds helps in catching the audience’s attention. Discover this section to learn additional advantages of video backgrounds:
1. Imitates Professionalism
Be it your video content for social media or a Zoom call, setting backgrounds is necessary. These backgrounds reflect the personality of the person who is recording the video. It tells viewers how serious you are about the task and reflects professionalism.
2. Consistent Brand Image
Putting product-relevant backgrounds behind your videos is an important part of marketing. They convey a consistent brand image and tell customers you put in effort. Moreover, a steady background for your videos builds and maintains brand identity.
3. Maintain Privacy and Security
If you are creating videos for a blog, removing backgrounds is compulsory. If you create videos at home, removing backgrounds will maintain privacy. They eliminate any additional people or messy surroundings in your videos.
4. Focused and Appealing Content
When you add a theme-relevant background in the video, it tells users about the product. In addition, not removing unprofessional backgrounds may distract the audience. However, adding such backgrounds keeps the audience’s focus on the product. Inserting an aligning background enhances the overall outlook of a video.
5. Enhanced Storytelling and Clarity
Adding a background with appealing colors and good quality uplifts the brand’s narrative. It immerses viewers in the video and helps them understand the theme better. Moreover, the right background complements the product or video and brings clarity.
Part 2: Best Sites for Accessing Sky Video Templates for Changing
Now that you know why we emphasized the importance of backgrounds, let’s move forward. This section will quote some of the leading sites for sky-change video backgrounds. Keep reading the below section to learn more about these sites:
1. Pexel s
Pexels is an online platform that provides stock images and videos for every context. You can join this platform to upload videos and images from your gallery. In addition, there is no limit to images and videos for content creation. You can add an image to your favorites, or you can save this image in your collection. There are trending and suggested categories for you, or you can also use the search bar.
When you go to videos and search for the sky, you’ll find 28.2k sky background videos. These sky-replace video backgrounds have distinct visual appeals. Some videos include skies, while others have both sky and landscapes. In addition, you can save, download, and share these videos with your team. You can also click on the video to see the preview of the video before downloading.
2. Videezy
Are you looking for a colorful and diverse background range to change the sky in a video online? Use Videezy, as it has a collection of 5000+ sky video backgrounds. All the backgrounds are unique in color tones and styles to serve multiple users. You can try a video before downloading it to be sure about what you’re buying. You can search for simple or specific sky images like night sky or others.
Videezy is a diverse platform for stock images and videos with AI integration. It has unlimited categories of images that you can employ in your content. However, if you don’t find what you had in mind, you can take its AI’s assistance. The AI helps you craft your imagination into an image using prompts. Along with images and videos, you’ll find music, sound effects, and templates in it.
3. Pixabay
Are you looking for royalty-free and realistic sky-change video backgrounds? Pixabay offers more than 7000 sky videos in HD and 4K resolution. In addition, you can select a video to see its preview and other properties. It supports MP4 video format, and you can download videos in 4 different resolutions. You can share these sky videos on social sites or add them to your save collection.
Pixabay does not limit itself to videos; it offers illustrations, music, sound effects, and more. You can add a keyword for what you’re looking for, and it will generate results. The images and other media have vibrant colors with realistic outlooks. In its “Explore” section, you can find out about trendy or popular media and use them.
4. Vecteezy
If you feel that the above-mentioned sites have limited collection, visit Vecteezy. The platform offers more than 90K videos related to sky change in videos. Upon clicking the video for a preview, you can explore its features. It has high-quality HD, 4K resolution videos in MP4, MOV, and other formats.
In addition, the tool has generative AI integration to bring diversity and uniqueness. Use the AI prompt section to add a video description, and AI will generate it. In addition, you can also observe the frame rate of a video in its properties. This will help you adjust the speed or duration of the video accordingly. You can customize and edit your chosen videos and images in the “Create” section.
Part 3: Wondershare Filmora: A Perfect Avenue for Replacing Sky Background in Video
Multiple tools in the market offer video background removal. However, for removing the background with precision, we recommend Wondershare Filmora . This is a professional video editing tool that offers AI integration for this purpose. The AI automates the process, and users must activate this functionality.
For a professional outlook, you don’t need to spend hours setting green screens. After that, you can sky change the video background from Filmora’s background options. It offers built-in solid, gradient, and grid options for this purpose.
Free Download For Win 7 or later(64-bit)
Free Download For macOS 10.14 or later
Video Editing Features of Wondershare Filmora
With its vast editing interface and a range of video editing features, Filmora brings diversity. In this section, we will focus on other video editing features of Filmora. Let’s dive into the process of exploring those features without further delay:
1. AI Text-to-Video
If you have no editing experience but want to generate a video, use this feature. The AI text-to-video functionality offers video generation from scripts. This feature is ideal for creating educational or explainer videos. The AI inserts the graphics and a voiceover in your video.
2. AI Text-Based Editing
Free yourself from the complexity of cutting or trimming a video in a precise manner. This functionality generates a transcript of your video, and you can use it for editing. In the relative window, removing text will also remove the video section.
3. AI Vocal Remover
Why upload videos with unclear audio when you can use Filmora’s vocal remover tool? This tool analyzes and separates the vocals of your videos from background noise. You need to enable it after selecting your video, and AI will do the rest. The separated vocals are editable and enhance audio clarity.
4. AI Music Generator
Are you unable to fit music behind your videos? Use Filmora’s music generator with AI-backed algorithms to help you. The AI enables you to set the theme, tone, or emotion of a video and create results on it. It crafts multiple music tracks for users to select a suitable one.
Steps to Remove Video Background in Filmora
In this section, users will learn a simple method to remove video backgrounds in Filmora. You can remove the background and replace the sky video with it. Here is the step-by-step guide to removing video background in Filmora:
Step 1: Import Your Media and Bring it to Timeline
First, download Filmora on your device and log in to access its features. After that, create a “New Project” using the main display options. Upon reaching Filmora’s editing interface, click the “Import” option. Following that, import media and drag and place it onto the timeline panel.
Step 2: Enable Background Removing AI
Once you have placed media on the timeline, navigate towards the right-side settings panel. In the “Video > AI Tools” tab, enable the “AI Smart Cutout” option and click “Click to start Smart Cutout.”
Step 3: Start Background Removing
In the Smart Cutout Video window, trace the background of your video. Move to the right side and click the “Click to start Smart Cutout” button. The tracking will start, and the options will appear on the screen. Afterward, click the “Save” button to add this edited video to the timeline.
Step 4: Add a Background and Export Video
Hover towards the right-side panel and access the “Video > Basic” tabs. Find the “Background” section, enable it, and choose any given background. Following that, click the “Export” button to download this video on your device.
Free Download For Win 7 or later(64-bit)
Free Download For macOS 10.14 or later
Conclusion
Reading this article has helped readers to understand the value of backgrounds. They learned about how sky change video backgrounds can enhance your content. Such backgrounds are ideal for product marketing and brand image. Moreover, users learned about how to change video backgrounds in Filmora. With its AI integration and diverse tools, one must explore it to upgrade their content.
How To Fade Audio With Movavi Editor
Movavi Video Editor Plus is the best option if you want to use its user-friendly Movavi fade audio feature set with plenty of functionality. There are versions of the app on Mac and Windows. For all intents and purposes, Movavi fade out music functionality is an excellent piece of this video editing software. The Movavi Video Editor Plus package comes with standard advanced features and functionality. You may also store your work and share your Movavi fade out audio exports across devices that have the software installed.
Looking for how to fade out music in Movavi? We’ve got you solutions to it. The ability to quickly and simply check that the beginning and conclusion of any audio is one of the best Movavi fade audio features. Prior to the audio, there must be a distinct period of quiet. Finding the program, like Movavi Audio fade out, that best suits your requirements is essential whether you want to fade-in, fad-out, trim, crop, clip, or combine audio files or segments of a music. Find out the details in the upcoming sections.
Part 1. How to Fade Audio with Movavi Editor
When the song’s ending is not featured in the video, fade-out is used to provide an added level of professionalism. Even if you’ve never altered a video before, using Movavi Video Editor Plus is simple. A step-by-step tutorial that walks you through all the tools you’ll need is shown to you when the software initially launches. Additionally, you may always search the Movavi official website for advice.
Steps to use Movavi Fade Audio:
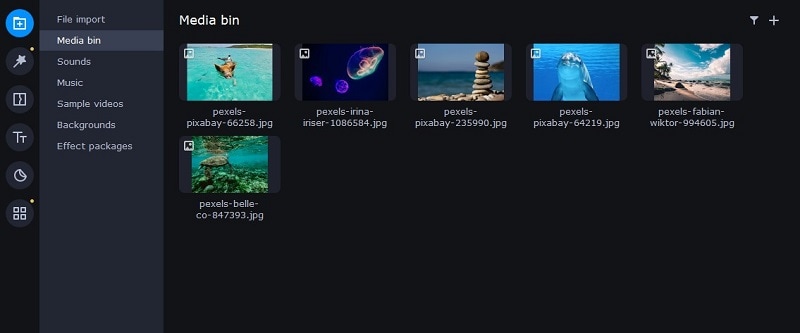
Step1The first step is to import the audio and video files you want to utilize. Drag and drop the files into the software or choose “Add Files” from the Media Bin area to do this. Drag and drop the clip into the timeline after that.
Step2Select the disconnect audio option from the edit menu. Additionally, you can see that the audio and video will no longer be connected by a little connection. Your titles’ location, color, and font may all be changed.
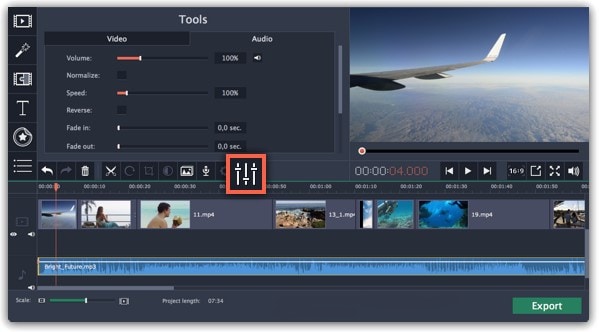
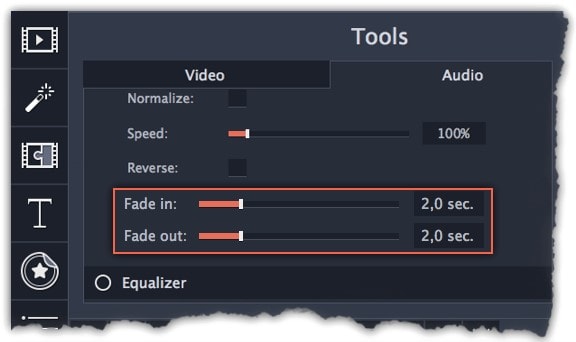
Step3Use the sliders on the Audio tab to set the fade duration by referring to the Audio Properties. Additional options may be used to increase the audio’s loudness, eliminate ambient noise, or even create an echo effect.
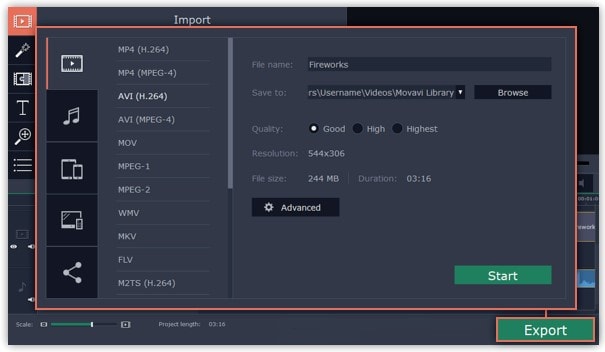
Step4Click on the export option to save this audio as an MP3. Select Audio Export. The MP3 choice is used by default. Select the Save Audio File tab after clicking the Export button. Choose the preferred format and press Start.
Part 2. Movavi Alternative to Fade Audio
Look no further than Filmora by Wondershare if you’re seeking for an effective and user-friendly Movavi audio fade out substitute. This program has all the tools you need to edit, apply special effects, and make titles for videos of a professional caliber. In contrast to Movavi, Filmora gives you the ability to create fade out music without requiring you to install a separate extension. In order to help you understand how to use this function using the Filmora video editing interface, we have enlisted the step-by-step guide for you as well.
Although there are several video editors on the market, Filmora has successfully carved out a position for itself with a variety of intriguing features. The application is appropriate for both new and more experienced users and was designed with novice users in mind. Its user interface (UI), which is rather simple when compared to professional applications. Among all the free video editing programs for beginners, Filmora also offers a far larger selection of effects, customizability, and correction tools, and its screen-splitting capability is much handier than Movavi fade audio feature.
Steps to Fade Out Audio in Filmora:
Step1Install Wondershare Filmora
The straightforward platform to start editing your audio and music files is Filmora, which is available for free. You must first download and install this application on your windows computer in order to utilize it without difficulty. Download the most current edition of this application first. It’s now time to install it on your computer when you’ve completed that. Simply install this program on your computer by following the standard setup instructions if you want to do it fast.
Step2Open Filmora Editor and Import Audio Files
In the step that follows, we’ll show you how to use this platform to fade in and out audio. Filmora may be immediately launched from your desktop or the search bar, then opened as seen below to begin going. By choosing the Video Editor option from the software’s home screen, you may now investigate the basic principles of editing. This will bring up the main interface for Filmora. To import your music and video files, just choose the Import button from the software’s main screen, as seen below:

Step3Load Built-in Audio Editor
You must drag the media files into the program’s timeline after importing them into Filmora. You may modify your media files using every tool in the timeline. To utilize the audio editor in Filmora, just right-click on the specific audio file and choose “Edit Audio” from the list, as seen below.

Step4Use Audio Fade-in/Fade-out
The initial step is to learn how to use Filmora to start fading in and, afterwards, fading out your audio recordings. The best aspect of Filmora is how simple it is to employ these techniques from the timeline. To achieve this, focus on the audio file that you want to change in the timeline; after you’ve picked it, the two icons will show up above the audio file. Drag the first one to the desired duration for the audio fade-in option, as demonstrated:

Step5Edit and Share Video/Sound
In addition to an audio editor, Filmora has a built-in toolset for video editing. You may utilize basic to sophisticated editing techniques inside the program. To choose the basic editor, just click on the video file within the timeline as seen below. There is support for all widely used video and audio formats, including MP3. Click “Export” and choose “File Format” to do this.
By pressing the Format button, choose the required configuration from the list. On a computer, the particular document will be saved to the designated directory.
The Bottom Line
Have you learned how to fade out music in Movavi? If so, then you would also find out that the Movavi fade audio alternative, Filmora , provides a selection of audio editing options in addition to video editing features. The Movavi editor is capable of spicing up your videos and audios, however; Filmora’s workflow is a little more established and well-defined than Movavi’s, which is what propels it to the top of the audio editing field. As a result, Filmora would be the better option if you intend to work as a video editor for a long time.
Free Download For Win 7 or later(64-bit)
Free Download For macOS 10.14 or later
This Article Will Show You How to Make a Tattoo Disappear on Your Body Magically
Do you have any tattoos that you don’t like anymore? Have you ever wished you had the superpower to make unwanted tattoos vanish? Then, keep reading this article since this article will provide you with how to use masking and colour correction to make a tattoo disappear in Filmora .
Part 1: What You’ll Need to Getting ready
Step1 The first thing you need is a video clip of your arm. Next, place the camera on a tripod, and tilt down to show the table from the top.

Step2 After that, put the arm on the tableand keep it still while filming. Meanwhile, have another hand perform on the other side of the frame and pretend to use magic to remove the tattoo.

Step3 Next, you need a picture of a tattoo. Indeed, it would be better to have the tattoo in the same position on the arm so it can match the video clip we just filmed.

After preparing everything, you need to go to Filmora 11 and start editing. If you haven’t downloaded Filmora already, you can visit filmora.wondershare.com.

Part 2: Editing Tutorial
Step1 First, drag and drop the arm video clip onto the first video track and the tattoo picture on the second video track.

Step2 Add a mask around the tattoo part from the picture. You must hide the first video track to see the mask clearly.Then, double-click on the picture on the timeline and go to the setting window on the top left. Find the Mask Section and select the circle shape. Now you can see the mask is applied.

Step3 Adjust the position and size of the mask to reveal only the tattoo part. Then you must change the “Blur Strength” to add more blur to the edge of the mask.

Step4 With the mask finalized,unhide the first video track with the arm video clip. Next, adjust the position and size of the tattoo and make it fit the arm clip.

Step5 Go to do colour correction on the tattoo image so that it matches better with the arm skin. Double-click on the tattoo on the timeline and go to the setting window on the top left. Find the “Color” Section and open the “Tone” menu. First, you have to adjust the brightness first.

Step6 Afterwards, open the “White Balance”menu and adjust the temperature. Indeed, you can also adjust the contrast and saturation if needed. Once done, click “OK.” The tattoo should look like it blends into the arm video.

Part 3: Make the tattoo disappear
Step1 Move the play head to where you want the tattoo fades, and adjust the length of the tattoo picture there.

Step2 Next, find the “Evaporate 1” from the “Transitions” window. Drag and drop it to the end of the tattoo clip.

Step3 Adjust the length if needed. Finally, Let’s playback and see how it looks!

Summary
That’s how to make a tattoo disappear in Filmora 11. With Filmora 11, you can get as many new tattoos as possible. Indeed, you can follow all the steps above carefully to get the perfect result.
Free Download For Win 7 or later(64-bit)
Free Download For macOS 10.14 or later
Free Download For macOS 10.14 or later
Making Slow Motion Videos in Premiere Pro: A Review on The Best Method
Slow-motion videos can give your videos more depth, drama, and emotion. Your viewers will find your films more interesting if you use slow-motion effects. It can bring attention to a shot, produce an artistic effect, or relive a memorable scene. Slow-motion video has been used for decades to add dramatic effects to films and videos.
If you’re interested in how to do slow-mo in Premiere Pro, this article is your ultimate solution. Read the article and add artistic to dramatic slow-mo to your videos. You will eventually come to know how to do slow mo on Premiere Pro with ease.
Slow Motion Video Maker Slow your video’s speed with better control of your keyframes to create unique cinematic effects!
Make A Slow Motion Video Make A Slow Motion Video More Features
Part 1: What Are Some Potential Real-Life Use Cases of Having Slow Motion Videos?
Slow-motion movies can be utilized to record and examine events in greater depth. Before delving into how to make a slow-motion video in Premiere Pro, learn its use cases. Thus, below are a few applications of the slow motion in real life:
- Medical Research and Imaging: Slow-motion videos are used in medical research and education. They thoroughly examine surgical methods and practices. This promotes medical practice improvement and student’s better comprehension of concepts.
- Cinematography and Filmmaking: Filmmakers use slow motion to add dramatic and creative effects. It can arouse feelings, highlight particular movements, or produce a dreamlike mood. In commercials, these videos create sequences of the message you want to convey.
- Wildlife Observation: Slow-motion recordings can be very useful in animal research. They can be used to watch and record animal activity more closely. It gives researchers a better knowledge of the animal’s habits.
- Sports analysis: Slow-motion effect can analyze an athlete’s movement mechanics and give reviews. Coaches and athletes pinpoint areas where their technique needs to be improved.
- Product Testing and Quality Control: Video effects also prove useful in industries. It allows engineers to inspect high-speed operations and identify any flaws or malfunctions.
- **Crash Test Analysis:**Analyzing slow-motion video is essential for examining vehicle crash tests. It aids in improving car designs and evaluating the performance of safety systems.
Part 2: Performing Slow Mo in Adobe Premiere Pro: Using A Good Option
Adobe Premiere Pro’s editing interface makes its reputation high in the market. It is known as the industry standard tool because of its unparalleled features. Content developers and filmmakers can arrange and edit video files on it. It can also improve audio and image quality with its extensive editing toolkit.
Premier Pro offers many more functions than basic video editing. It offers some features that can change your content creation journey. Following are some of its basic features that you should know before learning Premiere Pro how to slow motion:
- Auto Reframe: This feature keeps the object of the image in the frame no matter which frame you choose. You can easily auto-frame a single clip or go for the entire video.
- Text-Based Editing: Text-based editing can give you more control over the transcript. It can deal with multi-channel audio recordings and remove gaps with a single click.
- Color Settings: Color settings allow you to adjust colors quickly and easily. It can check the result by combining multiple color selections into a single tab.
- Audio Auto-Tagging: This feature classifies audio files as either dialogue, music, or ambiance. It then provides access to the most useful tools for producing high-quality audio.
This guide will tell you how to make a slow-motion video on Premiere Pro. Follow the steps below to decrease the speed of your video across Adobe Premiere Pro:
Step 1
Import your video into the timeline and right-click on the icon you see with the video file on the timeline. From here, go to “Time-Remapping” and click on “Speed.” You will know the function has been activated when you see the white line on your timeline.

Step 2
Expand the timeline to see the ramping line. Now click on the ramping line by using the “Ctrl + click” command. You can also add keyframes by going to the toolkit on the left side of the screen and selecting the “Add Keyframe” button. Another option is the time remapping speed settings from the top and activating the keyframe.

Step 3
Move the timeline cursor to the right side and add another keyframe there. Now, double-click on the first keyframe and drag it to the right side just a bit. After that, drag the speed ramping line downwards to create a ramp. To change the length of keyframes more precisely, go to “Effects Control” from the top and manage its length.

Part 3: Quick Alternative: Wondershare Filmora and Slow-Motion Clips
You might have gotten the answer to “how to make slow-motion video in Premiere Pro” until now. But another question comes into mind: “How to make slow-mo videos easily ?” Using Adobe Premiere Pro can be tricky for starters, so they look for alternative tools. Filmora is a great option if you struggle with using Adobe Premier Pro.
The tool is easy to use and can process heavy videos, keeping its quality intact. With its AI features, the edits that used to take hours can now be done within minutes. The tool has amazing options for all kinds of media editing.
Step-by-Step Guide to Perform Slow Motion in Filmora Using Different Methods
Remarkable features of Filmora do not end here. If you want to know more about Filmora, you should download it, but first, learn how to add slow motion in reels. In this read, follow the guide below:
Free Download For Win 7 or later(64-bit)
Free Download For macOS 10.14 or later
Method 1: Using Uniform Speed
Using this method, you can slow down your video smartly with the help of AI. Some options in uniform speed will help you to automate the process while ensuring the quality of the content. Look at the steps below to add slo-mo to your video like a pro:
Step 1Import Media to the Timeline and Explore Uniform Speed
Install Filmora 13 on your device and open it to access “New Project” from the main interface. When you enter the editing window, import your file into the media panel.

Step 2Adjust the Speed and Other Use Advanced Options
Later, drag that file to the timeline and right-click on it to get a list. Select the “Uniform Speed” option from that list and head to the editing panel opened to the right. Under the “Speed,” there will be a slider. You have to move it to the left for slow-motion video. While adjusting speed with that slider, track video duration from the “Duration” section. Below that option, you can toggle the “Reverse Speed” option if required.

Otherwise, check the “Ripple Edit” and “Maintain Pitch” option for good. Now, extend the “AI Interpolation” menu and choose “Optical Flow.” It will let AI automatically adjust the video speed in slow motion with high quality.

Method 2: Using Speed Ramping
If you want to bring a professional look to Slow-motion videos, use Speed Ramping. It will ensure a smooth change in video speed when it increases or decreases. To add this refined touch to videos, look at the given steps:
Step 1Access the Speed Ramping Option in 2 Ways
Tap the “Speed Ramping” next to the “Uniform Speed” in the right-side panel. Optionally, you can right-click on your videos in the timeline. There, you will find the “Speed Ramping” option below the “Uniform Speed” option in the list.

Step 2Speed Ramping Your Videos and Get Render Preview
In the Speed Ramping Section, you will get 6 templates. Pick one or hit the “Customize” to design your own speed ramping in videos. Later, move to the toolbar of the timeline section and choose “Render Preview” next to the “Copilot” icon. It will bring a smooth playback of your speed ramping in videos.

Matchless Features of Wondershare Filmora
Wondershare Filmora offers a creative editing experience. It has a number of important features, some of which are discussed below:
AI Copilot: You can speed up your video editing process with the AI Copilot Editing function. It offers AI assistance anytime you need it and gives a quick response. This feature directs you towards the required feature with a button. To get assistance, users just have to prompt questions in natural language.
AI Text-Based Editing: You can edit your video content with the AI Text-Based Editing tool. This feature can transcribe your spoken words into editable text. Afterward, you can edit the text based on your preferences, and the changes in the video will be added. Moreover, Filmora allows you to save the generated text to reuse it in articles and blogs later.
AI Copywriting: If you are stuck creating a unique script, get help from AI copywriting in Filmora. It gives several video ideas to generate YouTube video titles and descriptions. This creative personal assistant will bring content aligning with your video goals. The generated script can be used to make videos from Filmora’s text-to-video feature.
Conclusion
Regular videos do not always generate the same level of response from viewers. Slow-mo videos can make a video more entertaining and improve the film’s narrative. It’s good to use when you want to draw attention to the most significant shot in a video. This article shows how to make slow motion in Premiere Pro and offers an amazing alternative. Thus, try to use Filmora and improve your editing experiences with ease.
Make A Slow Motion Video Make A Slow Motion Video More Features
Part 1: What Are Some Potential Real-Life Use Cases of Having Slow Motion Videos?
Slow-motion movies can be utilized to record and examine events in greater depth. Before delving into how to make a slow-motion video in Premiere Pro, learn its use cases. Thus, below are a few applications of the slow motion in real life:
- Medical Research and Imaging: Slow-motion videos are used in medical research and education. They thoroughly examine surgical methods and practices. This promotes medical practice improvement and student’s better comprehension of concepts.
- Cinematography and Filmmaking: Filmmakers use slow motion to add dramatic and creative effects. It can arouse feelings, highlight particular movements, or produce a dreamlike mood. In commercials, these videos create sequences of the message you want to convey.
- Wildlife Observation: Slow-motion recordings can be very useful in animal research. They can be used to watch and record animal activity more closely. It gives researchers a better knowledge of the animal’s habits.
- Sports analysis: Slow-motion effect can analyze an athlete’s movement mechanics and give reviews. Coaches and athletes pinpoint areas where their technique needs to be improved.
- Product Testing and Quality Control: Video effects also prove useful in industries. It allows engineers to inspect high-speed operations and identify any flaws or malfunctions.
- **Crash Test Analysis:**Analyzing slow-motion video is essential for examining vehicle crash tests. It aids in improving car designs and evaluating the performance of safety systems.
Part 2: Performing Slow Mo in Adobe Premiere Pro: Using A Good Option
Adobe Premiere Pro’s editing interface makes its reputation high in the market. It is known as the industry standard tool because of its unparalleled features. Content developers and filmmakers can arrange and edit video files on it. It can also improve audio and image quality with its extensive editing toolkit.
Premier Pro offers many more functions than basic video editing. It offers some features that can change your content creation journey. Following are some of its basic features that you should know before learning Premiere Pro how to slow motion:
- Auto Reframe: This feature keeps the object of the image in the frame no matter which frame you choose. You can easily auto-frame a single clip or go for the entire video.
- Text-Based Editing: Text-based editing can give you more control over the transcript. It can deal with multi-channel audio recordings and remove gaps with a single click.
- Color Settings: Color settings allow you to adjust colors quickly and easily. It can check the result by combining multiple color selections into a single tab.
- Audio Auto-Tagging: This feature classifies audio files as either dialogue, music, or ambiance. It then provides access to the most useful tools for producing high-quality audio.
This guide will tell you how to make a slow-motion video on Premiere Pro. Follow the steps below to decrease the speed of your video across Adobe Premiere Pro:
Step 1
Import your video into the timeline and right-click on the icon you see with the video file on the timeline. From here, go to “Time-Remapping” and click on “Speed.” You will know the function has been activated when you see the white line on your timeline.
Step 2
Expand the timeline to see the ramping line. Now click on the ramping line by using the “Ctrl + click” command. You can also add keyframes by going to the toolkit on the left side of the screen and selecting the “Add Keyframe” button. Another option is the time remapping speed settings from the top and activating the keyframe.
Step 3
Move the timeline cursor to the right side and add another keyframe there. Now, double-click on the first keyframe and drag it to the right side just a bit. After that, drag the speed ramping line downwards to create a ramp. To change the length of keyframes more precisely, go to “Effects Control” from the top and manage its length.
Part 3: Quick Alternative: Wondershare Filmora and Slow-Motion Clips
You might have gotten the answer to “how to make slow-motion video in Premiere Pro” until now. But another question comes into mind: “How to make slow-mo videos easily ?” Using Adobe Premiere Pro can be tricky for starters, so they look for alternative tools. Filmora is a great option if you struggle with using Adobe Premier Pro.
The tool is easy to use and can process heavy videos, keeping its quality intact. With its AI features, the edits that used to take hours can now be done within minutes. The tool has amazing options for all kinds of media editing.
Step-by-Step Guide to Perform Slow Motion in Filmora Using Different Methods
Remarkable features of Filmora do not end here. If you want to know more about Filmora, you should download it, but first, learn how to add slow motion in reels. In this read, follow the guide below:
Free Download For Win 7 or later(64-bit)
Free Download For macOS 10.14 or later
Method 1: Using Uniform Speed
Using this method, you can slow down your video smartly with the help of AI. Some options in uniform speed will help you to automate the process while ensuring the quality of the content. Look at the steps below to add slo-mo to your video like a pro:
Step 1Import Media to the Timeline and Explore Uniform Speed
Install Filmora 13 on your device and open it to access “New Project” from the main interface. When you enter the editing window, import your file into the media panel.
Step 2Adjust the Speed and Other Use Advanced Options
Later, drag that file to the timeline and right-click on it to get a list. Select the “Uniform Speed” option from that list and head to the editing panel opened to the right. Under the “Speed,” there will be a slider. You have to move it to the left for slow-motion video. While adjusting speed with that slider, track video duration from the “Duration” section. Below that option, you can toggle the “Reverse Speed” option if required.
Otherwise, check the “Ripple Edit” and “Maintain Pitch” option for good. Now, extend the “AI Interpolation” menu and choose “Optical Flow.” It will let AI automatically adjust the video speed in slow motion with high quality.
Method 2: Using Speed Ramping
If you want to bring a professional look to Slow-motion videos, use Speed Ramping. It will ensure a smooth change in video speed when it increases or decreases. To add this refined touch to videos, look at the given steps:
Step 1Access the Speed Ramping Option in 2 Ways
Tap the “Speed Ramping” next to the “Uniform Speed” in the right-side panel. Optionally, you can right-click on your videos in the timeline. There, you will find the “Speed Ramping” option below the “Uniform Speed” option in the list.
Step 2Speed Ramping Your Videos and Get Render Preview
In the Speed Ramping Section, you will get 6 templates. Pick one or hit the “Customize” to design your own speed ramping in videos. Later, move to the toolbar of the timeline section and choose “Render Preview” next to the “Copilot” icon. It will bring a smooth playback of your speed ramping in videos.
Matchless Features of Wondershare Filmora
Wondershare Filmora offers a creative editing experience. It has a number of important features, some of which are discussed below:
AI Copilot: You can speed up your video editing process with the AI Copilot Editing function. It offers AI assistance anytime you need it and gives a quick response. This feature directs you towards the required feature with a button. To get assistance, users just have to prompt questions in natural language.
AI Text-Based Editing: You can edit your video content with the AI Text-Based Editing tool. This feature can transcribe your spoken words into editable text. Afterward, you can edit the text based on your preferences, and the changes in the video will be added. Moreover, Filmora allows you to save the generated text to reuse it in articles and blogs later.
AI Copywriting: If you are stuck creating a unique script, get help from AI copywriting in Filmora. It gives several video ideas to generate YouTube video titles and descriptions. This creative personal assistant will bring content aligning with your video goals. The generated script can be used to make videos from Filmora’s text-to-video feature.
Conclusion
Regular videos do not always generate the same level of response from viewers. Slow-mo videos can make a video more entertaining and improve the film’s narrative. It’s good to use when you want to draw attention to the most significant shot in a video. This article shows how to make slow motion in Premiere Pro and offers an amazing alternative. Thus, try to use Filmora and improve your editing experiences with ease.
Also read:
- Updated In 2024, If You Are a Marketer Who Want to Create Facebook Ads to Boost Your Business, You Are Coming to the Right Place. Well Share You some Useful Tips to Start Your First FB Ads Campaign
- New How to Make Falling Text Effect in Filmora, In 2024
- Updated 5 Tried-And-True Ways to GIF Making for 2024
- Updated Top List of Best VHS Video Effect Makers
- Updated 2024 Approved A Vlog Has Many Elements to Answer. While Setting up Ideas for It, There Are Several Things Into Which You Should Look. This Article Presents a Picture of How a Vlog Video Is Made Perfectly
- Are You Looking for the Best Way to Add Subtitles to Your Video? The Top SRT File Creators Can Help You Do That for 2024
- Updated 2 Methods to Crop Video in VLC for 2024
- Are You Looking to Remove Echo in Premiere Pro? Please Look at Our Guide for Advice and Suggestions on Getting the Best Possible Outcomes for 2024
- New What Is MOV Format and How to Edit MOV Video Better?
- How to Change the Speed of Video in DaVinci Resolve for 2024
- New How to Use LUTS to Color Grade on Your iPhone for 2024
- Updated In 2024, The Complete Guide to GIF for Discord Profile
- New Adobe Photoshop Is the Best Photo Editor to Add Green Screen Effect to Your Photo While Wondershare Filmora Is the Best Video Editor to Add Green Screen Effect to Your Video
- Updated Do You Want to Use a Video Editor for Your iOS Device? This Article Introduces LumaFusion, a Perfect Multi-Track Video Editor Designed to Cater to Your Needs
- Updated Do You Intend to Include Motion Blur on Your Video Using Video Star? This Article Explains How to Use Motion Blur on Video Star with Exquisite Control
- New How to Do Masking in After Effects Alternative Provided
- Updated Recording Slow-Motion Videos Is Not More Difficult Using a Smartphone. Learn Everything From How to Record Slow-Motion Video and Edit a Video to Slow Down It for 2024
- Do You Want to Be Aware of VHSs Meaning? There Is Nothing to Be Worried About because We Will Guide You in This Article
- New In 2024, How to Merge Videos in HandBrake? Expectation Vs. Reality
- New 2024 Approved What Is a Memoji and How to Make a Memoji? You Can Learn Top 8 Memoji Makers for PC, Android, or iOS, and the Steps to Make a Memoji
- New 2024 Approved How to Create a Light Sweep (Shine) Effect
- How Can You Get VHS Filter and Glitch Filter to Your Images or Videos, In 2024
- New How to Create Liquid Water Reveal Intro for 2024
- Something That You Should Know About MP4 Video Format for 2024
- Final Cut Pro - How to Download and Install It?
- Updated In 2024, How to Make A Fantastic Café Vlog
- In 2024, How Did AI Video Games Act More Human Than Human?
- New In 2024, How to Make a Video with My Phone
- In 2024, 8 Frame Rate Video Converters You Must Try
- New In 2024, Find a Solution for Effortless Sky Replacement Photoshop in This Comprehensive Guide. Also, Use the Easiest Video Editing Tool to Make Your Media Stunning
- Figuring Out Proper Ways to Play a Video in Slow Motion on iPhone for 2024
- This Article Will Show You How to Make a Tattoo Disappear on Your Body Magically for 2024
- Updated How to Make Video Slideshow with Your Travel Photos for 2024
- How To Check if Your Oppo Is Unlocked
- FRP Hijacker by Hagard Download and Bypass your Samsung Galaxy F34 5G FRP Locks
- New Learn How to Make Architecture Animation for 2024
- In 2024, How to Mirror Your Honor X7b Screen to PC with Chromecast | Dr.fone
- In 2024, 3 Things You Must Know about Fake Snapchat Location On Motorola Moto G73 5G | Dr.fone
- Sim Unlock Vivo Y28 5G Phones without Code 2 Ways to Remove Android Sim Lock
- 3 Ways for Android Pokemon Go Spoofing On Honor Magic 6 Lite | Dr.fone
- Remove X Fold 2 unlock screen
- Full Guide to Unlock Your ZTE Nubia Z60 Ultra
- How to Share/Fake Location on WhatsApp for Samsung Galaxy S23 Ultra | Dr.fone
- Stuck at Android System Recovery Of Oppo A2 ? Fix It Easily | Dr.fone
- List of Pokémon Go Joysticks On Realme 12 Pro+ 5G | Dr.fone
- In 2024, Unova Stone Pokémon Go Evolution List and How Catch Them For Vivo G2 | Dr.fone
- Title: Updated Do You Like Clouds or Sky and Want to Use Them as a Video Background? Explore This Article to Learn About the Sky Change Video in Filmora for 2024
- Author: Morgan
- Created at : 2024-04-24 01:09:03
- Updated at : 2024-04-25 01:09:03
- Link: https://ai-video-editing.techidaily.com/updated-do-you-like-clouds-or-sky-and-want-to-use-them-as-a-video-background-explore-this-article-to-learn-about-the-sky-change-video-in-filmora-for-2024/
- License: This work is licensed under CC BY-NC-SA 4.0.
