
:max_bytes(150000):strip_icc():format(webp)/001_how-to-transfer-data-from-ps4-to-ps5-3392eb400af3482fabad65cabb2a1a91.jpg)
Updated Do You Want to Know Where You Can Find Online Video Editing Courses? In This Article, We Have Provided 15 Options for Your Various Demand. We Also Recommend a Great Video Editor to Help You Start Your Video Editing Journey with Ease
Do You Want to Know Where You Can Find Online Video Editing Courses? In This Article, We Have Provided 15 Options for Your Various Demand. We Also Recommend a Great Video Editor to Help You Start Your Video Editing Journey with Ease
The best way to learn video editing is from people who are experts in the field. Plus, getting a certification is a nice bonus that can more easily land you a great job when you’re done. With that said, we’re offering a comprehensive list of the best video editing courses with certification — ones you’ll be glad to complete.
Read below to find out all about these courses. What they teach, who they are from, and how they will benefit you.
List of the Best Online Video Editing Courses With Certification
You’re about to see a list of video editing courses categorized into four groups. Each caters to specific needs that will help you make a better decision.
Courses With Certification for Popular Video Editor Platforms
| Course Name | Vendor |
|---|---|
| Premiere Pro CC for Beginners: Video Editing in Premiere | Udemy |
| Video Editing in DaVinci Resolve 18/17 | Udemy |
| DaVinci Resolve Fundamentals | LinkedIn Learning |
| PowerDirector 15 – Video Editing for PC Users | Udemy |
| Mastering Final Cut Pro | Coursera |
| Learning Final Cut Pro X – Video Editing Mastery | Udemy |
Video Editing Tutorials - Mastering The Basics
| Course Name | Vendor |
|---|---|
| Video Production Essentials | Fiverr Learn |
| Free Video Editing Courses and Tutorials | Udemy |
| Introduction to Video Editing | |
| Video editing fundamentals | |
| Online Video Editing Classes | Skillshare |
| The Complete Video Production Bootcamp | Udemy |
Video Editing Courses With Certification For Mobile Users
| Course Name | Vendor |
|---|---|
| Smartphone Video For Beginners – iPhone Video Editing Course | Udemy |
Cinematic Level Video Editing Courses
| Course Name | Vendor |
|---|---|
| VIDEO EDITING. Techniques loved by pro broadcast filmmakers | Udemy |
| The History of Film and Video Editing |
What You Will Learn From Each Course
Each video editing course online with certification offers something unique. Below, you can see a detailed comparison between all of them. As a result, you’ll know exactly which course to choose and which video editing tool to start with.
1. Courses With Certification for Popular Video Editor Platforms
First, let’s break down all the courses in this group. You’ll learn about its ratings, duration, contents, and more.
Premiere Pro CC for Beginners: Video Editing in Premiere

Initially, this course dives into the basics of video editing. Then, you get into more advanced topics that will help you distinguish yourself from the complete beginners.
- Vendor: Udemy
- Cost: $19.99
- Duration: 24.5 hours
- Rating: 4.7 / 5
- Level: Beginner-Advanced
Key topics inside this course:
- How to export your videos for High-Definition Playback and 4K
- Video color correction
- How to apply visual effects
- Design clean and modern titles for any video
- The editing process of a video from beginning to end
- Load the perfect settings at the start of each project
- Color grading
- Edit green screen footage
- How to add motion to titles, photos, and videos
At the end of the course, you’ll have the skills necessary to edit an entire video from start to finish. Additionally, you’ll know your way around Adobe Premiere Pro. Most of the topics taught inside will be enough to help you land a video editing job or edit your videos professionally.
Video Editing in DaVinci Resolve 18/17

With this video editing course, you will master editing in DaVinci Resolve. It includes beginner lessons, as well as a few advanced editing techniques. Over 30.000 students have currently completed it.
- Vendor: Udemy
- Cost: $84.99
- Duration: 11.5 hours
- Rating: 4.6 / 5
- Level: Beginner-Advanced
Key topics inside this course:
- How to add effects to videos in DaVinci Resolve
- Color Grading with multiple tools
- Master different types of Nodes
- Complete tests doing various projects
- Cut page quick and easy video editing
- Adding motion graphics
- Effective color-correcting methods
- Using Color Wheels, Power windows, Scopes, Curves, Qualifiers, and more
This course aims to teach you how to use DaVinci Resolve. After you’ve mastered the platform, the mentor shows you various tips and tricks to edit videos more professionally using this tool.
PowerDirector 15 - Video Editing for PC Users

Power Director 15 is a great app to learn video editing if you’re a Windows user. This course covers everything necessary for you to know your way around this program quickly.
- Vendor: Udemy
- Cost: $13.99
- Duration: 4h
- Rating: 4.5 / 5
- Level: Beginner
Key topics inside this course:
- How to export high-quality videos for any device or platform
- How to use every feature in Power Director, including the newest ones
- Add professional titles and animated graphics to any video
- Master using blend modes, masks, and the action camera center
The knowledge in this video editing course online with certification will allow you to edit videos the way you envision. You will have the ability to create anything you want, and deliver exceptional results.

Mastering Final Cut Pro is an online video editing course with certification that grants you the knowledge to use this tool. In addition, you and over 30.000 other students get to learn from Apple Certified trainers.
- Vendor: Coursera
- Cost: $49
- Duration: 40h
- Rating: 4.5 / 5
- Level: Beginner
Key topics inside this course:
- The best ways to import and export project files with Final Cut Pro
- How to apply effects and modern transitions
- Creating a project and editing a video from start to finish
- Change the timing of clips
This is the perfect course if you’ve never used Final Cut Pro. It’s beginner-friendly and takes you through every step of using the platform, from creating a project to editing it and finally exporting a high-quality video.
Learning Final Cut Pro X – Video Editing Mastery

This is a video editing course for anyone using Mavericks OS. It’s designed to take full advantage of this Operating System alongside the Final Cut Pro X platform.
- Vendor: Udemy
- Cost: $14.99
- Duration: 6h 30min
- Rating: 4.7 / 5
- Level: Beginner
Key topics inside this course:
- Mastering the user interface and choosing your preferences
- Learning helpful shortcuts to speed up your workflow
- Best and quickest methods to import media
- How to organize your clips
- Using the timeline
- Working with effects, keyframes, compounds clips, and audio clips
- How to use generators and white screens
- The best export settings and other tips
If you’ve ever wanted to master Final Cut Pro X, there’s no better place to go. This course is designed to start on a beginner-friendly level. But, it moves to more advanced lessons later down the line.
2. Video Editing Tutorials - Mastering The Basics
The following video editing courses include lessons mainly on the basics of video editing. They won’t focus on any specific platform or tool. Instead, you’ll be learning the most important principles of creating a high-quality and modern video.

A fairly simple course designed to teach you the process of creating and editing a video from scratch. This is one of the best video editing courses online, featuring several professional mentors.
- Vendor: Fiverr Learn
- Cost: $24
- Duration: 6h 38min
- Rating: 4.8 / 5
- Level: Beginner to Intermediate
Key topics inside this course:
- What equipment to use for professional video editing
- How to shoot high-quality video with your smartphone
- Professional video and audio recording techniques
- Exporting settings for high-quality online viewing
- Fundamentals of using a DSLR or Mirrorless camera
- Create high-converting CTAs for your videos
The course will help you understand crucial facts about many different types of videos that are in demand today. You’ll learn how to use and navigate video editing tools to create anything you can imagine. The mentors even offer a few tips for growing your own Youtube channel.
Free Video Editing Courses and Tutorials

This pick is slightly different. Here, you can see a list of a few of the best video editing courses that are completely free. They are still taught by experts and offer plenty of useful knowledge, especially for beginners.
- Vendor: Udemy
- Cost: Free
- Duration: Unknown
- Rating: Varies
- Level: Beginner to Intermediate
Key topics inside this course:
- Beginner lessons on editing all types of videos
- How to record professional video content
- Beginner lessons for many different video editing platforms
- 3D Video Composition
- Understand how to use Premiere Pro
- Video editing on your smartphone
- Camtasia 9 Mastery Course
- How to create social media marketing videos
This is a list of many different video editing courses that are free on Udemy. Millions of members have enrolled and are learning for free. Best of all, it’s a great way to dive into video editing for free. Then, you can choose some of the paid ones for more advanced lessons.

This course gives you a LinkedIn Learning Certificate and the knowledge to edit your first-ever video. There are 6 different lesson categories that you will enjoy going through. Each one focuses on another skill or principle.
- Vendor: LinkedIn Learning
- Cost: $34.99
- Duration: 2h 53min
- Rating: 4.7 / 5
- Level: Beginner
Key topics inside this course:
- The importance of storytelling in video editing
- Structures and transitions
- Timing and pacing
- Shot composition
- Comparing different editing applications
- Track-based editing vs. storyline-based editing
- Organizing your files
- How to edit a short documentary
- Audio editing lessons
- Post-production processes
This course offers a video editing certification that proves you’re well accustomed to the basic principles of this skill. You will know your way around different editing platforms. You will learn how to edit modern videos. And you will know exactly where to focus your efforts for improving yourself and your skills next.

This course features essential video editing foundations in one exciting program. It’s a short course designed to introduce you to video editing. To be more precise, you will mainly learn about the post-production process of video editing.
- Vendor: LinkedIn Learning
- Cost: LinkedIn Learning Membership Only ($39.99)
- Duration: 37min
- Rating: 4.7 / 5
- Level: Beginner
Key topics inside this course:
- Trimming or fine-tuning the product
- Audio editing process
- How to add images to your videos
- Video effects tutorials
- Color correction
- How to use text to your advantage
- Export and delivery settings
This certificate will prove that you know what it takes to edit a video professionally. It tells us that you are familiar with all the different parts that come together to create a video worth watching.

This is a list of video editing courses by some of the most popular video editors on the planet. You’ll learn from huge names such as Marques Brownies, Nathaniel Drew, Jordy Vandeput, and many more. So, pick your favorite, and start learning.
- Vendor: Skillshare
- Cost: Depends
- Duration: 37min
- Rating: Varies
- Level: From Beginner to Pro
Key topics inside this course:
- How to create mind-blowing Youtube videos
- Adobe Premiere Pro for Beginners
- How to document your life
- Final Cut Pro X - Beginner to Youtuber
- Introduction to Filmmaking
- Mastering TikTok videos
- iPhone Filmmaking
- Advanced training for all video editing apps
There are courses for all skill levels here. You can start as a complete beginner and finish as a master who knows how to create a worthwhile video. Or, you can choose one that improves your current skills.
The Complete Video Production Bootcamp

A nine-hour course on everything video editing related. To be more precise, you will dive into video production tutorials, cinematography, editing & distribution, and more. Companies like Nasdaq, Box, NetApp, and more offer this course to their employees.
- Vendor: Udemy
- Cost: $19.99
- Duration: 9h
- Rating: 4.5 / 5
- Level: Beginner
Key topics inside this course:
- Video storytelling
- How to record better audio
- Tips for posting videos online
- Discover the best equipment to use
- How to set up the perfect lighting
- How to get more engagement on your videos
- Create professional videos with any equipment
Over 160.000 students have benefited from the contents of this course. It dives into both beginner and advanced video editing lessons. So even if you don’t have any experience in this, you will still easily understand everything taught inside.
3. Video Editing Courses With Certification For Mobile Users
The courses you will see in this list are exclusively for mobile users. You can still make great videos on your mobile device if you don’t have a computer. All of the knowledge you need for this is below.
Smartphone Video For Beginners – iPhone Video Editing Course

Dive into five hours of content teaching you how to create unbelievable videos on your phone. You’ll be surprised by how it’s possible to create such professional videos on a smartphone.
- Vendor: Udemy
- Cost: $99.99
- Duration: 5h
- Rating: 4.3 / 5
- Level: Beginner
Key topics inside this course:
- Must-have gear for editing on a smartphone (Affordable options)
- How to set up your phone’s camera for optimal results
- Must-have free apps for professional smartphone video editing
- Using gimbals, action cams, and drones with your phone
- Video storytelling on a smartphone
- Phone resolutions, frame rates, ProRes, color space, and more
- How to make Cinematic shots, hit the right angles, and similar
This outstanding course will give you a certification proving you’re one of the rare video editors who can create wonders from their phones. From now on, you can’t use the excuse that you don’t have an excellent PC to create amazing videos.
4. Cinematic Level Video Editing Courses
The final category will introduce you to video editing courses online with certification for cinematic-level skills. Completing these courses will prove you are a master video editor who knows no bounds.
VIDEO EDITING. Techniques loved by pro broadcast filmmakers

Your teacher for this course will be Andrew St.Pierre White, an award-winning video editing veteran. He will teach you tips and tricks used by professionals to this day. Timeless advice that will take your career to the next level.
- Vendor: Udemy
- Cost: $84.99
- Duration: 3h 30min
- Rating: 4.5 / 5
- Level: Advanced to Pro
Key topics inside this course:
- How to entertain and inspire any audience
- Understand the balance between good editing and good content
- Amazing techniques used in TV production
- Turn great editing into great results
- Turn amateur videos into professional productions
- Most common mistakes filmmakers make
Once you know the basics of video editing, this course will take your skills to the next level. You will learn how the big players make professional videos that capture massive audiences. Plus, your mentor will show you how to work with big names in this industry.
The History of Film and Video Editing

Never underestimate how much history can teach you. Completing this course will teach you more about video editing than many pro filmmakers. Find out how video editing has progressed through the last century.
- Vendor: LinkedIn Learning
- Cost: $34.99
- Duration: 2h 10min
- Rating: 4.8 / 5
- Level: Everyone
Key topics inside this course:
- Early days of photography and film
- Continuity editing and montage theory
- When sound was born
- Establishing the standards for editing
- Evolution of editing techniques
- Technology
- The rise of the digital era
By learning the history of video editing, you will be more aware. You will realize what people love to see and detect patterns. These patterns will guide you toward becoming a professional video editor.
Make Your Video Editing Journey Easier
Now that we’re done with learning, it’s time to start doing. You already have enough fantastic courses to learn everything necessary to edit videos professionally. But now, how do you use your skills and achieve the easiest and quickest results?
Your best option is to use the Filmora video editor.
What Is Filmora and Filmora?
It’s as powerful as Adobe Premiere Pro but more straightforward to navigate. In addition, Filmora lets you command an arsenal of unique tools necessary for creating modern videos.
Free Download For Win 7 or later(64-bit)
Free Download For macOS 10.14 or later
Anyone on both Windows and Mac can use Filmora. In addition, if you’re a mobile user, you can download Filmora and enjoy the same benefits.
Aside from its easy-to-use interface, Filmora is packed with editing resources that will never leave you wondering how or what to do next. Of course, you can watch the free Youtube tutorials to master the platform entirely.
For example, we have prepared you with a video tutorial below to start your video editing journey with no delay!
Lastly, you can easily export in any format necessary for your project. It doesn’t get easier than this.
Conclusion
The video editing certification online courses you see here are more than enough to prepare you. You will learn everything it takes to edit any video. Use this information wisely and take advantage of this beautiful opportunity to become one of the best video editors.
Video Editing Tutorials - Mastering The Basics
| Course Name | Vendor |
|---|---|
| Video Production Essentials | Fiverr Learn |
| Free Video Editing Courses and Tutorials | Udemy |
| Introduction to Video Editing | |
| Video editing fundamentals | |
| Online Video Editing Classes | Skillshare |
| The Complete Video Production Bootcamp | Udemy |
Video Editing Courses With Certification For Mobile Users
| Course Name | Vendor |
|---|---|
| Smartphone Video For Beginners – iPhone Video Editing Course | Udemy |
Cinematic Level Video Editing Courses
| Course Name | Vendor |
|---|---|
| VIDEO EDITING. Techniques loved by pro broadcast filmmakers | Udemy |
| The History of Film and Video Editing |
What You Will Learn From Each Course
Each video editing course online with certification offers something unique. Below, you can see a detailed comparison between all of them. As a result, you’ll know exactly which course to choose and which video editing tool to start with.
1. Courses With Certification for Popular Video Editor Platforms
First, let’s break down all the courses in this group. You’ll learn about its ratings, duration, contents, and more.
Premiere Pro CC for Beginners: Video Editing in Premiere
Initially, this course dives into the basics of video editing. Then, you get into more advanced topics that will help you distinguish yourself from the complete beginners.
- Vendor: Udemy
- Cost: $19.99
- Duration: 24.5 hours
- Rating: 4.7 / 5
- Level: Beginner-Advanced
Key topics inside this course:
- How to export your videos for High-Definition Playback and 4K
- Video color correction
- How to apply visual effects
- Design clean and modern titles for any video
- The editing process of a video from beginning to end
- Load the perfect settings at the start of each project
- Color grading
- Edit green screen footage
- How to add motion to titles, photos, and videos
At the end of the course, you’ll have the skills necessary to edit an entire video from start to finish. Additionally, you’ll know your way around Adobe Premiere Pro. Most of the topics taught inside will be enough to help you land a video editing job or edit your videos professionally.
Video Editing in DaVinci Resolve 18/17
With this video editing course, you will master editing in DaVinci Resolve. It includes beginner lessons, as well as a few advanced editing techniques. Over 30.000 students have currently completed it.
- Vendor: Udemy
- Cost: $84.99
- Duration: 11.5 hours
- Rating: 4.6 / 5
- Level: Beginner-Advanced
Key topics inside this course:
- How to add effects to videos in DaVinci Resolve
- Color Grading with multiple tools
- Master different types of Nodes
- Complete tests doing various projects
- Cut page quick and easy video editing
- Adding motion graphics
- Effective color-correcting methods
- Using Color Wheels, Power windows, Scopes, Curves, Qualifiers, and more
This course aims to teach you how to use DaVinci Resolve. After you’ve mastered the platform, the mentor shows you various tips and tricks to edit videos more professionally using this tool.
PowerDirector 15 - Video Editing for PC Users
Power Director 15 is a great app to learn video editing if you’re a Windows user. This course covers everything necessary for you to know your way around this program quickly.
- Vendor: Udemy
- Cost: $13.99
- Duration: 4h
- Rating: 4.5 / 5
- Level: Beginner
Key topics inside this course:
- How to export high-quality videos for any device or platform
- How to use every feature in Power Director, including the newest ones
- Add professional titles and animated graphics to any video
- Master using blend modes, masks, and the action camera center
The knowledge in this video editing course online with certification will allow you to edit videos the way you envision. You will have the ability to create anything you want, and deliver exceptional results.
Mastering Final Cut Pro is an online video editing course with certification that grants you the knowledge to use this tool. In addition, you and over 30.000 other students get to learn from Apple Certified trainers.
- Vendor: Coursera
- Cost: $49
- Duration: 40h
- Rating: 4.5 / 5
- Level: Beginner
Key topics inside this course:
- The best ways to import and export project files with Final Cut Pro
- How to apply effects and modern transitions
- Creating a project and editing a video from start to finish
- Change the timing of clips
This is the perfect course if you’ve never used Final Cut Pro. It’s beginner-friendly and takes you through every step of using the platform, from creating a project to editing it and finally exporting a high-quality video.
Learning Final Cut Pro X – Video Editing Mastery
This is a video editing course for anyone using Mavericks OS. It’s designed to take full advantage of this Operating System alongside the Final Cut Pro X platform.
- Vendor: Udemy
- Cost: $14.99
- Duration: 6h 30min
- Rating: 4.7 / 5
- Level: Beginner
Key topics inside this course:
- Mastering the user interface and choosing your preferences
- Learning helpful shortcuts to speed up your workflow
- Best and quickest methods to import media
- How to organize your clips
- Using the timeline
- Working with effects, keyframes, compounds clips, and audio clips
- How to use generators and white screens
- The best export settings and other tips
If you’ve ever wanted to master Final Cut Pro X, there’s no better place to go. This course is designed to start on a beginner-friendly level. But, it moves to more advanced lessons later down the line.
2. Video Editing Tutorials - Mastering The Basics
The following video editing courses include lessons mainly on the basics of video editing. They won’t focus on any specific platform or tool. Instead, you’ll be learning the most important principles of creating a high-quality and modern video.
A fairly simple course designed to teach you the process of creating and editing a video from scratch. This is one of the best video editing courses online, featuring several professional mentors.
- Vendor: Fiverr Learn
- Cost: $24
- Duration: 6h 38min
- Rating: 4.8 / 5
- Level: Beginner to Intermediate
Key topics inside this course:
- What equipment to use for professional video editing
- How to shoot high-quality video with your smartphone
- Professional video and audio recording techniques
- Exporting settings for high-quality online viewing
- Fundamentals of using a DSLR or Mirrorless camera
- Create high-converting CTAs for your videos
The course will help you understand crucial facts about many different types of videos that are in demand today. You’ll learn how to use and navigate video editing tools to create anything you can imagine. The mentors even offer a few tips for growing your own Youtube channel.
Free Video Editing Courses and Tutorials
This pick is slightly different. Here, you can see a list of a few of the best video editing courses that are completely free. They are still taught by experts and offer plenty of useful knowledge, especially for beginners.
- Vendor: Udemy
- Cost: Free
- Duration: Unknown
- Rating: Varies
- Level: Beginner to Intermediate
Key topics inside this course:
- Beginner lessons on editing all types of videos
- How to record professional video content
- Beginner lessons for many different video editing platforms
- 3D Video Composition
- Understand how to use Premiere Pro
- Video editing on your smartphone
- Camtasia 9 Mastery Course
- How to create social media marketing videos
This is a list of many different video editing courses that are free on Udemy. Millions of members have enrolled and are learning for free. Best of all, it’s a great way to dive into video editing for free. Then, you can choose some of the paid ones for more advanced lessons.
This course gives you a LinkedIn Learning Certificate and the knowledge to edit your first-ever video. There are 6 different lesson categories that you will enjoy going through. Each one focuses on another skill or principle.
- Vendor: LinkedIn Learning
- Cost: $34.99
- Duration: 2h 53min
- Rating: 4.7 / 5
- Level: Beginner
Key topics inside this course:
- The importance of storytelling in video editing
- Structures and transitions
- Timing and pacing
- Shot composition
- Comparing different editing applications
- Track-based editing vs. storyline-based editing
- Organizing your files
- How to edit a short documentary
- Audio editing lessons
- Post-production processes
This course offers a video editing certification that proves you’re well accustomed to the basic principles of this skill. You will know your way around different editing platforms. You will learn how to edit modern videos. And you will know exactly where to focus your efforts for improving yourself and your skills next.
This course features essential video editing foundations in one exciting program. It’s a short course designed to introduce you to video editing. To be more precise, you will mainly learn about the post-production process of video editing.
- Vendor: LinkedIn Learning
- Cost: LinkedIn Learning Membership Only ($39.99)
- Duration: 37min
- Rating: 4.7 / 5
- Level: Beginner
Key topics inside this course:
- Trimming or fine-tuning the product
- Audio editing process
- How to add images to your videos
- Video effects tutorials
- Color correction
- How to use text to your advantage
- Export and delivery settings
This certificate will prove that you know what it takes to edit a video professionally. It tells us that you are familiar with all the different parts that come together to create a video worth watching.
This is a list of video editing courses by some of the most popular video editors on the planet. You’ll learn from huge names such as Marques Brownies, Nathaniel Drew, Jordy Vandeput, and many more. So, pick your favorite, and start learning.
- Vendor: Skillshare
- Cost: Depends
- Duration: 37min
- Rating: Varies
- Level: From Beginner to Pro
Key topics inside this course:
- How to create mind-blowing Youtube videos
- Adobe Premiere Pro for Beginners
- How to document your life
- Final Cut Pro X - Beginner to Youtuber
- Introduction to Filmmaking
- Mastering TikTok videos
- iPhone Filmmaking
- Advanced training for all video editing apps
There are courses for all skill levels here. You can start as a complete beginner and finish as a master who knows how to create a worthwhile video. Or, you can choose one that improves your current skills.
The Complete Video Production Bootcamp
A nine-hour course on everything video editing related. To be more precise, you will dive into video production tutorials, cinematography, editing & distribution, and more. Companies like Nasdaq, Box, NetApp, and more offer this course to their employees.
- Vendor: Udemy
- Cost: $19.99
- Duration: 9h
- Rating: 4.5 / 5
- Level: Beginner
Key topics inside this course:
- Video storytelling
- How to record better audio
- Tips for posting videos online
- Discover the best equipment to use
- How to set up the perfect lighting
- How to get more engagement on your videos
- Create professional videos with any equipment
Over 160.000 students have benefited from the contents of this course. It dives into both beginner and advanced video editing lessons. So even if you don’t have any experience in this, you will still easily understand everything taught inside.
3. Video Editing Courses With Certification For Mobile Users
The courses you will see in this list are exclusively for mobile users. You can still make great videos on your mobile device if you don’t have a computer. All of the knowledge you need for this is below.
Smartphone Video For Beginners – iPhone Video Editing Course
Dive into five hours of content teaching you how to create unbelievable videos on your phone. You’ll be surprised by how it’s possible to create such professional videos on a smartphone.
- Vendor: Udemy
- Cost: $99.99
- Duration: 5h
- Rating: 4.3 / 5
- Level: Beginner
Key topics inside this course:
- Must-have gear for editing on a smartphone (Affordable options)
- How to set up your phone’s camera for optimal results
- Must-have free apps for professional smartphone video editing
- Using gimbals, action cams, and drones with your phone
- Video storytelling on a smartphone
- Phone resolutions, frame rates, ProRes, color space, and more
- How to make Cinematic shots, hit the right angles, and similar
This outstanding course will give you a certification proving you’re one of the rare video editors who can create wonders from their phones. From now on, you can’t use the excuse that you don’t have an excellent PC to create amazing videos.
4. Cinematic Level Video Editing Courses
The final category will introduce you to video editing courses online with certification for cinematic-level skills. Completing these courses will prove you are a master video editor who knows no bounds.
VIDEO EDITING. Techniques loved by pro broadcast filmmakers
Your teacher for this course will be Andrew St.Pierre White, an award-winning video editing veteran. He will teach you tips and tricks used by professionals to this day. Timeless advice that will take your career to the next level.
- Vendor: Udemy
- Cost: $84.99
- Duration: 3h 30min
- Rating: 4.5 / 5
- Level: Advanced to Pro
Key topics inside this course:
- How to entertain and inspire any audience
- Understand the balance between good editing and good content
- Amazing techniques used in TV production
- Turn great editing into great results
- Turn amateur videos into professional productions
- Most common mistakes filmmakers make
Once you know the basics of video editing, this course will take your skills to the next level. You will learn how the big players make professional videos that capture massive audiences. Plus, your mentor will show you how to work with big names in this industry.
The History of Film and Video Editing
Never underestimate how much history can teach you. Completing this course will teach you more about video editing than many pro filmmakers. Find out how video editing has progressed through the last century.
- Vendor: LinkedIn Learning
- Cost: $34.99
- Duration: 2h 10min
- Rating: 4.8 / 5
- Level: Everyone
Key topics inside this course:
- Early days of photography and film
- Continuity editing and montage theory
- When sound was born
- Establishing the standards for editing
- Evolution of editing techniques
- Technology
- The rise of the digital era
By learning the history of video editing, you will be more aware. You will realize what people love to see and detect patterns. These patterns will guide you toward becoming a professional video editor.
Make Your Video Editing Journey Easier
Now that we’re done with learning, it’s time to start doing. You already have enough fantastic courses to learn everything necessary to edit videos professionally. But now, how do you use your skills and achieve the easiest and quickest results?
Your best option is to use the Filmora video editor.
What Is Filmora and Filmora?
It’s as powerful as Adobe Premiere Pro but more straightforward to navigate. In addition, Filmora lets you command an arsenal of unique tools necessary for creating modern videos.
Free Download For Win 7 or later(64-bit)
Free Download For macOS 10.14 or later
Anyone on both Windows and Mac can use Filmora. In addition, if you’re a mobile user, you can download Filmora and enjoy the same benefits.
Aside from its easy-to-use interface, Filmora is packed with editing resources that will never leave you wondering how or what to do next. Of course, you can watch the free Youtube tutorials to master the platform entirely.
For example, we have prepared you with a video tutorial below to start your video editing journey with no delay!
Lastly, you can easily export in any format necessary for your project. It doesn’t get easier than this.
Conclusion
The video editing certification online courses you see here are more than enough to prepare you. You will learn everything it takes to edit any video. Use this information wisely and take advantage of this beautiful opportunity to become one of the best video editors.
Step by Step to Rotate Videos Using OBS
Obs is video editing software that is used to create and edit videos. It is a powerful tool that can be used to do a variety of things, such as add text, music, and special effects to videos. It also allows you to cut and trim videos, and to merge them with other videos. Additionally, obs allows you to live stream your videos, which can be a great way to share them with others. Overall, obs is a powerful tool that can be used to create and edit amazing videos.
The main interface of Obs Studio is relatively simple, and it is easy to use. The top of the screen contains a number of icons that allow you to access different features of the software, such as the video editor, the live streamer, and the settings. The bottom of the screen contains a timeline, which allows you to easily edit your videos. The timeline also contains a number of tools that allow you to trim your videos, add text and music, and more. Overall, the main interface of Obs Studio is simple and easy to use.
There are many benefits to using obs, including:
- It is free to download and use.
- It is a powerful tool that can be used to create and edit amazing videos.
- It allows you to live stream your videos, which can be a great way to share them with others.
- There are many online communities where you can find help and advice from other users.
- Overall, obs is a great program that can be used to create and edit amazing videos.
There are many reasons why you might want to rotate a video. For example, if you captured a video of a person or object upside down, you would want to rotate it so that it is right-side up. Or, if you recorded a video in landscape mode but want to view it in portrait mode, you would need to rotate the video.
Luckily, there are a number of ways to rotate videos on different devices. In this article, we will show you how to rotate videos using Obs.
Step-by-step on how to rotate videos using Obs
How to rotate using the rotate tool in the video editor?
First, to use the rotate tool in the Edit tab, simply follow the steps below:
Step 1: Open the video editor and drag your video to the editor.

Step 2: Click on the Edit > Transform > Rotate 90 degrees CW tool to rotate it 90 degrees clockwise.

Step 3: Click on the Edit > Transform > Rotate 90 degrees CW tool to rotate it 90 degrees counterclockwise.

Step 4: Click on the Edit > Transform > Rotate 180 degrees tool to rotate it 180 degrees.

How to rotate using the advance controls in obs?
Second, to use the filters in obs, follow the steps below:
Step 1: Open obs and click on the Edit tab > Transform > Edit transform. You can also click Ctrl + E.

Step 2: Go to the Rotation section.

Step 3: Select the rotation degree you want to use.

Step 4: Click on enter on your keyboard to rotate it.
How to rotate using right-clicking on the video?
Third, to use right-clicking on the video, follow the following:
Step 1: Open obs and right-click on the clip that you want to rotate.
Step 2: Click on the Transform > Rotate 90 degrees CW tool to rotate it 90 degrees clockwise.

Step 3: Click on the Transform > Rotate 90 degrees CW tool to rotate it 90 degrees counterclockwise.

Step 4: Click on the Edit > Transform > Rotate 180 degrees tool to rotate it 180 degrees.

An Easy Way to Rotate Videos Using Filmora
To conclude, there are a number of ways to rotate videos on different devices. In this article, we have shown you how to rotate videos using Obs. Meanwhile, we have another suggestion which is using Filmora Video Editor to rotate videos. Filmora is a Wondershare product that helps you to rotate videos without quality loss. With its easy-to-use interface, you can rotate videos with just a few clicks. If you are interested in it, please feel free to check the guide below:
For Win 7 or later (64-bit)
For macOS 10.14 or later
Step-by-step on how to rotate videos using Filmora
How to rotate videos using Filmora?
First, to rotate videos using Filmora, follow the steps below:
Step 1: Import the video you want to rotate into Filmora.

Step 2: Click on the “Edit” button in the toolbar.

Step 3: Go to Transform > Rotate.

Step 4: Select the rotation angle you want to use.

Step 5: Click on the ‘Ok’ to rotate it.

Second, if you want to rotate a video and flip it, follow the steps below:
Click on the flip option that you want to use, either upside down or sideways, vertically or horizontally.

Click on ‘Ok’ to apply the rotation and the flip.
Third, if you want to rotate a video by a specific number of degrees, follow the steps below:
To conclude, Filmora provides a number of ways for you to rotate your videos as well as using Obs. If you are looking for an easy way to rotate your videos without quality loss, then Filmora is the best option for you.
Step 2: Click on the Edit > Transform > Rotate 90 degrees CW tool to rotate it 90 degrees clockwise.
Step 3: Click on the Edit > Transform > Rotate 90 degrees CW tool to rotate it 90 degrees counterclockwise.
Step 4: Click on the Edit > Transform > Rotate 180 degrees tool to rotate it 180 degrees.
How to rotate using the advance controls in obs?
Second, to use the filters in obs, follow the steps below:
Step 1: Open obs and click on the Edit tab > Transform > Edit transform. You can also click Ctrl + E.
Step 2: Go to the Rotation section.
Step 3: Select the rotation degree you want to use.
Step 4: Click on enter on your keyboard to rotate it.
How to rotate using right-clicking on the video?
Third, to use right-clicking on the video, follow the following:
Step 1: Open obs and right-click on the clip that you want to rotate.
Step 2: Click on the Transform > Rotate 90 degrees CW tool to rotate it 90 degrees clockwise.
Step 3: Click on the Transform > Rotate 90 degrees CW tool to rotate it 90 degrees counterclockwise.
Step 4: Click on the Edit > Transform > Rotate 180 degrees tool to rotate it 180 degrees.
An Easy Way to Rotate Videos Using Filmora
To conclude, there are a number of ways to rotate videos on different devices. In this article, we have shown you how to rotate videos using Obs. Meanwhile, we have another suggestion which is using Filmora Video Editor to rotate videos. Filmora is a Wondershare product that helps you to rotate videos without quality loss. With its easy-to-use interface, you can rotate videos with just a few clicks. If you are interested in it, please feel free to check the guide below:
For Win 7 or later (64-bit)
For macOS 10.14 or later
Step-by-step on how to rotate videos using Filmora
How to rotate videos using Filmora?
First, to rotate videos using Filmora, follow the steps below:
Step 1: Import the video you want to rotate into Filmora.
Step 2: Click on the “Edit” button in the toolbar.
Step 3: Go to Transform > Rotate.
Step 4: Select the rotation angle you want to use.
Step 5: Click on the ‘Ok’ to rotate it.
Second, if you want to rotate a video and flip it, follow the steps below:
Click on the flip option that you want to use, either upside down or sideways, vertically or horizontally.
Click on ‘Ok’ to apply the rotation and the flip.
Third, if you want to rotate a video by a specific number of degrees, follow the steps below:
To conclude, Filmora provides a number of ways for you to rotate your videos as well as using Obs. If you are looking for an easy way to rotate your videos without quality loss, then Filmora is the best option for you.
Windows Movie Maker Review
Are you considering creating impressive movies from your video clips? Then you need to install this famous Windows movie maker tool to fulfill your job. This is expert video editing Microsoft software that you may use for free. This video editing tool by Windows has received massive recognition due to its simplicity. Also, it makes every task easy and quick, like combining video clips to form digital movies, including various effects, background music, transitions, and titles.
So, Windows Movie Maker is undoubtedly the ideal software for this job. Moreover, video editors using this app experience several attributes in their organization to finally emerge with the perfect videos, like audio options, animations, transitions overlays, and timeline narration. It has user-friendly features, which you’ll enjoy experimenting with. This software also has XML code allowing its end users to modify live effects and transitions or even prepare very new ones.
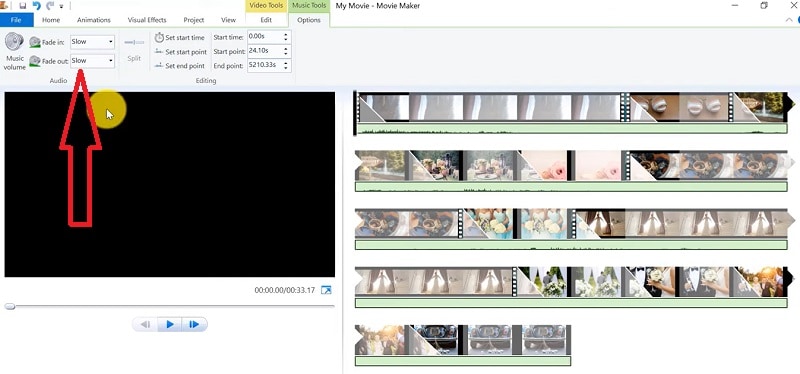
This brilliant tool can even do primary track editing, including fade-out and fade-in effects in your final audio tracks. Windows movie maker even allows you to post your final project effortlessly on various video sites and social media platforms. Here’s a complete guide:
1. Download and Install Windows Movie Maker
Windows movie maker was previously recognized in Windows 7 as Windows Live Movie Maker. So to experience the features of this software, first, you need to download and install this app which is available free of charge. The steps are as follows.
- Firstly, download the setup file of Windows Live Essentials.
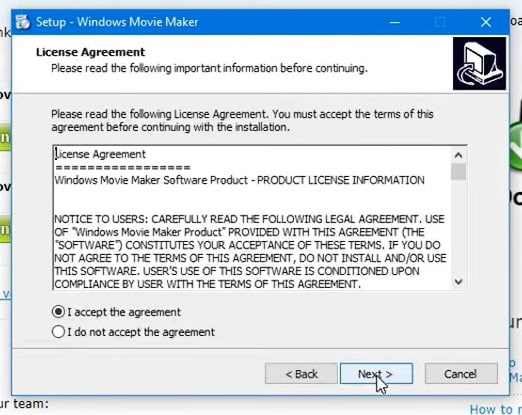
- You’ve to double-click on this setup file called windows-movie-maker.exe. Then tap on ‘Yes’ to permit the setup package to function.
- You’ll now be redirected to the installation window of Windows Essential. Next, you’ll see two options towards the web page’s top, and you’ll have to select the option ‘Install all of Windows Essentials (recommended)’ to continue with the installation process.
Windows Essentials comprise Microsoft OneDrive, Outlook Connector Pack, Movie Maker, Writer, Mail, Photo Gallery, and Messenger.
- Locate ‘View Details’ towards the left end of the page and tap on it. A progress and percentage bar will pop out along with the details regarding the program you’re installing.
- You need to wait a while to install Windows Movie Maker Software. Pause until the program completes its installation. After you find that the program title changes to another program such as Mail, you may proceed again.
- Now click on the Windows icon and then the ‘Start’ menu on the bottom left of your computer screen.
- Type and Search for ‘Windows Movie Maker, and you’ll find the newly downloaded app on the screen.
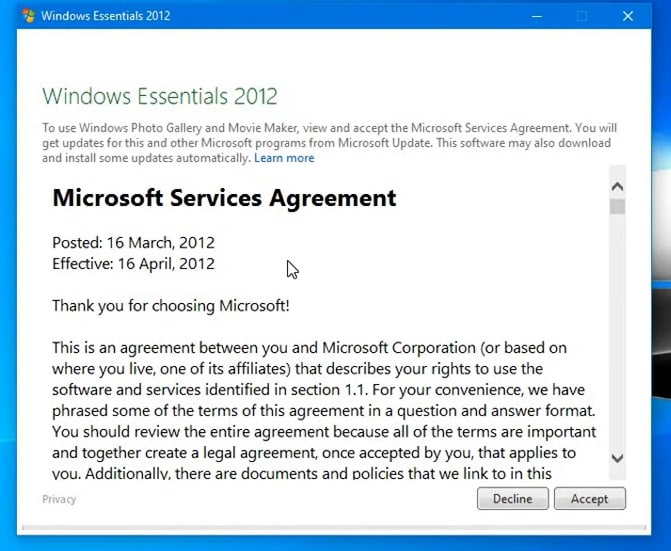
- Click on the icon with film reel, which is the Movie Maker app, and you’ll locate it above the Start menu. Next, you’ll be redirected to the terms of use of Windows Essentials for this Window to begin.
- Find the ‘Accept ‘ button towards the screen’s right-end corner and tap on it. Windows Movie Maker will now open.
- Next, tap on ‘Close’ when prompted with an error message from the installation windows.
You may now Enjoy Windows Movie Maker Live and begin making movies and videos using this software.
2. Interface
The user interface of Winona Movie Maker has three essential areas: the timeline and the storyboard, the panes and the toolbar, and the menu bar. This area covers…
- Timeline and storyboard: It offers a timeline and storyboard usage details for working with the current project clips.
- Panes: It offers details regarding Collections pane usage for viewing all your collections. Furthermore, it offers information regarding the Movie Task pane for all general tasks during movie making or project editing.
- Toolbar and Menubar: Here, you’ll get details regarding toolbar and menu commands usage for different tasks in this software.
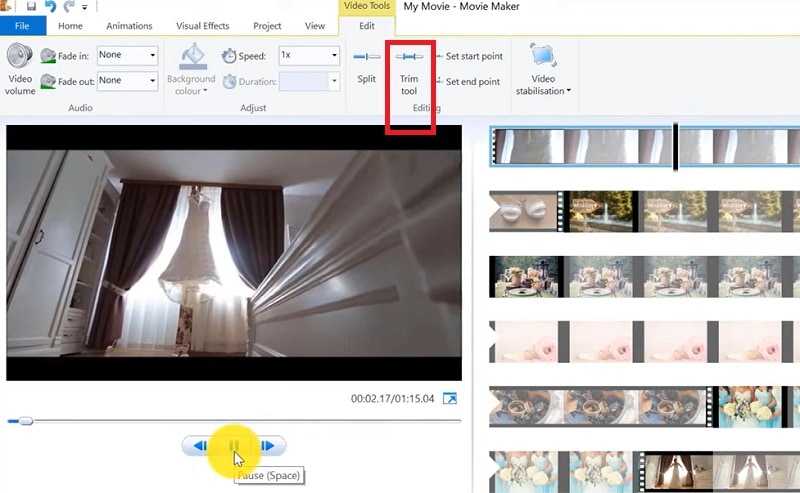
3. Basic Editing
Adding clips to your timeline is the most straightforward method for creating digital movies using Movie Maker. Thereby, picking any one AutoMovie Themes out of those seven choices from default, sepia, black and white, pan and zoom, fade, cinematic, and contemporary.
You can enjoy the following choices for editing all your video clips:
- Creating clips: You may create new clips from different video clips after you’re done with capturing and importing in the Windows Movie Maker. You may create clips in the software anytime, according to your convenience.
- Trimming any clip: You may hide any clip part you don’t wish to keep in the project. For instance, you may trim the clip’s end or beginning. Also, trimming doesn’t erase the details provided in their source material.
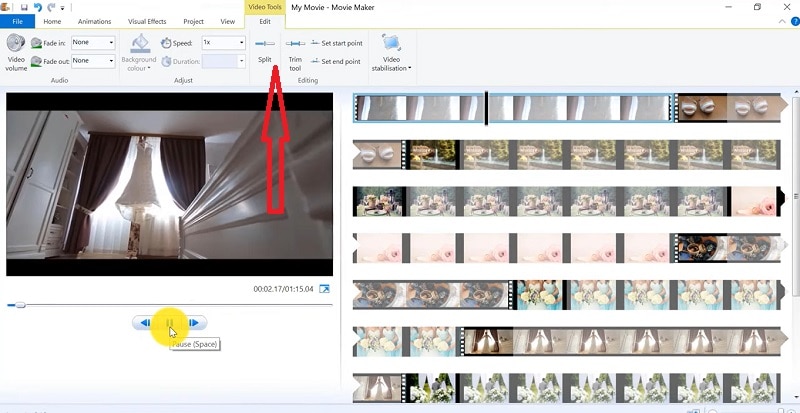
- Splitting Clips: Movie Maker allows you to split any video into two parts which can be helpful when you wish to add a video transition picture between the clips.
- Combining clips: Movie Maker allows you to merge two or multiple contiguous clips. Contiguous indicates that you need to record these clips together so that the beginning and end times are the same as the following video clip.
4. Add Video Effects
Video effects’ ascertain how any title, picture, or video clip displays in the final movie or project. Video effects permit you to include various effects in the movie and are added for the total time that the title, picture, or video clip displays.
Furthermore, you may add various other effects, which you’ll find in the folder of video effects in their Collections pane. You may maintain video effects when moving, copying, cutting, or splitting a picture or video clip.
5. Audio Editing
Windows Movie Maker permits you to operate various audios in several ways. A few specific audio-related jobs you may execute in Windows Movie Live Maker comprise the following:
- Audio levels adjustment: You can adjust your audio level so that you can easily control the audio playback and balance after you have the audio that comes up on Music/ Audio and Audio tracks in your timeline.
- Timeline narration: You may include a voice narration for the picture or video clips, which will appear on the timeline’s video track. There’ll be an automated synchronization of the audio narration with your video, where the narration shall elaborate on the movie event or action when you play it.
- Audio Clips Volume adjustment: You may adjust the audio volume for the video clip’s audio portion or the clips containing only audio. This permits you to control the audio clip’s volume such that you can hear it based on the sound level you’ve set for your audio clip.
- Adding audio effects: You may add various audio effects like mute, fade out and fade in.
6. Share Files
Are you done with video project editing, and now you wish to share it? Windows Movie Maker offers you various choices for sharing straight away from their app, comprising:
- YouTube
- Vimeo
So with this power, you may guarantee to share the video’s correct aspect ratio and size version to any planned platform. Nevertheless, you don’t require signing in to your Microsoft account for sharing to the preferred platform, which may act as a hurdle for all its users who do not have Microsoft Office accounts.
7. Pros and Cons
The software’s advantages are its automated preview, simple controls, and user-friendliness. Additionally, the following are some clear advantages and disadvantages of using Windows Movie Maker:
Pros
- This app is perfect for all novices and is an ideal introduction as it utilizes several pro editing systems’ general workflow components like assembling timelines and importing. Its interface has easy navigation and is exceptionally intuitive for most new beginners as well.
- Windows Live MovieMaker is a video editing Microsoft application that arrives standard with all Windows computers. It is amongst the most favorite editing apps obtainable and exact, as other programs are user-friendly and fun. This software comes free with Vista, XP, and Windows Me and has effortless usage. Moreover, you may download additional video plugins, plus it won’t give you any chance to complain regarding its free software.
- This app is straightforward to learn, and you won’t require any experience in film editing for using Windows Media Player. You’ll explore more than 130 effects with accessible Fantastic credits, titles, and transitions. Next to this, you may drag and then drop the clip at any place in the timeline.
- Windows Movie Maker is an ideal app for image slide shows and was developed to create photo and home movie slide shows. It presents excellent fun transitions and themes; you may add music easily. This app provides excellent variety, being a free editing application. Furthermore, it offers transitions and striking effects to function with.
- Windows Live Movie Maker is free of cost for all Microsoft Windows users and is basically for clients having zero to minimum experience editing audio and videos. Moreover, it has many special effects you may use while creating videos. Also, you may frag and then place any picture or video anywhere you wish to see it.
- You can choose from several themes, enhancing your film with tools like contemporary themes, fade effects, and sepia toning choices. You have to click once, and then the users can choose and apply from the multiple effects collection.
Cons
- Windows Movie Maker contains unlimited audio and video tracks, yet it provides just one accessible one at a time. Hence, if you wish to include some other audio or music track, you may prepare the video, thereby sending it to the ultimate file.
- It isn’t uninstallable using any remove or add control panel. Also, it is impossible to do video overlaying.
- This app requires much patience because it is prone to crashes. Moreover, you’ll require enough time and effort to do video reversing. It often becomes frustrating for all advanced editors to cut clips into small parts and then add them back. Hence, Windows Movie maker isn’t good for professional video editors.
- Windows Live MovieMaker can crash and freeze and is known to suffer frequent crashes. Hence, ensure saving often and avoid creating complex videos. Also, you cannot perform complex editing and can now prepare single audio and video track.
8. Windows Movie Maker Alternative Software
Wondershare Filmora Video Editor is the best alternative for Windows Movie Live Maker and is a highly favored and most effective software program. You can download it for free, and it is adaptable with Windows 7 OS or above. This app is user-friendly but powerful and allows you to split, merge, crop, and trip various video clips with essential built-in video editing attributes.
Free Download For Win 7 or later(64-bit)
Free Download For macOS 10.14 or later
Additionally, you may get a few advanced properties like video stabilization, color correction, and green screen in Filmora effortlessly. You may even explore several fashionable and modern video effects such as music, text, and intros for topics like games, Education, Travel, Vlogger, Beauty, etc. Here is the comparison between the two software:
Filmora and Windows Movie Maker comparison
| Basis | Windows Movie Maker | Wondershare Filmora |
|---|---|---|
| Pricing | Free/ inexpensive | Quote basedAnnual SubscriptionOne-time paymentMonthly Payment |
| Interface | Pleasing interface | Auto movie options |
| Effects | Several overlays and effects | Special effects choices and transition overlays |
| Integration | YouTubeFacebookVimeoEmail | TwitterInstagramFacebookVimeoYouTube |
Conclusion
You may use Windows Movie Maker Live for capturing videos and audio to the computer using various video sources, including Web Cameras and Video Cameras, thereby using the recorded data in your new movies. You may import still pictures, video, and audio into this application to use in the movies you’re making. Moreover, after you’ve finished with video and audio content editing in this app, which may involve adding effects, video transitions, and titles, you may finally save the ultimate movie and then share and watch it with your family and friends.
Do You Know How to Create AI Thumbnails for Videos? This Article Will Mention some of the Best Tools to Generate Attractive Thumbnails for Videos with AI
Thumbnails are a small visual preview of the images, videos, and documents to represent the linked content. They are mostly used in web pages, video playlists, and photo galleries to offer a visual preview to the users. Furthermore, professional YouTube content creators put extra effort into making captivating thumbnails for the videos. Such thumbnails help in click-baiting and gaining maximum viewership on YouTube.
In this article, we will highlight some competent AI thumbnail makers in detail. With such AI tools, you can create desired AI thumbnails in the best visual quality. Hence, consider this guide to use AI thumbnail creator for your YouTube videos without putting in manual effort.
AI Thumbnail Creator Generate template-driven video thumbnails with the help of AI in Filmora.
Free Download Free Download Learn More

Part 1: Some Other Top-Rated Solutions For Generating AI Thumbnails (Online)
Although Filmora provides a wonderful experience creating thumbnails, you must know about other online options. In this section, we will highlight some reliable online AI thumbnail generators with their key features.
1. VEED.io
VEED.io is an efficient tool that uses AI-powered algorithms to create thumbnails. These intelligent algorithms bring authentic results within a few minutes. To use this thumbnail generator AI, describe the thumbnail through the text field. You can write multiple words by adding commas to provide a comprehensive description. Once done, click the “Generate” button to craft the AI thumbnail.

Key Features
- io can function as a video editor to alter the settings of your video. Using this tool, you can add subtitles to your video in your preferred language.
- It includes a screen recorder to capture your screen activities in high resolution. Afterward, modify the screen recording with its editing tools.
- To generate vibrant images for your work projects, try its AI image generator. With this tool, describe your imagination through words to craft convincing images.
2. Simplified
Simplified is a famous platform offering unique features to generate videos and images. By navigating to its AI thumbnail maker, you can select the size of your thumbnail. Once done, explain your video content in the given box. Moreover, you can add personalized colors, text, and images without hassle. This online thumbnail maker AI also offers different options for thumbnail templates to generate attractive results.

Key Features
- This tool offers an AI Writer through which you can create outlines and scripts for the videos. Craft compelling captions for your social media posts with this feature.
- It contains a free graphic design tool on which you can create posts and illustrations in real time. Once done, publish the created design on this online platform.
- To make excellent presentations within a few minutes, try its AI presentation maker. Describe your topic in the text field, and the tool will use AI technology to create presentations.
3. Thumbnail.AI
Thumbnail.AI is a basic tool with a beginner-friendly interface. It’s a specialized tool in which you can make both manual and AI thumbnails. For AI generation, you have to add text and additional explanations in the given boxes. Moreover, it offers three thumbnail sizes: square, rectangle, and vertical. To craft more captivating thumbnails, insert images relevant to your content. Thus, this thumbnail generator is the best option for beginners.

Key Features
- To add images to your thumbnail, this tool provides three options. You can search, link, or upload images on this thumbnail AI tool easily.
- While creating thumbnails, the tool allows you to incorporate different elements. You can add icons, shapes, people, and social media banners.
- The customization options let you change the background color of the thumbnail. It also displays multiple options for font presets.
4. Hotpot.AI
If you want a comprehensive tool to create AI YouTube thumbnails, try Hotpot. It’s a free tool containing hundreds of YouTube thumbnail templates. After choosing the template, you can edit it without any skills. On the editing window, alter the width, height, and background color of the template. Furthermore, apply unique patterns and brand logos to the thumbnail for more effective results.

Key Features
- Are you annoyed by the unwanted people in the background of your videos? If yes, use the AI background remover of this tool to eradicate unnecessary objects from the background in an effective way.
- If you have a collection of vintage or old photos, colorize them with this online tool. With its colorizer feature, you can apply natural colors and shades to old images.
- This tool also includes an option to enhance the quality of facial images. It can remove blurriness, scratches, and tears from the uploaded images.
5. Canva
Canva is an all-one tool providing a robust interface to create designs, photos, and videos. By accessing its interface, you can find thousands of templates of multiple categories. You can filter the templates by choosing a specific style and theme. There are different themes for YouTube thumbnails on Canva, such as illustration, company, and business. Furthermore, select a thumbnail designed in your favorite color.

Key Features
- On this thumbnail AI generator, the thumbnail templates are 100% customizable. After editing them, you can download them quickly.
- Canva offers a PDF editor to edit and manage your PDF documents. Perform basic and advanced editing on your PDF files through this tool.
- Using this tool, make photo collages by combining desired photos. You can select attractive borders and styling boards to create collages.
6. Appy Pie
This AI thumbnail generator offers up to 47 thumbnail templates for your YouTube channel. You can preview and edit the thumbnail template within a few clicks. Furthermore, you can also design your own thumbnail by entering the text prompt. On its interface, it gives you the option to drag and drop the relevant images. By doing so, the tool will insert the relevant images on your thumbnail to generate the best results.

Key Features
- Do you want to create captivating avatars? You can try the AI avatar generator of this tool to create a personalized avatar by uploading your own photo.
- This tool consists of an AI text-to-video generator to craft stunning visuals. By using your textual prompt, generate a flawless video. Afterward, you can customize it from the given options.
- Using this online platform, add voiceovers to the videos with AI technology. You can write the narration in text and choose a preferred language. The tool will create a voiceover in natural voices.
7. AI YouTube Thumbnails
Do you want a professional and expert tool for creating AI thumbnails? This online tool is able to create 5 thumbnails for your video within five minutes. You can enter your video’s title or description in the text field as instructions. Afterward, the tool will email you with five attractive and relevant thumbnails for your video. Hence, it’s an easy-to-use tool to generate eye-catching thumbnails in minimal time.

Key Features
- Using advanced algorithms, this tool can convert the text into AI slides in an efficient manner. You can copy-paste the text, and the tool will generate an AI presentation with a single click.
- It offers advanced options to edit your Google slides to generate compelling results. You can remix layouts and content to create astonishing slides.
- This tool can help you collaborate with your team by sharing custom themes and styles. This will help you to stay on board while designing for your brand or company.
8. Snappa
Snappa is widely used to craft high-resolution images in desired colors and styles. Using this AI platform, create YouTube thumbnails with many templates. You can also start from scratch to display your creativity to the world. Moreover, upload a frame from your video to add a background in the thumbnail. It also offers thousands of royalty-free images, which you can utilize in the creation of thumbnails.

Key Features
- In this AI thumbnail creator, choose different dimensions to create images for social media posts. You can create Facebook, Instagram, LinkedIn, and other posts through this tool.
- To customize the template, add different elements from the options. You can add background, shapes, and effects to personalize the template.
- It provides multiple options to add graphics while designing a thumbnail. Add icons, vectors, photos, and uploads from your PC.
9. Picmaker
Picmaker offers the easiest way to create YouTube thumbnails in the desired manner. In this thumbnail AI maker, you can get perfectly sized YouTube thumbnails in the correct dimensions. You can use fancy colors and stylish text fonts in personalizing the thumbnail templates. Furthermore, download the thumbnail in many formats, such as SVG, PNG, PDF, and JPEG.

Key Features
- To create perfect online graphics, try its image resizer tool. Using this tool, you can resize the created digital designs according to the requirements of a particular platform.
- This AI thumbnail generator allows you to create customized brand kits. Create a brand kit by uploading fonts, colors, and logos effectively.
- By using its free photo editor, enhance the visual appearance of your images. You can apply captivating effects to the photos from the listed options. Also, blur the specific parts of the photo to add an aesthetic appeal.
Part 2: What Are The Benefits of Using Thumbnails in Generating Online Content?
Using thumbnails in creating online content can bring you many benefits. More specifically, if you want to generate thumbnails for YouTube videos, it can help you gain massive viewership. To know more about the benefits of thumbnail AI tools, read the below part:
1. Promotion of Brand
If you want to do your brand marketing, adding thumbnails in the videos can make an impact. You can add logos associated with your brand colors and fonts. This will help in gaining trust and credibility from your audience. Furthermore, it will display your professionalism by adding thumbnails relevant to your brand or company.
2. Enhanced Visual Representation
Thumbnails in a video help users browse and locate the content. With improved visibility of the content, users would be able to identify the content of your video. Moreover, it can increase your click-through rate (CTR), which can positively influence your viewership.
3. Offering Aesthetic Value
If you want to grow your YouTube channel or a website, YouTube thumbnail AI can help. They add an aesthetic appeal to your content, which can grasp the attention of viewers. Additionally, it will compel the viewers to explore your channel. As a result, build a strong community on your platform that can influence future progress.
4. Making Your Content Stands Out
In this competitive era, there are millions of channels and websites on online platforms. To gain a competitive edge among other channels, adding professional thumbnails is essential. Hence, make a prominent identity in the crowded online space through thumbnails.
5. Better SEO Ranking
Some online sites encourage the usage of thumbnails in the content. The reason is that thumbnails provide a preview to the users before clicking the video. In such a way, users can browse the content effortlessly. Hence, it can provide an improved SEO ranking that can highlight your content.
Part 3: Wondershare Filmora: The First-Base Solution To AI Thumbnail Making
If you want to experience a desktop-based solution for thumbnail AI creation, Wondershare Filmora is there for you. By launching this tool on Windows or macOS, you can execute professional video editing in its robust interface. Along with basic editing features like trimming and rearranging, utilize its AI tools.
It uses AI technology to provide the best performance in editing videos. It not only boosts your overall productivity but also brings perfection in editing videos. With the latest Filmora V13 launch, you can avail yourself of many game-changing features for video editing.
After this launch, you can modify your videos with the upgraded interface and intuitive controls. The new features include AI Copilot editing, AI copywriting, AI vocal remover, etc. Furthermore, it has also introduced an AI thumbnail maker to craft aesthetic thumbnails for the videos smartly.
Free Download For Win 7 or later(64-bit)
Free Download For macOS 10.14 or later
AI Thumbnail Creator Feature of Filmora
The AI Thumbnail feature of Filmora uses advanced algorithms to recognize the best shots from your video. By doing so, it can capture three thumbnails from your video that are linked to your video content. It also provides many customization options to meet your requirements for generating thumbnails. You can apply desired color schemes, fonts, and design elements.
Filmora also consists of up to 58 thumbnail templates to provide you with inspiring ideas. Moreover, it also supports advanced text and image editing to create flawless thumbnails. Thus, you must try the AI thumbnail generator of this tool for automated results.
Step-by-Step Guide To Use the AI Thumbnail Feature
Do you know how to use the AI thumbnail maker of Filmora? Here are the relevant instructions that can help you in this regard:
Step 1: Access the Thumbnail Generator
Launch Filmora on your PC and import the desired video. Once done with editing your video, hit the “Export” option. It will instantly open the Export window on your screen. From there, click the “Edit” option in the top left corner. This will open the thumbnail generator of Filmora on your screen.

Step 2: Determine the Desired Video Frame
After accessing the thumbnail generator, you can see the best frames of your video on the left side. These frames are gathered by AI technology to bring you the best frame options. While keeping in the “From Video” section, choose your preferred frame and then tap on “Edit.”

Step 3: Choose a Suitable Template
Now, the tool will display the thumbnail templates of different categories. Specify your category and then select the required thumbnail template from the listed options. Once done, tap on the “Save” button.

Step 4: Convert the Frame into a Thumbnail
Once you have saved the thumbnail template, the “Export” window will appear. From this window, click “Export” to convert the video frame into a thumbnail. After the conversion, check the AI-generated thumbnail by clicking the “Open Folder” option.

Conclusion
To make your YouTube videos look aesthetic, you should add relevant thumbnails. This will engage the viewers and help them to locate your content. Thus, being a content creator, you should know about some compelling thumbnail AI tools. By using AI-supported thumbnail creators, you can make attractive and high-quality thumbnails with little effort. Therefore, we highly recommend Filmora, which can create flawless thumbnails with up to 58 templates.
Free Download Free Download Learn More
Part 1: Some Other Top-Rated Solutions For Generating AI Thumbnails (Online)
Although Filmora provides a wonderful experience creating thumbnails, you must know about other online options. In this section, we will highlight some reliable online AI thumbnail generators with their key features.
1. VEED.io
VEED.io is an efficient tool that uses AI-powered algorithms to create thumbnails. These intelligent algorithms bring authentic results within a few minutes. To use this thumbnail generator AI, describe the thumbnail through the text field. You can write multiple words by adding commas to provide a comprehensive description. Once done, click the “Generate” button to craft the AI thumbnail.
Key Features
- io can function as a video editor to alter the settings of your video. Using this tool, you can add subtitles to your video in your preferred language.
- It includes a screen recorder to capture your screen activities in high resolution. Afterward, modify the screen recording with its editing tools.
- To generate vibrant images for your work projects, try its AI image generator. With this tool, describe your imagination through words to craft convincing images.
2. Simplified
Simplified is a famous platform offering unique features to generate videos and images. By navigating to its AI thumbnail maker, you can select the size of your thumbnail. Once done, explain your video content in the given box. Moreover, you can add personalized colors, text, and images without hassle. This online thumbnail maker AI also offers different options for thumbnail templates to generate attractive results.
Key Features
- This tool offers an AI Writer through which you can create outlines and scripts for the videos. Craft compelling captions for your social media posts with this feature.
- It contains a free graphic design tool on which you can create posts and illustrations in real time. Once done, publish the created design on this online platform.
- To make excellent presentations within a few minutes, try its AI presentation maker. Describe your topic in the text field, and the tool will use AI technology to create presentations.
3. Thumbnail.AI
Thumbnail.AI is a basic tool with a beginner-friendly interface. It’s a specialized tool in which you can make both manual and AI thumbnails. For AI generation, you have to add text and additional explanations in the given boxes. Moreover, it offers three thumbnail sizes: square, rectangle, and vertical. To craft more captivating thumbnails, insert images relevant to your content. Thus, this thumbnail generator is the best option for beginners.
Key Features
- To add images to your thumbnail, this tool provides three options. You can search, link, or upload images on this thumbnail AI tool easily.
- While creating thumbnails, the tool allows you to incorporate different elements. You can add icons, shapes, people, and social media banners.
- The customization options let you change the background color of the thumbnail. It also displays multiple options for font presets.
4. Hotpot.AI
If you want a comprehensive tool to create AI YouTube thumbnails, try Hotpot. It’s a free tool containing hundreds of YouTube thumbnail templates. After choosing the template, you can edit it without any skills. On the editing window, alter the width, height, and background color of the template. Furthermore, apply unique patterns and brand logos to the thumbnail for more effective results.
Key Features
- Are you annoyed by the unwanted people in the background of your videos? If yes, use the AI background remover of this tool to eradicate unnecessary objects from the background in an effective way.
- If you have a collection of vintage or old photos, colorize them with this online tool. With its colorizer feature, you can apply natural colors and shades to old images.
- This tool also includes an option to enhance the quality of facial images. It can remove blurriness, scratches, and tears from the uploaded images.
5. Canva
Canva is an all-one tool providing a robust interface to create designs, photos, and videos. By accessing its interface, you can find thousands of templates of multiple categories. You can filter the templates by choosing a specific style and theme. There are different themes for YouTube thumbnails on Canva, such as illustration, company, and business. Furthermore, select a thumbnail designed in your favorite color.
Key Features
- On this thumbnail AI generator, the thumbnail templates are 100% customizable. After editing them, you can download them quickly.
- Canva offers a PDF editor to edit and manage your PDF documents. Perform basic and advanced editing on your PDF files through this tool.
- Using this tool, make photo collages by combining desired photos. You can select attractive borders and styling boards to create collages.
6. Appy Pie
This AI thumbnail generator offers up to 47 thumbnail templates for your YouTube channel. You can preview and edit the thumbnail template within a few clicks. Furthermore, you can also design your own thumbnail by entering the text prompt. On its interface, it gives you the option to drag and drop the relevant images. By doing so, the tool will insert the relevant images on your thumbnail to generate the best results.
Key Features
- Do you want to create captivating avatars? You can try the AI avatar generator of this tool to create a personalized avatar by uploading your own photo.
- This tool consists of an AI text-to-video generator to craft stunning visuals. By using your textual prompt, generate a flawless video. Afterward, you can customize it from the given options.
- Using this online platform, add voiceovers to the videos with AI technology. You can write the narration in text and choose a preferred language. The tool will create a voiceover in natural voices.
7. AI YouTube Thumbnails
Do you want a professional and expert tool for creating AI thumbnails? This online tool is able to create 5 thumbnails for your video within five minutes. You can enter your video’s title or description in the text field as instructions. Afterward, the tool will email you with five attractive and relevant thumbnails for your video. Hence, it’s an easy-to-use tool to generate eye-catching thumbnails in minimal time.
Key Features
- Using advanced algorithms, this tool can convert the text into AI slides in an efficient manner. You can copy-paste the text, and the tool will generate an AI presentation with a single click.
- It offers advanced options to edit your Google slides to generate compelling results. You can remix layouts and content to create astonishing slides.
- This tool can help you collaborate with your team by sharing custom themes and styles. This will help you to stay on board while designing for your brand or company.
8. Snappa
Snappa is widely used to craft high-resolution images in desired colors and styles. Using this AI platform, create YouTube thumbnails with many templates. You can also start from scratch to display your creativity to the world. Moreover, upload a frame from your video to add a background in the thumbnail. It also offers thousands of royalty-free images, which you can utilize in the creation of thumbnails.
Key Features
- In this AI thumbnail creator, choose different dimensions to create images for social media posts. You can create Facebook, Instagram, LinkedIn, and other posts through this tool.
- To customize the template, add different elements from the options. You can add background, shapes, and effects to personalize the template.
- It provides multiple options to add graphics while designing a thumbnail. Add icons, vectors, photos, and uploads from your PC.
9. Picmaker
Picmaker offers the easiest way to create YouTube thumbnails in the desired manner. In this thumbnail AI maker, you can get perfectly sized YouTube thumbnails in the correct dimensions. You can use fancy colors and stylish text fonts in personalizing the thumbnail templates. Furthermore, download the thumbnail in many formats, such as SVG, PNG, PDF, and JPEG.
Key Features
- To create perfect online graphics, try its image resizer tool. Using this tool, you can resize the created digital designs according to the requirements of a particular platform.
- This AI thumbnail generator allows you to create customized brand kits. Create a brand kit by uploading fonts, colors, and logos effectively.
- By using its free photo editor, enhance the visual appearance of your images. You can apply captivating effects to the photos from the listed options. Also, blur the specific parts of the photo to add an aesthetic appeal.
Part 2: What Are The Benefits of Using Thumbnails in Generating Online Content?
Using thumbnails in creating online content can bring you many benefits. More specifically, if you want to generate thumbnails for YouTube videos, it can help you gain massive viewership. To know more about the benefits of thumbnail AI tools, read the below part:
1. Promotion of Brand
If you want to do your brand marketing, adding thumbnails in the videos can make an impact. You can add logos associated with your brand colors and fonts. This will help in gaining trust and credibility from your audience. Furthermore, it will display your professionalism by adding thumbnails relevant to your brand or company.
2. Enhanced Visual Representation
Thumbnails in a video help users browse and locate the content. With improved visibility of the content, users would be able to identify the content of your video. Moreover, it can increase your click-through rate (CTR), which can positively influence your viewership.
3. Offering Aesthetic Value
If you want to grow your YouTube channel or a website, YouTube thumbnail AI can help. They add an aesthetic appeal to your content, which can grasp the attention of viewers. Additionally, it will compel the viewers to explore your channel. As a result, build a strong community on your platform that can influence future progress.
4. Making Your Content Stands Out
In this competitive era, there are millions of channels and websites on online platforms. To gain a competitive edge among other channels, adding professional thumbnails is essential. Hence, make a prominent identity in the crowded online space through thumbnails.
5. Better SEO Ranking
Some online sites encourage the usage of thumbnails in the content. The reason is that thumbnails provide a preview to the users before clicking the video. In such a way, users can browse the content effortlessly. Hence, it can provide an improved SEO ranking that can highlight your content.
Part 3: Wondershare Filmora: The First-Base Solution To AI Thumbnail Making
If you want to experience a desktop-based solution for thumbnail AI creation, Wondershare Filmora is there for you. By launching this tool on Windows or macOS, you can execute professional video editing in its robust interface. Along with basic editing features like trimming and rearranging, utilize its AI tools.
It uses AI technology to provide the best performance in editing videos. It not only boosts your overall productivity but also brings perfection in editing videos. With the latest Filmora V13 launch, you can avail yourself of many game-changing features for video editing.
After this launch, you can modify your videos with the upgraded interface and intuitive controls. The new features include AI Copilot editing, AI copywriting, AI vocal remover, etc. Furthermore, it has also introduced an AI thumbnail maker to craft aesthetic thumbnails for the videos smartly.
Free Download For Win 7 or later(64-bit)
Free Download For macOS 10.14 or later
AI Thumbnail Creator Feature of Filmora
The AI Thumbnail feature of Filmora uses advanced algorithms to recognize the best shots from your video. By doing so, it can capture three thumbnails from your video that are linked to your video content. It also provides many customization options to meet your requirements for generating thumbnails. You can apply desired color schemes, fonts, and design elements.
Filmora also consists of up to 58 thumbnail templates to provide you with inspiring ideas. Moreover, it also supports advanced text and image editing to create flawless thumbnails. Thus, you must try the AI thumbnail generator of this tool for automated results.
Step-by-Step Guide To Use the AI Thumbnail Feature
Do you know how to use the AI thumbnail maker of Filmora? Here are the relevant instructions that can help you in this regard:
Step 1: Access the Thumbnail Generator
Launch Filmora on your PC and import the desired video. Once done with editing your video, hit the “Export” option. It will instantly open the Export window on your screen. From there, click the “Edit” option in the top left corner. This will open the thumbnail generator of Filmora on your screen.
Step 2: Determine the Desired Video Frame
After accessing the thumbnail generator, you can see the best frames of your video on the left side. These frames are gathered by AI technology to bring you the best frame options. While keeping in the “From Video” section, choose your preferred frame and then tap on “Edit.”
Step 3: Choose a Suitable Template
Now, the tool will display the thumbnail templates of different categories. Specify your category and then select the required thumbnail template from the listed options. Once done, tap on the “Save” button.
Step 4: Convert the Frame into a Thumbnail
Once you have saved the thumbnail template, the “Export” window will appear. From this window, click “Export” to convert the video frame into a thumbnail. After the conversion, check the AI-generated thumbnail by clicking the “Open Folder” option.
Conclusion
To make your YouTube videos look aesthetic, you should add relevant thumbnails. This will engage the viewers and help them to locate your content. Thus, being a content creator, you should know about some compelling thumbnail AI tools. By using AI-supported thumbnail creators, you can make attractive and high-quality thumbnails with little effort. Therefore, we highly recommend Filmora, which can create flawless thumbnails with up to 58 templates.
Also read:
- How to Make A Funny Vlog for TikTok for 2024
- Updated 2024 Approved Understanding More About CapCut Lenta Template and Slow-Motion Videos
- Updated How to Speed Up Pictures on TikTok Slideshow
- Updated In 2024, 10 Best Meme Text to Speech Tools Windows, Mac, Android, iPhone
- Updated 2024 Approved An Introduction to LUTs | Their Overview and Benefits
- New 12 Best Picks of Video Enhancer Software
- Are You Eager to Discover All About Dynamic Videos? You Are in the Right Place because This Article Provides Insight Into Dynamic Video Collages
- New How to Create Fantastic Glitch Effects with Filmora? Read This Guide to Find Out How to Apply Glitch Effects on Your Videos and Make Custom Glitch Effects
- New Wondering How to Stand Out with Your Adobe Slideshow Presentation? Follow the Given Discussion to Learn All About the Easiest Ways of Making a Slideshow at Adobe
- Perfecting the Art of Slowing Down Video on Instagram
- New 15 Must-Use Gifs Editors
- In 2024, Replacing Sky Background Using Adobe Photoshop A Comprehensive Guide
- In 2024, Top Best Free LUTs For Premiere Pro
- New How to Create Emoji on Mac That Take Less Than 10 Mins
- Updated How Does the YouTube AI Algorithm Work - AI EXPLAINED
- 12 Top Picks of Video Enhancer Software for 2024
- Updated 2024 Approved Best 8 Srt File Creators
- New How to Make an Instant Slideshow on Mac
- Updated How To Trim Video In Premiere Pro in Different Ways
- New 2024 Approved Looking for the Best Way to Create Stunning Video Animations? Here, We Look at some of the Best Animated Video Maker Solutions to Use
- 2024 Approved The Best Peter McKinnon LUTs for Perfect Video Editing
- New In 2024, 4 Ways for Rotating Your GoPro Videos Professionally
- In 2024, A Guide to Understanding Efectum App and Some Top Alternatives
- New A Roster of 8 Top Color Match Generators for 2024
- Updated In 2024, Top 5 Best Video Denoisers
- New 2024 Approved TOP 6 Online Video Speed Controller for Chrome, Safari, Firefox
- In 2024, The Way to Make Dynamic Video Collages?
- New How Can You Make a Slideshow Look Aesthetic? Follow the Given Discussion to Learn About Creating an Aesthetic Slideshow All by Yourself for 2024
- New 2024 Approved The After-Effects Match Colour Feature Bestows Numerous Benefits. Thus, in the Following Discussion, We Will Discuss This Feature and an Equally Proficient Efficient Alternative Tool for Colour Matching
- New Top 7 Easy Ways to Convert a Video to a GIF Online for 2024
- 7 Best MP4 Video Editors on Mac Edit MP4 Videos Easily for 2024
- How to Change Quicktime Player Speed on Mac, In 2024
- New 2024 Approved How to Make an Instant Slideshow on Mac
- New 2024 Approved Add Emoji to Linkedin Post – 5 Tips You Need to Know
- Updated 2024 Approved Slow Down the GIF to Emphasize Details Better. To Do so, Read This Guide and Learn to Use the Best Platforms for Slow-Motion GIFs
- New Replacing Sky in Your Pictures Using Online and Offline Tools
- Updated Best Movie Title Maker
- 2024 Approved How to Comment on YouTube Live Chat
- Updated 2024 Approved Here You Can Lean About the Different Ways for GIMP Transparent Background PNG Format Files
- New Converting Files Is Easy with the Right Tools, and Likewise, GIF to JPG Conversion Is. Choose the Best Tool and Get the Expected Results Within the Blink of an Eye for 2024
- Updated Guide Add LUTs in Premiere Pro with Ease
- Updated Text Animation Intro Tutorial in Filmora for 2024
- New How to Comment on YouTube Live Chat for 2024
- In 2024, Finding The Best LUTs for Wondershare Filmora
- New In 2024, Thousands Already Know What Ezgif Is and So Can You
- New In 2024, This Is a Recommendation About Bandicut. If You Are Confused, Please Check It Out
- Updated 8 Ways to Merge SRT with MP4 for 2024
- Updated 2024 Approved Here Is a Guide on How You Can Resize Videos via Handbrake and Wondershare Filmora. The Former Is a Lightweight Tool Perfect for Batch Resizing Videos, While the Latter Is a Powerful Free Video Editing Software
- Updated 2024 Approved Ways to Make Sure Your Recording Slideshow in Powerpoint Is Not Wrong
- New In 2024, Best 5 Tools to Help You Know More Freeze-Frame Video Editing Skills
- How to Transfer Videos from Poco F5 5G to iPad | Dr.fone
- In 2024, 4 solution to get rid of pokemon fail to detect location On Motorola Moto G24 | Dr.fone
- The Best Android SIM Unlock Code Generators Unlock Your Lava Storm 5G Phone Hassle-Free
- In 2024, Pattern Locks Are Unsafe Secure Your Xiaomi 13T Phone Now with These Tips
- The way to recover deleted contacts on Honor X8b without backup.
- Why Does My OnePlus Ace 2V Keep Turning Off By Itself? 6 Fixes Are Here | Dr.fone
- In 2024, Bypass Activation Lock On Apple iPhone 11 - 4 Easy Ways
- 3 Solutions to Find Your Oppo A1x 5G Current Location of a Mobile Number | Dr.fone
- In 2024, 5 Ways To Teach You To Transfer Files from Samsung Galaxy A24 to Other Android Devices Easily | Dr.fone
- How to Change Spotify Location After Moving to Another Country On Samsung Galaxy A23 5G | Dr.fone
- Can Life360 Track Or See Text Messages? What Can You Do with Life360 On Tecno Spark 10 5G? | Dr.fone
- Recover lost data from Nokia C300
- Title: Updated Do You Want to Know Where You Can Find Online Video Editing Courses? In This Article, We Have Provided 15 Options for Your Various Demand. We Also Recommend a Great Video Editor to Help You Start Your Video Editing Journey with Ease
- Author: Morgan
- Created at : 2024-05-19 05:12:33
- Updated at : 2024-05-20 05:12:33
- Link: https://ai-video-editing.techidaily.com/updated-do-you-want-to-know-where-you-can-find-online-video-editing-courses-in-this-article-we-have-provided-15-options-for-your-various-demand-we-also-reco/
- License: This work is licensed under CC BY-NC-SA 4.0.
