:max_bytes(150000):strip_icc():format(webp)/Flora_and_Son-f6517d3de531487e89f5e0e99192d13f.jpg)
Updated Do You Want to Make Your Background Disappear and Replace with an Attractive Background? Here Is How to Add a Green Screen to Zoom App and Add Any Virtual Background of Your Choice

Do You Want to Make Your Background Disappear and Replace with an Attractive Background? Here Is How to Add a Green Screen to Zoom App and Add Any Virtual Background of Your Choice
If you are a regular user of Zoom app because you have to attend meetings and video conferences every now and then, you should know how to create a green screen for Zoom calls. There are going to be times when you would not want to show what is in your background because it might look distracting. Besides, changing the background from time to time breaks the monotony of your Zoom calls.
Zoom app allows you to change your background and set any available virtual background. However, the effect of virtual background may not be accurate and smooth unless you have a uniform background color. If you use green screen background for Zoom, you can replace it with any virtual background that will look very realistic to your audiences. We will illustrate how to create a green screen background for Zoom.
Part 1. How to add green screen to Zoom on computer?
Regular Zoom users prefer arranging and attending video conferences from their computers. Zoom desktop app makes it more convenient to attend Zoom conference with a wider screen and better visibility. Make sure you have a uniform green screen in your background before attending Zoom call so that you can replace it with any available virtual background on Zoom. Here are the steps on how to create a green screen for Zoom app on your computer.
Step1Open Zoom app and make sure you are logged into your account. Adjust the webcam so that only you and your green screen should be visible in the frame.
Step2Click on Settings (gear icon) located in the top-right corner.
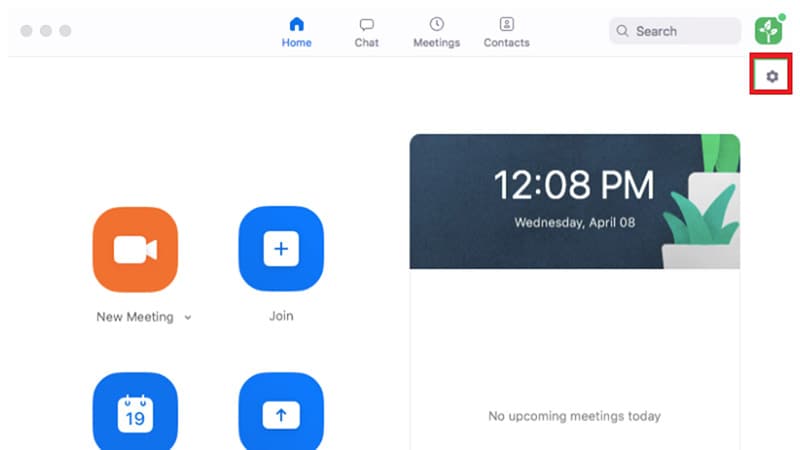
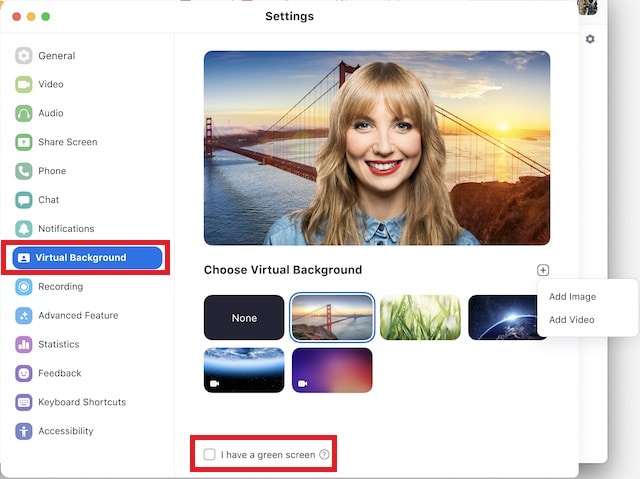
Step3Once Settings window opens, click on Virtual background option on the left panel.
Step4Turn on the option “I have a green screen” located at the bottom. Thereafter, choose a virtual background with which you want to replace the green screen in your video.
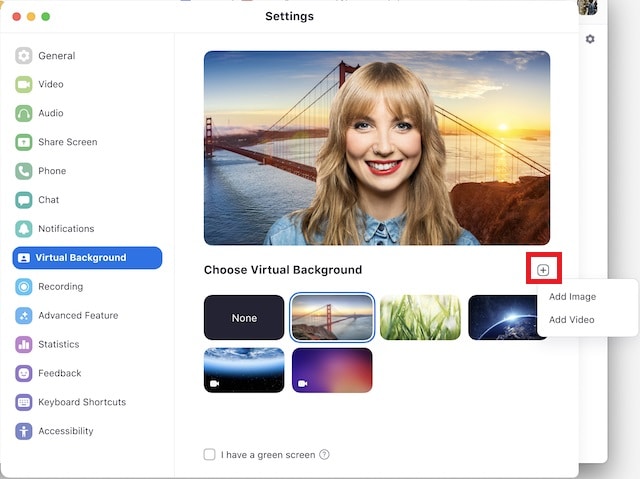
Step5Apart from the present virtual background, you can add photo or video to replace green screen background.
Step6Close Settings window and you will see that your green screen is replaced by your selected virtual background.
Part 2. How to add green screen to Zoom on mobile?
If you are an occasional Zoom user, you are more likely to use your smartphone to attend Zoom conferences. If you want green screen effect on your Zoom call, make sure you have a sizeable green screen in your background. This is because even if you happen to move your phone during the meeting, green screen background should come in the video frame all the time.
It is recommended to use a tripod to keep your smartphone fixed in one spot for better and consistent green screen effect. Here are the steps to answer your question how do you add a green screen to Zoom app on your mobile phone. The steps are the same for Android and iOS users.
Step1Open Zoom app on your smartphone and make sure you are signed into your account.
Step2Start a Zoom meeting and tap on More option located in the bottom-right corner.

Step3Tap on Virtual background and you can select any preset virtual background.
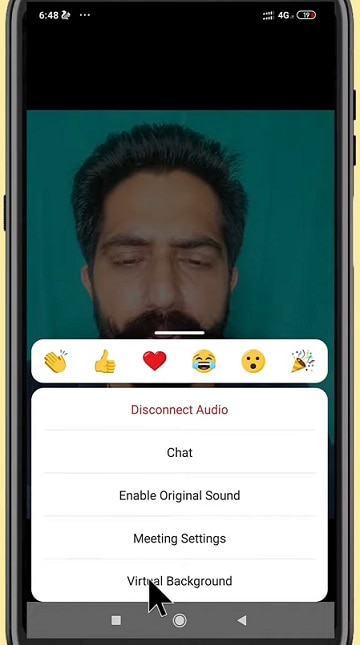
Step4If you want to replace green screen with a customized background, tap on “+” icon and select any photo or video from your phone.
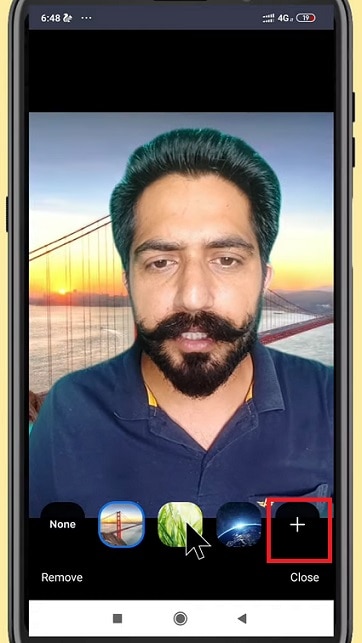
Step5Tap on Close option and the selected virtual background will be applied to your Zoom video.
Part 3. Tips to use green screen on Zoom video
Here are some important tips to use green screen on Zoom video for a better outcome.
Buy Large Green Screen - Since you are going to invest in buying green screen, you should buy a large green screen instead of buying two. Firstly, when you have one large green screen, you can set it up without any wrinkles or overlaps.
Secondly, a large green screen means greater surface area, and even when you slightly change the angle of your camera, your background will still have green screen instead of the exterior wall showing up and ruining virtual background effect.
Buy Green Screen Stand - Along with green screen, you should buy a sizeable green screen stand. A regular green screen stand contains two vertical supports at both ends and one horizontal support where you hand the green screen.
You can buy it according to the size of green screen you have bought. And you need to buy stand because you cannot fix the green screen on the wall properly. If you use any other means, there are going to be wrinkles and uneven virtual background effect.
Green Screen Quality - You can purchase any shade of green screen, but we recommend you opt for vibrant green color for a better outcome. Most importantly, the color should be even across the surface, and there should not be light and dark patches to dampen the virtual background effect and make it look unrealistic. That is why you should not compromise with quality.
Avoid Green Objects - You should not wear anything green. If your green screen has a lighter shade, you can wear deep color dresses and vice versa. Most importantly, you should not keep anything that is green while attending Zoom attending as it will disturb the green screen effect and it will look embarrassing. If you need to keep any green objects in your Zoom meetings, you should have blue screen instead of green screen.
Focus On Lighting - Lighting is extremely important when you want to use green screen. You should place the light so that it spreads evenly across the green screen. Otherwise, there are going to be light and dark patches, and the effect can get disturbed. Make sure you do not cast any shadow on the green screen by positioning the green screen accordingly.
Select A Proper Background - Last but not least, when you change your green screen to any virtual background photo or video, make sure you keep your audiences in mind. If you are attending a meeting, you should keep a professional-looking background. The background should not be distracting and match the theme of your meeting.
Conclusion
We have answered your question, “How do you add a green screen to zoom?” You can use green screen on your Zoom desktop app as well as smartphone app. This will help you to make your usual background cover up with green screen and replace green screen with any virtual background. Keep in mind all the tips we have provided you so that the green screen effect is perfect.
Free Download For Win 7 or later(64-bit)
Free Download For macOS 10.14 or later
Top 10 Sound Extractors to Extract Sound From Video 2023
It often happens that we get so engrossed in a movie or video and fall exceptionally hard for all elements. This can prompt us to extract sounds from videos, like the background music, a voiceover, or dialogue between characters.
Safe sound extraction from any type of video file will require the help of the best sound extractor software. Wondering about which you should try out? Go through this list, and then make up your mind.
- Adobe Premiere Pro
- Filmora
- iMovie
- VLC
- Online Audio Converter
- Audio Converter
- FFmpeg
- QuickTime
- Audio Extractor
- ASPOSE
- Practical Tips to Choose the Best One to Extract Sound from Videos
- Hot FAQs on Extract Sound from Videos
Top 10 Sound Extractors for Extracting Sound from video
We researched and found many software options for extracting Sound from video. After careful checking, we found 10 options with high-quality functions and performance levels. We recommend you consider them for pulling audio from video files- here’s why.
1. Adobe Premiere Pro
Adobe Premiere Pro is one of the top-level video editors available with various functions and pre-set filters/effects. So, one can customize the videos and audio as they require, like extracting Sound from video and saving them.

How to Download: Website
Compatible OS: Windows, Mac
Price: Individuals- USD 20.99/month. License for Teams- USD 35.99. All Apps-related plans.
Main Features:
- Pre-set templates are available in high-quality resolutions.
- Customize your titles and video edits.
- Automatically adjusts color matching in scenes.
- Robust text-to-speech function with multi-language support.
Pros
- Share easily across the platform with cloud support.
- Access to diverse stock media with Adobe membership.
- Supports many file formats like / (), MPEG-2, Apple ProRes, MPEG-4, native camera formats, etc.
Cons
- No perpetual license support.
- Strict eligibility rules to qualify for student-teacher plans.
Best for Users: Professionals and organization-based users, like teachers, can use this for personal and teaching-related video editing steps.
2. Filmora
If you want a software sound extractor that provides a wide range of audio editing functions, Filmora is one that we would recommend. While it is firstly a video editor, you can use audio-based editing functions like sound stabilization, extraction, visualization, audio ducking, silence detection, and more.

Free Download For Win 7 or later(64-bit)
Free Download For macOS 10.14 or later
Compatible OS: Windows, Mac
Price: Free, Annual- USD 49.99, Perpetual- USD 89.99
Main Features:
- The audio visualization feature analyzes and virtually shows beats.
- Detect silent sections in the video and remove them.
- Many audio stabilization settings like Denoise and Equalizer.
- Vital TTS/STT functions for voiceovers.
Pros
- Multiple video/audio formats are supported.
- Pre-set sound effects are present.
- Adjust the volume of videos during editing.
Cons
- Upgrade plan to remove ads.
- Audio output is mainly available in MP3.
How to use for extracting music from videos:
Step1 Download and install Filmora 11 .
Step2 Click on New Project.
Step3 Press “Click here to import Media” > choose file folder > Insert.

Step4 Drag file to editor timeline > Cut the file to a set suitable size for your audio extraction.
Step5 Click on the Edit icon from the list of icons above the timeline.
Step6 Press on Audio > Make adjustments for settings like Fade in/Face out, Equalizer, Pitch, etc.

Step7 Click Export > Local > MP3. Make changes as needed.

Step8 Hit the Export button.
Best for Users: Pro-level and beginner-level professionals and home-based users who want a comprehensive, feature-rich platform for video/audio editing can benefit from this.
3. iMovie
Mac and iOS users benefit significantly from this video editing software to create dynamic movie-quality videos. One major part of movies is the soundtrack, and you can use this software to add easily, control, and extract the sound clips.

How to Download: Mac App Store , Apple App Store
Compatible OS: Mac, iOS
Price: Free
Main Features:
- Pre-set storyboard available for optimized and thematic video edits.
- Royalty-free audio files in the library.
- You can add voiceovers.
- Add pre-set sound effects or customize them, like removing/adding audio clips.
Pros
- Sound aligns precisely with video.
- Multiple effects, filters, and editing tools are available.
- Simple sharing via social media accounts.
Cons
- Only available for iOS 15.1+ and such newest versions of Apple devices.
- You cannot access it without an Apple ID.
Best for Users: Professional video editors with diverse movie-like presentation-making needs can use this.
4. VLC
VLC is a well-known Windows-based media player that is accessible as a Chrome extension and has mobile app versions. While you can use it mainly to view videos, the software can easily cut out sound clips from the video here.

How to Download: Microsoft Store , Apple App Store , Google Play Store , Chrome Web Store
Compatible OS: Windows, iOS, Chromebook, Android
Price: Free
Main Features:
- Script the command line VLC-based invocations.
- Play different types of files with multi-format support.
- Use the in-built equalizer to optimize sound quality/effects.
- Sync with or create a new video stream.
Pros
- The software assures quick functions with all features.
- No codec installation is necessary.
- Keyboard shortcuts for specific actions.
Cons
- Difficult to search and open files.
- Not very customizable.
Best for Users: People can use VLC Media Player to stream or play videos and even make some minor adjustments/extraction.
5. Online Audio Converter
This is one of the more straightforward tools to add video files and extract Sound from video with some quick steps. The Online Audio Converter supports a wide range of video formats. You just have to add one file by dragging and dropping it from your device memory, inserting its URL, or uploading it via the cloud. Then, press the Start Extracting command.

How to Download: Website
Compatible OS: Windows, Mac, Online
Price: Monthly- USD 29.95, Annual- USD 39.95, Lifetime- USD 59.95
Main Features:
- Add files either directly through the device or the cloud.
- Insert video URL for audio extraction from online video.
- Supports multiple video file formats like MPEG, MOV, AVI, and MP4.
- Scroll to select extraction end and start points.
Pros
- Only allows videos with 500MB or smaller size.
- Straightforward three steps for the whole extraction process.
- Zero quality loss after an extraction.
Cons
- Customization options are limited.
- The main audio format supported is MP3 for extraction.
Best for Users: Beginners and pro-level users who want to extract Sound from video files quickly.
6. Audio Converter
The Audio Converter app can efficiently pull out audio clips from video and is compatible with many such media formats. You can use this to cut and trim your file, mainly to decide how much of the audio will extract. Then, play it to see the quality of the output file.

How to Download: Apple App Store
Compatible OS: iOS
Price: Free, Pro- USD 2.99.
Main Features:
- Extract sound from video in formats like M4A, MP3, OGG, M4R, FLAC, etc.
- Insert videos in formats like MP4, 3G2, 3GP, MOV, MKV, WMV, and more.
- Trim the audio to smaller sections for extraction.
- The media player version supports all audio/video types.
Pros
- Supports a wide variety of audio/video formats.
- A simple media player function is also available.
- It is compatible with many languages.
Cons
- App size of 143.1 MB can feel high to some users.
- Basic-level functions only.
Best for Users: People who want to extract Sound from video files to create ringtones can use this best.
7. FFmpeg
FFmpeg is one of the most trustworthy platforms for converting and extracting Sound from video. It is an open-source solution and comes with complete multi-media management work. This is mainly used for easily streaming, converting, and recording video/audio projects.

How to Download: Website
Compatible OS: Windows, Mac, etc.
Price: Free
Main Features:
- Audio filters are available, like virtualbass and tiltshelf.
- Video editing filters like colormap, blurdetect, and pixelize are available.
- Enhance dialog and extract sound clips.
- Constantly updating features.
Pros
- This has open-source benefits.
- No excessive installation steps are necessary.
- Supports a wide range of encoding benefits.
Cons
- One must have some sort of technical knowledge to use this.
- Finding the right features or solutions takes some time.
Best for Users: Developers with better technical knowledge can use this dynamic open-source platform for video/audio editing.
8. QuickTime
You can also use this Mac-based video player on Windows to watch different videos easily. Besides the streaming benefits, you can install plugins to optimize its available features, like adding the ability to record/edit video files.

How to Download: Website
Compatible OS: Mac, Windows
Price: Free
Main Features:
- Stream videos and even extract Sound from the files.
- Supports many video formats in the player.
- Record audio on this media player.
- Import files from other Mac products like Final Cut Pro and iMovie.
Pros
- Works on both Windows and Mac.
- Pre-set effects and filters are available that one can edit.
- Simple interface for beginners.
Cons
- Unnecessary bloatware installation is needed.
- Playback support is lacking.
Best for Users: New users can simply operate this media player to watch videos and learn the extraction process.
9. Audio Extractor
You can use this conversion and extraction software to do many editing functions, like changing, cutting, and extracting video/audio files. The supported format here is MP3 and WAV - choose which you find compatible with your final project. You can decide and extract from specific sections.

How to Download: Google Play Store
Compatible OS: Android
Price: Free with in-app purchases of USD 1.99- USD 6.99 for each item.
Main Features:
- Change audio file size and format.
- View/delete components through the app directly.
- Preview video/sound file.
- Trim/extract sounds from videos easily with the converter.
Pros <path d=”M7 22H4C3.46957 22 2.96086 21.7893 2.58579 21.4142C2.21071 21.0391 2 20.5304 2 20V13C2 12.4696 2.21071 11.9609 2.58579 11.5858C2.96086 11.2107 3.46957 11 4 11H7M14 9V5C14 4.20435
Top 10 Sound Extractors for Extracting Sound from video
We researched and found many software options for extracting Sound from video. After careful checking, we found 10 options with high-quality functions and performance levels. We recommend you consider them for pulling audio from video files- here’s why.
1. Adobe Premiere Pro
Adobe Premiere Pro is one of the top-level video editors available with various functions and pre-set filters/effects. So, one can customize the videos and audio as they require, like extracting Sound from video and saving them.

How to Download: Website
Compatible OS: Windows, Mac
Price: Individuals- USD 20.99/month. License for Teams- USD 35.99. All Apps-related plans.
Main Features:
- Pre-set templates are available in high-quality resolutions.
- Customize your titles and video edits.
- Automatically adjusts color matching in scenes.
- Robust text-to-speech function with multi-language support.
Pros
- Share easily across the platform with cloud support.
- Access to diverse stock media with Adobe membership.
- Supports many file formats like / (), MPEG-2, Apple ProRes, MPEG-4, native camera formats, etc.
Cons
- No perpetual license support.
- Strict eligibility rules to qualify for student-teacher plans.
Best for Users: Professionals and organization-based users, like teachers, can use this for personal and teaching-related video editing steps.
2. Filmora
If you want a software sound extractor that provides a wide range of audio editing functions, Filmora is one that we would recommend. While it is firstly a video editor, you can use audio-based editing functions like sound stabilization, extraction, visualization, audio ducking, silence detection, and more.

Free Download For Win 7 or later(64-bit)
Free Download For macOS 10.14 or later
Compatible OS: Windows, Mac
Price: Free, Annual- USD 49.99, Perpetual- USD 89.99
Main Features:
- The audio visualization feature analyzes and virtually shows beats.
- Detect silent sections in the video and remove them.
- Many audio stabilization settings like Denoise and Equalizer.
- Vital TTS/STT functions for voiceovers.
Pros
- Multiple video/audio formats are supported.
- Pre-set sound effects are present.
- Adjust the volume of videos during editing.
Cons
- Upgrade plan to remove ads.
- Audio output is mainly available in MP3.
How to use for extracting music from videos:
Step1 Download and install Filmora 11 .
Step2 Click on New Project.
Step3 Press “Click here to import Media” > choose file folder > Insert.

Step4 Drag file to editor timeline > Cut the file to a set suitable size for your audio extraction.
Step5 Click on the Edit icon from the list of icons above the timeline.
Step6 Press on Audio > Make adjustments for settings like Fade in/Face out, Equalizer, Pitch, etc.

Step7 Click Export > Local > MP3. Make changes as needed.

Step8 Hit the Export button.
Best for Users: Pro-level and beginner-level professionals and home-based users who want a comprehensive, feature-rich platform for video/audio editing can benefit from this.
3. iMovie
Mac and iOS users benefit significantly from this video editing software to create dynamic movie-quality videos. One major part of movies is the soundtrack, and you can use this software to add easily, control, and extract the sound clips.

How to Download: Mac App Store , Apple App Store
Compatible OS: Mac, iOS
Price: Free
Main Features:
- Pre-set storyboard available for optimized and thematic video edits.
- Royalty-free audio files in the library.
- You can add voiceovers.
- Add pre-set sound effects or customize them, like removing/adding audio clips.
Pros
- Sound aligns precisely with video.
- Multiple effects, filters, and editing tools are available.
- Simple sharing via social media accounts.
Cons
- Only available for iOS 15.1+ and such newest versions of Apple devices.
- You cannot access it without an Apple ID.
Best for Users: Professional video editors with diverse movie-like presentation-making needs can use this.
4. VLC
VLC is a well-known Windows-based media player that is accessible as a Chrome extension and has mobile app versions. While you can use it mainly to view videos, the software can easily cut out sound clips from the video here.

How to Download: Microsoft Store , Apple App Store , Google Play Store , Chrome Web Store
Compatible OS: Windows, iOS, Chromebook, Android
Price: Free
Main Features:
- Script the command line VLC-based invocations.
- Play different types of files with multi-format support.
- Use the in-built equalizer to optimize sound quality/effects.
- Sync with or create a new video stream.
Pros
- The software assures quick functions with all features.
- No codec installation is necessary.
- Keyboard shortcuts for specific actions.
Cons
- Difficult to search and open files.
- Not very customizable.
Best for Users: People can use VLC Media Player to stream or play videos and even make some minor adjustments/extraction.
5. Online Audio Converter
This is one of the more straightforward tools to add video files and extract Sound from video with some quick steps. The Online Audio Converter supports a wide range of video formats. You just have to add one file by dragging and dropping it from your device memory, inserting its URL, or uploading it via the cloud. Then, press the Start Extracting command.

How to Download: Website
Compatible OS: Windows, Mac, Online
Price: Monthly- USD 29.95, Annual- USD 39.95, Lifetime- USD 59.95
Main Features:
- Add files either directly through the device or the cloud.
- Insert video URL for audio extraction from online video.
- Supports multiple video file formats like MPEG, MOV, AVI, and MP4.
- Scroll to select extraction end and start points.
Pros
- Only allows videos with 500MB or smaller size.
- Straightforward three steps for the whole extraction process.
- Zero quality loss after an extraction.
Cons
- Customization options are limited.
- The main audio format supported is MP3 for extraction.
Best for Users: Beginners and pro-level users who want to extract Sound from video files quickly.
6. Audio Converter
The Audio Converter app can efficiently pull out audio clips from video and is compatible with many such media formats. You can use this to cut and trim your file, mainly to decide how much of the audio will extract. Then, play it to see the quality of the output file.

How to Download: Apple App Store
Compatible OS: iOS
Price: Free, Pro- USD 2.99.
Main Features:
- Extract sound from video in formats like M4A, MP3, OGG, M4R, FLAC, etc.
- Insert videos in formats like MP4, 3G2, 3GP, MOV, MKV, WMV, and more.
- Trim the audio to smaller sections for extraction.
- The media player version supports all audio/video types.
Pros
- Supports a wide variety of audio/video formats.
- A simple media player function is also available.
- It is compatible with many languages.
Cons
- App size of 143.1 MB can feel high to some users.
- Basic-level functions only.
Best for Users: People who want to extract Sound from video files to create ringtones can use this best.
7. FFmpeg
FFmpeg is one of the most trustworthy platforms for converting and extracting Sound from video. It is an open-source solution and comes with complete multi-media management work. This is mainly used for easily streaming, converting, and recording video/audio projects.

How to Download: Website
Compatible OS: Windows, Mac, etc.
Price: Free
Main Features:
- Audio filters are available, like virtualbass and tiltshelf.
- Video editing filters like colormap, blurdetect, and pixelize are available.
- Enhance dialog and extract sound clips.
- Constantly updating features.
Pros
- This has open-source benefits.
- No excessive installation steps are necessary.
- Supports a wide range of encoding benefits.
Cons
- One must have some sort of technical knowledge to use this.
- Finding the right features or solutions takes some time.
Best for Users: Developers with better technical knowledge can use this dynamic open-source platform for video/audio editing.
8. QuickTime
You can also use this Mac-based video player on Windows to watch different videos easily. Besides the streaming benefits, you can install plugins to optimize its available features, like adding the ability to record/edit video files.

How to Download: Website
Compatible OS: Mac, Windows
Price: Free
Main Features:
- Stream videos and even extract Sound from the files.
- Supports many video formats in the player.
- Record audio on this media player.
- Import files from other Mac products like Final Cut Pro and iMovie.
Pros
- Works on both Windows and Mac.
- Pre-set effects and filters are available that one can edit.
- Simple interface for beginners.
Cons
- Unnecessary bloatware installation is needed.
- Playback support is lacking.
Best for Users: New users can simply operate this media player to watch videos and learn the extraction process.
9. Audio Extractor
You can use this conversion and extraction software to do many editing functions, like changing, cutting, and extracting video/audio files. The supported format here is MP3 and WAV - choose which you find compatible with your final project. You can decide and extract from specific sections.

How to Download: Google Play Store
Compatible OS: Android
Price: Free with in-app purchases of USD 1.99- USD 6.99 for each item.
Main Features:
- Change audio file size and format.
- View/delete components through the app directly.
- Preview video/sound file.
- Trim/extract sounds from videos easily with the converter.
Pros <path d=”M7 22H4C3.46957 22 2.96086 21.7893 2.58579 21.4142C2.21071 21.0391 2 20.5304 2 20V13C2 12.4696 2.21071 11.9609 2.58579 11.5858C2.96086 11.2107 3.46957 11 4 11H7M14 9V5C14 4.20435
How to Change Video Thumbnail in Google Drive
What is a Google drive?
“Google drive is a self-hosted cloud-based site that provides free space to store your files and pictures to share them with your friends and family”.
Google Drive is also used to promote businesses or websites. You can upload a video to Google Drive and embed the file in your blog or any other website.
What is a Thumbnail?
“A Thumbnail is a still image that acts as
a preview image of your video.”
A thumbnail is the first thing seen by the viewers while watching videos. It is the only thing that forces the viewer either to watch the video or not because it previews the video content. It is also shown in the search results. A thumbnail is just like the cover or title of a book. You will read a book by its cover. In the same way, a video is viewed by its thumbnail.
Google drive is also used for the promotion of websites and businesses. It does not offer to add a thumbnail or cover image like YouTube has the option to set and can change the thumbnail of the video. As we all know Google drive is not a streaming platform and has its own boundaries.
Normally, the google drive can generate a thumbnail from the video and uses the generated thumbnail ignoring the one you have uploaded. But on the other hand, if it cannot generate a thumbnail the uploaded thumbnail will be displayed. Usually, the default thumbnail may have weird facial expressions or may not be attractive for the viewers to open the video.
Here we are discussing a few alternatives to change the thumbnail of the video in Google drive.
Select a separate image to be housed in a separate column to set as a thumbnail image and then go into the details, title, and Image settings.
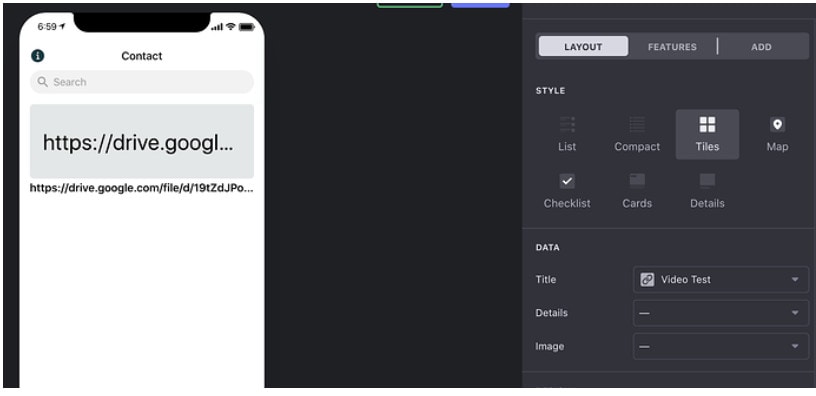
How to Add Thumbnails to the Video Using Wonder Share Filmora 11
Wonder Share Filmora 11 is an all-in-one video editing platform that provides powerful, creative, and simple interphase to edit videos and images in a few clicks. It has a ton of amazing features that make your videos, images, and audio stands out. You can edit your videos and images in a great cinematic form using its effects, transitions, overlays, text, and a lot more. Do not wait, go and download Filmora 11 and there are more tools for you to discover.
I am going to show you how to create a thumbnail of the video in Filmora11.
Let us get started!
- Open Wonder Share Filmora 11 and click on New Project.
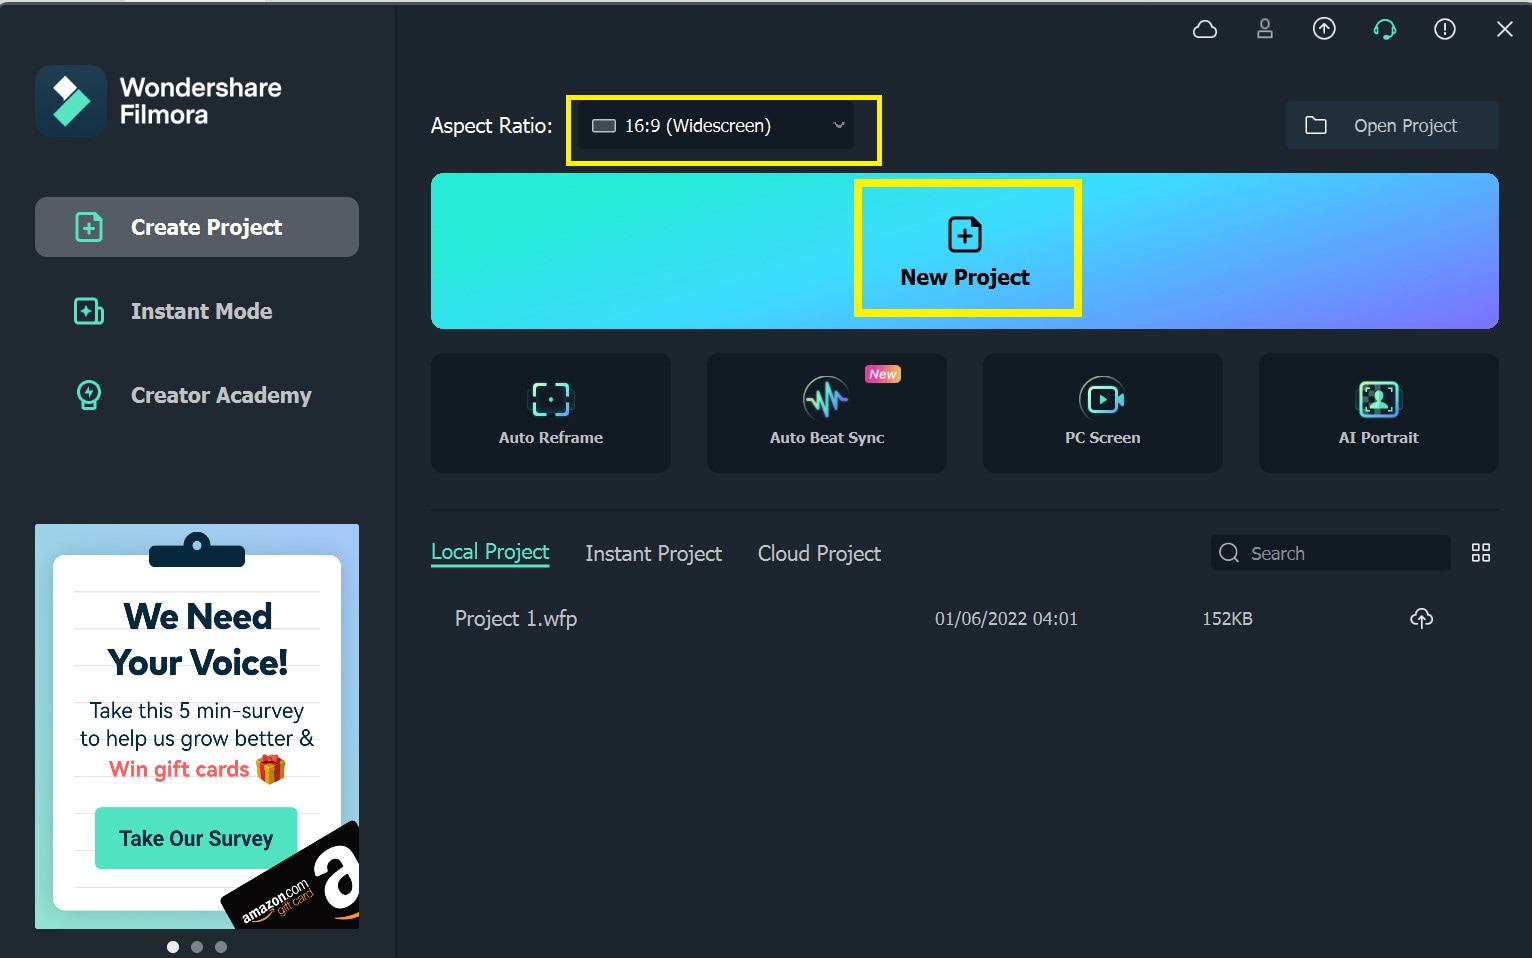
- Drag the image of your choice into the timeline.
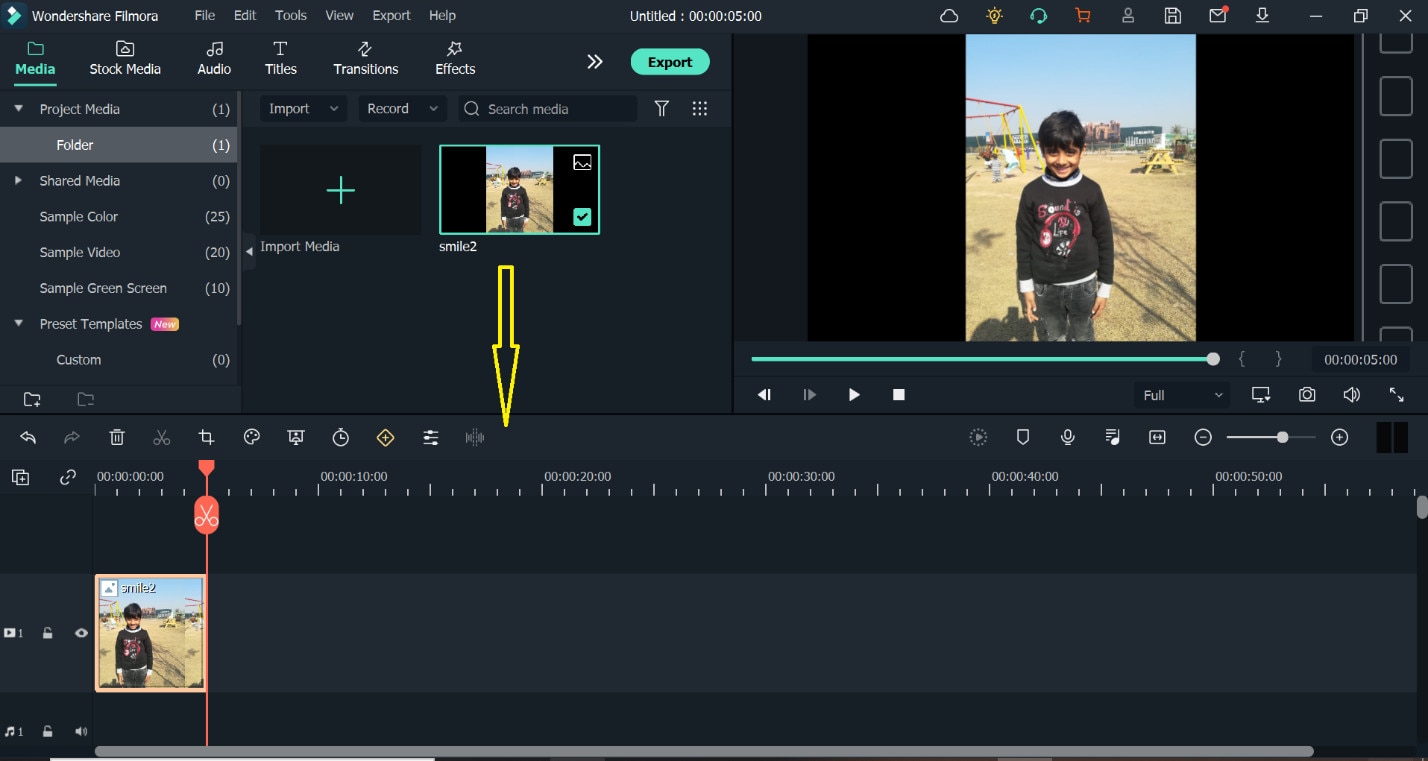
- Drag the image of your choice into the timeline.
- Click on the AI-Portrait option from the Effects
- Drag the Human Segmentation effect over the clip into the timeline.
Now you see that the subject of the video thumbnail is selected and the background has been removed.
The AI-Portrait is a very useful effect, it allows you to quickly remove the background through artificial intelligence.
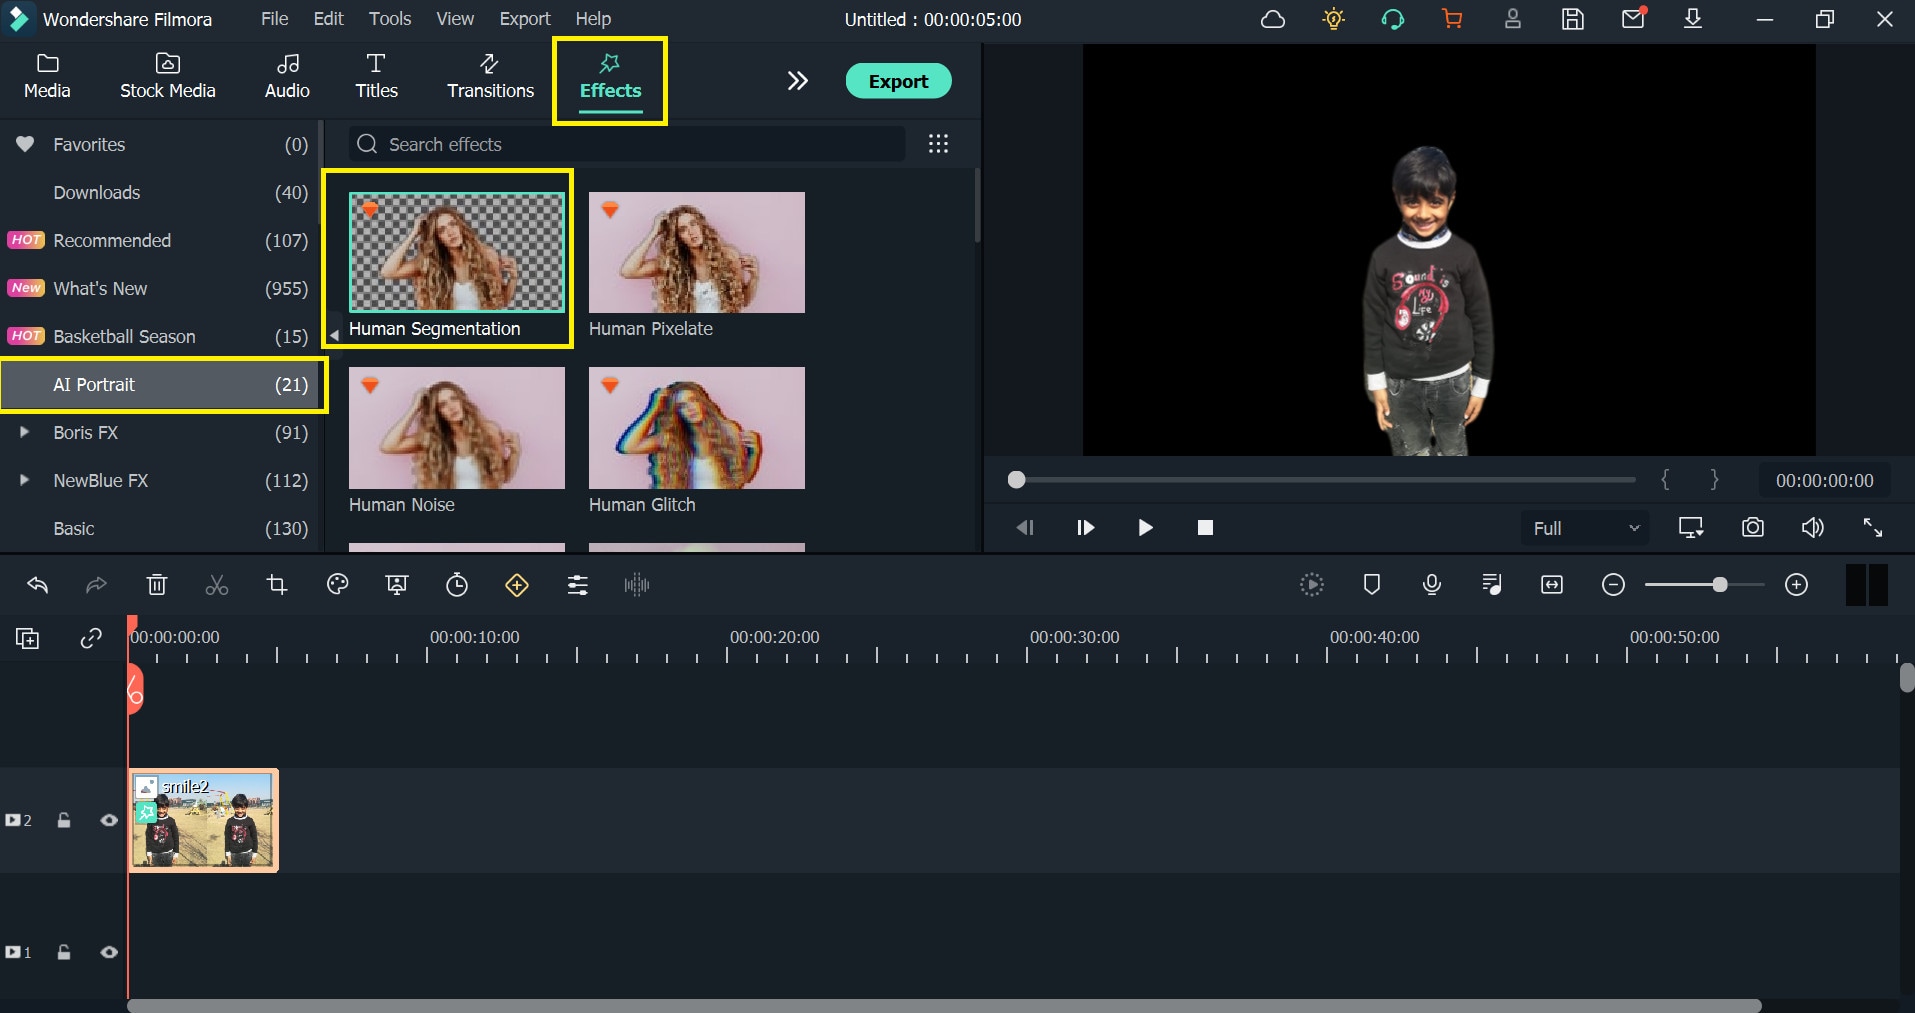
Now you can see the subject has been selected and the background has been removed.
- Now Scale up the photo to be visible on the screen.
- You can set the border settings here to make it more smooth and attractive.
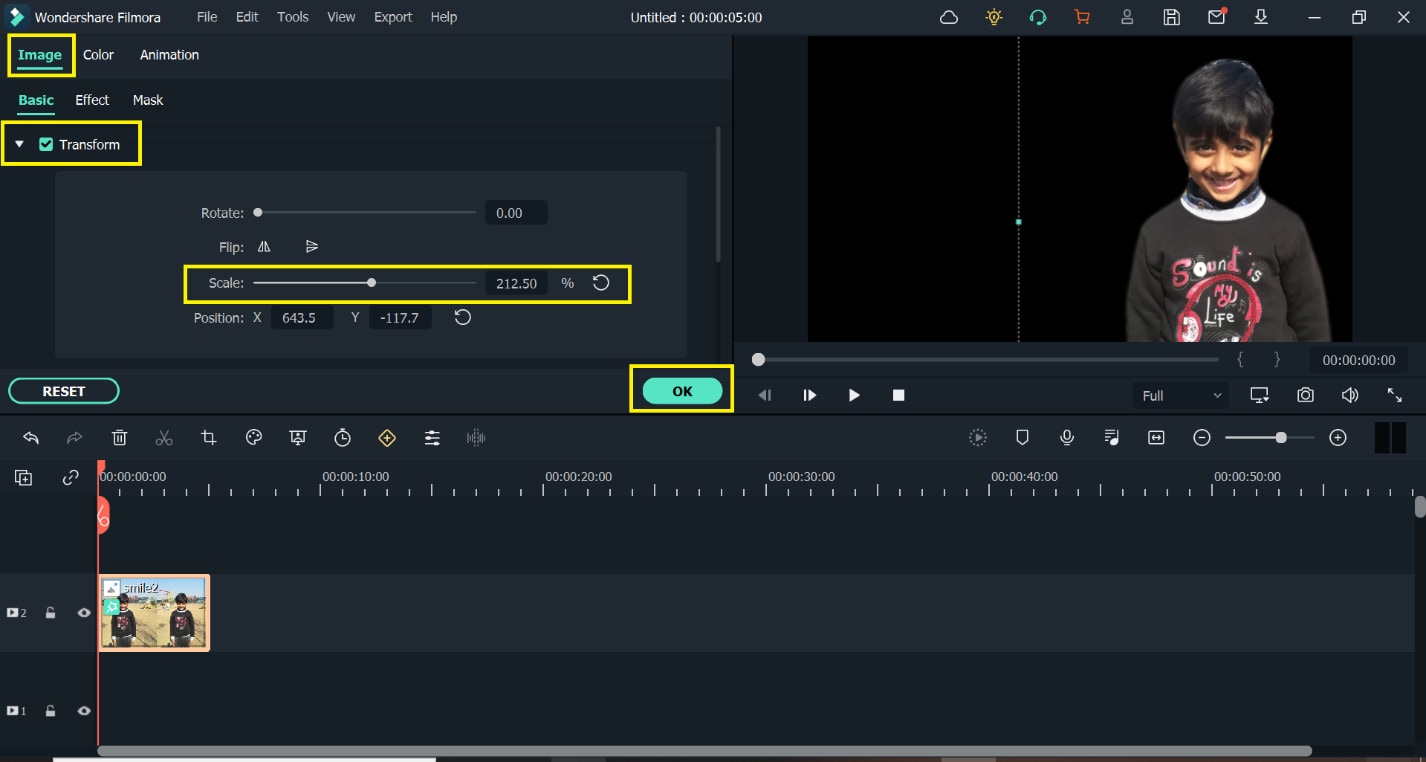
I have dragged my image to the left as I want my text to the right side.
- Let’s drag the desired background into the timeline. ( I got this background from Pexel.com)
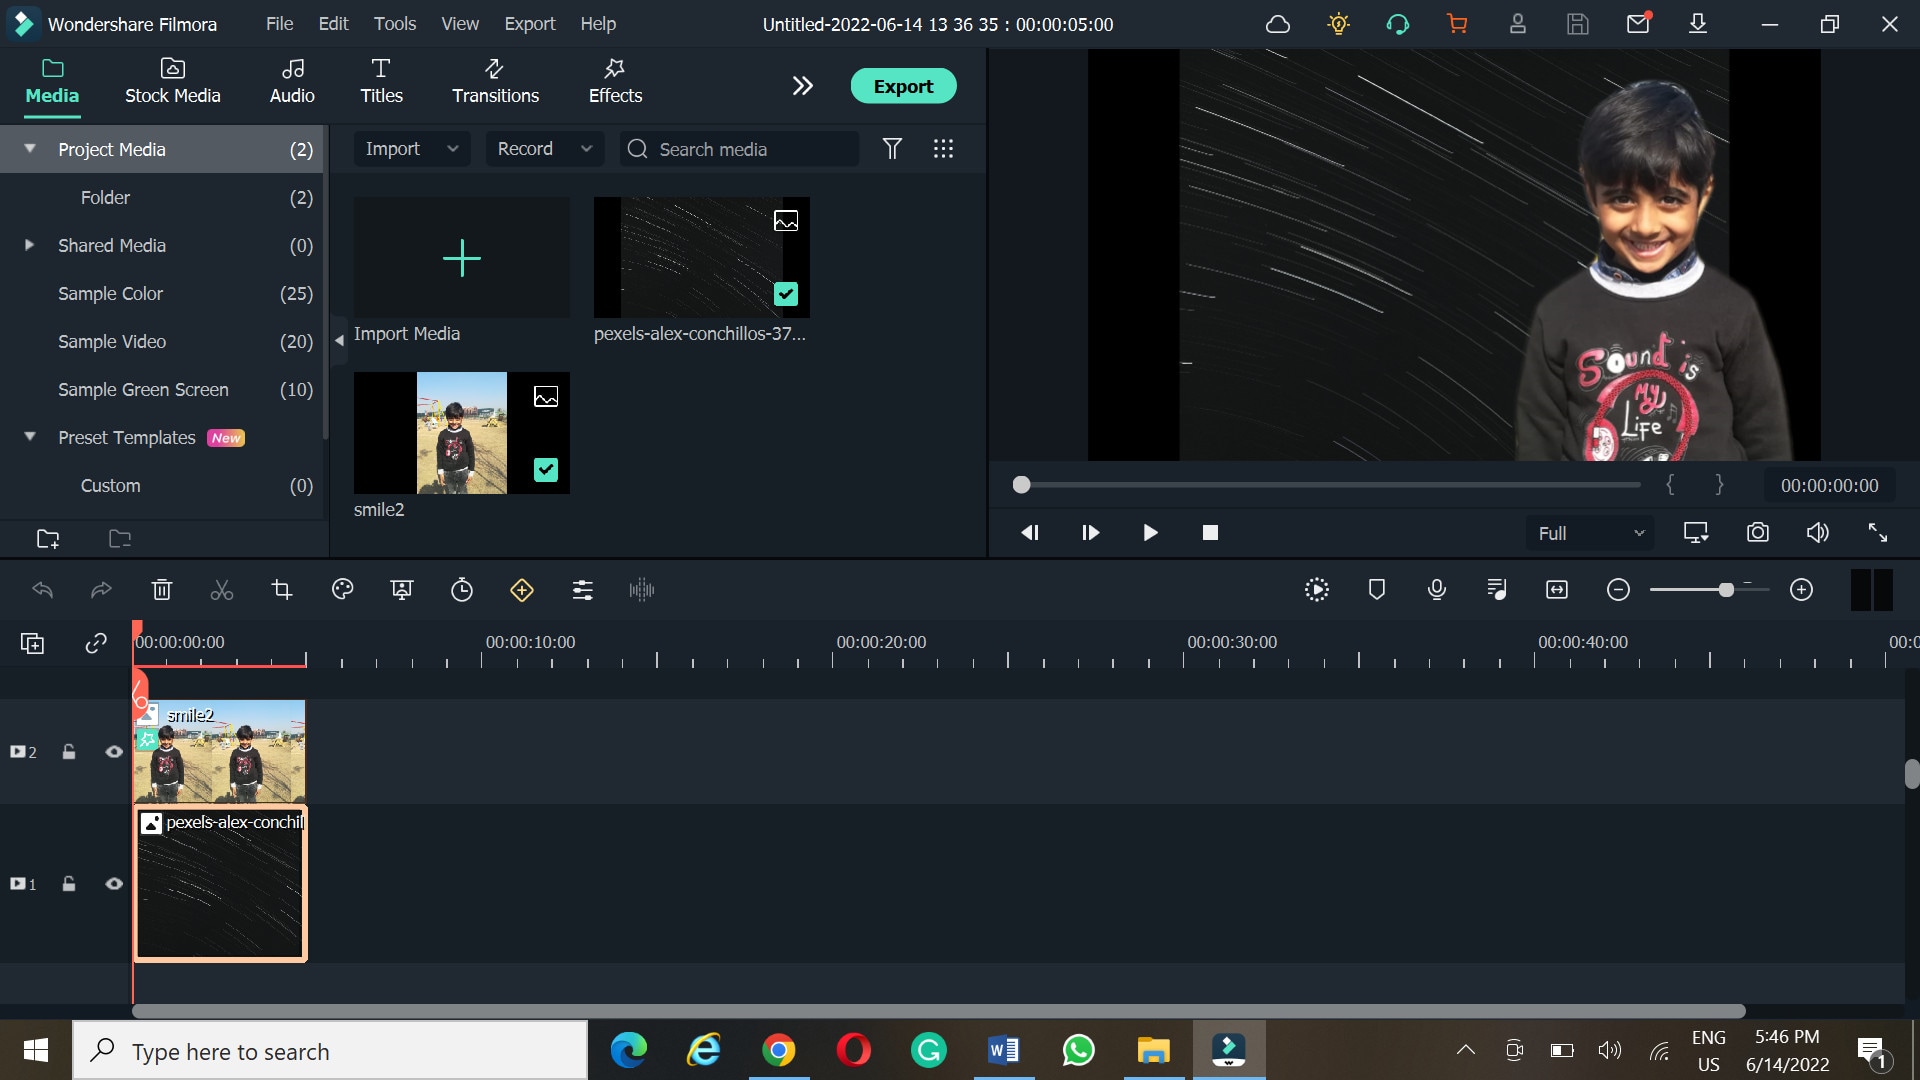
- Click on sample colors under the media option to add the gradient overlay.
- Drag your favorite Gradient and drop it below the background layer.
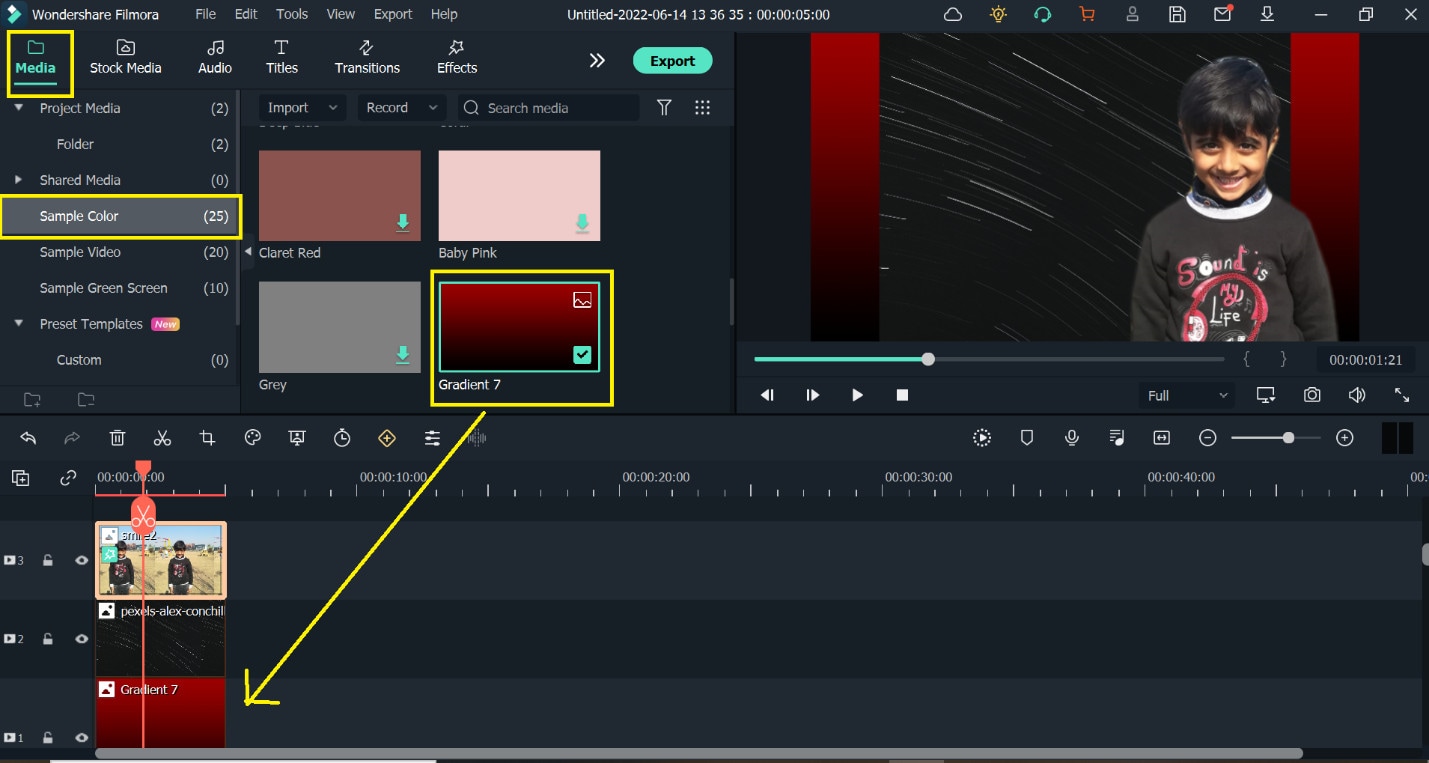
- Now select the Overlay option under the Effects tab and then Hit Frames.
- Add your desired frame between a photo layer and a background layer to show depth in your thumbnail.
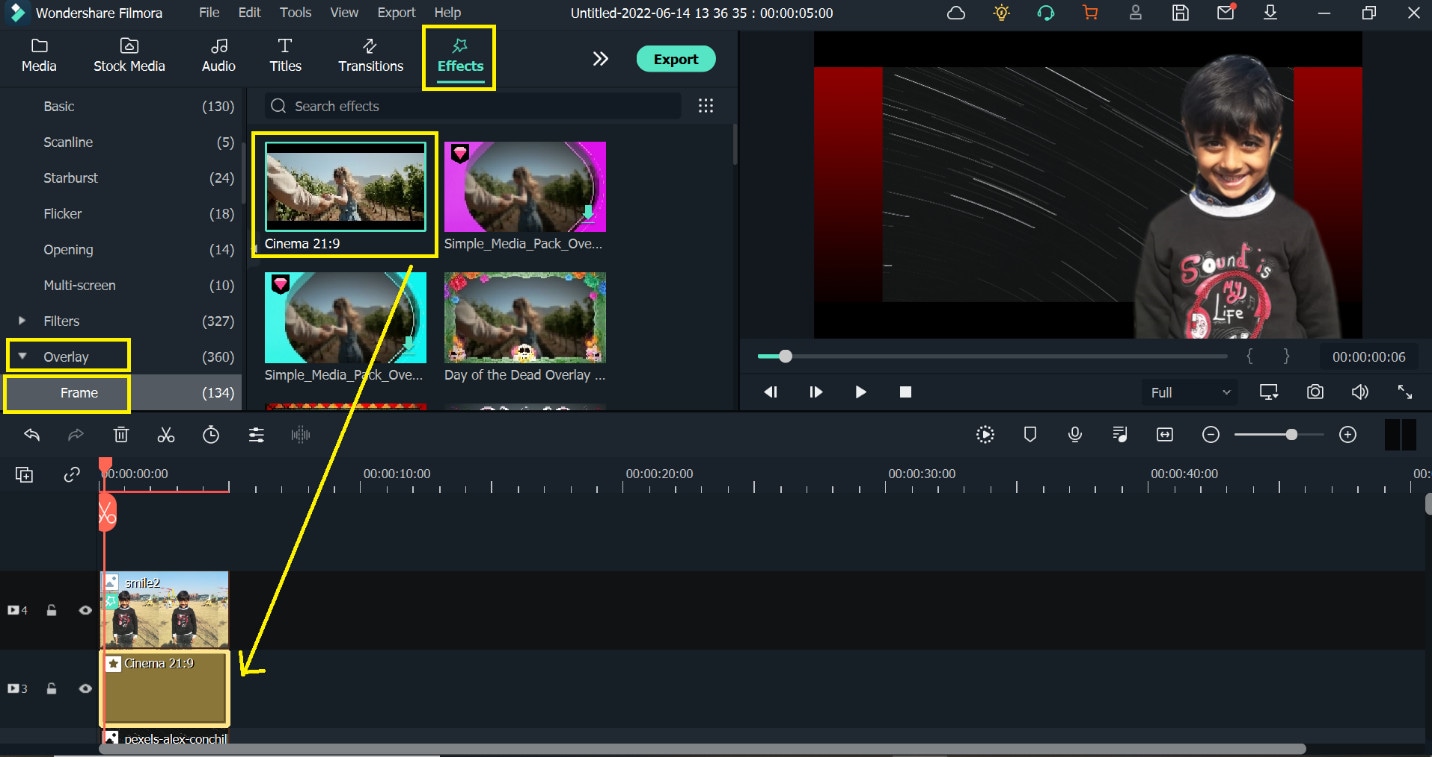
So, I choose cinema 21.9 frames to add two black bars behind our subject.
Let’s choose your desired Title from the Library. Here are tons of title packs, you can choose from.
- Select the Titles option under the Titles tab then select your desired Title.
- Drag and locate the title in the place of your taste and then write the text you want.
- Adjust your text accordingly, you can change the font size, color, style, and much more
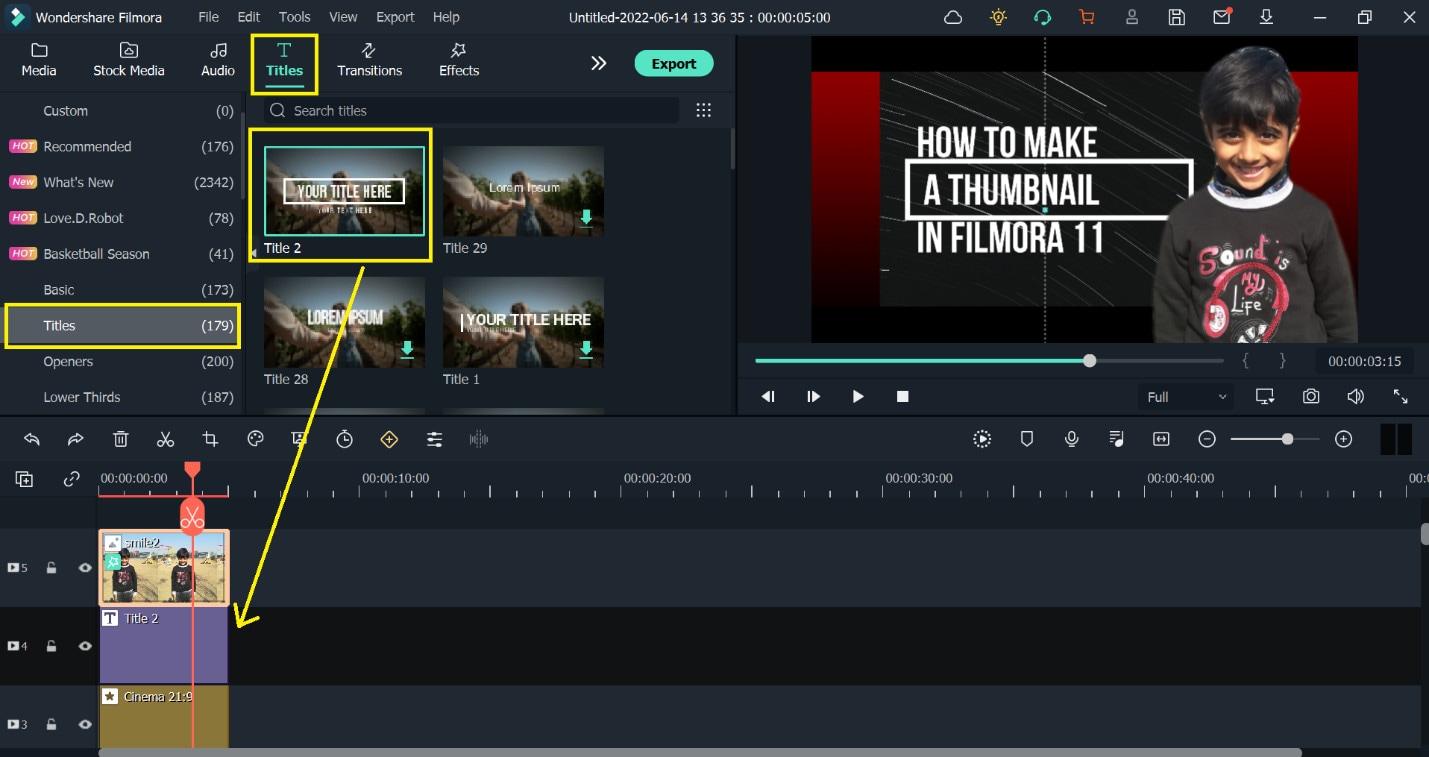
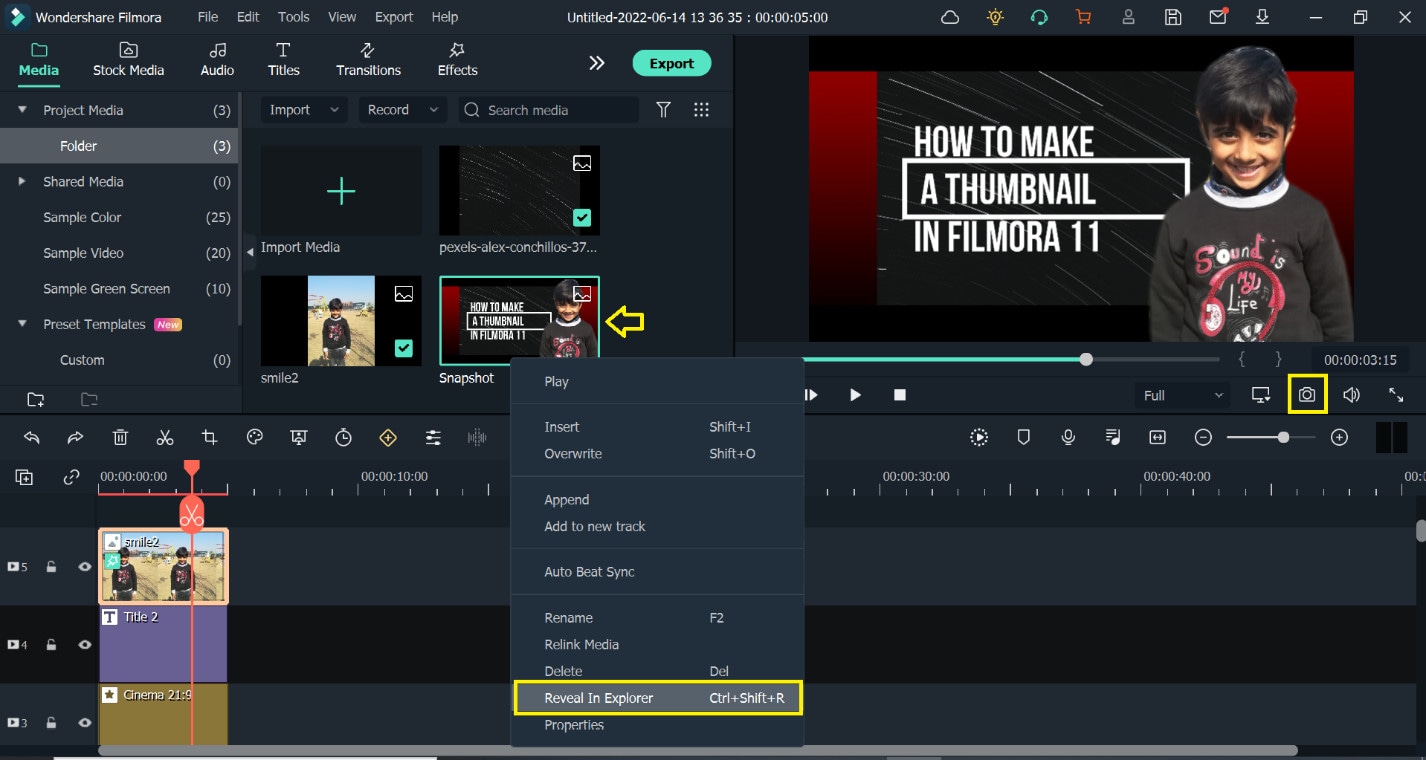
- Now simply click the snapshot button below the preview screen and the snapshot will be saved in default directory and automatically imported to the medium room.
- Right-click on the snapshot in the media pool and click on Reveal in explorer.
- Your thumbnail will be saved in the folder, you can upload it on the Google drive.
Unfortunately, there is no way to change the thumbnail of the video on Google drive. But we can take help from other websites to customize the thumbnail image and then upload it to Google drive. Let us discuss a few free websites used for the thumbnail of a video on Google drive.
Here are the best possible ways to change the thumbnail of the video stored in the Google drive.
1. Change the Thumbnails of Google drive using the Wix.
The Wix editor is a platform that is used to edit and make your own website. It provides easy interphase to customize the site using its amazing features. There are hundreds of features to build your own site or image by adding customizing elements and choosing color and text theme.
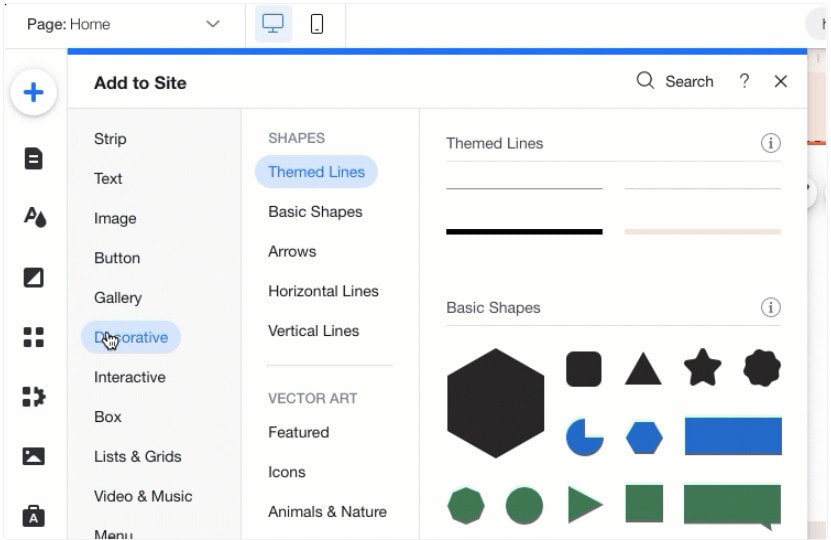
You can use the Wix to set or change your thumbnail to make your video attractive and eye-catching. The cover image can be by uploading and a frame can be selected from the video.
Let’s get started!
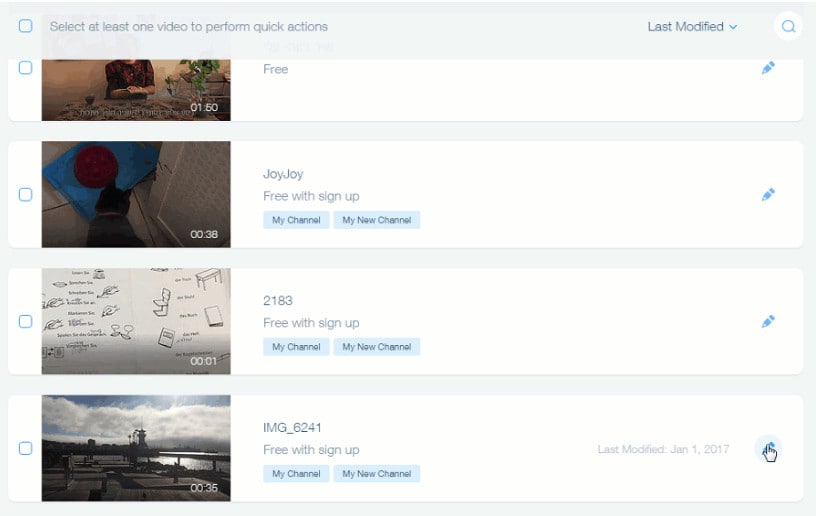
- Open the Wix editor from the browser.
- Select a video from your video library.
- Hit the Edit icon at the video
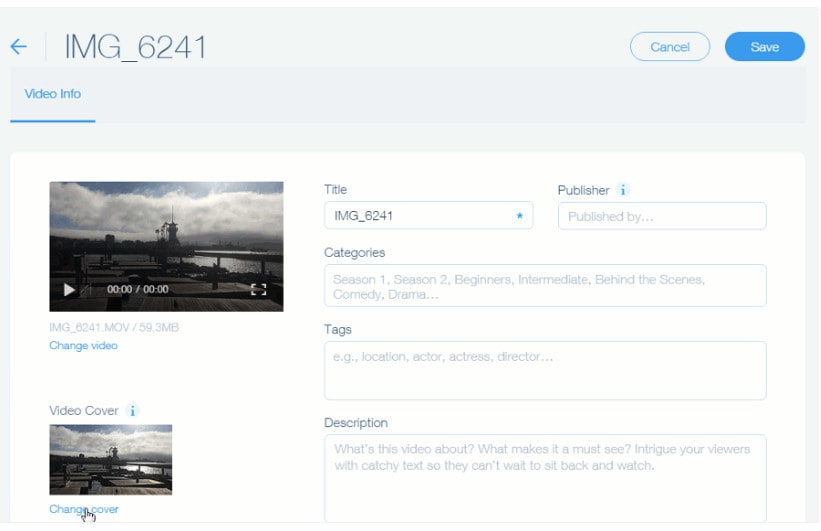
- Click on change cover under the cover image.
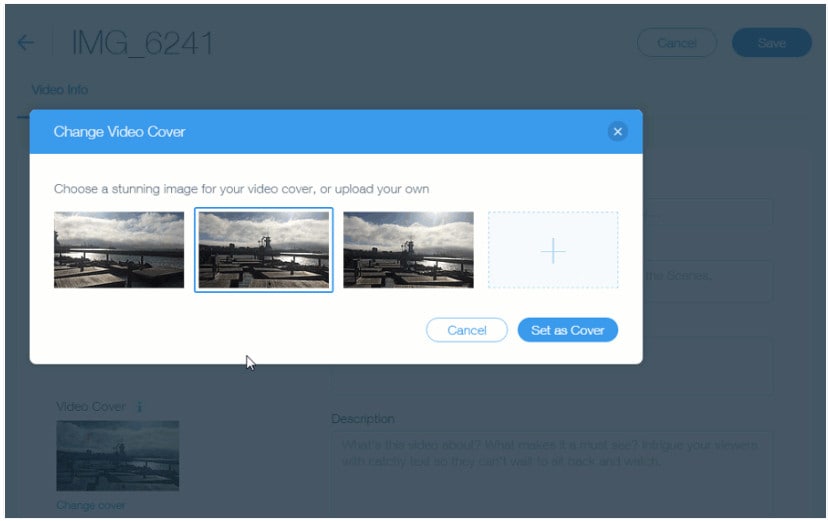
- Select the desired frame from the list, or you can upload your own by clicking the “+”
- Click on the Set as Cover
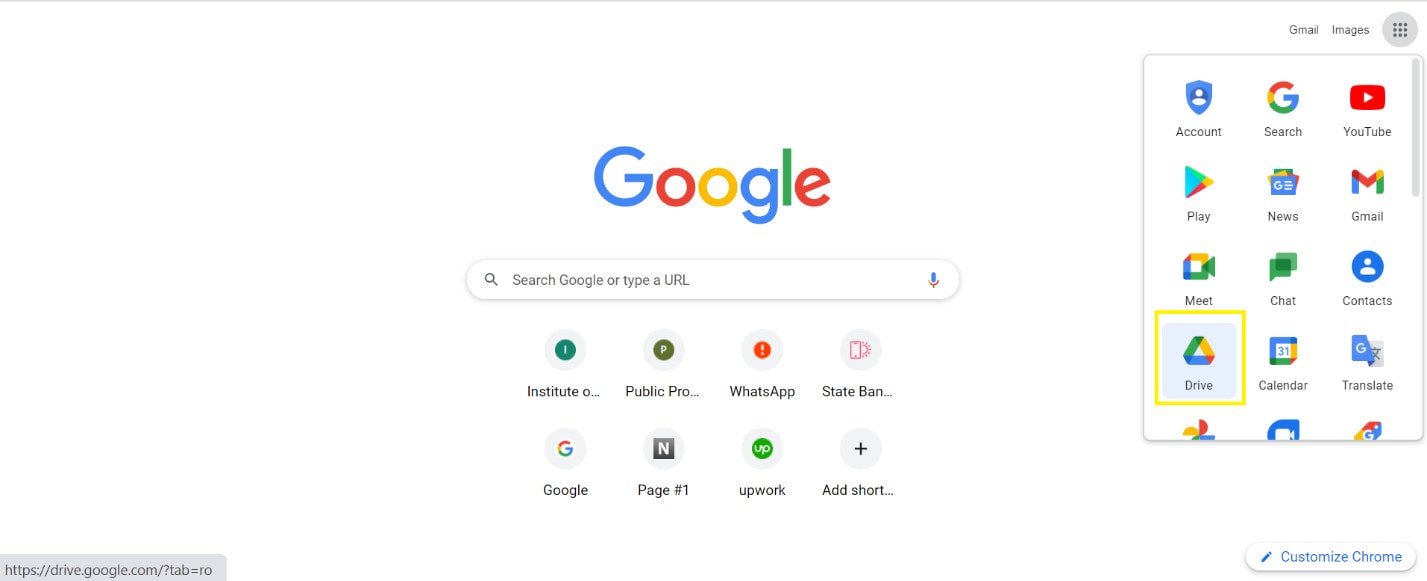
- Now upload the video on Google drive.
- If the file fails to upload, clear your cache and cookies and check your internet connection.
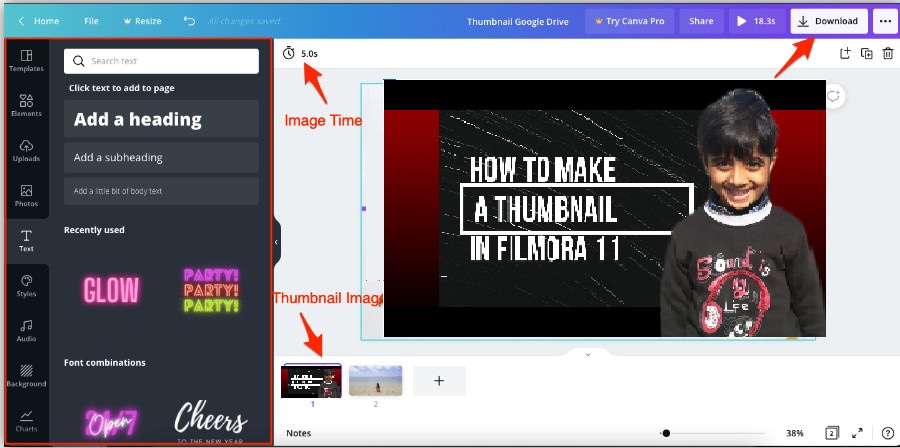
2. Change the Thumbnails of Google drive using Canvas.
Canvas is an online graphic design platform that allows and provides you with user-friendly interphase to make eye-catching logos, thumbnails, posters, and a ton of other visual content. You need not download any application and moreover, it is free to use. It saves your previous tasks and has hundreds of frames, and designs to select according to your taste or you can make your own design by editing.
So let’s start!
- Select a template of your choice from the library.
- Canvas provides you with more than 2 million images in the library but you can also upload your own image for Thumbnail.
- Click on the placeholder text to write your own text.
- You can change your image fonts, color, size, and
- You can easily customize your video thumbnail and upload it on Google drive.
- Download the video thumbnail.
- Now upload the Thumbnail on Google Drive.
3. Change the Thumbnails of Google drive using VLC Media Player.
VLC Media Player is a free and open-source media player that plays wide range of media files like images, video files as well as audio and DVDs. It is 100% free software and safe from viruses.

Here are the steps used to change the cover photo of your video using the VLC Media Player.
Let’s dive in…
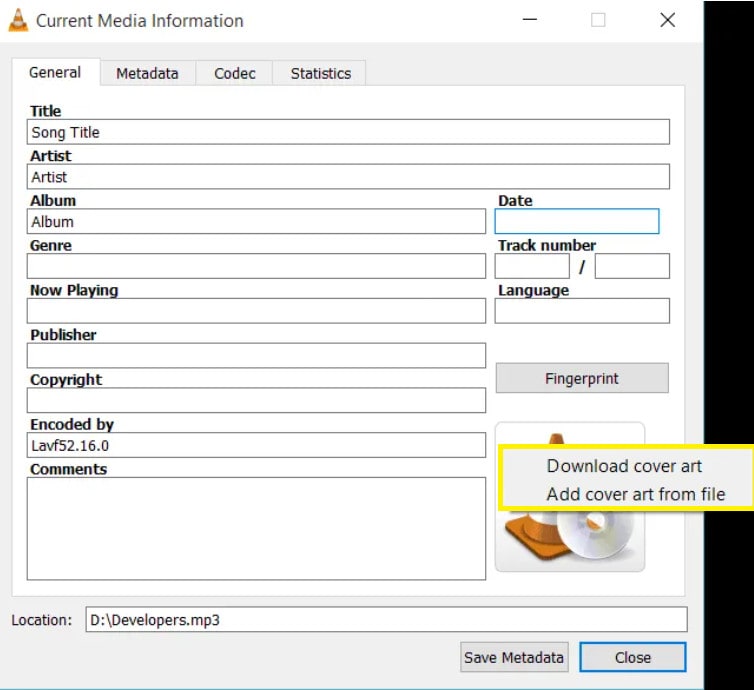
- Go to the tools and select information from the drop-down list.
- The Current Media Information tab will be shown.
- There will be a picture or VLC icon at the bottom-right corner.
- Right-click on that picture or icon and select the download cover art or add cover art from file.
- Download cover art; if you want to add pictures from the album from the internet.
- Add cover art from file; if you want to put your own thumbnail image and browse from the storage.
The information will be saved automatically and the thumbnail will be changed when you open the file.
Important points.
You can use any other video editor to change the thumbnail of the video but keep a few points in mind.
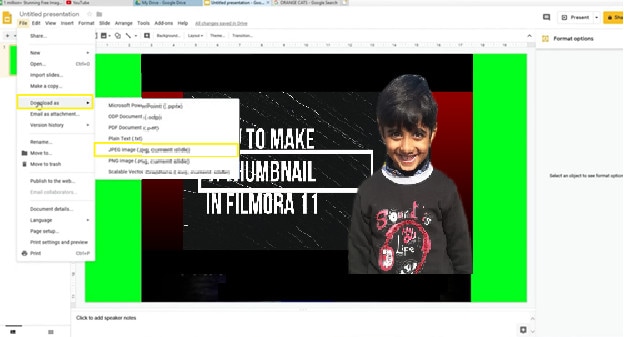
- Thumbnails should be added at the start of the video.
- The Thumbnail should be a few seconds long so that google drive considers it as a cover image.
- It works for short videos but it can be applied for long videos.
- Use a high-quality HD image for the thumbnail so that Google Drive can accept it as valuable for the thumbnail image.
- Thumbnails should be uploaded in PNG, GIF, or JPG
- The image ratio should be 16:9 and resolution of 1920x1080 pixels for PNG and JPG and 960x480 pixels for GIFs.
- The maximum file size should be
- The minimum width should be 220 pixels.
Even after keeping an eye on these important points, google drive sometimes does not show the thumbnail as a cover photo.
Conclusion.
In the above article, I have discussed a couple of different ways to add a thumbnail of the video and upload it on Google drive. I personally recommend Wonder Share Filmora 11 to make and change thumbnail image of the video as it is a very powerful as well as simple tool.
How to Add Thumbnails to the Video Using Wonder Share Filmora 11
Wonder Share Filmora 11 is an all-in-one video editing platform that provides powerful, creative, and simple interphase to edit videos and images in a few clicks. It has a ton of amazing features that make your videos, images, and audio stands out. You can edit your videos and images in a great cinematic form using its effects, transitions, overlays, text, and a lot more. Do not wait, go and download Filmora 11 and there are more tools for you to discover.
I am going to show you how to create a thumbnail of the video in Filmora11.
Let us get started!
- Open Wonder Share Filmora 11 and click on New Project.

- Drag the image of your choice into the timeline.

- Drag the image of your choice into the timeline.
- Click on the AI-Portrait option from the Effects
- Drag the Human Segmentation effect over the clip into the timeline.
Now you see that the subject of the video thumbnail is selected and the background has been removed.
The AI-Portrait is a very useful effect, it allows you to quickly remove the background through artificial intelligence.

Now you can see the subject has been selected and the background has been removed.
- Now Scale up the photo to be visible on the screen.
- You can set the border settings here to make it more smooth and attractive.

I have dragged my image to the left as I want my text to the right side.
- Let’s drag the desired background into the timeline. ( I got this background from Pexel.com)

- Click on sample colors under the media option to add the gradient overlay.
- Drag your favorite Gradient and drop it below the background layer.

- Now select the Overlay option under the Effects tab and then Hit Frames.
- Add your desired frame between a photo layer and a background layer to show depth in your thumbnail.

So, I choose cinema 21.9 frames to add two black bars behind our subject.
Let’s choose your desired Title from the Library. Here are tons of title packs, you can choose from.
- Select the Titles option under the Titles tab then select your desired Title.
- Drag and locate the title in the place of your taste and then write the text you want.
- Adjust your text accordingly, you can change the font size, color, style, and much more

- Now simply click the snapshot button below the preview screen and the snapshot will be saved in default directory and automatically imported to the medium room.
- Right-click on the snapshot in the media pool and click on Reveal in explorer.
- Your thumbnail will be saved in the folder, you can upload it on the Google drive.

Unfortunately, there is no way to change the thumbnail of the video on Google drive. But we can take help from other websites to customize the thumbnail image and then upload it to Google drive. Let us discuss a few free websites used for the thumbnail of a video on Google drive.
Here are the best possible ways to change the thumbnail of the video stored in the Google drive.
1. Change the Thumbnails of Google drive using the Wix.
The Wix editor is a platform that is used to edit and make your own website. It provides easy interphase to customize the site using its amazing features. There are hundreds of features to build your own site or image by adding customizing elements and choosing color and text theme.

You can use the Wix to set or change your thumbnail to make your video attractive and eye-catching. The cover image can be by uploading and a frame can be selected from the video.
Let’s get started!
- Open the Wix editor from the browser.
- Select a video from your video library.
- Hit the Edit icon at the video

- Click on change cover under the cover image.

- Select the desired frame from the list, or you can upload your own by clicking the “+”
- Click on the Set as Cover

- Now upload the video on Google drive.

- If the file fails to upload, clear your cache and cookies and check your internet connection.
2. Change the Thumbnails of Google drive using Canvas.
Canvas is an online graphic design platform that allows and provides you with user-friendly interphase to make eye-catching logos, thumbnails, posters, and a ton of other visual content. You need not download any application and moreover, it is free to use. It saves your previous tasks and has hundreds of frames, and designs to select according to your taste or you can make your own design by editing.
So let’s start!
- Select a template of your choice from the library.
- Canvas provides you with more than 2 million images in the library but you can also upload your own image for Thumbnail.
- Click on the placeholder text to write your own text.
- You can change your image fonts, color, size, and
- You can easily customize your video thumbnail and upload it on Google drive.
- Download the video thumbnail.
- Now upload the Thumbnail on Google Drive.

3. Change the Thumbnails of Google drive using VLC Media Player.
VLC Media Player is a free and open-source media player that plays wide range of media files like images, video files as well as audio and DVDs. It is 100% free software and safe from viruses.

Here are the steps used to change the cover photo of your video using the VLC Media Player.
Let’s dive in…
- Go to the tools and select information from the drop-down list.
- The Current Media Information tab will be shown.
- There will be a picture or VLC icon at the bottom-right corner.
- Right-click on that picture or icon and select the download cover art or add cover art from file.
- Download cover art; if you want to add pictures from the album from the internet.
- Add cover art from file; if you want to put your own thumbnail image and browse from the storage.

The information will be saved automatically and the thumbnail will be changed when you open the file.
Important points.
You can use any other video editor to change the thumbnail of the video but keep a few points in mind.
- Thumbnails should be added at the start of the video.
- The Thumbnail should be a few seconds long so that google drive considers it as a cover image.
- It works for short videos but it can be applied for long videos.
- Use a high-quality HD image for the thumbnail so that Google Drive can accept it as valuable for the thumbnail image.
- Thumbnails should be uploaded in PNG, GIF, or JPG
- The image ratio should be 16:9 and resolution of 1920x1080 pixels for PNG and JPG and 960x480 pixels for GIFs.
- The maximum file size should be
- The minimum width should be 220 pixels.

Even after keeping an eye on these important points, google drive sometimes does not show the thumbnail as a cover photo.
Conclusion.
In the above article, I have discussed a couple of different ways to add a thumbnail of the video and upload it on Google drive. I personally recommend Wonder Share Filmora 11 to make and change thumbnail image of the video as it is a very powerful as well as simple tool.
How to Add Thumbnails to the Video Using Wonder Share Filmora 11
Wonder Share Filmora 11 is an all-in-one video editing platform that provides powerful, creative, and simple interphase to edit videos and images in a few clicks. It has a ton of amazing features that make your videos, images, and audio stands out. You can edit your videos and images in a great cinematic form using its effects, transitions, overlays, text, and a lot more. Do not wait, go and download Filmora 11 and there are more tools for you to discover.
I am going to show you how to create a thumbnail of the video in Filmora11.
Let us get started!
- Open Wonder Share Filmora 11 and click on New Project.

- Drag the image of your choice into the timeline.

- Drag the image of your choice into the timeline.
- Click on the AI-Portrait option from the Effects
- Drag the Human Segmentation effect over the clip into the timeline.
Now you see that the subject of the video thumbnail is selected and the background has been removed.
The AI-Portrait is a very useful effect, it allows you to quickly remove the background through artificial intelligence.

Now you can see the subject has been selected and the background has been removed.
- Now Scale up the photo to be visible on the screen.
- You can set the border settings here to make it more smooth and attractive.

I have dragged my image to the left as I want my text to the right side.
- Let’s drag the desired background into the timeline. ( I got this background from Pexel.com)

- Click on sample colors under the media option to add the gradient overlay.
- Drag your favorite Gradient and drop it below the background layer.

- Now select the Overlay option under the Effects tab and then Hit Frames.
- Add your desired frame between a photo layer and a background layer to show depth in your thumbnail.

So, I choose cinema 21.9 frames to add two black bars behind our subject.
Let’s choose your desired Title from the Library. Here are tons of title packs, you can choose from.
- Select the Titles option under the Titles tab then select your desired Title.
- Drag and locate the title in the place of your taste and then write the text you want.
- Adjust your text accordingly, you can change the font size, color, style, and much more

- Now simply click the snapshot button below the preview screen and the snapshot will be saved in default directory and automatically imported to the medium room.
- Right-click on the snapshot in the media pool and click on Reveal in explorer.
- Your thumbnail will be saved in the folder, you can upload it on the Google drive.

Unfortunately, there is no way to change the thumbnail of the video on Google drive. But we can take help from other websites to customize the thumbnail image and then upload it to Google drive. Let us discuss a few free websites used for the thumbnail of a video on Google drive.
Here are the best possible ways to change the thumbnail of the video stored in the Google drive.
1. Change the Thumbnails of Google drive using the Wix.
The Wix editor is a platform that is used to edit and make your own website. It provides easy interphase to customize the site using its amazing features. There are hundreds of features to build your own site or image by adding customizing elements and choosing color and text theme.

You can use the Wix to set or change your thumbnail to make your video attractive and eye-catching. The cover image can be by uploading and a frame can be selected from the video.
Let’s get started!
- Open the Wix editor from the browser.
- Select a video from your video library.
- Hit the Edit icon at the video

- Click on change cover under the cover image.

- Select the desired frame from the list, or you can upload your own by clicking the “+”
- Click on the Set as Cover

- Now upload the video on Google drive.

- If the file fails to upload, clear your cache and cookies and check your internet connection.
2. Change the Thumbnails of Google drive using Canvas.
Canvas is an online graphic design platform that allows and provides you with user-friendly interphase to make eye-catching logos, thumbnails, posters, and a ton of other visual content. You need not download any application and moreover, it is free to use. It saves your previous tasks and has hundreds of frames, and designs to select according to your taste or you can make your own design by editing.
So let’s start!
- Select a template of your choice from the library.
- Canvas provides you with more than 2 million images in the library but you can also upload your own image for Thumbnail.
- Click on the placeholder text to write your own text.
- You can change your image fonts, color, size, and
- You can easily customize your video thumbnail and upload it on Google drive.
- Download the video thumbnail.
- Now upload the Thumbnail on Google Drive.

3. Change the Thumbnails of Google drive using VLC Media Player.
VLC Media Player is a free and open-source media player that plays wide range of media files like images, video files as well as audio and DVDs. It is 100% free software and safe from viruses.

Here are the steps used to change the cover photo of your video using the VLC Media Player.
Let’s dive in…
- Go to the tools and select information from the drop-down list.
- The Current Media Information tab will be shown.
- There will be a picture or VLC icon at the bottom-right corner.
- Right-click on that picture or icon and select the download cover art or add cover art from file.
- Download cover art; if you want to add pictures from the album from the internet.
- Add cover art from file; if you want to put your own thumbnail image and browse from the storage.

The information will be saved automatically and the thumbnail will be changed when you open the file.
Important points.
You can use any other video editor to change the thumbnail of the video but keep a few points in mind.
- Thumbnails should be added at the start of the video.
- The Thumbnail should be a few seconds long so that google drive considers it as a cover image.
- It works for short videos but it can be applied for long videos.
- Use a high-quality HD image for the thumbnail so that Google Drive can accept it as valuable for the thumbnail image.
- Thumbnails should be uploaded in PNG, GIF, or JPG
- The image ratio should be 16:9 and resolution of 1920x1080 pixels for PNG and JPG and 960x480 pixels for GIFs.
- The maximum file size should be
- The minimum width should be 220 pixels.

Even after keeping an eye on these important points, google drive sometimes does not show the thumbnail as a cover photo.
Conclusion.
In the above article, I have discussed a couple of different ways to add a thumbnail of the video and upload it on Google drive. I personally recommend Wonder Share Filmora 11 to make and change thumbnail image of the video as it is a very powerful as well as simple tool.
How to Add Thumbnails to the Video Using Wonder Share Filmora 11
Wonder Share Filmora 11 is an all-in-one video editing platform that provides powerful, creative, and simple interphase to edit videos and images in a few clicks. It has a ton of amazing features that make your videos, images, and audio stands out. You can edit your videos and images in a great cinematic form using its effects, transitions, overlays, text, and a lot more. Do not wait, go and download Filmora 11 and there are more tools for you to discover.
I am going to show you how to create a thumbnail of the video in Filmora11.
Let us get started!
- Open Wonder Share Filmora 11 and click on New Project.

- Drag the image of your choice into the timeline.

- Drag the image of your choice into the timeline.
- Click on the AI-Portrait option from the Effects
- Drag the Human Segmentation effect over the clip into the timeline.
Now you see that the subject of the video thumbnail is selected and the background has been removed.
The AI-Portrait is a very useful effect, it allows you to quickly remove the background through artificial intelligence.

Now you can see the subject has been selected and the background has been removed.
- Now Scale up the photo to be visible on the screen.
- You can set the border settings here to make it more smooth and attractive.

I have dragged my image to the left as I want my text to the right side.
- Let’s drag the desired background into the timeline. ( I got this background from Pexel.com)

- Click on sample colors under the media option to add the gradient overlay.
- Drag your favorite Gradient and drop it below the background layer.

- Now select the Overlay option under the Effects tab and then Hit Frames.
- Add your desired frame between a photo layer and a background layer to show depth in your thumbnail.

So, I choose cinema 21.9 frames to add two black bars behind our subject.
Let’s choose your desired Title from the Library. Here are tons of title packs, you can choose from.
- Select the Titles option under the Titles tab then select your desired Title.
- Drag and locate the title in the place of your taste and then write the text you want.
- Adjust your text accordingly, you can change the font size, color, style, and much more

- Now simply click the snapshot button below the preview screen and the snapshot will be saved in default directory and automatically imported to the medium room.
- Right-click on the snapshot in the media pool and click on Reveal in explorer.
- Your thumbnail will be saved in the folder, you can upload it on the Google drive.

Unfortunately, there is no way to change the thumbnail of the video on Google drive. But we can take help from other websites to customize the thumbnail image and then upload it to Google drive. Let us discuss a few free websites used for the thumbnail of a video on Google drive.
Here are the best possible ways to change the thumbnail of the video stored in the Google drive.
1. Change the Thumbnails of Google drive using the Wix.
The Wix editor is a platform that is used to edit and make your own website. It provides easy interphase to customize the site using its amazing features. There are hundreds of features to build your own site or image by adding customizing elements and choosing color and text theme.

You can use the Wix to set or change your thumbnail to make your video attractive and eye-catching. The cover image can be by uploading and a frame can be selected from the video.
Let’s get started!
- Open the Wix editor from the browser.
- Select a video from your video library.
- Hit the Edit icon at the video

- Click on change cover under the cover image.

- Select the desired frame from the list, or you can upload your own by clicking the “+”
- Click on the Set as Cover

- Now upload the video on Google drive.

- If the file fails to upload, clear your cache and cookies and check your internet connection.
2. Change the Thumbnails of Google drive using Canvas.
Canvas is an online graphic design platform that allows and provides you with user-friendly interphase to make eye-catching logos, thumbnails, posters, and a ton of other visual content. You need not download any application and moreover, it is free to use. It saves your previous tasks and has hundreds of frames, and designs to select according to your taste or you can make your own design by editing.
So let’s start!
- Select a template of your choice from the library.
- Canvas provides you with more than 2 million images in the library but you can also upload your own image for Thumbnail.
- Click on the placeholder text to write your own text.
- You can change your image fonts, color, size, and
- You can easily customize your video thumbnail and upload it on Google drive.
- Download the video thumbnail.
- Now upload the Thumbnail on Google Drive.

3. Change the Thumbnails of Google drive using VLC Media Player.
VLC Media Player is a free and open-source media player that plays wide range of media files like images, video files as well as audio and DVDs. It is 100% free software and safe from viruses.

Here are the steps used to change the cover photo of your video using the VLC Media Player.
Let’s dive in…
- Go to the tools and select information from the drop-down list.
- The Current Media Information tab will be shown.
- There will be a picture or VLC icon at the bottom-right corner.
- Right-click on that picture or icon and select the download cover art or add cover art from file.
- Download cover art; if you want to add pictures from the album from the internet.
- Add cover art from file; if you want to put your own thumbnail image and browse from the storage.

The information will be saved automatically and the thumbnail will be changed when you open the file.
Important points.
You can use any other video editor to change the thumbnail of the video but keep a few points in mind.
- Thumbnails should be added at the start of the video.
- The Thumbnail should be a few seconds long so that google drive considers it as a cover image.
- It works for short videos but it can be applied for long videos.
- Use a high-quality HD image for the thumbnail so that Google Drive can accept it as valuable for the thumbnail image.
- Thumbnails should be uploaded in PNG, GIF, or JPG
- The image ratio should be 16:9 and resolution of 1920x1080 pixels for PNG and JPG and 960x480 pixels for GIFs.
- The maximum file size should be
- The minimum width should be 220 pixels.

Even after keeping an eye on these important points, google drive sometimes does not show the thumbnail as a cover photo.
Conclusion.
In the above article, I have discussed a couple of different ways to add a thumbnail of the video and upload it on Google drive. I personally recommend Wonder Share Filmora 11 to make and change thumbnail image of the video as it is a very powerful as well as simple tool.
Best AR Video Apps
Best AR Video App - Top 10 Picks
An easy yet powerful editor
Numerous effects to choose from
Detailed tutorials provided by the official channel
AR i.e. Augmented reality is a unique approach that is trendy for its variety of applications. It is a technology that provides the composite view to the user’s perception of real world images and videos.
It is a great development in the direction of technological advancement. AR is the concept that combines real-life objects with simulated 3D objects. Businesses use this approach to make their products more presentable and lively for the customers. Whereas, it is also very helpful for the users to experiment and have fun. With the evolution of this approach, now there are many applications available in the market that offers AR functionaltiy. Here, we are listing down the top 10 AR video apps which are worth using to experience something unique.
In this article
01 [What Is the Difference Between VR and AR?](#Part 1)
02 [10 Top AR Apps Worth Trying](#Part 2)
03 [What New AR Effects Could Be Found in Filmora](#Part 3)
Part 1 What Is the Difference Between VR and AR?
Both AR and VR use a distinctive approach and consider different use cases. They work on the concept of bringing a simulated environment to the user. Both VR i.e. the virtual reality and AR i.e. augmented reality are technologies used to replace or enhance the real-life environment with the simulated one. Virtual reality is the replacement of real-life environments with simulated ones. Whereas, Augmented reality is the procedure of augmenting the real-life environment with the addition of digital elements to a live view. This can be done by the camera on a smartphone.
The main aim of designing AR is to provide detailed information to the user about the real world. Its whole design is done by considering and adding the elements of the real world. Whereas, virtual reality is an entirely different simulation. It completely replaces the real-world environment with the virtual world.
Even Though both technologies are the simulation of the real world, they use different components of design and also have distinct targeted audiences. The concept behind VR is to distance the user from the real world as much as possible. Whereas, the concept of AR works with the real world to create a simulated environment.
The use of an eye-covering headset and headphones is very common to make an illusion of the real world, in the case of VR. Whereas, AR is usually accomplished with a smartphone or tablet screen. Here, the camera of the phone is focused at a point to capture the live-streaming of a moment on the screen. The captured data is then prepared by adding some useful information.
The applications of VR are architecture and retail, training, product design, etc. Whereas, the applications of AR are diagnostic data, navigation information, repair instructions, etc. The availability of ar video maker also eases the task of the industries for the mentioned purposes.
Part 2 10 Top AR Apps Worth Trying
Here, you can run down the list of top 10 augmented video apps which are best and are worth trying. This list is prepared based on user ratings, reviews, and experiences.
01IKEA Place
The Swedish furniture giant has made a great mark in the AR world with the development of a high-tech app. Ikea Place is a great app that lets the shoppers visualize the placements of products at home before buying. You just need to scan the floor from your mobile phone. Then, the easy drag and drop feature enables you to select the best match. The app makes the selection of furniture and home decors fun.

02YouCam Makeup
YouCam Makeup is an AR assisted app that provides a variety of filters for photos. It also acts as a fashion and makeup assistant. This app allows you to preview a variety of beauty products in real-time. Some top makeup brands such as Urban Decay, Maybelline, and Loreal offer their products in the app for the user to test. The app also has the features of sharing the look, following other users and shopping and reviewing featured products.

03GIPHY World
GIPHY World is a 3D coloring app. It lets the colored picture turn into 3D animated graphics. This app can also be used for social media marketing. With its use, you can make your product more appealing to the audience. The tool is just fun, as it lets you convert the images into a variety of other fun characters.

04Google Lens
Google Lens works on the concept of Google Goggles. It is a very useful AR app widely used by users for various purposes. With standard Google, you can search for anything only by typing in the search bar. But, this tool enables searching by opening the camera of a smartphone. You only need to focus the camera lens on the object or text. The app will then identify it and show the top results. It also shows the link to read details about your object or text. If you are searching for a product, then the tool will also help with the location to buy it.

05Augment
Augment is another best-rated AR video editor app. It secured top ratings just within a short period after launch. The app allows users to create videos by considering the characters of both real and fictional worlds. With this app, the users can use augmented reality for the placement of animated 3D models on the surroundings. It can be used by business owners to create appealing videos of their products.

06Roar
Roar is also a powerful AR weapon for business owners. It generates AR content in addition to video, audio, and 3D content. There are lots of options available for business owners to use this app: creating an AR-powered online store, incorporating AR into print ads, experiencing the most popular categories and products, etc. Also, the shoppers can experience the more detailed content about the product, with pricing, reviews, and also the option of purchasing.

07Amikasa
Amikasa is amongst the best home-furnishing AR apps accessible by iPhone users. Anyone can measure the land areas and create floor plans like professionals, with this app. Also, the professionals can use this tool to generate appealing floor and design plans. For this, they can use AR applications along with their measuring tools. The app has listed down the products from the whole web, rather than focusing on any single brand.

08Snapchat
Snapchat is one of the most popular Augmented reality social media apps. There are a variety of features available in the app which is winning millions of hearts all around the world. The app provides features in the form of lenses to add special effects, filters, and real-time transformations to the video messages. This tool also can be used by businesses for marketing purposes.

09Wanna Kicks
Wanna kicks is the perfect app for sneaker lovers. Online shopping is a more demanded and convenient option these days, but the app allows you to visualize the look of footwear before buying. You can visualize the look of footwear on the foot from any desired angle. You just need to focus the phone’s camera on your feet and use the drag and drop option to select from varied categories.

10Houzz
Houzz is also the best AR video creator in the home goods and furniture category. The app allows you to match the furniture with the layout of your house just by sitting at home. The feature, “View in My Room” lets the user place the products on the picture of shoppers’ homes with AR technology. You can also check the product’s look in different lighting.

Part 3 What New AR Effects Could Be Found in Filmora
Filmora is a wonderful AR video editing app that lets the user create appealing videos with less effort. The tool also has some useful AR features and effects which allow the user to give AR touch to their creation.
01Stock Media
A great addition to the Filmora 11 library is stock media. Stock media got integrated with GIPHY, Unsplash, and Pixabay. It is a unique and interesting feature available in Filmora. With this, you can get royalty-free images, GIFs, and videos inside the video editing tool only.
02AI Portrait
The AI portrait feature of Filmora 11 allows the user to remove the background around the human face. The feature also has several AR stickers such as Cute cat, Zombie teeth, etc and effects such as Human glitch, Human Pixelate, etc to play with.
03Auto Beat Sync
This brand new feature will allow you to sync your video with the rhythm and tempo automatically. You just need to upload a video and music, you wish to sync. Then, the app allows you to specify the video effect such as RGB, glow, video wall, blur, etc to be applied. Now, just click on the “Analyze” button to see the magic. The tool will run an algorithm to create an interesting video.
04Boris FX
Boris FX is a feature containing an array of advanced post-production effects. This feature is only available in some professional video editors like VEGAS Pro. Filmora is also proud to be on the list now. The Boris FX Continuum pack includes great post-production video effects such as Art Looks, Blur, Image Restoration, Lights, Stylize, Particles, etc. To use this high-end feature, you will need a paid version and a high-end workstation.
05NewBlue FX
NewBlue FX is also one of the powerful ar features of Filmora. It is a unique collection of Video Essentials, Video Filters, Video Elements, Video Stylizer, and Title Pro 7. This feature allows you to perform advanced titling, stylizing, color enhancement, composition, color correction, etc, professionally.
06Preset Templates
The Preset Templates feature of Filmora allows users to create professional-looking videos in just hours. This feature enables you to access preset templates such as “Business Outro”, “Game Endscreen”, “How to Paint Intro”, “Birthday Openers”, etc. To provide the desired modifications to your video, just drag and drop the templates and have fun.
Some of the new AR effects found in the latest version of Wondershare Filmora Video Editor are: WordArt Font, Modern Birthday Pack, Broken Effect Pack, 3D Like and Subscribe Sticker, Comic Texts Stickers, Vintage Memories, Hi-Tech Intros Pack, Abstract Bubble Intro, Smooth Big Titles, Cinematic Digital Slideshow, Cinematic Dissolve Effect, 3D Fun Emoji, Illustration VR World Pack, Makeups Pack, Trendy Gaming Endscreen Pack, Birthday Pack Vol 02, Blingbling Pack Vol 02, Raindrop Pack, Pixel Game Transition, The Awakening of Magic, Dynamic Lines Title Pack, Fancy Atmosphere Pack, Basic Sunshine Effects, Old Paper Opener, Qte Gaming Effects, Neon Titles Pack.
For Win 7 or later (64-bit)
For macOS 10.12 or later
● Ending Thoughts →
● Augmented reality is an approach that has never-ending scope. The concept is used in a variety of applications these days. And its applications and uses are increasing with each passing day.
● So, here we have shared the list of the best AR video apps. There are many more apps available. But, these are some highly popular applications for business, consumer as well as entertainment purposes.
● If you are also wishing to contribute a little to the world of AR with your unique creativity and skills, then you should try Filmora. The variety of newly added features allows you to create AR-enabled videos with so much ease.
AR i.e. Augmented reality is a unique approach that is trendy for its variety of applications. It is a technology that provides the composite view to the user’s perception of real world images and videos.
It is a great development in the direction of technological advancement. AR is the concept that combines real-life objects with simulated 3D objects. Businesses use this approach to make their products more presentable and lively for the customers. Whereas, it is also very helpful for the users to experiment and have fun. With the evolution of this approach, now there are many applications available in the market that offers AR functionaltiy. Here, we are listing down the top 10 AR video apps which are worth using to experience something unique.
In this article
01 [What Is the Difference Between VR and AR?](#Part 1)
02 [10 Top AR Apps Worth Trying](#Part 2)
03 [What New AR Effects Could Be Found in Filmora](#Part 3)
Part 1 What Is the Difference Between VR and AR?
Both AR and VR use a distinctive approach and consider different use cases. They work on the concept of bringing a simulated environment to the user. Both VR i.e. the virtual reality and AR i.e. augmented reality are technologies used to replace or enhance the real-life environment with the simulated one. Virtual reality is the replacement of real-life environments with simulated ones. Whereas, Augmented reality is the procedure of augmenting the real-life environment with the addition of digital elements to a live view. This can be done by the camera on a smartphone.
The main aim of designing AR is to provide detailed information to the user about the real world. Its whole design is done by considering and adding the elements of the real world. Whereas, virtual reality is an entirely different simulation. It completely replaces the real-world environment with the virtual world.
Even Though both technologies are the simulation of the real world, they use different components of design and also have distinct targeted audiences. The concept behind VR is to distance the user from the real world as much as possible. Whereas, the concept of AR works with the real world to create a simulated environment.
The use of an eye-covering headset and headphones is very common to make an illusion of the real world, in the case of VR. Whereas, AR is usually accomplished with a smartphone or tablet screen. Here, the camera of the phone is focused at a point to capture the live-streaming of a moment on the screen. The captured data is then prepared by adding some useful information.
The applications of VR are architecture and retail, training, product design, etc. Whereas, the applications of AR are diagnostic data, navigation information, repair instructions, etc. The availability of ar video maker also eases the task of the industries for the mentioned purposes.
Part 2 10 Top AR Apps Worth Trying
Here, you can run down the list of top 10 augmented video apps which are best and are worth trying. This list is prepared based on user ratings, reviews, and experiences.
01IKEA Place
The Swedish furniture giant has made a great mark in the AR world with the development of a high-tech app. Ikea Place is a great app that lets the shoppers visualize the placements of products at home before buying. You just need to scan the floor from your mobile phone. Then, the easy drag and drop feature enables you to select the best match. The app makes the selection of furniture and home decors fun.

02YouCam Makeup
YouCam Makeup is an AR assisted app that provides a variety of filters for photos. It also acts as a fashion and makeup assistant. This app allows you to preview a variety of beauty products in real-time. Some top makeup brands such as Urban Decay, Maybelline, and Loreal offer their products in the app for the user to test. The app also has the features of sharing the look, following other users and shopping and reviewing featured products.

03GIPHY World
GIPHY World is a 3D coloring app. It lets the colored picture turn into 3D animated graphics. This app can also be used for social media marketing. With its use, you can make your product more appealing to the audience. The tool is just fun, as it lets you convert the images into a variety of other fun characters.

04Google Lens
Google Lens works on the concept of Google Goggles. It is a very useful AR app widely used by users for various purposes. With standard Google, you can search for anything only by typing in the search bar. But, this tool enables searching by opening the camera of a smartphone. You only need to focus the camera lens on the object or text. The app will then identify it and show the top results. It also shows the link to read details about your object or text. If you are searching for a product, then the tool will also help with the location to buy it.

05Augment
Augment is another best-rated AR video editor app. It secured top ratings just within a short period after launch. The app allows users to create videos by considering the characters of both real and fictional worlds. With this app, the users can use augmented reality for the placement of animated 3D models on the surroundings. It can be used by business owners to create appealing videos of their products.

06Roar
Roar is also a powerful AR weapon for business owners. It generates AR content in addition to video, audio, and 3D content. There are lots of options available for business owners to use this app: creating an AR-powered online store, incorporating AR into print ads, experiencing the most popular categories and products, etc. Also, the shoppers can experience the more detailed content about the product, with pricing, reviews, and also the option of purchasing.

07Amikasa
Amikasa is amongst the best home-furnishing AR apps accessible by iPhone users. Anyone can measure the land areas and create floor plans like professionals, with this app. Also, the professionals can use this tool to generate appealing floor and design plans. For this, they can use AR applications along with their measuring tools. The app has listed down the products from the whole web, rather than focusing on any single brand.

08Snapchat
Snapchat is one of the most popular Augmented reality social media apps. There are a variety of features available in the app which is winning millions of hearts all around the world. The app provides features in the form of lenses to add special effects, filters, and real-time transformations to the video messages. This tool also can be used by businesses for marketing purposes.

09Wanna Kicks
Wanna kicks is the perfect app for sneaker lovers. Online shopping is a more demanded and convenient option these days, but the app allows you to visualize the look of footwear before buying. You can visualize the look of footwear on the foot from any desired angle. You just need to focus the phone’s camera on your feet and use the drag and drop option to select from varied categories.

10Houzz
Houzz is also the best AR video creator in the home goods and furniture category. The app allows you to match the furniture with the layout of your house just by sitting at home. The feature, “View in My Room” lets the user place the products on the picture of shoppers’ homes with AR technology. You can also check the product’s look in different lighting.

Part 3 What New AR Effects Could Be Found in Filmora
Filmora is a wonderful AR video editing app that lets the user create appealing videos with less effort. The tool also has some useful AR features and effects which allow the user to give AR touch to their creation.
01Stock Media
A great addition to the Filmora 11 library is stock media. Stock media got integrated with GIPHY, Unsplash, and Pixabay. It is a unique and interesting feature available in Filmora. With this, you can get royalty-free images, GIFs, and videos inside the video editing tool only.
02AI Portrait
The AI portrait feature of Filmora 11 allows the user to remove the background around the human face. The feature also has several AR stickers such as Cute cat, Zombie teeth, etc and effects such as Human glitch, Human Pixelate, etc to play with.
03Auto Beat Sync
This brand new feature will allow you to sync your video with the rhythm and tempo automatically. You just need to upload a video and music, you wish to sync. Then, the app allows you to specify the video effect such as RGB, glow, video wall, blur, etc to be applied. Now, just click on the “Analyze” button to see the magic. The tool will run an algorithm to create an interesting video.
04Boris FX
Boris FX is a feature containing an array of advanced post-production effects. This feature is only available in some professional video editors like VEGAS Pro. Filmora is also proud to be on the list now. The Boris FX Continuum pack includes great post-production video effects such as Art Looks, Blur, Image Restoration, Lights, Stylize, Particles, etc. To use this high-end feature, you will need a paid version and a high-end workstation.
05NewBlue FX
NewBlue FX is also one of the powerful ar features of Filmora. It is a unique collection of Video Essentials, Video Filters, Video Elements, Video Stylizer, and Title Pro 7. This feature allows you to perform advanced titling, stylizing, color enhancement, composition, color correction, etc, professionally.
06Preset Templates
The Preset Templates feature of Filmora allows users to create professional-looking videos in just hours. This feature enables you to access preset templates such as “Business Outro”, “Game Endscreen”, “How to Paint Intro”, “Birthday Openers”, etc. To provide the desired modifications to your video, just drag and drop the templates and have fun.
Some of the new AR effects found in the latest version of Wondershare Filmora Video Editor are: WordArt Font, Modern Birthday Pack, Broken Effect Pack, 3D Like and Subscribe Sticker, Comic Texts Stickers, Vintage Memories, Hi-Tech Intros Pack, Abstract Bubble Intro, Smooth Big Titles, Cinematic Digital Slideshow, Cinematic Dissolve Effect, 3D Fun Emoji, Illustration VR World Pack, Makeups Pack, Trendy Gaming Endscreen Pack, Birthday Pack Vol 02, Blingbling Pack Vol 02, Raindrop Pack, Pixel Game Transition, The Awakening of Magic, Dynamic Lines Title Pack, Fancy Atmosphere Pack, Basic Sunshine Effects, Old Paper Opener, Qte Gaming Effects, Neon Titles Pack.
For Win 7 or later (64-bit)
For macOS 10.12 or later
● Ending Thoughts →
● Augmented reality is an approach that has never-ending scope. The concept is used in a variety of applications these days. And its applications and uses are increasing with each passing day.
● So, here we have shared the list of the best AR video apps. There are many more apps available. But, these are some highly popular applications for business, consumer as well as entertainment purposes.
● If you are also wishing to contribute a little to the world of AR with your unique creativity and skills, then you should try Filmora. The variety of newly added features allows you to create AR-enabled videos with so much ease.
AR i.e. Augmented reality is a unique approach that is trendy for its variety of applications. It is a technology that provides the composite view to the user’s perception of real world images and videos.
It is a great development in the direction of technological advancement. AR is the concept that combines real-life objects with simulated 3D objects. Businesses use this approach to make their products more presentable and lively for the customers. Whereas, it is also very helpful for the users to experiment and have fun. With the evolution of this approach, now there are many applications available in the market that offers AR functionaltiy. Here, we are listing down the top 10 AR video apps which are worth using to experience something unique.
In this article
01 [What Is the Difference Between VR and AR?](#Part 1)
02 [10 Top AR Apps Worth Trying](#Part 2)
03 [What New AR Effects Could Be Found in Filmora](#Part 3)
Part 1 What Is the Difference Between VR and AR?
Both AR and VR use a distinctive approach and consider different use cases. They work on the concept of bringing a simulated environment to the user. Both VR i.e. the virtual reality and AR i.e. augmented reality are technologies used to replace or enhance the real-life environment with the simulated one. Virtual reality is the replacement of real-life environments with simulated ones. Whereas, Augmented reality is the procedure of augmenting the real-life environment with the addition of digital elements to a live view. This can be done by the camera on a smartphone.
The main aim of designing AR is to provide detailed information to the user about the real world. Its whole design is done by considering and adding the elements of the real world. Whereas, virtual reality is an entirely different simulation. It completely replaces the real-world environment with the virtual world.
Even Though both technologies are the simulation of the real world, they use different components of design and also have distinct targeted audiences. The concept behind VR is to distance the user from the real world as much as possible. Whereas, the concept of AR works with the real world to create a simulated environment.
The use of an eye-covering headset and headphones is very common to make an illusion of the real world, in the case of VR. Whereas, AR is usually accomplished with a smartphone or tablet screen. Here, the camera of the phone is focused at a point to capture the live-streaming of a moment on the screen. The captured data is then prepared by adding some useful information.
The applications of VR are architecture and retail, training, product design, etc. Whereas, the applications of AR are diagnostic data, navigation information, repair instructions, etc. The availability of ar video maker also eases the task of the industries for the mentioned purposes.
Part 2 10 Top AR Apps Worth Trying
Here, you can run down the list of top 10 augmented video apps which are best and are worth trying. This list is prepared based on user ratings, reviews, and experiences.
01IKEA Place
The Swedish furniture giant has made a great mark in the AR world with the development of a high-tech app. Ikea Place is a great app that lets the shoppers visualize the placements of products at home before buying. You just need to scan the floor from your mobile phone. Then, the easy drag and drop feature enables you to select the best match. The app makes the selection of furniture and home decors fun.

02YouCam Makeup
YouCam Makeup is an AR assisted app that provides a variety of filters for photos. It also acts as a fashion and makeup assistant. This app allows you to preview a variety of beauty products in real-time. Some top makeup brands such as Urban Decay, Maybelline, and Loreal offer their products in the app for the user to test. The app also has the features of sharing the look, following other users and shopping and reviewing featured products.

03GIPHY World
GIPHY World is a 3D coloring app. It lets the colored picture turn into 3D animated graphics. This app can also be used for social media marketing. With its use, you can make your product more appealing to the audience. The tool is just fun, as it lets you convert the images into a variety of other fun characters.

04Google Lens
Google Lens works on the concept of Google Goggles. It is a very useful AR app widely used by users for various purposes. With standard Google, you can search for anything only by typing in the search bar. But, this tool enables searching by opening the camera of a smartphone. You only need to focus the camera lens on the object or text. The app will then identify it and show the top results. It also shows the link to read details about your object or text. If you are searching for a product, then the tool will also help with the location to buy it.

05Augment
Augment is another best-rated AR video editor app. It secured top ratings just within a short period after launch. The app allows users to create videos by considering the characters of both real and fictional worlds. With this app, the users can use augmented reality for the placement of animated 3D models on the surroundings. It can be used by business owners to create appealing videos of their products.

06Roar
Roar is also a powerful AR weapon for business owners. It generates AR content in addition to video, audio, and 3D content. There are lots of options available for business owners to use this app: creating an AR-powered online store, incorporating AR into print ads, experiencing the most popular categories and products, etc. Also, the shoppers can experience the more detailed content about the product, with pricing, reviews, and also the option of purchasing.

07Amikasa
Amikasa is amongst the best home-furnishing AR apps accessible by iPhone users. Anyone can measure the land areas and create floor plans like professionals, with this app. Also, the professionals can use this tool to generate appealing floor and design plans. For this, they can use AR applications along with their measuring tools. The app has listed down the products from the whole web, rather than focusing on any single brand.

08Snapchat
Snapchat is one of the most popular Augmented reality social media apps. There are a variety of features available in the app which is winning millions of hearts all around the world. The app provides features in the form of lenses to add special effects, filters, and real-time transformations to the video messages. This tool also can be used by businesses for marketing purposes.

09Wanna Kicks
Wanna kicks is the perfect app for sneaker lovers. Online shopping is a more demanded and convenient option these days, but the app allows you to visualize the look of footwear before buying. You can visualize the look of footwear on the foot from any desired angle. You just need to focus the phone’s camera on your feet and use the drag and drop option to select from varied categories.

10Houzz
Houzz is also the best AR video creator in the home goods and furniture category. The app allows you to match the furniture with the layout of your house just by sitting at home. The feature, “View in My Room” lets the user place the products on the picture of shoppers’ homes with AR technology. You can also check the product’s look in different lighting.

Part 3 What New AR Effects Could Be Found in Filmora
Filmora is a wonderful AR video editing app that lets the user create appealing videos with less effort. The tool also has some useful AR features and effects which allow the user to give AR touch to their creation.
01Stock Media
A great addition to the Filmora 11 library is stock media. Stock media got integrated with GIPHY, Unsplash, and Pixabay. It is a unique and interesting feature available in Filmora. With this, you can get royalty-free images, GIFs, and videos inside the video editing tool only.
02AI Portrait
The AI portrait feature of Filmora 11 allows the user to remove the background around the human face. The feature also has several AR stickers such as Cute cat, Zombie teeth, etc and effects such as Human glitch, Human Pixelate, etc to play with.
03Auto Beat Sync
This brand new feature will allow you to sync your video with the rhythm and tempo automatically. You just need to upload a video and music, you wish to sync. Then, the app allows you to specify the video effect such as RGB, glow, video wall, blur, etc to be applied. Now, just click on the “Analyze” button to see the magic. The tool will run an algorithm to create an interesting video.
04Boris FX
Boris FX is a feature containing an array of advanced post-production effects. This feature is only available in some professional video editors like VEGAS Pro. Filmora is also proud to be on the list now. The Boris FX Continuum pack includes great post-production video effects such as Art Looks, Blur, Image Restoration, Lights, Stylize, Particles, etc. To use this high-end feature, you will need a paid version and a high-end workstation.
05NewBlue FX
NewBlue FX is also one of the powerful ar features of Filmora. It is a unique collection of Video Essentials, Video Filters, Video Elements, Video Stylizer, and Title Pro 7. This feature allows you to perform advanced titling, stylizing, color enhancement, composition, color correction, etc, professionally.
06Preset Templates
The Preset Templates feature of Filmora allows users to create professional-looking videos in just hours. This feature enables you to access preset templates such as “Business Outro”, “Game Endscreen”, “How to Paint Intro”, “Birthday Openers”, etc. To provide the desired modifications to your video, just drag and drop the templates and have fun.
Some of the new AR effects found in the latest version of Wondershare Filmora Video Editor are: WordArt Font, Modern Birthday Pack, Broken Effect Pack, 3D Like and Subscribe Sticker, Comic Texts Stickers, Vintage Memories, Hi-Tech Intros Pack, Abstract Bubble Intro, Smooth Big Titles, Cinematic Digital Slideshow, Cinematic Dissolve Effect, 3D Fun Emoji, Illustration VR World Pack, Makeups Pack, Trendy Gaming Endscreen Pack, Birthday Pack Vol 02, Blingbling Pack Vol 02, Raindrop Pack, Pixel Game Transition, The Awakening of Magic, Dynamic Lines Title Pack, Fancy Atmosphere Pack, Basic Sunshine Effects, Old Paper Opener, Qte Gaming Effects, Neon Titles Pack.
For Win 7 or later (64-bit)
For macOS 10.12 or later
● Ending Thoughts →
● Augmented reality is an approach that has never-ending scope. The concept is used in a variety of applications these days. And its applications and uses are increasing with each passing day.
● So, here we have shared the list of the best AR video apps. There are many more apps available. But, these are some highly popular applications for business, consumer as well as entertainment purposes.
● If you are also wishing to contribute a little to the world of AR with your unique creativity and skills, then you should try Filmora. The variety of newly added features allows you to create AR-enabled videos with so much ease.
AR i.e. Augmented reality is a unique approach that is trendy for its variety of applications. It is a technology that provides the composite view to the user’s perception of real world images and videos.
It is a great development in the direction of technological advancement. AR is the concept that combines real-life objects with simulated 3D objects. Businesses use this approach to make their products more presentable and lively for the customers. Whereas, it is also very helpful for the users to experiment and have fun. With the evolution of this approach, now there are many applications available in the market that offers AR functionaltiy. Here, we are listing down the top 10 AR video apps which are worth using to experience something unique.
In this article
01 [What Is the Difference Between VR and AR?](#Part 1)
02 [10 Top AR Apps Worth Trying](#Part 2)
03 [What New AR Effects Could Be Found in Filmora](#Part 3)
Part 1 What Is the Difference Between VR and AR?
Both AR and VR use a distinctive approach and consider different use cases. They work on the concept of bringing a simulated environment to the user. Both VR i.e. the virtual reality and AR i.e. augmented reality are technologies used to replace or enhance the real-life environment with the simulated one. Virtual reality is the replacement of real-life environments with simulated ones. Whereas, Augmented reality is the procedure of augmenting the real-life environment with the addition of digital elements to a live view. This can be done by the camera on a smartphone.
The main aim of designing AR is to provide detailed information to the user about the real world. Its whole design is done by considering and adding the elements of the real world. Whereas, virtual reality is an entirely different simulation. It completely replaces the real-world environment with the virtual world.
Even Though both technologies are the simulation of the real world, they use different components of design and also have distinct targeted audiences. The concept behind VR is to distance the user from the real world as much as possible. Whereas, the concept of AR works with the real world to create a simulated environment.
The use of an eye-covering headset and headphones is very common to make an illusion of the real world, in the case of VR. Whereas, AR is usually accomplished with a smartphone or tablet screen. Here, the camera of the phone is focused at a point to capture the live-streaming of a moment on the screen. The captured data is then prepared by adding some useful information.
The applications of VR are architecture and retail, training, product design, etc. Whereas, the applications of AR are diagnostic data, navigation information, repair instructions, etc. The availability of ar video maker also eases the task of the industries for the mentioned purposes.
Part 2 10 Top AR Apps Worth Trying
Here, you can run down the list of top 10 augmented video apps which are best and are worth trying. This list is prepared based on user ratings, reviews, and experiences.
01IKEA Place
The Swedish furniture giant has made a great mark in the AR world with the development of a high-tech app. Ikea Place is a great app that lets the shoppers visualize the placements of products at home before buying. You just need to scan the floor from your mobile phone. Then, the easy drag and drop feature enables you to select the best match. The app makes the selection of furniture and home decors fun.

02YouCam Makeup
YouCam Makeup is an AR assisted app that provides a variety of filters for photos. It also acts as a fashion and makeup assistant. This app allows you to preview a variety of beauty products in real-time. Some top makeup brands such as Urban Decay, Maybelline, and Loreal offer their products in the app for the user to test. The app also has the features of sharing the look, following other users and shopping and reviewing featured products.

03GIPHY World
GIPHY World is a 3D coloring app. It lets the colored picture turn into 3D animated graphics. This app can also be used for social media marketing. With its use, you can make your product more appealing to the audience. The tool is just fun, as it lets you convert the images into a variety of other fun characters.

04Google Lens
Google Lens works on the concept of Google Goggles. It is a very useful AR app widely used by users for various purposes. With standard Google, you can search for anything only by typing in the search bar. But, this tool enables searching by opening the camera of a smartphone. You only need to focus the camera lens on the object or text. The app will then identify it and show the top results. It also shows the link to read details about your object or text. If you are searching for a product, then the tool will also help with the location to buy it.

05Augment
Augment is another best-rated AR video editor app. It secured top ratings just within a short period after launch. The app allows users to create videos by considering the characters of both real and fictional worlds. With this app, the users can use augmented reality for the placement of animated 3D models on the surroundings. It can be used by business owners to create appealing videos of their products.

06Roar
Roar is also a powerful AR weapon for business owners. It generates AR content in addition to video, audio, and 3D content. There are lots of options available for business owners to use this app: creating an AR-powered online store, incorporating AR into print ads, experiencing the most popular categories and products, etc. Also, the shoppers can experience the more detailed content about the product, with pricing, reviews, and also the option of purchasing.

07Amikasa
Amikasa is amongst the best home-furnishing AR apps accessible by iPhone users. Anyone can measure the land areas and create floor plans like professionals, with this app. Also, the professionals can use this tool to generate appealing floor and design plans. For this, they can use AR applications along with their measuring tools. The app has listed down the products from the whole web, rather than focusing on any single brand.

08Snapchat
Snapchat is one of the most popular Augmented reality social media apps. There are a variety of features available in the app which is winning millions of hearts all around the world. The app provides features in the form of lenses to add special effects, filters, and real-time transformations to the video messages. This tool also can be used by businesses for marketing purposes.

09Wanna Kicks
Wanna kicks is the perfect app for sneaker lovers. Online shopping is a more demanded and convenient option these days, but the app allows you to visualize the look of footwear before buying. You can visualize the look of footwear on the foot from any desired angle. You just need to focus the phone’s camera on your feet and use the drag and drop option to select from varied categories.

10Houzz
Houzz is also the best AR video creator in the home goods and furniture category. The app allows you to match the furniture with the layout of your house just by sitting at home. The feature, “View in My Room” lets the user place the products on the picture of shoppers’ homes with AR technology. You can also check the product’s look in different lighting.

Part 3 What New AR Effects Could Be Found in Filmora
Filmora is a wonderful AR video editing app that lets the user create appealing videos with less effort. The tool also has some useful AR features and effects which allow the user to give AR touch to their creation.
01Stock Media
A great addition to the Filmora 11 library is stock media. Stock media got integrated with GIPHY, Unsplash, and Pixabay. It is a unique and interesting feature available in Filmora. With this, you can get royalty-free images, GIFs, and videos inside the video editing tool only.
02AI Portrait
The AI portrait feature of Filmora 11 allows the user to remove the background around the human face. The feature also has several AR stickers such as Cute cat, Zombie teeth, etc and effects such as Human glitch, Human Pixelate, etc to play with.
03Auto Beat Sync
This brand new feature will allow you to sync your video with the rhythm and tempo automatically. You just need to upload a video and music, you wish to sync. Then, the app allows you to specify the video effect such as RGB, glow, video wall, blur, etc to be applied. Now, just click on the “Analyze” button to see the magic. The tool will run an algorithm to create an interesting video.
04Boris FX
Boris FX is a feature containing an array of advanced post-production effects. This feature is only available in some professional video editors like VEGAS Pro. Filmora is also proud to be on the list now. The Boris FX Continuum pack includes great post-production video effects such as Art Looks, Blur, Image Restoration, Lights, Stylize, Particles, etc. To use this high-end feature, you will need a paid version and a high-end workstation.
05NewBlue FX
NewBlue FX is also one of the powerful ar features of Filmora. It is a unique collection of Video Essentials, Video Filters, Video Elements, Video Stylizer, and Title Pro 7. This feature allows you to perform advanced titling, stylizing, color enhancement, composition, color correction, etc, professionally.
06Preset Templates
The Preset Templates feature of Filmora allows users to create professional-looking videos in just hours. This feature enables you to access preset templates such as “Business Outro”, “Game Endscreen”, “How to Paint Intro”, “Birthday Openers”, etc. To provide the desired modifications to your video, just drag and drop the templates and have fun.
Some of the new AR effects found in the latest version of Wondershare Filmora Video Editor are: WordArt Font, Modern Birthday Pack, Broken Effect Pack, 3D Like and Subscribe Sticker, Comic Texts Stickers, Vintage Memories, Hi-Tech Intros Pack, Abstract Bubble Intro, Smooth Big Titles, Cinematic Digital Slideshow, Cinematic Dissolve Effect, 3D Fun Emoji, Illustration VR World Pack, Makeups Pack, Trendy Gaming Endscreen Pack, Birthday Pack Vol 02, Blingbling Pack Vol 02, Raindrop Pack, Pixel Game Transition, The Awakening of Magic, Dynamic Lines Title Pack, Fancy Atmosphere Pack, Basic Sunshine Effects, Old Paper Opener, Qte Gaming Effects, Neon Titles Pack.
For Win 7 or later (64-bit)
For macOS 10.12 or later
● Ending Thoughts →
● Augmented reality is an approach that has never-ending scope. The concept is used in a variety of applications these days. And its applications and uses are increasing with each passing day.
● So, here we have shared the list of the best AR video apps. There are many more apps available. But, these are some highly popular applications for business, consumer as well as entertainment purposes.
● If you are also wishing to contribute a little to the world of AR with your unique creativity and skills, then you should try Filmora. The variety of newly added features allows you to create AR-enabled videos with so much ease.
Also read:
- New The Best Wedding LUTs for Premiere Pro
- New Best Filmic Pro LUTs For Video Editing
- 8 Tips to Apply Cinematic Color Grading to Your Video
- New 2024 Approved How to Create Video Contents That Convert Sales
- New 2024 Approved How to Apply Gaussian Blur Effect to Videos In Premiere Pro?
- New 2024 Approved In This Article, We Talk About How to Add Old Film Overlays and Other Effects to Turn the Videos or Photos More Vintage and with an Older Aspect. We Take a Look at Filmora in This Guide and Give Tips on How to Create Great Retro Videos
- Updated In 2024, How to Perfect Quick and Efficient Video Editing | Keyboard Shortcuts in Filmora
- Detailed Steps to Rotate Videos Using OBS
- Time Lapse Videos Play an Important Part in Videography. If You Want to Start Video Shooting, Then You Shouldnt Miss Time Lapse Video. This Article Will Show You some Ideas over This for 2024
- 4 Solutions to Add White Border to Video on Mobile and Desktop for 2024
- Updated 2024 Approved 11 Apps To Speed Up A Video On iPhone
- Updated 2024 Approved How to Make GIF With Transparent Background?
- New In 2024, Learn About How You Can Create a Smooth Speed Ramp with Premiere Pro. Also, Find Alternative Software “WonderShare Filmora” For the Same Purpose with a Much Easier User Interface
- In 2024, How to Combine Videos Into One on Instagram
- New How to Create a DIY Green Screen Video Effect, In 2024
- Updated In 2024, 3 Best Motion Blur Plugins for Adobe After Effects
- Updated In 2024, Do You Know How Boring a Video Can Be with Silent Moments? Some Tools with Silent Detection Features Help You Delete Those Moments
- New In 2024, 5 Excellent Tools To Convert Video to 60 FPS
- 2024 Approved 3 Ways To Stream And Record At The Same Time
- Best Tips on How to Design Travel Slideshow
- In 2024, Detailed Steps to Rotate Videos in Davinci Resolve
- Updated In 2024, Here We Are Going to Show You the Best Effects to Appear on Camera Made with Filmora
- In 2024, A How-To Guide on Bypassing Apple iPhone 14 Pro iCloud Activation Lock
- Spotify Keeps Crashing A Complete List of Fixes You Can Use on Realme Narzo 60x 5G | Dr.fone
- Complete Tutorial to Use VPNa to Fake GPS Location On Samsung Galaxy S24+ | Dr.fone
- In 2024, How To Use Allshare Cast To Turn On Screen Mirroring On Vivo Y78t | Dr.fone
- Best Fixes For Vivo Y100t Hard Reset | Dr.fone
- In 2024, A Working Guide For Pachirisu Pokemon Go Map On Samsung Galaxy F15 5G | Dr.fone
- How To Fix Auto Lock Greyed Out on Apple iPhone 14 Pro
- In 2024, 2 Ways to Transfer Text Messages from Honor 100 to iPhone 15/14/13/12/11/X/8/ | Dr.fone
- Restore Missing App Icon on Samsung Galaxy XCover 6 Pro Tactical Edition Step-by-Step Solutions | Dr.fone
- In 2024, Full Tutorial to Bypass Your Realme 11 5G Face Lock?
- The Complete Guide to Samsung Galaxy S23 Ultra FRP Bypass Everything You Need to Know
- In 2024, Hassle-Free Ways to Remove FRP Lock on Xiaomi Civi 3 Disney 100th Anniversary Editionwith/without a PC
- In 2024, Remove Device Supervision From your iPhone XS Max
- In 2024, Top 5 Tracking Apps to Track Apple iPhone SE (2022) without Them Knowing | Dr.fone
- Filter Not Working Error in Excel 2007 Fix 2024
- In 2024, How to Unlock Xiaomi 13T Phone without Any Data Loss
- Full Guide to Bypass Vivo T2x 5G FRP
- In 2024, Top 5 Tracking Apps to Track Oppo A1 5G without Them Knowing | Dr.fone
- 8 Ultimate Fixes for Google Play Your Samsung Galaxy A24 Isnt Compatible | Dr.fone
- In 2024, The Best iSpoofer Alternative to Try On Samsung Galaxy M34 5G | Dr.fone
- In 2024, How to Unlock Poco M6 Pro 5G Bootloader Easily
- In 2024, How to Transfer Contacts from Poco X6 Pro to Other Android Devices Using Bluetooth? | Dr.fone
- Title: Updated Do You Want to Make Your Background Disappear and Replace with an Attractive Background? Here Is How to Add a Green Screen to Zoom App and Add Any Virtual Background of Your Choice
- Author: Morgan
- Created at : 2024-05-19 05:12:33
- Updated at : 2024-05-20 05:12:33
- Link: https://ai-video-editing.techidaily.com/updated-do-you-want-to-make-your-background-disappear-and-replace-with-an-attractive-background-here-is-how-to-add-a-green-screen-to-zoom-app-and-add-any-vi/
- License: This work is licensed under CC BY-NC-SA 4.0.

