Updated Dollar-Store DIY Hacks to Use for Filmmaking for 2024

Dollar-Store DIY Hacks to Use for Filmmaking
Filmmaking is usually an expensive hobby, but slowly over time, it’s become more affordable. Regular gear like cameras and lights are slightly cheaper, but there are plenty of ways to DIY regular items to use as film gear.
Making DIY film gear may not give you the same look as professional gear, but it could be a fun project and give you similar looks on a budget. In this article, let’s look at some dollar-store DIY hacks that you can use for filmmaking on a budget.
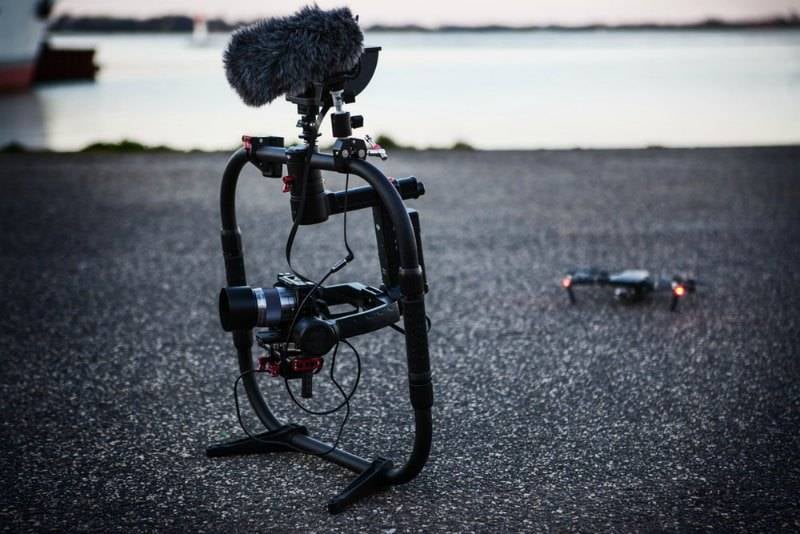
Tip 1. Add foreground elements to improve the frame of videos
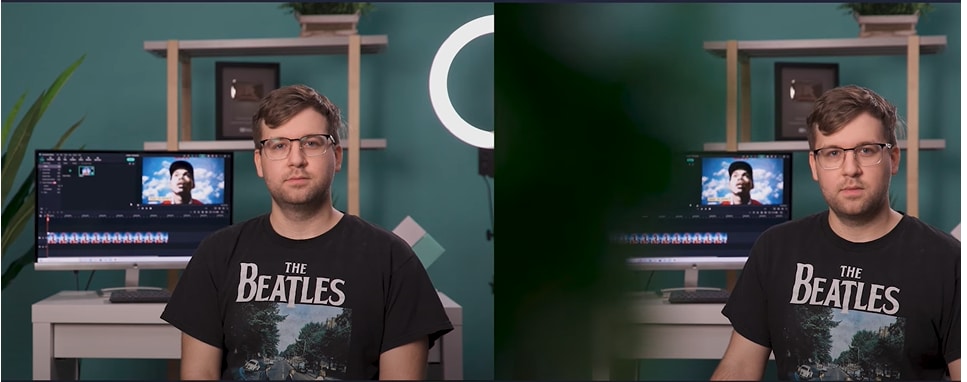
Let’s start with something we can do to enhance your framing. Sometimes we want to direct our audience’s attention to a specific part of the frame. In this case, it’s the talent of placing an object in the shot’s foreground that can help us do that. While also making a more attractive frame. At the dollar store, try using something like these fake plants.
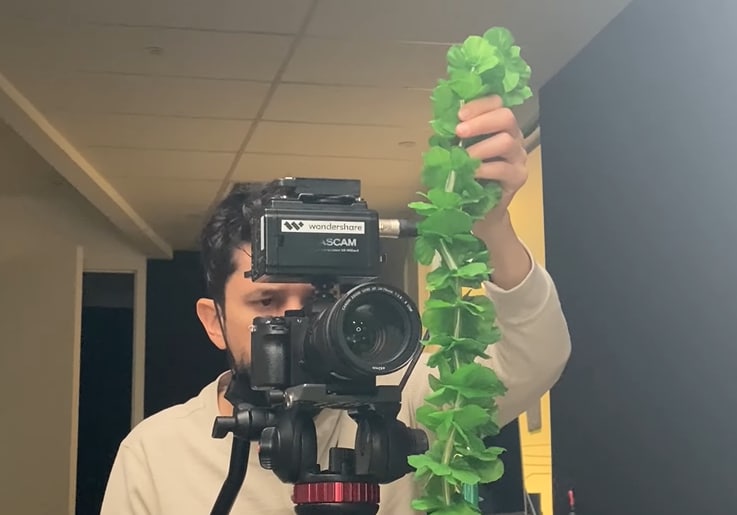
You can place it in front of your lens. Then focus on the talent behind it, giving a blurry foreground that perfectly frames the talent. Here’s how the shot looks with and without foreground elements.
![]()
Note: Remember, you can also use a different angle than simply approaching the object from the front. You can try and use different perspectives until you find the shot or footage you are looking for.
Tip 2. Adjust lights with poster boards
The shot below looks dark and boring because the background has no light. Here’s the shot with and without the lights.

A practical light is a light that shows up on screen rather than lighting talent from off-screen. For example, some dollar stores have small LED accent lights for around three dollars.
Others even have lights with adhesive backings that allow you to place them all over the room—creating great lighting accents with small eye-catching pockets of light.

On film sets, crews use a bounce to reflect light from one light source in another direction. At the dollar store, we can find something like this poster board to get a similar effect.
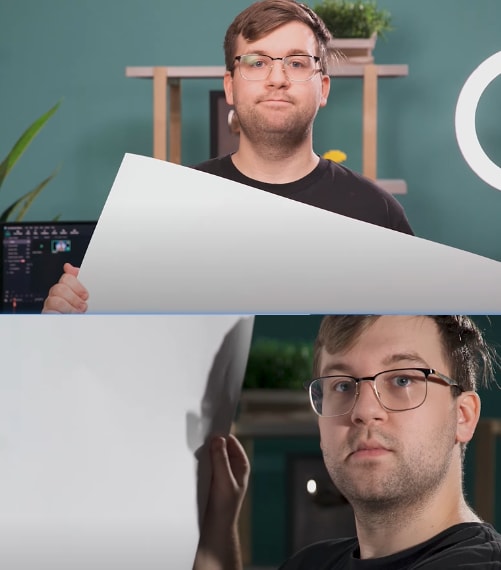
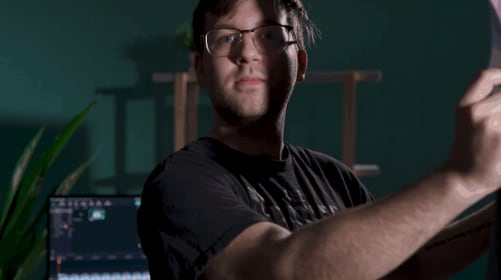
By reflecting the light onto the bounce, we get softer, more spread-out light when it’s reflected. Then you will get the result in a nicer look. Using poster boards, you can do multiple things with light.
- Use white to bounce light.
- Use black as a flag to shape or block light.
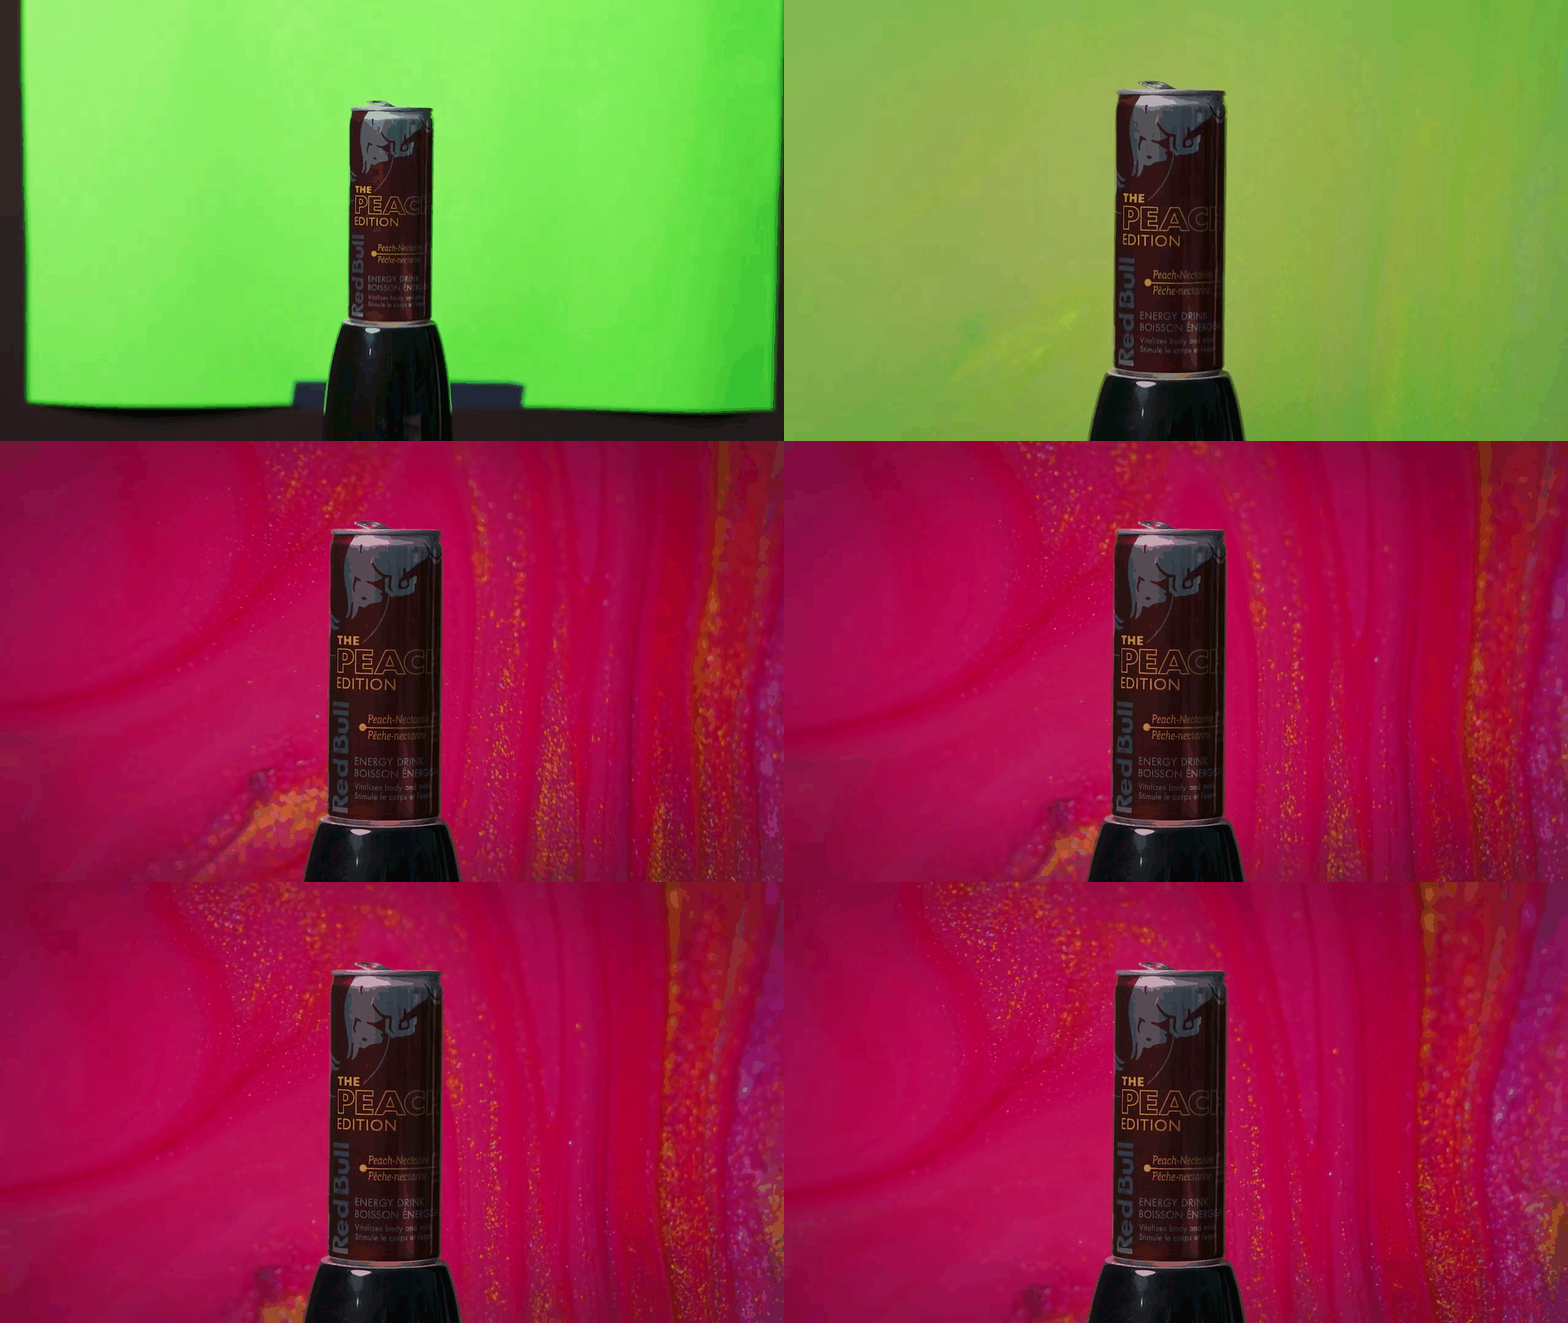
- You can also use green for a small green screen when filming a product video
You might have seen how big production companies create those alienated landscapes, such as in the movie Avatar and many more.
The concept is recording your object in front of a green screen behind it. Then, it’s much easier to add a separately filmed background to the final footage with a video editor like Filmora.
Tip 3. Smooth audio with felt pads or socks
Do you ever have audio pop while you are recording? It can get annoying. So, to fix the issues, we are now teaching you three practical ways.
1. Felt pads
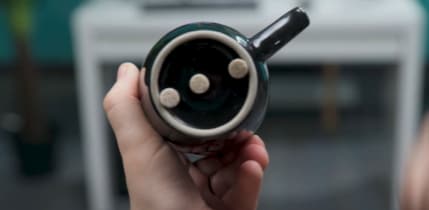
Felt pads with adhesive backs can be stuck onto noisy props like a coffee mug. This way, we won’t hear the mug hitting the table when we’re recording sound.
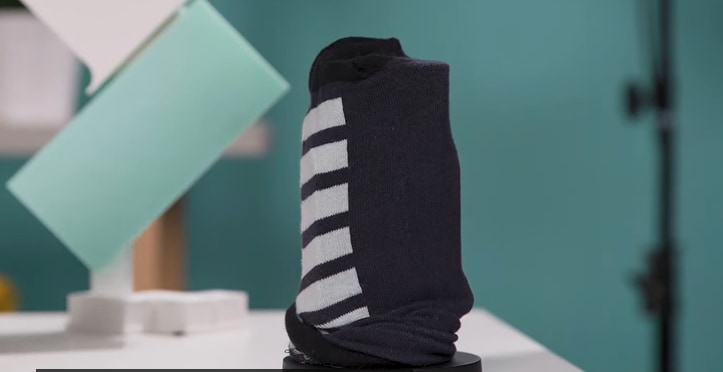
2. Socks as pop filters
Professionals use what they call a pop filter because a pop filter can reduce the loud pops from their mouths. But what is pop? Pops usually occur when people say words that start with the letter P or B.
Then what is a pop filter? You might have seen in some YouTube videos, especially live streamers, where they use a microphone with a plate on its head; that’s called a pop filter. You can purchase pricey gear like a pop filter, or we can get a pack of cheap socks at the dollar store and place them over the mic.
It will make your voiceover slightly quieter, but it should also get rid of the popping. So keep adding socks until you hear no more pops in your voiceover.
Conclusion
See how easy it was! Keep in mind these dollar store hacks in your next video. And you can edit your footage like a pro with an easy-to-use video editor like Wondershare Filmora . Keep exploring different ideas and perspectives to record.
Free Download For Win 7 or later(64-bit)
Free Download For macOS 10.14 or later
Tip 2. Adjust lights with poster boards
The shot below looks dark and boring because the background has no light. Here’s the shot with and without the lights.

A practical light is a light that shows up on screen rather than lighting talent from off-screen. For example, some dollar stores have small LED accent lights for around three dollars.
Others even have lights with adhesive backings that allow you to place them all over the room—creating great lighting accents with small eye-catching pockets of light.

On film sets, crews use a bounce to reflect light from one light source in another direction. At the dollar store, we can find something like this poster board to get a similar effect.

By reflecting the light onto the bounce, we get softer, more spread-out light when it’s reflected. Then you will get the result in a nicer look. Using poster boards, you can do multiple things with light.
- Use white to bounce light.
- Use black as a flag to shape or block light.

- You can also use green for a small green screen when filming a product video
You might have seen how big production companies create those alienated landscapes, such as in the movie Avatar and many more.
The concept is recording your object in front of a green screen behind it. Then, it’s much easier to add a separately filmed background to the final footage with a video editor like Filmora.

Tip 3. Smooth audio with felt pads or socks
Do you ever have audio pop while you are recording? It can get annoying. So, to fix the issues, we are now teaching you three practical ways.
1. Felt pads
Felt pads with adhesive backs can be stuck onto noisy props like a coffee mug. This way, we won’t hear the mug hitting the table when we’re recording sound.

2. Socks as pop filters
Professionals use what they call a pop filter because a pop filter can reduce the loud pops from their mouths. But what is pop? Pops usually occur when people say words that start with the letter P or B.
Then what is a pop filter? You might have seen in some YouTube videos, especially live streamers, where they use a microphone with a plate on its head; that’s called a pop filter. You can purchase pricey gear like a pop filter, or we can get a pack of cheap socks at the dollar store and place them over the mic.
It will make your voiceover slightly quieter, but it should also get rid of the popping. So keep adding socks until you hear no more pops in your voiceover.

Conclusion
See how easy it was! Keep in mind these dollar store hacks in your next video. And you can edit your footage like a pro with an easy-to-use video editor like Wondershare Filmora . Keep exploring different ideas and perspectives to record.
Free Download For Win 7 or later(64-bit)
Free Download For macOS 10.14 or later
How to Color Correct in OBS
Create High-Quality Video - Wondershare Filmora
An easy and powerful YouTube video editor
Numerous video and audio effects to choose from
Detailed tutorials are provided by the official channel
Color Correction is an outstanding functionality that allows editing photos and videos by altering their consistency to match a particular standard. Besides, color correction is available in the premium tool and free applications. And one of the established free software tools with color correction is the OBS.
Even though the Open Broadcaster Software is mainly known for live streaming and offline video recording, it also offers color correction functionality from its open canvas. Read this article to completion and get to the bottom line of how to do color correction in OBS.
More about OBS
In this article
01 What is OBS?
What is OBS?
Open Broadcaster Software (OBS) is free and open-source software that allows users to record videos and live stream events right at their comfort. The software functions effectively on Mac, Windows, and Linux computers.
Open Broadcaster Software (OBS) is free and open-source software that allows users to record videos and live stream events right at their comfort. The software functions effectively on Mac, Windows, and Linux computers.
Since its initial launch in 2012, OBS has made tremendous moves – This is not only from the constant release of its new versions but also the relentless increase in the functionality features. Besides, OBS is equipped with a robust API that enables plugins and scripts which provide extensive customization to precisely suit one’s needs.
However, OBS being a free application can function to date due to enough support from sponsors and backers.
How to Apply Color Correction in OBS
When you carry out basic edits to your videos or images with OBS and realize that your project has poor shade, color, or tone, you don’t have to export it to another software to correct it. Instead, you can use filters for color correction in OBS.
Apart from using OBS filters to color correct video clips and images, you can correct games, browser sources, and video capture devices.
There are various aspects of color correction in OBS. It includes:
1. Gamma
Gamma is a fundamental aspect in OBS that functions by balancing the brightness of an image through contrast. To be precise, Gamma works almost similarly to change in brightness while simultaneously increasing or decreasing the contrast.
In editing, Gamma is applicable mainly for removing shiny foreheads and webcam footage in gaming and browsing.
High Gamma is represented by “L,” whereas low Gamm is represented by “R.”
2. Contrast
Contrast is the difference in the degree of colors and tones in an image. Usually, the low contrast image has a narrow color range, whereas the high contrast images have dark shadows and bright highlights.
“L” represents high contrast in OBS contrast, whereas “R” represents low contrast.
3. Brightness
Brightness is the degree to how light or dark a picture is. To be able to understand an image clearly, it is best to correct its brightness. A change in brightness of a picture has a simultaneous change in pixels of that image.
High brightness in OBS is denounced by the letter “L,” whereas Low brightness is denounced by “R.”
4. Saturation
Saturation is the intensity of colors in a video or an image. High saturated images are bright, strong, and are rich, whereas the low saturated photos appear washed out. Black and white (grayscale) photos have no color saturation. In OBS, high saturation and low saturation are represented as “L” and “R.”
5. Hue Shift
Hue shift is the change in an image’s saturation, lightness, and hue colors. Hue shifting occurs when highlighting or shading images. In OBS, you can use the hue shift functionality to reimage your image with a completely different color palette.
With the hue shift functionality in OBS, you can place the image on top of another and have an 80% opacity. It means that you will still see the first image when you place the second one on top of it.
The “L” sign in the OBS hue shift represents 50% opacity, while the “R” represents 100% Opacity.
Color Grade in OBS
Color grading is the process of enhancing the appearance of an image through attributes such as contrast, saturation, and color, making them enchanting for presentations. Color grading is not only done for still images but also for motion pictures and images.
Color grading functionality in OBS is encompassed with several tools – This includes:
1. Lift tool
As the name suggests, lift tools are used in lifting or removing specific colors from an image. It does so without necessarily affecting other colors in an image.
With this tool, you can selectively remove unwanted colors from your image or video, replace them with your desired ones, and create astonishing results.
2. Offset
Offset is another outstanding tool in OBS color grading that controls the blacks/Shadows of an image. It functions by altering the brightness levels and leaving the highlights and the mid-tones unaffected.
3. Gain
A gain is a tool in OBS color correction that functions by only adjusting the white levels in an image. With the gain tool, brighter colors become brighter or darker.
Many people, especially beginner editors, experience difficulty differentiating between the Gamma and Offset tools. Yes, there is a closer similarity between the two, and for you to be on the safe side, you need to know that Gamma goes with the mid-tones (middle gray levels) whereas the Gain goes with highlights/whites.
How to Apply LUTs in OBS
Look up tables (LUTs) is a functionality feature that allows editors, colorists, and filmmakers to save certain colors as their templates. Therefore, when working on a particular project, they don’t have to create new working color grades; instead, you pick it from your LUT.
Using LUTs OBS is not rocket science. With LUTs, you can create unique projects with a vibrant feel. Here are the simple steps of using LUTs in OBS.
Step 1. Prepare your LUT
First, check and establish whether you have your LUT ready. If you don’t have it, you can download one from the internet. Make sure you download it as a folder. Even though OBS has LUT, It has limited color grades; therefore, it is best to download one. You can extract it to an OBS folder if you downloaded it in a zip file.
Step 2. Add your project to the OBS timeline
Open your OBS software and add your project file. Drag and drop your file to the OBS timeline.

Step 3. Add LUTs to your project
Right-click on the area in your project that you wish to apply LUTs, then click on “Filters.” Select “Apply LUT” from the drop-down menu,” which is usually at the top of the list.

Step 4. Apply your LUT as a filter
On the LUTs section, click on the browser, then open your downloaded LUT folder. Usually, the LUT is in the form of a .cube file. You can adjust your LUT by simply clicking on the “Adjust” option.
Bonus! How to Apply Color Correction for Webcam and Camera
People who primarily use their computers for recording sessions often find it difficult to capture quality videos. It is because most computer cameras are not straightforward. To do away with purchasing a new camera due to poor quality video capture, they can freely use OBS LUTs. For their camera and webcam. LUTs for webcam play a vital role in correcting the quality of photos and videos by using filters.
Here are the simple steps on how to use LUTs for color correction in webcam and camera
Step 1. Check whether your camera has additional software
Most webcams and cameras are controlled by external software, so you first need to check whether yours is also controlled. A thing with these cameras are controlled by their software is that the software determines the color settings and the specific image.
Double click on camera source and select “Configure video.” Computers with external software cameras will have a pop-up window that displays various customizable settings. Here, you can adjust the different settings based on your preference.

Step 2. Download your LUTs
Download online the LUTs you want to use. Download them as folders and extract the files you downloaded as zip files. Save them in the OBS folder.
Step 3. Apply your LUTs
Still, in your OBS software, open your camera and then right-click on it. From the displayed menu, click on “Filters.”
On the bottom left corner of your interface, hit the “+” sign, then select “Apply LUTs” > “Browse.”
Open your already downloaded OBS files. Usually, there is an “Adjust” that allows you to regulate the intensity of the LUT by sliding it.

Step 4. Start recording with LUTs on
After turning on your LUT, you can start recording videos and taking photos. There is an eye icon on the left-hand side of your screen. You can use it to turn on or off LUT.
Conclusion
● And that is how to do color correction in OBS. Besides, you do not have to go to the extremes of getting a new camera because of your webcam faultiness. With OBS, you can correct your camera and webcam and get outstanding results.
● Download LUTs from the internet and use them as a template in OBS. Besides, you don’t have to pay for the LUTs, but you can use the free ones.
Color Correction is an outstanding functionality that allows editing photos and videos by altering their consistency to match a particular standard. Besides, color correction is available in the premium tool and free applications. And one of the established free software tools with color correction is the OBS.
Even though the Open Broadcaster Software is mainly known for live streaming and offline video recording, it also offers color correction functionality from its open canvas. Read this article to completion and get to the bottom line of how to do color correction in OBS.
More about OBS
In this article
01 What is OBS?
What is OBS?
Open Broadcaster Software (OBS) is free and open-source software that allows users to record videos and live stream events right at their comfort. The software functions effectively on Mac, Windows, and Linux computers.
Open Broadcaster Software (OBS) is free and open-source software that allows users to record videos and live stream events right at their comfort. The software functions effectively on Mac, Windows, and Linux computers.
Since its initial launch in 2012, OBS has made tremendous moves – This is not only from the constant release of its new versions but also the relentless increase in the functionality features. Besides, OBS is equipped with a robust API that enables plugins and scripts which provide extensive customization to precisely suit one’s needs.
However, OBS being a free application can function to date due to enough support from sponsors and backers.
How to Apply Color Correction in OBS
When you carry out basic edits to your videos or images with OBS and realize that your project has poor shade, color, or tone, you don’t have to export it to another software to correct it. Instead, you can use filters for color correction in OBS.
Apart from using OBS filters to color correct video clips and images, you can correct games, browser sources, and video capture devices.
There are various aspects of color correction in OBS. It includes:
1. Gamma
Gamma is a fundamental aspect in OBS that functions by balancing the brightness of an image through contrast. To be precise, Gamma works almost similarly to change in brightness while simultaneously increasing or decreasing the contrast.
In editing, Gamma is applicable mainly for removing shiny foreheads and webcam footage in gaming and browsing.
High Gamma is represented by “L,” whereas low Gamm is represented by “R.”
2. Contrast
Contrast is the difference in the degree of colors and tones in an image. Usually, the low contrast image has a narrow color range, whereas the high contrast images have dark shadows and bright highlights.
“L” represents high contrast in OBS contrast, whereas “R” represents low contrast.
3. Brightness
Brightness is the degree to how light or dark a picture is. To be able to understand an image clearly, it is best to correct its brightness. A change in brightness of a picture has a simultaneous change in pixels of that image.
High brightness in OBS is denounced by the letter “L,” whereas Low brightness is denounced by “R.”
4. Saturation
Saturation is the intensity of colors in a video or an image. High saturated images are bright, strong, and are rich, whereas the low saturated photos appear washed out. Black and white (grayscale) photos have no color saturation. In OBS, high saturation and low saturation are represented as “L” and “R.”
5. Hue Shift
Hue shift is the change in an image’s saturation, lightness, and hue colors. Hue shifting occurs when highlighting or shading images. In OBS, you can use the hue shift functionality to reimage your image with a completely different color palette.
With the hue shift functionality in OBS, you can place the image on top of another and have an 80% opacity. It means that you will still see the first image when you place the second one on top of it.
The “L” sign in the OBS hue shift represents 50% opacity, while the “R” represents 100% Opacity.
Color Grade in OBS
Color grading is the process of enhancing the appearance of an image through attributes such as contrast, saturation, and color, making them enchanting for presentations. Color grading is not only done for still images but also for motion pictures and images.
Color grading functionality in OBS is encompassed with several tools – This includes:
1. Lift tool
As the name suggests, lift tools are used in lifting or removing specific colors from an image. It does so without necessarily affecting other colors in an image.
With this tool, you can selectively remove unwanted colors from your image or video, replace them with your desired ones, and create astonishing results.
2. Offset
Offset is another outstanding tool in OBS color grading that controls the blacks/Shadows of an image. It functions by altering the brightness levels and leaving the highlights and the mid-tones unaffected.
3. Gain
A gain is a tool in OBS color correction that functions by only adjusting the white levels in an image. With the gain tool, brighter colors become brighter or darker.
Many people, especially beginner editors, experience difficulty differentiating between the Gamma and Offset tools. Yes, there is a closer similarity between the two, and for you to be on the safe side, you need to know that Gamma goes with the mid-tones (middle gray levels) whereas the Gain goes with highlights/whites.
How to Apply LUTs in OBS
Look up tables (LUTs) is a functionality feature that allows editors, colorists, and filmmakers to save certain colors as their templates. Therefore, when working on a particular project, they don’t have to create new working color grades; instead, you pick it from your LUT.
Using LUTs OBS is not rocket science. With LUTs, you can create unique projects with a vibrant feel. Here are the simple steps of using LUTs in OBS.
Step 1. Prepare your LUT
First, check and establish whether you have your LUT ready. If you don’t have it, you can download one from the internet. Make sure you download it as a folder. Even though OBS has LUT, It has limited color grades; therefore, it is best to download one. You can extract it to an OBS folder if you downloaded it in a zip file.
Step 2. Add your project to the OBS timeline
Open your OBS software and add your project file. Drag and drop your file to the OBS timeline.

Step 3. Add LUTs to your project
Right-click on the area in your project that you wish to apply LUTs, then click on “Filters.” Select “Apply LUT” from the drop-down menu,” which is usually at the top of the list.

Step 4. Apply your LUT as a filter
On the LUTs section, click on the browser, then open your downloaded LUT folder. Usually, the LUT is in the form of a .cube file. You can adjust your LUT by simply clicking on the “Adjust” option.
Bonus! How to Apply Color Correction for Webcam and Camera
People who primarily use their computers for recording sessions often find it difficult to capture quality videos. It is because most computer cameras are not straightforward. To do away with purchasing a new camera due to poor quality video capture, they can freely use OBS LUTs. For their camera and webcam. LUTs for webcam play a vital role in correcting the quality of photos and videos by using filters.
Here are the simple steps on how to use LUTs for color correction in webcam and camera
Step 1. Check whether your camera has additional software
Most webcams and cameras are controlled by external software, so you first need to check whether yours is also controlled. A thing with these cameras are controlled by their software is that the software determines the color settings and the specific image.
Double click on camera source and select “Configure video.” Computers with external software cameras will have a pop-up window that displays various customizable settings. Here, you can adjust the different settings based on your preference.

Step 2. Download your LUTs
Download online the LUTs you want to use. Download them as folders and extract the files you downloaded as zip files. Save them in the OBS folder.
Step 3. Apply your LUTs
Still, in your OBS software, open your camera and then right-click on it. From the displayed menu, click on “Filters.”
On the bottom left corner of your interface, hit the “+” sign, then select “Apply LUTs” > “Browse.”
Open your already downloaded OBS files. Usually, there is an “Adjust” that allows you to regulate the intensity of the LUT by sliding it.

Step 4. Start recording with LUTs on
After turning on your LUT, you can start recording videos and taking photos. There is an eye icon on the left-hand side of your screen. You can use it to turn on or off LUT.
Conclusion
● And that is how to do color correction in OBS. Besides, you do not have to go to the extremes of getting a new camera because of your webcam faultiness. With OBS, you can correct your camera and webcam and get outstanding results.
● Download LUTs from the internet and use them as a template in OBS. Besides, you don’t have to pay for the LUTs, but you can use the free ones.
Color Correction is an outstanding functionality that allows editing photos and videos by altering their consistency to match a particular standard. Besides, color correction is available in the premium tool and free applications. And one of the established free software tools with color correction is the OBS.
Even though the Open Broadcaster Software is mainly known for live streaming and offline video recording, it also offers color correction functionality from its open canvas. Read this article to completion and get to the bottom line of how to do color correction in OBS.
More about OBS
In this article
01 What is OBS?
What is OBS?
Open Broadcaster Software (OBS) is free and open-source software that allows users to record videos and live stream events right at their comfort. The software functions effectively on Mac, Windows, and Linux computers.
Open Broadcaster Software (OBS) is free and open-source software that allows users to record videos and live stream events right at their comfort. The software functions effectively on Mac, Windows, and Linux computers.
Since its initial launch in 2012, OBS has made tremendous moves – This is not only from the constant release of its new versions but also the relentless increase in the functionality features. Besides, OBS is equipped with a robust API that enables plugins and scripts which provide extensive customization to precisely suit one’s needs.
However, OBS being a free application can function to date due to enough support from sponsors and backers.
How to Apply Color Correction in OBS
When you carry out basic edits to your videos or images with OBS and realize that your project has poor shade, color, or tone, you don’t have to export it to another software to correct it. Instead, you can use filters for color correction in OBS.
Apart from using OBS filters to color correct video clips and images, you can correct games, browser sources, and video capture devices.
There are various aspects of color correction in OBS. It includes:
1. Gamma
Gamma is a fundamental aspect in OBS that functions by balancing the brightness of an image through contrast. To be precise, Gamma works almost similarly to change in brightness while simultaneously increasing or decreasing the contrast.
In editing, Gamma is applicable mainly for removing shiny foreheads and webcam footage in gaming and browsing.
High Gamma is represented by “L,” whereas low Gamm is represented by “R.”
2. Contrast
Contrast is the difference in the degree of colors and tones in an image. Usually, the low contrast image has a narrow color range, whereas the high contrast images have dark shadows and bright highlights.
“L” represents high contrast in OBS contrast, whereas “R” represents low contrast.
3. Brightness
Brightness is the degree to how light or dark a picture is. To be able to understand an image clearly, it is best to correct its brightness. A change in brightness of a picture has a simultaneous change in pixels of that image.
High brightness in OBS is denounced by the letter “L,” whereas Low brightness is denounced by “R.”
4. Saturation
Saturation is the intensity of colors in a video or an image. High saturated images are bright, strong, and are rich, whereas the low saturated photos appear washed out. Black and white (grayscale) photos have no color saturation. In OBS, high saturation and low saturation are represented as “L” and “R.”
5. Hue Shift
Hue shift is the change in an image’s saturation, lightness, and hue colors. Hue shifting occurs when highlighting or shading images. In OBS, you can use the hue shift functionality to reimage your image with a completely different color palette.
With the hue shift functionality in OBS, you can place the image on top of another and have an 80% opacity. It means that you will still see the first image when you place the second one on top of it.
The “L” sign in the OBS hue shift represents 50% opacity, while the “R” represents 100% Opacity.
Color Grade in OBS
Color grading is the process of enhancing the appearance of an image through attributes such as contrast, saturation, and color, making them enchanting for presentations. Color grading is not only done for still images but also for motion pictures and images.
Color grading functionality in OBS is encompassed with several tools – This includes:
1. Lift tool
As the name suggests, lift tools are used in lifting or removing specific colors from an image. It does so without necessarily affecting other colors in an image.
With this tool, you can selectively remove unwanted colors from your image or video, replace them with your desired ones, and create astonishing results.
2. Offset
Offset is another outstanding tool in OBS color grading that controls the blacks/Shadows of an image. It functions by altering the brightness levels and leaving the highlights and the mid-tones unaffected.
3. Gain
A gain is a tool in OBS color correction that functions by only adjusting the white levels in an image. With the gain tool, brighter colors become brighter or darker.
Many people, especially beginner editors, experience difficulty differentiating between the Gamma and Offset tools. Yes, there is a closer similarity between the two, and for you to be on the safe side, you need to know that Gamma goes with the mid-tones (middle gray levels) whereas the Gain goes with highlights/whites.
How to Apply LUTs in OBS
Look up tables (LUTs) is a functionality feature that allows editors, colorists, and filmmakers to save certain colors as their templates. Therefore, when working on a particular project, they don’t have to create new working color grades; instead, you pick it from your LUT.
Using LUTs OBS is not rocket science. With LUTs, you can create unique projects with a vibrant feel. Here are the simple steps of using LUTs in OBS.
Step 1. Prepare your LUT
First, check and establish whether you have your LUT ready. If you don’t have it, you can download one from the internet. Make sure you download it as a folder. Even though OBS has LUT, It has limited color grades; therefore, it is best to download one. You can extract it to an OBS folder if you downloaded it in a zip file.
Step 2. Add your project to the OBS timeline
Open your OBS software and add your project file. Drag and drop your file to the OBS timeline.

Step 3. Add LUTs to your project
Right-click on the area in your project that you wish to apply LUTs, then click on “Filters.” Select “Apply LUT” from the drop-down menu,” which is usually at the top of the list.

Step 4. Apply your LUT as a filter
On the LUTs section, click on the browser, then open your downloaded LUT folder. Usually, the LUT is in the form of a .cube file. You can adjust your LUT by simply clicking on the “Adjust” option.
Bonus! How to Apply Color Correction for Webcam and Camera
People who primarily use their computers for recording sessions often find it difficult to capture quality videos. It is because most computer cameras are not straightforward. To do away with purchasing a new camera due to poor quality video capture, they can freely use OBS LUTs. For their camera and webcam. LUTs for webcam play a vital role in correcting the quality of photos and videos by using filters.
Here are the simple steps on how to use LUTs for color correction in webcam and camera
Step 1. Check whether your camera has additional software
Most webcams and cameras are controlled by external software, so you first need to check whether yours is also controlled. A thing with these cameras are controlled by their software is that the software determines the color settings and the specific image.
Double click on camera source and select “Configure video.” Computers with external software cameras will have a pop-up window that displays various customizable settings. Here, you can adjust the different settings based on your preference.

Step 2. Download your LUTs
Download online the LUTs you want to use. Download them as folders and extract the files you downloaded as zip files. Save them in the OBS folder.
Step 3. Apply your LUTs
Still, in your OBS software, open your camera and then right-click on it. From the displayed menu, click on “Filters.”
On the bottom left corner of your interface, hit the “+” sign, then select “Apply LUTs” > “Browse.”
Open your already downloaded OBS files. Usually, there is an “Adjust” that allows you to regulate the intensity of the LUT by sliding it.

Step 4. Start recording with LUTs on
After turning on your LUT, you can start recording videos and taking photos. There is an eye icon on the left-hand side of your screen. You can use it to turn on or off LUT.
Conclusion
● And that is how to do color correction in OBS. Besides, you do not have to go to the extremes of getting a new camera because of your webcam faultiness. With OBS, you can correct your camera and webcam and get outstanding results.
● Download LUTs from the internet and use them as a template in OBS. Besides, you don’t have to pay for the LUTs, but you can use the free ones.
Color Correction is an outstanding functionality that allows editing photos and videos by altering their consistency to match a particular standard. Besides, color correction is available in the premium tool and free applications. And one of the established free software tools with color correction is the OBS.
Even though the Open Broadcaster Software is mainly known for live streaming and offline video recording, it also offers color correction functionality from its open canvas. Read this article to completion and get to the bottom line of how to do color correction in OBS.
More about OBS
In this article
01 What is OBS?
What is OBS?
Open Broadcaster Software (OBS) is free and open-source software that allows users to record videos and live stream events right at their comfort. The software functions effectively on Mac, Windows, and Linux computers.
Open Broadcaster Software (OBS) is free and open-source software that allows users to record videos and live stream events right at their comfort. The software functions effectively on Mac, Windows, and Linux computers.
Since its initial launch in 2012, OBS has made tremendous moves – This is not only from the constant release of its new versions but also the relentless increase in the functionality features. Besides, OBS is equipped with a robust API that enables plugins and scripts which provide extensive customization to precisely suit one’s needs.
However, OBS being a free application can function to date due to enough support from sponsors and backers.
How to Apply Color Correction in OBS
When you carry out basic edits to your videos or images with OBS and realize that your project has poor shade, color, or tone, you don’t have to export it to another software to correct it. Instead, you can use filters for color correction in OBS.
Apart from using OBS filters to color correct video clips and images, you can correct games, browser sources, and video capture devices.
There are various aspects of color correction in OBS. It includes:
1. Gamma
Gamma is a fundamental aspect in OBS that functions by balancing the brightness of an image through contrast. To be precise, Gamma works almost similarly to change in brightness while simultaneously increasing or decreasing the contrast.
In editing, Gamma is applicable mainly for removing shiny foreheads and webcam footage in gaming and browsing.
High Gamma is represented by “L,” whereas low Gamm is represented by “R.”
2. Contrast
Contrast is the difference in the degree of colors and tones in an image. Usually, the low contrast image has a narrow color range, whereas the high contrast images have dark shadows and bright highlights.
“L” represents high contrast in OBS contrast, whereas “R” represents low contrast.
3. Brightness
Brightness is the degree to how light or dark a picture is. To be able to understand an image clearly, it is best to correct its brightness. A change in brightness of a picture has a simultaneous change in pixels of that image.
High brightness in OBS is denounced by the letter “L,” whereas Low brightness is denounced by “R.”
4. Saturation
Saturation is the intensity of colors in a video or an image. High saturated images are bright, strong, and are rich, whereas the low saturated photos appear washed out. Black and white (grayscale) photos have no color saturation. In OBS, high saturation and low saturation are represented as “L” and “R.”
5. Hue Shift
Hue shift is the change in an image’s saturation, lightness, and hue colors. Hue shifting occurs when highlighting or shading images. In OBS, you can use the hue shift functionality to reimage your image with a completely different color palette.
With the hue shift functionality in OBS, you can place the image on top of another and have an 80% opacity. It means that you will still see the first image when you place the second one on top of it.
The “L” sign in the OBS hue shift represents 50% opacity, while the “R” represents 100% Opacity.
Color Grade in OBS
Color grading is the process of enhancing the appearance of an image through attributes such as contrast, saturation, and color, making them enchanting for presentations. Color grading is not only done for still images but also for motion pictures and images.
Color grading functionality in OBS is encompassed with several tools – This includes:
1. Lift tool
As the name suggests, lift tools are used in lifting or removing specific colors from an image. It does so without necessarily affecting other colors in an image.
With this tool, you can selectively remove unwanted colors from your image or video, replace them with your desired ones, and create astonishing results.
2. Offset
Offset is another outstanding tool in OBS color grading that controls the blacks/Shadows of an image. It functions by altering the brightness levels and leaving the highlights and the mid-tones unaffected.
3. Gain
A gain is a tool in OBS color correction that functions by only adjusting the white levels in an image. With the gain tool, brighter colors become brighter or darker.
Many people, especially beginner editors, experience difficulty differentiating between the Gamma and Offset tools. Yes, there is a closer similarity between the two, and for you to be on the safe side, you need to know that Gamma goes with the mid-tones (middle gray levels) whereas the Gain goes with highlights/whites.
How to Apply LUTs in OBS
Look up tables (LUTs) is a functionality feature that allows editors, colorists, and filmmakers to save certain colors as their templates. Therefore, when working on a particular project, they don’t have to create new working color grades; instead, you pick it from your LUT.
Using LUTs OBS is not rocket science. With LUTs, you can create unique projects with a vibrant feel. Here are the simple steps of using LUTs in OBS.
Step 1. Prepare your LUT
First, check and establish whether you have your LUT ready. If you don’t have it, you can download one from the internet. Make sure you download it as a folder. Even though OBS has LUT, It has limited color grades; therefore, it is best to download one. You can extract it to an OBS folder if you downloaded it in a zip file.
Step 2. Add your project to the OBS timeline
Open your OBS software and add your project file. Drag and drop your file to the OBS timeline.

Step 3. Add LUTs to your project
Right-click on the area in your project that you wish to apply LUTs, then click on “Filters.” Select “Apply LUT” from the drop-down menu,” which is usually at the top of the list.

Step 4. Apply your LUT as a filter
On the LUTs section, click on the browser, then open your downloaded LUT folder. Usually, the LUT is in the form of a .cube file. You can adjust your LUT by simply clicking on the “Adjust” option.
Bonus! How to Apply Color Correction for Webcam and Camera
People who primarily use their computers for recording sessions often find it difficult to capture quality videos. It is because most computer cameras are not straightforward. To do away with purchasing a new camera due to poor quality video capture, they can freely use OBS LUTs. For their camera and webcam. LUTs for webcam play a vital role in correcting the quality of photos and videos by using filters.
Here are the simple steps on how to use LUTs for color correction in webcam and camera
Step 1. Check whether your camera has additional software
Most webcams and cameras are controlled by external software, so you first need to check whether yours is also controlled. A thing with these cameras are controlled by their software is that the software determines the color settings and the specific image.
Double click on camera source and select “Configure video.” Computers with external software cameras will have a pop-up window that displays various customizable settings. Here, you can adjust the different settings based on your preference.

Step 2. Download your LUTs
Download online the LUTs you want to use. Download them as folders and extract the files you downloaded as zip files. Save them in the OBS folder.
Step 3. Apply your LUTs
Still, in your OBS software, open your camera and then right-click on it. From the displayed menu, click on “Filters.”
On the bottom left corner of your interface, hit the “+” sign, then select “Apply LUTs” > “Browse.”
Open your already downloaded OBS files. Usually, there is an “Adjust” that allows you to regulate the intensity of the LUT by sliding it.

Step 4. Start recording with LUTs on
After turning on your LUT, you can start recording videos and taking photos. There is an eye icon on the left-hand side of your screen. You can use it to turn on or off LUT.
Conclusion
● And that is how to do color correction in OBS. Besides, you do not have to go to the extremes of getting a new camera because of your webcam faultiness. With OBS, you can correct your camera and webcam and get outstanding results.
● Download LUTs from the internet and use them as a template in OBS. Besides, you don’t have to pay for the LUTs, but you can use the free ones.
How to Add Custom Filters in VN App: 2024 Quick Guide
In the colorful world of video editing, the ability to personalize and enhance your clips with unique looks is what stands your work out. Enter the VN app, the game-changer in mobile video editing, bursting with user-friendly features.
If you’ve been searching for a simple way to dive into the realm of video filters, you’re in luck. Today, we’ll decode how to jazz up your videos using the VN app’s built-in and custom video filter features. Ready to elevate your video content game? Let’s get started!
- Step 2: Save the Filter Preset and Use It Directly Next Time
- Part 3: Best Alternatives
- Part 4: Summary
Part 1: Use VN App Built-in Video Filters (LUTs)
Step 1: Locate the Filters Feature
You must know where the magic happens before you go Spielberg on your videos. Upon launching the VN app, you’ll see a range of editing tools. Look for an icon resembling a magic wand or palette – your gateway to the wonderful world of video filters.
Step 2: Preview and Apply Effects
This step is all about experimenting and having fun. Tap on the filter icon, and voilà! You’re greeted with various preset looks, waiting for your videos to don them. Glide through the options; VN has got it all from vintage vibes to futuristic glow. Found one that catches your eye?
Tap on it and watch your video transform instantly. Not sure about your pick? No worries; simply swipe left or right to preview other effects. Once you’re satisfied, tap ‘apply.’
Step 3: Adjust Details with Color Settings
Okay, young director, you’ve chosen your filter. But what if you want to tweak it just a bit? VN’s got your back.
Once a filter is applied, you’ll notice sliders or dials – these are your video filter editor tools. Play around with them! You can adjust the filter’s intensity, making it as subtle or dramatic as you like. Tweak the brightness, contrast, and saturation until your video looks like you envisioned.
Part 2: Download External Filter Installation Package
Step 1: Locate the My Filters Feature
The VN app is awesome, but can you add even more flair to your videos with custom filters? Yup! These aren’t just your regular video presets – they’re unique styles you can download and add to your VN arsenal.
To begin, tap on the “My Filters” section within the app. If you’re wondering where this is, it’s usually nestled beside the built-in filter options, represented by a ‘+’ or ‘Add’ icon. This personal space is ready to be filled with your downloaded filter goodies.
Step 2: Import the Downloaded VN Filter APK
Here comes the cool part! To get new custom filters:
- Visit the website or store where the VN filters are available for download. (Hint: Search for “vn filter download APK” or “vn iPhone filter download” based on your device.)
- Once downloaded, head back to the VN app and click the ‘Add’ or ‘+’ icon in the “My Filters”
- Navigate to your device’s download folder or wherever the vn filter apk is saved.
- Select the filter file (it should have a .apk or similar extension for Android users and a different format for iPhone users).
- Tap on ‘Import’ and wait for the magic to happen. Your brand-new filter will now be housed in “My Filters”!
Step 2: Save the Filter Preset and Use It Directly Next Time
After importing your snazzy new filter, the next step is super easy. Simply apply it to your video, and if you love how it looks, save it as a preset. This way, the next time you’re editing, you can head straight to “My Filters,” find your favorite custom filter and slap it onto your video without a hitch. Talk about convenience!
Part 3: Best Alternatives
Though VN offers many fantastic filter options, it’s always nice to have alternatives, right? Meet Filmora, another stellar video editing tool known for its expansive video filter collection.
Filmora is more than just an editor; it’s a canvas for videographers. One of its most raved-about features is its extensive range of video filters. With Filmora, you can transport your audience from a sun-kissed beach to a moody, rain-soaked alley in just a tap. Whether you’re going for a documentary feel, a Hollywood movie vibe, or something out of a dream, Filmora’s filters have covered you.
Getting started is a breeze:
- Launch Filmora and import your video.
- Head to the “Effects” tab and immerse yourself in the filter options.
- Preview, select, and apply – it’s that simple!
- Like VN, Filmora allows you to tweak the filter settings for that perfect look.
While Filmora is a great tool, the best fit depends on personal preferences and specific project needs. However, it’s always good to have choices in your editing toolkit. Variety is, after all, the spice of life (and video editing)!
Part 4: Summary
The beauty of video editing lies in the limitless possibilities it offers. With every video filter, editor tweak, and custom preset, you’re not just editing – you’re storytelling. And with tools like VN and Filmora at your fingertips, you have everything you need to tell your story your way.
Remember, whether you’re a seasoned videographer or someone just starting, there’s no ‘right’ or ‘wrong’ regarding creativity. Play around, experiment, and, most importantly, have fun with the process. In the vast universe of video editing, every filter is a star waiting to shine on your masterpiece.
How Windows Movie Maker Save MP4 File
If you are a Windows user and you are looking for a free video editor, Windows Movie Maker is a great application. Windows Movie Maker comes pre-installed in older Windows versions though it has been discontinued in the latest Windows versions. However, if you are using the latest Windows versions, you can install MiniTool Movie Maker instead. If you are editing your video in Windows Movie Maker, you should know how to save your video in MP4 format.
MP4 file format is the most used video file format, and hence, you should know how to save Windows movie maker mp4 file. Otherwise, you won’t be able to play your video on regular video players on different devices. This is because not all video players support the native Windows Movie Maker file format, but they support MP4 format as it is very common. In this article, we will illustrate the steps for Windows Movie Maker how to save as MP4 file.
Part 1. Steps to Save Windows Movie Maker Video as MP4
There are two scenarios you may come across while dealing with Windows Movie Maker MP4 situation. First, you might be editing your video on Windows Movie Maker, and you want to save it in MP4 format. Second, you might have received a video file saved in the native Windows Movie Maker file format and you want to convert it to MP4 file format. In the second scenario, you must opt for a Windows Movie Maker to MP4 converter such as VideoConverterFactory.
For the first scenario where you are editing your video on Windows Movie Maker, the solution is simple. This is because the default file format to save a video file on Windows Movie Maker is MP4. There are other options available such as WMV, but if you opt for the recommended settings, you can easily save your video file in MP4. Here are the steps for Windows Movie Maker to mp4 file format.
Step1Launch Windows Movie Maker on your PC. Create a new project and import your video clips. Split, trim, join, add transitions, effects, and titles as per your requirements.
Step2When you are done editing your video, go to Home tab> Save Movie button available on Share section.
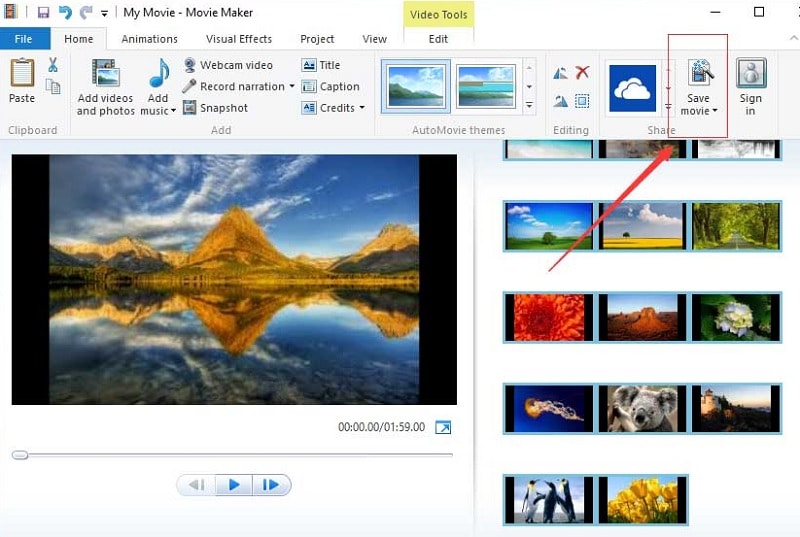
Step3Instead of clicking on Save Movie button, click on the small triangle icon on Save Movie button. Click on Recommended for this project option. You can hold your mouse pointer on the option for a few seconds before clicking to check out the different parameters of your video file that you are going to save.

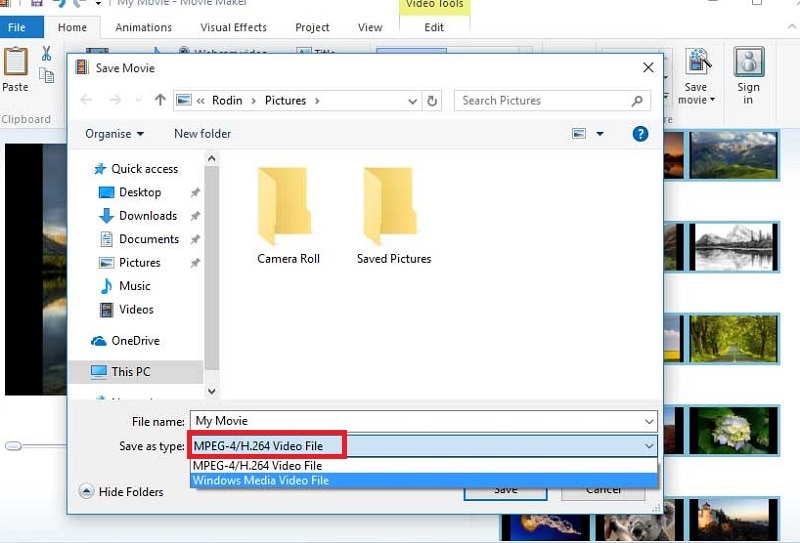
Step4The Save Movie dialog box will open on the screen. Go to the Save as type section and make sure it is selected for “MPEG-4/ Vide File”. MP4 is the abbreviation of MPEG-4. Finally, click on Save button and your video file will be saved in MP4 file format as per the destination you have chosen.
Part 2. Windows Movie Maker Alternative to Save as MP4
We have already stated that Windows Movie Maker from Microsoft has been discontinued in Window 10 and Windows 11. Instead, there is a basic video editor available under Photos app. Therefore, if you are looking for a Windows Live Movie Maker MP4 alternative, we recommend Wondershare Filmora.
Wondershare Filmora is a professional video editor where you can edit your videos like a pro and save your edited video as MP4 file format. You get more features on Filmora in comparison to Windows Movie Maker as it is a premium video editor. In fact, Filmora is easy to operate thanks to its super intuitive user interface. Here are the steps to export a video as MP4 format.
Free Download For Win 7 or later(64-bit)
Free Download For macOS 10.14 or later
Step1Download and install Wondershare Filmora. Click on New Project option on the welcome screen. Drag and drop your video clips into Project Media folder. Thereafter, bring them onto the timeline.

Step2Edit the video clips, add effects and animations as well as titles. Once your editing is done, click on Export button.

Step3Select MP4 file format on the left corner and specify the file name. Select the destination folder from Save To and other parameters as required. Finally, click on Export button.

Related FAQs of Movie Maker
The default file format of Windows Movie Maker is MP4. There is also an option to save video file as WMV format.
If you want to convert a movie maker file to MP4 file format, you can open the file in Windows Movie Maker and save the file as MP4. You can also use a video converter such as VideoConverterFactory to convert a movie maker file to MP4.
By default, Windows Movie Maker saves video files under My Documents or Documents folder as per Windows operating system you have on your PC. If it is not available there, you can check My Videos or My Pictures folder on your hard drive under User folder hierarchy.
If you are using Windows Movie Maker on your PC, we have stated how you can save your video file as MP4 format. We have also stated how to convert Windows Movie Maker file to MP4 format easily. We have also recommended the best Windows Movie Maker alternative as Wondershare Filmora where you get more video editing features as well as wide range of video file formats.
Free Download For macOS 10.14 or later
Step1Download and install Wondershare Filmora. Click on New Project option on the welcome screen. Drag and drop your video clips into Project Media folder. Thereafter, bring them onto the timeline.

Step2Edit the video clips, add effects and animations as well as titles. Once your editing is done, click on Export button.

Step3Select MP4 file format on the left corner and specify the file name. Select the destination folder from Save To and other parameters as required. Finally, click on Export button.

Related FAQs of Movie Maker
The default file format of Windows Movie Maker is MP4. There is also an option to save video file as WMV format.
If you want to convert a movie maker file to MP4 file format, you can open the file in Windows Movie Maker and save the file as MP4. You can also use a video converter such as VideoConverterFactory to convert a movie maker file to MP4.
By default, Windows Movie Maker saves video files under My Documents or Documents folder as per Windows operating system you have on your PC. If it is not available there, you can check My Videos or My Pictures folder on your hard drive under User folder hierarchy.
If you are using Windows Movie Maker on your PC, we have stated how you can save your video file as MP4 format. We have also stated how to convert Windows Movie Maker file to MP4 format easily. We have also recommended the best Windows Movie Maker alternative as Wondershare Filmora where you get more video editing features as well as wide range of video file formats.
Also read:
- How To Make a Video Podcast for 2024
- New 2024 Approved Practical Ways to Resize Video in Handbrake
- Updated Best Tips on How to Design Travel Slideshow for 2024
- New Detailed Steps to Rotate Videos Using Kdenlive for 2024
- New Best Ideas on Using Green Screen with Filmora
- Guide To Slowing Down Videos in Snapchat Discussing the Details
- New Are You a Teacher? Are You Looking for Educational Background Music? This Article Has Everything You Will Need to Know for Creating Outstanding Educational Teaching Videos
- Updated In 2024, Quickly Turn Any Video Into a Paper Rip Effect
- New In 2024, Difference Between Time Lapse and Hyperlapse
- 2024 Approved Looking for the Best Way to Create Stunning Video Animations? Here, We Look at some of the Best Animated Video Maker Solutions to Use
- Updated Detailed Tutorial to Rotate Videos in Cyberlink PowerDirector
- 6 Instant Mp4 to GIF Online Tools for You for 2024
- Best PDF to GIF Converters
- Updated This Article Aim to Teach You How to Make a Night to Day Effect Video with Filmora. Follow the Steps to Figure It Out for 2024
- Updated Time Lapse Video Is Very Interesting and Creative, Which Usually Attracts More Attention. This Article Will Show You How to Make a Time Lapse Video with Adobe After Effects
- Updated M31 LUT (Teal and Orange LUT) Free Download for 2024
- New 2024 Approved Slow Motion Video Editors To Look Out For
- New 2024 Approved How to Cut Videos on Mac without Using FFmpeg?
- New In 2024, 8 Free Title Makers to Use
- Updated Best Way To Color Grading & Color Correction in Filmora
- Updated 2024 Approved Slow Down the GIF to Emphasize Details Better. To Do so, Read This Guide and Learn to Use the Best Platforms for Slow-Motion GIFs
- New 2024 Approved 30+ Amazing Templates for VN Video Editor
- How To Unlock iPhone 13 3 Ways To Unlock
- Things You Dont Know About Motorola Moto G Stylus (2023) Reset Code | Dr.fone
- In 2024, PassFab Apple iPhone 13 Pro Max Backup Unlocker Top 4 Alternatives
- 3 Ways to Change Location on Facebook Marketplace for Xiaomi 13T Pro | Dr.fone
- In 2024, How PGSharp Save You from Ban While Spoofing Pokemon Go On Realme GT 5 (240W)? | Dr.fone
- Does Life360 Notify When You Log Out On Vivo V27e? | Dr.fone
- In 2024, How to Come up With the Best Pokemon Team On Xiaomi Civi 3? | Dr.fone
- In 2024, A Working Guide For Pachirisu Pokemon Go Map On Honor X8b | Dr.fone
- Overview of the Best Motorola G24 Power Screen Mirroring App | Dr.fone
- How to Reset a Honor 90 GT Phone That Is Locked | Dr.fone
- 5 Ways to Track Xiaomi Redmi K70 Pro without App | Dr.fone
- In 2024, How to Come up With the Best Pokemon Team On Apple iPhone 6s? | Dr.fone
- How to restore wiped music on Nova Y71
- Does find my friends work on Xiaomi Redmi Note 13 Pro 5G | Dr.fone
- Title: Updated Dollar-Store DIY Hacks to Use for Filmmaking for 2024
- Author: Morgan
- Created at : 2024-06-15 18:56:43
- Updated at : 2024-06-16 18:56:43
- Link: https://ai-video-editing.techidaily.com/updated-dollar-store-diy-hacks-to-use-for-filmmaking-for-2024/
- License: This work is licensed under CC BY-NC-SA 4.0.

