:max_bytes(150000):strip_icc():format(webp)/the_room-56cc7f225f9b5879cc590941.png)
Updated Fun & Easy Masking Tricks in Filmora for 2024

Fun & Easy Masking Tricks in Filmora
Masking is a video effect that allows you to cut out a scene and use the overlay to duplicate, hide, modify, or reveal your video footage. Just think of it as cutting something on your video so you can see what’s in the bottom layer. So, without wasting time, let me show you how to mask a video in Wondershare Filmora . Let’s get started!
Free Download For Win 7 or later(64-bit)
Free Download For macOS 10.14 or later
Masking Trick 1:
First, you need to shoot footage to add the masking effect. To do that, find a doorway with enough space to walk back and forth before setting up a camera with a tripod facing the entrance. Make sure you set the camera at the center height of the door to prevent lens distortion.

With the tripod set up, film yourself walking behind the door toward the camera. Get close to the camera, then walk back to the door. Then, cross the doorway slowly before walking out of the frame. Now let’s get editing with Wondershare Filmora.

Step 1 Fire up Wondershare Filmora, then import the clip on the video editor. After that, move the clip to the timeline by merely dragging it. Add two clips on the first and second tracks.

Step 2 Now proceed to hide the first track before adding a freeze frame on the second track. To do that, move the playhead to find the starting scene with the door frame without your subject. Then, right-click the clip and tap Add Freeze Frame. After that, extend the freeze frame area and cut out the rest of the clip.

Step 3 Next, click the Effect button and find the Image Mask effect in the Utility folder. Now drag the effect to the top layer.

Step 4 Double-click the clip to open the video editing options, then choose a rectangle image mast under Video Effects. Ensure the mask is inverted by clicking the Invert Mask checkbox. Now adjust the mast to match the door frame before clicking Ok.

Step 5 Up to this point, unhide the first track, then find the scene where the subject appears on the door frame. On the first track, cut the clip before the subject appears on the stage before cutting the scene where the subject crosses the door frame for the second time on the second track. Now play the video to view your masking effect.

Masking Trick: 2
In the second masking effect, we want to create a subject walking in and outside a tree. To do that, find a tree with a clear background, then place your camera to film the center of the tree trunk where the subject will be walking.

Now film the subject walking from one side of the tree, stop for a second, and then turn back. They should repeat the same action, but this time they’ll walk forward outside the frame after the one-second stop. That’s all!

Step 1 Import the clip on Filmora, then add the footage on the first and second timelines. After that, hide the first track, then find the scene where the subject walks forward away from the tree in the second track. Cut off the area before that action.

Step 2 Next, click Effects, choose Utility, then drag the Image Mask effect on the second video track. Then, double-click the second clip, select Video Effects, and choose a rectangular option that masks the right side of the frame.
Now adjust the mask until it covers the entire right side of the tree. After that, unhide the first clip and move the second to match the first clip’s timing. You can also cut out everything outside the scene of the first clip.

Step 3 Play the video to see your subject walking in both directions of the tree.

Masking Trick 3:
For this masking illusion, we’ll create a video with a subject jumping over a house. So, set up your camera tripod on a low level in front of the building. You can also add a mark on the ground for your subject to know where to jump.

Now tell your subject to walk to the marker before jumping and walking out of the scene.

Step 1 Import the clip into Filmora and add it to the first and second tracks. Now hide the first track before finding the scene without the subject in the second track and add a freeze frame. After that, extend the freeze frame area and cut out the rest of the clip.

Step 2 Now, it’s time to customize the clip with a mask. To do that, head to the Utility folder under Effects and choose Image Mask. Click the Invert Mask box to invert the mask.

Step 3 Double-click the video track and choose an image mask under Video Effects. Note that you may need several combinations of masks to mask out the sky and leave the building. So, play around with different masking shapes until the sky is covered.

Step 4 After masking, unhide the first track on the timeline before playing the video to find the scene where the subject appears and cut off everything before that scene. Also, find the scene where the subject jumps in the air and cut the clip in the second track. Then, delete everything after that scene.

Step 5 Play the video to see your subject jumping over the building and walking away from the scene.

Conclusion
That was easy, right? Playing around with Filmora’s masking tools can create incredible masking illusions like the ones we’ve discussed. And don’t forget this video editor has many more creative possibilities. You should try these masking tricks!
Free Download For macOS 10.14 or later
Masking Trick 1:
First, you need to shoot footage to add the masking effect. To do that, find a doorway with enough space to walk back and forth before setting up a camera with a tripod facing the entrance. Make sure you set the camera at the center height of the door to prevent lens distortion.

With the tripod set up, film yourself walking behind the door toward the camera. Get close to the camera, then walk back to the door. Then, cross the doorway slowly before walking out of the frame. Now let’s get editing with Wondershare Filmora.

Step 1 Fire up Wondershare Filmora, then import the clip on the video editor. After that, move the clip to the timeline by merely dragging it. Add two clips on the first and second tracks.

Step 2 Now proceed to hide the first track before adding a freeze frame on the second track. To do that, move the playhead to find the starting scene with the door frame without your subject. Then, right-click the clip and tap Add Freeze Frame. After that, extend the freeze frame area and cut out the rest of the clip.

Step 3 Next, click the Effect button and find the Image Mask effect in the Utility folder. Now drag the effect to the top layer.

Step 4 Double-click the clip to open the video editing options, then choose a rectangle image mast under Video Effects. Ensure the mask is inverted by clicking the Invert Mask checkbox. Now adjust the mast to match the door frame before clicking Ok.

Step 5 Up to this point, unhide the first track, then find the scene where the subject appears on the door frame. On the first track, cut the clip before the subject appears on the stage before cutting the scene where the subject crosses the door frame for the second time on the second track. Now play the video to view your masking effect.

Masking Trick: 2
In the second masking effect, we want to create a subject walking in and outside a tree. To do that, find a tree with a clear background, then place your camera to film the center of the tree trunk where the subject will be walking.

Now film the subject walking from one side of the tree, stop for a second, and then turn back. They should repeat the same action, but this time they’ll walk forward outside the frame after the one-second stop. That’s all!

Step 1 Import the clip on Filmora, then add the footage on the first and second timelines. After that, hide the first track, then find the scene where the subject walks forward away from the tree in the second track. Cut off the area before that action.

Step 2 Next, click Effects, choose Utility, then drag the Image Mask effect on the second video track. Then, double-click the second clip, select Video Effects, and choose a rectangular option that masks the right side of the frame.
Now adjust the mask until it covers the entire right side of the tree. After that, unhide the first clip and move the second to match the first clip’s timing. You can also cut out everything outside the scene of the first clip.

Step 3 Play the video to see your subject walking in both directions of the tree.

Masking Trick 3:
For this masking illusion, we’ll create a video with a subject jumping over a house. So, set up your camera tripod on a low level in front of the building. You can also add a mark on the ground for your subject to know where to jump.

Now tell your subject to walk to the marker before jumping and walking out of the scene.

Step 1 Import the clip into Filmora and add it to the first and second tracks. Now hide the first track before finding the scene without the subject in the second track and add a freeze frame. After that, extend the freeze frame area and cut out the rest of the clip.

Step 2 Now, it’s time to customize the clip with a mask. To do that, head to the Utility folder under Effects and choose Image Mask. Click the Invert Mask box to invert the mask.

Step 3 Double-click the video track and choose an image mask under Video Effects. Note that you may need several combinations of masks to mask out the sky and leave the building. So, play around with different masking shapes until the sky is covered.

Step 4 After masking, unhide the first track on the timeline before playing the video to find the scene where the subject appears and cut off everything before that scene. Also, find the scene where the subject jumps in the air and cut the clip in the second track. Then, delete everything after that scene.

Step 5 Play the video to see your subject jumping over the building and walking away from the scene.

Conclusion
That was easy, right? Playing around with Filmora’s masking tools can create incredible masking illusions like the ones we’ve discussed. And don’t forget this video editor has many more creative possibilities. You should try these masking tricks!
Free Download For macOS 10.14 or later
Masking Trick 1:
First, you need to shoot footage to add the masking effect. To do that, find a doorway with enough space to walk back and forth before setting up a camera with a tripod facing the entrance. Make sure you set the camera at the center height of the door to prevent lens distortion.

With the tripod set up, film yourself walking behind the door toward the camera. Get close to the camera, then walk back to the door. Then, cross the doorway slowly before walking out of the frame. Now let’s get editing with Wondershare Filmora.

Step 1 Fire up Wondershare Filmora, then import the clip on the video editor. After that, move the clip to the timeline by merely dragging it. Add two clips on the first and second tracks.

Step 2 Now proceed to hide the first track before adding a freeze frame on the second track. To do that, move the playhead to find the starting scene with the door frame without your subject. Then, right-click the clip and tap Add Freeze Frame. After that, extend the freeze frame area and cut out the rest of the clip.

Step 3 Next, click the Effect button and find the Image Mask effect in the Utility folder. Now drag the effect to the top layer.

Step 4 Double-click the clip to open the video editing options, then choose a rectangle image mast under Video Effects. Ensure the mask is inverted by clicking the Invert Mask checkbox. Now adjust the mast to match the door frame before clicking Ok.

Step 5 Up to this point, unhide the first track, then find the scene where the subject appears on the door frame. On the first track, cut the clip before the subject appears on the stage before cutting the scene where the subject crosses the door frame for the second time on the second track. Now play the video to view your masking effect.

Masking Trick: 2
In the second masking effect, we want to create a subject walking in and outside a tree. To do that, find a tree with a clear background, then place your camera to film the center of the tree trunk where the subject will be walking.

Now film the subject walking from one side of the tree, stop for a second, and then turn back. They should repeat the same action, but this time they’ll walk forward outside the frame after the one-second stop. That’s all!

Step 1 Import the clip on Filmora, then add the footage on the first and second timelines. After that, hide the first track, then find the scene where the subject walks forward away from the tree in the second track. Cut off the area before that action.

Step 2 Next, click Effects, choose Utility, then drag the Image Mask effect on the second video track. Then, double-click the second clip, select Video Effects, and choose a rectangular option that masks the right side of the frame.
Now adjust the mask until it covers the entire right side of the tree. After that, unhide the first clip and move the second to match the first clip’s timing. You can also cut out everything outside the scene of the first clip.

Step 3 Play the video to see your subject walking in both directions of the tree.

Masking Trick 3:
For this masking illusion, we’ll create a video with a subject jumping over a house. So, set up your camera tripod on a low level in front of the building. You can also add a mark on the ground for your subject to know where to jump.

Now tell your subject to walk to the marker before jumping and walking out of the scene.

Step 1 Import the clip into Filmora and add it to the first and second tracks. Now hide the first track before finding the scene without the subject in the second track and add a freeze frame. After that, extend the freeze frame area and cut out the rest of the clip.

Step 2 Now, it’s time to customize the clip with a mask. To do that, head to the Utility folder under Effects and choose Image Mask. Click the Invert Mask box to invert the mask.

Step 3 Double-click the video track and choose an image mask under Video Effects. Note that you may need several combinations of masks to mask out the sky and leave the building. So, play around with different masking shapes until the sky is covered.

Step 4 After masking, unhide the first track on the timeline before playing the video to find the scene where the subject appears and cut off everything before that scene. Also, find the scene where the subject jumps in the air and cut the clip in the second track. Then, delete everything after that scene.

Step 5 Play the video to see your subject jumping over the building and walking away from the scene.

Conclusion
That was easy, right? Playing around with Filmora’s masking tools can create incredible masking illusions like the ones we’ve discussed. And don’t forget this video editor has many more creative possibilities. You should try these masking tricks!
Free Download For macOS 10.14 or later
Masking Trick 1:
First, you need to shoot footage to add the masking effect. To do that, find a doorway with enough space to walk back and forth before setting up a camera with a tripod facing the entrance. Make sure you set the camera at the center height of the door to prevent lens distortion.

With the tripod set up, film yourself walking behind the door toward the camera. Get close to the camera, then walk back to the door. Then, cross the doorway slowly before walking out of the frame. Now let’s get editing with Wondershare Filmora.

Step 1 Fire up Wondershare Filmora, then import the clip on the video editor. After that, move the clip to the timeline by merely dragging it. Add two clips on the first and second tracks.

Step 2 Now proceed to hide the first track before adding a freeze frame on the second track. To do that, move the playhead to find the starting scene with the door frame without your subject. Then, right-click the clip and tap Add Freeze Frame. After that, extend the freeze frame area and cut out the rest of the clip.

Step 3 Next, click the Effect button and find the Image Mask effect in the Utility folder. Now drag the effect to the top layer.

Step 4 Double-click the clip to open the video editing options, then choose a rectangle image mast under Video Effects. Ensure the mask is inverted by clicking the Invert Mask checkbox. Now adjust the mast to match the door frame before clicking Ok.

Step 5 Up to this point, unhide the first track, then find the scene where the subject appears on the door frame. On the first track, cut the clip before the subject appears on the stage before cutting the scene where the subject crosses the door frame for the second time on the second track. Now play the video to view your masking effect.

Masking Trick: 2
In the second masking effect, we want to create a subject walking in and outside a tree. To do that, find a tree with a clear background, then place your camera to film the center of the tree trunk where the subject will be walking.

Now film the subject walking from one side of the tree, stop for a second, and then turn back. They should repeat the same action, but this time they’ll walk forward outside the frame after the one-second stop. That’s all!

Step 1 Import the clip on Filmora, then add the footage on the first and second timelines. After that, hide the first track, then find the scene where the subject walks forward away from the tree in the second track. Cut off the area before that action.

Step 2 Next, click Effects, choose Utility, then drag the Image Mask effect on the second video track. Then, double-click the second clip, select Video Effects, and choose a rectangular option that masks the right side of the frame.
Now adjust the mask until it covers the entire right side of the tree. After that, unhide the first clip and move the second to match the first clip’s timing. You can also cut out everything outside the scene of the first clip.

Step 3 Play the video to see your subject walking in both directions of the tree.

Masking Trick 3:
For this masking illusion, we’ll create a video with a subject jumping over a house. So, set up your camera tripod on a low level in front of the building. You can also add a mark on the ground for your subject to know where to jump.

Now tell your subject to walk to the marker before jumping and walking out of the scene.

Step 1 Import the clip into Filmora and add it to the first and second tracks. Now hide the first track before finding the scene without the subject in the second track and add a freeze frame. After that, extend the freeze frame area and cut out the rest of the clip.

Step 2 Now, it’s time to customize the clip with a mask. To do that, head to the Utility folder under Effects and choose Image Mask. Click the Invert Mask box to invert the mask.

Step 3 Double-click the video track and choose an image mask under Video Effects. Note that you may need several combinations of masks to mask out the sky and leave the building. So, play around with different masking shapes until the sky is covered.

Step 4 After masking, unhide the first track on the timeline before playing the video to find the scene where the subject appears and cut off everything before that scene. Also, find the scene where the subject jumps in the air and cut the clip in the second track. Then, delete everything after that scene.

Step 5 Play the video to see your subject jumping over the building and walking away from the scene.

Conclusion
That was easy, right? Playing around with Filmora’s masking tools can create incredible masking illusions like the ones we’ve discussed. And don’t forget this video editor has many more creative possibilities. You should try these masking tricks!
Are You Finding It Challenging to Convert GIFs Into JPG or PNG Images? Do Not Worry! The Best Free Online Tool and Software to Change Your GIF Into PNG or JPG Images Are Below
Great Video Converter - Wondershare Filmora
Provide abundant video effects - A creative video editor
Powerful color correction and grading
Detailed tutorials provided by the official channel
There are times you may need to convert GIFs into PNG or PNG and avoid losing image quality. Yet still, it can be tricky to carry this out without losing quality. This is the reason you need a powerful third-party image converter. So today, I will give you a list of the best GIF to image converters online. Let’s dive right in!
In addition, before jumping right into the conversion processes, it is paramount to know that many of these tools are free-to-all and offer exciting customization options. However, some might have specific requirements or conversion size limits. That aside, let’s now discuss how we can convert GIF into PNG online:
In this article
Part 1: Best Online GIF to PNG/JPG Converters
Part 2: How to Convert GIF to PNG?
Part 3: How to Convert GIF to JPG?
Part 1: Best Online GIF to PNG/JPG Converters
FileZigZag
This method can transfer GIF to JPG or PNG online, i.e., it does not require users to download any third-party software. In addition, it supports a wide range of formats, including PNG, WMA, SWF, image, documents, ZIP, MOV, etc.
This is a straightforward process: upload your image and choose the required format. Then input your email address, and the converter will send you a mail within minutes with the conversion.
Features
- Images, documents, audio and video files, ebooks, archival files, and webpages can all be converted with FileZigZag.
- Users will upload or drag a file to the platform.
- It supports a wide range of conversion formats.
- Convert files in minutes
Pros
It is convenient and free to use
The process is effortless, and the conversion speed is moderate
it provides users with sharing option
convert images in a real-time
Cons
You need to wait for a confirmation email, making it a little slow compared to other converters.
CoolUtils Online Image Converter
This is an online converter that gets rid of the need to download any software. In addition, you can get the conversion without wasting any time, and there is no need to wait for an email link.
Features
- To convert your files from GIF to JPG, PNG to JPG, and JPG to PNG, JPEG, or TIFF.
- Drag and drop your source file.
- Convert file online in a matter of seconds.
Pros
It allows users to rotate and resize the image before conversion.
It is compatible with nearly all operating system
It supports many file formats like JPEG, GIF, BMP, etc.
Cons
As of now, nothing in particular
ZAMZAR
This is a comprehensive GIF to PNG and JPG online converter that helps users convert GIF files to any photo format, including PNG and JPG format, for free.
Features
- Allows the addition of GIF files from your computer directly without downloading any programs to your PC.
- It requires only a few steps in converting GIF to JPG format
- It supports several video and photo formats in converting different formats easily
Pros
It is 100% simple to use
Support various input and output formats
No software installation is required
The software is free for conversions up to 100MB
Cons
Most users say the conversion process is a little too slow
The restriction of free conversion up to 100 MB makes it difficult in converting huge files
Ezgif
This is a free GIF to JPG converter that allows you to turn your GIF into an image with a single click leaving no watermark on the picture. In addition, the process is relatively easy to use as you need to upload a GIF file up to 35MB, then click the “Convert “ button, and your image will be ready.
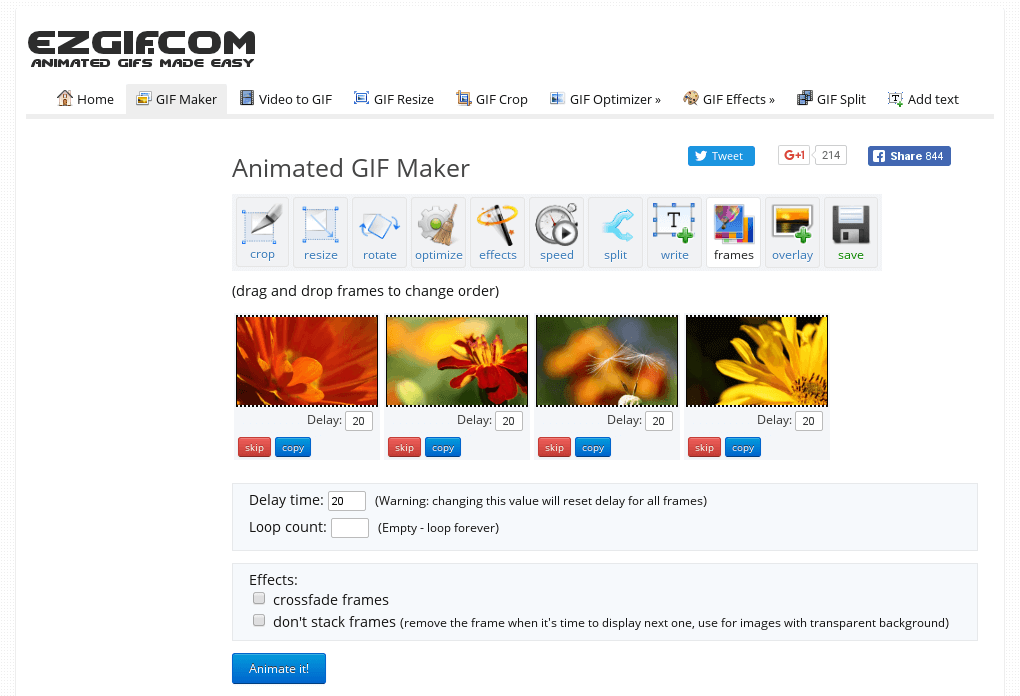
Features:
- It performs most picture editing tasks, such as scaling, optimization, and cropping.
- Making, optimizing, trimming, and resizing animated GIFs with gifsicle and lossygif.
- For video conversions and editing, use FFmpeg.
Pros
Fast and free
No watermark
No Ads
No software downloads
Cons
It is sometimes slow
This online editing tool is a complete package that enables you to choose more than 80 different operations, which include the following:
Features:
- It allows Metadata Editing, i.e., editing the data before saving and converting it.
- Transform your pictures as well as resize, rotate, etc.
- Colors can adjust according to users’ preference
- Includes the addition of different filters, including emboss, sharpen, blur, etc.
- Users can do special effects like; vignetting, watermarking, etc.
Pros
Supports 500+ formats
Available on Mac, Windows, and Linux OS
Available in 20+ different languages
Advanced options available.
Cons
Some specific programs require constant updates.
Picresize
This is a free web-based GIF to JPG Converter that lets users add pictures for editing by uploading, linking, URL, etc. It is a customizable, lightweight tool for free editing images and photos online.
Features:
- Shrink and enlarge your photos
- It can crop your images for print or social media.
- Flip and rotate your pictures.
- Reduce the file size of your photos to the desired quality or disk size.
- Get web-ready image files by converting your photos or graphics into BMP, GIF. JPG or PNG format
Pros
It is an easy-to-use software
Support many formats
Compatible with a lot of Operating System
Allows changing the quality of the output file
Cons
There are limited settings compared to other editing software
This is a free Image Convert and Resize editor that is compact yet powerful for batch mode image processing. In addition, the program can easily convert separate images and file folders containing images into different renames, graphic formats, and reorders and changes their size following the set parameters. The supported image file formats for this software include; JPG, PNG, BMP, GIF, TGA, and PDF (export only).
Features:
- It is a compact program required for batch mode image processing.
- It allows the conversion of separate images and file folders to resize them accordingly
- The software is safe to run and use
- There is an option to install additional features according to your requirement
Pros
A secure option for beginners.
This small program is quite light on your system.
It is customizable.
Cons
Not all image format is supported compared to other converters
This software allows the conversion of all your digital pictures for sending email, on your website, posting on auction sites, etc. It provides a straight way to batch convert your digital images according to your need and add your watermark.
Features:
- Allows users to carry out batch conversion
- Enables users to import multiple photos from a folder
- Allows users to add their watermark
- Users can rotate, resize, and alter the images before and after conversion.
- Enables the creation of thumbnail pictures
- Users can upload their pictures to a dedicated server using the built-in FTP client.
Pros
The online help desk is highly responsive
Exceptional quality
Reasonable price
There are no prerequisites related to knowledge or experience.
Massive demands
Cons
Based on users’ preferences, nothing major.
Based on the above list, we have picked two excellent GIF to PNG and GIF to JPG converters that will serve you the best across the industry. Let us look at them one by one.
Part 2: How to Convert GIF to PNG?
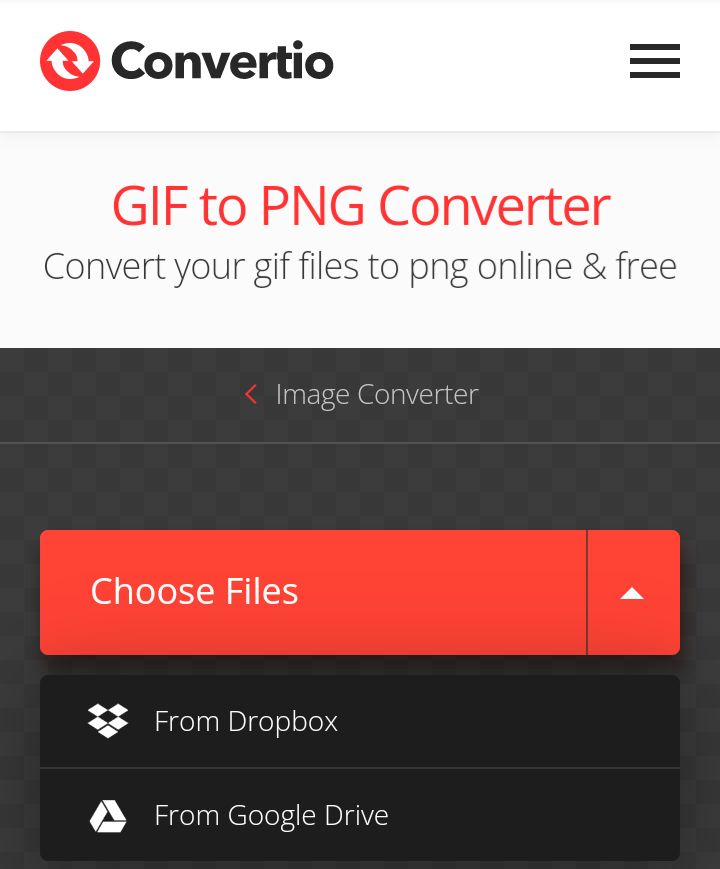
Undeniably, Convertio is the clearest GIF to PNG online converter on this list. The numbered steps make it super-easy to use as users can convert GIF to PNG, TIFF, TGA, JPG, BMP, and many others.
Step 1: Access the Website and Add Files
Log in to Convertio and click the Add Files button to add your GIF file. You can besides directly drag and drop your GIF file to the timeline.
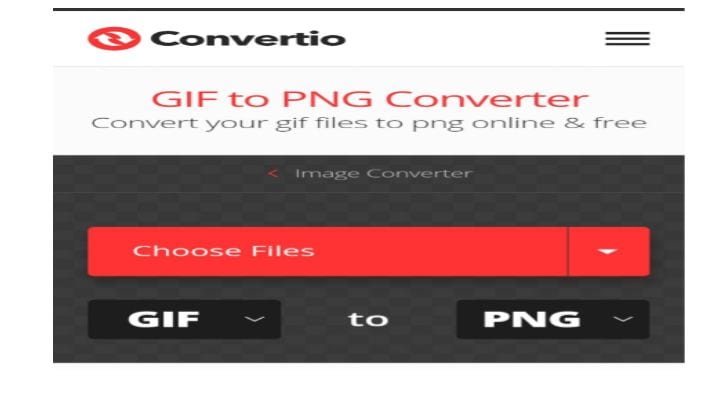
Step 2: Search and Choose the Format
Open the File drop-down list and select PNG open under the Image Formats.
Step 3: Convert and Download
Finally, click the Convert Now button to convert GIF to PNG.
Part 3: How to Convert GIF to JPG?
Ezgif is also a robust GIF converter that supports converting any image format to JPG without losing quality. It also supports the conversion of GIFs to other formats like PNG, WebP, or PDF formats.
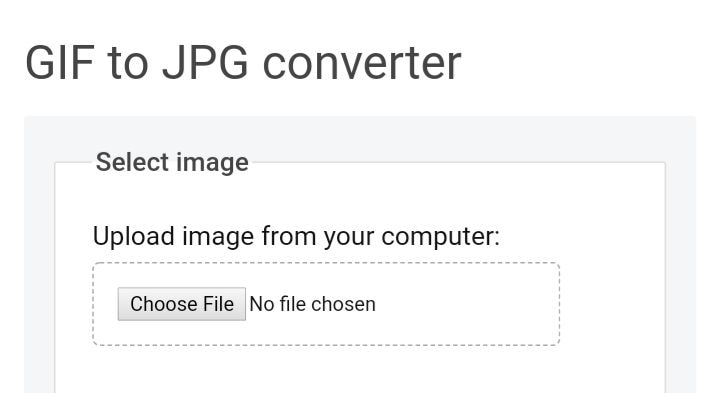
Step 1: Import GIF
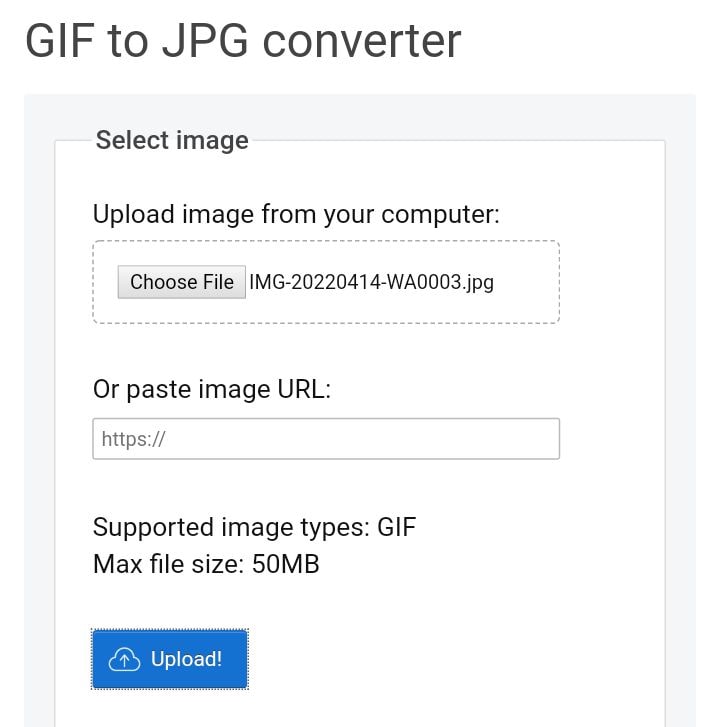
After logging in to the website and clicking the Choose file button to import your local GIF file, you can import multiple files having a total file size of less than 35MB.
Step 2: Start Editing GIF
Next is to click the Upload button to start editing your GIF file (cut, add text, resize, rotate) before converting it.
Step 3: Convert to APNG and Save
Finally, click the Convert to APNG! button to start converting, and your image is ready.
Conclusion
This article gave a detailed breakdown of GIF to PNG converter and explained how to convert GIF into JPG or PNG effectively.
Also, in the last two parts, you got details on how to use Convertio and Ezgif to convert GIF to PNG in a few simple steps.
There are times you may need to convert GIFs into PNG or PNG and avoid losing image quality. Yet still, it can be tricky to carry this out without losing quality. This is the reason you need a powerful third-party image converter. So today, I will give you a list of the best GIF to image converters online. Let’s dive right in!
In addition, before jumping right into the conversion processes, it is paramount to know that many of these tools are free-to-all and offer exciting customization options. However, some might have specific requirements or conversion size limits. That aside, let’s now discuss how we can convert GIF into PNG online:
In this article
Part 1: Best Online GIF to PNG/JPG Converters
Part 2: How to Convert GIF to PNG?
Part 3: How to Convert GIF to JPG?
Part 1: Best Online GIF to PNG/JPG Converters
FileZigZag
This method can transfer GIF to JPG or PNG online, i.e., it does not require users to download any third-party software. In addition, it supports a wide range of formats, including PNG, WMA, SWF, image, documents, ZIP, MOV, etc.
This is a straightforward process: upload your image and choose the required format. Then input your email address, and the converter will send you a mail within minutes with the conversion.
Features
- Images, documents, audio and video files, ebooks, archival files, and webpages can all be converted with FileZigZag.
- Users will upload or drag a file to the platform.
- It supports a wide range of conversion formats.
- Convert files in minutes
Pros
It is convenient and free to use
The process is effortless, and the conversion speed is moderate
it provides users with sharing option
convert images in a real-time
Cons
You need to wait for a confirmation email, making it a little slow compared to other converters.
CoolUtils Online Image Converter
This is an online converter that gets rid of the need to download any software. In addition, you can get the conversion without wasting any time, and there is no need to wait for an email link.
Features
- To convert your files from GIF to JPG, PNG to JPG, and JPG to PNG, JPEG, or TIFF.
- Drag and drop your source file.
- Convert file online in a matter of seconds.
Pros
It allows users to rotate and resize the image before conversion.
It is compatible with nearly all operating system
It supports many file formats like JPEG, GIF, BMP, etc.
Cons
As of now, nothing in particular
ZAMZAR
This is a comprehensive GIF to PNG and JPG online converter that helps users convert GIF files to any photo format, including PNG and JPG format, for free.
Features
- Allows the addition of GIF files from your computer directly without downloading any programs to your PC.
- It requires only a few steps in converting GIF to JPG format
- It supports several video and photo formats in converting different formats easily
Pros
It is 100% simple to use
Support various input and output formats
No software installation is required
The software is free for conversions up to 100MB
Cons
Most users say the conversion process is a little too slow
The restriction of free conversion up to 100 MB makes it difficult in converting huge files
Ezgif
This is a free GIF to JPG converter that allows you to turn your GIF into an image with a single click leaving no watermark on the picture. In addition, the process is relatively easy to use as you need to upload a GIF file up to 35MB, then click the “Convert “ button, and your image will be ready.

Features:
- It performs most picture editing tasks, such as scaling, optimization, and cropping.
- Making, optimizing, trimming, and resizing animated GIFs with gifsicle and lossygif.
- For video conversions and editing, use FFmpeg.
Pros
Fast and free
No watermark
No Ads
No software downloads
Cons
It is sometimes slow
This online editing tool is a complete package that enables you to choose more than 80 different operations, which include the following:
Features:
- It allows Metadata Editing, i.e., editing the data before saving and converting it.
- Transform your pictures as well as resize, rotate, etc.
- Colors can adjust according to users’ preference
- Includes the addition of different filters, including emboss, sharpen, blur, etc.
- Users can do special effects like; vignetting, watermarking, etc.
Pros
Supports 500+ formats
Available on Mac, Windows, and Linux OS
Available in 20+ different languages
Advanced options available.
Cons
Some specific programs require constant updates.
Picresize
This is a free web-based GIF to JPG Converter that lets users add pictures for editing by uploading, linking, URL, etc. It is a customizable, lightweight tool for free editing images and photos online.
Features:
- Shrink and enlarge your photos
- It can crop your images for print or social media.
- Flip and rotate your pictures.
- Reduce the file size of your photos to the desired quality or disk size.
- Get web-ready image files by converting your photos or graphics into BMP, GIF. JPG or PNG format
Pros
It is an easy-to-use software
Support many formats
Compatible with a lot of Operating System
Allows changing the quality of the output file
Cons
There are limited settings compared to other editing software
This is a free Image Convert and Resize editor that is compact yet powerful for batch mode image processing. In addition, the program can easily convert separate images and file folders containing images into different renames, graphic formats, and reorders and changes their size following the set parameters. The supported image file formats for this software include; JPG, PNG, BMP, GIF, TGA, and PDF (export only).
Features:
- It is a compact program required for batch mode image processing.
- It allows the conversion of separate images and file folders to resize them accordingly
- The software is safe to run and use
- There is an option to install additional features according to your requirement
Pros
A secure option for beginners.
This small program is quite light on your system.
It is customizable.
Cons
Not all image format is supported compared to other converters
This software allows the conversion of all your digital pictures for sending email, on your website, posting on auction sites, etc. It provides a straight way to batch convert your digital images according to your need and add your watermark.
Features:
- Allows users to carry out batch conversion
- Enables users to import multiple photos from a folder
- Allows users to add their watermark
- Users can rotate, resize, and alter the images before and after conversion.
- Enables the creation of thumbnail pictures
- Users can upload their pictures to a dedicated server using the built-in FTP client.
Pros
The online help desk is highly responsive
Exceptional quality
Reasonable price
There are no prerequisites related to knowledge or experience.
Massive demands
Cons
Based on users’ preferences, nothing major.
Based on the above list, we have picked two excellent GIF to PNG and GIF to JPG converters that will serve you the best across the industry. Let us look at them one by one.
Part 2: How to Convert GIF to PNG?
Undeniably, Convertio is the clearest GIF to PNG online converter on this list. The numbered steps make it super-easy to use as users can convert GIF to PNG, TIFF, TGA, JPG, BMP, and many others.
Step 1: Access the Website and Add Files
Log in to Convertio and click the Add Files button to add your GIF file. You can besides directly drag and drop your GIF file to the timeline.

Step 2: Search and Choose the Format
Open the File drop-down list and select PNG open under the Image Formats.

Step 3: Convert and Download
Finally, click the Convert Now button to convert GIF to PNG.
Part 3: How to Convert GIF to JPG?
Ezgif is also a robust GIF converter that supports converting any image format to JPG without losing quality. It also supports the conversion of GIFs to other formats like PNG, WebP, or PDF formats.
Step 1: Import GIF
After logging in to the website and clicking the Choose file button to import your local GIF file, you can import multiple files having a total file size of less than 35MB.

Step 2: Start Editing GIF
Next is to click the Upload button to start editing your GIF file (cut, add text, resize, rotate) before converting it.

Step 3: Convert to APNG and Save
Finally, click the Convert to APNG! button to start converting, and your image is ready.
Conclusion
This article gave a detailed breakdown of GIF to PNG converter and explained how to convert GIF into JPG or PNG effectively.
Also, in the last two parts, you got details on how to use Convertio and Ezgif to convert GIF to PNG in a few simple steps.
There are times you may need to convert GIFs into PNG or PNG and avoid losing image quality. Yet still, it can be tricky to carry this out without losing quality. This is the reason you need a powerful third-party image converter. So today, I will give you a list of the best GIF to image converters online. Let’s dive right in!
In addition, before jumping right into the conversion processes, it is paramount to know that many of these tools are free-to-all and offer exciting customization options. However, some might have specific requirements or conversion size limits. That aside, let’s now discuss how we can convert GIF into PNG online:
In this article
Part 1: Best Online GIF to PNG/JPG Converters
Part 2: How to Convert GIF to PNG?
Part 3: How to Convert GIF to JPG?
Part 1: Best Online GIF to PNG/JPG Converters
FileZigZag
This method can transfer GIF to JPG or PNG online, i.e., it does not require users to download any third-party software. In addition, it supports a wide range of formats, including PNG, WMA, SWF, image, documents, ZIP, MOV, etc.
This is a straightforward process: upload your image and choose the required format. Then input your email address, and the converter will send you a mail within minutes with the conversion.
Features
- Images, documents, audio and video files, ebooks, archival files, and webpages can all be converted with FileZigZag.
- Users will upload or drag a file to the platform.
- It supports a wide range of conversion formats.
- Convert files in minutes
Pros
It is convenient and free to use
The process is effortless, and the conversion speed is moderate
it provides users with sharing option
convert images in a real-time
Cons
You need to wait for a confirmation email, making it a little slow compared to other converters.
CoolUtils Online Image Converter
This is an online converter that gets rid of the need to download any software. In addition, you can get the conversion without wasting any time, and there is no need to wait for an email link.
Features
- To convert your files from GIF to JPG, PNG to JPG, and JPG to PNG, JPEG, or TIFF.
- Drag and drop your source file.
- Convert file online in a matter of seconds.
Pros
It allows users to rotate and resize the image before conversion.
It is compatible with nearly all operating system
It supports many file formats like JPEG, GIF, BMP, etc.
Cons
As of now, nothing in particular
ZAMZAR
This is a comprehensive GIF to PNG and JPG online converter that helps users convert GIF files to any photo format, including PNG and JPG format, for free.
Features
- Allows the addition of GIF files from your computer directly without downloading any programs to your PC.
- It requires only a few steps in converting GIF to JPG format
- It supports several video and photo formats in converting different formats easily
Pros
It is 100% simple to use
Support various input and output formats
No software installation is required
The software is free for conversions up to 100MB
Cons
Most users say the conversion process is a little too slow
The restriction of free conversion up to 100 MB makes it difficult in converting huge files
Ezgif
This is a free GIF to JPG converter that allows you to turn your GIF into an image with a single click leaving no watermark on the picture. In addition, the process is relatively easy to use as you need to upload a GIF file up to 35MB, then click the “Convert “ button, and your image will be ready.

Features:
- It performs most picture editing tasks, such as scaling, optimization, and cropping.
- Making, optimizing, trimming, and resizing animated GIFs with gifsicle and lossygif.
- For video conversions and editing, use FFmpeg.
Pros
Fast and free
No watermark
No Ads
No software downloads
Cons
It is sometimes slow
This online editing tool is a complete package that enables you to choose more than 80 different operations, which include the following:
Features:
- It allows Metadata Editing, i.e., editing the data before saving and converting it.
- Transform your pictures as well as resize, rotate, etc.
- Colors can adjust according to users’ preference
- Includes the addition of different filters, including emboss, sharpen, blur, etc.
- Users can do special effects like; vignetting, watermarking, etc.
Pros
Supports 500+ formats
Available on Mac, Windows, and Linux OS
Available in 20+ different languages
Advanced options available.
Cons
Some specific programs require constant updates.
Picresize
This is a free web-based GIF to JPG Converter that lets users add pictures for editing by uploading, linking, URL, etc. It is a customizable, lightweight tool for free editing images and photos online.
Features:
- Shrink and enlarge your photos
- It can crop your images for print or social media.
- Flip and rotate your pictures.
- Reduce the file size of your photos to the desired quality or disk size.
- Get web-ready image files by converting your photos or graphics into BMP, GIF. JPG or PNG format
Pros
It is an easy-to-use software
Support many formats
Compatible with a lot of Operating System
Allows changing the quality of the output file
Cons
There are limited settings compared to other editing software
This is a free Image Convert and Resize editor that is compact yet powerful for batch mode image processing. In addition, the program can easily convert separate images and file folders containing images into different renames, graphic formats, and reorders and changes their size following the set parameters. The supported image file formats for this software include; JPG, PNG, BMP, GIF, TGA, and PDF (export only).
Features:
- It is a compact program required for batch mode image processing.
- It allows the conversion of separate images and file folders to resize them accordingly
- The software is safe to run and use
- There is an option to install additional features according to your requirement
Pros
A secure option for beginners.
This small program is quite light on your system.
It is customizable.
Cons
Not all image format is supported compared to other converters
This software allows the conversion of all your digital pictures for sending email, on your website, posting on auction sites, etc. It provides a straight way to batch convert your digital images according to your need and add your watermark.
Features:
- Allows users to carry out batch conversion
- Enables users to import multiple photos from a folder
- Allows users to add their watermark
- Users can rotate, resize, and alter the images before and after conversion.
- Enables the creation of thumbnail pictures
- Users can upload their pictures to a dedicated server using the built-in FTP client.
Pros
The online help desk is highly responsive
Exceptional quality
Reasonable price
There are no prerequisites related to knowledge or experience.
Massive demands
Cons
Based on users’ preferences, nothing major.
Based on the above list, we have picked two excellent GIF to PNG and GIF to JPG converters that will serve you the best across the industry. Let us look at them one by one.
Part 2: How to Convert GIF to PNG?
Undeniably, Convertio is the clearest GIF to PNG online converter on this list. The numbered steps make it super-easy to use as users can convert GIF to PNG, TIFF, TGA, JPG, BMP, and many others.
Step 1: Access the Website and Add Files
Log in to Convertio and click the Add Files button to add your GIF file. You can besides directly drag and drop your GIF file to the timeline.

Step 2: Search and Choose the Format
Open the File drop-down list and select PNG open under the Image Formats.

Step 3: Convert and Download
Finally, click the Convert Now button to convert GIF to PNG.
Part 3: How to Convert GIF to JPG?
Ezgif is also a robust GIF converter that supports converting any image format to JPG without losing quality. It also supports the conversion of GIFs to other formats like PNG, WebP, or PDF formats.
Step 1: Import GIF
After logging in to the website and clicking the Choose file button to import your local GIF file, you can import multiple files having a total file size of less than 35MB.

Step 2: Start Editing GIF
Next is to click the Upload button to start editing your GIF file (cut, add text, resize, rotate) before converting it.

Step 3: Convert to APNG and Save
Finally, click the Convert to APNG! button to start converting, and your image is ready.
Conclusion
This article gave a detailed breakdown of GIF to PNG converter and explained how to convert GIF into JPG or PNG effectively.
Also, in the last two parts, you got details on how to use Convertio and Ezgif to convert GIF to PNG in a few simple steps.
There are times you may need to convert GIFs into PNG or PNG and avoid losing image quality. Yet still, it can be tricky to carry this out without losing quality. This is the reason you need a powerful third-party image converter. So today, I will give you a list of the best GIF to image converters online. Let’s dive right in!
In addition, before jumping right into the conversion processes, it is paramount to know that many of these tools are free-to-all and offer exciting customization options. However, some might have specific requirements or conversion size limits. That aside, let’s now discuss how we can convert GIF into PNG online:
In this article
Part 1: Best Online GIF to PNG/JPG Converters
Part 2: How to Convert GIF to PNG?
Part 3: How to Convert GIF to JPG?
Part 1: Best Online GIF to PNG/JPG Converters
FileZigZag
This method can transfer GIF to JPG or PNG online, i.e., it does not require users to download any third-party software. In addition, it supports a wide range of formats, including PNG, WMA, SWF, image, documents, ZIP, MOV, etc.
This is a straightforward process: upload your image and choose the required format. Then input your email address, and the converter will send you a mail within minutes with the conversion.
Features
- Images, documents, audio and video files, ebooks, archival files, and webpages can all be converted with FileZigZag.
- Users will upload or drag a file to the platform.
- It supports a wide range of conversion formats.
- Convert files in minutes
Pros
It is convenient and free to use
The process is effortless, and the conversion speed is moderate
it provides users with sharing option
convert images in a real-time
Cons
You need to wait for a confirmation email, making it a little slow compared to other converters.
CoolUtils Online Image Converter
This is an online converter that gets rid of the need to download any software. In addition, you can get the conversion without wasting any time, and there is no need to wait for an email link.
Features
- To convert your files from GIF to JPG, PNG to JPG, and JPG to PNG, JPEG, or TIFF.
- Drag and drop your source file.
- Convert file online in a matter of seconds.
Pros
It allows users to rotate and resize the image before conversion.
It is compatible with nearly all operating system
It supports many file formats like JPEG, GIF, BMP, etc.
Cons
As of now, nothing in particular
ZAMZAR
This is a comprehensive GIF to PNG and JPG online converter that helps users convert GIF files to any photo format, including PNG and JPG format, for free.
Features
- Allows the addition of GIF files from your computer directly without downloading any programs to your PC.
- It requires only a few steps in converting GIF to JPG format
- It supports several video and photo formats in converting different formats easily
Pros
It is 100% simple to use
Support various input and output formats
No software installation is required
The software is free for conversions up to 100MB
Cons
Most users say the conversion process is a little too slow
The restriction of free conversion up to 100 MB makes it difficult in converting huge files
Ezgif
This is a free GIF to JPG converter that allows you to turn your GIF into an image with a single click leaving no watermark on the picture. In addition, the process is relatively easy to use as you need to upload a GIF file up to 35MB, then click the “Convert “ button, and your image will be ready.

Features:
- It performs most picture editing tasks, such as scaling, optimization, and cropping.
- Making, optimizing, trimming, and resizing animated GIFs with gifsicle and lossygif.
- For video conversions and editing, use FFmpeg.
Pros
Fast and free
No watermark
No Ads
No software downloads
Cons
It is sometimes slow
This online editing tool is a complete package that enables you to choose more than 80 different operations, which include the following:
Features:
- It allows Metadata Editing, i.e., editing the data before saving and converting it.
- Transform your pictures as well as resize, rotate, etc.
- Colors can adjust according to users’ preference
- Includes the addition of different filters, including emboss, sharpen, blur, etc.
- Users can do special effects like; vignetting, watermarking, etc.
Pros
Supports 500+ formats
Available on Mac, Windows, and Linux OS
Available in 20+ different languages
Advanced options available.
Cons
Some specific programs require constant updates.
Picresize
This is a free web-based GIF to JPG Converter that lets users add pictures for editing by uploading, linking, URL, etc. It is a customizable, lightweight tool for free editing images and photos online.
Features:
- Shrink and enlarge your photos
- It can crop your images for print or social media.
- Flip and rotate your pictures.
- Reduce the file size of your photos to the desired quality or disk size.
- Get web-ready image files by converting your photos or graphics into BMP, GIF. JPG or PNG format
Pros
It is an easy-to-use software
Support many formats
Compatible with a lot of Operating System
Allows changing the quality of the output file
Cons
There are limited settings compared to other editing software
This is a free Image Convert and Resize editor that is compact yet powerful for batch mode image processing. In addition, the program can easily convert separate images and file folders containing images into different renames, graphic formats, and reorders and changes their size following the set parameters. The supported image file formats for this software include; JPG, PNG, BMP, GIF, TGA, and PDF (export only).
Features:
- It is a compact program required for batch mode image processing.
- It allows the conversion of separate images and file folders to resize them accordingly
- The software is safe to run and use
- There is an option to install additional features according to your requirement
Pros
A secure option for beginners.
This small program is quite light on your system.
It is customizable.
Cons
Not all image format is supported compared to other converters
This software allows the conversion of all your digital pictures for sending email, on your website, posting on auction sites, etc. It provides a straight way to batch convert your digital images according to your need and add your watermark.
Features:
- Allows users to carry out batch conversion
- Enables users to import multiple photos from a folder
- Allows users to add their watermark
- Users can rotate, resize, and alter the images before and after conversion.
- Enables the creation of thumbnail pictures
- Users can upload their pictures to a dedicated server using the built-in FTP client.
Pros
The online help desk is highly responsive
Exceptional quality
Reasonable price
There are no prerequisites related to knowledge or experience.
Massive demands
Cons
Based on users’ preferences, nothing major.
Based on the above list, we have picked two excellent GIF to PNG and GIF to JPG converters that will serve you the best across the industry. Let us look at them one by one.
Part 2: How to Convert GIF to PNG?
Undeniably, Convertio is the clearest GIF to PNG online converter on this list. The numbered steps make it super-easy to use as users can convert GIF to PNG, TIFF, TGA, JPG, BMP, and many others.
Step 1: Access the Website and Add Files
Log in to Convertio and click the Add Files button to add your GIF file. You can besides directly drag and drop your GIF file to the timeline.

Step 2: Search and Choose the Format
Open the File drop-down list and select PNG open under the Image Formats.

Step 3: Convert and Download
Finally, click the Convert Now button to convert GIF to PNG.
Part 3: How to Convert GIF to JPG?
Ezgif is also a robust GIF converter that supports converting any image format to JPG without losing quality. It also supports the conversion of GIFs to other formats like PNG, WebP, or PDF formats.
Step 1: Import GIF
After logging in to the website and clicking the Choose file button to import your local GIF file, you can import multiple files having a total file size of less than 35MB.

Step 2: Start Editing GIF
Next is to click the Upload button to start editing your GIF file (cut, add text, resize, rotate) before converting it.

Step 3: Convert to APNG and Save
Finally, click the Convert to APNG! button to start converting, and your image is ready.
Conclusion
This article gave a detailed breakdown of GIF to PNG converter and explained how to convert GIF into JPG or PNG effectively.
Also, in the last two parts, you got details on how to use Convertio and Ezgif to convert GIF to PNG in a few simple steps.
4 Ways to Add White Borders on Mobile and Desktop
Would you like to add white borders to your videos?
Are you looking to put white backgrounds to your videos without cutting them?
You have seen many videos with attractive borders on different social media platforms (Instagram, YouTube, Facebook, LinkedIn, etc.) Adding borders allows you to create an evocative effect and also adjust the cropping issues. It plays a good role in redesigning a video. It should be noted that a border can change the entire style of the video.
There are hundreds of video editing software that allow adding borders to the videos for mobile and desktop. In this article, we shall discuss different ways to add white borders in movies used on different social media platforms.

4 Ways to Add White Borders to Video
The following 4 ways can be used to add white borders to the videos.
- Add a white border to the video on the computer (using Filmora)
- Add a white border to the video online
- Add a white border to the video on Android
- Add a white border to the video on iOS
Recommended way to add a white border to the video on the computer - using Filmora
Filmora Video Editor is one of the best video editing software. It allows editing the videos in a professional way. It has built-in editing features like splitting/cutting, trimming, cropping, adding watermark, changing speed, recording voice, and many more Along with this, you can rely on this application to add borders with different colors including white borders, black borders, colored border, and customized border. Add white borders on a computer, all this can be done in a few simple steps.
For Win 7 or later (64-bit)
For macOS 10.14 or later
Let’s download the free Wonder Share Filmora 11 software to proceed.
- Go to media, and import the video from your storage.
- Drag the video into the timeline.

- Select the video by clicking on the video.
- Hit the effects You can select the colorful effects from the panel.
- Now, write borders in the search engine. You will find various borders styles in the panel.
- Select the white border at the top of the panel.
- Simply drag and drop the border to the video/image.

- You will see the white border on the selected video.

- You can change the color of the border.
- Select the video by double-clicking on it.
- Hit the Effect tab from the Image and then click on Borders.
- Here you can change the color of your borders.
- Hit the OK

Add a white border to the video online
You can change white borders without launching software by editing online. Kapwing is an online video editing tool that is used to edit videos, images, and GIFs. It is very easy to use and the good thing about Kapwing is, it’s free and you don’t need to sign up or add watermarks to your edited videos/images.
However, it allows you to edit a video up to 250MB or you can only upload a video of almost 7 minutes in length. What you would need is to have a good internet connection and a Web.
Let’s start editing to add white borders step by step:
- Visit Kapwing collage maker and hit start collage maker
- You will see the below window.

- Click on Add media and select the desired video or image.
- Drag and drop the video into the timeline.

- Click on the video and drag the 4 corners to resize your video.
- It will eventually provide you with a white background and you can use it as a white border.

- Hit the Lock ratio tab once you got satisfied with your image borders.
- Double click the border to set the background color.

- You can change the background colors of your choice.

Add a white border to the video on Android
You can add white borders to your videos using android. BeeCut is a very simple and useful application for video editing. It presents a lot of stylish and beautiful frames and effects to make your video amazing. Along with this, it allows you to add text, filters, transitions, and many features to make your video stand out. It is very easy to use as takes a few steps to add frames to your video in android. To start the process follow these steps;
- Launch BeeCut on your mobile/android.
- Open the app and click on Media.
- Hit on Import file.

- Drag the video into the timeline or hit the +
- Hit the overlays
- Select your desired border.

- Drag the desired overlay border over the timeline. Here you can edit your design (change color, effect, etc.)
- Now, hit the export tab and choose the quality and format of your video.
- Save the file on your android.
Add a white border to the video on iOS
The PicsArt app is commonly used to edit videos on iPhone as well as on android. It is a very simple app, even a layman can use PicsArt and make professional white borders. This app is familiar among Instagram users. It changes the rectangular video or image into a square format. The aspect ratio of 1:1 is used for Instagram videos. It not only adds borders to the videos but also provides editing features like cut, resize, rotate, trims, text, etc. Let’s start with step-by-step instructions to add white borders to the video.
- Go to the app store and download the PicsArt app.
- Open the app and select the desired video.
- Hit the Fit tab from the bottom center.

- Select the color tool from the bottom.
- Choose the white color for white borders and you can also choose the desired color.
- Hit the ütab and the video will be saved to your phone gallery or you can directly share the video on Instagram.

Conclusion:
In the above content, we have introduced four methods to add white borders in your videos using windows, android, iPhone, and online. All the methods are free to use.
Wonder Share Filmora 11 is highly recommended to get the best and most professional results. It not only allows you to add borders but also provides you with an advanced editing panel. You can easily edit your videos and share with your social circle.
4 Ways to Add White Borders to Video
The following 4 ways can be used to add white borders to the videos.
- Add a white border to the video on the computer (using Filmora)
- Add a white border to the video online
- Add a white border to the video on Android
- Add a white border to the video on iOS
Recommended way to add a white border to the video on the computer - using Filmora
Filmora Video Editor is one of the best video editing software. It allows editing the videos in a professional way. It has built-in editing features like splitting/cutting, trimming, cropping, adding watermark, changing speed, recording voice, and many more Along with this, you can rely on this application to add borders with different colors including white borders, black borders, colored border, and customized border. Add white borders on a computer, all this can be done in a few simple steps.
For Win 7 or later (64-bit)
For macOS 10.14 or later
Let’s download the free Wonder Share Filmora 11 software to proceed.
- Go to media, and import the video from your storage.
- Drag the video into the timeline.

- Select the video by clicking on the video.
- Hit the effects You can select the colorful effects from the panel.
- Now, write borders in the search engine. You will find various borders styles in the panel.
- Select the white border at the top of the panel.
- Simply drag and drop the border to the video/image.

- You will see the white border on the selected video.

- You can change the color of the border.
- Select the video by double-clicking on it.
- Hit the Effect tab from the Image and then click on Borders.
- Here you can change the color of your borders.
- Hit the OK

Add a white border to the video online
You can change white borders without launching software by editing online. Kapwing is an online video editing tool that is used to edit videos, images, and GIFs. It is very easy to use and the good thing about Kapwing is, it’s free and you don’t need to sign up or add watermarks to your edited videos/images.
However, it allows you to edit a video up to 250MB or you can only upload a video of almost 7 minutes in length. What you would need is to have a good internet connection and a Web.
Let’s start editing to add white borders step by step:
- Visit Kapwing collage maker and hit start collage maker
- You will see the below window.

- Click on Add media and select the desired video or image.
- Drag and drop the video into the timeline.

- Click on the video and drag the 4 corners to resize your video.
- It will eventually provide you with a white background and you can use it as a white border.

- Hit the Lock ratio tab once you got satisfied with your image borders.
- Double click the border to set the background color.

- You can change the background colors of your choice.

Add a white border to the video on Android
You can add white borders to your videos using android. BeeCut is a very simple and useful application for video editing. It presents a lot of stylish and beautiful frames and effects to make your video amazing. Along with this, it allows you to add text, filters, transitions, and many features to make your video stand out. It is very easy to use as takes a few steps to add frames to your video in android. To start the process follow these steps;
- Launch BeeCut on your mobile/android.
- Open the app and click on Media.
- Hit on Import file.

- Drag the video into the timeline or hit the +
- Hit the overlays
- Select your desired border.

- Drag the desired overlay border over the timeline. Here you can edit your design (change color, effect, etc.)
- Now, hit the export tab and choose the quality and format of your video.
- Save the file on your android.
Add a white border to the video on iOS
The PicsArt app is commonly used to edit videos on iPhone as well as on android. It is a very simple app, even a layman can use PicsArt and make professional white borders. This app is familiar among Instagram users. It changes the rectangular video or image into a square format. The aspect ratio of 1:1 is used for Instagram videos. It not only adds borders to the videos but also provides editing features like cut, resize, rotate, trims, text, etc. Let’s start with step-by-step instructions to add white borders to the video.
- Go to the app store and download the PicsArt app.
- Open the app and select the desired video.
- Hit the Fit tab from the bottom center.

- Select the color tool from the bottom.
- Choose the white color for white borders and you can also choose the desired color.
- Hit the ütab and the video will be saved to your phone gallery or you can directly share the video on Instagram.

Conclusion:
In the above content, we have introduced four methods to add white borders in your videos using windows, android, iPhone, and online. All the methods are free to use.
Wonder Share Filmora 11 is highly recommended to get the best and most professional results. It not only allows you to add borders but also provides you with an advanced editing panel. You can easily edit your videos and share with your social circle.
4 Ways to Add White Borders to Video
The following 4 ways can be used to add white borders to the videos.
- Add a white border to the video on the computer (using Filmora)
- Add a white border to the video online
- Add a white border to the video on Android
- Add a white border to the video on iOS
Recommended way to add a white border to the video on the computer - using Filmora
Filmora Video Editor is one of the best video editing software. It allows editing the videos in a professional way. It has built-in editing features like splitting/cutting, trimming, cropping, adding watermark, changing speed, recording voice, and many more Along with this, you can rely on this application to add borders with different colors including white borders, black borders, colored border, and customized border. Add white borders on a computer, all this can be done in a few simple steps.
For Win 7 or later (64-bit)
For macOS 10.14 or later
Let’s download the free Wonder Share Filmora 11 software to proceed.
- Go to media, and import the video from your storage.
- Drag the video into the timeline.

- Select the video by clicking on the video.
- Hit the effects You can select the colorful effects from the panel.
- Now, write borders in the search engine. You will find various borders styles in the panel.
- Select the white border at the top of the panel.
- Simply drag and drop the border to the video/image.

- You will see the white border on the selected video.

- You can change the color of the border.
- Select the video by double-clicking on it.
- Hit the Effect tab from the Image and then click on Borders.
- Here you can change the color of your borders.
- Hit the OK

Add a white border to the video online
You can change white borders without launching software by editing online. Kapwing is an online video editing tool that is used to edit videos, images, and GIFs. It is very easy to use and the good thing about Kapwing is, it’s free and you don’t need to sign up or add watermarks to your edited videos/images.
However, it allows you to edit a video up to 250MB or you can only upload a video of almost 7 minutes in length. What you would need is to have a good internet connection and a Web.
Let’s start editing to add white borders step by step:
- Visit Kapwing collage maker and hit start collage maker
- You will see the below window.

- Click on Add media and select the desired video or image.
- Drag and drop the video into the timeline.

- Click on the video and drag the 4 corners to resize your video.
- It will eventually provide you with a white background and you can use it as a white border.

- Hit the Lock ratio tab once you got satisfied with your image borders.
- Double click the border to set the background color.

- You can change the background colors of your choice.

Add a white border to the video on Android
You can add white borders to your videos using android. BeeCut is a very simple and useful application for video editing. It presents a lot of stylish and beautiful frames and effects to make your video amazing. Along with this, it allows you to add text, filters, transitions, and many features to make your video stand out. It is very easy to use as takes a few steps to add frames to your video in android. To start the process follow these steps;
- Launch BeeCut on your mobile/android.
- Open the app and click on Media.
- Hit on Import file.

- Drag the video into the timeline or hit the +
- Hit the overlays
- Select your desired border.

- Drag the desired overlay border over the timeline. Here you can edit your design (change color, effect, etc.)
- Now, hit the export tab and choose the quality and format of your video.
- Save the file on your android.
Add a white border to the video on iOS
The PicsArt app is commonly used to edit videos on iPhone as well as on android. It is a very simple app, even a layman can use PicsArt and make professional white borders. This app is familiar among Instagram users. It changes the rectangular video or image into a square format. The aspect ratio of 1:1 is used for Instagram videos. It not only adds borders to the videos but also provides editing features like cut, resize, rotate, trims, text, etc. Let’s start with step-by-step instructions to add white borders to the video.
- Go to the app store and download the PicsArt app.
- Open the app and select the desired video.
- Hit the Fit tab from the bottom center.

- Select the color tool from the bottom.
- Choose the white color for white borders and you can also choose the desired color.
- Hit the ütab and the video will be saved to your phone gallery or you can directly share the video on Instagram.

Conclusion:
In the above content, we have introduced four methods to add white borders in your videos using windows, android, iPhone, and online. All the methods are free to use.
Wonder Share Filmora 11 is highly recommended to get the best and most professional results. It not only allows you to add borders but also provides you with an advanced editing panel. You can easily edit your videos and share with your social circle.
4 Ways to Add White Borders to Video
The following 4 ways can be used to add white borders to the videos.
- Add a white border to the video on the computer (using Filmora)
- Add a white border to the video online
- Add a white border to the video on Android
- Add a white border to the video on iOS
Recommended way to add a white border to the video on the computer - using Filmora
Filmora Video Editor is one of the best video editing software. It allows editing the videos in a professional way. It has built-in editing features like splitting/cutting, trimming, cropping, adding watermark, changing speed, recording voice, and many more Along with this, you can rely on this application to add borders with different colors including white borders, black borders, colored border, and customized border. Add white borders on a computer, all this can be done in a few simple steps.
For Win 7 or later (64-bit)
For macOS 10.14 or later
Let’s download the free Wonder Share Filmora 11 software to proceed.
- Go to media, and import the video from your storage.
- Drag the video into the timeline.

- Select the video by clicking on the video.
- Hit the effects You can select the colorful effects from the panel.
- Now, write borders in the search engine. You will find various borders styles in the panel.
- Select the white border at the top of the panel.
- Simply drag and drop the border to the video/image.

- You will see the white border on the selected video.

- You can change the color of the border.
- Select the video by double-clicking on it.
- Hit the Effect tab from the Image and then click on Borders.
- Here you can change the color of your borders.
- Hit the OK

Add a white border to the video online
You can change white borders without launching software by editing online. Kapwing is an online video editing tool that is used to edit videos, images, and GIFs. It is very easy to use and the good thing about Kapwing is, it’s free and you don’t need to sign up or add watermarks to your edited videos/images.
However, it allows you to edit a video up to 250MB or you can only upload a video of almost 7 minutes in length. What you would need is to have a good internet connection and a Web.
Let’s start editing to add white borders step by step:
- Visit Kapwing collage maker and hit start collage maker
- You will see the below window.

- Click on Add media and select the desired video or image.
- Drag and drop the video into the timeline.

- Click on the video and drag the 4 corners to resize your video.
- It will eventually provide you with a white background and you can use it as a white border.

- Hit the Lock ratio tab once you got satisfied with your image borders.
- Double click the border to set the background color.

- You can change the background colors of your choice.

Add a white border to the video on Android
You can add white borders to your videos using android. BeeCut is a very simple and useful application for video editing. It presents a lot of stylish and beautiful frames and effects to make your video amazing. Along with this, it allows you to add text, filters, transitions, and many features to make your video stand out. It is very easy to use as takes a few steps to add frames to your video in android. To start the process follow these steps;
- Launch BeeCut on your mobile/android.
- Open the app and click on Media.
- Hit on Import file.

- Drag the video into the timeline or hit the +
- Hit the overlays
- Select your desired border.

- Drag the desired overlay border over the timeline. Here you can edit your design (change color, effect, etc.)
- Now, hit the export tab and choose the quality and format of your video.
- Save the file on your android.
Add a white border to the video on iOS
The PicsArt app is commonly used to edit videos on iPhone as well as on android. It is a very simple app, even a layman can use PicsArt and make professional white borders. This app is familiar among Instagram users. It changes the rectangular video or image into a square format. The aspect ratio of 1:1 is used for Instagram videos. It not only adds borders to the videos but also provides editing features like cut, resize, rotate, trims, text, etc. Let’s start with step-by-step instructions to add white borders to the video.
- Go to the app store and download the PicsArt app.
- Open the app and select the desired video.
- Hit the Fit tab from the bottom center.

- Select the color tool from the bottom.
- Choose the white color for white borders and you can also choose the desired color.
- Hit the ütab and the video will be saved to your phone gallery or you can directly share the video on Instagram.

Conclusion:
In the above content, we have introduced four methods to add white borders in your videos using windows, android, iPhone, and online. All the methods are free to use.
Wonder Share Filmora 11 is highly recommended to get the best and most professional results. It not only allows you to add borders but also provides you with an advanced editing panel. You can easily edit your videos and share with your social circle.
8 Best Free Title Maker You Must Try and Put to Use
Do you know what’s more important in a blog post? Yes, you guessed it right, headline. It helps your blog grab attention and encourages people to click through. Additionally, the title is a key factor in how search engines categorize and rank posts. A great blog free title maker might be a handy tool for those who want to boost their site’s traffic.
A headline generator may assist you in creating a compelling and efficient title that will make your blog distinguish itself from others by letting you enter a few essential details. Additionally, exploring ideas might be a terrific approach if you’re feeling stuck. A title generator is unquestionably something you should consider including in the toolkit if you’re signed in marketing and blogging.
8 Best Free Title Maker You Must Try and Put to Use
1. SEMrush Title Generator

While writing and publishing something the first thing that grabs a user’s attention is the title of the post. It must be catchy and good enough for them to read the whole thing. What SEMrush ideas generator does is that it suggests you some catchy and interesting title ideas when you type in and search the same keyword.
You can opt to choose the best among the suggested ones and grab people’s attention and make them read your blog/article. Since it’s a free title generator you need not worry about spending money for title ideas and search for as many topics as you need. You may also look for topic ideas by clicking the “get more content ideas” button that is there on the right side at the bottom.
2. Contentrow Title Generator
Another excellent title intro maker online free is Content Row. It provides specific outcomes when a specific keyword is used. You only have to register with the email ID if you want to discover your keyword’s currently trending titles. You can use this free tool to analyze your headline score as well. Once you’ve chosen the blog title or headline, you can assess the topic’s strength. Additionally, it provides some ideas on which you might base your new headline.
Also, this tool displays hot subjects currently being widely or passionately debated online. A case converter or word counter is also an option. Contentrow Title Generator helps you to generate clickable and catchy blog titles to drive traffic to the articles. Discover unique video ideas that will inspire you and interest your audience. Use the clickbait or linkbait ideas for the content with their title generator to capitalize on readers’ curiosity.
3. Hubspot Title Generator

The HubSpot Title Generator has a lot going for it, not the least because it is free to use. This indicates that using the tool is not dependent upon having a HubSpot account. Here are a few additional reasons you should use it, besides being free. HubSpot Title Generator is one of the most accessible content marketing strategies. Type up to five distinct nouns into the area provided and click “Give Me Blog Ideas.”
Afterward, you can navigate through a week’s generated blog post ideas. All it takes is that. It will only take a few seconds to generate title ideas, and once you have entered the nouns into the generator field, you will be given new ideas to create new posts instantly. Users can get a unique title every week based on the nouns they put. Hubspot doesn’t share copied blog titles, producing unique and plagiarism-free titles.
4. Tweak Your Biz
Tweak your Biz Title Maker. Create catchy headlines for your blog posts and articles. A great title can boost visitor traffic, Facebook Likes, and tweets by 50% or more. An online web-only creative title generator called Tweak Your Biz title generator online free is available to experienced and inexperienced bloggers and social media influencers. It is the free headline maker that provides the two-way service, and it serves as the best headline analyzer and generator.
The target word can be searched as a verb or a noun before the output in the Tweak Your Biz headline maker. Input your subject or topic in the box provided on this innovative title generator and press the “Submit” button. It provides headlines for various topics that are grouped under several categories and gives a variety of headlines to fit the tone of your site. Use this free headline generator to create attention-grabbing headlines for your blog or social media sites. It does not require the installation of any programs, just a web browser, to function.
5. The Hoth

A well-known free online title generator and marketing provider called The HOTH offers a variety of solutions for business owners and marketers. They provide a free blog subject headline generator so you can rapidly develop headlines for your posts to help you obtain the maximum traffic to your article. The HOTH’s headline generator is a fantastic choice if you want more control over the suggestions. It still requires little time to operate and is simple, but it requires more input than many other tools.
You must add a keyword, your audience’s intended goal, a frequent key point, the name of your industry, your target audience, and other information into this tool to generate titles. After that, the program generates ten titles simultaneously, each with options specific to the abovementioned factors. The title generator on the HOTH is still a quick and straightforward approach to developing a list of intriguing title concepts. You can specify your preferred term, target market, and other details to make the headline more suited to your needs.
6. Wix Title Generator

Well, this tool called Wix title generator is no different than others as it comes with a plethora of options. All you got to do is open the website using the above link and enter around 2 main keywords to look for a relevant and catchy title for your blog/article. Put the required keywords and then opt for clicking the button that says, “Get your Title.”
You will be given around 7-8 options for the title of the blog and you can choose whatever feels best for the same. You may also load more options by clicking the button that is there at the bottom of the PC’s screen. Once chosen, you can copy the title and use it however you like being it a free tool to be used as many times as you wish.
7. Small Biz Trends

Well, the Small Biz Trends title generator is a bit different when it comes to generating title ideas for your blog than other tools mentioned here. It’s because when you open the website and type in your topic and click the submit button, you will be given a ton of blog title options. Not just that, the options here will be presented to you category-wise. Isn’t this convenient?
Yes, it is, if you feel the other tools are giving you lesser options or ideas. You can just copy whatever title appeals to you the most and use it however you need to. Also, you may use the option given above the submit button “i.e. Small business trends Thesaurus,” of you wish to opt for generating more ideas.
8. fatjoe

With the help of the well-liked headline generator from FatJoe, users may quickly come up with over 100 ideas for blog posts. Have trouble coming to a title for your most recent blog post? There are always options available here. You can enter the focus keyword or selected subject to get the best clickable and SEO-friendly titles.
In addition to providing one of the best headline creation tools for free, Fat Joe is a link-building business. One can create more than 100 titles and even the best headline ideas. You can even create new topics for generating other topics.
Conclusion
Online free title creator can create catchy headlines that increase social media engagement, drive website traffic, and accomplish various other goals. Several automated solutions will handle your labor-intensive tasks, so you don’t have to rely only on your creativity to develop article titles. With the correct tools, you can improve your SEO content and grow your business without going over budget by bringing in more customers and increasing conversions.
Free Download For Win 7 or later(64-bit)
Free Download For macOS 10.14 or later
Free Download For macOS 10.14 or later
Also read:
- In 2024, Top 10 Voice Over Generators Windows, Mac, Android, iPhone, and Onli
- Updated 2024 Approved Easy Steps to Slow Down a Video on iPhone and Android
- New Learn How to Rotate Videos with Ease Using Shotcut with Our Comprehensive Guide. Discover Tips and Tricks to Get the Perfect Footage Every Time. Start Using Shotcut Today
- Want to Feather Shapes in After Effects? Read This
- Updated In 2024, How to Create Cooking Video Intro and End Screen for YouTube Channel?
- Updated In 2024, Customize PowerPoint Slideshow Icon in 8 Simple Ways
- Top 10 Fun Discord Bots You Need for 2024
- In 2024, Sometimes, when It Comes to Editing a Video, We Dont Even Know Where to Start, because There Are Too Many Options –Online Platforms Which Instantly Help Us Edit Our Clips, without Lengthy Process of Downloading and Installing Computer Programs
- Updated In 2024, How to Make A Jaw-Dropping Time Lapse Video?
- Updated In 2024, How to Make a PowerPoint Looping Slideshow
- New How to Record Clips Using Your Camera and Edit Them Using Wondershare Filmora to Make a Loop Video? A Complete Guide for Beginners for 2024
- Updated 11 Tools To Create Radial Blur Photo Mobile And Desktop for 2024
- Updated This Article Presents the Guide to Using Magic Effects for Creating Competent Films with Step-by-Step Instructions and Filmoras Grow and Win Program Contest
- In 2024, Do You Know What Is Motion Blur in Fortnite? Read This Article to Find Out How to Apply Motion Blur in Fortnite Efficiently and with Ease
- New How to Reduce the Size of Video Files Online? In This Article, Well Share the Top 10 Free Online Video Compressors that You Can Use Anywhere at Any Time and on Any Device
- New In 2024, Best Ways to Convert Video Frame Rate to 60FPS Software and Online Choices
- Wondering How to Edit a Video to Slow Motion on iPhone and Android Devices? Find Out How to Use Wondershare Filmora to Create and Edit Slo Mo Videos in a Few Clicks for 2024
- What are Location Permissions Life360 On Nokia C210? | Dr.fone
- Remove the lock of Infinix Zero 30 5G
- How does the stardust trade cost In pokemon go On Oppo F25 Pro 5G? | Dr.fone
- Complete guide for recovering contacts files on Honor V Purse.
- Troubleshooting Guide How to Fix an Unresponsive Samsung Galaxy F14 5G Screen | Dr.fone
- In 2024, Top 10 Password Cracking Tools For Xiaomi Redmi A2
- In 2024, How to Cast Honor X9a to Computer for iPhone and Android? | Dr.fone
- How to Factory Reset Honor Play 40C in 5 Easy Ways | Dr.fone
- How To Change Samsung Galaxy A23 5G Lock Screen Clock in Seconds
- In 2024, How to Unlock Xiaomi Redmi Note 12 Pro+ 5G PIN Code/Pattern Lock/Password
- In 2024, How to Change/Fake Your Samsung Galaxy S23 FE Location on Viber | Dr.fone
- How to Change/Fake Your Oppo A1 5G Location on Viber | Dr.fone
- Fixing Foneazy MockGo Not Working On Honor 100 Pro | Dr.fone
- Issues playing MKV video on Galaxy A05s
- How to Fix the Soft Bricked Poco C51? | Dr.fone
- In 2024, Forgotten The Voicemail Password Of Infinix Zero 30 5G? Try These Fixes
- In 2024, Top 10 Password Cracking Tools For Oppo Find N3
- Title: Updated Fun & Easy Masking Tricks in Filmora for 2024
- Author: Morgan
- Created at : 2024-04-24 01:05:17
- Updated at : 2024-04-25 01:05:17
- Link: https://ai-video-editing.techidaily.com/updated-fun-and-easy-masking-tricks-in-filmora-for-2024/
- License: This work is licensed under CC BY-NC-SA 4.0.

