:max_bytes(150000):strip_icc():format(webp)/GettyImages-1088144728-3a9f1bd54e994bfaa4cabea82414202e.jpg)
Updated How to Add Miniature Effect in Video with Filmora

How to Add Miniature Effect in Video with Filmora
Want to add selective blur to make everything look smaller? Don’t have any idea how to focus on specific mini-things? Then don’t worry! In this article, you’ll get a step-by-step process to add miniature effects to your video. At the end of the process, you’ll have cinematic shots. Then start with us now! Scroll more to get pro tips!
What Is a Miniature Effect?

But first, let’s learn the logic of making the miniature effect. As many video editing pros present on Tiktok, the miniature effect is a fun way to brighten up your photography or video shots. For example, when taking a video or a time-lapse of a landscape, we always have a bigger depth of field, so most objects in the frame are in focus.
However, when we film a miniature model, the depth of field is shallow. So, we only see some objects in focus, and the rest is blurry. This visual trick makes our brain believe that the big landscape we’re seeing is actually a tiny model.
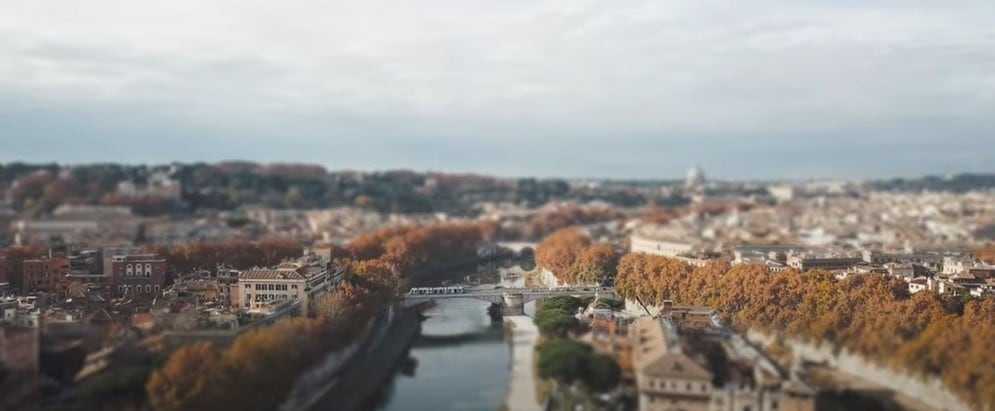
To create a miniature look, we can use specific effects to fake a shallow depth of field, and then the landscape view will look like a tiny model. While some keys to notice before making the miniature effect are:
- It utilizes selective blur to make things appear like small
- The miniature effect works best for footage filmed from a high angle.
- The tiny effect is usually used in drone footage, time lapses, or landscape photography.
Are you all set to add miniature effects to your video and make film-like shots? Then scroll more and get the step-by-step process.
How to Make a Miniature effect?
You are excited to add a miniature effect, and enjoy the rest! Without any further delay, follow the below instructions and get results!
Step1 Download the Wondershare Filmora
- First of all, you have to download the Wondershare Filmora .
- It’s packed with new features and effects plugins that make editing more filmy and fun!
![]()
Note: filmora has a unique “stock media” option that enables us to use all these elements and more to boost our videos!
Step2 Choose any stock footage
If you don’t have good-quality footage, but want to boost your video, here is how. You can get the miniature effect without a big format view camera or specialized lens.
- Open Filmora and select any stock footage in Wondershare Filmora.
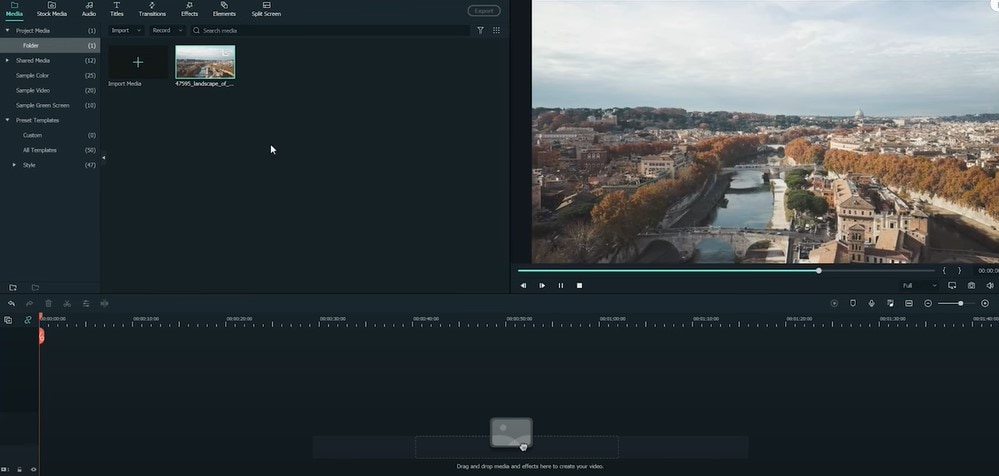
Move to the stock media folder on the above bar in the Wondershare Filmora. Or you can look towards the left window, where you will see the sample videos tab.
- Click on the sample videos tab, and a new window will appear on the library screen.
Here you will see almost more than 20 videos. So, instead of using the actual recorded footage, we’ll make do with what we have by default. After selecting and adding the stock footage of your choice. Then you have to follow the below process:
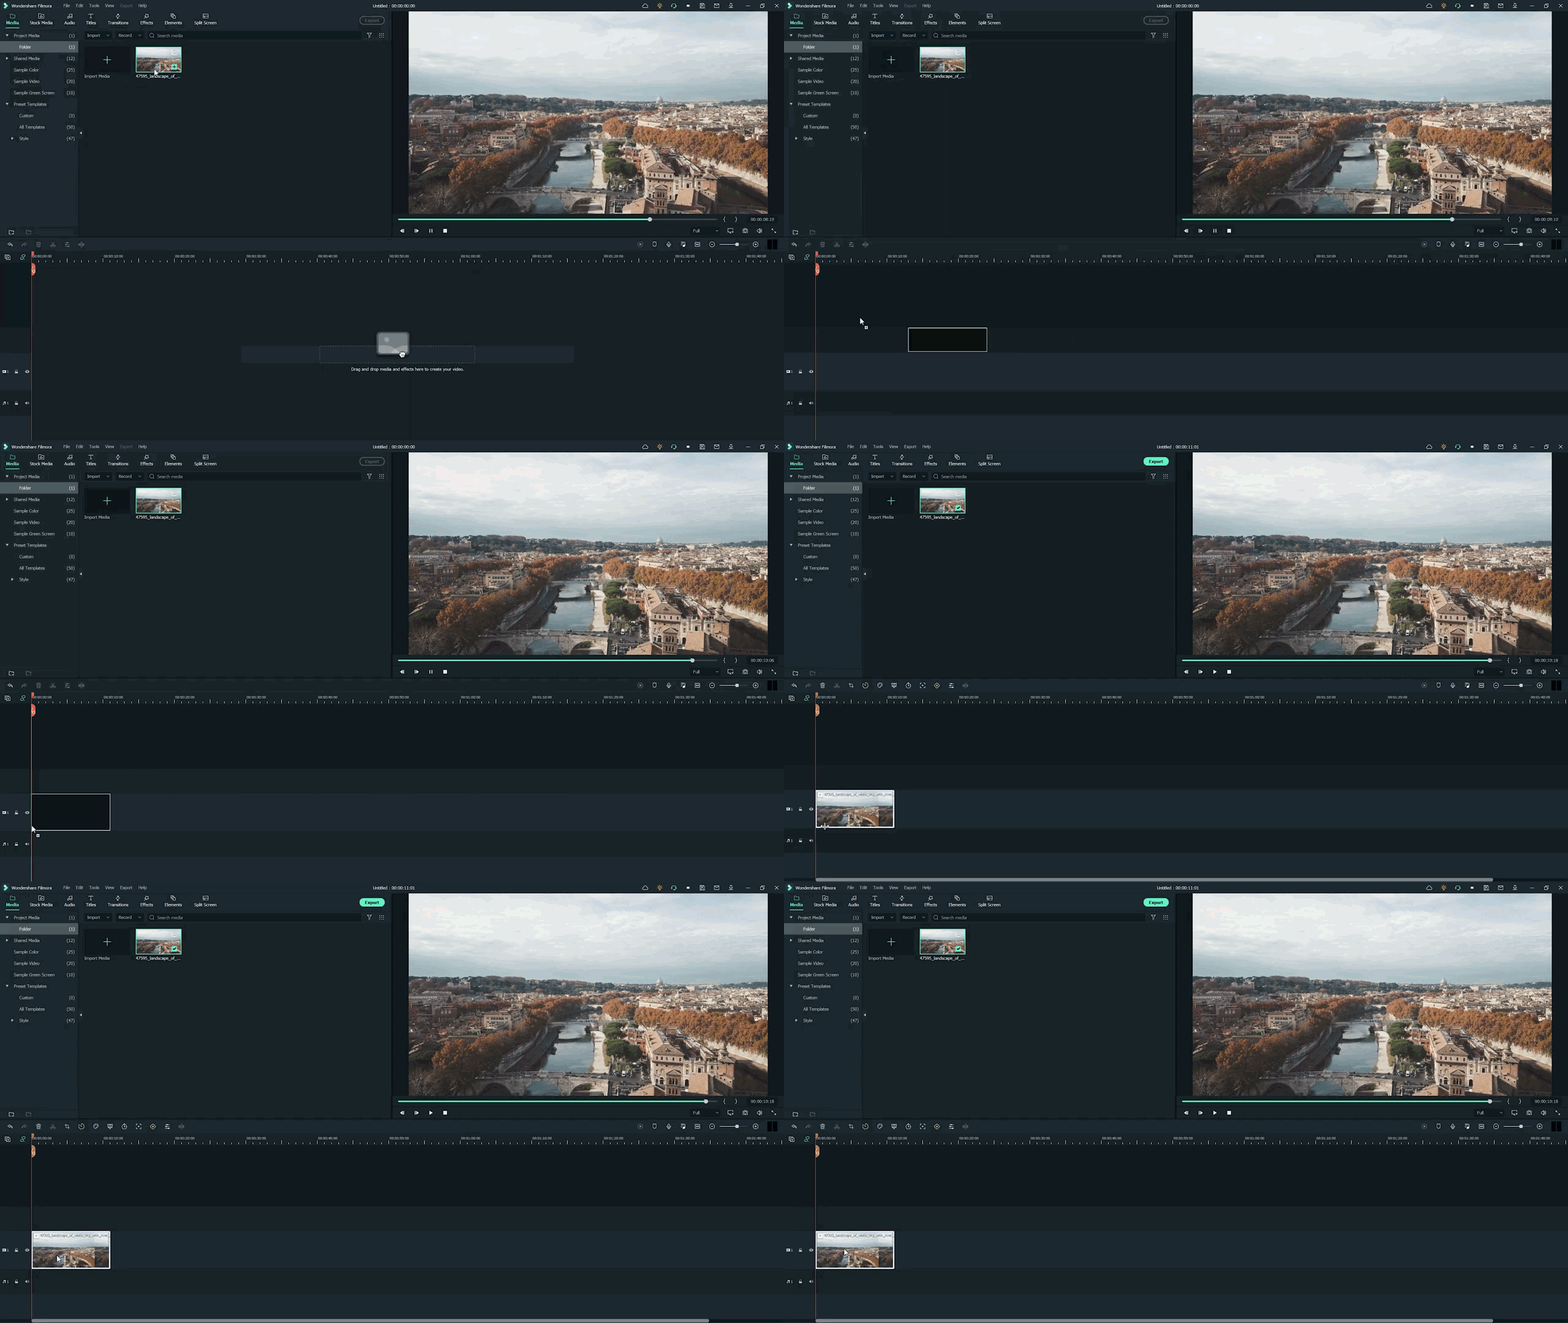
- First, hold the Stock Footage as shown in the folder section.
- Then Drag and Drop it to the timeline section for further editing.
Who will get Stock Media?
Want to get stock media? You can only have access to the stock media library if you already buy the license of Wondershare Filmora.
- The latest version has an unlimited stock library.
- After purchasing any plan, you can access Stock Media (Unsplash, Giphy, Pixabay, Pixel).
Step3 Head to the effect panel
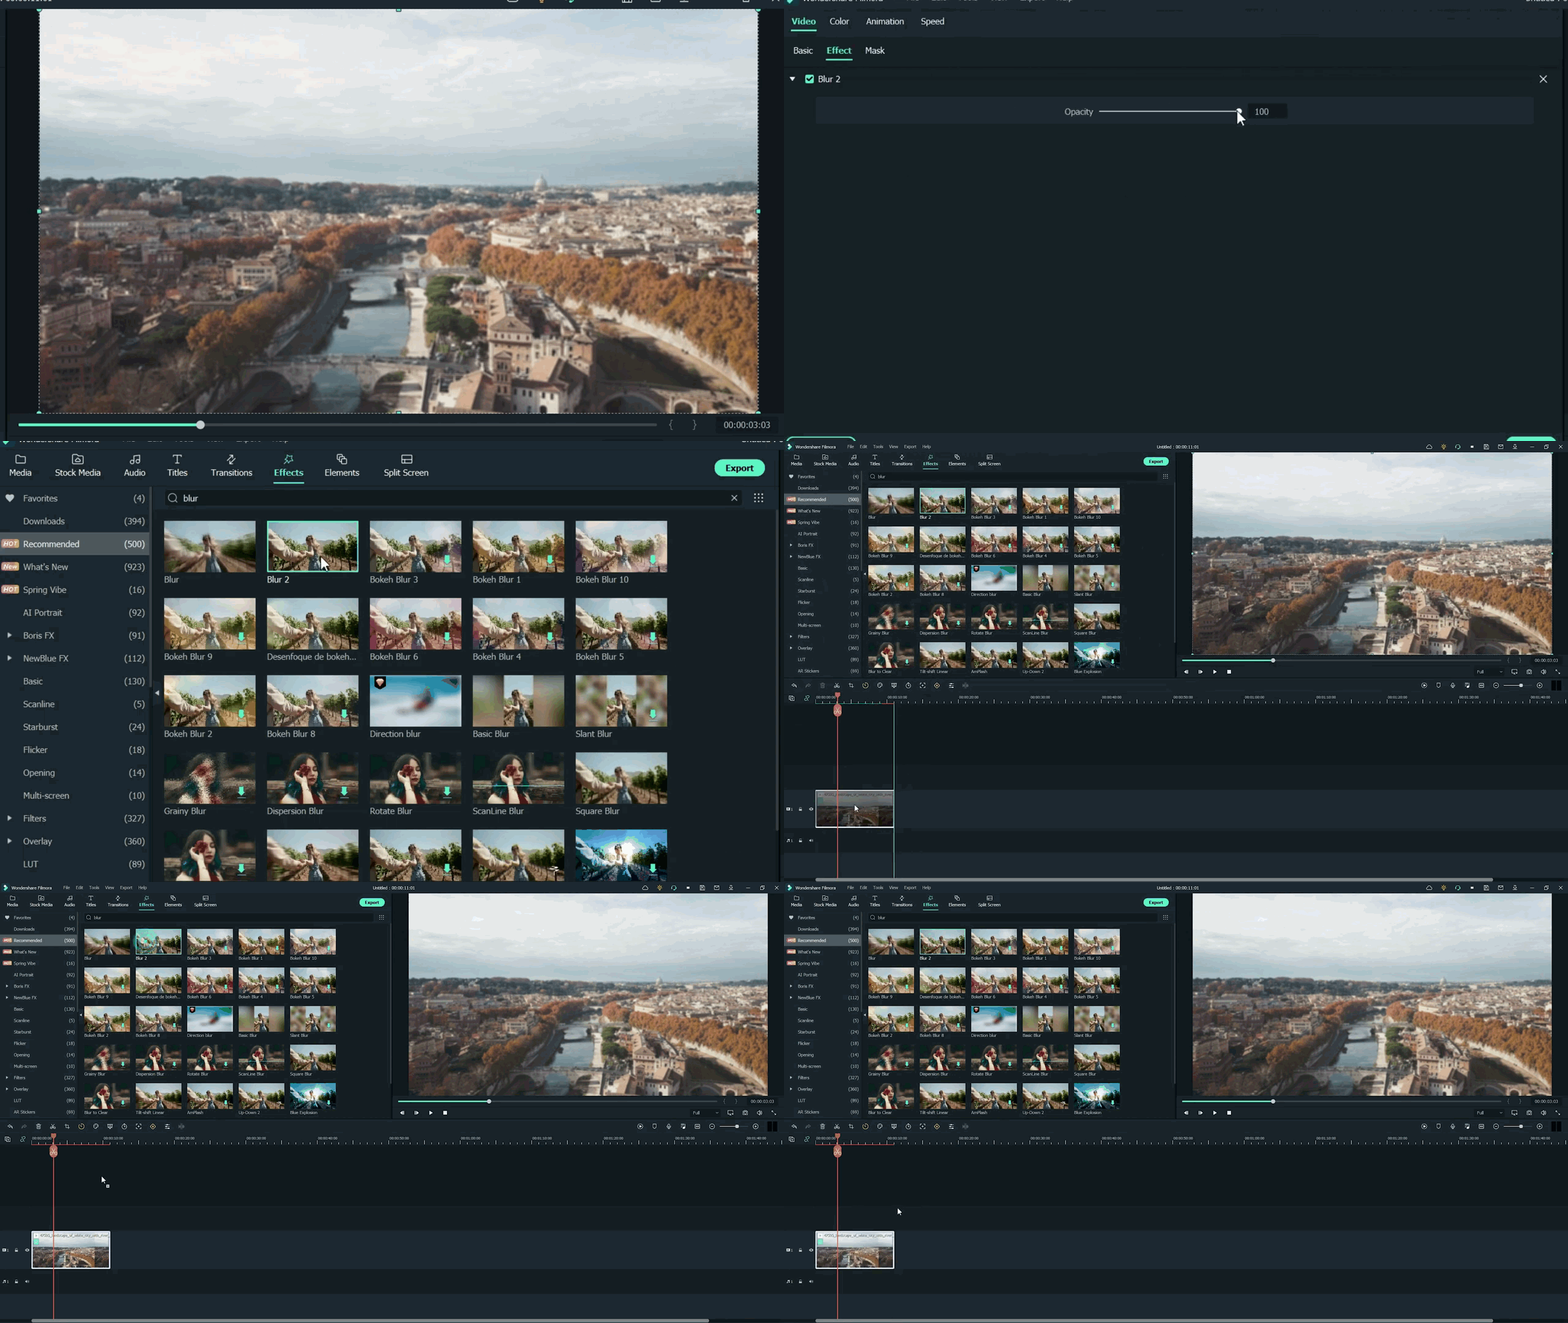
As we are working on miniature effects, what do we need first? First, we ensure that we have a Blur effect on the video.
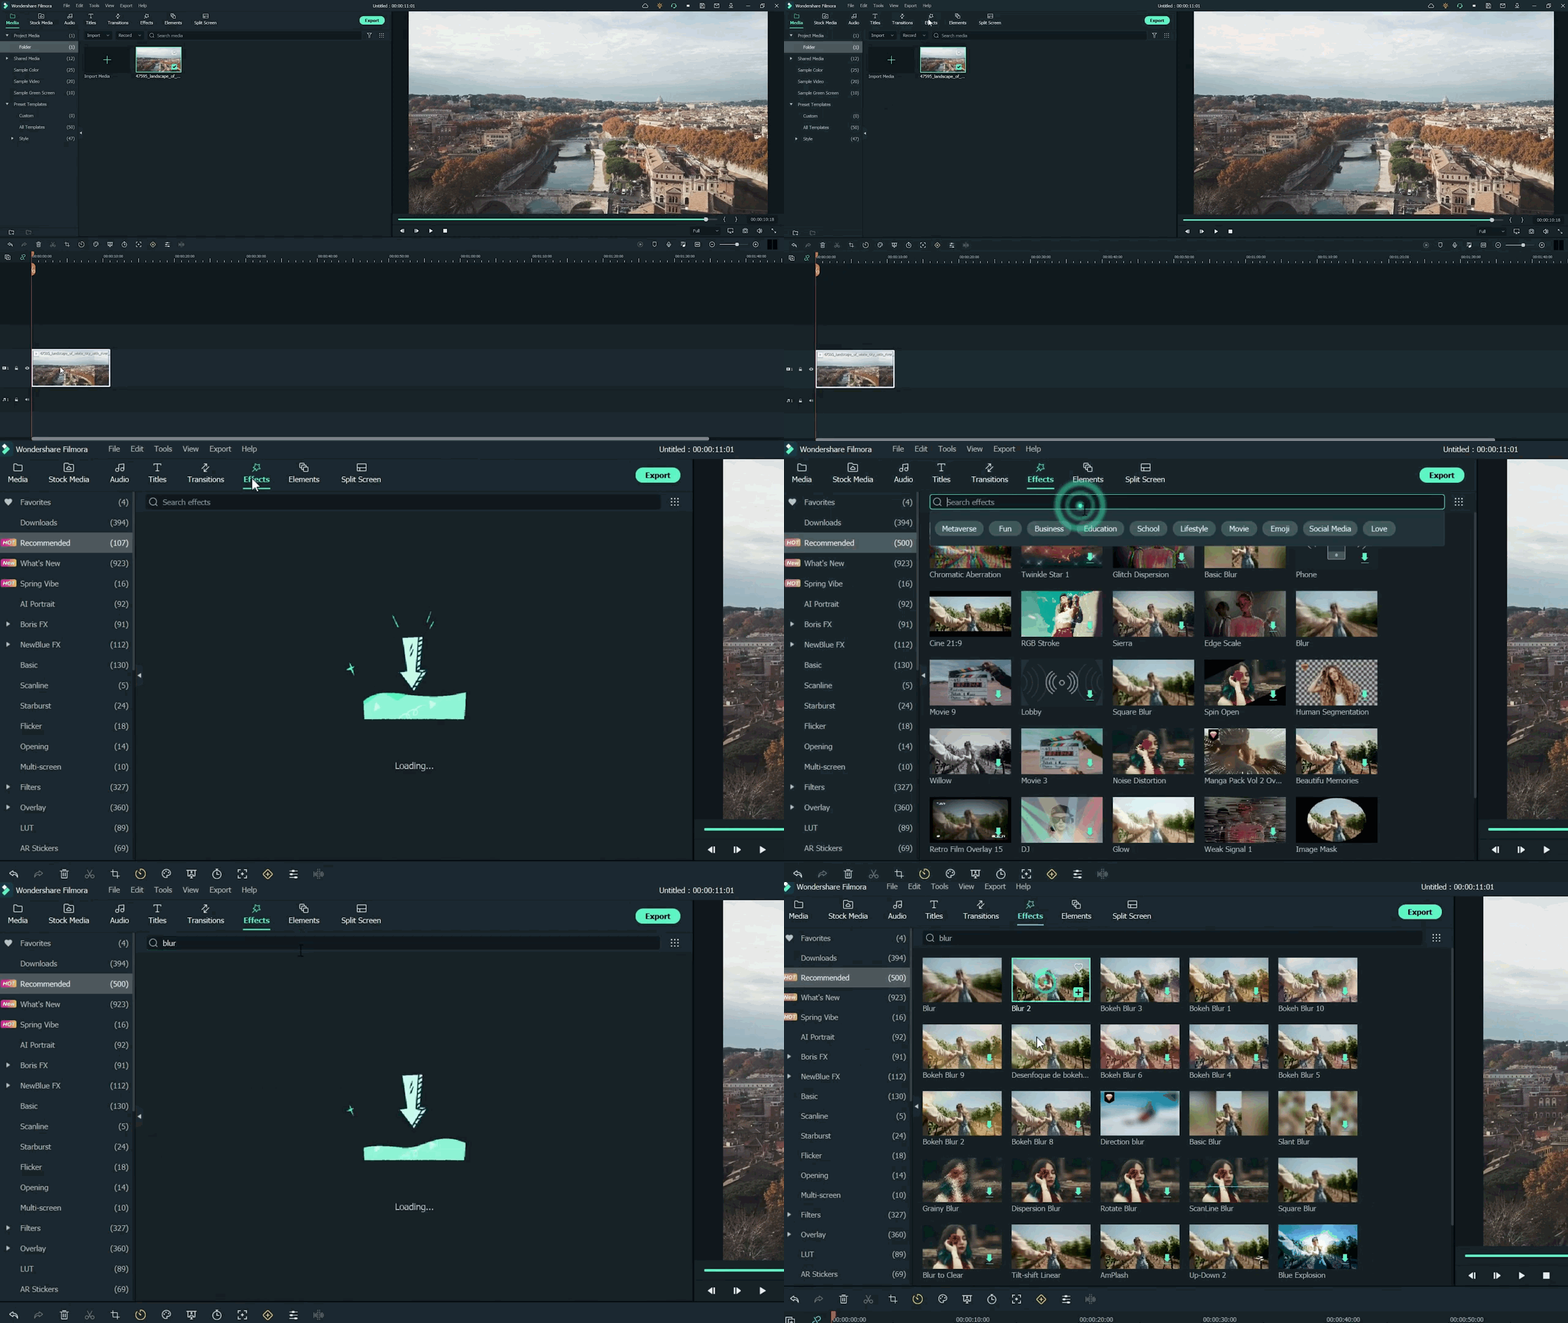
To add a blur effect from the panel, follow the below-mentioned steps:
- First of all, move toward the above tabs.
- Then click on the 5th section, which is Effect
- After selecting the effect tab, a new window will pop up.
- In this section, we have 500+ different effects.
- Then, click on the search bar.
- Search for the Blur effect.
- After that, click on the Blur 2
- Then Download this effect if you haven’t done this already.
Step4 Add the blur effect to the video
After selecting and downloading the blur effect, it’s time to add it to the video. Again, see how precise it turned out. To add effect, follow below steps:
- First, drag and Drop the effect toward the timeline.
- Then, make sure to release the effect on the video to give it a lens blur appearance.
Step5 Add the effect multiple times
Want to get an ideal blur level? If you need more blur level in your video and make it more cinematic, then follow the below steps:
- First, ensure that the opacity of the blur effect is 100%.
- Then, if you still want more blurriness, add Blur 2 effect multiple times on the video.
- Finally, add effect by just the Drag and Drop
Step6 Drop the same video clip
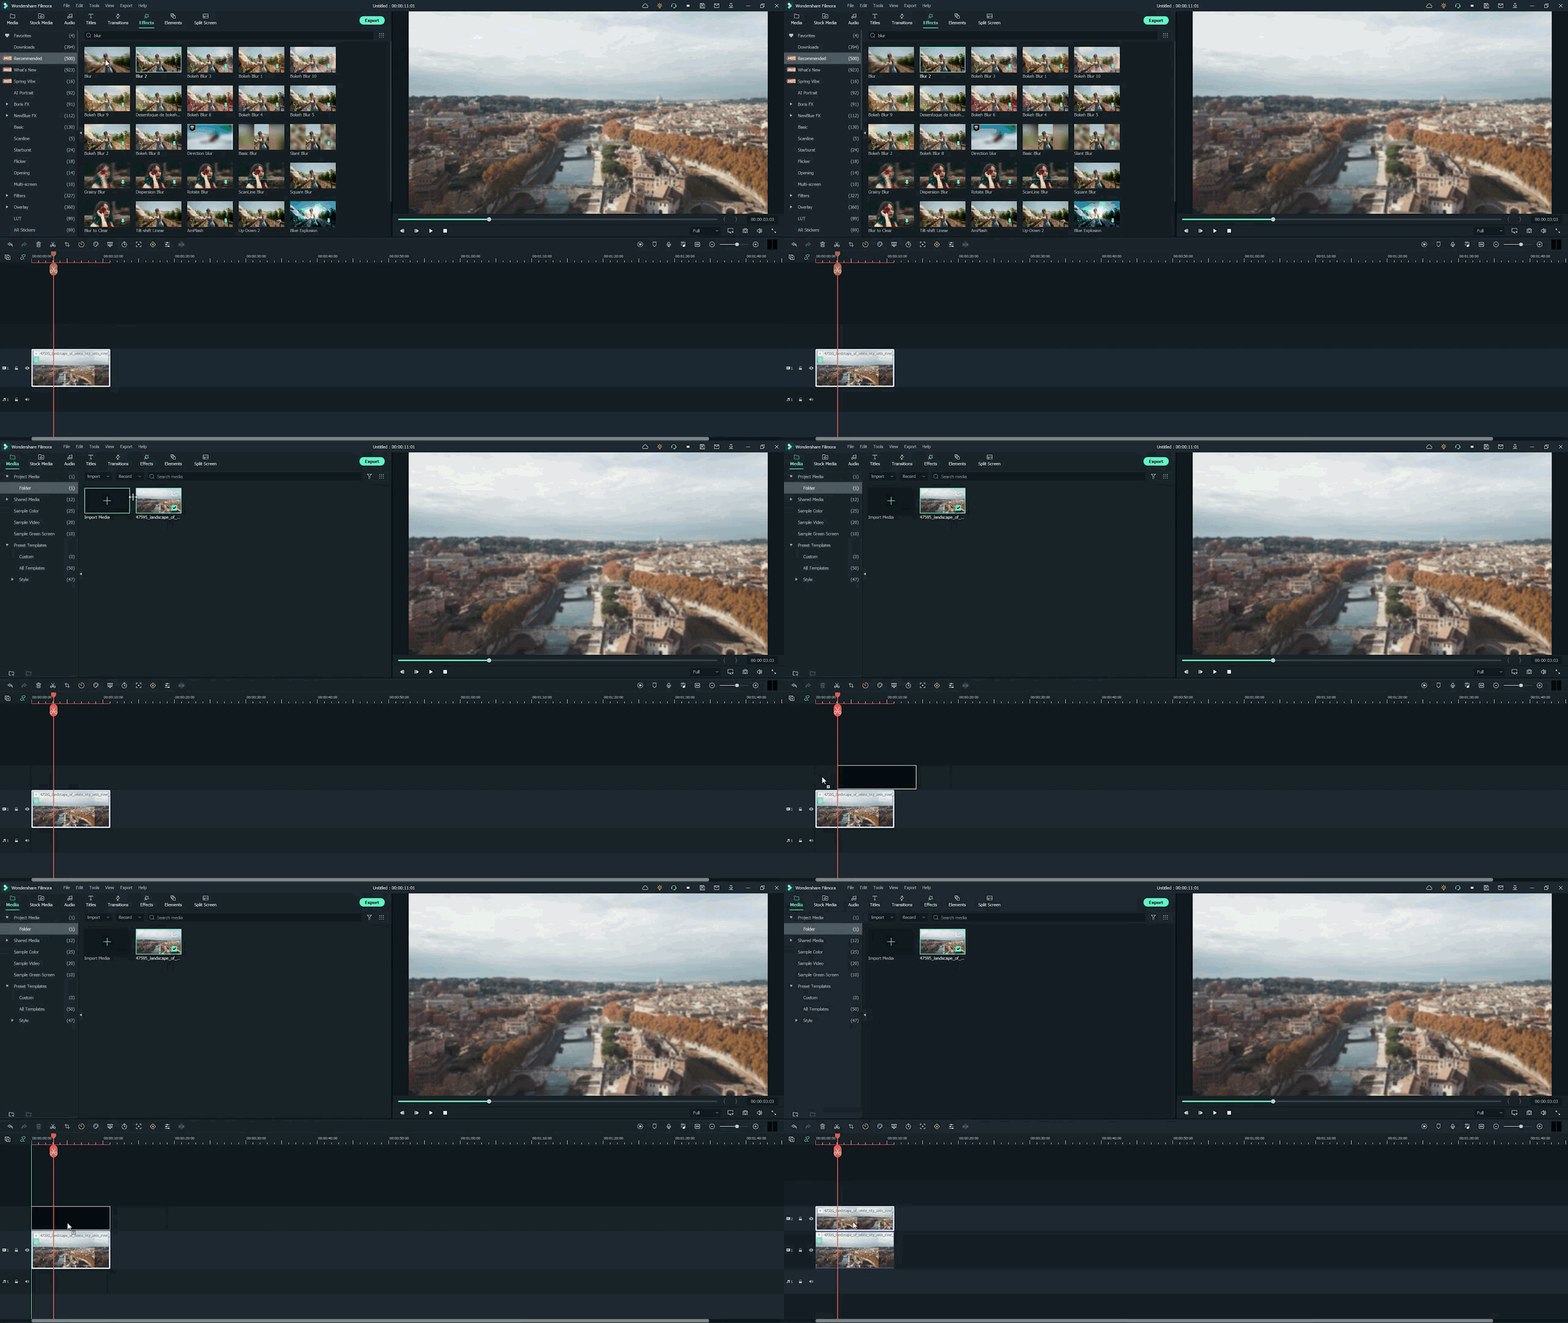
- Add the same video clip 2nd time on the timeline.
- Add it by just the Drag and Drop
- Make sure you add it to 2nd video track in the timeline above the first one.
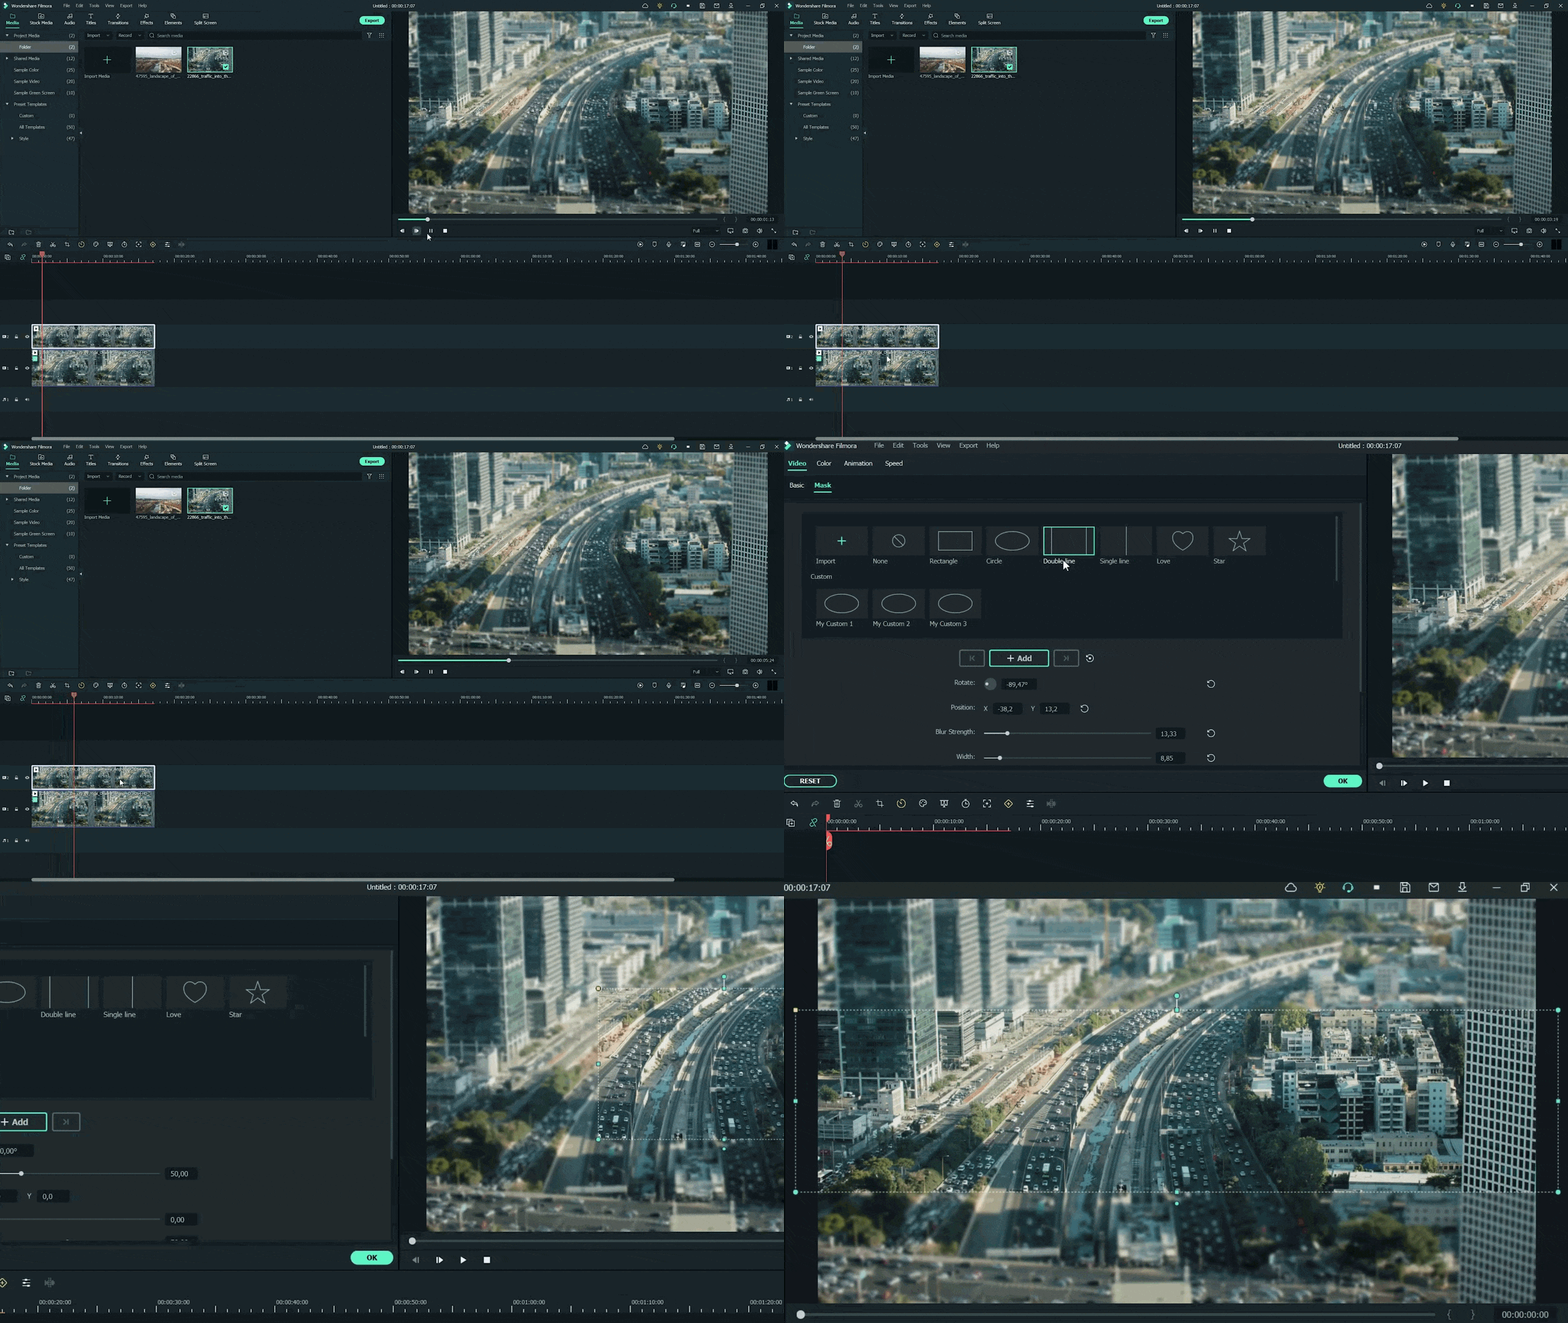
Step7 Add masks on the Video
Now, it’s time to select a specific video portion and add a mask. Due to this, we will have a selective blur portion. For this, follow the below guidelines:
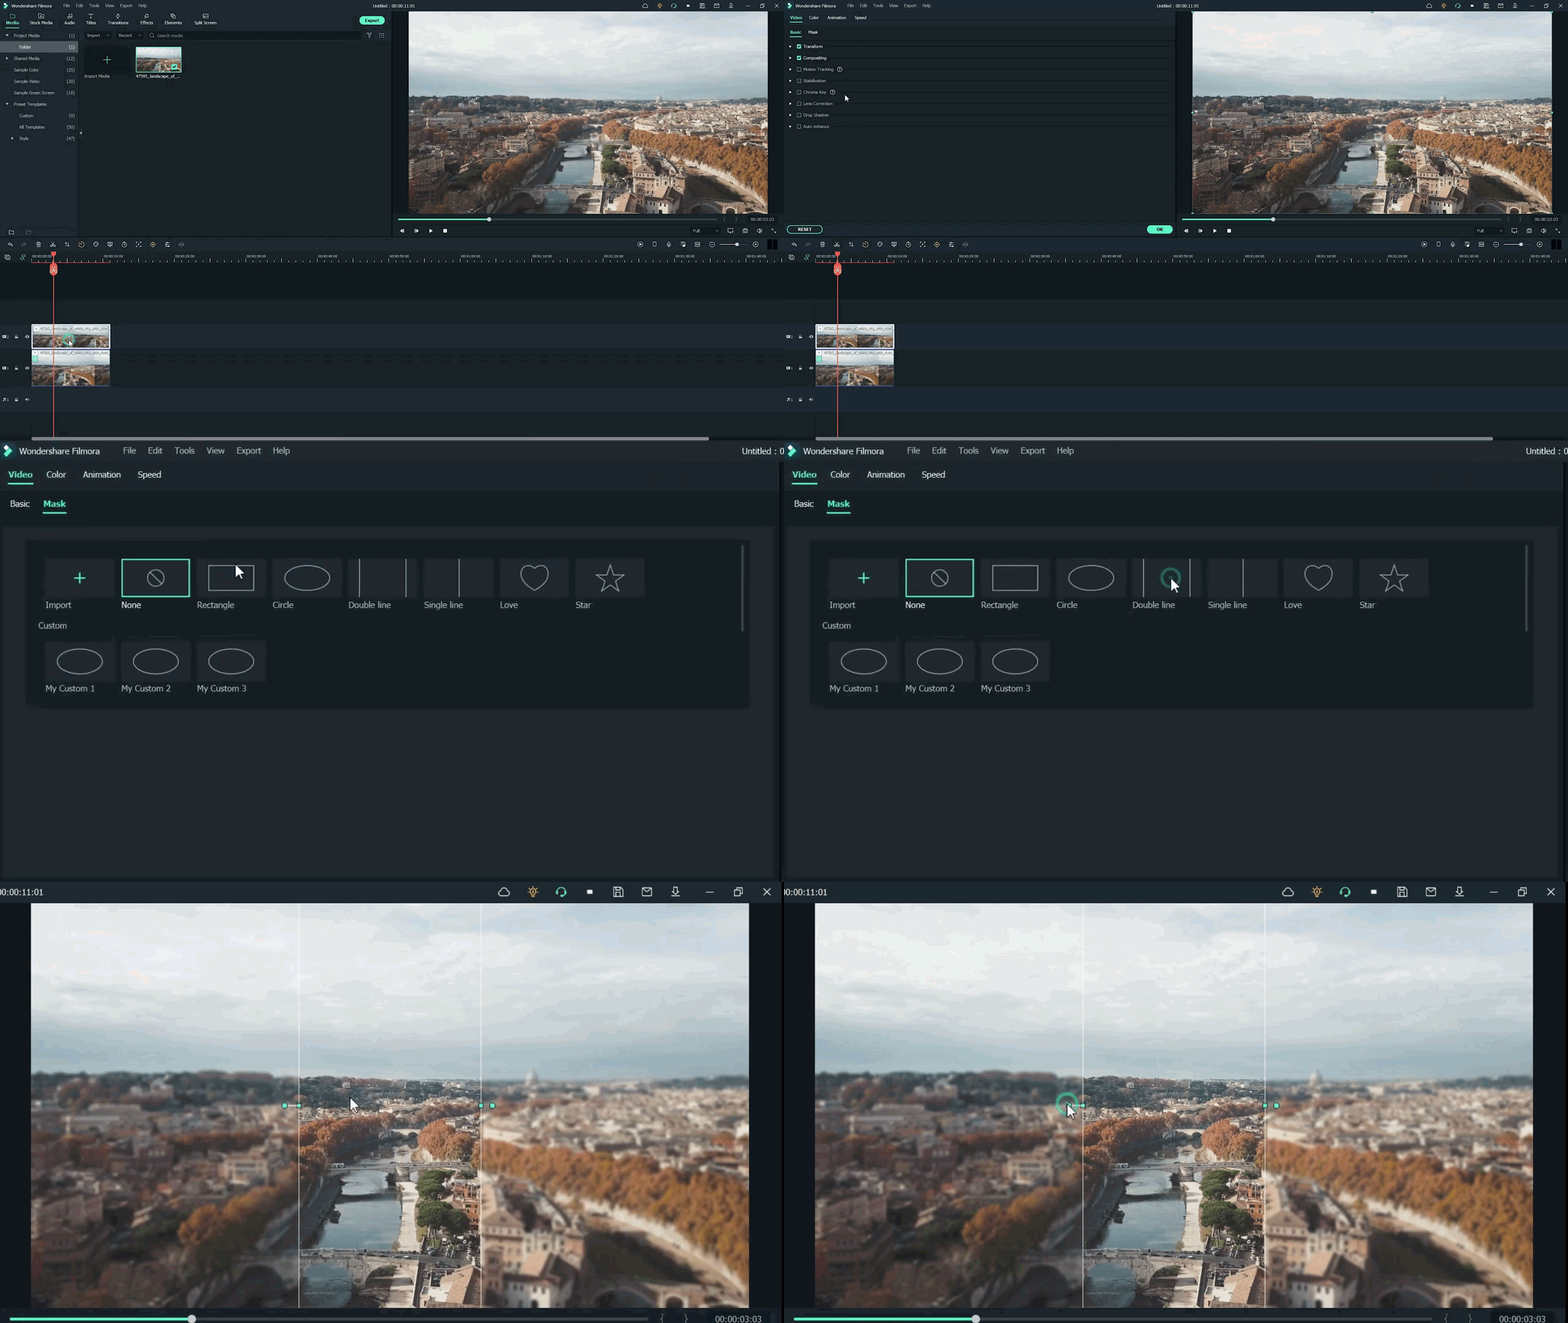
- Double-click on the video present in 2nd track.
- The settings tab will be open in the top left section.
- Then find the Mask section and click on it.
- After this, click on the Double-line.
- Set the mask on video according to your style and choice.
![]()
Note: you can adjust the mask size and position by rotating and changing its shape.
Watch the rotating and adjusting actions as shown below!
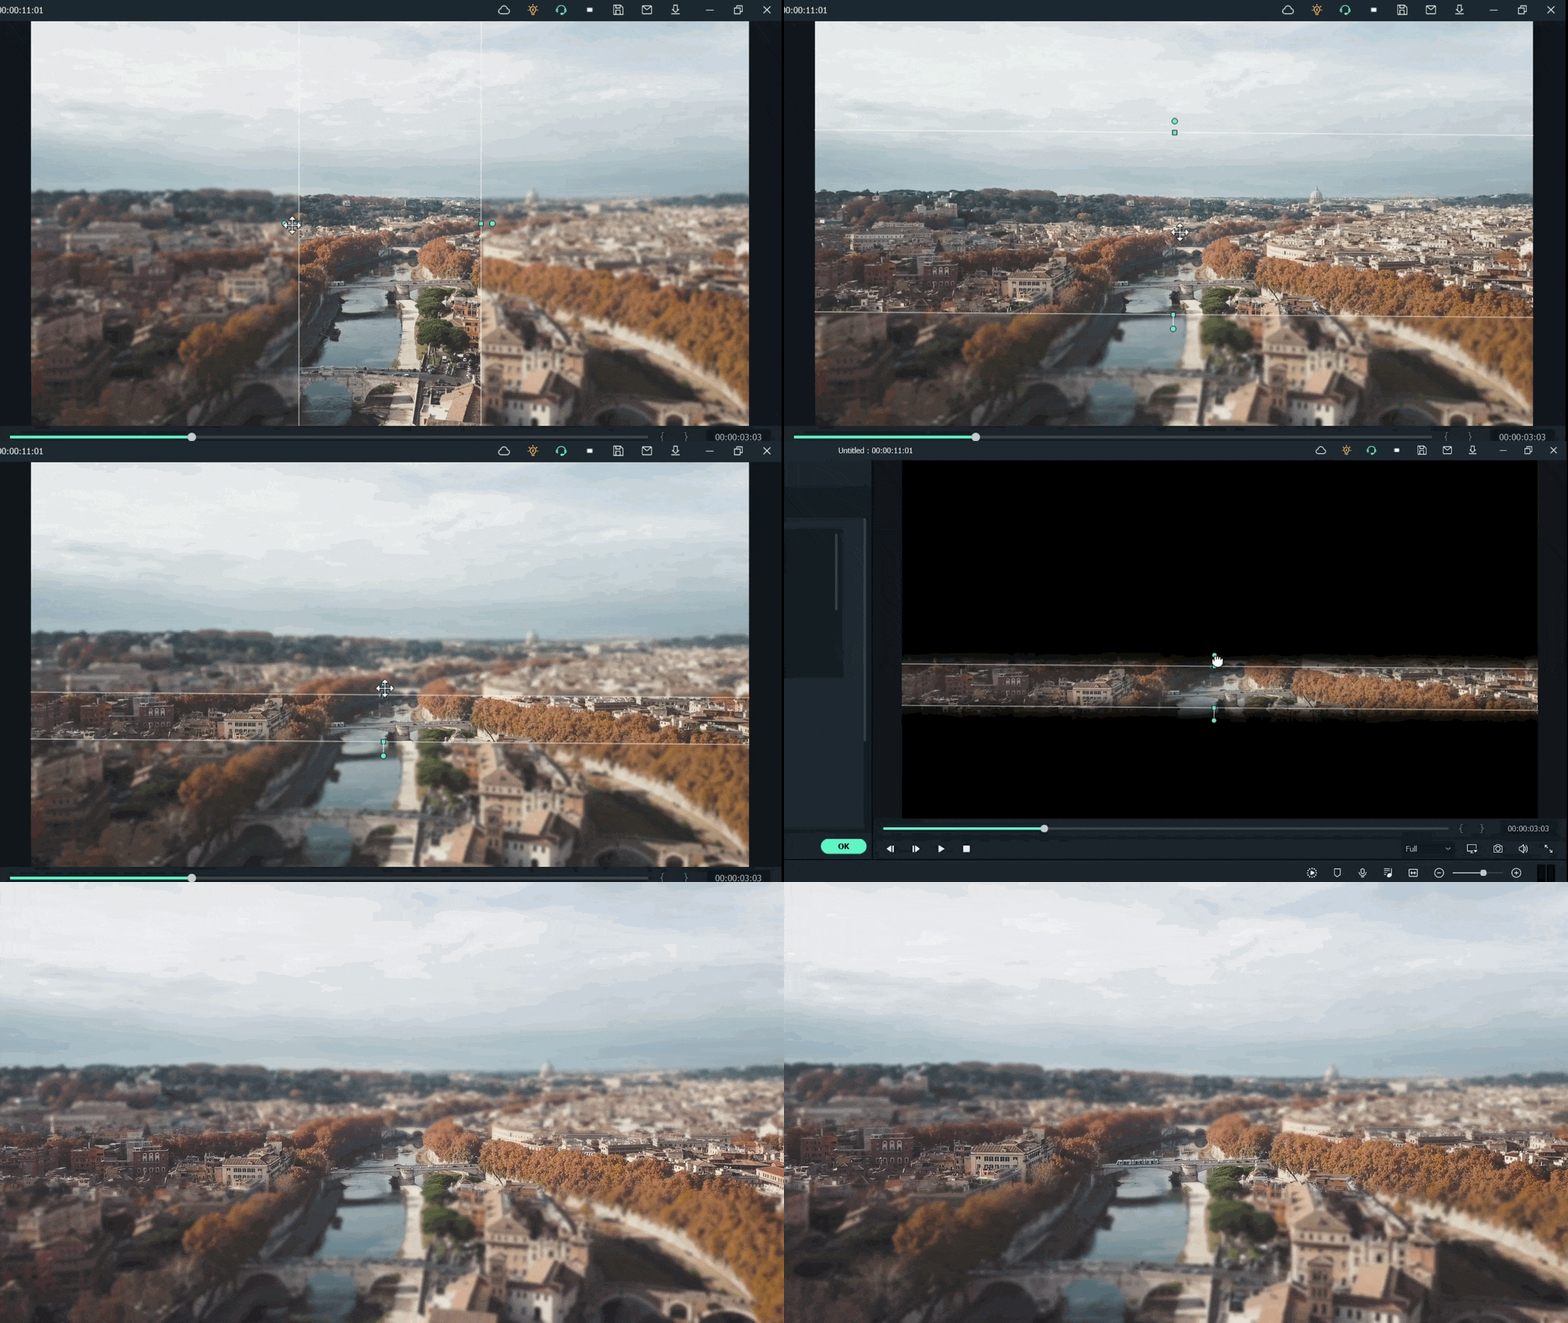
For example, when we add a mask in the below time-lapse video, follow the above mask adjustments. Unfortunately, we can’t get good results. Therefore, we will apply another way to add a mask by changing shape and position. Follow the instructions for modifications:
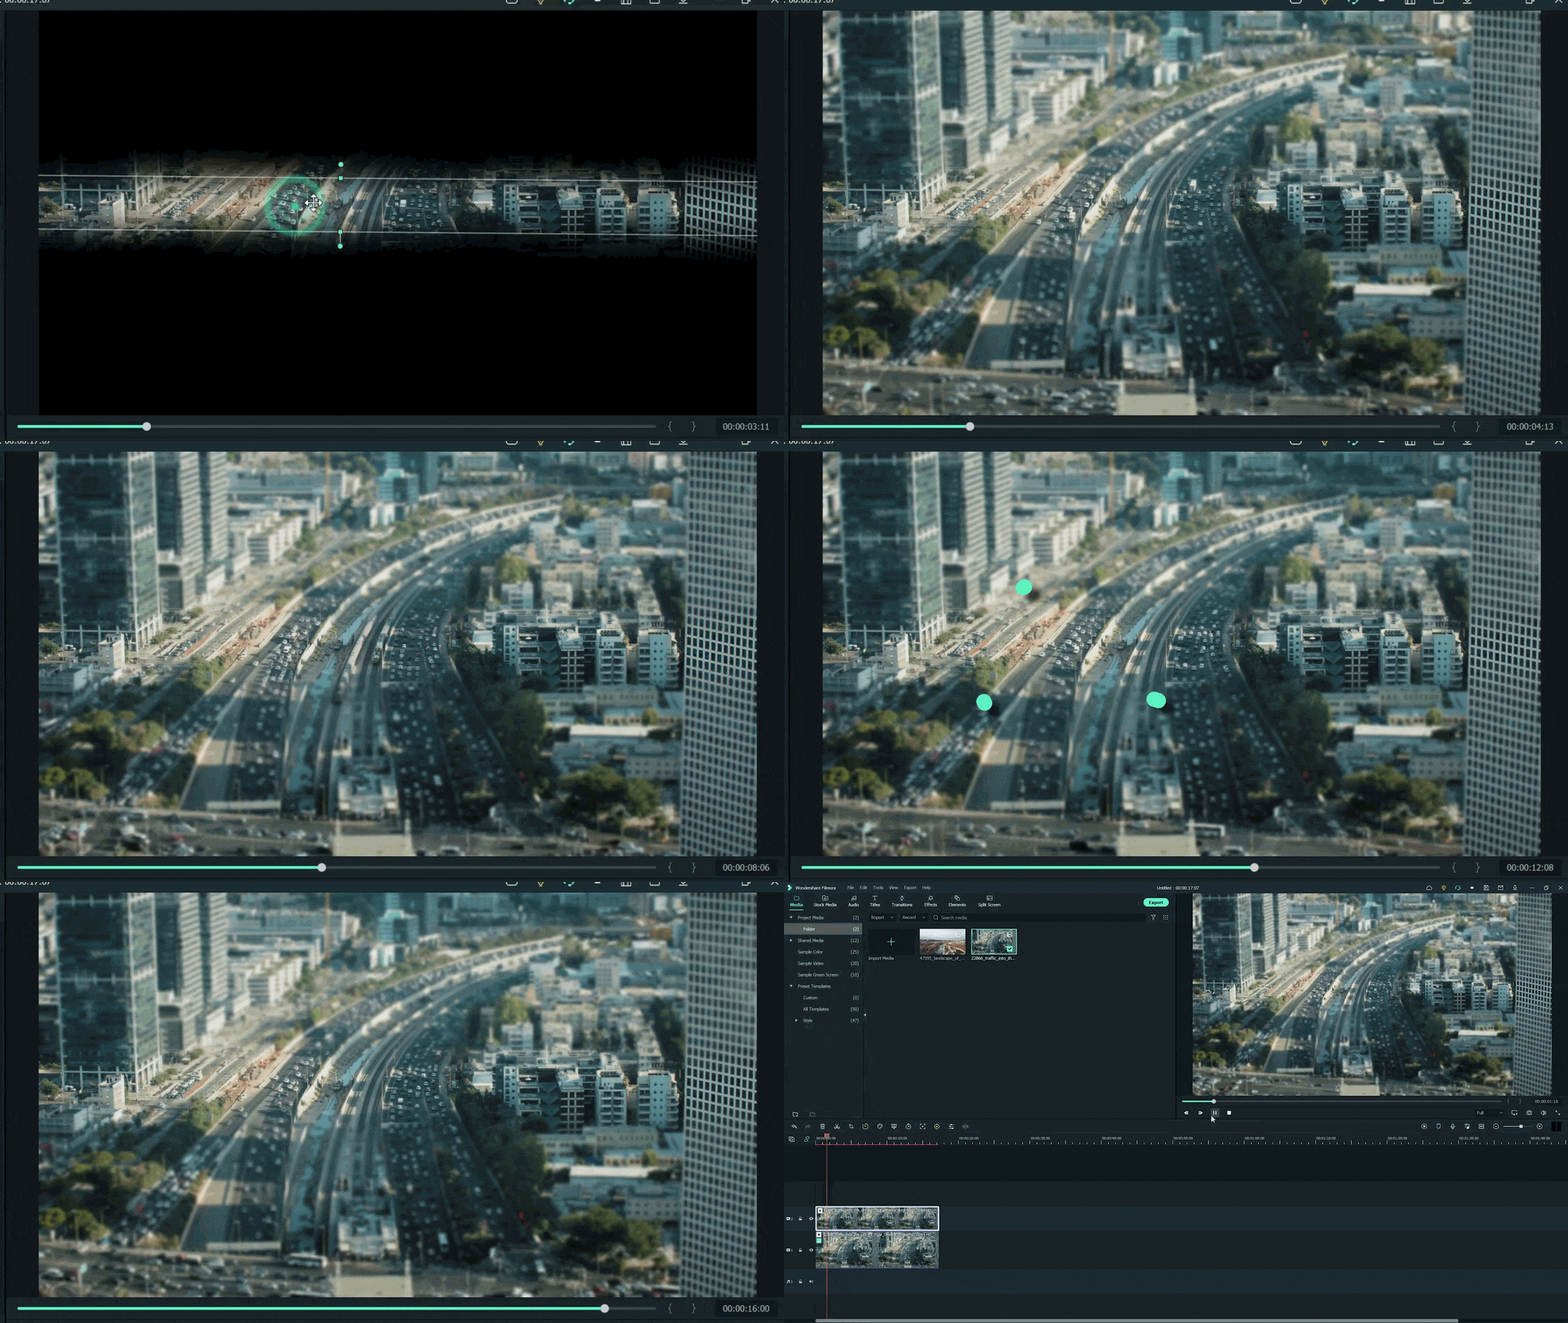
- Make a building or any object Blurry near the camera because it is not present within the depth of field.
- While the object is far from the camera, it is focused because it is in the depth of the field.
- Then adjust the mask, as per your choice.
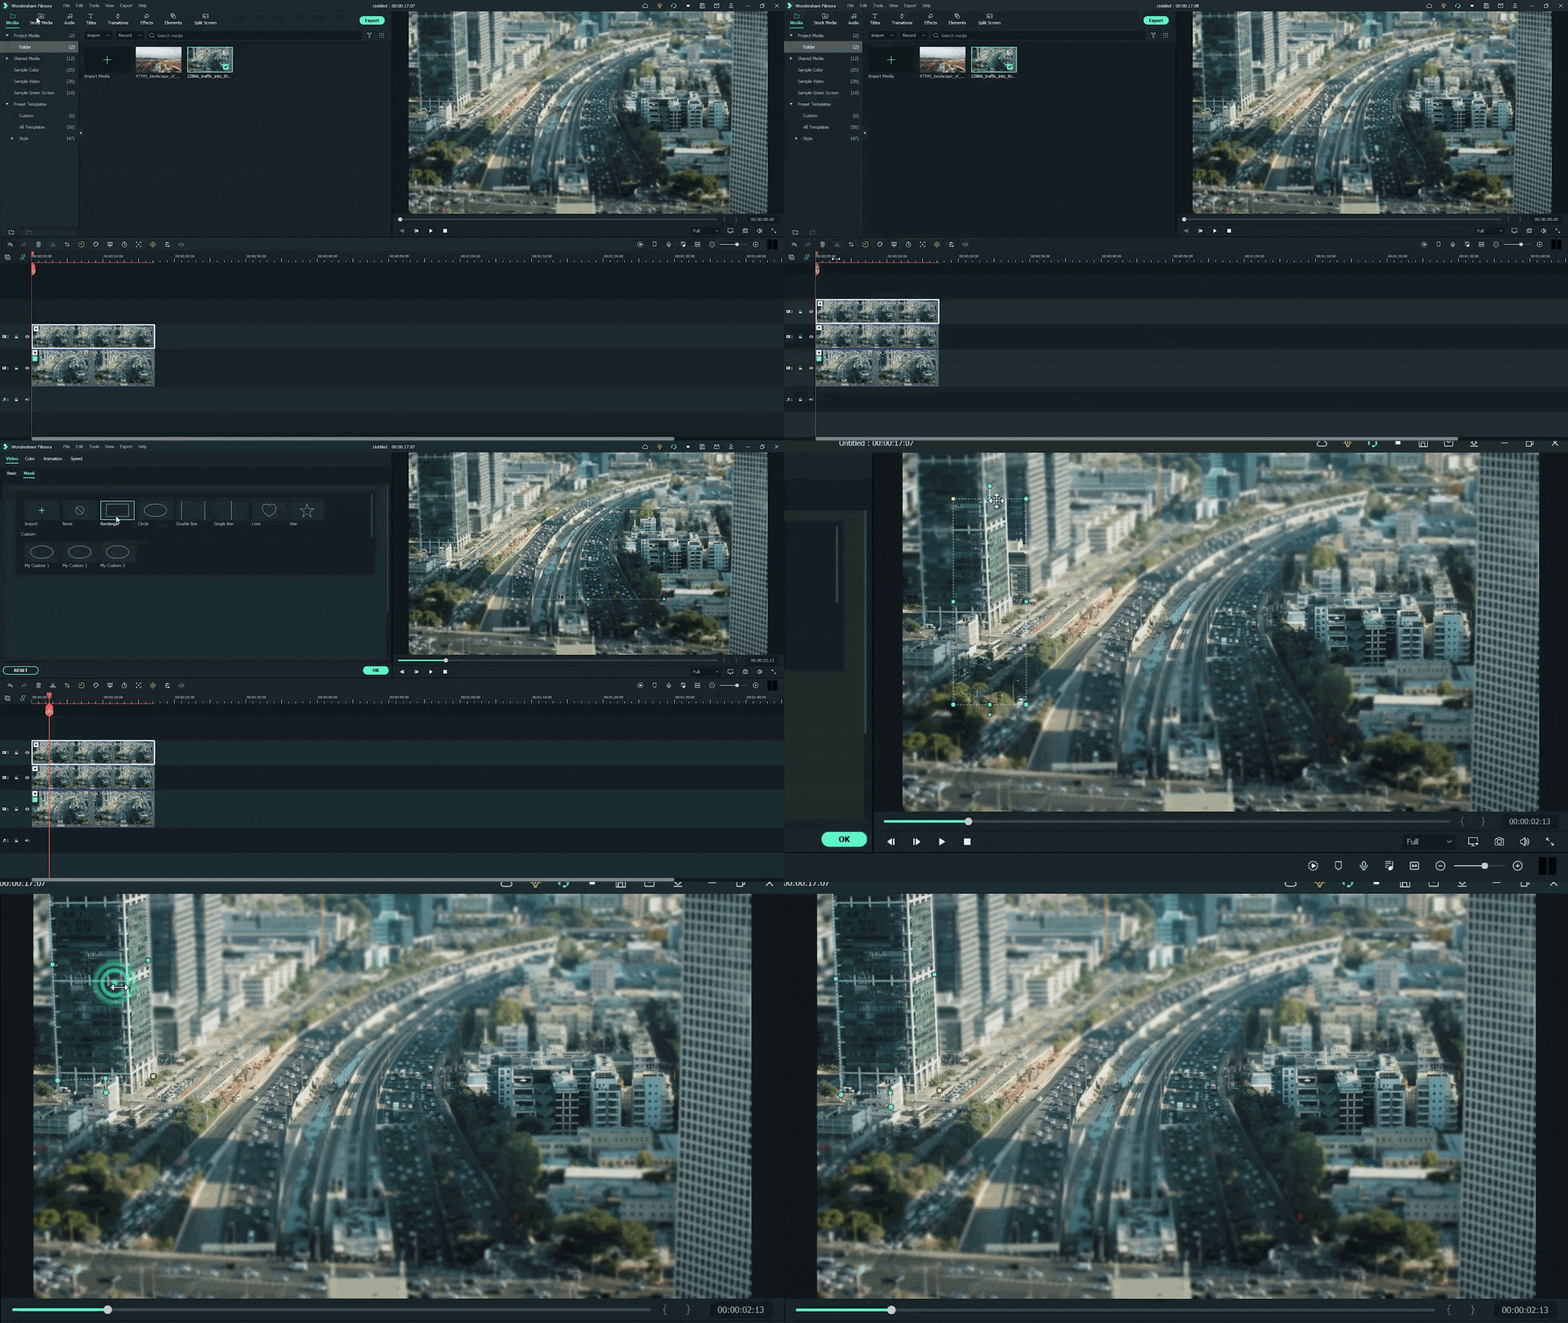
Want to change the shape of the mask? Then follow the below steps:
- Double-click on the video present in 2nd video track.
- Settings will activate on the top left side.
- Then click on the Mask tab to open it.
- Select the Rectangular mask from the list and apply it.
![]()
Note: make sure you are masking the same extent and excluding the object you want to be out of focus.
Now, it’s time to mask the whole object, which is far, but we want to make it in focus! For this, follow these steps:
- Add the same stock video clip a third time on the third video track of the timeline.
- Then add a mask in a Rectangle shape on the building.
- Don’t blur the edge of this mask.
Step8 Final Look
You are excited now to see the final look of your miniature effect! Finally, it’s in front of you! Just modify it more if you want to make it more precise.
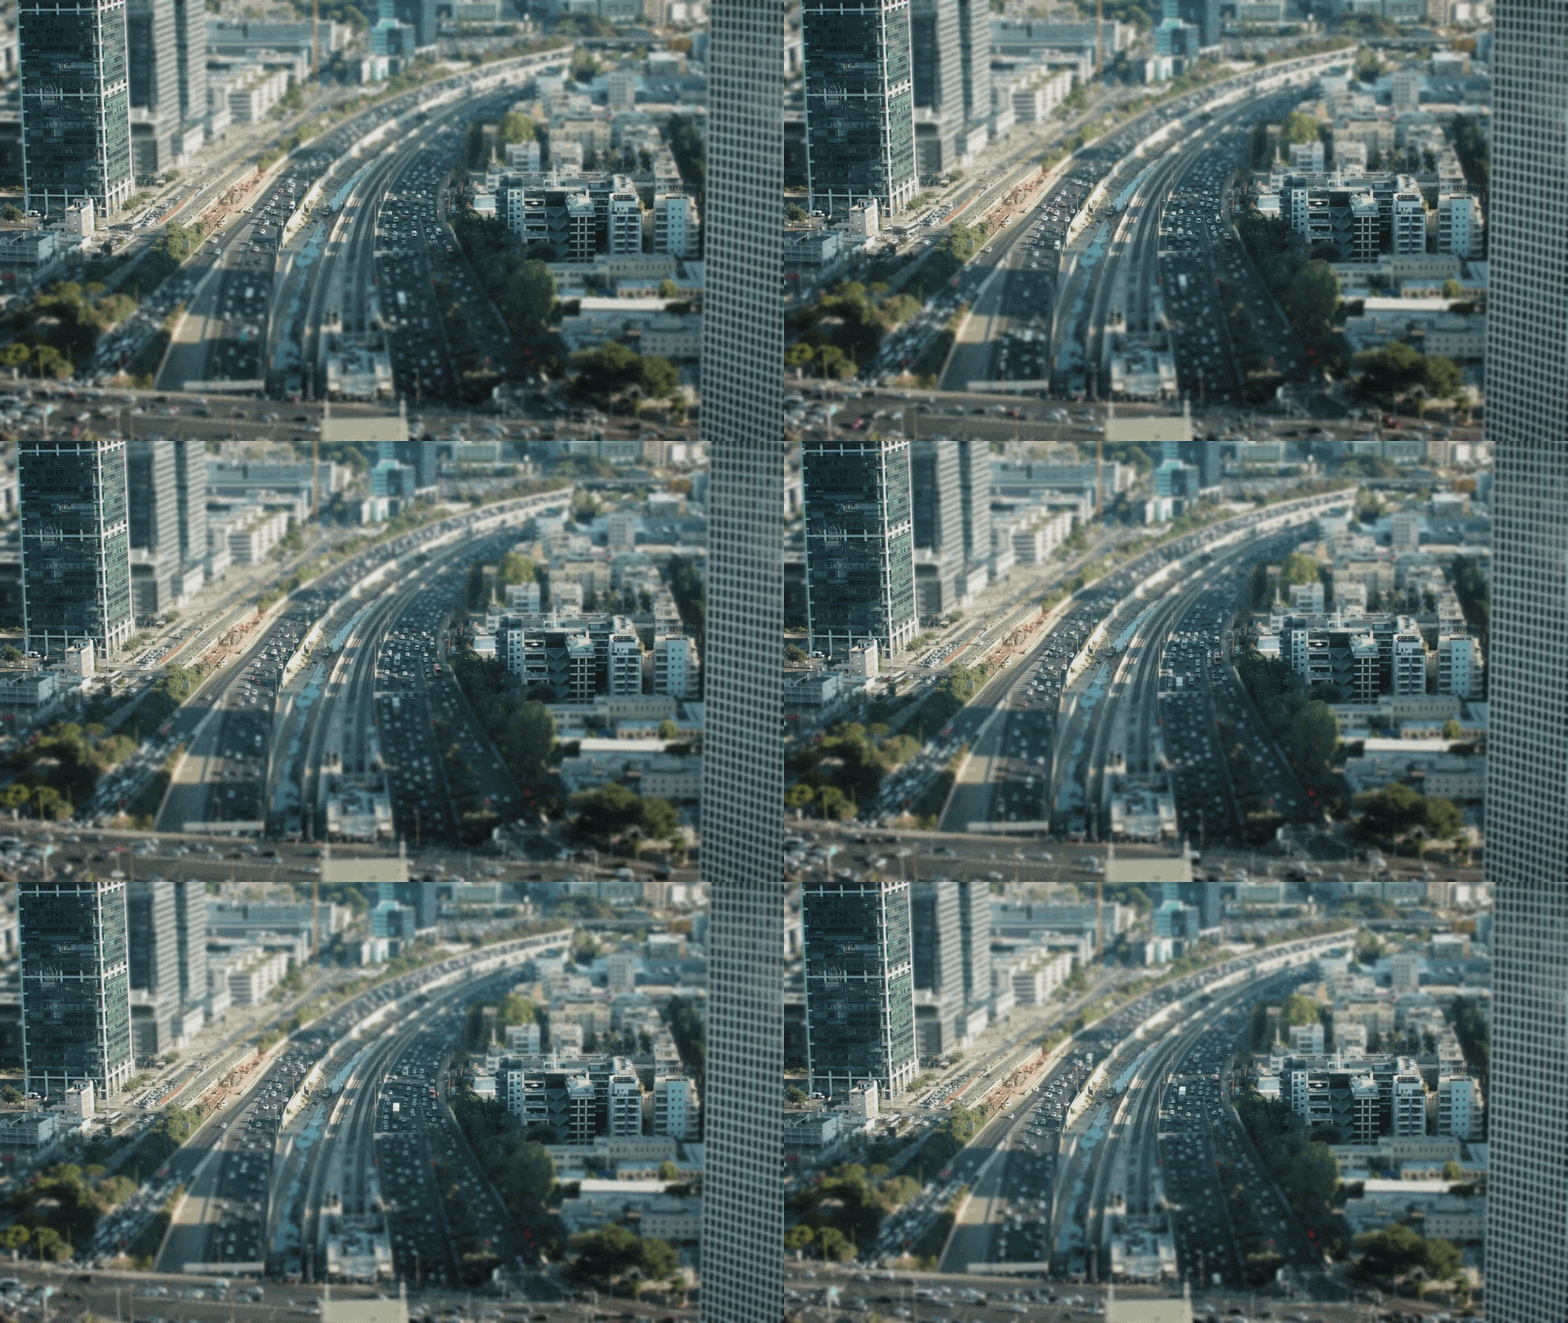
Have you tried to add a miniature effect before? If yes, then share your experience with us! Try with more mask shapes and add more blur effects. Make sure that you are using Wondershare Filmora to make more filmy shots. Feel free to try out different effects and enjoy the following results!
Free Download For Win 7 or later(64-bit)
Free Download For macOS 10.14 or later
Step2 Choose any stock footage
If you don’t have good-quality footage, but want to boost your video, here is how. You can get the miniature effect without a big format view camera or specialized lens.
- Open Filmora and select any stock footage in Wondershare Filmora.

Move to the stock media folder on the above bar in the Wondershare Filmora. Or you can look towards the left window, where you will see the sample videos tab.
- Click on the sample videos tab, and a new window will appear on the library screen.
Here you will see almost more than 20 videos. So, instead of using the actual recorded footage, we’ll make do with what we have by default. After selecting and adding the stock footage of your choice. Then you have to follow the below process:
- First, hold the Stock Footage as shown in the folder section.
- Then Drag and Drop it to the timeline section for further editing.

Who will get Stock Media?
Want to get stock media? You can only have access to the stock media library if you already buy the license of Wondershare Filmora.
- The latest version has an unlimited stock library.
- After purchasing any plan, you can access Stock Media (Unsplash, Giphy, Pixabay, Pixel).
Step3 Head to the effect panel
As we are working on miniature effects, what do we need first? First, we ensure that we have a Blur effect on the video.

To add a blur effect from the panel, follow the below-mentioned steps:
- First of all, move toward the above tabs.
- Then click on the 5th section, which is Effect
- After selecting the effect tab, a new window will pop up.
- In this section, we have 500+ different effects.
- Then, click on the search bar.
- Search for the Blur effect.
- After that, click on the Blur 2
- Then Download this effect if you haven’t done this already.
Step4 Add the blur effect to the video
After selecting and downloading the blur effect, it’s time to add it to the video. Again, see how precise it turned out. To add effect, follow below steps:
- First, drag and Drop the effect toward the timeline.
- Then, make sure to release the effect on the video to give it a lens blur appearance.

Step5 Add the effect multiple times
Want to get an ideal blur level? If you need more blur level in your video and make it more cinematic, then follow the below steps:
- First, ensure that the opacity of the blur effect is 100%.
- Then, if you still want more blurriness, add Blur 2 effect multiple times on the video.
- Finally, add effect by just the Drag and Drop

Step6 Drop the same video clip
- Add the same video clip 2nd time on the timeline.
- Add it by just the Drag and Drop
- Make sure you add it to 2nd video track in the timeline above the first one.

Step7 Add masks on the Video
Now, it’s time to select a specific video portion and add a mask. Due to this, we will have a selective blur portion. For this, follow the below guidelines:
- Double-click on the video present in 2nd track.
- The settings tab will be open in the top left section.
- Then find the Mask section and click on it.
- After this, click on the Double-line.
- Set the mask on video according to your style and choice.

![]()
Note: you can adjust the mask size and position by rotating and changing its shape.
Watch the rotating and adjusting actions as shown below!

For example, when we add a mask in the below time-lapse video, follow the above mask adjustments. Unfortunately, we can’t get good results. Therefore, we will apply another way to add a mask by changing shape and position. Follow the instructions for modifications:

- Make a building or any object Blurry near the camera because it is not present within the depth of field.
- While the object is far from the camera, it is focused because it is in the depth of the field.
- Then adjust the mask, as per your choice.
Want to change the shape of the mask? Then follow the below steps:

- Double-click on the video present in 2nd video track.
- Settings will activate on the top left side.
- Then click on the Mask tab to open it.
- Select the Rectangular mask from the list and apply it.
![]()
Note: make sure you are masking the same extent and excluding the object you want to be out of focus.
Now, it’s time to mask the whole object, which is far, but we want to make it in focus! For this, follow these steps:
- Add the same stock video clip a third time on the third video track of the timeline.
- Then add a mask in a Rectangle shape on the building.
- Don’t blur the edge of this mask.

Step8 Final Look
You are excited now to see the final look of your miniature effect! Finally, it’s in front of you! Just modify it more if you want to make it more precise.

Have you tried to add a miniature effect before? If yes, then share your experience with us! Try with more mask shapes and add more blur effects. Make sure that you are using Wondershare Filmora to make more filmy shots. Feel free to try out different effects and enjoy the following results!
Free Download For Win 7 or later(64-bit)
Free Download For macOS 10.14 or later
How to Create Cooking Video Intro and End Screen for YouTube Channel?
With the number of YouTube content creators increasing every minute, the competition will be strong and unmatched. If you are a chef owning a YouTube cooking channel, this article might be your calling.
The revolutionary cooking video intros and promising outro for the channels are the need of the hour. It has become crucial to give your competitors a powerful match via robust content, incredible cooking background music, and a great end. The article covers creating a café meal intro and cooking channel YouTube end screen. So, time to begin? Shall we?
In this article
01 How to Create a Cafe Meal Intro?
02 How to Create a Cooking Channel YouTube End Screen?
03 3 Recommended Sites to Download Cooking Background Music
Part 1: How to Create a Cafe Meal Intro?
Are you a chef in a restaurant in Paris? Do you need to create a café meal intro that grabs the attention of all food fanatics worldwide? Worry no more, as this section has got you covered.
Wondershare Filmora is a one of its kind software to create an astonishing café meal intro in seconds. Let us initiate the step-by-step!
For Win 7 or later (64-bit)
For macOS 10.12 or later
Step 1: Double click on Wondershare Filmora to open the software. Head to the “Audio” tab and tap “Young and Bright.” The process will launch interesting music from there.

Step 2: Pick one and drag it to the timeline. Navigate to the “Media” tab to drag the cooking video to the first track. You can also import the video from your system.

Step 3: It is time to use the “Split Screen” to show more scenes in one video. Pick one and drag it to the timeline. It will create three vertical divisions on the preview window. Drop three different videos in each division and adjust the height using the Zoom settings.

Step 4: Import another cooking video and import it to the first track. Navigate to the “Elements” section and drag one of it as a background to the end of the first track. Look for another “café” related element to drag it to the end of the second track.

Step 5: Moving on, scroll to the “Titles” panel to pick a “restaurant” related idea and drag it to the timeline. The position of the title can be adjusted, and the name of the title can be altered by placing it in the preview window.

Step 6: Use the big titles for the beginning of the video and drag them to the second track. The title can be adjusted and renamed effortlessly. Pick another title for the middle of the video and perform the same procedure. The process is completed, and you can export the video.

Part 2: How to Create a Cooking Channel YouTube End Screen?
Are you an impeccable chef? Do you own a YouTube channel with limited subscribers?
The background music for cooking videos is essential to capture the attention of food addicts in the world. Your cooking channel’s stunning YouTube end screen is your perfect shot at improving subscribers’ range. The subsection shall reflect upon the procedure to effortlessly use Wondershare Filmora. So, let us have a look!
For Win 7 or later (64-bit)
For macOS 10.12 or later
Step 1: Open Wondershare Filmora from your computer and import the video that you need for the YouTube outro. Drag the video to the first track of your timeline. Head to the “Titles” tab and find the ideal title related to the restaurant idea. Now, drag it on to the second track.

Step 2: Now, it is time to use the “Transitions” tab to pick one and drag it to the end of the second track. First, import another video and drag it to the first track. After that, select the “Titles” and search YouTube pack lower-thirds. Hit one and drag it to the second track. Make required alterations related to the position, allocation, title name, size, and color.

Step 3: Navigate to the “Transitions” and click on one. Drag it and drop between the two clips. Screenshot the picture from the preview window and drag it from the “Media” tab to the first track. Pick the “YouTube end screen template” from titles and drag it to the second track.

Step 4: Modify your text from the “Advanced Settings.” Now, it is time to pick another media from your system to be used as a YouTube channel avatar. Place it on to the third track. It is time to adjust the photo on the end screen.

Step 5: To do so, go to the “Effects” and pick an image mask from it. Drag it to the photo avatar in the preview window. After that, double click on the track, and settings will appear. Select “Image Mask” options to adjust the size of the circle as needed.

Step 6: Adjust the position of the avatar on your preview window. Moving on, pick the keyframe to animate the position of the avatar. Change the rotation, escalation, and opacity as needed.

Step 7: It is time to add another image to the fourth track and perform the same procedure as the profile image. It will be displayed as the recent video on the end screen. Animate the imagery as done previously. You have created a creative end screen for your cooking YouTube channel.

Part 3: 3 Recommended Sites to Download Cooking Background Music
The background music for cooking videos is an important part of a cooking video intro and outro. Therefore, we can introduce three sites that offer great cooking background music free of copyright infringement issues. So, are you with us? Let us start!
Envato Elements
The first one of the lot is Envato Elements. There are different genres of music linked with cooking videos. The website filters can be tailored according to the theme of one’s cooking YouTube channel. Additionally, there are cooking moods music as well.

MobCup
MobCup has made it easy to browse the related cooking background music. The cooking music soup, monster hunt, cooking instrumental, and cooking effects are famous music options. The user can download them by hitting the “Download” button effortlessly.

SoundCloud
SoundCloud is another remarkable source for cooking videos to get hands-on background music. The royalty-free music for food, cooking music, and uplifting background music can be incorporated in the videos to give an essence of the cooking tutorials. The link can be copied, and the track can be downloaded in seconds.

Concluding Remarks
The marketing industry is getting more fame than the actual brand services due to multiple reasons. The animations and transitions are used to attract the attention of potential users and clients. If you own a restaurant with a YouTube cooking channel, the exciting cooking background music will work best for you.
The article discussed creating a café meal intro and cooking channel YouTube end screen through Filmora. The three recommended sites to download the music were also this write-up’s crux.
Wondershare Filmora
Get started easily with Filmora’s powerful performance, intuitive interface, and countless effects!
Try It Free Try It Free Try It Free Learn More >

02 How to Create a Cooking Channel YouTube End Screen?
03 3 Recommended Sites to Download Cooking Background Music
Part 1: How to Create a Cafe Meal Intro?
Are you a chef in a restaurant in Paris? Do you need to create a café meal intro that grabs the attention of all food fanatics worldwide? Worry no more, as this section has got you covered.
Wondershare Filmora is a one of its kind software to create an astonishing café meal intro in seconds. Let us initiate the step-by-step!
For Win 7 or later (64-bit)
For macOS 10.12 or later
Step 1: Double click on Wondershare Filmora to open the software. Head to the “Audio” tab and tap “Young and Bright.” The process will launch interesting music from there.

Step 2: Pick one and drag it to the timeline. Navigate to the “Media” tab to drag the cooking video to the first track. You can also import the video from your system.

Step 3: It is time to use the “Split Screen” to show more scenes in one video. Pick one and drag it to the timeline. It will create three vertical divisions on the preview window. Drop three different videos in each division and adjust the height using the Zoom settings.

Step 4: Import another cooking video and import it to the first track. Navigate to the “Elements” section and drag one of it as a background to the end of the first track. Look for another “café” related element to drag it to the end of the second track.

Step 5: Moving on, scroll to the “Titles” panel to pick a “restaurant” related idea and drag it to the timeline. The position of the title can be adjusted, and the name of the title can be altered by placing it in the preview window.

Step 6: Use the big titles for the beginning of the video and drag them to the second track. The title can be adjusted and renamed effortlessly. Pick another title for the middle of the video and perform the same procedure. The process is completed, and you can export the video.

Part 2: How to Create a Cooking Channel YouTube End Screen?
Are you an impeccable chef? Do you own a YouTube channel with limited subscribers?
The background music for cooking videos is essential to capture the attention of food addicts in the world. Your cooking channel’s stunning YouTube end screen is your perfect shot at improving subscribers’ range. The subsection shall reflect upon the procedure to effortlessly use Wondershare Filmora. So, let us have a look!
For Win 7 or later (64-bit)
For macOS 10.12 or later
Step 1: Open Wondershare Filmora from your computer and import the video that you need for the YouTube outro. Drag the video to the first track of your timeline. Head to the “Titles” tab and find the ideal title related to the restaurant idea. Now, drag it on to the second track.

Step 2: Now, it is time to use the “Transitions” tab to pick one and drag it to the end of the second track. First, import another video and drag it to the first track. After that, select the “Titles” and search YouTube pack lower-thirds. Hit one and drag it to the second track. Make required alterations related to the position, allocation, title name, size, and color.

Step 3: Navigate to the “Transitions” and click on one. Drag it and drop between the two clips. Screenshot the picture from the preview window and drag it from the “Media” tab to the first track. Pick the “YouTube end screen template” from titles and drag it to the second track.

Step 4: Modify your text from the “Advanced Settings.” Now, it is time to pick another media from your system to be used as a YouTube channel avatar. Place it on to the third track. It is time to adjust the photo on the end screen.

Step 5: To do so, go to the “Effects” and pick an image mask from it. Drag it to the photo avatar in the preview window. After that, double click on the track, and settings will appear. Select “Image Mask” options to adjust the size of the circle as needed.

Step 6: Adjust the position of the avatar on your preview window. Moving on, pick the keyframe to animate the position of the avatar. Change the rotation, escalation, and opacity as needed.

Step 7: It is time to add another image to the fourth track and perform the same procedure as the profile image. It will be displayed as the recent video on the end screen. Animate the imagery as done previously. You have created a creative end screen for your cooking YouTube channel.

Part 3: 3 Recommended Sites to Download Cooking Background Music
The background music for cooking videos is an important part of a cooking video intro and outro. Therefore, we can introduce three sites that offer great cooking background music free of copyright infringement issues. So, are you with us? Let us start!
Envato Elements
The first one of the lot is Envato Elements. There are different genres of music linked with cooking videos. The website filters can be tailored according to the theme of one’s cooking YouTube channel. Additionally, there are cooking moods music as well.

MobCup
MobCup has made it easy to browse the related cooking background music. The cooking music soup, monster hunt, cooking instrumental, and cooking effects are famous music options. The user can download them by hitting the “Download” button effortlessly.

SoundCloud
SoundCloud is another remarkable source for cooking videos to get hands-on background music. The royalty-free music for food, cooking music, and uplifting background music can be incorporated in the videos to give an essence of the cooking tutorials. The link can be copied, and the track can be downloaded in seconds.

Concluding Remarks
The marketing industry is getting more fame than the actual brand services due to multiple reasons. The animations and transitions are used to attract the attention of potential users and clients. If you own a restaurant with a YouTube cooking channel, the exciting cooking background music will work best for you.
The article discussed creating a café meal intro and cooking channel YouTube end screen through Filmora. The three recommended sites to download the music were also this write-up’s crux.
Wondershare Filmora
Get started easily with Filmora’s powerful performance, intuitive interface, and countless effects!
Try It Free Try It Free Try It Free Learn More >

02 How to Create a Cooking Channel YouTube End Screen?
03 3 Recommended Sites to Download Cooking Background Music
Part 1: How to Create a Cafe Meal Intro?
Are you a chef in a restaurant in Paris? Do you need to create a café meal intro that grabs the attention of all food fanatics worldwide? Worry no more, as this section has got you covered.
Wondershare Filmora is a one of its kind software to create an astonishing café meal intro in seconds. Let us initiate the step-by-step!
For Win 7 or later (64-bit)
For macOS 10.12 or later
Step 1: Double click on Wondershare Filmora to open the software. Head to the “Audio” tab and tap “Young and Bright.” The process will launch interesting music from there.

Step 2: Pick one and drag it to the timeline. Navigate to the “Media” tab to drag the cooking video to the first track. You can also import the video from your system.

Step 3: It is time to use the “Split Screen” to show more scenes in one video. Pick one and drag it to the timeline. It will create three vertical divisions on the preview window. Drop three different videos in each division and adjust the height using the Zoom settings.

Step 4: Import another cooking video and import it to the first track. Navigate to the “Elements” section and drag one of it as a background to the end of the first track. Look for another “café” related element to drag it to the end of the second track.

Step 5: Moving on, scroll to the “Titles” panel to pick a “restaurant” related idea and drag it to the timeline. The position of the title can be adjusted, and the name of the title can be altered by placing it in the preview window.

Step 6: Use the big titles for the beginning of the video and drag them to the second track. The title can be adjusted and renamed effortlessly. Pick another title for the middle of the video and perform the same procedure. The process is completed, and you can export the video.

Part 2: How to Create a Cooking Channel YouTube End Screen?
Are you an impeccable chef? Do you own a YouTube channel with limited subscribers?
The background music for cooking videos is essential to capture the attention of food addicts in the world. Your cooking channel’s stunning YouTube end screen is your perfect shot at improving subscribers’ range. The subsection shall reflect upon the procedure to effortlessly use Wondershare Filmora. So, let us have a look!
For Win 7 or later (64-bit)
For macOS 10.12 or later
Step 1: Open Wondershare Filmora from your computer and import the video that you need for the YouTube outro. Drag the video to the first track of your timeline. Head to the “Titles” tab and find the ideal title related to the restaurant idea. Now, drag it on to the second track.

Step 2: Now, it is time to use the “Transitions” tab to pick one and drag it to the end of the second track. First, import another video and drag it to the first track. After that, select the “Titles” and search YouTube pack lower-thirds. Hit one and drag it to the second track. Make required alterations related to the position, allocation, title name, size, and color.

Step 3: Navigate to the “Transitions” and click on one. Drag it and drop between the two clips. Screenshot the picture from the preview window and drag it from the “Media” tab to the first track. Pick the “YouTube end screen template” from titles and drag it to the second track.

Step 4: Modify your text from the “Advanced Settings.” Now, it is time to pick another media from your system to be used as a YouTube channel avatar. Place it on to the third track. It is time to adjust the photo on the end screen.

Step 5: To do so, go to the “Effects” and pick an image mask from it. Drag it to the photo avatar in the preview window. After that, double click on the track, and settings will appear. Select “Image Mask” options to adjust the size of the circle as needed.

Step 6: Adjust the position of the avatar on your preview window. Moving on, pick the keyframe to animate the position of the avatar. Change the rotation, escalation, and opacity as needed.

Step 7: It is time to add another image to the fourth track and perform the same procedure as the profile image. It will be displayed as the recent video on the end screen. Animate the imagery as done previously. You have created a creative end screen for your cooking YouTube channel.

Part 3: 3 Recommended Sites to Download Cooking Background Music
The background music for cooking videos is an important part of a cooking video intro and outro. Therefore, we can introduce three sites that offer great cooking background music free of copyright infringement issues. So, are you with us? Let us start!
Envato Elements
The first one of the lot is Envato Elements. There are different genres of music linked with cooking videos. The website filters can be tailored according to the theme of one’s cooking YouTube channel. Additionally, there are cooking moods music as well.

MobCup
MobCup has made it easy to browse the related cooking background music. The cooking music soup, monster hunt, cooking instrumental, and cooking effects are famous music options. The user can download them by hitting the “Download” button effortlessly.

SoundCloud
SoundCloud is another remarkable source for cooking videos to get hands-on background music. The royalty-free music for food, cooking music, and uplifting background music can be incorporated in the videos to give an essence of the cooking tutorials. The link can be copied, and the track can be downloaded in seconds.

Concluding Remarks
The marketing industry is getting more fame than the actual brand services due to multiple reasons. The animations and transitions are used to attract the attention of potential users and clients. If you own a restaurant with a YouTube cooking channel, the exciting cooking background music will work best for you.
The article discussed creating a café meal intro and cooking channel YouTube end screen through Filmora. The three recommended sites to download the music were also this write-up’s crux.
Wondershare Filmora
Get started easily with Filmora’s powerful performance, intuitive interface, and countless effects!
Try It Free Try It Free Try It Free Learn More >

02 How to Create a Cooking Channel YouTube End Screen?
03 3 Recommended Sites to Download Cooking Background Music
Part 1: How to Create a Cafe Meal Intro?
Are you a chef in a restaurant in Paris? Do you need to create a café meal intro that grabs the attention of all food fanatics worldwide? Worry no more, as this section has got you covered.
Wondershare Filmora is a one of its kind software to create an astonishing café meal intro in seconds. Let us initiate the step-by-step!
For Win 7 or later (64-bit)
For macOS 10.12 or later
Step 1: Double click on Wondershare Filmora to open the software. Head to the “Audio” tab and tap “Young and Bright.” The process will launch interesting music from there.

Step 2: Pick one and drag it to the timeline. Navigate to the “Media” tab to drag the cooking video to the first track. You can also import the video from your system.

Step 3: It is time to use the “Split Screen” to show more scenes in one video. Pick one and drag it to the timeline. It will create three vertical divisions on the preview window. Drop three different videos in each division and adjust the height using the Zoom settings.

Step 4: Import another cooking video and import it to the first track. Navigate to the “Elements” section and drag one of it as a background to the end of the first track. Look for another “café” related element to drag it to the end of the second track.

Step 5: Moving on, scroll to the “Titles” panel to pick a “restaurant” related idea and drag it to the timeline. The position of the title can be adjusted, and the name of the title can be altered by placing it in the preview window.

Step 6: Use the big titles for the beginning of the video and drag them to the second track. The title can be adjusted and renamed effortlessly. Pick another title for the middle of the video and perform the same procedure. The process is completed, and you can export the video.

Part 2: How to Create a Cooking Channel YouTube End Screen?
Are you an impeccable chef? Do you own a YouTube channel with limited subscribers?
The background music for cooking videos is essential to capture the attention of food addicts in the world. Your cooking channel’s stunning YouTube end screen is your perfect shot at improving subscribers’ range. The subsection shall reflect upon the procedure to effortlessly use Wondershare Filmora. So, let us have a look!
For Win 7 or later (64-bit)
For macOS 10.12 or later
Step 1: Open Wondershare Filmora from your computer and import the video that you need for the YouTube outro. Drag the video to the first track of your timeline. Head to the “Titles” tab and find the ideal title related to the restaurant idea. Now, drag it on to the second track.

Step 2: Now, it is time to use the “Transitions” tab to pick one and drag it to the end of the second track. First, import another video and drag it to the first track. After that, select the “Titles” and search YouTube pack lower-thirds. Hit one and drag it to the second track. Make required alterations related to the position, allocation, title name, size, and color.

Step 3: Navigate to the “Transitions” and click on one. Drag it and drop between the two clips. Screenshot the picture from the preview window and drag it from the “Media” tab to the first track. Pick the “YouTube end screen template” from titles and drag it to the second track.

Step 4: Modify your text from the “Advanced Settings.” Now, it is time to pick another media from your system to be used as a YouTube channel avatar. Place it on to the third track. It is time to adjust the photo on the end screen.

Step 5: To do so, go to the “Effects” and pick an image mask from it. Drag it to the photo avatar in the preview window. After that, double click on the track, and settings will appear. Select “Image Mask” options to adjust the size of the circle as needed.

Step 6: Adjust the position of the avatar on your preview window. Moving on, pick the keyframe to animate the position of the avatar. Change the rotation, escalation, and opacity as needed.

Step 7: It is time to add another image to the fourth track and perform the same procedure as the profile image. It will be displayed as the recent video on the end screen. Animate the imagery as done previously. You have created a creative end screen for your cooking YouTube channel.

Part 3: 3 Recommended Sites to Download Cooking Background Music
The background music for cooking videos is an important part of a cooking video intro and outro. Therefore, we can introduce three sites that offer great cooking background music free of copyright infringement issues. So, are you with us? Let us start!
Envato Elements
The first one of the lot is Envato Elements. There are different genres of music linked with cooking videos. The website filters can be tailored according to the theme of one’s cooking YouTube channel. Additionally, there are cooking moods music as well.

MobCup
MobCup has made it easy to browse the related cooking background music. The cooking music soup, monster hunt, cooking instrumental, and cooking effects are famous music options. The user can download them by hitting the “Download” button effortlessly.

SoundCloud
SoundCloud is another remarkable source for cooking videos to get hands-on background music. The royalty-free music for food, cooking music, and uplifting background music can be incorporated in the videos to give an essence of the cooking tutorials. The link can be copied, and the track can be downloaded in seconds.

Concluding Remarks
The marketing industry is getting more fame than the actual brand services due to multiple reasons. The animations and transitions are used to attract the attention of potential users and clients. If you own a restaurant with a YouTube cooking channel, the exciting cooking background music will work best for you.
The article discussed creating a café meal intro and cooking channel YouTube end screen through Filmora. The three recommended sites to download the music were also this write-up’s crux.
Wondershare Filmora
Get started easily with Filmora’s powerful performance, intuitive interface, and countless effects!
Try It Free Try It Free Try It Free Learn More >

How to Make Video Slow Motion? [Complete Guide]
Slow-motion videos are in trend now, especially when shooting for Instagram Reels , TikTok videos, or YouTube Shorts . While many users record the entire video in slow motion, there are others who need only a particular section of a clip to play at a reduced speed. Nevertheless, slowing down footage is no longer rocket science, thanks to the advancements in technology, and the availability and ease of access to relevant apps.
That said, here you will learn what is needed to record a video in slow motion, and how to get the job done in a simple way. In addition, you will also learn how to reduce the playback speed of an already existing video if it was recorded at a normal pace.
In this article
01 How to Make Slow Motion Videos via Recording?
02 How to Apply the Smooth Slow-Motion Effect in Post-Production?
Part 1: How to Make Slow Motion Videos via Recording?
The fact is, the playback speed of a video is inversely proportional to the frames per second (FPS) it has been recorded in. Usually, to have a video play at normal speed, it is recorded at 24 FPS or 30 FPS. On the other hand, if you increase the frame rate (FPS) to 120 or 240, the playback speed slows down. You can easily check this if you have access to a DSLR camera or an iPhone. These devices allow you to adjust the FPS so the videos can be recorded in slow motion.
For your convenience and learning, the step-by-step procedure on how to record a video in slow motion using an iPhone is explained below:
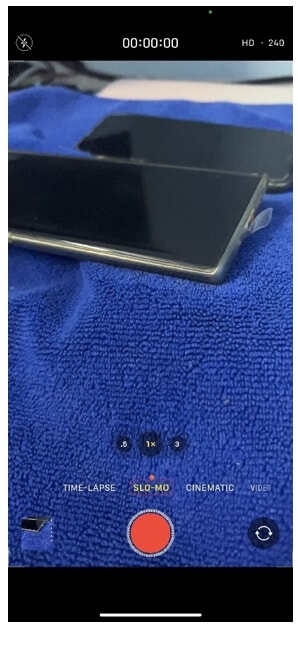
Step 1: Get to the SLO-MO Mode
Launch the Camera app on your iPhone (iPhone 13 Pro Max is used here for illustrations), and swipe the screen to the left to get to the SLO-MO mode.
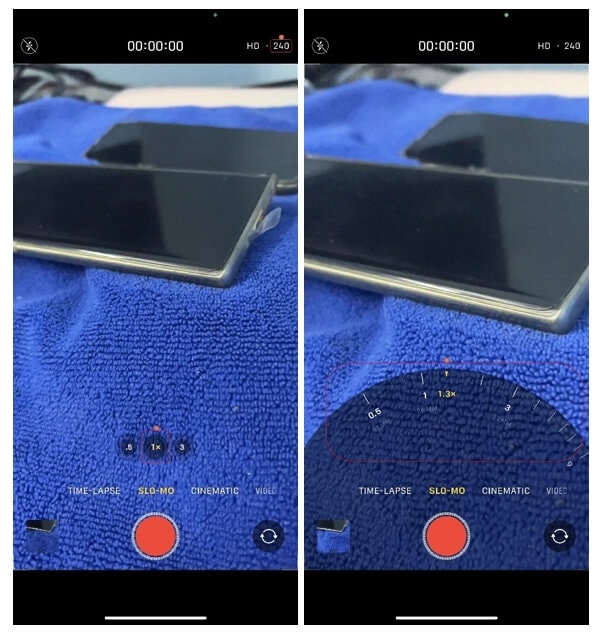
Step 2: Adjust Recording Preferences
Tap the number at the top-right corner to switch between 120 FPS and 240 FPS as needed. Tap 1x from the lower-middle section of the screen, and use the rotator to adjust your preferred zoom level.
Step 3: Start and Stop Recording
Tap the Record button from the bottom-center of the screen to begin recording the video in slow motion. Tap Stop when you are done. You can access the recorded video from the Videos container of the Photos app in your iPhone.
If you are using Android phone, you can check this article to find out more details about How to Record Super Slow Motion Videos on Your Phone.
You may also like: Best Slo-mo Camera Apps for Android And iPhone
Part 2: How to Apply the Smooth Slow-Motion Effect in Post-Production?
If you don’t have access to a camera that can record videos in slow motion, or in case you want to capture the footage at normal playback speed and then slow it down later, you need a dedicated tool to get the job done. Even though several post-production applications are available in the market, the one that is most versatile, has an intuitive interface, and is quite easy to use is Filmora video editor from Wondershare .
The latest version of the app, i.e., Wondershare Filmora 11 has a new feature called Speed Ramping that enables you to graphically manage the speed of the clips. While using the feature, you can either slow down the entire video or certain parts of it according to your requirements. For your learning, both the methods are explained below:
Method 1: Add Slow Motion Effect to the Whole Clip
For Win 7 or later (64-bit)
For macOS 10.12 or later
Step 1: Import the Source Video and Add to Timeline
Launch Wondershare Filmora on your Windows or Mac computer (a Windows 11 PC is used here for illustrations), click New Project from the first screen that appears. Make sure that the Media tool is selected from the standard tool bar at the top, click anywhere inside the Media window, and select and import the source clip to the program.
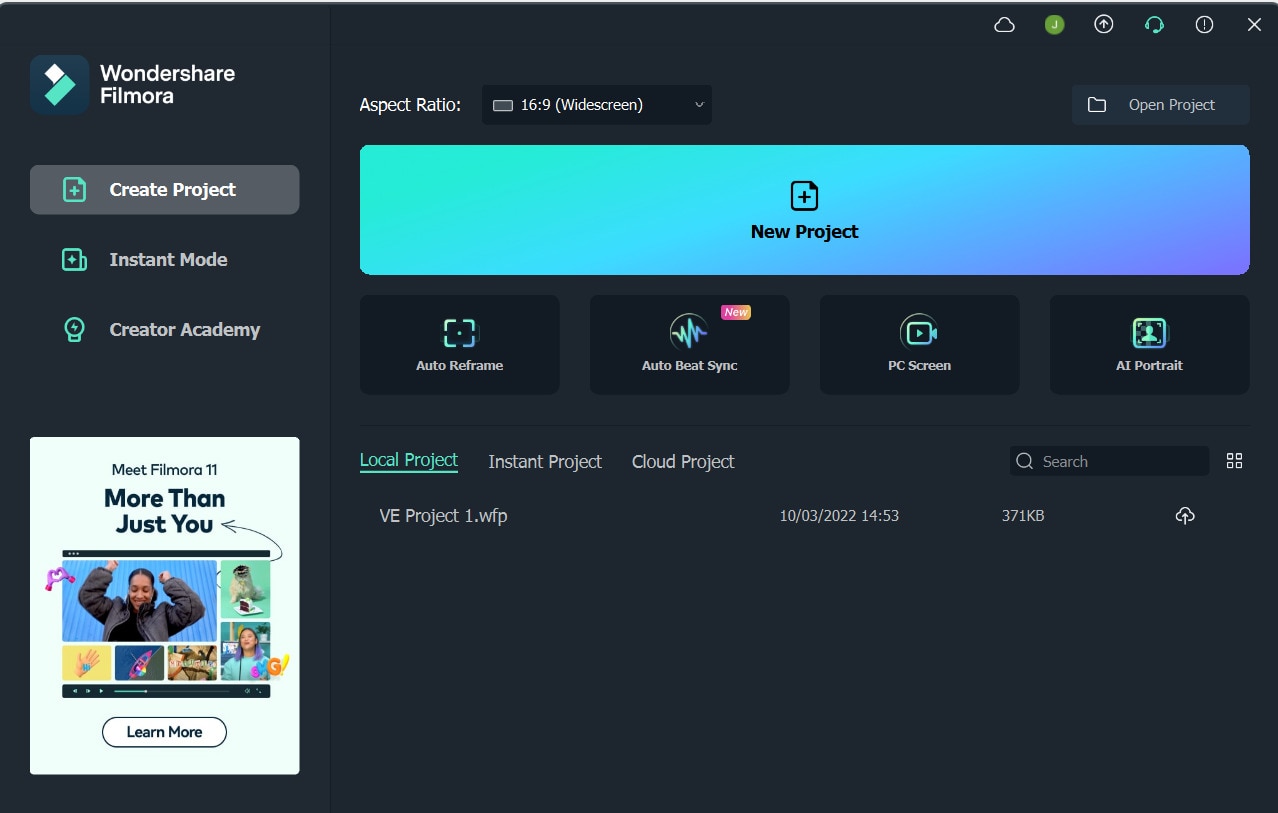
Next, hover the mouse over the thumbnail of the imported video in the Media window, and click the + icon present at its bottom-right corner. When the confirmation box comes up, click the Match to Media or Keep Project Settings button to change the project settings to match the resolution of the video, or change the footage to meet the project settings respectively.
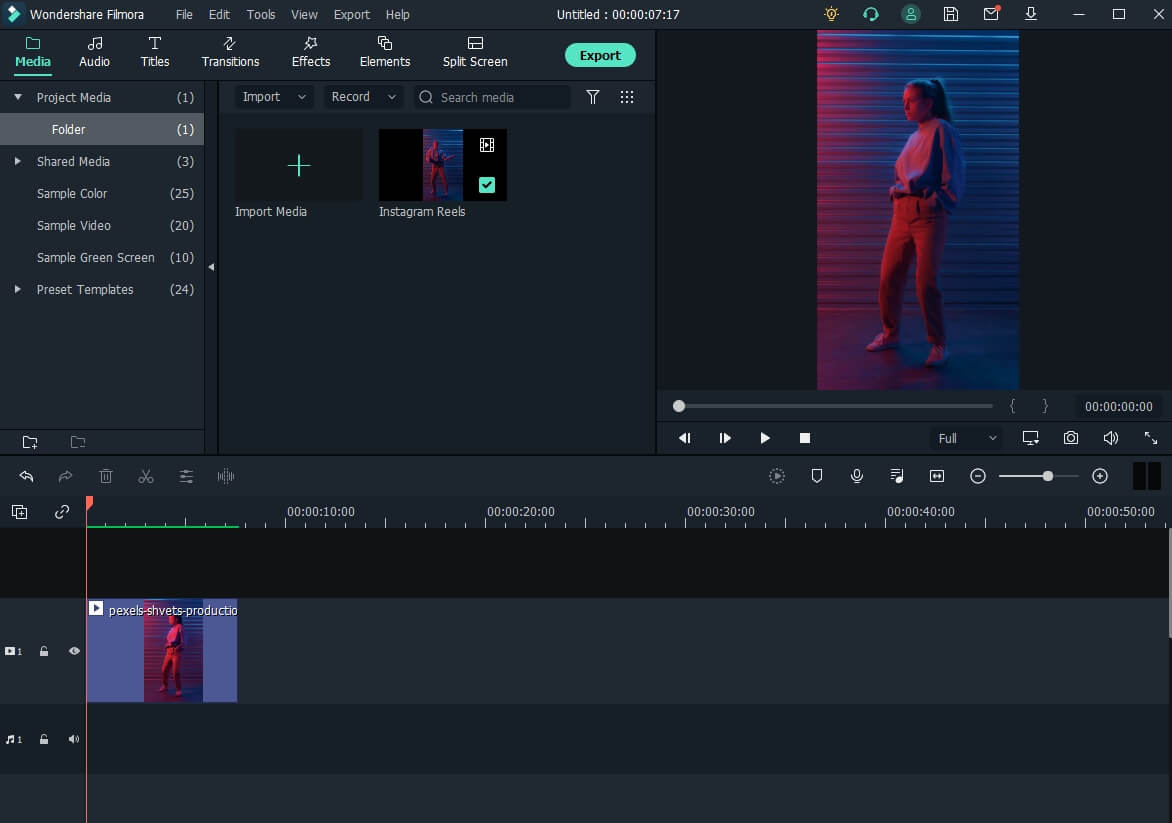
Step 2: Add Slow Motion Effect to the Whole Clip
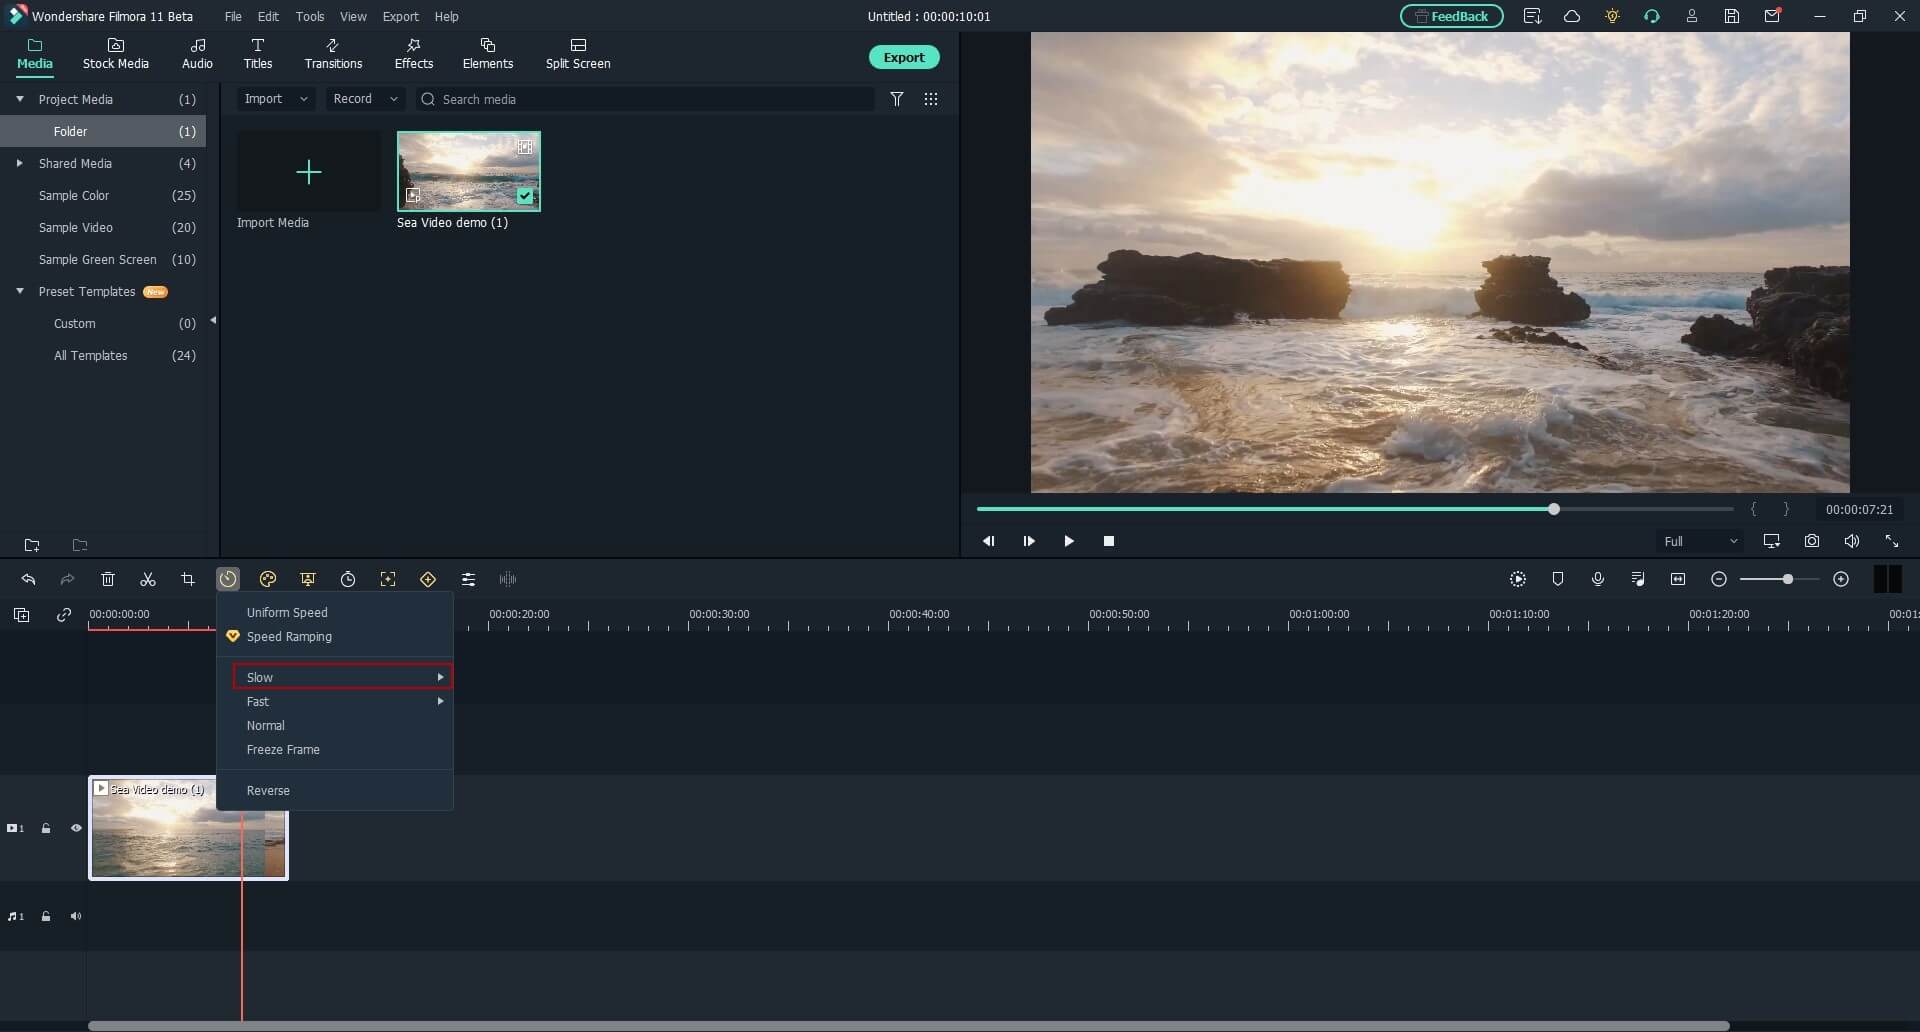
Once the media is added to the timeline, click on it and then click the Speed icon on the toolbar. Scroll down to the Slow menu and then you will see 0.5x, 0.25x, 0.1x, 0.05x and 0.01x presets. Select one to add slo-mo effects to the whole select clip. and click Speed Ramping from the menu that drops down.
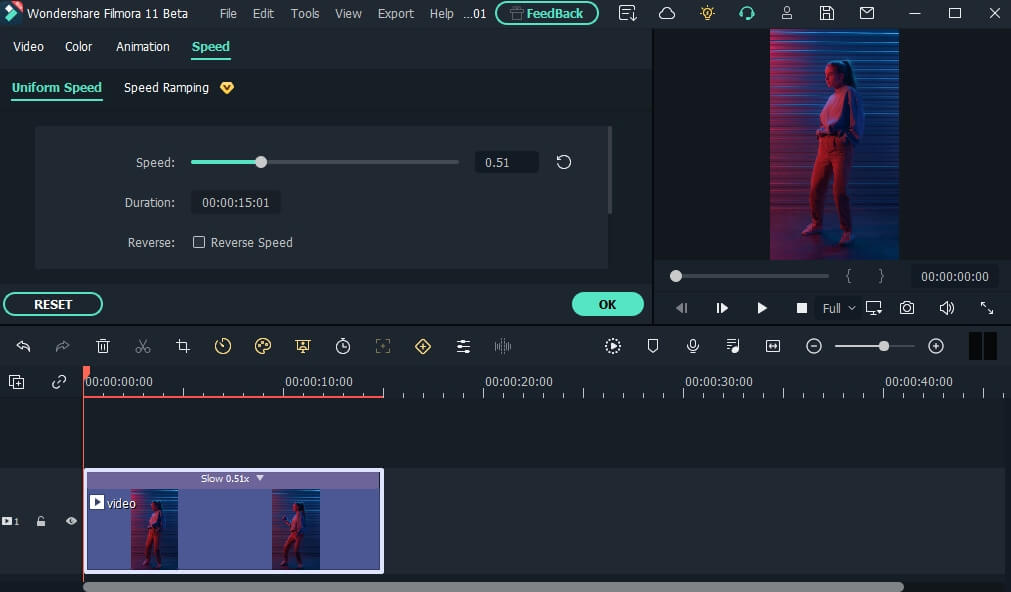
You can also right click the video in the timeline, and hover over to Speed option to select Uniform Speed to adjust the speed of the video to make a slo-mo effect video. Drag the speed slider to the left to slow down the video and you will see how many times it slowed down in the next field.
Method 2: Use Speed Ramping to Add Slow Motion Effect
For Win 7 or later (64-bit)
For macOS 10.12 or later
Speed Ramping enables you to add the slow-motion effect at different parts of a video and even freeze the screen for the duration that you specify. The processes to get these done are given below in detail:
Step 1: Add Source Video to Timeline and Get to the Speed Ramping Window
Use the process given in the previous method to import a source video to Wondershare Filmora 11 and add it to the Timeline. Then use the process given in the second step of the previous method to get to the Speed Ramping window.
Step 2: Add Slow Motion Effect to Different Parts of the Clip
Go to the Speed Ramping tab if it is not already selected, click Custom from the available options, and drag the adjustment points below the center line to reduce the playback speed for that particular section of the clip. Optionally, you can click any of the available presets to automatically add the slow-motion effect to the video.
Note: You can also drag the adjustment points above the line to increase the playback speed.
To add an adjustment point on the frame where it is not already present, place the playhead (skimmer) at the correct position, and click Add Adjust Point from the left of the Speed Ramping window itself. Once added, you can drag it downward to reduce the playback speed of that part of the clip.

Step 3: Freeze the Video
Place the skimmer on the frame where you want to freeze the video for a while, and click Add Freeze Frame from the left of the Speed Ramping window. When the time box appears, in the Freeze Time field, enter the duration in seconds you want to freeze the screen for, and click OK.
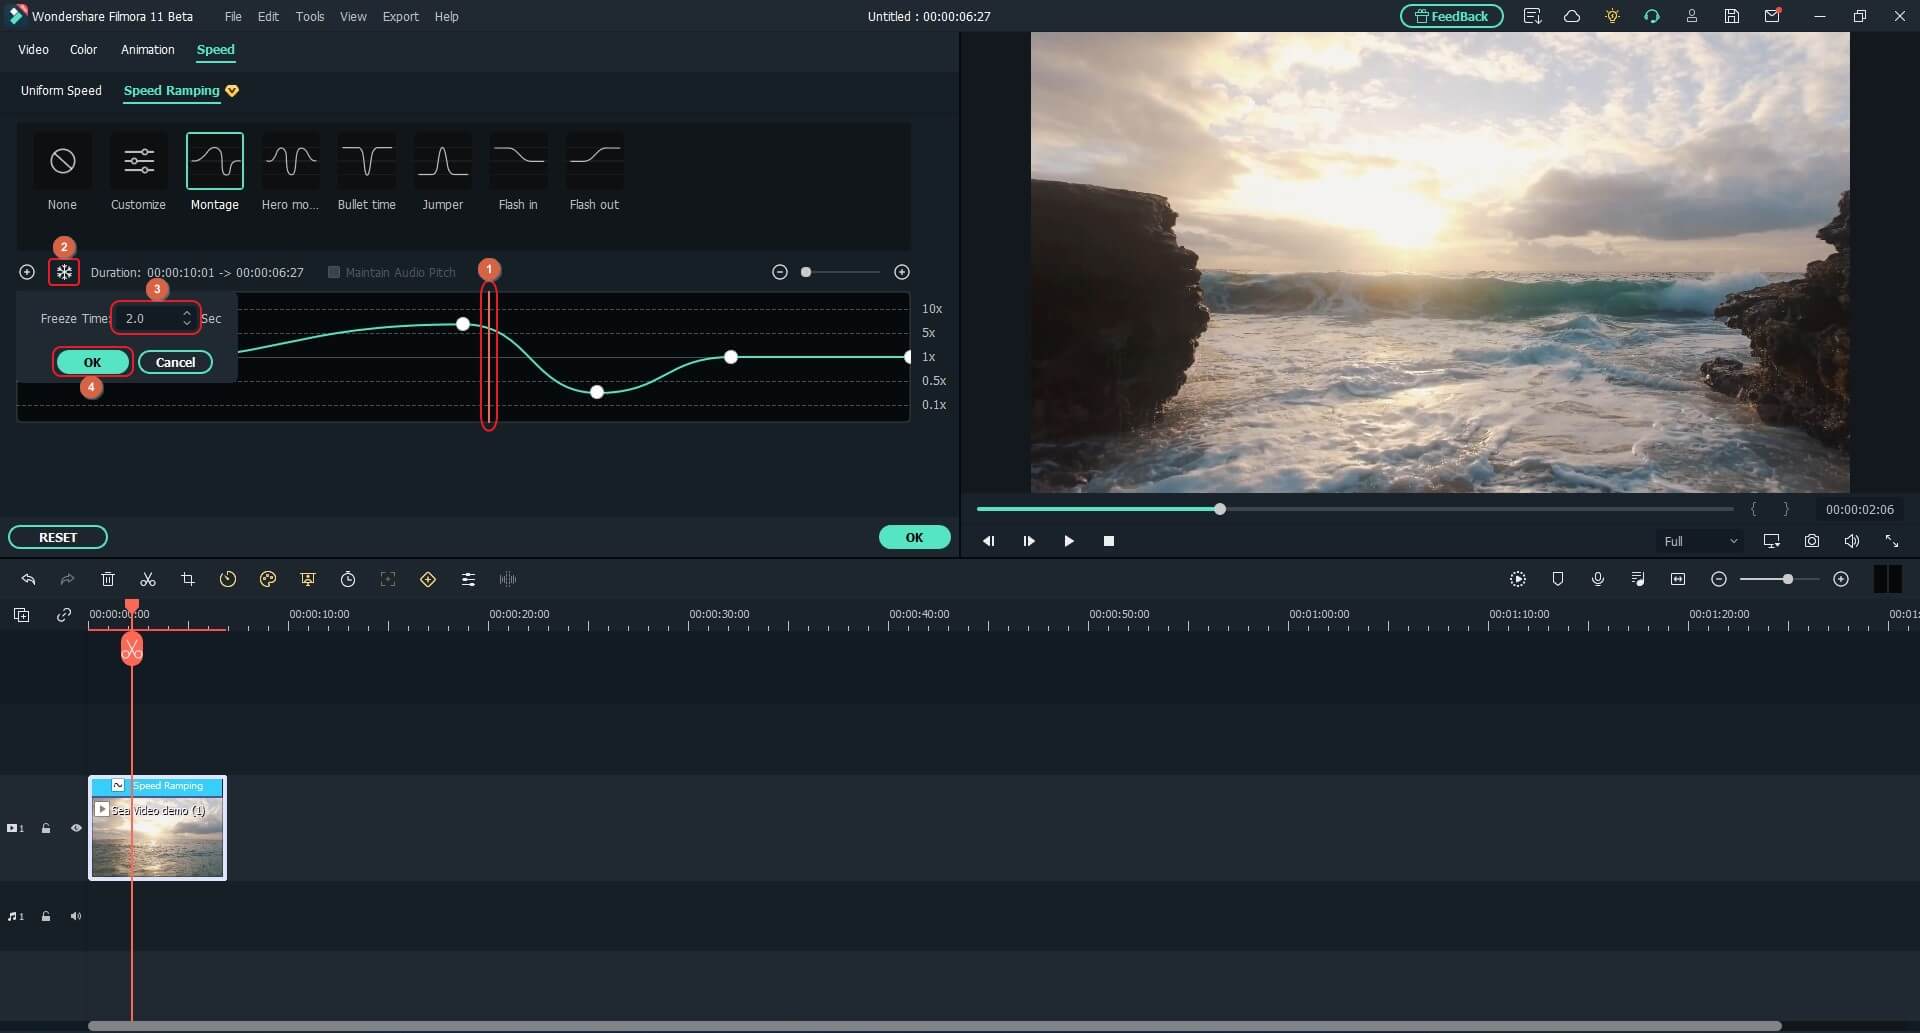
After adding a freeze point, optionally, you can drag and reposition it in the Speed Ramping timeline as needed. Finally, click OK from the bottom-right area to save the changes.
Part 3: When to Use Slow Motion?
There could be many instances when you want to add a slow-motion effect to your videos. Some of the most common ones include:
- Add Focus
If there is a particular scene in a clip that you want the audience to focus on, it would be a good idea to add the slow-motion effect right before that action appears on the screen, and bring the speed back to normal when the section is over.
- Skill or Style Demonstration
When a clip is playing at a normal speed, many times, the audience isn’t able to see the skills that you want to display. This is where you may want to add the slow-motion effect so that every detail can be noticed clearly and in detail.
- Replays
Mostly used for tournaments and matches where the actual action is to replayed so the audience, umpires, and other viewers can see the movements in detail before making the right decision.
- Observation
Some natural phenomena such as a deer running in the woods, a balloon full of water bursting, etc. occur quite quickly. If you want to witness such things clearly and in detail, it would be good to record them, and then reduce the playback speed for better viewing.
- Add Suspense
When you add the slow-motion effect to a scene, the impulse of the audience is automatically increased, and they take that particular section more seriously and with a thrill.
Conclusion
The slow-motion effect is inversely proportional to the framerate, i.e., frames per second or FPS. Almost all DSLR cameras that are available nowadays allow you to switch between different FPS values (typically 120 and 240) before recording. Also, if you have access to an iPhone, its Camera app has a built-in SLO-MO mode that can capture the footage in slow motion.
In addition, if you already have a video that has been recorded at a normal speed, you can use an efficient post-production software like Wondershare Filmora 11, and exploit its Speed Ramping feature to add the slow-motion effect at different scenes of a clip.
02 How to Apply the Smooth Slow-Motion Effect in Post-Production?
Part 1: How to Make Slow Motion Videos via Recording?
The fact is, the playback speed of a video is inversely proportional to the frames per second (FPS) it has been recorded in. Usually, to have a video play at normal speed, it is recorded at 24 FPS or 30 FPS. On the other hand, if you increase the frame rate (FPS) to 120 or 240, the playback speed slows down. You can easily check this if you have access to a DSLR camera or an iPhone. These devices allow you to adjust the FPS so the videos can be recorded in slow motion.
For your convenience and learning, the step-by-step procedure on how to record a video in slow motion using an iPhone is explained below:
Step 1: Get to the SLO-MO Mode
Launch the Camera app on your iPhone (iPhone 13 Pro Max is used here for illustrations), and swipe the screen to the left to get to the SLO-MO mode.

Step 2: Adjust Recording Preferences
Tap the number at the top-right corner to switch between 120 FPS and 240 FPS as needed. Tap 1x from the lower-middle section of the screen, and use the rotator to adjust your preferred zoom level.

Step 3: Start and Stop Recording
Tap the Record button from the bottom-center of the screen to begin recording the video in slow motion. Tap Stop when you are done. You can access the recorded video from the Videos container of the Photos app in your iPhone.
If you are using Android phone, you can check this article to find out more details about How to Record Super Slow Motion Videos on Your Phone.
You may also like: Best Slo-mo Camera Apps for Android And iPhone
Part 2: How to Apply the Smooth Slow-Motion Effect in Post-Production?
If you don’t have access to a camera that can record videos in slow motion, or in case you want to capture the footage at normal playback speed and then slow it down later, you need a dedicated tool to get the job done. Even though several post-production applications are available in the market, the one that is most versatile, has an intuitive interface, and is quite easy to use is Filmora video editor from Wondershare .
The latest version of the app, i.e., Wondershare Filmora 11 has a new feature called Speed Ramping that enables you to graphically manage the speed of the clips. While using the feature, you can either slow down the entire video or certain parts of it according to your requirements. For your learning, both the methods are explained below:
Method 1: Add Slow Motion Effect to the Whole Clip
For Win 7 or later (64-bit)
For macOS 10.12 or later
Step 1: Import the Source Video and Add to Timeline
Launch Wondershare Filmora on your Windows or Mac computer (a Windows 11 PC is used here for illustrations), click New Project from the first screen that appears. Make sure that the Media tool is selected from the standard tool bar at the top, click anywhere inside the Media window, and select and import the source clip to the program.

Next, hover the mouse over the thumbnail of the imported video in the Media window, and click the + icon present at its bottom-right corner. When the confirmation box comes up, click the Match to Media or Keep Project Settings button to change the project settings to match the resolution of the video, or change the footage to meet the project settings respectively.

Step 2: Add Slow Motion Effect to the Whole Clip
Once the media is added to the timeline, click on it and then click the Speed icon on the toolbar. Scroll down to the Slow menu and then you will see 0.5x, 0.25x, 0.1x, 0.05x and 0.01x presets. Select one to add slo-mo effects to the whole select clip. and click Speed Ramping from the menu that drops down.

You can also right click the video in the timeline, and hover over to Speed option to select Uniform Speed to adjust the speed of the video to make a slo-mo effect video. Drag the speed slider to the left to slow down the video and you will see how many times it slowed down in the next field.

Method 2: Use Speed Ramping to Add Slow Motion Effect
For Win 7 or later (64-bit)
For macOS 10.12 or later
Speed Ramping enables you to add the slow-motion effect at different parts of a video and even freeze the screen for the duration that you specify. The processes to get these done are given below in detail:
Step 1: Add Source Video to Timeline and Get to the Speed Ramping Window
Use the process given in the previous method to import a source video to Wondershare Filmora 11 and add it to the Timeline. Then use the process given in the second step of the previous method to get to the Speed Ramping window.
Step 2: Add Slow Motion Effect to Different Parts of the Clip
Go to the Speed Ramping tab if it is not already selected, click Custom from the available options, and drag the adjustment points below the center line to reduce the playback speed for that particular section of the clip. Optionally, you can click any of the available presets to automatically add the slow-motion effect to the video.
Note: You can also drag the adjustment points above the line to increase the playback speed.
To add an adjustment point on the frame where it is not already present, place the playhead (skimmer) at the correct position, and click Add Adjust Point from the left of the Speed Ramping window itself. Once added, you can drag it downward to reduce the playback speed of that part of the clip.

Step 3: Freeze the Video
Place the skimmer on the frame where you want to freeze the video for a while, and click Add Freeze Frame from the left of the Speed Ramping window. When the time box appears, in the Freeze Time field, enter the duration in seconds you want to freeze the screen for, and click OK.

After adding a freeze point, optionally, you can drag and reposition it in the Speed Ramping timeline as needed. Finally, click OK from the bottom-right area to save the changes.
Part 3: When to Use Slow Motion?
There could be many instances when you want to add a slow-motion effect to your videos. Some of the most common ones include:
- Add Focus
If there is a particular scene in a clip that you want the audience to focus on, it would be a good idea to add the slow-motion effect right before that action appears on the screen, and bring the speed back to normal when the section is over.
- Skill or Style Demonstration
When a clip is playing at a normal speed, many times, the audience isn’t able to see the skills that you want to display. This is where you may want to add the slow-motion effect so that every detail can be noticed clearly and in detail.
- Replays
Mostly used for tournaments and matches where the actual action is to replayed so the audience, umpires, and other viewers can see the movements in detail before making the right decision.
- Observation
Some natural phenomena such as a deer running in the woods, a balloon full of water bursting, etc. occur quite quickly. If you want to witness such things clearly and in detail, it would be good to record them, and then reduce the playback speed for better viewing.
- Add Suspense
When you add the slow-motion effect to a scene, the impulse of the audience is automatically increased, and they take that particular section more seriously and with a thrill.
Conclusion
The slow-motion effect is inversely proportional to the framerate, i.e., frames per second or FPS. Almost all DSLR cameras that are available nowadays allow you to switch between different FPS values (typically 120 and 240) before recording. Also, if you have access to an iPhone, its Camera app has a built-in SLO-MO mode that can capture the footage in slow motion.
In addition, if you already have a video that has been recorded at a normal speed, you can use an efficient post-production software like Wondershare Filmora 11, and exploit its Speed Ramping feature to add the slow-motion effect at different scenes of a clip.
02 How to Apply the Smooth Slow-Motion Effect in Post-Production?
Part 1: How to Make Slow Motion Videos via Recording?
The fact is, the playback speed of a video is inversely proportional to the frames per second (FPS) it has been recorded in. Usually, to have a video play at normal speed, it is recorded at 24 FPS or 30 FPS. On the other hand, if you increase the frame rate (FPS) to 120 or 240, the playback speed slows down. You can easily check this if you have access to a DSLR camera or an iPhone. These devices allow you to adjust the FPS so the videos can be recorded in slow motion.
For your convenience and learning, the step-by-step procedure on how to record a video in slow motion using an iPhone is explained below:
Step 1: Get to the SLO-MO Mode
Launch the Camera app on your iPhone (iPhone 13 Pro Max is used here for illustrations), and swipe the screen to the left to get to the SLO-MO mode.

Step 2: Adjust Recording Preferences
Tap the number at the top-right corner to switch between 120 FPS and 240 FPS as needed. Tap 1x from the lower-middle section of the screen, and use the rotator to adjust your preferred zoom level.

Step 3: Start and Stop Recording
Tap the Record button from the bottom-center of the screen to begin recording the video in slow motion. Tap Stop when you are done. You can access the recorded video from the Videos container of the Photos app in your iPhone.
If you are using Android phone, you can check this article to find out more details about How to Record Super Slow Motion Videos on Your Phone.
You may also like: Best Slo-mo Camera Apps for Android And iPhone
Part 2: How to Apply the Smooth Slow-Motion Effect in Post-Production?
If you don’t have access to a camera that can record videos in slow motion, or in case you want to capture the footage at normal playback speed and then slow it down later, you need a dedicated tool to get the job done. Even though several post-production applications are available in the market, the one that is most versatile, has an intuitive interface, and is quite easy to use is Filmora video editor from Wondershare .
The latest version of the app, i.e., Wondershare Filmora 11 has a new feature called Speed Ramping that enables you to graphically manage the speed of the clips. While using the feature, you can either slow down the entire video or certain parts of it according to your requirements. For your learning, both the methods are explained below:
Method 1: Add Slow Motion Effect to the Whole Clip
For Win 7 or later (64-bit)
For macOS 10.12 or later
Step 1: Import the Source Video and Add to Timeline
Launch Wondershare Filmora on your Windows or Mac computer (a Windows 11 PC is used here for illustrations), click New Project from the first screen that appears. Make sure that the Media tool is selected from the standard tool bar at the top, click anywhere inside the Media window, and select and import the source clip to the program.

Next, hover the mouse over the thumbnail of the imported video in the Media window, and click the + icon present at its bottom-right corner. When the confirmation box comes up, click the Match to Media or Keep Project Settings button to change the project settings to match the resolution of the video, or change the footage to meet the project settings respectively.

Step 2: Add Slow Motion Effect to the Whole Clip
Once the media is added to the timeline, click on it and then click the Speed icon on the toolbar. Scroll down to the Slow menu and then you will see 0.5x, 0.25x, 0.1x, 0.05x and 0.01x presets. Select one to add slo-mo effects to the whole select clip. and click Speed Ramping from the menu that drops down.

You can also right click the video in the timeline, and hover over to Speed option to select Uniform Speed to adjust the speed of the video to make a slo-mo effect video. Drag the speed slider to the left to slow down the video and you will see how many times it slowed down in the next field.

Method 2: Use Speed Ramping to Add Slow Motion Effect
For Win 7 or later (64-bit)
For macOS 10.12 or later
Speed Ramping enables you to add the slow-motion effect at different parts of a video and even freeze the screen for the duration that you specify. The processes to get these done are given below in detail:
Step 1: Add Source Video to Timeline and Get to the Speed Ramping Window
Use the process given in the previous method to import a source video to Wondershare Filmora 11 and add it to the Timeline. Then use the process given in the second step of the previous method to get to the Speed Ramping window.
Step 2: Add Slow Motion Effect to Different Parts of the Clip
Go to the Speed Ramping tab if it is not already selected, click Custom from the available options, and drag the adjustment points below the center line to reduce the playback speed for that particular section of the clip. Optionally, you can click any of the available presets to automatically add the slow-motion effect to the video.
Note: You can also drag the adjustment points above the line to increase the playback speed.
To add an adjustment point on the frame where it is not already present, place the playhead (skimmer) at the correct position, and click Add Adjust Point from the left of the Speed Ramping window itself. Once added, you can drag it downward to reduce the playback speed of that part of the clip.

Step 3: Freeze the Video
Place the skimmer on the frame where you want to freeze the video for a while, and click Add Freeze Frame from the left of the Speed Ramping window. When the time box appears, in the Freeze Time field, enter the duration in seconds you want to freeze the screen for, and click OK.

After adding a freeze point, optionally, you can drag and reposition it in the Speed Ramping timeline as needed. Finally, click OK from the bottom-right area to save the changes.
Part 3: When to Use Slow Motion?
There could be many instances when you want to add a slow-motion effect to your videos. Some of the most common ones include:
- Add Focus
If there is a particular scene in a clip that you want the audience to focus on, it would be a good idea to add the slow-motion effect right before that action appears on the screen, and bring the speed back to normal when the section is over.
- Skill or Style Demonstration
When a clip is playing at a normal speed, many times, the audience isn’t able to see the skills that you want to display. This is where you may want to add the slow-motion effect so that every detail can be noticed clearly and in detail.
- Replays
Mostly used for tournaments and matches where the actual action is to replayed so the audience, umpires, and other viewers can see the movements in detail before making the right decision.
- Observation
Some natural phenomena such as a deer running in the woods, a balloon full of water bursting, etc. occur quite quickly. If you want to witness such things clearly and in detail, it would be good to record them, and then reduce the playback speed for better viewing.
- Add Suspense
When you add the slow-motion effect to a scene, the impulse of the audience is automatically increased, and they take that particular section more seriously and with a thrill.
Conclusion
The slow-motion effect is inversely proportional to the framerate, i.e., frames per second or FPS. Almost all DSLR cameras that are available nowadays allow you to switch between different FPS values (typically 120 and 240) before recording. Also, if you have access to an iPhone, its Camera app has a built-in SLO-MO mode that can capture the footage in slow motion.
In addition, if you already have a video that has been recorded at a normal speed, you can use an efficient post-production software like Wondershare Filmora 11, and exploit its Speed Ramping feature to add the slow-motion effect at different scenes of a clip.
02 How to Apply the Smooth Slow-Motion Effect in Post-Production?
Part 1: How to Make Slow Motion Videos via Recording?
The fact is, the playback speed of a video is inversely proportional to the frames per second (FPS) it has been recorded in. Usually, to have a video play at normal speed, it is recorded at 24 FPS or 30 FPS. On the other hand, if you increase the frame rate (FPS) to 120 or 240, the playback speed slows down. You can easily check this if you have access to a DSLR camera or an iPhone. These devices allow you to adjust the FPS so the videos can be recorded in slow motion.
For your convenience and learning, the step-by-step procedure on how to record a video in slow motion using an iPhone is explained below:
Step 1: Get to the SLO-MO Mode
Launch the Camera app on your iPhone (iPhone 13 Pro Max is used here for illustrations), and swipe the screen to the left to get to the SLO-MO mode.

Step 2: Adjust Recording Preferences
Tap the number at the top-right corner to switch between 120 FPS and 240 FPS as needed. Tap 1x from the lower-middle section of the screen, and use the rotator to adjust your preferred zoom level.

Step 3: Start and Stop Recording
Tap the Record button from the bottom-center of the screen to begin recording the video in slow motion. Tap Stop when you are done. You can access the recorded video from the Videos container of the Photos app in your iPhone.
If you are using Android phone, you can check this article to find out more details about How to Record Super Slow Motion Videos on Your Phone.
You may also like: Best Slo-mo Camera Apps for Android And iPhone
Part 2: How to Apply the Smooth Slow-Motion Effect in Post-Production?
If you don’t have access to a camera that can record videos in slow motion, or in case you want to capture the footage at normal playback speed and then slow it down later, you need a dedicated tool to get the job done. Even though several post-production applications are available in the market, the one that is most versatile, has an intuitive interface, and is quite easy to use is Filmora video editor from Wondershare .
The latest version of the app, i.e., Wondershare Filmora 11 has a new feature called Speed Ramping that enables you to graphically manage the speed of the clips. While using the feature, you can either slow down the entire video or certain parts of it according to your requirements. For your learning, both the methods are explained below:
Method 1: Add Slow Motion Effect to the Whole Clip
For Win 7 or later (64-bit)
For macOS 10.12 or later
Step 1: Import the Source Video and Add to Timeline
Launch Wondershare Filmora on your Windows or Mac computer (a Windows 11 PC is used here for illustrations), click New Project from the first screen that appears. Make sure that the Media tool is selected from the standard tool bar at the top, click anywhere inside the Media window, and select and import the source clip to the program.

Next, hover the mouse over the thumbnail of the imported video in the Media window, and click the + icon present at its bottom-right corner. When the confirmation box comes up, click the Match to Media or Keep Project Settings button to change the project settings to match the resolution of the video, or change the footage to meet the project settings respectively.

Step 2: Add Slow Motion Effect to the Whole Clip
Once the media is added to the timeline, click on it and then click the Speed icon on the toolbar. Scroll down to the Slow menu and then you will see 0.5x, 0.25x, 0.1x, 0.05x and 0.01x presets. Select one to add slo-mo effects to the whole select clip. and click Speed Ramping from the menu that drops down.

You can also right click the video in the timeline, and hover over to Speed option to select Uniform Speed to adjust the speed of the video to make a slo-mo effect video. Drag the speed slider to the left to slow down the video and you will see how many times it slowed down in the next field.

Method 2: Use Speed Ramping to Add Slow Motion Effect
For Win 7 or later (64-bit)
For macOS 10.12 or later
Speed Ramping enables you to add the slow-motion effect at different parts of a video and even freeze the screen for the duration that you specify. The processes to get these done are given below in detail:
Step 1: Add Source Video to Timeline and Get to the Speed Ramping Window
Use the process given in the previous method to import a source video to Wondershare Filmora 11 and add it to the Timeline. Then use the process given in the second step of the previous method to get to the Speed Ramping window.
Step 2: Add Slow Motion Effect to Different Parts of the Clip
Go to the Speed Ramping tab if it is not already selected, click Custom from the available options, and drag the adjustment points below the center line to reduce the playback speed for that particular section of the clip. Optionally, you can click any of the available presets to automatically add the slow-motion effect to the video.
Note: You can also drag the adjustment points above the line to increase the playback speed.
To add an adjustment point on the frame where it is not already present, place the playhead (skimmer) at the correct position, and click Add Adjust Point from the left of the Speed Ramping window itself. Once added, you can drag it downward to reduce the playback speed of that part of the clip.

Step 3: Freeze the Video
Place the skimmer on the frame where you want to freeze the video for a while, and click Add Freeze Frame from the left of the Speed Ramping window. When the time box appears, in the Freeze Time field, enter the duration in seconds you want to freeze the screen for, and click OK.

After adding a freeze point, optionally, you can drag and reposition it in the Speed Ramping timeline as needed. Finally, click OK from the bottom-right area to save the changes.
Part 3: When to Use Slow Motion?
There could be many instances when you want to add a slow-motion effect to your videos. Some of the most common ones include:
- Add Focus
If there is a particular scene in a clip that you want the audience to focus on, it would be a good idea to add the slow-motion effect right before that action appears on the screen, and bring the speed back to normal when the section is over.
- Skill or Style Demonstration
When a clip is playing at a normal speed, many times, the audience isn’t able to see the skills that you want to display. This is where you may want to add the slow-motion effect so that every detail can be noticed clearly and in detail.
- Replays
Mostly used for tournaments and matches where the actual action is to replayed so the audience, umpires, and other viewers can see the movements in detail before making the right decision.
- Observation
Some natural phenomena such as a deer running in the woods, a balloon full of water bursting, etc. occur quite quickly. If you want to witness such things clearly and in detail, it would be good to record them, and then reduce the playback speed for better viewing.
- Add Suspense
When you add the slow-motion effect to a scene, the impulse of the audience is automatically increased, and they take that particular section more seriously and with a thrill.
Conclusion
The slow-motion effect is inversely proportional to the framerate, i.e., frames per second or FPS. Almost all DSLR cameras that are available nowadays allow you to switch between different FPS values (typically 120 and 240) before recording. Also, if you have access to an iPhone, its Camera app has a built-in SLO-MO mode that can capture the footage in slow motion.
In addition, if you already have a video that has been recorded at a normal speed, you can use an efficient post-production software like Wondershare Filmora 11, and exploit its Speed Ramping feature to add the slow-motion effect at different scenes of a clip.
Creating Motivational Videos with AI: Comprehensive Guide 2024
In the buzzing realm of social media, motivational videos have risen as a beacon of hope and inspiration for millions. Scrolling through your feeds, you’ve likely encountered a motivational video status that tugged at your heartstrings or ignited a spark of ambition. But why are these videos so compelling?
The answer lies in the innate human desire for encouragement. These videos often blend heartwarming visuals with potent words of wisdom, creating an emotional cocktail that resonates deeply with viewers. As the dawn of 2023 approaches, the ease with which we can produce these motivational status videos is becoming unparalleled, thanks to the advancements in artificial intelligence.
- Part 2: Use Runway Gen2 to convert pictures to videos
- Part 3: Use Chat-GPT to generate motivational quotes
- Part 4: Quick solution: Filmora AI Editing tool
- Part 5: Summary
Part 1: Use Midjourney to generate motivation status images
Enter Midjourney is a cutting-edge platform that harnesses AI to generate enchanting images that capture the essence of motivation. Whether you’re looking to convey an athlete’s grit or a scholar’s determination, Midjourney has an array of templates to cater to your needs.
To begin, simply navigate to the Midjourney homepage. From here, choose a theme or emotion you want to convey. You can input keywords like “determination,” “strength,” or any word that resonates with your desired sentiment. The platform will then utilize its AI algorithms to generate images that align with your keyword, giving you a wealth of visuals.
Remember the importance of keeping the motivation status video download feature in mind. Users love to save and share these videos, and starting with a captivating image ensures your video gets the traction it deserves.
Part 2: Use Runway Gen2 to convert pictures to videos
With your motivation status image, it’s time to bring it to life! That’s where Runway Gen2 steps in. This platform is designed to seamlessly convert static images into dynamic videos, enriching the user experience.
Start by uploading your chosen image from Midjourney. The intuitive interface of Runway Gen2 will guide you through the process. You can choose the movement or animation you want to infuse into your image. Whether it’s a subtle breeze causing ripples in a flag on Republic Day status videos or the emphatic beat of a heart symbolizing passion – the possibilities are endless.
The beauty of Runway Gen2 is that it does all the heavy lifting. Within moments, your static image evolves into a mesmerizing video clip. Perfect for those looking to create motivational status videos that inspire and captivate the viewer’s attention.
By harnessing AI tools like Midjourney and Runway Gen2, anyone can now become a creator of powerful motivational content.
Part 3: Use Chat-GPT to generate motivational quotes
Now that we have the visual backbone for our motivational video, the next step is to infuse it with words that resonate, inspire, and motivate. And who better to turn to than Chat-GPT, the AI writing virtuoso?
Chat-GPT’s prowess lies in producing human-like text that strikes a chord. It’s not just about churning out words; it’s about curating sentiments that align with the intended emotion.
To get started with Chat-GPT for your motivation status video:
- Navigate to the Chat-GPT portal.
- In the prompt box, specify the kind of quote you’re seeking. For instance, “Generate a motivational quote about perseverance.”
- You’ll receive a tailor-made quote for your video’s theme within moments.
Imagine having the capability to request specific quotes on themes like “overcoming challenges” or “embracing change” and receiving phrases that could potentially go viral on social media! With Chat-GPT, you have a personal quote-generator at your fingertips.
But what if you’re targeting events? For those creating Republic Day status videos, you can request patriotic quotes that ignite national pride or reflect upon the nation’s journey.
Part 4: Quick solution: Filmora AI Editing tool
For those in a hurry or those who might not incline to traverse through various platforms, there’s a one-stop solution: Filmora AI Editing tool. This all-encompassing tool streamlines the process of creating compelling motivational videos.
Create AI Captions For Win 7 or later(64-bit)
Create AI Captions For macOS 10.14 or later
Step 1: Use AI writing tools to generate motivational quotes
Begin with Filmora’s in-built AI writing tool. Like Chat-GPT, this tool provides many quotes based on the emotion or theme you’re targeting. Simply input a keyword and watch as the AI curates a list of quotes suitable for motivation status video download.
Step 2: Search for motivational footage in stock media
Filmora comes equipped with a rich library of stock media. Whether you’re hunting for serene landscapes, bustling cityscapes, or intimate close-ups, there’s a high chance you’ll find the perfect clip that complements your quote. These visuals are curated keeping in mind the trends and preferences of viewers in 2024, ensuring your video remains relevant and engaging.
Step 3: One-click generation using templates
For those who are not seasoned video editors, Filmora offers a range of templates designed specifically for motivational content. By selecting a template, the AI takes over, meshing together the quote and the footage to create a cohesive and professional video. The one-click generation feature is a godsend for those seeking a quick turnaround without compromising quality.
With the tools and techniques available in 2024, creating motivational videos has never been more accessible. Whether you’re a seasoned creator or a novice dipping your toes into the world of content creation, the AI-driven platforms mentioned above ensure that your motivation status video stands out and leaves an indelible mark on your audience.
Part 5: Summary
AI-driven tools have democratized motivational content creation. No longer exclusive to professionals, crafting inspiring motivational videos status is now accessible to all. These AI-enhanced videos serve as beacons of hope and encouragement, resonating deeply across various audience demographics.
In this digital era, harnessing AI simplifies content creation and amplifies its impact, making every message more poignant and every story more compelling. Embrace this AI revolution and let your creativity shine in 2024.
Also read:
- Updated In This Article, We Will Review Movavi Video Editor and List Out Movavi Video Suites Features for 2024
- Top 5 Video Filter Software Enhance Your Videos for 2024
- Updated In 2024, Do You Also Use Android to Create and Edit Videos? Read About the Efectum Video Effects Editor, Which Is Available in Your App Stores for Seamless Editing
- Discover Vintage LUTs Premiere Pro Free and Paid Options Available for 2024
- 2024 Approved How To Quickly Create A Screen Print Effect In Photoshop Detailed Gui
- New 2024 Approved How to Make an Intro Video Easy Solution
- 2024 Approved Are You Tired of Long Video Edits? Do You Speed up the Video in Canva without a Hassle? Well, Stick with Us as We Guide You Through the Process Step by Step
- New 20 Must-Have Graduation Songs
- In 2024, 10 Best Video Editing Apps With Templates
- New 2024 Approved This Article Introduce You the Best Video Trimmers to Use on Different Devices, Check Them Out and Choose Your Favoriate One
- New Tips That Show Anybody How To Create Youtube Slideshow – Guaranteed for 2024
- In 2024, Adding Shake Effects to Your Video With Alight Motion
- Want to Make a Slide Show Video? Heres How
- Thousands Already Know What Ezgif Is and So Can You for 2024
- Updated Learn How to Perform Velocity Edits on Your PC
- New 2024 Approved Discover the Various Techniques of Video Framing, Which Involve Capturing the Essence of a Subject While Eliminating Distractions in the Background, Andlearn How to Apply Them Skillfully to Achieve Desired Results
- New Making Slow Motion Videos in Premiere Pro A Review on The Best Method
- New This Article Shares Valuable Insight Into the Best Brand Story Videos. Also, It Highlights the Importance of a Video Maker in Your Brand Story Video Ad-Making Process and Why Filmora Should Be Your Go-To Choice
- New In 2024, To Know How to Add Effects in Premiere Pro, You Need to Follow This Guide as It Has All You Need to Know to Add Effects in Premiere Pro. Learn More Here
- New 2024 Approved Ultimate Guide To Make A Political Video
- New How to Make Discord Emoji GIF for 2024
- A Guide To Adopting Lumetri Color Presets in Effective Color Grading
- New 2024 Approved Learn How to Do Velocity Edits on PC to Enhance Your Videos, Adjusting Speed for Dynamic and Visually Engaging Results
- New How to Use Visual Effect for Zoom
- Updated In 2024, Every Compositor Should Know The Trick of Color Match in After Effects
- In 2024, Make Videos with Pictures and Music-10 Apps
- New Steps to Create Makeup Videos
- Updated How to Create Your Own LUTs for Your Video
- New Looking for the Ways by Which Subtitles Can Be Extracted From Your MKV Files without Affecting the File Quality? Look No Further as We Are Here to Help You Know the Best Tools that Can Easily Extract SRT From MKV
- New 10+ Best Unlimited FCPX Slideshow Templates
- Updated How to Combine Multiple Videos Into One on Instagram
- New How to Create Liquid Water Reveal Intro for 2024
- Updated With This Article, We Will Be Looking at Steps to Rotate a Video in Cyberlink PowerDirector to Help You when Required. We Have Also Mentioned the Steps You Will Need to Follow in Wondershare Filmora
- Tips That Show Anybody How To Make Youtube Slideshow – Guaranteed
- Updated 2024 Approved Designed for You! Best Image (JPG/PNG) to GIF Converters
- New 2024 Approved Stunning Glitch Effect and Its Creation Steps for Premiere Pro
- Best 12 Best Freeze Frame Video Editing Examples for 2024
- New Exploring Tools to Integrate Special Mask Effects Into Your Content. Read the Following Article to Master some Tools Experts in Mask Tracking for 2024
- 2024 Approved Guide To Using Free Luts for OBS
- 5 Tools to Create a Time-Lapse Video Online for 2024
- New Do You Want a LUT that You Can Use for Your High-Definition Content? You Can Use Rec 709 LUT Premiere Pro for Your HD Digital Media to Give the Perfect Result for 2024
- Updated Blender Green Screen Effects
- New Blender Tips - How to Make Blender Render Transparent Background
- Make Your Presentation More Attractive with Best Google Slideshows Templates. How to Make a Google Slideshow in Simple Step, In 2024 Do You Know How to Create Google Images Slideshow?
- New Finding Best GIF Websites Is Easy as Pie — Heres What You Should Know
- How to Add Filter to Video Online
- New In 2024, Top 15 Slow Motion CapCut Templates to Work With
- Simple ways to get recent calls back from Honor Magic5 Ultimate
- How to Share/Fake Location on WhatsApp for Vivo Y27 5G | Dr.fone
- In 2024, Top 15 Apps To Hack WiFi Password On Realme C33 2023
- How To Fix Apple ID Verification Code Not Working On iPhone 6s
- How does the stardust trade cost In pokemon go On Apple iPhone 15 Pro? | Dr.fone
- In 2024, How Can We Unlock Our Realme C51 Phone Screen?
- In 2024, Full Guide to Catch 100 IV Pokémon Using a Map On Apple iPhone 15 | Dr.fone
- In 2024, How To Unlock A Found Apple iPhone 12 mini? | Dr.fone
- Why does the pokemon go battle league not available On Vivo Y78+ (T1) Edition | Dr.fone
- In 2024, Forgot iPhone 15 Pro Max Backup Password? Heres What to Do | Dr.fone
- A Comprehensive Guide to iCloud Unlock On Apple iPhone XS Max Online
- Edit and Send Fake Location on Telegram For your Apple iPhone 6 in 3 Ways | Dr.fone
- Complete Tutorial to Use VPNa to Fake GPS Location On Realme C55 | Dr.fone
- Possible solutions to restore deleted music from S18 Pro
- 10 Most Popular Minion Memes that Moms Are Crazy About for 2024
- Why Does My Realme V30T Keep Turning Off By Itself? 6 Fixes Are Here | Dr.fone
- In 2024, 4 Ways to Transfer Music from OnePlus Open to iPhone | Dr.fone
- 4 solution to get rid of pokemon fail to detect location On Vivo V29 Pro | Dr.fone
- Ways To Find Unlocking Codes For OnePlus 12 Phones
- Easy Ways to Manage Your Nokia XR21 Location Settings | Dr.fone
- In 2024, How To Learn Cartoon Sketch Drawing
- Play MOV movies on Samsung Galaxy F14 5G, is it possible?
- In 2024, Top 6 Apps/Services to Trace Any Apple iPhone 11 Location By Mobile Number | Dr.fone
- In 2024, Everything You Need to Know about Lock Screen Settings on your Vivo Y100t
- How to Lock Apps on Motorola G24 Power to Protect Your Individual Information
- 7 Ways to Lock Apps on Apple iPhone 13 mini and iPad Securely
- 5 Best Route Generator Apps You Should Try On Realme 12 5G | Dr.fone
- Ultimate Guide to Free PPTP VPN For Beginners On Xiaomi Redmi 13C | Dr.fone
- How To Simulate GPS Movement With Location Spoofer On Apple iPhone X? | Dr.fone
- Updated 2024 Approved Best Claymation Shows That Make Your Memories Unforgettable
- In 2024, How to Bypass Google FRP Lock from Lava Agni 2 5G Devices
- In 2024, How to Share/Fake Location on WhatsApp for Samsung Galaxy S23 Tactical Edition | Dr.fone
- In 2024, The Magnificent Art of Pokemon Go Streaming On Motorola Moto E13? | Dr.fone
- Looking For A Location Changer On Realme 12 Pro+ 5G? Look No Further | Dr.fone
- How To Fix Unresponsive Touch Screen on Infinix Note 30 | Dr.fone
- In 2024, How to Come up With the Best Pokemon Team On Motorola Moto G34 5G? | Dr.fone
- How To Change Your Apple ID Password On your Apple iPhone 14 | Dr.fone
- In 2024, How to get the dragon scale and evolution-enabled pokemon On Realme 11 Pro+? | Dr.fone
- In 2024, Unlock Oppo Reno 11F 5G Phone Password Without Factory Reset Full Guide Here
- How and Where to Find a Shiny Stone Pokémon For Samsung Galaxy S23 FE? | Dr.fone
- In 2024, How to Display Apple iPhone 6s Plus Screen on PC Easily? | Dr.fone
- In 2024, How Can We Unlock Our Nubia Z50 Ultra Phone Screen?
- How to Screen Mirroring Itel P55T to PC? | Dr.fone
- Title: Updated How to Add Miniature Effect in Video with Filmora
- Author: Morgan
- Created at : 2024-05-19 05:12:00
- Updated at : 2024-05-20 05:12:00
- Link: https://ai-video-editing.techidaily.com/updated-how-to-add-miniature-effect-in-video-with-filmora/
- License: This work is licensed under CC BY-NC-SA 4.0.

