
:max_bytes(150000):strip_icc():format(webp)/samsung-unveils-new-products-at-its-annual-unpacked-event-1200186175-0a17180ae84e47f488f43d3afbb7daa6.jpg)
Updated How to Add Motion Titles
How to Add Motion Titles
Do you want to make your videos eye-catching instantly? Looking for some cool title animations to make your texts stand out? You should definitely opt for motion title templates that are widely available in popular video editors. Motion title templates come preloaded with animated texts, engaging graphic elements, and even background effects.
You can add them directly to your video and customize them as per you requirements so that your video looks exactly the way you desire. Different video editors have different motion titles, and therefore, you should check them out one by one to find out the templates you are looking for. We will illustrate title motion graphics in all the leading video editors.
Part 1. Add Motion Title with Filmora
The easiest way to add motion title to your video on your computer is through Wondershare Filmora . Filmora is a professional video editor that is available for Windows and Mac users. Filmora has the best collection of motion title templates, and the user interface is super intuitive and anyone can use without any prior experience. Here are the steps to add motion title with Filmora.
Step1Install and launch Wondershare Filmora on your computer. Click on New Project option on the welcome screen or go to File menu and click on New Project option.

Step2Go to File menu and Import Media option to import your video file. Otherwise, you can simply drop the video file into Project Media folder.
Step3Drag the video file from Project Media folder and drop it into the Timeline.

Step4Go to Titles at the top and go to the left panel. You can different categories of motion title templates. Select any desired text effect and drop into the Timeline above the video layer wherever you want.
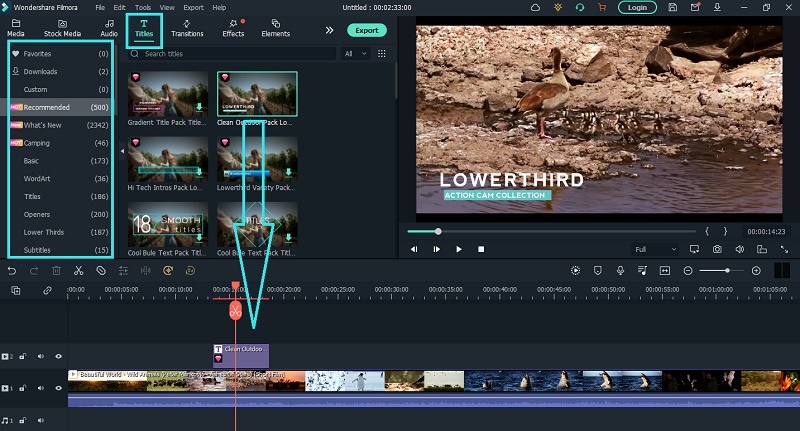
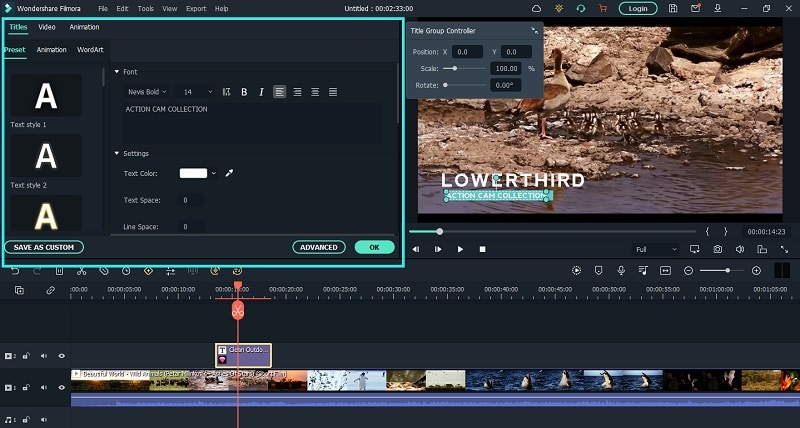
Step5Double clicking on the text layer on Timeline to edit the text and change the styles. Under Preset tab, you can change font, size, and color. Finally, click on OK button to save the edits done.
Part 2. Add Motion Title with Premiere Pro
Adobe Premiere Pro is a renowned video editor that is mostly used by professionals to edit videos and add effects and animations. Even though Premiere Pro has a steep learning curve, you can create motion title in simple steps. You can write any text on the video and select from different effects and animations to create motion title graphics. Here are the steps to add title motion graphics Premiere Pro free.
Step1Launch Premiere Pro and go to New> Project option. Import the video file and drop it into Timeline.
Step2Go to Title> New Title> Default Still option and follow the on-screen instructions.

Step3You will see different types of title styles and designs to choose from as you feel.

Step4Click on Type Tool option and click on the area on the video where you want the text to appear. You can customize them from the right panel from Title Styles, Title Properties, Tools and Title Actions.
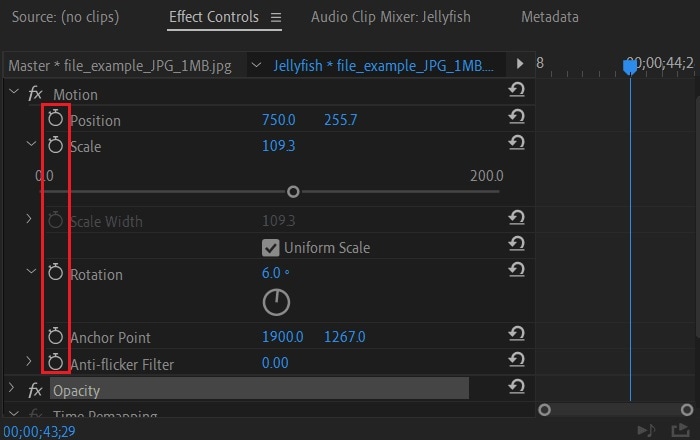
Step5To add motion to the title, click on Effects Control window. Click on any desired animation and turn to Stopwatch icon to apply the effect to the text. There is a dedicated Motion option available.
Part 3. Make motion title with Studio
Studio is a popular video editing software where you can not only apply motion title presets but also create motion title presets from scratch. The reason why video editors choose Studio is because it allows users to customize everything and create different templates and animations for personalization. Here are the steps to create title motion graphics in Studio as per your requirements.
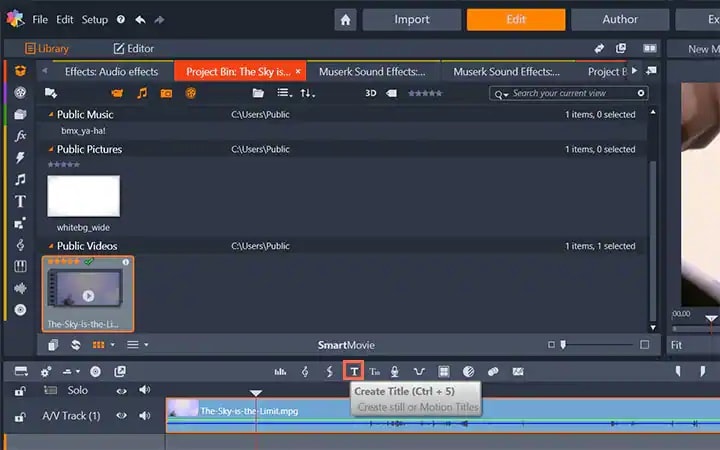
Step1Launch Studio. Import your video file, and you can import single frames such as images from a live video for stop motion titles. Once you have imported, go to the header bar above the Timeline. Click on Create Title option to open Title Editor to create title motion.
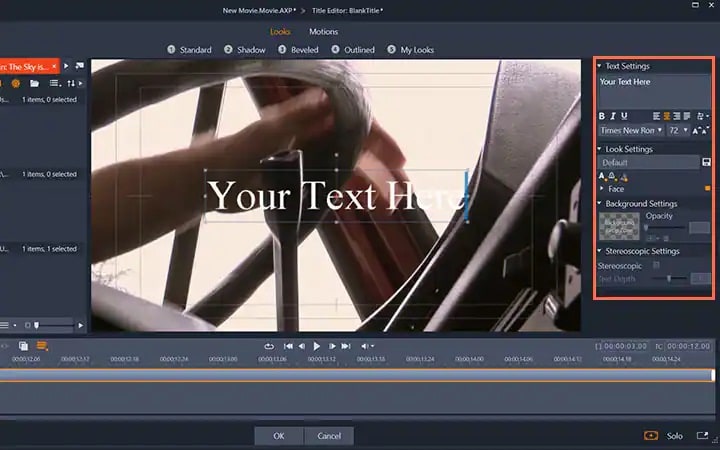
Step2Add your preferred text under Title Editor and adjust font, size, and style as you feel. Go to the right side to make changes to Look, Background, and Stereoscopic Settings to get the perfect text style from the wide range of choices available.
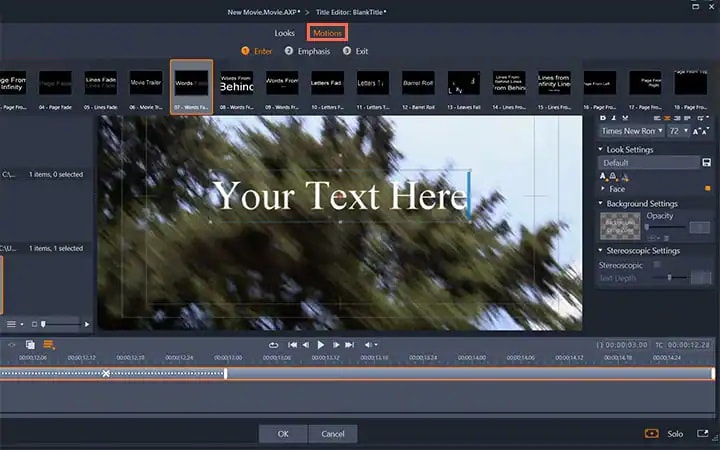
Step3Click on Motion option at the top to add motion to the text. Choose from the different motion title templates as per your preference.
Step4You can adjust the duration of the motion effect from the right panel and click on Ok button.

Part 4. Add Motion Title with WeVideo
WeVideo is a popular online video editor that you can use to add title motion graphics Premiere Pro free. You can find many motion titles on WeVideo for free like you get in Premiere Pro and there are many exclusive motion text templates available. You need to create a free account with WeVideo to get started. You can create your video from scratch by selecting from the available video templates. You can even import your recorded video and add motion texts and animations as per your preference. Here are the steps to add motion title with WeVideo.
Step1Open your web browser and visit “wevideo.com”. Click on Try For Free button. Sign up for free and go to WeVideo video editor.
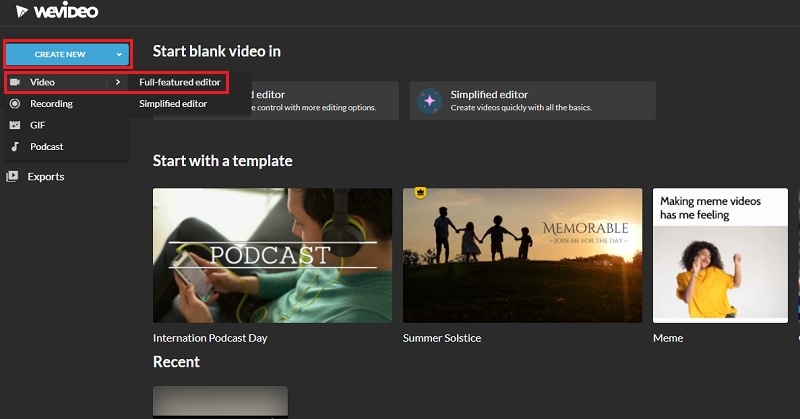
Step2Click on Create New button and select Video option. Click on Full-featured editor option.
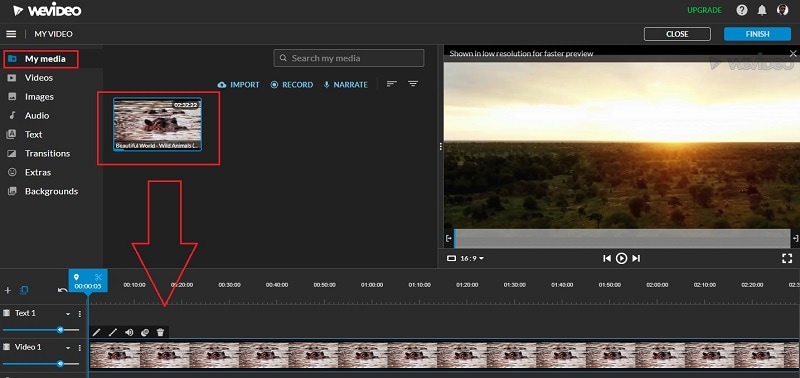
Step3Drag and drop your video file into My Media folder and bring it to Timeline.
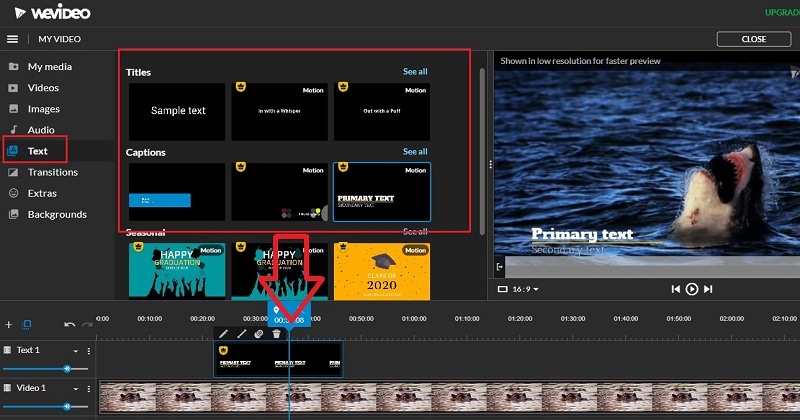
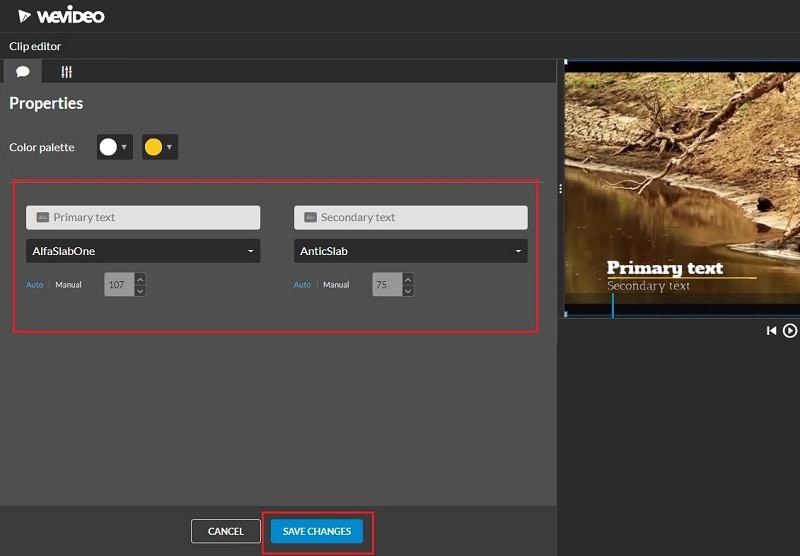
Step4Go to Text tab and you will see all the motion animated titles under Titles section. Click on them to check out their previews in Viewer. If you have selected anyone, drag and drop it into Timeline.
Step5Adjust the position where you want the title to appear on the video and stretch the duration as required. Double-click on the title to edit and customize it as per your preference. Finally, click on Save Changes button.
The Bottom Line
Motion titles are extremely important for any video because they bring in a variety to your video. They make the video eye-catching and help in getting the message across by grabbing the attention of the viewers. We have illustrated how to add motion titles Premiere Pro and Studio. You can also use WeVideo online video editor. We recommend Wondershare Filmora for its extensive collection of motion title templates to choose from and apply to your text.
Free Download For Win 7 or later(64-bit)
Free Download For macOS 10.14 or later
Best Android Apps For Creating Slow Motion Videos
Creating slow-motion videos has been a trend followed by millions across social platforms. For designing the perfect video as a slow-motion video, people seek a good option. Android slow motion video apps are one remedy to this requirement. Google Play Store offers a diversity of applications for making video slow motion Android.
This article is all about figuring out the top Android applications that can feature the best slow motion. For that, go through the content provided to find out the most suitable slow motion video in Android.
Slow Motion Video Maker Slow your video’s speed with better control of your keyframes to create unique cinematic effects!
Make A Slow Motion Video Make A Slow Motion Video More Features

Part 1. Top 10 Android Apps For Slowing Down Motion in Video
When searching for a slow motion video app for Android, there are many options to go by. Provided next is a composite list of mobile apps that serve the purpose of slow-motion video creation:
- Slow Motion Video – Fast&Slow Mo
- Slow Motion Video Maker
- Video Editor & Maker – InShot
- Video Maker & Editor - Vidma
- VivaVideo - Video Editor&Maker
- VivaVideo - Video Editor&Maker
- VivaVideo - Video Editor&Maker
- VivaVideo - Video Editor&Maker
- VivaVideo - Video Editor&Maker
- VivaVideo - Video Editor&Maker
1. Slow Motion Video – Fast&Slow Mo
This Android slow-motion video converter offers an intuitive user interface and simple functions. Users can craft slow motion via drag and adjust the action of the slider in a downward direction. The video’s playback speed is customizable, ranging from 0.25x to 4.0x. Additionally, the software empowers users to apply slow motion to specific video segments to enhance precision.

Key Features
- The application offers pre-installed filters and special effects to elevate visual aesthetics.
- It preserves video quality and transforms video resolution to high definition (HD).
- Incorporate high-quality music into your videos with its built-in music collection.
2. Slow Motion Video Maker
This slow-mo video Android editor offers advanced functionalities to craft perfect videos. With its timeline editing interface, it simplifies the application of slow-motion effects to specific scenes. The application showcases three distinct slow-motion speed options: 0.5x, 0.3x, and 0.25x, ensuring perfection.

Key Features
- Accelerate your videos up to 4x with its high-speed options and get high-quality results.
- The video trimming feature and timeline editing enable accurate segmentation of a video.
- It is equipped with pre-existing music tracks to create the perfect slow-motion video on Android.
3. Video Editor & Maker - InShot
Embark upon the journey to create video slow motion Android with this multifunctional app. It extends a straightforward approach to slow video speed through slider manipulation. Timeline editing and selective playhead options empower users to adjust the speed of specific segments. This exceeds the conventional approach of a slo-mo creation, unlocking creative possibilities.

Key Features
- Elevate the artistic expression of videos by integrating a wide range of animations and text.
- Enhance your reels with a collection of transition effects like Fade in, Fade out, basics, and more.
- This editor has AI capabilities and background removal options with a heightened level of accuracy.
4. Video Maker & Editor - Vidma
This slow-mo app for Android facilitates individuals seeking a video editor capable of producing convincing results. It acts as a Velocity Edit Maker, offering diverse playback speed and positioning controls. The interface resembles a velocity graph, providing a visual representation of speed adjustments.

Key Features
- Introduces an automated “Keep Audio Pitch” option, ensuring high-quality audio.
- Enhance the creative factor in your images and videos with its built-in text and stickers.
- Comes with a variety of visual filters with an intensity control option.
5. VivaVideo - Video Editor&Maker
If you are seeking the best Slomo app for Android, this editor provides diverse speed-setting presets for creating slow-motion and fast-motion effects. Among presets such as Montage, Hero, Bullet, and others, it offers a Custom preset option to help you adjust everything accordingly. With its ability to apply speed settings at specific periods, your slow motions are bound to be perfect.

Key Features
- The non-uniform timeline editor allows you to incorporate multiple assets at once.
- A range of texts, animations, themes, effects, and music tracks are in its Stock Library.
- This video maker also incorporates a Voice Editor to uphold the audio track’s quality.
6. Smart Video Crop - Video Cut
Although this video maker is specified for resizing videos, it also offers speed change options. To make a video slow motion on Android, you can change both playback speed and framerate. Once you have edited your video, you can make changes to the export options. In addition, the application updates its mechanism and shows compatibility with Android 4.4 and higher versions.

Key Features
- The application shows multi-format video support, i.e., MP4, 3GP, and AVI.
- Proposes multiple video crop options like 1:1, 4:3, 16:9, and 3:2.
- You can select to crop the whole video or apply the crop to a specific part of it.
7. Video Editor - Video.Guru
What would be better than a slow-motion video app for Android that can change speed and enhance video? To access this functionality, users need to switch to its PRO version. The speed change options that it offers are from 0.2x to 100x, with 0.2x being the slowest. In addition, the tool doesn’t decline video quality but enhances it to 4K.

Key Features
- If you are a YouTuber, then this editor affects and filters for Vloggers and offers to remove Watermark.
- You can crop a video into available ratios while keeping its HD quality.
- Can add 30+ video transition effects and incorporate music to enhance their quality.
8. Slow Motion - Slow Mo, Fast Mo
Make video slow motion Android effortlessly with this application, which is specified for speed change. It offers 10 playback speed options for creating slow motions with precision. The playback speed ranges from 0.95x to 0.1x. Once you have created a slow motion with it, you can easily preview it to observe if any changes are needed.

Key Features
- Along with precise slo-mo options, it also offers extensive fast motion option speed ranges.
- You can mix and match both fast and slow-motion effects in a video at once.
- It also offers a watermark removal option to avoid any visual weakening.
9. Slow Motion Video FX-camera
Not only video frame rates but also slow down your speech with this slow-motion app for Android. You can add dramatic or funny effects to your voices using the application. It offers to slow down video speed up to 0.25x. It uses the standard slider approach to manipulate the playback speed of your videos. You can apply the slow-mo effect to the overall video or to some specific parts of it.

Key Features
- An intuitive user interface with a velocity graph to observe the changes in speed and duration.
- Transform your low-quality videos to HD quality with this slow-motion app for Android.
- Use the application’s built-in music library to incorporate music tracks.
10. Slow Motion
Decrease your video speed up to 1/4th of its original speed with this Android slow-motion video editor. The speed options are customizable, and you can apply them to multiple video scenes. As the name indicates, the tool is specifically fashioned for slow-motion effects; hence, it offers an accessible user interface.

Key Features
- Export your videos in landscape or portrait mode; the choice is yours.
- In any mode, the application retains video quality and exports it in full resolution.
- It is excellent to slow down YouTube videos as there is no watermark addition.
Bonus Part: Wondershare Filmora: A Perfect Desktop Solution To Slow Down Video
Making slow motion videos in Android is like keeping creativity in your hand anywhere. This facility is good for basic effects but not for professional and advanced slow-motion effects. That’s where you need to shift to a more equipped alternative, which is Wondershare Filmora . Using Filmora means turning imagination into the real picture.
It is a video editing platform with artificial intelligence integration. You can create slow-motion videos with automation in Filmora. The interactive interface of Filmora caters to all users’ needs in simple steps. Freelancers, content creators, and educationists use this platform for diverse needs.
Free Download For Win 7 or later(64-bit)
Free Download For macOS 10.14 or later
How to Make Video Slow Motion Android in Filmora
As you are familiar with Filmora, let’s make a slow-motion video. It is quite easy if compared with Android slow-motion video making. Without further delay, delve into the given step-by-step guide:
Step 1Import Your Project After Successful Launch
Unleash your creativity in Filmora after downloading it. In this regard, you must go to Wondershare Filmora’s official site. Open the main interface of Filmora and tap “New Project” to enter the editing window. To start working, import a file in the media panel and drag it into the timeline section.

Step 2Slow Down the Video with Uniform Speed
After successful importing, right-click on your video and an extended list. Choose the “Uniform Speed” option from the list and find an editing panel towards your right. You will see the slider under the speed option. Hold on to the circle and drag it to the left if you want to slow down the videos. Move downward and toggle the “Ripple Edit” and “Maintain Pitch” for good results.

Step 3Enhance Video with Optical Flow
Towards the end, you will find the “AI Frame Interpolation.” Click on its downward symbol and select the “Optical Flow” option from the list. It will automatically boost your video quality. You can choose the “Reverse Speed” option if your video is required.

Step 4End Editing and Move to Export
Now, it’s up to you if you want to continue editing with Filmora or want to export the media. To end editing, you can hit the “Export” button from the top right.

Remarkable Key Functionalities of Filmora
If you want to understand the amazing features of Filmora better, this section is for you. Keep reading and find some integral functionalities of Filmora. This platform offers more than just creating slow-motion video Android:
1. AI Smart Cutout
Artificial intelligence in Filmora can amazingly assist you in making flawless videos. Unlike other tools, Filmora allows you to remove unwanted objects, people, and icons from videos. Besides, users can refine their cutout frame by frame using its’ advanced editing options. You can preview the modified media in four ways, such as Transparency grid and Alpha Mode.
2. AI Audio Stretch
This AI-based feature is new to the market and saves hours of rippling and cutting audio. It aims to match the length of your audio with videos. From Vlog videos to blockbuster audio effects, you can use this feature almost everywhere. This option allows you to re-time your audio tracks after detecting vocals in the music.
3. Speech-to-Text
Video captions make the content accessible to international viewers. That’s where Filmora proves vital in removing language barriers. It supports over 26 languages and adds subtitles to your videos with one click. This built-in feature in Filmora recognizes speech swiftly to guarantee accuracy. You can also export your SRT file of subtitles to make any edits.
4. AI Portrait
Beautify faces in your videos to set a new trend on social media with Filmora. To do so, an AI Portrait feature can automatically detect faces to apply changes. You can choose a sticker effect from more than 70 AI portrait AR stickers. Besides, it can remove video backgrounds by retaining the human beings there.
Conclusion
With all marked details, this article concludes with a note that there are always different calibers of tools that we can work with. While discovering the best Android application in the market, you got to know many slow motion videos on Android. Along with that, we also discussed DemoCreator as a comprehensive solution to the entire use of mobile apps.
Make A Slow Motion Video Make A Slow Motion Video More Features
Part 1. Top 10 Android Apps For Slowing Down Motion in Video
When searching for a slow motion video app for Android, there are many options to go by. Provided next is a composite list of mobile apps that serve the purpose of slow-motion video creation:
- Slow Motion Video – Fast&Slow Mo
- Slow Motion Video Maker
- Video Editor & Maker – InShot
- Video Maker & Editor - Vidma
- VivaVideo - Video Editor&Maker
- VivaVideo - Video Editor&Maker
- VivaVideo - Video Editor&Maker
- VivaVideo - Video Editor&Maker
- VivaVideo - Video Editor&Maker
- VivaVideo - Video Editor&Maker
1. Slow Motion Video – Fast&Slow Mo
This Android slow-motion video converter offers an intuitive user interface and simple functions. Users can craft slow motion via drag and adjust the action of the slider in a downward direction. The video’s playback speed is customizable, ranging from 0.25x to 4.0x. Additionally, the software empowers users to apply slow motion to specific video segments to enhance precision.
Key Features
- The application offers pre-installed filters and special effects to elevate visual aesthetics.
- It preserves video quality and transforms video resolution to high definition (HD).
- Incorporate high-quality music into your videos with its built-in music collection.
2. Slow Motion Video Maker
This slow-mo video Android editor offers advanced functionalities to craft perfect videos. With its timeline editing interface, it simplifies the application of slow-motion effects to specific scenes. The application showcases three distinct slow-motion speed options: 0.5x, 0.3x, and 0.25x, ensuring perfection.
Key Features
- Accelerate your videos up to 4x with its high-speed options and get high-quality results.
- The video trimming feature and timeline editing enable accurate segmentation of a video.
- It is equipped with pre-existing music tracks to create the perfect slow-motion video on Android.
3. Video Editor & Maker - InShot
Embark upon the journey to create video slow motion Android with this multifunctional app. It extends a straightforward approach to slow video speed through slider manipulation. Timeline editing and selective playhead options empower users to adjust the speed of specific segments. This exceeds the conventional approach of a slo-mo creation, unlocking creative possibilities.
Key Features
- Elevate the artistic expression of videos by integrating a wide range of animations and text.
- Enhance your reels with a collection of transition effects like Fade in, Fade out, basics, and more.
- This editor has AI capabilities and background removal options with a heightened level of accuracy.
4. Video Maker & Editor - Vidma
This slow-mo app for Android facilitates individuals seeking a video editor capable of producing convincing results. It acts as a Velocity Edit Maker, offering diverse playback speed and positioning controls. The interface resembles a velocity graph, providing a visual representation of speed adjustments.
Key Features
- Introduces an automated “Keep Audio Pitch” option, ensuring high-quality audio.
- Enhance the creative factor in your images and videos with its built-in text and stickers.
- Comes with a variety of visual filters with an intensity control option.
5. VivaVideo - Video Editor&Maker
If you are seeking the best Slomo app for Android, this editor provides diverse speed-setting presets for creating slow-motion and fast-motion effects. Among presets such as Montage, Hero, Bullet, and others, it offers a Custom preset option to help you adjust everything accordingly. With its ability to apply speed settings at specific periods, your slow motions are bound to be perfect.
Key Features
- The non-uniform timeline editor allows you to incorporate multiple assets at once.
- A range of texts, animations, themes, effects, and music tracks are in its Stock Library.
- This video maker also incorporates a Voice Editor to uphold the audio track’s quality.
6. Smart Video Crop - Video Cut
Although this video maker is specified for resizing videos, it also offers speed change options. To make a video slow motion on Android, you can change both playback speed and framerate. Once you have edited your video, you can make changes to the export options. In addition, the application updates its mechanism and shows compatibility with Android 4.4 and higher versions.
Key Features
- The application shows multi-format video support, i.e., MP4, 3GP, and AVI.
- Proposes multiple video crop options like 1:1, 4:3, 16:9, and 3:2.
- You can select to crop the whole video or apply the crop to a specific part of it.
7. Video Editor - Video.Guru
What would be better than a slow-motion video app for Android that can change speed and enhance video? To access this functionality, users need to switch to its PRO version. The speed change options that it offers are from 0.2x to 100x, with 0.2x being the slowest. In addition, the tool doesn’t decline video quality but enhances it to 4K.
Key Features
- If you are a YouTuber, then this editor affects and filters for Vloggers and offers to remove Watermark.
- You can crop a video into available ratios while keeping its HD quality.
- Can add 30+ video transition effects and incorporate music to enhance their quality.
8. Slow Motion - Slow Mo, Fast Mo
Make video slow motion Android effortlessly with this application, which is specified for speed change. It offers 10 playback speed options for creating slow motions with precision. The playback speed ranges from 0.95x to 0.1x. Once you have created a slow motion with it, you can easily preview it to observe if any changes are needed.
Key Features
- Along with precise slo-mo options, it also offers extensive fast motion option speed ranges.
- You can mix and match both fast and slow-motion effects in a video at once.
- It also offers a watermark removal option to avoid any visual weakening.
9. Slow Motion Video FX-camera
Not only video frame rates but also slow down your speech with this slow-motion app for Android. You can add dramatic or funny effects to your voices using the application. It offers to slow down video speed up to 0.25x. It uses the standard slider approach to manipulate the playback speed of your videos. You can apply the slow-mo effect to the overall video or to some specific parts of it.
Key Features
- An intuitive user interface with a velocity graph to observe the changes in speed and duration.
- Transform your low-quality videos to HD quality with this slow-motion app for Android.
- Use the application’s built-in music library to incorporate music tracks.
10. Slow Motion
Decrease your video speed up to 1/4th of its original speed with this Android slow-motion video editor. The speed options are customizable, and you can apply them to multiple video scenes. As the name indicates, the tool is specifically fashioned for slow-motion effects; hence, it offers an accessible user interface.
Key Features
- Export your videos in landscape or portrait mode; the choice is yours.
- In any mode, the application retains video quality and exports it in full resolution.
- It is excellent to slow down YouTube videos as there is no watermark addition.
Bonus Part: Wondershare Filmora: A Perfect Desktop Solution To Slow Down Video
Making slow motion videos in Android is like keeping creativity in your hand anywhere. This facility is good for basic effects but not for professional and advanced slow-motion effects. That’s where you need to shift to a more equipped alternative, which is Wondershare Filmora . Using Filmora means turning imagination into the real picture.
It is a video editing platform with artificial intelligence integration. You can create slow-motion videos with automation in Filmora. The interactive interface of Filmora caters to all users’ needs in simple steps. Freelancers, content creators, and educationists use this platform for diverse needs.
Free Download For Win 7 or later(64-bit)
Free Download For macOS 10.14 or later
How to Make Video Slow Motion Android in Filmora
As you are familiar with Filmora, let’s make a slow-motion video. It is quite easy if compared with Android slow-motion video making. Without further delay, delve into the given step-by-step guide:
Step 1Import Your Project After Successful Launch
Unleash your creativity in Filmora after downloading it. In this regard, you must go to Wondershare Filmora’s official site. Open the main interface of Filmora and tap “New Project” to enter the editing window. To start working, import a file in the media panel and drag it into the timeline section.
Step 2Slow Down the Video with Uniform Speed
After successful importing, right-click on your video and an extended list. Choose the “Uniform Speed” option from the list and find an editing panel towards your right. You will see the slider under the speed option. Hold on to the circle and drag it to the left if you want to slow down the videos. Move downward and toggle the “Ripple Edit” and “Maintain Pitch” for good results.
Step 3Enhance Video with Optical Flow
Towards the end, you will find the “AI Frame Interpolation.” Click on its downward symbol and select the “Optical Flow” option from the list. It will automatically boost your video quality. You can choose the “Reverse Speed” option if your video is required.
Step 4End Editing and Move to Export
Now, it’s up to you if you want to continue editing with Filmora or want to export the media. To end editing, you can hit the “Export” button from the top right.
Remarkable Key Functionalities of Filmora
If you want to understand the amazing features of Filmora better, this section is for you. Keep reading and find some integral functionalities of Filmora. This platform offers more than just creating slow-motion video Android:
1. AI Smart Cutout
Artificial intelligence in Filmora can amazingly assist you in making flawless videos. Unlike other tools, Filmora allows you to remove unwanted objects, people, and icons from videos. Besides, users can refine their cutout frame by frame using its’ advanced editing options. You can preview the modified media in four ways, such as Transparency grid and Alpha Mode.
2. AI Audio Stretch
This AI-based feature is new to the market and saves hours of rippling and cutting audio. It aims to match the length of your audio with videos. From Vlog videos to blockbuster audio effects, you can use this feature almost everywhere. This option allows you to re-time your audio tracks after detecting vocals in the music.
3. Speech-to-Text
Video captions make the content accessible to international viewers. That’s where Filmora proves vital in removing language barriers. It supports over 26 languages and adds subtitles to your videos with one click. This built-in feature in Filmora recognizes speech swiftly to guarantee accuracy. You can also export your SRT file of subtitles to make any edits.
4. AI Portrait
Beautify faces in your videos to set a new trend on social media with Filmora. To do so, an AI Portrait feature can automatically detect faces to apply changes. You can choose a sticker effect from more than 70 AI portrait AR stickers. Besides, it can remove video backgrounds by retaining the human beings there.
Conclusion
With all marked details, this article concludes with a note that there are always different calibers of tools that we can work with. While discovering the best Android application in the market, you got to know many slow motion videos on Android. Along with that, we also discussed DemoCreator as a comprehensive solution to the entire use of mobile apps.
Premiere Pro Text Effects Beginner Guide
If you want to edit your raw video footage and turn ordinary clips into eye-catching videos, you will need a professional video editor. Adobe Premiere Pro is the most commonly used premium video editor that most professionals prefer. When it comes to editing videos, text effects play a major role along with video effects and animations.
If you are new to Adobe Premiere Pro, you will experience a steep learning curve. This is because the user interface is specially designed for professional video editors. Therefore, you might not get Premiere Pro text effects readily available. In this article, we will illustrate how you can add Adobe Premiere Pro text effects to your video project. We will also state the best alternative to Premiere Pro to add stunning text effects easily.
Part 1. Steps to Add Text Effects to Adobe Premiere
Text effects are an essential part of videos to enhance the video content immensely. You can add opening titles and end credits with text effects and animations. You can display the dialogues on the screen as subtitles. Showing location information and shooting date through text effects is quite regular these days. Besides, the use of lower thirds for social media promotion in videos is common. Without further ado, let us look at the steps to add Premiere text effects.
Step1 Add Your Text
First of all, you need to import your video and add text to it and apply different text effects. Here we are starting from scratch for better illustration. Go to Window> Essential Graphics> Text Tool(T). Type your text as per your requirements. You will notice a new text layer appearing under Edit tab.

Select the text layer and you will see all the properties that you can tweak. For example, go to Align and Transform section to reposition and resize your text properly. Go to Text section to change the style of the text. Similarly, there is an Appearance section to adjust color, shadow, and much more.
Step2 Apply Pre-Animated Template
Go to Graphics> Essential Graphics and browser through the title templates available to match your requirements. Once you have selected one title template, drag and drop it into your timeline above your video clip.

Double-click on the text to edit the content and type your title. Go to Essential Graphics panel and customize the text effect as per your preference. You can also choose the available elements included in the template to enhance the text effects as you think fit.
Step3 Edit the Text Effect and Animation
Select the text layer on your timeline to check out the keyframes applied in the template. Go to Effects Control panel and open Keyframe box by dragging it to the right. Adjust the keyframe to speed up or slow down the animation.

Bring the keyframes closer or spread them apart respectively. You can also adjust Velocity Controls present under different text properties as per the speed requirements.
Part 2. Alternative Way to Make Text Effects
If you are new to Adobe Premiere Pro, you will find title effects Premiere Pro difficult to add and edit as per your requirements. It is very common for amateur video editors to look for an easy alternative to Premiere Pro. We recommend Wondershare Filmora as the best alternative to Adobe Premiere text effects.
Filmora has a super intuitive user interface that is suitable for everyone including those who do not have prior video editing experience. There are more text effects and animations available that you can customize to get the desired effect. Here are the steps to add text effects to your video on Filmora.
Free Download For Win 7 or later(64-bit)
Free Download For macOS 10.14 or later
Step1 Download and install Wondershare Filmora and it is available for both Windows and macOS. Launch the application and click on New Project on the welcome screen.

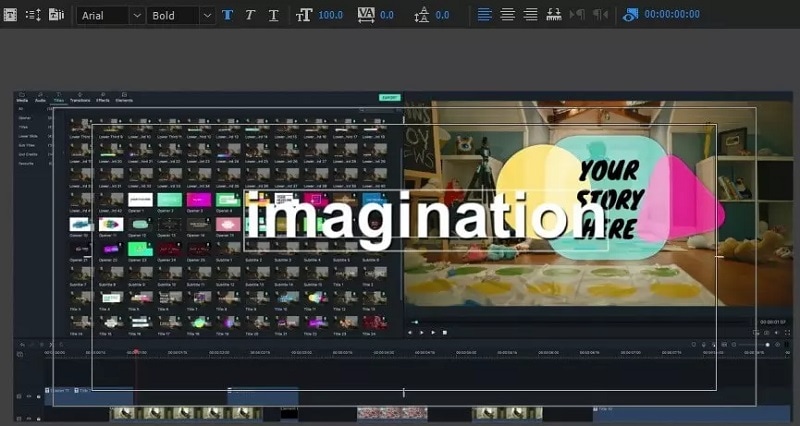
Step2 Drag and drop your video clips under Project Media folder and then onto the timeline. Go to Titles and you will see different categories of text effects and templates.

Step3 Select a template whichever you think is perfect for your project and drop it on the timeline. Adjust its position on the timeline as per where you want it to appear. Double-click on it to edit the title and type in your text. Similarly, you can reposition the text from Viewer as per your need.

Select the text style as well as adjust fonts and settings to get different styles for your texts. There is also an Advanced section available for detailed editing and getting the desired text effect.
Step4 You can animate the texts in your video from Animation section. Choose from the animation presets to animate individual text in the video. Besides, you can also add keyframes and animate the text as per your preference.

Part 3. Related FAQs on Adobe Premiere Pro
1. How do you make text look good in Premiere Pro?
There are several steps you need to take to make text look good in Premiere Pro. First of all, the color of the text should be in contrast to the background. You can add a rectangle highlighter in the background. Experiment with font and text of the text. Apply a text effect from the different templates available. Customize the effect to get the desired result.
2. How do you add typing effects in Premiere?
Add your text to your video so that a text layer appears on the timeline. Animate the text Effects> Video Effects> Liner Wipe and double-click to get the typing effect. Tweak the parameters like transition completion, wipe angle, and others to smoothen out the animation. Draw a cursor icon using rectangle tool and animation it to move with the text using keyframes.
3. How do I open text effects controls in Premiere Pro?
Select the text layer from the timeline of the project. From the main menu, go to Windows> Effects Control option to open effect controls for text. Otherwise, you can directly go to Effects Control tab located below the menu bar after selecting your text layer.
The Bottom Line
Adding text effects in Premiere Pro can be slightly overwhelming for an amateur video editor who does not have enough experience with Premiere Pro. We have stated the simple steps to apply Premiere Pro text effects to your video project. However, we recommend Wondershare Filmora as the best and the easiest alternative to Premiere Pro where you get more text effects and add them instantly and effortlessly.
Free Download For macOS 10.14 or later
Step1 Download and install Wondershare Filmora and it is available for both Windows and macOS. Launch the application and click on New Project on the welcome screen.
Step2 Drag and drop your video clips under Project Media folder and then onto the timeline. Go to Titles and you will see different categories of text effects and templates.
Step3 Select a template whichever you think is perfect for your project and drop it on the timeline. Adjust its position on the timeline as per where you want it to appear. Double-click on it to edit the title and type in your text. Similarly, you can reposition the text from Viewer as per your need.
Select the text style as well as adjust fonts and settings to get different styles for your texts. There is also an Advanced section available for detailed editing and getting the desired text effect.
Step4 You can animate the texts in your video from Animation section. Choose from the animation presets to animate individual text in the video. Besides, you can also add keyframes and animate the text as per your preference.
Part 3. Related FAQs on Adobe Premiere Pro
1. How do you make text look good in Premiere Pro?
There are several steps you need to take to make text look good in Premiere Pro. First of all, the color of the text should be in contrast to the background. You can add a rectangle highlighter in the background. Experiment with font and text of the text. Apply a text effect from the different templates available. Customize the effect to get the desired result.
2. How do you add typing effects in Premiere?
Add your text to your video so that a text layer appears on the timeline. Animate the text Effects> Video Effects> Liner Wipe and double-click to get the typing effect. Tweak the parameters like transition completion, wipe angle, and others to smoothen out the animation. Draw a cursor icon using rectangle tool and animation it to move with the text using keyframes.
3. How do I open text effects controls in Premiere Pro?
Select the text layer from the timeline of the project. From the main menu, go to Windows> Effects Control option to open effect controls for text. Otherwise, you can directly go to Effects Control tab located below the menu bar after selecting your text layer.
The Bottom Line
Adding text effects in Premiere Pro can be slightly overwhelming for an amateur video editor who does not have enough experience with Premiere Pro. We have stated the simple steps to apply Premiere Pro text effects to your video project. However, we recommend Wondershare Filmora as the best and the easiest alternative to Premiere Pro where you get more text effects and add them instantly and effortlessly.
What Is MKV Format and How To Play MKV Video?
MKV file format is a popularly adopted format. The format is easily accessible digital, and self-documented. The only problem people face with different formats is their compatibility. If you are trying to play an MKV video but facing problems, read the article below.
We will discuss the MKV video format, how it works, the way to play it, and other things you need to know. Stay with us; we are about to begin.
In this article
03 How to Play MKV Video Files on VLC Media Player?
04 How Can You Edit Video Files with Filmora Video Editor?
05 Which One Is Better? MKV or MOV?
Part 1: What is MKV format?
The MKV format, known as Matroska, was developed in 2002. This is an open standard video format. Different media files have different encoding, yet MKV stores various multimedia files as it is a container. Do you know what the format is widely used for? Well, the MKV file format is popularly used for online video streaming and also HD videos.

Typically, the format is used to store video clips, movies, and also TV shows. Among the list of audio and video codecs that MKV support, a few are VobSub subtitles, .SRT, .SSA, and .USF. The MKV container file format is famous in the anime fansubbing world. Many users create subtitles with this as the MKV video format supports various audio and subtitle tracks in one same file.
Part 2. How Does A MKV Video Work?
What do you know about the working of the MKV file? If you don’t have much knowledge, let’s share everything you need to know. The MKV format supports 3D objects and also subtitles. The file format is capable of running on both Windows and Mac. Interestingly, the MKV format supports all video and audio coding formats.
Let us clarify something, MKV file format is not an audio-video compression codec; it is a container format used to store subtitles, audio, video in a single file. Surprisingly, the MKV video format is also great for storing complete movies or CDs.
Do you know one amazing thing about MKV? It’s error-resilient; this means if your file is corrupted, it can recover the playback. The open-source format is great for describing technical information and commercial groups.
Part 3. How to Play MKV Video Files on VLC Media Player?
Different platforms support different formats like this MKV file format supported by Microsoft Movies & TV, VLC Media Player, and MPlayer. We will share how you can play MKV video files on VLC Media Player for the current article. If you don’t know, VLC is a cross-platform media player that supports most of the file formats, streaming protocols, DVDs, VCDs, Audio CDs, etc.
Interestingly, the media players work on all platforms like Windows, Mac, Linux, iOS, Android, etc. Do you know that the media playing software is free? Well, it is. It has no spyware and no user tracking. If you are interested in learning about how to play MKV video format on VLC, follow the steps below:
Step 1: Start by installing VLC Media Player on your respective device. It is possible you might have already installed VLC; what to do now? If this is the case, then open VLC and head over to the ‘Help’ option. There select the ‘Check for Updates’ option to update your VLC to the latest version for better performance.

Step 2: After you have either installed or updated VLC Media Player, launch it and move to the ‘Media’ option from the top bar. Next, select the ‘Open File’ option from the menu list and look for the MKV format video in your device to add to the media player. You can also add files to VLC by directly dragging them to the media player.

Step 3: Have you successfully imported the MKV file? If yes, then your video will start playing, and you can enjoy watching your videos with VLC.

Part 4. How Can You Edit Video Files with Filmora Video Editor?
You must have heard about Wondershare Filmora , as a great video editor. The software is used everywhere, by professionals, beginners, everyone. Do you not know much about it? Let us tell you! Whenever you plan to edit your MKV video format files, make sure you try Filmora. The video editor comes with uncountable features and offers limitless editing capabilities.
For Win 7 or later (64-bit)
For macOS 10.12 or later
While editing with Filmora, you never have to worry about video effects, transitions, titles, or anything. Do you know why? This is because Filmora provides every editing element. Let’s talk more about its features:
Audio Section
From the top menu bar on Filmora, you get an Audio section. This section can do wonders for your MVK format video. If you are looking for suitable audio to add to your video, try the audio collection from the audio section. You get sound effects of various types like Jazz, Rock, Happy, etc. You also get a wide variety of musical sounds, human sounds, etc.

Audio Editing Capacity
We must have mentioned above that apart from video editing; you get options for Audio Editing. Do you know what you can do? Start by accessing the Audio Editor by double-clicking on the audio file now, and you can do whatever you like.
For instance, the software offers features like Detach Audio from video, Mute video. Or even the advanced features offer Silence Detection, which automatically detects silence and crops the part.

Add Transitions and Titles
Like we said earlier, you don’t have to worry about transitions and titles with Filmora; this is because an independent section has been given to both the categories that are loaded with wide crazy options. Like if you head to the Transitions tab, you will get options like Speed Blur, Basic, Ripple & Dissolve, and others.

Whereas, if you open the Titles section, you will get various templates. The software offers Lower Thirds, Subtitles, Openers, etc. With Filmora, you get Titles and Transitions according to recent events and occasions.

Cool Elements
For video editing, effects and transitions are not everything. Although they play a vital role in setting and making a good video but do, you know what else matters? Let’s guide you. To make creative and eye-catching content, you need to add elements.

With Filmora, you get tons of great elements that can sustain your viewer’s interest. You can select between the various options like Subscribe Chanel, Share, Count Down, Metaverse, and much more than this. You can also get your hands-on Background Elements, Social Media Elements, etc.
Part 5. Which One Is Better? MKV or MOV?
MKV file format is not as commonly used as MOV because of its poor compatibility when it comes to mobile devices. If we talk about the file size, MKV tends to have a larger file size as compared to other used formats. MOV is a container file format that can store multiple media files of different tracks. Whereas MKV is an envelope format, even supporting to store complete movies with subtitles.
MKV format was developed by Matroska, whereas Apple developed the MOV file format. MKV format is good for storing HD videos, and MOV format is great for saving movies.
Last Words
MKV format is a container format that can store different files with different encodings. The article above has discussed the file format in detail. We talked about how you can use the format, play MKV video format, and also how to edit MKV videos. We will conclude the article by suggesting a great video editor, Wondershare Filmora.
Features like Keyframing, Motion Tracking are offered by the software. Along with this, some advanced-level features are also provided, like Advanced Color Tuning, Green Screen, Video Snapshot, and many others. So, for creating a nice video with great editing elements, Wondershare Filmora is a must.
For Win 7 or later (64-bit)
For macOS 10.12 or later
03 How to Play MKV Video Files on VLC Media Player?
04 How Can You Edit Video Files with Filmora Video Editor?
05 Which One Is Better? MKV or MOV?
Part 1: What is MKV format?
The MKV format, known as Matroska, was developed in 2002. This is an open standard video format. Different media files have different encoding, yet MKV stores various multimedia files as it is a container. Do you know what the format is widely used for? Well, the MKV file format is popularly used for online video streaming and also HD videos.
Typically, the format is used to store video clips, movies, and also TV shows. Among the list of audio and video codecs that MKV support, a few are VobSub subtitles, .SRT, .SSA, and .USF. The MKV container file format is famous in the anime fansubbing world. Many users create subtitles with this as the MKV video format supports various audio and subtitle tracks in one same file.
Part 2. How Does A MKV Video Work?
What do you know about the working of the MKV file? If you don’t have much knowledge, let’s share everything you need to know. The MKV format supports 3D objects and also subtitles. The file format is capable of running on both Windows and Mac. Interestingly, the MKV format supports all video and audio coding formats.
Let us clarify something, MKV file format is not an audio-video compression codec; it is a container format used to store subtitles, audio, video in a single file. Surprisingly, the MKV video format is also great for storing complete movies or CDs.
Do you know one amazing thing about MKV? It’s error-resilient; this means if your file is corrupted, it can recover the playback. The open-source format is great for describing technical information and commercial groups.
Part 3. How to Play MKV Video Files on VLC Media Player?
Different platforms support different formats like this MKV file format supported by Microsoft Movies & TV, VLC Media Player, and MPlayer. We will share how you can play MKV video files on VLC Media Player for the current article. If you don’t know, VLC is a cross-platform media player that supports most of the file formats, streaming protocols, DVDs, VCDs, Audio CDs, etc.
Interestingly, the media players work on all platforms like Windows, Mac, Linux, iOS, Android, etc. Do you know that the media playing software is free? Well, it is. It has no spyware and no user tracking. If you are interested in learning about how to play MKV video format on VLC, follow the steps below:
Step 1: Start by installing VLC Media Player on your respective device. It is possible you might have already installed VLC; what to do now? If this is the case, then open VLC and head over to the ‘Help’ option. There select the ‘Check for Updates’ option to update your VLC to the latest version for better performance.
Step 2: After you have either installed or updated VLC Media Player, launch it and move to the ‘Media’ option from the top bar. Next, select the ‘Open File’ option from the menu list and look for the MKV format video in your device to add to the media player. You can also add files to VLC by directly dragging them to the media player.
Step 3: Have you successfully imported the MKV file? If yes, then your video will start playing, and you can enjoy watching your videos with VLC.
Part 4. How Can You Edit Video Files with Filmora Video Editor?
You must have heard about Wondershare Filmora , as a great video editor. The software is used everywhere, by professionals, beginners, everyone. Do you not know much about it? Let us tell you! Whenever you plan to edit your MKV video format files, make sure you try Filmora. The video editor comes with uncountable features and offers limitless editing capabilities.
For Win 7 or later (64-bit)
For macOS 10.12 or later
While editing with Filmora, you never have to worry about video effects, transitions, titles, or anything. Do you know why? This is because Filmora provides every editing element. Let’s talk more about its features:
Audio Section
From the top menu bar on Filmora, you get an Audio section. This section can do wonders for your MVK format video. If you are looking for suitable audio to add to your video, try the audio collection from the audio section. You get sound effects of various types like Jazz, Rock, Happy, etc. You also get a wide variety of musical sounds, human sounds, etc.
Audio Editing Capacity
We must have mentioned above that apart from video editing; you get options for Audio Editing. Do you know what you can do? Start by accessing the Audio Editor by double-clicking on the audio file now, and you can do whatever you like.
For instance, the software offers features like Detach Audio from video, Mute video. Or even the advanced features offer Silence Detection, which automatically detects silence and crops the part.
Add Transitions and Titles
Like we said earlier, you don’t have to worry about transitions and titles with Filmora; this is because an independent section has been given to both the categories that are loaded with wide crazy options. Like if you head to the Transitions tab, you will get options like Speed Blur, Basic, Ripple & Dissolve, and others.
Whereas, if you open the Titles section, you will get various templates. The software offers Lower Thirds, Subtitles, Openers, etc. With Filmora, you get Titles and Transitions according to recent events and occasions.
Cool Elements
For video editing, effects and transitions are not everything. Although they play a vital role in setting and making a good video but do, you know what else matters? Let’s guide you. To make creative and eye-catching content, you need to add elements.
With Filmora, you get tons of great elements that can sustain your viewer’s interest. You can select between the various options like Subscribe Chanel, Share, Count Down, Metaverse, and much more than this. You can also get your hands-on Background Elements, Social Media Elements, etc.
Part 5. Which One Is Better? MKV or MOV?
MKV file format is not as commonly used as MOV because of its poor compatibility when it comes to mobile devices. If we talk about the file size, MKV tends to have a larger file size as compared to other used formats. MOV is a container file format that can store multiple media files of different tracks. Whereas MKV is an envelope format, even supporting to store complete movies with subtitles.
MKV format was developed by Matroska, whereas Apple developed the MOV file format. MKV format is good for storing HD videos, and MOV format is great for saving movies.
Last Words
MKV format is a container format that can store different files with different encodings. The article above has discussed the file format in detail. We talked about how you can use the format, play MKV video format, and also how to edit MKV videos. We will conclude the article by suggesting a great video editor, Wondershare Filmora.
Features like Keyframing, Motion Tracking are offered by the software. Along with this, some advanced-level features are also provided, like Advanced Color Tuning, Green Screen, Video Snapshot, and many others. So, for creating a nice video with great editing elements, Wondershare Filmora is a must.
For Win 7 or later (64-bit)
For macOS 10.12 or later
Also read:
- New 2024 Approved Shotcut Video Editor Review
- New In 2024, Keyframes Interval Everything You Need To Know | Filmora
- 2024 Approved Elevate Your Designs with Feather Shapes in After Effects
- Updated Color Lut Is an Easy and Powerful Tool to Make Your Video Stands Out From the Crowd. Check This Article to Learn the Details About Color Lut for 2024
- Updated In 2024, Steps to Denoise in Final Cut Pro – Reduce Video and Audio Noise
- New Detailed Tutorial to Crop Videos Using Openshot for 2024
- Tips That Show Anybody How To Make Youtube Slideshow – Guaranteed for 2024
- New How To Change Text Color In Premiere Pro
- Top Shortcut Towards Timeline Template for 2024
- Competitive Guide To Use Slow Motion in After Effects
- New 2024 Approved Best GIF to Video Converters
- New Guide Add LUTs in Premiere Pro with Ease for 2024
- Blender Is a 3D Animation Software that Can Be Used to Create Stunning 3D Models and Videos for 2024
- New In 2024, How to Loop a Video with iMovie on Mac and iPhone
- New In 2024, 15 Best Vloggers That You Should Follow for Travel
- Reasons for Asus ROG Phone 7 Stuck on Boot Screen and Ways To Fix Them | Dr.fone
- How to restore wiped messages on X9b
- A Comprehensive Guide to iCloud Unlock From Apple iPhone 12 Online
- Additional Tips About Sinnoh Stone For Infinix Note 30 VIP | Dr.fone
- In 2024, How and Where to Find a Shiny Stone Pokémon For Asus ROG Phone 8 Pro? | Dr.fone
- How to Rescue Lost Pictures from Samsung Galaxy S24?
- How to get back lost photos from Vivo V27 Pro.
- Updated 2024 Approved Techniques on Making After Effects 2D Animation
- In 2024, How To Delete iCloud Account Remove Your Apple ID Permanently On Apple iPhone 14 Pro Max
- How to Upgrade iPhone 11 Pro Max without iTunes? | Dr.fone
- Best Fixes For Samsung Galaxy A25 5G Hard Reset | Dr.fone
- How Do You Get Sun Stone Evolutions in Pokémon For Honor 90 Pro? | Dr.fone
- In 2024, The Magnificent Art of Pokemon Go Streaming On Apple iPhone 15 Pro Max? | Dr.fone
- Title: Updated How to Add Motion Titles
- Author: Morgan
- Created at : 2024-05-19 05:11:51
- Updated at : 2024-05-20 05:11:51
- Link: https://ai-video-editing.techidaily.com/updated-how-to-add-motion-titles/
- License: This work is licensed under CC BY-NC-SA 4.0.
