Updated How to Clone Yourself in Videos with Filmora?

How to Clone Yourself in Videos with Filmora?
With the help of video editing programs like Filmora , you can create clones of yourself. Whether you’re looking to create a funny skit or a serious video, cloning yourself can add much production value to your project.
In this article, we’ll walk you through the process of how to clone yourself in videos using Filmora.
Part 1: How to Film Clips for Cloning Effects?
To make cloning effects, you will need to take two different shots and use a tripod to place the camera, so the frame doesn’t change.
Shooting the first clip
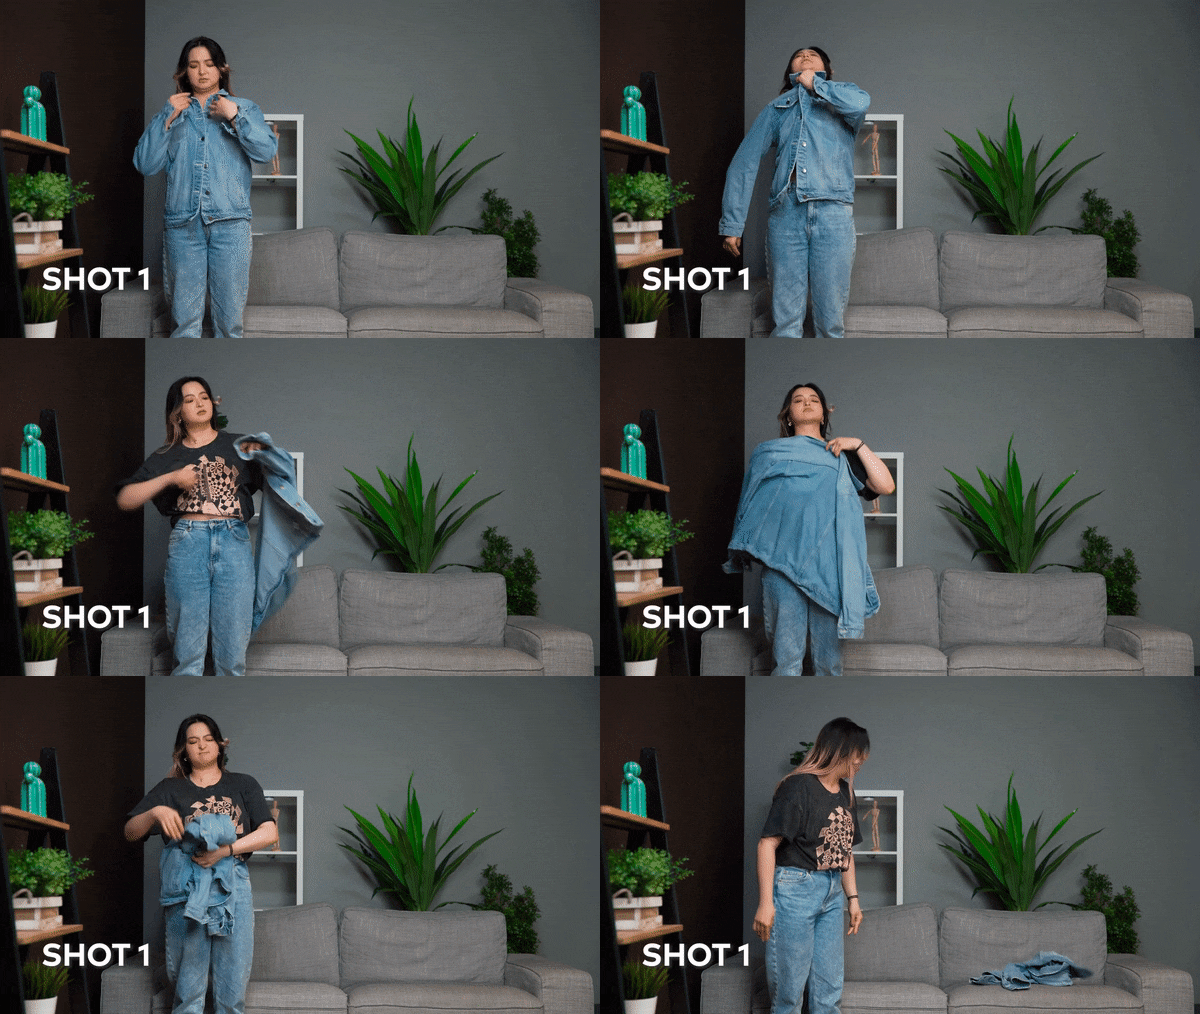
For the first shot, stay on one side of the frame and do the first action. For example, you can pretend to yank and take off your jacket. Then, drop the jacket to the other side of the frame.
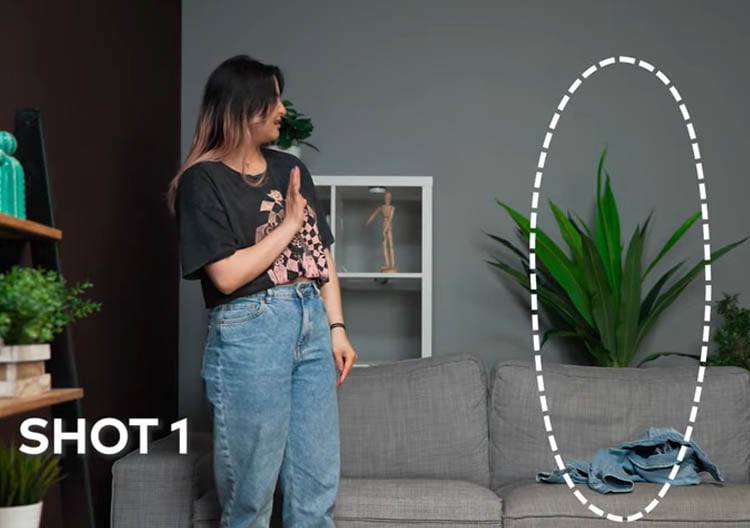
To make it more realistic, make an interaction by reacting to the “clone” while facing the other direction.
Shooting the second clip
Then, shoot for the second clip without changing the frame. You will have to go to the place where you dropped the jacket from the first shot.
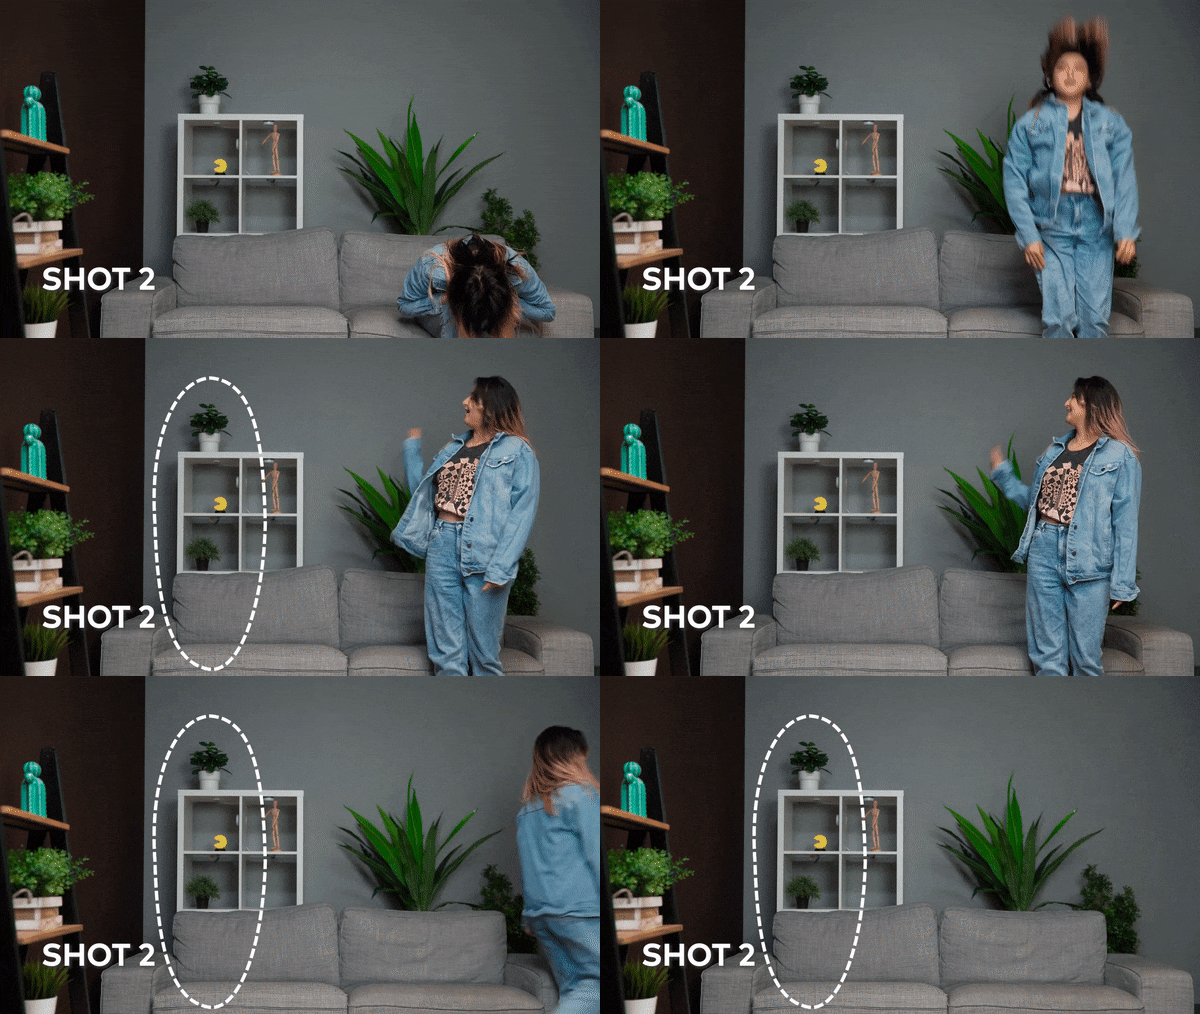
Act as if you have just appeared there and give a reaction to the other side as well.
Part 2: How to Do the Clone Effect with Filmora?
After you have shot the necessary film clips, bring the clips into Filmora 11. If you haven’t installed Filmora yet, you can go to their website and download it here:
Free Download For Win 7 or later(64-bit)
Free Download For macOS 10.14 or later
Once you have opened Filmora 11, follow the steps below:
Step1 Bring the first clip to the timeline and cut the clip where you pretend to yank and take off the jacket. Select and delete the unnecessary clip.
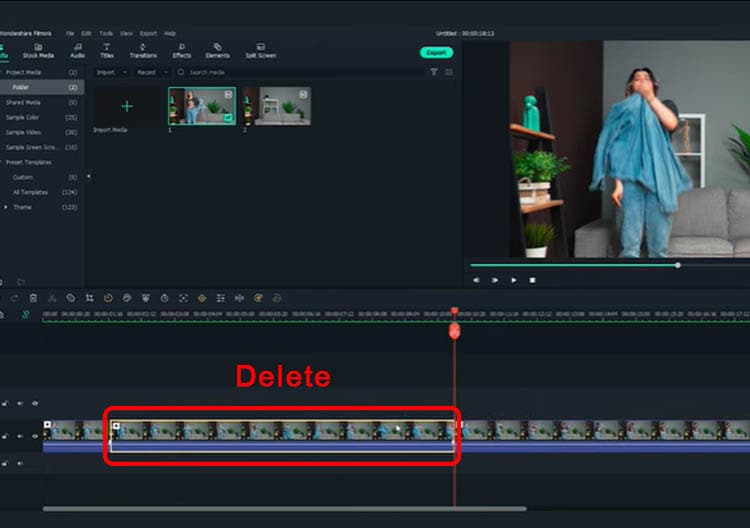
Step2 After you have the first part of the effect ready, let’s start working on the clone part using masking.
First, place the second clip on a different window track, and the starting point is where you react to the “clone.”
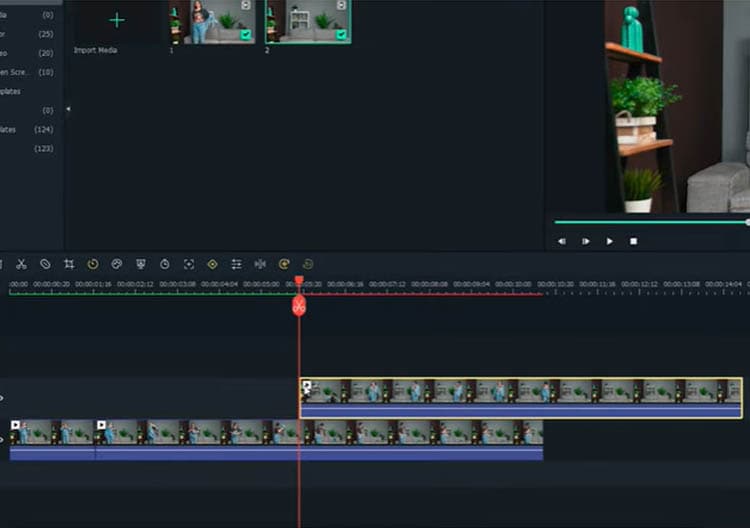
Then, double-click the second clip and go to the Filmora setting window. Tap on the Mask section > Single line.
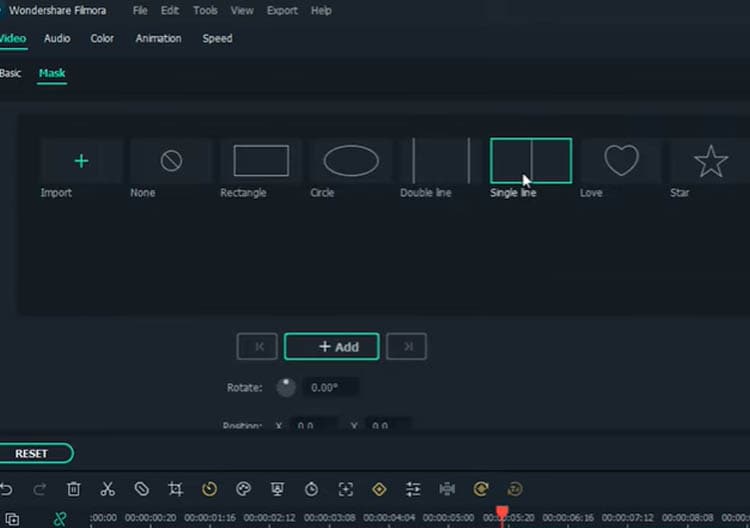
On the preview screen, adjust the position of the mask to only show “the clone.”
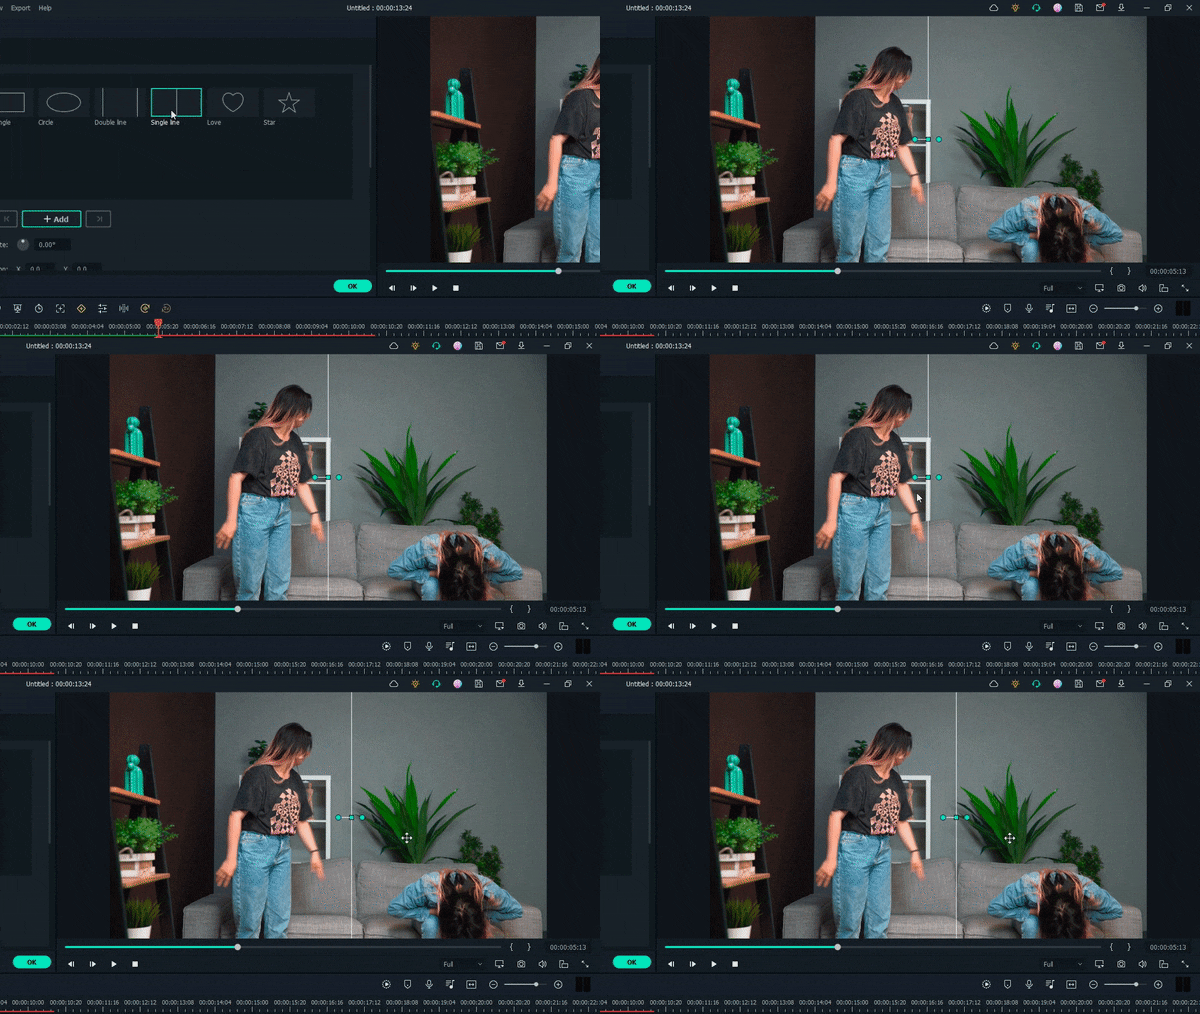
Set the blur strength on the setting to make a smoother edge transition.
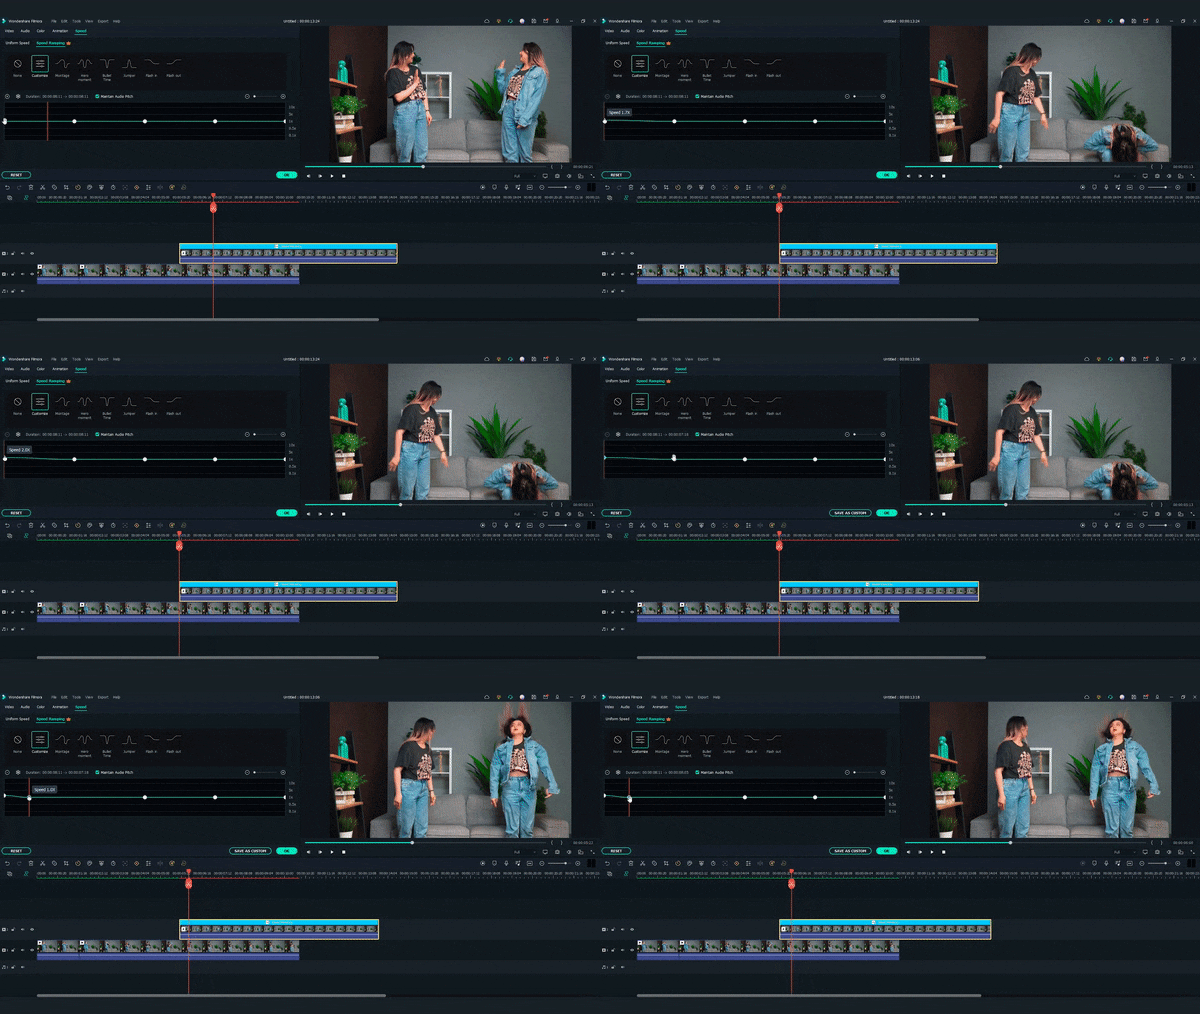
Step3 If the timing of the two clips doesn’t match, you can fix it using the speed ramping feature on Filmora 11. To use it, double-click the second clip and select Speed > Speed Ramping > Customize.
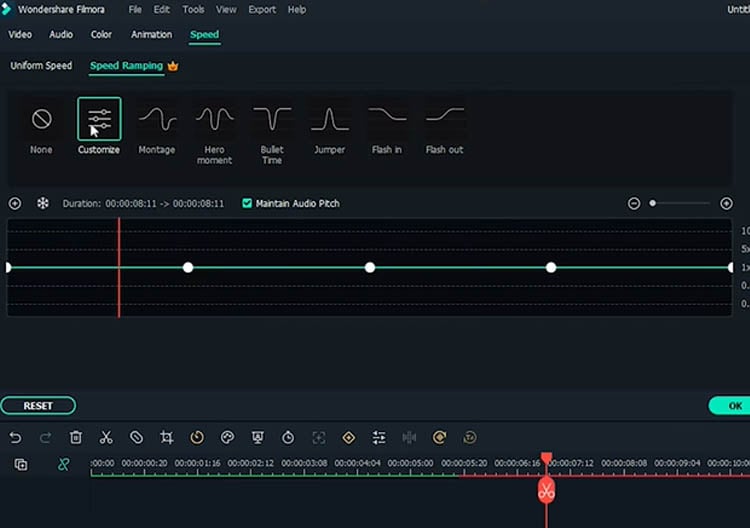
Move the keyframe up to increase the speed. You can adjust it according to your needs.
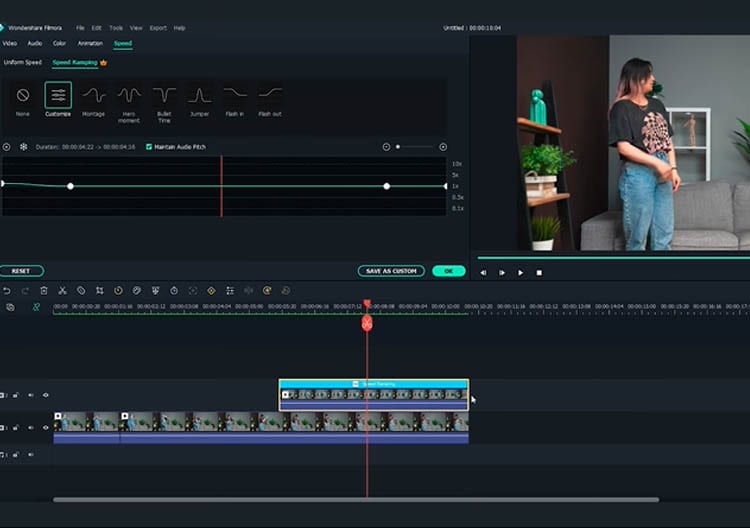
Step4 Once you are satisfied, adjust the clip length on the timeline and make sure that both clips finish at the same time.
Extra tip: Add one more effect to make it more magical.
Step1 Open the Effects window and search for “up down 1.”
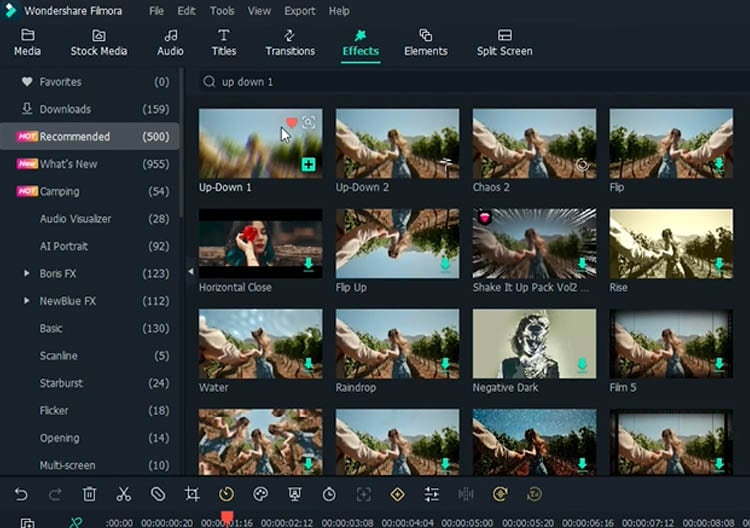
Step2 Drag and drop the effect onto the timeline where the first cut is set. Adjust the effect length to match the action.
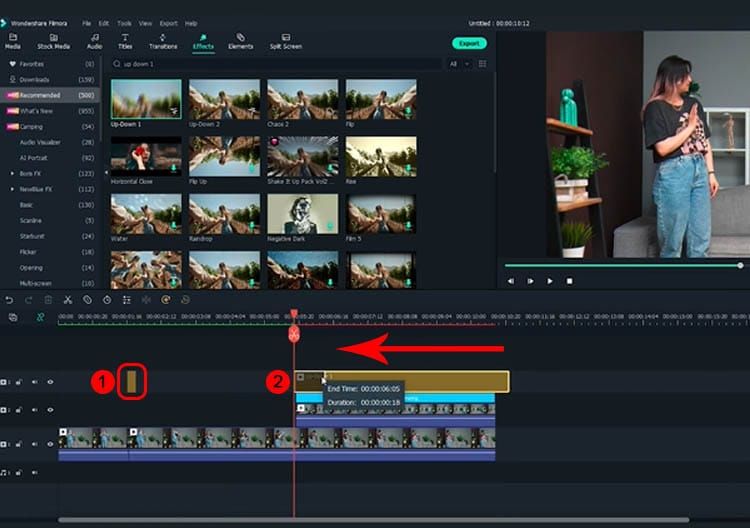
Then, drag and drop the effect again in the transition between the first and the second clip. Adjust it to the appropriate length, then it will give a more dramatic effect.
Step3 You can playback and see how it looks on the preview screen.
Summary
Making a clone effect on video is easy using Filmora. You can use the same trick to create a fashion lookbook video or other creative content to make them more engaging. Let us know if you want to see more tutorials.
Free Download For Win 7 or later(64-bit)
Free Download For macOS 10.14 or later
Free Download For macOS 10.14 or later
Once you have opened Filmora 11, follow the steps below:
Step1 Bring the first clip to the timeline and cut the clip where you pretend to yank and take off the jacket. Select and delete the unnecessary clip.

Step2 After you have the first part of the effect ready, let’s start working on the clone part using masking.
First, place the second clip on a different window track, and the starting point is where you react to the “clone.”

Then, double-click the second clip and go to the Filmora setting window. Tap on the Mask section > Single line.

On the preview screen, adjust the position of the mask to only show “the clone.”

Set the blur strength on the setting to make a smoother edge transition.
Step3 If the timing of the two clips doesn’t match, you can fix it using the speed ramping feature on Filmora 11. To use it, double-click the second clip and select Speed > Speed Ramping > Customize.

Move the keyframe up to increase the speed. You can adjust it according to your needs.

Step4 Once you are satisfied, adjust the clip length on the timeline and make sure that both clips finish at the same time.

Extra tip: Add one more effect to make it more magical.
Step1 Open the Effects window and search for “up down 1.”

Step2 Drag and drop the effect onto the timeline where the first cut is set. Adjust the effect length to match the action.

Then, drag and drop the effect again in the transition between the first and the second clip. Adjust it to the appropriate length, then it will give a more dramatic effect.
Step3 You can playback and see how it looks on the preview screen.
Summary
Making a clone effect on video is easy using Filmora. You can use the same trick to create a fashion lookbook video or other creative content to make them more engaging. Let us know if you want to see more tutorials.
Free Download For Win 7 or later(64-bit)
Free Download For macOS 10.14 or later
How to Set Up Twitch Green Screen
Green screens are a fun way for creators to bring their personality to their stream, allowing them to dynamically alter their stream background and make their content appear even more engaging and polished. With Twitch green screen background, you can easily configure Chroma key settings and detect your green screen with a single click.
The twitch green screen attaches directly to the back of your chair. You don’t have to worry about stands, or spacing behind your chair. Just attach it and go. This portable green screen can fit on the back of your chair a feature that makes it easy to assemble and use for start-up twitchers.
How to set up a Green Screen with Twitch Studio
**Set Up Your Camera
First things first, make sure that your camera is being detected on Twitch Studio. If you do not already have a layer with your webcam on your scene, click Edit Scene and add a webcam layer by clicking the + icon on the left next to Layers.
Once your webcam layer has been created, make sure that the desired device is selected, plugged in, and that you have not turned off every webcam (Camera icon on the bottom left of Twitch Studio).
**Set Up Your Green Screen
Once your green screen is set up in your background, select your webcam layers to display your webcam settings.
We recommend using the Auto-Detect Color feature as it will automatically detect the best color code for you and will be a great base to work from. If you prefer, you can manually pick the color code by either providing the color code in the Color to Remove field or clicking on the colored square to display a color spectrum that you can select from.
The Chroma Key section is located at the bottom of the webcam settings, and you will be able to toggle the chroma key on and off by clicking the eye icon.
To adjust the chroma key settings, you can click on Edit Chroma Key. You will be able to change the color code and change similarity, edge transparency and color correction for the perfect fit.
Other free ways to set up green screen for Twitch streams
OBS
OBS Studio is a free and open-source app for screen-casting and live streaming. Written in C/C++ and built with Qt, OBS Studio provides real-time capture, scene composition, recording, encoding, and broadcasting via the Real Time Messaging Protocol(RTMP).It can stream Videos to any RTMP supporting destination including YouTube, Twitch, Instagram and Facebook.
OBS Green Screen Set-up Steps
- Make sure you have the following equipment prepared: a solid green background, webcam or video camera, lighting, and OBS Studio.
- Download the latest stable version of OBS Studio from the official website and install the software. Open OBS and let the Auto-Configuration Wizard optimize the software’s settings based on your hardware.
- Now you can add a video source.
- Right-click on the video source you’ve created and select Filter.
- Click the +button under the Effects Filters section and select Chroma Key.
- Type in a name for this effect layer.
- After you add a chroma key, OBS will automatically create and adjust the baseline settings for the filter. You can experiment with the sliders and settle when you are satisfied with the result.
- Make sure you aren’t wearing any green or reflective material. You can double-checkthe performance on the preview screen.
- If things are working smoothly, you are all set to start streamingwith the green screen on.
Pro tip:
You can follow the instructions above and live stream to multiple platforms at once with Restream. Multistreaming to platforms like YouTube, Facebook, Twitter, Twitch, and LinkedIn allows you to drastically increase the audience reach and grow your followers.
XBOX
It is a video gaming brand created and owned by Microsoft. The brand consists of five video game consoles, as well as applications(games), streaming services, an online service by the name of Xbox network, and the development arm by the name of Xbox Game Studios. The brand was first introduced in the United States in November 2001, with the launch of the original Xbox console.
Steps on Using Xbox Green Screen
Make your Xbox console reflect your personal style by changing its look and feel. Choose a favourite colour, update your background with game art or a customised image, or select a different theme.
Choose your color
The color you choose will appear in tiles and accents on your Xbox. It also follows you to any console you sign in to.
- Press the Xboxbutton on your controller to open the guide, and then select Profile & system > Settings > General > Personalisation > My color & theme > My color.
- Select a color, and then select OK.
**Choose your background
Your background appears where you’d expect it to—in the background of Home. It can be a solid color or an image, such as game art, achievement art, a screenshot, or a customized image. Achievement art follows you to any Xbox, but screenshots and customized images stay on the console that they’re set to.
To choose your background, press the Xbox button on your controller to open the guide, and then select Profile & system > Settings > General > Personalization > My background.
From here, choose from the following options:
**Solid color and game art
Select a background color, and then select OK. To then add game art, choose the game most recently played and the game art will appear as the background.
**Achievement art
- Select Achievement art> Gaming.
- Select a game from your list of games with achievements.
- Select the achievement with the background art you want.
- Select Set as background.
**Custom image
Note Customized images must be smaller than 3 MB, and the best size for backgrounds is 1920 x 1080.
- Copy a JPG or PNG file that you want to use to a USB device, and then plug it into your Xbox.
- On your Xbox, select Customized image. A dialogue box appears that shows the contents of your console and attached USB device.
- Select the USB device, and then choose your image.
**Screenshot
- Select Screenshot, then choose the one you want.
- Select More actions> Set as background.
**Dynamic background
Note Dynamic backgrounds are only available on Xbox Series X|S.
- Select Dynamic background.
- Select the background art you want.
- Select Apply.
Note Some dynamic backgrounds are only available through promotions with special edition hardware (like the 20th Anniversary Special Edition controller). To see one of these special dynamic backgrounds in your list of options, make sure your special edition hardware is turned on and in use with your console when you set your background.
**Remove customized background
If you want to remove your background, select Remove customized background.
**Choose your theme
Themes can be set to dark or light and can also be scheduled. To set a theme:
- Press the Xboxbutton on your controller to open the guide, and then select Profile & system > Settings > General > Personalization.
- Select My color & theme.
- Under System theme, select Darkor Light. Select Scheduled to activate your theme according to specific times, or to start at sunrise and sunset.
Themes stay on the console they’re set to.
Solid Color
Achievement Art
Custom Image
Remove Custom Background
Filmora
Wondershare Filmora is the one of best video editing software with cool features that compares to other competing video editing Softwares. Many video editing programs claim to offer professional results; Filmora is one of a few consumer-level tools that actually delivers.
For Win 7 or later (64-bit)
For macOS 10.12 or later
Key Features
4k editing support
GIF support
Noise removal
Color tuning
Advanced tech editor
Audio mixer
Video stabilization
Scene detection
Conclusion
You probably already have an idea of how to use a green screen, at least in principle. You film something or someone in front of a colored background — the green screen — then you replace everything that’s in the color of the screen with other footage, images, charts, presentations, or whatever visuals you want. However, Chroma keying a live stream works almost the same way. The main difference is that you have to replace the green screen as you’re filming, rather than during editing.
The Quick and Simple Way to Mirror Video in Premiere Pro
Video editing is a crucial part of filmmaking, and it can make or break the outcome of a project. Adobe Premiere Pro is a widely used video editing software that provides a vast range of tools for professional video editing. One of the features that Premiere Pro offers is the ability to mirror video clips, which can add an interesting visual element to your footage.
In this article, we will look at how to mirror a video clip in Premiere Pro in a few simple steps. Whether you’re a seasoned video editor or just starting, this guide will help you achieve the desired effect in your videos. From basic mirroring to advanced techniques, we will cover everything you need to know to create a symmetrical and visually appealing look in your projects.
What Is To “Mirror” a Video?
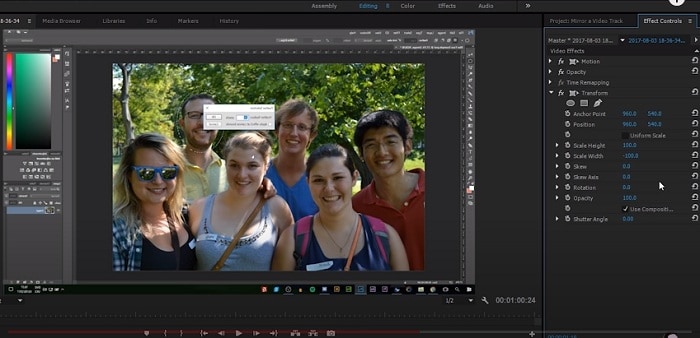
Mirroring a video in Adobe Premiere Pro refers to reflecting the footage along either the horizontal or vertical axis. This results in the composition being flipped and reversed, creating a reflection-like effect. Flipping a video is distinct from rotating it, as the orientation of the elements is changed, but their position remains the same.
Flipping can serve both creative and practical purposes. On the one hand, it can add a unique and visually interesting element to a project, creating a form of self-reflection or self-analysis. On the other hand, flipping can also be used to correct videos accidentally captured upside down. For example, flipping a video recorded with a selfie camera along the horizontal axis will correctly display the right side up.
It is important to note the distinction between flipping and rotating a video. A flipped video will look like a mirror image, whereas a video rotated 180 degrees will not. By understanding the differences between these techniques, you can effectively use mirroring to achieve the desired result in your projects.
How To Mirror a Video in Adobe Premiere Pro
Mirroring a video in Adobe Premiere Pro is a quick and simple process that can add a unique and visually appealing touch to your projects. Whether you want to create a symmetrical look or experiment with a new visual style, this guide will mirror a video clip in Premiere Pro. From basic to advanced techniques, you’ll be able to create stunning and reflective videos in no time. So, let’s get started!
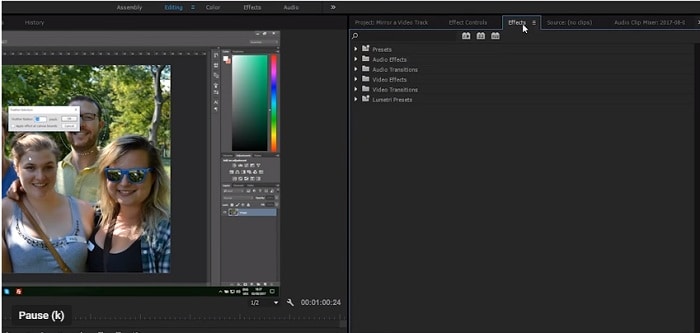
Step1 Choose the “Effects“ option from the menu.
Step2 Look for the “Transform“ tab.
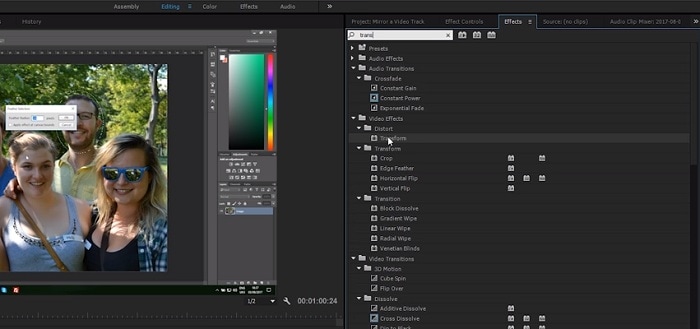
Step3 Pick the “Horizontal Flip“ or “Vertical Flip“ from the drop-down list.
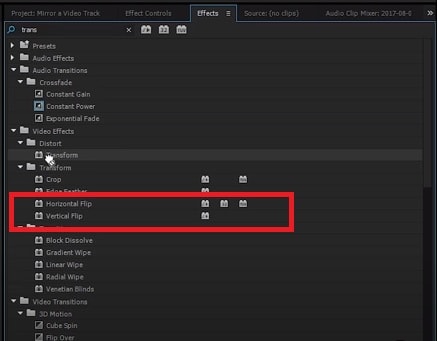
Step4 Drag the desired flip onto the selected clip, which will immediately reverse the image displayed on the Program Monitor.
How To Create Mirror Video Effect in Premiere Pro
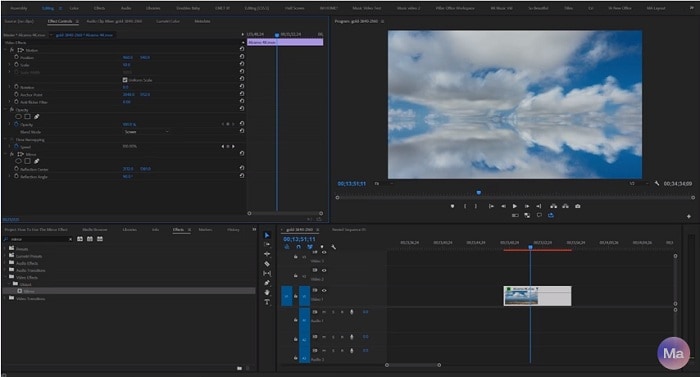
Creating a mirror video effect in Adobe Premiere Pro opens up a world of artistic possibilities for your projects. With the right techniques, you can create visually appealing and symmetrical videos that stand out from the crowd. This guide will show you how to master the art of mirror video effects in Premiere Pro, from the basics to more advanced techniques. Get ready to explore the creative side of video editing and elevate your projects to the next level.
Step1 Access the “Effects“ menu and select “Video Effects.”
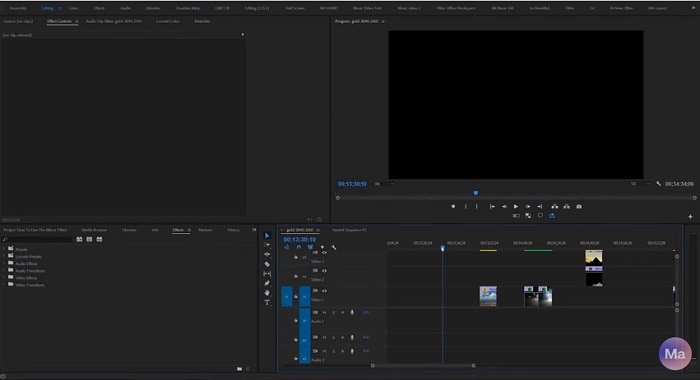
Step2 Pick “Distort“, then the “Mirror“.
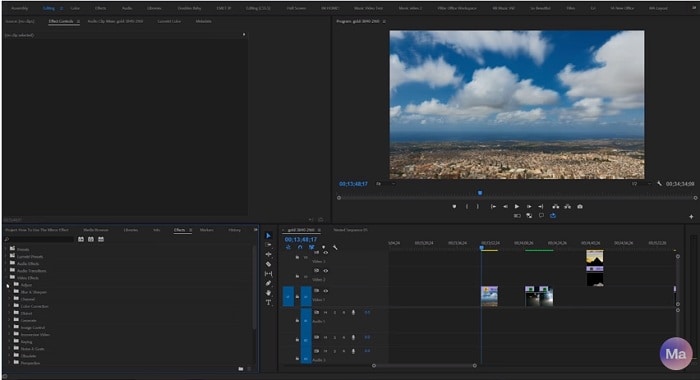
Step3 Apply the Mirror effect to your clip.
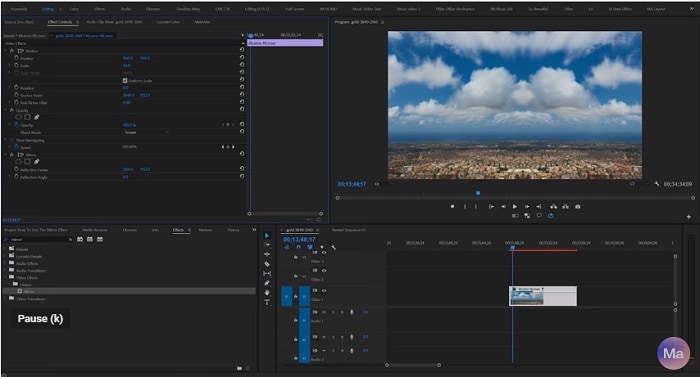
Step4 Adjust “Reflection Center“ for side-by-side effect or “Reflection Angle“ for up-and-down effect in the Effect Controls panel.
[Bonus] Wondershare Filmora – A Great Alternative to Premiere Pro Mirror Tool
Wondershare Filmora is a great alternative to Adobe Premiere Pro for video editing. Not only does it offer an intuitive interface for both beginners and professionals, but it also offers a range of video editing tools and features. One of those features is its ability to easily mirror a video. With Filmora, you can flip your videos vertically or horizontally with just a few clicks.
Free Download For Win 7 or later(64-bit)
Free Download For macOS 10.14 or later

Filmora also offers a variety of creative video effects and templates, making it easy to add a unique touch to your projects. In addition, its built-in audio editing tools allow you to create professional-sounding soundtracks for your videos. Filmora’s easy-to-use keyframe animation feature gives you precise control over the animation of your elements, allowing you to add movement and bring your videos to life.
Furthermore, Filmora’s advanced color correction tools help you achieve the perfect color balance in your videos. Whether you’re a beginner or a professional, Wondershare Filmora is a great option for anyone looking for a powerful and easy-to-use video editor.
How To Mirror a Video Clip With Wondershare Filmora
Mirroring a video clip is a simple process with Wondershare Filmora. This video editing software provides an intuitive and user-friendly interface, making it easy to achieve the desired result.
To mirror your video in Filmora, you can follow a few straightforward steps. Whether you want to flip your video horizontally or vertically, Filmora’s mirroring tool will help you achieve the perfect reflection with just a few clicks. So, if you’re looking for an alternative to Adobe Premiere Pro, Wondershare Filmora is a great option to consider for your video editing needs.
Step1 Within the “Flip“ section, there are four options available. To flip the clip from left to right, select the “Flip Horizontal“ icon, or if you want to turn the clip upside down, choose the “Flip “ option.
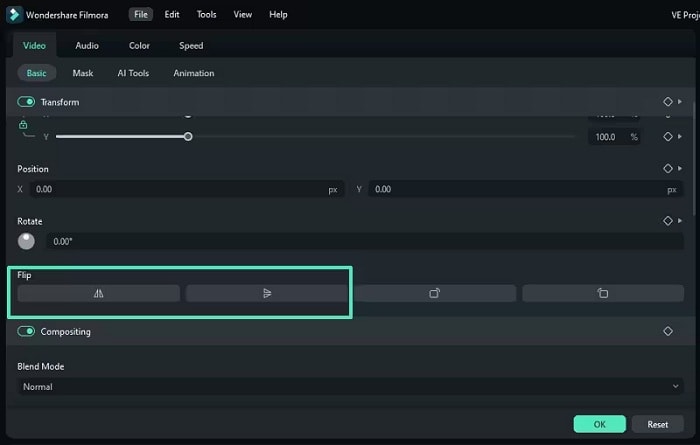
Step2 You can rotate the clip by clicking either the “Clockwise“ or “Counterclockwise“ icons under the Rotate section.

Step3 If you want to specify the rotation angle, you can either enter a value in the box under the Rotate tab or manipulate the dot in the circle to achieve the desired angle.

How To Create Mirror Video Effect in Wondershare Filmora
Wondershare Filmora is an excellent video editing software that offers a simple solution for creating a mirror video effect. Its intuitive interface and powerful features make it possible for amateur and professional video editors to achieve stunning results. Filmora provides users with an array of tools to create a mirror effect on their video clip effortlessly.
Whether you want to create a reversed image, flip the orientation vertically, or rotate the clip in a specific direction, Filmora has got you covered. Let’s see how to create a mirror video effect with Wondershare Filmora.
Step1 Add the video clip to a video track on the timeline
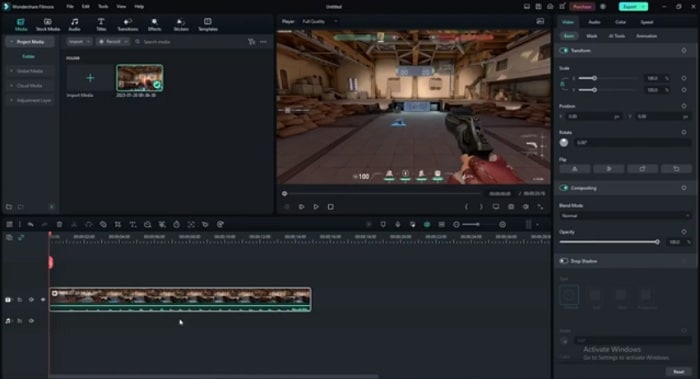
Step2 Click the “Filters“ icon and choose the “Distortion“ category
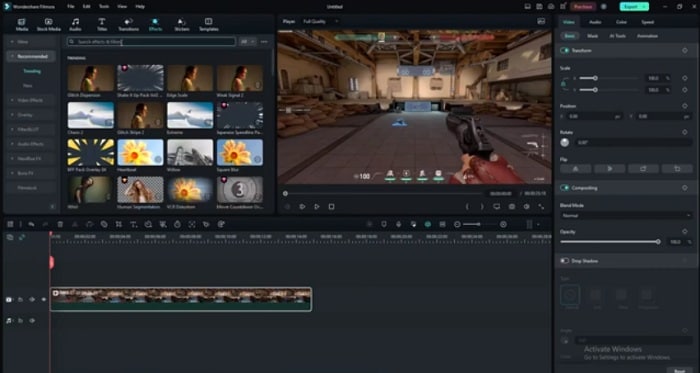
Step3 Locate the “Mirror“ effect, drag and drop it to the filter track, and adjust its duration to match the video clip
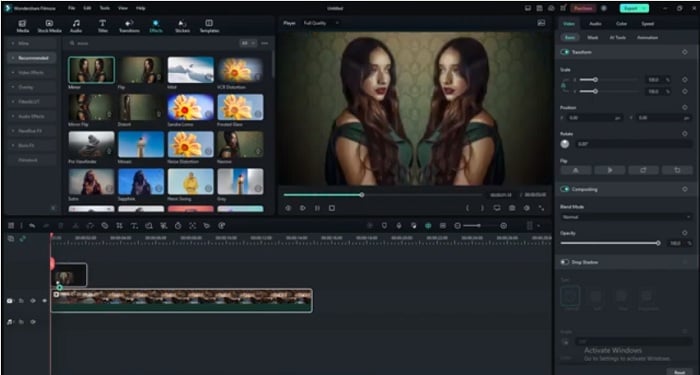
Step4 Preview the results in the Preview Window before exporting the video from Filmora.
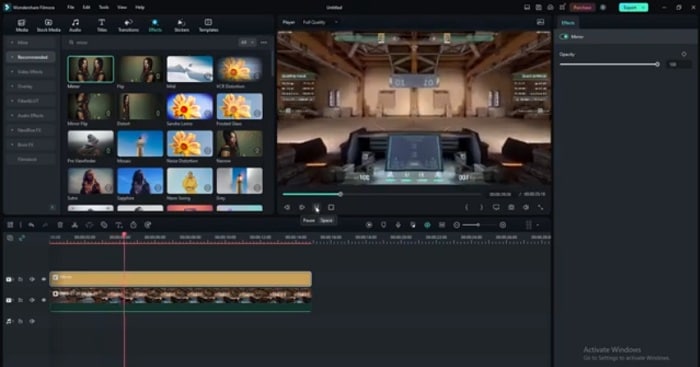
Conclusion
Mirroring a video can add an interesting and unique visual effect to your videos. Adobe Premiere Pro and Wondershare Filmora provide easy-to-use tools to achieve this effect. While Premiere Pro offers more advanced features and customization options, Filmora provides a simpler and more user-friendly interface for those who want to achieve the same results without the hassle. Whichever option you choose, you can create stunning mirror videos in no time.
Free Download For macOS 10.14 or later

Filmora also offers a variety of creative video effects and templates, making it easy to add a unique touch to your projects. In addition, its built-in audio editing tools allow you to create professional-sounding soundtracks for your videos. Filmora’s easy-to-use keyframe animation feature gives you precise control over the animation of your elements, allowing you to add movement and bring your videos to life.
Furthermore, Filmora’s advanced color correction tools help you achieve the perfect color balance in your videos. Whether you’re a beginner or a professional, Wondershare Filmora is a great option for anyone looking for a powerful and easy-to-use video editor.
How To Mirror a Video Clip With Wondershare Filmora
Mirroring a video clip is a simple process with Wondershare Filmora. This video editing software provides an intuitive and user-friendly interface, making it easy to achieve the desired result.
To mirror your video in Filmora, you can follow a few straightforward steps. Whether you want to flip your video horizontally or vertically, Filmora’s mirroring tool will help you achieve the perfect reflection with just a few clicks. So, if you’re looking for an alternative to Adobe Premiere Pro, Wondershare Filmora is a great option to consider for your video editing needs.
Step1 Within the “Flip“ section, there are four options available. To flip the clip from left to right, select the “Flip Horizontal“ icon, or if you want to turn the clip upside down, choose the “Flip “ option.

Step2 You can rotate the clip by clicking either the “Clockwise“ or “Counterclockwise“ icons under the Rotate section.

Step3 If you want to specify the rotation angle, you can either enter a value in the box under the Rotate tab or manipulate the dot in the circle to achieve the desired angle.

How To Create Mirror Video Effect in Wondershare Filmora
Wondershare Filmora is an excellent video editing software that offers a simple solution for creating a mirror video effect. Its intuitive interface and powerful features make it possible for amateur and professional video editors to achieve stunning results. Filmora provides users with an array of tools to create a mirror effect on their video clip effortlessly.
Whether you want to create a reversed image, flip the orientation vertically, or rotate the clip in a specific direction, Filmora has got you covered. Let’s see how to create a mirror video effect with Wondershare Filmora.
Step1 Add the video clip to a video track on the timeline

Step2 Click the “Filters“ icon and choose the “Distortion“ category

Step3 Locate the “Mirror“ effect, drag and drop it to the filter track, and adjust its duration to match the video clip

Step4 Preview the results in the Preview Window before exporting the video from Filmora.

Conclusion
Mirroring a video can add an interesting and unique visual effect to your videos. Adobe Premiere Pro and Wondershare Filmora provide easy-to-use tools to achieve this effect. While Premiere Pro offers more advanced features and customization options, Filmora provides a simpler and more user-friendly interface for those who want to achieve the same results without the hassle. Whichever option you choose, you can create stunning mirror videos in no time.
Are You in Search for a Step-by-Step Guide to How to Add Effects in TikTok? Here It Is. To Add some Flavor to Your TikTok Videos. Use These How to Add Effect to TikTok Recommendations
In TikTok, users may develop and produce visually appealing videos to share with their viewers. The program enables users to apply effects to TikTok videos in order to facilitate this kind of production. TikTok offers a lot of features, making it simple to become lost inside the application. The utilization of TikTok’s built-in effects is one of the elements that contributes to their films’ engaging nature. To know how to add effects to TikTok videos, you must thus follow the instructions provided in the article below.
To know how to add effect to TikTok is a daunting task if you don’t know the steps. However, it’s time to get familiar with the most prevalent and coolest effects of the app if you want to build a sizable following on this platform and produce films that go viral. With this guide you can add effects to your video to make it more visually appealing; this is one of the best possibilities. These effects might include slow motion, stickers, or even special effects like visual effects.
Part 1. Using TikTok In-App Effects
If you use Tik Tok often, you undoubtedly already know that this app has several effects available as well. These consist of stickers, time effects, video coverings, and filter effects. As soon as you record or submit a video clip, these effects are readily triggered. Simply locate the “Effects” option to begin adding them to your movie. However, using text or caption effects is not possible in this manner. However, it is a useful method for improving your Tik Tok video before sharing it.
Steps to Add Effects to TikTok Using Built-in Effects:
Step1 Open the app after installation and add a video by touching the “+” button to start a new recording or by tapping the “Upload” button to upload media files from your picture library.
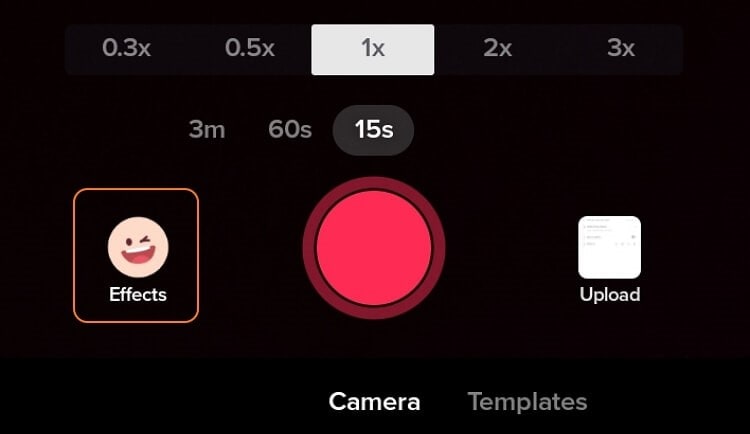
Step2 On the right side of the screen, tap “Filters.” You may now apply effects when a video file is available by touching the “Effects” button in the bottom left corner of the app.
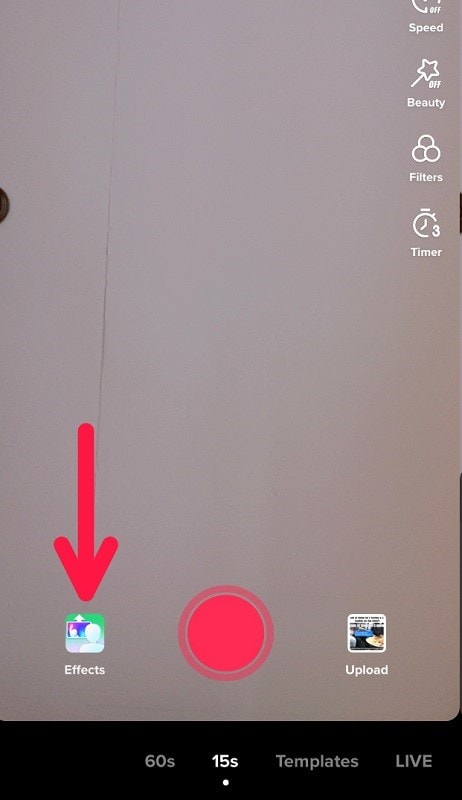
Step3 Choose the filter you want to use. To search, use the scroll, or choose a category to focus the sort of filter you want to apply.
Step4 Click on “Effects.” Once again, scroll to search or choose an effect category to browse. Tap “Save” to save the changes you’ve made. Tap “Next” and then “Post” to continue.

Part 2. Adding Effects Before Recording
Many people are hesitant to record a TikTok video with more than one filter effect applied. You’ve probably seen that a lot of well-known makers create videos that combine many different effects. Actually, the procedure is rather easy. You may apply as many filters as you’d like on the TikTok app while recording time stamps one at a time only! It is not feasible or the option is not presently accessible on the app if you wish to apply many effects at once.
Steps to Add Effects to TikTok Videos Before Recording:
Step1 Open the TikTok app and click the Create button in the lower-middle of the screen.

Step2 On the right side of the screen, tap Filters. The screen’s bottom will reveal a pop-up menu for filters.
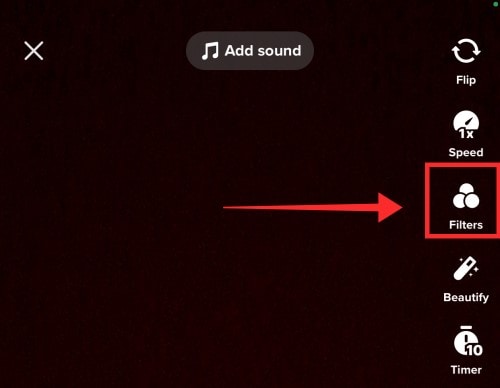
Step3 To see the choices, swipe. By tapping the tabs, you may quickly navigate to that particular set of filters. Alternatively, you may just swipe and browse through each choice. Select a filter by tapping it. To lessen or intensify the filter effect, move the slider to the left or right.
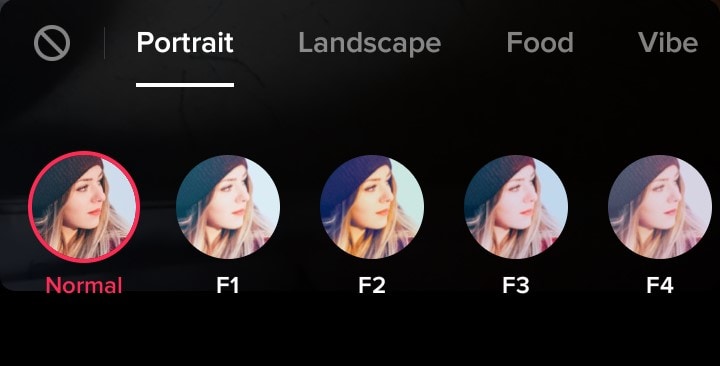
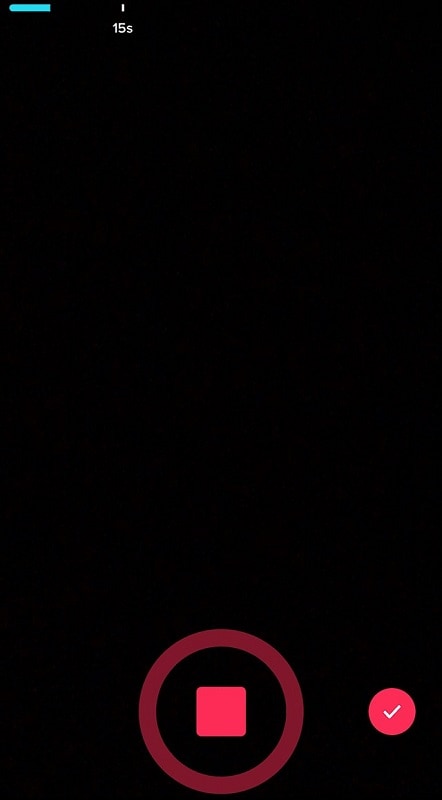
Step4 If you like the result, press the screen to start recording your video normally. Tap the Stop symbol at the very left to remove the filter.
Part 3. Adding Effects After Recording
Forgot to use a filter effect before to beginning your recording? Not to worry! On the Preview page, you may also apply a filter to your clips. By selecting Visual under Effects after recording or uploading your TikTok video, you may also add some lovely dynamic filter effects. You may achieve that by saving the films to your camera roll after applying each effect individually to the same clip. then launch the app’s video recorder, add the previously recorded video, and choose a new filter to apply to the video clip.
Steps to Add Effects to TikTok After Recording:
Step1 The first step is to launch the program on your phone and touch the “+” icon. Simply choose a filter effect for your movie by going right to the Filters section here.
![]()
Step2 The filters button, which is indicated by three circles, must be tapped in the second stage. You may choose the TikTok effect you wish to use once all of the effects are shown on the screen.
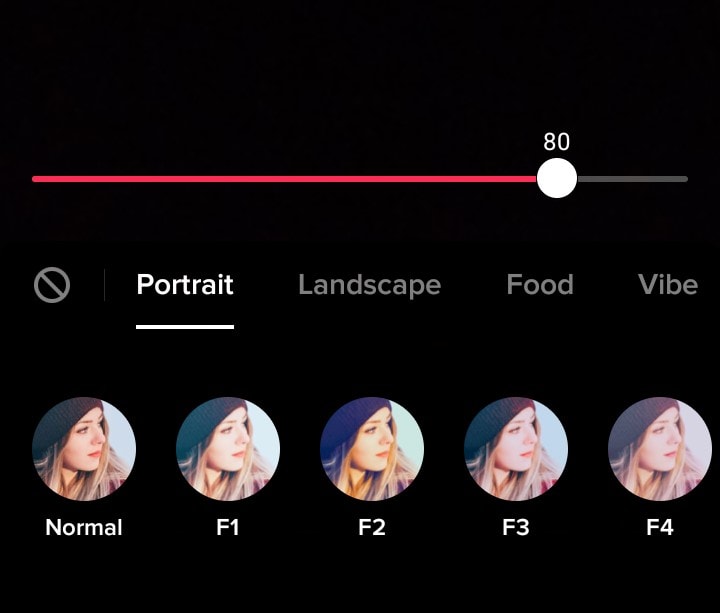
Step3 You have access to a wide variety of effects once you enter the effects gallery. Select the effect that best suits your video and that you prefer. After making your decision, leave the effects gallery and upload the recording.
Step4 Click the review button to examine your video with the effect applied before publishing it. This will lead you to a preview screen. Before you actually publish it, you may also add music and other components.
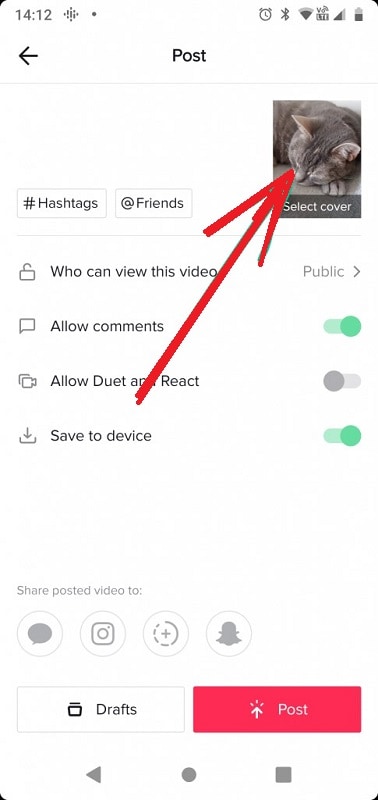
Part 4. Add Filter on Video in TikTok
You may apply the filters after you film the movie, just as you do with the effects. You just need to visit visual. There is no way to identify the filter that your favorite TikToker used on his video on TikTok. Don’t worry, they often include the effect they employ in the hashtag or description, so you are still welcome to utilize it. To hunt for filter effects on TikTok, you might request a search function.
Steps to Add Filter on Videos in TikTok:
Step1 Click the “+” symbol in the bottom menu’s center after launching the TikTok app on your phone. Press the “+” button to start your camera before applying a specific filter.
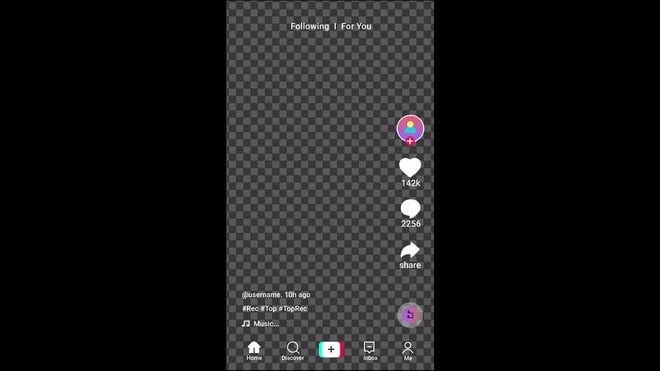
Step2 The “effects” symbol, which looks like a winking emoji, should be tapped. You will have access to a wide variety of TikTok filters once inside. On your screen, click the Filters symbol in the top right corner.
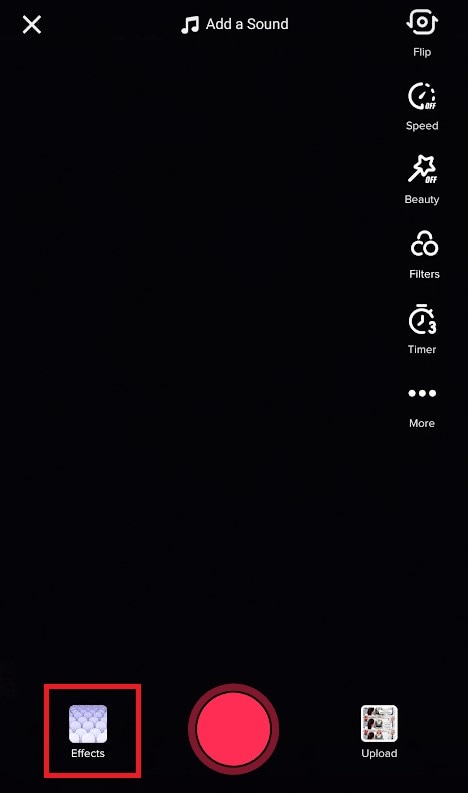
Step3 The options screen opens when you press the effect filter button. Your effect will appear in your video once you just hit the red button. When you are presented with all of these filters, choose the one that best fits your video and give it a try.
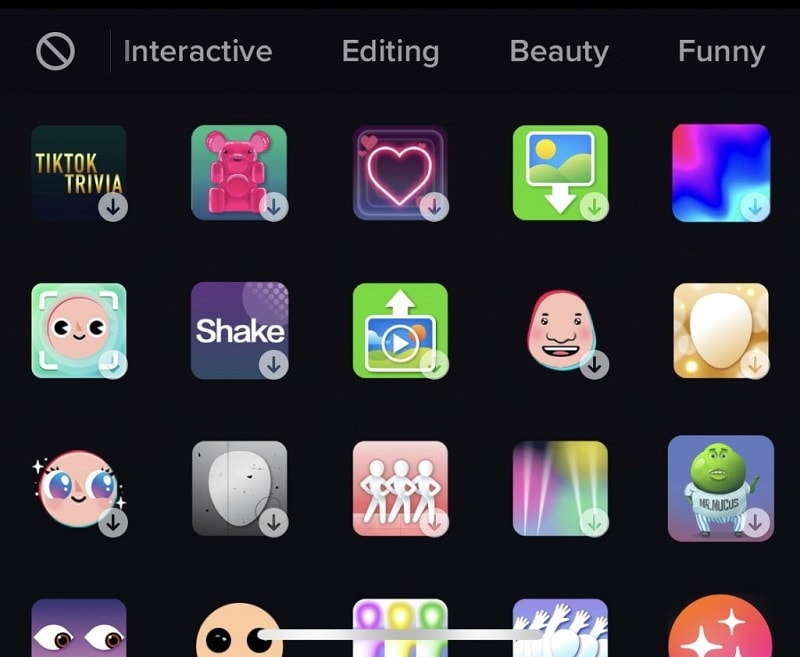
Step4 You may apply the filter to your video after you have officially made your decision. After doing this, leave the filter gallery and begin recording your video. Now that all of these procedures have been completed, you are able to capture your video with the effect on it.
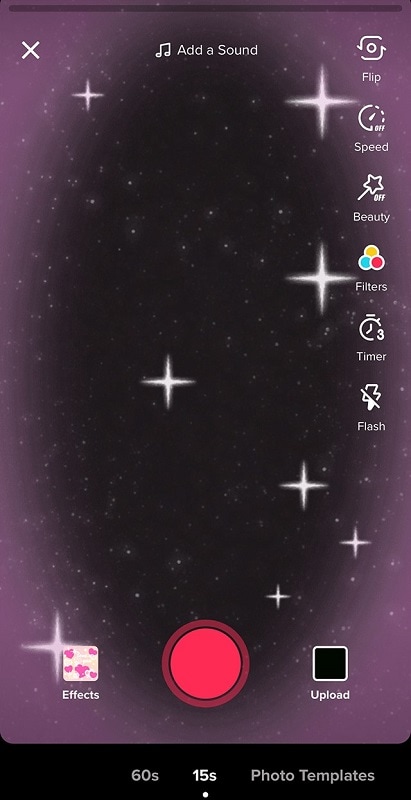
The Bottom Line
Filters on TikTok work similarly to filters on other social media applications. However, there is no option or function in the TikTok app that allows you to look for a filter effect under the Filters or Effects tab. However, since most TikTok users constantly upload videos with any filter and strive to put the filter’s name and hashtags on the films, you may search for some videos with the identical filter. Your films will get flair and individuality thanks to this simple technique, which also gives certain filters a chance to catch on as trends.
Free Download For Win 7 or later(64-bit)
Free Download For macOS 10.14 or later
Free Download For macOS 10.14 or later
Also read:
- [New] Best Box-Personalizing Online Spots Unique, Heartfelt Gestures
- [Updated] Crafting a Viral Path Best Hashtags for YouTube Riches
- [Updated] Hexa-Copters The Top Ten Selection for 2024
- Beat Bugs & Glitches: How To Ensure Smooth Gaming with Battlefield 5 on Your Desktop
- Forgot iPhone Passcode Again? Unlock iPhone 11 Pro Max Without Passcode Now | Dr.fone
- How to Fix FIFA 22 Game Crashes on Your Computer
- In 2024, How to use Snapchat Location Spoofer to Protect Your Privacy On Oppo Reno 9A? | Dr.fone
- In 2024, Hue Harmony Professionals Transforming Photos
- New 2024 Approved Create Stunning Videos Best Collage Apps for iOS Devices
- Solution Found! Overcoming the Sith's Blackout Glitch in Star Wars Battlefront 2
- Unveiling Gadgets with Tom's Equipment Guides
- WinX DVD Ripper Platinum - DVDコピー保護を容易に解除し、定番の高評価DVDコピーソフト
- World's First AMD Advantage Mini PC: Introducing the AtomMan G7 Pt with R9 7945HX & RX 760E XT Graphics
- Title: Updated How to Clone Yourself in Videos with Filmora?
- Author: Morgan
- Created at : 2024-09-30 06:39:05
- Updated at : 2024-10-06 00:32:11
- Link: https://ai-video-editing.techidaily.com/updated-how-to-clone-yourself-in-videos-with-filmora/
- License: This work is licensed under CC BY-NC-SA 4.0.
