:max_bytes(150000):strip_icc():format(webp)/GettyImages-1134410016-75c4b547097941299e55dceeef4b764c.jpg)
Updated How to Concatenate Videos Using FFmpeg for 2024

How to Concatenate Videos Using FFmpeg
Video editing is a crucial aspect of creating content for many people. Whether you’re a YouTuber, a marketer, or just someone who wants to share videos with friends and family, being able to edit and manipulate your videos is key. One of the most basic video editing tasks is concatenating videos, which combines multiple files to create one cohesive video.
FFmpeg is a powerful tool that allows you to do just that, and in this guide, we’ll walk you through the process of FFmpeg concatenate videos. Whether a beginner or an experienced video editor, this guide will provide you with all the information you need to seamlessly merge your videos. From installation to execution, we’ll cover it all so you can streamline your video editing process.
Overview and Installation of FFmpeg
FFmpeg is free, open-source project that allows you to record, convert, and stream digital audio and video. It is a command-line tool widely used in video editing and transcoding. FFmpeg can be used to concatenate videos and other tasks, such as adding subtitles, changing video resolution, and more. It is available for Windows, Mac, and Linux, making it a versatile and accessible tool for anyone to use.
Here’s how to install FFmpeg:
Step1 Log in to your Ubuntu server via SSH and update the package index.
$ sudo apt update
Step2 Install FFmpeg and all the required dependencies
$ sudo apt install ffmpeg
Step3 Verify the version of FFmpeg that you’ve installed.
$ ffmpeg -version
Prerequisite
Before we merge videos using FFmpeg, we must understand the various methods available to us. FFmpeg offers three ways to concatenate videos: a demuxer, a filter, or a protocol. However, each method has its own set of considerations, and the best method for you will depend on the properties of the videos you’re working with.
It’s crucial to ensure that all encoding-related properties align with your chosen method. This includes the timebase, height and width, codecs, and pixel format. Some methods require the videos you’re merging to have the same encoding, while others allow for different encodings. It’s essential to keep this in mind to ensure that the final video is seamless without any breaks. Remember that these prerequisites will help you have a smooth process.
Concatenate Videos With Same Codecs Using FFmpeg
If the videos you want to concatenate have the same codec, you can use the FFmpeg “concat” demuxer or protocol to join them together. This simple and efficient method doesn’t require re-encoding the videos, saving time and preserving the original quality. This section will review the steps to concatenate videos using the “concat” demuxer and “concat” protocols in FFmpeg.
Merge Videos With the “Concat” Demuxer
The concat demuxer in FFmpeg allows you to join together multiple video files with the same codecs by reading a list of file paths from a text file and demuxing them in sequence. Each video starts where the previous one finishes without needing to re-encode the videos. Here’s how to do it:
Step1 Create a .txt file and list the paths of the video files you want to merge.
Join_video.txt
file /Users/Video/input1.mp4
file /Users/Video/input2.mp4
![]()
Note: You can add more than two video files.
Step2 Run the FFmpeg command:
ffmpeg -f concat -safe 0 -i join_video.txt -c copy output_demuxer.mp4
![]()
Note: -safe 0 is added to accept any file name.
-c copy will copy all the streams.
As this method allows you to “stream copy” the files instead of re-encoding them, the concatenation is very fast. This can be a good option if you have videos with the same codecs and want to join them quickly without losing quality.
Join Videos With the “Concat” Protocol
The concat protocol in FFmpeg allows you to join together multiple video files in a specific format that supports file-level concatenation, such as MPEG-2 TS. However, it cannot be used for other video formats like MP4 and WEBM.
Here’s how to use the “concat protocol:
Step1 Run the FFmpeg command:
ffmpeg -i “concat:input1.ts|input2.ts” -c copy output_protocol.ts
![]()
Note: The concat protocol allows you to “stream copy” the files by adding the option -c copy.
Step2 Input the file name of the video using this code:
ffmpeg -i “concat:input1.mp4|input2.mp4” -c copy output_protocol.mp4
![]()
Note: If you try to use this method on video formats that are not supported, only the first input video will be saved in the output video. And the video ends after the first video.
Although this method is limited in terms of supported video formats, it’s very easy to use if you merge videos in the supported formats. It’s a single command in the terminal without needing a text file. Additionally, using the -c copy option makes it efficient as it doesn’t require re-encoding, saving time.
Concatenate MP4 Video Files of Different Codecs & Resolutions Using FFmpeg
If the videos you want to concatenate have different codecs or resolutions, you can still use FFmpeg to join them together. However, this method requires re-encoding the videos, which can take longer and may result in a loss of quality. This section will cover the steps to concatenate videos with different codecs or resolutions using FFmpeg.
Here’s how to do it:
Step1 Provide the names of the input files to FFmpeg.
ffmpeg -i file1.mp4 -i file2.mp4 -i file3.mp4 \
Step2 Use the filter_complex filtergraph parameter to instruct FFmpeg from where to take the audio and video.
-filter_complex “[0:v] [0:a] [1:v] [1:a] [2:v] [2:a]
![]()
Note: [0:v][0:a] means FFmpeg needs to take the video and audio from the 0th video (file1.mp4).
Step3 Tell FFmpeg to concatenate three files (n=3).
concat=n=3:v=1:a=1 [vv] [aa]“ \
![]()
Note: The v=1:a=1 implies one stream for the audio and one stream for the video.
Step4 Map these audio and video outputs to the final video container. This is done as follows:
-map “[vv]“ -map “[aa]“ mergedVideo.mp4
It is important to note that this method requires re-encoding the videos, which can take more time and may result in a loss of quality. However, it offers the flexibility of filtering the videos before concatenating them. The filter_complex method in FFmpeg allows you to concatenate videos of different codecs and resolutions. The final step is to map the audio and video outputs to the final video container. This can be done using the -map command.
Concatenate Videos With Multiple Audio Streams Using FFmpeg
Concatenating videos with multiple audio streams can be more complex than concatenating videos with a single audio stream. This section will cover the steps to concatenate videos with multiple audio streams using FFmpeg. We’ll be using the filter_complex method in FFmpeg, which allows you to manipulate and concatenate multiple audio and video streams in a single command. This method is more advanced but allows you to join videos with different audio streams and create a final video with multiple audio tracks.
Step1 Specify the input files and opening.mkv, episode.mkv, and ending.mkv:
$ ffmpeg -i opening.mkv -i episode.mkv -i ending.mkv -filter_complex
Step2 Use the filter_complex parameter in FFmpeg to specify the input streams for the video and audio.
[0:0] [0:1] [0:2] [1:0] [1:1] [1:2] [2:0] [2:1] [2:2]
![]()
Note: Single video stream ([0:0], [1:0], [2:0])
Dual audio streams ([0:1][0:2], [1:1][1:2], [2:1][2:2])
Step3 Use the concat filter to specify that you want to concatenate 3 files (n=3) with 1 video stream (v=1) and 2 audio streams (a=2). Specify the output streams as [v], [a1], [a2]:
concat=n=3:v=1:a=2 [v] [a1] [a2]
Step4 Use the -map option to map the output streams to the final video container:
-map ‘[v]‘ -map ‘[a1]‘ -map ‘[a2]‘ output.mkv
[Bonus] Join Videos Together With Filmora
While FFmpeg offers a wide range of options for joining videos together, it can have a steep learning curve for some users. An alternative method for joining videos is using Filmora. Wondershare Filmora is a user-friendly video editing software that allows you to easily join multiple videos. It’s a great option for users new to video editing or needing experience with command-line tools like FFmpeg.
Free Download For Win 7 or later(64-bit)
Free Download For macOS 10.14 or later
Filmora has a simple drag-and-drop interface, making adding, arranging, and editing videos and audio tracks easy. Additionally, it offers various features like split, trim, crop, merge, and more. It also has various effects, transitions, and animations to enhance the overall look of your video. With Filmora, you can create professional-looking videos with minimal effort.
How-to Steps
Here’s how to merge videos using Filmora:
Step1 Open Filmora and click “New Project.”

Step2 Go to “File“ > “Import Media“ > “Import Media Files“ to add your video files to the media library.

Step3 Drag and drop the files you want to merge from the media library to the timeline, and then you’ll get the merged video seamlessly.

Step4 Edit your video.

Step5 After editing, click the “Export“ tab to save your videos.

Conclusion
FFmpeg is a powerful tool that allows you to concatenate videos in various ways. Whether you’re working with videos of the same codecs and resolutions or videos with multiple audio streams, FFmpeg can handle it. However, for users new to video editing or needing experience with command-line tools, using Filmora can be a more user-friendly option. It offers a simple drag-and-drop interface and a variety of features and effects to enhance the overall look of your video.
Step2 Run the FFmpeg command:
ffmpeg -f concat -safe 0 -i join_video.txt -c copy output_demuxer.mp4
![]()
Note: -safe 0 is added to accept any file name.
-c copy will copy all the streams.
As this method allows you to “stream copy” the files instead of re-encoding them, the concatenation is very fast. This can be a good option if you have videos with the same codecs and want to join them quickly without losing quality.
Join Videos With the “Concat” Protocol
The concat protocol in FFmpeg allows you to join together multiple video files in a specific format that supports file-level concatenation, such as MPEG-2 TS. However, it cannot be used for other video formats like MP4 and WEBM.
Here’s how to use the “concat protocol:
Step1 Run the FFmpeg command:
ffmpeg -i “concat:input1.ts|input2.ts” -c copy output_protocol.ts
![]()
Note: The concat protocol allows you to “stream copy” the files by adding the option -c copy.
Step2 Input the file name of the video using this code:
ffmpeg -i “concat:input1.mp4|input2.mp4” -c copy output_protocol.mp4
![]()
Note: If you try to use this method on video formats that are not supported, only the first input video will be saved in the output video. And the video ends after the first video.
Although this method is limited in terms of supported video formats, it’s very easy to use if you merge videos in the supported formats. It’s a single command in the terminal without needing a text file. Additionally, using the -c copy option makes it efficient as it doesn’t require re-encoding, saving time.
Concatenate MP4 Video Files of Different Codecs & Resolutions Using FFmpeg
If the videos you want to concatenate have different codecs or resolutions, you can still use FFmpeg to join them together. However, this method requires re-encoding the videos, which can take longer and may result in a loss of quality. This section will cover the steps to concatenate videos with different codecs or resolutions using FFmpeg.
Here’s how to do it:
Step1 Provide the names of the input files to FFmpeg.
ffmpeg -i file1.mp4 -i file2.mp4 -i file3.mp4 \
Step2 Use the filter_complex filtergraph parameter to instruct FFmpeg from where to take the audio and video.
-filter_complex “[0:v] [0:a] [1:v] [1:a] [2:v] [2:a]
![]()
Note: [0:v][0:a] means FFmpeg needs to take the video and audio from the 0th video (file1.mp4).
Step3 Tell FFmpeg to concatenate three files (n=3).
concat=n=3:v=1:a=1 [vv] [aa]“ \
![]()
Note: The v=1:a=1 implies one stream for the audio and one stream for the video.
Step4 Map these audio and video outputs to the final video container. This is done as follows:
-map “[vv]“ -map “[aa]“ mergedVideo.mp4
It is important to note that this method requires re-encoding the videos, which can take more time and may result in a loss of quality. However, it offers the flexibility of filtering the videos before concatenating them. The filter_complex method in FFmpeg allows you to concatenate videos of different codecs and resolutions. The final step is to map the audio and video outputs to the final video container. This can be done using the -map command.
Concatenate Videos With Multiple Audio Streams Using FFmpeg
Concatenating videos with multiple audio streams can be more complex than concatenating videos with a single audio stream. This section will cover the steps to concatenate videos with multiple audio streams using FFmpeg. We’ll be using the filter_complex method in FFmpeg, which allows you to manipulate and concatenate multiple audio and video streams in a single command. This method is more advanced but allows you to join videos with different audio streams and create a final video with multiple audio tracks.
Step1 Specify the input files and opening.mkv, episode.mkv, and ending.mkv:
$ ffmpeg -i opening.mkv -i episode.mkv -i ending.mkv -filter_complex
Step2 Use the filter_complex parameter in FFmpeg to specify the input streams for the video and audio.
[0:0] [0:1] [0:2] [1:0] [1:1] [1:2] [2:0] [2:1] [2:2]
![]()
Note: Single video stream ([0:0], [1:0], [2:0])
Dual audio streams ([0:1][0:2], [1:1][1:2], [2:1][2:2])
Step3 Use the concat filter to specify that you want to concatenate 3 files (n=3) with 1 video stream (v=1) and 2 audio streams (a=2). Specify the output streams as [v], [a1], [a2]:
concat=n=3:v=1:a=2 [v] [a1] [a2]
Step4 Use the -map option to map the output streams to the final video container:
-map ‘[v]‘ -map ‘[a1]‘ -map ‘[a2]‘ output.mkv
[Bonus] Join Videos Together With Filmora
While FFmpeg offers a wide range of options for joining videos together, it can have a steep learning curve for some users. An alternative method for joining videos is using Filmora. Wondershare Filmora is a user-friendly video editing software that allows you to easily join multiple videos. It’s a great option for users new to video editing or needing experience with command-line tools like FFmpeg.
Free Download For Win 7 or later(64-bit)
Free Download For macOS 10.14 or later
Filmora has a simple drag-and-drop interface, making adding, arranging, and editing videos and audio tracks easy. Additionally, it offers various features like split, trim, crop, merge, and more. It also has various effects, transitions, and animations to enhance the overall look of your video. With Filmora, you can create professional-looking videos with minimal effort.
How-to Steps
Here’s how to merge videos using Filmora:
Step1 Open Filmora and click “New Project.”

Step2 Go to “File“ > “Import Media“ > “Import Media Files“ to add your video files to the media library.

Step3 Drag and drop the files you want to merge from the media library to the timeline, and then you’ll get the merged video seamlessly.

Step4 Edit your video.

Step5 After editing, click the “Export“ tab to save your videos.

Conclusion
FFmpeg is a powerful tool that allows you to concatenate videos in various ways. Whether you’re working with videos of the same codecs and resolutions or videos with multiple audio streams, FFmpeg can handle it. However, for users new to video editing or needing experience with command-line tools, using Filmora can be a more user-friendly option. It offers a simple drag-and-drop interface and a variety of features and effects to enhance the overall look of your video.
Create Chroma Key Written Text Effects in Filmora
Did you know it only takes a few clicks to key out the color in Filmora? It means that you can add green screen effects to many other objects. This article will show a cool chroma key effect you can try using written text.
Part 1. What Is Chroma Key Text Effect?
Composing of the chroma key effect is widely used in the gaming and newscasting industries. In this technique, you can make layering images and videos for the text together based on color hues.
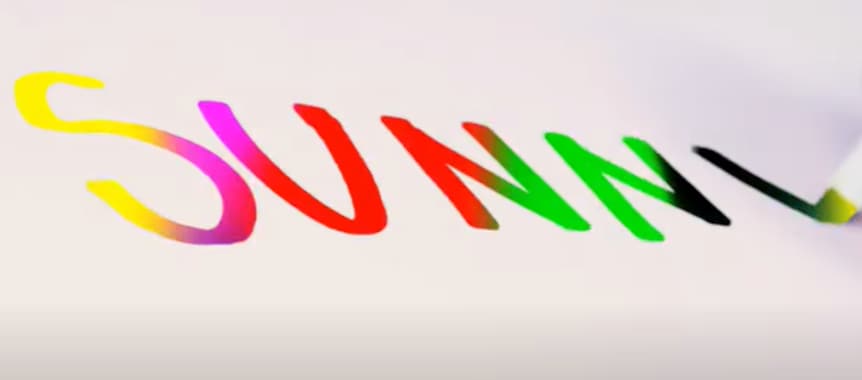
Video editors can eliminate the basis from a picture by automatically choosing a certain hue in post-production. An interactive animation results by adding different color schemes; it’s an easy way to make 3D motion videos.
To make the effects on text, we have to film the subject writing on white paper. For this, follow the below instructions:
Part 2. Filming Tips for Written Texts
To write a key text before adding the chroma effect, we have to film the writing process to understand your next project better. You can create your own by following these tips. We are just concluding a single example here.
Tip 1. A Pen and a White Paper
We need blank white paper with no boundaries and lines for writing a text. Because the chroma effect will embellish the other lines if present on paper. Make sure to choose a prominent color for writing a text.
We are using a purple color pen here for writing an essential text to make it more prominent, as shown below:
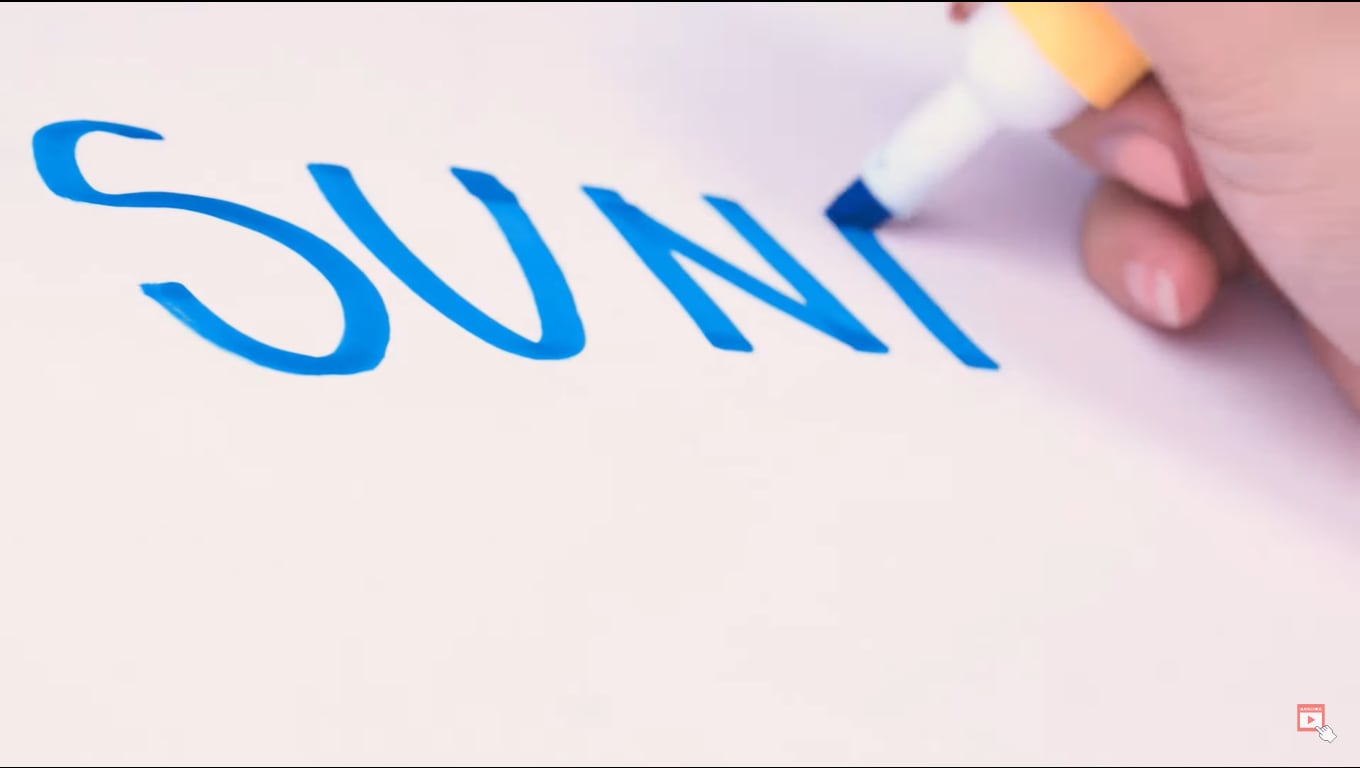
It all depends upon the contrast, and you can choose another color too but ensure that it’s more apparent during filming.
Tip 2. Different Color Paper
There are many chances that you don’t have only white paper in your studio, or your requirement is not going with a blank white sheet. Then you don’t need to worry because you can use different color papers too.
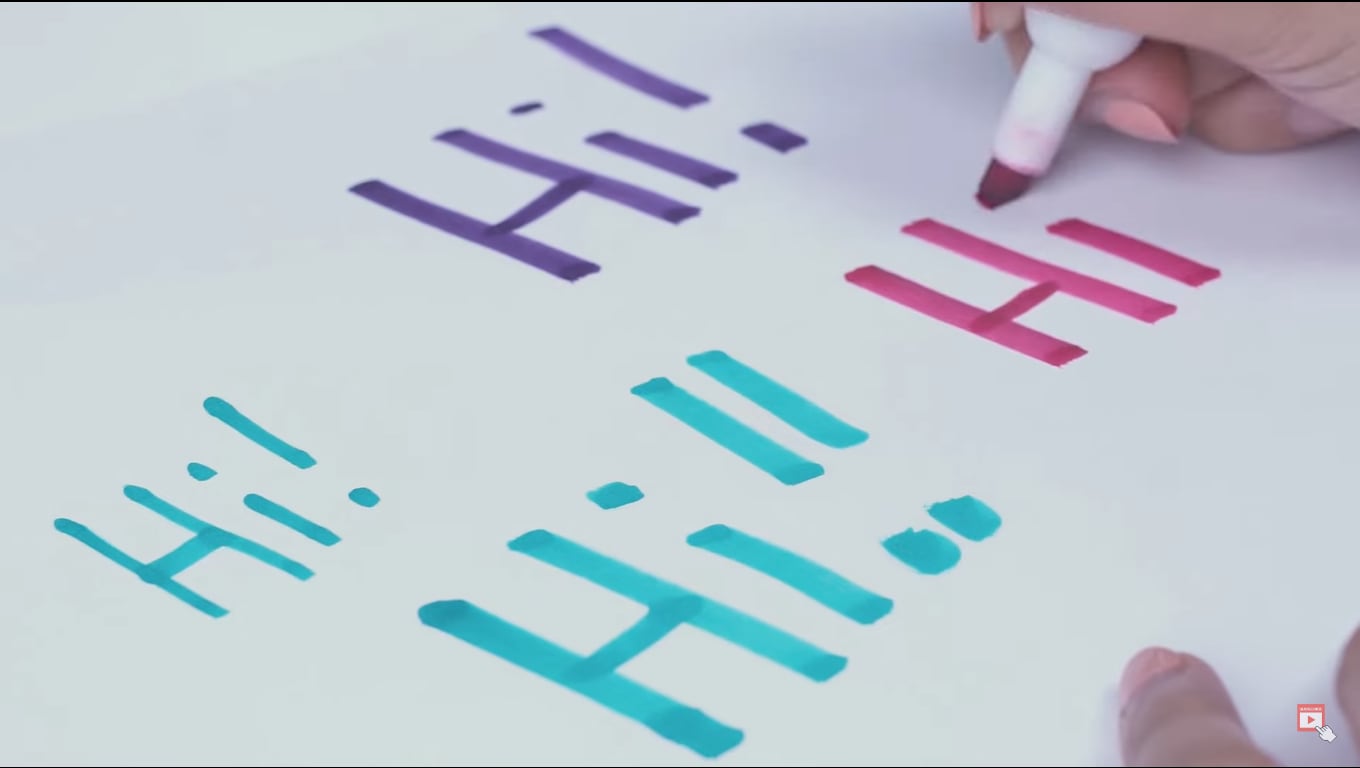
But always try to use clearer paper and a prominent pen or highlighter. See the below example of a different color paper with a different highlighter.
![]()
Note: Ensure that the colored pens have good contrast with colored paper. Don’t use dull color pens with bright color paper.
Tip 3. Camera Angles
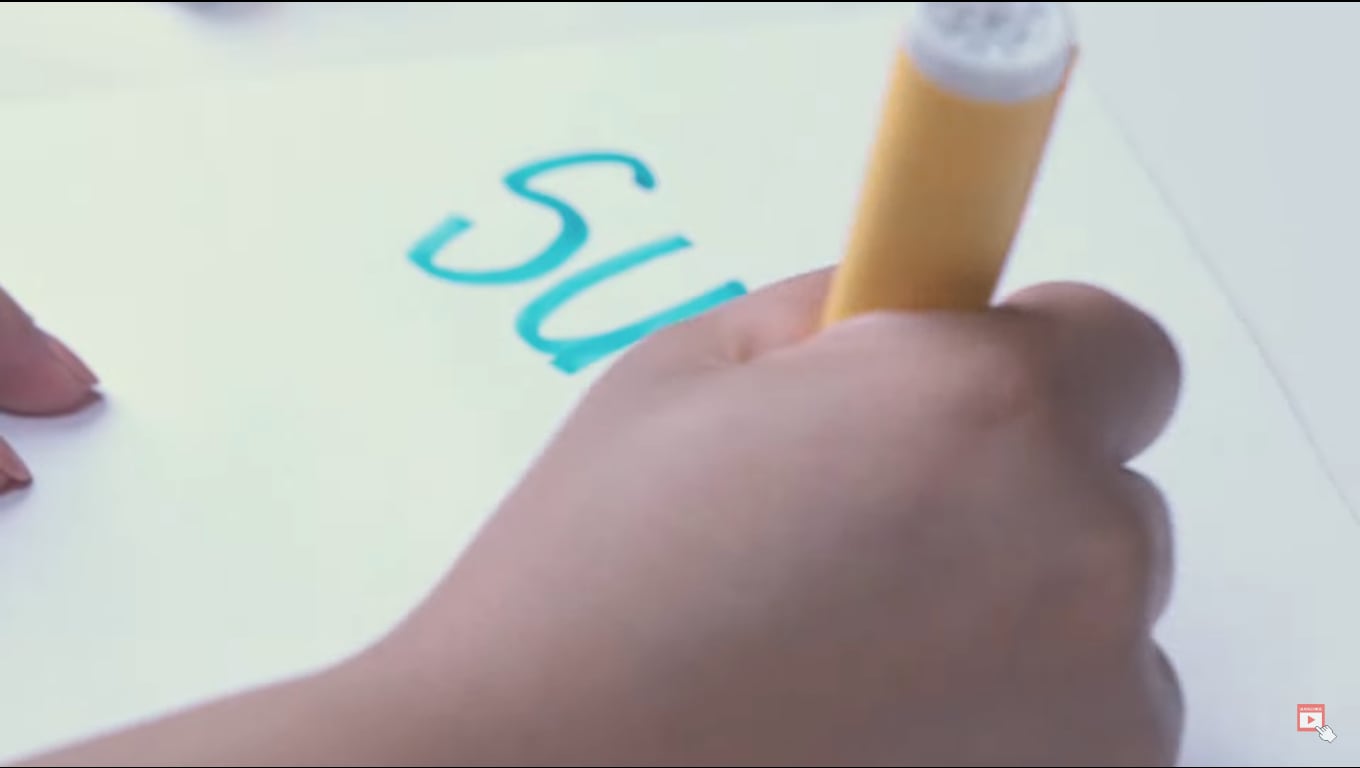
While filming a writing process for a video, you have to take care of the alignment of the camera. First, ensure the camera is at a suitable angle so it will not block the writing letters from the left side.
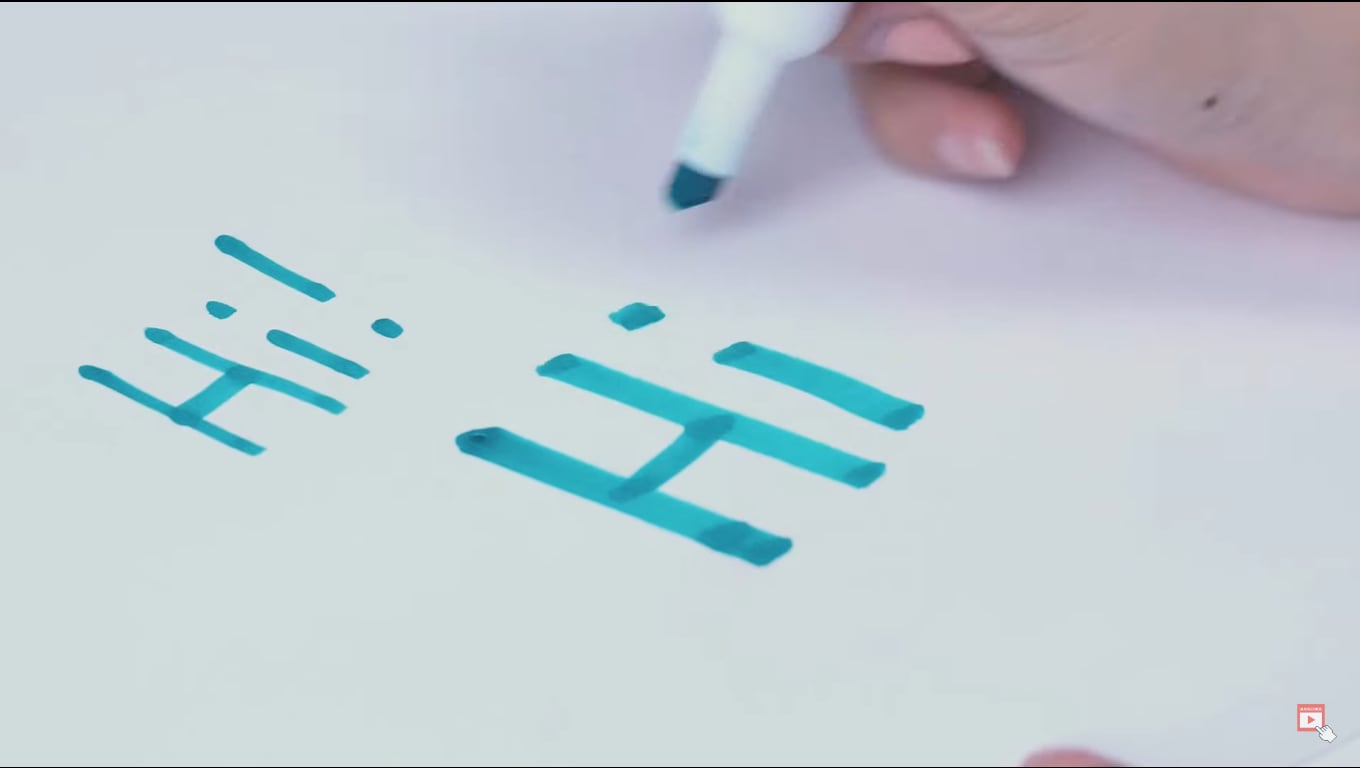
Sometimes, the writer’s hand blocks the letters on the left side during writing. Take note of this tip during filming a professional video, as shown below.
After checking the alignment of the camera, it’s time to look at what size we have to use for writing!
Tip 4. Larger Size of Letters
As we already said about the prominence of written text, we have to follow one more instruction related to the structure of the letters. Use the larger size and bold words when writing from a highlighter.
It is because the effect we insert during editing will be more standing and give a professional look to the video.
![]()
Note: You can create more shots till you get the right angle for a final video. Just focus on the camera alignment and highlighted words, then it will be all set.
After filming all the clips, you must edit those shots on the Filmora to get the chroma effect. Scroll more to get the step-by-step process!
Part 3. Editing the Chroma Key Text With Filmora
We need software that will give great setting choices and stock videos for a more professional look. For this, Wondershare Filmora will work more than a robot and give high-resolution results. To do the editing process on Filmora, follow the steps below and enjoy yourself with your followers.
Free Download For Win 7 or later(64-bit)
Free Download For macOS 10.14 or later
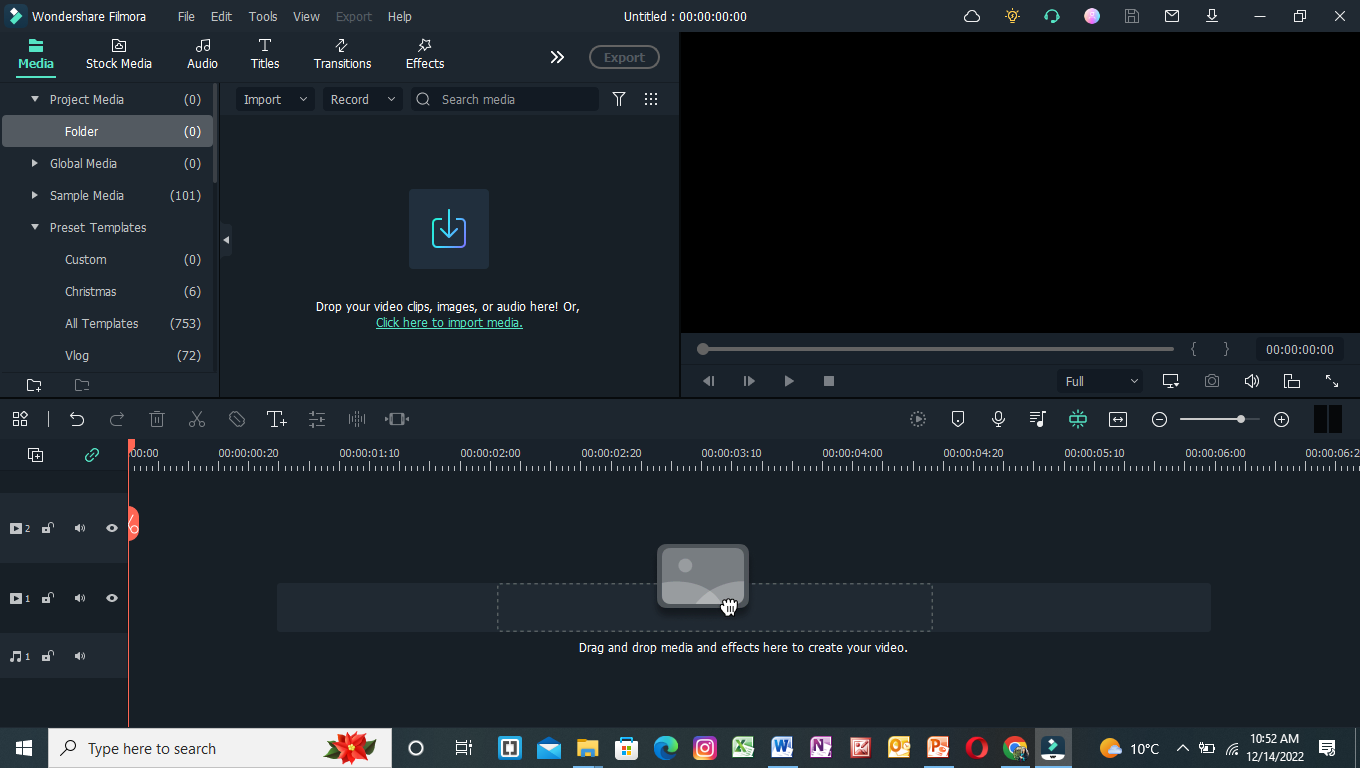
Step1 Download and install Wondershare Filmora
Launch Wondershare Filmora on your PC or Mac after downloading.
![]()
Note: If you want to enjoy its unlimited effect, you get its premium version quickly.
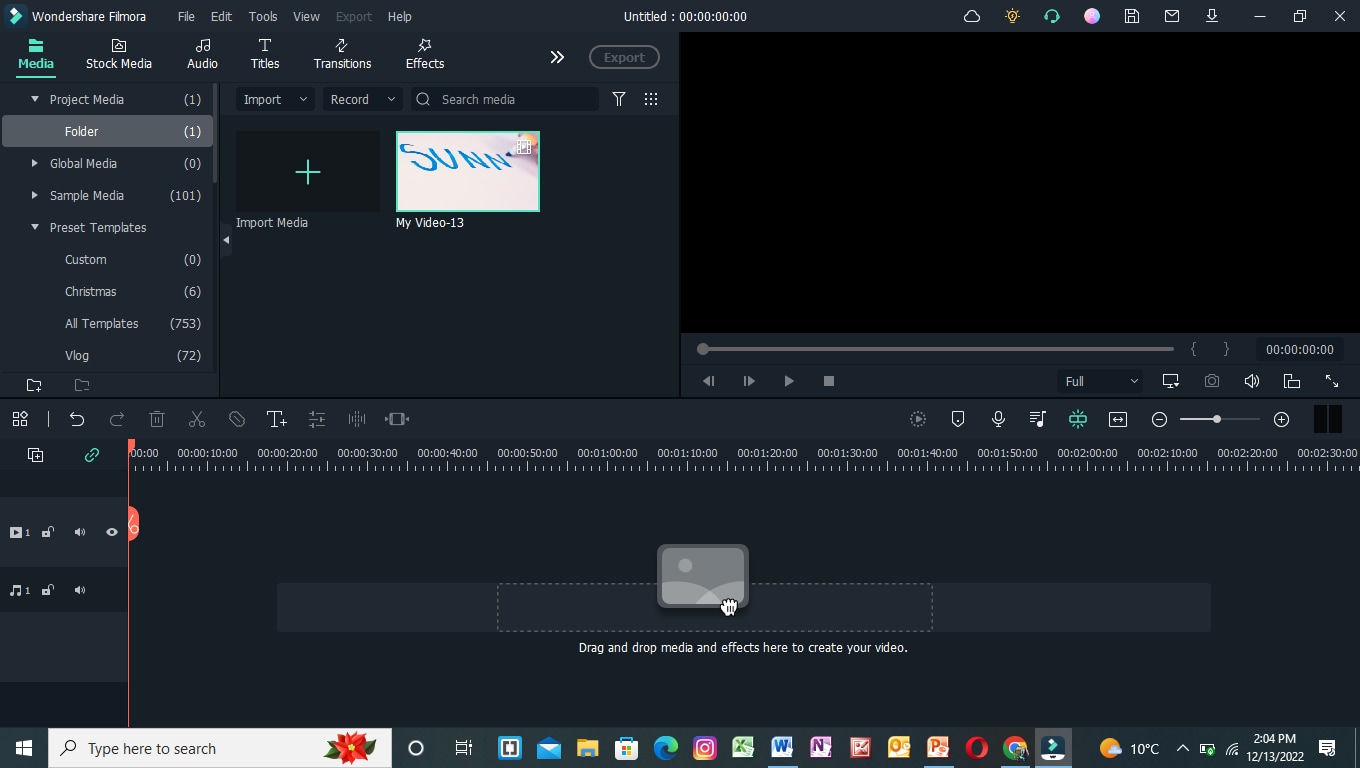
Step2 Import the clips to the Filmora
First, import the best footage into the filmora which you have shot. Ensure that the clip should have the best recording angle and that every word will be prominent on the page.
For this, click on Import Media and choose from the PC library what you want to edit.
Step3 Drag the clip to the timeline
Drag and drop the clip into the timeline from the import section. If you have more clips, choose first according to your script.
Add the text-written clip into the second video track because we have to insert the background into the first video track later.
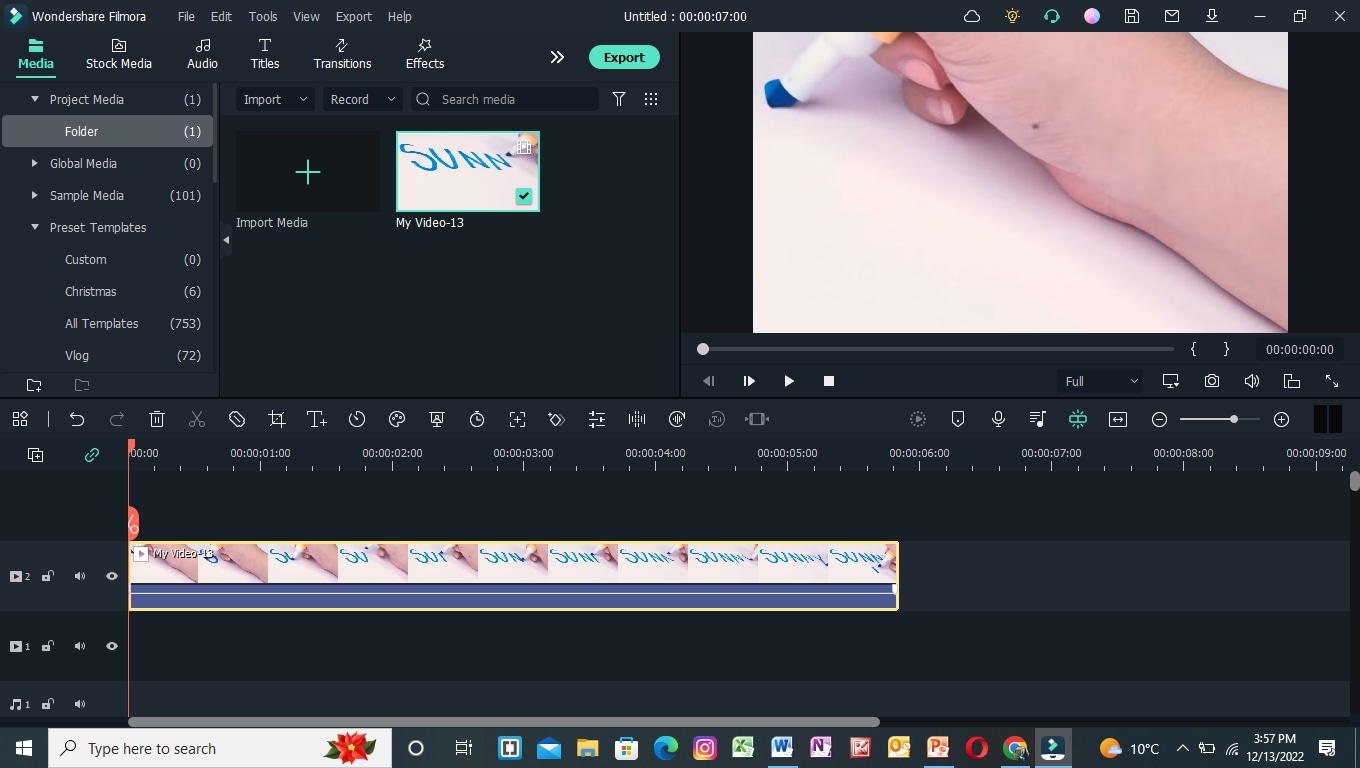
After inserting the clip into the timeline, it’s time to edit it. For this, keep following the below-mentioned steps!
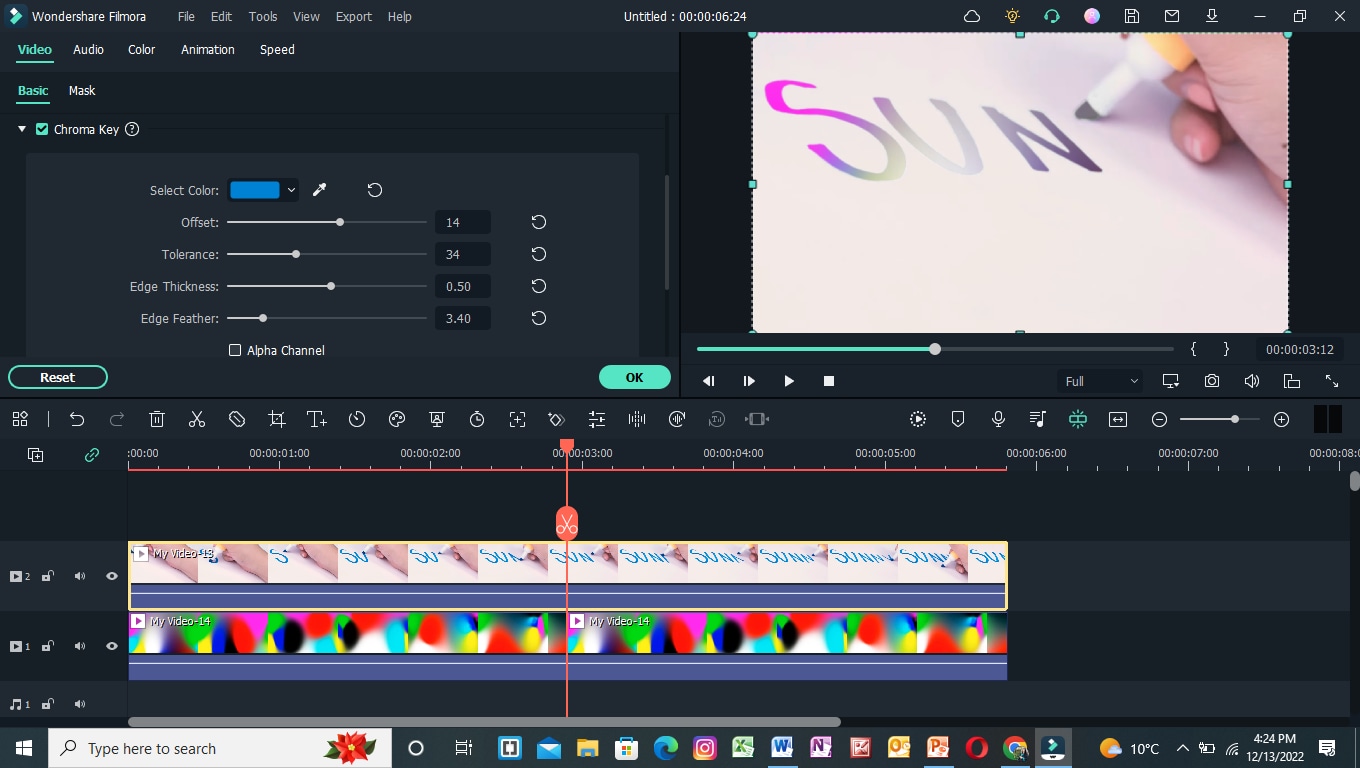
Step4 Chroma key settings
To edit the chroma key, you need to open the settings. For this, follow the below instructions:
- First, double-click on the clip in the timeline of the Filmora.
- Then, the setting section of the video will pop up at the top left side.
- Mark the tick in front of the Chroma Key section, and it will show the list of different features as shown below.
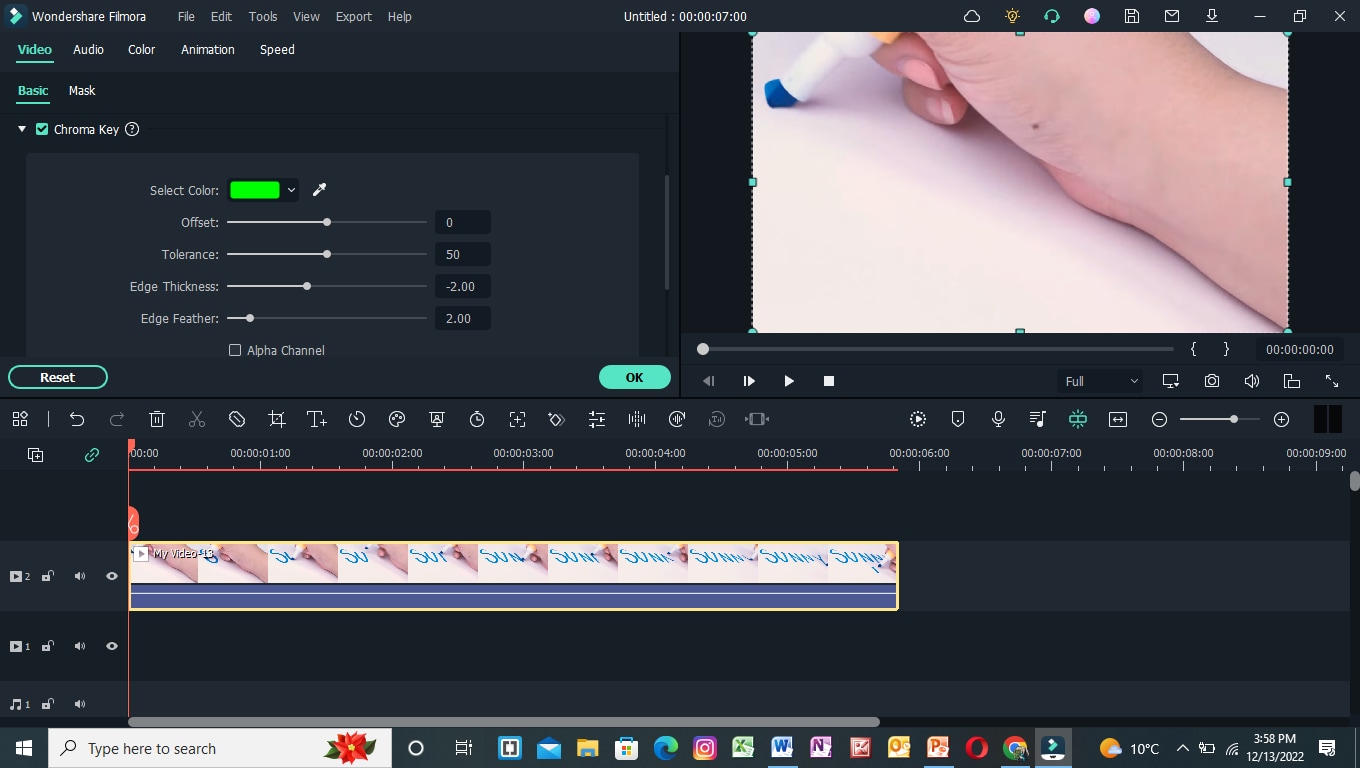
Step5 Color key out
To key out the specific color for changing its background, you have to perform the following actions:
- First, find the Select color option in the settings of the clip.
- Then click on the color dropper in front of the color tab.
- After that, pick the color dropper and move it on the video to select the color from the text.
![]()
Note: Ensure to select the color from the middle of the text for better key-out accuracy.
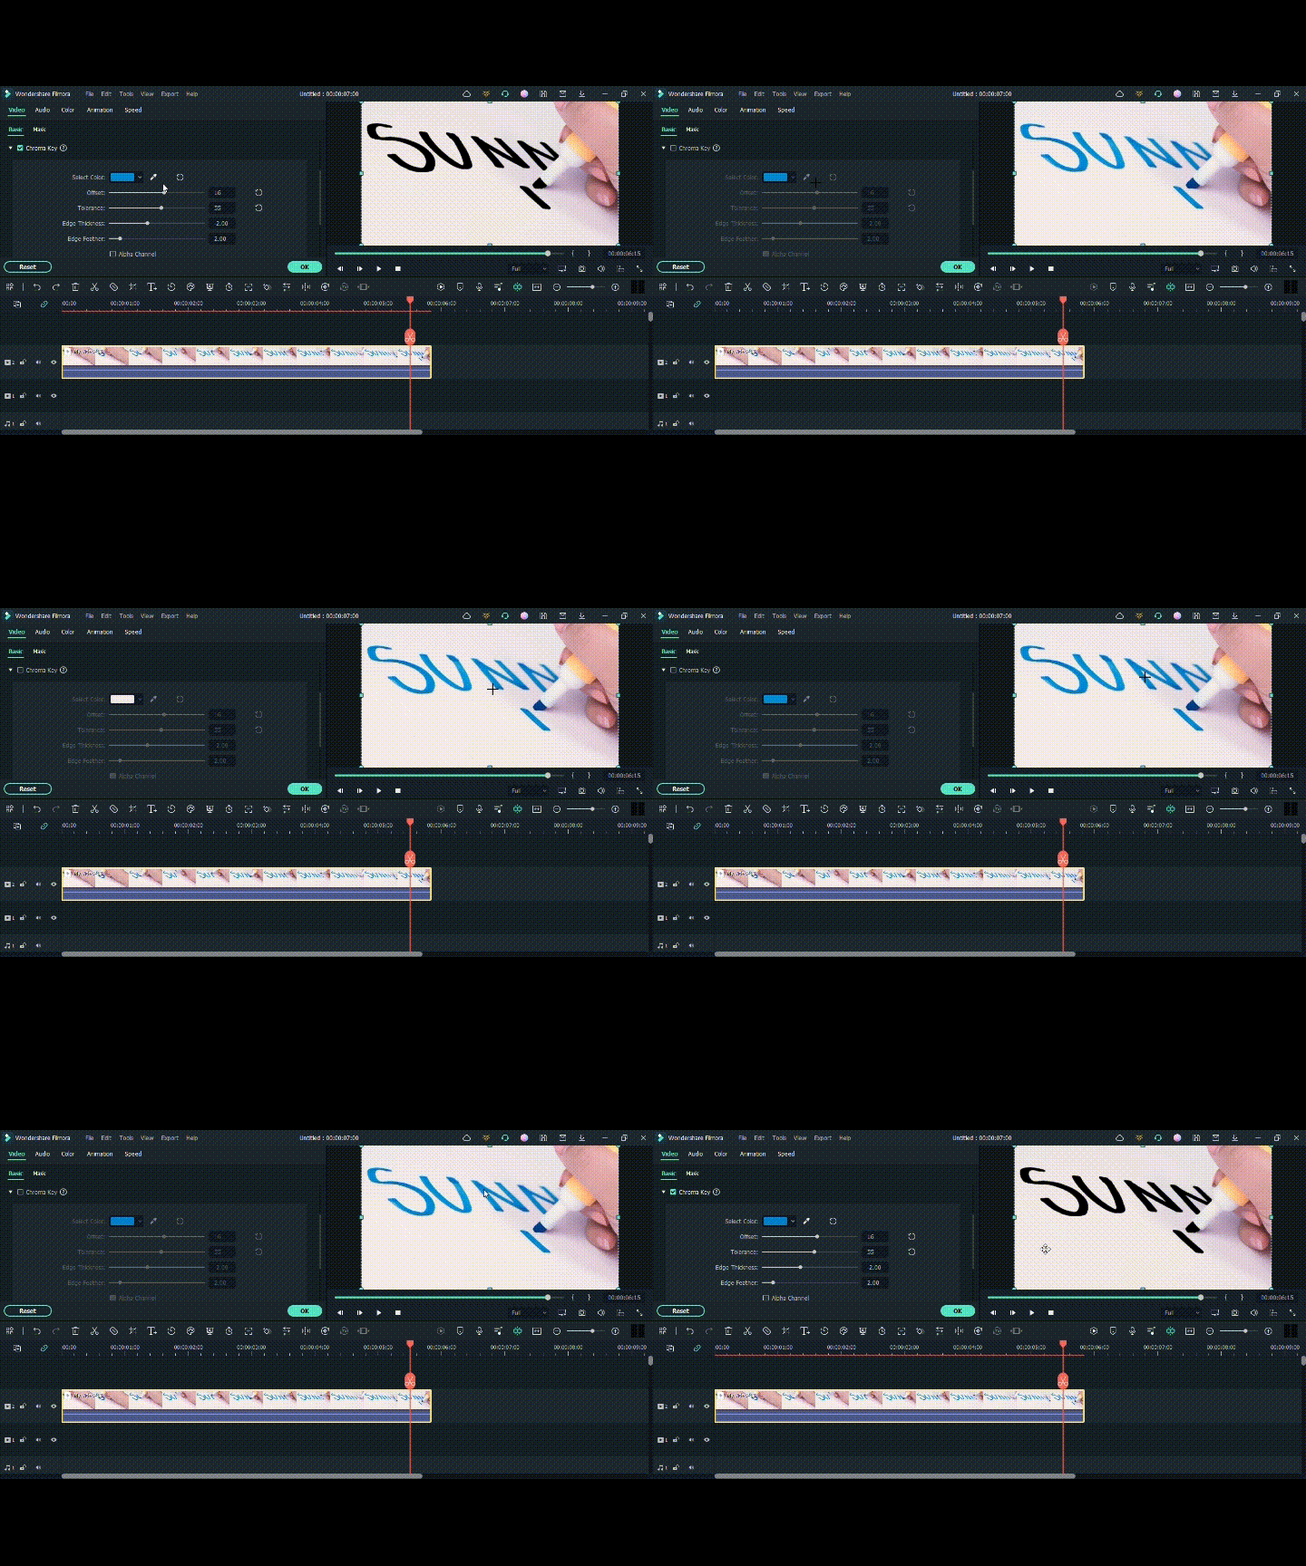
You have to adjust the size and thickness after selecting the key-out. For this, follow the next step!
Step6 Adjust the settings
To adjust the Chroma Key’s settings, set the offset, tolerance, edge thickness, and edge feather. Increase or decrease according to your range and that suits you the best.
Then click on Alpha Channel to mark the tick in front of the option. It is due to that chroma key effects will be more clearly shown.
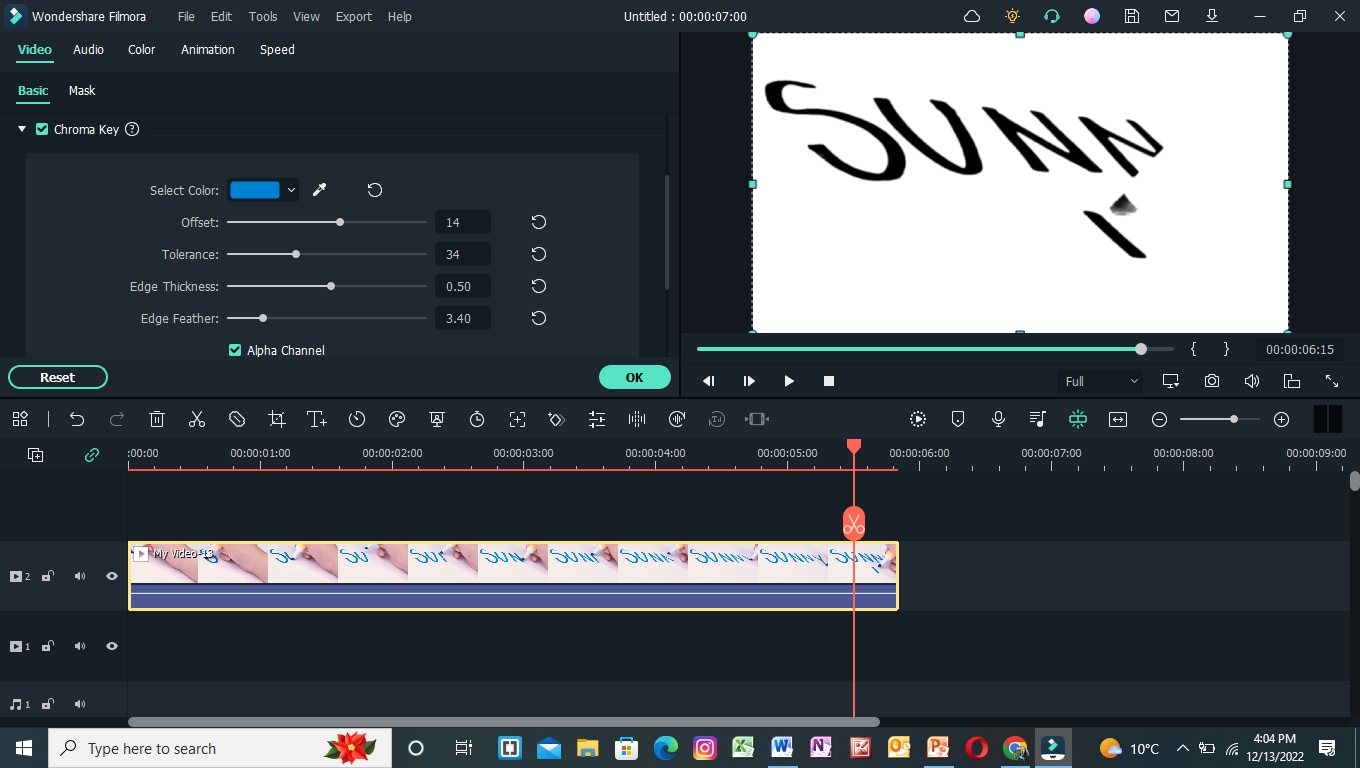
Now, it’s time to set the background after fixing all the settings of the chroma key effect. To perform this, scroll more to get to the next step.
Step7 Import background clips
You have to add an excellent motion background in the handwritten text video. For this, you must first import the background clip into the filmora. Then, click on Import Media and choose what you want from your PC.
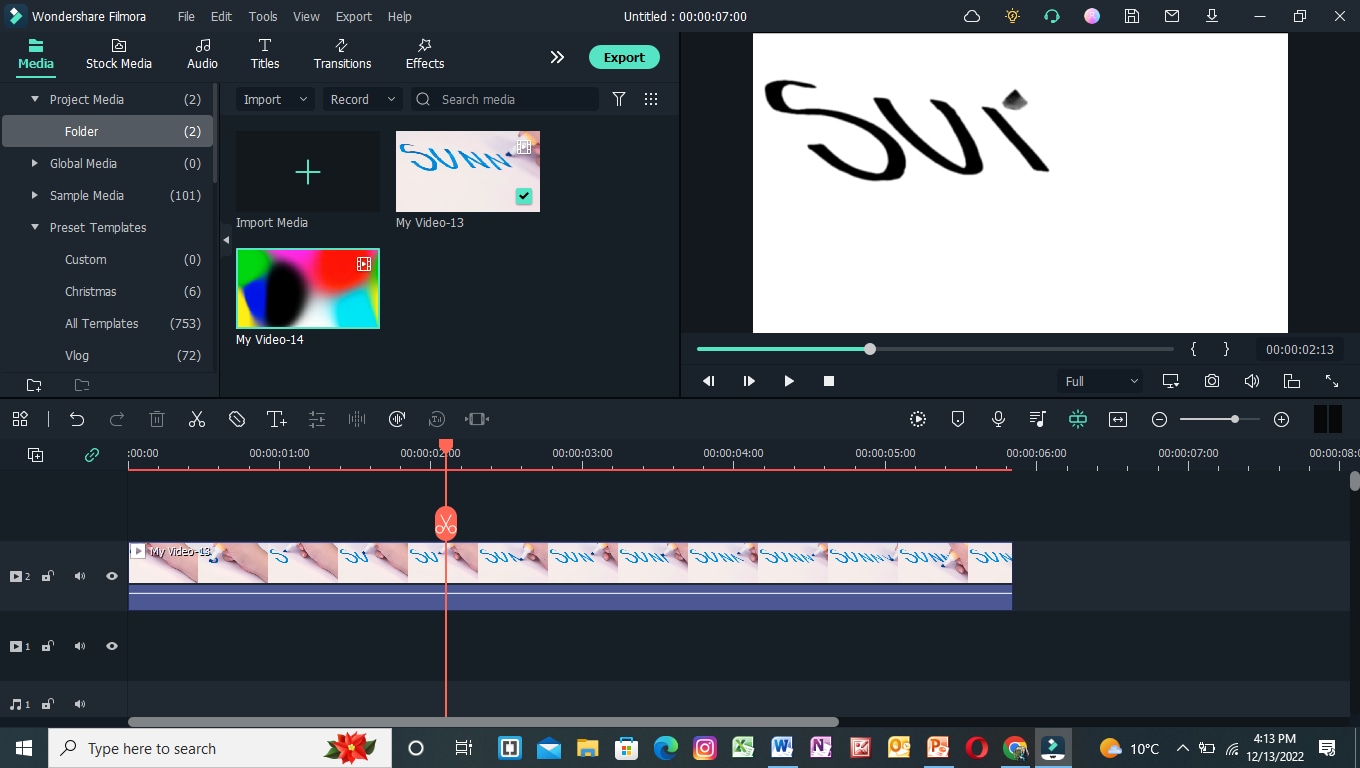
Step8 Add a background clip to the timeline
After importing the background clip, now drag and drop the clip into the timeline. Finally, add the background clip to the first video track at the bottom.
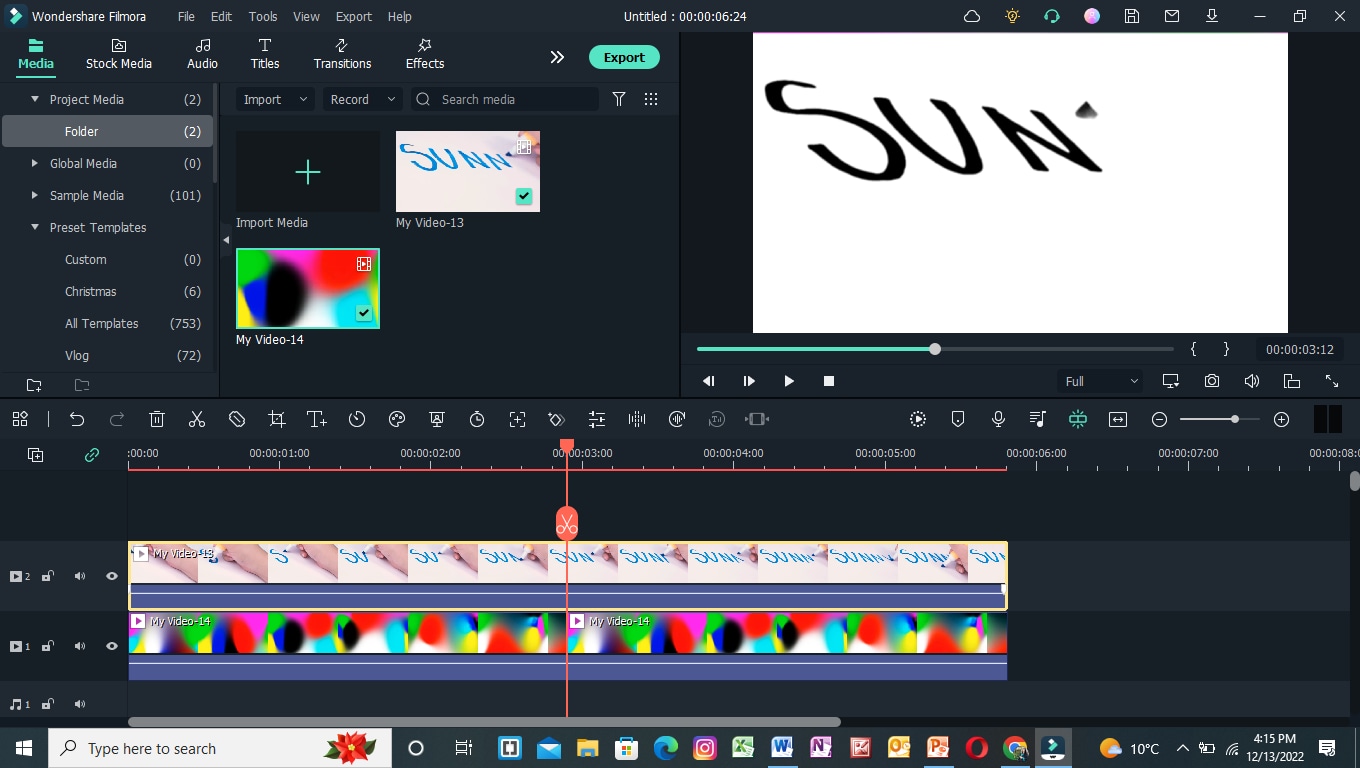
Step9 Turn off the alpha channel
The last step is merging the background clip with the first clip. For this, follow the below guidelines:
- First, double-click on the handwritten text video.
- It will show the settings section at the top left corner.
- Find the chroma key section and turn Alpha Channel
Final Results
You have all done with the steps and got such a fascinating result. Following the above tricks, you can easily make your vlogs and daily videos more professional and creative. Make sure to add a great and colorful background clip.
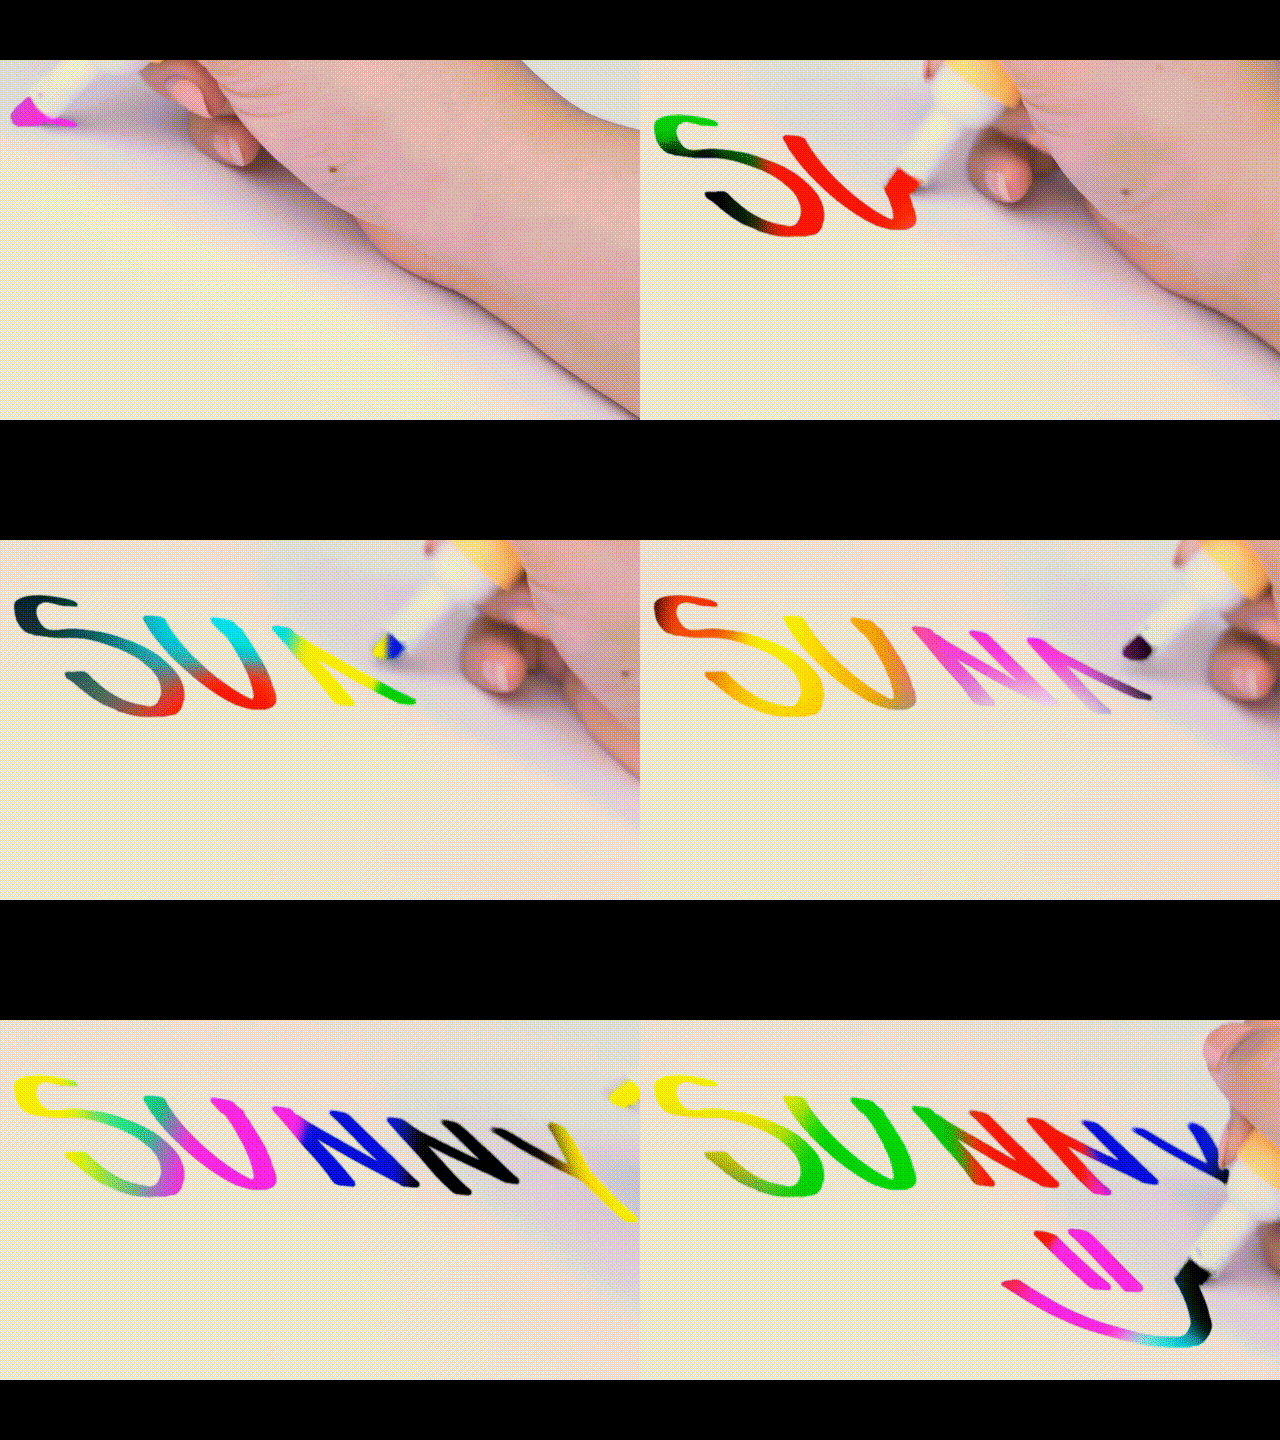
You can also use any other motion video of scenes rather than colorful videos to give a striking look.
Conclusion
Create more attractive looks and share them with your subscribers. Mainly, vloggers can attract many viewers by making the introductory part with this effect. Then, choose hundreds of other videos from the stock media and create different looks daily.
See how you can get editing tricks on Wondershare Filmora and use them in a few clicks to get an attractive look!
Tip 3. Camera Angles
While filming a writing process for a video, you have to take care of the alignment of the camera. First, ensure the camera is at a suitable angle so it will not block the writing letters from the left side.
Sometimes, the writer’s hand blocks the letters on the left side during writing. Take note of this tip during filming a professional video, as shown below.

After checking the alignment of the camera, it’s time to look at what size we have to use for writing!
Tip 4. Larger Size of Letters
As we already said about the prominence of written text, we have to follow one more instruction related to the structure of the letters. Use the larger size and bold words when writing from a highlighter.
It is because the effect we insert during editing will be more standing and give a professional look to the video.

![]()
Note: You can create more shots till you get the right angle for a final video. Just focus on the camera alignment and highlighted words, then it will be all set.
After filming all the clips, you must edit those shots on the Filmora to get the chroma effect. Scroll more to get the step-by-step process!
Part 3. Editing the Chroma Key Text With Filmora
We need software that will give great setting choices and stock videos for a more professional look. For this, Wondershare Filmora will work more than a robot and give high-resolution results. To do the editing process on Filmora, follow the steps below and enjoy yourself with your followers.
Free Download For Win 7 or later(64-bit)
Free Download For macOS 10.14 or later
Step1 Download and install Wondershare Filmora
Launch Wondershare Filmora on your PC or Mac after downloading.
![]()
Note: If you want to enjoy its unlimited effect, you get its premium version quickly.

Step2 Import the clips to the Filmora
First, import the best footage into the filmora which you have shot. Ensure that the clip should have the best recording angle and that every word will be prominent on the page.
For this, click on Import Media and choose from the PC library what you want to edit.

Step3 Drag the clip to the timeline
Drag and drop the clip into the timeline from the import section. If you have more clips, choose first according to your script.
Add the text-written clip into the second video track because we have to insert the background into the first video track later.

After inserting the clip into the timeline, it’s time to edit it. For this, keep following the below-mentioned steps!
Step4 Chroma key settings
To edit the chroma key, you need to open the settings. For this, follow the below instructions:
- First, double-click on the clip in the timeline of the Filmora.
- Then, the setting section of the video will pop up at the top left side.
- Mark the tick in front of the Chroma Key section, and it will show the list of different features as shown below.

Step5 Color key out
To key out the specific color for changing its background, you have to perform the following actions:
- First, find the Select color option in the settings of the clip.
- Then click on the color dropper in front of the color tab.
- After that, pick the color dropper and move it on the video to select the color from the text.
![]()
Note: Ensure to select the color from the middle of the text for better key-out accuracy.

You have to adjust the size and thickness after selecting the key-out. For this, follow the next step!
Step6 Adjust the settings
To adjust the Chroma Key’s settings, set the offset, tolerance, edge thickness, and edge feather. Increase or decrease according to your range and that suits you the best.
Then click on Alpha Channel to mark the tick in front of the option. It is due to that chroma key effects will be more clearly shown.

Now, it’s time to set the background after fixing all the settings of the chroma key effect. To perform this, scroll more to get to the next step.
Step7 Import background clips
You have to add an excellent motion background in the handwritten text video. For this, you must first import the background clip into the filmora. Then, click on Import Media and choose what you want from your PC.

Step8 Add a background clip to the timeline
After importing the background clip, now drag and drop the clip into the timeline. Finally, add the background clip to the first video track at the bottom.

Step9 Turn off the alpha channel
The last step is merging the background clip with the first clip. For this, follow the below guidelines:
- First, double-click on the handwritten text video.
- It will show the settings section at the top left corner.
- Find the chroma key section and turn Alpha Channel

Final Results
You have all done with the steps and got such a fascinating result. Following the above tricks, you can easily make your vlogs and daily videos more professional and creative. Make sure to add a great and colorful background clip.

You can also use any other motion video of scenes rather than colorful videos to give a striking look.
Conclusion
Create more attractive looks and share them with your subscribers. Mainly, vloggers can attract many viewers by making the introductory part with this effect. Then, choose hundreds of other videos from the stock media and create different looks daily.
See how you can get editing tricks on Wondershare Filmora and use them in a few clicks to get an attractive look!
How to Create a Makeup Video
This topic is one of the videos you can easily find on YouTube, apart from the fact that it’s easy to make a video like this, there are many people who want to learn how to do their own makeup, that is why this is the most search content on YouTube. Makeup tutorial is effective through video, since viewers can see exactly how makeup are executed, what products they are using and where to buy.
This kind of video is about sharing makeup techniques, makeup inspiration and beauty product reviews. So, whether you are a makeup artist or a makeup enthusiast you can surely record yourself, make a video and share to your YouTube channel to inspire everyone to be beautiful on their own.
In this article I will sharing may setup and tips on how you can create a makeup video on your YouTube channel.
How to Setup for Making a Makeup Video
You don’t need to have expensive gear to start making this kind of content, also having a small space in your room, a smart phone and a natural lighting from your window is good enough to start your video. But if you are willing to invest there are a lot of online shop selling affordable gear for your great setup.
So, let’s take a look at some of the basic gears recommended:
Smart Phone / Camera
Right now, if you don’t have a digital camera yet, cellphone or mobile phone is good enough to start making your makeup video. This is the most convenient and affordable option for filming a makeup video. I’m sure now a days most of the camera built in mobile phone are quality for making a good video.
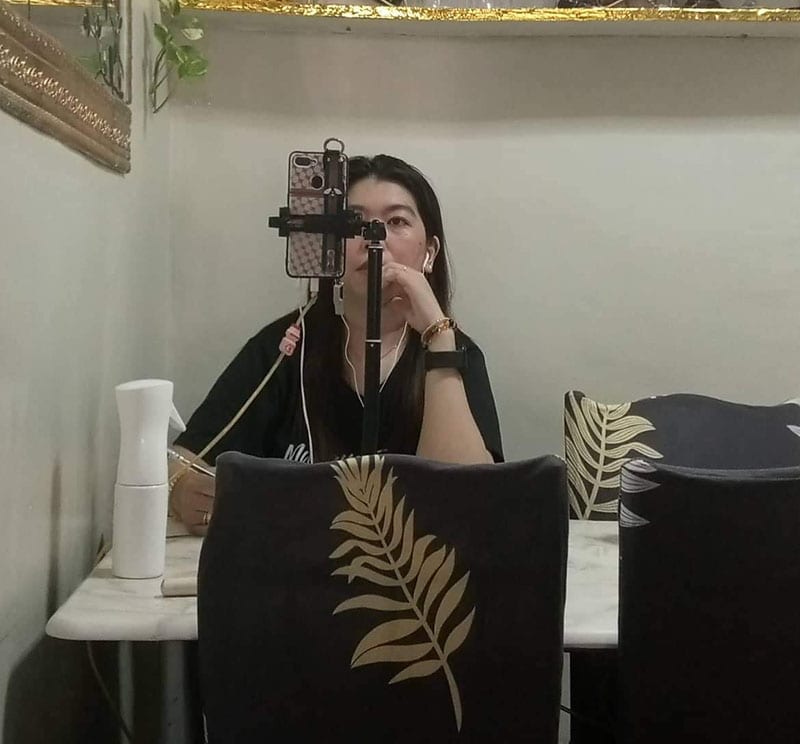
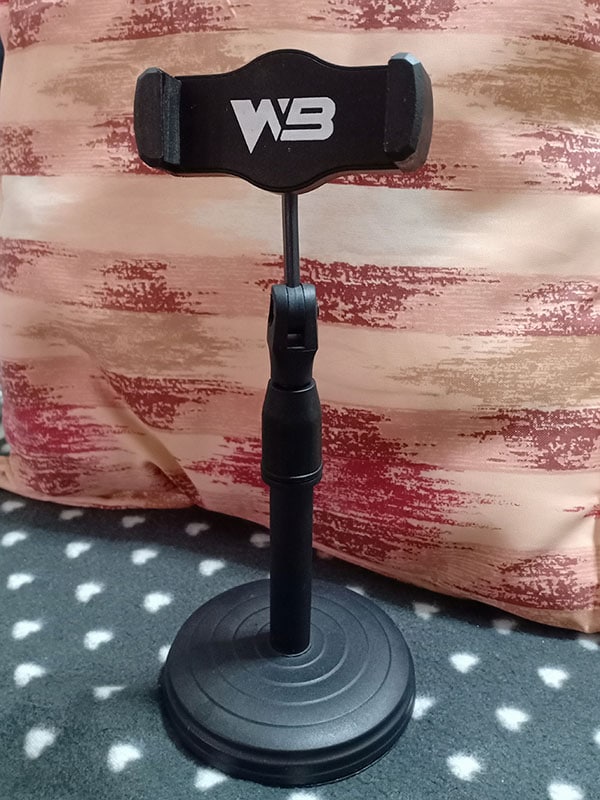
Cell Phone Stand
you must have a sturdy stand that allows to adjust height and rotation based on your needs.
If you don’t have a cell phone stand you can get anything that where you can put your camera on, but make sure that is just high enough that you can see your face for the tutorial.
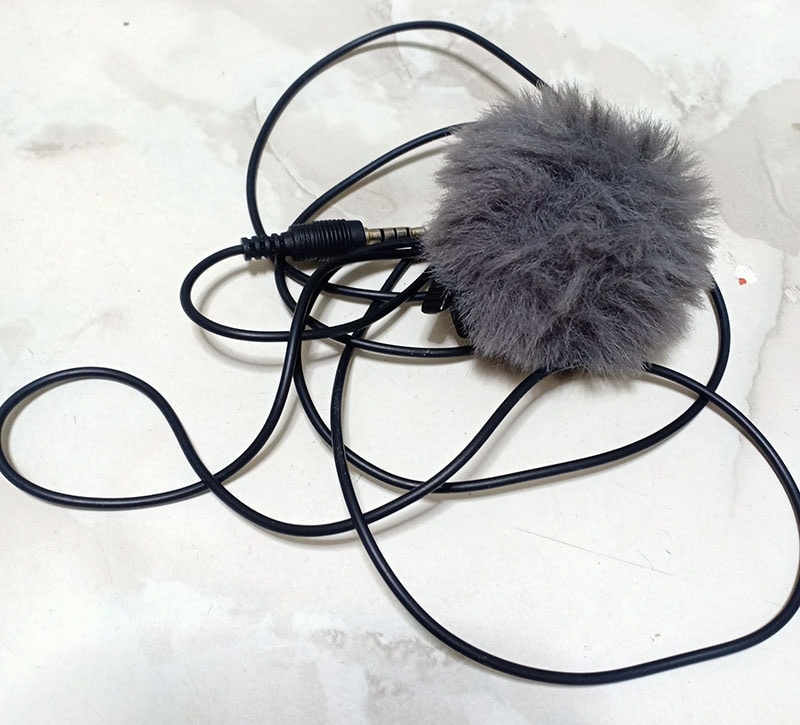
External Mic / Lapel Mic
To ensure you have both video and audio quality, it’s advisable to use an external microphone to record the audio separately, but there is lapel microphone that you can connect directly to your mobile phone make sure to use lapel mic that is compatible to your phone.
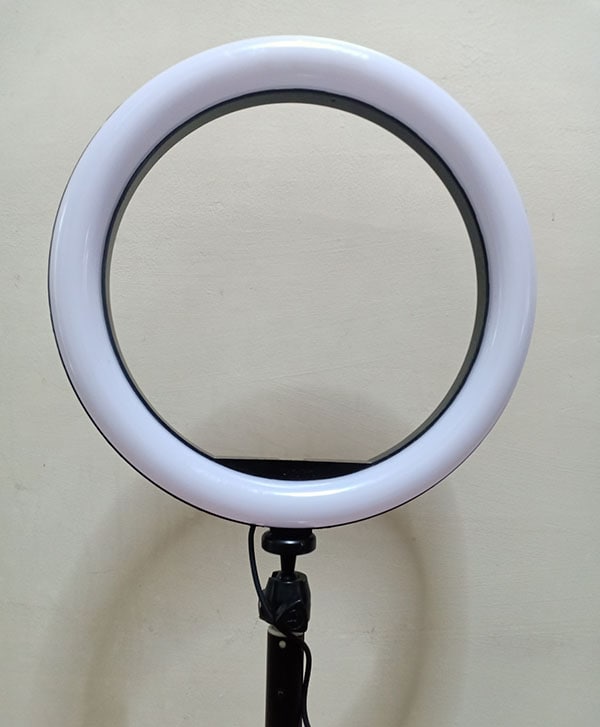
Ring Light
As I said natural lighting that comes from your window is your best friend when it comes to your lighting set up. Just find a window that the sun is shining through and use that light to your advantage.
but if you are willing to invest to have a quality video, just go with Ring Light. This light provides a soft, radial glow and its even capable as natural daylight. So, you don’t have to worry about flickers or distorts when filming, as the ring provides a continuous stream of light. Because you know lighting is one of the crucial setups for making all videos, especially to a makeup tutorial videos. You can always buy an affordable ring light online.
Editing Software
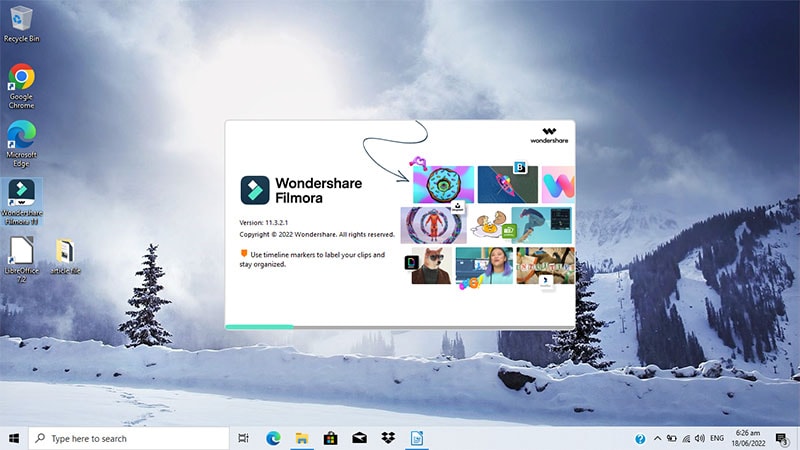
Other than the camera and the video footage itself, the video editing software is the mores essential steps as a content creator. There are usually awkward moments during filming that you may want to edit out, and you may also need to add effects and interesting transition. You can use a video editor that you can download from google.
Wondershare Filmora is a free, one of the easy-to-use software that most content creator used as their editing software. Filmora has editing tools like animation, effects, color change, transition, and overlays to make your video attractive and stands out to others.
Free Download For Win 7 or later(64-bit)
Free Download For macOS 10.14 or later
Step1Ready or set up your studio
A studio can be a corner of a room or if you have an extra space, you can dedicate an entire room to be your filming studio. Then get your camera or smart phone set up on a stable table with your cellphone stand to make it sturdy and make sure you have a suitable lighting. Dark video is not useful to anyone specially for something as detailed as applying a makeup.
Step2Create an outline
It may be helpful to create an outline or a script of your video beforehand so that you remember to do all the things your intent to do in your tutorial. This can also help you stay on track during filming so that you are remembering to demonstrate every part of your tutorial. Making a makeup tutorial video need also a step-by-step process so that you don’t forget anything that you will put or show in the video, you need to make a note or an outline for you to remember all because it so hustles to go back and record what you missed.
Step3Prepare Your Makeup
Before recording, prepare your makeup and make sure you use clean brushes. Set up the makeup you intent to use on the table or on you vanity near your filming setup. Lay out all you makeup and products that you want to use in this video. Have your makeup in front of you so that they are easily accessible during filming.
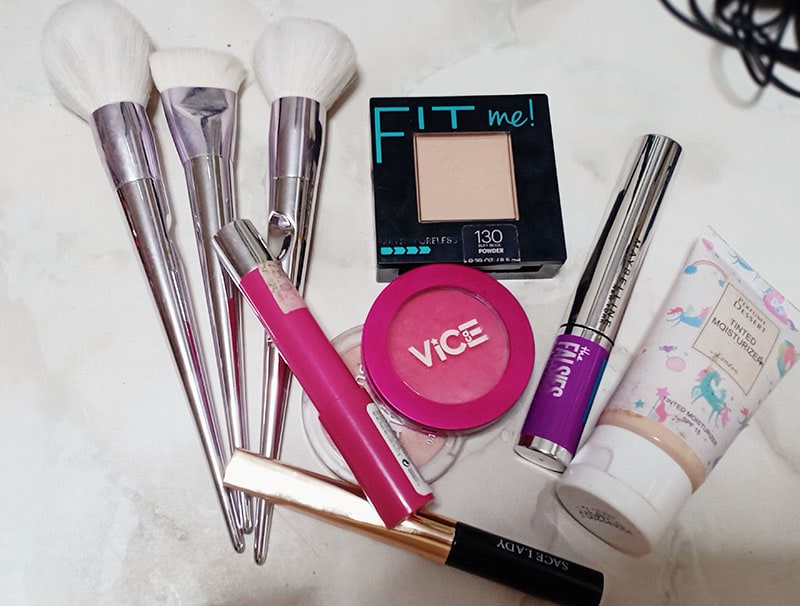
Make sure to have this thing in front of you before filming
- Makeup Brushes
- Skin and Eye Primer
- Moisturizer
- Foundation and Concealer
- Loose or Setting Powder
- Eyebrows Pencil or powder
- Contouring Palette
- Eyeshadow Palette
- Highlight powder
- Lipstick
- Setting Spray
Step4Concentrate and Film
Usually before filming I pray for guidance and knowledge. This is essential to me I do it before filming so that I can be guided and finish what I’m doing properly and less struggle.
If you are done the you can now start filming. Used your script to start talking to the camera, remember to be happy mood while doing this tutorial. Make your viewers feel good while watching you and don’t forget to tell them what product you are using. Also leave some comment to where they can buy the product you are using on your video.

Step5Edit and Upload
This is the last step for making a makeup video. Edit your video properly and make your video creative to attract more viewers. Cut the unwanted clips especially the part where you’re just talking. Because sometime viewers get bored if they only see you talking. Create a nice animation or transition to make your video stands out.
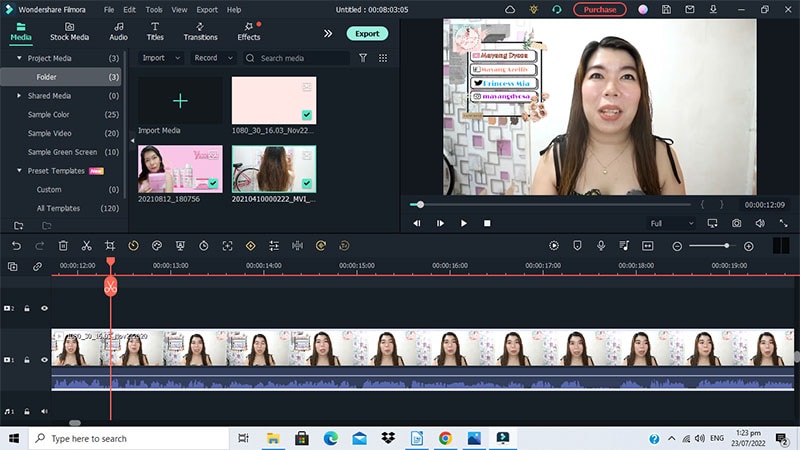
Then upload your finish video to your Youtube channel, make sure to public and promote your video so that more viewers will see how great you are in making this kind of videos. Remember to share your video to all your social media account to have more viewers and subscribers, don’t be shy to tell also your family and friends that you made a video so they can see the finished product of your hard work video tutorial and ask them to leave comment and suggestion if you have anything else to change or fix in making video, because for us content creator people’s feedback is very important so we can do better next time.
The Bottom Line
Now that you already knew the gear that you need to start setting up your studio for your makeup video and you also knew the step-by-step process, you are now ready to film a makeup video. But remember this you can’t just put makeup on your face style your hair and end the video. As a beauty vlogger, you’re an entertainer, so open dialogue is essential when filming. Ask your audience what they want to see, more importantly always remember to ask for feedback because for us content creator viewers feedback is very important so we can do better next time.If you’ve just started this inspiring journey of becoming a beauty Youtuber then hopefully these tips on how to create a makeup video will helped.
Free Download For Win 7 or later(64-bit)
Free Download For macOS 10.14 or later
Free Download For macOS 10.14 or later
Step1Ready or set up your studio
A studio can be a corner of a room or if you have an extra space, you can dedicate an entire room to be your filming studio. Then get your camera or smart phone set up on a stable table with your cellphone stand to make it sturdy and make sure you have a suitable lighting. Dark video is not useful to anyone specially for something as detailed as applying a makeup.

Step2Create an outline
It may be helpful to create an outline or a script of your video beforehand so that you remember to do all the things your intent to do in your tutorial. This can also help you stay on track during filming so that you are remembering to demonstrate every part of your tutorial. Making a makeup tutorial video need also a step-by-step process so that you don’t forget anything that you will put or show in the video, you need to make a note or an outline for you to remember all because it so hustles to go back and record what you missed.
Step3Prepare Your Makeup
Before recording, prepare your makeup and make sure you use clean brushes. Set up the makeup you intent to use on the table or on you vanity near your filming setup. Lay out all you makeup and products that you want to use in this video. Have your makeup in front of you so that they are easily accessible during filming.

Make sure to have this thing in front of you before filming
- Makeup Brushes
- Skin and Eye Primer
- Moisturizer
- Foundation and Concealer
- Loose or Setting Powder
- Eyebrows Pencil or powder
- Contouring Palette
- Eyeshadow Palette
- Highlight powder
- Lipstick
- Setting Spray
Step4Concentrate and Film
Usually before filming I pray for guidance and knowledge. This is essential to me I do it before filming so that I can be guided and finish what I’m doing properly and less struggle.
If you are done the you can now start filming. Used your script to start talking to the camera, remember to be happy mood while doing this tutorial. Make your viewers feel good while watching you and don’t forget to tell them what product you are using. Also leave some comment to where they can buy the product you are using on your video.

Step5Edit and Upload
This is the last step for making a makeup video. Edit your video properly and make your video creative to attract more viewers. Cut the unwanted clips especially the part where you’re just talking. Because sometime viewers get bored if they only see you talking. Create a nice animation or transition to make your video stands out.

Then upload your finish video to your Youtube channel, make sure to public and promote your video so that more viewers will see how great you are in making this kind of videos. Remember to share your video to all your social media account to have more viewers and subscribers, don’t be shy to tell also your family and friends that you made a video so they can see the finished product of your hard work video tutorial and ask them to leave comment and suggestion if you have anything else to change or fix in making video, because for us content creator people’s feedback is very important so we can do better next time.
The Bottom Line
Now that you already knew the gear that you need to start setting up your studio for your makeup video and you also knew the step-by-step process, you are now ready to film a makeup video. But remember this you can’t just put makeup on your face style your hair and end the video. As a beauty vlogger, you’re an entertainer, so open dialogue is essential when filming. Ask your audience what they want to see, more importantly always remember to ask for feedback because for us content creator viewers feedback is very important so we can do better next time.If you’ve just started this inspiring journey of becoming a beauty Youtuber then hopefully these tips on how to create a makeup video will helped.
Free Download For Win 7 or later(64-bit)
Free Download For macOS 10.14 or later
Free Download For macOS 10.14 or later
Step1Ready or set up your studio
A studio can be a corner of a room or if you have an extra space, you can dedicate an entire room to be your filming studio. Then get your camera or smart phone set up on a stable table with your cellphone stand to make it sturdy and make sure you have a suitable lighting. Dark video is not useful to anyone specially for something as detailed as applying a makeup.

Step2Create an outline
It may be helpful to create an outline or a script of your video beforehand so that you remember to do all the things your intent to do in your tutorial. This can also help you stay on track during filming so that you are remembering to demonstrate every part of your tutorial. Making a makeup tutorial video need also a step-by-step process so that you don’t forget anything that you will put or show in the video, you need to make a note or an outline for you to remember all because it so hustles to go back and record what you missed.
Step3Prepare Your Makeup
Before recording, prepare your makeup and make sure you use clean brushes. Set up the makeup you intent to use on the table or on you vanity near your filming setup. Lay out all you makeup and products that you want to use in this video. Have your makeup in front of you so that they are easily accessible during filming.

Make sure to have this thing in front of you before filming
- Makeup Brushes
- Skin and Eye Primer
- Moisturizer
- Foundation and Concealer
- Loose or Setting Powder
- Eyebrows Pencil or powder
- Contouring Palette
- Eyeshadow Palette
- Highlight powder
- Lipstick
- Setting Spray
Step4Concentrate and Film
Usually before filming I pray for guidance and knowledge. This is essential to me I do it before filming so that I can be guided and finish what I’m doing properly and less struggle.
If you are done the you can now start filming. Used your script to start talking to the camera, remember to be happy mood while doing this tutorial. Make your viewers feel good while watching you and don’t forget to tell them what product you are using. Also leave some comment to where they can buy the product you are using on your video.

Step5Edit and Upload
This is the last step for making a makeup video. Edit your video properly and make your video creative to attract more viewers. Cut the unwanted clips especially the part where you’re just talking. Because sometime viewers get bored if they only see you talking. Create a nice animation or transition to make your video stands out.

Then upload your finish video to your Youtube channel, make sure to public and promote your video so that more viewers will see how great you are in making this kind of videos. Remember to share your video to all your social media account to have more viewers and subscribers, don’t be shy to tell also your family and friends that you made a video so they can see the finished product of your hard work video tutorial and ask them to leave comment and suggestion if you have anything else to change or fix in making video, because for us content creator people’s feedback is very important so we can do better next time.
The Bottom Line
Now that you already knew the gear that you need to start setting up your studio for your makeup video and you also knew the step-by-step process, you are now ready to film a makeup video. But remember this you can’t just put makeup on your face style your hair and end the video. As a beauty vlogger, you’re an entertainer, so open dialogue is essential when filming. Ask your audience what they want to see, more importantly always remember to ask for feedback because for us content creator viewers feedback is very important so we can do better next time.If you’ve just started this inspiring journey of becoming a beauty Youtuber then hopefully these tips on how to create a makeup video will helped.
Free Download For Win 7 or later(64-bit)
Free Download For macOS 10.14 or later
Free Download For macOS 10.14 or later
Step1Ready or set up your studio
A studio can be a corner of a room or if you have an extra space, you can dedicate an entire room to be your filming studio. Then get your camera or smart phone set up on a stable table with your cellphone stand to make it sturdy and make sure you have a suitable lighting. Dark video is not useful to anyone specially for something as detailed as applying a makeup.

Step2Create an outline
It may be helpful to create an outline or a script of your video beforehand so that you remember to do all the things your intent to do in your tutorial. This can also help you stay on track during filming so that you are remembering to demonstrate every part of your tutorial. Making a makeup tutorial video need also a step-by-step process so that you don’t forget anything that you will put or show in the video, you need to make a note or an outline for you to remember all because it so hustles to go back and record what you missed.
Step3Prepare Your Makeup
Before recording, prepare your makeup and make sure you use clean brushes. Set up the makeup you intent to use on the table or on you vanity near your filming setup. Lay out all you makeup and products that you want to use in this video. Have your makeup in front of you so that they are easily accessible during filming.

Make sure to have this thing in front of you before filming
- Makeup Brushes
- Skin and Eye Primer
- Moisturizer
- Foundation and Concealer
- Loose or Setting Powder
- Eyebrows Pencil or powder
- Contouring Palette
- Eyeshadow Palette
- Highlight powder
- Lipstick
- Setting Spray
Step4Concentrate and Film
Usually before filming I pray for guidance and knowledge. This is essential to me I do it before filming so that I can be guided and finish what I’m doing properly and less struggle.
If you are done the you can now start filming. Used your script to start talking to the camera, remember to be happy mood while doing this tutorial. Make your viewers feel good while watching you and don’t forget to tell them what product you are using. Also leave some comment to where they can buy the product you are using on your video.

Step5Edit and Upload
This is the last step for making a makeup video. Edit your video properly and make your video creative to attract more viewers. Cut the unwanted clips especially the part where you’re just talking. Because sometime viewers get bored if they only see you talking. Create a nice animation or transition to make your video stands out.

Then upload your finish video to your Youtube channel, make sure to public and promote your video so that more viewers will see how great you are in making this kind of videos. Remember to share your video to all your social media account to have more viewers and subscribers, don’t be shy to tell also your family and friends that you made a video so they can see the finished product of your hard work video tutorial and ask them to leave comment and suggestion if you have anything else to change or fix in making video, because for us content creator people’s feedback is very important so we can do better next time.
The Bottom Line
Now that you already knew the gear that you need to start setting up your studio for your makeup video and you also knew the step-by-step process, you are now ready to film a makeup video. But remember this you can’t just put makeup on your face style your hair and end the video. As a beauty vlogger, you’re an entertainer, so open dialogue is essential when filming. Ask your audience what they want to see, more importantly always remember to ask for feedback because for us content creator viewers feedback is very important so we can do better next time.If you’ve just started this inspiring journey of becoming a beauty Youtuber then hopefully these tips on how to create a makeup video will helped.
Free Download For Win 7 or later(64-bit)
Free Download For macOS 10.14 or later
This Guide Is to Help You Select the Ways that Meet Your Needs, and It Is Easy for You to Combine 2 or More Videos Into One Video
You’ll need to combine the video segments you just recorded to create a beautiful video most of the time. You may mix and merge multiple video clips using a variety of desktop applications, smartphone apps, and web resources. You don’t have to try each one to see which one is the best for merging video clips in multiple formats, frame rates, or even aspect ratios.
This guide is to help you select the ways that meet your needs, and it is easy for you to combine 2 or more videos into one video. Therefore, the four ways to combine 2 or 3 videos or more into one include the following with a step-by-step guide:
Combining 2 or 3 Videos into 1 Using Filmora
Filmora Video Editor is a video editing software which allows you to merge multiple videos and edit them in the best way you can. Filmora Video Merger makes adding videos, audio files, and images simple. You can effortlessly combine numerous films into one with Filmora video editing software and apply transitions, overlays, filters, and many other features.
For Win 7 or later (64-bit)
For macOS 10.14 or later
Follow the step-by-step guide to merge videos using filmora:
Step 1: Import Video Files
You must load the video clips into Filmora after it has been installed. Then, to upload your video files, click Import or drag them directly to the media library. They’ll appear as thumbnails in the left pane when you’ve imported all of them.

Step 2: Drag and Drop
Drag & drop the files you wish to merge from the media library to the timeline, and the merged video will appear in real-time. The Preview window can be viewed by pressing the Play button. You can export it immediately if you’re happy with it, but you can also improve it by adding transitions, filters, or overlays.

Step 3: Trim or Add Transition (Optional)
Please click the video clip in the timeline to cut your videos. To cut, first, move the play head to the desired location, then click the slipt icon in the toolbar. After that, shift the play to a different frame. Then, finally, click the split icon again.

Select Transition from the top menu and drag your preferred transition effect between two clips. You can also Apply to Favourite any transition by right-clicking on it.

Step 4: Export Combined Video File
After making all the adjustments, click the EXPORT tab to export your videos. You may export or convert your original video formats to iPhone, iPad, HTC, Samsung Galaxy, and other portable devices. On your devices, they’ll run without a hitch.

Combining 2 or 3 Videos into 1 Using Photos App on Windows 10
Photos App on Windows 10 empowers you to experiment with the photos and videos to make them look better. It allows you to merge multiple videos and edit the video content, compare videos, and create films. It is easy to use and offers all basic viewing and fixing options.
Follow the step-by-step guide to merge videos using Photos App on Windows 10:
Step 1: Lauch the Photos App
You might wish to put all of the films or photographs you want to merge into one folder on your computer before going to the Photos app. It will aid in the speeding up of the entire procedure.
Type ‘Photos’ into your computer’s search bar, then click on the program that appears.

Step 2: Start a New Video Project
You want to start your video production after launching the Photos app. To do so, go to the top right corner of your screen and select New Video Project, which will take you to the editor mode.
The second part of this procedure is known by several titles in different versions of Windows 10’s Photos app, such as creating a video with music, creating a film with text, and a new video project.
Launching the editor mode directly from the photo if you’re using photos in your video project is also possible. In that case, consider the following:
- Open your file in the Photos app
- Select Edit & Create
- Select Create a movie with text from the drop-down menu.

You can name the project by typing it in the name tab in the top left corner of your screen. Then, by clicking the pencil icon next to your project’s name, you can alter your title at any moment.
The video editor in the Photos app won’t allow you to upload files until you’ve given your project a title. When you try to add a file, a pop-up choice will display, and you may write in the project’s name and then click OK or Create a Video to continue.
Step 3: Import Files
To add files to your video project, go to the Project Library portion of your screen and click the + icon that you see in the top left corner.
If you have all of the files you wish to merge into one video in one folder, you can select them all and add them to your project using the ‘This PC’ option. Alternatively, you can add the files one by one.
The tool will automatically combine all of your files into a single video. Then, you can alter the video order in the Storyboard and edit them.
Go to your Project Library and drag all of the files you added to the video editor into the Storyboard section to get started on your project.

Step 4: Trim Video Clips
You can also trim your clip in the Photos app if necessary. Here’s how to do it:
- On your Storyboard, select the Trim icon.
- Using the handlebar, shorten or prolong the duration of your clip as desired.
- Select “Done” from the drop-down menu.

Step 5: Remove/Add Sound
You can now select numerous music options from the Windows library or upload your own.
Select the Background Music option in the top-right corner of the screen. Then, mute or adjust the volume of your video.
Or select Add an audio file from the Custom Audio menu in the top-right corner of your screen, select the file you want to Import, click Open, make any necessary changes to the audio file, and select Done.

Step 6: Add Text
You can add text to your video project using the Windows video editor, but there aren’t many font styles to choose from. You’ll also have to add and optimize your text for each clip separately, which isn’t the most time-efficient approach.
To add text to your clips, follow these steps:
- Choose Text
- Select the small box icon on the clip you want to add text to
- In the empty box, type the text you wish to add.
- Select the font style you want to use.
- Choose where your text should show in the video.

Step 7: Export/Save Merged File
You can save your video project to your computer after being happy with it. To do so, follow these steps:
- Click the Export, Share, or Finish movie option in the top right corner of your screen.
- Select the video resolution in which you want your video to be saved.
Combining 2 or 3 Videos into 1 Using VLC
VLC is a widely used media player that is free to download and use on various platforms, including Linux, Mac OS X, Windows, and others. In addition, this open-source utility includes a wide range of editing tools, including converting, combining, and others, in addition to video playing. As a result, VLC is an excellent program to use if you’re seeking a cheap way to merge videos quickly and efficiently.
Step 1: Import files
VLC Media Player is a free media player that you can download, install, and use on your computer. First, click the Media tab on the main screen, then pick Open Multiple Files from the drop-down menu.

Step 2: Open Video Files
Select the File tab from the pop-up box, then click the +Add button to browse and load the videos to be merged. Here you can upload multiple files.
You can upload as many videos as you want. There are no such limitations to merge video files.

Step 3: Convert
Go to the Play menu and select the Convert option from the drop-down menu.

Step 4: Save Merged Video Files
You’ll be taken to a new Convert window, where you can save the merged file to your desktop. Finally, Click on the Play button to begin the VLC video merge process.
Once the process is completed, you can export your merged video files to any platform you like.

FAQs
Q1. How to merge two MP4 videos into 1?
Whether you have two MP4 clips or videos with different extensions, you can easily merge them into one with Filmora. To do that, position both videos on the same track without space. Then, export the project in your desired output format, such as MP4.
Q2. What is the best app for combining videos?
For fast video joining, you can choose Filmora or Adobe Premiere Pro. Both apps are available on Windows and Mac operating systems. Moreover, the combining process is also trouble-free.
Q3. How to merge two videos without losing quality?
Professionals with years of video editing experience choose Premiere Pro to maintain the quality of the merged videos. But remember, any mistakes in the export settings can reduce the calibre. Contrarily, Filmora offers user-friendly and uncomplicated export options so you can save combined videos in the highest quality possible.
The Bottom Line
Different methods of merging videos depend primarily on the type of program you intend to use. The step-by-step guide is to help beginners move ahead in their careers and choose the best method that they find easy. Each method is easy-to-use and accessible by all users. Also, it doesn’t require you to invest money to purchase premium versions of video merging softwares.
However, there are some other softwares that can also be used to merge videos. But they are complex and makes it challenging for a beginner to merge videos easily.
For macOS 10.14 or later
Follow the step-by-step guide to merge videos using filmora:
Step 1: Import Video Files
You must load the video clips into Filmora after it has been installed. Then, to upload your video files, click Import or drag them directly to the media library. They’ll appear as thumbnails in the left pane when you’ve imported all of them.

Step 2: Drag and Drop
Drag & drop the files you wish to merge from the media library to the timeline, and the merged video will appear in real-time. The Preview window can be viewed by pressing the Play button. You can export it immediately if you’re happy with it, but you can also improve it by adding transitions, filters, or overlays.

Step 3: Trim or Add Transition (Optional)
Please click the video clip in the timeline to cut your videos. To cut, first, move the play head to the desired location, then click the slipt icon in the toolbar. After that, shift the play to a different frame. Then, finally, click the split icon again.

Select Transition from the top menu and drag your preferred transition effect between two clips. You can also Apply to Favourite any transition by right-clicking on it.

Step 4: Export Combined Video File
After making all the adjustments, click the EXPORT tab to export your videos. You may export or convert your original video formats to iPhone, iPad, HTC, Samsung Galaxy, and other portable devices. On your devices, they’ll run without a hitch.

Combining 2 or 3 Videos into 1 Using Photos App on Windows 10
Photos App on Windows 10 empowers you to experiment with the photos and videos to make them look better. It allows you to merge multiple videos and edit the video content, compare videos, and create films. It is easy to use and offers all basic viewing and fixing options.
Follow the step-by-step guide to merge videos using Photos App on Windows 10:
Step 1: Lauch the Photos App
You might wish to put all of the films or photographs you want to merge into one folder on your computer before going to the Photos app. It will aid in the speeding up of the entire procedure.
Type ‘Photos’ into your computer’s search bar, then click on the program that appears.

Step 2: Start a New Video Project
You want to start your video production after launching the Photos app. To do so, go to the top right corner of your screen and select New Video Project, which will take you to the editor mode.
The second part of this procedure is known by several titles in different versions of Windows 10’s Photos app, such as creating a video with music, creating a film with text, and a new video project.
Launching the editor mode directly from the photo if you’re using photos in your video project is also possible. In that case, consider the following:
- Open your file in the Photos app
- Select Edit & Create
- Select Create a movie with text from the drop-down menu.

You can name the project by typing it in the name tab in the top left corner of your screen. Then, by clicking the pencil icon next to your project’s name, you can alter your title at any moment.
The video editor in the Photos app won’t allow you to upload files until you’ve given your project a title. When you try to add a file, a pop-up choice will display, and you may write in the project’s name and then click OK or Create a Video to continue.
Step 3: Import Files
To add files to your video project, go to the Project Library portion of your screen and click the + icon that you see in the top left corner.
If you have all of the files you wish to merge into one video in one folder, you can select them all and add them to your project using the ‘This PC’ option. Alternatively, you can add the files one by one.
The tool will automatically combine all of your files into a single video. Then, you can alter the video order in the Storyboard and edit them.
Go to your Project Library and drag all of the files you added to the video editor into the Storyboard section to get started on your project.

Step 4: Trim Video Clips
You can also trim your clip in the Photos app if necessary. Here’s how to do it:
- On your Storyboard, select the Trim icon.
- Using the handlebar, shorten or prolong the duration of your clip as desired.
- Select “Done” from the drop-down menu.

Step 5: Remove/Add Sound
You can now select numerous music options from the Windows library or upload your own.
Select the Background Music option in the top-right corner of the screen. Then, mute or adjust the volume of your video.
Or select Add an audio file from the Custom Audio menu in the top-right corner of your screen, select the file you want to Import, click Open, make any necessary changes to the audio file, and select Done.

Step 6: Add Text
You can add text to your video project using the Windows video editor, but there aren’t many font styles to choose from. You’ll also have to add and optimize your text for each clip separately, which isn’t the most time-efficient approach.
To add text to your clips, follow these steps:
- Choose Text
- Select the small box icon on the clip you want to add text to
- In the empty box, type the text you wish to add.
- Select the font style you want to use.
- Choose where your text should show in the video.

Step 7: Export/Save Merged File
You can save your video project to your computer after being happy with it. To do so, follow these steps:
- Click the Export, Share, or Finish movie option in the top right corner of your screen.
- Select the video resolution in which you want your video to be saved.
Combining 2 or 3 Videos into 1 Using VLC
VLC is a widely used media player that is free to download and use on various platforms, including Linux, Mac OS X, Windows, and others. In addition, this open-source utility includes a wide range of editing tools, including converting, combining, and others, in addition to video playing. As a result, VLC is an excellent program to use if you’re seeking a cheap way to merge videos quickly and efficiently.
Step 1: Import files
VLC Media Player is a free media player that you can download, install, and use on your computer. First, click the Media tab on the main screen, then pick Open Multiple Files from the drop-down menu.

Step 2: Open Video Files
Select the File tab from the pop-up box, then click the +Add button to browse and load the videos to be merged. Here you can upload multiple files.
You can upload as many videos as you want. There are no such limitations to merge video files.

Step 3: Convert
Go to the Play menu and select the Convert option from the drop-down menu.

Step 4: Save Merged Video Files
You’ll be taken to a new Convert window, where you can save the merged file to your desktop. Finally, Click on the Play button to begin the VLC video merge process.
Once the process is completed, you can export your merged video files to any platform you like.

FAQs
Q1. How to merge two MP4 videos into 1?
Whether you have two MP4 clips or videos with different extensions, you can easily merge them into one with Filmora. To do that, position both videos on the same track without space. Then, export the project in your desired output format, such as MP4.
Q2. What is the best app for combining videos?
For fast video joining, you can choose Filmora or Adobe Premiere Pro. Both apps are available on Windows and Mac operating systems. Moreover, the combining process is also trouble-free.
Q3. How to merge two videos without losing quality?
Professionals with years of video editing experience choose Premiere Pro to maintain the quality of the merged videos. But remember, any mistakes in the export settings can reduce the calibre. Contrarily, Filmora offers user-friendly and uncomplicated export options so you can save combined videos in the highest quality possible.
The Bottom Line
Different methods of merging videos depend primarily on the type of program you intend to use. The step-by-step guide is to help beginners move ahead in their careers and choose the best method that they find easy. Each method is easy-to-use and accessible by all users. Also, it doesn’t require you to invest money to purchase premium versions of video merging softwares.
However, there are some other softwares that can also be used to merge videos. But they are complex and makes it challenging for a beginner to merge videos easily.
For macOS 10.14 or later
Follow the step-by-step guide to merge videos using filmora:
Step 1: Import Video Files
You must load the video clips into Filmora after it has been installed. Then, to upload your video files, click Import or drag them directly to the media library. They’ll appear as thumbnails in the left pane when you’ve imported all of them.

Step 2: Drag and Drop
Drag & drop the files you wish to merge from the media library to the timeline, and the merged video will appear in real-time. The Preview window can be viewed by pressing the Play button. You can export it immediately if you’re happy with it, but you can also improve it by adding transitions, filters, or overlays.

Step 3: Trim or Add Transition (Optional)
Please click the video clip in the timeline to cut your videos. To cut, first, move the play head to the desired location, then click the slipt icon in the toolbar. After that, shift the play to a different frame. Then, finally, click the split icon again.

Select Transition from the top menu and drag your preferred transition effect between two clips. You can also Apply to Favourite any transition by right-clicking on it.

Step 4: Export Combined Video File
After making all the adjustments, click the EXPORT tab to export your videos. You may export or convert your original video formats to iPhone, iPad, HTC, Samsung Galaxy, and other portable devices. On your devices, they’ll run without a hitch.

Combining 2 or 3 Videos into 1 Using Photos App on Windows 10
Photos App on Windows 10 empowers you to experiment with the photos and videos to make them look better. It allows you to merge multiple videos and edit the video content, compare videos, and create films. It is easy to use and offers all basic viewing and fixing options.
Follow the step-by-step guide to merge videos using Photos App on Windows 10:
Step 1: Lauch the Photos App
You might wish to put all of the films or photographs you want to merge into one folder on your computer before going to the Photos app. It will aid in the speeding up of the entire procedure.
Type ‘Photos’ into your computer’s search bar, then click on the program that appears.

Step 2: Start a New Video Project
You want to start your video production after launching the Photos app. To do so, go to the top right corner of your screen and select New Video Project, which will take you to the editor mode.
The second part of this procedure is known by several titles in different versions of Windows 10’s Photos app, such as creating a video with music, creating a film with text, and a new video project.
Launching the editor mode directly from the photo if you’re using photos in your video project is also possible. In that case, consider the following:
- Open your file in the Photos app
- Select Edit & Create
- Select Create a movie with text from the drop-down menu.

You can name the project by typing it in the name tab in the top left corner of your screen. Then, by clicking the pencil icon next to your project’s name, you can alter your title at any moment.
The video editor in the Photos app won’t allow you to upload files until you’ve given your project a title. When you try to add a file, a pop-up choice will display, and you may write in the project’s name and then click OK or Create a Video to continue.
Step 3: Import Files
To add files to your video project, go to the Project Library portion of your screen and click the + icon that you see in the top left corner.
If you have all of the files you wish to merge into one video in one folder, you can select them all and add them to your project using the ‘This PC’ option. Alternatively, you can add the files one by one.
The tool will automatically combine all of your files into a single video. Then, you can alter the video order in the Storyboard and edit them.
Go to your Project Library and drag all of the files you added to the video editor into the Storyboard section to get started on your project.

Step 4: Trim Video Clips
You can also trim your clip in the Photos app if necessary. Here’s how to do it:
- On your Storyboard, select the Trim icon.
- Using the handlebar, shorten or prolong the duration of your clip as desired.
- Select “Done” from the drop-down menu.

Step 5: Remove/Add Sound
You can now select numerous music options from the Windows library or upload your own.
Select the Background Music option in the top-right corner of the screen. Then, mute or adjust the volume of your video.
Or select Add an audio file from the Custom Audio menu in the top-right corner of your screen, select the file you want to Import, click Open, make any necessary changes to the audio file, and select Done.

Step 6: Add Text
You can add text to your video project using the Windows video editor, but there aren’t many font styles to choose from. You’ll also have to add and optimize your text for each clip separately, which isn’t the most time-efficient approach.
To add text to your clips, follow these steps:
- Choose Text
- Select the small box icon on the clip you want to add text to
- In the empty box, type the text you wish to add.
- Select the font style you want to use.
- Choose where your text should show in the video.

Step 7: Export/Save Merged File
You can save your video project to your computer after being happy with it. To do so, follow these steps:
- Click the Export, Share, or Finish movie option in the top right corner of your screen.
- Select the video resolution in which you want your video to be saved.
Combining 2 or 3 Videos into 1 Using VLC
VLC is a widely used media player that is free to download and use on various platforms, including Linux, Mac OS X, Windows, and others. In addition, this open-source utility includes a wide range of editing tools, including converting, combining, and others, in addition to video playing. As a result, VLC is an excellent program to use if you’re seeking a cheap way to merge videos quickly and efficiently.
Step 1: Import files
VLC Media Player is a free media player that you can download, install, and use on your computer. First, click the Media tab on the main screen, then pick Open Multiple Files from the drop-down menu.

Step 2: Open Video Files
Select the File tab from the pop-up box, then click the +Add button to browse and load the videos to be merged. Here you can upload multiple files.
You can upload as many videos as you want. There are no such limitations to merge video files.

Step 3: Convert
Go to the Play menu and select the Convert option from the drop-down menu.

Step 4: Save Merged Video Files
You’ll be taken to a new Convert window, where you can save the merged file to your desktop. Finally, Click on the Play button to begin the VLC video merge process.
Once the process is completed, you can export your merged video files to any platform you like.

FAQs
Q1. How to merge two MP4 videos into 1?
Whether you have two MP4 clips or videos with different extensions, you can easily merge them into one with Filmora. To do that, position both videos on the same track without space. Then, export the project in your desired output format, such as MP4.
Q2. What is the best app for combining videos?
For fast video joining, you can choose Filmora or Adobe Premiere Pro. Both apps are available on Windows and Mac operating systems. Moreover, the combining process is also trouble-free.
Q3. How to merge two videos without losing quality?
Professionals with years of video editing experience choose Premiere Pro to maintain the quality of the merged videos. But remember, any mistakes in the export settings can reduce the calibre. Contrarily, Filmora offers user-friendly and uncomplicated export options so you can save combined videos in the highest quality possible.
The Bottom Line
Different methods of merging videos depend primarily on the type of program you intend to use. The step-by-step guide is to help beginners move ahead in their careers and choose the best method that they find easy. Each method is easy-to-use and accessible by all users. Also, it doesn’t require you to invest money to purchase premium versions of video merging softwares.
However, there are some other softwares that can also be used to merge videos. But they are complex and makes it challenging for a beginner to merge videos easily.
For macOS 10.14 or later
Follow the step-by-step guide to merge videos using filmora:
Step 1: Import Video Files
You must load the video clips into Filmora after it has been installed. Then, to upload your video files, click Import or drag them directly to the media library. They’ll appear as thumbnails in the left pane when you’ve imported all of them.

Step 2: Drag and Drop
Drag & drop the files you wish to merge from the media library to the timeline, and the merged video will appear in real-time. The Preview window can be viewed by pressing the Play button. You can export it immediately if you’re happy with it, but you can also improve it by adding transitions, filters, or overlays.

Step 3: Trim or Add Transition (Optional)
Please click the video clip in the timeline to cut your videos. To cut, first, move the play head to the desired location, then click the slipt icon in the toolbar. After that, shift the play to a different frame. Then, finally, click the split icon again.

Select Transition from the top menu and drag your preferred transition effect between two clips. You can also Apply to Favourite any transition by right-clicking on it.

Step 4: Export Combined Video File
After making all the adjustments, click the EXPORT tab to export your videos. You may export or convert your original video formats to iPhone, iPad, HTC, Samsung Galaxy, and other portable devices. On your devices, they’ll run without a hitch.

Combining 2 or 3 Videos into 1 Using Photos App on Windows 10
Photos App on Windows 10 empowers you to experiment with the photos and videos to make them look better. It allows you to merge multiple videos and edit the video content, compare videos, and create films. It is easy to use and offers all basic viewing and fixing options.
Follow the step-by-step guide to merge videos using Photos App on Windows 10:
Step 1: Lauch the Photos App
You might wish to put all of the films or photographs you want to merge into one folder on your computer before going to the Photos app. It will aid in the speeding up of the entire procedure.
Type ‘Photos’ into your computer’s search bar, then click on the program that appears.

Step 2: Start a New Video Project
You want to start your video production after launching the Photos app. To do so, go to the top right corner of your screen and select New Video Project, which will take you to the editor mode.
The second part of this procedure is known by several titles in different versions of Windows 10’s Photos app, such as creating a video with music, creating a film with text, and a new video project.
Launching the editor mode directly from the photo if you’re using photos in your video project is also possible. In that case, consider the following:
- Open your file in the Photos app
- Select Edit & Create
- Select Create a movie with text from the drop-down menu.

You can name the project by typing it in the name tab in the top left corner of your screen. Then, by clicking the pencil icon next to your project’s name, you can alter your title at any moment.
The video editor in the Photos app won’t allow you to upload files until you’ve given your project a title. When you try to add a file, a pop-up choice will display, and you may write in the project’s name and then click OK or Create a Video to continue.
Step 3: Import Files
To add files to your video project, go to the Project Library portion of your screen and click the + icon that you see in the top left corner.
If you have all of the files you wish to merge into one video in one folder, you can select them all and add them to your project using the ‘This PC’ option. Alternatively, you can add the files one by one.
The tool will automatically combine all of your files into a single video. Then, you can alter the video order in the Storyboard and edit them.
Go to your Project Library and drag all of the files you added to the video editor into the Storyboard section to get started on your project.

Step 4: Trim Video Clips
You can also trim your clip in the Photos app if necessary. Here’s how to do it:
- On your Storyboard, select the Trim icon.
- Using the handlebar, shorten or prolong the duration of your clip as desired.
- Select “Done” from the drop-down menu.

Step 5: Remove/Add Sound
You can now select numerous music options from the Windows library or upload your own.
Select the Background Music option in the top-right corner of the screen. Then, mute or adjust the volume of your video.
Or select Add an audio file from the Custom Audio menu in the top-right corner of your screen, select the file you want to Import, click Open, make any necessary changes to the audio file, and select Done.

Step 6: Add Text
You can add text to your video project using the Windows video editor, but there aren’t many font styles to choose from. You’ll also have to add and optimize your text for each clip separately, which isn’t the most time-efficient approach.
To add text to your clips, follow these steps:
- Choose Text
- Select the small box icon on the clip you want to add text to
- In the empty box, type the text you wish to add.
- Select the font style you want to use.
- Choose where your text should show in the video.

Step 7: Export/Save Merged File
You can save your video project to your computer after being happy with it. To do so, follow these steps:
- Click the Export, Share, or Finish movie option in the top right corner of your screen.
- Select the video resolution in which you want your video to be saved.
Combining 2 or 3 Videos into 1 Using VLC
VLC is a widely used media player that is free to download and use on various platforms, including Linux, Mac OS X, Windows, and others. In addition, this open-source utility includes a wide range of editing tools, including converting, combining, and others, in addition to video playing. As a result, VLC is an excellent program to use if you’re seeking a cheap way to merge videos quickly and efficiently.
Step 1: Import files
VLC Media Player is a free media player that you can download, install, and use on your computer. First, click the Media tab on the main screen, then pick Open Multiple Files from the drop-down menu.

Step 2: Open Video Files
Select the File tab from the pop-up box, then click the +Add button to browse and load the videos to be merged. Here you can upload multiple files.
You can upload as many videos as you want. There are no such limitations to merge video files.

Step 3: Convert
Go to the Play menu and select the Convert option from the drop-down menu.

Step 4: Save Merged Video Files
You’ll be taken to a new Convert window, where you can save the merged file to your desktop. Finally, Click on the Play button to begin the VLC video merge process.
Once the process is completed, you can export your merged video files to any platform you like.

FAQs
Q1. How to merge two MP4 videos into 1?
Whether you have two MP4 clips or videos with different extensions, you can easily merge them into one with Filmora. To do that, position both videos on the same track without space. Then, export the project in your desired output format, such as MP4.
Q2. What is the best app for combining videos?
For fast video joining, you can choose Filmora or Adobe Premiere Pro. Both apps are available on Windows and Mac operating systems. Moreover, the combining process is also trouble-free.
Q3. How to merge two videos without losing quality?
Professionals with years of video editing experience choose Premiere Pro to maintain the quality of the merged videos. But remember, any mistakes in the export settings can reduce the calibre. Contrarily, Filmora offers user-friendly and uncomplicated export options so you can save combined videos in the highest quality possible.
The Bottom Line
Different methods of merging videos depend primarily on the type of program you intend to use. The step-by-step guide is to help beginners move ahead in their careers and choose the best method that they find easy. Each method is easy-to-use and accessible by all users. Also, it doesn’t require you to invest money to purchase premium versions of video merging softwares.
However, there are some other softwares that can also be used to merge videos. But they are complex and makes it challenging for a beginner to merge videos easily.
Also read:
- New Learn How to Create Your Own Unique Video in Cinematic Text Intro in Filmora. Its a Simple Process that Will Offer Professional-Level Intros of Your Own
- In 2024, Useful Tips for Tiktok Video Aspect Ratio Included
- How to Create Fantastic Glitch Effects with Filmora? Read This Guide to Find Out How to Apply Glitch Effects on Your Videos and Make Custom Glitch Effects for 2024
- Updated In 2024, Do You Want to Get Green Screen Effects on Your Video without Green Screen Setup in Your Background? Learn How to Get Virtual Green Screen Background and Shoot Videos Like a Pro
- New In 2024, How to Animate Your Designs With Canva GIF
- Can You Get Free After Effects Templates Slideshow? Yes, You Definitely Can! Follow the Given Discussion to Learn About a Simple Trick and More About Getting Free Effects Template for Slideshows
- Updated 2024 Approved Adobe Photoshop Is the Best Photo Editor to Add Green Screen Effect to Your Photo While Wondershare Filmora Is the Best Video Editor to Add Green Screen Effect to Your Video
- Updated In 2024, Why Vimeo Slideshow Maker Become Popular
- Updated 2024 Approved Easy Steps to Slow Down a Video on iPhone and Android
- Updated There Are Many Vlogging Cameras You Can Find in the Market. However, to Get a Good Start in Vlogging, some Sony Vlogging Cameras and Canon Vlog Cameras Are to Consider. This Article Introduces You to the Respective List for 2024
- This Article Will Reveal the Secrets of Choosing a Location to Shoot Your Viral Music Video. As Well as Tips to Make an Energetic Schedule for Shooting Days for 2024
- | How to Share YouTube Video on Zoom for 2024
- New 2024 Approved The Ultimate Guide to Countdown Animation in Videos
- Updated 2024 Approved How to Create Chroma Key Written Text Effects in Filmora
- New In 2024, Separate Audio From Video in DaVinci Resolve Step by Step
- If You Want to Color Grading Your Video, Adobe Lightroom Will Be the Right Choice. This Article Will Teach You How to Use Lightroom to Apply Color Grading to Videos with Ease for 2024
- New In This Article, Youll Find Four Solutions for Rotating Your Go-Pro Videos. The Following Tools Will Be Used for This Purpose
- Updated Hey! Are You Looking for Video Reverse Effects in Your Videos? Then, You Are at the Right Place. This Article Will Guide You in Creating a Video Reverse Effect
- Updated 2024 Approved Use Path Blur In Photoshop To Create Motion Effect
- How to Add Green Screen Effects In Phhotoshop for 2024
- New Tips for Choosing Location & Scheduling Music Video for 2024
- Final Cut Pro - How to Download and Install It?
- How to recover old call logs from your Nokia G42 5G?
- Sign .dot file Online for Free
- In 2024, How to Mirror Samsung Galaxy S23 Ultra to Mac? | Dr.fone
- In 2024, How To Activate and Use Life360 Ghost Mode On Realme 11X 5G | Dr.fone
- In 2024, Still Using Pattern Locks with Motorola G24 Power? Tips, Tricks and Helpful Advice
- Will iSpoofer update On Apple iPhone 13 mini | Dr.fone
- New Multiple Ways How To Remove iCloud Activation Lock From your Apple iPhone 11
- Unlock Apple ID without Phone Number From Apple iPhone 11
- In 2024, How to Change/Add Location Filters on Snapchat For your Apple iPhone 14 | Dr.fone
- Best Anti Tracker Software For Apple iPhone 15 Pro | Dr.fone
- In 2024, How to Come up With the Best Pokemon Team On Vivo V27? | Dr.fone
- Hacks to do pokemon go trainer battles For Apple iPhone 15 | Dr.fone
- How to share/fake gps on Uber for Xiaomi Redmi K70 Pro | Dr.fone
- In 2024, Complete Tutorial to Use VPNa to Fake GPS Location On Xiaomi Redmi Note 12 Pro 4G | Dr.fone
- Removing Device From Apple ID For your Apple iPhone 12
- Best 10 Mock Location Apps Worth Trying On Vivo V30 | Dr.fone
- Quickly Remove Google FRP Lock on Open
- 3 Ways for Android Pokemon Go Spoofing On Nokia 105 Classic | Dr.fone
- In 2024, How to Track a Lost Oppo Reno 11 Pro 5G for Free? | Dr.fone
- How to Transfer Data After Switching From Sony Xperia 10 V to Latest Samsung | Dr.fone
- Title: Updated How to Concatenate Videos Using FFmpeg for 2024
- Author: Morgan
- Created at : 2024-04-24 01:02:19
- Updated at : 2024-04-25 01:02:19
- Link: https://ai-video-editing.techidaily.com/updated-how-to-concatenate-videos-using-ffmpeg-for-2024/
- License: This work is licensed under CC BY-NC-SA 4.0.


