:max_bytes(150000):strip_icc():format(webp)/frenchopen-4d320297828b413f84f9940d5bd258f9.jpg)
Updated How to Create a Dynamic Text Animation in Filmora — Step-By-Step

How to Create a Dynamic Text Animation in Filmora — Step-By-Step
Preparation
What you need to prepare:
- A computer (Windows or macOS)
- Your video materials.
- Filmora video editor
Step 1
Download and install the Filmora video editor . Just click the link, hit “Download”, and it will start automatically. Then, open a New Project.
Step 2
Click on the “Titles” tab and drag a Default Title to Track 2 on your Timeline.

Step 3
Double-click on it and change the font to anything you like. Then, enter the text in the box in front of you. While you’re here, you can also edit the text spacing and other features.

Step 4
Now, take a snapshot of the text. Then, double-click on the default title again and change the text to a single letter I. Once again, take a snapshot of this text and then delete the default title from the timeline.

You should have two snapshots in My Media now. One of them should say “FILMORA” and one with the letter “I”.

Step 5
Drag the “FILMORA” snapshot to track 2 and the “I” snapshot to track 3. Then, click on the “Zoom” button and set this to 50%.

Step 6
Double-click on the “I” snapshot from the timeline. Then, input these settings when the window pops up. After that, drag the Playhead 1 second and 15 frames further down the timeline. Then, double-click on the “I” snapshot again, and change the Y-axis value to 0.

Step 7
Copy the “I” snapshot track from the timeline. Then, paste it on Track 4. Next, double-click on this one and change the X-axis position to whichever letter you want. In this case, it’s the letter “M”. As for the Y-Axis, you can change it any way that suits you.

Step 8
Copy this process as often and with as many letters as you want. Then, when you’re done, export the title animation to your computer.

Step 9
Open a new project in Filmora and import the title animation we just created.
Step 10
Drag the custom title animation to Track 2 and drag any video background you have on Track 1.

Step 11
Double-click on the title track, go to the Video tab, and select “Lighten” from the Blending Mode tab.

Step 12
Shift the title clip from Track 2 to Track 3. Then, go to the Effects tab and drag the Dark Film effect to Track 1 on the timeline.

Step 13
Search for the “Blur” effect in the Effects tab. Then, drag “Square Blur” to Track 2 in the timeline.

Step 14
Select the “Cinema” effect from the Effects tab and drag it to Track 4. Double-click on it and change the border height to 0.10.

Step 15
Now, all left is to render the clip and review the final result.

Summary
What you’ve learned:
- Create a professional-level animated text in Filmora in 15 simple steps
- How to add a video background and cinematic effects to your animated title
- Adjust the settings of clips in the Filmora timeline
What you need to prepare:
- A computer (Windows or macOS)
- Your video materials.
- Filmora video editor
Step 1
Download and install the Filmora video editor . Just click the link, hit “Download”, and it will start automatically. Then, open a New Project.
Step 2
Click on the “Titles” tab and drag a Default Title to Track 2 on your Timeline.

Step 3
Double-click on it and change the font to anything you like. Then, enter the text in the box in front of you. While you’re here, you can also edit the text spacing and other features.

Step 4
Now, take a snapshot of the text. Then, double-click on the default title again and change the text to a single letter I. Once again, take a snapshot of this text and then delete the default title from the timeline.

You should have two snapshots in My Media now. One of them should say “FILMORA” and one with the letter “I”.

Step 5
Drag the “FILMORA” snapshot to track 2 and the “I” snapshot to track 3. Then, click on the “Zoom” button and set this to 50%.

Step 6
Double-click on the “I” snapshot from the timeline. Then, input these settings when the window pops up. After that, drag the Playhead 1 second and 15 frames further down the timeline. Then, double-click on the “I” snapshot again, and change the Y-axis value to 0.

Step 7
Copy the “I” snapshot track from the timeline. Then, paste it on Track 4. Next, double-click on this one and change the X-axis position to whichever letter you want. In this case, it’s the letter “M”. As for the Y-Axis, you can change it any way that suits you.

Step 8
Copy this process as often and with as many letters as you want. Then, when you’re done, export the title animation to your computer.

Step 9
Open a new project in Filmora and import the title animation we just created.
Step 10
Drag the custom title animation to Track 2 and drag any video background you have on Track 1.

Step 11
Double-click on the title track, go to the Video tab, and select “Lighten” from the Blending Mode tab.

Step 12
Shift the title clip from Track 2 to Track 3. Then, go to the Effects tab and drag the Dark Film effect to Track 1 on the timeline.

Step 13
Search for the “Blur” effect in the Effects tab. Then, drag “Square Blur” to Track 2 in the timeline.

Step 14
Select the “Cinema” effect from the Effects tab and drag it to Track 4. Double-click on it and change the border height to 0.10.

Step 15
Now, all left is to render the clip and review the final result.

Summary
What you’ve learned:
- Create a professional-level animated text in Filmora in 15 simple steps
- How to add a video background and cinematic effects to your animated title
- Adjust the settings of clips in the Filmora timeline
What you need to prepare:
- A computer (Windows or macOS)
- Your video materials.
- Filmora video editor
Step 1
Download and install the Filmora video editor . Just click the link, hit “Download”, and it will start automatically. Then, open a New Project.
Step 2
Click on the “Titles” tab and drag a Default Title to Track 2 on your Timeline.

Step 3
Double-click on it and change the font to anything you like. Then, enter the text in the box in front of you. While you’re here, you can also edit the text spacing and other features.

Step 4
Now, take a snapshot of the text. Then, double-click on the default title again and change the text to a single letter I. Once again, take a snapshot of this text and then delete the default title from the timeline.

You should have two snapshots in My Media now. One of them should say “FILMORA” and one with the letter “I”.

Step 5
Drag the “FILMORA” snapshot to track 2 and the “I” snapshot to track 3. Then, click on the “Zoom” button and set this to 50%.

Step 6
Double-click on the “I” snapshot from the timeline. Then, input these settings when the window pops up. After that, drag the Playhead 1 second and 15 frames further down the timeline. Then, double-click on the “I” snapshot again, and change the Y-axis value to 0.

Step 7
Copy the “I” snapshot track from the timeline. Then, paste it on Track 4. Next, double-click on this one and change the X-axis position to whichever letter you want. In this case, it’s the letter “M”. As for the Y-Axis, you can change it any way that suits you.

Step 8
Copy this process as often and with as many letters as you want. Then, when you’re done, export the title animation to your computer.

Step 9
Open a new project in Filmora and import the title animation we just created.
Step 10
Drag the custom title animation to Track 2 and drag any video background you have on Track 1.

Step 11
Double-click on the title track, go to the Video tab, and select “Lighten” from the Blending Mode tab.

Step 12
Shift the title clip from Track 2 to Track 3. Then, go to the Effects tab and drag the Dark Film effect to Track 1 on the timeline.

Step 13
Search for the “Blur” effect in the Effects tab. Then, drag “Square Blur” to Track 2 in the timeline.

Step 14
Select the “Cinema” effect from the Effects tab and drag it to Track 4. Double-click on it and change the border height to 0.10.

Step 15
Now, all left is to render the clip and review the final result.

Summary
What you’ve learned:
- Create a professional-level animated text in Filmora in 15 simple steps
- How to add a video background and cinematic effects to your animated title
- Adjust the settings of clips in the Filmora timeline
What you need to prepare:
- A computer (Windows or macOS)
- Your video materials.
- Filmora video editor
Step 1
Download and install the Filmora video editor . Just click the link, hit “Download”, and it will start automatically. Then, open a New Project.
Step 2
Click on the “Titles” tab and drag a Default Title to Track 2 on your Timeline.

Step 3
Double-click on it and change the font to anything you like. Then, enter the text in the box in front of you. While you’re here, you can also edit the text spacing and other features.

Step 4
Now, take a snapshot of the text. Then, double-click on the default title again and change the text to a single letter I. Once again, take a snapshot of this text and then delete the default title from the timeline.

You should have two snapshots in My Media now. One of them should say “FILMORA” and one with the letter “I”.

Step 5
Drag the “FILMORA” snapshot to track 2 and the “I” snapshot to track 3. Then, click on the “Zoom” button and set this to 50%.

Step 6
Double-click on the “I” snapshot from the timeline. Then, input these settings when the window pops up. After that, drag the Playhead 1 second and 15 frames further down the timeline. Then, double-click on the “I” snapshot again, and change the Y-axis value to 0.

Step 7
Copy the “I” snapshot track from the timeline. Then, paste it on Track 4. Next, double-click on this one and change the X-axis position to whichever letter you want. In this case, it’s the letter “M”. As for the Y-Axis, you can change it any way that suits you.

Step 8
Copy this process as often and with as many letters as you want. Then, when you’re done, export the title animation to your computer.

Step 9
Open a new project in Filmora and import the title animation we just created.
Step 10
Drag the custom title animation to Track 2 and drag any video background you have on Track 1.

Step 11
Double-click on the title track, go to the Video tab, and select “Lighten” from the Blending Mode tab.

Step 12
Shift the title clip from Track 2 to Track 3. Then, go to the Effects tab and drag the Dark Film effect to Track 1 on the timeline.

Step 13
Search for the “Blur” effect in the Effects tab. Then, drag “Square Blur” to Track 2 in the timeline.

Step 14
Select the “Cinema” effect from the Effects tab and drag it to Track 4. Double-click on it and change the border height to 0.10.

Step 15
Now, all left is to render the clip and review the final result.

Summary
What you’ve learned:
- Create a professional-level animated text in Filmora in 15 simple steps
- How to add a video background and cinematic effects to your animated title
- Adjust the settings of clips in the Filmora timeline
Track Mattes: The Ultimate Guide For After Effects
Are you wondering what Track Mattes is? In After Effects, this tool adds an invisible layer that is used to mask or reveal parts of a layer, including video, graphics, text, shapes, and images. This feature is in the arsenal of any visual effects artist or motion graphic designer.
For After Effects editors, Track Mattes can be an incredibly helpful tool for managing multiple layers and creating complex animations.
In this article, we’ll explore everything you need to know about Track Mattes. We’ll cover topics like the difference between a mask and Track Matte, finding this tool in After Effects, and its four options: Alpha Matter, Alpha Inverted Matte, Luma Matte, and Luma Inverted Matte.
- Alpha Matte
- Alpha Inverted Matte
- Luma Matte
- Luma Inverted Matte
- Differences Between Alpha Channel and Luma Channel
Part 1. What Are Track Mattes In After Effects?
A Track Matte is an element used in video editing to control the opacity of a layer. Essentially, it lets you create a “hole” in a layer so that underlying layers can show through. This tool can be used with video and audio layers, which is essential for creating complex composites in After Effects.
You can use Track Mattes to generate shapes, reveal part of a layer, or keying outs. Interestingly, it remains independent of all layers in your projects, which means you can get visual effects and animations more efficiently than with the masks tool.
Moreover, Track Mattes uses Alpha or Luma channels as a layer mask to determine what parts of the layer to reveal. For instance, you can make a top layer that provides an Alpha or Luminous effect and a bottom layer consisting of the image that will be revealed or shown.
Thus, if you want to use an image to hide your video until you want to unveil it or add a picture in your text, Track Mattes will help you to shape the appearance of a layer above it.
Part 2. Differences Between A Mask And A Track Matte
In Adobe After Effects, there are two types of masking tools: Masks and Track Mattes. Both are used to hide or reveal a portion of a layer.
Here’re some key differences between a Mask and a Track Matte:
- A mask is dependent on a specific layer, while the Track Matter is independent of any layer.
- A mask is applied directly to a layer having an image or a video and transforms with the layers. On the other hand, Track Matte is a stationary mask applied to the composition rather than a layer.
Part 3. Finding The Track Matte Tool In After Effects
Track Matte is located by default in the Timeline Window of the After Effects interface, but if it is unavailable there for some reason, toggle the Transfer Control Pane button on the bottom-left of the timeline.
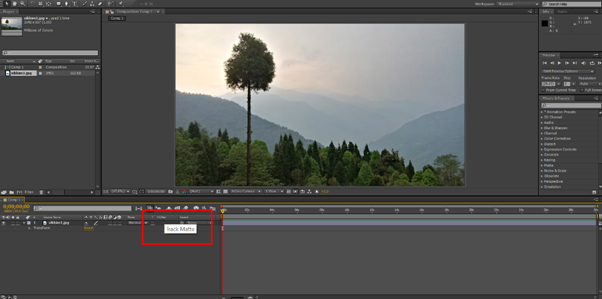
If you are still unable to find the Track Matte option, press the F1 key or do the following steps in sequence:
- Right-click on the area above your layers and select “Columns.”
- Scroll down and click the “Modes” option to enable it.
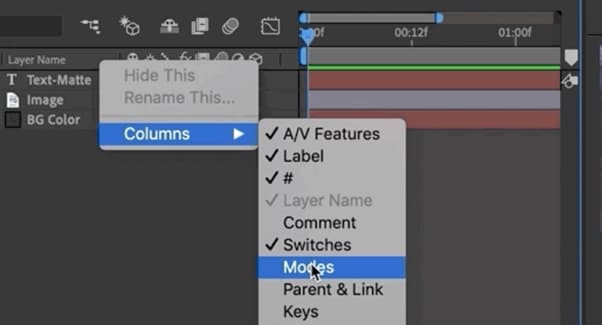
- Track Matte mode, Preserve Underlying Transparency, and Blending Modes will be available now.
Under Track Matte’s drop-down menu, you can find four further options, two with Alpha and two with Luma. We’ll discuss these options in detail in the next section.
Part 4. All Four Track Matte Options In After Effects
After Effects provides four types of Track Matte options: Alpha Matte, Alpha Inverted Matte, Luma Matte, and Luma Inverted Matte, each has its own specific use case. But first, you need to understand what Alpha and Luma are:
Alpha: This Track Matte type uses the layer’s Alpha channel to determine the layer’s opacity.
Luma: This Track Matte type uses the top layer’s brightness to mask the bottom layer.
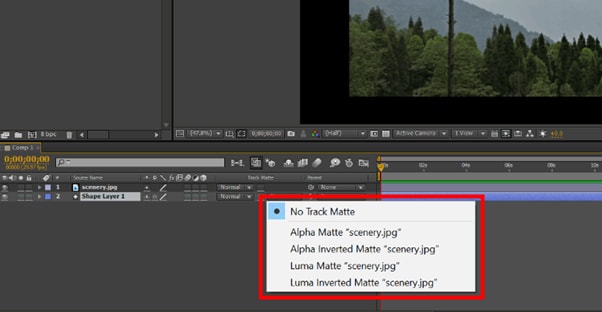
Let’s find out the functions of each option one by one:
Alpha Matte
Alpha Matte is an important option under the Track Matte menu, as it allows you to create a mask based on the transparency of the layer you are using it on. Like the mask, it will use any pixel above 0% opacity and can be useful for various purposes, such as creating a vignette or isolating a certain area of the frame.
Alpha Inverted Matte
The Alpha Inverted Matte option is quite the opposite of the Alpha Matte, and around the Alpha channel, it uses negative space from the above layer and will therefore use pixels with 0% opacity as it had 100% opacity.
Luma Matte
Instead of using the Alpha channel, Luma Mattes uses the brightness level or Luma channel of the upper layer to create a mask for the bottom layer.
Luma Inverted Matte
Opposite of the Luma Matte, the Luma Inverted Matte uses dark or low luminance areas of the upper layer to create a mask for the lower layer.
Differences Between Alpha Channel and Luma Channel
When altering the opacity of a layer, it may look like the brightness settings are changed. This might confuse some users, as both Alpha and Luma channels carry the same information. However, they differ in how they are used.
Alpha channel is a type of Track Matte that stores transparency information. This information determines how opaque or transparent a layer will be when superimposed over another layer.

On the other hand, a Luma channel is a video track that stores brightness information. This information is used to determine how bright or dark an image will be and is further divided into three channels, i.e., Red, Green, and Blue (RGB). Their value ranges from 0 to 255, where 0 represents the darkest value while 255 represents the brightest value.

Video – How to use Track Mattes in Adobe After Effects - Tutorial
Conclusion
In this article, we’ve discussed what Track Matte is in After Effects and how it differs from the mask tool. We also explored where to find the Track Matter option and its four options, i.e., Alpha Matte, Alpha Inverted Matte, Luma Matte, and Luma Inverted Matte. In the end, we discussed the difference between the Alpha and Luma channels to provide a clear view of the two.
Hopefully, this guide resolves your queries, and you now have a better understanding of the Track Matte tool in After Effects.
Free Download For Win 7 or later(64-bit)
Free Download For macOS 10.14 or later
Part 1. What Are Track Mattes In After Effects?
A Track Matte is an element used in video editing to control the opacity of a layer. Essentially, it lets you create a “hole” in a layer so that underlying layers can show through. This tool can be used with video and audio layers, which is essential for creating complex composites in After Effects.
You can use Track Mattes to generate shapes, reveal part of a layer, or keying outs. Interestingly, it remains independent of all layers in your projects, which means you can get visual effects and animations more efficiently than with the masks tool.
Moreover, Track Mattes uses Alpha or Luma channels as a layer mask to determine what parts of the layer to reveal. For instance, you can make a top layer that provides an Alpha or Luminous effect and a bottom layer consisting of the image that will be revealed or shown.
Thus, if you want to use an image to hide your video until you want to unveil it or add a picture in your text, Track Mattes will help you to shape the appearance of a layer above it.
Part 2. Differences Between A Mask And A Track Matte
In Adobe After Effects, there are two types of masking tools: Masks and Track Mattes. Both are used to hide or reveal a portion of a layer.
Here’re some key differences between a Mask and a Track Matte:
- A mask is dependent on a specific layer, while the Track Matter is independent of any layer.
- A mask is applied directly to a layer having an image or a video and transforms with the layers. On the other hand, Track Matte is a stationary mask applied to the composition rather than a layer.
Part 3. Finding The Track Matte Tool In After Effects
Track Matte is located by default in the Timeline Window of the After Effects interface, but if it is unavailable there for some reason, toggle the Transfer Control Pane button on the bottom-left of the timeline.

If you are still unable to find the Track Matte option, press the F1 key or do the following steps in sequence:
- Right-click on the area above your layers and select “Columns.”
- Scroll down and click the “Modes” option to enable it.

- Track Matte mode, Preserve Underlying Transparency, and Blending Modes will be available now.
Under Track Matte’s drop-down menu, you can find four further options, two with Alpha and two with Luma. We’ll discuss these options in detail in the next section.
Part 4. All Four Track Matte Options In After Effects
After Effects provides four types of Track Matte options: Alpha Matte, Alpha Inverted Matte, Luma Matte, and Luma Inverted Matte, each has its own specific use case. But first, you need to understand what Alpha and Luma are:
Alpha: This Track Matte type uses the layer’s Alpha channel to determine the layer’s opacity.
Luma: This Track Matte type uses the top layer’s brightness to mask the bottom layer.

Let’s find out the functions of each option one by one:
Alpha Matte
Alpha Matte is an important option under the Track Matte menu, as it allows you to create a mask based on the transparency of the layer you are using it on. Like the mask, it will use any pixel above 0% opacity and can be useful for various purposes, such as creating a vignette or isolating a certain area of the frame.
Alpha Inverted Matte
The Alpha Inverted Matte option is quite the opposite of the Alpha Matte, and around the Alpha channel, it uses negative space from the above layer and will therefore use pixels with 0% opacity as it had 100% opacity.
Luma Matte
Instead of using the Alpha channel, Luma Mattes uses the brightness level or Luma channel of the upper layer to create a mask for the bottom layer.
Luma Inverted Matte
Opposite of the Luma Matte, the Luma Inverted Matte uses dark or low luminance areas of the upper layer to create a mask for the lower layer.
Differences Between Alpha Channel and Luma Channel
When altering the opacity of a layer, it may look like the brightness settings are changed. This might confuse some users, as both Alpha and Luma channels carry the same information. However, they differ in how they are used.
Alpha channel is a type of Track Matte that stores transparency information. This information determines how opaque or transparent a layer will be when superimposed over another layer.

On the other hand, a Luma channel is a video track that stores brightness information. This information is used to determine how bright or dark an image will be and is further divided into three channels, i.e., Red, Green, and Blue (RGB). Their value ranges from 0 to 255, where 0 represents the darkest value while 255 represents the brightest value.

Video – How to use Track Mattes in Adobe After Effects - Tutorial
Conclusion
In this article, we’ve discussed what Track Matte is in After Effects and how it differs from the mask tool. We also explored where to find the Track Matter option and its four options, i.e., Alpha Matte, Alpha Inverted Matte, Luma Matte, and Luma Inverted Matte. In the end, we discussed the difference between the Alpha and Luma channels to provide a clear view of the two.
Hopefully, this guide resolves your queries, and you now have a better understanding of the Track Matte tool in After Effects.
Free Download For Win 7 or later(64-bit)
Free Download For macOS 10.14 or later
How Can You Get VHS Filter and Glitch Filter to Your Images or Videos?
A glitch in the video or an image gives the notion of an error in the video recording process, and it was not accepted in the media industry. However, presently, creative professionals are incorporating the VHS filters to give a vintage impression. The visual distortions are used by gamers and streaming creators extensively.
For this very reason, the article discusses the procedure to create a glitch filter in Photoshop, Instagram, TikTok, and in one of your impeccable travel videos. Time to start!
In this article
01 How to Make VHS Filter in Photoshop?
02 How to Get VHS Filter in Instagram?
03 How to Get VHS Filter in TikTok?
04 How to Add VHS Effects to your Travel Video?
Part 1: How to Make VHS Filter in Photoshop?
There are a lot of steps associated with VHS filter Photoshop. The procedure can be tricky for a beginner in the industry. Therefore, we have sketched out a guide to make a VHS image filter in Photoshop. Follow it carefully to have desirable results.
Step 1: Open Photoshop
Open Photoshop from your computer and click on “New.” Use the “Custom” option from the windows that appear. After that, click on “File” and launch the imagery. Drag and drop that picture to the customized workspace.

Step 2: Apply the Transformation
Head to the “Edit” from the top panel and press “Transform” from there. Click on “Scale” from the context menu. The user is recommended to set the scale as required using arrows from the mouse. After that, apply the transformation.

Step 3: Changing the Parameters
Now, right-click on your layer to click on “Brightness and Contrast.” Change it as you need. After that, move on to the “Curves” and play with the graphs of the picture. Change the “Solid Color” as well. Make the color white and change the opacity levels.

Step 4: Adding Noise
Moving on, click on the first layer and navigate to the “Filter” bar on the top of the interface. Hit “Noise” and then “Add Noise.” Make the necessary changes as you like and press “Enter.” Scroll up to the “File” and hit “Open Recent” to launch the VHS texture photo. Drag and drop the texture to the photo layer that we are working on.

Step 5: Inserting VHS Texture
Resize the VHS texture and then apply the transformation. By default, the blend mode is “Normal.” Change it to “Darken” from the right panel. The picture will get dark. Again, change the mode to “Screen.” Moving on, input another VHS Filter texture and drag and drop it to the layer we are working on. Resize it and apply the transformation.

Step 6: Altering the Blend Mode
Alter the blend mode to “Darker” and then to “Screen.” Apply another filter and then drag and drop the layer. Change the blend mode to “Screen.” Pick up the eraser from the left panel of tools and make necessary edits.

Step 7: Duplicating the Layer
Duplicate the photo layer and move it up. Again, click on “Filter” then “Noise” to add the noise as needed. Alter the blend mode to “Soft Light” and set the opacity value. After that, add any solid color and switch the blend mode back to Soft Light.

Step 8: Playing with the Layers
Duplicate the layer again to change the color. After that, double click the layer and deselect “R.” Move to left or right. Perform the same procedure for the rest of the layers. Use the erase tool to offer fine imprinting to the transition. Duplicate the final layer and deselect “R” and “C.” Move left and right.

Step 9: Final Process
Use the eraser tool one last time, and you are done with the VCR filter.
Part 2: How to Get VHS Filter in Instagram?
Now that you know how to add glitch filter Photoshop let us move on to Instagram. The sub-section of this write-up shall focus on VHS filter Instagram. If you are an Instagram user wishing to get a retro VHS filter, follow our lead.
Step 1: Finding the Filters
The first step revolves around clicking on the Instagram app to open it. Navigate to the “Story.” The user will find a number of filters in the top panel along a circle.

Step 2: Picking the Vintage Filter
Swipe right towards those filters until a “Search” option is seen. Type “Vintage DV” and press “Enter,” where several VHS video filters will be displayed. Pick one and save it to your camera roll.

Step 3: Using the VHS Filter
Head back to the “Story” and select the “Effects” option. Select the filter that you saved and initiate the recording process. You have got the VHS filter for videos.

Part 3: How to Get VHS Filter in TikTok?
The following section of the write-up shall highlight finding and getting the 90s VHS filter in TikTok. So, what are we waiting for? Let us start the procedure.
Find the VHS Filter in TikTok
Step 1: Navigate to the App
Use your computer to launch the TikTok application. As soon as the interface appears, click on “Trends” in the bottom left corner.
Step 2: Open the Effects
Type Retro VHS in the search bar and click on the second result that is displayed. Click on the “Effects” that says, “VHS Retro.”
Step 3: Add in Favorites
Add it to the favorites and then tap on the video icon located at the center of the screen.

Use the VHS Filter in TikTok
Step 1: Deactivating the Filter</p
With the camera open, click on “Effects” right next to the camera icon. The filter is activated, but we need to deactivate it by clicking on the stop icon with the effects. Click anywhere on the screen to exit the “Effects” panel.
Step 2: Recording Process
Now, click on the red video sign and begin recording for some seconds without the filter. It is important to record the video by pointing at the targeted person. After the first part of the video is recorded, head back to the “Effects” menu and navigate to the tab that says, “Add to Favorites.”

Step 3: Publishing the Video
Choose the Retro VHS Filter and point the camera at the person that needs the filter. Hit the “Register” button. Make the recording and press the red popcorn. Hit “Next” and “Publish” the video finally.

Part 4: How to Add VHS Effects to your Travel Video?
With vacation season on, bloggers are into adding VHS photo filters to their videos to be uploaded on YouTube channels. The section shall convey the detailed procedure of adding a glitch effect filter to the travel and vacation videos in Wondershare Filmora .
For Win 7 or later (64-bit)
For macOS 10.12 or later
Step 1: Initiating the Process
Begin the process by launching Wondershare Filmora. For starters, let us work on the perfect music for the video. The Audio tab shows an awful collection. Choose the “Young and Bright” category for the music.

Step 2: Picking the Music
Select any music and drag and drop it to the timeline. Now, trim the music into 15 seconds long. Now, input the travel videos to start their editing. Set the order for the video afterward.

Step 3: Choosing the Overlays
Navigate to the “Effects” panel and search for VHS. The software would offer multiple choices to pick from. Choose different overlays and place them onto the video tracks as you like.

Step 4: Adding the Transition
To add the transition, head to the “Transition” tab and find VHS. Drag and drop the transitions among the cuts between the video clips. Adjust their duration as needed. Preview the video, and the mission is accomplished.

Final Thoughts
Grabbing the attention of the audience is not as easy as it sounds. The creative industry uses a vast range of effects to compel the viewers to be on the edge of their seats. The article introduced the VHS filter while covering its procedure. If you are a TikTok, Instagram, or Photoshop user, we have got you. Wondershare Filmora helps perfectly to add the glitch filter to the vacation videos.
Versatile Video Editor - Wondershare Filmora
An easy yet powerful editor
Numerous effects to choose from
Detailed tutorials provided by the official channel
02 How to Get VHS Filter in Instagram?
03 How to Get VHS Filter in TikTok?
04 How to Add VHS Effects to your Travel Video?
Part 1: How to Make VHS Filter in Photoshop?
There are a lot of steps associated with VHS filter Photoshop. The procedure can be tricky for a beginner in the industry. Therefore, we have sketched out a guide to make a VHS image filter in Photoshop. Follow it carefully to have desirable results.
Step 1: Open Photoshop
Open Photoshop from your computer and click on “New.” Use the “Custom” option from the windows that appear. After that, click on “File” and launch the imagery. Drag and drop that picture to the customized workspace.

Step 2: Apply the Transformation
Head to the “Edit” from the top panel and press “Transform” from there. Click on “Scale” from the context menu. The user is recommended to set the scale as required using arrows from the mouse. After that, apply the transformation.

Step 3: Changing the Parameters
Now, right-click on your layer to click on “Brightness and Contrast.” Change it as you need. After that, move on to the “Curves” and play with the graphs of the picture. Change the “Solid Color” as well. Make the color white and change the opacity levels.

Step 4: Adding Noise
Moving on, click on the first layer and navigate to the “Filter” bar on the top of the interface. Hit “Noise” and then “Add Noise.” Make the necessary changes as you like and press “Enter.” Scroll up to the “File” and hit “Open Recent” to launch the VHS texture photo. Drag and drop the texture to the photo layer that we are working on.

Step 5: Inserting VHS Texture
Resize the VHS texture and then apply the transformation. By default, the blend mode is “Normal.” Change it to “Darken” from the right panel. The picture will get dark. Again, change the mode to “Screen.” Moving on, input another VHS Filter texture and drag and drop it to the layer we are working on. Resize it and apply the transformation.

Step 6: Altering the Blend Mode
Alter the blend mode to “Darker” and then to “Screen.” Apply another filter and then drag and drop the layer. Change the blend mode to “Screen.” Pick up the eraser from the left panel of tools and make necessary edits.

Step 7: Duplicating the Layer
Duplicate the photo layer and move it up. Again, click on “Filter” then “Noise” to add the noise as needed. Alter the blend mode to “Soft Light” and set the opacity value. After that, add any solid color and switch the blend mode back to Soft Light.

Step 8: Playing with the Layers
Duplicate the layer again to change the color. After that, double click the layer and deselect “R.” Move to left or right. Perform the same procedure for the rest of the layers. Use the erase tool to offer fine imprinting to the transition. Duplicate the final layer and deselect “R” and “C.” Move left and right.

Step 9: Final Process
Use the eraser tool one last time, and you are done with the VCR filter.
Part 2: How to Get VHS Filter in Instagram?
Now that you know how to add glitch filter Photoshop let us move on to Instagram. The sub-section of this write-up shall focus on VHS filter Instagram. If you are an Instagram user wishing to get a retro VHS filter, follow our lead.
Step 1: Finding the Filters
The first step revolves around clicking on the Instagram app to open it. Navigate to the “Story.” The user will find a number of filters in the top panel along a circle.

Step 2: Picking the Vintage Filter
Swipe right towards those filters until a “Search” option is seen. Type “Vintage DV” and press “Enter,” where several VHS video filters will be displayed. Pick one and save it to your camera roll.

Step 3: Using the VHS Filter
Head back to the “Story” and select the “Effects” option. Select the filter that you saved and initiate the recording process. You have got the VHS filter for videos.

Part 3: How to Get VHS Filter in TikTok?
The following section of the write-up shall highlight finding and getting the 90s VHS filter in TikTok. So, what are we waiting for? Let us start the procedure.
Find the VHS Filter in TikTok
Step 1: Navigate to the App
Use your computer to launch the TikTok application. As soon as the interface appears, click on “Trends” in the bottom left corner.
Step 2: Open the Effects
Type Retro VHS in the search bar and click on the second result that is displayed. Click on the “Effects” that says, “VHS Retro.”
Step 3: Add in Favorites
Add it to the favorites and then tap on the video icon located at the center of the screen.

Use the VHS Filter in TikTok
Step 1: Deactivating the Filter</p
With the camera open, click on “Effects” right next to the camera icon. The filter is activated, but we need to deactivate it by clicking on the stop icon with the effects. Click anywhere on the screen to exit the “Effects” panel.
Step 2: Recording Process
Now, click on the red video sign and begin recording for some seconds without the filter. It is important to record the video by pointing at the targeted person. After the first part of the video is recorded, head back to the “Effects” menu and navigate to the tab that says, “Add to Favorites.”

Step 3: Publishing the Video
Choose the Retro VHS Filter and point the camera at the person that needs the filter. Hit the “Register” button. Make the recording and press the red popcorn. Hit “Next” and “Publish” the video finally.

Part 4: How to Add VHS Effects to your Travel Video?
With vacation season on, bloggers are into adding VHS photo filters to their videos to be uploaded on YouTube channels. The section shall convey the detailed procedure of adding a glitch effect filter to the travel and vacation videos in Wondershare Filmora .
For Win 7 or later (64-bit)
For macOS 10.12 or later
Step 1: Initiating the Process
Begin the process by launching Wondershare Filmora. For starters, let us work on the perfect music for the video. The Audio tab shows an awful collection. Choose the “Young and Bright” category for the music.

Step 2: Picking the Music
Select any music and drag and drop it to the timeline. Now, trim the music into 15 seconds long. Now, input the travel videos to start their editing. Set the order for the video afterward.

Step 3: Choosing the Overlays
Navigate to the “Effects” panel and search for VHS. The software would offer multiple choices to pick from. Choose different overlays and place them onto the video tracks as you like.

Step 4: Adding the Transition
To add the transition, head to the “Transition” tab and find VHS. Drag and drop the transitions among the cuts between the video clips. Adjust their duration as needed. Preview the video, and the mission is accomplished.

Final Thoughts
Grabbing the attention of the audience is not as easy as it sounds. The creative industry uses a vast range of effects to compel the viewers to be on the edge of their seats. The article introduced the VHS filter while covering its procedure. If you are a TikTok, Instagram, or Photoshop user, we have got you. Wondershare Filmora helps perfectly to add the glitch filter to the vacation videos.
Versatile Video Editor - Wondershare Filmora
An easy yet powerful editor
Numerous effects to choose from
Detailed tutorials provided by the official channel
02 How to Get VHS Filter in Instagram?
03 How to Get VHS Filter in TikTok?
04 How to Add VHS Effects to your Travel Video?
Part 1: How to Make VHS Filter in Photoshop?
There are a lot of steps associated with VHS filter Photoshop. The procedure can be tricky for a beginner in the industry. Therefore, we have sketched out a guide to make a VHS image filter in Photoshop. Follow it carefully to have desirable results.
Step 1: Open Photoshop
Open Photoshop from your computer and click on “New.” Use the “Custom” option from the windows that appear. After that, click on “File” and launch the imagery. Drag and drop that picture to the customized workspace.

Step 2: Apply the Transformation
Head to the “Edit” from the top panel and press “Transform” from there. Click on “Scale” from the context menu. The user is recommended to set the scale as required using arrows from the mouse. After that, apply the transformation.

Step 3: Changing the Parameters
Now, right-click on your layer to click on “Brightness and Contrast.” Change it as you need. After that, move on to the “Curves” and play with the graphs of the picture. Change the “Solid Color” as well. Make the color white and change the opacity levels.

Step 4: Adding Noise
Moving on, click on the first layer and navigate to the “Filter” bar on the top of the interface. Hit “Noise” and then “Add Noise.” Make the necessary changes as you like and press “Enter.” Scroll up to the “File” and hit “Open Recent” to launch the VHS texture photo. Drag and drop the texture to the photo layer that we are working on.

Step 5: Inserting VHS Texture
Resize the VHS texture and then apply the transformation. By default, the blend mode is “Normal.” Change it to “Darken” from the right panel. The picture will get dark. Again, change the mode to “Screen.” Moving on, input another VHS Filter texture and drag and drop it to the layer we are working on. Resize it and apply the transformation.

Step 6: Altering the Blend Mode
Alter the blend mode to “Darker” and then to “Screen.” Apply another filter and then drag and drop the layer. Change the blend mode to “Screen.” Pick up the eraser from the left panel of tools and make necessary edits.

Step 7: Duplicating the Layer
Duplicate the photo layer and move it up. Again, click on “Filter” then “Noise” to add the noise as needed. Alter the blend mode to “Soft Light” and set the opacity value. After that, add any solid color and switch the blend mode back to Soft Light.

Step 8: Playing with the Layers
Duplicate the layer again to change the color. After that, double click the layer and deselect “R.” Move to left or right. Perform the same procedure for the rest of the layers. Use the erase tool to offer fine imprinting to the transition. Duplicate the final layer and deselect “R” and “C.” Move left and right.

Step 9: Final Process
Use the eraser tool one last time, and you are done with the VCR filter.
Part 2: How to Get VHS Filter in Instagram?
Now that you know how to add glitch filter Photoshop let us move on to Instagram. The sub-section of this write-up shall focus on VHS filter Instagram. If you are an Instagram user wishing to get a retro VHS filter, follow our lead.
Step 1: Finding the Filters
The first step revolves around clicking on the Instagram app to open it. Navigate to the “Story.” The user will find a number of filters in the top panel along a circle.

Step 2: Picking the Vintage Filter
Swipe right towards those filters until a “Search” option is seen. Type “Vintage DV” and press “Enter,” where several VHS video filters will be displayed. Pick one and save it to your camera roll.

Step 3: Using the VHS Filter
Head back to the “Story” and select the “Effects” option. Select the filter that you saved and initiate the recording process. You have got the VHS filter for videos.

Part 3: How to Get VHS Filter in TikTok?
The following section of the write-up shall highlight finding and getting the 90s VHS filter in TikTok. So, what are we waiting for? Let us start the procedure.
Find the VHS Filter in TikTok
Step 1: Navigate to the App
Use your computer to launch the TikTok application. As soon as the interface appears, click on “Trends” in the bottom left corner.
Step 2: Open the Effects
Type Retro VHS in the search bar and click on the second result that is displayed. Click on the “Effects” that says, “VHS Retro.”
Step 3: Add in Favorites
Add it to the favorites and then tap on the video icon located at the center of the screen.

Use the VHS Filter in TikTok
Step 1: Deactivating the Filter</p
With the camera open, click on “Effects” right next to the camera icon. The filter is activated, but we need to deactivate it by clicking on the stop icon with the effects. Click anywhere on the screen to exit the “Effects” panel.
Step 2: Recording Process
Now, click on the red video sign and begin recording for some seconds without the filter. It is important to record the video by pointing at the targeted person. After the first part of the video is recorded, head back to the “Effects” menu and navigate to the tab that says, “Add to Favorites.”

Step 3: Publishing the Video
Choose the Retro VHS Filter and point the camera at the person that needs the filter. Hit the “Register” button. Make the recording and press the red popcorn. Hit “Next” and “Publish” the video finally.

Part 4: How to Add VHS Effects to your Travel Video?
With vacation season on, bloggers are into adding VHS photo filters to their videos to be uploaded on YouTube channels. The section shall convey the detailed procedure of adding a glitch effect filter to the travel and vacation videos in Wondershare Filmora .
For Win 7 or later (64-bit)
For macOS 10.12 or later
Step 1: Initiating the Process
Begin the process by launching Wondershare Filmora. For starters, let us work on the perfect music for the video. The Audio tab shows an awful collection. Choose the “Young and Bright” category for the music.

Step 2: Picking the Music
Select any music and drag and drop it to the timeline. Now, trim the music into 15 seconds long. Now, input the travel videos to start their editing. Set the order for the video afterward.

Step 3: Choosing the Overlays
Navigate to the “Effects” panel and search for VHS. The software would offer multiple choices to pick from. Choose different overlays and place them onto the video tracks as you like.

Step 4: Adding the Transition
To add the transition, head to the “Transition” tab and find VHS. Drag and drop the transitions among the cuts between the video clips. Adjust their duration as needed. Preview the video, and the mission is accomplished.

Final Thoughts
Grabbing the attention of the audience is not as easy as it sounds. The creative industry uses a vast range of effects to compel the viewers to be on the edge of their seats. The article introduced the VHS filter while covering its procedure. If you are a TikTok, Instagram, or Photoshop user, we have got you. Wondershare Filmora helps perfectly to add the glitch filter to the vacation videos.
Versatile Video Editor - Wondershare Filmora
An easy yet powerful editor
Numerous effects to choose from
Detailed tutorials provided by the official channel
02 How to Get VHS Filter in Instagram?
03 How to Get VHS Filter in TikTok?
04 How to Add VHS Effects to your Travel Video?
Part 1: How to Make VHS Filter in Photoshop?
There are a lot of steps associated with VHS filter Photoshop. The procedure can be tricky for a beginner in the industry. Therefore, we have sketched out a guide to make a VHS image filter in Photoshop. Follow it carefully to have desirable results.
Step 1: Open Photoshop
Open Photoshop from your computer and click on “New.” Use the “Custom” option from the windows that appear. After that, click on “File” and launch the imagery. Drag and drop that picture to the customized workspace.

Step 2: Apply the Transformation
Head to the “Edit” from the top panel and press “Transform” from there. Click on “Scale” from the context menu. The user is recommended to set the scale as required using arrows from the mouse. After that, apply the transformation.

Step 3: Changing the Parameters
Now, right-click on your layer to click on “Brightness and Contrast.” Change it as you need. After that, move on to the “Curves” and play with the graphs of the picture. Change the “Solid Color” as well. Make the color white and change the opacity levels.

Step 4: Adding Noise
Moving on, click on the first layer and navigate to the “Filter” bar on the top of the interface. Hit “Noise” and then “Add Noise.” Make the necessary changes as you like and press “Enter.” Scroll up to the “File” and hit “Open Recent” to launch the VHS texture photo. Drag and drop the texture to the photo layer that we are working on.

Step 5: Inserting VHS Texture
Resize the VHS texture and then apply the transformation. By default, the blend mode is “Normal.” Change it to “Darken” from the right panel. The picture will get dark. Again, change the mode to “Screen.” Moving on, input another VHS Filter texture and drag and drop it to the layer we are working on. Resize it and apply the transformation.

Step 6: Altering the Blend Mode
Alter the blend mode to “Darker” and then to “Screen.” Apply another filter and then drag and drop the layer. Change the blend mode to “Screen.” Pick up the eraser from the left panel of tools and make necessary edits.

Step 7: Duplicating the Layer
Duplicate the photo layer and move it up. Again, click on “Filter” then “Noise” to add the noise as needed. Alter the blend mode to “Soft Light” and set the opacity value. After that, add any solid color and switch the blend mode back to Soft Light.

Step 8: Playing with the Layers
Duplicate the layer again to change the color. After that, double click the layer and deselect “R.” Move to left or right. Perform the same procedure for the rest of the layers. Use the erase tool to offer fine imprinting to the transition. Duplicate the final layer and deselect “R” and “C.” Move left and right.

Step 9: Final Process
Use the eraser tool one last time, and you are done with the VCR filter.
Part 2: How to Get VHS Filter in Instagram?
Now that you know how to add glitch filter Photoshop let us move on to Instagram. The sub-section of this write-up shall focus on VHS filter Instagram. If you are an Instagram user wishing to get a retro VHS filter, follow our lead.
Step 1: Finding the Filters
The first step revolves around clicking on the Instagram app to open it. Navigate to the “Story.” The user will find a number of filters in the top panel along a circle.

Step 2: Picking the Vintage Filter
Swipe right towards those filters until a “Search” option is seen. Type “Vintage DV” and press “Enter,” where several VHS video filters will be displayed. Pick one and save it to your camera roll.

Step 3: Using the VHS Filter
Head back to the “Story” and select the “Effects” option. Select the filter that you saved and initiate the recording process. You have got the VHS filter for videos.

Part 3: How to Get VHS Filter in TikTok?
The following section of the write-up shall highlight finding and getting the 90s VHS filter in TikTok. So, what are we waiting for? Let us start the procedure.
Find the VHS Filter in TikTok
Step 1: Navigate to the App
Use your computer to launch the TikTok application. As soon as the interface appears, click on “Trends” in the bottom left corner.
Step 2: Open the Effects
Type Retro VHS in the search bar and click on the second result that is displayed. Click on the “Effects” that says, “VHS Retro.”
Step 3: Add in Favorites
Add it to the favorites and then tap on the video icon located at the center of the screen.

Use the VHS Filter in TikTok
Step 1: Deactivating the Filter</p
With the camera open, click on “Effects” right next to the camera icon. The filter is activated, but we need to deactivate it by clicking on the stop icon with the effects. Click anywhere on the screen to exit the “Effects” panel.
Step 2: Recording Process
Now, click on the red video sign and begin recording for some seconds without the filter. It is important to record the video by pointing at the targeted person. After the first part of the video is recorded, head back to the “Effects” menu and navigate to the tab that says, “Add to Favorites.”

Step 3: Publishing the Video
Choose the Retro VHS Filter and point the camera at the person that needs the filter. Hit the “Register” button. Make the recording and press the red popcorn. Hit “Next” and “Publish” the video finally.

Part 4: How to Add VHS Effects to your Travel Video?
With vacation season on, bloggers are into adding VHS photo filters to their videos to be uploaded on YouTube channels. The section shall convey the detailed procedure of adding a glitch effect filter to the travel and vacation videos in Wondershare Filmora .
For Win 7 or later (64-bit)
For macOS 10.12 or later
Step 1: Initiating the Process
Begin the process by launching Wondershare Filmora. For starters, let us work on the perfect music for the video. The Audio tab shows an awful collection. Choose the “Young and Bright” category for the music.

Step 2: Picking the Music
Select any music and drag and drop it to the timeline. Now, trim the music into 15 seconds long. Now, input the travel videos to start their editing. Set the order for the video afterward.

Step 3: Choosing the Overlays
Navigate to the “Effects” panel and search for VHS. The software would offer multiple choices to pick from. Choose different overlays and place them onto the video tracks as you like.

Step 4: Adding the Transition
To add the transition, head to the “Transition” tab and find VHS. Drag and drop the transitions among the cuts between the video clips. Adjust their duration as needed. Preview the video, and the mission is accomplished.

Final Thoughts
Grabbing the attention of the audience is not as easy as it sounds. The creative industry uses a vast range of effects to compel the viewers to be on the edge of their seats. The article introduced the VHS filter while covering its procedure. If you are a TikTok, Instagram, or Photoshop user, we have got you. Wondershare Filmora helps perfectly to add the glitch filter to the vacation videos.
Versatile Video Editor - Wondershare Filmora
An easy yet powerful editor
Numerous effects to choose from
Detailed tutorials provided by the official channel
How to Make Sony Vegas Freeze Frame
How to Make Sony Vegas Freeze Frame
An easy yet powerful editor
Numerous effects to choose from
Detailed tutorials provided by the official channel
The simplest of tools is Freeze-Frame. It’s a one-minute technique that allows for a significant perception shift. It produces a definitive, sincere transformation in how we view a circumstance, an individual, or ourselves, and it is more than positive thinking.
Freezing a picture in a video with Sony Vegas is a simple editing method that you can accomplish with the help of simple tools and a basic understanding of the software. The terms “freezing an image” and “freezing a frame” is often helpful to describe interchangeably.
For informational purposes, Sony Vegas is non-linear video editing software widely recognized to be of good quality by many people throughout the world. Sony Vegas is recommendable for professionals and amateurs for excellent video editing results. Allowing publishers to use the Sony Vegas pause frame is one of the thousands of possibilities supplied by Sony Vegas; there are many tools in this application, but this task is achievable with only a few of them.
In this article
01 [Step-by-Step Guide on Adding Freeze Frame in Sony Vegas](#Part 1)
02 [How to Add Freeze Frame in Filmora](#Part 2)
Part 1 Step-by-Step Guide on Adding Freeze Frame in Sony Vegas
The Freeze-Frame effect freezes a portion of your video for a few seconds, allowing you to manipulate it. Stay with us; we’ll show you how to freeze a frame in Sony Vegas in a few simple steps.
Filmmakers, YouTubers, and professional videographers use Sony Vegas, a professional video editing software.
Here is a guide on how to freeze-frame in Sony Vegas
Step 1: Download and Import File
Install the app on your device after downloading it. To import your file, open the software, create a new project, then select the Import Media button towards the top left portion of the screen.
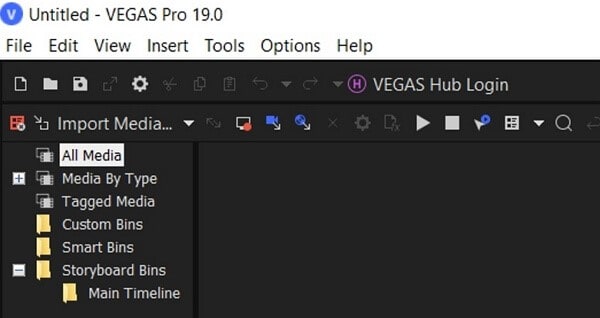
Step 2: Paste and Copy Video Parts
Drag/drop the imported file on the timeline, where you can stretch or zoom it. Now you can either play the video or move and stop the timeline marker where you wish to freeze the frame. After placing the marker, press S on the keyboard to split the video into two pieces. Then, copy and paste.

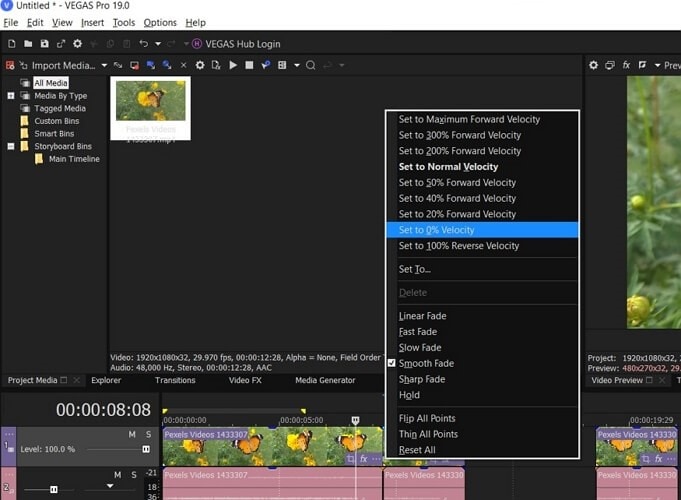
Step 3: Reduce the Velocity to 0%.
Right-click on the pasted video segment and choose Insert/Remove Envelope>Velocity from the context menu. It will draw a light green border around the pasted video segment. Set to 0 percent Velocity by right-clicking on that green box. It will freeze the extra part, making it look like a frozen frame.
Step 4: Disconnect the audio
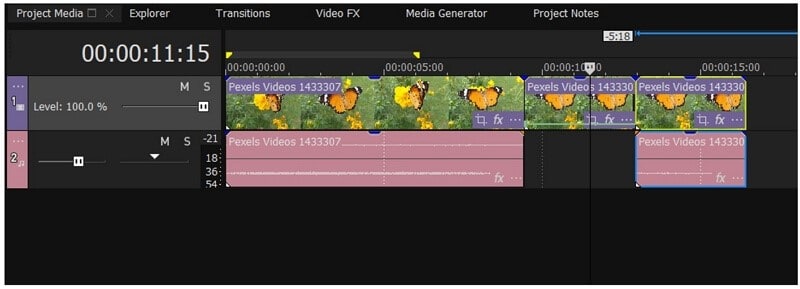
You may also detach audio with Sony Vegas. Select the frozen frame and press U on the keyboard to cut the background audio of the frozen area. Remove the audio segment from the timeline by clicking on it and deleting it. You can pick Delete from the right-click drop-down menu or use the Delete key on your keyboard.
After that, attach the second part.
Step 6: Make any necessary changes and save your work.
Finally, choose the frozen frame and customize it with text, effects, and other options. You may also modify the time duration by dragging the edges of the frozen frame. Finally, save the final file to the specified location on your device.
Apart from using the Sony Vegas Freeze frame, you can also look at another fantastic video editor like Wondershare Filmora to get the job all done.
Part 2 How to Add Freeze Frame in Wondershare Filmora Video Editor
Freezing a video to emphasize an action or adding captions is relatively simple if you have the correct technology.
For Win 7 or later (64-bit)
For macOS 10.12 or later
The editing duties have become more flexible and more straightforward, thanks to Freeze Frame. It allows individuals to make a video more concentrated by extending the duration of any single moment in the film. It adds to the video’s attractiveness and intrigue. Filmora also allows you to apply Freeze Frame to your videos to make them more attractive.
Wondershare Filmora is shared with you right here. It allows you to quickly produce a still image with your preferred zoom in and out effect.
Features
● Create a video effortlessly with Filmora Instant mode.
● Built-in preset templates are available.
● Quickly help match footage with music.
● Easily screen record activities.
● Resize videos in no time.
● Video editor suitable for amateurs.
How to Use Filmora to Freeze Video
This is a simple step guide on how to make a freeze-frame in Sony Vegas using filmora
Step 1 Import media files
To browse your file folder, click “Import,” or drag and drop all files into the main window. WMV, MOV, MP4, AVI, MKV, MTS, DV, TS, 3GP, M4V, and other media formats are supported by this tool.
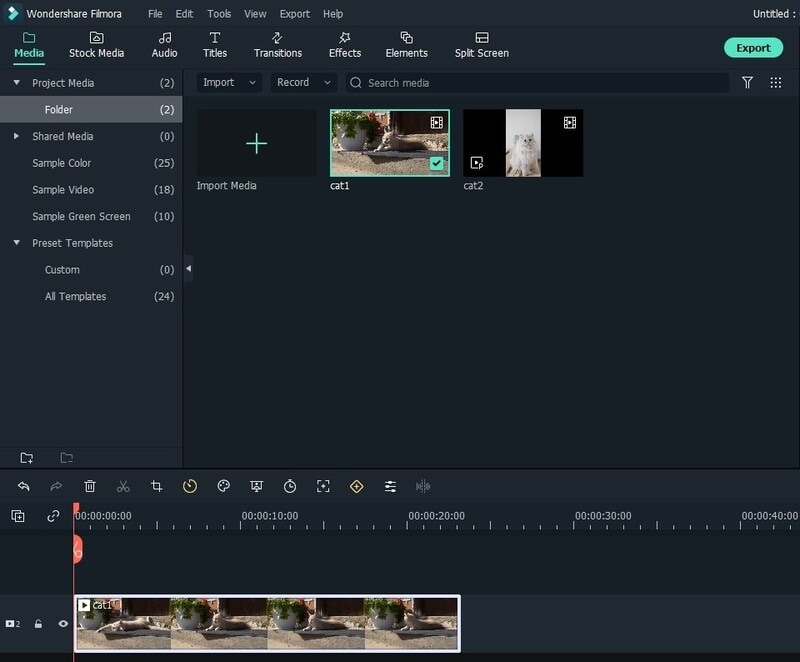
They’ll appear in the Media Library as thumbnails when you’ve loaded all of them. Drag them over to the Video Timeline now.
Step 2 Easily freeze video
Now, play the video clip you want to freeze and pause when it reaches the desired position. Underneath the Viewer panel, click the “Snapshot” icon. A photo will get added to the media library right away. Set the duration of the still picture by dragging it to the PIP track over the main video track.

Step 3 Save your work
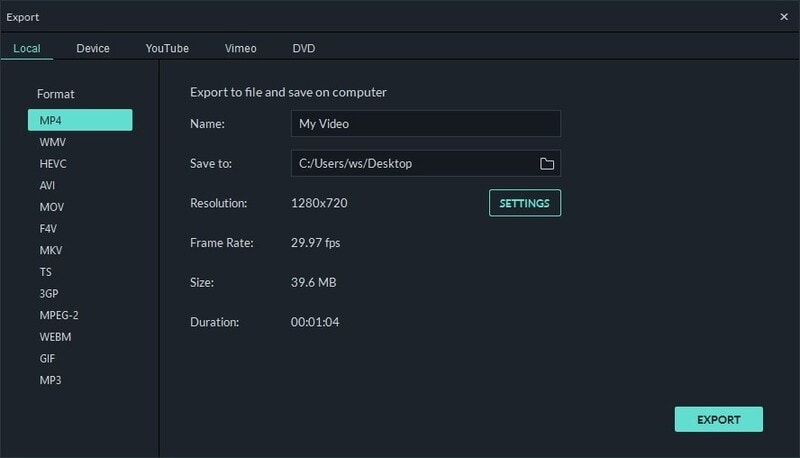
Click “Export” to save your work when you’re happy with everything. Choose from a choice of format options to save to your computer in the display pop-up box. Alternatively, you may share it with your friends and family by uploading it to YouTube, Facebook, or Twitter.
To make the still image more meaningful, you might wish to add subtitles. With the help of Wondershare Filmora, this is a reasonably simple task. Go to the toolbar’s “Text/Credit” tab and select your favorite template to personalize it further. You can customize all:
● the time of the animation,
● the size of the image, and
● the zoom in/out effect.
● Ending Thoughts →
● how to freeze-frame in Sony Vegas, you can now see that it is a straightforward process only if you follow the simple steps listed in the article.
● You can also know that you can easily use the Sony Vegas pause frame on videos using different tools. Still, we shall again recommend using the fantastic Filmora software to get this done as desired.
The simplest of tools is Freeze-Frame. It’s a one-minute technique that allows for a significant perception shift. It produces a definitive, sincere transformation in how we view a circumstance, an individual, or ourselves, and it is more than positive thinking.
Freezing a picture in a video with Sony Vegas is a simple editing method that you can accomplish with the help of simple tools and a basic understanding of the software. The terms “freezing an image” and “freezing a frame” is often helpful to describe interchangeably.
For informational purposes, Sony Vegas is non-linear video editing software widely recognized to be of good quality by many people throughout the world. Sony Vegas is recommendable for professionals and amateurs for excellent video editing results. Allowing publishers to use the Sony Vegas pause frame is one of the thousands of possibilities supplied by Sony Vegas; there are many tools in this application, but this task is achievable with only a few of them.
In this article
01 [Step-by-Step Guide on Adding Freeze Frame in Sony Vegas](#Part 1)
02 [How to Add Freeze Frame in Filmora](#Part 2)
Part 1 Step-by-Step Guide on Adding Freeze Frame in Sony Vegas
The Freeze-Frame effect freezes a portion of your video for a few seconds, allowing you to manipulate it. Stay with us; we’ll show you how to freeze a frame in Sony Vegas in a few simple steps.
Filmmakers, YouTubers, and professional videographers use Sony Vegas, a professional video editing software.
Here is a guide on how to freeze-frame in Sony Vegas
Step 1: Download and Import File
Install the app on your device after downloading it. To import your file, open the software, create a new project, then select the Import Media button towards the top left portion of the screen.

Step 2: Paste and Copy Video Parts
Drag/drop the imported file on the timeline, where you can stretch or zoom it. Now you can either play the video or move and stop the timeline marker where you wish to freeze the frame. After placing the marker, press S on the keyboard to split the video into two pieces. Then, copy and paste.

Step 3: Reduce the Velocity to 0%.
Right-click on the pasted video segment and choose Insert/Remove Envelope>Velocity from the context menu. It will draw a light green border around the pasted video segment. Set to 0 percent Velocity by right-clicking on that green box. It will freeze the extra part, making it look like a frozen frame.

Step 4: Disconnect the audio
You may also detach audio with Sony Vegas. Select the frozen frame and press U on the keyboard to cut the background audio of the frozen area. Remove the audio segment from the timeline by clicking on it and deleting it. You can pick Delete from the right-click drop-down menu or use the Delete key on your keyboard.
After that, attach the second part.

Step 6: Make any necessary changes and save your work.
Finally, choose the frozen frame and customize it with text, effects, and other options. You may also modify the time duration by dragging the edges of the frozen frame. Finally, save the final file to the specified location on your device.
Apart from using the Sony Vegas Freeze frame, you can also look at another fantastic video editor like Wondershare Filmora to get the job all done.
Part 2 How to Add Freeze Frame in Wondershare Filmora Video Editor
Freezing a video to emphasize an action or adding captions is relatively simple if you have the correct technology.
For Win 7 or later (64-bit)
For macOS 10.12 or later
The editing duties have become more flexible and more straightforward, thanks to Freeze Frame. It allows individuals to make a video more concentrated by extending the duration of any single moment in the film. It adds to the video’s attractiveness and intrigue. Filmora also allows you to apply Freeze Frame to your videos to make them more attractive.
Wondershare Filmora is shared with you right here. It allows you to quickly produce a still image with your preferred zoom in and out effect.
Features
● Create a video effortlessly with Filmora Instant mode.
● Built-in preset templates are available.
● Quickly help match footage with music.
● Easily screen record activities.
● Resize videos in no time.
● Video editor suitable for amateurs.
How to Use Filmora to Freeze Video
This is a simple step guide on how to make a freeze-frame in Sony Vegas using filmora
Step 1 Import media files
To browse your file folder, click “Import,” or drag and drop all files into the main window. WMV, MOV, MP4, AVI, MKV, MTS, DV, TS, 3GP, M4V, and other media formats are supported by this tool.
They’ll appear in the Media Library as thumbnails when you’ve loaded all of them. Drag them over to the Video Timeline now.

Step 2 Easily freeze video
Now, play the video clip you want to freeze and pause when it reaches the desired position. Underneath the Viewer panel, click the “Snapshot” icon. A photo will get added to the media library right away. Set the duration of the still picture by dragging it to the PIP track over the main video track.

Step 3 Save your work
Click “Export” to save your work when you’re happy with everything. Choose from a choice of format options to save to your computer in the display pop-up box. Alternatively, you may share it with your friends and family by uploading it to YouTube, Facebook, or Twitter.

To make the still image more meaningful, you might wish to add subtitles. With the help of Wondershare Filmora, this is a reasonably simple task. Go to the toolbar’s “Text/Credit” tab and select your favorite template to personalize it further. You can customize all:
● the time of the animation,
● the size of the image, and
● the zoom in/out effect.
● Ending Thoughts →
● how to freeze-frame in Sony Vegas, you can now see that it is a straightforward process only if you follow the simple steps listed in the article.
● You can also know that you can easily use the Sony Vegas pause frame on videos using different tools. Still, we shall again recommend using the fantastic Filmora software to get this done as desired.
The simplest of tools is Freeze-Frame. It’s a one-minute technique that allows for a significant perception shift. It produces a definitive, sincere transformation in how we view a circumstance, an individual, or ourselves, and it is more than positive thinking.
Freezing a picture in a video with Sony Vegas is a simple editing method that you can accomplish with the help of simple tools and a basic understanding of the software. The terms “freezing an image” and “freezing a frame” is often helpful to describe interchangeably.
For informational purposes, Sony Vegas is non-linear video editing software widely recognized to be of good quality by many people throughout the world. Sony Vegas is recommendable for professionals and amateurs for excellent video editing results. Allowing publishers to use the Sony Vegas pause frame is one of the thousands of possibilities supplied by Sony Vegas; there are many tools in this application, but this task is achievable with only a few of them.
In this article
01 [Step-by-Step Guide on Adding Freeze Frame in Sony Vegas](#Part 1)
02 [How to Add Freeze Frame in Filmora](#Part 2)
Part 1 Step-by-Step Guide on Adding Freeze Frame in Sony Vegas
The Freeze-Frame effect freezes a portion of your video for a few seconds, allowing you to manipulate it. Stay with us; we’ll show you how to freeze a frame in Sony Vegas in a few simple steps.
Filmmakers, YouTubers, and professional videographers use Sony Vegas, a professional video editing software.
Here is a guide on how to freeze-frame in Sony Vegas
Step 1: Download and Import File
Install the app on your device after downloading it. To import your file, open the software, create a new project, then select the Import Media button towards the top left portion of the screen.

Step 2: Paste and Copy Video Parts
Drag/drop the imported file on the timeline, where you can stretch or zoom it. Now you can either play the video or move and stop the timeline marker where you wish to freeze the frame. After placing the marker, press S on the keyboard to split the video into two pieces. Then, copy and paste.

Step 3: Reduce the Velocity to 0%.
Right-click on the pasted video segment and choose Insert/Remove Envelope>Velocity from the context menu. It will draw a light green border around the pasted video segment. Set to 0 percent Velocity by right-clicking on that green box. It will freeze the extra part, making it look like a frozen frame.

Step 4: Disconnect the audio
You may also detach audio with Sony Vegas. Select the frozen frame and press U on the keyboard to cut the background audio of the frozen area. Remove the audio segment from the timeline by clicking on it and deleting it. You can pick Delete from the right-click drop-down menu or use the Delete key on your keyboard.
After that, attach the second part.

Step 6: Make any necessary changes and save your work.
Finally, choose the frozen frame and customize it with text, effects, and other options. You may also modify the time duration by dragging the edges of the frozen frame. Finally, save the final file to the specified location on your device.
Apart from using the Sony Vegas Freeze frame, you can also look at another fantastic video editor like Wondershare Filmora to get the job all done.
Part 2 How to Add Freeze Frame in Wondershare Filmora Video Editor
Freezing a video to emphasize an action or adding captions is relatively simple if you have the correct technology.
For Win 7 or later (64-bit)
For macOS 10.12 or later
The editing duties have become more flexible and more straightforward, thanks to Freeze Frame. It allows individuals to make a video more concentrated by extending the duration of any single moment in the film. It adds to the video’s attractiveness and intrigue. Filmora also allows you to apply Freeze Frame to your videos to make them more attractive.
Wondershare Filmora is shared with you right here. It allows you to quickly produce a still image with your preferred zoom in and out effect.
Features
● Create a video effortlessly with Filmora Instant mode.
● Built-in preset templates are available.
● Quickly help match footage with music.
● Easily screen record activities.
● Resize videos in no time.
● Video editor suitable for amateurs.
How to Use Filmora to Freeze Video
This is a simple step guide on how to make a freeze-frame in Sony Vegas using filmora
Step 1 Import media files
To browse your file folder, click “Import,” or drag and drop all files into the main window. WMV, MOV, MP4, AVI, MKV, MTS, DV, TS, 3GP, M4V, and other media formats are supported by this tool.
They’ll appear in the Media Library as thumbnails when you’ve loaded all of them. Drag them over to the Video Timeline now.

Step 2 Easily freeze video
Now, play the video clip you want to freeze and pause when it reaches the desired position. Underneath the Viewer panel, click the “Snapshot” icon. A photo will get added to the media library right away. Set the duration of the still picture by dragging it to the PIP track over the main video track.

Step 3 Save your work
Click “Export” to save your work when you’re happy with everything. Choose from a choice of format options to save to your computer in the display pop-up box. Alternatively, you may share it with your friends and family by uploading it to YouTube, Facebook, or Twitter.

To make the still image more meaningful, you might wish to add subtitles. With the help of Wondershare Filmora, this is a reasonably simple task. Go to the toolbar’s “Text/Credit” tab and select your favorite template to personalize it further. You can customize all:
● the time of the animation,
● the size of the image, and
● the zoom in/out effect.
● Ending Thoughts →
● how to freeze-frame in Sony Vegas, you can now see that it is a straightforward process only if you follow the simple steps listed in the article.
● You can also know that you can easily use the Sony Vegas pause frame on videos using different tools. Still, we shall again recommend using the fantastic Filmora software to get this done as desired.
The simplest of tools is Freeze-Frame. It’s a one-minute technique that allows for a significant perception shift. It produces a definitive, sincere transformation in how we view a circumstance, an individual, or ourselves, and it is more than positive thinking.
Freezing a picture in a video with Sony Vegas is a simple editing method that you can accomplish with the help of simple tools and a basic understanding of the software. The terms “freezing an image” and “freezing a frame” is often helpful to describe interchangeably.
For informational purposes, Sony Vegas is non-linear video editing software widely recognized to be of good quality by many people throughout the world. Sony Vegas is recommendable for professionals and amateurs for excellent video editing results. Allowing publishers to use the Sony Vegas pause frame is one of the thousands of possibilities supplied by Sony Vegas; there are many tools in this application, but this task is achievable with only a few of them.
In this article
01 [Step-by-Step Guide on Adding Freeze Frame in Sony Vegas](#Part 1)
02 [How to Add Freeze Frame in Filmora](#Part 2)
Part 1 Step-by-Step Guide on Adding Freeze Frame in Sony Vegas
The Freeze-Frame effect freezes a portion of your video for a few seconds, allowing you to manipulate it. Stay with us; we’ll show you how to freeze a frame in Sony Vegas in a few simple steps.
Filmmakers, YouTubers, and professional videographers use Sony Vegas, a professional video editing software.
Here is a guide on how to freeze-frame in Sony Vegas
Step 1: Download and Import File
Install the app on your device after downloading it. To import your file, open the software, create a new project, then select the Import Media button towards the top left portion of the screen.

Step 2: Paste and Copy Video Parts
Drag/drop the imported file on the timeline, where you can stretch or zoom it. Now you can either play the video or move and stop the timeline marker where you wish to freeze the frame. After placing the marker, press S on the keyboard to split the video into two pieces. Then, copy and paste.

Step 3: Reduce the Velocity to 0%.
Right-click on the pasted video segment and choose Insert/Remove Envelope>Velocity from the context menu. It will draw a light green border around the pasted video segment. Set to 0 percent Velocity by right-clicking on that green box. It will freeze the extra part, making it look like a frozen frame.

Step 4: Disconnect the audio
You may also detach audio with Sony Vegas. Select the frozen frame and press U on the keyboard to cut the background audio of the frozen area. Remove the audio segment from the timeline by clicking on it and deleting it. You can pick Delete from the right-click drop-down menu or use the Delete key on your keyboard.
After that, attach the second part.

Step 6: Make any necessary changes and save your work.
Finally, choose the frozen frame and customize it with text, effects, and other options. You may also modify the time duration by dragging the edges of the frozen frame. Finally, save the final file to the specified location on your device.
Apart from using the Sony Vegas Freeze frame, you can also look at another fantastic video editor like Wondershare Filmora to get the job all done.
Part 2 How to Add Freeze Frame in Wondershare Filmora Video Editor
Freezing a video to emphasize an action or adding captions is relatively simple if you have the correct technology.
For Win 7 or later (64-bit)
For macOS 10.12 or later
The editing duties have become more flexible and more straightforward, thanks to Freeze Frame. It allows individuals to make a video more concentrated by extending the duration of any single moment in the film. It adds to the video’s attractiveness and intrigue. Filmora also allows you to apply Freeze Frame to your videos to make them more attractive.
Wondershare Filmora is shared with you right here. It allows you to quickly produce a still image with your preferred zoom in and out effect.
Features
● Create a video effortlessly with Filmora Instant mode.
● Built-in preset templates are available.
● Quickly help match footage with music.
● Easily screen record activities.
● Resize videos in no time.
● Video editor suitable for amateurs.
How to Use Filmora to Freeze Video
This is a simple step guide on how to make a freeze-frame in Sony Vegas using filmora
Step 1 Import media files
To browse your file folder, click “Import,” or drag and drop all files into the main window. WMV, MOV, MP4, AVI, MKV, MTS, DV, TS, 3GP, M4V, and other media formats are supported by this tool.
They’ll appear in the Media Library as thumbnails when you’ve loaded all of them. Drag them over to the Video Timeline now.

Step 2 Easily freeze video
Now, play the video clip you want to freeze and pause when it reaches the desired position. Underneath the Viewer panel, click the “Snapshot” icon. A photo will get added to the media library right away. Set the duration of the still picture by dragging it to the PIP track over the main video track.

Step 3 Save your work
Click “Export” to save your work when you’re happy with everything. Choose from a choice of format options to save to your computer in the display pop-up box. Alternatively, you may share it with your friends and family by uploading it to YouTube, Facebook, or Twitter.

To make the still image more meaningful, you might wish to add subtitles. With the help of Wondershare Filmora, this is a reasonably simple task. Go to the toolbar’s “Text/Credit” tab and select your favorite template to personalize it further. You can customize all:
● the time of the animation,
● the size of the image, and
● the zoom in/out effect.
● Ending Thoughts →
● how to freeze-frame in Sony Vegas, you can now see that it is a straightforward process only if you follow the simple steps listed in the article.
● You can also know that you can easily use the Sony Vegas pause frame on videos using different tools. Still, we shall again recommend using the fantastic Filmora software to get this done as desired.
Also read:
- Best Jump Cut Editing Tricks
- New This Article Discusses What Is Hitfilm Express, How to Download, Install and Use It, and Its Key Features. It Further Discusses Its Alternative for Editing Your Videos and More. Check Out Now for 2024
- Updated In 2024, Top 5 Online Video Converter for Instagram
- Updated There Are Many Vlogging Cameras You Can Find in the Market. However, to Get a Good Start in Vlogging, some Sony Vlogging Cameras and Canon Vlog Cameras Are to Consider. This Article Introduces You to the Respective List
- Updated 2024 Approved Top 10 Audio Visualizers Windows, Mac, Android, iPhone & Online
- Updated Step by Step to Cut a Video in Lightworks
- The Art of Fashioning Slow Motions Has Remained Popular Ever Since. Read This Article to Learn How to Do Slow-Mo in CapCut and Other Powerful Tools for 2024
- New Did You Know Cameras Have a Built-In Feature to Shoot Slow-Motion Clips? This Article Is About Using Sony S&Q to Capture Slow-Motion Scenes
- New 2024 Approved Learn How to Feather Shapes in After Effects and Add a Professional Touch to Your Designs. This Comprehensive Guide Covers Everything From the Basics to Advanced Techniques. Perfect for Beginners and Experts Alike
- Updated In 2024, Read This Review to Learn Everything You Need to Know About Leeming LUT Pro and How to Apply Pro LUTs Using Different Video Editors
- Updated In 2024, Best Video Format Converter for PC and Online
- Updated In 2024, How to Trim Video in Quicktime Player on Mac
- New 2024 Approved Create Your Slow Zoom TikTok in Minutes
- New 2024 Approved A Guide to Create Your Own LOL Montage Video
- Updated How to Add Motion Titles
- 2024 Approved Do You Intend to Include Motion Blur on Your Video Using Video Star? This Article Explains How to Use Motion Blur on Video Star with Exquisite Control
- Updated Top 10 Online And PC Cartoon Video Maker 2022 For Beginner
- New The Craziest 10 AI Editors Youve Ever Seen
- How to Speed Up Pictures on TikTok Slideshow
- Updated Best 10 Crazy-Cool Examples of AR Video for 2024
- Updated Wondering How to Edit a Video to Slow Motion on iPhone and Android Devices? Find Out How to Use Wondershare Filmora to Create and Edit Slo Mo Videos in a Few Clicks for 2024
- In 2024, Ways to Make Canva Collages
- Updated How to Splice Videos Together on iPhone
- Updated In 2024, Lets Look at Four Different Ways of Merging Audios and Videos. The Tools Will Help You Craft High-End Videos without Involving Any Complex Steps. You Can Make Your Videos Beautiful by Using the Following Easy to Use Tools
- New In 2024, Basic Introduction for LumaFusion Color Grading
- Updated Do You Need to Convert TXT to SRT to Add Subtitles to Your Videos? Here Are Three Effective Ways You Can Do It Effortlessly for 2024
- Add Neon Effects to Your Dance Videos with the Help of Wondershare Filmora After Reading This Article. It Will Give a More Thrilling and Exciting Appearance
- New Do You Seek a Guide to Add Motion in Blender? This Article Explains the Blender Motion Blur Effect in Detail and Helps You Master It
- New In 2024, How to Add Transitions in Adobe Premiere Pro
- Updated In 2024, How To Cut Videos For Instagram On Mac
- Updated Effective 10 Ways to Convert YouTube to MOV at Ease PC & Online
- New 10+ Top Unlimited FCPX Slideshow Templates
- Updated In 2024, Are You Also a Fan of the Slow Mo Guys? Well! Who Isnt? Learn How You Can Create Compelling Slow-Mo Videos Like the Slow Mo Guys Here
- New In 2024, Overview of Perfect Moody LUTs for VN Editor
- In 2024, Best 3 Infinix Smart 7 HD Emulator for Mac to Run Your Wanted Android Apps | Dr.fone
- 3 Ways to Change Location on Facebook Marketplace for Xiaomi 14 Ultra | Dr.fone
- In 2024, What Is a SIM Network Unlock PIN? Get Your Vivo Y78 5G Phone Network-Ready
- Honor X8b Video Recovery - Recover Deleted Videos from Honor X8b
- How To Transfer WhatsApp From iPhone 14 Pro Max to other iPhone 14 Pro devices? | Dr.fone
- What is the best Pokemon for pokemon pvp ranking On Honor Magic 5 Pro? | Dr.fone
- How to Fix Apple iPhone 15 Passcode not Working? | Dr.fone
- In 2024, 5 Ways To Teach You To Transfer Files from Nokia G42 5G to Other Android Devices Easily | Dr.fone
- iCloud Unlocker Download Unlock iCloud Lock for your iPhone 6s
- In 2024, Edit and Send Fake Location on Telegram For your Motorola Razr 40 Ultra in 3 Ways | Dr.fone
- Top 9 Motorola Moto G23 Monitoring Apps for Parental Controls | Dr.fone
- In 2024, Why does the pokemon go battle league not available On Tecno Phantom V Flip | Dr.fone
- In 2024, Easy Guide How To Bypass Motorola Edge 40 Neo FRP Android 10/11/12/13
- Top 4 Ways to Trace Realme C55 Location | Dr.fone
- Detailed Guide on Removing Apple iPhone 15 Plus Activation Lock without Previous Owner?
- How to recover deleted photos on Infinix Hot 40i
- How to Factory Reset Samsung Galaxy A54 5G in 5 Easy Ways | Dr.fone
- In 2024, Complete Tutorial to Use VPNa to Fake GPS Location On Vivo G2 | Dr.fone
- 5 Solutions For Realme C55 Unlock Without Password
- 11 Proven Solutions to Fix Google Play Store Not Working Issue on Honor X9b | Dr.fone
- How to Fix Android App Not Installed Error on OnePlus Nord 3 5G Quickly? | Dr.fone
- In 2024, How to Change Google Play Location On Google Pixel 8 | Dr.fone
- In 2024, How to use iSpoofer on OnePlus Nord CE 3 5G? | Dr.fone
- 5 Ways to Reset Tecno Spark 10 4G Without Volume Buttons | Dr.fone
- In 2024, Easy Guide to Huawei FRP Bypass With Best Methods
- In 2024, How To Fix Apple ID Verification Code Not Working From iPhone 15
- In 2024, Top 10 Password Cracking Tools For Realme 12 5G
- In 2024, Top 10 AirPlay Apps in ZTE Axon 40 Lite for Streaming | Dr.fone
- Title: Updated How to Create a Dynamic Text Animation in Filmora — Step-By-Step
- Author: Morgan
- Created at : 2024-05-19 05:12:16
- Updated at : 2024-05-20 05:12:16
- Link: https://ai-video-editing.techidaily.com/updated-how-to-create-a-dynamic-text-animation-in-filmora-step-by-step/
- License: This work is licensed under CC BY-NC-SA 4.0.

