
:max_bytes(150000):strip_icc():format(webp)/GettyImages-849896688-6d69f22bcf0a4ff092f444abe6e1c19f.jpg)
Updated How to Create a Glitch Text Effect?
How to Create a Glitch Text Effect?
Have you noticed the glitching effect that appears when you play a video or in games, creating a sporadic shaky effect on video edges? While this usually signifies a systematic software issue in these cases, the effect itself can work to create a dynamic visual style for different objects when done intentionally.
In fact, many video editors today use the glitch effect on elements in their videos, like the introductory title in movies or trailers. It creates a futuristic look to the text, which highly appeals to viewers who engage more in the video itself.
Suppose you are looking to add a similar effect to the title of your video project or other text-based content that you will add to your video, use a good tool for that. Wondershare Filmora , in particular, makes adding this effect very simple. Let’s learn how.
1. Launch the Filmora software
Free Download For Win 7 or later(64-bit)
Free Download For macOS 10.14 or later
The first step in preparing a customized glitch text effect is getting your software ready.
Visit the official website of Wondershare Filmora and tap on the Download button at the top to get the free software. The features necessary to create this effect are available under the free version, so you can avoid the plan upgradation process at this point.
After clicking the free download icon, the software’s installer version will save into your device automatically. Double-click on and agree with the related Terms and Conditions prompt. Then, tap on the Install button, and the software will take a few seconds to complete the installation process fully.

After that, click on the Start Now button to launch the software on your Mac or Windows computer that you are using. Filmora will open on its homepage.
2. Add the default title to timeline
Next, click the Create New Project button on the main page to access the editor section. Then, you have to click on the Titles tab and choose the Default Title option from the menu.
Drag it down from the media library section to the timeline and drop it in the Track 2 row. After that, move the play head with your cursor to the 1-second and the 10th frame on the timeline. Then, hold and move this clip until the end part of the clip is at this mark.

3. Adjust the font of the title
Next, double-click on this clip on the editor timeline to open the text editing window. Here, under the Preset section, change the title font to what to want to first word of your title to be.
Change the font style to a bigger bold option like Impact and increase the font size to 100. Then, scroll a little downward and tap on the Text Spacing option. Increase this value by 5 and press the OK button when you are done.

4. Add and copy all of the word clips
After adjusting the text font, tap on this clip on the timeline and copy it. Then, paste it just after the first clip ends, reducing its duration to around 1 second.
Then, double-click on the copied clip to open the text editing window. Click on the section where you can add the text and change it to the second word of your title. Again, copy this clip and paste it next to it, adjust it to be one second long, double-click on it to adjust the text to read the third word, and so on.

Continue until all of your intro’s words are added in these clip forms.
5. Create and add the snapshots
Following the previous step, click on the My Media section. Then, tap on the first clip in the collection and tap on the Snapshot icon at the end of the editing toolbar right above the timeline. Repeat this step for all the clips you have added until a snapshot of each of the words is stored in the media library.
Next, you have to grab hold of the first snapshot that you click and move it to the Track 1 of the timeline. Use the cursor to hold it and reduce the size of the clip to the same amount as the first clip on Track 1. To be sure, you can place the playhead at this point to see that the ending time for both clips is aligned.

6. Adjust the text effect for the first word
You have to click on the first-word snapshot in Track 1 of the Filmora editing timeline and double-click on it. Next, when the text editing window opens, you must change the Scale section to display the value of 290%. Following that, click on the slider in the Opacity parameter and decrease it to the 7% mark. Then, press the OK button.
On the timeline, right-click on this edited clip and choose the “Copy Effects” option from the drop-down menu.

7. Edit the snapshots for all words
After making changes to the first word, you must take hold of the second word’s snapshot from the media library. Drag and then drop it onto Track 1 of the editing timeline right next to the first clip. Then, hold the edge of this clip and reduce its size to fit the same duration as the second clip adjacent to it on Track 2.
Following that, you must choose this clip on Track 1 and right-click on top of it. Click on the “Paste Effects” option from the next drop-down menu, and the same adjustments will apply to this clip.

Repeat this step with all of the next snapshots of the following words.
8. Add the first effect layer
Next, you have to add stylish effects to your text. For that, you must tap on the Effects tab from the top toolbar of Filmora- a list of many effects collections will appear on the left panel.
Scroll down until you reach the Filmstock option. You must click on it and find the Flicker option from the list. Under this collection, there are many options available. You must choose the Video_seg effect and drag it to the editing timeline above Track 2.

At this point, ensure the effect falls right above the first and second clip parts in the track below. Tap on the edges of this clip to reduce the size of the video effect, taking careful note to keep the clip 8 frames long overall.
Then, copy the cut-down effect from Track 3 and paste it at every intersectional point between the separated word-based clips in Track 2.

9. Zoom in to edit the first effect layer
Following this, you must zoom into the timeline for a better view and editing control for the next part.
Go to the Effects tab at the top and choose the Filters collection next. Under it, choose the Chaos 1 effect option, drag it down to the timeline, and place it above the previous clip on Track 4. Adjust the starting edge of this clip to have the same starting point as the Video_seg effect on Track 3 with an overall 8-frame duration.

10. Edit the Effect
Next, you have to double-click on this clip to open the editing window for this effect. In this section, go to the Frequency parameter and increase the slider to 400. Following that, click on the Position X parameter and move the slider to the 0.20 point. Next, do the same for the Position Y parameter, but to the 0.70 point.
Change the Position Z parameter by typing the value 40 and disable the RGB Separate setting. Then, press the OK button and go to the timeline again.

11. Adjust the Glitch effects
Click on the effect clip on Track 4 and copy it. Please do the same as you did for the effect in Track 3 and paste it at the same locations between the clips in this track.
Afterward, go to the Effects tab again and choose the Filmstock tab. Among the collections here, you have to choose the Glitch option and select Glitch Stripe 1 from the collection. For an easier searching experience, you can directly type the effect in the search bar under the Effects tab.

Then, drag and drop it on Track 5 of the timeline right above the previous effect and reduce its duration to the same level as the first two effects. Copy it and then paste the clip again for each clip-to-clip intersection.
After this part, drag the Glitch Dispersion effect down to the timeline. Place it above the previous effect and adjust the clip’s size to the same length. Again, copy the effect and repeat the steps again. Next, repeat the same whole process with the Negative Flicker effect from the Flicker collection on Track 7.

12. See the preview and save the file
Finally, you are done adding all the effects, and you have to click on the Render Preview icon in the toolbar above the timeline. Then, press the Play button on the Preview window to see the full glitch text effect play out properly.

Conclusion
Now, you are done with creating a visually exciting and dynamic look for your introductory or ending title in the video using the glitch effect. For the best results, you should practice this process sometimes to get used to it and even make certain preferential changes to the font style. Ultimately, with the help of this software, you can expect a high-quality title look and use it for further video editing work.
Free Download For macOS 10.14 or later
The first step in preparing a customized glitch text effect is getting your software ready.
Visit the official website of Wondershare Filmora and tap on the Download button at the top to get the free software. The features necessary to create this effect are available under the free version, so you can avoid the plan upgradation process at this point.
After clicking the free download icon, the software’s installer version will save into your device automatically. Double-click on and agree with the related Terms and Conditions prompt. Then, tap on the Install button, and the software will take a few seconds to complete the installation process fully.
After that, click on the Start Now button to launch the software on your Mac or Windows computer that you are using. Filmora will open on its homepage.
2. Add the default title to timeline
Next, click the Create New Project button on the main page to access the editor section. Then, you have to click on the Titles tab and choose the Default Title option from the menu.
Drag it down from the media library section to the timeline and drop it in the Track 2 row. After that, move the play head with your cursor to the 1-second and the 10th frame on the timeline. Then, hold and move this clip until the end part of the clip is at this mark.
3. Adjust the font of the title
Next, double-click on this clip on the editor timeline to open the text editing window. Here, under the Preset section, change the title font to what to want to first word of your title to be.
Change the font style to a bigger bold option like Impact and increase the font size to 100. Then, scroll a little downward and tap on the Text Spacing option. Increase this value by 5 and press the OK button when you are done.
4. Add and copy all of the word clips
After adjusting the text font, tap on this clip on the timeline and copy it. Then, paste it just after the first clip ends, reducing its duration to around 1 second.
Then, double-click on the copied clip to open the text editing window. Click on the section where you can add the text and change it to the second word of your title. Again, copy this clip and paste it next to it, adjust it to be one second long, double-click on it to adjust the text to read the third word, and so on.
Continue until all of your intro’s words are added in these clip forms.
5. Create and add the snapshots
Following the previous step, click on the My Media section. Then, tap on the first clip in the collection and tap on the Snapshot icon at the end of the editing toolbar right above the timeline. Repeat this step for all the clips you have added until a snapshot of each of the words is stored in the media library.
Next, you have to grab hold of the first snapshot that you click and move it to the Track 1 of the timeline. Use the cursor to hold it and reduce the size of the clip to the same amount as the first clip on Track 1. To be sure, you can place the playhead at this point to see that the ending time for both clips is aligned.
6. Adjust the text effect for the first word
You have to click on the first-word snapshot in Track 1 of the Filmora editing timeline and double-click on it. Next, when the text editing window opens, you must change the Scale section to display the value of 290%. Following that, click on the slider in the Opacity parameter and decrease it to the 7% mark. Then, press the OK button.
On the timeline, right-click on this edited clip and choose the “Copy Effects” option from the drop-down menu.
7. Edit the snapshots for all words
After making changes to the first word, you must take hold of the second word’s snapshot from the media library. Drag and then drop it onto Track 1 of the editing timeline right next to the first clip. Then, hold the edge of this clip and reduce its size to fit the same duration as the second clip adjacent to it on Track 2.
Following that, you must choose this clip on Track 1 and right-click on top of it. Click on the “Paste Effects” option from the next drop-down menu, and the same adjustments will apply to this clip.
Repeat this step with all of the next snapshots of the following words.
8. Add the first effect layer
Next, you have to add stylish effects to your text. For that, you must tap on the Effects tab from the top toolbar of Filmora- a list of many effects collections will appear on the left panel.
Scroll down until you reach the Filmstock option. You must click on it and find the Flicker option from the list. Under this collection, there are many options available. You must choose the Video_seg effect and drag it to the editing timeline above Track 2.
At this point, ensure the effect falls right above the first and second clip parts in the track below. Tap on the edges of this clip to reduce the size of the video effect, taking careful note to keep the clip 8 frames long overall.
Then, copy the cut-down effect from Track 3 and paste it at every intersectional point between the separated word-based clips in Track 2.
9. Zoom in to edit the first effect layer
Following this, you must zoom into the timeline for a better view and editing control for the next part.
Go to the Effects tab at the top and choose the Filters collection next. Under it, choose the Chaos 1 effect option, drag it down to the timeline, and place it above the previous clip on Track 4. Adjust the starting edge of this clip to have the same starting point as the Video_seg effect on Track 3 with an overall 8-frame duration.
10. Edit the Effect
Next, you have to double-click on this clip to open the editing window for this effect. In this section, go to the Frequency parameter and increase the slider to 400. Following that, click on the Position X parameter and move the slider to the 0.20 point. Next, do the same for the Position Y parameter, but to the 0.70 point.
Change the Position Z parameter by typing the value 40 and disable the RGB Separate setting. Then, press the OK button and go to the timeline again.
11. Adjust the Glitch effects
Click on the effect clip on Track 4 and copy it. Please do the same as you did for the effect in Track 3 and paste it at the same locations between the clips in this track.
Afterward, go to the Effects tab again and choose the Filmstock tab. Among the collections here, you have to choose the Glitch option and select Glitch Stripe 1 from the collection. For an easier searching experience, you can directly type the effect in the search bar under the Effects tab.
Then, drag and drop it on Track 5 of the timeline right above the previous effect and reduce its duration to the same level as the first two effects. Copy it and then paste the clip again for each clip-to-clip intersection.
After this part, drag the Glitch Dispersion effect down to the timeline. Place it above the previous effect and adjust the clip’s size to the same length. Again, copy the effect and repeat the steps again. Next, repeat the same whole process with the Negative Flicker effect from the Flicker collection on Track 7.
12. See the preview and save the file
Finally, you are done adding all the effects, and you have to click on the Render Preview icon in the toolbar above the timeline. Then, press the Play button on the Preview window to see the full glitch text effect play out properly.
Conclusion
Now, you are done with creating a visually exciting and dynamic look for your introductory or ending title in the video using the glitch effect. For the best results, you should practice this process sometimes to get used to it and even make certain preferential changes to the font style. Ultimately, with the help of this software, you can expect a high-quality title look and use it for further video editing work.
How to Zoom Picture in Picture [Easy Solution]
Zoom is one of the greatest options on the market for video conferencing. It doesn’t matter whether you use it at home or in an office environment; it will quickly link the team members. One of the most popular video conferencing programs is Zoom. When in-person meetings aren’t feasible, it enables you to communicate electronically with employees, and it’s been a major popularity for social occasions as well. In case you’re not acquainted, picture-in-picture mode enables you to watch videos from one app while using your PC normally. The movie will keep playing in a tiny thumbnail window so that two applications may work simultaneously on your smartphone.
You may create virtual audio and video conferences, webinars, live chats, screen sharing, and other collaboration tools with Zoom, a cloud-based video communications solution. Zoom’s most recent iPhone apps let you dismiss a Zoom Meeting while keeping the Zoom video call open in a picture-in-picture mode. To join a Zoom conference, you don’t need an account, and because the software works with Mac, Windows, Linux, iOS, and Android devices, nearly anybody can use it. Since using Zoom’s picture-in-picture mode is the same as using it with other applications, you shouldn’t have any trouble if you often use PiP mode. Here are the top 4 methods you can refer to picture in picture in Zoom.
Method 1: Swap Shared Screen with Video
You may move the Zoom Meeting PiP window across the screen, change the thumbnail’s size, and utilize other applications while it remains open, just like any other picture-in-picture window. Before leaving the meeting if you’re not giving a presentation or speaking, you should definitely mute Zoom on your iPhone to prevent noises from your typing or other activities from entering the conversation. Additionally, keep in mind to switch off the camera if you’re engaged in something distracting, at least for the duration of your activity. To reopen the Zoom Meeting and go back to the Zoom app, touch the Picture-in-Picture mode pane. Here are some actions to keep in mind:
Steps to Swap Shared Screen for Zoom Picture in Picture
Step1Launch or enter a Zoom meeting. Keep the video on your main screen at all times, closing the chat and participant list as necessary.
Step2Tap the Home button or swipe up from the bottom of the screen.
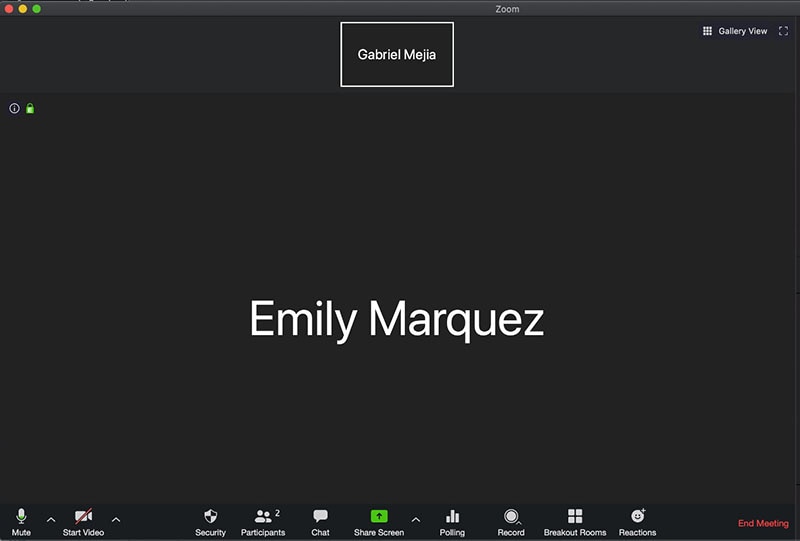
Step3Picture-in-picture mode should be activated automatically throughout the meeting.
Method 2: Use Ecamm Live
Live streaming is a fantastic way to provide original content and stand out from the crowd. To prevent any operational difficulties, a more sophisticated virtual camera is absolutely necessary. You now have magical abilities thanks to Ecamm virtual cam, including the ability to add text, animations, observe a live stream, post viewer comments, play music, share your screen, use sound effects, and many more. It offers the Ecamm live virtual camera zoom function for video conferences so you may improve your Zoom discussions by sending output to other PC programs. You could see a quality difference between what you view in Ecamm Live and what your Zoom visitors see while utilizing virtual camera with Zoom. The quality of a Zoom video stream cannot be improved using Ecamm Live. Simply broadcast the Zoom app using Ecamm Live’s Screen Share mode to utilize Ecamm Live for picture-in-picture virtual presentations on Zoom.
Steps to Use Ecamm Live for Zoom Picture in Picture
Step1Download the Ecamm Application
Install Ecamm Live on your computer, then choose the center button in the source switcher at the top of the main window to enter Screen Share mode.
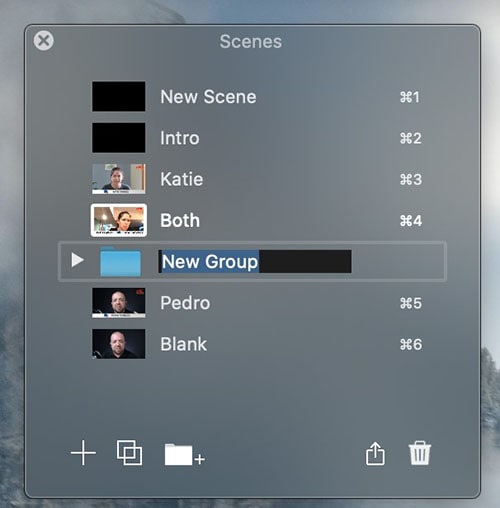
Step2Create Scenes
With the use of Ecamm Live’s Virtual Camera and Virtual Mic capabilities, you may transfer Ecamm Live’s output to almost any other Mac software, including Zoom. After setting, create the scenes in the program to quickly switch between various cameras.
Step3Select Ecamm on Zoom
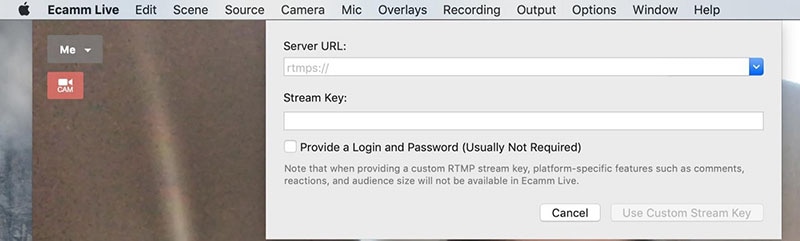
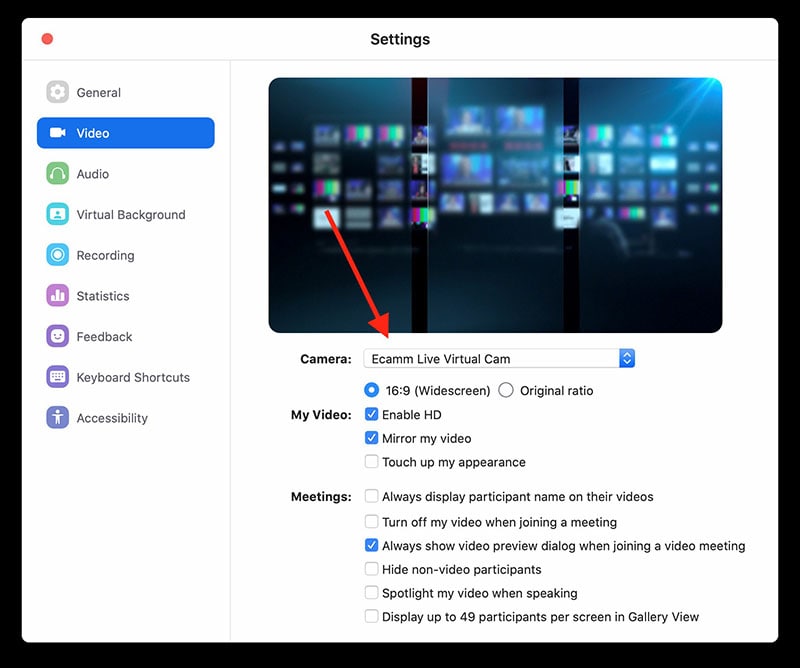
You may also utilize Ecamm Live’s Sharing Window capability to feed Ecamm Live output into Zoom. Simply activate the virtual camera, and then, as seen below, choose Ecamm Live Virtual Camera in Zoom’s video settings:
Step4Begin Your Presentation
Finally, click the PC share option to show your Zoom app to your audience. To conceal a picture-in-picture window that displays your camera image while live streaming, click the PIP button.
Method 3: Use Filmora as A Switcher
Zoom has solutions that will make your meetings simple and secure. It gives your remote staff a secure setting to interact and share crucial information. Ideal control over your film and configuration options to make them aesthetically pleasing is something Zoom lacks. To overcome the drawbacks and improve the quality of your online meetings, you may take use of the capabilities of Zoom in conjunction with Filmora. Filmora was developed with the intention of easing user burden and supporting applications. Though complicated, the program is simple to use. The perhaps most popular web information that may be saved on your computer can be easily captured by just angling your screen. For more information on how to record and save your Zoom for picture in picture, see the guide here.
To broadcast a variety of situations in a grid style, you may also combine inputs from your camera, microphone, computer screen, and web conferencing software. Wondershare -the finest desktop application for recording a Zoom Picture in Picture meeting- is Filmora. With the majority of cameras, this app’s screen recording capability is both user-friendly and feature-rich. Here, users may either choose a particular region to record or record their zoom meetings in Fullscreen mode. Additionally, you may choose the camera and input microphone that will be used while recording a video overlay. The addition of relevant comments like phrases, lines, drawings, symbols, etc. is also possible by users. The detailed procedure for recording a Zoom Picture-in-Picture meeting using a Filmora recorder is given below:
Free Download For Win 7 or later(64-bit)
Free Download For macOS 10.14 or later
Step1Download and Install Filmora Zoom Recorder
You may find both types, i.e., the most recent Windows and Mac versions, by first visiting the usual website and then using this Zoom. Install the program on your computer once you download it to get started.

Step2Initiate Filmora Recorder
After finishing the installation process for this Reside Zoom recorder, launch it from the main menus and choose “New Task” when prompted. It will take you to Filmora’s streamlined user interface where you can immediately start filming. Then, as seen in the picture below, you may adjust the screen recording using your preferred camera, microphone, and system settings:

Step3Begin/End the Recording
When you are through configuring this Zoom picture in picture recorder, click the Record button, and it will immediately begin recording your customized screen. Similar to that, after you’re done recording, click Stop, which will take you inside the video editor where you may edit your recorded information.

Step4Share Recordings
When you have everything ready, export your recording right away. After you’re done with the editing part, you do have a lot of options to choose from when displaying your screen capture and webcam stories. To do so, click the Export button in the item user interface’s top-right corner as shown below:
You may easily choose your preferred way to share from there if you choose to upload your work of zoom picture in picture recordings straight to the YouTube or other reputable websites right now. Simply refer to the Sharing plug-ins in the Export window to find out more.
Method 4: Use Hardware Switcher ATEM Mini Pro
Particularly on Zoom, the ATEM Mini is excellent for video conferences. The Blackmagic ATEM Mini is a USB video interface and HDMI switcher. Four HDMI inputs, or four cameras that can produce an HDMI video stream, may be switched between live. This device integrates Zoom meetings fast and makes it incredibly simple to set up your audio, a sometimes-forgotten aspect of video broadcasting. This sophisticated video switcher promises to offer broadcast-quality multi-camera footage with ease and is targeted at gamers, streamers, and online reviewers. It connects to a computer via a USB-C to USB-A connection. The video feed may then be sent to distant colleagues via a number of well-liked videos streaming services, including Zoom.
Step1The ATEM Mini Pro is a basic control switcher with pro-broadcast performance. Your ATEM Mini Pro is really simple to set up. You can connect a full setup with several cameras and microphones in around 30 minutes.
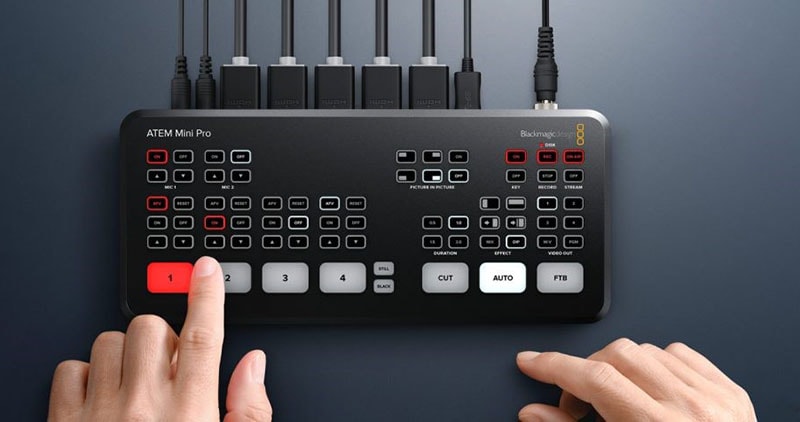
Step2You may connect several camera sources to the inputs of the ATEM Mini Pro. The 4 HDMI inputs each have a separate standards converter built in. As a result, the ATEM Mini can automatically convert inputs that are 1080p, 1080i, or 720p to the switcher’s video standard. You may make quick changes between inputs with no latency or disruption to your video output by using the ergonomic buttons.
Step3As a third option, Zoom offers ATEM Mini, which enables you to switch between several inputs, add custom visuals, and adjust audio levels all from a single interface. To improve the quality of your production, you may even use smooth transitions like wipes or fades. You can even test any input stream before making it live.
Conclusion
When you are doing a Zoom Meeting and share your screen, only to discover that what the other attendees see is a split screen with your material and the other Attendee cams, it is highly annoying. You may move the Zoom Meeting PiP window across the screen, change the thumbnail’s size, and utilize other applications while it remains open, just like any other picture-in-picture window. Someone must be sharing information in the Zoom conference for the Picture in Picture, or “Split Screen” option, to be active. We’ve listed the top techniques for doing it effectively above. To do this work without difficulty, use them as your guide.
Free Download For macOS 10.14 or later
Step1Download and Install Filmora Zoom Recorder
You may find both types, i.e., the most recent Windows and Mac versions, by first visiting the usual website and then using this Zoom. Install the program on your computer once you download it to get started.
Step2Initiate Filmora Recorder
After finishing the installation process for this Reside Zoom recorder, launch it from the main menus and choose “New Task” when prompted. It will take you to Filmora’s streamlined user interface where you can immediately start filming. Then, as seen in the picture below, you may adjust the screen recording using your preferred camera, microphone, and system settings:
Step3Begin/End the Recording
When you are through configuring this Zoom picture in picture recorder, click the Record button, and it will immediately begin recording your customized screen. Similar to that, after you’re done recording, click Stop, which will take you inside the video editor where you may edit your recorded information.
Step4Share Recordings
When you have everything ready, export your recording right away. After you’re done with the editing part, you do have a lot of options to choose from when displaying your screen capture and webcam stories. To do so, click the Export button in the item user interface’s top-right corner as shown below:
You may easily choose your preferred way to share from there if you choose to upload your work of zoom picture in picture recordings straight to the YouTube or other reputable websites right now. Simply refer to the Sharing plug-ins in the Export window to find out more.
Method 4: Use Hardware Switcher ATEM Mini Pro
Particularly on Zoom, the ATEM Mini is excellent for video conferences. The Blackmagic ATEM Mini is a USB video interface and HDMI switcher. Four HDMI inputs, or four cameras that can produce an HDMI video stream, may be switched between live. This device integrates Zoom meetings fast and makes it incredibly simple to set up your audio, a sometimes-forgotten aspect of video broadcasting. This sophisticated video switcher promises to offer broadcast-quality multi-camera footage with ease and is targeted at gamers, streamers, and online reviewers. It connects to a computer via a USB-C to USB-A connection. The video feed may then be sent to distant colleagues via a number of well-liked videos streaming services, including Zoom.
Step1The ATEM Mini Pro is a basic control switcher with pro-broadcast performance. Your ATEM Mini Pro is really simple to set up. You can connect a full setup with several cameras and microphones in around 30 minutes.
Step2You may connect several camera sources to the inputs of the ATEM Mini Pro. The 4 HDMI inputs each have a separate standards converter built in. As a result, the ATEM Mini can automatically convert inputs that are 1080p, 1080i, or 720p to the switcher’s video standard. You may make quick changes between inputs with no latency or disruption to your video output by using the ergonomic buttons.
Step3As a third option, Zoom offers ATEM Mini, which enables you to switch between several inputs, add custom visuals, and adjust audio levels all from a single interface. To improve the quality of your production, you may even use smooth transitions like wipes or fades. You can even test any input stream before making it live.
Conclusion
When you are doing a Zoom Meeting and share your screen, only to discover that what the other attendees see is a split screen with your material and the other Attendee cams, it is highly annoying. You may move the Zoom Meeting PiP window across the screen, change the thumbnail’s size, and utilize other applications while it remains open, just like any other picture-in-picture window. Someone must be sharing information in the Zoom conference for the Picture in Picture, or “Split Screen” option, to be active. We’ve listed the top techniques for doing it effectively above. To do this work without difficulty, use them as your guide.
Top 10 Sound Extractors to Extract Sound From Video 2023
It often happens that we get so engrossed in a movie or video and fall exceptionally hard for all elements. This can prompt us to extract sounds from videos, like the background music, a voiceover, or dialogue between characters.
Safe sound extraction from any type of video file will require the help of the best sound extractor software. Wondering about which you should try out? Go through this list, and then make up your mind.
- Adobe Premiere Pro
- Filmora
- iMovie
- VLC
- Online Audio Converter
- Audio Converter
- FFmpeg
- QuickTime
- Audio Extractor
- ASPOSE
- Practical Tips to Choose the Best One to Extract Sound from Videos
- Hot FAQs on Extract Sound from Videos
Top 10 Sound Extractors for Extracting Sound from video
We researched and found many software options for extracting Sound from video. After careful checking, we found 10 options with high-quality functions and performance levels. We recommend you consider them for pulling audio from video files- here’s why.
1. Adobe Premiere Pro
Adobe Premiere Pro is one of the top-level video editors available with various functions and pre-set filters/effects. So, one can customize the videos and audio as they require, like extracting Sound from video and saving them.

How to Download: Website
Compatible OS: Windows, Mac
Price: Individuals- USD 20.99/month. License for Teams- USD 35.99. All Apps-related plans.
Main Features:
- Pre-set templates are available in high-quality resolutions.
- Customize your titles and video edits.
- Automatically adjusts color matching in scenes.
- Robust text-to-speech function with multi-language support.
Pros
- Share easily across the platform with cloud support.
- Access to diverse stock media with Adobe membership.
- Supports many file formats like / (), MPEG-2, Apple ProRes, MPEG-4, native camera formats, etc.
Cons
- No perpetual license support.
- Strict eligibility rules to qualify for student-teacher plans.
Best for Users: Professionals and organization-based users, like teachers, can use this for personal and teaching-related video editing steps.
2. Filmora
If you want a software sound extractor that provides a wide range of audio editing functions, Filmora is one that we would recommend. While it is firstly a video editor, you can use audio-based editing functions like sound stabilization, extraction, visualization, audio ducking, silence detection, and more.

Free Download For Win 7 or later(64-bit)
Free Download For macOS 10.14 or later
Compatible OS: Windows, Mac
Price: Free, Annual- USD 49.99, Perpetual- USD 89.99
Main Features:
- The audio visualization feature analyzes and virtually shows beats.
- Detect silent sections in the video and remove them.
- Many audio stabilization settings like Denoise and Equalizer.
- Vital TTS/STT functions for voiceovers.
Pros
- Multiple video/audio formats are supported.
- Pre-set sound effects are present.
- Adjust the volume of videos during editing.
Cons
- Upgrade plan to remove ads.
- Audio output is mainly available in MP3.
How to use for extracting music from videos:
Step1 Download and install Filmora 11 .
Step2 Click on New Project.
Step3 Press “Click here to import Media” > choose file folder > Insert.

Step4 Drag file to editor timeline > Cut the file to a set suitable size for your audio extraction.
Step5 Click on the Edit icon from the list of icons above the timeline.
Step6 Press on Audio > Make adjustments for settings like Fade in/Face out, Equalizer, Pitch, etc.

Step7 Click Export > Local > MP3. Make changes as needed.

Step8 Hit the Export button.
Best for Users: Pro-level and beginner-level professionals and home-based users who want a comprehensive, feature-rich platform for video/audio editing can benefit from this.
3. iMovie
Mac and iOS users benefit significantly from this video editing software to create dynamic movie-quality videos. One major part of movies is the soundtrack, and you can use this software to add easily, control, and extract the sound clips.

How to Download: Mac App Store , Apple App Store
Compatible OS: Mac, iOS
Price: Free
Main Features:
- Pre-set storyboard available for optimized and thematic video edits.
- Royalty-free audio files in the library.
- You can add voiceovers.
- Add pre-set sound effects or customize them, like removing/adding audio clips.
Pros
- Sound aligns precisely with video.
- Multiple effects, filters, and editing tools are available.
- Simple sharing via social media accounts.
Cons
- Only available for iOS 15.1+ and such newest versions of Apple devices.
- You cannot access it without an Apple ID.
Best for Users: Professional video editors with diverse movie-like presentation-making needs can use this.
4. VLC
VLC is a well-known Windows-based media player that is accessible as a Chrome extension and has mobile app versions. While you can use it mainly to view videos, the software can easily cut out sound clips from the video here.

How to Download: Microsoft Store , Apple App Store , Google Play Store , Chrome Web Store
Compatible OS: Windows, iOS, Chromebook, Android
Price: Free
Main Features:
- Script the command line VLC-based invocations.
- Play different types of files with multi-format support.
- Use the in-built equalizer to optimize sound quality/effects.
- Sync with or create a new video stream.
Pros
- The software assures quick functions with all features.
- No codec installation is necessary.
- Keyboard shortcuts for specific actions.
Cons
- Difficult to search and open files.
- Not very customizable.
Best for Users: People can use VLC Media Player to stream or play videos and even make some minor adjustments/extraction.
5. Online Audio Converter
This is one of the more straightforward tools to add video files and extract Sound from video with some quick steps. The Online Audio Converter supports a wide range of video formats. You just have to add one file by dragging and dropping it from your device memory, inserting its URL, or uploading it via the cloud. Then, press the Start Extracting command.

How to Download: Website
Compatible OS: Windows, Mac, Online
Price: Monthly- USD 29.95, Annual- USD 39.95, Lifetime- USD 59.95
Main Features:
- Add files either directly through the device or the cloud.
- Insert video URL for audio extraction from online video.
- Supports multiple video file formats like MPEG, MOV, AVI, and MP4.
- Scroll to select extraction end and start points.
Pros
- Only allows videos with 500MB or smaller size.
- Straightforward three steps for the whole extraction process.
- Zero quality loss after an extraction.
Cons
- Customization options are limited.
- The main audio format supported is MP3 for extraction.
Best for Users: Beginners and pro-level users who want to extract Sound from video files quickly.
6. Audio Converter
The Audio Converter app can efficiently pull out audio clips from video and is compatible with many such media formats. You can use this to cut and trim your file, mainly to decide how much of the audio will extract. Then, play it to see the quality of the output file.

How to Download: Apple App Store
Compatible OS: iOS
Price: Free, Pro- USD 2.99.
Main Features:
- Extract sound from video in formats like M4A, MP3, OGG, M4R, FLAC, etc.
- Insert videos in formats like MP4, 3G2, 3GP, MOV, MKV, WMV, and more.
- Trim the audio to smaller sections for extraction.
- The media player version supports all audio/video types.
Pros
- Supports a wide variety of audio/video formats.
- A simple media player function is also available.
- It is compatible with many languages.
Cons
- App size of 143.1 MB can feel high to some users.
- Basic-level functions only.
Best for Users: People who want to extract Sound from video files to create ringtones can use this best.
7. FFmpeg
FFmpeg is one of the most trustworthy platforms for converting and extracting Sound from video. It is an open-source solution and comes with complete multi-media management work. This is mainly used for easily streaming, converting, and recording video/audio projects.

How to Download: Website
Compatible OS: Windows, Mac, etc.
Price: Free
Main Features:
- Audio filters are available, like virtualbass and tiltshelf.
- Video editing filters like colormap, blurdetect, and pixelize are available.
- Enhance dialog and extract sound clips.
- Constantly updating features.
Pros
- This has open-source benefits.
- No excessive installation steps are necessary.
- Supports a wide range of encoding benefits.
Cons
- One must have some sort of technical knowledge to use this.
- Finding the right features or solutions takes some time.
Best for Users: Developers with better technical knowledge can use this dynamic open-source platform for video/audio editing.
8. QuickTime
You can also use this Mac-based video player on Windows to watch different videos easily. Besides the streaming benefits, you can install plugins to optimize its available features, like adding the ability to record/edit video files.

How to Download: Website
Compatible OS: Mac, Windows
Price: Free
Main Features:
- Stream videos and even extract Sound from the files.
- Supports many video formats in the player.
- Record audio on this media player.
- Import files from other Mac products like Final Cut Pro and iMovie.
Pros
- Works on both Windows and Mac.
- Pre-set effects and filters are available that one can edit.
- Simple interface for beginners.
Cons
- Unnecessary bloatware installation is needed.
- Playback support is lacking.
Best for Users: New users can simply operate this media player to watch videos and learn the extraction process.
9. Audio Extractor
You can use this conversion and extraction software to do many editing functions, like changing, cutting, and extracting video/audio files. The supported format here is MP3 and WAV - choose which you find compatible with your final project. You can decide and extract from specific sections.

How to Download: Google Play Store
Compatible OS: Android
Price: Free with in-app purchases of USD 1.99- USD 6.99 for each item.
Main Features:
- Change audio file size and format.
- View/delete components through the app directly.
- Preview video/sound file.
- Trim/extract sounds from videos easily with the converter.
Pros <path d=”M7 22H4C3.46957 22 2.96086 21.7893 2.58579 21.4142C2.21071 21.0391 2 20.5304 2 20V13C2 12.4696 2.21071 11.9609 2.58579 11.5858C2.96086 11.2107 3.46957 11 4 11H7M14 9V5C14 4.20435
Top 10 Sound Extractors for Extracting Sound from video
We researched and found many software options for extracting Sound from video. After careful checking, we found 10 options with high-quality functions and performance levels. We recommend you consider them for pulling audio from video files- here’s why.
1. Adobe Premiere Pro
Adobe Premiere Pro is one of the top-level video editors available with various functions and pre-set filters/effects. So, one can customize the videos and audio as they require, like extracting Sound from video and saving them.
How to Download: Website
Compatible OS: Windows, Mac
Price: Individuals- USD 20.99/month. License for Teams- USD 35.99. All Apps-related plans.
Main Features:
- Pre-set templates are available in high-quality resolutions.
- Customize your titles and video edits.
- Automatically adjusts color matching in scenes.
- Robust text-to-speech function with multi-language support.
Pros
- Share easily across the platform with cloud support.
- Access to diverse stock media with Adobe membership.
- Supports many file formats like / (), MPEG-2, Apple ProRes, MPEG-4, native camera formats, etc.
Cons
- No perpetual license support.
- Strict eligibility rules to qualify for student-teacher plans.
Best for Users: Professionals and organization-based users, like teachers, can use this for personal and teaching-related video editing steps.
2. Filmora
If you want a software sound extractor that provides a wide range of audio editing functions, Filmora is one that we would recommend. While it is firstly a video editor, you can use audio-based editing functions like sound stabilization, extraction, visualization, audio ducking, silence detection, and more.
Free Download For Win 7 or later(64-bit)
Free Download For macOS 10.14 or later
Compatible OS: Windows, Mac
Price: Free, Annual- USD 49.99, Perpetual- USD 89.99
Main Features:
- The audio visualization feature analyzes and virtually shows beats.
- Detect silent sections in the video and remove them.
- Many audio stabilization settings like Denoise and Equalizer.
- Vital TTS/STT functions for voiceovers.
Pros
- Multiple video/audio formats are supported.
- Pre-set sound effects are present.
- Adjust the volume of videos during editing.
Cons
- Upgrade plan to remove ads.
- Audio output is mainly available in MP3.
How to use for extracting music from videos:
Step1 Download and install Filmora 11 .
Step2 Click on New Project.
Step3 Press “Click here to import Media” > choose file folder > Insert.
Step4 Drag file to editor timeline > Cut the file to a set suitable size for your audio extraction.
Step5 Click on the Edit icon from the list of icons above the timeline.
Step6 Press on Audio > Make adjustments for settings like Fade in/Face out, Equalizer, Pitch, etc.
Step7 Click Export > Local > MP3. Make changes as needed.
Step8 Hit the Export button.
Best for Users: Pro-level and beginner-level professionals and home-based users who want a comprehensive, feature-rich platform for video/audio editing can benefit from this.
3. iMovie
Mac and iOS users benefit significantly from this video editing software to create dynamic movie-quality videos. One major part of movies is the soundtrack, and you can use this software to add easily, control, and extract the sound clips.
How to Download: Mac App Store , Apple App Store
Compatible OS: Mac, iOS
Price: Free
Main Features:
- Pre-set storyboard available for optimized and thematic video edits.
- Royalty-free audio files in the library.
- You can add voiceovers.
- Add pre-set sound effects or customize them, like removing/adding audio clips.
Pros
- Sound aligns precisely with video.
- Multiple effects, filters, and editing tools are available.
- Simple sharing via social media accounts.
Cons
- Only available for iOS 15.1+ and such newest versions of Apple devices.
- You cannot access it without an Apple ID.
Best for Users: Professional video editors with diverse movie-like presentation-making needs can use this.
4. VLC
VLC is a well-known Windows-based media player that is accessible as a Chrome extension and has mobile app versions. While you can use it mainly to view videos, the software can easily cut out sound clips from the video here.
How to Download: Microsoft Store , Apple App Store , Google Play Store , Chrome Web Store
Compatible OS: Windows, iOS, Chromebook, Android
Price: Free
Main Features:
- Script the command line VLC-based invocations.
- Play different types of files with multi-format support.
- Use the in-built equalizer to optimize sound quality/effects.
- Sync with or create a new video stream.
Pros
- The software assures quick functions with all features.
- No codec installation is necessary.
- Keyboard shortcuts for specific actions.
Cons
- Difficult to search and open files.
- Not very customizable.
Best for Users: People can use VLC Media Player to stream or play videos and even make some minor adjustments/extraction.
5. Online Audio Converter
This is one of the more straightforward tools to add video files and extract Sound from video with some quick steps. The Online Audio Converter supports a wide range of video formats. You just have to add one file by dragging and dropping it from your device memory, inserting its URL, or uploading it via the cloud. Then, press the Start Extracting command.
How to Download: Website
Compatible OS: Windows, Mac, Online
Price: Monthly- USD 29.95, Annual- USD 39.95, Lifetime- USD 59.95
Main Features:
- Add files either directly through the device or the cloud.
- Insert video URL for audio extraction from online video.
- Supports multiple video file formats like MPEG, MOV, AVI, and MP4.
- Scroll to select extraction end and start points.
Pros
- Only allows videos with 500MB or smaller size.
- Straightforward three steps for the whole extraction process.
- Zero quality loss after an extraction.
Cons
- Customization options are limited.
- The main audio format supported is MP3 for extraction.
Best for Users: Beginners and pro-level users who want to extract Sound from video files quickly.
6. Audio Converter
The Audio Converter app can efficiently pull out audio clips from video and is compatible with many such media formats. You can use this to cut and trim your file, mainly to decide how much of the audio will extract. Then, play it to see the quality of the output file.
How to Download: Apple App Store
Compatible OS: iOS
Price: Free, Pro- USD 2.99.
Main Features:
- Extract sound from video in formats like M4A, MP3, OGG, M4R, FLAC, etc.
- Insert videos in formats like MP4, 3G2, 3GP, MOV, MKV, WMV, and more.
- Trim the audio to smaller sections for extraction.
- The media player version supports all audio/video types.
Pros
- Supports a wide variety of audio/video formats.
- A simple media player function is also available.
- It is compatible with many languages.
Cons
- App size of 143.1 MB can feel high to some users.
- Basic-level functions only.
Best for Users: People who want to extract Sound from video files to create ringtones can use this best.
7. FFmpeg
FFmpeg is one of the most trustworthy platforms for converting and extracting Sound from video. It is an open-source solution and comes with complete multi-media management work. This is mainly used for easily streaming, converting, and recording video/audio projects.
How to Download: Website
Compatible OS: Windows, Mac, etc.
Price: Free
Main Features:
- Audio filters are available, like virtualbass and tiltshelf.
- Video editing filters like colormap, blurdetect, and pixelize are available.
- Enhance dialog and extract sound clips.
- Constantly updating features.
Pros
- This has open-source benefits.
- No excessive installation steps are necessary.
- Supports a wide range of encoding benefits.
Cons
- One must have some sort of technical knowledge to use this.
- Finding the right features or solutions takes some time.
Best for Users: Developers with better technical knowledge can use this dynamic open-source platform for video/audio editing.
8. QuickTime
You can also use this Mac-based video player on Windows to watch different videos easily. Besides the streaming benefits, you can install plugins to optimize its available features, like adding the ability to record/edit video files.
How to Download: Website
Compatible OS: Mac, Windows
Price: Free
Main Features:
- Stream videos and even extract Sound from the files.
- Supports many video formats in the player.
- Record audio on this media player.
- Import files from other Mac products like Final Cut Pro and iMovie.
Pros
- Works on both Windows and Mac.
- Pre-set effects and filters are available that one can edit.
- Simple interface for beginners.
Cons
- Unnecessary bloatware installation is needed.
- Playback support is lacking.
Best for Users: New users can simply operate this media player to watch videos and learn the extraction process.
9. Audio Extractor
You can use this conversion and extraction software to do many editing functions, like changing, cutting, and extracting video/audio files. The supported format here is MP3 and WAV - choose which you find compatible with your final project. You can decide and extract from specific sections.
How to Download: Google Play Store
Compatible OS: Android
Price: Free with in-app purchases of USD 1.99- USD 6.99 for each item.
Main Features:
- Change audio file size and format.
- View/delete components through the app directly.
- Preview video/sound file.
- Trim/extract sounds from videos easily with the converter.
Pros <path d=”M7 22H4C3.46957 22 2.96086 21.7893 2.58579 21.4142C2.21071 21.0391 2 20.5304 2 20V13C2 12.4696 2.21071 11.9609 2.58579 11.5858C2.96086 11.2107 3.46957 11 4 11H7M14 9V5C14 4.20435
Do You Want Your Music Videos to Look Like Professional Music Videos? You Can Always Choose From Music Videos LUTs to Give Your Videos a Cinematic Touch
Have you ever wondered how music videos look so good and professional? One of the secrets lies in using LUTs, or Lookup Tables. With LUTs, music videos can match the song’s mood and create a unique atmosphere for each track. Every music video has a different color grading, which helps convey the song’s emotions and feelings.
Furthermore, using LUTs, music video creators can apply a consistent color grading to their videos. And the best part? You can also use music video LUTs to make your videos look more cinematic and professional, regardless of your level of expertise.
Part 1: What Should One Know About LUTs?
LUTs are “Lookup Tables,” which are small files containing color grading presets. In video editing or color-grading software, you can apply them to images or videos. Moreover, you can use LUTs for music video color grading, but first, learn more about LUTs.
Lookup Tables are often used in the film and video industry to give footage a particular look or feel. For instance, a vintage or retro LUT creates a more old-style feel with warmth and muddiness. They can help ensure that footage has a consistent color grading throughout a project. Moreover, they map the original footage’s colors to new ones based on a predetermined color grading preset.
It makes applying a specific look to footage easy without manually adjusting individual colors or settings. There are different types of LUTs, like basic LUTs for overall color and contrast adjustments. Additionally, there are creative LUTs for specific looks and technical LUTs to correct color or exposure issues. You can create LUTs using software or purchase them from online marketplaces.
Empower your videos with a new mood using different LUTs. Filmora now offers 100+ top-quality 3D LUTs cover a broad range of scenarios. Transform your videos with Filmora’s powerful 3D LUTs.
Apply LUT on Videos Apply LUT on Videos Learn More


Part 2: Best Cinematic LUTs for Music Videos in 2024
Music enthusiasts who kept themselves busy from recording to video editing, LUTs are for you. You can download paid or free music video LUTs to give your videos a cinematic feel. For this purpose, here are some of the best cinematic LUTs for music videos you can download.
1. Blue Tone Cinematic LUTs
Blue Tone Cinematic LUTs is an excellent option to give your music video a dramatic and moody look. This LUT pack adds a blue hue to your footage and enhances the shadows, giving your video a more cinematic feel. It has five cinematic-style LUTs that you can use for your videos. Use it for music videos with a sad theme or to convey a sense of mystery.

2. CINEMATIC LUTS: VINTAGE
Another perfect for creating a vintage look for your music video is Cinematic LUTs: Vintage. This pack has 12 fantastic old-style 60s cinematic LUTs. It gives your footage a warm and nostalgic feel with its sepia tone and soft contrast. You can use it for music videos with a retro vibe or to create a feeling of nostalgia and longing. Furthermore, it creates a desaturated warm tone to give an old cinematic feel.

3. Cinematic Color LUTs
Cinematic Color LUTs is yet another great choice to give your music video a vibrant and energetic look. It adds a punchy and rich color to your footage, making it perfect for music videos with a lively beat. This LUT pack has 16 LUTs, giving you more saturated and brighter colors for your media. Similarly, you can use these LUTs to bring out the energy and excitement in your music.

4. Cinema LUTs Sci-Fi
If you want to give your music video a futuristic color tone, then Cinema LUTs Sci-Fi is a great option. This pack has 20 LUTs with different opacity. Using these LUTs, you can create a cinematic look with a modern and futuristic feel. It gives your footage a high-contrast look with cool blue tones. It creates a perfect ambiance for music videos with a sci-fi or futuristic theme.

5. Cinematic DJI D-Log and Standard LUTs
Lastly, Cinematic DJI D-Log and Standard LUTs is a versatile LUT pack. You can use this pack for a variety of music video themes. It gives your footage a warm and cozy feel with its soft and natural colors. Similarly, you can use it for music videos focusing on emotions and feelings like love, friendship, or family. It’s perfect for creating a warm and intimate atmosphere.

6. VIBRANT HUE VIDEO LUTS | PIXMELLOW
Vibrant Hue LUT pack is a pack of 15 that increases the vibrancy of colors in music videos. Moreover, it is a perfect pack for making music videos look more captivating and livelier. With this LUT, your music video will come to life with intensified reds, blues, and greens. Furthermore, using this pack, you will be able to add a burst of energy to every frame.

7. Vintage Faded
If you’re looking to add a nostalgic and timeless feel to your music video, this is the perfect pack. This LUT pack creates a vintage aesthetic for your music footage. Additionally, it gives your footage a warm and slightly desaturated look. With a touch of softness and subtle color shifts, it enhances the overall atmosphere of your video. Moreover, this pack gives you 10 old-style LUTs for music videos.

8. MOODY LUTS
For music videos that aim to create an air of mystery and intrigue, Moody LUTs is the ideal companion. This pack adds depth and shadows, creating a moody ambiance in your music video. It highlights contrasting tones and shadows, allowing for dramatic lighting effects. Furthermore, this is a pack of over 50 .cube LUTs, perfect for giving a moody look to your music videos.

9. Soft and Dreamy LUTs
If you want your music video to be soft and dreamlike, this pack is the way to go. This pack lets your music video bathes in pastel tones. Moreover, the colors appear gentle and delicate, creating a feeling of calmness. Besides this, you’ll get 11 dreamy LUTs with a soft touch of colors. Furthermore, using this pack, you can give your music video a soft and dreamlike feel.

10. +CINE MONOCHROME LUTS
The +Cine monochrome LUTs pack is the best bet for a bold and striking visual statement. It turns your music video into a monochromatic masterpiece. In addition, this pack uses shades of a single color to give your music footage a more artistic feel. Additionally, the using hue of a single tone will create a bold and modern cinematic look. You can add different monochromatic shades with this LUT pack.

11. 20 Clean and Crisp Lightroom Presets & LUTs
Clean and Crisp is a music video LUT pack that gives your video a polished and pristine look. Moreover, this pack enhances the clarity and sharpness of your footage. Furthermore, it brightens colors to make every detail stand out. Additionally, adding a touch of brightness to the colors will make your music videos appear vivid and well-defined.

12. CL-Sunset
CL-Sunset is a fantastic choice for music videos that embrace the warmth and beauty of a sunset. This LUT adds a golden glow to your footage. Furthermore, it highlights the magical yellow hues that appear during twilight. Moreover, it enhances the oranges, yellows, and reds, creating a warm and inviting atmosphere. With this 32 LUTs pack, your music video will shine like the rays of the sun.

13. Neon City LUTs
Neon City LUTs is a pack that captures the essence of vibrant nightlife with its color grading. This pack of 25 LUTs intensifies the neon colors, making your videos appear electrifying. It adds a futuristic flair to your video, enhancing the blues, pinks, and purples. Furthermore, your music video will transport viewers to a neon-lit world filled with excitement and energy.

14. FCPX LUT Nature
It is a great pack for music videos that embrace the beauty of nature and the great outdoors. PCPX LUT Nature has over 60 landscape LUTs that you can use. Additionally, it enhances the natural colors, saturating the greens, blues, and browns. Moreover, by highlighting certain hues in your video, this pack creates a vibrant and earthy look. It brings out the richness of landscapes and the textures of natural elements.

15. 50 Mystical LUTs and Presets Pack
If you want to transport your viewers to a realm of fantasy and enchantment, it is the right pack. Mystical LUT pack offers more than 50 LUTS. Moreover, it adds a touch of magic to your footage, creating a fantasy work like color grading. It introduces subtle color shifts, creating a magical palette of purples, blues, and pinks. Furthermore, using this pack, your music video will unfold like a fairy tale.

16. 100 Contrast LUTs
For music videos that demand a bold and dynamic visual style, this contrast LUT pack is a perfect choice. This high-contrast LUT pack has over 100 LUTs, each with its own uniqueness. Furthermore, it enhances the contrast between lights and darks to create an impactful look. It highlights the blacks and whites to give your music video depth and dimension.

17. 6 SOFT PASTEL LUTS
If you’re aiming for a gentle and soothing visual tone in your music video, this pack is the ideal option. This LUT saturates your footage with soft pastel colors, which creates a dreamy atmosphere. It enhances pinks, lavenders, and light blues and creates a romantic look. Moreover, your music video will have a soft and inviting feel when using any of the 6 LUTs.

18. Urban Moods LUT Pack
Urban Moods LUT pack is for music videos that embrace the raw and gritty essence of urban environments. This pack adds a touch of desaturation and a hint of coolness to give your footage a raw urban look. It enhances the grays, blues, and muted tones to create a city-life feel. Additionally, your music video will give a faded urban vibe. It is one of the best packs of LUTs for music videos.

19. Pop Movie Look LUTs
Pop Movie Look is the perfect pack to infuse your music video with a vibrant and playful visual style. This LUT enhances the primary colors and introduces bold and vivid tones. Furthermore, it adds a touch of saturation and contrast, creating a visually striking and energetic look. Moreover, you can create a 90s pop music color tone for your video.

20. OLD SCHOOL MOBILE & DESKTOP VIDEO LUTS | PIXMELLOW
It is a pack of LUTs for music videos that draw inspiration from retro aesthetics and a laid-back vibe. This pack creates a vintage and nostalgic look, adding warmth and a hint of sepia tones to your footage. Furthermore, this pack has 18 high-quality LUTs to create a retro look for your music videos. Moreover, you can impress your viewers with your music video color grading.

Part 3: Wondershare Filmora: An Exquisite Video Editor for Using LUTs
Wondershare Filmora is the right choice for you to make your music video edits stand out from others. You can create an amazing music video with its perfect blend of color adjustments, effects, and filters. Filmora has over 200+ LUTs that can help you achieve the feel and mood you want for your music video. You can apply some of the best LUTs for music videos to your footage to add a professional touch.
Add LUTs on Video For Win 7 or later(64-bit)
Add LUTs on Video For macOS 10.14 or later
Additionally, with its unique transitions, you can take your video to the next level and give it a more creative feel. You can even change the speed of your video at any point to add more visual interest. Furthermore, Filmora has an AI denoiser that removes distortion and background noises. It ensures that the music video has a crisp and clear sound.

Key Features of Wondershare Filmora
- With Wondershare Filmora, you can save your music videos in up to 4K resolution. You can save your videos with an ultra-high resolution with more sharpness and details.
- Filmora also gives you access to over 10 billion free stock media resources that you can use. It makes it easy to find the perfect media file for your video.
- Furthermore, this tool has an audio visualizer that automatically matches the sound of your video. You can choose from over 25 different audio visualizers using this tool.
Conclusion
To conclude, it’s always welcoming to try a new project from scratch and then wait to see it become successful. Music is a passion; you need talent and some tools to take this passion to a new level. If you’re a passionate musician doing all the work from recording to editing, try to use some professional tools. Use LUTs for music videos and create professional-looking music videos for the world to see.
Add LUTs on Video For Win 7 or later(64-bit)
Add LUTs on Video For macOS 10.14 or later
Apply LUT on Videos Apply LUT on Videos Learn More
Part 2: Best Cinematic LUTs for Music Videos in 2024
Music enthusiasts who kept themselves busy from recording to video editing, LUTs are for you. You can download paid or free music video LUTs to give your videos a cinematic feel. For this purpose, here are some of the best cinematic LUTs for music videos you can download.
1. Blue Tone Cinematic LUTs
Blue Tone Cinematic LUTs is an excellent option to give your music video a dramatic and moody look. This LUT pack adds a blue hue to your footage and enhances the shadows, giving your video a more cinematic feel. It has five cinematic-style LUTs that you can use for your videos. Use it for music videos with a sad theme or to convey a sense of mystery.
2. CINEMATIC LUTS: VINTAGE
Another perfect for creating a vintage look for your music video is Cinematic LUTs: Vintage. This pack has 12 fantastic old-style 60s cinematic LUTs. It gives your footage a warm and nostalgic feel with its sepia tone and soft contrast. You can use it for music videos with a retro vibe or to create a feeling of nostalgia and longing. Furthermore, it creates a desaturated warm tone to give an old cinematic feel.
3. Cinematic Color LUTs
Cinematic Color LUTs is yet another great choice to give your music video a vibrant and energetic look. It adds a punchy and rich color to your footage, making it perfect for music videos with a lively beat. This LUT pack has 16 LUTs, giving you more saturated and brighter colors for your media. Similarly, you can use these LUTs to bring out the energy and excitement in your music.
4. Cinema LUTs Sci-Fi
If you want to give your music video a futuristic color tone, then Cinema LUTs Sci-Fi is a great option. This pack has 20 LUTs with different opacity. Using these LUTs, you can create a cinematic look with a modern and futuristic feel. It gives your footage a high-contrast look with cool blue tones. It creates a perfect ambiance for music videos with a sci-fi or futuristic theme.
5. Cinematic DJI D-Log and Standard LUTs
Lastly, Cinematic DJI D-Log and Standard LUTs is a versatile LUT pack. You can use this pack for a variety of music video themes. It gives your footage a warm and cozy feel with its soft and natural colors. Similarly, you can use it for music videos focusing on emotions and feelings like love, friendship, or family. It’s perfect for creating a warm and intimate atmosphere.
6. VIBRANT HUE VIDEO LUTS | PIXMELLOW
Vibrant Hue LUT pack is a pack of 15 that increases the vibrancy of colors in music videos. Moreover, it is a perfect pack for making music videos look more captivating and livelier. With this LUT, your music video will come to life with intensified reds, blues, and greens. Furthermore, using this pack, you will be able to add a burst of energy to every frame.
7. Vintage Faded
If you’re looking to add a nostalgic and timeless feel to your music video, this is the perfect pack. This LUT pack creates a vintage aesthetic for your music footage. Additionally, it gives your footage a warm and slightly desaturated look. With a touch of softness and subtle color shifts, it enhances the overall atmosphere of your video. Moreover, this pack gives you 10 old-style LUTs for music videos.
8. MOODY LUTS
For music videos that aim to create an air of mystery and intrigue, Moody LUTs is the ideal companion. This pack adds depth and shadows, creating a moody ambiance in your music video. It highlights contrasting tones and shadows, allowing for dramatic lighting effects. Furthermore, this is a pack of over 50 .cube LUTs, perfect for giving a moody look to your music videos.
9. Soft and Dreamy LUTs
If you want your music video to be soft and dreamlike, this pack is the way to go. This pack lets your music video bathes in pastel tones. Moreover, the colors appear gentle and delicate, creating a feeling of calmness. Besides this, you’ll get 11 dreamy LUTs with a soft touch of colors. Furthermore, using this pack, you can give your music video a soft and dreamlike feel.
10. +CINE MONOCHROME LUTS
The +Cine monochrome LUTs pack is the best bet for a bold and striking visual statement. It turns your music video into a monochromatic masterpiece. In addition, this pack uses shades of a single color to give your music footage a more artistic feel. Additionally, the using hue of a single tone will create a bold and modern cinematic look. You can add different monochromatic shades with this LUT pack.
11. 20 Clean and Crisp Lightroom Presets & LUTs
Clean and Crisp is a music video LUT pack that gives your video a polished and pristine look. Moreover, this pack enhances the clarity and sharpness of your footage. Furthermore, it brightens colors to make every detail stand out. Additionally, adding a touch of brightness to the colors will make your music videos appear vivid and well-defined.
12. CL-Sunset
CL-Sunset is a fantastic choice for music videos that embrace the warmth and beauty of a sunset. This LUT adds a golden glow to your footage. Furthermore, it highlights the magical yellow hues that appear during twilight. Moreover, it enhances the oranges, yellows, and reds, creating a warm and inviting atmosphere. With this 32 LUTs pack, your music video will shine like the rays of the sun.
13. Neon City LUTs
Neon City LUTs is a pack that captures the essence of vibrant nightlife with its color grading. This pack of 25 LUTs intensifies the neon colors, making your videos appear electrifying. It adds a futuristic flair to your video, enhancing the blues, pinks, and purples. Furthermore, your music video will transport viewers to a neon-lit world filled with excitement and energy.
14. FCPX LUT Nature
It is a great pack for music videos that embrace the beauty of nature and the great outdoors. PCPX LUT Nature has over 60 landscape LUTs that you can use. Additionally, it enhances the natural colors, saturating the greens, blues, and browns. Moreover, by highlighting certain hues in your video, this pack creates a vibrant and earthy look. It brings out the richness of landscapes and the textures of natural elements.
15. 50 Mystical LUTs and Presets Pack
If you want to transport your viewers to a realm of fantasy and enchantment, it is the right pack. Mystical LUT pack offers more than 50 LUTS. Moreover, it adds a touch of magic to your footage, creating a fantasy work like color grading. It introduces subtle color shifts, creating a magical palette of purples, blues, and pinks. Furthermore, using this pack, your music video will unfold like a fairy tale.
16. 100 Contrast LUTs
For music videos that demand a bold and dynamic visual style, this contrast LUT pack is a perfect choice. This high-contrast LUT pack has over 100 LUTs, each with its own uniqueness. Furthermore, it enhances the contrast between lights and darks to create an impactful look. It highlights the blacks and whites to give your music video depth and dimension.
17. 6 SOFT PASTEL LUTS
If you’re aiming for a gentle and soothing visual tone in your music video, this pack is the ideal option. This LUT saturates your footage with soft pastel colors, which creates a dreamy atmosphere. It enhances pinks, lavenders, and light blues and creates a romantic look. Moreover, your music video will have a soft and inviting feel when using any of the 6 LUTs.
18. Urban Moods LUT Pack
Urban Moods LUT pack is for music videos that embrace the raw and gritty essence of urban environments. This pack adds a touch of desaturation and a hint of coolness to give your footage a raw urban look. It enhances the grays, blues, and muted tones to create a city-life feel. Additionally, your music video will give a faded urban vibe. It is one of the best packs of LUTs for music videos.
19. Pop Movie Look LUTs
Pop Movie Look is the perfect pack to infuse your music video with a vibrant and playful visual style. This LUT enhances the primary colors and introduces bold and vivid tones. Furthermore, it adds a touch of saturation and contrast, creating a visually striking and energetic look. Moreover, you can create a 90s pop music color tone for your video.
20. OLD SCHOOL MOBILE & DESKTOP VIDEO LUTS | PIXMELLOW
It is a pack of LUTs for music videos that draw inspiration from retro aesthetics and a laid-back vibe. This pack creates a vintage and nostalgic look, adding warmth and a hint of sepia tones to your footage. Furthermore, this pack has 18 high-quality LUTs to create a retro look for your music videos. Moreover, you can impress your viewers with your music video color grading.
Part 3: Wondershare Filmora: An Exquisite Video Editor for Using LUTs
Wondershare Filmora is the right choice for you to make your music video edits stand out from others. You can create an amazing music video with its perfect blend of color adjustments, effects, and filters. Filmora has over 200+ LUTs that can help you achieve the feel and mood you want for your music video. You can apply some of the best LUTs for music videos to your footage to add a professional touch.
Add LUTs on Video For Win 7 or later(64-bit)
Add LUTs on Video For macOS 10.14 or later
Additionally, with its unique transitions, you can take your video to the next level and give it a more creative feel. You can even change the speed of your video at any point to add more visual interest. Furthermore, Filmora has an AI denoiser that removes distortion and background noises. It ensures that the music video has a crisp and clear sound.
Key Features of Wondershare Filmora
- With Wondershare Filmora, you can save your music videos in up to 4K resolution. You can save your videos with an ultra-high resolution with more sharpness and details.
- Filmora also gives you access to over 10 billion free stock media resources that you can use. It makes it easy to find the perfect media file for your video.
- Furthermore, this tool has an audio visualizer that automatically matches the sound of your video. You can choose from over 25 different audio visualizers using this tool.
Conclusion
To conclude, it’s always welcoming to try a new project from scratch and then wait to see it become successful. Music is a passion; you need talent and some tools to take this passion to a new level. If you’re a passionate musician doing all the work from recording to editing, try to use some professional tools. Use LUTs for music videos and create professional-looking music videos for the world to see.
Add LUTs on Video For Win 7 or later(64-bit)
Add LUTs on Video For macOS 10.14 or later
Also read:
- Learn How Video Montages Were Used over Film History with Examples and the Types of Videos for Shorter Montages. Plus, Learn About the Best Software for It
- 3GP Video Format What Is 3GP Format And How To Open It?
- New 2024 Approved Using VN Editor To Add Luts for Video Editing
- New Learn How to Make Modern TikTok Velocity Dance Videos in Filmora Just Like the Ones You See on TikTok and Instagram Reels
- Updated How to Add Subtitles in QuickTime Player for 2024
- In 2024, How to Create Intro Video with KineMaster
- Updated 2024 Approved How Can You Import and Adjust the Video Clips on Wondershare Filmora?
- Updated How to Make A Tattoo Disappear Like A Magic
- Looking for Final Cut Pro Alternative App for Your Android Smartphone or iPhone? Here Is the List of the Best FCP Alternative Apps for Android and iOS Users for 2024
- Updated AVI Video Format How to Open, Play, Edit AVI File?
- In This Article You Will Learn How to Crop a Video Through Windows Media Player and with Filmora Wondershare. Here Are Ways to Crop Your Video Clip
- Updated 2024 Approved AVI Editor for Windows 11/10/8.1/8/7 Easily Edit AVI Files on PC
- Updated Are You Aware that AV1 Has the Potential to Change the Way We Watch Videos Online? Read on to Learn More About AV1 and How It Could Impact Your Life
- New 2024 Approved Learn More About the Video Editing Interface of Wondershare Filmora
- New 2024 Approved You Can Make Attractive Videos by Adding Text Behind Objects. This Article Will Explain How to Use Wondershare Filmora to Create These Videos
- New 100+ Best TikTok Captions Enhance Your Content for 2024
- Updated | How to Share YouTube Video on Zoom for 2024
- Adobe Photoshop Is the Best Photo Editor to Add Green Screen Effect to Your Photo While Wondershare Filmora Is the Best Video Editor to Add Green Screen Effect to Your Video for 2024
- New Create Amazing Slow-Motion Videos 8 Affordable Slow-Motion Cameras for 2024
- New In 2024, Free Drone LUTs For Perfect Drone Footage
- New In 2024, Learning The Details Of How To Replace Sky in Lightroom
- Updated Based on Preferences, You Can Adjust the Speed of YouTube Videos. Learn How to Produce a YouTube Slow-Motion Video in This Article
- New In 2024, How Can You Create Outstanding Educational Teaching Videos?
- Updated Learn More About the Video Editing Interface of Wondershare Filmora for 2024
- 2024 Approved Discover the Various Techniques of Video Framing, Which Involve Capturing the Essence of a Subject While Eliminating Distractions in the Background, Andlearn How to Apply Them Skillfully to Achieve Desired Results
- New Learn About Open Broadcaster Software and How to Perform Obs Color Correction. Also, Explore the Various Aspects of Color Correction Like Contrast, Brightness, Saturation, Among Others for 2024
- New In 2024, How to Use iMovie Text Effects
- How Much Wedding Videographer Cost
- Updated 2024 Approved Discover the Essential Steps for Editing a Music Video in This Guide. Learn About Aspect Ratio and the First Cut Process to Create a Visually Captivating Video
- Updated If Youre Wondering How to Employ Transition Effects in Your Videos to Create Your Signature Look, This Article Can Help
- 2024 Approved This Is the Method Employed During Every Evening Weather Broadcast The Newscaster Is Standing in Front of a Blank Screen, but the Viewers at Home See a Weather Map
- New 2024 Approved 12 Best Picks of Video Enhancer Software
- In 2024, Replacing Sky Background Using Adobe Photoshop A Comprehensive Guide
- Updated 2024 Approved You May Want to Create Your Video Tutorial and Share Your Knowledge with Others. Fortunately, You Can Easily Create a Professionally Edited Tutorial Video with Filmora. Keep Reading This Article Since We Will Show You How to Do It
- 2024 Approved Are You a Video Editor Making Use of iMovie? Do You Wish to Read How to Change Orientation in iMovie? Youre in the Right Place! At the End of This Guide, Youd Have Learned How to Change Video Orientation in iMovie
- New As Video Editing Has Become a Pillar Stone in Post-Production Work, You Might Need to Upgrade Your Knowledge About It. In This Article, You Will Learn How to Rotate the Video
- Updated Whatever the Reason You Want to Convert an Mp4 to GIF Online, There Are a Number of Ways to Do It. Use This Guide to Learn the Best Methods. Read More Here for 2024
- Updated Best Tips for Camtasia Freeze-Frame for 2024
- New 2024 Approved Magic Effects Video Making How To
- Updated In 2024, Best Ways to Add Photos to Tik Tok Video
- New In 2024, How to Animate Your Designs With Canva GIF
- How to Stop My Spouse from Spying on My Motorola Razr 40 | Dr.fone
- In 2024, How to use iSpoofer on Oppo F23 5G? | Dr.fone
- 7 Ways to Unlock a Locked Tecno Spark Go (2023) Phone
- A Detailed VPNa Fake GPS Location Free Review On Oppo Find X7 | Dr.fone
- In 2024, CatchEmAll Celebrate National Pokémon Day with Virtual Location On Itel P55T | Dr.fone
- In 2024, Effective Ways To Fix Checkra1n Error 31 On Apple iPhone XR
- In 2024, 8 Ways to Transfer Photos from Xiaomi Civi 3 to iPhone Easily | Dr.fone
- Useful ways that can help to effectively recover deleted files from Lava Blaze 2 5G
- Best 10 Chinese Video to English Translator
- Ultimate Guide to Catch the Regional-Located Pokemon For Motorola Moto G14 | Dr.fone
- How to get back lost contacts from Vivo V27 Pro.
- Delete Gmail Account With/Without Password On Honor 70 Lite 5G
- In 2024, How to Bypass FRP on Vivo Y200e 5G?
- In 2024, 4 Things You Must Know About Apple iPhone 12 Pro Activation Lock
- In 2024, Hassle-Free Ways to Remove FRP Lock on Tecno Pova 5with/without a PC
- 11 Proven Solutions to Fix Google Play Store Not Working Issue on Samsung Galaxy S23 Tactical Edition | Dr.fone
- How to Fix OnePlus Ace 2V Find My Friends No Location Found? | Dr.fone
- How to Transfer Photos from Infinix Note 30i to New Android? | Dr.fone
- Guide on How To Erase Apple iPhone 11 Devices Entirely | Dr.fone
- How to Unlock Samsung Galaxy A14 4G Phone Pattern Lock without Factory Reset
- How To Transfer WhatsApp From iPhone SE to Android? | Dr.fone
- The 10 Best Tools to Bypass iCloud Activation Lock On Apple iPhone 8 Plus You Should Try Out
- 3 Things You Must Know about Fake Snapchat Location On Apple iPhone 15 Pro | Dr.fone
- In 2024, Lock Your Samsung Galaxy Z Fold 5 Phone in Style The Top 5 Gesture Lock Screen Apps
- How to Fix Android.Process.Media Has Stopped on Sony Xperia 1 V | Dr.fone
- 3 Best Tools to Hard Reset Asus ROG Phone 8 | Dr.fone
- In 2024, iSpoofer is not working On Vivo V29e? Fixed | Dr.fone
- Effective Ways To Fix Checkra1n Error 31 On iPhone 14 Plus
- In 2024, Complete Review & Guide to Techeligible FRP Bypass and More For Infinix Hot 40i
- Repair damaged, unplayable video files of Motorola Edge 40
- How to Track Samsung Galaxy A14 5G Location without Installing Software? | Dr.fone
- How to Repair corrupt MP4 and AVI files of Realme Narzo 60 Pro 5G with Video Repair Utility on Mac?
- Additional Tips About Sinnoh Stone For Honor Magic V2 | Dr.fone
- 5 Quick Methods to Bypass Vivo T2 Pro 5G FRP
- In 2024, Here are Some Pro Tips for Pokemon Go PvP Battles On Tecno Spark 20 Pro | Dr.fone
- 8 Workable Fixes to the SIM not provisioned MM#2 Error on Realme C55 | Dr.fone
- In 2024, How to Transfer Everything from Apple iPhone XS to iPhone 8/X/11 | Dr.fone
- Your Complete Guide To Reset Itel P55 5G | Dr.fone
- In 2024, Hassle-Free Ways to Remove FRP Lock from Honor Play 7T Phones with/without a PC
- Title: Updated How to Create a Glitch Text Effect?
- Author: Morgan
- Created at : 2024-05-19 05:12:16
- Updated at : 2024-05-20 05:12:16
- Link: https://ai-video-editing.techidaily.com/updated-how-to-create-a-glitch-text-effect/
- License: This work is licensed under CC BY-NC-SA 4.0.
