
:max_bytes(150000):strip_icc():format(webp)/man-attaching-action-camera-to-chest-664655587-5c8c2559c9e77c0001ac184b.jpg)
Updated How to Create Cinematic Style Videos? Easy Guide for Beginners for 2024
How to Create Cinematic Style Videos? [Easy Guide for Beginners]
Do you find cinematic-style videos appealing? Do you wish to give your content a cinematic vibe? Hold on to this article for more!
A cinematic video style resembles a film. The act is employed in film making and visual storytelling that considers aspect ratio, composition, color, lighting style, type of film, editing, filters, and set design. The cinematic background music plays an equally important role. The article is a guide to creating a cinematic intro for YouTube.
Additionally, we will discuss the procedure to work on travel intro for a vlog. So, let us not waste time anymore! Time to start the adventure!
In this article
01 How to Create a Cinematic Intro for Your Video?
02 How to Cinematic Travel Intro for Your Travel Vlog?
03 3 Trendy Sites to Download Cinematic Background Music
Part 1: How to Create a Cinematic Intro for Your Video?
Every content creator wishes to bring new ideas to the set. The part played by cinematic background music cannot be avoided no matter what innovation is ahead of us. A cinematic and classy intro to your video displays the effort performed on your work. It compels the audience to keep following you.
For this very reason, the article conveys a guide to creating a powerful cinematic intro. Let us begin this!
For Win 7 or later (64-bit)
For macOS 10.12 or later
Step 1: Launch Wondershare Filmora to begin. Import the targeted music in the program and drag it to the timeline. Now, trim the music to 30 seconds and listen to the end part. Select the last note to match the beat in the beginning part of the music.

Step 2: Moving on, add markers to the music. Use “M” from the keyboard to mark the specific part of the track. After you are done, drag the first track onto the timeline. Trim the video to match it to the first marker.

Step 3: Perform a similar process for the rest of the video clips and trim them according to the markers. The user is directed to create a 2.35:1 widescreen cinemascope bar opener. To do so, drag two black mattes onto the timeline on top of each other.

Step 4: Drag the end of both clips to match the length of the whole video. Now, it is time to animate it. Insert 240° in the y-axis for the first keyframe. Similarly, use 422.2° for the second keyframe. For the bottom y-axis, use -240° for the first keyframe and -422.2° for the second keyframe.

Step 5: After the animation is completed, head to the “Titles” tab and look for cinematic packs. Choose one and drag it onto the timeline. Secondly, alter the duration and animation of the title. The user is expected to insert a dissolve transition at the end of the title.

Step 6: Perform the same process for the rest of the tracks. Time the titles to match the clip’s ending. Now, add a dissolve transition at the end of the clip. Trim the clip into two parts and apply square blur by navigating to the “Effects” tab to blur the video clips.

Step 7: Moving on, adjust the alpha for blur intensity. Add a dissolve transition between the cuts. In the final step, go to the “Animation” and then “Customize.” Reframe the last clip and animate a zoom-out effect. Reduce the “Scale” percent to do so. A creative cinematic intro is ready!

Part 2: How to Cinematic Travel Intro for Your Travel Vlog?
Vacationing and traveling offer exposure to learn more about people and the world around us. Are you a traveler? Do you prefer a solo vacation or with your family? Whatever your answer might be, we have got you!
To make an astonishing and engaging cinematic travel for your travel vlog, Filmora is there for us. The section shall reflect on the whole procedure using royalty-free cinematic music. Let us initiate!
For Win 7 or later (64-bit)
For macOS 10.12 or later
Step 1: The first step is simple. Open Wondershare Filmora and head to the “Media” tab. Import the targeted travel video clips onto the timeline and rearrange them. Now, navigate to the “Effects” section and search “cinematic.”

Step 2: Pick one and drag it onto the second track to present cinematic bars and a widescreen look to the video. Now, move to the “Titles” section and choose the suitable one. Drag it to the third track. Double click on it to access the “Advanced settings” and make the required alterations.

Step 3: You can modify the font size, color, and timing of the video. Again, use the “Titles” panel and hit the “Subtitles” category. Select one and drag to the third track. Make relevant changes through the same procedure as above.

Step 4: After that, duplicate the subtitle track on the timeline and repeat the required changes. Sync the text to the audio once you are done with the process.

Step 5: The user is instructed to go back to the “Titles” section and search “cinematic end credits.” Pick one and drag it to the third track. Double click on it to make a few alterations. You have performed the procedure successfully.

Part 3: 3 Trendy Sites to Download Cinematic Background Music
The use of royalty-free cinematic music creates an unmatched vibe. If you do not use it, you might not run for competition. Therefore, you need to access a great music platform for this purpose. Allow us to introduce you to three workable marketplaces. The cinematic background music that they offer is mind-boggling for sure. So, let’s go? Shall we?
Pixabay
Pixabay is an online marketplace that can be accessed effortlessly. The user is free to tailor the filter options to give the system an idea of the music requirement. You can change the results from genre to movement and theme to categories as needed. Essentially, royalty-free cinematic music can be downloaded with one tap of a button.
Moreover, the duration of the track is shown to decide consciously. Cinematic dramatic, caves of dawn, honor and sword, the introvert, and chill abstract are some music offered by Pixabay.

Chosic
Chosic is a house for a wide range of cinematic background music tracks. You can preview the audio tracks before downloading them and tackle the search bar according to your movie themes and type of set design.
Furthermore, the search filters are tailored based on relevancy, popularity, and random audios. Press the download button to have the audio in MP3 format. Epic cinematic, the inspiration, discovery, and the battle are renowned cinematic background music from Chosic.

Mixkit
Mixkit has got to be an excellent choice to deal with your everyday needs of royalty-free cinematic music. With Mixkit in the frame, the user can create movie magic using the impeccable cinematic music collection. Cinematic trailer, slow trail, piano horror, motivational cinematic, and silent descent are a few examples of a strong cinematic collection.

Final Thoughts
Every content creator wishes to transform their work using different effects and filters. Adding a cinematic style video compels the audience to be on the verge of their seats, giving them a film notion. The article highlighted three apps to download good quality and cinematic background music. Filmora also brought a thrill to the vlogs and YouTube intros.
Versatile Video Editor - Wondershare Filmora
An easy yet powerful editor
Numerous effects to choose from
Detailed tutorials provided by the official channel
02 How to Cinematic Travel Intro for Your Travel Vlog?
03 3 Trendy Sites to Download Cinematic Background Music
Part 1: How to Create a Cinematic Intro for Your Video?
Every content creator wishes to bring new ideas to the set. The part played by cinematic background music cannot be avoided no matter what innovation is ahead of us. A cinematic and classy intro to your video displays the effort performed on your work. It compels the audience to keep following you.
For this very reason, the article conveys a guide to creating a powerful cinematic intro. Let us begin this!
For Win 7 or later (64-bit)
For macOS 10.12 or later
Step 1: Launch Wondershare Filmora to begin. Import the targeted music in the program and drag it to the timeline. Now, trim the music to 30 seconds and listen to the end part. Select the last note to match the beat in the beginning part of the music.
Step 2: Moving on, add markers to the music. Use “M” from the keyboard to mark the specific part of the track. After you are done, drag the first track onto the timeline. Trim the video to match it to the first marker.
Step 3: Perform a similar process for the rest of the video clips and trim them according to the markers. The user is directed to create a 2.35:1 widescreen cinemascope bar opener. To do so, drag two black mattes onto the timeline on top of each other.
Step 4: Drag the end of both clips to match the length of the whole video. Now, it is time to animate it. Insert 240° in the y-axis for the first keyframe. Similarly, use 422.2° for the second keyframe. For the bottom y-axis, use -240° for the first keyframe and -422.2° for the second keyframe.
Step 5: After the animation is completed, head to the “Titles” tab and look for cinematic packs. Choose one and drag it onto the timeline. Secondly, alter the duration and animation of the title. The user is expected to insert a dissolve transition at the end of the title.
Step 6: Perform the same process for the rest of the tracks. Time the titles to match the clip’s ending. Now, add a dissolve transition at the end of the clip. Trim the clip into two parts and apply square blur by navigating to the “Effects” tab to blur the video clips.
Step 7: Moving on, adjust the alpha for blur intensity. Add a dissolve transition between the cuts. In the final step, go to the “Animation” and then “Customize.” Reframe the last clip and animate a zoom-out effect. Reduce the “Scale” percent to do so. A creative cinematic intro is ready!
Part 2: How to Cinematic Travel Intro for Your Travel Vlog?
Vacationing and traveling offer exposure to learn more about people and the world around us. Are you a traveler? Do you prefer a solo vacation or with your family? Whatever your answer might be, we have got you!
To make an astonishing and engaging cinematic travel for your travel vlog, Filmora is there for us. The section shall reflect on the whole procedure using royalty-free cinematic music. Let us initiate!
For Win 7 or later (64-bit)
For macOS 10.12 or later
Step 1: The first step is simple. Open Wondershare Filmora and head to the “Media” tab. Import the targeted travel video clips onto the timeline and rearrange them. Now, navigate to the “Effects” section and search “cinematic.”
Step 2: Pick one and drag it onto the second track to present cinematic bars and a widescreen look to the video. Now, move to the “Titles” section and choose the suitable one. Drag it to the third track. Double click on it to access the “Advanced settings” and make the required alterations.
Step 3: You can modify the font size, color, and timing of the video. Again, use the “Titles” panel and hit the “Subtitles” category. Select one and drag to the third track. Make relevant changes through the same procedure as above.
Step 4: After that, duplicate the subtitle track on the timeline and repeat the required changes. Sync the text to the audio once you are done with the process.
Step 5: The user is instructed to go back to the “Titles” section and search “cinematic end credits.” Pick one and drag it to the third track. Double click on it to make a few alterations. You have performed the procedure successfully.
Part 3: 3 Trendy Sites to Download Cinematic Background Music
The use of royalty-free cinematic music creates an unmatched vibe. If you do not use it, you might not run for competition. Therefore, you need to access a great music platform for this purpose. Allow us to introduce you to three workable marketplaces. The cinematic background music that they offer is mind-boggling for sure. So, let’s go? Shall we?
Pixabay
Pixabay is an online marketplace that can be accessed effortlessly. The user is free to tailor the filter options to give the system an idea of the music requirement. You can change the results from genre to movement and theme to categories as needed. Essentially, royalty-free cinematic music can be downloaded with one tap of a button.
Moreover, the duration of the track is shown to decide consciously. Cinematic dramatic, caves of dawn, honor and sword, the introvert, and chill abstract are some music offered by Pixabay.
Chosic
Chosic is a house for a wide range of cinematic background music tracks. You can preview the audio tracks before downloading them and tackle the search bar according to your movie themes and type of set design.
Furthermore, the search filters are tailored based on relevancy, popularity, and random audios. Press the download button to have the audio in MP3 format. Epic cinematic, the inspiration, discovery, and the battle are renowned cinematic background music from Chosic.
Mixkit
Mixkit has got to be an excellent choice to deal with your everyday needs of royalty-free cinematic music. With Mixkit in the frame, the user can create movie magic using the impeccable cinematic music collection. Cinematic trailer, slow trail, piano horror, motivational cinematic, and silent descent are a few examples of a strong cinematic collection.
Final Thoughts
Every content creator wishes to transform their work using different effects and filters. Adding a cinematic style video compels the audience to be on the verge of their seats, giving them a film notion. The article highlighted three apps to download good quality and cinematic background music. Filmora also brought a thrill to the vlogs and YouTube intros.
Versatile Video Editor - Wondershare Filmora
An easy yet powerful editor
Numerous effects to choose from
Detailed tutorials provided by the official channel
How To Make Ninja Jump Effect with Filmora
Superpower scenes derived from movies are trending these days. Everyone wants to add these superpower effects to their clips. We have covered several of these tutorials, and here we are with a new one; the Super/Ninja Jump effect.
This effect is for the quick movement of a subject from one position to another. Naruto is the prime example where ninjas are made to move around by this effect. Anime creators use this ninja effect a lot.
This article includes tutorials on what to shoot and how to add the Super Jump effect using Wondershare Filmora . The use of tools like masking, time ramping, keyframing, and the new version addition, the Boris FX Pack, makes it super easy to get a perfect super jump effect.
Shots Required For Super Jump Effect
You can use either a mobile phone or a camera for shooting, but you have to keep these things in mind:
Keep the following important tips in mind while shooting clips using your phone or camera.
● Use Wide-Angle
Always use the wide-angle view to ensure everything is in focus with a good depth of field.
● The Camera Should Be Steady
Make sure that the phone or camera is on a steady surface to avoid any turbulence or frame shifting.
● Sufficient Light
Make sure there is sufficient light and ambiance. Once you have set your camera, these are the three shots you have to take:
Shot 1: Jump Into the Air at a Distance
The subject will jump into the air at a distance from the camera. He should jump as high as he can, folding his legs so his body is in a ball position while in the air. The distance should be proper—not very far away.

Shot 2: Jump and Act Like You Are Landing
The subject should jump and act like he is landing on the floor. This shot has to be taken directly in front of the camera.

Shot 3: Empty Background Clip
This is an empty background clip. This clip includes only background settings without the subject. We need this clip to make layers while editing.

How To Edit These Clips On Filmora?
Once the shots have been taken, we move towards editing these clips, and for this purpose, we are using Filmora. Here is a step-by-step guide for editing these shots.
Steps To Edit These Clips
The tools we are going to use in this editing are masking, time ramping, speed ramping, keyframing, the Boris FX effect, and many more.
Open Wondershare Filmora and Add Video Tracks
Steps
Step1 Select the empty background clip (shot 3) and place it on the first video track timeline.
Step2 Now place the jumping clip (shot 4) on the top.
Adding a Freeze Frame
A freeze frame is a type of still image that is created by simply freezing the action. Most of the time, this is used in the last shot of a movie to capture a moment in time. Here are the steps to adding a free frame.
Steps
Step1 Move the playhead up to the point where the subject’s body appears smallest.
Step2 Add a freeze frame at this point by right-clicking on the playhead and selecting the speed option.
Step3 Make a cut at the start of the freeze frame, keep it for 8 frames and delete the rest.

Masking of the Video Clips
Masking is a tool in editing software that allows you to hide, duplicate, show, or adjust footage by selecting a specific section of the video or using video overlays. The steps for adding the masking effect are given below:
Steps
Step1 Now click on the clip view to open the “settings” window.
Step2 Click on the “mask” section and select the circle mask and create the mask of the jumping subject.
Step3 Hide the first track clip so that mask can be viewed better and edited effectively.
Step4 Adjust the scale, position, and shape of the mask and make the edges smoother to match the object.

Boris Fx Effect
Boris FX is a video editing and visual effects software. Filmora supports six continuum units-professional quality effects plugins from award-winning developer Boris FX.
To add these effects to your videos, follow the steps below:
Steps
Step1 Go to the “effects” window and open the Boris FX effects.
Step2 Select the directional blur from the bcc blur category.
Step3 Drag the effect to the freeze frame.
Step4 Now clicking on freeze frame, its settings will open.
Step5 Adjust the degree and angle of blur to get a perfect mask object. Turn ON the first video track.
Step6 Add the landing clip (shot 2) on top of the first video track after the freezing frame.
Step7 Find the point where the subject starts to descend toward the floor. Cut the clip here and delete the previous part.
Step8 Move the clip next to the freeze frame clip.

Keyframing
Now we have to add animation in the freezing frame so that the masked shadow can be shown moving from the back towards the front, a speedy moving shadow. This is probably the most crucial step in editing.
Steps
Step1 Click on the freezing frame, and in the settings window, open “animation.”
Step2 Click on the customized option. Add the first keyframe at the start of the clip.
Step3 Now move two frames and add another keyframe with the position of the masked shadow as it is moving out of frame.
Step4 Now move two frames keeping the settings the same.
Step5 Add another keyframe at the end with your masked shadow appearing half from the top of the frame.
This step is a bit tricky to understand, but the most important. Once it is done, your animation will give the impression of an object moving like a flash from the back to the front of view.

Speed Ramping
Once the keyframing is done, your super jump effect is roughly ready. All you have to do now is synchronize the speed of jumping, moving shadow, and landing. Here we will use the “speed ramping” tool.
Steps
Step1 Click on the clip, and in the settings window, choose “speed.”
Step2 Click on customize and increase the speed of any frame or clip.
Step3 Move the play head on the frame that you intend to increase the speed of, and move the frame on the speed window to speed up that part.
Once you have done speed ramping on both clips, your editing is done. Now play the video and see how the clip looks and if your super jump effect is remarkable or not.

Final Words
Make sure you follow all these steps in the correct order. You can get Filmora from the Filmora website, but its cracked versions are also available. While editing, try to make the transitions and clips as smooth and synchronized as you can. Also, if you find this article helpful, do not forget to share these tips with your friends.
Free Download For Win 7 or later(64-bit)
Free Download For macOS 10.14 or later
Free Download For macOS 10.14 or later
How to Get Zoom on TV [Easy Solutions]
The modern workforce needs adaptable alternatives to the conventional room-to-room conferencing. The latest integrated online collaboration platform is called Zoom. What’s more, now you can get Zoom on TV. Being one of the most well-known conferencing programs, it offers reliable and efficient hosting of online meetings. In a same vein, you may set up conference rooms, do video seminars, and use instant messaging to receive real-time communications. Moreover, can you get zoom on your tv? Then the answer is Yes! The ideal technique to expand a small conference is to mirror it on TV using Zoom meetings. Additionally, sharing across all platforms and devices is possible. Sharing HD video, audio, and material from your desktop and mobile devices to conference rooms and phone systems is simple, dependable, and safe with Zoom Meetings.
Zoom is one of the top videos calling applications available, however, in terms of functionality, dependability, and stability. Special features include screen sharing for multi-user annotation and local and cloud recording with transcription. With just a single click, you may share any file with supported and encrypted settings for increased security and communicate across all platforms. Zoom has now come to represent meetings for those who do their business remotely. For almost all platforms, including Android, iOS, macOS, Windows, Smart TVs, etc., the Zoom app is officially accessible. For the query how to get zoom on portal tv? you may activate Zoom screen casting whether you’re using a Windows 10 or a Mac laptop with the Chrome browser. This section will be useful to you if you want to benefit from Zoom on a TV. You may thus do so. Continue reading the article to learn more about how to get zoom on tv.
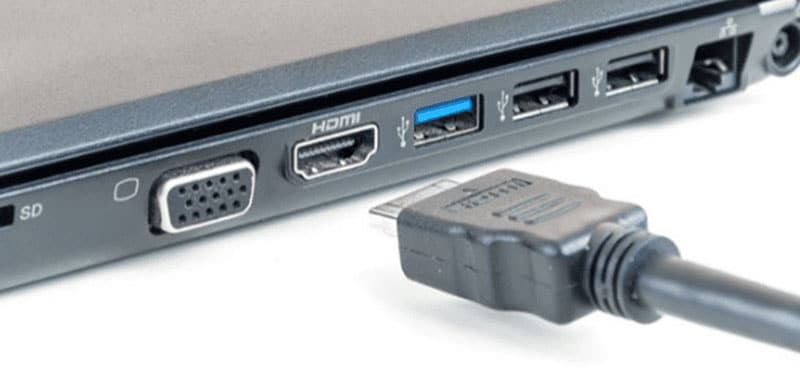
Part 1: Get Zoom on TV with HDMI Cable
Although Zoom provides companies and bigger organizations with a professional solution like Zoom Rooms, if you’re at home, you don’t need to put anything on your TV to use Zoom. You may start using Zoom right away by simply connecting your Zoom device to your TV. Connect your TV to your laptop’s HDMI port if it has one. Simple as that, however if the laptop doesn’t figure it out on its own you may need to explain what is going on with the second display. Although more reliable, connecting via cable means your source device is linked to the TV and you can’t go for a stroll. It also means you don’t have to worry about the wireless connection fading.
Steps to Get Zoom on TV with HDMI
Step1Connect the HDMI End to the TV and the Other End to Your Device
You may use this in its place if you don’t have an HDMI but do have a USB-C port. To connect to the HDMI cable coming into your TV, you’ll need a dongle, but you’ll need to make sure it’s compatible.
Step2Turn On your TV
Turn on your TV, then switch the video source to the HDMI port you just connected in your device to using the TV remote.
Step3Launch Zoom Meeting
Start or join a meeting by using the Zoom app on your smartphone (available for Android, iOS, Windows, and macOS).
Part 2: Use AirPlay to Connect Zoom to TV
Using AirPlay mirroring, MacOS or iOS devices may share content with Zoom rooms. On MacOS and iOS, Airplay is used to communicate between the Zoom client and the Zoom room. There may be a great potential for your own business requirements if you can figure out how to utilize Airplay to Zoom mirror your screen to your Apple TV. By default, AirPlay sends audio to the Apple TV. Depending on how loud your speakers are set to play and where your input device’s microphone is located, this may cause echoing and ever-louder feedback loops. Without further ado, let’s look at some of the important strategies you may use to maximize live screen streaming on your Apple TV device.
Steps to Use AirPlay to Connect Zoom to TV
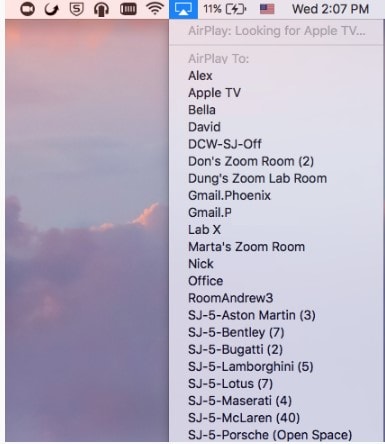
Step1Navigate to the Airplay Display in the Apple menu’s top right corner. Choose your Apple TV from the list of AirPlay Display options in the Displays preference pane. The “Show mirroring option in the menu bar when available” checkbox makes it easier to reach the AirPlay menu.

Step2Select Room Management > Zoom Rooms after logging into the Zoom online interface to manage your current Zoom Rooms. Then, modify the account settings and turn on Apple screen mirroring using the location hierarchy system.
Step3Turn on Apple Screen Mirroring by going to the Meetings tab. If this happens, you may need to activate it from the verification dialog box; otherwise, screen mirroring ought to start immediately on your device and let you see Zoom on your Apple TV. A shared password will be required of you.
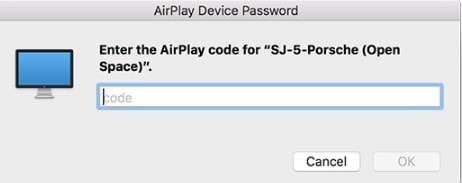
Step4Enter the passcode that is shown on the Zoom room’s screen. You may start using Airplay on your smartphone after enabling Apple screen mirroring.
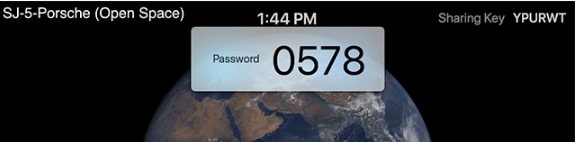
Step5After that, turn off AirPlay Display by using the option in the preference pane or the system menu bar. To stop sharing, click Disconnect Airplay.
Part 3: Mirror Screen with Chromecast
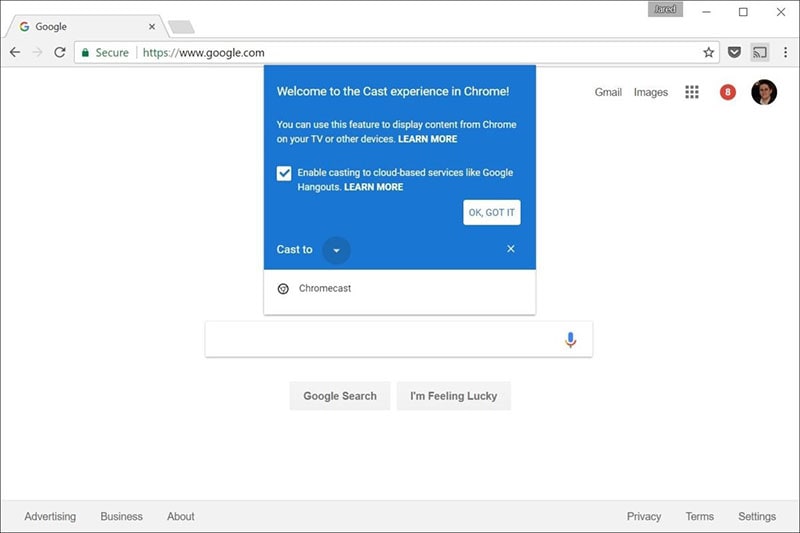
The Chromecast gadgets from Google are well constructed. They should be able to cast more than just standard streaming services to your TV, logically speaking. Using a Chromecast device is one of the simplest methods to cast a Zoom conference to your TV. They are affordable, and any Google browser and the Google Home app for your Android or iOS smartphone both contain the cast capability. Between a device, such as your phone or computer, and the television, Chromecast offers the perfect connection. Chromecast makes it easy to cast Zoom meetings, particularly conferences with many of participants, since it can virtually reflect everything on your phone, tablet, or computer screen to your TV. For meetings with bigger attendance, it is advantageous to be able to cast Zoom meetings to almost any device, even a smart TV, using Chromecast.
Steps to Mirror Screen with Chromecast
Step1Install the Chromecast
Connect your Google Chromecast to the same internet source as your casting device by plugging it in.
Step2Manage Cast Settings
Locate the casting option on your device and search for recipients. Get the Zoom Cloud Meetings app for iOS or Android. You’ll also need to download the third-party software if you use an iPad or iPhone. After that, sign up for a Zoom account and log in to get started.
Step3Start Mirroring Zoom
The screen of your phone will show up on your TV when you tap your Chromecast. The best view is obtained by turning your phone into landscape after opening Zoom as usual. Once you place a call from here, the video will cast to your TV. Go to the next screen and click Start Broadcasting. You may now start casting to your Chromecast device by opening the Zoom Cloud Meeting app.

You must download the third-party app if you use an iPhone or iPad. The Chromecast Streamer software will let you cast a Zoom meeting on your Chromecast device as Zoom doesn’t provide a casting option.
Conclusion
Zoom’s popularity has skyrocketed as a result of the Pandemic. Zoom has emerged as the preferred video conferencing solution as the bulk of the global workforce shifts to a “work from home” environment. Now that more individuals than ever before work from home, video conferencing has emerged as a vital tool for marketing and corporate communication. Mirroring Zoom meetings to TV has never been this simple. In light of this, we hope that this guide has helped you come up with some of the greatest ideas and approaches for your personal zoom sharing needs. We really hope that this information has been helpful to you if you’ve been interested in learning more about screen sharing your Zoom to TV. Thanks to these methods, you can now mirror any device platform on TV.
The modern workforce needs adaptable alternatives to the conventional room-to-room conferencing. The latest integrated online collaboration platform is called Zoom. What’s more, now you can get Zoom on TV. Being one of the most well-known conferencing programs, it offers reliable and efficient hosting of online meetings. In a same vein, you may set up conference rooms, do video seminars, and use instant messaging to receive real-time communications. Moreover, can you get zoom on your tv? Then the answer is Yes! The ideal technique to expand a small conference is to mirror it on TV using Zoom meetings. Additionally, sharing across all platforms and devices is possible. Sharing HD video, audio, and material from your desktop and mobile devices to conference rooms and phone systems is simple, dependable, and safe with Zoom Meetings.
Zoom is one of the top videos calling applications available, however, in terms of functionality, dependability, and stability. Special features include screen sharing for multi-user annotation and local and cloud recording with transcription. With just a single click, you may share any file with supported and encrypted settings for increased security and communicate across all platforms. Zoom has now come to represent meetings for those who do their business remotely. For almost all platforms, including Android, iOS, macOS, Windows, Smart TVs, etc., the Zoom app is officially accessible. For the query how to get zoom on portal tv? you may activate Zoom screen casting whether you’re using a Windows 10 or a Mac laptop with the Chrome browser. This section will be useful to you if you want to benefit from Zoom on a TV. You may thus do so. Continue reading the article to learn more about how to get zoom on tv.
Part 1: Get Zoom on TV with HDMI Cable
Although Zoom provides companies and bigger organizations with a professional solution like Zoom Rooms, if you’re at home, you don’t need to put anything on your TV to use Zoom. You may start using Zoom right away by simply connecting your Zoom device to your TV. Connect your TV to your laptop’s HDMI port if it has one. Simple as that, however if the laptop doesn’t figure it out on its own you may need to explain what is going on with the second display. Although more reliable, connecting via cable means your source device is linked to the TV and you can’t go for a stroll. It also means you don’t have to worry about the wireless connection fading.
Steps to Get Zoom on TV with HDMI
Step1Connect the HDMI End to the TV and the Other End to Your Device
You may use this in its place if you don’t have an HDMI but do have a USB-C port. To connect to the HDMI cable coming into your TV, you’ll need a dongle, but you’ll need to make sure it’s compatible.
Step2Turn On your TV
Turn on your TV, then switch the video source to the HDMI port you just connected in your device to using the TV remote.
Step3Launch Zoom Meeting
Start or join a meeting by using the Zoom app on your smartphone (available for Android, iOS, Windows, and macOS).
Part 2: Use AirPlay to Connect Zoom to TV
Using AirPlay mirroring, MacOS or iOS devices may share content with Zoom rooms. On MacOS and iOS, Airplay is used to communicate between the Zoom client and the Zoom room. There may be a great potential for your own business requirements if you can figure out how to utilize Airplay to Zoom mirror your screen to your Apple TV. By default, AirPlay sends audio to the Apple TV. Depending on how loud your speakers are set to play and where your input device’s microphone is located, this may cause echoing and ever-louder feedback loops. Without further ado, let’s look at some of the important strategies you may use to maximize live screen streaming on your Apple TV device.
Steps to Use AirPlay to Connect Zoom to TV
Step1Navigate to the Airplay Display in the Apple menu’s top right corner. Choose your Apple TV from the list of AirPlay Display options in the Displays preference pane. The “Show mirroring option in the menu bar when available” checkbox makes it easier to reach the AirPlay menu.
Step2Select Room Management > Zoom Rooms after logging into the Zoom online interface to manage your current Zoom Rooms. Then, modify the account settings and turn on Apple screen mirroring using the location hierarchy system.
Step3Turn on Apple Screen Mirroring by going to the Meetings tab. If this happens, you may need to activate it from the verification dialog box; otherwise, screen mirroring ought to start immediately on your device and let you see Zoom on your Apple TV. A shared password will be required of you.
Step4Enter the passcode that is shown on the Zoom room’s screen. You may start using Airplay on your smartphone after enabling Apple screen mirroring.
Step5After that, turn off AirPlay Display by using the option in the preference pane or the system menu bar. To stop sharing, click Disconnect Airplay.
Part 3: Mirror Screen with Chromecast
The Chromecast gadgets from Google are well constructed. They should be able to cast more than just standard streaming services to your TV, logically speaking. Using a Chromecast device is one of the simplest methods to cast a Zoom conference to your TV. They are affordable, and any Google browser and the Google Home app for your Android or iOS smartphone both contain the cast capability. Between a device, such as your phone or computer, and the television, Chromecast offers the perfect connection. Chromecast makes it easy to cast Zoom meetings, particularly conferences with many of participants, since it can virtually reflect everything on your phone, tablet, or computer screen to your TV. For meetings with bigger attendance, it is advantageous to be able to cast Zoom meetings to almost any device, even a smart TV, using Chromecast.
Steps to Mirror Screen with Chromecast
Step1Install the Chromecast
Connect your Google Chromecast to the same internet source as your casting device by plugging it in.
Step2Manage Cast Settings
Locate the casting option on your device and search for recipients. Get the Zoom Cloud Meetings app for iOS or Android. You’ll also need to download the third-party software if you use an iPad or iPhone. After that, sign up for a Zoom account and log in to get started.
Step3Start Mirroring Zoom
The screen of your phone will show up on your TV when you tap your Chromecast. The best view is obtained by turning your phone into landscape after opening Zoom as usual. Once you place a call from here, the video will cast to your TV. Go to the next screen and click Start Broadcasting. You may now start casting to your Chromecast device by opening the Zoom Cloud Meeting app.
You must download the third-party app if you use an iPhone or iPad. The Chromecast Streamer software will let you cast a Zoom meeting on your Chromecast device as Zoom doesn’t provide a casting option.
Conclusion
Zoom’s popularity has skyrocketed as a result of the Pandemic. Zoom has emerged as the preferred video conferencing solution as the bulk of the global workforce shifts to a “work from home” environment. Now that more individuals than ever before work from home, video conferencing has emerged as a vital tool for marketing and corporate communication. Mirroring Zoom meetings to TV has never been this simple. In light of this, we hope that this guide has helped you come up with some of the greatest ideas and approaches for your personal zoom sharing needs. We really hope that this information has been helpful to you if you’ve been interested in learning more about screen sharing your Zoom to TV. Thanks to these methods, you can now mirror any device platform on TV.
How to Make Tutorial Video with Filmora
You may want to create your video tutorial and share your knowledge with others. Fortunately, you can easily create a professionally edited tutorial video with Filmora . Keep reading this article since we will show you how to do it.
Part 1. Recording your footage
The first step of any video is to record your footage for some tutorials like arts and cooking. You can use a camera to get the footage you need. However, sometimes you’ll need to record your computer screen, and you can do that easily in Filmora.
Free Download For Win 7 or later(64-bit)
Free Download For macOS 10.14 or later
Step1 Firstly, open Filmora on your computer. If you haven’t already downloaded it you can get it at filmora.wondershare.com. Once you open Filmora, click “File” and “Record screen.” Here you can adjust various options like recording your computer’s audio or including your webcam.

Step2 Click settings to unlock even more options. Recording at the highest quality setting is recommended in case you need to zoom in later. Also, make sure to enable the show mouse if you want your viewer to follow along with your cursor.

Step3 When you’re ready press these buttons to begin recording your tutorial and hit them again to finish your recording.

Part 2. Keep your intro short
Avoid adding any long intro monologues or skits to your tutorial. First, your goal is to be informative and entertaining. Second, it’s always best to lead with a peek at what the final result of your tutorial will look like whether it’s a video effect arts and crafts or a recipe video.

Part 3. Break down your tutorial into steps
No matter what your tutorial is about, breaking down your process into steps makes your tutorial a lot easier to understand with Filmora. You can do this in just a few minutes.
Step1 Move the playhead to where you want your first section to begin. Next, click the “Tittles” and pick a style that appeals to you.

Step2 Click and drag your title on a track above your footage.

Step3 Double-click your new title and type in your section title. You can even adjust the style of the text to your liking. Repeat the process for as many steps as you’d like for your tutorial

Part 4. Narrate your video
Narration is a crucial part of making an effective tutorial video. Indeed, with Filmora adding narration to your video couldn’t be easier.
Step1 Moving your playhead to the beginning of your video. Then go to file record media and record voiceover and select your microphone. The drop-down menu and click the red button, then simply narrate your video as it plays out. Your voice will automatically be recorded and placed into the project. Additionally, make sure to speak, reduce background noise, and use simple language

Step2 Once you’re done recording, you can adjust the volume and further edit the voiceover by double-clicking the new audio file on your timeline.

Part 5. Emphasize important steps
Since you are working in a visual medium, emphasizing critical steps visually is very important. Here are some of the easiest and most effective ways to do that in Filmora
Step1 firstly, the freeze frame. Move your playhead to the frame you want to freeze, select your clip, go to tools speed, and click add freeze frame.

Step2 To adjust the length of your freeze, click “freeze frame.” and enter any duration you want.

Step3 Next is about to zoom the video. Double-click your clip and click on “Animation” and then “customize.”

Step4 Move your playhead to where you want the zoom to begin and click “Add” to add a keyframe. Then move your playhead where you want your zoom to finish and click “Add” again.

Step5 Now, you have to double-click the clip in the preview window and move and resize it to your liking.

Step6 You can also use the sliders in the animation tab to do this if you want.

Step7 Lastly, the mask highlight. To achieve this effect, you need to duplicate your desired clip by right-clicking and clicking “Duplicate.”

Step8 Drag the new clip to any layer above the original and make sure they’re lined up.

Step9 To make things easier, turn off the bottom track by clicking the eye icon.

Step10 Double-click the clip on top and go to “Video > “Mask” and .click the button to turn it on. In this tutorial, we’re going to use a “Rectangle” mask but the choice is yours.

Step11 Adjust the mask size and position in the preview window to the area you want to highlight.

Step12 Once you’re happy with the mask’s position with the top clip, turn the bottom trackback on by clicking the eye icon.

Step13 here’s where it all comes together. Double-click the bottom clip, click on “Anmation,” and “Customize.”

Step14 Drag the opacity slider until you’re happy with the contrast. Finally, you have a nifty mask highlight for your tutorial.

Summary
That’s how you create a tutorial video with Wondershare Filmora. Ensure you follow all the steps below to get perfect results.
Free Download For Win 7 or later(64-bit)
Free Download For macOS 10.14 or later
Free Download For macOS 10.14 or later
Step1 Firstly, open Filmora on your computer. If you haven’t already downloaded it you can get it at filmora.wondershare.com. Once you open Filmora, click “File” and “Record screen.” Here you can adjust various options like recording your computer’s audio or including your webcam.
Step2 Click settings to unlock even more options. Recording at the highest quality setting is recommended in case you need to zoom in later. Also, make sure to enable the show mouse if you want your viewer to follow along with your cursor.
Step3 When you’re ready press these buttons to begin recording your tutorial and hit them again to finish your recording.
Part 2. Keep your intro short
Avoid adding any long intro monologues or skits to your tutorial. First, your goal is to be informative and entertaining. Second, it’s always best to lead with a peek at what the final result of your tutorial will look like whether it’s a video effect arts and crafts or a recipe video.
Part 3. Break down your tutorial into steps
No matter what your tutorial is about, breaking down your process into steps makes your tutorial a lot easier to understand with Filmora. You can do this in just a few minutes.
Step1 Move the playhead to where you want your first section to begin. Next, click the “Tittles” and pick a style that appeals to you.
Step2 Click and drag your title on a track above your footage.
Step3 Double-click your new title and type in your section title. You can even adjust the style of the text to your liking. Repeat the process for as many steps as you’d like for your tutorial
Part 4. Narrate your video
Narration is a crucial part of making an effective tutorial video. Indeed, with Filmora adding narration to your video couldn’t be easier.
Step1 Moving your playhead to the beginning of your video. Then go to file record media and record voiceover and select your microphone. The drop-down menu and click the red button, then simply narrate your video as it plays out. Your voice will automatically be recorded and placed into the project. Additionally, make sure to speak, reduce background noise, and use simple language
Step2 Once you’re done recording, you can adjust the volume and further edit the voiceover by double-clicking the new audio file on your timeline.
Part 5. Emphasize important steps
Since you are working in a visual medium, emphasizing critical steps visually is very important. Here are some of the easiest and most effective ways to do that in Filmora
Step1 firstly, the freeze frame. Move your playhead to the frame you want to freeze, select your clip, go to tools speed, and click add freeze frame.
Step2 To adjust the length of your freeze, click “freeze frame.” and enter any duration you want.
Step3 Next is about to zoom the video. Double-click your clip and click on “Animation” and then “customize.”
Step4 Move your playhead to where you want the zoom to begin and click “Add” to add a keyframe. Then move your playhead where you want your zoom to finish and click “Add” again.
Step5 Now, you have to double-click the clip in the preview window and move and resize it to your liking.
Step6 You can also use the sliders in the animation tab to do this if you want.
Step7 Lastly, the mask highlight. To achieve this effect, you need to duplicate your desired clip by right-clicking and clicking “Duplicate.”
Step8 Drag the new clip to any layer above the original and make sure they’re lined up.
Step9 To make things easier, turn off the bottom track by clicking the eye icon.
Step10 Double-click the clip on top and go to “Video > “Mask” and .click the button to turn it on. In this tutorial, we’re going to use a “Rectangle” mask but the choice is yours.
Step11 Adjust the mask size and position in the preview window to the area you want to highlight.
Step12 Once you’re happy with the mask’s position with the top clip, turn the bottom trackback on by clicking the eye icon.
Step13 here’s where it all comes together. Double-click the bottom clip, click on “Anmation,” and “Customize.”
Step14 Drag the opacity slider until you’re happy with the contrast. Finally, you have a nifty mask highlight for your tutorial.
Summary
That’s how you create a tutorial video with Wondershare Filmora. Ensure you follow all the steps below to get perfect results.
Free Download For Win 7 or later(64-bit)
Free Download For macOS 10.14 or later
Also read:
- Updated In 2024, Land Into the Thrill of Creating Stunning GIFs with Ezgif
- New 15 Amazing GIF Splitter Examples You Need to Bookmark for 2024
- Updated Want to Make Your Canva Slideshow More Attractive? Follow the Given Discussion to Know Everything About Making the Best Slideshows with Canva for 2024
- Updated Turn Any Video Into a Paper Rip Effect with Filmora for 2024
- Updated 2024 Approved Are You Looking for a Video Format Converter Free? We Will Introduce the 5 Best Online Converters and Also the 5 Best Video Format Converters for PC
- Updated HOW to Add Fade to Black on Premiere Pro for 2024
- New In 2024, Confused About Deciding the Next Destination for Your Trip? This Article Features some of the Best Vloggers You Can Find for Gaining Inspiration for Traveling
- Updated Add Zoom Blur Effect In Photoshop Step by Step
- New Where To Find The Best Free Canon LUTs? Learn More
- Updated How to DIY VHS Overlay in After Effects, In 2024
- In 2024, Unlock the Power of Shotcut The Ultimate Guide to Rotating Videos
- Updated 2024 Approved So, without Further Dilly-Dallying, Lets Learn How to Create a Retro 1950-Style Video with This Simple Filmora Tutorial
- New In 2024, How To Zoom In On TikTok Videos?
- New In 2024, Ultimate Guide to Countdown Animation in Videos
- Updated In 2024, Best Green Screen Software for Beginner on Mac
- Updated How to Use Deep Fried Meme Maker
- Updated The Ultimate Guide to Countdown Animation in Videos
- Updated 2024 Approved Looking for Simple Steps to Customize the Speed of Your Video in DaVinci Resolve? Find Out How You Can Do that and Discover an Easier Alternative to DaVinci Resolve
- Updated Are You Interested in the Best LUTs ? Do You Want to Enhance Your Photos and Images with High-End Quality? Then, Quickly Step Into This Article for Mind-Blowing Facts on It
- 2024 Approved The Power of Music in Videos (+Filmora Editing Tricks)
- New 2024 Approved How To Make a Video by Mouse in Filmora?
- Updated How to Select and Use The Best BRAW LUTs for 2024
- In 2024, Ultimate Guide on How To Plan and Storyboard a Music Video
- How to Make A Tattoo Disappear Like A Magic for 2024
- New Easy Steps to Make Glitch Effect with Filmora for 2024
- Updated In 2024, 10 Best Meme Text to Speech Tools Windows, Mac, Android, iPhone
- When Struggling to Find a Suitable Game Recorder for Your PC, You Might Come Across Many Options. Explore the Best Game Recorders for Sharing Game Highlights for 2024
- 2024 Approved Best Online MPEG to GIF Converters
- New In 2024, This Article Will Address Your Questions About the Easiest Way to Turn a Blog Into a Podcast. Lets Begin with the Reasons Why You Should Do a Podcast
- Updated 2024 Approved A Countdown Effect Is Widely Used in Gaming and Report Videos. So How to Create Your Own Countdown Video? This Article Will Tell You some Ideas About Contdown Video Editing
- Best Ways to Merge FLV Files Windows, Mac,Android, iPhone & Online
- Complete Tutorial for Xiaomi Redmi 12 Hard Reset | Dr.fone
- How to Mirror Your Xiaomi Redmi 13C 5G Screen to PC with Chromecast | Dr.fone
- iCloud Separation How To Disconnect Apple iPhone SE (2020) and iPad
- The way to get back lost music from Nokia G310
- Ultimate Guide from OnePlus 12R FRP Bypass
- In 2024, Everything You Need To Know About Unlocked iPhone 7 Plus | Dr.fone
- How to Reset your Motorola Moto G04 Lock Screen Password
- How To Change Your Apple iPhone 7 Apple ID on MacBook
- Easy steps to recover deleted pictures from Infinix GT 10 Pro.
- Updated The Best Translator to Translate Videos Online
- In 2024, How To Remove Flashlight From Apple iPhone 8 Plus Lock Screen | Dr.fone
- In 2024, Hassle-Free Ways to Remove FRP Lock from Oppo K11 5G Phones with/without a PC
- In 2024, Full Guide to Catch 100 IV Pokémon Using a Map On Tecno Spark 20 | Dr.fone
- Title: Updated How to Create Cinematic Style Videos? Easy Guide for Beginners for 2024
- Author: Morgan
- Created at : 2024-04-24 01:05:42
- Updated at : 2024-04-25 01:05:42
- Link: https://ai-video-editing.techidaily.com/updated-how-to-create-cinematic-style-videos-easy-guide-for-beginners-for-2024/
- License: This work is licensed under CC BY-NC-SA 4.0.
