:max_bytes(150000):strip_icc():format(webp)/GettyImages-93420821-0ce0b19097fb47d78dec8dbc039c1260.jpg)
Updated How to Do Censor Effects with Filmora

How to Do Censor Effects with Filmora
There are many aspects to consider when it comes to publishing a video. Safety and privacy aspects are some of them. If you’re looking to blur out a bystander or cut out profanities from your video with Filmora, this is the right article for you.
Part 1. How to add a beep sound to a video with Filmora
Filmora’s powerful video editing menu includes easy tweaking on audio. You can censor any part of speech you want to exclude from your video with just these simple steps.
Step1 Create a new project and import the video to Filmora.

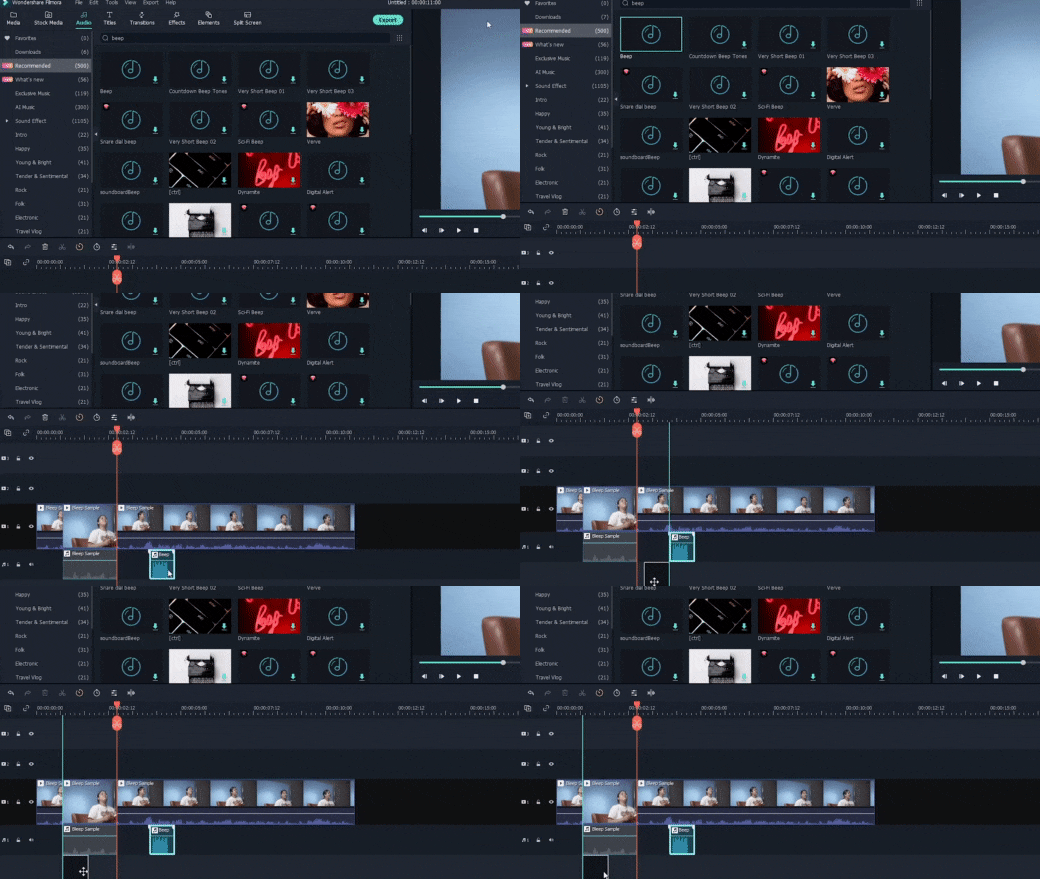
Step2 Separate the audio component from the video by right-clicking on the video and selecting the Detach Audio option. You can now edit each of them individually.

Step3 Mark the part to place the start of the beep using the playhead and click the Split icon on the editor’s toolbar.

Step4 Place the playhead at the end of the censored segment and click Split. Double-click on the segment to open the audio editing menu, then you can remove that part of the audio or lower the volume.

Step5 Click the Audio>Audio Effects menu on the upper left corner of the screen. After you find the Beep effect, drag the track to the audio timeline and place it in between the split section. Adjust trimming and volume until the censor is placed correctly.
Part 2. How to add mosaic to video with Filmora
Whether you want to hide a passerby’s face or your own, or even other types of objects, Wondershare Filmora is ready to take on the task. While its nifty face-off function automatically follows the movement of a marked face, the mosaic effect is the fast and perfect solution for a static object in the video.
Step1 After importing a video to Filmora, tap on the Effects tab and find the Mosaic filter from the gallery.

Step2 Drag the Mosaic filter to the timeline just above the main video track.

Step3 A yellow box will appear in the viewer. You can drag and adjust its size to hide the targetted object. You can also adjust the opacity and intensity of the effect using the adjustment menu, accessible when you double-click the yellow box.

If the targetted object moves, you can set the automatic tracking before adding the mosaic filter by clicking on the Motion Tracking>Start Tracking located above the timeline. Before you place the filter, preview and adjust the tracking frame to ensure tight proof censor.

Conclusion
Wondershare Filmora offers a large array of special effects that goes beyond simply trimming, cropping, splitting, or adding transitions to your video. You can add some special effects to your video as well, such as Blur, Face-Off, Mosaic, Tilt Shift and Jump Cut at Beat. On top of completing it with audio effects, you can also add subtitles or typography easily.
With Filmora, you can always enhance your video within minutes with excellent quality.
Free Download For Win 7 or later(64-bit)
Free Download For macOS 10.14 or later
Free Download For macOS 10.14 or later
How to Color Correct in OBS
Create High-Quality Video - Wondershare Filmora
An easy and powerful YouTube video editor
Numerous video and audio effects to choose from
Detailed tutorials are provided by the official channel
Color Correction is an outstanding functionality that allows editing photos and videos by altering their consistency to match a particular standard. Besides, color correction is available in the premium tool and free applications. And one of the established free software tools with color correction is the OBS.
Even though the Open Broadcaster Software is mainly known for live streaming and offline video recording, it also offers color correction functionality from its open canvas. Read this article to completion and get to the bottom line of how to do color correction in OBS.
More about OBS
In this article
01 What is OBS?
What is OBS?
Open Broadcaster Software (OBS) is free and open-source software that allows users to record videos and live stream events right at their comfort. The software functions effectively on Mac, Windows, and Linux computers.
Open Broadcaster Software (OBS) is free and open-source software that allows users to record videos and live stream events right at their comfort. The software functions effectively on Mac, Windows, and Linux computers.
Since its initial launch in 2012, OBS has made tremendous moves – This is not only from the constant release of its new versions but also the relentless increase in the functionality features. Besides, OBS is equipped with a robust API that enables plugins and scripts which provide extensive customization to precisely suit one’s needs.
However, OBS being a free application can function to date due to enough support from sponsors and backers.
How to Apply Color Correction in OBS
When you carry out basic edits to your videos or images with OBS and realize that your project has poor shade, color, or tone, you don’t have to export it to another software to correct it. Instead, you can use filters for color correction in OBS.
Apart from using OBS filters to color correct video clips and images, you can correct games, browser sources, and video capture devices.
There are various aspects of color correction in OBS. It includes:
1. Gamma
Gamma is a fundamental aspect in OBS that functions by balancing the brightness of an image through contrast. To be precise, Gamma works almost similarly to change in brightness while simultaneously increasing or decreasing the contrast.
In editing, Gamma is applicable mainly for removing shiny foreheads and webcam footage in gaming and browsing.
High Gamma is represented by “L,” whereas low Gamm is represented by “R.”
2. Contrast
Contrast is the difference in the degree of colors and tones in an image. Usually, the low contrast image has a narrow color range, whereas the high contrast images have dark shadows and bright highlights.
“L” represents high contrast in OBS contrast, whereas “R” represents low contrast.
3. Brightness
Brightness is the degree to how light or dark a picture is. To be able to understand an image clearly, it is best to correct its brightness. A change in brightness of a picture has a simultaneous change in pixels of that image.
High brightness in OBS is denounced by the letter “L,” whereas Low brightness is denounced by “R.”
4. Saturation
Saturation is the intensity of colors in a video or an image. High saturated images are bright, strong, and are rich, whereas the low saturated photos appear washed out. Black and white (grayscale) photos have no color saturation. In OBS, high saturation and low saturation are represented as “L” and “R.”
5. Hue Shift
Hue shift is the change in an image’s saturation, lightness, and hue colors. Hue shifting occurs when highlighting or shading images. In OBS, you can use the hue shift functionality to reimage your image with a completely different color palette.
With the hue shift functionality in OBS, you can place the image on top of another and have an 80% opacity. It means that you will still see the first image when you place the second one on top of it.
The “L” sign in the OBS hue shift represents 50% opacity, while the “R” represents 100% Opacity.
Color Grade in OBS
Color grading is the process of enhancing the appearance of an image through attributes such as contrast, saturation, and color, making them enchanting for presentations. Color grading is not only done for still images but also for motion pictures and images.
Color grading functionality in OBS is encompassed with several tools – This includes:
1. Lift tool
As the name suggests, lift tools are used in lifting or removing specific colors from an image. It does so without necessarily affecting other colors in an image.
With this tool, you can selectively remove unwanted colors from your image or video, replace them with your desired ones, and create astonishing results.
2. Offset
Offset is another outstanding tool in OBS color grading that controls the blacks/Shadows of an image. It functions by altering the brightness levels and leaving the highlights and the mid-tones unaffected.
3. Gain
A gain is a tool in OBS color correction that functions by only adjusting the white levels in an image. With the gain tool, brighter colors become brighter or darker.
Many people, especially beginner editors, experience difficulty differentiating between the Gamma and Offset tools. Yes, there is a closer similarity between the two, and for you to be on the safe side, you need to know that Gamma goes with the mid-tones (middle gray levels) whereas the Gain goes with highlights/whites.
How to Apply LUTs in OBS
Look up tables (LUTs) is a functionality feature that allows editors, colorists, and filmmakers to save certain colors as their templates. Therefore, when working on a particular project, they don’t have to create new working color grades; instead, you pick it from your LUT.
Using LUTs OBS is not rocket science. With LUTs, you can create unique projects with a vibrant feel. Here are the simple steps of using LUTs in OBS.
Step 1. Prepare your LUT
First, check and establish whether you have your LUT ready. If you don’t have it, you can download one from the internet. Make sure you download it as a folder. Even though OBS has LUT, It has limited color grades; therefore, it is best to download one. You can extract it to an OBS folder if you downloaded it in a zip file.
Step 2. Add your project to the OBS timeline
Open your OBS software and add your project file. Drag and drop your file to the OBS timeline.

Step 3. Add LUTs to your project
Right-click on the area in your project that you wish to apply LUTs, then click on “Filters.” Select “Apply LUT” from the drop-down menu,” which is usually at the top of the list.

Step 4. Apply your LUT as a filter
On the LUTs section, click on the browser, then open your downloaded LUT folder. Usually, the LUT is in the form of a .cube file. You can adjust your LUT by simply clicking on the “Adjust” option.
Bonus! How to Apply Color Correction for Webcam and Camera
People who primarily use their computers for recording sessions often find it difficult to capture quality videos. It is because most computer cameras are not straightforward. To do away with purchasing a new camera due to poor quality video capture, they can freely use OBS LUTs. For their camera and webcam. LUTs for webcam play a vital role in correcting the quality of photos and videos by using filters.
Here are the simple steps on how to use LUTs for color correction in webcam and camera
Step 1. Check whether your camera has additional software
Most webcams and cameras are controlled by external software, so you first need to check whether yours is also controlled. A thing with these cameras are controlled by their software is that the software determines the color settings and the specific image.
Double click on camera source and select “Configure video.” Computers with external software cameras will have a pop-up window that displays various customizable settings. Here, you can adjust the different settings based on your preference.

Step 2. Download your LUTs
Download online the LUTs you want to use. Download them as folders and extract the files you downloaded as zip files. Save them in the OBS folder.
Step 3. Apply your LUTs
Still, in your OBS software, open your camera and then right-click on it. From the displayed menu, click on “Filters.”
On the bottom left corner of your interface, hit the “+” sign, then select “Apply LUTs” > “Browse.”
Open your already downloaded OBS files. Usually, there is an “Adjust” that allows you to regulate the intensity of the LUT by sliding it.

Step 4. Start recording with LUTs on
After turning on your LUT, you can start recording videos and taking photos. There is an eye icon on the left-hand side of your screen. You can use it to turn on or off LUT.
Conclusion
● And that is how to do color correction in OBS. Besides, you do not have to go to the extremes of getting a new camera because of your webcam faultiness. With OBS, you can correct your camera and webcam and get outstanding results.
● Download LUTs from the internet and use them as a template in OBS. Besides, you don’t have to pay for the LUTs, but you can use the free ones.
Color Correction is an outstanding functionality that allows editing photos and videos by altering their consistency to match a particular standard. Besides, color correction is available in the premium tool and free applications. And one of the established free software tools with color correction is the OBS.
Even though the Open Broadcaster Software is mainly known for live streaming and offline video recording, it also offers color correction functionality from its open canvas. Read this article to completion and get to the bottom line of how to do color correction in OBS.
More about OBS
In this article
01 What is OBS?
What is OBS?
Open Broadcaster Software (OBS) is free and open-source software that allows users to record videos and live stream events right at their comfort. The software functions effectively on Mac, Windows, and Linux computers.
Open Broadcaster Software (OBS) is free and open-source software that allows users to record videos and live stream events right at their comfort. The software functions effectively on Mac, Windows, and Linux computers.
Since its initial launch in 2012, OBS has made tremendous moves – This is not only from the constant release of its new versions but also the relentless increase in the functionality features. Besides, OBS is equipped with a robust API that enables plugins and scripts which provide extensive customization to precisely suit one’s needs.
However, OBS being a free application can function to date due to enough support from sponsors and backers.
How to Apply Color Correction in OBS
When you carry out basic edits to your videos or images with OBS and realize that your project has poor shade, color, or tone, you don’t have to export it to another software to correct it. Instead, you can use filters for color correction in OBS.
Apart from using OBS filters to color correct video clips and images, you can correct games, browser sources, and video capture devices.
There are various aspects of color correction in OBS. It includes:
1. Gamma
Gamma is a fundamental aspect in OBS that functions by balancing the brightness of an image through contrast. To be precise, Gamma works almost similarly to change in brightness while simultaneously increasing or decreasing the contrast.
In editing, Gamma is applicable mainly for removing shiny foreheads and webcam footage in gaming and browsing.
High Gamma is represented by “L,” whereas low Gamm is represented by “R.”
2. Contrast
Contrast is the difference in the degree of colors and tones in an image. Usually, the low contrast image has a narrow color range, whereas the high contrast images have dark shadows and bright highlights.
“L” represents high contrast in OBS contrast, whereas “R” represents low contrast.
3. Brightness
Brightness is the degree to how light or dark a picture is. To be able to understand an image clearly, it is best to correct its brightness. A change in brightness of a picture has a simultaneous change in pixels of that image.
High brightness in OBS is denounced by the letter “L,” whereas Low brightness is denounced by “R.”
4. Saturation
Saturation is the intensity of colors in a video or an image. High saturated images are bright, strong, and are rich, whereas the low saturated photos appear washed out. Black and white (grayscale) photos have no color saturation. In OBS, high saturation and low saturation are represented as “L” and “R.”
5. Hue Shift
Hue shift is the change in an image’s saturation, lightness, and hue colors. Hue shifting occurs when highlighting or shading images. In OBS, you can use the hue shift functionality to reimage your image with a completely different color palette.
With the hue shift functionality in OBS, you can place the image on top of another and have an 80% opacity. It means that you will still see the first image when you place the second one on top of it.
The “L” sign in the OBS hue shift represents 50% opacity, while the “R” represents 100% Opacity.
Color Grade in OBS
Color grading is the process of enhancing the appearance of an image through attributes such as contrast, saturation, and color, making them enchanting for presentations. Color grading is not only done for still images but also for motion pictures and images.
Color grading functionality in OBS is encompassed with several tools – This includes:
1. Lift tool
As the name suggests, lift tools are used in lifting or removing specific colors from an image. It does so without necessarily affecting other colors in an image.
With this tool, you can selectively remove unwanted colors from your image or video, replace them with your desired ones, and create astonishing results.
2. Offset
Offset is another outstanding tool in OBS color grading that controls the blacks/Shadows of an image. It functions by altering the brightness levels and leaving the highlights and the mid-tones unaffected.
3. Gain
A gain is a tool in OBS color correction that functions by only adjusting the white levels in an image. With the gain tool, brighter colors become brighter or darker.
Many people, especially beginner editors, experience difficulty differentiating between the Gamma and Offset tools. Yes, there is a closer similarity between the two, and for you to be on the safe side, you need to know that Gamma goes with the mid-tones (middle gray levels) whereas the Gain goes with highlights/whites.
How to Apply LUTs in OBS
Look up tables (LUTs) is a functionality feature that allows editors, colorists, and filmmakers to save certain colors as their templates. Therefore, when working on a particular project, they don’t have to create new working color grades; instead, you pick it from your LUT.
Using LUTs OBS is not rocket science. With LUTs, you can create unique projects with a vibrant feel. Here are the simple steps of using LUTs in OBS.
Step 1. Prepare your LUT
First, check and establish whether you have your LUT ready. If you don’t have it, you can download one from the internet. Make sure you download it as a folder. Even though OBS has LUT, It has limited color grades; therefore, it is best to download one. You can extract it to an OBS folder if you downloaded it in a zip file.
Step 2. Add your project to the OBS timeline
Open your OBS software and add your project file. Drag and drop your file to the OBS timeline.

Step 3. Add LUTs to your project
Right-click on the area in your project that you wish to apply LUTs, then click on “Filters.” Select “Apply LUT” from the drop-down menu,” which is usually at the top of the list.

Step 4. Apply your LUT as a filter
On the LUTs section, click on the browser, then open your downloaded LUT folder. Usually, the LUT is in the form of a .cube file. You can adjust your LUT by simply clicking on the “Adjust” option.
Bonus! How to Apply Color Correction for Webcam and Camera
People who primarily use their computers for recording sessions often find it difficult to capture quality videos. It is because most computer cameras are not straightforward. To do away with purchasing a new camera due to poor quality video capture, they can freely use OBS LUTs. For their camera and webcam. LUTs for webcam play a vital role in correcting the quality of photos and videos by using filters.
Here are the simple steps on how to use LUTs for color correction in webcam and camera
Step 1. Check whether your camera has additional software
Most webcams and cameras are controlled by external software, so you first need to check whether yours is also controlled. A thing with these cameras are controlled by their software is that the software determines the color settings and the specific image.
Double click on camera source and select “Configure video.” Computers with external software cameras will have a pop-up window that displays various customizable settings. Here, you can adjust the different settings based on your preference.

Step 2. Download your LUTs
Download online the LUTs you want to use. Download them as folders and extract the files you downloaded as zip files. Save them in the OBS folder.
Step 3. Apply your LUTs
Still, in your OBS software, open your camera and then right-click on it. From the displayed menu, click on “Filters.”
On the bottom left corner of your interface, hit the “+” sign, then select “Apply LUTs” > “Browse.”
Open your already downloaded OBS files. Usually, there is an “Adjust” that allows you to regulate the intensity of the LUT by sliding it.

Step 4. Start recording with LUTs on
After turning on your LUT, you can start recording videos and taking photos. There is an eye icon on the left-hand side of your screen. You can use it to turn on or off LUT.
Conclusion
● And that is how to do color correction in OBS. Besides, you do not have to go to the extremes of getting a new camera because of your webcam faultiness. With OBS, you can correct your camera and webcam and get outstanding results.
● Download LUTs from the internet and use them as a template in OBS. Besides, you don’t have to pay for the LUTs, but you can use the free ones.
Color Correction is an outstanding functionality that allows editing photos and videos by altering their consistency to match a particular standard. Besides, color correction is available in the premium tool and free applications. And one of the established free software tools with color correction is the OBS.
Even though the Open Broadcaster Software is mainly known for live streaming and offline video recording, it also offers color correction functionality from its open canvas. Read this article to completion and get to the bottom line of how to do color correction in OBS.
More about OBS
In this article
01 What is OBS?
What is OBS?
Open Broadcaster Software (OBS) is free and open-source software that allows users to record videos and live stream events right at their comfort. The software functions effectively on Mac, Windows, and Linux computers.
Open Broadcaster Software (OBS) is free and open-source software that allows users to record videos and live stream events right at their comfort. The software functions effectively on Mac, Windows, and Linux computers.
Since its initial launch in 2012, OBS has made tremendous moves – This is not only from the constant release of its new versions but also the relentless increase in the functionality features. Besides, OBS is equipped with a robust API that enables plugins and scripts which provide extensive customization to precisely suit one’s needs.
However, OBS being a free application can function to date due to enough support from sponsors and backers.
How to Apply Color Correction in OBS
When you carry out basic edits to your videos or images with OBS and realize that your project has poor shade, color, or tone, you don’t have to export it to another software to correct it. Instead, you can use filters for color correction in OBS.
Apart from using OBS filters to color correct video clips and images, you can correct games, browser sources, and video capture devices.
There are various aspects of color correction in OBS. It includes:
1. Gamma
Gamma is a fundamental aspect in OBS that functions by balancing the brightness of an image through contrast. To be precise, Gamma works almost similarly to change in brightness while simultaneously increasing or decreasing the contrast.
In editing, Gamma is applicable mainly for removing shiny foreheads and webcam footage in gaming and browsing.
High Gamma is represented by “L,” whereas low Gamm is represented by “R.”
2. Contrast
Contrast is the difference in the degree of colors and tones in an image. Usually, the low contrast image has a narrow color range, whereas the high contrast images have dark shadows and bright highlights.
“L” represents high contrast in OBS contrast, whereas “R” represents low contrast.
3. Brightness
Brightness is the degree to how light or dark a picture is. To be able to understand an image clearly, it is best to correct its brightness. A change in brightness of a picture has a simultaneous change in pixels of that image.
High brightness in OBS is denounced by the letter “L,” whereas Low brightness is denounced by “R.”
4. Saturation
Saturation is the intensity of colors in a video or an image. High saturated images are bright, strong, and are rich, whereas the low saturated photos appear washed out. Black and white (grayscale) photos have no color saturation. In OBS, high saturation and low saturation are represented as “L” and “R.”
5. Hue Shift
Hue shift is the change in an image’s saturation, lightness, and hue colors. Hue shifting occurs when highlighting or shading images. In OBS, you can use the hue shift functionality to reimage your image with a completely different color palette.
With the hue shift functionality in OBS, you can place the image on top of another and have an 80% opacity. It means that you will still see the first image when you place the second one on top of it.
The “L” sign in the OBS hue shift represents 50% opacity, while the “R” represents 100% Opacity.
Color Grade in OBS
Color grading is the process of enhancing the appearance of an image through attributes such as contrast, saturation, and color, making them enchanting for presentations. Color grading is not only done for still images but also for motion pictures and images.
Color grading functionality in OBS is encompassed with several tools – This includes:
1. Lift tool
As the name suggests, lift tools are used in lifting or removing specific colors from an image. It does so without necessarily affecting other colors in an image.
With this tool, you can selectively remove unwanted colors from your image or video, replace them with your desired ones, and create astonishing results.
2. Offset
Offset is another outstanding tool in OBS color grading that controls the blacks/Shadows of an image. It functions by altering the brightness levels and leaving the highlights and the mid-tones unaffected.
3. Gain
A gain is a tool in OBS color correction that functions by only adjusting the white levels in an image. With the gain tool, brighter colors become brighter or darker.
Many people, especially beginner editors, experience difficulty differentiating between the Gamma and Offset tools. Yes, there is a closer similarity between the two, and for you to be on the safe side, you need to know that Gamma goes with the mid-tones (middle gray levels) whereas the Gain goes with highlights/whites.
How to Apply LUTs in OBS
Look up tables (LUTs) is a functionality feature that allows editors, colorists, and filmmakers to save certain colors as their templates. Therefore, when working on a particular project, they don’t have to create new working color grades; instead, you pick it from your LUT.
Using LUTs OBS is not rocket science. With LUTs, you can create unique projects with a vibrant feel. Here are the simple steps of using LUTs in OBS.
Step 1. Prepare your LUT
First, check and establish whether you have your LUT ready. If you don’t have it, you can download one from the internet. Make sure you download it as a folder. Even though OBS has LUT, It has limited color grades; therefore, it is best to download one. You can extract it to an OBS folder if you downloaded it in a zip file.
Step 2. Add your project to the OBS timeline
Open your OBS software and add your project file. Drag and drop your file to the OBS timeline.

Step 3. Add LUTs to your project
Right-click on the area in your project that you wish to apply LUTs, then click on “Filters.” Select “Apply LUT” from the drop-down menu,” which is usually at the top of the list.

Step 4. Apply your LUT as a filter
On the LUTs section, click on the browser, then open your downloaded LUT folder. Usually, the LUT is in the form of a .cube file. You can adjust your LUT by simply clicking on the “Adjust” option.
Bonus! How to Apply Color Correction for Webcam and Camera
People who primarily use their computers for recording sessions often find it difficult to capture quality videos. It is because most computer cameras are not straightforward. To do away with purchasing a new camera due to poor quality video capture, they can freely use OBS LUTs. For their camera and webcam. LUTs for webcam play a vital role in correcting the quality of photos and videos by using filters.
Here are the simple steps on how to use LUTs for color correction in webcam and camera
Step 1. Check whether your camera has additional software
Most webcams and cameras are controlled by external software, so you first need to check whether yours is also controlled. A thing with these cameras are controlled by their software is that the software determines the color settings and the specific image.
Double click on camera source and select “Configure video.” Computers with external software cameras will have a pop-up window that displays various customizable settings. Here, you can adjust the different settings based on your preference.

Step 2. Download your LUTs
Download online the LUTs you want to use. Download them as folders and extract the files you downloaded as zip files. Save them in the OBS folder.
Step 3. Apply your LUTs
Still, in your OBS software, open your camera and then right-click on it. From the displayed menu, click on “Filters.”
On the bottom left corner of your interface, hit the “+” sign, then select “Apply LUTs” > “Browse.”
Open your already downloaded OBS files. Usually, there is an “Adjust” that allows you to regulate the intensity of the LUT by sliding it.

Step 4. Start recording with LUTs on
After turning on your LUT, you can start recording videos and taking photos. There is an eye icon on the left-hand side of your screen. You can use it to turn on or off LUT.
Conclusion
● And that is how to do color correction in OBS. Besides, you do not have to go to the extremes of getting a new camera because of your webcam faultiness. With OBS, you can correct your camera and webcam and get outstanding results.
● Download LUTs from the internet and use them as a template in OBS. Besides, you don’t have to pay for the LUTs, but you can use the free ones.
Color Correction is an outstanding functionality that allows editing photos and videos by altering their consistency to match a particular standard. Besides, color correction is available in the premium tool and free applications. And one of the established free software tools with color correction is the OBS.
Even though the Open Broadcaster Software is mainly known for live streaming and offline video recording, it also offers color correction functionality from its open canvas. Read this article to completion and get to the bottom line of how to do color correction in OBS.
More about OBS
In this article
01 What is OBS?
What is OBS?
Open Broadcaster Software (OBS) is free and open-source software that allows users to record videos and live stream events right at their comfort. The software functions effectively on Mac, Windows, and Linux computers.
Open Broadcaster Software (OBS) is free and open-source software that allows users to record videos and live stream events right at their comfort. The software functions effectively on Mac, Windows, and Linux computers.
Since its initial launch in 2012, OBS has made tremendous moves – This is not only from the constant release of its new versions but also the relentless increase in the functionality features. Besides, OBS is equipped with a robust API that enables plugins and scripts which provide extensive customization to precisely suit one’s needs.
However, OBS being a free application can function to date due to enough support from sponsors and backers.
How to Apply Color Correction in OBS
When you carry out basic edits to your videos or images with OBS and realize that your project has poor shade, color, or tone, you don’t have to export it to another software to correct it. Instead, you can use filters for color correction in OBS.
Apart from using OBS filters to color correct video clips and images, you can correct games, browser sources, and video capture devices.
There are various aspects of color correction in OBS. It includes:
1. Gamma
Gamma is a fundamental aspect in OBS that functions by balancing the brightness of an image through contrast. To be precise, Gamma works almost similarly to change in brightness while simultaneously increasing or decreasing the contrast.
In editing, Gamma is applicable mainly for removing shiny foreheads and webcam footage in gaming and browsing.
High Gamma is represented by “L,” whereas low Gamm is represented by “R.”
2. Contrast
Contrast is the difference in the degree of colors and tones in an image. Usually, the low contrast image has a narrow color range, whereas the high contrast images have dark shadows and bright highlights.
“L” represents high contrast in OBS contrast, whereas “R” represents low contrast.
3. Brightness
Brightness is the degree to how light or dark a picture is. To be able to understand an image clearly, it is best to correct its brightness. A change in brightness of a picture has a simultaneous change in pixels of that image.
High brightness in OBS is denounced by the letter “L,” whereas Low brightness is denounced by “R.”
4. Saturation
Saturation is the intensity of colors in a video or an image. High saturated images are bright, strong, and are rich, whereas the low saturated photos appear washed out. Black and white (grayscale) photos have no color saturation. In OBS, high saturation and low saturation are represented as “L” and “R.”
5. Hue Shift
Hue shift is the change in an image’s saturation, lightness, and hue colors. Hue shifting occurs when highlighting or shading images. In OBS, you can use the hue shift functionality to reimage your image with a completely different color palette.
With the hue shift functionality in OBS, you can place the image on top of another and have an 80% opacity. It means that you will still see the first image when you place the second one on top of it.
The “L” sign in the OBS hue shift represents 50% opacity, while the “R” represents 100% Opacity.
Color Grade in OBS
Color grading is the process of enhancing the appearance of an image through attributes such as contrast, saturation, and color, making them enchanting for presentations. Color grading is not only done for still images but also for motion pictures and images.
Color grading functionality in OBS is encompassed with several tools – This includes:
1. Lift tool
As the name suggests, lift tools are used in lifting or removing specific colors from an image. It does so without necessarily affecting other colors in an image.
With this tool, you can selectively remove unwanted colors from your image or video, replace them with your desired ones, and create astonishing results.
2. Offset
Offset is another outstanding tool in OBS color grading that controls the blacks/Shadows of an image. It functions by altering the brightness levels and leaving the highlights and the mid-tones unaffected.
3. Gain
A gain is a tool in OBS color correction that functions by only adjusting the white levels in an image. With the gain tool, brighter colors become brighter or darker.
Many people, especially beginner editors, experience difficulty differentiating between the Gamma and Offset tools. Yes, there is a closer similarity between the two, and for you to be on the safe side, you need to know that Gamma goes with the mid-tones (middle gray levels) whereas the Gain goes with highlights/whites.
How to Apply LUTs in OBS
Look up tables (LUTs) is a functionality feature that allows editors, colorists, and filmmakers to save certain colors as their templates. Therefore, when working on a particular project, they don’t have to create new working color grades; instead, you pick it from your LUT.
Using LUTs OBS is not rocket science. With LUTs, you can create unique projects with a vibrant feel. Here are the simple steps of using LUTs in OBS.
Step 1. Prepare your LUT
First, check and establish whether you have your LUT ready. If you don’t have it, you can download one from the internet. Make sure you download it as a folder. Even though OBS has LUT, It has limited color grades; therefore, it is best to download one. You can extract it to an OBS folder if you downloaded it in a zip file.
Step 2. Add your project to the OBS timeline
Open your OBS software and add your project file. Drag and drop your file to the OBS timeline.

Step 3. Add LUTs to your project
Right-click on the area in your project that you wish to apply LUTs, then click on “Filters.” Select “Apply LUT” from the drop-down menu,” which is usually at the top of the list.

Step 4. Apply your LUT as a filter
On the LUTs section, click on the browser, then open your downloaded LUT folder. Usually, the LUT is in the form of a .cube file. You can adjust your LUT by simply clicking on the “Adjust” option.
Bonus! How to Apply Color Correction for Webcam and Camera
People who primarily use their computers for recording sessions often find it difficult to capture quality videos. It is because most computer cameras are not straightforward. To do away with purchasing a new camera due to poor quality video capture, they can freely use OBS LUTs. For their camera and webcam. LUTs for webcam play a vital role in correcting the quality of photos and videos by using filters.
Here are the simple steps on how to use LUTs for color correction in webcam and camera
Step 1. Check whether your camera has additional software
Most webcams and cameras are controlled by external software, so you first need to check whether yours is also controlled. A thing with these cameras are controlled by their software is that the software determines the color settings and the specific image.
Double click on camera source and select “Configure video.” Computers with external software cameras will have a pop-up window that displays various customizable settings. Here, you can adjust the different settings based on your preference.

Step 2. Download your LUTs
Download online the LUTs you want to use. Download them as folders and extract the files you downloaded as zip files. Save them in the OBS folder.
Step 3. Apply your LUTs
Still, in your OBS software, open your camera and then right-click on it. From the displayed menu, click on “Filters.”
On the bottom left corner of your interface, hit the “+” sign, then select “Apply LUTs” > “Browse.”
Open your already downloaded OBS files. Usually, there is an “Adjust” that allows you to regulate the intensity of the LUT by sliding it.

Step 4. Start recording with LUTs on
After turning on your LUT, you can start recording videos and taking photos. There is an eye icon on the left-hand side of your screen. You can use it to turn on or off LUT.
Conclusion
● And that is how to do color correction in OBS. Besides, you do not have to go to the extremes of getting a new camera because of your webcam faultiness. With OBS, you can correct your camera and webcam and get outstanding results.
● Download LUTs from the internet and use them as a template in OBS. Besides, you don’t have to pay for the LUTs, but you can use the free ones.
AI Features of Filmora - Silence Detection in Videos
Sometimes awkward silent moments can make a video look cringe and boring. Silence in videos can often be a major drawback, making the content dull and unengaging. However, fear not because there are ways to eliminate them and keep your viewers hooked. One effective solution is to utilize certain features that help in removing silence from videos.
Silence detection is a feature that lets you detect silence and awkward pauses in your content. It can detect those instances where there is no audio or any significant sound present. By utilizing this feature, you can easily identify and remove these silent parts from your videos. Wondershare Filmora is a tool that offers this AI-powered feature to remove silence from videos.
Part 1: How Can Silencing in Videos Damage It?
Silence can negatively affect videos, making them less engaging and captivating. Many video silence removers are available, but first, learn how silence affects video content. Let’s explore some of how silence can damage the quality of video content:
1. Loss of Interest
When viewers encounter long silent moments in a video, they lose interest. Silence fails to hold their attention and leaves them craving for something more stimulating. As a result, they may lose interest in the content and look for other videos. This is somewhat discouraging for a content creator. That’s why short and meaningful content is what the audience demand.
2. Lack of Emotional Connection
Sound and audio play an essential role in creating an emotional connection with the audience. Silence, on the other hand, fails to start any emotional response. Without appropriate sound effects or dialogue, videos can feel empty and emotionless. The absence of audio elements also fails to establish a connection with the viewer.
3. Breaks the Flow
Silent moments in videos can disrupt the natural flow and rhythm of the content. Viewers expect a seamless progression from one scene to another. However, sudden silences in a video may create frustration for some individuals. It may also lead to a disjointed viewing experience for the viewer. Meanwhile, the audience sometimes couldn’t understand the intended message.
4. Awkwardness and Uncomfortable Silence
Silence can create awkward moments in videos, especially when it’s unexpected or prolonged. These silent gaps can make viewers feel uncomfortable. The viewer becomes unsure of what to expect or how to interpret the situation. Moreover, awkward silences can detract from the overall viewing experience. It also leaves a negative impression and makes the content less enjoyable.
5. Reduced Engagement and Sharing
Videos that contain excessive silence are less likely to be shared or discussed among viewers. Silent moments fail to generate excitement or spark conversations. In contrast, videos with dynamic audio elements are more likely to capture attention. If your video has long pauses or awkward silent moments, it may not get the expected response.
Video Slience Detector
Easily and precisely detect slience in video with Filmora Video Editor ! Experience the magic of cool to make great videos.
Detect Slience in Video Detect Slience in Video Learn More >

Part 2: Silence Detection Feature of Wondershare Filmora - An Understanding
Wondershare Filmora Video Editor always surprises you with its unique editing options and features. Its many features make it easy and pretty straightforward for you like. With another excellent feature, you can detect silence in audio files and videos. This unique feature will automatically detect awkward silence or long pauses.
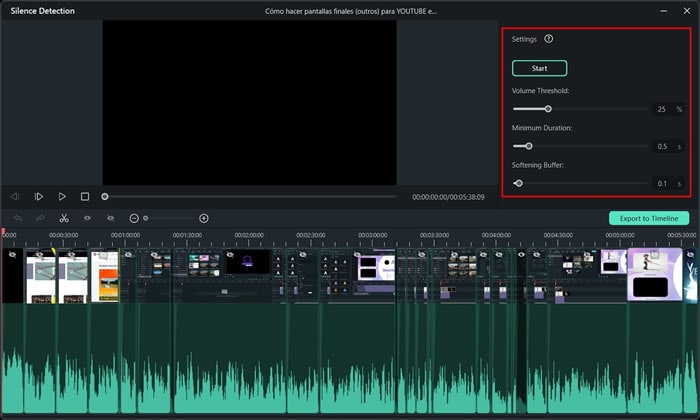
Furthermore, you can remove those moments from your project to create a seamless experience. This video silence remover uses AI to find silent intervals in your video. You can also change the volume threshold by helping the tool find more such moments in your project. Additionally, you can change the minimum duration of such silent intervals of your video.
Part 3: Gathering Details About the Other AI Features of Filmora
Wondershare Filmora can auto remove silence in videos, but it has other AI features too. Learn more about Filmora’s AI features in this section.
Edit Video with AI For Win 7 or later(64-bit)
Edit Video with AI For macOS 10.14 or later
AI Image
This feature of the Wondershare Filmora employs AI to improve the appearance of images in videos. It automatically fixes imperfections like noise and color asymmetry. Furthermore, it also corrects brightness, giving your videos a better, more polished appearance. You can fast and easily enhance the quality of your video with the help of this feature.
Auto Reframe
If you want to change the aspect ratio of your video automatically, then this is the feature for you. The Auto Reframe function in Filmora automatically modifies aspect ratios for your video .
Motion Tracking
Filmora’s motion tracking feature tracks and follows moving objects in videos . It allows you to add effects, text, or graphics that move along with the object. Furthermore, this feature makes it easy to highlight and enhance specific elements in a video. You can even create engaging and professional-looking effects using the motion tracking feature. This feature makes it simple to add dynamic elements to videos.
Instant Mode
Wondershare Filmora has an Instant Mode feature that lets users create videos easily and quickly. You can choose a template, import your video, and let the software will edit it automatically. This feature can automatically apply transitions, effects, and music to your videos. It’s a simple and convenient way to make polished videos without needing advanced editing skills.
Auto Beat Sync
It is a feature that synchronizes video clips and effects with the beats of background music. This feature can automatically detect the rhythm and aligns the visuals accordingly. Moreover, it can save you time and make your videos more engaging. You can edit and synchronize audio with video without having expertise by using this AI feature of Filmora.
Part 4: Tutorial: Using The Silence Detection Feature in Filmora
Wondershare Filmora can automatically remove silence from videos in no time. With its silent detection feature, you can easily remove awkward silence from your videos. Follow these guided steps to remove such moments from your videos.
Detect Slience in Video For Win 7 or later(64-bit)
Detect Slience in Video For macOS 10.14 or later
Step 1Open Wondershare Filmora
To auto remove silence in videos, start by opening Wondershare Filmora on your system. Look for the “Silence Detection” button located just beneath the “New Project” option.

Step 2Import and Detect Silence
Click on the “Silence Detection“ button, and then import your video file into the tool. If needed, you can adjust the parameters in the “Settings” menu according to your requirements. Continue to select the “Start” button, and Filmora will automatically detect any silent intervals in your video or audio file.
Step 3Delete Silence and Merge Clips
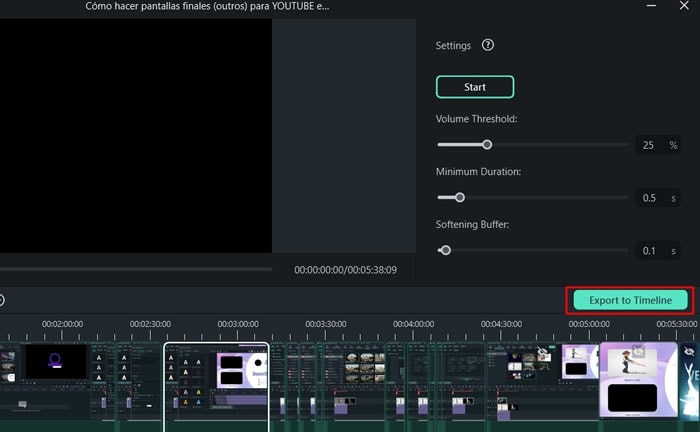
Continue to remove the silent portions from the timeline by merging the clips together. To merge the remaining clips together, drag and place each clip right next to each other. Once done, click the “Export to Timeline” button to lead into the main interface.
Conclusion
To conclude, silence detection eliminates boring stretches of silence from a video. Additionally, it allows you to enhance the overall flow of your video. By removing such intervals, you can maintain a consistent pace throughout your video. Wondershare Filmora is a fantastic tool that automatically removes silence from video and audio files.
Detect Slience in Video Detect Slience in Video Learn More >

Part 2: Silence Detection Feature of Wondershare Filmora - An Understanding
Wondershare Filmora Video Editor always surprises you with its unique editing options and features. Its many features make it easy and pretty straightforward for you like. With another excellent feature, you can detect silence in audio files and videos. This unique feature will automatically detect awkward silence or long pauses.
Furthermore, you can remove those moments from your project to create a seamless experience. This video silence remover uses AI to find silent intervals in your video. You can also change the volume threshold by helping the tool find more such moments in your project. Additionally, you can change the minimum duration of such silent intervals of your video.
Part 3: Gathering Details About the Other AI Features of Filmora
Wondershare Filmora can auto remove silence in videos, but it has other AI features too. Learn more about Filmora’s AI features in this section.
Edit Video with AI For Win 7 or later(64-bit)
Edit Video with AI For macOS 10.14 or later
AI Image
This feature of the Wondershare Filmora employs AI to improve the appearance of images in videos. It automatically fixes imperfections like noise and color asymmetry. Furthermore, it also corrects brightness, giving your videos a better, more polished appearance. You can fast and easily enhance the quality of your video with the help of this feature.
Auto Reframe
If you want to change the aspect ratio of your video automatically, then this is the feature for you. The Auto Reframe function in Filmora automatically modifies aspect ratios for your video .
Motion Tracking
Filmora’s motion tracking feature tracks and follows moving objects in videos . It allows you to add effects, text, or graphics that move along with the object. Furthermore, this feature makes it easy to highlight and enhance specific elements in a video. You can even create engaging and professional-looking effects using the motion tracking feature. This feature makes it simple to add dynamic elements to videos.
Instant Mode
Wondershare Filmora has an Instant Mode feature that lets users create videos easily and quickly. You can choose a template, import your video, and let the software will edit it automatically. This feature can automatically apply transitions, effects, and music to your videos. It’s a simple and convenient way to make polished videos without needing advanced editing skills.
Auto Beat Sync
It is a feature that synchronizes video clips and effects with the beats of background music. This feature can automatically detect the rhythm and aligns the visuals accordingly. Moreover, it can save you time and make your videos more engaging. You can edit and synchronize audio with video without having expertise by using this AI feature of Filmora.
Part 4: Tutorial: Using The Silence Detection Feature in Filmora
Wondershare Filmora can automatically remove silence from videos in no time. With its silent detection feature, you can easily remove awkward silence from your videos. Follow these guided steps to remove such moments from your videos.
Detect Slience in Video For Win 7 or later(64-bit)
Detect Slience in Video For macOS 10.14 or later
Step 1Open Wondershare Filmora
To auto remove silence in videos, start by opening Wondershare Filmora on your system. Look for the “Silence Detection” button located just beneath the “New Project” option.

Step 2Import and Detect Silence
Click on the “Silence Detection“ button, and then import your video file into the tool. If needed, you can adjust the parameters in the “Settings” menu according to your requirements. Continue to select the “Start” button, and Filmora will automatically detect any silent intervals in your video or audio file.

Step 3Delete Silence and Merge Clips
Continue to remove the silent portions from the timeline by merging the clips together. To merge the remaining clips together, drag and place each clip right next to each other. Once done, click the “Export to Timeline” button to lead into the main interface.

Conclusion
To conclude, silence detection eliminates boring stretches of silence from a video. Additionally, it allows you to enhance the overall flow of your video. By removing such intervals, you can maintain a consistent pace throughout your video. Wondershare Filmora is a fantastic tool that automatically removes silence from video and audio files.
What Should Be Considered to Choose A Nice GoPro for Vlogging?
Vlogging has developed into quite an industry in a short period. We have seen many people building up their image as professional vloggers who have entertained millions of users with their unique content. However, while understanding the dynamics of vlogging, it is particularly important to set up the equipment that would help the user in their vlogging.
This article discusses very proficient equipment, GoPro for YouTubers, which has been considered across various scales for professional vlogging. We shall be providing our readers with an idea of the best GoPro they can be used to cover their vlogs.
In this article
01 What Need to Be Considered Before Choosing a GoPro for Vlogging?
02 8 Best GoPro for Vlogging in 2022
Part 1: What Need to Be Considered Before Choosing a GoPro for Vlogging?
GoPro cameras are known for their versatility. While being simply the best tool for vlogging, they are known for offering several impressive features. This, however, needs to be considered before choosing a GoPro for vlogging. Get ready as we are about to figure them out.

1. Portable and Easy to Carry
Isn’t it great that you are not required to carry heavy equipment everywhere? GoPro cameras offer convenience to their users by providing small sizes and rugged designs. This can prove to be extremely good for vloggers who have rough uses.
2. Multiple Video Features
Are you tired of capturing a simple video? GoPro offers you multiple options while capturing videos, which come in the form of time-lapses. Get creative with the videos that you shoot across your vlogs. Isn’t it great?
3. Affordability
GoPro should never be judged by its size. These tools are considered the most high-end cameras that can be used for vlogging. As they compete for professional cameras, they are considered relatively affordable in their comparison, which makes them a suitable choice in vlogging.
4. Shooting Modes
Have you ever heard about shooting modes? GoPro for vlogging comes up with different modes that can help you manage impressive visuals for your videos. GoPro helps you design content that is visually appealing to the viewers.
5. Quality of Video
Have you ever thought to have video resolutions up to 6K in a small camera? GoPro provides you the opportunity of witnessing history across the cameras with its stunning video resolution features. This is truly exceptional in the video-making industry.
Part 2: 8 Best GoPro for Vlogging in 2022
Once you are aware of what should be kept in mind for selecting a GoPro for vlogging, it is time to come up with some of the best-recommended models according to the use case of the vlogger. Let’s get started on this exceptional journey of finding the best GoPro for yourselves. Come right away!
1. GoPro Hero10 Black
Price: $499.99
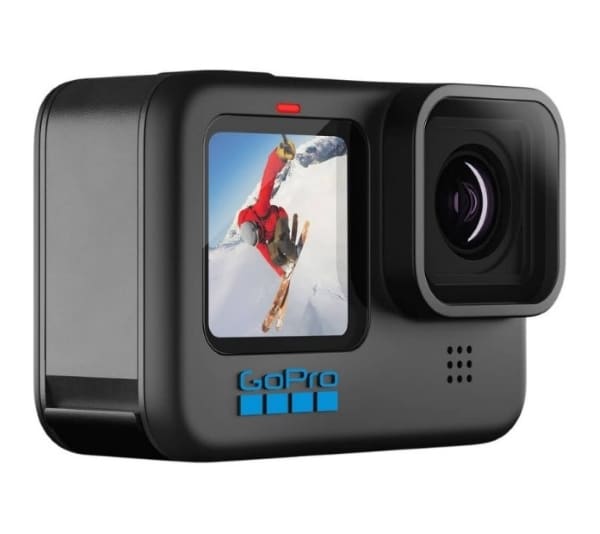
The first and foremost model that may come into our mind is the GoPro Hero10 Black, which is, without any discussion, the most advanced model in GoPro cameras. Taking the features to the next level, GoPro Hero10 Black is available with a 5.3K resolution, which is the smoothest resolution in videos you can ask for. It provides faster processors than its predecessors, with features that make it the top-of-the-line choice.
You can find improved stabilization across Hero10; however, the price tag across the camera is as much as a mirrorless camera. Absolutely stunning, it is!
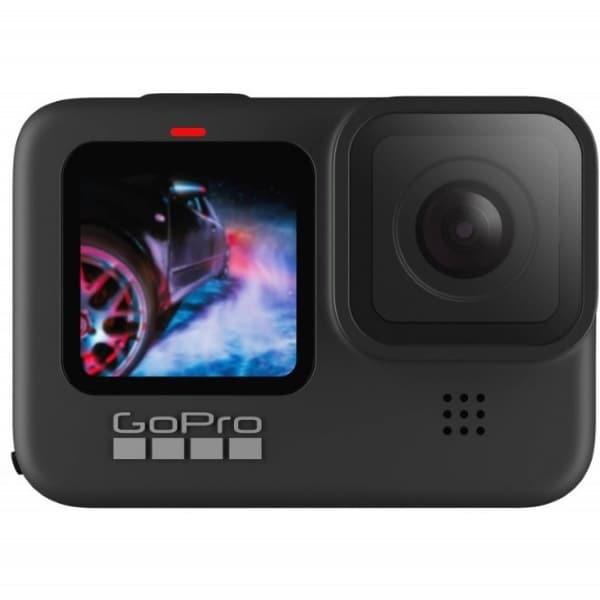
2. GoPro Hero9 Black
Price: $399.99
Another impressive model in the GoPro products is the Hero9 Black model, referred to as the previous iteration of the Hero10. Although it is not as remarkable as the Hero10, it takes up videos with 5K Ultra HD resolution, with a 1080p live streaming facility. Talking about the stabilization of this camera, it isn’t as proficient as the Hero10; however, it still performs better than the previous iterations.
A heavier camera’s multifunctional characteristics are a few major points that need to be considered for Hero9 Black. Do you wish to buy this?
3. GoPro Hero8 Black
Price: $349.98
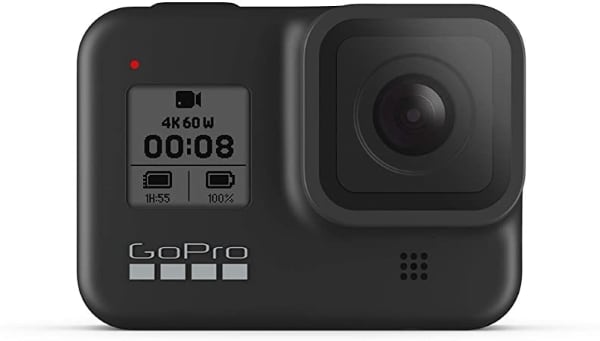
GoPro cameras are known for their effective sizes and high-performance results. GoPro Hero8 Black is recognized among the most versatile GoPro for YouTubers, accompanied by the small size. Being the first GoPro camera that provides a microphone to its users, GoPro Hero8 changed the dynamics of video making with its effective features. Users can cover 4K Ultra HD video across the device with a 12MP resolution for photos.
The Media Mode offered across the device makes video enhancement possible across GoPro for vlogging, which is commendable.
4. GoPro Hero7 Silver
Price: $299.99
Are you confused about the GoPro that fits your needs? GoPro Hero7 Silver is the most budget-friendly vlogging camera that can be found across the market. GoPro Hero7 Silver can be your perfect companion in tough vlogs with a rugged outlook and waterproofing. It provides voice control, two-mic, slo-mo, time-lapse across a 4K Ultra HD resolution, which broadens the possibility for the users.
This GoPro for YouTubers is still among the people’s favorites, which makes it a consistent choice among newbies. Isn’t it great?

5. GoPro Max
Price: $549.98
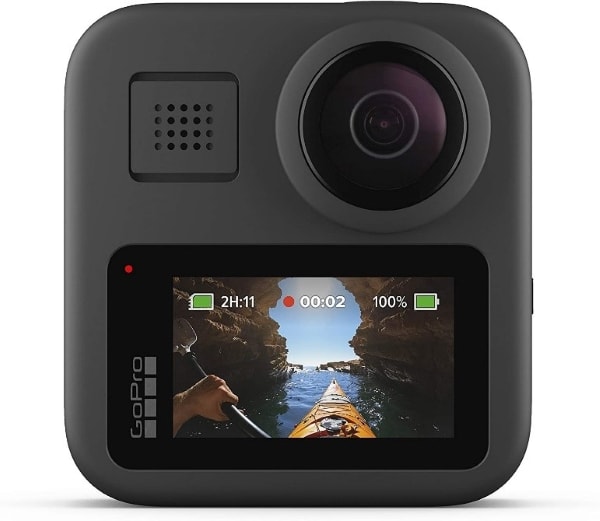
Want a camera that captures 360-degree shots? GoPro Max is the camera that you should look for in the market. GoPro Max is a very impressive up-gradation across GoPro cameras, which came to offer more features to it than before. The two 180-degree cameras provide better stabilization, thus crossing cameras like Hero8 quite easily. The details are extremely proficient in this design with improved mic facilities and other characteristics.
If you wish to shift yourselves from a single-camera device, this GoPro for vlogging is the perfect choice you can come by.
6. GoPro Hero7 Black
Price: $319.99
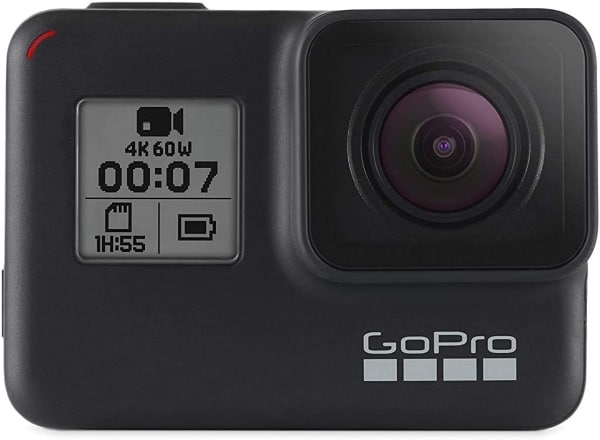
GoPro Hero7 Black, though introduced in 2018, came out to be a quite advanced version of the previous GoPro cameras. This camera allows 4K video resolution shooting under 60fps, stabilizing for smoothing out shakes and vibrations. The video quality from a GoPro is different from the rest, which makes it basic equipment in vlogging.
This GoPro for YouTubers offered excessive controls to its user base, with commands that were able to neutralize and optimize video enhancement. What a great choice!
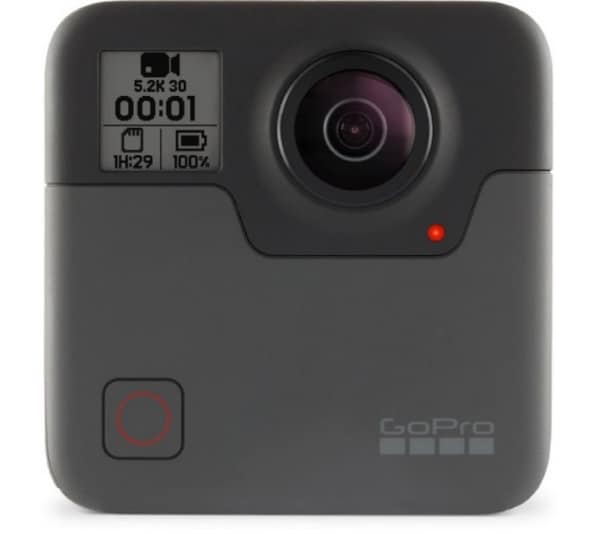
7. GoPro Fusion
Price: $279.99
This is a hugely different camera across the complete GoPro series. Fusion is known for many things, out of which the size comes out to be the main reason for its popularity. This iteration in GoPro cameras provides 5.2K video resolution quality under a pocket-sized model. Although it is quite durable compared to the other cameras in the market for vlogging, the price tag across this device is usually not much acceptable for users.
It is a bold choice to have Fusion as your GoPro for vlogging, which also allows adding audio across the 360-degree feature. This is sensational.
8. GoPro Hero7 White
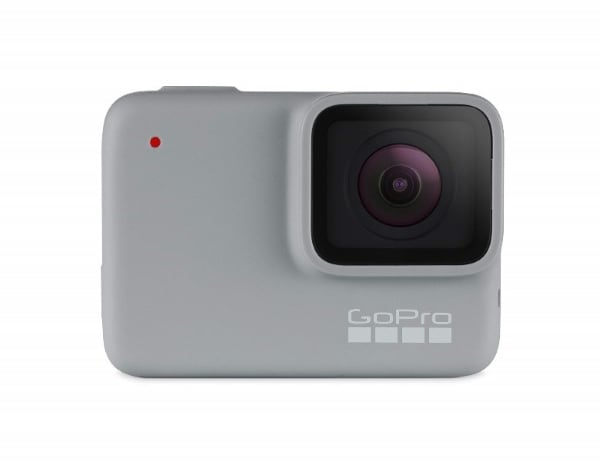
Price: $274.49
GoPro Hero7 White is a perfect option to start vlogging. Designed for beginners, it provides Full HD video resolution with a touch screen for better functioning. Although the camera is quite downgraded in terms of the features it offers, it is basically offered for catering to user-friendliness.
It also offers video stabilization for introducing users to a certain environment in video editing. With an affordable price tag, this camera can be the perfect start as your GoPro for vlogging. Do you wish to get started?
Closing Words
Got to know about the best GoPro cameras? Are you ready to select your GoPro for vlogging? We hope that this article has featured the most optimal options. Go through this article to get the perfect start for your vlogging journey. However, if you wish to have a good experience with video editing, you should consider working on Wondershare Filmora .
The tool manages all GoPro videos to perfection. It is truly an exceptional platform to work with. Along with that, Filmora provides a list of impressive video editing functions which can be adopted for making the video look professional. That is why this platform is recommended across multiple stages. Surely the best editor you can use!
Wondershare Filmora
Get started easily with Filmora’s powerful performance, intuitive interface, and countless effects!
Try It Free Try It Free Try It Free Learn More >

02 8 Best GoPro for Vlogging in 2022
Part 1: What Need to Be Considered Before Choosing a GoPro for Vlogging?
GoPro cameras are known for their versatility. While being simply the best tool for vlogging, they are known for offering several impressive features. This, however, needs to be considered before choosing a GoPro for vlogging. Get ready as we are about to figure them out.

1. Portable and Easy to Carry
Isn’t it great that you are not required to carry heavy equipment everywhere? GoPro cameras offer convenience to their users by providing small sizes and rugged designs. This can prove to be extremely good for vloggers who have rough uses.
2. Multiple Video Features
Are you tired of capturing a simple video? GoPro offers you multiple options while capturing videos, which come in the form of time-lapses. Get creative with the videos that you shoot across your vlogs. Isn’t it great?
3. Affordability
GoPro should never be judged by its size. These tools are considered the most high-end cameras that can be used for vlogging. As they compete for professional cameras, they are considered relatively affordable in their comparison, which makes them a suitable choice in vlogging.
4. Shooting Modes
Have you ever heard about shooting modes? GoPro for vlogging comes up with different modes that can help you manage impressive visuals for your videos. GoPro helps you design content that is visually appealing to the viewers.
5. Quality of Video
Have you ever thought to have video resolutions up to 6K in a small camera? GoPro provides you the opportunity of witnessing history across the cameras with its stunning video resolution features. This is truly exceptional in the video-making industry.
Part 2: 8 Best GoPro for Vlogging in 2022
Once you are aware of what should be kept in mind for selecting a GoPro for vlogging, it is time to come up with some of the best-recommended models according to the use case of the vlogger. Let’s get started on this exceptional journey of finding the best GoPro for yourselves. Come right away!
1. GoPro Hero10 Black
Price: $499.99
The first and foremost model that may come into our mind is the GoPro Hero10 Black, which is, without any discussion, the most advanced model in GoPro cameras. Taking the features to the next level, GoPro Hero10 Black is available with a 5.3K resolution, which is the smoothest resolution in videos you can ask for. It provides faster processors than its predecessors, with features that make it the top-of-the-line choice.
You can find improved stabilization across Hero10; however, the price tag across the camera is as much as a mirrorless camera. Absolutely stunning, it is!

2. GoPro Hero9 Black
Price: $399.99
Another impressive model in the GoPro products is the Hero9 Black model, referred to as the previous iteration of the Hero10. Although it is not as remarkable as the Hero10, it takes up videos with 5K Ultra HD resolution, with a 1080p live streaming facility. Talking about the stabilization of this camera, it isn’t as proficient as the Hero10; however, it still performs better than the previous iterations.
A heavier camera’s multifunctional characteristics are a few major points that need to be considered for Hero9 Black. Do you wish to buy this?

3. GoPro Hero8 Black
Price: $349.98
GoPro cameras are known for their effective sizes and high-performance results. GoPro Hero8 Black is recognized among the most versatile GoPro for YouTubers, accompanied by the small size. Being the first GoPro camera that provides a microphone to its users, GoPro Hero8 changed the dynamics of video making with its effective features. Users can cover 4K Ultra HD video across the device with a 12MP resolution for photos.
The Media Mode offered across the device makes video enhancement possible across GoPro for vlogging, which is commendable.

4. GoPro Hero7 Silver
Price: $299.99
Are you confused about the GoPro that fits your needs? GoPro Hero7 Silver is the most budget-friendly vlogging camera that can be found across the market. GoPro Hero7 Silver can be your perfect companion in tough vlogs with a rugged outlook and waterproofing. It provides voice control, two-mic, slo-mo, time-lapse across a 4K Ultra HD resolution, which broadens the possibility for the users.
This GoPro for YouTubers is still among the people’s favorites, which makes it a consistent choice among newbies. Isn’t it great?

5. GoPro Max
Price: $549.98
Want a camera that captures 360-degree shots? GoPro Max is the camera that you should look for in the market. GoPro Max is a very impressive up-gradation across GoPro cameras, which came to offer more features to it than before. The two 180-degree cameras provide better stabilization, thus crossing cameras like Hero8 quite easily. The details are extremely proficient in this design with improved mic facilities and other characteristics.
If you wish to shift yourselves from a single-camera device, this GoPro for vlogging is the perfect choice you can come by.

6. GoPro Hero7 Black
Price: $319.99
GoPro Hero7 Black, though introduced in 2018, came out to be a quite advanced version of the previous GoPro cameras. This camera allows 4K video resolution shooting under 60fps, stabilizing for smoothing out shakes and vibrations. The video quality from a GoPro is different from the rest, which makes it basic equipment in vlogging.
This GoPro for YouTubers offered excessive controls to its user base, with commands that were able to neutralize and optimize video enhancement. What a great choice!

7. GoPro Fusion
Price: $279.99
This is a hugely different camera across the complete GoPro series. Fusion is known for many things, out of which the size comes out to be the main reason for its popularity. This iteration in GoPro cameras provides 5.2K video resolution quality under a pocket-sized model. Although it is quite durable compared to the other cameras in the market for vlogging, the price tag across this device is usually not much acceptable for users.
It is a bold choice to have Fusion as your GoPro for vlogging, which also allows adding audio across the 360-degree feature. This is sensational.

8. GoPro Hero7 White
Price: $274.49
GoPro Hero7 White is a perfect option to start vlogging. Designed for beginners, it provides Full HD video resolution with a touch screen for better functioning. Although the camera is quite downgraded in terms of the features it offers, it is basically offered for catering to user-friendliness.
It also offers video stabilization for introducing users to a certain environment in video editing. With an affordable price tag, this camera can be the perfect start as your GoPro for vlogging. Do you wish to get started?

Closing Words
Got to know about the best GoPro cameras? Are you ready to select your GoPro for vlogging? We hope that this article has featured the most optimal options. Go through this article to get the perfect start for your vlogging journey. However, if you wish to have a good experience with video editing, you should consider working on Wondershare Filmora .
The tool manages all GoPro videos to perfection. It is truly an exceptional platform to work with. Along with that, Filmora provides a list of impressive video editing functions which can be adopted for making the video look professional. That is why this platform is recommended across multiple stages. Surely the best editor you can use!
Wondershare Filmora
Get started easily with Filmora’s powerful performance, intuitive interface, and countless effects!
Try It Free Try It Free Try It Free Learn More >

02 8 Best GoPro for Vlogging in 2022
Part 1: What Need to Be Considered Before Choosing a GoPro for Vlogging?
GoPro cameras are known for their versatility. While being simply the best tool for vlogging, they are known for offering several impressive features. This, however, needs to be considered before choosing a GoPro for vlogging. Get ready as we are about to figure them out.

1. Portable and Easy to Carry
Isn’t it great that you are not required to carry heavy equipment everywhere? GoPro cameras offer convenience to their users by providing small sizes and rugged designs. This can prove to be extremely good for vloggers who have rough uses.
2. Multiple Video Features
Are you tired of capturing a simple video? GoPro offers you multiple options while capturing videos, which come in the form of time-lapses. Get creative with the videos that you shoot across your vlogs. Isn’t it great?
3. Affordability
GoPro should never be judged by its size. These tools are considered the most high-end cameras that can be used for vlogging. As they compete for professional cameras, they are considered relatively affordable in their comparison, which makes them a suitable choice in vlogging.
4. Shooting Modes
Have you ever heard about shooting modes? GoPro for vlogging comes up with different modes that can help you manage impressive visuals for your videos. GoPro helps you design content that is visually appealing to the viewers.
5. Quality of Video
Have you ever thought to have video resolutions up to 6K in a small camera? GoPro provides you the opportunity of witnessing history across the cameras with its stunning video resolution features. This is truly exceptional in the video-making industry.
Part 2: 8 Best GoPro for Vlogging in 2022
Once you are aware of what should be kept in mind for selecting a GoPro for vlogging, it is time to come up with some of the best-recommended models according to the use case of the vlogger. Let’s get started on this exceptional journey of finding the best GoPro for yourselves. Come right away!
1. GoPro Hero10 Black
Price: $499.99
The first and foremost model that may come into our mind is the GoPro Hero10 Black, which is, without any discussion, the most advanced model in GoPro cameras. Taking the features to the next level, GoPro Hero10 Black is available with a 5.3K resolution, which is the smoothest resolution in videos you can ask for. It provides faster processors than its predecessors, with features that make it the top-of-the-line choice.
You can find improved stabilization across Hero10; however, the price tag across the camera is as much as a mirrorless camera. Absolutely stunning, it is!

2. GoPro Hero9 Black
Price: $399.99
Another impressive model in the GoPro products is the Hero9 Black model, referred to as the previous iteration of the Hero10. Although it is not as remarkable as the Hero10, it takes up videos with 5K Ultra HD resolution, with a 1080p live streaming facility. Talking about the stabilization of this camera, it isn’t as proficient as the Hero10; however, it still performs better than the previous iterations.
A heavier camera’s multifunctional characteristics are a few major points that need to be considered for Hero9 Black. Do you wish to buy this?

3. GoPro Hero8 Black
Price: $349.98
GoPro cameras are known for their effective sizes and high-performance results. GoPro Hero8 Black is recognized among the most versatile GoPro for YouTubers, accompanied by the small size. Being the first GoPro camera that provides a microphone to its users, GoPro Hero8 changed the dynamics of video making with its effective features. Users can cover 4K Ultra HD video across the device with a 12MP resolution for photos.
The Media Mode offered across the device makes video enhancement possible across GoPro for vlogging, which is commendable.

4. GoPro Hero7 Silver
Price: $299.99
Are you confused about the GoPro that fits your needs? GoPro Hero7 Silver is the most budget-friendly vlogging camera that can be found across the market. GoPro Hero7 Silver can be your perfect companion in tough vlogs with a rugged outlook and waterproofing. It provides voice control, two-mic, slo-mo, time-lapse across a 4K Ultra HD resolution, which broadens the possibility for the users.
This GoPro for YouTubers is still among the people’s favorites, which makes it a consistent choice among newbies. Isn’t it great?

5. GoPro Max
Price: $549.98
Want a camera that captures 360-degree shots? GoPro Max is the camera that you should look for in the market. GoPro Max is a very impressive up-gradation across GoPro cameras, which came to offer more features to it than before. The two 180-degree cameras provide better stabilization, thus crossing cameras like Hero8 quite easily. The details are extremely proficient in this design with improved mic facilities and other characteristics.
If you wish to shift yourselves from a single-camera device, this GoPro for vlogging is the perfect choice you can come by.

6. GoPro Hero7 Black
Price: $319.99
GoPro Hero7 Black, though introduced in 2018, came out to be a quite advanced version of the previous GoPro cameras. This camera allows 4K video resolution shooting under 60fps, stabilizing for smoothing out shakes and vibrations. The video quality from a GoPro is different from the rest, which makes it basic equipment in vlogging.
This GoPro for YouTubers offered excessive controls to its user base, with commands that were able to neutralize and optimize video enhancement. What a great choice!

7. GoPro Fusion
Price: $279.99
This is a hugely different camera across the complete GoPro series. Fusion is known for many things, out of which the size comes out to be the main reason for its popularity. This iteration in GoPro cameras provides 5.2K video resolution quality under a pocket-sized model. Although it is quite durable compared to the other cameras in the market for vlogging, the price tag across this device is usually not much acceptable for users.
It is a bold choice to have Fusion as your GoPro for vlogging, which also allows adding audio across the 360-degree feature. This is sensational.

8. GoPro Hero7 White
Price: $274.49
GoPro Hero7 White is a perfect option to start vlogging. Designed for beginners, it provides Full HD video resolution with a touch screen for better functioning. Although the camera is quite downgraded in terms of the features it offers, it is basically offered for catering to user-friendliness.
It also offers video stabilization for introducing users to a certain environment in video editing. With an affordable price tag, this camera can be the perfect start as your GoPro for vlogging. Do you wish to get started?

Closing Words
Got to know about the best GoPro cameras? Are you ready to select your GoPro for vlogging? We hope that this article has featured the most optimal options. Go through this article to get the perfect start for your vlogging journey. However, if you wish to have a good experience with video editing, you should consider working on Wondershare Filmora .
The tool manages all GoPro videos to perfection. It is truly an exceptional platform to work with. Along with that, Filmora provides a list of impressive video editing functions which can be adopted for making the video look professional. That is why this platform is recommended across multiple stages. Surely the best editor you can use!
Wondershare Filmora
Get started easily with Filmora’s powerful performance, intuitive interface, and countless effects!
Try It Free Try It Free Try It Free Learn More >

02 8 Best GoPro for Vlogging in 2022
Part 1: What Need to Be Considered Before Choosing a GoPro for Vlogging?
GoPro cameras are known for their versatility. While being simply the best tool for vlogging, they are known for offering several impressive features. This, however, needs to be considered before choosing a GoPro for vlogging. Get ready as we are about to figure them out.

1. Portable and Easy to Carry
Isn’t it great that you are not required to carry heavy equipment everywhere? GoPro cameras offer convenience to their users by providing small sizes and rugged designs. This can prove to be extremely good for vloggers who have rough uses.
2. Multiple Video Features
Are you tired of capturing a simple video? GoPro offers you multiple options while capturing videos, which come in the form of time-lapses. Get creative with the videos that you shoot across your vlogs. Isn’t it great?
3. Affordability
GoPro should never be judged by its size. These tools are considered the most high-end cameras that can be used for vlogging. As they compete for professional cameras, they are considered relatively affordable in their comparison, which makes them a suitable choice in vlogging.
4. Shooting Modes
Have you ever heard about shooting modes? GoPro for vlogging comes up with different modes that can help you manage impressive visuals for your videos. GoPro helps you design content that is visually appealing to the viewers.
5. Quality of Video
Have you ever thought to have video resolutions up to 6K in a small camera? GoPro provides you the opportunity of witnessing history across the cameras with its stunning video resolution features. This is truly exceptional in the video-making industry.
Part 2: 8 Best GoPro for Vlogging in 2022
Once you are aware of what should be kept in mind for selecting a GoPro for vlogging, it is time to come up with some of the best-recommended models according to the use case of the vlogger. Let’s get started on this exceptional journey of finding the best GoPro for yourselves. Come right away!
1. GoPro Hero10 Black
Price: $499.99
The first and foremost model that may come into our mind is the GoPro Hero10 Black, which is, without any discussion, the most advanced model in GoPro cameras. Taking the features to the next level, GoPro Hero10 Black is available with a 5.3K resolution, which is the smoothest resolution in videos you can ask for. It provides faster processors than its predecessors, with features that make it the top-of-the-line choice.
You can find improved stabilization across Hero10; however, the price tag across the camera is as much as a mirrorless camera. Absolutely stunning, it is!

2. GoPro Hero9 Black
Price: $399.99
Another impressive model in the GoPro products is the Hero9 Black model, referred to as the previous iteration of the Hero10. Although it is not as remarkable as the Hero10, it takes up videos with 5K Ultra HD resolution, with a 1080p live streaming facility. Talking about the stabilization of this camera, it isn’t as proficient as the Hero10; however, it still performs better than the previous iterations.
A heavier camera’s multifunctional characteristics are a few major points that need to be considered for Hero9 Black. Do you wish to buy this?

3. GoPro Hero8 Black
Price: $349.98
GoPro cameras are known for their effective sizes and high-performance results. GoPro Hero8 Black is recognized among the most versatile GoPro for YouTubers, accompanied by the small size. Being the first GoPro camera that provides a microphone to its users, GoPro Hero8 changed the dynamics of video making with its effective features. Users can cover 4K Ultra HD video across the device with a 12MP resolution for photos.
The Media Mode offered across the device makes video enhancement possible across GoPro for vlogging, which is commendable.

4. GoPro Hero7 Silver
Price: $299.99
Are you confused about the GoPro that fits your needs? GoPro Hero7 Silver is the most budget-friendly vlogging camera that can be found across the market. GoPro Hero7 Silver can be your perfect companion in tough vlogs with a rugged outlook and waterproofing. It provides voice control, two-mic, slo-mo, time-lapse across a 4K Ultra HD resolution, which broadens the possibility for the users.
This GoPro for YouTubers is still among the people’s favorites, which makes it a consistent choice among newbies. Isn’t it great?

5. GoPro Max
Price: $549.98
Want a camera that captures 360-degree shots? GoPro Max is the camera that you should look for in the market. GoPro Max is a very impressive up-gradation across GoPro cameras, which came to offer more features to it than before. The two 180-degree cameras provide better stabilization, thus crossing cameras like Hero8 quite easily. The details are extremely proficient in this design with improved mic facilities and other characteristics.
If you wish to shift yourselves from a single-camera device, this GoPro for vlogging is the perfect choice you can come by.

6. GoPro Hero7 Black
Price: $319.99
GoPro Hero7 Black, though introduced in 2018, came out to be a quite advanced version of the previous GoPro cameras. This camera allows 4K video resolution shooting under 60fps, stabilizing for smoothing out shakes and vibrations. The video quality from a GoPro is different from the rest, which makes it basic equipment in vlogging.
This GoPro for YouTubers offered excessive controls to its user base, with commands that were able to neutralize and optimize video enhancement. What a great choice!

7. GoPro Fusion
Price: $279.99
This is a hugely different camera across the complete GoPro series. Fusion is known for many things, out of which the size comes out to be the main reason for its popularity. This iteration in GoPro cameras provides 5.2K video resolution quality under a pocket-sized model. Although it is quite durable compared to the other cameras in the market for vlogging, the price tag across this device is usually not much acceptable for users.
It is a bold choice to have Fusion as your GoPro for vlogging, which also allows adding audio across the 360-degree feature. This is sensational.

8. GoPro Hero7 White
Price: $274.49
GoPro Hero7 White is a perfect option to start vlogging. Designed for beginners, it provides Full HD video resolution with a touch screen for better functioning. Although the camera is quite downgraded in terms of the features it offers, it is basically offered for catering to user-friendliness.
It also offers video stabilization for introducing users to a certain environment in video editing. With an affordable price tag, this camera can be the perfect start as your GoPro for vlogging. Do you wish to get started?

Closing Words
Got to know about the best GoPro cameras? Are you ready to select your GoPro for vlogging? We hope that this article has featured the most optimal options. Go through this article to get the perfect start for your vlogging journey. However, if you wish to have a good experience with video editing, you should consider working on Wondershare Filmora .
The tool manages all GoPro videos to perfection. It is truly an exceptional platform to work with. Along with that, Filmora provides a list of impressive video editing functions which can be adopted for making the video look professional. That is why this platform is recommended across multiple stages. Surely the best editor you can use!
Wondershare Filmora
Get started easily with Filmora’s powerful performance, intuitive interface, and countless effects!
Try It Free Try It Free Try It Free Learn More >

Also read:
- New Adobe Premiere Pro Download and Use Guide In Depth
- Updated In 2024, Wondering How to Replace Sky in After Effects? Learn How
- New In 2024, Keyframes Interval Everything You Need To Know
- New In 2024, 3GP Video Format What Is 3GP Format And How To Open It?
- New In 2024, How to Add Zoom Blur Effect In Photoshop
- New In 2024, Top 10 Free WhatsApp Video Converter
- 2024 Approved Whats The Best Laptops For Video Editing
- Step by Step to Cut Videos in Adobe Premiere Pro
- New Converting Files Is Easy with the Right Tools, and Likewise, GIF to JPG Conversion Is. Choose the Best Tool and Get the Expected Results Within the Blink of an Eye for 2024
- New 2024 Approved Video Course and Online Learning Are Very Popular Nowadays. Here We Are Going to Recommend some of the Best Video Websites for Teachers to Use
- 2024 Approved Vintage Film Effect 1920S - How to Make
- Tutorial | How to Make a Smooth Speed Ramping in Premiere Pro for 2024
- New In 2024, How Can You Get VHS Filter and Glitch Filter to Your Images or Videos?
- Updated How to Add Effects on TikTok
- New 2024 Approved Looking Forward to Try Hands at Using the Icecream Slideshow Maker Program to Create High End Slideshow Presentations? Stay Here for a Complete Insight Into the Process
- Updated Top 5 Best Video to PPT Converters You Should Know
- New 2024 Approved How to Make Canva Collages
- New In 2024, How To Track and Blur Faces in Premiere Pro
- New How to Create The Best Video Collages for 2024
- Updated Want to Make Your Canva Slideshow More Attractive? Follow the Given Discussion to Know Everything About Making the Best Slideshows with Canva for 2024
- New Do You Want to Know All About Video Frame Rates and Speed? Wondershare Filmora Will Help You to Get More Information on This Matter for 2024
- New 2024 Approved Top 10 Movie Trailer Voice Generators Windows, Mac, Android, iPhone
- New 2024 Approved Add Background to Video With/Without a Green Screen
- New In 2024, Looking For a Cheap Camera to Make Slow Motion Video? Get It Now
- New In 2024, Different Ways to Crop TikTok Video in High-Quality
- Updated It Is Easy to Separate the Audio From the Video in DaVinci Resolve. But, to Avail of This Feature, You Need to Follow Proper Steps, and This Article Is All About It
- Updated How to Create a Slideshow with Icecream Slideshow Maker
- New 2024 Approved How to Create A Freeze Frame Sequence in Video
- 2024 Approved We All Know Very Well that a 1-Second-Video Has Several Images in a Single Row. Even with iMovie Time-Lapse, You Can Create This! So, without Any Further Ado, Lets Learn How to Make a Timelapse in iMovie
- 2 Actionable Ways to Extract Subtitles From MKV Videos without Quality Loss for 2024
- New How to Use Motion Tracking in Video Editing for 2024
- Updated In 2024, If You Are a Free Video Editor Being a Windows User, VSDC Free Video Editor Is a Great Choice. But Is It the Best Video Editor You Should Use? Find Out From Our VSDC Free Video Editor Review
- New Best 8 Animated Video Makers for 2024
- Updated What You Should Know About Speech-to-Text Technology for 2024
- Color Finale Is a Color Grading Plugin for Final Cur Pro. It Allows Users to Make Cinematic Looking Video Scenes by Adjusting the Color. Here Well Share You some Basic Information About This Plugin
- In 2024, How to Upload the Video to Twitch? Well, if You Dont Know the Process, This Detailed Guide Will Help You. While Explaining the Process, This Article Will Also Let You Know some Twitch Video Upload Guidelines
- Updated In 2024, Brighten a Video in Windows 10 Easily When Video Clips You Recorded on Your Windows 10 Computer or Those Downloaded From YouTube Are Too Dark or Too Bright, You Can Easily Adjust the Color Levels in a Few Clicks
- Best Online GIF to Image (PNG/JPG) Converters
- New 2024 Approved Easy Ways to Remove Motion Blur In Photoshop
- New Enhance Your Video Color Accuracy with Video Scopes for 2024
- New | How to Livestream Zoom on Facebook?
- In 2024, Do You Want to Know How to Remove Audio From a Video without a Watermark? Keep Reading This Article Since We Have the Answers for You. Complete with the Guide on How to Do It
- Updated In 2024, Slow Down the GIF to Emphasize Details Better. To Do so, Read This Guide and Learn to Use the Best Platforms for Slow-Motion GIFs
- In 2024, Step-by-Step Guide to Storyboard
- Updated 2024 Approved How to Make a DIY Vlog or Video
- Updated Learn Color Correction in After Effects with These Videos for 2024
- Best 31 Video Trimmers for Computer, Phone and Online
- Updated Slow Down or Speed Up Videos Easily on PC, Online, and Phone
- How to Rescue Lost Music from P55+
- Ways to trade pokemon go from far away On Samsung Galaxy A05s? | Dr.fone
- Vivo Y200 Not Connecting to Wi-Fi? 12 Quick Ways to Fix | Dr.fone
- What Legendaries Are In Pokemon Platinum On Samsung Galaxy XCover 6 Pro Tactical Edition? | Dr.fone
- How to Get and Use Pokemon Go Promo Codes On Motorola G24 Power | Dr.fone
- In 2024, Hassle-Free Ways to Remove FRP Lock from Nokia 130 Music Phones with/without a PC
- In 2024, How To Enable USB Debugging on a Locked Samsung Galaxy S23 Ultra Phone
- Different Methods for Resetting Infinix Hot 30i Phones with Screen Locked and Not | Dr.fone
- Forgot iPhone Passcode Again? Unlock Apple iPhone 6 Without Passcode Now
- How to Fix Oppo A56s 5G Find My Friends No Location Found? | Dr.fone
- In 2024, How Do You Get Sun Stone Evolutions in Pokémon For Apple iPhone 8 Plus? | Dr.fone
- Why Your WhatsApp Location is Not Updating and How to Fix On Samsung Galaxy S23 | Dr.fone
- In 2024, The Ultimate Guide to Bypassing iCloud Activation Lock from iPhone 12
- How To Bypass the Required Apple Store Verification For iPhone SE
- In 2024, Set Your Preferred Job Location on LinkedIn App of your Realme GT 5 | Dr.fone
- In 2024, How can I get more stardust in pokemon go On Xiaomi Redmi Note 12 4G? | Dr.fone
- In 2024, Troubleshooting Error Connecting to the Apple ID Server On Apple iPhone 15 Plus
- In 2024, How to Bypass Google FRP Lock on Vivo Y78+ (T1) Edition Devices
- In 2024, Rootjunky APK To Bypass Google FRP Lock For Honor Magic 6
- In 2024, Best Itel A05s Pattern Lock Removal Tools Remove Android Pattern Lock Without Losing Data
- How to Undo Git Pull
- Title: Updated How to Do Censor Effects with Filmora
- Author: Morgan
- Created at : 2024-05-19 05:12:02
- Updated at : 2024-05-20 05:12:02
- Link: https://ai-video-editing.techidaily.com/updated-how-to-do-censor-effects-with-filmora/
- License: This work is licensed under CC BY-NC-SA 4.0.


