:max_bytes(150000):strip_icc():format(webp)/AIrendering_CROPPED_Guillaume_GettyImages-1418477818-d0a9c5ce09584a1099f21a5f1f690a88.jpg)
Updated How to Loop a Video with iMovie on Mac and iPhone

How to Loop a Video with iMovie on Mac and iPhone
If you are a video creator, there are times when you have to loop a video. This is to extend the duration of the original video. For instance, you have a stock video of a short duration. You want it to be the background in your video throughout. You have to extend the duration of the stock video by playing it in a loop.
If you are a macOS user, you can use iMovie to loop your video. iMovie comes pre-install on macOS devices. iMovie happens to be one of the most preferred video editors among beginners. In fact, iMovie comes pre-installed on iPhones and iPads. You can easily loop your video on your mobile devices as well. We will illustrate how to loop a video on iMovie on iPhone as well as on Mac.
Part 1. How to loop a video on iMovie iPhone
iMovie by Apple comes pre-installed on iPhone and iPad. Naturally, it is one of the most widely used video editors by iPhone users. iMovie app has options for basic and even advanced levels of video editing. Looping a video on iMovie involves a few simple steps that everyone can perform easily. Here are the steps on how to loop a video in the iMovie app on your iPhone.
Step1 Launch the iMovie app on your iPhone. If you have uninstalled or disabled the app, you can always go to App Store to install it again.

Step2 If you are opening the app for the first time, you will get a welcome screen. Follow the on-screen instructions to land on the home screen of the app.
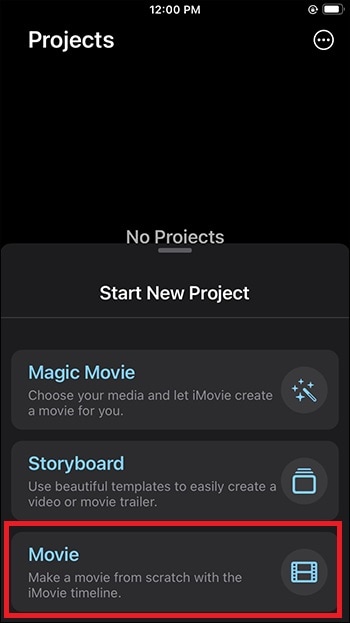
Step3 Tap on New Project “+” icon and select the Movie option to get started. This will take you to the phone media gallery to select a media file to get started.
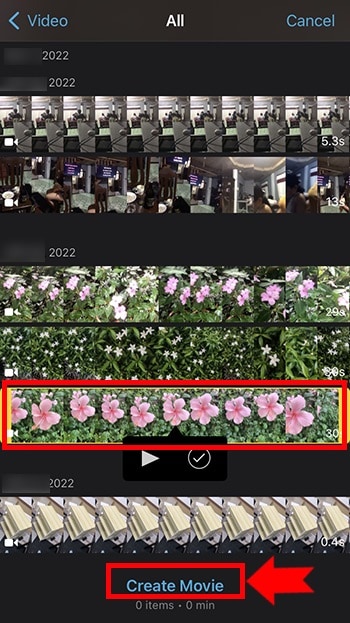
Step4 You should tap on the Video option and select the video that you want to put into a loop. After selecting a video, tap on Create Movie option.
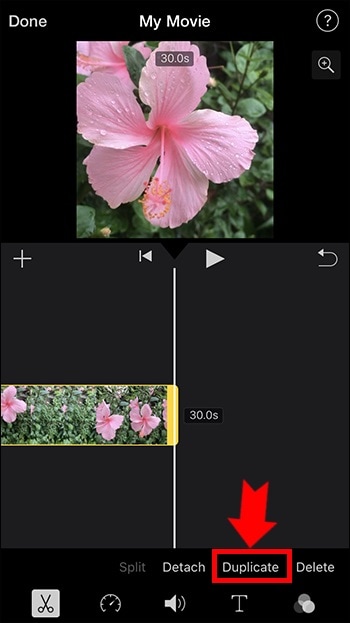
Step5 Tap on the video on the timeline to select the video and tap on the Duplicate option. You will see that the duration of the video has doubled. You can tap on Duplicate as many times as you want to increase the video duration.
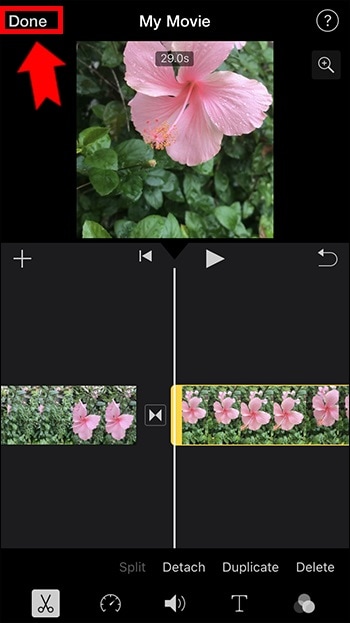
Step6 Once you are done with the iMovie loop, tap on the Done option located in the top-left corner. Thereafter, tap on the Share icon at the bottom.
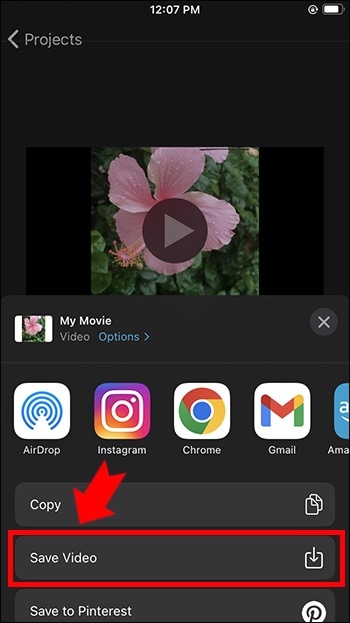
Step7 You will get a pop-up where you have to tap on the Save Video option. The edited video will be saved on your iPhone. You can open the new video from the Photos app.
Part 2. Loop Videos on Mac with iMovie
Editing a video on a Mac is always more comfortable than on an iPhone because of the larger screen. iMovie from Apple comes pre-installed on Mac as well, and hence, you can get started right away. It is completely free to use, and hence, you do not need to install any third-party video editor. Here are the steps on how to loop an iMovie video in simple steps.
Step1 Open the iMovie app from the Applications folder.
Step2 Click on Create New option and then click on the Movie option.

Step3 Bring in the required video under Movie Library by dragging the file from Finder on your Mac. You can also go to File> Import Media option and select the required video. You can also select the required media file from Events or Photos under the Libraries section.

Step4 Drag and drop the video on your timeline. When you want to loop the video, drag and drop the video clip again on the timeline. Make sure there is no gap between the first clip and the second clip on the timeline. You can drag and drop the video clip multiple times on the timeline to increase its duration.

Step5 Once you are done, go to File> Share> File option. Choose the destination to save the edited video.

Part 3. iMovie Alternative to Loop Videos on Mac
If you are looking for an iMovie alternative to perform iMovie loop video action easily, we recommend Wondershare Filmora . Filmora is available for both Mac and Windows. Filmora is a better video editor than iMovie. It is a premium video editor and it has more features and functionalities.
You can loop any video as many times as you want instantly. Besides, you can edit your video clip as per your requirements before looping the edited video. The user interface is highly intuitive for everyone. Hence, it has huge popularity among Mac users. You can also save the looped video in different file formats. Here are the steps to loop a video on Filmora.
Free Download For Win 7 or later(64-bit)
Free Download For macOS 10.14 or later
Step1 Download and install Wondershare Filmora. Launch Filmora and click on New Project on the welcome screen.

Step2 Drag and drop the video file from Finder on Mac to the Project Media folder on Filmora. Thereafter, drop the video file into the timeline.

Step3 Drag and drop the video clip into the timeline again. Make sure that there is no gap between the clips. Besides, make sure that they are on the same channel for looping. You can drag and drop the video into the timeline multiple times.
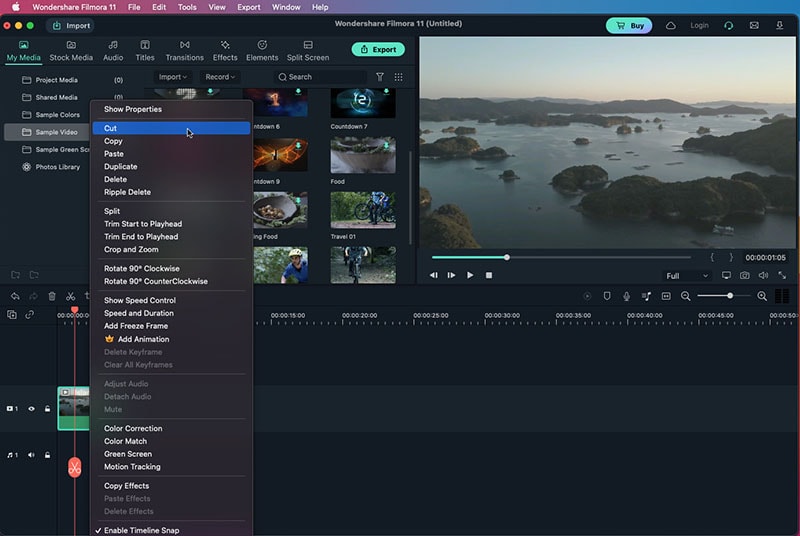
Step4 You can zoom out the timeline for better viewing. Play the video to check its output on Viewer. Finally, click on the Export button and save the video in the desired file format on your Mac.
The Bottom Line
If you want to loop a video on your Mac, iMovie is the most preferred option. The same is applicable to iPhone users as well. iMovie comes pre-installed, and it is completely free to use. That is why you can loop any video instantly. Wondershare Filmora is the best alternative to iMovie to edit and loop your video.
Free Download For macOS 10.14 or later
Step1 Download and install Wondershare Filmora. Launch Filmora and click on New Project on the welcome screen.

Step2 Drag and drop the video file from Finder on Mac to the Project Media folder on Filmora. Thereafter, drop the video file into the timeline.

Step3 Drag and drop the video clip into the timeline again. Make sure that there is no gap between the clips. Besides, make sure that they are on the same channel for looping. You can drag and drop the video into the timeline multiple times.

Step4 You can zoom out the timeline for better viewing. Play the video to check its output on Viewer. Finally, click on the Export button and save the video in the desired file format on your Mac.
The Bottom Line
If you want to loop a video on your Mac, iMovie is the most preferred option. The same is applicable to iPhone users as well. iMovie comes pre-installed, and it is completely free to use. That is why you can loop any video instantly. Wondershare Filmora is the best alternative to iMovie to edit and loop your video.
How to Brighten Video in Premiere Pro
Create High-Quality Video - Wondershare Filmora
An easy and powerful YouTube video editor
Numerous video and audio effects to choose from
Detailed tutorials provided by the official channel
Brighter videos always attract more attention. Indeed, a well-lit video can make your content shine and bring out the best in your story. But what if you forgot to turn on the lights or the camera just couldn’t handle the situation? We’ve all been there: you’re shooting a video, but there aren’t enough light sources. You end up with dark footage. It’s impossible to share this on your social media accounts or with your friends and family.
There are many reasons why people want to brighten a dark video. Maybe you recorded a video with your phone, but the lighting was too dim in the room. Or maybe you were outside, and the sun was behind you, casting shadows on your face while recording. In these cases, it can be helpful to know how to make a dark video brighter.
There is a way to apply simple corrections using Premiere Pro, no matter the reason. In this article, I’ll show you how to brighten your video in Premiere Pro so you can keep all the details in the highlights. This can be very useful if you’re working with a lot of footage that has been underexposed, and sometimes your shot might look too dark or even black.
In this article
01 Can I Brighten A Dark Video?
02 How to Brighten Video in Adobe Premiere Pro?
03 How To Lighten Up A Dark Video In Adobe Premiere Pro?
04 Enhancing Your Video In Premiere Pro
Can I Brighten A Dark Video?
This is a common question that comes up among video editors, so I thought I’d answer it here. The quick answer is yes. There are many online tools that can help you brighten a dark video or adjust the brightness of your video. A lot of times, you’ll get a video file that was shot in low light, and it will make your subject look dark and underexposed. Video brightness is an important feature that is easy to adjust. However, if your video is too dark to start off with, it may be difficult to brighten it in a way that doesn’t look unnatural.
There are several ways you can brighten a dark video. For example, you can use color correction or add more light to the scene before you film. If you already have a dark video, then you’ll need to adjust the contrast and brightness of your video during post-production. You can easily do this by using video editing software but keep in mind that too much brightness or too much contrast can result in poor video quality. So, you have to keep everything in balance.
How to Brighten Video in Adobe Premiere Pro?
Adobe Premiere Pro is your one-stop solution for editing videos, whether you’re editing a film or a TV ad. It gives you the flexibility to edit videos of any format. Adobe Premium makes brightening videos easy. Follow the steps below.
Step 1
Launch Adobe Premiere Pro, open a project, and then import the video file you want to brighten. Make sure that the video file has been imported into the media library before you start editing it.
Step 2
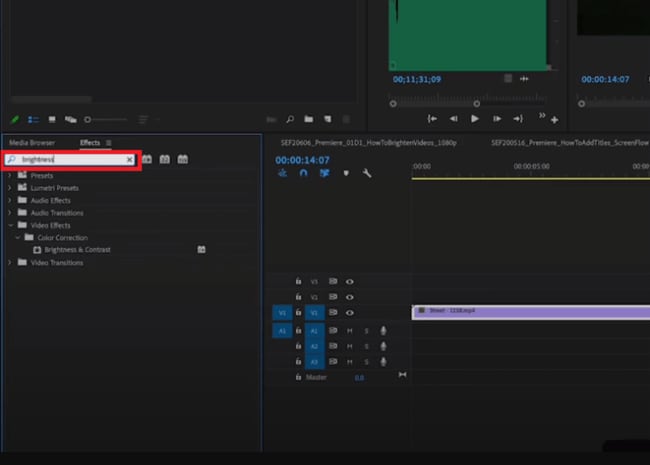
Next, click on the brightness and contrast option in the Effects panel, located at the bottom left of the software to adjust the brightness and contrast of your video.
Step 3
Bring the brightness and contrast option to the center area below the uploaded video. You can do this by simply dragging it and dropping it beneath the video.
Step 4
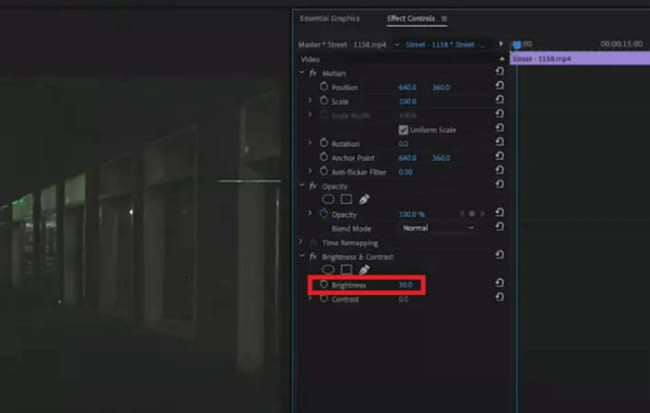
You can now easily increase the brightness by changing the brightness number in the effects control panel located to the right of the uploaded video.
Step 5
Adjust the brightness according to your needs and save the video with your preferred settings so you can watch it later or share it with your friends across different platforms.
How To Lighten Up A Dark Video In Adobe Premiere Pro?
The first method that we used was quite simple. All you needed to do was to increase the brightness of the video, and you were good to go. But this method is a bit different. Although it is a little more complicated than the first method, it can do wonders for you. Suppose you have a video shot in very dim light, and it has a lot of dark sections. There is a chance that Increasing the brightness won’t do much. So, you can use this method to brighten your video and improve its visibility. Just follow the steps mentioned below:
Step 1
If you haven’t already opened your video in Adobe Premiere Pro, launch the program and import your footage. Then drag it onto the timeline so that it appears at the top.
Step 2
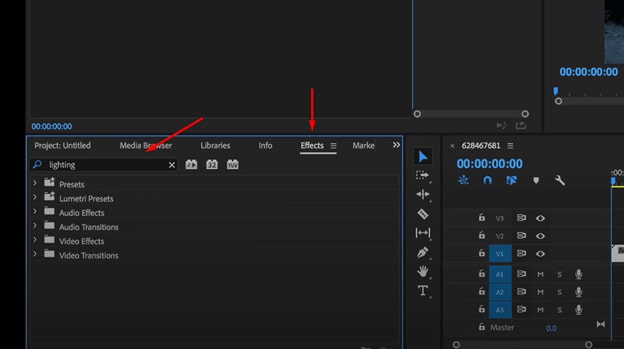
Effects tab can be found in the left-most panel of adobe premiere pro. Click the Effects tab and search for Lightning effects in the search bar and click on it.
Step 3
Use the drag-and-drop method to add the lighting effects to the clip. Once you have done that, you will feel like your video is having a distorted flash-like effect. But don’t worry as we are not going for that.
Step 4
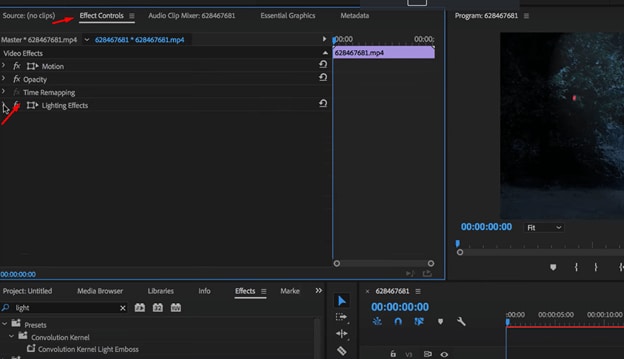
Now go to the effects control tab present at the top of the screen, and from there, you have to click on the lighting effects.
Step 5
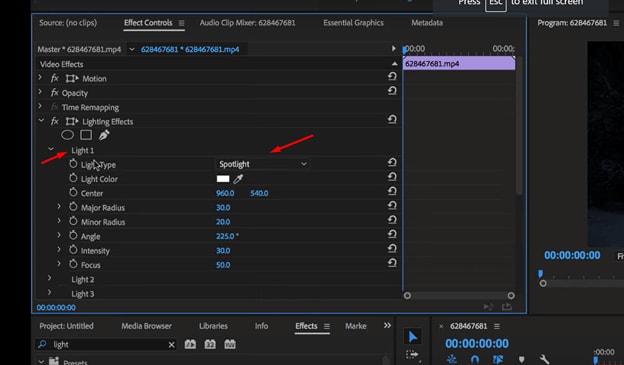
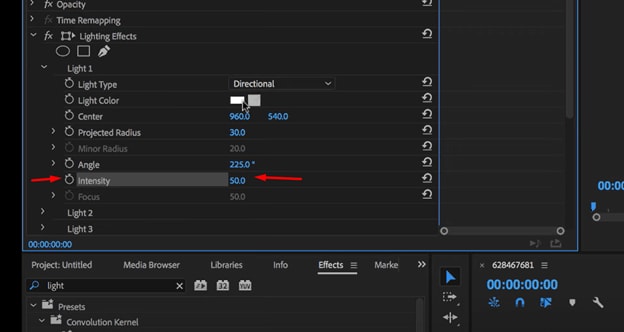
Once you click on the lighting effects, you will see many options on your screen. Click on the “Light 1” button to open its dropdown menu. There you will see the spotlight selected by default.
Step 6
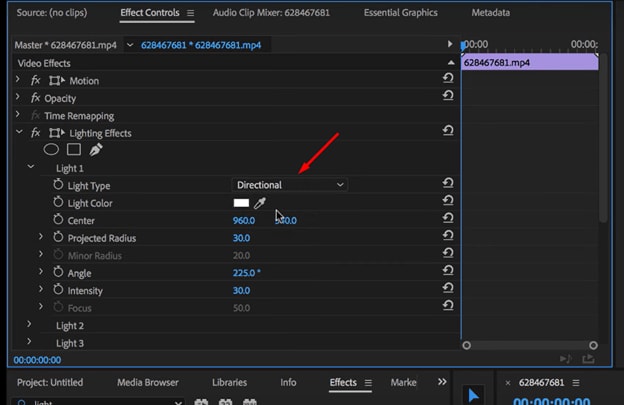
Click on the dropdown icon adjacent to the spotlight to open up the menu. You need to select “Directional” instead of Spotlight, and you will notice that the dark sections have been brightened significantly.
Step 7
The brightness intensity can even be increased by changing the value for the intensity option within the effect control panel.
Enhancing Your Video In Premiere Pro
Once you have done all the steps above, you can also use the video enhancing feature of adobe premiere pro to improve the quality of your videos. When you brighten a video, there is a chance that you might lose quality a little bit. So, to overcome that deficiency, this method might be helpful. Enhancing your videos with Premiere Pro is easy once you know the proper steps to do so. Just follow the steps described below:
Step 1
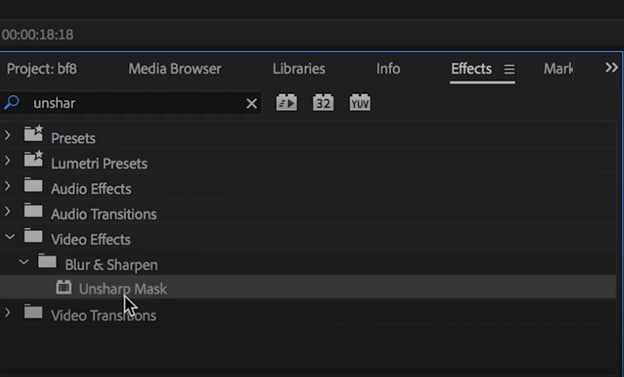
In the effects panel, search for “unsharp Mask” and drag it to the video clip.
Step 2
In the effect control panel under the Unsharp mask, set the amounts, radius, and threshold to enhance the video.
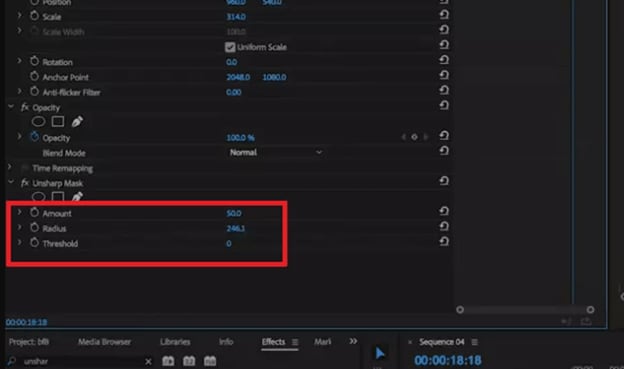
Keep in mind that you can increase the values of these parameters too high, but you will end up with a distorted video. Try increasing the values by small increments and see what happens. Avoid increasing the “amount” and radius value beyond 100% and ten, respectively.
Conclusion
● Brightening in Premiere Pro is a simple process that can benefit some video projects. Whether you want to brighten the video by increasing exposure, increasing luminance, or adding a vignette effect altogether, there are several ways to do so in Premiere Pro.
● However, you should know that neither option is necessarily better than the other. Video editing in general does take a bit of practice to master, but in this article, we have provided you with the basics and helped you on your way. All methods can be helpful in different situations, and even with similar circumstances, you might find advantages to all practices. Try out these methods for yourself and see which one best suits your needs.
Brighter videos always attract more attention. Indeed, a well-lit video can make your content shine and bring out the best in your story. But what if you forgot to turn on the lights or the camera just couldn’t handle the situation? We’ve all been there: you’re shooting a video, but there aren’t enough light sources. You end up with dark footage. It’s impossible to share this on your social media accounts or with your friends and family.
There are many reasons why people want to brighten a dark video. Maybe you recorded a video with your phone, but the lighting was too dim in the room. Or maybe you were outside, and the sun was behind you, casting shadows on your face while recording. In these cases, it can be helpful to know how to make a dark video brighter.
There is a way to apply simple corrections using Premiere Pro, no matter the reason. In this article, I’ll show you how to brighten your video in Premiere Pro so you can keep all the details in the highlights. This can be very useful if you’re working with a lot of footage that has been underexposed, and sometimes your shot might look too dark or even black.
In this article
01 Can I Brighten A Dark Video?
02 How to Brighten Video in Adobe Premiere Pro?
03 How To Lighten Up A Dark Video In Adobe Premiere Pro?
04 Enhancing Your Video In Premiere Pro
Can I Brighten A Dark Video?
This is a common question that comes up among video editors, so I thought I’d answer it here. The quick answer is yes. There are many online tools that can help you brighten a dark video or adjust the brightness of your video. A lot of times, you’ll get a video file that was shot in low light, and it will make your subject look dark and underexposed. Video brightness is an important feature that is easy to adjust. However, if your video is too dark to start off with, it may be difficult to brighten it in a way that doesn’t look unnatural.
There are several ways you can brighten a dark video. For example, you can use color correction or add more light to the scene before you film. If you already have a dark video, then you’ll need to adjust the contrast and brightness of your video during post-production. You can easily do this by using video editing software but keep in mind that too much brightness or too much contrast can result in poor video quality. So, you have to keep everything in balance.
How to Brighten Video in Adobe Premiere Pro?
Adobe Premiere Pro is your one-stop solution for editing videos, whether you’re editing a film or a TV ad. It gives you the flexibility to edit videos of any format. Adobe Premium makes brightening videos easy. Follow the steps below.
Step 1
Launch Adobe Premiere Pro, open a project, and then import the video file you want to brighten. Make sure that the video file has been imported into the media library before you start editing it.
Step 2
Next, click on the brightness and contrast option in the Effects panel, located at the bottom left of the software to adjust the brightness and contrast of your video.

Step 3
Bring the brightness and contrast option to the center area below the uploaded video. You can do this by simply dragging it and dropping it beneath the video.
Step 4
You can now easily increase the brightness by changing the brightness number in the effects control panel located to the right of the uploaded video.

Step 5
Adjust the brightness according to your needs and save the video with your preferred settings so you can watch it later or share it with your friends across different platforms.
How To Lighten Up A Dark Video In Adobe Premiere Pro?
The first method that we used was quite simple. All you needed to do was to increase the brightness of the video, and you were good to go. But this method is a bit different. Although it is a little more complicated than the first method, it can do wonders for you. Suppose you have a video shot in very dim light, and it has a lot of dark sections. There is a chance that Increasing the brightness won’t do much. So, you can use this method to brighten your video and improve its visibility. Just follow the steps mentioned below:
Step 1
If you haven’t already opened your video in Adobe Premiere Pro, launch the program and import your footage. Then drag it onto the timeline so that it appears at the top.
Step 2
Effects tab can be found in the left-most panel of adobe premiere pro. Click the Effects tab and search for Lightning effects in the search bar and click on it.

Step 3
Use the drag-and-drop method to add the lighting effects to the clip. Once you have done that, you will feel like your video is having a distorted flash-like effect. But don’t worry as we are not going for that.
Step 4
Now go to the effects control tab present at the top of the screen, and from there, you have to click on the lighting effects.

Step 5
Once you click on the lighting effects, you will see many options on your screen. Click on the “Light 1” button to open its dropdown menu. There you will see the spotlight selected by default.

Step 6
Click on the dropdown icon adjacent to the spotlight to open up the menu. You need to select “Directional” instead of Spotlight, and you will notice that the dark sections have been brightened significantly.

Step 7
The brightness intensity can even be increased by changing the value for the intensity option within the effect control panel.

Enhancing Your Video In Premiere Pro
Once you have done all the steps above, you can also use the video enhancing feature of adobe premiere pro to improve the quality of your videos. When you brighten a video, there is a chance that you might lose quality a little bit. So, to overcome that deficiency, this method might be helpful. Enhancing your videos with Premiere Pro is easy once you know the proper steps to do so. Just follow the steps described below:
Step 1
In the effects panel, search for “unsharp Mask” and drag it to the video clip.

Step 2
In the effect control panel under the Unsharp mask, set the amounts, radius, and threshold to enhance the video.

Keep in mind that you can increase the values of these parameters too high, but you will end up with a distorted video. Try increasing the values by small increments and see what happens. Avoid increasing the “amount” and radius value beyond 100% and ten, respectively.
Conclusion
● Brightening in Premiere Pro is a simple process that can benefit some video projects. Whether you want to brighten the video by increasing exposure, increasing luminance, or adding a vignette effect altogether, there are several ways to do so in Premiere Pro.
● However, you should know that neither option is necessarily better than the other. Video editing in general does take a bit of practice to master, but in this article, we have provided you with the basics and helped you on your way. All methods can be helpful in different situations, and even with similar circumstances, you might find advantages to all practices. Try out these methods for yourself and see which one best suits your needs.
Brighter videos always attract more attention. Indeed, a well-lit video can make your content shine and bring out the best in your story. But what if you forgot to turn on the lights or the camera just couldn’t handle the situation? We’ve all been there: you’re shooting a video, but there aren’t enough light sources. You end up with dark footage. It’s impossible to share this on your social media accounts or with your friends and family.
There are many reasons why people want to brighten a dark video. Maybe you recorded a video with your phone, but the lighting was too dim in the room. Or maybe you were outside, and the sun was behind you, casting shadows on your face while recording. In these cases, it can be helpful to know how to make a dark video brighter.
There is a way to apply simple corrections using Premiere Pro, no matter the reason. In this article, I’ll show you how to brighten your video in Premiere Pro so you can keep all the details in the highlights. This can be very useful if you’re working with a lot of footage that has been underexposed, and sometimes your shot might look too dark or even black.
In this article
01 Can I Brighten A Dark Video?
02 How to Brighten Video in Adobe Premiere Pro?
03 How To Lighten Up A Dark Video In Adobe Premiere Pro?
04 Enhancing Your Video In Premiere Pro
Can I Brighten A Dark Video?
This is a common question that comes up among video editors, so I thought I’d answer it here. The quick answer is yes. There are many online tools that can help you brighten a dark video or adjust the brightness of your video. A lot of times, you’ll get a video file that was shot in low light, and it will make your subject look dark and underexposed. Video brightness is an important feature that is easy to adjust. However, if your video is too dark to start off with, it may be difficult to brighten it in a way that doesn’t look unnatural.
There are several ways you can brighten a dark video. For example, you can use color correction or add more light to the scene before you film. If you already have a dark video, then you’ll need to adjust the contrast and brightness of your video during post-production. You can easily do this by using video editing software but keep in mind that too much brightness or too much contrast can result in poor video quality. So, you have to keep everything in balance.
How to Brighten Video in Adobe Premiere Pro?
Adobe Premiere Pro is your one-stop solution for editing videos, whether you’re editing a film or a TV ad. It gives you the flexibility to edit videos of any format. Adobe Premium makes brightening videos easy. Follow the steps below.
Step 1
Launch Adobe Premiere Pro, open a project, and then import the video file you want to brighten. Make sure that the video file has been imported into the media library before you start editing it.
Step 2
Next, click on the brightness and contrast option in the Effects panel, located at the bottom left of the software to adjust the brightness and contrast of your video.

Step 3
Bring the brightness and contrast option to the center area below the uploaded video. You can do this by simply dragging it and dropping it beneath the video.
Step 4
You can now easily increase the brightness by changing the brightness number in the effects control panel located to the right of the uploaded video.

Step 5
Adjust the brightness according to your needs and save the video with your preferred settings so you can watch it later or share it with your friends across different platforms.
How To Lighten Up A Dark Video In Adobe Premiere Pro?
The first method that we used was quite simple. All you needed to do was to increase the brightness of the video, and you were good to go. But this method is a bit different. Although it is a little more complicated than the first method, it can do wonders for you. Suppose you have a video shot in very dim light, and it has a lot of dark sections. There is a chance that Increasing the brightness won’t do much. So, you can use this method to brighten your video and improve its visibility. Just follow the steps mentioned below:
Step 1
If you haven’t already opened your video in Adobe Premiere Pro, launch the program and import your footage. Then drag it onto the timeline so that it appears at the top.
Step 2
Effects tab can be found in the left-most panel of adobe premiere pro. Click the Effects tab and search for Lightning effects in the search bar and click on it.

Step 3
Use the drag-and-drop method to add the lighting effects to the clip. Once you have done that, you will feel like your video is having a distorted flash-like effect. But don’t worry as we are not going for that.
Step 4
Now go to the effects control tab present at the top of the screen, and from there, you have to click on the lighting effects.

Step 5
Once you click on the lighting effects, you will see many options on your screen. Click on the “Light 1” button to open its dropdown menu. There you will see the spotlight selected by default.

Step 6
Click on the dropdown icon adjacent to the spotlight to open up the menu. You need to select “Directional” instead of Spotlight, and you will notice that the dark sections have been brightened significantly.

Step 7
The brightness intensity can even be increased by changing the value for the intensity option within the effect control panel.

Enhancing Your Video In Premiere Pro
Once you have done all the steps above, you can also use the video enhancing feature of adobe premiere pro to improve the quality of your videos. When you brighten a video, there is a chance that you might lose quality a little bit. So, to overcome that deficiency, this method might be helpful. Enhancing your videos with Premiere Pro is easy once you know the proper steps to do so. Just follow the steps described below:
Step 1
In the effects panel, search for “unsharp Mask” and drag it to the video clip.

Step 2
In the effect control panel under the Unsharp mask, set the amounts, radius, and threshold to enhance the video.

Keep in mind that you can increase the values of these parameters too high, but you will end up with a distorted video. Try increasing the values by small increments and see what happens. Avoid increasing the “amount” and radius value beyond 100% and ten, respectively.
Conclusion
● Brightening in Premiere Pro is a simple process that can benefit some video projects. Whether you want to brighten the video by increasing exposure, increasing luminance, or adding a vignette effect altogether, there are several ways to do so in Premiere Pro.
● However, you should know that neither option is necessarily better than the other. Video editing in general does take a bit of practice to master, but in this article, we have provided you with the basics and helped you on your way. All methods can be helpful in different situations, and even with similar circumstances, you might find advantages to all practices. Try out these methods for yourself and see which one best suits your needs.
Brighter videos always attract more attention. Indeed, a well-lit video can make your content shine and bring out the best in your story. But what if you forgot to turn on the lights or the camera just couldn’t handle the situation? We’ve all been there: you’re shooting a video, but there aren’t enough light sources. You end up with dark footage. It’s impossible to share this on your social media accounts or with your friends and family.
There are many reasons why people want to brighten a dark video. Maybe you recorded a video with your phone, but the lighting was too dim in the room. Or maybe you were outside, and the sun was behind you, casting shadows on your face while recording. In these cases, it can be helpful to know how to make a dark video brighter.
There is a way to apply simple corrections using Premiere Pro, no matter the reason. In this article, I’ll show you how to brighten your video in Premiere Pro so you can keep all the details in the highlights. This can be very useful if you’re working with a lot of footage that has been underexposed, and sometimes your shot might look too dark or even black.
In this article
01 Can I Brighten A Dark Video?
02 How to Brighten Video in Adobe Premiere Pro?
03 How To Lighten Up A Dark Video In Adobe Premiere Pro?
04 Enhancing Your Video In Premiere Pro
Can I Brighten A Dark Video?
This is a common question that comes up among video editors, so I thought I’d answer it here. The quick answer is yes. There are many online tools that can help you brighten a dark video or adjust the brightness of your video. A lot of times, you’ll get a video file that was shot in low light, and it will make your subject look dark and underexposed. Video brightness is an important feature that is easy to adjust. However, if your video is too dark to start off with, it may be difficult to brighten it in a way that doesn’t look unnatural.
There are several ways you can brighten a dark video. For example, you can use color correction or add more light to the scene before you film. If you already have a dark video, then you’ll need to adjust the contrast and brightness of your video during post-production. You can easily do this by using video editing software but keep in mind that too much brightness or too much contrast can result in poor video quality. So, you have to keep everything in balance.
How to Brighten Video in Adobe Premiere Pro?
Adobe Premiere Pro is your one-stop solution for editing videos, whether you’re editing a film or a TV ad. It gives you the flexibility to edit videos of any format. Adobe Premium makes brightening videos easy. Follow the steps below.
Step 1
Launch Adobe Premiere Pro, open a project, and then import the video file you want to brighten. Make sure that the video file has been imported into the media library before you start editing it.
Step 2
Next, click on the brightness and contrast option in the Effects panel, located at the bottom left of the software to adjust the brightness and contrast of your video.

Step 3
Bring the brightness and contrast option to the center area below the uploaded video. You can do this by simply dragging it and dropping it beneath the video.
Step 4
You can now easily increase the brightness by changing the brightness number in the effects control panel located to the right of the uploaded video.

Step 5
Adjust the brightness according to your needs and save the video with your preferred settings so you can watch it later or share it with your friends across different platforms.
How To Lighten Up A Dark Video In Adobe Premiere Pro?
The first method that we used was quite simple. All you needed to do was to increase the brightness of the video, and you were good to go. But this method is a bit different. Although it is a little more complicated than the first method, it can do wonders for you. Suppose you have a video shot in very dim light, and it has a lot of dark sections. There is a chance that Increasing the brightness won’t do much. So, you can use this method to brighten your video and improve its visibility. Just follow the steps mentioned below:
Step 1
If you haven’t already opened your video in Adobe Premiere Pro, launch the program and import your footage. Then drag it onto the timeline so that it appears at the top.
Step 2
Effects tab can be found in the left-most panel of adobe premiere pro. Click the Effects tab and search for Lightning effects in the search bar and click on it.

Step 3
Use the drag-and-drop method to add the lighting effects to the clip. Once you have done that, you will feel like your video is having a distorted flash-like effect. But don’t worry as we are not going for that.
Step 4
Now go to the effects control tab present at the top of the screen, and from there, you have to click on the lighting effects.

Step 5
Once you click on the lighting effects, you will see many options on your screen. Click on the “Light 1” button to open its dropdown menu. There you will see the spotlight selected by default.

Step 6
Click on the dropdown icon adjacent to the spotlight to open up the menu. You need to select “Directional” instead of Spotlight, and you will notice that the dark sections have been brightened significantly.

Step 7
The brightness intensity can even be increased by changing the value for the intensity option within the effect control panel.

Enhancing Your Video In Premiere Pro
Once you have done all the steps above, you can also use the video enhancing feature of adobe premiere pro to improve the quality of your videos. When you brighten a video, there is a chance that you might lose quality a little bit. So, to overcome that deficiency, this method might be helpful. Enhancing your videos with Premiere Pro is easy once you know the proper steps to do so. Just follow the steps described below:
Step 1
In the effects panel, search for “unsharp Mask” and drag it to the video clip.

Step 2
In the effect control panel under the Unsharp mask, set the amounts, radius, and threshold to enhance the video.

Keep in mind that you can increase the values of these parameters too high, but you will end up with a distorted video. Try increasing the values by small increments and see what happens. Avoid increasing the “amount” and radius value beyond 100% and ten, respectively.
Conclusion
● Brightening in Premiere Pro is a simple process that can benefit some video projects. Whether you want to brighten the video by increasing exposure, increasing luminance, or adding a vignette effect altogether, there are several ways to do so in Premiere Pro.
● However, you should know that neither option is necessarily better than the other. Video editing in general does take a bit of practice to master, but in this article, we have provided you with the basics and helped you on your way. All methods can be helpful in different situations, and even with similar circumstances, you might find advantages to all practices. Try out these methods for yourself and see which one best suits your needs.
How To Split Videos in Premier Pro
You might regularly split and cut clips while doing video editing to find the perfect tempo for your video or removes portions of recordings you might not want. When you first begin using Adobe Premiere for video editing, it is highly possible that you will feel overwhelmed by the number of options at your disposal and question how to divide your footage quickly.
Premiere Pro is the most popular video editing program for movies, television, and online. You may edit the footage into polished films and videos with the aid of creative tools and interaction with other apps and services.
Part 1. How to split a clip in premiere pro?
1. The Razor tool
The Razor tool in Premiere is the simplest way to split or cut clips. This enables you to separate clips from the project timeline during your chosen clip. This technique is useful for making the first rough cut of your clips, with the sole drawback being that it can be less exact.
You can use the following steps to split a clip using the Razor tool:
Step1By pressing Cmd+I or Ctrl+I or by choosing File > Import, you can import it into Premiere Pro.
Step2Drag the clip onto the timeline if there is an existing sequence. If not, use the right-click menu to choose New Sequence From Clip. The video will now appear as a single block.

Step3Choose the Razor tool from the panel next to the timeline to split the clip.
Step4To split a video clip, click on the section you want to split.
Step5Now that you have two segments from the same video file, you can edit them separately.
2. Current-Time Indicator
A blue triangular indication called the Current Time Indicator (CTI) lets you know where you are in the timeline. CTIs are employed in a variety of panels.
You can follow these steps to split the clip using Current-Time Indicator:
Step1Select the section of the clip you want to split by moving the Current-Time Indicator there.
Step2Ensure that the video layer you want to split is highlighted on the timeline’s left side.
Step3Use the keyboard shortcuts Cmd+K or Ctrl+K to split the clip.
3. Source Panel
Individual clips are played back on the Source Monitor. You prepare clips for a sequence in the Source Monitor. You designate the clip’s source tracks, In points, and Out points. In a Timeline panel, you may add clips to a sequence and place clip markers.
How to split video clips with source panel in premiere pro :
For the clip, you want to split to appear in the Source panel, choose it from the Project panel. Then take these actions.
Step1First, locate the arrow-shaped marker at the start of the clip’s time bar in the Source Panel to navigate and indicate the In and Out points.
Step2Wherever you want the In and Out indicators to appear, press the I or O key. I stand for inside, and O for outside.
Step3Select Insert from the Source panel’s tools once your marks are in place.
Part 2. How to split audio from video in premiere pro?
1. The Razor tool
You can use the following steps to split an audio clip using the Razor tool:
Step1You can import it into Premiere Pro by selecting File > Import, or pressing Ctrl+I or Cmd+I.
Step2If there is an existing sequence, drag the clip onto it. If not, select New Sequence From Clip from the right-click menu. Now the video will play in a block format.
Step3Choose the moment at which you want to separate. To trim the movie, choose the “Razor” tool from the Tools area. Utilizing this tool, navigate to the timeline for the video or audio, left click on the video, and it will divide the file into two pieces.
Step4You can edit each part separately now that you have two from the same audio file.
2. Current-Time Indicator
You can follow these steps to split the audio clip using Current-Time Indicator:
Step1By dragging the Current-Time Indicator there, you can choose the part of the audio clip you want to separate.
Step2On the timeline’s left side, make sure the audio layer you want to split is highlighted.
Step3Use the keyboard commands Cmd+K or Ctrl+K to divide the audio clip.
![]()
Note: The methods to split a video/audio are the same. Splitting a video clip using this method will automatically be split if the audio has been highlighted.
Part 3. How to split video and audio in alternative to premiere pro?
As a professional video editing software, Premiere Pro offers a wide range of professional editing features. But, for a beginner, it might seem time-consuming to master the software. Because it requires a high-speed PC due to the video resolution and requirements. So, we suggest Wondershare Filmora because it is considerably easier to use. Products on Filmora are available for various users, from novice to expert. A timeline, preview window, and effects library are common features. These may be accessed and managed using a drag-and-drop interface.
You can follow these steps to split audio and video without any hassle:
Step1To add video files to the Timeline for trimming, first click “Import“ on the main windows and choose the video files you want from your computer. You can also just drag and drop movies into the Media Library.

Step2To eliminate an undesirable segment, move the playhead over it and select the scissor icon.
Step3”Detach Audio” from the context menu when you are ready to extract the audio track from a video file. You’ll see that an audio file immediately appears on the audio track.

Step4Click “Export“ after you’re done trimming, then choose where you want to save the edited video.

Conclusion
Since we run out of time because of our busy schedules, you might find it inconvenient to use two different software programs when it can be done using Filmora. Due to the highly advanced and user-friendly tools introduced in Filmora , it is one of the best and most highly recommended video editing software.
Free Download For Win 7 or later(64-bit)
Free Download For macOS 10.14 or later
Part 3. How to split video and audio in alternative to premiere pro?
As a professional video editing software, Premiere Pro offers a wide range of professional editing features. But, for a beginner, it might seem time-consuming to master the software. Because it requires a high-speed PC due to the video resolution and requirements. So, we suggest Wondershare Filmora because it is considerably easier to use. Products on Filmora are available for various users, from novice to expert. A timeline, preview window, and effects library are common features. These may be accessed and managed using a drag-and-drop interface.
You can follow these steps to split audio and video without any hassle:
Step1To add video files to the Timeline for trimming, first click “Import“ on the main windows and choose the video files you want from your computer. You can also just drag and drop movies into the Media Library.

Step2To eliminate an undesirable segment, move the playhead over it and select the scissor icon.
Step3”Detach Audio” from the context menu when you are ready to extract the audio track from a video file. You’ll see that an audio file immediately appears on the audio track.

Step4Click “Export“ after you’re done trimming, then choose where you want to save the edited video.

Conclusion
Since we run out of time because of our busy schedules, you might find it inconvenient to use two different software programs when it can be done using Filmora. Due to the highly advanced and user-friendly tools introduced in Filmora , it is one of the best and most highly recommended video editing software.
Free Download For Win 7 or later(64-bit)
Free Download For macOS 10.14 or later
How To Quickly Create A Screen Print Effect In Photoshop: Detailed Gui
Screen printing is a unique method that uses a mesh to transfer ink onto a surface and is commonly used to print designs onto t-shirts or other garments, such as hoodies, tote bags, and even sneakers.
Nowadays, digital means such as Photoshop or Illustrator are used to create the screen print effect, which is achieved by using a layer mask to cut out a portion of the image and filling it with the color or pattern of your choice. The design is then printed onto fabric using water-based CMYK (cyan, magenta, yellow, black) inks with inkjet printers.
Suppose you’ve ever wanted to create the screen print effect in Photoshop to give that artistic look to your pictures and embed them in your clothes or other accessories but don’t know where to start or are not familiar with the process. In that case, this guide can surely help you figure this out quickly!
So without any delay, let’s get on with it!
How To Use Photoshop To Create The Print Effect
Below we’ve provided a detailed guide using Adobe Photoshop to create the print effect with easy step-by-step instructions.
What Are The Requirements For Creating the Print Effect In PhotoShop?
Before we discuss the complete process of creating the print effect while using Photoshop, here are the resources you have to arrange.
- Picture of the object: We will cut out the object from the original image using the Lasso tool and unsaturate it. However, you have to ensure that the object is clear and easily detectable within the picture.
- A background image: You will need a background image to add the object to. For this, you can use a solid background, capture scenery, etc.
- Fonts: You can also add fonts to the final image to add your ideas or thoughts, making your final project more eye-catching and engaging.
- Photoshop latest version: For this tutorial, we will use the Photoshop CC 2021 version, so make sure to download and install it to your computer immediately!
What Are The Steps To Create Print Effect in PhotoShop?
Now that you know the necessary resources, the following are the steps to create the print effect in Photoshop:
Step1 Launch thePhotoshop program on your laptop/desktop and click “Create New” on the software dashboard. Next, select the page size, such as “letter,” and click “Open.”

Now, click the “File” option in the top toolbar, and from the drop-down menu, select “Open.” Next, choose the image you want to apply the screen print effect by browsing to its location on your computer.

Step2 Next, click the “Lasso” tool from the left-side menu to create the selection around the object in the image.

Press the CMD/Ctrl + C on your computer’s keyboard to copy the selection. Next, click the “Layer“ option in the top toolbar, select “New,” and click “Layer via Copy.”

Step3 Now, hide the background layer in the “Layers” panel on the right-hand side, and you will get your object without any BG. Click the “Image” option in the top toolbar and select “Adjustments.”
Click “Threshold…” from the drop-down menu, and set the “Threshold level.” Alternatively, you can click “Cmd/ctrl+Shift+U” on the keyboard to desaturate the image.

Step4 Next, select the “Magic Eraser Tool” from the left-side menu and remove the white parts to smooth down the background. Afterward, choose the “Move Tool” from the menu and drag your object to a new layer.
To add the background image, click “File” and select “Open.” Next, select the file and again click “Open.”
Step5 Select the object using the “Move Tool” and drag it to the background image layer. If the thing is too large and you want to resize it, select the object using the “CMD/Ctrl” key and click “Edit” from the top toolbar. From the drop-down menu, choose “Transform” and click “Scale.”

Next, drag the handles to adjust the size of the object on the Background image.
Step6 Click the “T” icon from the left-hand side menu and set the font style, color, and size. You can also click the “3D” option to convert your text to a three-dimensional form.

Try removing the left-out white patches on the object using the “Magic Eraser Tool” to give a polished look to the print screen effect. Once you are satisfied, click the “File” option from the top toolbar panel and select “Save As.”
Type in the file name and select the file type from the drop-down menu next to “Save As Type.” Choose the storage location, click “Save” to export your final project, and you’re done!
Conclusion
In this article, we’ve explored what the screen print effect is and how it is used in digital art. We’ve also discussed the requirements and resources you need to use and then demonstrated a step-by-step process of how to create the screen print effect in Photoshop with simple and easy-to-follow instructions.
To make things easy for you, we also added original screenshots while creating a sample project on the software.
Hopefully, this article helped resolve your queries, and you can now give a vintage or retro look to your images using the screen print effect in Photoshop.
Free Download For Win 7 or later(64-bit)
Free Download For macOS 10.14 or later
Free Download For macOS 10.14 or later
Also read:
- 2024 Approved The Best GIF Editors Weve Tested Heres What We Learned
- Updated Troubleshoot Snapchat Camera Zoomed in Issue for 2024
- Updated Find Out About MAGIX Vegas Pro Pricing Plan and Features to See How the Software Can Help You with Your Video Editing Tasks for 2024
- Updated 2024 Approved How to Create Educational Teaching Videos in An Outstanding Way?
- Updated 2024 Approved So, without Further Dilly-Dallying, Lets Learn How to Create a Retro 1950-Style Video with This Simple Filmora Tutorial
- New Tips & Tricks To Perfectly Use the Audio Mixer in Filmora
- New Looking Forward to Complement Your Weekend Evenings with a Fantasy Tour to the Anime World? Stay Here to Pick the Most Appealing Alternative From the Best and Timeless Anime Creations
- 2024 Approved Are You Planning to Make a Product Review Video but Wondering How to Set up Your Background? If so, Then Youre in the Right Place. This Post Will Show You How to Adjust the Background to Black for Your Product Review Video
- Updated Adjust the TikTok Videos Length to Make Them Captivating
- Updated In 2024, How To Use Virtual Green Screen to Shoot Video
- Updated In 2024, Step by Step to Crop a Video with CyberLink PowerDirector
- Updated 2024 Approved 3 Ways To Stream And Record At The Same Time
- Updated How to Denoise in After Effects – Audio & Video Noise Removal for 2024
- Updated 2024 Approved How to Create Photoshop GIF The Easy Way
- Want to Sync Separate Audio with Video? Check Out This Guide to Do It in the Simplest Way Using the Video Editor - Wondershare Filmora
- New Can You Get Free After Effects Templates Slideshow? Yes, You Definitely Can! Follow the Given Discussion to Learn About a Simple Trick and More About Getting Free Effects Template for Slideshows for 2024
- Want to Give a Bold and Colorful Look to Your Ad or Abstract Art Project? This Quick and Easy Tutorial Teaches How to Create a Risograph Effect in Photoshop
- Are You Searching the Internet for Top Wedding LUTs Premiere Pro? This Article Provides Suggestions on the Best LUT Color Presets for 2024
- In 2024, Best CapCut Templates for Slow Motion Video Trend
- Are You Looking to Store Your Videos Securely and Efficiently? Look No Further than Our Top Pick for the Best Cloud Storage Service for Videos for 2024
- Updated Best 5 AI Music Video Examples and Makers to Make Them
- Updated This Article Will Show You the Steps to Make Coin Magic in Videos with Filmora for 2024
- New In 2024, Top Free LUTs To Use in Shotcut An Overview
- If You Want to Know More About the Basics of Final Cut Pro, It Would Be Helpful to Watch a Beginner Tutorial, with the Length of only 20 Minutes, an Introduction of the Whole Program for 2024
- How to Add Subtitles to Videos With Kapwing
- Updated 2024 Approved How to Turn Text Into a Podcast
- Complete Guide 2024 A Review On 3D LUT Creator
- YouTube Lives Are Very Popular Nowadays and People Can Interact with the Anchor at Real Time. If You Want to Comment on a YouTube Live Chat, You Can Follow the Guide Below for 2024
- Updated Looking Forward to Try Hands at Using the Icecream Slideshow Maker Program to Create High End Slideshow Presentations? Stay Here for a Complete Insight Into the Process
- Fix Cant Take Screenshot Due to Security Policy on Honor X8b | Dr.fone
- In 2024, Ways to stop parent tracking your Motorola Moto G 5G (2023) | Dr.fone
- How to Analyze an Editorial Cartoon for 2024
- In 2024, 4 Most-Known Ways to Find Someone on Tinder For Xiaomi Redmi K70 by Name | Dr.fone
- In 2024, Is GSM Flasher ADB Legit? Full Review To Bypass Your Tecno Spark 20 Pro+FRP Lock
- Updated Best 10 Apps to Enhance Your Instagram Story Slideshow
- In 2024, How to Transfer Contacts from Lava Blaze 2 5G to Other Android Devices Devices? | Dr.fone
- In 2024, About Motorola Edge 40 Pro FRP Bypass
- How to Transfer Photos from Realme 11 Pro+ to Laptop Without USB | Dr.fone
- In 2024, Does find my friends work on Apple iPhone 11 | Dr.fone
- Effective Guide to Cast Apple iPhone SE to MacBook without Hindrance | Dr.fone
- 2024 Approved In-Depth Review of Ivona Text to Speech Converter
- A Perfect Guide To Remove or Disable Google Smart Lock On Nokia
- Top 4 Ways to Trace Oppo A2 Location | Dr.fone
- Title: Updated How to Loop a Video with iMovie on Mac and iPhone
- Author: Morgan
- Created at : 2024-05-19 05:12:18
- Updated at : 2024-05-20 05:12:18
- Link: https://ai-video-editing.techidaily.com/updated-how-to-loop-a-video-with-imovie-on-mac-and-iphone/
- License: This work is licensed under CC BY-NC-SA 4.0.

