
:max_bytes(150000):strip_icc():format(webp)/switcheshero-4f3b792cb7014baf919e7c68b91e96ab.jpg)
Updated How to Make A Funny Vlog for TikTok?
How to Make A Funny Vlog for TikTok?
TikTok has been among the few social media platforms that have gained an exponential following in a truly short time. Regardless of this stunted digital environment, the platform made its statement of becoming part of the all-time greats.
TikTok became known as a short-video platform that influenced the making of funny vlogs. If you are interested in making a funny vlog, you are at the right place.
In this article
01 Ideas for Creating A Funny Vlog for TikTok
02 5 Popular Funny Vloggers on TikTok
Part 1: Ideas for Creating A Funny Vlog for TikTok
When creating a funny vlog across TikTok, there are numerous ideas that one can think of. However, since TikTok videos are of small lengths, achieving diversity is difficult yet possible. You’ll surely get your break if you understand the following ideas for creating a funny vlog.
React to Other Videos
While it may seem the most mainstream style of creating funny content across TikTok, it is also the most effective way of making people laugh while watching your video. This will also bring recurring viewers across your channel.
Display Failure Videos
It is always great to see people trying and doing something funny across the video. Failure videos are believed to be the other way of creating content for a funny vlog on your TikTok, which shall make people laugh hard.
Use Goofy and Peculiar Voices
Unrealistic and weird voices can make your short video seem funny. If you consider talking about something in a silly voice, it will make people burst out of laughter.
Trolling Family Members
One of the best ways to make something good out of TikTok is creating candid moments. This can always be done if you troll or prank your family members out of nowhere. Just keep reminding that you have to ensure no one gets injured due to it.
Impersonations
Making impersonated videos of major celebrities is another way of showing funny content to the viewers on TikTok. If you consider some funny examples for this, it will surely bring you effective results.
Make Puns and Funny Statements
Another great way to create a funny vlog for your TikTok is to be good at making puns. This is purely hilarious content and needs someone to be highly great in it.
Physical Challenges
This can be a bit risky, but it can become quite fun to make and show to the world if executed with care. However, this can be conducted individually or in a group of people, as you find it appropriate.
Use Effects of TikTok
TikTok makes sure to provide something funny in effects to its users. The use of effects for TikTok is an excellent technique to make funny vlogs; however, it can get funny if the elements used across it have a dubious meaning.
Run Everything in Reverse
One of the most straightforward techniques to make a funny vlog is to run everything in reverse order. The simplest thing of a video becomes the funniest to watch.
Part 2: 5 Popular Funny Vloggers on TikTok
This part will provide some popular examples of TikTokers who have made a considerate performance in providing funny content to people across the platform.
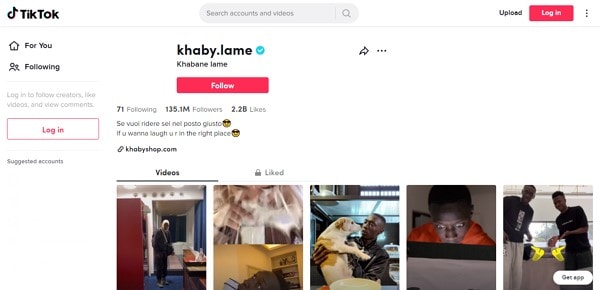
Khaby Lame
This is, without a doubt, the first-choice in TikTok accounts that would always come while relating to funny content. Khaby started his journey as a TikToker with a remarkably simple motive of pointing out the simplicity in different tasks, which were displayed to be difficult. Although it sounds pretty basic, the technique taken by Khaby has been so considerate it brought him millions of followers for creating funny content.
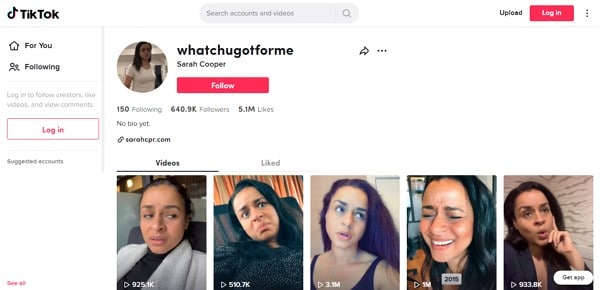
Sarah Cooper
Want to see a great impersonation of Donald Trump? It is undoubtedly great to see every time. With Sarah Cooper, it just becomes an entirely different story. Her impersonation has been so perfect that she has been referred to as one of the best funny vloggers on TikTok. Her likes across the platform may not be that great, but she has shown some stature in presenting funny content in a great way.
Dobre Twins
This twin duo is known across many social media platforms for its funny content. As the twins started using TikTok, they started creating good funny vlogs, which gained quite the traction for them. Their unique ideas to present different things have presented the following worth 23 million likes across TikTok, which is quite commendable. However, Lucas and Marcus are only known to operate this TikTok account.

Image alt: dobre twins funny tiktoker
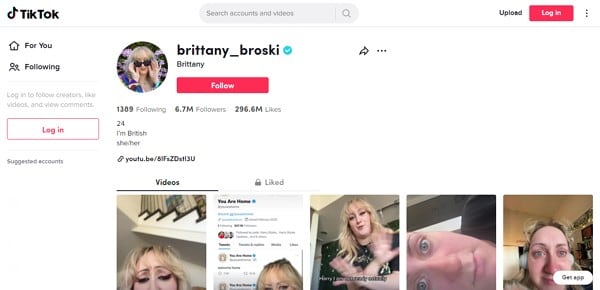
Brittany Broski
Quite a few TikTokers actually make funny videos with impressive comedy. Brittany Broski is a celebrity in this genre, where she has taken great use of her comedy skills to present great vlogs with different and unique topics. Her take on comedy is entirely different, which makes her funny vlog unique and better than others.
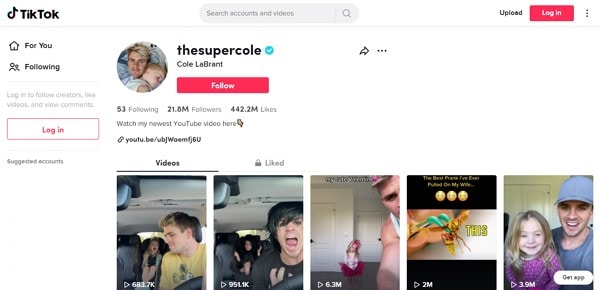
Cole LeBrant
This TikToker makes a good collection of funny vlogs across his account with his family. The variety and variability in his videos make him a different version of fun compared to other TikTokers. He has built a great reach across the account, which makes him an impressive choice.
Part 3: How to Make a Funny Vlog?
Funny vlogs are a fabulous way to interact with people of different tastes. It can be something that cherishes the moods of the viewers, regardless of their current emotions. To make this happen, you need a good platform that helps you create a video for your viewers to watch. Wondershare Filmora fulfills the needs of a video editor by providing you with the perfect options while editing the video for TikTok.
For Win 7 or later (64-bit)
For macOS 10.12 or later
If you are looking forward to understanding how to create a funny vlog for your TikTok using Filmora, you need to follow a set of simple steps. These are shown as follows:
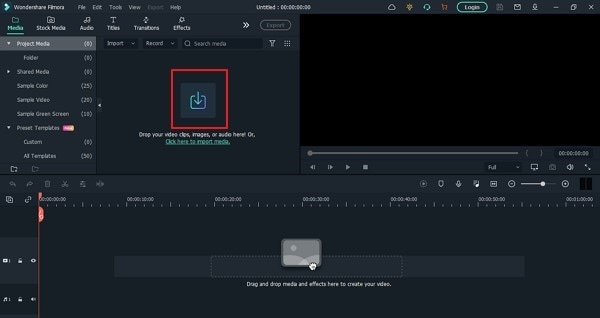
Step 1: Launch and Import Video
To start, you need to have Wondershare Filmora installed across your device. Launch the tool and click on “New Project” to start from scratch. Once the screen opens up, you need to click on the “Arrow Head” icon across the ‘Media’ Tab to import the audio you wish to amend for TikTok.
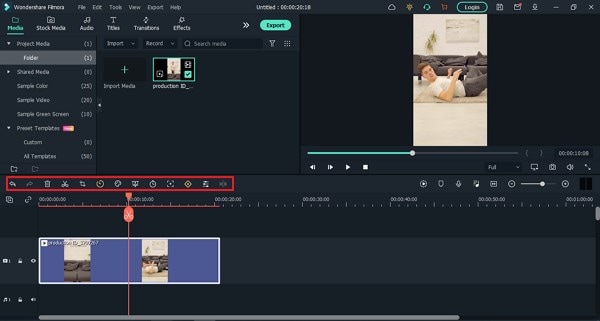
Step 2: Perform Basic Editing
Wondershare Filmora provides users with multiple options for editing their files. At first, drag the file onto the timeline. Following this, you can merge different videos or enhance the video by trimming it. Along with that, you can also consider splitting the image or changing its playback speed for different results.
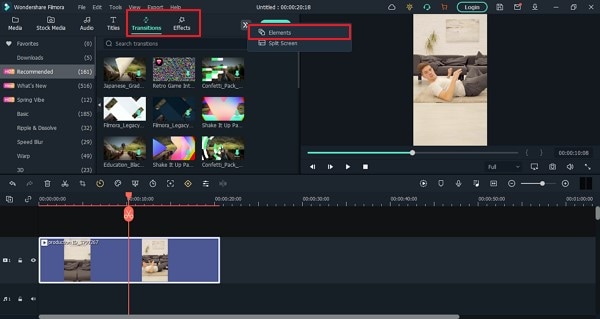
Step 3: Add Effects and Transitions
After you are done with some basic editing, you can add different effects from the “Effects” section. To make the video look exclusive, you can also include “Transitions” across it. Use the “Elements” tab to include stickers and emojis to enhance your TikTok video.
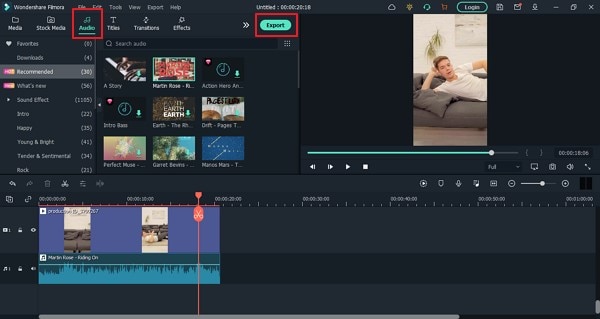
Step 4: Manage the Audio
For managing the audio of your video, you can make several changes across it. You can detach audio and change the audio with another soundtrack. Filmora also allows you to add audio from the “Audio” section, which contains royalty-free music to add. Once you are done, click on the “Export” button to set the settings of the video before exporting it back onto the device.
Closing Words
This article has presented some of the finest tips that can be utilized for creating funny vlogs on your TikTok. If you coherently use these tips, you can get significant results across your account in the name of the followers. Along with that, you can also use Filmora for making the best funny vlog with different editing tools.
Wondershare Filmora
Get started easily with Filmora’s powerful performance, intuitive interface, and countless effects!
Try It Free Try It Free Try It Free Learn More >

02 5 Popular Funny Vloggers on TikTok
Part 1: Ideas for Creating A Funny Vlog for TikTok
When creating a funny vlog across TikTok, there are numerous ideas that one can think of. However, since TikTok videos are of small lengths, achieving diversity is difficult yet possible. You’ll surely get your break if you understand the following ideas for creating a funny vlog.
React to Other Videos
While it may seem the most mainstream style of creating funny content across TikTok, it is also the most effective way of making people laugh while watching your video. This will also bring recurring viewers across your channel.
Display Failure Videos
It is always great to see people trying and doing something funny across the video. Failure videos are believed to be the other way of creating content for a funny vlog on your TikTok, which shall make people laugh hard.
Use Goofy and Peculiar Voices
Unrealistic and weird voices can make your short video seem funny. If you consider talking about something in a silly voice, it will make people burst out of laughter.
Trolling Family Members
One of the best ways to make something good out of TikTok is creating candid moments. This can always be done if you troll or prank your family members out of nowhere. Just keep reminding that you have to ensure no one gets injured due to it.
Impersonations
Making impersonated videos of major celebrities is another way of showing funny content to the viewers on TikTok. If you consider some funny examples for this, it will surely bring you effective results.
Make Puns and Funny Statements
Another great way to create a funny vlog for your TikTok is to be good at making puns. This is purely hilarious content and needs someone to be highly great in it.
Physical Challenges
This can be a bit risky, but it can become quite fun to make and show to the world if executed with care. However, this can be conducted individually or in a group of people, as you find it appropriate.
Use Effects of TikTok
TikTok makes sure to provide something funny in effects to its users. The use of effects for TikTok is an excellent technique to make funny vlogs; however, it can get funny if the elements used across it have a dubious meaning.
Run Everything in Reverse
One of the most straightforward techniques to make a funny vlog is to run everything in reverse order. The simplest thing of a video becomes the funniest to watch.
Part 2: 5 Popular Funny Vloggers on TikTok
This part will provide some popular examples of TikTokers who have made a considerate performance in providing funny content to people across the platform.
Khaby Lame
This is, without a doubt, the first-choice in TikTok accounts that would always come while relating to funny content. Khaby started his journey as a TikToker with a remarkably simple motive of pointing out the simplicity in different tasks, which were displayed to be difficult. Although it sounds pretty basic, the technique taken by Khaby has been so considerate it brought him millions of followers for creating funny content.
Sarah Cooper
Want to see a great impersonation of Donald Trump? It is undoubtedly great to see every time. With Sarah Cooper, it just becomes an entirely different story. Her impersonation has been so perfect that she has been referred to as one of the best funny vloggers on TikTok. Her likes across the platform may not be that great, but she has shown some stature in presenting funny content in a great way.
Dobre Twins
This twin duo is known across many social media platforms for its funny content. As the twins started using TikTok, they started creating good funny vlogs, which gained quite the traction for them. Their unique ideas to present different things have presented the following worth 23 million likes across TikTok, which is quite commendable. However, Lucas and Marcus are only known to operate this TikTok account.
Image alt: dobre twins funny tiktoker
Brittany Broski
Quite a few TikTokers actually make funny videos with impressive comedy. Brittany Broski is a celebrity in this genre, where she has taken great use of her comedy skills to present great vlogs with different and unique topics. Her take on comedy is entirely different, which makes her funny vlog unique and better than others.
Cole LeBrant
This TikToker makes a good collection of funny vlogs across his account with his family. The variety and variability in his videos make him a different version of fun compared to other TikTokers. He has built a great reach across the account, which makes him an impressive choice.
Part 3: How to Make a Funny Vlog?
Funny vlogs are a fabulous way to interact with people of different tastes. It can be something that cherishes the moods of the viewers, regardless of their current emotions. To make this happen, you need a good platform that helps you create a video for your viewers to watch. Wondershare Filmora fulfills the needs of a video editor by providing you with the perfect options while editing the video for TikTok.
For Win 7 or later (64-bit)
For macOS 10.12 or later
If you are looking forward to understanding how to create a funny vlog for your TikTok using Filmora, you need to follow a set of simple steps. These are shown as follows:
Step 1: Launch and Import Video
To start, you need to have Wondershare Filmora installed across your device. Launch the tool and click on “New Project” to start from scratch. Once the screen opens up, you need to click on the “Arrow Head” icon across the ‘Media’ Tab to import the audio you wish to amend for TikTok.
Step 2: Perform Basic Editing
Wondershare Filmora provides users with multiple options for editing their files. At first, drag the file onto the timeline. Following this, you can merge different videos or enhance the video by trimming it. Along with that, you can also consider splitting the image or changing its playback speed for different results.
Step 3: Add Effects and Transitions
After you are done with some basic editing, you can add different effects from the “Effects” section. To make the video look exclusive, you can also include “Transitions” across it. Use the “Elements” tab to include stickers and emojis to enhance your TikTok video.
Step 4: Manage the Audio
For managing the audio of your video, you can make several changes across it. You can detach audio and change the audio with another soundtrack. Filmora also allows you to add audio from the “Audio” section, which contains royalty-free music to add. Once you are done, click on the “Export” button to set the settings of the video before exporting it back onto the device.
Closing Words
This article has presented some of the finest tips that can be utilized for creating funny vlogs on your TikTok. If you coherently use these tips, you can get significant results across your account in the name of the followers. Along with that, you can also use Filmora for making the best funny vlog with different editing tools.
Wondershare Filmora
Get started easily with Filmora’s powerful performance, intuitive interface, and countless effects!
Try It Free Try It Free Try It Free Learn More >
The Ultimate Guide to GIF for Discord Profile
The Ultimate Guide to GIF for Discord Profile
An easy yet powerful editor
Numerous effects to choose from
Detailed tutorials provided by the official channel
Discord is the future of digital communication. After all, it is a new platform with unique and amazing features that most people need. Discord is a digital platform where users communicate via video calls, audio calls, media, files, and text in private chats. It works under multiple operating systems, including Mac, Windows, Linux, iPadOS, Web browsers, and Android. In other words, it is excellent for various users with different devices.
Discord GIF profile pic is one of the most popular topics related to the platform. Of course, the platform is new; hence developing a discord animated profile pic can be a hustle to newbies. Fortunately, this article is here with the right questions and responses. Do you wish to learn how to get a discord animated profile picture? If yes, journey with us to learn about discord GIF profile pics and get animated profile pictures on discord. Read on!
In this article
01 [What’s GIF for Discord profile?](#Part 1)
02 [How to Get Animated Profile Picture without having Discord Nitro?](#Part 2)
03 [How to make Discord PFP a GIF?](#Part 3)
04 [How to Put a GIF in Discord profile Picture?](#Part 4)
Part 1 What’s GIF for Discord profile?
Before reviewing the meaning of a GIF in Discord, it is essential to understand what it generally means. Technically, GIF in full means Graphical Interchange Format referring to an image format. In other words, it is an animated image. The file size is probably the smallest, with images looping continuously in a soundless video without the user doing much.
In this case, we are talking about discord and gifs. That is the animated profile picture discord. Think about how you have profile images for different social media accounts. It is the same case, but you settle for a GIF discord profile instead of photos**.**
Why use GIF for Discord Profile?
It is no hush-hush that many people are gradually adopting the idea of gifs in their discord profiles. After all, gifs aren’t new, and they are everywhere. This fact leaves us wondering why you should use it and its effect on your account.
● GIFs are the best way to grab attention and create a connection with your friends. From its definition, gif contains loops that quickly get the attention you wish for your work.
● They display a friendly side that helps you create a connection with people.
● It gives your account more emotion and a sense of friendliness that leaves people wanting to communicate with you.
● Gifs are the current trend; hence, they indicate a direction. In other words, you pay attention to trends.
● It provides a sense of entertainment and youthfulness in your work.
GIFs are everywhere; hence, it is fantastic to adapt to the current trends that young people follow to keep up with technological evolutions. Create a GIF profile on discord and realize the fun you miss out on discord. And if you are yet to create a discord account, ensure that you join the platform and freely communicate with your friends.
Part 2 How to Get Animated Profile Picture without having Discord Nitro?
Are you a Discord user, or are you get to create an account? If yes, you are familiar with discord nitro and all the advantages that come with it. And if you are not a user, you probably are confused about discord Nitro. Let’s start with basic information on discord nitro and its use. Discord Nitro is the genre version of discord with multiple features, making it a worthy option. It enhances your experience with discord voice, text, video, and most importantly, creating profile pictures.
The Nitro version promotes animated discord profile pics. It is a great option but, what do you do when you can’t afford it? Is it still possible to get cool animated discord profile pics? Yes. You can comfortably get a profile discord GIF without Discord Nitro. And you are lucky since this section will cover this necessary topic.
Of course, we have to thank content writer Ubaid Ullah for the article on how to get Discord GIF profile without nitro. After all, it is one of our reference points.
Step 1: Create a GIF or download one that meets your taste from different websites. Currently, we have many sites offering free GIFs; hence you don’t have to worry about copyright issues. Some top websites to consider are Giphy, Gifer, etc.
Step 2: Look for a site that can translate a GIF document to the APNG file. Don’t worry about this step since you can always google the top options. We currently have the ezgif site but technology changes every day; hence you can expect rising websites.
Step 3: Let’s use the ezgif website. Upon accessing it, ensure that you settle for the APNG maker icon. It is on the top left of the website.

Step 4: Check on the Crossfade Frames option. Note that you need to choose images with at most thirty frames. Finally, click on the Make APNG option

Step 6: You can add multiple after-effects after creating the GIF to customize the final look
Step 7: Download the final file and save it on your PC with the name you wish
Step 8: Upload on Discord
Important things to note when uploading GIFs on Discord
● Discord only allows a file that is at least 8MBs. So, if yours isn’t, you can compress it via different websites.
● A gif with nitro is neater, but a GIF without nitro works better than having an image.
● Even without discord Nitro, you still have access to the cool animated discord profile pics if you have a discord server. Suppose you have an animated discord profile, and then we can only see one frame without discord nitro.
Part 3 How to make Discord PFP a GIF?
From the beginning of this piece until now, all we have discussed is getting or making a GIF. However, we will define the simplest way to make your profile pic a GIF in Discord in this case. Ensure that you read through this section.
Generally, discord nitro users are more privileged compared to normal discord users. Of course, the Nitro subscribers pay a fee to access these privileges. There are two options:
● Making your profile picture a GIF
● Utilizing the Tenor GIFs
● Uploading them from your files
02How to create your profile picture a GIF?
Step 1: Log into your Discord account

Step 2: Visit the user settings gear icon and go to edit profile to access your account details.
Step 3: Click on your current profile or click on the Change Avatar option
Step 5: Use the available GIF search engine or upload files from your device. It depends on whether you are a Nitro subscriber or a normal user. Select your GIF and go to the Apply option to save the file
Step 6: Move to the escape button to exit the settings, and you realize that your PFP is officially a GIF.
02Key points on discord GIF profile
● You only have access to the discord nitro profile GIFs if you are a nitro subscriber. Otherwise, you need to look for GIFs from different websites and upload them.
● The maximum resolution of a GIF is 128 by 128 pixels hence you need to be careful.
● The GIF file size for discord is at most 8MBs.
● You can create a GIF instead of uploading it from free websites.
Part 4 How to Put a GIF in Discord profile Picture?
Discord is quite a popular platform with millions of users worldwide. Thanks to the user-friendly interface it includes, this number is enormous, especially when you wish to edit your profile picture. In our case, we explain facts about having a GIF as a PFP in discord.
Like most social media platforms, this process is relatively easy. It only requires you to be a discord user, and it is better if you are a nitro subscriber. Why? Because the latter have the discord GIF options easing the process. Note that you can still add a GIF even without nitro.
The first point is to log into your account, go to setting and click on the edit your profile option. Upon clicking on the available PFP, you will automatically access a file dialogue that prompts you to include your GIF. Later save these changes and get a GIF profile in discord.
GIFs are like looping or repetitive short videos; hence they need editing. Fortunately, we have the Wondershare Filmora Video Editor editor, which includes multiple features which assist in editing your work. Filmora features scene detection, video stabilization, noise removal, text editor, etc. All these features work together to deliver high-quality discord profile GIFs.

Wondershare Filmora - Best Video Editor for Mac/Windows
5,481,435 people have downloaded it.
Build unique custom animations without breaking a sweat.
Focus on creating epic stories and leave the details to Filmora’s auto features.
Start a creative adventure with drag & drop effects and endless possibilities.
Filmora simplifies advanced features to save you time and effort.
Filmora cuts out repetition so you can move on to your next creative breakthrough.
● Ending Thoughts →
● It is possible to have unique GIFs in your Discord account as a normal discord user
●> Editing Discord profile is convenient for all
● There are countless websites available that can assist you in getting a good GIF
● Generally, discord is a powerful platform with millions of users. It is pretty new but has received positive feedback from people. Discord includes amazing unique features, including animated discord profile pictures. However, there is maximum confusion on setting discord gif profiles, which is the area that this article addresses. Clear all doubts on profile discord GIFs by reading the content above.
Discord is the future of digital communication. After all, it is a new platform with unique and amazing features that most people need. Discord is a digital platform where users communicate via video calls, audio calls, media, files, and text in private chats. It works under multiple operating systems, including Mac, Windows, Linux, iPadOS, Web browsers, and Android. In other words, it is excellent for various users with different devices.
Discord GIF profile pic is one of the most popular topics related to the platform. Of course, the platform is new; hence developing a discord animated profile pic can be a hustle to newbies. Fortunately, this article is here with the right questions and responses. Do you wish to learn how to get a discord animated profile picture? If yes, journey with us to learn about discord GIF profile pics and get animated profile pictures on discord. Read on!
In this article
01 [What’s GIF for Discord profile?](#Part 1)
02 [How to Get Animated Profile Picture without having Discord Nitro?](#Part 2)
03 [How to make Discord PFP a GIF?](#Part 3)
04 [How to Put a GIF in Discord profile Picture?](#Part 4)
Part 1 What’s GIF for Discord profile?
Before reviewing the meaning of a GIF in Discord, it is essential to understand what it generally means. Technically, GIF in full means Graphical Interchange Format referring to an image format. In other words, it is an animated image. The file size is probably the smallest, with images looping continuously in a soundless video without the user doing much.
In this case, we are talking about discord and gifs. That is the animated profile picture discord. Think about how you have profile images for different social media accounts. It is the same case, but you settle for a GIF discord profile instead of photos**.**
Why use GIF for Discord Profile?
It is no hush-hush that many people are gradually adopting the idea of gifs in their discord profiles. After all, gifs aren’t new, and they are everywhere. This fact leaves us wondering why you should use it and its effect on your account.
● GIFs are the best way to grab attention and create a connection with your friends. From its definition, gif contains loops that quickly get the attention you wish for your work.
● They display a friendly side that helps you create a connection with people.
● It gives your account more emotion and a sense of friendliness that leaves people wanting to communicate with you.
● Gifs are the current trend; hence, they indicate a direction. In other words, you pay attention to trends.
● It provides a sense of entertainment and youthfulness in your work.
GIFs are everywhere; hence, it is fantastic to adapt to the current trends that young people follow to keep up with technological evolutions. Create a GIF profile on discord and realize the fun you miss out on discord. And if you are yet to create a discord account, ensure that you join the platform and freely communicate with your friends.
Part 2 How to Get Animated Profile Picture without having Discord Nitro?
Are you a Discord user, or are you get to create an account? If yes, you are familiar with discord nitro and all the advantages that come with it. And if you are not a user, you probably are confused about discord Nitro. Let’s start with basic information on discord nitro and its use. Discord Nitro is the genre version of discord with multiple features, making it a worthy option. It enhances your experience with discord voice, text, video, and most importantly, creating profile pictures.
The Nitro version promotes animated discord profile pics. It is a great option but, what do you do when you can’t afford it? Is it still possible to get cool animated discord profile pics? Yes. You can comfortably get a profile discord GIF without Discord Nitro. And you are lucky since this section will cover this necessary topic.
Of course, we have to thank content writer Ubaid Ullah for the article on how to get Discord GIF profile without nitro. After all, it is one of our reference points.
Step 1: Create a GIF or download one that meets your taste from different websites. Currently, we have many sites offering free GIFs; hence you don’t have to worry about copyright issues. Some top websites to consider are Giphy, Gifer, etc.
Step 2: Look for a site that can translate a GIF document to the APNG file. Don’t worry about this step since you can always google the top options. We currently have the ezgif site but technology changes every day; hence you can expect rising websites.
Step 3: Let’s use the ezgif website. Upon accessing it, ensure that you settle for the APNG maker icon. It is on the top left of the website.
Step 4: Check on the Crossfade Frames option. Note that you need to choose images with at most thirty frames. Finally, click on the Make APNG option
Step 6: You can add multiple after-effects after creating the GIF to customize the final look
Step 7: Download the final file and save it on your PC with the name you wish
Step 8: Upload on Discord
Important things to note when uploading GIFs on Discord
● Discord only allows a file that is at least 8MBs. So, if yours isn’t, you can compress it via different websites.
● A gif with nitro is neater, but a GIF without nitro works better than having an image.
● Even without discord Nitro, you still have access to the cool animated discord profile pics if you have a discord server. Suppose you have an animated discord profile, and then we can only see one frame without discord nitro.
Part 3 How to make Discord PFP a GIF?
From the beginning of this piece until now, all we have discussed is getting or making a GIF. However, we will define the simplest way to make your profile pic a GIF in Discord in this case. Ensure that you read through this section.
Generally, discord nitro users are more privileged compared to normal discord users. Of course, the Nitro subscribers pay a fee to access these privileges. There are two options:
● Making your profile picture a GIF
● Utilizing the Tenor GIFs
● Uploading them from your files
02How to create your profile picture a GIF?
Step 1: Log into your Discord account
Step 2: Visit the user settings gear icon and go to edit profile to access your account details.
Step 3: Click on your current profile or click on the Change Avatar option
Step 5: Use the available GIF search engine or upload files from your device. It depends on whether you are a Nitro subscriber or a normal user. Select your GIF and go to the Apply option to save the file
Step 6: Move to the escape button to exit the settings, and you realize that your PFP is officially a GIF.
02Key points on discord GIF profile
● You only have access to the discord nitro profile GIFs if you are a nitro subscriber. Otherwise, you need to look for GIFs from different websites and upload them.
● The maximum resolution of a GIF is 128 by 128 pixels hence you need to be careful.
● The GIF file size for discord is at most 8MBs.
● You can create a GIF instead of uploading it from free websites.
Part 4 How to Put a GIF in Discord profile Picture?
Discord is quite a popular platform with millions of users worldwide. Thanks to the user-friendly interface it includes, this number is enormous, especially when you wish to edit your profile picture. In our case, we explain facts about having a GIF as a PFP in discord.
Like most social media platforms, this process is relatively easy. It only requires you to be a discord user, and it is better if you are a nitro subscriber. Why? Because the latter have the discord GIF options easing the process. Note that you can still add a GIF even without nitro.
The first point is to log into your account, go to setting and click on the edit your profile option. Upon clicking on the available PFP, you will automatically access a file dialogue that prompts you to include your GIF. Later save these changes and get a GIF profile in discord.
GIFs are like looping or repetitive short videos; hence they need editing. Fortunately, we have the Wondershare Filmora Video Editor editor, which includes multiple features which assist in editing your work. Filmora features scene detection, video stabilization, noise removal, text editor, etc. All these features work together to deliver high-quality discord profile GIFs.
Wondershare Filmora - Best Video Editor for Mac/Windows
5,481,435 people have downloaded it.
Build unique custom animations without breaking a sweat.
Focus on creating epic stories and leave the details to Filmora’s auto features.
Start a creative adventure with drag & drop effects and endless possibilities.
Filmora simplifies advanced features to save you time and effort.
Filmora cuts out repetition so you can move on to your next creative breakthrough.
● Ending Thoughts →
● It is possible to have unique GIFs in your Discord account as a normal discord user
●> Editing Discord profile is convenient for all
● There are countless websites available that can assist you in getting a good GIF
● Generally, discord is a powerful platform with millions of users. It is pretty new but has received positive feedback from people. Discord includes amazing unique features, including animated discord profile pictures. However, there is maximum confusion on setting discord gif profiles, which is the area that this article addresses. Clear all doubts on profile discord GIFs by reading the content above.
Easy Ways to Edit Recorded Video
The most critical component of post-production for a video marketer is editing. Your video will seem unfinished and repel your viewers if you cannot effortlessly weave your images together or get your cut to reach the proper frame. Learning to edit a video may soon become a never-ending task. While each project you work on will have somewhat different editing needs, the principles of video editing remain basically the same. You don’t need to spend a lot on costly equipment to have a professional appearance; if you pay attention to a few important things, you can produce excellent movies with whatever you have right now.
Content producers, entrepreneurs, and influencers can have much too much material to include into a single YouTube video. You may not be able to buy video editing software if you’re on a tight budget. So, what does a video marketer do if they don’t have editing software? To assist you with the process of video editing, we’ve put up this thorough tutorial that covers everything you’ll need to know to make stunning films, even if you’ve never done it before. We’ll also demonstrate how to utilize the super-intuitive and user-friendly editor to create a video.
Part 1. Edit Recorded Video in OBS
OBS is a video streaming and recording application. It’s open source, free, and works on Macs, Windows, and Linux. It is a strong and adaptable screencast video creation tool when paired with competent audio and video editing tools. Unfortunately, OBS doesn’t support editing feature and hence, we’re enlisting the recording steps so you can edit them by using a third-party toolkit mentioned in the guide.
Step 1. Download and Install OBS
Install OBS according to the instructions for your operating system by downloading it from the link below.
Step 2. Setup Screen Recording
The window is divided into separate parts called “docks” when you initially launch the app. Every dock has a distinct function. Scenes, Sources, Mixer, and Controls are the areas to pay attention to. OBS employs a Scenes and Sources system, which will be discussed in more depth in a later lesson. These two tools operate in tandem to help you keep track of your video, audio, and other production materials. When you first start OBS, you’ll see that a scene is already loaded, which you can locate in the bottom left corner of the interface.

You’ll also need to add a source to this scene before you can begin recording. Click the Add button at the bottom of the Sources panel, then pick Screen Capture on Linux or Display Capture on Mac and Windows with the default Scene chosen (it will be highlighted).
Step 3. Customize the Recording Source
You’ll need to create a new source before you can begin recording your desktop screen. Select “Display Capture” by clicking the “+” icon on the Sources dock. You will be prompted to name the Display source in a popup window. Click “OK”. At the bottom right of the screen, click the Settings icon. Take note of the Recording Path field under the Output tab. This is where your recorded video will be kept on your computer.

Step 4. Start/Stop Recording
You’ll be able to choose the computer screen display you wish to capture in the following window. If you just have one monitor, make that the default. OBS Studios should show you the screen in the window after a valid display has been chosen. We need to change your graphics settings if OBS is unable to successfully load the screen video. Click the Start Recording button in the bottom right corner when you’re ready to begin recording. When you’re finished, click Stop Recording, and a movie will be saved to the folder you chose in the preferences.

Part 2. Edit Recorded Video in Filmora
Wondershare Filmora is a powerful screen recording application that includes a video editing suite, screen sketching tools, AI face recognition, built-in video effect packs, customizable branding watermark, and more. It may not only make recording movies simpler, but it may also provide you more possibilities for making your films more professional, creative, and attractive. Filmora is a great tool for beginners who want to make high-quality explainer films, training videos, demo videos, and more quickly. Because of the excellent video templates, screen recording is more appealing. To highlight important information, people might utilize annotation tools like as callouts, arrows, and drawing motions.
Steps to Record and Edit with Filmora
Step 1: Install Filmora on your laptop
To begin, you must first download this software program to your system from the following links:
For Win 7 or later (64-bit)
For macOS 10.12 or later
After you’ve finished downloading it, you’ll need to install it on your computer so that you can start using it with your laptop.
Step 2: Launch the Program and Begin Customizing It
The next step is to launch the software application and start recording your screen. Simply click the New Recording button in the start-up box to start recording. You may totally alter your screen recordings using the tools included in Filmora. You may also incorporate your laptop’s Webcam or a microphone as an audio source in your recordings.

Step 3: Start/Stop Screen Recording
Now is the time to begin recording your audio, which you can accomplish by hitting the red circular recording button. Press the Square-shaped button on your laptop’s screen to end the recording.

Step 4: Edit the Recordings and Save Them
Finally, you may adjust your audio recordings with entirely configurable editing tools. To do so, use Filmora’s editor and utilize easy to complicated editing ways to edit your recorded audio files. Filmora’s Editor lets you add Animated Titles, amazing effects, Audio Enhancements, and more to your recorded video to make it more polished.

Step 5: Add Special Effects to Your Video
Wondershare Filmora was designed specifically to provide a professional touch to your videos. It includes a number of eye-catching and adaptable effects that you can use to make your video projects stand out from the crowd. We’ve gone through some of the greatest effects for giving life to your drab and amateurish videos in this section.

Step 6: Save or Share the Videos
Finally, after you’ve finished editing the recorded video, you may utilize the Filmora editor in its entirety, as described before. Click the Export option and select the platform where you wish to share your video clip to post your work of art immediately to YouTube or another well-known website. You may even alter the movie before sharing it if you desire.

Part 3. Edit Recorded Video with Zoom
Trimming and editing Zoom recordings is a necessary for digging out value-packed nuggets from captured footage. But although you already know this, you’re probably putting off doing so as you’re anticipating you’ll need to learn a ton of new tools to edit Zoom recordings.
Steps to Record Videos with Zoom
Step 1For the cloud recordings, go to zoom.us and log in to your account. Then, navigate to ‘Settings’ from the navigation menu on the left.

Step 2 Under Advanced cloud recording options, tick the option for ‘Optimize the recording for 3rd party video editor’ and click ‘Save’.

Step 3Then, navigate to ‘Recording’ from the navigation menu on the left. Check the option for ‘Optimize for 3rd party video editor.

Step 4To really edit a Zoom recording, whether it’s stored on your PC or Zoom cloud, you need to utilize third-party video editing software. But no worries, you don’t need any sophisticated equipment or software here.
Part 4. Edit Recorded Video in Teams
Teams gives the opportunity to record your online meetings. This may be especially beneficial for sharing meeting recordings with individuals unable to attend live, to preserve instructional material for future use, or to enable participants to revisit prior meeting topics. At the top of the meeting window, a message will appear stating that the recording has begun, which alerts participants that their interactions in the meeting may be recorded by the recording. You will also notice a recording sign and the duration of the recording in the top-left corner of the meeting window.
Steps to Record Videos with Teams
Step 1 Open Microsoft Teams on Windows and Mac.
Step 2 Go to appropriate Teams or Channel and click on the Video button at the top to create a video call.

Step 3Invite people and organize a meeting. Whenever you feel you need to record any significant point, click on the three-dot menu at the top.

Step 4 Click on Start recording and Microsoft Teams will start recording the video/voice call. As soon as you start recording, every participant will be told about it.
At any moment, you may stop recording from the same. Once the meeting as concluded, your recording will display in the Chat panel in the main Teams window. Please note that depending on the length of the recording it might take some time for the recording to complete and display in the meeting chat. To find the recording, pick the Chat panel, open the correct meeting from the chat list and the recording will display in the chat window once processed.

Part 5. Edit Recorded Video in Google Meet
With more individuals working from home these days, services like Google Meet are rising in popularity. You may have an online video conference, see everyone’s face, communicate, and take care of business. As with in-office meetings, notes with action items and summaries for online meetings are just as crucial. Unfortunately, it doesn’t always happen. To have formal documentation for your meeting or share it with people who couldn’t attend, try recording your Google Meet.
Steps to Record and Edit Videos by Meet
Step 1. Launch Meet
Visit Google Meet and sign in to join or start your meeting.
Step 2. Start Recording
Select the Activities symbol on the bottom right and pick Recording when you’re ready to start recording.

Step 3. Stop/Save Recording
Visit Google Drive and login in if required. Navigate to My Drive on the left and search for the Meet Recordings folder on the right. It may take several minutes for the recording to show. If you do not already have a Meet Recordings folder, Google Drive will create one. You’ll notice the recording named with the meeting identifier along with the date and hour. If Chat took occurred during the meeting, you’d view this as a distinct text file.
To get a preview of your recording or chat transcript, just double-click the file in the Meet Recordings folder on Google Drive. You may download, distribute, or acquire a link to the recording (or chat) file from the Meet Recordings folder or the File Preview. In the folder, right-click the file and pick an action from the menu. Notice you may execute further options such as Rename, Make a copy, and Open with.

Step 4. Use WeVideo to Edit Videos
WeVideo is the cloud-based video production tool that supports student creativity, narrative, engagement and multimodal learning. Video projects develop deep knowledge about a subject through creating abilities like teamwork, communication and critical thinking. Log in and click Create New. Choose what you want to make (video, recording, etc.) and a format. Upload your media or search the Stock media repository. Make any extra modifications and preview your movie one final time. All done? Click Finish to export, download and share your video!

Part 6: Related FAQs
1. How do I edit video recordings?
Most individuals have the tools they need to film and edit small videos. With a smartphone or tablet and access to a computer, you can get the job done without even checking out equipment, much less employing a key grip. A laptop isn’t the finest equipment to film a movie–that would be extremely uncomfortable. Smartphone or tablet is easy to use. This topic is for those with access to an iPhone and a PC. Android, iPad, and Mac users will have a distinct process. Smartphones and tablets often default to recording video at a very high-Quality level, which takes up a lot of memory and results in big file sizes. Most likely you will want to lessen the resolution that you photograph.
Can you edit an already uploaded video?
If you have found yourself in this circumstance, your initial instinct could be to worry and assume you must repair the issue, delete the uploaded video, and re-upload the new one. However, this procedure will make your prior video URL dead, and any embeds of your video will display the following graphic to visitors. Nevertheless, these aforementioned sites recognizes that artists occasionally make small honest errors, or someone included in the uploaded video may demand that they be removed from it. So, to permit that, makers may chop away sections from their film without resetting a video’s metrics.
How to edit recorded video on iPhone?
If you have iOS 13 or later, you can edit films in the built-in Photos app… much as you edit your images. You may cut, crop, and straighten your films. And you may make your film more attractive by altering brightness, color, or even making it black and white. Filming films on iPhone has gotten more popular as iPhone camera lenses have progressed over the years. Many iPhone filmmakers desire the capacity to edit their video directly from their phone for simple social sharing. Using a video editing software for iPhone is a terrific method to effortlessly produce and upload videos. just open the video you want to modify, then press Edit at the upper right to get it done.
Conclusion:
If you routinely use Google Meet or Zoom, it can be a good idea to record your conferences so you can still return to them at a later period. Recording these conversations and meetings may be a big assistance when it’s time for later evaluations, updates, and enabling absent team members catch up on the meeting topic. For instance, do you wish to share meeting minutes or information with people missing in this meeting? Essentially the call recording is for other co-workers to view afterwards. Instead, you may use the recommended screen recorders to capture every moment and then use a specialist video editor like Filmora to make the required edits before sharing it with others.
For macOS 10.12 or later
After you’ve finished downloading it, you’ll need to install it on your computer so that you can start using it with your laptop.
Step 2: Launch the Program and Begin Customizing It
The next step is to launch the software application and start recording your screen. Simply click the New Recording button in the start-up box to start recording. You may totally alter your screen recordings using the tools included in Filmora. You may also incorporate your laptop’s Webcam or a microphone as an audio source in your recordings.
Step 3: Start/Stop Screen Recording
Now is the time to begin recording your audio, which you can accomplish by hitting the red circular recording button. Press the Square-shaped button on your laptop’s screen to end the recording.
Step 4: Edit the Recordings and Save Them
Finally, you may adjust your audio recordings with entirely configurable editing tools. To do so, use Filmora’s editor and utilize easy to complicated editing ways to edit your recorded audio files. Filmora’s Editor lets you add Animated Titles, amazing effects, Audio Enhancements, and more to your recorded video to make it more polished.
Step 5: Add Special Effects to Your Video
Wondershare Filmora was designed specifically to provide a professional touch to your videos. It includes a number of eye-catching and adaptable effects that you can use to make your video projects stand out from the crowd. We’ve gone through some of the greatest effects for giving life to your drab and amateurish videos in this section.
Step 6: Save or Share the Videos
Finally, after you’ve finished editing the recorded video, you may utilize the Filmora editor in its entirety, as described before. Click the Export option and select the platform where you wish to share your video clip to post your work of art immediately to YouTube or another well-known website. You may even alter the movie before sharing it if you desire.
Part 3. Edit Recorded Video with Zoom
Trimming and editing Zoom recordings is a necessary for digging out value-packed nuggets from captured footage. But although you already know this, you’re probably putting off doing so as you’re anticipating you’ll need to learn a ton of new tools to edit Zoom recordings.
Steps to Record Videos with Zoom
Step 1For the cloud recordings, go to zoom.us and log in to your account. Then, navigate to ‘Settings’ from the navigation menu on the left.
Step 2 Under Advanced cloud recording options, tick the option for ‘Optimize the recording for 3rd party video editor’ and click ‘Save’.
Step 3Then, navigate to ‘Recording’ from the navigation menu on the left. Check the option for ‘Optimize for 3rd party video editor.
Step 4To really edit a Zoom recording, whether it’s stored on your PC or Zoom cloud, you need to utilize third-party video editing software. But no worries, you don’t need any sophisticated equipment or software here.
Part 4. Edit Recorded Video in Teams
Teams gives the opportunity to record your online meetings. This may be especially beneficial for sharing meeting recordings with individuals unable to attend live, to preserve instructional material for future use, or to enable participants to revisit prior meeting topics. At the top of the meeting window, a message will appear stating that the recording has begun, which alerts participants that their interactions in the meeting may be recorded by the recording. You will also notice a recording sign and the duration of the recording in the top-left corner of the meeting window.
Steps to Record Videos with Teams
Step 1 Open Microsoft Teams on Windows and Mac.
Step 2 Go to appropriate Teams or Channel and click on the Video button at the top to create a video call.
Step 3Invite people and organize a meeting. Whenever you feel you need to record any significant point, click on the three-dot menu at the top.
Step 4 Click on Start recording and Microsoft Teams will start recording the video/voice call. As soon as you start recording, every participant will be told about it.
At any moment, you may stop recording from the same. Once the meeting as concluded, your recording will display in the Chat panel in the main Teams window. Please note that depending on the length of the recording it might take some time for the recording to complete and display in the meeting chat. To find the recording, pick the Chat panel, open the correct meeting from the chat list and the recording will display in the chat window once processed.
Part 5. Edit Recorded Video in Google Meet
With more individuals working from home these days, services like Google Meet are rising in popularity. You may have an online video conference, see everyone’s face, communicate, and take care of business. As with in-office meetings, notes with action items and summaries for online meetings are just as crucial. Unfortunately, it doesn’t always happen. To have formal documentation for your meeting or share it with people who couldn’t attend, try recording your Google Meet.
Steps to Record and Edit Videos by Meet
Step 1. Launch Meet
Visit Google Meet and sign in to join or start your meeting.
Step 2. Start Recording
Select the Activities symbol on the bottom right and pick Recording when you’re ready to start recording.
Step 3. Stop/Save Recording
Visit Google Drive and login in if required. Navigate to My Drive on the left and search for the Meet Recordings folder on the right. It may take several minutes for the recording to show. If you do not already have a Meet Recordings folder, Google Drive will create one. You’ll notice the recording named with the meeting identifier along with the date and hour. If Chat took occurred during the meeting, you’d view this as a distinct text file.
To get a preview of your recording or chat transcript, just double-click the file in the Meet Recordings folder on Google Drive. You may download, distribute, or acquire a link to the recording (or chat) file from the Meet Recordings folder or the File Preview. In the folder, right-click the file and pick an action from the menu. Notice you may execute further options such as Rename, Make a copy, and Open with.
Step 4. Use WeVideo to Edit Videos
WeVideo is the cloud-based video production tool that supports student creativity, narrative, engagement and multimodal learning. Video projects develop deep knowledge about a subject through creating abilities like teamwork, communication and critical thinking. Log in and click Create New. Choose what you want to make (video, recording, etc.) and a format. Upload your media or search the Stock media repository. Make any extra modifications and preview your movie one final time. All done? Click Finish to export, download and share your video!
Part 6: Related FAQs
1. How do I edit video recordings?
Most individuals have the tools they need to film and edit small videos. With a smartphone or tablet and access to a computer, you can get the job done without even checking out equipment, much less employing a key grip. A laptop isn’t the finest equipment to film a movie–that would be extremely uncomfortable. Smartphone or tablet is easy to use. This topic is for those with access to an iPhone and a PC. Android, iPad, and Mac users will have a distinct process. Smartphones and tablets often default to recording video at a very high-Quality level, which takes up a lot of memory and results in big file sizes. Most likely you will want to lessen the resolution that you photograph.
Can you edit an already uploaded video?
If you have found yourself in this circumstance, your initial instinct could be to worry and assume you must repair the issue, delete the uploaded video, and re-upload the new one. However, this procedure will make your prior video URL dead, and any embeds of your video will display the following graphic to visitors. Nevertheless, these aforementioned sites recognizes that artists occasionally make small honest errors, or someone included in the uploaded video may demand that they be removed from it. So, to permit that, makers may chop away sections from their film without resetting a video’s metrics.
How to edit recorded video on iPhone?
If you have iOS 13 or later, you can edit films in the built-in Photos app… much as you edit your images. You may cut, crop, and straighten your films. And you may make your film more attractive by altering brightness, color, or even making it black and white. Filming films on iPhone has gotten more popular as iPhone camera lenses have progressed over the years. Many iPhone filmmakers desire the capacity to edit their video directly from their phone for simple social sharing. Using a video editing software for iPhone is a terrific method to effortlessly produce and upload videos. just open the video you want to modify, then press Edit at the upper right to get it done.
Conclusion:
If you routinely use Google Meet or Zoom, it can be a good idea to record your conferences so you can still return to them at a later period. Recording these conversations and meetings may be a big assistance when it’s time for later evaluations, updates, and enabling absent team members catch up on the meeting topic. For instance, do you wish to share meeting minutes or information with people missing in this meeting? Essentially the call recording is for other co-workers to view afterwards. Instead, you may use the recommended screen recorders to capture every moment and then use a specialist video editor like Filmora to make the required edits before sharing it with others.
How to Speed Up Pictures on TikTok Slideshow
How to Speed Up Pictures on Tiktok Slideshow
An easy yet powerful editor
Numerous effects to choose from
Detailed tutorials provided by the official channel
Increasing the play speed of a TikTok slideshow may sometime appear a necessity. Stay here to have an insight into the process of making your TikTok slideshows faster!
In this article
01 [How Do You Change the Time on a Tiktok Slideshow?](#Part 1)
02 [How Do You Watch 3x Speed on Tiktok?](#Part 2)
03 [Why You Should Speed Up Pictures on Tiktok?](#Part 3)
04 [5 Best Ways to Speed Up a Video on Tiktok](#Part 4)
05 [FAQs of Speeding Up Pictures on Tiktok Slideshow](#Part 5)
Part 1 How Do You Change the Time on a Tiktok Slideshow?
TikTok slideshows are a guaranteed media of fun and entertainment among family and friends. Used mostly as a source of personal recreation, these are a storehouse of creativity and enjoyment. Such video presentations are short enough to last for a mere set of seconds to minutes, and consequently the play speed hardly gets noticed. However, there may be a few instances that put forward the concern of how to speed up TikTok slideshows.
Discussing along the line, let us look through solutions of modifying the play duration of TikTok slideshows in the following section:
User’s Guide to Adjust the Play Duration of a TikTok Slideshow
Step 1: Launch the Application
To proceed with the duration adjustment process, start with launching the TikTok application in your preferred device.
Step 2: Open a Slideshow
In the application’s main interface, open a preferred slideshow presentation that you wish to adjust the time duration of.
Step 3: Set the Play Duration
Navigate to the top right corner of the app screen and click on the ‘Adjust Clips’ icon. A duration slider holding you selected slideshow pops up on the screen. Drag the duration bars to the left and right sides for fixing the start and stop time of the presentation.
Step 4: Save Your Changes
As you finish setting the play duration, navigate to and click on the ‘Save’ button at the top right corner of the app screen to confirm and apply the changes to the TikTok slideshow.
Part 2 How Do You Watch 3x Speed on Tiktok?
Creating and watching TikTok slideshows is a mix and match of craft and fun. As already stated, such slideshows are small enough to escape the time frame; however, you may often require a speed modification of the same. When the talk is of speed adjustment, the beneficiary side generally lies in decreasing the slideshow run time.
Moving ahead with our discussion, let us look through the process of watching a TikTok slideshow in 3x speed while sorting out the issue of how to speed up photo slideshow on TikTok in the upcoming section of this article:
User’s Guide to Watch a TikTok Slideshow in 3x Speed
Step 1: Launch the TikTok App
In any of your preferred MacOs, Windows or Android devices, proceed to launch the TikTok application, as the first step to increase the slideshow speed.
Step 2: Create a Slideshow
Navigate to and tap the ‘+’ icon at the bottom of the app’s welcome screen to create a slideshow video or post.
Step 3: Adjust the Play Speed
You now need to head towards the top right corner of the interface and click on the ‘Speed’ button. You will see the ‘Speed Bar’ pop up over of the ‘Record’ button with a series of speed modification options. Select the desired speed you wish to watch the slideshow in. Addressing the specific concern of 3x speed, tap on the respective option.
Part 3 Why You Should Speed Up Pictures on Tiktok?
TikTok pictures are a delight to watch and share among friends and family on social media. While creating image and video posts on TikTok sounds good enough, it is common to land across instances that demand an increase of the image play speed. Extending our talk a bit further, let us dive into the credibility of speeding up images on the TikTok application in the following section:
Importance of Speeding Up TikTok Presentations
It is a commonly known fact that the play duration of TikTok slideshows can be 3 minutes at the most. This stands up as a problem when you have a series of images to include within the slideshow and there exists a significant time lapse between the transitions of any 2 successive images. This time gap may lead to a miss out of images from being uploaded to the slideshow before the expiry of the allotted 3 minute run time.
To escape the disappointment of an incomplete presentation, you can easily pick the alternative of speeding up the slideshow images, so that all the photos may become a part of the slideshow. If you are bothered by the concerns of image quality and output resolution, rest assured, as the speed adjustment utility of the TikTok application has nothing to do with these parameters.
Part 4 Best Ways to Speed Up a Video on Tiktok
As explained in the previous section, speeding up videos and images within the TikTok application is of great significance to make sure that all the required media content fits in the 180 second long post on the platform. Adhering to the same, let us look through some of the best and popular methods to set straight the issue of how to speed up slideshow on TikTok in what follows next:
01Using the Motion Effects of TikTok to Record Fast Motion Videos
The aforesaid method conveniently takes the credit of being the most widely preferred means to increase the play speed of TikTok videos. The method works to cater to the speed modification concern by recording a high speed motion video through the default motion effects of the TikTok application. This in turn, rescues you from the task of downloading the TikTok video to your device.
Working with the feature, you can opt to increase or decrease the play speed of the videos, along with simultaneously recording them prior to a social media export. The process is easy and simple enough to proceed with, as explained in the following user guide:
User’s Guide to Speed Up TikTok Videos by Recording
Step 1: Launch the TikTok Camera
To answer the query of how to speed up a TikTok slideshow, start with opening the TikTok application in any of your preferred devices. When you are welcomed by the app’s main interface, navigate to the bottom of the same and click on the ‘+’ icon. This will instantly cause the application’s camera to open up.
Step 2: Pick a Motion Effect
The TikTok camera launches to bring the ‘Motion Effects’ window into picture. You can choose a desired speed modification effect from the 5 choices available. If you are keen on increasing the video speed, pick any one of the 2x or 3x effects for recording a video in the fast-forward mode.
If however, the aforesaid motion effects do not appear on your app screen, navigate to the ‘Options’ menu at the top left corner of the same and tap on the ‘Speed’ icon.

Step 3: Record the Video
Hit the red colored ‘Record’ button to capture a TikTok video in the fast-forward motion. The app further allows you to create multiple speed recordings of a particular video clip. All you need to do is, click on the ‘Stop’ button, followed by making a desired adjustment in the recording speed, and lastly, resume the video recording process.
Step 4: Customize the Recorded Video
As you finish recording the high speed video, click on ‘OK’ to launch TikTok’s editing interface. Here, proceed to customize the recorded video with the app’s preset editing effects and filters. When you are happy with your work, move ahead with posting the same to tour TikTok account.
02Applying a High Speed Motion Effect to a Locally Saved TikTok Video
As stated earlier, the TikTok application comes with a built-in graphic editor to allow its users to create high quality media edits. Likewise, you can work with the aforesaid utility to increase the speed of TikTok videos prior to an upload across media sharing platforms as well as TikTok itself. Here’s a detailed, stepwise user guide to go about the process without a hustle:
User’s Guide to Speed Up Locally Saved TikTok Videos
Step 1: Open the Application Camera
Begin with launching the TikTok application in a suitable Windows, MacOS or Android device, followed by heading to the bottom of the app’s launch screen and clicking on the ‘+’ symbol to automatically open the latter’s camera.
Step 2: Upload the Videos
Navigate to the ‘Upload’ option beside the ‘Record’ button to open your device’s local media gallery. You can browse through this space to select and upload a desired video. You can also upload a set of videos, provided that all your uploaded clips should fall under the 3-minute constraint of TikTok posts. Tap ‘Next’ to complete the video upload process.

Step 3: Adjust the Video Play Speed
The completion of Step 2 causes a video timeline to pop up at the bottom the app’s working screen. To make adjustments in the video playback rate, hit the ‘Speed’ icon within the timeline, followed by selecting the 2x playback speed. You can further, trim the video by dragging the sliders, as well as change the video layout using the ‘Flip’ option. When you have made the required changes, tap ‘Next’ to proceed further.
the

Step 4: Customize the Video
As the video processing comes to an end, you will be directed to the app’s editing workspace, where you can customize your clip quickly and easily with texts, filters, sounds, stickers, voiceovers, etc.
03Speeding Up a TikTok Video Using the Wondershare Online UniConverter Program
While the TikTok application comes with an inbuilt feature to increase the playback rate of its videos, there are a range of third party programs and utilities that promise of adhering to the aforesaid concern with utmost ease. Moving along the line, there is the Wondershare Online UniConverter program that works to speed up Tiktok videos up to 2x the original playback rate.
You can additionally work with the program to customize the video in a variety of aspects, while exporting the same across a series of media sharing platforms in a diversity of file formats. Having talked enough about the program’s video editing credibility, let us look into the process of increasing the run speed of TikTok videos using the app in what follows next:
User’s Guide to Increase the TikTok Video Speed With Wondershare Online UniConverter
Step 1: Launch the Program
In any of your favorite web browsers, navigate to the official site of Wondershare and launch the Online UniConverter program from the list of available utilities.
Step 2: Open the Required Tool
in the application’s welcome interface, navigate to the ‘Online Tools’ tab in the top toolbar and click on the same to select the ‘Change Video Speed’ option from the drop down menu that follows.

Step 3: Upload the TikTok Video
As far as the video upload task is concerned, desktop users can directly upload their TikTok video to the utility by dragging and dropping the video file from its location in the device. In case of laptop, smartphone and iOS users, they can tap ‘Choose Files’ on the app’s main screen to select and upload the video file from the local media gallery of their device.

Step 4: Pick a Suitable Video Speed
When you have finished uploading the video, navigate to the toolbar at the top of the app’s welcome interface and hit the ‘Video Speed’ tab. A ‘Speed Slider’ will pop up, which you can use to make suitable speed adjustments by dragging the latter in the left or right directions to respectively, decrease or increase the video playback rate.

The app allows you to set a video run speed between 0.25x to 2x. Prefer watching a preview of the clip with the modified speed to ensure affordable results.
Step 5: Save the Fast-Forwarded Video
If the video playback preview in Step 3 satisfies you enough, proceed to save the clip locally to your device. All you need to do is, select a video file format, (MP4 is recommended to ensure affordable output quality), followed by navigating to the bottom right corner of the screen and hitting the ‘Start’ button.

04Speeding Up a TikTok Video Using the Clideo Online Tool
In line with the Wondershare Online UniConverter program, this one is another reliable web based utility to modify the speed of your TikTok videos. Working with the facility, you are permitted to change the playback speed of a video clip in a variety of file formats, along with getting to customize the latter with a range of tools and effects.
The app however, takes a bit longer time to render the speeded up video output, and leaves a watermark on the same. Nevertheless, let us try hands at understanding the procedure to increase the speed of TikTok videos with the app in the following section:
User’s Guide to Speed-up TikTok Videos With Clideo Online Tool
Step 1: Launch the Online Tool
Start with visiting the home website of Clideo in your preferred internet browser and launching the online program in your device. In the app’s main interface, navigate to and click on ‘Tools’ followed by selecting the ‘Speed Video’ option from the drop down menu that appears next.
Step 2: Select Your TikTok Video
As you complete Step 1, the ‘Choose File’ tab appears on the app screen. Click on the same to reach your device’s local media gallery and pick a desired TikTok video to upload to the program for modifying the latter’s speed. You can alternatively, ‘Drag and Drop’ the clip to the program’s file upload section.
Step 3: Change the Video Speed
As you upload the clip, the app’s video editing window pops up, where you can modify the playback speed of your clip, either by dragging the ‘Change Video Speed’ slider from left to right, or by setting a suitable playback speed value among 1.25x, 1.5x and 2.0x in the ‘Speed Chart’ at the right side of the editor window.

Step 4: Export Your Video
When you are satisfied with all the changes till here, proceed to choose a desired file format for sharing the video. Format options are available at the bottom ribbon of the editor window. When you have selected the preferred video format, navigate to and click on the ‘Export’ button at the bottom right corner of the editor workspace to share the video across different media handles.
05Fast Forwarding a TikTok Video With the Wondershare UniConverter Application
Entering the world of third party video editing software programs, you will come across a diversity of choices to work with. As far as the task of modifying the playback speed of TikTok videos is concerned, you can make a smart selection by picking the Wondershare UniConverter application to proceed with the process.
Continuing the legacy of Wondershare utilities, this one is an all-in-one video editor program that you can work with to customize your TikTok videos with a variety of effects and filters, apart from just increasing their playback speed. As of now, let us look through the knowhow of fast-forwarding TikTok clips with the software in the following section:
User’s Guide to Speed-up TikTok Videos with the Wondershare UniConverter Software
Step 1: Launch the Software Program
Visit the official Wondershare website and download the UniConverter program in your preferred desktop or PC, followed by installing and launching the same on your system. Upon being greeted by the app’s welcome screen, navigate to the ‘Features Panel’ at the left and select the ‘Video Editor’ tab. In the window that pops up navigate to and hit the ‘Effect’ option. You can now upload a desired TikTok video that you want to increase the speed of.

Step 2: Select an Incremental Video Playback Speed
Within the ‘Effect’ interface, head to and click on the ‘Change Speed’ tab at the right side of the window, followed by selecting a suitable playback speed greater than 1x and up to 2x. When you have made your choice; tap ‘OK’ to confirm your speed selection.

Step 3: Save the Fast-Forwarded Video
Proceed to save the high speed video by navigating to the bottom left corner and hitting the ‘Output Format’ tab. Now head to the ‘Functions Toolbar’ at the top of the app screen to hit the ‘Web Video’ tab. Within the new window that appears next, reach the left side panel and choose ‘TikTok’.
Select a preferred video format from the list that appears at the right side of the window and lastly, reach to and tap the ‘Start’ button at the bottom right corner to initiate the video conversion speed increment process.

06Fast Forwarding a TikTok Video with the VideoProc Vlogger Application
Moving ahead in the line of software utilities that work towards the requirement of how to speed up a slideshow on TikTok, the VideoProc Vlogger application offers a dependable credibility. This one is a Windows and Mac compatible video editor program that claims of a high end video customization facility along with playback rate adjustments, while assuring an appreciable output quality.
Working with the program, you are allowed to set a 16x faster or slower video speed in relation to the actual playback rate. You can further, choose to render the fast-forwarded video in a variety of file formats. As of now, let us see through the method of increasing the speed of a TikTok video within the app in what follows next:
User’s Guide to Speed-up TikTok Videos With the VideoProc Vlogger Program
Step 1: Launch the Application Program
Navigate to the official website of the software to download, install and launch the program in your preferred Windows and MacOS device, followed by clicking on the ‘New Project’ tab at the bottom right corner of the program’s welcome interface.
vui

Step 2: Import Your TikTok Video
The Within the ‘New Project’ window, proceed to import the desired TikTok video from your device’s local media gallery to the app’s media library, followed by dragging the same to the software’s editor timeline.
Step 3: Make Speed Adjustments
Navigate to and hit the ‘Play Speed’ tab at the right side of the app’s editing workspace. The speed adjustment window pops up, where you can choose to increase or decrease the speed of the uploaded video by clicking on the ‘Speed’ option. Tap the ‘Custom Menu’ to set a desired playback speed value within the speed box. In case you want to include advanced speed customization, click on the ‘Nonlinear Editor’ tab. When you have made the changes, hit ‘OK’ to apply the same.

Part 5 FAQs of Speeding Up Pictures on Tiktok Slideshow
● How can the speed of TikTok slideshows be slowed down?
Start with creating a new post by tapping the ‘+’ icon at the bottom of the app’s launch screen to slow down the speed of a TikTok slideshow. The ‘Recording Speed Options’ appear at the bottom of the screen, from where you can pick the 0.3x and 0.5x playback rates. Proceed to record a new video with reduced play speed by pressing the ‘Record’ button.
● How can the duration of TikTok images be modified?
To set the screen time of a TikTok picture, navigate to the desired image, followed by tapping on the ‘Time’ icon. An adjustment slider pops up, which you can drag from left to right for respectively, increasing or decreasing the image play duration.
● What is the best video editing program to create TikTok slideshows?
If you are keen on posting high quality slideshows on TikTok, consider editing them using the feature-rich library of the Wondershare Filmora video editor program. The app allows you to work with top rated and professionally advanced customization features to add an irresistible spark to your slideshows, with a guaranteed viewer attention.
For Win 7 or later (64-bit)
For macOS 10.12 or later
● How can the speed of a TikTok picture be increased?
To address the concern of how to speed up pictures on TikTok slideshow, navigate to the right side of the app screen and tap the ‘Speed’ icon. From the list of options that appears, you can choose to fast forward the video up to 3x the original playback speed. Select the speed option that suits your requirements and proceed to record the video in high speed by pressing the ‘Record’ button in red.
● How can a specific section of a TikTok video be sped up?
Start with selecting the desired TikTok Video in the app’s timeline, followed by heading to the right side of the launch screen and hitting the ‘Speed’ icon. From the speed options that pop up next, pick any one of the 2X, 4X, 8X, 20X and 50X playback rate choices to fast forward the video section. As an alternative, navigate to the ‘Speed Properties’ window, hit the ‘Speed’ button and move the speed slider to the right side to increase the clip’s running speed.
● Ending Thoughts →
● Creating TikTok videos and slideshow presentations for fun and entertainment has become an evergreen social media trend in today’s time.
● The short duration of TikTok slideshows poses the query of how to speed up picture slideshow on TikTok for including the entire content within the presentation.
● When browsing through software solutions to customize high speed TikTok slideshows, you can conveniently bank upon the Wondershare Filmora video editor program.
Increasing the play speed of a TikTok slideshow may sometime appear a necessity. Stay here to have an insight into the process of making your TikTok slideshows faster!
In this article
01 [How Do You Change the Time on a Tiktok Slideshow?](#Part 1)
02 [How Do You Watch 3x Speed on Tiktok?](#Part 2)
03 [Why You Should Speed Up Pictures on Tiktok?](#Part 3)
04 [5 Best Ways to Speed Up a Video on Tiktok](#Part 4)
05 [FAQs of Speeding Up Pictures on Tiktok Slideshow](#Part 5)
Part 1 How Do You Change the Time on a Tiktok Slideshow?
TikTok slideshows are a guaranteed media of fun and entertainment among family and friends. Used mostly as a source of personal recreation, these are a storehouse of creativity and enjoyment. Such video presentations are short enough to last for a mere set of seconds to minutes, and consequently the play speed hardly gets noticed. However, there may be a few instances that put forward the concern of how to speed up TikTok slideshows.
Discussing along the line, let us look through solutions of modifying the play duration of TikTok slideshows in the following section:
User’s Guide to Adjust the Play Duration of a TikTok Slideshow
Step 1: Launch the Application
To proceed with the duration adjustment process, start with launching the TikTok application in your preferred device.
Step 2: Open a Slideshow
In the application’s main interface, open a preferred slideshow presentation that you wish to adjust the time duration of.
Step 3: Set the Play Duration
Navigate to the top right corner of the app screen and click on the ‘Adjust Clips’ icon. A duration slider holding you selected slideshow pops up on the screen. Drag the duration bars to the left and right sides for fixing the start and stop time of the presentation.
Step 4: Save Your Changes
As you finish setting the play duration, navigate to and click on the ‘Save’ button at the top right corner of the app screen to confirm and apply the changes to the TikTok slideshow.
Part 2 How Do You Watch 3x Speed on Tiktok?
Creating and watching TikTok slideshows is a mix and match of craft and fun. As already stated, such slideshows are small enough to escape the time frame; however, you may often require a speed modification of the same. When the talk is of speed adjustment, the beneficiary side generally lies in decreasing the slideshow run time.
Moving ahead with our discussion, let us look through the process of watching a TikTok slideshow in 3x speed while sorting out the issue of how to speed up photo slideshow on TikTok in the upcoming section of this article:
User’s Guide to Watch a TikTok Slideshow in 3x Speed
Step 1: Launch the TikTok App
In any of your preferred MacOs, Windows or Android devices, proceed to launch the TikTok application, as the first step to increase the slideshow speed.
Step 2: Create a Slideshow
Navigate to and tap the ‘+’ icon at the bottom of the app’s welcome screen to create a slideshow video or post.
Step 3: Adjust the Play Speed
You now need to head towards the top right corner of the interface and click on the ‘Speed’ button. You will see the ‘Speed Bar’ pop up over of the ‘Record’ button with a series of speed modification options. Select the desired speed you wish to watch the slideshow in. Addressing the specific concern of 3x speed, tap on the respective option.
Part 3 Why You Should Speed Up Pictures on Tiktok?
TikTok pictures are a delight to watch and share among friends and family on social media. While creating image and video posts on TikTok sounds good enough, it is common to land across instances that demand an increase of the image play speed. Extending our talk a bit further, let us dive into the credibility of speeding up images on the TikTok application in the following section:
Importance of Speeding Up TikTok Presentations
It is a commonly known fact that the play duration of TikTok slideshows can be 3 minutes at the most. This stands up as a problem when you have a series of images to include within the slideshow and there exists a significant time lapse between the transitions of any 2 successive images. This time gap may lead to a miss out of images from being uploaded to the slideshow before the expiry of the allotted 3 minute run time.
To escape the disappointment of an incomplete presentation, you can easily pick the alternative of speeding up the slideshow images, so that all the photos may become a part of the slideshow. If you are bothered by the concerns of image quality and output resolution, rest assured, as the speed adjustment utility of the TikTok application has nothing to do with these parameters.
Part 4 Best Ways to Speed Up a Video on Tiktok
As explained in the previous section, speeding up videos and images within the TikTok application is of great significance to make sure that all the required media content fits in the 180 second long post on the platform. Adhering to the same, let us look through some of the best and popular methods to set straight the issue of how to speed up slideshow on TikTok in what follows next:
01Using the Motion Effects of TikTok to Record Fast Motion Videos
The aforesaid method conveniently takes the credit of being the most widely preferred means to increase the play speed of TikTok videos. The method works to cater to the speed modification concern by recording a high speed motion video through the default motion effects of the TikTok application. This in turn, rescues you from the task of downloading the TikTok video to your device.
Working with the feature, you can opt to increase or decrease the play speed of the videos, along with simultaneously recording them prior to a social media export. The process is easy and simple enough to proceed with, as explained in the following user guide:
User’s Guide to Speed Up TikTok Videos by Recording
Step 1: Launch the TikTok Camera
To answer the query of how to speed up a TikTok slideshow, start with opening the TikTok application in any of your preferred devices. When you are welcomed by the app’s main interface, navigate to the bottom of the same and click on the ‘+’ icon. This will instantly cause the application’s camera to open up.
Step 2: Pick a Motion Effect
The TikTok camera launches to bring the ‘Motion Effects’ window into picture. You can choose a desired speed modification effect from the 5 choices available. If you are keen on increasing the video speed, pick any one of the 2x or 3x effects for recording a video in the fast-forward mode.
If however, the aforesaid motion effects do not appear on your app screen, navigate to the ‘Options’ menu at the top left corner of the same and tap on the ‘Speed’ icon.
Step 3: Record the Video
Hit the red colored ‘Record’ button to capture a TikTok video in the fast-forward motion. The app further allows you to create multiple speed recordings of a particular video clip. All you need to do is, click on the ‘Stop’ button, followed by making a desired adjustment in the recording speed, and lastly, resume the video recording process.
Step 4: Customize the Recorded Video
As you finish recording the high speed video, click on ‘OK’ to launch TikTok’s editing interface. Here, proceed to customize the recorded video with the app’s preset editing effects and filters. When you are happy with your work, move ahead with posting the same to tour TikTok account.
02Applying a High Speed Motion Effect to a Locally Saved TikTok Video
As stated earlier, the TikTok application comes with a built-in graphic editor to allow its users to create high quality media edits. Likewise, you can work with the aforesaid utility to increase the speed of TikTok videos prior to an upload across media sharing platforms as well as TikTok itself. Here’s a detailed, stepwise user guide to go about the process without a hustle:
User’s Guide to Speed Up Locally Saved TikTok Videos
Step 1: Open the Application Camera
Begin with launching the TikTok application in a suitable Windows, MacOS or Android device, followed by heading to the bottom of the app’s launch screen and clicking on the ‘+’ symbol to automatically open the latter’s camera.
Step 2: Upload the Videos
Navigate to the ‘Upload’ option beside the ‘Record’ button to open your device’s local media gallery. You can browse through this space to select and upload a desired video. You can also upload a set of videos, provided that all your uploaded clips should fall under the 3-minute constraint of TikTok posts. Tap ‘Next’ to complete the video upload process.
Step 3: Adjust the Video Play Speed
The completion of Step 2 causes a video timeline to pop up at the bottom the app’s working screen. To make adjustments in the video playback rate, hit the ‘Speed’ icon within the timeline, followed by selecting the 2x playback speed. You can further, trim the video by dragging the sliders, as well as change the video layout using the ‘Flip’ option. When you have made the required changes, tap ‘Next’ to proceed further.
the
Step 4: Customize the Video
As the video processing comes to an end, you will be directed to the app’s editing workspace, where you can customize your clip quickly and easily with texts, filters, sounds, stickers, voiceovers, etc.
03Speeding Up a TikTok Video Using the Wondershare Online UniConverter Program
While the TikTok application comes with an inbuilt feature to increase the playback rate of its videos, there are a range of third party programs and utilities that promise of adhering to the aforesaid concern with utmost ease. Moving along the line, there is the Wondershare Online UniConverter program that works to speed up Tiktok videos up to 2x the original playback rate.
You can additionally work with the program to customize the video in a variety of aspects, while exporting the same across a series of media sharing platforms in a diversity of file formats. Having talked enough about the program’s video editing credibility, let us look into the process of increasing the run speed of TikTok videos using the app in what follows next:
User’s Guide to Increase the TikTok Video Speed With Wondershare Online UniConverter
Step 1: Launch the Program
In any of your favorite web browsers, navigate to the official site of Wondershare and launch the Online UniConverter program from the list of available utilities.
Step 2: Open the Required Tool
in the application’s welcome interface, navigate to the ‘Online Tools’ tab in the top toolbar and click on the same to select the ‘Change Video Speed’ option from the drop down menu that follows.
Step 3: Upload the TikTok Video
As far as the video upload task is concerned, desktop users can directly upload their TikTok video to the utility by dragging and dropping the video file from its location in the device. In case of laptop, smartphone and iOS users, they can tap ‘Choose Files’ on the app’s main screen to select and upload the video file from the local media gallery of their device.
Step 4: Pick a Suitable Video Speed
When you have finished uploading the video, navigate to the toolbar at the top of the app’s welcome interface and hit the ‘Video Speed’ tab. A ‘Speed Slider’ will pop up, which you can use to make suitable speed adjustments by dragging the latter in the left or right directions to respectively, decrease or increase the video playback rate.
The app allows you to set a video run speed between 0.25x to 2x. Prefer watching a preview of the clip with the modified speed to ensure affordable results.
Step 5: Save the Fast-Forwarded Video
If the video playback preview in Step 3 satisfies you enough, proceed to save the clip locally to your device. All you need to do is, select a video file format, (MP4 is recommended to ensure affordable output quality), followed by navigating to the bottom right corner of the screen and hitting the ‘Start’ button.
04Speeding Up a TikTok Video Using the Clideo Online Tool
In line with the Wondershare Online UniConverter program, this one is another reliable web based utility to modify the speed of your TikTok videos. Working with the facility, you are permitted to change the playback speed of a video clip in a variety of file formats, along with getting to customize the latter with a range of tools and effects.
The app however, takes a bit longer time to render the speeded up video output, and leaves a watermark on the same. Nevertheless, let us try hands at understanding the procedure to increase the speed of TikTok videos with the app in the following section:
User’s Guide to Speed-up TikTok Videos With Clideo Online Tool
Step 1: Launch the Online Tool
Start with visiting the home website of Clideo in your preferred internet browser and launching the online program in your device. In the app’s main interface, navigate to and click on ‘Tools’ followed by selecting the ‘Speed Video’ option from the drop down menu that appears next.
Step 2: Select Your TikTok Video
As you complete Step 1, the ‘Choose File’ tab appears on the app screen. Click on the same to reach your device’s local media gallery and pick a desired TikTok video to upload to the program for modifying the latter’s speed. You can alternatively, ‘Drag and Drop’ the clip to the program’s file upload section.
Step 3: Change the Video Speed
As you upload the clip, the app’s video editing window pops up, where you can modify the playback speed of your clip, either by dragging the ‘Change Video Speed’ slider from left to right, or by setting a suitable playback speed value among 1.25x, 1.5x and 2.0x in the ‘Speed Chart’ at the right side of the editor window.
Step 4: Export Your Video
When you are satisfied with all the changes till here, proceed to choose a desired file format for sharing the video. Format options are available at the bottom ribbon of the editor window. When you have selected the preferred video format, navigate to and click on the ‘Export’ button at the bottom right corner of the editor workspace to share the video across different media handles.
05Fast Forwarding a TikTok Video With the Wondershare UniConverter Application
Entering the world of third party video editing software programs, you will come across a diversity of choices to work with. As far as the task of modifying the playback speed of TikTok videos is concerned, you can make a smart selection by picking the Wondershare UniConverter application to proceed with the process.
Continuing the legacy of Wondershare utilities, this one is an all-in-one video editor program that you can work with to customize your TikTok videos with a variety of effects and filters, apart from just increasing their playback speed. As of now, let us look through the knowhow of fast-forwarding TikTok clips with the software in the following section:
User’s Guide to Speed-up TikTok Videos with the Wondershare UniConverter Software
Step 1: Launch the Software Program
Visit the official Wondershare website and download the UniConverter program in your preferred desktop or PC, followed by installing and launching the same on your system. Upon being greeted by the app’s welcome screen, navigate to the ‘Features Panel’ at the left and select the ‘Video Editor’ tab. In the window that pops up navigate to and hit the ‘Effect’ option. You can now upload a desired TikTok video that you want to increase the speed of.
Step 2: Select an Incremental Video Playback Speed
Within the ‘Effect’ interface, head to and click on the ‘Change Speed’ tab at the right side of the window, followed by selecting a suitable playback speed greater than 1x and up to 2x. When you have made your choice; tap ‘OK’ to confirm your speed selection.
Step 3: Save the Fast-Forwarded Video
Proceed to save the high speed video by navigating to the bottom left corner and hitting the ‘Output Format’ tab. Now head to the ‘Functions Toolbar’ at the top of the app screen to hit the ‘Web Video’ tab. Within the new window that appears next, reach the left side panel and choose ‘TikTok’.
Select a preferred video format from the list that appears at the right side of the window and lastly, reach to and tap the ‘Start’ button at the bottom right corner to initiate the video conversion speed increment process.
06Fast Forwarding a TikTok Video with the VideoProc Vlogger Application
Moving ahead in the line of software utilities that work towards the requirement of how to speed up a slideshow on TikTok, the VideoProc Vlogger application offers a dependable credibility. This one is a Windows and Mac compatible video editor program that claims of a high end video customization facility along with playback rate adjustments, while assuring an appreciable output quality.
Working with the program, you are allowed to set a 16x faster or slower video speed in relation to the actual playback rate. You can further, choose to render the fast-forwarded video in a variety of file formats. As of now, let us see through the method of increasing the speed of a TikTok video within the app in what follows next:
User’s Guide to Speed-up TikTok Videos With the VideoProc Vlogger Program
Step 1: Launch the Application Program
Navigate to the official website of the software to download, install and launch the program in your preferred Windows and MacOS device, followed by clicking on the ‘New Project’ tab at the bottom right corner of the program’s welcome interface.
vui
Step 2: Import Your TikTok Video
The Within the ‘New Project’ window, proceed to import the desired TikTok video from your device’s local media gallery to the app’s media library, followed by dragging the same to the software’s editor timeline.
Step 3: Make Speed Adjustments
Navigate to and hit the ‘Play Speed’ tab at the right side of the app’s editing workspace. The speed adjustment window pops up, where you can choose to increase or decrease the speed of the uploaded video by clicking on the ‘Speed’ option. Tap the ‘Custom Menu’ to set a desired playback speed value within the speed box. In case you want to include advanced speed customization, click on the ‘Nonlinear Editor’ tab. When you have made the changes, hit ‘OK’ to apply the same.
Part 5 FAQs of Speeding Up Pictures on Tiktok Slideshow
● How can the speed of TikTok slideshows be slowed down?
Start with creating a new post by tapping the ‘+’ icon at the bottom of the app’s launch screen to slow down the speed of a TikTok slideshow. The ‘Recording Speed Options’ appear at the bottom of the screen, from where you can pick the 0.3x and 0.5x playback rates. Proceed to record a new video with reduced play speed by pressing the ‘Record’ button.
● How can the duration of TikTok images be modified?
To set the screen time of a TikTok picture, navigate to the desired image, followed by tapping on the ‘Time’ icon. An adjustment slider pops up, which you can drag from left to right for respectively, increasing or decreasing the image play duration.
● What is the best video editing program to create TikTok slideshows?
If you are keen on posting high quality slideshows on TikTok, consider editing them using the feature-rich library of the Wondershare Filmora video editor program. The app allows you to work with top rated and professionally advanced customization features to add an irresistible spark to your slideshows, with a guaranteed viewer attention.
For Win 7 or later (64-bit)
For macOS 10.12 or later
● How can the speed of a TikTok picture be increased?
To address the concern of how to speed up pictures on TikTok slideshow, navigate to the right side of the app screen and tap the ‘Speed’ icon. From the list of options that appears, you can choose to fast forward the video up to 3x the original playback speed. Select the speed option that suits your requirements and proceed to record the video in high speed by pressing the ‘Record’ button in red.
● How can a specific section of a TikTok video be sped up?
Start with selecting the desired TikTok Video in the app’s timeline, followed by heading to the right side of the launch screen and hitting the ‘Speed’ icon. From the speed options that pop up next, pick any one of the 2X, 4X, 8X, 20X and 50X playback rate choices to fast forward the video section. As an alternative, navigate to the ‘Speed Properties’ window, hit the ‘Speed’ button and move the speed slider to the right side to increase the clip’s running speed.
● Ending Thoughts →
● Creating TikTok videos and slideshow presentations for fun and entertainment has become an evergreen social media trend in today’s time.
● The short duration of TikTok slideshows poses the query of how to speed up picture slideshow on TikTok for including the entire content within the presentation.
● When browsing through software solutions to customize high speed TikTok slideshows, you can conveniently bank upon the Wondershare Filmora video editor program.
Also read:
- Updated 10 Matching Color Combination That Works Together Greatly for 2024
- New TikTok Slow Zoom | Create Your Slow Zoom TikTok in Minutes for 2024
- Updated How To Make A Do-It-Yourself Video
- New How to Make Vintage Film Effect 1980S for 2024
- New Perfectly Use the Audio Mixer in Filmora
- 2024 Approved How to Make GIF With Transparent Background?
- New How to Export iMovie, In 2024
- Updated A Vacation Slideshow Is a Great Way to Relive the Vacation Memories and Also Share Them with Your Loved Ones. If You Are Looking for Ways to Create a Slideshow in Just a Few Minutes, We Will Help You with the Best Tool
- In 2024, Lets Create a New Premiere Pro Project, Import some Video, and Control Video Playback Speed. Also, Find Alternative Software (WonderShare Filmora) to Control Playback Speed in Minutes
- Learn How to Create Quiz Videos for YouTube that Are Interactive and Can Get Your Audience Engaged with Your Content
- 2024 Approved How to Record Video Streams With FFmpeg on Windows and Mac?
- Updated In 2024, Do You Know that Google Photos App Can Be Used to Edit and Stabilize Shaky Videos? In This Article, I Will Show You a Step by Step Tutorial About How to Use Google Photos to Stabilize Videos
- New Video Course and Online Learning Are Very Popular Nowadays. Here We Are Going to Recommend some of the Best Video Websites for Teachers to Use
- New 2024 Approved 8 Best Free Title Maker You Must Try and Put to Use
- 2024 Approved Best Cinematic LUTs For Premiere Pro Recommendation
- Updated In 2024, Tutorial Guides for Video Maker with Song
- In 2024, Find The Best LUTs for Lightroom
- Updated 2024 Approved How to Create Vintage Film Effect 1920S
- Do You Want to Add an Adjustment Layer to Your Video for Easier Editing? Read This Article to Find Out How to Efficiently Add an Adjustment Layer in After Effects
- A Comprehensive Guide to Slow Motion YouTube Videos and How to Manage Them
- 2024 Approved Do You Want to Experiment with Various Sky Backgrounds for Your Footage? Learn About Sky Replacement After Effects in This Article with a Step-by-Step Guide
- Facts About GIF Background You Didnt Know
- New 2024 Approved Video Editors Use Transitions to Tie Their Shots and Clips Together Into a Cohesive, Polished Program. Learn the Best Method to Create a Smooth Cut Transition Effect
- New Sometimes, when It Comes to Editing a Video, We Dont Even Know Where to Start, because There Are Too Many Options –Online Platforms Which Instantly Help Us Edit Our Clips, without Lengthy Process of Downloading and Installing Computer Programs for 2024
- The Complete Guide to Make a Text Collage
- Creating Motivational Videos with AI Comprehensive Guide 2024
- New Discover 30+ Amazing Templates for VN Video Editor to Elevate Your Videos. Create Professional-Looking Videos with Ease for 2024
- New The Way to Quick and Efficient Editing | Keyboard Shortcuts in Filmora
- In 2024, Top Online Video Background Changers Transform Your Videos with Ease
- 2024 Approved Are You Looking to Enhance Your Video or Photo Colors Using Premiere LUTs? Get to Know About the Best Free LUT Effects to Get Started
- New In 2024, The Article Is a Guide About the Split of the Videos in VLC. There Is Also a Particular Description of Its Alternative Wondershare Filmora. It Is Suitable as Well as Reasonable
- Updated 2024 Approved LumaFusion – One of the Best Video Editors for iOS
- Merging Videos Like a Pro A Step-by-Step Guide to Use FFmpeg
- 6 Methods to Mirror Apple iPhone 7 to your Windows PC | Dr.fone
- Reliable User Guide to Fix Vivo G2 Running Slow and Freezing | Dr.fone
- In 2024, How To Unlock Cricket Apple iPhone X for Free
- In 2024, How to Change your Oppo A1 5G Location on Twitter | Dr.fone
- 3 Effective Methods to Fake GPS location on Android For your Lava Storm 5G | Dr.fone
- 3 Easy Ways to Factory Reset a Locked iPhone 15 Without iTunes | Dr.fone
- Use Device Manager to reinstall hardware drivers on Windows 11/10/7
- Ways To Find Unlocking Codes For Asus ROG Phone 8 Pro Phones
- In 2024, Top 10 AirPlay Apps in Poco X6 Pro for Streaming | Dr.fone
- How To Unbrick a Dead Realme C67 4G | Dr.fone
- How to recover deleted contacts from Lava Blaze Pro 5G.
- How to Turn Off Google Location to Stop Tracking You on Oppo Reno 11F 5G | Dr.fone
- How to Transfer Photos from Motorola Edge 2023 to Laptop Without USB | Dr.fone
- In 2024, 3 Ways to Track Vivo V30 Pro without Them Knowing | Dr.fone
- Full Guide to Catch 100 IV Pokémon Using a Map On Poco C50 | Dr.fone
- How To Restore Missing Contacts Files from Oppo A1 5G.
- The way to get back lost videos from X50i
- How to Find iSpoofer Pro Activation Key On Oppo K11x? | Dr.fone
- In 2024, How to Hide/Fake Snapchat Location on Your Gionee F3 Pro | Dr.fone
- Best 10 Mock Location Apps Worth Trying On Apple iPhone 11 Pro | Dr.fone
- Getting the Pokemon Go GPS Signal Not Found 11 Error in Realme 11 5G | Dr.fone
- In 2024, Full guide to Apple iPhone SE (2020) iCloud Bypass
- Can Life360 Track You When Your Honor 100 is off? | Dr.fone
- In 2024, Unlocking iPhone 8 Lock Screen 3 Foolproof Methods that Actually Work | Dr.fone
- Title: Updated How to Make A Funny Vlog for TikTok?
- Author: Morgan
- Created at : 2024-05-19 05:12:18
- Updated at : 2024-05-20 05:12:18
- Link: https://ai-video-editing.techidaily.com/updated-how-to-make-a-funny-vlog-for-tiktok/
- License: This work is licensed under CC BY-NC-SA 4.0.
