Updated How To Make a Video by Mouse in Filmora?

How To Make a Video by Mouse in Filmora?
Have you ever wondered, what if somehow your keyboard just broken or disappeared? And you’re stuck in the middle of your project with just a mouse. Don’t know how to proceed remaining project with a mouse? Then no worries! We got you.
This article will guide you how to use stock videos and stock audio to create a music video. The catch, you say? We will be doing that only with a use of a mouse.
Things To Know Before Editing
Let us be honest, most shortcuts are not available without the keyboard. To counter that, our approach will need to be more general. General here means you need to know all the necessary controls and panels.

Take the challenge and find a solution together
To counter these difficulties, even if you have a keyboard, you can imagine yourself in a situation. A situation in which we have a keyboard but will not be using it.
Therefore, presenting us with a challenge, so if you someday come across a situation like this, you will be prepared. All in all, you would be learning more things by returning to the roots of your practice, which in most cases, can prove helpful.
Get Ready With the Professional Editing Tool
Before getting into the editing process handicapped from resources, you need to be familiar with the software that we will use. We will use Wondershare Filmora You can click the link below and catch it up.

Create a Music Video Without a Keyboard
Let us get started! Whether you have a real mouseless experience or want to take it as a challenge, let’s get the things clear first.
- We need to create a 20 seconds music video.
- We will only be using the footage from the stock library.
- We will be using music from the Wondershare Filmora library.
- We will have 5 minutes to review the footage and the music available.
- And most importantly, we don’t have a keyboard.
Step 1. Review your footage
Our first and most crucial step will be to use our imagination and creativity. So get those neurons firing, and let us go!

- Head to the stock media folder on the bar mentioned above, the Wondershare Filmora.
- Or you can simply look towards the left window, where you will find the sample videos tab.
- Click on the sample videos tab, and a new window will appear on the library screen.
- Here you will find almost more than 20 videos.
- So apart from using the actual recorded footage, we will work our way with what we have from default.
- For the music, we would be scrolling in the stock audio library.
- Click on the audio tab above and start scrolling.
- You will also find some categories in the left window.
- Choose the category of your choice and listen to the audio.
Do whatever suit you best. Keep in mind you only have 5 minutes.
Step 2. Pick music for your clips
Suppose you have found audio that speaks your vibe. The next step would be to find a video that tallies that audio. Let us suppose we have audio that is of the hip-hop genre. Let that creativity shine now!

If you like to add a more classical vibe, pick a classical song or audio from the audio library.
- After picking the song, move on to the sample videos tab and search for videos that match a classic vibe.
- Now random close-up shots of a piano, cinematic footage of a big orchestra, or simple landscapes with minimalistic movement while focusing on a single object, consider the example below.

Now that a scenario is constructed, our next step is to arrange these clips in the Wondershare Filmora timeline.
Step 3. Download the clips and audio
You have 15 minutes to create the music video. Start the timer! Once you have selected a sample video and audio that matches your scenario, you can download them from the bottom right icon on the thumbnail. Only if you still need to download them.
Step 4. Insert the audio into the timeline
- The first step is to drag the audio to the timeline.
- Now play the audio from the start. If you can work with the audio as a whole, then it’s perfect.
If you want your audio to start at a certain point. You have to follow the below-mentioned steps. It is as simple as that!

- Add your audio to the timeline.
- Then move the timer or the slider where you want your audio to start.
- Right-click on the audio file. Select split.
- Your audio file will split into two parts.
- Delete the prior file and drag the file ahead to the start of the timeline.
The next step is to add the videos to the timeline.
Step 5. Add the video to the timeline
When you have your audio in the timeline, your next step is adding the video. After you have trimmed or split your audio to your wish, follow the below steps.
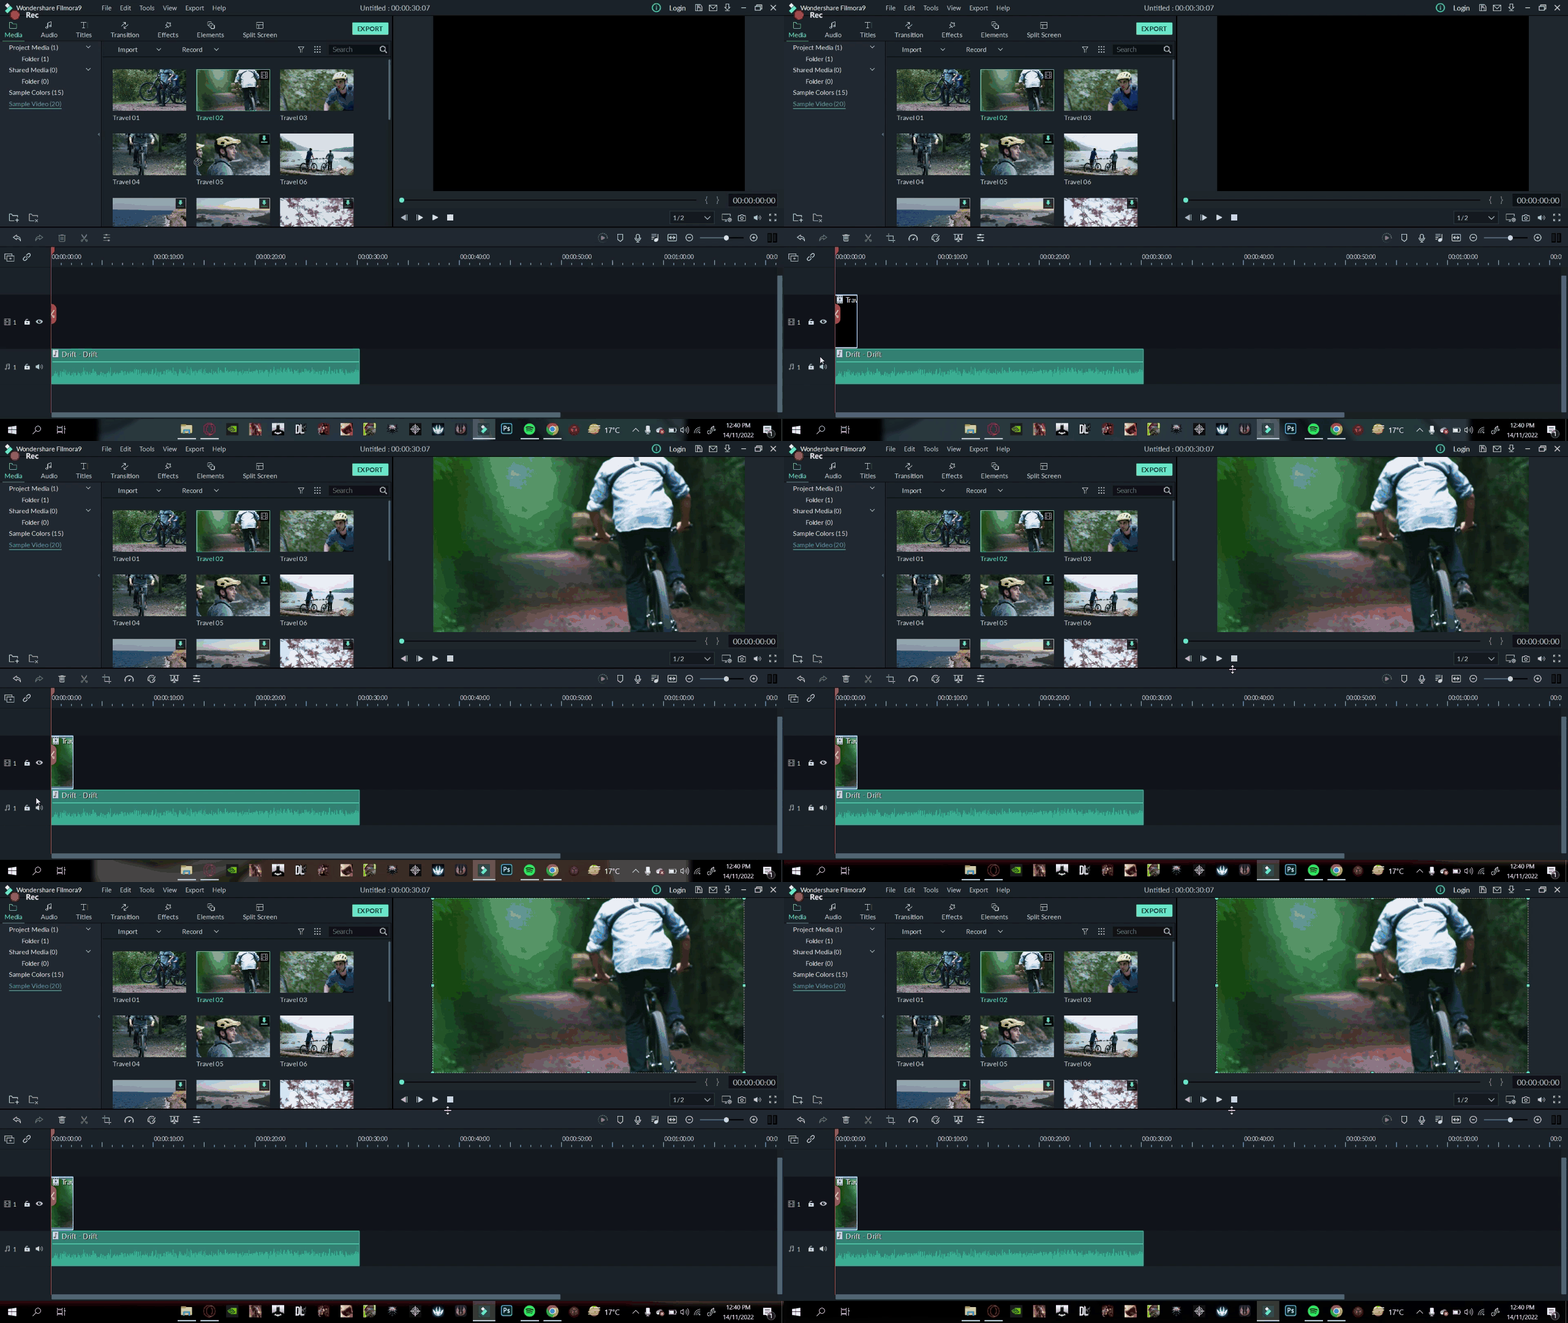
- Click and drag to drop the video clips where you want the video to start.
- Play the audio first is a good feature for where you want your video to insert.
- Then adjust the timeline slider on that point.
- Simply drag your video and drop it into the timeline.
![]()
Note: now, remember you have multiple videos to match the audio length as we create a music video. The more, the more optimistic. Now, remember you have multiple videos to match the audio length as we create a music video. The more, the more optimistic.
Download the remaining videos that you would wish to be added to the music and follow the steps mentioned above to add the clips where you desire.
Step 6. Finishing touches
You can add some transitions to give your music video a fine touch**.** To add transitions, you can follow the below steps:
- First, click on the transition icon on the bar above. Then, browse as far as your imagination takes you.
- If the effect you want still needs to be downloaded, click on the download icon in the bottom right corner and download the effect.
- Click on the effect and drag it to drop it on your video. It will create a smooth transition while shifting from one video to the other.
Keep going you are almost there!
- Do this for all the videos in the timeline above the audio file.
If you have time, you can also add a few of the effects in the Wondershare Filmora.
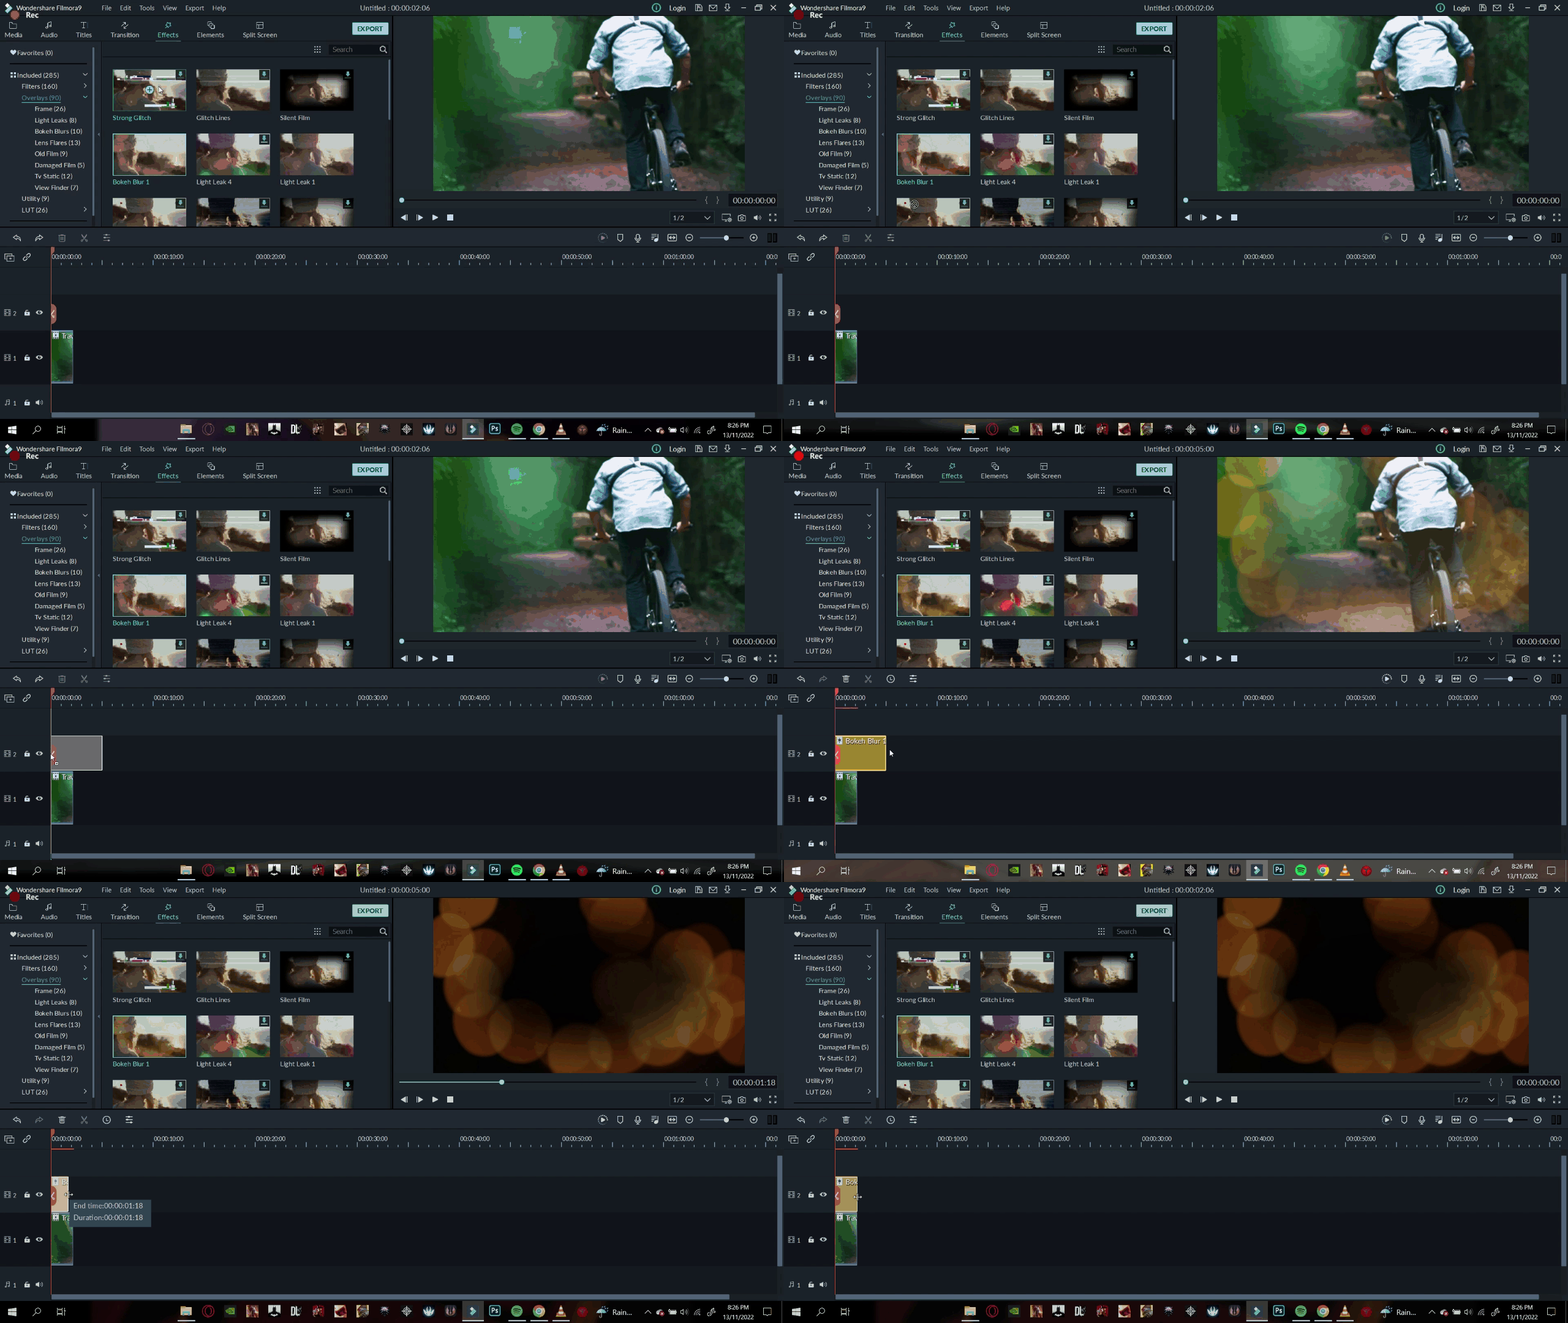
- To do so, click on the effect icon on the top bar.
- A window will open to your left, indicating different available effects categories. Select any tab you want that fits your music video scenario.
- Download the effect mentioned above by clicking on the download icon in the bottom right corner of the effect thumbnail.
- Click to drag and drop it on top of your video.
![]()
Note: you can do so as many times as you want for the remaining video clips in the timeline.
It seems our 15 minutes are running out! Play the music video from the beginning and review the edits you made. Then, finalize your edits and Voila. You have successfully created a music video using a mouse on Wondershare Filmora.
So in a rare scenario when you don’t have a keyboard, you can just use your mouse to browse the Wondershare Filmora and put those creative ideas to work.
Conclusion
With just a mouse, you have created a music video! How easy is that? Try different music, audio, and video, and then enjoy the rest! Creativity has no limits if you know how to make the most of it by using the tools at your hand. Tell out more about your creative ideas! We love to hear from your side!
Free Download For Win 7 or later(64-bit)
Free Download For macOS 10.14 or later
Download the remaining videos that you would wish to be added to the music and follow the steps mentioned above to add the clips where you desire.
Step 6. Finishing touches
You can add some transitions to give your music video a fine touch**.** To add transitions, you can follow the below steps:

- First, click on the transition icon on the bar above. Then, browse as far as your imagination takes you.
- If the effect you want still needs to be downloaded, click on the download icon in the bottom right corner and download the effect.
- Click on the effect and drag it to drop it on your video. It will create a smooth transition while shifting from one video to the other.
Keep going you are almost there!
- Do this for all the videos in the timeline above the audio file.
If you have time, you can also add a few of the effects in the Wondershare Filmora.
- To do so, click on the effect icon on the top bar.
- A window will open to your left, indicating different available effects categories. Select any tab you want that fits your music video scenario.
- Download the effect mentioned above by clicking on the download icon in the bottom right corner of the effect thumbnail.
- Click to drag and drop it on top of your video.
![]()
Note: you can do so as many times as you want for the remaining video clips in the timeline.
It seems our 15 minutes are running out! Play the music video from the beginning and review the edits you made. Then, finalize your edits and Voila. You have successfully created a music video using a mouse on Wondershare Filmora.
So in a rare scenario when you don’t have a keyboard, you can just use your mouse to browse the Wondershare Filmora and put those creative ideas to work.
Conclusion
With just a mouse, you have created a music video! How easy is that? Try different music, audio, and video, and then enjoy the rest! Creativity has no limits if you know how to make the most of it by using the tools at your hand. Tell out more about your creative ideas! We love to hear from your side!
Free Download For Win 7 or later(64-bit)
Free Download For macOS 10.14 or later
How to Make Falling Text Effect in Filmora?
Indeed, there are different elements of a video that has the potential to make it stand out to viewers. The title you add to the video, content information in the slides, and other elements are some parts that capture one’s interest.
But seeing only the text in single lines or paragraphs can get repetitive and unappealing, especially with so many videos having the same style. In this context, the fun falling text effect is a unique and exciting approach to making your titles in videos engaging. It creates a fun look when the viewer clicks into the video and is met with this styling title effect.
On Wondershare Filmora , there is a feature available for users to apply this effect to videos in a more straightforward sequence of steps than other editors. Yet, knowing how it works is still valid, even for experienced editing professionals. In this post, we shall detail all of the steps that go into creating this effect in videos, with examples.
Launch Filmora on the Device
Before getting started with the editing steps, you need to download and install this third-party editing software into your device. Filmora works on both Mac and Windows-based computers. (Download here:
Free Download For Win 7 or later(64-bit)
Free Download For macOS 10.14 or later
After switching on your device and going to your preferred browser, search for Wonderhsare Filmora’s official website. Upon accessing it, you will see the “Download” button at the top of the screen. Click on it, and the respective Filmora installer will download into your device instantly, depending on your OS type.
Then, you have to double-click on the installer file you will find in the Downloads folder. This will open the software installation problem window. Click on the Install button and then tap the Agree option for the terms & conditions that appear next on the screen. After that, the software will begin installing automatically.
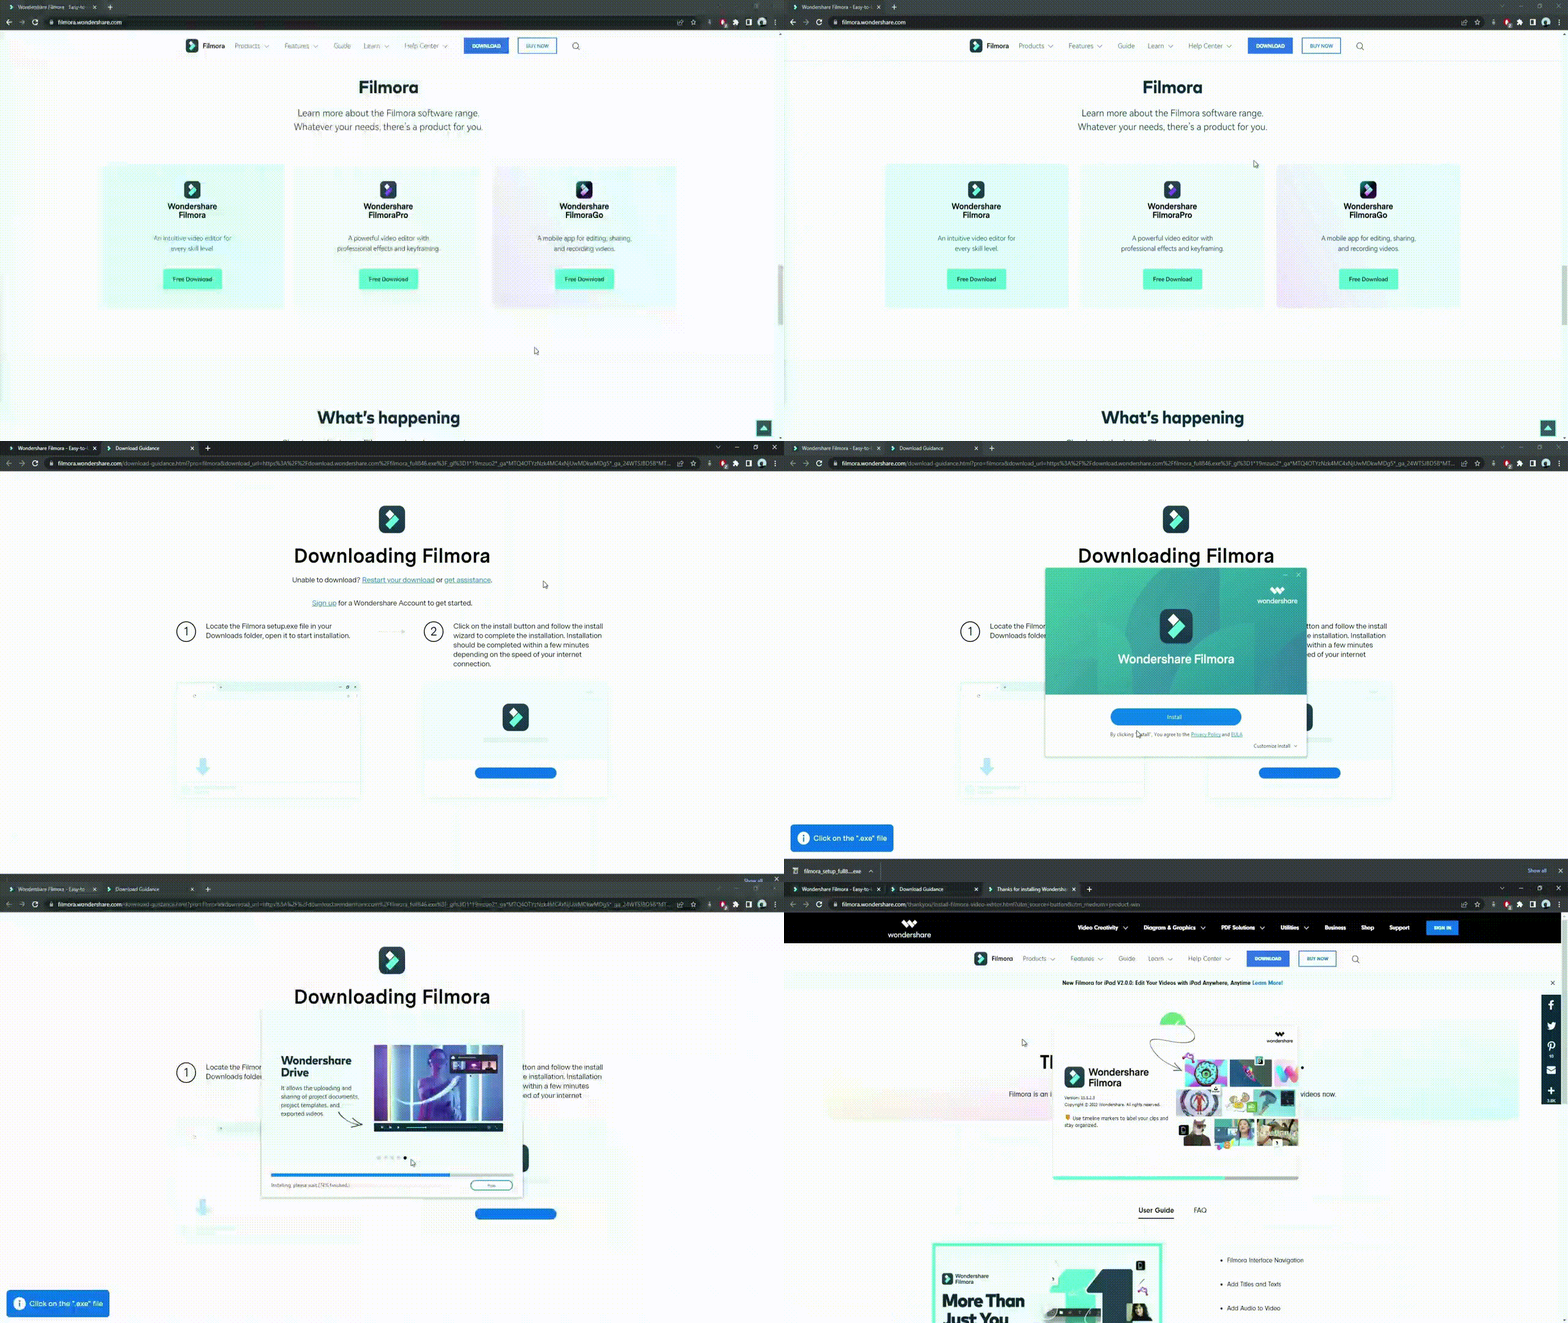
Finally, press the Start Now button on the installation complete prompt window. The software will then launch automatically.
Adjust the project settings
After the software launches on your device, you should tap on the Create New Project button. Before you add the video file you will edit from your device through; you should take time to change some aspects of the project settings.
For this, click on the File tab at the top-most toolbar in the editor window. You should click on the Project Settings option from the drop-down menu, which will open the dialog box. Under the resolution option, you will see the Frame Rate element. Click on the drop-down menu and adjust the video’s frame rate to 25 FPS. After you are done, tap the OK button.
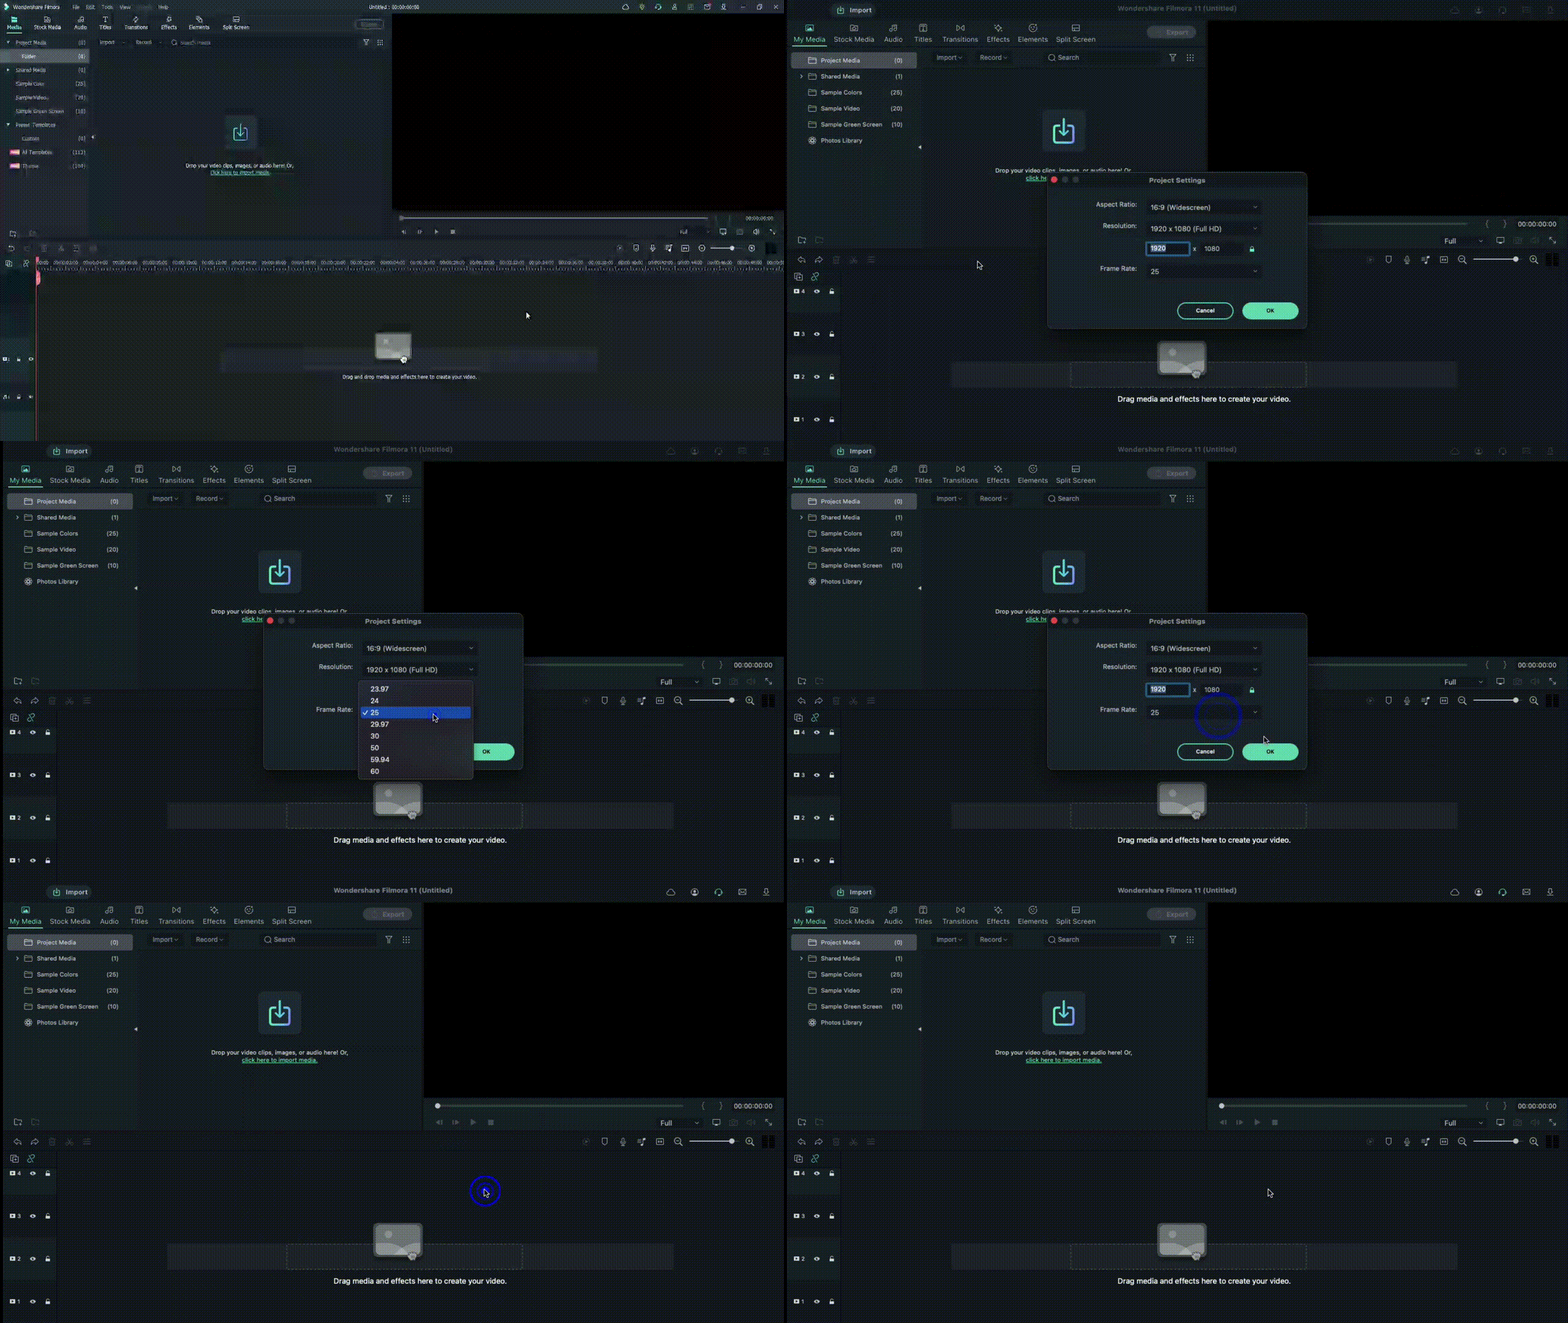
Add the Title
Following this, you must click on the Titles tab at the top toolbar on the editor. Different title templates, like Custom, Openers, End Credits, etc., will appear. Choose the default title of your liking and download it.
Next, hold the title that appears in the library window and then drag it to the first layer of the editing timeline. Clip the title short by moving the play head to the 3-second and 15 frames mark and shape the title to that length. Then, delete the rest of the part.
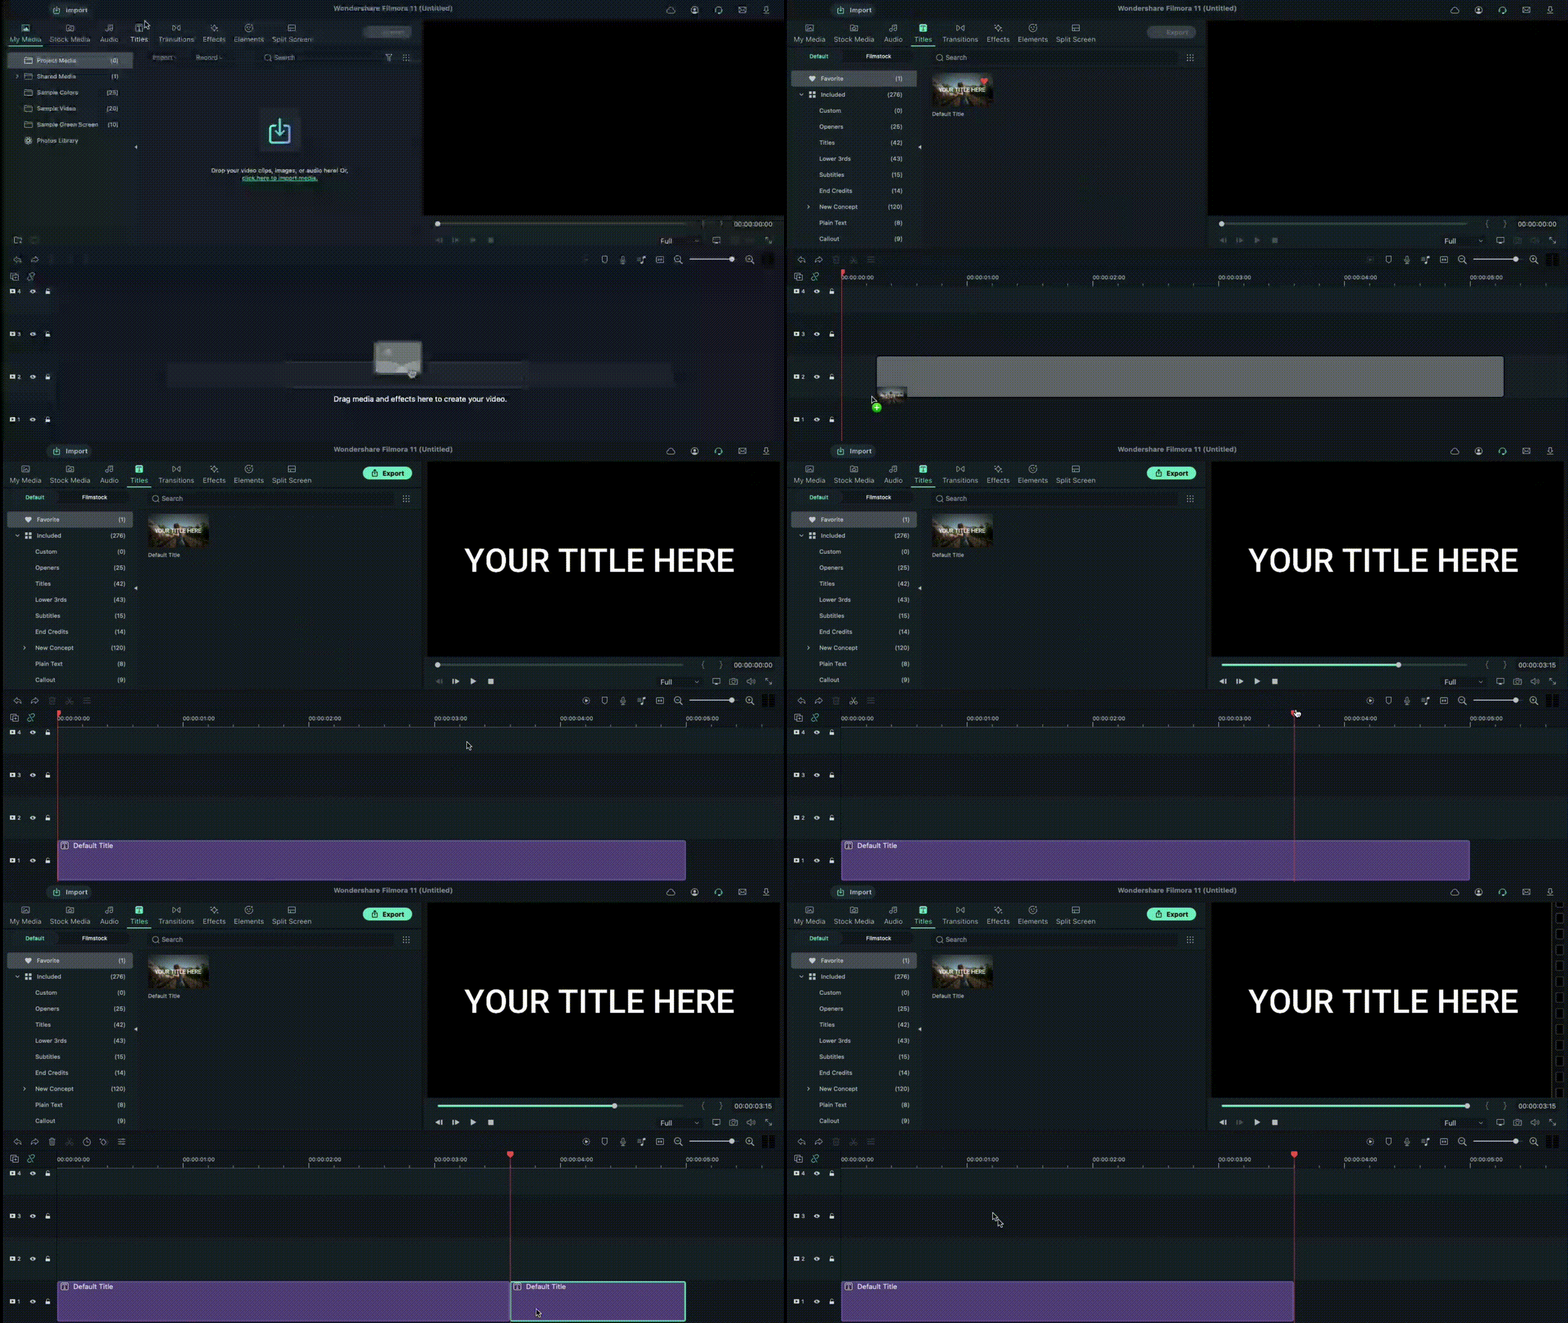
Edit the Title
After this, you have to double-click on the top of the default title in your Track 1 timeline. A window will appear for editing the title. Click on the Text tab in this window and tap on the Font options. You should change the font of your title to Futura Bold or any other option that you would prefer.
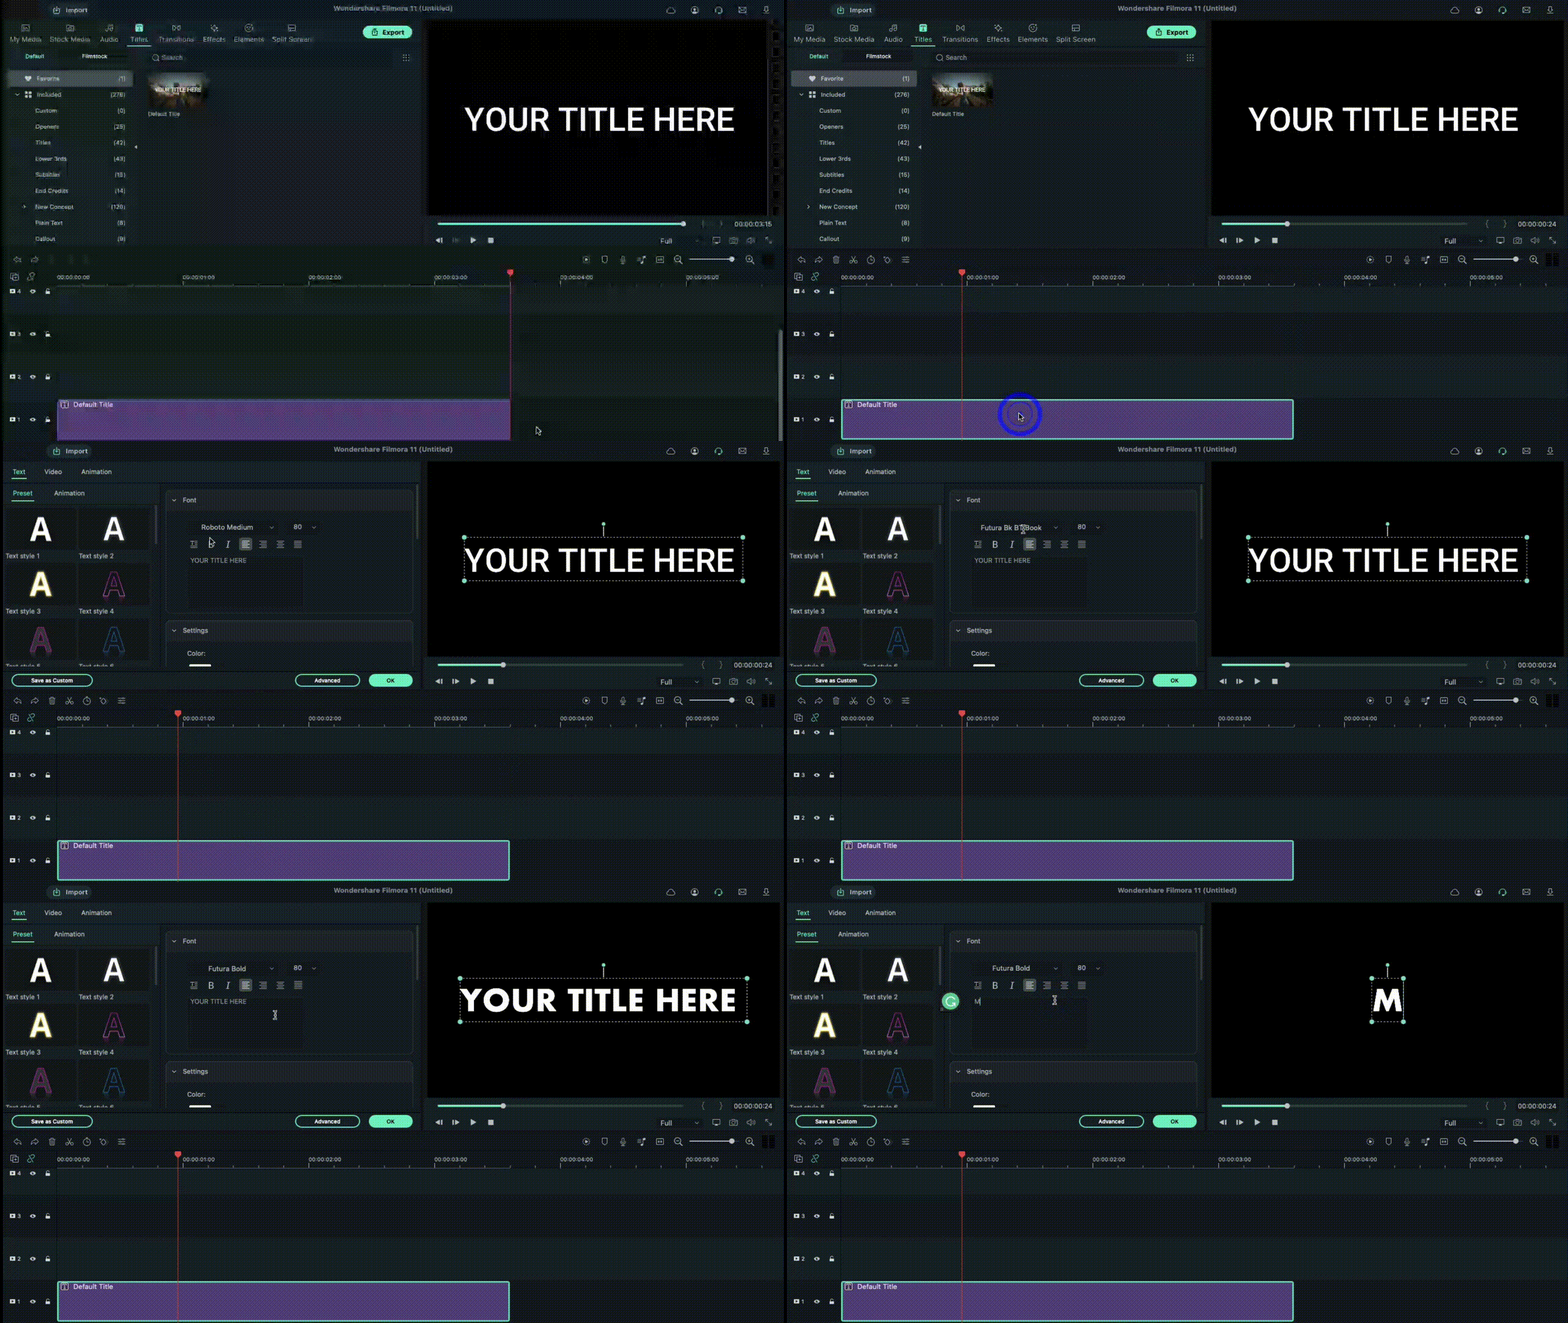
Animate the characters
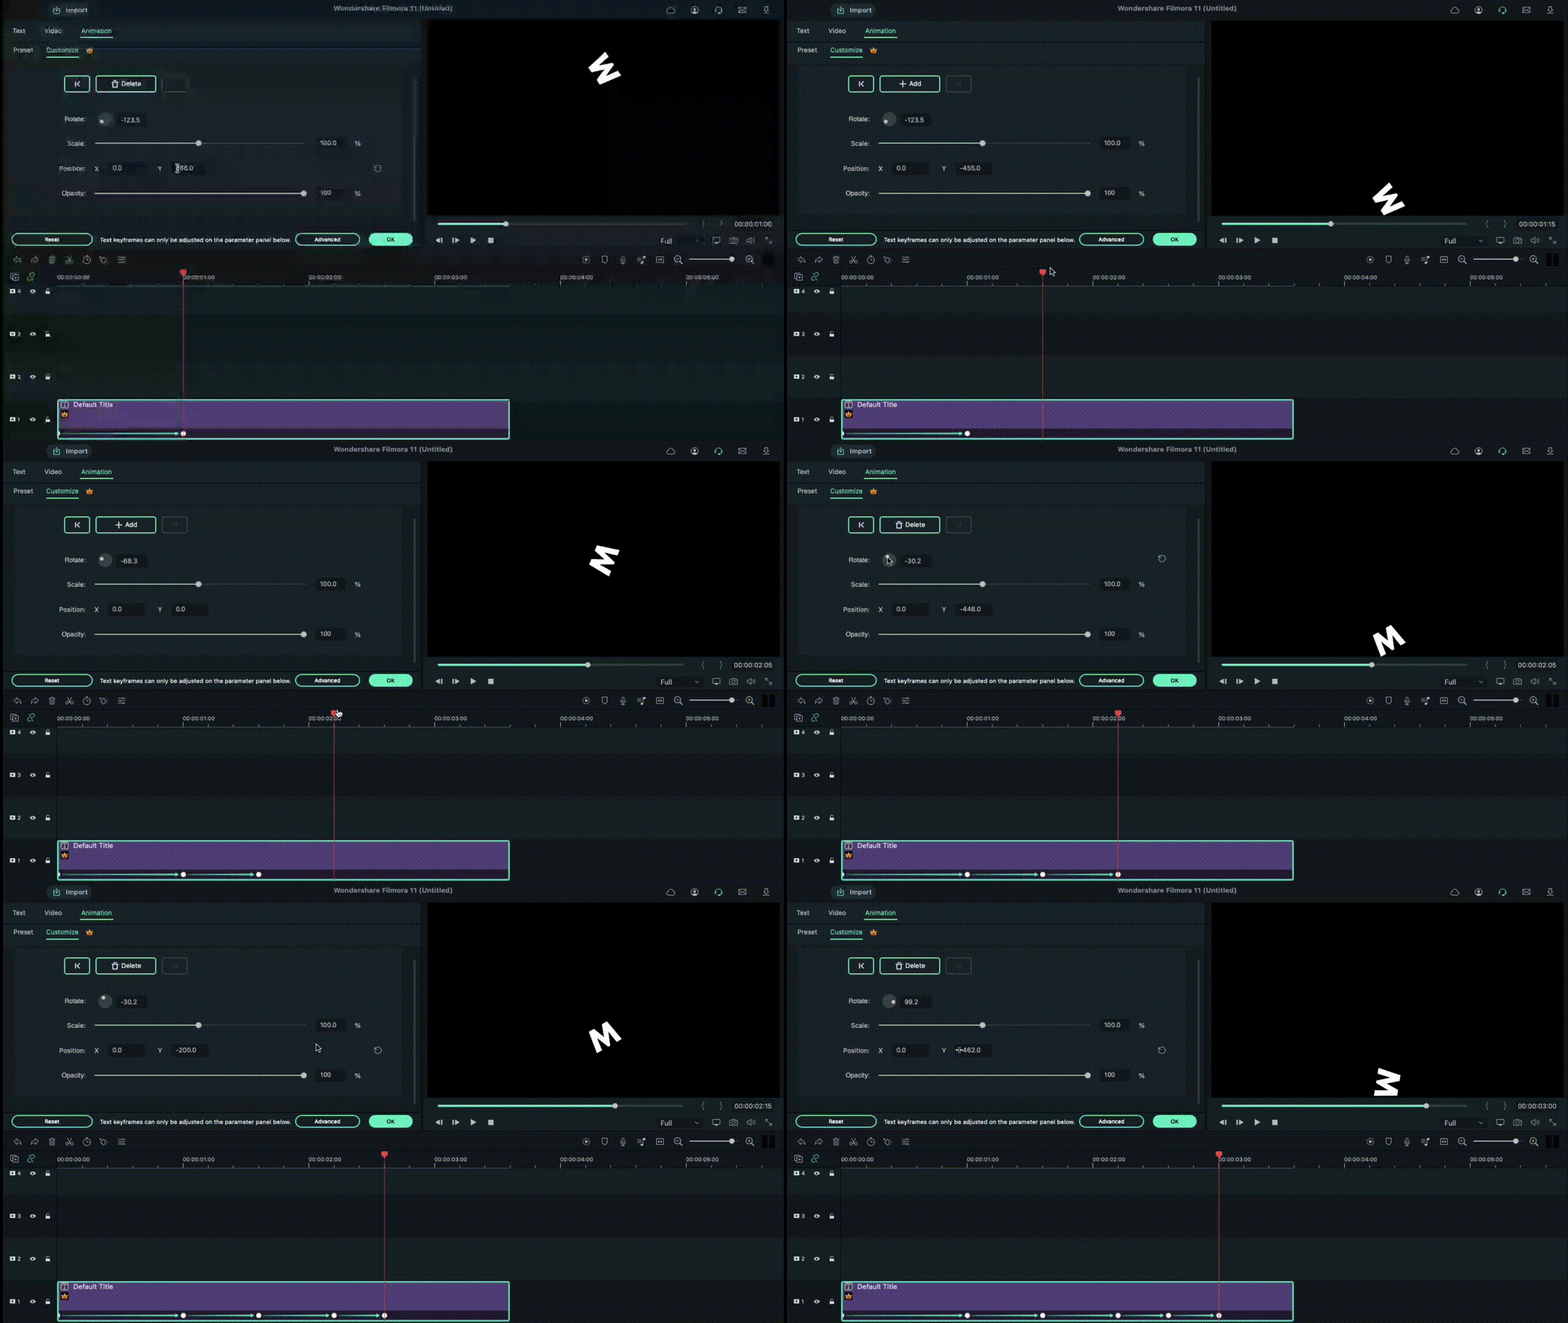
When this part is done, in the text field, add the first letter of the text you will add to your animated introduction. After inserting the first letter only, click on the Animation tab next. Following that, you have to move the playhead on your timeline to the very front. You will see the Position parameter in the Animation settings and change the number in the Y axis until it goes out of the top frame of the video.
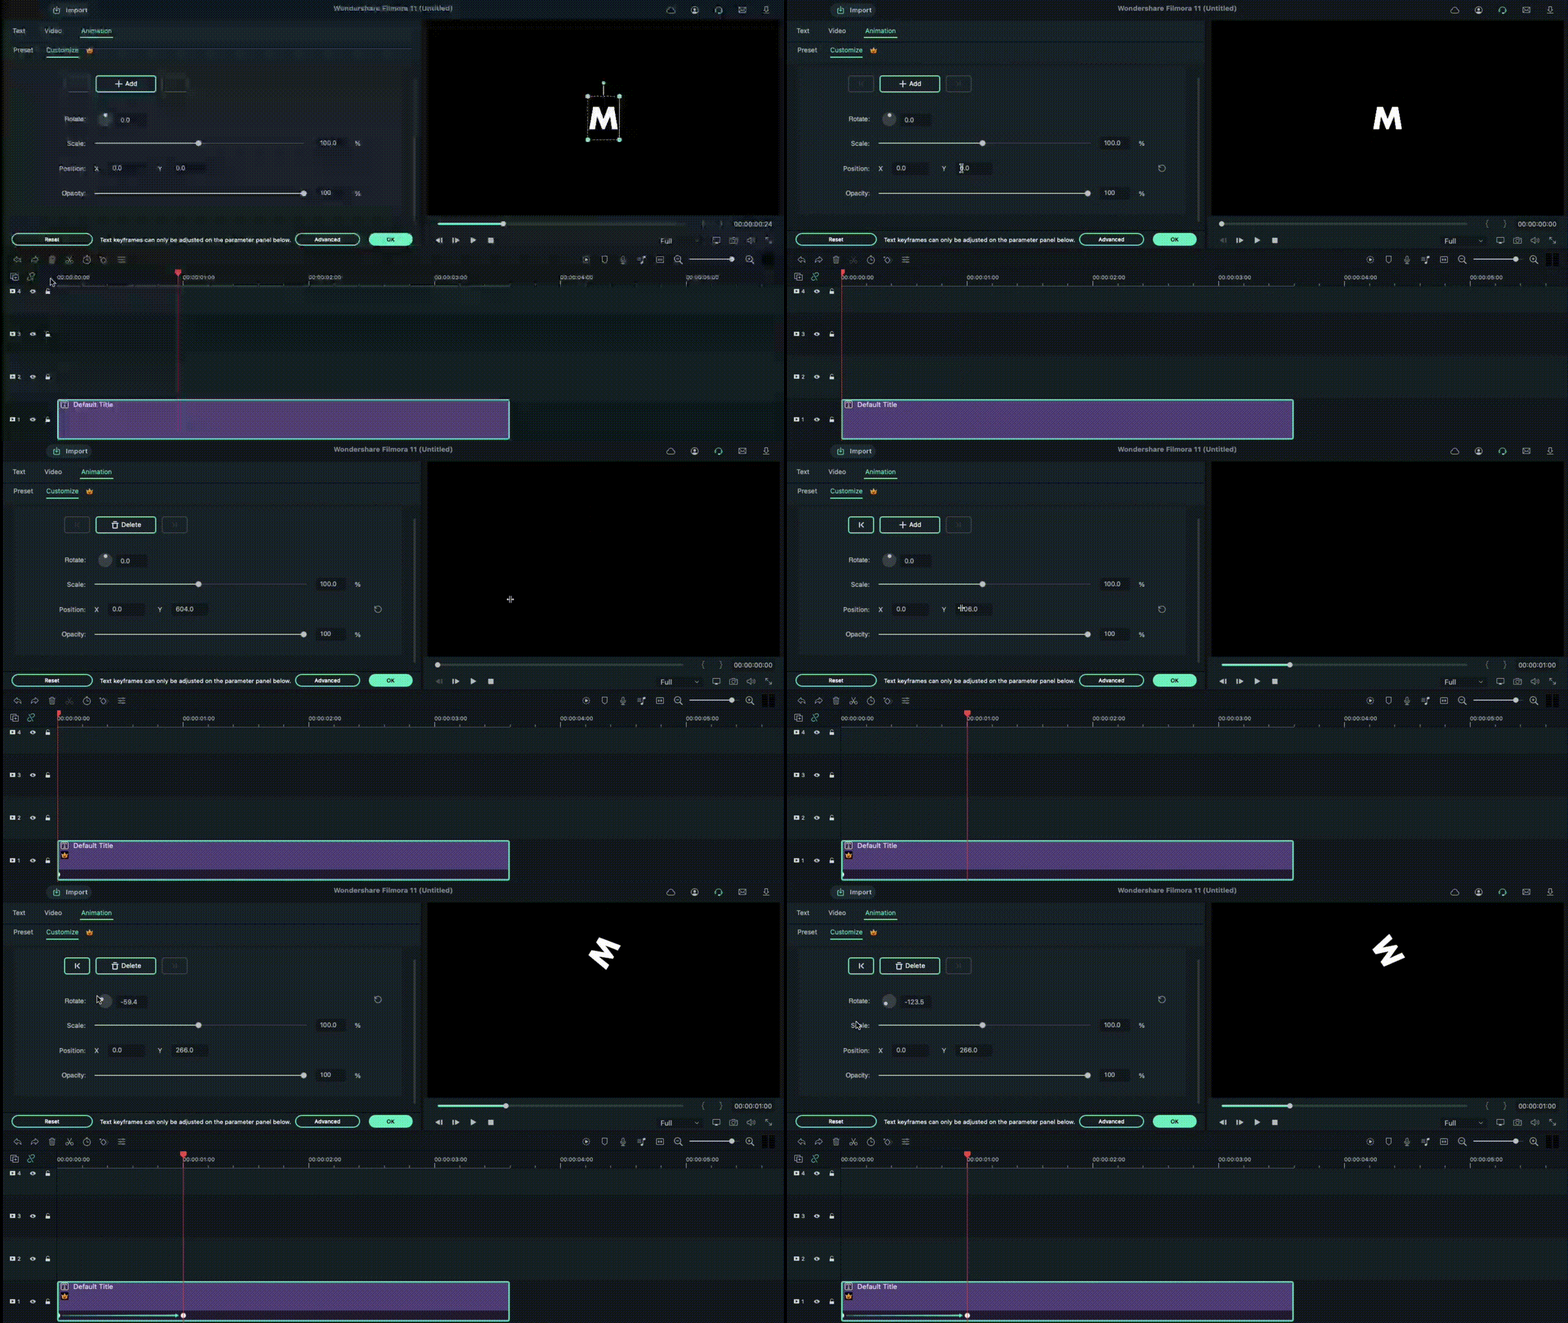
Next, you must move the play head to the 1-second position in the timeline. Here, you must change the number Y axis to a lower position and adjust the Rotate element as per your preference. After that, move the playhead again to 15 frames from the 1-second mark. It would be best if you changed the Y-axis position digit to 0 and adjusted the Rotation value slightly.
Following that, move the playhead again by 15 frames ahead. Rotate the letter again and change the Y-axis value until the letter rests at the bottom of the screen. Again, you have to move the play head on the timeline to 10 frames ahead and adjust the Y-axis and Rotation values to a higher point. Then, continue the step like this at ten frames forward, this time making the character move to the ground again. Press the OK button to complete.
Repeat for the next letters
After you are done with this editing process for the first letter, hold the default title in the library and drag and drop it into Track 2 on the timeline. Adjust the starting point for this layer to frame five from the beginning, and move the file to that starting point. In the end, cut the title length at the same position as layer one was, at 3.15 seconds.
Follow the process explained in the previous section for the first letter, i.e., moving the playhead at specific frames and changing the Y-axis and Rotation value multiple times.
After editing the second letter in the title, repeat the process of holding and dragging the default title to Track 3 in the timeline and adjusting starting position at the 10th frame. Again, follow the process of animating the letter like for Letter 1 and Letter 2. Continue doing this process for multiple more letters in your title text.
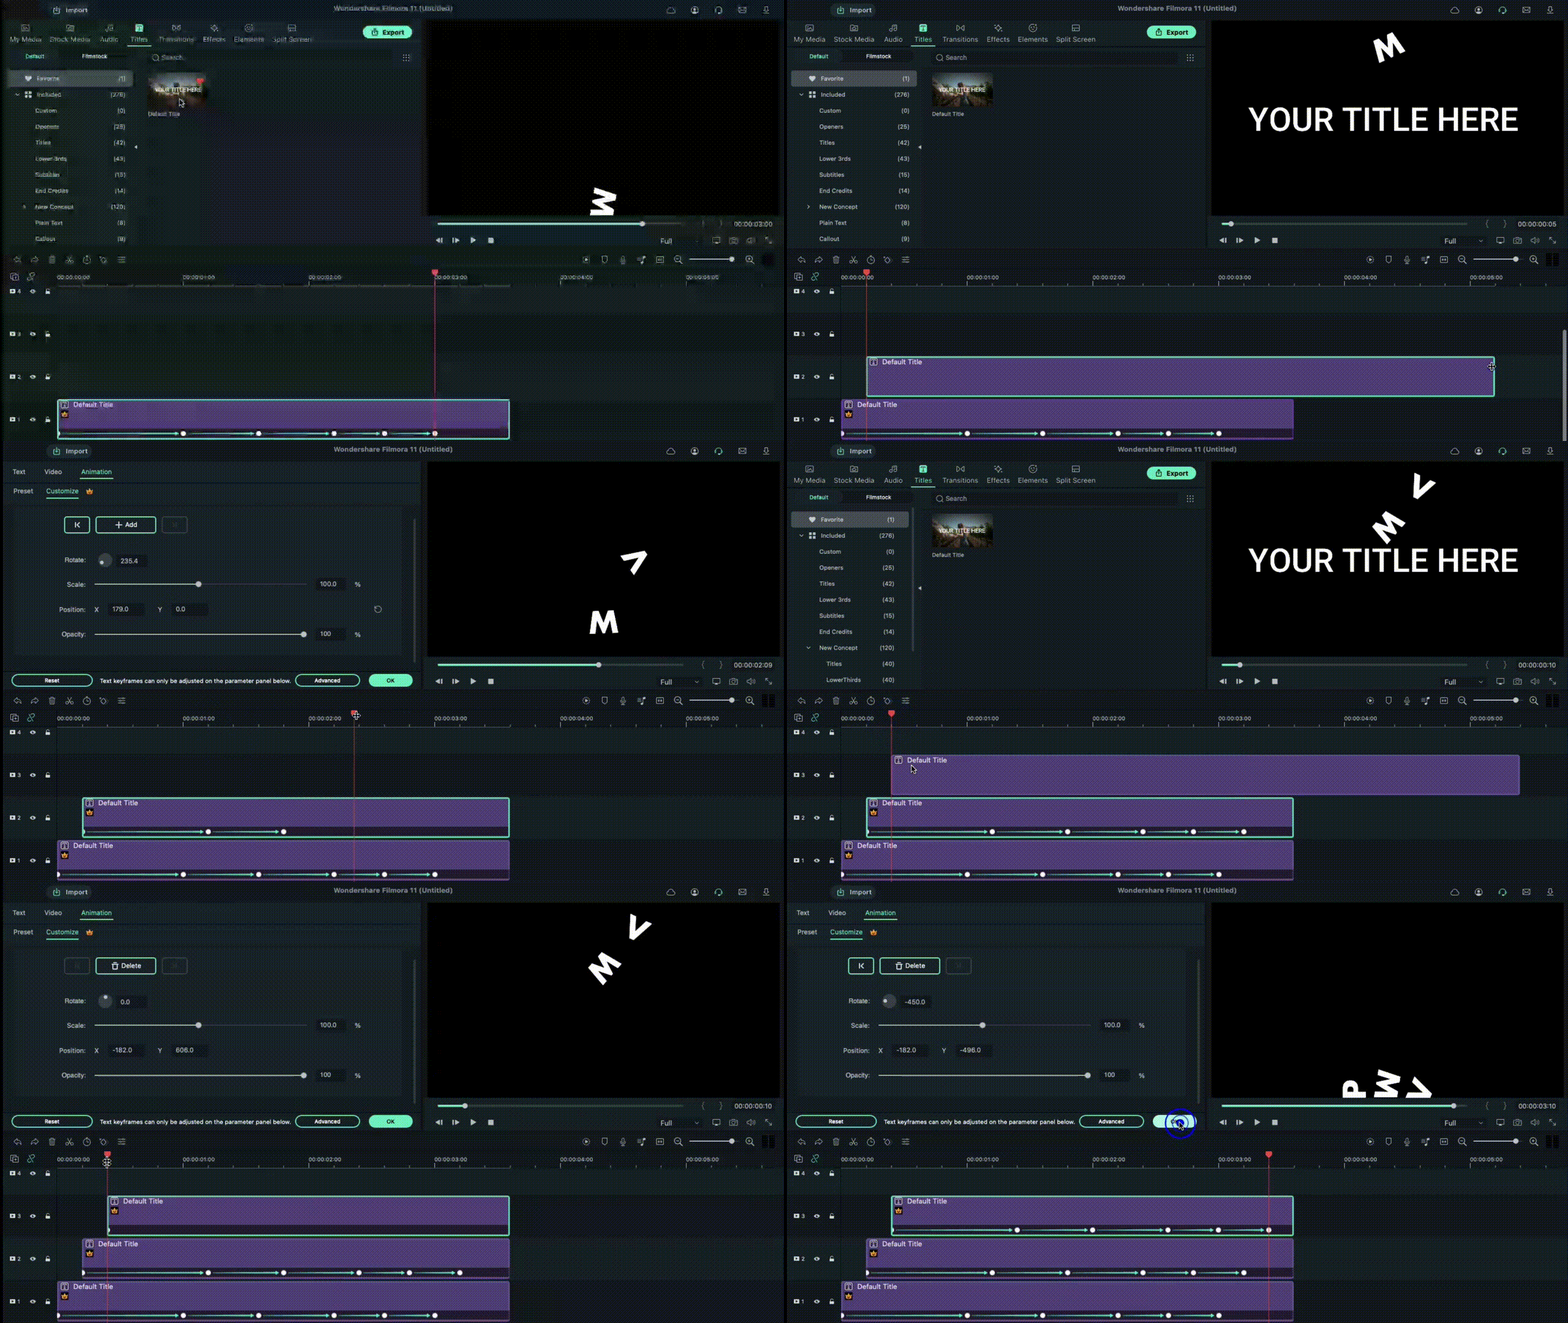
Tap on the Play button under the Preview screen to see how the letters have the falling text effect.
Add Screenshot
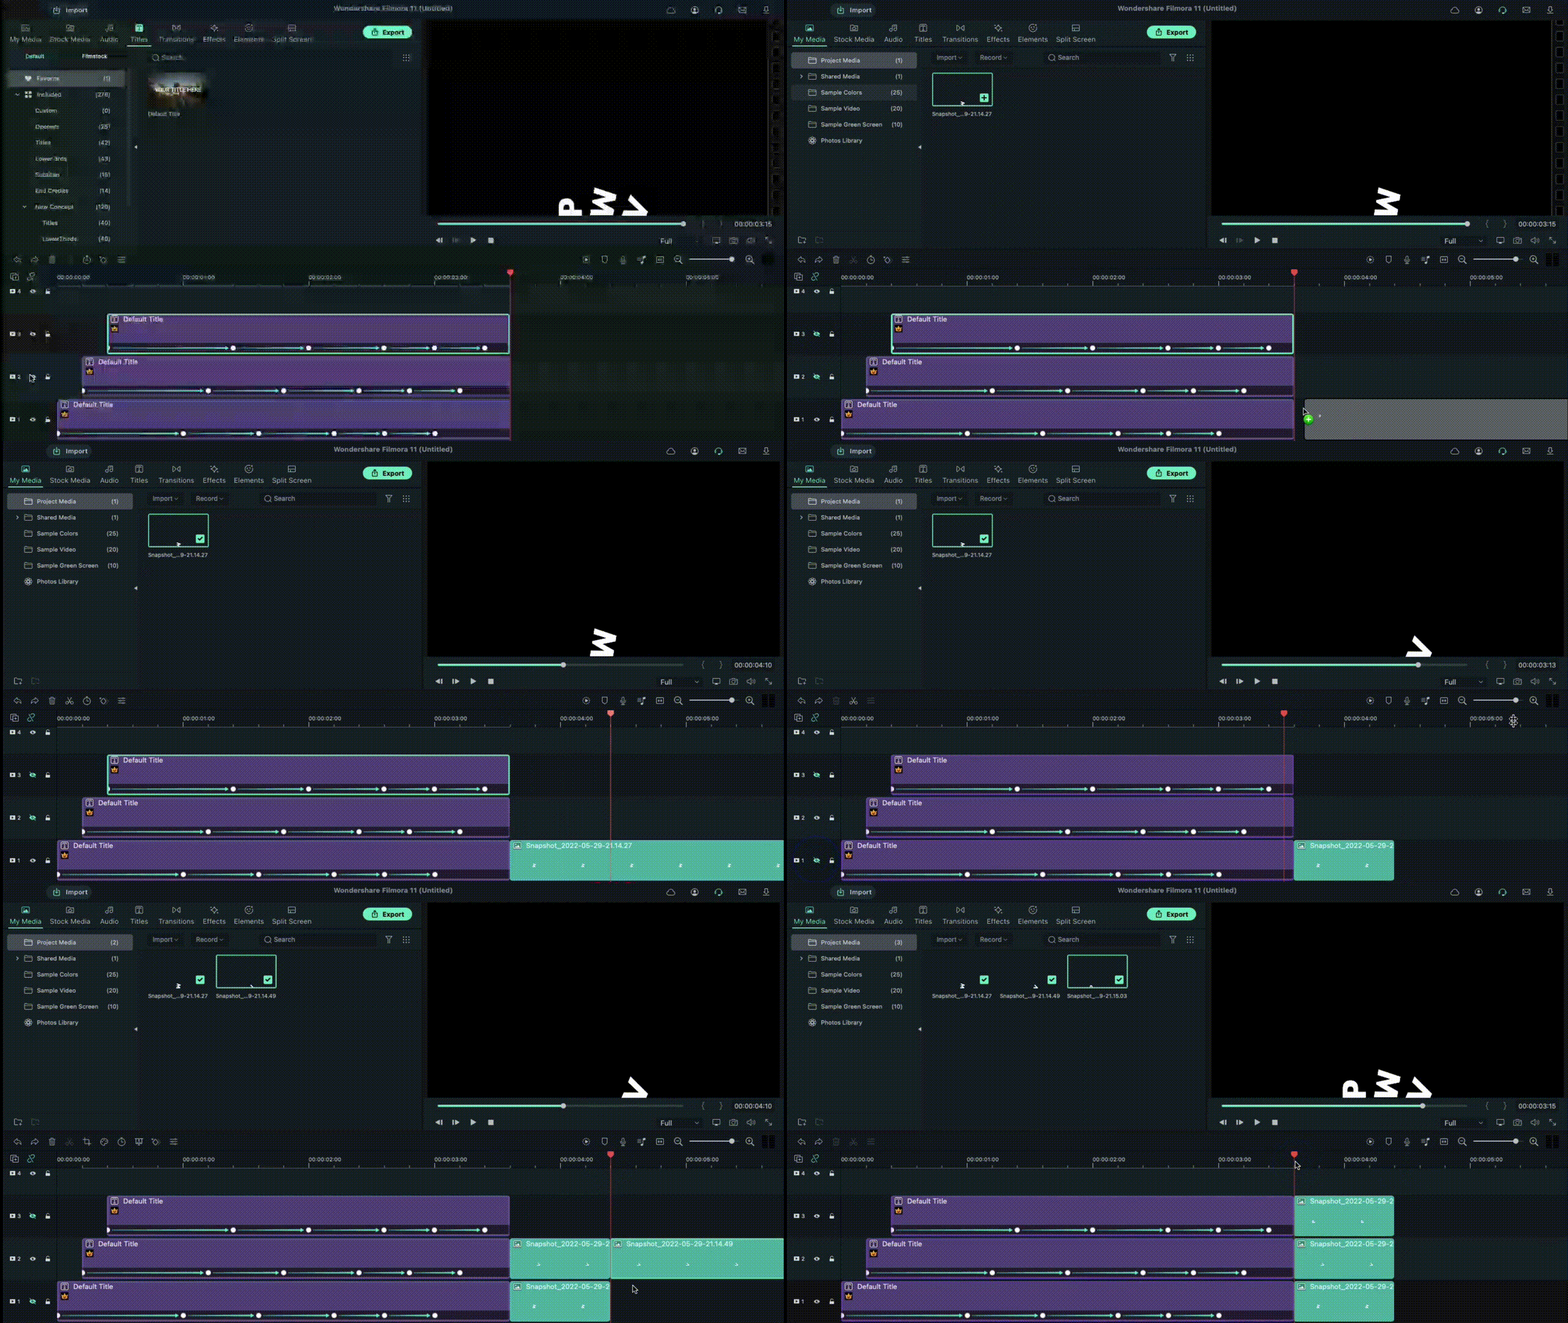
Next, you have to click on the hide button for Tracks 2 and up. Tap on the Snapshot icon in the editing timeline of the first letter. Then, when it appears in the library window, click on it and move it beside the Track 1 Title file that you were editing. Move the play head to the 1-second position of this file in the timeline.
Hide Track 1 again and click the Unhide button on Track 2. Repeat the snapshot function and add it to Layer 2. Adjust the end as per Track 1. After this, follow these steps for the subsequent letters as well.
Adjust Keyframing
Follow the animation process for all of the title clips and screenshots you did before. Move the play head to the point where the Tracks end and the Screenshots on the timeline start. Choose the first letter and click on the Keyframe icon in the editing window under Animation. Then, make adjustments to the values of Position, Rotation, etc.
Continue this keyframing step for all of the letters in sequence. After you are done here, click on the Render Preview icon on the right-hand side of the toolbar above the editing timeline. See how the falling text effects line up.
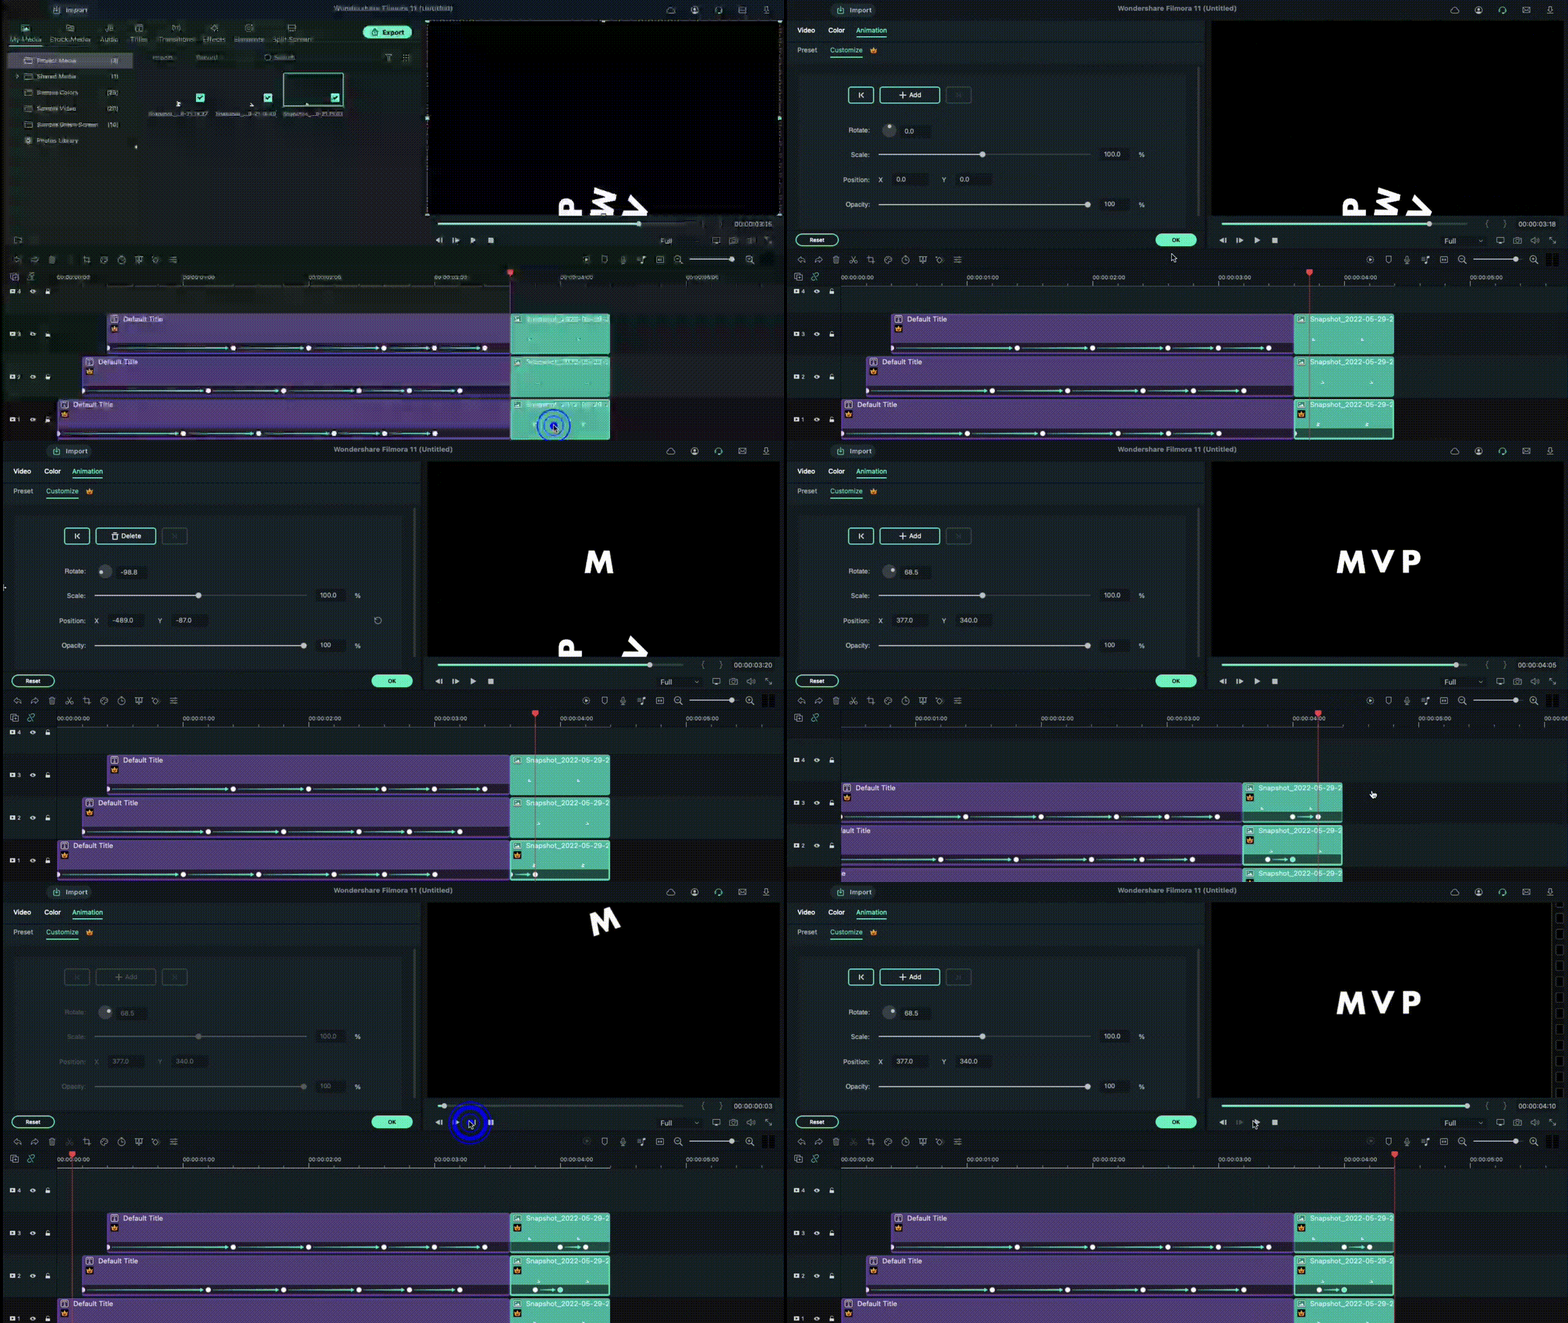
After that, you can export the final file to your device or do further editing work through the Export button.
Final Words
Indeed, adding the falling text effect should allow you to create a stunning, dynamic, and engaging video project. While the feature is available in many other editing software, you can expect a better user experience on Filmora, especially as a beginner-level user.
The UI on this software is simple to navigate, with all features easily accessible. Besides the falling text customization benefits, you will also use other effects, filters, and title presets in videos with some simple taps. So, install it soon and give it a try.
Free Download For macOS 10.14 or later
After switching on your device and going to your preferred browser, search for Wonderhsare Filmora’s official website. Upon accessing it, you will see the “Download” button at the top of the screen. Click on it, and the respective Filmora installer will download into your device instantly, depending on your OS type.
Then, you have to double-click on the installer file you will find in the Downloads folder. This will open the software installation problem window. Click on the Install button and then tap the Agree option for the terms & conditions that appear next on the screen. After that, the software will begin installing automatically.

Finally, press the Start Now button on the installation complete prompt window. The software will then launch automatically.
Adjust the project settings
After the software launches on your device, you should tap on the Create New Project button. Before you add the video file you will edit from your device through; you should take time to change some aspects of the project settings.
For this, click on the File tab at the top-most toolbar in the editor window. You should click on the Project Settings option from the drop-down menu, which will open the dialog box. Under the resolution option, you will see the Frame Rate element. Click on the drop-down menu and adjust the video’s frame rate to 25 FPS. After you are done, tap the OK button.

Add the Title
Following this, you must click on the Titles tab at the top toolbar on the editor. Different title templates, like Custom, Openers, End Credits, etc., will appear. Choose the default title of your liking and download it.
Next, hold the title that appears in the library window and then drag it to the first layer of the editing timeline. Clip the title short by moving the play head to the 3-second and 15 frames mark and shape the title to that length. Then, delete the rest of the part.

Edit the Title
After this, you have to double-click on the top of the default title in your Track 1 timeline. A window will appear for editing the title. Click on the Text tab in this window and tap on the Font options. You should change the font of your title to Futura Bold or any other option that you would prefer.

Animate the characters
When this part is done, in the text field, add the first letter of the text you will add to your animated introduction. After inserting the first letter only, click on the Animation tab next. Following that, you have to move the playhead on your timeline to the very front. You will see the Position parameter in the Animation settings and change the number in the Y axis until it goes out of the top frame of the video.

Next, you must move the play head to the 1-second position in the timeline. Here, you must change the number Y axis to a lower position and adjust the Rotate element as per your preference. After that, move the playhead again to 15 frames from the 1-second mark. It would be best if you changed the Y-axis position digit to 0 and adjusted the Rotation value slightly.
Following that, move the playhead again by 15 frames ahead. Rotate the letter again and change the Y-axis value until the letter rests at the bottom of the screen. Again, you have to move the play head on the timeline to 10 frames ahead and adjust the Y-axis and Rotation values to a higher point. Then, continue the step like this at ten frames forward, this time making the character move to the ground again. Press the OK button to complete.

Repeat for the next letters
After you are done with this editing process for the first letter, hold the default title in the library and drag and drop it into Track 2 on the timeline. Adjust the starting point for this layer to frame five from the beginning, and move the file to that starting point. In the end, cut the title length at the same position as layer one was, at 3.15 seconds.
Follow the process explained in the previous section for the first letter, i.e., moving the playhead at specific frames and changing the Y-axis and Rotation value multiple times.
After editing the second letter in the title, repeat the process of holding and dragging the default title to Track 3 in the timeline and adjusting starting position at the 10th frame. Again, follow the process of animating the letter like for Letter 1 and Letter 2. Continue doing this process for multiple more letters in your title text.

Tap on the Play button under the Preview screen to see how the letters have the falling text effect.
Add Screenshot
Next, you have to click on the hide button for Tracks 2 and up. Tap on the Snapshot icon in the editing timeline of the first letter. Then, when it appears in the library window, click on it and move it beside the Track 1 Title file that you were editing. Move the play head to the 1-second position of this file in the timeline.
Hide Track 1 again and click the Unhide button on Track 2. Repeat the snapshot function and add it to Layer 2. Adjust the end as per Track 1. After this, follow these steps for the subsequent letters as well.

Adjust Keyframing
Follow the animation process for all of the title clips and screenshots you did before. Move the play head to the point where the Tracks end and the Screenshots on the timeline start. Choose the first letter and click on the Keyframe icon in the editing window under Animation. Then, make adjustments to the values of Position, Rotation, etc.
Continue this keyframing step for all of the letters in sequence. After you are done here, click on the Render Preview icon on the right-hand side of the toolbar above the editing timeline. See how the falling text effects line up.

After that, you can export the final file to your device or do further editing work through the Export button.
Final Words
Indeed, adding the falling text effect should allow you to create a stunning, dynamic, and engaging video project. While the feature is available in many other editing software, you can expect a better user experience on Filmora, especially as a beginner-level user.
The UI on this software is simple to navigate, with all features easily accessible. Besides the falling text customization benefits, you will also use other effects, filters, and title presets in videos with some simple taps. So, install it soon and give it a try.
How to Zoom Video in VLC Media Player
Even though VLC Media Player is not the default video player in any operating system, most users install VLC Player separately on their computers. This is because VLC Media Player offers several useful and advanced features that the default media player like Windows Media Player lacks. There are situations when users need to zoom into certain parts of a video, and that is where VLC zoom in video feature comes in handy.
You may need to zoom into videos to pay attention to details and focus on parts around the subject that others are missing out. For example, you have recorded a video, and you have played it on VLC to zoom in and ensure that there is nothing distracting before you publish the video. Now, we will illustrate all the different ways on how to zoom in VLC Media Player. We will also suggest a better alternative to zoom into videos easily.
Part 1: Zoom VLC Video Using Interactive Zoom
VLC Media Player comes with Interactive Zoom feature that lets you zoom into a section of a video irrespective of its resolution. You can use Interactive Zoom feature to zoom nearly eight times the original size of the video. While you zoom your video with Interactive Zoom option, VLC Media Player zooms the video digitally, and if the video resolution is not high, you can see some deterioration in video quality as you zoom in. Here are the steps on how to VLC zoom with Interactive Zoom.
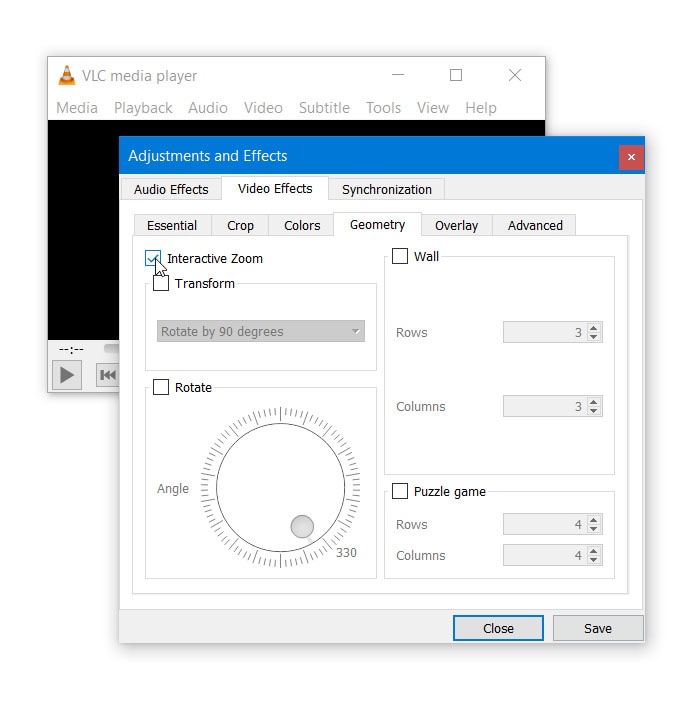
Step1First, you have to enable Interactive Zoom feature. Launch VLC Player and go to Tools menu option.
Step2Select Effects and Filters and you will see Adjustments and Effects window open.
Step3Go to Video Effects tab and then go to Geometry tab.
Step4Turn on Interactive Zoom option. Click on Save and Close buttons.
Step5Play a video and you will see a Picture in Picture window in the top-left corner where you can see live preview of the video. You will notice a rectangular box that you can drag around the PiP window to zoom that section of the video.
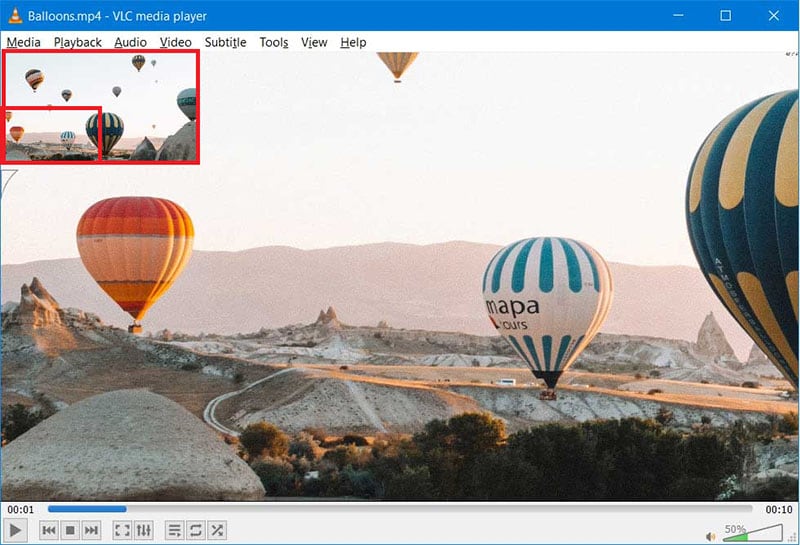
Step6Wherever you place the rectangular box in PiP window, that part will be zoomed and shown outside the PiP window. You can increase or decrease the level of magnification from the vertical slider present below PiP window.
Part 2: Zoom Video Using VLC Video Menu
Apart from Interactive Zoom, there is also an inbuilt Zoom option available under Video Menu. While Interactive Zoom is for detailed zooming, Zoom through Video menu on VLC is for instant zooming. Moreover, Zoom through Video menu is effective only when you view the video on VLC Player. If you are watching the video on full screen, the zooming effect will not be easily noticeable. Here are the steps on how to zoom in VLC player using VLC Video menu.
Step1Open VLC Media player in windowed mode and play the desired video.
Step2Go to Video menu and select Zoom option.
Step3You will come across several options such as 1:4 quarter, 1:2 half, 1:1 original, and 2:1 double. You can select from one of them as per your requirements.
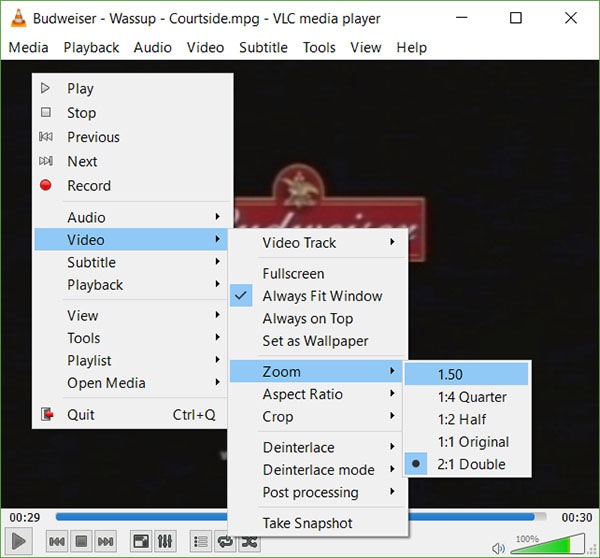
Otherwise, you can press Shift + Z keys together to try out different zoom options.
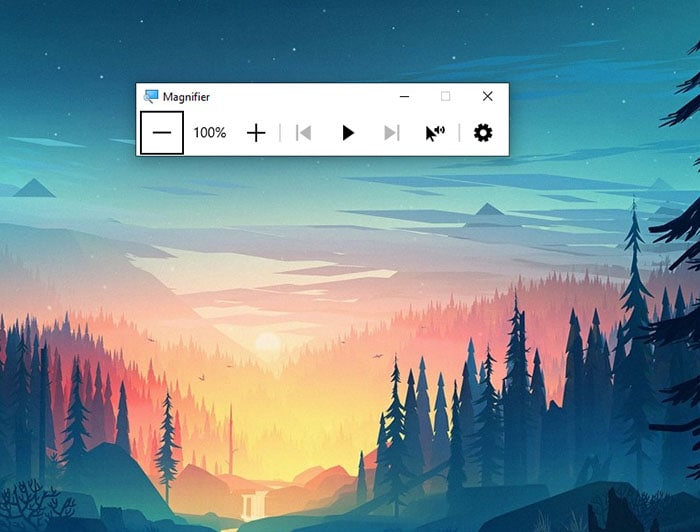
Part 3: Zoom VLC Video Using Magnifier
If you are using VLC Media Player on your Windows desktop computer, you can use the inbuilt Magnifier tool to zoom into a video that you are playing on VLC. You can zoom into videos to read any text in the background but this leads to low resolution and distortion. You can zoom in by 16 times which is the highest among all the three methods. Here are the steps on how to VLC zoom video using Magnifier tool.
Step1Open VLC Player and play the desired video.
Step2Go to Start menu on Windows and search for “Magnifier”.
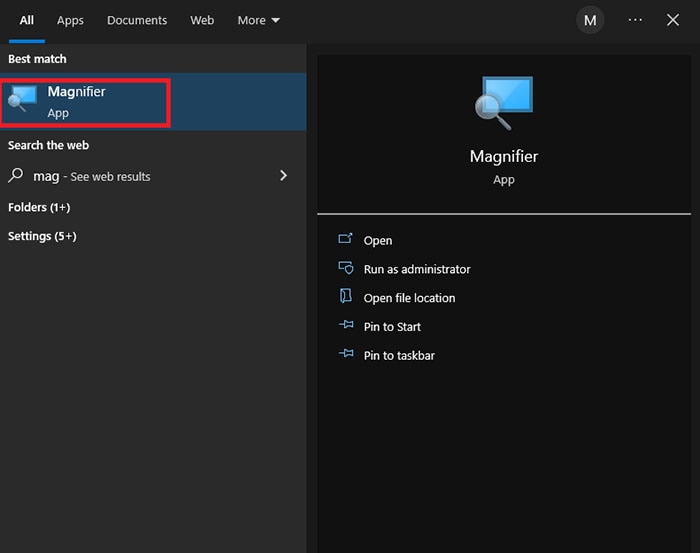
Step3Click on Magnifier App. Once it opens, place the mouse pointer on the video and you will see its magnified version.
Step4Press Windows and “+” keys to zoom in while press Windows and “-“ keys to zoom out.
Part 4: VLC Alternative to Zoom in Videos
If you are not satisfied with VLC Player zoom feature, you can use a video editor to zoom into your video conveniently so that you can check any focused section on your video. You can also read any text on the video comfortably. We recommend Wondershare Filmora as an alternative to VLC Media Player for zooming into videos. Filmora is a professional video editor and here is the list of the steps on how to zoom into videos with Filmora.
Step 1: Download and install Wondershare Filmora and it is available for Windows and Mac users.
Free Download For Win 7 or later(64-bit)
Free Download For macOS 10.14 or later
Step 2: Launch Wondershare and click on New Project option.
Step 3: Import your video on Filmora into Project Media folder by drag and drop option.

Step 4: Drag and drop the video file into Timeline. Click on Crop icon on the top bar of Timeline.
Step 5: Go to Pan & Zoom tab and move the rectangular box and play the video to watch its magnified video. You can also export the video after cropping in your desired file format.

Conclusion
There are several scenarios when you need to zoom into a video to focus on the details. VLC Media Player comes with instant zoom as well as detailed zoom options to satisfy your requirements. You can even use Magnifier App on Windows to zoom into videos. But for the best result, we recommend Wondershare Filmora as the best VLC Player alternative for zooming videos.
Free Download For macOS 10.14 or later
Step 2: Launch Wondershare and click on New Project option.
Step 3: Import your video on Filmora into Project Media folder by drag and drop option.

Step 4: Drag and drop the video file into Timeline. Click on Crop icon on the top bar of Timeline.
Step 5: Go to Pan & Zoom tab and move the rectangular box and play the video to watch its magnified video. You can also export the video after cropping in your desired file format.

Conclusion
There are several scenarios when you need to zoom into a video to focus on the details. VLC Media Player comes with instant zoom as well as detailed zoom options to satisfy your requirements. You can even use Magnifier App on Windows to zoom into videos. But for the best result, we recommend Wondershare Filmora as the best VLC Player alternative for zooming videos.
Use The Best LUTs for Lightroom
Colors play an essential role in our lives. They add emotions, create moods, and set the tone for our experiences. Using colors in media is significant as they help create an atmosphere that improves your story. That’s why filmmakers and photographers focus so much on color grading and adjustment. For this purpose, they use different tools like LUTs.
You can use LUTs in your images and videos to achieve a particular look or feel in Lightroom. With LUTs, you can make fantastic color grading in Lightroom. Many paid and free LUTs for Lightroom are available to download and use for your media. Moreover, LUTs can save time and give your story perspective and emotion.
Part 1: How Are LUTs Influencing Video Editors?
There are many ways in which LUTs can help and influence content creators and video editors. From Lightroom presets to Premiere Pro presets, you can download any. However, you need to learn the many ways in which LUTs are helping editors.
Efficiency
LUTs (Lookup Tables) are a powerful tool that can help you in many ways if you are a video editor. First, they can make your editing process more efficient. You can apply color grading and correction to your footage, saving you time and increasing productivity. Instead of manually adjusting the colors for each clip, you can use LUTs to achieve a particular look.
Creativity
In addition to efficiency, LUTs also offer a wide range of creative options. You can use LUTs to explore different styles and moods, from vintage looks to modern cinematic ones. It can help you create a unique style for your videos and make them look more meaningful. With LUTs, you can experiment with different colors and effects to achieve the perfect look for your footage.
Consistency
Another benefit of using LUTs is consistency. With LUTs, you can maintain a consistent look and feel across different video clips. It gives all clips in a project a cohesive and professional appearance. These LUTs can be especially helpful if you work on a long-term project or with multiple editors. It will give a uniform look and feel throughout your project.
Accessibility
LUTs are also becoming more accessible than ever before. With free and paid online options, video editors of all skill levels can access these tools for their video projects. You don’t need extensive training or experience in color grading to use LUTs for your videos. Moreover, anyone can use LUTs with simple steps and make their content look more professional.
Part 2: Top Free LUTs for Lightroom
You don’t need to search for free LUTs for Lightroom for your media content. Here is a list of 5 Lightroom LUTs free to download to color grade your media in different tones.
1. 50 Vintage Cinematic Lightroom Presets and LUTs
It is a pack of 50 Cinematic-style vintage LUTs you can apply to your media files. This LUT pack has a warm and orangey tone to give a golden hour and warm color scheme touch. You can use it to create a vintage, nostalgic look for your content. Furthermore, you can use your travel photos or outdoor adventure videos to give them a dreamy rusty vibe.
2. Free LUTs Ciné Green
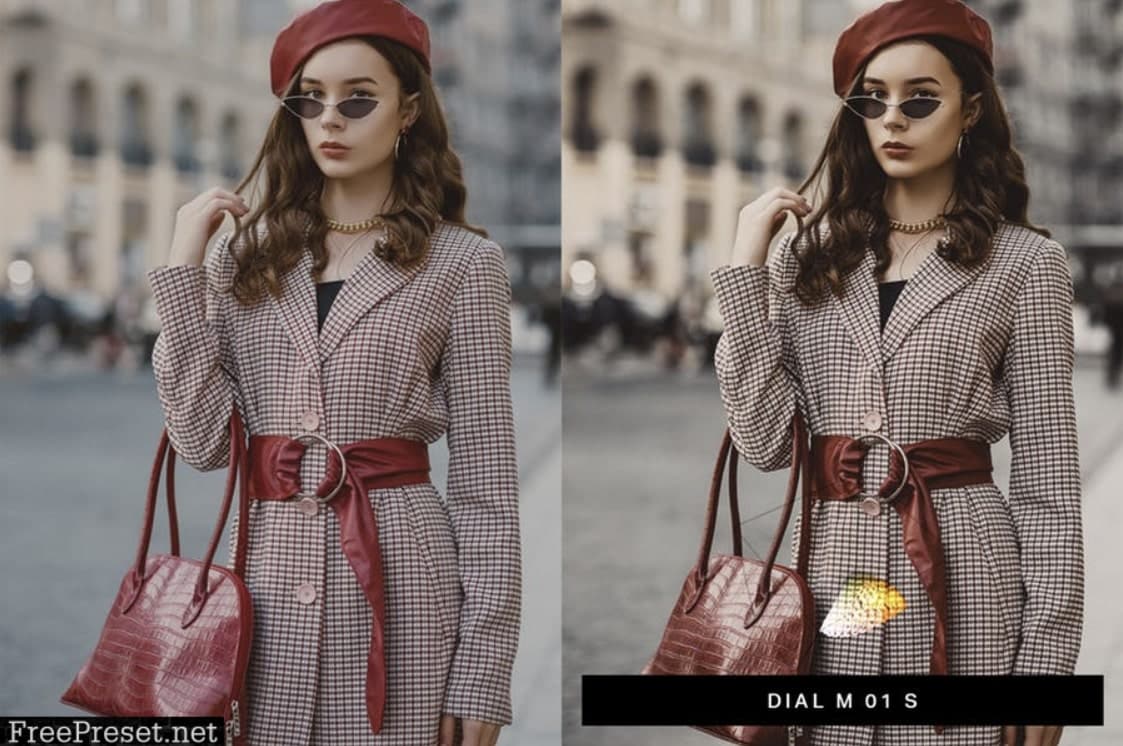
If you want to add a cool and moody feel to your content, try using this LUT. It has a greenish-blue tone that can give your photos and videos a mysterious and cinematic look. Moreover, this LUT is excellent for nighttime cityscape shots or dramatic portrait photography. Furthermore, you can use it to create a dark and edgy vibe for your content.

3. Urban LUTs
Urban LUT is a pack of 10 rich-color LUTs you can use on your photos and videos. This pack has a bright and cheerful feel to it. It enhances the colors in your photos and videos, making them pop and look more vibrant. Additionally, you can use it to create a fun and lively atmosphere for your content. Moreover, you can try this pack for your vacation photos or family videos to give them an energetic feel.
4. 90’s Vintage LUT Presets
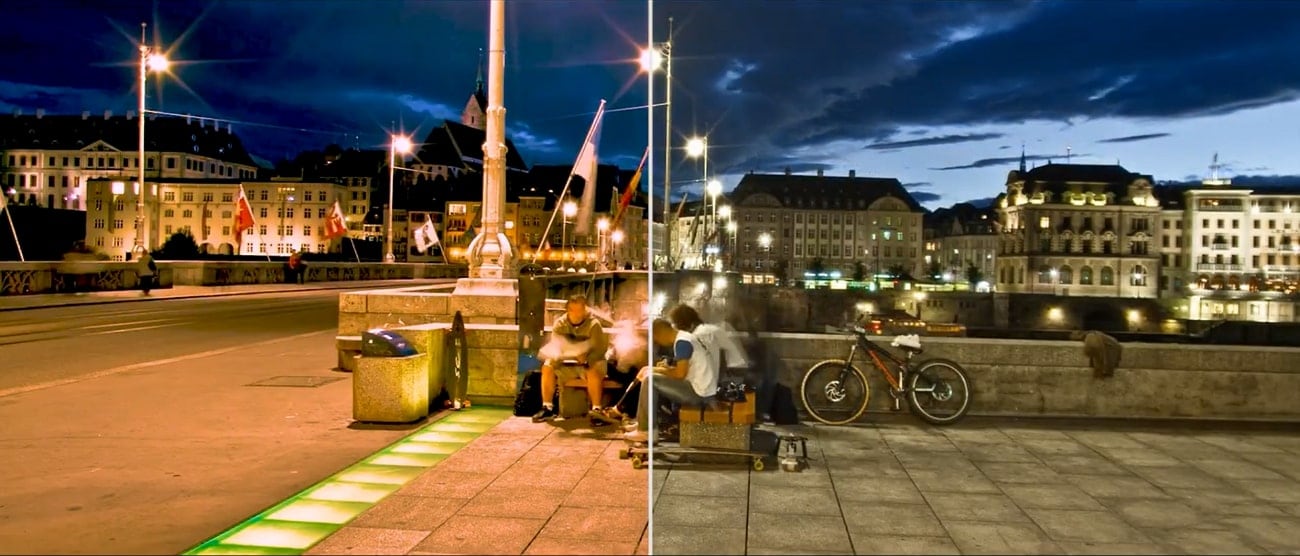
If you want to add a vintage and retro look to your content, 90’s Vintage LUT Presets are perfect. It has a yellow and orange tone that can give your photos and videos an old-fashioned and nostalgic feel. Moreover, it gives your media a 90s feel with ten different LUTs. This pack can create a vintage feel for your content and give your project a throwback look.
5. 8 Free Pastel Day Lightroom Presets and LUTs
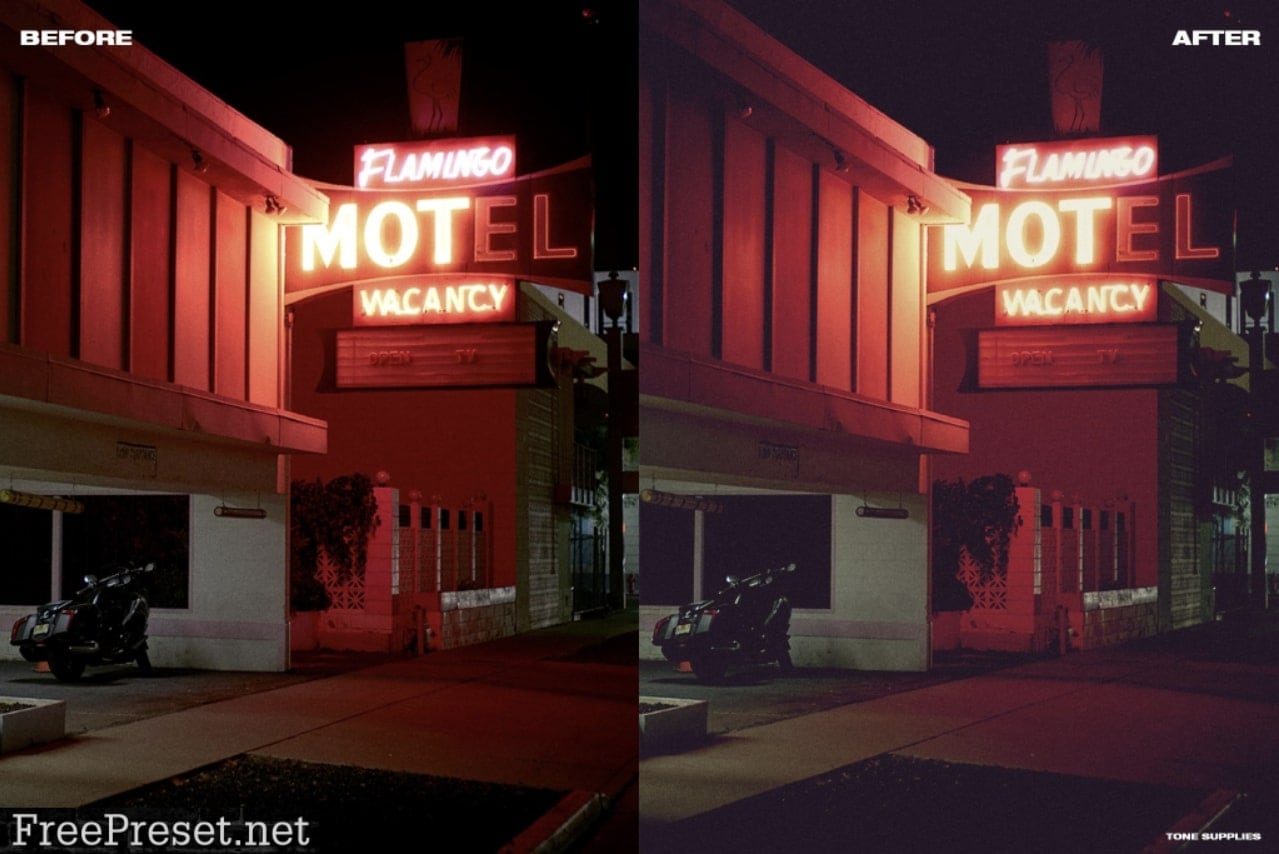
This LUT offers eight paste color-grade presets for photos and videos. This pack has a soft and pastel tone to give your media a dreamy and romantic look for your content. It’s excellent for portrait photography, especially for outdoor shoots with natural lighting. Additionally, you can use it to create a soft and gentle vibe for your content with a more delicate touch.

Bonus Part: Wondershare Filmora: A Great Haven for LUTs
Wondershare Filmora might just be what you need to give your videos a cinematic touch. This powerful tool has over 200+ LUTs in its library to give your videos the perfect tone and color grading. You can even adjust the intensity of the LUTs to match the mood of your videos. Furthermore, you can tweak with basic options like hue, saturation, exposure, white balance, and more.
In addition, Wondershare Filmora offers over 10 billion free stock media for you to use in your photos and videos. Moreover, you can even save your music videos up to 4K resolution with sharper and more detailed results. Additionally, you can use the audio visualizer to match the sound of your video automatically. You can choose from different transitions and effects for your videos as well.

Empower your videos with a new mood using different LUTs. Filmora now offers 100+ top-quality 3D LUTs cover a broad range of scenarios. Transform your videos with Filmora’s powerful 3D LUTs.
Apply LUT on Videos Apply LUT on Videos Learn More

Conclusion
In conclusion, LUTs are a powerful tool for video editors who want to give their videos a cinematic look. You can easily achieve the perfect tone and color grading for your videos and pictures. Moreover, LUTs can save you time and effort in video editing. With many paid and free LUTs for Lightroom available that you can use to create professional-looking videos.
Part 1: How Are LUTs Influencing Video Editors?
There are many ways in which LUTs can help and influence content creators and video editors. From Lightroom presets to Premiere Pro presets, you can download any. However, you need to learn the many ways in which LUTs are helping editors.
Efficiency
LUTs (Lookup Tables) are a powerful tool that can help you in many ways if you are a video editor. First, they can make your editing process more efficient. You can apply color grading and correction to your footage, saving you time and increasing productivity. Instead of manually adjusting the colors for each clip, you can use LUTs to achieve a particular look.
Creativity
In addition to efficiency, LUTs also offer a wide range of creative options. You can use LUTs to explore different styles and moods, from vintage looks to modern cinematic ones. It can help you create a unique style for your videos and make them look more meaningful. With LUTs, you can experiment with different colors and effects to achieve the perfect look for your footage.
Consistency
Another benefit of using LUTs is consistency. With LUTs, you can maintain a consistent look and feel across different video clips. It gives all clips in a project a cohesive and professional appearance. These LUTs can be especially helpful if you work on a long-term project or with multiple editors. It will give a uniform look and feel throughout your project.
Accessibility
LUTs are also becoming more accessible than ever before. With free and paid online options, video editors of all skill levels can access these tools for their video projects. You don’t need extensive training or experience in color grading to use LUTs for your videos. Moreover, anyone can use LUTs with simple steps and make their content look more professional.
Part 2: Top Free LUTs for Lightroom
You don’t need to search for free LUTs for Lightroom for your media content. Here is a list of 5 Lightroom LUTs free to download to color grade your media in different tones.
1. 50 Vintage Cinematic Lightroom Presets and LUTs
It is a pack of 50 Cinematic-style vintage LUTs you can apply to your media files. This LUT pack has a warm and orangey tone to give a golden hour and warm color scheme touch. You can use it to create a vintage, nostalgic look for your content. Furthermore, you can use your travel photos or outdoor adventure videos to give them a dreamy rusty vibe.

2. Free LUTs Ciné Green
If you want to add a cool and moody feel to your content, try using this LUT. It has a greenish-blue tone that can give your photos and videos a mysterious and cinematic look. Moreover, this LUT is excellent for nighttime cityscape shots or dramatic portrait photography. Furthermore, you can use it to create a dark and edgy vibe for your content.

3. Urban LUTs
Urban LUT is a pack of 10 rich-color LUTs you can use on your photos and videos. This pack has a bright and cheerful feel to it. It enhances the colors in your photos and videos, making them pop and look more vibrant. Additionally, you can use it to create a fun and lively atmosphere for your content. Moreover, you can try this pack for your vacation photos or family videos to give them an energetic feel.

4. 90’s Vintage LUT Presets
If you want to add a vintage and retro look to your content, 90’s Vintage LUT Presets are perfect. It has a yellow and orange tone that can give your photos and videos an old-fashioned and nostalgic feel. Moreover, it gives your media a 90s feel with ten different LUTs. This pack can create a vintage feel for your content and give your project a throwback look.

5. 8 Free Pastel Day Lightroom Presets and LUTs
This LUT offers eight paste color-grade presets for photos and videos. This pack has a soft and pastel tone to give your media a dreamy and romantic look for your content. It’s excellent for portrait photography, especially for outdoor shoots with natural lighting. Additionally, you can use it to create a soft and gentle vibe for your content with a more delicate touch.

Bonus Part: Wondershare Filmora: A Great Haven for LUTs
Wondershare Filmora might just be what you need to give your videos a cinematic touch. This powerful tool has over 200+ LUTs in its library to give your videos the perfect tone and color grading. You can even adjust the intensity of the LUTs to match the mood of your videos. Furthermore, you can tweak with basic options like hue, saturation, exposure, white balance, and more.
In addition, Wondershare Filmora offers over 10 billion free stock media for you to use in your photos and videos. Moreover, you can even save your music videos up to 4K resolution with sharper and more detailed results. Additionally, you can use the audio visualizer to match the sound of your video automatically. You can choose from different transitions and effects for your videos as well.

Empower your videos with a new mood using different LUTs. Filmora now offers 100+ top-quality 3D LUTs cover a broad range of scenarios. Transform your videos with Filmora’s powerful 3D LUTs.
Apply LUT on Videos Apply LUT on Videos Learn More

Conclusion
In conclusion, LUTs are a powerful tool for video editors who want to give their videos a cinematic look. You can easily achieve the perfect tone and color grading for your videos and pictures. Moreover, LUTs can save you time and effort in video editing. With many paid and free LUTs for Lightroom available that you can use to create professional-looking videos.
Also read:
- [New] 2024 Approved Social Media Coverage Start Scale, Resolution, Length
- [New] In 2024, How To Record Switch Gameplay
- [Updated] 2024 Approved The Comprehensive Guide to Superior Recordings in Audacity
- [Updated] In 2024, Freely Accessible Platforms for Professional Photography Edits
- Driver Unavailable Alert - BCM20702A0
- Elevate Your Vimeo Media with Well-Defined Chapters
- In 2024, Can Life360 Track Or See Text Messages? What Can You Do with Life360 On Poco C50? | Dr.fone
- In 2024, How to Change Credit Card from Your iPhone 6 Plus Apple ID and Apple Pay
- New 2024 Approved Are You Curious About Finding a Good iPhone Slow-Motion App? Discover the Top-Rated Applications in the Market that Will Help You Create the Perfect Video
- New 2024 Approved Have You Ever Used Premiere Pro to Create Slow-Motion Effects? This Article Will Provide a Guide on Producing Slow-Motion Effects by Using Adobe Premiere Pro
- New 2024 Approved How to Perform Mask Tracking Discovering the Best Methods
- New 2024 Approved How to Use Deep Fried Meme Maker
- New 2024 Approved Master Premiere Pro Custom Sequence Presets
- New In 2024, Are You a Video Editor Making Use of iMovie? Do You Wish to Read How to Change Orientation in iMovie? Youre in the Right Place! At the End of This Guide, Youd Have Learned How to Change Video Orientation in iMovie
- Quick Fix to Connect Xbox Wirelessly - Download the Necessary Software Now!
- Updated 2024 Approved Do You Wish to Learn About some Tools to Slow Down a Video? Discover How to Slow Down Time Lapse on iPhone Throughout This Article
- Title: Updated How To Make a Video by Mouse in Filmora?
- Author: Morgan
- Created at : 2024-09-29 04:53:06
- Updated at : 2024-10-05 18:13:50
- Link: https://ai-video-editing.techidaily.com/updated-how-to-make-a-video-by-mouse-in-filmora/
- License: This work is licensed under CC BY-NC-SA 4.0.

