
:max_bytes(150000):strip_icc():format(webp)/homepod-hero-5a79bc226bf06900378a7e1a.jpg)
Updated How to Make Falling Text Effect in Filmora, In 2024
How to Make Falling Text Effect in Filmora?
Indeed, there are different elements of a video that has the potential to make it stand out to viewers. The title you add to the video, content information in the slides, and other elements are some parts that capture one’s interest.
But seeing only the text in single lines or paragraphs can get repetitive and unappealing, especially with so many videos having the same style. In this context, the fun falling text effect is a unique and exciting approach to making your titles in videos engaging. It creates a fun look when the viewer clicks into the video and is met with this styling title effect.
On Wondershare Filmora , there is a feature available for users to apply this effect to videos in a more straightforward sequence of steps than other editors. Yet, knowing how it works is still valid, even for experienced editing professionals. In this post, we shall detail all of the steps that go into creating this effect in videos, with examples.
Launch Filmora on the Device
Before getting started with the editing steps, you need to download and install this third-party editing software into your device. Filmora works on both Mac and Windows-based computers. (Download here:
Free Download For Win 7 or later(64-bit)
Free Download For macOS 10.14 or later
After switching on your device and going to your preferred browser, search for Wonderhsare Filmora’s official website. Upon accessing it, you will see the “Download” button at the top of the screen. Click on it, and the respective Filmora installer will download into your device instantly, depending on your OS type.
Then, you have to double-click on the installer file you will find in the Downloads folder. This will open the software installation problem window. Click on the Install button and then tap the Agree option for the terms & conditions that appear next on the screen. After that, the software will begin installing automatically.

Finally, press the Start Now button on the installation complete prompt window. The software will then launch automatically.
Adjust the project settings
After the software launches on your device, you should tap on the Create New Project button. Before you add the video file you will edit from your device through; you should take time to change some aspects of the project settings.
For this, click on the File tab at the top-most toolbar in the editor window. You should click on the Project Settings option from the drop-down menu, which will open the dialog box. Under the resolution option, you will see the Frame Rate element. Click on the drop-down menu and adjust the video’s frame rate to 25 FPS. After you are done, tap the OK button.

Add the Title
Following this, you must click on the Titles tab at the top toolbar on the editor. Different title templates, like Custom, Openers, End Credits, etc., will appear. Choose the default title of your liking and download it.
Next, hold the title that appears in the library window and then drag it to the first layer of the editing timeline. Clip the title short by moving the play head to the 3-second and 15 frames mark and shape the title to that length. Then, delete the rest of the part.

Edit the Title
After this, you have to double-click on the top of the default title in your Track 1 timeline. A window will appear for editing the title. Click on the Text tab in this window and tap on the Font options. You should change the font of your title to Futura Bold or any other option that you would prefer.

Animate the characters
When this part is done, in the text field, add the first letter of the text you will add to your animated introduction. After inserting the first letter only, click on the Animation tab next. Following that, you have to move the playhead on your timeline to the very front. You will see the Position parameter in the Animation settings and change the number in the Y axis until it goes out of the top frame of the video.

Next, you must move the play head to the 1-second position in the timeline. Here, you must change the number Y axis to a lower position and adjust the Rotate element as per your preference. After that, move the playhead again to 15 frames from the 1-second mark. It would be best if you changed the Y-axis position digit to 0 and adjusted the Rotation value slightly.
Following that, move the playhead again by 15 frames ahead. Rotate the letter again and change the Y-axis value until the letter rests at the bottom of the screen. Again, you have to move the play head on the timeline to 10 frames ahead and adjust the Y-axis and Rotation values to a higher point. Then, continue the step like this at ten frames forward, this time making the character move to the ground again. Press the OK button to complete.

Repeat for the next letters
After you are done with this editing process for the first letter, hold the default title in the library and drag and drop it into Track 2 on the timeline. Adjust the starting point for this layer to frame five from the beginning, and move the file to that starting point. In the end, cut the title length at the same position as layer one was, at 3.15 seconds.
Follow the process explained in the previous section for the first letter, i.e., moving the playhead at specific frames and changing the Y-axis and Rotation value multiple times.
After editing the second letter in the title, repeat the process of holding and dragging the default title to Track 3 in the timeline and adjusting starting position at the 10th frame. Again, follow the process of animating the letter like for Letter 1 and Letter 2. Continue doing this process for multiple more letters in your title text.

Tap on the Play button under the Preview screen to see how the letters have the falling text effect.
Add Screenshot
Next, you have to click on the hide button for Tracks 2 and up. Tap on the Snapshot icon in the editing timeline of the first letter. Then, when it appears in the library window, click on it and move it beside the Track 1 Title file that you were editing. Move the play head to the 1-second position of this file in the timeline.
Hide Track 1 again and click the Unhide button on Track 2. Repeat the snapshot function and add it to Layer 2. Adjust the end as per Track 1. After this, follow these steps for the subsequent letters as well.

Adjust Keyframing
Follow the animation process for all of the title clips and screenshots you did before. Move the play head to the point where the Tracks end and the Screenshots on the timeline start. Choose the first letter and click on the Keyframe icon in the editing window under Animation. Then, make adjustments to the values of Position, Rotation, etc.
Continue this keyframing step for all of the letters in sequence. After you are done here, click on the Render Preview icon on the right-hand side of the toolbar above the editing timeline. See how the falling text effects line up.

After that, you can export the final file to your device or do further editing work through the Export button.
Final Words
Indeed, adding the falling text effect should allow you to create a stunning, dynamic, and engaging video project. While the feature is available in many other editing software, you can expect a better user experience on Filmora, especially as a beginner-level user.
The UI on this software is simple to navigate, with all features easily accessible. Besides the falling text customization benefits, you will also use other effects, filters, and title presets in videos with some simple taps. So, install it soon and give it a try.
Free Download For macOS 10.14 or later
After switching on your device and going to your preferred browser, search for Wonderhsare Filmora’s official website. Upon accessing it, you will see the “Download” button at the top of the screen. Click on it, and the respective Filmora installer will download into your device instantly, depending on your OS type.
Then, you have to double-click on the installer file you will find in the Downloads folder. This will open the software installation problem window. Click on the Install button and then tap the Agree option for the terms & conditions that appear next on the screen. After that, the software will begin installing automatically.
Finally, press the Start Now button on the installation complete prompt window. The software will then launch automatically.
Adjust the project settings
After the software launches on your device, you should tap on the Create New Project button. Before you add the video file you will edit from your device through; you should take time to change some aspects of the project settings.
For this, click on the File tab at the top-most toolbar in the editor window. You should click on the Project Settings option from the drop-down menu, which will open the dialog box. Under the resolution option, you will see the Frame Rate element. Click on the drop-down menu and adjust the video’s frame rate to 25 FPS. After you are done, tap the OK button.
Add the Title
Following this, you must click on the Titles tab at the top toolbar on the editor. Different title templates, like Custom, Openers, End Credits, etc., will appear. Choose the default title of your liking and download it.
Next, hold the title that appears in the library window and then drag it to the first layer of the editing timeline. Clip the title short by moving the play head to the 3-second and 15 frames mark and shape the title to that length. Then, delete the rest of the part.
Edit the Title
After this, you have to double-click on the top of the default title in your Track 1 timeline. A window will appear for editing the title. Click on the Text tab in this window and tap on the Font options. You should change the font of your title to Futura Bold or any other option that you would prefer.
Animate the characters
When this part is done, in the text field, add the first letter of the text you will add to your animated introduction. After inserting the first letter only, click on the Animation tab next. Following that, you have to move the playhead on your timeline to the very front. You will see the Position parameter in the Animation settings and change the number in the Y axis until it goes out of the top frame of the video.
Next, you must move the play head to the 1-second position in the timeline. Here, you must change the number Y axis to a lower position and adjust the Rotate element as per your preference. After that, move the playhead again to 15 frames from the 1-second mark. It would be best if you changed the Y-axis position digit to 0 and adjusted the Rotation value slightly.
Following that, move the playhead again by 15 frames ahead. Rotate the letter again and change the Y-axis value until the letter rests at the bottom of the screen. Again, you have to move the play head on the timeline to 10 frames ahead and adjust the Y-axis and Rotation values to a higher point. Then, continue the step like this at ten frames forward, this time making the character move to the ground again. Press the OK button to complete.
Repeat for the next letters
After you are done with this editing process for the first letter, hold the default title in the library and drag and drop it into Track 2 on the timeline. Adjust the starting point for this layer to frame five from the beginning, and move the file to that starting point. In the end, cut the title length at the same position as layer one was, at 3.15 seconds.
Follow the process explained in the previous section for the first letter, i.e., moving the playhead at specific frames and changing the Y-axis and Rotation value multiple times.
After editing the second letter in the title, repeat the process of holding and dragging the default title to Track 3 in the timeline and adjusting starting position at the 10th frame. Again, follow the process of animating the letter like for Letter 1 and Letter 2. Continue doing this process for multiple more letters in your title text.
Tap on the Play button under the Preview screen to see how the letters have the falling text effect.
Add Screenshot
Next, you have to click on the hide button for Tracks 2 and up. Tap on the Snapshot icon in the editing timeline of the first letter. Then, when it appears in the library window, click on it and move it beside the Track 1 Title file that you were editing. Move the play head to the 1-second position of this file in the timeline.
Hide Track 1 again and click the Unhide button on Track 2. Repeat the snapshot function and add it to Layer 2. Adjust the end as per Track 1. After this, follow these steps for the subsequent letters as well.
Adjust Keyframing
Follow the animation process for all of the title clips and screenshots you did before. Move the play head to the point where the Tracks end and the Screenshots on the timeline start. Choose the first letter and click on the Keyframe icon in the editing window under Animation. Then, make adjustments to the values of Position, Rotation, etc.
Continue this keyframing step for all of the letters in sequence. After you are done here, click on the Render Preview icon on the right-hand side of the toolbar above the editing timeline. See how the falling text effects line up.
After that, you can export the final file to your device or do further editing work through the Export button.
Final Words
Indeed, adding the falling text effect should allow you to create a stunning, dynamic, and engaging video project. While the feature is available in many other editing software, you can expect a better user experience on Filmora, especially as a beginner-level user.
The UI on this software is simple to navigate, with all features easily accessible. Besides the falling text customization benefits, you will also use other effects, filters, and title presets in videos with some simple taps. So, install it soon and give it a try.
How To Add Text In After Effects
In almost every video you come across, you will see text added to the video in different parts. There are various reasons why adding text to videos becomes a necessity. First of all, you can highlight the underlying message or key points in your video. Along with audio and video, the viewers will have another cue point in the form of text that they can retain in their memory for longer. You add animated texts to video to make the video interesting to watch and break the monotony of visual cues only.
Besides, you may have to want credits and add intro as well as outro to your video where adding text is almost a necessity. Text can help your viewer get the context of your video and make sense of the content. After Effects is a popular video editor thanks to its visual effects, text animation animations, and instant video enhancement tools. We will illustrate the different ways of adding text in After Effects in simple steps.
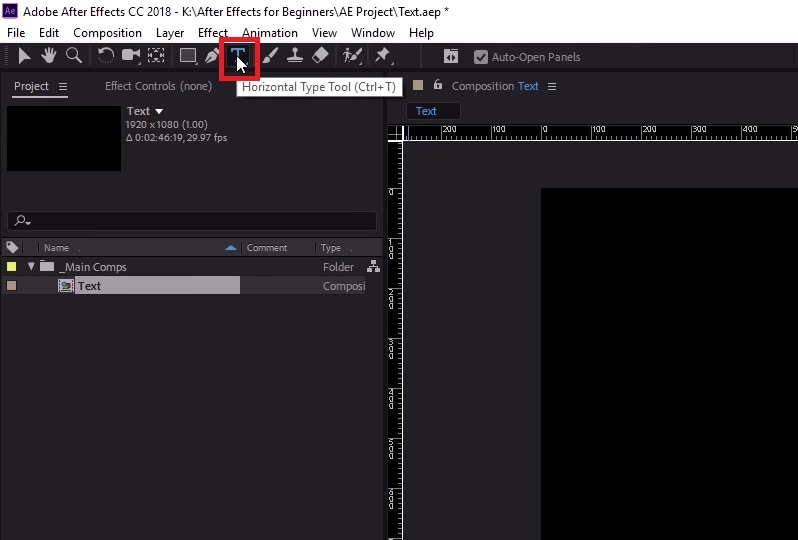
Part 1. Add Text in After Effects with Horizontal Type Tool
Once you have imported your video clip into the Timeline, there are several ways you can add text to your video. First of all, you can right-click on the Timeline and select New> Text to create an empty text layer and add any text you want. Similarly, you can go to Layer> New> Text option to do the same. But the easiest way of adding text in After Effects is by using Horizontal Type Tool. Here are the steps on how you can add text in AE with the type tool.
Step1Once you have imported your video into the Timeline, click on Horizontal Type Tool located in the top bar to add any text. You can press Ctrl+T(Windows) or Command+H(Mac) to get it instantly.
Step2Click on the video where you want to place the text and type your desired text there. After you are done adding your text, press Enter key in Num pad to exit out of the text field in the video.
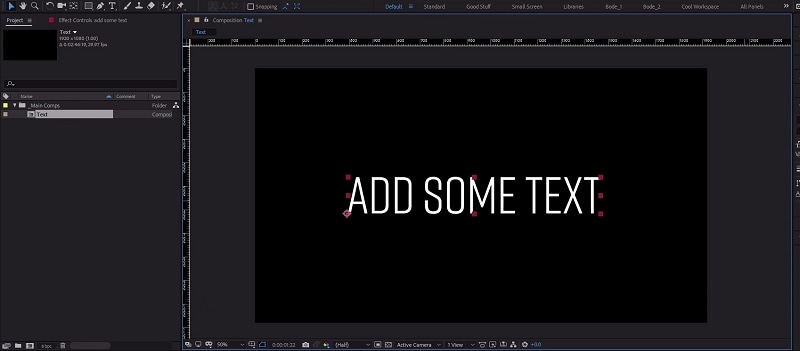
Step3This will automatically create a text layer on Timeline. You can now move the text and place it anywhere you want. You can also modify the text style and add animation which we will illustrate in the next section.
Part 2. Use the Character Panel to Edit Text in AE
When you select Type tool and add your desired text, you get a default style for the text. It is most likely that you have to modify the text style such as changing color, font, and size to fit in your video seamlessly. That is when you have to visit the Character Panel. Character Panel is where you get to edit the font of the text you have typed, increase or decrease the font size, change the font color, and much more. Apart from that, you can increase the spacing between lines when your text is a paragraph instead of a few words. Here are the steps to use Character Panel to edit text in AE.
Step1Once you have typed your text using Horizontal Type tool on the video, click on the text.
Step2Go to Character panel located in the right side of the screen. If it is minimized, click on the panel to expand it.
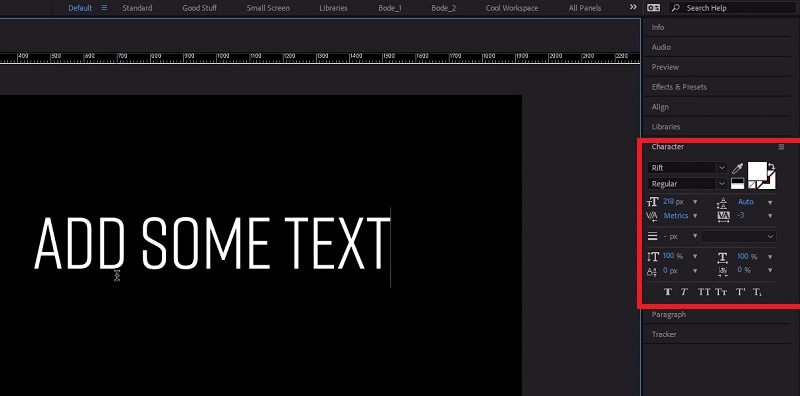
Step3The first option in the panel is the font of the text. By the side of the font is the text color. You can use the color picker tool to choose any color as per your preference.
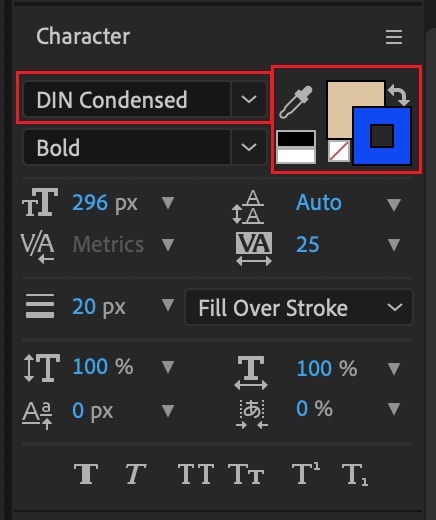
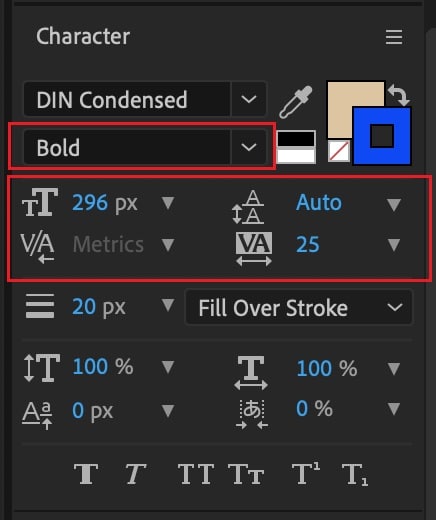
Step4Below the font, you can select the font style such as regular, bold, italics, and likewise. The subsequent part is to change the font size and adjust vertical spacing between lines and horizontal spacing between characters.
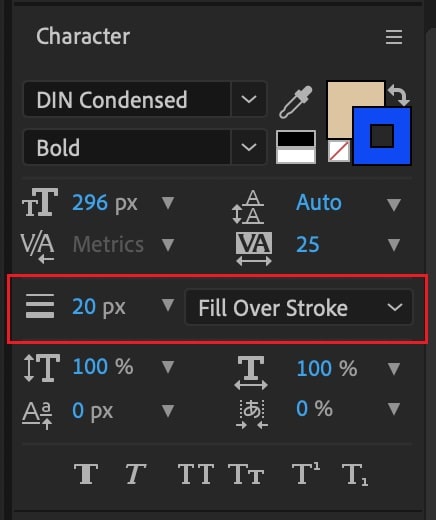
Step5The next section deals with Stroke option as well as fill the text option. You can fill the background of the text with any desired color.
Part 3. Add Animated Text to Video with Animation Presets
Now that you have added a static text and set the text format as per your preference, it is time to animate the text. A static text in a video does not look appealing, and animated texts make the video eye-catching instantly. You can use text animation presets in After Effects to add animated text to video. Here are the steps to add animated text to video with animation presets and effects.
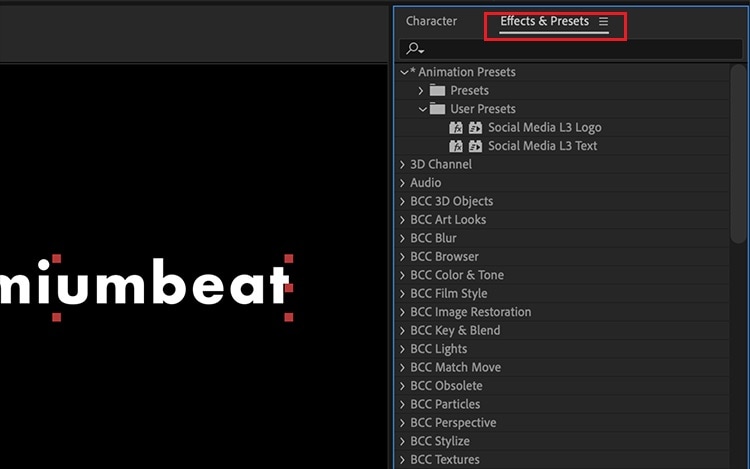
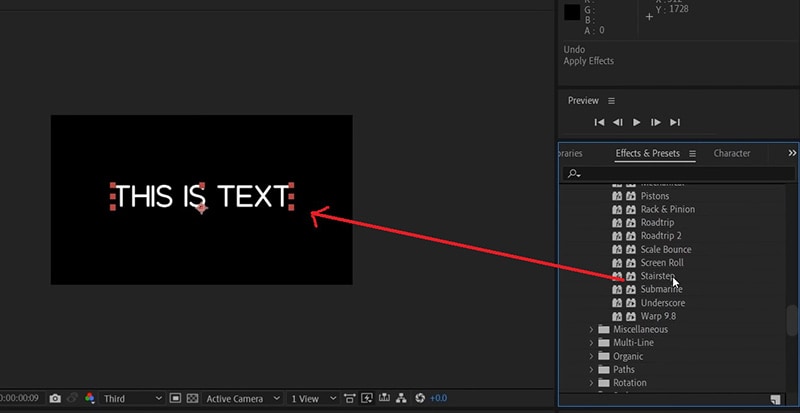
Step1Click on the text on your video that you want to animate. Go to Effects and Presets panel located on the right side.
Step2Under Effects and Presets panel, Click on Text option. This will open all the different categories of animation presets available that you can apply to the text on your video.
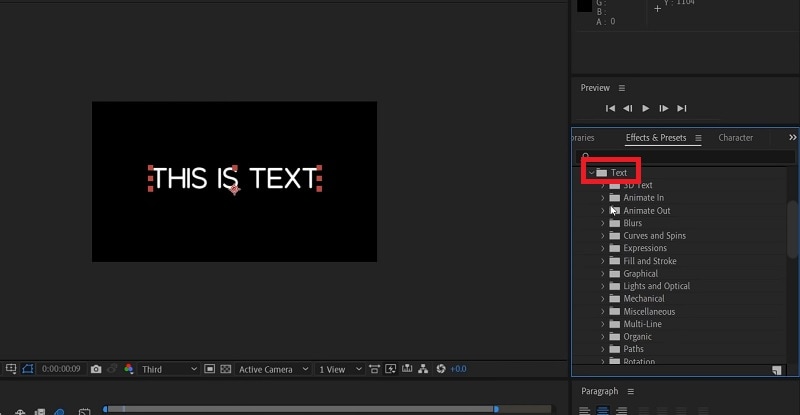
Step3Select any desired animation that you want to apply to the text and drag and drop the animation on the text in the composition window. Play the video and watch the applied animation on the text.
Part 4. Alternative Way to Add Text to Videos
If you are not comfortable with After Effects as a video editor, we recommend Wondershare as the best AE alternative. This is because the user interface of Filmora is super simple and there are loads of text effects and animations available to enhance your video content. Filmora is a professional video editor that is extremely popular among amateur and professional video editors. The application is available for both Windows and Mac users. Here are the steps for adding animated text to video using Filmora.
Step1Install Wondershare Filmora on your computer and launch the application. Click on New Project option on the welcome screen. Otherwise, you can go to File> New Project option.

Step2Go to File> Import Media> Import Media Files to import your video file. You can also drop the video file directly into Project Media folder.

Step3Drag and drop the video file from Project Media folder into the Timeline. If you have multiple video clips, you need to arrange them sequentially on the Timeline.
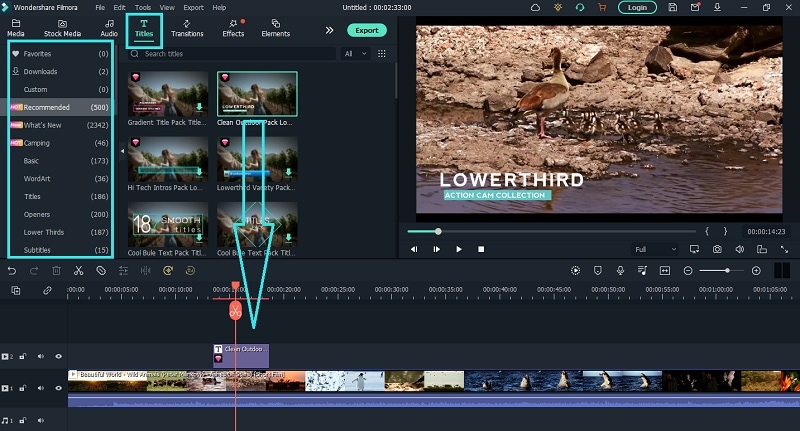
Step4To add text to your video, go to Titles located at the top bar. Check the left panel where you can see different categories of text effects. Select any desired text effect and drop into the Timeline. Make sure that the text layer is above the video layer on Timeline. You can shift the text layer on Timeline to place it where you want it to appear. You can also stretch the duration of the text effect as per your requirements.
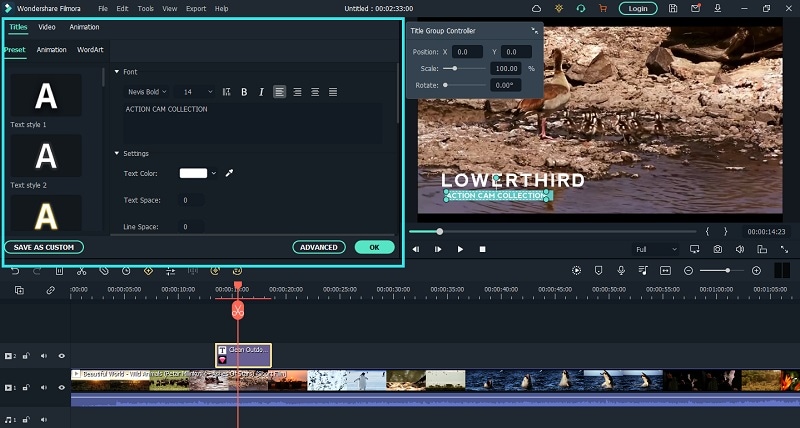
Step5You can edit the text effect by double clicking on the text layer on Timeline. Under Preset tab, you can change the text, font type and size, text color and much more. For further customization, you can click on Advanced button. At last, click on OK button to save the edits done.
The Bottom Line
If you want to add animated text to photo and video, After Effects is a great editor you can use. We have illustrated how you can add text and customize the text and finally, animate it as per your preference. However, if you are looking for AE alternative, we recommend Wondershare Filmora where you can add text to video instantly and choose from a wide range of text effects and animations.
Free Download For Win 7 or later(64-bit)
Free Download For macOS 10.14 or later
LUTs Can Make Ordinary-Looking Footage Look More Attractive. Read This Guide to Learn How You Can Easily Create Your Own LUTs Using Filmora
Create High-Quality Video - Wondershare Filmora
An easy and powerful YouTube video editor
Numerous video and audio effects to choose from
Detailed tutorials are provided by the official channel
Color grading can feel daunting, especially if you don’t have much experience grading footage. Fortunately, LUTs can help you grade your footage almost effortlessly. Like your favorite Snapchat or Instagram filters, a LUT can instantly transform dull-looking footage into something more vibrant. So, what is a LUT?
LUT is an acronym for “look up table.” A LUT is a preset color that you can apply to footage to transform how it looks. Video editors, colorists, and filmmakers use LUTs to speed up color grading. However, you don’t need to be an experienced professional to use them. With minimal color grading and video editing experience, you can easily apply LUTs to your footage.
LUTs are usually denoted by the .LUT, .CUBE, or. 3DL file extensions. You can create LUTs using several video editing and color grading applications, such as Adobe Premiere Pro, Final Cut Pro, DaVinci Resolve, and Filmora. In this guide, we’ll explore how to create your own LUT and use custom LUTs in Filmora.
In this article
01 Why We Need to Create Our Own LUT
03 How to Use Custom LUTs in Filmora
Why We Need to Create Our Own LUT
Many video editing tools usually come with pre-installed LUTs that you can quickly apply to footage. However, you may need to create your own LUT in some cases. Here are some reasons why you may need to create your own LUT:
1. To Create a Particular Feeling
Clients may want their videos to evoke a particular emotion. If the pre-installed LUTs that come with your video editing software can’t evoke the particular feeling the client wants, you may need to create your own LUT. Some key questions to ask yourself when creating the LUT include:
- What is the genre of the video project?
- What kind of atmosphere do you want to create?
- Are there any colors or tones that you should emphasize?
- Once you ask yourself these questions, you’ll be able to create an appropriate LUT for the client.
For instance, if the genre of the video project is a comedy, you may want to create a LUT that highlights orange, yellow, and its tones to create a cheerful atmosphere.
On the other hand, if the project’s genre is an action video, you may want to create a LUT that highlights blue, green, and other similar tones to evoke a serious feeling.
2. To Showcase Several Looks
Color grading often comes down to preference. There isn’t a one-size-fits-all solution when grading footage, especially if the video project is on a neutral topic.
Creating custom LUTs can allow you to preview different looks for clients and allow them to choose the footage they like.
3. To Speed Up the Color Grading Process
Perhaps the biggest pro of LUTs is their ability to speed up the color grading process. Creating your own LUTs can allow you to use the same LUT for multiple projects that are similar and save time during color grading.
In addition, since color grading can take a considerable amount of time, creating your own LUTs can be helpful if you regularly work on projects with tight deadlines.
And if you’re working with an editor or team of editors, adding your own LUT to the footage can speed up editing and give the final cut a more refined look.
4. When Working with Multiple Editing Tools
Nearly all popular video editing applications support LUTs. If you regularly use several applications for editing and color grading, LUTs can help you quickly achieve the same colors across all the various applications you use.
All editing applications have different color grading tools, so it’s relatively challenging to achieve the same colors across several applications. Creating your own LUTs can make it easier to transfer color values between different software.
How to Create Your Own LUT
Creating LUTs is fairly simple. However, to create effective LUTs, ensure you prepare your source footage to avoid issues down the line when applying the LUT to your footage.
Here are some crucial things you should do when prepping your source footage:
- Ensure your exposure is perfect.
- Ensure your white balance is correct.
- Ensure your lighting reflects an accurate balance of highlights and shadows.
By ensuring these things are in order, you will be able to create a versatile LUT that you can apply across a wide variety of footage.
After prepping your source footage, you can then create your own LUT. Here’s how you can create a LUT in Filmora following a few simple steps:
Tips for Filmora New Version Users
Due to the updating of Filmora, some of the following operations may be different from the operations of the new version, new version users can click on the latest operation guide - Apply 3D LUT in color correction in the User Guide section.
Step 1. Import the Footage
Launch Filmora and click on New Project. In the New Project window that opens, import your footage by clicking on Import and selecting one of the drop-down options.
Step 2. Add the Footage to the Timeline
Drag and drop the footage into your project’s timeline.
Step 3. Open the Color Tab
Double click on the video on the timeline to select it. Then, navigate to the top left panel and click on the Color tab.

Step 4. Create Your LUT
Under the Color tab, choose the ‘3D LUT’ in Basic to customize your own LUTs.

Since you’re creating your own LUT instead of using the pre-built LUTs, scroll down to adjust various things, such as the White Balance, Color, Light, HSL, and Vignette.

Tweak these settings until you’re satisfied with the results. To help you make the adjustments and balance the intensity of the colors in your footage, check the color histogram located at the top right corner of the window.
Step 5. Save Your LUT
If you’re satisfied with the results, click on the ![]() Save button locate in the menu bar.
Save button locate in the menu bar.
You’ll need to name and save your LUT in the new window that opens. Give your LUT a descriptive name and click on OK to save it.

And that’s it! You’ve successfully created your own LUT.
How to Use Custom LUTs in Filmora
Step 1. Import the Footage
Follow steps 1, 2, and 3 in the section on creating your own LUT to launch Filmora, import your footage, add it to the project timeline, and open the Color tab.
Step 2. Apply the Custom LUT
Under the Color tab, click on the All Presets drop-down menu to view all the available preset options.

Click on the Custom option to view the LUT you created. To apply the custom LUT, simply click on it to apply it to your footage.

Step 3. Save the Changes
If you’re pleased with the results, click on the OK button to save the changes.
Filmora will apply the custom LUT to the video in the Preview Monitor.
Step 4. Export the Footage
Finally, you can export the footage by clicking on the Export tab on the main menu and selecting one of the available options on the drop-down menu.
For Win 7 or later (64-bit)
For macOS 10.12 or later
Conclusion
LUTs can make the color grading process easier and quicker. They can prove incredibly useful, especially if you’re unfamiliar with the color grading workflow or hard-pressed for time. They can also elevate your footage and make it look more cinematic.
While many video editing applications come with several pre-installed LUTs, try to create your custom LUTs using the steps above. Creating your LUTs from scratch may take you slightly more time than using pre-created LUTs, but creating the perfect LUT could save you time grading future projects.
When creating your own LUTs, try to create and apply several different LUTs to see which one is suitable for your footage. There usually isn’t a one-size-fits-all LUT option, so creating and testing out different LUTs is the best way to find the perfect custom LUT for your projects.
Color grading can feel daunting, especially if you don’t have much experience grading footage. Fortunately, LUTs can help you grade your footage almost effortlessly. Like your favorite Snapchat or Instagram filters, a LUT can instantly transform dull-looking footage into something more vibrant. So, what is a LUT?
LUT is an acronym for “look up table.” A LUT is a preset color that you can apply to footage to transform how it looks. Video editors, colorists, and filmmakers use LUTs to speed up color grading. However, you don’t need to be an experienced professional to use them. With minimal color grading and video editing experience, you can easily apply LUTs to your footage.
LUTs are usually denoted by the .LUT, .CUBE, or. 3DL file extensions. You can create LUTs using several video editing and color grading applications, such as Adobe Premiere Pro, Final Cut Pro, DaVinci Resolve, and Filmora. In this guide, we’ll explore how to create your own LUT and use custom LUTs in Filmora.
In this article
01 Why We Need to Create Our Own LUT
03 How to Use Custom LUTs in Filmora
Why We Need to Create Our Own LUT
Many video editing tools usually come with pre-installed LUTs that you can quickly apply to footage. However, you may need to create your own LUT in some cases. Here are some reasons why you may need to create your own LUT:
1. To Create a Particular Feeling
Clients may want their videos to evoke a particular emotion. If the pre-installed LUTs that come with your video editing software can’t evoke the particular feeling the client wants, you may need to create your own LUT. Some key questions to ask yourself when creating the LUT include:
- What is the genre of the video project?
- What kind of atmosphere do you want to create?
- Are there any colors or tones that you should emphasize?
- Once you ask yourself these questions, you’ll be able to create an appropriate LUT for the client.
For instance, if the genre of the video project is a comedy, you may want to create a LUT that highlights orange, yellow, and its tones to create a cheerful atmosphere.
On the other hand, if the project’s genre is an action video, you may want to create a LUT that highlights blue, green, and other similar tones to evoke a serious feeling.
2. To Showcase Several Looks
Color grading often comes down to preference. There isn’t a one-size-fits-all solution when grading footage, especially if the video project is on a neutral topic.
Creating custom LUTs can allow you to preview different looks for clients and allow them to choose the footage they like.
3. To Speed Up the Color Grading Process
Perhaps the biggest pro of LUTs is their ability to speed up the color grading process. Creating your own LUTs can allow you to use the same LUT for multiple projects that are similar and save time during color grading.
In addition, since color grading can take a considerable amount of time, creating your own LUTs can be helpful if you regularly work on projects with tight deadlines.
And if you’re working with an editor or team of editors, adding your own LUT to the footage can speed up editing and give the final cut a more refined look.
4. When Working with Multiple Editing Tools
Nearly all popular video editing applications support LUTs. If you regularly use several applications for editing and color grading, LUTs can help you quickly achieve the same colors across all the various applications you use.
All editing applications have different color grading tools, so it’s relatively challenging to achieve the same colors across several applications. Creating your own LUTs can make it easier to transfer color values between different software.
How to Create Your Own LUT
Creating LUTs is fairly simple. However, to create effective LUTs, ensure you prepare your source footage to avoid issues down the line when applying the LUT to your footage.
Here are some crucial things you should do when prepping your source footage:
- Ensure your exposure is perfect.
- Ensure your white balance is correct.
- Ensure your lighting reflects an accurate balance of highlights and shadows.
By ensuring these things are in order, you will be able to create a versatile LUT that you can apply across a wide variety of footage.
After prepping your source footage, you can then create your own LUT. Here’s how you can create a LUT in Filmora following a few simple steps:
Tips for Filmora New Version Users
Due to the updating of Filmora, some of the following operations may be different from the operations of the new version, new version users can click on the latest operation guide - Apply 3D LUT in color correction in the User Guide section.
Step 1. Import the Footage
Launch Filmora and click on New Project. In the New Project window that opens, import your footage by clicking on Import and selecting one of the drop-down options.
Step 2. Add the Footage to the Timeline
Drag and drop the footage into your project’s timeline.
Step 3. Open the Color Tab
Double click on the video on the timeline to select it. Then, navigate to the top left panel and click on the Color tab.
Step 4. Create Your LUT
Under the Color tab, choose the ‘3D LUT’ in Basic to customize your own LUTs.
Since you’re creating your own LUT instead of using the pre-built LUTs, scroll down to adjust various things, such as the White Balance, Color, Light, HSL, and Vignette.
Tweak these settings until you’re satisfied with the results. To help you make the adjustments and balance the intensity of the colors in your footage, check the color histogram located at the top right corner of the window.
Step 5. Save Your LUT
If you’re satisfied with the results, click on the ![]() Save button locate in the menu bar.
Save button locate in the menu bar.
You’ll need to name and save your LUT in the new window that opens. Give your LUT a descriptive name and click on OK to save it.
And that’s it! You’ve successfully created your own LUT.
How to Use Custom LUTs in Filmora
Step 1. Import the Footage
Follow steps 1, 2, and 3 in the section on creating your own LUT to launch Filmora, import your footage, add it to the project timeline, and open the Color tab.
Step 2. Apply the Custom LUT
Under the Color tab, click on the All Presets drop-down menu to view all the available preset options.
Click on the Custom option to view the LUT you created. To apply the custom LUT, simply click on it to apply it to your footage.
Step 3. Save the Changes
If you’re pleased with the results, click on the OK button to save the changes.
Filmora will apply the custom LUT to the video in the Preview Monitor.
Step 4. Export the Footage
Finally, you can export the footage by clicking on the Export tab on the main menu and selecting one of the available options on the drop-down menu.
For Win 7 or later (64-bit)
For macOS 10.12 or later
Conclusion
LUTs can make the color grading process easier and quicker. They can prove incredibly useful, especially if you’re unfamiliar with the color grading workflow or hard-pressed for time. They can also elevate your footage and make it look more cinematic.
While many video editing applications come with several pre-installed LUTs, try to create your custom LUTs using the steps above. Creating your LUTs from scratch may take you slightly more time than using pre-created LUTs, but creating the perfect LUT could save you time grading future projects.
When creating your own LUTs, try to create and apply several different LUTs to see which one is suitable for your footage. There usually isn’t a one-size-fits-all LUT option, so creating and testing out different LUTs is the best way to find the perfect custom LUT for your projects.
5 Methods to Make a Fake Facetime Call Video
Creating fake video call clips for entertainment has been a new norm on social media platforms. If you are looking for a software to create a fake Facetime call video, then let’s get started:
5 ways to make a fake facetime call video
1. Filmora
Compatibility: Windows/Mac
Wondershare Filmora is the greatest video editor on the market, without a doubt, and it deserves to be at the top of our list.
You’ll discover some professional tools to help you improve video quality and over 300 creative filters and effects to give your movie a new, fresh look without putting in a lot of effort with the Filmora video editor. This tool is one of the most dependable, aside from the features that allow you to modify video rotation easily.
Steps
Step 1: Import the photo or video files
Import all your media files, including video, photos, and music. You have two options for importing your videos: drag and drop directly into our software or click import to select the media files you wish to upload.

Step 2: Edit the video
Wondershare Filmora’s video templates can be added. You can apply music, text, filters and overlays, and motion effects by right-clicking on them and selecting apply. After adding video resources such as text and elements, you may customize the texts by changing the size, placement, etc.
Also, you can add overlay video clips using templates of a video call to make it look like a real call.

Step 3: Export and Save
Quickly export your project to a new video. After you’ve applied the video resources to your videos and clicked Export, you’ll have a whole new video that you can share at birthday parties, weddings, or for marketing purposes, just like any other video you’ve created.

2. Kapwing
Compatibility: Online
Kapwing is a powerful online video editor with a non-linear editing methodology. Upload photos, audio, and video files, then edit them all in one spot.
Creators may view and alter their content from any device or location because Kapwing is entirely online. Work is automatically saved in the cloud, eliminating the need to transfer data locally. When you’re ready to export, sit back and relax because everything is handled in the cloud.
This template allows you to blend two videos into one like an iPhone Facetime call. First, put two videos in a photo and arrange them in a picture arrangement. Then, as a video overlay in the upper corner, layer one on top of the other.
Steps
Step 1: Open Kapwing Fake Video Call Template

Step 2: Import video files
Click on ‘Add Media’ to add video clips.


Step 3: Save and Export Video
Once you are done editing the template with the images you want, click on ‘Export Project’ to Export and save the video.

3. VITA App
Compatibility: Android/Mac

VITA is a program that allows you to make visually appealing videos by combining several filters and other features. The program comes with a large template library, so making films will be a breeze. The best part is that no prior experience is required.
All of VITA’s templates are divided into categories is one of its most noticeable features. This makes it simple to locate the desired impact. It’s critical to stress that you must have all the audiovisual materials you intend to use in your smartphone’s gallery. VITA also allows you to include text in your designs, making them fascinating.
Steps
Step 1: Import the file
Download the application from Google Play Store or Apple Store. Then, launch the application and import the video files.

Step 2: Edit the video
Download PNG images that will help you add all the call elements. Choose a picture-in-picture template. Add Subtitles.

Step 3: Export the video
Once you are done with editing, you can export the file by selecting the ‘Export’ option on the top right corner of the screen.

4. Clipchamp
Compatibility: Windows/Mac
Clipchamp is a free online video editor that makes movie creation simple for anyone, even if they have no prior editing knowledge. It lets you blend films, photos, and audio files and add text and effects before saving the finished product to your computer.
Steps
Step 1: To get started, log into your Clipchamp account or create a free account.

Step 2: Click the ‘Create a video’ button on the left sidebar. There are five different forms from which to pick. First, choose the video aspect ratio that works best for your project. For example, if you wish to upload to YouTube, we recommend shooting in widescreen 16:9.

Step 3: Click ‘Add media’ and drag and drop your films, audio, and photographs into the media box if you already have filmed footage you’d like to utilize in your project. You may also add media by clicking ‘Browse my files.’ If you wish to use free stock footage, go to ‘Stock’ and upload your films to the project by clicking the ‘+’ button. All your films will be saved in your library.

Step 4: You can now find your videos in your media library. Drag and drop the picture-in-picture videos you want to alter to the editing timeline. As shown in the sample below, arrange the two videos one over the other. Make sure both clips are precisely underneath one another.

Step 5: Now that your movies are aligned, select the one you want to shrink. The video you’re reducing must be at the top of the screen. To move it from the bottom to the top, drag and drop it. A small box will appear on the timeline in the bottom left corner of the clip. The clip will shrink when you click the box once. When you click the box once again, modifying choices will appear. You can move the smaller video around and increase or decrease its size.

Step 6: Export your project once you’ve completed editing your video. Save to your preferred place or folder. You can share the video straight on social media or embed it in a document.

5. Movavi
Compatibility: Windows/Mac
Movavi Video Editor is a video editing tool for Windows that is powerful and simple to use. Apply stunning video effects and filters, add music and titles, and more! Yet, despite its enormous features, Movavi’s video editing program is quite simple to use: add a sprinkle of fantasy and some spare time, and you’ll have a Hollywood-style video with far less effort.
Steps
Step 1: Download the software.
Download the installation file and run it. Follow the on-screen directions. Following the setup, the PiP editor will launch.
Step 2: Import files
Select two files: the one you want to use as a background and the one you want to display over it by clicking Add Files.

Step 3: Create a video track
Make an extra video track before you begin video editing. To do so, go to the Plus menu and select Add Video Track. Then, drag one of the videos to the secondary track and the other to the primary track.
From the menu, select the Picture in Picture option. To change the size of the video, drag the boundaries. Then, drag it to the desired location on the background video by clicking and holding.

Step 4: Export and Save
Save your PiP video once you’ve finished editing it. First, select the video format, quality, and folder where the file will be saved by clicking Export and adjusting the parameters in the display popup. Then press the Start button. The picture-in-picture video editor will open the folder holding the file after the Export is complete.

FAQs
1. How do you make a facetime video call?
Tap New FaceTime towards the top of the screen in FaceTime.
Tap to make a video call or an audio call after typing the name or number you wish to call in the top field (not available in all countries or regions). You can also tap instead.
2. How do you add a virtual background on Facetime?
To change the background, use a filter: s
- Tap your tile, then tap during a FaceTime video call (supported models).
- Open the filters by tapping.
- Select your look by tapping a filter at the bottom of the screen (swipe left or right to preview them).
4. Does Facetime have virtual backgrounds?
No. Facetime does have virtual backgrounds, but it allows the users to blur the background.
5. Can you get fake facetime calls?
There is less probability of getting fake facetime calls, but you might spam FaceTime calls from random numbers.
6. Can you Facetime a random number?
FaceTime isn’t any different. A caller could try their luck by FaceTime a random phone number or email address, and if they belong to an iPhone user or an Apple ID, the FaceTime call will be accepted.
7. Can you Facetime from an unknown number?
Switching to your email address for FaceTime audio and video chats is the way to go if you always want to keep your phone number private. You may even go a step further and only receive FaceTime calls via email, with your phone number serving as your FaceTime caller ID.
8. How do I call someone on Facetime?
Launch FaceTime. In the search field, type the names, phone numbers, or email addresses of the persons you wish to contact. Then, click the video or audio icon, depending on the type of call you wish to make. To begin the call, press the video or audio button in the screen’s bottom-left corner.
9. Can you create a background on Facetime?
No. However, FaceTime allows you to apply camera effects on video calls.
Step 2: Edit the video
Wondershare Filmora’s video templates can be added. You can apply music, text, filters and overlays, and motion effects by right-clicking on them and selecting apply. After adding video resources such as text and elements, you may customize the texts by changing the size, placement, etc.
Also, you can add overlay video clips using templates of a video call to make it look like a real call.
Step 3: Export and Save
Quickly export your project to a new video. After you’ve applied the video resources to your videos and clicked Export, you’ll have a whole new video that you can share at birthday parties, weddings, or for marketing purposes, just like any other video you’ve created.
2. Kapwing
Compatibility: Online
Kapwing is a powerful online video editor with a non-linear editing methodology. Upload photos, audio, and video files, then edit them all in one spot.
Creators may view and alter their content from any device or location because Kapwing is entirely online. Work is automatically saved in the cloud, eliminating the need to transfer data locally. When you’re ready to export, sit back and relax because everything is handled in the cloud.
This template allows you to blend two videos into one like an iPhone Facetime call. First, put two videos in a photo and arrange them in a picture arrangement. Then, as a video overlay in the upper corner, layer one on top of the other.
Steps
Step 1: Open Kapwing Fake Video Call Template
Step 2: Import video files
Click on ‘Add Media’ to add video clips.
Step 3: Save and Export Video
Once you are done editing the template with the images you want, click on ‘Export Project’ to Export and save the video.
3. VITA App
Compatibility: Android/Mac
VITA is a program that allows you to make visually appealing videos by combining several filters and other features. The program comes with a large template library, so making films will be a breeze. The best part is that no prior experience is required.
All of VITA’s templates are divided into categories is one of its most noticeable features. This makes it simple to locate the desired impact. It’s critical to stress that you must have all the audiovisual materials you intend to use in your smartphone’s gallery. VITA also allows you to include text in your designs, making them fascinating.
Steps
Step 1: Import the file
Download the application from Google Play Store or Apple Store. Then, launch the application and import the video files.
Step 2: Edit the video
Download PNG images that will help you add all the call elements. Choose a picture-in-picture template. Add Subtitles.
Step 3: Export the video
Once you are done with editing, you can export the file by selecting the ‘Export’ option on the top right corner of the screen.
4. Clipchamp
Compatibility: Windows/Mac
Clipchamp is a free online video editor that makes movie creation simple for anyone, even if they have no prior editing knowledge. It lets you blend films, photos, and audio files and add text and effects before saving the finished product to your computer.
Steps
Step 1: To get started, log into your Clipchamp account or create a free account.
Step 2: Click the ‘Create a video’ button on the left sidebar. There are five different forms from which to pick. First, choose the video aspect ratio that works best for your project. For example, if you wish to upload to YouTube, we recommend shooting in widescreen 16:9.
Step 3: Click ‘Add media’ and drag and drop your films, audio, and photographs into the media box if you already have filmed footage you’d like to utilize in your project. You may also add media by clicking ‘Browse my files.’ If you wish to use free stock footage, go to ‘Stock’ and upload your films to the project by clicking the ‘+’ button. All your films will be saved in your library.
Step 4: You can now find your videos in your media library. Drag and drop the picture-in-picture videos you want to alter to the editing timeline. As shown in the sample below, arrange the two videos one over the other. Make sure both clips are precisely underneath one another.
Step 5: Now that your movies are aligned, select the one you want to shrink. The video you’re reducing must be at the top of the screen. To move it from the bottom to the top, drag and drop it. A small box will appear on the timeline in the bottom left corner of the clip. The clip will shrink when you click the box once. When you click the box once again, modifying choices will appear. You can move the smaller video around and increase or decrease its size.
Step 6: Export your project once you’ve completed editing your video. Save to your preferred place or folder. You can share the video straight on social media or embed it in a document.
5. Movavi
Compatibility: Windows/Mac
Movavi Video Editor is a video editing tool for Windows that is powerful and simple to use. Apply stunning video effects and filters, add music and titles, and more! Yet, despite its enormous features, Movavi’s video editing program is quite simple to use: add a sprinkle of fantasy and some spare time, and you’ll have a Hollywood-style video with far less effort.
Steps
Step 1: Download the software.
Download the installation file and run it. Follow the on-screen directions. Following the setup, the PiP editor will launch.
Step 2: Import files
Select two files: the one you want to use as a background and the one you want to display over it by clicking Add Files.
Step 3: Create a video track
Make an extra video track before you begin video editing. To do so, go to the Plus menu and select Add Video Track. Then, drag one of the videos to the secondary track and the other to the primary track.
From the menu, select the Picture in Picture option. To change the size of the video, drag the boundaries. Then, drag it to the desired location on the background video by clicking and holding.
Step 4: Export and Save
Save your PiP video once you’ve finished editing it. First, select the video format, quality, and folder where the file will be saved by clicking Export and adjusting the parameters in the display popup. Then press the Start button. The picture-in-picture video editor will open the folder holding the file after the Export is complete.
FAQs
1. How do you make a facetime video call?
Tap New FaceTime towards the top of the screen in FaceTime.
Tap to make a video call or an audio call after typing the name or number you wish to call in the top field (not available in all countries or regions). You can also tap instead.
2. How do you add a virtual background on Facetime?
To change the background, use a filter: s
- Tap your tile, then tap during a FaceTime video call (supported models).
- Open the filters by tapping.
- Select your look by tapping a filter at the bottom of the screen (swipe left or right to preview them).
4. Does Facetime have virtual backgrounds?
No. Facetime does have virtual backgrounds, but it allows the users to blur the background.
5. Can you get fake facetime calls?
There is less probability of getting fake facetime calls, but you might spam FaceTime calls from random numbers.
6. Can you Facetime a random number?
FaceTime isn’t any different. A caller could try their luck by FaceTime a random phone number or email address, and if they belong to an iPhone user or an Apple ID, the FaceTime call will be accepted.
7. Can you Facetime from an unknown number?
Switching to your email address for FaceTime audio and video chats is the way to go if you always want to keep your phone number private. You may even go a step further and only receive FaceTime calls via email, with your phone number serving as your FaceTime caller ID.
8. How do I call someone on Facetime?
Launch FaceTime. In the search field, type the names, phone numbers, or email addresses of the persons you wish to contact. Then, click the video or audio icon, depending on the type of call you wish to make. To begin the call, press the video or audio button in the screen’s bottom-left corner.
9. Can you create a background on Facetime?
No. However, FaceTime allows you to apply camera effects on video calls.
Also read:
- Updated How to Use LUTs in VN Editor – Complete Guide and Best LUTs Download for 2024
- Updated In 2024, Need to Learn About Halftone Effects? Learn How to Quickly Create a Halftone Effect in Adobe Photoshop with Simple, Easy-to-Follow Instructions
- Updated How to Make Stunning Glitch Effect in Photoshop? Ultimate Guide for 2024
- Wondering About Vimeo Slideshow Maker? Know Everything About the Platform Which Is Gaining Much Popularity. Also, Browse some Tips to Create Appealing Video Slideshows for 2024
- How to Create Emoji on Mac That Take Less Than 10 Mins
- New 6 Instant Mp4 to GIF Online Tools for You
- New Do You Want to Excel at Using Adobe Premiere Pro Software for Splitting Videos and Audio? Learn About Splitting a Video and Audio Using Different Tools and Add a New Skill to Your Skillset with a Step-by-Step Guide in This Article
- The Article Introduces Three Recommended Apps to Download Royalty-Free Cinematic Music and Covers an Extensive Procedure to Create a Cinematic Travel Intro for a Travel Vlog for 2024
- Updated How to Make a Transparent Background in Paint. How 3D Paint Transparent Background Can Be Made. How to Save an Image with Transparent Background?
- In 2024, Easy Way to Create a DIY Green Screen Video Effect
- Updated In 2024, Do You Use Premiere Pro and Want to Learn How to Change a Videos Frame Rate Using the Tool? Here Are the Steps that You Need to Follow
- 2024 Approved What Are The Stages Of Film Production
- Updated In 2024, Are You a Teacher? Are You Looking for Educational Background Music? This Article Has Everything You Will Need to Know for Creating Outstanding Educational Teaching Videos
- Updated Achieving GoPro Slow Motion with Quality An In-Depth Overview
- New Templates Increase the Editing Possibilities for Beginners and Professionals. Read This Article to Learn About some Customizable Slow-Motion CapCut Templates
- Updated Best Free LUTs To Use in Shotcut for 2024
- New Looking Forward to Making up Your Career in Video Editing? Land in Here to Learn About the Credibility of some Popular Video Editing Courses
- New In 2024, The Complete Guide to Converting GIF to SVG With Ease
- In 2024, How to Make a Video Slideshow in iMovie
- The Most Effective Ways to Bypass iPhone XS Max Activation Lock
- Pokemon Go No GPS Signal? Heres Every Possible Solution On Sony Xperia 1 V | Dr.fone
- In 2024, Detailed guide of ispoofer for pogo installation On Oppo A1 5G | Dr.fone
- In 2024, How to Unlock Disabled iPhone 14 Plus/iPad Without Computer | Dr.fone
- In 2024, How Can You Transfer Files From Samsung Galaxy Z Flip 5 To iPhone 15/14/13? | Dr.fone
- New Create AI Avatar Video with Avatar | Online for 2024
- New In 2024, Some Must-Know Useful Lego Animation Ideas for You
- In 2024, 3 Effective Ways to Bypass Activation Lock from Apple iPhone 15 Plus
- 5 Best Route Generator Apps You Should Try On OnePlus Nord 3 5G | Dr.fone
- In 2024, The Top 5 Android Apps That Use Fingerprint Sensor to Lock Your Apps On Xiaomi Redmi Note 12 Pro 5G
- How to Fake GPS on Android without Mock Location For your Xiaomi Redmi K70 | Dr.fone
- How to Screen Mirroring Honor 90 to PC? | Dr.fone
- In 2024, How to Transfer Everything from Apple iPhone 13 to iPhone | Dr.fone
- The Most Effective Ways to Bypass Apple iPhone 12 mini Activation Lock
- In 2024, What Is a SIM Network Unlock PIN? Get Your Vivo S17 Pro Phone Network-Ready
- Title: Updated How to Make Falling Text Effect in Filmora, In 2024
- Author: Morgan
- Created at : 2024-04-24 01:06:15
- Updated at : 2024-04-25 01:06:15
- Link: https://ai-video-editing.techidaily.com/updated-how-to-make-falling-text-effect-in-filmora-in-2024/
- License: This work is licensed under CC BY-NC-SA 4.0.
