:max_bytes(150000):strip_icc():format(webp)/001_2654847-5b99b903c9e77c005077d0d8.jpg)
Updated How to Make Text Reveal Effect Easily for 2024

How to Make Text Reveal Effect Easily
Have you ever seen the text reveal led by a subject when moving across the frame? It’s one of the most common text-revealing effects in video editing. This technique is often used to add titles or credits to a scene for cinematic vibes and creative effects.
While it may look complicated, it’s actually quite easy to create with a video editing program like Filmora. Filmora’s masking feature allows users to create impressive and eye-catching text reveals in their videos. For those looking for a tutorial on how to make text reveal, here’s a step-by-step guide to help you out.
How to add text reveal effect using Filmora’s masking tool
Free Download For Win 7 or later(64-bit)
Free Download For macOS 10.14 or later
First, make sure the video clips you are using are clear, with the subject moving across the frame. It will help the text to stand out and be more easily seen. Now, follow the step-by-step guides below:
Step 1 Add video tracks
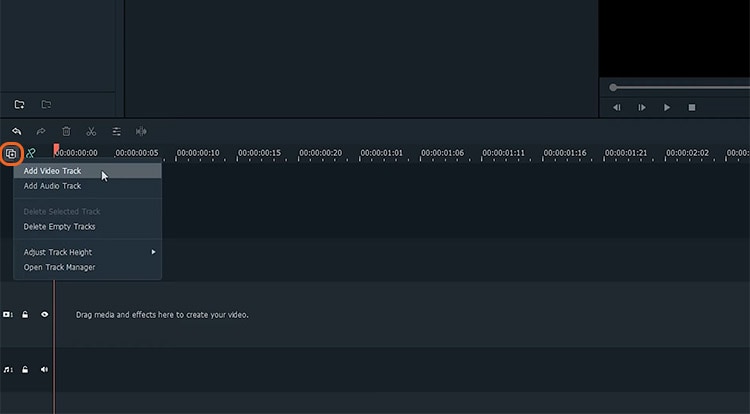
You will need three video tracks in order to create this effect, so click the (+) icon above the timeline > Add Video Track and add two more video tracks.
Step 2 Import the clip to the timeline
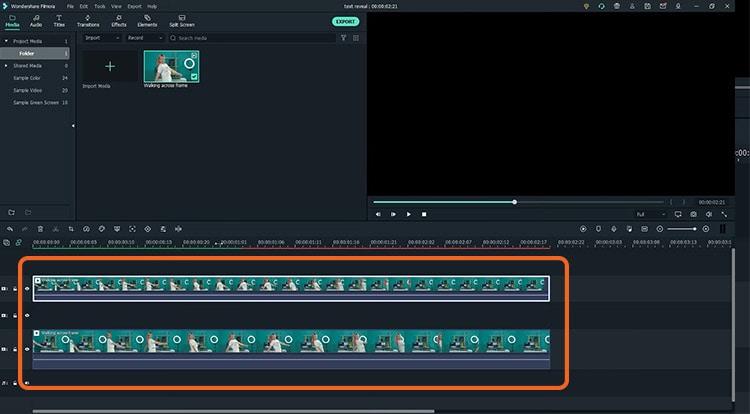
Drag and drop your clip onto the first and third video tracks of the timeline. Then, align them with each other.
Step 3 Make a cut at the beginning of the text
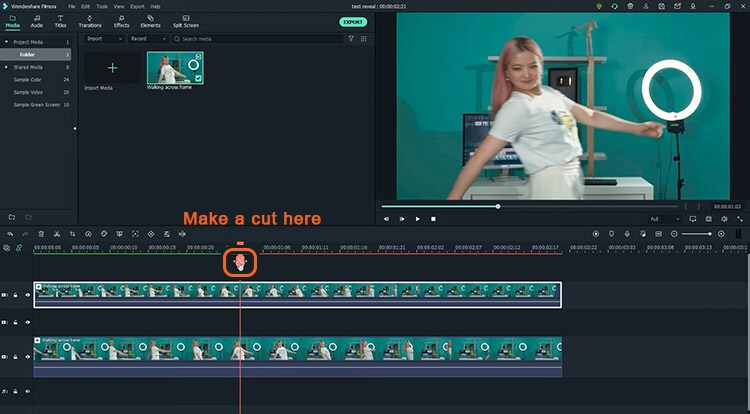
Find the spot where you want the text reveals to start, then click the scissor icon to make a cut on the clip from the first video track.
Step 4 Add and adjust the text
Go to Title > Plain Text > select which text styles suit you best. Then, drag the title to the second video track.
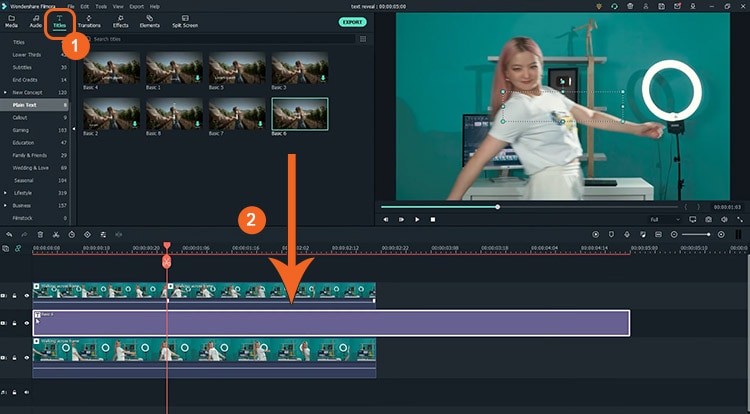
Double-click on the title clip and type out your text. Then, adjust the text position and align it to the cut you have made.
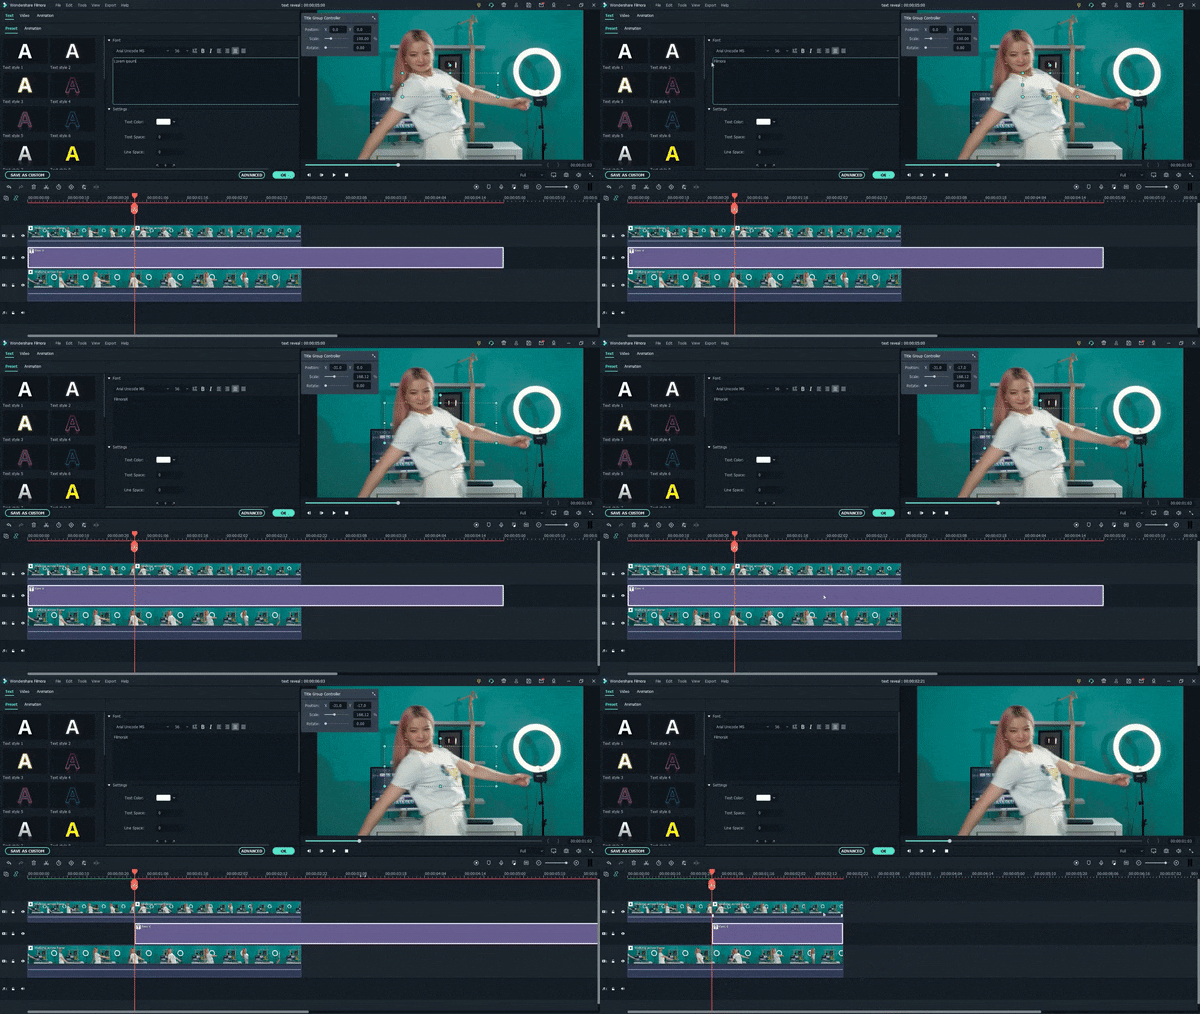
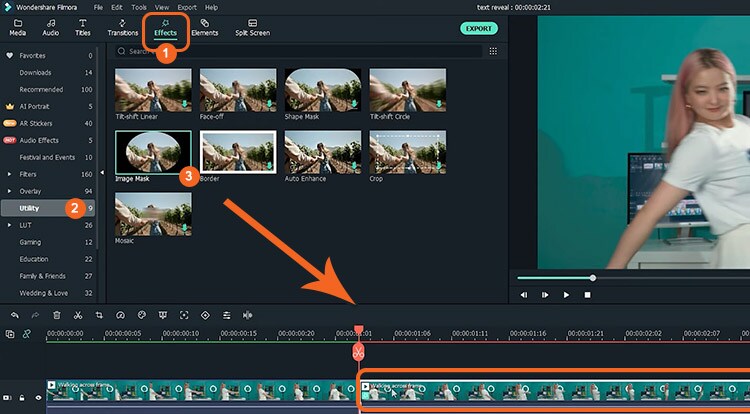
Step 5 Use the masking tool
Go to Effects > Utility > Image Mask, then drag and drop it onto the latter half of the top video clip.
Make more cuts on the top latter clip, frame by frame, starting from the first cut you have made.
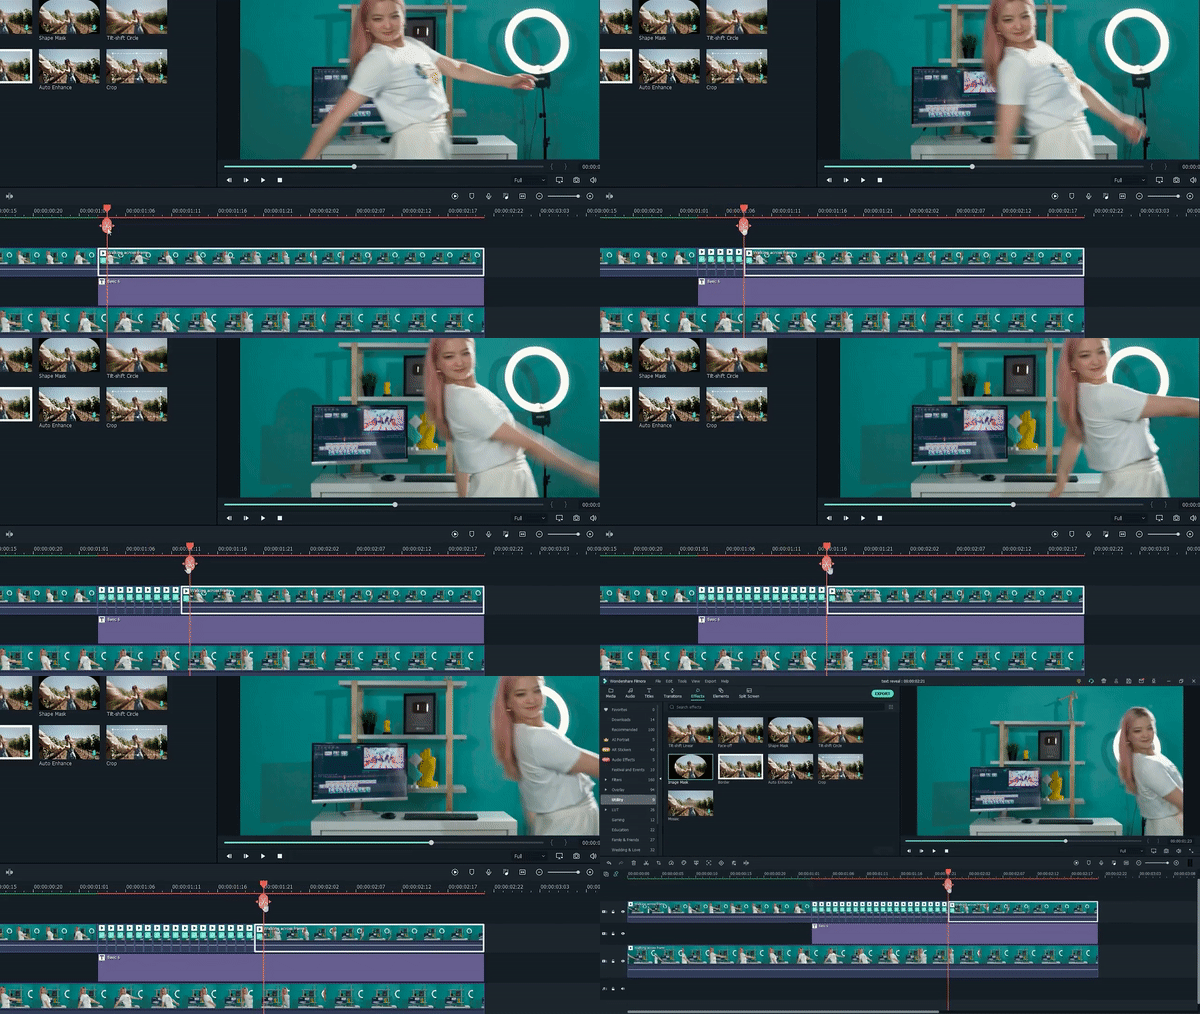
Double-click on each of the smaller clips and find the mask settings.
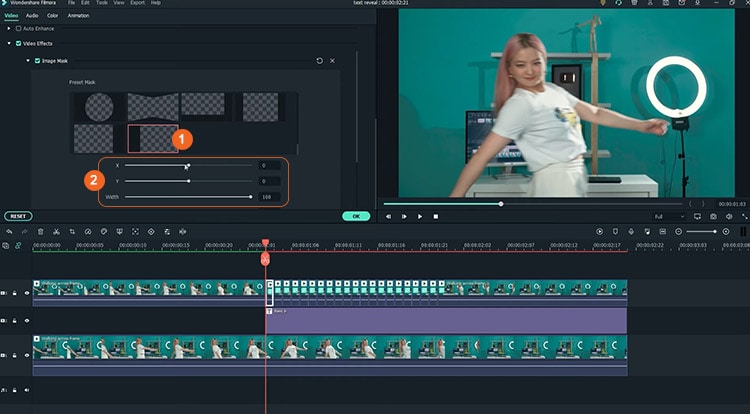
Since the subject in this tutorial is moving from side to side, we are going to match the mask’s y-axis setting, which is also the revealed text portion, with the subject’s movement. Starting from the first clip, adjust the y-axis number to a smaller/bigger number.
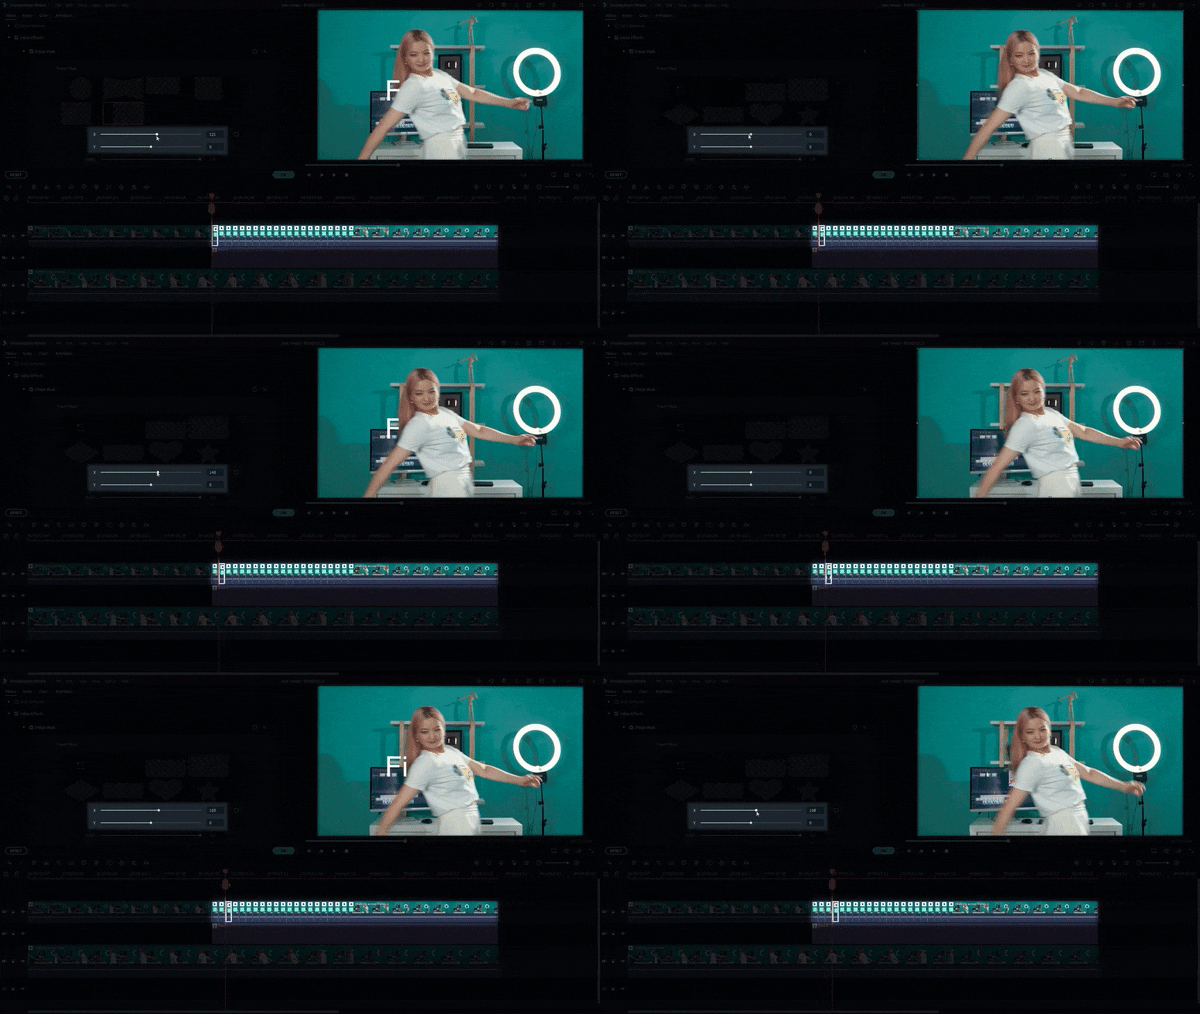
There we go! The final look should look like this:

Summary
That is how we can create the text reveal effect using Wondershare Filmora. Using Filmora’s masking tool, it’s easy to create a text reveal the effect that can add flair and interest to your videos. Just follow the simple steps, and you’ll be able to get the desired result with a few clicks of your mouse. Give it a try, and share your thoughts with us.
Free Download For macOS 10.14 or later
First, make sure the video clips you are using are clear, with the subject moving across the frame. It will help the text to stand out and be more easily seen. Now, follow the step-by-step guides below:
Step 1 Add video tracks
You will need three video tracks in order to create this effect, so click the (+) icon above the timeline > Add Video Track and add two more video tracks.

Step 2 Import the clip to the timeline
Drag and drop your clip onto the first and third video tracks of the timeline. Then, align them with each other.

Step 3 Make a cut at the beginning of the text
Find the spot where you want the text reveals to start, then click the scissor icon to make a cut on the clip from the first video track.

Step 4 Add and adjust the text
Go to Title > Plain Text > select which text styles suit you best. Then, drag the title to the second video track.

Double-click on the title clip and type out your text. Then, adjust the text position and align it to the cut you have made.

Step 5 Use the masking tool
Go to Effects > Utility > Image Mask, then drag and drop it onto the latter half of the top video clip.

Make more cuts on the top latter clip, frame by frame, starting from the first cut you have made.

Double-click on each of the smaller clips and find the mask settings.

Since the subject in this tutorial is moving from side to side, we are going to match the mask’s y-axis setting, which is also the revealed text portion, with the subject’s movement. Starting from the first clip, adjust the y-axis number to a smaller/bigger number.

There we go! The final look should look like this:

Summary
That is how we can create the text reveal effect using Wondershare Filmora. Using Filmora’s masking tool, it’s easy to create a text reveal the effect that can add flair and interest to your videos. Just follow the simple steps, and you’ll be able to get the desired result with a few clicks of your mouse. Give it a try, and share your thoughts with us.
Free Download For macOS 10.14 or later
First, make sure the video clips you are using are clear, with the subject moving across the frame. It will help the text to stand out and be more easily seen. Now, follow the step-by-step guides below:
Step 1 Add video tracks
You will need three video tracks in order to create this effect, so click the (+) icon above the timeline > Add Video Track and add two more video tracks.

Step 2 Import the clip to the timeline
Drag and drop your clip onto the first and third video tracks of the timeline. Then, align them with each other.

Step 3 Make a cut at the beginning of the text
Find the spot where you want the text reveals to start, then click the scissor icon to make a cut on the clip from the first video track.

Step 4 Add and adjust the text
Go to Title > Plain Text > select which text styles suit you best. Then, drag the title to the second video track.

Double-click on the title clip and type out your text. Then, adjust the text position and align it to the cut you have made.

Step 5 Use the masking tool
Go to Effects > Utility > Image Mask, then drag and drop it onto the latter half of the top video clip.

Make more cuts on the top latter clip, frame by frame, starting from the first cut you have made.

Double-click on each of the smaller clips and find the mask settings.

Since the subject in this tutorial is moving from side to side, we are going to match the mask’s y-axis setting, which is also the revealed text portion, with the subject’s movement. Starting from the first clip, adjust the y-axis number to a smaller/bigger number.

There we go! The final look should look like this:

Summary
That is how we can create the text reveal effect using Wondershare Filmora. Using Filmora’s masking tool, it’s easy to create a text reveal the effect that can add flair and interest to your videos. Just follow the simple steps, and you’ll be able to get the desired result with a few clicks of your mouse. Give it a try, and share your thoughts with us.
Free Download For macOS 10.14 or later
First, make sure the video clips you are using are clear, with the subject moving across the frame. It will help the text to stand out and be more easily seen. Now, follow the step-by-step guides below:
Step 1 Add video tracks
You will need three video tracks in order to create this effect, so click the (+) icon above the timeline > Add Video Track and add two more video tracks.

Step 2 Import the clip to the timeline
Drag and drop your clip onto the first and third video tracks of the timeline. Then, align them with each other.

Step 3 Make a cut at the beginning of the text
Find the spot where you want the text reveals to start, then click the scissor icon to make a cut on the clip from the first video track.

Step 4 Add and adjust the text
Go to Title > Plain Text > select which text styles suit you best. Then, drag the title to the second video track.

Double-click on the title clip and type out your text. Then, adjust the text position and align it to the cut you have made.

Step 5 Use the masking tool
Go to Effects > Utility > Image Mask, then drag and drop it onto the latter half of the top video clip.

Make more cuts on the top latter clip, frame by frame, starting from the first cut you have made.

Double-click on each of the smaller clips and find the mask settings.

Since the subject in this tutorial is moving from side to side, we are going to match the mask’s y-axis setting, which is also the revealed text portion, with the subject’s movement. Starting from the first clip, adjust the y-axis number to a smaller/bigger number.

There we go! The final look should look like this:

Summary
That is how we can create the text reveal effect using Wondershare Filmora. Using Filmora’s masking tool, it’s easy to create a text reveal the effect that can add flair and interest to your videos. Just follow the simple steps, and you’ll be able to get the desired result with a few clicks of your mouse. Give it a try, and share your thoughts with us.
Learn How to Trim/Crop Video in Microsoft PowerPoint
Create High-Quality Video - Wondershare Filmora
An easy and powerful YouTube video editor
Numerous video and audio effects to choose from
Detailed tutorials provided by the official channel
PowerPoint allows you to trim or crop the length of your video and save it as a separate media file. Trimming/cropping video is a great way to remove distracting or unnecessary parts of your video or change its dimensions so that it fits within a certain area. Doing this will make your videos captivating, and more people will want to watch them. Keeping that in mind, we’ll explain how you can crop or trim video in PowerPoint. You will also learn some helpful tips that you can use when editing videos on this presentation program.
In this article
01 How to Trim Videos in PowerPoint
02 Bonus! Tips on Editing Videos in Powerpoint
How to Trim Videos in PowerPoint
Many people use Microsoft PowerPoint to prepare basic animated explainers and presentations, but you can learn how to trip or crop videos in this program with the tools that it provides. With that in mind, here is how to trim, reset, or edit videos in PowerPoint.
How to Trim a Video in PowerPoint
You can trip unnecessary content at the start or end of your video clip. However, you can only trim videos you have inserted from your PC, as this feature is not yet available for videos on the web. Follow the steps below to learn how to trim video in PowerPoint.
- If you are in a slide containing a media placeholder, click on Insert Video from File. A window will open; select the From a File option.
- Find the video file on your PC and select it. Then, click the arrow that’s right next to the Insert button. Choose either the Link to File or Insert option and your video will appear on the slide.
- If you are not using a slide that has a media placeholder, find the Insert tab and click Video on My PC. You will be able to locate the video file on your PC.
- You are now ready to trim video PowerPoint.
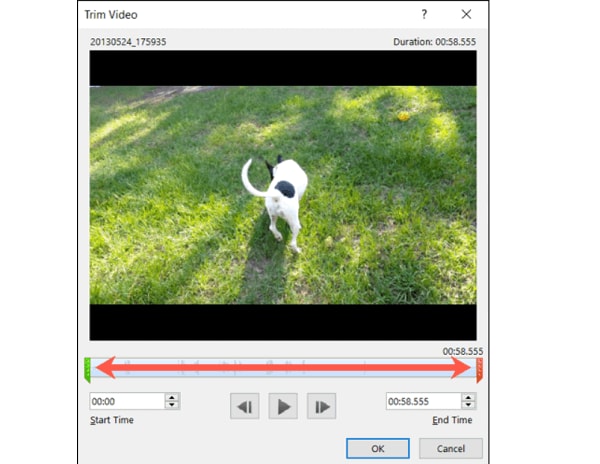
- Select your video, and the Playback tab will appear. Navigate to the Editing area of the ribbon and hit the Trim Video button.

- You’ll see a small editing window that allows you to trim video in PowerPoint.
- Enter the end and start times for the sections of the video you would like to keep. Alternatively, you can use the markers to choose the start and endpoints.
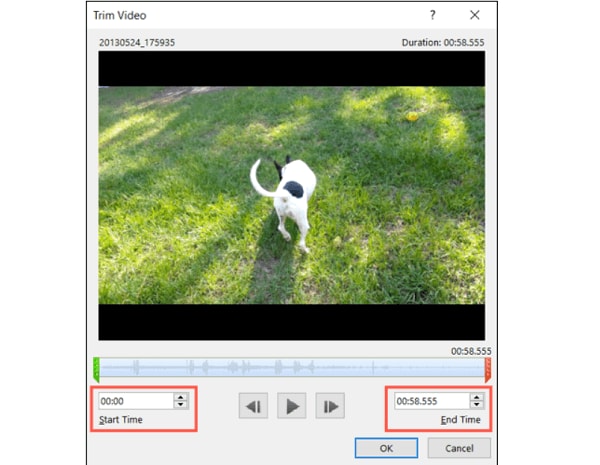
- To adjust the start and end times in smaller increments, you can use the arrows you see on the sides of those boxes. If you know the exact times, enter them into the corresponding boxes.
- You can also select the portion you would like to keep using the end and start time markers. In this case, sliding the red marker allows you to the end time while the green one lets you set the start time.
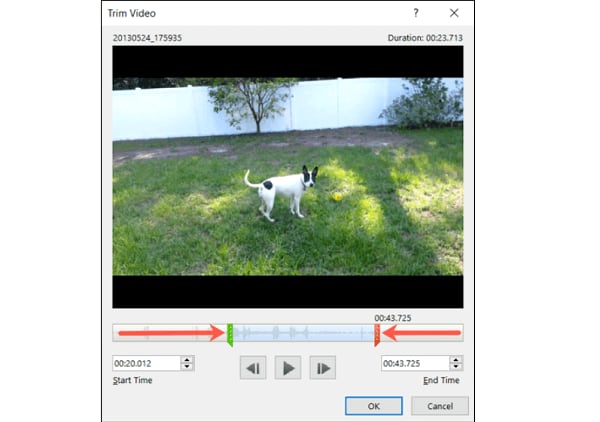
- If you want to use a combination of the tools above to pinpoint where to start and end the video, hit the Play button, then click the Pause button when you reach the time you want.
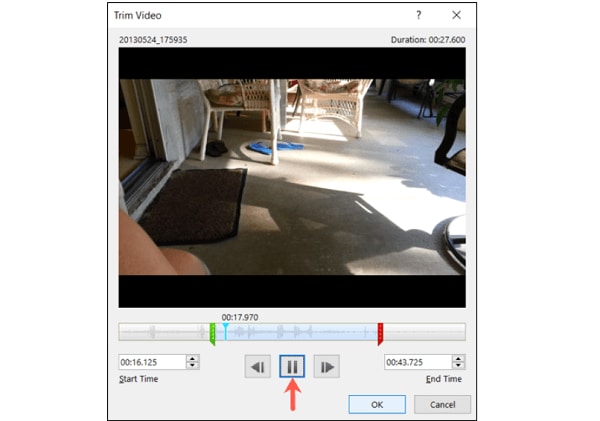
- Enter this time into the End Time or Start Time box, depending on the portion you would like to keep. Or you can move any of the markers to this spot.
- Hit the OK button once the portion of the video clip you want is all set. The video will appear on your slide update, and it will only play the section that you kept when trimming the video.
How to Reset or Edit a Trimmed Video in PowerPoint
If you trim video in PowerPoint and change your mind, you can always edit where you have trimmed it or reset the trimmed video back to its original state. Follow the steps below to learn how to edit to reset a trimmed video in PowerPoint.
- Select your video, and then find the Playback tab.

- Hit the Trim Video button, and the Trim Video Settings will be as they were when you were trimming the video. That means you can make the necessary adjustments.
- To reset a trimmed video back to its original length, slide the red end marker to the right and the green start maker to the left. The OK button allows you to play the whole video in your presentation.
How to Save a Trimmed Video
Now that you have trimmed your video in Microsoft PowerPoint, you might want to save it to use it outside this program. You can only save the video file after compressing it, then you can use the trimmed video as you want.
After compressing your trimmed video, only the trimmed section will show up on your slide. That said, follow the steps below to save your trimmed video:
- From the PowerPoint menu, select File > Info
- Next, select the Compress Media option.
- Next to Compress Media, you will see all media that are in your slideshow, including your trimmed video. If you’ve got other video files here, the compression process will apply to these files.
- Choose the suitable level of compression. A dialog box will pop up as the compression process takes place. Hit the Close button when this process completes.
- Go back to the slide that contains your trimmed video, which has now been compressed.
- Right-click the compressed video, and select the Save Media As option.

- Choose the location where you want to save your video. You can change its name if you want and click the Save button.
You have now successfully saved your trimmed video.
Bonus! Tips on Editing Videos in Powerpoint
Now that you know how to trim video PowerPoint, here are some helpful tips on editing videos on this application.
How to Crop Videos in PowerPoint
Once you have inserted your video in the slide, you have the option of cropping it. Follow these steps below to learn how to crop video PowerPoint.
- Open your presentation and then go to the slide where you have inserted your video clip.
- Double-click or select the video, and the two Video Tools tabs will appear in the ribbon: Playback and Format. Hit the Format tab option to activate it.
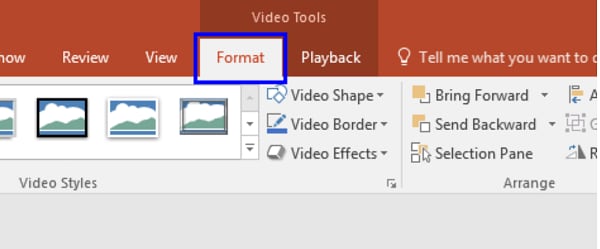
- Your slide may show a black rectangle after you insert your video.
- Add a Poster Frame to the video clip to get rid of the black rectangle.
- Click Crop in the Video Tools Format tab.
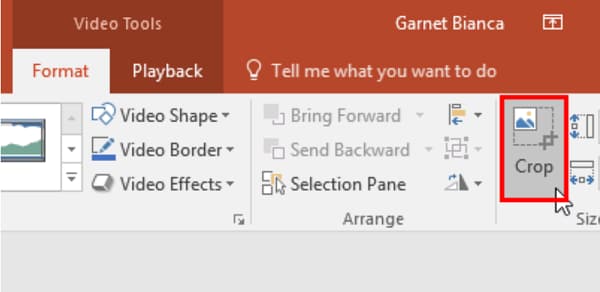
- On the edges of your video clip, you’ll see dark crop handles. If you use the Video Shape option, the crop handles will appear on the edge of that shape.
- Pressing the Ctrl key on your keyboard while you drag allows you to alter how you crop. Pressing Ctrl plus dragging the side cropping handles resizes two opposite sides, while Ctrl plus dragging the corner cropping handles resizes all the four sides.
- Pressing the Shift key on your keyboard while dragging will give you different results. You can also use the Shift and Ctrl keys simultaneously to combine both capabilities.
- You can reposition the crop by either moving the video itself or the crop area.
- Crop the unwanted portion by hitting the Crop button again or pressing the Enter key. You can also click on the Slide Area to apply the cropping changes.
- You can access more crop options by right-clicking the video, where a contextual menu will appear. Select the Format Video option.
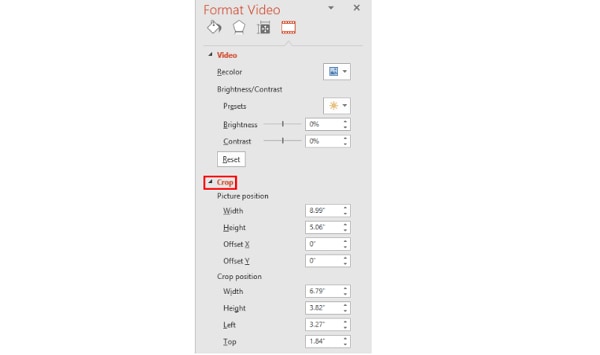
- You’ll see the Format Video Task Pane; select the Crop option.
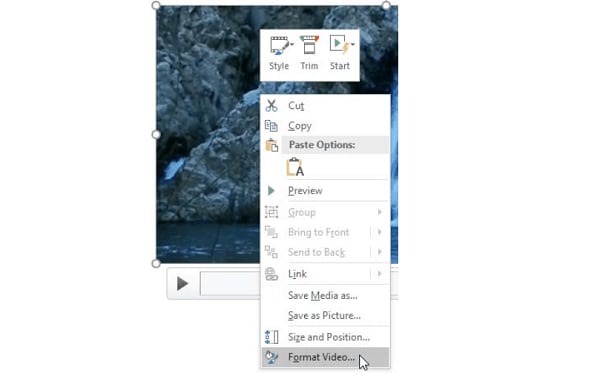
- You can crop sections of the video by specifying the Picture or Crop Position. You can also change other crop parameters, such as Top, Left, Offset Y, Offset X, Height, and Width.
How to Play Video Inside a Shape
If you want to edit your video and enhance its appearance, you can have it play inside a unique shape instead of the usual rectangle format that videos play in. In turn, you’ll draw attention to your video.
To play your video in an unusual shape, select your video and navigate to the Format tab. Then, go to the Video Shape menu, where you’ll see multiple shapes to choose from.

How to Apply Preset Video Styles
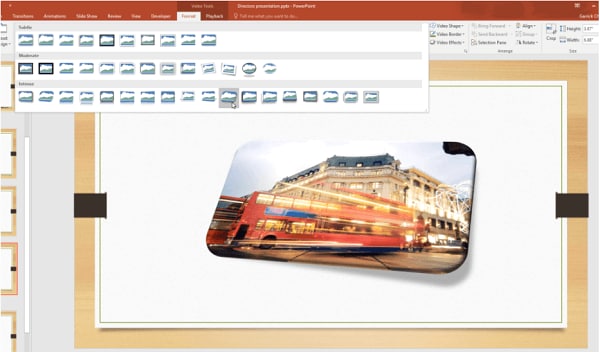
You can also liven up your video by applying one of the pre-designed styles that PowerPoints provides. These styles combine various effects, including bevels, reflections, shadows, tilts, and frames.
Applying preset video styles is a simple process. Select the video, then navigate to the Format tab. Click More under the Video Style section. You’ll see a gallery of preset styles; roll your mouse over it and hold the cursor over any style type. The program will apply a live preview of this style to your video.
Conclusion
● You can use PowerPoint to crop, trim, and add video styles to your videos to make them more attractive to your audience by following the steps above. In turn, they will get more views and attract more attention.
PowerPoint allows you to trim or crop the length of your video and save it as a separate media file. Trimming/cropping video is a great way to remove distracting or unnecessary parts of your video or change its dimensions so that it fits within a certain area. Doing this will make your videos captivating, and more people will want to watch them. Keeping that in mind, we’ll explain how you can crop or trim video in PowerPoint. You will also learn some helpful tips that you can use when editing videos on this presentation program.
In this article
01 How to Trim Videos in PowerPoint
02 Bonus! Tips on Editing Videos in Powerpoint
How to Trim Videos in PowerPoint
Many people use Microsoft PowerPoint to prepare basic animated explainers and presentations, but you can learn how to trip or crop videos in this program with the tools that it provides. With that in mind, here is how to trim, reset, or edit videos in PowerPoint.
How to Trim a Video in PowerPoint
You can trip unnecessary content at the start or end of your video clip. However, you can only trim videos you have inserted from your PC, as this feature is not yet available for videos on the web. Follow the steps below to learn how to trim video in PowerPoint.
- If you are in a slide containing a media placeholder, click on Insert Video from File. A window will open; select the From a File option.
- Find the video file on your PC and select it. Then, click the arrow that’s right next to the Insert button. Choose either the Link to File or Insert option and your video will appear on the slide.
- If you are not using a slide that has a media placeholder, find the Insert tab and click Video on My PC. You will be able to locate the video file on your PC.
- You are now ready to trim video PowerPoint.
- Select your video, and the Playback tab will appear. Navigate to the Editing area of the ribbon and hit the Trim Video button.

- You’ll see a small editing window that allows you to trim video in PowerPoint.
- Enter the end and start times for the sections of the video you would like to keep. Alternatively, you can use the markers to choose the start and endpoints.

- To adjust the start and end times in smaller increments, you can use the arrows you see on the sides of those boxes. If you know the exact times, enter them into the corresponding boxes.
- You can also select the portion you would like to keep using the end and start time markers. In this case, sliding the red marker allows you to the end time while the green one lets you set the start time.

- If you want to use a combination of the tools above to pinpoint where to start and end the video, hit the Play button, then click the Pause button when you reach the time you want.

- Enter this time into the End Time or Start Time box, depending on the portion you would like to keep. Or you can move any of the markers to this spot.
- Hit the OK button once the portion of the video clip you want is all set. The video will appear on your slide update, and it will only play the section that you kept when trimming the video.
How to Reset or Edit a Trimmed Video in PowerPoint
If you trim video in PowerPoint and change your mind, you can always edit where you have trimmed it or reset the trimmed video back to its original state. Follow the steps below to learn how to edit to reset a trimmed video in PowerPoint.
- Select your video, and then find the Playback tab.

- Hit the Trim Video button, and the Trim Video Settings will be as they were when you were trimming the video. That means you can make the necessary adjustments.
- To reset a trimmed video back to its original length, slide the red end marker to the right and the green start maker to the left. The OK button allows you to play the whole video in your presentation.

How to Save a Trimmed Video
Now that you have trimmed your video in Microsoft PowerPoint, you might want to save it to use it outside this program. You can only save the video file after compressing it, then you can use the trimmed video as you want.
After compressing your trimmed video, only the trimmed section will show up on your slide. That said, follow the steps below to save your trimmed video:
- From the PowerPoint menu, select File > Info
- Next, select the Compress Media option.
- Next to Compress Media, you will see all media that are in your slideshow, including your trimmed video. If you’ve got other video files here, the compression process will apply to these files.
- Choose the suitable level of compression. A dialog box will pop up as the compression process takes place. Hit the Close button when this process completes.
- Go back to the slide that contains your trimmed video, which has now been compressed.
- Right-click the compressed video, and select the Save Media As option.

- Choose the location where you want to save your video. You can change its name if you want and click the Save button.
You have now successfully saved your trimmed video.
Bonus! Tips on Editing Videos in Powerpoint
Now that you know how to trim video PowerPoint, here are some helpful tips on editing videos on this application.
How to Crop Videos in PowerPoint
Once you have inserted your video in the slide, you have the option of cropping it. Follow these steps below to learn how to crop video PowerPoint.
- Open your presentation and then go to the slide where you have inserted your video clip.
- Double-click or select the video, and the two Video Tools tabs will appear in the ribbon: Playback and Format. Hit the Format tab option to activate it.

- Your slide may show a black rectangle after you insert your video.
- Add a Poster Frame to the video clip to get rid of the black rectangle.
- Click Crop in the Video Tools Format tab.

- On the edges of your video clip, you’ll see dark crop handles. If you use the Video Shape option, the crop handles will appear on the edge of that shape.
- Pressing the Ctrl key on your keyboard while you drag allows you to alter how you crop. Pressing Ctrl plus dragging the side cropping handles resizes two opposite sides, while Ctrl plus dragging the corner cropping handles resizes all the four sides.
- Pressing the Shift key on your keyboard while dragging will give you different results. You can also use the Shift and Ctrl keys simultaneously to combine both capabilities.
- You can reposition the crop by either moving the video itself or the crop area.
- Crop the unwanted portion by hitting the Crop button again or pressing the Enter key. You can also click on the Slide Area to apply the cropping changes.
- You can access more crop options by right-clicking the video, where a contextual menu will appear. Select the Format Video option.
- You’ll see the Format Video Task Pane; select the Crop option.

- You can crop sections of the video by specifying the Picture or Crop Position. You can also change other crop parameters, such as Top, Left, Offset Y, Offset X, Height, and Width.

How to Play Video Inside a Shape
If you want to edit your video and enhance its appearance, you can have it play inside a unique shape instead of the usual rectangle format that videos play in. In turn, you’ll draw attention to your video.
To play your video in an unusual shape, select your video and navigate to the Format tab. Then, go to the Video Shape menu, where you’ll see multiple shapes to choose from.

How to Apply Preset Video Styles
You can also liven up your video by applying one of the pre-designed styles that PowerPoints provides. These styles combine various effects, including bevels, reflections, shadows, tilts, and frames.
Applying preset video styles is a simple process. Select the video, then navigate to the Format tab. Click More under the Video Style section. You’ll see a gallery of preset styles; roll your mouse over it and hold the cursor over any style type. The program will apply a live preview of this style to your video.

Conclusion
● You can use PowerPoint to crop, trim, and add video styles to your videos to make them more attractive to your audience by following the steps above. In turn, they will get more views and attract more attention.
PowerPoint allows you to trim or crop the length of your video and save it as a separate media file. Trimming/cropping video is a great way to remove distracting or unnecessary parts of your video or change its dimensions so that it fits within a certain area. Doing this will make your videos captivating, and more people will want to watch them. Keeping that in mind, we’ll explain how you can crop or trim video in PowerPoint. You will also learn some helpful tips that you can use when editing videos on this presentation program.
In this article
01 How to Trim Videos in PowerPoint
02 Bonus! Tips on Editing Videos in Powerpoint
How to Trim Videos in PowerPoint
Many people use Microsoft PowerPoint to prepare basic animated explainers and presentations, but you can learn how to trip or crop videos in this program with the tools that it provides. With that in mind, here is how to trim, reset, or edit videos in PowerPoint.
How to Trim a Video in PowerPoint
You can trip unnecessary content at the start or end of your video clip. However, you can only trim videos you have inserted from your PC, as this feature is not yet available for videos on the web. Follow the steps below to learn how to trim video in PowerPoint.
- If you are in a slide containing a media placeholder, click on Insert Video from File. A window will open; select the From a File option.
- Find the video file on your PC and select it. Then, click the arrow that’s right next to the Insert button. Choose either the Link to File or Insert option and your video will appear on the slide.
- If you are not using a slide that has a media placeholder, find the Insert tab and click Video on My PC. You will be able to locate the video file on your PC.
- You are now ready to trim video PowerPoint.
- Select your video, and the Playback tab will appear. Navigate to the Editing area of the ribbon and hit the Trim Video button.

- You’ll see a small editing window that allows you to trim video in PowerPoint.
- Enter the end and start times for the sections of the video you would like to keep. Alternatively, you can use the markers to choose the start and endpoints.

- To adjust the start and end times in smaller increments, you can use the arrows you see on the sides of those boxes. If you know the exact times, enter them into the corresponding boxes.
- You can also select the portion you would like to keep using the end and start time markers. In this case, sliding the red marker allows you to the end time while the green one lets you set the start time.

- If you want to use a combination of the tools above to pinpoint where to start and end the video, hit the Play button, then click the Pause button when you reach the time you want.

- Enter this time into the End Time or Start Time box, depending on the portion you would like to keep. Or you can move any of the markers to this spot.
- Hit the OK button once the portion of the video clip you want is all set. The video will appear on your slide update, and it will only play the section that you kept when trimming the video.
How to Reset or Edit a Trimmed Video in PowerPoint
If you trim video in PowerPoint and change your mind, you can always edit where you have trimmed it or reset the trimmed video back to its original state. Follow the steps below to learn how to edit to reset a trimmed video in PowerPoint.
- Select your video, and then find the Playback tab.

- Hit the Trim Video button, and the Trim Video Settings will be as they were when you were trimming the video. That means you can make the necessary adjustments.
- To reset a trimmed video back to its original length, slide the red end marker to the right and the green start maker to the left. The OK button allows you to play the whole video in your presentation.

How to Save a Trimmed Video
Now that you have trimmed your video in Microsoft PowerPoint, you might want to save it to use it outside this program. You can only save the video file after compressing it, then you can use the trimmed video as you want.
After compressing your trimmed video, only the trimmed section will show up on your slide. That said, follow the steps below to save your trimmed video:
- From the PowerPoint menu, select File > Info
- Next, select the Compress Media option.
- Next to Compress Media, you will see all media that are in your slideshow, including your trimmed video. If you’ve got other video files here, the compression process will apply to these files.
- Choose the suitable level of compression. A dialog box will pop up as the compression process takes place. Hit the Close button when this process completes.
- Go back to the slide that contains your trimmed video, which has now been compressed.
- Right-click the compressed video, and select the Save Media As option.

- Choose the location where you want to save your video. You can change its name if you want and click the Save button.
You have now successfully saved your trimmed video.
Bonus! Tips on Editing Videos in Powerpoint
Now that you know how to trim video PowerPoint, here are some helpful tips on editing videos on this application.
How to Crop Videos in PowerPoint
Once you have inserted your video in the slide, you have the option of cropping it. Follow these steps below to learn how to crop video PowerPoint.
- Open your presentation and then go to the slide where you have inserted your video clip.
- Double-click or select the video, and the two Video Tools tabs will appear in the ribbon: Playback and Format. Hit the Format tab option to activate it.

- Your slide may show a black rectangle after you insert your video.
- Add a Poster Frame to the video clip to get rid of the black rectangle.
- Click Crop in the Video Tools Format tab.

- On the edges of your video clip, you’ll see dark crop handles. If you use the Video Shape option, the crop handles will appear on the edge of that shape.
- Pressing the Ctrl key on your keyboard while you drag allows you to alter how you crop. Pressing Ctrl plus dragging the side cropping handles resizes two opposite sides, while Ctrl plus dragging the corner cropping handles resizes all the four sides.
- Pressing the Shift key on your keyboard while dragging will give you different results. You can also use the Shift and Ctrl keys simultaneously to combine both capabilities.
- You can reposition the crop by either moving the video itself or the crop area.
- Crop the unwanted portion by hitting the Crop button again or pressing the Enter key. You can also click on the Slide Area to apply the cropping changes.
- You can access more crop options by right-clicking the video, where a contextual menu will appear. Select the Format Video option.
- You’ll see the Format Video Task Pane; select the Crop option.

- You can crop sections of the video by specifying the Picture or Crop Position. You can also change other crop parameters, such as Top, Left, Offset Y, Offset X, Height, and Width.

How to Play Video Inside a Shape
If you want to edit your video and enhance its appearance, you can have it play inside a unique shape instead of the usual rectangle format that videos play in. In turn, you’ll draw attention to your video.
To play your video in an unusual shape, select your video and navigate to the Format tab. Then, go to the Video Shape menu, where you’ll see multiple shapes to choose from.

How to Apply Preset Video Styles
You can also liven up your video by applying one of the pre-designed styles that PowerPoints provides. These styles combine various effects, including bevels, reflections, shadows, tilts, and frames.
Applying preset video styles is a simple process. Select the video, then navigate to the Format tab. Click More under the Video Style section. You’ll see a gallery of preset styles; roll your mouse over it and hold the cursor over any style type. The program will apply a live preview of this style to your video.

Conclusion
● You can use PowerPoint to crop, trim, and add video styles to your videos to make them more attractive to your audience by following the steps above. In turn, they will get more views and attract more attention.
PowerPoint allows you to trim or crop the length of your video and save it as a separate media file. Trimming/cropping video is a great way to remove distracting or unnecessary parts of your video or change its dimensions so that it fits within a certain area. Doing this will make your videos captivating, and more people will want to watch them. Keeping that in mind, we’ll explain how you can crop or trim video in PowerPoint. You will also learn some helpful tips that you can use when editing videos on this presentation program.
In this article
01 How to Trim Videos in PowerPoint
02 Bonus! Tips on Editing Videos in Powerpoint
How to Trim Videos in PowerPoint
Many people use Microsoft PowerPoint to prepare basic animated explainers and presentations, but you can learn how to trip or crop videos in this program with the tools that it provides. With that in mind, here is how to trim, reset, or edit videos in PowerPoint.
How to Trim a Video in PowerPoint
You can trip unnecessary content at the start or end of your video clip. However, you can only trim videos you have inserted from your PC, as this feature is not yet available for videos on the web. Follow the steps below to learn how to trim video in PowerPoint.
- If you are in a slide containing a media placeholder, click on Insert Video from File. A window will open; select the From a File option.
- Find the video file on your PC and select it. Then, click the arrow that’s right next to the Insert button. Choose either the Link to File or Insert option and your video will appear on the slide.
- If you are not using a slide that has a media placeholder, find the Insert tab and click Video on My PC. You will be able to locate the video file on your PC.
- You are now ready to trim video PowerPoint.
- Select your video, and the Playback tab will appear. Navigate to the Editing area of the ribbon and hit the Trim Video button.

- You’ll see a small editing window that allows you to trim video in PowerPoint.
- Enter the end and start times for the sections of the video you would like to keep. Alternatively, you can use the markers to choose the start and endpoints.

- To adjust the start and end times in smaller increments, you can use the arrows you see on the sides of those boxes. If you know the exact times, enter them into the corresponding boxes.
- You can also select the portion you would like to keep using the end and start time markers. In this case, sliding the red marker allows you to the end time while the green one lets you set the start time.

- If you want to use a combination of the tools above to pinpoint where to start and end the video, hit the Play button, then click the Pause button when you reach the time you want.

- Enter this time into the End Time or Start Time box, depending on the portion you would like to keep. Or you can move any of the markers to this spot.
- Hit the OK button once the portion of the video clip you want is all set. The video will appear on your slide update, and it will only play the section that you kept when trimming the video.
How to Reset or Edit a Trimmed Video in PowerPoint
If you trim video in PowerPoint and change your mind, you can always edit where you have trimmed it or reset the trimmed video back to its original state. Follow the steps below to learn how to edit to reset a trimmed video in PowerPoint.
- Select your video, and then find the Playback tab.

- Hit the Trim Video button, and the Trim Video Settings will be as they were when you were trimming the video. That means you can make the necessary adjustments.
- To reset a trimmed video back to its original length, slide the red end marker to the right and the green start maker to the left. The OK button allows you to play the whole video in your presentation.

How to Save a Trimmed Video
Now that you have trimmed your video in Microsoft PowerPoint, you might want to save it to use it outside this program. You can only save the video file after compressing it, then you can use the trimmed video as you want.
After compressing your trimmed video, only the trimmed section will show up on your slide. That said, follow the steps below to save your trimmed video:
- From the PowerPoint menu, select File > Info
- Next, select the Compress Media option.
- Next to Compress Media, you will see all media that are in your slideshow, including your trimmed video. If you’ve got other video files here, the compression process will apply to these files.
- Choose the suitable level of compression. A dialog box will pop up as the compression process takes place. Hit the Close button when this process completes.
- Go back to the slide that contains your trimmed video, which has now been compressed.
- Right-click the compressed video, and select the Save Media As option.

- Choose the location where you want to save your video. You can change its name if you want and click the Save button.
You have now successfully saved your trimmed video.
Bonus! Tips on Editing Videos in Powerpoint
Now that you know how to trim video PowerPoint, here are some helpful tips on editing videos on this application.
How to Crop Videos in PowerPoint
Once you have inserted your video in the slide, you have the option of cropping it. Follow these steps below to learn how to crop video PowerPoint.
- Open your presentation and then go to the slide where you have inserted your video clip.
- Double-click or select the video, and the two Video Tools tabs will appear in the ribbon: Playback and Format. Hit the Format tab option to activate it.

- Your slide may show a black rectangle after you insert your video.
- Add a Poster Frame to the video clip to get rid of the black rectangle.
- Click Crop in the Video Tools Format tab.

- On the edges of your video clip, you’ll see dark crop handles. If you use the Video Shape option, the crop handles will appear on the edge of that shape.
- Pressing the Ctrl key on your keyboard while you drag allows you to alter how you crop. Pressing Ctrl plus dragging the side cropping handles resizes two opposite sides, while Ctrl plus dragging the corner cropping handles resizes all the four sides.
- Pressing the Shift key on your keyboard while dragging will give you different results. You can also use the Shift and Ctrl keys simultaneously to combine both capabilities.
- You can reposition the crop by either moving the video itself or the crop area.
- Crop the unwanted portion by hitting the Crop button again or pressing the Enter key. You can also click on the Slide Area to apply the cropping changes.
- You can access more crop options by right-clicking the video, where a contextual menu will appear. Select the Format Video option.
- You’ll see the Format Video Task Pane; select the Crop option.

- You can crop sections of the video by specifying the Picture or Crop Position. You can also change other crop parameters, such as Top, Left, Offset Y, Offset X, Height, and Width.

How to Play Video Inside a Shape
If you want to edit your video and enhance its appearance, you can have it play inside a unique shape instead of the usual rectangle format that videos play in. In turn, you’ll draw attention to your video.
To play your video in an unusual shape, select your video and navigate to the Format tab. Then, go to the Video Shape menu, where you’ll see multiple shapes to choose from.

How to Apply Preset Video Styles
You can also liven up your video by applying one of the pre-designed styles that PowerPoints provides. These styles combine various effects, including bevels, reflections, shadows, tilts, and frames.
Applying preset video styles is a simple process. Select the video, then navigate to the Format tab. Click More under the Video Style section. You’ll see a gallery of preset styles; roll your mouse over it and hold the cursor over any style type. The program will apply a live preview of this style to your video.

Conclusion
● You can use PowerPoint to crop, trim, and add video styles to your videos to make them more attractive to your audience by following the steps above. In turn, they will get more views and attract more attention.
The Top 10 AI Video Analytics Companies at a Glance
The Best 10 AI Video Analytics Companies at a Glance
An easy yet powerful editor
Numerous effects to choose from
Detailed tutorials provided by the official channel
Video Analytics is widely used in an array of setup and industries these days. Be it security cameras, automated parking, face recognition, or other industrial or household requirements, the use of video analytics has increased in the last few years. To take care of these analyses in an efficient manner, several Video Analytic Companies are present with their specialized set of services. So, if you too are keen to know more about this technology and the best AI video analytics companies for the same, the content below will be a wonderful read for you.

In this article
01 [What is Video Analytics?](#Part 1)
02 [Top 10 Leading Video Content Analytics Companies](#Part 2)
03 [Additional Part: Best tool for advanced video editing- Wondershare Filmora](#Part 3)
Part 1 What is Video Analytics?
Video Analytics that is also commonly known as video content analysis is an advanced technology where the video footage is automatically analyzed to find the spatial as well as temporal events. The technology uses specialized algorithms that can be implemented using the software, processing units, as well as machines, and hardware.
Talk about any industry like retail, automotive, transport, healthcare, security, and others, video analytics are in use. Some of the key functionalities that are employed by the technology include dynamic masking, motion detection, egomotion estimation, video tacking, shape recognition, and more.
Part 1 Top 10 Leading Video Content Analytics Companies
Though Video Content Analysis is relatively a new technology, a lot of companies have their products and services in the field. We have shortlisted the top 10 companies in the field.
01Honeywell
Founded in the year 1906, Honeywell is a public company with its headquarters in North California, US. The company is known for its advanced solutions and innovations and among the long list of its services is also video analytics. The company is popular for its video surveillance and access control solutions.

02IBM
IBM is one of the most popular companies across the globe that is known for providing services in an array of formats including software, consulting, hardware, infrastructure, and others. All types of industries are covered by the company like chemical, life sciences, insurance, health, media, retail, and much more. IBM also offers its services in video analytics and is among the top revenue-generating company in the field.

03Axis Communication
With its headquarter in Lund Sweden, the company is known for providing advanced network solutions, intercom devices, access control, IP video surveillance, and related services in more than 50 countries. The company has multiple apps for video analytics that also includes the Axis Camera App platform. Depending upon your requirements for business and security needs, analytics can be added which are also fully scalable that help in saving the bandwidth.

04Pure Tech Systems
Established in the year 2005, the company has its headquarters in Phoenix, Arizona, and is popular for its video surveillance as well as video analytics. The company is known for its excellent real-time security solutions and also offers automated protection systems. The software produced by the company is capable of offering automatic real-time event detection services.

05Agent Video Intelligence
When it comes to AI-powered analytics solutions, Agent Vinod is a reputed and high-rated company. Offering its services across the globe in the security and safety domain it has a lot of tools for AI-powered video analytics. You can choose between on-premises and in-cloud services offered by the company as needed. The apps of the company can also be integrated with third-party devices.

06Avigilon
The company is known for its specialization in video analytics, access control systems, surveillance cameras, and network video management. In the year 2018, the company was purchased by Motorola Solutions. In the field of video analytics, the popular tools by the company are Avigilon Control Center and Appearance Search, and Unusual Motion Detection technology. In addition to the software, VA appliances are also introduced by the company.

07Intelligent Security Systems
Operating in more than 23 countries worldwide, this is one of the most popular companies when it comes to controlling systems and security monitoring. Some of the key services offered by the company include processing video image patterns, recording network digital video and audio, and more. To support security gadgets, advanced technology is available with the company.

08AllGoVision
This is a widely used company for video content analysis that operates in an array of industries like business intelligence, building surveillance, and more. The products by other popular companies like Honeywell, Milestone, and more can be very well integrated with the products of AllGoVision. The flexibility of installation is also offered by the company.

09Gorilla Technology
The company is known for its high-end technology in the Internet of Things (IoT) and video intelligence. The IoT along with video analytic solutions are also offered by the company for better surveillance and management. The VA solutions offered by the company include API connections, object identification, real-time insights, and more. The real-time IVAR analytic platform has a single dashboard for business and operations.

10Aventura
The company is known for offering services in an array of fields including cameras, UTP, cognitive analytics, and more. There are several systems with which the company services can integrate and some of these include dispatch, access control, analytics, intrusion detection, and more. The services and the products by the company in the field of VA help in increasing the productivity as well as performance and customer care of the company. Moreover, the products can also be customized as per the requirements.

Part 2 Additional Part: Best tool for advanced video editing- Wondershare Filmora
With videos dominating the entire digital platform, the need for advanced video creation and editing tools have also increased. Among the myriad of options available, selecting one can be a difficult task. So, if you are looking for a program that is quick as well as simple to use, we recommend Wondershare Filmora Video Editor as the best option. This feature packed tool can create lively videos like a pro in no time.
For Win 7 or later (64-bit)
For macOS 10.12 or later
All the needed video creation and editing tools are supported by this Windows and Mac based software.
Key features of the software
● All-in-one video creation and editing software.
● Comes with wide range of advanced functions for facilitating hassle-free task.
● Customizable animation options with features like motion tracking, pan & zoom, ease-in, ease-out, and more.
● Support adding text, titles, masking, warping, and distorting.
● Auto correction, control settings, color wheels, and other advanced features supported.
● Support multiple audio-based functions like automatic sync, audio compression, audio noise reduction, and audio transitions.
● Windows and Mac support.
● Ending Thoughts →
● Video analytics services and products are a lot in use these days for improving efficiency, and productivity and for better management and surveillance.
● There are several popular companies with their products and services in the video analytics field.
● Depending on the services and the software required you can choose from these top companies.
Video Analytics is widely used in an array of setup and industries these days. Be it security cameras, automated parking, face recognition, or other industrial or household requirements, the use of video analytics has increased in the last few years. To take care of these analyses in an efficient manner, several Video Analytic Companies are present with their specialized set of services. So, if you too are keen to know more about this technology and the best AI video analytics companies for the same, the content below will be a wonderful read for you.

In this article
01 [What is Video Analytics?](#Part 1)
02 [Top 10 Leading Video Content Analytics Companies](#Part 2)
03 [Additional Part: Best tool for advanced video editing- Wondershare Filmora](#Part 3)
Part 1 What is Video Analytics?
Video Analytics that is also commonly known as video content analysis is an advanced technology where the video footage is automatically analyzed to find the spatial as well as temporal events. The technology uses specialized algorithms that can be implemented using the software, processing units, as well as machines, and hardware.
Talk about any industry like retail, automotive, transport, healthcare, security, and others, video analytics are in use. Some of the key functionalities that are employed by the technology include dynamic masking, motion detection, egomotion estimation, video tacking, shape recognition, and more.
Part 1 Top 10 Leading Video Content Analytics Companies
Though Video Content Analysis is relatively a new technology, a lot of companies have their products and services in the field. We have shortlisted the top 10 companies in the field.
01Honeywell
Founded in the year 1906, Honeywell is a public company with its headquarters in North California, US. The company is known for its advanced solutions and innovations and among the long list of its services is also video analytics. The company is popular for its video surveillance and access control solutions.

02IBM
IBM is one of the most popular companies across the globe that is known for providing services in an array of formats including software, consulting, hardware, infrastructure, and others. All types of industries are covered by the company like chemical, life sciences, insurance, health, media, retail, and much more. IBM also offers its services in video analytics and is among the top revenue-generating company in the field.

03Axis Communication
With its headquarter in Lund Sweden, the company is known for providing advanced network solutions, intercom devices, access control, IP video surveillance, and related services in more than 50 countries. The company has multiple apps for video analytics that also includes the Axis Camera App platform. Depending upon your requirements for business and security needs, analytics can be added which are also fully scalable that help in saving the bandwidth.

04Pure Tech Systems
Established in the year 2005, the company has its headquarters in Phoenix, Arizona, and is popular for its video surveillance as well as video analytics. The company is known for its excellent real-time security solutions and also offers automated protection systems. The software produced by the company is capable of offering automatic real-time event detection services.

05Agent Video Intelligence
When it comes to AI-powered analytics solutions, Agent Vinod is a reputed and high-rated company. Offering its services across the globe in the security and safety domain it has a lot of tools for AI-powered video analytics. You can choose between on-premises and in-cloud services offered by the company as needed. The apps of the company can also be integrated with third-party devices.

06Avigilon
The company is known for its specialization in video analytics, access control systems, surveillance cameras, and network video management. In the year 2018, the company was purchased by Motorola Solutions. In the field of video analytics, the popular tools by the company are Avigilon Control Center and Appearance Search, and Unusual Motion Detection technology. In addition to the software, VA appliances are also introduced by the company.

07Intelligent Security Systems
Operating in more than 23 countries worldwide, this is one of the most popular companies when it comes to controlling systems and security monitoring. Some of the key services offered by the company include processing video image patterns, recording network digital video and audio, and more. To support security gadgets, advanced technology is available with the company.

08AllGoVision
This is a widely used company for video content analysis that operates in an array of industries like business intelligence, building surveillance, and more. The products by other popular companies like Honeywell, Milestone, and more can be very well integrated with the products of AllGoVision. The flexibility of installation is also offered by the company.

09Gorilla Technology
The company is known for its high-end technology in the Internet of Things (IoT) and video intelligence. The IoT along with video analytic solutions are also offered by the company for better surveillance and management. The VA solutions offered by the company include API connections, object identification, real-time insights, and more. The real-time IVAR analytic platform has a single dashboard for business and operations.

10Aventura
The company is known for offering services in an array of fields including cameras, UTP, cognitive analytics, and more. There are several systems with which the company services can integrate and some of these include dispatch, access control, analytics, intrusion detection, and more. The services and the products by the company in the field of VA help in increasing the productivity as well as performance and customer care of the company. Moreover, the products can also be customized as per the requirements.

Part 2 Additional Part: Best tool for advanced video editing- Wondershare Filmora
With videos dominating the entire digital platform, the need for advanced video creation and editing tools have also increased. Among the myriad of options available, selecting one can be a difficult task. So, if you are looking for a program that is quick as well as simple to use, we recommend Wondershare Filmora Video Editor as the best option. This feature packed tool can create lively videos like a pro in no time.
For Win 7 or later (64-bit)
For macOS 10.12 or later
All the needed video creation and editing tools are supported by this Windows and Mac based software.
Key features of the software
● All-in-one video creation and editing software.
● Comes with wide range of advanced functions for facilitating hassle-free task.
● Customizable animation options with features like motion tracking, pan & zoom, ease-in, ease-out, and more.
● Support adding text, titles, masking, warping, and distorting.
● Auto correction, control settings, color wheels, and other advanced features supported.
● Support multiple audio-based functions like automatic sync, audio compression, audio noise reduction, and audio transitions.
● Windows and Mac support.
● Ending Thoughts →
● Video analytics services and products are a lot in use these days for improving efficiency, and productivity and for better management and surveillance.
● There are several popular companies with their products and services in the video analytics field.
● Depending on the services and the software required you can choose from these top companies.
Video Analytics is widely used in an array of setup and industries these days. Be it security cameras, automated parking, face recognition, or other industrial or household requirements, the use of video analytics has increased in the last few years. To take care of these analyses in an efficient manner, several Video Analytic Companies are present with their specialized set of services. So, if you too are keen to know more about this technology and the best AI video analytics companies for the same, the content below will be a wonderful read for you.

In this article
01 [What is Video Analytics?](#Part 1)
02 [Top 10 Leading Video Content Analytics Companies](#Part 2)
03 [Additional Part: Best tool for advanced video editing- Wondershare Filmora](#Part 3)
Part 1 What is Video Analytics?
Video Analytics that is also commonly known as video content analysis is an advanced technology where the video footage is automatically analyzed to find the spatial as well as temporal events. The technology uses specialized algorithms that can be implemented using the software, processing units, as well as machines, and hardware.
Talk about any industry like retail, automotive, transport, healthcare, security, and others, video analytics are in use. Some of the key functionalities that are employed by the technology include dynamic masking, motion detection, egomotion estimation, video tacking, shape recognition, and more.
Part 1 Top 10 Leading Video Content Analytics Companies
Though Video Content Analysis is relatively a new technology, a lot of companies have their products and services in the field. We have shortlisted the top 10 companies in the field.
01Honeywell
Founded in the year 1906, Honeywell is a public company with its headquarters in North California, US. The company is known for its advanced solutions and innovations and among the long list of its services is also video analytics. The company is popular for its video surveillance and access control solutions.

02IBM
IBM is one of the most popular companies across the globe that is known for providing services in an array of formats including software, consulting, hardware, infrastructure, and others. All types of industries are covered by the company like chemical, life sciences, insurance, health, media, retail, and much more. IBM also offers its services in video analytics and is among the top revenue-generating company in the field.

03Axis Communication
With its headquarter in Lund Sweden, the company is known for providing advanced network solutions, intercom devices, access control, IP video surveillance, and related services in more than 50 countries. The company has multiple apps for video analytics that also includes the Axis Camera App platform. Depending upon your requirements for business and security needs, analytics can be added which are also fully scalable that help in saving the bandwidth.

04Pure Tech Systems
Established in the year 2005, the company has its headquarters in Phoenix, Arizona, and is popular for its video surveillance as well as video analytics. The company is known for its excellent real-time security solutions and also offers automated protection systems. The software produced by the company is capable of offering automatic real-time event detection services.

05Agent Video Intelligence
When it comes to AI-powered analytics solutions, Agent Vinod is a reputed and high-rated company. Offering its services across the globe in the security and safety domain it has a lot of tools for AI-powered video analytics. You can choose between on-premises and in-cloud services offered by the company as needed. The apps of the company can also be integrated with third-party devices.

06Avigilon
The company is known for its specialization in video analytics, access control systems, surveillance cameras, and network video management. In the year 2018, the company was purchased by Motorola Solutions. In the field of video analytics, the popular tools by the company are Avigilon Control Center and Appearance Search, and Unusual Motion Detection technology. In addition to the software, VA appliances are also introduced by the company.

07Intelligent Security Systems
Operating in more than 23 countries worldwide, this is one of the most popular companies when it comes to controlling systems and security monitoring. Some of the key services offered by the company include processing video image patterns, recording network digital video and audio, and more. To support security gadgets, advanced technology is available with the company.

08AllGoVision
This is a widely used company for video content analysis that operates in an array of industries like business intelligence, building surveillance, and more. The products by other popular companies like Honeywell, Milestone, and more can be very well integrated with the products of AllGoVision. The flexibility of installation is also offered by the company.

09Gorilla Technology
The company is known for its high-end technology in the Internet of Things (IoT) and video intelligence. The IoT along with video analytic solutions are also offered by the company for better surveillance and management. The VA solutions offered by the company include API connections, object identification, real-time insights, and more. The real-time IVAR analytic platform has a single dashboard for business and operations.

10Aventura
The company is known for offering services in an array of fields including cameras, UTP, cognitive analytics, and more. There are several systems with which the company services can integrate and some of these include dispatch, access control, analytics, intrusion detection, and more. The services and the products by the company in the field of VA help in increasing the productivity as well as performance and customer care of the company. Moreover, the products can also be customized as per the requirements.

Part 2 Additional Part: Best tool for advanced video editing- Wondershare Filmora
With videos dominating the entire digital platform, the need for advanced video creation and editing tools have also increased. Among the myriad of options available, selecting one can be a difficult task. So, if you are looking for a program that is quick as well as simple to use, we recommend Wondershare Filmora Video Editor as the best option. This feature packed tool can create lively videos like a pro in no time.
For Win 7 or later (64-bit)
For macOS 10.12 or later
All the needed video creation and editing tools are supported by this Windows and Mac based software.
Key features of the software
● All-in-one video creation and editing software.
● Comes with wide range of advanced functions for facilitating hassle-free task.
● Customizable animation options with features like motion tracking, pan & zoom, ease-in, ease-out, and more.
● Support adding text, titles, masking, warping, and distorting.
● Auto correction, control settings, color wheels, and other advanced features supported.
● Support multiple audio-based functions like automatic sync, audio compression, audio noise reduction, and audio transitions.
● Windows and Mac support.
● Ending Thoughts →
● Video analytics services and products are a lot in use these days for improving efficiency, and productivity and for better management and surveillance.
● There are several popular companies with their products and services in the video analytics field.
● Depending on the services and the software required you can choose from these top companies.
Video Analytics is widely used in an array of setup and industries these days. Be it security cameras, automated parking, face recognition, or other industrial or household requirements, the use of video analytics has increased in the last few years. To take care of these analyses in an efficient manner, several Video Analytic Companies are present with their specialized set of services. So, if you too are keen to know more about this technology and the best AI video analytics companies for the same, the content below will be a wonderful read for you.

In this article
01 [What is Video Analytics?](#Part 1)
02 [Top 10 Leading Video Content Analytics Companies](#Part 2)
03 [Additional Part: Best tool for advanced video editing- Wondershare Filmora](#Part 3)
Part 1 What is Video Analytics?
Video Analytics that is also commonly known as video content analysis is an advanced technology where the video footage is automatically analyzed to find the spatial as well as temporal events. The technology uses specialized algorithms that can be implemented using the software, processing units, as well as machines, and hardware.
Talk about any industry like retail, automotive, transport, healthcare, security, and others, video analytics are in use. Some of the key functionalities that are employed by the technology include dynamic masking, motion detection, egomotion estimation, video tacking, shape recognition, and more.
Part 1 Top 10 Leading Video Content Analytics Companies
Though Video Content Analysis is relatively a new technology, a lot of companies have their products and services in the field. We have shortlisted the top 10 companies in the field.
01Honeywell
Founded in the year 1906, Honeywell is a public company with its headquarters in North California, US. The company is known for its advanced solutions and innovations and among the long list of its services is also video analytics. The company is popular for its video surveillance and access control solutions.

02IBM
IBM is one of the most popular companies across the globe that is known for providing services in an array of formats including software, consulting, hardware, infrastructure, and others. All types of industries are covered by the company like chemical, life sciences, insurance, health, media, retail, and much more. IBM also offers its services in video analytics and is among the top revenue-generating company in the field.

03Axis Communication
With its headquarter in Lund Sweden, the company is known for providing advanced network solutions, intercom devices, access control, IP video surveillance, and related services in more than 50 countries. The company has multiple apps for video analytics that also includes the Axis Camera App platform. Depending upon your requirements for business and security needs, analytics can be added which are also fully scalable that help in saving the bandwidth.

04Pure Tech Systems
Established in the year 2005, the company has its headquarters in Phoenix, Arizona, and is popular for its video surveillance as well as video analytics. The company is known for its excellent real-time security solutions and also offers automated protection systems. The software produced by the company is capable of offering automatic real-time event detection services.

05Agent Video Intelligence
When it comes to AI-powered analytics solutions, Agent Vinod is a reputed and high-rated company. Offering its services across the globe in the security and safety domain it has a lot of tools for AI-powered video analytics. You can choose between on-premises and in-cloud services offered by the company as needed. The apps of the company can also be integrated with third-party devices.

06Avigilon
The company is known for its specialization in video analytics, access control systems, surveillance cameras, and network video management. In the year 2018, the company was purchased by Motorola Solutions. In the field of video analytics, the popular tools by the company are Avigilon Control Center and Appearance Search, and Unusual Motion Detection technology. In addition to the software, VA appliances are also introduced by the company.

07Intelligent Security Systems
Operating in more than 23 countries worldwide, this is one of the most popular companies when it comes to controlling systems and security monitoring. Some of the key services offered by the company include processing video image patterns, recording network digital video and audio, and more. To support security gadgets, advanced technology is available with the company.

08AllGoVision
This is a widely used company for video content analysis that operates in an array of industries like business intelligence, building surveillance, and more. The products by other popular companies like Honeywell, Milestone, and more can be very well integrated with the products of AllGoVision. The flexibility of installation is also offered by the company.

09Gorilla Technology
The company is known for its high-end technology in the Internet of Things (IoT) and video intelligence. The IoT along with video analytic solutions are also offered by the company for better surveillance and management. The VA solutions offered by the company include API connections, object identification, real-time insights, and more. The real-time IVAR analytic platform has a single dashboard for business and operations.

10Aventura
The company is known for offering services in an array of fields including cameras, UTP, cognitive analytics, and more. There are several systems with which the company services can integrate and some of these include dispatch, access control, analytics, intrusion detection, and more. The services and the products by the company in the field of VA help in increasing the productivity as well as performance and customer care of the company. Moreover, the products can also be customized as per the requirements.

Part 2 Additional Part: Best tool for advanced video editing- Wondershare Filmora
With videos dominating the entire digital platform, the need for advanced video creation and editing tools have also increased. Among the myriad of options available, selecting one can be a difficult task. So, if you are looking for a program that is quick as well as simple to use, we recommend Wondershare Filmora Video Editor as the best option. This feature packed tool can create lively videos like a pro in no time.
For Win 7 or later (64-bit)
For macOS 10.12 or later
All the needed video creation and editing tools are supported by this Windows and Mac based software.
Key features of the software
● All-in-one video creation and editing software.
● Comes with wide range of advanced functions for facilitating hassle-free task.
● Customizable animation options with features like motion tracking, pan & zoom, ease-in, ease-out, and more.
● Support adding text, titles, masking, warping, and distorting.
● Auto correction, control settings, color wheels, and other advanced features supported.
● Support multiple audio-based functions like automatic sync, audio compression, audio noise reduction, and audio transitions.
● Windows and Mac support.
● Ending Thoughts →
● Video analytics services and products are a lot in use these days for improving efficiency, and productivity and for better management and surveillance.
● There are several popular companies with their products and services in the video analytics field.
● Depending on the services and the software required you can choose from these top companies.
How to Vlog? A Beginners’ Guide to Start Vlogging
Are you new to vlogging? Have you gone through the basics of starting a vlog? If not, don’t worry, as we have the best guide for you to start vlogging. Initially, you will get to know about what is a vlog, along with several tips that should be kept in mind while making a vlog video.
In this article
01 How to Start Vlogging for Beginners?
02 Inspirations and Tips for Vlog Video Ideas
Part 1: How to Start Vlogging for Beginners?
A proper guide can be considered while starting your vlog video channel. Although there are hundreds and thousands of vloggers across the social media platform, there is still room for more. As you think of an intuitive idea for vlogging, there are some steps you need to reconsider before going into this system.

1. Finding the Niche and Audience of Choice
Looking into the variety of niches that can be tried for vlog videos, the selection can never be easy. You need to be sure which genre you are looking forward to picking, which then develops a target audience that you would be addressing. Your content heavily depends on the type of target audience you pick for yourselves. Be very appropriate and original while you add yourselves in the vlog video.
Finding the appropriate niche and working across it while understanding the answer to what is a vlog is quite essential. This guides the complete future of your channel across this section.
2. Look And Inspire From Competition
The second most important thing to be done before starting vlogs on your channel is an overview of the competitive market. Understanding the current video creator market dynamics is the next direction that you need to consider for starting vlogging. Competition lets you understand the loopholes that exist in the current system. This is a highly effective way of discovering innovation within any market.
Get inspired from the competition that exists within the current vlogging market. Find what they do best and consider the strong points within yourself.
3. Creating a Brand
The next step to starting your personal vlogs is setting up a brand that would become a highlight of yours across the platforms. People need something unifying to follow a certain party or personality; the same is true with vlogging. As many vloggers describe their community as a family, they set up a complete brand across this narrative and present a great idea of inclusivity.
While you prepare for your vlog video, you need to specify the name logo and create art that would set up the complete vlog channel. These should be extremely attractive and alluring for the community to watch and learn.
4. Familiarize and Invest
You should be sure about what you need to do across the platform. While you design the video for your vlog channel, it is important to understand what needs to be done to become a professional in this sector. Familiarizing yourselves about the platform is one crucial thing that helps you understand the requirements to fulfill for a video.
Make sure that you work with good gear and equipment. Video quality is one significant point that is considered by viewers in this community. To make yourselves heard out, you need to invest across the gear appropriately.
Part 2: Inspirations and Tips for Vlog Video Ideas
While you dissect the answer to the question of “what is vlogging,” this part indicates all the essential points and tips that need to be considered for vlog video ideas. These tips shall help you set up a platform for yourself to inspire and direct people to your content.

1. Be Innovative in Your First Vlog
The first vlog is essential for many reasons. Where you let people know about yourselves, this can be a great start to your impressive journey in vlogging. The only thing that you need to do is innovate users into setting up their first vlog. This can be done through a good idea or targeting your introduction under a particular niche. Innovate your method of interacting with people, and this would attract every person you may have thought of.
2. Make Yourselves Personal
To interact in a better way, it is always considered best to be personal with your viewers. Share things that you find especially important for the viewers to know. Where you think you’ll inspire people with your idea, you need to highlight it properly. This can include your personal goals, gains, routine, and other details that highlight your personal life in and out of work. Providing facts about your personality can be the perfect choice for a vlog about to make a start.
3. Include a Comedy Touch
People love comedy! They die for looking content that can make them laugh and make their day good. Your vlog video should be a distributed combination of different niches and types that can be targeted across different points as per the requirement of the audience. You will always understand the point where you wish to add a particular style of interaction. Adding a comedy touch will make your viewers laugh, which is a win-win for your vlog channel.
4. Add in Information
The community does not always like content that does not teach something well to the viewers. If you keep yourselves stagnant to a single point, it will never bring you a breakthrough in your vlogging history. Informative videos are realized as interactive, which many viewers usually promote at times. The topic or concept that has been presented needs to be addressed perfectly in vlogs to cater to the requirements.
5. Provide Utility Services
Vlogs that are a combination of fun, information, and utility are considered the best. Showing viewers a clear picture of your lifestyle can be used to inspire most of them. This can be one of the best tips that would be put into practice for inspiring people. Your vlog journey should be expressive and offer priority, which can be done by showcasing the world through traveling or providing fitness goals.
Closing Words
Wish to start your vlog channel? After hearing every important information and criteria, are you ready to make your first vlog? This article has provided a distinctive understanding of making the first vlog video with effective tips and tricks. Along with that, whenever it comes to editing these vlogs, you can consider using Wondershare Filmora for this purpose.
Wondershare Filmora provides a complete editorial collection of tools that can be used ideally for enhancing the quality of the video. Filmora allows you to change the videos and audios under essential tools to design the best video. You can also employ effective techniques such as using effects and transitions.
Such elements can provoke the user to perform systematically while presenting a cognitive solution to video editing. Multiple things can be done across the platform while designing the first vlog. Look into the provided tips and tricks to avoid all kinds of errors.
Wondershare Filmora
Get started easily with Filmora’s powerful performance, intuitive interface, and countless effects!
Try It Free Try It Free Try It Free Learn More >

02 Inspirations and Tips for Vlog Video Ideas
Part 1: How to Start Vlogging for Beginners?
A proper guide can be considered while starting your vlog video channel. Although there are hundreds and thousands of vloggers across the social media platform, there is still room for more. As you think of an intuitive idea for vlogging, there are some steps you need to reconsider before going into this system.

1. Finding the Niche and Audience of Choice
Looking into the variety of niches that can be tried for vlog videos, the selection can never be easy. You need to be sure which genre you are looking forward to picking, which then develops a target audience that you would be addressing. Your content heavily depends on the type of target audience you pick for yourselves. Be very appropriate and original while you add yourselves in the vlog video.
Finding the appropriate niche and working across it while understanding the answer to what is a vlog is quite essential. This guides the complete future of your channel across this section.
2. Look And Inspire From Competition
The second most important thing to be done before starting vlogs on your channel is an overview of the competitive market. Understanding the current video creator market dynamics is the next direction that you need to consider for starting vlogging. Competition lets you understand the loopholes that exist in the current system. This is a highly effective way of discovering innovation within any market.
Get inspired from the competition that exists within the current vlogging market. Find what they do best and consider the strong points within yourself.
3. Creating a Brand
The next step to starting your personal vlogs is setting up a brand that would become a highlight of yours across the platforms. People need something unifying to follow a certain party or personality; the same is true with vlogging. As many vloggers describe their community as a family, they set up a complete brand across this narrative and present a great idea of inclusivity.
While you prepare for your vlog video, you need to specify the name logo and create art that would set up the complete vlog channel. These should be extremely attractive and alluring for the community to watch and learn.
4. Familiarize and Invest
You should be sure about what you need to do across the platform. While you design the video for your vlog channel, it is important to understand what needs to be done to become a professional in this sector. Familiarizing yourselves about the platform is one crucial thing that helps you understand the requirements to fulfill for a video.
Make sure that you work with good gear and equipment. Video quality is one significant point that is considered by viewers in this community. To make yourselves heard out, you need to invest across the gear appropriately.
Part 2: Inspirations and Tips for Vlog Video Ideas
While you dissect the answer to the question of “what is vlogging,” this part indicates all the essential points and tips that need to be considered for vlog video ideas. These tips shall help you set up a platform for yourself to inspire and direct people to your content.

1. Be Innovative in Your First Vlog
The first vlog is essential for many reasons. Where you let people know about yourselves, this can be a great start to your impressive journey in vlogging. The only thing that you need to do is innovate users into setting up their first vlog. This can be done through a good idea or targeting your introduction under a particular niche. Innovate your method of interacting with people, and this would attract every person you may have thought of.
2. Make Yourselves Personal
To interact in a better way, it is always considered best to be personal with your viewers. Share things that you find especially important for the viewers to know. Where you think you’ll inspire people with your idea, you need to highlight it properly. This can include your personal goals, gains, routine, and other details that highlight your personal life in and out of work. Providing facts about your personality can be the perfect choice for a vlog about to make a start.
3. Include a Comedy Touch
People love comedy! They die for looking content that can make them laugh and make their day good. Your vlog video should be a distributed combination of different niches and types that can be targeted across different points as per the requirement of the audience. You will always understand the point where you wish to add a particular style of interaction. Adding a comedy touch will make your viewers laugh, which is a win-win for your vlog channel.
4. Add in Information
The community does not always like content that does not teach something well to the viewers. If you keep yourselves stagnant to a single point, it will never bring you a breakthrough in your vlogging history. Informative videos are realized as interactive, which many viewers usually promote at times. The topic or concept that has been presented needs to be addressed perfectly in vlogs to cater to the requirements.
5. Provide Utility Services
Vlogs that are a combination of fun, information, and utility are considered the best. Showing viewers a clear picture of your lifestyle can be used to inspire most of them. This can be one of the best tips that would be put into practice for inspiring people. Your vlog journey should be expressive and offer priority, which can be done by showcasing the world through traveling or providing fitness goals.
Closing Words
Wish to start your vlog channel? After hearing every important information and criteria, are you ready to make your first vlog? This article has provided a distinctive understanding of making the first vlog video with effective tips and tricks. Along with that, whenever it comes to editing these vlogs, you can consider using Wondershare Filmora for this purpose.
Wondershare Filmora provides a complete editorial collection of tools that can be used ideally for enhancing the quality of the video. Filmora allows you to change the videos and audios under essential tools to design the best video. You can also employ effective techniques such as using effects and transitions.
Such elements can provoke the user to perform systematically while presenting a cognitive solution to video editing. Multiple things can be done across the platform while designing the first vlog. Look into the provided tips and tricks to avoid all kinds of errors.
Wondershare Filmora
Get started easily with Filmora’s powerful performance, intuitive interface, and countless effects!
Try It Free Try It Free Try It Free Learn More >

02 Inspirations and Tips for Vlog Video Ideas
Part 1: How to Start Vlogging for Beginners?
A proper guide can be considered while starting your vlog video channel. Although there are hundreds and thousands of vloggers across the social media platform, there is still room for more. As you think of an intuitive idea for vlogging, there are some steps you need to reconsider before going into this system.

1. Finding the Niche and Audience of Choice
Looking into the variety of niches that can be tried for vlog videos, the selection can never be easy. You need to be sure which genre you are looking forward to picking, which then develops a target audience that you would be addressing. Your content heavily depends on the type of target audience you pick for yourselves. Be very appropriate and original while you add yourselves in the vlog video.
Finding the appropriate niche and working across it while understanding the answer to what is a vlog is quite essential. This guides the complete future of your channel across this section.
2. Look And Inspire From Competition
The second most important thing to be done before starting vlogs on your channel is an overview of the competitive market. Understanding the current video creator market dynamics is the next direction that you need to consider for starting vlogging. Competition lets you understand the loopholes that exist in the current system. This is a highly effective way of discovering innovation within any market.
Get inspired from the competition that exists within the current vlogging market. Find what they do best and consider the strong points within yourself.
3. Creating a Brand
The next step to starting your personal vlogs is setting up a brand that would become a highlight of yours across the platforms. People need something unifying to follow a certain party or personality; the same is true with vlogging. As many vloggers describe their community as a family, they set up a complete brand across this narrative and present a great idea of inclusivity.
While you prepare for your vlog video, you need to specify the name logo and create art that would set up the complete vlog channel. These should be extremely attractive and alluring for the community to watch and learn.
4. Familiarize and Invest
You should be sure about what you need to do across the platform. While you design the video for your vlog channel, it is important to understand what needs to be done to become a professional in this sector. Familiarizing yourselves about the platform is one crucial thing that helps you understand the requirements to fulfill for a video.
Make sure that you work with good gear and equipment. Video quality is one significant point that is considered by viewers in this community. To make yourselves heard out, you need to invest across the gear appropriately.
Part 2: Inspirations and Tips for Vlog Video Ideas
While you dissect the answer to the question of “what is vlogging,” this part indicates all the essential points and tips that need to be considered for vlog video ideas. These tips shall help you set up a platform for yourself to inspire and direct people to your content.

1. Be Innovative in Your First Vlog
The first vlog is essential for many reasons. Where you let people know about yourselves, this can be a great start to your impressive journey in vlogging. The only thing that you need to do is innovate users into setting up their first vlog. This can be done through a good idea or targeting your introduction under a particular niche. Innovate your method of interacting with people, and this would attract every person you may have thought of.
2. Make Yourselves Personal
To interact in a better way, it is always considered best to be personal with your viewers. Share things that you find especially important for the viewers to know. Where you think you’ll inspire people with your idea, you need to highlight it properly. This can include your personal goals, gains, routine, and other details that highlight your personal life in and out of work. Providing facts about your personality can be the perfect choice for a vlog about to make a start.
3. Include a Comedy Touch
People love comedy! They die for looking content that can make them laugh and make their day good. Your vlog video should be a distributed combination of different niches and types that can be targeted across different points as per the requirement of the audience. You will always understand the point where you wish to add a particular style of interaction. Adding a comedy touch will make your viewers laugh, which is a win-win for your vlog channel.
4. Add in Information
The community does not always like content that does not teach something well to the viewers. If you keep yourselves stagnant to a single point, it will never bring you a breakthrough in your vlogging history. Informative videos are realized as interactive, which many viewers usually promote at times. The topic or concept that has been presented needs to be addressed perfectly in vlogs to cater to the requirements.
5. Provide Utility Services
Vlogs that are a combination of fun, information, and utility are considered the best. Showing viewers a clear picture of your lifestyle can be used to inspire most of them. This can be one of the best tips that would be put into practice for inspiring people. Your vlog journey should be expressive and offer priority, which can be done by showcasing the world through traveling or providing fitness goals.
Closing Words
Wish to start your vlog channel? After hearing every important information and criteria, are you ready to make your first vlog? This article has provided a distinctive understanding of making the first vlog video with effective tips and tricks. Along with that, whenever it comes to editing these vlogs, you can consider using Wondershare Filmora for this purpose.
Wondershare Filmora provides a complete editorial collection of tools that can be used ideally for enhancing the quality of the video. Filmora allows you to change the videos and audios under essential tools to design the best video. You can also employ effective techniques such as using effects and transitions.
Such elements can provoke the user to perform systematically while presenting a cognitive solution to video editing. Multiple things can be done across the platform while designing the first vlog. Look into the provided tips and tricks to avoid all kinds of errors.
Wondershare Filmora
Get started easily with Filmora’s powerful performance, intuitive interface, and countless effects!
Try It Free Try It Free Try It Free Learn More >

02 Inspirations and Tips for Vlog Video Ideas
Part 1: How to Start Vlogging for Beginners?
A proper guide can be considered while starting your vlog video channel. Although there are hundreds and thousands of vloggers across the social media platform, there is still room for more. As you think of an intuitive idea for vlogging, there are some steps you need to reconsider before going into this system.

1. Finding the Niche and Audience of Choice
Looking into the variety of niches that can be tried for vlog videos, the selection can never be easy. You need to be sure which genre you are looking forward to picking, which then develops a target audience that you would be addressing. Your content heavily depends on the type of target audience you pick for yourselves. Be very appropriate and original while you add yourselves in the vlog video.
Finding the appropriate niche and working across it while understanding the answer to what is a vlog is quite essential. This guides the complete future of your channel across this section.
2. Look And Inspire From Competition
The second most important thing to be done before starting vlogs on your channel is an overview of the competitive market. Understanding the current video creator market dynamics is the next direction that you need to consider for starting vlogging. Competition lets you understand the loopholes that exist in the current system. This is a highly effective way of discovering innovation within any market.
Get inspired from the competition that exists within the current vlogging market. Find what they do best and consider the strong points within yourself.
3. Creating a Brand
The next step to starting your personal vlogs is setting up a brand that would become a highlight of yours across the platforms. People need something unifying to follow a certain party or personality; the same is true with vlogging. As many vloggers describe their community as a family, they set up a complete brand across this narrative and present a great idea of inclusivity.
While you prepare for your vlog video, you need to specify the name logo and create art that would set up the complete vlog channel. These should be extremely attractive and alluring for the community to watch and learn.
4. Familiarize and Invest
You should be sure about what you need to do across the platform. While you design the video for your vlog channel, it is important to understand what needs to be done to become a professional in this sector. Familiarizing yourselves about the platform is one crucial thing that helps you understand the requirements to fulfill for a video.
Make sure that you work with good gear and equipment. Video quality is one significant point that is considered by viewers in this community. To make yourselves heard out, you need to invest across the gear appropriately.
Part 2: Inspirations and Tips for Vlog Video Ideas
While you dissect the answer to the question of “what is vlogging,” this part indicates all the essential points and tips that need to be considered for vlog video ideas. These tips shall help you set up a platform for yourself to inspire and direct people to your content.

1. Be Innovative in Your First Vlog
The first vlog is essential for many reasons. Where you let people know about yourselves, this can be a great start to your impressive journey in vlogging. The only thing that you need to do is innovate users into setting up their first vlog. This can be done through a good idea or targeting your introduction under a particular niche. Innovate your method of interacting with people, and this would attract every person you may have thought of.
2. Make Yourselves Personal
To interact in a better way, it is always considered best to be personal with your viewers. Share things that you find especially important for the viewers to know. Where you think you’ll inspire people with your idea, you need to highlight it properly. This can include your personal goals, gains, routine, and other details that highlight your personal life in and out of work. Providing facts about your personality can be the perfect choice for a vlog about to make a start.
3. Include a Comedy Touch
People love comedy! They die for looking content that can make them laugh and make their day good. Your vlog video should be a distributed combination of different niches and types that can be targeted across different points as per the requirement of the audience. You will always understand the point where you wish to add a particular style of interaction. Adding a comedy touch will make your viewers laugh, which is a win-win for your vlog channel.
4. Add in Information
The community does not always like content that does not teach something well to the viewers. If you keep yourselves stagnant to a single point, it will never bring you a breakthrough in your vlogging history. Informative videos are realized as interactive, which many viewers usually promote at times. The topic or concept that has been presented needs to be addressed perfectly in vlogs to cater to the requirements.
5. Provide Utility Services
Vlogs that are a combination of fun, information, and utility are considered the best. Showing viewers a clear picture of your lifestyle can be used to inspire most of them. This can be one of the best tips that would be put into practice for inspiring people. Your vlog journey should be expressive and offer priority, which can be done by showcasing the world through traveling or providing fitness goals.
Closing Words
Wish to start your vlog channel? After hearing every important information and criteria, are you ready to make your first vlog? This article has provided a distinctive understanding of making the first vlog video with effective tips and tricks. Along with that, whenever it comes to editing these vlogs, you can consider using Wondershare Filmora for this purpose.
Wondershare Filmora provides a complete editorial collection of tools that can be used ideally for enhancing the quality of the video. Filmora allows you to change the videos and audios under essential tools to design the best video. You can also employ effective techniques such as using effects and transitions.
Such elements can provoke the user to perform systematically while presenting a cognitive solution to video editing. Multiple things can be done across the platform while designing the first vlog. Look into the provided tips and tricks to avoid all kinds of errors.
Wondershare Filmora
Get started easily with Filmora’s powerful performance, intuitive interface, and countless effects!
Try It Free Try It Free Try It Free Learn More >

Also read:
- New Beginners Guide to Green Screen Keying for 2024
- Updated If You Do Not Know How to Blur Faces in a Video on iPhone, You Are in the Right Place. We Have Provided You with All the Details You Need to Learn How to Blur Part of Your Video on Your iOS Device for 2024
- How to Make Loop Video in PowerPoint
- New 2024 Approved Do You Want to Add a Motion Blur Effect in Valorant? Read This Guide to Find Out How to Create a Motion Blur Effect in Valorant without Any Hassle
- Updated 2024 Approved What Is MKV Format and How To Play MKV Video?
- Updated Color Lut Is an Easy and Powerful Tool to Make Your Video Stands Out From the Crowd. Check This Article to Learn the Details About Color Lut for 2024
- Updated 2024 Approved Best 8 Srt File Creators
- New 2024 Approved How to Change Aspect Ratio of Video?
- In 2024, Adding a Spooky Shadow Effect with Filmora
- In 2024, Guide To Using Free Luts for OBS
- Updated How to Color Grading in Final Cut Pro
- Updated Making a Countdown Timer Video Like a Pro Isnt a Problem Anymore. Follow the Steps Mentioned in This Guide and Create an Impressive Countdown Timer for Your Videos
- 2024 Approved Funny Content Ideas for YouTube Videos
- Are You Looking for Dark LUTs Premiere Pro Free? This Article Discusses the Dark Moody LUTs with Top Recommendations for Beginning Visual Editing
- Updated 2024 Approved Want to Create a Stunning Intro Video on Your Smartphone? Legend Intro Maker Is a Popular Choice. Learn the Steps to Design Intro Video Legend Intro Maker
- Top 22 Free Video Editing Software
- New Learn About Splice Video Online and Its Advantages. Also, Check Out the Best Online Apps for Splice Editing for 2024
- Something That You Should Know About MP4 Video Format for 2024
- Updated In 2024, Do You Want to Know How to Add LUTs to Premiere Pro? In This Guide, You Will Find Details and Easy Steps to Proceed with Using LUTs in Premiere Pro
- Updated 2024 Approved How to Rotate Video in iMovie with Alternative
- New 2024 Approved How to Create Discord Logo GIF
- Updated 2024 Approved Easy Ways to Edit Recorded Video
- How to Concatenate Videos Using FFmpeg for 2024
- How to Add Adjustment Layer (Clip) in DaVinci Resolve for 2024
- In 2024, End Screen Makers
- How to Make a Slideshow GIF for 2024
- Updated How to Make a PowerPoint Looping Slideshow
- 2024 Approved Do You Wish to Make Your Discord PFP an Attention-Seeker? If Yes, Try the Animated Discord PFP. Lets Go over Essential Facts on the Topic, Including How to Get an Animated Discord PFP
- Updated How to Make Vintage Film Effect 1980S
- Bypassing Google Account With vnROM Bypass For Xiaomi Redmi Note 13 5G
- Bypassing Google Account With vnROM Bypass For OnePlus Nord N30 SE
- In 2024, CatchEmAll Celebrate National Pokémon Day with Virtual Location On Lava Blaze 2 5G | Dr.fone
- How to Downgrade Apple iPhone SE without Losing Anything? | Dr.fone
- Honor 90 Lite ADB Format Tool for PC vs. Other Unlocking Tools Which One is the Best?
- Unlock android phone if you don't have Honor 100 Pro fingerprint
- Can I recover permanently deleted photos from V29
- In 2024, Rootjunky APK To Bypass Google FRP Lock For Samsung Galaxy F14 5G
- How to get back lost photos from Moto G24.
- Life360 Learn How Everything Works On Nokia G310 | Dr.fone
- 3 Things You Must Know about Fake Snapchat Location On Realme C53 | Dr.fone
- In 2024, How to Bypass iCloud Lock from Apple iPhone SE (2022)
- How to Factory Reset Realme Narzo N53 without Losing Data | Dr.fone
- In 2024, Complete Tutorial to Use GPS Joystick to Fake GPS Location On Tecno Spark 20C | Dr.fone
- A Detailed Guide on Faking Your Location in Mozilla Firefox On Nokia C02 | Dr.fone
- Thinking About Changing Your Netflix Region Without a VPN On Apple iPhone 14 Pro Max? | Dr.fone
- Full Guide to Fix iToolab AnyGO Not Working On Motorola Moto G23 | Dr.fone
- Easily Unlock Your Honor 100 Pro Device SIM
- Overview of the Best Oppo A1x 5G Screen Mirroring App | Dr.fone
- Top 15 Apps To Hack WiFi Password On Samsung Galaxy S23 FE
- How to Make the Most of Your Apple iPhone 13 Pro Lock Screen with Notifications?
- In 2024, Is Fake GPS Location Spoofer a Good Choice On Itel A60? | Dr.fone
- OnePlus 12 Not Receiving Texts? 10 Hassle-Free Solutions Here | Dr.fone
- In 2024, Is GSM Flasher ADB Legit? Full Review To Bypass Your Vivo Y56 5GFRP Lock
- Title: Updated How to Make Text Reveal Effect Easily for 2024
- Author: Morgan
- Created at : 2024-04-24 01:02:49
- Updated at : 2024-04-25 01:02:49
- Link: https://ai-video-editing.techidaily.com/updated-how-to-make-text-reveal-effect-easily-for-2024/
- License: This work is licensed under CC BY-NC-SA 4.0.

