:max_bytes(150000):strip_icc():format(webp)/GettyImages-585151372-a659baf0c7b441b9b7e7896716b12784.jpg)
Updated How to Make Vintage Film Effect 1950S

How to Make Vintage Film Effect 1950S
So, what’s the difference between a vintage film shot in the 1920s and 1950s? It’s simple; in the 1950s, video-making technologies were slightly advanced, although films were more about rock and roll and poodle skirts. So, without further dilly-dallying, let’s learn how to create a retro 1950-style video with this simple Filmora tutorial.
Preparation

Shooting a video to teleport yourself to the 1950s doesn’t need to be complicated. You simply need to look the part in the video. For example, you can wear velvet-collar jackets, stovepipe trousers, carefully combed back hair, and other trendy styles in the 50s. It’s even better if you can find those vintage chairs in your grandparent’s collection.
How to create a 1950s vintage film:
Step 1 Add your video on Filmora
Free Download For Win 7 or later(64-bit)
Free Download For macOS 10.14 or later
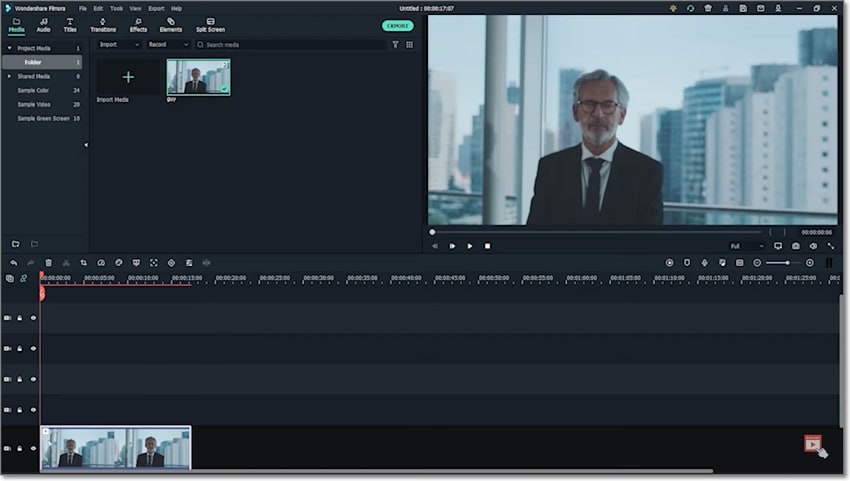
First, fire up Filmora and load the video you want to send back to the 1950s. Then, drag your footage onto the editing timeline.
Step 2 Apply a cropping effect to the video
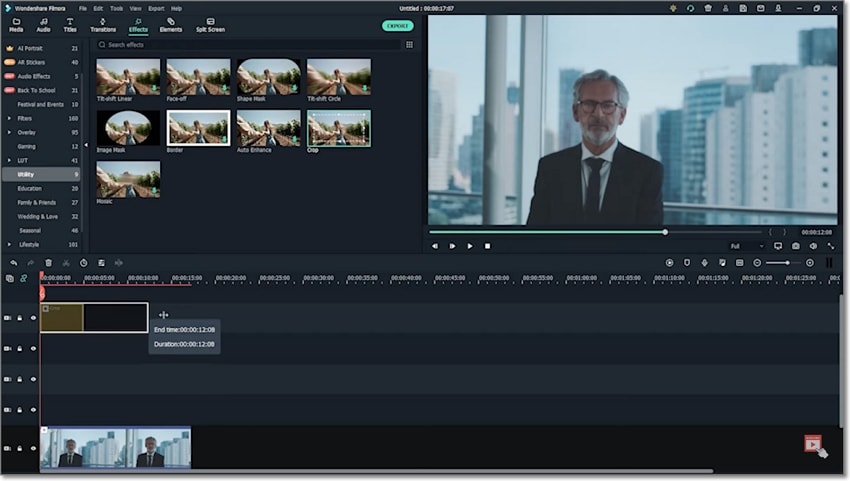
Once the video is successfully added to Filmora, click the Effect tab on the top menu bar and choose the Crop effect under the Utility folder. Make sure you add the Crop effect two or three tracks above the original video track.
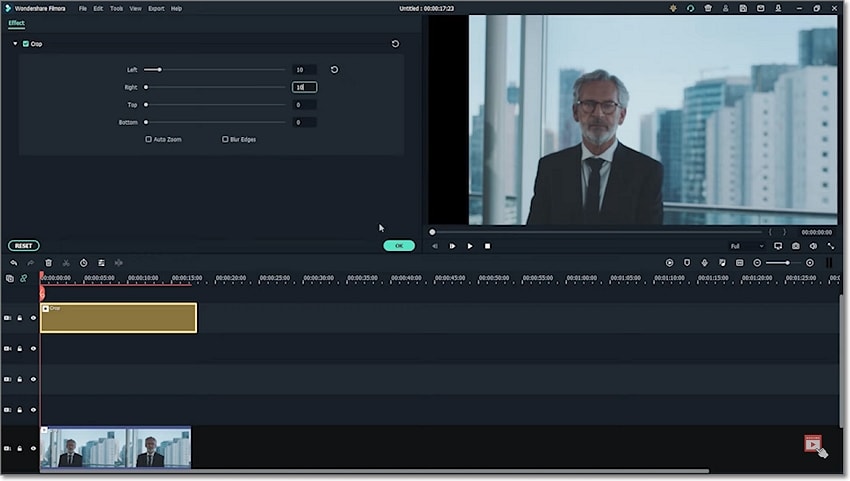
Double-click the Crop effect, then change the Left and Right values to make the video look like it was shot in the 50s. You can set the values as 10.
Step 3 Add a Warm Film color effect
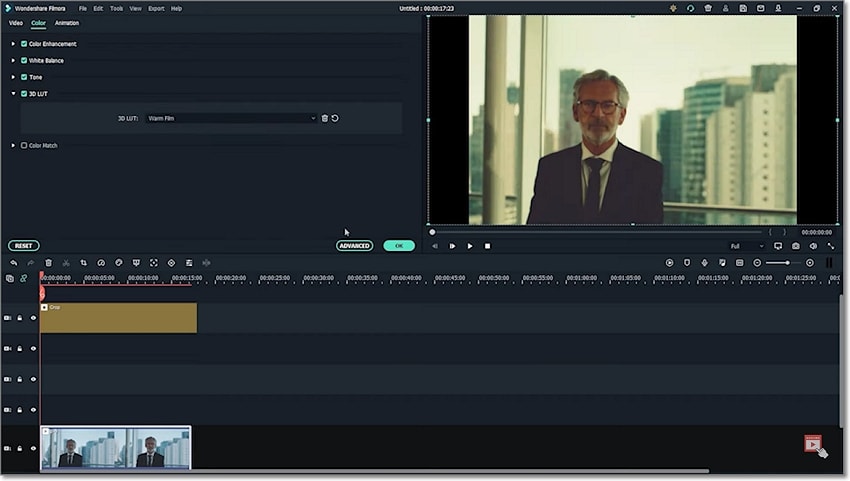
Up to here, you’ll realize that your video doesn’t still look like a 1950s film per se. Double-click your video clip and choose the 3D LUT option under the Color category. Then, open the drop-down menu and choose Warm Film. This will make your video look like it was shot using an old camera.
Step 4 Apply more graininess to the film
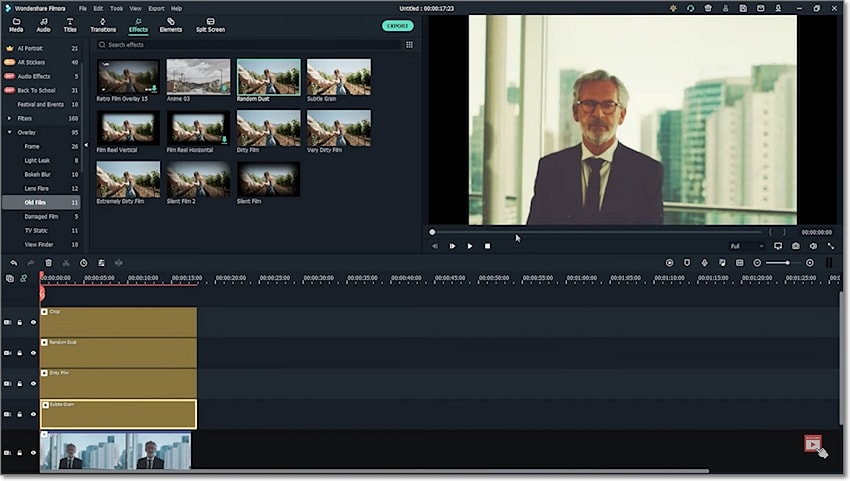
Please don’t stop there; we want to make the footage slightly grainy. In other words, you need to make the footage have a lot of grain and low light. To do that, tap the Overlay menu under the Effects tab, then click Old Film. After that, choose the Random Dust, Dirty Film, and Subtle Grain effects and add them to the tracks above your video clip. Remember to use as much grain as possible to give your footage that vintage look of the 1950s.
Summary
And that’s all there is today! With these steps, you can create an engaging 1950s film without breaking a sweat on Filmora. Remember to visit our other vintage tutorials to learn how to create a film recorded in the 20s, 80s, and 90s. Happy editing, everyone!
Free Download For macOS 10.14 or later

First, fire up Filmora and load the video you want to send back to the 1950s. Then, drag your footage onto the editing timeline.
Step 2 Apply a cropping effect to the video

Once the video is successfully added to Filmora, click the Effect tab on the top menu bar and choose the Crop effect under the Utility folder. Make sure you add the Crop effect two or three tracks above the original video track.

Double-click the Crop effect, then change the Left and Right values to make the video look like it was shot in the 50s. You can set the values as 10.
Step 3 Add a Warm Film color effect

Up to here, you’ll realize that your video doesn’t still look like a 1950s film per se. Double-click your video clip and choose the 3D LUT option under the Color category. Then, open the drop-down menu and choose Warm Film. This will make your video look like it was shot using an old camera.
Step 4 Apply more graininess to the film

Please don’t stop there; we want to make the footage slightly grainy. In other words, you need to make the footage have a lot of grain and low light. To do that, tap the Overlay menu under the Effects tab, then click Old Film. After that, choose the Random Dust, Dirty Film, and Subtle Grain effects and add them to the tracks above your video clip. Remember to use as much grain as possible to give your footage that vintage look of the 1950s.
Summary
And that’s all there is today! With these steps, you can create an engaging 1950s film without breaking a sweat on Filmora. Remember to visit our other vintage tutorials to learn how to create a film recorded in the 20s, 80s, and 90s. Happy editing, everyone!
Free Download For macOS 10.14 or later

First, fire up Filmora and load the video you want to send back to the 1950s. Then, drag your footage onto the editing timeline.
Step 2 Apply a cropping effect to the video

Once the video is successfully added to Filmora, click the Effect tab on the top menu bar and choose the Crop effect under the Utility folder. Make sure you add the Crop effect two or three tracks above the original video track.

Double-click the Crop effect, then change the Left and Right values to make the video look like it was shot in the 50s. You can set the values as 10.
Step 3 Add a Warm Film color effect

Up to here, you’ll realize that your video doesn’t still look like a 1950s film per se. Double-click your video clip and choose the 3D LUT option under the Color category. Then, open the drop-down menu and choose Warm Film. This will make your video look like it was shot using an old camera.
Step 4 Apply more graininess to the film

Please don’t stop there; we want to make the footage slightly grainy. In other words, you need to make the footage have a lot of grain and low light. To do that, tap the Overlay menu under the Effects tab, then click Old Film. After that, choose the Random Dust, Dirty Film, and Subtle Grain effects and add them to the tracks above your video clip. Remember to use as much grain as possible to give your footage that vintage look of the 1950s.
Summary
And that’s all there is today! With these steps, you can create an engaging 1950s film without breaking a sweat on Filmora. Remember to visit our other vintage tutorials to learn how to create a film recorded in the 20s, 80s, and 90s. Happy editing, everyone!
Free Download For macOS 10.14 or later

First, fire up Filmora and load the video you want to send back to the 1950s. Then, drag your footage onto the editing timeline.
Step 2 Apply a cropping effect to the video

Once the video is successfully added to Filmora, click the Effect tab on the top menu bar and choose the Crop effect under the Utility folder. Make sure you add the Crop effect two or three tracks above the original video track.

Double-click the Crop effect, then change the Left and Right values to make the video look like it was shot in the 50s. You can set the values as 10.
Step 3 Add a Warm Film color effect

Up to here, you’ll realize that your video doesn’t still look like a 1950s film per se. Double-click your video clip and choose the 3D LUT option under the Color category. Then, open the drop-down menu and choose Warm Film. This will make your video look like it was shot using an old camera.
Step 4 Apply more graininess to the film

Please don’t stop there; we want to make the footage slightly grainy. In other words, you need to make the footage have a lot of grain and low light. To do that, tap the Overlay menu under the Effects tab, then click Old Film. After that, choose the Random Dust, Dirty Film, and Subtle Grain effects and add them to the tracks above your video clip. Remember to use as much grain as possible to give your footage that vintage look of the 1950s.
Summary
And that’s all there is today! With these steps, you can create an engaging 1950s film without breaking a sweat on Filmora. Remember to visit our other vintage tutorials to learn how to create a film recorded in the 20s, 80s, and 90s. Happy editing, everyone!
Are You Looking to Create some Impressive Slow-Motion Video Content? Get This Done with some Impressive Android Slow Motion Video Apps
Creating slow-motion videos has been a trend followed by millions across social platforms. For designing the perfect video as a slow-motion video, people seek a good option. Android slow motion video apps are one remedy to this requirement. Google Play Store offers a diversity of applications for making video slow motion Android.
This article is all about figuring out the top Android applications that can feature the best slow motion. For that, go through the content provided to find out the most suitable slow motion video in Android.
Slow Motion Video Maker Slow your video’s speed with better control of your keyframes to create unique cinematic effects!
Make A Slow Motion Video Make A Slow Motion Video More Features

Part 1. Top 10 Android Apps For Slowing Down Motion in Video
When searching for a slow motion video app for Android, there are many options to go by. Provided next is a composite list of mobile apps that serve the purpose of slow-motion video creation:
- Slow Motion Video – Fast&Slow Mo
- Slow Motion Video Maker
- Video Editor & Maker – InShot
- Video Maker & Editor - Vidma
- VivaVideo - Video Editor&Maker
- VivaVideo - Video Editor&Maker
- VivaVideo - Video Editor&Maker
- VivaVideo - Video Editor&Maker
- VivaVideo - Video Editor&Maker
- VivaVideo - Video Editor&Maker
1. Slow Motion Video – Fast&Slow Mo
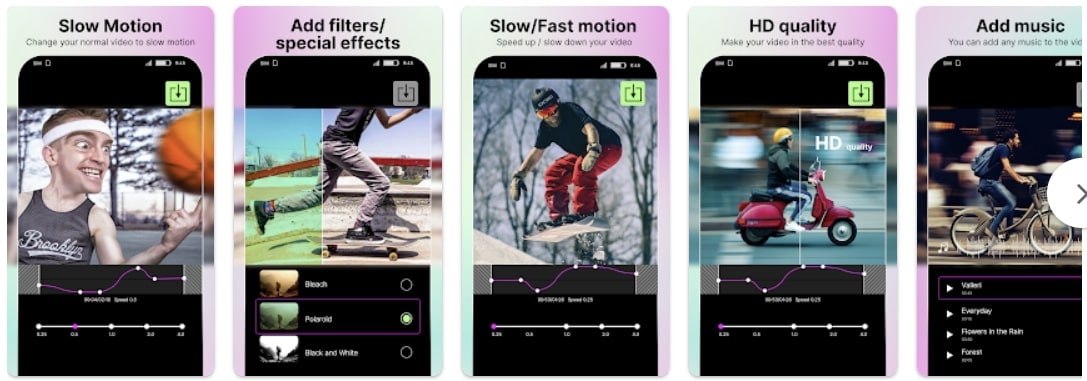
This Android slow-motion video converter offers an intuitive user interface and simple functions. Users can craft slow motion via drag and adjust the action of the slider in a downward direction. The video’s playback speed is customizable, ranging from 0.25x to 4.0x. Additionally, the software empowers users to apply slow motion to specific video segments to enhance precision.
Key Features
- The application offers pre-installed filters and special effects to elevate visual aesthetics.
- It preserves video quality and transforms video resolution to high definition (HD).
- Incorporate high-quality music into your videos with its built-in music collection.
2. Slow Motion Video Maker
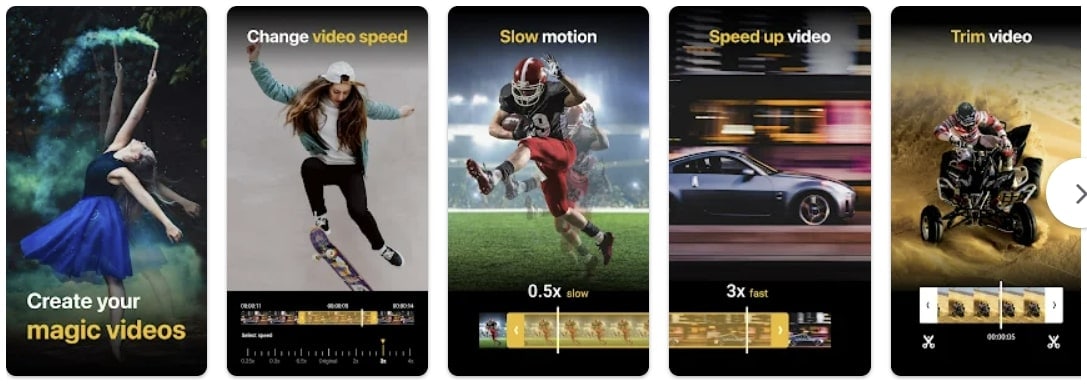
This slow-mo video Android editor offers advanced functionalities to craft perfect videos. With its timeline editing interface, it simplifies the application of slow-motion effects to specific scenes. The application showcases three distinct slow-motion speed options: 0.5x, 0.3x, and 0.25x, ensuring perfection.
Key Features
- Accelerate your videos up to 4x with its high-speed options and get high-quality results.
- The video trimming feature and timeline editing enable accurate segmentation of a video.
- It is equipped with pre-existing music tracks to create the perfect slow-motion video on Android.
3. Video Editor & Maker - InShot
Embark upon the journey to create video slow motion Android with this multifunctional app. It extends a straightforward approach to slow video speed through slider manipulation. Timeline editing and selective playhead options empower users to adjust the speed of specific segments. This exceeds the conventional approach of a slo-mo creation, unlocking creative possibilities.

Key Features
- Elevate the artistic expression of videos by integrating a wide range of animations and text.
- Enhance your reels with a collection of transition effects like Fade in, Fade out, basics, and more.
- This editor has AI capabilities and background removal options with a heightened level of accuracy.
4. Video Maker & Editor - Vidma
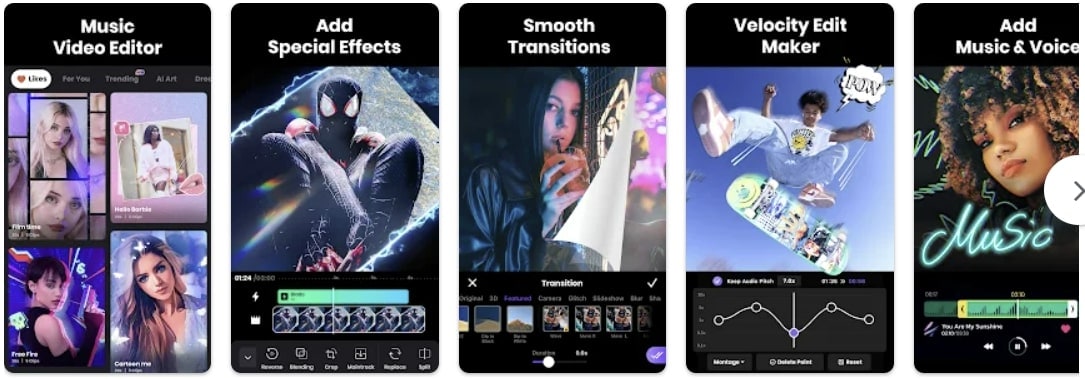
This slow-mo app for Android facilitates individuals seeking a video editor capable of producing convincing results. It acts as a Velocity Edit Maker, offering diverse playback speed and positioning controls. The interface resembles a velocity graph, providing a visual representation of speed adjustments.
Key Features
- Introduces an automated “Keep Audio Pitch” option, ensuring high-quality audio.
- Enhance the creative factor in your images and videos with its built-in text and stickers.
- Comes with a variety of visual filters with an intensity control option.
5. VivaVideo - Video Editor&Maker
If you are seeking the best Slomo app for Android, this editor provides diverse speed-setting presets for creating slow-motion and fast-motion effects. Among presets such as Montage, Hero, Bullet, and others, it offers a Custom preset option to help you adjust everything accordingly. With its ability to apply speed settings at specific periods, your slow motions are bound to be perfect.
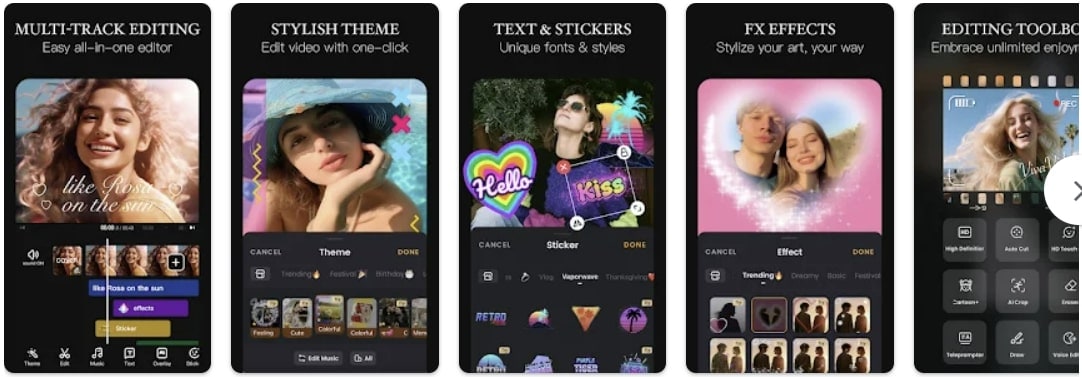
Key Features
- The non-uniform timeline editor allows you to incorporate multiple assets at once.
- A range of texts, animations, themes, effects, and music tracks are in its Stock Library.
- This video maker also incorporates a Voice Editor to uphold the audio track’s quality.
6. Smart Video Crop - Video Cut
Although this video maker is specified for resizing videos, it also offers speed change options. To make a video slow motion on Android, you can change both playback speed and framerate. Once you have edited your video, you can make changes to the export options. In addition, the application updates its mechanism and shows compatibility with Android 4.4 and higher versions.

Key Features
- The application shows multi-format video support, i.e., MP4, 3GP, and AVI.
- Proposes multiple video crop options like 1:1, 4:3, 16:9, and 3:2.
- You can select to crop the whole video or apply the crop to a specific part of it.
7. Video Editor - Video.Guru
What would be better than a slow-motion video app for Android that can change speed and enhance video? To access this functionality, users need to switch to its PRO version. The speed change options that it offers are from 0.2x to 100x, with 0.2x being the slowest. In addition, the tool doesn’t decline video quality but enhances it to 4K.
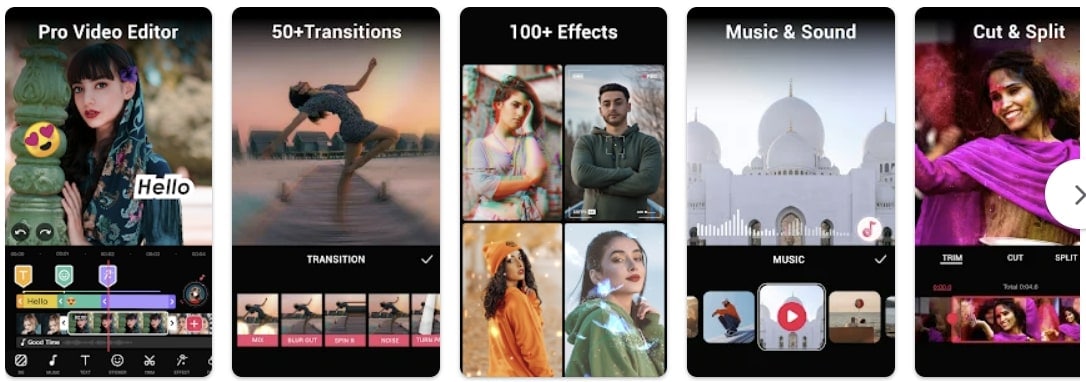
Key Features
- If you are a YouTuber, then this editor affects and filters for Vloggers and offers to remove Watermark.
- You can crop a video into available ratios while keeping its HD quality.
- Can add 30+ video transition effects and incorporate music to enhance their quality.
8. Slow Motion - Slow Mo, Fast Mo
Make video slow motion Android effortlessly with this application, which is specified for speed change. It offers 10 playback speed options for creating slow motions with precision. The playback speed ranges from 0.95x to 0.1x. Once you have created a slow motion with it, you can easily preview it to observe if any changes are needed.
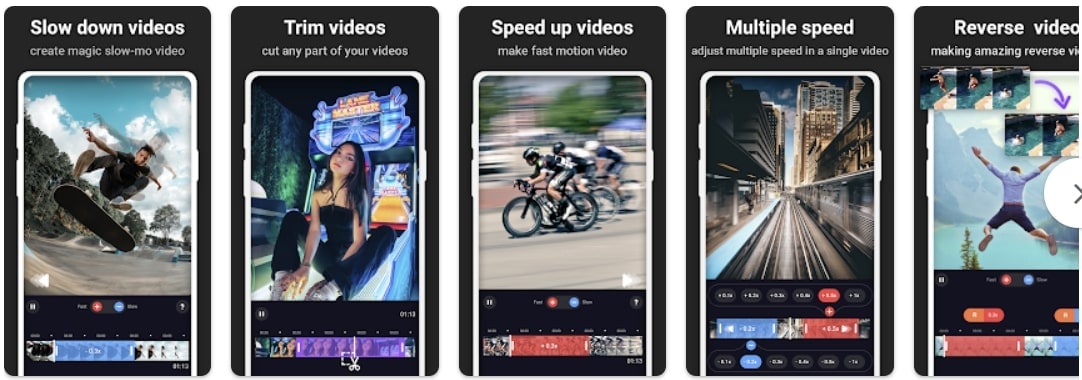
Key Features
- Along with precise slo-mo options, it also offers extensive fast motion option speed ranges.
- You can mix and match both fast and slow-motion effects in a video at once.
- It also offers a watermark removal option to avoid any visual weakening.
9. Slow Motion Video FX-camera
Not only video frame rates but also slow down your speech with this slow-motion app for Android. You can add dramatic or funny effects to your voices using the application. It offers to slow down video speed up to 0.25x. It uses the standard slider approach to manipulate the playback speed of your videos. You can apply the slow-mo effect to the overall video or to some specific parts of it.
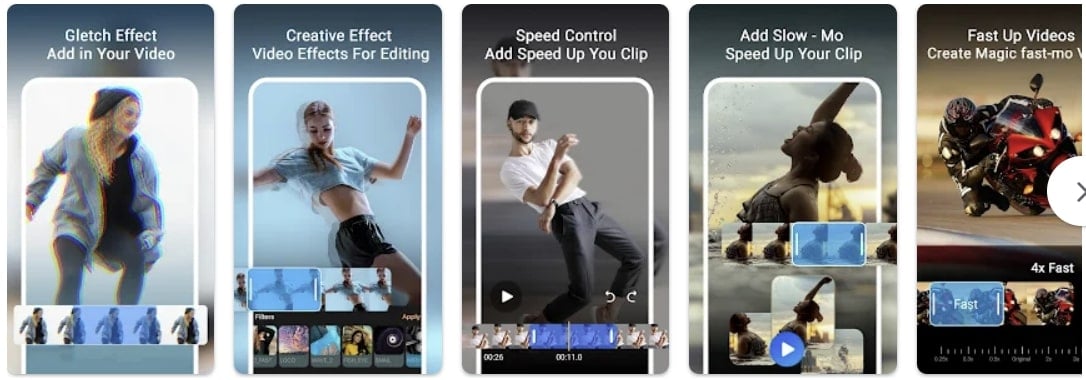
Key Features
- An intuitive user interface with a velocity graph to observe the changes in speed and duration.
- Transform your low-quality videos to HD quality with this slow-motion app for Android.
- Use the application’s built-in music library to incorporate music tracks.
10. Slow Motion
Decrease your video speed up to 1/4th of its original speed with this Android slow-motion video editor. The speed options are customizable, and you can apply them to multiple video scenes. As the name indicates, the tool is specifically fashioned for slow-motion effects; hence, it offers an accessible user interface.

Key Features
- Export your videos in landscape or portrait mode; the choice is yours.
- In any mode, the application retains video quality and exports it in full resolution.
- It is excellent to slow down YouTube videos as there is no watermark addition.
Bonus Part: Wondershare Filmora: A Perfect Desktop Solution To Slow Down Video
Making slow motion videos in Android is like keeping creativity in your hand anywhere. This facility is good for basic effects but not for professional and advanced slow-motion effects. That’s where you need to shift to a more equipped alternative, which is Wondershare Filmora . Using Filmora means turning imagination into the real picture.
It is a video editing platform with artificial intelligence integration. You can create slow-motion videos with automation in Filmora. The interactive interface of Filmora caters to all users’ needs in simple steps. Freelancers, content creators, and educationists use this platform for diverse needs.
Free Download For Win 7 or later(64-bit)
Free Download For macOS 10.14 or later
How to Make Video Slow Motion Android in Filmora
As you are familiar with Filmora, let’s make a slow-motion video. It is quite easy if compared with Android slow-motion video making. Without further delay, delve into the given step-by-step guide:
Step 1Import Your Project After Successful Launch
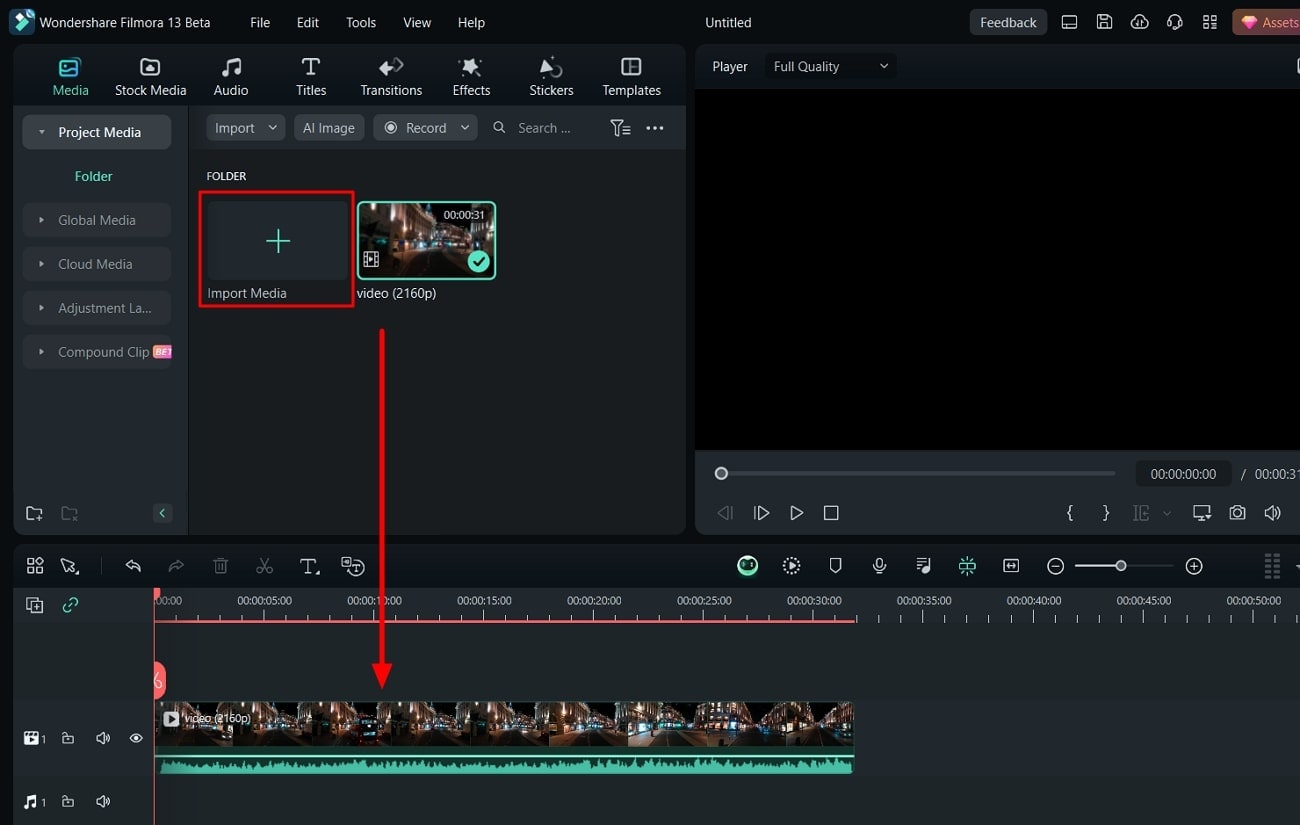
Unleash your creativity in Filmora after downloading it. In this regard, you must go to Wondershare Filmora’s official site. Open the main interface of Filmora and tap “New Project” to enter the editing window. To start working, import a file in the media panel and drag it into the timeline section.
Step 2Slow Down the Video with Uniform Speed
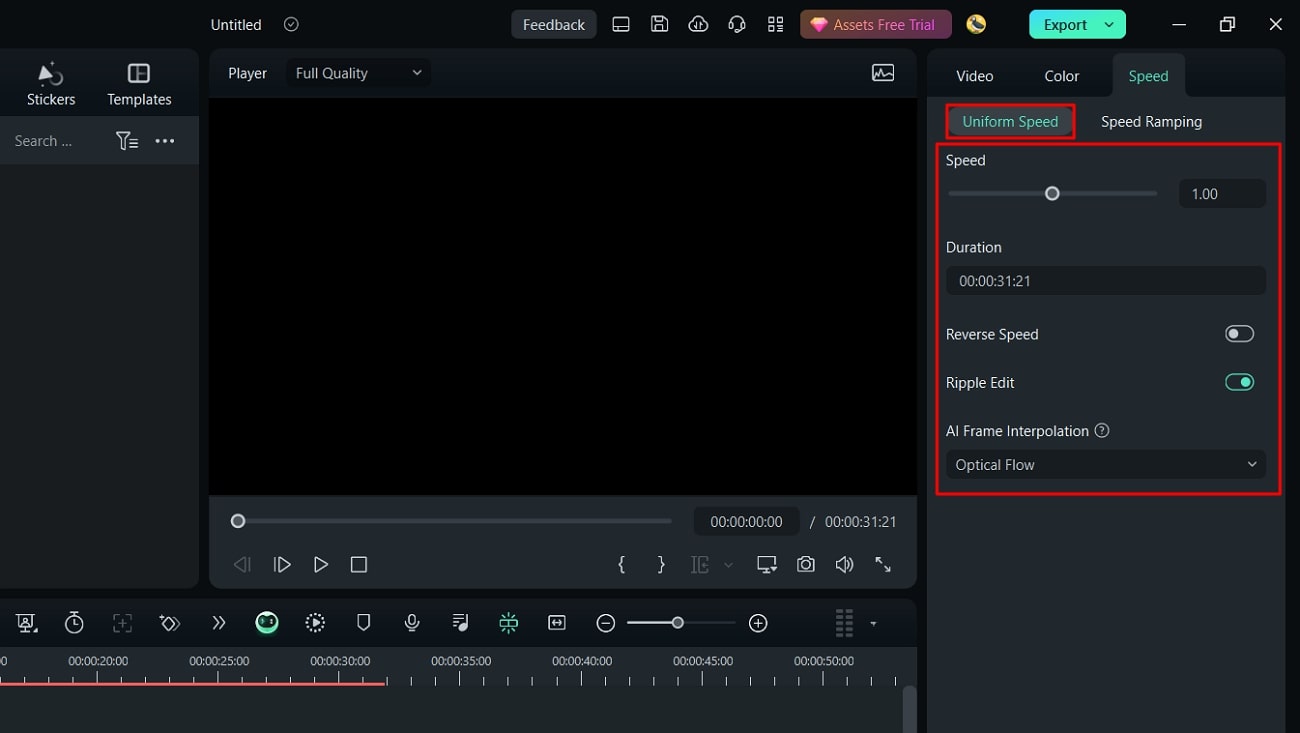
After successful importing, right-click on your video and an extended list. Choose the “Uniform Speed” option from the list and find an editing panel towards your right. You will see the slider under the speed option. Hold on to the circle and drag it to the left if you want to slow down the videos. Move downward and toggle the “Ripple Edit” and “Maintain Pitch” for good results.
Step 3Enhance Video with Optical Flow
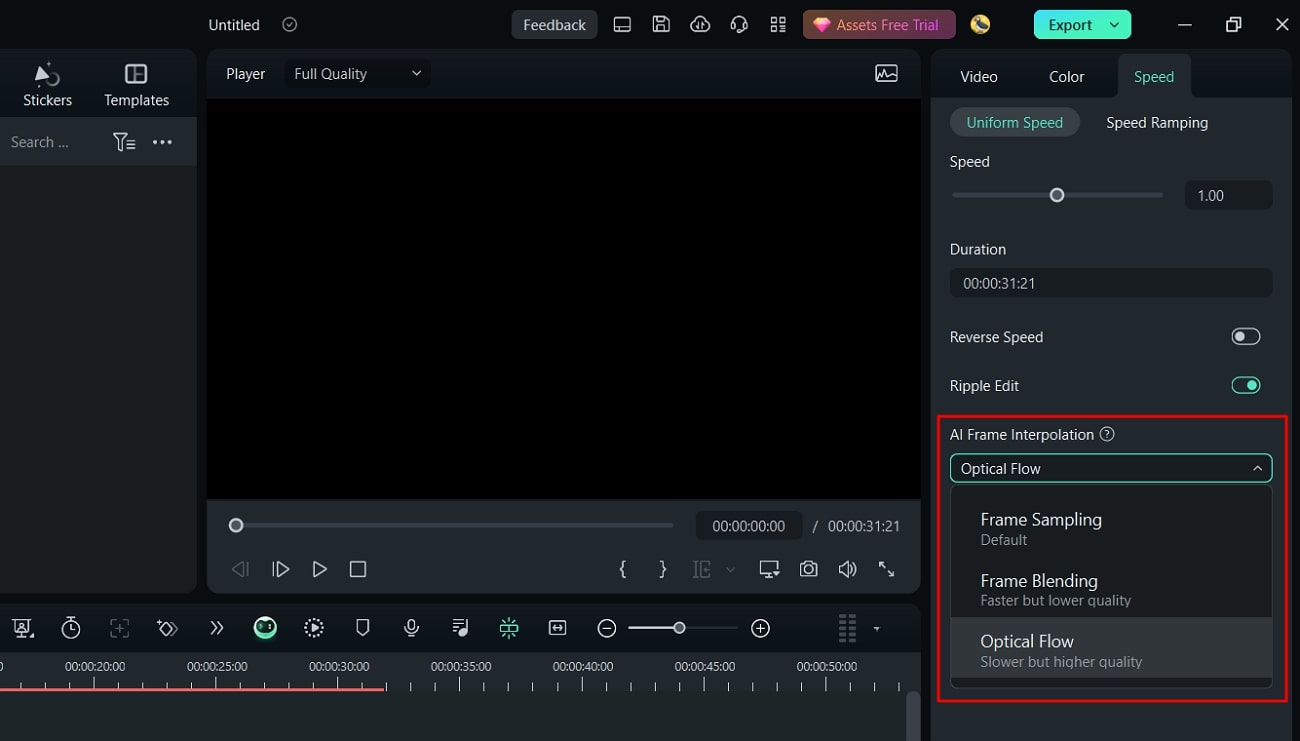
Towards the end, you will find the “AI Frame Interpolation.” Click on its downward symbol and select the “Optical Flow” option from the list. It will automatically boost your video quality. You can choose the “Reverse Speed” option if your video is required.
Step 4End Editing and Move to Export
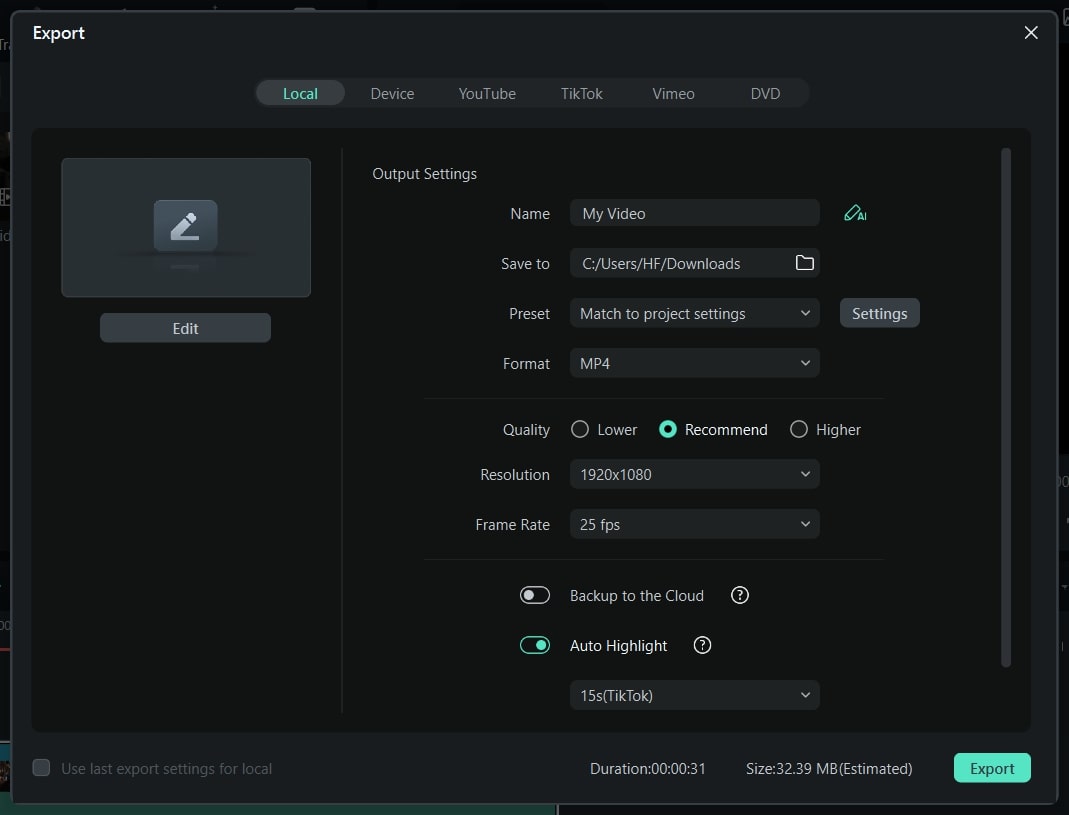
Now, it’s up to you if you want to continue editing with Filmora or want to export the media. To end editing, you can hit the “Export” button from the top right.
Remarkable Key Functionalities of Filmora
If you want to understand the amazing features of Filmora better, this section is for you. Keep reading and find some integral functionalities of Filmora. This platform offers more than just creating slow-motion video Android:
1. AI Smart Cutout
Artificial intelligence in Filmora can amazingly assist you in making flawless videos. Unlike other tools, Filmora allows you to remove unwanted objects, people, and icons from videos. Besides, users can refine their cutout frame by frame using its’ advanced editing options. You can preview the modified media in four ways, such as Transparency grid and Alpha Mode.
2. AI Audio Stretch
This AI-based feature is new to the market and saves hours of rippling and cutting audio. It aims to match the length of your audio with videos. From Vlog videos to blockbuster audio effects, you can use this feature almost everywhere. This option allows you to re-time your audio tracks after detecting vocals in the music.
3. Speech-to-Text
Video captions make the content accessible to international viewers. That’s where Filmora proves vital in removing language barriers. It supports over 26 languages and adds subtitles to your videos with one click. This built-in feature in Filmora recognizes speech swiftly to guarantee accuracy. You can also export your SRT file of subtitles to make any edits.
4. AI Portrait
Beautify faces in your videos to set a new trend on social media with Filmora. To do so, an AI Portrait feature can automatically detect faces to apply changes. You can choose a sticker effect from more than 70 AI portrait AR stickers. Besides, it can remove video backgrounds by retaining the human beings there.
Conclusion
With all marked details, this article concludes with a note that there are always different calibers of tools that we can work with. While discovering the best Android application in the market, you got to know many slow motion videos on Android. Along with that, we also discussed DemoCreator as a comprehensive solution to the entire use of mobile apps.
Make A Slow Motion Video Make A Slow Motion Video More Features

Part 1. Top 10 Android Apps For Slowing Down Motion in Video
When searching for a slow motion video app for Android, there are many options to go by. Provided next is a composite list of mobile apps that serve the purpose of slow-motion video creation:
- Slow Motion Video – Fast&Slow Mo
- Slow Motion Video Maker
- Video Editor & Maker – InShot
- Video Maker & Editor - Vidma
- VivaVideo - Video Editor&Maker
- VivaVideo - Video Editor&Maker
- VivaVideo - Video Editor&Maker
- VivaVideo - Video Editor&Maker
- VivaVideo - Video Editor&Maker
- VivaVideo - Video Editor&Maker
1. Slow Motion Video – Fast&Slow Mo
This Android slow-motion video converter offers an intuitive user interface and simple functions. Users can craft slow motion via drag and adjust the action of the slider in a downward direction. The video’s playback speed is customizable, ranging from 0.25x to 4.0x. Additionally, the software empowers users to apply slow motion to specific video segments to enhance precision.

Key Features
- The application offers pre-installed filters and special effects to elevate visual aesthetics.
- It preserves video quality and transforms video resolution to high definition (HD).
- Incorporate high-quality music into your videos with its built-in music collection.
2. Slow Motion Video Maker
This slow-mo video Android editor offers advanced functionalities to craft perfect videos. With its timeline editing interface, it simplifies the application of slow-motion effects to specific scenes. The application showcases three distinct slow-motion speed options: 0.5x, 0.3x, and 0.25x, ensuring perfection.

Key Features
- Accelerate your videos up to 4x with its high-speed options and get high-quality results.
- The video trimming feature and timeline editing enable accurate segmentation of a video.
- It is equipped with pre-existing music tracks to create the perfect slow-motion video on Android.
3. Video Editor & Maker - InShot
Embark upon the journey to create video slow motion Android with this multifunctional app. It extends a straightforward approach to slow video speed through slider manipulation. Timeline editing and selective playhead options empower users to adjust the speed of specific segments. This exceeds the conventional approach of a slo-mo creation, unlocking creative possibilities.

Key Features
- Elevate the artistic expression of videos by integrating a wide range of animations and text.
- Enhance your reels with a collection of transition effects like Fade in, Fade out, basics, and more.
- This editor has AI capabilities and background removal options with a heightened level of accuracy.
4. Video Maker & Editor - Vidma
This slow-mo app for Android facilitates individuals seeking a video editor capable of producing convincing results. It acts as a Velocity Edit Maker, offering diverse playback speed and positioning controls. The interface resembles a velocity graph, providing a visual representation of speed adjustments.

Key Features
- Introduces an automated “Keep Audio Pitch” option, ensuring high-quality audio.
- Enhance the creative factor in your images and videos with its built-in text and stickers.
- Comes with a variety of visual filters with an intensity control option.
5. VivaVideo - Video Editor&Maker
If you are seeking the best Slomo app for Android, this editor provides diverse speed-setting presets for creating slow-motion and fast-motion effects. Among presets such as Montage, Hero, Bullet, and others, it offers a Custom preset option to help you adjust everything accordingly. With its ability to apply speed settings at specific periods, your slow motions are bound to be perfect.

Key Features
- The non-uniform timeline editor allows you to incorporate multiple assets at once.
- A range of texts, animations, themes, effects, and music tracks are in its Stock Library.
- This video maker also incorporates a Voice Editor to uphold the audio track’s quality.
6. Smart Video Crop - Video Cut
Although this video maker is specified for resizing videos, it also offers speed change options. To make a video slow motion on Android, you can change both playback speed and framerate. Once you have edited your video, you can make changes to the export options. In addition, the application updates its mechanism and shows compatibility with Android 4.4 and higher versions.

Key Features
- The application shows multi-format video support, i.e., MP4, 3GP, and AVI.
- Proposes multiple video crop options like 1:1, 4:3, 16:9, and 3:2.
- You can select to crop the whole video or apply the crop to a specific part of it.
7. Video Editor - Video.Guru
What would be better than a slow-motion video app for Android that can change speed and enhance video? To access this functionality, users need to switch to its PRO version. The speed change options that it offers are from 0.2x to 100x, with 0.2x being the slowest. In addition, the tool doesn’t decline video quality but enhances it to 4K.

Key Features
- If you are a YouTuber, then this editor affects and filters for Vloggers and offers to remove Watermark.
- You can crop a video into available ratios while keeping its HD quality.
- Can add 30+ video transition effects and incorporate music to enhance their quality.
8. Slow Motion - Slow Mo, Fast Mo
Make video slow motion Android effortlessly with this application, which is specified for speed change. It offers 10 playback speed options for creating slow motions with precision. The playback speed ranges from 0.95x to 0.1x. Once you have created a slow motion with it, you can easily preview it to observe if any changes are needed.

Key Features
- Along with precise slo-mo options, it also offers extensive fast motion option speed ranges.
- You can mix and match both fast and slow-motion effects in a video at once.
- It also offers a watermark removal option to avoid any visual weakening.
9. Slow Motion Video FX-camera
Not only video frame rates but also slow down your speech with this slow-motion app for Android. You can add dramatic or funny effects to your voices using the application. It offers to slow down video speed up to 0.25x. It uses the standard slider approach to manipulate the playback speed of your videos. You can apply the slow-mo effect to the overall video or to some specific parts of it.

Key Features
- An intuitive user interface with a velocity graph to observe the changes in speed and duration.
- Transform your low-quality videos to HD quality with this slow-motion app for Android.
- Use the application’s built-in music library to incorporate music tracks.
10. Slow Motion
Decrease your video speed up to 1/4th of its original speed with this Android slow-motion video editor. The speed options are customizable, and you can apply them to multiple video scenes. As the name indicates, the tool is specifically fashioned for slow-motion effects; hence, it offers an accessible user interface.

Key Features
- Export your videos in landscape or portrait mode; the choice is yours.
- In any mode, the application retains video quality and exports it in full resolution.
- It is excellent to slow down YouTube videos as there is no watermark addition.
Bonus Part: Wondershare Filmora: A Perfect Desktop Solution To Slow Down Video
Making slow motion videos in Android is like keeping creativity in your hand anywhere. This facility is good for basic effects but not for professional and advanced slow-motion effects. That’s where you need to shift to a more equipped alternative, which is Wondershare Filmora . Using Filmora means turning imagination into the real picture.
It is a video editing platform with artificial intelligence integration. You can create slow-motion videos with automation in Filmora. The interactive interface of Filmora caters to all users’ needs in simple steps. Freelancers, content creators, and educationists use this platform for diverse needs.
Free Download For Win 7 or later(64-bit)
Free Download For macOS 10.14 or later
How to Make Video Slow Motion Android in Filmora
As you are familiar with Filmora, let’s make a slow-motion video. It is quite easy if compared with Android slow-motion video making. Without further delay, delve into the given step-by-step guide:
Step 1Import Your Project After Successful Launch
Unleash your creativity in Filmora after downloading it. In this regard, you must go to Wondershare Filmora’s official site. Open the main interface of Filmora and tap “New Project” to enter the editing window. To start working, import a file in the media panel and drag it into the timeline section.

Step 2Slow Down the Video with Uniform Speed
After successful importing, right-click on your video and an extended list. Choose the “Uniform Speed” option from the list and find an editing panel towards your right. You will see the slider under the speed option. Hold on to the circle and drag it to the left if you want to slow down the videos. Move downward and toggle the “Ripple Edit” and “Maintain Pitch” for good results.

Step 3Enhance Video with Optical Flow
Towards the end, you will find the “AI Frame Interpolation.” Click on its downward symbol and select the “Optical Flow” option from the list. It will automatically boost your video quality. You can choose the “Reverse Speed” option if your video is required.

Step 4End Editing and Move to Export
Now, it’s up to you if you want to continue editing with Filmora or want to export the media. To end editing, you can hit the “Export” button from the top right.

Remarkable Key Functionalities of Filmora
If you want to understand the amazing features of Filmora better, this section is for you. Keep reading and find some integral functionalities of Filmora. This platform offers more than just creating slow-motion video Android:
1. AI Smart Cutout
Artificial intelligence in Filmora can amazingly assist you in making flawless videos. Unlike other tools, Filmora allows you to remove unwanted objects, people, and icons from videos. Besides, users can refine their cutout frame by frame using its’ advanced editing options. You can preview the modified media in four ways, such as Transparency grid and Alpha Mode.
2. AI Audio Stretch
This AI-based feature is new to the market and saves hours of rippling and cutting audio. It aims to match the length of your audio with videos. From Vlog videos to blockbuster audio effects, you can use this feature almost everywhere. This option allows you to re-time your audio tracks after detecting vocals in the music.
3. Speech-to-Text
Video captions make the content accessible to international viewers. That’s where Filmora proves vital in removing language barriers. It supports over 26 languages and adds subtitles to your videos with one click. This built-in feature in Filmora recognizes speech swiftly to guarantee accuracy. You can also export your SRT file of subtitles to make any edits.
4. AI Portrait
Beautify faces in your videos to set a new trend on social media with Filmora. To do so, an AI Portrait feature can automatically detect faces to apply changes. You can choose a sticker effect from more than 70 AI portrait AR stickers. Besides, it can remove video backgrounds by retaining the human beings there.
Conclusion
With all marked details, this article concludes with a note that there are always different calibers of tools that we can work with. While discovering the best Android application in the market, you got to know many slow motion videos on Android. Along with that, we also discussed DemoCreator as a comprehensive solution to the entire use of mobile apps.
Learn to Merge Clips in DaVinci Resolve with Simple Steps
Combining two or more clips in a video doesn’t seem like a tough job. But to be fair, the video merger means a lot to professional video editors and videographers. Doing so could add that “special” element of continuity you mostly see in the long clips without noticing the cuts, breaks, and retakes between them.
And just like a few drops makes an entire ocean, the joining of multiple video clips can give life and meaning to your shots. So, how to merge clips in DaVinci Resolve to make your videos look perfect? Here’s the step-by-step guide.
In this article
02 How to Merge Clips in DaVinci Resolve?
03 How to Merge Clips in Wondershare Filmora?
Part 1: About DaVinci Resolve
DaVinci Resolve is a Blackmagic Design’s video editing software. It’s one of the favorite tools of professional video editors. And apart from video editing, the software works great when it comes to color coding, motion graphics, and even audio production.
Although DaVinci Resolve has several excellent video editing tools, it isn’t easy for beginners and intermediate users. Nevertheless, you can expect admirable outcomes if you spend a reasonable amount of time learning this software.
But on the other hand, if merging clips in DaVinci Resolve is what you want to do, you will be glad to know that it has an uncomplicated method. So let’s begin with the step-by-step process on how to merge clips in DaVinci Resolve.
Part 2: How to Merge Clips in DaVinci Resolve
Step 1: Download DaVinci Resolve
To download DaVinci Resolve , go to the official website and click on the “Free Download Now” button if you wish to use it for free.
Contrarily, if you desire to enjoy all the software features, feel free to purchase it by clicking on the “Buy Online Now” button.

Step 2: Import Clips on DaVinci Resolve Timeline
After installing the software on your PC or MAC operating systems, open DaVinci Resolve and import two or more clips on the timeline.
For example, you can see two different video clips on the timeline.

Step 3: Slide Clips and Select
In the next step, slide both clips together, so there’s no gap left between them. And then, using your mouse, select both clips, like this:

Make sure that all clips are on the same timeline.
Step 4: Merge Clips
Once you have selected all the clips, right-click anywhere on the selection. And choose the “New Compound” option from the list of options.

Now, rename the clip and hit the “Create” button.

DaVinci Resolve will merge the clips within a blink of an eye, as seen in this screenshot.

You can see that within a few steps, you can easily merge videos using DaVinci Resolve. However, you should know that this software requires a heavy system to work smoothly. And sometimes, the quality and result are not up to the mark.
That is why most video editors prefer Filmora by Wondershare when editing and merging videos. So, let’s see how you can use Filmora to do the same task in the next part.
Part 3: An Easier Way to Merge Clips in Wondershare Filmora
Filmora Video Editor is a powerful tool for video editing. With easy options and an extremely user-friendly interface, the software is nothing less than a boon for newbies, intermediated, and professional-level video editors.
For Win 7 or later (64-bit)
For macOS 10.14 or later
Compared to DaVinci Resolve, Filmora requires fewer tools to combine multiple videos in a single frame. So, without further waiting, let’s learn how to merge clips in Filmora.
Step 1: Download and Open Filmora
Go to Filmora’s official website and download the latest version for your MAC or Windows.

Run the setup and let the system complete the installation. Depending on the version, more or less, the software will look like this as you will open it on your system.

Step 2: Import Your Videos to Merge
Click on the “Import Media Files Here” button to choose the videos you want to merge.

For instance, here, you can see two different video clips on the timeline.

Step 3: Place Videos on the Same Timeline to Merge
First of all, you must plan the order of the clips because it will help you place the video clips correctly.
So, use your mouse and select the clip.
For example, you can see that there are two clips below. The first clip is named “Islands,” and the second clip is called “Beach.”

Then, move the selected clip (“second clip” is selected for demonstration) and place it right next to the first clip.

You must keep in mind that there shouldn’t be any gap between the clips.

Or else the final result will have a “black space” between the clips.

Step 4: Export Your File
When you are done merging clips on the timeline, click on the “Export” button to save the combined video in your system.

You can merge several clips in just four steps without wasting your time looking around for options and losing the video quality.
If you are aware of using the software, you can quickly learn how to merge clips in DaVinci Resolve. Undoubtedly, this video editing tool is helpful for professionals, and that is why new users may find it a bit difficult when using it for the first time. Contrarily, Filmora is a friendly video editor, allowing all kinds of users to merge clips quickly.
FAQs
Q1. Can I merge clips on different timelines in DaVinci Resolve?
To merge two or more clips in DaVinci Resolve, you must place the clips on the same timeline for better results.
Q2. How can I unmerge clips in DaVinci Resolve?
To unmerge clips in DaVinci, right-click on the merged clip and select the “Decompose in Place” option.
Q3. Can I use the same method to merge video clips in DaVinci Resolve 16 and 17?
Yes. You can use the same method to merge clips in any version of DaVinci Resolve.
02 How to Merge Clips in DaVinci Resolve?
03 How to Merge Clips in Wondershare Filmora?
Part 1: About DaVinci Resolve
DaVinci Resolve is a Blackmagic Design’s video editing software. It’s one of the favorite tools of professional video editors. And apart from video editing, the software works great when it comes to color coding, motion graphics, and even audio production.
Although DaVinci Resolve has several excellent video editing tools, it isn’t easy for beginners and intermediate users. Nevertheless, you can expect admirable outcomes if you spend a reasonable amount of time learning this software.
But on the other hand, if merging clips in DaVinci Resolve is what you want to do, you will be glad to know that it has an uncomplicated method. So let’s begin with the step-by-step process on how to merge clips in DaVinci Resolve.
Part 2: How to Merge Clips in DaVinci Resolve
Step 1: Download DaVinci Resolve
To download DaVinci Resolve , go to the official website and click on the “Free Download Now” button if you wish to use it for free.
Contrarily, if you desire to enjoy all the software features, feel free to purchase it by clicking on the “Buy Online Now” button.

Step 2: Import Clips on DaVinci Resolve Timeline
After installing the software on your PC or MAC operating systems, open DaVinci Resolve and import two or more clips on the timeline.
For example, you can see two different video clips on the timeline.

Step 3: Slide Clips and Select
In the next step, slide both clips together, so there’s no gap left between them. And then, using your mouse, select both clips, like this:

Make sure that all clips are on the same timeline.
Step 4: Merge Clips
Once you have selected all the clips, right-click anywhere on the selection. And choose the “New Compound” option from the list of options.

Now, rename the clip and hit the “Create” button.

DaVinci Resolve will merge the clips within a blink of an eye, as seen in this screenshot.

You can see that within a few steps, you can easily merge videos using DaVinci Resolve. However, you should know that this software requires a heavy system to work smoothly. And sometimes, the quality and result are not up to the mark.
That is why most video editors prefer Filmora by Wondershare when editing and merging videos. So, let’s see how you can use Filmora to do the same task in the next part.
Part 3: An Easier Way to Merge Clips in Wondershare Filmora
Filmora Video Editor is a powerful tool for video editing. With easy options and an extremely user-friendly interface, the software is nothing less than a boon for newbies, intermediated, and professional-level video editors.
For Win 7 or later (64-bit)
For macOS 10.14 or later
Compared to DaVinci Resolve, Filmora requires fewer tools to combine multiple videos in a single frame. So, without further waiting, let’s learn how to merge clips in Filmora.
Step 1: Download and Open Filmora
Go to Filmora’s official website and download the latest version for your MAC or Windows.

Run the setup and let the system complete the installation. Depending on the version, more or less, the software will look like this as you will open it on your system.

Step 2: Import Your Videos to Merge
Click on the “Import Media Files Here” button to choose the videos you want to merge.

For instance, here, you can see two different video clips on the timeline.

Step 3: Place Videos on the Same Timeline to Merge
First of all, you must plan the order of the clips because it will help you place the video clips correctly.
So, use your mouse and select the clip.
For example, you can see that there are two clips below. The first clip is named “Islands,” and the second clip is called “Beach.”

Then, move the selected clip (“second clip” is selected for demonstration) and place it right next to the first clip.

You must keep in mind that there shouldn’t be any gap between the clips.

Or else the final result will have a “black space” between the clips.

Step 4: Export Your File
When you are done merging clips on the timeline, click on the “Export” button to save the combined video in your system.

You can merge several clips in just four steps without wasting your time looking around for options and losing the video quality.
If you are aware of using the software, you can quickly learn how to merge clips in DaVinci Resolve. Undoubtedly, this video editing tool is helpful for professionals, and that is why new users may find it a bit difficult when using it for the first time. Contrarily, Filmora is a friendly video editor, allowing all kinds of users to merge clips quickly.
FAQs
Q1. Can I merge clips on different timelines in DaVinci Resolve?
To merge two or more clips in DaVinci Resolve, you must place the clips on the same timeline for better results.
Q2. How can I unmerge clips in DaVinci Resolve?
To unmerge clips in DaVinci, right-click on the merged clip and select the “Decompose in Place” option.
Q3. Can I use the same method to merge video clips in DaVinci Resolve 16 and 17?
Yes. You can use the same method to merge clips in any version of DaVinci Resolve.
02 How to Merge Clips in DaVinci Resolve?
03 How to Merge Clips in Wondershare Filmora?
Part 1: About DaVinci Resolve
DaVinci Resolve is a Blackmagic Design’s video editing software. It’s one of the favorite tools of professional video editors. And apart from video editing, the software works great when it comes to color coding, motion graphics, and even audio production.
Although DaVinci Resolve has several excellent video editing tools, it isn’t easy for beginners and intermediate users. Nevertheless, you can expect admirable outcomes if you spend a reasonable amount of time learning this software.
But on the other hand, if merging clips in DaVinci Resolve is what you want to do, you will be glad to know that it has an uncomplicated method. So let’s begin with the step-by-step process on how to merge clips in DaVinci Resolve.
Part 2: How to Merge Clips in DaVinci Resolve
Step 1: Download DaVinci Resolve
To download DaVinci Resolve , go to the official website and click on the “Free Download Now” button if you wish to use it for free.
Contrarily, if you desire to enjoy all the software features, feel free to purchase it by clicking on the “Buy Online Now” button.

Step 2: Import Clips on DaVinci Resolve Timeline
After installing the software on your PC or MAC operating systems, open DaVinci Resolve and import two or more clips on the timeline.
For example, you can see two different video clips on the timeline.

Step 3: Slide Clips and Select
In the next step, slide both clips together, so there’s no gap left between them. And then, using your mouse, select both clips, like this:

Make sure that all clips are on the same timeline.
Step 4: Merge Clips
Once you have selected all the clips, right-click anywhere on the selection. And choose the “New Compound” option from the list of options.

Now, rename the clip and hit the “Create” button.

DaVinci Resolve will merge the clips within a blink of an eye, as seen in this screenshot.

You can see that within a few steps, you can easily merge videos using DaVinci Resolve. However, you should know that this software requires a heavy system to work smoothly. And sometimes, the quality and result are not up to the mark.
That is why most video editors prefer Filmora by Wondershare when editing and merging videos. So, let’s see how you can use Filmora to do the same task in the next part.
Part 3: An Easier Way to Merge Clips in Wondershare Filmora
Filmora Video Editor is a powerful tool for video editing. With easy options and an extremely user-friendly interface, the software is nothing less than a boon for newbies, intermediated, and professional-level video editors.
For Win 7 or later (64-bit)
For macOS 10.14 or later
Compared to DaVinci Resolve, Filmora requires fewer tools to combine multiple videos in a single frame. So, without further waiting, let’s learn how to merge clips in Filmora.
Step 1: Download and Open Filmora
Go to Filmora’s official website and download the latest version for your MAC or Windows.

Run the setup and let the system complete the installation. Depending on the version, more or less, the software will look like this as you will open it on your system.

Step 2: Import Your Videos to Merge
Click on the “Import Media Files Here” button to choose the videos you want to merge.

For instance, here, you can see two different video clips on the timeline.

Step 3: Place Videos on the Same Timeline to Merge
First of all, you must plan the order of the clips because it will help you place the video clips correctly.
So, use your mouse and select the clip.
For example, you can see that there are two clips below. The first clip is named “Islands,” and the second clip is called “Beach.”

Then, move the selected clip (“second clip” is selected for demonstration) and place it right next to the first clip.

You must keep in mind that there shouldn’t be any gap between the clips.

Or else the final result will have a “black space” between the clips.

Step 4: Export Your File
When you are done merging clips on the timeline, click on the “Export” button to save the combined video in your system.

You can merge several clips in just four steps without wasting your time looking around for options and losing the video quality.
If you are aware of using the software, you can quickly learn how to merge clips in DaVinci Resolve. Undoubtedly, this video editing tool is helpful for professionals, and that is why new users may find it a bit difficult when using it for the first time. Contrarily, Filmora is a friendly video editor, allowing all kinds of users to merge clips quickly.
FAQs
Q1. Can I merge clips on different timelines in DaVinci Resolve?
To merge two or more clips in DaVinci Resolve, you must place the clips on the same timeline for better results.
Q2. How can I unmerge clips in DaVinci Resolve?
To unmerge clips in DaVinci, right-click on the merged clip and select the “Decompose in Place” option.
Q3. Can I use the same method to merge video clips in DaVinci Resolve 16 and 17?
Yes. You can use the same method to merge clips in any version of DaVinci Resolve.
02 How to Merge Clips in DaVinci Resolve?
03 How to Merge Clips in Wondershare Filmora?
Part 1: About DaVinci Resolve
DaVinci Resolve is a Blackmagic Design’s video editing software. It’s one of the favorite tools of professional video editors. And apart from video editing, the software works great when it comes to color coding, motion graphics, and even audio production.
Although DaVinci Resolve has several excellent video editing tools, it isn’t easy for beginners and intermediate users. Nevertheless, you can expect admirable outcomes if you spend a reasonable amount of time learning this software.
But on the other hand, if merging clips in DaVinci Resolve is what you want to do, you will be glad to know that it has an uncomplicated method. So let’s begin with the step-by-step process on how to merge clips in DaVinci Resolve.
Part 2: How to Merge Clips in DaVinci Resolve
Step 1: Download DaVinci Resolve
To download DaVinci Resolve , go to the official website and click on the “Free Download Now” button if you wish to use it for free.
Contrarily, if you desire to enjoy all the software features, feel free to purchase it by clicking on the “Buy Online Now” button.

Step 2: Import Clips on DaVinci Resolve Timeline
After installing the software on your PC or MAC operating systems, open DaVinci Resolve and import two or more clips on the timeline.
For example, you can see two different video clips on the timeline.

Step 3: Slide Clips and Select
In the next step, slide both clips together, so there’s no gap left between them. And then, using your mouse, select both clips, like this:

Make sure that all clips are on the same timeline.
Step 4: Merge Clips
Once you have selected all the clips, right-click anywhere on the selection. And choose the “New Compound” option from the list of options.

Now, rename the clip and hit the “Create” button.

DaVinci Resolve will merge the clips within a blink of an eye, as seen in this screenshot.

You can see that within a few steps, you can easily merge videos using DaVinci Resolve. However, you should know that this software requires a heavy system to work smoothly. And sometimes, the quality and result are not up to the mark.
That is why most video editors prefer Filmora by Wondershare when editing and merging videos. So, let’s see how you can use Filmora to do the same task in the next part.
Part 3: An Easier Way to Merge Clips in Wondershare Filmora
Filmora Video Editor is a powerful tool for video editing. With easy options and an extremely user-friendly interface, the software is nothing less than a boon for newbies, intermediated, and professional-level video editors.
For Win 7 or later (64-bit)
For macOS 10.14 or later
Compared to DaVinci Resolve, Filmora requires fewer tools to combine multiple videos in a single frame. So, without further waiting, let’s learn how to merge clips in Filmora.
Step 1: Download and Open Filmora
Go to Filmora’s official website and download the latest version for your MAC or Windows.

Run the setup and let the system complete the installation. Depending on the version, more or less, the software will look like this as you will open it on your system.

Step 2: Import Your Videos to Merge
Click on the “Import Media Files Here” button to choose the videos you want to merge.

For instance, here, you can see two different video clips on the timeline.

Step 3: Place Videos on the Same Timeline to Merge
First of all, you must plan the order of the clips because it will help you place the video clips correctly.
So, use your mouse and select the clip.
For example, you can see that there are two clips below. The first clip is named “Islands,” and the second clip is called “Beach.”

Then, move the selected clip (“second clip” is selected for demonstration) and place it right next to the first clip.

You must keep in mind that there shouldn’t be any gap between the clips.

Or else the final result will have a “black space” between the clips.

Step 4: Export Your File
When you are done merging clips on the timeline, click on the “Export” button to save the combined video in your system.

You can merge several clips in just four steps without wasting your time looking around for options and losing the video quality.
If you are aware of using the software, you can quickly learn how to merge clips in DaVinci Resolve. Undoubtedly, this video editing tool is helpful for professionals, and that is why new users may find it a bit difficult when using it for the first time. Contrarily, Filmora is a friendly video editor, allowing all kinds of users to merge clips quickly.
FAQs
Q1. Can I merge clips on different timelines in DaVinci Resolve?
To merge two or more clips in DaVinci Resolve, you must place the clips on the same timeline for better results.
Q2. How can I unmerge clips in DaVinci Resolve?
To unmerge clips in DaVinci, right-click on the merged clip and select the “Decompose in Place” option.
Q3. Can I use the same method to merge video clips in DaVinci Resolve 16 and 17?
Yes. You can use the same method to merge clips in any version of DaVinci Resolve.
Ultimate Guide on How To Plan and Storyboard a Music Video
Do you want to bring your music to life on the big screen? Do you want to create something visually striking? Making a music video seems like a big task. Sometimes, the artist you’re working with might not have a clear idea for their music video. It’s your job to help guide the creative process.
But don’t worry! This guide is going to make it easy for you to plan and storyboard your music video step by step with the help of Filmora . So let’s get started and make an amazing music video together!
Plan and develop initial ideas
The first and essential step in creating a music video is planning. This is where you will lay the foundation of your music video. You need to figure out what your video is about and what you want to convey to the audience. It involves a concept or theme for the video, research, and reference material. You can also explore different ideas to make your video unique and engaging.
Step1Research and gather information
You can begin by researching and gathering information from other music videos. This will help you to know what has been done before and what is currently popular. You can also figure out how you can do it differently.
Step2Brainstorm and concept development
Once you understand the current trends and styles in the music video. It’s time to start brainstorming ideas. You can do it alone or with the help of your team. But remember that you have to think out of the box to make it creative.
Step3Consider the lyrics and message
In the planning stage, it is also important to consider the lyrics and message of the song. It would be best if you plan according to the feel and vibe of the song. It will help you to create a concept tied to the song and will help enhance its meaning.
Step4Experiment and find the right direction
Once you have a general concept, it’s time to develop it further. You can do it by creating rough sketches or storyboards. You can also film test footage to see how the concept will look on screen.
Step5Effort and attention to detail
Remember, this step is the foundation of your music video. So, take your time and don’t rush through it. By putting in effort and attention to detail, you’ll be able to create a visually stunning and closely tied to the song’s music video.
Choose a style for your music video
While creating ideas for the music video, it’s also important to consider the style of the music video. There are two main styles of music videos:
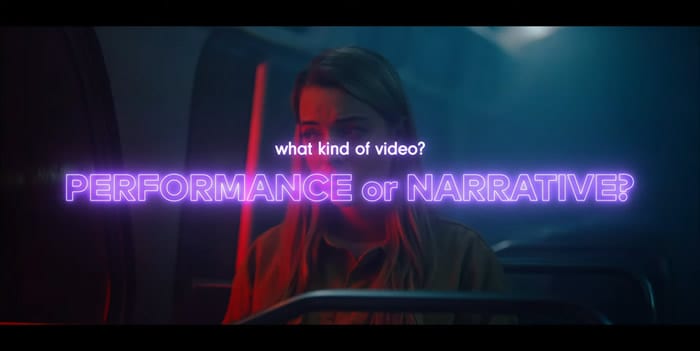
1.Performance-style music video
If you want to showcase energy and charisma in your music video, go for a performance-style music video. This video style focuses on you and your band performing live in front of an audience. You can shoot a video in a single take with minimal cuts or feature different angles and shots. The key is to capture the raw energy and emotion of the performance.
2.Narrative-style music video
A narrative-style music video tells a story or conveys a message along with the music. The story can be a visual representation of the lyrics or a multi-layered narrative. You can choose this style to convey a deeper message or story.
You can shoot this video in different locations and can include different scenes. The main motive is to create a video that emotionally connects with the audience.
Once you have an idea of what you want your music video to be about, you can put together a treatment to show the artist what your initial plan for the music video is.
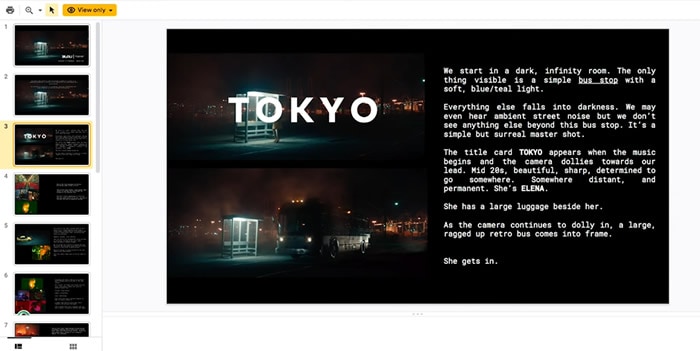
If the artist approves the direction of the video, it’s time to move on to storyboarding!
Storyboard your music video
Once you are done with the style and concept of the video, the next step is storyboarding! It allows you to break down your music video visually and highlight key visual moments. It can save time and money and convey a clear idea to the team. You can do this on paper, a computer, or a tablet, whatever works best for you. Let’s see how to do it with the help of Filmora .
Free Download For Win 7 or later(64-bit)
Free Download For macOS 10.14 or later
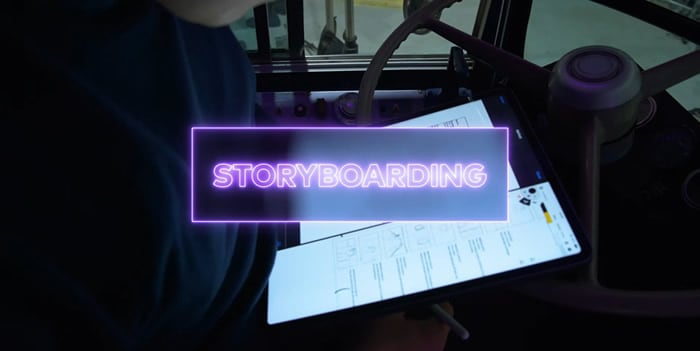
Step1Draw your ideas
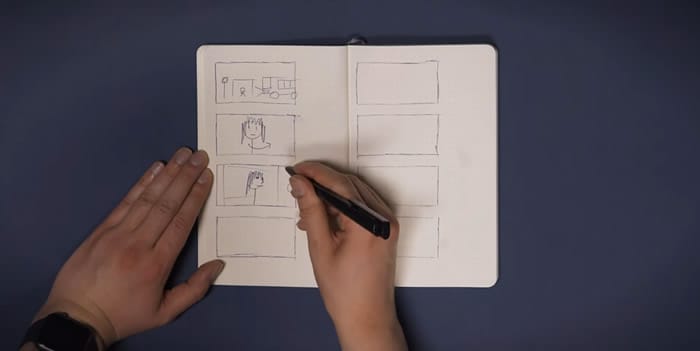
You are supposed to break your video idea into different scenes. For each scene, you should draw a picture of what the shot will look like and draw them within the rectangles.
Step2Take pictures
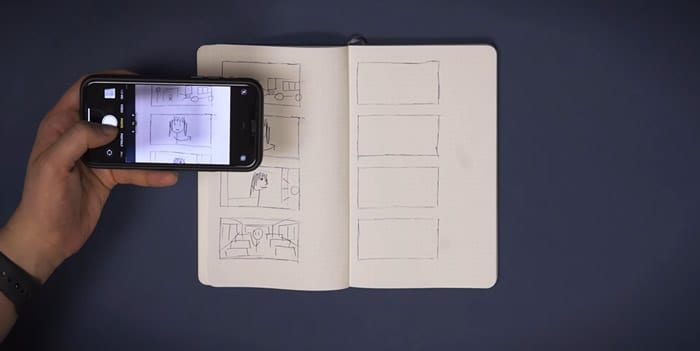
After doing your storyboarding on paper, take photos of each shot in a sequence and import them to your computer.
Before going to the next step, make sure to download Wondershare Filmora. It is powerful editing software that can help you easily make a storyboard. With its wide range of features, you can also customize your clips with special effects, transitions, and more.

Free Download For Win 7 or later(64-bit)
Free Download For macOS 10.14 or later
Step3Import pictures to Filmora
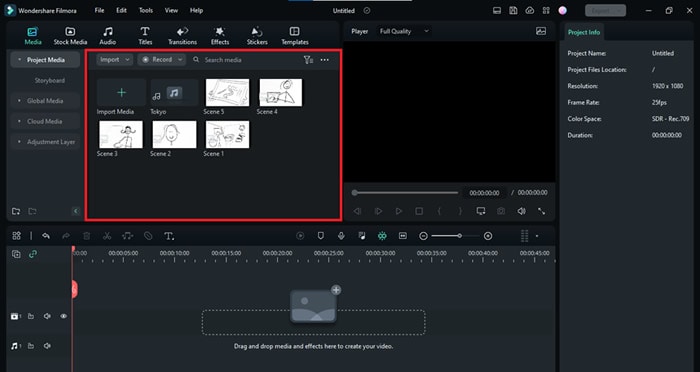
Now import all the scenes and music to Filmora. You can also create separate folders if you have multiple concepts for a single video.
Step4Drop your media onto the timeline
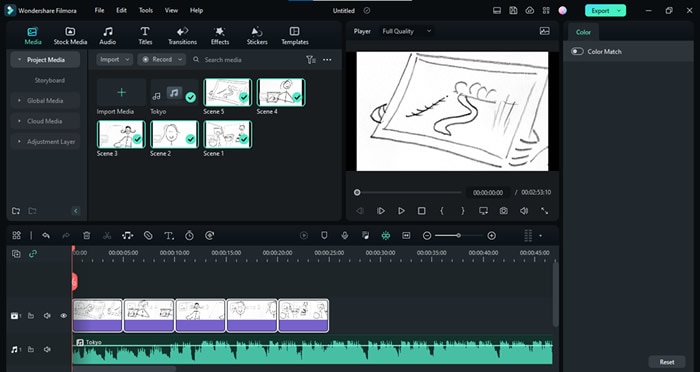
Drag and drop the song to the audio timeline. Then press shift, select all images, and drop them into the picture timeline. If you realize you are missing enough clips to complete the song, you can draw and add more shots.
Step5Adjust the frame
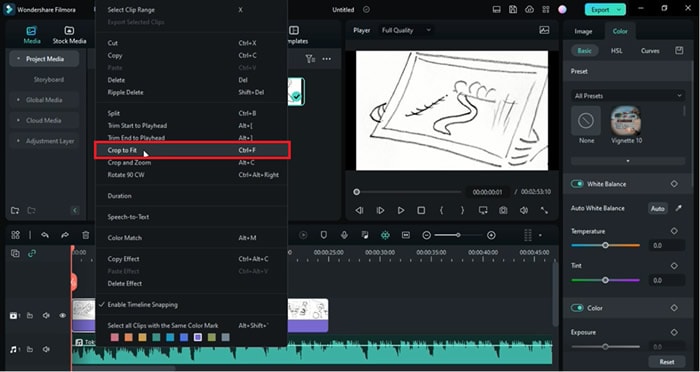
You can right-click on the picture’s timeline and select Crop to fit to adjust the image on the screen. You can also adjust the scenes according to the song.
Step6Add effects
You can also simulate transitions and effects in the clips. Let’s suppose you want to show a zoom-in shot. Then you would click on the picture frame and the keyframe option just above the timeline. Now keyframe the position and scale of the clip according to you.
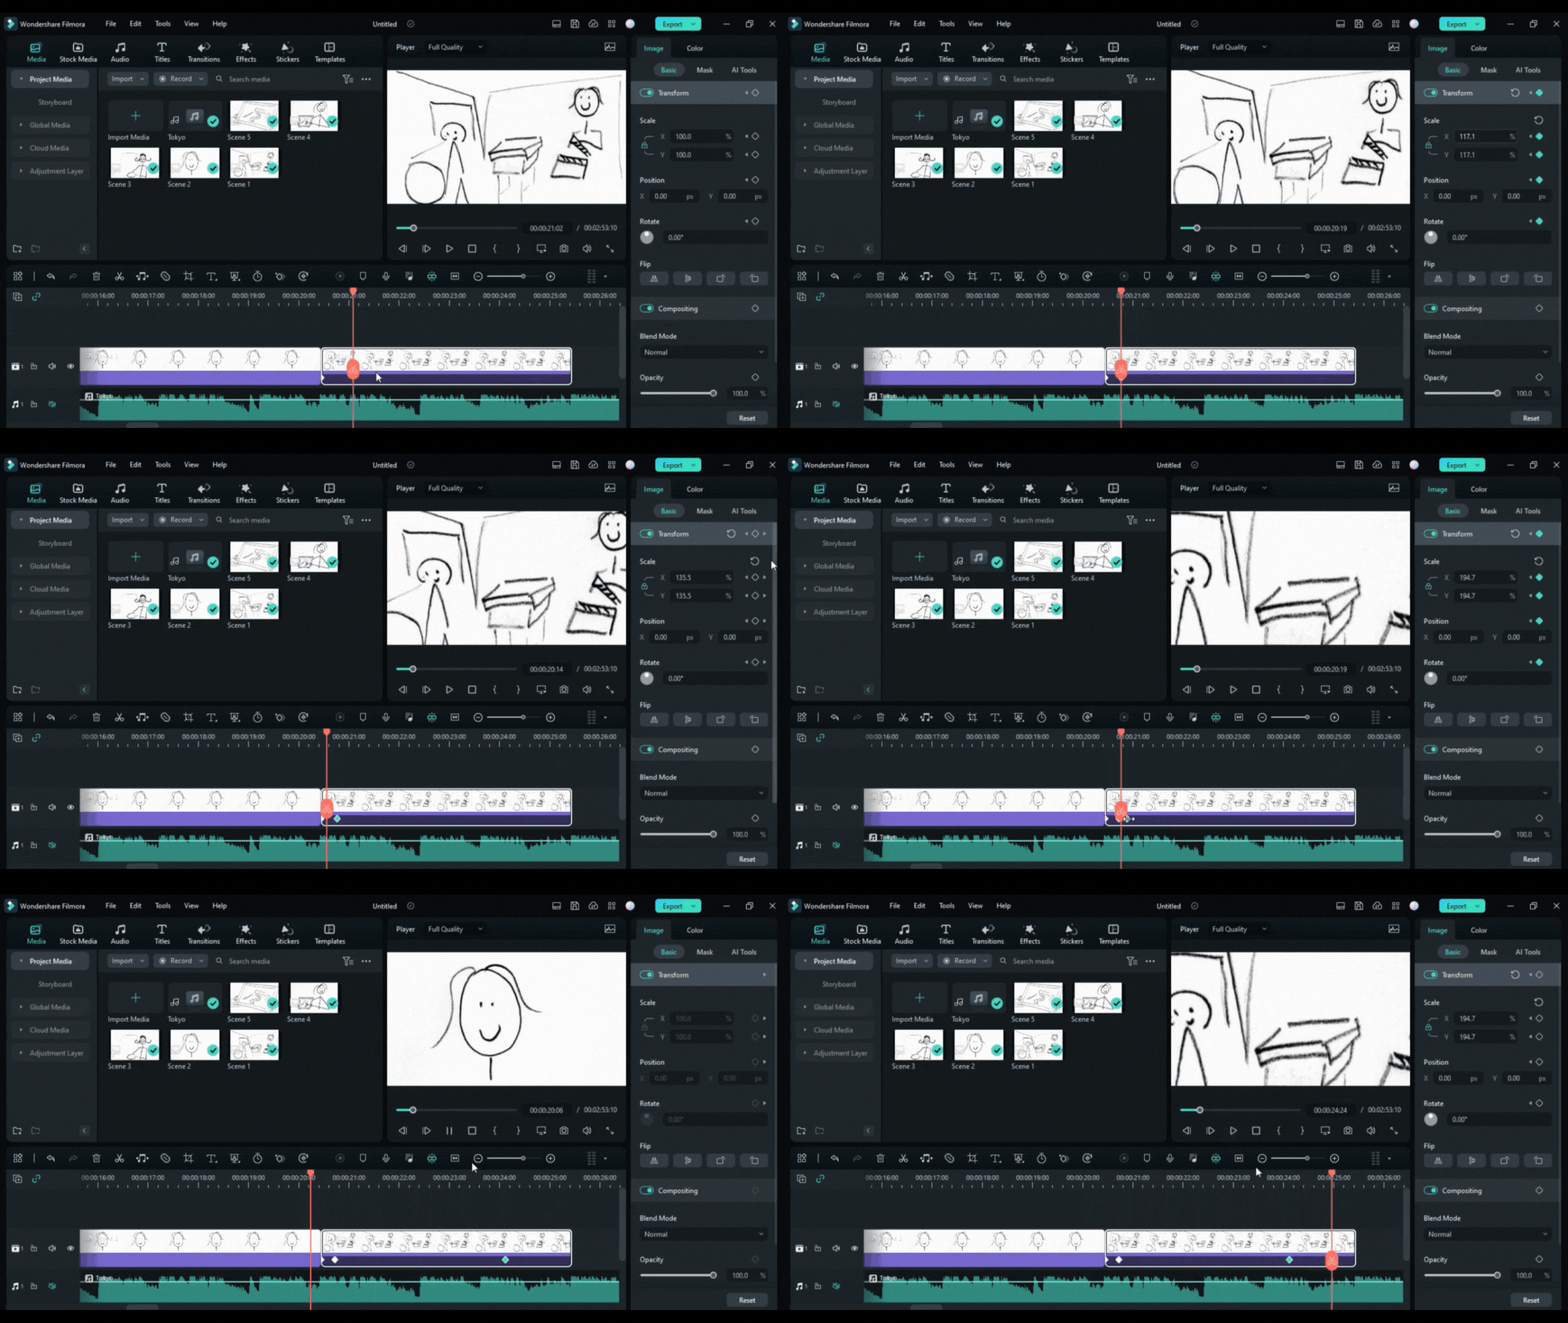
Once you feel like your clips sync with the song, you are ready to start planning for the production of your music video.
Conclusion
We hope this blog has given you a better understanding of how planning and storyboarding can help make your music videos better. You can ensure that your vision is clearly communicated to the audience by planning and storyboarding your music videos properly. Now that you know what to do, it’s time to put that knowledge into action. Take a pencil and paper and start sketching the shots and scenes you want to create.
Free Download For macOS 10.14 or later

Step1Draw your ideas
You are supposed to break your video idea into different scenes. For each scene, you should draw a picture of what the shot will look like and draw them within the rectangles.

Step2Take pictures
After doing your storyboarding on paper, take photos of each shot in a sequence and import them to your computer.

Before going to the next step, make sure to download Wondershare Filmora. It is powerful editing software that can help you easily make a storyboard. With its wide range of features, you can also customize your clips with special effects, transitions, and more.

Free Download For Win 7 or later(64-bit)
Free Download For macOS 10.14 or later
Step3Import pictures to Filmora
Now import all the scenes and music to Filmora. You can also create separate folders if you have multiple concepts for a single video.

Step4Drop your media onto the timeline
Drag and drop the song to the audio timeline. Then press shift, select all images, and drop them into the picture timeline. If you realize you are missing enough clips to complete the song, you can draw and add more shots.

Step5Adjust the frame
You can right-click on the picture’s timeline and select Crop to fit to adjust the image on the screen. You can also adjust the scenes according to the song.

Step6Add effects
You can also simulate transitions and effects in the clips. Let’s suppose you want to show a zoom-in shot. Then you would click on the picture frame and the keyframe option just above the timeline. Now keyframe the position and scale of the clip according to you.

Once you feel like your clips sync with the song, you are ready to start planning for the production of your music video.
Conclusion
We hope this blog has given you a better understanding of how planning and storyboarding can help make your music videos better. You can ensure that your vision is clearly communicated to the audience by planning and storyboarding your music videos properly. Now that you know what to do, it’s time to put that knowledge into action. Take a pencil and paper and start sketching the shots and scenes you want to create.
Also read:
- New Learn the Step-by-Step Process of Slowing Down Time-Lapse Videos on Your iPhone
- Are You Looking for Top AI Video Recognition Software to Choose From? Please Stay on This Article as We Look at the Current Top AI-Based Video Tools for 2024
- How to Easily Convert SRT to VTT for 2024
- 2024 Approved Do You Want to Get Green Screen Effects on Your Video without Green Screen Setup in Your Background? Learn How to Get Virtual Green Screen Background and Shoot Videos Like a Pro
- New LumaFusion – What Is It and the Best Alternative to Use
- Updated Steps to Make a Neon Dance Effect With Filmora
- Updated 2024 Approved 7 Best MP4 Video Editors on Mac Edit MP4 Videos Easily
- Updated How to Create Intro Video with Filmora
- How to Create A Freeze Frame Sequence in Video for 2024
- New 2024 Approved Spooky Halloween with the Best 15+ Halloween Countdown Video Clips
- Green Screens Are a Fun Way for Creators to Bring Their Personality to Their Stream, Allowing Them to Dynamically Alter Their Stream Background and Make Their Content Appear Even More Engaging and Polished for 2024
- Updated What Is MOV Format and How to Edit MOV Video Better?
- In 2024, Want to Apply a Filter on Your Video Using Your iPhone or Mac? Here Are the Simple Steps to Put Add Filters on iMovie. Find Out a Better iMovie Alternative with More Filters
- New 2024 Approved What Is HDRI? Everything You Need to Know About HDRI
- New 2024 Approved Step-by-Step Guide to Storyboard
- Updated 2024 Approved How to Use Filmora Slideshow Maker for Making Slideshow? What Is Slideshow Filmora? Know the Steps to Make Filmora Slideshow. What Are Steps to Make Filmora Slideshow Template?
- New How to Use LUTs Perfectly in Final Cut Pro
- New Learn Eight Simple Steps that Will Allow You to Create a Stunning Text Reveal Animation in Filmora. Simple yet Very Professional
- New VLC Media Player How to Merge Audio and Video Like a Pro for 2024
- Updated How Windows Movie Maker Save MP4 File
- Updated 2024 Approved Extracting Audio From Videos Is a Key to Better Storytelling. Learn How Filmoras Audio Removal Feature Can Enhance Your Video Stories
- Updated Find Out About MAGIX Vegas Pro Pricing Plan and Features to See How the Software Can Help You with Your Video Editing Tasks for 2024
- How to Create Motion Text Effects for Your Video?
- Updated 2024 Approved Everything You Need to Know About Color Grading in Photography
- In 2024, How to Shoot Cinematic Footage From a Smartphone
- New In This Article, Youll Find Four Solutions for Rotating Your Go-Pro Videos. The Following Tools Will Be Used for This Purpose
- Updated In 2024, Find Out the Best Animated Text Video Tools and Learn How to Animate Text in a Video in Simple Steps. Discover the Best Fonts to Animate Text Along with the Text Animation Templates
- Best Method to Split Video Into Parts Online for 2024
- New 2024 Approved How to Slow-Mo YouTube Videos
- Why Your Transparent GIF Is Hard to Remove for 2024
- Updated 2024 Approved Premiere Pro Is a Powerful Video Editing Software. In This Article, You Will Learn About How to Use, Save and Export LUTs in Adobe Premiere Pro
- Updated VSDC Free Video Editor Review
- New What Is an Eye Zoom Transition Effect? Its a Close-Up Video Effect Allowing Viewers to Transit to the Next Clip From the Eye
- How To Achieve LumaFusion Color Grading Through LUTs
- New Steps to Denoise in Final Cut Pro – Reduce Video and Audio Noise
- Updated How to Create the Night-to-Day Effect Video for 2024
- Updated How to Make Canva Collages for 2024
- New In 2024, In This Article I Will Share to You My Tips and Experiences on How to Become a YouTube Vlogger and Things You Need to Consider Being a Vlogger
- 2024 Approved Easy Ways to Edit Recorded Video
- 2024 Approved How to Add Green Screen Effects In Phhotoshop
- New 2024 Approved Best 10 Mind-Blowing Video Collage Maker for PC
- Updated 2024 Approved How to Merge Audio and Video in VLC Media Player
- Updated If You Are Wondering How to Play a Slideshow in PowerPoint Automatically, This Article Is for You. Here We Will Be Looking at How to Add a Slideshow in PowerPoint and Other Relevant Headings that Would Help You Quickly Work on a PowerPoint
- Using Track Matte and Tracking in Adobe After Effects Reviewing All Possibilities for 2024
- In 2024, VSDC Free Video Editor Review 2023
- Updated 2024 Approved Top 10 Mp3 Visualizers Windows, Mac, Android, iPhone & Online
- New You Can Easily Cut or Crop a Part of Your Video by Using Its Editing Tools Such as Crop (To Remove Unwanted Black Borders), Trim (To Remove the Unwanted Front and End Parts of Your Video Clip) for 2024
- Is GSM Flasher ADB Legit? Full Review To Bypass Your Itel S23 Phone FRP Lock
- Top 6 Apps/Services to Trace Any Lava Agni 2 5G Location By Mobile Number | Dr.fone
- Some MP4 won't play on my Galaxy Z Fold 5
- In 2024, How to Change/Fake Your Apple iPhone 13 mini Location on Viber | Dr.fone
- Fix the Error of Unfortunately the Process.com.android.phone Has Stopped on Tecno Spark 10 4G | Dr.fone
- In 2024, 4 solution to get rid of pokemon fail to detect location On Apple iPhone 6 | Dr.fone
- Authentication Error Occurred on Samsung Galaxy S23 Tactical Edition? Here Are 10 Proven Fixes | Dr.fone
- In 2024, How does the stardust trade cost In pokemon go On Samsung Galaxy S23 Ultra? | Dr.fone
- In 2024, 3 Easy Ways to Factory Reset a Locked Apple iPhone 14 Plus Without iTunes | Dr.fone
- In 2024, What Is a SIM Network Unlock PIN? Get Your Sony Phone Network-Ready
- In 2024, How to Unlock Apple ID From your Apple iPhone 8 Plus without Security Questions?
- Is GSM Flasher ADB Legit? Full Review To Bypass Your Samsung Galaxy Z Flip 5FRP Lock
- Guide on How To Change Your Apple ID Email Address On Apple iPhone X
- In 2024, Full Guide to Fix iToolab AnyGO Not Working On Motorola Moto G84 5G | Dr.fone
- Updated The 10 Most Adorable Aesthetic Cartoon Characters for 2024
- Does Airplane Mode Turn off GPS Location On Xiaomi Redmi K70? | Dr.fone
- How to Bypass FRP on OnePlus 12?
- 9 Best Phone Monitoring Apps for Nokia G42 5G | Dr.fone
- Universal Unlock Pattern for Poco M6 Pro 4G
- Vivo V27e support - Forgotten screen lock.
- In 2024, How and Where to Find a Shiny Stone Pokémon For Poco X6? | Dr.fone
- In 2024, Full Guide to Catch 100 IV Pokémon Using a Map On Vivo Y100 5G | Dr.fone
- In 2024, How to Unlock Apple ID Activation Lock On Apple iPhone 7?
- In 2024, How to Get and Use Pokemon Go Promo Codes On Nokia C22 | Dr.fone
- In 2024, How To Remove Phone Number From Your Apple ID from Your Apple iPhone SE (2020)?
- 3 Ways to Erase iPhone 6s When Its Locked Within Seconds
- How to Unlock Apple iPhone 8, Apples New iPhone
- In 2024, How to Mirror PC Screen to Xiaomi Redmi 13C 5G Phones? | Dr.fone
- How to Transfer Photos From ZTE Axon 40 Lite to Samsung Galaxy S21 Ultra | Dr.fone
- Fix Unfortunately Settings Has Stopped on Oppo Reno 9A Quickly | Dr.fone
- In 2024, Guide to Mirror Your Vivo V29 to Other Android devices | Dr.fone
- Top 10 Fingerprint Lock Apps to Lock Your Itel P55+ Phone
- In 2024, The Ultimate Guide to Unlocking Your Apple iPhone 14 Pro Max on MetroPCS
- How to get the dragon scale and evolution-enabled pokemon On Realme V30T? | Dr.fone
- In 2024, How to Unlock iPhone SE (2022) Without Passcode?
- 10 Free Location Spoofers to Fake GPS Location on your Samsung Galaxy F15 5G | Dr.fone
- In 2024, Best 3 Software to Transfer Files to/from Your Samsung Galaxy A23 5G via a USB Cable | Dr.fone
- How to Successfully Bypass iCloud Activation Lock on Apple iPhone 6 Plus
- In 2024, Apple ID Locked or Disabled From Apple iPhone 6? 7 Mehtods You Cant-Miss
- Top 7 iCloud Activation Bypass Tools For your Apple iPhone X
- The 10 Best Tools to Bypass iCloud Activation Lock On Apple iPhone 14 Plus You Should Try Out
- In 2024, How to Track WhatsApp Messages on Oppo Reno 9A Without Them Knowing? | Dr.fone
- In 2024, 3 Methods to Mirror Xiaomi 13T to Roku | Dr.fone
- Title: Updated How to Make Vintage Film Effect 1950S
- Author: Morgan
- Created at : 2024-05-19 05:12:03
- Updated at : 2024-05-20 05:12:03
- Link: https://ai-video-editing.techidaily.com/updated-how-to-make-vintage-film-effect-1950s/
- License: This work is licensed under CC BY-NC-SA 4.0.

