
:max_bytes(150000):strip_icc():format(webp)/removerokuchannel-c354faa0f712495384a4d5888017e30c.png)
Updated How to Split Videos - 33 Best Video Splitter Recommend
How to Split Videos - 33 Best Video Splitter Recommend
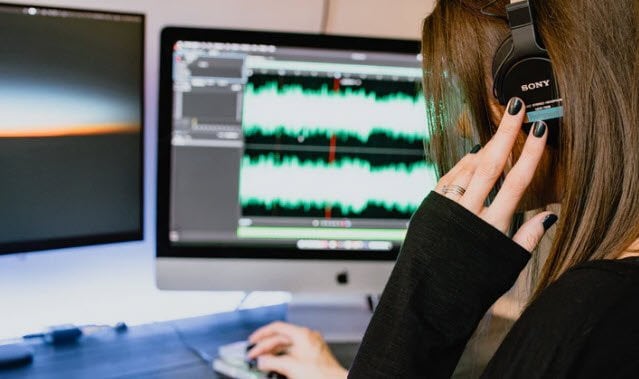
A video splitter is necessary when you need to extract a crucial or particular portion of a video file. Many users trim or reduce video segments by deleting superfluous or undesired elements. While splitting a video into smaller clips is a challenging task in and of itself, don’t overlook the importance of keeping the quality of the video clip you plan to obtain. While there are various online video splitter software available today, most of them do not achieve what they claim. We’ve put together a compelling list of the best video splitters in this post, including full-featured software and lightweight editing solutions. Continue reading to learn more about them and choose the one that most appeals to you.
- Filmora
- Boilsoft Video Splitter
- Solveigmm Video Splitter
- BandiCut
- Free Video Cutter
- Easy Video Splitter
- Avidemux
- Ultra Video Splitter
- VideoPad Video Editor
- Windows Movie Maker
- Windows Photos
- VLC
- iMovie
- Format Factory
- 7 Best Free Video Splitter Online
- 10 Best Video Splitter for Mobile Phone
- Filmora
- AndroVid Video Editor
- Easy Video Cutter
- Video Editor
- VideoShow – Video Editor
- Trim Video
- Video Splitter
- Crop video
- Video Crop
- Video Trim & Cut
Part 1: Backup Your Original Video
Making several backups is perhaps the most critical thing you can do for your project. Whether your computer dies suddenly or your editing application crashes, you’ll have a point to fall back on if you have a backup. Making this a habit will save you a lot of time and work in the long term. How many copies of your data should you make? You should create at least three project duplicates in the best-case scenario. Also, make sure they’re preserved in various formats and places—one on an SD card, another on a hard drive, or a USB drive.
14 Best Video Splitter for Windows/Mac
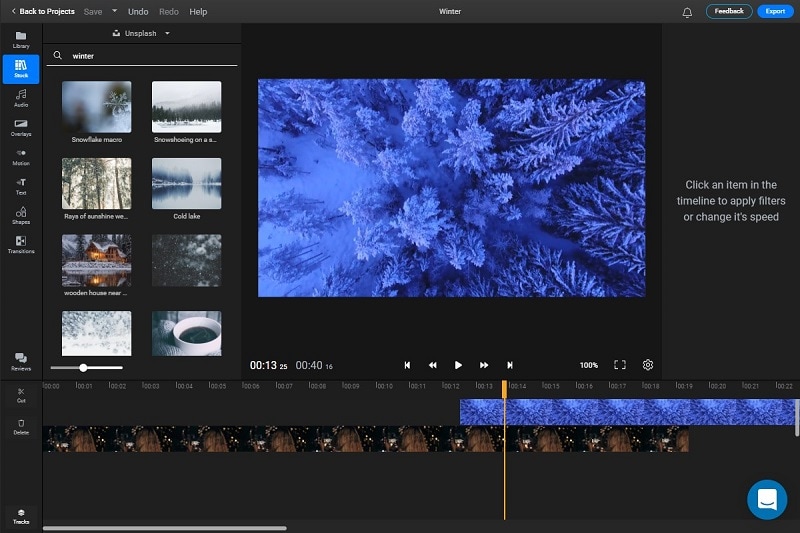
1. Filmora
Wondershare Filmora Video Editor is a superb video editor for those seeking software that can split videos and has a lot of functions. It was originally only accessible for Windows, but thanks to the developers, Mac users may now use this high-quality video splitter. Using this program to split and join videos is pretty basic and straightforward. It’s an intriguing tool since it allows users to produce high-quality films using filters, effects, and other features in an easier method than employing professional editors. This program also lets you export video at a breakneck speed, up to 4k quality.
![]()
Platform: Windows/Mac
Price: Free Trial
Features
- Editing is intuitive and quick.
- Export video in 4k quality.
- There are several graphic effects and transitions.
- Footage from the internet.
- Regularly upgraded features.
Pros
- Large films can be easily cut, trimmed, and combined without compromising quality.
- On the exported video, there is no watermark.
- Both Windows and Mac computers are supported.
- Splitting a video is such a breeze.
- For novices, it has a lot of handy options that will help you create a stunning film.
Cons
- Large-scale content editing might be slow at times.
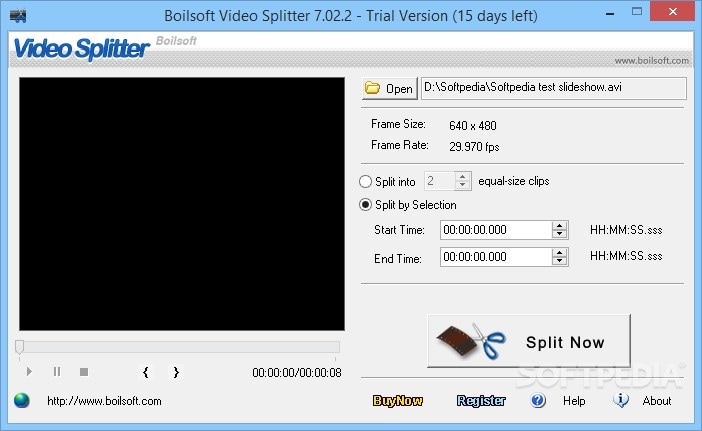
2. Boilsoft Video Splitter
Boilsoft Video Splitter can divide, edit, or trim a big AVI, MPEG, RM, ASF, WMV, 3GP, MKV, FLV, or MP4 video file without re-encoding smaller video segments. It has a built-in player that allows you to effortlessly split/cut video files according to time or selection.
Platform: Windows/Mac
Price:$34.95 one-time payment
Features
- Split Video
- Cut video
- Built-in player
Pros
- It supports lots of video format.
- User-friendly software.
Cons
- Because you can’t adjust the program window, using the slider for selection becomes increasingly difficult as your video becomes longer.
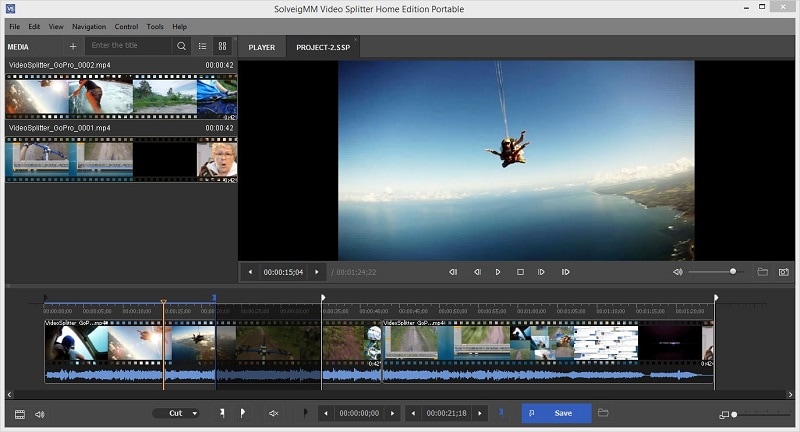
3. Solveigmm Video Splitter
SolveigMM Video Splitter is suitable for simple editing processes such as removing an extra section from a video, removing an advertisement from a movie, muting the sound on a selected video fragment, saving only a video or audio track from a file, cutting a video into parts, saving segments into separate files, and so on. The editing procedure takes just a few seconds.
Platform: Windows/Mac
Price:$7.99 per month
Features
- Video cutter
- Video editor
- Video Joiner
Pros
- No previous training or knowledge is necessary to understand how to use the software.
- All major file formats are supported.
- The output file quality is unaffected.
Cons
- It sometimes crashes depending on the file size.
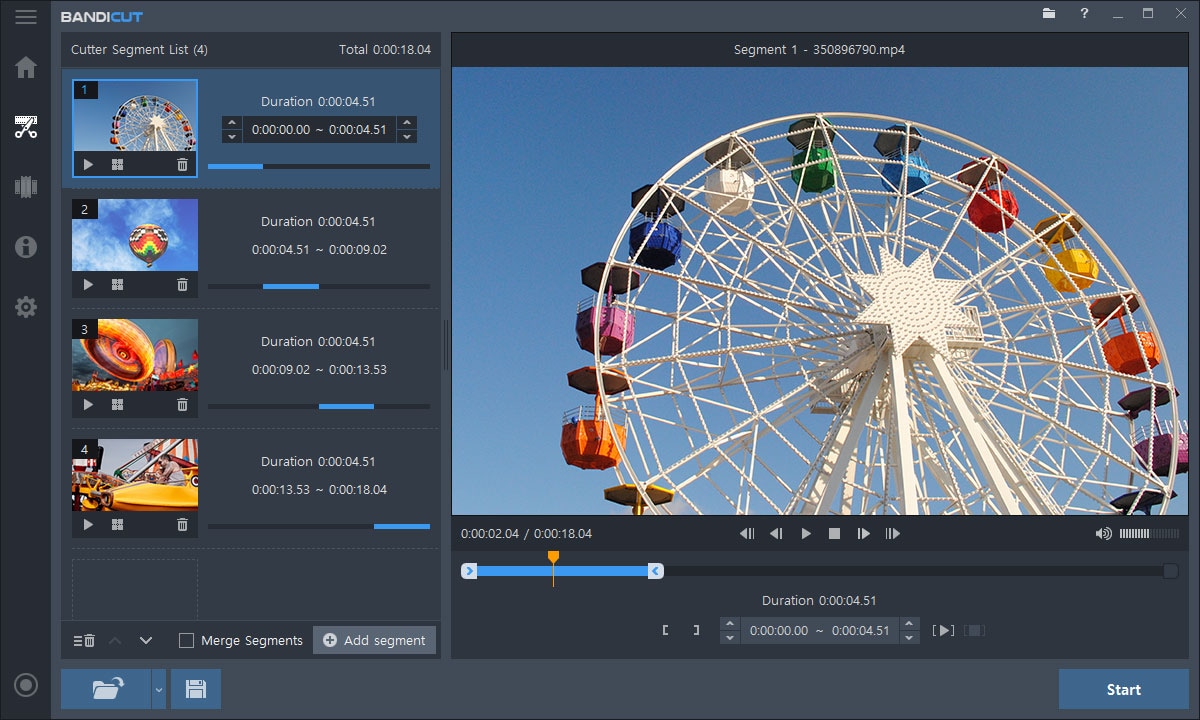
4. BandiCut
Bandicut is a video splitting and joining program for Windows systems only. It has a straightforward UI and simple settings. It may also be used as a video converter, allowing you to modify the format of the output clips. The tool is useful for both newcomers and seasoned users.
Platform: Windows
Price:$29.95 per user per month
Features
- Easy and fast video cutter
- Video splitter
Pros
- The interface is pleasing to the eye, and the functions are simple.
- High-capacity mode
Cons
- There isn’t a fully working free version available.
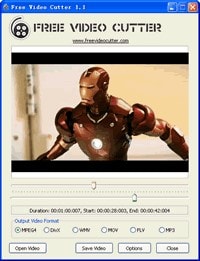
5. Free Video Cutter
This is a basic tool for reducing the size of large video files. It allows you to cut a clip from a movie or video in various formats and save it in four other formats. The hand-drawn interface, by the way, is incredibly charming.
Platform: Windows
**Price:**a free version and premium version ($17.99 per month)
Features
- An irregularly shaped hand-drawn art style interface.
- Videos in a variety of formats are accepted.
- The control panel is small, with just three major buttons.
Pros
- Save as new videos in a variety of formats without compromising quality.
- It may be used to trim lengthy movies, mobile videos, and camera recordings, among other things.
Cons
- For huge files, there are a lot of crashes.
- For Mac users, this tool is not accessible.
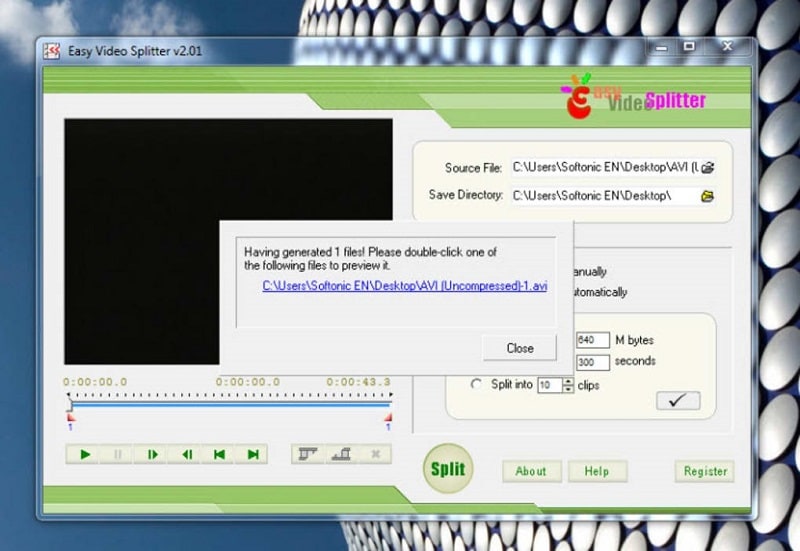
6. Easy Video Splitter
Easy Video Splitter is a simple video editing application that allows you to divide your video into many segments. It can play AVI, MPEG, WMV, and ASF files. The scroll bats may be used to cut the movie precisely where you want it to be cut or to divide the film at certain intervals.
**Platform:**Windows/Mac
**Price:**free with ads
Features
- Has a batch processor
- Multiple file support
- Easy to use
Pros
- Batch processing is supported.
Cons
- Only one frame at a time may be fine-tuned.
7. Avidemux
Avidemux is perfect if you have a video to encode or arrange for a certain speaker system. It’s also an ideal choice if you just require a basic video editor, although there are many more extensive applications available that may be better appropriate.
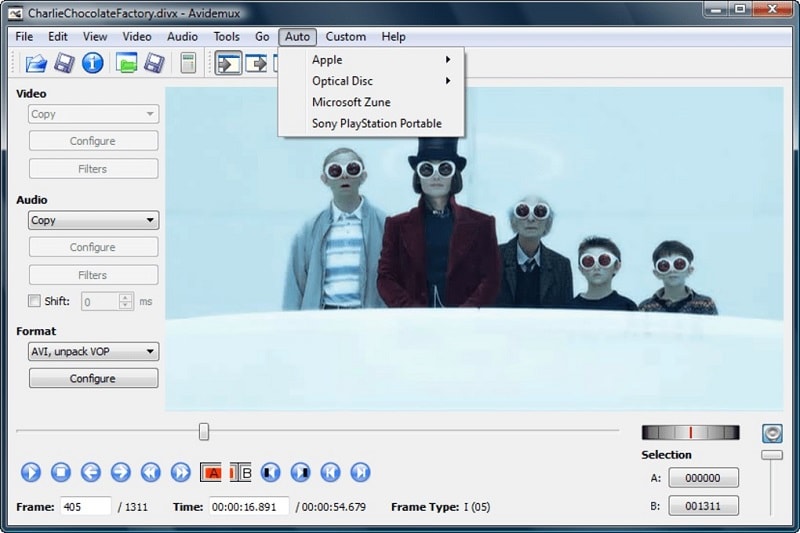
**Platform:**Windows/Mac
**Price:**free
Features
- This program can handle a variety of subtitle formats, including SUB and SRT.
- They also provide a variety of filtering options.
- You may export videos in various formats, including MKV, MPEG, and MP4.
Pros
- A user-friendly interface
- Excellent alternatives for encoding
- Filters for sharpening and de-noising
Cons
- There is no timeline.
- There are no innovative transitions or effects.
8. Ultra Video Splitter
Ultra Video Splitter is an excellent solution for people who just need to complete this one operation and hence do not need the usage of sophisticated video editing software. The tool enables you to choose from a variety of parameters for the final file or files, such as file size, final format, and bitrate.
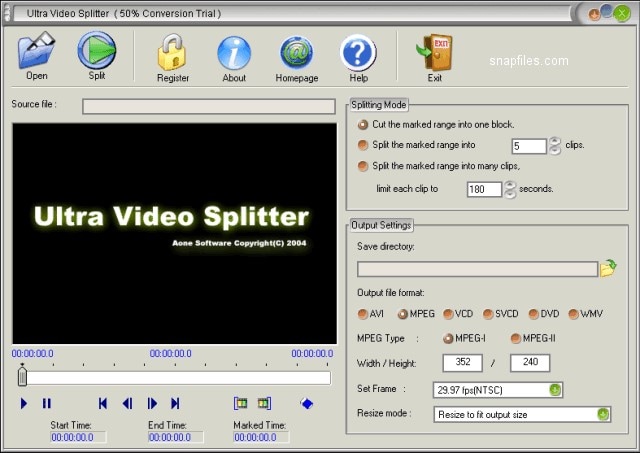
**Platform:**Windows/Mac
Price:$25.00 one-time payment
Features
- Supports videos in WMV, XviD, MPEG, ASF, AVI, RM, MOV, 3GP, Divx, and MP4 format.
- Can export the final video in VCD, SVCD, DVD, AVI, DivX, MPEG, or WMV format.
Pros
- Video trimming and exporting are both quick.
- Multiple video formats are supported.
Cons
- Has just a few video editing options.
9. VideoPad Video Editor
On Mac and Windows, the VideoPad video editor allows you to edit clips and produce professional-quality films. Its divide and merge functions are also straightforward to utilize. VideoPad editing software can be used to create visually appealing videos. As a result, the video splitter software for Mac can rapidly and efficiently manipulate video streams.
**Platform:**Windows/Mac
Price:$60.00 one-time payment
Features
- It supports a variety of file formats, offering users additional choices for how to utilize the tool with different file kinds.
Pros
- The cost of a professional business video is surprisingly low.
- Importing video is as simple as dragging and dropping.
Cons
- The free edition offers a restricted number of functions.
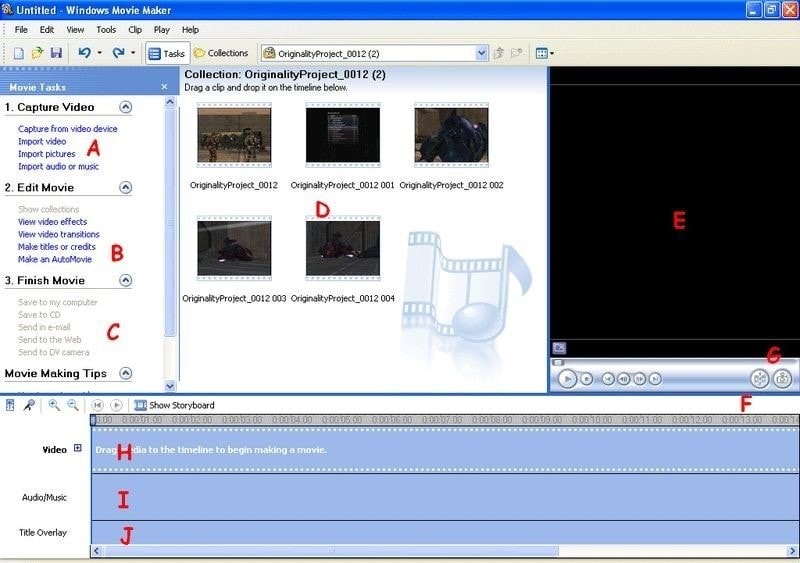
10. Windows Movie Maker
This video editing software comes with Windows OS and is focused on simplicity: There’s no easier method to split videos and save into lossless codecs with titles, transitions, background music, and effects than this. Earlier versions of the application were so basic that they couldn’t accomplish what most people required. Still, over time, features like voiceover recording and even anti-shake have crept into what is today a highly useful free video splitter.
**Platform:**Windows
**Price:**free
Features
- Cool transitions
- Effects on video
- Voiceovers are some of the audio features
Pros
- Effects are automatically previewed.
- Audio features such as voiceovers and other audio enhancements.
- Excellent choices for sharing.
- Simple to use
- Stabilization.
Cons
- There are no modifications to the contrast or saturation.
- The effects aren’t flexible.
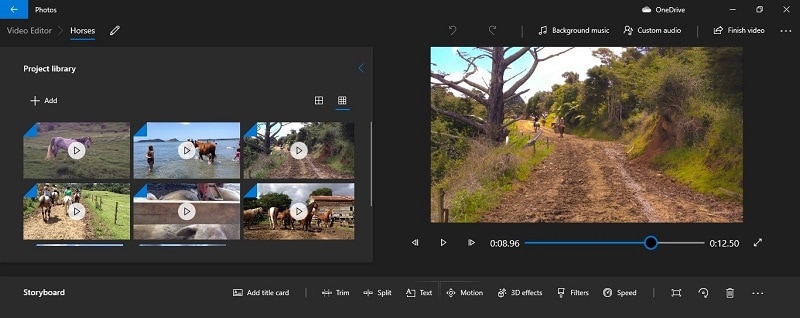
11. Windows Photos
Many users will never require more than Windows 10’s built-in picture and video editor . It is an automatic video splitter with sophisticated effects like 3D overlays and animated titles are among the extras.
**Platform:**Windows
**Price:**free
Features
- Face recognition
- Video cutter
- 3D overlays
Pros
- A simple interface.
- Detecting faces and objects.
- Album creation is done automatically.
- It works with OneDrive.
- Soundtracks, text, and transitions are all used in video editing.
Cons
- There isn’t a before-and-after comparison.
- Panorama stitching and selective focus are not supported.
- There is no geometry correction or chromatic aberration correction.
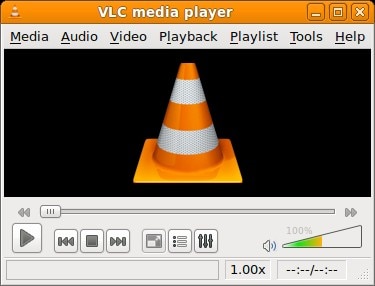
12. VLC
VLC Media Player , for good reasons, is a hugely popular video splitter. It is completely free, supports almost everything without the need to download additional codecs, supports streaming, can enhance video and audio playback for your chosen device, and can be extended almost infinitely with plugins downloadable from the internet.
**Platform:**Windows/Mac
**Price:**free
Features
- Allows streaming of MPEG and DivX files
- Excellent video and audio playback modifying tools
Pros
- It can play all kinds of music and video formats, even compressed ones.
Cons
- It is GPU-dependent and may crash at random moments.
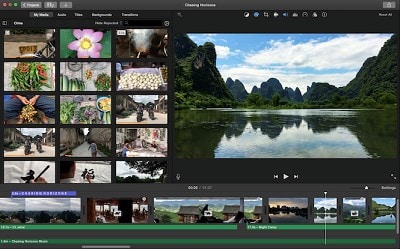
13. iMovie
If you’re using a Mac,iMovie video editing program can help you split videos. Mac users will find this to be one of the finest video splitters available. It contains a wide range of capabilities that may improve the quality of your video in a variety of ways. The video may be trimmed and enhanced with many features, such as text, special effects, and audio. Video quality may be improved with this software’s special effects and video upgrades. In addition, the interface is so user-friendly that even novices may generate stunning results. On the other hand, iMovie is capable of storing 4K films.
**Platform:**Mac
**Price:**free
Features
- An easy-to-use video splitter that is already built-in
- It’s simple to use
Pros
- An easy-to-use video splitter that is already built-in
- It’s simple to use
Cons
- Uploading and exporting videos takes a long time.
14. Format Factory
Multifunctional document and multimedia processing software -Format Factory - is only available for Windows. It’s meticulously designed to keep you from getting lost in the weeds when working on any project. It is designed to be a stand-alone file management application, and judging by the wealth of options available, it has done an excellent job.

**Platform:**Windows
**Price:**free
Features
- Video joining and muxing are available.
- It has a screen recorder built right in.
- A built-in video player and downloader are included.
- Allows for hardware acceleration.
- Disk ripping options are provided.
- Processing may be done in a batch.
Pros
- Removes watermarks and logos.
- File formats supported include video, audio, images, and documents.
Cons
- Unnecessary software is installed when installing the program.
7 Best Free Video Splitter Online
2. VEED.IO
Veed.io is a free online video editing tool that allows anybody to make powerful movies and expand their audiences. It has several useful features, such as cutting and filtering films based on their appearance. Users may cut, add text, and draw on the videos. Veed may also be used to generate videos on social media channels.

**Price:**free
Features
- Video splitter and joiner
Pros
- Simple and quick.
- A preview of the cutting result is available.
Cons
- The maximum file size is 50 MB.
3. Flixier
Flixier is a web-based video editor that offers 1-minute exports to any device, easy collaboration, and lots of cloud storage. Flixier enables customers to export whatever video they want, independent of their technology. It keeps all stakeholders in the loop by allowing each team member and contributor to remain in sync across all platforms. Teams may interact in real time without fear of losing track of the project. Cloud storage, version history, feedback comments, sophisticated exports, and email alerts are all available. The tool supports Windows, Mac, Linux, and Chromebooks.
**Price:**free
Features
- Video splitter and joiner
Pros
- iPhone version is available.
- Automatic sound amplification.
Cons
- May seem too overloaded with functions.
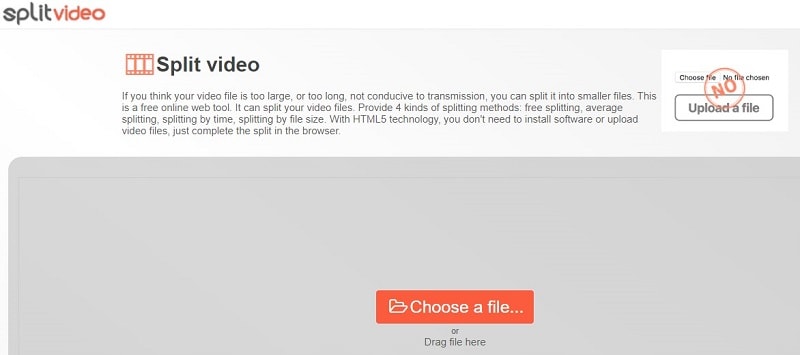
4. Split Video
Split Video program may also be used to edit and split huge videos into smaller segments. It’s quite simple to work with. All you have to do now is choose the video to divide. Tell the app how you’d want the video to be divided. Choose how many parts you want in your video. You may watch the app-split clips before sharing them.
**Price:**free
Features
- Video splitter and joiner
Pros
- Interface that is easy to use.
Cons
- The maximum file size is 200 MB.
5. Kapwing
This application primarily advertises itself as a video trimmer. It lets you edit films by removing unwanted bits and trimming them to the appropriate length. It also has some basic settings, such as utilizing it as a free online MP4 splitter. The user interface is simple, and uploading a movie takes just a few moments. The primary drawback is that your film may only be 300 MB in size and must be under 30 minutes in length.

**Price:**free
Features
- Video splitter and joiner
Pros
- Interface that is simple to use.
Cons
- A little watermark appears in the corner of your video with the free version.
- Only supports films up to 300 MB in size and up to half an hour in length.
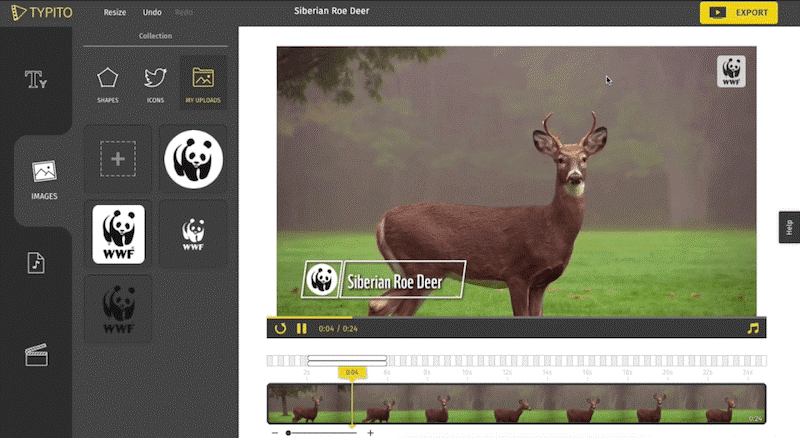
6. Typito
Typito is a video collaboration tool that allows you and your team to work together to make better films for your business. Typito allows you to make and utilize professionally created graphic overlays for free, as well as generate full-length HR movies in both square and portrait formats. It enables you to produce movies consistent with your brand, allowing you to change and customize elements like font, color, and logo with a few mouse clicks. You may save time for your organization by producing videos quicker and working with your team to publish professional-looking films while previewing them on the move. Inviting team members to the project and assigning responsibilities for editing and reviewing videos are just a few collaboration tools.
**Price:**free
Features
- Video splitter and joiner
Pros
- Simple features to use
Cons
- Few transition templates.
7. Clideo
Clideo is a one-of-a-kind platform that allows you to easily produce and modify any video, GIFS, and picture files in one spot. Merging, compressing, resizing, slideshow, cropping, rotation, and other video editing tools are included in the program. Users may add music or text to videos to help them stand out and draw in the right audience. The video editing platform supports various video formats such as MP4, AVI, MPG, VOB, WMV, MOV, and others. There is no need to download or install any applications since everything may be done entirely online. The premium security encryption that comes with it ensures that all video files are always well-protected.
**Price:**free
Features
- Video splitter and joiner
Pros
- Much easier to use than other video editing software.
- Projects are stored on the cloud, so they don’t take up any computer resources.
- There is no need to download any program.
Cons
- The feature set is limited in comparison to other video editing suites.
- Visual artistry is required.
- Some undertakings need a significant amount of time to complete.
10 Best Video Splitter for Mobile Phone
1. Filmora
A good video editor is required to split a video qualitatively.Filmora Video Editor & Maker might be the answer. It works with high-definition videos. It comes with all of the necessary editing tools. As a result, you will not be sorry for installing this software. Not only will you be able to edit and divide films effortlessly, but you’ll also be able to add fun filters.
The sticker library in Filmora Video Editor & Maker is extensive. The number is in the thousands. You’ll be able to apply both realistic and humorous animated stickers. Use video transitions such as Flash, Page Cut, Cross Zoom, Blurry Roll, and Cube. You have complete control over the speed of your edited video.
**Price:**free
Features
- Video splitter and joiner
- Video editor
Pros
- Files may be readily exported and imported.
Cons
- Compatibility of exported videos is limited.
2. AndroVid Video Editor
AndroVid is a video-splitting program with all the tools you’ll ever need. This program is jam-packed with editing tools, allowing you to create a polished video quickly. The program is also quite user-friendly, so even if this is your first time splitting a video, you will be able to handle it.
**Platform:**Android
**Price:**free
Features
- Video splitter and joiner
- Video editor
Pros
- Simple video cutting tool; can extract single-frame pictures from videos.
Cons
- There are no sophisticated editing choices, and the audio options are quite restricted.
- There is no tool for full-screen graphics, and the user interface is a little complicated.
- The ad-free version is nearly as expensive as KineMaster Pro, which is more sophisticated.
3. Easy Video Cutter
Becausethis program is only devoted to video editing, it can handle a wide range of tasks. The program, for example, may clip videos, combine them, rotate them, and so on. You may also adjust the pace of the videos as needed. It should be noted that trimming the video in this program is quite simple — just pick the range with the slider instrument, and that’s it. Because this program is only devoted to video editing, it can handle a wide range of tasks. The program, for example, may clip videos, combine them, rotate them, and so on. You may also adjust the pace of the videos as needed. It should be noted that trimming the video in this program is quite simple — just pick the range with the slider instrument and that’s it.

**Platform:**Android
**Price:**free
Features
- Video splitter and joiner
- Video editor
Pros
- It’s quite simple to use.
- It’s ideal for simple video cutting tasks.
Cons
- There are no additional editing options available.
4. Video Editor
Video Editor is a fantastic app for Android users who want to edit and enhance their videos. It can break a video into segments, combine several films, crop videos, and adjust the video’s size. You may also add audio to the video of your choosing.
**Platform:**Android
**Price:**free
Features
- Video splitter and joiner
- Video editor
Pros
- You may rearrange your clips in any order you choose.
- Many older file types are supported by the program.
Cons
- The video scroll bar might be a little tricky to use.
- It’s quite basic.
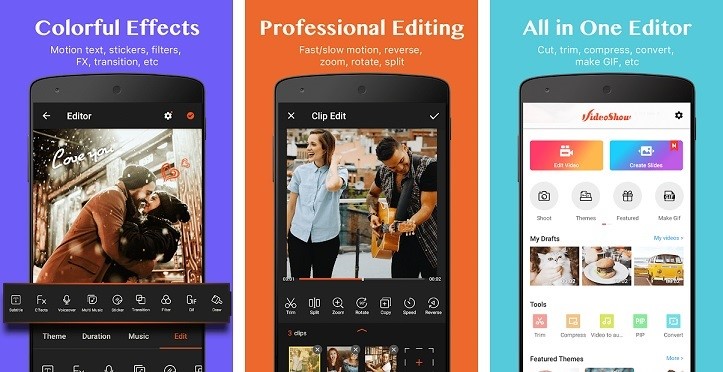
5. VideoShow – Video Editor
On the Google Play market,VideoShow is one of the most popular video editing applications. There are several themes, filters, music, and audio to choose from while creating great videos. It’s a fantastic video trimming software.
**Platform:**Android/iPhone
**Price:**free
Features
- Video splitter and joiner
- Video editor
Pros
- It has the ability to both connect and cut clips.
- It’ll run on almost any android phone.
Cons
- Video Scissors has taken the place of the iPhone version.
- Cutting is fast, but re-encoding might take a long time.
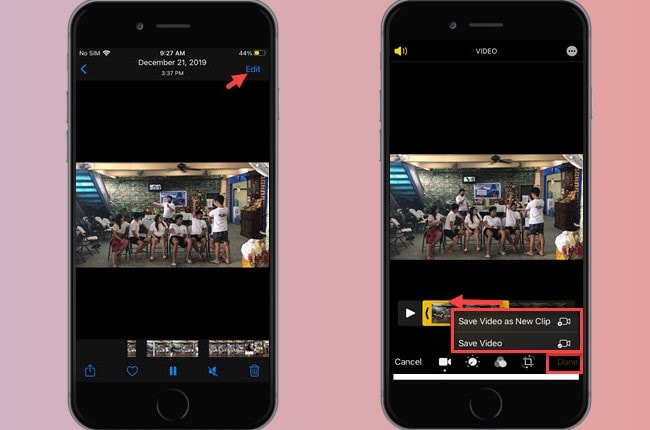
6. Trim Video
Trim Video is the greatest app for iPhone video editing and cutting of huge videos. From the huge file, you may easily crop a video clip. Although the program is highly useful and entertaining for video makers, it is not free and costs $0.99.
**Platform:**iPhone
Price:$0.99 per month
Features
- Video splitter
Pros
- All major video and audio formats are supported.
- When you’re finished, there’s no need to re-render the video.
- There are no watermarks.
Cons
- This software does not include video joining; it must be downloaded separately.
- This app’s main purpose is to cut.
7. Video Splitter
Video Splitter is an iPhone software that allows you to edit and divide videos into segments. It’s a free program that combines all of your editing tools into one application. The tool successfully splits a huge video into little chunks, which can be quickly texted or uploaded to social media.
**Platform:**iPhone
**Price:**free
Features
- Video splitter and joiner
- Video editor
Pros
- A broad number of formats, including audio, are supported.
- It’s a breeze to use.
Cons
- There are no choices for video converting.
- It’s been a long time since it’s been updated.
8. Crop video
Crop Video is another handy iPhone app if you wish to cut your movie to a lesser size. It is one of the most popular tools for cutting videos and altering them for a better impact. It contains several features that boost the app’s versatility. It’ll set you back $2.99.
**Platform:**iPhone
Price:$2.99 per month
Features
- Video splitter and joiner
- Video editor
Pros
- The video cutter is helpful for novices.
- It works with every iPhone version.
Cons
- The free version has a lot of limitations.
- The videos of free users are watermarked.
9. Video Crop
Video Crop is a free iPhone software that allows you to crop videos. There are many more options in the software that may be used to modify and improve a video. This program has a lot of flexibility when it comes to video editing and other video settings. This program may also be used to split videos.
**Platform:**iPhone
**Price:**free
Features
- Video splitter and joiner
- Video editor
Pros
- Splitting and joining MP4 files is simple and effective.
Cons
- It’s only compatible with MP4 files.
- The UI is really sluggish.
10. Video Trim & Cut
Video Trim & Cut is an iPhone software that allows you to divide or trim videos. Adding effects, cropping, altering color, and changing themes are just a few things you can do with the app.
**Platform:**iPhone
**Price:**free
Features
- Video splitter and joiner
- Video editor
Pros
- Excellent templates.
- It has the appearance and functionality of a more costly app.
Cons
- It’s only available on iPhone.
- It might take a long time for a video to render.
Part 5: How to Split Video with Filmora
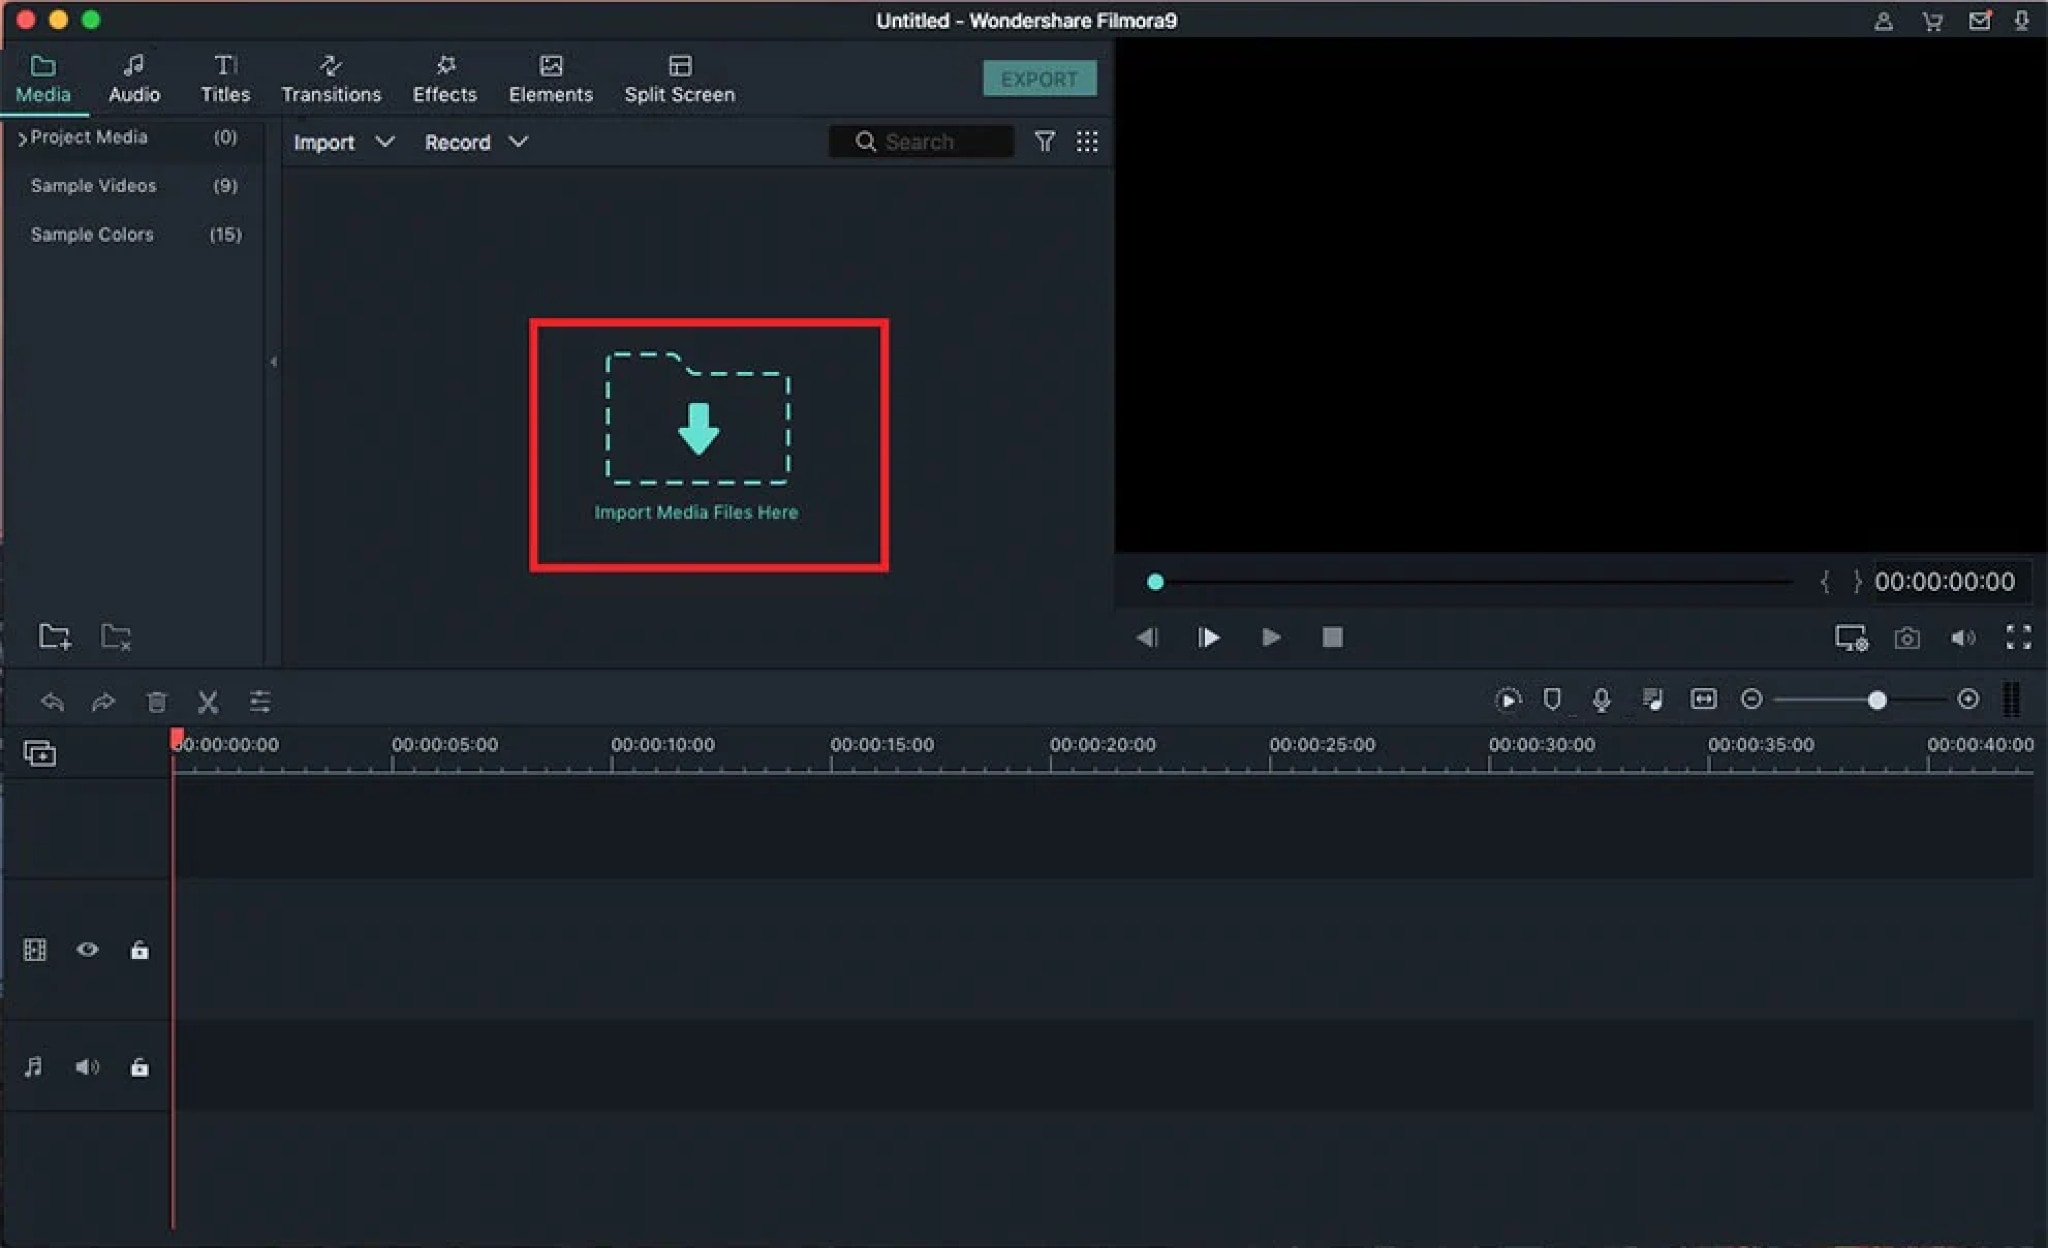
Step1Import your videos to Filmora Video Cutter
Launch the video cutter once it has been installed and click New Project to access the video editing interface. Now you must import the video, which must be divided into numerous portions.
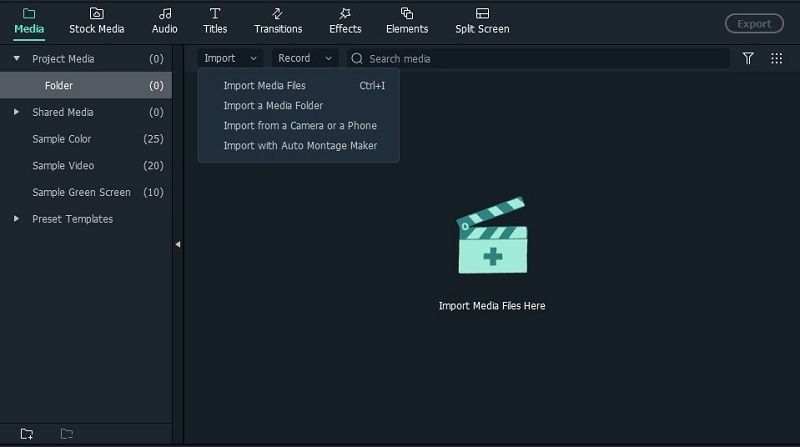
Upload files
You can either drag and drop files to the media library before adding them to the timeline for editing, or you can click “Import” on the main interface and choose files from your computer.
VOB, 3GP, 3G2, MP4, FLV, AVI, MOV, F4V, M4V, TRP, M2TS, MTS, TP, DAT, WMV, MPG, MPEG, TS, MKV, ASF, DV, EVO, MOD, NSV, and TOD files are all supported by Filmora video cutter.
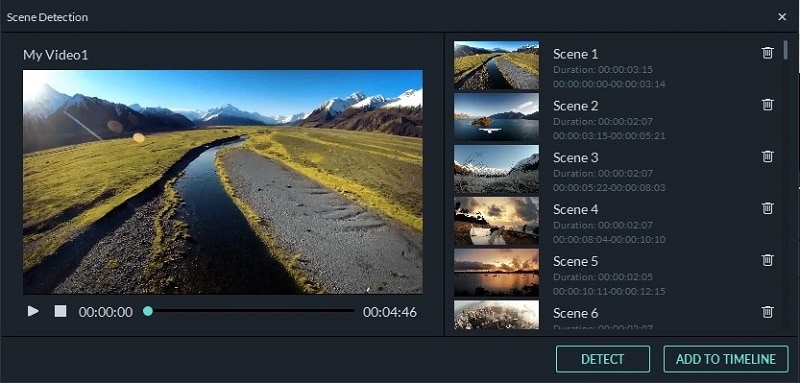
If your video contains a lot of distinct sequences, Filmora can help you discover the clip you want to trim. The “Scene Detection” tool will assist you in rapidly locating the part you wish to clip. To open the Scene Detection window, choose the video in the media library (not the timeline), right-click it, and select “Scene Detection.”

Detect video
When you click Detect, Filmora will automatically split your films into multiple segments depending on scene changes.
Scenes detected automatically
By clicking the Delete symbol next to the clip, you may delete the undesired sequences and quickly get to the section you want. When you click the Add to Timeline button, all of the segmented video sections will be instantly imported into the timeline, which you can then modify.
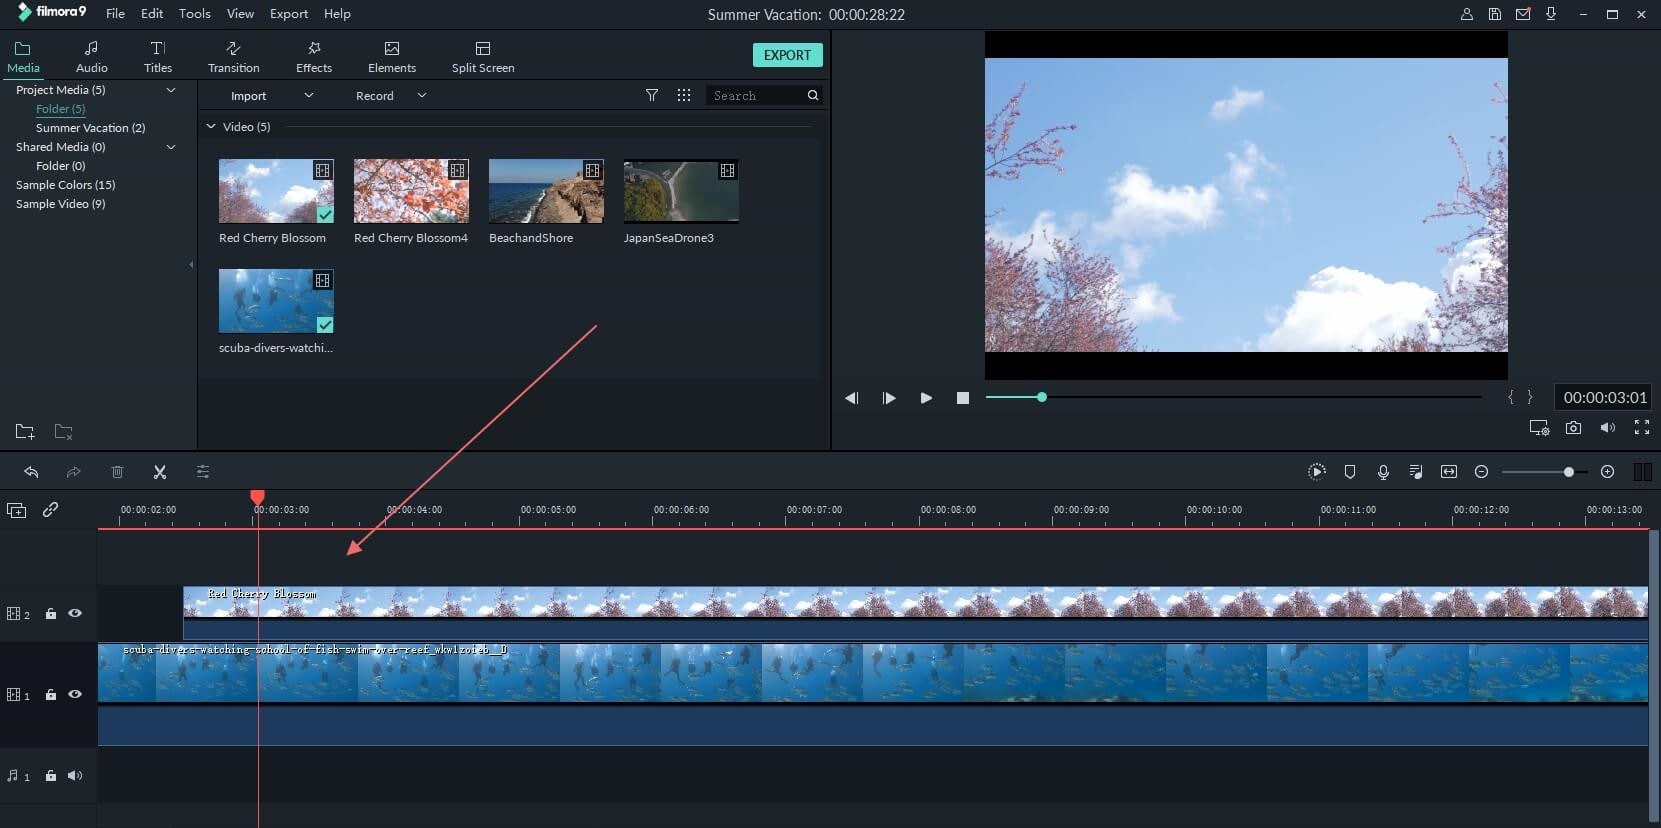
Step2Manually trim/split/cut/delete videos
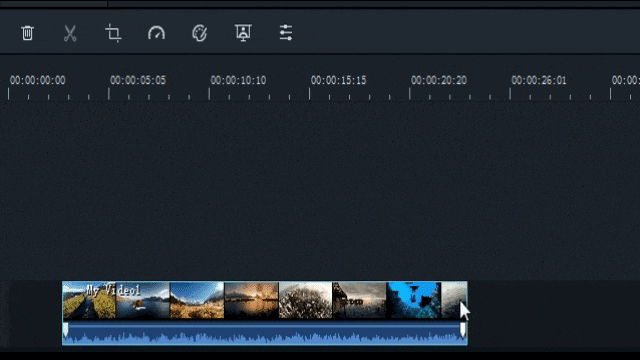
To trim video files, drag clips from the media library to the video track on the timeline and follow these steps. You may use the trim option to chop off the beginning or conclusion of a video swiftly.
Trim video using filmora
- i.Zoom in on the frames you wish to remove from the timeline. Drag the trim symbol to the right to remove the video’s beginning segments from the timeline or to the left to remove the video’s undesired ending segments. You may use the trim tool to cut the beginning and end parts of a sentence with a single drag.
- ii.You may edit a movie into portions, eliminate unnecessary aspects, and combine them into a new film, in addition to chopping off segments at the beginning or conclusion.
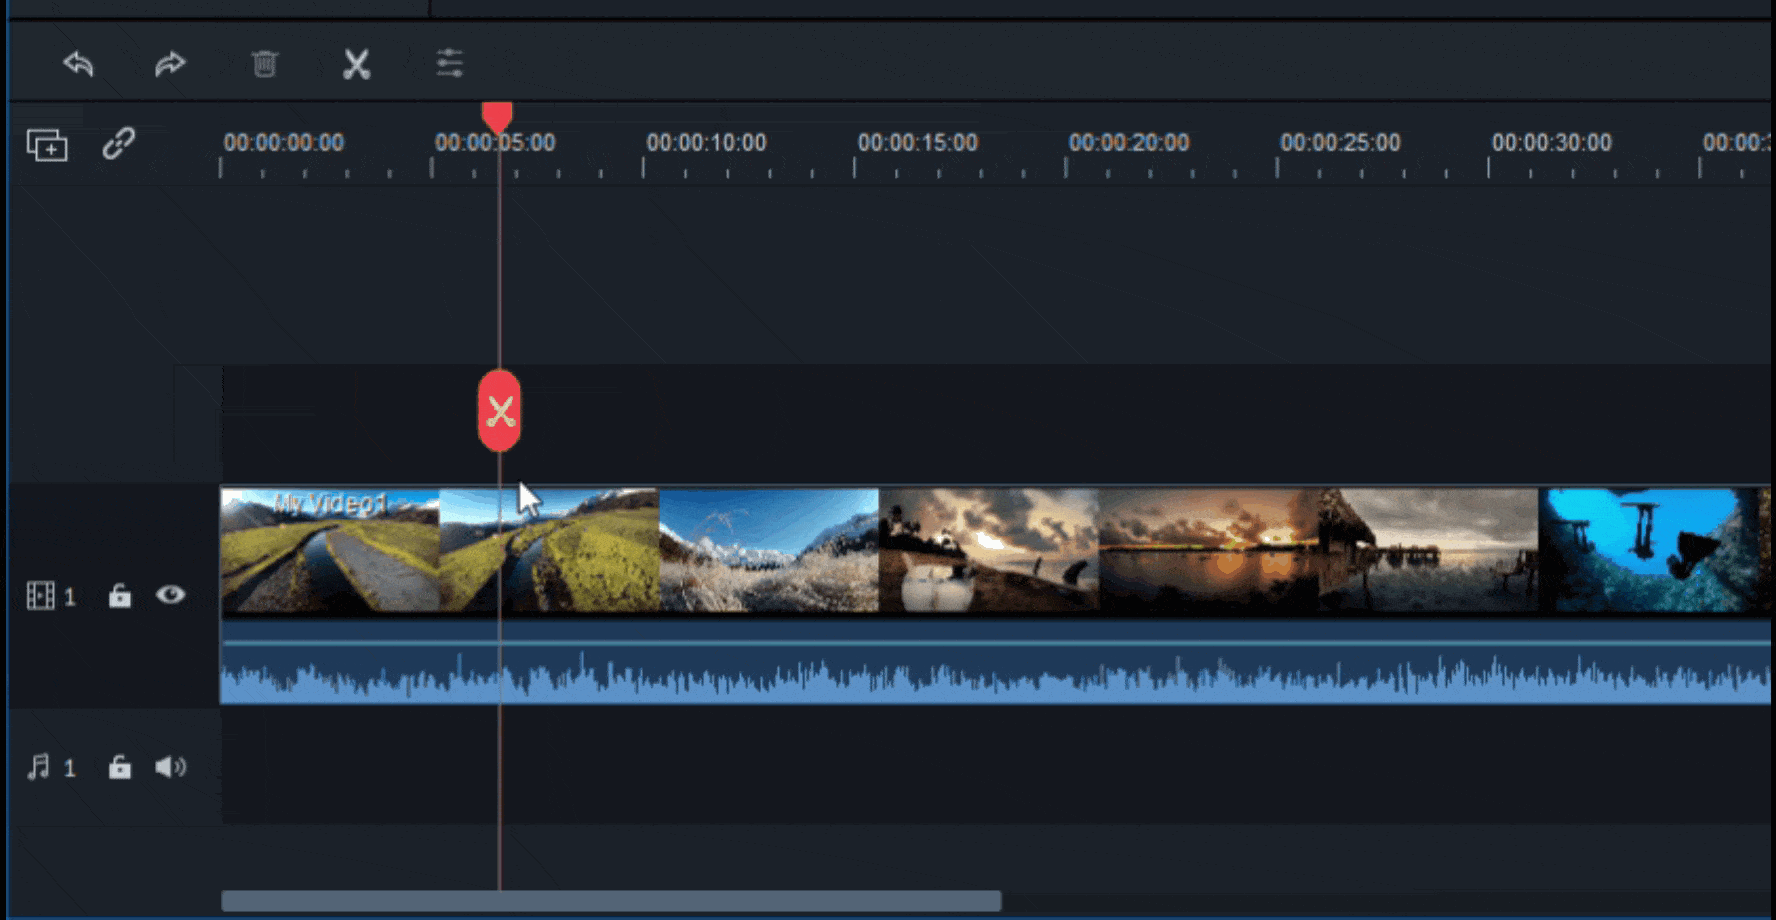
- iii.Move the play head to the beginning of the video part you want to cut, then click the Split icon (scissor icon) on the toolbar or the Split button on the play head to split the video. You will get the starting frame, then move the play head to the ending frame and click the Split button again to get the ending part.
- iv.To cut a video into many sections, repeat the procedure. You will get multiple clipped portions, which you may either remove or re-order and alter further.
- v.You may edit out an undesirable cut video by hitting the Delete symbol on the toolbar.
Add trim start and end
Step3Export your video
Click the Export button on the screen after you’ve completed cutting and basic editing. By choosing “Format” and specifying the essential options such as frame rate and resolution, you may save the video in different formats on your local computer.
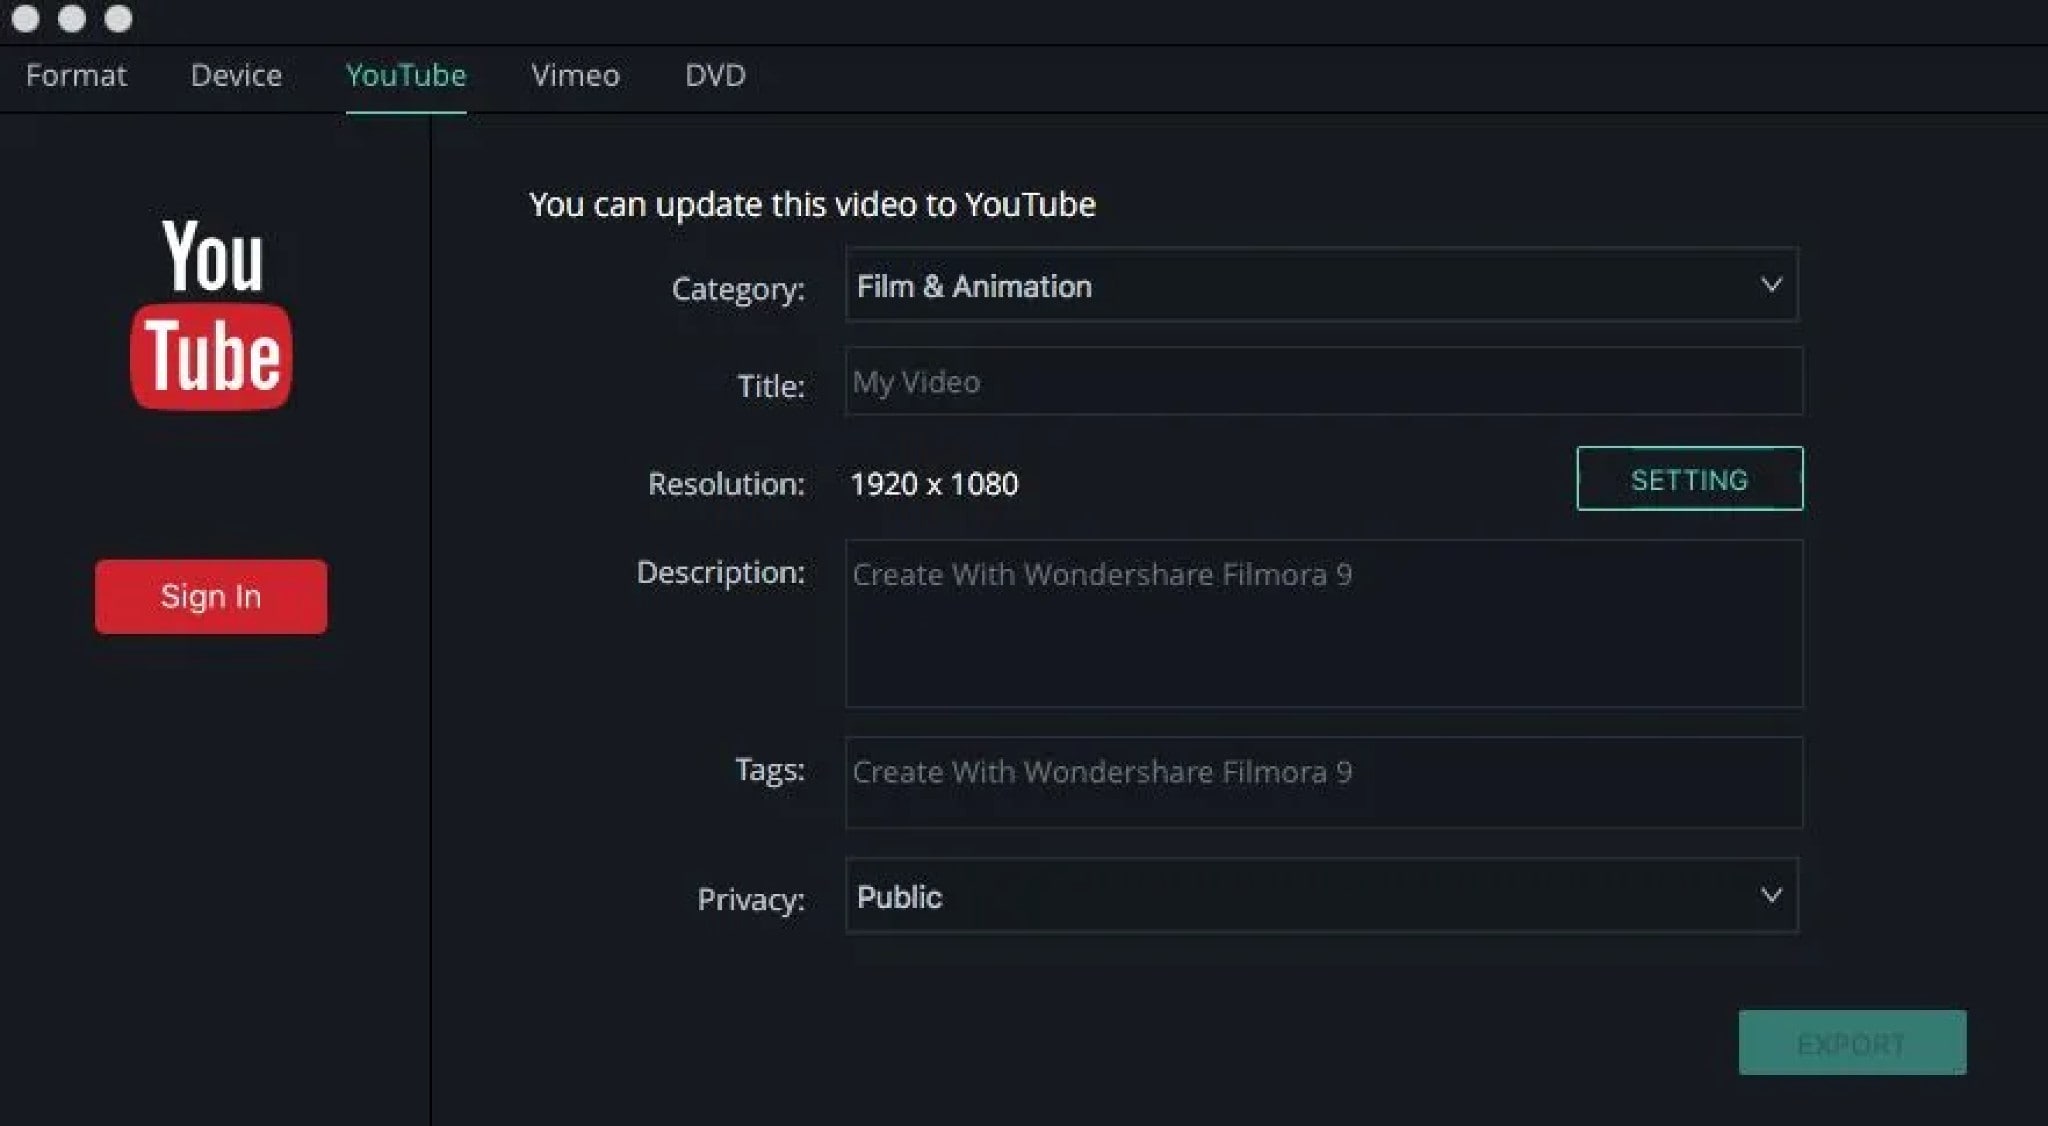
If you wish to see your video production on your iPod, iPhone, or iPad, go to “Device” and choose your device’s thumbnail. You may also instantly post your films on YouTube or Vimeo, or burn them to DVDs for long-term storage.
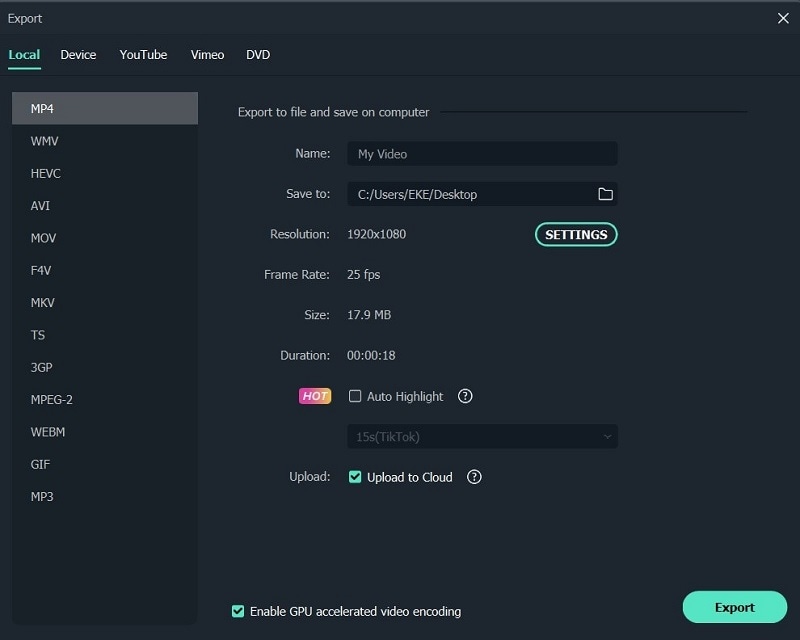
Export video after splitting
Bottom Line
Video splitting can be a daunting task when you don’t have the right tools to help you. If you are a Windows or a Mac user then Wondershare Filmora will help you split videos in just few clicks. The software is completely free with an option to go pro for a cheaper price compared to other premium apps. If you prefer splitting your video online then still Filmora online editor will help you in this. Moreover, some good news for android and iPhone users as Filmora comes with all features to split and join videos. With all these tools you can take your video creation process to the next level.
- Filmora
- AndroVid Video Editor
- Easy Video Cutter
- Video Editor
- VideoShow – Video Editor
- Trim Video
- Video Splitter
- Crop video
- Video Crop
- Video Trim & Cut
Part 1: Backup Your Original Video
Making several backups is perhaps the most critical thing you can do for your project. Whether your computer dies suddenly or your editing application crashes, you’ll have a point to fall back on if you have a backup. Making this a habit will save you a lot of time and work in the long term. How many copies of your data should you make? You should create at least three project duplicates in the best-case scenario. Also, make sure they’re preserved in various formats and places—one on an SD card, another on a hard drive, or a USB drive.
14 Best Video Splitter for Windows/Mac
1. Filmora
Wondershare Filmora Video Editor is a superb video editor for those seeking software that can split videos and has a lot of functions. It was originally only accessible for Windows, but thanks to the developers, Mac users may now use this high-quality video splitter. Using this program to split and join videos is pretty basic and straightforward. It’s an intriguing tool since it allows users to produce high-quality films using filters, effects, and other features in an easier method than employing professional editors. This program also lets you export video at a breakneck speed, up to 4k quality.
![]()
Platform: Windows/Mac
Price: Free Trial
Features
- Editing is intuitive and quick.
- Export video in 4k quality.
- There are several graphic effects and transitions.
- Footage from the internet.
- Regularly upgraded features.
Pros
- Large films can be easily cut, trimmed, and combined without compromising quality.
- On the exported video, there is no watermark.
- Both Windows and Mac computers are supported.
- Splitting a video is such a breeze.
- For novices, it has a lot of handy options that will help you create a stunning film.
Cons
- Large-scale content editing might be slow at times.
2. Boilsoft Video Splitter
Boilsoft Video Splitter can divide, edit, or trim a big AVI, MPEG, RM, ASF, WMV, 3GP, MKV, FLV, or MP4 video file without re-encoding smaller video segments. It has a built-in player that allows you to effortlessly split/cut video files according to time or selection.
Platform: Windows/Mac
Price:$34.95 one-time payment
Features
- Split Video
- Cut video
- Built-in player
Pros
- It supports lots of video format.
- User-friendly software.
Cons
- Because you can’t adjust the program window, using the slider for selection becomes increasingly difficult as your video becomes longer.
3. Solveigmm Video Splitter
SolveigMM Video Splitter is suitable for simple editing processes such as removing an extra section from a video, removing an advertisement from a movie, muting the sound on a selected video fragment, saving only a video or audio track from a file, cutting a video into parts, saving segments into separate files, and so on. The editing procedure takes just a few seconds.
Platform: Windows/Mac
Price:$7.99 per month
Features
- Video cutter
- Video editor
- Video Joiner
Pros
- No previous training or knowledge is necessary to understand how to use the software.
- All major file formats are supported.
- The output file quality is unaffected.
Cons
- It sometimes crashes depending on the file size.
4. BandiCut
Bandicut is a video splitting and joining program for Windows systems only. It has a straightforward UI and simple settings. It may also be used as a video converter, allowing you to modify the format of the output clips. The tool is useful for both newcomers and seasoned users.
Platform: Windows
Price:$29.95 per user per month
Features
- Easy and fast video cutter
- Video splitter
Pros
- The interface is pleasing to the eye, and the functions are simple.
- High-capacity mode
Cons
- There isn’t a fully working free version available.
5. Free Video Cutter
This is a basic tool for reducing the size of large video files. It allows you to cut a clip from a movie or video in various formats and save it in four other formats. The hand-drawn interface, by the way, is incredibly charming.
Platform: Windows
**Price:**a free version and premium version ($17.99 per month)
Features
- An irregularly shaped hand-drawn art style interface.
- Videos in a variety of formats are accepted.
- The control panel is small, with just three major buttons.
Pros
- Save as new videos in a variety of formats without compromising quality.
- It may be used to trim lengthy movies, mobile videos, and camera recordings, among other things.
Cons
- For huge files, there are a lot of crashes.
- For Mac users, this tool is not accessible.
6. Easy Video Splitter
Easy Video Splitter is a simple video editing application that allows you to divide your video into many segments. It can play AVI, MPEG, WMV, and ASF files. The scroll bats may be used to cut the movie precisely where you want it to be cut or to divide the film at certain intervals.
**Platform:**Windows/Mac
**Price:**free with ads
Features
- Has a batch processor
- Multiple file support
- Easy to use
Pros
- Batch processing is supported.
Cons
- Only one frame at a time may be fine-tuned.
7. Avidemux
Avidemux is perfect if you have a video to encode or arrange for a certain speaker system. It’s also an ideal choice if you just require a basic video editor, although there are many more extensive applications available that may be better appropriate.
**Platform:**Windows/Mac
**Price:**free
Features
- This program can handle a variety of subtitle formats, including SUB and SRT.
- They also provide a variety of filtering options.
- You may export videos in various formats, including MKV, MPEG, and MP4.
Pros
- A user-friendly interface
- Excellent alternatives for encoding
- Filters for sharpening and de-noising
Cons
- There is no timeline.
- There are no innovative transitions or effects.
8. Ultra Video Splitter
Ultra Video Splitter is an excellent solution for people who just need to complete this one operation and hence do not need the usage of sophisticated video editing software. The tool enables you to choose from a variety of parameters for the final file or files, such as file size, final format, and bitrate.
**Platform:**Windows/Mac
Price:$25.00 one-time payment
Features
- Supports videos in WMV, XviD, MPEG, ASF, AVI, RM, MOV, 3GP, Divx, and MP4 format.
- Can export the final video in VCD, SVCD, DVD, AVI, DivX, MPEG, or WMV format.
Pros
- Video trimming and exporting are both quick.
- Multiple video formats are supported.
Cons
- Has just a few video editing options.
9. VideoPad Video Editor
On Mac and Windows, the VideoPad video editor allows you to edit clips and produce professional-quality films. Its divide and merge functions are also straightforward to utilize. VideoPad editing software can be used to create visually appealing videos. As a result, the video splitter software for Mac can rapidly and efficiently manipulate video streams.
**Platform:**Windows/Mac
Price:$60.00 one-time payment
Features
- It supports a variety of file formats, offering users additional choices for how to utilize the tool with different file kinds.
Pros
- The cost of a professional business video is surprisingly low.
- Importing video is as simple as dragging and dropping.
Cons
- The free edition offers a restricted number of functions.
10. Windows Movie Maker
This video editing software comes with Windows OS and is focused on simplicity: There’s no easier method to split videos and save into lossless codecs with titles, transitions, background music, and effects than this. Earlier versions of the application were so basic that they couldn’t accomplish what most people required. Still, over time, features like voiceover recording and even anti-shake have crept into what is today a highly useful free video splitter.
**Platform:**Windows
**Price:**free
Features
- Cool transitions
- Effects on video
- Voiceovers are some of the audio features
Pros
- Effects are automatically previewed.
- Audio features such as voiceovers and other audio enhancements.
- Excellent choices for sharing.
- Simple to use
- Stabilization.
Cons
- There are no modifications to the contrast or saturation.
- The effects aren’t flexible.
11. Windows Photos
Many users will never require more than Windows 10’s built-in picture and video editor . It is an automatic video splitter with sophisticated effects like 3D overlays and animated titles are among the extras.
**Platform:**Windows
**Price:**free
Features
- Face recognition
- Video cutter
- 3D overlays
Pros
- A simple interface.
- Detecting faces and objects.
- Album creation is done automatically.
- It works with OneDrive.
- Soundtracks, text, and transitions are all used in video editing.
Cons
- There isn’t a before-and-after comparison.
- Panorama stitching and selective focus are not supported.
- There is no geometry correction or chromatic aberration correction.
12. VLC
VLC Media Player , for good reasons, is a hugely popular video splitter. It is completely free, supports almost everything without the need to download additional codecs, supports streaming, can enhance video and audio playback for your chosen device, and can be extended almost infinitely with plugins downloadable from the internet.
**Platform:**Windows/Mac
**Price:**free
Features
- Allows streaming of MPEG and DivX files
- Excellent video and audio playback modifying tools
Pros
- It can play all kinds of music and video formats, even compressed ones.
Cons
- It is GPU-dependent and may crash at random moments.
13. iMovie
If you’re using a Mac,iMovie video editing program can help you split videos. Mac users will find this to be one of the finest video splitters available. It contains a wide range of capabilities that may improve the quality of your video in a variety of ways. The video may be trimmed and enhanced with many features, such as text, special effects, and audio. Video quality may be improved with this software’s special effects and video upgrades. In addition, the interface is so user-friendly that even novices may generate stunning results. On the other hand, iMovie is capable of storing 4K films.
**Platform:**Mac
**Price:**free
Features
- An easy-to-use video splitter that is already built-in
- It’s simple to use
Pros
- An easy-to-use video splitter that is already built-in
- It’s simple to use
Cons
- Uploading and exporting videos takes a long time.
14. Format Factory
Multifunctional document and multimedia processing software -Format Factory - is only available for Windows. It’s meticulously designed to keep you from getting lost in the weeds when working on any project. It is designed to be a stand-alone file management application, and judging by the wealth of options available, it has done an excellent job.
**Platform:**Windows
**Price:**free
Features
- Video joining and muxing are available.
- It has a screen recorder built right in.
- A built-in video player and downloader are included.
- Allows for hardware acceleration.
- Disk ripping options are provided.
- Processing may be done in a batch.
Pros
- Removes watermarks and logos.
- File formats supported include video, audio, images, and documents.
Cons
- Unnecessary software is installed when installing the program.
7 Best Free Video Splitter Online
2. VEED.IO
Veed.io is a free online video editing tool that allows anybody to make powerful movies and expand their audiences. It has several useful features, such as cutting and filtering films based on their appearance. Users may cut, add text, and draw on the videos. Veed may also be used to generate videos on social media channels.
**Price:**free
Features
- Video splitter and joiner
Pros
- Simple and quick.
- A preview of the cutting result is available.
Cons
- The maximum file size is 50 MB.
3. Flixier
Flixier is a web-based video editor that offers 1-minute exports to any device, easy collaboration, and lots of cloud storage. Flixier enables customers to export whatever video they want, independent of their technology. It keeps all stakeholders in the loop by allowing each team member and contributor to remain in sync across all platforms. Teams may interact in real time without fear of losing track of the project. Cloud storage, version history, feedback comments, sophisticated exports, and email alerts are all available. The tool supports Windows, Mac, Linux, and Chromebooks.
**Price:**free
Features
- Video splitter and joiner
Pros
- iPhone version is available.
- Automatic sound amplification.
Cons
- May seem too overloaded with functions.
4. Split Video
Split Video program may also be used to edit and split huge videos into smaller segments. It’s quite simple to work with. All you have to do now is choose the video to divide. Tell the app how you’d want the video to be divided. Choose how many parts you want in your video. You may watch the app-split clips before sharing them.
**Price:**free
Features
- Video splitter and joiner
Pros
- Interface that is easy to use.
Cons
- The maximum file size is 200 MB.
5. Kapwing
This application primarily advertises itself as a video trimmer. It lets you edit films by removing unwanted bits and trimming them to the appropriate length. It also has some basic settings, such as utilizing it as a free online MP4 splitter. The user interface is simple, and uploading a movie takes just a few moments. The primary drawback is that your film may only be 300 MB in size and must be under 30 minutes in length.
**Price:**free
Features
- Video splitter and joiner
Pros
- Interface that is simple to use.
Cons
- A little watermark appears in the corner of your video with the free version.
- Only supports films up to 300 MB in size and up to half an hour in length.
6. Typito
Typito is a video collaboration tool that allows you and your team to work together to make better films for your business. Typito allows you to make and utilize professionally created graphic overlays for free, as well as generate full-length HR movies in both square and portrait formats. It enables you to produce movies consistent with your brand, allowing you to change and customize elements like font, color, and logo with a few mouse clicks. You may save time for your organization by producing videos quicker and working with your team to publish professional-looking films while previewing them on the move. Inviting team members to the project and assigning responsibilities for editing and reviewing videos are just a few collaboration tools.
**Price:**free
Features
- Video splitter and joiner
Pros
- Simple features to use
Cons
- Few transition templates.
7. Clideo
Clideo is a one-of-a-kind platform that allows you to easily produce and modify any video, GIFS, and picture files in one spot. Merging, compressing, resizing, slideshow, cropping, rotation, and other video editing tools are included in the program. Users may add music or text to videos to help them stand out and draw in the right audience. The video editing platform supports various video formats such as MP4, AVI, MPG, VOB, WMV, MOV, and others. There is no need to download or install any applications since everything may be done entirely online. The premium security encryption that comes with it ensures that all video files are always well-protected.
**Price:**free
Features
- Video splitter and joiner
Pros
- Much easier to use than other video editing software.
- Projects are stored on the cloud, so they don’t take up any computer resources.
- There is no need to download any program.
Cons
- The feature set is limited in comparison to other video editing suites.
- Visual artistry is required.
- Some undertakings need a significant amount of time to complete.
10 Best Video Splitter for Mobile Phone
1. Filmora
A good video editor is required to split a video qualitatively.Filmora Video Editor & Maker might be the answer. It works with high-definition videos. It comes with all of the necessary editing tools. As a result, you will not be sorry for installing this software. Not only will you be able to edit and divide films effortlessly, but you’ll also be able to add fun filters.
The sticker library in Filmora Video Editor & Maker is extensive. The number is in the thousands. You’ll be able to apply both realistic and humorous animated stickers. Use video transitions such as Flash, Page Cut, Cross Zoom, Blurry Roll, and Cube. You have complete control over the speed of your edited video.
**Price:**free
Features
- Video splitter and joiner
- Video editor
Pros
- Files may be readily exported and imported.
Cons
- Compatibility of exported videos is limited.
2. AndroVid Video Editor
AndroVid is a video-splitting program with all the tools you’ll ever need. This program is jam-packed with editing tools, allowing you to create a polished video quickly. The program is also quite user-friendly, so even if this is your first time splitting a video, you will be able to handle it.
**Platform:**Android
**Price:**free
Features
- Video splitter and joiner
- Video editor
Pros
- Simple video cutting tool; can extract single-frame pictures from videos.
Cons
- There are no sophisticated editing choices, and the audio options are quite restricted.
- There is no tool for full-screen graphics, and the user interface is a little complicated.
- The ad-free version is nearly as expensive as KineMaster Pro, which is more sophisticated.
3. Easy Video Cutter
Becausethis program is only devoted to video editing, it can handle a wide range of tasks. The program, for example, may clip videos, combine them, rotate them, and so on. You may also adjust the pace of the videos as needed. It should be noted that trimming the video in this program is quite simple — just pick the range with the slider instrument, and that’s it. Because this program is only devoted to video editing, it can handle a wide range of tasks. The program, for example, may clip videos, combine them, rotate them, and so on. You may also adjust the pace of the videos as needed. It should be noted that trimming the video in this program is quite simple — just pick the range with the slider instrument and that’s it.
**Platform:**Android
**Price:**free
Features
- Video splitter and joiner
- Video editor
Pros
- It’s quite simple to use.
- It’s ideal for simple video cutting tasks.
Cons
- There are no additional editing options available.
4. Video Editor
Video Editor is a fantastic app for Android users who want to edit and enhance their videos. It can break a video into segments, combine several films, crop videos, and adjust the video’s size. You may also add audio to the video of your choosing.
**Platform:**Android
**Price:**free
Features
- Video splitter and joiner
- Video editor
Pros
- You may rearrange your clips in any order you choose.
- Many older file types are supported by the program.
Cons
- The video scroll bar might be a little tricky to use.
- It’s quite basic.
5. VideoShow – Video Editor
On the Google Play market,VideoShow is one of the most popular video editing applications. There are several themes, filters, music, and audio to choose from while creating great videos. It’s a fantastic video trimming software.
**Platform:**Android/iPhone
**Price:**free
Features
- Video splitter and joiner
- Video editor
Pros
- It has the ability to both connect and cut clips.
- It’ll run on almost any android phone.
Cons
- Video Scissors has taken the place of the iPhone version.
- Cutting is fast, but re-encoding might take a long time.
6. Trim Video
Trim Video is the greatest app for iPhone video editing and cutting of huge videos. From the huge file, you may easily crop a video clip. Although the program is highly useful and entertaining for video makers, it is not free and costs $0.99.
**Platform:**iPhone
Price:$0.99 per month
Features
- Video splitter
Pros
- All major video and audio formats are supported.
- When you’re finished, there’s no need to re-render the video.
- There are no watermarks.
Cons
- This software does not include video joining; it must be downloaded separately.
- This app’s main purpose is to cut.
7. Video Splitter
Video Splitter is an iPhone software that allows you to edit and divide videos into segments. It’s a free program that combines all of your editing tools into one application. The tool successfully splits a huge video into little chunks, which can be quickly texted or uploaded to social media.
**Platform:**iPhone
**Price:**free
Features
- Video splitter and joiner
- Video editor
Pros
- A broad number of formats, including audio, are supported.
- It’s a breeze to use.
Cons
- There are no choices for video converting.
- It’s been a long time since it’s been updated.
8. Crop video
Crop Video is another handy iPhone app if you wish to cut your movie to a lesser size. It is one of the most popular tools for cutting videos and altering them for a better impact. It contains several features that boost the app’s versatility. It’ll set you back $2.99.
**Platform:**iPhone
Price:$2.99 per month
Features
- Video splitter and joiner
- Video editor
Pros
- The video cutter is helpful for novices.
- It works with every iPhone version.
Cons
- The free version has a lot of limitations.
- The videos of free users are watermarked.
9. Video Crop
Video Crop is a free iPhone software that allows you to crop videos. There are many more options in the software that may be used to modify and improve a video. This program has a lot of flexibility when it comes to video editing and other video settings. This program may also be used to split videos.
**Platform:**iPhone
**Price:**free
Features
- Video splitter and joiner
- Video editor
Pros
- Splitting and joining MP4 files is simple and effective.
Cons
- It’s only compatible with MP4 files.
- The UI is really sluggish.
10. Video Trim & Cut
Video Trim & Cut is an iPhone software that allows you to divide or trim videos. Adding effects, cropping, altering color, and changing themes are just a few things you can do with the app.
**Platform:**iPhone
**Price:**free
Features
- Video splitter and joiner
- Video editor
Pros
- Excellent templates.
- It has the appearance and functionality of a more costly app.
Cons
- It’s only available on iPhone.
- It might take a long time for a video to render.
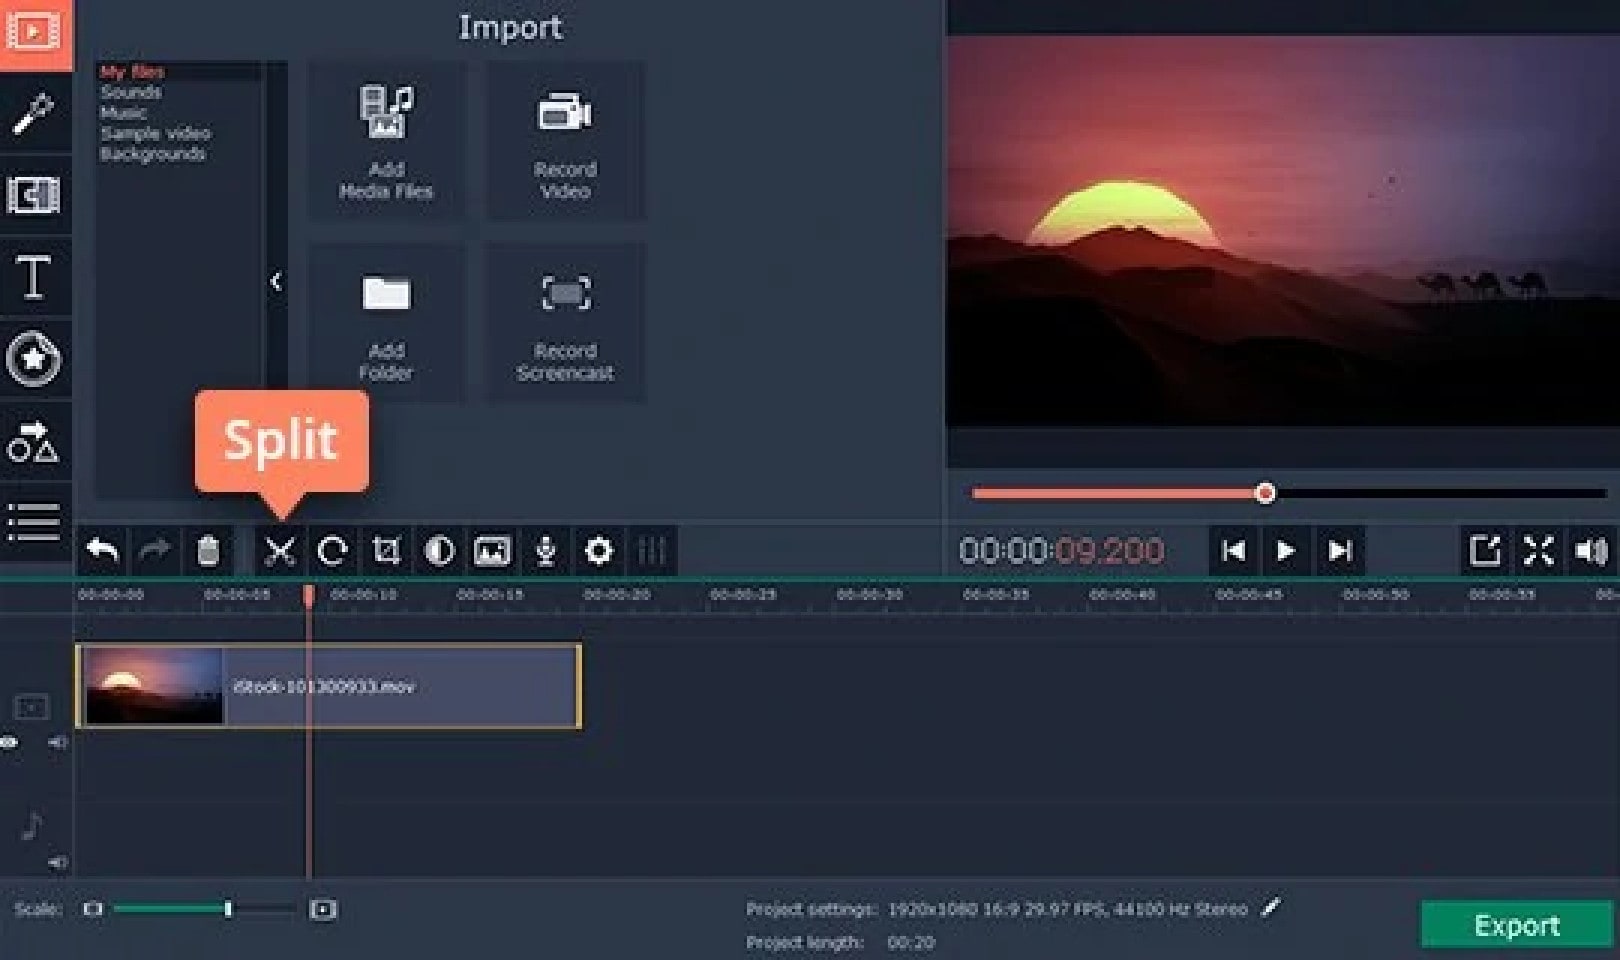
Part 5: How to Split Video with Filmora
Step1Import your videos to Filmora Video Cutter
Launch the video cutter once it has been installed and click New Project to access the video editing interface. Now you must import the video, which must be divided into numerous portions.
Upload files
You can either drag and drop files to the media library before adding them to the timeline for editing, or you can click “Import” on the main interface and choose files from your computer.
VOB, 3GP, 3G2, MP4, FLV, AVI, MOV, F4V, M4V, TRP, M2TS, MTS, TP, DAT, WMV, MPG, MPEG, TS, MKV, ASF, DV, EVO, MOD, NSV, and TOD files are all supported by Filmora video cutter.
If your video contains a lot of distinct sequences, Filmora can help you discover the clip you want to trim. The “Scene Detection” tool will assist you in rapidly locating the part you wish to clip. To open the Scene Detection window, choose the video in the media library (not the timeline), right-click it, and select “Scene Detection.”
Detect video
When you click Detect, Filmora will automatically split your films into multiple segments depending on scene changes.
Scenes detected automatically
By clicking the Delete symbol next to the clip, you may delete the undesired sequences and quickly get to the section you want. When you click the Add to Timeline button, all of the segmented video sections will be instantly imported into the timeline, which you can then modify.
Step2Manually trim/split/cut/delete videos
To trim video files, drag clips from the media library to the video track on the timeline and follow these steps. You may use the trim option to chop off the beginning or conclusion of a video swiftly.
Trim video using filmora
- i.Zoom in on the frames you wish to remove from the timeline. Drag the trim symbol to the right to remove the video’s beginning segments from the timeline or to the left to remove the video’s undesired ending segments. You may use the trim tool to cut the beginning and end parts of a sentence with a single drag.
- ii.You may edit a movie into portions, eliminate unnecessary aspects, and combine them into a new film, in addition to chopping off segments at the beginning or conclusion.
- iii.Move the play head to the beginning of the video part you want to cut, then click the Split icon (scissor icon) on the toolbar or the Split button on the play head to split the video. You will get the starting frame, then move the play head to the ending frame and click the Split button again to get the ending part.
- iv.To cut a video into many sections, repeat the procedure. You will get multiple clipped portions, which you may either remove or re-order and alter further.
- v.You may edit out an undesirable cut video by hitting the Delete symbol on the toolbar.
Add trim start and end
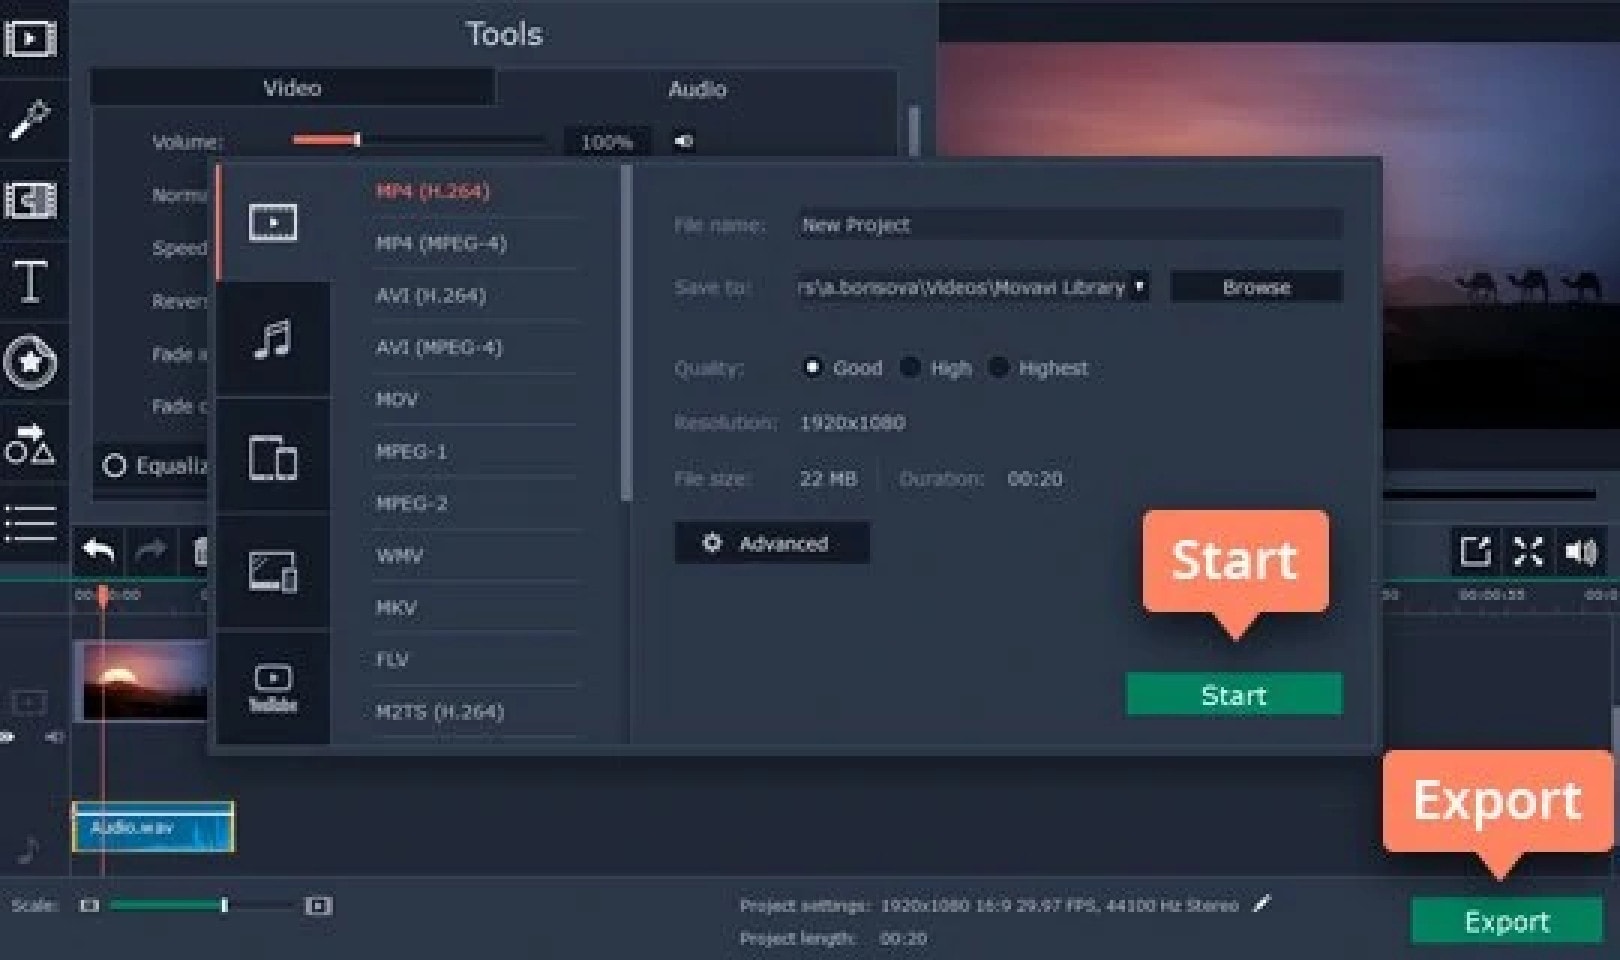
Step3Export your video
Click the Export button on the screen after you’ve completed cutting and basic editing. By choosing “Format” and specifying the essential options such as frame rate and resolution, you may save the video in different formats on your local computer.
If you wish to see your video production on your iPod, iPhone, or iPad, go to “Device” and choose your device’s thumbnail. You may also instantly post your films on YouTube or Vimeo, or burn them to DVDs for long-term storage.
Export video after splitting
Bottom Line
Video splitting can be a daunting task when you don’t have the right tools to help you. If you are a Windows or a Mac user then Wondershare Filmora will help you split videos in just few clicks. The software is completely free with an option to go pro for a cheaper price compared to other premium apps. If you prefer splitting your video online then still Filmora online editor will help you in this. Moreover, some good news for android and iPhone users as Filmora comes with all features to split and join videos. With all these tools you can take your video creation process to the next level.
7 Solutions to Cut Video on Mac without Using FFmpeg?
Tiktok, Instagram reels, and Ads are well-known short video platforms that are popular due to their ease of use. Making film collections for entertainment purposes is a popular trend. As the previous user mentioned, sometimes all you want is a section of your movie, which can be the highlight or any other part you want to keep. Long videos are no longer a problem with such a video cutter for Mac. If that’s what you’re looking for, you might want to look into some of the software that’s available here.
HOW TO CUT VIDEO ON MAC WITHOUT USING FFMPEG?
What are FFmpeg and its cons for cut videos?
Without transcoding the media, FFmpeg can cut, trim, and extract videos. This is an excellent method for preserving original quality and avoiding generation loss.
Because of how keyframes work, it is impossible to cut at an exact point in time using FFmpeg without transcoding the video. As a result, you’re left with a cut at the nearest keyframe.
BEST FREE FFMPEG ALTERNATIVE TO CUT VIDEO ON MAC

FILMORA VIDEO EDITOR
Supported OS: Windows and Mac
Filmora Video Editor is another well-known video editor that is widely used for video editing. It was released two decades ago to provide low-cost video editing software. Aside from video cutting and joining, it has some great features such as adding filters, titles, texts, and so on. You can also record your voice or live music, mix audio and video tracks, and do other things. It is simple to use and is available for both Mac and Windows users.
Filmora includes an instant cutter tool that can be used throughout clip import and is designed for use with large amounts of high-resolution content. As the names indicate, it is very simple and serves only one purpose. You can drag multiple clips onto its window, but only if the Merge sub-mode is enabled. Trim mode is only for trimming the ends of a single clip, and its interface only displays one clip in the left-size source tray. You can Add Segments, which creates a new clip based on your trimmed original, but you can’t split a clip explicitly.
For Win 7 or later (64-bit)
For macOS 10.14 or later
Features:
- All editing tools and features are well-displayed in the main windows, which can be found and used easily;
- Very easy to cut or trim video files just with a few clicks;
- Lots of filters, overlays, motion graphics, titles, and more special effects can be added to the video.
- More features like Picture in Picture and Green Screen and Split Screen can be used to make videos more unique.
Pros:
- Intuitive Interface
- Easy To Use
- Great Features
- Affordable Perpetual License
- Great Final Video Results
- Faster Renders And Previews
- Supports Screen Capturing
- Support Wide Range Of File Formats
- User Support Is Good
Cons:
- Lacks Advanced Feature
- Free Version Has Watermark
- Not Available For Linux And Phones
- Pricing Is Expensive
- Software Lagging
Steps On How To Cut Video On Mac Using Filmora Video Editor
Step 1: Import Video Files
You will begin by importing the video files into the project window of your program through dragging and dropping.
Step 2: Add Video To The Timeline
Drag and dropping are the easiest way to add the video to the timeline.
Step 3: Cut Video
If you want to trim the video, just move the cursor at the beginning or end of the video. When the cursor becomes a cross, move it forward or backward. Trimming only allows you to cut the beginning or end of a video.
If you need to cut a section of a video, you should follow do this: move the cursor at the beginning of the video section you want to cut, then click the scissors icon > Next, move the cursor to the end of the video section you want to cut and click scissors icon > Right-click on the video section you want to cut and click “Delete“.
Step 4: Export the Video
To export your video, click the “export” button and choose the local tab. After selecting the output device and format, just click “Create” to save it.
HANDBRAKE
Supported OS: Linux, Windows, and Mac
HandBrake is a multithreaded video transcoder that is unfastened and open source. It can compress and convert nearly any virtual media layout to another. HandBrake is able to rip encrypted DVDs the usage of libdvdcss (libdvdcss is covered with the VLC media participant on macOS and AnyDVD/DVD forty three on Windows).
This software program additionally enables batch processing, which converts a couple of video files at the same time. Additionally, a plethora of presets are available to guide you to the preferred output without having to tinker with a plethora of options.
Handbrake is a powerful and excellent video converter for Windows, Mac, and Linux that should not be overlooked. It provides all of the necessary features in a simple tool that gives the user complete control over the output. Before we get into the specifics, here’s a rundown of Handbrake’s advantages and disadvantages.
Features:
- Support of chapter selections
- Support of subtitles
- Integrated bitrate calculator
- Picture deinterlacing, cropping, and scaling
- Live Video Preview
Pros:
- HandBrake has a very simple layout which makes the video converter very easy to use, even for those who are converting videos for the first time.
- The live preview helps.
- The fact that the software is free and has device presets for iOS and Android certainly makes HandBrake a welcome video converter.
- The queuing tray for batch conversions is particularly nice.
- People who convert a lot of videos will find it very helpful.
Cons:
- On the flip side, the settings are not always easy to deal with.
- It takes a lot of time and then there are errors. The latest version fixes some old bugs but there are hiccups.
- The live preview is for up to four minutes of a video.
- It is futile for very long videos.
- The settings interface and that of the live preview could be better.
- The open-source software also doesn’t support all video formats.
- Given the diversity of devices and the multitude of formats in use today, HandBrake needs more compatibility.
Steps On How To Compress Video Using Handbrake
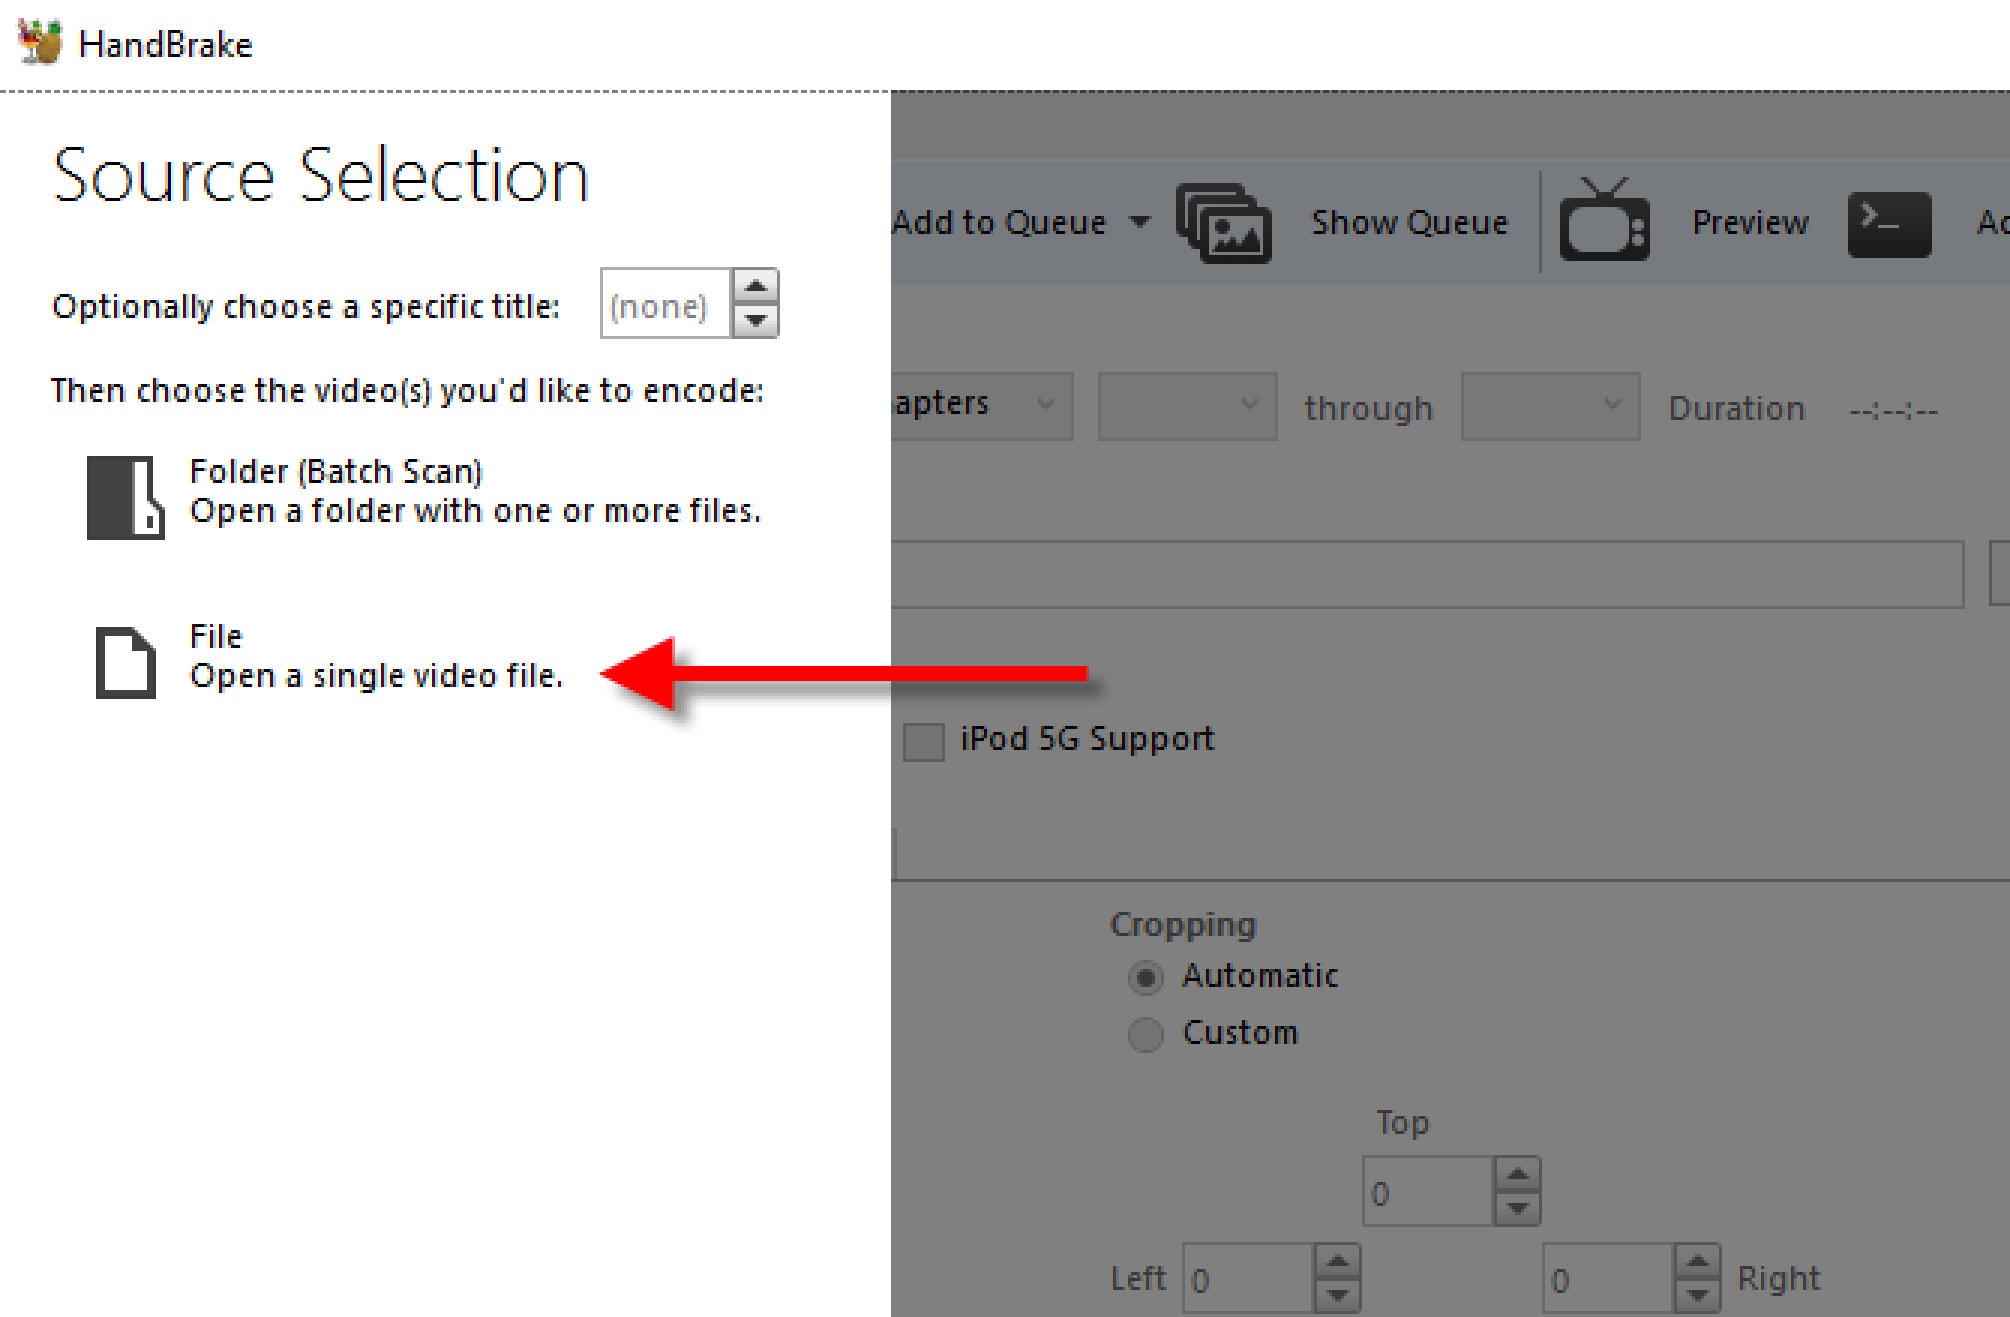
- After you download and install Handbrake, open the app. On the left side, under ‘Source Selection’, click ‘File’. Select the file from the folder and then click ‘open’.
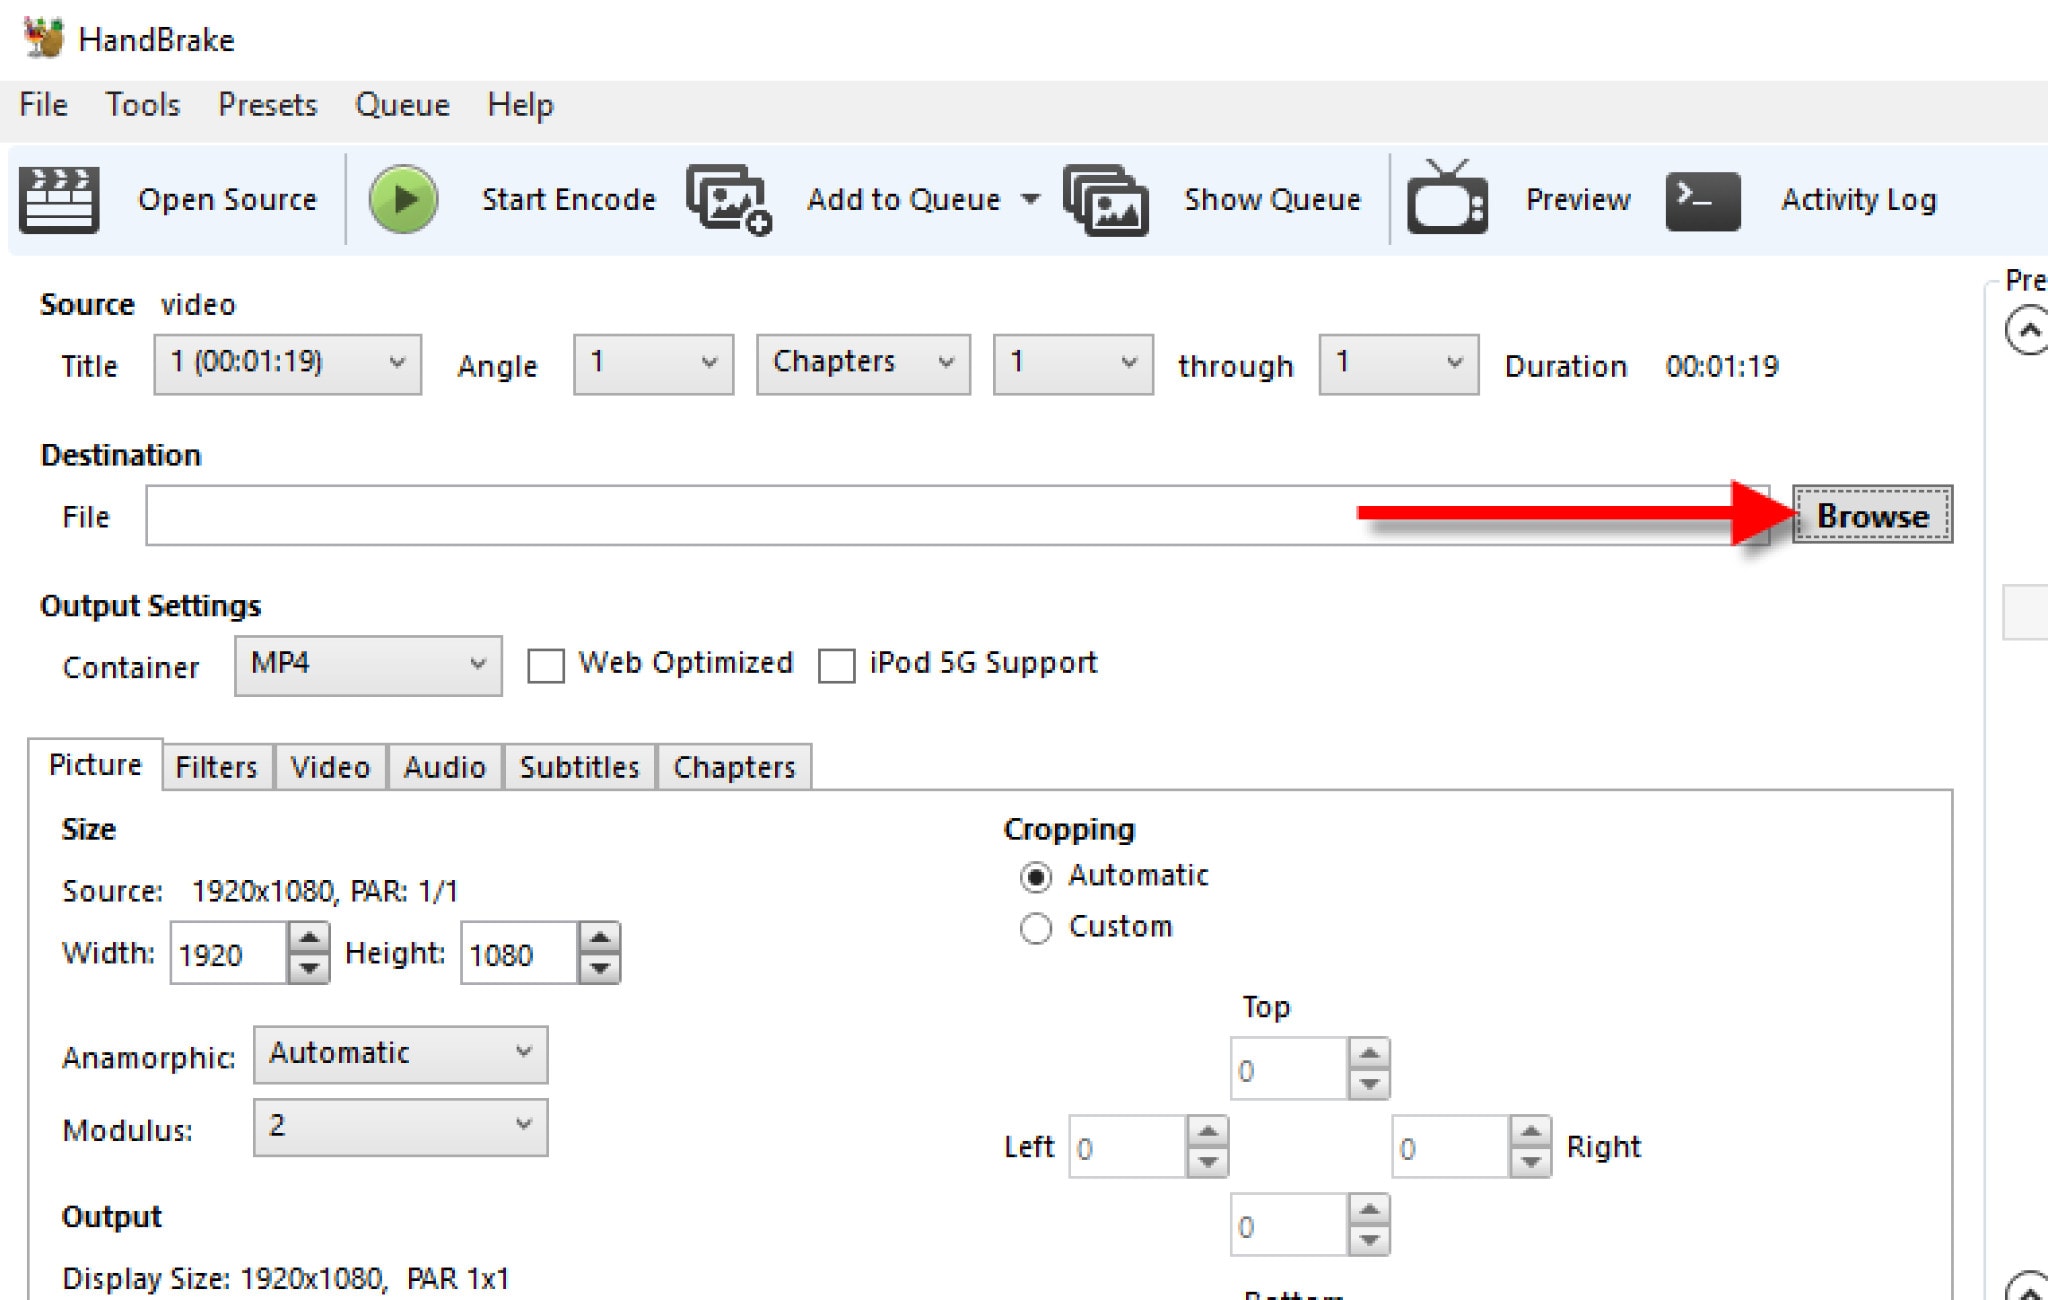
- Choose where you want the compressed video to be saved by clicking ‘Browse’.
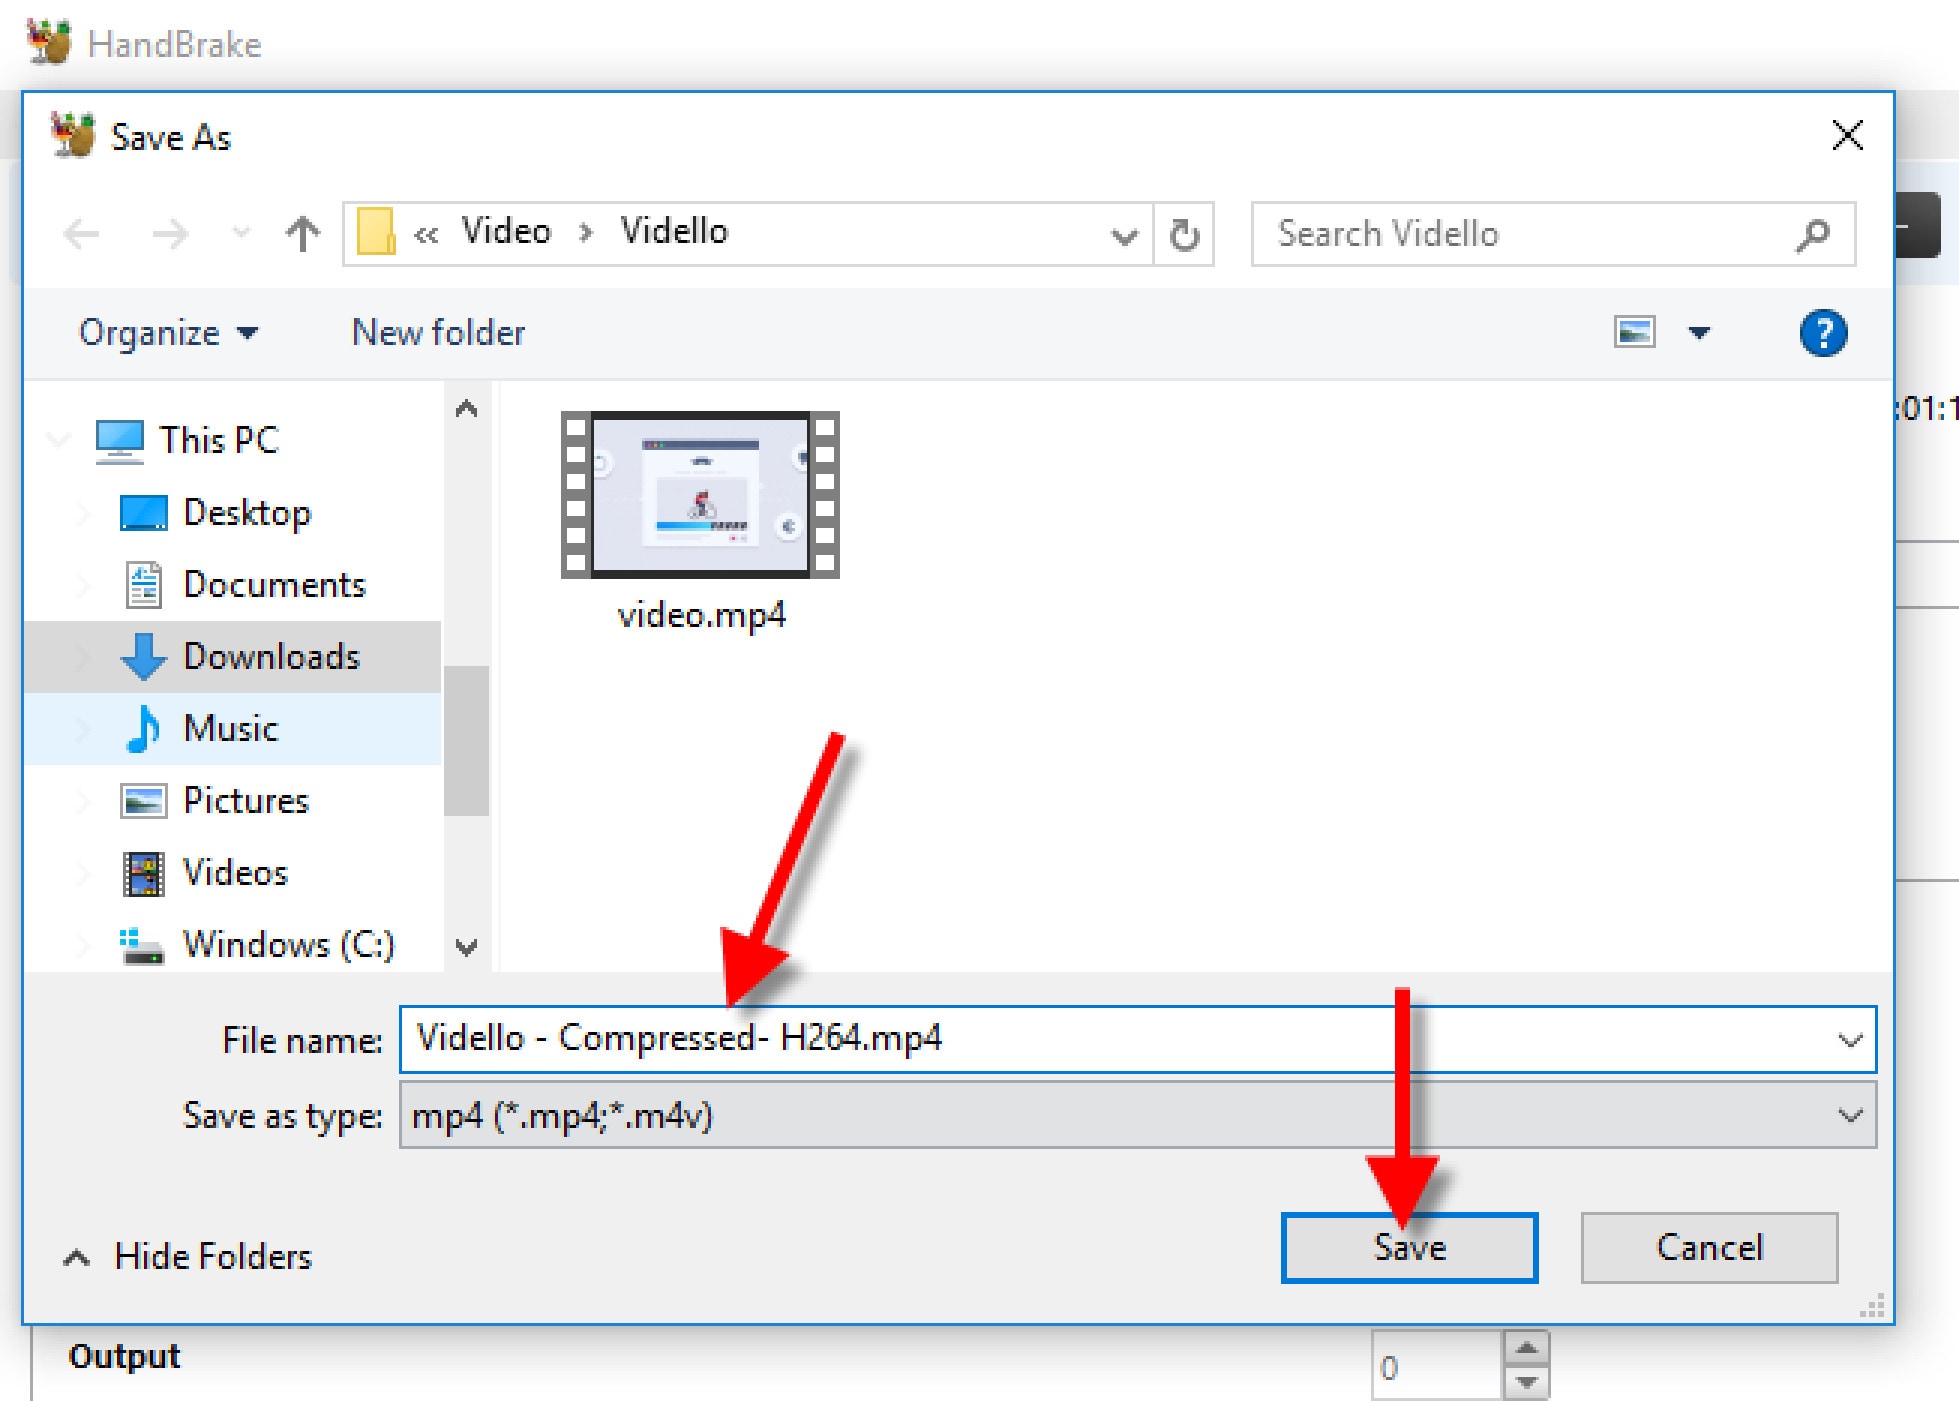
- Enter a name for the video, and click ‘Save’.
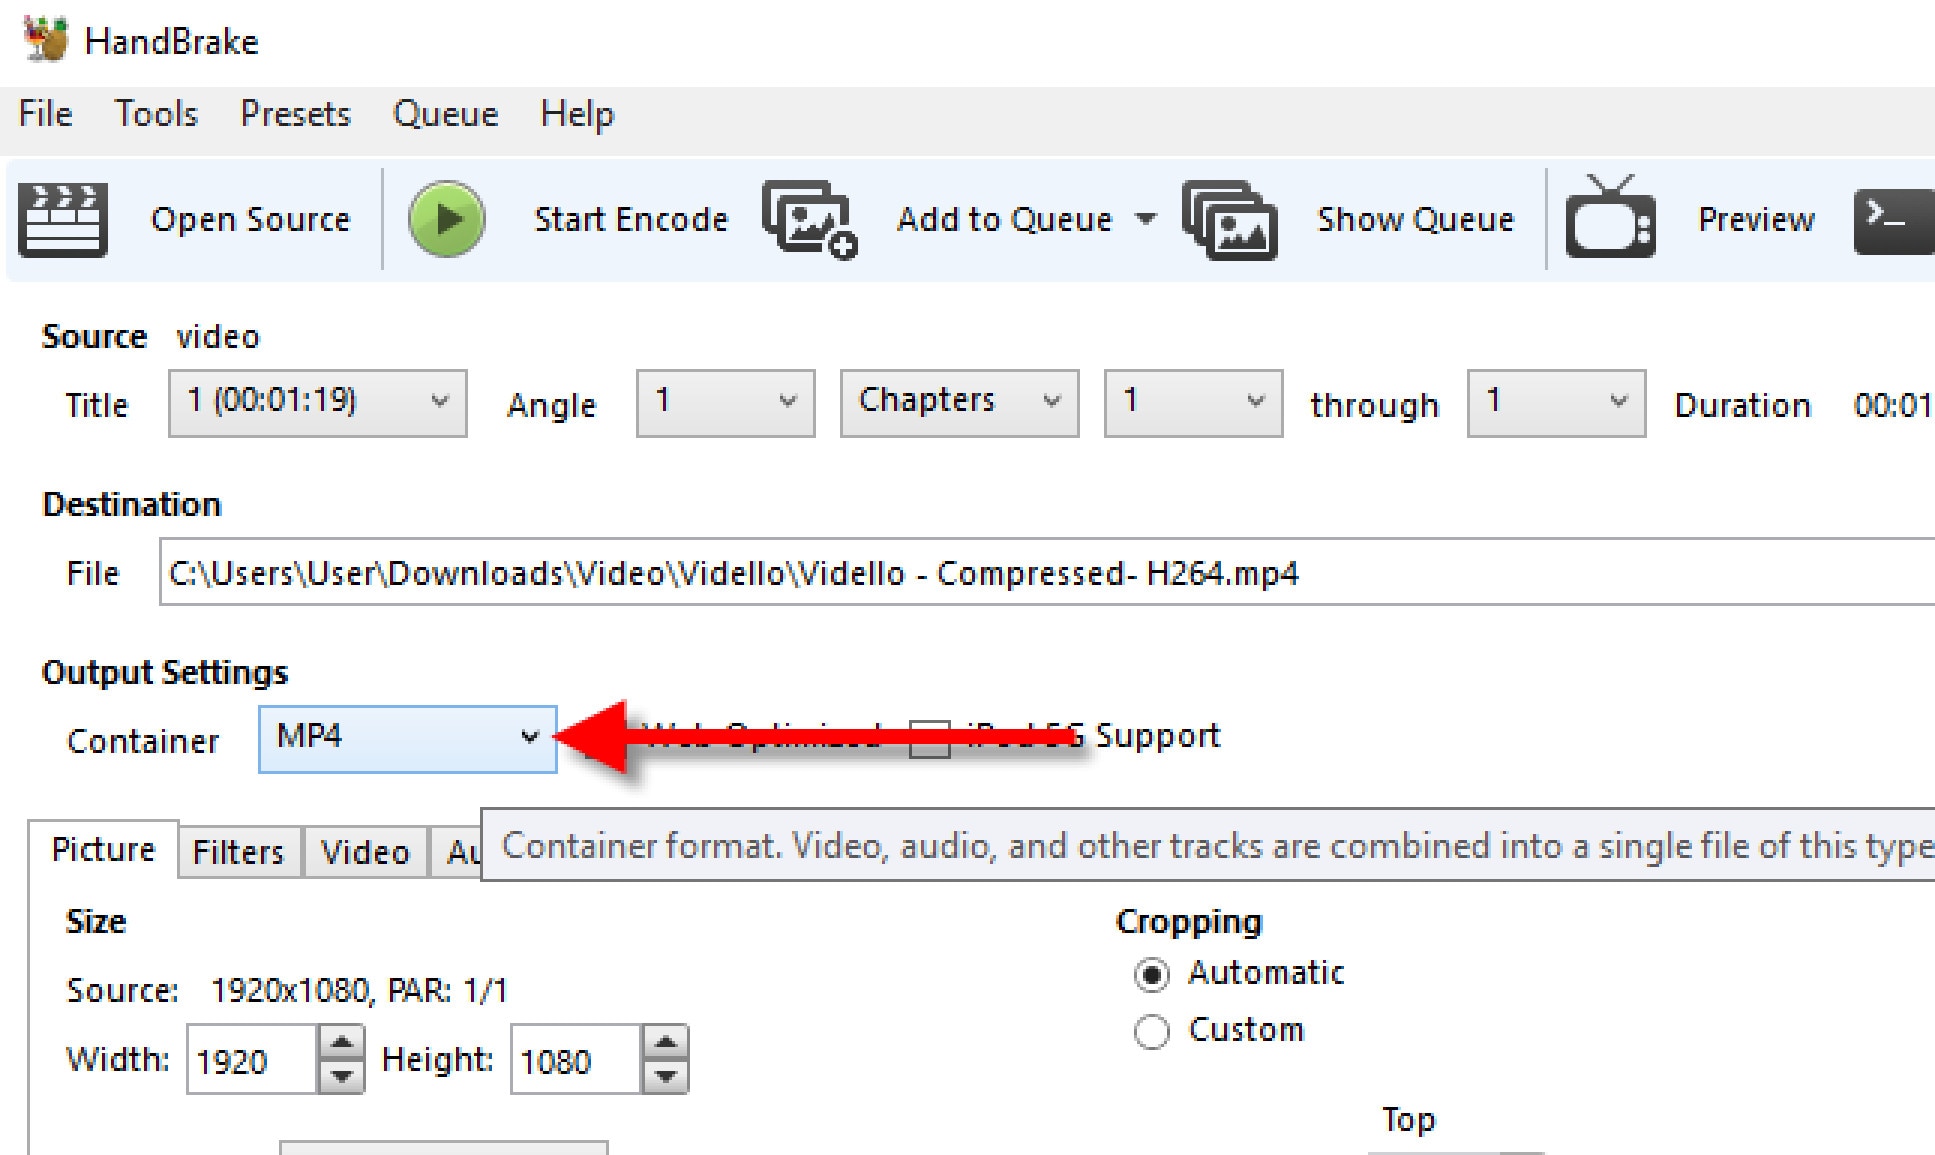
- Under ‘Output Settings’, choose MP4 for ‘Container’.
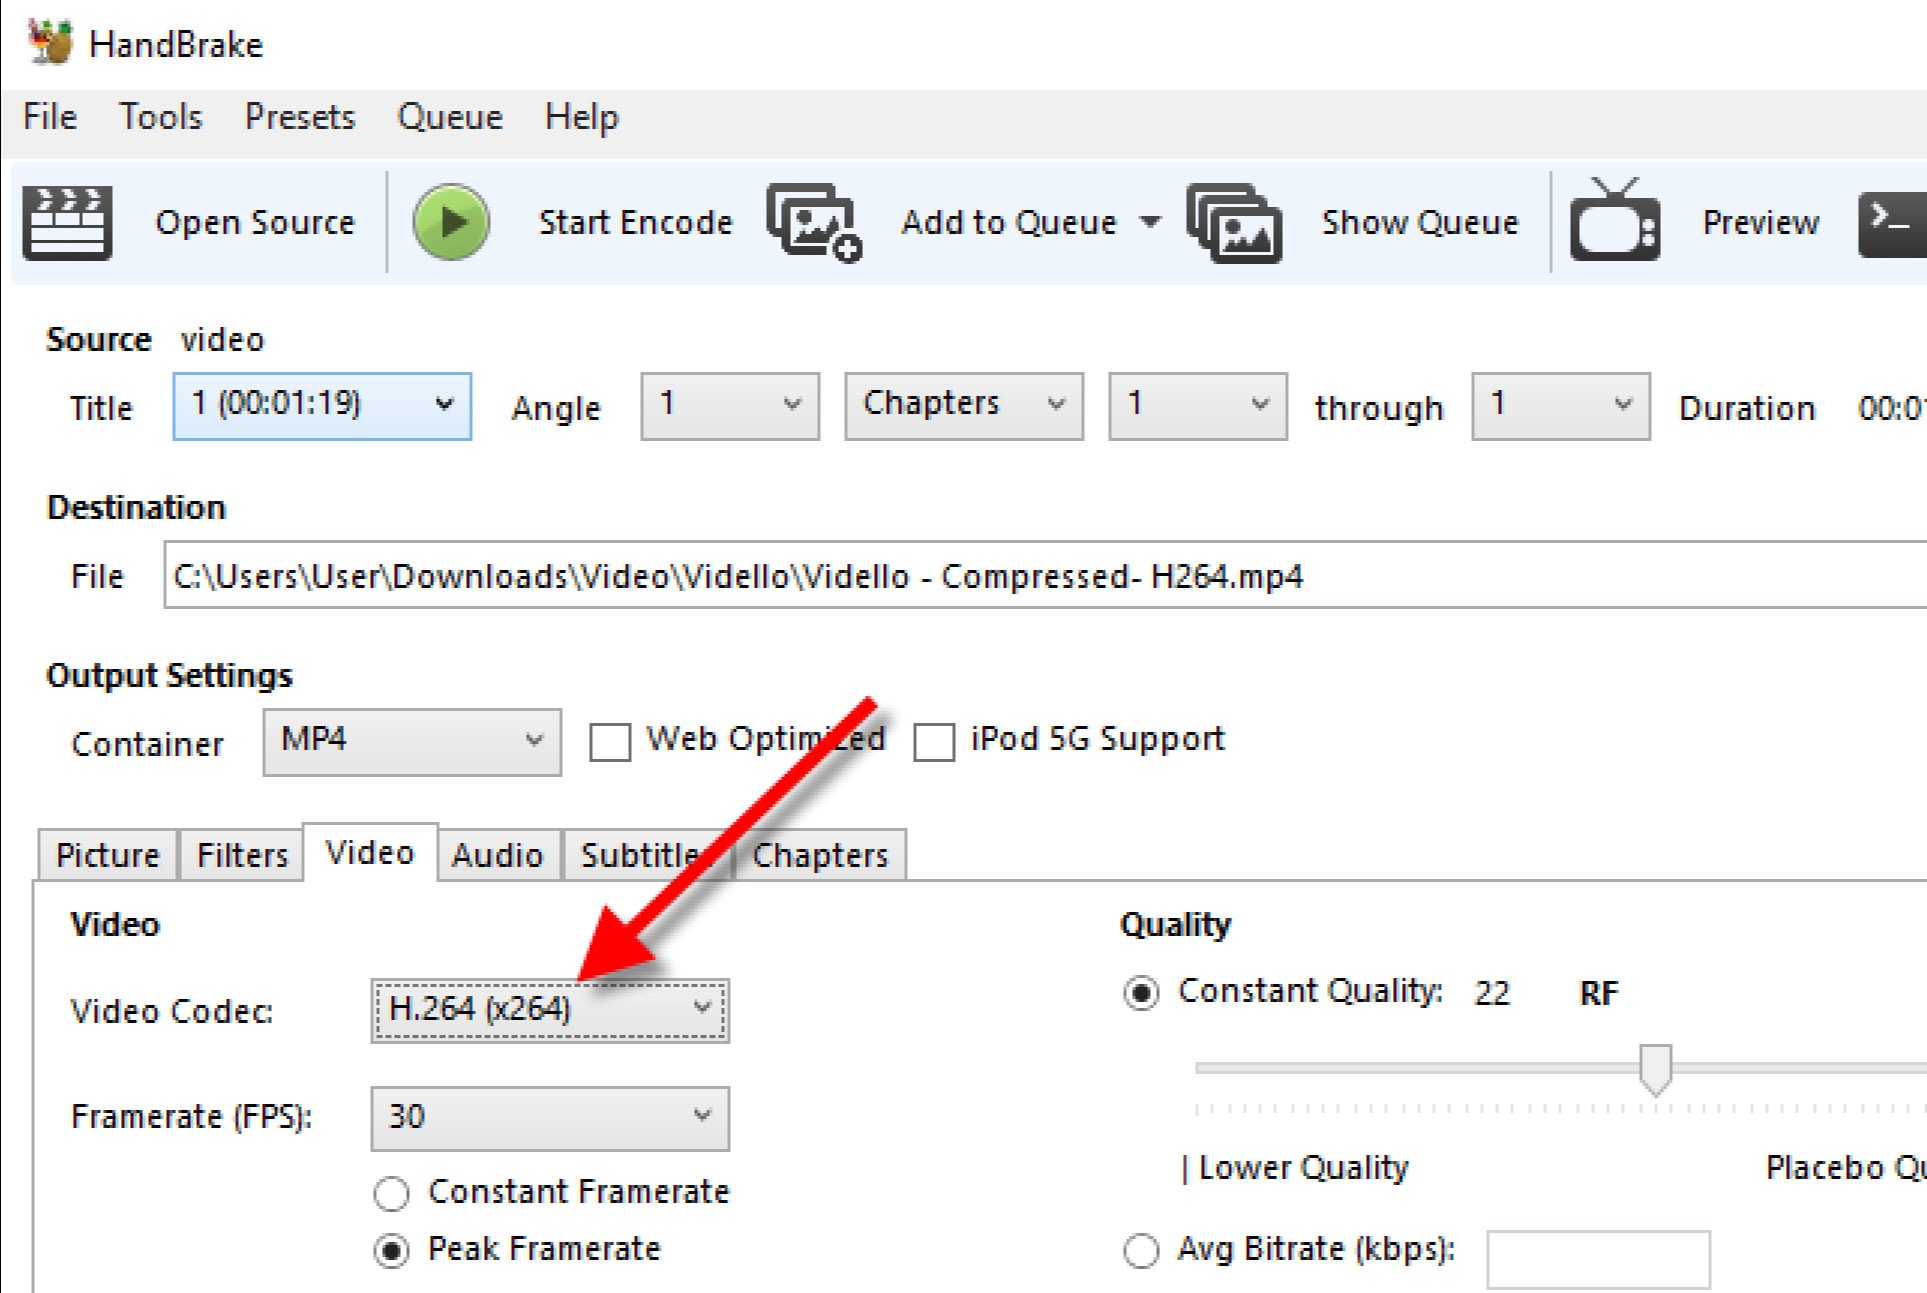
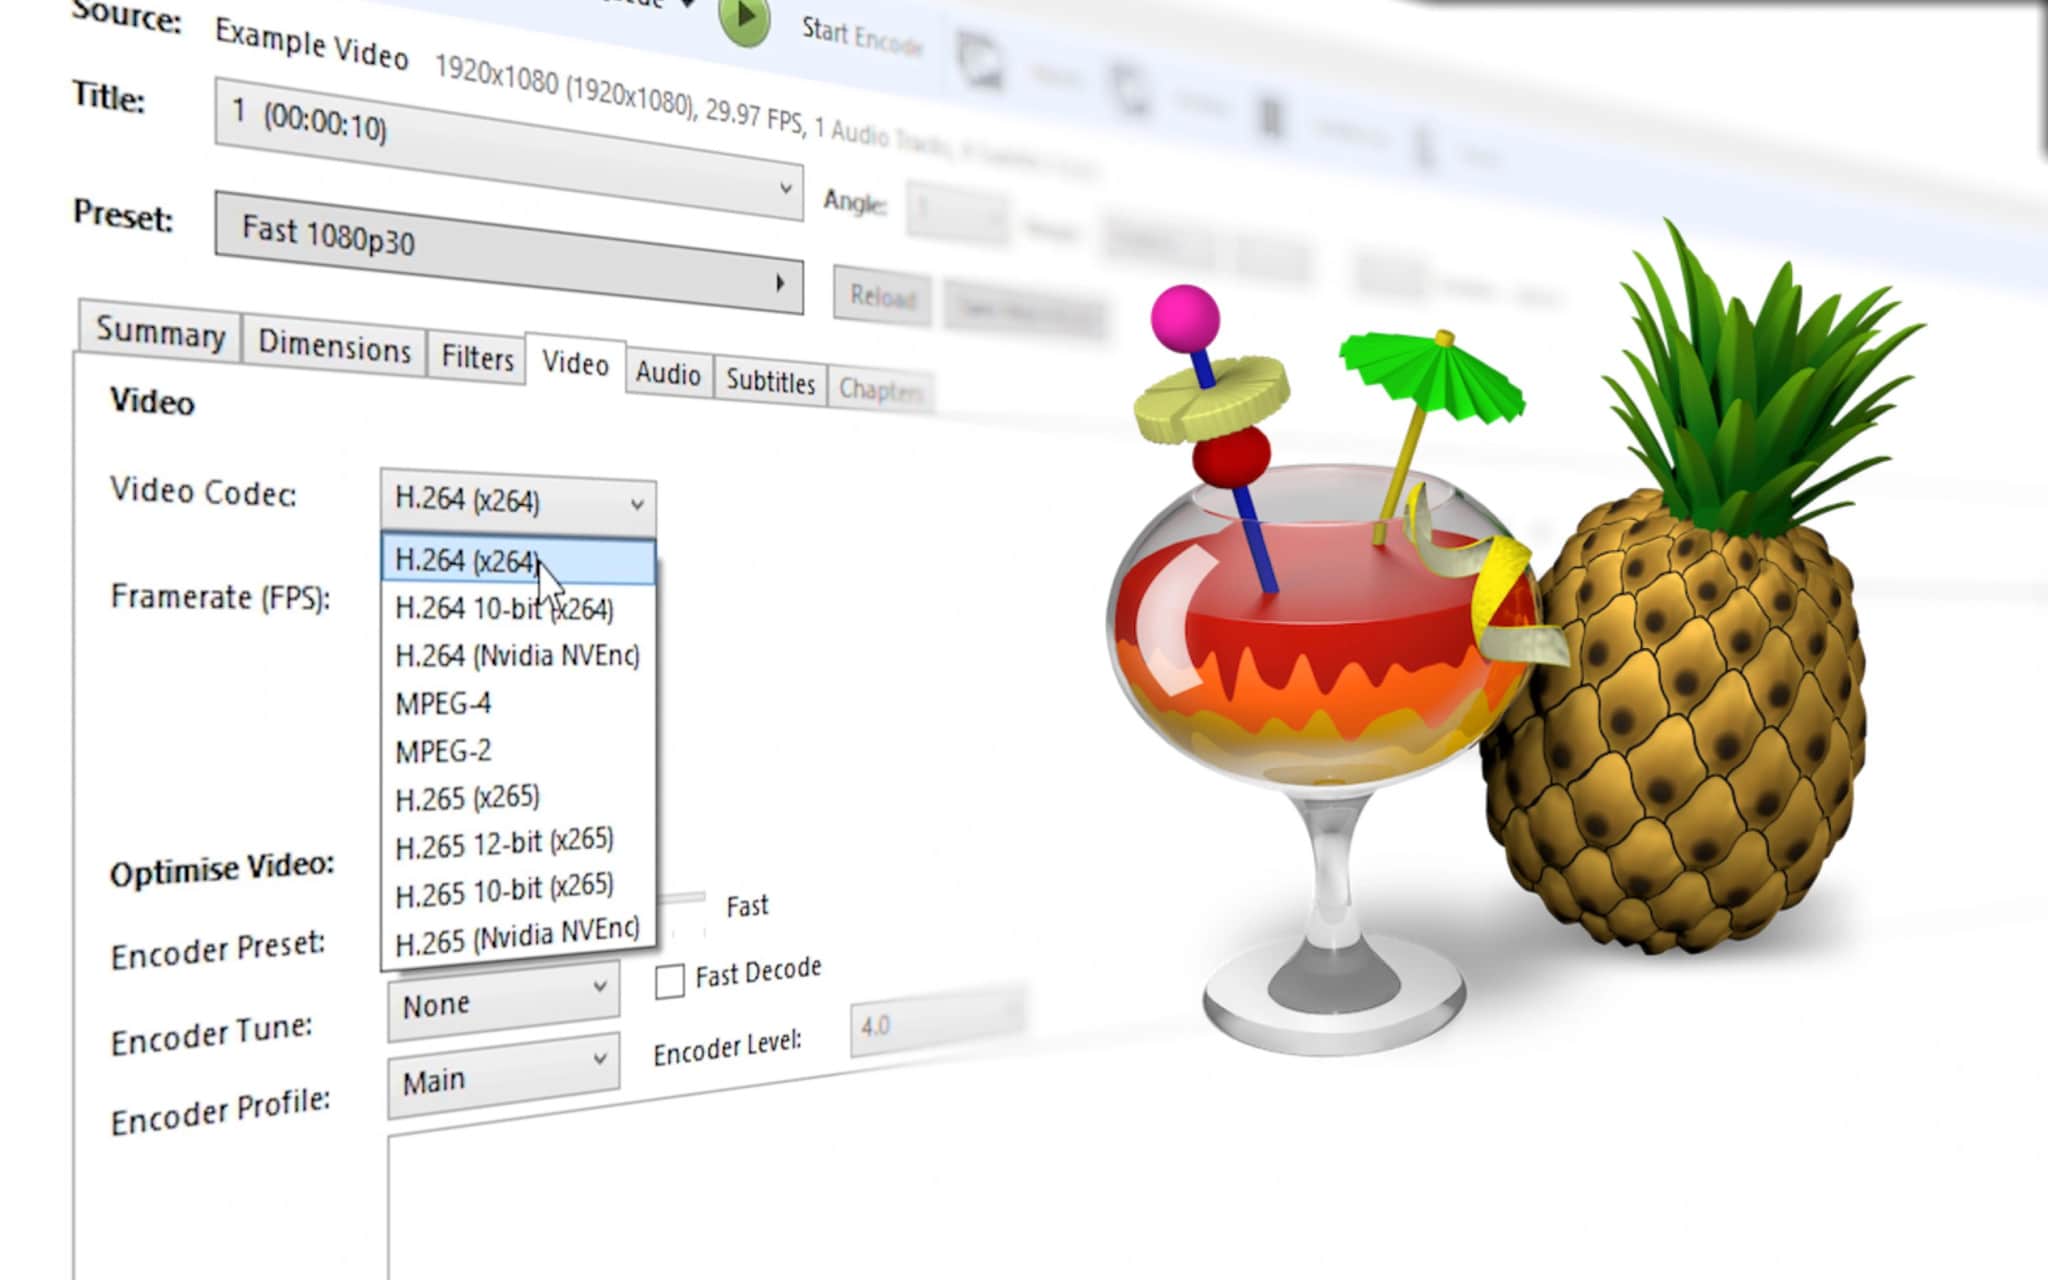
- Click the ‘Video’ tab, under it, is the ‘Video Codec’, choose (x264).
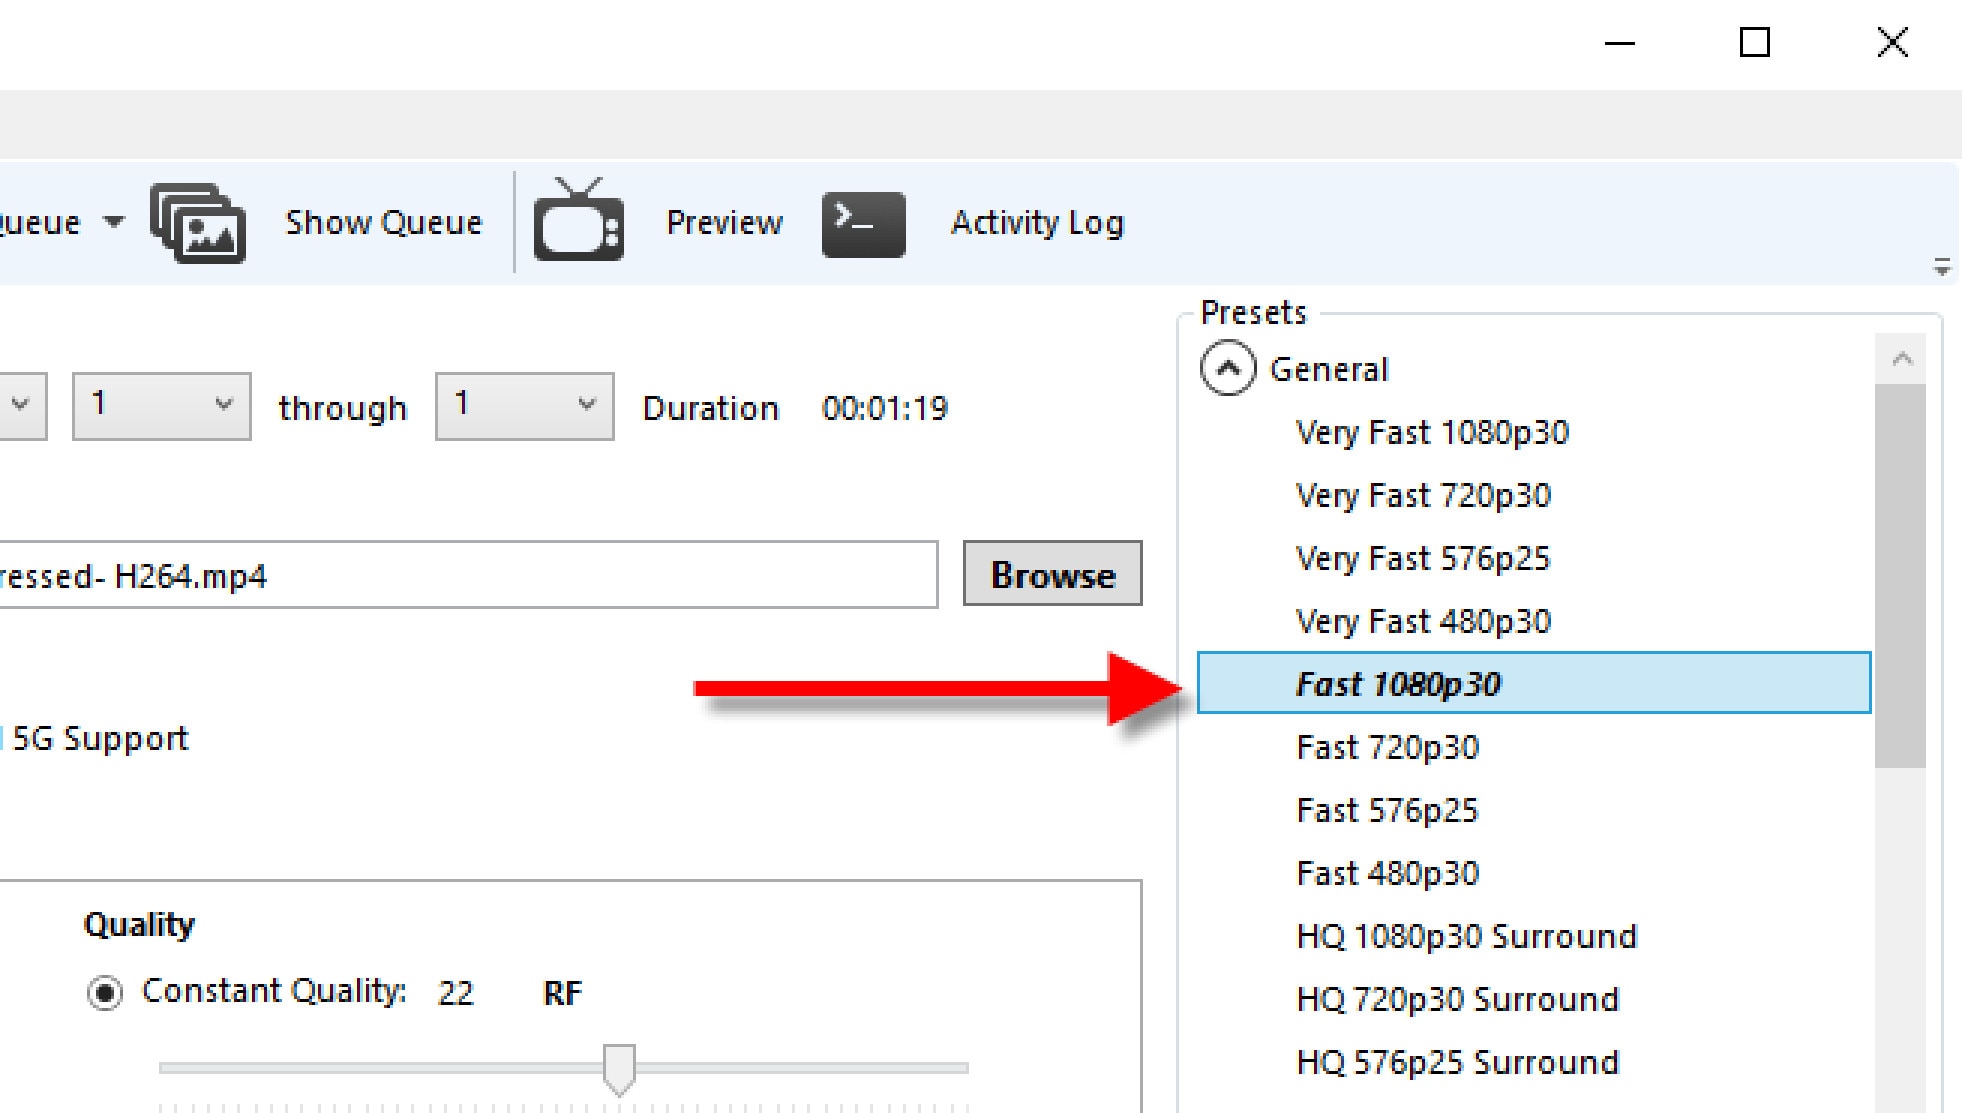
- Select a Preset from the ‘Preset Drawer’. We recommend you choose Fast1030p 30 for high quality.
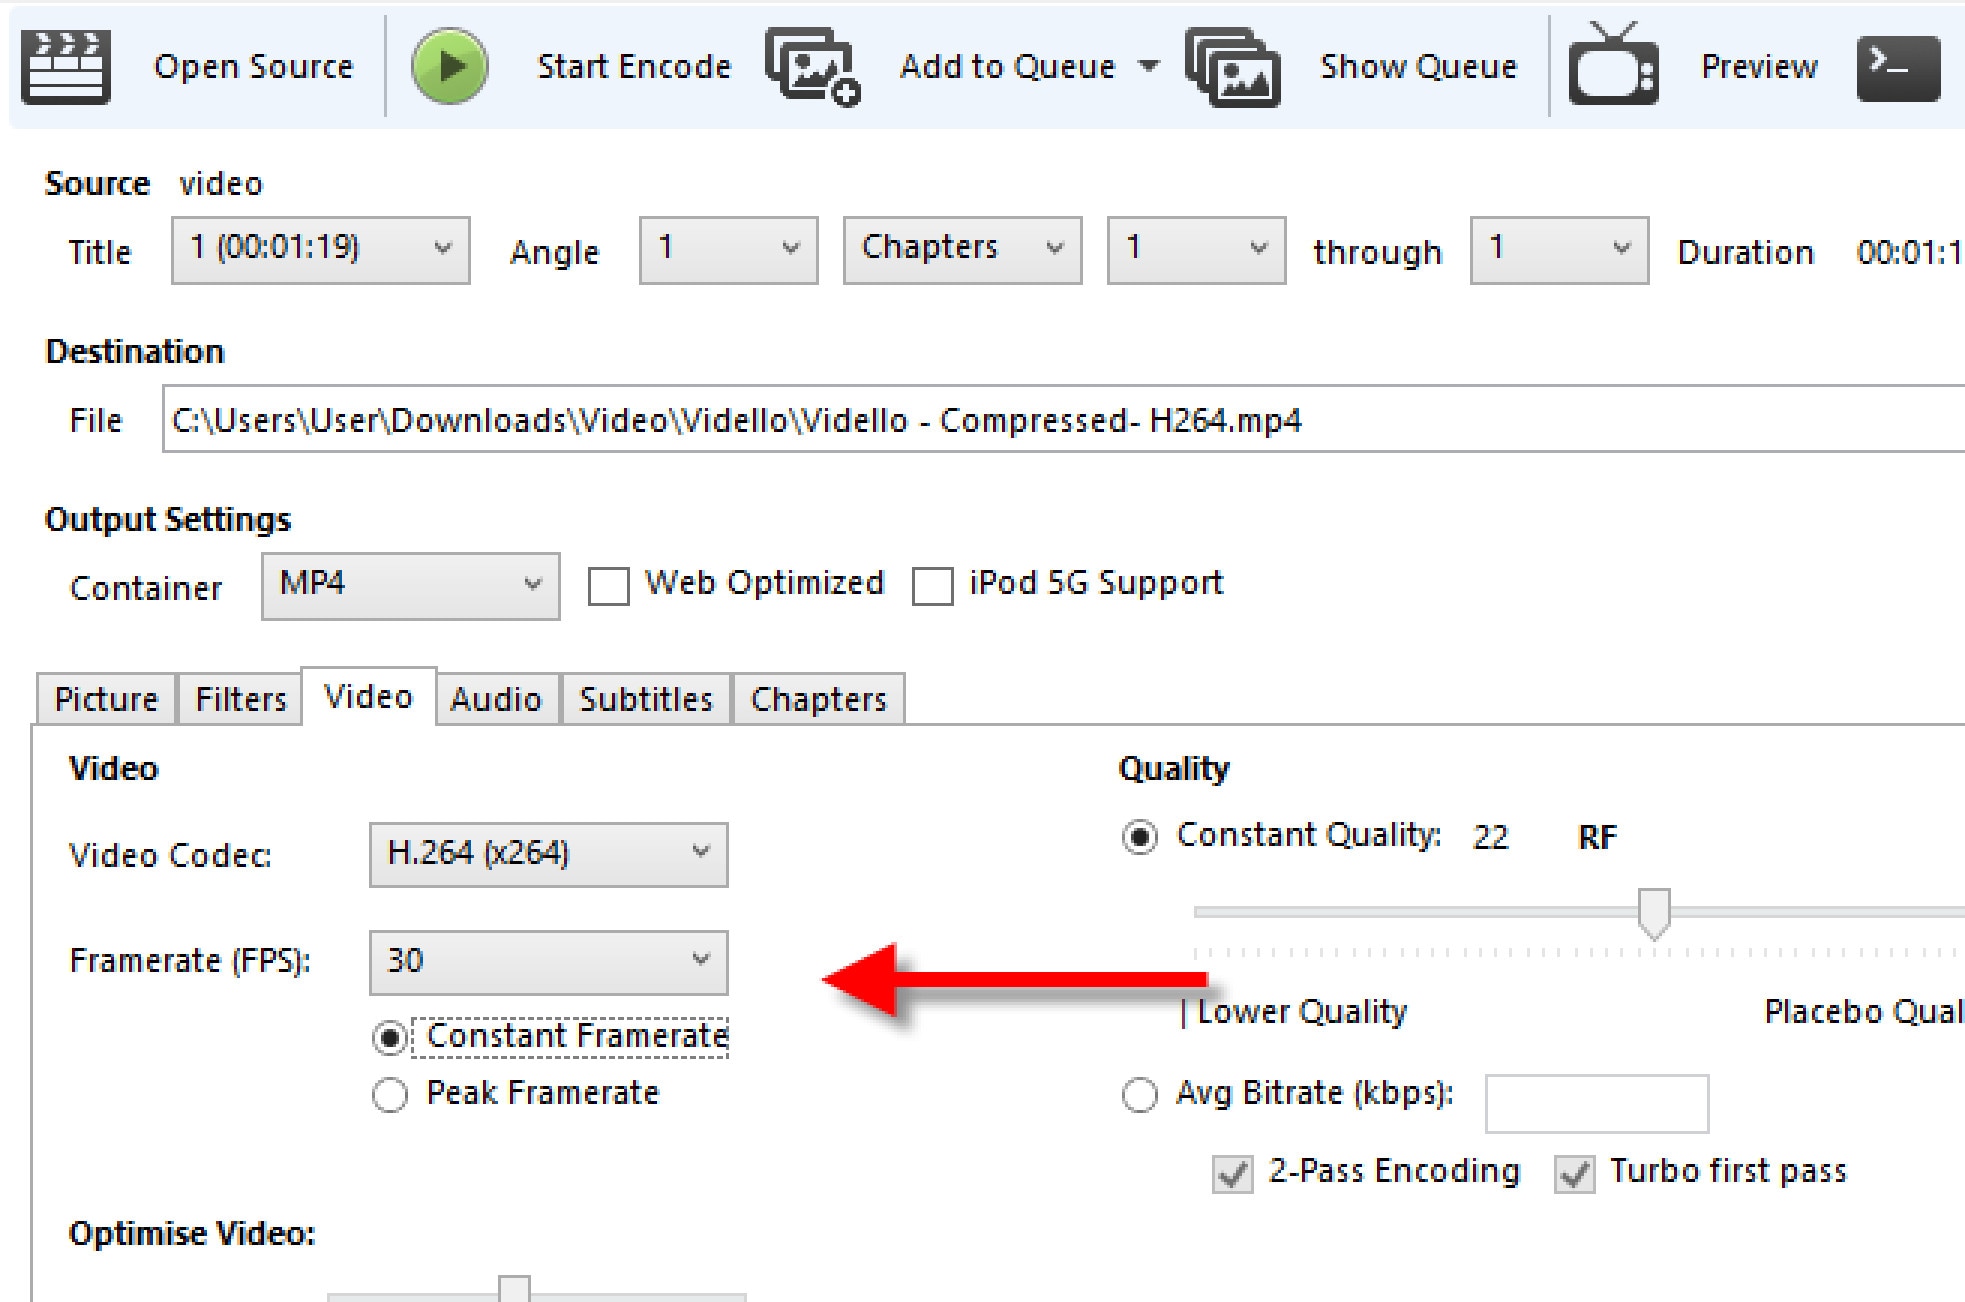
- Choose the ‘framerate’, depending on your source video i.e. NTSC (29.97fps), then make it 30fps by choosing 30. Also, tick the ‘Constant Framerate’ to ensure better compatibility.
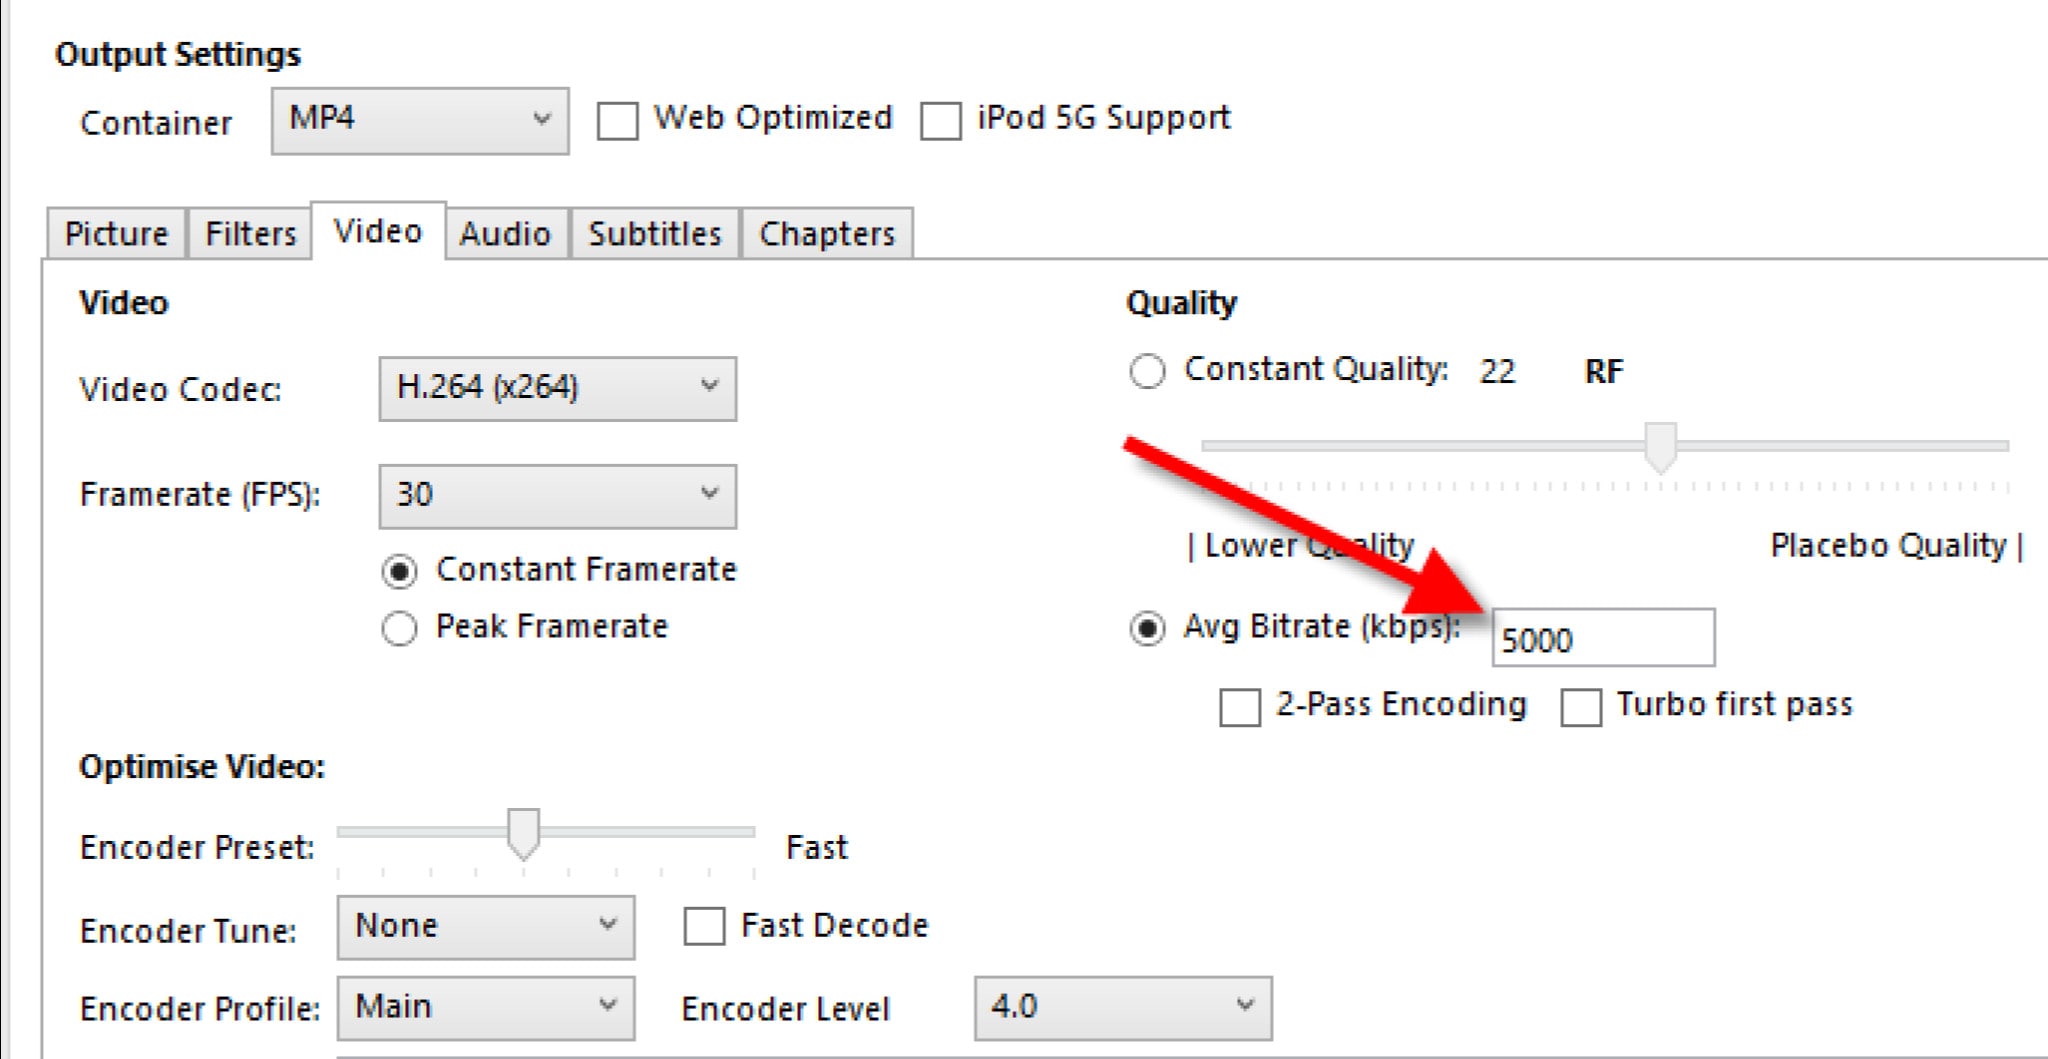
- Enter an ‘Average Bitrate (kbps)’ for the video between 5,000-10,000 (take note: higher bitrate has higher quality video but will take longer to upload and download).
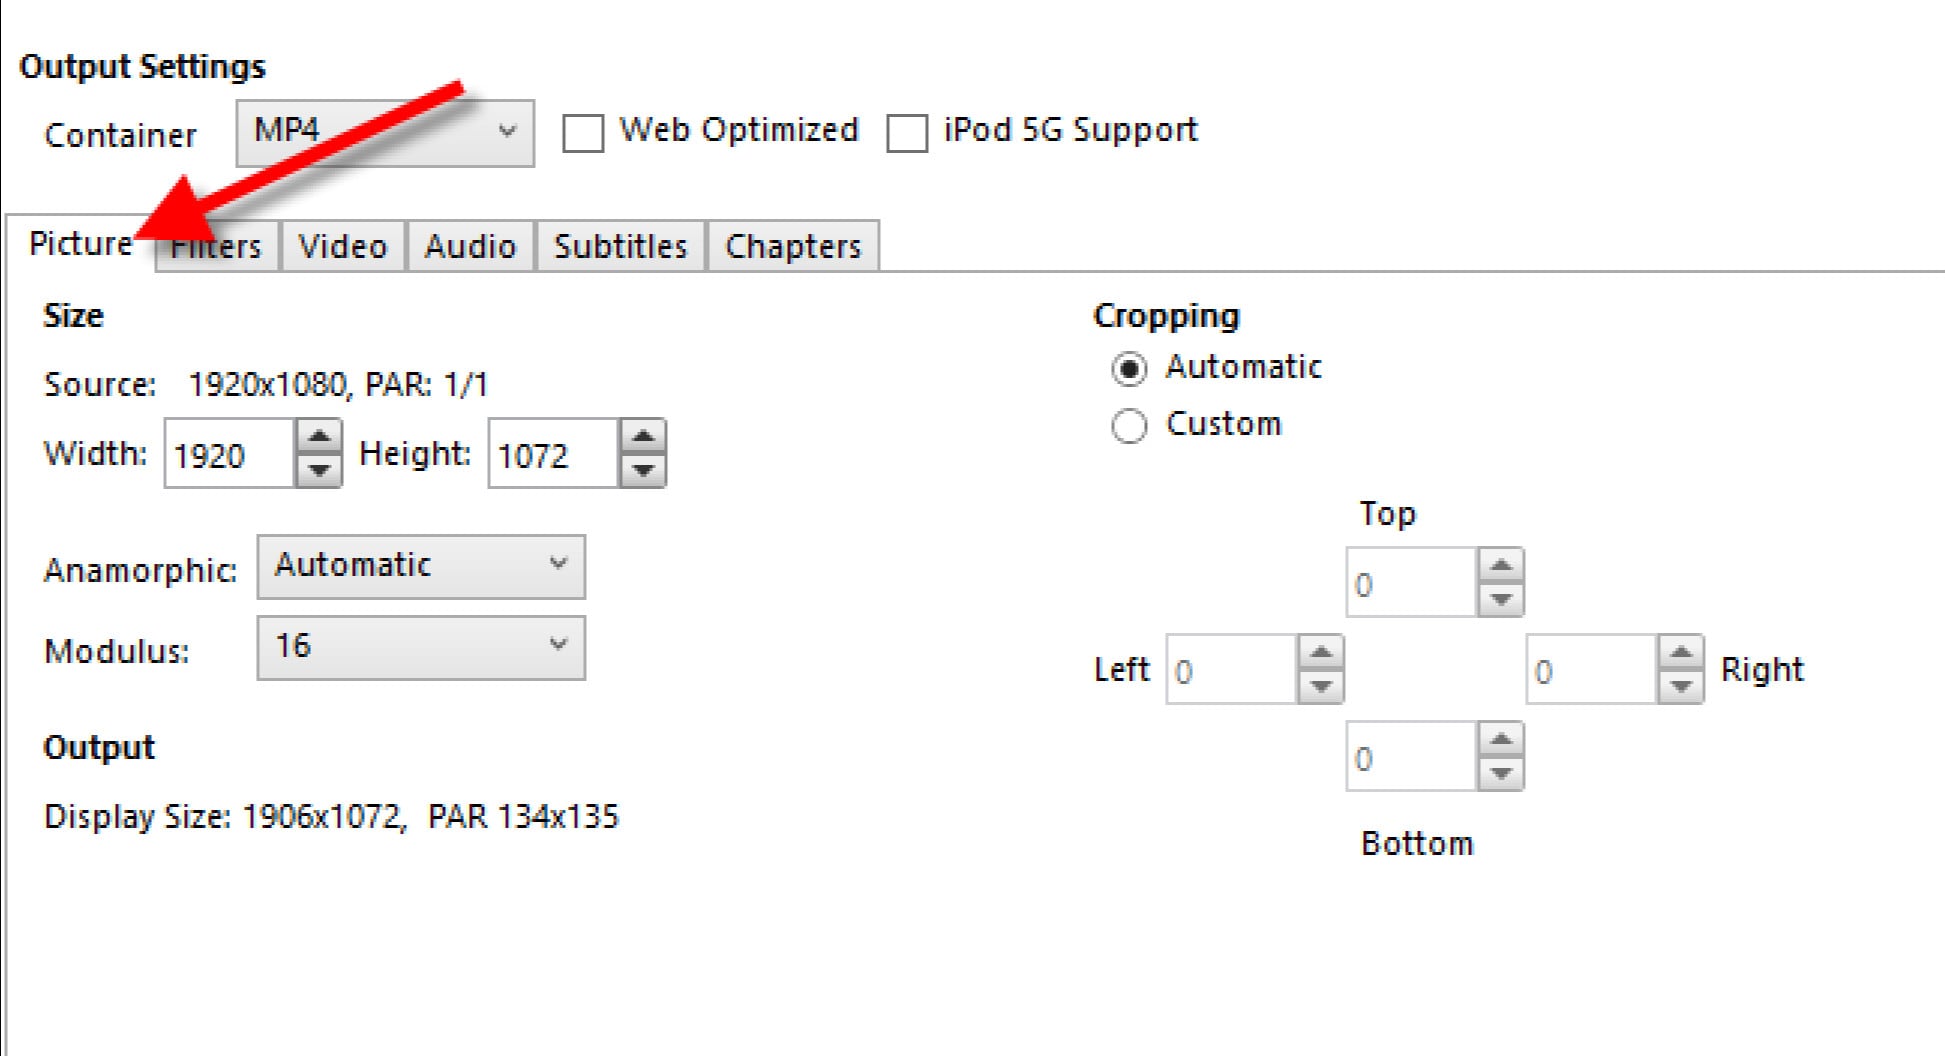
- Click the ‘Picture’ tab if you want to change the video frame size or resolution.
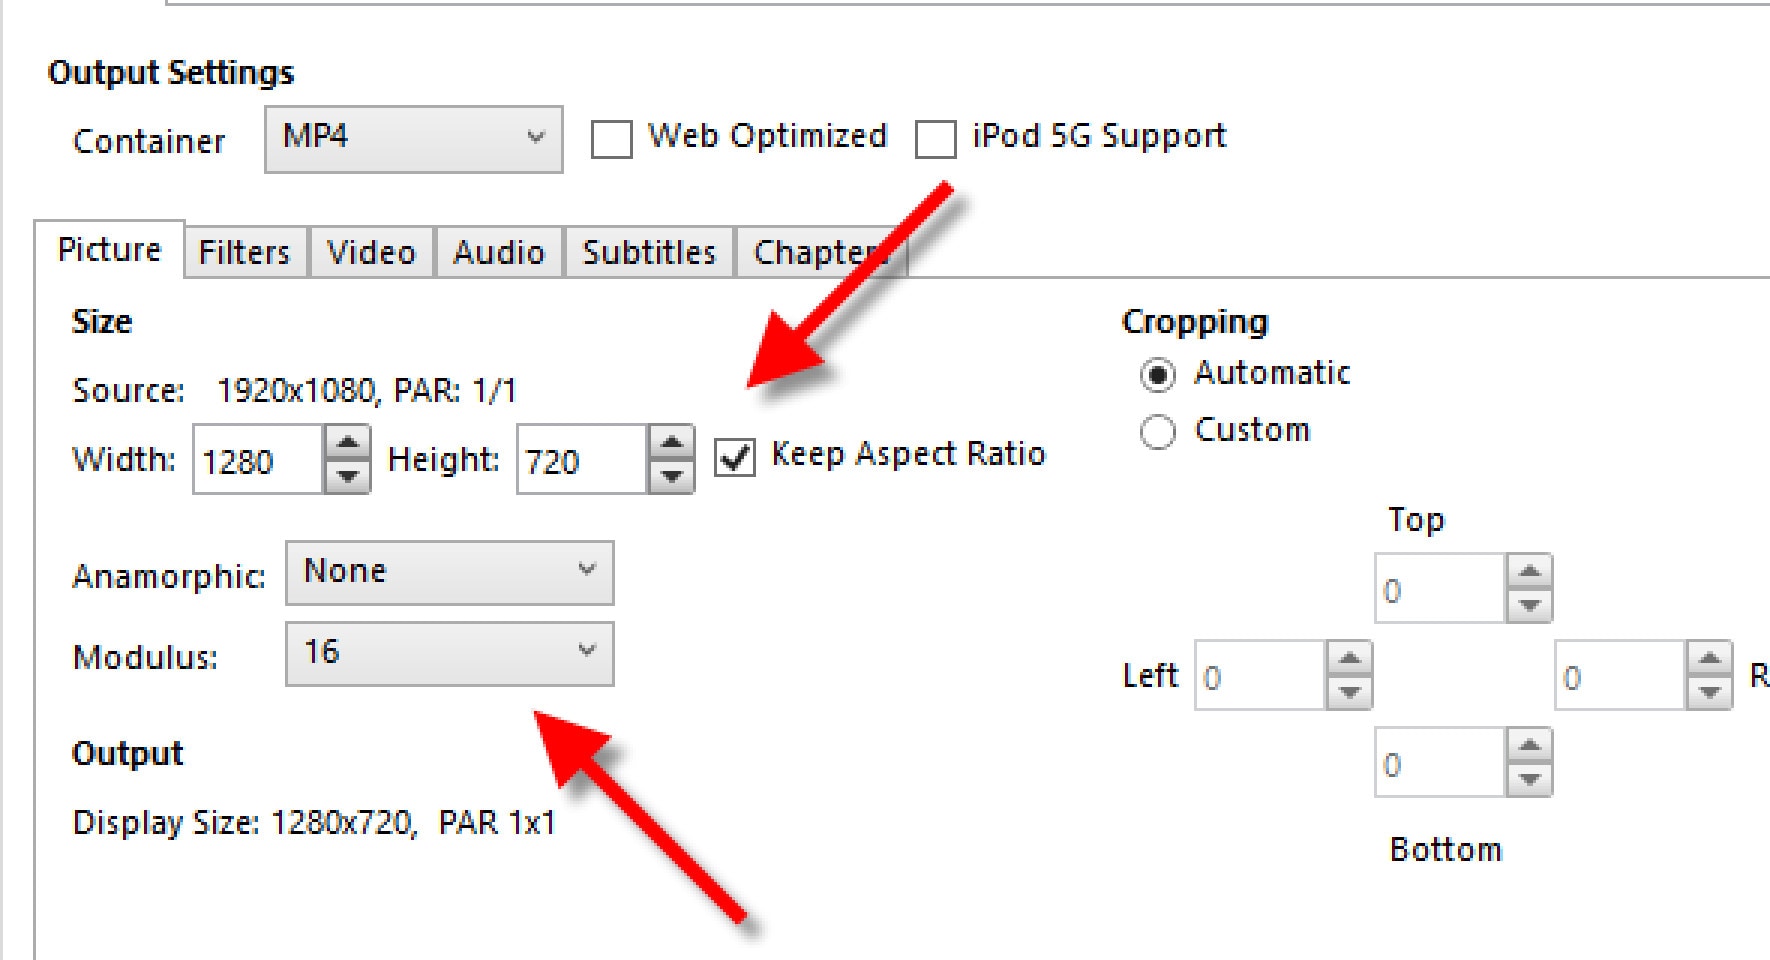

Change ‘Anamorphic’ to ‘None’, and ‘Modulus’ to ‘16’. And tick ‘Keep Aspect Ratio’. Use the arrow down on Width to change from 1920 (full HD) down to 1280.
Select the ‘Audio’ tab and choose 48 for the Samplerate. Choose Stereo for Mixdown. Choose 320 for your audio Bitrate.
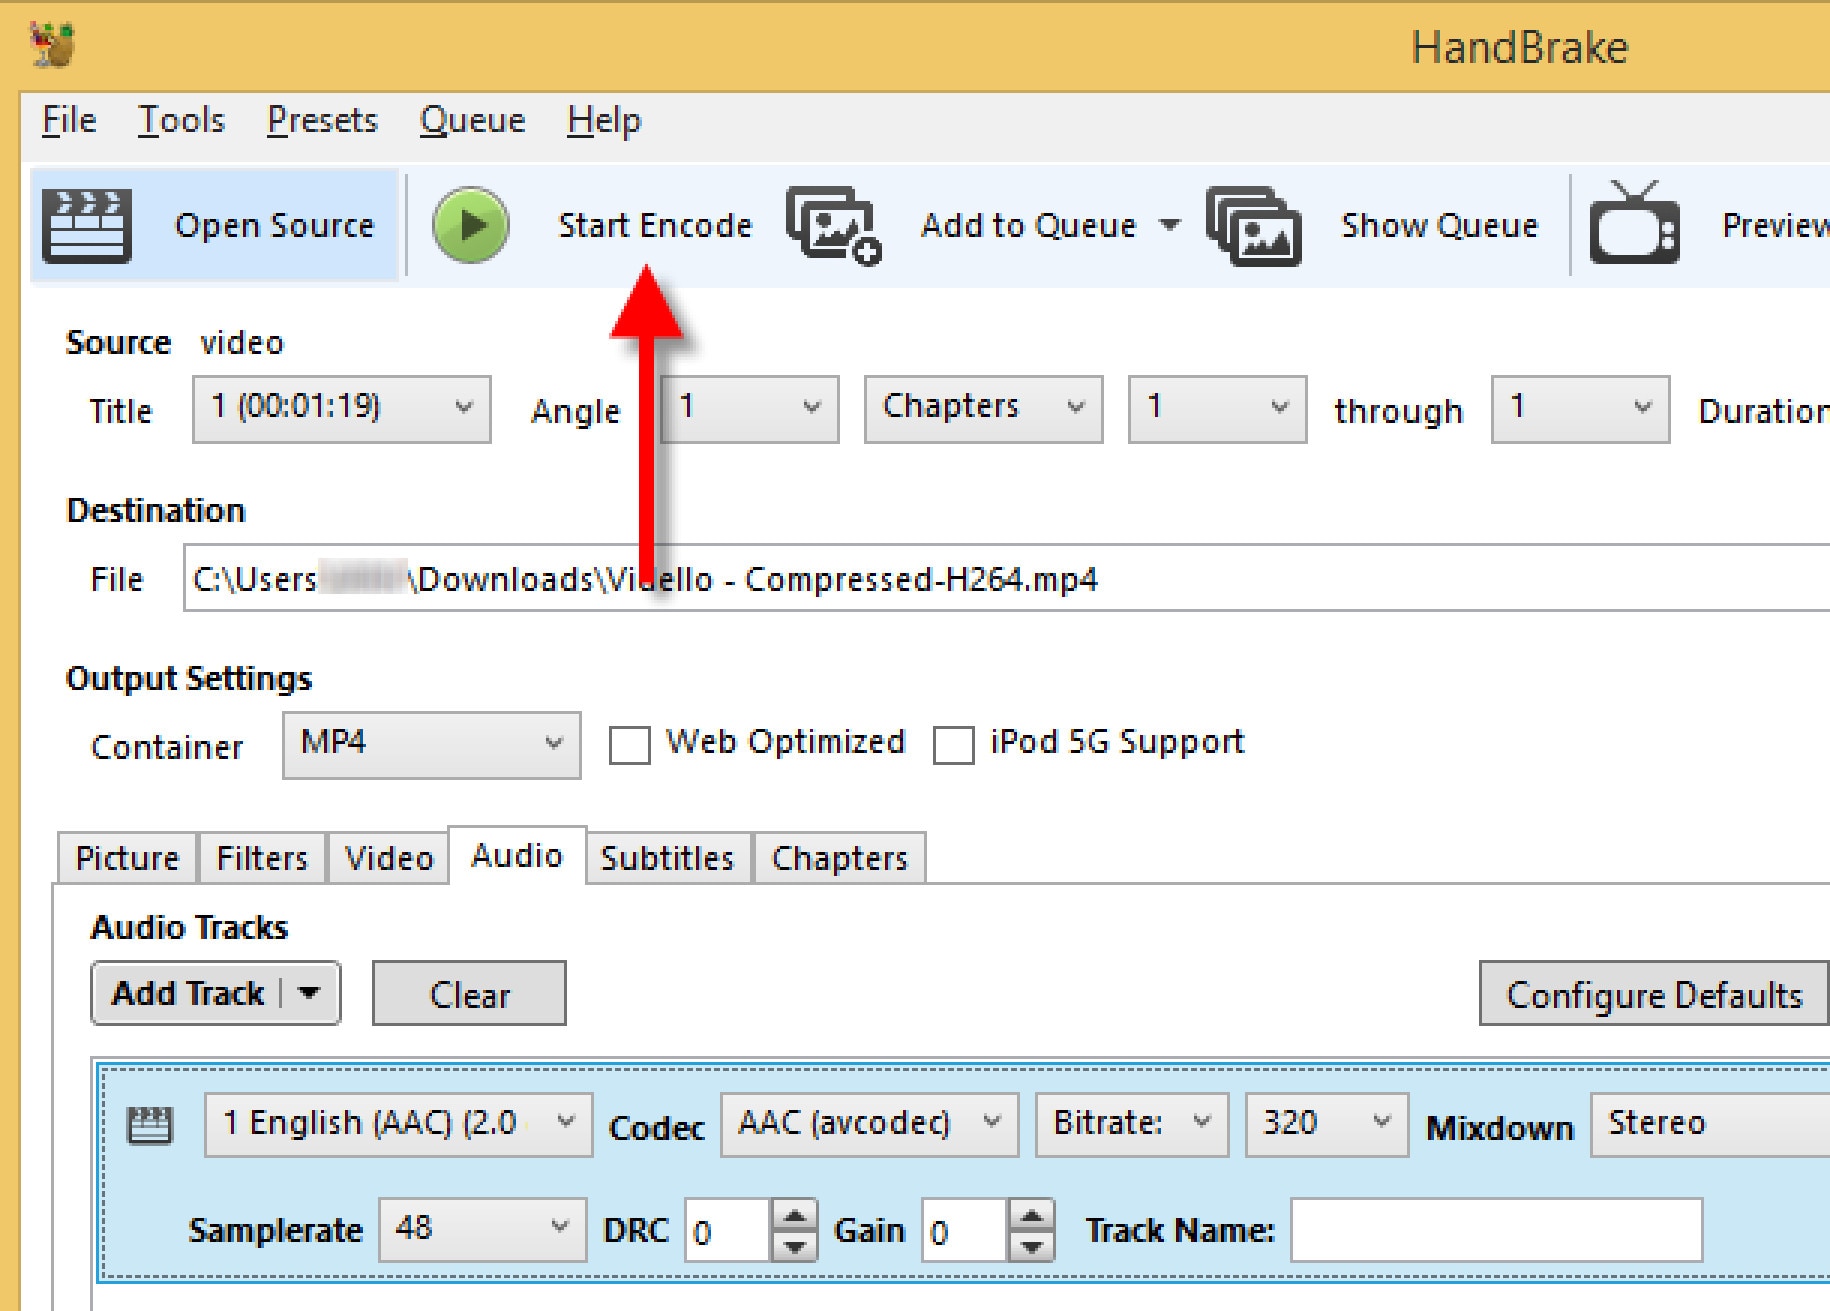
- Hit the ‘Start Encode’ button and wait until the video has finished compressing. Handbrake will let you know when it has finished.
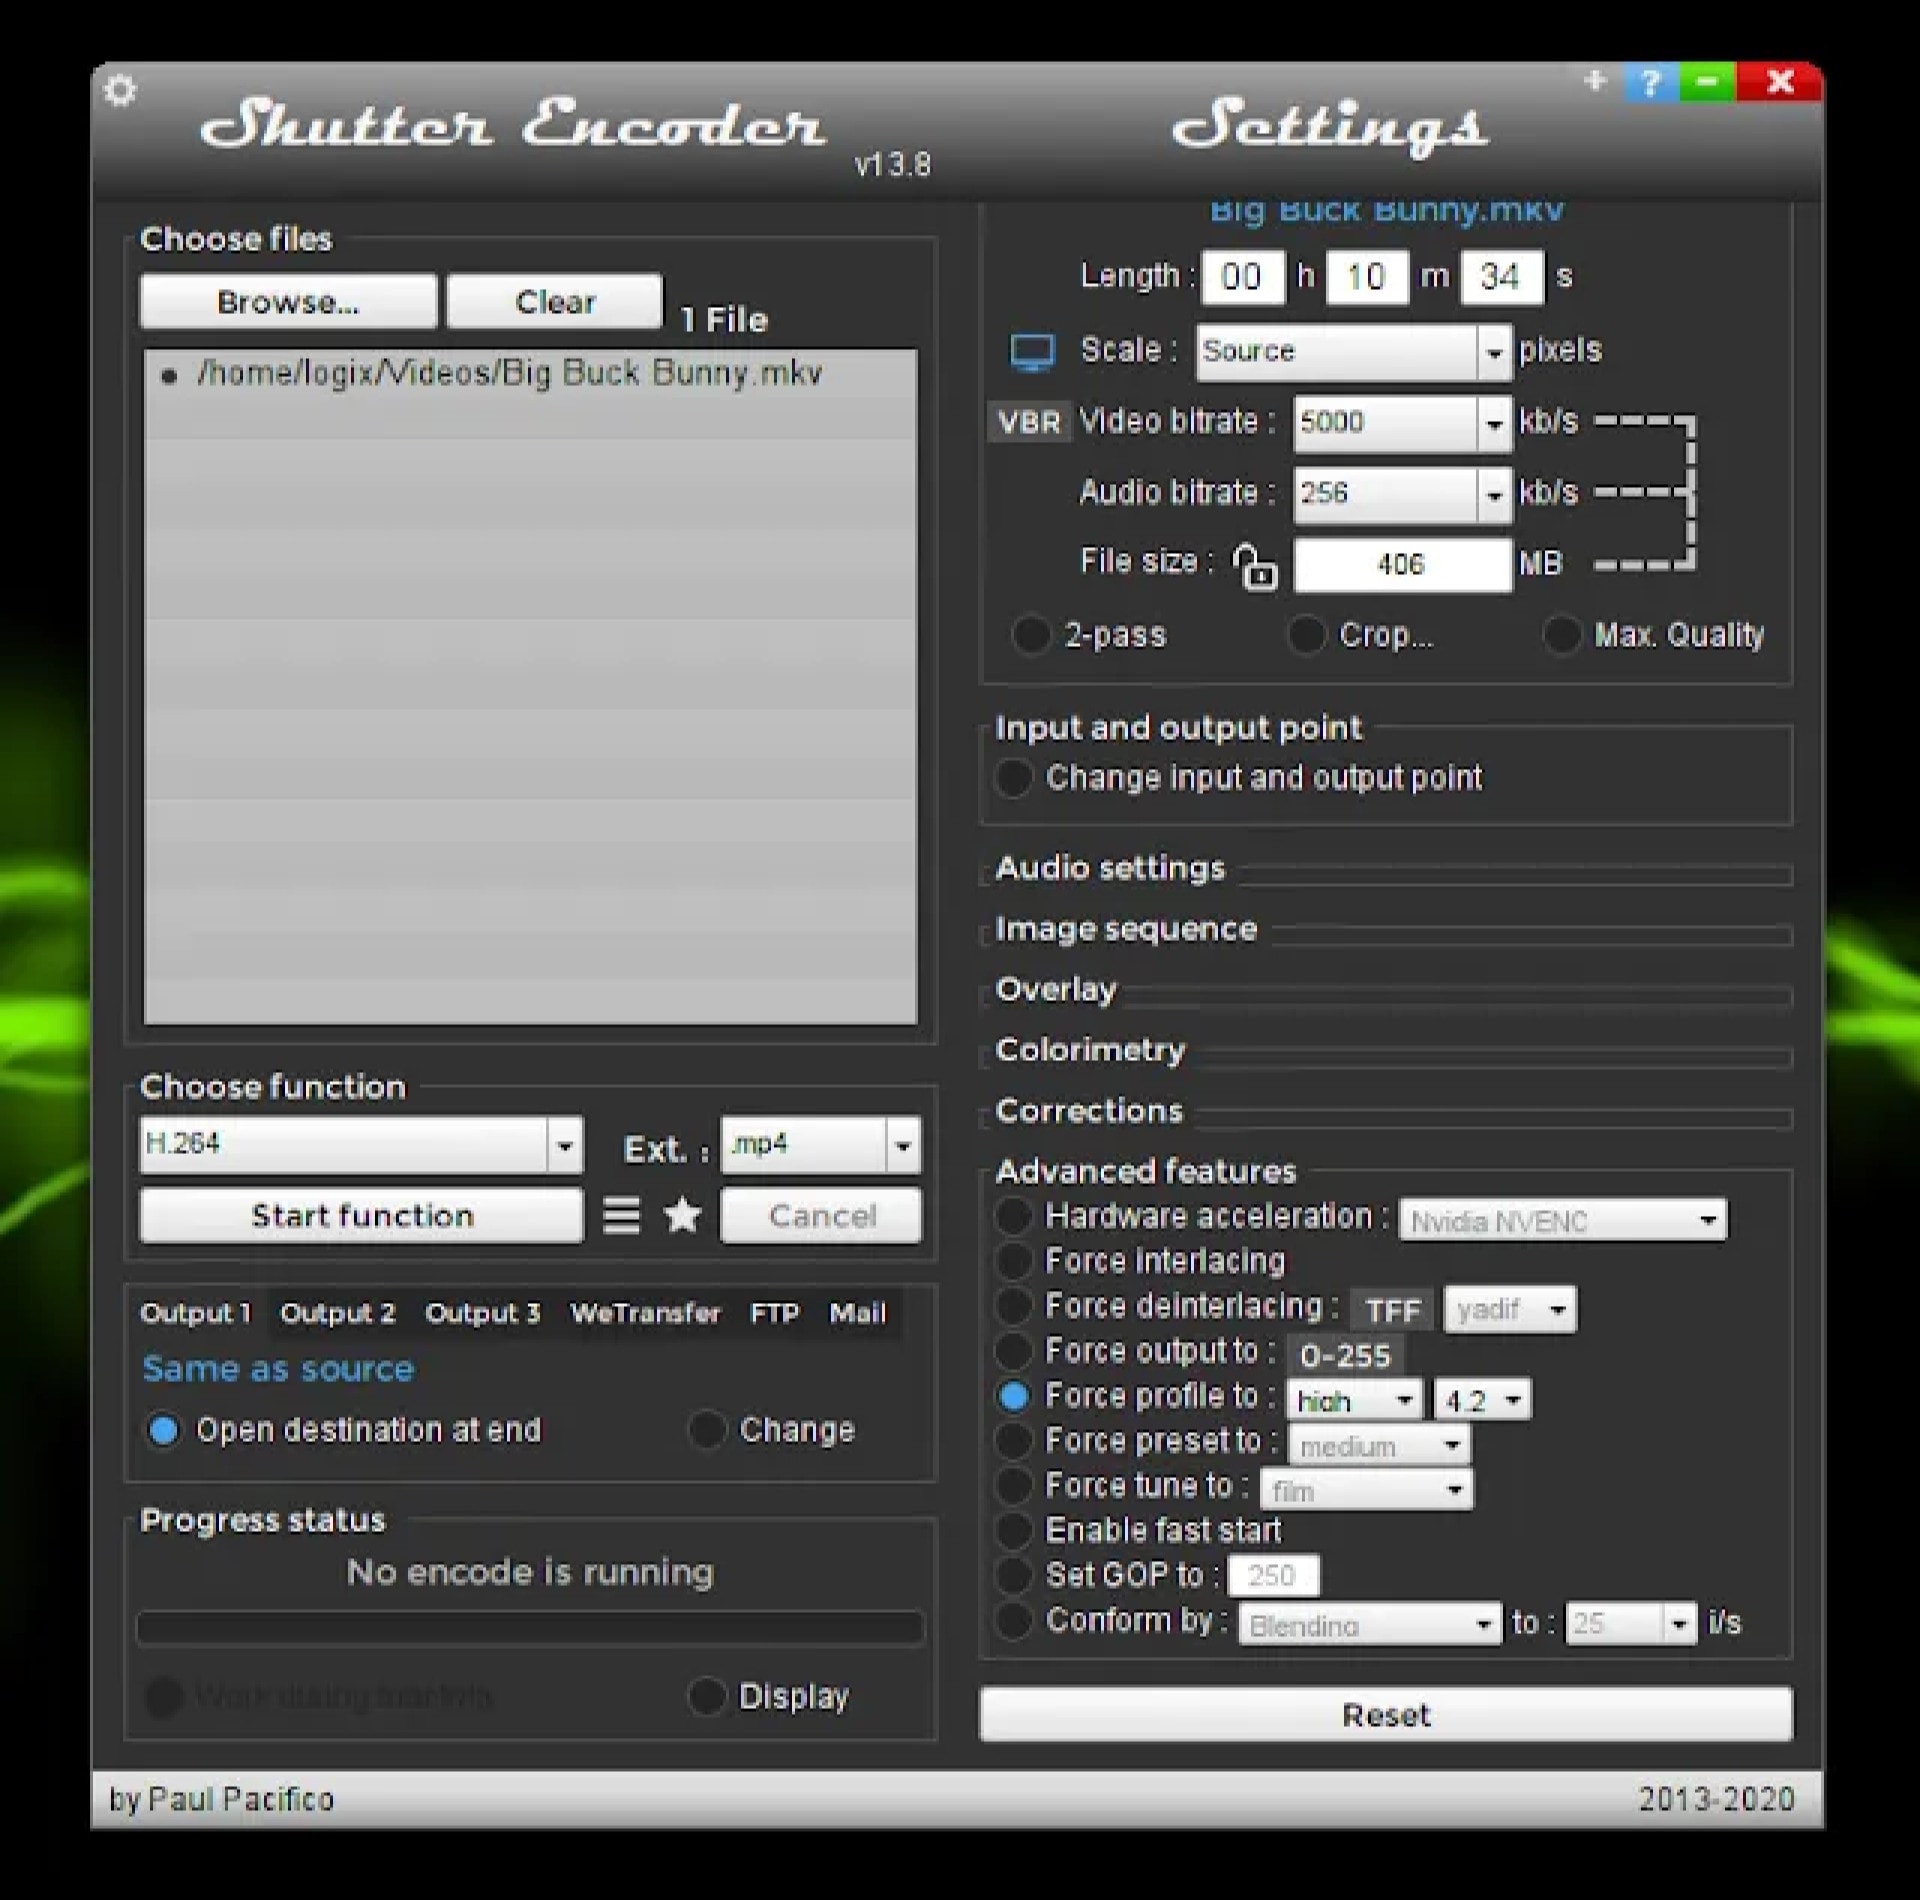
SHUTTER ENCODER
Supported OS: Mac, Linux, and Windows
Shutter Encoder offers a complimentary codec and conversion tool for everyone that was created in collaboration with video editors.
Convert your videos, images, and audio files to OP-Atom format, which is compatible with Avid Media Composer and Pro Tools. Encode your files, replace audio, burn to DVD, analyze audio volume, download web videos, and create your own timelapse.
Analyze audio loudness, replace audio, author DVDs and Blu-rays, create image sequences, download web videos, and more. Everything is done as simply and efficiently as possible
Shutter Encoder makes use of Java as well as other tools such as 7za, VLC, FFmpeg, ExifTool, MKVMerge (part of MKVToolNix), MediaInfo, DVDAuthor, youtube-dl, and others.
Shutter Encoder offers advanced users the option to tailor the conversion individually. You can, for example, manually change the bitrate of audio and video, but you can also set a file size limit and perform the conversion based on that. Further work techniques, such as the ability to enable hardware of the computer itself and complete the conversion according to a predefined profile, are available in a separate box.
Features:
- Without conversion: Cut without re-encoding, Replace audio, Rewrap, Conform, Merge, Subtitling (create subtitles for a video), Video inserts
- Sound conversion: WAV, AIFF, FLAC, MP3, AC3, OPUS, OGG
- Editing codecs: DNxHD, DNxHR, Apple ProRes, QT Animation, Uncompressed YUV
- Output codecs: , DV PAL, XDCAM HD422, AVC-Intra 100, XAVC, HAP, , VP9, AV1, OGV, MJPEG, Xvid, WMV, MPEG
- Archiving codec: FFV1
- Image creation: JPEG, PNG, TIF, TGA, DPX, BPM, ICO, WEBP
- Burn & Rip: DVD, Blu-ray, DVD RIP
- Analysis: Loudness & True Peak, Audio normalization, Cut detection, Black detection
- Download web videos using youtube-dl
Pros:
- Conversion according to profiles
- Extensive advanced options
- Built-in editing capabilities
Cons:
- Limited preview capability
Steps On How To Use Shutter Encoder
- To start, drag the video from your file manager and drop it onto the Shutter Encoder window, or use the ‘Browse’ button available in the upper left-hand side corner of the window to add a video.
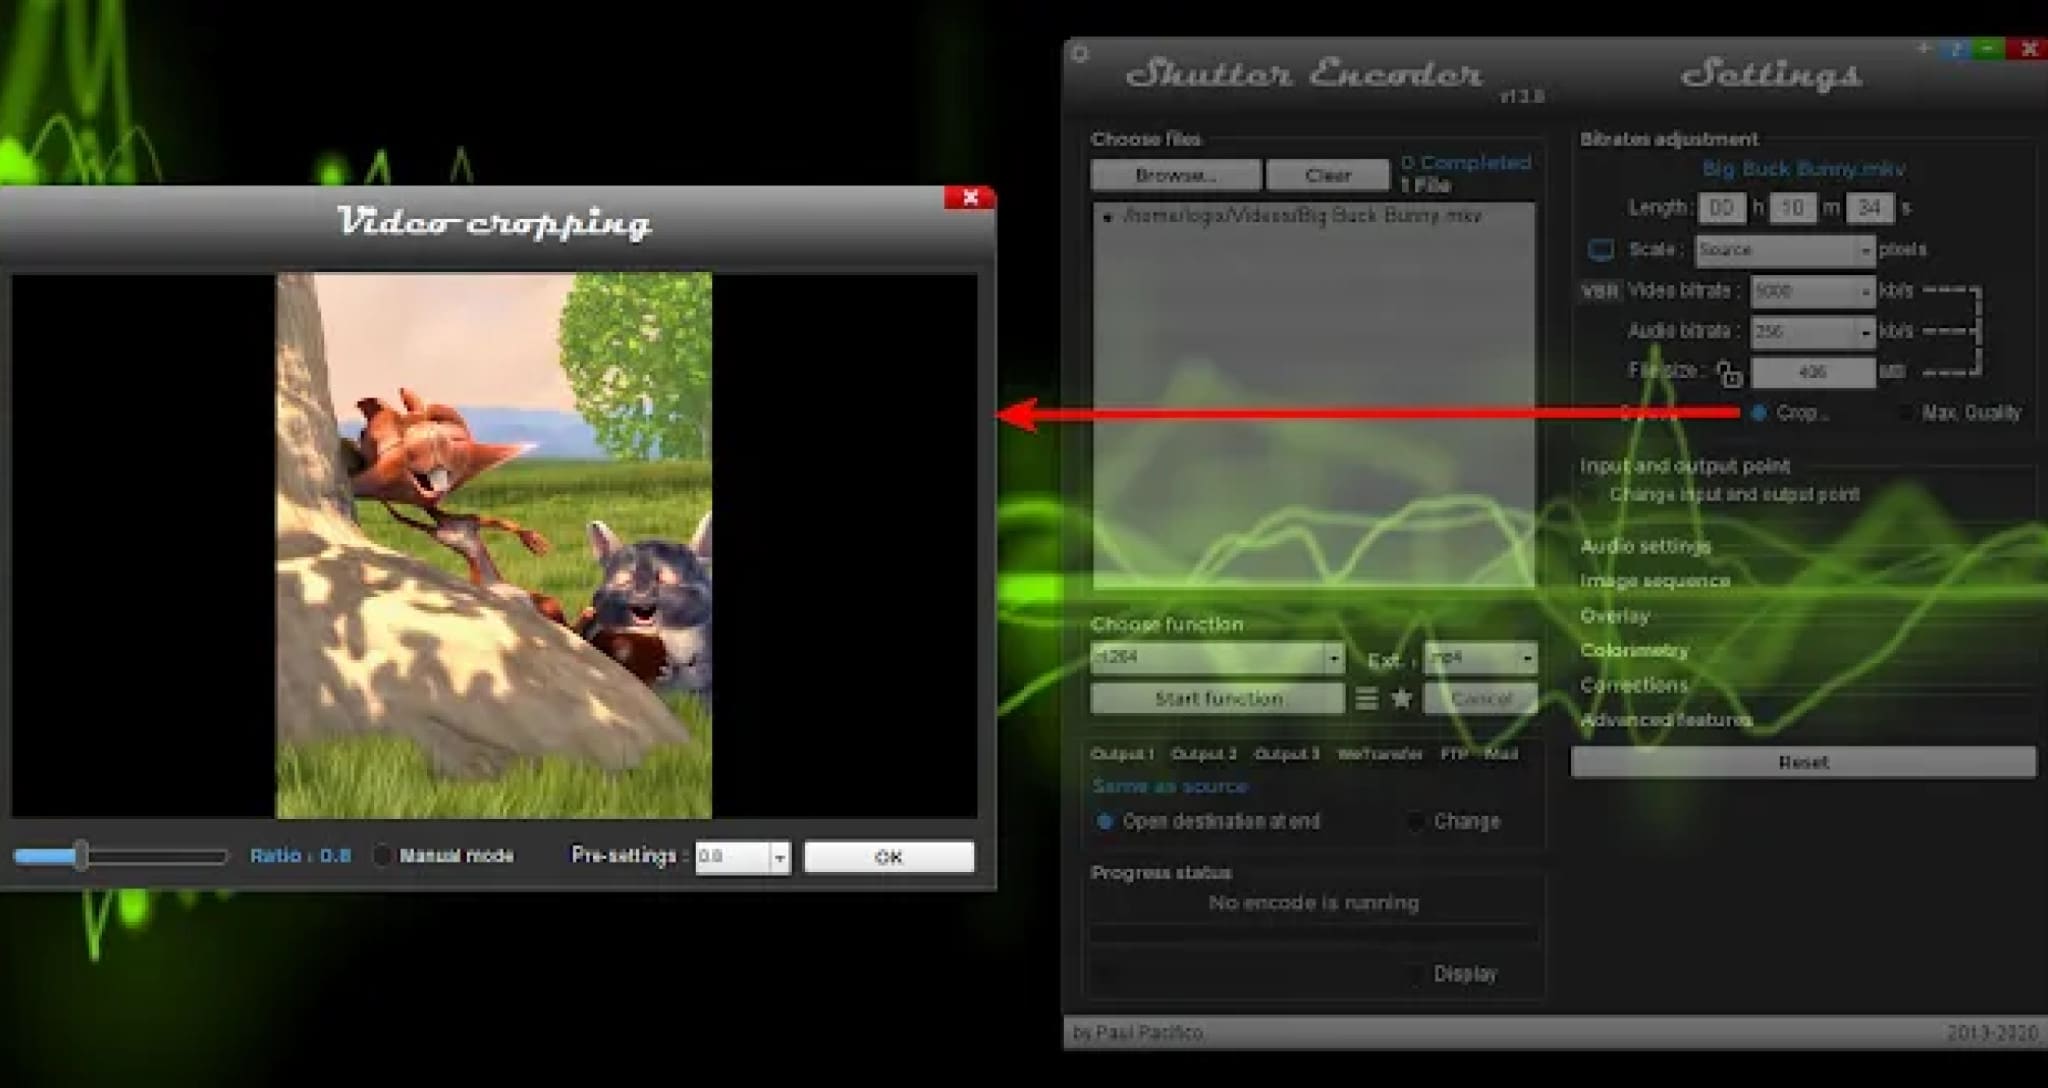
- Next, from the ‘Choose function’ drop-down menu, scroll to (it’s the first under Output codecs). You will now see some new options in a new panel that appears on the right-hand side of the Shutter Encoder window. From there, if you want to crop the video, click the Crop checkbox:
A new window will pop up where you can use your mouse to crop the video to the desired size. If you want to change it to a predefined, fixed-size ratio value, uncheck the ‘Manual mode’ box, and you’ll be able to choose a ratio from the ‘Pre-settings’ drop-down.
Next, if you want to change the profile, expand the ‘Advanced features’ item in the Shutter Encoder sidebar, check the box for the Force profile option, then change the profile to what you want to use:
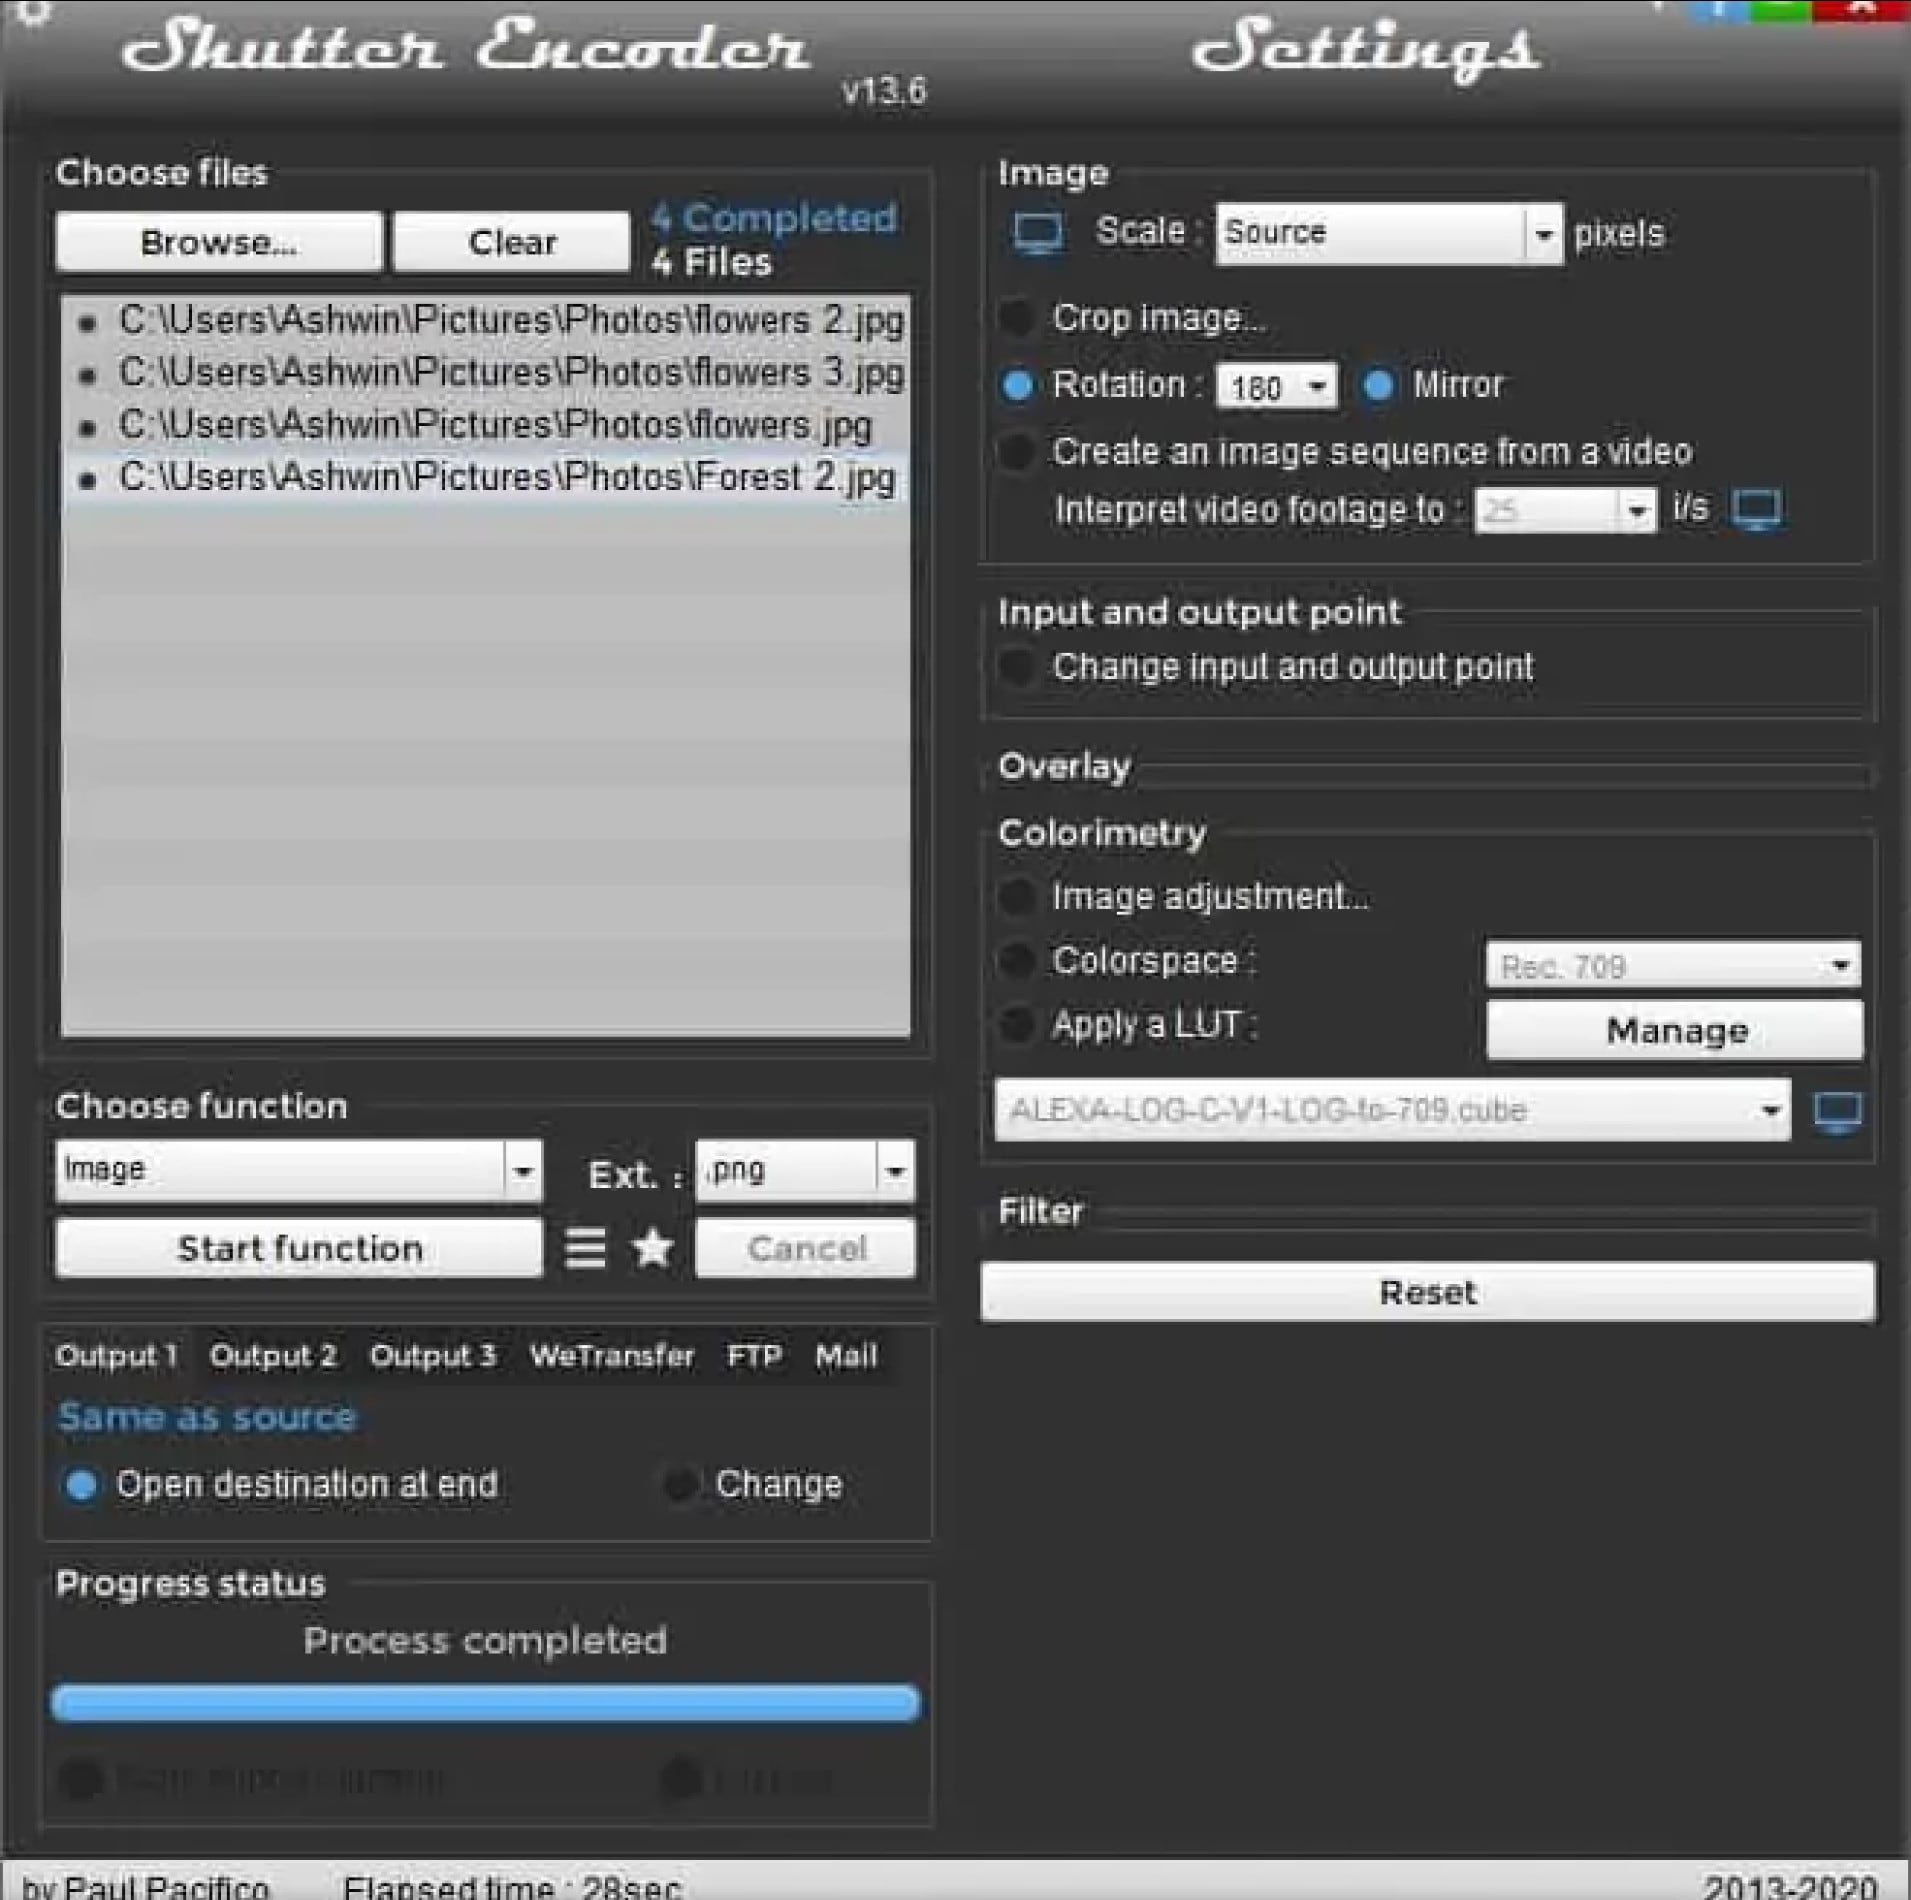
- When you’re done with the video adjustments you want to make, click the ‘Start function’ button, and Shutter Encoder will begin encoding your new video.
AVIDEMUX
Supported OS: Linux, BSD, Mac OS X, and Microsoft Windows
Avidemux offers three fundamental operations: cutting, encoding, and filtering. Cutting allows users to copy, paste, save, or delete a specific part of a video and is incredibly beneficial when users are only interested in a small portion of a video or want to remove commercials from a TV show that they have recorded.
Encoding, on the other contrary, is the way of transforming a video to various formats so that it can be played on different players. Users of Avidemux can use this feature on videos they want to use for business or archive for personal use. They could also use this to convert a video that they intend to post online.
Users can also use Avidemux to filter their videos, which include incorporating subtitles and color profiles, deinterlacing, resizing and sharpening the image of a video, and increasing or decreasing the overall volume of the audio.
Meanwhile, Avidemux has task automation features that make video processing and editing quick and painless. A feature called Joblist allows users to organize their projects in a queue so that they can access their files from a single location. They can use this queue to handle videos in bulk as well.
Features:
- Multiple Formats
- Video Filters
- Advanced Interlacing
- Full Editing Control
- Simple Interface
- Open Source
Pros:
- Covers standard formats.
- All essential features are present.
- Surprisingly advanced filtering, processing, editing, and filtering controls.
- The interface is easy to learn.
- Open-source
Cons:
- The interface is very legacy and needs remodeling
- No longer updated
- No support
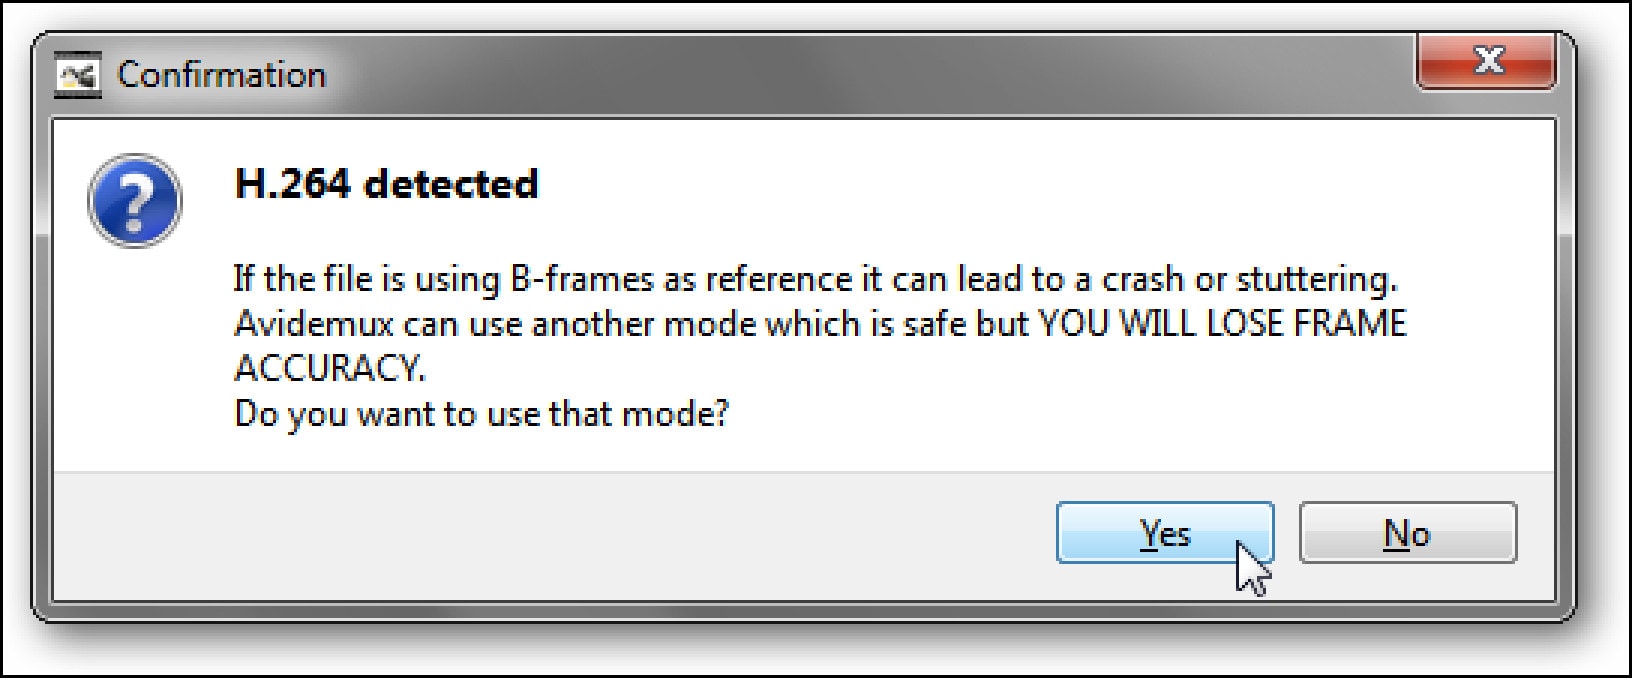
Steps On How To Cut Videos On Avidemux:
- Open up Avidemux, and load the video file that you want to work with. If you get a prompt like this one: we recommend clicking Yes to use the safer mode.


Find the portion of the video that you’d like to isolate. Get as close as you can to the start of the clip you want to cut.
You want it to read I; if it isn’t framed type I, then use the single left and right arrow buttons to go forward or backward one frame until you find an appropriate I frame.
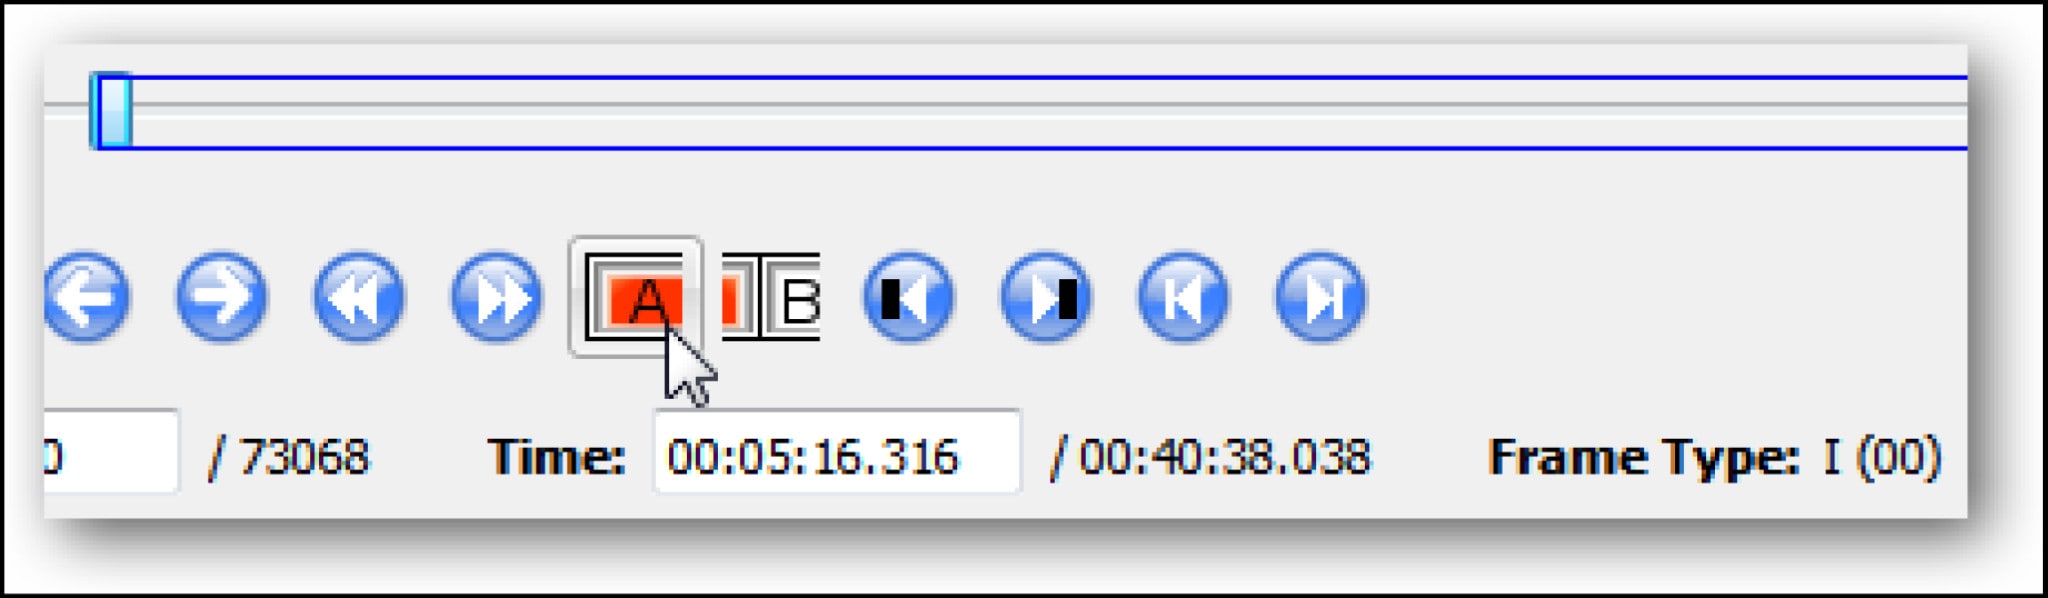
- Once you’ve found the right starting frame, click the button with the A over a red bar. This will set the start of the clip.
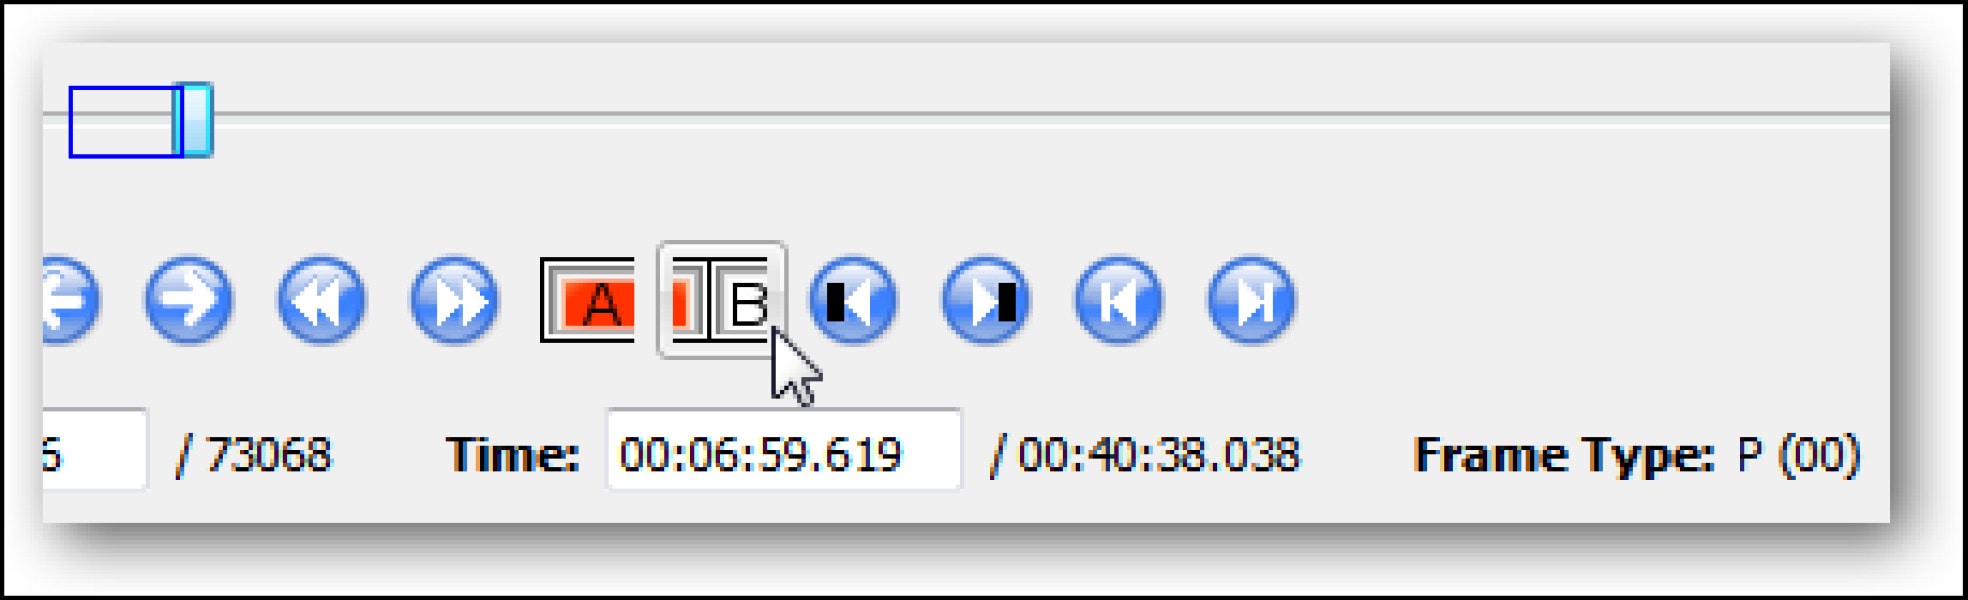
- Advance to where you want your clip to end. Click on the button with a B when you’ve found the appropriate frame. This frame can be of any type.
- You can now save the clip, either by going to File –> Save –> Save Video, or by pressing Ctrl+S. Give the file a name, and Avidemux will prepare your clip.
BEST PAID FFMPEG ALTERNATIVE TO CUT VIDEO ON MAC
JOYOSHARE MEDIA CUTTER
Supported OS: Mac and Windows
The best video cutting tool is Joyoshare Media Cutter for Windows (or Mac). As a professional video trimmer, it allows you to cut your media files at a 60X faster rate, allowing you to clip a 60-minute video or audio file in just one minute. The interface design is also simple and clean, allowing you to do it quickly.
Another noteworthy feature is the ability to easily cut and merge both video and audio without sacrificing quality. The cropper supports a variety of video and audio formats, including AVI, MP4, MPEG, VOB, WMV, ASF, RM, RMVB, 3GP, MP3, WMA, M4R, and others, allowing you to save the file in any format and on any device, including Apple.
More notably, this is a capable all-in-one video cutter. In addition to cutting videos and audio, it can convert all popular video formats, extract audio from video files, and merge video and audio files from the same source into a new one.
Features:
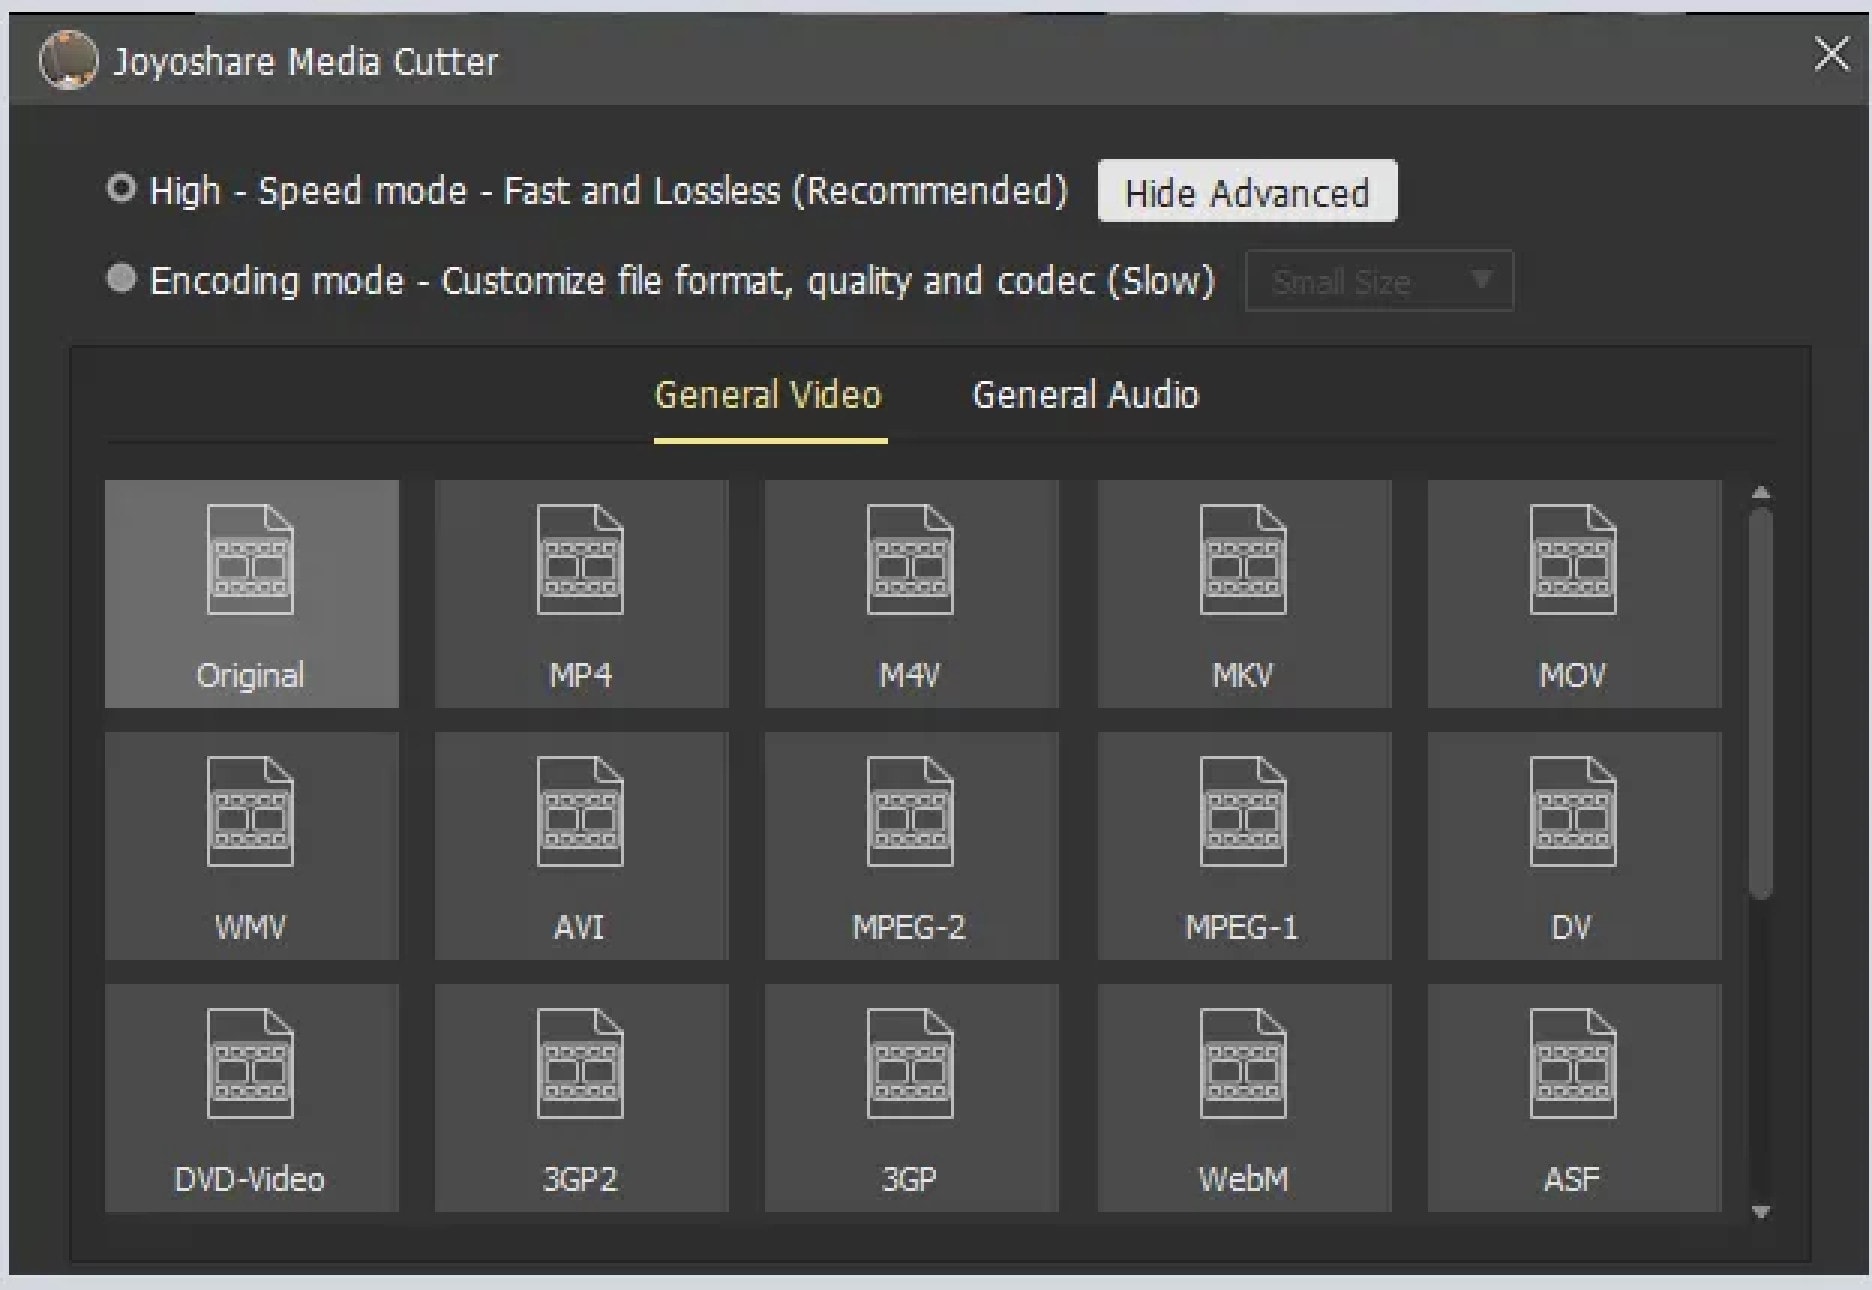
Convert to Any File Format
Merge Video and Audio Files into Multiple Formats
Improved Accuracy & Efficiency in Cutting Videos
60X Fast Conversion
Pros:
- Offers an easy way to cut, merge, and convert video files
- Blazing fast video-cutting and file-conversion speed
- Supports multiple audio and video file formats
Cons:
- Can only merge videos from the same source. That means you can’t use the program to merge separate videos from your gallery.
- The program doesn’t offer an easy way to remove an unwanted part of a video if it’s in the middle of the video. The only way to do that is by cutting the section before and after the video, then merging them into one.
Steps:
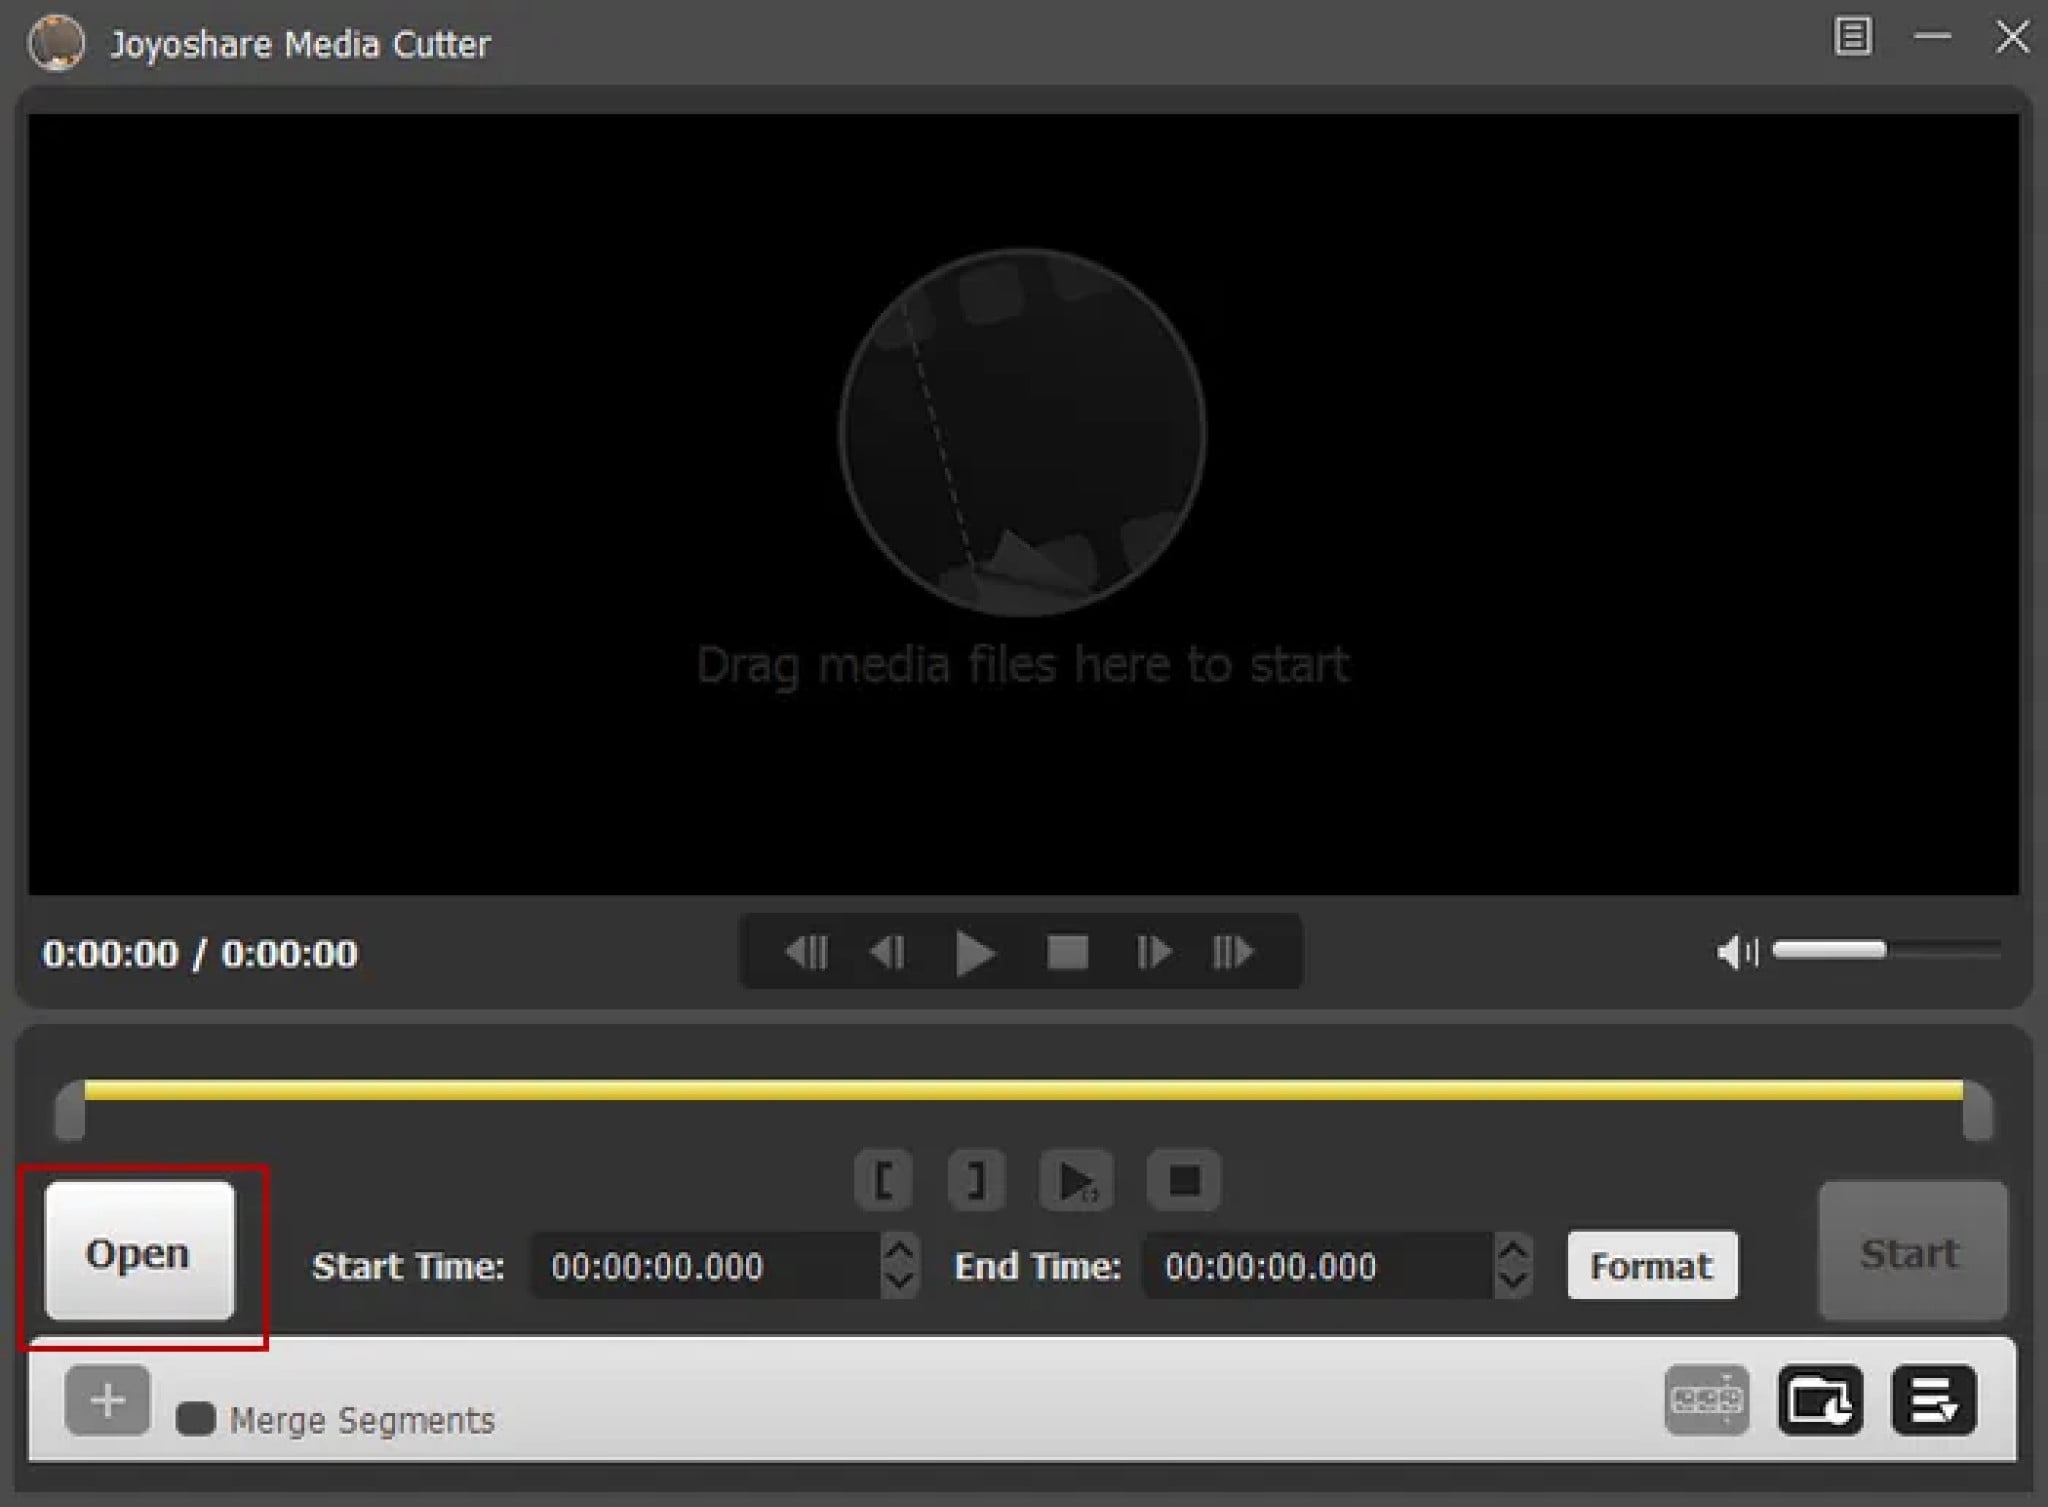
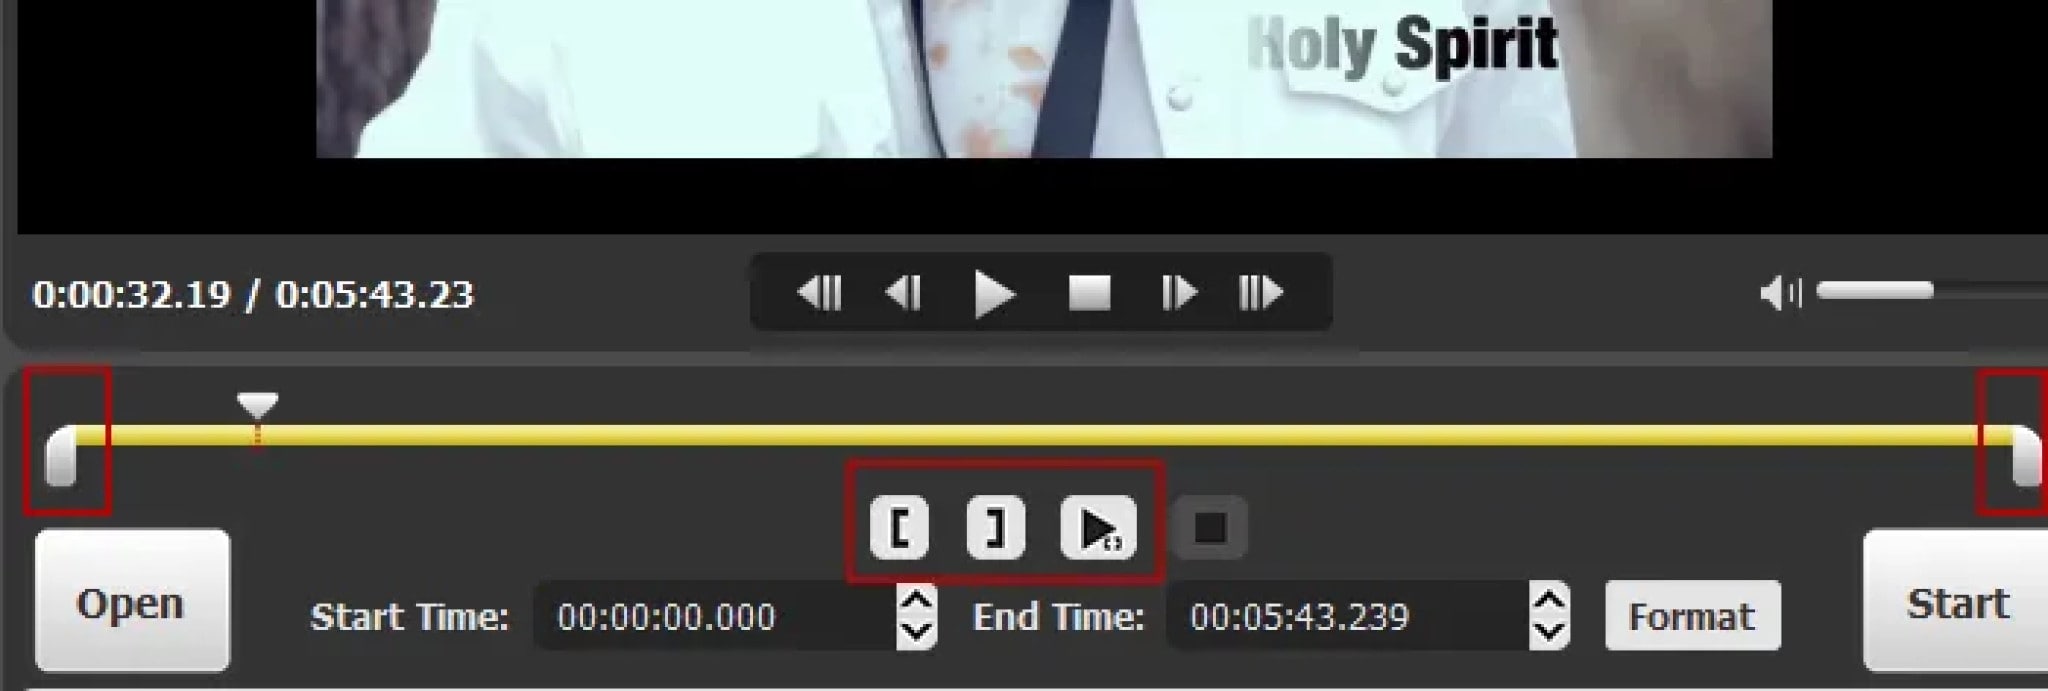
Step 1: Adding Video
To add a video, click the “Open” button. Locate the video you want to trim from your collection and open it. Alternatively, you can use the drag-and-drop feature.
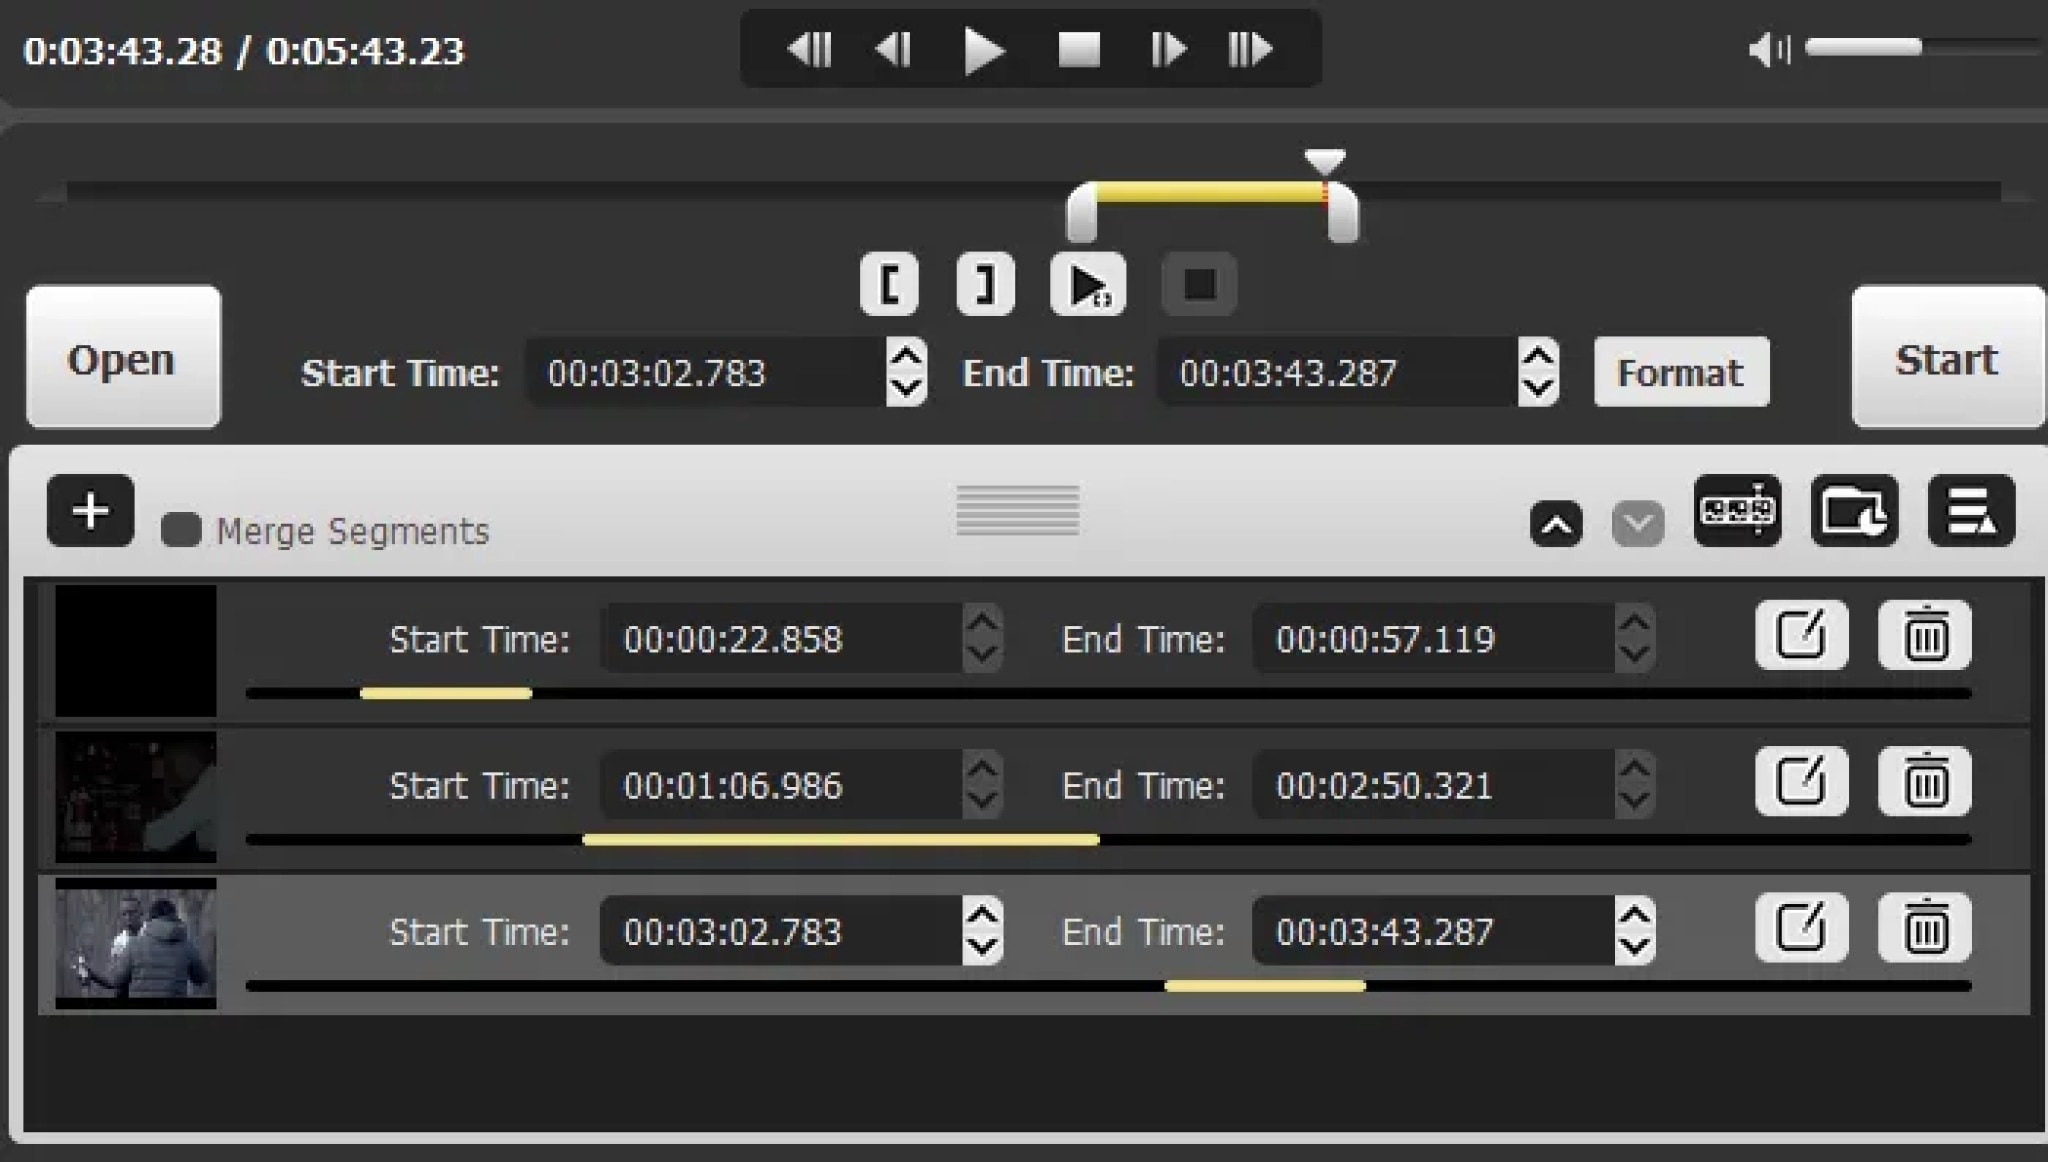
Step 2: Select the Segment to Be Trimmed
At the bottom of the Joyoshare video window, you’ll be able to see a time slider through which you can skip to your desired timeframe. Move the slider handles attached to the yellow timeline bar to set the starting and ending points of your video.
Once you’ve set your desired starting point, click on the “[” button to highlight the starting segment, then move the right-hand slider to select the ending point, and click the ] button to set the end segment.
Step 3: Choose Your Desired Output Format and Destination Folder
Click the “Format” button, and a new window will pop up where you’ll be able to choose your preferred output format.
Step 4: Trim the Video
Click the “Start” button to begin trimming the segment. Wait for a minute for the program to finalize trimming the segment, then click the save button. That’s it! You’ve successfully trimmed your first video.
If you wish to cut and merge several segments, click the “+” icon at the bottom of the segments tab, then follow the above procedure to create several segments.
MOVAVI VIDEO EDITOR
Supported OS: Mac and Windows
Movavi Video Editor for Mac and Windows is a simple-to-use yet effective video editor and cutter. Aside from cutting and joining short videos, it can apply various video effects, add music and titles, and so on to make your movie more visually appealing. The video cutter tool has an easy-to-use interface and outstanding instructional videos, so you can get started quickly.
Movavi comes with a bunch of video editing controls into a straightforward, user-friendly interface. PiP, chroma-key, titling, basic keyframing, and even motion tracking are included. It isn’t as feature-rich or as fast as most of the competition, but it allows you to easily create visually appealing work.
The tool is not free, but it does offer a limited-time free trial to users. However, it is a little irritating when the ad appears after you install and launch the trial version.
Features:
- Media Library
- Templates
- Upload video or audio file
- Video and image management
- Title Editor
- Trim & Slice
- Video Effect
- Slow Motion & Time Effect
- Social Sharing
- Brand Overlay
- Text Overlay
- Audio Tools
- Speed Adjustment
- Split / Merge
- Video Stabilization
Pros:
- Easy-to-understand user interface
- Transitions with sound
- Motion tracking and picture-in-picture tools
- Chroma keying
- Quick movie-creation tool
Cons:
- Lacks advanced trim modes and clip pre-trimming
- Rendering on the slow side
- Not compatible with Apple Silicon M1
Steps:
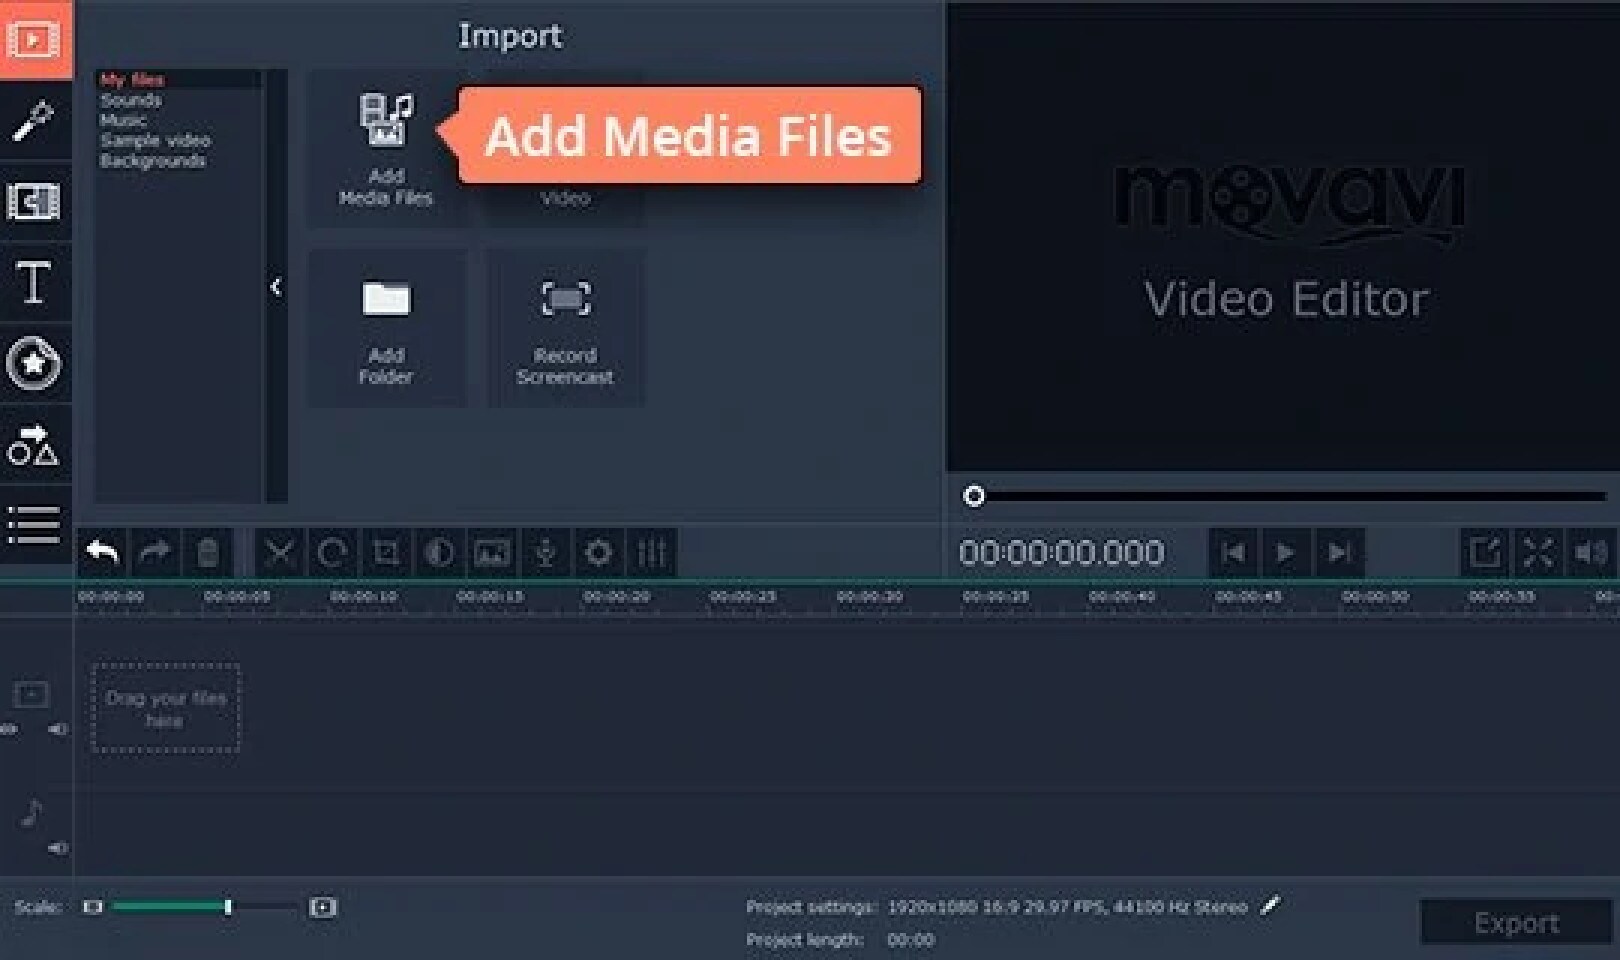
- Add Video Files
Launch Movavi’s MP4 trimmer, click the Add Media Files button, and upload the MP4 files you want to work with. The videos you’ve added will appear on the Timeline in the lower part of the program window.
- Cut And Trim Your Videos

So how to cut MP4 video with Movavi Video Editor Plus? If you want to snip a video into two or more parts, click the file on the Timeline and move the red marker to the place where you want to make the first cut. Then click the Split button with the scissors icon or hit Ctrl+B. Repeat the process as many times as you need.
If you want to trim your video clip, select the file on the Timeline and then just pull the edge of the clip to shorten it as shown in the picture.
- Save The Result
All that’s left to do is save your edited video. Click the Export button, choose the appropriate video format, and hit Start.
XILISOFT VIDEO CUTTER

Supported OS: Mac and Windows
Xilisoft Video Cutter is an effective programming cutter that lets you choose and cut your preferred segments in a single file as well as cut out the segments you don’t like. It is compatible with almost all popular video formats, including VCD, AVI, MPEG, MP4, WMV, 3GP, /MPEG-4 AVC, /PSP AVC, MOV, ASF, and others. It enables you to precisely set the start and end points.
While the software cannot cut segments from multiple input files at the same time, it can cut your selected source video into the number of clips you require in a single step. Xilisoft Video Cutter goes beyond standard cutting or slicing by allowing you to convert your video input files to a variety of well-known codecs. It is possible to convert the entire source file or just a specific segment, but this requires removing those unnecessary parts that frequently cause problems (TV advertisements, trailers, etc.).
Features:
Easily Cut Video Clips
Multi-trim Video to Whole
Output Clips to Multiple Formats
Instant Preview
Clear Timeline
Advanced Editing
1-2-3 Interface
Multilingual Interface
Pros:
Supports all of the most widely used video file formats
Converts your videos between formats
Simple cutting interface
Allows for multiple cuttings from a single source file
Cons:
Does not support batch processing
Steps On How To Cut Your Favored Segments:
- Add Source Video File

Click the “Open“ button on the main interface, and select a video file in the pop-up window.
- Set Clip Segments
Click “Play” and click the “Set Start Point” and “Set End Point” buttons successively during playing the video to set the start point and endpoint of the clip.
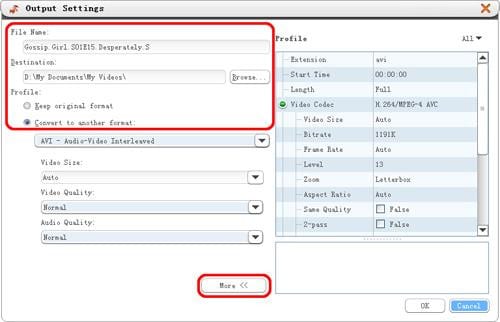
You can also set several segments. Click the “Show Advanced Mode” button and click the “New Clip” button in advanced mode to set the start and endpoints of the segments. Repeat the above steps to set several segments.
Tip: To delete a segment, please choose the segment in the segment list, and click the “Delete Clip” button on the toolbar; to adjust the segment order, please choose the segment and click the “Move Up” or “Move Down” button to adjust its order.
- Output Settings
Click the “Cut” button at the bottom of the window to open the “Output Settings” window.
- Start Cutting
Click the “OK” button to start video cutting. During cutting, you can check the cutting status by dragging the process bar or canceling the cutting. Tip: After cutting is done, click the “Open Output Folder” button to open the destination folder to check the clippings. Click the “Done” button to go back to the main window.
WHICH SHOULD I CHOOSE: FREE OR PAID VIDEO CUTTER ON MAC?
Whether you choose Free or Paid Video Cutter, it still depends on your edit and navigation if the project will succeed like what you’re anticipating. Beginners in the industry can go for Free Video Cutters to practice the craft without worrying about the monthly subscription.
However, if you’re a professional, I highly suggest that you choose Paid Video Cutter to lessen the hassle and create amazing output.
FAQS ABOUT CUTTING VIDEOS
- How can I cut a video without losing quality?
Trimming VLC through LosslessCut
LosslessCut is an open-source video cutter that runs on Windows, Linux, and Mac. Like Filmora, this software also allows you to cut videos without re-encoding, so there is no loss of quality.
- Who is the best video cutter?
Filmora is one of the best video cutter software that allows you to change the aesthetic of your video with one click. It comes with a wide range of video effects that enable you to make clips look good. Features: This tool provides fast editing processing and adjustable preview quality.
- Why does trimming videos reduce quality?
In most cases, trimming only causes a minor loss of video quality. And there is no clear causal relationship between trimming and losing video quality. The main factors that influence video quality are Resolution, Bitrate, and Frame size.
If you are longing to pick up the best video cutter for Mac, you are supposed to evaluate it from different aspects, like operating interface, cutting features, output quality, post-processing ability, etc. Frankly speaking, there is no fixed answer. Everything depends on your actual requirements. If you want to cut videos on Mac with the forthright method, iMovie can be your top priority. If you prefer top-leading editing features, Blender is competitive enough for you.
Conclusion:
There you have it! Here is the alternative software to cut/shorten your video without using FFmpeg. All these editors cater to different needs, so be sure to try them out, understand your requirements, and use the right one for your project!
FILMORA VIDEO EDITOR
Supported OS: Windows and Mac
Filmora Video Editor is another well-known video editor that is widely used for video editing. It was released two decades ago to provide low-cost video editing software. Aside from video cutting and joining, it has some great features such as adding filters, titles, texts, and so on. You can also record your voice or live music, mix audio and video tracks, and do other things. It is simple to use and is available for both Mac and Windows users.
Filmora includes an instant cutter tool that can be used throughout clip import and is designed for use with large amounts of high-resolution content. As the names indicate, it is very simple and serves only one purpose. You can drag multiple clips onto its window, but only if the Merge sub-mode is enabled. Trim mode is only for trimming the ends of a single clip, and its interface only displays one clip in the left-size source tray. You can Add Segments, which creates a new clip based on your trimmed original, but you can’t split a clip explicitly.
For Win 7 or later (64-bit)
For macOS 10.14 or later
Features:
- All editing tools and features are well-displayed in the main windows, which can be found and used easily;
- Very easy to cut or trim video files just with a few clicks;
- Lots of filters, overlays, motion graphics, titles, and more special effects can be added to the video.
- More features like Picture in Picture and Green Screen and Split Screen can be used to make videos more unique.
Pros:
- Intuitive Interface
- Easy To Use
- Great Features
- Affordable Perpetual License
- Great Final Video Results
- Faster Renders And Previews
- Supports Screen Capturing
- Support Wide Range Of File Formats
- User Support Is Good
Cons:
- Lacks Advanced Feature
- Free Version Has Watermark
- Not Available For Linux And Phones
- Pricing Is Expensive
- Software Lagging
Steps On How To Cut Video On Mac Using Filmora Video Editor
Step 1: Import Video Files
You will begin by importing the video files into the project window of your program through dragging and dropping.
Step 2: Add Video To The Timeline
Drag and dropping are the easiest way to add the video to the timeline.
Step 3: Cut Video
If you want to trim the video, just move the cursor at the beginning or end of the video. When the cursor becomes a cross, move it forward or backward. Trimming only allows you to cut the beginning or end of a video.
If you need to cut a section of a video, you should follow do this: move the cursor at the beginning of the video section you want to cut, then click the scissors icon > Next, move the cursor to the end of the video section you want to cut and click scissors icon > Right-click on the video section you want to cut and click “Delete“.
Step 4: Export the Video
To export your video, click the “export” button and choose the local tab. After selecting the output device and format, just click “Create” to save it.
HANDBRAKE
Supported OS: Linux, Windows, and Mac
HandBrake is a multithreaded video transcoder that is unfastened and open source. It can compress and convert nearly any virtual media layout to another. HandBrake is able to rip encrypted DVDs the usage of libdvdcss (libdvdcss is covered with the VLC media participant on macOS and AnyDVD/DVD forty three on Windows).
This software program additionally enables batch processing, which converts a couple of video files at the same time. Additionally, a plethora of presets are available to guide you to the preferred output without having to tinker with a plethora of options.
Handbrake is a powerful and excellent video converter for Windows, Mac, and Linux that should not be overlooked. It provides all of the necessary features in a simple tool that gives the user complete control over the output. Before we get into the specifics, here’s a rundown of Handbrake’s advantages and disadvantages.
Features:
- Support of chapter selections
- Support of subtitles
- Integrated bitrate calculator
- Picture deinterlacing, cropping, and scaling
- Live Video Preview
Pros:
- HandBrake has a very simple layout which makes the video converter very easy to use, even for those who are converting videos for the first time.
- The live preview helps.
- The fact that the software is free and has device presets for iOS and Android certainly makes HandBrake a welcome video converter.
- The queuing tray for batch conversions is particularly nice.
- People who convert a lot of videos will find it very helpful.
Cons:
- On the flip side, the settings are not always easy to deal with.
- It takes a lot of time and then there are errors. The latest version fixes some old bugs but there are hiccups.
- The live preview is for up to four minutes of a video.
- It is futile for very long videos.
- The settings interface and that of the live preview could be better.
- The open-source software also doesn’t support all video formats.
- Given the diversity of devices and the multitude of formats in use today, HandBrake needs more compatibility.
Steps On How To Compress Video Using Handbrake
- After you download and install Handbrake, open the app. On the left side, under ‘Source Selection’, click ‘File’. Select the file from the folder and then click ‘open’.
- Choose where you want the compressed video to be saved by clicking ‘Browse’.
- Enter a name for the video, and click ‘Save’.
- Under ‘Output Settings’, choose MP4 for ‘Container’.
- Click the ‘Video’ tab, under it, is the ‘Video Codec’, choose (x264).
- Select a Preset from the ‘Preset Drawer’. We recommend you choose Fast1030p 30 for high quality.
- Choose the ‘framerate’, depending on your source video i.e. NTSC (29.97fps), then make it 30fps by choosing 30. Also, tick the ‘Constant Framerate’ to ensure better compatibility.
- Enter an ‘Average Bitrate (kbps)’ for the video between 5,000-10,000 (take note: higher bitrate has higher quality video but will take longer to upload and download).
- Click the ‘Picture’ tab if you want to change the video frame size or resolution.
Change ‘Anamorphic’ to ‘None’, and ‘Modulus’ to ‘16’. And tick ‘Keep Aspect Ratio’. Use the arrow down on Width to change from 1920 (full HD) down to 1280.
Select the ‘Audio’ tab and choose 48 for the Samplerate. Choose Stereo for Mixdown. Choose 320 for your audio Bitrate.
- Hit the ‘Start Encode’ button and wait until the video has finished compressing. Handbrake will let you know when it has finished.
SHUTTER ENCODER
Supported OS: Mac, Linux, and Windows
Shutter Encoder offers a complimentary codec and conversion tool for everyone that was created in collaboration with video editors.
Convert your videos, images, and audio files to OP-Atom format, which is compatible with Avid Media Composer and Pro Tools. Encode your files, replace audio, burn to DVD, analyze audio volume, download web videos, and create your own timelapse.
Analyze audio loudness, replace audio, author DVDs and Blu-rays, create image sequences, download web videos, and more. Everything is done as simply and efficiently as possible
Shutter Encoder makes use of Java as well as other tools such as 7za, VLC, FFmpeg, ExifTool, MKVMerge (part of MKVToolNix), MediaInfo, DVDAuthor, youtube-dl, and others.
Shutter Encoder offers advanced users the option to tailor the conversion individually. You can, for example, manually change the bitrate of audio and video, but you can also set a file size limit and perform the conversion based on that. Further work techniques, such as the ability to enable hardware of the computer itself and complete the conversion according to a predefined profile, are available in a separate box.
Features:
- Without conversion: Cut without re-encoding, Replace audio, Rewrap, Conform, Merge, Subtitling (create subtitles for a video), Video inserts
- Sound conversion: WAV, AIFF, FLAC, MP3, AC3, OPUS, OGG
- Editing codecs: DNxHD, DNxHR, Apple ProRes, QT Animation, Uncompressed YUV
- Output codecs: , DV PAL, XDCAM HD422, AVC-Intra 100, XAVC, HAP, , VP9, AV1, OGV, MJPEG, Xvid, WMV, MPEG
- Archiving codec: FFV1
- Image creation: JPEG, PNG, TIF, TGA, DPX, BPM, ICO, WEBP
- Burn & Rip: DVD, Blu-ray, DVD RIP
- Analysis: Loudness & True Peak, Audio normalization, Cut detection, Black detection
- Download web videos using youtube-dl
Pros:
- Conversion according to profiles
- Extensive advanced options
- Built-in editing capabilities
Cons:
- Limited preview capability
Steps On How To Use Shutter Encoder
- To start, drag the video from your file manager and drop it onto the Shutter Encoder window, or use the ‘Browse’ button available in the upper left-hand side corner of the window to add a video.
- Next, from the ‘Choose function’ drop-down menu, scroll to (it’s the first under Output codecs). You will now see some new options in a new panel that appears on the right-hand side of the Shutter Encoder window. From there, if you want to crop the video, click the Crop checkbox:
A new window will pop up where you can use your mouse to crop the video to the desired size. If you want to change it to a predefined, fixed-size ratio value, uncheck the ‘Manual mode’ box, and you’ll be able to choose a ratio from the ‘Pre-settings’ drop-down.
Next, if you want to change the profile, expand the ‘Advanced features’ item in the Shutter Encoder sidebar, check the box for the Force profile option, then change the profile to what you want to use:
- When you’re done with the video adjustments you want to make, click the ‘Start function’ button, and Shutter Encoder will begin encoding your new video.
AVIDEMUX
Supported OS: Linux, BSD, Mac OS X, and Microsoft Windows
Avidemux offers three fundamental operations: cutting, encoding, and filtering. Cutting allows users to copy, paste, save, or delete a specific part of a video and is incredibly beneficial when users are only interested in a small portion of a video or want to remove commercials from a TV show that they have recorded.
Encoding, on the other contrary, is the way of transforming a video to various formats so that it can be played on different players. Users of Avidemux can use this feature on videos they want to use for business or archive for personal use. They could also use this to convert a video that they intend to post online.
Users can also use Avidemux to filter their videos, which include incorporating subtitles and color profiles, deinterlacing, resizing and sharpening the image of a video, and increasing or decreasing the overall volume of the audio.
Meanwhile, Avidemux has task automation features that make video processing and editing quick and painless. A feature called Joblist allows users to organize their projects in a queue so that they can access their files from a single location. They can use this queue to handle videos in bulk as well.
Features:
- Multiple Formats
- Video Filters
- Advanced Interlacing
- Full Editing Control
- Simple Interface
- Open Source
Pros:
- Covers standard formats.
- All essential features are present.
- Surprisingly advanced filtering, processing, editing, and filtering controls.
- The interface is easy to learn.
- Open-source
Cons:
- The interface is very legacy and needs remodeling
- No longer updated
- No support
Steps On How To Cut Videos On Avidemux:
- Open up Avidemux, and load the video file that you want to work with. If you get a prompt like this one: we recommend clicking Yes to use the safer mode.
Find the portion of the video that you’d like to isolate. Get as close as you can to the start of the clip you want to cut.
You want it to read I; if it isn’t framed type I, then use the single left and right arrow buttons to go forward or backward one frame until you find an appropriate I frame.
- Once you’ve found the right starting frame, click the button with the A over a red bar. This will set the start of the clip.
- Advance to where you want your clip to end. Click on the button with a B when you’ve found the appropriate frame. This frame can be of any type.
- You can now save the clip, either by going to File –> Save –> Save Video, or by pressing Ctrl+S. Give the file a name, and Avidemux will prepare your clip.
BEST PAID FFMPEG ALTERNATIVE TO CUT VIDEO ON MAC
JOYOSHARE MEDIA CUTTER
Supported OS: Mac and Windows
The best video cutting tool is Joyoshare Media Cutter for Windows (or Mac). As a professional video trimmer, it allows you to cut your media files at a 60X faster rate, allowing you to clip a 60-minute video or audio file in just one minute. The interface design is also simple and clean, allowing you to do it quickly.
Another noteworthy feature is the ability to easily cut and merge both video and audio without sacrificing quality. The cropper supports a variety of video and audio formats, including AVI, MP4, MPEG, VOB, WMV, ASF, RM, RMVB, 3GP, MP3, WMA, M4R, and others, allowing you to save the file in any format and on any device, including Apple.
More notably, this is a capable all-in-one video cutter. In addition to cutting videos and audio, it can convert all popular video formats, extract audio from video files, and merge video and audio files from the same source into a new one.
Features:
Convert to Any File Format
Merge Video and Audio Files into Multiple Formats
Improved Accuracy & Efficiency in Cutting Videos
60X Fast Conversion
Pros:
- Offers an easy way to cut, merge, and convert video files
- Blazing fast video-cutting and file-conversion speed
- Supports multiple audio and video file formats
Cons:
- Can only merge videos from the same source. That means you can’t use the program to merge separate videos from your gallery.
- The program doesn’t offer an easy way to remove an unwanted part of a video if it’s in the middle of the video. The only way to do that is by cutting the section before and after the video, then merging them into one.
Steps:
Step 1: Adding Video
To add a video, click the “Open” button. Locate the video you want to trim from your collection and open it. Alternatively, you can use the drag-and-drop feature.
Step 2: Select the Segment to Be Trimmed
At the bottom of the Joyoshare video window, you’ll be able to see a time slider through which you can skip to your desired timeframe. Move the slider handles attached to the yellow timeline bar to set the starting and ending points of your video.
Once you’ve set your desired starting point, click on the “[” button to highlight the starting segment, then move the right-hand slider to select the ending point, and click the ] button to set the end segment.
Step 3: Choose Your Desired Output Format and Destination Folder
Click the “Format” button, and a new window will pop up where you’ll be able to choose your preferred output format.
Step 4: Trim the Video
Click the “Start” button to begin trimming the segment. Wait for a minute for the program to finalize trimming the segment, then click the save button. That’s it! You’ve successfully trimmed your first video.
If you wish to cut and merge several segments, click the “+” icon at the bottom of the segments tab, then follow the above procedure to create several segments.
MOVAVI VIDEO EDITOR
Supported OS: Mac and Windows
Movavi Video Editor for Mac and Windows is a simple-to-use yet effective video editor and cutter. Aside from cutting and joining short videos, it can apply various video effects, add music and titles, and so on to make your movie more visually appealing. The video cutter tool has an easy-to-use interface and outstanding instructional videos, so you can get started quickly.
Movavi comes with a bunch of video editing controls into a straightforward, user-friendly interface. PiP, chroma-key, titling, basic keyframing, and even motion tracking are included. It isn’t as feature-rich or as fast as most of the competition, but it allows you to easily create visually appealing work.
The tool is not free, but it does offer a limited-time free trial to users. However, it is a little irritating when the ad appears after you install and launch the trial version.
Features:
- Media Library
- Templates
- Upload video or audio file
- Video and image management
- Title Editor
- Trim & Slice
- Video Effect
- Slow Motion & Time Effect
- Social Sharing
- Brand Overlay
- Text Overlay
- Audio Tools
- Speed Adjustment
- Split / Merge
- Video Stabilization
Pros:
- Easy-to-understand user interface
- Transitions with sound
- Motion tracking and picture-in-picture tools
- Chroma keying
- Quick movie-creation tool
Cons:
- Lacks advanced trim modes and clip pre-trimming
- Rendering on the slow side
- Not compatible with Apple Silicon M1
Steps:
- Add Video Files
Launch Movavi’s MP4 trimmer, click the Add Media Files button, and upload the MP4 files you want to work with. The videos you’ve added will appear on the Timeline in the lower part of the program window.
- Cut And Trim Your Videos
So how to cut MP4 video with Movavi Video Editor Plus? If you want to snip a video into two or more parts, click the file on the Timeline and move the red marker to the place where you want to make the first cut. Then click the Split button with the scissors icon or hit Ctrl+B. Repeat the process as many times as you need.
If you want to trim your video clip, select the file on the Timeline and then just pull the edge of the clip to shorten it as shown in the picture.
- Save The Result
All that’s left to do is save your edited video. Click the Export button, choose the appropriate video format, and hit Start.
XILISOFT VIDEO CUTTER
Supported OS: Mac and Windows
Xilisoft Video Cutter is an effective programming cutter that lets you choose and cut your preferred segments in a single file as well as cut out the segments you don’t like. It is compatible with almost all popular video formats, including VCD, AVI, MPEG, MP4, WMV, 3GP, /MPEG-4 AVC, /PSP AVC, MOV, ASF, and others. It enables you to precisely set the start and end points.
While the software cannot cut segments from multiple input files at the same time, it can cut your selected source video into the number of clips you require in a single step. Xilisoft Video Cutter goes beyond standard cutting or slicing by allowing you to convert your video input files to a variety of well-known codecs. It is possible to convert the entire source file or just a specific segment, but this requires removing those unnecessary parts that frequently cause problems (TV advertisements, trailers, etc.).
Features:
Easily Cut Video Clips
Multi-trim Video to Whole
Output Clips to Multiple Formats
Instant Preview
Clear Timeline
Advanced Editing
1-2-3 Interface
Multilingual Interface
Pros:
Supports all of the most widely used video file formats
Converts your videos between formats
Simple cutting interface
Allows for multiple cuttings from a single source file
Cons:
Does not support batch processing
Steps On How To Cut Your Favored Segments:
- Add Source Video File
Click the “Open“ button on the main interface, and select a video file in the pop-up window.
- Set Clip Segments
Click “Play” and click the “Set Start Point” and “Set End Point” buttons successively during playing the video to set the start point and endpoint of the clip.
You can also set several segments. Click the “Show Advanced Mode” button and click the “New Clip” button in advanced mode to set the start and endpoints of the segments. Repeat the above steps to set several segments.
Tip: To delete a segment, please choose the segment in the segment list, and click the “Delete Clip” button on the toolbar; to adjust the segment order, please choose the segment and click the “Move Up” or “Move Down” button to adjust its order.
- Output Settings
Click the “Cut” button at the bottom of the window to open the “Output Settings” window.
- Start Cutting
Click the “OK” button to start video cutting. During cutting, you can check the cutting status by dragging the process bar or canceling the cutting. Tip: After cutting is done, click the “Open Output Folder” button to open the destination folder to check the clippings. Click the “Done” button to go back to the main window.
WHICH SHOULD I CHOOSE: FREE OR PAID VIDEO CUTTER ON MAC?
Whether you choose Free or Paid Video Cutter, it still depends on your edit and navigation if the project will succeed like what you’re anticipating. Beginners in the industry can go for Free Video Cutters to practice the craft without worrying about the monthly subscription.
However, if you’re a professional, I highly suggest that you choose Paid Video Cutter to lessen the hassle and create amazing output.
FAQS ABOUT CUTTING VIDEOS
- How can I cut a video without losing quality?
Trimming VLC through LosslessCut
LosslessCut is an open-source video cutter that runs on Windows, Linux, and Mac. Like Filmora, this software also allows you to cut videos without re-encoding, so there is no loss of quality.
- Who is the best video cutter?
Filmora is one of the best video cutter software that allows you to change the aesthetic of your video with one click. It comes with a wide range of video effects that enable you to make clips look good. Features: This tool provides fast editing processing and adjustable preview quality.
- Why does trimming videos reduce quality?
In most cases, trimming only causes a minor loss of video quality. And there is no clear causal relationship between trimming and losing video quality. The main factors that influence video quality are Resolution, Bitrate, and Frame size.
If you are longing to pick up the best video cutter for Mac, you are supposed to evaluate it from different aspects, like operating interface, cutting features, output quality, post-processing ability, etc. Frankly speaking, there is no fixed answer. Everything depends on your actual requirements. If you want to cut videos on Mac with the forthright method, iMovie can be your top priority. If you prefer top-leading editing features, Blender is competitive enough for you.
Conclusion:
There you have it! Here is the alternative software to cut/shorten your video without using FFmpeg. All these editors cater to different needs, so be sure to try them out, understand your requirements, and use the right one for your project!
Are You Convincingly Fascinated by the Whole Idea of Augmented Reality and Want to Level up Your Marketing Skills with an AR Integration? Rest Assured, You’ve Found the Right Place
10 Crazy-Cool Examples of AR Video
An easy yet powerful editor
Numerous effects to choose from
Detailed tutorials provided by the official channel
Revolutions in technology have brought about the integration of augmented and virtual reality into marketing strategies. Stay tuned to learn about the most amazing AR video examples!
In this article
01 [What Is AR and the Technology Used for Augmented Reality Development?](#Part 1)
02 [What Is the Difference Between Augmented Reality and Virtual Reality?](#Part 2)
03 [10 Examples of Augmented Reality (AR) In Marketing](#Part 3)
Part 1 What is AR and the Technology Used for Augmented Reality Development?
Expanding the acronym, AR stands for Augmented Reality, a relatively newer concept in the world of graphic imaging and other computer based real-time applications. Talking of the exact explanation, augmented reality refers to a responsive synchronization of real world elements into digital platforms, while upgrading the same with high end perceptual information generated from specialized computer systems.
The entire concept of augmented reality rests on 3 major aspects, viz., a synchronized combination of the virtual and real world environments, a responsive interaction of associated elements in real-time, and a precise 3-dimensional registration of virtual and real elements. The aforesaid aspects of augmented reality are often guaranteed by a number of sensory modalities, like that of auditory, visual, somatosensory, olfactory and haptic ones.
Technology Behind Augmented Reality
As far as the technology behind the development of augmented reality video is concerned, the overall implementation is categorized into 3 different tasks. The process is initiated with generating concise, high resolution images of real world elements, followed by creating an overlay of computer generated 3D images on the previously generated real world images. This is further succeeded by facilitating an interactive user engagement and interaction within the simulated surroundings.
The process of technology implementation is seconded by a responsive display mechanism which can be done conveniently on any one among glasses, smartphones, screens, head-mounted displays and handheld devices. Concerning the factor of output credibility, head-mounted displays take the credit of generating a much more immersive augmented reality in comparison to the other display alternatives.
Part 2 What Is the Difference Between Augmented Reality and Virtual Reality?
Advancements in technology has treated the world with a multitude of concepts to simulate real-time elements into digital environments. In addition to augmented reality, the techniques of virtual and alternate reality have come into focus in recent times to address the diversely specific needs of digital and real world integration.
Lack of proper awareness, however, leads to the treatment of these fundamentally different concepts as one and the same thing. Considering the credibility of such technologies towards addressing certain specific purposes, it becomes important to understand the difference among these apparently similar concepts. Having said that, let us make an attempt to realise the dissimilarity between augmented and virtual reality in the following section:
● Underlying Concept
Stressing on the parameter of conceptual utility, augmented reality refers to the integration of digital aspects into a real-time surrounding, most probably through a smartphone or camera, whereas, virtual reality on the other hand, is responsible for the replacement of a real-time setting with a simulated environment.
● Existence Constraints
Talking about augmented reality, the technique showcases the coexistence of the real and virtual surroundings, with the primary goal of supplying extra information about the real-time environment, which can be accessed without a content search. Conversely, virtual reality is predominantly concerned with bringing about a complete shift of the user’s actual ambiances to an entirely fabricated environment that undertakes an independent existence.
● User Control
Speaking on the extent of user control, augmented reality allows you to monitor your real world presence, mostly with a smartphone, while users of virtual reality are entirely controlled by the system, with strictly no self-access. Also, you would require a headset equipment to make use of virtual reality.
Part 3 Examples of Augmented Reality (AR) In Marketing
Having discussed enough about the fundamental aspects of augmented reality, let us proceed towards understanding the credibility of augmented video in the light of modern day information centered applications. While there are manifold varieties of augmented reality usage, the following section highlights the best examples of integrating AR into brand marketing:
01Walmart- Inventory Control
With the aim to examine the dual credibility of its brand stores as online fulfillment as well as physical shopping centers, Walmart in October 2020, announced the proposition of its 4 shopping units as ‘test centers’ of augmented reality, where the latter was supposed to aid in the management and tracking of company inventories.
The technology was implemented through a smartphone application to quicken the transportation process of item packages from the inventory to the sales area. The utility works when the employees hold a handheld device that highlights the dispatch ready boxes in an augmented reality stock video, instead of scanning each box individually.

02Snap- City Painter
Launched in London in October 2020, the City Painter utility lands among the best augmented reality video examples, allowing you to spray paint on and decorate street shops with pre-designed wall paintings, through the use of augmented reality. The most striking aspect of the aforesaid application is its information sharing feature, which allows the changes introduced by you to be seen by fellow users if the app in real time.
The utility is regarded as first step of Snap towards its aim of developing a shared virtual space via a mapping of potential landmarks. The tool has a progressive future in travel and tourism sector, with brand wanting to invest capital on the newly introduced customer needs of adventure and exploration.

03Asos- See My Fit
While the company is a renowned name in the domain of mobile technology and augmented reality innovation since 2009, the ‘See My Fit’ tool was launched by the latter in the year 2020 amid the pandemic period to assist the company’s models who were bound to work from home during the calamity.
Talking of the application, the tool makes use of augmented reality to fit apparels on the models in a digital manner. Additionally, the app works to provide the customers with a realistic insight into the appearance of the products with respect to size and body structure, which further aids to increase the company sales, while minimizing the return risks.

04 Pull & Bear- Console Game
This one is a famous retail brand, whose owner Inditex, has collaborated with the ‘Creative Shop’ utility of Facebook to launch ‘Pacific Game’, a console relish, with the implementation of augmented reality. The gameplay requires you to undertake a journey from California to Tokyo, where the travel obstacles need to be escaped through cohesive head movements to earn game points.
The game was essentially designed as a social media attraction and can be enjoyed on Instagram, as a Facebook AR video, and even on the official Pull & Bear website. If you are playing the dame on Instagram, do try on using the latter’s front camera feature for a more enhanced gaming experience.

05Burberry- Olympia Pop Up at Harrods
The current post pandemic period is witnessing a creative use of augmented reality by brand companies to attract their customers back to the retail shops. To complement the launch of its Olympia Bag, Burberry had introduced a pronounced AR utility at the Harrods. Customers visiting the shop are allowed to witness the Elphis statue walks in real-time environment through an in-store QR code.
The customers can additionally, click pictures and create videos of the same to share on their social media handles. The integration of augmented reality into retail shopping in such innovative ways has guaranteed an immersive experience of the otherwise ordinary store purchases, with a simultaneous benefit to both, product companies and customers.

06IKEA Studio Application
IKEA is known to have integrated augmented reality into its working protocol for a long time now. Space 10, the company’s design laboratory has recently planned a more immersive relaunch of its AR facility with its brand new IKEA Studio application that allows you to capture and redesign room plans in 3D space, including the finest details of door frames, windows, floor rugs and wall colors.
The application is conceptualized considering the inclusion of LiDAR, that is, Light Detection and Ranging sensors in iPhones and is visibly seen as a precursor to the Apple Glass, a more comprehensive application that promised an escalated and realistic experience of augmented reality.

07Amazon- Hair Coloring and Amazon Salon
Boasting of being the largest e-commerce platform, Amazon took its first step into experimenting with augmented reality by introducing the Amazon Salon. Realized as a digital marketplace, the utility works through a ‘Point and Learn’ approach where customers and view and select any product on the tool’s display shelf to get a detailed information about the same through educational content and brand videos on the product display screen.
If you are interested in buying a particular product, you need to scan the latter’s QR code on the display shelf, which will redirect you to the product’s e-commerce page on Amazon’s official website. The AR utility implemented here also allows you to examine the look of various hair shades, before you actually get into choosing a suitable one for the perfect hairdo.

08Gucci- Virtual Sneakers
Gucci lands among the first luxury retail brands to implement augmented reality in its operation model for facilitating its customers with a comprehensive and informed product buying experience. The company incorporated a feature of ‘try on sneakers’ in its retail application, which allowed users to get an insight into the product’s appearance in real-time, thus reducing the return risks while simultaneously ensuring a better customer satisfaction.
The recently launched ‘virtual sneakers’ on the Gucci app are created to be tried and shared exclusively on the online store. Designed with the collaborative efforts of Gucci and the augmented reality fashion house Wanna, this ‘digital only’ footwear is available on Gucci’s online app for customer buying.

09Wayfair- View in Room
This one is essentially a furniture retail company that makes use of augmented reality to provide its customers with a wholesome shopping experience at the comfort of their homes. Wayfair incorporates the AR utility through the upgraded version of its ‘View in Room’ application that works on the LiDAR and RealityKit technologies to provide an authentic and a better realistic product view to the customers.
A few AR incorporated features of the app include precise cast lighting in real-time, product stacking and a real world interface to stand before and examine the overall product appearance, as the customers would actually do in real-time; thus ensuring a personalized product experience to the potential buyers.

10Machine A- Virtual Concept Store
This one is more of a digital platform to showcase the modern day developments in fashion design. Based in London, the Machine-A virtual store was conceptualized to allow the access of relevant audience to the works of new talent in the fashion field, when the Covid-19 pandemic caused a shutdown of the London Fashion Week.
The store was launched as a virtual boutique that could be visited by interested audience through a QR code, which could be scanned from billboards and posters around the London city, and allowed them to view the latest works of the associated fashion designers through an augmented reality concept video. The major success of the utility lies in the enhancement of the consumer-brand relationship, while focusing primarily on product awareness and customer engagement.

● Working With Augmented Reality Videos in Filmora
If you are keen on exploring your editing creativity in augmented reality with video, do consider working with the Wondershare Filmora Video Editor program. The software is affordably the best AR video editing tools available to you free of cost. While the application greets you with the most responsive and clean interfaces, with a plethora of professional quality video editing features that promise to effectively address your most diverse AR video editing requirements.
The software package comes with an inbuilt screen recorder, which you can use to capture specific video snippets and later on edit them with a variety of audio-visual effects from the app’s huge effects library. Not to forget, the application also grants you the liberty to share and export the edits to your social media handles.
For Win 7 or later (64-bit)
For macOS 10.12 or later
● Ending Thoughts →
● Augmented reality is an interactive means of integrating the real world with digitally simulated components.
● There are a hoard of applications that augmented reality can be put to, marketing field being a significant one among them.
● You can comfortably work with the Wondershare Filmora video editing program to add a variety of AR elements to your videos.
Revolutions in technology have brought about the integration of augmented and virtual reality into marketing strategies. Stay tuned to learn about the most amazing AR video examples!
In this article
01 [What Is AR and the Technology Used for Augmented Reality Development?](#Part 1)
02 [What Is the Difference Between Augmented Reality and Virtual Reality?](#Part 2)
03 [10 Examples of Augmented Reality (AR) In Marketing](#Part 3)
Part 1 What is AR and the Technology Used for Augmented Reality Development?
Expanding the acronym, AR stands for Augmented Reality, a relatively newer concept in the world of graphic imaging and other computer based real-time applications. Talking of the exact explanation, augmented reality refers to a responsive synchronization of real world elements into digital platforms, while upgrading the same with high end perceptual information generated from specialized computer systems.
The entire concept of augmented reality rests on 3 major aspects, viz., a synchronized combination of the virtual and real world environments, a responsive interaction of associated elements in real-time, and a precise 3-dimensional registration of virtual and real elements. The aforesaid aspects of augmented reality are often guaranteed by a number of sensory modalities, like that of auditory, visual, somatosensory, olfactory and haptic ones.
Technology Behind Augmented Reality
As far as the technology behind the development of augmented reality video is concerned, the overall implementation is categorized into 3 different tasks. The process is initiated with generating concise, high resolution images of real world elements, followed by creating an overlay of computer generated 3D images on the previously generated real world images. This is further succeeded by facilitating an interactive user engagement and interaction within the simulated surroundings.
The process of technology implementation is seconded by a responsive display mechanism which can be done conveniently on any one among glasses, smartphones, screens, head-mounted displays and handheld devices. Concerning the factor of output credibility, head-mounted displays take the credit of generating a much more immersive augmented reality in comparison to the other display alternatives.
Part 2 What Is the Difference Between Augmented Reality and Virtual Reality?
Advancements in technology has treated the world with a multitude of concepts to simulate real-time elements into digital environments. In addition to augmented reality, the techniques of virtual and alternate reality have come into focus in recent times to address the diversely specific needs of digital and real world integration.
Lack of proper awareness, however, leads to the treatment of these fundamentally different concepts as one and the same thing. Considering the credibility of such technologies towards addressing certain specific purposes, it becomes important to understand the difference among these apparently similar concepts. Having said that, let us make an attempt to realise the dissimilarity between augmented and virtual reality in the following section:
● Underlying Concept
Stressing on the parameter of conceptual utility, augmented reality refers to the integration of digital aspects into a real-time surrounding, most probably through a smartphone or camera, whereas, virtual reality on the other hand, is responsible for the replacement of a real-time setting with a simulated environment.
● Existence Constraints
Talking about augmented reality, the technique showcases the coexistence of the real and virtual surroundings, with the primary goal of supplying extra information about the real-time environment, which can be accessed without a content search. Conversely, virtual reality is predominantly concerned with bringing about a complete shift of the user’s actual ambiances to an entirely fabricated environment that undertakes an independent existence.
● User Control
Speaking on the extent of user control, augmented reality allows you to monitor your real world presence, mostly with a smartphone, while users of virtual reality are entirely controlled by the system, with strictly no self-access. Also, you would require a headset equipment to make use of virtual reality.
Part 3 Examples of Augmented Reality (AR) In Marketing
Having discussed enough about the fundamental aspects of augmented reality, let us proceed towards understanding the credibility of augmented video in the light of modern day information centered applications. While there are manifold varieties of augmented reality usage, the following section highlights the best examples of integrating AR into brand marketing:
01Walmart- Inventory Control
With the aim to examine the dual credibility of its brand stores as online fulfillment as well as physical shopping centers, Walmart in October 2020, announced the proposition of its 4 shopping units as ‘test centers’ of augmented reality, where the latter was supposed to aid in the management and tracking of company inventories.
The technology was implemented through a smartphone application to quicken the transportation process of item packages from the inventory to the sales area. The utility works when the employees hold a handheld device that highlights the dispatch ready boxes in an augmented reality stock video, instead of scanning each box individually.
02Snap- City Painter
Launched in London in October 2020, the City Painter utility lands among the best augmented reality video examples, allowing you to spray paint on and decorate street shops with pre-designed wall paintings, through the use of augmented reality. The most striking aspect of the aforesaid application is its information sharing feature, which allows the changes introduced by you to be seen by fellow users if the app in real time.
The utility is regarded as first step of Snap towards its aim of developing a shared virtual space via a mapping of potential landmarks. The tool has a progressive future in travel and tourism sector, with brand wanting to invest capital on the newly introduced customer needs of adventure and exploration.
03Asos- See My Fit
While the company is a renowned name in the domain of mobile technology and augmented reality innovation since 2009, the ‘See My Fit’ tool was launched by the latter in the year 2020 amid the pandemic period to assist the company’s models who were bound to work from home during the calamity.
Talking of the application, the tool makes use of augmented reality to fit apparels on the models in a digital manner. Additionally, the app works to provide the customers with a realistic insight into the appearance of the products with respect to size and body structure, which further aids to increase the company sales, while minimizing the return risks.
04 Pull & Bear- Console Game
This one is a famous retail brand, whose owner Inditex, has collaborated with the ‘Creative Shop’ utility of Facebook to launch ‘Pacific Game’, a console relish, with the implementation of augmented reality. The gameplay requires you to undertake a journey from California to Tokyo, where the travel obstacles need to be escaped through cohesive head movements to earn game points.
The game was essentially designed as a social media attraction and can be enjoyed on Instagram, as a Facebook AR video, and even on the official Pull & Bear website. If you are playing the dame on Instagram, do try on using the latter’s front camera feature for a more enhanced gaming experience.
05Burberry- Olympia Pop Up at Harrods
The current post pandemic period is witnessing a creative use of augmented reality by brand companies to attract their customers back to the retail shops. To complement the launch of its Olympia Bag, Burberry had introduced a pronounced AR utility at the Harrods. Customers visiting the shop are allowed to witness the Elphis statue walks in real-time environment through an in-store QR code.
The customers can additionally, click pictures and create videos of the same to share on their social media handles. The integration of augmented reality into retail shopping in such innovative ways has guaranteed an immersive experience of the otherwise ordinary store purchases, with a simultaneous benefit to both, product companies and customers.
06IKEA Studio Application
IKEA is known to have integrated augmented reality into its working protocol for a long time now. Space 10, the company’s design laboratory has recently planned a more immersive relaunch of its AR facility with its brand new IKEA Studio application that allows you to capture and redesign room plans in 3D space, including the finest details of door frames, windows, floor rugs and wall colors.
The application is conceptualized considering the inclusion of LiDAR, that is, Light Detection and Ranging sensors in iPhones and is visibly seen as a precursor to the Apple Glass, a more comprehensive application that promised an escalated and realistic experience of augmented reality.
07Amazon- Hair Coloring and Amazon Salon
Boasting of being the largest e-commerce platform, Amazon took its first step into experimenting with augmented reality by introducing the Amazon Salon. Realized as a digital marketplace, the utility works through a ‘Point and Learn’ approach where customers and view and select any product on the tool’s display shelf to get a detailed information about the same through educational content and brand videos on the product display screen.
If you are interested in buying a particular product, you need to scan the latter’s QR code on the display shelf, which will redirect you to the product’s e-commerce page on Amazon’s official website. The AR utility implemented here also allows you to examine the look of various hair shades, before you actually get into choosing a suitable one for the perfect hairdo.
08Gucci- Virtual Sneakers
Gucci lands among the first luxury retail brands to implement augmented reality in its operation model for facilitating its customers with a comprehensive and informed product buying experience. The company incorporated a feature of ‘try on sneakers’ in its retail application, which allowed users to get an insight into the product’s appearance in real-time, thus reducing the return risks while simultaneously ensuring a better customer satisfaction.
The recently launched ‘virtual sneakers’ on the Gucci app are created to be tried and shared exclusively on the online store. Designed with the collaborative efforts of Gucci and the augmented reality fashion house Wanna, this ‘digital only’ footwear is available on Gucci’s online app for customer buying.
09Wayfair- View in Room
This one is essentially a furniture retail company that makes use of augmented reality to provide its customers with a wholesome shopping experience at the comfort of their homes. Wayfair incorporates the AR utility through the upgraded version of its ‘View in Room’ application that works on the LiDAR and RealityKit technologies to provide an authentic and a better realistic product view to the customers.
A few AR incorporated features of the app include precise cast lighting in real-time, product stacking and a real world interface to stand before and examine the overall product appearance, as the customers would actually do in real-time; thus ensuring a personalized product experience to the potential buyers.
10Machine A- Virtual Concept Store
This one is more of a digital platform to showcase the modern day developments in fashion design. Based in London, the Machine-A virtual store was conceptualized to allow the access of relevant audience to the works of new talent in the fashion field, when the Covid-19 pandemic caused a shutdown of the London Fashion Week.
The store was launched as a virtual boutique that could be visited by interested audience through a QR code, which could be scanned from billboards and posters around the London city, and allowed them to view the latest works of the associated fashion designers through an augmented reality concept video. The major success of the utility lies in the enhancement of the consumer-brand relationship, while focusing primarily on product awareness and customer engagement.
● Working With Augmented Reality Videos in Filmora
If you are keen on exploring your editing creativity in augmented reality with video, do consider working with the Wondershare Filmora Video Editor program. The software is affordably the best AR video editing tools available to you free of cost. While the application greets you with the most responsive and clean interfaces, with a plethora of professional quality video editing features that promise to effectively address your most diverse AR video editing requirements.
The software package comes with an inbuilt screen recorder, which you can use to capture specific video snippets and later on edit them with a variety of audio-visual effects from the app’s huge effects library. Not to forget, the application also grants you the liberty to share and export the edits to your social media handles.
For Win 7 or later (64-bit)
For macOS 10.12 or later
● Ending Thoughts →
● Augmented reality is an interactive means of integrating the real world with digitally simulated components.
● There are a hoard of applications that augmented reality can be put to, marketing field being a significant one among them.
● You can comfortably work with the Wondershare Filmora video editing program to add a variety of AR elements to your videos.
The Article Shall Offer an Overview to Create a Promising Sports Intro and Edit a YouTube Outro for a Sports Channel. There Will Also Be Three Recommended Apps to Download Background Music for Exercise
Are you deep into sports? Have you created a sports channel on YouTube but are still clueless? You do not need to panic. The article has got you covered.
There is an extensive range of sports channels on YouTube struggling and surviving. It includes gaming, exercise, athletics, basketball, hockey, and tennis sports. A promising sports background music in the intro and outro makes it appealing for the audience. Hence, the article will focus on three platforms for exercise downloading impeccable background music.
The step-by-step guide to creating an outstanding sports intro will also be sketched out. So, what are we waiting for? Time to commence this!
In this article
01 How to Create an Epic Sports Intro?
02 How to Edit a Sport Style YouTube Outro or End Screen?
03 3 Recommended Sites to Download Background Music for Exercise Videos
Part 1: How to Create an Epic Sports Intro?
Do you own a sports channel? Continue exploring the section to know more!
A sports channel needs a promising intro to keep the audience interested in the content. An exceptional intro to a sports channel with great music enables you to gain subscribers. The sub-section would cover an extensive procedure to make a startling sports intro with yoga background music or other sport. So, let us start? Shall we?
For Win 7 or later (64-bit)
For macOS 10.12 or later
Step 1: Open Wondershare Filmora from your computer. Now, head to the “Audio” panel to drop a powerful track to the timeline. Use the “Media” panel to import the sports video clips for your intro.

Step 2: Keep the highlights and trim the clips to be in sync with the music. After the editing is concluded, shift your focus to the “Titles.” Move to the Titles panel and use title animations for the “Energy Sports” pack.

Step 3: Drag and drop the titles on the top of the footage. It would be best to match the duration of the video clips with the titles. Now, double-click the title to rename it according to your need.

Step 4: To make the ending more powerful, right-click on the last video clip and click on “Speed and Duration.” Enhance the speed to make it engaging. Moving on, navigate to the “Effects” panel.

Step 5: From there, pick the “Shake” filter and drag and drop the “Chaos 1” to the last clip. Similarly, click on the “Distortion” filter to drop the “Chromatic Aberration” effect onto the last clip.

Step 6: Now, it is time to add transitions to create a smooth connection between the clips. Click on “Transitions” and then “Energy Sports” pack. Drag and drop both transitions in between the clips. A creative and captivating sports intro has been created with solid sports background music.

Part 2: How to Edit a Sport Style YouTube Outro or End Screen?
Communicating with the users about a channel doesn’t have to be with words. The background music for exercise expresses the aims of a channel more perfectly. The same goes for a profound sport-style outro which tells the audience that we are ending on a high note.
The sub-section takes the opportunity to offer a step-by-step to edit a sport-style YouTube end screen. So, come with us as we explore it together! Let us go!
For Win 7 or later (64-bit)
For macOS 10.12 or later
Step 1: To begin, launch Wondershare. Import the targeted video clips that you need as an engaging YouTube outro. After that, click on “Split Screen.” Please choose your favorite split-screen design and drag it to the timeline.

Step 2: Use the imported videos to drag them on the preview window in the split-screen design as selected. You can adjust the scale and position through the mouse click. Now, drag and drop the video onto the timeline and trim it as needed.

Step 3: Head to the “Effects” tab and search for blur in the space bar. Drag and drop the square blur to the second part of the video. Adjust the blur intensity as required. Import another video and add it to the timeline.

Step 4: Insert dissolved transitions between the first two cuts to smooth the process. Now, it is time to add an avatar image. Import the profile picture to the timeline above the second track. Head to the utility category under the “Effects” tab and drag the “Image Mask” to the image on the timeline.

Step 5: Double click on it to alter the masking width so that the circle mask can fit on the image. Scale down the picture and set it to the center of the frame. Navigate to the “Elements” panel and pick the YouTube subscribe button. Drag it to the third track afterward.

Step 6: Place the location on the preview window as you need. Now, move to the social media category in the “Titles” to choose the perfect one and add it to the timeline above the last clip. The user is instructed to add a transition at the beginning of the clip. Rename the social media names of your sports channel, and you are done with the process.

Part 3: 3 Recommended Sites to Download Background Music for Exercise Videos
Sports background music is one of the significant ways to keep the audience motivated for sports and exercise. It helps enhance the subscribers’ multifold. Therefore, the importance of promising yoga background music cannot be neglected.
Mixkit
Mixkit is a renowned place to access royalty-free marketplaces, bringing revolution to the market and content creators. It is extremely workable to download background music for exercise in seconds. Based on genre, mood, and tag, you can search for a suitable music track.
The trap sport workout, motivating mornings, positive energy, super strong, and the greatest comeback is one of the most exemplary tracks from Mixkit. The audio can be listened to before making the decision. The genre offers ambient, cinematic, funk, hip-hop, acoustic, classical, and electronica.

TunePocket
Changing the narrative of music platforms, TunePocket pretty much takes the lead. The filter results make the process flawless. You can tailor the search results by playing with category, mood, genres, instruments, length, and tempo.
The duration of each sports background music is also mentioned to give the content creators an idea. Power dance workout, workout fitness motivation, summer western dance, young gamers, and sports power electro, and techno blast are some examples of outstanding music tracks.

Envato Elements
The next on the list is Envato Elements making wonders in the business. The search filters are refined as the user deems necessary. Online exercise, motivational EDM, fitness, workout, corporate meditation, and exercise are some amazing examples of royalty-free music. The search results can be tailored according to relevancy and popularity.

Concluding Remarks
There is an awful load of sports channels on YouTube. The content creators are trying their best to beat the competitors. It is crucial to access energetic background music for exercise to make intro and outro engaging.
The article recommended three apps to download sports background music. The step-by-step guide to creating an inspiring sports intro and editing sports style YouTube outro via Filmora.
Wondershare Filmora
Get started easily with Filmora’s powerful performance, intuitive interface, and countless effects!
Try It Free Try It Free Try It Free Learn More >

02 How to Edit a Sport Style YouTube Outro or End Screen?
03 3 Recommended Sites to Download Background Music for Exercise Videos
Part 1: How to Create an Epic Sports Intro?
Do you own a sports channel? Continue exploring the section to know more!
A sports channel needs a promising intro to keep the audience interested in the content. An exceptional intro to a sports channel with great music enables you to gain subscribers. The sub-section would cover an extensive procedure to make a startling sports intro with yoga background music or other sport. So, let us start? Shall we?
For Win 7 or later (64-bit)
For macOS 10.12 or later
Step 1: Open Wondershare Filmora from your computer. Now, head to the “Audio” panel to drop a powerful track to the timeline. Use the “Media” panel to import the sports video clips for your intro.
Step 2: Keep the highlights and trim the clips to be in sync with the music. After the editing is concluded, shift your focus to the “Titles.” Move to the Titles panel and use title animations for the “Energy Sports” pack.
Step 3: Drag and drop the titles on the top of the footage. It would be best to match the duration of the video clips with the titles. Now, double-click the title to rename it according to your need.
Step 4: To make the ending more powerful, right-click on the last video clip and click on “Speed and Duration.” Enhance the speed to make it engaging. Moving on, navigate to the “Effects” panel.
Step 5: From there, pick the “Shake” filter and drag and drop the “Chaos 1” to the last clip. Similarly, click on the “Distortion” filter to drop the “Chromatic Aberration” effect onto the last clip.
Step 6: Now, it is time to add transitions to create a smooth connection between the clips. Click on “Transitions” and then “Energy Sports” pack. Drag and drop both transitions in between the clips. A creative and captivating sports intro has been created with solid sports background music.
Part 2: How to Edit a Sport Style YouTube Outro or End Screen?
Communicating with the users about a channel doesn’t have to be with words. The background music for exercise expresses the aims of a channel more perfectly. The same goes for a profound sport-style outro which tells the audience that we are ending on a high note.
The sub-section takes the opportunity to offer a step-by-step to edit a sport-style YouTube end screen. So, come with us as we explore it together! Let us go!
For Win 7 or later (64-bit)
For macOS 10.12 or later
Step 1: To begin, launch Wondershare. Import the targeted video clips that you need as an engaging YouTube outro. After that, click on “Split Screen.” Please choose your favorite split-screen design and drag it to the timeline.
Step 2: Use the imported videos to drag them on the preview window in the split-screen design as selected. You can adjust the scale and position through the mouse click. Now, drag and drop the video onto the timeline and trim it as needed.
Step 3: Head to the “Effects” tab and search for blur in the space bar. Drag and drop the square blur to the second part of the video. Adjust the blur intensity as required. Import another video and add it to the timeline.
Step 4: Insert dissolved transitions between the first two cuts to smooth the process. Now, it is time to add an avatar image. Import the profile picture to the timeline above the second track. Head to the utility category under the “Effects” tab and drag the “Image Mask” to the image on the timeline.
Step 5: Double click on it to alter the masking width so that the circle mask can fit on the image. Scale down the picture and set it to the center of the frame. Navigate to the “Elements” panel and pick the YouTube subscribe button. Drag it to the third track afterward.
Step 6: Place the location on the preview window as you need. Now, move to the social media category in the “Titles” to choose the perfect one and add it to the timeline above the last clip. The user is instructed to add a transition at the beginning of the clip. Rename the social media names of your sports channel, and you are done with the process.
Part 3: 3 Recommended Sites to Download Background Music for Exercise Videos
Sports background music is one of the significant ways to keep the audience motivated for sports and exercise. It helps enhance the subscribers’ multifold. Therefore, the importance of promising yoga background music cannot be neglected.
Mixkit
Mixkit is a renowned place to access royalty-free marketplaces, bringing revolution to the market and content creators. It is extremely workable to download background music for exercise in seconds. Based on genre, mood, and tag, you can search for a suitable music track.
The trap sport workout, motivating mornings, positive energy, super strong, and the greatest comeback is one of the most exemplary tracks from Mixkit. The audio can be listened to before making the decision. The genre offers ambient, cinematic, funk, hip-hop, acoustic, classical, and electronica.
TunePocket
Changing the narrative of music platforms, TunePocket pretty much takes the lead. The filter results make the process flawless. You can tailor the search results by playing with category, mood, genres, instruments, length, and tempo.
The duration of each sports background music is also mentioned to give the content creators an idea. Power dance workout, workout fitness motivation, summer western dance, young gamers, and sports power electro, and techno blast are some examples of outstanding music tracks.
Envato Elements
The next on the list is Envato Elements making wonders in the business. The search filters are refined as the user deems necessary. Online exercise, motivational EDM, fitness, workout, corporate meditation, and exercise are some amazing examples of royalty-free music. The search results can be tailored according to relevancy and popularity.
Concluding Remarks
There is an awful load of sports channels on YouTube. The content creators are trying their best to beat the competitors. It is crucial to access energetic background music for exercise to make intro and outro engaging.
The article recommended three apps to download sports background music. The step-by-step guide to creating an inspiring sports intro and editing sports style YouTube outro via Filmora.
Wondershare Filmora
Get started easily with Filmora’s powerful performance, intuitive interface, and countless effects!
Try It Free Try It Free Try It Free Learn More >
Also read:
- In 2024, | Change Speed of a Video on iPhone
- New In 2024, Knowing All Ways To Slow Down Video With Adobe Premiere Pro
- Updated In 2024, 7 Tips to Create Teaching Videos
- 2024 Approved The Complete Guide to Zoho Slides with Ease
- New How To Make Split Screen Videos in Filmora
- New How to Download and Use Vegas Pro for 2024
- New 2024 Approved Want to Add Motion Effects to Your Texts in Your Video? Learn the Simple Steps to Create Motion Text Effects in Popular Video Editors
- 2024 Approved Top 10 Free Spanish Text To Speech Converter Websites
- New Guide on VHS Technology and Its Influence on Video Editing
- New What Is MOV Format and How to Edit MOV Video Better for 2024
- New 2024 Approved How to Add Font Effects to Videos
- In 2024, Want to Play a Video on Loop on Vimeo so that It Plays Again and Again? Here Are All the Different Ways to Loop a Video on Vimeo in Simple Steps
- Track Mattes The Ultimate Guide For After Effects
- New In 2024, List of Whatsapp Video Format That You May Need to Know
- 2024 Approved Boost the Pace of Your Instagram Reels Videos with These Simple Tricks
- New Are You a Videographer or Video Content Creator? Is Enhancing Your Videography Skills Your Priority? Do You Want to Learn the Basics of LumaFusion Color Grading? Read on to Find All the Information You Need
- Deep Learning of AI Video Recognition for 2024
- Updated In 2024, Mastering the Art of Video Framing
- Updated How to Add Freeze Frame to Your Video From Any Device, In 2024
- New Whatre the Best Alternatives to Pexels, In 2024
- New Extracting Audio From Videos Is a Key to Better Storytelling. Learn How Filmoras Audio Removal Feature Can Enhance Your Video Stories for 2024
- Updated 2024 Approved How to Loop QuickTime Video
- Detailed Tutorial to Crop a Video in KineMaster
- Updated Techniques You Never Heard of for Learning AI Marketing YouTube for 2024
- Updated How to Make Eye Zoom Transition Effect with Filmora
- In 2024, Are You Looking for the Best Way to Add Subtitles to Your Video? The Top SRT File Creators Can Help You Do That
- Updated 2024 Approved Find a Video Background Change Online that Works for You. This Article Contains Tools that Can Edit Video Backgrounds Online with Little Effort
- Updated 2024 Approved Tiktok Aspect Ratio Is a Crucial Element to Succeeding in the Tiktok Algorithm. Here Are some Suggestions to Improve Video Quality and Land on the for You Page
- Updated The Ultimate Wedding Videography Checklist for 2024
- New 2024 Approved How to Add Font Effect
- Updated Want to Take Your Editing Creativity to the Next Level by Designing Top-Class, Professional-Quality Slideshows in Aquasoft? Rest Assured, You Have Landed at the Right Place for 2024
- New In 2024, Are You Curious About Finding a Good iPhone Slow-Motion App? Discover the Top-Rated Applications in the Market that Will Help You Create the Perfect Video
- New How To Track and Blur Faces in Premiere Pro
- Updated How to Be a YouTube Vlogger
- In 2024, How to Rotate AVI in Vertical/Portrait Orientation Windows, Mac,Android, iPhone & Online
- 2024 Approved How to Create a Makeup Video
- New In 2024, Blender Tips - How to Make Blender Render Transparent Background
- In 2024, How does the stardust trade cost In pokemon go On Apple iPhone SE (2022)? | Dr.fone
- In 2024, How to Unlock iCloud lock from your iPhone X and iPad?
- In 2024, Unlock Xiaomi Redmi Note 12 Pro+ 5G Phone Password Without Factory Reset Full Guide Here
- How to Simulate GPS Movement in AR games On Honor Magic 5? | Dr.fone
- Easy steps to recover deleted pictures from Lava Yuva 3 Pro.
- What is Geo-Blocking and How to Bypass it On Honor Magic 5 Pro? | Dr.fone
- 10 of the Best Disney Animated Shows for 2024
- Here are Some Pro Tips for Pokemon Go PvP Battles On Vivo V29e | Dr.fone
- In 2024, Unlock Your Infinix Smart 8 Plus Phone with Ease The 3 Best Lock Screen Removal Tools
- In 2024, How to Change Honor X9b Location on Skout | Dr.fone
- Title: Updated How to Split Videos - 33 Best Video Splitter Recommend
- Author: Morgan
- Created at : 2024-05-19 05:12:20
- Updated at : 2024-05-20 05:12:20
- Link: https://ai-video-editing.techidaily.com/updated-how-to-split-videos-33-best-video-splitter-recommend/
- License: This work is licensed under CC BY-NC-SA 4.0.
