Updated How to Stabilize Videos with Google Photos App for Free

How to Stabilize Videos with Google Photos App for Free
While recording a video, it is pretty normal if you don’t end up having a stabilized clip due to camera shakes or movements on an unstable and unpaved road. This is where the Google stabilizer video editing feature comes into play. You can stabilize a video with the Google Photos app that has a built-in video stabilizer and other editing tools to give a finishing touch to your media files before they are shared online or with family, friends, and/or colleagues.
In this article, we will show you how to use Google Photos as a stabilizer video Google offers to its consumer. In addition, you will also learn about one of the most trusted and efficient third-party tools to stabilize the clips if Google video stabilizer fails to produce quality output.
In this article
01 What is Google Photos and How Does It Work?
02 How to Stabilize Videos with Google Photos on Android and iPhone?
03 How to Stabilize Videos with Google Photos Online?
04 How to Use Google Photos to Edit Video?
Part 1: What is Google Photos and How Does It Work?
Google Photos is an app that can be obtained from Play Store or App Store to be installed on an Android-based smartphone or iPhone or iPad respectively.
The program can store photos and videos from your phone, and ensures that those media files are well-backed up so they can be recovered easily if/when lost due to some mishaps. Furthermore, the tool even lets you edit, customize, and share your photos and videos with ease.
1. History and Current Policies
Earlier, Google Photos used to offer unlimited storage to the users where they can save as many photos as they want, as long as the images were saved in ‘high-quality’ resolution. However, from June 01, 2021, Google changed its policies of using the app, and now the tool offers limited storage. If more space is needed, the users must subscribe to a paid plan.
2. Accessibility
Google Photos can be accessed from a web browser, Google Drive desktop program, and smartphone app. While you can make only minor changes to the videos such as editing date, time, and location when accessing Google Photos via a web browser, the smartphone app allows you to edit the clips comparatively more sophisticatedly.
3. Deletion
The files that are stored in Google Photos remain there for an indefinite duration, of course until the entire space is completely consumed. When you delete something, it is moved to the Trash and stays there for another 60 days, after which it is automatically deleted from the Cloud forever.
Part 2: How to Stabilize Videos with Google Photos on Android and iPhone?
Google Photos is available for both Android and iPhone smartphones, and as explained earlier, the app can be downloaded from Play Store and App Store respectively. Using the built-in Google stabilizer video editor of the Photos app on both platforms is almost identical and extremely easy.
You can learn how to work with Google video stabilizer to stabilize a video by following the steps that are given below:
Step 1: Locate and Open the Source Video in Google Photos
Download and install Google Photos on your smartphone (Samsung Galaxy Note 10+ is used here for illustrations). Launch the app, tap Library from the bottom-right corner of the interface, and tap to open the source video that you want to stabilize with Google video stabilizer.

Step 2: Stabilize the Video
After the video opens in the app and the playback begins, tap Edit from the bottom. On the next screen, ensure that the Video section is selected. Tap the Stabilize icon from the lower-left area of the window, and wait while Google Photos stabilize video.

Step 3: Save the Video
Once the stabilization process is complete, click Save copy from the bottom-right corner to save the modified video as a separate copy, thus leaving the original instance intact.

Part 3: How to Stabilize Videos with Google Photos Online?
Unfortunately, Google Photos doesn’t have many editing options when accessed via a web browser, and therefore, at the time of this writing, you cannot stabilize a video with the tool’s web interface. But if you are using a Windows or Mac computer, you can try some free online video stabilization software , or use Wondershare Filmora video editor to stabilize video with one click.
For Win 7 or later (64-bit)
For macOS 10.12 or later
Wondershare Filmora video editor is available for Windows and Mac platforms, and gives a tough competition to other industry-standard video editing applications like Final Cut Pro X and Adobe Premiere Pro, etc. You can learn how to stabilize a clip with Filmora instead of using Google stabilizer video editor by following the step-by-step instructions that are explained below:
Step 1: Add the Source Video to the Timeline
After downloading and installing Wondershare Filmora on your Mac or Windows computer (a Windows 11 PC is used here for illustrations), launch the program, and click the New Project tile from the first screen that appears.

When on the main interface, ensure that Media is selected from the standard toolbar at the top, and click anywhere inside the Media window that is present at the upper-left corner. Next, locate, select, and import the source video from your PC that you want to stabilize.

Now, drag and drop the video to the timeline, or hover the mouse over the clip’s thumbnail in the Media window, click the + icon from the bottom-right area. Click the button under the Match to Media or Keep Project Settings label when the confirmation box comes up to add the film to the Timeline using the preferences that you selected.

Step 2: Stabilize the Video
Double click the video in the timeline, and then enable the Stabilization category under video editing pane. Wait while Filmora video editor stabilizes the video without Google video stabilizer. Click OK when done.

Step 3: Export the Stabilized Video
Back on the main interface, click Export from the center-top. On the Export box that opens up next, go to your preferred tab, pick an output format, define output preferences, and click Export from the bottom-right corner to export the stabilized clip without even using Google stabilizer video.

Part 4: How to Use Google Photos to Edit Video?
Google Photos doesn’t only work as a Google video stabilizer app but it also enables you to edit your media clips much more professionally. Some post-production tasks that you can perform while using Google Photos include:
1. Trimming
The trimming handles can be seen when you are on the ‘Video’ section after tapping ‘Edit’ in Google Photos after opening the video. You can drag these handles inwards to get rid of the unwanted starting and ending parts of a clip.

2. Cropping
The ‘Crop’ section enables you to crop the videos in a particular aspect ratio that can be selected from the available list, or drag the handles manually to get custom results.

3. Rotating
The ‘Crop’ section also has an option to rotate the video. Each time you tap the ‘Rotate’ icon, the screen rotates 90o in the counterclockwise direction.

4. Color Correction
The ‘Adjust’ section allows you to adjust the display of a video such as its brightness, contrast, shadows, etc.

5. Filters
You can even add a filter using the presets available in the ‘Filters’ section.

6. Annotations
The ‘Markup’ section enables you to annotate the video. You can either use the ‘Pen’ tool or ‘Highlighter’ to write text on the video or give the screen a different shade respectively.

Depending on the type of modifications you want in your video, you can use Google Photos to get the job done easily and quickly.
Conclusion
Google video stabilizer is a built-in tool in Google Photos. Google Photos can be obtained from Play Store or App Store for your Android or iOS smart devices respectively. In addition to stabilizing your videos, Google Photos app also enables you to make other modifications such as trimming, cropping, applying filters, and much more.
02 How to Stabilize Videos with Google Photos on Android and iPhone?
03 How to Stabilize Videos with Google Photos Online?
04 How to Use Google Photos to Edit Video?
Part 1: What is Google Photos and How Does It Work?
Google Photos is an app that can be obtained from Play Store or App Store to be installed on an Android-based smartphone or iPhone or iPad respectively.
The program can store photos and videos from your phone, and ensures that those media files are well-backed up so they can be recovered easily if/when lost due to some mishaps. Furthermore, the tool even lets you edit, customize, and share your photos and videos with ease.
1. History and Current Policies
Earlier, Google Photos used to offer unlimited storage to the users where they can save as many photos as they want, as long as the images were saved in ‘high-quality’ resolution. However, from June 01, 2021, Google changed its policies of using the app, and now the tool offers limited storage. If more space is needed, the users must subscribe to a paid plan.
2. Accessibility
Google Photos can be accessed from a web browser, Google Drive desktop program, and smartphone app. While you can make only minor changes to the videos such as editing date, time, and location when accessing Google Photos via a web browser, the smartphone app allows you to edit the clips comparatively more sophisticatedly.
3. Deletion
The files that are stored in Google Photos remain there for an indefinite duration, of course until the entire space is completely consumed. When you delete something, it is moved to the Trash and stays there for another 60 days, after which it is automatically deleted from the Cloud forever.
Part 2: How to Stabilize Videos with Google Photos on Android and iPhone?
Google Photos is available for both Android and iPhone smartphones, and as explained earlier, the app can be downloaded from Play Store and App Store respectively. Using the built-in Google stabilizer video editor of the Photos app on both platforms is almost identical and extremely easy.
You can learn how to work with Google video stabilizer to stabilize a video by following the steps that are given below:
Step 1: Locate and Open the Source Video in Google Photos
Download and install Google Photos on your smartphone (Samsung Galaxy Note 10+ is used here for illustrations). Launch the app, tap Library from the bottom-right corner of the interface, and tap to open the source video that you want to stabilize with Google video stabilizer.

Step 2: Stabilize the Video
After the video opens in the app and the playback begins, tap Edit from the bottom. On the next screen, ensure that the Video section is selected. Tap the Stabilize icon from the lower-left area of the window, and wait while Google Photos stabilize video.

Step 3: Save the Video
Once the stabilization process is complete, click Save copy from the bottom-right corner to save the modified video as a separate copy, thus leaving the original instance intact.

Part 3: How to Stabilize Videos with Google Photos Online?
Unfortunately, Google Photos doesn’t have many editing options when accessed via a web browser, and therefore, at the time of this writing, you cannot stabilize a video with the tool’s web interface. But if you are using a Windows or Mac computer, you can try some free online video stabilization software , or use Wondershare Filmora video editor to stabilize video with one click.
For Win 7 or later (64-bit)
For macOS 10.12 or later
Wondershare Filmora video editor is available for Windows and Mac platforms, and gives a tough competition to other industry-standard video editing applications like Final Cut Pro X and Adobe Premiere Pro, etc. You can learn how to stabilize a clip with Filmora instead of using Google stabilizer video editor by following the step-by-step instructions that are explained below:
Step 1: Add the Source Video to the Timeline
After downloading and installing Wondershare Filmora on your Mac or Windows computer (a Windows 11 PC is used here for illustrations), launch the program, and click the New Project tile from the first screen that appears.

When on the main interface, ensure that Media is selected from the standard toolbar at the top, and click anywhere inside the Media window that is present at the upper-left corner. Next, locate, select, and import the source video from your PC that you want to stabilize.

Now, drag and drop the video to the timeline, or hover the mouse over the clip’s thumbnail in the Media window, click the + icon from the bottom-right area. Click the button under the Match to Media or Keep Project Settings label when the confirmation box comes up to add the film to the Timeline using the preferences that you selected.

Step 2: Stabilize the Video
Double click the video in the timeline, and then enable the Stabilization category under video editing pane. Wait while Filmora video editor stabilizes the video without Google video stabilizer. Click OK when done.

Step 3: Export the Stabilized Video
Back on the main interface, click Export from the center-top. On the Export box that opens up next, go to your preferred tab, pick an output format, define output preferences, and click Export from the bottom-right corner to export the stabilized clip without even using Google stabilizer video.

Part 4: How to Use Google Photos to Edit Video?
Google Photos doesn’t only work as a Google video stabilizer app but it also enables you to edit your media clips much more professionally. Some post-production tasks that you can perform while using Google Photos include:
1. Trimming
The trimming handles can be seen when you are on the ‘Video’ section after tapping ‘Edit’ in Google Photos after opening the video. You can drag these handles inwards to get rid of the unwanted starting and ending parts of a clip.

2. Cropping
The ‘Crop’ section enables you to crop the videos in a particular aspect ratio that can be selected from the available list, or drag the handles manually to get custom results.

3. Rotating
The ‘Crop’ section also has an option to rotate the video. Each time you tap the ‘Rotate’ icon, the screen rotates 90o in the counterclockwise direction.

4. Color Correction
The ‘Adjust’ section allows you to adjust the display of a video such as its brightness, contrast, shadows, etc.

5. Filters
You can even add a filter using the presets available in the ‘Filters’ section.

6. Annotations
The ‘Markup’ section enables you to annotate the video. You can either use the ‘Pen’ tool or ‘Highlighter’ to write text on the video or give the screen a different shade respectively.

Depending on the type of modifications you want in your video, you can use Google Photos to get the job done easily and quickly.
Conclusion
Google video stabilizer is a built-in tool in Google Photos. Google Photos can be obtained from Play Store or App Store for your Android or iOS smart devices respectively. In addition to stabilizing your videos, Google Photos app also enables you to make other modifications such as trimming, cropping, applying filters, and much more.
02 How to Stabilize Videos with Google Photos on Android and iPhone?
03 How to Stabilize Videos with Google Photos Online?
04 How to Use Google Photos to Edit Video?
Part 1: What is Google Photos and How Does It Work?
Google Photos is an app that can be obtained from Play Store or App Store to be installed on an Android-based smartphone or iPhone or iPad respectively.
The program can store photos and videos from your phone, and ensures that those media files are well-backed up so they can be recovered easily if/when lost due to some mishaps. Furthermore, the tool even lets you edit, customize, and share your photos and videos with ease.
1. History and Current Policies
Earlier, Google Photos used to offer unlimited storage to the users where they can save as many photos as they want, as long as the images were saved in ‘high-quality’ resolution. However, from June 01, 2021, Google changed its policies of using the app, and now the tool offers limited storage. If more space is needed, the users must subscribe to a paid plan.
2. Accessibility
Google Photos can be accessed from a web browser, Google Drive desktop program, and smartphone app. While you can make only minor changes to the videos such as editing date, time, and location when accessing Google Photos via a web browser, the smartphone app allows you to edit the clips comparatively more sophisticatedly.
3. Deletion
The files that are stored in Google Photos remain there for an indefinite duration, of course until the entire space is completely consumed. When you delete something, it is moved to the Trash and stays there for another 60 days, after which it is automatically deleted from the Cloud forever.
Part 2: How to Stabilize Videos with Google Photos on Android and iPhone?
Google Photos is available for both Android and iPhone smartphones, and as explained earlier, the app can be downloaded from Play Store and App Store respectively. Using the built-in Google stabilizer video editor of the Photos app on both platforms is almost identical and extremely easy.
You can learn how to work with Google video stabilizer to stabilize a video by following the steps that are given below:
Step 1: Locate and Open the Source Video in Google Photos
Download and install Google Photos on your smartphone (Samsung Galaxy Note 10+ is used here for illustrations). Launch the app, tap Library from the bottom-right corner of the interface, and tap to open the source video that you want to stabilize with Google video stabilizer.

Step 2: Stabilize the Video
After the video opens in the app and the playback begins, tap Edit from the bottom. On the next screen, ensure that the Video section is selected. Tap the Stabilize icon from the lower-left area of the window, and wait while Google Photos stabilize video.

Step 3: Save the Video
Once the stabilization process is complete, click Save copy from the bottom-right corner to save the modified video as a separate copy, thus leaving the original instance intact.

Part 3: How to Stabilize Videos with Google Photos Online?
Unfortunately, Google Photos doesn’t have many editing options when accessed via a web browser, and therefore, at the time of this writing, you cannot stabilize a video with the tool’s web interface. But if you are using a Windows or Mac computer, you can try some free online video stabilization software , or use Wondershare Filmora video editor to stabilize video with one click.
For Win 7 or later (64-bit)
For macOS 10.12 or later
Wondershare Filmora video editor is available for Windows and Mac platforms, and gives a tough competition to other industry-standard video editing applications like Final Cut Pro X and Adobe Premiere Pro, etc. You can learn how to stabilize a clip with Filmora instead of using Google stabilizer video editor by following the step-by-step instructions that are explained below:
Step 1: Add the Source Video to the Timeline
After downloading and installing Wondershare Filmora on your Mac or Windows computer (a Windows 11 PC is used here for illustrations), launch the program, and click the New Project tile from the first screen that appears.

When on the main interface, ensure that Media is selected from the standard toolbar at the top, and click anywhere inside the Media window that is present at the upper-left corner. Next, locate, select, and import the source video from your PC that you want to stabilize.

Now, drag and drop the video to the timeline, or hover the mouse over the clip’s thumbnail in the Media window, click the + icon from the bottom-right area. Click the button under the Match to Media or Keep Project Settings label when the confirmation box comes up to add the film to the Timeline using the preferences that you selected.

Step 2: Stabilize the Video
Double click the video in the timeline, and then enable the Stabilization category under video editing pane. Wait while Filmora video editor stabilizes the video without Google video stabilizer. Click OK when done.

Step 3: Export the Stabilized Video
Back on the main interface, click Export from the center-top. On the Export box that opens up next, go to your preferred tab, pick an output format, define output preferences, and click Export from the bottom-right corner to export the stabilized clip without even using Google stabilizer video.

Part 4: How to Use Google Photos to Edit Video?
Google Photos doesn’t only work as a Google video stabilizer app but it also enables you to edit your media clips much more professionally. Some post-production tasks that you can perform while using Google Photos include:
1. Trimming
The trimming handles can be seen when you are on the ‘Video’ section after tapping ‘Edit’ in Google Photos after opening the video. You can drag these handles inwards to get rid of the unwanted starting and ending parts of a clip.

2. Cropping
The ‘Crop’ section enables you to crop the videos in a particular aspect ratio that can be selected from the available list, or drag the handles manually to get custom results.

3. Rotating
The ‘Crop’ section also has an option to rotate the video. Each time you tap the ‘Rotate’ icon, the screen rotates 90o in the counterclockwise direction.

4. Color Correction
The ‘Adjust’ section allows you to adjust the display of a video such as its brightness, contrast, shadows, etc.

5. Filters
You can even add a filter using the presets available in the ‘Filters’ section.

6. Annotations
The ‘Markup’ section enables you to annotate the video. You can either use the ‘Pen’ tool or ‘Highlighter’ to write text on the video or give the screen a different shade respectively.

Depending on the type of modifications you want in your video, you can use Google Photos to get the job done easily and quickly.
Conclusion
Google video stabilizer is a built-in tool in Google Photos. Google Photos can be obtained from Play Store or App Store for your Android or iOS smart devices respectively. In addition to stabilizing your videos, Google Photos app also enables you to make other modifications such as trimming, cropping, applying filters, and much more.
02 How to Stabilize Videos with Google Photos on Android and iPhone?
03 How to Stabilize Videos with Google Photos Online?
04 How to Use Google Photos to Edit Video?
Part 1: What is Google Photos and How Does It Work?
Google Photos is an app that can be obtained from Play Store or App Store to be installed on an Android-based smartphone or iPhone or iPad respectively.
The program can store photos and videos from your phone, and ensures that those media files are well-backed up so they can be recovered easily if/when lost due to some mishaps. Furthermore, the tool even lets you edit, customize, and share your photos and videos with ease.
1. History and Current Policies
Earlier, Google Photos used to offer unlimited storage to the users where they can save as many photos as they want, as long as the images were saved in ‘high-quality’ resolution. However, from June 01, 2021, Google changed its policies of using the app, and now the tool offers limited storage. If more space is needed, the users must subscribe to a paid plan.
2. Accessibility
Google Photos can be accessed from a web browser, Google Drive desktop program, and smartphone app. While you can make only minor changes to the videos such as editing date, time, and location when accessing Google Photos via a web browser, the smartphone app allows you to edit the clips comparatively more sophisticatedly.
3. Deletion
The files that are stored in Google Photos remain there for an indefinite duration, of course until the entire space is completely consumed. When you delete something, it is moved to the Trash and stays there for another 60 days, after which it is automatically deleted from the Cloud forever.
Part 2: How to Stabilize Videos with Google Photos on Android and iPhone?
Google Photos is available for both Android and iPhone smartphones, and as explained earlier, the app can be downloaded from Play Store and App Store respectively. Using the built-in Google stabilizer video editor of the Photos app on both platforms is almost identical and extremely easy.
You can learn how to work with Google video stabilizer to stabilize a video by following the steps that are given below:
Step 1: Locate and Open the Source Video in Google Photos
Download and install Google Photos on your smartphone (Samsung Galaxy Note 10+ is used here for illustrations). Launch the app, tap Library from the bottom-right corner of the interface, and tap to open the source video that you want to stabilize with Google video stabilizer.

Step 2: Stabilize the Video
After the video opens in the app and the playback begins, tap Edit from the bottom. On the next screen, ensure that the Video section is selected. Tap the Stabilize icon from the lower-left area of the window, and wait while Google Photos stabilize video.

Step 3: Save the Video
Once the stabilization process is complete, click Save copy from the bottom-right corner to save the modified video as a separate copy, thus leaving the original instance intact.

Part 3: How to Stabilize Videos with Google Photos Online?
Unfortunately, Google Photos doesn’t have many editing options when accessed via a web browser, and therefore, at the time of this writing, you cannot stabilize a video with the tool’s web interface. But if you are using a Windows or Mac computer, you can try some free online video stabilization software , or use Wondershare Filmora video editor to stabilize video with one click.
For Win 7 or later (64-bit)
For macOS 10.12 or later
Wondershare Filmora video editor is available for Windows and Mac platforms, and gives a tough competition to other industry-standard video editing applications like Final Cut Pro X and Adobe Premiere Pro, etc. You can learn how to stabilize a clip with Filmora instead of using Google stabilizer video editor by following the step-by-step instructions that are explained below:
Step 1: Add the Source Video to the Timeline
After downloading and installing Wondershare Filmora on your Mac or Windows computer (a Windows 11 PC is used here for illustrations), launch the program, and click the New Project tile from the first screen that appears.

When on the main interface, ensure that Media is selected from the standard toolbar at the top, and click anywhere inside the Media window that is present at the upper-left corner. Next, locate, select, and import the source video from your PC that you want to stabilize.

Now, drag and drop the video to the timeline, or hover the mouse over the clip’s thumbnail in the Media window, click the + icon from the bottom-right area. Click the button under the Match to Media or Keep Project Settings label when the confirmation box comes up to add the film to the Timeline using the preferences that you selected.

Step 2: Stabilize the Video
Double click the video in the timeline, and then enable the Stabilization category under video editing pane. Wait while Filmora video editor stabilizes the video without Google video stabilizer. Click OK when done.

Step 3: Export the Stabilized Video
Back on the main interface, click Export from the center-top. On the Export box that opens up next, go to your preferred tab, pick an output format, define output preferences, and click Export from the bottom-right corner to export the stabilized clip without even using Google stabilizer video.

Part 4: How to Use Google Photos to Edit Video?
Google Photos doesn’t only work as a Google video stabilizer app but it also enables you to edit your media clips much more professionally. Some post-production tasks that you can perform while using Google Photos include:
1. Trimming
The trimming handles can be seen when you are on the ‘Video’ section after tapping ‘Edit’ in Google Photos after opening the video. You can drag these handles inwards to get rid of the unwanted starting and ending parts of a clip.

2. Cropping
The ‘Crop’ section enables you to crop the videos in a particular aspect ratio that can be selected from the available list, or drag the handles manually to get custom results.

3. Rotating
The ‘Crop’ section also has an option to rotate the video. Each time you tap the ‘Rotate’ icon, the screen rotates 90o in the counterclockwise direction.

4. Color Correction
The ‘Adjust’ section allows you to adjust the display of a video such as its brightness, contrast, shadows, etc.

5. Filters
You can even add a filter using the presets available in the ‘Filters’ section.

6. Annotations
The ‘Markup’ section enables you to annotate the video. You can either use the ‘Pen’ tool or ‘Highlighter’ to write text on the video or give the screen a different shade respectively.

Depending on the type of modifications you want in your video, you can use Google Photos to get the job done easily and quickly.
Conclusion
Google video stabilizer is a built-in tool in Google Photos. Google Photos can be obtained from Play Store or App Store for your Android or iOS smart devices respectively. In addition to stabilizing your videos, Google Photos app also enables you to make other modifications such as trimming, cropping, applying filters, and much more.
How to Add Selective Color Effect to Your Videos
Selective color is an effect that lets you desaturate all the colors in a photo or video while preserving one or more colors of your choice. It is done by isolating a specific color of your choice in the frame while all other colors turn into black and white, just like this.

By using this effect, we can draw viewers’ attention to a specific point in the clip. If you want your video do the same, Filmora can be a good helper. Alright, we’ll be creating selective color effects in two examples. Let’s get started.
Tutorial 1 on making color isolation by selective color effect
In this first example, we are going to use stock footage showing a subject on a bike.
To add a selective color effect, download Wondershare Filmora on your PC or Mac. Now follow the steps as explained below to add this effect and isolate the color of your choice.
Free Download For Win 7 or later(64-bit)
Free Download For macOS 10.14 or later
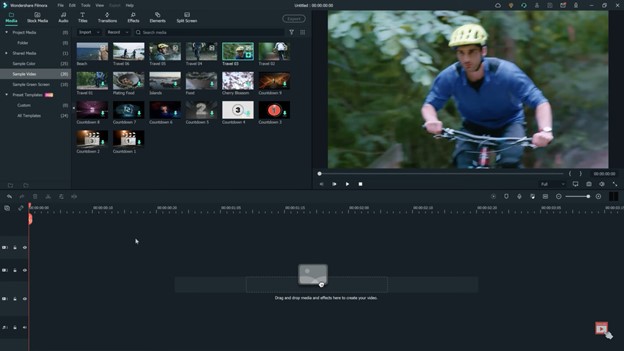
Step1 Launch Wondershare Filmora and drag and drop your clip to the timeline.
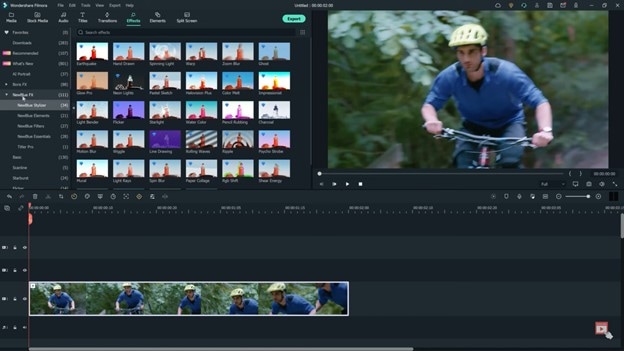
Step2 Go to effects and then click “NewBlue FX” option and select Newblue filters.
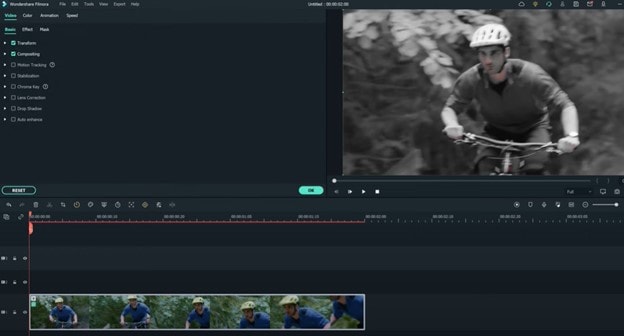
Step3 Find the Selective Color Effect and drag it onto the clip. The effect will be instantly applied.
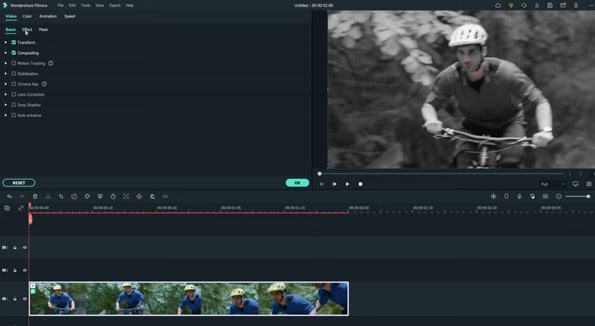
Step4 Next, double-click on the clip and check out the effects menu at the top of the screen.
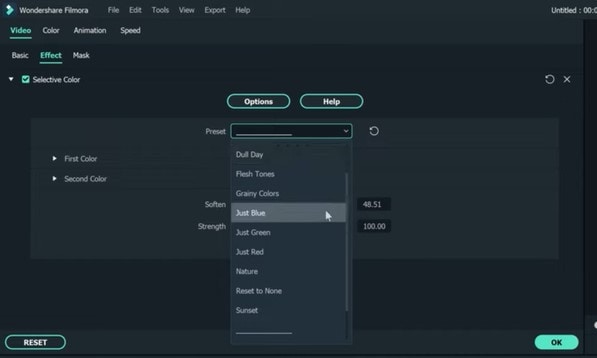
Step5 Open the preset drop-down menu. There will be a lot of presets with different colors. Select the preset you want to use. In this scenario, let us select Just Blue.
Step6 If you see a blue tint at a place or object which you want to be white and black, click on the first color.
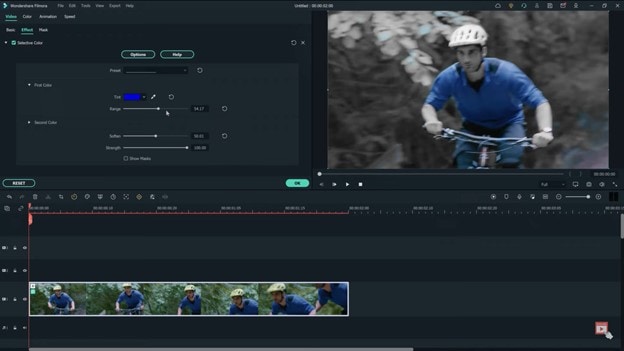
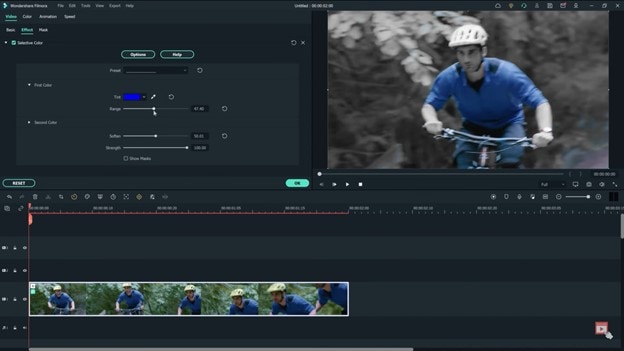
Step7 Now adjust the range slider to decrease the number of unwanted tints.
Step8 To blur the edges of the effects, turn up the softened slider and remove any unwanted tint previously remaining.
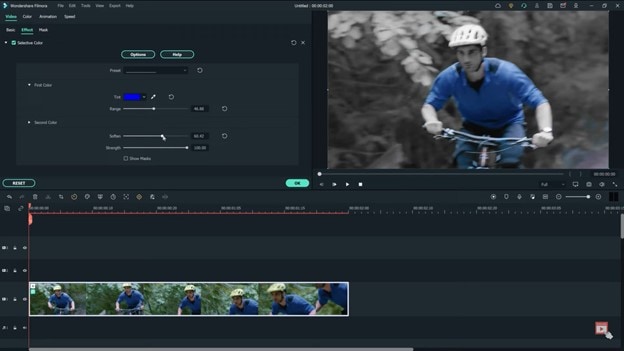
In this way, you can add a selective color effect to your video clips and isolate the color of your choice.
Tutorial 2 on make color isolation using eyedropper tool
You might ask how do we use the eyedropper tool here. It can sample colors from anywhere in a video or an image and add them to your swatch panel. The steps to use the eyedropper tool to add a selective color to your video are below.
Step1 As same as the first one, launching Wondershare Filmora is the first priority. And drag your clip to the timeline.
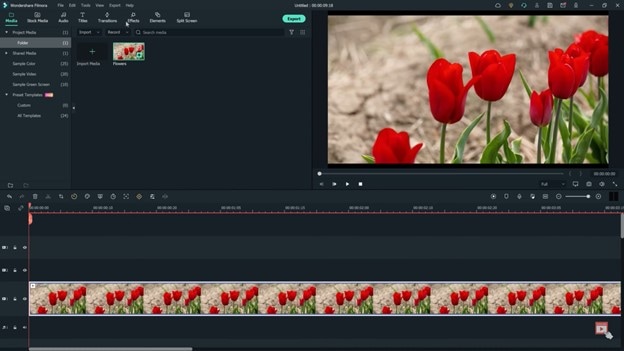
Step2 Go to effects at the top, and find Newblue effects, and click on the Newblue filters.
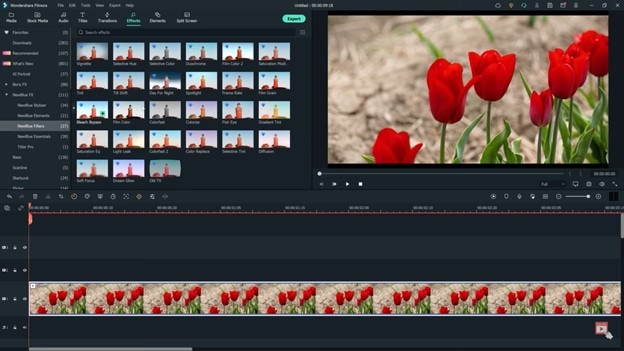
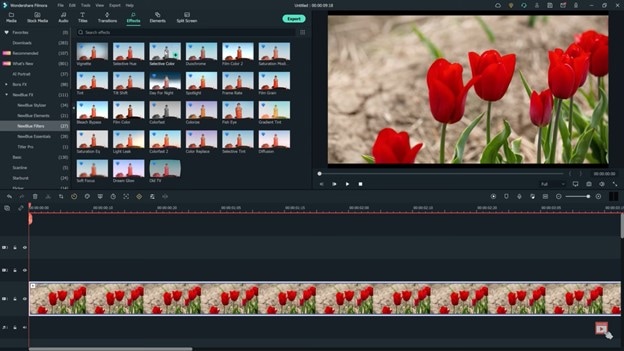
Step3 Find the selective color effect and drag it to the clip.
Step4 Double-click on the clip and visit the effects menu at the top of the screen.
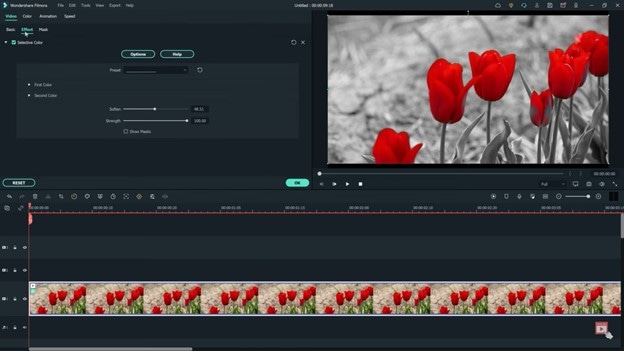
Step5 Click on the ‘first color’ and select the eye dropper tool. This will allow us to select the red flower in the preview window. You can also click different parts of the image to get the color that we want.
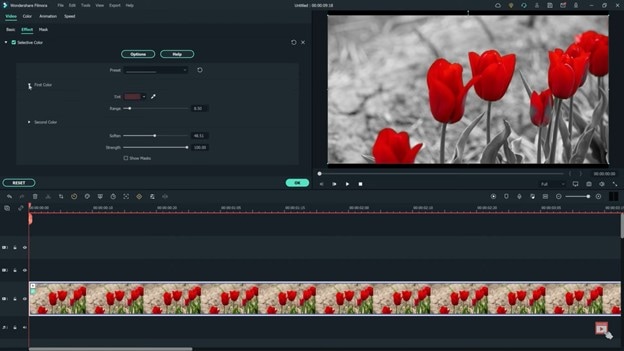
Step6 Next, try selecting a second color to isolate within our shot. In this example, we are going to make the stems on the flowers stand out as well. Select second color and go to the tint section. And find a color that is close to the second color, which will be green in this case.
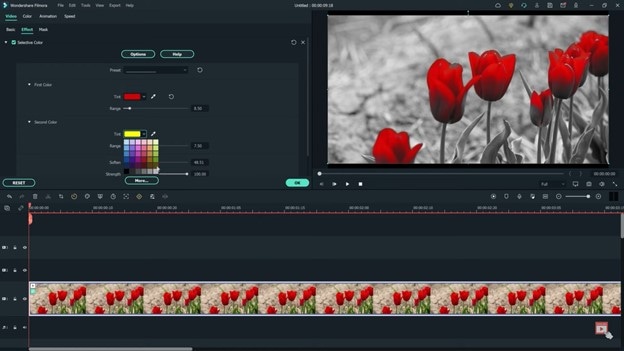
Step7 Pick the eyedropper tool and click it on the green part of the clip. Then adjust the range slider as needed.
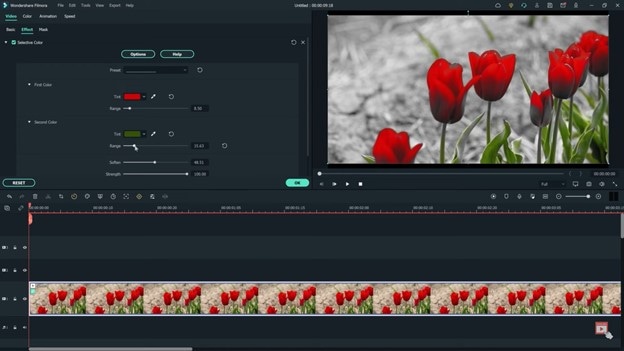
Alright, let’s watch back the video to see how both colors are now isolated.

Follow all the steps in the correct order. This is how you can use NewBlue effects for color isolation using Wondershare Filmora. The color isolation using the selective color effect defines the point of interest in the clip for the viewers.
Free Download For macOS 10.14 or later
Step1 Launch Wondershare Filmora and drag and drop your clip to the timeline.

Step2 Go to effects and then click “NewBlue FX” option and select Newblue filters.

Step3 Find the Selective Color Effect and drag it onto the clip. The effect will be instantly applied.

Step4 Next, double-click on the clip and check out the effects menu at the top of the screen.

Step5 Open the preset drop-down menu. There will be a lot of presets with different colors. Select the preset you want to use. In this scenario, let us select Just Blue.

Step6 If you see a blue tint at a place or object which you want to be white and black, click on the first color.

Step7 Now adjust the range slider to decrease the number of unwanted tints.

Step8 To blur the edges of the effects, turn up the softened slider and remove any unwanted tint previously remaining.

In this way, you can add a selective color effect to your video clips and isolate the color of your choice.
Tutorial 2 on make color isolation using eyedropper tool
You might ask how do we use the eyedropper tool here. It can sample colors from anywhere in a video or an image and add them to your swatch panel. The steps to use the eyedropper tool to add a selective color to your video are below.
Step1 As same as the first one, launching Wondershare Filmora is the first priority. And drag your clip to the timeline.

Step2 Go to effects at the top, and find Newblue effects, and click on the Newblue filters.

Step3 Find the selective color effect and drag it to the clip.

Step4 Double-click on the clip and visit the effects menu at the top of the screen.

Step5 Click on the ‘first color’ and select the eye dropper tool. This will allow us to select the red flower in the preview window. You can also click different parts of the image to get the color that we want.

Step6 Next, try selecting a second color to isolate within our shot. In this example, we are going to make the stems on the flowers stand out as well. Select second color and go to the tint section. And find a color that is close to the second color, which will be green in this case.

Step7 Pick the eyedropper tool and click it on the green part of the clip. Then adjust the range slider as needed.

Alright, let’s watch back the video to see how both colors are now isolated.

Follow all the steps in the correct order. This is how you can use NewBlue effects for color isolation using Wondershare Filmora. The color isolation using the selective color effect defines the point of interest in the clip for the viewers.
What Is AI Composite Video App and AI Composite Video Guide
What is AI Composite Video App and AI Composite Video Tutorial
An easy yet powerful editor
Numerous effects to choose from
Detailed tutorials provided by the official channel
The internet space is all dominated by video content these days. Be it a blog, social media site, or any other platform, interesting videos, and images are grabbing the attention of the viewers and visitors. So, whether you wish to create an interesting video for your loved one, or make one for your brand promotion, a good editing tool is a must. Among the long list of these tools available, AI Composite Video Application is one of the latest additions. This article will help you know all about this app, its supported features, functions, and a lot more. Keep reading.
A cross-platform for making videos anywhere for all creators

Why your video editing isn’t good enough? How about some creative inspo?
- 100 Million+ Users
- 150+ Countries and Regions
- 4 Million+ Social Media Followers
- 5 Million+ Stock Media for Use
* Secure Download

In this article
01 [What is AI Composite Video App?](#Part 1)
02 [The Best Alternative To Ai Composite Video App For Adding Special Effects And Transitions](#Part 2)
Part 1 What is AI Composite Video App?
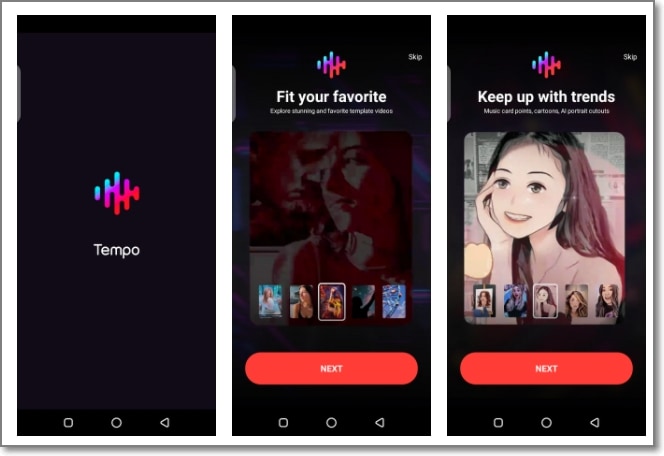
The AI Composite Video App is a new editing app that is available for free download on Android and iOS devices. The app allows creating of interesting and professional-looking videos using a wide range of editing features supported. An array of templates, stickers, filters, transitions, and other elements in the tool can be used for creating the desired video.
Key features of AI Composite Video App
● Video editing app available for Android and iOS devices.
● Simple and user-friendly interface.
● Comes with pre-designed templates for creating the desired video.
● Multiple options for filters, stickers, transitions, effects, and other elements.
● Support to multiple languages.
● Facilitates adding music to the videos.
● Option to change and customize the sound quality using Introduct56n beat effects, and filters.
● Allows to use the saved videos as well as capture them.
● Free app without ads.
● Share videos on social networking sites.
Pros:
● Free to use app with a user-friendly interface.
● The app can be downloaded directly from the third-party website and thus the downloading is quick and instant.
● The APK files are saved to your system memory or the card. You can now install and uninstall it multiple times as needed without downloading it.
Cons:
● Being an APK file, the tool is susceptible to having viruses that may lead to device damage or stealing data.
● If you are using the mod version of the tempo AI composite video app, the update will not be done automatically.
Language supported
The AI Composite Video App supports 10 languages which include English, Dutch, French, Korean, Polish, Japanese, Hindi, Malaysian, Indonesian, and Taiwanese.
Steps to download and use AI Composite Video Mod Apk Latest Version
The official app is available at the Google Play Store with IAP but if you need to unlock and use all the premium features without any payment, you can use the mod version. The steps for AI Composite video apps download using the Mod version are as follows
Step 1. On your Android or iOS device, at the Security settings, permit to enable the unknown sources.
Step 2. Download, install and open the app.
Step 3. The templates will now appear on the main dashboard of the app. There are templates in multiple categories, you can choose the one as desired.
Step 4. Add the desired video or image and edit them using several functions and features.
Step 5. The created video can be saved or shared on social media sites as needed.
Part 2 The Best Alternative To AI Composite Video App – ** Filmora
The AI Composite Video App is a mobile-based app that also has several limitations as discussed above. So, if you are in search of a professional alternative tool, we recommend Wondershare Filmora as the best option. This powerful video editing tool will let you unleash your creativity and make professional-looking videos.
For Win 7 or later (64-bit)
For macOS 10.14 or later
download filmora app for ios ](https://app.adjust.com/b0k9hf2%5F4bsu85t ) download filmora app for android ](https://app.adjust.com/b0k9hf2%5F4bsu85t )
Click here to get Filmora for PC by email
You just need to image and the tools in the software will let you create the desired piece of the video.
Key features of the software
● Windows and Mac-based professional video editing software.
● Comes with customized animations for creating personalized videos.
● Comes with features like motion tracking, pan & zoom, ease-in, ease-out, and more.
● Multiple features and effects can be added to the videos like text & titles, warp & distort, masking, lights & flares, and more.
● Enhance videos using features like auto-correction, control settings, color wheels, scopes, and more.
● Multiple audio-related functions are also supported like audio compression, automatic audio-syncing, audio transitions, audio noise correction, and more.
● Windows and Mac support.
● Ending Thoughts →
● A good editing tool lets you edit your videos efficiently and quickly.
● AI Composite Video App is one such Android and iOS-based editing app.
● The AI Composite app comes with decent features but there are several limitations to using the app as well.
● To create magical videos like a pro, Wondershare Filmora works as an excellent tool.
The internet space is all dominated by video content these days. Be it a blog, social media site, or any other platform, interesting videos, and images are grabbing the attention of the viewers and visitors. So, whether you wish to create an interesting video for your loved one, or make one for your brand promotion, a good editing tool is a must. Among the long list of these tools available, AI Composite Video Application is one of the latest additions. This article will help you know all about this app, its supported features, functions, and a lot more. Keep reading.
A cross-platform for making videos anywhere for all creators

Why your video editing isn’t good enough? How about some creative inspo?
- 100 Million+ Users
- 150+ Countries and Regions
- 4 Million+ Social Media Followers
- 5 Million+ Stock Media for Use
* Secure Download

In this article
01 [What is AI Composite Video App?](#Part 1)
02 [The Best Alternative To Ai Composite Video App For Adding Special Effects And Transitions](#Part 2)
Part 1 What is AI Composite Video App?
The AI Composite Video App is a new editing app that is available for free download on Android and iOS devices. The app allows creating of interesting and professional-looking videos using a wide range of editing features supported. An array of templates, stickers, filters, transitions, and other elements in the tool can be used for creating the desired video.
Key features of AI Composite Video App
● Video editing app available for Android and iOS devices.
● Simple and user-friendly interface.
● Comes with pre-designed templates for creating the desired video.
● Multiple options for filters, stickers, transitions, effects, and other elements.
● Support to multiple languages.
● Facilitates adding music to the videos.
● Option to change and customize the sound quality using Introduct56n beat effects, and filters.
● Allows to use the saved videos as well as capture them.
● Free app without ads.
● Share videos on social networking sites.
Pros:
● Free to use app with a user-friendly interface.
● The app can be downloaded directly from the third-party website and thus the downloading is quick and instant.
● The APK files are saved to your system memory or the card. You can now install and uninstall it multiple times as needed without downloading it.
Cons:
● Being an APK file, the tool is susceptible to having viruses that may lead to device damage or stealing data.
● If you are using the mod version of the tempo AI composite video app, the update will not be done automatically.
Language supported
The AI Composite Video App supports 10 languages which include English, Dutch, French, Korean, Polish, Japanese, Hindi, Malaysian, Indonesian, and Taiwanese.
Steps to download and use AI Composite Video Mod Apk Latest Version
The official app is available at the Google Play Store with IAP but if you need to unlock and use all the premium features without any payment, you can use the mod version. The steps for AI Composite video apps download using the Mod version are as follows
Step 1. On your Android or iOS device, at the Security settings, permit to enable the unknown sources.
Step 2. Download, install and open the app.
Step 3. The templates will now appear on the main dashboard of the app. There are templates in multiple categories, you can choose the one as desired.
Step 4. Add the desired video or image and edit them using several functions and features.
Step 5. The created video can be saved or shared on social media sites as needed.

Part 2 The Best Alternative To AI Composite Video App – ** Filmora
The AI Composite Video App is a mobile-based app that also has several limitations as discussed above. So, if you are in search of a professional alternative tool, we recommend Wondershare Filmora as the best option. This powerful video editing tool will let you unleash your creativity and make professional-looking videos.
For Win 7 or later (64-bit)
For macOS 10.14 or later
download filmora app for ios ](https://app.adjust.com/b0k9hf2%5F4bsu85t ) download filmora app for android ](https://app.adjust.com/b0k9hf2%5F4bsu85t )
Click here to get Filmora for PC by email
You just need to image and the tools in the software will let you create the desired piece of the video.
Key features of the software
● Windows and Mac-based professional video editing software.
● Comes with customized animations for creating personalized videos.
● Comes with features like motion tracking, pan & zoom, ease-in, ease-out, and more.
● Multiple features and effects can be added to the videos like text & titles, warp & distort, masking, lights & flares, and more.
● Enhance videos using features like auto-correction, control settings, color wheels, scopes, and more.
● Multiple audio-related functions are also supported like audio compression, automatic audio-syncing, audio transitions, audio noise correction, and more.
● Windows and Mac support.
● Ending Thoughts →
● A good editing tool lets you edit your videos efficiently and quickly.
● AI Composite Video App is one such Android and iOS-based editing app.
● The AI Composite app comes with decent features but there are several limitations to using the app as well.
● To create magical videos like a pro, Wondershare Filmora works as an excellent tool.
The internet space is all dominated by video content these days. Be it a blog, social media site, or any other platform, interesting videos, and images are grabbing the attention of the viewers and visitors. So, whether you wish to create an interesting video for your loved one, or make one for your brand promotion, a good editing tool is a must. Among the long list of these tools available, AI Composite Video Application is one of the latest additions. This article will help you know all about this app, its supported features, functions, and a lot more. Keep reading.
A cross-platform for making videos anywhere for all creators

Why your video editing isn’t good enough? How about some creative inspo?
- 100 Million+ Users
- 150+ Countries and Regions
- 4 Million+ Social Media Followers
- 5 Million+ Stock Media for Use
* Secure Download

In this article
01 [What is AI Composite Video App?](#Part 1)
02 [The Best Alternative To Ai Composite Video App For Adding Special Effects And Transitions](#Part 2)
Part 1 What is AI Composite Video App?
The AI Composite Video App is a new editing app that is available for free download on Android and iOS devices. The app allows creating of interesting and professional-looking videos using a wide range of editing features supported. An array of templates, stickers, filters, transitions, and other elements in the tool can be used for creating the desired video.
Key features of AI Composite Video App
● Video editing app available for Android and iOS devices.
● Simple and user-friendly interface.
● Comes with pre-designed templates for creating the desired video.
● Multiple options for filters, stickers, transitions, effects, and other elements.
● Support to multiple languages.
● Facilitates adding music to the videos.
● Option to change and customize the sound quality using Introduct56n beat effects, and filters.
● Allows to use the saved videos as well as capture them.
● Free app without ads.
● Share videos on social networking sites.
Pros:
● Free to use app with a user-friendly interface.
● The app can be downloaded directly from the third-party website and thus the downloading is quick and instant.
● The APK files are saved to your system memory or the card. You can now install and uninstall it multiple times as needed without downloading it.
Cons:
● Being an APK file, the tool is susceptible to having viruses that may lead to device damage or stealing data.
● If you are using the mod version of the tempo AI composite video app, the update will not be done automatically.
Language supported
The AI Composite Video App supports 10 languages which include English, Dutch, French, Korean, Polish, Japanese, Hindi, Malaysian, Indonesian, and Taiwanese.
Steps to download and use AI Composite Video Mod Apk Latest Version
The official app is available at the Google Play Store with IAP but if you need to unlock and use all the premium features without any payment, you can use the mod version. The steps for AI Composite video apps download using the Mod version are as follows
Step 1. On your Android or iOS device, at the Security settings, permit to enable the unknown sources.
Step 2. Download, install and open the app.
Step 3. The templates will now appear on the main dashboard of the app. There are templates in multiple categories, you can choose the one as desired.
Step 4. Add the desired video or image and edit them using several functions and features.
Step 5. The created video can be saved or shared on social media sites as needed.

Part 2 The Best Alternative To AI Composite Video App – ** Filmora
The AI Composite Video App is a mobile-based app that also has several limitations as discussed above. So, if you are in search of a professional alternative tool, we recommend Wondershare Filmora as the best option. This powerful video editing tool will let you unleash your creativity and make professional-looking videos.
For Win 7 or later (64-bit)
For macOS 10.14 or later
download filmora app for ios ](https://app.adjust.com/b0k9hf2%5F4bsu85t ) download filmora app for android ](https://app.adjust.com/b0k9hf2%5F4bsu85t )
Click here to get Filmora for PC by email
You just need to image and the tools in the software will let you create the desired piece of the video.
Key features of the software
● Windows and Mac-based professional video editing software.
● Comes with customized animations for creating personalized videos.
● Comes with features like motion tracking, pan & zoom, ease-in, ease-out, and more.
● Multiple features and effects can be added to the videos like text & titles, warp & distort, masking, lights & flares, and more.
● Enhance videos using features like auto-correction, control settings, color wheels, scopes, and more.
● Multiple audio-related functions are also supported like audio compression, automatic audio-syncing, audio transitions, audio noise correction, and more.
● Windows and Mac support.
● Ending Thoughts →
● A good editing tool lets you edit your videos efficiently and quickly.
● AI Composite Video App is one such Android and iOS-based editing app.
● The AI Composite app comes with decent features but there are several limitations to using the app as well.
● To create magical videos like a pro, Wondershare Filmora works as an excellent tool.
The internet space is all dominated by video content these days. Be it a blog, social media site, or any other platform, interesting videos, and images are grabbing the attention of the viewers and visitors. So, whether you wish to create an interesting video for your loved one, or make one for your brand promotion, a good editing tool is a must. Among the long list of these tools available, AI Composite Video Application is one of the latest additions. This article will help you know all about this app, its supported features, functions, and a lot more. Keep reading.
A cross-platform for making videos anywhere for all creators

Why your video editing isn’t good enough? How about some creative inspo?
- 100 Million+ Users
- 150+ Countries and Regions
- 4 Million+ Social Media Followers
- 5 Million+ Stock Media for Use
* Secure Download

In this article
01 [What is AI Composite Video App?](#Part 1)
02 [The Best Alternative To Ai Composite Video App For Adding Special Effects And Transitions](#Part 2)
Part 1 What is AI Composite Video App?
The AI Composite Video App is a new editing app that is available for free download on Android and iOS devices. The app allows creating of interesting and professional-looking videos using a wide range of editing features supported. An array of templates, stickers, filters, transitions, and other elements in the tool can be used for creating the desired video.
Key features of AI Composite Video App
● Video editing app available for Android and iOS devices.
● Simple and user-friendly interface.
● Comes with pre-designed templates for creating the desired video.
● Multiple options for filters, stickers, transitions, effects, and other elements.
● Support to multiple languages.
● Facilitates adding music to the videos.
● Option to change and customize the sound quality using Introduct56n beat effects, and filters.
● Allows to use the saved videos as well as capture them.
● Free app without ads.
● Share videos on social networking sites.
Pros:
● Free to use app with a user-friendly interface.
● The app can be downloaded directly from the third-party website and thus the downloading is quick and instant.
● The APK files are saved to your system memory or the card. You can now install and uninstall it multiple times as needed without downloading it.
Cons:
● Being an APK file, the tool is susceptible to having viruses that may lead to device damage or stealing data.
● If you are using the mod version of the tempo AI composite video app, the update will not be done automatically.
Language supported
The AI Composite Video App supports 10 languages which include English, Dutch, French, Korean, Polish, Japanese, Hindi, Malaysian, Indonesian, and Taiwanese.
Steps to download and use AI Composite Video Mod Apk Latest Version
The official app is available at the Google Play Store with IAP but if you need to unlock and use all the premium features without any payment, you can use the mod version. The steps for AI Composite video apps download using the Mod version are as follows
Step 1. On your Android or iOS device, at the Security settings, permit to enable the unknown sources.
Step 2. Download, install and open the app.
Step 3. The templates will now appear on the main dashboard of the app. There are templates in multiple categories, you can choose the one as desired.
Step 4. Add the desired video or image and edit them using several functions and features.
Step 5. The created video can be saved or shared on social media sites as needed.

Part 2 The Best Alternative To AI Composite Video App – ** Filmora
The AI Composite Video App is a mobile-based app that also has several limitations as discussed above. So, if you are in search of a professional alternative tool, we recommend Wondershare Filmora as the best option. This powerful video editing tool will let you unleash your creativity and make professional-looking videos.
For Win 7 or later (64-bit)
For macOS 10.14 or later
download filmora app for ios ](https://app.adjust.com/b0k9hf2%5F4bsu85t ) download filmora app for android ](https://app.adjust.com/b0k9hf2%5F4bsu85t )
Click here to get Filmora for PC by email
You just need to image and the tools in the software will let you create the desired piece of the video.
Key features of the software
● Windows and Mac-based professional video editing software.
● Comes with customized animations for creating personalized videos.
● Comes with features like motion tracking, pan & zoom, ease-in, ease-out, and more.
● Multiple features and effects can be added to the videos like text & titles, warp & distort, masking, lights & flares, and more.
● Enhance videos using features like auto-correction, control settings, color wheels, scopes, and more.
● Multiple audio-related functions are also supported like audio compression, automatic audio-syncing, audio transitions, audio noise correction, and more.
● Windows and Mac support.
● Ending Thoughts →
● A good editing tool lets you edit your videos efficiently and quickly.
● AI Composite Video App is one such Android and iOS-based editing app.
● The AI Composite app comes with decent features but there are several limitations to using the app as well.
● To create magical videos like a pro, Wondershare Filmora works as an excellent tool.
How to Enable and Use OBS Zoom Camera
The number of online meetings, seminars, and networking events for translators and interpreters has increased dramatically in the last year. The OBS Studio is one of them. A streaming program called OBS Studio aids users in planning and arranging their material. To create enlightening and captivating visual sceneries, you may combine several sources. You’ve undoubtedly acquired a reliable webcam by this point and learned how to adjust your lighting and frame to appear decent on video. You could have even splashed out on a green screen to make your online meetings’ backgrounds seem more branded and professional. Without OBS, you may utilize your webcam directly with Zoom, but the picture quality will be poor. This is due to Zoom’s lack of access to your webcam’s exposure and white balance settings. Additionally, you cannot apply any filters, such as LUTs. This tutorial will show you how to use the OBS Virtual Camera to install OBS as a camera in Zoom.
A video source option called “OBS Virtual Camera” may be found in the settings of video conferencing applications like Zoom, Teams, and Google Meet. You may also be curious about it and how to use the virtual camera. With Zoom, OBS is now easy to set up. Every single scene, overlay, and widget you have access to may be used as a video source for the well-liked conference meetings program. Your ability to utilize OBS Studio with Zoom will help you make your meetings more professional. You may utilize an external media resource, such as a video file, screenshot, app, game, etc., as the camera output for Zoom, Teams, Meet, or other video calls by using the OBS virtual camera. Instead of your face from the camera, your conference partner will see the video source you just selected. We’ll walk you through setting up OBS Studio as a virtual camera in this post so that you may utilize any of your OBS collections in Zoom rather than your webcam. Find out more here:
Also read:
- Updated 15 Best CapCut Templates for Slow Motion Editing for 2024
- How to Add Text in Adobe Rush for 2024
- Updated 2024 Approved Creating a Slideshow Is Necessity of the Modern Time. Whether You Plan a Business Meeting or You Are Going to Do some Family Event with Slideshow Presentation, a Good Slideshow Maker Will Help You in This Direction
- Updated In 2024, Adobe After Effects Review
- Top 10 iPad Slideshow Apps to Create a Slideshow
- New 2024 Approved REVIEW Whats Top 10 Software to Make AI Upscaling Video
- In 2024, 15 Camera Shake Preset for Adobe Premiere Pro
- Updated In 2024, 10 Best Sony LUT for Different Purposes
- Updated In 2024, Create Intro Video with Flixpress
- New Expolring Top 6 Best Alternatives to Clownfish Voice Changer for 2024
- Updated Get 15 Absolutely-Free LUTs From This Article as Well as Get an Insight on How Cinematic LUTs Affect Your Film
- In 2024, Do You Intend to Include Motion Blur on Your Video Using Video Star? This Article Explains How to Use Motion Blur on Video Star with Exquisite Control
- 2024 Approved This Article Will Show You the Steps to Make Coin Magic in Videos with Filmora
- Looking for Free Tools to Create Radial Blur Images Online? Read Our Full Guide to Learn About the 6 Best Programs to Add This Effect to Your Pictures for 2024
- New Want to Create a Polaroid Collage for Your Social Media Platform, Online Site, or to Wish Your Best Buddy on Their Special Done? You Are on the Right Page as We Will Help You with the Best Tools and Ideas for Generating an Impressive Polaroid Collage
- Updated Replacing the Sky in Adobe After Effects An Extensive Guide
- Updated 2024 Approved Learn Color Correction in After Effects with These Videos
- Updated Creating Motivational Videos with AI Comprehensive Guide 2024
- New How to Do Datamoshing Effect in After Effects for 2024
- Updated How to Create Cinematic Style Videos? Easy Guide for Beginners for 2024
- New How to Add Subtitles to MKV Videos on All Platforms
- Updated In 2024, Learn How to Use 3D Camera Tracking in Adobe After Effects and Take Your Skills to the Next Level
- Updated In 2024, 15 Free Cinematic LUTs for Your Film
- New Do You Need to Make Your Video More Immersive? You Can Make It 60 FPS to Achieve That. And Here Are the 5 Best Tools that You Can Use
- Updated 2024 Approved Whatre the Best Alternatives to Pexels?
- How To Use Motion Blur On Video Star, In 2024
- 2024 Approved Want to Play a Video in the Loop on Your Mac? Here Is How You Can Make a Video Loop in QuickTime in Simple Steps
- Updated In 2024, Looking For The Best Slow Motion Effect in Premiere Pro
- 2024 Approved The Ultimate Guide to Learning All the Details About Voice Cloning
- In 2024, How to Bypass Google FRP Lock from Vivo S17 Devices
- In 2024, Bypass iCloud Activation Lock with IMEI Code On iPhone X
- In 2024, A Quick Guide to Motorola Moto G73 5G FRP Bypass Instantly
- 10 Fake GPS Location Apps on Android Of your Lenovo ThinkPhone | Dr.fone
- The way to get back lost data from Infinix GT 10 Pro
- Downloading SamFw FRP Tool 3.0 for Infinix Smart 8 HD
- How Many Attempts To Unlock iPhone 6 | Dr.fone
- Top IMEI Unlokers for Your OnePlus Nord 3 5G Phone
- 8 Top Motion Graphics Online Tools for Your Inspiration for 2024
- What are Location Permissions Life360 On Poco X6 Pro? | Dr.fone
- Hard Resetting an Oppo A56s 5G Device Made Easy | Dr.fone
- In 2024, How to Transfer Data from Lava Yuva 3 Pro to Any iOS Devices | Dr.fone
- Top 7 Animated GIF Text Makers for 2024
- How to Fix Pokemon Go Route Not Working On Apple iPhone SE? | Dr.fone
- How to get back lost photos from HTC U23.
- In 2024, Different Methods To Unlock Your iPhone 12 Pro Max | Dr.fone
- In 2024, Bypassing Google Account With vnROM Bypass For Poco C55
- In 2024, Lock Your Vivo Y28 5G Phone in Style The Top 5 Gesture Lock Screen Apps
- Updated How To Translate Videos in Tamil for a Wider Reach for 2024
- How to Unlock Apple ID Activation Lock From Apple iPhone 6s?
- Top 4 Eminem Voice Generator Apps for PC, Mac, Mobile, and Online
- New 2024 Approved Best 5 AI Voice Generators Online (Supports All Browsers)
- Android Safe Mode - How to Turn off Safe Mode on Oppo F23 5G? | Dr.fone
- How to Get and Use Pokemon Go Promo Codes On Apple iPhone SE | Dr.fone
- Title: Updated How to Stabilize Videos with Google Photos App for Free
- Author: Morgan
- Created at : 2024-06-24 01:30:09
- Updated at : 2024-06-25 01:30:09
- Link: https://ai-video-editing.techidaily.com/updated-how-to-stabilize-videos-with-google-photos-app-for-free/
- License: This work is licensed under CC BY-NC-SA 4.0.


