
Updated How to Use Adjustment Layer in Photoshop, In 2024

How to Use Adjustment Layer in Photoshop?
Adobe Photoshop is a famous and powerful image editor through which you can draw captivating illustrations proficiently. Using this advanced software, you can also work on complex 3D artwork efficiently. You can change image backgrounds and eliminate the flaws in your pictures using Photoshop.
As Photoshop is a layer-based editing software, this article will focus on how to resize the layer in Photoshop effectively. Moreover, you can also discover how to create an adjustment layer in Photoshop within a few clicks.

Part 1: What is Layer in Photoshop?
Do you know how layers work in Photoshop? By using layers in Photoshop, you can execute flawless editing without modifying the composition of the whole image. Moreover, it does not alter the original image, so you can revert the changes anytime you want. You can easily adjust the saturation, brightness, contrast, and other elements on each layer in Photoshop. Moreover, you can add special effects to each layer according to your choice.
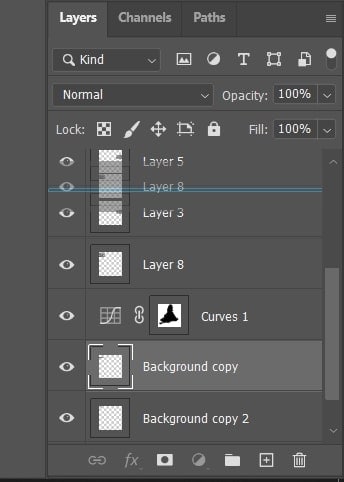
There are different sorts of layers in Photoshop. For example, fill layers consist of color patterns, and type layers allow you to create text and shapes. You can also move and change the position of layers to insert a specific element into the image. Thus, layers are the essential component of Photoshop, enabling you to add text, shapes, and special effects to the images effortlessly.
Part 2: How to Resize a Layer in Photoshop?
Do you want to learn how to change the size of a layer in Photoshop? Here are the simple steps that you can follow to resize a layer in Photoshop:
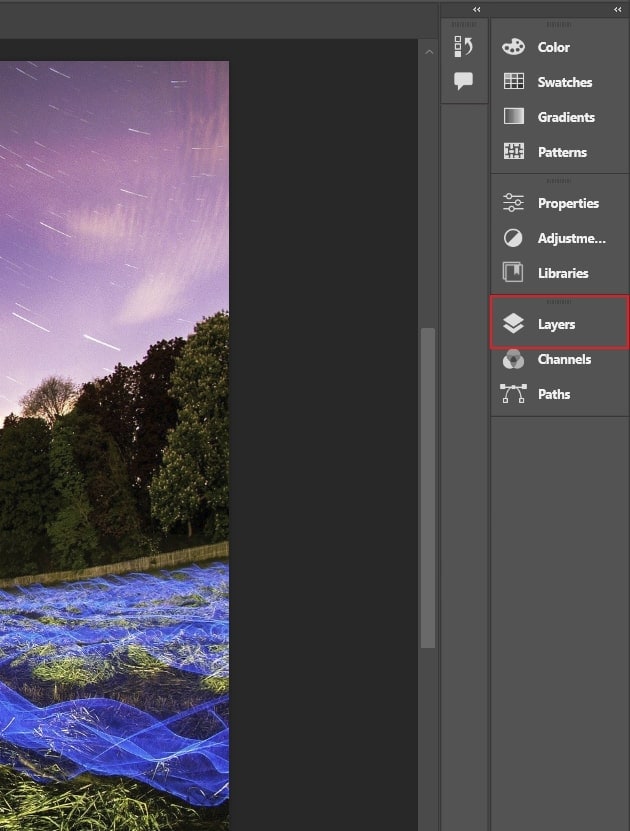
Step1 Go to the right panel of Photoshop and click on “Layers.” From there, choose the layer that you want to resize.
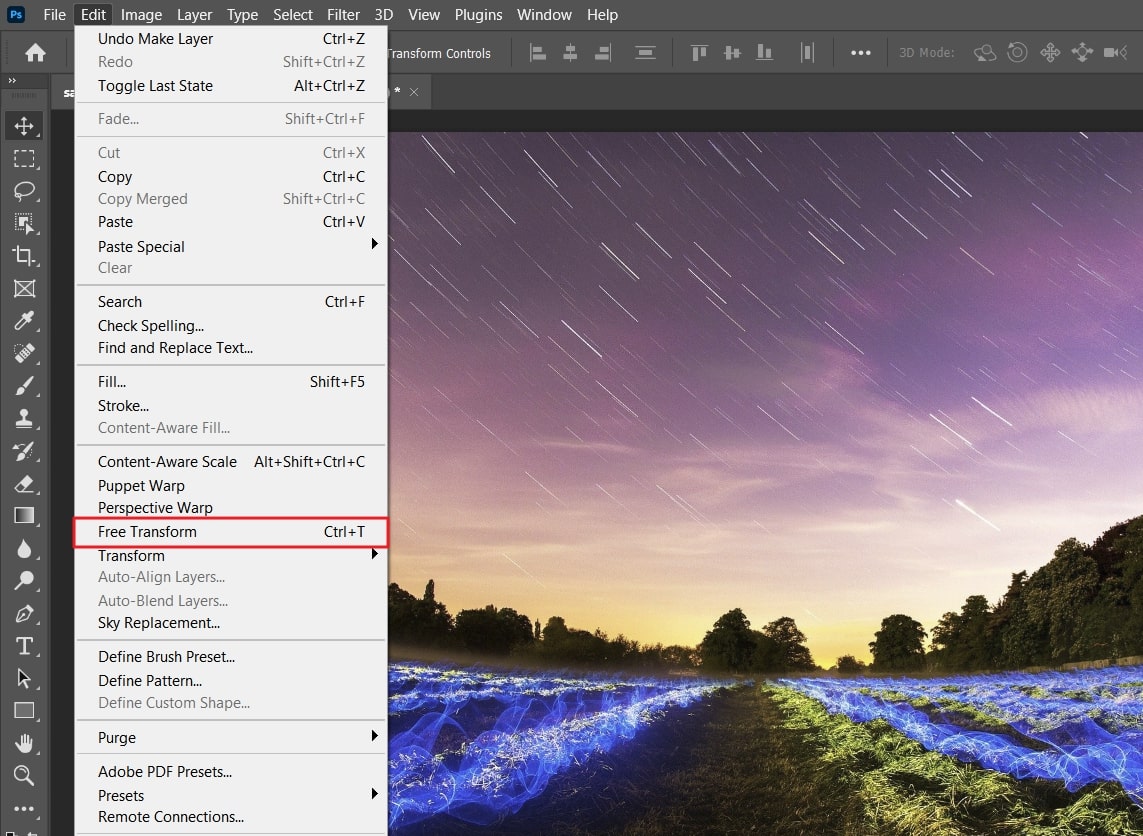
Step2 Once done with selecting the layer, go to the “Edit” tab given at the top. From there, tap on “Free Transform,” which will display the resize bars.
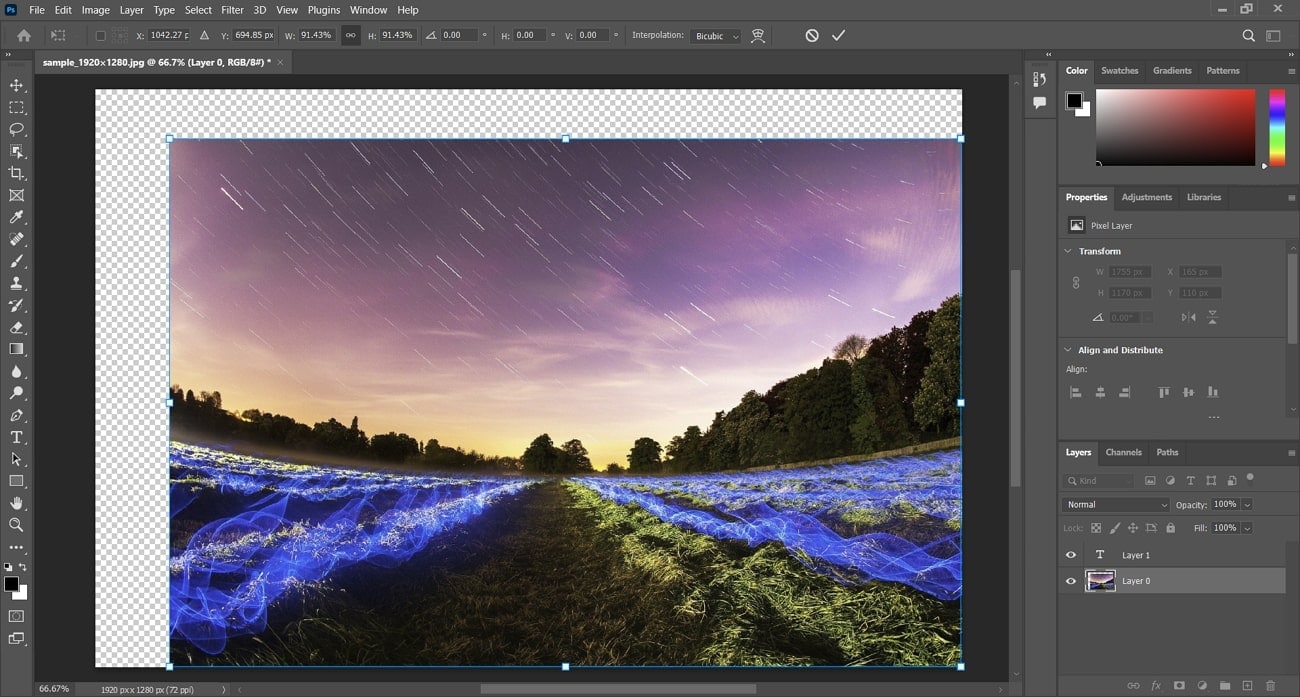
Step3 Now, you can drag and drop the layer according to your preferences. You can also change the height and width of the layer by holding the “Shift” key. Once done, fill in the checkmark at the top options bar. To finalize the resize of your layer, press “Enter” for Windows and “Return” for Mac.
Part 3: How to Change Layer Color in Photoshop?
Do you want to change the color of the layer in Photoshop? Here are the simple steps that you can follow:
Step1 To begin, create a new hue/saturation adjustment layer using the “Adjustments Panel.” Now, double-click on this newly created adjustment layer and select “Create Clipping Mask.” This will let you make color-changing adjustments.
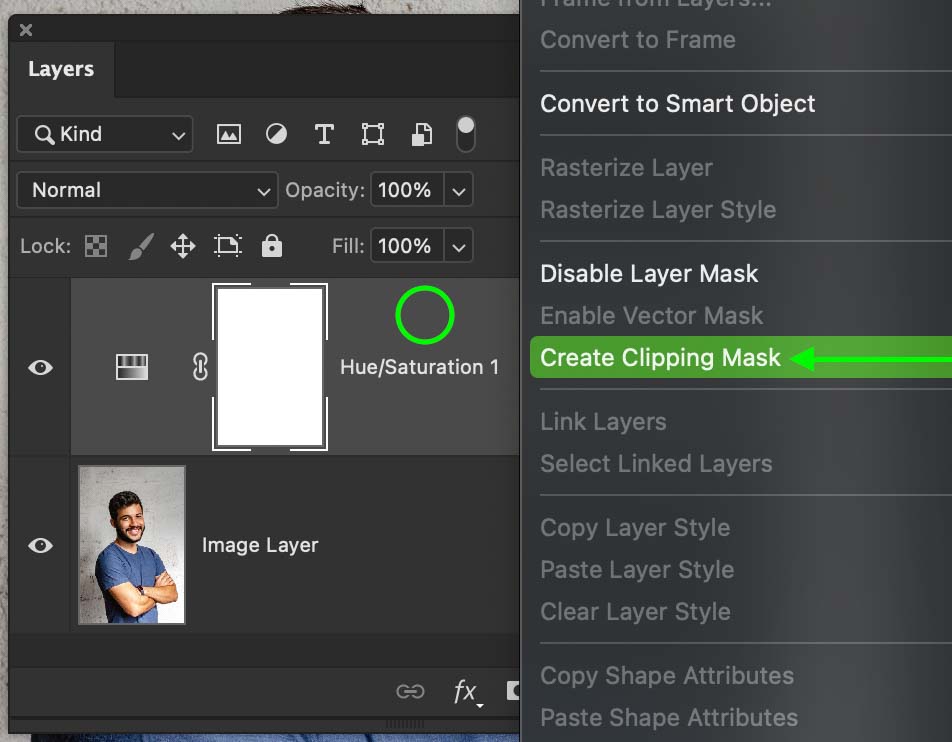
Step2 After creating the clipping mask, you will be able to see a right-angle arrow that is directed down to the image. Now make sure to select the colors of the color channel to make some changes. Afterward, double-click on the “Hue/Saturation” adjustment layer and choose the “Preset” option. Once done, choose the color of your choice.
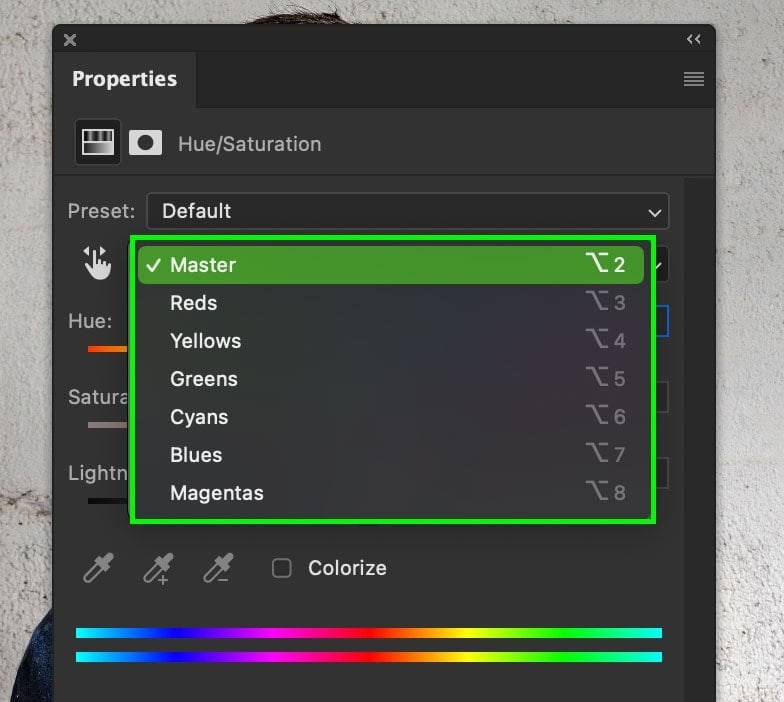
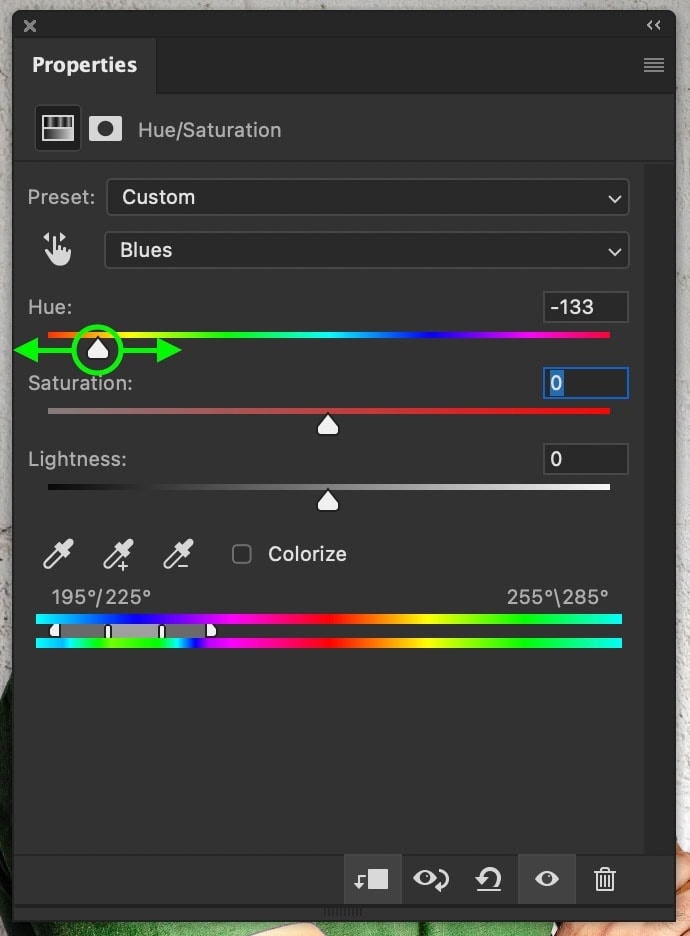
Step3 Once you have chosen the color, make sure to adjust the saturation accordingly. Afterward, manage the hue slider to your preferred color. Once done, you can adjust the sliders of saturation and lightness according to your choice.
Part 4: How to Use Adjustment Layers in Photoshop?
If you are unaware of how to use adjustment layers in Photoshop, this section will provide you with all the details. Thus, continue reading to find out the significance of adjustment layers in Photoshop.
4.1 Why Do You Need to Add an Adjustment Layer?
Raw images always come with lots of imperfections. If you want to edit and enhance them flawlessly, adjustment layers can help you. By adding the adjustment layer, you can manage the levels and curves of the images to make the shadows darker in the picture. Moreover, you can increase or decrease the contrast of the image in specific parts using the adjustment layers properly.
If your image has light problems, you can set the exposure by adding an adjustment layer. Furthermore, you can make the colors of the image pop out by adjusting the color balance. This is also possible with adjustment layers, as it makes the whole process of image editing efficient. Other components that you can modify using adjustment layers are brightness, curves, hue, photo filter, vibrance, etc.
4.2 What Kinds of Adjustment Layers Can You Try?
There are different kinds of adjustment layers that you can try in Photoshop. To discover about them, proceed to the following section.
1. Add a Color Lookup Adjustment Layer
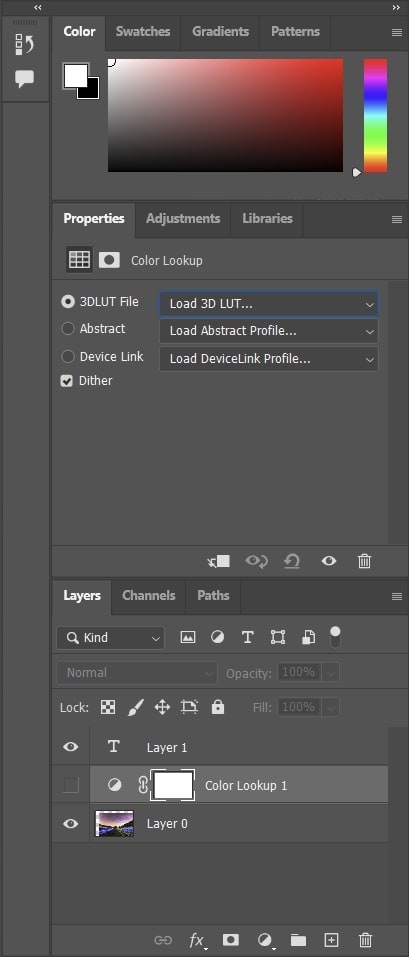
Once you have opened the image in Photoshop, add an adjustment layer and select the option of “Color Lookup” from the “Layers Panel.” From the properties, you can choose any of the color lookup tables. Here you can select any suitable preset to create a new look in your image. You can try different presets according to your image. Once done, you can use the “Blend Mode” option to make final adjustments.
2. Add a Blur Adjustment Layer in Photoshop
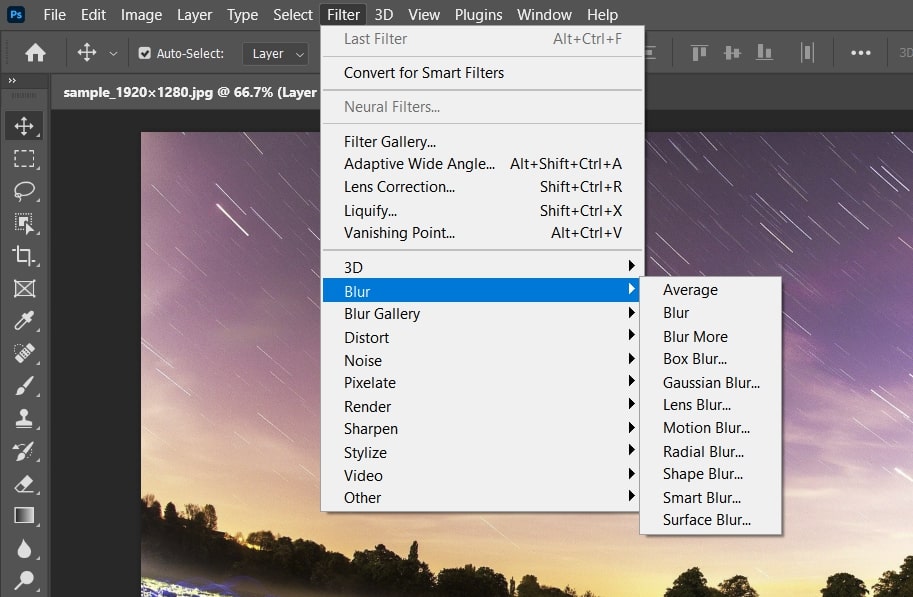
First, you have to create an adjustment layer in Photoshop. Once done, you can navigate to the “Filters” and choose any blur effects, such as Gaussian Blur. You can also apply the motion or radial blur effect from the “Filters” tab. Once you have selected the blur effect, apply it to the adjustment layer. Moreover, you can also try the “Layer Mask” to paint on the specific parts you want to make sharp.
3. Add a Curves Adjustment Layer in Photoshop
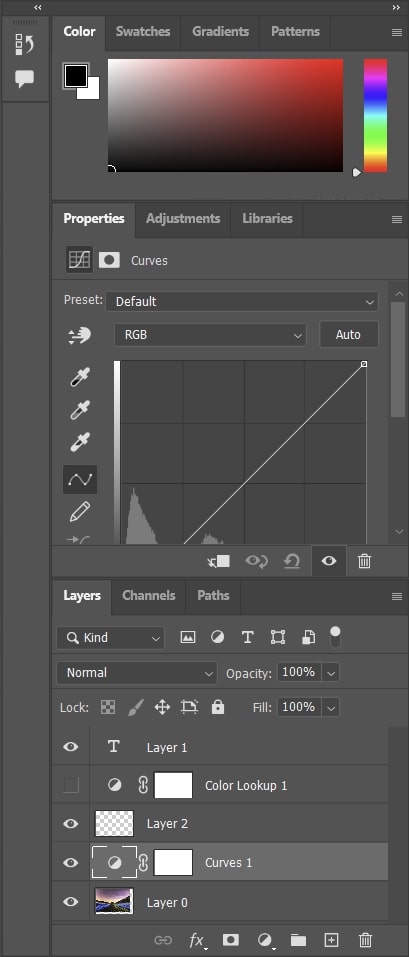
If you want to change the color of particular pixels in the image, you can add the curves adjustment in Photoshop. By doing so, you can execute minor changes in your image easily. To do so, go to the “Adjustments Panel” and click on the “Curves” icon.
Now, in the properties panel, you can move the curves to adjust the specific tonal area of the image. You can also add more points to the curve and apply any preset from the preset menu.
4. Make a Brightness and Contrast Layer in Photoshop
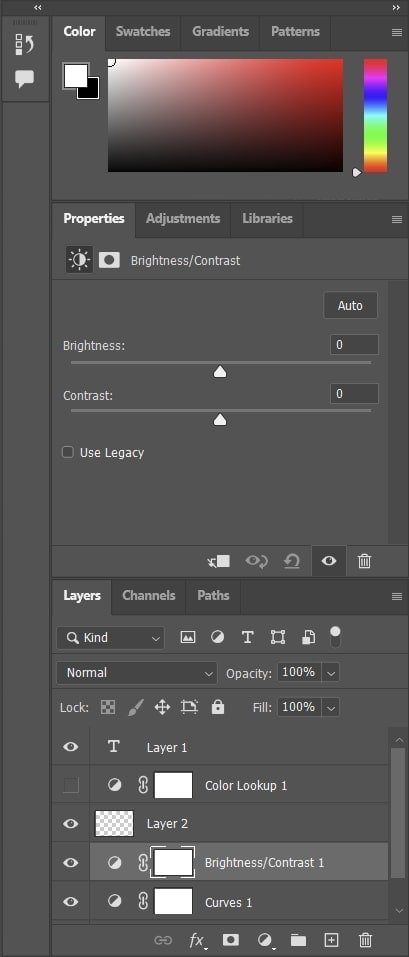
To make a brightness and contrast layer in Photoshop, go to the “Adjustments Panel” first. From there, tap on the “Brightness/Contrast” option that will instantly add a layer in the layers panel. Afterward, a properties panel will also open from which you can modify the settings. Here, you can drag the sliders of brightness and contrast to enhance them accordingly.
5. Adjust Layer Opacity in Photoshop
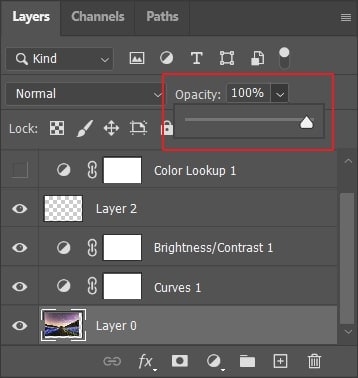
To learn how to adjust opacity in Photoshop, select the desired layer and click on the drop-down menu of “Opacity” in the layers panel. Next, move the slider to adjust the opacity accordingly. If you set the opacity value to 0%, the layer will become invisible.
Conclusion
Photoshop is widely used by professionals to perform high-end image editing. If you want to become an expert in using Photoshop, you must know how to add an adjustment layer in Photoshop. Through this article, you have learned about the importance of layers in image editing. Moreover, you have also discovered different kinds of adjustment layers that you can try to enhance your photos.
Adobe Photoshop is a famous and powerful image editor through which you can draw captivating illustrations proficiently. Using this advanced software, you can also work on complex 3D artwork efficiently. You can change image backgrounds and eliminate the flaws in your pictures using Photoshop.
As Photoshop is a layer-based editing software, this article will focus on how to resize the layer in Photoshop effectively. Moreover, you can also discover how to create an adjustment layer in Photoshop within a few clicks.

Also read:
- [New] 2024 Approved Mastering Outro Techniques for Videos
- [New] 2024 Approved Swift Restoration of Photos Viewer Performance in Windows 10
- [Updated] 2024 Approved Update Twitter Video Box Picture
- [Updated] Advanced Audio Segmentation Made Simple A Premiere Guide for 2024
- [Updated] In 2024, Discover Innovative Strategies in Creating Stunning FB Ad Videos
- [Updated] In 2024, Educational Videography Mastery in Cutting & Pacing
- [Updated] Selecting the Perfect Screen Recorder for Educational Purposes for 2024
- In 2024, Wondering the Best Alternative to Hola On Vivo Y17s? Here Is the Answer | Dr.fone
- New 2024 Approved Have a Desire to Uplift Your Editing Creativity with Trying Hands at Working with Storyboards? Keep Reading to Have a Comprehensive Understating of the Workflow Through Stepwise User Guides
- New In 2024, Top 10 Video Editing Online Makers Is Worth Your Attention
- New Use The Best LUTs for Lightroom for 2024
- Updated 2024 Approved Let Us Talk About the Famous Photoshop and Most Commonly Used Glitch Effect. The Article Understudy Will Discuss in Detail About Photo Glitch Effect
- Title: Updated How to Use Adjustment Layer in Photoshop, In 2024
- Author: Morgan
- Created at : 2025-02-04 04:18:17
- Updated at : 2025-02-09 10:33:53
- Link: https://ai-video-editing.techidaily.com/updated-how-to-use-adjustment-layer-in-photoshop-in-2024/
- License: This work is licensed under CC BY-NC-SA 4.0.