
:max_bytes(150000):strip_icc():format(webp)/001_the-best-kids-movies-on-disney-plus-june-2023-5112564-37245acf2e6840ba8319f0e13985e04a.jpg)
Updated How To Use Slow Zoom Effect in Your Video for 2024
How To Use Slow Zoom Effect in Your Video?
A raw video without any effect will fall flat on its face when it comes to engagement and watch time. Nobody likes watching videos without effects as there is no entertainment value, and the video is not soothing and pleasing to the eyes. That is why effects in videos are extremely important especially when it is a video you are posting on social media to get everyone’s attention. You should definitely consider adding slow zoom effect in your video to make it stand out.
The slow zoom effect is one of the most common but widely loved video effects that work for any video. Human eyes love when there is slow motion effect of panning and zooming into the central or specific portion of a video. The slow zoom in effect is extremely popular among TikTok videos. We will illustrate how to apply slow zoom effect to your video on your smartphone as well as on your computer.
Part 1. How to create slow zoom-in effect in Filmora
If you want to add slow zoom to any recorded video on your computer, you will need a dedicated video editor. There are many popular video editors available where slow zoom effect is not available. We recommend Wondershare Filmora which is a professional video editor that is available for Windows and Mac users. You will need to combine slow motion and keyframe to achieve the desired slow zoom effect. Here are the steps on how to create slow zoom in effect for your videos.
Free Download For Win 7 or later(64-bit)
Free Download For macOS 10.14 or later
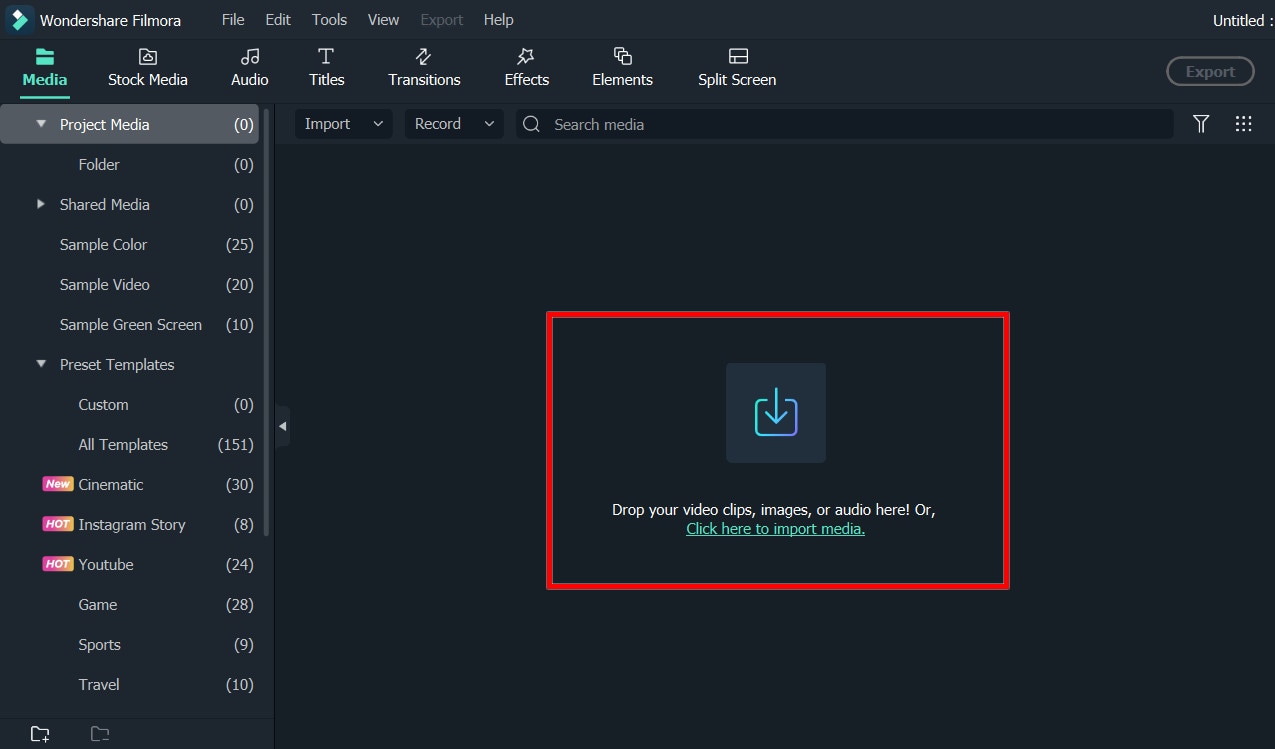
Step1 Download and install Wondershare Filmora . Launch the application and click on New Project option from the welcome screen.

Step2 Drag and drop your video in Project Media folder. Thereafter, drag and drop the video into the Timeline.

Step3 Put the red header on the beginning part of the clip that you want to cut off and click on Cut(Scissor) icon. Then put the red header on the end part of the clip and click on Cut icon again. You should now have the separated clip for applying slow zoom effect.

Step4 Select the separated clip and click on Speed icon. Go to Slow option and select the speed according to the slowness of zooming you want.

Step5 Now you have to add multiple keyframes so that the slow zoom effect is smooth and soothing. Right-click on the clip, go to Animation and click on Add Animation. Go to Animation tab and then to Customization section.

Move the red header to the point where you want a keyframe and click on Add option. Similarly, move the red header slightly farther and add another keyframe. Keep adding like that till you reach the end point.

Step6 Double-click on the clip and go to Video> Basic> Transform. Select keyframes and slowly increase the scale slider for each keyframe to apply the zoom effect. Therefore, for every keyframe, zooming will increase gradually and you have already applied slow speed for complete slow zoom effect.

Part 2. How to do the slow zoom in effect on TikTok?
TikTok is one of the most popular short-video sharing platforms among teenagers and young adults. The slow zoom effect has been popularized by TikTokers as they use the effect quite regularly. Naturally, adding slow zoom in effect on your video on TikTok is the easiest. Here are the steps to follow one by one.
Step1 Launch TikTok app and you can shoot your video directly from TikTok. If you have already recorded the video, tap on “+” icon located at the bottom of the app screen and select the video.
Step2 After adding the video, go to Effects> Time. Under Time section, tap on “Slo-Mo” option to add slow-motion effect on your video.

Step3 Go to Visuals and you will find Zoom option. Place the header on the part of the video where you want to place the slow zoom effect. Thereafter, tap and hold Zoom effect so that the effect applies on the video clip. Release the effect where the desired section is covered.

Step4 Tap on Save option and play the video to see slow zoom effect. Tap on Next button and you can share the video on social media platforms as well.

There is another way you can apply slow zoom effect on TikTok. Here are the steps to find and apply slow zoom effect.
Step1 Launch TikTok app and tap on Discover option located at the bottom.

Step2 On the next screen, type “Slow Zoom” on the search bar and tap on Search option.

Step3 Now you will see the videos where different TikTok users have already applied slow zoom effect. Tap on Effects Slow Motion to apply the same effect to your video.

Step4 On the next screen, tap on Try This Effect button. You can select the duration of the zooming of the video you are about to shoot as well the zooming magnification.

Step5 Finally, tap on Record button to capture your video and apply slow zoom effect on the video automatically.

Conclusion
The slow zoom effect is one of the most viral and trending video effects on social media platforms. If you want to add slow zoom effect to your video for a certain portion, you can do the same from your smartphone as well as computer. For Windows and Mac users, we recommend you use Wondershare Filmora .
Free Download For macOS 10.14 or later
Step1 Download and install Wondershare Filmora . Launch the application and click on New Project option from the welcome screen.
Step2 Drag and drop your video in Project Media folder. Thereafter, drag and drop the video into the Timeline.
Step3 Put the red header on the beginning part of the clip that you want to cut off and click on Cut(Scissor) icon. Then put the red header on the end part of the clip and click on Cut icon again. You should now have the separated clip for applying slow zoom effect.
Step4 Select the separated clip and click on Speed icon. Go to Slow option and select the speed according to the slowness of zooming you want.
Step5 Now you have to add multiple keyframes so that the slow zoom effect is smooth and soothing. Right-click on the clip, go to Animation and click on Add Animation. Go to Animation tab and then to Customization section.
Move the red header to the point where you want a keyframe and click on Add option. Similarly, move the red header slightly farther and add another keyframe. Keep adding like that till you reach the end point.
Step6 Double-click on the clip and go to Video> Basic> Transform. Select keyframes and slowly increase the scale slider for each keyframe to apply the zoom effect. Therefore, for every keyframe, zooming will increase gradually and you have already applied slow speed for complete slow zoom effect.
Part 2. How to do the slow zoom in effect on TikTok?
TikTok is one of the most popular short-video sharing platforms among teenagers and young adults. The slow zoom effect has been popularized by TikTokers as they use the effect quite regularly. Naturally, adding slow zoom in effect on your video on TikTok is the easiest. Here are the steps to follow one by one.
Step1 Launch TikTok app and you can shoot your video directly from TikTok. If you have already recorded the video, tap on “+” icon located at the bottom of the app screen and select the video.
Step2 After adding the video, go to Effects> Time. Under Time section, tap on “Slo-Mo” option to add slow-motion effect on your video.
Step3 Go to Visuals and you will find Zoom option. Place the header on the part of the video where you want to place the slow zoom effect. Thereafter, tap and hold Zoom effect so that the effect applies on the video clip. Release the effect where the desired section is covered.
Step4 Tap on Save option and play the video to see slow zoom effect. Tap on Next button and you can share the video on social media platforms as well.
There is another way you can apply slow zoom effect on TikTok. Here are the steps to find and apply slow zoom effect.
Step1 Launch TikTok app and tap on Discover option located at the bottom.
Step2 On the next screen, type “Slow Zoom” on the search bar and tap on Search option.
Step3 Now you will see the videos where different TikTok users have already applied slow zoom effect. Tap on Effects Slow Motion to apply the same effect to your video.
Step4 On the next screen, tap on Try This Effect button. You can select the duration of the zooming of the video you are about to shoot as well the zooming magnification.
Step5 Finally, tap on Record button to capture your video and apply slow zoom effect on the video automatically.
Conclusion
The slow zoom effect is one of the most viral and trending video effects on social media platforms. If you want to add slow zoom effect to your video for a certain portion, you can do the same from your smartphone as well as computer. For Windows and Mac users, we recommend you use Wondershare Filmora .
How to Create Chroma Key Written Text Effects in Filmora
Did you know it only takes a few clicks to key out the color in Filmora? It means that you can add green screen effects to many other objects. This article will show a cool chroma key effect you can try using written text.
Part 1. What Is Chroma Key Text Effect?
Composing of the chroma key effect is widely used in the gaming and newscasting industries. In this technique, you can make layering images and videos for the text together based on color hues.

Video editors can eliminate the basis from a picture by automatically choosing a certain hue in post-production. An interactive animation results by adding different color schemes; it’s an easy way to make 3D motion videos.
To make the effects on text, we have to film the subject writing on white paper. For this, follow the below instructions:
Part 2. Filming Tips for Written Texts
To write a key text before adding the chroma effect, we have to film the writing process to understand your next project better. You can create your own by following these tips. We are just concluding a single example here.
Tip 1. A Pen and a White Paper
We need blank white paper with no boundaries and lines for writing a text. Because the chroma effect will embellish the other lines if present on paper. Make sure to choose a prominent color for writing a text.
We are using a purple color pen here for writing an essential text to make it more prominent, as shown below:

It all depends upon the contrast, and you can choose another color too but ensure that it’s more apparent during filming.
Tip 2. Different Color Paper
There are many chances that you don’t have only white paper in your studio, or your requirement is not going with a blank white sheet. Then you don’t need to worry because you can use different color papers too.
But always try to use clearer paper and a prominent pen or highlighter. See the below example of a different color paper with a different highlighter.

![]()
Note: Ensure that the colored pens have good contrast with colored paper. Don’t use dull color pens with bright color paper.
Tip 3. Camera Angles
While filming a writing process for a video, you have to take care of the alignment of the camera. First, ensure the camera is at a suitable angle so it will not block the writing letters from the left side.
Sometimes, the writer’s hand blocks the letters on the left side during writing. Take note of this tip during filming a professional video, as shown below.

After checking the alignment of the camera, it’s time to look at what size we have to use for writing!
Tip 4. Larger Size of Letters
As we already said about the prominence of written text, we have to follow one more instruction related to the structure of the letters. Use the larger size and bold words when writing from a highlighter.
It is because the effect we insert during editing will be more standing and give a professional look to the video.

![]()
Note: You can create more shots till you get the right angle for a final video. Just focus on the camera alignment and highlighted words, then it will be all set.
After filming all the clips, you must edit those shots on the Filmora to get the chroma effect. Scroll more to get the step-by-step process!
Part 3. Editing the Chroma Key Text With Filmora
We need software that will give great setting choices and stock videos for a more professional look. For this, Wondershare Filmora will work more than a robot and give high-resolution results. To do the editing process on Filmora, follow the steps below and enjoy yourself with your followers.
Free Download For Win 7 or later(64-bit)
Free Download For macOS 10.14 or later
Step1 Download and install Wondershare Filmora
Launch Wondershare Filmora on your PC or Mac after downloading.
![]()
Note: If you want to enjoy its unlimited effect, you get its premium version quickly.

Step2 Import the clips to the Filmora
First, import the best footage into the filmora which you have shot. Ensure that the clip should have the best recording angle and that every word will be prominent on the page.
For this, click on Import Media and choose from the PC library what you want to edit.

Step3 Drag the clip to the timeline
Drag and drop the clip into the timeline from the import section. If you have more clips, choose first according to your script.
Add the text-written clip into the second video track because we have to insert the background into the first video track later.

After inserting the clip into the timeline, it’s time to edit it. For this, keep following the below-mentioned steps!
Step4 Chroma key settings
To edit the chroma key, you need to open the settings. For this, follow the below instructions:
- First, double-click on the clip in the timeline of the Filmora.
- Then, the setting section of the video will pop up at the top left side.
- Mark the tick in front of the Chroma Key section, and it will show the list of different features as shown below.

Step5 Color key out
To key out the specific color for changing its background, you have to perform the following actions:
- First, find the Select color option in the settings of the clip.
- Then click on the color dropper in front of the color tab.
- After that, pick the color dropper and move it on the video to select the color from the text.
![]()
Note: Ensure to select the color from the middle of the text for better key-out accuracy.

You have to adjust the size and thickness after selecting the key-out. For this, follow the next step!
Step6 Adjust the settings
To adjust the Chroma Key’s settings, set the offset, tolerance, edge thickness, and edge feather. Increase or decrease according to your range and that suits you the best.
Then click on Alpha Channel to mark the tick in front of the option. It is due to that chroma key effects will be more clearly shown.

Now, it’s time to set the background after fixing all the settings of the chroma key effect. To perform this, scroll more to get to the next step.
Step7 Import background clips
You have to add an excellent motion background in the handwritten text video. For this, you must first import the background clip into the filmora. Then, click on Import Media and choose what you want from your PC.

Step8 Add a background clip to the timeline
After importing the background clip, now drag and drop the clip into the timeline. Finally, add the background clip to the first video track at the bottom.

Step9 Turn off the alpha channel
The last step is merging the background clip with the first clip. For this, follow the below guidelines:
- First, double-click on the handwritten text video.
- It will show the settings section at the top left corner.
- Find the chroma key section and turn Alpha Channel

Final Results
You have all done with the steps and got such a fascinating result. Following the above tricks, you can easily make your vlogs and daily videos more professional and creative. Make sure to add a great and colorful background clip.

You can also use any other motion video of scenes rather than colorful videos to give a striking look.
Conclusion
Create more attractive looks and share them with your subscribers. Mainly, vloggers can attract many viewers by making the introductory part with this effect. Then, choose hundreds of other videos from the stock media and create different looks daily.
See how you can get editing tricks on Wondershare Filmora and use them in a few clicks to get an attractive look!
Tip 3. Camera Angles
While filming a writing process for a video, you have to take care of the alignment of the camera. First, ensure the camera is at a suitable angle so it will not block the writing letters from the left side.
Sometimes, the writer’s hand blocks the letters on the left side during writing. Take note of this tip during filming a professional video, as shown below.
After checking the alignment of the camera, it’s time to look at what size we have to use for writing!
Tip 4. Larger Size of Letters
As we already said about the prominence of written text, we have to follow one more instruction related to the structure of the letters. Use the larger size and bold words when writing from a highlighter.
It is because the effect we insert during editing will be more standing and give a professional look to the video.
![]()
Note: You can create more shots till you get the right angle for a final video. Just focus on the camera alignment and highlighted words, then it will be all set.
After filming all the clips, you must edit those shots on the Filmora to get the chroma effect. Scroll more to get the step-by-step process!
Part 3. Editing the Chroma Key Text With Filmora
We need software that will give great setting choices and stock videos for a more professional look. For this, Wondershare Filmora will work more than a robot and give high-resolution results. To do the editing process on Filmora, follow the steps below and enjoy yourself with your followers.
Free Download For Win 7 or later(64-bit)
Free Download For macOS 10.14 or later
Step1 Download and install Wondershare Filmora
Launch Wondershare Filmora on your PC or Mac after downloading.
![]()
Note: If you want to enjoy its unlimited effect, you get its premium version quickly.
Step2 Import the clips to the Filmora
First, import the best footage into the filmora which you have shot. Ensure that the clip should have the best recording angle and that every word will be prominent on the page.
For this, click on Import Media and choose from the PC library what you want to edit.
Step3 Drag the clip to the timeline
Drag and drop the clip into the timeline from the import section. If you have more clips, choose first according to your script.
Add the text-written clip into the second video track because we have to insert the background into the first video track later.
After inserting the clip into the timeline, it’s time to edit it. For this, keep following the below-mentioned steps!
Step4 Chroma key settings
To edit the chroma key, you need to open the settings. For this, follow the below instructions:
- First, double-click on the clip in the timeline of the Filmora.
- Then, the setting section of the video will pop up at the top left side.
- Mark the tick in front of the Chroma Key section, and it will show the list of different features as shown below.
Step5 Color key out
To key out the specific color for changing its background, you have to perform the following actions:
- First, find the Select color option in the settings of the clip.
- Then click on the color dropper in front of the color tab.
- After that, pick the color dropper and move it on the video to select the color from the text.
![]()
Note: Ensure to select the color from the middle of the text for better key-out accuracy.
You have to adjust the size and thickness after selecting the key-out. For this, follow the next step!
Step6 Adjust the settings
To adjust the Chroma Key’s settings, set the offset, tolerance, edge thickness, and edge feather. Increase or decrease according to your range and that suits you the best.
Then click on Alpha Channel to mark the tick in front of the option. It is due to that chroma key effects will be more clearly shown.
Now, it’s time to set the background after fixing all the settings of the chroma key effect. To perform this, scroll more to get to the next step.
Step7 Import background clips
You have to add an excellent motion background in the handwritten text video. For this, you must first import the background clip into the filmora. Then, click on Import Media and choose what you want from your PC.
Step8 Add a background clip to the timeline
After importing the background clip, now drag and drop the clip into the timeline. Finally, add the background clip to the first video track at the bottom.
Step9 Turn off the alpha channel
The last step is merging the background clip with the first clip. For this, follow the below guidelines:
- First, double-click on the handwritten text video.
- It will show the settings section at the top left corner.
- Find the chroma key section and turn Alpha Channel
Final Results
You have all done with the steps and got such a fascinating result. Following the above tricks, you can easily make your vlogs and daily videos more professional and creative. Make sure to add a great and colorful background clip.
You can also use any other motion video of scenes rather than colorful videos to give a striking look.
Conclusion
Create more attractive looks and share them with your subscribers. Mainly, vloggers can attract many viewers by making the introductory part with this effect. Then, choose hundreds of other videos from the stock media and create different looks daily.
See how you can get editing tricks on Wondershare Filmora and use them in a few clicks to get an attractive look!
Tips to Make Cinematic Color Grading
New modern color grading software allows you to do point-and-click color grading right in your browser. Color changes are as easy and intuitive as painting or sketching.
You can choose from many different look presets and movie emulations based on Hollywood movies plus real-time previews of your favorite LUTs with this software.
Part 1. What is Cinematic Color Grading?
The cinematic look is all the rage these days and aims to mimic images captured on real film rather than digitally created. To achieve this effect, film directors use various means from lighting to cinematic color gradation. The latter is a powerful tool for bringing a cool or warm tone to a video and providing smooth color transitions to fall on an image that doesn’t look too real but feels emotional.
This kind of post-production processing, which produces beautiful results when used by color magicians, requires a deep understanding of colors and their effect on our psyche and even physiology. It’s not enough to watch a color grading video and use a LUT to get where you want. You should at the very least have an understanding of:
- Color wheel
- Color quality
- Color harmony and discord
- Warm and cool colors
- Color context
Part 2. Tips to make cinematic color grading
Here are three helpful tips to create cinematic-looking images in DaVinci Resolve.
In my 10-year career as a colorist, I’ve worked on every type of content imaginable: short, long, commercial, educational, episodic—you name it. And while each of these formats requires its approach, the one constant that spans them all is the client’s desire for a cinematic look.
Virtually all of us aspire to more cinematic color, but we often come up short—in part because the term itself has become too broad to effectively target. To focus on the goal, I like to think of “cinematic” as “an image whose key visual properties are consistent with those of printed film.”
The print film was the primary medium through which we consumed cinematic images for the first century of filmmaking and is therefore at the very heart of cinematic aesthetics. In this video, I’ll show you my top three secrets to achieving this aesthetic quickly and consistently in Davinci Resolve.
Tips1: Create Color Density
The first secret to film color is to create color density. Another key aesthetic property of film images is that colors can be either highly saturated or highly luminescent but cannot be both.
We can mimic this visual characteristic by identifying strongly saturated colors in our image and using the Hue vs. Lum to reduce their brightness. This simple technique is especially effective on pure primary colors (red, green, and blue).
Tips2: Separation Beats Saturation
The second secret to film color is prioritizing separation over saturation. When you feel like an image lacks overall color or pop, it’s all too easy to reach for the saturation knob, but that’s not a very cinematic solution.
Instead, try using split toning—pushing cool colors into shadows and warm colors into highlights—to increase tonal separation and add depth to an image. This characteristic is present in virtually every film print and is deeply evocative when applied correctly.
Tips3: Strong Contrast is Your Friend
The third secret of film colors is a strong contrast. This is not always easy, as a higher contrast look inherently requires more precision with exposure placement. Too often we pump up some contrast, end up with an image that looks blown out or too crisp, and then immediately back away from editing.
However, if you stick with high contrast long enough to improve your exposure, you’ll get a very different result and be well on your way to a more cinematic image.
Part 3. How to add color cinematic grading by using Filmora?
New modern color grading software allows you to do point-and-click color grading right in your browser. Color changes are as easy and intuitive as painting or sketching.
You can choose from many different look presets and movie emulations based on Hollywood movies plus real-time previews of your favorite LUTs with this software.
Wondershare Filmora is an option if you want to easily change the colors of your projects. You may just double-click the media after dragging it onto the editing timeline to change the contrast, saturation, brightness, and hue.
Despite its speed, it also allows you to merge, edit audio, divide, rotate, and apply as many cool video effects as you like.
Step1Add the media
After installing Wondershare Filmora, click the New Project and Import button to easily find and load your videos.
Step2Correct the color [Basic and Advanced]
In the timeline, double-click the video editing window. Select the “Color” panel and make adjustments.
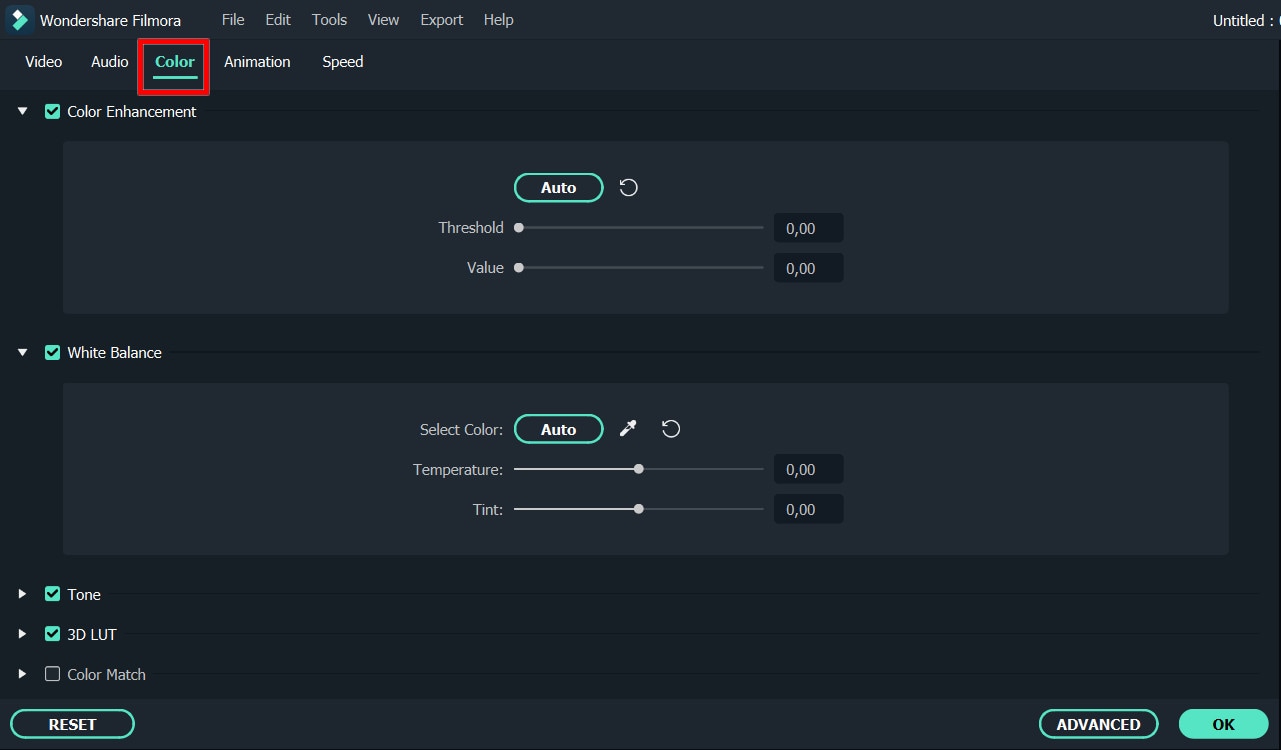
- Contrast: By adjusting this setting, you can control the brightness and color in different parts of the image.
- Saturation: This setting highlights the gray part of the video to a shade. You can adjust it to make the colors of the entire video image appear more saturated or more subdued.
- Brightness: You can change this setting to adjust the overall darkness and lightness of your project.
- Hue: Hue is generally the lightness of a color. Let’s say that when red is saturated with white, it creates a shade of pink.
- 3D LUT: 3D lookup tables provide your media with Hollywood movie color sets like the 007 series, Batman, Harry Porter, etc.
Hover over the indicator to adjust the color correction settings. Then left click on it and move the slider. The corresponding value stabilizes after releasing the mouse button.
With Filmora, you also have access to advanced color correction. Click the Advanced Color Tuning icon to enter the appropriate window where you can fine-tune the color or use preset templates.
The Preferences tab has a variety of templates, including Movie, Normal, 3D LUT, and Vignette. In the Edit tab, you can adjust color temperature, white balance, hue, 3D LUT, color, HSL, light, vignette, etc.
Step3Preview and save the new video
When you are satisfied with your creation, click “Export”. Then click the Settings button and save the new videos in different formats in the Format tab. You can also export the video directly to Vimeo or YouTube or burn it to DVD for better preservation.
Filmora’s color correction tools will make your videos look natural, more attractive, more vibrant, consistent, and professional.
Color Correction Presets
Color correction presets help your video achieve an enhanced cinematic look. Adjust gives you control over fine-tuning the colors in your shots. You can make various adjustments such as color temperature and exposure.
In the “Effects > LUT” tab, you’ll see an extensive selection of preset color settings. These include Vignettes, Movie Looks Like Old Movies, and Cinematic 3D LUT effects such as Harry Potter, Game of Thrones, House of Cards, and Mission Impossible.
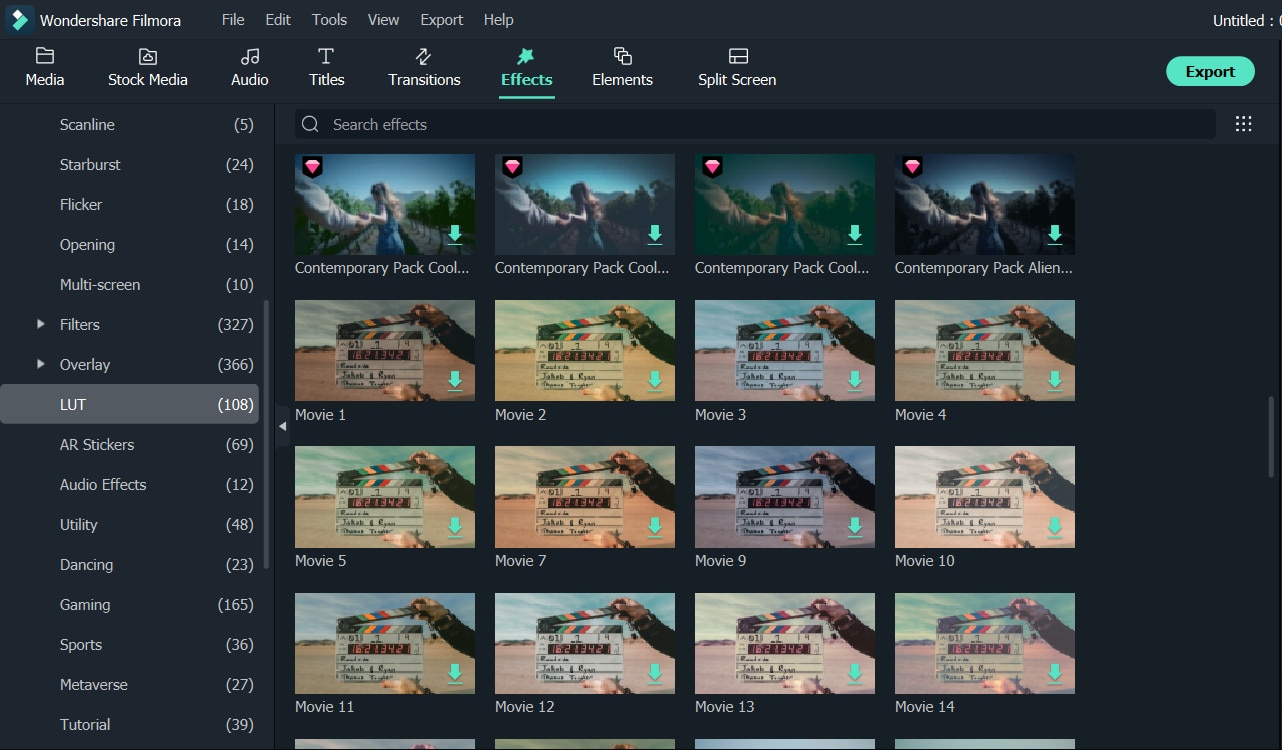
Filmora’s Color Correction Advanced Tool also categorizes your presets. Click on All Presents to see six categories: Favorites, Custom, 3D Lut, Common, Film, and Vignette.
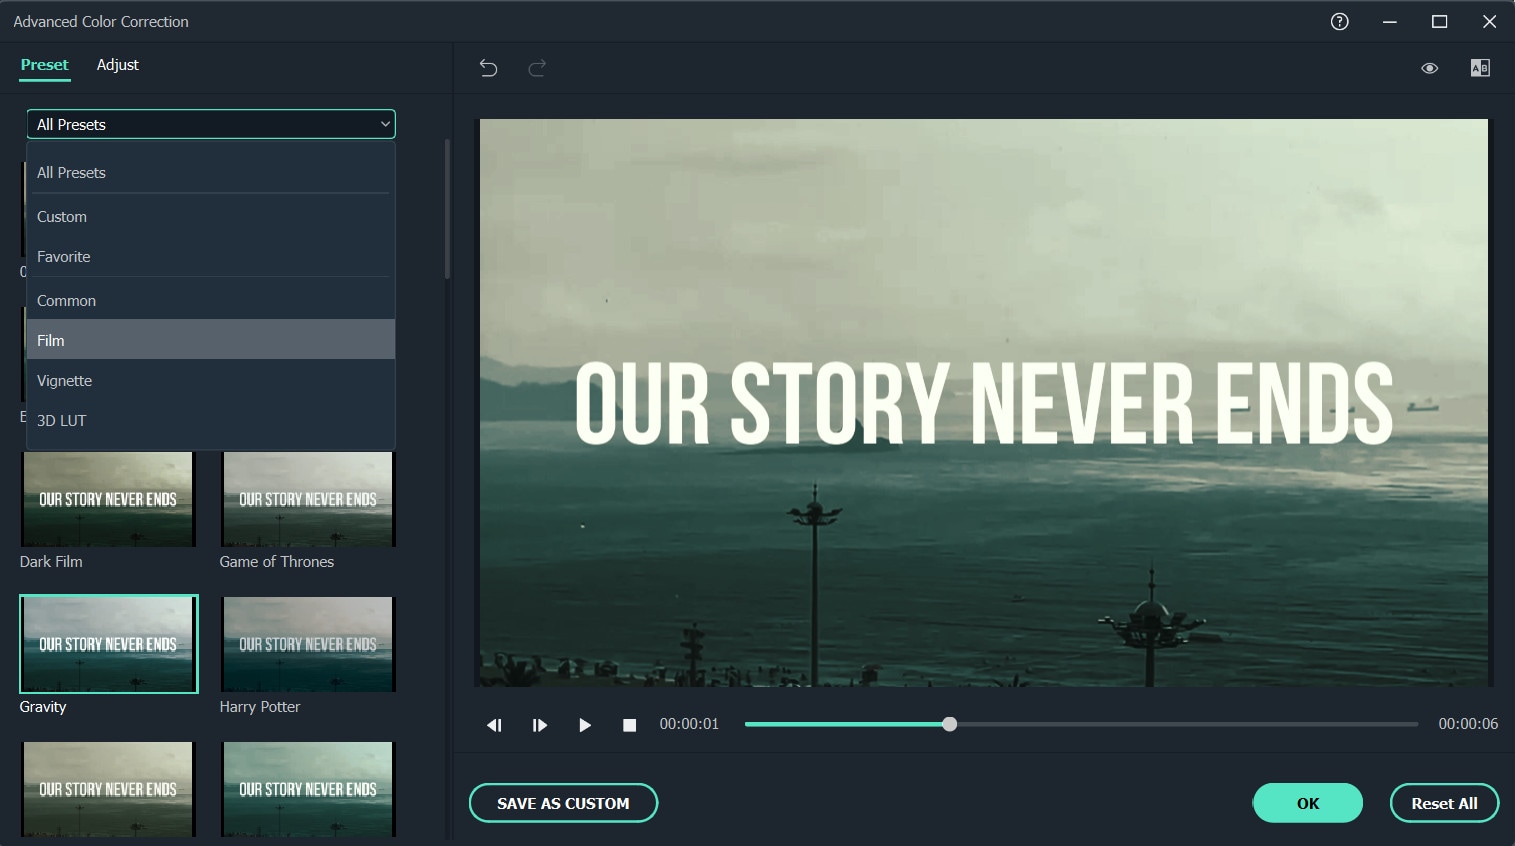
Double-click a preset to apply it to your video. You can see how it looks in the Advanced Color Correction preview window. If you are satisfied with the results, click OK.
Conclusion
Above are the steps to give your video a cinematic look using Wondershare Filmora, hope this helps if you are wondering how to do it. As we can see above, using Filmora video editor will make you more creative in making videos with a suitable emotional tone.
Free Download For Win 7 or later(64-bit)
Free Download For macOS 10.14 or later
Best 8 Free Video Editing Software Reddit
Reddit is the most popular online platform which users use as a news website, a social media platform, but mostly as a web forum. Reddit has a huge user base, and users prefer posting videos to respond to any question as well as promote products and services. A video is where a user can explain anything in detail, and even viewers prefer watching videos rather than reading a long text response.
That is why users search for free video editing software Reddit to create their videos and post them on Reddit. You will find several questions on Reddit asking “which is the best free video editing software Reddit?” There are only a few high-quality Reddit video editing software available that can get the job done perfectly. Here is the list of the best video editors for Reddit for all categories of users.
Part 1. Why Use a Reddit Video Editor?
When you are posting anything on Reddit, you want other users to read your post or response. According to the current trend, short videos are more engaging than textual posts and responses. That is why you should consider posting videos to answer any question in detail as well as promote your brand. In order to make the video engaging, you have to use a Reddit video editor.
A Reddit video editor lets you edit your video so that you can trim out unnecessary parts, join multiple video clips, and add texts wherever required. Moreover, you can add audio effects, use greenscreen effects as well as add transitions and animation to make the video eye-catching and interesting. All in all, you need a Reddit video editor to publish highly engaging and professional-quality videos on Reddit instantly.
Part 2. Best Video Editors for Reddit
1. Filmora
Wondershare Filmora is the best video editor for Reddit users. It is a premium video editor, and it is available for Windows and Mac users. You can use Filmora to capture your screen as well as record your video through webcam. You can record your system audio as well as sound from external mic. Therefore, you can make videos where you speak on a topic directly to the camera, and you can use greenscreen effect for a professional background.

Coming to the editing part, you can join different video clips, and you can trim out unnecessary parts instantly. You can also add music as well as audio effects in appropriate places. The video editor lets you add transitions, effects, graphical elements, custom texts and titles, and much more. There is also a stock library available for media files. You can publish the video in desired resolution and file formats. Here are the pros and cons of Wondershare Filmora.
For Win 7 or later (64-bit)
For macOS 10.12 or later
Pros –
- Capture your screen as well as webcam.
- Record mic audio and add voiceover to any video.
- Trim and join video clips and photos.
- Transitions, effects, elements, texts and titles.
- Add external audio files, apply audio effects, and stock library.
- Super intuitive user interface for suitability of all users.
Cons –
- Belongs to premium category of video editors.
- Video rendering can take some time.
2. iMovie
iMovie is the Reddit free video editing software for Mac users. It comes with many amazing features that let you create exceptional videos. It has amazing video editing abilities and you can create split-screen videos. The software is easy to use and lets you download it for free. With the software, you will also be able to post your videos to different sites like Facebook and YouTube.
As far as editing is concerned, iMovie lets you add transitions and effects. It also lets you add text with different styles. You can add video clips where it can automatically create and edit by identifying the best footage parts. You will also find video color settings and you can even go for music editing. It lets you open multiple projects at a time. These are the pros and cons of iMovie.

Pros –
- Choose from different transitions and video effects.
- Work on different projects at the same time.
- Add a broadcast feel with split-screen and picture-in-picture.
- Select from multiple filters to add a perfect effect.
- Built-in sound effects automatically adjust the video length.
- Send a project wirelessly via iCloud Drive or AirDrop.
Cons –
- Limited support for different media file formats.
- Takes relatively more space on the hard drive.
3. Lightworks
Lightworks has a user-friendly interface and processes video quickly. You can choose from any frame rate and it even supports any type of file format. The video editing tool can deliver your videos to any social media platform. It supports fast and precision editing with amazing editing options. In Lightworks, you will find creative control for motion graphics and multicam editing.

You can edit videos directly from Cloud storage. It will instantly autosave your work without needing to save it manually. Additionally, there is also background processing for faster rendering. You can assign keyboard shortcuts and have a flexible layout. With the feature of advanced metadata, it let you uses it for professional purposes. The pros and cons of Lightworks are as follows.
Pros –
- Customize the interface by assigning keyboard shortcuts.
- Perform editing even while exporting the video.
- Supports any video format without transcoding.
- Manage content with advanced metadata.
- Share projects instantly on different platforms.
- Choose from hundreds of custom prebuilt graphics.
Cons –
- Application can crash for high-resolution videos.
- Advanced features are locked for premium users.
4. Hitfilm Express
Hitfilm Express has an intuitive interface and lets you download it for free. It supports both Windows and Mac platforms. The reliable video editor comes with versatile features and offers free tutorials of over 100 hours. You don’t have to worry about any watermark and you can create amazing Reddit videos. It comes with advanced features as well that let you use it for professional editing.

The tool comes with motion tracking ability. You will also find free effects that provide access to color adjustments and keying effects. It will let you export the file in 4K format. You will also find prebuilt Behavior effects that can be perfect for creating visually engaging animations. These are the pros and cons of Hitfilm Express.
Pros –
- Create and track professional-looking motion graphics.
- Export in 4K format without any watermark.
- Access the VFX toolkit for different effects and adjustments.
- Vertical video support with easy rotation.
- Comes with quick tools for standard video editing.
- Simple but robust timeline for instant video creation.
Cons –
- Features are limited in the free edition.
- Exporting videos takes relatively more time.
5. OpenShot
Whether it is Windows, Linux, or Mac, Open Shot lets you use it anywhere as it is in open-source video editor. It supports different types of image, video, and audio formats. It is undoubtedly the Reddit best free video editor for computer users. OpenShot has an advanced timeline that enables drag-and-drop, zooming, snapping, scrolling, and panning. It also lets you go for audio editing and mixing.

With OpenShot, you will be able to make multiple layers according to your requirements. It lets you resize or trim timelines in multiple ways. The software also enables rotation and cutting. It features more than 400 transitions that allow adjusting keyframes. Moreover, you can overlap two clips and check with real-time previews. Here are the pros and cons of OpenShot.
Pros –
- Apply 3D animations with the open-source Blender application.
- Animate the direction and speed of the clip with a powerful keyframe.
- Built-in audio editing options with waveforms.
- Select from over 40 title templates and 400 transitions.
- Dedicated audio editor and useful pan and zoom and scroll effect.
Cons –
- Not highly recommended for high-resolution videos.
6. FlexClip
If you are looking for an online video editor Reddit, FlexClip is your best choice. It is loaded with versatile features and is easy to use. While using FlexClip, you don’t have to get any video editing experience before. It is an all-in-one video editor, movie maker, screen recorder, and slideshow maker. You can make a video in just three simple steps. The online video editing tool has thousands of templates and animated texts.

It lets you create stunning videos that can be great for education or business purposes. Packed with some rich animated elements, it lets you choose from different widgets, overlays, and logos. You can also have access to millions of stock media for smooth video editing. FlexClip serves great for making any type of video. The pros and cons of FlexClip are as follows.
Pros –
- Select from thousands of templates for making videos.
- Select from animated elements with diverse dynamic text.
- Engage in immersive editing with a simple interface.
- Access to over 4 million royalty-free photos, videos, and music.
- Record video tutorials, meetings, or games with the screen recorder.
Cons –
- Free plan has limited features.
- Lacks advanced video editing options.
7. CapCut
CapCut video editor is perfect for smartphone users as it is available for Android and iOS users. You can select from advanced filters to add effects to your videos. The app also provides access to a tremendous music library. You can cut everything for making stunning videos. It can perform different operations like rotating, reversing, and splitting.

One of the best things about CapCut is that it lets you use it for free. You can even choose the speed of the video for slow-motion. It is an all-in-one video editing app that has different magical effects. It also lets you select from trending fonts and stickers for expressing your videos. The pros and cons of CapCut are as under.
Pros –
- Edit anything hassle-free with the interactive interface.
- Change speed, cut, or reverse to make incredible videos.
- Select from a range of effects and filers.
- Choose from top and trending fonts and stickers.
- Have access to the tremendous music library.
- Save the video in a high-quality format.
Cons –
- The app can crash when the video tends to be long.
8. LiVES
If you are a beginner and you prefer open-source software, Lives is the best free video editor Reddit. LiVES is also great for professional editors and it is for Windows, Mac, and Linux users. It is easy to use and offers better flexibility in video editing. With it, there would be accurate cutting and editing between the frames. Lives come with versatile features that make it great for editing video and audio.

You can upload almost any type of video clips. It also supports variable and fixed frame rates. Lives will let you re-encode or save the clips or in individual frames. You can easily choose from different transitions and effects. It comes with dynamic loading for effects and you can even apply multiple real-time effects. Here are the pros and cons of Lives.
Pros
- Save everything automatically.
- Import clips from YouTube directly.
- Time stretch or reverse audio blocks.
- Option to have automatic audio gain control.
- Apply multiple real-time effects to frames.
- Trim, rotate or reverse video clips hassle-free.
Cons
- The user interface is outdated.
- Lacks advance video editing options.
Part 3. Related FAQs
1.Where can I edit videos for free?
OpenShot is a great open-source software that you can use on any computer operating system to edit videos for free. You will get all the standard video editing options to publish high-quality videos.
2.What is the best free Reddit editor?
For Mac users, iMovie is the best free Reddit video editor. For Windows users, Hitfilm Express is the best free Reddit editor. OpenShot is the best free Reddit editor for open-source and cross-platform support. But the overall best Reddit video editor is Wondershare Filmora.
For macOS 10.12 or later
Pros –
- Capture your screen as well as webcam.
- Record mic audio and add voiceover to any video.
- Trim and join video clips and photos.
- Transitions, effects, elements, texts and titles.
- Add external audio files, apply audio effects, and stock library.
- Super intuitive user interface for suitability of all users.
Cons –
- Belongs to premium category of video editors.
- Video rendering can take some time.
2. iMovie
iMovie is the Reddit free video editing software for Mac users. It comes with many amazing features that let you create exceptional videos. It has amazing video editing abilities and you can create split-screen videos. The software is easy to use and lets you download it for free. With the software, you will also be able to post your videos to different sites like Facebook and YouTube.
As far as editing is concerned, iMovie lets you add transitions and effects. It also lets you add text with different styles. You can add video clips where it can automatically create and edit by identifying the best footage parts. You will also find video color settings and you can even go for music editing. It lets you open multiple projects at a time. These are the pros and cons of iMovie.
Pros –
- Choose from different transitions and video effects.
- Work on different projects at the same time.
- Add a broadcast feel with split-screen and picture-in-picture.
- Select from multiple filters to add a perfect effect.
- Built-in sound effects automatically adjust the video length.
- Send a project wirelessly via iCloud Drive or AirDrop.
Cons –
- Limited support for different media file formats.
- Takes relatively more space on the hard drive.
3. Lightworks
Lightworks has a user-friendly interface and processes video quickly. You can choose from any frame rate and it even supports any type of file format. The video editing tool can deliver your videos to any social media platform. It supports fast and precision editing with amazing editing options. In Lightworks, you will find creative control for motion graphics and multicam editing.
You can edit videos directly from Cloud storage. It will instantly autosave your work without needing to save it manually. Additionally, there is also background processing for faster rendering. You can assign keyboard shortcuts and have a flexible layout. With the feature of advanced metadata, it let you uses it for professional purposes. The pros and cons of Lightworks are as follows.
Pros –
- Customize the interface by assigning keyboard shortcuts.
- Perform editing even while exporting the video.
- Supports any video format without transcoding.
- Manage content with advanced metadata.
- Share projects instantly on different platforms.
- Choose from hundreds of custom prebuilt graphics.
Cons –
- Application can crash for high-resolution videos.
- Advanced features are locked for premium users.
4. Hitfilm Express
Hitfilm Express has an intuitive interface and lets you download it for free. It supports both Windows and Mac platforms. The reliable video editor comes with versatile features and offers free tutorials of over 100 hours. You don’t have to worry about any watermark and you can create amazing Reddit videos. It comes with advanced features as well that let you use it for professional editing.
The tool comes with motion tracking ability. You will also find free effects that provide access to color adjustments and keying effects. It will let you export the file in 4K format. You will also find prebuilt Behavior effects that can be perfect for creating visually engaging animations. These are the pros and cons of Hitfilm Express.
Pros –
- Create and track professional-looking motion graphics.
- Export in 4K format without any watermark.
- Access the VFX toolkit for different effects and adjustments.
- Vertical video support with easy rotation.
- Comes with quick tools for standard video editing.
- Simple but robust timeline for instant video creation.
Cons –
- Features are limited in the free edition.
- Exporting videos takes relatively more time.
5. OpenShot
Whether it is Windows, Linux, or Mac, Open Shot lets you use it anywhere as it is in open-source video editor. It supports different types of image, video, and audio formats. It is undoubtedly the Reddit best free video editor for computer users. OpenShot has an advanced timeline that enables drag-and-drop, zooming, snapping, scrolling, and panning. It also lets you go for audio editing and mixing.
With OpenShot, you will be able to make multiple layers according to your requirements. It lets you resize or trim timelines in multiple ways. The software also enables rotation and cutting. It features more than 400 transitions that allow adjusting keyframes. Moreover, you can overlap two clips and check with real-time previews. Here are the pros and cons of OpenShot.
Pros –
- Apply 3D animations with the open-source Blender application.
- Animate the direction and speed of the clip with a powerful keyframe.
- Built-in audio editing options with waveforms.
- Select from over 40 title templates and 400 transitions.
- Dedicated audio editor and useful pan and zoom and scroll effect.
Cons –
- Not highly recommended for high-resolution videos.
6. FlexClip
If you are looking for an online video editor Reddit, FlexClip is your best choice. It is loaded with versatile features and is easy to use. While using FlexClip, you don’t have to get any video editing experience before. It is an all-in-one video editor, movie maker, screen recorder, and slideshow maker. You can make a video in just three simple steps. The online video editing tool has thousands of templates and animated texts.
It lets you create stunning videos that can be great for education or business purposes. Packed with some rich animated elements, it lets you choose from different widgets, overlays, and logos. You can also have access to millions of stock media for smooth video editing. FlexClip serves great for making any type of video. The pros and cons of FlexClip are as follows.
Pros –
- Select from thousands of templates for making videos.
- Select from animated elements with diverse dynamic text.
- Engage in immersive editing with a simple interface.
- Access to over 4 million royalty-free photos, videos, and music.
- Record video tutorials, meetings, or games with the screen recorder.
Cons –
- Free plan has limited features.
- Lacks advanced video editing options.
7. CapCut
CapCut video editor is perfect for smartphone users as it is available for Android and iOS users. You can select from advanced filters to add effects to your videos. The app also provides access to a tremendous music library. You can cut everything for making stunning videos. It can perform different operations like rotating, reversing, and splitting.
One of the best things about CapCut is that it lets you use it for free. You can even choose the speed of the video for slow-motion. It is an all-in-one video editing app that has different magical effects. It also lets you select from trending fonts and stickers for expressing your videos. The pros and cons of CapCut are as under.
Pros –
- Edit anything hassle-free with the interactive interface.
- Change speed, cut, or reverse to make incredible videos.
- Select from a range of effects and filers.
- Choose from top and trending fonts and stickers.
- Have access to the tremendous music library.
- Save the video in a high-quality format.
Cons –
- The app can crash when the video tends to be long.
8. LiVES
If you are a beginner and you prefer open-source software, Lives is the best free video editor Reddit. LiVES is also great for professional editors and it is for Windows, Mac, and Linux users. It is easy to use and offers better flexibility in video editing. With it, there would be accurate cutting and editing between the frames. Lives come with versatile features that make it great for editing video and audio.
You can upload almost any type of video clips. It also supports variable and fixed frame rates. Lives will let you re-encode or save the clips or in individual frames. You can easily choose from different transitions and effects. It comes with dynamic loading for effects and you can even apply multiple real-time effects. Here are the pros and cons of Lives.
Pros
- Save everything automatically.
- Import clips from YouTube directly.
- Time stretch or reverse audio blocks.
- Option to have automatic audio gain control.
- Apply multiple real-time effects to frames.
- Trim, rotate or reverse video clips hassle-free.
Cons
- The user interface is outdated.
- Lacks advance video editing options.
Part 3. Related FAQs
1.Where can I edit videos for free?
OpenShot is a great open-source software that you can use on any computer operating system to edit videos for free. You will get all the standard video editing options to publish high-quality videos.
2.What is the best free Reddit editor?
For Mac users, iMovie is the best free Reddit video editor. For Windows users, Hitfilm Express is the best free Reddit editor. OpenShot is the best free Reddit editor for open-source and cross-platform support. But the overall best Reddit video editor is Wondershare Filmora.
Also read:
- Extracting Audio From Videos Is a Key to Better Storytelling. Learn How Filmoras Audio Removal Feature Can Enhance Your Video Stories for 2024
- Updated 2024 Approved Ultimate Guide to Making Cinematography for Music Video
- Updated How to Create a Slideshow GIF?
- New 2024 Approved Want to Create an Impressive Video Collage but Clueless About the Best Tools? No Worries as We Are Here and Will Help You to Learn About the Best Video Collage Maker PC Tools
- New In 2024, How to Add Expression in After Effects
- New In 2024, How to Convert Images Into Video - Kapwing Tutorial
- Updated 2024 Approved If You Are Into GIFs and Want to Know a Great Extent of Information About It Then We Have Got You Covered in This Article. Here Is What We Have Learned so Far About It
- In 2024, How to Make Video Slow Motion? Complete Guide
- New How to Create Emoji on Mac That Take Less Than 10 Mins
- New 4 Ways to Merge MP4 and MP3 for 2024
- New 10 Best Video Editing Apps With Templates
- New 2024 Approved Powerpoint Supported Video Format and User Tips
- Are You Seeking an Answer for What Is a LUT in the Video? In This Article, We Will Provide You with Detailed Information About LUTs and Their Utility
- 2024 Approved How Can You Make a Slideshow Look Aesthetic? Follow the Given Discussion to Learn About Creating an Aesthetic Slideshow All by Yourself
- In 2024, Comprehensive Guide to Add LUTs in Premiere Pro with Ease
- Updated 2024 Approved This Article Talks in Detail About How to Download Windows Movie Maker 2012 Version, the Key Features, How to Use It, Etc. It Further Discusses an Alternative Way to Create Videos on Windows PC. Check Out
- New Ideas to Make A Perfect Café Vlog
- Updated 2024 Approved How to Make a Slideshow with Movavi Slideshow Maker
- 2024 Approved Splitting the Clips in Adobe After Effects Step by Step
- New Do You Want to Print Designs Onto Your Garments or Other Fashion Accessories? Find Out How to Create a Screen Print Effect in Photoshop to Give Your Text or Graphics a Vintage or Retro Look
- Updated In 2024, Creative Ways to Add Green Screen Effects In Photoshop
- 2024 Approved Unleash the Power of Video Scopes in Your Video Editing Projects. Find the Most Common Video Scopes and How to Use Them on Video Editing Software
- Updated 2024 Approved There Are 10 Slideshow Makers Coming with Beautiful Music for Creating a Stunning Slideshow
- New In 2024, Where To Find The Best Free Canon LUTs? Learn More
- Updated 2024 Approved Do You Want to Make Your Background Disappear and Replace with an Attractive Background? Here Is How to Add a Green Screen to Zoom App and Add Any Virtual Background of Your Choice
- New 11 Tips to Make Product Ad Videos
- Updated 2024 Approved Perfectly Use the Audio Mixer in Filmora
- Updated 2024 Approved There Are Many Vlogging Cameras You Can Find in the Market. However, to Get a Good Start in Vlogging, some Sony Vlogging Cameras and Canon Vlog Cameras Are to Consider. This Article Introduces You to the Respective List
- New Are You Planning to Make a Product Review Video but Wondering How to Set up Your Background? If so, Then Youre in the Right Place. This Post Will Show You How to Adjust the Background to Black for Your Product Review Video
- 2024 Approved Creating a Slideshow Is Necessity of the Modern Time. Whether You Plan a Business Meeting or You Are Going to Do some Family Event with Slideshow Presentation, a Good Slideshow Maker Will Help You in This Direction
- New 2024 Approved Are You in Search for a Step-by-Step Guide to How to Add Effects in TikTok? Here It Is. To Add some Flavor to Your TikTok Videos. Use These How to Add Effect to TikTok Recommendations
- Top 10 Video Editing Online Makers Is Worth Your Attention for 2024
- Updated How to Merge Audio and Video Using FFmpeg for 2024
- New Step by Step to Cut a Video in QuickTime
- How to Create Custom Lower Thirds in Filmora
- 2024 Approved How to Make Discord GIF Avatar in Depth Guide
- In 2024, List of Pokémon Go Joysticks On Asus ROG Phone 7 | Dr.fone
- Android Screen Stuck General Sony Xperia 10 V Partly Screen Unresponsive | Dr.fone
- The Magnificent Art of Pokemon Go Streaming On Samsung Galaxy M34? | Dr.fone
- How Do You Get Sun Stone Evolutions in Pokémon For Nokia C110? | Dr.fone
- Video File Repair - How to Fix Corrupted video files of Motorola Moto G73 5G on Windows?
- How to Change Nokia 130 Music Location on Skout | Dr.fone
- In 2024, 5 Techniques to Transfer Data from Vivo S17 to iPhone 15/14/13/12 | Dr.fone
- In 2024, Which Pokémon can Evolve with a Moon Stone For OnePlus Nord N30 SE? | Dr.fone
- How To Deal With the Xiaomi Redmi Note 12 Pro 5G Screen Black But Still Works? | Dr.fone
- FRP Hijacker by Hagard Download and Bypass your Tecno Spark 20 FRP Locks
- In 2024, 6 Ways To Transfer Contacts From Realme V30T to iPhone | Dr.fone
- How to Factory Reset Samsung Galaxy S24 Ultra without Losing Data | Dr.fone
- Fix Tecno Camon 20 Premier 5G Android System Webview Crash 2024 Issue | Dr.fone
- Fake the Location to Get Around the MLB Blackouts on Tecno Camon 20 Pro 5G | Dr.fone
- Full Guide to Bypass Infinix Smart 8 Pro FRP
- 5 Ways to Track Infinix Smart 8 Pro without App | Dr.fone
- 4 Ways to Sync Contacts from Apple iPhone 14 Pro Max to iPad Easily | Dr.fone
- How To Translate Video From Japanese to English Online for 2024
- In 2024, How to use Snapchat Location Spoofer to Protect Your Privacy On Realme 11 Pro? | Dr.fone
- Life360 Circle Everything You Need to Know On Asus ROG Phone 8 Pro | Dr.fone
- How to Unlock Oppo F25 Pro 5G Pattern Lock if Forgotten? 6 Ways
- In 2024, How Can We Unlock Our Vivo Y100t Phone Screen?
- Title: Updated How To Use Slow Zoom Effect in Your Video for 2024
- Author: Morgan
- Created at : 2024-04-24 01:06:42
- Updated at : 2024-04-25 01:06:42
- Link: https://ai-video-editing.techidaily.com/updated-how-to-use-slow-zoom-effect-in-your-video-for-2024/
- License: This work is licensed under CC BY-NC-SA 4.0.
