:max_bytes(150000):strip_icc():format(webp)/switcheshero-4f3b792cb7014baf919e7c68b91e96ab.jpg)
Updated How To Use Speed Ramping to Create an Intense Action Footage

How To Use Speed Ramping to Create an Intense Action Footage
Are you tired of using the same old way to edit your montages? Or do you want to learn to be more professional in your creativity? Don’t worry. We got you.
Here you will learn how to take your videos to the next level using speed ramping with a professional video editor- Wondershare Filmora. Moreover, you will get to know two ways to add the effect.
- Using speed ramping effect and glitch effects.
- Using the standard speed settings.
These effects can work well for any action sports or dance video. Let’s check out about speed ramping effect and ways to add it.
Part 1. What is speed ramping?
You’ve probably seen speed ramping used in suspenseful moments of a basketball video before, like a ball bouncing on the rim or a long buzzer-beating shot.

With speed ramping, we can slow down our most exciting moments to show our audience. And then speed it up again to keep pace with the music or action. So it will give you a smooth transition effect.
Part 2. How to enhance action videos with the speed ramping effect?
For example, we’ll create an intense basketball video with speed ramping and glitch effects in Filmora . Then, to show you how to show off your filming, editing, and basketball skills.
Free Download For Win 7 or later(64-bit)
Free Download For macOS 10.14 or later
Step1 Shot the footage
To edit a montage, you must first capture it correctly. For our example footage, we want to ensure we have set our camera to a higher frame rate for filming this type of video since we’re going to use slow motion.

How to capture the best footage?
You can shoot handheld with a camera or a mobile phone because it allows you to move around your talent and catch some movements and action while giving a shaky camera effect for added suspense. To make evenly balanced videos, you can use a gimbal stabilizer. Here are some tips to get better shots.
- Change camera angles. Try getting shots low to the ground as well as at higher angles. That will give you more options to cut between when you edit the video.
- Get various shots. You can get shots of dribbling, shooting, and just running with the ball to work with.
- Try shooting on a longer lens. It is because you may not be able to get close to the action.
- Record footage in slow mode on your camera or phone. It will allow you to capture more frames: the more frames, the smoother the slow-motion effect.
Best capturing will make your video more cinematic and visually pleasing after preparing the footage. Finally, we will dive into edit tutorials on speed ramping and glitch effects separately for better understanding.
Step2 Edit the speed of footage in Filmora
There are two ways to achieve the speed ramping effect. One is to use the speed ramping feature to adjust the video speed—the other way to achieve a similar effect is by using the standard speed settings.
Edit with speed ramping feature in Filmora
The speed ramping feature is included in Filmora standard license. So let’s start by opening Filmora.
1. Import media
First, import a video from your media library in the Wondershare Filmora. And drag the clip down on the timeline to start editing.

2. Apply the speed ramping feature
To apply the speed ramping feature, right-click on the clip on the timeline. And click speed in the menu and choose speed ramping to open the settings window.

You can choose different speed templates in the setting window. Or, on the left corner, click on the customize option to adjust the keyframes and create the speed you want for the video.

The lower keyframe is when the video is slowest, and the peak is when the video is fastest. The middle parts between the keyframes are when it speeds up or slows down to reach the specific speed you set on each keyframe.

Grab the keyframes and move them up to increase the speed or down to slow down the rate. You can also add more keyframes by moving the playhead to the spot where you want to change speed and clicking the plus button.
After adjusting our keyframes, we can play it back to see if we like the result.
Edit with standard speed settings in Filmora
Since speed ramping can only be used for paid users, we also provide you with an alternative way to give an exact transition effect, like speed ramping. Check out the following steps to add it.
1. You can drag the video from your library to the timeline. While in the timeline, double-click to open the speed menu. Then choose the starting speed you want your video to be with the speed slider.

2. Next, move your playhead to the point of the video you want to slow down the speed. Here we will cut and then double-click that clip to open the speed menu again. Change the pace with the speed slider again

Following the above steps, a speed ramping style effect can be created without using the premium feature. Stealthy, isn’t it?
Step3 Add some intensity to shots with the BCC glitch effect
We will use Boris FX BCC glitch to add some intensity to our video. It is a plug-in built-in Filmora and gives a feeling of chaos to match the action in the video. To apply the BCC glitch effect to the video.
- Click on the effects options in the top bar. For example, a window on the left side showing you the option Boris FX will have a sub-option BCC stylize. Click on it.
- Drag the effect above the place you want it in the timeline.
- Double-click the effect to open its settings.
- A drop-down menu at the top of the screen has tons of glitch presets to try out.
- We are going to scroll down and select shake with motion blur. This preset will use the exact look we want for our basketball video to make the speed ramping more intense.

- You can change the settings around after choosing a preset. For example, let’s turn up the glitch intensity to have our glitch a little more extreme. Moving further, we can change the glitch duration to our specific needs.
Now we can watch our video to see our glitch with the motion blur effect. Isn’t it crazy to make a cinematic video by yourself? The speed ramping feature and glitch effects can bring any sports video to the next level.
Free Download For macOS 10.14 or later
Step1 Shot the footage
To edit a montage, you must first capture it correctly. For our example footage, we want to ensure we have set our camera to a higher frame rate for filming this type of video since we’re going to use slow motion.

How to capture the best footage?
You can shoot handheld with a camera or a mobile phone because it allows you to move around your talent and catch some movements and action while giving a shaky camera effect for added suspense. To make evenly balanced videos, you can use a gimbal stabilizer. Here are some tips to get better shots.
- Change camera angles. Try getting shots low to the ground as well as at higher angles. That will give you more options to cut between when you edit the video.
- Get various shots. You can get shots of dribbling, shooting, and just running with the ball to work with.
- Try shooting on a longer lens. It is because you may not be able to get close to the action.
- Record footage in slow mode on your camera or phone. It will allow you to capture more frames: the more frames, the smoother the slow-motion effect.
Best capturing will make your video more cinematic and visually pleasing after preparing the footage. Finally, we will dive into edit tutorials on speed ramping and glitch effects separately for better understanding.
Step2 Edit the speed of footage in Filmora
There are two ways to achieve the speed ramping effect. One is to use the speed ramping feature to adjust the video speed—the other way to achieve a similar effect is by using the standard speed settings.
Edit with speed ramping feature in Filmora
The speed ramping feature is included in Filmora standard license. So let’s start by opening Filmora.
1. Import media
First, import a video from your media library in the Wondershare Filmora. And drag the clip down on the timeline to start editing.

2. Apply the speed ramping feature
To apply the speed ramping feature, right-click on the clip on the timeline. And click speed in the menu and choose speed ramping to open the settings window.

You can choose different speed templates in the setting window. Or, on the left corner, click on the customize option to adjust the keyframes and create the speed you want for the video.

The lower keyframe is when the video is slowest, and the peak is when the video is fastest. The middle parts between the keyframes are when it speeds up or slows down to reach the specific speed you set on each keyframe.

Grab the keyframes and move them up to increase the speed or down to slow down the rate. You can also add more keyframes by moving the playhead to the spot where you want to change speed and clicking the plus button.
After adjusting our keyframes, we can play it back to see if we like the result.
Edit with standard speed settings in Filmora
Since speed ramping can only be used for paid users, we also provide you with an alternative way to give an exact transition effect, like speed ramping. Check out the following steps to add it.
1. You can drag the video from your library to the timeline. While in the timeline, double-click to open the speed menu. Then choose the starting speed you want your video to be with the speed slider.

2. Next, move your playhead to the point of the video you want to slow down the speed. Here we will cut and then double-click that clip to open the speed menu again. Change the pace with the speed slider again

Following the above steps, a speed ramping style effect can be created without using the premium feature. Stealthy, isn’t it?
Step3 Add some intensity to shots with the BCC glitch effect
We will use Boris FX BCC glitch to add some intensity to our video. It is a plug-in built-in Filmora and gives a feeling of chaos to match the action in the video. To apply the BCC glitch effect to the video.
- Click on the effects options in the top bar. For example, a window on the left side showing you the option Boris FX will have a sub-option BCC stylize. Click on it.
- Drag the effect above the place you want it in the timeline.
- Double-click the effect to open its settings.
- A drop-down menu at the top of the screen has tons of glitch presets to try out.
- We are going to scroll down and select shake with motion blur. This preset will use the exact look we want for our basketball video to make the speed ramping more intense.

- You can change the settings around after choosing a preset. For example, let’s turn up the glitch intensity to have our glitch a little more extreme. Moving further, we can change the glitch duration to our specific needs.
Now we can watch our video to see our glitch with the motion blur effect. Isn’t it crazy to make a cinematic video by yourself? The speed ramping feature and glitch effects can bring any sports video to the next level.
Some Top Methods to Create AI Slow Motion Videos
The prediction was that AI would take over the world with its advanced algorithms and efficiency. Many believe that AI can achieve task completion better than humans. Even though it hasn’t been able to replace the human race, it surpasses many fields. One such field is the media and entertainment industry for content editing. Today’s article topic revolves around AI editing and editors.
Specifically, we will dive into understanding AI slow motion in depth. We will discuss its purpose, significance, and process along the way. You can find many slow-motion AI tools to compare and choose a suitable one. The article will conclude by recommending an AI slow-motion tool that tops all.
Slow Motion Video Maker Slow your video’s speed with better control of your keyframes to create unique cinematic effects!
Make A Slow Motion Video Make A Slow Motion Video More Features

Part 1: How Does AI Improve Slow Motion Video Editing?
AI can enhance the quality of content and the mechanism of crafting slow-mo AI video. It not only contributes to task achievement but also improves various aspects. Find out about the influence that AI has in achieving a perfect slow-mo effect below:
1. Frame Interpolation
If you create an AI slow-motion video, the slow motion is often abrupt. To resolve this problem and bring smoothness to slow-mo, AI frame interpolation can help. Users must activate this function, and AI will handle all the technicalities. The AI adds extra frames to your video to ensure a smooth, slow motion.
2. Minimizing Artifacts
When you convert a video into slow motion, certain changes take place. It introduces artifacts such as motion blur or unwanted distortions. They decline the quality of content, and the view becomes distorted. Reducing these factors magnifies the slow-motion effect and brings perfection to it.
3. AI Auto Enhancement
Many slow-motion AI creators have a built-in auto enhancement feature or effect. They incorporate this function to minimize the negative elements. They increase sharpness for clarity and light settings for visual appeal. While slowing down footage, these enhancements act as a helping hand.
4. Time Remapping Option
In slow-motion AI video editors, users have the option to manipulate time at different frames. It is a video editing technique that gives you control over pacing and timing. This helps you bring precision to your slow-mo videos through detailed settings. You can manipulate video frames and speed better with this option.
5. Automated Noise Cancellation
Just when you think the AI is done for the day, it comes up with another feature. Another significance of AI in slow-motion video creation is reducing noise. Advanced AI algorithms are designed to assist in providing high-quality audio. It is because the audio track quality often declines during a slow-mo.
Part 2: Top Tools Available Online for AI Slow Motion Editing
Creating slow-motion videos enhances your video content as it emphasizes the parts of it. In addition, it contributes to creative storytelling, flashbacks, and showing emotions. In this section, discover some slow-mo AI video creators here:
1. RunwayML
Do you have a short video frame rate clip and want to convert it into a slow-mo? This slow-motion AI tool helps increase the video frames for creating a slow-mo. This tool offers an adjustable speed option to create according to your preferences. It has a Super-Slow Motion AI Magic Tool that smoothens out the video slow-mo of any duration.

Key Features
- It is a multifunctional video editor with unlimited features, so you don’t need a plugin.
- With its AI-backed algorithms, it makes rotoscoping and motion tracking easier.
- Collaborative cloud storage lets you pick from where you left editing.
Pricing
| Pricing Plans | Annual Pricing/month |
|---|---|
| Standard | $12 |
| Pro | $28 |
| Unlimited | $76 |
| Enterprise | Contact Sales |
2. Neural Love
Are you looking for an AI slow-motion tool with multiple customization options? Neural Love is the best fit as it offers naturalistic slow-mo effects and speed adjustments. In addition, the tool supports MP4 and MOV video formats to do so. You can also manipulate slow motion settings via the FPS option in it. The tool can slow down a video by 2 to 8 times and crafts realistic effects.

Key Features
- This tool offers multiple generative AI services like Avatar or Art Generation.
- It offers both audio and video enhancement functionality that you can use to enhance a slow-mo.
- You can also use its AI Face enhancement feature to improve slow-motion results.
Pricing
| Pricing Plans | Price Per 100 Credits |
|---|---|
| Subscription | $10 |
| Pay As You Go | $19 |
3. VEED.io
Creating a slow-motion video without any prior experience can be confusing. There are so many terms to learn, but with this slow-mo AI tool, anyone can do it. Whether a video clip or a GIF, it can transform both into a slow-mo. Once you upload a video, select a speed option to slow down the clip. You can start editing with this tool without any sign-up or sign-in before.

Key Features
- Users can split a clip’s frames to edit or introduce different effects and filters to a specific part.
- The editing interface of this tool to create slow motions is very easy and intuitive.
- Whether it is MP4, MOV, or AVI, it shows compatibility with all video formats.
Pricing
| Pricing Plans | Annual Pricing/month |
|---|---|
| Basic | $12 |
| Pro | $24 |
| Business | $59 |
| Enterprise | Contact Sales |
4. CapCut
With the help of this powerful AI slow-motion video generator, sit back and see the magic. Its AI algorithms analyze a clip and apply the automated slow-mo effect. Along with automated slow-motion adjustment, you can do some personalization. It has slow-motion effects like criminal investigation, cinema trailers, and smooth processing. Once you have created a slow motion, it allows you to edit it.

Key Features
- You can transform a declined video resolution to 4K with this tool.
- It also has a video resizer option to transform your video into any size.
- If you want to change a video format, this tool also offers a video converter tool to do so.
Pricing
Free
Part 3: How to Use AI Slow Motion Videos for High-Quality Edits?
Now that you have been made aware of plenty of the slow-motion AI tools, let’s move forward. Although operating all these tools is easy for proficient results, you must master them. Here is a detailed guide to two of the above AI slow-motion tools:
1. RunwayML
Editing a video from simple to slow motion is very laidback with this tool. The AI does most of the work, and you need to give a few directions. Here is a step-by-step guide to using this slow-mo AI tool:
Step 1: Once logged in and reached its editing interface, navigate towards the left panel. Then, opt for the “Edit videos” option under the “Video” section. From the display menu, locate and select the “Super-Slow Motion” option.

Step 2: In the Super Slow Motion window, click the “Upload” option and drop a file.

Step 3: Once the video has been uploaded, modify the speed of the video. You can do this by accessing the “Speed” slider at the right. After editing, click the “Process” button to finalize the slow-motion settings. The edited video will appear on the screen; play it to see if the results are satisfactory. Then, click the “Export” button at the right to download the video.

2. Neural Love
This is another slow-motion AI tool for those with little knowledge of creating slow-mo. It uses AI tech to facilitate users and automate the major editing elements. Following are the steps to operate this online tool seamlessly:
Step 1: After accessing this tool, click the “Upload Video” button to import media. Once the import progress is completed, the tool will analyze your video.

Step 2: Scroll down and set the percentage slider for slowing down the video. You can also select to upscale your video or change its frame rate. Moreover, you can select to colorize the video as well.

Step 3: Click the “Start Full Video Processing” button after setting preferences. Once you have subscribed to a plan, the video slow motion will be ready.
Part 4: Desktop Alternative: Slowing Down Videos Using AI With Wondershare Filmora
Indeed, all these tools are experts in what they do. However, they all have some drawbacks. All these slow-motion AI tools require internet access to create a slow-mo. In such circumstances, users require a desktop tool that masters this task. Wondershare Filmora is an efficient tool for creating videos slow-mo with ease. Amongst slow-motion AI, it has other AI features, a resource library, and custom setting options.
Free Download For Win 7 or later(64-bit)
Free Download For macOS 10.14 or later
Speed Ramping for Creating Slow Motion in Wondershare Filmora
This feature can do everything, whether it’s about creating slow motion or speeding up your video. You can customize the speed of your video at specific frame rates with this. In addition, there are 6 pre-assembled speed ramping presets that you can apply. All presets are popular and tailored to fit most of the video contexts.
Along with speed, you can also maintain the audio pitch to align with the speed of the video. The feature later uses AI assistance in frame interpolation to smooth the added effect. There are 3 options for AI frame interpolation, and one of them is Optical Flow. This option helps with bringing smoothness to your AI slow-motion videos. In short, Filmora offers a professional ground for making a slow-mo.
Guide to Manage Speed Ramping in Wondershare Filmora
Now that you know its speed ramping option, it is time to try it. Although Filmora rules out the technicalities, there is still much to learn. In this section, find the step-by-step guide to creating a slow-motion AI video:
Step 1Import Files and Access the Speed Ramping Option
Once you have created a new project in Filmora, use the “Ctrl + I” keys to import files. After that, bring this clip to the timeline and select it. Navigate towards the right-side panel and go to the “Speed > Speed Ramping” tab. Under this tab, choose a preset or the “Customize” option to set a speed.

Step 2Enable Optical Flow Option
Once you have set speed preferences, reach the “AI Frame Interpolation” section at the bottom. From there, select the “Optical Flow” option to add extra frames. The AI will smoothen out the slow-motion effect in your video on its own.

Step 3Enable Render Preview to See Results
Once you have enabled the Optical Flow option, go to the timeline panel and locate the respective option. Once you find the “Render Preview” icon, click it to see results.

Conclusion
Upon reaching the end, you must have gained a brief knowledge of slow-motion AI. The article discussed the advantages of AI integration in slow-motion video generators. In addition, there was a brief knowledge about some of the effective slow-mo makers. Wondershare Filmora is an AI-driven desktop tool for making such videos. If you haven’t already used it, we suggest this user-friendly tool for creation.
Make A Slow Motion Video Make A Slow Motion Video More Features

Part 1: How Does AI Improve Slow Motion Video Editing?
AI can enhance the quality of content and the mechanism of crafting slow-mo AI video. It not only contributes to task achievement but also improves various aspects. Find out about the influence that AI has in achieving a perfect slow-mo effect below:
1. Frame Interpolation
If you create an AI slow-motion video, the slow motion is often abrupt. To resolve this problem and bring smoothness to slow-mo, AI frame interpolation can help. Users must activate this function, and AI will handle all the technicalities. The AI adds extra frames to your video to ensure a smooth, slow motion.
2. Minimizing Artifacts
When you convert a video into slow motion, certain changes take place. It introduces artifacts such as motion blur or unwanted distortions. They decline the quality of content, and the view becomes distorted. Reducing these factors magnifies the slow-motion effect and brings perfection to it.
3. AI Auto Enhancement
Many slow-motion AI creators have a built-in auto enhancement feature or effect. They incorporate this function to minimize the negative elements. They increase sharpness for clarity and light settings for visual appeal. While slowing down footage, these enhancements act as a helping hand.
4. Time Remapping Option
In slow-motion AI video editors, users have the option to manipulate time at different frames. It is a video editing technique that gives you control over pacing and timing. This helps you bring precision to your slow-mo videos through detailed settings. You can manipulate video frames and speed better with this option.
5. Automated Noise Cancellation
Just when you think the AI is done for the day, it comes up with another feature. Another significance of AI in slow-motion video creation is reducing noise. Advanced AI algorithms are designed to assist in providing high-quality audio. It is because the audio track quality often declines during a slow-mo.
Part 2: Top Tools Available Online for AI Slow Motion Editing
Creating slow-motion videos enhances your video content as it emphasizes the parts of it. In addition, it contributes to creative storytelling, flashbacks, and showing emotions. In this section, discover some slow-mo AI video creators here:
1. RunwayML
Do you have a short video frame rate clip and want to convert it into a slow-mo? This slow-motion AI tool helps increase the video frames for creating a slow-mo. This tool offers an adjustable speed option to create according to your preferences. It has a Super-Slow Motion AI Magic Tool that smoothens out the video slow-mo of any duration.

Key Features
- It is a multifunctional video editor with unlimited features, so you don’t need a plugin.
- With its AI-backed algorithms, it makes rotoscoping and motion tracking easier.
- Collaborative cloud storage lets you pick from where you left editing.
Pricing
| Pricing Plans | Annual Pricing/month |
|---|---|
| Standard | $12 |
| Pro | $28 |
| Unlimited | $76 |
| Enterprise | Contact Sales |
2. Neural Love
Are you looking for an AI slow-motion tool with multiple customization options? Neural Love is the best fit as it offers naturalistic slow-mo effects and speed adjustments. In addition, the tool supports MP4 and MOV video formats to do so. You can also manipulate slow motion settings via the FPS option in it. The tool can slow down a video by 2 to 8 times and crafts realistic effects.

Key Features
- This tool offers multiple generative AI services like Avatar or Art Generation.
- It offers both audio and video enhancement functionality that you can use to enhance a slow-mo.
- You can also use its AI Face enhancement feature to improve slow-motion results.
Pricing
| Pricing Plans | Price Per 100 Credits |
|---|---|
| Subscription | $10 |
| Pay As You Go | $19 |
3. VEED.io
Creating a slow-motion video without any prior experience can be confusing. There are so many terms to learn, but with this slow-mo AI tool, anyone can do it. Whether a video clip or a GIF, it can transform both into a slow-mo. Once you upload a video, select a speed option to slow down the clip. You can start editing with this tool without any sign-up or sign-in before.

Key Features
- Users can split a clip’s frames to edit or introduce different effects and filters to a specific part.
- The editing interface of this tool to create slow motions is very easy and intuitive.
- Whether it is MP4, MOV, or AVI, it shows compatibility with all video formats.
Pricing
| Pricing Plans | Annual Pricing/month |
|---|---|
| Basic | $12 |
| Pro | $24 |
| Business | $59 |
| Enterprise | Contact Sales |
4. CapCut
With the help of this powerful AI slow-motion video generator, sit back and see the magic. Its AI algorithms analyze a clip and apply the automated slow-mo effect. Along with automated slow-motion adjustment, you can do some personalization. It has slow-motion effects like criminal investigation, cinema trailers, and smooth processing. Once you have created a slow motion, it allows you to edit it.

Key Features
- You can transform a declined video resolution to 4K with this tool.
- It also has a video resizer option to transform your video into any size.
- If you want to change a video format, this tool also offers a video converter tool to do so.
Pricing
Free
Part 3: How to Use AI Slow Motion Videos for High-Quality Edits?
Now that you have been made aware of plenty of the slow-motion AI tools, let’s move forward. Although operating all these tools is easy for proficient results, you must master them. Here is a detailed guide to two of the above AI slow-motion tools:
1. RunwayML
Editing a video from simple to slow motion is very laidback with this tool. The AI does most of the work, and you need to give a few directions. Here is a step-by-step guide to using this slow-mo AI tool:
Step 1: Once logged in and reached its editing interface, navigate towards the left panel. Then, opt for the “Edit videos” option under the “Video” section. From the display menu, locate and select the “Super-Slow Motion” option.

Step 2: In the Super Slow Motion window, click the “Upload” option and drop a file.

Step 3: Once the video has been uploaded, modify the speed of the video. You can do this by accessing the “Speed” slider at the right. After editing, click the “Process” button to finalize the slow-motion settings. The edited video will appear on the screen; play it to see if the results are satisfactory. Then, click the “Export” button at the right to download the video.

2. Neural Love
This is another slow-motion AI tool for those with little knowledge of creating slow-mo. It uses AI tech to facilitate users and automate the major editing elements. Following are the steps to operate this online tool seamlessly:
Step 1: After accessing this tool, click the “Upload Video” button to import media. Once the import progress is completed, the tool will analyze your video.

Step 2: Scroll down and set the percentage slider for slowing down the video. You can also select to upscale your video or change its frame rate. Moreover, you can select to colorize the video as well.

Step 3: Click the “Start Full Video Processing” button after setting preferences. Once you have subscribed to a plan, the video slow motion will be ready.
Part 4: Desktop Alternative: Slowing Down Videos Using AI With Wondershare Filmora
Indeed, all these tools are experts in what they do. However, they all have some drawbacks. All these slow-motion AI tools require internet access to create a slow-mo. In such circumstances, users require a desktop tool that masters this task. Wondershare Filmora is an efficient tool for creating videos slow-mo with ease. Amongst slow-motion AI, it has other AI features, a resource library, and custom setting options.
Free Download For Win 7 or later(64-bit)
Free Download For macOS 10.14 or later
Speed Ramping for Creating Slow Motion in Wondershare Filmora
This feature can do everything, whether it’s about creating slow motion or speeding up your video. You can customize the speed of your video at specific frame rates with this. In addition, there are 6 pre-assembled speed ramping presets that you can apply. All presets are popular and tailored to fit most of the video contexts.
Along with speed, you can also maintain the audio pitch to align with the speed of the video. The feature later uses AI assistance in frame interpolation to smooth the added effect. There are 3 options for AI frame interpolation, and one of them is Optical Flow. This option helps with bringing smoothness to your AI slow-motion videos. In short, Filmora offers a professional ground for making a slow-mo.
Guide to Manage Speed Ramping in Wondershare Filmora
Now that you know its speed ramping option, it is time to try it. Although Filmora rules out the technicalities, there is still much to learn. In this section, find the step-by-step guide to creating a slow-motion AI video:
Step 1Import Files and Access the Speed Ramping Option
Once you have created a new project in Filmora, use the “Ctrl + I” keys to import files. After that, bring this clip to the timeline and select it. Navigate towards the right-side panel and go to the “Speed > Speed Ramping” tab. Under this tab, choose a preset or the “Customize” option to set a speed.

Step 2Enable Optical Flow Option
Once you have set speed preferences, reach the “AI Frame Interpolation” section at the bottom. From there, select the “Optical Flow” option to add extra frames. The AI will smoothen out the slow-motion effect in your video on its own.

Step 3Enable Render Preview to See Results
Once you have enabled the Optical Flow option, go to the timeline panel and locate the respective option. Once you find the “Render Preview” icon, click it to see results.

Conclusion
Upon reaching the end, you must have gained a brief knowledge of slow-motion AI. The article discussed the advantages of AI integration in slow-motion video generators. In addition, there was a brief knowledge about some of the effective slow-mo makers. Wondershare Filmora is an AI-driven desktop tool for making such videos. If you haven’t already used it, we suggest this user-friendly tool for creation.
This Article Will Focus on Understanding the Secret Tips in Wondershare Filmora that You Can Use to Edit Videos Faster and More Efficiently
Wondershare Filmora is a great video editing software with millions of users worldwide. It has many features that it provides to its users. However, there are some other features hidden up its sleeve.
This article will share some “secrets” of Wondershare Filmora features you may not know that they exist in Filmora. Scroll below to see the features that level up your editing skills.
Part 1. Shared Media Folder
You might have had the hassle of importing the same videos for a considerable time in a different project. It can become a problem for you. It may be fine if you have organized your videos from the start.
Shared Media Folder in Filmora, now called the Global Media Folder, can store video and audio that you’ve imported for future projects. So you don’t have to keep re-importing your media for future videos.

Moreover, when you have imported files into the Shared Media Folder, you can create new Sub-Folders. You can name these folders according to the types of media you are going to use.
Suppose you are a content creator and want to spice up your content with memes. You can create a meme folder to import recent memes into your videos.
Once you have imported them into the Wondershare Filmora’s Shared Media Folder, you can access them anytime. Doing so will allow you to save time and build a base for your future projects.
Free Download For Win 7 or later(64-bit)
Free Download For macOS 10.14 or later
Part 2. Customize Proxy Files
Before understanding the custom proxy settings, let us know what proxy files are.
Proxy Files
Proxy files in Wondershare Filmora allow you to render and edit 4K and other higher-resolution videos easily, regardless of your computer’s processing power.
No one wants to compromise PC performance when editing videos. But if you are importing a video with a higher resolution than your PC, you can only play it sometimes. Other than that, your PC might get stuck and slow down.
If your PC has a built-in resolution of 1080p, but the video you are going to import is 2160p, you can encounter rendering and performance problems. But in the case of Wondershare Filmora Proxy files, you can smoothly edit your videos without any trouble.
How to Customize Proxy Files in Filmora
Although Wondershare Filmora automatically creates proxy files when it encounters resolutions more significant than the PC performance. But you can also set them to your preference.
And customize your proxy files takes some simple and easy steps. But first, follow the steps mentioned below.
Step1 Find the File option on the top left corner of the Wonderhsare Filmora home interface.
Step2 Click on Files and go to Preferences.
Step3 A window will pop up, and here you can see multiple options.
Step4 Go to the performance.
Step5 In the performance tab, scroll down till your see Proxy.
Step6 Here check the box that says, “Automatically create proxies when resolution higher than:”

Step7 Below you can see multiple options. In these options, select the resolution that you want.
Step8 You can also click on the box below to automatically delete the proxies when you close your project.
Now, whenever you encounter a resolution of a higher video than the one you selected, Wondershare Filmora will do its magic.
Part 3. Delete Project Render Cache
Another hack you can use to save space on your hard drive is Deleting the Render cache. But before we do that, let us understand what Render cache is!
What is Render Cache?
Rendering can be a giant leap to give you a smooth performance experience. However, when you import your videos into the timeline, you can always render to have an uninterrupted playback experience.
Doing so will allow you to work in your zone quickly and efficiently. You can do a manual rendering before you begin the editing process. Or you can also opt to choose automatic rendering. In the automatic rendering option, you can continue your editing process. In the meantime, your timeline will be rendered.
How to Delete Render Cache in Filmora
To save up storage space on your computer, you can delete your render cache by following the steps.
Step1 Click on files in the top left corner of the Wondershare Filmora home interface.
Step2 Go to Preferences.
Step3 A window will pop up and go to Performance.
Step4 In the performance tab, scroll down below to the Preview Render.
Step5 Check the box saying, “Automatically delete render files when a project is closed.”

Step6 Click on OK to save your changes.
Now, whenever you close your project, your render cache will be deleted and would have given you extra space on your computer.
Part 4. Remove Split Button on Playhead
In some instances, when you are moving the playhead on the timelines, it can distract you from doing your editing. Or even more, you can mistakenly click on the Split button to split the clips you don’t want them to.
Well, no worries at all! Wondershare Filmora takes care of that for you. You can hide or remove the Split button on the playhead. It only takes a few simple and easy steps. Follow the steps mentioned below to remove the Split button:
Step1 You will notice the File option on the top left corner of the Wonderhsare Filmora home interface.
Step2 Click on Files and go to Preferences.
Step3 A window will pop up, and here you can see multiple options.
Step4 Go to the editing
Step5 In the editing tab, scroll down till your see the Split button.

Step6 Check the box. Then, click OK to save your changes.
Doing so would have removed the Split button from your playhead. So now you can edit your videos without any distractions.
Part 5. Copy and Paste Effects
Copy and paste are one of the oldest tricks in editing procedures. Wondershare Filmora comes with a range of commands and features that allow you to save time and be reliable.
Suppose you want to add an effect to a video clip in the timeline. Then, after adding the effect to your video, make custom changes to make it look more closely to the style you want. You can now use the copy-and-paste function to add the same effect to another clip. That helps you save a lot of time from tedious and time-consuming work.
How to Copy and Paste Effects
While editing, you will need to ensure that your editing process is as clean as possible and that you have all the time on hand.
But there is a solution! You can easily copy and paste the effects you placed on one video clip to another. Just follow the steps mentioned, and you will be good to go:
Step1 Right-click on the video to you added the effects too.
Step2 A drop-down column will pop up.
Step3 In the options below, you will notice an option called “Copy Effects.”
Step4 Click on the “Copy Effects” option.
Step5 Now move the playhead to the video clip on which you want to paste the effects.
Step6 Right-click on the video that you want to place the effect on.
Step7 In the pop-up column, select the Paste Effect
Step8 It adjusts the video clip according to the changes of the prior one.
You can save editing time by simply copying and pasting video effects.

Part 6. Timeline Snap
You might have added multiple videos in the same timeline track. If you removed the video ahead of the video clip, you have to close the gap in between.
So, arranging and moving clips in the timeline are hectic and time-consuming. However, that is the case without timeline snapping.
How to Apply Timeline Snap in Filmora
Timeline snapping will allow you to arrange video clips side by side without any breaks and cut-offs. Also, it will enable you to place it precisely above other video and audio gaps in the timeline.
In most cases, Timeline snapping is enabled from the start. But if you are encountering some problems managing your videos. Or if you want to remove the Timeline snap feature. Follow the steps mentioned below:
Step1 Right-click on the Timeline.
Step2 A pop will open up, giving you multiple options.
Step3 Click on timeline Snapping to either enable it or disable it.

Now you can easily enable and disable timeline snapping according to your choice!
Part 7. Color Code Video Clips
When editing footage from multiple cameras, you might want to organize which media is from which source in the timeline. You can do this by color coding your clips.
Steps to Color Code Your Videos
Color coding allows you to edit all the clips marked with a particular color to be selected simultaneously without selecting them manually in the timeline.
To color code a video, follow the steps as mentioned:
Step1 Select the clips you want to color code, right-click, and choose from the available colors.
Step2 Once you’ve color coded your clips, you can right-click on the clip again and choose to select all clips from the color mark option.
Step3 And all the clips marked with that color will be selected.

Part 8. Group Clips Together
Now in an editing timeline, you might encounter a situation where you want to arrange a video clip with specific audio. Again, it allows you to stay organized and save up a lot of time.
Grouping clips together can also be helpful when you want to edit multiple clips in the timeline but want to maintain a particular order. The group will remain in its place and allow you to edit your other video clips quickly.
Stepwise Guide to Grouping the Clips in Filmora
You can group video and audio clips in straightforward steps. Just follow the actions ahead, and you will be good to go:
Step1 Hold Left-click and drag across the clips that you want to select.
Step2 When you are done, Right-click on the clip to open the options tab.
Step3 Scroll down, and you will see a “” option.
Step4 Select Group, and that’s done.

Your whole group will be selected whenever you select a video clip or an audio clip.
Part 9. Pan and Zoom Shortcut
Editing shortcuts are excellent. They allow you to save up a lot of time. Some people prefer to use a mouse only to edit their videos, but professionals always use a keyboard.
But there are some other shortcuts too! In these shortcuts, you would not necessarily need a keyboard; only a mouse will work and give a good outcome.
You might have seen those videos in which a specific screen ratio moves over a picture. Or, in some cases when you have to pan and zoom to create a flow effect.
Instead of manually adjusting the ratio of your videos and photos, Pan and Zoom shortcuts will allow you to use multiple features. These features allow you to select where your video or photo will start, zoom, and end.
These shortcuts are so easy to apply. Just go through the steps below, and you will accomplish the following:
Step1 Right-click on a photo or a video clip.
Step2 Go to the crop and zoom tab above the timeline.
Step3 In the window that opens up, you will see a pan and zoom option in the top left corner. Click on it.
Step4 And on the bottom right corner of the window, you can see the pan and zoom shortcuts available.
Step5 Please select any of them you want and then click on OK.

Part 10. New Feature Request
One of the significant features of Wondershare Filmora that sets it among the best is its capability to listen to the users. When you have been using Wondershare Filmora for a long time, there will come a time when you wish for a feature. You can also do so in a few simple steps. Just follow the steps mentioned:
Step1 Multiple options are available on the top left corner of the Wondershare Filmora home interface. Click on help.
Step2 A drop-down box will open up.
Step3 In the options offered to you, select suggest a feature.

Step4 It automatically directs you to your default browser, where you can see the multiple feature requests.
Step5 You can vote for a feature you want in the next update.
Step6 Or you can also create a request for another particular feature.

Summing Up
Wondershare Filmora is the best in the business regarding editing your videos. It has such creative and easy-to-use software that even a beginner efficiently edits videos.
There are a lot of features that Wondershare Filmora provides. But now, with these secret and hidden tips, you can edit your videos more creatively.
Free Download For macOS 10.14 or later
Part 2. Customize Proxy Files
Before understanding the custom proxy settings, let us know what proxy files are.
Proxy Files
Proxy files in Wondershare Filmora allow you to render and edit 4K and other higher-resolution videos easily, regardless of your computer’s processing power.
No one wants to compromise PC performance when editing videos. But if you are importing a video with a higher resolution than your PC, you can only play it sometimes. Other than that, your PC might get stuck and slow down.
If your PC has a built-in resolution of 1080p, but the video you are going to import is 2160p, you can encounter rendering and performance problems. But in the case of Wondershare Filmora Proxy files, you can smoothly edit your videos without any trouble.
How to Customize Proxy Files in Filmora
Although Wondershare Filmora automatically creates proxy files when it encounters resolutions more significant than the PC performance. But you can also set them to your preference.
And customize your proxy files takes some simple and easy steps. But first, follow the steps mentioned below.
Step1 Find the File option on the top left corner of the Wonderhsare Filmora home interface.
Step2 Click on Files and go to Preferences.
Step3 A window will pop up, and here you can see multiple options.
Step4 Go to the performance.
Step5 In the performance tab, scroll down till your see Proxy.
Step6 Here check the box that says, “Automatically create proxies when resolution higher than:”

Step7 Below you can see multiple options. In these options, select the resolution that you want.
Step8 You can also click on the box below to automatically delete the proxies when you close your project.
Now, whenever you encounter a resolution of a higher video than the one you selected, Wondershare Filmora will do its magic.
Part 3. Delete Project Render Cache
Another hack you can use to save space on your hard drive is Deleting the Render cache. But before we do that, let us understand what Render cache is!
What is Render Cache?
Rendering can be a giant leap to give you a smooth performance experience. However, when you import your videos into the timeline, you can always render to have an uninterrupted playback experience.
Doing so will allow you to work in your zone quickly and efficiently. You can do a manual rendering before you begin the editing process. Or you can also opt to choose automatic rendering. In the automatic rendering option, you can continue your editing process. In the meantime, your timeline will be rendered.
How to Delete Render Cache in Filmora
To save up storage space on your computer, you can delete your render cache by following the steps.
Step1 Click on files in the top left corner of the Wondershare Filmora home interface.
Step2 Go to Preferences.
Step3 A window will pop up and go to Performance.
Step4 In the performance tab, scroll down below to the Preview Render.
Step5 Check the box saying, “Automatically delete render files when a project is closed.”

Step6 Click on OK to save your changes.
Now, whenever you close your project, your render cache will be deleted and would have given you extra space on your computer.
Part 4. Remove Split Button on Playhead
In some instances, when you are moving the playhead on the timelines, it can distract you from doing your editing. Or even more, you can mistakenly click on the Split button to split the clips you don’t want them to.
Well, no worries at all! Wondershare Filmora takes care of that for you. You can hide or remove the Split button on the playhead. It only takes a few simple and easy steps. Follow the steps mentioned below to remove the Split button:
Step1 You will notice the File option on the top left corner of the Wonderhsare Filmora home interface.
Step2 Click on Files and go to Preferences.
Step3 A window will pop up, and here you can see multiple options.
Step4 Go to the editing
Step5 In the editing tab, scroll down till your see the Split button.

Step6 Check the box. Then, click OK to save your changes.
Doing so would have removed the Split button from your playhead. So now you can edit your videos without any distractions.
Part 5. Copy and Paste Effects
Copy and paste are one of the oldest tricks in editing procedures. Wondershare Filmora comes with a range of commands and features that allow you to save time and be reliable.
Suppose you want to add an effect to a video clip in the timeline. Then, after adding the effect to your video, make custom changes to make it look more closely to the style you want. You can now use the copy-and-paste function to add the same effect to another clip. That helps you save a lot of time from tedious and time-consuming work.
How to Copy and Paste Effects
While editing, you will need to ensure that your editing process is as clean as possible and that you have all the time on hand.
But there is a solution! You can easily copy and paste the effects you placed on one video clip to another. Just follow the steps mentioned, and you will be good to go:
Step1 Right-click on the video to you added the effects too.
Step2 A drop-down column will pop up.
Step3 In the options below, you will notice an option called “Copy Effects.”
Step4 Click on the “Copy Effects” option.
Step5 Now move the playhead to the video clip on which you want to paste the effects.
Step6 Right-click on the video that you want to place the effect on.
Step7 In the pop-up column, select the Paste Effect
Step8 It adjusts the video clip according to the changes of the prior one.
You can save editing time by simply copying and pasting video effects.

Part 6. Timeline Snap
You might have added multiple videos in the same timeline track. If you removed the video ahead of the video clip, you have to close the gap in between.
So, arranging and moving clips in the timeline are hectic and time-consuming. However, that is the case without timeline snapping.
How to Apply Timeline Snap in Filmora
Timeline snapping will allow you to arrange video clips side by side without any breaks and cut-offs. Also, it will enable you to place it precisely above other video and audio gaps in the timeline.
In most cases, Timeline snapping is enabled from the start. But if you are encountering some problems managing your videos. Or if you want to remove the Timeline snap feature. Follow the steps mentioned below:
Step1 Right-click on the Timeline.
Step2 A pop will open up, giving you multiple options.
Step3 Click on timeline Snapping to either enable it or disable it.

Now you can easily enable and disable timeline snapping according to your choice!
Part 7. Color Code Video Clips
When editing footage from multiple cameras, you might want to organize which media is from which source in the timeline. You can do this by color coding your clips.
Steps to Color Code Your Videos
Color coding allows you to edit all the clips marked with a particular color to be selected simultaneously without selecting them manually in the timeline.
To color code a video, follow the steps as mentioned:
Step1 Select the clips you want to color code, right-click, and choose from the available colors.
Step2 Once you’ve color coded your clips, you can right-click on the clip again and choose to select all clips from the color mark option.
Step3 And all the clips marked with that color will be selected.

Part 8. Group Clips Together
Now in an editing timeline, you might encounter a situation where you want to arrange a video clip with specific audio. Again, it allows you to stay organized and save up a lot of time.
Grouping clips together can also be helpful when you want to edit multiple clips in the timeline but want to maintain a particular order. The group will remain in its place and allow you to edit your other video clips quickly.
Stepwise Guide to Grouping the Clips in Filmora
You can group video and audio clips in straightforward steps. Just follow the actions ahead, and you will be good to go:
Step1 Hold Left-click and drag across the clips that you want to select.
Step2 When you are done, Right-click on the clip to open the options tab.
Step3 Scroll down, and you will see a “” option.
Step4 Select Group, and that’s done.

Your whole group will be selected whenever you select a video clip or an audio clip.
Part 9. Pan and Zoom Shortcut
Editing shortcuts are excellent. They allow you to save up a lot of time. Some people prefer to use a mouse only to edit their videos, but professionals always use a keyboard.
But there are some other shortcuts too! In these shortcuts, you would not necessarily need a keyboard; only a mouse will work and give a good outcome.
You might have seen those videos in which a specific screen ratio moves over a picture. Or, in some cases when you have to pan and zoom to create a flow effect.
Instead of manually adjusting the ratio of your videos and photos, Pan and Zoom shortcuts will allow you to use multiple features. These features allow you to select where your video or photo will start, zoom, and end.
These shortcuts are so easy to apply. Just go through the steps below, and you will accomplish the following:
Step1 Right-click on a photo or a video clip.
Step2 Go to the crop and zoom tab above the timeline.
Step3 In the window that opens up, you will see a pan and zoom option in the top left corner. Click on it.
Step4 And on the bottom right corner of the window, you can see the pan and zoom shortcuts available.
Step5 Please select any of them you want and then click on OK.

Part 10. New Feature Request
One of the significant features of Wondershare Filmora that sets it among the best is its capability to listen to the users. When you have been using Wondershare Filmora for a long time, there will come a time when you wish for a feature. You can also do so in a few simple steps. Just follow the steps mentioned:
Step1 Multiple options are available on the top left corner of the Wondershare Filmora home interface. Click on help.
Step2 A drop-down box will open up.
Step3 In the options offered to you, select suggest a feature.

Step4 It automatically directs you to your default browser, where you can see the multiple feature requests.
Step5 You can vote for a feature you want in the next update.
Step6 Or you can also create a request for another particular feature.

Summing Up
Wondershare Filmora is the best in the business regarding editing your videos. It has such creative and easy-to-use software that even a beginner efficiently edits videos.
There are a lot of features that Wondershare Filmora provides. But now, with these secret and hidden tips, you can edit your videos more creatively.
Using One of the Best Converter Tools to Turn GIFs Into PNG or JPG. Here, Learn About the Ten Best Ones for Different Operating Systems, with Details on Features, Prices, and More
A GIF to JPG converter software is responsible for altering files in the animated GIF format to static JPG or PNG image format. Since GIFs are not compatible with some sites, platforms, or documentation types, this is a safer alternative.
JPG, PNG, and even APNG formats are easier to download, work on most device/OS types, and are simpler to print. They have a lesser size as well.
If you are looking for a stable converter, we present the top tools for that here, no matter what kind of devices you use! Read to know which ones you can use based on their features, usability, and support.
10 Best Tools to convert GIF into JPG/PNG/APNG
The following are the best converters for turning GIF into JPG, APNG, or PNG formats.
1. OnlineConvert
One of the simplest GIF to JPG converter types is OnlineConvert. It has diverse customization settings. For example, you can choose the image size and quality or use AI-powered optimization support.

How to download: iOS , Android , Online tool , Chrome extension , Firefox extension
Rating: 3.7 stars out of 5 (Google Play Store)
Compatible OS: web-based, iOS, Android
Price: Free
Main Features:
- Advanced features like Equalize, Stabilize, etc.
- Decide the black/white threshold limits.
- Activate AI enable for optimized conversion.
- Set cropping limits.
Pros
- Decide the image quality.
- Choose image width/height.
- Add an example file.
Cons
- The maximum size of the file is 100 MB.
- It cannot convert encrypted files.
2. Ezgif
Ezgif is another simple-to-use online tool with substantial image conversion benefits. You can add your GIF files from the Cloud account or computer and directly get JPG files. PNG does not have a direct conversion here, though.

How to download: Online tool
Rating: 100 out of 100 (Scam Detector)
Compatible OS: web-based browsers
Price: Free
Main Features:
- Support a maximum of 50 MB file size for images.
- Direct converter to JPG.
- Set background color to white.
- Add URL link of online GIF files.
Pros
- Instant conversion.
- No changes to original file quality.
- Add from the device.
Cons
- Upload and convert files one by one.
- No cloud support.
3. CloudConvert
CloudConvert is a high-quality online GIF to PNG converter that people can use to convert high-quality image files with no quality loss. First, choose your files, go for settings, and then the converting will be finished in minutes.
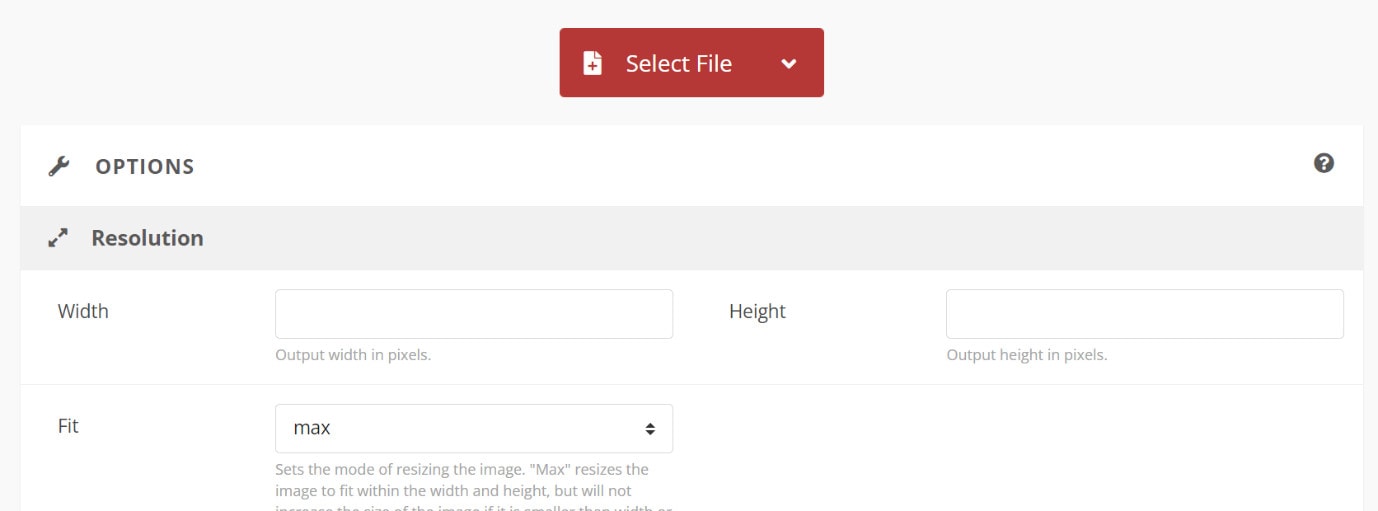
How to download: Online tool
Rating: 4.5 stars of 5 (Capterra)
Compatible OS: web-based
Price: Packages/Subscriptions- Costs start at USD 8 per conversion minute.
Main Features:
- Select a file from various formats, like URL, Device, or cloud accounts.
- Set crop/scape adjustments.
- Note image width and height.
- Select to strip or vice versa.
Pros
- Customize output file type.
- Support watermark security feature. It protects your images and graphic files from being stolen, used, or altered without the owner’s permission.
- High-quality image resolution is available.
Cons
- Slightly complex for beginners to understand or use initially.
- Bigger files take a longer time to load.
4. Convertio
Convertio is another top-grade GIF to JPGF converter which people can utilize to prepare high-definition image files from animated pictures. You can make multiple conversions and get high-priority customer support.

How to download: Online tool
Rating: 4.9 stars of 5 (Capterra)
Compatible OS: web-based
Price: Light- USD 9.99/month, Basic- USD 14.99/month, Unlimited- USD 25.99/month
Main Features:
- Get at least 25 concurrent conversion benefits with paid plans.
- Adfree pages.
- Unlimited conversions are only supported by the highest-paid plan.
- Unlimited allowed conversion minutes for users daily.
Pros
- The drag and drop function is smooth to use.
- Add files with at least 100 MB file size.
- Multiple formats are supported.
Cons
- Signup is necessary for a higher file size allowance.
- More limited service for free.
5. Soda PDF
This GIF to PNG converter is top-notch and used for changing big and small-sized GIF files into static PNG or JPG formats. However, no issues with image quality would be noticeable. You can use it for multiple conversions.

How to download: Online tool
Rating: 3.4 stars of 5 (Capterra)
Compatible OS: Online, Mac, Windows, Linux
Price: Standard- USD 6.73/month, Pro- USD 8.23/month, Business- USD 16.63/month
Main Features:
- Add GIF files from the computer, Dropbox, or Google Drive.
- Files are stored for a full day.
- Direct download button available.
- Redo conversion in case of issues.
Pros
- A desktop version with offline usage is available.
- The drag and drop function makes the converting process more convenient.
- Quick file saving.
Cons
- Cannot access old converted files from servers.
- Ads are available.
6. FreeConvert.com
FreeConvert is operable for multiple types of file conversions. In addition, you can store your files in the cloud and handle various tasks simultaneously, depending on your plan.
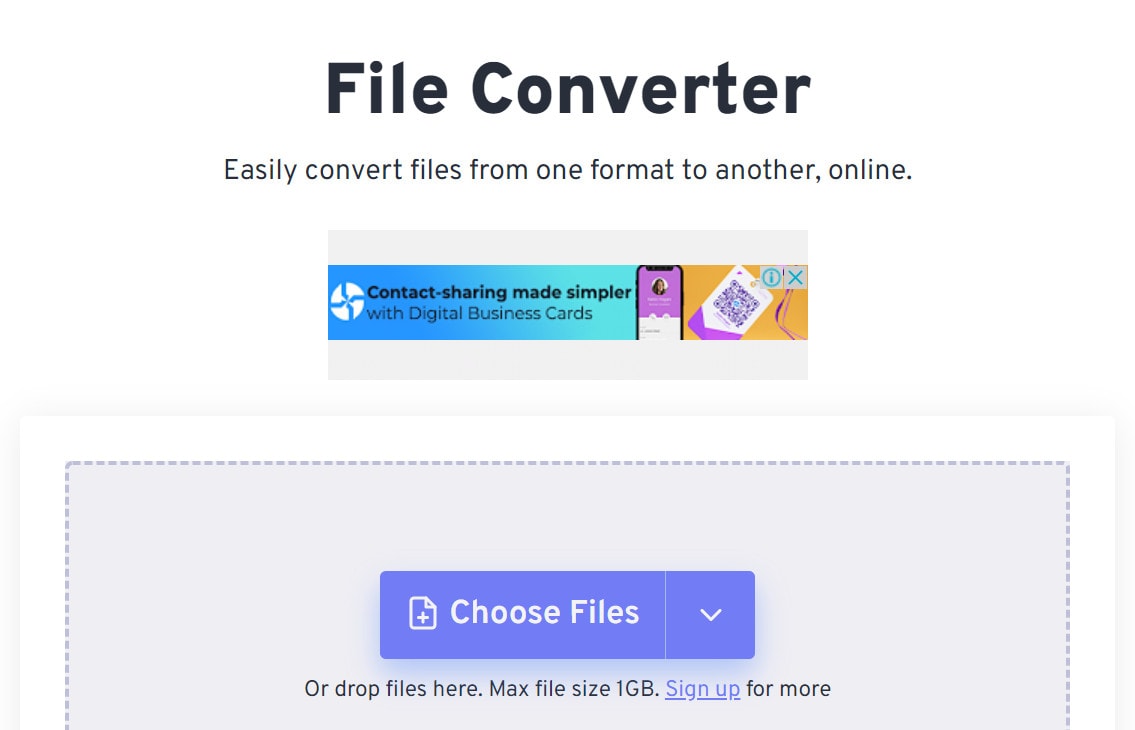
How to download: Online tool , Chrome extension
Rating: 58.40 out of 100 (Scam Detector)
Compatible OS: Windows, Mac, Linux
Price: 24-hour Pass- USD 12.99, Pro- USD 25.99/month, Basic- USD 9.99/month, Standard- USD 14.99/month.
Main Features:
- Max 1GB of size allows for free conversion.
- Auto-orientation setting available.
- Choose to compress the file or not.
- Insert from device or cloud.
Pros
- You can add files from the computer, Dropbox, Google Drive, or URL.
- It enables you to strip attached metadata.
- Adjust image size freely.
Cons
- Limited customizations.
- No free plan.
7. Zamzar
You can efficiently utilize this online tool to convert different file formats into another, like GIF into PNG. You can access the files you created for at least 24 hours after the conversion. For more time, upgrade your account.
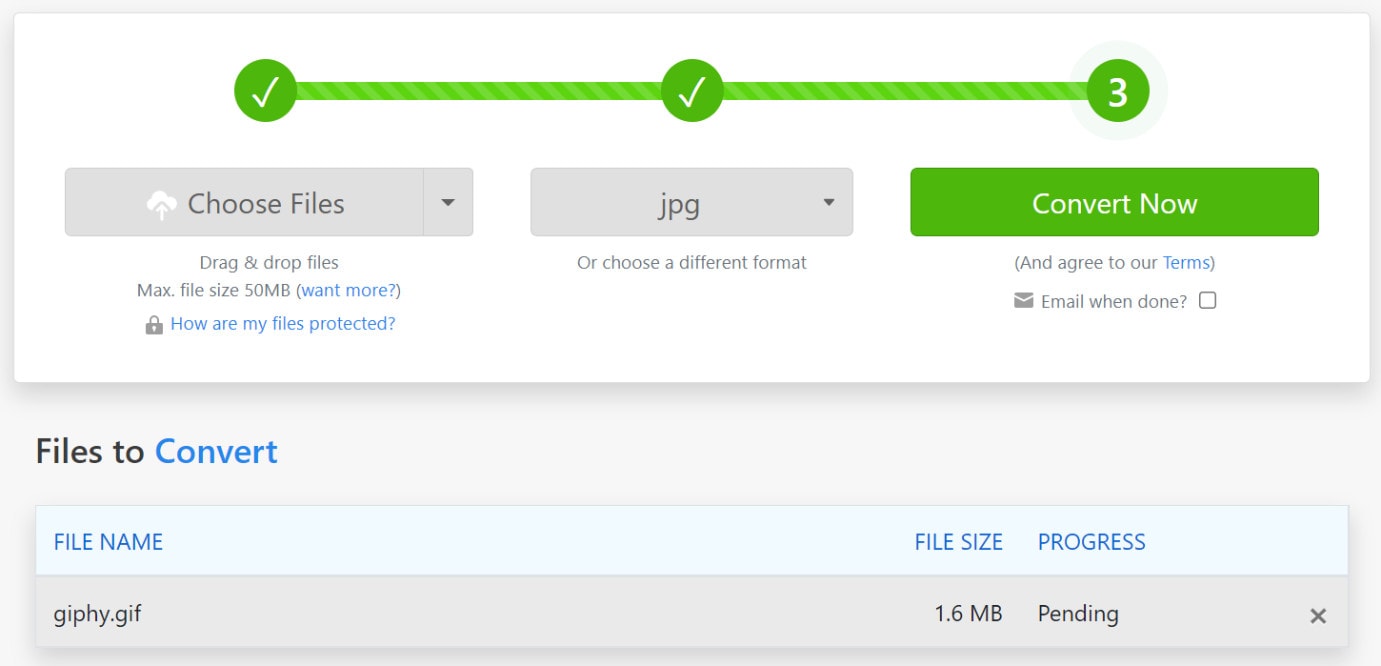
How to download: Online tool
Rating: 4.5 stars out of 5 (Capterra)
Compatible OS: web-based
Price: Basic- USD 8.60/month, Pro- USD 15.18/month, Business- USD 24.04/month
Main Features:
- It supports multiple file formats for converting.
- Add a file from the device or cloud.
- Insert online URL of files.
- 50 MB is the maximum file size.
Pros
- All saved files for free users can be saved for 24 hours.
- Paid users can decide to remove files from storage.
- Email notification for downloading is possible.
Cons
- Convert/save only two files per day for free.
- You need to register an account when using.
8. Browserling
Browserling is one of the most accessible and high-quality conversion tools for turning GIFs into PNG, JPG, or any other format. The settings are simple to understand and use, and one can convert multiple files.

How to download: Online tool
Rating: 4 stars out of 5 (G2)
Compatible OS: web-based, Windows/Android devices.
Price: Free, Developer- USD 19/month, Team- USD 29+/month
Main Features:
- Insert from the device.
- You can add GIFs of any size.
- Drag and drop functionality is available.
- Automatically saves to the device.
Pros
- Quick conversion.
- Zero complex steps.
- Easy to use for all users at different stages.
Cons
- No batch processing is allowed.
- The free version is only web-based and not compatible with most OS/devices/browsers.
9. iLoveIMG
Another top-notch online GIF to PNG converter is iLoveIMG, with which you can add and alter multiple GIF files simultaneously. Then, after the conversion, share to social media accounts from Facebook or others easily.

How to download: Online tool
Rating: 3.6 stars out of 5 (TrustPilot)
Compatible OS: web-based
Price: Free, Business- custom price, Premium- USD 3.79
Main Features:
- Insert from a folder, Dropbox, or Google Drive.
- Add multiple images.
- Rotate the files.
- Share to social media.
Pros
- Add from the device.
- Cloud support is available.
- Align files alphabetically.
Cons
- Does not work offline.
- Limited batch process for free users.
10. Convertfiles
This online tool can easily include and change GIFs into PNG files. The conversions occur quickly, and you can add your email account to get quick alerts for the completion of the process.

How to download: Online tool
Rating: 4.6 stars out of 5 (mywot.com)
Compatible OS: web-based
Price: Free
Main Features:
- Add specific input format.
- Include the preferred output format.
- Insert email for notifications.
- Support files to be added from the device library.
Pros
- Quicker process of conversion.
- A variety of file formats are compatible.
- Categorized list of formats like documents, images, videos, etc.
Cons
- Can include third-party unauthorized sites that transfer users to other pages.
- No video formats for output.
Pro Tips: How to Convert GIF to Video for Free?
Besides utilizing suitable tools to convert GIFs into PNG or other image files, you can also use the best GIF to video converters. For example, with Wondershare Filmora , you can easily convert GIFs or other image files into video files. In addition, some editing options, like GIFs, allow users to create videos after merging image files.
Free Download For Win 7 or later(64-bit)
Free Download For macOS 10.14 or later
Step1Launch the Filmora software.
Step2Press the “New Project” section and then access “Click to import media files.”
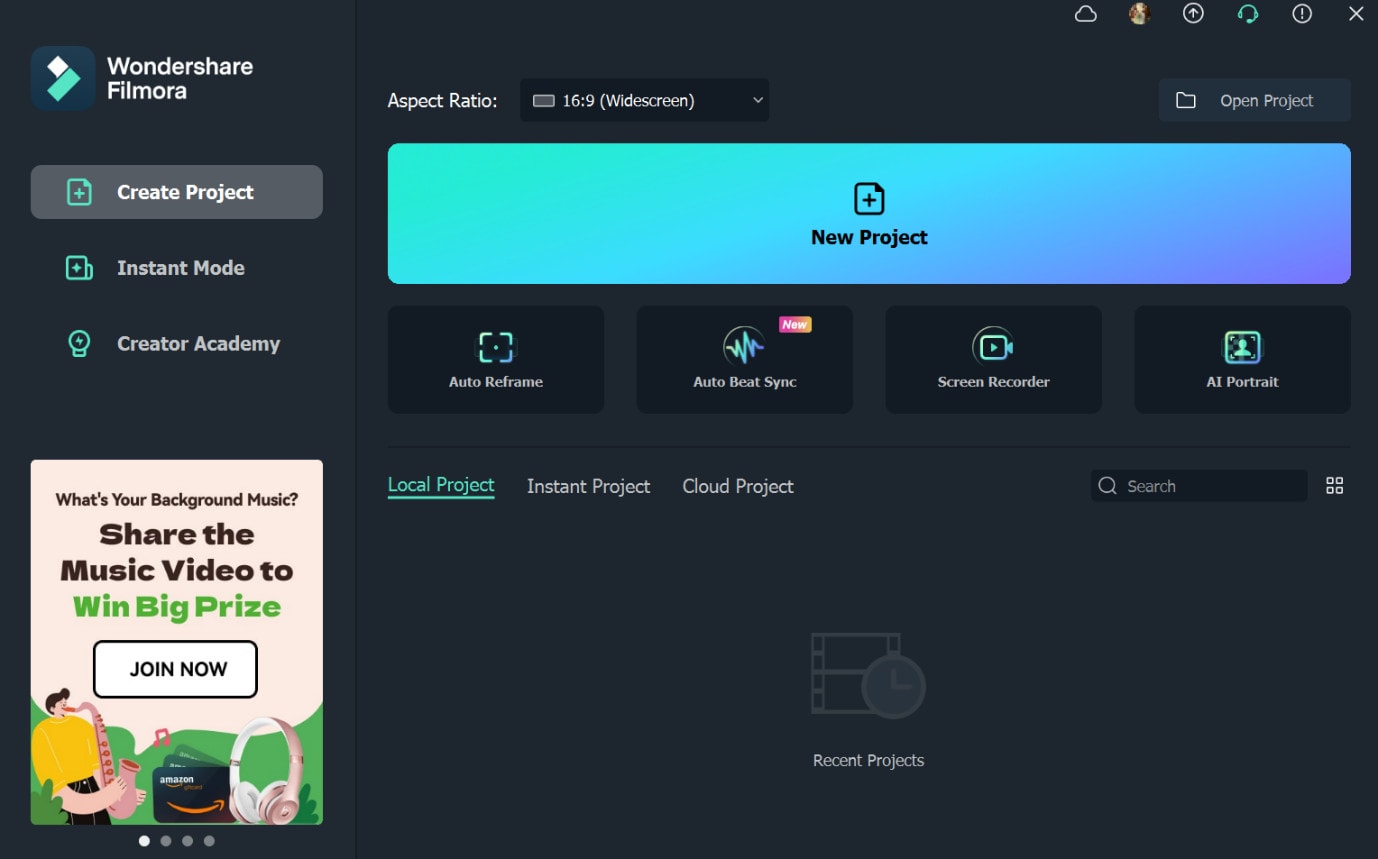
Add the image files, like GIFs, into the editor.
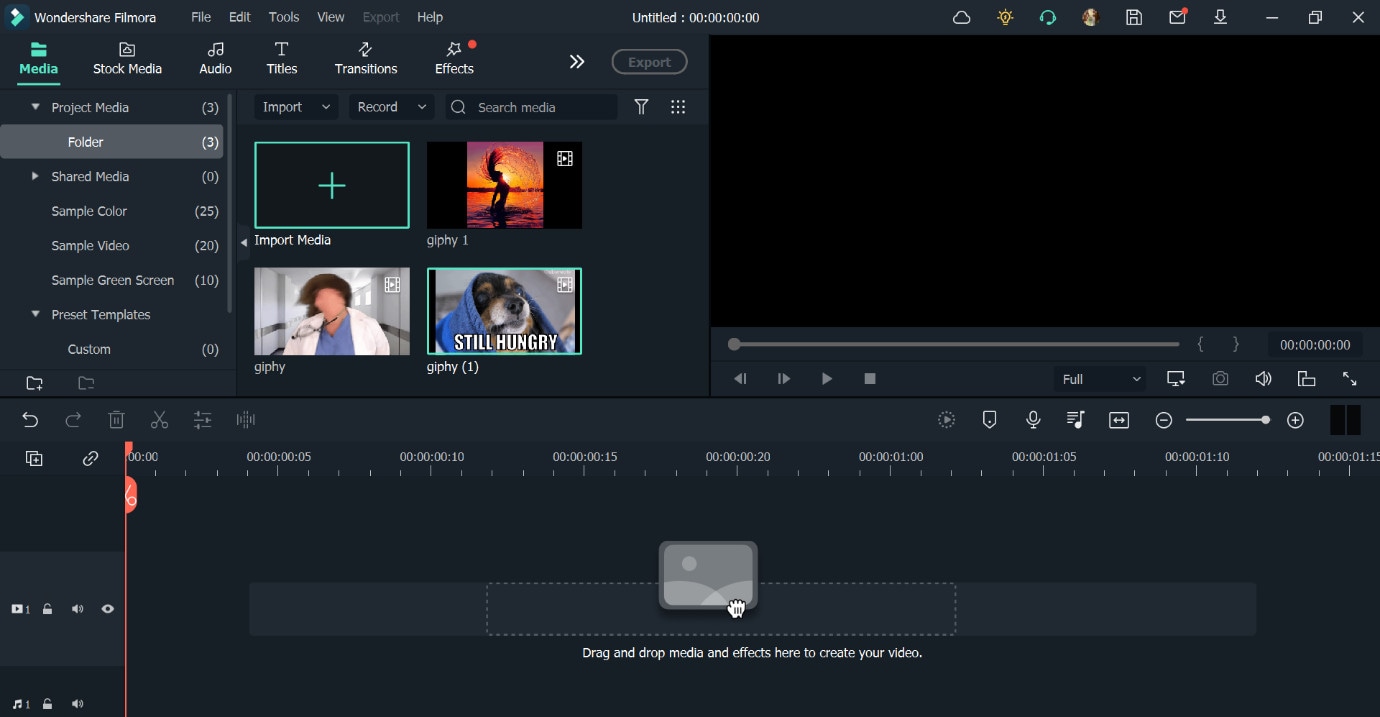
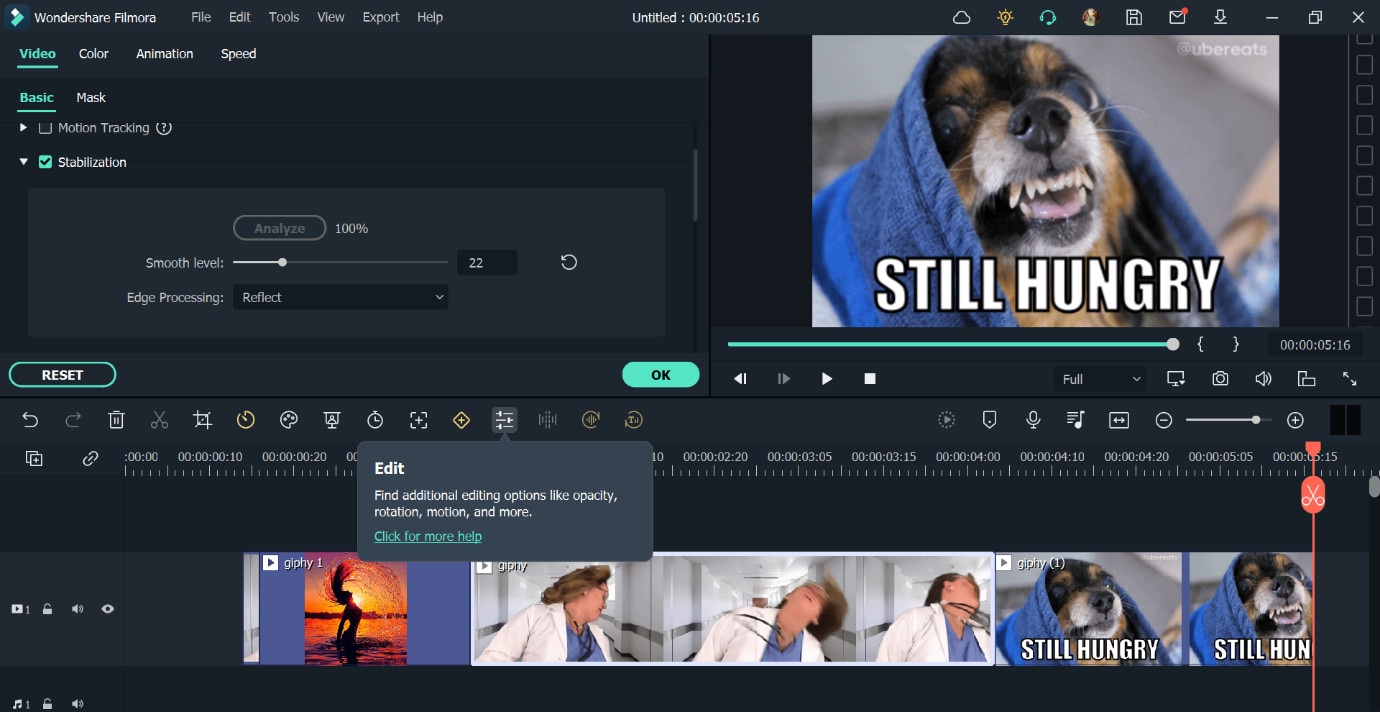
Step3Drag the files to the editing timeline. Use customization settings like Speed, Animation, Audio, Effects, etc., to edit the file.
Step4Click on Export > Local > Mp4. You can choose other video formats too.
Step5Add file information like saving location, name, and formatting specification.
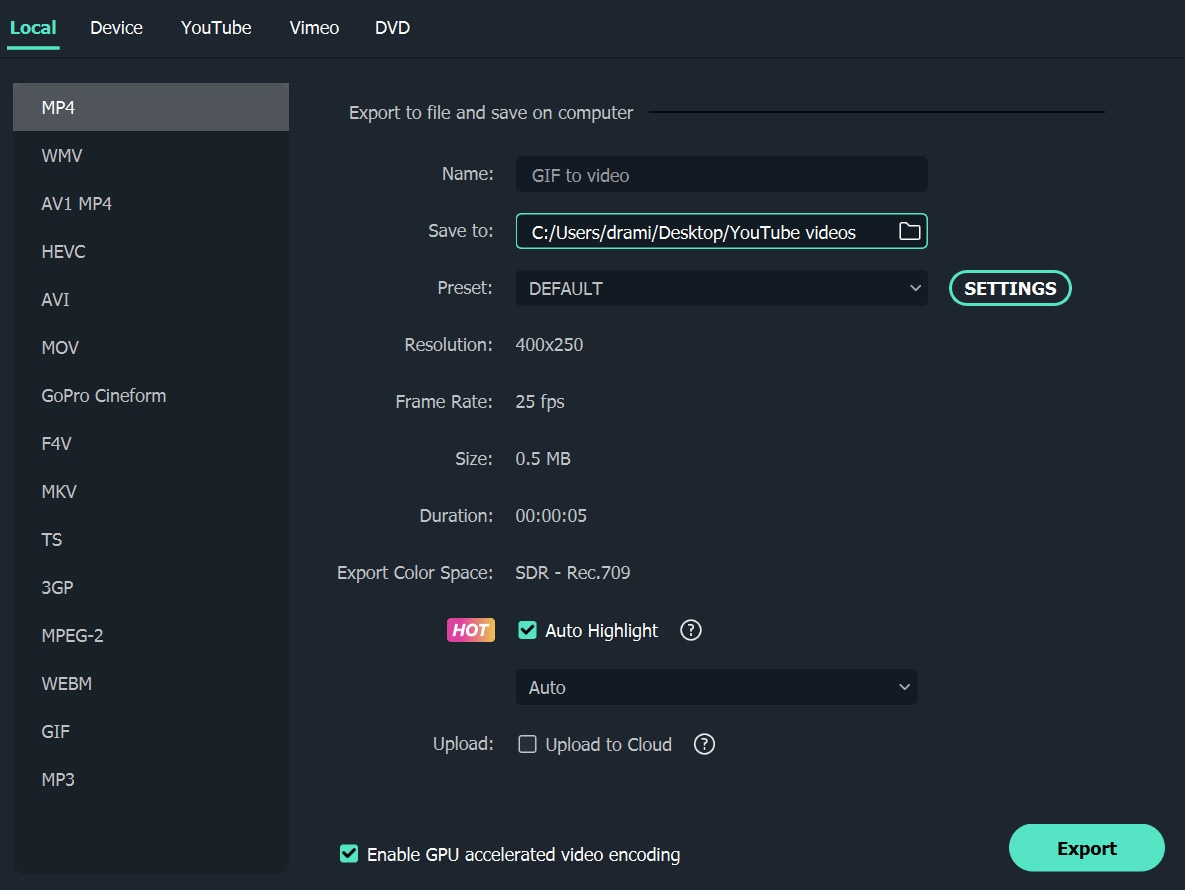
Step6Click on the Export button.
Final Words
You can easily use one of the given tools to convert GIF files into varying image file types. There are fully online options like CloudConvert, and certain choices with a software version, like Online Convert. Try each at least once for the best results to know which fits your needs perfectly.
2. Ezgif
Ezgif is another simple-to-use online tool with substantial image conversion benefits. You can add your GIF files from the Cloud account or computer and directly get JPG files. PNG does not have a direct conversion here, though.

How to download: Online tool
Rating: 100 out of 100 (Scam Detector)
Compatible OS: web-based browsers
Price: Free
Main Features:
- Support a maximum of 50 MB file size for images.
- Direct converter to JPG.
- Set background color to white.
- Add URL link of online GIF files.
Pros
- Instant conversion.
- No changes to original file quality.
- Add from the device.
Cons
- Upload and convert files one by one.
- No cloud support.
3. CloudConvert
CloudConvert is a high-quality online GIF to PNG converter that people can use to convert high-quality image files with no quality loss. First, choose your files, go for settings, and then the converting will be finished in minutes.

How to download: Online tool
Rating: 4.5 stars of 5 (Capterra)
Compatible OS: web-based
Price: Packages/Subscriptions- Costs start at USD 8 per conversion minute.
Main Features:
- Select a file from various formats, like URL, Device, or cloud accounts.
- Set crop/scape adjustments.
- Note image width and height.
- Select to strip or vice versa.
Pros
- Customize output file type.
- Support watermark security feature. It protects your images and graphic files from being stolen, used, or altered without the owner’s permission.
- High-quality image resolution is available.
Cons
- Slightly complex for beginners to understand or use initially.
- Bigger files take a longer time to load.
4. Convertio
Convertio is another top-grade GIF to JPGF converter which people can utilize to prepare high-definition image files from animated pictures. You can make multiple conversions and get high-priority customer support.

How to download: Online tool
Rating: 4.9 stars of 5 (Capterra)
Compatible OS: web-based
Price: Light- USD 9.99/month, Basic- USD 14.99/month, Unlimited- USD 25.99/month
Main Features:
- Get at least 25 concurrent conversion benefits with paid plans.
- Adfree pages.
- Unlimited conversions are only supported by the highest-paid plan.
- Unlimited allowed conversion minutes for users daily.
Pros
- The drag and drop function is smooth to use.
- Add files with at least 100 MB file size.
- Multiple formats are supported.
Cons
- Signup is necessary for a higher file size allowance.
- More limited service for free.
5. Soda PDF
This GIF to PNG converter is top-notch and used for changing big and small-sized GIF files into static PNG or JPG formats. However, no issues with image quality would be noticeable. You can use it for multiple conversions.

How to download: Online tool
Rating: 3.4 stars of 5 (Capterra)
Compatible OS: Online, Mac, Windows, Linux
Price: Standard- USD 6.73/month, Pro- USD 8.23/month, Business- USD 16.63/month
Main Features:
- Add GIF files from the computer, Dropbox, or Google Drive.
- Files are stored for a full day.
- Direct download button available.
- Redo conversion in case of issues.
Pros
- A desktop version with offline usage is available.
- The drag and drop function makes the converting process more convenient.
- Quick file saving.
Cons
- Cannot access old converted files from servers.
- Ads are available.
6. FreeConvert.com
FreeConvert is operable for multiple types of file conversions. In addition, you can store your files in the cloud and handle various tasks simultaneously, depending on your plan.

How to download: Online tool , Chrome extension
Rating: 58.40 out of 100 (Scam Detector)
Compatible OS: Windows, Mac, Linux
Price: 24-hour Pass- USD 12.99, Pro- USD 25.99/month, Basic- USD 9.99/month, Standard- USD 14.99/month.
Main Features:
- Max 1GB of size allows for free conversion.
- Auto-orientation setting available.
- Choose to compress the file or not.
- Insert from device or cloud.
Pros
- You can add files from the computer, Dropbox, Google Drive, or URL.
- It enables you to strip attached metadata.
- Adjust image size freely.
Cons
- Limited customizations.
- No free plan.
7. Zamzar
You can efficiently utilize this online tool to convert different file formats into another, like GIF into PNG. You can access the files you created for at least 24 hours after the conversion. For more time, upgrade your account.

How to download: Online tool
Rating: 4.5 stars out of 5 (Capterra)
Compatible OS: web-based
Price: Basic- USD 8.60/month, Pro- USD 15.18/month, Business- USD 24.04/month
Main Features:
- It supports multiple file formats for converting.
- Add a file from the device or cloud.
- Insert online URL of files.
- 50 MB is the maximum file size.
Pros
- All saved files for free users can be saved for 24 hours.
- Paid users can decide to remove files from storage.
- Email notification for downloading is possible.
Cons
- Convert/save only two files per day for free.
- You need to register an account when using.
8. Browserling
Browserling is one of the most accessible and high-quality conversion tools for turning GIFs into PNG, JPG, or any other format. The settings are simple to understand and use, and one can convert multiple files.

How to download: Online tool
Rating: 4 stars out of 5 (G2)
Compatible OS: web-based, Windows/Android devices.
Price: Free, Developer- USD 19/month, Team- USD 29+/month
Main Features:
- Insert from the device.
- You can add GIFs of any size.
- Drag and drop functionality is available.
- Automatically saves to the device.
Pros
- Quick conversion.
- Zero complex steps.
- Easy to use for all users at different stages.
Cons
- No batch processing is allowed.
- The free version is only web-based and not compatible with most OS/devices/browsers.
9. iLoveIMG
Another top-notch online GIF to PNG converter is iLoveIMG, with which you can add and alter multiple GIF files simultaneously. Then, after the conversion, share to social media accounts from Facebook or others easily.

How to download: Online tool
Rating: 3.6 stars out of 5 (TrustPilot)
Compatible OS: web-based
Price: Free, Business- custom price, Premium- USD 3.79
Main Features:
- Insert from a folder, Dropbox, or Google Drive.
- Add multiple images.
- Rotate the files.
- Share to social media.
Pros
- Add from the device.
- Cloud support is available.
- Align files alphabetically.
Cons
- Does not work offline.
- Limited batch process for free users.
10. Convertfiles
This online tool can easily include and change GIFs into PNG files. The conversions occur quickly, and you can add your email account to get quick alerts for the completion of the process.

How to download: Online tool
Rating: 4.6 stars out of 5 (mywot.com)
Compatible OS: web-based
Price: Free
Main Features:
- Add specific input format.
- Include the preferred output format.
- Insert email for notifications.
- Support files to be added from the device library.
Pros
- Quicker process of conversion.
- A variety of file formats are compatible.
- Categorized list of formats like documents, images, videos, etc.
Cons
- Can include third-party unauthorized sites that transfer users to other pages.
- No video formats for output.
Pro Tips: How to Convert GIF to Video for Free?
Besides utilizing suitable tools to convert GIFs into PNG or other image files, you can also use the best GIF to video converters. For example, with Wondershare Filmora , you can easily convert GIFs or other image files into video files. In addition, some editing options, like GIFs, allow users to create videos after merging image files.
Free Download For Win 7 or later(64-bit)
Free Download For macOS 10.14 or later
Step1Launch the Filmora software.
Step2Press the “New Project” section and then access “Click to import media files.”

Add the image files, like GIFs, into the editor.

Step3Drag the files to the editing timeline. Use customization settings like Speed, Animation, Audio, Effects, etc., to edit the file.

Step4Click on Export > Local > Mp4. You can choose other video formats too.
Step5Add file information like saving location, name, and formatting specification.

Step6Click on the Export button.
Final Words
You can easily use one of the given tools to convert GIF files into varying image file types. There are fully online options like CloudConvert, and certain choices with a software version, like Online Convert. Try each at least once for the best results to know which fits your needs perfectly.
Also read:
- An Overview of the Best Free LUTs to Use
- Updated In 2024, How to Use Canva Color Match
- New 2024 Approved This Article Aim to Teach You How to Make a Night to Day Effect Video with Filmora. Follow the Steps to Figure It Out
- Updated 2024 Approved MP3 CUTTER DOWNLOADMP3 Cutter Download Is One of the Most Reliable Tools for Editing of Music Files in a Fast and Friendly Way
- Updated In 2024, Steps to Denoise in Final Cut Pro – Reduce Video and Audio Noise
- New Are You Excited to Find Out the Top-Class VHS Video Effects Maker? Put Your Worries at Rest because This Article Will Provide the Best VHS Effect Makers
- New In 2024, Top 31 Video Trimmers That Will Save You Time in Ediitng
- New In 2024, If You Want to Know How to Live Stream Pre-Recorded Video, You Are in the Right Place. We Will Give You a Complete Guide on 8 Ways You Can Live Stream Pre-Recorded Videos Successfully
- Updated In 2024, If You Dont Know How to Blur a Part of a Video, Youre in the Right Place. We Have Provided All the Details You Need to Help You Blur a Still or Moving Portion of Your Video
- Learn How to Create Custom Titles in Filmora and Add a Unique Lower Third Animation Effect in Six Simple Steps
- Updated In 2024, How to Remove Audio From Video on Mac? Free and Official Solutions
- SRT Not Displaying How to Open and Use SRT File in VLC, In 2024
- New 2024 Approved How Have Game Recording Software Improved Their Stature in the Market? An Overview
- Updated 2024 Approved How To Use Speed Ramping to Create an Intense Action Footage
- 2024 Approved How to Loop a Video on Android
- 2024 Approved How to Use GIMP GREEN SCREEN
- Updated Making Creative and Engaging Youtube Videos Is Now Easy with Several Tools. Now, YouTube Also Offers You Its Own Built-In Video Editor Through Which You Can Edit and Enhance the Video Quality
- In 2024, How to Mirror Google Pixel 7a to Mac? | Dr.fone
- Will the iPogo Get You Banned and How to Solve It On Nokia C210 | Dr.fone
- Why does the pokemon go battle league not available On Apple iPhone SE (2020) | Dr.fone
- Which Pokémon can Evolve with a Moon Stone For Vivo Y200? | Dr.fone
- How To Unbrick a Dead Oppo A78 | Dr.fone
- Can I Bypass a Forgotten Phone Password Of Oppo Find X6 Pro?
- In 2024, 9 Best Phone Monitoring Apps for Vivo G2 | Dr.fone
- How to Update Apple iPhone 6s without Losing Anything? | Dr.fone
- In 2024, Apple ID Locked or Disabled From Apple iPhone 14 Plus? 7 Mehtods You Cant-Miss
- How to Reset Honor V Purse without Losing Data | Dr.fone
- Prank Your Friends! Easy Ways to Fake and Share Google Maps Location On Oppo A79 5G | Dr.fone
- Why is iPogo not working On Vivo Y36? Fixed | Dr.fone
- Title: Updated How To Use Speed Ramping to Create an Intense Action Footage
- Author: Morgan
- Created at : 2024-05-19 05:12:04
- Updated at : 2024-05-20 05:12:04
- Link: https://ai-video-editing.techidaily.com/updated-how-to-use-speed-ramping-to-create-an-intense-action-footage/
- License: This work is licensed under CC BY-NC-SA 4.0.

