
:max_bytes(150000):strip_icc():format(webp)/ps5controller-0d702b25f7fa47b482999811cfc7af39.jpg)
Updated How to Zoom Picture in Picture Easy Solution
How to Zoom Picture in Picture [Easy Solution]
Zoom is one of the greatest options on the market for video conferencing. It doesn’t matter whether you use it at home or in an office environment; it will quickly link the team members. One of the most popular video conferencing programs is Zoom. When in-person meetings aren’t feasible, it enables you to communicate electronically with employees, and it’s been a major popularity for social occasions as well. In case you’re not acquainted, picture-in-picture mode enables you to watch videos from one app while using your PC normally. The movie will keep playing in a tiny thumbnail window so that two applications may work simultaneously on your smartphone.
You may create virtual audio and video conferences, webinars, live chats, screen sharing, and other collaboration tools with Zoom, a cloud-based video communications solution. Zoom’s most recent iPhone apps let you dismiss a Zoom Meeting while keeping the Zoom video call open in a picture-in-picture mode. To join a Zoom conference, you don’t need an account, and because the software works with Mac, Windows, Linux, iOS, and Android devices, nearly anybody can use it. Since using Zoom’s picture-in-picture mode is the same as using it with other applications, you shouldn’t have any trouble if you often use PiP mode. Here are the top 4 methods you can refer to picture in picture in Zoom.
Method 1: Swap Shared Screen with Video
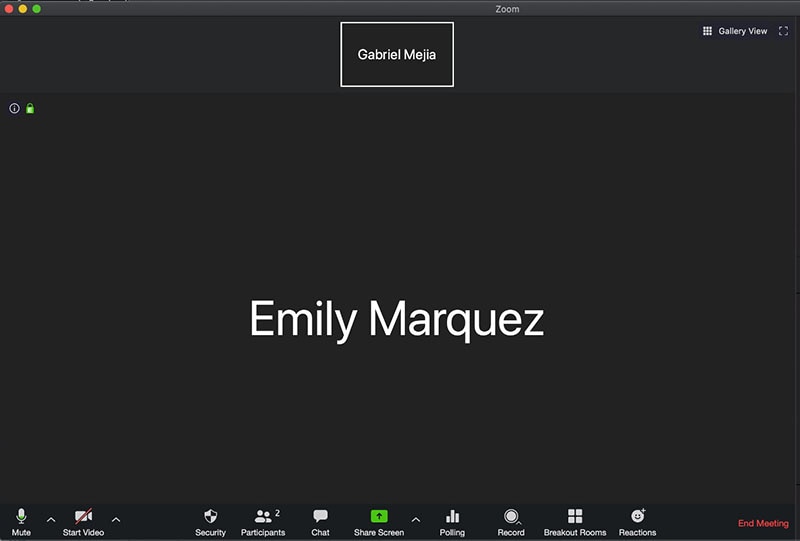
You may move the Zoom Meeting PiP window across the screen, change the thumbnail’s size, and utilize other applications while it remains open, just like any other picture-in-picture window. Before leaving the meeting if you’re not giving a presentation or speaking, you should definitely mute Zoom on your iPhone to prevent noises from your typing or other activities from entering the conversation. Additionally, keep in mind to switch off the camera if you’re engaged in something distracting, at least for the duration of your activity. To reopen the Zoom Meeting and go back to the Zoom app, touch the Picture-in-Picture mode pane. Here are some actions to keep in mind:
Steps to Swap Shared Screen for Zoom Picture in Picture
Step1Launch or enter a Zoom meeting. Keep the video on your main screen at all times, closing the chat and participant list as necessary.
Step2Tap the Home button or swipe up from the bottom of the screen.
Step3Picture-in-picture mode should be activated automatically throughout the meeting.
Method 2: Use Ecamm Live
Live streaming is a fantastic way to provide original content and stand out from the crowd. To prevent any operational difficulties, a more sophisticated virtual camera is absolutely necessary. You now have magical abilities thanks to Ecamm virtual cam, including the ability to add text, animations, observe a live stream, post viewer comments, play music, share your screen, use sound effects, and many more. It offers the Ecamm live virtual camera zoom function for video conferences so you may improve your Zoom discussions by sending output to other PC programs. You could see a quality difference between what you view in Ecamm Live and what your Zoom visitors see while utilizing virtual camera with Zoom. The quality of a Zoom video stream cannot be improved using Ecamm Live. Simply broadcast the Zoom app using Ecamm Live’s Screen Share mode to utilize Ecamm Live for picture-in-picture virtual presentations on Zoom.
Steps to Use Ecamm Live for Zoom Picture in Picture
Step1Download the Ecamm Application
Install Ecamm Live on your computer, then choose the center button in the source switcher at the top of the main window to enter Screen Share mode.
Step2Create Scenes
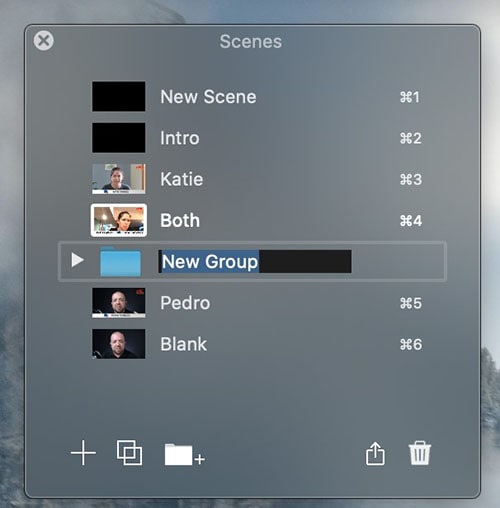
With the use of Ecamm Live’s Virtual Camera and Virtual Mic capabilities, you may transfer Ecamm Live’s output to almost any other Mac software, including Zoom. After setting, create the scenes in the program to quickly switch between various cameras.
Step3Select Ecamm on Zoom
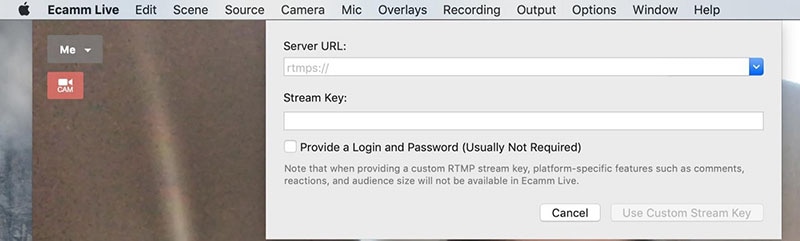
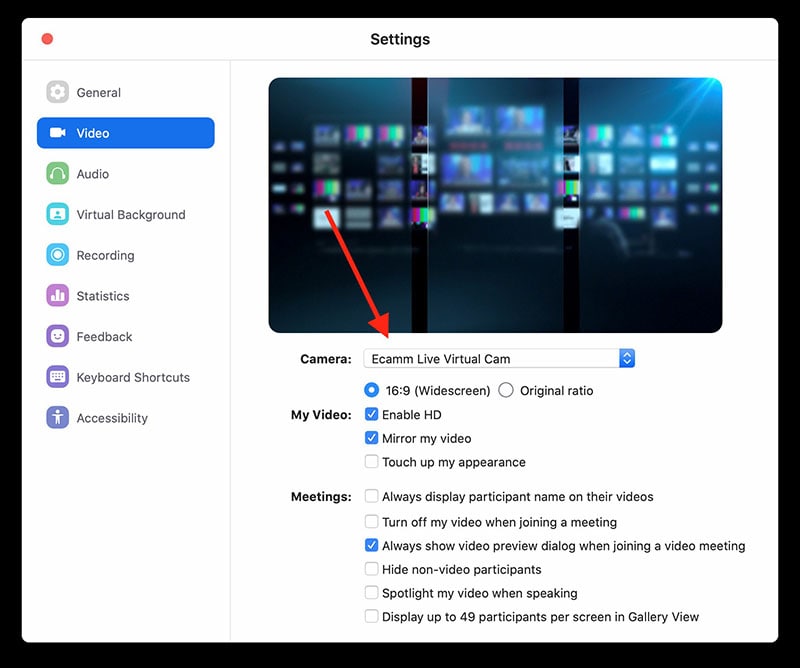
You may also utilize Ecamm Live’s Sharing Window capability to feed Ecamm Live output into Zoom. Simply activate the virtual camera, and then, as seen below, choose Ecamm Live Virtual Camera in Zoom’s video settings:
Step4Begin Your Presentation
Finally, click the PC share option to show your Zoom app to your audience. To conceal a picture-in-picture window that displays your camera image while live streaming, click the PIP button.
Method 3: Use Filmora as A Switcher
Zoom has solutions that will make your meetings simple and secure. It gives your remote staff a secure setting to interact and share crucial information. Ideal control over your film and configuration options to make them aesthetically pleasing is something Zoom lacks. To overcome the drawbacks and improve the quality of your online meetings, you may take use of the capabilities of Zoom in conjunction with Filmora. Filmora was developed with the intention of easing user burden and supporting applications. Though complicated, the program is simple to use. The perhaps most popular web information that may be saved on your computer can be easily captured by just angling your screen. For more information on how to record and save your Zoom for picture in picture, see the guide here.
To broadcast a variety of situations in a grid style, you may also combine inputs from your camera, microphone, computer screen, and web conferencing software. Wondershare -the finest desktop application for recording a Zoom Picture in Picture meeting- is Filmora. With the majority of cameras, this app’s screen recording capability is both user-friendly and feature-rich. Here, users may either choose a particular region to record or record their zoom meetings in Fullscreen mode. Additionally, you may choose the camera and input microphone that will be used while recording a video overlay. The addition of relevant comments like phrases, lines, drawings, symbols, etc. is also possible by users. The detailed procedure for recording a Zoom Picture-in-Picture meeting using a Filmora recorder is given below:
Free Download For Win 7 or later(64-bit)
Free Download For macOS 10.14 or later
Step1Download and Install Filmora Zoom Recorder
You may find both types, i.e., the most recent Windows and Mac versions, by first visiting the usual website and then using this Zoom. Install the program on your computer once you download it to get started.

Step2Initiate Filmora Recorder
After finishing the installation process for this Reside Zoom recorder, launch it from the main menus and choose “New Task” when prompted. It will take you to Filmora’s streamlined user interface where you can immediately start filming. Then, as seen in the picture below, you may adjust the screen recording using your preferred camera, microphone, and system settings:

Step3Begin/End the Recording
When you are through configuring this Zoom picture in picture recorder, click the Record button, and it will immediately begin recording your customized screen. Similar to that, after you’re done recording, click Stop, which will take you inside the video editor where you may edit your recorded information.

Step4Share Recordings
When you have everything ready, export your recording right away. After you’re done with the editing part, you do have a lot of options to choose from when displaying your screen capture and webcam stories. To do so, click the Export button in the item user interface’s top-right corner as shown below:
You may easily choose your preferred way to share from there if you choose to upload your work of zoom picture in picture recordings straight to the YouTube or other reputable websites right now. Simply refer to the Sharing plug-ins in the Export window to find out more.
Method 4: Use Hardware Switcher ATEM Mini Pro
Particularly on Zoom, the ATEM Mini is excellent for video conferences. The Blackmagic ATEM Mini is a USB video interface and HDMI switcher. Four HDMI inputs, or four cameras that can produce an HDMI video stream, may be switched between live. This device integrates Zoom meetings fast and makes it incredibly simple to set up your audio, a sometimes-forgotten aspect of video broadcasting. This sophisticated video switcher promises to offer broadcast-quality multi-camera footage with ease and is targeted at gamers, streamers, and online reviewers. It connects to a computer via a USB-C to USB-A connection. The video feed may then be sent to distant colleagues via a number of well-liked videos streaming services, including Zoom.
Step1The ATEM Mini Pro is a basic control switcher with pro-broadcast performance. Your ATEM Mini Pro is really simple to set up. You can connect a full setup with several cameras and microphones in around 30 minutes.
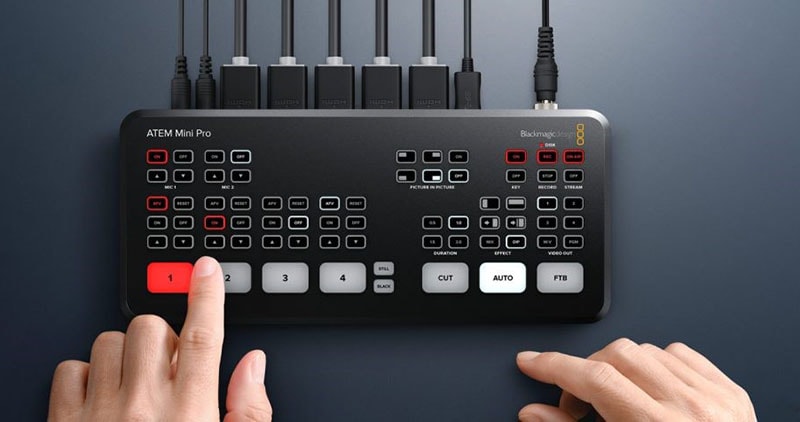
Step2You may connect several camera sources to the inputs of the ATEM Mini Pro. The 4 HDMI inputs each have a separate standards converter built in. As a result, the ATEM Mini can automatically convert inputs that are 1080p, 1080i, or 720p to the switcher’s video standard. You may make quick changes between inputs with no latency or disruption to your video output by using the ergonomic buttons.
Step3As a third option, Zoom offers ATEM Mini, which enables you to switch between several inputs, add custom visuals, and adjust audio levels all from a single interface. To improve the quality of your production, you may even use smooth transitions like wipes or fades. You can even test any input stream before making it live.
Conclusion
When you are doing a Zoom Meeting and share your screen, only to discover that what the other attendees see is a split screen with your material and the other Attendee cams, it is highly annoying. You may move the Zoom Meeting PiP window across the screen, change the thumbnail’s size, and utilize other applications while it remains open, just like any other picture-in-picture window. Someone must be sharing information in the Zoom conference for the Picture in Picture, or “Split Screen” option, to be active. We’ve listed the top techniques for doing it effectively above. To do this work without difficulty, use them as your guide.
Free Download For macOS 10.14 or later
Step1Download and Install Filmora Zoom Recorder
You may find both types, i.e., the most recent Windows and Mac versions, by first visiting the usual website and then using this Zoom. Install the program on your computer once you download it to get started.
Step2Initiate Filmora Recorder
After finishing the installation process for this Reside Zoom recorder, launch it from the main menus and choose “New Task” when prompted. It will take you to Filmora’s streamlined user interface where you can immediately start filming. Then, as seen in the picture below, you may adjust the screen recording using your preferred camera, microphone, and system settings:
Step3Begin/End the Recording
When you are through configuring this Zoom picture in picture recorder, click the Record button, and it will immediately begin recording your customized screen. Similar to that, after you’re done recording, click Stop, which will take you inside the video editor where you may edit your recorded information.
Step4Share Recordings
When you have everything ready, export your recording right away. After you’re done with the editing part, you do have a lot of options to choose from when displaying your screen capture and webcam stories. To do so, click the Export button in the item user interface’s top-right corner as shown below:
You may easily choose your preferred way to share from there if you choose to upload your work of zoom picture in picture recordings straight to the YouTube or other reputable websites right now. Simply refer to the Sharing plug-ins in the Export window to find out more.
Method 4: Use Hardware Switcher ATEM Mini Pro
Particularly on Zoom, the ATEM Mini is excellent for video conferences. The Blackmagic ATEM Mini is a USB video interface and HDMI switcher. Four HDMI inputs, or four cameras that can produce an HDMI video stream, may be switched between live. This device integrates Zoom meetings fast and makes it incredibly simple to set up your audio, a sometimes-forgotten aspect of video broadcasting. This sophisticated video switcher promises to offer broadcast-quality multi-camera footage with ease and is targeted at gamers, streamers, and online reviewers. It connects to a computer via a USB-C to USB-A connection. The video feed may then be sent to distant colleagues via a number of well-liked videos streaming services, including Zoom.
Step1The ATEM Mini Pro is a basic control switcher with pro-broadcast performance. Your ATEM Mini Pro is really simple to set up. You can connect a full setup with several cameras and microphones in around 30 minutes.
Step2You may connect several camera sources to the inputs of the ATEM Mini Pro. The 4 HDMI inputs each have a separate standards converter built in. As a result, the ATEM Mini can automatically convert inputs that are 1080p, 1080i, or 720p to the switcher’s video standard. You may make quick changes between inputs with no latency or disruption to your video output by using the ergonomic buttons.
Step3As a third option, Zoom offers ATEM Mini, which enables you to switch between several inputs, add custom visuals, and adjust audio levels all from a single interface. To improve the quality of your production, you may even use smooth transitions like wipes or fades. You can even test any input stream before making it live.
Conclusion
When you are doing a Zoom Meeting and share your screen, only to discover that what the other attendees see is a split screen with your material and the other Attendee cams, it is highly annoying. You may move the Zoom Meeting PiP window across the screen, change the thumbnail’s size, and utilize other applications while it remains open, just like any other picture-in-picture window. Someone must be sharing information in the Zoom conference for the Picture in Picture, or “Split Screen” option, to be active. We’ve listed the top techniques for doing it effectively above. To do this work without difficulty, use them as your guide.
Green Screen YouTube Videos
This is a large green backdrop that is placed in the background of a shot to allow for digital effects later on. A majority of popular YouTube vloggers use green to enhance interesting background views to their videos. Screen replaces the background and adds depth and visually interesting patterns that ends up keeping the viewer captivated.
Why use Green Screen
1. Creativity
There are several effects that can be applied to green screen video editing in the editing process, it gives one a chance to explore their imagination. A good editor can really customize the video to make the production really stand out from those of the competitors.
2. Flexibility
There are portable green screens that can be taken to any location of choice for video shooting. Location allows one endless possibilities without having to spend time and resources doing assembling of different sets and backgrounds. The desired feel to the video can be simply achieved by an image.
3. Budget
Filming YouTube using green screen is a cost effective way of producing professional video content on a small budget. This is a great idea for upcoming YouTube vloggers as expenses catering for travel and location are eliminated.
4. Consistency
At some point in YouTube green screen use, you may be affected by the weather and worse pf all, natural lighting may end up being problematic while you are on location doing your video shots. However, with YouTube Video green screen technology, ambient lighting is blocked out and the screen can be lit the same way every time. This brings consistency over a number of videos the user applies green screen on.
5. Clarity
Youtube video green screen allows for an additional visual ellements and diagrams such as graphics, this can be added on to the video to illustrate what the speaker is saying. This green screen effect helps the viewer to gain a better understanding of any concepts or complex illustrations mentioned by the presenter.
6. Branding
YouTube green screen logo and branding colors can be easily added into the video, this can easily make the viewers to identify the video with your business. Apart from standing out from other competitors, you will also have a professional, high quality and reliable video to use anytime you please.
Best Places to find Green Screen Effects
Filmstock
Filmstock features a massive library full of royalty-free stock video, video effects, sound effects, video templates, and so much more. There are resources on the platform for all kinds of creators, including video editors, content creators, social media influencers, and marketers. You get unlimited access to all these resources for a single price when you subscribe to Filmstock. While there are other marketplaces that offer similar options, Filmstock does things differently.
Green Screen Effects
1. Balance Beam
Ever wanted to walk across a small beam way high up in the air? Me neither, but you can make a cool effect that looks like you did. Throwing a green screen on the ground and then building a balance beam over top of it you can start recording the main shot. Strap a GoPro to your head and look down while walking across the beam.
2. Shrink Effect
Okay this one is really easy. Take some footage of a person walking in front of a green screen, ideally looking at something to be featured in the main shot to sell the effect. Then take a close up of a small object. Key out the green behind the person, take the footage and drop it over your close up, and then scale it to match. Duplicate it, mirror it horizontally to act as a reflection and then drop the opacity and add some blur to make it look more realistic. It’s a fun little trick.
3. Floating Object
This is a simple one, making an object appear to be floating. This is another two clip shot. First, take a shot with the object hanging in front of a blue screen. Then on the same location, take another shot but while pretending to levitate the hammer. Masking around the hammer will get rid of the string for hanging, key out the blue, and then dropping it on top of the other clip is all you need.
Best Green Screen Video Editor for YouTube
Filmora
If you’re just starting out with video editing, or just want a simple program that works, Wondershare Filmora might be what you’re looking for. It has the essential tools, and anyone can learn to use it easily.
Wondershare Filmora is the one of best video editing software with cool features that compares to other competing video editing Softwares. Many video editing programs claim to offer professional results; Filmora is one of a few consumer-level tools that actually delivers.
For Win 7 or later (64-bit)
For macOS 10.12 or later
Installation Steps
- Click the icon in the center of the Media Library to add files directly.
- Go File > Import Media > Import Media Files.
- Drag and drop to the Media Library directly.
While importing a media file, Wondershar Filmora may ask you if you wish to create a proxy file to accelerate the editing process. Select “Yes” to have a fast video editing experience.
You can also import video clips using your Touch Bar controls if your computer has Touch Bar.
Record a media file
Apart from the videos shot by your digital devices, you can also directly import media files by recording video from your webcam, capturing the computer screen, or recording a voice-over.
Find green screen effects: Now you can select the different types of green screen effects.

Apply green screen: drag the effects to the timeline to apply it to your videos.

Save and Export: Then you can save or export the video.
A green screen is a green surface used as a background when filming so that any image can replace the screen behind the actor or presenter. Shooting with a green screen involves filming a person or adding visual effects in front of a solid color. Then, by digitally removing or “keying out” that color, you can drop that scene onto the background of your choice in post-production. Removing the colored background is also referred to as “chroma keying.”
Steps with Images
The first step is to record footage in front of a green screen so that you can import it into WeVideo as a media file. To capture footage that is optimal for the Green Screen effect, please ensure the following:
- There is ample lighting distributed evenly around you with no shadows.
- You are in front of a solid background with no creases. Green or blue is the recommended color for your background.
- The quality of your camera is high enough so that the footage is not pixelated or grainy. 720p HD footage or above is recommended.
Step 2) Add media to the Timeline
Once you’ve captured the footage you want to use for the Green Screen effect, import that media file and add it to the Timeline. Remember to place the green screen footage in the Video 2 track and the clip you would like to use as the background in the Video 1 track.
If you are using more than two video tracks, place the green screen footage in the track above whichever track holds the background footage to ensure proper layering techniques are used.
Step 3) Open the clip editor
Double click on the green screen clip in the Timeline to open the clip editor. In the clip editor, navigate to the Color Keying tab.
Step 4) Use the color picker tool
Select the color picker tool and then click anywhere on the green screen footage to apply the effect.
Step 5) _(optional) Adjust the color settings
The Green Screen effect should automatically apply without the need to adjust the color settings. However, if you would like to make these additional modifications, you can use the scroll bars to make the following adjustments:
- **Show- You can select Mask to reveal a black and white representation of the mask you are applying using the color keying tool. Notice that the black area represents transparent sections of your video, while the white area represents opaque sections.
- **Color Balance- This adjusts how selective the effect is. The further right you scroll, the wider the range of tints and shades are removed.
- **Color Sensitivity- This smooths out any pixelation and rough edges of color that remain.
- **Defringe- This helps reduce color bleeding at the edges of your mask. The left and right sliders control the level of white and black respectively to help match the edges of the mask with your new background color.
For macOS 10.12 or later
Installation Steps
- Click the icon in the center of the Media Library to add files directly.
- Go File > Import Media > Import Media Files.
- Drag and drop to the Media Library directly.
While importing a media file, Wondershar Filmora may ask you if you wish to create a proxy file to accelerate the editing process. Select “Yes” to have a fast video editing experience.
You can also import video clips using your Touch Bar controls if your computer has Touch Bar.
Record a media file
Apart from the videos shot by your digital devices, you can also directly import media files by recording video from your webcam, capturing the computer screen, or recording a voice-over.
Find green screen effects: Now you can select the different types of green screen effects.
Apply green screen: drag the effects to the timeline to apply it to your videos.
Save and Export: Then you can save or export the video.
A green screen is a green surface used as a background when filming so that any image can replace the screen behind the actor or presenter. Shooting with a green screen involves filming a person or adding visual effects in front of a solid color. Then, by digitally removing or “keying out” that color, you can drop that scene onto the background of your choice in post-production. Removing the colored background is also referred to as “chroma keying.”
Steps with Images
The first step is to record footage in front of a green screen so that you can import it into WeVideo as a media file. To capture footage that is optimal for the Green Screen effect, please ensure the following:
- There is ample lighting distributed evenly around you with no shadows.
- You are in front of a solid background with no creases. Green or blue is the recommended color for your background.
- The quality of your camera is high enough so that the footage is not pixelated or grainy. 720p HD footage or above is recommended.
Step 2) Add media to the Timeline
Once you’ve captured the footage you want to use for the Green Screen effect, import that media file and add it to the Timeline. Remember to place the green screen footage in the Video 2 track and the clip you would like to use as the background in the Video 1 track.
If you are using more than two video tracks, place the green screen footage in the track above whichever track holds the background footage to ensure proper layering techniques are used.
Step 3) Open the clip editor
Double click on the green screen clip in the Timeline to open the clip editor. In the clip editor, navigate to the Color Keying tab.
Step 4) Use the color picker tool
Select the color picker tool and then click anywhere on the green screen footage to apply the effect.
Step 5) _(optional) Adjust the color settings
The Green Screen effect should automatically apply without the need to adjust the color settings. However, if you would like to make these additional modifications, you can use the scroll bars to make the following adjustments:
- **Show- You can select Mask to reveal a black and white representation of the mask you are applying using the color keying tool. Notice that the black area represents transparent sections of your video, while the white area represents opaque sections.
- **Color Balance- This adjusts how selective the effect is. The further right you scroll, the wider the range of tints and shades are removed.
- **Color Sensitivity- This smooths out any pixelation and rough edges of color that remain.
- **Defringe- This helps reduce color bleeding at the edges of your mask. The left and right sliders control the level of white and black respectively to help match the edges of the mask with your new background color.
Most-Used 3 Ways to Compress Video for Instagram Story, Feed, and IGTV
Did your high-quality 4K video become total garbage when uploaded to Instagram? If it’s a yes from your side, then what you need now is a video compressor for Instagram. This article will cover how to compress a video for Instagram while maintaining its quality with a professional video editing tool, online video editors, and mobile phone applications.
But first, let’s look for the things we need to know before compressing a video for Instagram.
Part 1: Before reducing video size for Instagram, things you need to know
If you want to use a video compressor for Instagram, you must know the specific requirements of an Instagram video. Instagram only accepts MP4, MOV, or GIF videos and has concrete limitations on almost every video aspect. But you don’t have to be tense because for your ease, we have compiled all those limitations on Story, Reel, Live, or feed videos into a tabular form. Here it is,
| Features | Feed Video (landscape, square, portrait) | Story | Reels | Live |
|---|---|---|---|---|
| Size guide | Max 60 sec | Max 15 sec | Max 90 sec | Max 60 min |
| Aspect ratio | 16:9 for landscape, 1:1 for square, 4:5 for portrait | 9:16 | 9:16 | 9:16 |
| Frame rate.( frame per sec) | 23 - 60 FPS | Min 30 FPS | Min 30 FPS | Min 30 FPS |
| File size | Max 4 GB | Max 4 GB | Max 4 GB | Max 4 GB |
| Upload video captions | Can upload a full caption and Up to 30 Hashtags | No caption Upto 10 hashtags per story. | Can upload a full caption and up to 30 Hashtags | Auto-generated captions uploaded if enabled |
| 60- second feed reviews | MP4/MOV/GIF | MP4/MOV/GIF | MP4/MOV | MP4/MOV |
| Minimum dimensions.(pixels) | 600×315 for landscape, 600×600 for square, 600×750 for portrait | 600 x 1067 | 600 x 1067 | 600 x 1067 |
| Maximum dimension(pixels) | 1080 x 608 for landscape, 1080 x 1080 for square, 1080 x 1350 for portrait | 1080 x 1920 | 1080 x 1920 | 1080 x 1920 |
That’s a lot of information, right? That’s why we have sorted out the best Instagram video compression settings recommended to make a high-quality video for Instagram, which are as.
Format:
Resolution: 720P or 1080P
Bitrate:
3Mbps-6Mbps
Frame rate:
30Fps
Now that you know all the specific requirements and the recommended video compression settings. Let us show you how to compress a video without losing quality for Instagram with a professional Video-Editing Tool.
Part 2: Compress Video Without Losing Quality for Instagram with a Professional Video-Editing Tool
Wondershare Filmora
Speaking of the simplest video compressor for Instagram on all recent Windows or macOS computers, Wondershare Filmora stands out as one of the best bets. In addition to video-editing, most users prefer this tool for compressing their videos before uploading them to Instagram. It is highly reliable and takes less time when compared to other methods and tools in the digital market.
Wondershare Filmora is not only trusted by a community of over 85 Million Users but is also an award-winning video editing tool in the market. Here are some awards and some customer reviews which it boasts of.
Free Download For Win 7 or later(64-bit)
Free Download For macOS 10.14 or later
Awards:
- G2 Leader Spring 2022: with a winning streak of 17 Quarters.
- Shorty Awards: “Best in Photo and Video” and “Audience Honor” awards on the 13th edition of shorty awards.
- Category Leaders 2022: “ Category Leaders in Video Editing” award.

Now some customer reviews.
Reviews
The evaluation of Wondershare Filmora by the people who have purchased or experienced it is almost always positive. This can be shown by the amazing reviews which people leave after using Wondershare Filmora. Here are some of the reviews about it.

Now, let’s move forward and see the key features provided byWondershare Filmora.
Main Features
WondrShare Filmora is one of the best Video Editing tools out there. Not only it’s an excellent video compressor for Instagram, but it also provides all the powerful editing tools one could want. Here are the main features which Wondershare Filmora provides.
- Filmora allows users to create GIF from all popular video formats like .wmv, .mp4, .mkv, .evo, .dat, .wav, .mpeg and .avi etc. so you need not to worry about compatibility issues.
- The best thing to know about the Filmora video editing software tool is that it allows users to edit GIF files with some basic editing tools like color correction, cropping, splitting, rotation, combining two or more frames, speeding up frame motion or slow down as per requirement.
- It allows you to edit files with text and other similar interesting elements.
- Moreover, you can also add some incredible effects to your videos by using Filmora.
- On top of that, its video compressing feature makes it an excellent video compressor for Instagram.
Now moving on to the Pros and Cons of using Wondershare Filmora.
Pros
- It is easy to use, even for beginners
- Multiple formats are supported
- Tutorials are available on youtube for their every feature
- Free trial is available for everyone
Cons
- Leaves a watermark (can be removed after buying the full version)
- Full features are available only in the premium version
- Latest versions operate slowly in weak capability computers
We’ve known that Wondershare Filmora is a great video compressor for Instagram. Let’s move to the step-by-step guide for using Wondershare Filmora to compress a video for Instagram.
Step1Download, install, and launch the program (buy the full version to enjoy its all features.)
Step2Change the Aspect Ratio from the first screen that appears and click on the “New Project” option.

Step3When the main screen appears, drag the video to the area shown below or click here to select the video from your storage to import the video to the software.

Step4Drag the video to the bottom area.

Step5Then click the “export” button above, and a new screen will appear.

Step6Change the video format from the left area to MP4 and click the “SETTINGS” button to change further settings.

Step7Then change the resolution, frame rate, and bit rate to the recommended values shown in part 1 of this article.

Step8Now the settings have been changed. Just click the export button to convert the video to the changed settings.

Easy right? Now let’s see how we can use an online video compressor for Instagram.
Part 3: Free Online Video Compressor to Resize Your Videos for Instagram
Although Wondershare Filmora is an incredible video compressor for Instagram, there are instances when someone’s computer doesn’t support it or if someone only uses video compressors once in a while.
If that is your case, you don’t need to buy expensive video compressors because we have made it easy for you. In this part of the article, we will discuss some outstanding free online video compressors to resize your videos for Instagram. So why wait? Let’s move on.
But there are myriad online video compressors, like VEED.IO, FreeConvert, Clipchamp, VideoSmaller, and Adobe Express. So which one to choose? Of course, it’s Adobe Express.
Adobe Express
Adobe Express is a free online tool for making quality images, videos, and texts for all your projects, all in one place.
On top of that, it enables you to quickly create standard social graphics, flyers, and logos without hassle. And the video editing tools in it make it an excellent video compressor for Instagram.
Let’s see some Pros and Cons of using Adobe Express as a video compressor for Instagram.
Pros
- Easy to use interface
- Free accounts are available and can also be upgraded to enjoy more amazing features
Cons
- Bitrate and framerate can’t be changed
Here are the step-by-step instructions to compress a video for Instagram.
Step1Go to Adobe Express and click the “start for free” button.

Step2Sign in using Google, Facebook, Apple, Email, or Adobe ID. Then the main screen of the Adobe Express will be shown.

Step3Click on the “ + “ sign in the top left corner.

Step4Here from the video editing tools section, select the “ Resize video .“

Step5Drag the video you want to compress here or open it from your storage.

Step6Now select the shape and resolution and click the Download button.

Step7Adobe Express will compress your video, and it will be downloaded automatically.

But What if someone wants to compress videos on their mobile phones? Is that possible? Of course, it is! Let us show you some amazing video compressors for Instagram on iPhone and Android.
Part 4: How to reduce video/mp4 size for Instagram on iPhone and Android
As the era of mobile phones is improving day by day, most social media applications, including Instagram, are used on either Android or iPhones. So if you took a high-quality 4K video from your mobile and are looking for a video compressor for Instagram, you don’t need to open your computer for this trivial matter. Because here are some of the best video compressor apps for android and video compressor apps for iOS.
All these have pros and cons, but we recommend using “Video Compress” to compress your high-quality video on Android or iPhone. And why is that? Because not only does it support all video formats but also provides the function of trimming, cropping, or rotating the video. Moreover, it also allows the audio removal to increase the video’s compression further.
Here are some Pros and Cons of using “Video Compress”
Pros
- Very simple to use
- On top of adjusting the quality between low and high, you can also make custom settings
- Can share the video directly from the app
Cons
- There is no search option; you must manually select the video from your storage
- No option for merging multiple videos into one
Here are the steps to compress video using Video Compress on Android phones.
Step1Download, Install and Launch the “Video Compress” from the AppStore.

Step2Open the folder containing the file, then select the video you want to compress.
Step3“Compress Video” will show you many options for editing your video. Press on the compress video option.

Step4Go to the Custom Settings and change the video resolution and bitrate to the ones recommended in Part 1 of this article.
Step5Finally, press the video compress icon on the bottom of the screen, and “Video Compress” will compress your video with the selected settings.

But there are some limitations, too, like it doesn’t change the aspect ratio and frame rate of the video, which are crucial for uploading it on Instagram. So we recommend using Wondershare Filmora if you are looking for a video compressor for Instagram.
Final Words
Compressing a high-quality video before uploading it on Instagram is necessary because of the concrete limitations of Instagram. In this article, we have gone over different video compressors for Instagram. Each of these video compressors can shrink the video without compromising its quality. So you can upload those videos on your Instagram feed, story, reels, or live videos effectively.
Did you use one of these video compressors for Instagram? Let us know your thoughts in the comments section below. Thanks for reading.
Part 1: Before reducing video size for Instagram, things you need to know
If you want to use a video compressor for Instagram, you must know the specific requirements of an Instagram video. Instagram only accepts MP4, MOV, or GIF videos and has concrete limitations on almost every video aspect. But you don’t have to be tense because for your ease, we have compiled all those limitations on Story, Reel, Live, or feed videos into a tabular form. Here it is,
| Features | Feed Video (landscape, square, portrait) | Story | Reels | Live |
|---|---|---|---|---|
| Size guide | Max 60 sec | Max 15 sec | Max 90 sec | Max 60 min |
| Aspect ratio | 16:9 for landscape, 1:1 for square, 4:5 for portrait | 9:16 | 9:16 | 9:16 |
| Frame rate.( frame per sec) | 23 - 60 FPS | Min 30 FPS | Min 30 FPS | Min 30 FPS |
| File size | Max 4 GB | Max 4 GB | Max 4 GB | Max 4 GB |
| Upload video captions | Can upload a full caption and Up to 30 Hashtags | No caption Upto 10 hashtags per story. | Can upload a full caption and up to 30 Hashtags | Auto-generated captions uploaded if enabled |
| 60- second feed reviews | MP4/MOV/GIF | MP4/MOV/GIF | MP4/MOV | MP4/MOV |
| Minimum dimensions.(pixels) | 600×315 for landscape, 600×600 for square, 600×750 for portrait | 600 x 1067 | 600 x 1067 | 600 x 1067 |
| Maximum dimension(pixels) | 1080 x 608 for landscape, 1080 x 1080 for square, 1080 x 1350 for portrait | 1080 x 1920 | 1080 x 1920 | 1080 x 1920 |
That’s a lot of information, right? That’s why we have sorted out the best Instagram video compression settings recommended to make a high-quality video for Instagram, which are as.
Format:
Resolution: 720P or 1080P
Bitrate:
3Mbps-6Mbps
Frame rate:
30Fps
Now that you know all the specific requirements and the recommended video compression settings. Let us show you how to compress a video without losing quality for Instagram with a professional Video-Editing Tool.
Part 2: Compress Video Without Losing Quality for Instagram with a Professional Video-Editing Tool
Wondershare Filmora
Speaking of the simplest video compressor for Instagram on all recent Windows or macOS computers, Wondershare Filmora stands out as one of the best bets. In addition to video-editing, most users prefer this tool for compressing their videos before uploading them to Instagram. It is highly reliable and takes less time when compared to other methods and tools in the digital market.
Wondershare Filmora is not only trusted by a community of over 85 Million Users but is also an award-winning video editing tool in the market. Here are some awards and some customer reviews which it boasts of.
Free Download For Win 7 or later(64-bit)
Free Download For macOS 10.14 or later
Awards:
- G2 Leader Spring 2022: with a winning streak of 17 Quarters.
- Shorty Awards: “Best in Photo and Video” and “Audience Honor” awards on the 13th edition of shorty awards.
- Category Leaders 2022: “ Category Leaders in Video Editing” award.
Now some customer reviews.
Reviews
The evaluation of Wondershare Filmora by the people who have purchased or experienced it is almost always positive. This can be shown by the amazing reviews which people leave after using Wondershare Filmora. Here are some of the reviews about it.
Now, let’s move forward and see the key features provided byWondershare Filmora.
Main Features
WondrShare Filmora is one of the best Video Editing tools out there. Not only it’s an excellent video compressor for Instagram, but it also provides all the powerful editing tools one could want. Here are the main features which Wondershare Filmora provides.
- Filmora allows users to create GIF from all popular video formats like .wmv, .mp4, .mkv, .evo, .dat, .wav, .mpeg and .avi etc. so you need not to worry about compatibility issues.
- The best thing to know about the Filmora video editing software tool is that it allows users to edit GIF files with some basic editing tools like color correction, cropping, splitting, rotation, combining two or more frames, speeding up frame motion or slow down as per requirement.
- It allows you to edit files with text and other similar interesting elements.
- Moreover, you can also add some incredible effects to your videos by using Filmora.
- On top of that, its video compressing feature makes it an excellent video compressor for Instagram.
Now moving on to the Pros and Cons of using Wondershare Filmora.
Pros
- It is easy to use, even for beginners
- Multiple formats are supported
- Tutorials are available on youtube for their every feature
- Free trial is available for everyone
Cons
- Leaves a watermark (can be removed after buying the full version)
- Full features are available only in the premium version
- Latest versions operate slowly in weak capability computers
We’ve known that Wondershare Filmora is a great video compressor for Instagram. Let’s move to the step-by-step guide for using Wondershare Filmora to compress a video for Instagram.
Step1Download, install, and launch the program (buy the full version to enjoy its all features.)
Step2Change the Aspect Ratio from the first screen that appears and click on the “New Project” option.
Step3When the main screen appears, drag the video to the area shown below or click here to select the video from your storage to import the video to the software.
Step4Drag the video to the bottom area.
Step5Then click the “export” button above, and a new screen will appear.
Step6Change the video format from the left area to MP4 and click the “SETTINGS” button to change further settings.
Step7Then change the resolution, frame rate, and bit rate to the recommended values shown in part 1 of this article.
Step8Now the settings have been changed. Just click the export button to convert the video to the changed settings.
Easy right? Now let’s see how we can use an online video compressor for Instagram.
Part 3: Free Online Video Compressor to Resize Your Videos for Instagram
Although Wondershare Filmora is an incredible video compressor for Instagram, there are instances when someone’s computer doesn’t support it or if someone only uses video compressors once in a while.
If that is your case, you don’t need to buy expensive video compressors because we have made it easy for you. In this part of the article, we will discuss some outstanding free online video compressors to resize your videos for Instagram. So why wait? Let’s move on.
But there are myriad online video compressors, like VEED.IO, FreeConvert, Clipchamp, VideoSmaller, and Adobe Express. So which one to choose? Of course, it’s Adobe Express.
Adobe Express
Adobe Express is a free online tool for making quality images, videos, and texts for all your projects, all in one place.
On top of that, it enables you to quickly create standard social graphics, flyers, and logos without hassle. And the video editing tools in it make it an excellent video compressor for Instagram.
Let’s see some Pros and Cons of using Adobe Express as a video compressor for Instagram.
Pros
- Easy to use interface
- Free accounts are available and can also be upgraded to enjoy more amazing features
Cons
- Bitrate and framerate can’t be changed
Here are the step-by-step instructions to compress a video for Instagram.
Step1Go to Adobe Express and click the “start for free” button.
Step2Sign in using Google, Facebook, Apple, Email, or Adobe ID. Then the main screen of the Adobe Express will be shown.
Step3Click on the “ + “ sign in the top left corner.
Step4Here from the video editing tools section, select the “ Resize video .“
Step5Drag the video you want to compress here or open it from your storage.
Step6Now select the shape and resolution and click the Download button.
Step7Adobe Express will compress your video, and it will be downloaded automatically.
But What if someone wants to compress videos on their mobile phones? Is that possible? Of course, it is! Let us show you some amazing video compressors for Instagram on iPhone and Android.
Part 4: How to reduce video/mp4 size for Instagram on iPhone and Android
As the era of mobile phones is improving day by day, most social media applications, including Instagram, are used on either Android or iPhones. So if you took a high-quality 4K video from your mobile and are looking for a video compressor for Instagram, you don’t need to open your computer for this trivial matter. Because here are some of the best video compressor apps for android and video compressor apps for iOS.
All these have pros and cons, but we recommend using “Video Compress” to compress your high-quality video on Android or iPhone. And why is that? Because not only does it support all video formats but also provides the function of trimming, cropping, or rotating the video. Moreover, it also allows the audio removal to increase the video’s compression further.
Here are some Pros and Cons of using “Video Compress”
Pros
- Very simple to use
- On top of adjusting the quality between low and high, you can also make custom settings
- Can share the video directly from the app
Cons
- There is no search option; you must manually select the video from your storage
- No option for merging multiple videos into one
Here are the steps to compress video using Video Compress on Android phones.
Step1Download, Install and Launch the “Video Compress” from the AppStore.
Step2Open the folder containing the file, then select the video you want to compress.
Step3“Compress Video” will show you many options for editing your video. Press on the compress video option.
Step4Go to the Custom Settings and change the video resolution and bitrate to the ones recommended in Part 1 of this article.
Step5Finally, press the video compress icon on the bottom of the screen, and “Video Compress” will compress your video with the selected settings.
But there are some limitations, too, like it doesn’t change the aspect ratio and frame rate of the video, which are crucial for uploading it on Instagram. So we recommend using Wondershare Filmora if you are looking for a video compressor for Instagram.
Final Words
Compressing a high-quality video before uploading it on Instagram is necessary because of the concrete limitations of Instagram. In this article, we have gone over different video compressors for Instagram. Each of these video compressors can shrink the video without compromising its quality. So you can upload those videos on your Instagram feed, story, reels, or live videos effectively.
Did you use one of these video compressors for Instagram? Let us know your thoughts in the comments section below. Thanks for reading.
Guide To Slowing Down Videos in Snapchat: Discussing the Details
Applying slow-motion effects using sophisticated cameras or apps was a matter of the past. In this digital era, mobile technology makes all kinds of video editing right in your palm. Snapchat is one such exciting application that combines editing and social interaction. Primarily, it’s a social media platform to share your moments in one-time played snaps.
Some of its features also include speed modifiers for creating slow-motion videos on Snapchat. The slow-motion Snapchat option is pretty simple to apply to your pre-recorded videos. This guide will teach you how to slow down a Snapchat video to avoid ambiguity. Keep reading and get some mobile apps for slow-motion videos other than Snapchat.
Slow Motion Video Maker Slow your video’s speed with better control of your keyframes to create unique cinematic effects!
Make A Slow Motion Video Make A Slow Motion Video More Features

Part 1: How Are Slow-Motion Videos Used by Social Media Users?
Snapchat offers creative sets of features to enhance the impact of captured media. This social media app can instantly slow down your video without any effort. Such videos can retain the viewers’ attention and urge them to explore the details. Plus, slow-motion videos encourage the audience to stay tuned to the upcoming content. Look at the below point to explore the uses of slow motion in Snapchat:
- Creating Comedy: Sometimes, people use slow-motion to turn their captured moments into comedy. For instance, you can add slow motion to your friend’s video of eating noodles. This way, a playful, hilarious, and entertaining element will be added to your content.
- Emphasizing Detail: Social media users usually slow down the video to enhance details. At normal speed, such details can easily be missed. Slowing down the sports, action shots, and fast-paced activities can reveal interesting details.
- Showcasing Skills: Dance and performance art videos can be slowed down with Snapchat. Social media users use slow-motion Snapchat to show talent and skills. Such footage allows viewers to appreciate the performance after watching the details.
- Capturing Nature: Aesthetic lovers use slow-motion effects to make their content appealing. They slow down the falling raindrops, clouds movements, and fluttering of butterfly wings. Capturing the beauty of nature this way resonates with social media users.
- Product Demonstration: Social media influencers showcase the product’s features in slow-motion videos. Snapchat assists them in making detailed and engaging videos with just a swap. Fashion and technology industries are influencing purchasing decisions through such videos.
Part 2: How to Slow Down Videos on Snapchat? A Simple Guide
You might be familiar with this famous social media app. If not, then let us simply tell you that it’s a platform to share fleeting pictures and videos. This top social media app was introduced in 2011, and according to stats, it grows 23% each year.
Some of its essential features include taking pictures and videos by adding filters and lenses. Now, let’s come to the point and learn how to make slow-motion videos on Snapchat:
Step 1
After getting Snapchat on your mobile phone, log in to an account. Open the app and record a video. To record, tap and hold down the “Capture” button at the lower part of the screen. Let it go when you are done recording a suitable clip.

Step 2
You can crop the video by clicking on the “Loop” button on the right side. Otherwise, just swipe the screen from left to right until you get a “Snail” icon. It will be the slow-motion effect that will reduce the speed of your video.

Step 3
Optionally, you can decorate or edit the clip using the right-side toolbar. When you are done editing, touch the “Save” icon at the bottom-left side. It will save the video in your camera roll or Snapchat Memories. Besides using the “Save” icon, you can click the “Next” button to share the video with your friends.

Part 3: Other Ways to Slow Down Videos to Post on Snapchat
The slow-motion effect is no more challenging as many apps are available online to do this. If you are unsatisfied with Snapchat’s motion video, this part is for you. Here, you can pick any app to make slow-motion videos and use plenty of editing features. These apps are useful for creating professional slow-mo videos right with your iOS or Android.
1. CapCut (Android | iOS )
This tool has made video creation effortless with video assets and flexible editing. It contains a cloud storage system that allows users to collaborate on projects freely. With its powerful features, users can remove background, split audio, and insert sounds. CapCut offers a feature to turn your normal videos into slow motion and alter the duration of clips.

Key Features
- It enables you to customize the pace of your video scenes separately. You can make slow-motion videos by using its “Speed” slider. Users can also track the previous and the latest video durations.
- The speed ramping features allow you to ensure a smooth transition in slow motions. To do so, you can choose the bullet, montage, and hero presets.
- Apart from making slow-motion videos, users can extract audio from videos. They just have to upload a video, and CapCut will extract original quality sound.
2. InShot (Android | iOS )
InShot claims to release your creativity through its video editing features. It offers seamless video trimming, splitting, and merging to get desired media. Users can adjust the speed of clips and add slow-motion or fast motions. Besides, they can insert sound effects, voice-overs, and popular music in their vlogs.

Key Features
- Despite slow-motion Snapchat, you can make a smooth slow motion in this editing app. It offers a speed option from which you can choose any Speed rate for your video.
- InShot tries to make your content breathe with its text and stickers. Users can add animated stickers and text using the timeline functions.
- Another specialty of this app is its aesthetic filters, such as Film and Cinema. Moreover, there are AI effects to provide a professional look to projects.
3. Videoshop (Android | iOS )
If you find slowing down videos on Snapchat difficult, try this video editing app. With its advanced editing tools, this versatile app can level up your social media expression. Some of its essential editing features involve rotation, merging, and flipping clips. Users can perform color correction, reverse, and slow down video functions.

Key Features
- Turning videos into fast motion, slow motion, and the reverse is quicker on Videoshop. You can swipe the speed slider towards the left and make a personalized slow-motion video.
- After getting a slow-mo, users can share it on popular social media apps. Some platforms include Snapchat, TikTok, WhatsApp, YouTube, etc.
- Besides, there are unlimited editing features to fine-tune your editing. It offers special effects, lip sync, animated titles, and GIFs to meet diverse needs.
Bonus Part: Guide made to Make Slow Motion Videos Easy with Wondershare Filmora
No doubt, the apps mentioned above are handy video editing tools. Such apps facilitate smartphone users, but what about PC users? For them, Wondershare Filmora is designed as an efficient video editing platform. This application is easy for all users and provides a wide range of editing tools. Beginners or non-tech persons can utilize an AI copilot editor for assistance in editing.
Free Download For Win 7 or later(64-bit)
Free Download For macOS 10.14 or later
How to Make Slow Motion Video with Optical Flow in Filmora
This editing platform can make slow-motion Snapchat videos of high quality. Users can adjust the slow-motion speed, apply speed ramping, or reverse the videos. Let’s explore all these features and get a slow-motion video by following the given steps:
Step 1Access Filmora and Import Media to Start a Project
Go to the official site of Filmora and ensure you install the latest version. Launch and enter the main interface. Click “New Project” and look for “Import” in the media panel. Browse and bring media to Filmora to start editing in the timeline section.

Step 2Discover the Uniform Speed Option
Place your cursor on the media and right-click on it. Look for the “Uniform Speed” option from the list and navigate toward the right-side panel. Alternatively, you can press the “Ctrl + R” key using your keyboard.

Step 3Adjust Speed for Slow Motion video with optical Flow
From Uniform Speed, move the “Speed” slider to the left. Keep moving until you set the desired “Duration” of the video. Afterward, head to the “AI Frame Interpolation” and extend the menu. Choose the “Optical Flow” option from the menu and get a preview of the results.

Step 4Continue Editing or Exporting the File
Lastly, shift to the top right corner and press “Export” if you are done editing. Otherwise, explore other features of Filmora.

Filmora is more than just a simple tool with cutting, trimming, and merging features. It is an AI platform that can generate music, scripts, and images for diverse needs. With its cloud storage, you can start editing where you left off. Smartphone users don’t have to worry because Filmora is now available as a mobile app.
Some Smart and Unique Features of Filmora
Completely exploring Filmora is not possible without knowing its key features. Thus, head down here and get a brief introduction to Filmora’s powerful functionalities.
AI Vocal Remover: Try this hot feature of Filmora to separate vocals from any song. This way, you can effortlessly remove vocals from audio and soundtracks. It enables you to dub videos with fresh and high-quality sound.
AI Copywriting: No more internet surfing for unique content when Filmora is here to help. With the ChatGPT plug-in, Filmora generates YouTube Titles and scripts. The AI-generated content proves engaging and perfectly aligns with your requirements.
Instant Mode: Like other editing apps, Filmora is also equipped with Instant mode. It provides video assets where you just have to upload clips in predesigned video templates. One thing Filmora has done differently is the editing options available until the last moment.
AI Smart Cutout: Who needs to record content with a green screen in this tech-based era? Enable this feature and remove unwanted objects and people with accuracy. Thus, users can make a clean video even when not recorded with a clean background.
Conclusion
Ultimately, the slow-motion filter is one of the options in Snapchat to make attractive snaps. In this guide, you’ve learned how to slow down videos on Snapchat. Besides, there were a few alternatives in the form of mobile apps. In search of a reliable platform, you can trust Filmora to make slow-motion videos easily.
Make A Slow Motion Video Make A Slow Motion Video More Features
Part 1: How Are Slow-Motion Videos Used by Social Media Users?
Snapchat offers creative sets of features to enhance the impact of captured media. This social media app can instantly slow down your video without any effort. Such videos can retain the viewers’ attention and urge them to explore the details. Plus, slow-motion videos encourage the audience to stay tuned to the upcoming content. Look at the below point to explore the uses of slow motion in Snapchat:
- Creating Comedy: Sometimes, people use slow-motion to turn their captured moments into comedy. For instance, you can add slow motion to your friend’s video of eating noodles. This way, a playful, hilarious, and entertaining element will be added to your content.
- Emphasizing Detail: Social media users usually slow down the video to enhance details. At normal speed, such details can easily be missed. Slowing down the sports, action shots, and fast-paced activities can reveal interesting details.
- Showcasing Skills: Dance and performance art videos can be slowed down with Snapchat. Social media users use slow-motion Snapchat to show talent and skills. Such footage allows viewers to appreciate the performance after watching the details.
- Capturing Nature: Aesthetic lovers use slow-motion effects to make their content appealing. They slow down the falling raindrops, clouds movements, and fluttering of butterfly wings. Capturing the beauty of nature this way resonates with social media users.
- Product Demonstration: Social media influencers showcase the product’s features in slow-motion videos. Snapchat assists them in making detailed and engaging videos with just a swap. Fashion and technology industries are influencing purchasing decisions through such videos.
Part 2: How to Slow Down Videos on Snapchat? A Simple Guide
You might be familiar with this famous social media app. If not, then let us simply tell you that it’s a platform to share fleeting pictures and videos. This top social media app was introduced in 2011, and according to stats, it grows 23% each year.
Some of its essential features include taking pictures and videos by adding filters and lenses. Now, let’s come to the point and learn how to make slow-motion videos on Snapchat:
Step 1
After getting Snapchat on your mobile phone, log in to an account. Open the app and record a video. To record, tap and hold down the “Capture” button at the lower part of the screen. Let it go when you are done recording a suitable clip.
Step 2
You can crop the video by clicking on the “Loop” button on the right side. Otherwise, just swipe the screen from left to right until you get a “Snail” icon. It will be the slow-motion effect that will reduce the speed of your video.
Step 3
Optionally, you can decorate or edit the clip using the right-side toolbar. When you are done editing, touch the “Save” icon at the bottom-left side. It will save the video in your camera roll or Snapchat Memories. Besides using the “Save” icon, you can click the “Next” button to share the video with your friends.
Part 3: Other Ways to Slow Down Videos to Post on Snapchat
The slow-motion effect is no more challenging as many apps are available online to do this. If you are unsatisfied with Snapchat’s motion video, this part is for you. Here, you can pick any app to make slow-motion videos and use plenty of editing features. These apps are useful for creating professional slow-mo videos right with your iOS or Android.
1. CapCut (Android | iOS )
This tool has made video creation effortless with video assets and flexible editing. It contains a cloud storage system that allows users to collaborate on projects freely. With its powerful features, users can remove background, split audio, and insert sounds. CapCut offers a feature to turn your normal videos into slow motion and alter the duration of clips.
Key Features
- It enables you to customize the pace of your video scenes separately. You can make slow-motion videos by using its “Speed” slider. Users can also track the previous and the latest video durations.
- The speed ramping features allow you to ensure a smooth transition in slow motions. To do so, you can choose the bullet, montage, and hero presets.
- Apart from making slow-motion videos, users can extract audio from videos. They just have to upload a video, and CapCut will extract original quality sound.
2. InShot (Android | iOS )
InShot claims to release your creativity through its video editing features. It offers seamless video trimming, splitting, and merging to get desired media. Users can adjust the speed of clips and add slow-motion or fast motions. Besides, they can insert sound effects, voice-overs, and popular music in their vlogs.
Key Features
- Despite slow-motion Snapchat, you can make a smooth slow motion in this editing app. It offers a speed option from which you can choose any Speed rate for your video.
- InShot tries to make your content breathe with its text and stickers. Users can add animated stickers and text using the timeline functions.
- Another specialty of this app is its aesthetic filters, such as Film and Cinema. Moreover, there are AI effects to provide a professional look to projects.
3. Videoshop (Android | iOS )
If you find slowing down videos on Snapchat difficult, try this video editing app. With its advanced editing tools, this versatile app can level up your social media expression. Some of its essential editing features involve rotation, merging, and flipping clips. Users can perform color correction, reverse, and slow down video functions.
Key Features
- Turning videos into fast motion, slow motion, and the reverse is quicker on Videoshop. You can swipe the speed slider towards the left and make a personalized slow-motion video.
- After getting a slow-mo, users can share it on popular social media apps. Some platforms include Snapchat, TikTok, WhatsApp, YouTube, etc.
- Besides, there are unlimited editing features to fine-tune your editing. It offers special effects, lip sync, animated titles, and GIFs to meet diverse needs.
Bonus Part: Guide made to Make Slow Motion Videos Easy with Wondershare Filmora
No doubt, the apps mentioned above are handy video editing tools. Such apps facilitate smartphone users, but what about PC users? For them, Wondershare Filmora is designed as an efficient video editing platform. This application is easy for all users and provides a wide range of editing tools. Beginners or non-tech persons can utilize an AI copilot editor for assistance in editing.
Free Download For Win 7 or later(64-bit)
Free Download For macOS 10.14 or later
How to Make Slow Motion Video with Optical Flow in Filmora
This editing platform can make slow-motion Snapchat videos of high quality. Users can adjust the slow-motion speed, apply speed ramping, or reverse the videos. Let’s explore all these features and get a slow-motion video by following the given steps:
Step 1Access Filmora and Import Media to Start a Project
Go to the official site of Filmora and ensure you install the latest version. Launch and enter the main interface. Click “New Project” and look for “Import” in the media panel. Browse and bring media to Filmora to start editing in the timeline section.
Step 2Discover the Uniform Speed Option
Place your cursor on the media and right-click on it. Look for the “Uniform Speed” option from the list and navigate toward the right-side panel. Alternatively, you can press the “Ctrl + R” key using your keyboard.
Step 3Adjust Speed for Slow Motion video with optical Flow
From Uniform Speed, move the “Speed” slider to the left. Keep moving until you set the desired “Duration” of the video. Afterward, head to the “AI Frame Interpolation” and extend the menu. Choose the “Optical Flow” option from the menu and get a preview of the results.
Step 4Continue Editing or Exporting the File
Lastly, shift to the top right corner and press “Export” if you are done editing. Otherwise, explore other features of Filmora.
Filmora is more than just a simple tool with cutting, trimming, and merging features. It is an AI platform that can generate music, scripts, and images for diverse needs. With its cloud storage, you can start editing where you left off. Smartphone users don’t have to worry because Filmora is now available as a mobile app.
Some Smart and Unique Features of Filmora
Completely exploring Filmora is not possible without knowing its key features. Thus, head down here and get a brief introduction to Filmora’s powerful functionalities.
AI Vocal Remover: Try this hot feature of Filmora to separate vocals from any song. This way, you can effortlessly remove vocals from audio and soundtracks. It enables you to dub videos with fresh and high-quality sound.
AI Copywriting: No more internet surfing for unique content when Filmora is here to help. With the ChatGPT plug-in, Filmora generates YouTube Titles and scripts. The AI-generated content proves engaging and perfectly aligns with your requirements.
Instant Mode: Like other editing apps, Filmora is also equipped with Instant mode. It provides video assets where you just have to upload clips in predesigned video templates. One thing Filmora has done differently is the editing options available until the last moment.
AI Smart Cutout: Who needs to record content with a green screen in this tech-based era? Enable this feature and remove unwanted objects and people with accuracy. Thus, users can make a clean video even when not recorded with a clean background.
Conclusion
Ultimately, the slow-motion filter is one of the options in Snapchat to make attractive snaps. In this guide, you’ve learned how to slow down videos on Snapchat. Besides, there were a few alternatives in the form of mobile apps. In search of a reliable platform, you can trust Filmora to make slow-motion videos easily.
Also read:
- New In 2024, Do You Want to Know How to Convert YouTube SBV Subtitles to SRT Format? Here Is an Ultimate Guide About It
- Updated 2024 Approved Want to Speed up Your Video to Create Short-Duration Instagram Reels? Here Is How You Can Change the Speed of Pre-Recorded and Live Videos on Instagram Reels
- In 2024, End Screen Makers
- New How to Add Text in Adobe Rush
- Updated 2024 Approved Right Tools for Converting 60FPS Frame Rate in Videos
- New 2024 Approved Splice App for Android - Guide to Download & Use
- 2024 Approved The Availability of the Slow-Motion Feature on the iPhone Is Often Debated. This Article Will Guide You on How to Slow Down a Video on iPhone
- New In 2024, The Complete Guide to Zoho Slides with Ease
- New In 2024, Finding Best GIF Websites Is Easy as Pie
- New How to Add Filter to Video Online
- New 2024 Approved Experience Time Differently with The Top Slow-Motion Applications
- Have You Ever Watched YouTube Live Streams? In Fact, You Can Also Start a Live Streaming on YouTube if You Want. Here Well Share some Tips to Live Stream on YouTube
- Updated Learning Unique Ways to Slow Down Time Lapse on iPhone for 2024
- Video Course and Online Learning Are Very Popular Nowadays. Here We Are Going to Recommend some of the Best Video Websites for Teachers to Use for 2024
- In 2024, Have You Ever Watched YouTube Live Streams? In Fact, You Can Also Start a Live Streaming on YouTube if You Want. Here Well Share some Tips to Live Stream on YouTube
- New In 2024, This Article Aims to Show You How to Export Videos in Filmora
- 2024 Approved End This Problem! Make Transparent Background Video Today
- Updated In 2024, 20 Must-Have Graduation Songs
- In 2024, Have You Tried Using a Craig Bot on Discord to Record Audio? Do You Have an Idea of Using a Discord Craig Bot Is Safe? Get Answers to These Questions and More From This Article as You Continue Reading
- New In 2024, Minecraft Pixel Art Is a Trending Subject, and They Simply Consist of In-Game Pixel Artworks, Besides the Minecraft Houses, Farms, or Cities. Lets Explore the Fantastic World of Minecraft Pixel Art
- 2024 Approved Learn How to Add Dynamic Shake Effects to Your Videos Using Alight Motion. Our Step-by-Step Guide Makes It Easy to Create Cinematic Footage
- New 3D Ray Traced Settings In After Effects for 2024
- In This Article, We Will Discuss What Lens Distortion Is, How It May Be Fixed, and the Factors You Need to Pay Attention to Avoid Lens Distortion when Taking or Recording Videos
- Updated How to Create a Custom Slide Show in PowerPoint
- Updated Deleting White Background in Photoshop Is Hard? No for 2024
- Updated In 2024, Making Slow Motion Videos in Final Cut Pro The Best Methods
- New How to Export Video From iMovie for 2024
- In 2024, VSDC Free Video Editor Review 2023
- New 2024 Approved Tutorial to Add Effects with Movavi Slideshow Maker
- A Guide To Adopting Lumetri Color Presets in Effective Color Grading for 2024
- New 2024 Approved Why Your Transparent GIF Is Hard to Remove and How to Do With It
- New 2024 Approved A Comprehensive Review of LUTs Finding LUTs Made by Danny Gevirtz
- New In 2024, Have the Desire to Create a Stylish Glitch Effect to a Text on Your Video? Use Filmora for the Editing, Following the Given Steps Explained in Detail
- Updated In 2024, Best Cinematic LUTs For Premiere Pro Recommendation
- How to Use LUTs in Lumafusion & Free Resource
- New Do You Have an Idea on How to Zoom in on Snapchat? Using This Article, You Will Find the Easiest Way to Zoom in and Out on Snapchat Videos for Different Purposes
- How To Make a Photo Collage in Microsoft Word
- Tutorial How To Add Motion Blur in Blender for 2024
- New 2024 Approved It Is Crucial to Introduce Your Kids to the Different Colors and Practice the Color Matching Game. So, Here Are the Various Factors Related to Color Matching for Your Child with a Tool to Help You in It Ideally
- Best Green Screen Software for Beginner on Mac for 2024
- New 7 Best MP4 Video Editors on Mac Edit MP4 Videos Easily
- New In 2024, A Guide to Understanding Efectum App and Some Top Alternatives
- In 2024, Detailed Steps to Resize Video in Davinci Resolve
- New Best Shortcut Towards Timeline Template for 2024
- Updated 10 Best Old Film Overlays to Make Your Videos Look Vintage
- 2024 Approved Top 5 Free Online Video Filter Editors Improve Your Videos with Filters
- Learn Color Correction in After Effects with These YouTube Videos for 2024
- In 2024, How To Create The Best AI Thumbnail Using The Right Tools?
- New This Article Talks About Pixel Art Wallpapers. It Gives Examples of Different Pixel Art to Show You How to Customize Your Own Pixel Art Wallpapers, and How to Make a Pixel Art Gif on Filmora for 2024
- How to Downgrade iPhone 13 Pro Max to an Older iOS System Version? | Dr.fone
- Top 15 Augmented Reality Games Like Pokémon GO To Play On Oppo Reno 9A | Dr.fone
- Rootjunky APK To Bypass Google FRP Lock For Vivo Y77t
- 3 Things You Must Know about Fake Snapchat Location On Nokia G42 5G | Dr.fone
- Prank Your Friends! Easy Ways to Fake and Share Google Maps Location On Realme 11 5G | Dr.fone
- How to Upgrade iPhone 13 mini without Losing Any Data? | Dr.fone
- How to Repair a Damaged video file of Realme GT 5 (240W)?
- How To Unlock SIM Cards Of Vivo V27 Without PUK Codes
- In 2024, How To Track IMEI Number Of Itel P55 5G Through Google Earth?
- In 2024, How to Transfer Contacts from Infinix GT 10 Pro to Outlook | Dr.fone
- In 2024, Is Mega Mewtwo The Strongest Pokémon On Apple iPhone 8? | Dr.fone
- Sim Unlock Motorola Moto G04 Phones without Code 2 Ways to Remove Android Sim Lock
- Why Apple Account Disabled From your iPhone 11 Pro? How to Fix
- How To Repair iOS of iPhone 13 Pro? | Dr.fone
- How to Intercept Text Messages on Xiaomi Redmi Note 12 Pro+ 5G | Dr.fone
- Title: Updated How to Zoom Picture in Picture Easy Solution
- Author: Morgan
- Created at : 2024-05-19 05:12:21
- Updated at : 2024-05-20 05:12:21
- Link: https://ai-video-editing.techidaily.com/updated-how-to-zoom-picture-in-picture-easy-solution/
- License: This work is licensed under CC BY-NC-SA 4.0.
