

Updated How to Zoom Webcam on PC for 2024
How to Zoom Webcam on PC
Making certain our digital presence is the best it can be pays dividends as more and more of what we do online; similar is the case with how to zoom out webcam windows 10. The majority of experts advise against using the built-in camera that comes with your laptop or computer and instead advocate getting a webcam or an HD camera. These, however, may be hard to come by and pricy if you locate a nice one. If the built-in camera on your laptop doesn’t perform effectively during Zoom meetings, you may want to consider about investing in a separate, better webcam. Webcams offer automatic settings that are intended to function with the largest variety of lighting situations possible. This suggests that they average out a great number of responses to the content of the frame. Because of this, we have incorporated basic PC webcam zooming settings. These answers may be found in the portions that follow.
It’s vital to know how to zoom in on a webcam before visiting there. The camera wasn’t always as vital as it is today, and only very large corporations could afford to employ it as a convenience. But today, nearly everyone, from huge organizations to little firms, acknowledges its value. Everybody needs a webcam that works properly. The camera control software you are using determines the zoom function. The resolution of your picture window and the capabilities of the application dictate how far you can zoom in on the webcam’s video image. You can zoom in and out on camera photos using tools like YouCam and Windows Live Messenger. The most critical camera capabilities for the ideal video conferencing experience are zoom in and zoom out, which at first look may appear trivial. Here, we’ll walk you through each step, in detail. Continue reading, and we’ll check your understanding of webcam zoom in and zoom out skills!
Way 1: Zoom with Windows Live Messenger
When utilizing a camera for video conferencing, you may zoom in on a user’s face to get rid of the background. Webcam settings are not accessible by default in Microsoft Windows. However, camera zoom settings may be changed in instant chat systems. Through an instant messaging tool, such as Windows Live Messenger, you may simply access these options. This application provides private offline chat, video messaging, image and video sharing, and video chatting.
Step1Start Windows Live Messenger on your PC or laptop first. Enter your login name and password by clicking the “Sign In” button.

Step2On the top menu bar, pick “Tools.” And then select the “Audio and Video Setup”. Drag the slider next to “Speaker” to modify the speaker volume. Drag the slider next to “Microphone” to modify the microphone sensitivity. Press “Next.”

Step3From the drop-down list, pick the webcam. The “Camera Control” option is situated on the top; pick “Webcam Settings” after that.
Step4Now, to alter the zoom settings, drag the “Zoom” slider. To zoom in or out, drag the slider to the left or right. Press “OK.”
Way 2: Use Windows 10 Camera App
Wondering how to zoom your camera in the Windows 10 Camera app? The Camera app enables you to zoom in or out on your webcam in both image and video modes. To accomplish so, click or push the Magnification button, and then use the slider to modify the webcam’s zoom level. To operate the zoom feature manually, pick “Manual Zoom.” In the preview window, a square appears when you pick this option. To zoom in on a specific region of the capture window, drag the square there. To expand the image that was acquired by the webcam, slide the slider bar. In simply, The Camera app enables you zoom in or out of photographs and movies shot with your webcam. To do this, click on the “Zoom” button and drag the slider to the left or right as appropriate on your Windows 10 camera. the following steps:
Step1To open the “Start Menu,” make a right-click on “Start.” Now, to access the Camera app, type “Camera App” into the start menu’s search box.

Step2Tap the Camera Control icon when you start or join a meeting. To zoom and pan the camera to the appropriate spot, utilize the icons on the Camera Control panel.
![]()
Step3To exit the Camera Control window and return to the Meeting Controls, touch outside of it.
Way 3: Zoom with YouCam
Unfortunately, the default cameras or webcams bundled with the majority of Windows laptops and desktops don’t have an automatic zoom option. In fact, the only method to adjust their crop is to switch from “Standard” to “Widescreen,” which does slightly zoom in on you but not in the manner we’d want. This makes it inescapable that the only method to manually alter a webcam’s magnification is to acquire one separately and apply its software settings. , like YouCam. YouCam provides video calling, streaming, and broadcasting. includes an integrated app. To employ Zoom with YouCam, refer to the methods given below:
Step1Launch the YouCam camera program and activate the webcam.

Step2In the camera preview window, pick Settings. Then, select “Enable Video Zoom” from the menu.
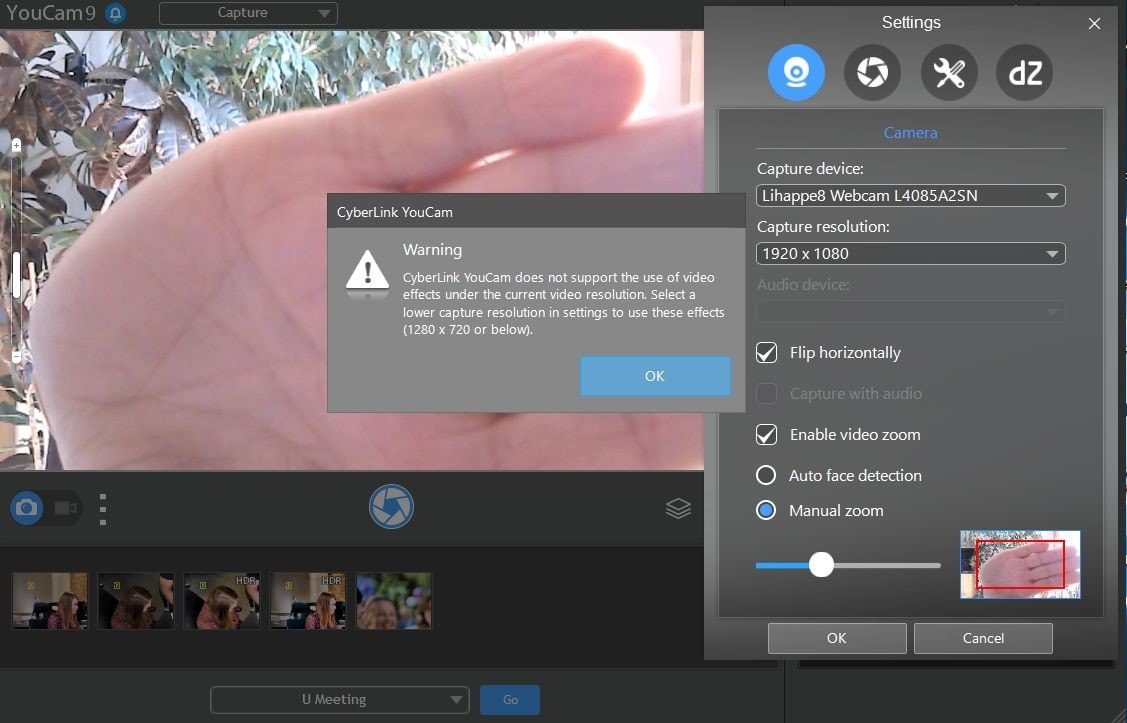
Step3Select “Automatic Face Detection” from the menu. As you wander about in the capture window, the camera watches your face and automatically zooms in on your photo as shown above.
Step4To handle the zoom feature manually, pick “Manual Zoom.” In the preview window, a square appears when you pick this option. To zoom in on a specific region of the capture window, drag the square there. To expand the image that was acquired by the webcam, slide the slider bar.

Way 4: Use iGlasses on Mac
For the perfect webcam look on a MAC, install the Chrome plugin iGlasses for video effects and style tweaks. Your videos will appear better on Zoom as a consequence. You may instantly enhance the appearance of your video interactions by utilizing the digital zoom on your iGlasses. Digital pan, tilt, and zoom are all possible with easy controls. For Macs that support it, an Apple Remote may be used to operate. iGlasses will become an option in Zoom’s video settings when it has been installed. You may improve your camera by altering the settings in iGlasses. You may experiment with a range of amusing effects, like 3-D distortions, using the virtual camera. Let’s learn how to utilize iGlasses on a Mac:
Step1Installing Ecamm’s iGlasses on a MacBook in the first step.
Step2To activate the camera, go to your video settings and pick iGlasses.
Step3Choose the Zoom window and execute the appropriate operations using the Zoom and Flip options. You may now zoom in and out using the camera on your MacBook as you like.

Conclusion
In conclusion, so many people currently take part in online conferences and virtual meetings. You want to create a lasting impression, don’t you? Not or whether you are the host of an online meeting or event, you must now maintain a professional image to prevent turning off attendees. You have discovered how to utilize the tools at your disposal to boost the zoom in and out quality of your camera in this post. However, as will be explained in the sections ahead, you may do it without the third-party plugins. With just one quick plugin, you can significantly transform how you look on a camera. Hence, try out the easy method from the above enlisted ones to get hold on your PC webcam to zoom in or out purposes.
Making certain our digital presence is the best it can be pays dividends as more and more of what we do online; similar is the case with how to zoom out webcam windows 10. The majority of experts advise against using the built-in camera that comes with your laptop or computer and instead advocate getting a webcam or an HD camera. These, however, may be hard to come by and pricy if you locate a nice one. If the built-in camera on your laptop doesn’t perform effectively during Zoom meetings, you may want to consider about investing in a separate, better webcam. Webcams offer automatic settings that are intended to function with the largest variety of lighting situations possible. This suggests that they average out a great number of responses to the content of the frame. Because of this, we have incorporated basic PC webcam zooming settings. These answers may be found in the portions that follow.
It’s vital to know how to zoom in on a webcam before visiting there. The camera wasn’t always as vital as it is today, and only very large corporations could afford to employ it as a convenience. But today, nearly everyone, from huge organizations to little firms, acknowledges its value. Everybody needs a webcam that works properly. The camera control software you are using determines the zoom function. The resolution of your picture window and the capabilities of the application dictate how far you can zoom in on the webcam’s video image. You can zoom in and out on camera photos using tools like YouCam and Windows Live Messenger. The most critical camera capabilities for the ideal video conferencing experience are zoom in and zoom out, which at first look may appear trivial. Here, we’ll walk you through each step, in detail. Continue reading, and we’ll check your understanding of webcam zoom in and zoom out skills!
Way 1: Zoom with Windows Live Messenger
When utilizing a camera for video conferencing, you may zoom in on a user’s face to get rid of the background. Webcam settings are not accessible by default in Microsoft Windows. However, camera zoom settings may be changed in instant chat systems. Through an instant messaging tool, such as Windows Live Messenger, you may simply access these options. This application provides private offline chat, video messaging, image and video sharing, and video chatting.
Step1Start Windows Live Messenger on your PC or laptop first. Enter your login name and password by clicking the “Sign In” button.
Step2On the top menu bar, pick “Tools.” And then select the “Audio and Video Setup”. Drag the slider next to “Speaker” to modify the speaker volume. Drag the slider next to “Microphone” to modify the microphone sensitivity. Press “Next.”
Step3From the drop-down list, pick the webcam. The “Camera Control” option is situated on the top; pick “Webcam Settings” after that.
Step4Now, to alter the zoom settings, drag the “Zoom” slider. To zoom in or out, drag the slider to the left or right. Press “OK.”
Way 2: Use Windows 10 Camera App
Wondering how to zoom your camera in the Windows 10 Camera app? The Camera app enables you to zoom in or out on your webcam in both image and video modes. To accomplish so, click or push the Magnification button, and then use the slider to modify the webcam’s zoom level. To operate the zoom feature manually, pick “Manual Zoom.” In the preview window, a square appears when you pick this option. To zoom in on a specific region of the capture window, drag the square there. To expand the image that was acquired by the webcam, slide the slider bar. In simply, The Camera app enables you zoom in or out of photographs and movies shot with your webcam. To do this, click on the “Zoom” button and drag the slider to the left or right as appropriate on your Windows 10 camera. the following steps:
Step1To open the “Start Menu,” make a right-click on “Start.” Now, to access the Camera app, type “Camera App” into the start menu’s search box.
Step2Tap the Camera Control icon when you start or join a meeting. To zoom and pan the camera to the appropriate spot, utilize the icons on the Camera Control panel.
![]()
Step3To exit the Camera Control window and return to the Meeting Controls, touch outside of it.
Way 3: Zoom with YouCam
Unfortunately, the default cameras or webcams bundled with the majority of Windows laptops and desktops don’t have an automatic zoom option. In fact, the only method to adjust their crop is to switch from “Standard” to “Widescreen,” which does slightly zoom in on you but not in the manner we’d want. This makes it inescapable that the only method to manually alter a webcam’s magnification is to acquire one separately and apply its software settings. , like YouCam. YouCam provides video calling, streaming, and broadcasting. includes an integrated app. To employ Zoom with YouCam, refer to the methods given below:
Step1Launch the YouCam camera program and activate the webcam.
Step2In the camera preview window, pick Settings. Then, select “Enable Video Zoom” from the menu.
Step3Select “Automatic Face Detection” from the menu. As you wander about in the capture window, the camera watches your face and automatically zooms in on your photo as shown above.
Step4To handle the zoom feature manually, pick “Manual Zoom.” In the preview window, a square appears when you pick this option. To zoom in on a specific region of the capture window, drag the square there. To expand the image that was acquired by the webcam, slide the slider bar.
Way 4: Use iGlasses on Mac
For the perfect webcam look on a MAC, install the Chrome plugin iGlasses for video effects and style tweaks. Your videos will appear better on Zoom as a consequence. You may instantly enhance the appearance of your video interactions by utilizing the digital zoom on your iGlasses. Digital pan, tilt, and zoom are all possible with easy controls. For Macs that support it, an Apple Remote may be used to operate. iGlasses will become an option in Zoom’s video settings when it has been installed. You may improve your camera by altering the settings in iGlasses. You may experiment with a range of amusing effects, like 3-D distortions, using the virtual camera. Let’s learn how to utilize iGlasses on a Mac:
Step1Installing Ecamm’s iGlasses on a MacBook in the first step.
Step2To activate the camera, go to your video settings and pick iGlasses.
Step3Choose the Zoom window and execute the appropriate operations using the Zoom and Flip options. You may now zoom in and out using the camera on your MacBook as you like.
Conclusion
In conclusion, so many people currently take part in online conferences and virtual meetings. You want to create a lasting impression, don’t you? Not or whether you are the host of an online meeting or event, you must now maintain a professional image to prevent turning off attendees. You have discovered how to utilize the tools at your disposal to boost the zoom in and out quality of your camera in this post. However, as will be explained in the sections ahead, you may do it without the third-party plugins. With just one quick plugin, you can significantly transform how you look on a camera. Hence, try out the easy method from the above enlisted ones to get hold on your PC webcam to zoom in or out purposes.
The Availability of the Slow-Motion Feature on the iPhone Is Often Debated. This Article Will Guide You on How to Slow Down a Video on iPhone
Slow-motion videos are widely used for various purposes in videography or filmmaking. They not only underline the significance of a shot but also elevate creativity. The frame rate is remarkably higher in slow-motion videos than in normal videos. There are two methods included in the process of how to slow down a video on an iPhone.
The first method involves increasing the frame rate; meanwhile, the other is playback speed adjustment. This article will enfold apps to teach how to slow a video down on iPhone. All these applications will be available in the iPhone’s official App Store. However, check the compatibility of these apps with the iOS version you’re using. Ultimately, we’ll share a desktop alternative on how to slow down a video iPhone.
Slow Motion Video Maker Slow your video’s speed with better control of your keyframes to create unique cinematic effects!
Make A Slow Motion Video Make A Slow Motion Video More Features

Part 1: Pre-Recorded A Video? Adjust Slow Motion Parameters Right Away
One of the major reasons Gen Z and Gen Alpha opt for iPhones is their high-quality camera. It is ideal for capturing and editing videos in high resolution is ideal. In 2013, iPhones were integrated with the Slow-mo feature for creative purposes. Where first users needed third-party applications, they could use the built-in feature. Here is how do you slow down a video on iPhone officially:
Step 1
Locate the “Photos” application on your iPhone and launch it by simply clicking. Upon accessing the app, go to the bottom and click on “Albums.” Afterward, click the “Slo-mo” option from the expanding menu. Formerly, select a video from your device media library import.

Step 2
Once the video has been selected, navigate to the top right corner and select “Edit.”

Step 3
When the editing panel appears, navigate towards the bottom of the timeline bar. Drag the slider’s position to adjust the speed to create a slow motion. As the slow-motion effect has been created, click the “Done” button. Commencing this action will finalize your slow-motion video.

Part 2: Some Top-Notch Solutions to Slow Down Any Video on iPhone
The iPhone does offer a built-in feature to help you curate a perfect slow-mo. Nonetheless, a third-party application can offer additional and upgraded features. They offer specialized effects and filters, multiplatform support, and more. This section discusses 4 applications and how to make video slow motion iPhone using them. Find the brief introduction, capabilities, and guides of these apps below:
- SpeedPro Slow Speed Video Edit
- Slow Fast Slow – Control the Speed of Your Videos
- Slo Mo – Speed Up Video Editor
- Video Speed Editor Slow & Fast
1. SpeedPro Slow Speed Video Edit
This is an exclusive application to answer your question about how to put a video in slow motion on an iPhone. This application offers a -2x to -6x playback speed option for a slow-mo. Its intuitive feature enables speed alteration from a specific video section. This option is ideal for creatively editing your Instagram reels. Along with slowing down the speed, you can also enhance it for fast motion generation.

Key Features
- The application offers a timeline editing interface that enhances precision and accuracy.
- It possesses the ability to incorporate music in your videos using its Music feature.
- The application collaborates with social platforms like Instagram and Facebook for
Steps to Add Slow Motion in Video Using SpeedPro Slow Speed Video Edit
When you embark on a new experience, using something for the first time can be tricky. The unfamiliarity makes it harder, and one doubts its abilities. Hence, consider us your partner in guiding you on how to edit slow motion on your iPhone. We have curated a step-by-step guide to help you in creating a slow-mo:
Step 1: After downloading and accessing the application’s main menu, click the “Speed Pro” option. Then, select a video clip from your device that you desire to apply this effect to.

Step 2: Once the video clip has been selected, click the “Done” button to import.

Step 3: Afterward, you’ll be redirected to its editing interface for speed change. Navigate toward the speed slider at the bottom of the video display. Drag the slider towards the left to select a suitable playback speed option. You can also apply the slow-mo to a specific area by dragging the timeline slider.

2. Slow Fast Slow - Control the Speed of Your Videos
Use this application to record a slow-motion video or add the effect in post-production editing. This application offers a high frame rate of 240 fps for a high-grade slow-mo effect. This means you can now slow a video up to 1/16th of its original speed. It wins at creating slow motion with the iPhone’s built-in speed manipulation feature.

Key Features
- Provides audio pitch maintenance feature during speed alteration.
- Gives the option to adjust the screen ratio before editing, like square or more.
- The application is compatible with all your iOS 10.0 devices and higher versions.
Steps to Add Slow Motion in Video Using Slow Fast Slow
The encounter with an advanced tool or application is often stressful as you are unfamiliar with it. You do not want to mess up the video, so you must master an app. Following is how to slow down a video on an iPhone using the Slow Fast Slow app:
Step 1: After launching the application, give it access to your files for editing. Then, click on the “Other Videos” option to select a video from a device for slow-mo.

Step 2: Once the video has been imported, you will reach the editing interface. You’ll notice a slider with different points. These points indicate the time frames of your video. The slider is positioned downward to add a slow-mo effect at specific durations.

Step 3: Once you are done with the editing, click the play button to preview. Next, navigate towards the right-side bottom of the preview screen and hit “Export.” Select any particular resolution to save the slowed-down video on your device.

3. Slo Mo – Speed Up Video Editor
Are you looking for a versatile application about how to make a normal video slow-motion iPhone 13? Fashioned to modify a video’s speed, this app can help you. It allows users to adjust the video speed up to 12x for slow and fast motion. In addition, you can alter the video frame rate up to 240 fps at precise frames.

Key Feature
- With an additional freeze frame feature, infuse an innovative touch to videos.
- Experience a more productive workflow with its quick processing feature.
- Keeping up an accessible to all approach, the user interface is straightforward and minimal.
Steps to Add Slow Motion in Video Using Slo Mo – Speed Up Video Editor
Those initial stages of operating a new app and getting your hands on its UI are difficult. However, this article prioritizes your ease more than anything. Find our guide on how to make a video in slow motion on iPhone here:
Step 1: Upon launching the application, it will ask you for storage access. After that, you’ll have to import a video to add slow motion. Just select any normal video on your device and click on the “Next” option.

Step 2: Navigate toward the bar at the bottom of the timeline panel and select “Adjust.”

Step 3: This will feature the speed control options on your screen; go to “Advance.” Further, change the speed change slider towards the left to manipulate it. Afterward, preview the video and click on the “tick” icon.

Step 4: Further, select the “Export” icon appearing in the expanded menu.

4. Video Speed Editor Slow & Fast
How do you slow down a video on an iPhone after recording in a minimalistic way? This iPhone application is designed for such contexts to create slow-motion videos. Users can slow down a clip’s playback speed up to 8x at specific durations. Simply trim the video parts to apply the speed setting at specific sections and merge them later.

Key Features
- After slow motion, you have the option to keep the original sound or insert music offered by it.
- The timeline editing method helps you to trim the video at the right time.
- The application is compatible with iOS 12.0, iPadOS 12.0, macOS 11.0, and newer versions.
Steps to Add Slow Motion in Video Using Video Speed Editor Slow & Fast
This application has an innovative user interface with a simple operational menu. To add a slow-motion effect to a video, buy its Pro subscription first. To assist you further, here is how to slow down an iPhone video in it:
Step 1: Create a new project after launching the application and giving access to storage. Do this by clicking on the screen saying, “Tap to create a new project.”

Step 2: From the Videos section of your media, select a video and hit “Choose.”

Step 3: In the editing interface, simply select a speed option from -2x to -8x for slowing. Once the video is slowed down according to your preferences, export it.

Part 3: Failed to Slow Down Video Properly? Try Wondershare Filmora as a Remedy
Have you tried all the given solutions on how to slow-mo a video on an iPhone and are still clueless? Not getting the desired results can be frustrating, but we have brought the best answer. Wondershare Filmora helps you achieve slow motion on a computer or laptop. The software is compatible with all Windows and macOS devices. You can just connect your iPhone with the source using a cable and import media.
Being a versatile software, Filmora introduces you to two advanced methods. Uniform speed emerges as a simple method of creating a slow-motion effect. On the other hand, Speed Ramping allows you to edit speed for professional purposes. Amongst speed alteration, users can also use the frame interpolation technique. It increases video frames to ensure a smooth playback during slow-mo.
Step-by-Step Guide to Creating Slow-Motion in Filmora
If you are using Filmora for the first time, the user interface might initially seem confusing. However, in comparison to other post-production software, it possesses a minimal interface. In this section, learn about how to slo-mo a video iPhone using Filmora:
Free Download For Win 7 or later(64-bit)
Free Download For macOS 10.14 or later
Step 1Connect iPhone and Import Clip
Once you have created a new project on Filmora, import media. First, to import media from your iPhone, connect it to your computer or related device. Then, go to “Import” > “Import from a Camera or Phone” option. Further, select the device name and import data.

Step 2Access Speed Ramping Option
Use your cursor to bring the edited media to the timeline and select it. From the appearing settings panel, access the “Speed” > “Speed Ramping” tabs. Here, either choose any of the predesigned templates or customize one.

Step 3Enable Optical Flow for Additional Touch
If the slow motion seems rough or abrupt, Filmora has a solution to that as well. Go to the “AI Frame Interpolation” section and expand it. From the expanding menu, click the “Optical Flow” option for a high-quality slow-mo.

Step 4Rendering for Final Preview
To observe the overall results, navigate towards the top toolbar. Select the “File” tab and “Render Preview” from the dropdown menu. After reviewing the final video, use your cursor to click the “Export” button.

Key Features of Wondershare Filmora
Wondershare Filmora provides a wide range of features for a full-fledged editing experience. Some of these features are for video, some are for audio, and others are for visuals. Here is a list of some of Filmora’s key features that you must give a try to:
1. Instant Mode
Once you have recorded a video, the post-production process cannot be neglected. However, when you start editing a video, the process might be confusing at first. With Filmora’s Instant Mode, use AI’s assistance to edit any video without effort. There are 115 built-in templates to integrate according to context and highlights it.
2. Green Screen
Integrate attractive backgrounds in your videos, like mountains, beaches, or more. With Filmora’s Green Screen feature, remove the video backgrounds with accuracy. After removing the background, you can insert multiple backgrounds, like solid colors. If there are backgrounds that you have previously saved, import them to the timeline. They will automatically show in the video, and you can customize them further.
3. Color Correction
Filmora offers an extensive range of color correction elements to enhance visibility. There are 40+ free presets in Filmora that you can download and apply within the app. In addition, you can do custom color settings and save them as custom presets. You can also use the 3D LUT feature to set preferences for specific factors.
4. Text-to-Speech
Another important feature that helps with interactive video creation is text-to-speech. It allows users to transform text into speech with voice selection options. The software has been trained on NLP and integrates realistic voices in videos. Being closer to the human voice helps with better audience interaction and understanding.
Conclusion
The main theme of this article was how to slow down a video on iPhone and the tools to do it. We mentioned 4 applications that are compatible with higher versions of the iPhone. In addition, the article provided detailed guides on all these applications.
Among them, Wondershare Filmora has been integrated with an advanced slow-mo feature. It allows a seamless and professional user interface to import, edit, and customize. The AI Optical Flow in it adds a remarkable fine touch to your slow-mo video.
Make A Slow Motion Video Make A Slow Motion Video More Features
Part 1: Pre-Recorded A Video? Adjust Slow Motion Parameters Right Away
One of the major reasons Gen Z and Gen Alpha opt for iPhones is their high-quality camera. It is ideal for capturing and editing videos in high resolution is ideal. In 2013, iPhones were integrated with the Slow-mo feature for creative purposes. Where first users needed third-party applications, they could use the built-in feature. Here is how do you slow down a video on iPhone officially:
Step 1
Locate the “Photos” application on your iPhone and launch it by simply clicking. Upon accessing the app, go to the bottom and click on “Albums.” Afterward, click the “Slo-mo” option from the expanding menu. Formerly, select a video from your device media library import.
Step 2
Once the video has been selected, navigate to the top right corner and select “Edit.”
Step 3
When the editing panel appears, navigate towards the bottom of the timeline bar. Drag the slider’s position to adjust the speed to create a slow motion. As the slow-motion effect has been created, click the “Done” button. Commencing this action will finalize your slow-motion video.
Part 2: Some Top-Notch Solutions to Slow Down Any Video on iPhone
The iPhone does offer a built-in feature to help you curate a perfect slow-mo. Nonetheless, a third-party application can offer additional and upgraded features. They offer specialized effects and filters, multiplatform support, and more. This section discusses 4 applications and how to make video slow motion iPhone using them. Find the brief introduction, capabilities, and guides of these apps below:
- SpeedPro Slow Speed Video Edit
- Slow Fast Slow – Control the Speed of Your Videos
- Slo Mo – Speed Up Video Editor
- Video Speed Editor Slow & Fast
1. SpeedPro Slow Speed Video Edit
This is an exclusive application to answer your question about how to put a video in slow motion on an iPhone. This application offers a -2x to -6x playback speed option for a slow-mo. Its intuitive feature enables speed alteration from a specific video section. This option is ideal for creatively editing your Instagram reels. Along with slowing down the speed, you can also enhance it for fast motion generation.
Key Features
- The application offers a timeline editing interface that enhances precision and accuracy.
- It possesses the ability to incorporate music in your videos using its Music feature.
- The application collaborates with social platforms like Instagram and Facebook for
Steps to Add Slow Motion in Video Using SpeedPro Slow Speed Video Edit
When you embark on a new experience, using something for the first time can be tricky. The unfamiliarity makes it harder, and one doubts its abilities. Hence, consider us your partner in guiding you on how to edit slow motion on your iPhone. We have curated a step-by-step guide to help you in creating a slow-mo:
Step 1: After downloading and accessing the application’s main menu, click the “Speed Pro” option. Then, select a video clip from your device that you desire to apply this effect to.
Step 2: Once the video clip has been selected, click the “Done” button to import.
Step 3: Afterward, you’ll be redirected to its editing interface for speed change. Navigate toward the speed slider at the bottom of the video display. Drag the slider towards the left to select a suitable playback speed option. You can also apply the slow-mo to a specific area by dragging the timeline slider.
2. Slow Fast Slow - Control the Speed of Your Videos
Use this application to record a slow-motion video or add the effect in post-production editing. This application offers a high frame rate of 240 fps for a high-grade slow-mo effect. This means you can now slow a video up to 1/16th of its original speed. It wins at creating slow motion with the iPhone’s built-in speed manipulation feature.
Key Features
- Provides audio pitch maintenance feature during speed alteration.
- Gives the option to adjust the screen ratio before editing, like square or more.
- The application is compatible with all your iOS 10.0 devices and higher versions.
Steps to Add Slow Motion in Video Using Slow Fast Slow
The encounter with an advanced tool or application is often stressful as you are unfamiliar with it. You do not want to mess up the video, so you must master an app. Following is how to slow down a video on an iPhone using the Slow Fast Slow app:
Step 1: After launching the application, give it access to your files for editing. Then, click on the “Other Videos” option to select a video from a device for slow-mo.
Step 2: Once the video has been imported, you will reach the editing interface. You’ll notice a slider with different points. These points indicate the time frames of your video. The slider is positioned downward to add a slow-mo effect at specific durations.
Step 3: Once you are done with the editing, click the play button to preview. Next, navigate towards the right-side bottom of the preview screen and hit “Export.” Select any particular resolution to save the slowed-down video on your device.
3. Slo Mo – Speed Up Video Editor
Are you looking for a versatile application about how to make a normal video slow-motion iPhone 13? Fashioned to modify a video’s speed, this app can help you. It allows users to adjust the video speed up to 12x for slow and fast motion. In addition, you can alter the video frame rate up to 240 fps at precise frames.
Key Feature
- With an additional freeze frame feature, infuse an innovative touch to videos.
- Experience a more productive workflow with its quick processing feature.
- Keeping up an accessible to all approach, the user interface is straightforward and minimal.
Steps to Add Slow Motion in Video Using Slo Mo – Speed Up Video Editor
Those initial stages of operating a new app and getting your hands on its UI are difficult. However, this article prioritizes your ease more than anything. Find our guide on how to make a video in slow motion on iPhone here:
Step 1: Upon launching the application, it will ask you for storage access. After that, you’ll have to import a video to add slow motion. Just select any normal video on your device and click on the “Next” option.
Step 2: Navigate toward the bar at the bottom of the timeline panel and select “Adjust.”
Step 3: This will feature the speed control options on your screen; go to “Advance.” Further, change the speed change slider towards the left to manipulate it. Afterward, preview the video and click on the “tick” icon.
Step 4: Further, select the “Export” icon appearing in the expanded menu.
4. Video Speed Editor Slow & Fast
How do you slow down a video on an iPhone after recording in a minimalistic way? This iPhone application is designed for such contexts to create slow-motion videos. Users can slow down a clip’s playback speed up to 8x at specific durations. Simply trim the video parts to apply the speed setting at specific sections and merge them later.
Key Features
- After slow motion, you have the option to keep the original sound or insert music offered by it.
- The timeline editing method helps you to trim the video at the right time.
- The application is compatible with iOS 12.0, iPadOS 12.0, macOS 11.0, and newer versions.
Steps to Add Slow Motion in Video Using Video Speed Editor Slow & Fast
This application has an innovative user interface with a simple operational menu. To add a slow-motion effect to a video, buy its Pro subscription first. To assist you further, here is how to slow down an iPhone video in it:
Step 1: Create a new project after launching the application and giving access to storage. Do this by clicking on the screen saying, “Tap to create a new project.”
Step 2: From the Videos section of your media, select a video and hit “Choose.”
Step 3: In the editing interface, simply select a speed option from -2x to -8x for slowing. Once the video is slowed down according to your preferences, export it.
Part 3: Failed to Slow Down Video Properly? Try Wondershare Filmora as a Remedy
Have you tried all the given solutions on how to slow-mo a video on an iPhone and are still clueless? Not getting the desired results can be frustrating, but we have brought the best answer. Wondershare Filmora helps you achieve slow motion on a computer or laptop. The software is compatible with all Windows and macOS devices. You can just connect your iPhone with the source using a cable and import media.
Being a versatile software, Filmora introduces you to two advanced methods. Uniform speed emerges as a simple method of creating a slow-motion effect. On the other hand, Speed Ramping allows you to edit speed for professional purposes. Amongst speed alteration, users can also use the frame interpolation technique. It increases video frames to ensure a smooth playback during slow-mo.
Step-by-Step Guide to Creating Slow-Motion in Filmora
If you are using Filmora for the first time, the user interface might initially seem confusing. However, in comparison to other post-production software, it possesses a minimal interface. In this section, learn about how to slo-mo a video iPhone using Filmora:
Free Download For Win 7 or later(64-bit)
Free Download For macOS 10.14 or later
Step 1Connect iPhone and Import Clip
Once you have created a new project on Filmora, import media. First, to import media from your iPhone, connect it to your computer or related device. Then, go to “Import” > “Import from a Camera or Phone” option. Further, select the device name and import data.
Step 2Access Speed Ramping Option
Use your cursor to bring the edited media to the timeline and select it. From the appearing settings panel, access the “Speed” > “Speed Ramping” tabs. Here, either choose any of the predesigned templates or customize one.
Step 3Enable Optical Flow for Additional Touch
If the slow motion seems rough or abrupt, Filmora has a solution to that as well. Go to the “AI Frame Interpolation” section and expand it. From the expanding menu, click the “Optical Flow” option for a high-quality slow-mo.
Step 4Rendering for Final Preview
To observe the overall results, navigate towards the top toolbar. Select the “File” tab and “Render Preview” from the dropdown menu. After reviewing the final video, use your cursor to click the “Export” button.
Key Features of Wondershare Filmora
Wondershare Filmora provides a wide range of features for a full-fledged editing experience. Some of these features are for video, some are for audio, and others are for visuals. Here is a list of some of Filmora’s key features that you must give a try to:
1. Instant Mode
Once you have recorded a video, the post-production process cannot be neglected. However, when you start editing a video, the process might be confusing at first. With Filmora’s Instant Mode, use AI’s assistance to edit any video without effort. There are 115 built-in templates to integrate according to context and highlights it.
2. Green Screen
Integrate attractive backgrounds in your videos, like mountains, beaches, or more. With Filmora’s Green Screen feature, remove the video backgrounds with accuracy. After removing the background, you can insert multiple backgrounds, like solid colors. If there are backgrounds that you have previously saved, import them to the timeline. They will automatically show in the video, and you can customize them further.
3. Color Correction
Filmora offers an extensive range of color correction elements to enhance visibility. There are 40+ free presets in Filmora that you can download and apply within the app. In addition, you can do custom color settings and save them as custom presets. You can also use the 3D LUT feature to set preferences for specific factors.
4. Text-to-Speech
Another important feature that helps with interactive video creation is text-to-speech. It allows users to transform text into speech with voice selection options. The software has been trained on NLP and integrates realistic voices in videos. Being closer to the human voice helps with better audience interaction and understanding.
Conclusion
The main theme of this article was how to slow down a video on iPhone and the tools to do it. We mentioned 4 applications that are compatible with higher versions of the iPhone. In addition, the article provided detailed guides on all these applications.
Among them, Wondershare Filmora has been integrated with an advanced slow-mo feature. It allows a seamless and professional user interface to import, edit, and customize. The AI Optical Flow in it adds a remarkable fine touch to your slow-mo video.
30+ Amazing Templates for VN Video Editor
Creating engaging and professional-looking videos can be difficult, especially if you need to familiarize yourself with video editing software. However, with the right tools, it can be a breeze. The VN Video Editor is a powerful and user-friendly software that allows you to create stunning videos easily.
One of the best things about VN Video Editor is that this app comes with a wide variety of templates that you can use to make your videos look even better. This article will share amazing templates for VN Video Editor that you can download for free.
These templates have been carefully crafted to help you create professional-looking videos in no time. Whether you’re creating videos for your business or YouTube channel or just for fun, these templates will take your videos to the next level. So, without further ado, let’s dive in and explore the best templates for VN Video Editor that you can use to make your videos stand out.

- Travel Vlog Template in VN Video Editor
- Production Introduction Video Template in VN Video Editor
- VN Cooking Vlog Template
- VN Fashion Video Template
- Beauty Video Template of VN Video Editor
Overview of VN Video Editor and Its Templates
VN Video Editor is a popular video editing software on desktop and mobile devices. The mobile version of VN Video Editor is available on both Google Play Store and App Store. The app’s mobile version is particularly useful for those who want to create and edit videos on the go. The app is user-friendly and intuitive, making it easy for anyone to create professional-looking videos.

One of the best features of VN Video Editor is its wide variety of templates, which makes it easy for users to create videos that look great in just a few minutes. In addition, the templates are very customizable; users can change the color and text and add their media files.
The templates are also useful for those who need to become more familiar with video editing and want to create professional-looking videos without spending much time on the editing process.
The templates include various styles and themes, such as modern, classic, and vintage. They also come with various layouts, such as split-screen and collage. Moreover, these templates can create a wide range of videos, from promotional and product demonstrations to travel vlogs and personal videos.
How To Use & Download VN Video Templates
Using templates in VN Video Editor is a great way to create professional-looking videos quickly and easily. The process is straightforward and can be done in just a few steps. Here’s a quick guide on how to use and download templates in VN Video Editor.
Step1 Download VN Video Editor and launch it on your mobile phone. Tap the “Template“ button.

Step2 Choose the free available templates you want to use.

Step3 Click the “Download“ button to download your template.

Step4 Click the “Use Template“ button to start the editing process.

Step5 Select the images or clips you want and click “Next.”

Step6 Make desired adjustments to your template.

Step7 Click the “Export“ button and adjust the “Export Settings.”

Step8 Click “Save“ and wait for your exported clip.

5 Amazing Templates in VN Video Editor
VN Video Editor is a powerful and user-friendly app with various templates. These templates can create a wide range of videos, from promotional and product demonstrations to travel vlogs and personal videos. This section will introduce you to 5 amazing templates you can use in VN Video Editor to create professional-looking videos.
1. Travel Vlog Template in VN Video Editor

This template is perfect for capturing the essence of your travels. It features a split-screen layout that lets you showcase multiple footage and locations at once, giving your audience a glimpse of all the exciting places you’ve visited. The template also includes customizable text and map animations to help you create a professional and engaging travel vlog.
2. Production Introduction Video Template in VN Video Editor

This template is designed to help you introduce your products or services professionally and engagingly. It features a clean and modern design highlighting your products and services and includes customizable text, product demonstrations, and animations to help create a video that stands out.
3. VN Cooking Vlog Template

This template is perfect for creating cooking videos that are both informative and engaging. It features a split-screen layout that lets you showcase multiple recipes and cooking techniques and includes customizable text and animations to help you create a professional cooking vlog.
4. VN Fashion Video Template

This template is perfect for creating fashion videos that are both stylish and engaging. It features a clean and modern design highlighting the latest fashion trends and includes customizable text and animations to help create a video that stands out in the fashion industry.
5. Beauty Video Template of VN Video Editor

This template is designed to help you create videos that showcase your beauty and skincare products professionally and engagingly. It features a clean and modern design highlighting your products and services and includes customizable text and animations to help create a video that stands out in the beauty industry.
Each template has its unique style and design and can be easily customized to match your brand or style. With the help of these templates, you can create professional-looking videos in no time.
20+ VN Code Video Templates
In addition to the templates that come with VN Video Editor, a wide variety of templates are available from other vloggers and creators. These templates are created by app users who have shared their designs for others to use. These templates are often more specialized and niche-focused than the templates that come with the app, making them ideal for creating videos on specific topics.
1. 10 VN Video Templates for Instagram Reel
This provides access to 10 VN Video Templates for Instagram Reel made by YouTuber Bagus Muhamad. These templates are designed to help you create engaging and professional-looking Instagram Reel videos quickly and easily.
These templates come in various styles and themes, such as modern, classic, and vintage. They also come with various layouts, such as split-screen and collage. All templates are fully customizable with the VN Video Editor. You can change the color and text and add your media files.
These templates are perfect for creating Instagram Reel videos that attract attention. With the help of these templates, you can create professional-looking videos in no time.
2. 10 VN Cinematic Video Templates
This provides access to 10 VN Cinematic Video Templates by YouTuber Dhemusz Official. These templates are designed to help you create cinematic and professional-looking videos quickly and easily.
They come in various styles and themes, such as modern, classic, and vintage. They also come with various layouts, such as split-screen and collage. All templates are fully customizable with the VN Video Editor, and you can change the color and text and add your media files to them.
These templates are perfect for creating videos with a cinematic feel and look, making them great for movie trailers, short films, and more. With the help of these templates, you can create professional-looking videos in no time.
3. 8 VN Video Templates
This provides access to a collection of 8 VN Video Templates created by YouTuber desiwithcamera. These templates offer a unique blend of style and functionality, making it easy for users to create professional-looking videos.
Each template boasts a different aesthetic, including modern, classic, and vintage themes and diverse layout options such as split-screen and collage. The templates are fully customizable with the VN Video Editor, enabling users to incorporate their media files, adjust colors and add texts, thus making it stand out from the crowd.
These templates suit various videos, such as product reviews, personal vlogs, and event videos. With these templates, you can elevate your video editing skills and create visually stunning videos in minutes.
[Bonus] VN’s Best Alternative - Filmora Mobile Video Editor
Filmora Mobile Video Editor is a great alternative to VN Video Editor. It is a powerful and user-friendly video editing app that allows you to create stunning videos on your mobile device. It comes with various templates and features similar to VN Video Editor.
Free Download For Win 7 or later(64-bit)
Free Download For macOS 10.14 or later

Here are some of the key template features of Filmora Mobile Video Editor:
- Variety of Templates: Filmora Mobile Video Editor offers a wide range of templates for various types of videos, such as travel vlogs, product reviews, and personal vlogs.
- Customizable Templates: Filmora Mobile Video Editor’s templates are fully customizable, allowing you to add your media files and text and adjust the colors to match your brand or style.
- Unique Templates: Filmora Mobile Video Editor provides unique templates with different themes and styles that are not commonly found in other video editing apps.
- Animated Templates: Filmora Mobile Video Editor has a variety of animated templates that add dynamic movement to your videos and give them a professional look.
- Split-screen templates: Filmora Mobile Video Editor also has a variety of split-screen templates that allow you to showcase multiple footages at once, giving your videos a unique and interesting look.
Using these templates, you can easily create professional-looking videos that stand out. The templates in Filmora Mobile Video Editor are perfect for those who need to become more familiar with video editing and want to create professional-looking videos without spending much time on the editing process.
Conclusion
VN Video Editor is a powerful and user-friendly video editing app with various templates to choose from. These templates are perfect for creating professional-looking videos quickly and easily.
However, Filmora Mobile Video Editor is also a great alternative for VN. It offers similar features, such as customizable templates and various templates for various types of videos. It also has unique preset templates not commonly found in other video editing apps, and its animated templates add dynamic movement to your videos, giving them a professional look.
Overview of VN Video Editor and Its Templates
VN Video Editor is a popular video editing software on desktop and mobile devices. The mobile version of VN Video Editor is available on both Google Play Store and App Store. The app’s mobile version is particularly useful for those who want to create and edit videos on the go. The app is user-friendly and intuitive, making it easy for anyone to create professional-looking videos.
One of the best features of VN Video Editor is its wide variety of templates, which makes it easy for users to create videos that look great in just a few minutes. In addition, the templates are very customizable; users can change the color and text and add their media files.
The templates are also useful for those who need to become more familiar with video editing and want to create professional-looking videos without spending much time on the editing process.
The templates include various styles and themes, such as modern, classic, and vintage. They also come with various layouts, such as split-screen and collage. Moreover, these templates can create a wide range of videos, from promotional and product demonstrations to travel vlogs and personal videos.
How To Use & Download VN Video Templates
Using templates in VN Video Editor is a great way to create professional-looking videos quickly and easily. The process is straightforward and can be done in just a few steps. Here’s a quick guide on how to use and download templates in VN Video Editor.
Step1 Download VN Video Editor and launch it on your mobile phone. Tap the “Template“ button.
Step2 Choose the free available templates you want to use.
Step3 Click the “Download“ button to download your template.
Step4 Click the “Use Template“ button to start the editing process.
Step5 Select the images or clips you want and click “Next.”
Step6 Make desired adjustments to your template.
Step7 Click the “Export“ button and adjust the “Export Settings.”
Step8 Click “Save“ and wait for your exported clip.
5 Amazing Templates in VN Video Editor
VN Video Editor is a powerful and user-friendly app with various templates. These templates can create a wide range of videos, from promotional and product demonstrations to travel vlogs and personal videos. This section will introduce you to 5 amazing templates you can use in VN Video Editor to create professional-looking videos.
1. Travel Vlog Template in VN Video Editor
This template is perfect for capturing the essence of your travels. It features a split-screen layout that lets you showcase multiple footage and locations at once, giving your audience a glimpse of all the exciting places you’ve visited. The template also includes customizable text and map animations to help you create a professional and engaging travel vlog.
2. Production Introduction Video Template in VN Video Editor
This template is designed to help you introduce your products or services professionally and engagingly. It features a clean and modern design highlighting your products and services and includes customizable text, product demonstrations, and animations to help create a video that stands out.
3. VN Cooking Vlog Template
This template is perfect for creating cooking videos that are both informative and engaging. It features a split-screen layout that lets you showcase multiple recipes and cooking techniques and includes customizable text and animations to help you create a professional cooking vlog.
4. VN Fashion Video Template
This template is perfect for creating fashion videos that are both stylish and engaging. It features a clean and modern design highlighting the latest fashion trends and includes customizable text and animations to help create a video that stands out in the fashion industry.
5. Beauty Video Template of VN Video Editor
This template is designed to help you create videos that showcase your beauty and skincare products professionally and engagingly. It features a clean and modern design highlighting your products and services and includes customizable text and animations to help create a video that stands out in the beauty industry.
Each template has its unique style and design and can be easily customized to match your brand or style. With the help of these templates, you can create professional-looking videos in no time.
20+ VN Code Video Templates
In addition to the templates that come with VN Video Editor, a wide variety of templates are available from other vloggers and creators. These templates are created by app users who have shared their designs for others to use. These templates are often more specialized and niche-focused than the templates that come with the app, making them ideal for creating videos on specific topics.
1. 10 VN Video Templates for Instagram Reel
This provides access to 10 VN Video Templates for Instagram Reel made by YouTuber Bagus Muhamad. These templates are designed to help you create engaging and professional-looking Instagram Reel videos quickly and easily.
These templates come in various styles and themes, such as modern, classic, and vintage. They also come with various layouts, such as split-screen and collage. All templates are fully customizable with the VN Video Editor. You can change the color and text and add your media files.
These templates are perfect for creating Instagram Reel videos that attract attention. With the help of these templates, you can create professional-looking videos in no time.
2. 10 VN Cinematic Video Templates
This provides access to 10 VN Cinematic Video Templates by YouTuber Dhemusz Official. These templates are designed to help you create cinematic and professional-looking videos quickly and easily.
They come in various styles and themes, such as modern, classic, and vintage. They also come with various layouts, such as split-screen and collage. All templates are fully customizable with the VN Video Editor, and you can change the color and text and add your media files to them.
These templates are perfect for creating videos with a cinematic feel and look, making them great for movie trailers, short films, and more. With the help of these templates, you can create professional-looking videos in no time.
3. 8 VN Video Templates
This provides access to a collection of 8 VN Video Templates created by YouTuber desiwithcamera. These templates offer a unique blend of style and functionality, making it easy for users to create professional-looking videos.
Each template boasts a different aesthetic, including modern, classic, and vintage themes and diverse layout options such as split-screen and collage. The templates are fully customizable with the VN Video Editor, enabling users to incorporate their media files, adjust colors and add texts, thus making it stand out from the crowd.
These templates suit various videos, such as product reviews, personal vlogs, and event videos. With these templates, you can elevate your video editing skills and create visually stunning videos in minutes.
[Bonus] VN’s Best Alternative - Filmora Mobile Video Editor
Filmora Mobile Video Editor is a great alternative to VN Video Editor. It is a powerful and user-friendly video editing app that allows you to create stunning videos on your mobile device. It comes with various templates and features similar to VN Video Editor.
Free Download For Win 7 or later(64-bit)
Free Download For macOS 10.14 or later
Here are some of the key template features of Filmora Mobile Video Editor:
- Variety of Templates: Filmora Mobile Video Editor offers a wide range of templates for various types of videos, such as travel vlogs, product reviews, and personal vlogs.
- Customizable Templates: Filmora Mobile Video Editor’s templates are fully customizable, allowing you to add your media files and text and adjust the colors to match your brand or style.
- Unique Templates: Filmora Mobile Video Editor provides unique templates with different themes and styles that are not commonly found in other video editing apps.
- Animated Templates: Filmora Mobile Video Editor has a variety of animated templates that add dynamic movement to your videos and give them a professional look.
- Split-screen templates: Filmora Mobile Video Editor also has a variety of split-screen templates that allow you to showcase multiple footages at once, giving your videos a unique and interesting look.
Using these templates, you can easily create professional-looking videos that stand out. The templates in Filmora Mobile Video Editor are perfect for those who need to become more familiar with video editing and want to create professional-looking videos without spending much time on the editing process.
Conclusion
VN Video Editor is a powerful and user-friendly video editing app with various templates to choose from. These templates are perfect for creating professional-looking videos quickly and easily.
However, Filmora Mobile Video Editor is also a great alternative for VN. It offers similar features, such as customizable templates and various templates for various types of videos. It also has unique preset templates not commonly found in other video editing apps, and its animated templates add dynamic movement to your videos, giving them a professional look.
How to Be a Good Podcast Host
You may be a blogger who has the habit of writing long articles. Or you may be a YouTuber with a hi-fi channel with many subscribers, but a podcast is a different thing in general.
This article will look at how to prepare, call guests, warm them up, and give practical ideas about how to host a podcast. Let’s start the article by learning how to get prepared to host a podcast.
#1 Get prepared to host a podcast
A good podcast host always gets prepared, sets up his goals, and gets easy tips to set apart from everyone in the marketplace. For this, you have to follow the below instructions and tips:
1. A proper pre-interview process
Before starting the podcast, the host should have quality and organic content. The content is related to the guest or any foremost personality related to the topic.
The host should be confident and relaxed to kill the anxiety process. If the host has low confidence, he may suffer from nervousness. This will kill the authenticity.
2. Share questions with the audience
A good understanding of how to pan out a situation makes you a good host. You must share the question on and off during podcasts to build engaging criteria with the audience.
You don’t need to sound the script on the screen like a robot. Scripts can be helpful but only if read in a conversational mood.
3. Find the right location
A good location means good conversation. A proper set prepared for the guest and the podcast will help you boost your conversation skills and get yourself and the guest into the mood of your show.
Before the show, you can change the settings or have a monotone set that fits every mood.
#2 Warm up the audience
Warming up is a necessary part of the show. A warmup works just like gas in a car before a long drive. You have to do this by asking any question or by telling them an inspirational or motivational story.
A good host must realize that a warm show has a high chance of becoming viral, and you won’t get that if the guest is nervous, tired, or not in the mood.
Tip 1. Setting the mood
Your goal is to set the mood of the audience according to the topic. Warming up the audience before getting to the guest.
You have to set the tone according to the topic of your podcast to warm them up. In this way, you need to make the connection between the guest, you, and your voice.
Tip 2. Build an emotional connection
Building an emotional connection helps to engage the audience till the end of the show. To make this possible, you can share a funny story with them or about a recent event or any recent incident.
Tip 3. Polls and questionnaires
Modern media has connected everything through the internet. You need to interact with the audience by asking questions from them and giving them a chance to answer them by live calling or on social media.
You can also do this on Instagram polls or by posting a story and asking them to select an upcoming topic for the podcast. Introducing this concept will boost your podcast views and help you engage more followers on your other social media platforms.
#3 Try to be authenticity
You need to have authenticity if you want your podcast to be successful. An authentic show attracts a larger audience, while a show whose mood resembles a person with a multiple personality disorder will throw off the whole vibe of the podcast. And the listeners will eventually press back buttons to escape the colossal wreck.
Tips to have authentic content
- Your topic may be emotional, happy, or of any other information.
- A good host needs to have the skills of a good actor to convey the emotions that the audience will perceive more efficiently.
- An idea of how the audience will perceive you and how to make your voice tone with emotions on podcasts.
- Don’t go for a more serious tone.
Things to Avoid
- What you should opt away from is, faking
- Don’t try to get excited about something that you’re not.
- Do not pretend to care about something when you do not.
- The fakeness will only result in the downfall of your podcast, as the listeners will eventually grow tired and leave.
- You must act well and sell yourself more efficiently to develop that trust with the audience.
The more the audience trusts you, the more authentic you seem.
#4 Storytelling
Tales are as old as time. As time moves on, more and more stories pile up. Your podcast has the potential to be the best if you know how to utilize those storytelling skills of yours. It’s never about information alone!
You may have a bland topic to discuss or a guest who is tough to break character. These are the situations where your charm and concern will play their part. So you also want to learn how to make your podcasts enjoyable through stories? Then check out the short tips below:
How to add stories to your podcasts
- First, you should have the skill to read the room and the mood.
- If you start telling a story about yourself that has no relation to the topic whatsoever will only lead to the guest being annoyed.
- You may have called the guest for a reason. This reason should tally with your topic as it will make you ask about their experience.
- Asking the right questions is important.
- You’d better not begin with leading statements such as, “Obi-wan Kenobi is a good TV show.” the guest may simply reply, “I do not care.”
- You should approach with question statements such as, “Did you know that your son is a big fan of the Obi-wan Kenobi TV show.” These are indulging questions to help your audience be more involved in your podcasts.
The audience and the guest will also develop an interest in the conversation that will lead to a successful show for the day.
#5 Transcribe your episodes
A good podcast also looks to give you quality content for each episode. You may call on guests upon guests and promote your podcasts in many ways. One of the ways you can also allow your podcasts to be recognized more is by the use of transcribing.
What is transcribing?
Transcribing means converting the speech in the audio of your podcasts to a text format. Your podcast may raise some eyes if the content is desirable to the audience.
It may happen your podcast gets around a person whose brother suffers from hearing loss. By a transcription, you offer a chance to let them involved in your podcast. You can accomplish this feat in one of two ways.
- Either use an AI-powered audio editing program, like Wondershare Filmora , to get you through the speech-to-text transcription by default or a more auto way.
- Convert your text into audio, but this article will not look at it.
Free Download For Win 7 or later(64-bit)
Free Download For macOS 10.14 or later
Our main focus would be manually converting speech to text using a human transcriber. And we will be doing so by using the Wondershare Filmora app.
Transcribing podcasts with Wondershare Filmora
Filmora is an all-in-one video editing tool. In the following steps, we will learn the step-by-step process of transcribing podcast by using Wondershare Filmora.
Step1Add audio files or footage
- First of all, drag the imported audio files or footage into the timeline.

Step2Add subtitles
To show the transcription of the podcast’s audio, you have to add sbtitles for better understanding. For this, perform these steps:
- Select the tile icon on the bar above.
- In the window that pops up, select your favorite subtitle format.

Step3Adjust the size
For better playout and matching the audio with subtitles, you have to adjust the size of the video as:
- Add a subtitle tile above the video.
- Then adjust the size of the video.

Step4Convert speech into text
- At last, type the speech into text in the subtitle box.

In this way, you have created speech-to-text using a human transcriber rather than an AI. Doing this will ensure no mistakes are recorded and make it even more efficient.
#6 Put yourself in audiences’ shoes
And if you feel like the general audience would want to make sense of a particular statement, ask the guest about it. This is what differentiates a good host from a bad one! A general understanding of the audience’s point of view would always allow you to process your podcast accordingly.
- You should understand the general sentiments of the audience.
- When you feel a particular subject will attract more audience, do the process accordingly.
- Maybe they like how you process a story and evaluate it. Do that!
All qualities of a good podcast are there, and it’s your job to identify them and make the most of them.
#7 Understand why the guest is here
You are the host of the podcast. Your job is to be sincere with the guest. Moreover, useful information or a valued thought might be a reason why the guest has come to your show. Understand that reason and try to make the most of it.
- The guest might have heard about your podcast, or they could be a constant
- Your approach to the guest should tally with the topic of the podcast.
- The guest might be going through a tough time that makes them a suitable guest for that particular episode.
- Or it could be that your podcast attracted them, and now they want to use your interview to promote a book or any other service they think is best.
- As a host, you should allow the guest to have some control over the podcast.
- Develop a sense of trust between the host and the guest.
- The more you allow the guest to speak freely about themselves, the more they will feel interested in your podcast.
Your goal should be to captivate the guest as much as you can. If the guest is entertained, the more chances are that they will recommend you to other guests. An experience gone wrong will be bad for the podcast.
#8 Invite the right guest
A podcast can be an excellent tool for attracting the audience to your content. And as podcast hosts guests, your first step is finding the right guests for your audience.
Is it necessary to search for a host before calling? Yes! It’s quite a complicated and sensitive step to call out guests. A guest is the only one who can make or break the Podcast show. It’s important to study the nature of guests too. Because a guest is also considered as a co-host of the show.
If a guest is bored and doesn’t take much interest, then there are 100% chance that the show will fail. To find who is more compatible, we have to take assistance from a tool.
You can do this by plugging your podcast into a tool like Sparktoro. Sparktoro allows you to see what your audience is engaging with. It could be other platforms of podcasts such as youtube or other social media platforms.
For example, If we search for “the art of product podcast” on the Sparktoro website. It will direct us to demographic data, providing information about the content the audience is interacting with.
- It will show different hashtags and frequently used phrases.

- Here you can see the top words in bios, hashtags, and frequent phrases.
- On the left window, you can search for other related podcasts your viewers are watching.

- Similarly, you can also use the YouTube option to look at what kind of content your audience watches on youtube.
Following the above methods could give you 50-100 potential clients. Your main goal will be creating a list allowing you to call guests on your show. You can divide the list according to the priorities.
- Close friends: the ones who are going to be available whenever you call upon them.
- The probable list: the ones who would most probably agree to come on your podcast.
- The premium list: these guests will resemble a dream list of guests you want to call on your podcast.
Start by writing emails and promoting content that will attract these guests. Your chances are increased by how much you polish your podcast into creating premium content. The more premium the content is, the more premium your chances are of inviting those dream guests.
The Bottom Line
Podcasts are tricky to promote. Many other alternatives are available in the market that provides a more Visual representation. And it’s no lie; an audience like to sit and watch rather than sit and listen.
Following the steps, tips, and tricks mentioned above, you can build a strong base for being a good podcast host. Although it will take time to set off on your dreams, consistency and determination will eventually bear fruit.
Free Download For macOS 10.14 or later
Our main focus would be manually converting speech to text using a human transcriber. And we will be doing so by using the Wondershare Filmora app.
Transcribing podcasts with Wondershare Filmora
Filmora is an all-in-one video editing tool. In the following steps, we will learn the step-by-step process of transcribing podcast by using Wondershare Filmora.
Step1Add audio files or footage
- First of all, drag the imported audio files or footage into the timeline.
Step2Add subtitles
To show the transcription of the podcast’s audio, you have to add sbtitles for better understanding. For this, perform these steps:
- Select the tile icon on the bar above.
- In the window that pops up, select your favorite subtitle format.
Step3Adjust the size
For better playout and matching the audio with subtitles, you have to adjust the size of the video as:
- Add a subtitle tile above the video.
- Then adjust the size of the video.
Step4Convert speech into text
- At last, type the speech into text in the subtitle box.
In this way, you have created speech-to-text using a human transcriber rather than an AI. Doing this will ensure no mistakes are recorded and make it even more efficient.
#6 Put yourself in audiences’ shoes
And if you feel like the general audience would want to make sense of a particular statement, ask the guest about it. This is what differentiates a good host from a bad one! A general understanding of the audience’s point of view would always allow you to process your podcast accordingly.
- You should understand the general sentiments of the audience.
- When you feel a particular subject will attract more audience, do the process accordingly.
- Maybe they like how you process a story and evaluate it. Do that!
All qualities of a good podcast are there, and it’s your job to identify them and make the most of them.
#7 Understand why the guest is here
You are the host of the podcast. Your job is to be sincere with the guest. Moreover, useful information or a valued thought might be a reason why the guest has come to your show. Understand that reason and try to make the most of it.
- The guest might have heard about your podcast, or they could be a constant
- Your approach to the guest should tally with the topic of the podcast.
- The guest might be going through a tough time that makes them a suitable guest for that particular episode.
- Or it could be that your podcast attracted them, and now they want to use your interview to promote a book or any other service they think is best.
- As a host, you should allow the guest to have some control over the podcast.
- Develop a sense of trust between the host and the guest.
- The more you allow the guest to speak freely about themselves, the more they will feel interested in your podcast.
Your goal should be to captivate the guest as much as you can. If the guest is entertained, the more chances are that they will recommend you to other guests. An experience gone wrong will be bad for the podcast.
#8 Invite the right guest
A podcast can be an excellent tool for attracting the audience to your content. And as podcast hosts guests, your first step is finding the right guests for your audience.
Is it necessary to search for a host before calling? Yes! It’s quite a complicated and sensitive step to call out guests. A guest is the only one who can make or break the Podcast show. It’s important to study the nature of guests too. Because a guest is also considered as a co-host of the show.
If a guest is bored and doesn’t take much interest, then there are 100% chance that the show will fail. To find who is more compatible, we have to take assistance from a tool.
You can do this by plugging your podcast into a tool like Sparktoro. Sparktoro allows you to see what your audience is engaging with. It could be other platforms of podcasts such as youtube or other social media platforms.
For example, If we search for “the art of product podcast” on the Sparktoro website. It will direct us to demographic data, providing information about the content the audience is interacting with.
- It will show different hashtags and frequently used phrases.
- Here you can see the top words in bios, hashtags, and frequent phrases.
- On the left window, you can search for other related podcasts your viewers are watching.
- Similarly, you can also use the YouTube option to look at what kind of content your audience watches on youtube.
Following the above methods could give you 50-100 potential clients. Your main goal will be creating a list allowing you to call guests on your show. You can divide the list according to the priorities.
- Close friends: the ones who are going to be available whenever you call upon them.
- The probable list: the ones who would most probably agree to come on your podcast.
- The premium list: these guests will resemble a dream list of guests you want to call on your podcast.
Start by writing emails and promoting content that will attract these guests. Your chances are increased by how much you polish your podcast into creating premium content. The more premium the content is, the more premium your chances are of inviting those dream guests.
The Bottom Line
Podcasts are tricky to promote. Many other alternatives are available in the market that provides a more Visual representation. And it’s no lie; an audience like to sit and watch rather than sit and listen.
Following the steps, tips, and tricks mentioned above, you can build a strong base for being a good podcast host. Although it will take time to set off on your dreams, consistency and determination will eventually bear fruit.
Also read:
- How to Add the Popular Video Text Effects to Your Video, In 2024
- New Are You Stuck with How to Use Discord GIF Ideally? Check that Out in This Article, as We Will Guide You on All You Need to Know About GIFs for Discord for 2024
- A Complete Guide to the Best Brand Story Videos |2023| for 2024
- New In 2024, Wondering How to Edit a Video to Slow Motion on iPhone and Android Devices? Find Out How to Use Wondershare Filmora to Create and Edit Slo Mo Videos in a Few Clicks
- Updated In 2024, How to Add Subtitles to MKV Videos on All Platforms
- Discord Is Becoming More Popular with Time with Millions of Users. Are You Thinking of Getting a GIF for Discord Profile? If Yes, Learn From This Piece Since We Have a Conclusive Summary of Getting a GIF Profile Picture for Discord
- Updated 2024 Approved When Struggling to Find a Suitable Game Recorder for Your PC, You Might Come Across Many Options. Explore the Best Game Recorders for Sharing Game Highlights
- Updated This Article Will Show You How to Make a Tattoo Disappear on Your Body Magically for 2024
- New Detailed Tutorial to Crop a Video Using Openshot?
- In 2024, Do You Want to Know How to Remove Audio From a Video without a Watermark? Keep Reading This Article Since We Have the Answers for You. Complete with the Guide on How to Do It
- Discover the Best Video Frame Rate Converters for Smooth Playback, Including Online and Offline Options. Learn How to Convert Frame Rates for Free and Elevate Your Video Quality with These Top 8 Tools for 2024
- In 2024, Best 6 Online MP4 Croppers
- 2024 Approved Best Cloud Storage Service for Videos
- New Are You Looking for the Best Way to Add Subtitles to Your Video? The Top SRT File Creators Can Help You Do That for 2024
- Updated 2024 Approved It Is Crucial to Introduce Your Kids to the Different Colors and Practice the Color Matching Game. So, Here Are the Various Factors Related to Color Matching for Your Child with a Tool to Help You in It Ideally
- Updated 2024 Approved 5 Tools to Create a Time-Lapse Video Online
- Updated 2024 Approved How to Use LUTs in Adobe Premiere Pro
- New Getting Into The Details A Review of Kodak LUTs for 2024
- In 2024, Discover How You Can Use Vectorscope to Adjust Luminance, Color Grading, and More in Your Video Editing Projects
- A Comprehensive Review of LUTs Finding LUTs Made by Danny Gevirtz
- Updated How to Animate Text in A Video
- Updated Do You Want to Excel at Using Adobe Premiere Pro Software for Splitting Videos and Audio? Learn About Splitting a Video and Audio Using Different Tools and Add a New Skill to Your Skillset with a Step-by-Step Guide in This Article
- Updated 2024 Approved 10 Amazing Anime Character Designs to Inspire You
- Updated In 2024, Want to Learn How to Trim Videos in Premiere Pro. Read on; Our Guide Will Help You Trim Videos with This Timeline-Based Video Editing Software Application to Make Them Engaging to Viewers
- New 2024 Approved MP3 Cutter Download for Computer and Mobile
- Updated In 2024, Create a Kickass COD Warzone Thumbnail for Free
- Updated Have You Ever Tried DaVinci Resolve for Creating a Motion Blur Effect? Read This Article to Discover How to Use DaVinci Resolve Motion Blur with the Help of Detailed Instructions
- New 2024 Approved How to Create Your Own LUTs for Your Video with Filmora
- In 2024, Easy Steps to Make Glitch Effect with Filmora
- Updated How to Export iMovie for 2024
- New Learn the Step-by-Step Process of Slowing Down Time-Lapse Videos on Your iPhone
- Best 16 Motion Blur Apps for Videos & Photos for 2024
- Split a Video in the Lightworks Step by Step for 2024
- Updated 2024 Approved Step by Step to Rotate Videos Using Kdenlive
- 2024 Approved Looking for Simple Steps to Customize the Speed of Your Video in DaVinci Resolve? Find Out How You Can Do that and Discover an Easier Alternative to DaVinci Resolve
- 7 Solutions to Fix Chrome Crashes or Wont Open on Samsung Galaxy M34 | Dr.fone
- Life360 Learn How Everything Works On Nubia Z50S Pro | Dr.fone
- Top 5 Tracking Apps to Track Realme 12+ 5G without Them Knowing | Dr.fone
- The Ultimate Guide to Bypassing iCloud Activation Lock from Apple iPhone 14 Pro Max
- How To Simulate GPS Movement With Location Spoofer On Apple iPhone 12 Pro Max? | Dr.fone
- In 2024, How to Fake Snapchat Location on Vivo T2x 5G | Dr.fone
- Bricked Your Poco F5 Pro 5G? Heres A Full Solution | Dr.fone
- Cloning Voices in Real-Time With Top GitHub Repositories
- Dose Life360 Notify Me When Someone Checks My Location On Samsung Galaxy A24? | Dr.fone
- iPhone 12 Pro Backup Password Never Set But Still Asking? Heres the Fix
- Data Retrieval tool – restore lost data from Galaxy A15 5G
- Here are Some of the Best Pokemon Discord Servers to Join On Realme V30T | Dr.fone
- Title: Updated How to Zoom Webcam on PC for 2024
- Author: Morgan
- Created at : 2024-06-15 18:56:19
- Updated at : 2024-06-16 18:56:19
- Link: https://ai-video-editing.techidaily.com/updated-how-to-zoom-webcam-on-pc-for-2024/
- License: This work is licensed under CC BY-NC-SA 4.0.
