
:max_bytes(150000):strip_icc():format(webp)/GettyImages-475157855-5b24021b04d1cf00369d7e11-5c66f1c04cedfd00010a2553.jpg)
Updated In 2024, Best Green Screen Software for Beginner on Mac
Best Green Screen Software for Beginner on Mac
Almost every major film released in 2019 used green screen effects for at least one scene. While that is an entirely unscientific assessment that you should not cite in a college paper, given the accessibility and sophistication of today’s green screen technology, it is probably not far off. Everyone has access to expert compositing technology, from Marvel movies to local news stations.
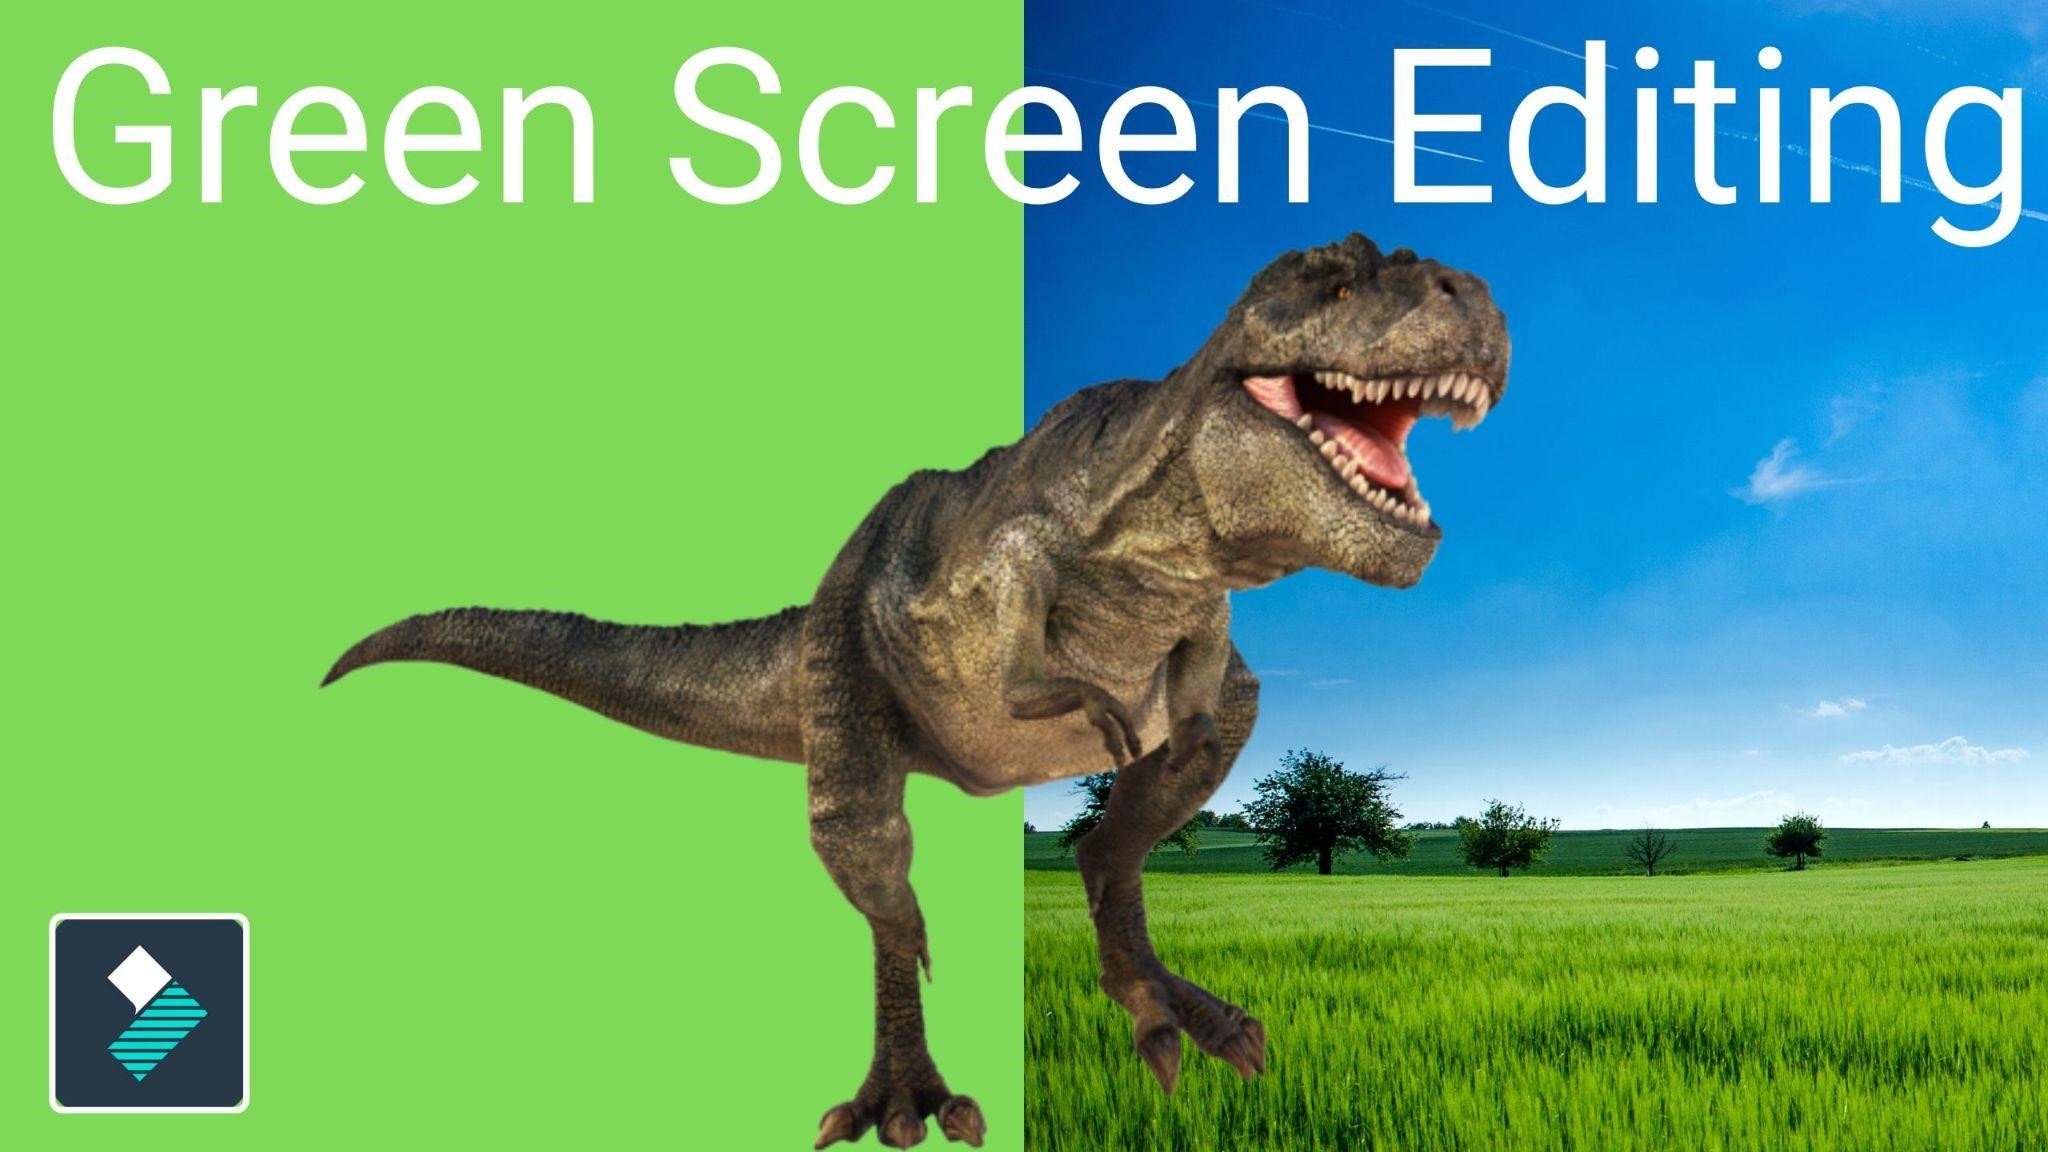
WHAT ARE GREEN SCREEN AND CHROMA KEYING?
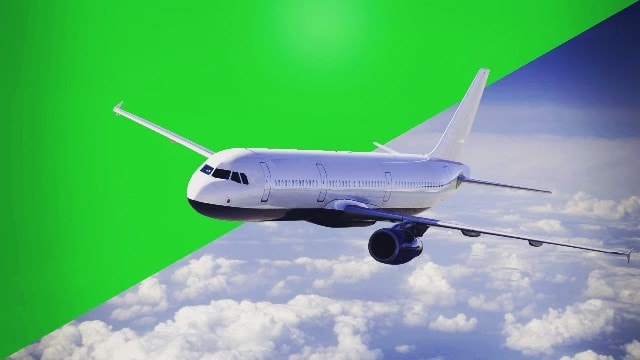
The colored background you want to make transparent and remove from your shot is referred to as a green screen. This is typically a single-colored backdrop, which can be any color but is usually bright green because it is the color most dissimilar to human skin tones. (Blue screens were commonly used in the early days of film, and they may still be used in some cases.)
The chroma key is a time-honored and widely used visual effects technique. Simply stated, chroma key is the process of photographing a subject against a solid-color background and then removing that background in post-production and replacing it with transparency. The subject can then be positioned in front of any new background.
BEST FREE GREEN SCREEN SOFTWARE FOR BEGINNERS ON MAC
FILMORA VIDEO EDITOR
Supported OS: Windows, Mac, iOS, Android
Filmora Video Editor has two modes based on your experience with video editing software. Users can use the easy mode or the full feature editor to access the program’s full focus.
The theme focus can also make it easier to select the videos and audio that you want to use. There are a number of features and effects that can be used to complement various themes, which can help improve transitions or find different effects in the program without having to dig around.
The preview mode and music tracks available from the themes make it simple to enhance your video.
The full feature mode gives you even more control; this is where Filmora begins to resemble an actual video editor. You can drag images, sounds, and other media into different tracks and apply advanced effects.
Green screens, premade filters for color correction, cropping, cutting, splitting, and combining with simple tools are all available in the full feature mode. The full-featured editor also has an audio mixer and equalizer, as well as the ability to burn your creations to DVD, Facebook, Vimeo, and other platforms.
For Win 7 or later (64-bit)
For macOS 10.14 or later
Features:
4k Editing Support
Gif Support
Noise Removal
Color Tuning
Advanced Text Editor
Audio Mixer
Video Stabilization
Scene Detection
Audio Equalizer
Chroma Keying
Pros:
- It can be a program that’s easy to master even if you have never used a video editing program before
- There are plenty of visual effects and premade effects that can help you make a great looking video within a few minutes
- The 4k video support is also helpful
Cons:
- It does lack a few advanced features like the option for motion tracking, multi-camera support, and assistance with 360° videos
Steps On How To Chroma Key On Filmora
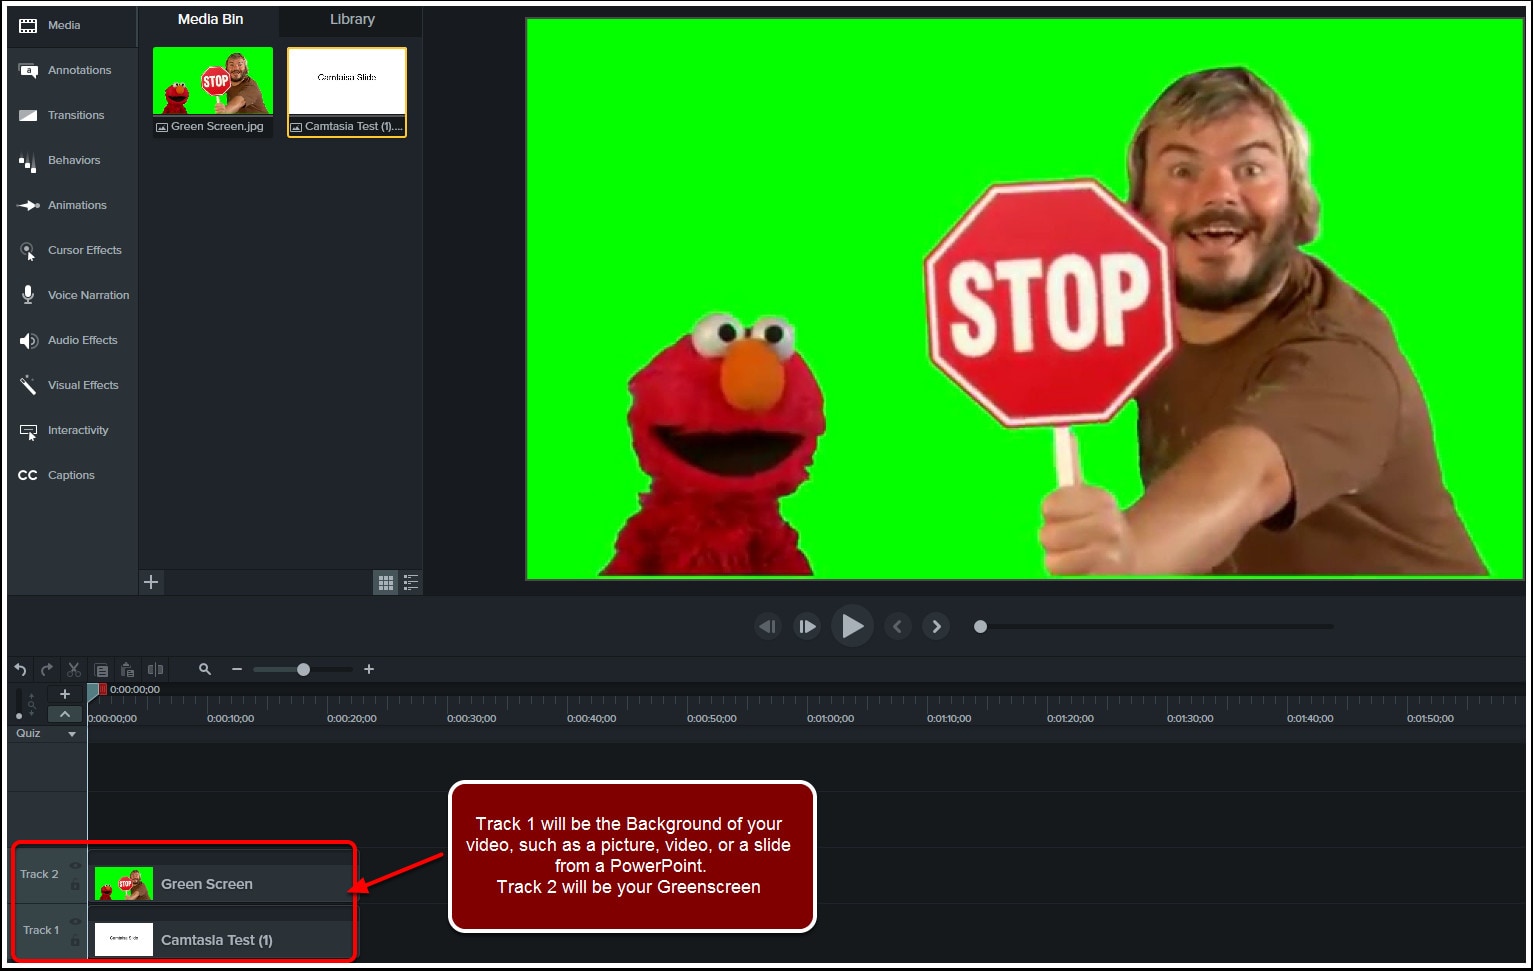
- Click the “Import Media Files Here“ to import the background video and video with the green screen background into the media library. And then drag and drop the background video and green screen video to the video track in the timeline respectively.
Note: Ensure the video with green screen background is placed as the overlay video.
- Right-click on the overlay video and find the “Green Screen“ option.
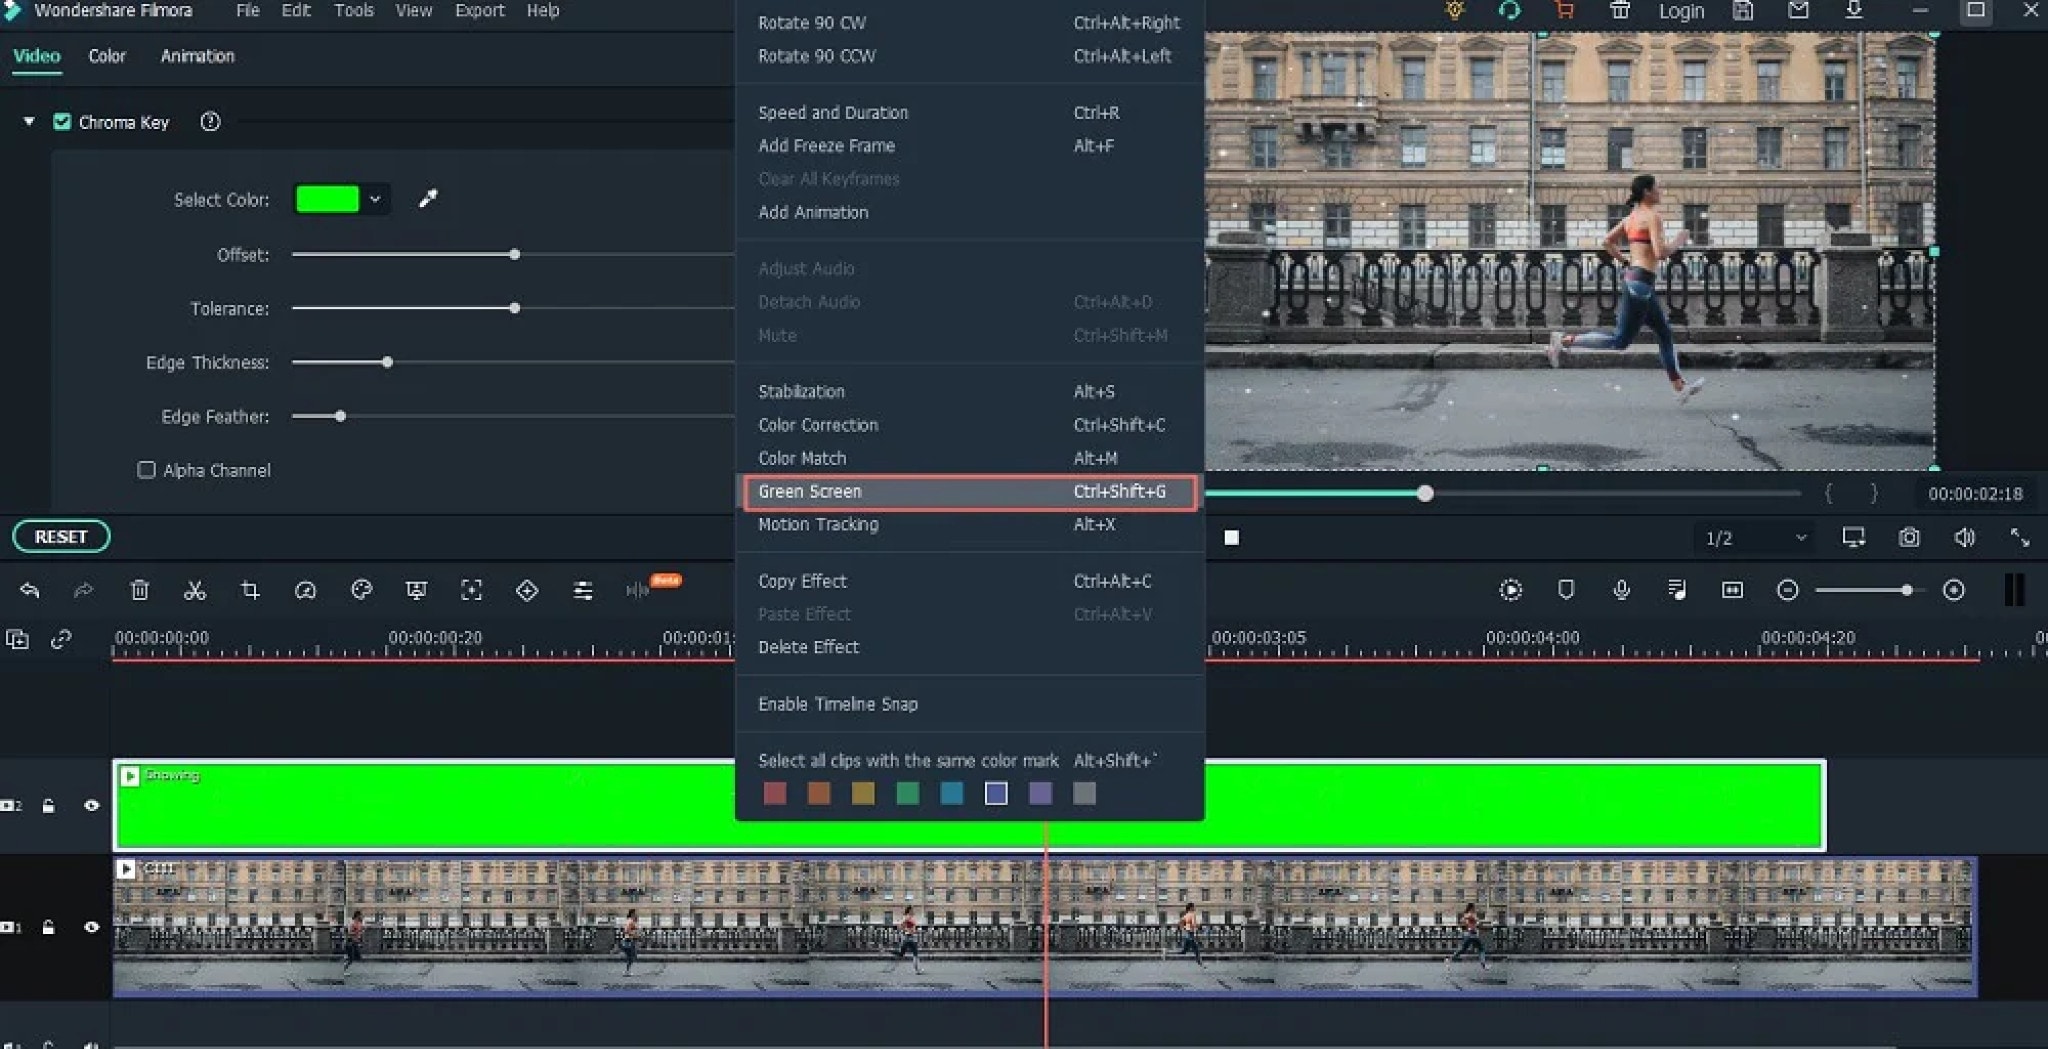
- Click on “Green Screen“ and you’ll open the video editing panel. And the green screen background has been removed.
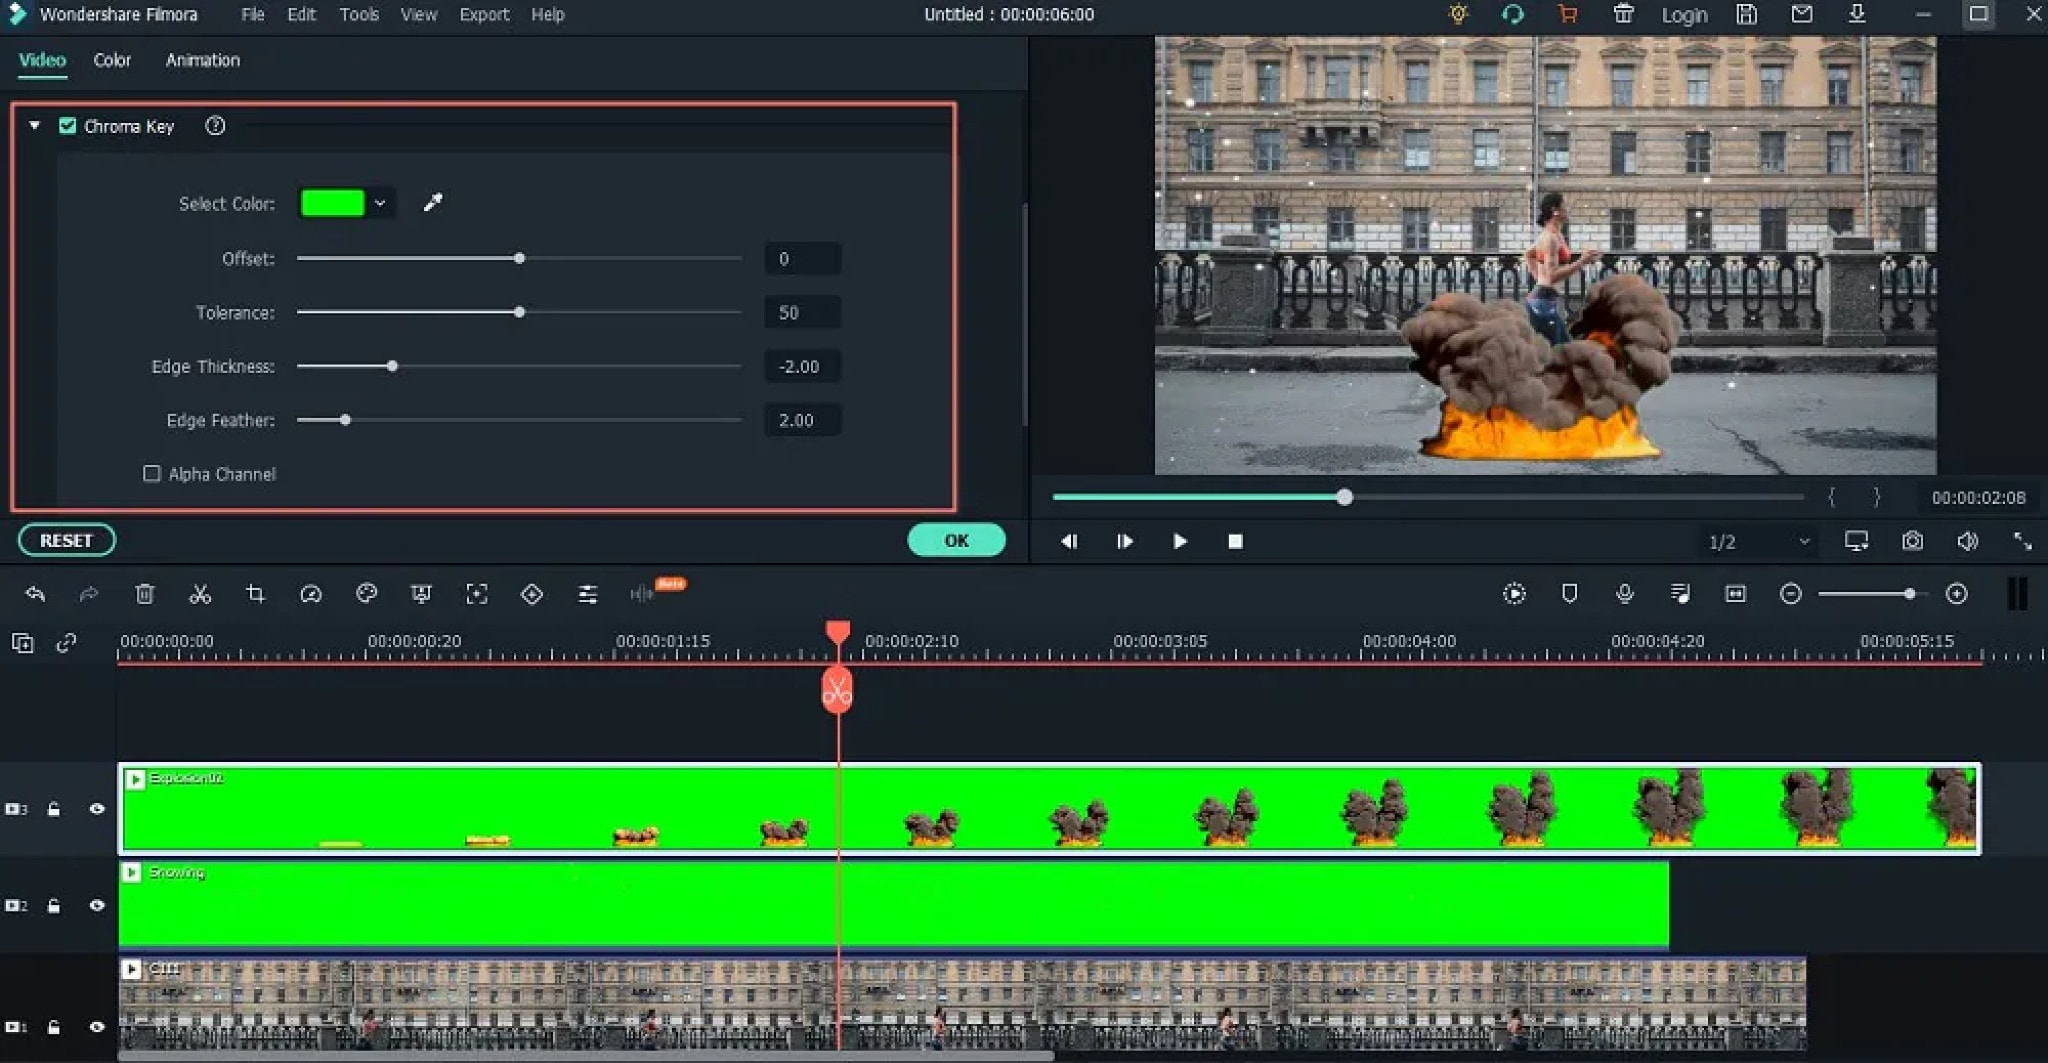
To open the green screen editing panel, you can also double click the overlay video, then check “Chroma Key” to apply the green screen function. And you can also adjust the offset, tolerance, edge thickness, etc. according to your own needs.
When you’re satisfied with the effect, you can click the “OK“ button to save the changes.
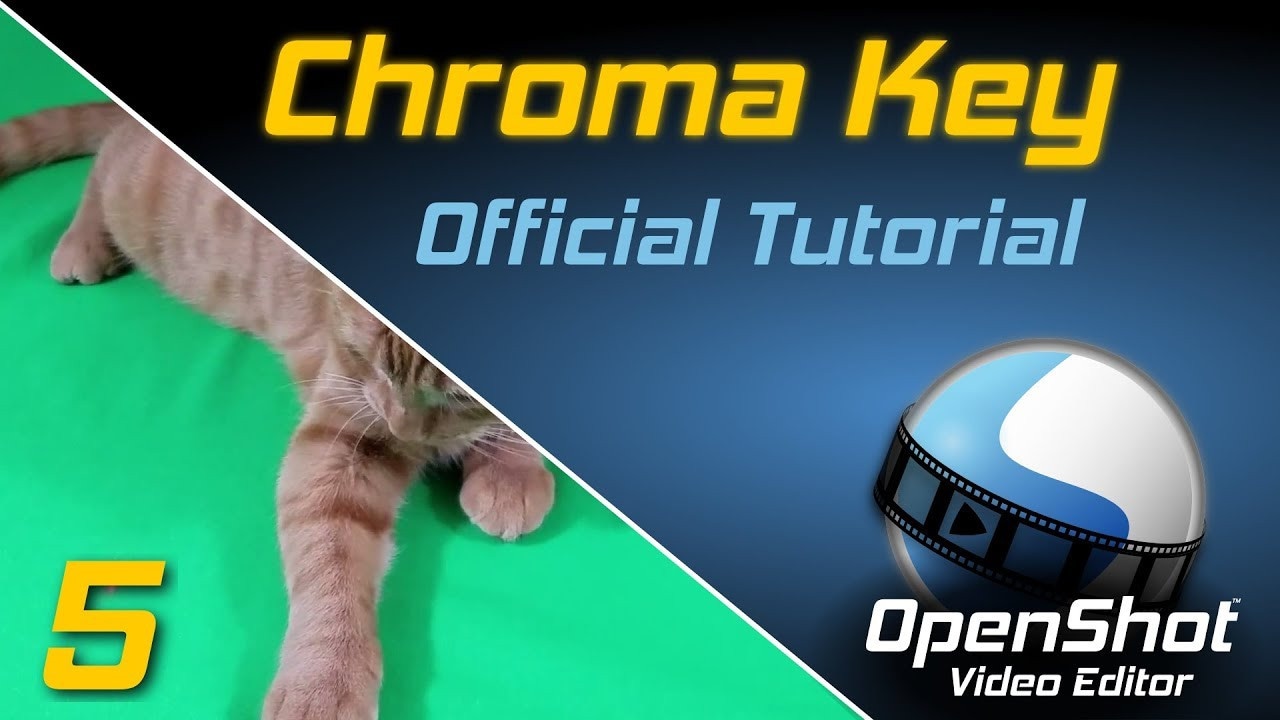
OPENSHOT
OpenShot Video Editor is a free, open-source video editor for Mac and Windows PC that can take your videos, photos, and music files and assist you in creating the film you’ve always wanted to make. Add subtitles, transitions, and effects with ease, and then export your film to DVD, YouTube, Vimeo, Xbox 360, and a variety of other popular formats.
A cross-platform video editing solution designed to help businesses of all sizes edit audios, videos, or images using a drag-and-drop interface. Administrators can use OpenShot Video Editor to enhance videos by adding animation effects such as fade, flying text, snow, and bounce, watermarks, 3D titles, and audio tracks, among other things.
The multilingual platform, which was specifically designed for video editors, allows teams to adjust color contrasts and brightness, as well as add time.
Supported OS: Windows, macOS, Linux
Features:
- Cross-platform (Linux, Mac, and Windows)
- Support for many videos, audio, and image formats (based on FFmpeg)
- Powerful curve-based Key frame animations
- Desktop integration (drag and drop support)
- Unlimited tracks/layers
- Clip resizing, scaling, trimming, snapping, rotation, and cutting
- Video transitions with real-time previews
- Compositing, image overlays, watermarks
- Title templates, title creation, sub-titles
- 2D animation support (image sequences)
- 3D animated titles (and effects)
- SVG friendly, to create and include vector titles and credits
- Scrolling motion picture credits
- Advanced Timeline (including Drag & drop scrolling, panning, zooming, and snapping)
- Frame accuracy (step through each frame of video)
- Time-mapping and speed changes on clips (slow/fast, forward/backward, etc…)
- Audio mixing and editing
- Digital video effects, including brightness, gamma, hue, greyscale, chroma key, and many more!
- Experimental hardware encoding and decoding (VA-API, NVDEC, D3D9, D3D11, VTB)
- Import & Export widely supported formats (EDL, XML)
- Render videos in many codecs and formats (based on FFmpeg)
Pros:
- 3D Titles
- Curve-based Time Mapping
- Non-linear Editor with Infinite Tracks
- No Watermark
- Frequent Update
- Easy to Use
- Multi-lingual
Cons:
- Unstable Performance
- Limited Editing Features
- Less Powerful Hardware Acceleration
- Obsolete Interface
Steps On How To Chroma Key In Openshot
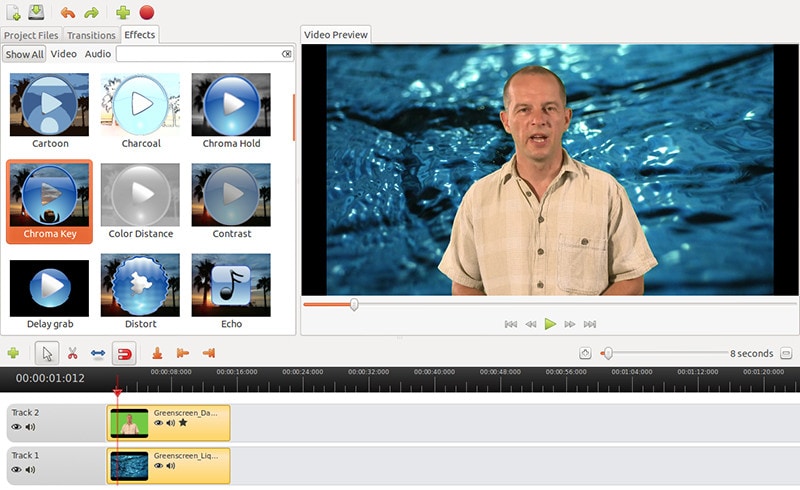
- To create a chroma key (e.g. greenscreen or bluescreen) in OpenShot, begin by importing the files you’re going to use.
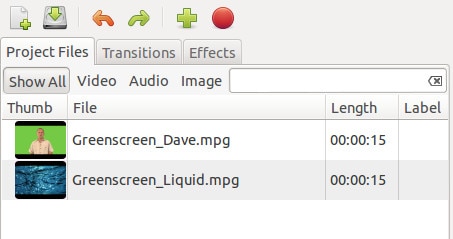
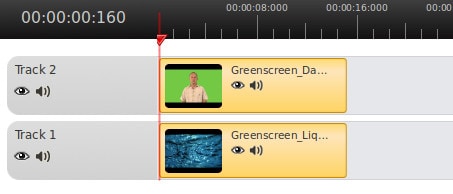
- Drag the file to be keyed onto Track 2 in the timeline, and the file to use as the background onto Track 1. The plan is to make the green part of the upper image transparent so the file underneath becomes visible.
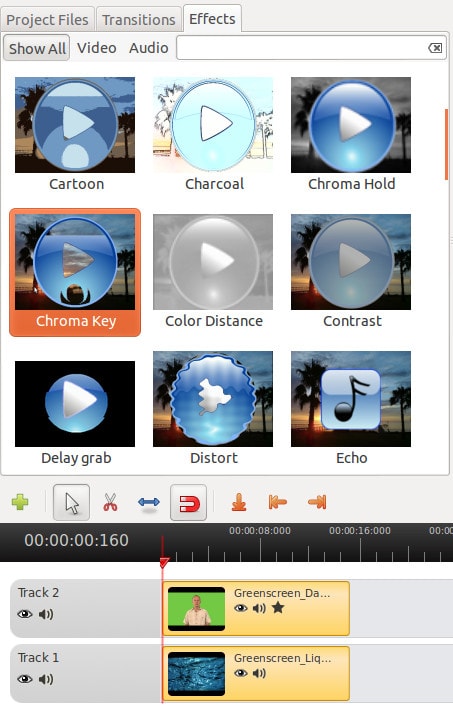
- Click the Effects tab, find the Chroma Key effect, and drag it onto the top file in the timeline. You will see a star appear on the file in the timeline.
- Right-click the top file in the timeline and select Properties. In the Properties window, click the Effects tab and then click the Chroma Key effect.
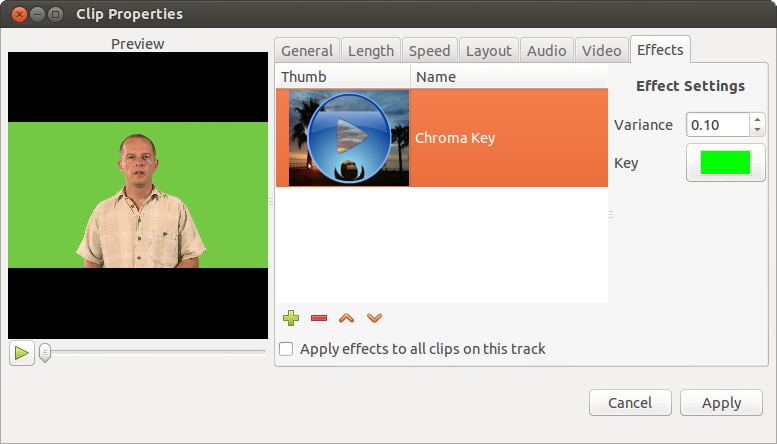
- Click the green-colored area next to the word “Key” (shown above) to bring up the Pick a Color window (shown below). Click the eyedropper tool and then click on a green part of the video image.
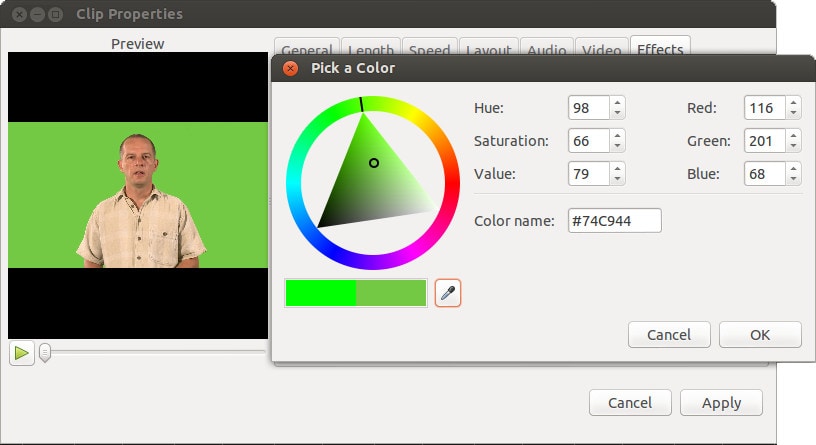
- Click OK, then click Apply in the properties window. You should now be able to scrub through the timeline and see the effect in action.
iMovie
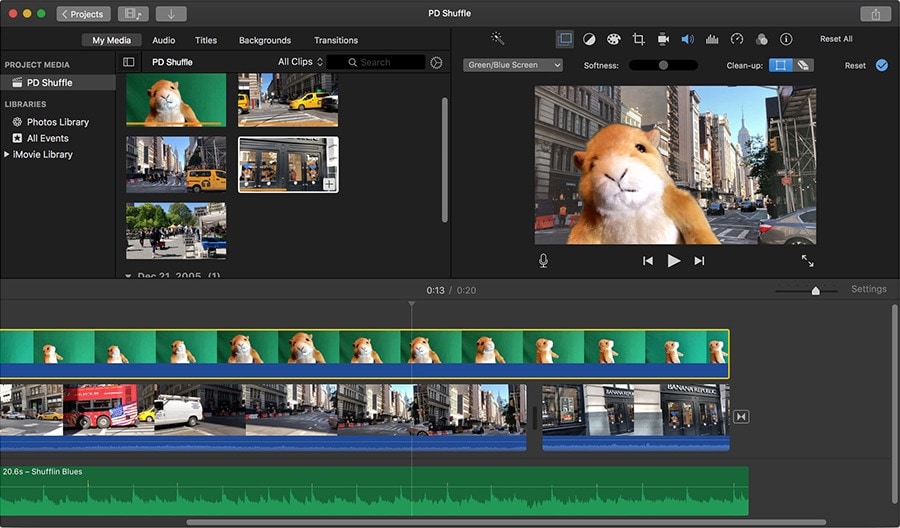
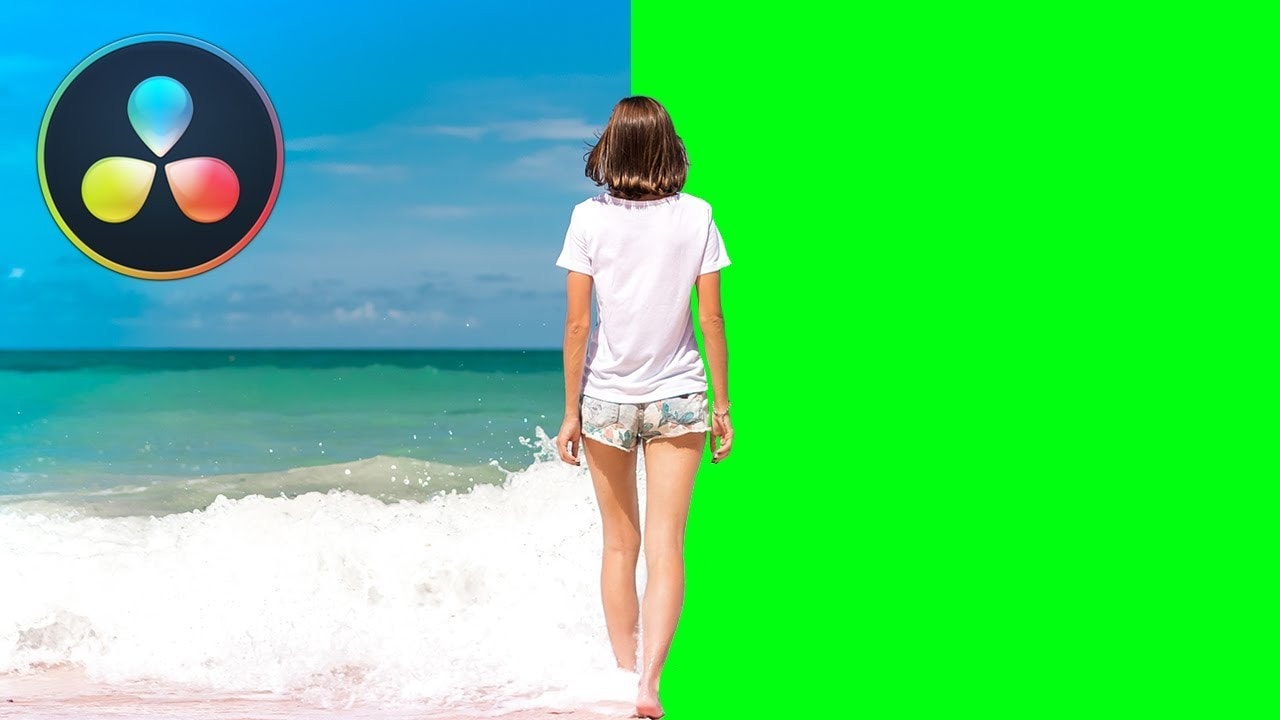
When you record a video against a green screen, you can make the background transparent and replace it with other video clips, graphics, or still images of your choice. It’s easy to overlay any footage with iMovie’s green screen effect. For example, you can transport yourself anywhere or appear in your favorite films.
The green Screen effect, also referred as the Chroma Key effect, is a simple way to combine two clips into one with impressive scenes. You can, for example, fly over a very high mountain. Green Screen is a background that is only one color, usually green. This could be another pure color, such as Blue or Pink. By dragging and dropping, you can apply a green screen video to another in iMovie. It’s incredibly simple to create stunning videos using the iMovie Green Screen effect.
Supported OS: macOS and iOS
Features:
- Options to modify and enhance video color settings
- Crop and rotate video clips
- Stabilize shaky videos
- Add video transitions
- Change the speed of clips.
- iMovie allows you to remove both green and blue screens
Pros:
- Clean, elegant interface
- Well optimized, responsive, and fast on modern Macs
- Effects and titles are all top-notch—especially for a free program
- Robust and useful interactions with other Apple products and software
Cons:
- Doesn’t have some advanced features present in other applications, like 360 video or Multicam
- Sometimes the efforts to keep the interface simple make finding a solution obtuse
- The user interface is not customizable
- Supports fewer export formats than some competing products
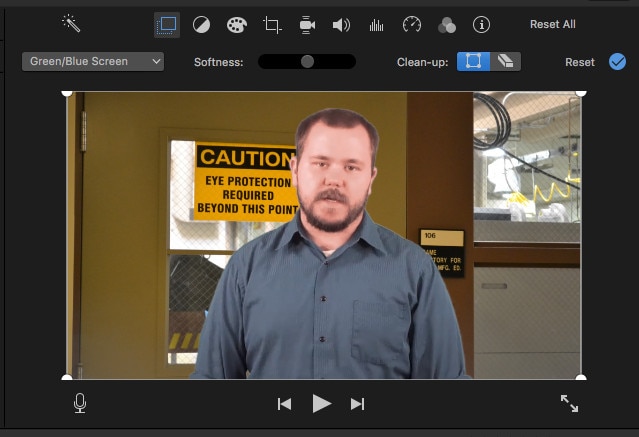
Steps On How To Chroma Key In iMovie
- Open an empty project.
- Select the background you would like to use.
- Drag and drop the background video or image into the timeline.
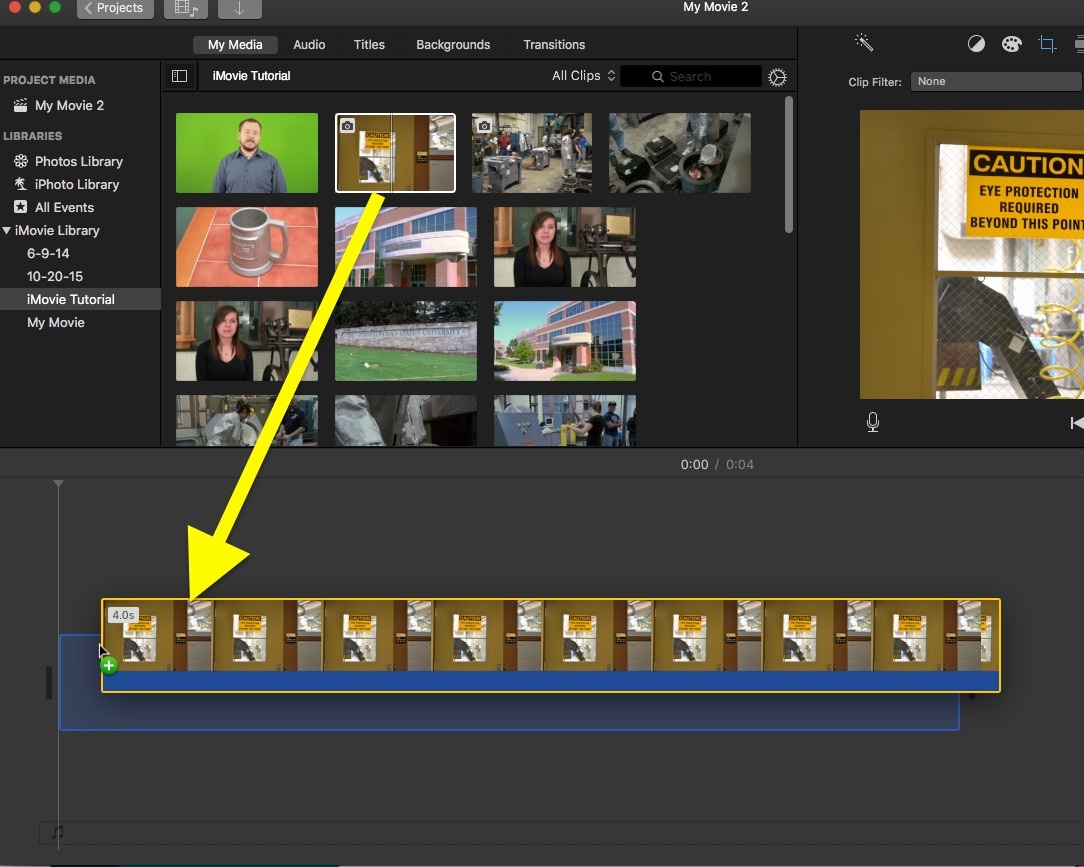
- Select the green screen footage you want to use.
- Drag and drop it above the background.
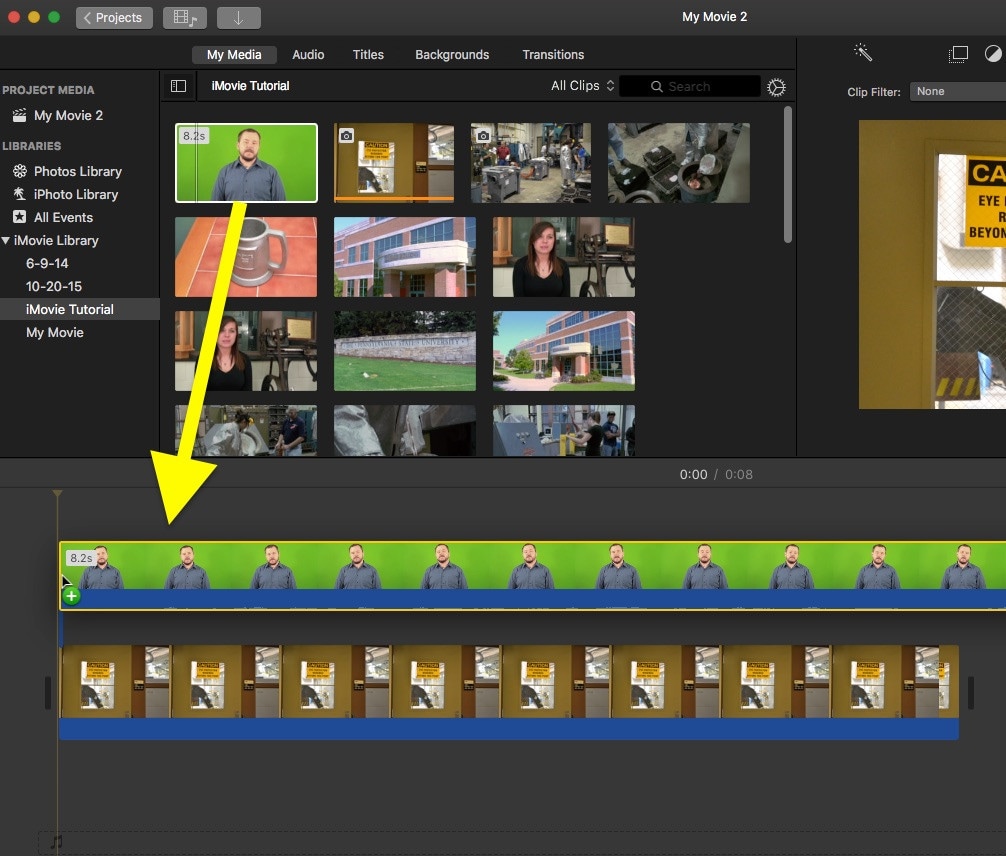
- Drag the edge of the background to make the background longer or shorter to match your green screen footage.
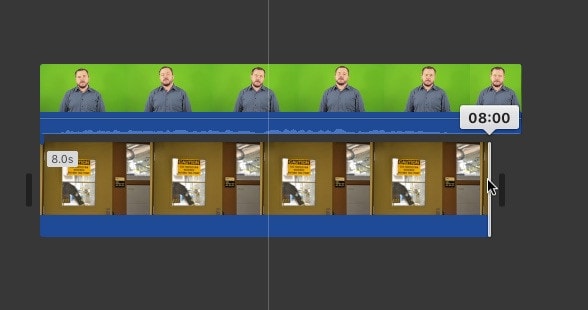
- Click to select the green screen footage in the timeline
- Select Green/Blue Screen from the drop-down menu that defaults to Cutaway above the left corner of the viewer window.
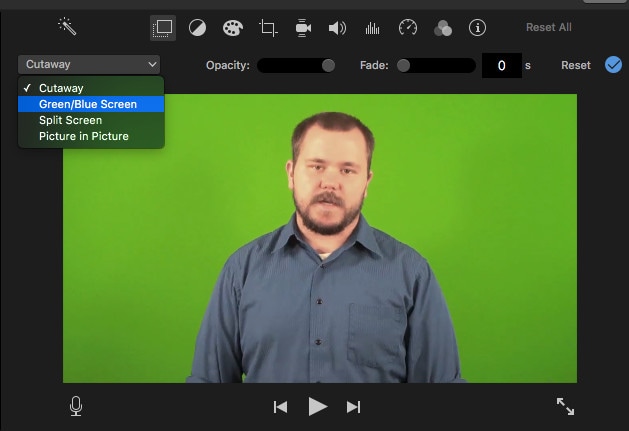
- The green should now be removed to reveal the background behind it.
DA VINCI RESOLVE
Davinci Resolve has two versions including a full studio version which is available for $299. Because some professional tools, such as team collaboration and video noise reduction, cannot be used without a full license, the free program has a surprising number of features. The majority of the features included in the free version are adequate for professionals and hobbyists.
Although the Davinci Resolve program is regarded as a professional grade editor, it does include some advanced tools such as exporting, audio mastering, color correction, and more. The program is also useful for arranging audio and video clips, and it has a large selection of effects and filters. The additional color correction and adjustments available here can also aid in HDR support and produce more professional results when working with camera RAW data.
Davinci Resolve is also well-known for having one of the best color grading programs available. The outcome can be hugely potent when using the accessible chromakey tools. It doesn’t take much to figure out how to use this effect with the quick tutorial on board.
Supported OS: Mac and Windows
Features:
- Options to modify and enhance video color settings
- Crop and rotate video clips
- Stabilize shaky videos
- Add video transitions
- Change the speed of clips.
- iMovie allows you to remove both green and blue screens
Pros:
- Clean, elegant interface
- Well optimized, responsive, and fast on modern Macs
- Effects and titles are all top-notch—especially for a free program
- Robust and useful interactions with other Apple products and software
Cons:
- Doesn’t have some advanced features present in other applications, like 360 video or Multicam
- Sometimes the efforts to keep the interface simple make finding a solution obtuse
- The user interface is not customizable
- Supports fewer export formats than some competing products
Steps On How To Remove the Green Screen in DaVinci Resolve Inside the Color Tab
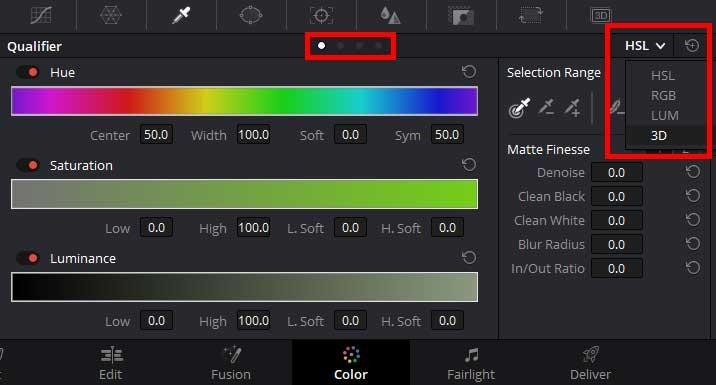
Step 1 – Add the Qualifier Tool & select the color
After you finish cutting the video, jump inside the “Color” tab and select the Qualifier Tool. Make sure you set the tool in “3D” mode to enable us to select a bigger range of the green spectrum.
Do this by simply selecting the fourth dot from the middle-upper area of the window or by selecting it from the drop-down mode selector situated in the window’s top-right corner.
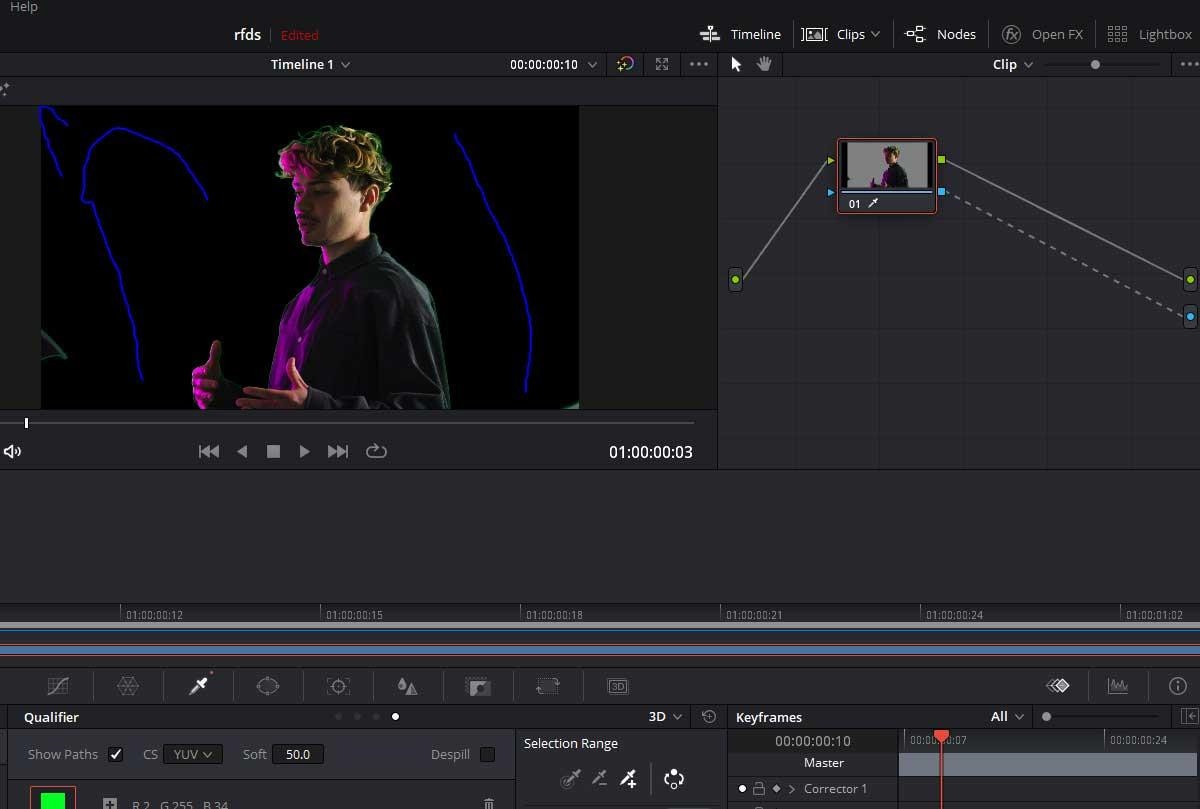
After selecting the 3D mode for the Qualifier Tool, go ahead and select the range of green colors you want to remove by simply drawing lines on top of the screen, similar to the way I did in the image below.
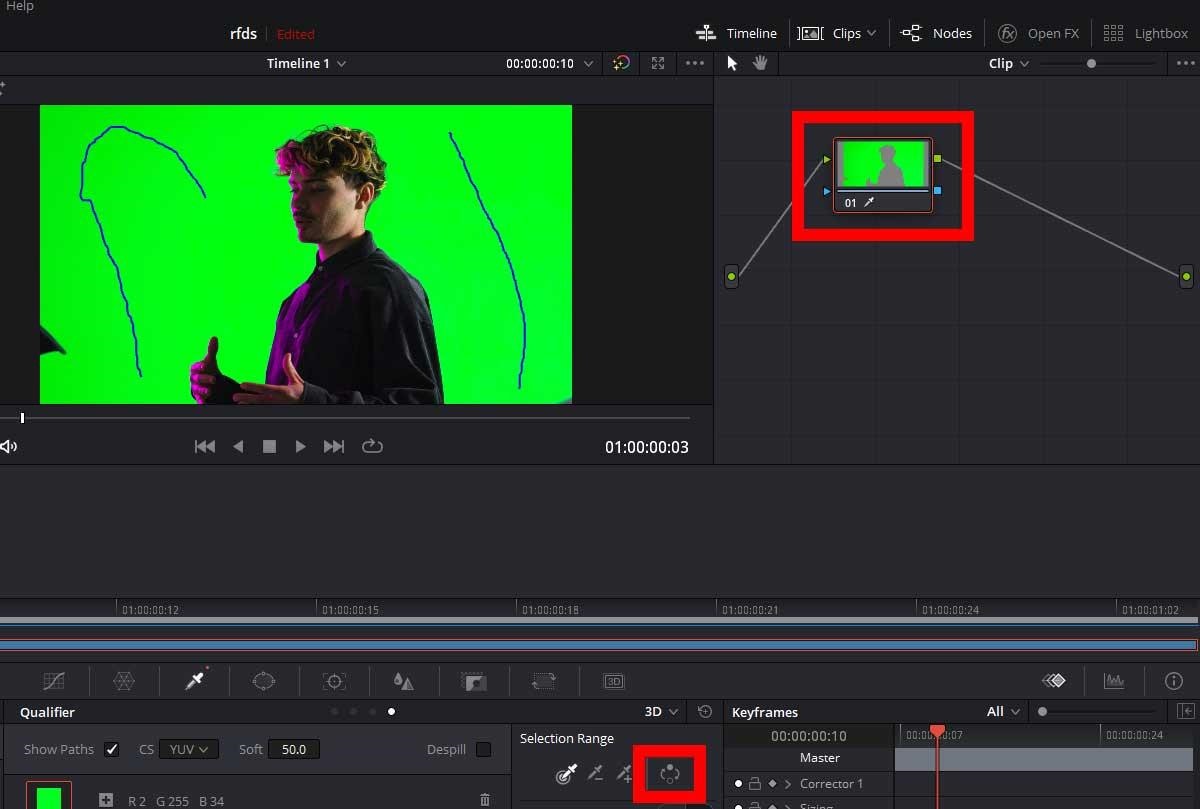
Step 2 – Removing the color
As you can see in the small rectangle, Resolve did the keying, but it doesn’t know what to do with it because we didn’t specify. Right-click underneath the node, select “Add Alpha Output” and then link the node.
Yes, I know it will key out the subject and not the green screen. There is no problem. Go ahead and select the Revert button situated in the “Selection Range” window. Everything should be OK now.
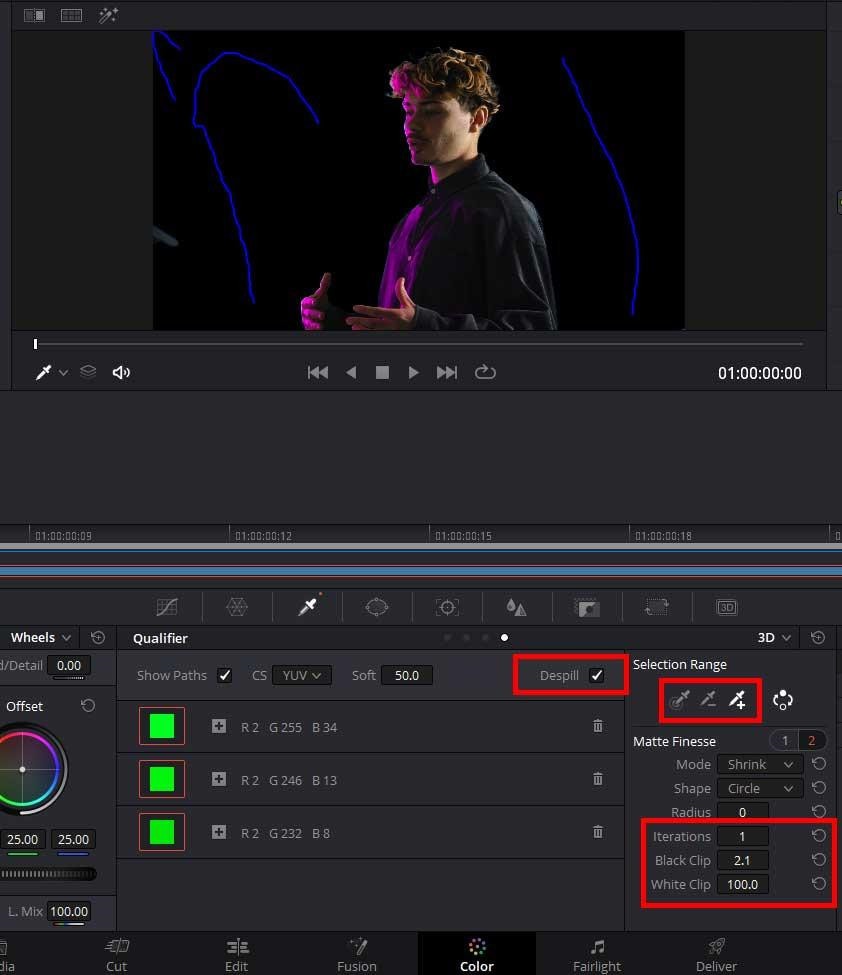
Step 3 – Clean the edges
As you can surely notice, there are still some issues we have to address. In the hair area and on the outline of the subject, there is a noticeable green color spill. We don’t want that! On top of this, there will be many situations where you will still notice some noisy green pixels in the transparent area, around the corners of the screen, or the subject.
To get rid of these problems, we have to jump into the Qualifier window. Here, there are many settings you can play with to tweak the output. Most of the time, you will solve these problems by checking “Despill”, further selecting more of the greens and adding them to the Selection Range, or modifying the shrink, ”Black Clip” and “White Clip”.
Step 3 – Done
This is all for this method! Go ahead and add a background in the “Edit” mode and your job is done! Feel free to watch the video below, where I went through the same steps as above, but faster.
BEST PAID GREEN SCREEN SOFTWARE FOR BEGINNERS ON MAC
WEVIDEO
Supported OS: Windows, Mac, iOS, Android
This program, which costs only $4 per month, has extensive compatibility with nearly 20 different input and output formats. Most common input and output formats, such as NT 4.0, avi, 3gp, and others, are well represented.
If you want to do green screen options online but don’t want to install any software to access a full-featured video editor, this could be one of your best options.
WeVideo is a cloud-based video editing solution that is both powerful and simple to use. There’s a reason it’s one of the most popular online video editors out there. This includes options for photo animations, clip transformations, voiceovers, and more. You can also improve your video by using a variety of premium features such as screencasting, custom branding, and a wide range of free tracks that can be used with copyright-free music.
With this online editor, you can easily control almost everything in a video, from motion effects to green screen technology to scene transitions.
Features:
- 720p video resolution
- Motion titles
- Screencasting
- WeVideo JumpStart
- Cloud storage
- Music library
- Slow motion
- Voiceover
- Guilt in graphics
- Customizable environment
- Green screen
- Advanced text editing
- File & media manager
- Multi-track editing and storyboard
Pros:
- This is a multiplatform video editor that works with intense compatibility online. You can use it on almost any device.
- The interface is also quite simple and it has some tools that are used by the pros as well as a format that most people can easily understand.
- There is a full licensed library of songs with over 100 tracks you can use royalty-free.
- The cloud storage also ensures that you can pick up a project on any device that you won’t. Cloud access anywhere gives you more time for efficiency and handling your workload.
Cons:
- The program only currently supports 720 P resolution in some of the cheaper plans and there are limited minutes allowed with editing if you are only going to use the trial-free plan.
Steps On How To Chroma Key In WeVideo
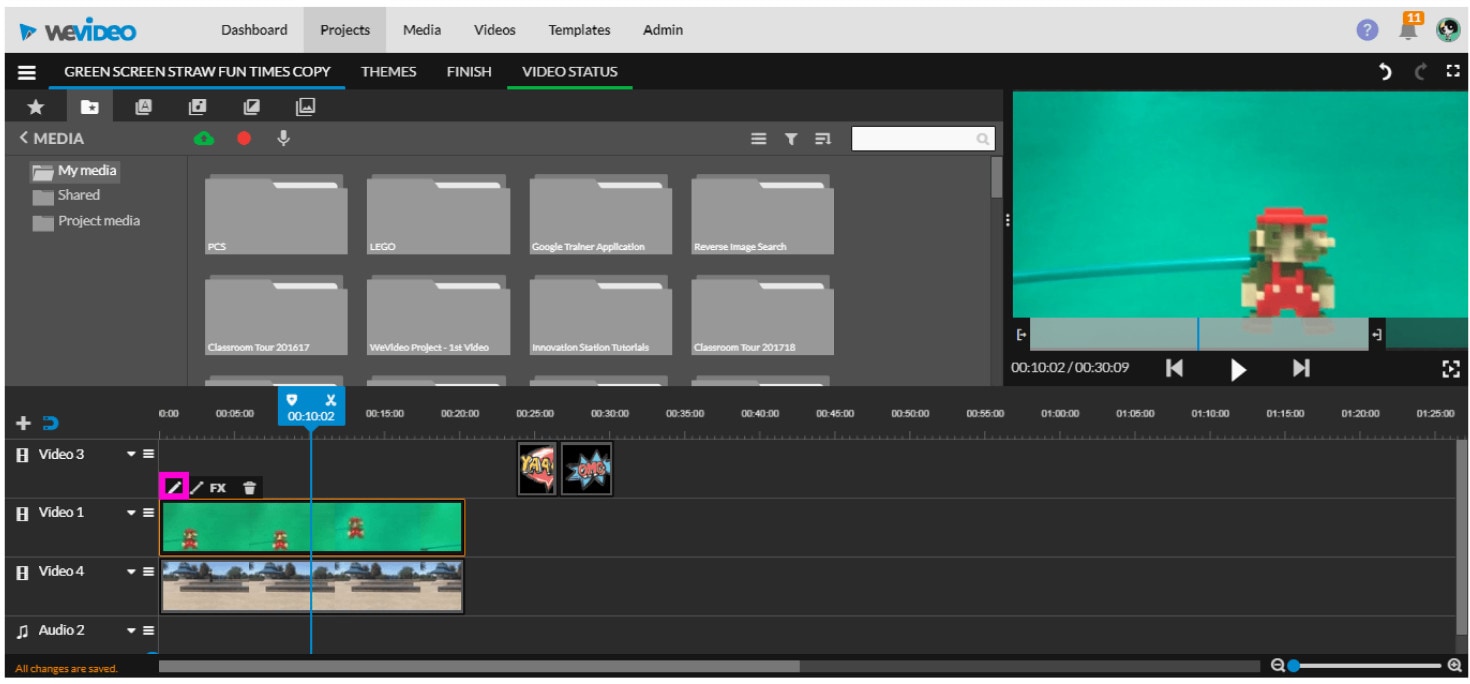
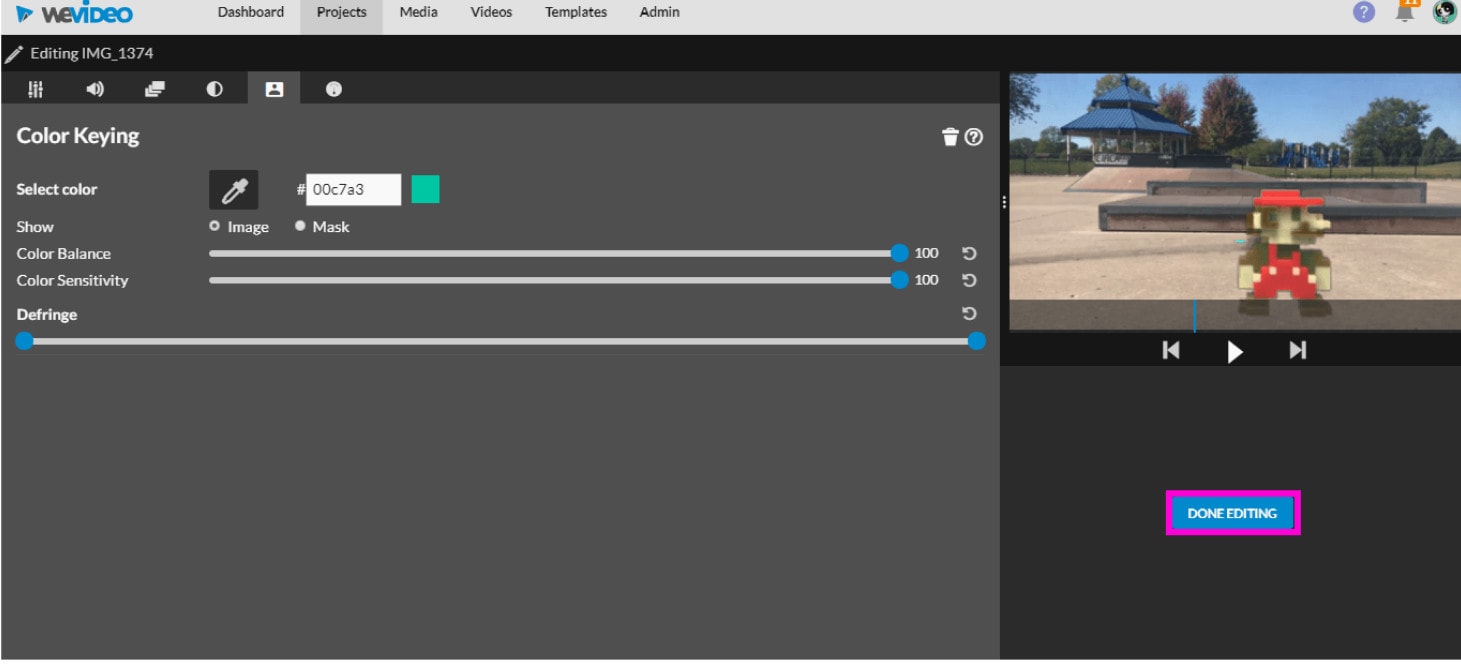
- When your WeVideo project is open, click on the clip that you wish to remove the green background from.

- The video or image layer underneath the color-keyed clip will show through, as the background.
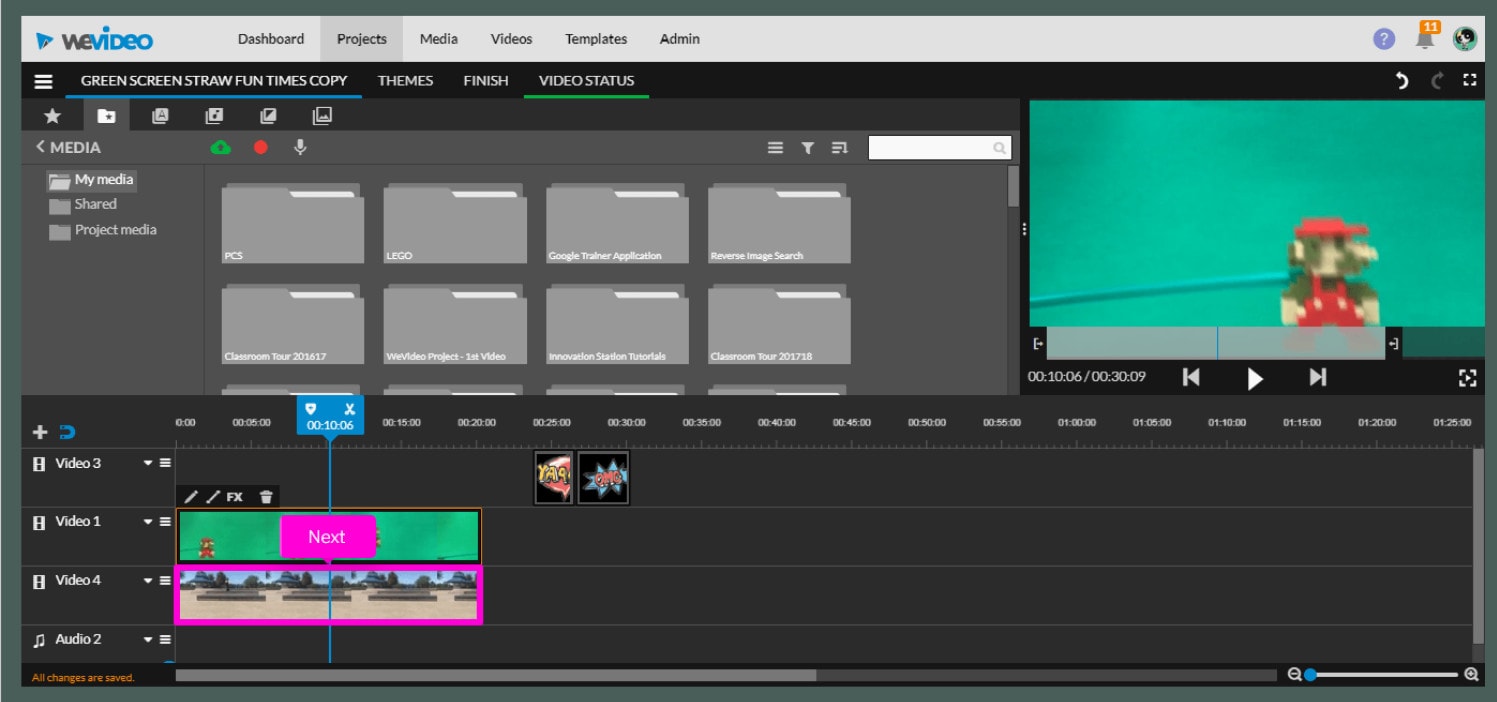
- Click on the clip editor pencil icon.
- Click on the eyedropper to choose the color you’re going to remove.
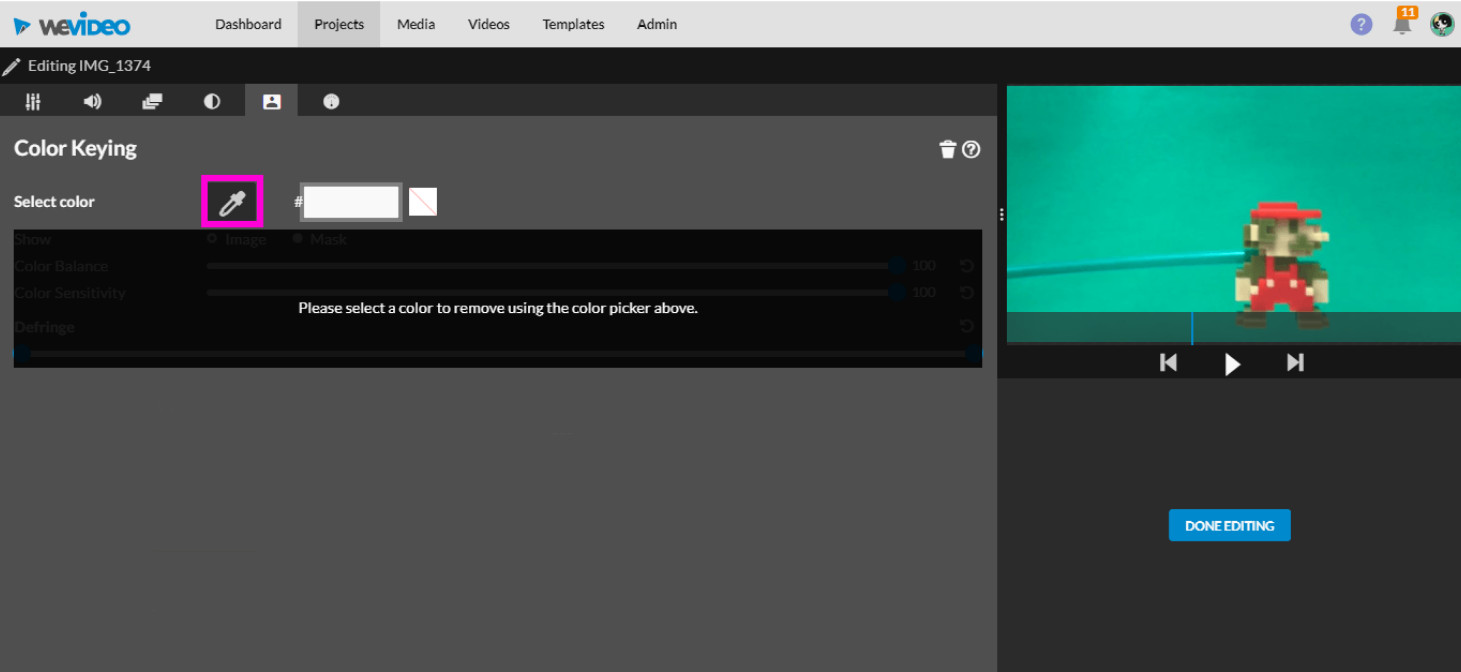
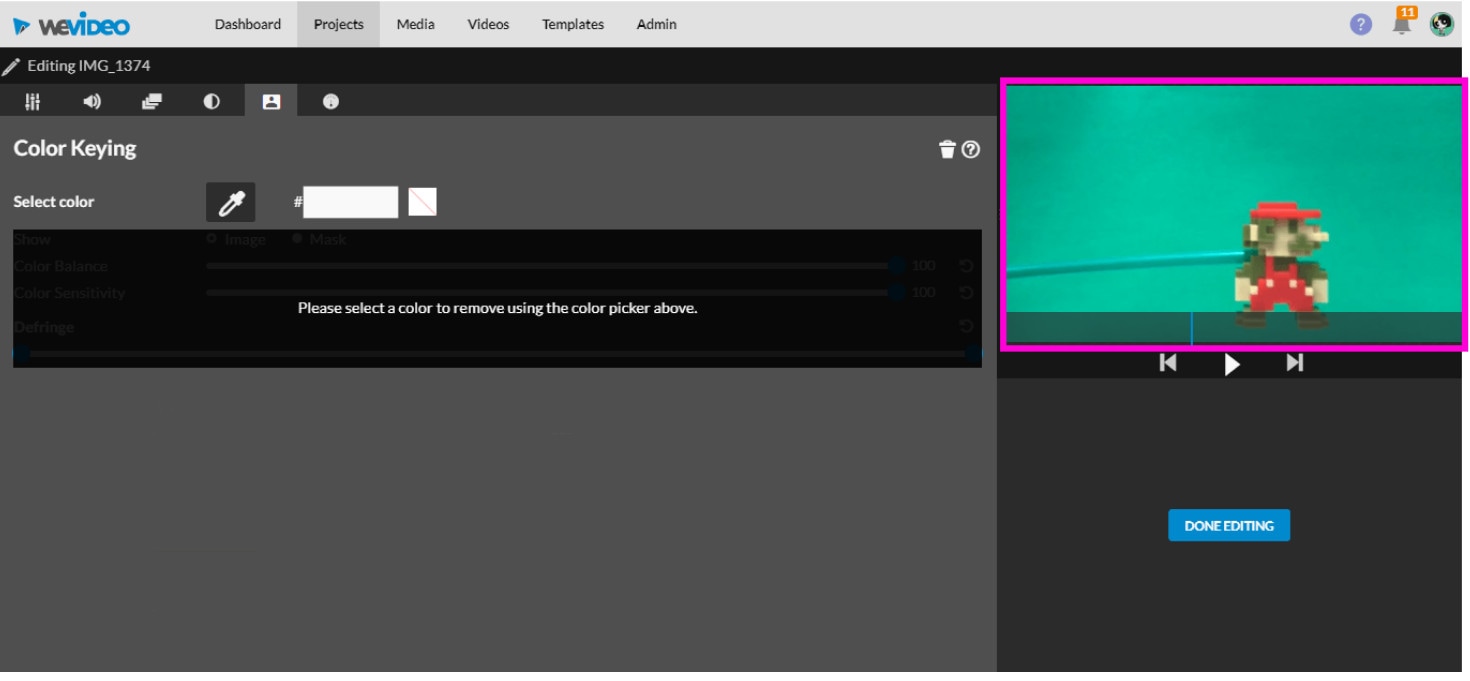
- Click an area that is the color that you would like to remove.
CAMTASIA
Supported OS: Mac and Windows
Camtasia by Techsmith is a simple video editing and screen recording application. Camtasia, designed for beginners, allows users to create professional training videos quickly and easily.
Camtasia is a straightforward video editor and chroma key software (for basic green screen editing) that may meet your needs.
It is the ideal video editor for beginners with little knowledge to editing. It includes numerous features that make it simple to create professional videos, whether you are a student, business owner, or regular YouTube user looking to spice up their content.
Features:
- Intuitive and easy-to-use interface.
- The ability to upload videos straight from the application, via Dropbox or YouTube.
- A wide range of built-in editing templates makes it easier for beginners to create professional-looking video content.
- Screen recording options for capturing live demos and lectures.
- Camtasia for Mac is also available, which makes it an ideal video editor for Apple users.
Pros:
- Very easy to learn
- Amazing screen capture feature
- Impressive cursor effects
- Interactivity features
- Good asset library
- Mobile version
- Great customer service
- Low cost
Cons:
- Constant crashes and bugs
- Limited customization
- No keyframe tracking
- Poor keyboard commands
- Export issues
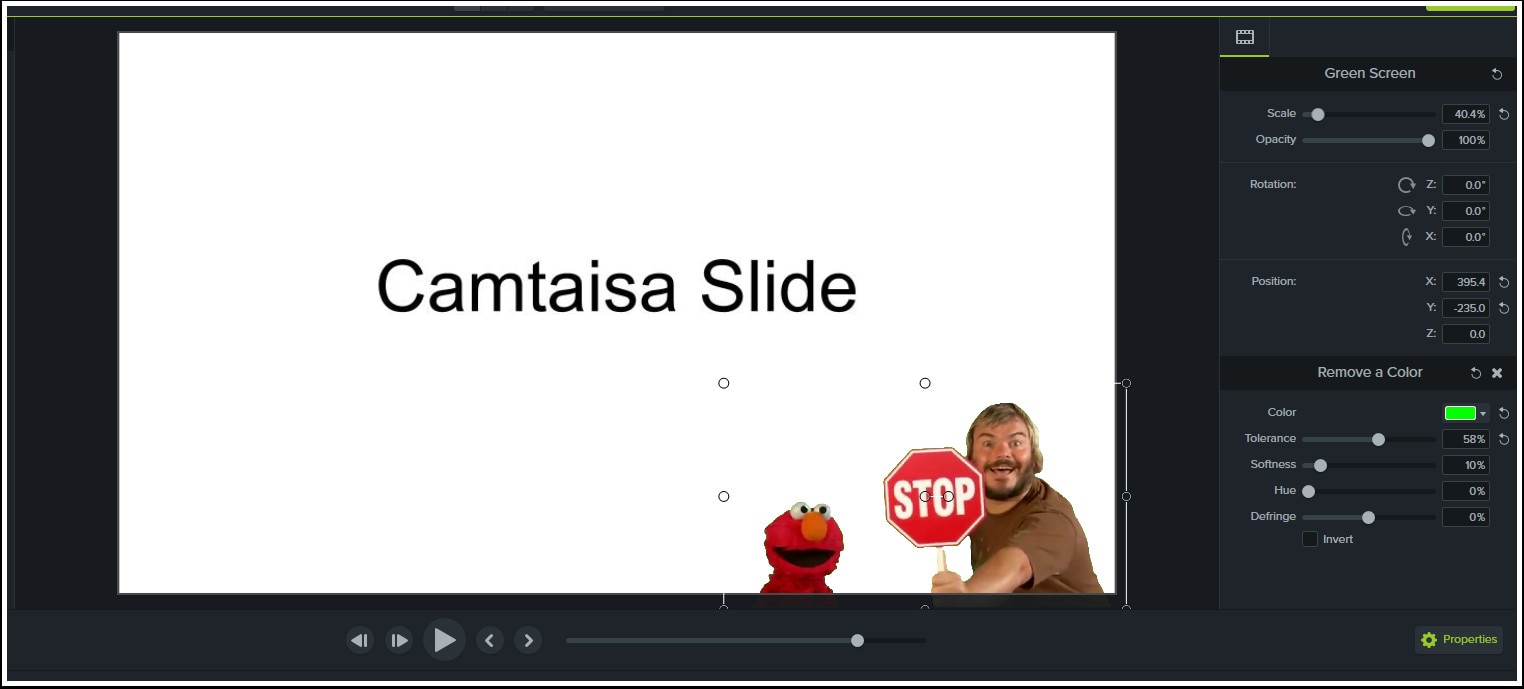
Steps On How To Chroma Key In Camtasia
1. Record a video with a green screen
Make sure the green screen fills up the whole background while recording.
After your video is recorded, it will be placed on your Timeline as the recorded Camera and Screen.
2. Remove the green
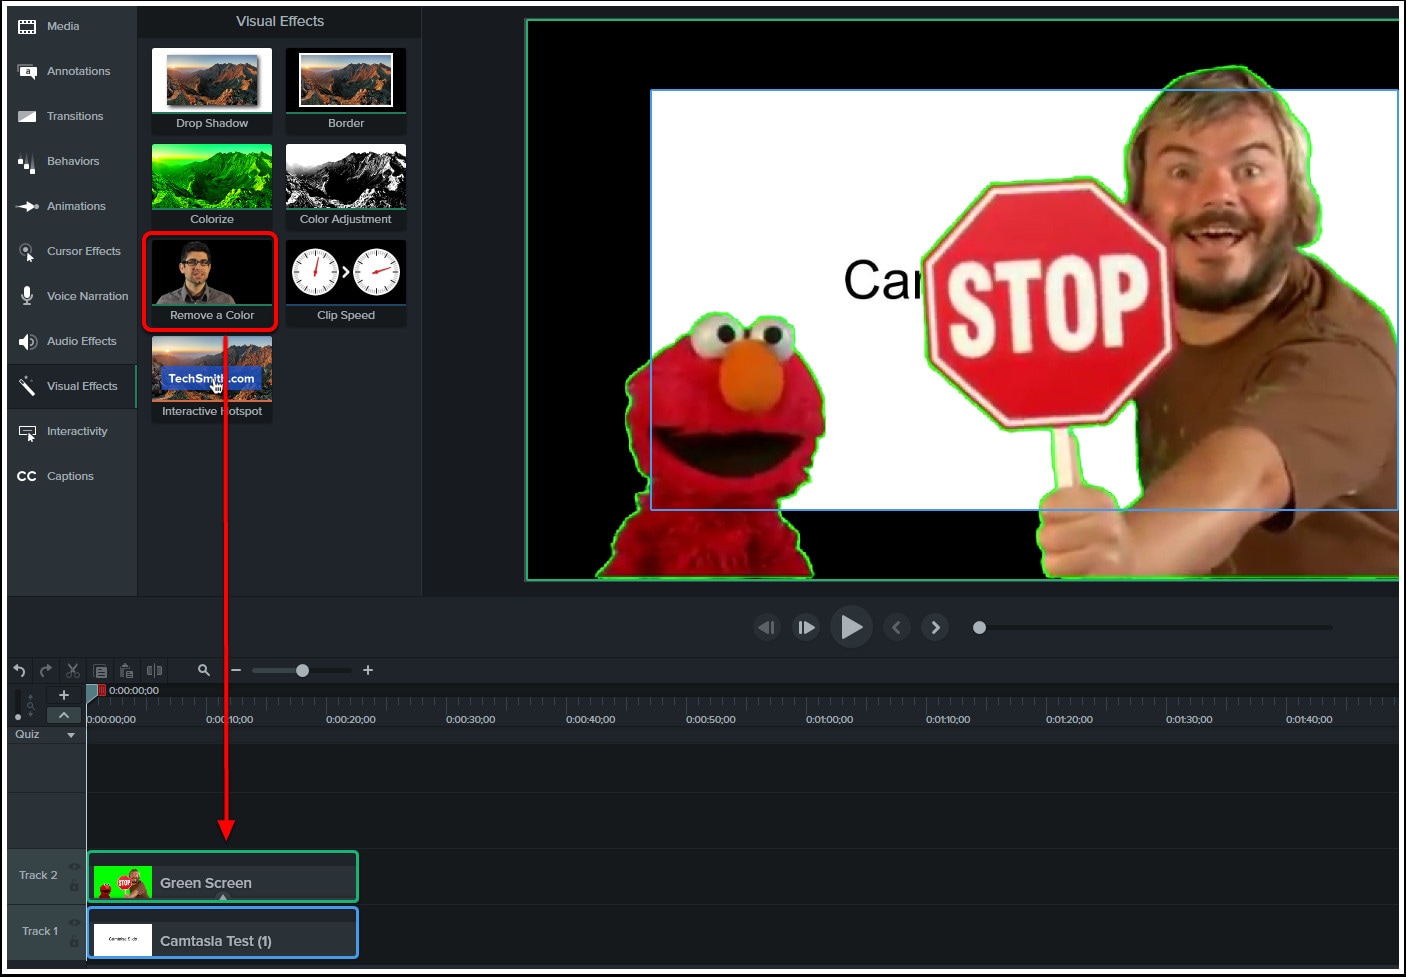
Use the Remove a Color tool from the Visual Effects section to remove the green in the background.
Under the properties on the right side, select the color drop-down menu and use the eyedropper tool to select the green color. (Tip: With the Eyedropper tool selected, click on the green part of your Green Screen to select that color for removal.)
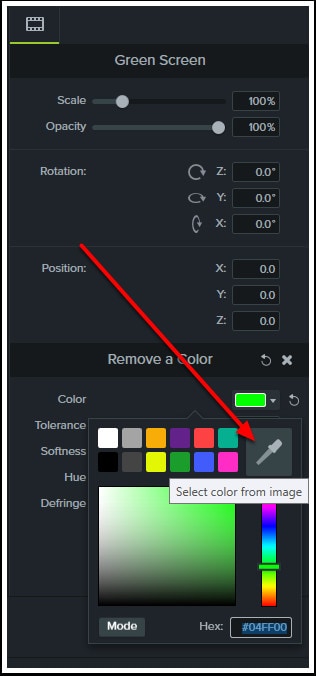
Adjust the Tolerance and Softness to get a clean color removal.

- Adjust the video
Adjust and move your now greenless recording to a desired size and position.
Lightworks

Supported OS: Mac, Windows 8.1, and Linux
Lightworks is ideal for creating real-time effects. The basic package includes free software with green screen editing capabilities. It makes changing the background of your videos simple and effective.
Lightworks provides access to professional-grade features that allow you to create visually appealing videos. The software is quick and adapts quickly to your needs, whether you are a beginner or a pro. It has a learning curve, but there is probably no tool out there that is easier to use once you get used to it.
It offers advanced effects that allow users to enhance videos in real time. You can use a variety of tools, including blurring, masking, and color grading.
You can instantly export videos to YouTube, Vimeo, and other platform services.
Features:
- Works with a wide variety of video formats
- Allows fast export to MPEG4/
- Fully optimized to offer fast speeds
- Multicam editing options
- Realtime effects with the help of inbuilt presets
- Advanced Boris FX Plugin
- Boris Graffiti for text effects
- Fully customizable interface
- Options for real-time collaboration
- Dedicated hardware support
Pros:
- Real-time effects with 4K Editing
- Keyboard shortcuts
- Easy to share videos on the internet
- Access to royalty-free audio and video content
- Histogram tool and 32bit GPU precision
- Lots of ready-to-use effects
Cons:
- The Video Stabilization feature is missing
- 3D Video Editing is not supported
- No Split and Merge features
Steps On How To Chroma Key In Lightworks
1. Record your video
First, you need a green or blue background to shoot against. As we’ll explain later, it doesn’t have to be a very specific shade, but it needs to be substantially different from the subject you’re shooting. You might have seen occasions when a weather presenter’s tie has appeared transparent during a broadcast. This is because the material was too close in color to the backdrop, or the key wasn’t quite set accurately enough.

You can make your backdrop using a sheet, or a large sheet of paper or card. If you’re planning to make videos frequently, there are inexpensive chromakey backdrops available that include a frame to hang the cloth from. If space is limited, collapsible screens are also available starting at around US$40. These screens are also handy for photography.
Good lighting is essential. You need to make sure that the screen is evenly lit so the color is consistent. It’s also important to ensure your subject is far enough from the screen to avoid shadows and color spills (when the blue or green backdrop reflects off your subject).
2. Import and trim
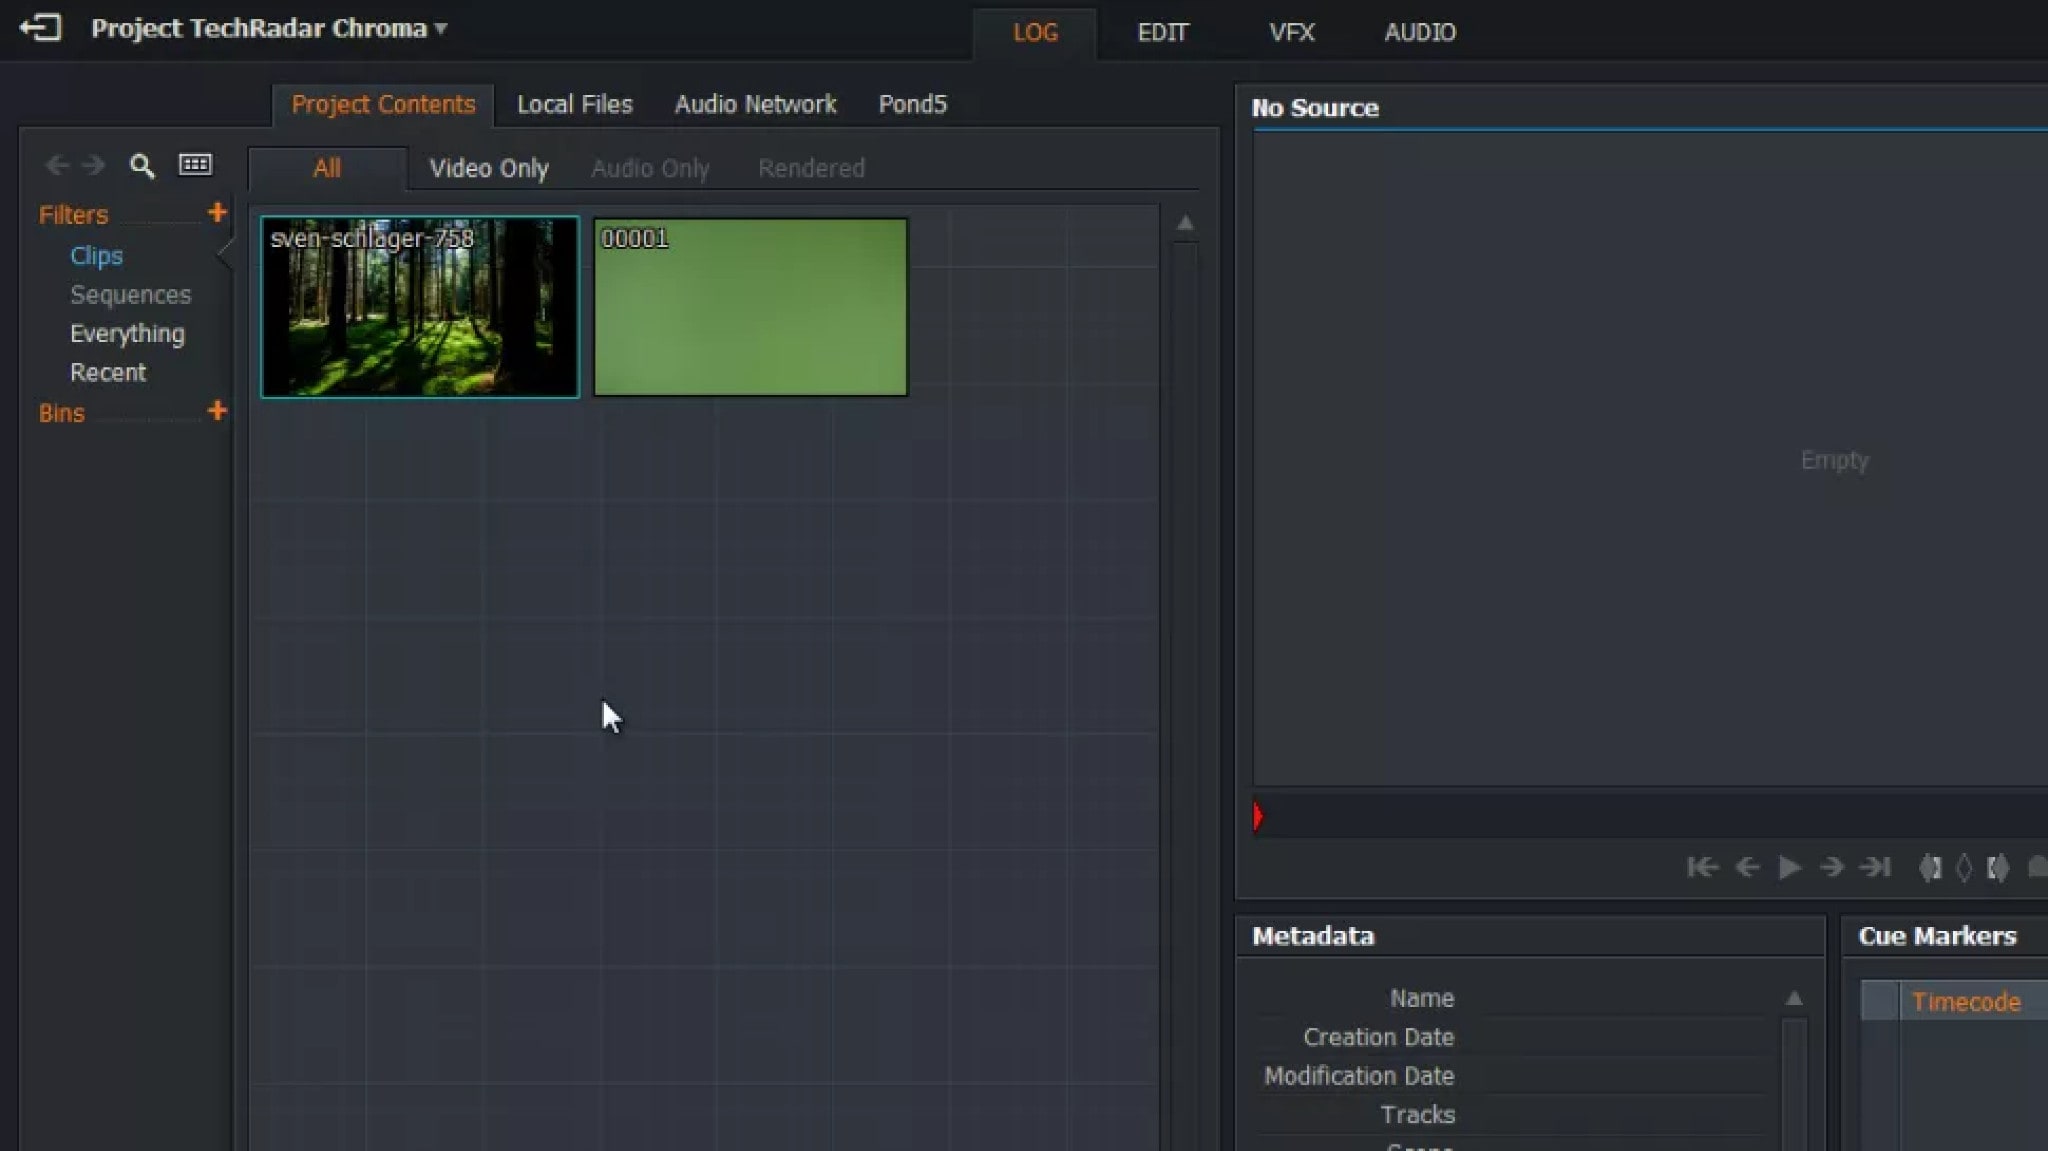
Once you’ve shot your video, download and install Lightworks . It’s free for personal use, but you’ll need to register for a free account if you want to use it for longer than 30 days.
Click the button marked Create a New Project, give it a name, and select a frame rate (you can find this by right-clicking your recorded video and selecting the Details tab). Here we’re using a still image as a background, but you can also use another video. Import this the same way.
Click the Edit tab and drag your video from the Project Contents panel onto the V1 track of the timeline below. If there’s unwanted footage at the beginning or end of your clip, right-click it and select Trim In or Trim Out, then use the yellow handles to change where the clip starts and finishes.
Right-click the preview window marked Sequence #1 and select Tracks > Add Video. Drag your video clip into the V1 track and your still image into V2. Click and drag the right-hand side of the image in the V2 track until it’s the same length as the video.
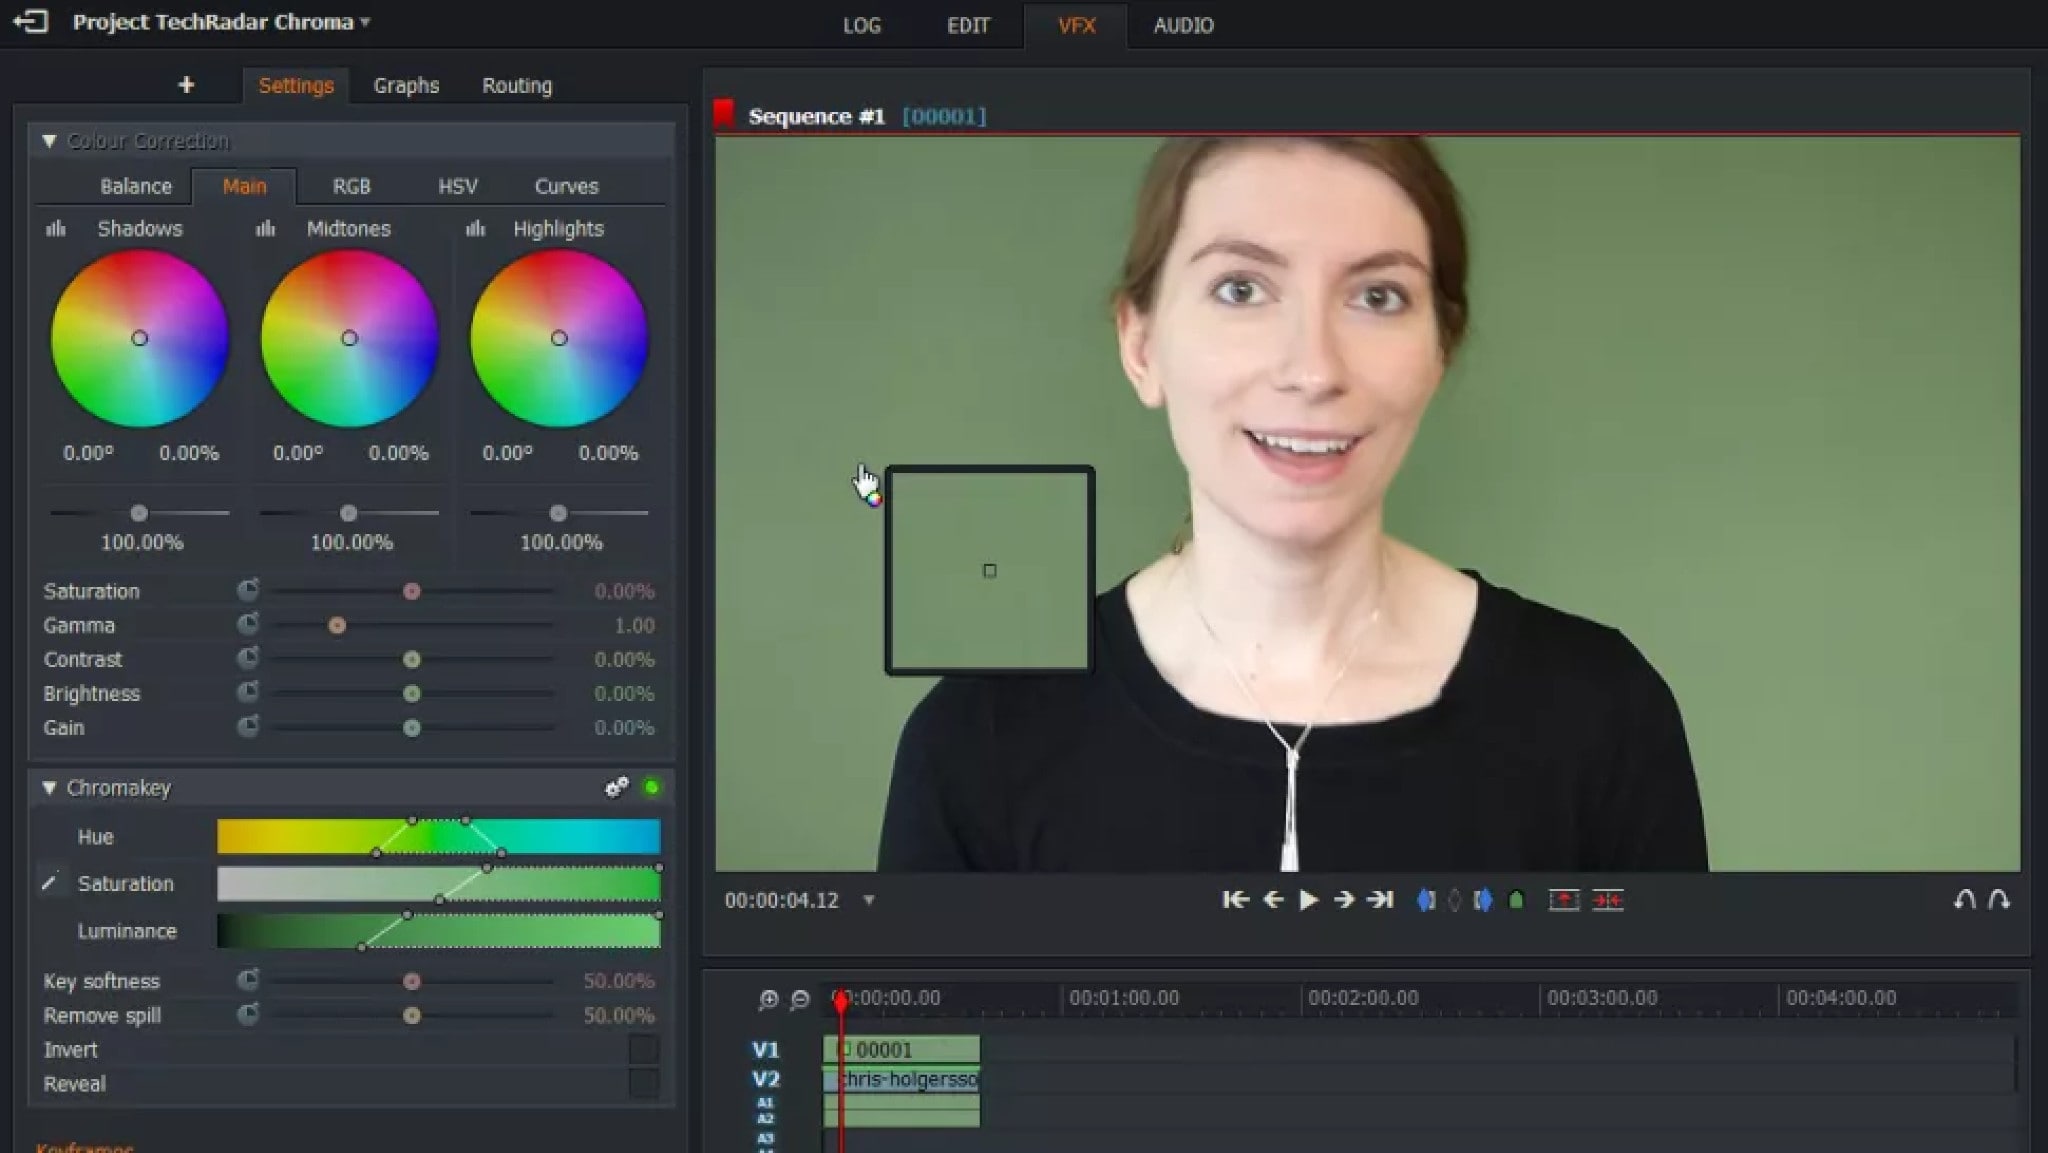
3. Set the key
Now click the VFX tab, select the V1 track in the timeline and click the tab marked with a plus icon. Click the Favorites drop-down menu and select Key, followed by Green Screen. Click Add Effect and you’ll see a new panel of settings under the color correction wheels.
Use the eyedropper tool on the left to select the background you want to remove. This will typically do quite a good job by itself, but it will need a little fine-tuning. Try sliding the Saturation and Luminance sliders and adjusting their steepness using the handles that appear when you move your mouse over them. You’ll notice that each adjustment you make has a knock-on effect on the changes you’ve made with the other sliders; it’s a matter of balancing all three to achieve the best effect, preserving detail while minimizing spill.
To see how the filter is working, click the ‘Reveal’ box. The white areas are the parts of the video that will be removed, and the black areas are the parts that will remain.
The Remove Spill slider will add a purple tint to neutralize green tones in areas that need it.
4. Tweak and export
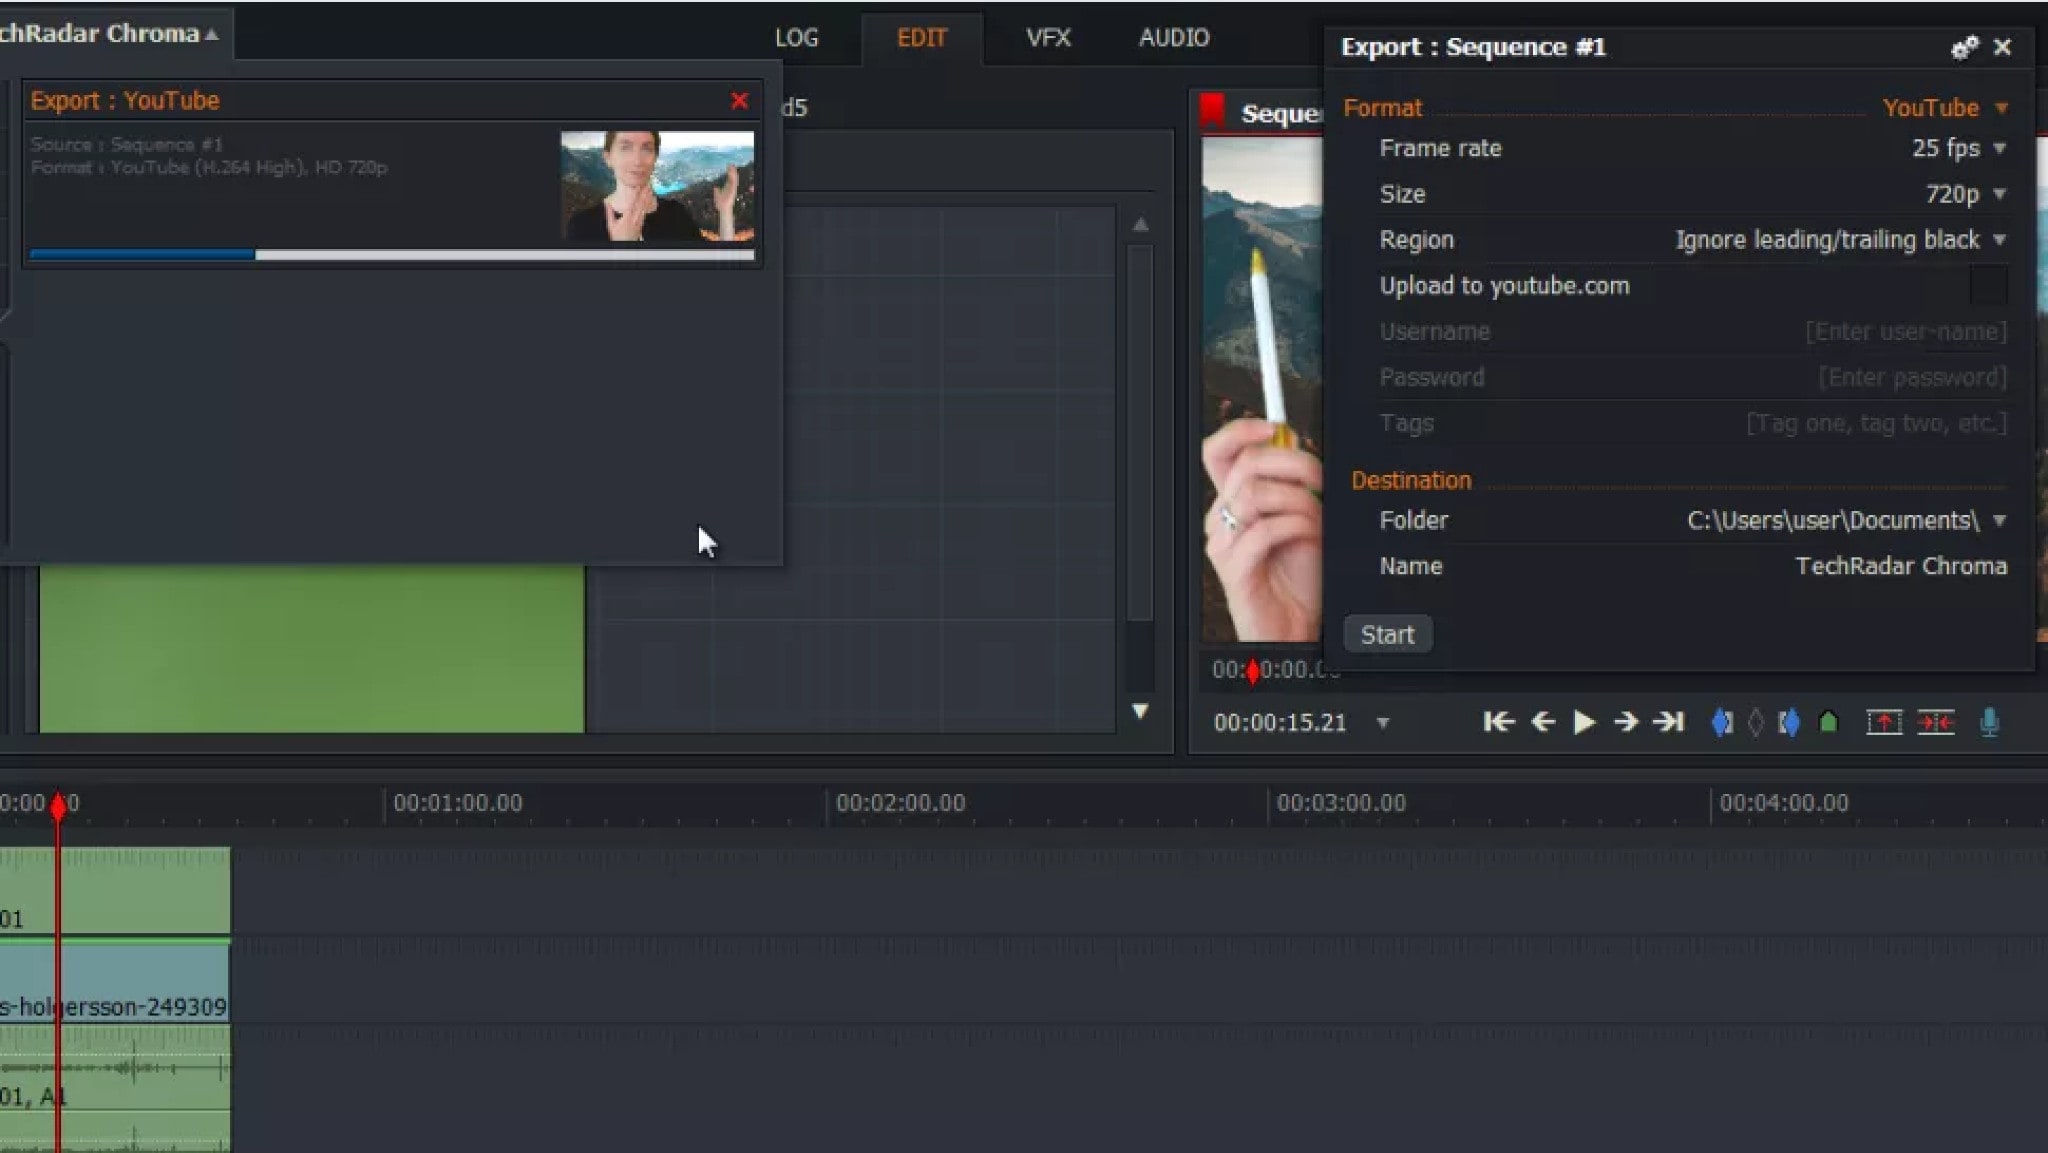
Once you’re happy, you can use Lightworks’ other VFX tools to make other changes like color correction and cropping. When you’re done, return to the Edit tab, right-click the preview window at the top right and select Export.
The only two export options you’ll see in the free version of Lightworks are Vimeo and YouTube, but this is a little misleading. These will save the video to your PC or Mac in an MP4 format, but they won’t do the uploading for you unless you check the appropriate box.
Select a destination folder and name for your video file and click ‘Start’. The processing will begin, and you’ll see a progress bar at the top right. This task will run in the background so you can continue working on your project, and you’ll be notified when it’s complete.
WHICH SHOULD I CHOOSE: FREE OR PAID GREEN SCREEN SOFTWARE?
If you want something quick, cheap, and easy, and having your footage seems to be fairly clean with few shadows or spills, there are several cheap or free apps into which you can import a clip, apply a chroma key, and export without much editing or advanced features.
If your footage calls for attention, extra equipment can be required. If your clip has inconsistent lighting fixtures or poor quality, you may require equipment that permits you to observe a couple of chroma keys to suit the numerous shades of green or color correction equipment to restore your pictures. For even advanced functions, you’ll want to spend a little time and money learning, however the end result will most possibly be worthwhile. More advanced chroma key equipment are normally used inside full-featured NLEs through integrated equipment or expert plug-ins that encompass extra beneficial functions including advanced color correction, noise reduction, HDR (High Dynamic Range) color support, movement and keyframing, extra file layout and high-resolution support, and multi-camera editing.
FAQS ABOUT EDITING GREEN SCREEN
- What is the most important thing when using a green screen?
When lighting your green screen, ensure there is even, soft light on the entirety of the green screen. This is crucial for a proper key. Many filmmakers overlook this essential part and focus on lighting the subject. However, be sure to use whatever lights you have to expose the green screen background evenly.
- Why do filmmakers use green screens?
A green screen basically lets you drop in whatever background images you want behind the actors and/or foreground. It’s used in film production (and also in news and weather reports) to relatively simply place the desired background behind the subject/actor/presenter.
- Why is a green screen not a different color?
The really short answer is that green screens are green because people are not green. For the effect to work, the background must use a color that isn’t used elsewhere in the shot – and green is nothing like human skin tone.
Conclusion:
Green screen video production is not difficult. Anyone, with the right tools can create green screen effects like a pro. Simply follow the precautions listed above and choose the software that best suits your needs.
Whether you’re making a professional film or a simple family video, I’m confident you’ll find something suitable among the options listed above.
Supported OS: Windows, Mac, iOS, Android
Filmora Video Editor has two modes based on your experience with video editing software. Users can use the easy mode or the full feature editor to access the program’s full focus.
The theme focus can also make it easier to select the videos and audio that you want to use. There are a number of features and effects that can be used to complement various themes, which can help improve transitions or find different effects in the program without having to dig around.
The preview mode and music tracks available from the themes make it simple to enhance your video.
The full feature mode gives you even more control; this is where Filmora begins to resemble an actual video editor. You can drag images, sounds, and other media into different tracks and apply advanced effects.
Green screens, premade filters for color correction, cropping, cutting, splitting, and combining with simple tools are all available in the full feature mode. The full-featured editor also has an audio mixer and equalizer, as well as the ability to burn your creations to DVD, Facebook, Vimeo, and other platforms.
For Win 7 or later (64-bit)
For macOS 10.14 or later
Features:
4k Editing Support
Gif Support
Noise Removal
Color Tuning
Advanced Text Editor
Audio Mixer
Video Stabilization
Scene Detection
Audio Equalizer
Chroma Keying
Pros:
- It can be a program that’s easy to master even if you have never used a video editing program before
- There are plenty of visual effects and premade effects that can help you make a great looking video within a few minutes
- The 4k video support is also helpful
Cons:
- It does lack a few advanced features like the option for motion tracking, multi-camera support, and assistance with 360° videos
Steps On How To Chroma Key On Filmora
- Click the “Import Media Files Here“ to import the background video and video with the green screen background into the media library. And then drag and drop the background video and green screen video to the video track in the timeline respectively.
Note: Ensure the video with green screen background is placed as the overlay video.
- Right-click on the overlay video and find the “Green Screen“ option.
- Click on “Green Screen“ and you’ll open the video editing panel. And the green screen background has been removed.
To open the green screen editing panel, you can also double click the overlay video, then check “Chroma Key” to apply the green screen function. And you can also adjust the offset, tolerance, edge thickness, etc. according to your own needs.
When you’re satisfied with the effect, you can click the “OK“ button to save the changes.
OPENSHOT
OpenShot Video Editor is a free, open-source video editor for Mac and Windows PC that can take your videos, photos, and music files and assist you in creating the film you’ve always wanted to make. Add subtitles, transitions, and effects with ease, and then export your film to DVD, YouTube, Vimeo, Xbox 360, and a variety of other popular formats.
A cross-platform video editing solution designed to help businesses of all sizes edit audios, videos, or images using a drag-and-drop interface. Administrators can use OpenShot Video Editor to enhance videos by adding animation effects such as fade, flying text, snow, and bounce, watermarks, 3D titles, and audio tracks, among other things.
The multilingual platform, which was specifically designed for video editors, allows teams to adjust color contrasts and brightness, as well as add time.
Supported OS: Windows, macOS, Linux
Features:
- Cross-platform (Linux, Mac, and Windows)
- Support for many videos, audio, and image formats (based on FFmpeg)
- Powerful curve-based Key frame animations
- Desktop integration (drag and drop support)
- Unlimited tracks/layers
- Clip resizing, scaling, trimming, snapping, rotation, and cutting
- Video transitions with real-time previews
- Compositing, image overlays, watermarks
- Title templates, title creation, sub-titles
- 2D animation support (image sequences)
- 3D animated titles (and effects)
- SVG friendly, to create and include vector titles and credits
- Scrolling motion picture credits
- Advanced Timeline (including Drag & drop scrolling, panning, zooming, and snapping)
- Frame accuracy (step through each frame of video)
- Time-mapping and speed changes on clips (slow/fast, forward/backward, etc…)
- Audio mixing and editing
- Digital video effects, including brightness, gamma, hue, greyscale, chroma key, and many more!
- Experimental hardware encoding and decoding (VA-API, NVDEC, D3D9, D3D11, VTB)
- Import & Export widely supported formats (EDL, XML)
- Render videos in many codecs and formats (based on FFmpeg)
Pros:
- 3D Titles
- Curve-based Time Mapping
- Non-linear Editor with Infinite Tracks
- No Watermark
- Frequent Update
- Easy to Use
- Multi-lingual
Cons:
- Unstable Performance
- Limited Editing Features
- Less Powerful Hardware Acceleration
- Obsolete Interface
Steps On How To Chroma Key In Openshot
- To create a chroma key (e.g. greenscreen or bluescreen) in OpenShot, begin by importing the files you’re going to use.
- Drag the file to be keyed onto Track 2 in the timeline, and the file to use as the background onto Track 1. The plan is to make the green part of the upper image transparent so the file underneath becomes visible.
- Click the Effects tab, find the Chroma Key effect, and drag it onto the top file in the timeline. You will see a star appear on the file in the timeline.
- Right-click the top file in the timeline and select Properties. In the Properties window, click the Effects tab and then click the Chroma Key effect.
- Click the green-colored area next to the word “Key” (shown above) to bring up the Pick a Color window (shown below). Click the eyedropper tool and then click on a green part of the video image.
- Click OK, then click Apply in the properties window. You should now be able to scrub through the timeline and see the effect in action.
iMovie
When you record a video against a green screen, you can make the background transparent and replace it with other video clips, graphics, or still images of your choice. It’s easy to overlay any footage with iMovie’s green screen effect. For example, you can transport yourself anywhere or appear in your favorite films.
The green Screen effect, also referred as the Chroma Key effect, is a simple way to combine two clips into one with impressive scenes. You can, for example, fly over a very high mountain. Green Screen is a background that is only one color, usually green. This could be another pure color, such as Blue or Pink. By dragging and dropping, you can apply a green screen video to another in iMovie. It’s incredibly simple to create stunning videos using the iMovie Green Screen effect.
Supported OS: macOS and iOS
Features:
- Options to modify and enhance video color settings
- Crop and rotate video clips
- Stabilize shaky videos
- Add video transitions
- Change the speed of clips.
- iMovie allows you to remove both green and blue screens
Pros:
- Clean, elegant interface
- Well optimized, responsive, and fast on modern Macs
- Effects and titles are all top-notch—especially for a free program
- Robust and useful interactions with other Apple products and software
Cons:
- Doesn’t have some advanced features present in other applications, like 360 video or Multicam
- Sometimes the efforts to keep the interface simple make finding a solution obtuse
- The user interface is not customizable
- Supports fewer export formats than some competing products
Steps On How To Chroma Key In iMovie
- Open an empty project.
- Select the background you would like to use.
- Drag and drop the background video or image into the timeline.
- Select the green screen footage you want to use.
- Drag and drop it above the background.
- Drag the edge of the background to make the background longer or shorter to match your green screen footage.
- Click to select the green screen footage in the timeline
- Select Green/Blue Screen from the drop-down menu that defaults to Cutaway above the left corner of the viewer window.
- The green should now be removed to reveal the background behind it.
DA VINCI RESOLVE
Davinci Resolve has two versions including a full studio version which is available for $299. Because some professional tools, such as team collaboration and video noise reduction, cannot be used without a full license, the free program has a surprising number of features. The majority of the features included in the free version are adequate for professionals and hobbyists.
Although the Davinci Resolve program is regarded as a professional grade editor, it does include some advanced tools such as exporting, audio mastering, color correction, and more. The program is also useful for arranging audio and video clips, and it has a large selection of effects and filters. The additional color correction and adjustments available here can also aid in HDR support and produce more professional results when working with camera RAW data.
Davinci Resolve is also well-known for having one of the best color grading programs available. The outcome can be hugely potent when using the accessible chromakey tools. It doesn’t take much to figure out how to use this effect with the quick tutorial on board.
Supported OS: Mac and Windows
Features:
- Options to modify and enhance video color settings
- Crop and rotate video clips
- Stabilize shaky videos
- Add video transitions
- Change the speed of clips.
- iMovie allows you to remove both green and blue screens
Pros:
- Clean, elegant interface
- Well optimized, responsive, and fast on modern Macs
- Effects and titles are all top-notch—especially for a free program
- Robust and useful interactions with other Apple products and software
Cons:
- Doesn’t have some advanced features present in other applications, like 360 video or Multicam
- Sometimes the efforts to keep the interface simple make finding a solution obtuse
- The user interface is not customizable
- Supports fewer export formats than some competing products
Steps On How To Remove the Green Screen in DaVinci Resolve Inside the Color Tab
Step 1 – Add the Qualifier Tool & select the color
After you finish cutting the video, jump inside the “Color” tab and select the Qualifier Tool. Make sure you set the tool in “3D” mode to enable us to select a bigger range of the green spectrum.
Do this by simply selecting the fourth dot from the middle-upper area of the window or by selecting it from the drop-down mode selector situated in the window’s top-right corner.
After selecting the 3D mode for the Qualifier Tool, go ahead and select the range of green colors you want to remove by simply drawing lines on top of the screen, similar to the way I did in the image below.
Step 2 – Removing the color
As you can see in the small rectangle, Resolve did the keying, but it doesn’t know what to do with it because we didn’t specify. Right-click underneath the node, select “Add Alpha Output” and then link the node.
Yes, I know it will key out the subject and not the green screen. There is no problem. Go ahead and select the Revert button situated in the “Selection Range” window. Everything should be OK now.
Step 3 – Clean the edges
As you can surely notice, there are still some issues we have to address. In the hair area and on the outline of the subject, there is a noticeable green color spill. We don’t want that! On top of this, there will be many situations where you will still notice some noisy green pixels in the transparent area, around the corners of the screen, or the subject.
To get rid of these problems, we have to jump into the Qualifier window. Here, there are many settings you can play with to tweak the output. Most of the time, you will solve these problems by checking “Despill”, further selecting more of the greens and adding them to the Selection Range, or modifying the shrink, ”Black Clip” and “White Clip”.
Step 3 – Done
This is all for this method! Go ahead and add a background in the “Edit” mode and your job is done! Feel free to watch the video below, where I went through the same steps as above, but faster.
BEST PAID GREEN SCREEN SOFTWARE FOR BEGINNERS ON MAC
WEVIDEO
Supported OS: Windows, Mac, iOS, Android
This program, which costs only $4 per month, has extensive compatibility with nearly 20 different input and output formats. Most common input and output formats, such as NT 4.0, avi, 3gp, and others, are well represented.
If you want to do green screen options online but don’t want to install any software to access a full-featured video editor, this could be one of your best options.
WeVideo is a cloud-based video editing solution that is both powerful and simple to use. There’s a reason it’s one of the most popular online video editors out there. This includes options for photo animations, clip transformations, voiceovers, and more. You can also improve your video by using a variety of premium features such as screencasting, custom branding, and a wide range of free tracks that can be used with copyright-free music.
With this online editor, you can easily control almost everything in a video, from motion effects to green screen technology to scene transitions.
Features:
- 720p video resolution
- Motion titles
- Screencasting
- WeVideo JumpStart
- Cloud storage
- Music library
- Slow motion
- Voiceover
- Guilt in graphics
- Customizable environment
- Green screen
- Advanced text editing
- File & media manager
- Multi-track editing and storyboard
Pros:
- This is a multiplatform video editor that works with intense compatibility online. You can use it on almost any device.
- The interface is also quite simple and it has some tools that are used by the pros as well as a format that most people can easily understand.
- There is a full licensed library of songs with over 100 tracks you can use royalty-free.
- The cloud storage also ensures that you can pick up a project on any device that you won’t. Cloud access anywhere gives you more time for efficiency and handling your workload.
Cons:
- The program only currently supports 720 P resolution in some of the cheaper plans and there are limited minutes allowed with editing if you are only going to use the trial-free plan.
Steps On How To Chroma Key In WeVideo
- When your WeVideo project is open, click on the clip that you wish to remove the green background from.
- The video or image layer underneath the color-keyed clip will show through, as the background.
- Click on the clip editor pencil icon.
- Click on the eyedropper to choose the color you’re going to remove.
- Click an area that is the color that you would like to remove.
CAMTASIA
Supported OS: Mac and Windows
Camtasia by Techsmith is a simple video editing and screen recording application. Camtasia, designed for beginners, allows users to create professional training videos quickly and easily.
Camtasia is a straightforward video editor and chroma key software (for basic green screen editing) that may meet your needs.
It is the ideal video editor for beginners with little knowledge to editing. It includes numerous features that make it simple to create professional videos, whether you are a student, business owner, or regular YouTube user looking to spice up their content.
Features:
- Intuitive and easy-to-use interface.
- The ability to upload videos straight from the application, via Dropbox or YouTube.
- A wide range of built-in editing templates makes it easier for beginners to create professional-looking video content.
- Screen recording options for capturing live demos and lectures.
- Camtasia for Mac is also available, which makes it an ideal video editor for Apple users.
Pros:
- Very easy to learn
- Amazing screen capture feature
- Impressive cursor effects
- Interactivity features
- Good asset library
- Mobile version
- Great customer service
- Low cost
Cons:
- Constant crashes and bugs
- Limited customization
- No keyframe tracking
- Poor keyboard commands
- Export issues
Steps On How To Chroma Key In Camtasia
1. Record a video with a green screen
Make sure the green screen fills up the whole background while recording.
After your video is recorded, it will be placed on your Timeline as the recorded Camera and Screen.
2. Remove the green
Use the Remove a Color tool from the Visual Effects section to remove the green in the background.
Under the properties on the right side, select the color drop-down menu and use the eyedropper tool to select the green color. (Tip: With the Eyedropper tool selected, click on the green part of your Green Screen to select that color for removal.)
Adjust the Tolerance and Softness to get a clean color removal.
- Adjust the video
Adjust and move your now greenless recording to a desired size and position.
Lightworks
Supported OS: Mac, Windows 8.1, and Linux
Lightworks is ideal for creating real-time effects. The basic package includes free software with green screen editing capabilities. It makes changing the background of your videos simple and effective.
Lightworks provides access to professional-grade features that allow you to create visually appealing videos. The software is quick and adapts quickly to your needs, whether you are a beginner or a pro. It has a learning curve, but there is probably no tool out there that is easier to use once you get used to it.
It offers advanced effects that allow users to enhance videos in real time. You can use a variety of tools, including blurring, masking, and color grading.
You can instantly export videos to YouTube, Vimeo, and other platform services.
Features:
- Works with a wide variety of video formats
- Allows fast export to MPEG4/
- Fully optimized to offer fast speeds
- Multicam editing options
- Realtime effects with the help of inbuilt presets
- Advanced Boris FX Plugin
- Boris Graffiti for text effects
- Fully customizable interface
- Options for real-time collaboration
- Dedicated hardware support
Pros:
- Real-time effects with 4K Editing
- Keyboard shortcuts
- Easy to share videos on the internet
- Access to royalty-free audio and video content
- Histogram tool and 32bit GPU precision
- Lots of ready-to-use effects
Cons:
- The Video Stabilization feature is missing
- 3D Video Editing is not supported
- No Split and Merge features
Steps On How To Chroma Key In Lightworks
1. Record your video
First, you need a green or blue background to shoot against. As we’ll explain later, it doesn’t have to be a very specific shade, but it needs to be substantially different from the subject you’re shooting. You might have seen occasions when a weather presenter’s tie has appeared transparent during a broadcast. This is because the material was too close in color to the backdrop, or the key wasn’t quite set accurately enough.
You can make your backdrop using a sheet, or a large sheet of paper or card. If you’re planning to make videos frequently, there are inexpensive chromakey backdrops available that include a frame to hang the cloth from. If space is limited, collapsible screens are also available starting at around US$40. These screens are also handy for photography.
Good lighting is essential. You need to make sure that the screen is evenly lit so the color is consistent. It’s also important to ensure your subject is far enough from the screen to avoid shadows and color spills (when the blue or green backdrop reflects off your subject).
2. Import and trim
Once you’ve shot your video, download and install Lightworks . It’s free for personal use, but you’ll need to register for a free account if you want to use it for longer than 30 days.
Click the button marked Create a New Project, give it a name, and select a frame rate (you can find this by right-clicking your recorded video and selecting the Details tab). Here we’re using a still image as a background, but you can also use another video. Import this the same way.
Click the Edit tab and drag your video from the Project Contents panel onto the V1 track of the timeline below. If there’s unwanted footage at the beginning or end of your clip, right-click it and select Trim In or Trim Out, then use the yellow handles to change where the clip starts and finishes.
Right-click the preview window marked Sequence #1 and select Tracks > Add Video. Drag your video clip into the V1 track and your still image into V2. Click and drag the right-hand side of the image in the V2 track until it’s the same length as the video.
3. Set the key
Now click the VFX tab, select the V1 track in the timeline and click the tab marked with a plus icon. Click the Favorites drop-down menu and select Key, followed by Green Screen. Click Add Effect and you’ll see a new panel of settings under the color correction wheels.
Use the eyedropper tool on the left to select the background you want to remove. This will typically do quite a good job by itself, but it will need a little fine-tuning. Try sliding the Saturation and Luminance sliders and adjusting their steepness using the handles that appear when you move your mouse over them. You’ll notice that each adjustment you make has a knock-on effect on the changes you’ve made with the other sliders; it’s a matter of balancing all three to achieve the best effect, preserving detail while minimizing spill.
To see how the filter is working, click the ‘Reveal’ box. The white areas are the parts of the video that will be removed, and the black areas are the parts that will remain.
The Remove Spill slider will add a purple tint to neutralize green tones in areas that need it.
4. Tweak and export
Once you’re happy, you can use Lightworks’ other VFX tools to make other changes like color correction and cropping. When you’re done, return to the Edit tab, right-click the preview window at the top right and select Export.
The only two export options you’ll see in the free version of Lightworks are Vimeo and YouTube, but this is a little misleading. These will save the video to your PC or Mac in an MP4 format, but they won’t do the uploading for you unless you check the appropriate box.
Select a destination folder and name for your video file and click ‘Start’. The processing will begin, and you’ll see a progress bar at the top right. This task will run in the background so you can continue working on your project, and you’ll be notified when it’s complete.
WHICH SHOULD I CHOOSE: FREE OR PAID GREEN SCREEN SOFTWARE?
If you want something quick, cheap, and easy, and having your footage seems to be fairly clean with few shadows or spills, there are several cheap or free apps into which you can import a clip, apply a chroma key, and export without much editing or advanced features.
If your footage calls for attention, extra equipment can be required. If your clip has inconsistent lighting fixtures or poor quality, you may require equipment that permits you to observe a couple of chroma keys to suit the numerous shades of green or color correction equipment to restore your pictures. For even advanced functions, you’ll want to spend a little time and money learning, however the end result will most possibly be worthwhile. More advanced chroma key equipment are normally used inside full-featured NLEs through integrated equipment or expert plug-ins that encompass extra beneficial functions including advanced color correction, noise reduction, HDR (High Dynamic Range) color support, movement and keyframing, extra file layout and high-resolution support, and multi-camera editing.
FAQS ABOUT EDITING GREEN SCREEN
- What is the most important thing when using a green screen?
When lighting your green screen, ensure there is even, soft light on the entirety of the green screen. This is crucial for a proper key. Many filmmakers overlook this essential part and focus on lighting the subject. However, be sure to use whatever lights you have to expose the green screen background evenly.
- Why do filmmakers use green screens?
A green screen basically lets you drop in whatever background images you want behind the actors and/or foreground. It’s used in film production (and also in news and weather reports) to relatively simply place the desired background behind the subject/actor/presenter.
- Why is a green screen not a different color?
The really short answer is that green screens are green because people are not green. For the effect to work, the background must use a color that isn’t used elsewhere in the shot – and green is nothing like human skin tone.
Conclusion:
Green screen video production is not difficult. Anyone, with the right tools can create green screen effects like a pro. Simply follow the precautions listed above and choose the software that best suits your needs.
Whether you’re making a professional film or a simple family video, I’m confident you’ll find something suitable among the options listed above.
Zoom In and Out on Discord
Abundant Video Effects - Wondershare Filmora
Provide abundant video effects - A creative video editor
Powerful color correction and grading
Detailed tutorials are provided by the official channel
Discord has gained much popularity in recent years owing to its versatility and wide range of customization options available. It is an innovative program that allows users to communicate via text messages, voice and video calls, media files, and more.
One of the main reasons for Discord’s growing popularity is its multipurpose resources that allow people to stay in touch with their communities. As Discord features are customizable, you can alter the zoom settings on the servers and chat screens to increase visibility and ease.
Not sure how to do that? You can head over to the article below to find easy step-by-step guides on how to zoom in Discord desktop and mobile applications and the official website.
In this article
Part 1: Zoom In and Out on Discord Software
Part 2: Zoom In and Out in Discord Mobile App
Part 3: Zoom In and Out on Discord Website
Part 4: Frequently Asked Questions (FAQs)
Part 1: Zoom In and Out on Discord Software
The Discord desktop software is available for Windows 7 and above, Linux, and Mac computers. If you want to know how to zoom in on Discord desktop software, you have landed on the right page. The following steps indicate how to zoom in or out on Discord’s desktop version by accessing the software’s settings.
Step 1: To begin with, launch the Discord desktop application on your computer. Sign in to your Discord profile if asked.
Step 2: On Discord’s homepage, in the left corner at the bottom, you will see your profile name along with the headphones and microphone icons. Next to these, a cog-shaped icon for Settings will be visible. Tap on it to launch user settings.

Step 3: Under “User Settings,” locate the “App Settings” category from the sidebar at the left. Find and click on the “Appearance” option from here.

Step 4: When you scroll down under the “Appearance” settings, you will find the sliders to change the “Chant Font Scaling,” “Space between Message Groups,” and the “Zoom Level” settings at the bottom.

Step 5: The sliders are set on a highlighted percentage visible in green by default. If you wish to increase the chat font size, drag that particular slider to the right and check the preview until you arrive at the size you want. To decrease the font size, you have to drag the slider to the left and look for the desired result in the preview section.

Step 6: If you wish to change the zoom levels of all the elements in a chat screen, you can change the “Zoom Level” slider’s position until you reach your desired result. Now exit the Settings window to apply your changes.

Part 2: Zoom In and Out in Discord Mobile App
Discord offers its mobile applications for Android and iOS devices. You can easily change the Discord app’s built-in settings to change the zoom level. To know how to zoom in on the Discord mobile app, take a look at the comprehensive step-by-step guide below:
Step 1: Firstly, install and launch the Discord app on your mobile and sign in to your profile.
Step 2: Go to the app’s homepage and search for your profile icon at the bottom-right corner of the screen. Click on it to access “User Settings.”

Step 3: Now, look for the “Appearance” settings by scrolling down and tapping on it. You will see the “Chat Font Scaling” option and a slider under it. You can drag the slider to adjust the font size on the Discord application.

Step 4: You can drag the slider to the right to increase the font scale across the app and check for your desired preview. To decrease the font size, you will need to drag the slider to the left. Now exit your Settings and restart the app to make your changes effective.

Step 5: If you want to restore the zoom settings to default, you can click the “Reset” button at the bottom left corner of the screen.

Part 3: Zoom In and Out on Discord Website
If you are using the web version of Discord, there are multiple ways to zoom in. On your native web browser, you can access the ellipses icon at the right and find the “Zoom” option. From here, you can simply click on the “+” icon to zoom in and the “-” icon to zoom out on the page you have opened at the moment.
If you prefer to change the Zoom settings using Discord’s native settings, you can easily do so in the web version using keyboard shortcuts. Here is an in-depth guide indicating how to zoom out in Discord for the online version.
Step 1: Launch the web browser on your computer and open the online version of the Discord software. You might be asked to sign in to your profile at this point.

Step 2: Once you are at the homepage of your Discord profile, you can access the keyboard shortcuts to zoom in or out. To zoom in on Discord, simply hold the “CTRL” key on your keyboard and click the “+” icon key. Each click of the key will result in a 10% increase in the zoom level of the screen.

Step 3: If you want to zoom out on Discord’s screen, you can use your keyboard. Similar to the step mentioned above, tap the “-” key on your keyboard while holding down the “Ctrl” key to make your screen and chat appear smaller.

Step 4: You can reset the zoom settings to default by holding down the “Ctrl” key and hitting “0” on the keyboard. This will restore the settings back to the default 100%.
Part 4: Frequently Asked Questions (FAQs)
Are Discord zoom and text size settings different?
Yes, there is a difference between the zoom levels and the text size settings on Discord. By changing the zoom levels of the software, you alter the zoom level of all the elements, including icons, images, windows, and more, across the Discord application. Changing the text size settings will simply alter the chat font scale in a specific chat window.
Does changing the Discord zoom on my PC affect the settings on my mobile app?
No, all the changes made on the zoom level or text size of Discord remain limited to the version of the software you are currently using. If you change the zoom settings on your PC, the change will not be reflected on your mobile application.
Conclusion
Digital chatting applications such as Discord have made it exceedingly easy to stay in touch with friends and family over long distances. From sending and receiving messages to voice and video calls, you can do a lot with Discord.
If you are a Discord user, knowing how to alter the zoom level on the app can prove to be incredibly beneficial. By changing the zoom settings on Discord, you can make the text, images, and other items present on the screen appear bigger or smaller. With the guide mentioned above, you now know how to zoom in on Discord across the mobile, desktop, and web.
Discord has gained much popularity in recent years owing to its versatility and wide range of customization options available. It is an innovative program that allows users to communicate via text messages, voice and video calls, media files, and more.
One of the main reasons for Discord’s growing popularity is its multipurpose resources that allow people to stay in touch with their communities. As Discord features are customizable, you can alter the zoom settings on the servers and chat screens to increase visibility and ease.
Not sure how to do that? You can head over to the article below to find easy step-by-step guides on how to zoom in Discord desktop and mobile applications and the official website.
In this article
Part 1: Zoom In and Out on Discord Software
Part 2: Zoom In and Out in Discord Mobile App
Part 3: Zoom In and Out on Discord Website
Part 4: Frequently Asked Questions (FAQs)
Part 1: Zoom In and Out on Discord Software
The Discord desktop software is available for Windows 7 and above, Linux, and Mac computers. If you want to know how to zoom in on Discord desktop software, you have landed on the right page. The following steps indicate how to zoom in or out on Discord’s desktop version by accessing the software’s settings.
Step 1: To begin with, launch the Discord desktop application on your computer. Sign in to your Discord profile if asked.
Step 2: On Discord’s homepage, in the left corner at the bottom, you will see your profile name along with the headphones and microphone icons. Next to these, a cog-shaped icon for Settings will be visible. Tap on it to launch user settings.
Step 3: Under “User Settings,” locate the “App Settings” category from the sidebar at the left. Find and click on the “Appearance” option from here.
Step 4: When you scroll down under the “Appearance” settings, you will find the sliders to change the “Chant Font Scaling,” “Space between Message Groups,” and the “Zoom Level” settings at the bottom.
Step 5: The sliders are set on a highlighted percentage visible in green by default. If you wish to increase the chat font size, drag that particular slider to the right and check the preview until you arrive at the size you want. To decrease the font size, you have to drag the slider to the left and look for the desired result in the preview section.
Step 6: If you wish to change the zoom levels of all the elements in a chat screen, you can change the “Zoom Level” slider’s position until you reach your desired result. Now exit the Settings window to apply your changes.
Part 2: Zoom In and Out in Discord Mobile App
Discord offers its mobile applications for Android and iOS devices. You can easily change the Discord app’s built-in settings to change the zoom level. To know how to zoom in on the Discord mobile app, take a look at the comprehensive step-by-step guide below:
Step 1: Firstly, install and launch the Discord app on your mobile and sign in to your profile.
Step 2: Go to the app’s homepage and search for your profile icon at the bottom-right corner of the screen. Click on it to access “User Settings.”
Step 3: Now, look for the “Appearance” settings by scrolling down and tapping on it. You will see the “Chat Font Scaling” option and a slider under it. You can drag the slider to adjust the font size on the Discord application.
Step 4: You can drag the slider to the right to increase the font scale across the app and check for your desired preview. To decrease the font size, you will need to drag the slider to the left. Now exit your Settings and restart the app to make your changes effective.
Step 5: If you want to restore the zoom settings to default, you can click the “Reset” button at the bottom left corner of the screen.
Part 3: Zoom In and Out on Discord Website
If you are using the web version of Discord, there are multiple ways to zoom in. On your native web browser, you can access the ellipses icon at the right and find the “Zoom” option. From here, you can simply click on the “+” icon to zoom in and the “-” icon to zoom out on the page you have opened at the moment.
If you prefer to change the Zoom settings using Discord’s native settings, you can easily do so in the web version using keyboard shortcuts. Here is an in-depth guide indicating how to zoom out in Discord for the online version.
Step 1: Launch the web browser on your computer and open the online version of the Discord software. You might be asked to sign in to your profile at this point.
Step 2: Once you are at the homepage of your Discord profile, you can access the keyboard shortcuts to zoom in or out. To zoom in on Discord, simply hold the “CTRL” key on your keyboard and click the “+” icon key. Each click of the key will result in a 10% increase in the zoom level of the screen.
Step 3: If you want to zoom out on Discord’s screen, you can use your keyboard. Similar to the step mentioned above, tap the “-” key on your keyboard while holding down the “Ctrl” key to make your screen and chat appear smaller.
Step 4: You can reset the zoom settings to default by holding down the “Ctrl” key and hitting “0” on the keyboard. This will restore the settings back to the default 100%.
Part 4: Frequently Asked Questions (FAQs)
Are Discord zoom and text size settings different?
Yes, there is a difference between the zoom levels and the text size settings on Discord. By changing the zoom levels of the software, you alter the zoom level of all the elements, including icons, images, windows, and more, across the Discord application. Changing the text size settings will simply alter the chat font scale in a specific chat window.
Does changing the Discord zoom on my PC affect the settings on my mobile app?
No, all the changes made on the zoom level or text size of Discord remain limited to the version of the software you are currently using. If you change the zoom settings on your PC, the change will not be reflected on your mobile application.
Conclusion
Digital chatting applications such as Discord have made it exceedingly easy to stay in touch with friends and family over long distances. From sending and receiving messages to voice and video calls, you can do a lot with Discord.
If you are a Discord user, knowing how to alter the zoom level on the app can prove to be incredibly beneficial. By changing the zoom settings on Discord, you can make the text, images, and other items present on the screen appear bigger or smaller. With the guide mentioned above, you now know how to zoom in on Discord across the mobile, desktop, and web.
3 Different Methods to Correct Color Distortion in Videos
Create High-Quality Video - Wondershare Filmora
An easy and powerful YouTube video editor
Numerous video and audio effects to choose from
Detailed tutorials are provided by the official channel
Nothing is more satisfying than seeing the final cut of a video and realizing that everything we filmed is crystal clear, with vibrant colors and balanced light. Unfortunately, whether you are editing on your own or collaborating with a team, this can be difficult to achieve because color problems often occur. Unlike photo editors, where one photo can easily be fixed without affecting the rest of an album, video editing requires adjusting to fix one problem. We’ll look at three different methods to correct color distortion in videos.
In this article
02 How will Color Distortion Affect Your Videos?
03 Different Methods to Correct Color Distortion in Videos
What Is Color Distortion
Color distortion, also called chromatic aberration (CA), happens when the camera’s lens cannot resolve the wavelengths of light that it is recording. It occurs due to dispersion, which is when the lens elements’ refractive index varies with the light wavelength.
The refractive index of transparent materials often reduces with increasing wavelength. Because a lens’ focal length depends on the index of refraction, this variation in refraction index affects focusing.
There are two types of CA: transverse (lateral) and axial (longitudinal). Axial aberration happens when different wavelengths of light focus at different distances from a lens (focus shift). Essentially, longitudinal aberration is often at long focal lengths.
On the other hand, transverse aberration happens when different wavelengths focus at different places in the focal plane due to the magnification or distortion of the lens varying with wavelength. Ideally, transverse aberration is often at short focal lengths.
The two types of CA have different characteristics, and they may occur together. Axial chromatic aberration occurs throughout an image, and you can reduce it by stopping down, hence increasing the depth of the field so that although the different wavelengths are focusing at different distances, they’re still in acceptable focus.
When it comes to transverse chromatic aberration, it doesn’t occur in the middle of the image, and it increases towards the edge. What’s more? Stopping down does not affect it.
How will Color Distortion Affect Your Videos?
Colour distortion displays itself as “fringes” of color on the boundaries separating bright and dark parts of the image in a video. Color distortion can also occur when adding effects to a video, such as the use of a green screen. By using the green screen to replace the real thing, the colors in the video can appear a little off.
Different Methods to Correct Color Distortion in Videos
There are several methods to correct color distortion in your video. They include.
Method 1: Correct Color Distortion in Videos Using Filmora
Filmora is user-friendly software with powerful tools that allow users to tweak the color settings and correct color distortion. Follow the steps below to learn how to correct color distortion in videos using Filmora.
Step 1. Download and Install Filmora
Head to https://filmora.wondershare.net/ and download Filmora. Once you have finished downloading the software, install Filmora on your device and launch it.
Step 2. Import Your videos to Filmora
Select the New Project option to create a new project file. Click on the Import Media Files Here to find and load your videos to the Filmora’s media library. Alternatively, you can drag and drop your video file to the media library, and then put it on the timeline.

Step 3. Correct Color Distortions with Your Preferences
Navigate to the timeline and double-click your video. You’ll see the video editing window. Select the Color panel; you’ll see several parameters that you can tweak.
- Contrast allows you to control the difference in brightness and color in different areas of your video image. The Brightness setting lets you customize the overall darkness or lightness of the video image.
- With the Saturation setting, you can make the colors in your video image appear more inconspicuous or saturated.
- If the color in your video image is set too high, it will look oversaturated. The colors will be washed out and muted if it’s set to low. The Tint control in Filmora allows you to adjust the balance between these two chroma channels.
- Additionally, you can employ Hollywood film-looking color sets for videos from Sparta 300, Walking Dead, Game of Thrones, Star Wars, and much more.
- Preview and Save Your Edited Video

Once you have finished correcting the color distortion in your video, you can hit the Play symbol to view the changes in the previewing window. Click the Export button if you are content with the results. You can click on Settings to change the settings if you want.
Filmora allows you to save your videos in different formats. To do this, navigate to the Format tab. The software has the option of uploading videos directly to Vimeo or YouTube. Alternatively, you can burn it to DVD or export it to a portable device.

For Win 7 or later (64-bit)
For macOS 10.12 or later
Method 2: Correct Color Distortion in Videos Using Premiere Pro
Premiere Pro provides color correction tools that allow users to edit footage directly on their timeline. To learn how to correct color distortion in video using Premiere Pro, follow these steps:
Step 1. Import Your Video Files
Use the Import command to bring video files on your device into your project; this will make the video files available to the Premiere Pro project. This timeline-based video editing software application allows you to import an entire folder, multiple files, or a single file. You can import video files using the Import command or the Media Browser.
Step 2. Head to Color Correction Effect
Once you have imported your video, place it on the timeline. Apply color correction effects to the video you placed in the Timeline. You can also select your video and drag and drop the effect you want to the Video Effects selection under the Effects Control Panel. Here are some of the color correction effects you can apply:
Brightness and Contrast Effect: With this effect, you can adjust the contrast and brightness of your video. Using this effect allows you to make adjustments to all pixel values in your video image at once — mid-tones, shadows, and highlights.
Color Balance Effect: This effect changes the amount of blue, green, and red in the shadow, highlights of an image, and mid-tones. Preserve Luminosity preserves the average brightness of your video image and changes the color. It maintains the tonal balance in your video image.

Method 3: Correct Color Distortion in Videos Using Final Cut Pro
Developed by Macromedia and later Apple, Final Cut Pro is a non-linear video editing software that allows you to log and transfer videos onto a hard drive, where you can edit them, process them, and output the videos to various formats.
The software provides non-destructive and non-linear editing of QuickTime-compatible video formats. These include 8K, 5K, 4K, 2K, XDCAM (via plug-in), P2 MXF (DVCProHD), HDV, and DV film formats. Final Cut Pro can also import projects from iMovie for iPadOS and iOS. It also comes with multiple color correction tools, such as color wheels, video scopes, and sliders and curves.
With that in mind, let’s look at how to correct color distortion in videos using Final Cut Pro.
Step 1. Open Your Video in Final Cut Pro
Click on the ‘Window’ tab at the top of your screen and select the video you’d like to edit from the drop-down menu.
Step 2. Switch to Color Effects Work Space

Go to the Window panel and select the Workspaces option. Then, choose the Color & Effects option. Here, you can adjust a range of scopes, including the Luma Waveform, Vectorscope, and RGB Overlay.

Step 3. Correct the Color
Head to the color panel and click the drop-down menu next to No Corrections. Select Color Wheels, where you’ll be able to control various parts of your video clips individually.

The Shadows wheel allows you to control the darker shades of your footage, Highlights controls the bright shades of your footage, and the Midtones wheel allows you to adjust the Luma channels in the middle of your video clip. The Master wheel allows you to adjust hue, saturation, and Luma channel (exposure).

In addition to the color wheels, you’ll find more controls below that help you adjust the white balance.
Step 4. Save Your New Video File
After you’ve made these adjustments to your video, it’s time to save and export the file. Click on the ‘File’ tab at the top of your screen and choose ‘Export. Once you click ‘Export,’ you’ll be saving the file to your hard drive. Once it’s done, click ‘Save.’ The file will automatically be saved on your desktop.
Conclusion
● If you are experiencing color distortion, you can use any of the three methods above to correct it. Filmora is one of the most popular video edit tools that people use to correct color distortion videos.
Nothing is more satisfying than seeing the final cut of a video and realizing that everything we filmed is crystal clear, with vibrant colors and balanced light. Unfortunately, whether you are editing on your own or collaborating with a team, this can be difficult to achieve because color problems often occur. Unlike photo editors, where one photo can easily be fixed without affecting the rest of an album, video editing requires adjusting to fix one problem. We’ll look at three different methods to correct color distortion in videos.
In this article
02 How will Color Distortion Affect Your Videos?
03 Different Methods to Correct Color Distortion in Videos
What Is Color Distortion
Color distortion, also called chromatic aberration (CA), happens when the camera’s lens cannot resolve the wavelengths of light that it is recording. It occurs due to dispersion, which is when the lens elements’ refractive index varies with the light wavelength.
The refractive index of transparent materials often reduces with increasing wavelength. Because a lens’ focal length depends on the index of refraction, this variation in refraction index affects focusing.
There are two types of CA: transverse (lateral) and axial (longitudinal). Axial aberration happens when different wavelengths of light focus at different distances from a lens (focus shift). Essentially, longitudinal aberration is often at long focal lengths.
On the other hand, transverse aberration happens when different wavelengths focus at different places in the focal plane due to the magnification or distortion of the lens varying with wavelength. Ideally, transverse aberration is often at short focal lengths.
The two types of CA have different characteristics, and they may occur together. Axial chromatic aberration occurs throughout an image, and you can reduce it by stopping down, hence increasing the depth of the field so that although the different wavelengths are focusing at different distances, they’re still in acceptable focus.
When it comes to transverse chromatic aberration, it doesn’t occur in the middle of the image, and it increases towards the edge. What’s more? Stopping down does not affect it.
How will Color Distortion Affect Your Videos?
Colour distortion displays itself as “fringes” of color on the boundaries separating bright and dark parts of the image in a video. Color distortion can also occur when adding effects to a video, such as the use of a green screen. By using the green screen to replace the real thing, the colors in the video can appear a little off.
Different Methods to Correct Color Distortion in Videos
There are several methods to correct color distortion in your video. They include.
Method 1: Correct Color Distortion in Videos Using Filmora
Filmora is user-friendly software with powerful tools that allow users to tweak the color settings and correct color distortion. Follow the steps below to learn how to correct color distortion in videos using Filmora.
Step 1. Download and Install Filmora
Head to https://filmora.wondershare.net/ and download Filmora. Once you have finished downloading the software, install Filmora on your device and launch it.
Step 2. Import Your videos to Filmora
Select the New Project option to create a new project file. Click on the Import Media Files Here to find and load your videos to the Filmora’s media library. Alternatively, you can drag and drop your video file to the media library, and then put it on the timeline.
Step 3. Correct Color Distortions with Your Preferences
Navigate to the timeline and double-click your video. You’ll see the video editing window. Select the Color panel; you’ll see several parameters that you can tweak.
- Contrast allows you to control the difference in brightness and color in different areas of your video image. The Brightness setting lets you customize the overall darkness or lightness of the video image.
- With the Saturation setting, you can make the colors in your video image appear more inconspicuous or saturated.
- If the color in your video image is set too high, it will look oversaturated. The colors will be washed out and muted if it’s set to low. The Tint control in Filmora allows you to adjust the balance between these two chroma channels.
- Additionally, you can employ Hollywood film-looking color sets for videos from Sparta 300, Walking Dead, Game of Thrones, Star Wars, and much more.
- Preview and Save Your Edited Video
Once you have finished correcting the color distortion in your video, you can hit the Play symbol to view the changes in the previewing window. Click the Export button if you are content with the results. You can click on Settings to change the settings if you want.
Filmora allows you to save your videos in different formats. To do this, navigate to the Format tab. The software has the option of uploading videos directly to Vimeo or YouTube. Alternatively, you can burn it to DVD or export it to a portable device.
For Win 7 or later (64-bit)
For macOS 10.12 or later
Method 2: Correct Color Distortion in Videos Using Premiere Pro
Premiere Pro provides color correction tools that allow users to edit footage directly on their timeline. To learn how to correct color distortion in video using Premiere Pro, follow these steps:
Step 1. Import Your Video Files
Use the Import command to bring video files on your device into your project; this will make the video files available to the Premiere Pro project. This timeline-based video editing software application allows you to import an entire folder, multiple files, or a single file. You can import video files using the Import command or the Media Browser.
Step 2. Head to Color Correction Effect
Once you have imported your video, place it on the timeline. Apply color correction effects to the video you placed in the Timeline. You can also select your video and drag and drop the effect you want to the Video Effects selection under the Effects Control Panel. Here are some of the color correction effects you can apply:
Brightness and Contrast Effect: With this effect, you can adjust the contrast and brightness of your video. Using this effect allows you to make adjustments to all pixel values in your video image at once — mid-tones, shadows, and highlights.
Color Balance Effect: This effect changes the amount of blue, green, and red in the shadow, highlights of an image, and mid-tones. Preserve Luminosity preserves the average brightness of your video image and changes the color. It maintains the tonal balance in your video image.
Method 3: Correct Color Distortion in Videos Using Final Cut Pro
Developed by Macromedia and later Apple, Final Cut Pro is a non-linear video editing software that allows you to log and transfer videos onto a hard drive, where you can edit them, process them, and output the videos to various formats.
The software provides non-destructive and non-linear editing of QuickTime-compatible video formats. These include 8K, 5K, 4K, 2K, XDCAM (via plug-in), P2 MXF (DVCProHD), HDV, and DV film formats. Final Cut Pro can also import projects from iMovie for iPadOS and iOS. It also comes with multiple color correction tools, such as color wheels, video scopes, and sliders and curves.
With that in mind, let’s look at how to correct color distortion in videos using Final Cut Pro.
Step 1. Open Your Video in Final Cut Pro
Click on the ‘Window’ tab at the top of your screen and select the video you’d like to edit from the drop-down menu.
Step 2. Switch to Color Effects Work Space
Go to the Window panel and select the Workspaces option. Then, choose the Color & Effects option. Here, you can adjust a range of scopes, including the Luma Waveform, Vectorscope, and RGB Overlay.
Step 3. Correct the Color
Head to the color panel and click the drop-down menu next to No Corrections. Select Color Wheels, where you’ll be able to control various parts of your video clips individually.
The Shadows wheel allows you to control the darker shades of your footage, Highlights controls the bright shades of your footage, and the Midtones wheel allows you to adjust the Luma channels in the middle of your video clip. The Master wheel allows you to adjust hue, saturation, and Luma channel (exposure).
In addition to the color wheels, you’ll find more controls below that help you adjust the white balance.
Step 4. Save Your New Video File
After you’ve made these adjustments to your video, it’s time to save and export the file. Click on the ‘File’ tab at the top of your screen and choose ‘Export. Once you click ‘Export,’ you’ll be saving the file to your hard drive. Once it’s done, click ‘Save.’ The file will automatically be saved on your desktop.
Conclusion
● If you are experiencing color distortion, you can use any of the three methods above to correct it. Filmora is one of the most popular video edit tools that people use to correct color distortion videos.
Top-Rated Android Apps For Slowing Down Motion
Creating slow-motion videos has been a trend followed by millions across social platforms. For designing the perfect video as a slow-motion video, people seek a good option. Android slow motion video apps are one remedy to this requirement. Google Play Store offers a diversity of applications for making video slow motion Android.
This article is all about figuring out the top Android applications that can feature the best slow motion. For that, go through the content provided to find out the most suitable slow motion video in Android.
Slow Motion Video Maker Slow your video’s speed with better control of your keyframes to create unique cinematic effects!
Make A Slow Motion Video Make A Slow Motion Video More Features

Part 1. Top 10 Android Apps For Slowing Down Motion in Video
When searching for a slow motion video app for Android, there are many options to go by. Provided next is a composite list of mobile apps that serve the purpose of slow-motion video creation:
- Slow Motion Video – Fast&Slow Mo
- Slow Motion Video Maker
- Video Editor & Maker – InShot
- Video Maker & Editor - Vidma
- VivaVideo - Video Editor&Maker
- VivaVideo - Video Editor&Maker
- VivaVideo - Video Editor&Maker
- VivaVideo - Video Editor&Maker
- VivaVideo - Video Editor&Maker
- VivaVideo - Video Editor&Maker
1. Slow Motion Video – Fast&Slow Mo
This Android slow-motion video converter offers an intuitive user interface and simple functions. Users can craft slow motion via drag and adjust the action of the slider in a downward direction. The video’s playback speed is customizable, ranging from 0.25x to 4.0x. Additionally, the software empowers users to apply slow motion to specific video segments to enhance precision.

Key Features
- The application offers pre-installed filters and special effects to elevate visual aesthetics.
- It preserves video quality and transforms video resolution to high definition (HD).
- Incorporate high-quality music into your videos with its built-in music collection.
2. Slow Motion Video Maker
This slow-mo video Android editor offers advanced functionalities to craft perfect videos. With its timeline editing interface, it simplifies the application of slow-motion effects to specific scenes. The application showcases three distinct slow-motion speed options: 0.5x, 0.3x, and 0.25x, ensuring perfection.

Key Features
- Accelerate your videos up to 4x with its high-speed options and get high-quality results.
- The video trimming feature and timeline editing enable accurate segmentation of a video.
- It is equipped with pre-existing music tracks to create the perfect slow-motion video on Android.
3. Video Editor & Maker - InShot
Embark upon the journey to create video slow motion Android with this multifunctional app. It extends a straightforward approach to slow video speed through slider manipulation. Timeline editing and selective playhead options empower users to adjust the speed of specific segments. This exceeds the conventional approach of a slo-mo creation, unlocking creative possibilities.

Key Features
- Elevate the artistic expression of videos by integrating a wide range of animations and text.
- Enhance your reels with a collection of transition effects like Fade in, Fade out, basics, and more.
- This editor has AI capabilities and background removal options with a heightened level of accuracy.
4. Video Maker & Editor - Vidma
This slow-mo app for Android facilitates individuals seeking a video editor capable of producing convincing results. It acts as a Velocity Edit Maker, offering diverse playback speed and positioning controls. The interface resembles a velocity graph, providing a visual representation of speed adjustments.

Key Features
- Introduces an automated “Keep Audio Pitch” option, ensuring high-quality audio.
- Enhance the creative factor in your images and videos with its built-in text and stickers.
- Comes with a variety of visual filters with an intensity control option.
5. VivaVideo - Video Editor&Maker
If you are seeking the best Slomo app for Android, this editor provides diverse speed-setting presets for creating slow-motion and fast-motion effects. Among presets such as Montage, Hero, Bullet, and others, it offers a Custom preset option to help you adjust everything accordingly. With its ability to apply speed settings at specific periods, your slow motions are bound to be perfect.

Key Features
- The non-uniform timeline editor allows you to incorporate multiple assets at once.
- A range of texts, animations, themes, effects, and music tracks are in its Stock Library.
- This video maker also incorporates a Voice Editor to uphold the audio track’s quality.
6. Smart Video Crop - Video Cut
Although this video maker is specified for resizing videos, it also offers speed change options. To make a video slow motion on Android, you can change both playback speed and framerate. Once you have edited your video, you can make changes to the export options. In addition, the application updates its mechanism and shows compatibility with Android 4.4 and higher versions.

Key Features
- The application shows multi-format video support, i.e., MP4, 3GP, and AVI.
- Proposes multiple video crop options like 1:1, 4:3, 16:9, and 3:2.
- You can select to crop the whole video or apply the crop to a specific part of it.
7. Video Editor - Video.Guru
What would be better than a slow-motion video app for Android that can change speed and enhance video? To access this functionality, users need to switch to its PRO version. The speed change options that it offers are from 0.2x to 100x, with 0.2x being the slowest. In addition, the tool doesn’t decline video quality but enhances it to 4K.

Key Features
- If you are a YouTuber, then this editor affects and filters for Vloggers and offers to remove Watermark.
- You can crop a video into available ratios while keeping its HD quality.
- Can add 30+ video transition effects and incorporate music to enhance their quality.
8. Slow Motion - Slow Mo, Fast Mo
Make video slow motion Android effortlessly with this application, which is specified for speed change. It offers 10 playback speed options for creating slow motions with precision. The playback speed ranges from 0.95x to 0.1x. Once you have created a slow motion with it, you can easily preview it to observe if any changes are needed.

Key Features
- Along with precise slo-mo options, it also offers extensive fast motion option speed ranges.
- You can mix and match both fast and slow-motion effects in a video at once.
- It also offers a watermark removal option to avoid any visual weakening.
9. Slow Motion Video FX-camera
Not only video frame rates but also slow down your speech with this slow-motion app for Android. You can add dramatic or funny effects to your voices using the application. It offers to slow down video speed up to 0.25x. It uses the standard slider approach to manipulate the playback speed of your videos. You can apply the slow-mo effect to the overall video or to some specific parts of it.

Key Features
- An intuitive user interface with a velocity graph to observe the changes in speed and duration.
- Transform your low-quality videos to HD quality with this slow-motion app for Android.
- Use the application’s built-in music library to incorporate music tracks.
10. Slow Motion
Decrease your video speed up to 1/4th of its original speed with this Android slow-motion video editor. The speed options are customizable, and you can apply them to multiple video scenes. As the name indicates, the tool is specifically fashioned for slow-motion effects; hence, it offers an accessible user interface.

Key Features
- Export your videos in landscape or portrait mode; the choice is yours.
- In any mode, the application retains video quality and exports it in full resolution.
- It is excellent to slow down YouTube videos as there is no watermark addition.
Bonus Part: Wondershare Filmora: A Perfect Desktop Solution To Slow Down Video
Making slow motion videos in Android is like keeping creativity in your hand anywhere. This facility is good for basic effects but not for professional and advanced slow-motion effects. That’s where you need to shift to a more equipped alternative, which is Wondershare Filmora . Using Filmora means turning imagination into the real picture.
It is a video editing platform with artificial intelligence integration. You can create slow-motion videos with automation in Filmora. The interactive interface of Filmora caters to all users’ needs in simple steps. Freelancers, content creators, and educationists use this platform for diverse needs.
Free Download For Win 7 or later(64-bit)
Free Download For macOS 10.14 or later
How to Make Video Slow Motion Android in Filmora
As you are familiar with Filmora, let’s make a slow-motion video. It is quite easy if compared with Android slow-motion video making. Without further delay, delve into the given step-by-step guide:
Step 1Import Your Project After Successful Launch
Unleash your creativity in Filmora after downloading it. In this regard, you must go to Wondershare Filmora’s official site. Open the main interface of Filmora and tap “New Project” to enter the editing window. To start working, import a file in the media panel and drag it into the timeline section.

Step 2Slow Down the Video with Uniform Speed
After successful importing, right-click on your video and an extended list. Choose the “Uniform Speed” option from the list and find an editing panel towards your right. You will see the slider under the speed option. Hold on to the circle and drag it to the left if you want to slow down the videos. Move downward and toggle the “Ripple Edit” and “Maintain Pitch” for good results.

Step 3Enhance Video with Optical Flow
Towards the end, you will find the “AI Frame Interpolation.” Click on its downward symbol and select the “Optical Flow” option from the list. It will automatically boost your video quality. You can choose the “Reverse Speed” option if your video is required.

Step 4End Editing and Move to Export
Now, it’s up to you if you want to continue editing with Filmora or want to export the media. To end editing, you can hit the “Export” button from the top right.

Remarkable Key Functionalities of Filmora
If you want to understand the amazing features of Filmora better, this section is for you. Keep reading and find some integral functionalities of Filmora. This platform offers more than just creating slow-motion video Android:
1. AI Smart Cutout
Artificial intelligence in Filmora can amazingly assist you in making flawless videos. Unlike other tools, Filmora allows you to remove unwanted objects, people, and icons from videos. Besides, users can refine their cutout frame by frame using its’ advanced editing options. You can preview the modified media in four ways, such as Transparency grid and Alpha Mode.
2. AI Audio Stretch
This AI-based feature is new to the market and saves hours of rippling and cutting audio. It aims to match the length of your audio with videos. From Vlog videos to blockbuster audio effects, you can use this feature almost everywhere. This option allows you to re-time your audio tracks after detecting vocals in the music.
3. Speech-to-Text
Video captions make the content accessible to international viewers. That’s where Filmora proves vital in removing language barriers. It supports over 26 languages and adds subtitles to your videos with one click. This built-in feature in Filmora recognizes speech swiftly to guarantee accuracy. You can also export your SRT file of subtitles to make any edits.
4. AI Portrait
Beautify faces in your videos to set a new trend on social media with Filmora. To do so, an AI Portrait feature can automatically detect faces to apply changes. You can choose a sticker effect from more than 70 AI portrait AR stickers. Besides, it can remove video backgrounds by retaining the human beings there.
Conclusion
With all marked details, this article concludes with a note that there are always different calibers of tools that we can work with. While discovering the best Android application in the market, you got to know many slow motion videos on Android. Along with that, we also discussed DemoCreator as a comprehensive solution to the entire use of mobile apps.
Make A Slow Motion Video Make A Slow Motion Video More Features
Part 1. Top 10 Android Apps For Slowing Down Motion in Video
When searching for a slow motion video app for Android, there are many options to go by. Provided next is a composite list of mobile apps that serve the purpose of slow-motion video creation:
- Slow Motion Video – Fast&Slow Mo
- Slow Motion Video Maker
- Video Editor & Maker – InShot
- Video Maker & Editor - Vidma
- VivaVideo - Video Editor&Maker
- VivaVideo - Video Editor&Maker
- VivaVideo - Video Editor&Maker
- VivaVideo - Video Editor&Maker
- VivaVideo - Video Editor&Maker
- VivaVideo - Video Editor&Maker
1. Slow Motion Video – Fast&Slow Mo
This Android slow-motion video converter offers an intuitive user interface and simple functions. Users can craft slow motion via drag and adjust the action of the slider in a downward direction. The video’s playback speed is customizable, ranging from 0.25x to 4.0x. Additionally, the software empowers users to apply slow motion to specific video segments to enhance precision.
Key Features
- The application offers pre-installed filters and special effects to elevate visual aesthetics.
- It preserves video quality and transforms video resolution to high definition (HD).
- Incorporate high-quality music into your videos with its built-in music collection.
2. Slow Motion Video Maker
This slow-mo video Android editor offers advanced functionalities to craft perfect videos. With its timeline editing interface, it simplifies the application of slow-motion effects to specific scenes. The application showcases three distinct slow-motion speed options: 0.5x, 0.3x, and 0.25x, ensuring perfection.
Key Features
- Accelerate your videos up to 4x with its high-speed options and get high-quality results.
- The video trimming feature and timeline editing enable accurate segmentation of a video.
- It is equipped with pre-existing music tracks to create the perfect slow-motion video on Android.
3. Video Editor & Maker - InShot
Embark upon the journey to create video slow motion Android with this multifunctional app. It extends a straightforward approach to slow video speed through slider manipulation. Timeline editing and selective playhead options empower users to adjust the speed of specific segments. This exceeds the conventional approach of a slo-mo creation, unlocking creative possibilities.
Key Features
- Elevate the artistic expression of videos by integrating a wide range of animations and text.
- Enhance your reels with a collection of transition effects like Fade in, Fade out, basics, and more.
- This editor has AI capabilities and background removal options with a heightened level of accuracy.
4. Video Maker & Editor - Vidma
This slow-mo app for Android facilitates individuals seeking a video editor capable of producing convincing results. It acts as a Velocity Edit Maker, offering diverse playback speed and positioning controls. The interface resembles a velocity graph, providing a visual representation of speed adjustments.
Key Features
- Introduces an automated “Keep Audio Pitch” option, ensuring high-quality audio.
- Enhance the creative factor in your images and videos with its built-in text and stickers.
- Comes with a variety of visual filters with an intensity control option.
5. VivaVideo - Video Editor&Maker
If you are seeking the best Slomo app for Android, this editor provides diverse speed-setting presets for creating slow-motion and fast-motion effects. Among presets such as Montage, Hero, Bullet, and others, it offers a Custom preset option to help you adjust everything accordingly. With its ability to apply speed settings at specific periods, your slow motions are bound to be perfect.
Key Features
- The non-uniform timeline editor allows you to incorporate multiple assets at once.
- A range of texts, animations, themes, effects, and music tracks are in its Stock Library.
- This video maker also incorporates a Voice Editor to uphold the audio track’s quality.
6. Smart Video Crop - Video Cut
Although this video maker is specified for resizing videos, it also offers speed change options. To make a video slow motion on Android, you can change both playback speed and framerate. Once you have edited your video, you can make changes to the export options. In addition, the application updates its mechanism and shows compatibility with Android 4.4 and higher versions.
Key Features
- The application shows multi-format video support, i.e., MP4, 3GP, and AVI.
- Proposes multiple video crop options like 1:1, 4:3, 16:9, and 3:2.
- You can select to crop the whole video or apply the crop to a specific part of it.
7. Video Editor - Video.Guru
What would be better than a slow-motion video app for Android that can change speed and enhance video? To access this functionality, users need to switch to its PRO version. The speed change options that it offers are from 0.2x to 100x, with 0.2x being the slowest. In addition, the tool doesn’t decline video quality but enhances it to 4K.
Key Features
- If you are a YouTuber, then this editor affects and filters for Vloggers and offers to remove Watermark.
- You can crop a video into available ratios while keeping its HD quality.
- Can add 30+ video transition effects and incorporate music to enhance their quality.
8. Slow Motion - Slow Mo, Fast Mo
Make video slow motion Android effortlessly with this application, which is specified for speed change. It offers 10 playback speed options for creating slow motions with precision. The playback speed ranges from 0.95x to 0.1x. Once you have created a slow motion with it, you can easily preview it to observe if any changes are needed.
Key Features
- Along with precise slo-mo options, it also offers extensive fast motion option speed ranges.
- You can mix and match both fast and slow-motion effects in a video at once.
- It also offers a watermark removal option to avoid any visual weakening.
9. Slow Motion Video FX-camera
Not only video frame rates but also slow down your speech with this slow-motion app for Android. You can add dramatic or funny effects to your voices using the application. It offers to slow down video speed up to 0.25x. It uses the standard slider approach to manipulate the playback speed of your videos. You can apply the slow-mo effect to the overall video or to some specific parts of it.
Key Features
- An intuitive user interface with a velocity graph to observe the changes in speed and duration.
- Transform your low-quality videos to HD quality with this slow-motion app for Android.
- Use the application’s built-in music library to incorporate music tracks.
10. Slow Motion
Decrease your video speed up to 1/4th of its original speed with this Android slow-motion video editor. The speed options are customizable, and you can apply them to multiple video scenes. As the name indicates, the tool is specifically fashioned for slow-motion effects; hence, it offers an accessible user interface.
Key Features
- Export your videos in landscape or portrait mode; the choice is yours.
- In any mode, the application retains video quality and exports it in full resolution.
- It is excellent to slow down YouTube videos as there is no watermark addition.
Bonus Part: Wondershare Filmora: A Perfect Desktop Solution To Slow Down Video
Making slow motion videos in Android is like keeping creativity in your hand anywhere. This facility is good for basic effects but not for professional and advanced slow-motion effects. That’s where you need to shift to a more equipped alternative, which is Wondershare Filmora . Using Filmora means turning imagination into the real picture.
It is a video editing platform with artificial intelligence integration. You can create slow-motion videos with automation in Filmora. The interactive interface of Filmora caters to all users’ needs in simple steps. Freelancers, content creators, and educationists use this platform for diverse needs.
Free Download For Win 7 or later(64-bit)
Free Download For macOS 10.14 or later
How to Make Video Slow Motion Android in Filmora
As you are familiar with Filmora, let’s make a slow-motion video. It is quite easy if compared with Android slow-motion video making. Without further delay, delve into the given step-by-step guide:
Step 1Import Your Project After Successful Launch
Unleash your creativity in Filmora after downloading it. In this regard, you must go to Wondershare Filmora’s official site. Open the main interface of Filmora and tap “New Project” to enter the editing window. To start working, import a file in the media panel and drag it into the timeline section.
Step 2Slow Down the Video with Uniform Speed
After successful importing, right-click on your video and an extended list. Choose the “Uniform Speed” option from the list and find an editing panel towards your right. You will see the slider under the speed option. Hold on to the circle and drag it to the left if you want to slow down the videos. Move downward and toggle the “Ripple Edit” and “Maintain Pitch” for good results.
Step 3Enhance Video with Optical Flow
Towards the end, you will find the “AI Frame Interpolation.” Click on its downward symbol and select the “Optical Flow” option from the list. It will automatically boost your video quality. You can choose the “Reverse Speed” option if your video is required.
Step 4End Editing and Move to Export
Now, it’s up to you if you want to continue editing with Filmora or want to export the media. To end editing, you can hit the “Export” button from the top right.
Remarkable Key Functionalities of Filmora
If you want to understand the amazing features of Filmora better, this section is for you. Keep reading and find some integral functionalities of Filmora. This platform offers more than just creating slow-motion video Android:
1. AI Smart Cutout
Artificial intelligence in Filmora can amazingly assist you in making flawless videos. Unlike other tools, Filmora allows you to remove unwanted objects, people, and icons from videos. Besides, users can refine their cutout frame by frame using its’ advanced editing options. You can preview the modified media in four ways, such as Transparency grid and Alpha Mode.
2. AI Audio Stretch
This AI-based feature is new to the market and saves hours of rippling and cutting audio. It aims to match the length of your audio with videos. From Vlog videos to blockbuster audio effects, you can use this feature almost everywhere. This option allows you to re-time your audio tracks after detecting vocals in the music.
3. Speech-to-Text
Video captions make the content accessible to international viewers. That’s where Filmora proves vital in removing language barriers. It supports over 26 languages and adds subtitles to your videos with one click. This built-in feature in Filmora recognizes speech swiftly to guarantee accuracy. You can also export your SRT file of subtitles to make any edits.
4. AI Portrait
Beautify faces in your videos to set a new trend on social media with Filmora. To do so, an AI Portrait feature can automatically detect faces to apply changes. You can choose a sticker effect from more than 70 AI portrait AR stickers. Besides, it can remove video backgrounds by retaining the human beings there.
Conclusion
With all marked details, this article concludes with a note that there are always different calibers of tools that we can work with. While discovering the best Android application in the market, you got to know many slow motion videos on Android. Along with that, we also discussed DemoCreator as a comprehensive solution to the entire use of mobile apps.
Also read:
- New In 2024, Best GIF to Video Converters
- Complete Guide to Make a Super Easy Rotating Video Effect
- Explore the Advanced Tools to Help You Reshape the Art of Sky Replacement in Digital Imagery. Discover Methods to Enhance Your Visual Narratives Through AI
- New In 2024, Do You Use Premiere Pro and Want to Learn How to Change a Videos Frame Rate Using the Tool? Here Are the Steps that You Need to Follow
- Updated Ultimate Guide on Magic Effects Video Making
- New 2024 Approved OBS Green Screen Guide
- 2024 Approved Slow Motion Video Editors To Look Out For
- Updated In 2024, How to Create Sports Intro and Outro for YouTube Video?
- Updated Whatever the Reason You Want to Convert an Mp4 to GIF Online, There Are a Number of Ways to Do It. Use This Guide to Learn the Best Methods. Read More Here
- In 2024, Minecraft Pixel Art A Complete Guide for Die-Hard Fans
- Updated Making Slow Motion Videos in Premiere Pro A Review on The Best Methods for 2024
- Updated When It Comes to Video Editing, There Are Countless Software Options Available on the Market. However, Not All of Them Come with Useful Masking Tools. In This Article, We Will Be Discussing the Top 8 Video Editor with Useful Masking Tools for 2024
- New In 2024, How to Change Video Thumbnail on Google Drive
- New Add Effects to Video Online
- Updated In 2024, AI Features of Filmora - Silence Detection in Videos
- New In 2024, Top 7 Easy Ways to Convert a Video to a GIF Online
- Updated Are You Searching the Internet for Top Wedding LUTs Premiere Pro? This Article Provides Suggestions on the Best LUT Color Presets for 2024
- Updated Color Lut in Video - Color Grade Your Video for 2024
- Time Lapse Videos Play an Important Part in Videography. If You Want to Start Video Shooting, Then You Shouldnt Miss Time Lapse Video. This Article Will Show You some Ideas over This for 2024
- Top List Best VHS Sound Effect That You Can Use in Video Making for 2024
- Updated In 2024, Best Way to Freeze-Frame in Final Cut Pro
- New 2024 Approved 10 Mind-Blowing Video Collage Maker for PC
- 2024 Approved Learn Eight Simple Steps that Will Allow You to Create a Stunning Text Reveal Animation in Filmora. Simple yet Very Professional
- Updated In 2024, Ultimate Guidelines to Help You Use VLC Media Player Better
- Updated In 2024, Have You Ever Applied the Gaussian Blur Effect to Your Videos? Read This Article to Find a Reliable and Convenient Tool to Generate the Gaussian Blur Effect
- Updated In 2024, To Find the Best Tool Out of Hundreds of Online and Offline GIF to Video Converters, You Need to Check These Specifications. Read This Review and Get the Best Out of the Best
- Updated 2024 Approved Some Top Methods to Create AI Slow Motion Videos
- In 2024, What You Should Know About Speech-to-Text Technology
- Updated How to Add Adjustment Layer in Premiere Pro for 2024
- New 8 Free Title Makers to Use for 2024
- 2024 Approved Ways to Make Sure Your Recording Slideshow in Powerpoint Is Not Wrong
- Applying and Creating Gif Background on Your Devices and Presentations Is Not Hard. Read Below to Learn How to Apply a GIF Background on All Devices for 2024
- DVD Slideshow Builder 2024 Review and Tutorial
- Tactics to Make Transparent Image in Minimal Steps
- The Most Efficient Ways to Manage Your Timeline for 2024
- New 2024 Approved Lets Create a New Premiere Pro Project, Import some Video, and Control Video Playback Speed. Also, Find Alternative Software (WonderShare Filmora) to Control Playback Speed in Minutes
- Top 9 Best Solutions To Go For When Creating an AI Thumbnail for 2024
- In 2024, Slow Down the GIF to Emphasize Details Better. To Do so, Read This Guide and Learn to Use the Best Platforms for Slow-Motion GIFs
- New How to Crop a Video in Windows Media Player
- Updated In 2024, Denoise Video in Adobe Premiere Pro – Audio and Video Noise Removal
- How To Remove Audio From Video for 2024
- Updated Are You Searching for the Best Cinematic LUTs for Premiere Pro? You Are in the Right Place because This Article Is Dedicated to LUTs for 2024
- New 2024 Approved How to Create Video Contents That Convert Sales
- 2024 Approved Elevate Your Designs with Feather Shapes in After Effects
- Updated 2024 Approved 5 Tried-And-True Methods to GIF Making
- 2024 Approved How to Remove Audio From Videos with FFmpeg?
- Detailed guide of ispoofer for pogo installation On Motorola Moto G04 | Dr.fone
- How to get the dragon scale and evolution-enabled pokemon On Oppo A1 5G? | Dr.fone
- Infinix Hot 30 5G support - Turn Off Screen Lock.
- In 2024, How to Cast OnePlus Nord N30 5G Screen to PC Using WiFi | Dr.fone
- In 2024, A Quick Guide to Vivo S18 FRP Bypass Instantly
- In 2024, Is pgsharp legal when you are playing pokemon On Oppo A1x 5G? | Dr.fone
- In 2024, How to Lock Apps on Realme C33 2023 to Protect Your Individual Information
- In 2024, Recommended Best Applications for Mirroring Your Nokia G310 Screen | Dr.fone
- In 2024, The Best Android Unlock Software For Samsung Galaxy XCover 6 Pro Tactical Edition Device Top 5 Picks to Remove Android Locks
- Top 7 Phone Number Locators To Track HTC U23 Location | Dr.fone
- In 2024, Unlock ZTE Axon 40 Lite Phone Password Without Factory Reset Full Guide Here
- Hassle-Free Ways to Remove FRP Lock from Vivo T2 5G Phones with/without a PC
- New 12+ Stunning Instagram GIF Stickers for 2024
- In 2024, How To Activate and Use Life360 Ghost Mode On Realme GT 5 Pro | Dr.fone
- What are Location Permissions Life360 On Sony Xperia 10 V? | Dr.fone
- How To Remove Passcode From Apple iPhone 6s? Complete Guide | Dr.fone
- In 2024, How Can I Use a Fake GPS Without Mock Location On Oppo A56s 5G? | Dr.fone
- The way to get back lost music from Huawei Nova Y91
- Title: Updated In 2024, Best Green Screen Software for Beginner on Mac
- Author: Morgan
- Created at : 2024-05-19 05:13:01
- Updated at : 2024-05-20 05:13:01
- Link: https://ai-video-editing.techidaily.com/updated-in-2024-best-green-screen-software-for-beginner-on-mac/
- License: This work is licensed under CC BY-NC-SA 4.0.
