
:max_bytes(150000):strip_icc():format(webp)/TheWolfAmongUsBigby-793544cded2749488ae1d20113d8d73a.jpg)
Updated In 2024, Discover the Top 5 Online Tools for Merging MP4 Files Easily and Quickly. Streamline Your Video Editing Process and Create Seamless Videos with These User-Friendly Tools
Discover the Top 5 Online Tools for Merging MP4 Files Easily and Quickly. Streamline Your Video Editing Process and Create Seamless Videos with These User-Friendly Tools
Welcome to the video editing world, where merging multiple MP4 files into one seamless video is a common task. Whether creating a montage or compiling footage from different cameras, merging videos can be time-consuming and challenging. However, it can be done quickly and easily with the right tools.
In this article, we’ll introduce you to 5 best online tools to merge MP4 files. These tools are user-friendly and easy to use, making merging videos a breeze. Whether you’re a professional videographer or a hobbyist, these tools will help you create professional-looking videos in no time. So let’s dive in and explore the options available to you.
- Merge MP4 Files Online Using Media.io
- Use Flixier To Combine MP4 Files Online
- Video Candy To Merge MP4 Files Online for Free
- Pixiko mp4 Joiner Online
- Join MP4 Files Online With Creatorkit
- Advantages and Disadvantages of MP4 Combiners Online
- It May Interest You – Join MP4 Videos Offline With Wondershare Filmora
- People Also Ask
5 Amazing Tools To Merge MP4 Online
There are many options available when it comes to merging MP4 files online. But to save you time and hassle, we’ve narrowed down the list to the top 5 tools that are easy to use and offer a variety of options. From basic editing to more advanced features, these tools will help you create the perfect video for any occasion.
1. Merge MP4 Files Online Using Media.io

Ratings from G2: 4.5 out of 5
Pricing:
- Free - $0
- Basic - $3.95 / monthly
- Pro - $6.66 / monthly
Pros
- Fast compression speeds
- No file limits
- No watermarks
- Smart output settings
Cons
- Lacks some functionality
Media.io is an all-in-one online tool that allows you to merge multiple videos and photos and convert audio and video formats. It’s easy to use and works on all major browsers, making it a great option for those who want a user-friendly and versatile tool.
This tool offers a wide range of output options, allowing you to export your merged video in your chosen format, making it a perfect solution for those looking for an online tool that’s easy to use and offers a wide range of features.
Merging videos and photos on Media.io is a simple process with just 3 steps:
Step1 Navigate to the Media.io video editor and select the “Upload“ button to add your videos to the media library.

Step2 Utilize the drag-and-drop feature to arrange the videos in the timeline.

Step3 Press the “Export“ button to download the newly merged video to your device.

2. Use Flixier To Combine MP4 Files Online

Ratings from G2: 4.6 out of 5
Pricing:
- Free - $0
- Basic - $14.00 / monthly
- Business - $30.00 / monthly
- Enterprise - $55.00 / monthly
Pros
- Unlimited video and audio tracks
- All future updates are included
- Video templates
- Easy for beginners
Cons
- The export hour/dollar ratio could be better
- Limited storage space
Flixier is another online tool that allows you to merge MP4 files online easily. With its user-friendly interface, you can quickly upload your videos and arrange them in the timeline using the drag-and-drop feature. You can also trim, crop, and adjust the videos to your liking. Once you are satisfied with the final output, you can export the merged video in the format of your choice.
Flixier also offers a wide range of customization options to enhance your video. This tool is a great option for those looking for an easy-to-use and versatile tool for merging MP4 files online.
Here’s how to merge mp4 online using Flixier:
Step1 Upload your videos from a computer, YouTube link, or cloud storage.

Step2 Drag videos to the timeline, trim, overlap, and add transitions.

Step3 Click the “Export and Download“ button, wait for processing and save to your computer.

3. Video Candy To Merge MP4 Files Online for Free

Ratings from G2: No rating
Pricing:
- Free - $0
Pros
- Free online tool
- User-friendly interface
- Provides a variety of output options
Cons
- Limited features
- Limited storage space
- Less advanced editing options
- Limited customer support
If you’re looking for a sweet treat for your video editing needs, look no further than Video Candy! This online tool lets you easily merge multiple MP4 files; it’s completely free to use. With its user-friendly interface, you can upload your videos, drag and drop them into the timeline, and voila! Your videos are now one cohesive masterpiece.
Not only that, but Video Candy also allows you to trim, crop, and adjust the videos to your liking before merging, giving you even more control over the final product. And once you’re happy with your creation, you can export it in various formats to be compatible with any platform. So here’s how to merge videos using Video Candy:
Step1 Upload the videos by clicking the “+Add Files“ button.

Step2 Arrange the videos you want to merge and add some transitions.

Step3 Click the “Export“ button and the “Download File“ to save the video on your device.

4. Pixiko mp4 Joiner Online

Ratings from G2: 4.8 out of 5
Pricing:
- Free - $0 with a watermark
- 1 Video - $4.89
- Monthly - $14.87
- Annually - $148.00
Pros
- The page has very good quality
- Easy to use
- Simple and brilliant
Cons
- With watermark
- Can’t change the font size
Looking for a tool to help you join your MP4 files with ease and precision? Look no further than Pixiko! This online MP4 Joiner is the perfect tool for merging multiple videos into one smooth, seamless masterpiece. With its easy-to-use interface and advanced editing options, you’ll have complete control over the final product.
To merge videos using Pixiko online tool, follow these steps:
Step1 Upload the videos you want to merge.

Step2 Click the “Merge“ button to combine all the videos

Step3 Wait for your video, then click “Download“ to save your merged video.

5. Join MP4 Files Online With Creatorkit

Ratings from G2: No Rating Yet
Pricing:
- Free - $0
- Pro - $29.00 per month
- Business - $149 per month
Pros
- User-friendly interface
- Easy to use
- Advanced editing options
Cons
- Limited features
- Limited storage capacity
This powerful platform makes it easy to combine multiple videos into one polished, professional-looking production. With its sleek and intuitive interface, you’ll be able to upload your videos, arrange them on the timeline, and tweak them to perfection with just a few clicks.
Here’s how to merge videos using Creatorkit:
Step1 Upload the videos that you want to merge.

Step2 Arrange the clips and add some transitions.

Step3 Click the “Export in HD“ button and input your email. Click the “Get the link to download.”

Advantages and Disadvantages of MP4 Combiners Online
Using an online MP4 combiner has several advantages and disadvantages.
Pros
- One of the main advantages is convenience, as you can easily access and use the tool from any device with an internet connection.
- Additionally, many online MP4 combiners are free to use, which makes them a cost-effective solution for those on a budget.
- They also provide a wide range of output options so that you can export your merged video in the format of your choice.
Cons
- One of the main disadvantages is that the tool may have limited storage capacity and file upload size, which could be a problem if you have large files to merge.
- Additionally, online MP4 combiners may have limited features compared to paid alternatives, which could limit the quality and customization of the final product.
- Some online MP4 combiners may also have a limit on the number of videos you can merge at once.
It May Interest You – Join MP4 Videos Offline With Wondershare Filmora
Free Download For Win 7 or later(64-bit)
Free Download For macOS 10.14 or later
If you prefer to merge MP4 videos offline, Wondershare Filmora is a great option. It is a powerful video editing software that offers a wide range of features to help you create professional-looking videos. One of the features it offers is the ability to merge multiple MP4 files into one cohesive video.
With Wondershare Filmora, you can easily import your MP4 files, drag and drop them into the timeline, and arrange them in the order you want. The software also allows you to trim, crop, and adjust the videos before merging, giving you complete control over the final product. Additionally, it offers a wide range of output options so that you can export your merged video in the format of your choice.
To merge videos using Wondershare Filmora Video Editor, follow these steps:
Step1 Open the software and select “New Project,” then go to “File“ > “Import Media“ > “Import Media Files“ to add the videos you want to merge.

Step2 Drag the video clips to the timeline and arrange it.

Step3 Press the “Play“ button to preview your video and edit the videos to your liking.

Step4 Once you are satisfied with the result, save your merged video.
People Also Ask
Here are some frequently asked questions about merging videos using online tools.
Q1. How To Combine 2 Videos Into 1?
Combining two or more videos into one is a common task for video editing. There are two main ways to do this: online and offline. Online tools such as Media.io, Flixier, Video Candy, Pixiko mp4 Joiner Online, and Creatorkit allow you to upload your videos, arrange them on a timeline, and merge them into one cohesive video. These tools are easy to use and accessible from any device with an internet connection.
On the other hand, offline tools, such as Wondershare Filmora, are powerful video editing software that can be installed on your computer. Additionally, these tools offer advanced video editing features like adding text, effects, and transitions.
Q2. What Is the Best Free App To Combine Videos ?
Some popular free apps to combine videos for Android include Video Joiner, AndroVid Video Editor, VideoShow, Video Merger Free, Video Merge, VidTrim, and InVideo. These apps offer a variety of features, such as the ability to trim, crop, and adjust videos before merging, as well as add text, effects, and transitions.
For iOS, some popular free apps to combine videos include Apple iMovie, Splice, Vimeo, Videorama, Filmmaker, and WeVideo. These apps offer similar features to the Android apps, such as trimming, cropping, and adjusting videos before merging and adding text, effects, and transitions. iMovie is a built-in app for iOS users which is user-friendly and offers a wide range of features.
Q3. How Can I Merge Videos on My Laptop Without Software?
You can use online tools to merge videos on your laptop without using the software. Some of the online tools recommended in the previous part are Media.io, Flixier, Video Candy, Pixiko mp4 Joiner Online, and Creatorkit.
These tools allow you to upload your videos, arrange them on a timeline, and merge them into one cohesive video. They are easy to use and accessible from any device with an internet connection. Additionally, these tools offer a wide range of output options so that you can export your merged video in the format of your choice.
Conclusion
Merging MP4 files is a common task for video editing, and many options are available for both online and offline tools. Online tools such as Media.io, Flixier, Video Candy, Pixiko mp4 Joiner Online, and Creatorkit are easy to use, accessible from any device with an internet connection, and offer a wide range of output options.
Offline tools such as Wondershare Filmora are powerful video editing software that offers advanced video editing features. No matter which tool you choose, you can easily create professional-looking videos.
5 Amazing Tools To Merge MP4 Online
There are many options available when it comes to merging MP4 files online. But to save you time and hassle, we’ve narrowed down the list to the top 5 tools that are easy to use and offer a variety of options. From basic editing to more advanced features, these tools will help you create the perfect video for any occasion.
1. Merge MP4 Files Online Using Media.io
Ratings from G2: 4.5 out of 5
Pricing:
- Free - $0
- Basic - $3.95 / monthly
- Pro - $6.66 / monthly
Pros
- Fast compression speeds
- No file limits
- No watermarks
- Smart output settings
Cons
- Lacks some functionality
Media.io is an all-in-one online tool that allows you to merge multiple videos and photos and convert audio and video formats. It’s easy to use and works on all major browsers, making it a great option for those who want a user-friendly and versatile tool.
This tool offers a wide range of output options, allowing you to export your merged video in your chosen format, making it a perfect solution for those looking for an online tool that’s easy to use and offers a wide range of features.
Merging videos and photos on Media.io is a simple process with just 3 steps:
Step1 Navigate to the Media.io video editor and select the “Upload“ button to add your videos to the media library.
Step2 Utilize the drag-and-drop feature to arrange the videos in the timeline.
Step3 Press the “Export“ button to download the newly merged video to your device.
2. Use Flixier To Combine MP4 Files Online
Ratings from G2: 4.6 out of 5
Pricing:
- Free - $0
- Basic - $14.00 / monthly
- Business - $30.00 / monthly
- Enterprise - $55.00 / monthly
Pros
- Unlimited video and audio tracks
- All future updates are included
- Video templates
- Easy for beginners
Cons
- The export hour/dollar ratio could be better
- Limited storage space
Flixier is another online tool that allows you to merge MP4 files online easily. With its user-friendly interface, you can quickly upload your videos and arrange them in the timeline using the drag-and-drop feature. You can also trim, crop, and adjust the videos to your liking. Once you are satisfied with the final output, you can export the merged video in the format of your choice.
Flixier also offers a wide range of customization options to enhance your video. This tool is a great option for those looking for an easy-to-use and versatile tool for merging MP4 files online.
Here’s how to merge mp4 online using Flixier:
Step1 Upload your videos from a computer, YouTube link, or cloud storage.
Step2 Drag videos to the timeline, trim, overlap, and add transitions.
Step3 Click the “Export and Download“ button, wait for processing and save to your computer.
3. Video Candy To Merge MP4 Files Online for Free
Ratings from G2: No rating
Pricing:
- Free - $0
Pros
- Free online tool
- User-friendly interface
- Provides a variety of output options
Cons
- Limited features
- Limited storage space
- Less advanced editing options
- Limited customer support
If you’re looking for a sweet treat for your video editing needs, look no further than Video Candy! This online tool lets you easily merge multiple MP4 files; it’s completely free to use. With its user-friendly interface, you can upload your videos, drag and drop them into the timeline, and voila! Your videos are now one cohesive masterpiece.
Not only that, but Video Candy also allows you to trim, crop, and adjust the videos to your liking before merging, giving you even more control over the final product. And once you’re happy with your creation, you can export it in various formats to be compatible with any platform. So here’s how to merge videos using Video Candy:
Step1 Upload the videos by clicking the “+Add Files“ button.
Step2 Arrange the videos you want to merge and add some transitions.
Step3 Click the “Export“ button and the “Download File“ to save the video on your device.
4. Pixiko mp4 Joiner Online
Ratings from G2: 4.8 out of 5
Pricing:
- Free - $0 with a watermark
- 1 Video - $4.89
- Monthly - $14.87
- Annually - $148.00
Pros
- The page has very good quality
- Easy to use
- Simple and brilliant
Cons
- With watermark
- Can’t change the font size
Looking for a tool to help you join your MP4 files with ease and precision? Look no further than Pixiko! This online MP4 Joiner is the perfect tool for merging multiple videos into one smooth, seamless masterpiece. With its easy-to-use interface and advanced editing options, you’ll have complete control over the final product.
To merge videos using Pixiko online tool, follow these steps:
Step1 Upload the videos you want to merge.
Step2 Click the “Merge“ button to combine all the videos
Step3 Wait for your video, then click “Download“ to save your merged video.
5. Join MP4 Files Online With Creatorkit
Ratings from G2: No Rating Yet
Pricing:
- Free - $0
- Pro - $29.00 per month
- Business - $149 per month
Pros
- User-friendly interface
- Easy to use
- Advanced editing options
Cons
- Limited features
- Limited storage capacity
This powerful platform makes it easy to combine multiple videos into one polished, professional-looking production. With its sleek and intuitive interface, you’ll be able to upload your videos, arrange them on the timeline, and tweak them to perfection with just a few clicks.
Here’s how to merge videos using Creatorkit:
Step1 Upload the videos that you want to merge.
Step2 Arrange the clips and add some transitions.
Step3 Click the “Export in HD“ button and input your email. Click the “Get the link to download.”
Advantages and Disadvantages of MP4 Combiners Online
Using an online MP4 combiner has several advantages and disadvantages.
Pros
- One of the main advantages is convenience, as you can easily access and use the tool from any device with an internet connection.
- Additionally, many online MP4 combiners are free to use, which makes them a cost-effective solution for those on a budget.
- They also provide a wide range of output options so that you can export your merged video in the format of your choice.
Cons
- One of the main disadvantages is that the tool may have limited storage capacity and file upload size, which could be a problem if you have large files to merge.
- Additionally, online MP4 combiners may have limited features compared to paid alternatives, which could limit the quality and customization of the final product.
- Some online MP4 combiners may also have a limit on the number of videos you can merge at once.
It May Interest You – Join MP4 Videos Offline With Wondershare Filmora
Free Download For Win 7 or later(64-bit)
Free Download For macOS 10.14 or later
If you prefer to merge MP4 videos offline, Wondershare Filmora is a great option. It is a powerful video editing software that offers a wide range of features to help you create professional-looking videos. One of the features it offers is the ability to merge multiple MP4 files into one cohesive video.
With Wondershare Filmora, you can easily import your MP4 files, drag and drop them into the timeline, and arrange them in the order you want. The software also allows you to trim, crop, and adjust the videos before merging, giving you complete control over the final product. Additionally, it offers a wide range of output options so that you can export your merged video in the format of your choice.
To merge videos using Wondershare Filmora Video Editor, follow these steps:
Step1 Open the software and select “New Project,” then go to “File“ > “Import Media“ > “Import Media Files“ to add the videos you want to merge.
Step2 Drag the video clips to the timeline and arrange it.
Step3 Press the “Play“ button to preview your video and edit the videos to your liking.
Step4 Once you are satisfied with the result, save your merged video.
People Also Ask
Here are some frequently asked questions about merging videos using online tools.
Q1. How To Combine 2 Videos Into 1?
Combining two or more videos into one is a common task for video editing. There are two main ways to do this: online and offline. Online tools such as Media.io, Flixier, Video Candy, Pixiko mp4 Joiner Online, and Creatorkit allow you to upload your videos, arrange them on a timeline, and merge them into one cohesive video. These tools are easy to use and accessible from any device with an internet connection.
On the other hand, offline tools, such as Wondershare Filmora, are powerful video editing software that can be installed on your computer. Additionally, these tools offer advanced video editing features like adding text, effects, and transitions.
Q2. What Is the Best Free App To Combine Videos ?
Some popular free apps to combine videos for Android include Video Joiner, AndroVid Video Editor, VideoShow, Video Merger Free, Video Merge, VidTrim, and InVideo. These apps offer a variety of features, such as the ability to trim, crop, and adjust videos before merging, as well as add text, effects, and transitions.
For iOS, some popular free apps to combine videos include Apple iMovie, Splice, Vimeo, Videorama, Filmmaker, and WeVideo. These apps offer similar features to the Android apps, such as trimming, cropping, and adjusting videos before merging and adding text, effects, and transitions. iMovie is a built-in app for iOS users which is user-friendly and offers a wide range of features.
Q3. How Can I Merge Videos on My Laptop Without Software?
You can use online tools to merge videos on your laptop without using the software. Some of the online tools recommended in the previous part are Media.io, Flixier, Video Candy, Pixiko mp4 Joiner Online, and Creatorkit.
These tools allow you to upload your videos, arrange them on a timeline, and merge them into one cohesive video. They are easy to use and accessible from any device with an internet connection. Additionally, these tools offer a wide range of output options so that you can export your merged video in the format of your choice.
Conclusion
Merging MP4 files is a common task for video editing, and many options are available for both online and offline tools. Online tools such as Media.io, Flixier, Video Candy, Pixiko mp4 Joiner Online, and Creatorkit are easy to use, accessible from any device with an internet connection, and offer a wide range of output options.
Offline tools such as Wondershare Filmora are powerful video editing software that offers advanced video editing features. No matter which tool you choose, you can easily create professional-looking videos.
Mastering the Art of Video Framing
Are you in search of the best practice to frame a video? If yes, then cheer up, as we have got you covered! In this guide, we will share the top 6 types of video framing that even novice and expert users can master.
Framing videos involves focusing on a specific subject and blocking out the irrelevant things in the background. Depending on the results you want, video framing can differ a lot. The information below will help you learn about different frames and how to utilize them effectively.
So, without further ado, let’s get into the deets.
- 01 Establishing Shots
- 02 Single Shot
- 03 Two Shot/Group Shot
- 04 Over-the-shoulder (OTS)
- 05 Insert Shot
- 06 POV Shot (OTS)
Part1 Basic Knowledge About Different Framing
Because framing is related to capturing or focusing an object by the camera lens, it can vary depending on your desired shot. Let’s start with the full-shot first and understand how it works.
01 Full Shot (FS)
Remember the shot of Marvel’s Guardians of the Galaxy, where all the players are focused in one wide frame? This excerpt is a practical example of what a full shot looks like. Full-shot video framing is particularly common in action or thriller movies where the creator wants to generate suspense in the audience.
As the name indicates, a full shot often emphasizes the scenery as your subject fills the frame. Like the background isn’t ignored or blurred out; instead, it isn’t overly stressed as well. In most cases, the camera starts with a wide-angle shot and then eventually ends with focusing on the subject.
A full-camera shot greatly emphasizes the physical presence of the character. It tracks the subject’s movements, gestures, or body language, making it the focal point. As a result, the shot obtained delivers a better understanding of actions and interactions among the character and its surroundings.
02 Medium Shot (MS)
We often see friends in movies, going to a casino, or playing cards at a bar. What do we observe in that shot? Hand movements, facial expressions, body language, and a little context of what is happening in the background. This shot is known as the medium shot and is often called the ¾ shot.
Using the medium shot video framing technique, the camera lens allows the viewers to see the background while still focusing on the main character. It’s like you will know what is happening at the back but still remain close to the character’s emotions and gestures.
A medium shot usually begins by showing the subject from the knees to his face. In other cases, the shot can also start from the character’s waist to the top of their head. Compared to long shots, a medium shot takes you closer to the subject’s emotions.
For example, in The Princess Diary, you can see how medium-shot video framing has been useful in portraying comedic scenes. You can see Mia reaching out for plates and glasses around the tables and her eyes squinting to concentrate on the process. The medium shot captures even the smallest emotions while focusing on the background.
03 Close-Up (CU)
When the subject’s head and face take up most of the frame, framing videos is known as a close-up shot. And a particular example of this shot can be spotted in the airport scene in “Casablanca.” This scene shows how the camera lens takes various shots before ending up on the actor’s face, showcasing a number of emotions and intimacy.
A close-up shot is an eye-level shot, and as a result, it takes the subject to the forefront. As a result, this shot establishes a distinct sense of connection between the audience and the character. Additionally, the environmental distraction is kept minimal throughout this shot. This setup helps maintain the emotional impact that the shot will portray.
Some of the common emotions that would be captured using close-up video framing techniques include:
- Tear-filled gaze
- Furrowed brow
- Subtle smile
Cinematographers often use such shots to intensify climaxes. These shots can be viewed as a window to the characters’ souls, allowing viewers to adapt the emotions on another level.
04 Extreme Close-Up (XCU)
To understand the extreme close-up video framing technique, let us illustrate the movie that remained our favorite action thriller while growing up: Minority Report (2002). In this movie, the shots briefly focus on the character’s eyes before hopping into the future view. This extreme close shot serves as a crucial plot to develop thematic elements in the audience.
So, an extremely close shot focuses on specific details of a character. This can be either the subject’s eyes, ears, or mouth. However, the shot is not often employed casually. Instead, it is used in a stance where it is appropriate and when there is a need to develop heightened emotion among the viewers.
You can see this shot as a magnifying glass that draws attention to even the smallest emotion that would have gone unnoticed otherwise.
Part2 Master framing types
Don’t know how to master framing types? No worries, we have a comprehensive guide on that! First of all, let’s start with the most basic way to frame a video:
01 Establishing Shots
An establishing shot is usually used to develop a context for the next upcoming scene. It is often a movie’s first scene and portrays an extremely wide shot of the context. This frame on the video indicates the location and time of the scene to the audience to engage with them on a deeper level.
One of the least-known things about an establishing shot is that it doesn’t require a narrative to explain what is happening. Instead, it is shot alone, and the context is shot so that the audience gets to know everything as soon as they see the excerpt.
An amazing example of establishing a shot can be seen in Stanely Kubrick’s horror film, The Shining. In the movie’s opening scene, the camera goes through the forest and mountains before getting onto the mountaintop hotel where the action occurs.
02 Single Shot
A single shot frames a video that includes a single subject or character. It occurs when a character is talking or reacting to a scenario. Here, remember that if the lens shifts focus from a subject, it is not a single shot.
In the movie Extraction 2020, you can see a single shot being utilized when the character goes on to rescue his son from the kidnappers. The shot extends a long way, including through a car crash, weapon chasing, and that iconic Hemsworth sliding off a building into a brutal fight. And the incredible part was that all of this was captured in a single shot.
03 Two Shot/Group Shot
As the name indicates, a two-shot or a group shot is used to frame a video that involves more than one character. It could be two people conversing or friends sitting at a cafe gossiping. This shot is particularly helpful in portraying the relationship between the characters in the frame.
A good example of two-shot video framing can be seen in the movie Silverado. During the final shooting scene, you can see two cowboys standing far apart while facing each other. Here, the two-shot technique emphasizes tension before the cowboys draw their guns.
04 Over-the-shoulder (OTS)
OTS, or Over-the-shoulder, is the most used shot in framing videos for making movies. To understand how this shot works, let us take an example of two subjects, one named A and the other named B. Now, A is sitting right in front of subject B. Here; the shot is executed by focusing on subject A from the shoulder of subject B. The basic purpose of the shot is to fill the conversation or the meeting between the subjects.
To understand this situation better, let’s take an example from the movie How to Train Your Dragon. In the scene, Hiccup is seen having a conversation with his father. Here, when Hiccup is talking, the camera is focused on him over his father’s shoulder. And when his father talks, the shot is taken over the shoulder of Hiccup.
05 Insert Shot
Insert short framing technique uses selective focus to draw the audience’s attention to the subject. Whether it be an object or merely a piece of information, insert shot has always been effective in emphasizing details.
For example, in The X-Files, an insert shot is used to provide the audience with a look at the file of Scully. This insert shot reveals the most shocking revelations in the file, including a tissue sample. Additionally, the file insert shot also shows how shady Mulder is.
06 POV Shot
A POV shot is used to frame a video in a way that shows what a character is doing. You can take this as a shot showing the world from the character’s perspective. Our modern-day games, including Call of Duty Black Ops, are a common example of such POV shots.
The movie Friday the 13th is an iconic example of a POV shot frame on video. If you remember, the movie revolved around a killer who wasn’t identified until the end. So, the audience watched the film from the killer’s perspective until he was recognized.
Conclusion
To sum it up, mastering the art of video framing, from full shots to POV shots, is an exciting journey that helps you to weave exciting stories. Understanding these techniques will empower you to craft a compelling narrative to captivate your audience, whether you are a beginner or a professional.
So, begin with framing videos now and let your work speak volumes!
Final Cut Pro Is a Video Editing Software Exclusive to Apple Devices. It Features Numerous Editing Tools and Video Effects, Enabling You to Produce Quality Creations Every Time. Keep Reading to Discover How to Apply the Final Cut Pro Camera Shake Effect

Are you struggling to attract audiences to your videos? If so, you may consider adding effects to them during your editing process. Most video editing software includes preset video effects to create and publish attractive videos quickly. For example, Final Cut Pro is a video editing software for Apple devices and includes lots of editing tools and video effects. Here is a detailed guide on how to apply the Final Cut Pro camera shake effect to your videos.
- What are hand shake effects for
- What kind of shots are best for such an effect
- Is it better to hand shake when shooting or add the effects
Part1: When Do You Need a Hand Shake Effect?

Adding effects to your videos is a great way to make them more impactful. However, you need to apply them correctly for them to be effective. The following information explores different aspects of the Final Cut Pro camera shake effect, including its definition, why video creators use it, and how best to apply it.
What are hand shake effects for?
Hand shake effects are video adjustments you apply to specific scenes that make the shot vibrate. Depending on the software you use, there are multiple variations of the effect. In addition, developers refer to it by different names. For example, Final Cut Pro users know it as the earthquake effect, which is a preset video effect in most versions of the software.
Typically, video creators use the Final Cut Pro camera shake effect to add energy to their videos. As such, their scenes are more dramatic and encourage you to pay more attention to the video. For example, you can apply the effect to indicate the arrival of the villain in your video. In addition, the effect will be more impactful if the villain is a giant.
You can also use the camera shake video effect for the following purposes:
- Break the monotony in a scene. Applying this scene after a long dialogue scene will give your audience a brief respite, allowing them to regain their focus.
- The camera shake effect can also be an effective tool to build your brand identity. Instead of applying it during the screenplay, you can use it in the end credits to introduce your logo to audiences. Furthermore, you can include a creative sound track for additional emphasis.
What kind of shots are best for such an effect?
The best shot to apply the camera shake effect are still shots. This is because they give you extra creative room with the scene since the subjects are facing the camera directly from a level angle. As such, you can customize unique motion patterns for each subject when applying the camera shake effect.
Is it better to hand shake when shooting or add the effects?
Although it may seem tempting to physically shake the camera when shooting, most filmmakers prefer to add the effect during editing. This is because shaking the camera during shooting may result in unusable shots in post-production. For example, shooting a car scene from a hand-held camera in the passenger seat often results in shaky footage. As such, video creators mount the camera on a tripod to capture still shots and then add the camera shake during post-production.
Part2: How to Add a hand shake effect with FCPX?
The following is a step-to-step guide on how to add a hand shake effect on Final Cut Pro X. However, you need to meet the following requirements for the process to work.
A licensed copy of Final Cut Pro X

The camera shake effect is only available with the full version of Final Cut Pro X. In addition, you will access all variations of the effect with the full version.
A compatible video file
Apple’s Final Cut Pro X is compatible with the following video file formats:
- QuickTime formats.
- Apple ProRes
- Apple Animation Codec
- XF-AVC
- Container files, such as3GP, AVI, and MP4.
Camera shake effect plugins
The video editing software comes with preset camera shake effects, which you can find in the Effects Browser. However, you can also download compatible plugins from established sources, such as the Camera Shake Effects pack from Motion Array.
Once you have everything in place, follow the below steps.
- Import your desired video clip to the Final Cut Pro X workspace. Your video will appear in the timeline section at the bottom of your workspace.

- Select the section where you want to add the camera shake effect. In addition, you need to set the in and out points from the timeline. For example, Mac users can set these points by pressing the Iand O keys, respectively.
- Then, select the Shakefrom the Effects browser and search for Hand Held.

- Drag the effect over your selection to apply the effect.
- You can also make additional adjustments to your hand-held shake effect from the inspector panel.

For example, you can prevent black borders from appearing with the effect by increasing the Scale attribute to 105%. Scroll to the bottom right section of your workspace to the Inspector Panel, and click on Scale to make the adjustment.
Part3: How to add hand shake effect in the simplest way?
If the above guide is too complicated for you, Wondershare Filmora offers you the simplest way to add the hand shake effect to your videos.

The program is a stand-alone video editor for Windows and macOS users. It comes with a variety of preset camera shaking effects, including
- Up-down shaking
- Extreme shaking
- Chaos shaking
- Sideways shaking
Free Download For Win 7 or later(64-bit)
Free Download For macOS 10.14 or later
The above effects offer various shaking intensities and patterns to help you achieve your desired effect. In addition, you will need to purchase a license to access the different versions of the hand shake video effect. Once you have Wondershare Filmora running on your device, follow the below steps to add the hand shake effect to your videos.
1. Import your video
Click on the Import tab on your user interface and select Import Media Files. Then, drag and drop the files you want to edit to your timeline from the resulting window.
2. Applying Wondershare Filmora’s hand shake effect
Click on the Effects tab from the user interface and then select Filters. Next, proceed to the Shake subcategory to view all available presets. Currently, the program has eight camera shake presets, which you can preview using the pop-up thumbnail on your workspace.
Once you identify your desired effect, drag and drop it over the video selection, you want to apply it. You can make further adjustments using the sliders on the effect’s sub menu. For example, you can vary the duration of the effect by adjusting the frequency and intensity sliders.
Finally, click on Ok to apply the hand shake effect to your video and save the changes.
3. Exporting your final project
Wondershare Filmora allows you to export your completed projects to external locations, such as external hard drives and cloud storage. In addition, you can directly upload your videos to YouTube and Vimeo from the workspace.
Here is how to export videos from Filmora:
- Click on the Exporttab from the program’s main menu.
- Identify your file destination from the options on the Export The latest version of Filmora allows file exports to your local storage, YouTube, Vimeo, and DVD.
- Select your file format from the left menu and click Exporton the bottom right corner to finalize the process. Some of the available file formats include MP4, WMV, and FLV.
Kindly note that the above guide is for the latest version of Wondershare Filmora. As such, confirm that you have the latest edition before using it. Alternatively, you can download the latest version for free from the Filmora website.
FAQs
1. What are the minimum system requirements to run Film Cut Pro X?
According to Apple, your device needs to have the below minimum system requirements.
- 4 gigabytes of RAM. However, running the program on a device with 8 GB RAM allows you to work with 4K videos and perform 360-degree video editing seamlessly.
- A dedicated graphics processing unit with at least 1 GB of VRAM.
- About 4.5 GB of storage space for Final Cut Pro’s system files.
- An active internet connection to enable access to online customer support and additional features.
- You will also need a Blu-ray recorder to export videos directly to DVDs.
- Finally, your device should be running macOS 11.5.1 or later.
2. Can you import custom hand shake effects to Final Cut Pro?
Yes, you can import custom hand shake effects to your licensed version of Final Cut Pro. However, always install custom plugins from verifiable sites to prevent the installation of malicious software such as spyware. Some of the sites to consider consist of Motion Array, Studio Binder, and FCPX Free. For example, you can check out these 10 free plugins for Final Cut Pro from Filmora .
- A licensed copy of Final Cut Pro X
- A compatible video file
- Camera shake effect plugins
- How to add hand shake effect in the simplest way
Part1: When Do You Need a Hand Shake Effect?
Adding effects to your videos is a great way to make them more impactful. However, you need to apply them correctly for them to be effective. The following information explores different aspects of the Final Cut Pro camera shake effect, including its definition, why video creators use it, and how best to apply it.
What are hand shake effects for?
Hand shake effects are video adjustments you apply to specific scenes that make the shot vibrate. Depending on the software you use, there are multiple variations of the effect. In addition, developers refer to it by different names. For example, Final Cut Pro users know it as the earthquake effect, which is a preset video effect in most versions of the software.
Typically, video creators use the Final Cut Pro camera shake effect to add energy to their videos. As such, their scenes are more dramatic and encourage you to pay more attention to the video. For example, you can apply the effect to indicate the arrival of the villain in your video. In addition, the effect will be more impactful if the villain is a giant.
You can also use the camera shake video effect for the following purposes:
- Break the monotony in a scene. Applying this scene after a long dialogue scene will give your audience a brief respite, allowing them to regain their focus.
- The camera shake effect can also be an effective tool to build your brand identity. Instead of applying it during the screenplay, you can use it in the end credits to introduce your logo to audiences. Furthermore, you can include a creative sound track for additional emphasis.
What kind of shots are best for such an effect?
The best shot to apply the camera shake effect are still shots. This is because they give you extra creative room with the scene since the subjects are facing the camera directly from a level angle. As such, you can customize unique motion patterns for each subject when applying the camera shake effect.
Is it better to hand shake when shooting or add the effects?
Although it may seem tempting to physically shake the camera when shooting, most filmmakers prefer to add the effect during editing. This is because shaking the camera during shooting may result in unusable shots in post-production. For example, shooting a car scene from a hand-held camera in the passenger seat often results in shaky footage. As such, video creators mount the camera on a tripod to capture still shots and then add the camera shake during post-production.
Part2: How to Add a hand shake effect with FCPX?
The following is a step-to-step guide on how to add a hand shake effect on Final Cut Pro X. However, you need to meet the following requirements for the process to work.
A licensed copy of Final Cut Pro X
The camera shake effect is only available with the full version of Final Cut Pro X. In addition, you will access all variations of the effect with the full version.
A compatible video file
Apple’s Final Cut Pro X is compatible with the following video file formats:
- QuickTime formats.
- Apple ProRes
- Apple Animation Codec
- XF-AVC
- Container files, such as3GP, AVI, and MP4.
Camera shake effect plugins
The video editing software comes with preset camera shake effects, which you can find in the Effects Browser. However, you can also download compatible plugins from established sources, such as the Camera Shake Effects pack from Motion Array.
Once you have everything in place, follow the below steps.
- Import your desired video clip to the Final Cut Pro X workspace. Your video will appear in the timeline section at the bottom of your workspace.
- Select the section where you want to add the camera shake effect. In addition, you need to set the in and out points from the timeline. For example, Mac users can set these points by pressing the Iand O keys, respectively.
- Then, select the Shakefrom the Effects browser and search for Hand Held.
- Drag the effect over your selection to apply the effect.
- You can also make additional adjustments to your hand-held shake effect from the inspector panel.
For example, you can prevent black borders from appearing with the effect by increasing the Scale attribute to 105%. Scroll to the bottom right section of your workspace to the Inspector Panel, and click on Scale to make the adjustment.
Part3: How to add hand shake effect in the simplest way?
If the above guide is too complicated for you, Wondershare Filmora offers you the simplest way to add the hand shake effect to your videos.
The program is a stand-alone video editor for Windows and macOS users. It comes with a variety of preset camera shaking effects, including
- Up-down shaking
- Extreme shaking
- Chaos shaking
- Sideways shaking
Free Download For Win 7 or later(64-bit)
Free Download For macOS 10.14 or later
The above effects offer various shaking intensities and patterns to help you achieve your desired effect. In addition, you will need to purchase a license to access the different versions of the hand shake video effect. Once you have Wondershare Filmora running on your device, follow the below steps to add the hand shake effect to your videos.
1. Import your video
Click on the Import tab on your user interface and select Import Media Files. Then, drag and drop the files you want to edit to your timeline from the resulting window.
2. Applying Wondershare Filmora’s hand shake effect
Click on the Effects tab from the user interface and then select Filters. Next, proceed to the Shake subcategory to view all available presets. Currently, the program has eight camera shake presets, which you can preview using the pop-up thumbnail on your workspace.
Once you identify your desired effect, drag and drop it over the video selection, you want to apply it. You can make further adjustments using the sliders on the effect’s sub menu. For example, you can vary the duration of the effect by adjusting the frequency and intensity sliders.
Finally, click on Ok to apply the hand shake effect to your video and save the changes.
3. Exporting your final project
Wondershare Filmora allows you to export your completed projects to external locations, such as external hard drives and cloud storage. In addition, you can directly upload your videos to YouTube and Vimeo from the workspace.
Here is how to export videos from Filmora:
- Click on the Exporttab from the program’s main menu.
- Identify your file destination from the options on the Export The latest version of Filmora allows file exports to your local storage, YouTube, Vimeo, and DVD.
- Select your file format from the left menu and click Exporton the bottom right corner to finalize the process. Some of the available file formats include MP4, WMV, and FLV.
Kindly note that the above guide is for the latest version of Wondershare Filmora. As such, confirm that you have the latest edition before using it. Alternatively, you can download the latest version for free from the Filmora website.
FAQs
1. What are the minimum system requirements to run Film Cut Pro X?
According to Apple, your device needs to have the below minimum system requirements.
- 4 gigabytes of RAM. However, running the program on a device with 8 GB RAM allows you to work with 4K videos and perform 360-degree video editing seamlessly.
- A dedicated graphics processing unit with at least 1 GB of VRAM.
- About 4.5 GB of storage space for Final Cut Pro’s system files.
- An active internet connection to enable access to online customer support and additional features.
- You will also need a Blu-ray recorder to export videos directly to DVDs.
- Finally, your device should be running macOS 11.5.1 or later.
2. Can you import custom hand shake effects to Final Cut Pro?
Yes, you can import custom hand shake effects to your licensed version of Final Cut Pro. However, always install custom plugins from verifiable sites to prevent the installation of malicious software such as spyware. Some of the sites to consider consist of Motion Array, Studio Binder, and FCPX Free. For example, you can check out these 10 free plugins for Final Cut Pro from Filmora .
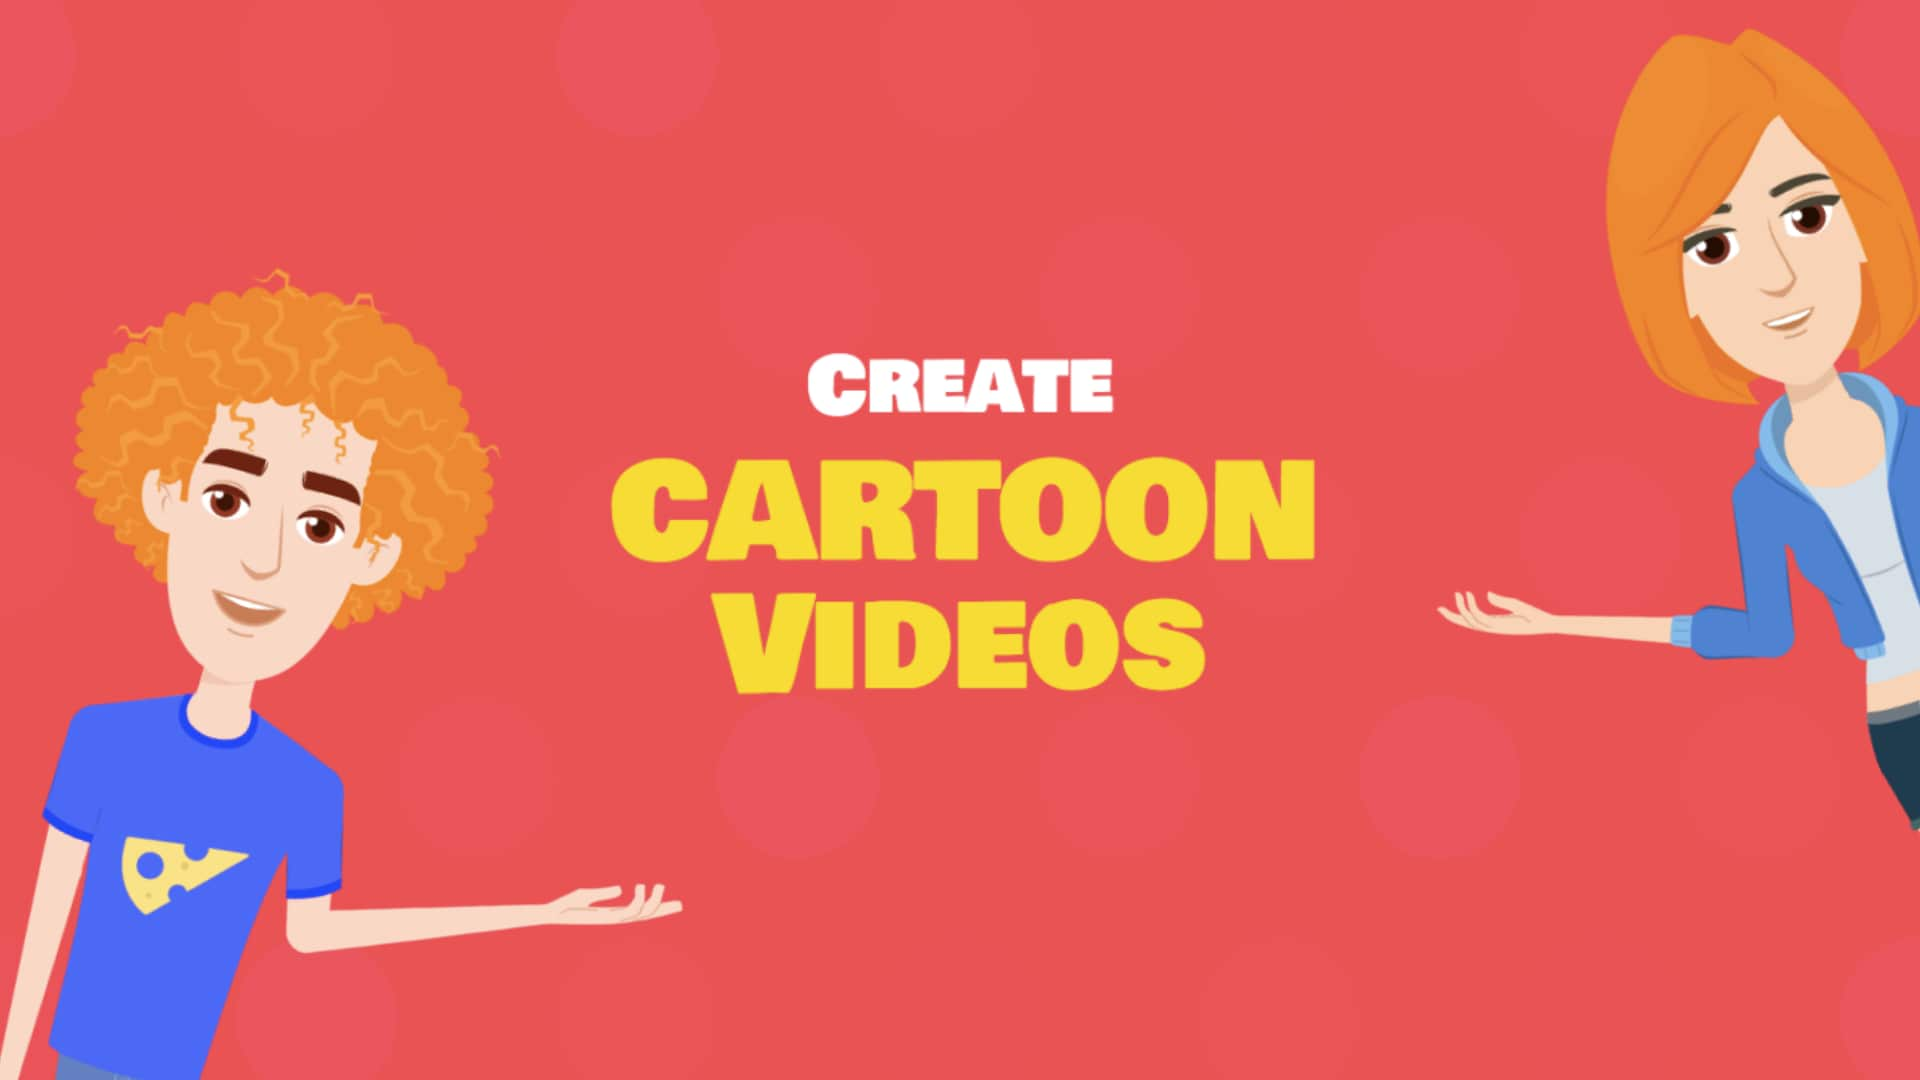
Despite the Aforementioned Restrictions, Cartoon Video Makers Still Offer a Sea of Possibilities to Their Users, so Let’s Dive Into the Magical World of Animated Videos
Abundant Video Effects - Wondershare Filmora
Provide abundant video effects - A creative video editor
Powerful color correction and grading
Detailed tutorials are provided by the official channel
Introduction
There are some issues common to the video production process. However, animated or cartoon videos have helped to combat such issues. You do not need to scout for locations, go through a seemingly endless casting process, or rent the pricey equipment. A cartoon is simply a type of animation or an illustration that usually appears in a semi-realistic or an unreal style. In addition, it uses simple, satirical, and humorous drawing language to tell the story.
Although there are restrictions, there are a lot of possibilities cartoon video makers still offer to their users. Therefore, this article will share the top 10 best cartoon video makers online and on PC that you can use before diving into an animated video world.
So, here is what we shall learn about cartoon makers today:
In this article
01 Best 5 Online Cartoon Makers
02 Cartoon Video Maker for Desktop (Win and Mac)
03 How Can I Create My Own Cartoon Using Wondershare Anireel
Part 1: Best 5 Online Cartoon Makers
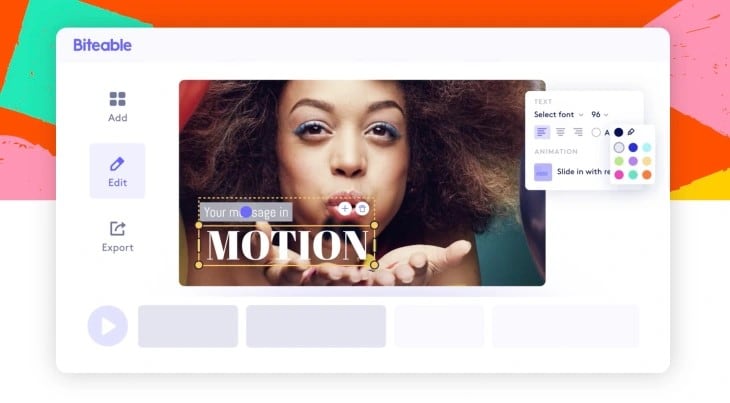
1. Biteable
Biteable provides a seemingly endless list of template categories to cater to your online media marketing needs. Aside from offering entertaining cartoon-making templates, the platform also allows users to create motion graphics or content, and Facebook covers for their social media channels.
Price: Free, $23 per month, billed annually.
Features:
- Offering library with lots of templates to choose from
- Free to use, except you are looking for additional features
- Five simple steps to an incredible cartoon video
- It has an easily customizable template
Pros
- It is a perfect option for social media managers
- Quickly create entertaining cartoons
- Used by biggies like Amazon, Microsoft, Google, Disney, BBC, Shopify, Samsung, and salesforce.
- Over 9 million users
Cons
- There is a mandatory registration
- There are no audio editing options
- The file-sharing capabilities are limited to YouTube and Facebook
- The download option is disabled in the free version
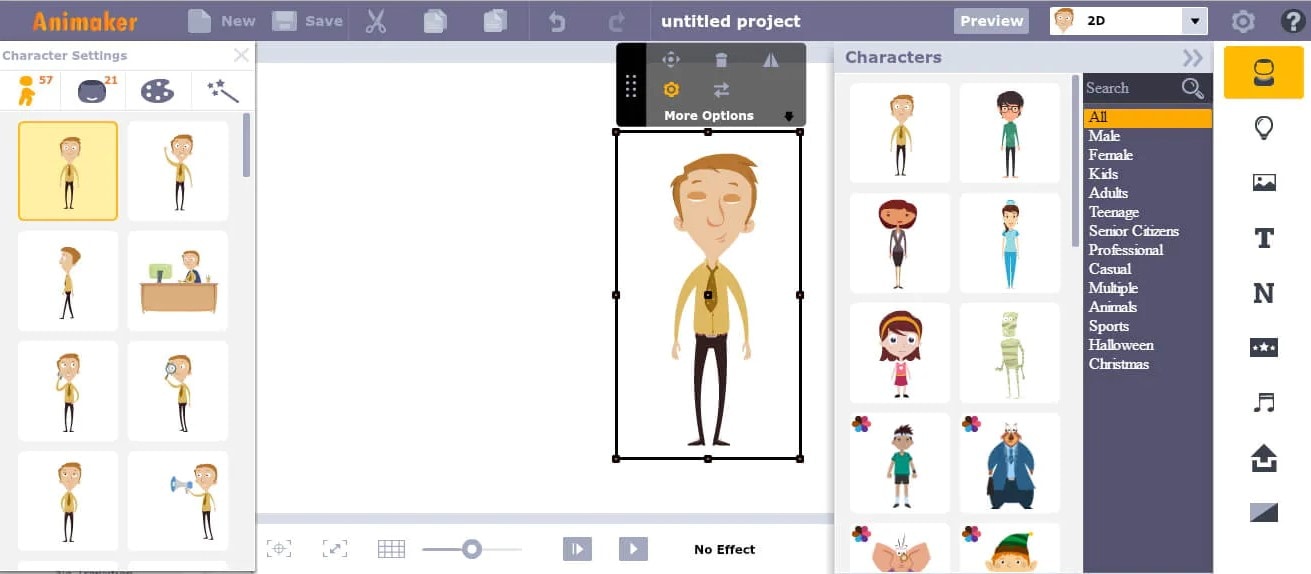
2. Animaker
With this animated maker, you get access to hundreds of animated characters, maps, and backgrounds. There are six (6) video styles available in this cartoon maker: Typography, Infographic, or 2D for different types of projects.
Price: Free version available. Subscription plans start at $12 per month/billed annually.
Features
- Different video styles, marketing, explainer, or 2D animation.
- Posts itself as the number 1 cartoon maker
- No need for a credit card to start.
- Four-step process; select template, customize it, add music, and download or share.
- 200+ voices, 25+ languages, and loads of customizable options.
- It offers auto-lip sync with advanced animation effects.
- There is a rich selection of 1000+ templates
Pros:
- Superb audio editing options
- Excellent and quick animation tools.
- Over 10 million users so far and still counting.
- Currently used by Amazon, Bosch, HP, Nokia, and Philips.
Cons:
- The monthly fee is pricey
- Account creation is mandatory for a free version
- The free version contains a watermark
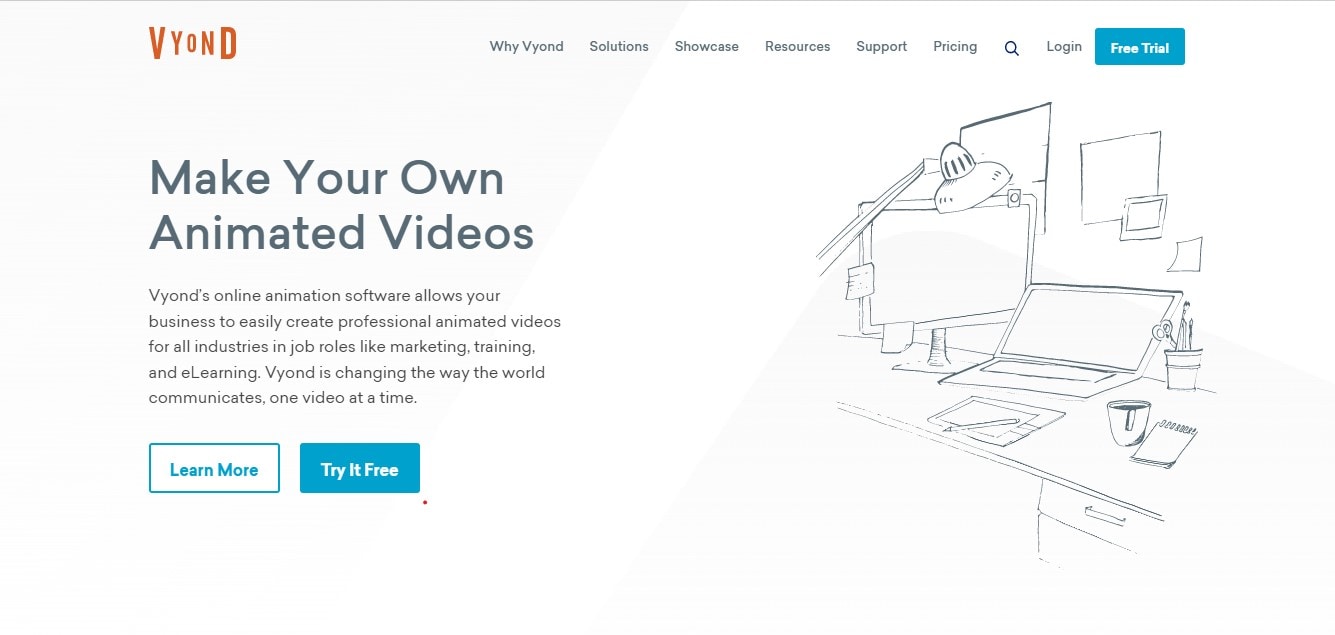
3. Vyond
Vyond, the cartoon creator launched in 2007, is probably one of the oldest online cartoon video makers. Additionally, it is still one of the most popular online destinations meant for anyone who wants to create an animated video quickly.
Price: Subscription plans start from $39 per month, billed annually.
Features:
- Perfect for animated video creation
- There is automatic character lip-syncing
- Try it for free before purchasing
- Make videos for training, e-learning, marketing, human resources, etc.
- The maximum duration of the video is 120 minutes
Pros:
- It has a fully customizable template
- There are high-end object and character animated features
- Certified by GDPR, TrustArc, BSI, and CCPA
- A wholesome cartoon makerfor enterprise and individual
- Data security and privacy assurance by BSI, CCPA, and GPDR.
Cons:
- It is quite expensive
- Vyond is not the best option for inexperienced animators
- The features depend on the subscription model
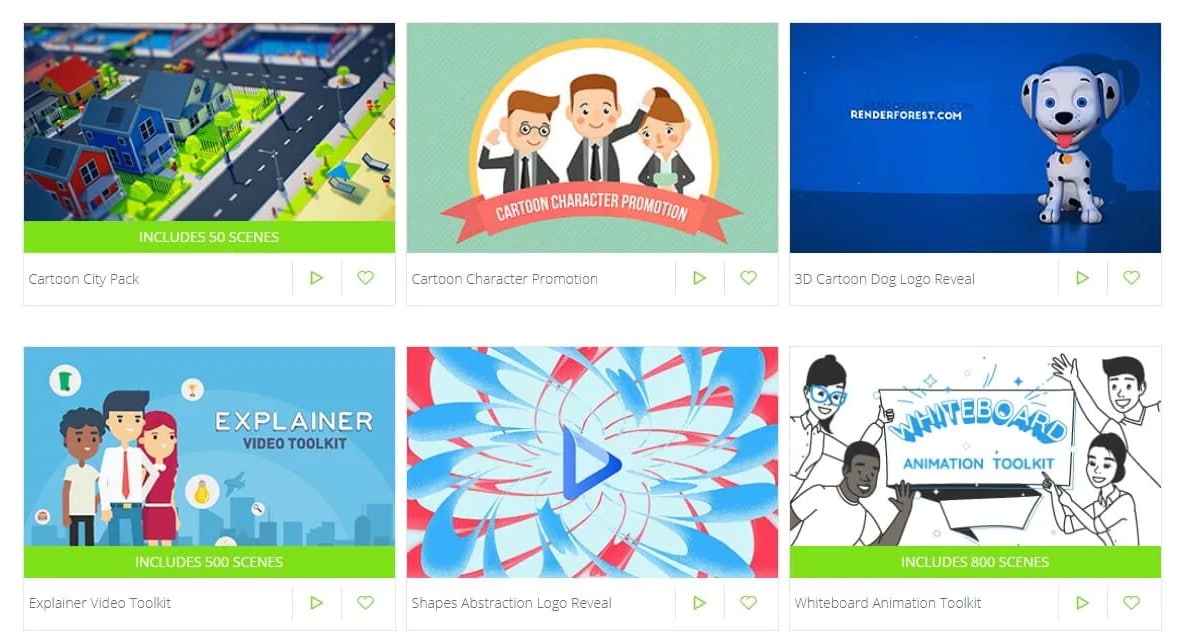
4. Renderforest
This is a famous online cartoon video maker for many purposes. Among the numerous options, the platform offers to its user. They include; 3D explainer videos, logo animations, or professional presentations.
Price: Free version available. Subscription plans start at $16 per month, billed annually.
Features:
- There is an extensive library of templates with numerous options
- Has a large online storage
- Was among the top 100 software companies in 2019.
- Top ranked solution holder for 2020
- Up to 250GB of online storage space
- Use the in-built template to make a story, customize the video, and then export it to share with your friends.
- Amadeus, Bose, BBC, Vodafone, Sony Music, and many others use Renderforest.
Pros:
- Produce videos like a pro
- Comes with an ultimate animation pack.
- Trusted by millions and one of the oldest cartoon makers.
Cons:
- A limited amount of commercial music tracks
- There are modest export options
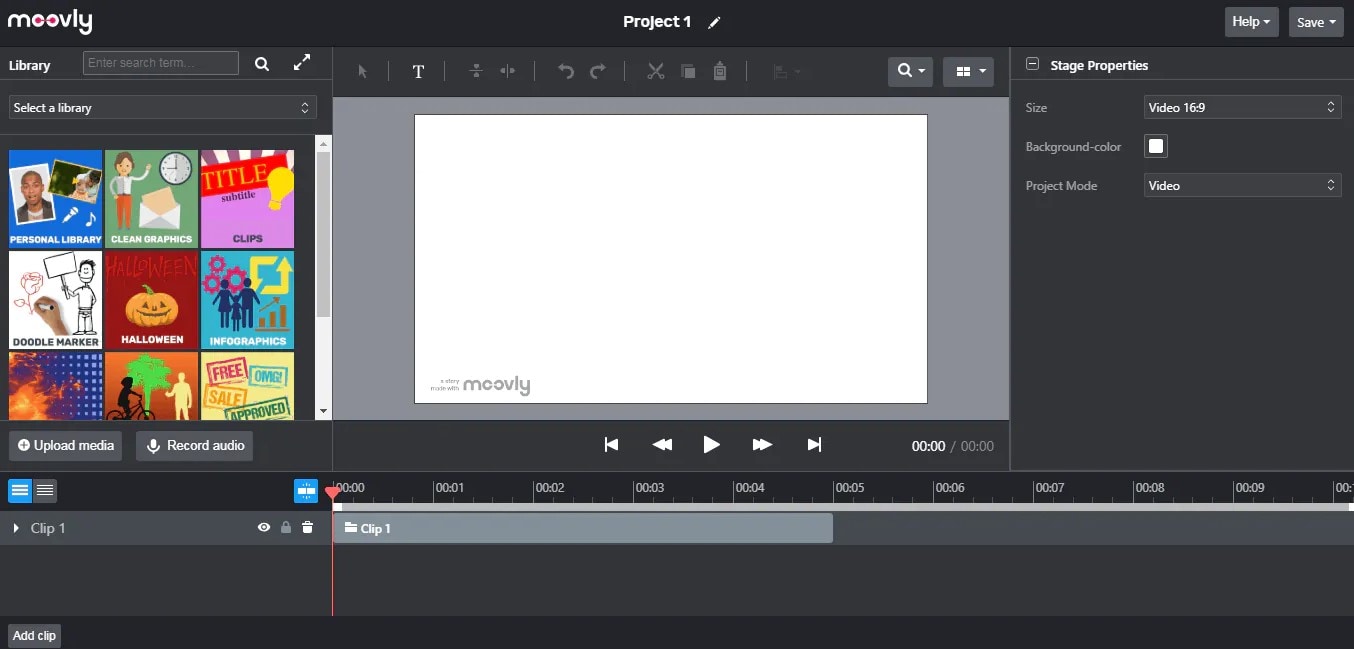
5. Moovly
With this cartoon maker, users must first log in. However, there is no need to create a new account as you can use your LinkedIn or Google account to sign in quickly.
Price: Free 30-day trial, $24.92 per month billed annually.
Features:
- Moovly is the perfect cartoon video maker for sales&marketing, human resources, internal communication, learning&development, agencies, and education.
- Apply expert features in one click with Moovly.
- Create videos and edit with browser-based or drag and drop features without installing software.
- Moovly has over 1.3 million free media, like images, sounds, music, and royalty-free stock videos at no extra charge.
- Besides, it offers 100 million extra media you can try and then purchase.
- You can add your images, music, and videos to create unique clips in style.
- Add text, remove color, add subtitles or generate them, auto-translate your text and subtitles, import PPT files, structure your content, record yourself or your computer screen, edit, mix, etc.
Pros:
- Even if users need to log in, they don’t need to create an account
- Allows users to import content from online sources like Storyblock, Shutterstock, etc.
- It is the number 1 customizable and straightforward solution to making cartoons.
- Use by Colgate-Palmolive, NHS, Teradata, Amadeus, Cisco, Continental, and Logitech.
- The interface is intuitive and user-friendly.
Cons:
- Watermarked videos during the free trial
- To export videos in HD 1080p quality, one needs to purchase one of the available plans.
Renderforest is the best cartoon maker online of the listed five in this article due to the vast library template and large online bandwidth.
Part 2: Cartoon Video Maker for Desktop (Win and Mac)
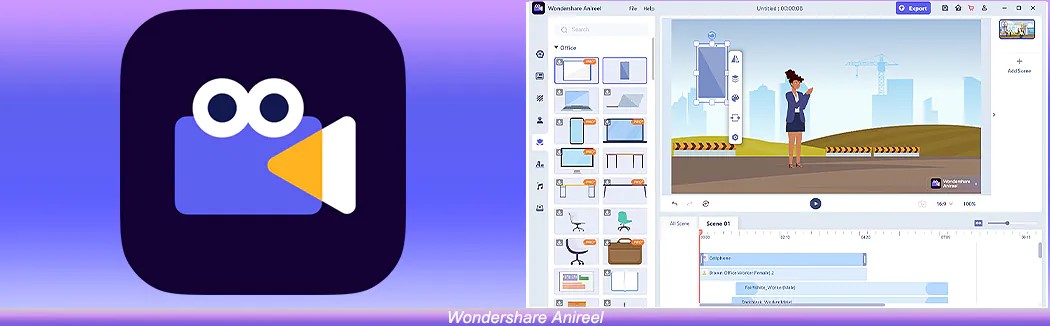
1. Wondershare Anireel
Anireel is one of the top animation software on the internet that allows users to bring their imaginations to life with a huge range of customizable elements and features.
Price: $9.99 per month billed annually and $19.99 monthly
Features:
- 40+ customizable templates
- Top animation software
- Compatible with Windows 11/10/8.1 (64 bit OS)
- Only three steps to an excellent animated video.
- Import images, videos, and sound in almost all formats.
- Create unique avatar, logo images, and more specific to your brand.
- The Deep Learning tech offers quick text-to-speech conversion.
- Animate camera movements, entry and exit effects, motion path, etc.
- Use the one-click option and change scripts to clips.
- Anireel cartoon video makercan lip-sync your characters with perfection.
- Quick and easy drag and drop editing.
Pros:
- It is convenient and simple to use
- Anireel has an intuitive interface
- The cartoon makeroffers a practical and seamless animated video editing
- It comes at an affordable and competitive price
Cons:
- It has a limited amount of assets
- Not suitable for too professional people to use.
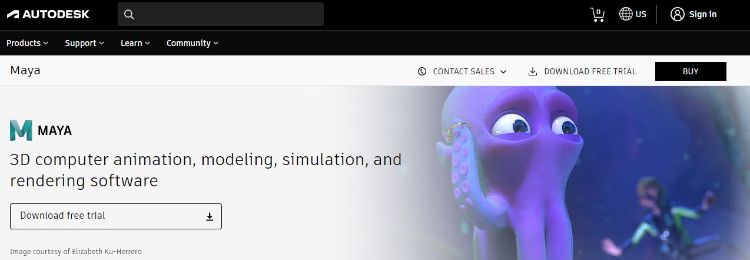
2. Autodesk Maya
Autodesk Maya is one of the best animation tools used to create animation pictures, video games, and add 3D effects in motion pictures. Plus, this cartoon maker is the best if you require a high-quality visual impact.
Price: Free trial, $225 billed monthly.
Features:
- It offers AutoDesk financing for new buyers.
- Maya is the go-to shop for architects, engineers, designers, media, and entertainment.
- Shape 3D objects and add realistic effects with Maya cartoon maker’s NURBS modeling.
- The Integrated Arnold rendering technology lets you view scene changes in real-time.
- Maya has been part of the top movie makers, including the MCU.
- This cartoon video maker offers geometry-based polygon modeling and helps create accurate simulations for visual programming.
- Maya can load and change vast data sets at a faster pace.
Pros:
- It makes complex hand-made animation tasks extremely easy
- Efficient color management
- Allows the creation of realistic effects like cloth simulations and explosions
- 30-day free trial and 30-day money-back guarantee
- Meet deadlines, add fine details to develop even the most complex shots or characters.
- Excellent tool for professionals
Cons:
- The pro is quite expensive
3. Adobe Animate
This is one of the most powerful animation software products on the internet that has been available for decades. It can animate images used for games, film, or online and produce HTML 5, WebGL, or Flash content.
Price: This cartoon creator offers three pricing plans starting at US$24.14/month
Features:
- Excellent for complex animation
- The capability of freehand drawing
- Animate, illustrate, and make 3D typography.
- Import and add vector drawings for further editing.
- Export your work as HTML5 Canvas, WebGL, Flash/Adobe AIR, GIF, or QuickTime movie.
- With the Bone tool, make your cartoon characters fluid and natural.
- Synchronize sounds and music for your project.
- Choose parts of the clip to be animated.
Pros:
- It has Puppeting features
- It is an excellent choice for complex animations
- It includes freehand drawing capability
Cons:
- It is not suitable for beginners
- Other Adobe software may be required while working on a project
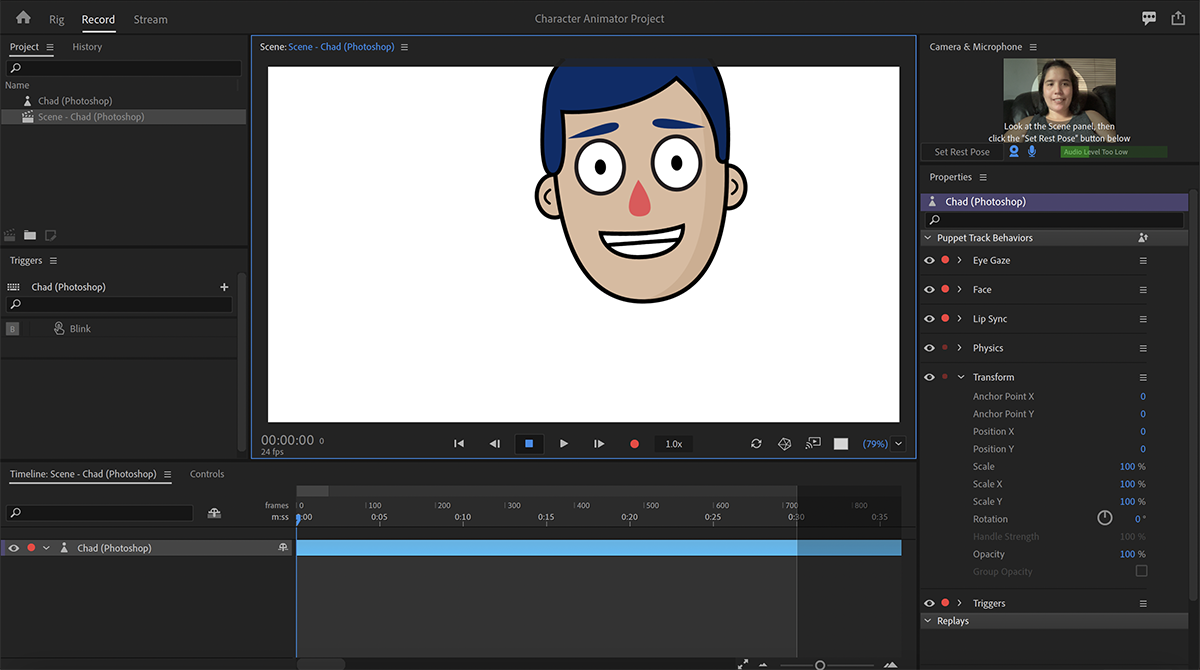
4. Adobe Character Animator
Adobe Character Animator is another type of Adobe’s animation software stack that allows users to use motion to capture and create live animations of their 2D characters.
Price: Adobe Character Animator has two pricing plans starting at US$34,49/month for the first year
Features:
- This product requires other Adobe products to function
- Lots of options to export and import.
- Make your real-life cartoon using the Motion Capture feature in five steps.
- The Avatar will walk, talk, and copy your expressions in real-time.
- Integrate and add assets from other Adobe Creative Cloud apps.
- Auto lip-syncing and real-time facial movement capture.
- Works on iOS and Android.
Pros:
- Easy to replicate real-life movements and expressions with facial tracking.
- There are various import and export options.
Cons:
- It is not a standalone product.
- Users need to have a webcam and microphone to use the motion capture feature.
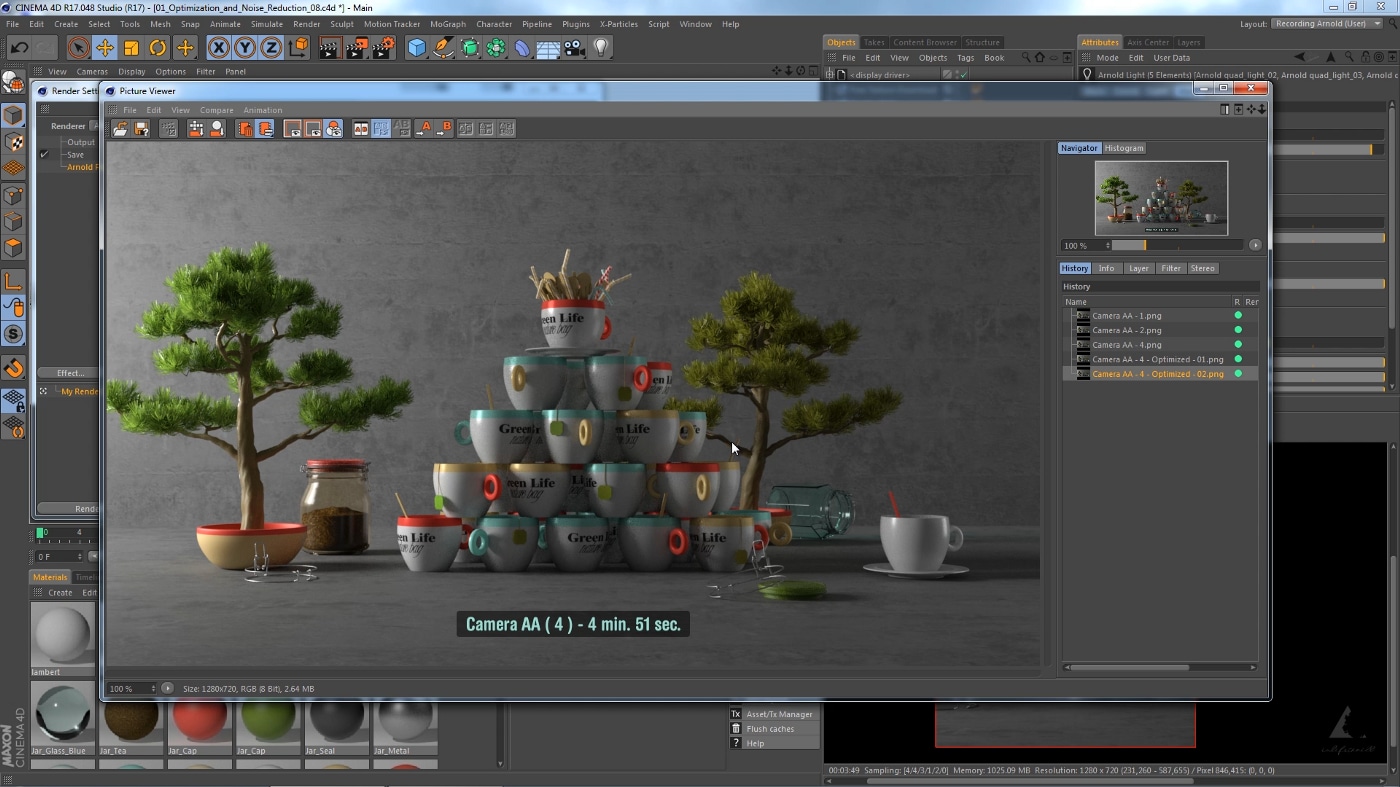
5. Cinema 4D
This cartoon maker has a 3D application interface that offers a keyframe animation, life-like characters, simulation building, object tracking, flexible rig building, cartoon styling, and animation basics.
Price: 4 pricing plans, starting at $99.91/month and $1199.00 billed annually.
Features:
- Keyframing animation effect
- It has a 3d interface
- The ZRemesher for retopology and new tools for modeling add to the new features.
- The Cloth Simulation features help make your cartoon more real.
- It supports CPU rendering with Redshift, which helps you preview, import, and export in high quality.
Pros:
- It is pretty easy to use.
- Lots of exciting design templates are available
- Many editing features are available
Cons
- It is pretty expensive compared to other software
- Not good for beginners
Wondershare Anireel is the best cartoon maker of the five listed in this article. It has lots of advanced features and templates to choose from.
Part 3: How Can I Create My Own Cartoon Using Wondershare Anireel
As stated, Wondershare Anireel has become our top cartoon creator pick due to its affordable pricing, secure server, and ease of use.
So, let us view the simple steps to create your cartoon using the Anireel software.
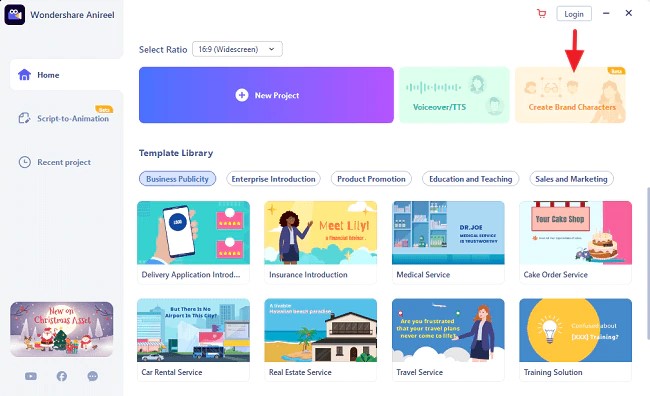
Step 1: Download, install and Create Character
Run Anireel on your device, visit Characters Tab and then click on Create a Character option, or you may click on the Create Brand Characters tab on the home screen.
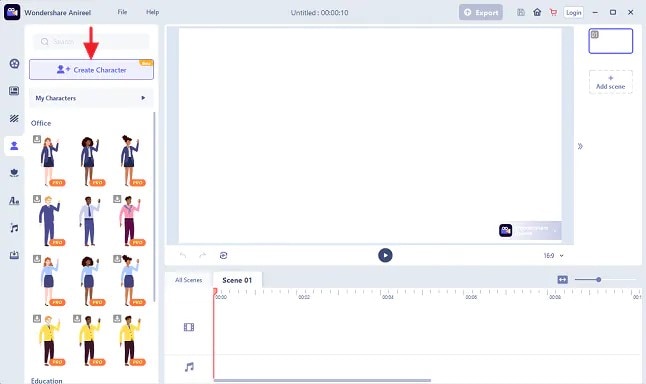
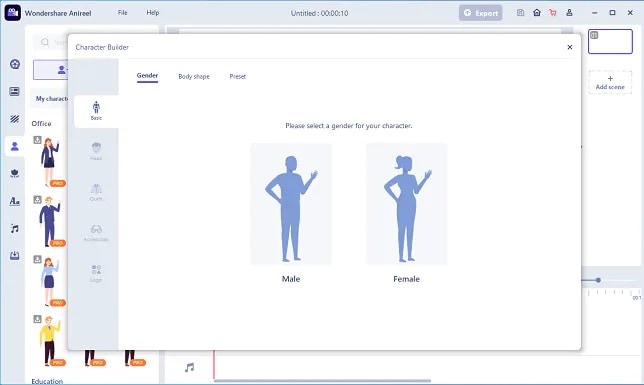
Step 2: Start Creating your Cartoon Character
Choose your gender and body shape, and apply some preset suits.
Now, you can start building facial features using the Head tab to customize the shape of the face, eyes, hairstyle, nose, mouth, ears, and eyebrows.
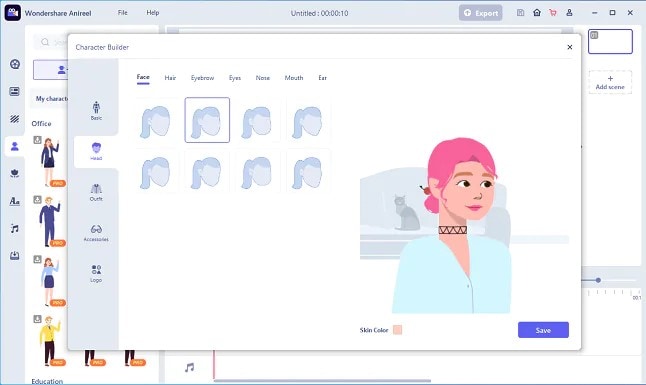
You can also choose to change the skin tone to match yours.
Step 3: Add an Outfit and Accessories
Choose the Outfit tab in Character Builder to select the base layer, outfit, bottom wear, and footwear. Pick what you want to use on your cartoon and keep adding.
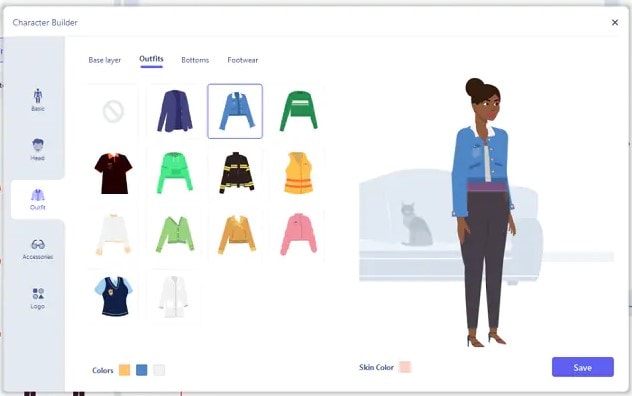
Next, reach the Accessories tab to add glasses, necklaces, and more to your cartoon character.
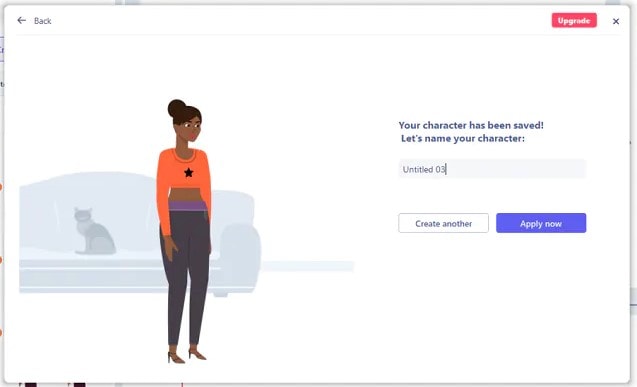
Step 4: Name your Cartoon and Apply
Click on Save and add a name to your cartoon when all done. Finally, click Apply Now to add your cartoon character to your Anireel cartoon maker canvas or My Characters tab.
Part 4: People Also Want to Know
Below are some answers to a few queries about cartoon creators. Let us look at them one by one.
1. What is the best free cartoon maker?
Wondershare Anireel is the best cartoon maker for Android as it is free to use with lots of advanced features and templates to choose from.
2. What is the best app to make a cartoon?
Wondershare Anireel’s Microsoft app is also one of the best cartoon applications that are very flexible and easy to use on the go.
Conclusion
In this article, we explained the best cartoon creators in the industry. Also, we gave the best cartoon video maker from the list. Thus, as you saw, in this report, we have summarized a few essential points regarding cartoon video makers. You learned:
- The cartoon video maker for free that you should know of.
- The ten best cartoon video makers.
- Why are Wondershare Anireel and Renderforest excellent online cartoon video makers?
- How does Anireel, cartoon creator, work?
- Finally, a few FAQs for users to better understand the cartoon maker
Introduction
There are some issues common to the video production process. However, animated or cartoon videos have helped to combat such issues. You do not need to scout for locations, go through a seemingly endless casting process, or rent the pricey equipment. A cartoon is simply a type of animation or an illustration that usually appears in a semi-realistic or an unreal style. In addition, it uses simple, satirical, and humorous drawing language to tell the story.
Although there are restrictions, there are a lot of possibilities cartoon video makers still offer to their users. Therefore, this article will share the top 10 best cartoon video makers online and on PC that you can use before diving into an animated video world.
So, here is what we shall learn about cartoon makers today:
In this article
01 Best 5 Online Cartoon Makers
02 Cartoon Video Maker for Desktop (Win and Mac)
03 How Can I Create My Own Cartoon Using Wondershare Anireel
Part 1: Best 5 Online Cartoon Makers
1. Biteable
Biteable provides a seemingly endless list of template categories to cater to your online media marketing needs. Aside from offering entertaining cartoon-making templates, the platform also allows users to create motion graphics or content, and Facebook covers for their social media channels.
Price: Free, $23 per month, billed annually.
Features:
- Offering library with lots of templates to choose from
- Free to use, except you are looking for additional features
- Five simple steps to an incredible cartoon video
- It has an easily customizable template
Pros
- It is a perfect option for social media managers
- Quickly create entertaining cartoons
- Used by biggies like Amazon, Microsoft, Google, Disney, BBC, Shopify, Samsung, and salesforce.
- Over 9 million users
Cons
- There is a mandatory registration
- There are no audio editing options
- The file-sharing capabilities are limited to YouTube and Facebook
- The download option is disabled in the free version
2. Animaker
With this animated maker, you get access to hundreds of animated characters, maps, and backgrounds. There are six (6) video styles available in this cartoon maker: Typography, Infographic, or 2D for different types of projects.
Price: Free version available. Subscription plans start at $12 per month/billed annually.
Features
- Different video styles, marketing, explainer, or 2D animation.
- Posts itself as the number 1 cartoon maker
- No need for a credit card to start.
- Four-step process; select template, customize it, add music, and download or share.
- 200+ voices, 25+ languages, and loads of customizable options.
- It offers auto-lip sync with advanced animation effects.
- There is a rich selection of 1000+ templates
Pros:
- Superb audio editing options
- Excellent and quick animation tools.
- Over 10 million users so far and still counting.
- Currently used by Amazon, Bosch, HP, Nokia, and Philips.
Cons:
- The monthly fee is pricey
- Account creation is mandatory for a free version
- The free version contains a watermark
3. Vyond
Vyond, the cartoon creator launched in 2007, is probably one of the oldest online cartoon video makers. Additionally, it is still one of the most popular online destinations meant for anyone who wants to create an animated video quickly.
Price: Subscription plans start from $39 per month, billed annually.
Features:
- Perfect for animated video creation
- There is automatic character lip-syncing
- Try it for free before purchasing
- Make videos for training, e-learning, marketing, human resources, etc.
- The maximum duration of the video is 120 minutes
Pros:
- It has a fully customizable template
- There are high-end object and character animated features
- Certified by GDPR, TrustArc, BSI, and CCPA
- A wholesome cartoon makerfor enterprise and individual
- Data security and privacy assurance by BSI, CCPA, and GPDR.
Cons:
- It is quite expensive
- Vyond is not the best option for inexperienced animators
- The features depend on the subscription model
4. Renderforest
This is a famous online cartoon video maker for many purposes. Among the numerous options, the platform offers to its user. They include; 3D explainer videos, logo animations, or professional presentations.
Price: Free version available. Subscription plans start at $16 per month, billed annually.
Features:
- There is an extensive library of templates with numerous options
- Has a large online storage
- Was among the top 100 software companies in 2019.
- Top ranked solution holder for 2020
- Up to 250GB of online storage space
- Use the in-built template to make a story, customize the video, and then export it to share with your friends.
- Amadeus, Bose, BBC, Vodafone, Sony Music, and many others use Renderforest.
Pros:
- Produce videos like a pro
- Comes with an ultimate animation pack.
- Trusted by millions and one of the oldest cartoon makers.
Cons:
- A limited amount of commercial music tracks
- There are modest export options
5. Moovly
With this cartoon maker, users must first log in. However, there is no need to create a new account as you can use your LinkedIn or Google account to sign in quickly.
Price: Free 30-day trial, $24.92 per month billed annually.
Features:
- Moovly is the perfect cartoon video maker for sales&marketing, human resources, internal communication, learning&development, agencies, and education.
- Apply expert features in one click with Moovly.
- Create videos and edit with browser-based or drag and drop features without installing software.
- Moovly has over 1.3 million free media, like images, sounds, music, and royalty-free stock videos at no extra charge.
- Besides, it offers 100 million extra media you can try and then purchase.
- You can add your images, music, and videos to create unique clips in style.
- Add text, remove color, add subtitles or generate them, auto-translate your text and subtitles, import PPT files, structure your content, record yourself or your computer screen, edit, mix, etc.
Pros:
- Even if users need to log in, they don’t need to create an account
- Allows users to import content from online sources like Storyblock, Shutterstock, etc.
- It is the number 1 customizable and straightforward solution to making cartoons.
- Use by Colgate-Palmolive, NHS, Teradata, Amadeus, Cisco, Continental, and Logitech.
- The interface is intuitive and user-friendly.
Cons:
- Watermarked videos during the free trial
- To export videos in HD 1080p quality, one needs to purchase one of the available plans.
Renderforest is the best cartoon maker online of the listed five in this article due to the vast library template and large online bandwidth.
Part 2: Cartoon Video Maker for Desktop (Win and Mac)
1. Wondershare Anireel
Anireel is one of the top animation software on the internet that allows users to bring their imaginations to life with a huge range of customizable elements and features.
Price: $9.99 per month billed annually and $19.99 monthly
Features:
- 40+ customizable templates
- Top animation software
- Compatible with Windows 11/10/8.1 (64 bit OS)
- Only three steps to an excellent animated video.
- Import images, videos, and sound in almost all formats.
- Create unique avatar, logo images, and more specific to your brand.
- The Deep Learning tech offers quick text-to-speech conversion.
- Animate camera movements, entry and exit effects, motion path, etc.
- Use the one-click option and change scripts to clips.
- Anireel cartoon video makercan lip-sync your characters with perfection.
- Quick and easy drag and drop editing.
Pros:
- It is convenient and simple to use
- Anireel has an intuitive interface
- The cartoon makeroffers a practical and seamless animated video editing
- It comes at an affordable and competitive price
Cons:
- It has a limited amount of assets
- Not suitable for too professional people to use.
2. Autodesk Maya
Autodesk Maya is one of the best animation tools used to create animation pictures, video games, and add 3D effects in motion pictures. Plus, this cartoon maker is the best if you require a high-quality visual impact.
Price: Free trial, $225 billed monthly.
Features:
- It offers AutoDesk financing for new buyers.
- Maya is the go-to shop for architects, engineers, designers, media, and entertainment.
- Shape 3D objects and add realistic effects with Maya cartoon maker’s NURBS modeling.
- The Integrated Arnold rendering technology lets you view scene changes in real-time.
- Maya has been part of the top movie makers, including the MCU.
- This cartoon video maker offers geometry-based polygon modeling and helps create accurate simulations for visual programming.
- Maya can load and change vast data sets at a faster pace.
Pros:
- It makes complex hand-made animation tasks extremely easy
- Efficient color management
- Allows the creation of realistic effects like cloth simulations and explosions
- 30-day free trial and 30-day money-back guarantee
- Meet deadlines, add fine details to develop even the most complex shots or characters.
- Excellent tool for professionals
Cons:
- The pro is quite expensive
3. Adobe Animate
This is one of the most powerful animation software products on the internet that has been available for decades. It can animate images used for games, film, or online and produce HTML 5, WebGL, or Flash content.
Price: This cartoon creator offers three pricing plans starting at US$24.14/month
Features:
- Excellent for complex animation
- The capability of freehand drawing
- Animate, illustrate, and make 3D typography.
- Import and add vector drawings for further editing.
- Export your work as HTML5 Canvas, WebGL, Flash/Adobe AIR, GIF, or QuickTime movie.
- With the Bone tool, make your cartoon characters fluid and natural.
- Synchronize sounds and music for your project.
- Choose parts of the clip to be animated.
Pros:
- It has Puppeting features
- It is an excellent choice for complex animations
- It includes freehand drawing capability
Cons:
- It is not suitable for beginners
- Other Adobe software may be required while working on a project
4. Adobe Character Animator
Adobe Character Animator is another type of Adobe’s animation software stack that allows users to use motion to capture and create live animations of their 2D characters.
Price: Adobe Character Animator has two pricing plans starting at US$34,49/month for the first year
Features:
- This product requires other Adobe products to function
- Lots of options to export and import.
- Make your real-life cartoon using the Motion Capture feature in five steps.
- The Avatar will walk, talk, and copy your expressions in real-time.
- Integrate and add assets from other Adobe Creative Cloud apps.
- Auto lip-syncing and real-time facial movement capture.
- Works on iOS and Android.
Pros:
- Easy to replicate real-life movements and expressions with facial tracking.
- There are various import and export options.
Cons:
- It is not a standalone product.
- Users need to have a webcam and microphone to use the motion capture feature.
5. Cinema 4D
This cartoon maker has a 3D application interface that offers a keyframe animation, life-like characters, simulation building, object tracking, flexible rig building, cartoon styling, and animation basics.
Price: 4 pricing plans, starting at $99.91/month and $1199.00 billed annually.
Features:
- Keyframing animation effect
- It has a 3d interface
- The ZRemesher for retopology and new tools for modeling add to the new features.
- The Cloth Simulation features help make your cartoon more real.
- It supports CPU rendering with Redshift, which helps you preview, import, and export in high quality.
Pros:
- It is pretty easy to use.
- Lots of exciting design templates are available
- Many editing features are available
Cons
- It is pretty expensive compared to other software
- Not good for beginners
Wondershare Anireel is the best cartoon maker of the five listed in this article. It has lots of advanced features and templates to choose from.
Part 3: How Can I Create My Own Cartoon Using Wondershare Anireel
As stated, Wondershare Anireel has become our top cartoon creator pick due to its affordable pricing, secure server, and ease of use.
So, let us view the simple steps to create your cartoon using the Anireel software.
Step 1: Download, install and Create Character
Run Anireel on your device, visit Characters Tab and then click on Create a Character option, or you may click on the Create Brand Characters tab on the home screen.
Step 2: Start Creating your Cartoon Character
Choose your gender and body shape, and apply some preset suits.
Now, you can start building facial features using the Head tab to customize the shape of the face, eyes, hairstyle, nose, mouth, ears, and eyebrows.
You can also choose to change the skin tone to match yours.
Step 3: Add an Outfit and Accessories
Choose the Outfit tab in Character Builder to select the base layer, outfit, bottom wear, and footwear. Pick what you want to use on your cartoon and keep adding.
Next, reach the Accessories tab to add glasses, necklaces, and more to your cartoon character.
Step 4: Name your Cartoon and Apply
Click on Save and add a name to your cartoon when all done. Finally, click Apply Now to add your cartoon character to your Anireel cartoon maker canvas or My Characters tab.
Part 4: People Also Want to Know
Below are some answers to a few queries about cartoon creators. Let us look at them one by one.
1. What is the best free cartoon maker?
Wondershare Anireel is the best cartoon maker for Android as it is free to use with lots of advanced features and templates to choose from.
2. What is the best app to make a cartoon?
Wondershare Anireel’s Microsoft app is also one of the best cartoon applications that are very flexible and easy to use on the go.
Conclusion
In this article, we explained the best cartoon creators in the industry. Also, we gave the best cartoon video maker from the list. Thus, as you saw, in this report, we have summarized a few essential points regarding cartoon video makers. You learned:
- The cartoon video maker for free that you should know of.
- The ten best cartoon video makers.
- Why are Wondershare Anireel and Renderforest excellent online cartoon video makers?
- How does Anireel, cartoon creator, work?
- Finally, a few FAQs for users to better understand the cartoon maker
Also read:
- Updated 2024 Approved Step by Step to Rotate Videos in Davinci Resolve
- New In 2024, Learn to Create Custom Sequence Presets in Premiere Pro for Efficient Video Editing. Ensure Consistency and Speed up Your Workflow with Personalized Settings
- New In 2024, 10 Top Suggestions for AI Video Interviews
- 2024 Approved Best 10 Fun Discord Bots You Need
- This Article Will Reveal the Secrets of Choosing a Location to Shoot Your Viral Music Video. As Well as Tips to Make an Energetic Schedule for Shooting Days for 2024
- In 2024, Looking for a Way to Edit Your Profile Picture for Telegram? Heres an Easy and Quick Guide on How to Change, Delete and Hide Your Profile Picture with Simple Steps
- New 2024 Approved How To Be A Successful YouTuber
- In 2024, Convert MP4 to 60 FPS GIF A Step-by-Step Guide
- 2024 Approved Learn How to Create Your Own Unique Video in Cinematic Text Intro in Filmora. Its a Simple Process that Will Offer Professional-Level Intros of Your Own
- How To Make Transparent Background On Picsart
- Are You Looking for Funny Discord Emojis to Massively Improve Your Discord Experience? Using some Fun Bots for Discord Is an Excellent Way of Doing That! Thus, We Compiled a List of 10 Fun Discord Bots You Need
- Updated In 2024, Hey! Are You Looking for Video Reverse Effects in Your Videos? Then, You Are at the Right Place. This Article Will Guide You in Creating a Video Reverse Effect
- Updated 2024 Approved This Article Aims to Provide a Step-by-Step Guide to Changing a Videos Speed by Using the Speed Adjustment Panel and Duration Panel on Wondershare Filmora
- New 2024 Approved How to Add Filter to Video in Premiere Pro?
- The Ultimate Guide to Countdown Animation in Videos for 2024
- Do You Need to Convert TXT to SRT to Add Subtitles to Your Videos? Here Are Three Effective Ways You Can Do It Effortlessly for 2024
- Updated 2024 Approved 4 Solutions to Crop a Video on Android Easily
- New Do You Want Your Videos to Look Like Danny Gevirtz? You Can Use some Inspired Presets. There Are Different Danny Gevirtz LUTs that You Can Download and Use
- 2024 Approved What Is the Best Voice Changer for WhatsApp? Discover the Seven (7) Best Voice Changers for WhatsApp Here in This Post
- New How to Merge Videos in HandBrake? Expectation Vs. Reality for 2024
- New How To Use Speed Ramping to Create an Intense Action Footage for 2024
- Updated The Ultimate Guide to Countdown Animation in Videos
- New In 2024, What Is the Best MP4 Cutter for YouTuber on Mac?
- Updated LumaFusion – One of the Best Video Editors for iOS
- In 2024, 3 Facts You Need to Know about Screen Mirroring Oppo Reno 11 Pro 5G | Dr.fone
- In 2024, Two Ways to Track My Boyfriends Oppo K11x without Him Knowing | Dr.fone
- Unova Stone Pokémon Go Evolution List and How Catch Them For Apple iPhone 6s Plus | Dr.fone
- Spoofing Life360 How to Do it on Oppo A78 5G? | Dr.fone
- How to Track a Lost Vivo Y100i for Free? | Dr.fone
- 8 Safe and Effective Methods to Unlock Your Apple iPhone 7 Plus Without a Passcode | Dr.fone
- How To Restore a Bricked Nokia C12 Back to Operation | Dr.fone
- How to Access Your Apple iPhone 6 When You Forget the Passcode?
- Hard Reset Oppo A78 in 3 Efficient Ways | Dr.fone
- How To Transfer Data From iPhone 13 mini To Other iPhone 13 Pro devices? | Dr.fone
- In 2024, The Best Android Unlock Software For Lenovo Device Top 5 Picks to Remove Android Locks
- How do I reset my Honor X8b Phone without technical knowledge? | Dr.fone
- Thinking About Changing Your Netflix Region Without a VPN On Google Pixel Fold? | Dr.fone
- Oppo Reno 10 5G ADB Format Tool for PC vs. Other Unlocking Tools Which One is the Best?
- In 2024, What Legendaries Are In Pokemon Platinum On Realme V30? | Dr.fone
- How to Fix Android App Not Installed Error on Infinix Smart 7 Quickly? | Dr.fone
- Top 4 Android System Repair Software for Vivo V30 Bricked Devices | Dr.fone
- In 2024, 2 Ways to Monitor Realme GT Neo 5 Activity | Dr.fone
- In 2024, What You Want To Know About Two-Factor Authentication for iCloud From your iPhone 15 Pro Max
- How To Transfer Data From iPhone 11 To Other iPhone 12 Pro devices? | Dr.fone
- In 2024, How to Change Location On Facebook Dating for your Nubia Z50S Pro | Dr.fone
- In 2024, How to Detect and Stop mSpy from Spying on Your Samsung Galaxy S23 Ultra | Dr.fone
- Title: Updated In 2024, Discover the Top 5 Online Tools for Merging MP4 Files Easily and Quickly. Streamline Your Video Editing Process and Create Seamless Videos with These User-Friendly Tools
- Author: Morgan
- Created at : 2024-04-24 01:08:55
- Updated at : 2024-04-25 01:08:55
- Link: https://ai-video-editing.techidaily.com/updated-in-2024-discover-the-top-5-online-tools-for-merging-mp4-files-easily-and-quickly-streamline-your-video-editing-process-and-create-seamless-videos-wi/
- License: This work is licensed under CC BY-NC-SA 4.0.
