
:max_bytes(150000):strip_icc():format(webp)/TheWolfAmongUsBigby-793544cded2749488ae1d20113d8d73a.jpg)
Updated In 2024, Do You Know How AI Is Helping Video Editors and Enthusiasts? Many Video Editing Software Allows an Auto Reframe Option to Use that Can Help Manage Videos
Do You Know How AI Is Helping Video Editors and Enthusiasts? Many Video Editing Software Allows an Auto Reframe Option to Use that Can Help Manage Videos
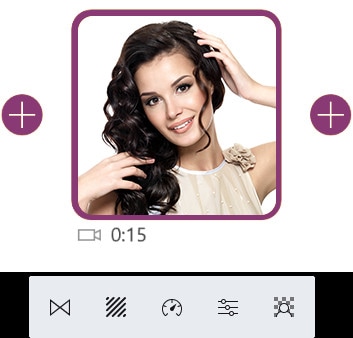
If you’ve struggled with adjusting the frame of your videos, there is a solution for you. The solution is to change the video aspect ratio, which is a game-changer in the world of video editing. It is a powerful feature that automatically adjusts the frame to fit different aspect ratios. With this feature, you don’t have to manually resize and reposition your video. The Auto Reframe feature will do all the work for you.
Additionally, it ensures that your videos look great on any screen by frame adjustment. It will keep your subject in focus and eliminate any unnecessary cropping. As we all know, the utility of auto reframe is undeniable. So, share your videos, knowing that they will look their best. The good part is that you can view your video at its best regardless of the device on which they are viewed.
Part 1: How Has AI Been Helping Video Editors?
With AI’s help, video editors’ jobs have become more accessible. You can change the aspect ratio of video with this feature to reduce your time and effort. Some of these ways are mentioned below, benefiting the video editors.
1. Automation in Video Editing
AI tools can help you analyze your video content and generate automated edited versions. This feature use algorithm to identify key moments in your video. Additionally, it improves your video by doing basic edits on it. These edits include basic trimming, color correction, and other options.
2. Content Analysis
This AI-based technology can help you to analyze your content in both video and image form. You can extract valuable information using AI, like facial recognition and sentiment analysis. With the help of this analysis, the editors can make precise decisions regarding editing and more.
3. Automated Captions
AI technology also recognizes speech which is very helpful for transcribing videos automatically. This feature is helping many video editors to add a professional touch to videos. Additionally, speech recognition tools add attention-grabbing subtitles with good accuracy. This saves the editors a lot of time and effort compared to manual transcription.
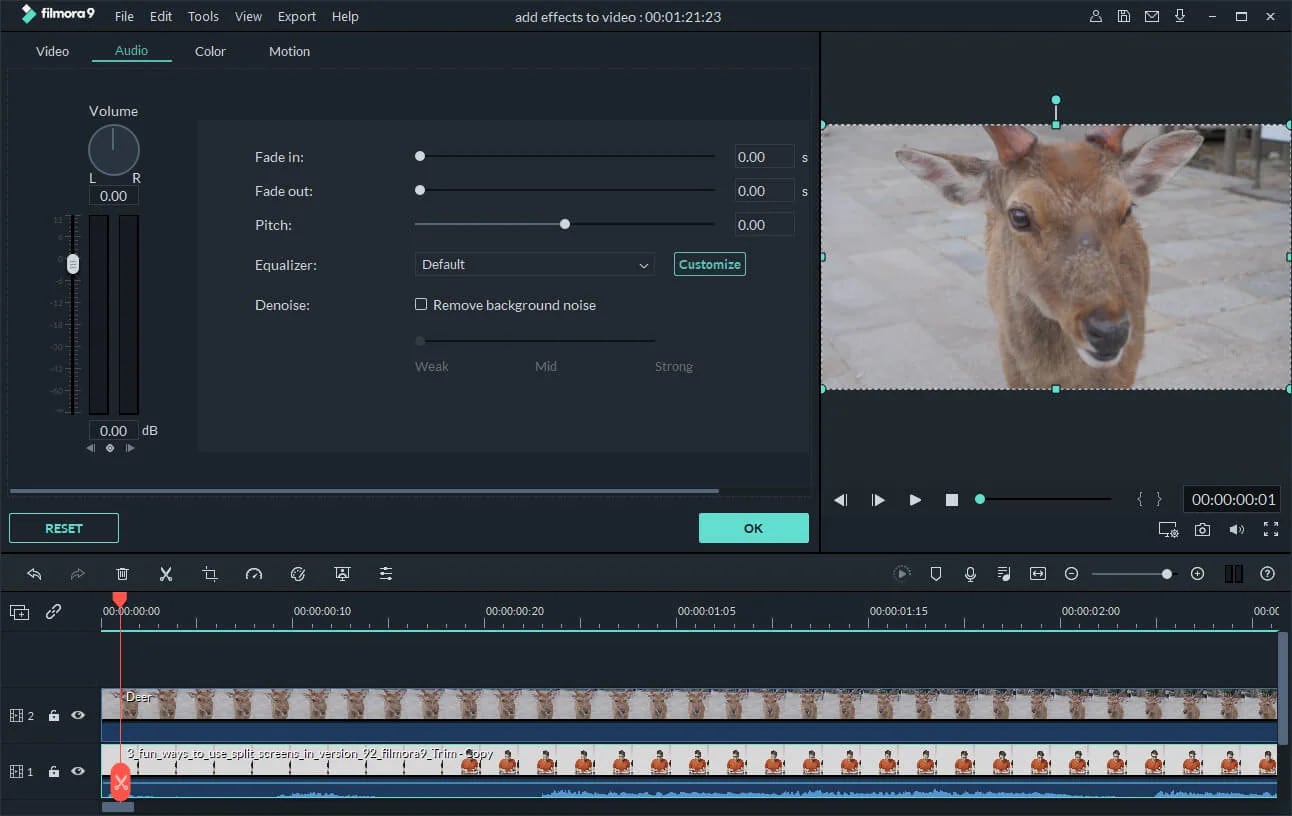
4. Noise Enhancement
If you have a problem with background noise and distortion, AI tools can help. AI algorithms can help you to improve your noise quality and reduce background noise. For this, you will need the original footage so that AI can work well on it. Furthermore, this will also improve the overall experience of the viewer.
5. Changing Background
With the help of AI, you can even remove unwanted elements or objects in your video. These AI tools allow you to replace objects from video frames. Also, it makes your video’s background look more appealing. In scenarios where removing logos and replacing the green screen background, this feature helps you a lot.
6. Professional Video Effects
Additionally, you can add artistic filters, effects, and appealing filters to your video with these tools. Such AI tools use deep learning algorithms to analyze the video and suggest you some corrections. This allows editors to add desired visual aesthetic effects to their content to look more attractive.
7. Content Recommendation
Using deep learning algorithms, AI can give you recommendations for your video content. These recommendations are based on user preferences and viewing patterns. This can help content creators understand their audience preferences and trends to create better video content.
Auto Reframe Video in 1-Click
Automatically resize videos in the fastest way. No editing skills are required!
Resize Video for Free Resize Video for Free Learn More >


Part 2: Understanding The Auto Reframe Feature in Wondershare Filmora
Wondershare Filmora embeds high-profile features into its video editing ecosystem. The platform integrates artificial intelligence into its video editing system to bring some of the best features. The Auto Reframe feature is one of the AI-integrated features of Wondershare Filmora. The video editing platform resizes the videos in the quickest possible ways.
Using this feature, you can easily involve a single video for all available platforms for posting videos. With a single click, you can save all the time and effort required to resize videos manually. The videos are easily adjusted across different aspect ratios using the efficient AI feature offered by Filmora.
Part 3: Other Prominent AI Features Offered by Wondershare Filmora
Wondershare Filmora offers many advanced and unique features. However, its newly incorporated AI features are some of the best. Here are the top 5 AI features Filmora offers, as discussed in the portion below.
1. AI Smart Cutout
Wondershare Filmora introduced an extraordinary feature of the smart cutout. This feature is a straightforward approach for creators who want to delete undesired items from a video. It uses AI to quickly and accurately find and separate people or objects from the background in videos. Users can easily make cool effects with a few steps, like having a green screen or changing the background effortlessly.
2. AI Copywriting
Filmora offers an AI copywriting feature that directly integrates with ChatGPT. It can generate video text and can also write titles and descriptions of YouTube Videos. The AI copywriting function saves a lot of time. It allows users to easily create professional-looking videos by incorporating AI into their platform.
3. AI Audio Stretch
Any audio track can be quickly re-timed to match the length of your video. AI Audio Stretch can be used with all kinds of music tracks. It works well for various types of videos, whether a casual vlog or a professional video. AI Audio Stretch can recognize and analyze music’s singing or vocal parts. It then remixes the audio clip to match the patterns.
4. AI Portrait
By using this feature of Filmora, users can easily remove backgrounds from images and videos. It offers over 70 different AI effects for portraits and stickers. Moreover, it can automatically detect faces and apply augmented reality (AR) stickers to them. Users don’t need any professional skills to use its portrait effects. Simply select the effect you like and click to add it to your video.
5. AI Audio Denoise
This feature automatically detects noise in any audio or video file and removes unwanted noise. It uses AI to detect background distortion in a video or audio file . Then, it further eliminates the distortion from your video project. This feature allows you to experience your video in quality and crisp sound.
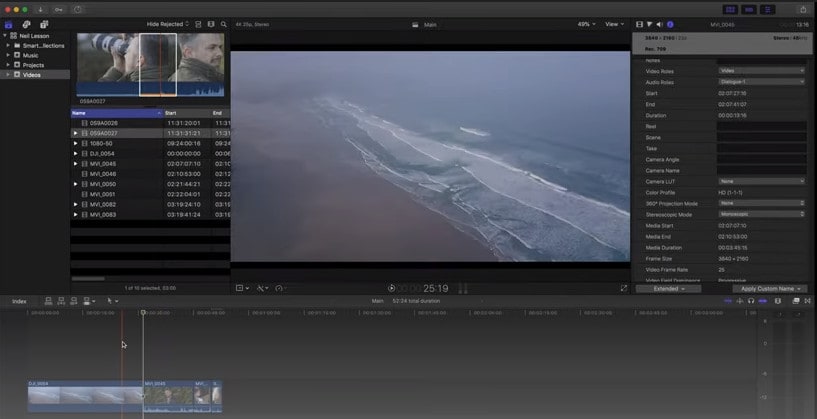
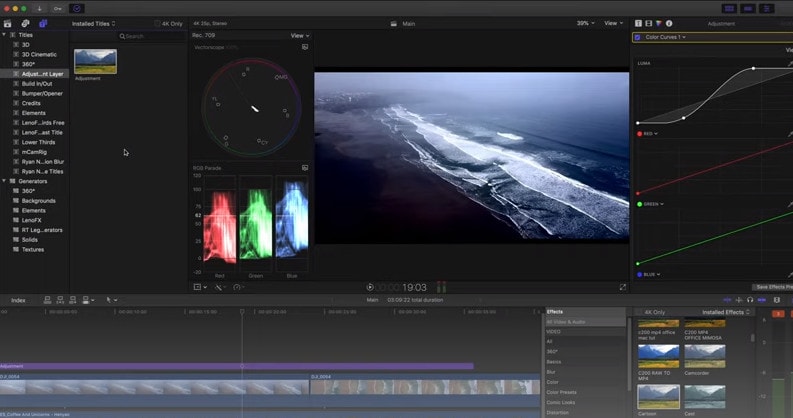
Part 4: Using The Auto Reframe Feature in Wondershare Filmora
After covering an overview of Wondershare Filmora, we will work on the Auto Reframe feature. Look ahead into the steps to figure out how to auto-reframe a video using Filmora:
Convert Text-to-Speech For Win 7 or later(64-bit)
Convert Text-to-Speech For macOS 10.14 or later
Filmora Tutorial -Auto Reframe Filmora Tutorial
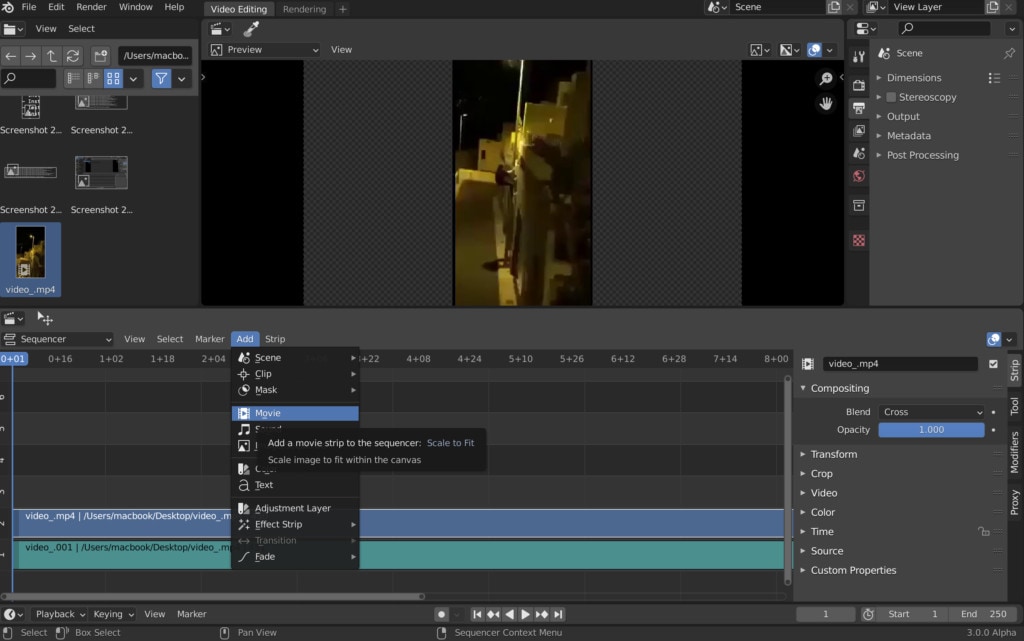
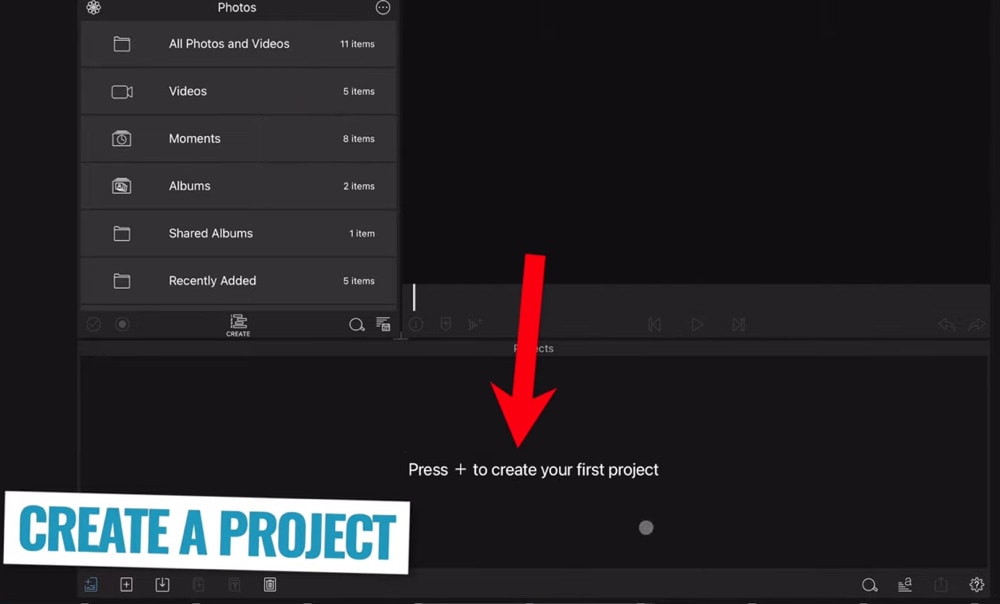
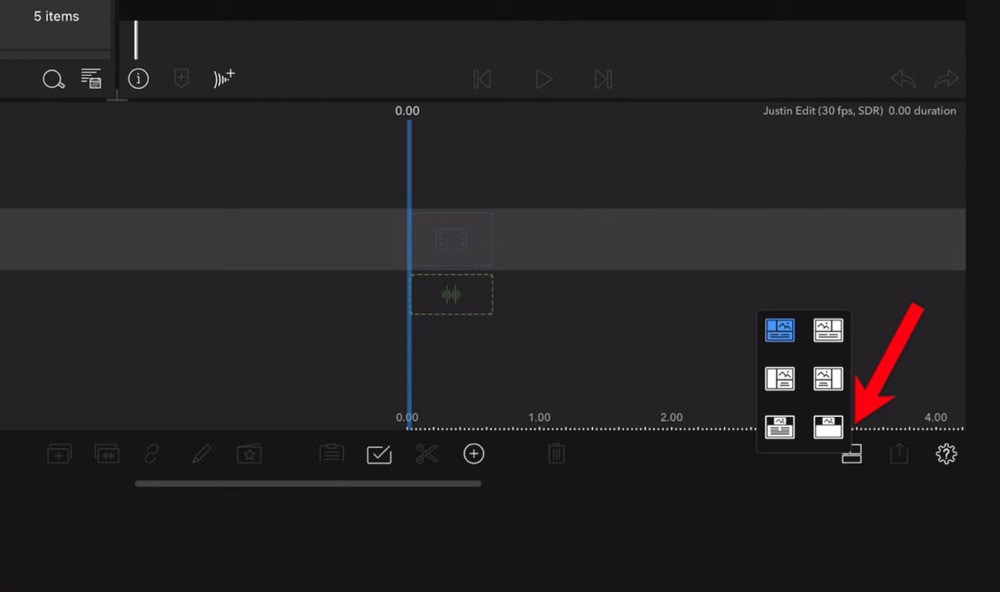
Step 1Start Using Auto Reframe Feature
Open Wondershare Filmora on your computer and proceed to select the “Auto Reframe” feature from the options available on the home screen.

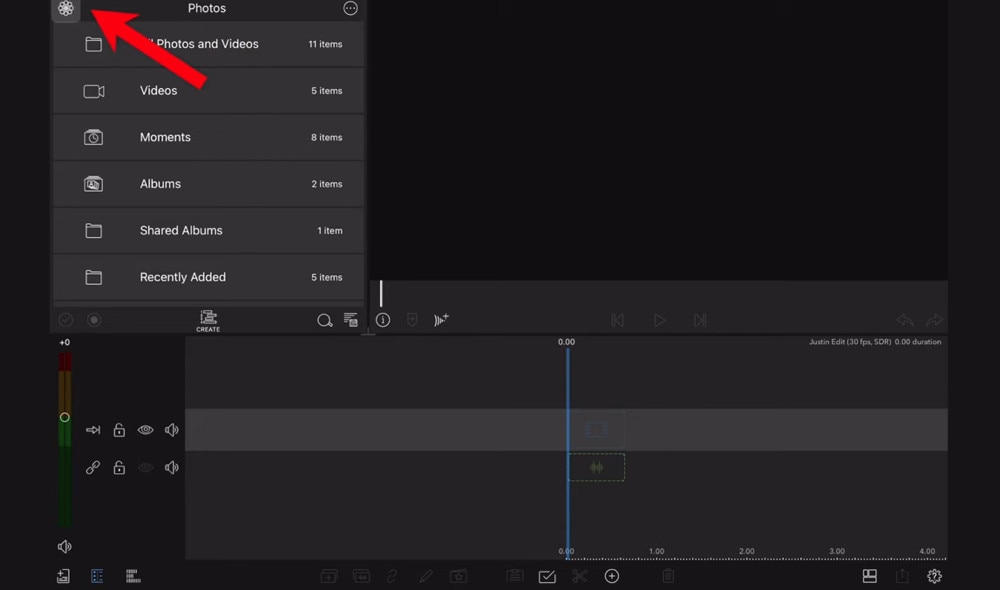
Step 2Import The Video
This opens a new window where you can proceed with auto reframing of the video. Click the “Import” button on the top-right of the window to add the video you wish to reframe.

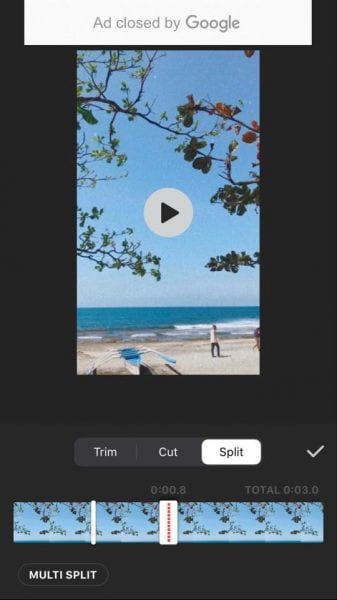
Step 3Change Parameters and Export
After adding the video, adjust the “Aspect Ratio” and “Motion Speed” with the available parameters. Click “Analyze” to observe the changes in reframing as provided. In this way, you can change the aspect ratio of your video using the auto reframe feature. Once completed, save your video project in the system.

Conclusion
In conclusion, auto reframe is a remarkable feature that simplifies video editing. This feature aims to ensure that your videos look great on any screen. If you seek a way to explain how to change the aspect ratio of a video, many video editing tools are now offering this feature to provide a better editing experience. Wondershare Filmora has this feature available for its users. You can easily download and install this tool to auto-reframe your video project.
Resize Video for Free Resize Video for Free Learn More >
Part 2: Understanding The Auto Reframe Feature in Wondershare Filmora
Wondershare Filmora embeds high-profile features into its video editing ecosystem. The platform integrates artificial intelligence into its video editing system to bring some of the best features. The Auto Reframe feature is one of the AI-integrated features of Wondershare Filmora. The video editing platform resizes the videos in the quickest possible ways.
Using this feature, you can easily involve a single video for all available platforms for posting videos. With a single click, you can save all the time and effort required to resize videos manually. The videos are easily adjusted across different aspect ratios using the efficient AI feature offered by Filmora.
Part 3: Other Prominent AI Features Offered by Wondershare Filmora
Wondershare Filmora offers many advanced and unique features. However, its newly incorporated AI features are some of the best. Here are the top 5 AI features Filmora offers, as discussed in the portion below.
1. AI Smart Cutout
Wondershare Filmora introduced an extraordinary feature of the smart cutout. This feature is a straightforward approach for creators who want to delete undesired items from a video. It uses AI to quickly and accurately find and separate people or objects from the background in videos. Users can easily make cool effects with a few steps, like having a green screen or changing the background effortlessly.
2. AI Copywriting
Filmora offers an AI copywriting feature that directly integrates with ChatGPT. It can generate video text and can also write titles and descriptions of YouTube Videos. The AI copywriting function saves a lot of time. It allows users to easily create professional-looking videos by incorporating AI into their platform.
3. AI Audio Stretch
Any audio track can be quickly re-timed to match the length of your video. AI Audio Stretch can be used with all kinds of music tracks. It works well for various types of videos, whether a casual vlog or a professional video. AI Audio Stretch can recognize and analyze music’s singing or vocal parts. It then remixes the audio clip to match the patterns.
4. AI Portrait
By using this feature of Filmora, users can easily remove backgrounds from images and videos. It offers over 70 different AI effects for portraits and stickers. Moreover, it can automatically detect faces and apply augmented reality (AR) stickers to them. Users don’t need any professional skills to use its portrait effects. Simply select the effect you like and click to add it to your video.
5. AI Audio Denoise
This feature automatically detects noise in any audio or video file and removes unwanted noise. It uses AI to detect background distortion in a video or audio file . Then, it further eliminates the distortion from your video project. This feature allows you to experience your video in quality and crisp sound.
Part 4: Using The Auto Reframe Feature in Wondershare Filmora
After covering an overview of Wondershare Filmora, we will work on the Auto Reframe feature. Look ahead into the steps to figure out how to auto-reframe a video using Filmora:
Convert Text-to-Speech For Win 7 or later(64-bit)
Convert Text-to-Speech For macOS 10.14 or later
Filmora Tutorial -Auto Reframe Filmora Tutorial
Step 1Start Using Auto Reframe Feature
Open Wondershare Filmora on your computer and proceed to select the “Auto Reframe” feature from the options available on the home screen.
Step 2Import The Video
This opens a new window where you can proceed with auto reframing of the video. Click the “Import” button on the top-right of the window to add the video you wish to reframe.
Step 3Change Parameters and Export
After adding the video, adjust the “Aspect Ratio” and “Motion Speed” with the available parameters. Click “Analyze” to observe the changes in reframing as provided. In this way, you can change the aspect ratio of your video using the auto reframe feature. Once completed, save your video project in the system.
Conclusion
In conclusion, auto reframe is a remarkable feature that simplifies video editing. This feature aims to ensure that your videos look great on any screen. If you seek a way to explain how to change the aspect ratio of a video, many video editing tools are now offering this feature to provide a better editing experience. Wondershare Filmora has this feature available for its users. You can easily download and install this tool to auto-reframe your video project.
How to Create Sports Intro and Outro for YouTube Video?
Are you deep into sports? Have you created a sports channel on YouTube but are still clueless? You do not need to panic. The article has got you covered.
There is an extensive range of sports channels on YouTube struggling and surviving. It includes gaming, exercise, athletics, basketball, hockey, and tennis sports. A promising sports background music in the intro and outro makes it appealing for the audience. Hence, the article will focus on three platforms for exercise downloading impeccable background music.
The step-by-step guide to creating an outstanding sports intro will also be sketched out. So, what are we waiting for? Time to commence this!
In this article
01 How to Create an Epic Sports Intro?
02 How to Edit a Sport Style YouTube Outro or End Screen?
03 3 Recommended Sites to Download Background Music for Exercise Videos
Part 1: How to Create an Epic Sports Intro?
Do you own a sports channel? Continue exploring the section to know more!
A sports channel needs a promising intro to keep the audience interested in the content. An exceptional intro to a sports channel with great music enables you to gain subscribers. The sub-section would cover an extensive procedure to make a startling sports intro with yoga background music or other sport. So, let us start? Shall we?
For Win 7 or later (64-bit)
For macOS 10.12 or later
Step 1: Open Wondershare Filmora from your computer. Now, head to the “Audio” panel to drop a powerful track to the timeline. Use the “Media” panel to import the sports video clips for your intro.

Step 2: Keep the highlights and trim the clips to be in sync with the music. After the editing is concluded, shift your focus to the “Titles.” Move to the Titles panel and use title animations for the “Energy Sports” pack.

Step 3: Drag and drop the titles on the top of the footage. It would be best to match the duration of the video clips with the titles. Now, double-click the title to rename it according to your need.

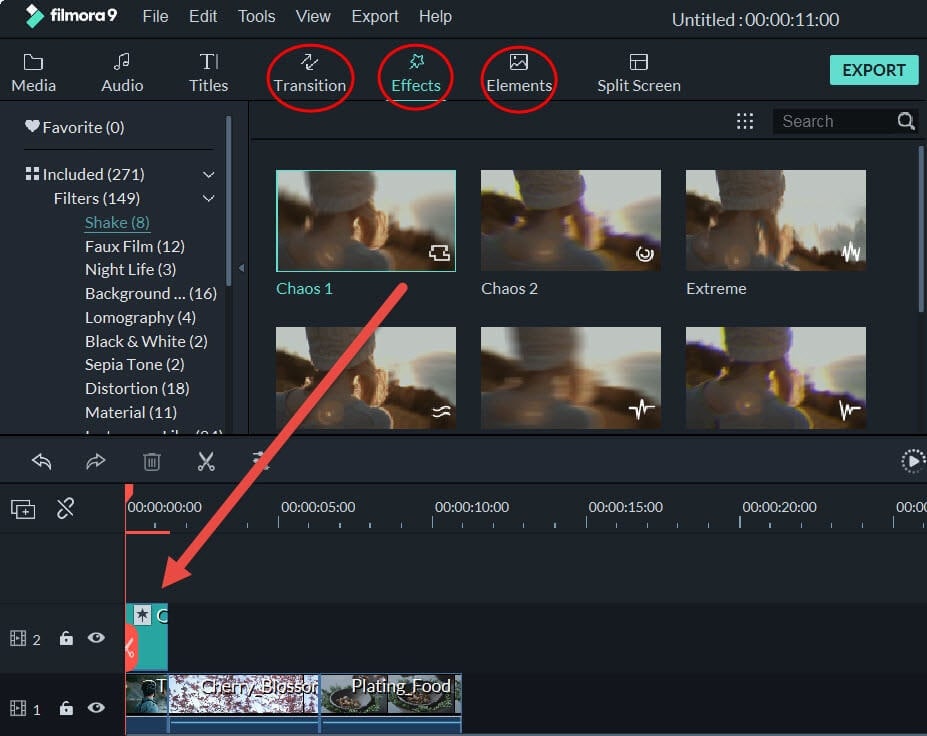
Step 4: To make the ending more powerful, right-click on the last video clip and click on “Speed and Duration.” Enhance the speed to make it engaging. Moving on, navigate to the “Effects” panel.

Step 5: From there, pick the “Shake” filter and drag and drop the “Chaos 1” to the last clip. Similarly, click on the “Distortion” filter to drop the “Chromatic Aberration” effect onto the last clip.

Step 6: Now, it is time to add transitions to create a smooth connection between the clips. Click on “Transitions” and then “Energy Sports” pack. Drag and drop both transitions in between the clips. A creative and captivating sports intro has been created with solid sports background music.

Part 2: How to Edit a Sport Style YouTube Outro or End Screen?
Communicating with the users about a channel doesn’t have to be with words. The background music for exercise expresses the aims of a channel more perfectly. The same goes for a profound sport-style outro which tells the audience that we are ending on a high note.
The sub-section takes the opportunity to offer a step-by-step to edit a sport-style YouTube end screen. So, come with us as we explore it together! Let us go!
For Win 7 or later (64-bit)
For macOS 10.12 or later
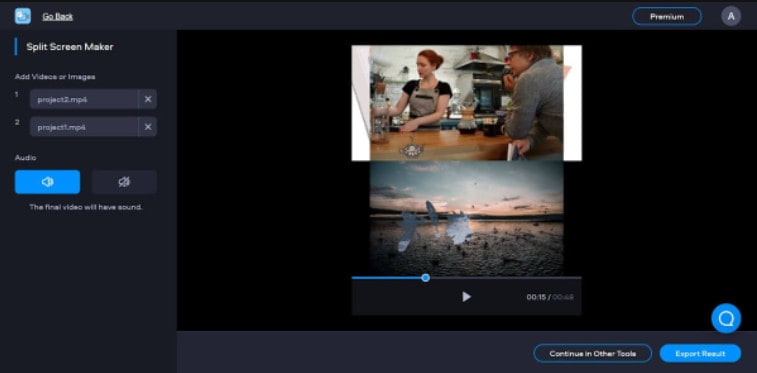
Step 1: To begin, launch Wondershare. Import the targeted video clips that you need as an engaging YouTube outro. After that, click on “Split Screen.” Please choose your favorite split-screen design and drag it to the timeline.

Step 2: Use the imported videos to drag them on the preview window in the split-screen design as selected. You can adjust the scale and position through the mouse click. Now, drag and drop the video onto the timeline and trim it as needed.

Step 3: Head to the “Effects” tab and search for blur in the space bar. Drag and drop the square blur to the second part of the video. Adjust the blur intensity as required. Import another video and add it to the timeline.

Step 4: Insert dissolved transitions between the first two cuts to smooth the process. Now, it is time to add an avatar image. Import the profile picture to the timeline above the second track. Head to the utility category under the “Effects” tab and drag the “Image Mask” to the image on the timeline.

Step 5: Double click on it to alter the masking width so that the circle mask can fit on the image. Scale down the picture and set it to the center of the frame. Navigate to the “Elements” panel and pick the YouTube subscribe button. Drag it to the third track afterward.

Step 6: Place the location on the preview window as you need. Now, move to the social media category in the “Titles” to choose the perfect one and add it to the timeline above the last clip. The user is instructed to add a transition at the beginning of the clip. Rename the social media names of your sports channel, and you are done with the process.

Part 3: 3 Recommended Sites to Download Background Music for Exercise Videos
Sports background music is one of the significant ways to keep the audience motivated for sports and exercise. It helps enhance the subscribers’ multifold. Therefore, the importance of promising yoga background music cannot be neglected.
Mixkit
Mixkit is a renowned place to access royalty-free marketplaces, bringing revolution to the market and content creators. It is extremely workable to download background music for exercise in seconds. Based on genre, mood, and tag, you can search for a suitable music track.
The trap sport workout, motivating mornings, positive energy, super strong, and the greatest comeback is one of the most exemplary tracks from Mixkit. The audio can be listened to before making the decision. The genre offers ambient, cinematic, funk, hip-hop, acoustic, classical, and electronica.

TunePocket
Changing the narrative of music platforms, TunePocket pretty much takes the lead. The filter results make the process flawless. You can tailor the search results by playing with category, mood, genres, instruments, length, and tempo.
The duration of each sports background music is also mentioned to give the content creators an idea. Power dance workout, workout fitness motivation, summer western dance, young gamers, and sports power electro, and techno blast are some examples of outstanding music tracks.

Envato Elements
The next on the list is Envato Elements making wonders in the business. The search filters are refined as the user deems necessary. Online exercise, motivational EDM, fitness, workout, corporate meditation, and exercise are some amazing examples of royalty-free music. The search results can be tailored according to relevancy and popularity.

Concluding Remarks
There is an awful load of sports channels on YouTube. The content creators are trying their best to beat the competitors. It is crucial to access energetic background music for exercise to make intro and outro engaging.
The article recommended three apps to download sports background music. The step-by-step guide to creating an inspiring sports intro and editing sports style YouTube outro via Filmora.
Wondershare Filmora
Get started easily with Filmora’s powerful performance, intuitive interface, and countless effects!
Try It Free Try It Free Try It Free Learn More >

02 How to Edit a Sport Style YouTube Outro or End Screen?
03 3 Recommended Sites to Download Background Music for Exercise Videos
Part 1: How to Create an Epic Sports Intro?
Do you own a sports channel? Continue exploring the section to know more!
A sports channel needs a promising intro to keep the audience interested in the content. An exceptional intro to a sports channel with great music enables you to gain subscribers. The sub-section would cover an extensive procedure to make a startling sports intro with yoga background music or other sport. So, let us start? Shall we?
For Win 7 or later (64-bit)
For macOS 10.12 or later
Step 1: Open Wondershare Filmora from your computer. Now, head to the “Audio” panel to drop a powerful track to the timeline. Use the “Media” panel to import the sports video clips for your intro.
Step 2: Keep the highlights and trim the clips to be in sync with the music. After the editing is concluded, shift your focus to the “Titles.” Move to the Titles panel and use title animations for the “Energy Sports” pack.
Step 3: Drag and drop the titles on the top of the footage. It would be best to match the duration of the video clips with the titles. Now, double-click the title to rename it according to your need.
Step 4: To make the ending more powerful, right-click on the last video clip and click on “Speed and Duration.” Enhance the speed to make it engaging. Moving on, navigate to the “Effects” panel.
Step 5: From there, pick the “Shake” filter and drag and drop the “Chaos 1” to the last clip. Similarly, click on the “Distortion” filter to drop the “Chromatic Aberration” effect onto the last clip.
Step 6: Now, it is time to add transitions to create a smooth connection between the clips. Click on “Transitions” and then “Energy Sports” pack. Drag and drop both transitions in between the clips. A creative and captivating sports intro has been created with solid sports background music.
Part 2: How to Edit a Sport Style YouTube Outro or End Screen?
Communicating with the users about a channel doesn’t have to be with words. The background music for exercise expresses the aims of a channel more perfectly. The same goes for a profound sport-style outro which tells the audience that we are ending on a high note.
The sub-section takes the opportunity to offer a step-by-step to edit a sport-style YouTube end screen. So, come with us as we explore it together! Let us go!
For Win 7 or later (64-bit)
For macOS 10.12 or later
Step 1: To begin, launch Wondershare. Import the targeted video clips that you need as an engaging YouTube outro. After that, click on “Split Screen.” Please choose your favorite split-screen design and drag it to the timeline.
Step 2: Use the imported videos to drag them on the preview window in the split-screen design as selected. You can adjust the scale and position through the mouse click. Now, drag and drop the video onto the timeline and trim it as needed.
Step 3: Head to the “Effects” tab and search for blur in the space bar. Drag and drop the square blur to the second part of the video. Adjust the blur intensity as required. Import another video and add it to the timeline.
Step 4: Insert dissolved transitions between the first two cuts to smooth the process. Now, it is time to add an avatar image. Import the profile picture to the timeline above the second track. Head to the utility category under the “Effects” tab and drag the “Image Mask” to the image on the timeline.
Step 5: Double click on it to alter the masking width so that the circle mask can fit on the image. Scale down the picture and set it to the center of the frame. Navigate to the “Elements” panel and pick the YouTube subscribe button. Drag it to the third track afterward.
Step 6: Place the location on the preview window as you need. Now, move to the social media category in the “Titles” to choose the perfect one and add it to the timeline above the last clip. The user is instructed to add a transition at the beginning of the clip. Rename the social media names of your sports channel, and you are done with the process.
Part 3: 3 Recommended Sites to Download Background Music for Exercise Videos
Sports background music is one of the significant ways to keep the audience motivated for sports and exercise. It helps enhance the subscribers’ multifold. Therefore, the importance of promising yoga background music cannot be neglected.
Mixkit
Mixkit is a renowned place to access royalty-free marketplaces, bringing revolution to the market and content creators. It is extremely workable to download background music for exercise in seconds. Based on genre, mood, and tag, you can search for a suitable music track.
The trap sport workout, motivating mornings, positive energy, super strong, and the greatest comeback is one of the most exemplary tracks from Mixkit. The audio can be listened to before making the decision. The genre offers ambient, cinematic, funk, hip-hop, acoustic, classical, and electronica.
TunePocket
Changing the narrative of music platforms, TunePocket pretty much takes the lead. The filter results make the process flawless. You can tailor the search results by playing with category, mood, genres, instruments, length, and tempo.
The duration of each sports background music is also mentioned to give the content creators an idea. Power dance workout, workout fitness motivation, summer western dance, young gamers, and sports power electro, and techno blast are some examples of outstanding music tracks.
Envato Elements
The next on the list is Envato Elements making wonders in the business. The search filters are refined as the user deems necessary. Online exercise, motivational EDM, fitness, workout, corporate meditation, and exercise are some amazing examples of royalty-free music. The search results can be tailored according to relevancy and popularity.
Concluding Remarks
There is an awful load of sports channels on YouTube. The content creators are trying their best to beat the competitors. It is crucial to access energetic background music for exercise to make intro and outro engaging.
The article recommended three apps to download sports background music. The step-by-step guide to creating an inspiring sports intro and editing sports style YouTube outro via Filmora.
Wondershare Filmora
Get started easily with Filmora’s powerful performance, intuitive interface, and countless effects!
Try It Free Try It Free Try It Free Learn More >
Edit FLV Video Files with FLV Editor [Windows, Mac,Android, iPhone
FLV is a common container format for transferring digital video and audio information over the Internet. A.flv file is a flash video that may be seen on your computer with Adobe Flash Player, Adobe Air, or some third-party Adobe Flash plugins.
FLV has become the standard video format for web-based streaming video service providers such as Hulu and VEVO due to its superior functionality and tiny size. It’s also the default format for Quicktime on Mac systems.
If you wish to edit FLV videos without any problems, you should utilize a multipurpose video editor that supports the FLV file format.
Best FLV Editor to Edit FlV Video on Windows and Mac - Filmroa Video Editor
Filmora Video Editor is a professional FLV video editing application. This software allows you to edit 4K video files, share completed films directly on social media platforms, and add subtitles and audio files.
You may mix multiple films and enhance your footage with numerous transitions and other effects using this FLV video editing software. Furthermore, the free Filmora application is ideal for adding audio files or video clips from the wide library and uploading your soundtrack.
For Win 7 or later (64-bit)
For macOS 10.14 or later
Therefore, you can use the following steps to edit FLV video on Windows and Mac:
Step 1: Import file:

Step 2: Edit the FLV file:
Acquire the perfect tool in your palm for anything you want to do, such as clipping, cropping, rotating, and more.
Furthermore, all editing capabilities in the toolbar allow drag-and-drop, making it even easier to touch up your films quickly. Consider the following scenario:
- Drag and drop a transition into the video/photo, or right-click it and select “Apply to All.”
- Please drag & drop a title template to the position where you want it to appear, then adjust it.
- To use the effects, select one from the 50+ available video effects, select it, and apply it to your photos/videos instantaneously.
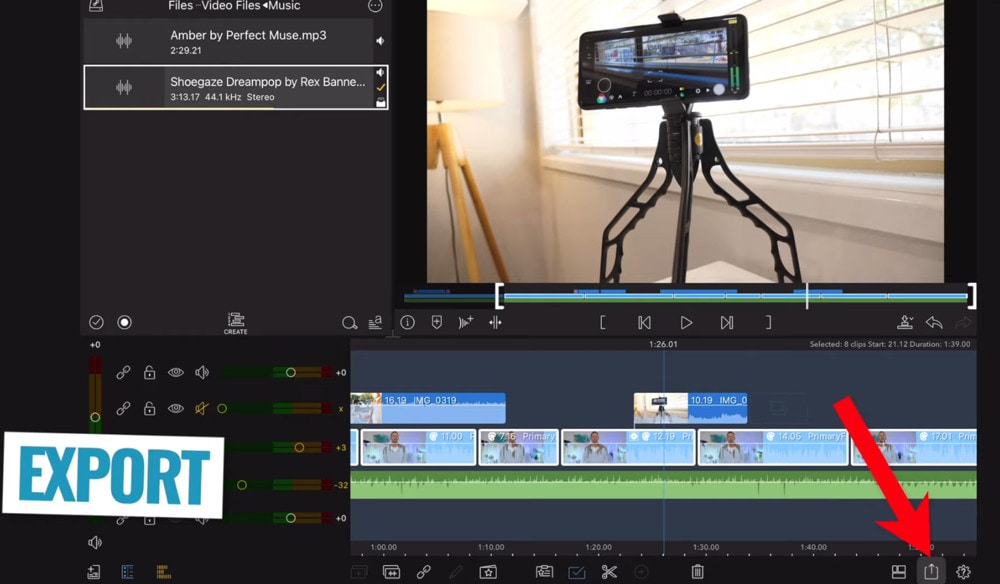
Step 3: Save or Export the file:

When you’re done, export your modified MP4 files to Windows/Mac and quickly share them on YouTube, with the option of sending a message to Facebook and Twitter. When you click Create in the program window’s middle right corner, you’ll be taken to the Output window below.
Alternative Way to Edit FlV Video on Windows
1. VSDC
VSDC is a free video editor along with a lot of advanced features. Cut, combine, trim, crop, and other editing capabilities are available to help you polish your FLV films.
Although it may not look logical, learning the editing capabilities hidden within modular boxes is simple. One noteworthy aspect of VSDC is its ability to produce good visual effects using many trendy video effects, transitions, and filters.
Furthermore, strong chroma keys, color correction, object modification, and other editing tools can be utilized to edit FLV videos. It not only creates excellent FLV videos, but it also supports a wide range of media conversion, allowing you to convert FLV files to various formats and export them without a watermark.
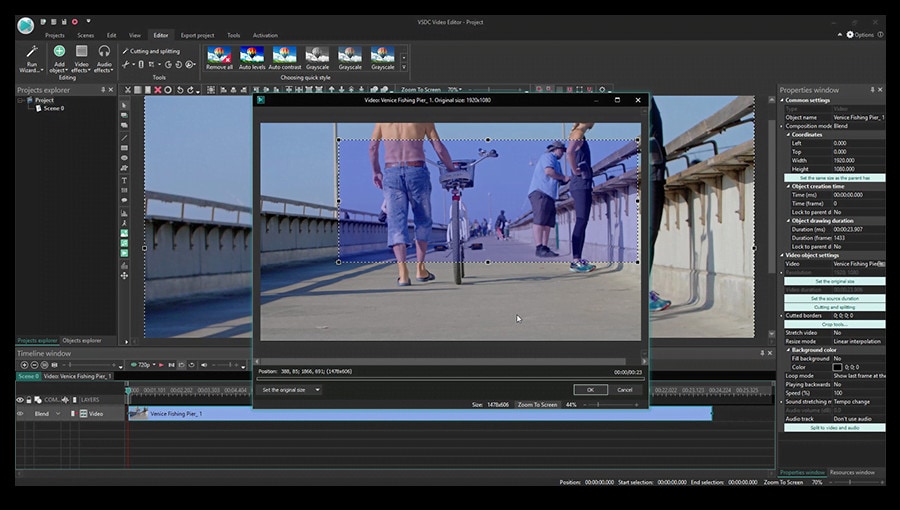
Therefore, follow the below mentioned steps to edit FLV video using VSDC:
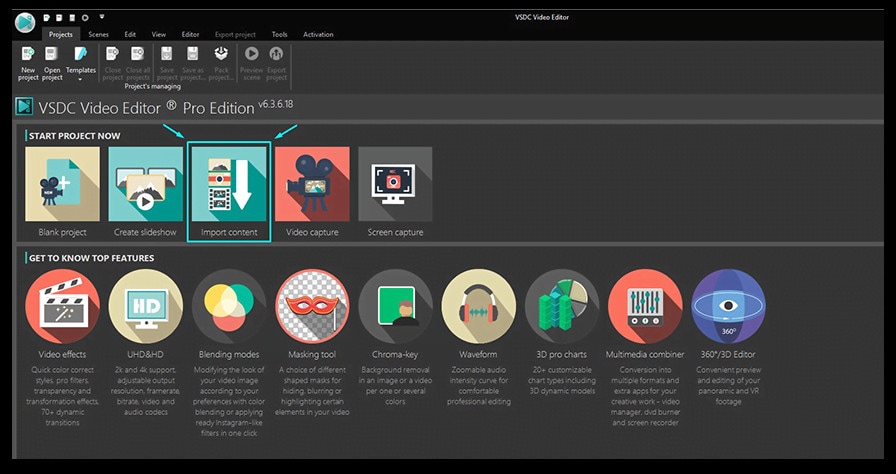
Step 1: Install the software on the Windows. Open the application and import the video.
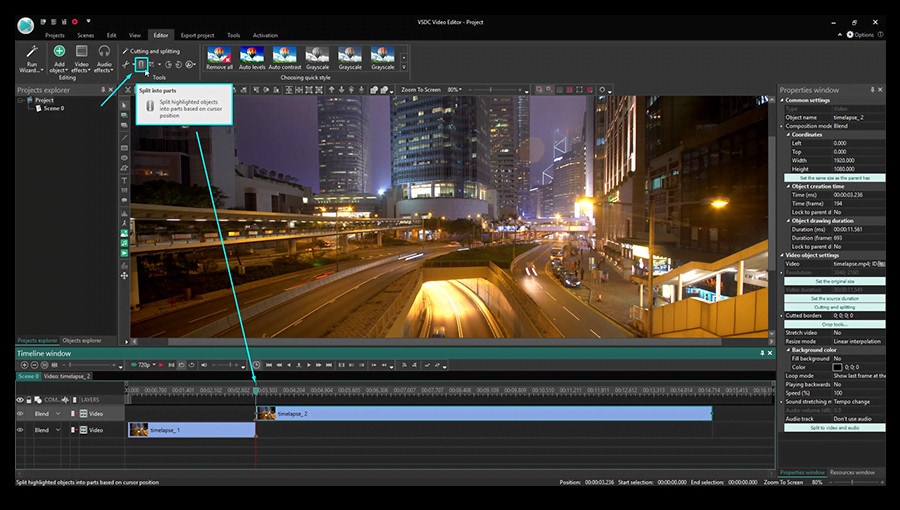
Step 2: Use cutting and splitting tools to edit the video.
The first icon is a picture of a pair of scissors, which is a cutting tool. It’s very useful when you need to cut the beginning or end of a film. Place the cursor exactly where you want to cut, then select “Trim start” or “Trim finish” from the dropdown cutting menu (the small triangle next to the scissors icon).
Cropping is also simple. If you have too much additional space around the scene object recorded, just choose the file you want to trim and select the cropping icon from the “Cutting and Splitting” option. A new window will appear, allowing you to select the region of the scene that should stay.
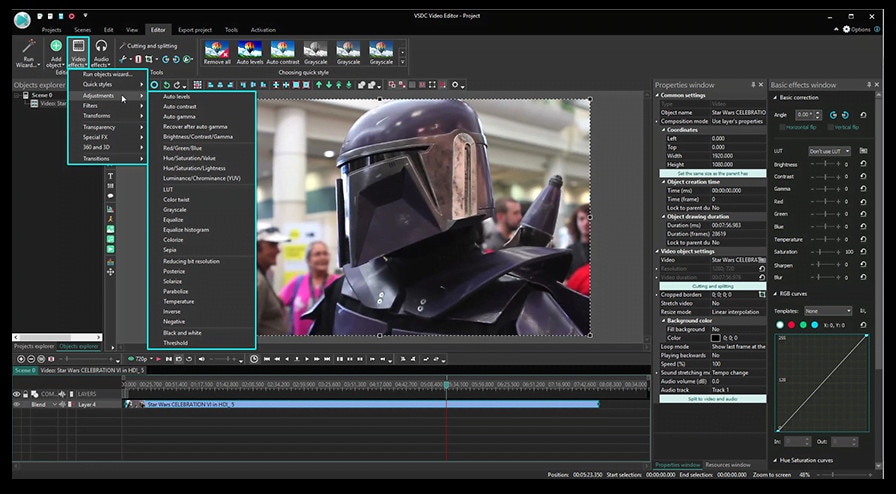
Step 3: Apply effects and transitions.
To use one, first select the video file you wish to edit, then go to the Video effects tab and select the effect you want to use. On the timeline, a new tab will appear, containing all of the effects done to the selected object. You can alter the effect’s duration and position in time by dragging it with the mouse there. The properties pane on the right-hand side can be used to change other parameters.
Transitions follow the same rule. Place your cursor where you want the transition to begin, then choose a transition from the Video effects dropdown menu and manually adjust the duration.
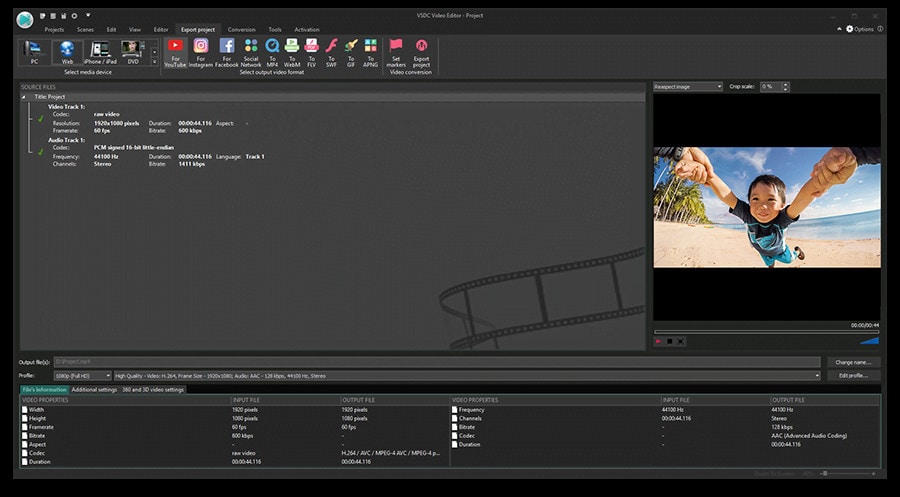
Step 4: Save changes and export video.
Make sure your movie appears exactly how you want it to before exporting it. If the video appears choppy, use the red preview button and lower the preview quality. When the PC’s resources are insufficient to process the video in real time, lagging can occur. Keep in mind that it has no bearing on the outcome. When you’re finished, navigate to the Export project tab and select an export format.
2. Adobe Premiere Pro:
Professional video editors use Premiere Pro to make everything from YouTube videos to Hollywood films like Mank, a 2021 Oscar candidate. It’s also widely utilized in the workflows of designers, animators, and VFX artists, and we can see why after lengthy testing.
We found the software’s UI to be simple to use, and it increased our productivity by separating things into various workspaces, such as editing, effects, and audio. When we tested it on both Mac and PC, we discovered that each workspace helps handle a specific activity while minimizing distraction.
Edit the FLV video with Adobe Premiere Pro using the following steps:
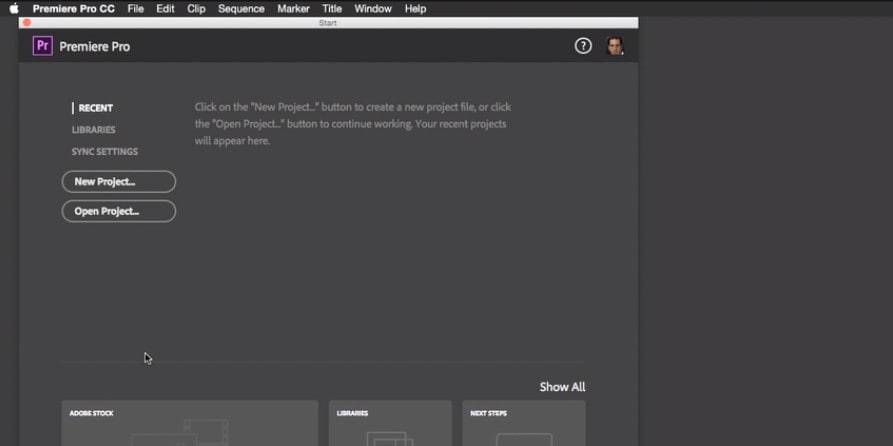
Step 1: Import the video and create initial sequence.
Step 2: In the Timeline, trim and rearrange clips, add audio, and transitions.
Step 3: Add title and graphics.
In Premiere Pro, you may make onscreen titles, as well as stylize and animate your images.
Step 4: Export your video.

Alternative Way to Edit FlV Video on Mac
1. Blender:
Under the GNU General Public License, Blender is a free, open-source 3D content production program that runs on all major operating systems. Blender is one of the greatest video editors for both Windows and Mac, with advanced features such as modifier-based modeling tools, powerful character animation capabilities, a node-based material, etc.
Because it is developed for professionals, it is tough to use as a beginner. However, it is unrestricted in its use and distribution. In addition, color options are changeable and versatile in the UI.
In contrast, this free video editor is perfect for semi-pros or those who want to enhance their video editing skills. However, you’ll need a lot of time and effort to learn it.
Step 1: Open the application.
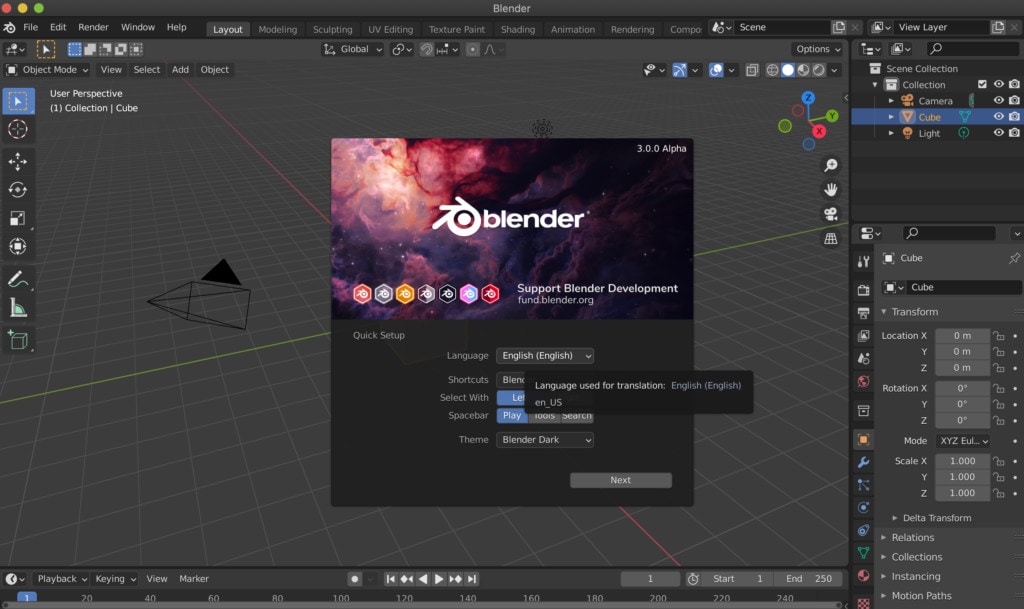
Step 2: Then, go into File->New->Video Editing to open the video editor.
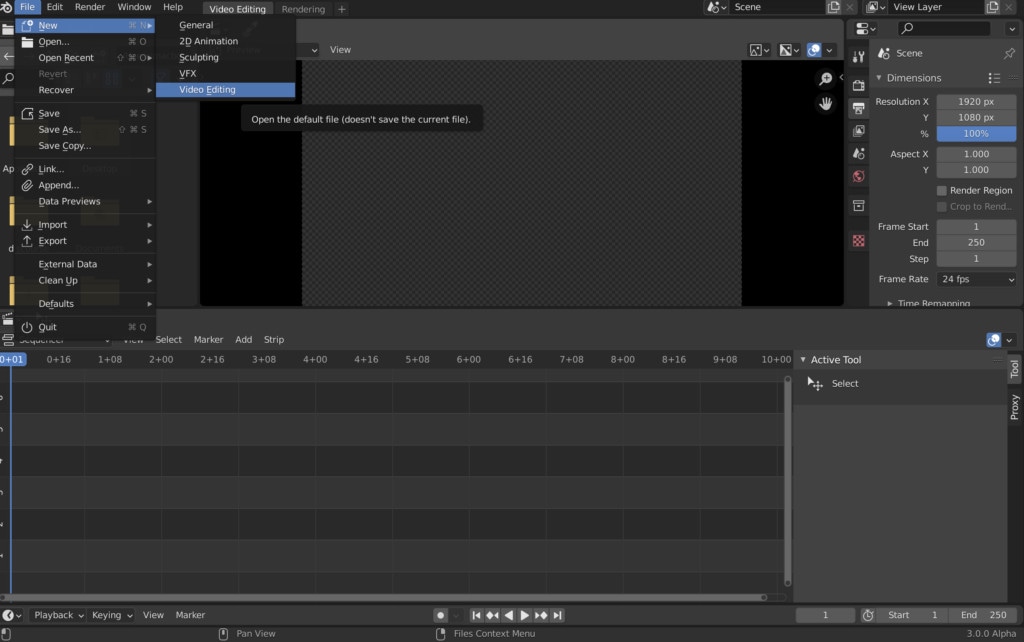
Step 3: Import the video and start editing using the editing tools.
Step 4: Save and export the video.

2. Final Cut Pro:
When it comes to video editing software, Apple’s Final Cut Pro is one of the industry standards. As a result, it’s widely utilized in the television and film industries - at least among Mac users. However, one of the truly convincing reasons to choose it over Premiere Pro is because it is subscription-free: you only pay once.
The software’s Magnetic Timeline, grouping tools, a vast selection of effects, solid organizational capabilities, and simple ways to add and edit audio make it a favorite among professional video editors. 360° video, HDR, and powerful color correcting tools are among the other capabilities. It’s a strong software with a lot of features.
Follow the steps to edit FLV video using Final Cut Pro:
Step 1: Create Project.
To make a movie in Final Cut Pro, you must first establish a project, which keeps track of your editing selections and the media you utilize.
Step 2: Select and add clips to the timeline:
The second stage in making a movie with Final Cut Pro is to add and arrange clips in your project. In the timeline, you can move and reorder clips.
Step 3: Cut and trim video:
Final Cut Pro has a number of features for altering the start and stop points of clips in the timeline, as well as regulating the pacing of shots from one to the next.
Step 4: Edit the video by adding effects and transitions:
Final Cut Pro includes a number of advanced editing features that make it simple to create a professional film. Visual enhancements and colour correction are among the finishing touches.

Step 5: Save and export video:
2 Ways to Edit FlV Video on Android:
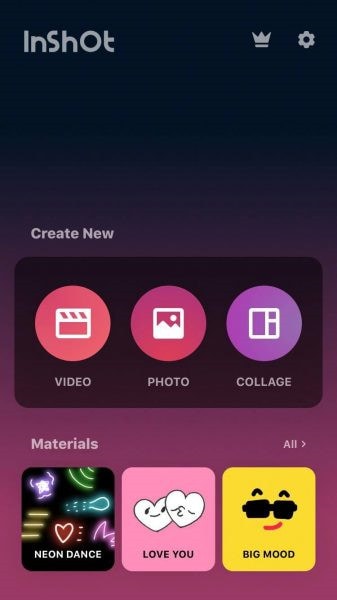
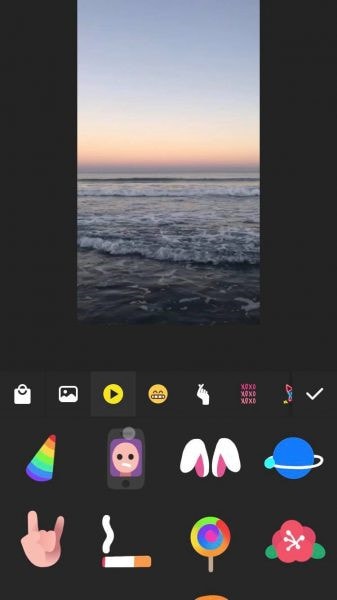
1. Inshot:
For Android users, Inshot is a fantastic image and video editor. This Android video editor allows you to add popular stickers and emoticons to your films, making them more fashionable and unique.
The program supports HD video output, allowing you more control over your footage. Moreover, the additional sound and video can be synchronized with the available video chronology.
You can quickly blend more than two movies into one with rich effects and sound with this Android editor app. In addition, you can generate a watermark using unique text provided in the app, and subtitles support allow you to produce one with a variety of fonts.
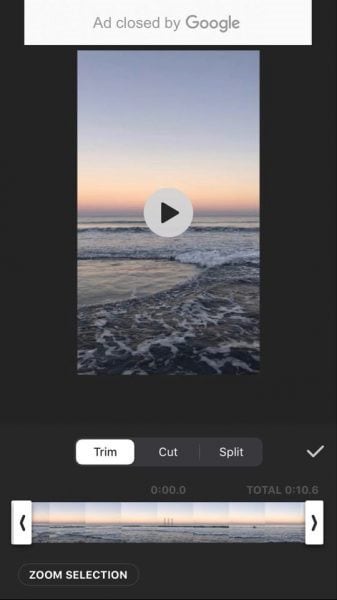
Following are the steps that you can follow to edit FLV video using Inshot:
Step 1: Open the app and import the video.
Tap “Video” to open your phone’s gallery folder and begin editing a video in the InShot app. Select a video to work with. Adjust the canvass after your video has been loaded into the InShot App. For your other social media accounts, there are aspect ratios and sizes that work well with the video. It also has the option of being in portrait or landscape mode.
Step 2: Trim and split videos.
Step 3: Merge videos (optional):
By combining clips, you can combine them into a single film or project. Simply choose the videos you want to import from the drop-down menu. By tapping the “+” button on the lower left of the screen, you can insert and merge more videos. Your project will then be updated using the selected video.
Step 4: Apply filters, add music, text and stickers.
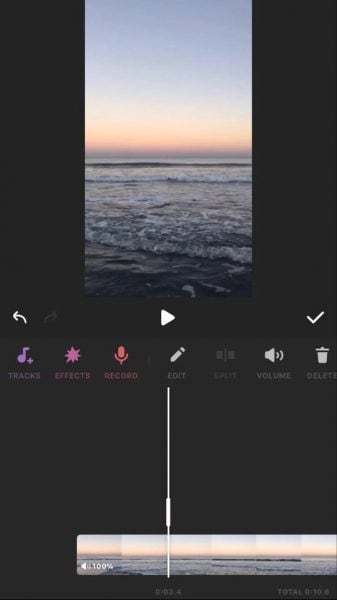
Step 5: Once you are done with the editing process, save the file.
2. Videoshow:
VideoShow has a lot of video editing options. It is a simple and practical video editing program and movie scene maker for art directors and beginners. Using this video cutter, you may reverse, blur, duplicate, edit, merge and split collage clips or films.
You can also use VideoShow to adjust the audio or add subtitles to any video. It also allows you to use different filters on any video on your device. Over 50 intricate themes are included in the program, allowing you to create gorgeous music videos, slide shows, and vlogs in no time.
The annual subscription package is for $135.19, or you can also make a one-time purchase for $225.78.
However, to edit the video, you can use the following steps:
Step 1: Download and install the videoshow application and open it. Upload the video that you want to edit.
Step 2: Edit the video by applying filters or cutting and trimming the part of the video that you want to remove.
Step 3: Save changes and export the video to your preferred location.
2 Ways to Edit FlV Video on iPhone:
1. LumaFusion:
No other software program on the iPhone comes close to the feature set that LumaFusion offers for video editing. It is the only premium app on this list, and it is well worth every penny.
But, of course, YouTubers aren’t the only ones who use the program; mobile journalists and professional video producers who don’t want to lug along their bulky camera equipment and editing apparatus also use it.
LumaFusion deals with up to six video and audio tracks for photographs, movies, audio, titles, and graphics, and six audio tracks for narration, music, and sound effects. You also receive a magnetic timeline; importing clips is a breeze once they’ve been imported.
There are many transitions and effects to choose from, all of which can be layered. Finally, it includes much royalty-free music, sound effects, and other assets. So if you need a professional video editing tool for your iPhone, LumaFusion ($29.99) is the way to go.
Follow these steps to edit FLV video using LumaFusion:
Step 1: To create your first project, press + at the bottom of the screen. You can create a new project by tapping that area or by tapping the Plus button.
Step 2: Import video:
The Import section is located in the top left corner of the screen. This defaults to the Photos tab when you initially launch a new project. All of the photographs and videos can be seen here.
Step 3: Check layout and adjust volume levels
Step 4: Edit the video and add titles.
Step 5: Export the video.
2. Filmora Go:
Without a doubt, Filmora is one of the greatest free video editors for iPhone that does not contain any watermarks. In addition, it’s compatible with both iPhones and Android devices and has a simple user interface.
Filmora is the greatest iPhone video editor for beginners, with themed filters and effects that add flair to your videos without any work.
Filmora has many unique features, including themes for your videos and ‘Materials,’ which are visual effects created by the program. Unfortunately, materials are only available with Filmora Pro, so keep that in mind.
Aside from that, you’ll find all of the typical features here. You can also add titles to videos, utilize stickers and effects, and add music to the background of your movie. You may also add another clip in picture-in-picture mode, which is beneficial.
Below are the following steps to edit FLV video:
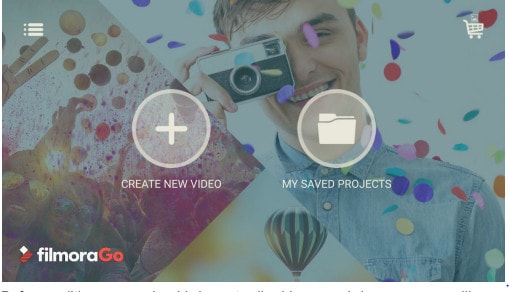
Step 1: Open the application and select ‘Create new video’. Now, import the video by choosing the video icon.
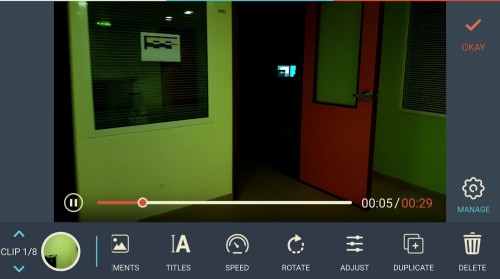
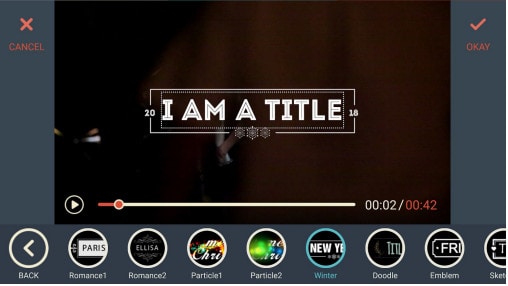
Step 2: Edit the video. Within the edit tool, you can trim and split the video. You can also improve the video quality by adding titles, transitions, and music, and voiceovers.


Step 3: After editing the video, select ‘SAVE’ and export the video or download it.
2 Ways to Edit FlV Video Online:
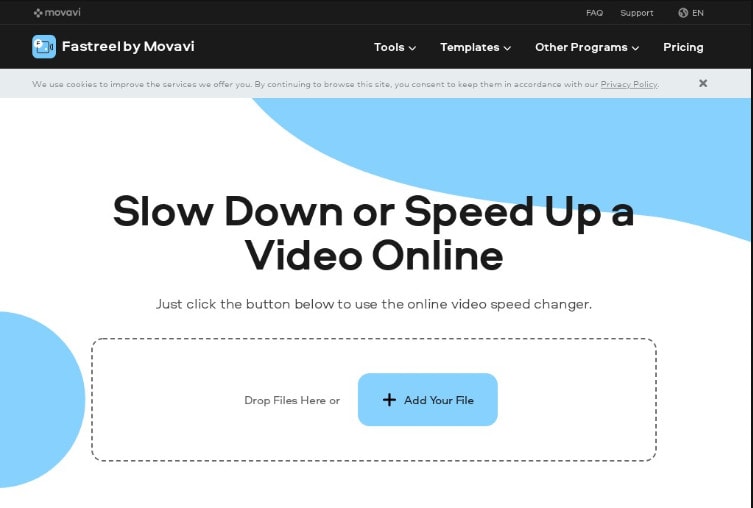
1. Fastreel:
If you’re seeking the finest free online video editor, Fastreel is a terrific tool to start with. This online video editing software provides a wide range of editing options. It can merge, edit, crop, and compress videos to make sharing easier.
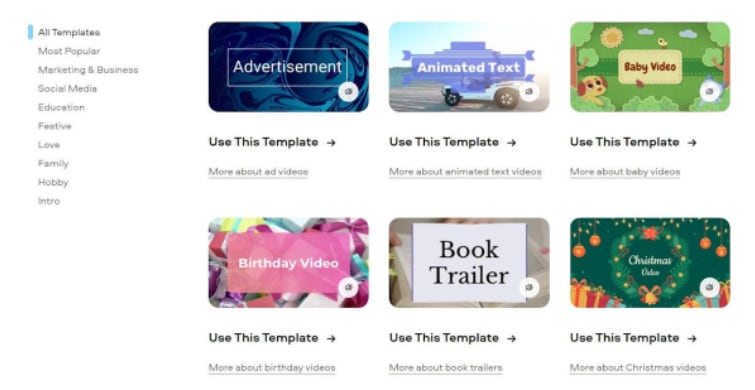
It also includes many pre-made templates that you can change to create titles and transitions and other editing features like reverse, looping, and rotating. It’s also quite simple to use, and you can have polished videos in minutes.
There are also numerous pricing options to suit different customers, ranging from a completely free plan with watermarks to paid subscriptions with no limitations.
Use the following steps to edit FLV video:
Step 1: Open Fastreel web and import the video.
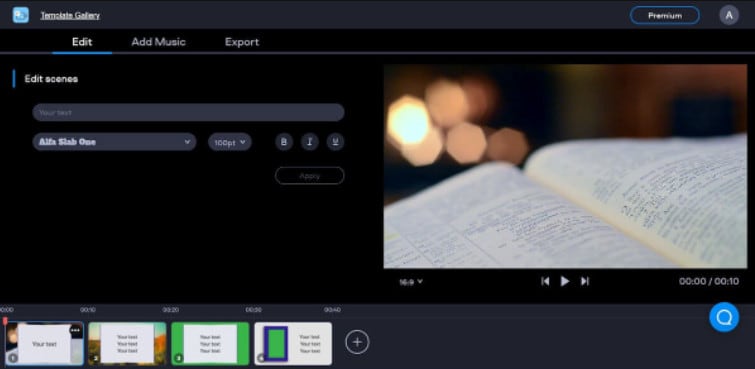
Step 2: Use templates to make it look attractive.
Step 3: Edit the video using the template.
Templates are unfinished videos with all of the effects already applied, such as backdrops, transitions, animated stickers, and titles. There are blank spots for your photos or videos, and you can arrange them in any sequence you like. You can also add music from the Fastreel library or upload your own track after entering your text.
Step 4: Once you are done with edits, save the video and export it.
2. WeVideo:
When you’re seeking the greatest video producer online, another wonderful choice to explore is WeVideo.
Google, Dropbox, Rover, and Roche are just a few of the huge names that trust our online editor. Its fast, versatile editing engine and vast stock content collection for adding stock movies, photos, and audio tracks to your productions are ideal for business users.
WeVideo also stands out since it provides unlimited cloud storage for all of your videos, which you can download and watch on any device. The only drawback is that all of this comes at a price, with WeVideo offering a variety of payment plans ranging from $4.99 to $36.99 a month.
Follow the steps to edit videos using WeVideo:
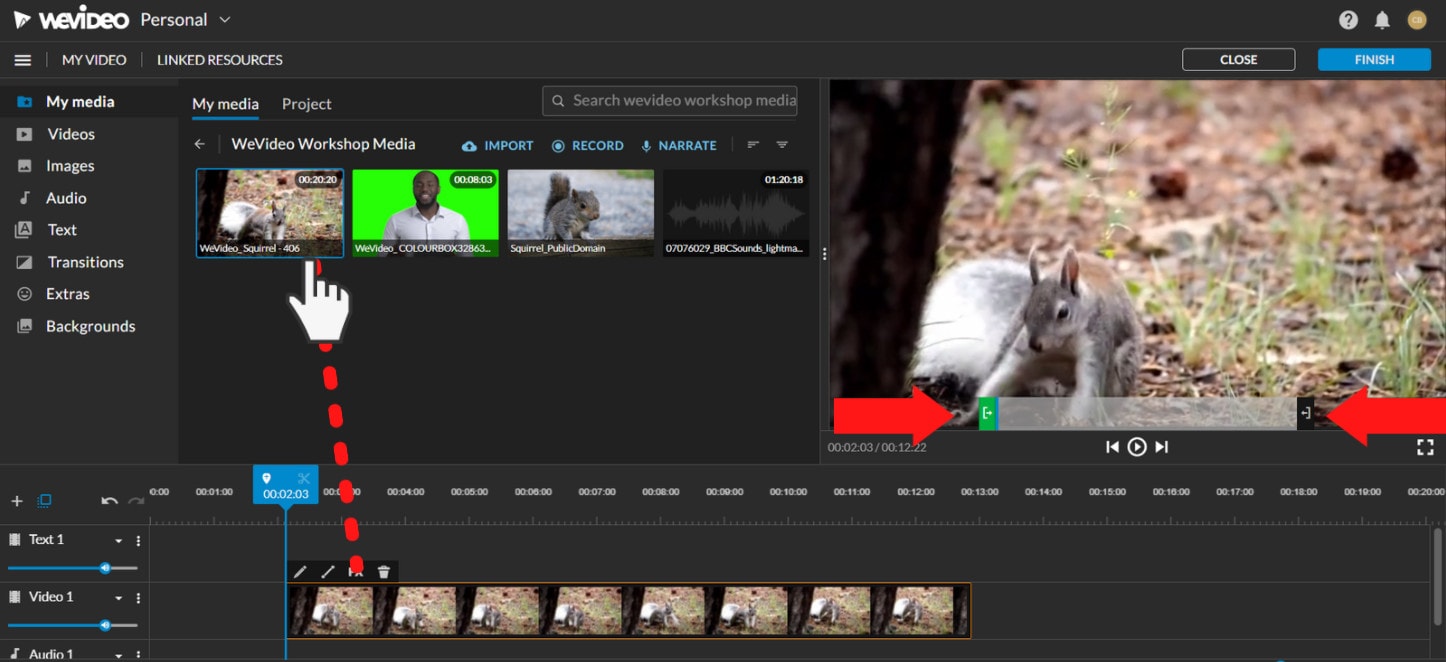
Step 1: Open WeVideo and import the video file.
Step 2: Click on create new video in the left-hand corner of the screen.
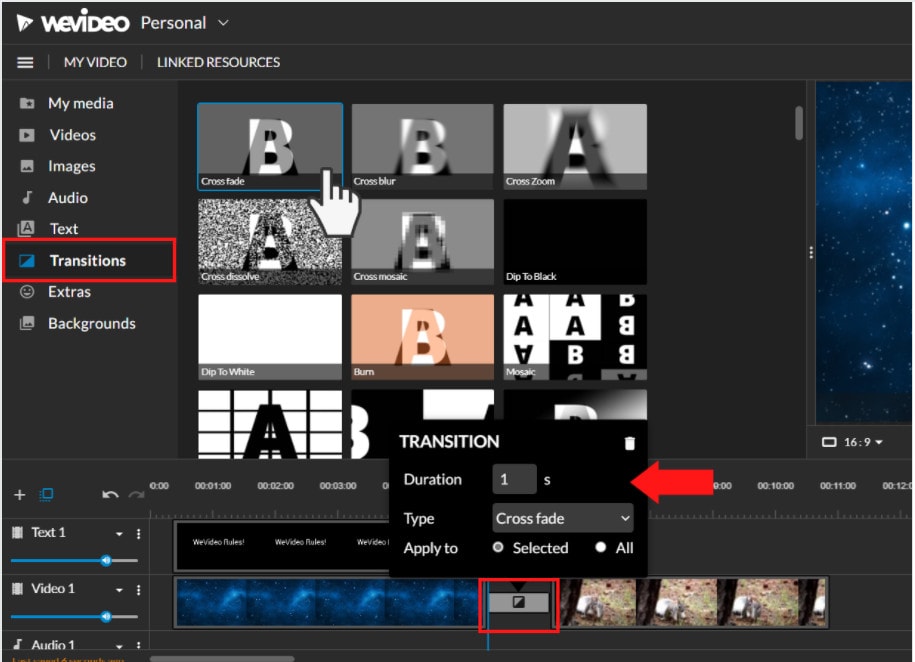
Step 3: Edit the video.
The video clip you imported will appear in the viewing window to the right once you click on it. By moving the arrows and either end, you can edit out the beginning or end of your footage.
- Drag the clip into your timeline from your media pool.
- Place the clip on your timeline by dragging and dropping it.
- Click the scissor symbol after moving the blue marker to the spot where you want to cut your clip.
- Once the material has been chopped, you can erase bits of it by selecting it with your mouse and then pressing delete on your keyboard or rearrange the clips in the timeline by dragging and dropping them to other positions.
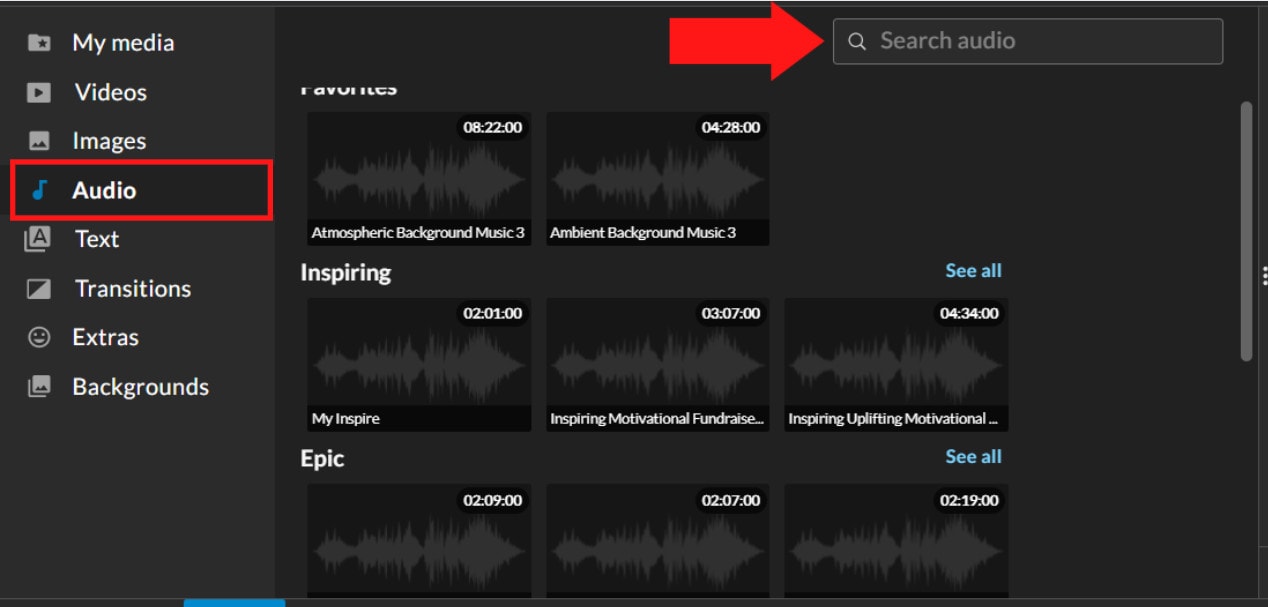
Step 4: Add effects, transitions, and music to the video.
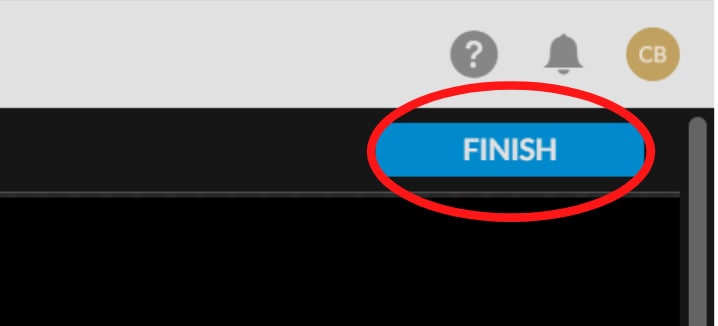
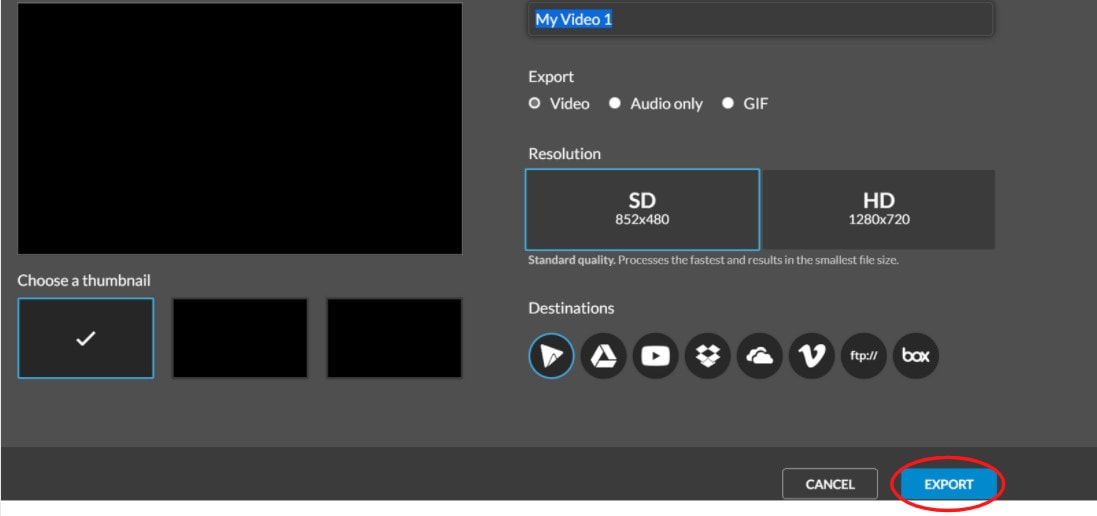
Step 5: Save and export the video by clicking on the Finish tab.
FAQs about editing FLV video
- How to open FLV files?
Any FLV player is required to view FLV files. Various players are available, including VLC, FLV Player, Sothink FLV Player for Mac, Tonec Free FLV Player, Any FLV Player, and others.
- Is Filmora compatible with Mac?
Filmora requires macOS Sierra (version 10.12) or later and the Big Sur (version 11) and Apple M1 chips. Touch Bar compatibility for MacBook Pro users and custom shortcuts to speed up editing.
- What is the best online FLV editor?
There are numerous free online editors to choose from. Fastreel, WeVideo, and FlexClip Video Maker are a few of the most popular.
- Is FLV better than MP4?
Because FLV and MP4 are the two most popular video file formats, it’s crucial to know which one is preferable. Adobe’s proprietary format is FLV. Both formats employ video and audio codecs and have equal performance levels. In their unprocessed state, MP4 files are more adaptable. You can, however, use an FLV file at the same time if you have the correct player.
- How do I choose a video editor?
When comparing video editing software, there are six crucial elements to consider.
- Budget and cost
- Ease of use/learning curve
- Multi-GPGPU acceleration and video format support
- Tools for advanced editing
- Music, special effects, and other goodies
- Customer service is second to none.
For macOS 10.14 or later
Therefore, you can use the following steps to edit FLV video on Windows and Mac:
Step 1: Import file:
Step 2: Edit the FLV file:
Acquire the perfect tool in your palm for anything you want to do, such as clipping, cropping, rotating, and more.
Furthermore, all editing capabilities in the toolbar allow drag-and-drop, making it even easier to touch up your films quickly. Consider the following scenario:
- Drag and drop a transition into the video/photo, or right-click it and select “Apply to All.”
- Please drag & drop a title template to the position where you want it to appear, then adjust it.
- To use the effects, select one from the 50+ available video effects, select it, and apply it to your photos/videos instantaneously.
Step 3: Save or Export the file:
When you’re done, export your modified MP4 files to Windows/Mac and quickly share them on YouTube, with the option of sending a message to Facebook and Twitter. When you click Create in the program window’s middle right corner, you’ll be taken to the Output window below.
Alternative Way to Edit FlV Video on Windows
1. VSDC
VSDC is a free video editor along with a lot of advanced features. Cut, combine, trim, crop, and other editing capabilities are available to help you polish your FLV films.
Although it may not look logical, learning the editing capabilities hidden within modular boxes is simple. One noteworthy aspect of VSDC is its ability to produce good visual effects using many trendy video effects, transitions, and filters.
Furthermore, strong chroma keys, color correction, object modification, and other editing tools can be utilized to edit FLV videos. It not only creates excellent FLV videos, but it also supports a wide range of media conversion, allowing you to convert FLV files to various formats and export them without a watermark.
Therefore, follow the below mentioned steps to edit FLV video using VSDC:
Step 1: Install the software on the Windows. Open the application and import the video.
Step 2: Use cutting and splitting tools to edit the video.
The first icon is a picture of a pair of scissors, which is a cutting tool. It’s very useful when you need to cut the beginning or end of a film. Place the cursor exactly where you want to cut, then select “Trim start” or “Trim finish” from the dropdown cutting menu (the small triangle next to the scissors icon).
Cropping is also simple. If you have too much additional space around the scene object recorded, just choose the file you want to trim and select the cropping icon from the “Cutting and Splitting” option. A new window will appear, allowing you to select the region of the scene that should stay.
Step 3: Apply effects and transitions.
To use one, first select the video file you wish to edit, then go to the Video effects tab and select the effect you want to use. On the timeline, a new tab will appear, containing all of the effects done to the selected object. You can alter the effect’s duration and position in time by dragging it with the mouse there. The properties pane on the right-hand side can be used to change other parameters.
Transitions follow the same rule. Place your cursor where you want the transition to begin, then choose a transition from the Video effects dropdown menu and manually adjust the duration.
Step 4: Save changes and export video.
Make sure your movie appears exactly how you want it to before exporting it. If the video appears choppy, use the red preview button and lower the preview quality. When the PC’s resources are insufficient to process the video in real time, lagging can occur. Keep in mind that it has no bearing on the outcome. When you’re finished, navigate to the Export project tab and select an export format.
2. Adobe Premiere Pro:
Professional video editors use Premiere Pro to make everything from YouTube videos to Hollywood films like Mank, a 2021 Oscar candidate. It’s also widely utilized in the workflows of designers, animators, and VFX artists, and we can see why after lengthy testing.
We found the software’s UI to be simple to use, and it increased our productivity by separating things into various workspaces, such as editing, effects, and audio. When we tested it on both Mac and PC, we discovered that each workspace helps handle a specific activity while minimizing distraction.
Edit the FLV video with Adobe Premiere Pro using the following steps:
Step 1: Import the video and create initial sequence.
Step 2: In the Timeline, trim and rearrange clips, add audio, and transitions.
Step 3: Add title and graphics.
In Premiere Pro, you may make onscreen titles, as well as stylize and animate your images.
Step 4: Export your video.
Alternative Way to Edit FlV Video on Mac
1. Blender:
Under the GNU General Public License, Blender is a free, open-source 3D content production program that runs on all major operating systems. Blender is one of the greatest video editors for both Windows and Mac, with advanced features such as modifier-based modeling tools, powerful character animation capabilities, a node-based material, etc.
Because it is developed for professionals, it is tough to use as a beginner. However, it is unrestricted in its use and distribution. In addition, color options are changeable and versatile in the UI.
In contrast, this free video editor is perfect for semi-pros or those who want to enhance their video editing skills. However, you’ll need a lot of time and effort to learn it.
Step 1: Open the application.
Step 2: Then, go into File->New->Video Editing to open the video editor.
Step 3: Import the video and start editing using the editing tools.
Step 4: Save and export the video.
2. Final Cut Pro:
When it comes to video editing software, Apple’s Final Cut Pro is one of the industry standards. As a result, it’s widely utilized in the television and film industries - at least among Mac users. However, one of the truly convincing reasons to choose it over Premiere Pro is because it is subscription-free: you only pay once.
The software’s Magnetic Timeline, grouping tools, a vast selection of effects, solid organizational capabilities, and simple ways to add and edit audio make it a favorite among professional video editors. 360° video, HDR, and powerful color correcting tools are among the other capabilities. It’s a strong software with a lot of features.
Follow the steps to edit FLV video using Final Cut Pro:
Step 1: Create Project.
To make a movie in Final Cut Pro, you must first establish a project, which keeps track of your editing selections and the media you utilize.
Step 2: Select and add clips to the timeline:
The second stage in making a movie with Final Cut Pro is to add and arrange clips in your project. In the timeline, you can move and reorder clips.
Step 3: Cut and trim video:
Final Cut Pro has a number of features for altering the start and stop points of clips in the timeline, as well as regulating the pacing of shots from one to the next.
Step 4: Edit the video by adding effects and transitions:
Final Cut Pro includes a number of advanced editing features that make it simple to create a professional film. Visual enhancements and colour correction are among the finishing touches.
Step 5: Save and export video:
2 Ways to Edit FlV Video on Android:
1. Inshot:
For Android users, Inshot is a fantastic image and video editor. This Android video editor allows you to add popular stickers and emoticons to your films, making them more fashionable and unique.
The program supports HD video output, allowing you more control over your footage. Moreover, the additional sound and video can be synchronized with the available video chronology.
You can quickly blend more than two movies into one with rich effects and sound with this Android editor app. In addition, you can generate a watermark using unique text provided in the app, and subtitles support allow you to produce one with a variety of fonts.
Following are the steps that you can follow to edit FLV video using Inshot:
Step 1: Open the app and import the video.
Tap “Video” to open your phone’s gallery folder and begin editing a video in the InShot app. Select a video to work with. Adjust the canvass after your video has been loaded into the InShot App. For your other social media accounts, there are aspect ratios and sizes that work well with the video. It also has the option of being in portrait or landscape mode.
Step 2: Trim and split videos.
Step 3: Merge videos (optional):
By combining clips, you can combine them into a single film or project. Simply choose the videos you want to import from the drop-down menu. By tapping the “+” button on the lower left of the screen, you can insert and merge more videos. Your project will then be updated using the selected video.
Step 4: Apply filters, add music, text and stickers.
Step 5: Once you are done with the editing process, save the file.
2. Videoshow:
VideoShow has a lot of video editing options. It is a simple and practical video editing program and movie scene maker for art directors and beginners. Using this video cutter, you may reverse, blur, duplicate, edit, merge and split collage clips or films.
You can also use VideoShow to adjust the audio or add subtitles to any video. It also allows you to use different filters on any video on your device. Over 50 intricate themes are included in the program, allowing you to create gorgeous music videos, slide shows, and vlogs in no time.
The annual subscription package is for $135.19, or you can also make a one-time purchase for $225.78.
However, to edit the video, you can use the following steps:
Step 1: Download and install the videoshow application and open it. Upload the video that you want to edit.
Step 2: Edit the video by applying filters or cutting and trimming the part of the video that you want to remove.
Step 3: Save changes and export the video to your preferred location.
2 Ways to Edit FlV Video on iPhone:
1. LumaFusion:
No other software program on the iPhone comes close to the feature set that LumaFusion offers for video editing. It is the only premium app on this list, and it is well worth every penny.
But, of course, YouTubers aren’t the only ones who use the program; mobile journalists and professional video producers who don’t want to lug along their bulky camera equipment and editing apparatus also use it.
LumaFusion deals with up to six video and audio tracks for photographs, movies, audio, titles, and graphics, and six audio tracks for narration, music, and sound effects. You also receive a magnetic timeline; importing clips is a breeze once they’ve been imported.
There are many transitions and effects to choose from, all of which can be layered. Finally, it includes much royalty-free music, sound effects, and other assets. So if you need a professional video editing tool for your iPhone, LumaFusion ($29.99) is the way to go.
Follow these steps to edit FLV video using LumaFusion:
Step 1: To create your first project, press + at the bottom of the screen. You can create a new project by tapping that area or by tapping the Plus button.
Step 2: Import video:
The Import section is located in the top left corner of the screen. This defaults to the Photos tab when you initially launch a new project. All of the photographs and videos can be seen here.
Step 3: Check layout and adjust volume levels
Step 4: Edit the video and add titles.
Step 5: Export the video.
2. Filmora Go:
Without a doubt, Filmora is one of the greatest free video editors for iPhone that does not contain any watermarks. In addition, it’s compatible with both iPhones and Android devices and has a simple user interface.
Filmora is the greatest iPhone video editor for beginners, with themed filters and effects that add flair to your videos without any work.
Filmora has many unique features, including themes for your videos and ‘Materials,’ which are visual effects created by the program. Unfortunately, materials are only available with Filmora Pro, so keep that in mind.
Aside from that, you’ll find all of the typical features here. You can also add titles to videos, utilize stickers and effects, and add music to the background of your movie. You may also add another clip in picture-in-picture mode, which is beneficial.
Below are the following steps to edit FLV video:
Step 1: Open the application and select ‘Create new video’. Now, import the video by choosing the video icon.
Step 2: Edit the video. Within the edit tool, you can trim and split the video. You can also improve the video quality by adding titles, transitions, and music, and voiceovers.
Step 3: After editing the video, select ‘SAVE’ and export the video or download it.
2 Ways to Edit FlV Video Online:
1. Fastreel:
If you’re seeking the finest free online video editor, Fastreel is a terrific tool to start with. This online video editing software provides a wide range of editing options. It can merge, edit, crop, and compress videos to make sharing easier.
It also includes many pre-made templates that you can change to create titles and transitions and other editing features like reverse, looping, and rotating. It’s also quite simple to use, and you can have polished videos in minutes.
There are also numerous pricing options to suit different customers, ranging from a completely free plan with watermarks to paid subscriptions with no limitations.
Use the following steps to edit FLV video:
Step 1: Open Fastreel web and import the video.
Step 2: Use templates to make it look attractive.
Step 3: Edit the video using the template.
Templates are unfinished videos with all of the effects already applied, such as backdrops, transitions, animated stickers, and titles. There are blank spots for your photos or videos, and you can arrange them in any sequence you like. You can also add music from the Fastreel library or upload your own track after entering your text.
Step 4: Once you are done with edits, save the video and export it.
2. WeVideo:
When you’re seeking the greatest video producer online, another wonderful choice to explore is WeVideo.
Google, Dropbox, Rover, and Roche are just a few of the huge names that trust our online editor. Its fast, versatile editing engine and vast stock content collection for adding stock movies, photos, and audio tracks to your productions are ideal for business users.
WeVideo also stands out since it provides unlimited cloud storage for all of your videos, which you can download and watch on any device. The only drawback is that all of this comes at a price, with WeVideo offering a variety of payment plans ranging from $4.99 to $36.99 a month.
Follow the steps to edit videos using WeVideo:
Step 1: Open WeVideo and import the video file.
Step 2: Click on create new video in the left-hand corner of the screen.
Step 3: Edit the video.
The video clip you imported will appear in the viewing window to the right once you click on it. By moving the arrows and either end, you can edit out the beginning or end of your footage.
- Drag the clip into your timeline from your media pool.
- Place the clip on your timeline by dragging and dropping it.
- Click the scissor symbol after moving the blue marker to the spot where you want to cut your clip.
- Once the material has been chopped, you can erase bits of it by selecting it with your mouse and then pressing delete on your keyboard or rearrange the clips in the timeline by dragging and dropping them to other positions.
Step 4: Add effects, transitions, and music to the video.
Step 5: Save and export the video by clicking on the Finish tab.
FAQs about editing FLV video
- How to open FLV files?
Any FLV player is required to view FLV files. Various players are available, including VLC, FLV Player, Sothink FLV Player for Mac, Tonec Free FLV Player, Any FLV Player, and others.
- Is Filmora compatible with Mac?
Filmora requires macOS Sierra (version 10.12) or later and the Big Sur (version 11) and Apple M1 chips. Touch Bar compatibility for MacBook Pro users and custom shortcuts to speed up editing.
- What is the best online FLV editor?
There are numerous free online editors to choose from. Fastreel, WeVideo, and FlexClip Video Maker are a few of the most popular.
- Is FLV better than MP4?
Because FLV and MP4 are the two most popular video file formats, it’s crucial to know which one is preferable. Adobe’s proprietary format is FLV. Both formats employ video and audio codecs and have equal performance levels. In their unprocessed state, MP4 files are more adaptable. You can, however, use an FLV file at the same time if you have the correct player.
- How do I choose a video editor?
When comparing video editing software, there are six crucial elements to consider.
- Budget and cost
- Ease of use/learning curve
- Multi-GPGPU acceleration and video format support
- Tools for advanced editing
- Music, special effects, and other goodies
- Customer service is second to none.
We’ve Picked up the Best Online as Well as Offline MOV to GIF Converters . These Converters Are Easy to Use and Have No Limitations on Size. Get Your One
Powerful Video Editor - Wondershare Filmora
Provide abundant video effects - A creative video editor
Powerful color correction and grading
Detailed tutorials are provided by the official channel
There are more than enough GIF makers available on the Internet. However, we’ve found it difficult to find quality MP4-to-GIF converters. Some of the tools that commonly pop up in your search results are either unreliable or simply bad at what they do. In some cases, you will also have to deal with intrusive ads and pop-ups.
Stop scrolling through a sea of options, and start converting your video files into animated GIFs in just a few steps. You no longer need to upload your files to some random website to get your desired results.
We’ve picked up the best online as well as offline MP4-to-GIF converters of 2022 and explained how to use them in a more easy way.
Best 5 MOV to GIF Converter Software
It’s no secret that converting video to GIFs is a good idea: they’re small, easy to share, and fun to look at. That’s why we decided to take the time to compare and review some of the best-animated GIF makers out there, from free online tools to offline software for PCs, Macs, and other devices.
1. Wondershare Filmora

Wondershare Filmora Video Editor is a professional and easy-to-use video editing software. This converter provides you with a lot of really cool filters and effects that let you make your videos even better. It is able to export videos in many different formats, including GIFs.
It is one of the best MOV to GIF Converters for Mac & Windows. It has all the important features that you need to convert, edit and create animated GIFs from any video format quickly and easily. With its simple and easy-to-use interface, you can choose your desired video clip or effect, edit it in different ways and then output it as a GIF.
Pros
Easy-to-use Tool for all device users
Able to export videos in multiple formats
Create animated GIFs from any video format
Best for professional work
Cons
Super effects cannot be added
Some effects can disturb tool’s functioning
2. Adobe Premiere Pro

To make the best GIFs, you need to use a program that can be versatile and powerful all at once. Adobe Premiere Pro is one of the best video editing softwares for professionals and amateurs. It is a great choice for people who have basic knowledge of film creation and want to produce video content at a professional level.
The reasons for its popularity are quite clear. The program has a non-linear video editing interface, an unrivaled system of working tools, and a powerful feature set.
Pros
Goes professionally with Windows OS, macOS
Provides non-linear video editing
Supports Flash Video, HD, and HDV
Featured for all professional tasks
Cons
Freemium for only a month
3. Movavi Video Editor Plus

The best way to create video highlights is to use an editing program and extract the best moments from your footage. Movavi’s new Video Editor Plus has all the tools you need to create compelling videos quickly and easily, with a user interface that even novice editors can master right away.
This affordable program gives you all the power (and simplicity) you need to create a high-quality GIF that represents your video perfectly. All without costing too much or putting up too many barriers to using this software.
Pros
Movement tracking and picture-in-picture features
Chroma keying
Sharp movie-creation software
Has multiple different features more
Cons
Resistive on slow slides
Doesn’t support high-end transitions
4. VLC

VLC Player is a highly portable multimedia player for various audio and video formats, including MPEG-4, DivX, MP3, and Ogg/Vorbis.
It is a free and open-source cross-platform multimedia player and framework that plays most multimedia files as well as DVDs, Audio CDs, VCDs, and various streaming protocols.
It can also be used to convert MOV format to GIF in many different ways.
To start with: you can use the tool to create animated avatars for Facebook and other social networks or even make an animated GIF for mobile phone wallpaper.
Pros
Most popular media players today
support DivX streaming and MPEG
Can be controlled using keyboard shortcuts
Support all formats, including BluRay, .mov, and .avi
Cons
No feature for upgradations
Some found it a hard tool as a converter
5. Cyberlink PowerDirector

Whether they’re an amateur or a seasoned pro, editing videos is easier than ever before with CyberLink PowerDirector . It comes with a host of advanced editing tools, including multi-cam editing, 3D title creation, and special effects. Avid editors can also upload their work to cloud services right from the app!
It is ideal for practically anyone who wants to create movies. It even comes with easy-to-use video editing and productive media sharing tools, so anyone can turn their videos into polished movies using this tool.
Pros
Featuring over 100 top-notch audio and video editing attributes
Enables you to easily edit and export videos in 4K
Features 360-degree video editing qualification
Quick customer support 24 hours a day
Cons
Adding ads to the page causes frustration
Costly
Online MOV to GIF Converter
If you have ever wanted to convert your MOV files into gifs, here are a few online tools that will help you do it with ease. Upload your .mov file to the service and enjoy the convenience of watching your favorite movies in animated gif format.
1. CloudConvert

The CloudConvert allows you to convert online documents, images, presentations, and much more into other formats. To use its API you need a free account on our servers (which allow you to do around 100 conversions per month).
Conversion is done on their servers, which means that: - The users of your app never have to install any software. - The API is fast and scalable. - It works across all popular platforms: Windows, macOS, Linux, iPhone, Android…
Pros
200+ File Formats Sustained
Absolute Data Protection
Persuasive API Integration
Rapid Online File Converter
Cons
Conversion minutes determine prepaid package plans
2. EZGIF.COM

Create GIFs from your video clips with this free online MOV to GIF converter.Ezgif.com is a simple to use toolset designed primarily for creating and editing animated GIFs but also can perform conversions.
With Ezgif you can capture videos, adjust the frames to suit your needs, save them as an animated GIF with text or sound, share them via email, Facebook, and more!
So, convert MOV, M4V, MP4, and various other video formats to animated GIFs with this free tool.
Pros
Design is comprehensive for all level users
Engaging work/functioning
Can stand with lots of devices
Easy to use
Cons
The structure of the tool is linear
3. Convertio

Convertio is easy to use, fast and available without signing up. The website offers a list of file converters that can be added directly to your Chrome browser.
The process uses Optimal media conversion settings that ensure the best quality possible with every conversion. It has worldwide popularity with millions of visitors each month.
It also has a large database of links to various online video web pages, so you can quickly access the video file you need and convert it into GIF format as well as other image formats like JPG, PNG, and BMP.
Pros
Permits you to check up to ten pages for free
Uses Optical Character Recognition technology
Save transformed files to Google Drive or Dropbox
Professional overall
Cons
There are certain security and safety risks
How to Convert MOV to GIF Using Wondershare Filmora?
Step 1: Import the MOV file
To get started, simply drag and drop your MOV file onto the interface of Filmora. Alternatively, click on the “Import” button in the upper left corner to browse and load the MOV file from your hard drive or external storage device. A third option is to right-click on the video in the media library and choose “Import Media Files” from the drop-down menu. This will open up a new window where you can select your desired video file.

Now that you have successfully imported your MOV file into Filmora, let’s look at how to proceed with making a GIF out of it.
Step 2: Trim to shorten the video
Next, you will need to trim the video. This is optional, but important if you want to make a GIF from a video. A longer video means a bigger file size and an increased loading time for your final GIF, so try to keep it as short as possible!

To trim your video, add another start and endpoint by clicking on the scissors icon below. You can also put them in manually by typing in the time (in seconds) into the box provided.
Step 3: Export as GIF
Click on the Export button to open up the Export dialog box. From here, you can choose how you want your file exported from a number of options including GIF under the Formats tab. Under the Video tab, select the video quality settings that best suit your requirements. You can also set the frame rate and resolution for your GIF image file at this point. Once you are done, click on Save to specify a location for your file as well as a name for it.

Step 4: Save the GIF file
Click “Convert” to start the MOV to GIF conversion.
When it’s done, click “Open Folder”, and you’ll see the generated GIF file there, which could be shared with others via social platforms such as Twitter, YouTube, and Facebook directly or used for other purposes.
Conclusion
We have not gathered several MOV to GIF converters for you to buy, but we have gone ahead and selected some and explained how to use them in easy steps. You no longer need to upload your files to some random website to get your desired results.
We’ve explored the market, and picked up the best MOV-to-GIF converters.
There are more than enough GIF makers available on the Internet. However, we’ve found it difficult to find quality MP4-to-GIF converters. Some of the tools that commonly pop up in your search results are either unreliable or simply bad at what they do. In some cases, you will also have to deal with intrusive ads and pop-ups.
Stop scrolling through a sea of options, and start converting your video files into animated GIFs in just a few steps. You no longer need to upload your files to some random website to get your desired results.
We’ve picked up the best online as well as offline MP4-to-GIF converters of 2022 and explained how to use them in a more easy way.
Best 5 MOV to GIF Converter Software
It’s no secret that converting video to GIFs is a good idea: they’re small, easy to share, and fun to look at. That’s why we decided to take the time to compare and review some of the best-animated GIF makers out there, from free online tools to offline software for PCs, Macs, and other devices.
1. Wondershare Filmora
Wondershare Filmora Video Editor is a professional and easy-to-use video editing software. This converter provides you with a lot of really cool filters and effects that let you make your videos even better. It is able to export videos in many different formats, including GIFs.
It is one of the best MOV to GIF Converters for Mac & Windows. It has all the important features that you need to convert, edit and create animated GIFs from any video format quickly and easily. With its simple and easy-to-use interface, you can choose your desired video clip or effect, edit it in different ways and then output it as a GIF.
Pros
Easy-to-use Tool for all device users
Able to export videos in multiple formats
Create animated GIFs from any video format
Best for professional work
Cons
Super effects cannot be added
Some effects can disturb tool’s functioning
2. Adobe Premiere Pro
To make the best GIFs, you need to use a program that can be versatile and powerful all at once. Adobe Premiere Pro is one of the best video editing softwares for professionals and amateurs. It is a great choice for people who have basic knowledge of film creation and want to produce video content at a professional level.
The reasons for its popularity are quite clear. The program has a non-linear video editing interface, an unrivaled system of working tools, and a powerful feature set.
Pros
Goes professionally with Windows OS, macOS
Provides non-linear video editing
Supports Flash Video, HD, and HDV
Featured for all professional tasks
Cons
Freemium for only a month
3. Movavi Video Editor Plus
The best way to create video highlights is to use an editing program and extract the best moments from your footage. Movavi’s new Video Editor Plus has all the tools you need to create compelling videos quickly and easily, with a user interface that even novice editors can master right away.
This affordable program gives you all the power (and simplicity) you need to create a high-quality GIF that represents your video perfectly. All without costing too much or putting up too many barriers to using this software.
Pros
Movement tracking and picture-in-picture features
Chroma keying
Sharp movie-creation software
Has multiple different features more
Cons
Resistive on slow slides
Doesn’t support high-end transitions
4. VLC
VLC Player is a highly portable multimedia player for various audio and video formats, including MPEG-4, DivX, MP3, and Ogg/Vorbis.
It is a free and open-source cross-platform multimedia player and framework that plays most multimedia files as well as DVDs, Audio CDs, VCDs, and various streaming protocols.
It can also be used to convert MOV format to GIF in many different ways.
To start with: you can use the tool to create animated avatars for Facebook and other social networks or even make an animated GIF for mobile phone wallpaper.
Pros
Most popular media players today
support DivX streaming and MPEG
Can be controlled using keyboard shortcuts
Support all formats, including BluRay, .mov, and .avi
Cons
No feature for upgradations
Some found it a hard tool as a converter
5. Cyberlink PowerDirector
Whether they’re an amateur or a seasoned pro, editing videos is easier than ever before with CyberLink PowerDirector . It comes with a host of advanced editing tools, including multi-cam editing, 3D title creation, and special effects. Avid editors can also upload their work to cloud services right from the app!
It is ideal for practically anyone who wants to create movies. It even comes with easy-to-use video editing and productive media sharing tools, so anyone can turn their videos into polished movies using this tool.
Pros
Featuring over 100 top-notch audio and video editing attributes
Enables you to easily edit and export videos in 4K
Features 360-degree video editing qualification
Quick customer support 24 hours a day
Cons
Adding ads to the page causes frustration
Costly
Online MOV to GIF Converter
If you have ever wanted to convert your MOV files into gifs, here are a few online tools that will help you do it with ease. Upload your .mov file to the service and enjoy the convenience of watching your favorite movies in animated gif format.
1. CloudConvert
The CloudConvert allows you to convert online documents, images, presentations, and much more into other formats. To use its API you need a free account on our servers (which allow you to do around 100 conversions per month).
Conversion is done on their servers, which means that: - The users of your app never have to install any software. - The API is fast and scalable. - It works across all popular platforms: Windows, macOS, Linux, iPhone, Android…
Pros
200+ File Formats Sustained
Absolute Data Protection
Persuasive API Integration
Rapid Online File Converter
Cons
Conversion minutes determine prepaid package plans
2. EZGIF.COM
Create GIFs from your video clips with this free online MOV to GIF converter.Ezgif.com is a simple to use toolset designed primarily for creating and editing animated GIFs but also can perform conversions.
With Ezgif you can capture videos, adjust the frames to suit your needs, save them as an animated GIF with text or sound, share them via email, Facebook, and more!
So, convert MOV, M4V, MP4, and various other video formats to animated GIFs with this free tool.
Pros
Design is comprehensive for all level users
Engaging work/functioning
Can stand with lots of devices
Easy to use
Cons
The structure of the tool is linear
3. Convertio
Convertio is easy to use, fast and available without signing up. The website offers a list of file converters that can be added directly to your Chrome browser.
The process uses Optimal media conversion settings that ensure the best quality possible with every conversion. It has worldwide popularity with millions of visitors each month.
It also has a large database of links to various online video web pages, so you can quickly access the video file you need and convert it into GIF format as well as other image formats like JPG, PNG, and BMP.
Pros
Permits you to check up to ten pages for free
Uses Optical Character Recognition technology
Save transformed files to Google Drive or Dropbox
Professional overall
Cons
There are certain security and safety risks
How to Convert MOV to GIF Using Wondershare Filmora?
Step 1: Import the MOV file
To get started, simply drag and drop your MOV file onto the interface of Filmora. Alternatively, click on the “Import” button in the upper left corner to browse and load the MOV file from your hard drive or external storage device. A third option is to right-click on the video in the media library and choose “Import Media Files” from the drop-down menu. This will open up a new window where you can select your desired video file.
Now that you have successfully imported your MOV file into Filmora, let’s look at how to proceed with making a GIF out of it.
Step 2: Trim to shorten the video
Next, you will need to trim the video. This is optional, but important if you want to make a GIF from a video. A longer video means a bigger file size and an increased loading time for your final GIF, so try to keep it as short as possible!
To trim your video, add another start and endpoint by clicking on the scissors icon below. You can also put them in manually by typing in the time (in seconds) into the box provided.
Step 3: Export as GIF
Click on the Export button to open up the Export dialog box. From here, you can choose how you want your file exported from a number of options including GIF under the Formats tab. Under the Video tab, select the video quality settings that best suit your requirements. You can also set the frame rate and resolution for your GIF image file at this point. Once you are done, click on Save to specify a location for your file as well as a name for it.
Step 4: Save the GIF file
Click “Convert” to start the MOV to GIF conversion.
When it’s done, click “Open Folder”, and you’ll see the generated GIF file there, which could be shared with others via social platforms such as Twitter, YouTube, and Facebook directly or used for other purposes.
Conclusion
We have not gathered several MOV to GIF converters for you to buy, but we have gone ahead and selected some and explained how to use them in easy steps. You no longer need to upload your files to some random website to get your desired results.
We’ve explored the market, and picked up the best MOV-to-GIF converters.
Also read:
- 7 Ways Add Subtitles to MKV Videos on All Platforms
- Learn How to Feather Shapes in After Effects and Add a Professional Touch to Your Designs. This Comprehensive Guide Covers Everything From the Basics to Advanced Techniques. Perfect for Beginners and Experts Alike for 2024
- Updated In 2024, How to Edit a TikTok Video After Posting
- Updated Top 6 MP4 Mergers to Join Videos Easily for 2024
- New 2024 Approved Do You Still Waste Time Making Transparent Background in Paint
- New 2024 Approved Ever Wondered About the Similarity You Bear with an Anime Character? If You Have Not yet Looked Into This Exciting Aspect of Motion Graphic Design, You Can Very Well Break the Ice Here
- In 2024, Easily Cut Large Videos Faster on Mac 7 Solutions Included
- Mastering OpenCV Object Tracking A Comprehensive Guide for Beginners and Experts
- Updated Top 9 Best Solutions To Go For When Creating an AI Thumbnail
- Updated How to Make a GIF With Transparent Background, In 2024
- 2024 Approved As Video Editing Has Become a Pillar Stone in Post-Production Work, You Might Need to Upgrade Your Knowledge About It. In This Article, You Will Learn How to Rotate the Video
- Is Windows Movie Maker Still Available?
- 2024 Approved Multi Object Tracking The Ultimate Guide
- Updated Here You Can Lean About the Different Ways for GIMP Transparent Background PNG Format Files for 2024
- Creating a Slideshow Is Necessity of the Modern Time. Whether You Plan a Business Meeting or You Are Going to Do some Family Event with Slideshow Presentation, a Good Slideshow Maker Will Help You in This Direction
- Updated Whatre the Best Alternatives to Pexels, In 2024
- 2024 Approved Do You Want to Add Subtitles to Your MKV Files Easily? This Article Will Introduce 7 Simple Ways Through Which You Can Add Subtitles to MKV on Different Devices
- Updated Do You Know What Is Motion Blur in Fortnite? Read This Article to Find Out How to Apply Motion Blur in Fortnite Efficiently and with Ease for 2024
- Updated 2024 Approved How-To Tutorials of Kapwing Collage Maker
- New 2024 Approved Blender Is an Open-Source Cross-Platform 3D Graphics Program, but This Doesnt Mean Its a Low-Rent Option
- 3D LUT Mobile App Review - A Composite Application for Editing Media for 2024
- VSDC Free Video Editor Review
- In 2024, Do You Intend to Include Motion Blur on Your Video Using Video Star? This Article Explains How to Use Motion Blur on Video Star with Exquisite Control
- Best AR Video App - Top 10 Picks
- A Complete Overview of VSCO Video Editor for 2024
- In 2024, How to Create Vintage Film Effect 1920S
- Updated 2024 Approved Top Ever Ways Make Tiktok Slideshow Solved
- Updated In 2024, Want to Learn How to Trim Videos in Premiere Pro. Read on; Our Guide Will Help You Trim Videos with This Timeline-Based Video Editing Software Application to Make Them Engaging to Viewers
- Updated 2024 Approved The Quick and Simple Way to Mirror Video in Premiere Pro
- New You Must Be Wondering Which the Best Online Transparent Image-Maker Is! Well, There Is No Need to Get Confused as Here; You Will Get a Curated List for the Same
- Magic Effects Video Making How To
- How to Add Filter to Video Online
- Updated 2024 Approved Add Green Screen Effects in Final Cut Pro
- 2024 Approved How Can You Deny These Top 10 Free Speech to Text Software
- Updated All About GIF Keyboard That You May Want to Know for 2024
- New 2024 Approved Do You Want to Get Green Screen Effects on Your Video without Green Screen Setup in Your Background? Learn How to Get Virtual Green Screen Background and Shoot Videos Like a Pro
- New 2024 Approved Create Risograph Effect In Photoshop A Beginners Guide
- New The Complete Guide to GIF for Discord Profile
- New How to Make a Video with My Phone for 2024
- In This Article, You Will Learn Easy Ways to Edit Videos Using a Mouse in Wondershare Filmora. You Can Do Video Editing without a Keyboard After Reading This Article
- Updated Want to Make a Fun and Cinematic Video with an Introductory Text Title? Learn the Stages of Editing with Filmora for This Effect Here
- How PGSharp Save You from Ban While Spoofing Pokemon Go On Huawei Nova Y91? | Dr.fone
- Easy Guide How To Bypass Vivo X90S FRP Android 10/11/12/13
- In 2024, How to Reset your Honor X9b Lock Screen Password
- In 2024, Does Nokia 150 (2023) Have Find My Friends? | Dr.fone
- In 2024, A Comprehensive Guide to iCloud Unlock On iPhone 6 Plus Online
- How To Bypass FRP on Vivo T2 Pro 5G
- How to Stop Life360 from Tracking You On Infinix Smart 8 HD? | Dr.fone
- Forgot iPhone Passcode Again? Unlock iPhone 12 Without Passcode Now | Dr.fone
- What Pokémon Evolve with A Dawn Stone For Tecno Pop 8? | Dr.fone
- Easy steps to recover deleted videos from Motorola
- Locked Out of iPhone 7? 5 Ways to get into a Locked iPhone 7
- 2 Ways to Transfer Text Messages from Infinix Hot 40i to iPhone 15/14/13/12/11/X/8/ | Dr.fone
- Title: Updated In 2024, Do You Know How AI Is Helping Video Editors and Enthusiasts? Many Video Editing Software Allows an Auto Reframe Option to Use that Can Help Manage Videos
- Author: Morgan
- Created at : 2024-04-24 01:08:59
- Updated at : 2024-04-25 01:08:59
- Link: https://ai-video-editing.techidaily.com/updated-in-2024-do-you-know-how-ai-is-helping-video-editors-and-enthusiasts-many-video-editing-software-allows-an-auto-reframe-option-to-use-that-can-help-m/
- License: This work is licensed under CC BY-NC-SA 4.0.
