:max_bytes(150000):strip_icc():format(webp)/AE-lock-572ece975f9b58c34c0a2492.jpg)
Updated In 2024, Easy Way to Create an Alternate Reality Effect

Easy Way to Create an Alternate Reality Effect
Ditch boring one-dimensional videos and create a mesmerizing video with this alternative reality effect you can easily create using Wondershare Filmora.
This cool effect enables you to show a dream-like scene where two mirrored footages appear within the same frame using the Masking feature. But why stop there?
Keep reading to find out how you can use this style of effect to spice up your daily vlog bumper intro or even for your upcoming sci-fi content.

Preparing the footage
There are not many restrictions on preparing the footage for this effect. However, depending on the results you’re aiming for, you might need to consider a few things.
First, a wider view and some camera panning, or tilting will deliver a better result as it provides angle variations. This will later enhance the dynamic of the scene, making it feels even more uncanny.
Then, while you’re at it, you need to also figure out the purpose of the video itself. If you want to upload it to certain platforms where vertical videos are more popular, you will want to work on that as well. When you’re shooting your footage, make sure that you’re taking it at the correct angle that would fit the ratio you’re aiming for.
Last but not least, consider the length of the footage. If you’re planning to make a bumper video, you might want a quick yet comprehensive shot of the objects you want to highlight. You can always trim and adjust the timing later, but it is better to also plan it early.
Editing the video
If you have your footage or stock video ready, then you can start editing. Follow this simple step-by-step guide to create your own alternate reality using Filmora .
Free Download For Win 7 or later(64-bit)
Free Download For macOS 10.14 or later
Step 1: Drag and drop the video footage into the timeline - this will be the bottom part of the scene. Go to Effect > Utility > Image Mask. Drag and drop it onto the video footage.

Step 2: Adjust the mask by double-clicking the video footage. Go to Setting > Mask Setting and choose any shape you like. Set the feather number to 100.

Step 3: Scroll up the Setting > Transform. Adjust the position of the video footage on the x and y-axis to ensure that the mask shows the bottom of the landscape view. Click Ok.

Step 4: Drag and drop the same video footage onto the timeline next to the first video footage. Place an Image Mask as well on this footage. This will be the upper part of the scene.

Step 5: Double-click the second footage to open the Setting menu on the top left. Choose Transform > Vertical Flip.

Step 6: Scroll down the Setting menu to find the mask settings. Choose an opposing mask shape for this second footage then set the feather number to 100 as well.

Step 7: Adjust the video footage position by dragging the second footage to the second video track and aligning it with the first video footage.

Step 8: Double-click to open the Setting > Transform, then, adjust the x and y-axis numbers to ensure that the mask reveals only the top half of the landscape. Click Ok.

You can recheck the preview at this stage and just save it as it is if you’re already satisfied with the result. However, if you want a more dynamic alternate reality scene, continue reading to see advanced tips you can follow to make your video looks even more otherworldly.
Enhancing the effect with rotation keyframes
If you’re using stock videos or encountering limitations when making your footage, chances are your alternate reality is not looking as dynamic as you want it to be. Go all out by adding the rotation keyframes to the video footage so that the alternate reality looks more unreal.
Step 1: Double-click the video footage on the first video track to open the Animation Settings > Customize.

Step 2: Move the playhead to the beginning of the first video footage and add a keyframe by clicking on the Add button. Set the rotation of this keyframe at 0 and the scale at 100.

Step 3: Now move the playhead to the end of the video footage and add another keyframe. This time, set the rotation to 20 and adjust the scale number to 115.

Step 4: Do Steps 1 to 3 to the second video footage. Don’t forget to preview the result to see if both footages are rotated properly.

Your alternate reality is now more dynamic with more movement. You can also add more filters or effects to further enhance the sci-fi ambiance. Once you’re satisfied, you can export the file to a format that is compatible with your destination platform.
Conclusion
Wondershare Filmora aims to empower your inner video creator with its robust yet easy-to-use editing suite. You can easily mimic the scenes from the latest blockbuster superhero movies with some simple clicks.
Not only it offers a strapping video editing menu with simple visual effects plug-ins and beginner-friendly smart templates, but you can also access its rich royalty-free stock media library. You can operate the program on both Windows and Mac. Install the program and let it do wonders to your content.
Free Download For macOS 10.14 or later
Step 1: Drag and drop the video footage into the timeline - this will be the bottom part of the scene. Go to Effect > Utility > Image Mask. Drag and drop it onto the video footage.

Step 2: Adjust the mask by double-clicking the video footage. Go to Setting > Mask Setting and choose any shape you like. Set the feather number to 100.

Step 3: Scroll up the Setting > Transform. Adjust the position of the video footage on the x and y-axis to ensure that the mask shows the bottom of the landscape view. Click Ok.

Step 4: Drag and drop the same video footage onto the timeline next to the first video footage. Place an Image Mask as well on this footage. This will be the upper part of the scene.

Step 5: Double-click the second footage to open the Setting menu on the top left. Choose Transform > Vertical Flip.

Step 6: Scroll down the Setting menu to find the mask settings. Choose an opposing mask shape for this second footage then set the feather number to 100 as well.

Step 7: Adjust the video footage position by dragging the second footage to the second video track and aligning it with the first video footage.

Step 8: Double-click to open the Setting > Transform, then, adjust the x and y-axis numbers to ensure that the mask reveals only the top half of the landscape. Click Ok.

You can recheck the preview at this stage and just save it as it is if you’re already satisfied with the result. However, if you want a more dynamic alternate reality scene, continue reading to see advanced tips you can follow to make your video looks even more otherworldly.
Enhancing the effect with rotation keyframes
If you’re using stock videos or encountering limitations when making your footage, chances are your alternate reality is not looking as dynamic as you want it to be. Go all out by adding the rotation keyframes to the video footage so that the alternate reality looks more unreal.
Step 1: Double-click the video footage on the first video track to open the Animation Settings > Customize.

Step 2: Move the playhead to the beginning of the first video footage and add a keyframe by clicking on the Add button. Set the rotation of this keyframe at 0 and the scale at 100.

Step 3: Now move the playhead to the end of the video footage and add another keyframe. This time, set the rotation to 20 and adjust the scale number to 115.

Step 4: Do Steps 1 to 3 to the second video footage. Don’t forget to preview the result to see if both footages are rotated properly.

Your alternate reality is now more dynamic with more movement. You can also add more filters or effects to further enhance the sci-fi ambiance. Once you’re satisfied, you can export the file to a format that is compatible with your destination platform.
Conclusion
Wondershare Filmora aims to empower your inner video creator with its robust yet easy-to-use editing suite. You can easily mimic the scenes from the latest blockbuster superhero movies with some simple clicks.
Not only it offers a strapping video editing menu with simple visual effects plug-ins and beginner-friendly smart templates, but you can also access its rich royalty-free stock media library. You can operate the program on both Windows and Mac. Install the program and let it do wonders to your content.
Exploring the Top Professional Tools to Perform Mask Tracking
Mask tracking refers to editing a specific part of a video without overlapping. Masking helps with creative transitions and background removal with ease. The integration of AI technology in masking tools has made masking more accessible. They help with masking an object or landscape with precision.
In addition, you can correct the colors of a specific part through a motion tracking mask. In this article, we’ll discuss masker tracking using three different software. Two of those software are renowned for their professionalism and precision. We’ll discuss masking in Adobe After Effects , Adobe Premiere Pro , and an alternative.
AI Smart Masking Spice up your video content with the endless possibilities of AI masking functions!
Free Download Free Download Learn More

Part 1: Working Out the Comprehensive Methods to Perform Mask Tracking on Adobe After Effects
Adobe After Effects is a powerful tool for mask tracking and other functions. The interface of this tool tailors your content to your needs with precision. The process of masking is convenient and accessible and provides accurate results. Its advanced masking options, like filling up the mask, add a realistic touch. Before learning about masking in After Effects, let’s discuss some of its features:
- Text Animations: Animating your text in Adobe After Effects is a comprehensive experience. It is because the software has amazing text fonts and animation options. You can also set the appearance settings like opacity, color, and more text. In addition, the software has pre-installed effects and presets to ease the process.
- VFX/Visual Effects: Elevate your images and videos using Adobe’s amazing visual elements. It can eliminate mistakes, and results are so promising that they become invisible. You can use the mask tracking effect to hide and fill objects. In addition, you can turn your transitions into high-resolution 3D or 4D videos.
- Motion Graphics: It moves anything with its motion graphics functionality and advanced keyframing. Along with animating text, the feature allows you to move the logos. You can move a logo on any background from top to bottom or left to right. With its flickering and wiggling effects, make animations without keyframing.
- Rotoscoping: This After Effects function eliminates using green screens in your videos. Using the pen tool, you can merge a different object in a different footage. Afterward, you can polish the mask by resizing and adjusting opacity values.
- Motion Tracking: Elevate the graphics of your videos using the motion tracking feature. This function connects any image with an object’s motion. Therefore, your images become animated and add a creative element to the content. Its cloud collaboration with other software allows users to download assets.
Step-by-Step Procedure for Masking in Adobe After Effects
Now that you know the After Effects masker line tracking feature, let’s move forward. Read the following guide to learn more about masking:
Step 1
After importing your clip into the timeline, select it in the timeline panel. Navigate towards the upper toolbar and select the “Pen Tool” option. Afterward, create a mask around the object that you want to remove.
![]()
Step 2
You’ll see a mask around the object, and the rest of the screen will disappear. Navigate to the timeline panel, expand the video track options, and select “Mask.” Click the “Mask” navigation arrow and select “None.”
![]()
Step 3
Click the “Mask” button and select the “Track Mask” option. A mask tracker window will appear on the right side; expand the “Method” option. Following that, select the type of masking you want, like “Position.” Play the video from beginning to end for motion detection. Afterward, change the “Mask” mode to “Add” to apply masking.
![]()
Step 4
Afterward, change the Mask mode to “Subtract” from the timeline. Now, navigate towards the topmost toolbar and expand the “Window” tab. From the expansion menu, click the “Content-Aware Fill” option.
![]()
Step 5
Move towards the “Mask” option, expand “Mask Path,” and change the values below. Now, go to the right side, increase “Alpha Expansion,” and click “Generate Fill Layer.” Once the mask tracking completes, download your video.
![]()
Part 2: Providing a Detailed Guide on How to Do Mask Tracking with Adobe Premiere Pro
Adobe Premiere Pro is one of the industry’s leading tools for editing videos. It offers a wide range of features and built-in effects to elevate content. The software offers precise editing capabilities for mask tracking and other enhancements. In addition, it has many visual, video, and audio effects and presets to apply. Let’s discuss some key features of this tool that make it worthy of being top:
- Motion Graphics Templates: With its seamless After Effect collaboration, it offers built-in templates. These templates include multiple text, shapes, and graphics. You can also customize these templates as per content relevancy and taste.
- Edit Audio: Premiere Pro has multiple audio editing options to maintain audio quality. The tool allows you to decrease the volume of one track while increasing others. In addition, you can make audio adjustments that fit a sound.
- Color Correction: Enhance the graphical element in your videos using this feature. It offers both color correction and enhancing capabilities. You can employ this color correction if you have overexposed or underexposed videos.
- Movie and Film Editing: A professional editor offers applications in the media industry. The Premiere Pro offers seamless collaboration with all video and audio formats. In addition, it can import files from all sources like DSLRs and more.
- Speech to Text: It doesn’t just limit you to video editing but also offers transcript creation. The software analyzes your footage’s audio and creates transcripts. Afterward, you can use them as subtitles and captions.
Step-by-Step Procedure for Masking in Premiere Pro
After introducing mask tracking in Adobe Premiere Pro, let’s progress further. Continue reading the following guide to gain a deeper understanding of masking:
Step 1
After importing your video in the timeline, select it and navigate towards the toolbar. In the “Edit > Effect” section, select “Lumetri Color” under “Video Effects.” Then, select the mask option under Lumetri colors and set it on the screen.
![]()
Step 2
Then, apply the color correction options on the masked areas.
![]()
Step 3
Select “Mask Path” under the Mask section and play it upon color correcting. This will start the mask tracking throughout the clip. The color corrections will be applied to the masked area throughout the video.
![]()
Part 3: Make Mask Tracking Easy with Wondershare Filmora: Working Out the Details
The above-mentioned mask tracking software is professional but is difficult to comprehend. This software is not compatible in terms of convenience. This was when users needed software with easy access and an editing interface. Wondershare Filmora performs diverse creation and editing tasks with expertise. The software assists in diverse audio, video, and text-editing tasks.
The AI-backed algorithms have made achieving perfection in your editing task seamless. In Filmora’s new V13 upgrade, it has introduced an AI masking feature. This feature offers to mask character or subject and auto-analyzes the selected area. In addition, for manual motion tracking masks, users can also resize the mask brush.
Step-by-Step Guide to AI Masking in Filmora
To understand this mask tracking feature better, we have assembled the steps of it. In the following guide, you will learn about accessing and applying this tool:
Step 1Place Media to the Timeline
Upon entering Filmora, click the “New Project” button and access its editing interface. Go to the Project Media section and click the “Import” button. Afterward, import your file and bring it to the timeline using your cursor.
![]()
Step 2Access and Employ AI Masking
Select the video in the timeline and navigate towards the right-side settings panel. In the “Video” tab, you’ll find the “Mask” section. Under this section, select the “AI Mask” option and scroll down to adjust its settings. Expand the “AI Mask” section, and choose the options you want masking for. Once you see the masked results on the preview screen, adjust the other settings below.
![]()
Step 3Save the Settings and Export
Afterward, click the “Save as custom” button to save these settings as a preset for later use. Further, make other adjustments and click on the “Export” button to finalize.
![]()
Free Download For Win 7 or later(64-bit)
Free Download For macOS 10.14 or later
Additional Editing Features of Wondershare Filmora
Along with masker line tracking, there are other video editing and AI features of Filmora. Keep reading the below section to know more about them:
1. AI Text-to-Video
Turn your words into graphics using this generative AI of Filmora. It transforms your textual directions into videos, along with images and voices. Using this AI will save you the effort of creating or hiring a professional.
2. AI Copilot Editing
Why spend hours exploring Filmora’s interface when you can have your guide? The AI Copilot acts like your personal chatbot assistant. You can converse with it like regular people, and it will show you directions on the feature. In addition, it features buttons to employ a specific effect or function.
3. Screen Recorder
Are you a creator who uploads video tutorials and educational videos? You can use Filmora’s screen recorder to create content in a seamless manner. It offers microphone recording and webcam recording for maximum interactivity. In addition, you can adjust custom screen resolution settings and more.
4. Video Background Remover
Leave the effort of adding a green screen in your background during video creation. Filmora’s AI technology can remove video backgrounds without any flaws. Users can replace the background with solid colors, gradients, and more afterward.
5. Silence Detection
Those long or short pauses during video recording are annoying for your audience. They decline the quality of the video and ultimately decline audience engagement. To remove such pauses, use Filmora silence detection AI to auto-eliminate them.
Free Download For Win 7 or later(64-bit)
Free Download For macOS 10.14 or later
Conclusion
In this article, users have gained insights into top mask tracking software. Along with their applications, the article discussed how to access and apply masking. However, masking in the first two tools can be difficult for some people. Hence, we introduced Wondershare Filmora as an easy desktop alternative. If you want to employ an easy motion tracking mask, use this versatile software.
Free Download Free Download Learn More

Part 1: Working Out the Comprehensive Methods to Perform Mask Tracking on Adobe After Effects
Adobe After Effects is a powerful tool for mask tracking and other functions. The interface of this tool tailors your content to your needs with precision. The process of masking is convenient and accessible and provides accurate results. Its advanced masking options, like filling up the mask, add a realistic touch. Before learning about masking in After Effects, let’s discuss some of its features:
- Text Animations: Animating your text in Adobe After Effects is a comprehensive experience. It is because the software has amazing text fonts and animation options. You can also set the appearance settings like opacity, color, and more text. In addition, the software has pre-installed effects and presets to ease the process.
- VFX/Visual Effects: Elevate your images and videos using Adobe’s amazing visual elements. It can eliminate mistakes, and results are so promising that they become invisible. You can use the mask tracking effect to hide and fill objects. In addition, you can turn your transitions into high-resolution 3D or 4D videos.
- Motion Graphics: It moves anything with its motion graphics functionality and advanced keyframing. Along with animating text, the feature allows you to move the logos. You can move a logo on any background from top to bottom or left to right. With its flickering and wiggling effects, make animations without keyframing.
- Rotoscoping: This After Effects function eliminates using green screens in your videos. Using the pen tool, you can merge a different object in a different footage. Afterward, you can polish the mask by resizing and adjusting opacity values.
- Motion Tracking: Elevate the graphics of your videos using the motion tracking feature. This function connects any image with an object’s motion. Therefore, your images become animated and add a creative element to the content. Its cloud collaboration with other software allows users to download assets.
Step-by-Step Procedure for Masking in Adobe After Effects
Now that you know the After Effects masker line tracking feature, let’s move forward. Read the following guide to learn more about masking:
Step 1
After importing your clip into the timeline, select it in the timeline panel. Navigate towards the upper toolbar and select the “Pen Tool” option. Afterward, create a mask around the object that you want to remove.
![]()
Step 2
You’ll see a mask around the object, and the rest of the screen will disappear. Navigate to the timeline panel, expand the video track options, and select “Mask.” Click the “Mask” navigation arrow and select “None.”
![]()
Step 3
Click the “Mask” button and select the “Track Mask” option. A mask tracker window will appear on the right side; expand the “Method” option. Following that, select the type of masking you want, like “Position.” Play the video from beginning to end for motion detection. Afterward, change the “Mask” mode to “Add” to apply masking.
![]()
Step 4
Afterward, change the Mask mode to “Subtract” from the timeline. Now, navigate towards the topmost toolbar and expand the “Window” tab. From the expansion menu, click the “Content-Aware Fill” option.
![]()
Step 5
Move towards the “Mask” option, expand “Mask Path,” and change the values below. Now, go to the right side, increase “Alpha Expansion,” and click “Generate Fill Layer.” Once the mask tracking completes, download your video.
![]()
Part 2: Providing a Detailed Guide on How to Do Mask Tracking with Adobe Premiere Pro
Adobe Premiere Pro is one of the industry’s leading tools for editing videos. It offers a wide range of features and built-in effects to elevate content. The software offers precise editing capabilities for mask tracking and other enhancements. In addition, it has many visual, video, and audio effects and presets to apply. Let’s discuss some key features of this tool that make it worthy of being top:
- Motion Graphics Templates: With its seamless After Effect collaboration, it offers built-in templates. These templates include multiple text, shapes, and graphics. You can also customize these templates as per content relevancy and taste.
- Edit Audio: Premiere Pro has multiple audio editing options to maintain audio quality. The tool allows you to decrease the volume of one track while increasing others. In addition, you can make audio adjustments that fit a sound.
- Color Correction: Enhance the graphical element in your videos using this feature. It offers both color correction and enhancing capabilities. You can employ this color correction if you have overexposed or underexposed videos.
- Movie and Film Editing: A professional editor offers applications in the media industry. The Premiere Pro offers seamless collaboration with all video and audio formats. In addition, it can import files from all sources like DSLRs and more.
- Speech to Text: It doesn’t just limit you to video editing but also offers transcript creation. The software analyzes your footage’s audio and creates transcripts. Afterward, you can use them as subtitles and captions.
Step-by-Step Procedure for Masking in Premiere Pro
After introducing mask tracking in Adobe Premiere Pro, let’s progress further. Continue reading the following guide to gain a deeper understanding of masking:
Step 1
After importing your video in the timeline, select it and navigate towards the toolbar. In the “Edit > Effect” section, select “Lumetri Color” under “Video Effects.” Then, select the mask option under Lumetri colors and set it on the screen.
![]()
Step 2
Then, apply the color correction options on the masked areas.
![]()
Step 3
Select “Mask Path” under the Mask section and play it upon color correcting. This will start the mask tracking throughout the clip. The color corrections will be applied to the masked area throughout the video.
![]()
Part 3: Make Mask Tracking Easy with Wondershare Filmora: Working Out the Details
The above-mentioned mask tracking software is professional but is difficult to comprehend. This software is not compatible in terms of convenience. This was when users needed software with easy access and an editing interface. Wondershare Filmora performs diverse creation and editing tasks with expertise. The software assists in diverse audio, video, and text-editing tasks.
The AI-backed algorithms have made achieving perfection in your editing task seamless. In Filmora’s new V13 upgrade, it has introduced an AI masking feature. This feature offers to mask character or subject and auto-analyzes the selected area. In addition, for manual motion tracking masks, users can also resize the mask brush.
Step-by-Step Guide to AI Masking in Filmora
To understand this mask tracking feature better, we have assembled the steps of it. In the following guide, you will learn about accessing and applying this tool:
Step 1Place Media to the Timeline
Upon entering Filmora, click the “New Project” button and access its editing interface. Go to the Project Media section and click the “Import” button. Afterward, import your file and bring it to the timeline using your cursor.
![]()
Step 2Access and Employ AI Masking
Select the video in the timeline and navigate towards the right-side settings panel. In the “Video” tab, you’ll find the “Mask” section. Under this section, select the “AI Mask” option and scroll down to adjust its settings. Expand the “AI Mask” section, and choose the options you want masking for. Once you see the masked results on the preview screen, adjust the other settings below.
![]()
Step 3Save the Settings and Export
Afterward, click the “Save as custom” button to save these settings as a preset for later use. Further, make other adjustments and click on the “Export” button to finalize.
![]()
Free Download For Win 7 or later(64-bit)
Free Download For macOS 10.14 or later
Additional Editing Features of Wondershare Filmora
Along with masker line tracking, there are other video editing and AI features of Filmora. Keep reading the below section to know more about them:
1. AI Text-to-Video
Turn your words into graphics using this generative AI of Filmora. It transforms your textual directions into videos, along with images and voices. Using this AI will save you the effort of creating or hiring a professional.
2. AI Copilot Editing
Why spend hours exploring Filmora’s interface when you can have your guide? The AI Copilot acts like your personal chatbot assistant. You can converse with it like regular people, and it will show you directions on the feature. In addition, it features buttons to employ a specific effect or function.
3. Screen Recorder
Are you a creator who uploads video tutorials and educational videos? You can use Filmora’s screen recorder to create content in a seamless manner. It offers microphone recording and webcam recording for maximum interactivity. In addition, you can adjust custom screen resolution settings and more.
4. Video Background Remover
Leave the effort of adding a green screen in your background during video creation. Filmora’s AI technology can remove video backgrounds without any flaws. Users can replace the background with solid colors, gradients, and more afterward.
5. Silence Detection
Those long or short pauses during video recording are annoying for your audience. They decline the quality of the video and ultimately decline audience engagement. To remove such pauses, use Filmora silence detection AI to auto-eliminate them.
Free Download For Win 7 or later(64-bit)
Free Download For macOS 10.14 or later
Conclusion
In this article, users have gained insights into top mask tracking software. Along with their applications, the article discussed how to access and apply masking. However, masking in the first two tools can be difficult for some people. Hence, we introduced Wondershare Filmora as an easy desktop alternative. If you want to employ an easy motion tracking mask, use this versatile software.
Mastering the Art of Video Framing
Are you in search of the best practice to frame a video? If yes, then cheer up, as we have got you covered! In this guide, we will share the top 6 types of video framing that even novice and expert users can master.
Framing videos involves focusing on a specific subject and blocking out the irrelevant things in the background. Depending on the results you want, video framing can differ a lot. The information below will help you learn about different frames and how to utilize them effectively.
So, without further ado, let’s get into the deets.
- 01 Establishing Shots
- 02 Single Shot
- 03 Two Shot/Group Shot
- 04 Over-the-shoulder (OTS)
- 05 Insert Shot
- 06 POV Shot (OTS)
Part1 Basic Knowledge About Different Framing
Because framing is related to capturing or focusing an object by the camera lens, it can vary depending on your desired shot. Let’s start with the full-shot first and understand how it works.
01 Full Shot (FS)
Remember the shot of Marvel’s Guardians of the Galaxy, where all the players are focused in one wide frame? This excerpt is a practical example of what a full shot looks like. Full-shot video framing is particularly common in action or thriller movies where the creator wants to generate suspense in the audience.
As the name indicates, a full shot often emphasizes the scenery as your subject fills the frame. Like the background isn’t ignored or blurred out; instead, it isn’t overly stressed as well. In most cases, the camera starts with a wide-angle shot and then eventually ends with focusing on the subject.
A full-camera shot greatly emphasizes the physical presence of the character. It tracks the subject’s movements, gestures, or body language, making it the focal point. As a result, the shot obtained delivers a better understanding of actions and interactions among the character and its surroundings.
02 Medium Shot (MS)
We often see friends in movies, going to a casino, or playing cards at a bar. What do we observe in that shot? Hand movements, facial expressions, body language, and a little context of what is happening in the background. This shot is known as the medium shot and is often called the ¾ shot.
Using the medium shot video framing technique, the camera lens allows the viewers to see the background while still focusing on the main character. It’s like you will know what is happening at the back but still remain close to the character’s emotions and gestures.
A medium shot usually begins by showing the subject from the knees to his face. In other cases, the shot can also start from the character’s waist to the top of their head. Compared to long shots, a medium shot takes you closer to the subject’s emotions.
For example, in The Princess Diary, you can see how medium-shot video framing has been useful in portraying comedic scenes. You can see Mia reaching out for plates and glasses around the tables and her eyes squinting to concentrate on the process. The medium shot captures even the smallest emotions while focusing on the background.
03 Close-Up (CU)
When the subject’s head and face take up most of the frame, framing videos is known as a close-up shot. And a particular example of this shot can be spotted in the airport scene in “Casablanca.” This scene shows how the camera lens takes various shots before ending up on the actor’s face, showcasing a number of emotions and intimacy.
A close-up shot is an eye-level shot, and as a result, it takes the subject to the forefront. As a result, this shot establishes a distinct sense of connection between the audience and the character. Additionally, the environmental distraction is kept minimal throughout this shot. This setup helps maintain the emotional impact that the shot will portray.
Some of the common emotions that would be captured using close-up video framing techniques include:
- Tear-filled gaze
- Furrowed brow
- Subtle smile
Cinematographers often use such shots to intensify climaxes. These shots can be viewed as a window to the characters’ souls, allowing viewers to adapt the emotions on another level.
04 Extreme Close-Up (XCU)
To understand the extreme close-up video framing technique, let us illustrate the movie that remained our favorite action thriller while growing up: Minority Report (2002). In this movie, the shots briefly focus on the character’s eyes before hopping into the future view. This extreme close shot serves as a crucial plot to develop thematic elements in the audience.
So, an extremely close shot focuses on specific details of a character. This can be either the subject’s eyes, ears, or mouth. However, the shot is not often employed casually. Instead, it is used in a stance where it is appropriate and when there is a need to develop heightened emotion among the viewers.
You can see this shot as a magnifying glass that draws attention to even the smallest emotion that would have gone unnoticed otherwise.
Part2 Master framing types
Don’t know how to master framing types? No worries, we have a comprehensive guide on that! First of all, let’s start with the most basic way to frame a video:
01 Establishing Shots
An establishing shot is usually used to develop a context for the next upcoming scene. It is often a movie’s first scene and portrays an extremely wide shot of the context. This frame on the video indicates the location and time of the scene to the audience to engage with them on a deeper level.
One of the least-known things about an establishing shot is that it doesn’t require a narrative to explain what is happening. Instead, it is shot alone, and the context is shot so that the audience gets to know everything as soon as they see the excerpt.
An amazing example of establishing a shot can be seen in Stanely Kubrick’s horror film, The Shining. In the movie’s opening scene, the camera goes through the forest and mountains before getting onto the mountaintop hotel where the action occurs.
02 Single Shot
A single shot frames a video that includes a single subject or character. It occurs when a character is talking or reacting to a scenario. Here, remember that if the lens shifts focus from a subject, it is not a single shot.
In the movie Extraction 2020, you can see a single shot being utilized when the character goes on to rescue his son from the kidnappers. The shot extends a long way, including through a car crash, weapon chasing, and that iconic Hemsworth sliding off a building into a brutal fight. And the incredible part was that all of this was captured in a single shot.
03 Two Shot/Group Shot
As the name indicates, a two-shot or a group shot is used to frame a video that involves more than one character. It could be two people conversing or friends sitting at a cafe gossiping. This shot is particularly helpful in portraying the relationship between the characters in the frame.
A good example of two-shot video framing can be seen in the movie Silverado. During the final shooting scene, you can see two cowboys standing far apart while facing each other. Here, the two-shot technique emphasizes tension before the cowboys draw their guns.
04 Over-the-shoulder (OTS)
OTS, or Over-the-shoulder, is the most used shot in framing videos for making movies. To understand how this shot works, let us take an example of two subjects, one named A and the other named B. Now, A is sitting right in front of subject B. Here; the shot is executed by focusing on subject A from the shoulder of subject B. The basic purpose of the shot is to fill the conversation or the meeting between the subjects.
To understand this situation better, let’s take an example from the movie How to Train Your Dragon. In the scene, Hiccup is seen having a conversation with his father. Here, when Hiccup is talking, the camera is focused on him over his father’s shoulder. And when his father talks, the shot is taken over the shoulder of Hiccup.
05 Insert Shot
Insert short framing technique uses selective focus to draw the audience’s attention to the subject. Whether it be an object or merely a piece of information, insert shot has always been effective in emphasizing details.
For example, in The X-Files, an insert shot is used to provide the audience with a look at the file of Scully. This insert shot reveals the most shocking revelations in the file, including a tissue sample. Additionally, the file insert shot also shows how shady Mulder is.
06 POV Shot
A POV shot is used to frame a video in a way that shows what a character is doing. You can take this as a shot showing the world from the character’s perspective. Our modern-day games, including Call of Duty Black Ops, are a common example of such POV shots.
The movie Friday the 13th is an iconic example of a POV shot frame on video. If you remember, the movie revolved around a killer who wasn’t identified until the end. So, the audience watched the film from the killer’s perspective until he was recognized.
Conclusion
To sum it up, mastering the art of video framing, from full shots to POV shots, is an exciting journey that helps you to weave exciting stories. Understanding these techniques will empower you to craft a compelling narrative to captivate your audience, whether you are a beginner or a professional.
So, begin with framing videos now and let your work speak volumes!
GIF to JPG Is as Simple as a Blink of an Eye
GIF to JPG is as Simple as a Blink of an Eye
An easy yet powerful editor
Numerous effects to choose from
Detailed tutorials provided by the official channel
We are a generation of people who are aware of all the tools that are catering to our needs. For all the procedures from basic to advance, now the tools are available helping us to deal with all such things.
Well, this read is for those who are in the editing field and always ready to try hands-on new animations. Every time it is not necessary that the file you have received is in the same format as required. In that case, the right tools are important to make the conversion.
By keeping the same in mind, we have presented this read for you. Here we discuss GIF to JPG converting tools or vice-versa. These tools will help you to get the task done as required, and you will not face any sort of problem at all. To know all the details keep reading till the last!
In this article
01 [How to Create GIF Animation from a Stack of JPGs](#Part 1)
02 [5 Ways to Convert GIF to Jpg [Online & Desktop]](#Part 2)
03 [5 Ways to Convert Jpg to GIF [Online & Desktop]](#Part 3)
Part 1 How to Create GIF Animation from a Stack of JPGs
Sometimes it happens that we have some pictures from our favorite even or so, and we are looking forward to combining all of them in one file. Undoubtedly, this conversion is easy but only when you are aware of the right steps. Until and unless you have no clue about the steps, the JPG to GIF conversion seems to be impossible. Let’s have a look at the steps you need to follow for it:
Step 1: Firstly, “choose the photos”. Until and unless you do not have the selected photos, you cannot initiate the conversion process.
Step 2: Choose the right tool. A tool is important to choose because, without it, you cannot be a part of the process. In this case, we are discussing ADOBE Photoshop.
Step 3: Upload all the photos that you have selected and move them to the timeline panel by clicking on the Windows option. Here you need to select “Create Video Timeline.”
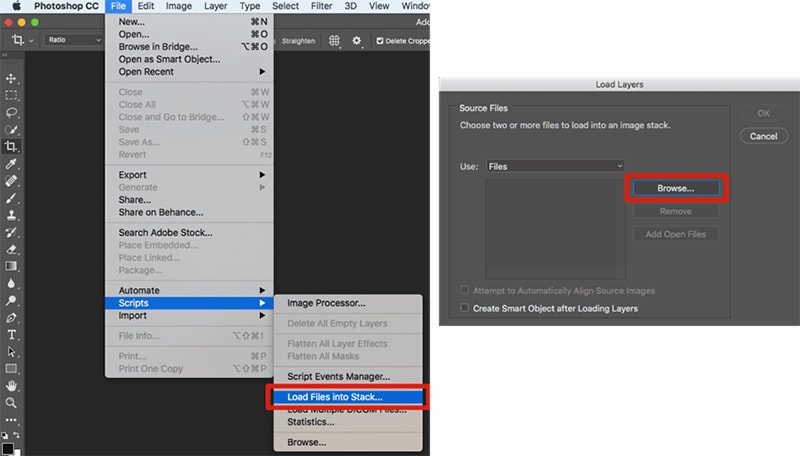
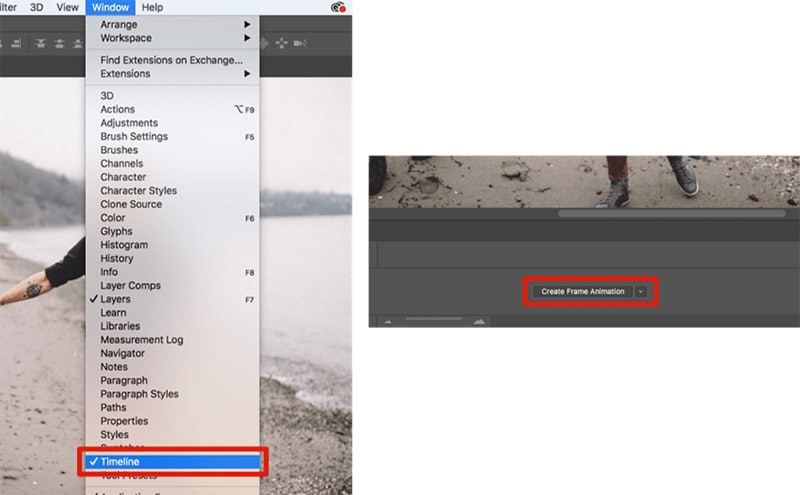
Step 4: Do the editing as needed. You can simply add layers to the frame or change the basics of the particular image by clicking on it.
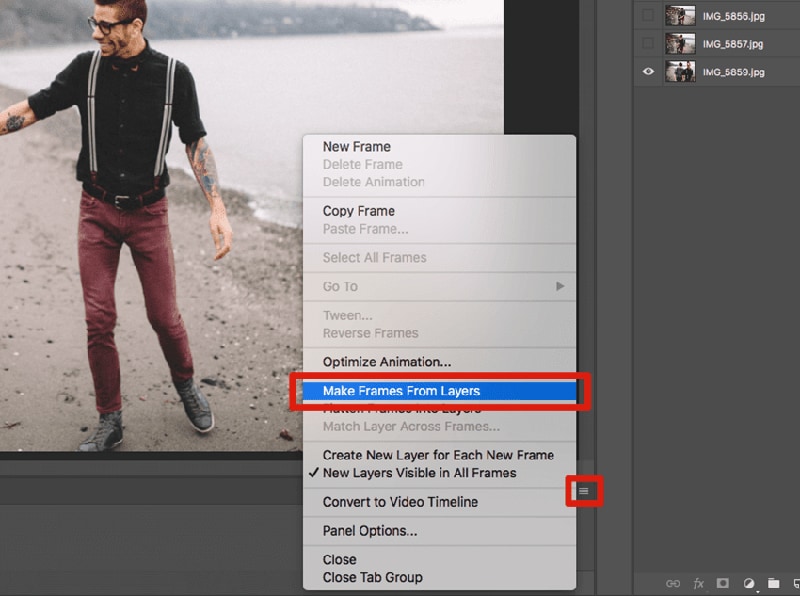
Step 5: Set up the loop timing and then click on “Save as GIF”

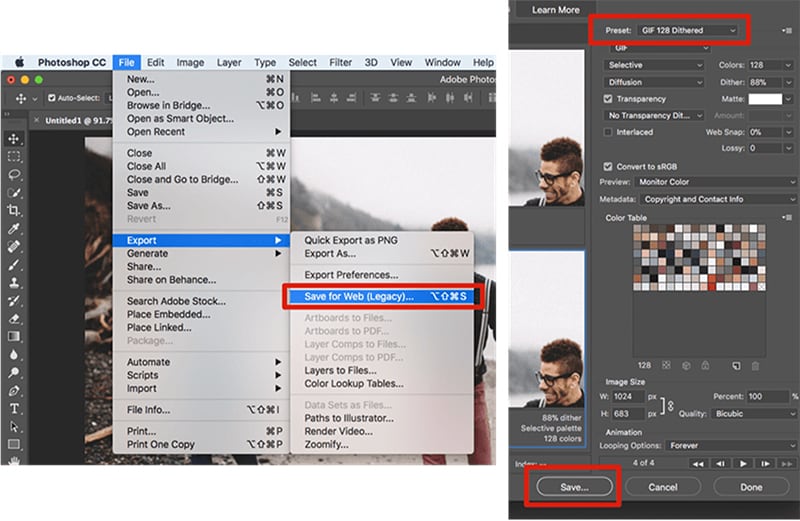
Part 2 Ways to Convert GIF to Jpg [Online & Desktop]
Well, in this section, we are discussing the best tools that cater to your needs of converting GIF to JPG easily. These tools are available in the form of extensions and also on desktops. It is on the user which format they want to consider. The tools to know are as follows:-
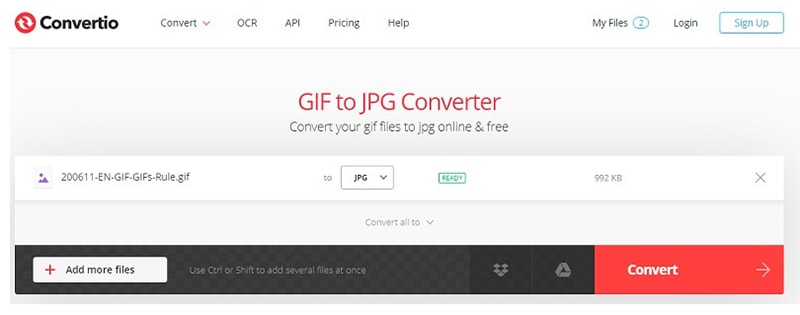
01Convertio
Convertio is a free online tool that converts GIF to JPG. It is easy to use, just upload the GIF and then download the converted JPG file. This tool is useful for those who want to share their animated GIFs on social media sites such as Facebook or Twitter that don’t accept animated GIFs. Furthermore, it is a perfect tool for marketers who want to use GIFs in their content, but they need the images to be in JPG format. However, it works like any other online converter, you upload your GIF, and it will generate an image of the same size as the original one.
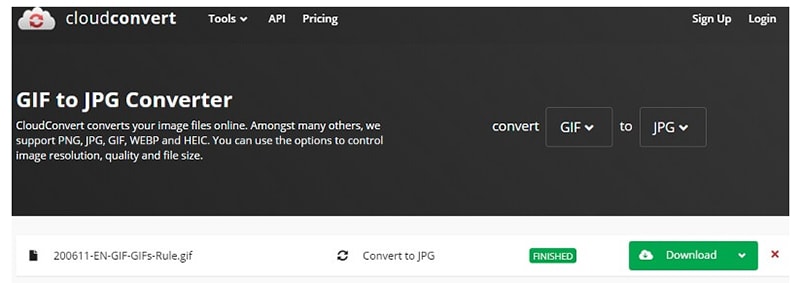
02CloudConvert
CloudConvert is a cloud-based online conversion tool that converts files from one format to another. The service can convert GIFs to JPGs, PNGs, and other formats. Users are happy because CloudConvert is a reliable and easy-to-use tool that can help you convert files from one format to another. It has a simple interface with drag-and-drop features. It also offers an efficient way to convert large batches of files at once, without the need for uploading them on your device or using any additional software.
03FileZigZag
FileZigZag is an easy to use web app that converts GIFs to JPGs with just a few clicks. In the toolbar, you can upload the GIF of your choice and then convert it into one of three different resolutions: HD, Medium, or Low. The higher resolution will produce better quality but will take up more space on your hard drive. It is a free, open-source tool that can be used on both Windows and Mac computers.

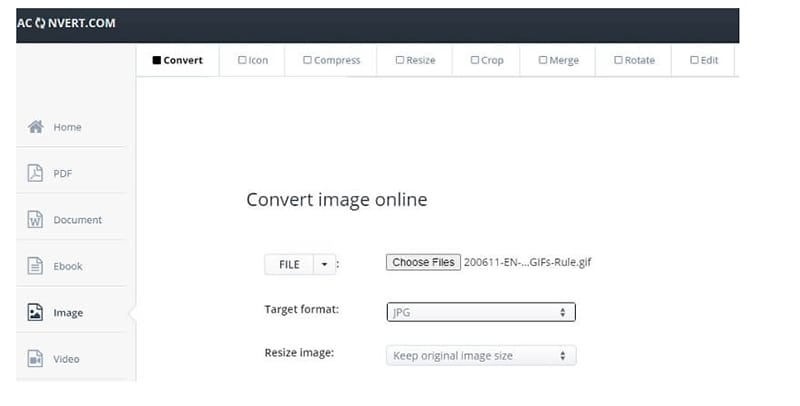
04Aconvert
Aconvert is a tool that converts GIFs to JPGs. It’s a very simple and straightforward tool for converting GIFs to JPGs. It has two main features: Convert gif files to jpg files and Convert jpg files to gif files.
The first feature is self-explanatory: it will convert any gif file, even animated, into a jpg file. The second feature is also easy to use: you just have to drag and drop the desired jpg file onto the converter, and it will create a corresponding animated gif file of the same size as the original one.
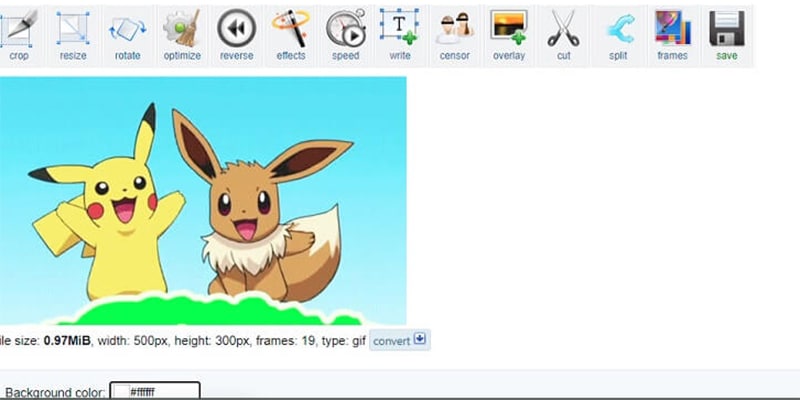
05Ezgif
Ezgif is a free online tool that converts GIF to JPG. This tool was created by the team of developers at Ezgif in order to make converting GIFs as easy as possible. It’s a very simple and straightforward process, which makes it perfect for anyone who wants to convert GIFs but doesn’t want to spend time learning how it works. All you need to do is upload your GIF, choose the desired output format (JPG), and click convert.
It’s a free and easy to use tool that converts your animated GIFs into high-quality JPGs, PNGs, and WebP formats.
Part 3 5 Ways to Convert Jpg to GIF [Online & Desktop]
This section will help you to know about the best tools available to convert the JPG file into GIF. We all know it is not necessary that every time you have a GIF available suiting to the needs. In that case, these tools will help you. Well, the tools you can consider include-
01Filmora
Wondershare Filmora Video Editor is video editing software that helps users to create and share videos of their own. It provides an easy way to make videos from photos, videos, and music. Users can edit the video by adding text, filters, and other effects. This tool is a JPG to GIF converter as well that has been around for many years. It has evolved into a more sophisticated tool with time. This software has been used by professionals in many different fields such as marketing, design, photography, etc. Furthermore, it has a simple and intuitive interface which makes it easy to use.

Wondershare Filmora - Best Video Editor for Mac/Windows
5,481,435 people have downloaded it.
Build unique custom animations without breaking a sweat.
Focus on creating epic stories and leave the details to Filmora’s auto features.
Start a creative adventure with drag & drop effects and endless possibilities.
Filmora simplifies advanced features to save you time and effort.
Filmora cuts out repetition so you can move on to your next creative breakthrough.
02OnlineConverterFree
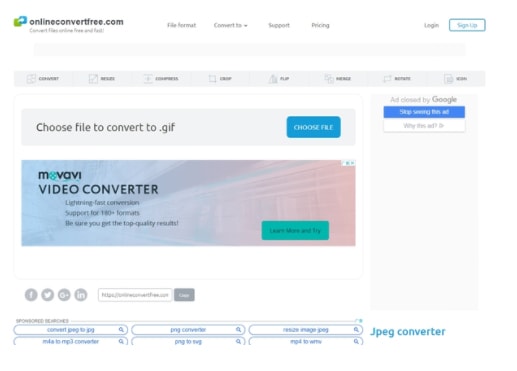
OnlineConverterFree is an online conversion tool that converts JPG images to GIF format. It is a free, easy-to-use, and powerful converter. Additionally, It can convert any of the following formats: JPEG, PNG, BMP, TIFF, and GIF.
It also has a preview function for checking the quality of the converted images before you download them. You just need to check that out so that you can analyze whether the same quality will suit your needs or not. Also, the conversion process is so fast that it can be used on large files without taking up too much time or space.
03MyGeodata Converter
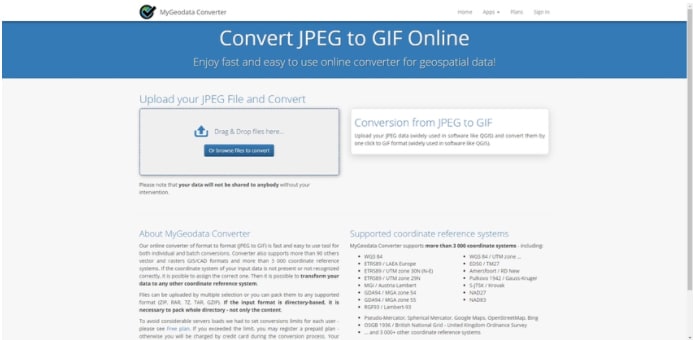
MyGeodata Converter is a web-based tool that converts files from one format to another. It has the capability to convert between different formats like JPG, GIF, PNG, SVG, and more. The converter provides an easy way to convert JPG into the desired format. It also supports batch conversion of multiple files at the same time.
The interface of the tool is very simple, which means that even a layman will be able to use this tool.
04ConvertImage
ConvertImage is an online tool that converts images from one format to another. This tool is a JPG to GIF converter that can be used on the web. It has a drag and drop interface, which makes it easy to use for anyone who knows how to use a computer. Users can upload their photos from their computer or from any URL and then choose the desired output format.

05Pixillion image converter
Pixillion is a free online image converter that converts images between different formats.
It is one of the most popular converters available on the internet. It converts images between different formats and has a user-friendly interface. The Pixillion converter supports converting images from JPG to GIF, PNG, BMP, TIFF, and other formats. It also provides support for batch conversion of multiple files at once.

● Key Takeaways from This Episode →
● Converting GIF to JPG is a simple process.
● Filmora is an occupied tool for all conversions.
● Conversions are easy to do with the right set of tools.
We are a generation of people who are aware of all the tools that are catering to our needs. For all the procedures from basic to advance, now the tools are available helping us to deal with all such things.
Well, this read is for those who are in the editing field and always ready to try hands-on new animations. Every time it is not necessary that the file you have received is in the same format as required. In that case, the right tools are important to make the conversion.
By keeping the same in mind, we have presented this read for you. Here we discuss GIF to JPG converting tools or vice-versa. These tools will help you to get the task done as required, and you will not face any sort of problem at all. To know all the details keep reading till the last!
In this article
01 [How to Create GIF Animation from a Stack of JPGs](#Part 1)
02 [5 Ways to Convert GIF to Jpg [Online & Desktop]](#Part 2)
03 [5 Ways to Convert Jpg to GIF [Online & Desktop]](#Part 3)
Part 1 How to Create GIF Animation from a Stack of JPGs
Sometimes it happens that we have some pictures from our favorite even or so, and we are looking forward to combining all of them in one file. Undoubtedly, this conversion is easy but only when you are aware of the right steps. Until and unless you have no clue about the steps, the JPG to GIF conversion seems to be impossible. Let’s have a look at the steps you need to follow for it:
Step 1: Firstly, “choose the photos”. Until and unless you do not have the selected photos, you cannot initiate the conversion process.
Step 2: Choose the right tool. A tool is important to choose because, without it, you cannot be a part of the process. In this case, we are discussing ADOBE Photoshop.
Step 3: Upload all the photos that you have selected and move them to the timeline panel by clicking on the Windows option. Here you need to select “Create Video Timeline.”


Step 4: Do the editing as needed. You can simply add layers to the frame or change the basics of the particular image by clicking on it.

Step 5: Set up the loop timing and then click on “Save as GIF”


Part 2 Ways to Convert GIF to Jpg [Online & Desktop]
Well, in this section, we are discussing the best tools that cater to your needs of converting GIF to JPG easily. These tools are available in the form of extensions and also on desktops. It is on the user which format they want to consider. The tools to know are as follows:-
01Convertio
Convertio is a free online tool that converts GIF to JPG. It is easy to use, just upload the GIF and then download the converted JPG file. This tool is useful for those who want to share their animated GIFs on social media sites such as Facebook or Twitter that don’t accept animated GIFs. Furthermore, it is a perfect tool for marketers who want to use GIFs in their content, but they need the images to be in JPG format. However, it works like any other online converter, you upload your GIF, and it will generate an image of the same size as the original one.

02CloudConvert
CloudConvert is a cloud-based online conversion tool that converts files from one format to another. The service can convert GIFs to JPGs, PNGs, and other formats. Users are happy because CloudConvert is a reliable and easy-to-use tool that can help you convert files from one format to another. It has a simple interface with drag-and-drop features. It also offers an efficient way to convert large batches of files at once, without the need for uploading them on your device or using any additional software.

03FileZigZag
FileZigZag is an easy to use web app that converts GIFs to JPGs with just a few clicks. In the toolbar, you can upload the GIF of your choice and then convert it into one of three different resolutions: HD, Medium, or Low. The higher resolution will produce better quality but will take up more space on your hard drive. It is a free, open-source tool that can be used on both Windows and Mac computers.

04Aconvert
Aconvert is a tool that converts GIFs to JPGs. It’s a very simple and straightforward tool for converting GIFs to JPGs. It has two main features: Convert gif files to jpg files and Convert jpg files to gif files.
The first feature is self-explanatory: it will convert any gif file, even animated, into a jpg file. The second feature is also easy to use: you just have to drag and drop the desired jpg file onto the converter, and it will create a corresponding animated gif file of the same size as the original one.

05Ezgif
Ezgif is a free online tool that converts GIF to JPG. This tool was created by the team of developers at Ezgif in order to make converting GIFs as easy as possible. It’s a very simple and straightforward process, which makes it perfect for anyone who wants to convert GIFs but doesn’t want to spend time learning how it works. All you need to do is upload your GIF, choose the desired output format (JPG), and click convert.
It’s a free and easy to use tool that converts your animated GIFs into high-quality JPGs, PNGs, and WebP formats.

Part 3 5 Ways to Convert Jpg to GIF [Online & Desktop]
This section will help you to know about the best tools available to convert the JPG file into GIF. We all know it is not necessary that every time you have a GIF available suiting to the needs. In that case, these tools will help you. Well, the tools you can consider include-
01Filmora
Wondershare Filmora Video Editor is video editing software that helps users to create and share videos of their own. It provides an easy way to make videos from photos, videos, and music. Users can edit the video by adding text, filters, and other effects. This tool is a JPG to GIF converter as well that has been around for many years. It has evolved into a more sophisticated tool with time. This software has been used by professionals in many different fields such as marketing, design, photography, etc. Furthermore, it has a simple and intuitive interface which makes it easy to use.

Wondershare Filmora - Best Video Editor for Mac/Windows
5,481,435 people have downloaded it.
Build unique custom animations without breaking a sweat.
Focus on creating epic stories and leave the details to Filmora’s auto features.
Start a creative adventure with drag & drop effects and endless possibilities.
Filmora simplifies advanced features to save you time and effort.
Filmora cuts out repetition so you can move on to your next creative breakthrough.
02OnlineConverterFree
OnlineConverterFree is an online conversion tool that converts JPG images to GIF format. It is a free, easy-to-use, and powerful converter. Additionally, It can convert any of the following formats: JPEG, PNG, BMP, TIFF, and GIF.
It also has a preview function for checking the quality of the converted images before you download them. You just need to check that out so that you can analyze whether the same quality will suit your needs or not. Also, the conversion process is so fast that it can be used on large files without taking up too much time or space.

03MyGeodata Converter
MyGeodata Converter is a web-based tool that converts files from one format to another. It has the capability to convert between different formats like JPG, GIF, PNG, SVG, and more. The converter provides an easy way to convert JPG into the desired format. It also supports batch conversion of multiple files at the same time.
The interface of the tool is very simple, which means that even a layman will be able to use this tool.

04ConvertImage
ConvertImage is an online tool that converts images from one format to another. This tool is a JPG to GIF converter that can be used on the web. It has a drag and drop interface, which makes it easy to use for anyone who knows how to use a computer. Users can upload their photos from their computer or from any URL and then choose the desired output format.

05Pixillion image converter
Pixillion is a free online image converter that converts images between different formats.
It is one of the most popular converters available on the internet. It converts images between different formats and has a user-friendly interface. The Pixillion converter supports converting images from JPG to GIF, PNG, BMP, TIFF, and other formats. It also provides support for batch conversion of multiple files at once.

● Key Takeaways from This Episode →
● Converting GIF to JPG is a simple process.
● Filmora is an occupied tool for all conversions.
● Conversions are easy to do with the right set of tools.
We are a generation of people who are aware of all the tools that are catering to our needs. For all the procedures from basic to advance, now the tools are available helping us to deal with all such things.
Well, this read is for those who are in the editing field and always ready to try hands-on new animations. Every time it is not necessary that the file you have received is in the same format as required. In that case, the right tools are important to make the conversion.
By keeping the same in mind, we have presented this read for you. Here we discuss GIF to JPG converting tools or vice-versa. These tools will help you to get the task done as required, and you will not face any sort of problem at all. To know all the details keep reading till the last!
In this article
01 [How to Create GIF Animation from a Stack of JPGs](#Part 1)
02 [5 Ways to Convert GIF to Jpg [Online & Desktop]](#Part 2)
03 [5 Ways to Convert Jpg to GIF [Online & Desktop]](#Part 3)
Part 1 How to Create GIF Animation from a Stack of JPGs
Sometimes it happens that we have some pictures from our favorite even or so, and we are looking forward to combining all of them in one file. Undoubtedly, this conversion is easy but only when you are aware of the right steps. Until and unless you have no clue about the steps, the JPG to GIF conversion seems to be impossible. Let’s have a look at the steps you need to follow for it:
Step 1: Firstly, “choose the photos”. Until and unless you do not have the selected photos, you cannot initiate the conversion process.
Step 2: Choose the right tool. A tool is important to choose because, without it, you cannot be a part of the process. In this case, we are discussing ADOBE Photoshop.
Step 3: Upload all the photos that you have selected and move them to the timeline panel by clicking on the Windows option. Here you need to select “Create Video Timeline.”


Step 4: Do the editing as needed. You can simply add layers to the frame or change the basics of the particular image by clicking on it.

Step 5: Set up the loop timing and then click on “Save as GIF”


Part 2 Ways to Convert GIF to Jpg [Online & Desktop]
Well, in this section, we are discussing the best tools that cater to your needs of converting GIF to JPG easily. These tools are available in the form of extensions and also on desktops. It is on the user which format they want to consider. The tools to know are as follows:-
01Convertio
Convertio is a free online tool that converts GIF to JPG. It is easy to use, just upload the GIF and then download the converted JPG file. This tool is useful for those who want to share their animated GIFs on social media sites such as Facebook or Twitter that don’t accept animated GIFs. Furthermore, it is a perfect tool for marketers who want to use GIFs in their content, but they need the images to be in JPG format. However, it works like any other online converter, you upload your GIF, and it will generate an image of the same size as the original one.

02CloudConvert
CloudConvert is a cloud-based online conversion tool that converts files from one format to another. The service can convert GIFs to JPGs, PNGs, and other formats. Users are happy because CloudConvert is a reliable and easy-to-use tool that can help you convert files from one format to another. It has a simple interface with drag-and-drop features. It also offers an efficient way to convert large batches of files at once, without the need for uploading them on your device or using any additional software.

03FileZigZag
FileZigZag is an easy to use web app that converts GIFs to JPGs with just a few clicks. In the toolbar, you can upload the GIF of your choice and then convert it into one of three different resolutions: HD, Medium, or Low. The higher resolution will produce better quality but will take up more space on your hard drive. It is a free, open-source tool that can be used on both Windows and Mac computers.

04Aconvert
Aconvert is a tool that converts GIFs to JPGs. It’s a very simple and straightforward tool for converting GIFs to JPGs. It has two main features: Convert gif files to jpg files and Convert jpg files to gif files.
The first feature is self-explanatory: it will convert any gif file, even animated, into a jpg file. The second feature is also easy to use: you just have to drag and drop the desired jpg file onto the converter, and it will create a corresponding animated gif file of the same size as the original one.

05Ezgif
Ezgif is a free online tool that converts GIF to JPG. This tool was created by the team of developers at Ezgif in order to make converting GIFs as easy as possible. It’s a very simple and straightforward process, which makes it perfect for anyone who wants to convert GIFs but doesn’t want to spend time learning how it works. All you need to do is upload your GIF, choose the desired output format (JPG), and click convert.
It’s a free and easy to use tool that converts your animated GIFs into high-quality JPGs, PNGs, and WebP formats.

Part 3 5 Ways to Convert Jpg to GIF [Online & Desktop]
This section will help you to know about the best tools available to convert the JPG file into GIF. We all know it is not necessary that every time you have a GIF available suiting to the needs. In that case, these tools will help you. Well, the tools you can consider include-
01Filmora
Wondershare Filmora Video Editor is video editing software that helps users to create and share videos of their own. It provides an easy way to make videos from photos, videos, and music. Users can edit the video by adding text, filters, and other effects. This tool is a JPG to GIF converter as well that has been around for many years. It has evolved into a more sophisticated tool with time. This software has been used by professionals in many different fields such as marketing, design, photography, etc. Furthermore, it has a simple and intuitive interface which makes it easy to use.

Wondershare Filmora - Best Video Editor for Mac/Windows
5,481,435 people have downloaded it.
Build unique custom animations without breaking a sweat.
Focus on creating epic stories and leave the details to Filmora’s auto features.
Start a creative adventure with drag & drop effects and endless possibilities.
Filmora simplifies advanced features to save you time and effort.
Filmora cuts out repetition so you can move on to your next creative breakthrough.
02OnlineConverterFree
OnlineConverterFree is an online conversion tool that converts JPG images to GIF format. It is a free, easy-to-use, and powerful converter. Additionally, It can convert any of the following formats: JPEG, PNG, BMP, TIFF, and GIF.
It also has a preview function for checking the quality of the converted images before you download them. You just need to check that out so that you can analyze whether the same quality will suit your needs or not. Also, the conversion process is so fast that it can be used on large files without taking up too much time or space.

03MyGeodata Converter
MyGeodata Converter is a web-based tool that converts files from one format to another. It has the capability to convert between different formats like JPG, GIF, PNG, SVG, and more. The converter provides an easy way to convert JPG into the desired format. It also supports batch conversion of multiple files at the same time.
The interface of the tool is very simple, which means that even a layman will be able to use this tool.

04ConvertImage
ConvertImage is an online tool that converts images from one format to another. This tool is a JPG to GIF converter that can be used on the web. It has a drag and drop interface, which makes it easy to use for anyone who knows how to use a computer. Users can upload their photos from their computer or from any URL and then choose the desired output format.

05Pixillion image converter
Pixillion is a free online image converter that converts images between different formats.
It is one of the most popular converters available on the internet. It converts images between different formats and has a user-friendly interface. The Pixillion converter supports converting images from JPG to GIF, PNG, BMP, TIFF, and other formats. It also provides support for batch conversion of multiple files at once.

● Key Takeaways from This Episode →
● Converting GIF to JPG is a simple process.
● Filmora is an occupied tool for all conversions.
● Conversions are easy to do with the right set of tools.
We are a generation of people who are aware of all the tools that are catering to our needs. For all the procedures from basic to advance, now the tools are available helping us to deal with all such things.
Well, this read is for those who are in the editing field and always ready to try hands-on new animations. Every time it is not necessary that the file you have received is in the same format as required. In that case, the right tools are important to make the conversion.
By keeping the same in mind, we have presented this read for you. Here we discuss GIF to JPG converting tools or vice-versa. These tools will help you to get the task done as required, and you will not face any sort of problem at all. To know all the details keep reading till the last!
In this article
01 [How to Create GIF Animation from a Stack of JPGs](#Part 1)
02 [5 Ways to Convert GIF to Jpg [Online & Desktop]](#Part 2)
03 [5 Ways to Convert Jpg to GIF [Online & Desktop]](#Part 3)
Part 1 How to Create GIF Animation from a Stack of JPGs
Sometimes it happens that we have some pictures from our favorite even or so, and we are looking forward to combining all of them in one file. Undoubtedly, this conversion is easy but only when you are aware of the right steps. Until and unless you have no clue about the steps, the JPG to GIF conversion seems to be impossible. Let’s have a look at the steps you need to follow for it:
Step 1: Firstly, “choose the photos”. Until and unless you do not have the selected photos, you cannot initiate the conversion process.
Step 2: Choose the right tool. A tool is important to choose because, without it, you cannot be a part of the process. In this case, we are discussing ADOBE Photoshop.
Step 3: Upload all the photos that you have selected and move them to the timeline panel by clicking on the Windows option. Here you need to select “Create Video Timeline.”


Step 4: Do the editing as needed. You can simply add layers to the frame or change the basics of the particular image by clicking on it.

Step 5: Set up the loop timing and then click on “Save as GIF”


Part 2 Ways to Convert GIF to Jpg [Online & Desktop]
Well, in this section, we are discussing the best tools that cater to your needs of converting GIF to JPG easily. These tools are available in the form of extensions and also on desktops. It is on the user which format they want to consider. The tools to know are as follows:-
01Convertio
Convertio is a free online tool that converts GIF to JPG. It is easy to use, just upload the GIF and then download the converted JPG file. This tool is useful for those who want to share their animated GIFs on social media sites such as Facebook or Twitter that don’t accept animated GIFs. Furthermore, it is a perfect tool for marketers who want to use GIFs in their content, but they need the images to be in JPG format. However, it works like any other online converter, you upload your GIF, and it will generate an image of the same size as the original one.

02CloudConvert
CloudConvert is a cloud-based online conversion tool that converts files from one format to another. The service can convert GIFs to JPGs, PNGs, and other formats. Users are happy because CloudConvert is a reliable and easy-to-use tool that can help you convert files from one format to another. It has a simple interface with drag-and-drop features. It also offers an efficient way to convert large batches of files at once, without the need for uploading them on your device or using any additional software.

03FileZigZag
FileZigZag is an easy to use web app that converts GIFs to JPGs with just a few clicks. In the toolbar, you can upload the GIF of your choice and then convert it into one of three different resolutions: HD, Medium, or Low. The higher resolution will produce better quality but will take up more space on your hard drive. It is a free, open-source tool that can be used on both Windows and Mac computers.

04Aconvert
Aconvert is a tool that converts GIFs to JPGs. It’s a very simple and straightforward tool for converting GIFs to JPGs. It has two main features: Convert gif files to jpg files and Convert jpg files to gif files.
The first feature is self-explanatory: it will convert any gif file, even animated, into a jpg file. The second feature is also easy to use: you just have to drag and drop the desired jpg file onto the converter, and it will create a corresponding animated gif file of the same size as the original one.

05Ezgif
Ezgif is a free online tool that converts GIF to JPG. This tool was created by the team of developers at Ezgif in order to make converting GIFs as easy as possible. It’s a very simple and straightforward process, which makes it perfect for anyone who wants to convert GIFs but doesn’t want to spend time learning how it works. All you need to do is upload your GIF, choose the desired output format (JPG), and click convert.
It’s a free and easy to use tool that converts your animated GIFs into high-quality JPGs, PNGs, and WebP formats.

Part 3 5 Ways to Convert Jpg to GIF [Online & Desktop]
This section will help you to know about the best tools available to convert the JPG file into GIF. We all know it is not necessary that every time you have a GIF available suiting to the needs. In that case, these tools will help you. Well, the tools you can consider include-
01Filmora
Wondershare Filmora Video Editor is video editing software that helps users to create and share videos of their own. It provides an easy way to make videos from photos, videos, and music. Users can edit the video by adding text, filters, and other effects. This tool is a JPG to GIF converter as well that has been around for many years. It has evolved into a more sophisticated tool with time. This software has been used by professionals in many different fields such as marketing, design, photography, etc. Furthermore, it has a simple and intuitive interface which makes it easy to use.

Wondershare Filmora - Best Video Editor for Mac/Windows
5,481,435 people have downloaded it.
Build unique custom animations without breaking a sweat.
Focus on creating epic stories and leave the details to Filmora’s auto features.
Start a creative adventure with drag & drop effects and endless possibilities.
Filmora simplifies advanced features to save you time and effort.
Filmora cuts out repetition so you can move on to your next creative breakthrough.
02OnlineConverterFree
OnlineConverterFree is an online conversion tool that converts JPG images to GIF format. It is a free, easy-to-use, and powerful converter. Additionally, It can convert any of the following formats: JPEG, PNG, BMP, TIFF, and GIF.
It also has a preview function for checking the quality of the converted images before you download them. You just need to check that out so that you can analyze whether the same quality will suit your needs or not. Also, the conversion process is so fast that it can be used on large files without taking up too much time or space.

03MyGeodata Converter
MyGeodata Converter is a web-based tool that converts files from one format to another. It has the capability to convert between different formats like JPG, GIF, PNG, SVG, and more. The converter provides an easy way to convert JPG into the desired format. It also supports batch conversion of multiple files at the same time.
The interface of the tool is very simple, which means that even a layman will be able to use this tool.

04ConvertImage
ConvertImage is an online tool that converts images from one format to another. This tool is a JPG to GIF converter that can be used on the web. It has a drag and drop interface, which makes it easy to use for anyone who knows how to use a computer. Users can upload their photos from their computer or from any URL and then choose the desired output format.

05Pixillion image converter
Pixillion is a free online image converter that converts images between different formats.
It is one of the most popular converters available on the internet. It converts images between different formats and has a user-friendly interface. The Pixillion converter supports converting images from JPG to GIF, PNG, BMP, TIFF, and other formats. It also provides support for batch conversion of multiple files at once.

● Key Takeaways from This Episode →
● Converting GIF to JPG is a simple process.
● Filmora is an occupied tool for all conversions.
● Conversions are easy to do with the right set of tools.
Also read:
- Updated 2024 Approved Splitting Audio From Video in Sony Vegas Step by Step
- 2024 Approved Detailed Guide to Crop Video in Sony Vegas Pro
- New In 2024, Have You Ever Wondered How Those PowerPoint, Looping Slideshows You See in Conferences and Reception Areas Display and Move to the Next Slide Automatically without Clicking a Mouse? You Dont Have to Be Amazed at This
- How to Use LUTs in Premiere Pro for 2024
- Merging Videos Like a Pro A Step-by-Step Guide to Use FFmpeg
- Updated Do You Want to Know About Efficient Motion Blur Plugins for Adobe Effects? Read This Article to Find Out How to Use Motion Blur Plugins for Enhanced Results for 2024
- New Looking For the Best VHS Video Effect Makers? Get To Know the Top List
- New In 2024, Learn How to Create Your Own Unique Video in Cinematic Text Intro in Filmora. Its a Simple Process that Will Offer Professional-Level Intros of Your Own
- Updated In 2024, What Are AR Emoji Stickers & How to Add Them to Your Video
- Updated 2024 Approved Why Did Filmora AI Portrait Attract People?
- Updated In 2024, Looking for Efficient Ways to Create a Slow-Motion Video? Read the Article for Reliable Solutions that Provide Excellent Results
- Updated In 2024, A Guide to Speed up a Video on Splice
- Updated Are You Looking to Freeze-Frame in FCP? If Yes, Read One, as Here Is a Guide About How to Freeze-Frame in Final Cut Pro (FCP) with Ease
- Updated How to Create Liquid Water Reveal Intro?
- Updated 2024 Approved Are You Looking to Make Subscribe Channel Graphics? Here Is a Complete Guide on How to Make One on Your Own
- New In 2024, How to Create Liquid Water Reveal Intro?
- Updated 2024 Approved Do You Want to Apply Professional-Looking Color Grading on Your iPhones Photos and Videos? You Can Use Different iPhone LUTs for Your Pictures and Videos
- Updated 2024 Approved Want to Speed up Your Video to Create Short-Duration Instagram Reels? Here Is How You Can Change the Speed of Pre-Recorded and Live Videos on Instagram Reels
- Updated Top Tools To Create Blend Image Collage for 2024
- This Guide Will Help You to Understand Everything About the Zoho Show. Also, Know What the Zoho Show Slide Is, Why It Is Used and All Related Information for 2024
- New Quick Answer What Is a GIF File, In 2024
- Updated In 2024, Ultimate Guide on How to Film Better in Public
- New Finding Best GIF Websites Is Easy as Pie — Heres What You Should Know for 2024
- 2024 Approved Achieving GoPro Slow Motion with Quality An In-Depth Overview
- New Where To Find The Best Free Canon LUTs? Learn More for 2024
- Updated 2024 Approved Merge MP4 Online? Its Easy With These 5 Tools
- New Detailed Guide to the Best Convertors for Turning GIF Into PDF Files. Know Their Features, Pros, Cons, and More for 2024
- Updated How to Convert SRT to DOCX
- Updated How to Create Discord Logo GIF for 2024
- Updated In 2024, End Your Struggles with Choppy Playback on DaVinci Resolve. Read This Guide to Find Effective Fixes and Reliable DaVinci Resolve Slow Playback Alternatives
- Updated Camtasia Video Editor Review for 2024
- New In 2024, Are You Thinking of Learning Video Editing in the Final Cut Pro Software? In This Article, You Will Learn Different Ways of Splitting and Merging Multiple Videos at Once as a New Skill to Get Your Business to a New Level
- New How to Create Discord GIF Avatar in Depth Guide for 2024
- Effective Guide to Cast Apple iPhone 7 to MacBook without Hindrance | Dr.fone
- In 2024, Top Apps and Online Tools To Track Vivo V27e Phone With/Without IMEI Number
- How to Change Your Motorola Moto E13 Location on life360 Without Anyone Knowing? | Dr.fone
- In 2024, Can I use iTools gpx file to catch the rare Pokemon On Realme 12 Pro 5G | Dr.fone
- Fix Oppo Find N3 Flip Android System Webview Crash 2024 Issue | Dr.fone
- In 2024, AddROM Bypass An Android Tool to Unlock FRP Lock Screen For your Vivo Y100t
- Play Store Stuck on Downloading Of Sony Xperia 10 V? 7 Ways to Resolve | Dr.fone
- Online signature for PDF v1.1 document
- How To Get the Apple ID Verification Code From Apple iPhone 11 Pro Max in the Best Ways
- The Best Android Unlock Software For Samsung Galaxy F15 5G Device Top 5 Picks to Remove Android Locks
- In 2024, How To Remove Screen Lock PIN On Xiaomi Redmi 12 Like A Pro 5 Easy Ways
- In 2024, How to Mirror Apple iPhone 14 Pro Max to Mac? | Dr.fone
- 2024 Approved Top 12 Illusion Gifs Top Picks
- Tips and Tricks for Setting Up your Xiaomi Redmi K70E Phone Pattern Lock
- Fix Cant Take Screenshot Due to Security Policy on Motorola Moto G23 | Dr.fone
- Unlock Your Vivo Y36is Potential The Top 20 Lock Screen Apps You Need to Try
- In 2024, Forgot Pattern Lock? Heres How You Can Unlock Nubia Red Magic 8S Pro Pattern Lock Screen
- In 2024, How to Fake GPS on Android without Mock Location For your Samsung Galaxy S23 Tactical Edition | Dr.fone
- In 2024, What Does Enter PUK Code Mean And Why Did The Sim Get PUK Blocked On Lava Blaze 2 Device
- How to Reset a Vivo V27 Phone that is Locked?
- How to Reset a Locked Vivo V27 Pro Phone
- Title: Updated In 2024, Easy Way to Create an Alternate Reality Effect
- Author: Morgan
- Created at : 2024-04-24 01:05:06
- Updated at : 2024-04-25 01:05:06
- Link: https://ai-video-editing.techidaily.com/updated-in-2024-easy-way-to-create-an-alternate-reality-effect/
- License: This work is licensed under CC BY-NC-SA 4.0.

