
:max_bytes(150000):strip_icc():format(webp)/GettyImages-184415451-9f59b82b64ac421cad0f28540a515b5f.jpg)
Updated In 2024, Fixes | What If YouTube Zoom to Fill Not Working?
Fixes | What If YouTube Zoom to Fill Not Working?
Abundant Video Effects - Wondershare Filmora
Provide abundant video effects - A creative video editor
Powerful color correction and grading
Detailed tutorials are provided by the official channel
YouTube is an application that is in demand by millions of users throughout the globe. With such high demands, there are several features that have been enhanced across the platform for the sake of providing users with better functionality. One such feature comes under the zoom characteristic that provides a better cinematic experience to the user upon its use.
This article is a discussion of the issues caused by the zoom to fill YouTube feature. As it hinders the operability of the user, there are several impacts on the complete operation of the tool. However, to counter it, this article turns up different techniques that can be implemented to resolve this problem.
In this article
Part 1: Fix YouTube Zoom to Fill Not Working on Android or iPhone
Part 2: Fix YouTube Zoom to Fill Not Working on Chrome
Part 1: Fix YouTube Zoom to Fill Not Working on Android or iPhone
If the YouTube zoom to fill not working error is present across the smartphone that you own, there are several remedies that can be considered as a proper solution to this issue. Go through these fixes to know more about how you can resolve it without putting yourselves in miserable conditions:
1. Update YouTube Application
The first remedy that may come into your mind related to resolving the zoom to fill YouTube issues on your smartphone is by updating the application. YouTube requires frequent updates, and an outdated application may not work properly, which may lead to such consequences. To counter this issue, you need to go through the following steps:
For Android
Step 1: Initially, you need to direct yourselves into the “Play Store” and click on the “Profile” icon. Across the list of different options, you will find the “Manage apps and device” section.

Step 2: On the new screen that opens up, select the “Manage” tab and proceed to turn on the “Updates available” filter for your device.

Step 3: Find the update of the YouTube app across the provided list. Click on the tool to open it across a new screen. Click on “Update” to successfully update the application on your Android.

For iPhone
Step 1: Start by launching the App Store across the iPhone. Click on the “Profile” and locate the applications installed across your iPhone.

Step 2: Find YouTube in the list of different available updates. Click on “Update” to put your YouTube application in the latest version.

2. Re-Launch YouTube Application
Restarting the YouTube application across your device may get you out of such miserable issues with platforms that are mere because of software glitches. To counter this problem, you can consider re-launching your YouTube application on smartphones as required:
For Android
Step 1: You need to tap on the ‘rectangular’ icon present at the bottom of the screen to open the applications that are currently running in the background.
Step 2: To close YouTube, you need to swipe right or left the application from the said screen. Re-launch YouTube by accessing the app from the homepage.

For iPhone
Step 1: With YouTube turned on across the iPhone, swipe up from the bottom of the screen at a consistent speed smoothly or double press the Home button according to your iPhone model. This will show the running applications in the background.
Step 2: To close YouTube, you need to swipe up the application. Re-launch it from your iPhone’s homepage.

3. Restart Your Device
This is another extensive zoom to fill YouTube issue solution that can help you recover your device from the illicit software glitches that are preventing it from starting properly. By restarting the devices, you can easily get rid of this problem within no time.
For Android
Step 1: To reboot an Android device, you need to hold the ‘Power’ button of the device until a screen displays on your front.
Step 2: Click on the “Restart” option on your Android to restart your device properly.

For iPhone
Step 1: To restart an iPhone, it is best that you proceed to your “Settings” and access the “General” option.

Step 2: Click on “Shut Down” from the available list of settings to turn off the iPhone. Re-launch the iPhone by holding the “Power” button of the device.

Part 2: Fix YouTube Zoom to Fill Not Working on Chrome
Users who are using YouTube across their browsers can also face the above-mentioned concerns. As an answer to YouTube zoom to fill malfunctioning across Chrome, this part comes up with a discussion of three impressive solutions that can be adopted right away for effective results.
1. Clear Browser’s Cache
To start with the solutions, the first thing that you can do is to clear your Chrome’s cache. A filled cache usually hinders the flow of the application, which in turn leads to a decreased performance. To clear the browser’s cache, you need to look across the following steps:
Step 1: Launch your Chrome browser and click on the “Three-Dotted” icon on the top-right corner of the screen.

Step 2: Select “Clear browsing data…” from the ‘More Tools’ option across the drop-down menu. This leads you to a new window.

Step 3: Make sure you have the right time range selected for this purpose. Select the right options that will clear out the cache of your Chrome and hit “Clear Data.”

2. Update Your Chrome
While seeking the right zoom to fill YouTube solution, you may come up with the idea of updating your Chrome browser. For this, you have to look into the steps shown below:
Step 1: Open Google Chrome on your desktop and click on the three-dotted icon on the top-right section. Find the option of “Help” in the drop-down menu and proceed by clicking ‘About Google Chrome’ from the next menu.

Step 2: The browser detects an update that is due for Chrome. It will automatically start updating the browser if detected. Once the update is complete, you need to restart your Chrome browser.

3. Delete the Extensions
It can be quite surprising to find the extensions across your Chrome being the perpetrator of this problem. With extensions like different ad blockers on your list, the YouTube zoom to fill problem can be caused because of it. To remove these extensions from Chrome, you need to:
Step 1: Lead to the three-dotted icon on the top-right corner of Chrome to open the settings. Direct the cursor to “More Tools” and select “Extensions” in the protruding menu.

Step 2: The new window opens up with the list of extensions installed across your Chrome browser. Click on “Remove” to delete the extension from the browser simply. Tap on “Remove” once again when prompted.

Conclusion
The article has provided you with some comprehensive methods that can be adopted to solve the YouTube zoom to fill problem on your device. With these methods, you can go through all the small glitches that occur on the YouTube app that is hindering your work.
YouTube is an application that is in demand by millions of users throughout the globe. With such high demands, there are several features that have been enhanced across the platform for the sake of providing users with better functionality. One such feature comes under the zoom characteristic that provides a better cinematic experience to the user upon its use.
This article is a discussion of the issues caused by the zoom to fill YouTube feature. As it hinders the operability of the user, there are several impacts on the complete operation of the tool. However, to counter it, this article turns up different techniques that can be implemented to resolve this problem.
In this article
Part 1: Fix YouTube Zoom to Fill Not Working on Android or iPhone
Part 2: Fix YouTube Zoom to Fill Not Working on Chrome
Part 1: Fix YouTube Zoom to Fill Not Working on Android or iPhone
If the YouTube zoom to fill not working error is present across the smartphone that you own, there are several remedies that can be considered as a proper solution to this issue. Go through these fixes to know more about how you can resolve it without putting yourselves in miserable conditions:
1. Update YouTube Application
The first remedy that may come into your mind related to resolving the zoom to fill YouTube issues on your smartphone is by updating the application. YouTube requires frequent updates, and an outdated application may not work properly, which may lead to such consequences. To counter this issue, you need to go through the following steps:
For Android
Step 1: Initially, you need to direct yourselves into the “Play Store” and click on the “Profile” icon. Across the list of different options, you will find the “Manage apps and device” section.
Step 2: On the new screen that opens up, select the “Manage” tab and proceed to turn on the “Updates available” filter for your device.
Step 3: Find the update of the YouTube app across the provided list. Click on the tool to open it across a new screen. Click on “Update” to successfully update the application on your Android.
For iPhone
Step 1: Start by launching the App Store across the iPhone. Click on the “Profile” and locate the applications installed across your iPhone.
Step 2: Find YouTube in the list of different available updates. Click on “Update” to put your YouTube application in the latest version.
2. Re-Launch YouTube Application
Restarting the YouTube application across your device may get you out of such miserable issues with platforms that are mere because of software glitches. To counter this problem, you can consider re-launching your YouTube application on smartphones as required:
For Android
Step 1: You need to tap on the ‘rectangular’ icon present at the bottom of the screen to open the applications that are currently running in the background.
Step 2: To close YouTube, you need to swipe right or left the application from the said screen. Re-launch YouTube by accessing the app from the homepage.
For iPhone
Step 1: With YouTube turned on across the iPhone, swipe up from the bottom of the screen at a consistent speed smoothly or double press the Home button according to your iPhone model. This will show the running applications in the background.
Step 2: To close YouTube, you need to swipe up the application. Re-launch it from your iPhone’s homepage.
3. Restart Your Device
This is another extensive zoom to fill YouTube issue solution that can help you recover your device from the illicit software glitches that are preventing it from starting properly. By restarting the devices, you can easily get rid of this problem within no time.
For Android
Step 1: To reboot an Android device, you need to hold the ‘Power’ button of the device until a screen displays on your front.
Step 2: Click on the “Restart” option on your Android to restart your device properly.
For iPhone
Step 1: To restart an iPhone, it is best that you proceed to your “Settings” and access the “General” option.
Step 2: Click on “Shut Down” from the available list of settings to turn off the iPhone. Re-launch the iPhone by holding the “Power” button of the device.
Part 2: Fix YouTube Zoom to Fill Not Working on Chrome
Users who are using YouTube across their browsers can also face the above-mentioned concerns. As an answer to YouTube zoom to fill malfunctioning across Chrome, this part comes up with a discussion of three impressive solutions that can be adopted right away for effective results.
1. Clear Browser’s Cache
To start with the solutions, the first thing that you can do is to clear your Chrome’s cache. A filled cache usually hinders the flow of the application, which in turn leads to a decreased performance. To clear the browser’s cache, you need to look across the following steps:
Step 1: Launch your Chrome browser and click on the “Three-Dotted” icon on the top-right corner of the screen.
Step 2: Select “Clear browsing data…” from the ‘More Tools’ option across the drop-down menu. This leads you to a new window.
Step 3: Make sure you have the right time range selected for this purpose. Select the right options that will clear out the cache of your Chrome and hit “Clear Data.”
2. Update Your Chrome
While seeking the right zoom to fill YouTube solution, you may come up with the idea of updating your Chrome browser. For this, you have to look into the steps shown below:
Step 1: Open Google Chrome on your desktop and click on the three-dotted icon on the top-right section. Find the option of “Help” in the drop-down menu and proceed by clicking ‘About Google Chrome’ from the next menu.
Step 2: The browser detects an update that is due for Chrome. It will automatically start updating the browser if detected. Once the update is complete, you need to restart your Chrome browser.
3. Delete the Extensions
It can be quite surprising to find the extensions across your Chrome being the perpetrator of this problem. With extensions like different ad blockers on your list, the YouTube zoom to fill problem can be caused because of it. To remove these extensions from Chrome, you need to:
Step 1: Lead to the three-dotted icon on the top-right corner of Chrome to open the settings. Direct the cursor to “More Tools” and select “Extensions” in the protruding menu.
Step 2: The new window opens up with the list of extensions installed across your Chrome browser. Click on “Remove” to delete the extension from the browser simply. Tap on “Remove” once again when prompted.
Conclusion
The article has provided you with some comprehensive methods that can be adopted to solve the YouTube zoom to fill problem on your device. With these methods, you can go through all the small glitches that occur on the YouTube app that is hindering your work.
12 Impressive AI Video Ideas for Creating Engaging Video Content
12 Impressive AI Video Ideas for Creating Engaging Video Content
An easy yet powerful editor
Numerous effects to choose from
Detailed tutorials provided by the official channel
In recent times, AI technology has become more useful for content creators to get more effective and engaging AI video ideas. Various AI video idea generator tools like Jasper, WeShare, etc., save con-tent creators time by giving the latest trending video ideas. These tools made content creators work easy as they need not spend much time on video ideas.
Most of us know AI-Artificial Intelligence and its role in achieving better and fast results in different areas. This article will let us know the position of YouTube video idea generator AI in generating engaging video content using Artificial Intelligence. Nowadays, these tools also help add audio/video summary and animations for the videos.
In this article
01 [What’s Video Ideas Generator and How to Use This Tool to Get More Views](#Part 1)
02 [12 Great AI Video Ideas to Bring More Traffic](#Part 2)
Part 1 What’s Video Ideas Generator and How to Use This Tool to Get More Views
It’s not enough to create a YouTube channel and post some video that does not have informative content. Sometimes, even though the video has informative content, the content might not be attractive to the viewers for various reasons, like the content might be routine and does not have more reach, likes, or shares. Along with good content, we also need new and creative ideas to get more viewers. Thus, we have some tools to provide unique and innovative ideas based on the niche you choose.
Videos Idea Generator is a tool that gives ideas for YouTube videos, and it works based on AI technology (Neural Networks). This tool will be more beneficial for the content creators to get more AI video ideas. Naturally, you might be out of ideas for your channel, or sometimes it takes more time to get an idea, or it could be a routine idea that does not sound interesting to the viewers. In such cases, an AI video idea generator is more helpful in suggesting new and innovative ideas for the content creators based on their interesting topics.
Some of the advantages of a video idea generator are:
● Time-saving – as one can utilize the time in other work, such as editing the video/ adding subtitles, etc., instead of thinking of an idea.
● Engaging with the audience – can utilize the time in engaging with the audience by answering their questions.
● Promote videos – can utilize time to promote their videos on other social media platforms or collaborate with other content creators for promotions.
● Add animations – animations and other visual effects can be added to the videos using AI. Also, we can add video and audio summaries after each video so that the viewers can get brief detailing of the whole video.
How to use Videos Idea Generator:
There are different AI video idea generator tools, and most of them work similarly. The most common steps are:
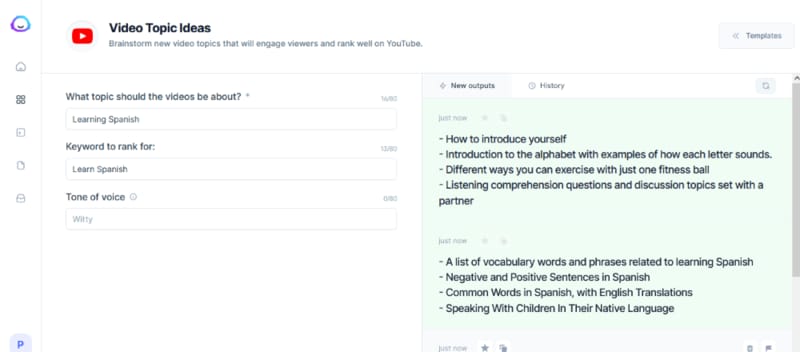
Step 1: Provide Topic
Here you need to provide the topic’s name on which we are planning to create the video.
Step 2: Provide Keywords
After providing a topic, give the keywords required for publishing. The video needs to have all the keywords so that the main content of the video can project adequately.
Based on the topic name and keywords, the tool will generate suggestions for the video ideas using the Neural Network concept of Artificial Learning.
Part 2 12 Great AI Video Ideas to Bring More Traffic
Now, let us know 12 AI video ideas that can become viral and get more likes and views :
01Idea 1: Know your Interest
Before starting a YouTube channel or posting a video, know your area of interest first. Once you get clarity on the area of interest, it’s easy to pick a topic from that and create an innovative video. Try to be more specific in the topic you choose. Also, have clarity on the section of audience you want to target.
For example, if your topic is more related to children, add more animations of animals/ cartoons that interest children. If you choose a related topic, do not add more animations that might confuse the audience. Add more reference links so that they can refer to those and be more particular on the specific topic you are trying to explain through the video. Similarly, if you choose a gaming-related topic, do not be more general about gaming.
Be specific towards a particular section of games like mobile gaming/ desktop/ virtual to reach more audience, and it does not seem boring to the audience.
02Idea 2: Interview Questions
As many students graduate every year, the competition for jobs has increased. People are more interested in getting an appointment as soon as possible, and for that, they need to prepare for the interview thoroughly. A video containing the main topics for the discussion that has references for the interview questions would benefit the students. It can engage with people within no time. Also, if the video is more specific to the department-wise interview questions/ job-level interview questions, it would reach more people and be more helpful to them.
03Idea 3: Full Course in Any Technology
Apart from the entertainment-related videos, education-related videos will be more helpful and engaging. Any video related to any technology course can get more views. Using the YouTube video idea generator AI tool, you can generate more unique videos related to education. Instead of giving a brief idea of the technology, it’s better to pick up a few topics and explain them in detail so that it would be helpful for interviews too. You can use AI technology to add a voice-over and a small summary at the end of the video so that the main points get revised once again.
04Idea 4: Cooking Ideas
Cooking is one of the most trending topics on YouTube. Whatever the language might be, cooking-related videos can get more views, create more creativity, and engage with the audience. You can choose a dish from any cuisine and make a video. You can add slow motion/ fast forward actions and small creative animations using AI. Using AI video ideas tools, you can get more creative ideas related to cooking that can increase views, as viewers will be more interested if the videos are innovative.
05Idea 5: Art and Craft ideas
Recently, people have seem more interested in the interior design of the house. For such people, art and craft ideas might be more helpful. Also, nowadays, schools are encouraging students in other circular activities and studies. These videos might be more attractive to the school’s students. Also, in crafts, select a specific area and make videos on that so that the video will be short and crisp, and easily understandable to the viewers. You can also add a voice-over while doing the craftwork to make it more transparent for the viewers.
06Idea 6: Photo and Video Editing Related Videos
People have become more addicted to taking photos and storing them. Any video related to editing the photos/ videos will engage more with viewers as it is not associated with any section of people. Anyone from any place and with any qualification can understand such videos. Consider a few topics related to the editing and give a detailed description/ explanation of those ideas, or consider any photo/ video editing app and explain how the app works in the video so that it might be helpful for the people who are using the app for the first time. Also, please reply to the frequently asked questions related to the app in the form of comments or summary so that it can reach more people, and there is a chance that the viewers might suggest the video to others who are about to use the app.
07Idea 7: Movies Related Videos
In every country, people are more addicted to movies regardless of language. Movies have become a part of daily life for almost all people. Some of the movie-related video ideas can be:
● Video regarding actor interviews.
● Video regarding the movie review/ collections.
● Video regarding highlights/ mistakes in the movie.
● Video related to small clips/ songs in the film.
● Video related to the spoof of the central theme of the film.
Any video related to a movie can be more viral. To create new content, use AI video idea generator tools so that the videos can be more engaging and creative.
08Idea 8: Lifehacks Related Videos
Simple daily life hack idea-related videos will be more helpful to people irrespective of their living. Any statements about keeping the house clean/clothing/makeup/skincare can be beneficial. You can take simple concepts related to our daily life like:
● How to use a few tools in our everyday life.
● Simple cleaning techniques.
● Folding clothes easily saves time.
09Idea 9: Earning Related Ideas
Videos related to earning can get more views and become more viral among people. Any detailed description of any earning app/ small startup ideas can be helpful. The video ideas generator tool can give more suggestions related to such trending topics.
10Idea 10: Sports related ideas
A large population is into sports, like football and cricket. People enjoy watching and playing these sports regularly from young to old age. It will be a good idea if you can try videos on sports. Using the video generator AI, you can generate animation videos playing cricket and add small clips of old generation cricket players as examples. You may also create small teaching videos on other sports for children. Through animation, giving the latest sports updates worldwide will also be a better idea to get more views for videos.
11Idea 11: Current Affairs Related Videos
Current affairs and general knowledge-related videos will be more helpful to people preparing for competitive exams as most people are learning through the internet rather than from books. If you can take a specific subject and give a detailed description of its past and current updates, it can be helpful for many people. And also, while doing such information-related videos, you get a chance to research it, and it will help improve your knowledge of the subject and searching skills.
12Idea 12: Gadget And Product Review Ideas
Reportedly, there has been a tremendous increase in new products related to mobiles, laptops, TV, other hardware tools, skin, hair care products, etc. You can take a specific product and create innovative ideas on how to use the product using animations/ cartoons and give a short review of the product. Through this, you can earn as you promote a company product, and people will know about the product. This is beneficial in both ways. If the product is related to electronic gadgets, make a video explaining the product’s features and how to use them. If it is hair or skincare related, include the ingredients used, advantages of the product, how to use the product, and any disadvantages, etc. Based on the product you choose, the content of the video should change.
Bonus Idea:
Use an innovative and powerful tool like Wondershare Filmora Video Editor to beautify your AI videos in the shortest time frame.
Filmora’s latest version offers various upgraded tools like:
● Instant Mode to create accessible and quick videos.
● A shop of preset templates to power up your videos.
● The Filmora Auto Beat Sync can match your clip with music.
● Adjust the speed of your video and introduce cinematic effects.
● You can even record your screen with Filmora and use that in your AI videos ideas.

Wondershare Filmora - Best Video Editor for Mac/Windows
5,481,435 people have downloaded it.
Build unique custom animations without breaking a sweat.
Focus on creating epic stories and leave the details to Filmora’s auto features.
Start a creative adventure with drag & drop effects and endless possibilities.
Filmora simplifies advanced features to save you time and effort.
Filmora cuts out repetition so you can move on to your next creative breakthrough.
● Ending Thoughts →
● Finally, that you have a fair idea of what a YouTube video idea generator is about and how it helps content creators in daily life get more innovative ideas for YouTube videos.
● Make use of this tool to get more engaging and creative content and more AI video ideas so that the views for the video increase and the audience receives good knowledge through the videos. Try out these ideas, use Filmora to create exceptional animations on your videos, and watch your YouTube channel grow as expected.
In recent times, AI technology has become more useful for content creators to get more effective and engaging AI video ideas. Various AI video idea generator tools like Jasper, WeShare, etc., save con-tent creators time by giving the latest trending video ideas. These tools made content creators work easy as they need not spend much time on video ideas.
Most of us know AI-Artificial Intelligence and its role in achieving better and fast results in different areas. This article will let us know the position of YouTube video idea generator AI in generating engaging video content using Artificial Intelligence. Nowadays, these tools also help add audio/video summary and animations for the videos.
In this article
01 [What’s Video Ideas Generator and How to Use This Tool to Get More Views](#Part 1)
02 [12 Great AI Video Ideas to Bring More Traffic](#Part 2)
Part 1 What’s Video Ideas Generator and How to Use This Tool to Get More Views
It’s not enough to create a YouTube channel and post some video that does not have informative content. Sometimes, even though the video has informative content, the content might not be attractive to the viewers for various reasons, like the content might be routine and does not have more reach, likes, or shares. Along with good content, we also need new and creative ideas to get more viewers. Thus, we have some tools to provide unique and innovative ideas based on the niche you choose.
Videos Idea Generator is a tool that gives ideas for YouTube videos, and it works based on AI technology (Neural Networks). This tool will be more beneficial for the content creators to get more AI video ideas. Naturally, you might be out of ideas for your channel, or sometimes it takes more time to get an idea, or it could be a routine idea that does not sound interesting to the viewers. In such cases, an AI video idea generator is more helpful in suggesting new and innovative ideas for the content creators based on their interesting topics.
Some of the advantages of a video idea generator are:
● Time-saving – as one can utilize the time in other work, such as editing the video/ adding subtitles, etc., instead of thinking of an idea.
● Engaging with the audience – can utilize the time in engaging with the audience by answering their questions.
● Promote videos – can utilize time to promote their videos on other social media platforms or collaborate with other content creators for promotions.
● Add animations – animations and other visual effects can be added to the videos using AI. Also, we can add video and audio summaries after each video so that the viewers can get brief detailing of the whole video.
How to use Videos Idea Generator:
There are different AI video idea generator tools, and most of them work similarly. The most common steps are:
Step 1: Provide Topic
Here you need to provide the topic’s name on which we are planning to create the video.
Step 2: Provide Keywords
After providing a topic, give the keywords required for publishing. The video needs to have all the keywords so that the main content of the video can project adequately.
Based on the topic name and keywords, the tool will generate suggestions for the video ideas using the Neural Network concept of Artificial Learning.
Part 2 12 Great AI Video Ideas to Bring More Traffic
Now, let us know 12 AI video ideas that can become viral and get more likes and views :
01Idea 1: Know your Interest
Before starting a YouTube channel or posting a video, know your area of interest first. Once you get clarity on the area of interest, it’s easy to pick a topic from that and create an innovative video. Try to be more specific in the topic you choose. Also, have clarity on the section of audience you want to target.
For example, if your topic is more related to children, add more animations of animals/ cartoons that interest children. If you choose a related topic, do not add more animations that might confuse the audience. Add more reference links so that they can refer to those and be more particular on the specific topic you are trying to explain through the video. Similarly, if you choose a gaming-related topic, do not be more general about gaming.
Be specific towards a particular section of games like mobile gaming/ desktop/ virtual to reach more audience, and it does not seem boring to the audience.
02Idea 2: Interview Questions
As many students graduate every year, the competition for jobs has increased. People are more interested in getting an appointment as soon as possible, and for that, they need to prepare for the interview thoroughly. A video containing the main topics for the discussion that has references for the interview questions would benefit the students. It can engage with people within no time. Also, if the video is more specific to the department-wise interview questions/ job-level interview questions, it would reach more people and be more helpful to them.
03Idea 3: Full Course in Any Technology
Apart from the entertainment-related videos, education-related videos will be more helpful and engaging. Any video related to any technology course can get more views. Using the YouTube video idea generator AI tool, you can generate more unique videos related to education. Instead of giving a brief idea of the technology, it’s better to pick up a few topics and explain them in detail so that it would be helpful for interviews too. You can use AI technology to add a voice-over and a small summary at the end of the video so that the main points get revised once again.
04Idea 4: Cooking Ideas
Cooking is one of the most trending topics on YouTube. Whatever the language might be, cooking-related videos can get more views, create more creativity, and engage with the audience. You can choose a dish from any cuisine and make a video. You can add slow motion/ fast forward actions and small creative animations using AI. Using AI video ideas tools, you can get more creative ideas related to cooking that can increase views, as viewers will be more interested if the videos are innovative.
05Idea 5: Art and Craft ideas
Recently, people have seem more interested in the interior design of the house. For such people, art and craft ideas might be more helpful. Also, nowadays, schools are encouraging students in other circular activities and studies. These videos might be more attractive to the school’s students. Also, in crafts, select a specific area and make videos on that so that the video will be short and crisp, and easily understandable to the viewers. You can also add a voice-over while doing the craftwork to make it more transparent for the viewers.
06Idea 6: Photo and Video Editing Related Videos
People have become more addicted to taking photos and storing them. Any video related to editing the photos/ videos will engage more with viewers as it is not associated with any section of people. Anyone from any place and with any qualification can understand such videos. Consider a few topics related to the editing and give a detailed description/ explanation of those ideas, or consider any photo/ video editing app and explain how the app works in the video so that it might be helpful for the people who are using the app for the first time. Also, please reply to the frequently asked questions related to the app in the form of comments or summary so that it can reach more people, and there is a chance that the viewers might suggest the video to others who are about to use the app.
07Idea 7: Movies Related Videos
In every country, people are more addicted to movies regardless of language. Movies have become a part of daily life for almost all people. Some of the movie-related video ideas can be:
● Video regarding actor interviews.
● Video regarding the movie review/ collections.
● Video regarding highlights/ mistakes in the movie.
● Video related to small clips/ songs in the film.
● Video related to the spoof of the central theme of the film.
Any video related to a movie can be more viral. To create new content, use AI video idea generator tools so that the videos can be more engaging and creative.
08Idea 8: Lifehacks Related Videos
Simple daily life hack idea-related videos will be more helpful to people irrespective of their living. Any statements about keeping the house clean/clothing/makeup/skincare can be beneficial. You can take simple concepts related to our daily life like:
● How to use a few tools in our everyday life.
● Simple cleaning techniques.
● Folding clothes easily saves time.
09Idea 9: Earning Related Ideas
Videos related to earning can get more views and become more viral among people. Any detailed description of any earning app/ small startup ideas can be helpful. The video ideas generator tool can give more suggestions related to such trending topics.
10Idea 10: Sports related ideas
A large population is into sports, like football and cricket. People enjoy watching and playing these sports regularly from young to old age. It will be a good idea if you can try videos on sports. Using the video generator AI, you can generate animation videos playing cricket and add small clips of old generation cricket players as examples. You may also create small teaching videos on other sports for children. Through animation, giving the latest sports updates worldwide will also be a better idea to get more views for videos.
11Idea 11: Current Affairs Related Videos
Current affairs and general knowledge-related videos will be more helpful to people preparing for competitive exams as most people are learning through the internet rather than from books. If you can take a specific subject and give a detailed description of its past and current updates, it can be helpful for many people. And also, while doing such information-related videos, you get a chance to research it, and it will help improve your knowledge of the subject and searching skills.
12Idea 12: Gadget And Product Review Ideas
Reportedly, there has been a tremendous increase in new products related to mobiles, laptops, TV, other hardware tools, skin, hair care products, etc. You can take a specific product and create innovative ideas on how to use the product using animations/ cartoons and give a short review of the product. Through this, you can earn as you promote a company product, and people will know about the product. This is beneficial in both ways. If the product is related to electronic gadgets, make a video explaining the product’s features and how to use them. If it is hair or skincare related, include the ingredients used, advantages of the product, how to use the product, and any disadvantages, etc. Based on the product you choose, the content of the video should change.
Bonus Idea:
Use an innovative and powerful tool like Wondershare Filmora Video Editor to beautify your AI videos in the shortest time frame.
Filmora’s latest version offers various upgraded tools like:
● Instant Mode to create accessible and quick videos.
● A shop of preset templates to power up your videos.
● The Filmora Auto Beat Sync can match your clip with music.
● Adjust the speed of your video and introduce cinematic effects.
● You can even record your screen with Filmora and use that in your AI videos ideas.
Wondershare Filmora - Best Video Editor for Mac/Windows
5,481,435 people have downloaded it.
Build unique custom animations without breaking a sweat.
Focus on creating epic stories and leave the details to Filmora’s auto features.
Start a creative adventure with drag & drop effects and endless possibilities.
Filmora simplifies advanced features to save you time and effort.
Filmora cuts out repetition so you can move on to your next creative breakthrough.
● Ending Thoughts →
● Finally, that you have a fair idea of what a YouTube video idea generator is about and how it helps content creators in daily life get more innovative ideas for YouTube videos.
● Make use of this tool to get more engaging and creative content and more AI video ideas so that the views for the video increase and the audience receives good knowledge through the videos. Try out these ideas, use Filmora to create exceptional animations on your videos, and watch your YouTube channel grow as expected.
5 Ways to Make a Fake Facetime Call Video
Creating fake video call clips for entertainment has been a new norm on social media platforms. If you are looking for a software to create a fake Facetime call video, then let’s get started:
5 ways to make a fake facetime call video
1. Filmora
Compatibility: Windows/Mac
Wondershare Filmora is the greatest video editor on the market, without a doubt, and it deserves to be at the top of our list.
You’ll discover some professional tools to help you improve video quality and over 300 creative filters and effects to give your movie a new, fresh look without putting in a lot of effort with the Filmora video editor. This tool is one of the most dependable, aside from the features that allow you to modify video rotation easily.
Steps
Step 1: Import the photo or video files
Import all your media files, including video, photos, and music. You have two options for importing your videos: drag and drop directly into our software or click import to select the media files you wish to upload.

Step 2: Edit the video
Wondershare Filmora’s video templates can be added. You can apply music, text, filters and overlays, and motion effects by right-clicking on them and selecting apply. After adding video resources such as text and elements, you may customize the texts by changing the size, placement, etc.
Also, you can add overlay video clips using templates of a video call to make it look like a real call.

Step 3: Export and Save
Quickly export your project to a new video. After you’ve applied the video resources to your videos and clicked Export, you’ll have a whole new video that you can share at birthday parties, weddings, or for marketing purposes, just like any other video you’ve created.

2. Kapwing
Compatibility: Online
Kapwing is a powerful online video editor with a non-linear editing methodology. Upload photos, audio, and video files, then edit them all in one spot.
Creators may view and alter their content from any device or location because Kapwing is entirely online. Work is automatically saved in the cloud, eliminating the need to transfer data locally. When you’re ready to export, sit back and relax because everything is handled in the cloud.
This template allows you to blend two videos into one like an iPhone Facetime call. First, put two videos in a photo and arrange them in a picture arrangement. Then, as a video overlay in the upper corner, layer one on top of the other.
Steps
Step 1: Open Kapwing Fake Video Call Template

Step 2: Import video files
Click on ‘Add Media’ to add video clips.


Step 3: Save and Export Video
Once you are done editing the template with the images you want, click on ‘Export Project’ to Export and save the video.

3. VITA App
Compatibility: Android/Mac

VITA is a program that allows you to make visually appealing videos by combining several filters and other features. The program comes with a large template library, so making films will be a breeze. The best part is that no prior experience is required.
All of VITA’s templates are divided into categories is one of its most noticeable features. This makes it simple to locate the desired impact. It’s critical to stress that you must have all the audiovisual materials you intend to use in your smartphone’s gallery. VITA also allows you to include text in your designs, making them fascinating.
Steps
Step 1: Import the file
Download the application from Google Play Store or Apple Store. Then, launch the application and import the video files.

Step 2: Edit the video
Download PNG images that will help you add all the call elements. Choose a picture-in-picture template. Add Subtitles.

Step 3: Export the video
Once you are done with editing, you can export the file by selecting the ‘Export’ option on the top right corner of the screen.

4. Clipchamp
Compatibility: Windows/Mac
Clipchamp is a free online video editor that makes movie creation simple for anyone, even if they have no prior editing knowledge. It lets you blend films, photos, and audio files and add text and effects before saving the finished product to your computer.
Steps
Step 1: To get started, log into your Clipchamp account or create a free account.

Step 2: Click the ‘Create a video’ button on the left sidebar. There are five different forms from which to pick. First, choose the video aspect ratio that works best for your project. For example, if you wish to upload to YouTube, we recommend shooting in widescreen 16:9.

Step 3: Click ‘Add media’ and drag and drop your films, audio, and photographs into the media box if you already have filmed footage you’d like to utilize in your project. You may also add media by clicking ‘Browse my files.’ If you wish to use free stock footage, go to ‘Stock’ and upload your films to the project by clicking the ‘+’ button. All your films will be saved in your library.

Step 4: You can now find your videos in your media library. Drag and drop the picture-in-picture videos you want to alter to the editing timeline. As shown in the sample below, arrange the two videos one over the other. Make sure both clips are precisely underneath one another.

Step 5: Now that your movies are aligned, select the one you want to shrink. The video you’re reducing must be at the top of the screen. To move it from the bottom to the top, drag and drop it. A small box will appear on the timeline in the bottom left corner of the clip. The clip will shrink when you click the box once. When you click the box once again, modifying choices will appear. You can move the smaller video around and increase or decrease its size.

Step 6: Export your project once you’ve completed editing your video. Save to your preferred place or folder. You can share the video straight on social media or embed it in a document.

5. Movavi
Compatibility: Windows/Mac
Movavi Video Editor is a video editing tool for Windows that is powerful and simple to use. Apply stunning video effects and filters, add music and titles, and more! Yet, despite its enormous features, Movavi’s video editing program is quite simple to use: add a sprinkle of fantasy and some spare time, and you’ll have a Hollywood-style video with far less effort.
Steps
Step 1: Download the software.
Download the installation file and run it. Follow the on-screen directions. Following the setup, the PiP editor will launch.
Step 2: Import files
Select two files: the one you want to use as a background and the one you want to display over it by clicking Add Files.

Step 3: Create a video track
Make an extra video track before you begin video editing. To do so, go to the Plus menu and select Add Video Track. Then, drag one of the videos to the secondary track and the other to the primary track.
From the menu, select the Picture in Picture option. To change the size of the video, drag the boundaries. Then, drag it to the desired location on the background video by clicking and holding.

Step 4: Export and Save
Save your PiP video once you’ve finished editing it. First, select the video format, quality, and folder where the file will be saved by clicking Export and adjusting the parameters in the display popup. Then press the Start button. The picture-in-picture video editor will open the folder holding the file after the Export is complete.

FAQs
1. How do you make a facetime video call?
Tap New FaceTime towards the top of the screen in FaceTime.
Tap to make a video call or an audio call after typing the name or number you wish to call in the top field (not available in all countries or regions). You can also tap instead.
2. How do you add a virtual background on Facetime?
To change the background, use a filter: s
- Tap your tile, then tap during a FaceTime video call (supported models).
- Open the filters by tapping.
- Select your look by tapping a filter at the bottom of the screen (swipe left or right to preview them).
4. Does Facetime have virtual backgrounds?
No. Facetime does have virtual backgrounds, but it allows the users to blur the background.
5. Can you get fake facetime calls?
There is less probability of getting fake facetime calls, but you might spam FaceTime calls from random numbers.
6. Can you Facetime a random number?
FaceTime isn’t any different. A caller could try their luck by FaceTime a random phone number or email address, and if they belong to an iPhone user or an Apple ID, the FaceTime call will be accepted.
7. Can you Facetime from an unknown number?
Switching to your email address for FaceTime audio and video chats is the way to go if you always want to keep your phone number private. You may even go a step further and only receive FaceTime calls via email, with your phone number serving as your FaceTime caller ID.
8. How do I call someone on Facetime?
Launch FaceTime. In the search field, type the names, phone numbers, or email addresses of the persons you wish to contact. Then, click the video or audio icon, depending on the type of call you wish to make. To begin the call, press the video or audio button in the screen’s bottom-left corner.
9. Can you create a background on Facetime?
No. However, FaceTime allows you to apply camera effects on video calls.
Step 2: Edit the video
Wondershare Filmora’s video templates can be added. You can apply music, text, filters and overlays, and motion effects by right-clicking on them and selecting apply. After adding video resources such as text and elements, you may customize the texts by changing the size, placement, etc.
Also, you can add overlay video clips using templates of a video call to make it look like a real call.
Step 3: Export and Save
Quickly export your project to a new video. After you’ve applied the video resources to your videos and clicked Export, you’ll have a whole new video that you can share at birthday parties, weddings, or for marketing purposes, just like any other video you’ve created.
2. Kapwing
Compatibility: Online
Kapwing is a powerful online video editor with a non-linear editing methodology. Upload photos, audio, and video files, then edit them all in one spot.
Creators may view and alter their content from any device or location because Kapwing is entirely online. Work is automatically saved in the cloud, eliminating the need to transfer data locally. When you’re ready to export, sit back and relax because everything is handled in the cloud.
This template allows you to blend two videos into one like an iPhone Facetime call. First, put two videos in a photo and arrange them in a picture arrangement. Then, as a video overlay in the upper corner, layer one on top of the other.
Steps
Step 1: Open Kapwing Fake Video Call Template
Step 2: Import video files
Click on ‘Add Media’ to add video clips.
Step 3: Save and Export Video
Once you are done editing the template with the images you want, click on ‘Export Project’ to Export and save the video.
3. VITA App
Compatibility: Android/Mac
VITA is a program that allows you to make visually appealing videos by combining several filters and other features. The program comes with a large template library, so making films will be a breeze. The best part is that no prior experience is required.
All of VITA’s templates are divided into categories is one of its most noticeable features. This makes it simple to locate the desired impact. It’s critical to stress that you must have all the audiovisual materials you intend to use in your smartphone’s gallery. VITA also allows you to include text in your designs, making them fascinating.
Steps
Step 1: Import the file
Download the application from Google Play Store or Apple Store. Then, launch the application and import the video files.
Step 2: Edit the video
Download PNG images that will help you add all the call elements. Choose a picture-in-picture template. Add Subtitles.
Step 3: Export the video
Once you are done with editing, you can export the file by selecting the ‘Export’ option on the top right corner of the screen.
4. Clipchamp
Compatibility: Windows/Mac
Clipchamp is a free online video editor that makes movie creation simple for anyone, even if they have no prior editing knowledge. It lets you blend films, photos, and audio files and add text and effects before saving the finished product to your computer.
Steps
Step 1: To get started, log into your Clipchamp account or create a free account.
Step 2: Click the ‘Create a video’ button on the left sidebar. There are five different forms from which to pick. First, choose the video aspect ratio that works best for your project. For example, if you wish to upload to YouTube, we recommend shooting in widescreen 16:9.
Step 3: Click ‘Add media’ and drag and drop your films, audio, and photographs into the media box if you already have filmed footage you’d like to utilize in your project. You may also add media by clicking ‘Browse my files.’ If you wish to use free stock footage, go to ‘Stock’ and upload your films to the project by clicking the ‘+’ button. All your films will be saved in your library.
Step 4: You can now find your videos in your media library. Drag and drop the picture-in-picture videos you want to alter to the editing timeline. As shown in the sample below, arrange the two videos one over the other. Make sure both clips are precisely underneath one another.
Step 5: Now that your movies are aligned, select the one you want to shrink. The video you’re reducing must be at the top of the screen. To move it from the bottom to the top, drag and drop it. A small box will appear on the timeline in the bottom left corner of the clip. The clip will shrink when you click the box once. When you click the box once again, modifying choices will appear. You can move the smaller video around and increase or decrease its size.
Step 6: Export your project once you’ve completed editing your video. Save to your preferred place or folder. You can share the video straight on social media or embed it in a document.
5. Movavi
Compatibility: Windows/Mac
Movavi Video Editor is a video editing tool for Windows that is powerful and simple to use. Apply stunning video effects and filters, add music and titles, and more! Yet, despite its enormous features, Movavi’s video editing program is quite simple to use: add a sprinkle of fantasy and some spare time, and you’ll have a Hollywood-style video with far less effort.
Steps
Step 1: Download the software.
Download the installation file and run it. Follow the on-screen directions. Following the setup, the PiP editor will launch.
Step 2: Import files
Select two files: the one you want to use as a background and the one you want to display over it by clicking Add Files.
Step 3: Create a video track
Make an extra video track before you begin video editing. To do so, go to the Plus menu and select Add Video Track. Then, drag one of the videos to the secondary track and the other to the primary track.
From the menu, select the Picture in Picture option. To change the size of the video, drag the boundaries. Then, drag it to the desired location on the background video by clicking and holding.
Step 4: Export and Save
Save your PiP video once you’ve finished editing it. First, select the video format, quality, and folder where the file will be saved by clicking Export and adjusting the parameters in the display popup. Then press the Start button. The picture-in-picture video editor will open the folder holding the file after the Export is complete.
FAQs
1. How do you make a facetime video call?
Tap New FaceTime towards the top of the screen in FaceTime.
Tap to make a video call or an audio call after typing the name or number you wish to call in the top field (not available in all countries or regions). You can also tap instead.
2. How do you add a virtual background on Facetime?
To change the background, use a filter: s
- Tap your tile, then tap during a FaceTime video call (supported models).
- Open the filters by tapping.
- Select your look by tapping a filter at the bottom of the screen (swipe left or right to preview them).
4. Does Facetime have virtual backgrounds?
No. Facetime does have virtual backgrounds, but it allows the users to blur the background.
5. Can you get fake facetime calls?
There is less probability of getting fake facetime calls, but you might spam FaceTime calls from random numbers.
6. Can you Facetime a random number?
FaceTime isn’t any different. A caller could try their luck by FaceTime a random phone number or email address, and if they belong to an iPhone user or an Apple ID, the FaceTime call will be accepted.
7. Can you Facetime from an unknown number?
Switching to your email address for FaceTime audio and video chats is the way to go if you always want to keep your phone number private. You may even go a step further and only receive FaceTime calls via email, with your phone number serving as your FaceTime caller ID.
8. How do I call someone on Facetime?
Launch FaceTime. In the search field, type the names, phone numbers, or email addresses of the persons you wish to contact. Then, click the video or audio icon, depending on the type of call you wish to make. To begin the call, press the video or audio button in the screen’s bottom-left corner.
9. Can you create a background on Facetime?
No. However, FaceTime allows you to apply camera effects on video calls.
How to Make After Effects Gifs
How to Create After Effects Gifs
An easy yet powerful editor
Numerous effects to choose from
Detailed tutorials provided by the official channel
GIFs have been around for quite some time but as the flow of content continues to plummet on popular social media platforms like Facebook or Instagram, the demand for GIFs would continue to increase.
Unfortunately, you won’t be able to make a gif in after effects directly, unless with the help of a plug-in like GIFGun.
Before moving forward, keep in mind that using Adobe Media Encoder is an easier method for compressing your exports rather than any third-party compressor.
In this article, you will find easy to follow methods using which you can create after effects GIFs within a matter of minutes.
In this article
01 [General Knowledge on GIF Animation](#Part 1)
02 [What Is the Difference Between After Effects Gifs’ Making and Photoshop Gifs’ Making?](#Part 2)
03 [How to Create After Effects Gifs](#Part 3)
Part 1 General Knowledge on GIF Animation
01What is a GIF?
The acronym GIF stands for Graphics Interchange Format and the file is created in bitmap image format. This was developed back in 1987 by a working in CompuServe.
This format was incredibly successful on the WEB due to benefits like smaller file sizes, broader support, and its easy compatibility with Operating Systems.
However, GIFs are much more suitable as simple graphics and logos rather than Live Action Videos with its palette limitation of 256 per image.
Creating a GIF is like looping an animation or animated elements. You can use these animated GIFs in banners to engage your audience or even create fun sharable content for your Facebook pages.
You can start by creating basic easy animations in Photoshop and then elevate them by using After Effects.
02Why create a GIF?
Here are a handful of things you can keep your eye on if you are just starting on making GIFs;
● Simple Product Demonstrations. With simple 3 to 4 step GIFs, you can briefly introduce steps on how to use a product.
● You can provide instructions in a short span of time.
● UX designers use GIFs to show the functioning of certain digital experiences.
● You can introduce GIFs on your page to keep followers engaged.
● You can display some amazing things on your website.
Part 2 Difference between making GIFs in After Effects and Photoshop
Creating GIFs in After Effects and Photoshop are both one in the same thing but the results may vary depending on which choice of tools and features suits you better.
Now, for those who are learning Photoshop and After Effects for the first time, to understand the difference in results between both these software lets familiarize you with their features in brief.
01What’s Similar?
Since both are designed by Adobe, there are bound to be similarities in the tools and interface they use. Both these software enables you to use layers of editing from the layer panel where you separate the blending or transform multiple layers. You can apply masks to these layers in different ways on both software.
02Groups (PS) and Nested (AE) Composition
In Photoshop, you can group layers together and apply styles, blends, and transformations together. However, in After Effects, this is called Nesting.
Both are in a way similar to each other but Nesting Comps give users more functionality as it interprets probable compositions during the nesting process.
Smart objects used in PS are also comparable to Nested Comps as you can apply filters over one while applying effects to the other.
03Vector and Shapes
You can use the Pen tool or Shape tool in both PS and AE that creates shape layers without losing any integrity. Both the applications support Bezier which lets you control curves between anchor points in PS and vertices in AE.
04Destructive Effects
After Effects does not provide you with destructive effects while in Photoshop you can apply non-destructive filters. You can also combine several layers to apply changes or distort your images but these permanent changes cannot be made in After Effects.
You will also notice that although there are several similarities, there are tools and features which are not shared between both applications. The types of tool categories would also vary. Like with After Effects, you can create paragraph and character styles that you can apply to texts.
Part 3 How to Create After Effects Gifs
After Effects harbors greater video editing capabilities rather than the basic animating options you can try on Photoshop. In creating a GIF, you would want to leverage the combination of tools offered on both After Effects and Photoshop.
Let’s first get into how you can create an animated video on After Effects and then convert it into an animated GIF in Photoshop.
01Animating in After Effects
Step 1: Open After Effects, go to ‘Composition’ and create ‘New Composition’. You will need to fill out the dimensions and specs for your project on the window that pops up. For example, 300x250 px at 30 fps and 6 sec duration.

Step 2: You can import assets by dragging and dropping, or by going to the ‘Project Panel’ in the After Effects Workspace as shown in the image.

Step 3: Now, you can begin animating your Assets. Drag them and add them to the ‘Composition’ panel or ‘Timeline’ panel. Placing them in either one will make them appear on both. Adjust the layers according to the topmost layer on the panel.

Dial down the scale of every animation to 0% so that can be animated in a growing sequence. Select the layer you wish to adjust and click on ‘Transform’. Click on ‘Scale’ to give that layer an active marker on the timeline. Set the scale to 0%.

You can now begin animating the first item by moving the current time indicator to 06f (the 6th frame on the 30fps timeline). Scale the item back to 100% and the marker will reappear.

Repeat this for the other items. Keep in mind that each item has a 06f space between them for later adjustability.

Your equation is now complete and all that is left to do is animate your CTA button. Adjust the position of the top layer on your CTA and set the current time indicator to start time on the button animation. Click on ‘position’ to set up a marker on your Timeline. Forward the 04f then nudge the button and reverse back to the original position so that it looks like a button clicking animation.

Your animation is now complete. Now go to ‘Composition’ and shorten the time in the ‘Duration’ panel.
Step 4: Go to Composition. Click on Pre-Render and a new selection will pop up. Now click on ‘Render’. Your output will be a .mov file.

If you find exporting gifs from After Effects too complicated, you can also upload and loop videos using Wondershare Filmora Video Editor which has plenty of other amazing video editing features you can drag and drop to create.
Wondershare Filmora - Best Video Editor for Mac/Windows
5,481,435 people have downloaded it.
Build unique custom animations without breaking a sweat.
Focus on creating epic stories and leave the details to Filmora’s auto features.
Start a creative adventure with drag & drop effects and endless possibilities.
Filmora simplifies advanced features to save you time and effort.
Filmora cuts out repetition so you can move on to your next creative breakthrough.
02Converting Animation to GIF in Photoshop
Step 1: Create a new file in Photoshop with the same specs as you did in After Effects. Now go to ‘File’ > ‘Import’ > ‘Frames to Layers’ and import the saved .mov file.

Step 2: If you don’t automatically see the timeline, go to Windows > Timeline.

Step 3: Decide on how many loops you want in your animation. Once you are done with your GIF, go to ‘File’ > Export. Apply the Legacy Save for Web and choose the format for your GIF.

Step 4: In Export options, you can gain access to several presets to apply to your animated GIFs. The more color displayed in your GIF, the larger its size. You can use Dethering to smoothen gradients and shades. Looping is also turned off on Photoshop but you can apply looping from the ‘Options’ shown at the bottom of the menu.
Part 1 Ending Thoughts
● GIFs are a popular type of media that is quite trendy and easy to make using Adobe after effects gifs or Photoshop. They are called Graphics Interchange Format and are best used as simple graphic images.
● You require a combination of both Photoshop and After Effects, though both share similar interfaces, tools, and effects. You can group or nest compositions, apply filters or effects, and adjust vectors and shapes.
● After Effects is better than Photoshop in terms of creating videos, so you can first create a project in AE and then import the project onto PS after exporting after effects to gif. You can also use Filmora for the first step of this process.
GIFs have been around for quite some time but as the flow of content continues to plummet on popular social media platforms like Facebook or Instagram, the demand for GIFs would continue to increase.
Unfortunately, you won’t be able to make a gif in after effects directly, unless with the help of a plug-in like GIFGun.
Before moving forward, keep in mind that using Adobe Media Encoder is an easier method for compressing your exports rather than any third-party compressor.
In this article, you will find easy to follow methods using which you can create after effects GIFs within a matter of minutes.
In this article
01 [General Knowledge on GIF Animation](#Part 1)
02 [What Is the Difference Between After Effects Gifs’ Making and Photoshop Gifs’ Making?](#Part 2)
03 [How to Create After Effects Gifs](#Part 3)
Part 1 General Knowledge on GIF Animation
01What is a GIF?
The acronym GIF stands for Graphics Interchange Format and the file is created in bitmap image format. This was developed back in 1987 by a working in CompuServe.
This format was incredibly successful on the WEB due to benefits like smaller file sizes, broader support, and its easy compatibility with Operating Systems.
However, GIFs are much more suitable as simple graphics and logos rather than Live Action Videos with its palette limitation of 256 per image.
Creating a GIF is like looping an animation or animated elements. You can use these animated GIFs in banners to engage your audience or even create fun sharable content for your Facebook pages.
You can start by creating basic easy animations in Photoshop and then elevate them by using After Effects.
02Why create a GIF?
Here are a handful of things you can keep your eye on if you are just starting on making GIFs;
● Simple Product Demonstrations. With simple 3 to 4 step GIFs, you can briefly introduce steps on how to use a product.
● You can provide instructions in a short span of time.
● UX designers use GIFs to show the functioning of certain digital experiences.
● You can introduce GIFs on your page to keep followers engaged.
● You can display some amazing things on your website.
Part 2 Difference between making GIFs in After Effects and Photoshop
Creating GIFs in After Effects and Photoshop are both one in the same thing but the results may vary depending on which choice of tools and features suits you better.
Now, for those who are learning Photoshop and After Effects for the first time, to understand the difference in results between both these software lets familiarize you with their features in brief.
01What’s Similar?
Since both are designed by Adobe, there are bound to be similarities in the tools and interface they use. Both these software enables you to use layers of editing from the layer panel where you separate the blending or transform multiple layers. You can apply masks to these layers in different ways on both software.
02Groups (PS) and Nested (AE) Composition
In Photoshop, you can group layers together and apply styles, blends, and transformations together. However, in After Effects, this is called Nesting.
Both are in a way similar to each other but Nesting Comps give users more functionality as it interprets probable compositions during the nesting process.
Smart objects used in PS are also comparable to Nested Comps as you can apply filters over one while applying effects to the other.
03Vector and Shapes
You can use the Pen tool or Shape tool in both PS and AE that creates shape layers without losing any integrity. Both the applications support Bezier which lets you control curves between anchor points in PS and vertices in AE.
04Destructive Effects
After Effects does not provide you with destructive effects while in Photoshop you can apply non-destructive filters. You can also combine several layers to apply changes or distort your images but these permanent changes cannot be made in After Effects.
You will also notice that although there are several similarities, there are tools and features which are not shared between both applications. The types of tool categories would also vary. Like with After Effects, you can create paragraph and character styles that you can apply to texts.
Part 3 How to Create After Effects Gifs
After Effects harbors greater video editing capabilities rather than the basic animating options you can try on Photoshop. In creating a GIF, you would want to leverage the combination of tools offered on both After Effects and Photoshop.
Let’s first get into how you can create an animated video on After Effects and then convert it into an animated GIF in Photoshop.
01Animating in After Effects
Step 1: Open After Effects, go to ‘Composition’ and create ‘New Composition’. You will need to fill out the dimensions and specs for your project on the window that pops up. For example, 300x250 px at 30 fps and 6 sec duration.
Step 2: You can import assets by dragging and dropping, or by going to the ‘Project Panel’ in the After Effects Workspace as shown in the image.
Step 3: Now, you can begin animating your Assets. Drag them and add them to the ‘Composition’ panel or ‘Timeline’ panel. Placing them in either one will make them appear on both. Adjust the layers according to the topmost layer on the panel.
Dial down the scale of every animation to 0% so that can be animated in a growing sequence. Select the layer you wish to adjust and click on ‘Transform’. Click on ‘Scale’ to give that layer an active marker on the timeline. Set the scale to 0%.
You can now begin animating the first item by moving the current time indicator to 06f (the 6th frame on the 30fps timeline). Scale the item back to 100% and the marker will reappear.
Repeat this for the other items. Keep in mind that each item has a 06f space between them for later adjustability.
Your equation is now complete and all that is left to do is animate your CTA button. Adjust the position of the top layer on your CTA and set the current time indicator to start time on the button animation. Click on ‘position’ to set up a marker on your Timeline. Forward the 04f then nudge the button and reverse back to the original position so that it looks like a button clicking animation.
Your animation is now complete. Now go to ‘Composition’ and shorten the time in the ‘Duration’ panel.
Step 4: Go to Composition. Click on Pre-Render and a new selection will pop up. Now click on ‘Render’. Your output will be a .mov file.
If you find exporting gifs from After Effects too complicated, you can also upload and loop videos using Wondershare Filmora Video Editor which has plenty of other amazing video editing features you can drag and drop to create.
Wondershare Filmora - Best Video Editor for Mac/Windows
5,481,435 people have downloaded it.
Build unique custom animations without breaking a sweat.
Focus on creating epic stories and leave the details to Filmora’s auto features.
Start a creative adventure with drag & drop effects and endless possibilities.
Filmora simplifies advanced features to save you time and effort.
Filmora cuts out repetition so you can move on to your next creative breakthrough.
02Converting Animation to GIF in Photoshop
Step 1: Create a new file in Photoshop with the same specs as you did in After Effects. Now go to ‘File’ > ‘Import’ > ‘Frames to Layers’ and import the saved .mov file.
Step 2: If you don’t automatically see the timeline, go to Windows > Timeline.
Step 3: Decide on how many loops you want in your animation. Once you are done with your GIF, go to ‘File’ > Export. Apply the Legacy Save for Web and choose the format for your GIF.
Step 4: In Export options, you can gain access to several presets to apply to your animated GIFs. The more color displayed in your GIF, the larger its size. You can use Dethering to smoothen gradients and shades. Looping is also turned off on Photoshop but you can apply looping from the ‘Options’ shown at the bottom of the menu.
Part 1 Ending Thoughts
● GIFs are a popular type of media that is quite trendy and easy to make using Adobe after effects gifs or Photoshop. They are called Graphics Interchange Format and are best used as simple graphic images.
● You require a combination of both Photoshop and After Effects, though both share similar interfaces, tools, and effects. You can group or nest compositions, apply filters or effects, and adjust vectors and shapes.
● After Effects is better than Photoshop in terms of creating videos, so you can first create a project in AE and then import the project onto PS after exporting after effects to gif. You can also use Filmora for the first step of this process.
Also read:
- New In 2024, How to Loop YouTube Videos on iPhone
- The Only Guide Youll Ever Need to Learn GIF Design That Get Shared Like Crazy
- 2024 Approved How To Quickly Create A Screen Print Effect In Photoshop Detailed Guide
- 6 Instant Mp4 to GIF Online Tools for You for 2024
- Updated In 2024, Why Vimeo Slideshow Maker Become Popular
- Best 10 Anime Movies for All Time
- Want to Make a Slide Show Video? Heres How
- Updated 2024 Approved Top 10 Best Slideshow Makers with Music
- In 2024, To Find the Best Tool Out of Hundreds of Online and Offline GIF to Video Converters, You Need to Check These Specifications. Read This Review and Get the Best Out of the Best
- Updated 2024 Approved How to Use LUTs in Adobe Premiere Pro
- Easy Steps to Create Intro Video with After Effects
- Updated 2024 Approved Renderforest Is a Great Online Editing Platform to Use for Many Video Creators. If You Want to Make an Intro Video for Your Channel or Daily Vlogs, You Can Follow This Article to Know More Details
- Updated 2024 Approved How to Add a Lower Third to Your Video
- New 10 Best Vloggers on YouTube for 2024
- New 2024 Approved Start Making Procreate GIFs and Take Your Editing Creativity to the Next Level
- New You Can Make Stylish Chroma Key Text Effects After Reading This Article. Wondershare Filmora Will Fill the Crazy Colors in Your Handwritten Note or Words
- In 2024, Top Fixes to Resolve Issues with Premiere Pro Slow Playback
- 2024 Approved 11 Apps To Speed Up A Video On iPhone
- New 2024 Approved In This Article, We Shall Take a Look at the Various Steps of Making a Photo Collage in Microsoft Word, and Also at Other Details of the Process, Which Might Be Relevant
- In 2024, Best Dark Moody LUTs During Editing
- In 2024, Quick Answer Why Did Filmora AI Portrait Attract People?
- How to Trim Video in QuickTime Player on Your Mac for 2024
- New In 2024, Best Cinematic LUTs For Premiere Pro Recommendation
- New Guide to Create Intro Video with KineMaster
- Customize PowerPoint Slideshow Icon in Simple Ways for 2024
- New In 2024, The Ultimate Wedding Videography Checklist
- New In 2024, How to Use Twixtor Effect to Create Super Slow-Motion Video?
- Updated Ultimate Guidelines to Help You Better Use VLC Media Player
- Updated In 2024, The Frames per Second Can Enhance or Hamper Your Ability to Enjoy Watching a Video on YouTube. This Article Will Define Frame Rates and Help You Choose the Best FPS
- 2024 Approved A Review of 3D LUT Mobile App - A Composite Application for Editing Media
- Updated Have You Ever Wondered How Those PowerPoint, Looping Slideshows You See in Conferences and Reception Areas Display and Move to the Next Slide Automatically without Clicking a Mouse? You Dont Have to Be Amazed at This for 2024
- The Best 10 AI Video Analytics Companies at a Glance
- Updated Looking Into The Top Free Slow Motion Apps (Android & iOS)
- New Looking Forward to Making up Your Career in Video Editing? Land in Here to Learn About the Credibility of some Popular Video Editing Courses
- New Camtasia Review – Is It The Best Video Editor?
- How to Use iMovie Text Effects
- In 2024, How to Correct Lens Distortion With Filmora
- With Everything Centered Around Videos on the Digital Platform, the Use and the Need for AI-Based Editing Tools Have Also Increased Manifold. We Have Curated a List of the Top Programs that Can Help You with AI Video Editing for 2024
- How to Make an Intro Video Easy Solution for 2024
- Updated AI Features of Filmora - Silence Detection in Videos for 2024
- New Do You Know that You Can Apply Different LUTs and Create Your Own? There Are Many LUT Online and Offline Generators that You Can Use to Create Your LUT for 2024
- Updated Top Fixes to Resolve Issues with Premiere Pro Slow Playback for 2024
- Updated 2024 Approved How to Use LUTs in Lumafusion & Free LUTs Resource
- New How to Create a Custom Slide Show in PowerPoint for 2024
- Updated 2024 Approved What Is the Best Frame Rate for 4K Videos?
- Updated Steps to Create Gold Text Effects After Effects
- New Overview of Perfect Moody LUTs for VN Editor
- In 2024, Preparation to Beat Giovani in Pokemon Go For Samsung Galaxy S24 Ultra | Dr.fone
- Fix Cant Take Screenshot Due to Security Policy on Samsung Galaxy A05 | Dr.fone
- How To Transfer Data From iPhone 12 Pro Max To Other iPhone 14 devices? | Dr.fone
- In 2024, Top IMEI Unlokers for Your Lava Yuva 3 Phone
- Learn How To Lock Stolen Your iPhone 15 Properly | Dr.fone
- In 2024, 5 Ways To Teach You To Transfer Files from Xiaomi Redmi Note 12 Pro+ 5G to Other Android Devices Easily | Dr.fone
- How to Track Vivo Y100i Power 5G by Phone Number | Dr.fone
- Lock Your Samsung Galaxy A23 5G Phone in Style The Top 5 Gesture Lock Screen Apps
- In 2024, How to Bypass iCloud Lock on iPhone 12
- In 2024, How To Leave a Life360 Group On Apple iPhone 13 Pro Without Anyone Knowing? | Dr.fone
- Updated Creating AI Videos With Templates
- In 2024, How to Change Netflix Location to Get More Country Version On Honor Magic 6 Lite | Dr.fone
- Best Android Data Recovery - Retrieve Lost Contacts from Hot 40.
- Ways to trade pokemon go from far away On Oppo Reno 8T 5G? | Dr.fone
- New Best 10 Animated Templates in Canva for 2024
- How To Remove Phone Number From Your Apple ID on Your iPhone 13 mini?
- How to Get and Use Pokemon Go Promo Codes On Lava Yuva 2 Pro | Dr.fone
- How To Fake GPS On Oppo Reno 10 Pro 5G For Mobile Legends? | Dr.fone
- In 2024, How to Unlock Realme 11 Pro+ Phone Password Without Factory Reset?
- Spoofing Life360 How to Do it on Xiaomi Redmi Note 12 Pro 5G? | Dr.fone
- Various Methods to Transfer Pictures from Apple iPhone SE (2022) to PC | Dr.fone
- Online signatures for .xls files
- In 2024, Is Fake GPS Location Spoofer a Good Choice On Nokia C300? | Dr.fone
- How To Stream Anything From Xiaomi Redmi 13C 5G to Apple TV | Dr.fone
- New 2024 Approved 4 Things You Need to Know About Pinterest GIF
- How To Unlink Your iPhone 7 Plus From Your Apple ID
- In 2024, The Top 5 Android Apps That Use Fingerprint Sensor to Lock Your Apps On Tecno Spark Go (2023)
- How To Transfer Data From Apple iPhone XS Max To Other iPhone 11 Pro devices? | Dr.fone
- In 2024, 5 Quick Methods to Bypass Infinix Note 30 Pro FRP
- How to get back lost photos from Poco M6 5G.
- How To Change Your SIM PIN Code on Your Gionee F3 Pro Phone
- In 2024, Top 5 Car Locator Apps for Apple iPhone 8 | Dr.fone
- 2024 Approved Ultimate Guide to Translating YouTube Videos Without CC
- Hassle-Free Ways to Remove FRP Lock on Infinix Zero 5G 2023 Turbo Phones with/without a PC
- Complete guide for recovering video files on Motorola Moto G Stylus (2023)
- How to Cast Samsung Galaxy F14 5G to Computer for iPhone and Android? | Dr.fone
- 7 Ways to Unlock a Locked Oppo F25 Pro 5G Phone
- How To Transfer WhatsApp From Apple iPhone 8 to other iPhone devices? | Dr.fone
- Title: Updated In 2024, Fixes | What If YouTube Zoom to Fill Not Working?
- Author: Morgan
- Created at : 2024-04-24 01:05:14
- Updated at : 2024-04-25 01:05:14
- Link: https://ai-video-editing.techidaily.com/updated-in-2024-fixes-what-if-youtube-zoom-to-fill-not-working/
- License: This work is licensed under CC BY-NC-SA 4.0.
