
Updated In 2024, How to Add Green Screen Effects In Phhotoshop
How to Add Green Screen Effects In Phhotoshop
Removing green screen backgrounds and replacing them with stunning videos is a common practice in video and movie making. The same process is applicable to still photos as well. You can take a photo with a green screen background and replace the screen with any photo as per your preference and requirement. You will need a high-quality photo editor to add green screen effects to your photo. There is no better photo editor in the world than Adobe Photoshop.
First, you have to opt for remove green screen Photoshop and then add anything you want in place of the green screen. The difference between Chroma key Photoshop and any other photo editor is that you can pay attention to details and remove the entire green screen halo effect around the main subject or object on the photo. Therefore, there will be no jittery green edges and green patches to disturb the overall photo quality. Here are the steps to use green screen effect in Adobe Photoshop.
1. How To Use Green Screen in Photoshop?
There are various ways available to remove greenscreen Photoshop. The beginners prefer using the Magic Wand tool but there will always be green patches around the main object on the photo. These green patches will get highlighted when you insert any image in the background. Therefore, we are using the best method to Chroma key Photoshop and that is through Color Range option. Here are the detailed steps to use color keying in Photoshop to use green screen effect.
Step 1: Launch Adobe Photoshop and open your photo with green screen background.
Step 2: Go to Select menu and click on Color Range.

Step 3: Pick the Eyedropper tool. Hold Shift key to select the green background. You can also hold Alt key to remove any selection that you might have done by mistake. When you are perfectly ok with the selection of the green screen background, you should click on OK button.

Step 3: Go to Select menu and click on Inverse. Now, the selection will be on the main subject instead of the background.

Step 4: If you want to see a preview of the selection in your photo, you should select Image radio button and from Selection Preview, select any option other than None.

Step 5: Go to Select menu again and click on Refine Edge. Use the sliders to fine-tune the selection so that the selection is smooth on the edges of the main subject of the photo. Once done, click on OK button.

Step 6: Go to Select menu and click on Inverse again.
Step 7: Press Delete key to delete the green screen background selection.
Step 8: Open the replacement image which you want to put in the place of the green screen background that you have just deleted.
Step 9: Select the entire replacement image and copy the replacement. Come back to your photo and paste the replacement image. Make sure that the layer of the replacement image must be placed below the layer of your photo.

Step 10: You can adjust the size of the images as per your requirement so that everything fits perfectly in the frame. Similarly, you should adjust the color scheme so that the superimposition does not look awkward.
2. Best Way To Add Green Screen Effect To Video
In the previous section, we have stated how to remove the green screen background in any image and replace that with a stunning background photo. In this section, we will state how to add green screen effects in a video. There are many who think that adding green screen effects in a video takes a lot of expertise, but it is not the case.
If you select the suitable video editor, it is a matter of a few steps only. We recommend Wondershare Filmora to add green screen effects to your video where you have shot the scenes with green screen backgrounds. Here are the steps to follow to remove green screen backgrounds and replace with any photo or video as per your preference.
For Win 7 or later (64-bit)
For macOS 10.12 or later
Step 1: Download and install Wondershare Filmora.
Step 2: Launch Filmora and go for Create New Project option to get started.
Step 3: Import your video with green screen background and move it to the Timeline.
Step 4: Import the replacement photo or video and put it directly on the Timeline.
On the Timeline, your recorded video should be below the replacement photo or video.

Step 5: Double-click on your video, and you will come across a panel on the upper-left side. From that panel, you have to turn on Chroma Key option. This will enable the green screen effect due to which you will see the replacement photo or video superimposed on your recorded video in the green screen background.

Step 6: Finally, adjust the parameters available to fine-tune the overall green screen effect. Lastly, click on Ok button.

Conclusion
If you are looking to add green screen effects to your photo, you can opt for Chroma key Photoshop. Adobe Photoshop is the best photo editor to remove the green screen backgrounds on your photo and replace them with any image you want. Color keying in Photoshop enables you to change any solid color background to anything you want. Similarly, you can use Wondershare Filmora to add green screen effects to your video in simple steps.
For macOS 10.12 or later
Step 1: Download and install Wondershare Filmora.
Step 2: Launch Filmora and go for Create New Project option to get started.
Step 3: Import your video with green screen background and move it to the Timeline.
Step 4: Import the replacement photo or video and put it directly on the Timeline.
On the Timeline, your recorded video should be below the replacement photo or video.
Step 5: Double-click on your video, and you will come across a panel on the upper-left side. From that panel, you have to turn on Chroma Key option. This will enable the green screen effect due to which you will see the replacement photo or video superimposed on your recorded video in the green screen background.
Step 6: Finally, adjust the parameters available to fine-tune the overall green screen effect. Lastly, click on Ok button.
Conclusion
If you are looking to add green screen effects to your photo, you can opt for Chroma key Photoshop. Adobe Photoshop is the best photo editor to remove the green screen backgrounds on your photo and replace them with any image you want. Color keying in Photoshop enables you to change any solid color background to anything you want. Similarly, you can use Wondershare Filmora to add green screen effects to your video in simple steps.
What Is First Impression Review Video
There are many types of first impression reviews, it can be for gadgets, it can also be for products like skin care, makeup or it can also be home related like appliances, home decor etc. or any products that is available in the market. It depends on the content you choose but this are all example of some products that people want to see impression reviews before buying products.
Doing a first impression review is important specially for companies, because they want to know how the public will accept their products or what else should be changed in the products. The views and opinion of content creator and also for buyer are much needed of this company.
Using this video content to market will benefits the company and products, this is because people engage more with videos than with words or static photo.In this article I will share to you the information about first impression review video and tips on how to make an effective first impression product review.
First Impression Review Video
First impression review is more likely product reviews or live review, products reviews are the videos where you are explaining, products features, pros and cons are describe while first time to see the products. It include also a little of unboxing reviews, because when doing a first impression review, it show how you accept the product looks or what can you say about the product even if it’s the first time you see it.
A review has a simple goal, to check if the products is worth buying or not. It covers how the products helps you. This can involve examining or test the products performance, cost and more.

How this kind of content will help you
Let’s say you want to create content and you have thought or chosen to create these kind of video, so below are the benefits of how it can help to grow your channel.
- Strengthening your online presence
- Engaging viewers
- Building stronger community
- Converting viewers into buyers
- Opportunity to work with Brand
- Product Sponsorship
Tips on How to Perform Product First Impression Review
Include unboxing Video
Unboxing video is recording yourself while opening item for the first time. This opportunity can benefit people who are weighing multiple products before making a purchase. Unboxing videos can recreate the feeling of getting something new and enjoying it for the first time.
Its seems that it is same as you make a first impression video and It would be better if includes this type of video the unboxing of the product in front of the viewers so they see how you react about the product. The genuine reaction upon opening the product is always the best reaction they will see.
Unboxing video make people feel that way and the people behind the camera have knack for building excitement.

Detailed explanation
Detailed explanation meaning starting from the moment you open the package to details that are into the packaging of the products like the ingredients, manufacturer, expiration etc. Introduce the product properly and talk about the where you saw it or how you found out about this. Explain also the product claims that sometime you will read on the packaging but if luck of information you also need to search in their website or pages. Just don’t forget to include everything that you think people need to know about the product.
What include in the video is a commentary explaining to the viewers the features of a particular product. The review may typically includes the strengths and weaknesses of the products.
Talk about Product features and benefits
Products features are the characteristics of the products you are making a vlog. These are the plain facts about the products like the sizes, weight, functionality and benefits because viewers or customers are more likely to know the products performance. Make a list about all the features of the product you are reviewing, explain briefly each one so that viewers can better understand. The same with the benefits they will get if they buy this products.
When you use features in this manner, you help customers who have already decided to buy the product decide which version they are going to buy.

Share personal thoughts
Of course it’s important here that you can share your personal thoughts for the first time you see or touch the product. As an influencer for your viewers to believe and trust you, you just need to give your honest review about the product. Also share them your thoughts about the appearance, what should be change or fixed in the products if any.
Don’t forget to update your viewers when you already use the products. Make another video on how the product perform on you or how the product effects. So that the viewers know immediately if they will buy or not or if it is worth to buy.
Be honest when reviewing especially many viewers only rely on the video review of the influencers.

For Effective Video Performance and Promotion
You need to make the video better so that the brand will be more happy when they see that apart from your effort to search for good things about the products, they will also see your effort when it comes to video editing.
I’m talking about video editing software, you can see many in the market that can be downloaded for free but of course make sure if it’s performance wise to use.
Wondershare Filmora is one of the effective video editing software that can be use especially if you are a beginner in this kind of work.
Filmora has many great features that you can use to enhance the video you make. Use the color enhancer to make the color of the product you show in the video even better. Also use effects to make the video more creative and nice, don’t forget to use background music so the video isn’t boring. There are viewers that beside of how effective you are in doing product review, they are also commenting about the video editing. You have to make your video creative and stand out so that you can attract more viewers to your channel.

Free Download For Win 7 or later(64-bit)
Free Download For macOS 10.14 or later
After making your video creative by editing, it is important that you always promote your videos on all your social media or pages, so that many people can see your hard work, make all effort to get your video noticed by social networks, because nowadays social network make easy for people to share information thru videos. This sharing gives your vlog the potential to reach out to the audiences exponentially. The more entertaining and helpful you make your vlogs the better the chances of sharing.
Conclusion
For Business owners, they will get great benefits when they use influencer to promote their new products because apart from the great help of online promotion, many people also listen to what influencers or vlogger say, especially when they show how effective the product is or how the product perform well. The reason why other brand owner refers to vlogger to promote their brand is because it gives a sense of transparency in communication for the consumers. Although the vlog varies slightly different depending on the vlog, the vlogger appears in the video in a tone that sounds like telling a story to the friends or acquaintance.
Tips to Make Cinematic Color Grading
New modern color grading software allows you to do point-and-click color grading right in your browser. Color changes are as easy and intuitive as painting or sketching.
You can choose from many different look presets and movie emulations based on Hollywood movies plus real-time previews of your favorite LUTs with this software.
Part 1. What is Cinematic Color Grading?
The cinematic look is all the rage these days and aims to mimic images captured on real film rather than digitally created. To achieve this effect, film directors use various means from lighting to cinematic color gradation. The latter is a powerful tool for bringing a cool or warm tone to a video and providing smooth color transitions to fall on an image that doesn’t look too real but feels emotional.
This kind of post-production processing, which produces beautiful results when used by color magicians, requires a deep understanding of colors and their effect on our psyche and even physiology. It’s not enough to watch a color grading video and use a LUT to get where you want. You should at the very least have an understanding of:
- Color wheel
- Color quality
- Color harmony and discord
- Warm and cool colors
- Color context
Part 2. Tips to make cinematic color grading
Here are three helpful tips to create cinematic-looking images in DaVinci Resolve.
In my 10-year career as a colorist, I’ve worked on every type of content imaginable: short, long, commercial, educational, episodic—you name it. And while each of these formats requires its approach, the one constant that spans them all is the client’s desire for a cinematic look.
Virtually all of us aspire to more cinematic color, but we often come up short—in part because the term itself has become too broad to effectively target. To focus on the goal, I like to think of “cinematic” as “an image whose key visual properties are consistent with those of printed film.”
The print film was the primary medium through which we consumed cinematic images for the first century of filmmaking and is therefore at the very heart of cinematic aesthetics. In this video, I’ll show you my top three secrets to achieving this aesthetic quickly and consistently in Davinci Resolve.
Tips1: Create Color Density
The first secret to film color is to create color density. Another key aesthetic property of film images is that colors can be either highly saturated or highly luminescent but cannot be both.
We can mimic this visual characteristic by identifying strongly saturated colors in our image and using the Hue vs. Lum to reduce their brightness. This simple technique is especially effective on pure primary colors (red, green, and blue).
Tips2: Separation Beats Saturation
The second secret to film color is prioritizing separation over saturation. When you feel like an image lacks overall color or pop, it’s all too easy to reach for the saturation knob, but that’s not a very cinematic solution.
Instead, try using split toning—pushing cool colors into shadows and warm colors into highlights—to increase tonal separation and add depth to an image. This characteristic is present in virtually every film print and is deeply evocative when applied correctly.
Tips3: Strong Contrast is Your Friend
The third secret of film colors is a strong contrast. This is not always easy, as a higher contrast look inherently requires more precision with exposure placement. Too often we pump up some contrast, end up with an image that looks blown out or too crisp, and then immediately back away from editing.
However, if you stick with high contrast long enough to improve your exposure, you’ll get a very different result and be well on your way to a more cinematic image.
Part 3. How to add color cinematic grading by using Filmora?
New modern color grading software allows you to do point-and-click color grading right in your browser. Color changes are as easy and intuitive as painting or sketching.
You can choose from many different look presets and movie emulations based on Hollywood movies plus real-time previews of your favorite LUTs with this software.
Wondershare Filmora is an option if you want to easily change the colors of your projects. You may just double-click the media after dragging it onto the editing timeline to change the contrast, saturation, brightness, and hue.
Despite its speed, it also allows you to merge, edit audio, divide, rotate, and apply as many cool video effects as you like.
Step1Add the media
After installing Wondershare Filmora, click the New Project and Import button to easily find and load your videos.
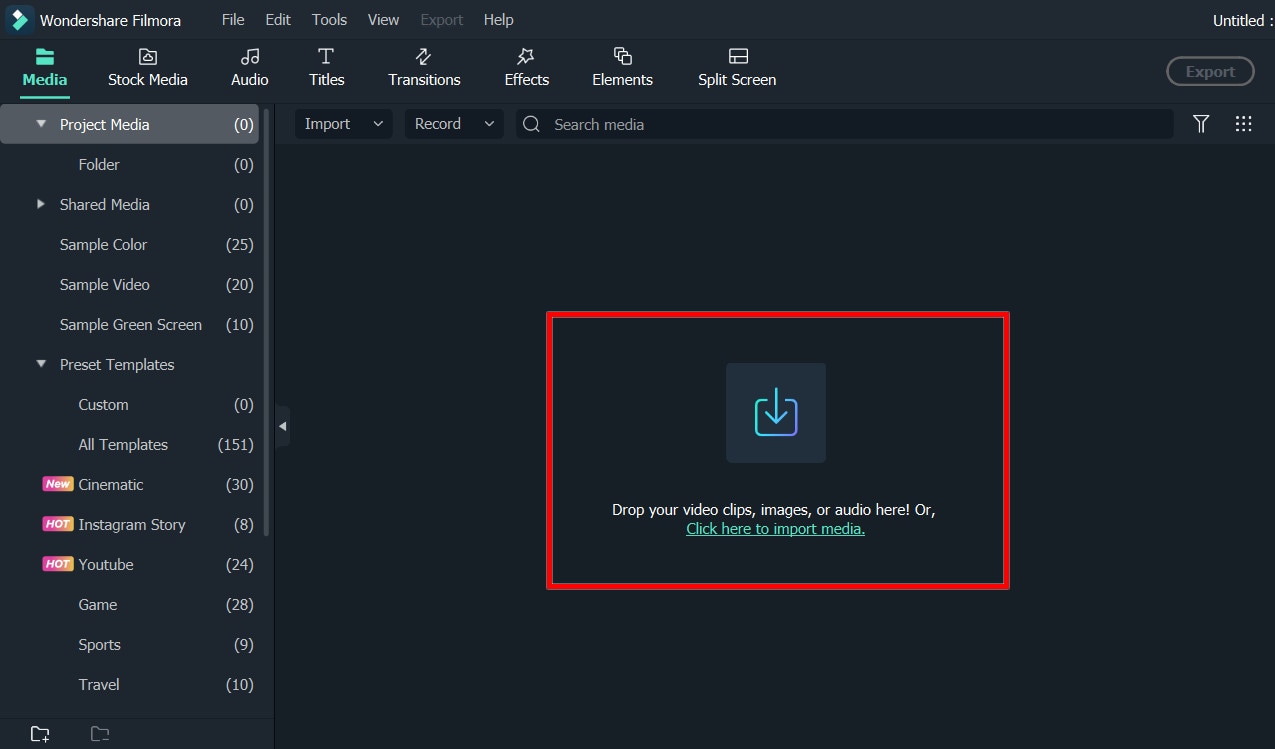
Step2Correct the color [Basic and Advanced]
In the timeline, double-click the video editing window. Select the “Color” panel and make adjustments.
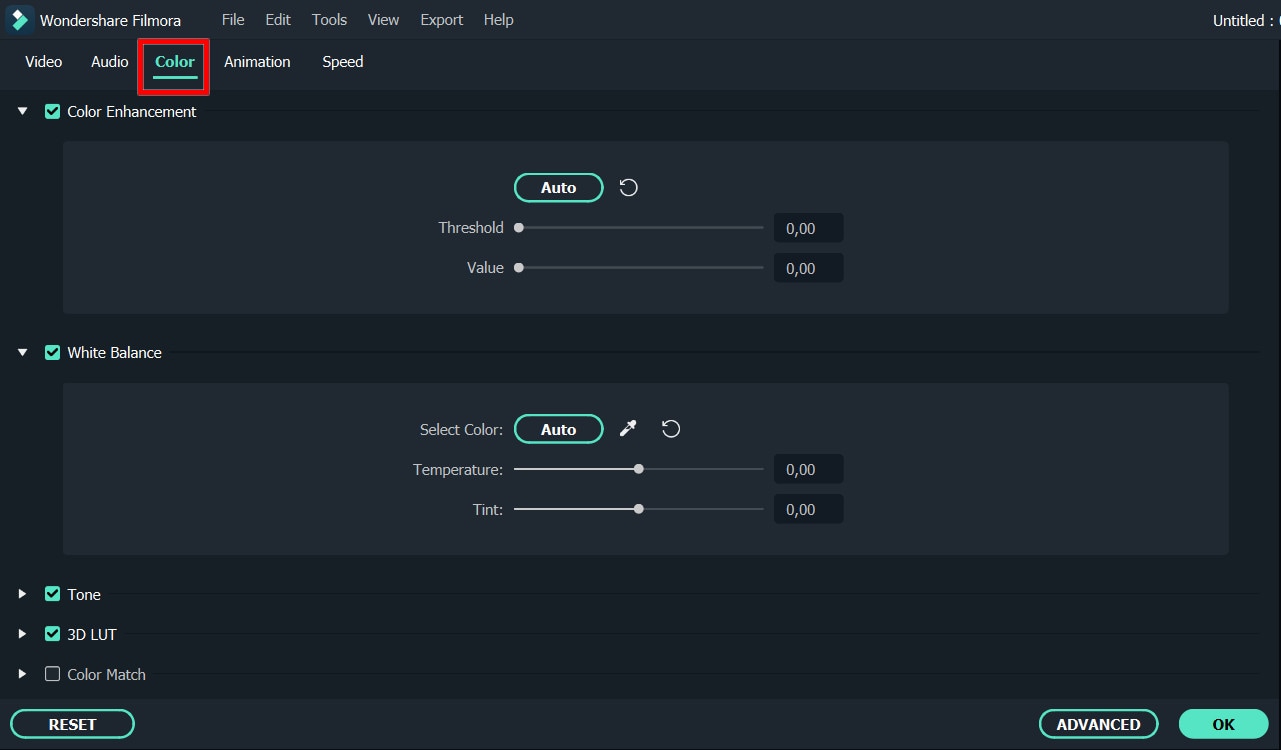
- Contrast: By adjusting this setting, you can control the brightness and color in different parts of the image.
- Saturation: This setting highlights the gray part of the video to a shade. You can adjust it to make the colors of the entire video image appear more saturated or more subdued.
- Brightness: You can change this setting to adjust the overall darkness and lightness of your project.
- Hue: Hue is generally the lightness of a color. Let’s say that when red is saturated with white, it creates a shade of pink.
- 3D LUT: 3D lookup tables provide your media with Hollywood movie color sets like the 007 series, Batman, Harry Porter, etc.
Hover over the indicator to adjust the color correction settings. Then left click on it and move the slider. The corresponding value stabilizes after releasing the mouse button.
With Filmora, you also have access to advanced color correction. Click the Advanced Color Tuning icon to enter the appropriate window where you can fine-tune the color or use preset templates.
The Preferences tab has a variety of templates, including Movie, Normal, 3D LUT, and Vignette. In the Edit tab, you can adjust color temperature, white balance, hue, 3D LUT, color, HSL, light, vignette, etc.
Step3Preview and save the new video
When you are satisfied with your creation, click “Export”. Then click the Settings button and save the new videos in different formats in the Format tab. You can also export the video directly to Vimeo or YouTube or burn it to DVD for better preservation.
Filmora’s color correction tools will make your videos look natural, more attractive, more vibrant, consistent, and professional.
Color Correction Presets
Color correction presets help your video achieve an enhanced cinematic look. Adjust gives you control over fine-tuning the colors in your shots. You can make various adjustments such as color temperature and exposure.
In the “Effects > LUT” tab, you’ll see an extensive selection of preset color settings. These include Vignettes, Movie Looks Like Old Movies, and Cinematic 3D LUT effects such as Harry Potter, Game of Thrones, House of Cards, and Mission Impossible.
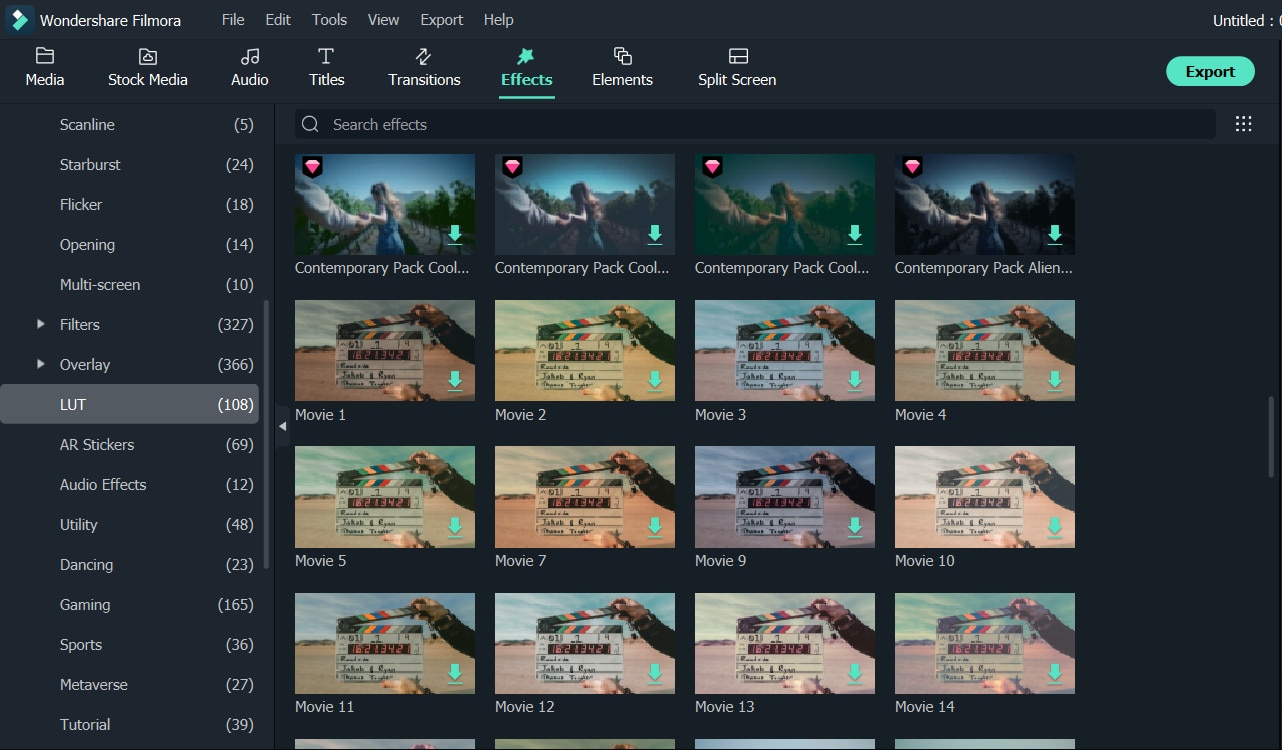
Filmora’s Color Correction Advanced Tool also categorizes your presets. Click on All Presents to see six categories: Favorites, Custom, 3D Lut, Common, Film, and Vignette.
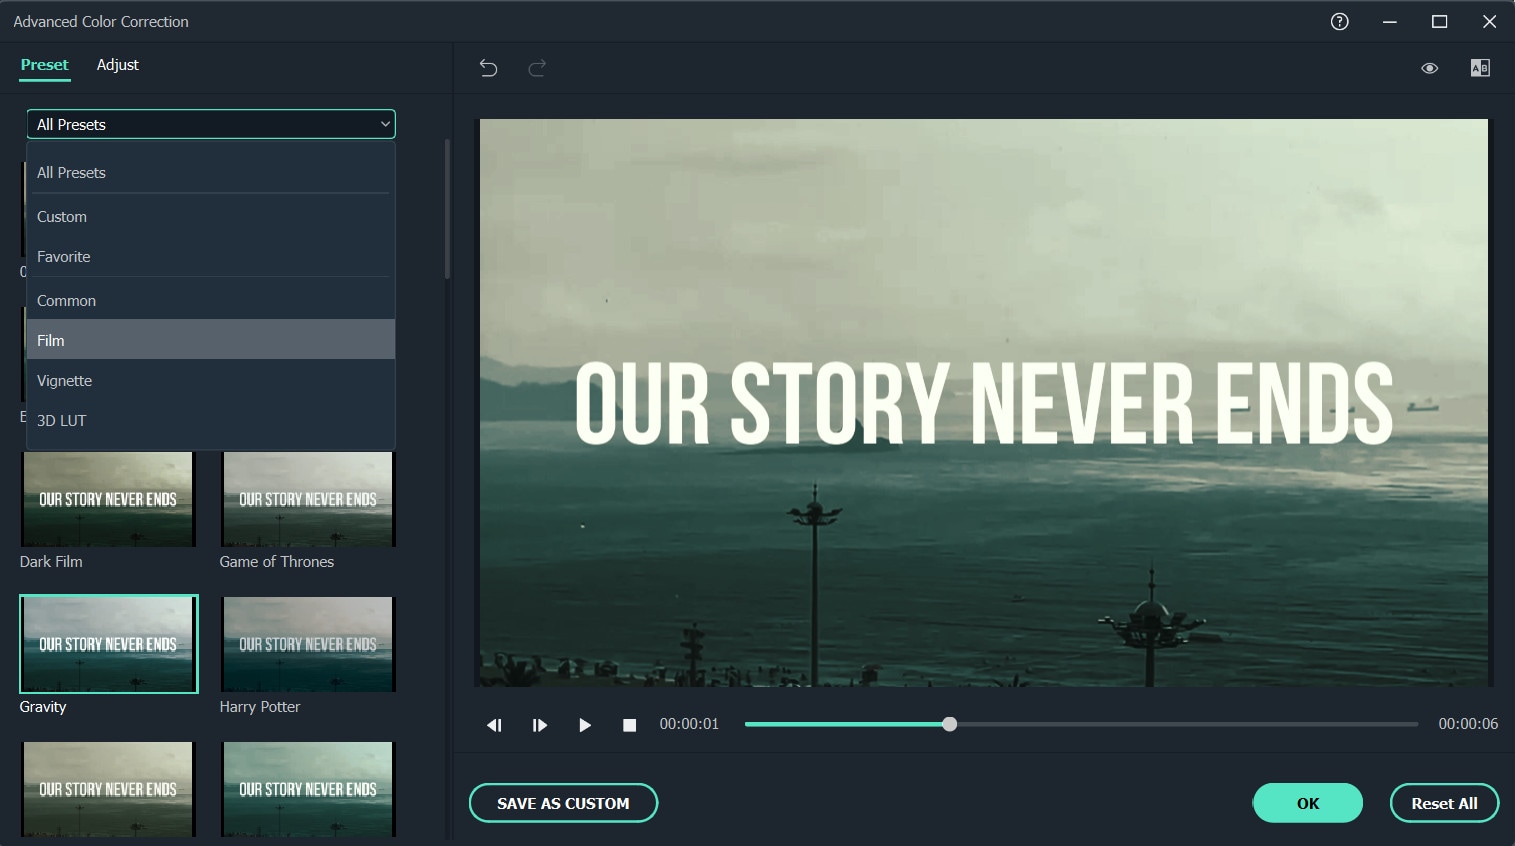
Double-click a preset to apply it to your video. You can see how it looks in the Advanced Color Correction preview window. If you are satisfied with the results, click OK.
Conclusion
Above are the steps to give your video a cinematic look using Wondershare Filmora, hope this helps if you are wondering how to do it. As we can see above, using Filmora video editor will make you more creative in making videos with a suitable emotional tone.
Free Download For Win 7 or later(64-bit)
Free Download For macOS 10.14 or later
Speed Control Is Frequently Used in Video Editing. By Speed up or Slow Down the Video Speed, You Can Achieve Different Visual Results. This Article Will Show You How to Control the Speed of a Video
Speed doesn’t course at the same level for everyone. You can change momentum. You can slow it down and speed it up to convey a particular mood. In this article, you will learn how and when to control the speed of the video and its importance.
Importance of Speeding up/Slowing Down Your video?
Speeding up or slowing it down, known as slow or fast motion, can make your video faster or slower than its actual speed, called speed ramping. Overall, adjusting the speed of video clips can enhance the video’s visual effects, especially if you want to convey a particular mood to the audience. Speeding up your video may create a comical and dramatic impact, while slowing down your video can give viewers a time-lapse feel or an emotional mood.
This video speed controlling software can instantly speed up video up to 50x times. On the contrary, you can also slow down the video up to 0.1x, which means a one-minute video will run for 10 minutes.
How important is this Feature? The technique plays an essential role in adjusting the video’s speed. You will appreciate this technique once you’ve started editing your video. At first, controlling the speed of your video without music will give you a plain or bare impression. Based on my experience, I cannot quickly identify which video part needs to control the speed. Still, once you’ve added music at the start, you can quickly determine when and where you should maintain the momentum based on the beat of the music.
How to Speed up/Slow down a Video?
Nowadays, most video editing software offers an effortless way of giving special cinematic effects through speed ramping? Speed ramping is an approach to adjusting the clip’s speed to send the message across and provide the audience with an element of confusion. Since speed ramp is a gradual increase in the acceleration or deceleration of a video clip, reasons to slow down or speed up video vary from merely decorative to practical, but whatever your reasons, speed effects can add some production value to your projects.
This article gives you a guide on how to slow down or speed up video on your video editing software, for example, using Wondershare Filmora on your device.
In this tutorial, you will learn how to change the speed of your video using Wondershare Filmora
Free Download For Win 7 or later(64-bit)
Free Download For macOS 10.14 or later
Step1 Open your Video editing software
Launch Wondershare Filmora from your system and select New Project.

Import the selected videos and open them in the program to enhance the speed and duration of the video. The video can also be dragged and dropped to the interface.

Drag the selected video clip on Timeline Panel. You can click the + button or drag the video.
Step2 Change the Speed of your video
In Wondershare Filmora there are two available features you can use, first is using the Uniform Speed Feature.
Uniform Speed - Uniform Speed feature in Filmora is used to change the speed of your video or audio clips. Compared to Speed Ramping function, Uniform speed will change the whole clip’s speed evenly, instead of parts of your clips. How to use this Feature?
Using the Uniform Speed
- After adding the video on your timeline, drag the play head line and choose where will the uniform speed start.

- Right-click on the video or audio clip, or go to Speed>Uniform Speed then choose Uniform Speed.

- Uniform Speed window will pop up then adjust the slider to your desired speed. Click ok once you’re done.

- You can observe that the video from where you set your playback has indicator of how fast does the video will play which is 6.50x.

- You can also revert back or customize the set Uniform Speed by clicking the arrow down on the Uniform Speed Indicator or click the Speed button on the left side of the screen. There are also options whether you want to set the speed to slow, fast and normal.

Speed ramping - In Filmora, you can choose to change speed uniformly or speedily. To change the rate of the video or audio clip speed, you need to use the Filmora Speed Ramping feature.
In the Speed Ramping panel, you can customize the speed or select the speed preset such as Montage, Hero Moment, Bullet Time, Jumper, Flash in, and Flash out. You can choose the Preset speed ramps.
Evenly change the speed of the video clip to match another clip. Much software available will give you the option to speed ramp.
The importance of speed controls Having control over the speed of your motors and machinery is vital for you to get the full potential of your tools. Giving yourself complete speed control will ensure you experience little to no tool chatter and a perfect machined finish every time.
Playing with speed controls can help displeasure interest and guide focus when editing your video. You might have used slow motion to overemphasize a scene, or maybe you’ve sped up a clip to create a time-lapse—but have you tried to speed ramping?

If you want to add cinematic to your video. The speed ramp effect describes a smooth transition between speeds, resulting in a video that dips in and out of slow-mo. and high-speed playback. You can ramp up, down, or do a mix of both for multiple speed adjustments throughout a video!
Visualize you’re trying to bring a simple pan shot of a product to life, energize the transitions in your latest travel video, emphasize the beat drop in a music video, or keep eyes affix to your content.
Speed ramping can give your video. style. It can help you do anything from excitement up B-roll to infuse otherwise unremarkable footage with personality.
Proper timing and speed make videos more useful and spectacular. You can enable slow motion to add enthusiasm to dramatics or speed up a video to spur the action. No matter your idea, you can fulfill it with some video editing software.
Free Download For Win 7 or later(64-bit)
Free Download For macOS 10.14 or later
Free Download For macOS 10.14 or later
Step1 Open your Video editing software
Launch Wondershare Filmora from your system and select New Project.
Import the selected videos and open them in the program to enhance the speed and duration of the video. The video can also be dragged and dropped to the interface.
Drag the selected video clip on Timeline Panel. You can click the + button or drag the video.
Step2 Change the Speed of your video
In Wondershare Filmora there are two available features you can use, first is using the Uniform Speed Feature.
Uniform Speed - Uniform Speed feature in Filmora is used to change the speed of your video or audio clips. Compared to Speed Ramping function, Uniform speed will change the whole clip’s speed evenly, instead of parts of your clips. How to use this Feature?
Using the Uniform Speed
- After adding the video on your timeline, drag the play head line and choose where will the uniform speed start.
- Right-click on the video or audio clip, or go to Speed>Uniform Speed then choose Uniform Speed.
- Uniform Speed window will pop up then adjust the slider to your desired speed. Click ok once you’re done.
- You can observe that the video from where you set your playback has indicator of how fast does the video will play which is 6.50x.
- You can also revert back or customize the set Uniform Speed by clicking the arrow down on the Uniform Speed Indicator or click the Speed button on the left side of the screen. There are also options whether you want to set the speed to slow, fast and normal.
Speed ramping - In Filmora, you can choose to change speed uniformly or speedily. To change the rate of the video or audio clip speed, you need to use the Filmora Speed Ramping feature.
In the Speed Ramping panel, you can customize the speed or select the speed preset such as Montage, Hero Moment, Bullet Time, Jumper, Flash in, and Flash out. You can choose the Preset speed ramps.
Evenly change the speed of the video clip to match another clip. Much software available will give you the option to speed ramp.
The importance of speed controls Having control over the speed of your motors and machinery is vital for you to get the full potential of your tools. Giving yourself complete speed control will ensure you experience little to no tool chatter and a perfect machined finish every time.
Playing with speed controls can help displeasure interest and guide focus when editing your video. You might have used slow motion to overemphasize a scene, or maybe you’ve sped up a clip to create a time-lapse—but have you tried to speed ramping?
If you want to add cinematic to your video. The speed ramp effect describes a smooth transition between speeds, resulting in a video that dips in and out of slow-mo. and high-speed playback. You can ramp up, down, or do a mix of both for multiple speed adjustments throughout a video!
Visualize you’re trying to bring a simple pan shot of a product to life, energize the transitions in your latest travel video, emphasize the beat drop in a music video, or keep eyes affix to your content.
Speed ramping can give your video. style. It can help you do anything from excitement up B-roll to infuse otherwise unremarkable footage with personality.
Proper timing and speed make videos more useful and spectacular. You can enable slow motion to add enthusiasm to dramatics or speed up a video to spur the action. No matter your idea, you can fulfill it with some video editing software.
Free Download For Win 7 or later(64-bit)
Free Download For macOS 10.14 or later
Also read:
- [New] 2024 Approved Breakthrough Tactics for Optimal IPTV Screening
- 2024 Approved Open-Source Templates Transform Your YouTube Channel
- Elevate Visuals No Cost with Some Color Correction Tools
- Enhanced Collaboration
- In 2024, Delving Into Past Our Top 10 Picks of History Channels Online
- New 2024 Approved Understanding The Best Tools for Changing Sky Background
- Possible solutions to restore deleted pictures from Oppo K11 5G.
- Updated 2024 Approved How to Zoom in on PowerPoint Easy Ways
- Updated In 2024, How to Zoom in Discord
- Updated In 2024, If You Want to Replace or Delete the Sky Pictures or Background Media, Then Give a Quick Read to This Article for Effective Solutions
- Updated Using Slow Motion in Adobe After Effects A Step-by-Step Procession for 2024
- Title: Updated In 2024, How to Add Green Screen Effects In Phhotoshop
- Author: Morgan
- Created at : 2024-09-27 22:33:30
- Updated at : 2024-09-30 20:41:28
- Link: https://ai-video-editing.techidaily.com/updated-in-2024-how-to-add-green-screen-effects-in-phhotoshop/
- License: This work is licensed under CC BY-NC-SA 4.0.