
:max_bytes(150000):strip_icc():format(webp)/how-to-watch-tiktok-without-the-app-63a4562e4c4b4bd69477425853809a35.jpg)
Updated In 2024, How to Add Motion Titles
How to Add Motion Titles
Do you want to make your videos eye-catching instantly? Looking for some cool title animations to make your texts stand out? You should definitely opt for motion title templates that are widely available in popular video editors. Motion title templates come preloaded with animated texts, engaging graphic elements, and even background effects.
You can add them directly to your video and customize them as per you requirements so that your video looks exactly the way you desire. Different video editors have different motion titles, and therefore, you should check them out one by one to find out the templates you are looking for. We will illustrate title motion graphics in all the leading video editors.
Part 1. Add Motion Title with Filmora
The easiest way to add motion title to your video on your computer is through Wondershare Filmora . Filmora is a professional video editor that is available for Windows and Mac users. Filmora has the best collection of motion title templates, and the user interface is super intuitive and anyone can use without any prior experience. Here are the steps to add motion title with Filmora.
Step1Install and launch Wondershare Filmora on your computer. Click on New Project option on the welcome screen or go to File menu and click on New Project option.

Step2Go to File menu and Import Media option to import your video file. Otherwise, you can simply drop the video file into Project Media folder.
Step3Drag the video file from Project Media folder and drop it into the Timeline.

Step4Go to Titles at the top and go to the left panel. You can different categories of motion title templates. Select any desired text effect and drop into the Timeline above the video layer wherever you want.
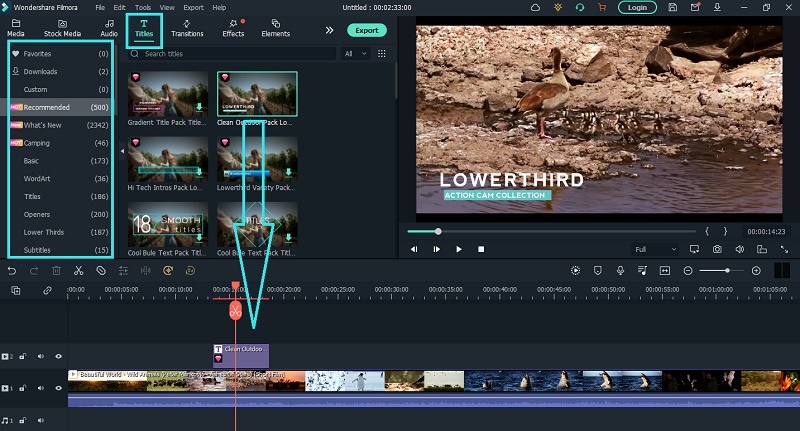
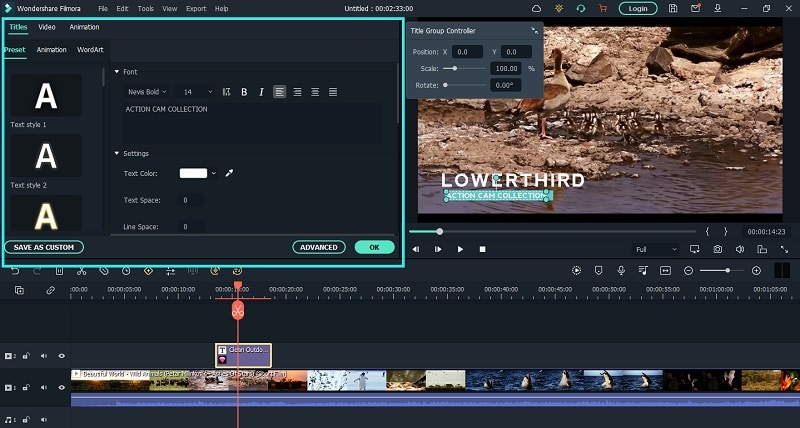
Step5Double clicking on the text layer on Timeline to edit the text and change the styles. Under Preset tab, you can change font, size, and color. Finally, click on OK button to save the edits done.
Part 2. Add Motion Title with Premiere Pro
Adobe Premiere Pro is a renowned video editor that is mostly used by professionals to edit videos and add effects and animations. Even though Premiere Pro has a steep learning curve, you can create motion title in simple steps. You can write any text on the video and select from different effects and animations to create motion title graphics. Here are the steps to add title motion graphics Premiere Pro free.
Step1Launch Premiere Pro and go to New> Project option. Import the video file and drop it into Timeline.
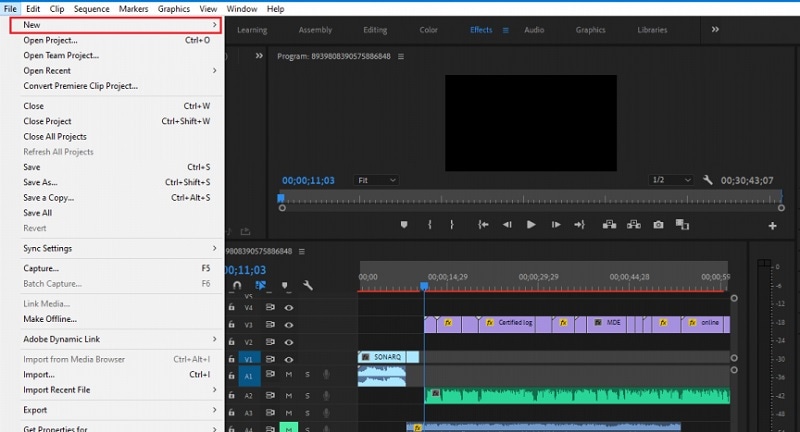
Step2Go to Title> New Title> Default Still option and follow the on-screen instructions.

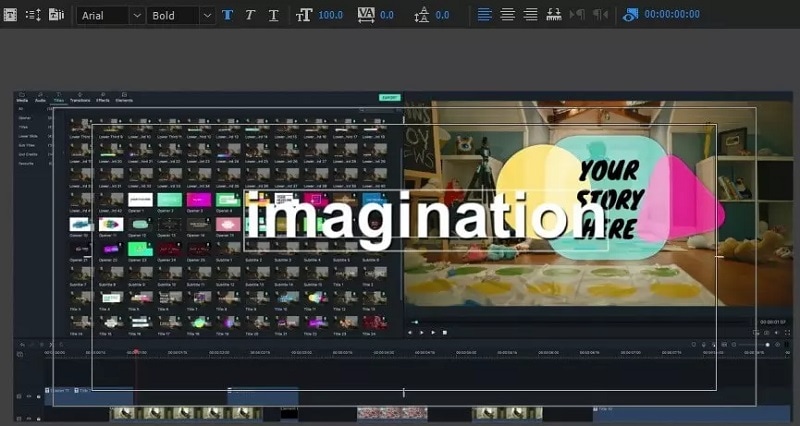
Step3You will see different types of title styles and designs to choose from as you feel.

Step4Click on Type Tool option and click on the area on the video where you want the text to appear. You can customize them from the right panel from Title Styles, Title Properties, Tools and Title Actions.
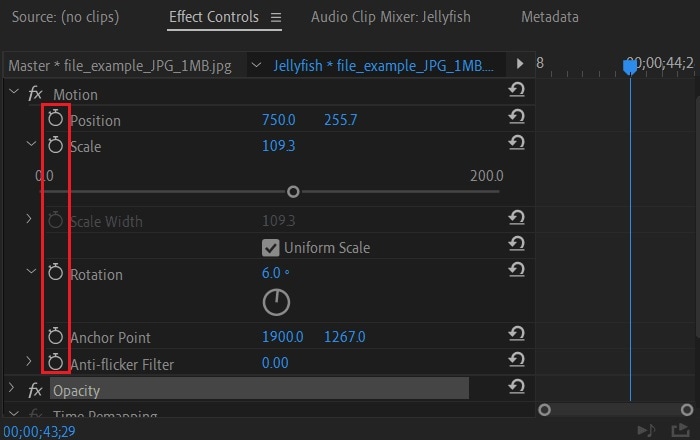
Step5To add motion to the title, click on Effects Control window. Click on any desired animation and turn to Stopwatch icon to apply the effect to the text. There is a dedicated Motion option available.
Part 3. Make motion title with Studio
Studio is a popular video editing software where you can not only apply motion title presets but also create motion title presets from scratch. The reason why video editors choose Studio is because it allows users to customize everything and create different templates and animations for personalization. Here are the steps to create title motion graphics in Studio as per your requirements.
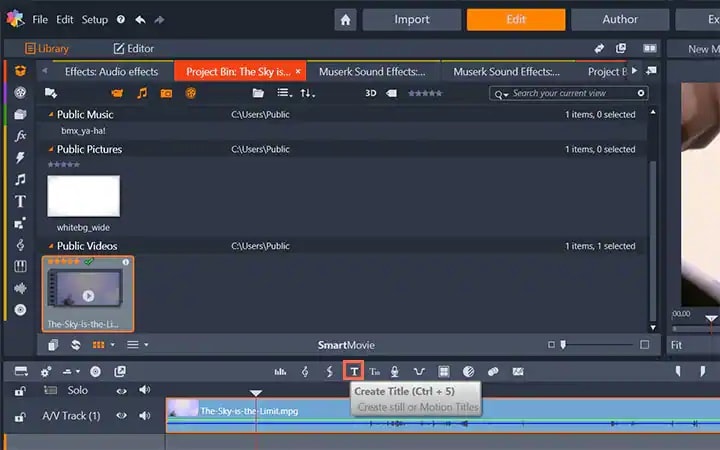
Step1Launch Studio. Import your video file, and you can import single frames such as images from a live video for stop motion titles. Once you have imported, go to the header bar above the Timeline. Click on Create Title option to open Title Editor to create title motion.
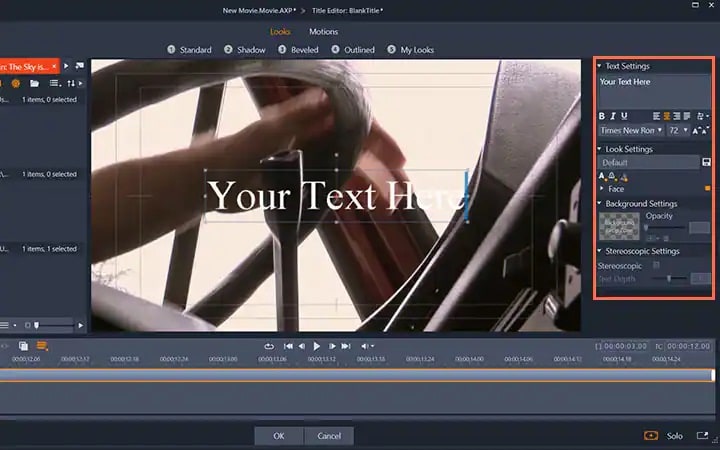
Step2Add your preferred text under Title Editor and adjust font, size, and style as you feel. Go to the right side to make changes to Look, Background, and Stereoscopic Settings to get the perfect text style from the wide range of choices available.
Step3Click on Motion option at the top to add motion to the text. Choose from the different motion title templates as per your preference.
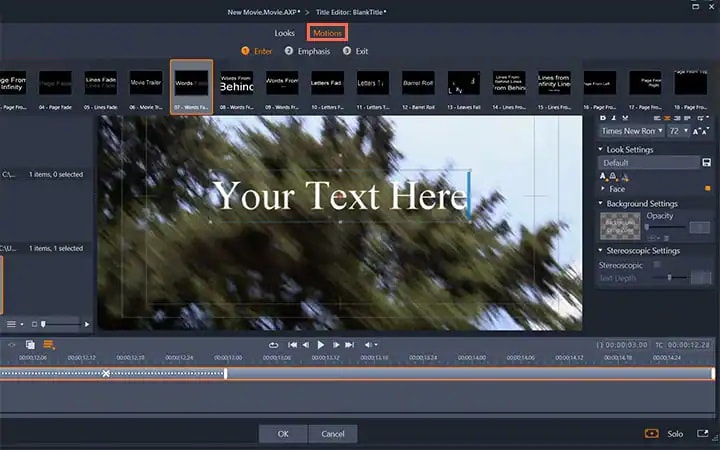
Step4You can adjust the duration of the motion effect from the right panel and click on Ok button.

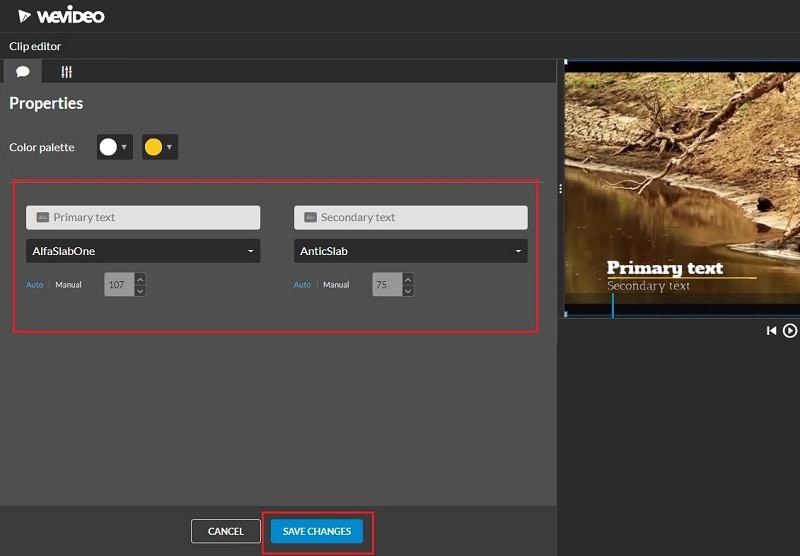
Part 4. Add Motion Title with WeVideo
WeVideo is a popular online video editor that you can use to add title motion graphics Premiere Pro free. You can find many motion titles on WeVideo for free like you get in Premiere Pro and there are many exclusive motion text templates available. You need to create a free account with WeVideo to get started. You can create your video from scratch by selecting from the available video templates. You can even import your recorded video and add motion texts and animations as per your preference. Here are the steps to add motion title with WeVideo.
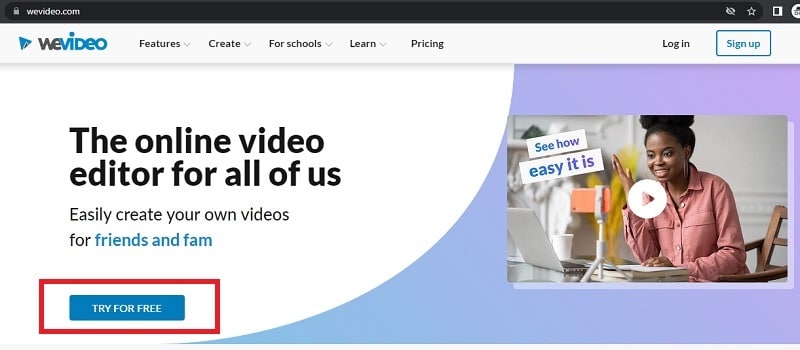
Step1Open your web browser and visit “wevideo.com”. Click on Try For Free button. Sign up for free and go to WeVideo video editor.
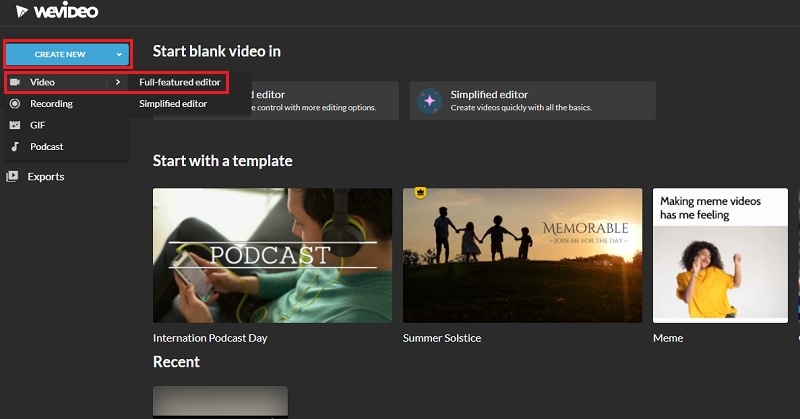
Step2Click on Create New button and select Video option. Click on Full-featured editor option.
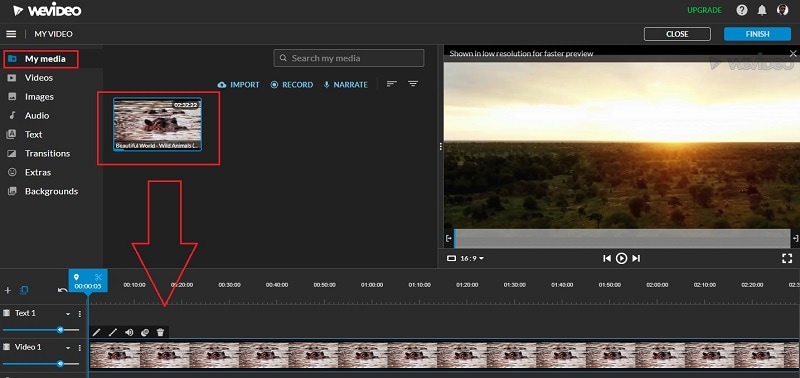
Step3Drag and drop your video file into My Media folder and bring it to Timeline.
Step4Go to Text tab and you will see all the motion animated titles under Titles section. Click on them to check out their previews in Viewer. If you have selected anyone, drag and drop it into Timeline.
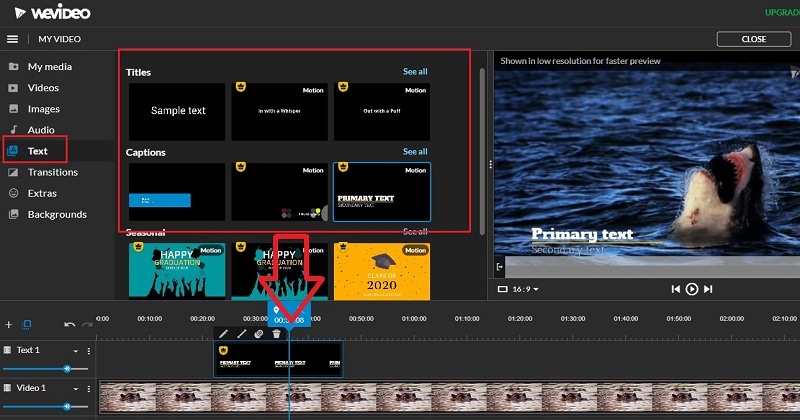
Step5Adjust the position where you want the title to appear on the video and stretch the duration as required. Double-click on the title to edit and customize it as per your preference. Finally, click on Save Changes button.
The Bottom Line
Motion titles are extremely important for any video because they bring in a variety to your video. They make the video eye-catching and help in getting the message across by grabbing the attention of the viewers. We have illustrated how to add motion titles Premiere Pro and Studio. You can also use WeVideo online video editor. We recommend Wondershare Filmora for its extensive collection of motion title templates to choose from and apply to your text.
Free Download For Win 7 or later(64-bit)
Free Download For macOS 10.14 or later
Mix and Match: The Ultimate List of 8 Video and Photo Merging Tools
When it comes to creating and sharing visual content, it’s important to have a variety of tools at your disposal. Whether you’re a professional photographer or a hobbyist, merging photos and videos can add a whole new dimension to your work. You can create stunning visuals with the right tools that captivate your audience.
This article will look at some of the best video and photo merging tools available for desktop, mobile, and online use. From free and easy-to-use options to more advanced and feature-rich applications, there’s something for everyone on this list. Whether you’re looking to create a short film, a time-lapse video, or a panorama, these tools will help you take your visual storytelling to the next level.
- Combine Videos and Pictures Using Wondershare Filmora
- Merge Videos and Photos With Windows Movie Maker
- How To Add Photos and Videos Together With iMovie
- Combine Video and Picture With Filmora for Mobile
- BeeCut Video and Picture Combiner
- VN Photo and Video Merger
3 Video and Photo Mergers for Windows/Mac
There are several options available for those looking for a robust video and photo merging tool for their Windows or Mac computer. In this section, we’ll highlight three popular choices that offer a wide range of features and capabilities. Whether you’re a professional photographer or videographer or just looking for a fun and easy way to merge your media, these tools will meet your needs.
1. Combine Videos and Pictures Using Wondershare Filmora
Free Download For Win 7 or later(64-bit)
Free Download For macOS 10.14 or later

Ratings from G2: 4.4 out of 5
Operating Systems: Windows / Mac
Pricing:
- $49.99 - Annual Plan
- $79.99 - Perpetual Plan
Pros
- Easy to use
- Number of transitions and video results
- Beautiful effects
- Can enhance the quality of video
- Can export/import files easily
- Perfect for beginners
Cons
- Watermarking
- Proxy set up
- Compatibility of video importing
- A bit pricey
Wondershare Filmora is a popular video editing software for Windows and Mac. It offers a wide range of features, including merging videos and pictures. With Filmora, you can easily import your photos and videos and then drag and drop them into the timeline to create a cohesive video.
Filmora offers a range of customization options, such as adjusting video speed, adding transitions, and overlaying text and graphics. Additionally, it provides a user-friendly interface which makes it easy for anyone to use and navigate.
To merge video and picture using Wondershare Filmora Video Editor, follow these steps:
Step1 Open the software and select “New Project,” then go to “File“ > “Import Media“ > “Import Media Files“ to add the video and picture files you want to merge.

Step2 Drag the video clip to the timeline, then place the photo on a track above it.

Step3 Press the “Play“ button to preview your video.

Step4 Edit the photo to your liking.

Step5 Once you are satisfied with the result, save your merged video.

Check this video below to learn more in how to add an image to a photo with Filmora.
2. Merge Videos and Photos With Windows Movie Maker

Ratings from G2: 4.0 out of 5
Operating Systems: Windows
Pricing:
- Free
Pros
- Freeware
- Transitions
- Effects auto preview
- Audio features include voiceovers
- Sharing capabilities
Cons
- No way to change saturation or contrast
- No adjustments to visual effects
- Installation challenges
Windows Movie Maker is a free video editing software for Windows users. It offers basic video editing capabilities, including merging videos and pictures.
To merge a video and a picture, you can import the media files into the software, then drag and drop them into the timeline. You can place the photo on top of the video, adjust the duration of the photo and video, and add transitions between them. It also allows you to edit the video and picture by adding text, effects, and music. It provides a simple and intuitive interface which makes it easy for anyone to use.
Follow these steps to merge videos and pictures using Windows Movie Maker:
Step1 Download and install the software on your computer.
Step2 Ensure to tick the “Photo Gallery and Movie Maker“ checkbox during installation.

Step3 Once installed, import the video and picture files you want to merge into the software.

Step4 Organize the videos and pictures in the order you want them to appear in the merged video.

Step5 Once you have arranged the videos and pictures, go to “File“ > “Save movie“ > “Recommended for this project“ to save the merged video.

3. How To Add Photos and Videos Together With iMovie

Ratings from G2: 4.3 out of 5
Operating Systems: Mac
Pricing:
- Free
Pros
- User-friendly interface
- Easy sharing
- Easy to learn
Cons
- Requires a high level of HDD space
- Importing MP4 files for editing is complex
iMovie is a free video editing software for Mac users. It offers various features for creating and editing videos, including merging videos and pictures. It also offers a range of customization options, such as adjusting video speed, adding transitions, and overlaying text and graphics.
One of the most notable features of iMovie is its ability to work seamlessly with other Apple devices such as iPhone, iPad, and Apple TV, which makes it a versatile tool for media editing.
To merge videos and pictures using iMovie, follow these steps:
Step1 Launch the software and press the “Create New“ button.

Step2 From the dropdown menu, choose “Movie.”

Step3 Utilize the “Import Media“ button to bring in the videos and photos you want to merge.

Step4 Use drag-and-drop to organize the videos and photos in the order you want them to appear in the merged video.

Step5 Once you have arranged the videos and photos, edit them as per your preference and save the final merged video to your device.

3 Apps to Merge Video and Photos on iPhone/Android
There are several apps available for those looking for a convenient way to merge videos and photos on their iPhone or Android device. In this section, we’ll highlight three popular mobile apps that offer a wide range of features and capabilities for merging videos and photos. Whether you’re looking for an app that’s easy to use, or one that offers more advanced options, these apps are sure to meet your needs.
4. Combine Video and Picture With Filmora for Mobile

Ratings from App Store: 4.7 out of 5
Ratings from Google Play Store: 4.7 out of 5
Operating Systems: Android / iOS
Pricing:
- Free with In-app purchases
Pros
- Excellent editing interface
- Good range of tools
- The storage options are a bonus
- Multi-platform (Android and iOS)
Cons
- Limited additional features
- Cannot edit effects
- The store is a little bare
Filmora for Mobile is a mobile video editing app that allows you to merge videos and photos on your iPhone or Android device. With this app, you can easily import your photos and videos and then drag and drop them into the timeline to create a cohesive video.
Filmora for Mobile has various customization options, such as adjusting video speed, adding transitions, and overlaying text and graphics. The app also has a user-friendly interface that is easy to navigate, making it simple for anyone without a video editing experience. Once you’ve finished editing, you can quickly share your merged video to various social media platforms with just one click.
To merge videos and pictures using Filmora for Mobile:
Step1 Download and open the app, then tap “New Project“ to access your videos.

Step2 Choose the videos and pictures you want to merge and import them to the timeline.

Step3 Use the “plus“ sign on the right-hand side of the timeline to add more videos to the merge.

Step4 Use the editing tools below the timeline to edit your clip

Step5 Once you are satisfied with your creation, export it and share it to your desired platform.

5. BeeCut Video and Picture Combiner

Ratings from App Store: 3.0 out of 5
Ratings from Google Play Store: 2.4 out of 5
Operating Systems: Android / iOS
Pricing:
- Free with In-app purchases
Pros
- Super simple to use
- It supports multiple video and image formats
- An extensive list of editing tools
Cons
- It doesn’t support 4K rendering
- It’s buggy sometimes
BeeCut is an excellent free app for merging videos and pictures. The app is user-friendly, with a straightforward interface, making it suitable for beginner video editors.
With BeeCut, you can edit and merge various video and image formats such as MOV, MP4, JPG, PNG, and more. In addition, the app offers useful editing tools such as cropping, cutting, and adding transitions. Once you’ve finished editing, you can export your video in 1080p, 720p, or 480p resolution before saving it to your desired social media platform.
To merge videos and pictures using BeeCut:
Step1 Install the app on your mobile and tap the “+” sign icon to import your videos and photos.

Step2 Select all the photos and press “Next step“ on the top right corner, then choose the aspect ratio for your video.

Step3 Edit your clip using the available tools. Once you are done, press the “Export“ button in the top right corner.

6. VN Photo and Video Merger

Ratings from App Store: 4.7 out of 5
Ratings from Google Play Store: 4.7 out of 5
Operating Systems: Android / iOS
Pricing:
- Free with In-app purchases
Pros
- Shifting curves
- 9 different transition modes built-in
- 50+ movie-sensitive filters available
Cons
- Bugs like lagging clips & losing soundtrack
VN is a free and user-friendly video editing app that does not leave any watermark on your edited videos. The app’s interface is intuitive, making it easy for anyone to edit videos, even without prior knowledge. It provides all the necessary features for creating professional and high-quality videos, catering to professional and amateur video editors alike.
To merge videos and pictures using VN Video Editor:
Step1 Launch the app and tap on the “+” icon at the bottom.

Step2 Pick the videos and photos from your phone’s gallery and tap “Next.”

Step3 Use the editing tools to add elements to your clip, then save it to your device.

2 Online Photo and Video Mergers
If you’re looking for a flexible and convenient solution to merge your videos and photos online, you’re in luck! In this section, we’ll showcase two popular online tools perfect for beginners and advanced users. These tools are browser-based, meaning you can access them from anywhere and on any device with an internet connection. So, get ready to elevate your media game and create stunning visuals with ease!
7. Merge Pictures and Videos on Medio.io

Ratings from G2: 4.5 out of 5
Pricing:
- Free - $0
- Basic - $47.40 / monthly
- Pro - $79.99 / annually
Pros
- Fast compression speeds
- No file limits
- No watermarks
- Smart output settings
Cons
- Lacks some functionality
Media.io is an online tool that allows you to merge videos and photos, convert audio and video formats, and more. It’s user-friendly, easy to use, and works on all major browsers. Additionally, it provides a wide range of output options, allowing you to export your merged video in the format of your choice. Media.io is a perfect solution for those looking for an online tool that’s easy to use and offers a wide range of features.
To merge videos and pictures using Media.io:
Step1 Go to the Media.io video editor interface, and click the “Upload“ button to import all the videos and photos to the media library.

Step2 Move the photo above the video in the timeline by using drag-and-drop.

Step3 Press the “Export“ button to download the merged video with photos to your device.

8. Use Movie Maker Online To Combine Photos and Videos

Ratings from G2: 3.0 out of 5
Pricing:
- Free
Pros
- Completely free
- Free photos, music, and sound effects
- Built-in help
- Video and slideshow functions
Cons
- Confusing and clunky interface
- Learning curve
- Ads
Movie Maker Online is an online tool that allows you to easily merge videos and photos. With this tool, you can import your media files and drag and drop them into the timeline to create a single, cohesive video. It also offers a range of customization options, such as adjusting video speed, adding transitions, and overlaying text and graphics.
To merge videos and pictures using Movie Maker Online:
Step1 Drag and drop the files you want to merge onto the webpage.

Step2 Arrange the files in the desired order by dragging and dropping them.

Step3 Enable the “Hold position“ feature and place the files at the desired location.

Step4 Once you are satisfied with the merged video, download it.

Conclusion
There are various options for merging videos and photos on desktop, mobile, and online platforms. Whether you’re looking for professional video editings software like Filmora, or a simple mobile app for quick edits, there’s something for everyone. No matter your needs, there’s a tool that can help you create stunning and cohesive videos with your photos and videos.
- Combine Video and Picture With Filmora for Mobile
- BeeCut Video and Picture Combiner
- VN Photo and Video Merger
- 2 Online Photo and Video Mergers
3 Video and Photo Mergers for Windows/Mac
There are several options available for those looking for a robust video and photo merging tool for their Windows or Mac computer. In this section, we’ll highlight three popular choices that offer a wide range of features and capabilities. Whether you’re a professional photographer or videographer or just looking for a fun and easy way to merge your media, these tools will meet your needs.
1. Combine Videos and Pictures Using Wondershare Filmora
Free Download For Win 7 or later(64-bit)
Free Download For macOS 10.14 or later
Ratings from G2: 4.4 out of 5
Operating Systems: Windows / Mac
Pricing:
- $49.99 - Annual Plan
- $79.99 - Perpetual Plan
Pros
- Easy to use
- Number of transitions and video results
- Beautiful effects
- Can enhance the quality of video
- Can export/import files easily
- Perfect for beginners
Cons
- Watermarking
- Proxy set up
- Compatibility of video importing
- A bit pricey
Wondershare Filmora is a popular video editing software for Windows and Mac. It offers a wide range of features, including merging videos and pictures. With Filmora, you can easily import your photos and videos and then drag and drop them into the timeline to create a cohesive video.
Filmora offers a range of customization options, such as adjusting video speed, adding transitions, and overlaying text and graphics. Additionally, it provides a user-friendly interface which makes it easy for anyone to use and navigate.
To merge video and picture using Wondershare Filmora Video Editor, follow these steps:
Step1 Open the software and select “New Project,” then go to “File“ > “Import Media“ > “Import Media Files“ to add the video and picture files you want to merge.
Step2 Drag the video clip to the timeline, then place the photo on a track above it.
Step3 Press the “Play“ button to preview your video.
Step4 Edit the photo to your liking.
Step5 Once you are satisfied with the result, save your merged video.
Check this video below to learn more in how to add an image to a photo with Filmora.
2. Merge Videos and Photos With Windows Movie Maker
Ratings from G2: 4.0 out of 5
Operating Systems: Windows
Pricing:
- Free
Pros
- Freeware
- Transitions
- Effects auto preview
- Audio features include voiceovers
- Sharing capabilities
Cons
- No way to change saturation or contrast
- No adjustments to visual effects
- Installation challenges
Windows Movie Maker is a free video editing software for Windows users. It offers basic video editing capabilities, including merging videos and pictures.
To merge a video and a picture, you can import the media files into the software, then drag and drop them into the timeline. You can place the photo on top of the video, adjust the duration of the photo and video, and add transitions between them. It also allows you to edit the video and picture by adding text, effects, and music. It provides a simple and intuitive interface which makes it easy for anyone to use.
Follow these steps to merge videos and pictures using Windows Movie Maker:
Step1 Download and install the software on your computer.
Step2 Ensure to tick the “Photo Gallery and Movie Maker“ checkbox during installation.
Step3 Once installed, import the video and picture files you want to merge into the software.
Step4 Organize the videos and pictures in the order you want them to appear in the merged video.
Step5 Once you have arranged the videos and pictures, go to “File“ > “Save movie“ > “Recommended for this project“ to save the merged video.
3. How To Add Photos and Videos Together With iMovie
Ratings from G2: 4.3 out of 5
Operating Systems: Mac
Pricing:
- Free
Pros
- User-friendly interface
- Easy sharing
- Easy to learn
Cons
- Requires a high level of HDD space
- Importing MP4 files for editing is complex
iMovie is a free video editing software for Mac users. It offers various features for creating and editing videos, including merging videos and pictures. It also offers a range of customization options, such as adjusting video speed, adding transitions, and overlaying text and graphics.
One of the most notable features of iMovie is its ability to work seamlessly with other Apple devices such as iPhone, iPad, and Apple TV, which makes it a versatile tool for media editing.
To merge videos and pictures using iMovie, follow these steps:
Step1 Launch the software and press the “Create New“ button.
Step2 From the dropdown menu, choose “Movie.”
Step3 Utilize the “Import Media“ button to bring in the videos and photos you want to merge.
Step4 Use drag-and-drop to organize the videos and photos in the order you want them to appear in the merged video.
Step5 Once you have arranged the videos and photos, edit them as per your preference and save the final merged video to your device.
3 Apps to Merge Video and Photos on iPhone/Android
There are several apps available for those looking for a convenient way to merge videos and photos on their iPhone or Android device. In this section, we’ll highlight three popular mobile apps that offer a wide range of features and capabilities for merging videos and photos. Whether you’re looking for an app that’s easy to use, or one that offers more advanced options, these apps are sure to meet your needs.
4. Combine Video and Picture With Filmora for Mobile
Ratings from App Store: 4.7 out of 5
Ratings from Google Play Store: 4.7 out of 5
Operating Systems: Android / iOS
Pricing:
- Free with In-app purchases
Pros
- Excellent editing interface
- Good range of tools
- The storage options are a bonus
- Multi-platform (Android and iOS)
Cons
- Limited additional features
- Cannot edit effects
- The store is a little bare
Filmora for Mobile is a mobile video editing app that allows you to merge videos and photos on your iPhone or Android device. With this app, you can easily import your photos and videos and then drag and drop them into the timeline to create a cohesive video.
Filmora for Mobile has various customization options, such as adjusting video speed, adding transitions, and overlaying text and graphics. The app also has a user-friendly interface that is easy to navigate, making it simple for anyone without a video editing experience. Once you’ve finished editing, you can quickly share your merged video to various social media platforms with just one click.
To merge videos and pictures using Filmora for Mobile:
Step1 Download and open the app, then tap “New Project“ to access your videos.
Step2 Choose the videos and pictures you want to merge and import them to the timeline.
Step3 Use the “plus“ sign on the right-hand side of the timeline to add more videos to the merge.
Step4 Use the editing tools below the timeline to edit your clip
Step5 Once you are satisfied with your creation, export it and share it to your desired platform.
5. BeeCut Video and Picture Combiner
Ratings from App Store: 3.0 out of 5
Ratings from Google Play Store: 2.4 out of 5
Operating Systems: Android / iOS
Pricing:
- Free with In-app purchases
Pros
- Super simple to use
- It supports multiple video and image formats
- An extensive list of editing tools
Cons
- It doesn’t support 4K rendering
- It’s buggy sometimes
BeeCut is an excellent free app for merging videos and pictures. The app is user-friendly, with a straightforward interface, making it suitable for beginner video editors.
With BeeCut, you can edit and merge various video and image formats such as MOV, MP4, JPG, PNG, and more. In addition, the app offers useful editing tools such as cropping, cutting, and adding transitions. Once you’ve finished editing, you can export your video in 1080p, 720p, or 480p resolution before saving it to your desired social media platform.
To merge videos and pictures using BeeCut:
Step1 Install the app on your mobile and tap the “+” sign icon to import your videos and photos.
Step2 Select all the photos and press “Next step“ on the top right corner, then choose the aspect ratio for your video.
Step3 Edit your clip using the available tools. Once you are done, press the “Export“ button in the top right corner.
6. VN Photo and Video Merger
Ratings from App Store: 4.7 out of 5
Ratings from Google Play Store: 4.7 out of 5
Operating Systems: Android / iOS
Pricing:
- Free with In-app purchases
Pros
- Shifting curves
- 9 different transition modes built-in
- 50+ movie-sensitive filters available
Cons
- Bugs like lagging clips & losing soundtrack
VN is a free and user-friendly video editing app that does not leave any watermark on your edited videos. The app’s interface is intuitive, making it easy for anyone to edit videos, even without prior knowledge. It provides all the necessary features for creating professional and high-quality videos, catering to professional and amateur video editors alike.
To merge videos and pictures using VN Video Editor:
Step1 Launch the app and tap on the “+” icon at the bottom.
Step2 Pick the videos and photos from your phone’s gallery and tap “Next.”
Step3 Use the editing tools to add elements to your clip, then save it to your device.
2 Online Photo and Video Mergers
If you’re looking for a flexible and convenient solution to merge your videos and photos online, you’re in luck! In this section, we’ll showcase two popular online tools perfect for beginners and advanced users. These tools are browser-based, meaning you can access them from anywhere and on any device with an internet connection. So, get ready to elevate your media game and create stunning visuals with ease!
7. Merge Pictures and Videos on Medio.io
Ratings from G2: 4.5 out of 5
Pricing:
- Free - $0
- Basic - $47.40 / monthly
- Pro - $79.99 / annually
Pros
- Fast compression speeds
- No file limits
- No watermarks
- Smart output settings
Cons
- Lacks some functionality
Media.io is an online tool that allows you to merge videos and photos, convert audio and video formats, and more. It’s user-friendly, easy to use, and works on all major browsers. Additionally, it provides a wide range of output options, allowing you to export your merged video in the format of your choice. Media.io is a perfect solution for those looking for an online tool that’s easy to use and offers a wide range of features.
To merge videos and pictures using Media.io:
Step1 Go to the Media.io video editor interface, and click the “Upload“ button to import all the videos and photos to the media library.
Step2 Move the photo above the video in the timeline by using drag-and-drop.
Step3 Press the “Export“ button to download the merged video with photos to your device.
8. Use Movie Maker Online To Combine Photos and Videos
Ratings from G2: 3.0 out of 5
Pricing:
- Free
Pros
- Completely free
- Free photos, music, and sound effects
- Built-in help
- Video and slideshow functions
Cons
- Confusing and clunky interface
- Learning curve
- Ads
Movie Maker Online is an online tool that allows you to easily merge videos and photos. With this tool, you can import your media files and drag and drop them into the timeline to create a single, cohesive video. It also offers a range of customization options, such as adjusting video speed, adding transitions, and overlaying text and graphics.
To merge videos and pictures using Movie Maker Online:
Step1 Drag and drop the files you want to merge onto the webpage.
Step2 Arrange the files in the desired order by dragging and dropping them.
Step3 Enable the “Hold position“ feature and place the files at the desired location.
Step4 Once you are satisfied with the merged video, download it.
Conclusion
There are various options for merging videos and photos on desktop, mobile, and online platforms. Whether you’re looking for professional video editings software like Filmora, or a simple mobile app for quick edits, there’s something for everyone. No matter your needs, there’s a tool that can help you create stunning and cohesive videos with your photos and videos.
How to Make Canva Collages
How to Make Canva Collages
An easy yet powerful editor
Numerous effects to choose from
Detailed tutorials provided by the official channel
Collages are everywhere, be it social media sites, shopping sites, business sites, personal blogs, or anywhere else. Whenever you need to showcase multiple images at one place for the visual experience, or for any other purpose, collages work best.

There are several popular tools available that help you create a collage-like pro and Canva is one of them. So, if you too have been wanting to use Canva collage tool, this article will surely help you to learn about the tool and its use. Keep reading!!!
In this article
01 [What are a collage and its use?](#Part 1)
02 [Using Canva to create a collage](#Part 2)
03 [Get stock of media files at Wondershare Filmora](#Part 3)
Part 1 Part 1. What are a collage and its use?
In simplest terms, a collage is a collection of items that have been placed on a single frame or a page. Thus, an image collage can be termed as a collection of images placed interestingly in a single frame and for this task to be done with perfection, several collage-making tools are available.
Collages can be created for various reasons be it personal or professional. You can create a collage of your best friend’s birthday, wedding, or any special occasion. An online shopping site can create a collage for showcasing all its product under a similar niche in one place. A company can create a collage showcasing its projects, and similar others. Thus, different types of collages can be created for different purposes and requirements.
Part 2 Using Canva to create a collage
Canva is one of the most widely collage-making tools that is user-friendly and comes with a wide range of templates and editing options to let you create a customized college like a pro. It is available as a desktop tool as well as an app for Android and iOS devices. You need to free sign-up using Google, Email, or Facebook at Canva and then you are all set to the collage-making world.
The templates at Canva are available in multiple categories like fashion, travel, food, wedding, beauty, and many more. The option to design your own collage is also there.
Key features
● Simple and easy-to-use desktop and app-based collage maker.
● Comes with several pre-design templates in different categories. Templates can be customized.
● Allows designing your own design.
● Multiple editing options are supported like adding filters, background removal, adding effects, and more.
● Comes with a huge collection of stock images to meet your requirements
● Collage on Canva can be created in high-quality and can be downloaded.
● Allows resizing of the designs depending on the platform it has to be used for.
Steps to create Canva picture collage
● Step 1. On your browser window open Canva collage-maker and choose the Photo Collage option. Sign-up or log in if you already have an account.
● Step 2. At the Home window, choose the desired template from the available options. Using the search bar, you can also look for other Canva collage templates that matches your theme.

Note: Clicking on the arrow at the “Create a design” option will open the template options if not visible otherwise. Also, to get a customized size for your collage, click on the Custom dimensions button in the upper-right corner.
● Step 3. Selecting and clicking on the desired templatewill open a worktop window. Next, browse and add the images that you need to import to the collage by clicking on the Uploads tab. You can also drag and drop the images.
Images can be moved to place them in the right position.

● Step 4. Click on the image and them using one of the tools you can edit it as needed using filter effects, and another toolbar. Use the Elements tab on the left side, for adjusting more elements.
● Step 5. When all the settings are done, tap on the Download button to save the collage in one of the supported formats (JPEG, PNG, and others). You can also share or export the collage.

The steps for creating a collage using the Canva app are almost the same as that of the desktop with few changes.

Part 3 Get stock of media files at Wondershare Filmora
If you want to explore more media files for your collage, Wondershare Filmora Video Editor is excellent software. Though it is a professional video editing software, its latest version comes with a huge library of media files in an array of categories and themes. You can even search for your choice of GIFs and stickers at the tool.
Additional features of the software include creating a split-screen video that looks at a video slideshow, support to basic and advanced video editing functions, audio enhancement and editing functions, and more.
The interface of the software is simple and user-friendly making it apt for all types of users including the ones who have no prior experience of working with such tools.

● Key Takeaways from This Episode →
● Image collage is created by arranging multiple images on a single screen, frame, or page.
● Canva collage maker is one of the popular and widely used collage-maker that is available as a browser tool and phone app.
● To edit your videos professionally and also to get access to a wide range of media files Wondershare Filmora is an excellent tool.
Collages are everywhere, be it social media sites, shopping sites, business sites, personal blogs, or anywhere else. Whenever you need to showcase multiple images at one place for the visual experience, or for any other purpose, collages work best.
There are several popular tools available that help you create a collage-like pro and Canva is one of them. So, if you too have been wanting to use Canva collage tool, this article will surely help you to learn about the tool and its use. Keep reading!!!
In this article
01 [What are a collage and its use?](#Part 1)
02 [Using Canva to create a collage](#Part 2)
03 [Get stock of media files at Wondershare Filmora](#Part 3)
Part 1 Part 1. What are a collage and its use?
In simplest terms, a collage is a collection of items that have been placed on a single frame or a page. Thus, an image collage can be termed as a collection of images placed interestingly in a single frame and for this task to be done with perfection, several collage-making tools are available.
Collages can be created for various reasons be it personal or professional. You can create a collage of your best friend’s birthday, wedding, or any special occasion. An online shopping site can create a collage for showcasing all its product under a similar niche in one place. A company can create a collage showcasing its projects, and similar others. Thus, different types of collages can be created for different purposes and requirements.
Part 2 Using Canva to create a collage
Canva is one of the most widely collage-making tools that is user-friendly and comes with a wide range of templates and editing options to let you create a customized college like a pro. It is available as a desktop tool as well as an app for Android and iOS devices. You need to free sign-up using Google, Email, or Facebook at Canva and then you are all set to the collage-making world.
The templates at Canva are available in multiple categories like fashion, travel, food, wedding, beauty, and many more. The option to design your own collage is also there.
Key features
● Simple and easy-to-use desktop and app-based collage maker.
● Comes with several pre-design templates in different categories. Templates can be customized.
● Allows designing your own design.
● Multiple editing options are supported like adding filters, background removal, adding effects, and more.
● Comes with a huge collection of stock images to meet your requirements
● Collage on Canva can be created in high-quality and can be downloaded.
● Allows resizing of the designs depending on the platform it has to be used for.
Steps to create Canva picture collage
● Step 1. On your browser window open Canva collage-maker and choose the Photo Collage option. Sign-up or log in if you already have an account.
● Step 2. At the Home window, choose the desired template from the available options. Using the search bar, you can also look for other Canva collage templates that matches your theme.
Note: Clicking on the arrow at the “Create a design” option will open the template options if not visible otherwise. Also, to get a customized size for your collage, click on the Custom dimensions button in the upper-right corner.
● Step 3. Selecting and clicking on the desired templatewill open a worktop window. Next, browse and add the images that you need to import to the collage by clicking on the Uploads tab. You can also drag and drop the images.
Images can be moved to place them in the right position.
● Step 4. Click on the image and them using one of the tools you can edit it as needed using filter effects, and another toolbar. Use the Elements tab on the left side, for adjusting more elements.
● Step 5. When all the settings are done, tap on the Download button to save the collage in one of the supported formats (JPEG, PNG, and others). You can also share or export the collage.
The steps for creating a collage using the Canva app are almost the same as that of the desktop with few changes.
Part 3 Get stock of media files at Wondershare Filmora
If you want to explore more media files for your collage, Wondershare Filmora Video Editor is excellent software. Though it is a professional video editing software, its latest version comes with a huge library of media files in an array of categories and themes. You can even search for your choice of GIFs and stickers at the tool.
Additional features of the software include creating a split-screen video that looks at a video slideshow, support to basic and advanced video editing functions, audio enhancement and editing functions, and more.
The interface of the software is simple and user-friendly making it apt for all types of users including the ones who have no prior experience of working with such tools.
● Key Takeaways from This Episode →
● Image collage is created by arranging multiple images on a single screen, frame, or page.
● Canva collage maker is one of the popular and widely used collage-maker that is available as a browser tool and phone app.
● To edit your videos professionally and also to get access to a wide range of media files Wondershare Filmora is an excellent tool.
How to Add Miniature Effect in Video with Filmora
Want to add selective blur to make everything look smaller? Don’t have any idea how to focus on specific mini-things? Then don’t worry! In this article, you’ll get a step-by-step process to add miniature effects to your video. At the end of the process, you’ll have cinematic shots. Then start with us now! Scroll more to get pro tips!
What Is a Miniature Effect?

But first, let’s learn the logic of making the miniature effect. As many video editing pros present on Tiktok, the miniature effect is a fun way to brighten up your photography or video shots. For example, when taking a video or a time-lapse of a landscape, we always have a bigger depth of field, so most objects in the frame are in focus.
However, when we film a miniature model, the depth of field is shallow. So, we only see some objects in focus, and the rest is blurry. This visual trick makes our brain believe that the big landscape we’re seeing is actually a tiny model.

To create a miniature look, we can use specific effects to fake a shallow depth of field, and then the landscape view will look like a tiny model. While some keys to notice before making the miniature effect are:
- It utilizes selective blur to make things appear like small
- The miniature effect works best for footage filmed from a high angle.
- The tiny effect is usually used in drone footage, time lapses, or landscape photography.
Are you all set to add miniature effects to your video and make film-like shots? Then scroll more and get the step-by-step process.
How to Make a Miniature effect?
You are excited to add a miniature effect, and enjoy the rest! Without any further delay, follow the below instructions and get results!
Step1 Download the Wondershare Filmora
- First of all, you have to download the Wondershare Filmora .
- It’s packed with new features and effects plugins that make editing more filmy and fun!
![]()
Note: filmora has a unique “stock media” option that enables us to use all these elements and more to boost our videos!
Step2 Choose any stock footage
If you don’t have good-quality footage, but want to boost your video, here is how. You can get the miniature effect without a big format view camera or specialized lens.
- Open Filmora and select any stock footage in Wondershare Filmora.

Move to the stock media folder on the above bar in the Wondershare Filmora. Or you can look towards the left window, where you will see the sample videos tab.
- Click on the sample videos tab, and a new window will appear on the library screen.
Here you will see almost more than 20 videos. So, instead of using the actual recorded footage, we’ll make do with what we have by default. After selecting and adding the stock footage of your choice. Then you have to follow the below process:
- First, hold the Stock Footage as shown in the folder section.
- Then Drag and Drop it to the timeline section for further editing.

Who will get Stock Media?
Want to get stock media? You can only have access to the stock media library if you already buy the license of Wondershare Filmora.
- The latest version has an unlimited stock library.
- After purchasing any plan, you can access Stock Media (Unsplash, Giphy, Pixabay, Pixel).
Step3 Head to the effect panel
As we are working on miniature effects, what do we need first? First, we ensure that we have a Blur effect on the video.

To add a blur effect from the panel, follow the below-mentioned steps:
- First of all, move toward the above tabs.
- Then click on the 5th section, which is Effect
- After selecting the effect tab, a new window will pop up.
- In this section, we have 500+ different effects.
- Then, click on the search bar.
- Search for the Blur effect.
- After that, click on the Blur 2
- Then Download this effect if you haven’t done this already.
Step4 Add the blur effect to the video
After selecting and downloading the blur effect, it’s time to add it to the video. Again, see how precise it turned out. To add effect, follow below steps:
- First, drag and Drop the effect toward the timeline.
- Then, make sure to release the effect on the video to give it a lens blur appearance.

Step5 Add the effect multiple times
Want to get an ideal blur level? If you need more blur level in your video and make it more cinematic, then follow the below steps:
- First, ensure that the opacity of the blur effect is 100%.
- Then, if you still want more blurriness, add Blur 2 effect multiple times on the video.
- Finally, add effect by just the Drag and Drop

Step6 Drop the same video clip
- Add the same video clip 2nd time on the timeline.
- Add it by just the Drag and Drop
- Make sure you add it to 2nd video track in the timeline above the first one.

Step7 Add masks on the Video
Now, it’s time to select a specific video portion and add a mask. Due to this, we will have a selective blur portion. For this, follow the below guidelines:
- Double-click on the video present in 2nd track.
- The settings tab will be open in the top left section.
- Then find the Mask section and click on it.
- After this, click on the Double-line.
- Set the mask on video according to your style and choice.

![]()
Note: you can adjust the mask size and position by rotating and changing its shape.
Watch the rotating and adjusting actions as shown below!

For example, when we add a mask in the below time-lapse video, follow the above mask adjustments. Unfortunately, we can’t get good results. Therefore, we will apply another way to add a mask by changing shape and position. Follow the instructions for modifications:

- Make a building or any object Blurry near the camera because it is not present within the depth of field.
- While the object is far from the camera, it is focused because it is in the depth of the field.
- Then adjust the mask, as per your choice.
Want to change the shape of the mask? Then follow the below steps:

- Double-click on the video present in 2nd video track.
- Settings will activate on the top left side.
- Then click on the Mask tab to open it.
- Select the Rectangular mask from the list and apply it.
![]()
Note: make sure you are masking the same extent and excluding the object you want to be out of focus.
Now, it’s time to mask the whole object, which is far, but we want to make it in focus! For this, follow these steps:
- Add the same stock video clip a third time on the third video track of the timeline.
- Then add a mask in a Rectangle shape on the building.
- Don’t blur the edge of this mask.

Step8 Final Look
You are excited now to see the final look of your miniature effect! Finally, it’s in front of you! Just modify it more if you want to make it more precise.

Have you tried to add a miniature effect before? If yes, then share your experience with us! Try with more mask shapes and add more blur effects. Make sure that you are using Wondershare Filmora to make more filmy shots. Feel free to try out different effects and enjoy the following results!
Free Download For Win 7 or later(64-bit)
Free Download For macOS 10.14 or later
Step2 Choose any stock footage
If you don’t have good-quality footage, but want to boost your video, here is how. You can get the miniature effect without a big format view camera or specialized lens.
- Open Filmora and select any stock footage in Wondershare Filmora.
Move to the stock media folder on the above bar in the Wondershare Filmora. Or you can look towards the left window, where you will see the sample videos tab.
- Click on the sample videos tab, and a new window will appear on the library screen.
Here you will see almost more than 20 videos. So, instead of using the actual recorded footage, we’ll make do with what we have by default. After selecting and adding the stock footage of your choice. Then you have to follow the below process:
- First, hold the Stock Footage as shown in the folder section.
- Then Drag and Drop it to the timeline section for further editing.
Who will get Stock Media?
Want to get stock media? You can only have access to the stock media library if you already buy the license of Wondershare Filmora.
- The latest version has an unlimited stock library.
- After purchasing any plan, you can access Stock Media (Unsplash, Giphy, Pixabay, Pixel).
Step3 Head to the effect panel
As we are working on miniature effects, what do we need first? First, we ensure that we have a Blur effect on the video.
To add a blur effect from the panel, follow the below-mentioned steps:
- First of all, move toward the above tabs.
- Then click on the 5th section, which is Effect
- After selecting the effect tab, a new window will pop up.
- In this section, we have 500+ different effects.
- Then, click on the search bar.
- Search for the Blur effect.
- After that, click on the Blur 2
- Then Download this effect if you haven’t done this already.
Step4 Add the blur effect to the video
After selecting and downloading the blur effect, it’s time to add it to the video. Again, see how precise it turned out. To add effect, follow below steps:
- First, drag and Drop the effect toward the timeline.
- Then, make sure to release the effect on the video to give it a lens blur appearance.
Step5 Add the effect multiple times
Want to get an ideal blur level? If you need more blur level in your video and make it more cinematic, then follow the below steps:
- First, ensure that the opacity of the blur effect is 100%.
- Then, if you still want more blurriness, add Blur 2 effect multiple times on the video.
- Finally, add effect by just the Drag and Drop
Step6 Drop the same video clip
- Add the same video clip 2nd time on the timeline.
- Add it by just the Drag and Drop
- Make sure you add it to 2nd video track in the timeline above the first one.
Step7 Add masks on the Video
Now, it’s time to select a specific video portion and add a mask. Due to this, we will have a selective blur portion. For this, follow the below guidelines:
- Double-click on the video present in 2nd track.
- The settings tab will be open in the top left section.
- Then find the Mask section and click on it.
- After this, click on the Double-line.
- Set the mask on video according to your style and choice.
![]()
Note: you can adjust the mask size and position by rotating and changing its shape.
Watch the rotating and adjusting actions as shown below!
For example, when we add a mask in the below time-lapse video, follow the above mask adjustments. Unfortunately, we can’t get good results. Therefore, we will apply another way to add a mask by changing shape and position. Follow the instructions for modifications:
- Make a building or any object Blurry near the camera because it is not present within the depth of field.
- While the object is far from the camera, it is focused because it is in the depth of the field.
- Then adjust the mask, as per your choice.
Want to change the shape of the mask? Then follow the below steps:
- Double-click on the video present in 2nd video track.
- Settings will activate on the top left side.
- Then click on the Mask tab to open it.
- Select the Rectangular mask from the list and apply it.
![]()
Note: make sure you are masking the same extent and excluding the object you want to be out of focus.
Now, it’s time to mask the whole object, which is far, but we want to make it in focus! For this, follow these steps:
- Add the same stock video clip a third time on the third video track of the timeline.
- Then add a mask in a Rectangle shape on the building.
- Don’t blur the edge of this mask.
Step8 Final Look
You are excited now to see the final look of your miniature effect! Finally, it’s in front of you! Just modify it more if you want to make it more precise.
Have you tried to add a miniature effect before? If yes, then share your experience with us! Try with more mask shapes and add more blur effects. Make sure that you are using Wondershare Filmora to make more filmy shots. Feel free to try out different effects and enjoy the following results!
Free Download For Win 7 or later(64-bit)
Free Download For macOS 10.14 or later
Also read:
- New Looking for the Best Quiz-Making Tools? Read Our Full Review to Find Out the 10 Best Video Quiz Makers Available for 2024
- New GIF Splitting Into Frames Is an Interesting Activity to Do with the Right Tools. Convert GIFs Into Frames Easily with Tools and Use Them as Needed
- Updated In 2024, Best Phantom Slow-Mo Camera For Recording Slow Motion Videos
- Updated 2024 Approved Creating a Slideshow Is Necessity of the Modern Time. Whether You Plan a Business Meeting or You Are Going to Do some Family Event with Slideshow Presentation, a Good Slideshow Maker Will Help You in This Direction
- New Advancements in Game Recording Software A Comprehensive Overview for 2024
- Updated Best Applications That Can Help Apply The Best VHS Camera Effect
- In 2024, Working Through the Details of iMovie Slow Motion Video Making 100 Effective
- Competitive Guide To Use Slow Motion in After Effects
- How to Shoot Cinematic Footage with Phone for 2024
- Updated 2024 Approved How Can You Get VHS Filter and Glitch Filter to Your Images or Videos?
- New Step by Step to Add Border to Video Using Premiere Pro for 2024
- In 2024, Want to Create a Stunning Intro Video on Your Smartphone? Legend Intro Maker Is a Popular Choice. Learn the Steps to Design Intro Video Legend Intro Maker
- In 2024, Get Creative with These 10 Video Editing App With Templates
- New 2024 Approved M31 LUT (Teal and Orange LUT) Free Download
- New This Blog Post Shows How to Create an Eye-Catching Paper Rip Effect for Your Videos Using Wondershare Filmora with These Easy-to-Follow Steps for 2024
- Additional Tips About Sinnoh Stone For Nokia XR21 | Dr.fone
- In 2024, 5 Ways to Track Realme 11 Pro without App | Dr.fone
- How to Fix Error 495 While Download/Updating Android Apps On Itel A60s | Dr.fone
- How to Change your OnePlus Nord CE 3 5G Location on Twitter | Dr.fone
- In 2024, 5 Techniques to Transfer Data from Infinix Zero 30 5G to iPhone 15/14/13/12 | Dr.fone
- Here are Some of the Best Pokemon Discord Servers to Join On Realme V30 | Dr.fone
- Full Guide to Catch 100 IV Pokémon Using a Map On Oppo Reno 10 5G | Dr.fone
- How To Fix Auto Lock Greyed Out on Apple iPhone 14 Pro | Dr.fone
- In 2024, Apple ID is Greyed Out On iPhone 13 Pro Max How to Bypass?
- In 2024, How to Change Nokia C12 Pro Location on Skout | Dr.fone
- Title: Updated In 2024, How to Add Motion Titles
- Author: Morgan
- Created at : 2024-05-19 05:12:55
- Updated at : 2024-05-20 05:12:55
- Link: https://ai-video-editing.techidaily.com/updated-in-2024-how-to-add-motion-titles/
- License: This work is licensed under CC BY-NC-SA 4.0.
