
:max_bytes(150000):strip_icc():format(webp)/012_how-to-make-video-call-on-android-bd93ab594aa648c7977f4c1ecf42c85b.jpg)
Updated In 2024, How To Change Font In Premiere Pro
How To Change Font In Premiere Pro
To know how to change font Premiere Pro, A video editing program called Adobe Premiere Pro enables you to change font Premiere Pro with high resolution and broadcast quality. Using this tool, you can simply add, modify, or import visuals and text for your films. Utilizing distinctive typefaces in your project gives the video a distinctive feel and helps you create a brand image. Regardless of the operating system you’re using, Premiere Pro makes it simple to edit videos. On this program, free downloadable fonts may also be added or imported.
People that need to create and edit video often utilize Premiere Pro. Knowing how to change font in Premiere Pro is a mandatory skill set. Premiere Pro comes with all you need to create basic text. You may also need After Effects if you want to create something a bit nicer. You may edit elements like text, color, size, and certain animations with Premiere Pro. Text is always added throughout the video editing process, and if you’re using Adobe Premiere Pro, this guide explains how to change font in Premiere Pro in detail.
Part 1. Steps to Change Font on Premiere Pro
Depending on the kind of projects you want to do in the future, learning how to edit text in Premiere Pro is a basic job and a critical talent to acquire. We’ll teach you how to add and modify the pre-installed typefaces in Adobe Premiere Pro so you may utilize them in your movie clip. The tools and functions in Adobe Premiere Pro allow video editors to add, alter, or change the typeface used in their films.
Step1Add Text Template
At the top of your project, and above the preview window, the Graphics panel will appear. When you choose it, the Essentials Graphics panel will appear on the Premiere Pro software’s right side. Select Browse. By dragging them into your sequence, you may utilize the graphic templates that are shown.

Step2Change Your Text
You may make simple text modifications, such as changing the font’s size, color, or style, by opening the Essential Graphics panel (Window > Essential Graphics).

Step3Change the Font
To open the title in the Monitor panel and choose the text, double-click the title under the Export view timeline. Change the font of your text by choosing a style from the Font Style option under the text tab of the Adjust panel.

Step4Export the Content
Last but not least, choose File > Export > Media in Premiere Pro to export a video. On a PC or a Mac, you might alternatively hit the shortcut key CMD + M. Your window for export settings will open as a result. Prior to submitting the movie to Media Encoder for export, you may choose your preferred parameters (or presets) for it in this window.

Part 2. Premiere Pro Alternative to Change Font in Video
That’s simple to change typefaces in Adobe Premiere Pro, and it could be all you need to do to keep your audience interested in the footage. It may not be sufficient for your requirements in terms of video editing. Having a backup plan is always beneficial, regardless of the situation. In case anything goes wrong with your initial choice, you will have a backup alternative. You thus need an option like Filmora , which comes with a variety of typefaces pre-installed.
You can simply give your films an aesthetic with Filmora by adding text in a variety of fonts and colors. It’s simple to navigate this program. The installation procedure is also fairly rapid, which is a bonus. Downloads for all of the visuals, audio, and fonts are offered. You don’t have to download everything at once because of this. In conclusion, Filmora is a fantastic substitute to utilize if you are unable to use Adobe Premiere Pro. It contains a number of features that are quite helpful while editing videos. Videos with the highest quality and frame rates are supported.
Step1Install and Import Files
You’ll get the following screen once you launch Filmora on your PC. the Editing Mode option. to open a file, choose it from the menu. Select the picture or video on which you want to add a text by choosing the Import to Add Files option.

Step2Create a Text Layout
In the next step, refer to the Titles menu and from there, you can add a variety of layouts to add text into your video. For that, add the selected one inside the timeline and refer to the next step:

Step3Add and Change Text Font
On the timeline, drag the picture. Click the picture twice. Select all text by selecting it after selecting the text menu item. Choose text from the menu on the left after that, and then choose the font style you want to use for the picture. You may now alter the text’s font. The text may also be changed, and you can add animation and other styles.

Step4Export or Share Content
In the final step, you can save the photo or video now. You may choose your preferred extension by selecting the export option and saving the movie there. You can also share your content by selecting YouTube or Vimeo or any social platform available to share your edited content on the go. hhghh
Part 3. Related FAQs of Video Font Editing
1. How to change font color in Premiere Pro?
To do so, double-click the title in the timeline of the Expert view to bring up the Monitor panel. Select the text in the Monitor panel, then choose from the options below: Select a font color from the Font menu and paste it into the Text tab of the Adjust panel. Alternately, you may change the font color by pressing Alt + H, typing Font Color and then selecting a color.
2. How to fix the font in Premiere Pro?
You may even classify your excess typefaces if you have too many of them. You’ll be able to locate all of your typefaces in this method. You may use Adobe Premiere Pro’s Align and Transform feature to align the text with the screen. The text’s alignment, centering, nudge, and opacity are all editable. If you don’t want to, you are under no need to arrange your typefaces. It is, nevertheless, quite practical.
3. How to you add font in Premiere Mac?
Fonts from other sources may be downloaded and used with ease in Adobe Premiere Pro Mac. You may download other fonts if you don’t want to utilize Adobe Premiere Pro’s built-in fonts. Downloading your favorite typefaces is the first step. You may obtain fonts from a variety of websites.
Free Download For Win 7 or later(64-bit)
Free Download For macOS 10.14 or later
Rotate Video in iMovie
Are you wondering how to change the orientation of videos in iMovie? You’re not alone. With iMovie as a professional video editing suite, it is no surprise to see iOS, iPad OS, and Mac OS users wanting to learn how to create cinematic and breathtaking videos using iMovie. iMovie allows its users to import clips, add effects, customize music, employ filters and motion elements, and lots more.
There are many ways of being creative during movie production. iMovie editors are exploring fast forward and slow-motion effects to changing backgrounds and flipping clips over. Depending on what you would like to achieve, you may flip your video clips to make them appear better or give them another outlook. You can decide to change orientation in iMovie. To change video orientation in iMovie requires that you know how to use the software. You can vertically or horizontally flip a clip and rotate it left or right in iMovie.
In this article
01 What is Rotating Video and Why
02 Detailed Steps to Rotate Video in iMovie
03 Rotate Video - iMovie Alternative
Part 1: What is Rotating Video and Why
Rotating a video means changing its orientation. A video clip can turn in a clockwise or counterclockwise direction, in 90° increments. Different video-making and editing software or applications have other steps to carry out this process. However, the result is the same for all, a change in the orientation of the video.
People rotate video clips for a variety of reasons. Here are some reasons as to why you may want to change video orientation in iMovie:
- Video stylization: While a rotated video may look disoriented, editors sometimes use the technique to convey a particular mood or emotion.
- Continuity: Video clip rotation can help you correct production errors or last-minute effect changes.
- Correct disorientation: Sometimes, as a result of errors while shooting, especially when using a mobile device, some video clips may appear in a lateral direction; video rotation can help fix this.
- Create horizontal videos: With a change in video orientation, you can make some footage like backgrounds appear vertically or horizontally.
Now that you know what video rotation is and some of the reasons people choose to change a video’s orientation, let’s now dive right into rotating videos in iMovie. And move ahead to lead from other video editors with this change orientation of video in iMovie technique going to discuss below.
Part 2: Detailed Steps to Rotate Video in iMovie
Appropriate video orientation is the requirement of every video creation project. If video orientation is not as needed, either the one created in iMovie or already existing video. Then, the need arises to look around ways to assist in performing the iMovie change orientation task effectively. This part of the article will specifically explain how to change the orientation of video in iMovie with all the necessary steps.
Before adding a clip or photo to your movie, you can decide to change its orientation. The following steps would show how to change video orientation in iMovie:
Step 1: Launch iMovie
On your Mac, launch iMovie > From the browser or timeline, select the photo or video clip to be rotated.
Step 2: Click on the Crop icon
Click the cropping icon to reveal the cropping options/controls.
![]()
Step 3:Rotate Video
On the right portion of the cropping controls, click Rotate Clockwise to rotate the clip or photo in a clockwise direction. Otherwise, click Rotates Counterclockwise to rotate the clip or image counterclockwise.

Step 4:Apply Changes
In the cropping controls, click Apply to effect the changes.
If you wish to remove the rotation, click the reset button at the top right-hand corner of your screen.
Now, as you know the steps to change video orientation in iMovie, simply move ahead of your video creation and editing process with iMovie and enjoy the wonderful experience of creating something new, engaging, and innovative in the world of video making. Not only this step guide will be going to assist you, but there are some more alternative ways also that you can give a try to enhance your overall experience in the area of the video content editing process. For that, you don’t need to go anywhere. Right here, you will have that vast area of information.
Part 3: Rotate Video - iMovie Alternative
Are you looking for some other software to rotate your Video with? Wondershare Filmora is your sure plug! This easy-to-use yet professional video editing software turns videos and add titles, add text, perform color grading, add multiple overlays, do motion tracking, use stickers and animations, and, what is more, purchase the software at an affordable price. With this software, you can comment and play your video clips to not have to worry about doing this now and then.
To rotate MPEG and MPG videos using Wondershare Filmora, follow these simple steps:
Step 1: Import the MP4 files to be rotated
Drag and drop the clip to be rotated on the primary window or click Import to browse your files.

Step 2: Rotate the MP4 clips
Now, from the User’s Album, drag the MP4 file to be rotated to the video track on the timeline. Double click the MP4 video thumbnail to reveal the Rotate options, allowing you to rotate your video in one click. There are four rotation related options in Wondershare Filmora:
- Rotate the clip 90° in a clockwise direction and continuously. This way, you can rotate the clip 90°, 180°, and 270°.
- Rotate the clip 90° in an anticlockwise direction and constantly.
- Flip the Video horizontally in an upside-down fashion.
- Flip the Video vertically left to right.

Step 3: Export the rotated video clip
To permanently save the changes made, click the Create button to reveal four options: YouTube, DVD, Format, and Device. Select the right format/device and click Create to output your rotated video clip.

You have sufficient equipment to start your voyage to creation and innovation by now. No doubt, Filmora comes here as a rescue and an alternative solution to let you change video orientation and a provider of many editing options. So without any concern, you can explore the tool at any time as per your availability and requirement.
Conclusion
Wondershare Filmora
Get started easily with Filmora’s powerful performance, intuitive interface, and countless effects!
Try It Free Try It Free Try It Free Learn More about Filmora>

Through this article, you learnt how to change orientation in iMovie, and thus nothing is holding your creativity back! With iMovie change orientation, you can now flip video clips in different directions to suit your preference. You now also know that with Wondershare Filmora, you can achieve just about the same result as you would if you were using iMovie for video rotation. So, now you have two robust tools to perform your task. Just keep going and let rock the world with your fantastic creativity and efforts.
02 Detailed Steps to Rotate Video in iMovie
03 Rotate Video - iMovie Alternative
Part 1: What is Rotating Video and Why
Rotating a video means changing its orientation. A video clip can turn in a clockwise or counterclockwise direction, in 90° increments. Different video-making and editing software or applications have other steps to carry out this process. However, the result is the same for all, a change in the orientation of the video.
People rotate video clips for a variety of reasons. Here are some reasons as to why you may want to change video orientation in iMovie:
- Video stylization: While a rotated video may look disoriented, editors sometimes use the technique to convey a particular mood or emotion.
- Continuity: Video clip rotation can help you correct production errors or last-minute effect changes.
- Correct disorientation: Sometimes, as a result of errors while shooting, especially when using a mobile device, some video clips may appear in a lateral direction; video rotation can help fix this.
- Create horizontal videos: With a change in video orientation, you can make some footage like backgrounds appear vertically or horizontally.
Now that you know what video rotation is and some of the reasons people choose to change a video’s orientation, let’s now dive right into rotating videos in iMovie. And move ahead to lead from other video editors with this change orientation of video in iMovie technique going to discuss below.
Part 2: Detailed Steps to Rotate Video in iMovie
Appropriate video orientation is the requirement of every video creation project. If video orientation is not as needed, either the one created in iMovie or already existing video. Then, the need arises to look around ways to assist in performing the iMovie change orientation task effectively. This part of the article will specifically explain how to change the orientation of video in iMovie with all the necessary steps.
Before adding a clip or photo to your movie, you can decide to change its orientation. The following steps would show how to change video orientation in iMovie:
Step 1: Launch iMovie
On your Mac, launch iMovie > From the browser or timeline, select the photo or video clip to be rotated.
Step 2: Click on the Crop icon
Click the cropping icon to reveal the cropping options/controls.
![]()
Step 3:Rotate Video
On the right portion of the cropping controls, click Rotate Clockwise to rotate the clip or photo in a clockwise direction. Otherwise, click Rotates Counterclockwise to rotate the clip or image counterclockwise.
Step 4:Apply Changes
In the cropping controls, click Apply to effect the changes.
If you wish to remove the rotation, click the reset button at the top right-hand corner of your screen.
Now, as you know the steps to change video orientation in iMovie, simply move ahead of your video creation and editing process with iMovie and enjoy the wonderful experience of creating something new, engaging, and innovative in the world of video making. Not only this step guide will be going to assist you, but there are some more alternative ways also that you can give a try to enhance your overall experience in the area of the video content editing process. For that, you don’t need to go anywhere. Right here, you will have that vast area of information.
Part 3: Rotate Video - iMovie Alternative
Are you looking for some other software to rotate your Video with? Wondershare Filmora is your sure plug! This easy-to-use yet professional video editing software turns videos and add titles, add text, perform color grading, add multiple overlays, do motion tracking, use stickers and animations, and, what is more, purchase the software at an affordable price. With this software, you can comment and play your video clips to not have to worry about doing this now and then.
To rotate MPEG and MPG videos using Wondershare Filmora, follow these simple steps:
Step 1: Import the MP4 files to be rotated
Drag and drop the clip to be rotated on the primary window or click Import to browse your files.
Step 2: Rotate the MP4 clips
Now, from the User’s Album, drag the MP4 file to be rotated to the video track on the timeline. Double click the MP4 video thumbnail to reveal the Rotate options, allowing you to rotate your video in one click. There are four rotation related options in Wondershare Filmora:
- Rotate the clip 90° in a clockwise direction and continuously. This way, you can rotate the clip 90°, 180°, and 270°.
- Rotate the clip 90° in an anticlockwise direction and constantly.
- Flip the Video horizontally in an upside-down fashion.
- Flip the Video vertically left to right.
Step 3: Export the rotated video clip
To permanently save the changes made, click the Create button to reveal four options: YouTube, DVD, Format, and Device. Select the right format/device and click Create to output your rotated video clip.
You have sufficient equipment to start your voyage to creation and innovation by now. No doubt, Filmora comes here as a rescue and an alternative solution to let you change video orientation and a provider of many editing options. So without any concern, you can explore the tool at any time as per your availability and requirement.
Conclusion
Wondershare Filmora
Get started easily with Filmora’s powerful performance, intuitive interface, and countless effects!
Try It Free Try It Free Try It Free Learn More about Filmora>
Through this article, you learnt how to change orientation in iMovie, and thus nothing is holding your creativity back! With iMovie change orientation, you can now flip video clips in different directions to suit your preference. You now also know that with Wondershare Filmora, you can achieve just about the same result as you would if you were using iMovie for video rotation. So, now you have two robust tools to perform your task. Just keep going and let rock the world with your fantastic creativity and efforts.
Step by Step to Crop a Video with CyberLink PowerDirector
Video Editing is an art form dependent on various elements and factors that are part of your video; this means people, items, or objects in the background can often make or break the viewing experience.
Can you imagine having shot a scene with impeccable attention to detail, but a small uncontrollable action leaves a portion of an unwanted cable or equipment in the frame? Bummer, right? But luckily, due to the power of video editing software, it is not hard to deal with such problems.
A way to work with such clips is to use the crop function while editing, as it can help emphasize or detract attention from a particular part of any video project.
Author’s Note: While filming, try to capture footage in the highest resolution allowed by the available camera hardware; this will give you more room to play with while using the crop function.
To preface, CyberLink PowerDirector is a free video editing tool capable of accomplishing this and providing a professional touch to your video projects. And like other competing software, the program not only allows you to crop into clips but also uses keyframes to modify aspects like panning and zoom. So to help you perform this action, in this article, we list the steps you will need for cropping into video clips with PowerDirector. As an added bonus, we have also included the method to perform the same actions in WonderShare Filmora.
Note: We documented the steps in this guide with PowerDirector 365 and WonderShare Filmora X.
How to Crop Videos with CyberLink PowerDirector?
The idea of cropping into clips has always been an easy action to perform; once you have PowerDirector 365 open, follow the steps listed below.
If you do not already have CyberLink PowerDirector 365, download the software by visiting Cyberlink’s official website.
Step 1: Create a new video project in Cyberlink PowerDirector 365 by choosing Full Mode.

Note: Full Mode in Cyberlink PowerDirector 365 provides access to a full-featured video editing tool, similar to Wondershare Filmora. The other available options cater to distinct video types.
Step 2: Import media onto the Timeline from the Media Library; in this guide, we have gone ahead and used the pre-existing stock footage.

Step 3: Now, click on the video file on the Timeline; this will activate the video toolbar giving you access to the various controls built into PowerDirector 365. Hover over the tools open, following which you need to click on the Crop, Zoom, and Pan option.

Step 4: Pick either corner of the frame visible around the video and set the area you want the clip to focus upon; following this, click Save.

This action will crop the video clip according to your desired size.
Tip:
The activation of Keyframes while cropping will allow you to create an effect that slowly zooms into the footage. To do this, set Keyframe Point 1 at a specific time (say the fifth second) and at one zoom level (say zero) and create Keyframe Point 2 at another time (fifteenth second) and a different zoom level (say fifty). So, between the fifth second and fifteenth second, the zoom will steadily increase and raise emphasis on an object. You can also add an element of position to this action if you want the focus to be on something not in the center of the screen.
Definition: Keyframes while Video Editing is a software-based feature that allows you to set In and Out Points, giving clips between the two positions different properties that change as the playhead continues to move. These properties can be increased zoom, rotation, different colors, or even a gradual pan.
We recommend experimenting with this feature if you want to bring a more dynamic feeling to your video project.
An Easier Way to Crop Video with Wondershare Filmora
While Cyberlink PowerDirector 365 is a powerful video editing tool, in our experience, its menus are not as simple to navigate as some of the other competing video editing tools available, Wondershare Filmora Video Editor included.
An emphasis on quick accessibility is present with Filmora, and we believe this is a huge plus for beginning creators. The use of iconography resemblant to mobile software is another aspect that helps increase familiarity.
If you do not already have Wondershare Filmora, you can download the software by visiting the official website.
Now, to help you learn how to use the Crop Tool and to show you an example of what we mean, here is how you can use the feature Wondershare Filmora to get the desired output.
For Win 7 or later (64-bit)
For macOS 10.14 or later
Once you have the software open, follow the steps listed below.
Step 1: Import the Media File into your Video Project.

Step 2: Drag the clip onto the Timeline and then select it to activate further interactions.

Step 3: Choose the Crop Options (marked in Red) to open the Crop window.

Step 4: Pick any edge within the visible box and resize them to select the portion you want to keep in the clip.

Having read this bit of the guide, we believe you may have noticed how Filmora is more convenient due to the easier access it provides to the crop function.
The Bottom Line
So, at the end of the day, both software listed in this article are fully functional and highly-capable video editing tools, but saving time spent in front of the computer is a huge factor for any video editor.
And Wondershare Filmora does just that with its modern iconography and increased accessibility. With its thoughtful, less-frills approach, Filmora is the one to pick if you do not want to be bogged down by needless menus and have to hunt for actions that will help you create a video that you would want to watch yourself.
Note: Full Mode in Cyberlink PowerDirector 365 provides access to a full-featured video editing tool, similar to Wondershare Filmora. The other available options cater to distinct video types.
Step 2: Import media onto the Timeline from the Media Library; in this guide, we have gone ahead and used the pre-existing stock footage.
Step 3: Now, click on the video file on the Timeline; this will activate the video toolbar giving you access to the various controls built into PowerDirector 365. Hover over the tools open, following which you need to click on the Crop, Zoom, and Pan option.
Step 4: Pick either corner of the frame visible around the video and set the area you want the clip to focus upon; following this, click Save.
This action will crop the video clip according to your desired size.
Tip:
The activation of Keyframes while cropping will allow you to create an effect that slowly zooms into the footage. To do this, set Keyframe Point 1 at a specific time (say the fifth second) and at one zoom level (say zero) and create Keyframe Point 2 at another time (fifteenth second) and a different zoom level (say fifty). So, between the fifth second and fifteenth second, the zoom will steadily increase and raise emphasis on an object. You can also add an element of position to this action if you want the focus to be on something not in the center of the screen.
Definition: Keyframes while Video Editing is a software-based feature that allows you to set In and Out Points, giving clips between the two positions different properties that change as the playhead continues to move. These properties can be increased zoom, rotation, different colors, or even a gradual pan.
We recommend experimenting with this feature if you want to bring a more dynamic feeling to your video project.
An Easier Way to Crop Video with Wondershare Filmora
While Cyberlink PowerDirector 365 is a powerful video editing tool, in our experience, its menus are not as simple to navigate as some of the other competing video editing tools available, Wondershare Filmora Video Editor included.
An emphasis on quick accessibility is present with Filmora, and we believe this is a huge plus for beginning creators. The use of iconography resemblant to mobile software is another aspect that helps increase familiarity.
If you do not already have Wondershare Filmora, you can download the software by visiting the official website.
Now, to help you learn how to use the Crop Tool and to show you an example of what we mean, here is how you can use the feature Wondershare Filmora to get the desired output.
For Win 7 or later (64-bit)
For macOS 10.14 or later
Once you have the software open, follow the steps listed below.
Step 1: Import the Media File into your Video Project.
Step 2: Drag the clip onto the Timeline and then select it to activate further interactions.
Step 3: Choose the Crop Options (marked in Red) to open the Crop window.
Step 4: Pick any edge within the visible box and resize them to select the portion you want to keep in the clip.
Having read this bit of the guide, we believe you may have noticed how Filmora is more convenient due to the easier access it provides to the crop function.
The Bottom Line
So, at the end of the day, both software listed in this article are fully functional and highly-capable video editing tools, but saving time spent in front of the computer is a huge factor for any video editor.
And Wondershare Filmora does just that with its modern iconography and increased accessibility. With its thoughtful, less-frills approach, Filmora is the one to pick if you do not want to be bogged down by needless menus and have to hunt for actions that will help you create a video that you would want to watch yourself.
What Are the Best 10 GIF Creator?
What are the 10 Best GIF Creator?
An easy yet powerful editor
Numerous effects to choose from
Detailed tutorials provided by the official channel
Stay tuned to find the most affordable GIF creator solutions.
In this article
01 [Why Gifs Are Essential for Every Marketer?](#Part 1)
02 [How to Make Your Own GIF?](#Part 2)
03 [What Are 10 Best GIF Creator to Find Brilliant Pre-made Gifs?](#Part 3)
Part 1 Why Gifs Are Essential for Every Marketer?
Everyone around you today is accustomed with the fact that GIFs are an interesting and impactful means of content sharing. These 3-5 second snippets are highly preferred and convenient ways to deliver information that is precise, clear and to the point. When it comes to time frames, short and quick GIFs are obvious choices over lengthy videos. Additionally, GIFs are eye-catchy and keep you captivated to see though the entire content within seconds, contradictory to those monotonous and often dull videos that sound more like a long, boring lecture.
These are an effective media tool that is not limited to sharing information that is chiefly entertainment based or fun centered. You can use them to deliver important content that addresses a specific purpose or audience. Owing to this, GIFs have become an essential marketing utility, here’s why:
● Improve Product Branding:
GIFs can serve as impressive branding tools for your products in the market. Markets today are considerably impacted by the ‘What You See is What You Buy’ concept, which puts forward the need to lay added stress on effective branding.
GIFs are ready to sort this out with their exciting range of features. From video editing choices to sound and color customization, GIFs are loaded with everything you need to improvise your product branding. All you have to do is explore your creativity to make the most of the GIF branding choices.
● Explain it Better
On a preference poll, most of us would shift to ‘watch’ over ‘read’ for a comprehensive understanding. An attractive motion visual is an even better treat. GIFs are pivotal in making viewers relate to the concept and message behind your product in a more enhanced manner.
Additionally, these are a continent means to introduce emotional mobility among your target audience with depictive emojis. You can use GIFs to develop effective content approaches to make the audience connect with your product viability, both practically band emotionally.
● Increase Visitor Attraction
Today’s changing times have brought about a rapid outlook towards everything. All of us are bounded by time constraints and when browsing the web, the prime need is to look for quick and accurate solutions to everything concerned.
Short and exact information delivery of GIFs is something that would keep visitors glued to your site because they will be assured of getting exactly what they search for and that too in an interesting and entertaining way.
Part 2 How to Make Your Own GIF?
Now that you are familiar with the creative marketing credibility of GIFs, you might naturally feel motivated towards creating a GIF of your own. In case you are, see through the following section of this article to find out interesting ways of creating interesting and catchy GIFs, either for impressive product marketing or just to make your social media posts leave your community peers in awe!
Looking for the best GIF creator solutions on the web, you can rely on GIPHY, one of the most preferred and convenient databases to create GIFs quickly. This is a smartphone compatible tool and works well with almost any device. Follow the steps given below to make GIFs with this tool:
Step 1:
Download and install the GIPHY app in your device.
Step 2:
Click on ‘Create’ in the app’s welcome screen. This will change (+) icon at the top-right corner to the ‘Camera’ symbol. You can also navigate to the ‘Profile’ at the bottom-right and tap the (+) or ‘Camera’ icon in the app’s account page.
Step 3:
Click on ‘Allow Camera Access’. You will receive two successive prompt messages from the app. Click on ‘Allow’ to grant access permissions to your device media. When you are done, click on ‘I Agree’.
Step 4:
GIFHY uses your device’s front camera for GIF creation. However, if you need to go for a camera switch, click on the ‘Camera’ sign at the bottom-right.
Step 5:
Choose a desired filter and effect for your GIF with a left or right swipe on the live feed toolbar. The app has 11 amazing and realistic effects, including VHS Static, 3D Glasses, etc.
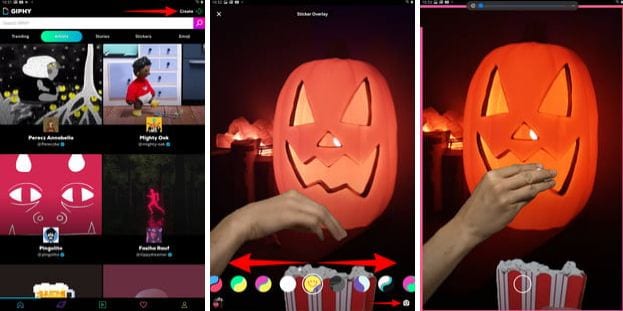
Step 6:
You can take up either of the following:
Press either of the ‘Filter’ or ‘Effect’ buttons to take static shots to create GIF from images, or press and hold the same to create animated GIF. For simply using effects, tap the white button.
In case you choose to create a motion GIF, the app forms a ‘visual timer’ around the editor screen. The motion recording stops once the line is in sync with the screen edges.
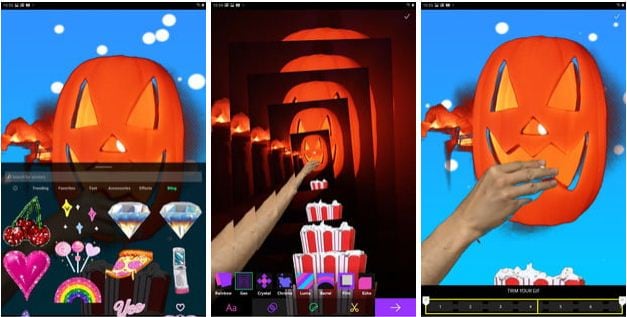
Step 7:
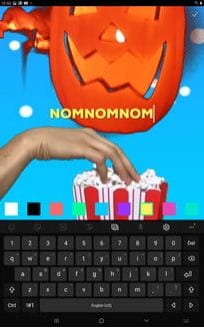
Having captured your perfect shot, you have the liberty to merge it with an image or video. However, do consider the following options to add some more elements to your capture: You can add relatable text in 9 color choices.
● Enhance your graphic presentation with 8 amazing effects like, ‘rainbow overlays’, BW film grains, etc.
● Choose from a never ending list of suitable stickers to add the feel through connect to your GIFs.
● Trim your animated GIFs to the ‘just perfect’ portion by adjusting the editing markers.
Relax; that’s no rocket science. Just tap on the respective buttons and there you go!
Step 8:
Set your GIF in a desired size frame by choosing the ‘Crop’ tool from the top-right corner of the editing screen. You are given a size flexibility of 1:1, 3:2, 16:9, 4:5 and 9:16.

Step 9:
Once you are satisfied with your creation, tap the ‘Right Arrow’ icon. In the interface that follows, add suitable share tags to the GIF.
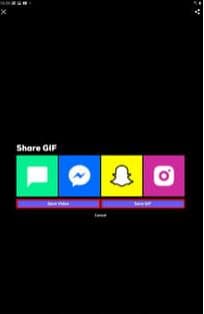
Step 10:
Tap ‘Share GIF’ to post your creation on social media platforms or share it through popular IM apps. To save your initially captured clip, click on ‘Save Video’ or tap ‘Save GIF’ to save your creation in your smartphone’s memory.
Part 1 What Are 10 Best GIF Creator to Find Brilliant Pre-made Gifs?
Having talked about GIF creation on the go, let’s take a dive into the best GIF creator solutions that are a storehouse of exciting pre-made GIFs. When browsing the web for an affordable GIF maker tool, you land across a pool of choices. Read through the further sections of this article to find out what’s best for you.
Described below are 10 best alternatives to get amazing pre-made GIFs:
● Wondershare Filmora Video Editor
This one is a popular, preferred and top rated application where you get to choose from an exciting range of pre-made GIFs under a variety of specific categories. All you need to do is, visit the app’s official site, browse to your favorite GIF category and select a desired GIF. Follow a few app instructions to save your selection and that’s it! Your selected GIF reaches your device memory within seconds.

Wondershare Filmora - Best Video Editor for Mac/Windows
5,481,435 people have downloaded it.
Build unique custom animations without breaking a sweat.
Focus on creating epic stories and leave the details to Filmora’s auto features.
Start a creative adventure with drag & drop effects and endless possibilities.
Filmora simplifies advanced features to save you time and effort.
Filmora cuts out repetition so you can move on to your next creative breakthrough.
Key Features
● This app is available to you absolutely free of cost.
● Has an intelligent and user cohesive interface.
● Loaded with tons of brilliant GIFs to choose from.
● The app supports GIF customization.
● GIFHY
Launched in 2013, this one is probably the best GIF maker and downloader tool available on the web today. It is a free tool, packed with enormous varieties of GIFs to choose from. What’s more interesting about the app is that you are free to play with your editing creativity to enhance your downloaded GIFs in the GIPHY editor.
Key Features
● It comes with an easy to use, convenient interface.
● You can edit downloaded GIFs with hundreds of effects and filters.
● The app provides you a direct sharing platform, allowing you to post GIFs to various social media platforms and also go for sharing via Instant Messaging applications.
● This is a fast processing tool that allows you to escape the notch of annoying and delayed download processes.
● Tenor
You can conveniently regard this one as the closest competitor to the GIPHY GIF creator and downloader tool. Needless to say, both are quite similar to each other in interface and usage respects. However, focusing on search results for a common keyword, you find diverse variations to your obvious surprise.
Key Features
● This is a free to use, interactive interface tool.
● It introduces a GIF Keyboard that allows you to search the most specific and relatable GIFs.
● It ensures a speedy and high quality GIF download.
● You can explore your editing skills to your heart’s content to improvise the downloaded GIFs with this tool.
● This tool gives you the liberty to directly share GIFs across different platforms.
If you like to spend ample time on choosing what’s perfect for you, refer this online tool for your GIF download solutions. It caters to your love of diversity with the most deep rooted and broad GIF range. However, this one comes with a little messy interface, demanding some patience from you to get to the right thing.
Key Features
● This tool provides you with almost all possible choices for a GIF category.
● It is available to you free of cost
● The tool site is loaded with rich and quality GIF content.
● This one is a direct save and export tool for your downloaded GIFs.
● Gfycat
You can prefer this one as a GIF hosting tool. Developed with a view to launch a common medium for GIF and HTML contents, this app ensures in-time and hassle free downloads and delivery. Though lacking a refined search bar, this tool promises you of excellence in content quality.
Key Features
● This comes to you as one of the most reliable GIF hosting tools.
● It is a free and quick content delivery tool.
● You are allowed to select the most suitable one from a variety of playback choices.
● This tool also gives you the flexibility of direct media sharing.
● GIFbin
If you are hung-over decade old nostalgia and the fever doesn’t seem to go away, you can check this site for some really satisfying retro and other similar content. This would definitely make you take a toll back to the times when MSN and Limewire were unparalleled market leaders in content sharing.
Key Features
● GIFbin is a storehouse of the best animated GIFs, that is on a continuous update to facilitate fresh and quality based content, every time you visit the site.
● It has an advanced, API enabled search mechanism.
● It boasts of having the handiest and convenient user interface.
● If you prefer GIFs of the comic genre, this tool is heaven for you.
● Imgflip
This is another GIF download site, commonly preferred for comedy and fun oriented content. Using this site, you can download and create a variety of GIF based memes that have the potential to flood your social media posts with likes and comments. This one is a complete GIF basket, suited to vast content varieties and user preferences. You will find the site’s official watermark on all its contents.
Key Features
● The site stands among the most preferred GIF-meme creation and sharing platforms.
● The tool is packed with loads of quality content under specific categories
● You can improvise the dimensions of your editing skills to modify downloaded GIFs.
● This site has a default media export feature that you can use to share your GIFs on social media.
● Imgur
Launched in 2009, this is among the most visited GIF sites, originally created for sharing meme based contents on social media. Its extensive search filters are dedicated to fetch the exact GIFs and memes you are looking for. If you are tired of browsing sites for particular content requirements, your search spree will definitely end here.
Key Features
● The site is known for its extensive and diversified content quality.
● It is a free, convenient and dependable GIF download tool.
● Imgur is highly preferred for content export across various media platforms.
● It is equipped with an advanced and updated search filter that assures you of getting fresh and top quality GIFs on almost every possible keyword.
● Tumblr
Claiming a launch date of 13 years back, this is quite a good GIF download option. You can find excellent quality GIF content on the site, particularly in the comic genre. Though not as popular as its online counterparts today, the site definitely enjoyed commendable visitor preferences at the time of its launch. You can certainly visit this site for a filling entertainment dose.
Key Features
● Tumblr is a free download site with a user friendly interface.
● The site is loaded with notable content varieties.
● You can go for direct media sharing through this site.
● Its comic GIFs are quite hilarious.
● Know Your Meme
This site uses the Wiki software to stock an inventory of classic GIFs and memes. Using this database for GIF downloads means that you don’t need to compromise on content and image quality. The site contents are periodically updated to ensure that visitors are not exposed to stale and outdated content.
Key Features
● The site offers fresh content having catchy and latest GIFs.
● This is a complete storehouse of GIFs and memes that can definitely keep you rolling.
● The site comes as a free tool and gas a user cohesive interface
● It hast the most efficient search filters that are regularly improvised to ensure quality content delivery.
● Key Takeaways from This Episode →
● GIFs are an effective and captivating means of quality content sharing and message delivery. Take them as a hilarious entertainment source or use them to enhance your marketing policies, GIFs can do it all.
● Influenced by the user credibility of GIFs, there are loads of GIF creator and download tools available online; among which Filmora by Wondershare is the current market leader. You can use this app to explore your GIF editing skills or download and share latest GIFs across media sharing platforms.
Stay tuned to find the most affordable GIF creator solutions.
In this article
01 [Why Gifs Are Essential for Every Marketer?](#Part 1)
02 [How to Make Your Own GIF?](#Part 2)
03 [What Are 10 Best GIF Creator to Find Brilliant Pre-made Gifs?](#Part 3)
Part 1 Why Gifs Are Essential for Every Marketer?
Everyone around you today is accustomed with the fact that GIFs are an interesting and impactful means of content sharing. These 3-5 second snippets are highly preferred and convenient ways to deliver information that is precise, clear and to the point. When it comes to time frames, short and quick GIFs are obvious choices over lengthy videos. Additionally, GIFs are eye-catchy and keep you captivated to see though the entire content within seconds, contradictory to those monotonous and often dull videos that sound more like a long, boring lecture.
These are an effective media tool that is not limited to sharing information that is chiefly entertainment based or fun centered. You can use them to deliver important content that addresses a specific purpose or audience. Owing to this, GIFs have become an essential marketing utility, here’s why:
● Improve Product Branding:
GIFs can serve as impressive branding tools for your products in the market. Markets today are considerably impacted by the ‘What You See is What You Buy’ concept, which puts forward the need to lay added stress on effective branding.
GIFs are ready to sort this out with their exciting range of features. From video editing choices to sound and color customization, GIFs are loaded with everything you need to improvise your product branding. All you have to do is explore your creativity to make the most of the GIF branding choices.
● Explain it Better
On a preference poll, most of us would shift to ‘watch’ over ‘read’ for a comprehensive understanding. An attractive motion visual is an even better treat. GIFs are pivotal in making viewers relate to the concept and message behind your product in a more enhanced manner.
Additionally, these are a continent means to introduce emotional mobility among your target audience with depictive emojis. You can use GIFs to develop effective content approaches to make the audience connect with your product viability, both practically band emotionally.
● Increase Visitor Attraction
Today’s changing times have brought about a rapid outlook towards everything. All of us are bounded by time constraints and when browsing the web, the prime need is to look for quick and accurate solutions to everything concerned.
Short and exact information delivery of GIFs is something that would keep visitors glued to your site because they will be assured of getting exactly what they search for and that too in an interesting and entertaining way.
Part 2 How to Make Your Own GIF?
Now that you are familiar with the creative marketing credibility of GIFs, you might naturally feel motivated towards creating a GIF of your own. In case you are, see through the following section of this article to find out interesting ways of creating interesting and catchy GIFs, either for impressive product marketing or just to make your social media posts leave your community peers in awe!
Looking for the best GIF creator solutions on the web, you can rely on GIPHY, one of the most preferred and convenient databases to create GIFs quickly. This is a smartphone compatible tool and works well with almost any device. Follow the steps given below to make GIFs with this tool:
Step 1:
Download and install the GIPHY app in your device.
Step 2:
Click on ‘Create’ in the app’s welcome screen. This will change (+) icon at the top-right corner to the ‘Camera’ symbol. You can also navigate to the ‘Profile’ at the bottom-right and tap the (+) or ‘Camera’ icon in the app’s account page.
Step 3:
Click on ‘Allow Camera Access’. You will receive two successive prompt messages from the app. Click on ‘Allow’ to grant access permissions to your device media. When you are done, click on ‘I Agree’.
Step 4:
GIFHY uses your device’s front camera for GIF creation. However, if you need to go for a camera switch, click on the ‘Camera’ sign at the bottom-right.
Step 5:
Choose a desired filter and effect for your GIF with a left or right swipe on the live feed toolbar. The app has 11 amazing and realistic effects, including VHS Static, 3D Glasses, etc.
Step 6:
You can take up either of the following:
Press either of the ‘Filter’ or ‘Effect’ buttons to take static shots to create GIF from images, or press and hold the same to create animated GIF. For simply using effects, tap the white button.
In case you choose to create a motion GIF, the app forms a ‘visual timer’ around the editor screen. The motion recording stops once the line is in sync with the screen edges.
Step 7:
Having captured your perfect shot, you have the liberty to merge it with an image or video. However, do consider the following options to add some more elements to your capture: You can add relatable text in 9 color choices.
● Enhance your graphic presentation with 8 amazing effects like, ‘rainbow overlays’, BW film grains, etc.
● Choose from a never ending list of suitable stickers to add the feel through connect to your GIFs.
● Trim your animated GIFs to the ‘just perfect’ portion by adjusting the editing markers.
Relax; that’s no rocket science. Just tap on the respective buttons and there you go!
Step 8:
Set your GIF in a desired size frame by choosing the ‘Crop’ tool from the top-right corner of the editing screen. You are given a size flexibility of 1:1, 3:2, 16:9, 4:5 and 9:16.
Step 9:
Once you are satisfied with your creation, tap the ‘Right Arrow’ icon. In the interface that follows, add suitable share tags to the GIF.
Step 10:
Tap ‘Share GIF’ to post your creation on social media platforms or share it through popular IM apps. To save your initially captured clip, click on ‘Save Video’ or tap ‘Save GIF’ to save your creation in your smartphone’s memory.
Part 1 What Are 10 Best GIF Creator to Find Brilliant Pre-made Gifs?
Having talked about GIF creation on the go, let’s take a dive into the best GIF creator solutions that are a storehouse of exciting pre-made GIFs. When browsing the web for an affordable GIF maker tool, you land across a pool of choices. Read through the further sections of this article to find out what’s best for you.
Described below are 10 best alternatives to get amazing pre-made GIFs:
● Wondershare Filmora Video Editor
This one is a popular, preferred and top rated application where you get to choose from an exciting range of pre-made GIFs under a variety of specific categories. All you need to do is, visit the app’s official site, browse to your favorite GIF category and select a desired GIF. Follow a few app instructions to save your selection and that’s it! Your selected GIF reaches your device memory within seconds.
Wondershare Filmora - Best Video Editor for Mac/Windows
5,481,435 people have downloaded it.
Build unique custom animations without breaking a sweat.
Focus on creating epic stories and leave the details to Filmora’s auto features.
Start a creative adventure with drag & drop effects and endless possibilities.
Filmora simplifies advanced features to save you time and effort.
Filmora cuts out repetition so you can move on to your next creative breakthrough.
Key Features
● This app is available to you absolutely free of cost.
● Has an intelligent and user cohesive interface.
● Loaded with tons of brilliant GIFs to choose from.
● The app supports GIF customization.
● GIFHY
Launched in 2013, this one is probably the best GIF maker and downloader tool available on the web today. It is a free tool, packed with enormous varieties of GIFs to choose from. What’s more interesting about the app is that you are free to play with your editing creativity to enhance your downloaded GIFs in the GIPHY editor.
Key Features
● It comes with an easy to use, convenient interface.
● You can edit downloaded GIFs with hundreds of effects and filters.
● The app provides you a direct sharing platform, allowing you to post GIFs to various social media platforms and also go for sharing via Instant Messaging applications.
● This is a fast processing tool that allows you to escape the notch of annoying and delayed download processes.
● Tenor
You can conveniently regard this one as the closest competitor to the GIPHY GIF creator and downloader tool. Needless to say, both are quite similar to each other in interface and usage respects. However, focusing on search results for a common keyword, you find diverse variations to your obvious surprise.
Key Features
● This is a free to use, interactive interface tool.
● It introduces a GIF Keyboard that allows you to search the most specific and relatable GIFs.
● It ensures a speedy and high quality GIF download.
● You can explore your editing skills to your heart’s content to improvise the downloaded GIFs with this tool.
● This tool gives you the liberty to directly share GIFs across different platforms.
If you like to spend ample time on choosing what’s perfect for you, refer this online tool for your GIF download solutions. It caters to your love of diversity with the most deep rooted and broad GIF range. However, this one comes with a little messy interface, demanding some patience from you to get to the right thing.
Key Features
● This tool provides you with almost all possible choices for a GIF category.
● It is available to you free of cost
● The tool site is loaded with rich and quality GIF content.
● This one is a direct save and export tool for your downloaded GIFs.
● Gfycat
You can prefer this one as a GIF hosting tool. Developed with a view to launch a common medium for GIF and HTML contents, this app ensures in-time and hassle free downloads and delivery. Though lacking a refined search bar, this tool promises you of excellence in content quality.
Key Features
● This comes to you as one of the most reliable GIF hosting tools.
● It is a free and quick content delivery tool.
● You are allowed to select the most suitable one from a variety of playback choices.
● This tool also gives you the flexibility of direct media sharing.
● GIFbin
If you are hung-over decade old nostalgia and the fever doesn’t seem to go away, you can check this site for some really satisfying retro and other similar content. This would definitely make you take a toll back to the times when MSN and Limewire were unparalleled market leaders in content sharing.
Key Features
● GIFbin is a storehouse of the best animated GIFs, that is on a continuous update to facilitate fresh and quality based content, every time you visit the site.
● It has an advanced, API enabled search mechanism.
● It boasts of having the handiest and convenient user interface.
● If you prefer GIFs of the comic genre, this tool is heaven for you.
● Imgflip
This is another GIF download site, commonly preferred for comedy and fun oriented content. Using this site, you can download and create a variety of GIF based memes that have the potential to flood your social media posts with likes and comments. This one is a complete GIF basket, suited to vast content varieties and user preferences. You will find the site’s official watermark on all its contents.
Key Features
● The site stands among the most preferred GIF-meme creation and sharing platforms.
● The tool is packed with loads of quality content under specific categories
● You can improvise the dimensions of your editing skills to modify downloaded GIFs.
● This site has a default media export feature that you can use to share your GIFs on social media.
● Imgur
Launched in 2009, this is among the most visited GIF sites, originally created for sharing meme based contents on social media. Its extensive search filters are dedicated to fetch the exact GIFs and memes you are looking for. If you are tired of browsing sites for particular content requirements, your search spree will definitely end here.
Key Features
● The site is known for its extensive and diversified content quality.
● It is a free, convenient and dependable GIF download tool.
● Imgur is highly preferred for content export across various media platforms.
● It is equipped with an advanced and updated search filter that assures you of getting fresh and top quality GIFs on almost every possible keyword.
● Tumblr
Claiming a launch date of 13 years back, this is quite a good GIF download option. You can find excellent quality GIF content on the site, particularly in the comic genre. Though not as popular as its online counterparts today, the site definitely enjoyed commendable visitor preferences at the time of its launch. You can certainly visit this site for a filling entertainment dose.
Key Features
● Tumblr is a free download site with a user friendly interface.
● The site is loaded with notable content varieties.
● You can go for direct media sharing through this site.
● Its comic GIFs are quite hilarious.
● Know Your Meme
This site uses the Wiki software to stock an inventory of classic GIFs and memes. Using this database for GIF downloads means that you don’t need to compromise on content and image quality. The site contents are periodically updated to ensure that visitors are not exposed to stale and outdated content.
Key Features
● The site offers fresh content having catchy and latest GIFs.
● This is a complete storehouse of GIFs and memes that can definitely keep you rolling.
● The site comes as a free tool and gas a user cohesive interface
● It hast the most efficient search filters that are regularly improvised to ensure quality content delivery.
● Key Takeaways from This Episode →
● GIFs are an effective and captivating means of quality content sharing and message delivery. Take them as a hilarious entertainment source or use them to enhance your marketing policies, GIFs can do it all.
● Influenced by the user credibility of GIFs, there are loads of GIF creator and download tools available online; among which Filmora by Wondershare is the current market leader. You can use this app to explore your GIF editing skills or download and share latest GIFs across media sharing platforms.
Also read:
- Free Green Screen Mobile Frame Downloads
- Have the Desire to Create a Stylish Glitch Effect to a Text on Your Video? Use Filmora for the Editing, Following the Given Steps Explained in Detail
- New In 2024, How to Make a Transparent Background in Paint. How 3D Paint Transparent Background Can Be Made. How to Save an Image with Transparent Background?
- Color Lut Is an Easy and Powerful Tool to Make Your Video Stands Out From the Crowd. Check This Article to Learn the Details About Color Lut for 2024
- Start Your Creative Journey Now. Follow This Step-by-Step Guide on How to Add Double Exposure Effects to Your Personal Videos by Using the Filmora Video Editor
- New 2024 Approved How to Create The Best Video Collages ?
- New 2024 Approved How to Cut Videos on Mac without Using FFmpeg?
- New How to Use LUTS to Color Grade on Your iPhone for 2024
- New Step by Step to Rotate Video in Google Photos for 2024
- How to Make Text Reveal Effect for Your Video
- Updated In 2024, Learn How to Make Modern TikTok Velocity Dance Videos in Filmora Just Like the Ones You See on TikTok and Instagram Reels
- In 2024, A Full Review of Leeming LUT Pro
- Updated 2024 Approved How Does the YouTube AI Algorithm Work - AI EXPLAINED
- New How to Create Simple Slideshow Word
- Recording Video in Slow Motion Some Considerable Points for 2024
- New In 2024, How I Got Free After Effects Templates Slideshow with Simple Trick
- Updated Free Ways to Download Mobile Phone Green Screen Videos and Pictures No Copyright
- New In 2024, In This Article, We Will Discuss What Lens Distortion Is, How It May Be Fixed, and the Factors You Need to Pay Attention to Avoid Lens Distortion when Taking or Recording Videos
- New In 2024, Do You Want to Know How to Convert YouTube SBV Subtitles to SRT Format? Here Is an Ultimate Guide About It
- New Have You Ever Played Roblox Games? Read This Article to Find Out How to Get Motion Blur in Roblox Using Simple and Efficient Ways for 2024
- In 2024, What Is the Best Voice Changer for WhatsApp? Discover the Seven (7) Best Voice Changers for WhatsApp Here in This Post
- In 2024, A Wedding Is One of the Exciting Parts that Will Happen in Your Life. Its Not that Easy to Plan a Wedding, Theres a Lot to Be Consider Like Wedding Dress, Food, Venue, Videographer Etc
- New 2024 Approved Need to Learn About Halftone Effects? Learn How to Quickly Create a Halftone Effect in Adobe Photoshop with Simple, Easy-to-Follow Instructions
- Updated In 2024, Do You Want to Blur Faces in Your Videos? Read This Article to Find Out the Easiest Way to Blur the Faces in Videos Using Adobe Premiere Pro
- Top Photo Video Maker Apps with Song for 2024
- Full Guide to Catch 100 IV Pokémon Using a Map On Honor Magic5 Ultimate | Dr.fone
- In 2024, How to Unlock Poco Phone without Google Account?
- How to Mirror Oppo A58 4G to Mac? | Dr.fone
- In 2024, Additional Tips About Sinnoh Stone For Asus ROG Phone 8 | Dr.fone
- How to share/fake gps on Uber for Xiaomi Redmi Note 12 Pro 4G | Dr.fone
- How To Fix Apple ID Verification Code Not Working From Apple iPhone 13 Pro
- In 2024, 3 Ways to Track Xiaomi Civi 3 Disney 100th Anniversary Edition without Them Knowing | Dr.fone
- The way to get back lost messages from Itel P55+
- In 2024, 3 Facts You Need to Know about Screen Mirroring Nokia 150 (2023) | Dr.fone
- In 2024, Does Airplane Mode Turn off GPS Location On Vivo Y100A? | Dr.fone
- For People Wanting to Mock GPS on Honor Magic 6 Lite Devices | Dr.fone
- How To Open Your Apple iPhone 11 Without a Home Button | Dr.fone
- How to restore wiped call history on Motorola G54 5G?
- In 2024, A Complete Guide To OEM Unlocking on Poco X5
- How to Unlock Poco X6 Pro Bootloader Easily
- In 2024, How to Fake GPS on Android without Mock Location For your Nokia C02 | Dr.fone
- Title: Updated In 2024, How To Change Font In Premiere Pro
- Author: Morgan
- Created at : 2024-04-24 01:05:30
- Updated at : 2024-04-25 01:05:30
- Link: https://ai-video-editing.techidaily.com/updated-in-2024-how-to-change-font-in-premiere-pro/
- License: This work is licensed under CC BY-NC-SA 4.0.
