
:max_bytes(150000):strip_icc():format(webp)/dts-play-fi-lifestyle-aaa-5a4c211daad52b00366a3575.jpg)
Updated In 2024, How to Create Sports Intro and Outro for YouTube Video?
How to Create Sports Intro and Outro for YouTube Video?
Are you deep into sports? Have you created a sports channel on YouTube but are still clueless? You do not need to panic. The article has got you covered.
There is an extensive range of sports channels on YouTube struggling and surviving. It includes gaming, exercise, athletics, basketball, hockey, and tennis sports. A promising sports background music in the intro and outro makes it appealing for the audience. Hence, the article will focus on three platforms for exercise downloading impeccable background music.
The step-by-step guide to creating an outstanding sports intro will also be sketched out. So, what are we waiting for? Time to commence this!
In this article
01 How to Create an Epic Sports Intro?
02 How to Edit a Sport Style YouTube Outro or End Screen?
03 3 Recommended Sites to Download Background Music for Exercise Videos
Part 1: How to Create an Epic Sports Intro?
Do you own a sports channel? Continue exploring the section to know more!
A sports channel needs a promising intro to keep the audience interested in the content. An exceptional intro to a sports channel with great music enables you to gain subscribers. The sub-section would cover an extensive procedure to make a startling sports intro with yoga background music or other sport. So, let us start? Shall we?
For Win 7 or later (64-bit)
For macOS 10.12 or later
Step 1: Open Wondershare Filmora from your computer. Now, head to the “Audio” panel to drop a powerful track to the timeline. Use the “Media” panel to import the sports video clips for your intro.

Step 2: Keep the highlights and trim the clips to be in sync with the music. After the editing is concluded, shift your focus to the “Titles.” Move to the Titles panel and use title animations for the “Energy Sports” pack.

Step 3: Drag and drop the titles on the top of the footage. It would be best to match the duration of the video clips with the titles. Now, double-click the title to rename it according to your need.

Step 4: To make the ending more powerful, right-click on the last video clip and click on “Speed and Duration.” Enhance the speed to make it engaging. Moving on, navigate to the “Effects” panel.

Step 5: From there, pick the “Shake” filter and drag and drop the “Chaos 1” to the last clip. Similarly, click on the “Distortion” filter to drop the “Chromatic Aberration” effect onto the last clip.

Step 6: Now, it is time to add transitions to create a smooth connection between the clips. Click on “Transitions” and then “Energy Sports” pack. Drag and drop both transitions in between the clips. A creative and captivating sports intro has been created with solid sports background music.

Part 2: How to Edit a Sport Style YouTube Outro or End Screen?
Communicating with the users about a channel doesn’t have to be with words. The background music for exercise expresses the aims of a channel more perfectly. The same goes for a profound sport-style outro which tells the audience that we are ending on a high note.
The sub-section takes the opportunity to offer a step-by-step to edit a sport-style YouTube end screen. So, come with us as we explore it together! Let us go!
For Win 7 or later (64-bit)
For macOS 10.12 or later
Step 1: To begin, launch Wondershare. Import the targeted video clips that you need as an engaging YouTube outro. After that, click on “Split Screen.” Please choose your favorite split-screen design and drag it to the timeline.

Step 2: Use the imported videos to drag them on the preview window in the split-screen design as selected. You can adjust the scale and position through the mouse click. Now, drag and drop the video onto the timeline and trim it as needed.

Step 3: Head to the “Effects” tab and search for blur in the space bar. Drag and drop the square blur to the second part of the video. Adjust the blur intensity as required. Import another video and add it to the timeline.

Step 4: Insert dissolved transitions between the first two cuts to smooth the process. Now, it is time to add an avatar image. Import the profile picture to the timeline above the second track. Head to the utility category under the “Effects” tab and drag the “Image Mask” to the image on the timeline.

Step 5: Double click on it to alter the masking width so that the circle mask can fit on the image. Scale down the picture and set it to the center of the frame. Navigate to the “Elements” panel and pick the YouTube subscribe button. Drag it to the third track afterward.

Step 6: Place the location on the preview window as you need. Now, move to the social media category in the “Titles” to choose the perfect one and add it to the timeline above the last clip. The user is instructed to add a transition at the beginning of the clip. Rename the social media names of your sports channel, and you are done with the process.

Part 3: 3 Recommended Sites to Download Background Music for Exercise Videos
Sports background music is one of the significant ways to keep the audience motivated for sports and exercise. It helps enhance the subscribers’ multifold. Therefore, the importance of promising yoga background music cannot be neglected.
Mixkit
Mixkit is a renowned place to access royalty-free marketplaces, bringing revolution to the market and content creators. It is extremely workable to download background music for exercise in seconds. Based on genre, mood, and tag, you can search for a suitable music track.
The trap sport workout, motivating mornings, positive energy, super strong, and the greatest comeback is one of the most exemplary tracks from Mixkit. The audio can be listened to before making the decision. The genre offers ambient, cinematic, funk, hip-hop, acoustic, classical, and electronica.

TunePocket
Changing the narrative of music platforms, TunePocket pretty much takes the lead. The filter results make the process flawless. You can tailor the search results by playing with category, mood, genres, instruments, length, and tempo.
The duration of each sports background music is also mentioned to give the content creators an idea. Power dance workout, workout fitness motivation, summer western dance, young gamers, and sports power electro, and techno blast are some examples of outstanding music tracks.

Envato Elements
The next on the list is Envato Elements making wonders in the business. The search filters are refined as the user deems necessary. Online exercise, motivational EDM, fitness, workout, corporate meditation, and exercise are some amazing examples of royalty-free music. The search results can be tailored according to relevancy and popularity.

Concluding Remarks
There is an awful load of sports channels on YouTube. The content creators are trying their best to beat the competitors. It is crucial to access energetic background music for exercise to make intro and outro engaging.
The article recommended three apps to download sports background music. The step-by-step guide to creating an inspiring sports intro and editing sports style YouTube outro via Filmora.
Wondershare Filmora
Get started easily with Filmora’s powerful performance, intuitive interface, and countless effects!
Try It Free Try It Free Try It Free Learn More >

02 How to Edit a Sport Style YouTube Outro or End Screen?
03 3 Recommended Sites to Download Background Music for Exercise Videos
Part 1: How to Create an Epic Sports Intro?
Do you own a sports channel? Continue exploring the section to know more!
A sports channel needs a promising intro to keep the audience interested in the content. An exceptional intro to a sports channel with great music enables you to gain subscribers. The sub-section would cover an extensive procedure to make a startling sports intro with yoga background music or other sport. So, let us start? Shall we?
For Win 7 or later (64-bit)
For macOS 10.12 or later
Step 1: Open Wondershare Filmora from your computer. Now, head to the “Audio” panel to drop a powerful track to the timeline. Use the “Media” panel to import the sports video clips for your intro.
Step 2: Keep the highlights and trim the clips to be in sync with the music. After the editing is concluded, shift your focus to the “Titles.” Move to the Titles panel and use title animations for the “Energy Sports” pack.
Step 3: Drag and drop the titles on the top of the footage. It would be best to match the duration of the video clips with the titles. Now, double-click the title to rename it according to your need.
Step 4: To make the ending more powerful, right-click on the last video clip and click on “Speed and Duration.” Enhance the speed to make it engaging. Moving on, navigate to the “Effects” panel.
Step 5: From there, pick the “Shake” filter and drag and drop the “Chaos 1” to the last clip. Similarly, click on the “Distortion” filter to drop the “Chromatic Aberration” effect onto the last clip.
Step 6: Now, it is time to add transitions to create a smooth connection between the clips. Click on “Transitions” and then “Energy Sports” pack. Drag and drop both transitions in between the clips. A creative and captivating sports intro has been created with solid sports background music.
Part 2: How to Edit a Sport Style YouTube Outro or End Screen?
Communicating with the users about a channel doesn’t have to be with words. The background music for exercise expresses the aims of a channel more perfectly. The same goes for a profound sport-style outro which tells the audience that we are ending on a high note.
The sub-section takes the opportunity to offer a step-by-step to edit a sport-style YouTube end screen. So, come with us as we explore it together! Let us go!
For Win 7 or later (64-bit)
For macOS 10.12 or later
Step 1: To begin, launch Wondershare. Import the targeted video clips that you need as an engaging YouTube outro. After that, click on “Split Screen.” Please choose your favorite split-screen design and drag it to the timeline.
Step 2: Use the imported videos to drag them on the preview window in the split-screen design as selected. You can adjust the scale and position through the mouse click. Now, drag and drop the video onto the timeline and trim it as needed.
Step 3: Head to the “Effects” tab and search for blur in the space bar. Drag and drop the square blur to the second part of the video. Adjust the blur intensity as required. Import another video and add it to the timeline.
Step 4: Insert dissolved transitions between the first two cuts to smooth the process. Now, it is time to add an avatar image. Import the profile picture to the timeline above the second track. Head to the utility category under the “Effects” tab and drag the “Image Mask” to the image on the timeline.
Step 5: Double click on it to alter the masking width so that the circle mask can fit on the image. Scale down the picture and set it to the center of the frame. Navigate to the “Elements” panel and pick the YouTube subscribe button. Drag it to the third track afterward.
Step 6: Place the location on the preview window as you need. Now, move to the social media category in the “Titles” to choose the perfect one and add it to the timeline above the last clip. The user is instructed to add a transition at the beginning of the clip. Rename the social media names of your sports channel, and you are done with the process.
Part 3: 3 Recommended Sites to Download Background Music for Exercise Videos
Sports background music is one of the significant ways to keep the audience motivated for sports and exercise. It helps enhance the subscribers’ multifold. Therefore, the importance of promising yoga background music cannot be neglected.
Mixkit
Mixkit is a renowned place to access royalty-free marketplaces, bringing revolution to the market and content creators. It is extremely workable to download background music for exercise in seconds. Based on genre, mood, and tag, you can search for a suitable music track.
The trap sport workout, motivating mornings, positive energy, super strong, and the greatest comeback is one of the most exemplary tracks from Mixkit. The audio can be listened to before making the decision. The genre offers ambient, cinematic, funk, hip-hop, acoustic, classical, and electronica.
TunePocket
Changing the narrative of music platforms, TunePocket pretty much takes the lead. The filter results make the process flawless. You can tailor the search results by playing with category, mood, genres, instruments, length, and tempo.
The duration of each sports background music is also mentioned to give the content creators an idea. Power dance workout, workout fitness motivation, summer western dance, young gamers, and sports power electro, and techno blast are some examples of outstanding music tracks.
Envato Elements
The next on the list is Envato Elements making wonders in the business. The search filters are refined as the user deems necessary. Online exercise, motivational EDM, fitness, workout, corporate meditation, and exercise are some amazing examples of royalty-free music. The search results can be tailored according to relevancy and popularity.
Concluding Remarks
There is an awful load of sports channels on YouTube. The content creators are trying their best to beat the competitors. It is crucial to access energetic background music for exercise to make intro and outro engaging.
The article recommended three apps to download sports background music. The step-by-step guide to creating an inspiring sports intro and editing sports style YouTube outro via Filmora.
Wondershare Filmora
Get started easily with Filmora’s powerful performance, intuitive interface, and countless effects!
Try It Free Try It Free Try It Free Learn More >
How to Create Intro with Renderforest
When individuals hear about free online items, they frequently associate them with being of poor quality, ineffective, or unreliable. Renderforest, on the other hand, is an exception. This can be precisely what you need if you’re seeking a cheap—or even free—high-quality online video editing platform. The service offers both freemium and premium solutions. The more expensive solutions provide the most flexibility.
What is Renderforest?
A free online tool for making animated videos and slideshows is Renderforest. The web platform makes it simple, quick, and affordable for organizations and individuals to produce slideshows, explainer and promotional business movies, logo animations, and much more.
The online video creation platform Renderforest enables people and companies to produce “broadcast grade” videos for personal or professional usage. Anyone may register as a user in just a few easy steps, and using it is free.
Users can produce an infinite number of high-quality videos, export them, and then share them online or on social media.
The web platform already provides various tailor-made options for blog animations, wedding and photo slideshows, instructional films, and video invites for personal use.
Additionally, the platform offers simple-to-use alternatives for company presentations, invites to events, promotional films, kinetic typography, explainer videos, testimonials, and more.
Renderforest’s Primary Attributes include:
- Videos of high quality
- A sizable collection of animation templates and storylines
- Access to more than 195,000 Royalty-free stock footage clips with an intuitive online movie editor
- One-click video publishing to YouTube channels or Facebook pages
- A music library with commercial licenses for use in making videos
Added characteristics:
- A voiceover generator for text
- Create an infinite number of color schemes
- Countless font uploads
- Obtainable 1,000,000+ premium video templates
- Including a custom watermark
- A reseller’s permit
- Working in teams
How it Works
Choose a video template from their selection by browsing. Once you register, you can utilize any of the hundreds of editable templates that they have available.
You will be presented with various categories when you choose video templates, from promotional templates to logo animation templates to slide displays and everything in between.
You may freely post high-quality photographs, audio, and voice-over, an incredibly fantastic feature. The ability to share their tales in a way that customers can relate to is given to business owners by this.
After you’ve finished editing, the video must render for a while before it’s prepared for publishing. Click the edit button if you want to make some changes to the video or are unsatisfied with it. The video can be edited as many times as you like.
Users can directly post their videos on social media platforms, including Facebook, Twitter, Google+, Pinterest, and Instagram, through the website.
Renderforest maintains all your projects on your dashboard for as long as you use the service, so you don’t have to fear that you’ll lose your work..
Pricing
Regarding costs, Renderforest provides four different kinds of subscription options. The Free, Amateur, Pro, and Business plans are among them. The Free program makes a fantastic study aid. It’s possible to take your time with it, hone your talents, and upgrade to the paid plans after becoming familiar with the platform.
Regarding the free plan, you may watch and share your films on social media but not download them. You must utilize one of the paying subscriptions to download your videos. Choose the Business package if you don’t want Renderforest’s watermark to appear on your video. If you select monthly billing, it will cost you $149.99 per month or $49.99 per year.
If you want to take your company to the next level with distinctive videos, think about selecting one of the expertly produced video production packages. The starting package, which starts at $699, is the least priced.
Tutorial on How to Create an Intro Using Renderforest
Professional video creators are likely aware that starting a video without a suitable introduction is equivalent to sneaking into someone’s house without permission. A good intro is a doorbell to let people know you’ve arrived.
A strong introduction ensures that more people will view your film. Adults have an attention span of about 12 seconds, according to studies from 2000. It is now only 8 seconds. You have 8 seconds to entice viewers to watch your video, so don’t waste it. A captivating introduction will give your content a professional touch and pique your audience’s interest. This task is worthwhile if you want to advertise your videos successfully.
These days, you don’t necessarily need to hire a pro to make a film if you need one. The majority of the available tools are free. We’ll demonstrate in this lesson how to use Renderforest to create a polished video intro. Our intro maker will let you start strong, whether for a fun birthday video or commercial use.
When you’re prepared to begin producing your videos, go to Renderforest, register for an account, or sign in if you already have one.
Check out the vast selection of templates under “Intros and logos“ in the “Create Video“ section of the navigation menu. Here, you can select the intro you like most and begin altering it, or use our advanced search filters to locate the specific content you require.

We’ll use the “Swift Glitch Logo“ template for this tutorial, enabling you to present your logo with glitch effects. This template may produce intro and outro movies for presentations, your YouTube channel, lobby backgrounds, and other uses.
Select your preferred template and click the “Create now“ button to start.
![]()
Your logo should now be uploaded with a transparent background (PNG). You can upload it in one of three ways: using an image URL directly from your device or selecting an existing file from your “Media library.” If you don’t already have one, you may make one right away using our logo maker tool, which is also accessible in the editor.

Write your company’s name, tagline, or other brief words in the text field once you’ve added your logo. To save the changes, don’t forget to click “Save and close.”
You can select the overall design of your logo and the preferred font style in the “Style” section.

Select your preferred color scheme in the “Color“ section now. You can choose between two color schemes made by our design team and manually selectable custom colors in this section.
Go to the “Music“ area to select a song for your intro. You can add one or pick from our “Music collection.” You can record a voice-over in the editor or upload one for your introduction.
Well done! Let’s check out your introduction in the “Preview“ area now. Click “Free preview“ to check your video and ensure you like the outcome. Click back and tweak the introduction if you need to make any adjustments.
Instantly create professional introduction videos in your browser! Utilize our intro maker, and let its unique touch set your videos apart from the competition.
Enjoy making videos with Renderforest, where your imagination is the only restriction.
Renderforest Pros & Cons
This section is for you if you need to learn quickly about Renderforest’s advantages and disadvantages and are short on time. We’ve studied all the relevant reviews available and created a list of advantages and disadvantages for you to consider.
To determine if this is the best product for your company’s needs, look over these Renderforest advantages and disadvantages.
Pros
- Many lovely and contemporary templates
- a 4K video export feature
- 5-in-1 solution
- use is limitless for all services
- Quick and friendly client support
Cons
- With free version, watermark
- Only paying customers have access to font modification
- Costly single-project packages
- Free high-quality video preview unavailable
- a few templates allow for limited customisation
Competition to Renderforest
Animoto and PowToon are a couple of the site’s main rivals. These are excellent online video editing tools, but Renderforest stands out because it is simple to use and enables even novice users to create, share quickly, and download “broadcast grade videos.”
Renderforest vs PowToon
One of the most popular Renderforest Video alternatives available is PowToon. It’s challenging to decide which of these two platforms is superior because they are the best on the market. What you want as a business owner ultimately determines everything.
PowToon is a similar business that focuses on corporate videos but doesn’t provide the extra things Renderforest delivers (logo maker, graphic design, mockups, website builder). Pro customers pay $89 per month ($20 if invoiced annually), which is significantly more expensive than the alternative. Fortunately, they offer a complimentary bundle so you can sample the goods.
PowToon offers many more customizing choices than Renderforest because it is a video-based platform, but it will cost you.
Renderforest is a more cost-effective option if you need a range of services for your small business. PowToon is a better option for more prominent firms seeking a professional video creation platform.
Currently, some internet video services might be pricey and time-consuming to use. Renderforest will be welcomed by many small businesses looking for an economical and user-friendly online video editing platform.
Renderforest combines the top tools under a single subscription bundle in terms of features. In the end, you can manage your website, branding, and marketing visual production for less than $25 per month.
Fortunately, you don’t have to believe us. You may experience all the main advantages of Renderforest yourself by giving it a try. Check out the pros and drawbacks list in our Renderforest review if you need more assistance.
Free Download For Win 7 or later(64-bit)
Free Download For macOS 10.14 or later
Top 7 Easy Ways to Convert a Video to a GIF Online
Looking for the best video to gif online conversion tools? No worries, as we have done all the research work and have shortlisted the best tools that can assist you with the task. GIF is short and cute animated files that help in interestingly conveying a message. These short-animated visuals help in reaching and creating an impact on the target audience. So, if you have some videos, GIF animations can be created from them using a good converter tool which can be an online program or system software.
Online programs are preferred by the users owing to their simple and hassle-free use, support for basic features, and cost-saving options. So, here in this topic, we will discuss the top and easy ways to convert video to GIF online.

Part 1: Top 7 Easy Ways to Convert a Video to a GIF Online
Several online tools can be used for converting a video file into GIF, but all do not stand up to the tall claims it makes. So, if you are in search of an easy yet effective tool, shortlisted below are the top 7 tools for video into GIF online conversion.
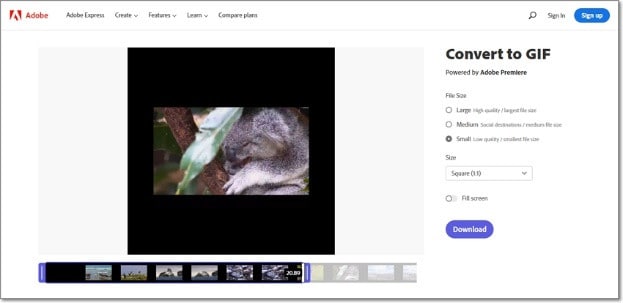
1. Adobe Express
Powered by Adobe Premiere, this is an excellent online tool that allows converting videos in all key formats in GIF format. The free version allows adding videos for up to 1 hour and the processed files can be downloaded to the local system.
Key features
- Video files in all key formats can be converted to GIF.
- Allows selecting the aspect ratio and the file size of the target file.
- This video to GIF converter online tool support drag and drop feature.
- Allows trimming the video so that the file portion can be selected.
Pros:
- Simple and clean interface.
- Quick file processing.
- Allows selecting aspect ratio and file size.
Cons:
- Only one file at a time can be processed.
- Only desktop files can be added.
- To download the file, you need to free sign-up.
User Review:
A good online multi-platform service that works with interesting features. -TechRadar
This is one of the best programs that comes packed with wide range of features that can assist you in getting the target customized files.
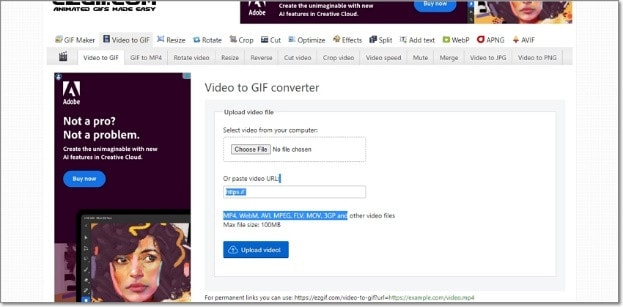
2. Ezgif
Using this browser-based tool, local as well as online videos in key formats can be converted to GIFs. The interface is simple where you just need to add the file and the conversion will be done automatically.
Key features
- GIF can be created from the local and online video files in all key formats.
- Choose the video part for creating the GIF file else by default, the first 5 seconds of the video are used.
Pros:
- All popular video formats like MP4, MPEG, FLV, MOV, and others are supported for conversion to GIF.
- Local, as well as file links in case of online files, can be added.
- Allows selecting the video part for which the GIF has to be created.
- Allows choosing the frame rate, and the size of the video.
This online GIF converter has an option to set static background.
Cons:
- File size limitation of 100 MB.
- Internet dependency.
User Review
“A website with many important and good tools that facilitates making your task easier. You get all features in one place. -Sasa011, Mywot.
This simple online tool is a pocket friendly option for converting your videos into GIF with added option for editing them. Supporting all key formats, the program supports additional tools as well.
3. Img2Go
Your videos on the system, cloud storage, as well as using URLs can be added to this online tool for conversion to GIF format. The look and the quality of GIFs can be adjusted by making changes in the file parameters.

Key features
- Convert all key video files like MP4, MOV, MPEG, and others to GIF.
- Customize the GIF look by editing the file size and applying the color filter.
- This online video to GIF converter allows to choose to enhance, sharpen, equalize, and edit files in other ways.
- Files to be converted can be added from the desktop, Google Drive, Dropbox, as well as URL.
- Processed files can be saved to the cloud storage in addition to the local system.
Pros:
- Multiple sources to add the video file.
- Customize the file parameters and enhance its look.
- Converted file is downloaded automatically to the local system.
Cons:
- Free version allows converting only 3 files at a time.
- Dependency on internet connectivity.
User review:
“This is the best online converter app I have discovered. It is really easy and fast to use. I absolutely recommend it and it really works.”-Maria Ancil, ChromeStats
When you need to convert only a few files at a time in a hassle-free manner consider this simple online tool. After the conversion is done, you would not have any hassles of file downloading as it is automatically saved to the system.
4. CloudConvert
Convert your videos in MP4, FLV, WebM, and other key formats to GIF using this browser-based tool that is simple and free to use. Multiple file parameters can be changed using the tool to get the desired file.

Key Features:
- Allows converting all key video formats.
- Files to be converted can be added from the desktop, URL, Dropbox, Google Drive, and OneDrive.
- Allows adjusting the fit, codec, resolution, aspect ratio, and fps.
- Option to trim the file and also add a watermark.
Pros:
- Files to be converted can be added from multiple sources.
- All key video formats supported.
- Option to control the video size, quality, and aspect ratio.
Cons:
- Free version allows only 25 conversions per day.
- Converted files need to be downloaded.
User Review
“Instant way of converting small-sized files online in many different formats.”
-Sushil, SoftwareAdvice
When conversion of cloud-based files is needed, this works a good online tool that also allows you to edit and change the key file parameters.
5. io
This is a free browser-based tool that allows creating of animated GIF files from videos. There are several video editing options also supported by the tool like split, cut, adding text, and more. You can even add a YouTube video or its link to create a GIF.

Key features:
- Free online tool for creating a GIF file.
- Support all key video formats like MP4, MOV, FLV, and others.
- Local, YouTube as well as videos from Dropbox can be added.
- Option to record the video and create its GIF.
- ‘Allows choosing the size, duration, background color, and several other file parameters.
Pros:
- Videos from multiple sources can be added.
- YouTube videos can also be converted to GIFs.
- Option to record the video and create its GIF.
- Support multiple video editing options.
Cons:
- Slow processing speed.
- Files processed through the free version have a watermark.
- Free version allows processing files under 10 minutes and of 250Mb in size.
User Review:
“It is just a perfect tool and easy to use. It supports a wide variety of media files.” - Koi, Trustpilot.
Option to convert the YouTube videos as well as the recorded videos make this tool different from the others. All popular file formats are supported and you can even customize and change the file parameters as per your requirements.
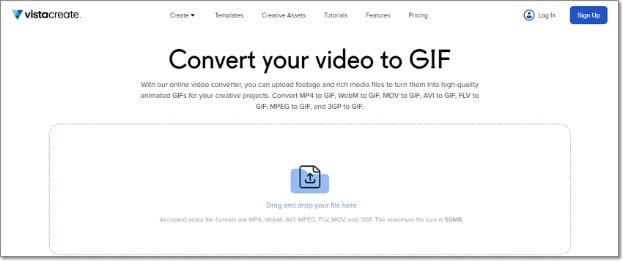
6. VistaCreate
This is another simple-to-use tool that allows converting all key video formats to a GIF file. The program allows setting various parameters as needed.
Key Features
- Convert MP4, WebM, AVI, MPEG, FLV, MOV, and 3GP to GIF.
- Support Drag and Drop feature.
- Videos up to 50MB can be processed.
- Allows choosing the video start and the end time for which GIF is to be created. If no time is selected, the first 5 seconds of the video are used.
Pros:
- Simple user interface.
- Allows selecting the video part for which GIF is to be created.
- Choose the frame rate and the speed.
Cons:
- Limited format support.
- Free version has a limitation of 50Mb file size.
- Processing speed is slow.
User Review:
“It is a simple and fast online tool that works. The program allows creating eye-catchy visuals and is free to use.”-Kshitij T, G2. Com
Simple to use, this online tool is apt when you need selected parts of the video for creating a GIF. Though it is compatible with a few selected formats, the process of conversion is simple.
7. XConvert
This online tool support conversion of wide range of file types and formats including videos to GIF. The supported video formats are MP4, WebM, MOV, and MKV. The tool also allows changing the target file parameters.

Key Features
- Free to use online tool with a simple interface.
- Allows converting MO4, MOV, WebM, and MKV videos to GIF.
- Frame Rate and resolution of the target GIF file can be selected.
- Allows adding local as well as files saved to the cloud storage.
Pros:
- Add videos from the desktop, Google Drive, and Dropbox.
- Choose the desired frame rate and resolution.
- Option to save the processed file to the system or Dropbox. Option to get the converted file download link.
Cons:
- Limited file support.
- Converted files need to be downloaded.
- Internet dependency.
User Review:
Portable, nice UI, cross-platform tool and has a lot of actions and run fast. -Roflpancake, Alternativeto
When simple conversion with basic file editing is needed, consider this online tool for your task. In addition to the local system, you can even save the files to your cloud storage.
Part 2: Comparison Table of the Best Video to GIF Converters
The table below compares the above 7 listed tools based on the formats supports, speed of file processing, and the watermark on the processed files.
| Features/Tool | Supported Format | Free Version with watermark or not | Speed of conversion |
|---|---|---|---|
| Adobe Express | All key video formats | No watermark | 2 (Fast) |
| Ezgif | All key formats including MP4, MPEG, FLV, MOV, and others. | No watermark. | 4 (Slow) |
| Img2Go | MP4, FLV, MOV, and all key video formats. | No Watermark | 2 (Fast) |
| CloudConvert | All popular video formats including MP4, MOV, FLV, MPEG, and more. | No Watermark | 2(Fast) |
| Veed.io | All key formats | Yes, free version has a watermark. | 5 (very Slow) |
| VistaCreate | MP4, WebM, AVI, MPEG, FLV, MOV, and 3GP. | No watermark | 5 (Very Slow) |
| XConvert | MP4, WebM, MOV, MKV. | No watermark | 3 (Average) |
Part 3: Best Solution to Convert Video to GIF on Windows/Mac
To convert videos to GIF on your Windows and Mac without worrying about any limitations or internet dependency, desktop software works as the best option. If you too have been looking for one such desktop program, we recommend Filmora Video Editor as the best choice. Though the software is used majorly for advanced video editing options, it is capable of performing a variety of other tasks as well including video to GIF conversion. The software allows file conversion through its export feature.
For Win 7 or later (64-bit)
For macOS 10.14 or later
Key Features
- Almost all video formats like MOV, MP4, MKV, FLV, and others can be converted to GIF.
- High-quality conversion at a fast speed.
- Support batch processing so that multiple files can be processed at a time.
- Allows editing and customizing videos using the built-in features of the software like effects, subtitles, crop, cut, and more.
Pros:
- The interface is simple which makes the software suitable even for beginners.
- Almost all popular video formats are supported.
- High-quality conversion in a hassle-free manner.
- Windows and Mac support.
Cons:
- Being a desktop software, it needs download and installation.
- Need to purchase the software subscription.
Steps to convert videos to GIF using Wondershare Filmora
Step 1. Launch the installed software on your system and the main interface select Create Project > New Project.

Step 2. Click on Import Media Files Here option under the Media tab to browse and add the local video file. Multiple files for batch processing can be added here.

Step 3. After the files are added, now it’s time to move them to the time and for this, you can simply drag and drop them to the bottom. Now at the timeline, using the built-in editing features, customization can be done as required.

Step 4. Finally, tap on the Export button and then choose GIF as the desired target format and also the location to save the converted files.

Conclusion
If one of the above-listed online tools serves your videos for GIF conversion purposes, it’s great. If not, you can use the Wondershare Filmora software. Once downloaded, the software can be used for several editing and other video-related tasks.
For macOS 10.14 or later
Key Features
- Almost all video formats like MOV, MP4, MKV, FLV, and others can be converted to GIF.
- High-quality conversion at a fast speed.
- Support batch processing so that multiple files can be processed at a time.
- Allows editing and customizing videos using the built-in features of the software like effects, subtitles, crop, cut, and more.
Pros:
- The interface is simple which makes the software suitable even for beginners.
- Almost all popular video formats are supported.
- High-quality conversion in a hassle-free manner.
- Windows and Mac support.
Cons:
- Being a desktop software, it needs download and installation.
- Need to purchase the software subscription.
Steps to convert videos to GIF using Wondershare Filmora
Step 1. Launch the installed software on your system and the main interface select Create Project > New Project.
Step 2. Click on Import Media Files Here option under the Media tab to browse and add the local video file. Multiple files for batch processing can be added here.
Step 3. After the files are added, now it’s time to move them to the time and for this, you can simply drag and drop them to the bottom. Now at the timeline, using the built-in editing features, customization can be done as required.
Step 4. Finally, tap on the Export button and then choose GIF as the desired target format and also the location to save the converted files.
Conclusion
If one of the above-listed online tools serves your videos for GIF conversion purposes, it’s great. If not, you can use the Wondershare Filmora software. Once downloaded, the software can be used for several editing and other video-related tasks.
Speed Control Is Frequently Used in Video Editing. By Speed up or Slow Down the Video Speed, You Can Achieve Different Visual Results. This Article Will Show You How to Control the Speed of a Video
Speed doesn’t course at the same level for everyone. You can change momentum. You can slow it down and speed it up to convey a particular mood. In this article, you will learn how and when to control the speed of the video and its importance.
Importance of Speeding up/Slowing Down Your video?
Speeding up or slowing it down, known as slow or fast motion, can make your video faster or slower than its actual speed, called speed ramping. Overall, adjusting the speed of video clips can enhance the video’s visual effects, especially if you want to convey a particular mood to the audience. Speeding up your video may create a comical and dramatic impact, while slowing down your video can give viewers a time-lapse feel or an emotional mood.
This video speed controlling software can instantly speed up video up to 50x times. On the contrary, you can also slow down the video up to 0.1x, which means a one-minute video will run for 10 minutes.
How important is this Feature? The technique plays an essential role in adjusting the video’s speed. You will appreciate this technique once you’ve started editing your video. At first, controlling the speed of your video without music will give you a plain or bare impression. Based on my experience, I cannot quickly identify which video part needs to control the speed. Still, once you’ve added music at the start, you can quickly determine when and where you should maintain the momentum based on the beat of the music.
How to Speed up/Slow down a Video?
Nowadays, most video editing software offers an effortless way of giving special cinematic effects through speed ramping? Speed ramping is an approach to adjusting the clip’s speed to send the message across and provide the audience with an element of confusion. Since speed ramp is a gradual increase in the acceleration or deceleration of a video clip, reasons to slow down or speed up video vary from merely decorative to practical, but whatever your reasons, speed effects can add some production value to your projects.
This article gives you a guide on how to slow down or speed up video on your video editing software, for example, using Wondershare Filmora on your device.
In this tutorial, you will learn how to change the speed of your video using Wondershare Filmora
Free Download For Win 7 or later(64-bit)
Free Download For macOS 10.14 or later
Step1 Open your Video editing software
Launch Wondershare Filmora from your system and select New Project.

Import the selected videos and open them in the program to enhance the speed and duration of the video. The video can also be dragged and dropped to the interface.

Drag the selected video clip on Timeline Panel. You can click the + button or drag the video.
Step2 Change the Speed of your video
In Wondershare Filmora there are two available features you can use, first is using the Uniform Speed Feature.
Uniform Speed - Uniform Speed feature in Filmora is used to change the speed of your video or audio clips. Compared to Speed Ramping function, Uniform speed will change the whole clip’s speed evenly, instead of parts of your clips. How to use this Feature?
Using the Uniform Speed
- After adding the video on your timeline, drag the play head line and choose where will the uniform speed start.

- Right-click on the video or audio clip, or go to Speed>Uniform Speed then choose Uniform Speed.

- Uniform Speed window will pop up then adjust the slider to your desired speed. Click ok once you’re done.

- You can observe that the video from where you set your playback has indicator of how fast does the video will play which is 6.50x.

- You can also revert back or customize the set Uniform Speed by clicking the arrow down on the Uniform Speed Indicator or click the Speed button on the left side of the screen. There are also options whether you want to set the speed to slow, fast and normal.

Speed ramping - In Filmora, you can choose to change speed uniformly or speedily. To change the rate of the video or audio clip speed, you need to use the Filmora Speed Ramping feature.
In the Speed Ramping panel, you can customize the speed or select the speed preset such as Montage, Hero Moment, Bullet Time, Jumper, Flash in, and Flash out. You can choose the Preset speed ramps.
Evenly change the speed of the video clip to match another clip. Much software available will give you the option to speed ramp.
The importance of speed controls Having control over the speed of your motors and machinery is vital for you to get the full potential of your tools. Giving yourself complete speed control will ensure you experience little to no tool chatter and a perfect machined finish every time.
Playing with speed controls can help displeasure interest and guide focus when editing your video. You might have used slow motion to overemphasize a scene, or maybe you’ve sped up a clip to create a time-lapse—but have you tried to speed ramping?

If you want to add cinematic to your video. The speed ramp effect describes a smooth transition between speeds, resulting in a video that dips in and out of slow-mo. and high-speed playback. You can ramp up, down, or do a mix of both for multiple speed adjustments throughout a video!
Visualize you’re trying to bring a simple pan shot of a product to life, energize the transitions in your latest travel video, emphasize the beat drop in a music video, or keep eyes affix to your content.
Speed ramping can give your video. style. It can help you do anything from excitement up B-roll to infuse otherwise unremarkable footage with personality.
Proper timing and speed make videos more useful and spectacular. You can enable slow motion to add enthusiasm to dramatics or speed up a video to spur the action. No matter your idea, you can fulfill it with some video editing software.
Free Download For Win 7 or later(64-bit)
Free Download For macOS 10.14 or later
Free Download For macOS 10.14 or later
Step1 Open your Video editing software
Launch Wondershare Filmora from your system and select New Project.
Import the selected videos and open them in the program to enhance the speed and duration of the video. The video can also be dragged and dropped to the interface.
Drag the selected video clip on Timeline Panel. You can click the + button or drag the video.
Step2 Change the Speed of your video
In Wondershare Filmora there are two available features you can use, first is using the Uniform Speed Feature.
Uniform Speed - Uniform Speed feature in Filmora is used to change the speed of your video or audio clips. Compared to Speed Ramping function, Uniform speed will change the whole clip’s speed evenly, instead of parts of your clips. How to use this Feature?
Using the Uniform Speed
- After adding the video on your timeline, drag the play head line and choose where will the uniform speed start.
- Right-click on the video or audio clip, or go to Speed>Uniform Speed then choose Uniform Speed.
- Uniform Speed window will pop up then adjust the slider to your desired speed. Click ok once you’re done.
- You can observe that the video from where you set your playback has indicator of how fast does the video will play which is 6.50x.
- You can also revert back or customize the set Uniform Speed by clicking the arrow down on the Uniform Speed Indicator or click the Speed button on the left side of the screen. There are also options whether you want to set the speed to slow, fast and normal.
Speed ramping - In Filmora, you can choose to change speed uniformly or speedily. To change the rate of the video or audio clip speed, you need to use the Filmora Speed Ramping feature.
In the Speed Ramping panel, you can customize the speed or select the speed preset such as Montage, Hero Moment, Bullet Time, Jumper, Flash in, and Flash out. You can choose the Preset speed ramps.
Evenly change the speed of the video clip to match another clip. Much software available will give you the option to speed ramp.
The importance of speed controls Having control over the speed of your motors and machinery is vital for you to get the full potential of your tools. Giving yourself complete speed control will ensure you experience little to no tool chatter and a perfect machined finish every time.
Playing with speed controls can help displeasure interest and guide focus when editing your video. You might have used slow motion to overemphasize a scene, or maybe you’ve sped up a clip to create a time-lapse—but have you tried to speed ramping?
If you want to add cinematic to your video. The speed ramp effect describes a smooth transition between speeds, resulting in a video that dips in and out of slow-mo. and high-speed playback. You can ramp up, down, or do a mix of both for multiple speed adjustments throughout a video!
Visualize you’re trying to bring a simple pan shot of a product to life, energize the transitions in your latest travel video, emphasize the beat drop in a music video, or keep eyes affix to your content.
Speed ramping can give your video. style. It can help you do anything from excitement up B-roll to infuse otherwise unremarkable footage with personality.
Proper timing and speed make videos more useful and spectacular. You can enable slow motion to add enthusiasm to dramatics or speed up a video to spur the action. No matter your idea, you can fulfill it with some video editing software.
Free Download For Win 7 or later(64-bit)
Free Download For macOS 10.14 or later
Also read:
- New In 2024, List of Whatsapp Video Format That You May Need to Know
- 2024 Approved Start Making Procreate GIFs and Take Your Editing Creativity to the Next Level
- New In 2024, This Article Talks in Detail About How to Edit Videos with Windows Movie Maker 10, How to Download or Install It, and so On. It Further Involves the Use of an Alternative to This Tool. Check Out Now
- 5 Ways to Make a Fake Facetime Call Video for 2024
- New In 2024, Do You Want to Use a Professional Tool to Add Subtitles? Read This Article to Discover the Best Reliable Tool to Create Subtitles in Your Desired Manner
- In 2024, Best Ever Ways Make Tiktok Slideshow Solved
- In 2024, Best GIF to AVI Converters (Online + Software Solutions)
- 2024 Approved Multi Object Tracking The Ultimate Guide
- New How To Trim Video In Premiere Pro in Different Ways
- New How to Enable and Use OBS Zoom Camera
- YouTube Lives Are Very Popular Nowadays and People Can Interact with the Anchor at Real Time. If You Want to Comment on a YouTube Live Chat, You Can Follow the Guide Below for 2024
- Updated In 2024, Step by Step to Rotate Videos Using OBS
- 2024 Approved How to Loop Video in Canva
- 2024 Approved Powerpoint Supported Video Format and Advanced User Tips
- New Easy Steps to Add Miniature Effect to Videos for 2024
- Updated Bandicut Video Editor Download and Review for 2024
- New In 2024, How to Create a Freeze Frame Sequence Effect
- Record Slow Motion Videos With Phantom Slow-Mo Camera
- Updated In 2024, Any Video May Be Enhanced Using Adobe Premiere Transitions. If You Are Looking to Learn How to Add Fade to Black in Premiere Pro? Then, Check Out This Fade to Black Transition Premiere Pro Guide to Learn the Trick
- 4K Videos Are the in Thing because of Their Flexibility and High Resolution. Stick Around to Learn How to Choose the Best Frame Rate for 4K Videos
- Updated How Can You Import and Adjust the Video Clips on Wondershare Filmora for 2024
- New 2024 Approved How to Create a Special Animated Transition in Filmora in Just 2 Minutes. This Simple Step-by-Step Guide Will Show You the Easy Way
- Updated 2024 Approved Zoom In and Out on Discord (Desktop + App + Browser Solutions)
- New 7 Tips to Create Teaching Videos
- Updated 2024 Approved Create a Stunning Light Sweep Effect in Filmora. Use Simple and Easy Steps to Export a High-Quality Video that Will Impress Even Pro Video Editors
- New In 2024, Having Issues Trying to View SRT Files when You Add Subtitle Files for VLC? Learn the Right Ways to Do so and the Best Alternative Solution
- Repeated Text Animation Tutorial in Filmora for 2024
- Updated In 2024, Do You Want a LUT that You Can Use for Your High-Definition Content? You Can Use Rec 709 LUT Premiere Pro for Your HD Digital Media to Give the Perfect Result
- Updated Wondering How to Rotate a Video in Windows at Any Desired Angle and Save It Permanently? Find Out All the Different Ways to Rotate Videos Temporarily as Well as Permanently
- In 2024, Detailed Steps to Add Border to Video Using Premiere Pro
- Updated 2024 Approved Denoise a Video in Adobe Premiere Pro – Audio and Video Noise Removal
- New How to Do Masking in After Effects Alternative Provided for 2024
- In 2024, 15 Camera Shake Preset for Premiere Pro to Add Camera Shake with Simple Keyframes. Each Preset Is Editable with Easy Steps. Make Your Video Shocking and Impressive with These Camera Shake Effects
- 10 Best Audio Visualizers Windows, Mac, Android, iPhone & Online
- Simple and Effective Ways to Change Your Country on YouTube App Of your Oppo F23 5G | Dr.fone
- Will MOV files play on Motorola Edge 40 Neo ?
- Google Play Services Wont Update? 12 Fixes are Here on Oppo A58 4G | Dr.fone
- Updated 2024 Approved How to Make Photo 3D Cartoon Online
- How to Change Lock Screen Wallpaper on Xiaomi Redmi K70 Pro
- How to Unlock Your Apple iPhone X Passcode 4 Easy Methods (With or Without iTunes)
- In 2024, Top 10 Telegram Spy Tools On Realme Narzo 60 5G for Parents | Dr.fone
- Identify missing hardware drivers with Windows Device Manager on Windows 11/10
- Possible solutions to restore deleted music from Nokia C300
- App Wont Open on Your Motorola G24 Power? Here Are All Fixes | Dr.fone
- How to Unlock Samsung Galaxy A15 5G Phone without Any Data Loss
- In 2024, Your Account Has Been Disabled in the App Store and iTunes On Apple iPhone 6s?
- In 2024, How to Get and Use Pokemon Go Promo Codes On Apple iPhone 8 Plus | Dr.fone
- How to Transfer Text Messages from Poco M6 5G to New Phone | Dr.fone
- In 2024, How To Unlock The iPhone 11 SIM Lock 4 Easy Methods
- How to Soft Reset Motorola Edge+ (2023) phone? | Dr.fone
- 5 Quick Methods to Bypass Tecno Spark 20 Pro FRP
- In 2024, What You Want To Know About Two-Factor Authentication for iCloud On your Apple iPhone X
- Unlock iPhone 12 Pro Without Passcode Easily
- How to Track Realme V30T Location without Installing Software? | Dr.fone
- In 2024, How to Reset your Xiaomi Redmi 13C Lock Screen Password
- Ultimate Guide from Lava Blaze 2 5G FRP Bypass
- In 2024, How To Use Allshare Cast To Turn On Screen Mirroring On Infinix Hot 40i | Dr.fone
- Title: Updated In 2024, How to Create Sports Intro and Outro for YouTube Video?
- Author: Morgan
- Created at : 2024-04-24 01:05:47
- Updated at : 2024-04-25 01:05:47
- Link: https://ai-video-editing.techidaily.com/updated-in-2024-how-to-create-sports-intro-and-outro-for-youtube-video/
- License: This work is licensed under CC BY-NC-SA 4.0.
