:max_bytes(150000):strip_icc():format(webp)/operationcouldnotcomplete-95695abe458d4062a2c2f7e46e656b08.png)
Updated In 2024, How to Make Eye Zoom Transition Effect with Filmora

How to Make Eye Zoom Transition Effect with Filmora
What is an eye zoom transition effect? It’s a close-up video effect allowing viewers to transit to the next clip from the eye. This effect is commonly used by musicians and travel bloggers to give their videos a more cinematic feel. So, without wasting time, let’s learn how to create an eye zoom transition with Wondershare Filmora .
Free Download For Win 7 or later(64-bit)
Free Download For macOS 10.14 or later
Preparation:
First, you need to create a close-up eye video. Although you can do that with your digital camera, a standard smartphone should do it just fine. Just ask a friend or family member to use your phone’s rear camera to record your eye centered on the screen. Ensure that the eye is as close as possible and you don’t lose focus. The camera should be around 10cm away from your face. And lest I forget, the flash should be ON.

How to Create an Eye-zoom Transition
Step 1 Align the video clips on Filmora
After recording a close-up eye video, add it on Wondershare Filmora and duplicate it. Alternatively, you can add the video to the first and second tracks.

Step 2 Add a freeze frame to the video
Next, we want to add a freeze frame to the section where the eye opens fully. To do that, select the second video track and place the playhead where the eye is fully open. After that, right-click the video track, then choose the Add Freeze Frame option.

Now trim the first video track from where the freeze frame starts on the second video. Also, cut the second video track to leave only the freeze frame
Step 3 Add a masking effect to the eye
With the two video tracks ready, it’s time to apply a masking effect. Tap the Effect tab on the top menu bar and then find the Shape Mask under the utility section. Now drag and drop the effect to the freeze frame.

Double-click on the freeze frame clip to adjust the Shape Mask on the preview screen. Ensure the mask reveals the eye pupil only and check the Invert Mask box. Also, set the Feather number to 10.

Step 4 Add the transition video
Next, add the video you want to edit with an eye-zoom effect next to the first video track. Preview the video, and you’ll notice your new video playing inside the eye mask.
With that done, move the playhead to the start of the freeze frame video and double-click the video clip to launch the settings window. Click the Animation tab before clicking Customize to see the keyframe settings. Tap the Add button to add a keyframe. Then, add a few frames using the playhead before clicking Add. But because we’re zooming in, increase the scale to 160%. You can also add the rotation and position.

After setting the second keyframe, move the playhead to the right and add the third keyframe. This time, increase the scale number to 400%, as well as the rotation and position. Now preview the video, and you’ll notice the rotating eye-zoom effect.
Summary
There you go! That’s how to create an eye-zoom transition using Wondershare Filmora. Don’t forget to play around with this feature-rich video editor to unlock its full capabilities. Enjoy!
Free Download For macOS 10.14 or later
Preparation:
First, you need to create a close-up eye video. Although you can do that with your digital camera, a standard smartphone should do it just fine. Just ask a friend or family member to use your phone’s rear camera to record your eye centered on the screen. Ensure that the eye is as close as possible and you don’t lose focus. The camera should be around 10cm away from your face. And lest I forget, the flash should be ON.

How to Create an Eye-zoom Transition
Step 1 Align the video clips on Filmora
After recording a close-up eye video, add it on Wondershare Filmora and duplicate it. Alternatively, you can add the video to the first and second tracks.

Step 2 Add a freeze frame to the video
Next, we want to add a freeze frame to the section where the eye opens fully. To do that, select the second video track and place the playhead where the eye is fully open. After that, right-click the video track, then choose the Add Freeze Frame option.

Now trim the first video track from where the freeze frame starts on the second video. Also, cut the second video track to leave only the freeze frame
Step 3 Add a masking effect to the eye
With the two video tracks ready, it’s time to apply a masking effect. Tap the Effect tab on the top menu bar and then find the Shape Mask under the utility section. Now drag and drop the effect to the freeze frame.

Double-click on the freeze frame clip to adjust the Shape Mask on the preview screen. Ensure the mask reveals the eye pupil only and check the Invert Mask box. Also, set the Feather number to 10.

Step 4 Add the transition video
Next, add the video you want to edit with an eye-zoom effect next to the first video track. Preview the video, and you’ll notice your new video playing inside the eye mask.
With that done, move the playhead to the start of the freeze frame video and double-click the video clip to launch the settings window. Click the Animation tab before clicking Customize to see the keyframe settings. Tap the Add button to add a keyframe. Then, add a few frames using the playhead before clicking Add. But because we’re zooming in, increase the scale to 160%. You can also add the rotation and position.

After setting the second keyframe, move the playhead to the right and add the third keyframe. This time, increase the scale number to 400%, as well as the rotation and position. Now preview the video, and you’ll notice the rotating eye-zoom effect.
Summary
There you go! That’s how to create an eye-zoom transition using Wondershare Filmora. Don’t forget to play around with this feature-rich video editor to unlock its full capabilities. Enjoy!
Free Download For macOS 10.14 or later
Preparation:
First, you need to create a close-up eye video. Although you can do that with your digital camera, a standard smartphone should do it just fine. Just ask a friend or family member to use your phone’s rear camera to record your eye centered on the screen. Ensure that the eye is as close as possible and you don’t lose focus. The camera should be around 10cm away from your face. And lest I forget, the flash should be ON.

How to Create an Eye-zoom Transition
Step 1 Align the video clips on Filmora
After recording a close-up eye video, add it on Wondershare Filmora and duplicate it. Alternatively, you can add the video to the first and second tracks.

Step 2 Add a freeze frame to the video
Next, we want to add a freeze frame to the section where the eye opens fully. To do that, select the second video track and place the playhead where the eye is fully open. After that, right-click the video track, then choose the Add Freeze Frame option.

Now trim the first video track from where the freeze frame starts on the second video. Also, cut the second video track to leave only the freeze frame
Step 3 Add a masking effect to the eye
With the two video tracks ready, it’s time to apply a masking effect. Tap the Effect tab on the top menu bar and then find the Shape Mask under the utility section. Now drag and drop the effect to the freeze frame.

Double-click on the freeze frame clip to adjust the Shape Mask on the preview screen. Ensure the mask reveals the eye pupil only and check the Invert Mask box. Also, set the Feather number to 10.

Step 4 Add the transition video
Next, add the video you want to edit with an eye-zoom effect next to the first video track. Preview the video, and you’ll notice your new video playing inside the eye mask.
With that done, move the playhead to the start of the freeze frame video and double-click the video clip to launch the settings window. Click the Animation tab before clicking Customize to see the keyframe settings. Tap the Add button to add a keyframe. Then, add a few frames using the playhead before clicking Add. But because we’re zooming in, increase the scale to 160%. You can also add the rotation and position.

After setting the second keyframe, move the playhead to the right and add the third keyframe. This time, increase the scale number to 400%, as well as the rotation and position. Now preview the video, and you’ll notice the rotating eye-zoom effect.
Summary
There you go! That’s how to create an eye-zoom transition using Wondershare Filmora. Don’t forget to play around with this feature-rich video editor to unlock its full capabilities. Enjoy!
Free Download For macOS 10.14 or later
Preparation:
First, you need to create a close-up eye video. Although you can do that with your digital camera, a standard smartphone should do it just fine. Just ask a friend or family member to use your phone’s rear camera to record your eye centered on the screen. Ensure that the eye is as close as possible and you don’t lose focus. The camera should be around 10cm away from your face. And lest I forget, the flash should be ON.

How to Create an Eye-zoom Transition
Step 1 Align the video clips on Filmora
After recording a close-up eye video, add it on Wondershare Filmora and duplicate it. Alternatively, you can add the video to the first and second tracks.

Step 2 Add a freeze frame to the video
Next, we want to add a freeze frame to the section where the eye opens fully. To do that, select the second video track and place the playhead where the eye is fully open. After that, right-click the video track, then choose the Add Freeze Frame option.

Now trim the first video track from where the freeze frame starts on the second video. Also, cut the second video track to leave only the freeze frame
Step 3 Add a masking effect to the eye
With the two video tracks ready, it’s time to apply a masking effect. Tap the Effect tab on the top menu bar and then find the Shape Mask under the utility section. Now drag and drop the effect to the freeze frame.

Double-click on the freeze frame clip to adjust the Shape Mask on the preview screen. Ensure the mask reveals the eye pupil only and check the Invert Mask box. Also, set the Feather number to 10.

Step 4 Add the transition video
Next, add the video you want to edit with an eye-zoom effect next to the first video track. Preview the video, and you’ll notice your new video playing inside the eye mask.
With that done, move the playhead to the start of the freeze frame video and double-click the video clip to launch the settings window. Click the Animation tab before clicking Customize to see the keyframe settings. Tap the Add button to add a keyframe. Then, add a few frames using the playhead before clicking Add. But because we’re zooming in, increase the scale to 160%. You can also add the rotation and position.

After setting the second keyframe, move the playhead to the right and add the third keyframe. This time, increase the scale number to 400%, as well as the rotation and position. Now preview the video, and you’ll notice the rotating eye-zoom effect.
Summary
There you go! That’s how to create an eye-zoom transition using Wondershare Filmora. Don’t forget to play around with this feature-rich video editor to unlock its full capabilities. Enjoy!
REVIEW: What’s Best 10 Software to Make AI Upscaling Video
REVIEW: What’s Best 10 Software to Make AI Upscaling Video
An easy yet powerful editor
Numerous effects to choose from
Detailed tutorials provided by the official channel
AI Upscaling is often used to improve the video quality. Here are some of the methods to do AI video upscaling. Follow these methods to successfully enhance your video quality.
In this article
01 [What Is AI Upscaling? And Why AI Upscaling Is Significant?](#Part 1)
02 [How to Easily AI Upscale Video to 1080p or 4K?](#Part 2)
03 [Best 10 Software to Make AI Upscaling Video](#Part 3)
Part 1 What Is AI Upscaling? And Why AI Upscaling Is Significant?
The process of generating or creating additional pixels of an image or frame in a video is AI Upscaling. This has many good results on the final video output.
This is mainly done to raise the bit rate of the video and, therefore, slightly improve the visual quality of the video. This is also used to improve the picture quality of DVDs and other low-quality videos. It is done to support lower quality videos or pictures on higher resolution screens like TV. This kind of upscaling is mostly done in TVs automatically.
Part 2 How to Easily AI Upscale Video to 1080p or 4K?
The interesting part is that this upscaling is done by the higher resolution device itself. If you display a lower resolution video on a high-resolution TV, the TV will upscale the video quality of the lower resolution video. This process mainly happens by the displaying device itself. But you can try to upscale videos by yourself using this software, which will help you achieve the best results.
Part 3 Best 10 Software to Make AI Upscaling Video
There are numerous AI upscale video software on the internet. The software listed below is the best among the numerous software because of its extraordinary features and interface. The 10 best AI video upscaling software are:
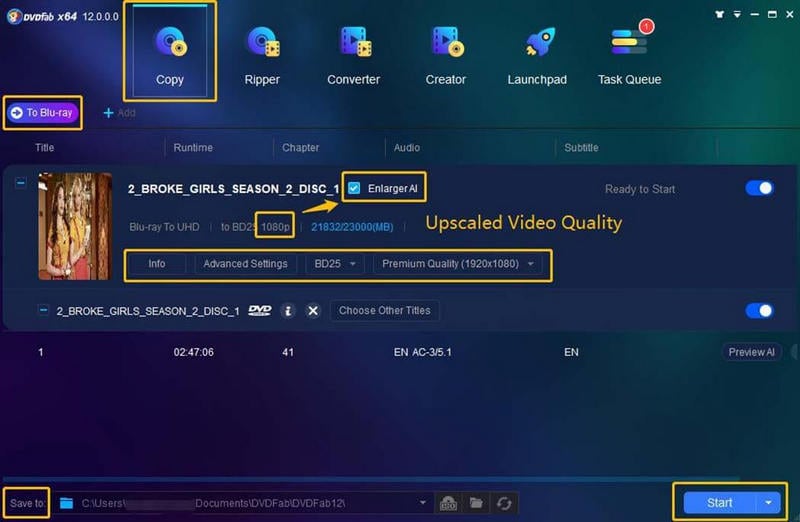
01DVDFab Enlarger AI
DVDFab Enlarger AI is an AI upscale video software published by Fengtao Software Limited. You can upscale any video you want to 4k. There are a few highlights of this software, and they are:
● This software is available onWindows.
● The price of the software ranges from $44.99 to $139.99
● You can use this software to rip videos from both DVDs and Blu-ray.
● You can save the output from the software in MP4 or MKV form.
● This software allows you to boost your fps up to 60.
Pros
Upscale your video to 4K resolution.
Boost your video to 60 fps.
Appropriate for beginners.
Cons
Available only on Windows.
Very Expensive.
No slow-motion is available.
02Video2X
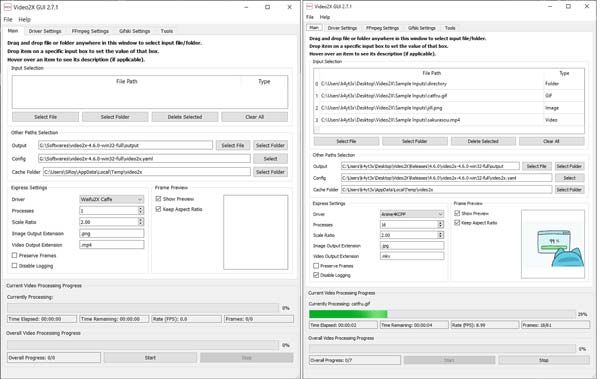
Video2X is popular ai video upscaling software that is developed by Open-source. It is quite popular among the professionals for various reasons like:
● Video2X is available exclusive to Windows.
● You can avail this software without paying any money.
● You can upscale old low-resolution videos.
● Upscale your videos to 4K.
● You can save the output from the software in MP4 or MKV form.
Pros
You can availthis software for free.
You can upscale GIFs.
You can decide your output format.
Cons
It is not beginner-friendly.
No slow-motion editing is available.
There is no fps boosting.
03Pixop
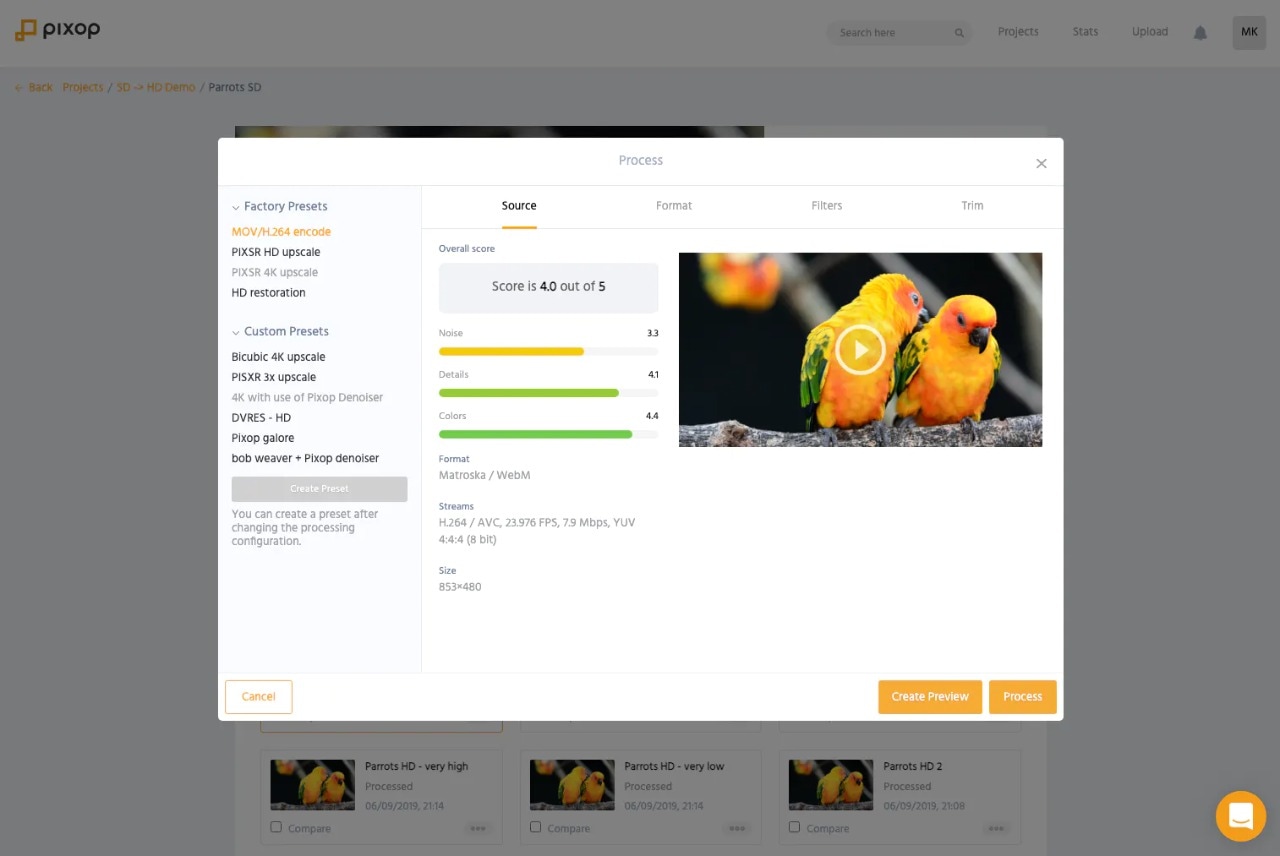
Pixop ai video upscaling online software is published or developed by Pixop ApS. The main features of this software are:
● It is available online.
● Available both for Windows and Mac.
● Allows to upscale videos up to 8K.
● Supports MP4, MXF, M2TS, and MOV formats of output.
● Allows custom fps boost in videos.
Pros
Available online for both Windows and Mac.
Allows video upscaling up to 8K.
Allows custom fps boost.
Cons
Expensive for longer videos.
Does not support slow-motion editing.
Only supports MP4, MXF, M2TS, and MOV formats of output.
04Topaz Video Enhance AI
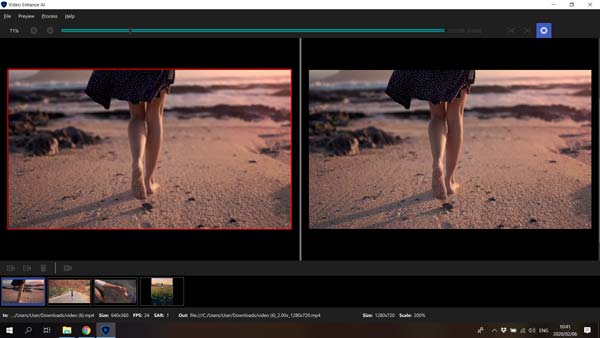
Topaz Video Enhance AI is an ai upscaling video enhancing app developed by the Topaz labs. The built-in AI system in topaz ai upscale software has been experimented on numerous videos, and it has been successful each time to edit every pixel in every frame of the video. The main features of this software are:
● The software is available for both os that is Mac and Windows.
● You can use this software to edit your video into slow motion, two thousand percent.
● This software can enhance any video up to 8K resolution.
● You can save the output from the software in any form, like MP4, PNG, TIFF, JPG, or MOV.
● This software allows fps boosting up to 120.
Pros
You can have a free trial.
You can upscale any video up to 8K resolution.
You can edit the video into slow motion to 2000%.
Cons
The app is expensive.
A watermark remains on the videos edited through these apps.
This software is not beginner-friendly software.
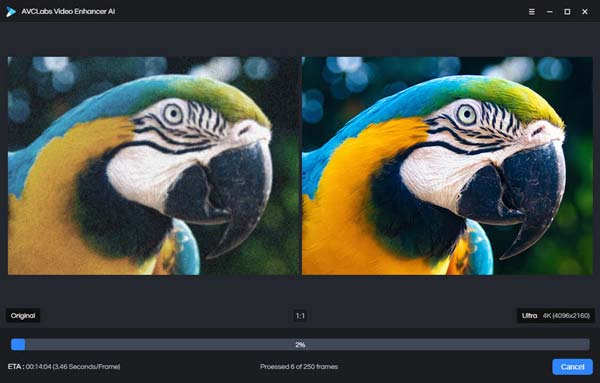
05AVCLabs Video Enhancer AI
AVCLabs Video Enhancer AI is ai video upscaling software developed by Anvsoft Inc. The most interesting features of this software are:
● Available for Windows only.
● It can be accessed through payment of $39.95/Month.
● Enhance video quality up to 4K.
● ‘Multi-frame feature’ helps to edit every frame of the video minutely.
● Manual settings for upscaling video or converting to low-quality video up to 480p.
Pros
Excellent video enhancing quality.
Allows enhancing video up to 4K.
This software can remove noise, overlay, and blurriness from the videos.
Cons
Expensive
Available only on Windows
Only for professional or expert users.
06GDFLab
GDFLab is an AI video enhancer online software. You can edit both images and videos with this software. This app is used in many fields, and it has been successful in all those fields due to its outstanding features like:
● This ai video upscaling online software gives a full free trial for its users.
● It is available online.
● It can be used both in Windows and Mac.
● You can upscale your videos up to 4K.
● The price of the software depends on the size of the video or photo you are enhancing.
Pros
This software is available both in Windows and Mac.
You can upscale your videos up to 4K.
You can use this app to restore your images to 4x.
Cons
Interruption in editing for internet problems.
You cannot use this app until you register.
This software is too complex for beginners to handle.

07iSize
iSize is an ai upscaler video online enhancer published by iSize technologies. It is said that this app excels in its field. This may happen for its extraordinary features like:
● This software is available both for Mac and Windows.
● A must-use software for professionals.
● High-end video codec capacity.
● You can use this app to upscale videos and also images.
Pros
You can use this software to upscale both videos and photos.
The video conversion process is fast.
This software supports batch conversion of videos.
Cons
Hardware is not upgraded regularly.
Expensive to avail.
Not for beginners.
● You can upscale your videos up to 8K.

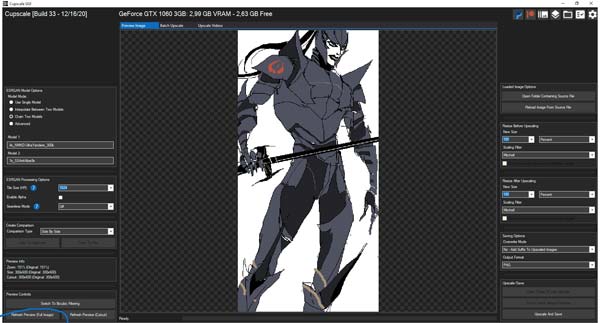
08Cupscale
Cupscale is another such ai upscaling video software. The main features of this software are:
● This software uses the very popular ESRGAN algorithm.
● This software is available both for PC and Mac.
● This software is available for free.
● This software can be used to upscale videos up to 8K.
● This software does not change the actual video format while editing the video.
Pros
Available for both Windows and Mac.
Available free.
Allows you to upscale videos up to 8K.
Cons
Supports only MP4, PNG, and JPG output formats.
Complex interface.
The AI used by this software is not stable.
09MiniTool Video Converter
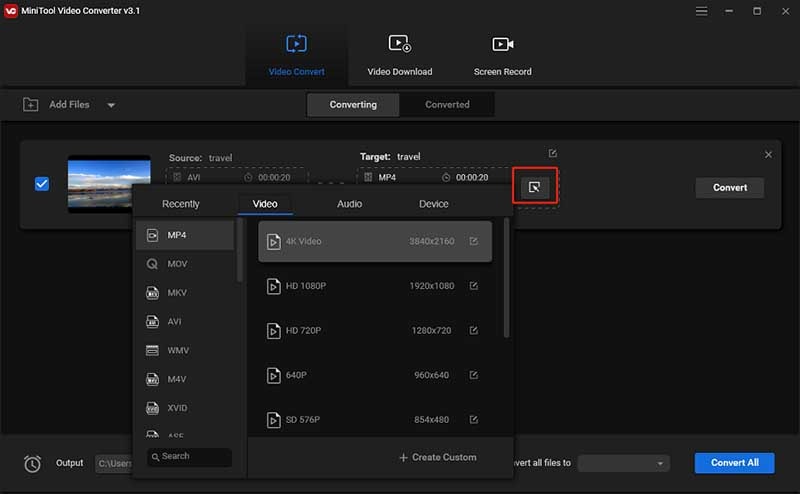
MiniTool Video Converter is another AI-driven video upscaling software. This app can also be used to upscale videos. It has some exciting features which can make your editing experience outstanding. The features are:
● This software is available for free.
● It is available only for Windows.
● This software supports more than 1000 output formats.
● You can use this video to enhance videos as well as audio.
● You can record your computer screen without a watermark.
Pros
Available free.
Supports more than 1000 different output formats.
Allows to the record computer screen without watermark.
Cons
Available only on Windows.
To run this software, high-end PC specifications are required.
This software is not for beginner use.
10Tipard Video Converter Ultimate
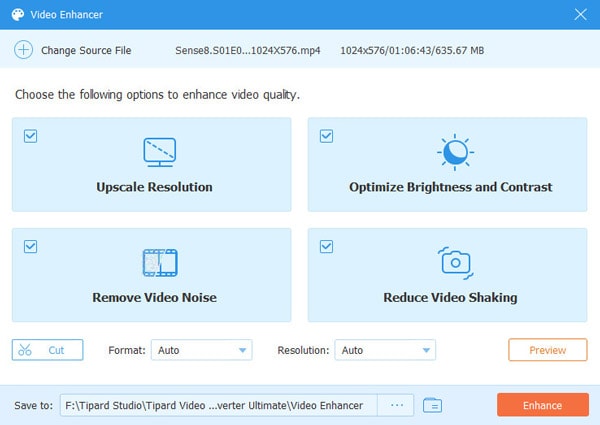
Tipard Video Converter Ultimate has some mind-boggling features, making this software one of the bestai upscale video software**.** This software is an all-in-one solution for the editors. The main features of this app are:
● Available in both Windows and Mac.
● Supports almost all different video formats.
● Upscale videos from DVDs to UHD videos.
● You can upscale your videos up to 8K.
● This app allows you to edit or retouch your videos on the timeline.
Pros
Available both for Windows and Mac.
You can rip videos from DVDs.
Allows you to upscale your videos up to 8K resolution.
Cons
It has a time-consuming editing process.
Does not support any usual PC.
Not beginner-friendly software.
Tip:Comparison between different AI Video Upscaling software
| Software | Windows/Mac/Both | 8K/4K Upscaling | Expensive | Beginner Friendly |
|---|---|---|---|---|
| DVDFab Enlarger AI | Windows | 4k | Yes | Yes |
| Video2x | Windows | 4k | No | No |
| Pixop | Both | 8k | Yes | No |
| Topaz Video Enhance AI | Both | 8k | Yes | No |
| AVCLabs Video Enhancer AI | Both | 8k | Yes | No |
| Windows | Both | 4k | Yes | No |
| GDFLab | Both | 4k | No | No |
| iSize | Both | 8k | Yes | No |
| Cupscale | Both | 8k | No | No |
| MiniTool Video Converter | Windows | 8k | No | No |
| Tipard Video Converter | Both | 8k | No | No |
There is another video editing app, which is Wondershare Filmora Video Editor . It is not an AI-driven video upscaling app. You can use this app to upscale videos of any format and create outputs of any format. This app allows you to upscale videos to 4K. You can use this app also for other video editing purposes to add new meaning and engagement to your video.
For Win 7 or later (64-bit)
For macOS 10.12 or later
● Ending Thoughts →
● I hope by now you know different software to upscale your low-quality video.
● Though this is an automatic process, you can use any software mentioned above to make your work smooth and hustle-free.
● You can access most software from any device and get output in any format with high-quality editing. This software will help you achieve the best results in your editing experience.
AI Upscaling is often used to improve the video quality. Here are some of the methods to do AI video upscaling. Follow these methods to successfully enhance your video quality.
In this article
01 [What Is AI Upscaling? And Why AI Upscaling Is Significant?](#Part 1)
02 [How to Easily AI Upscale Video to 1080p or 4K?](#Part 2)
03 [Best 10 Software to Make AI Upscaling Video](#Part 3)
Part 1 What Is AI Upscaling? And Why AI Upscaling Is Significant?
The process of generating or creating additional pixels of an image or frame in a video is AI Upscaling. This has many good results on the final video output.
This is mainly done to raise the bit rate of the video and, therefore, slightly improve the visual quality of the video. This is also used to improve the picture quality of DVDs and other low-quality videos. It is done to support lower quality videos or pictures on higher resolution screens like TV. This kind of upscaling is mostly done in TVs automatically.
Part 2 How to Easily AI Upscale Video to 1080p or 4K?
The interesting part is that this upscaling is done by the higher resolution device itself. If you display a lower resolution video on a high-resolution TV, the TV will upscale the video quality of the lower resolution video. This process mainly happens by the displaying device itself. But you can try to upscale videos by yourself using this software, which will help you achieve the best results.
Part 3 Best 10 Software to Make AI Upscaling Video
There are numerous AI upscale video software on the internet. The software listed below is the best among the numerous software because of its extraordinary features and interface. The 10 best AI video upscaling software are:
01DVDFab Enlarger AI
DVDFab Enlarger AI is an AI upscale video software published by Fengtao Software Limited. You can upscale any video you want to 4k. There are a few highlights of this software, and they are:
● This software is available onWindows.
● The price of the software ranges from $44.99 to $139.99
● You can use this software to rip videos from both DVDs and Blu-ray.
● You can save the output from the software in MP4 or MKV form.
● This software allows you to boost your fps up to 60.
Pros
Upscale your video to 4K resolution.
Boost your video to 60 fps.
Appropriate for beginners.
Cons
Available only on Windows.
Very Expensive.
No slow-motion is available.

02Video2X
Video2X is popular ai video upscaling software that is developed by Open-source. It is quite popular among the professionals for various reasons like:
● Video2X is available exclusive to Windows.
● You can avail this software without paying any money.
● You can upscale old low-resolution videos.
● Upscale your videos to 4K.
● You can save the output from the software in MP4 or MKV form.
Pros
You can availthis software for free.
You can upscale GIFs.
You can decide your output format.
Cons
It is not beginner-friendly.
No slow-motion editing is available.
There is no fps boosting.

03Pixop
Pixop ai video upscaling online software is published or developed by Pixop ApS. The main features of this software are:
● It is available online.
● Available both for Windows and Mac.
● Allows to upscale videos up to 8K.
● Supports MP4, MXF, M2TS, and MOV formats of output.
● Allows custom fps boost in videos.
Pros
Available online for both Windows and Mac.
Allows video upscaling up to 8K.
Allows custom fps boost.
Cons
Expensive for longer videos.
Does not support slow-motion editing.
Only supports MP4, MXF, M2TS, and MOV formats of output.

04Topaz Video Enhance AI
Topaz Video Enhance AI is an ai upscaling video enhancing app developed by the Topaz labs. The built-in AI system in topaz ai upscale software has been experimented on numerous videos, and it has been successful each time to edit every pixel in every frame of the video. The main features of this software are:
● The software is available for both os that is Mac and Windows.
● You can use this software to edit your video into slow motion, two thousand percent.
● This software can enhance any video up to 8K resolution.
● You can save the output from the software in any form, like MP4, PNG, TIFF, JPG, or MOV.
● This software allows fps boosting up to 120.
Pros
You can have a free trial.
You can upscale any video up to 8K resolution.
You can edit the video into slow motion to 2000%.
Cons
The app is expensive.
A watermark remains on the videos edited through these apps.
This software is not beginner-friendly software.

05AVCLabs Video Enhancer AI
AVCLabs Video Enhancer AI is ai video upscaling software developed by Anvsoft Inc. The most interesting features of this software are:
● Available for Windows only.
● It can be accessed through payment of $39.95/Month.
● Enhance video quality up to 4K.
● ‘Multi-frame feature’ helps to edit every frame of the video minutely.
● Manual settings for upscaling video or converting to low-quality video up to 480p.
Pros
Excellent video enhancing quality.
Allows enhancing video up to 4K.
This software can remove noise, overlay, and blurriness from the videos.
Cons
Expensive
Available only on Windows
Only for professional or expert users.

06GDFLab
GDFLab is an AI video enhancer online software. You can edit both images and videos with this software. This app is used in many fields, and it has been successful in all those fields due to its outstanding features like:
● This ai video upscaling online software gives a full free trial for its users.
● It is available online.
● It can be used both in Windows and Mac.
● You can upscale your videos up to 4K.
● The price of the software depends on the size of the video or photo you are enhancing.
Pros
This software is available both in Windows and Mac.
You can upscale your videos up to 4K.
You can use this app to restore your images to 4x.
Cons
Interruption in editing for internet problems.
You cannot use this app until you register.
This software is too complex for beginners to handle.

07iSize
iSize is an ai upscaler video online enhancer published by iSize technologies. It is said that this app excels in its field. This may happen for its extraordinary features like:
● This software is available both for Mac and Windows.
● A must-use software for professionals.
● High-end video codec capacity.
● You can use this app to upscale videos and also images.
Pros
You can use this software to upscale both videos and photos.
The video conversion process is fast.
This software supports batch conversion of videos.
Cons
Hardware is not upgraded regularly.
Expensive to avail.
Not for beginners.
● You can upscale your videos up to 8K.

08Cupscale
Cupscale is another such ai upscaling video software. The main features of this software are:
● This software uses the very popular ESRGAN algorithm.
● This software is available both for PC and Mac.
● This software is available for free.
● This software can be used to upscale videos up to 8K.
● This software does not change the actual video format while editing the video.
Pros
Available for both Windows and Mac.
Available free.
Allows you to upscale videos up to 8K.
Cons
Supports only MP4, PNG, and JPG output formats.
Complex interface.
The AI used by this software is not stable.

09MiniTool Video Converter
MiniTool Video Converter is another AI-driven video upscaling software. This app can also be used to upscale videos. It has some exciting features which can make your editing experience outstanding. The features are:
● This software is available for free.
● It is available only for Windows.
● This software supports more than 1000 output formats.
● You can use this video to enhance videos as well as audio.
● You can record your computer screen without a watermark.
Pros
Available free.
Supports more than 1000 different output formats.
Allows to the record computer screen without watermark.
Cons
Available only on Windows.
To run this software, high-end PC specifications are required.
This software is not for beginner use.

10Tipard Video Converter Ultimate
Tipard Video Converter Ultimate has some mind-boggling features, making this software one of the bestai upscale video software**.** This software is an all-in-one solution for the editors. The main features of this app are:
● Available in both Windows and Mac.
● Supports almost all different video formats.
● Upscale videos from DVDs to UHD videos.
● You can upscale your videos up to 8K.
● This app allows you to edit or retouch your videos on the timeline.
Pros
Available both for Windows and Mac.
You can rip videos from DVDs.
Allows you to upscale your videos up to 8K resolution.
Cons
It has a time-consuming editing process.
Does not support any usual PC.
Not beginner-friendly software.

Tip:Comparison between different AI Video Upscaling software
| Software | Windows/Mac/Both | 8K/4K Upscaling | Expensive | Beginner Friendly |
|---|---|---|---|---|
| DVDFab Enlarger AI | Windows | 4k | Yes | Yes |
| Video2x | Windows | 4k | No | No |
| Pixop | Both | 8k | Yes | No |
| Topaz Video Enhance AI | Both | 8k | Yes | No |
| AVCLabs Video Enhancer AI | Both | 8k | Yes | No |
| Windows | Both | 4k | Yes | No |
| GDFLab | Both | 4k | No | No |
| iSize | Both | 8k | Yes | No |
| Cupscale | Both | 8k | No | No |
| MiniTool Video Converter | Windows | 8k | No | No |
| Tipard Video Converter | Both | 8k | No | No |
There is another video editing app, which is Wondershare Filmora Video Editor . It is not an AI-driven video upscaling app. You can use this app to upscale videos of any format and create outputs of any format. This app allows you to upscale videos to 4K. You can use this app also for other video editing purposes to add new meaning and engagement to your video.
For Win 7 or later (64-bit)
For macOS 10.12 or later
● Ending Thoughts →
● I hope by now you know different software to upscale your low-quality video.
● Though this is an automatic process, you can use any software mentioned above to make your work smooth and hustle-free.
● You can access most software from any device and get output in any format with high-quality editing. This software will help you achieve the best results in your editing experience.
AI Upscaling is often used to improve the video quality. Here are some of the methods to do AI video upscaling. Follow these methods to successfully enhance your video quality.
In this article
01 [What Is AI Upscaling? And Why AI Upscaling Is Significant?](#Part 1)
02 [How to Easily AI Upscale Video to 1080p or 4K?](#Part 2)
03 [Best 10 Software to Make AI Upscaling Video](#Part 3)
Part 1 What Is AI Upscaling? And Why AI Upscaling Is Significant?
The process of generating or creating additional pixels of an image or frame in a video is AI Upscaling. This has many good results on the final video output.
This is mainly done to raise the bit rate of the video and, therefore, slightly improve the visual quality of the video. This is also used to improve the picture quality of DVDs and other low-quality videos. It is done to support lower quality videos or pictures on higher resolution screens like TV. This kind of upscaling is mostly done in TVs automatically.
Part 2 How to Easily AI Upscale Video to 1080p or 4K?
The interesting part is that this upscaling is done by the higher resolution device itself. If you display a lower resolution video on a high-resolution TV, the TV will upscale the video quality of the lower resolution video. This process mainly happens by the displaying device itself. But you can try to upscale videos by yourself using this software, which will help you achieve the best results.
Part 3 Best 10 Software to Make AI Upscaling Video
There are numerous AI upscale video software on the internet. The software listed below is the best among the numerous software because of its extraordinary features and interface. The 10 best AI video upscaling software are:
01DVDFab Enlarger AI
DVDFab Enlarger AI is an AI upscale video software published by Fengtao Software Limited. You can upscale any video you want to 4k. There are a few highlights of this software, and they are:
● This software is available onWindows.
● The price of the software ranges from $44.99 to $139.99
● You can use this software to rip videos from both DVDs and Blu-ray.
● You can save the output from the software in MP4 or MKV form.
● This software allows you to boost your fps up to 60.
Pros
Upscale your video to 4K resolution.
Boost your video to 60 fps.
Appropriate for beginners.
Cons
Available only on Windows.
Very Expensive.
No slow-motion is available.

02Video2X
Video2X is popular ai video upscaling software that is developed by Open-source. It is quite popular among the professionals for various reasons like:
● Video2X is available exclusive to Windows.
● You can avail this software without paying any money.
● You can upscale old low-resolution videos.
● Upscale your videos to 4K.
● You can save the output from the software in MP4 or MKV form.
Pros
You can availthis software for free.
You can upscale GIFs.
You can decide your output format.
Cons
It is not beginner-friendly.
No slow-motion editing is available.
There is no fps boosting.

03Pixop
Pixop ai video upscaling online software is published or developed by Pixop ApS. The main features of this software are:
● It is available online.
● Available both for Windows and Mac.
● Allows to upscale videos up to 8K.
● Supports MP4, MXF, M2TS, and MOV formats of output.
● Allows custom fps boost in videos.
Pros
Available online for both Windows and Mac.
Allows video upscaling up to 8K.
Allows custom fps boost.
Cons
Expensive for longer videos.
Does not support slow-motion editing.
Only supports MP4, MXF, M2TS, and MOV formats of output.

04Topaz Video Enhance AI
Topaz Video Enhance AI is an ai upscaling video enhancing app developed by the Topaz labs. The built-in AI system in topaz ai upscale software has been experimented on numerous videos, and it has been successful each time to edit every pixel in every frame of the video. The main features of this software are:
● The software is available for both os that is Mac and Windows.
● You can use this software to edit your video into slow motion, two thousand percent.
● This software can enhance any video up to 8K resolution.
● You can save the output from the software in any form, like MP4, PNG, TIFF, JPG, or MOV.
● This software allows fps boosting up to 120.
Pros
You can have a free trial.
You can upscale any video up to 8K resolution.
You can edit the video into slow motion to 2000%.
Cons
The app is expensive.
A watermark remains on the videos edited through these apps.
This software is not beginner-friendly software.

05AVCLabs Video Enhancer AI
AVCLabs Video Enhancer AI is ai video upscaling software developed by Anvsoft Inc. The most interesting features of this software are:
● Available for Windows only.
● It can be accessed through payment of $39.95/Month.
● Enhance video quality up to 4K.
● ‘Multi-frame feature’ helps to edit every frame of the video minutely.
● Manual settings for upscaling video or converting to low-quality video up to 480p.
Pros
Excellent video enhancing quality.
Allows enhancing video up to 4K.
This software can remove noise, overlay, and blurriness from the videos.
Cons
Expensive
Available only on Windows
Only for professional or expert users.

06GDFLab
GDFLab is an AI video enhancer online software. You can edit both images and videos with this software. This app is used in many fields, and it has been successful in all those fields due to its outstanding features like:
● This ai video upscaling online software gives a full free trial for its users.
● It is available online.
● It can be used both in Windows and Mac.
● You can upscale your videos up to 4K.
● The price of the software depends on the size of the video or photo you are enhancing.
Pros
This software is available both in Windows and Mac.
You can upscale your videos up to 4K.
You can use this app to restore your images to 4x.
Cons
Interruption in editing for internet problems.
You cannot use this app until you register.
This software is too complex for beginners to handle.

07iSize
iSize is an ai upscaler video online enhancer published by iSize technologies. It is said that this app excels in its field. This may happen for its extraordinary features like:
● This software is available both for Mac and Windows.
● A must-use software for professionals.
● High-end video codec capacity.
● You can use this app to upscale videos and also images.
Pros
You can use this software to upscale both videos and photos.
The video conversion process is fast.
This software supports batch conversion of videos.
Cons
Hardware is not upgraded regularly.
Expensive to avail.
Not for beginners.
● You can upscale your videos up to 8K.

08Cupscale
Cupscale is another such ai upscaling video software. The main features of this software are:
● This software uses the very popular ESRGAN algorithm.
● This software is available both for PC and Mac.
● This software is available for free.
● This software can be used to upscale videos up to 8K.
● This software does not change the actual video format while editing the video.
Pros
Available for both Windows and Mac.
Available free.
Allows you to upscale videos up to 8K.
Cons
Supports only MP4, PNG, and JPG output formats.
Complex interface.
The AI used by this software is not stable.

09MiniTool Video Converter
MiniTool Video Converter is another AI-driven video upscaling software. This app can also be used to upscale videos. It has some exciting features which can make your editing experience outstanding. The features are:
● This software is available for free.
● It is available only for Windows.
● This software supports more than 1000 output formats.
● You can use this video to enhance videos as well as audio.
● You can record your computer screen without a watermark.
Pros
Available free.
Supports more than 1000 different output formats.
Allows to the record computer screen without watermark.
Cons
Available only on Windows.
To run this software, high-end PC specifications are required.
This software is not for beginner use.

10Tipard Video Converter Ultimate
Tipard Video Converter Ultimate has some mind-boggling features, making this software one of the bestai upscale video software**.** This software is an all-in-one solution for the editors. The main features of this app are:
● Available in both Windows and Mac.
● Supports almost all different video formats.
● Upscale videos from DVDs to UHD videos.
● You can upscale your videos up to 8K.
● This app allows you to edit or retouch your videos on the timeline.
Pros
Available both for Windows and Mac.
You can rip videos from DVDs.
Allows you to upscale your videos up to 8K resolution.
Cons
It has a time-consuming editing process.
Does not support any usual PC.
Not beginner-friendly software.

Tip:Comparison between different AI Video Upscaling software
| Software | Windows/Mac/Both | 8K/4K Upscaling | Expensive | Beginner Friendly |
|---|---|---|---|---|
| DVDFab Enlarger AI | Windows | 4k | Yes | Yes |
| Video2x | Windows | 4k | No | No |
| Pixop | Both | 8k | Yes | No |
| Topaz Video Enhance AI | Both | 8k | Yes | No |
| AVCLabs Video Enhancer AI | Both | 8k | Yes | No |
| Windows | Both | 4k | Yes | No |
| GDFLab | Both | 4k | No | No |
| iSize | Both | 8k | Yes | No |
| Cupscale | Both | 8k | No | No |
| MiniTool Video Converter | Windows | 8k | No | No |
| Tipard Video Converter | Both | 8k | No | No |
There is another video editing app, which is Wondershare Filmora Video Editor . It is not an AI-driven video upscaling app. You can use this app to upscale videos of any format and create outputs of any format. This app allows you to upscale videos to 4K. You can use this app also for other video editing purposes to add new meaning and engagement to your video.
For Win 7 or later (64-bit)
For macOS 10.12 or later
● Ending Thoughts →
● I hope by now you know different software to upscale your low-quality video.
● Though this is an automatic process, you can use any software mentioned above to make your work smooth and hustle-free.
● You can access most software from any device and get output in any format with high-quality editing. This software will help you achieve the best results in your editing experience.
AI Upscaling is often used to improve the video quality. Here are some of the methods to do AI video upscaling. Follow these methods to successfully enhance your video quality.
In this article
01 [What Is AI Upscaling? And Why AI Upscaling Is Significant?](#Part 1)
02 [How to Easily AI Upscale Video to 1080p or 4K?](#Part 2)
03 [Best 10 Software to Make AI Upscaling Video](#Part 3)
Part 1 What Is AI Upscaling? And Why AI Upscaling Is Significant?
The process of generating or creating additional pixels of an image or frame in a video is AI Upscaling. This has many good results on the final video output.
This is mainly done to raise the bit rate of the video and, therefore, slightly improve the visual quality of the video. This is also used to improve the picture quality of DVDs and other low-quality videos. It is done to support lower quality videos or pictures on higher resolution screens like TV. This kind of upscaling is mostly done in TVs automatically.
Part 2 How to Easily AI Upscale Video to 1080p or 4K?
The interesting part is that this upscaling is done by the higher resolution device itself. If you display a lower resolution video on a high-resolution TV, the TV will upscale the video quality of the lower resolution video. This process mainly happens by the displaying device itself. But you can try to upscale videos by yourself using this software, which will help you achieve the best results.
Part 3 Best 10 Software to Make AI Upscaling Video
There are numerous AI upscale video software on the internet. The software listed below is the best among the numerous software because of its extraordinary features and interface. The 10 best AI video upscaling software are:
01DVDFab Enlarger AI
DVDFab Enlarger AI is an AI upscale video software published by Fengtao Software Limited. You can upscale any video you want to 4k. There are a few highlights of this software, and they are:
● This software is available onWindows.
● The price of the software ranges from $44.99 to $139.99
● You can use this software to rip videos from both DVDs and Blu-ray.
● You can save the output from the software in MP4 or MKV form.
● This software allows you to boost your fps up to 60.
Pros
Upscale your video to 4K resolution.
Boost your video to 60 fps.
Appropriate for beginners.
Cons
Available only on Windows.
Very Expensive.
No slow-motion is available.

02Video2X
Video2X is popular ai video upscaling software that is developed by Open-source. It is quite popular among the professionals for various reasons like:
● Video2X is available exclusive to Windows.
● You can avail this software without paying any money.
● You can upscale old low-resolution videos.
● Upscale your videos to 4K.
● You can save the output from the software in MP4 or MKV form.
Pros
You can availthis software for free.
You can upscale GIFs.
You can decide your output format.
Cons
It is not beginner-friendly.
No slow-motion editing is available.
There is no fps boosting.

03Pixop
Pixop ai video upscaling online software is published or developed by Pixop ApS. The main features of this software are:
● It is available online.
● Available both for Windows and Mac.
● Allows to upscale videos up to 8K.
● Supports MP4, MXF, M2TS, and MOV formats of output.
● Allows custom fps boost in videos.
Pros
Available online for both Windows and Mac.
Allows video upscaling up to 8K.
Allows custom fps boost.
Cons
Expensive for longer videos.
Does not support slow-motion editing.
Only supports MP4, MXF, M2TS, and MOV formats of output.

04Topaz Video Enhance AI
Topaz Video Enhance AI is an ai upscaling video enhancing app developed by the Topaz labs. The built-in AI system in topaz ai upscale software has been experimented on numerous videos, and it has been successful each time to edit every pixel in every frame of the video. The main features of this software are:
● The software is available for both os that is Mac and Windows.
● You can use this software to edit your video into slow motion, two thousand percent.
● This software can enhance any video up to 8K resolution.
● You can save the output from the software in any form, like MP4, PNG, TIFF, JPG, or MOV.
● This software allows fps boosting up to 120.
Pros
You can have a free trial.
You can upscale any video up to 8K resolution.
You can edit the video into slow motion to 2000%.
Cons
The app is expensive.
A watermark remains on the videos edited through these apps.
This software is not beginner-friendly software.

05AVCLabs Video Enhancer AI
AVCLabs Video Enhancer AI is ai video upscaling software developed by Anvsoft Inc. The most interesting features of this software are:
● Available for Windows only.
● It can be accessed through payment of $39.95/Month.
● Enhance video quality up to 4K.
● ‘Multi-frame feature’ helps to edit every frame of the video minutely.
● Manual settings for upscaling video or converting to low-quality video up to 480p.
Pros
Excellent video enhancing quality.
Allows enhancing video up to 4K.
This software can remove noise, overlay, and blurriness from the videos.
Cons
Expensive
Available only on Windows
Only for professional or expert users.

06GDFLab
GDFLab is an AI video enhancer online software. You can edit both images and videos with this software. This app is used in many fields, and it has been successful in all those fields due to its outstanding features like:
● This ai video upscaling online software gives a full free trial for its users.
● It is available online.
● It can be used both in Windows and Mac.
● You can upscale your videos up to 4K.
● The price of the software depends on the size of the video or photo you are enhancing.
Pros
This software is available both in Windows and Mac.
You can upscale your videos up to 4K.
You can use this app to restore your images to 4x.
Cons
Interruption in editing for internet problems.
You cannot use this app until you register.
This software is too complex for beginners to handle.

07iSize
iSize is an ai upscaler video online enhancer published by iSize technologies. It is said that this app excels in its field. This may happen for its extraordinary features like:
● This software is available both for Mac and Windows.
● A must-use software for professionals.
● High-end video codec capacity.
● You can use this app to upscale videos and also images.
Pros
You can use this software to upscale both videos and photos.
The video conversion process is fast.
This software supports batch conversion of videos.
Cons
Hardware is not upgraded regularly.
Expensive to avail.
Not for beginners.
● You can upscale your videos up to 8K.

08Cupscale
Cupscale is another such ai upscaling video software. The main features of this software are:
● This software uses the very popular ESRGAN algorithm.
● This software is available both for PC and Mac.
● This software is available for free.
● This software can be used to upscale videos up to 8K.
● This software does not change the actual video format while editing the video.
Pros
Available for both Windows and Mac.
Available free.
Allows you to upscale videos up to 8K.
Cons
Supports only MP4, PNG, and JPG output formats.
Complex interface.
The AI used by this software is not stable.

09MiniTool Video Converter
MiniTool Video Converter is another AI-driven video upscaling software. This app can also be used to upscale videos. It has some exciting features which can make your editing experience outstanding. The features are:
● This software is available for free.
● It is available only for Windows.
● This software supports more than 1000 output formats.
● You can use this video to enhance videos as well as audio.
● You can record your computer screen without a watermark.
Pros
Available free.
Supports more than 1000 different output formats.
Allows to the record computer screen without watermark.
Cons
Available only on Windows.
To run this software, high-end PC specifications are required.
This software is not for beginner use.

10Tipard Video Converter Ultimate
Tipard Video Converter Ultimate has some mind-boggling features, making this software one of the bestai upscale video software**.** This software is an all-in-one solution for the editors. The main features of this app are:
● Available in both Windows and Mac.
● Supports almost all different video formats.
● Upscale videos from DVDs to UHD videos.
● You can upscale your videos up to 8K.
● This app allows you to edit or retouch your videos on the timeline.
Pros
Available both for Windows and Mac.
You can rip videos from DVDs.
Allows you to upscale your videos up to 8K resolution.
Cons
It has a time-consuming editing process.
Does not support any usual PC.
Not beginner-friendly software.

Tip:Comparison between different AI Video Upscaling software
| Software | Windows/Mac/Both | 8K/4K Upscaling | Expensive | Beginner Friendly |
|---|---|---|---|---|
| DVDFab Enlarger AI | Windows | 4k | Yes | Yes |
| Video2x | Windows | 4k | No | No |
| Pixop | Both | 8k | Yes | No |
| Topaz Video Enhance AI | Both | 8k | Yes | No |
| AVCLabs Video Enhancer AI | Both | 8k | Yes | No |
| Windows | Both | 4k | Yes | No |
| GDFLab | Both | 4k | No | No |
| iSize | Both | 8k | Yes | No |
| Cupscale | Both | 8k | No | No |
| MiniTool Video Converter | Windows | 8k | No | No |
| Tipard Video Converter | Both | 8k | No | No |
There is another video editing app, which is Wondershare Filmora Video Editor . It is not an AI-driven video upscaling app. You can use this app to upscale videos of any format and create outputs of any format. This app allows you to upscale videos to 4K. You can use this app also for other video editing purposes to add new meaning and engagement to your video.
For Win 7 or later (64-bit)
For macOS 10.12 or later
● Ending Thoughts →
● I hope by now you know different software to upscale your low-quality video.
● Though this is an automatic process, you can use any software mentioned above to make your work smooth and hustle-free.
● You can access most software from any device and get output in any format with high-quality editing. This software will help you achieve the best results in your editing experience.
Ultimate Guide on Making A Slideshow Video
You have taken photos and videos all over your trip. Showing them to your friends and family can be a hassle if you have a lot of pictures. Viewing them all at once is possible by creating a slideshow video.
The slideshow video combines all the memories in one place. To make one on your own, we prefer just one best UI editing tools, Wondershare Filmora.
Before we create a slideshow, ensure to learn the basics of the slideshow video. Then, scroll below to get more!
Part 1. What Is a Slideshow Video?
A slideshow video is a video that combines your photos and videos to create a montage. This slideshow can be used as a collection of memories you can watch whenever you like.
You might have a photo album lying around somewhere in your house. A slideshow video can act like a modern-day photo album. But instead of photos, you can also add videos and create a monument of your precious memories.
Modern-day content creators on Youtube and other platforms can use a slideshow method to create short recap videos of their travels.
Part 2. What Are Some of the Uses of Slideshow Videos?
A slideshow video can be a great way to summarize all the moments of a marriage ceremony, graduation event, etc. And the list goes on and on.
- A wedding ceremony
- Anniversary recording
- A graduation ceremony
- A birthday party
- Your pet
- Your friends
- Your family
- A trip that you went on
Part 3. What Are the Benefits of a Slideshow?
There are many benefits to creating a slideshow video.
A long-lasting memory
Creating a slideshow video can be a digital reminiscent, allowing you to hold a precious video with your friends and family. Apart from physical portraits, a slideshow video will be a digital backup for your memories that you can watch in the future.
Easy to save and share
Since a video slideshow is a digital content, typically with an extension .mp4, .mov, etc., you can watch it whenever and wherever you want. Moreover, you can conveniently send it to the person who spent the time and shares the same memories with you.
Part 4. What Will You Need To Make a Slideshow?
To create an attractive slideshow video, you must fulfill the following requirements.
1. Good Quality Photos
To create a good slideshow, you must have good-quality photos with good resolution. Always take pictures with a good-quality camera or a mobile phone whenever you want to create a slideshow. Using filters in the editing software can disrupt the quality of your slideshow.
2. Video Clips
The slideshow is always combined with videos and photos. After taking good-quality images, remember always to record short video clips you can add between your pictures.
3. A Good Video Editor - Wondershare Filmora
To edit a slideshow video, you will need editing software. There’s no better tool to do the job than Wondershare Filmora . Wondershare Filmora enables you to make creative and appealing videos. It has a very engaging system UI that allows even novice users to get the hang of it quickly. You will learn how to make a slideshow in a few simple steps.
Free Download For Win 7 or later(64-bit)
Free Download For macOS 10.14 or later

Let’s start with the step-by-step instructions for making a slideshow video now that you know the requirements for generating a slideshow.
Part 5. Step-by-Step Guide to Creating a Slideshow Video
Utilizing filmora will reduce your workload while producing quality work. Follow the below step-by-step guide to make your slideshow video instantly!
Step1 Download Wondershare Filmora
Wondershare Filmora will provide the working platform. Follow the below steps to download it:
- First, install the Wondershare Filmora.
- Then, launch this application on your PC or Mac
Let’s proceed to edit our video after downloading the Wondershare Filmora software. Continue reading to find out how to begin the editing process.
Step2 Import your Photos and Videos
Importing your videos and pictures to Filmora’s media panel is best to have them all in one folder. Therefore, when you open Wondershare Filmora, you will notice the main import window in the top left corner.
- Click in the center of the import window upon the import icon.
- Browse from the PC library to where your target Videos and Photos are stored.
- Please select the required videos and photos and Open
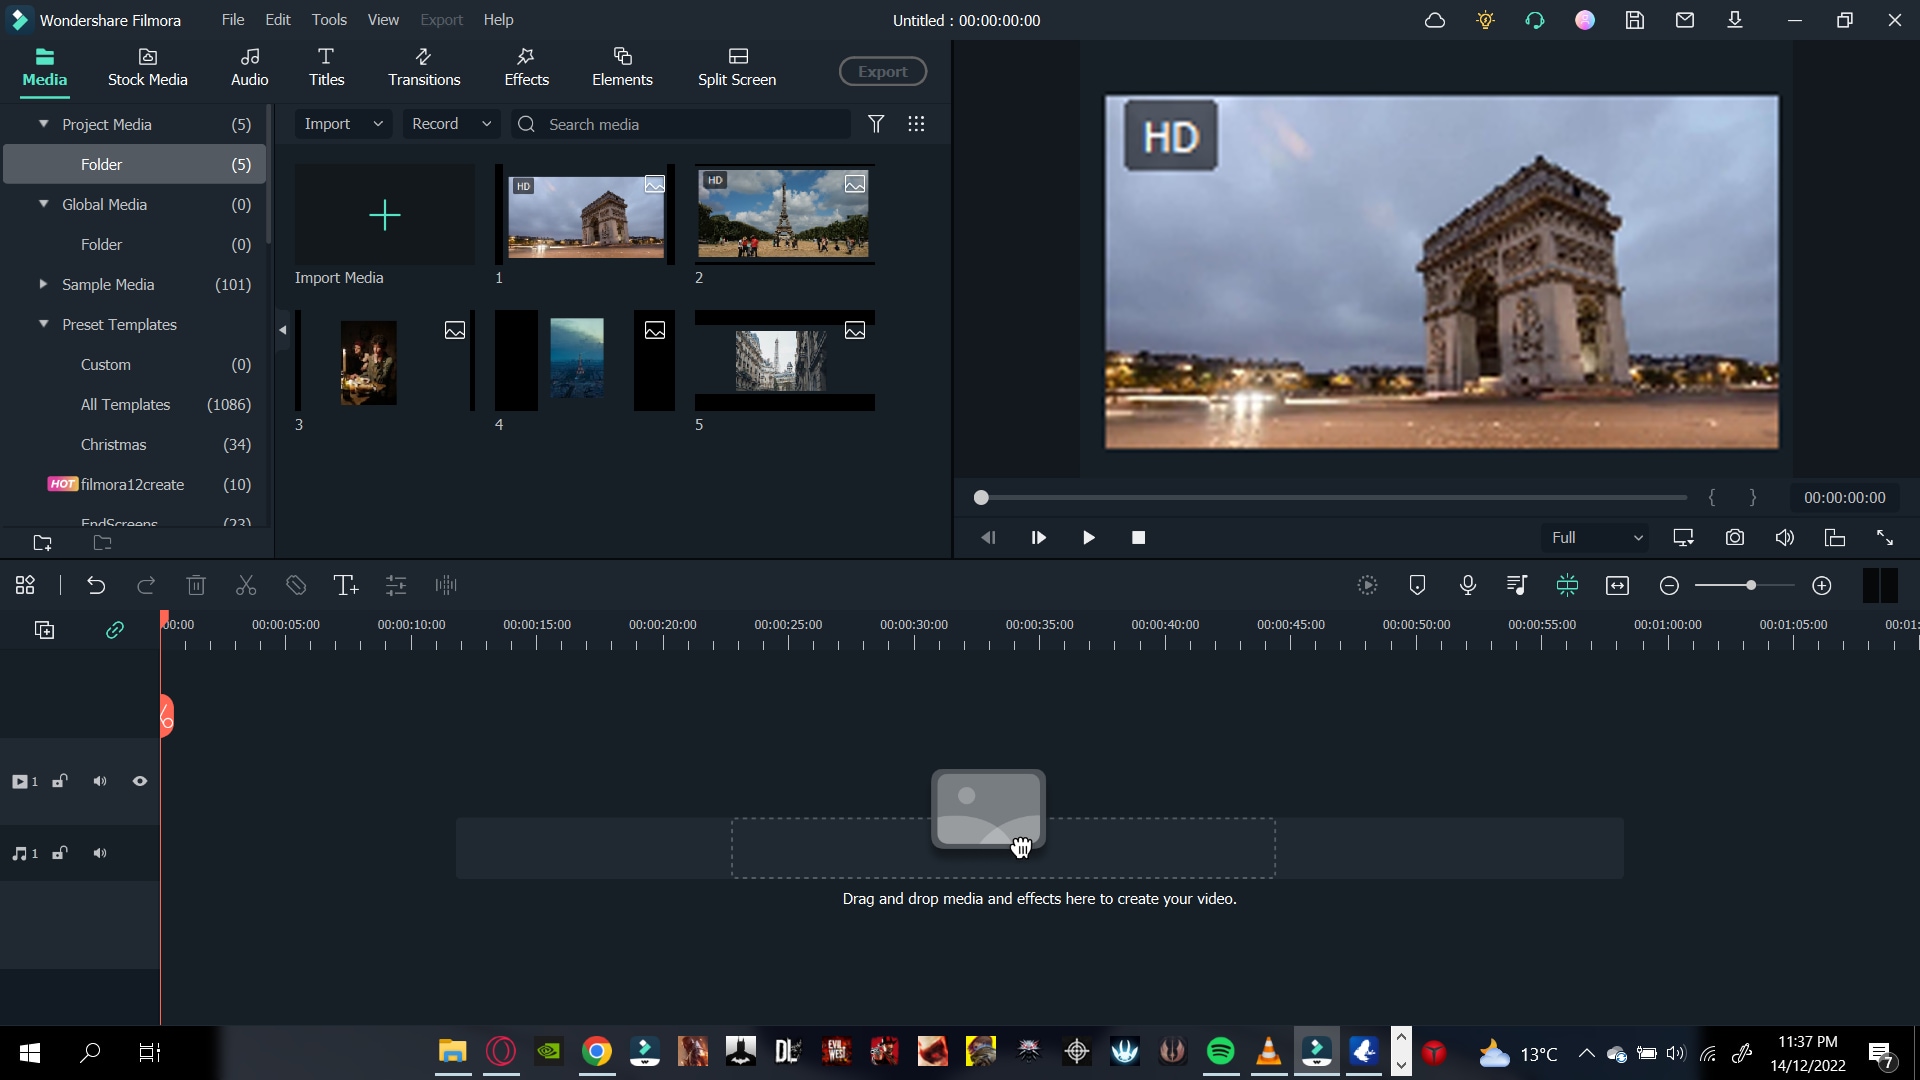
Your next step will be to add the imported videos and images to the timeline.
Step3 Add your Photos and Videos to the Timeline
When you have multiple videos and photos, you can add all of them simultaneously. Or you can also add them one by one wherever you need. Follow the steps mentioned:
- Right-click on the photo or video you want.
- Keep holding the Right-click and drag it down to the timeline.
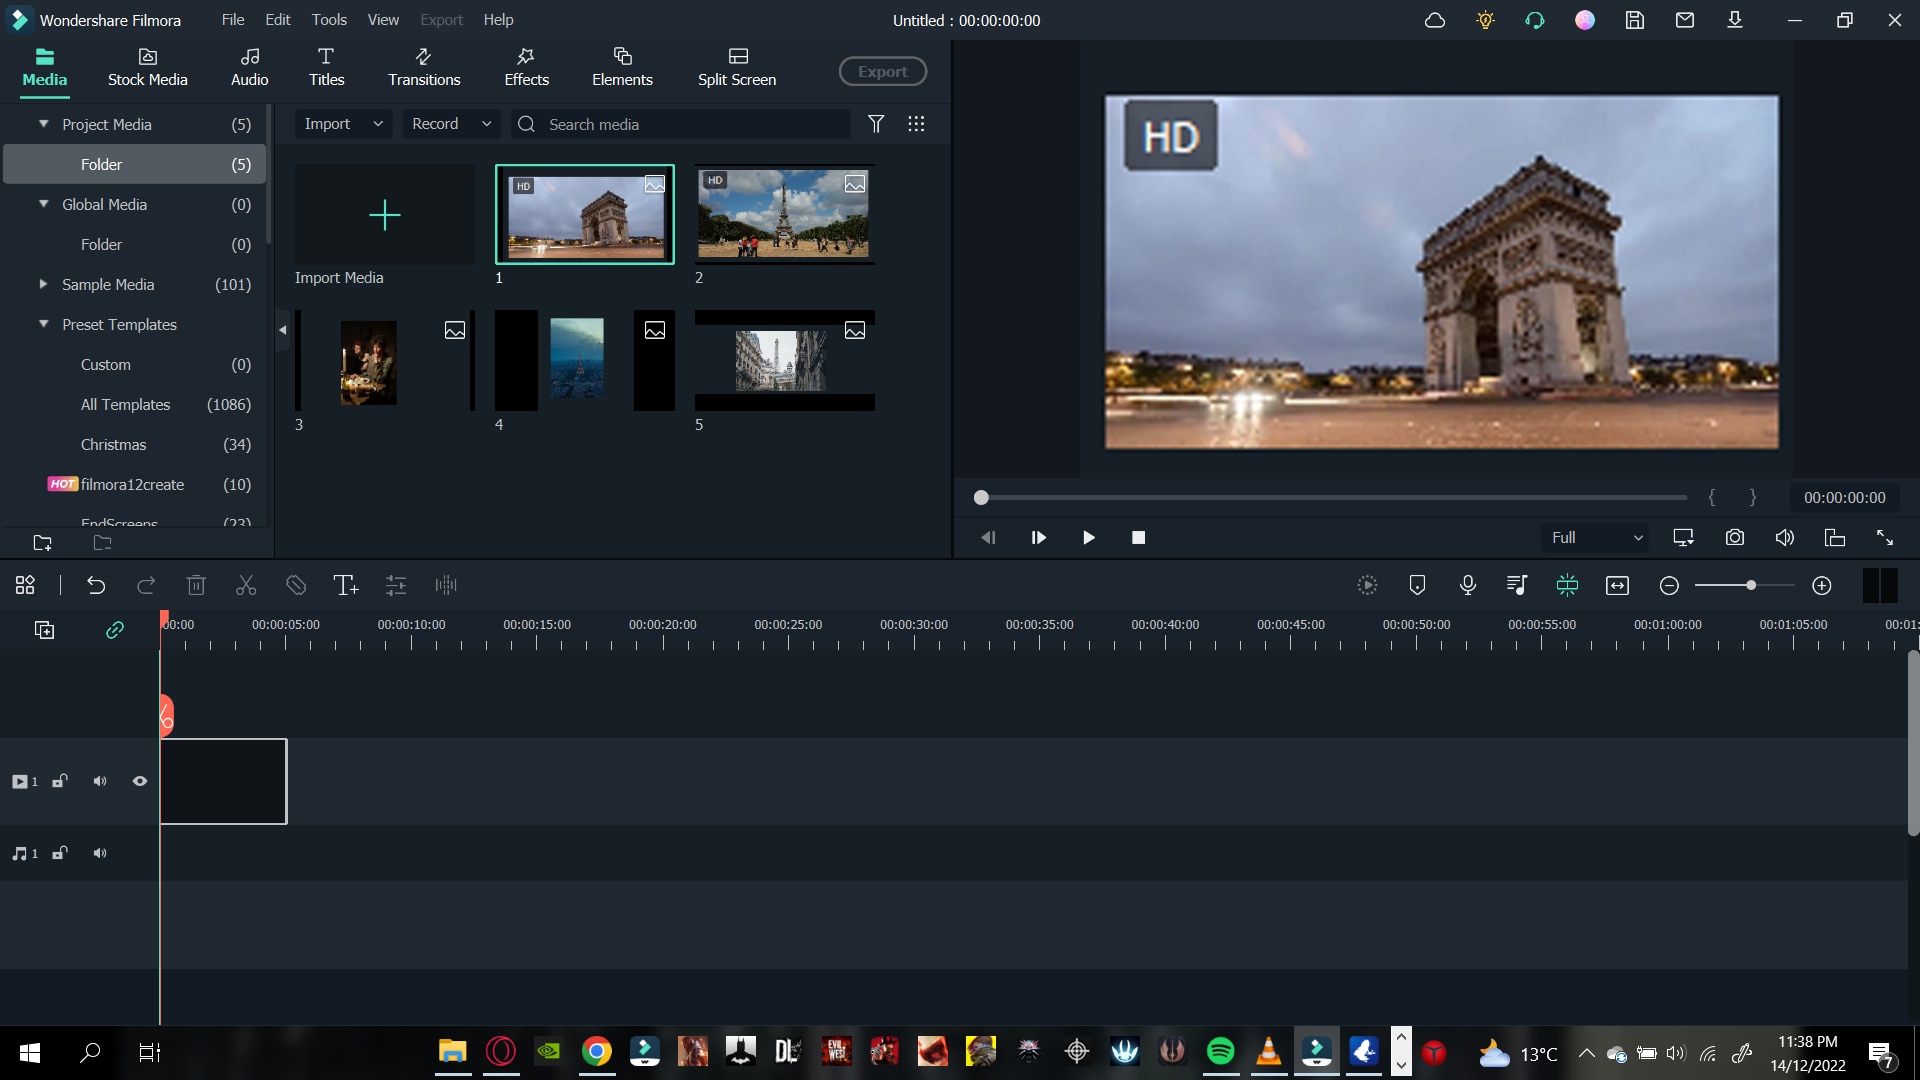
Now that we have imported your photos and videos into the timeline, it is time to align and add text.
Step4 Add the Title
To create an attractive slideshow, you will need to add a title before the start of the video. Doing so will allow you to gain more viewers and audiences.
Add a Black Screen
The black screen will eventually act like a canvas to give your title a good look. To add a black screen, follow the steps mentioned:
- Click on the media icon from the bar above the import window.
- You will notice many tabs on the left-hand side under a drop-down bar.
- Scroll below to find the sample media
- Download the black color if it is not downloaded already.
- Click and drag it down below to the start of your video.
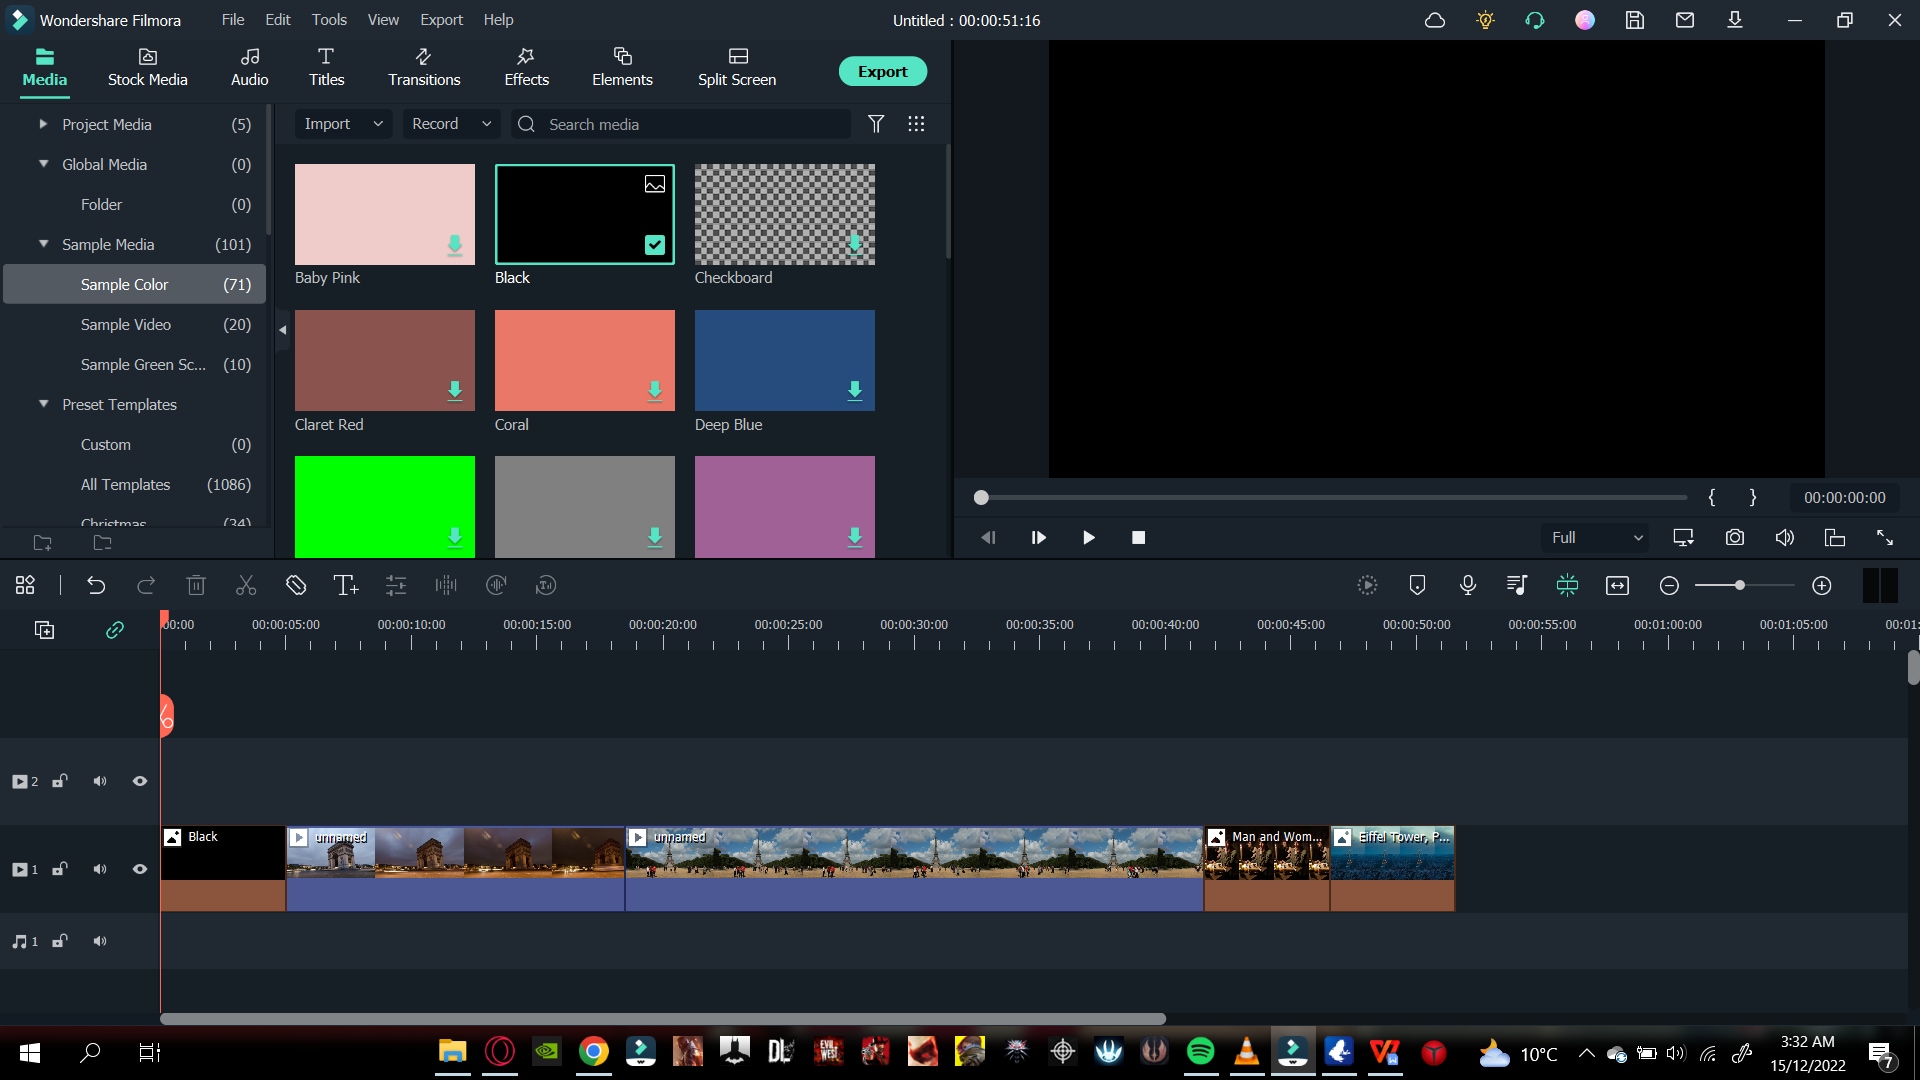
Add a Title Tile
Now that we have our canvas, we will now add the title. Above the import media library, there will be a Title icon.
- Click on the title icon, and select the title that you want for your video by browsing and scrolling down.
- For this purpose, we will use a simple title tile called “Title 29.”
![]()
Note: You can find the same title by scrolling, browsing, or searching in the search bar above the import library.
- Click and drag the title onto the black screen that we added.
- Double-click the title to open its settings.
- Here you can type in the text that you want.
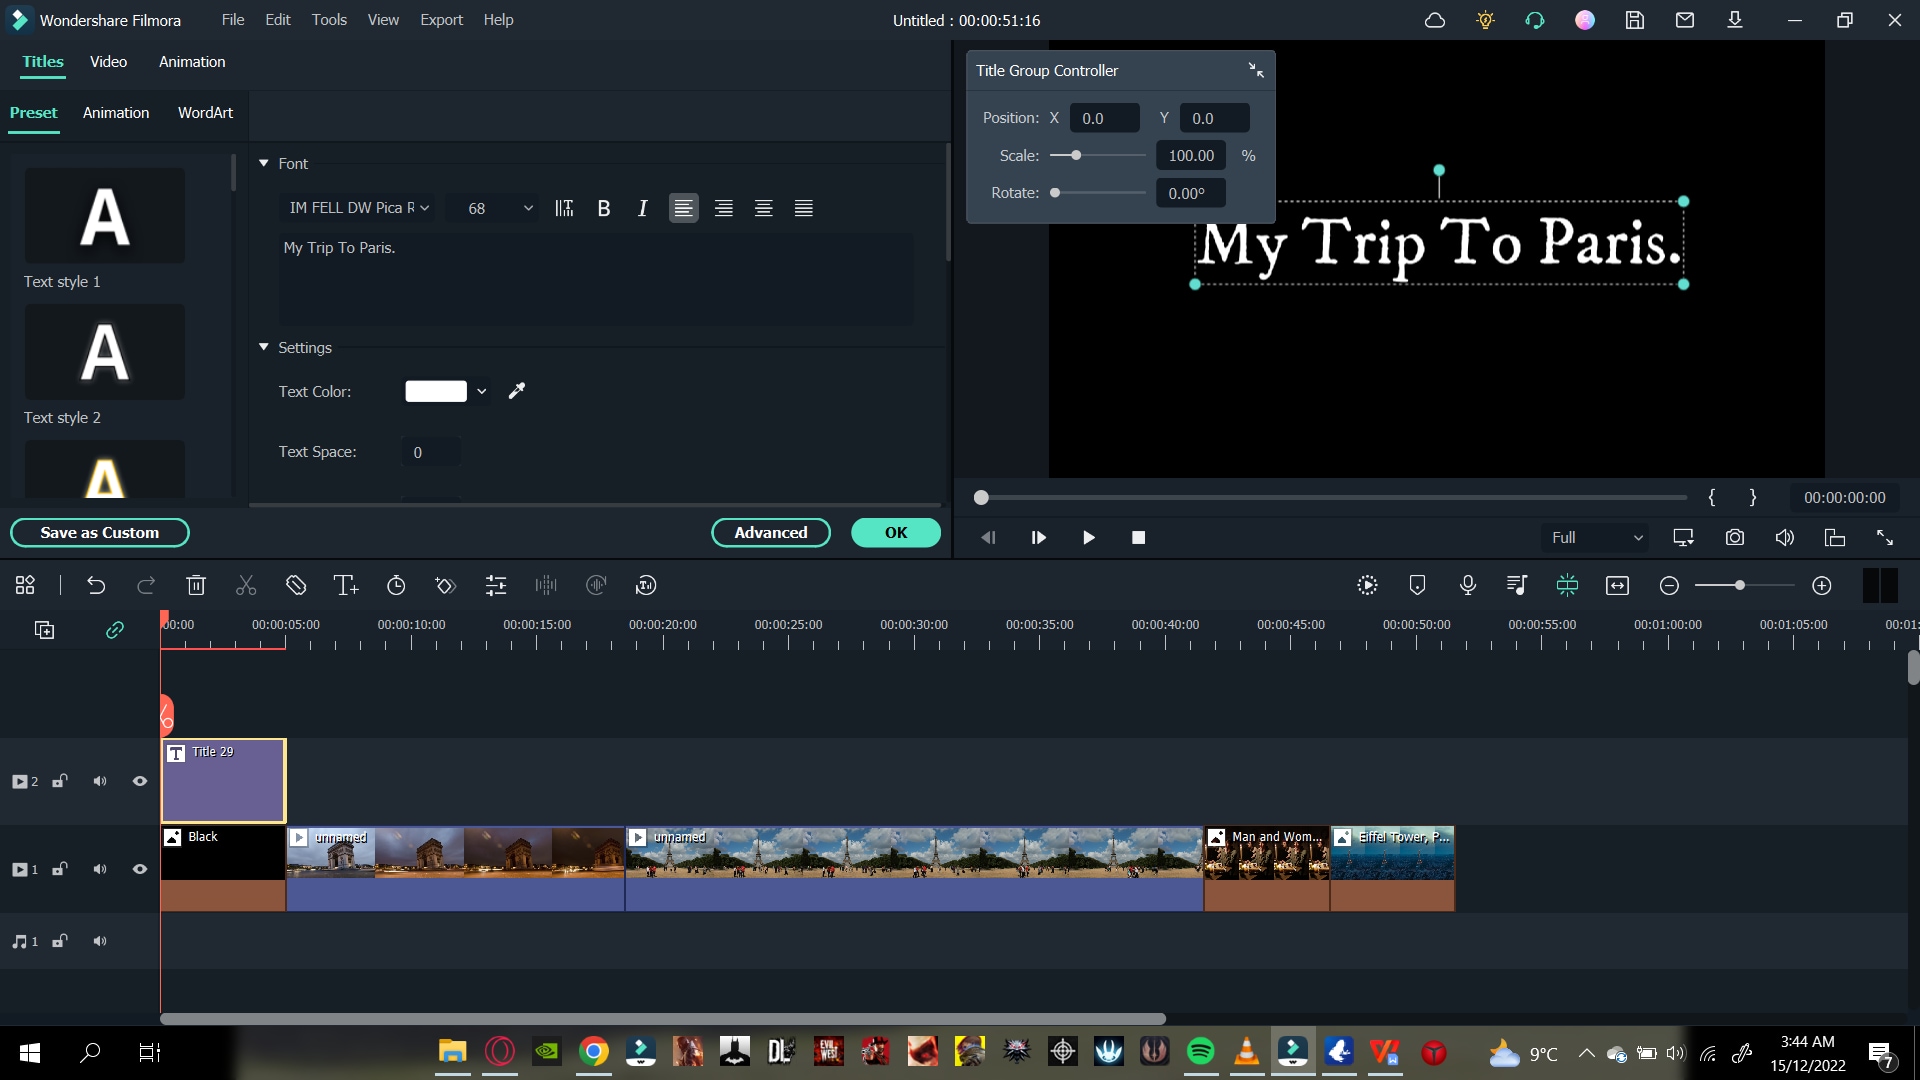
You can also change its font. When you click on the font bar, a drop-down option will pop up, and you choose whichever you like.
- Change the animation of the text title from the top left corner animation
Change The Timing of The Title
You can also adjust the timing of the title by below steps:
- Click on the advanced option in the bottom right corner, and settings will pop up.
- Find the title bar and drag it to the right side to increase the timing of the title.
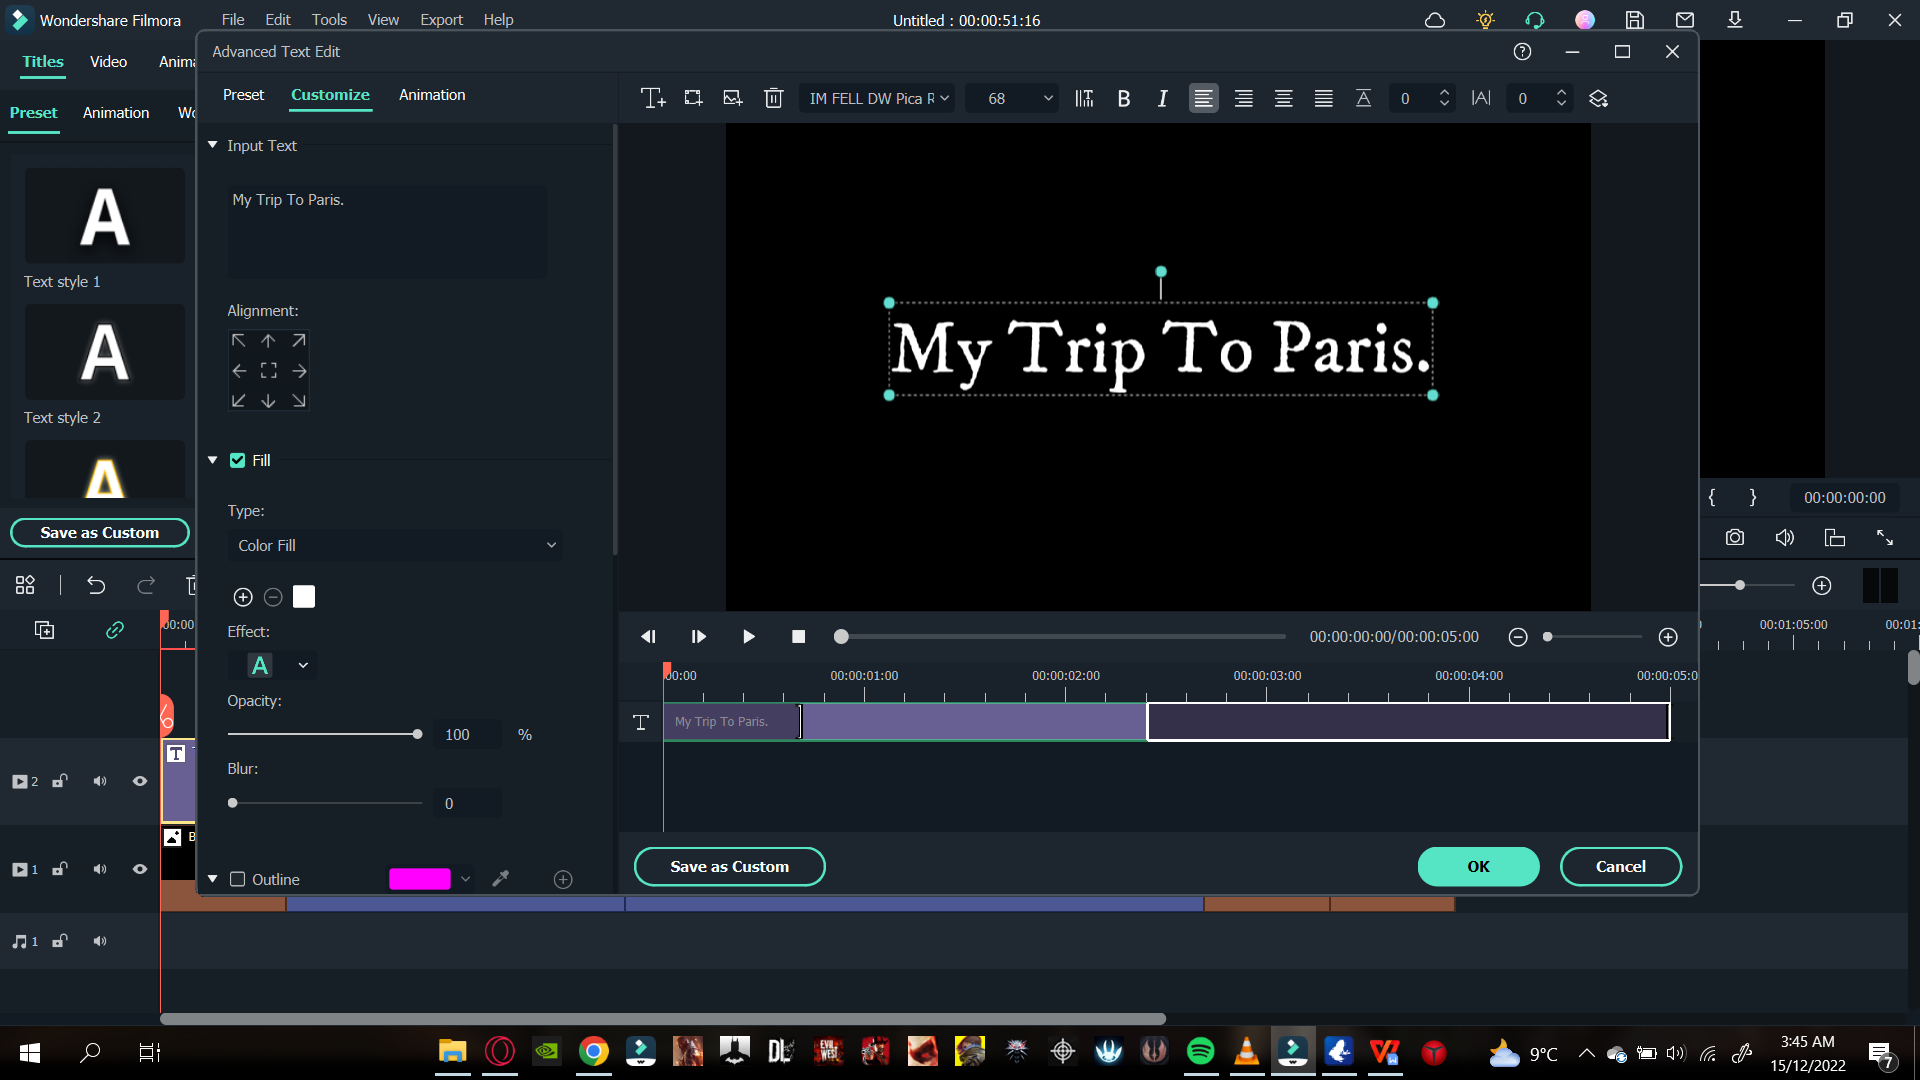
After adding the title, it’s time to go with fading effect as shown below!
Step5 Add a Fade effect
You can also add a fade transition to the start of your video. It will blend the title with the first clip. Follow the steps mentioned to add the transition effects:
- Search the Fade option from the Transitions tab above the import window
![]()
Note: A fade transition will allow your title to fade into the first clip creating a visually pleasing effect.
- Download the Fade transition and drag it between the Black screen and the first clip.
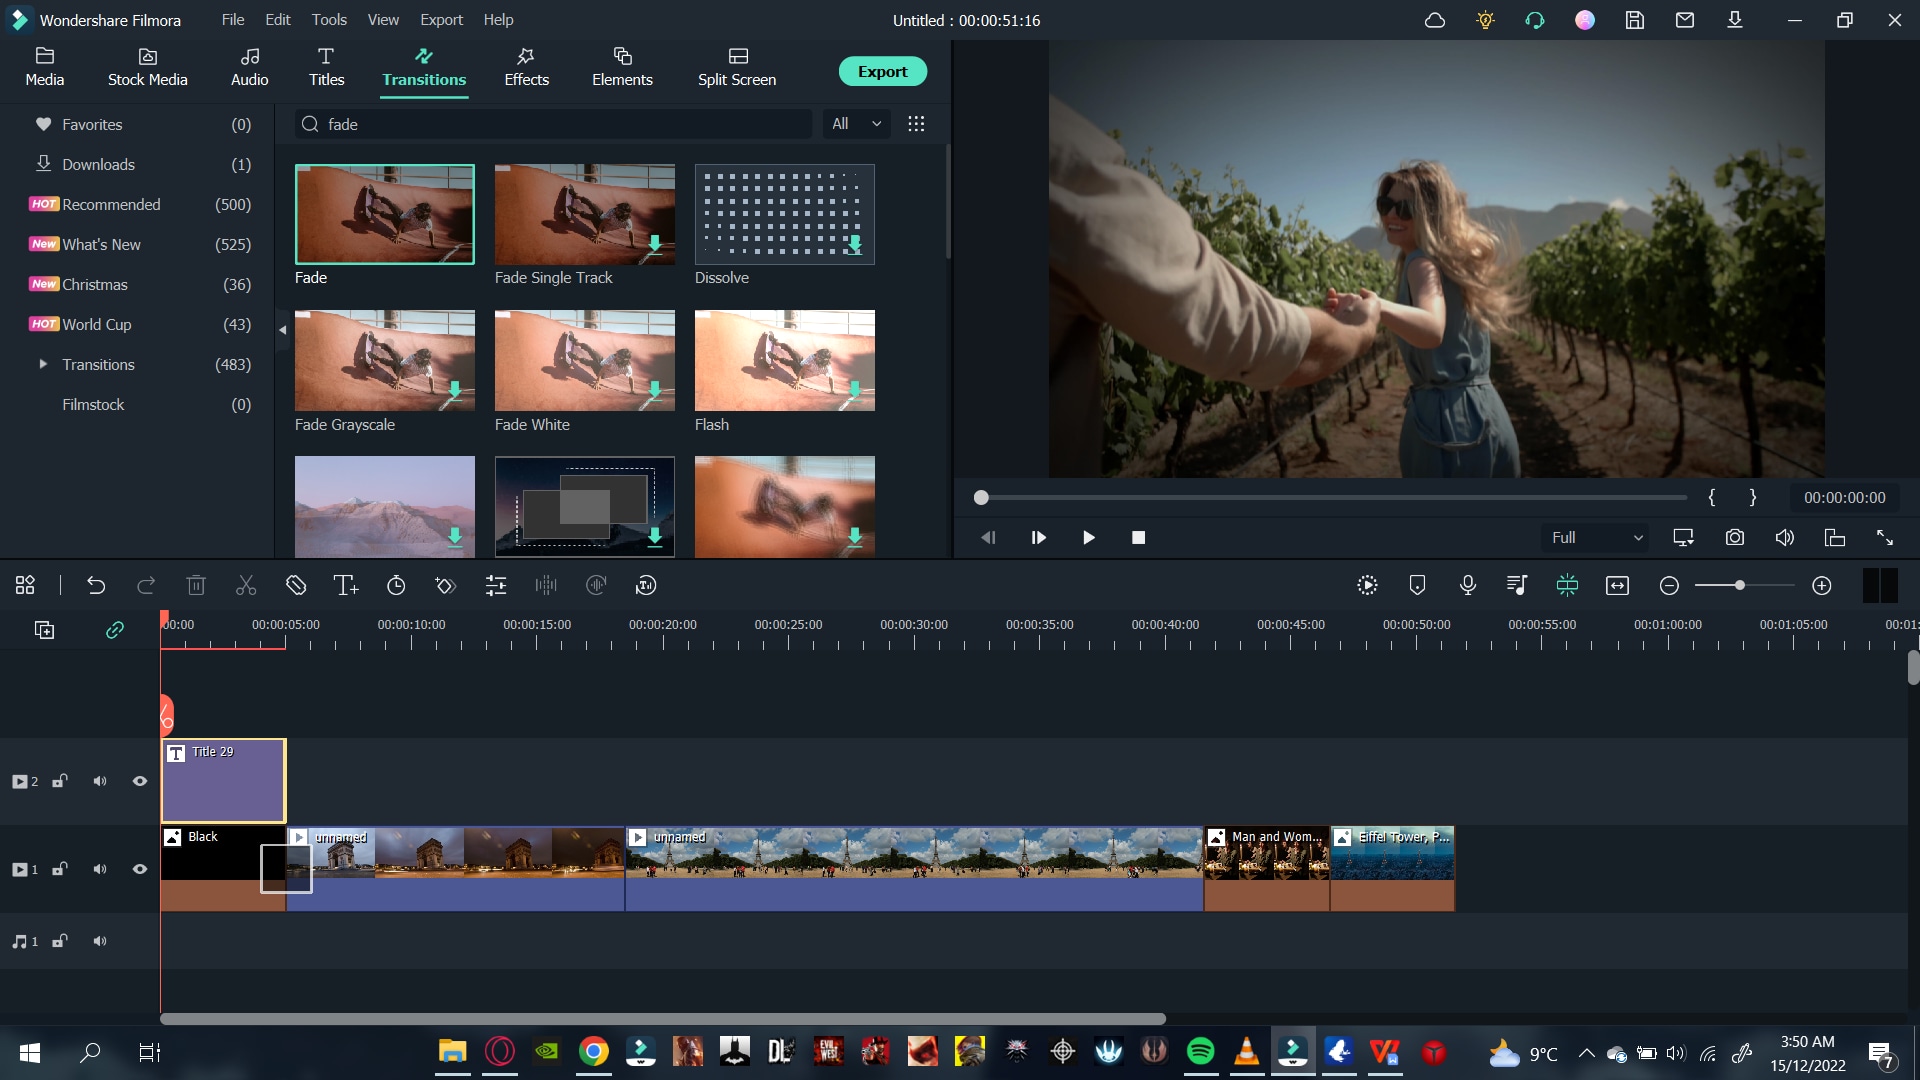
Now that we have added a transition, it is time to move on to our music!
Step6 Add The Music
You can add your music to the slideshow from your PC library, but make sure you have the music rights. It is better to use stock audio by following the steps:
- Click on the Audio icon on the bar above the import window, and the list will pop up.
- Please browse the library to find music that best suits your video and download it.
- Then add it to the timeline’s audio track.
Add Beat Detection
To match your video clips properly with the music, so it remains in sync, you can adjust it with the beat of the music. To add beat detection, follow the steps mentioned:
- Right-Click on the audio that you selected in the audio library.
- You will see a pop-up list, and in the options, you will see Beat detection.
- Click on Beat detection.
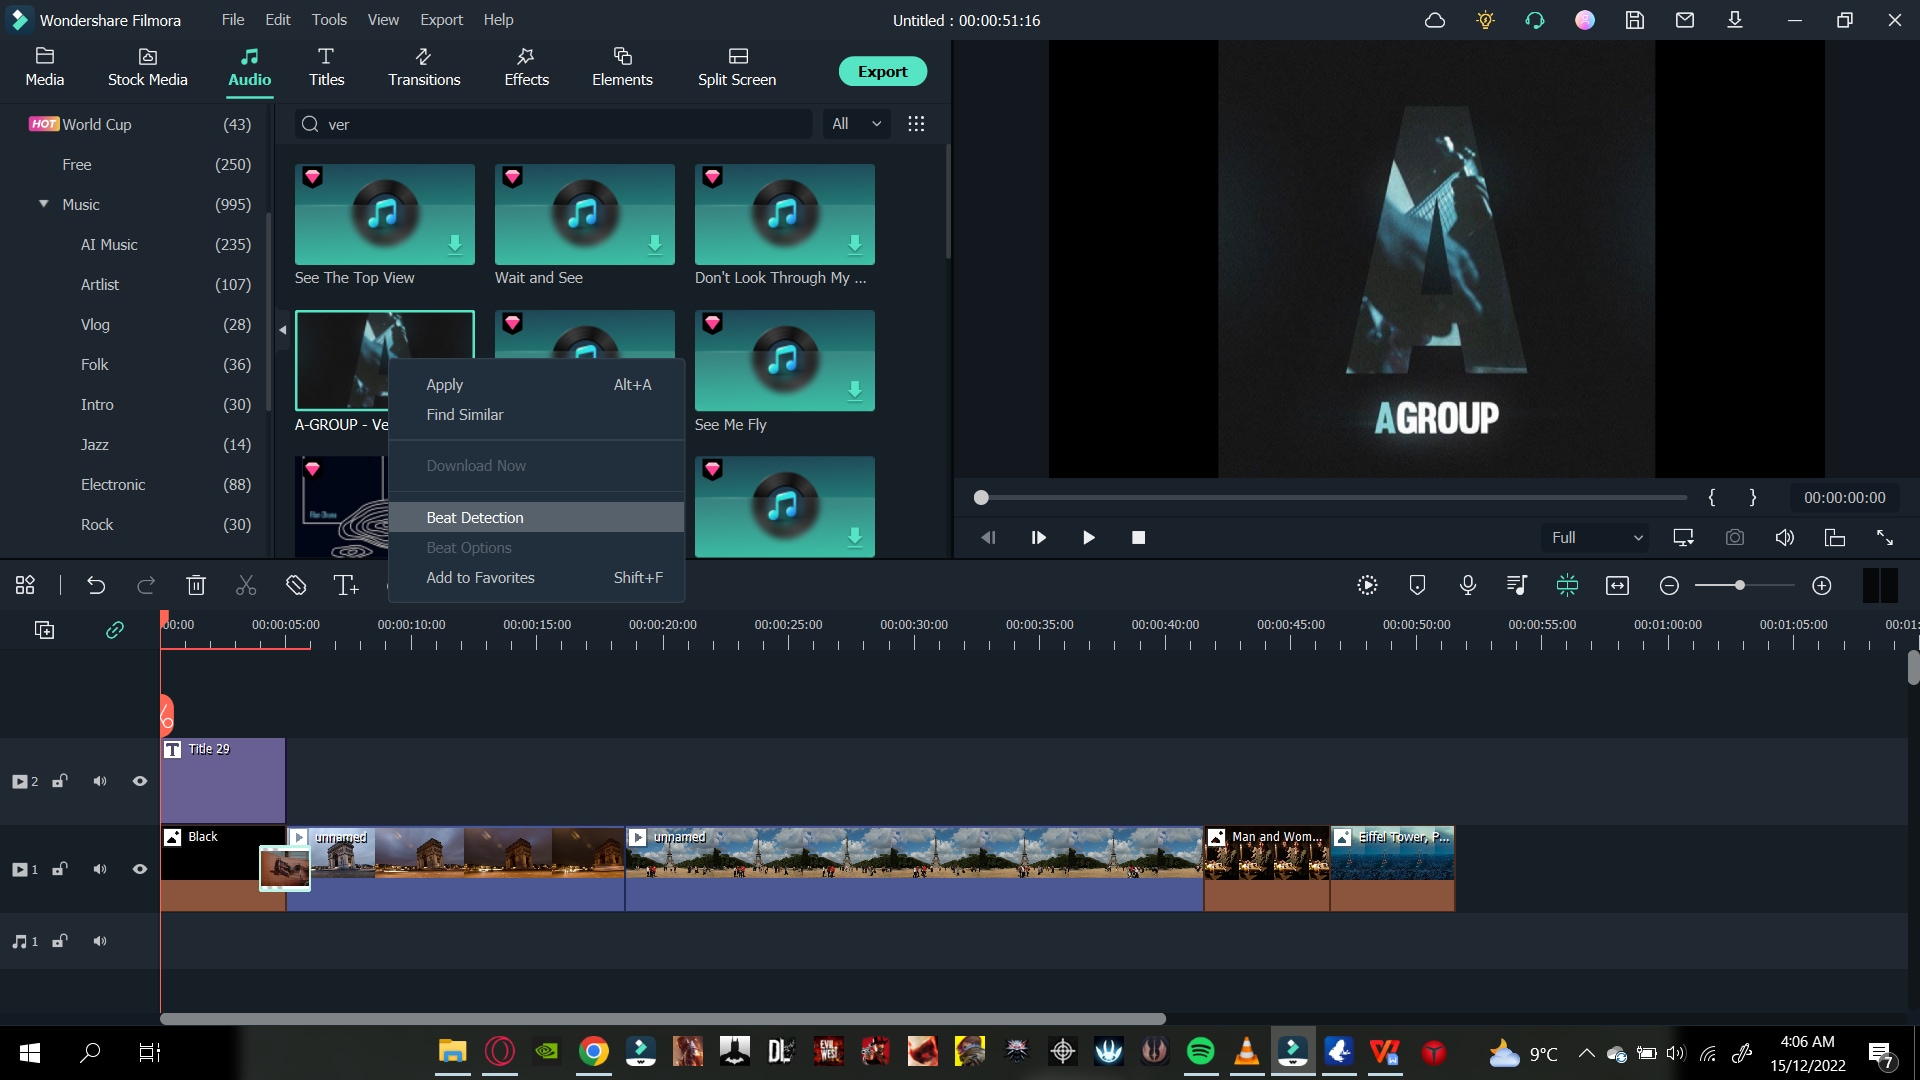
- Then click on the audio and drag it below on the timeline.
Match The Video With The Audio Markers
To have the full advantage of beat detection, you must adjust your videos and photos to the markers. Follow the steps mentioned below to do so:
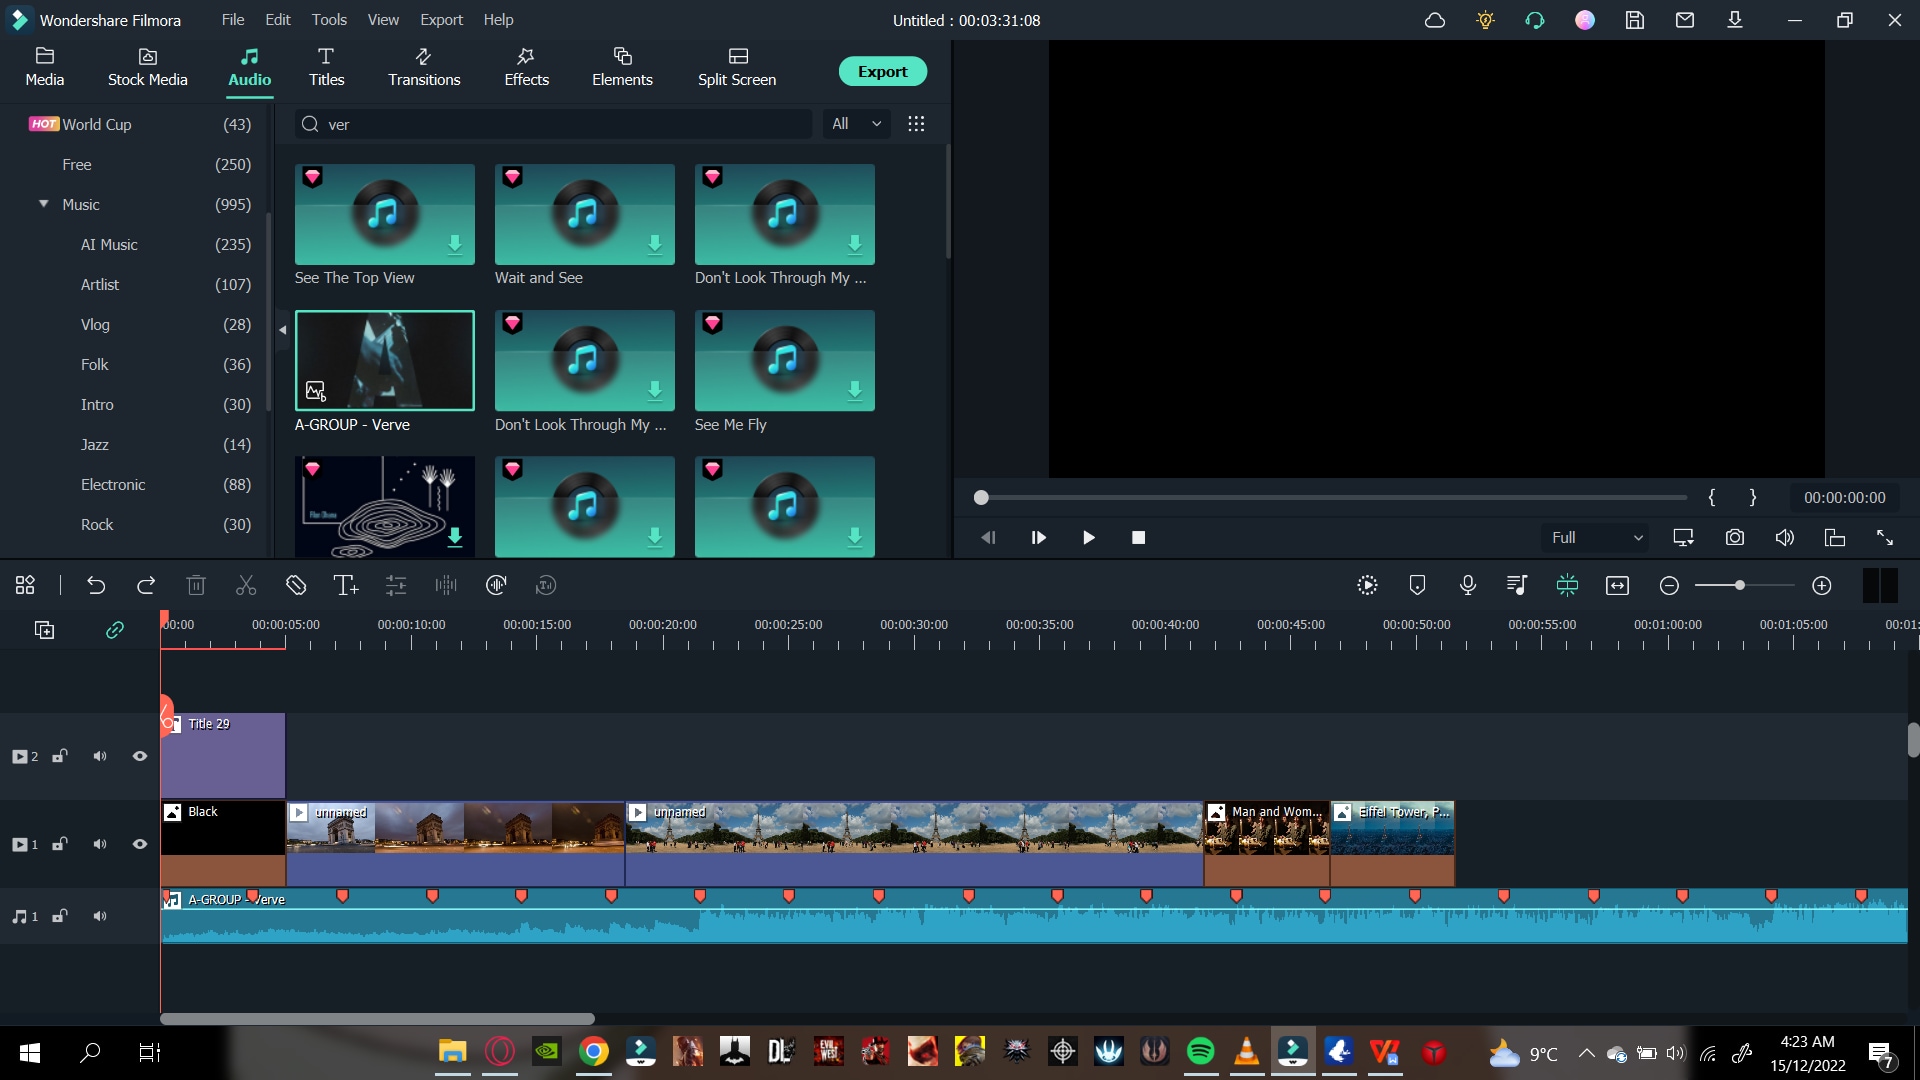
- Check that the video clips are in sync with the marker on the audio.
- For this, drag one video end to a marker or as many videos as you want.
- Ultimately, you will create a timeline in which your videos sync with the audio beat.
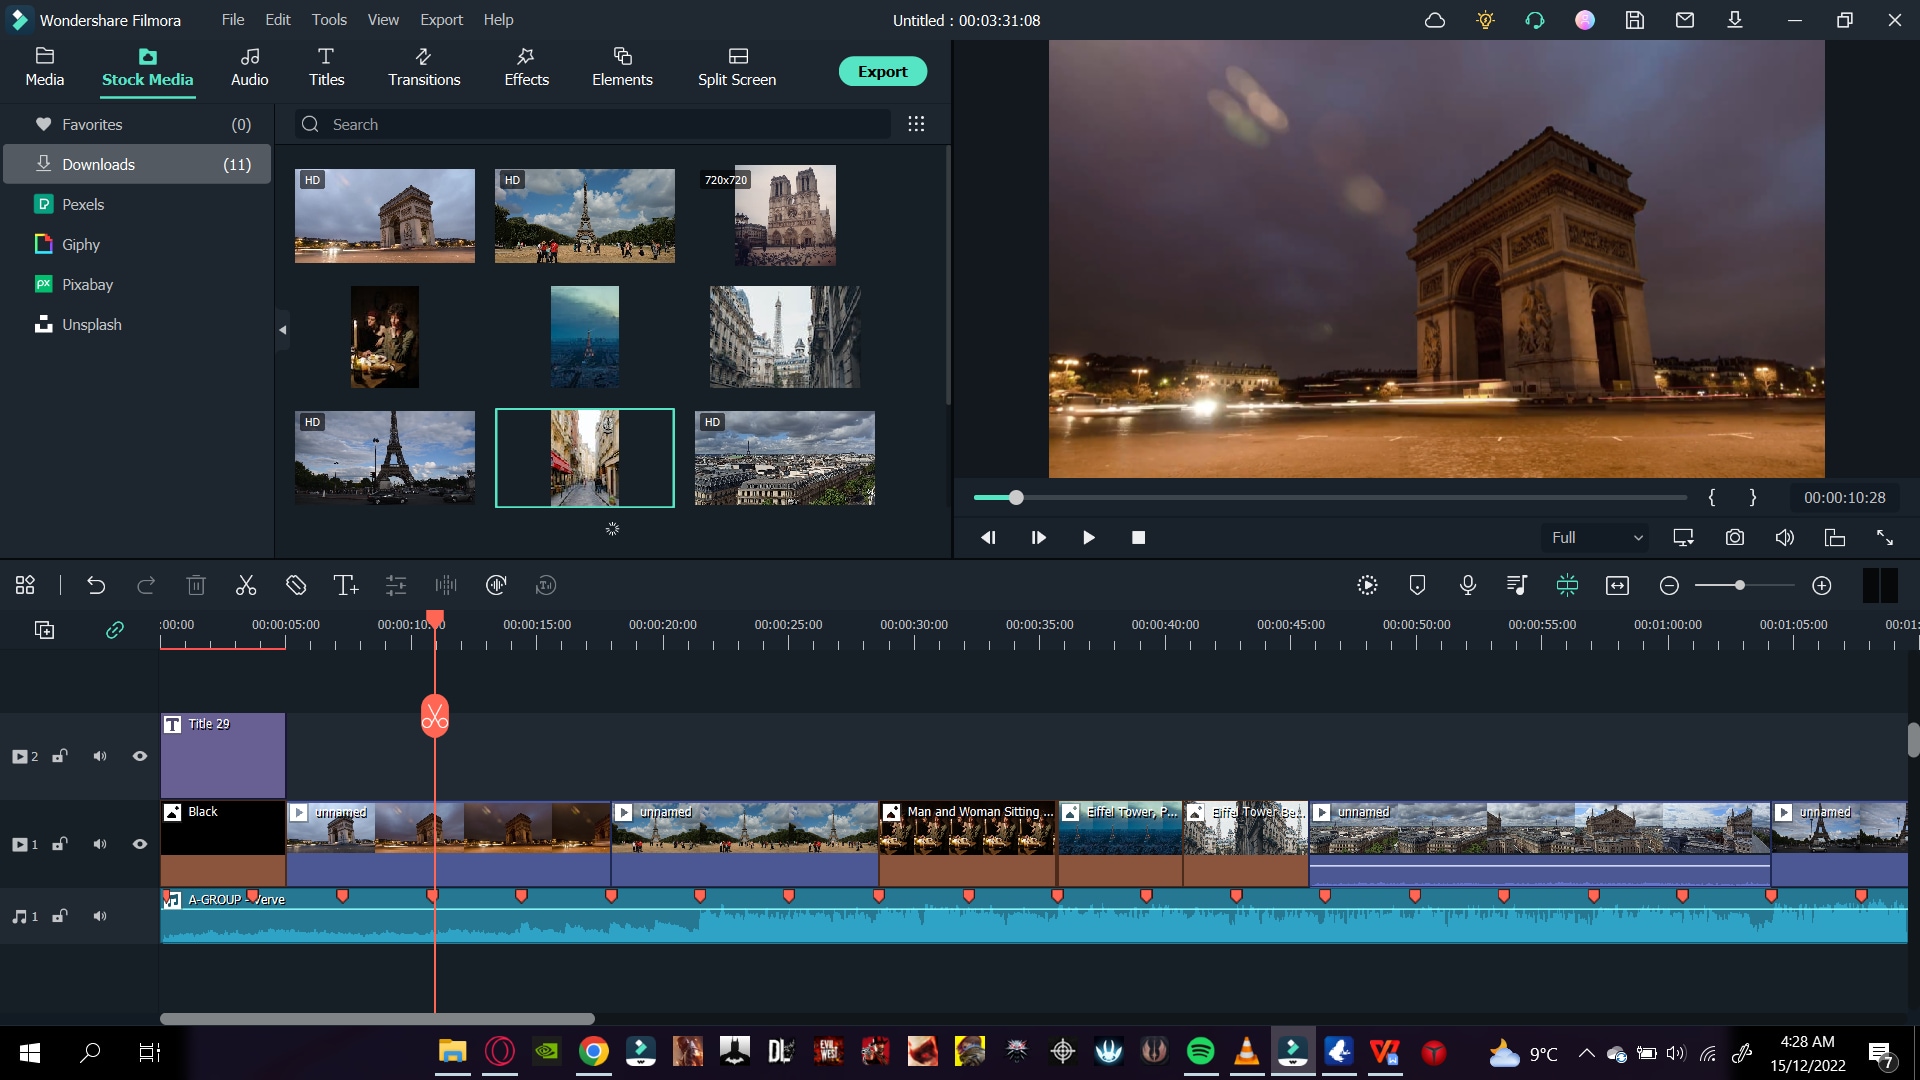
After syncing your videos and photos to the audio, it is time to move on to the scaling and background blur.
Step7 Scale and Blur The Background
Now, some of the pictures you have added must-have black borders. It usually means that your image is shorter than the aspect ratio.
If you leave the picture/photo as it is, the black borders will make it look shorter and out of proportion. As a result, it gives a generally poor look, as shown below.
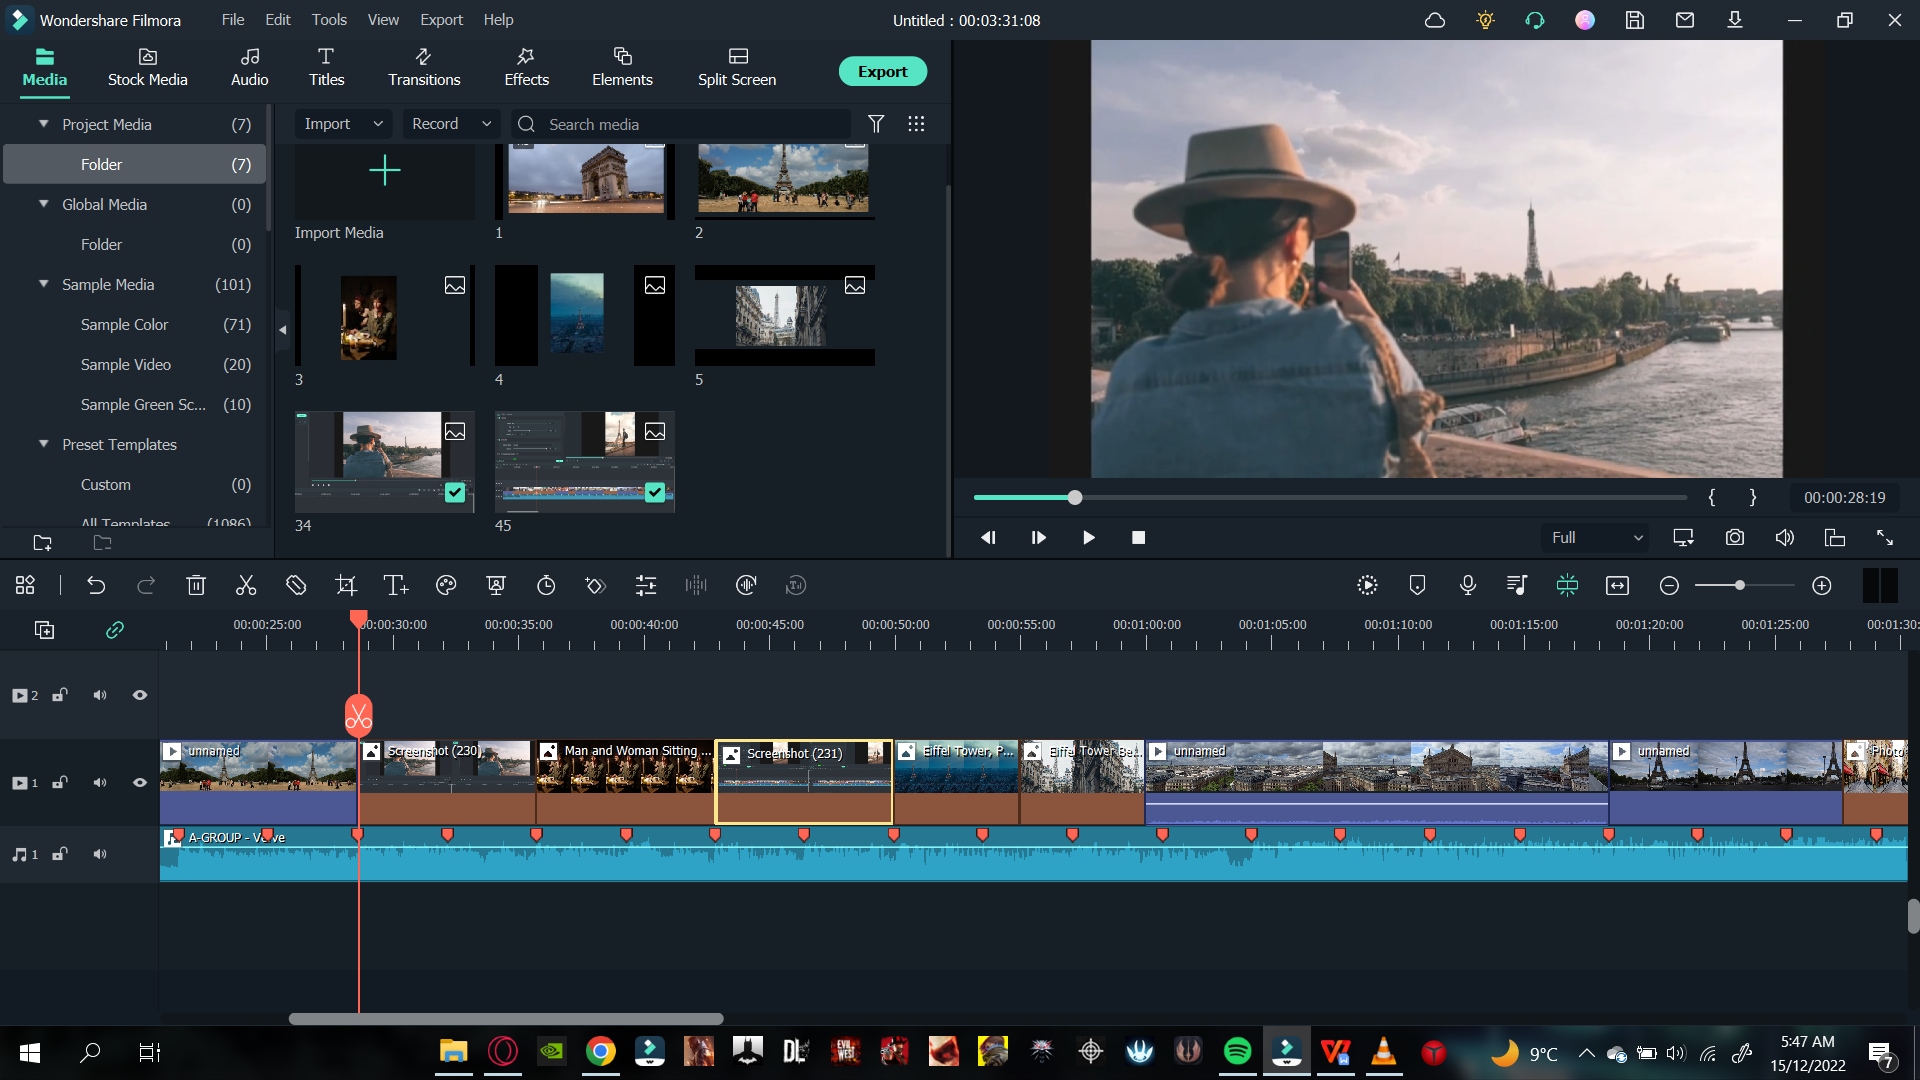
To counter this problem, follow some easy steps:
- Double-click on the picture with black borders, and it will open the settings list.
- Go into the Transform Here you can see multiple settings.
- Increase the size of your photo to match the aspect ratio.
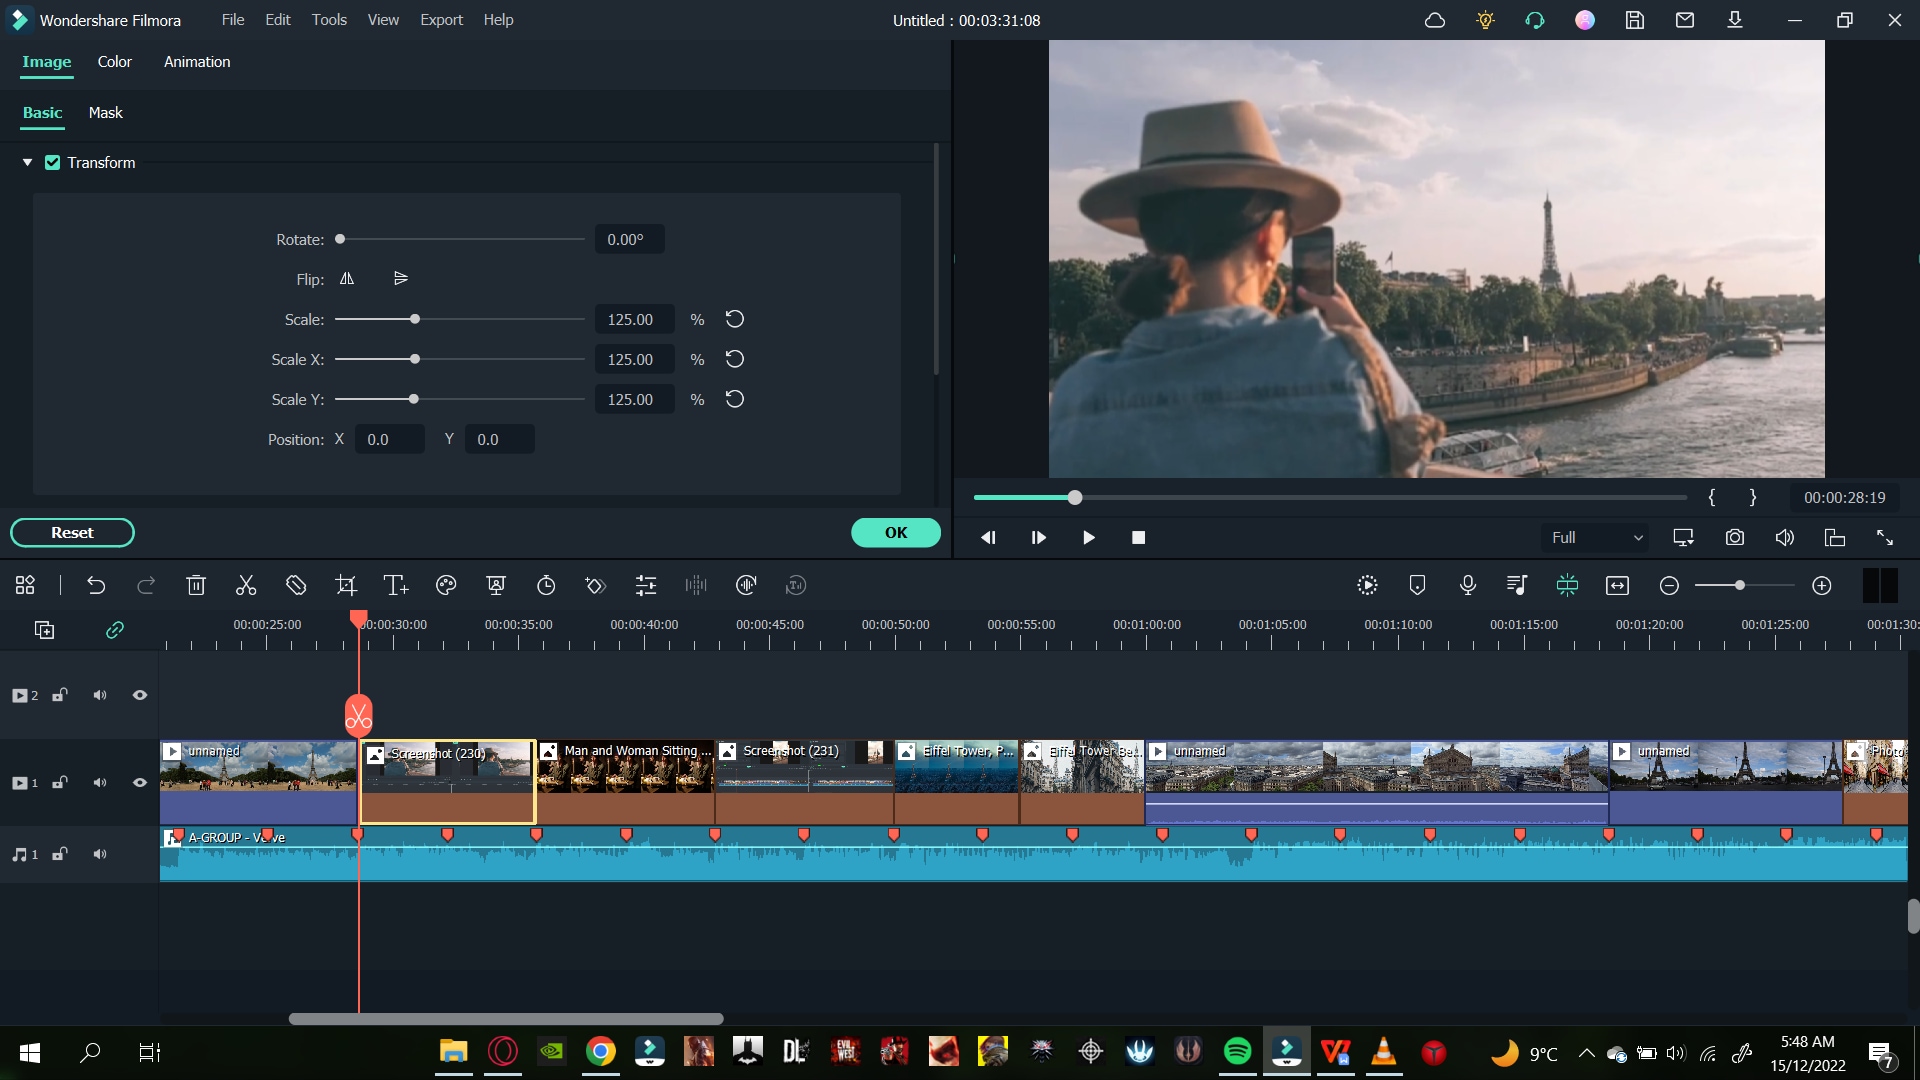
Add a Background Blur Effect
In some cases where you have taken a portrait photo where the picture is vertical, it ultimately stays out of proportion to the aspect ratio.
![]()
Note: Simply scaling the image to match the aspect ratio size is not sensible in this case. Doing so will hide the many pretty features of a portrait.
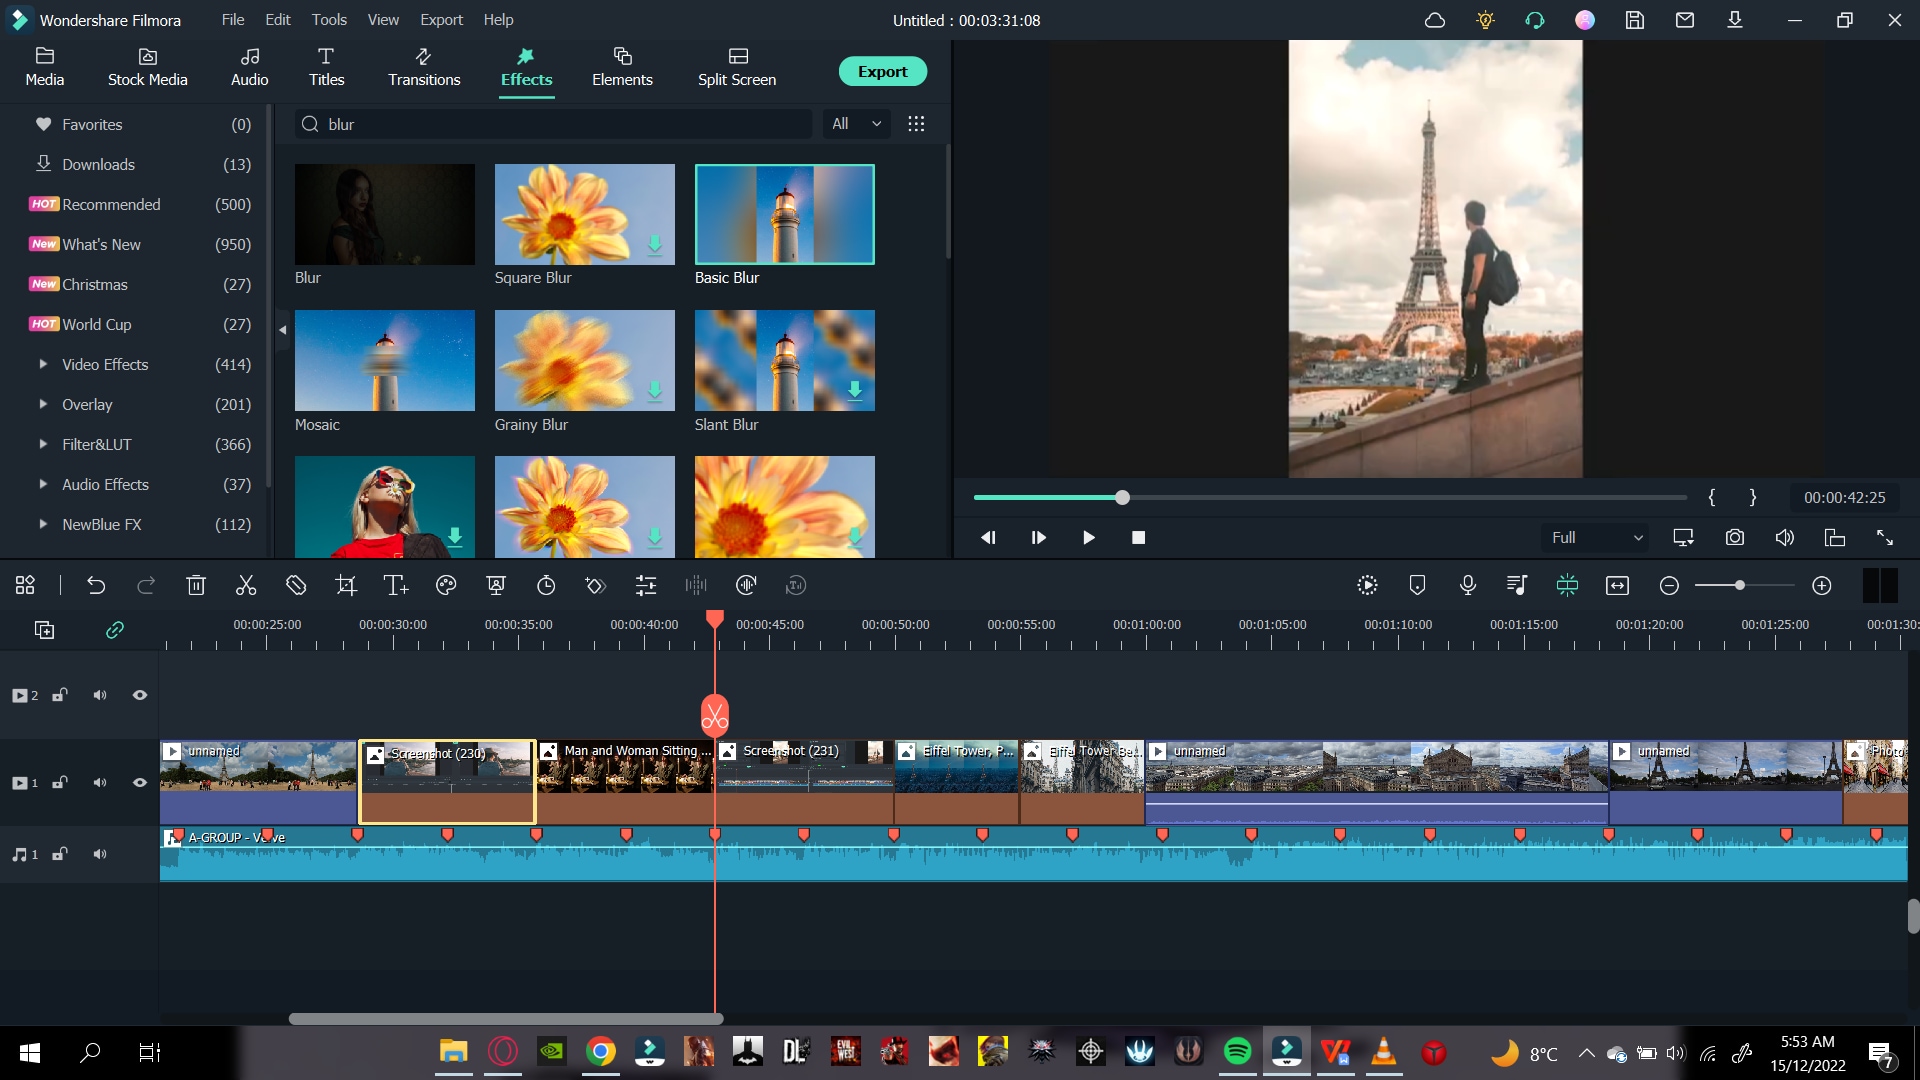
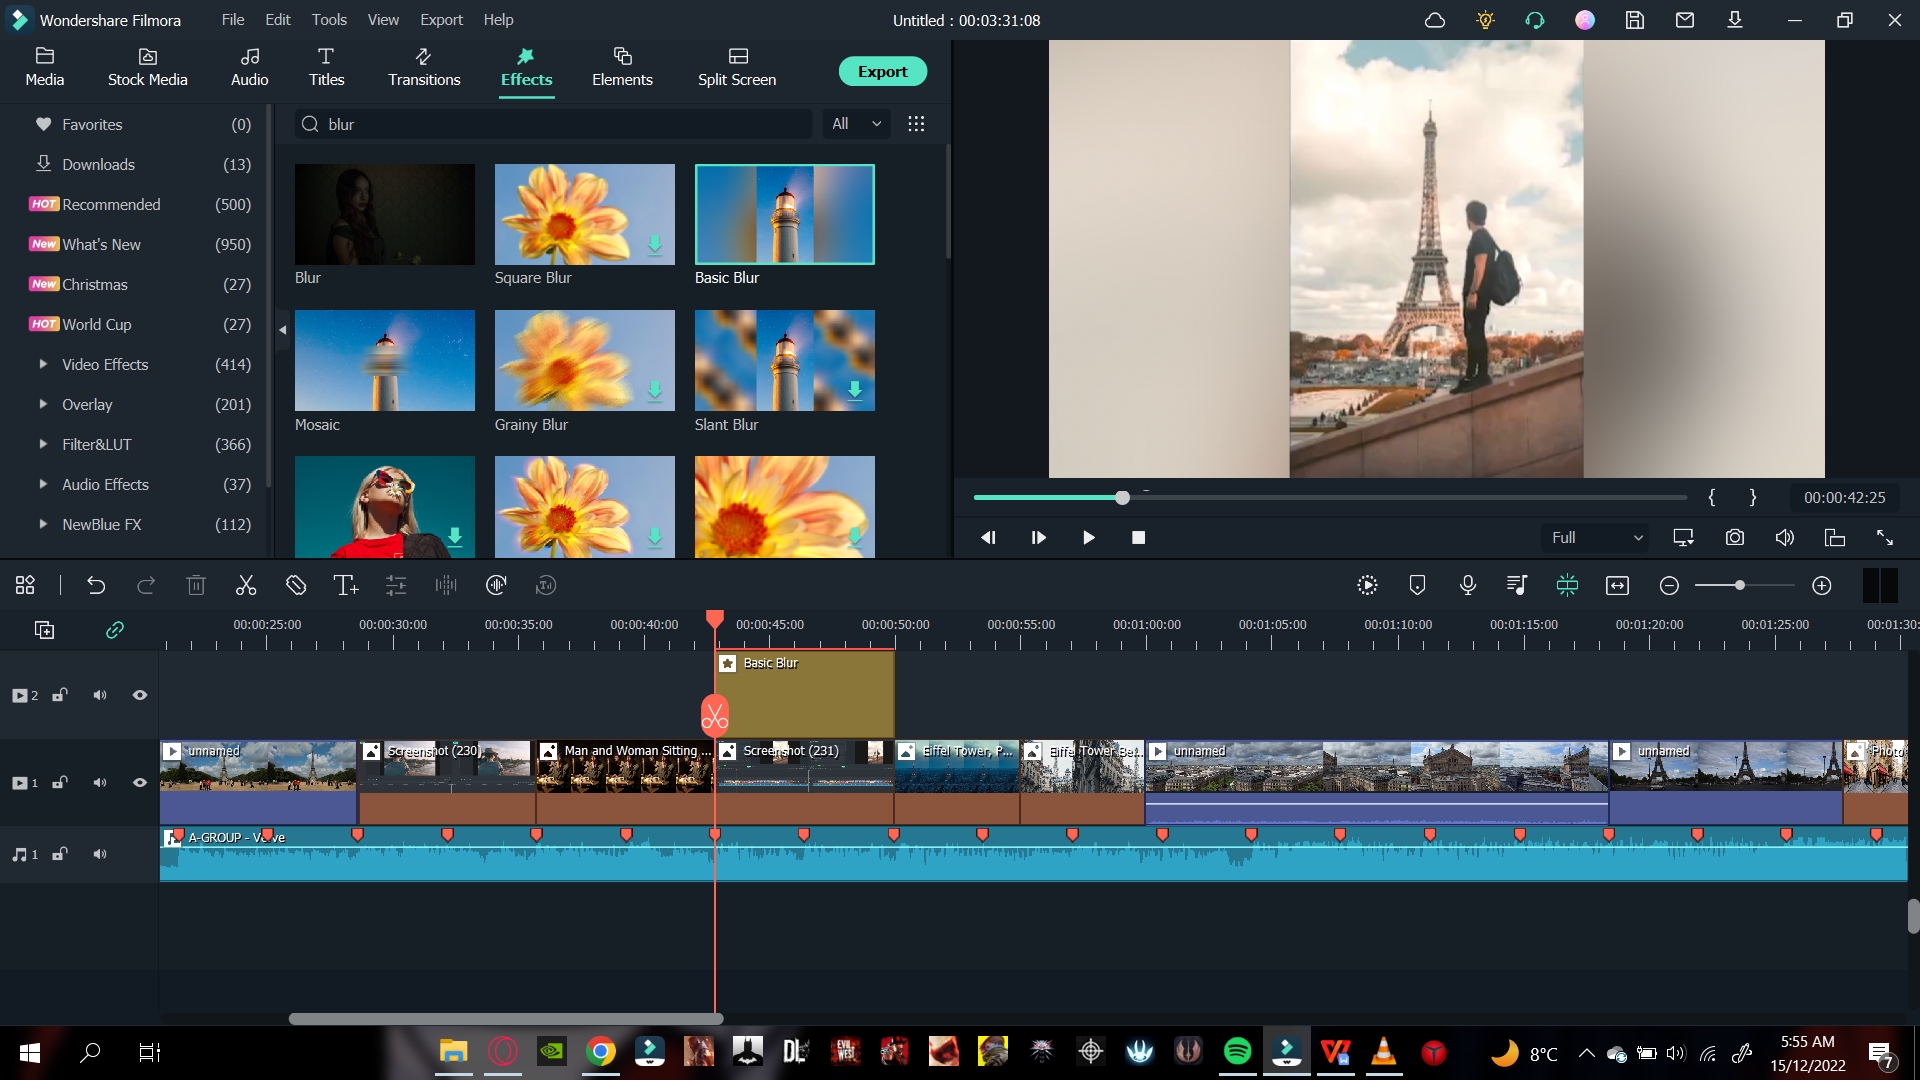
To counter this problem, you can add a blur effect. This effect will turn your background blur, matching the aspect ratio. Follow the steps mentioned below:
- Click on the Effects tab above the import window and search for Blur.
- Download the blur effect that suits you best and then drag the blur effect above your photo in the timeline.
You will notice the background turn to a blur in the main play screen.
Step8 Add a Transition
You can also add a transition effect to spice up things. It can get bland when your video or photo changes from one to another. To create a good slideshow video, you can add a transition effect by following the steps mentioned below:
- Click on the Transition icon above the import window.
- Browse the library until you find a transition you like, then download one.
- Click on the transition and drag it between the clips.

Adjust The Duration and Placement of The Transition
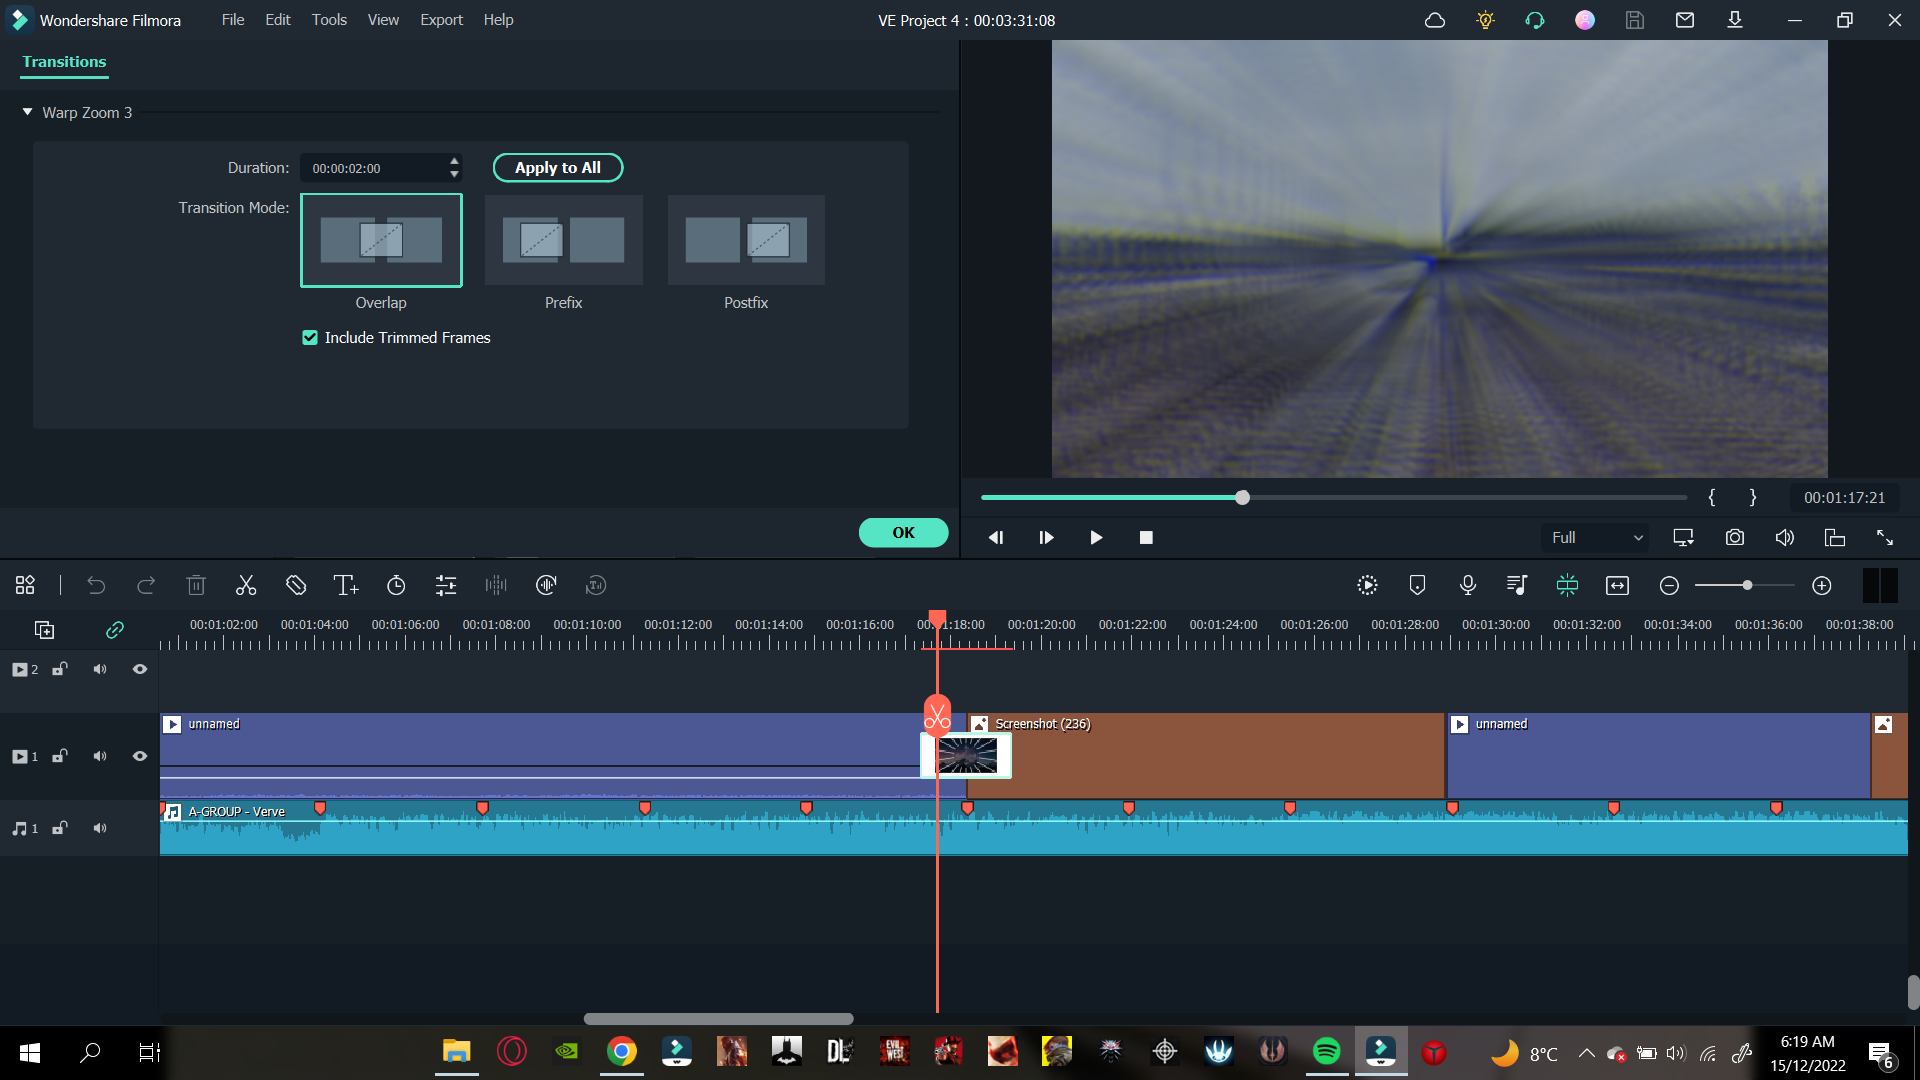
Now it’s time to adjust the duration and placement of the transition. For this, you can follow the steps mentioned below:
- Double-click on the transition effect, and it will open the settings list.
- You can adjust the duration by setting the timer as per your requirement.
![]()
Note: If other transitions are added to the timeline, you can adjust them by clicking Apply to all.
When you have adjusted the slideshow transitions, it is time to move on to the effects and filters.
Step9 Add the Effects and Filters
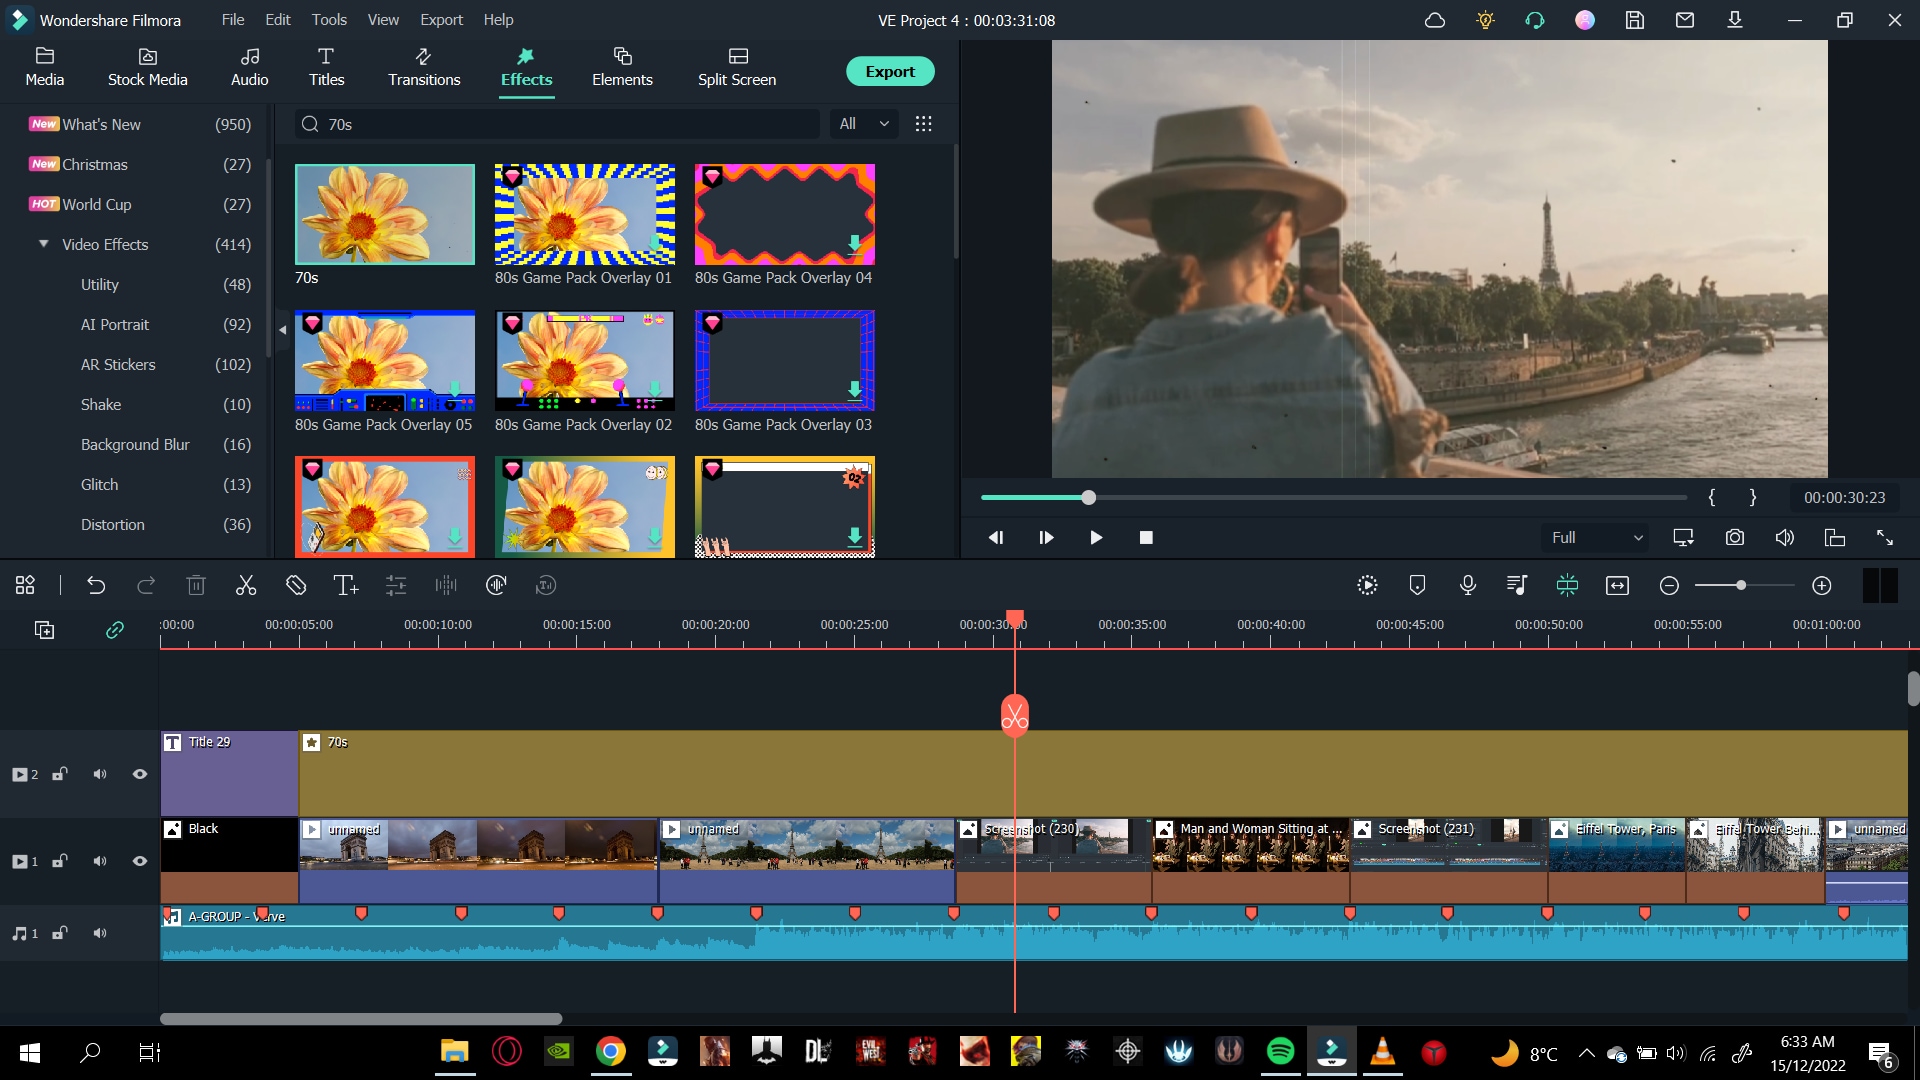
If you create a slideshow video of your trip to a historical place. You can add a Vintage filter to your video to give it that vintage tint. Follow the steps mentioned below:
- Head over to the Effects tab, where the effects library will open up
- Select any effect and download
- Click on the effect and drag it to drop in the timeline.
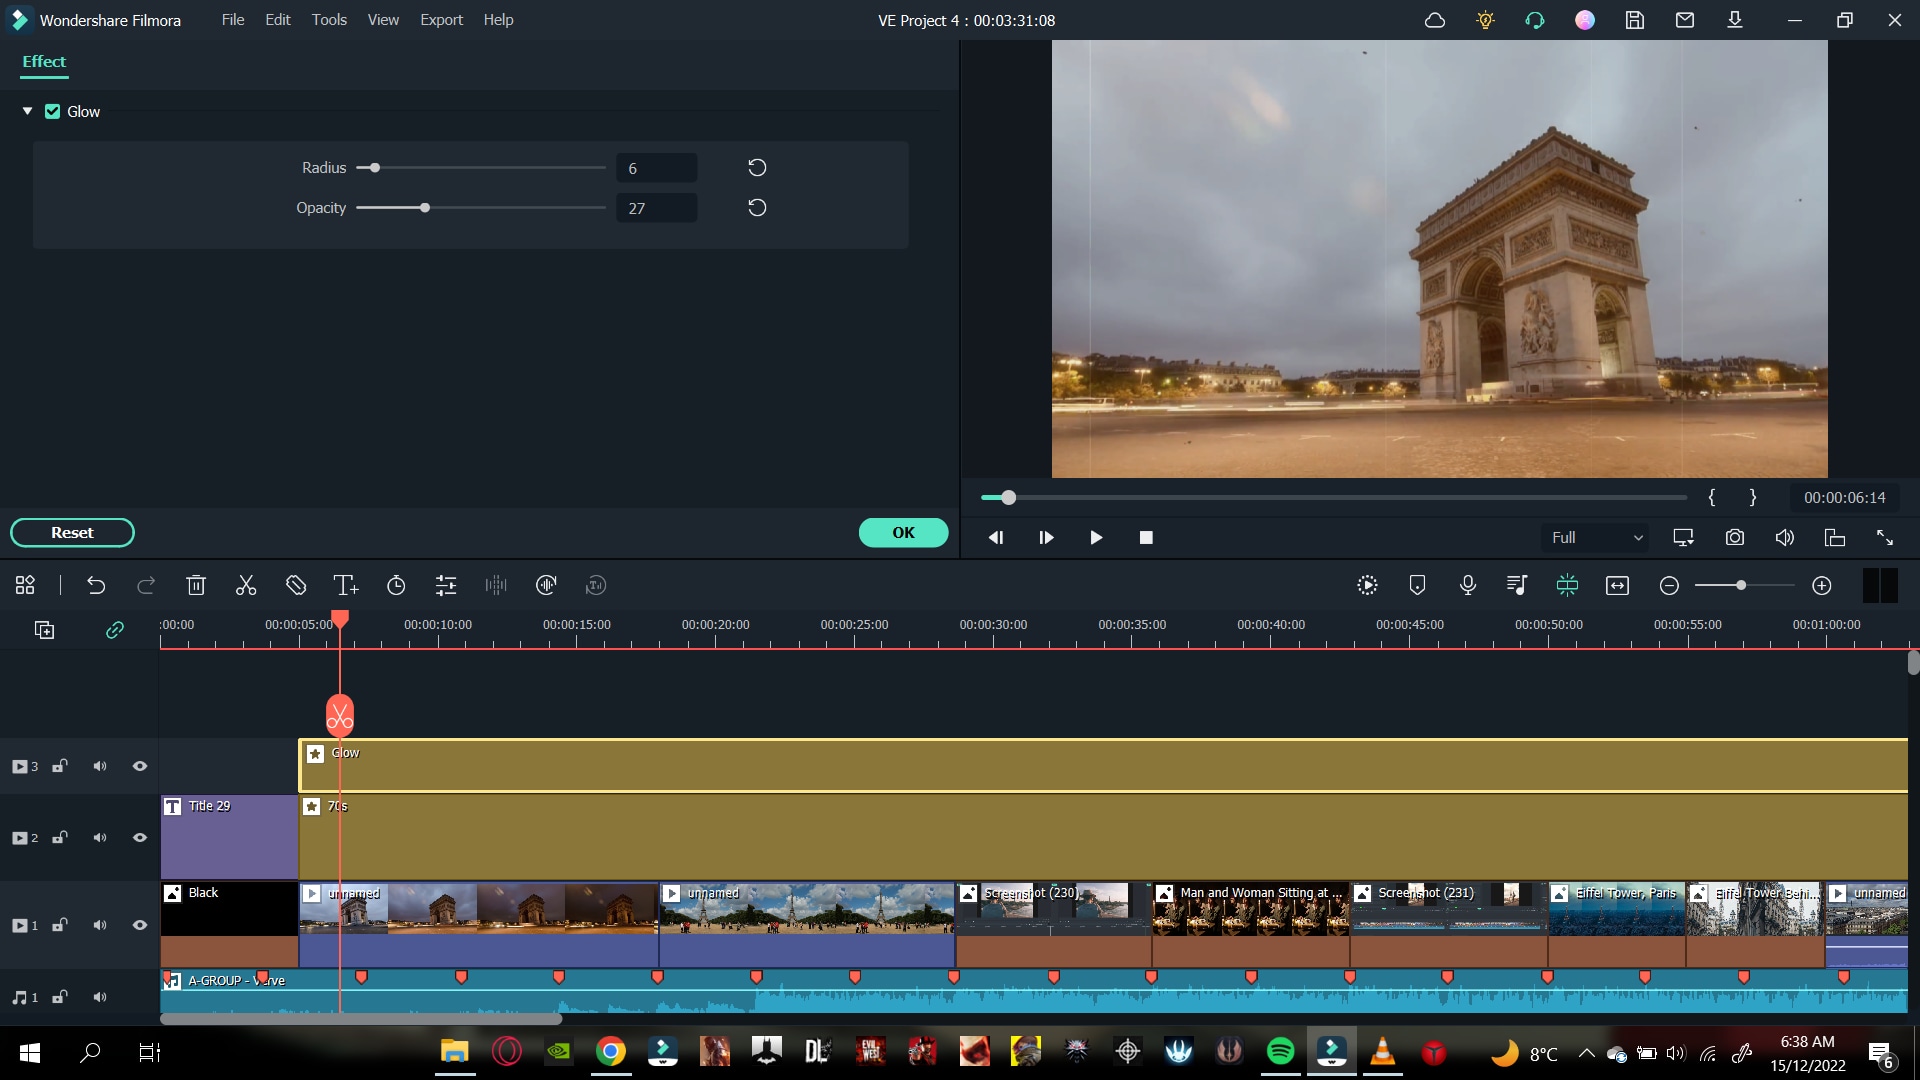
Combining a vintage effect with a dreamy glow will make your video pop up even more. To add a nostalgic glow to your video, follow the steps:
- Click on the effects and search for Glow in the search bar.
- Click and drag the glow effect above the timeline and ensure the effect is in the separate video timeline.
- Ensure the effect is applied to every photo and video.
- Double-click on the effect, and settings will open in the import window.
- Then, you can adjust the radius and opacity of the video. Adjust as you desire.
We are almost done. Let us now move toward our outro!
Step10 Create an Outro
The steps we will do will be similar to the ones we did initially. As we are creating, we will again need a canvas. Follow the steps mentioned below:
- Head to the media icon on the bar and scroll until you see the sample media tab.
- In the sample color option, drag and drop the black color at the end of your video.
Add an Outro Transition
To finalize things, add a transition effect at the end of the clip by these steps:
- In the Transition tab, search for the Fade effect.
- Drag and drop the Fade effect between your last video clip and the Black screen.
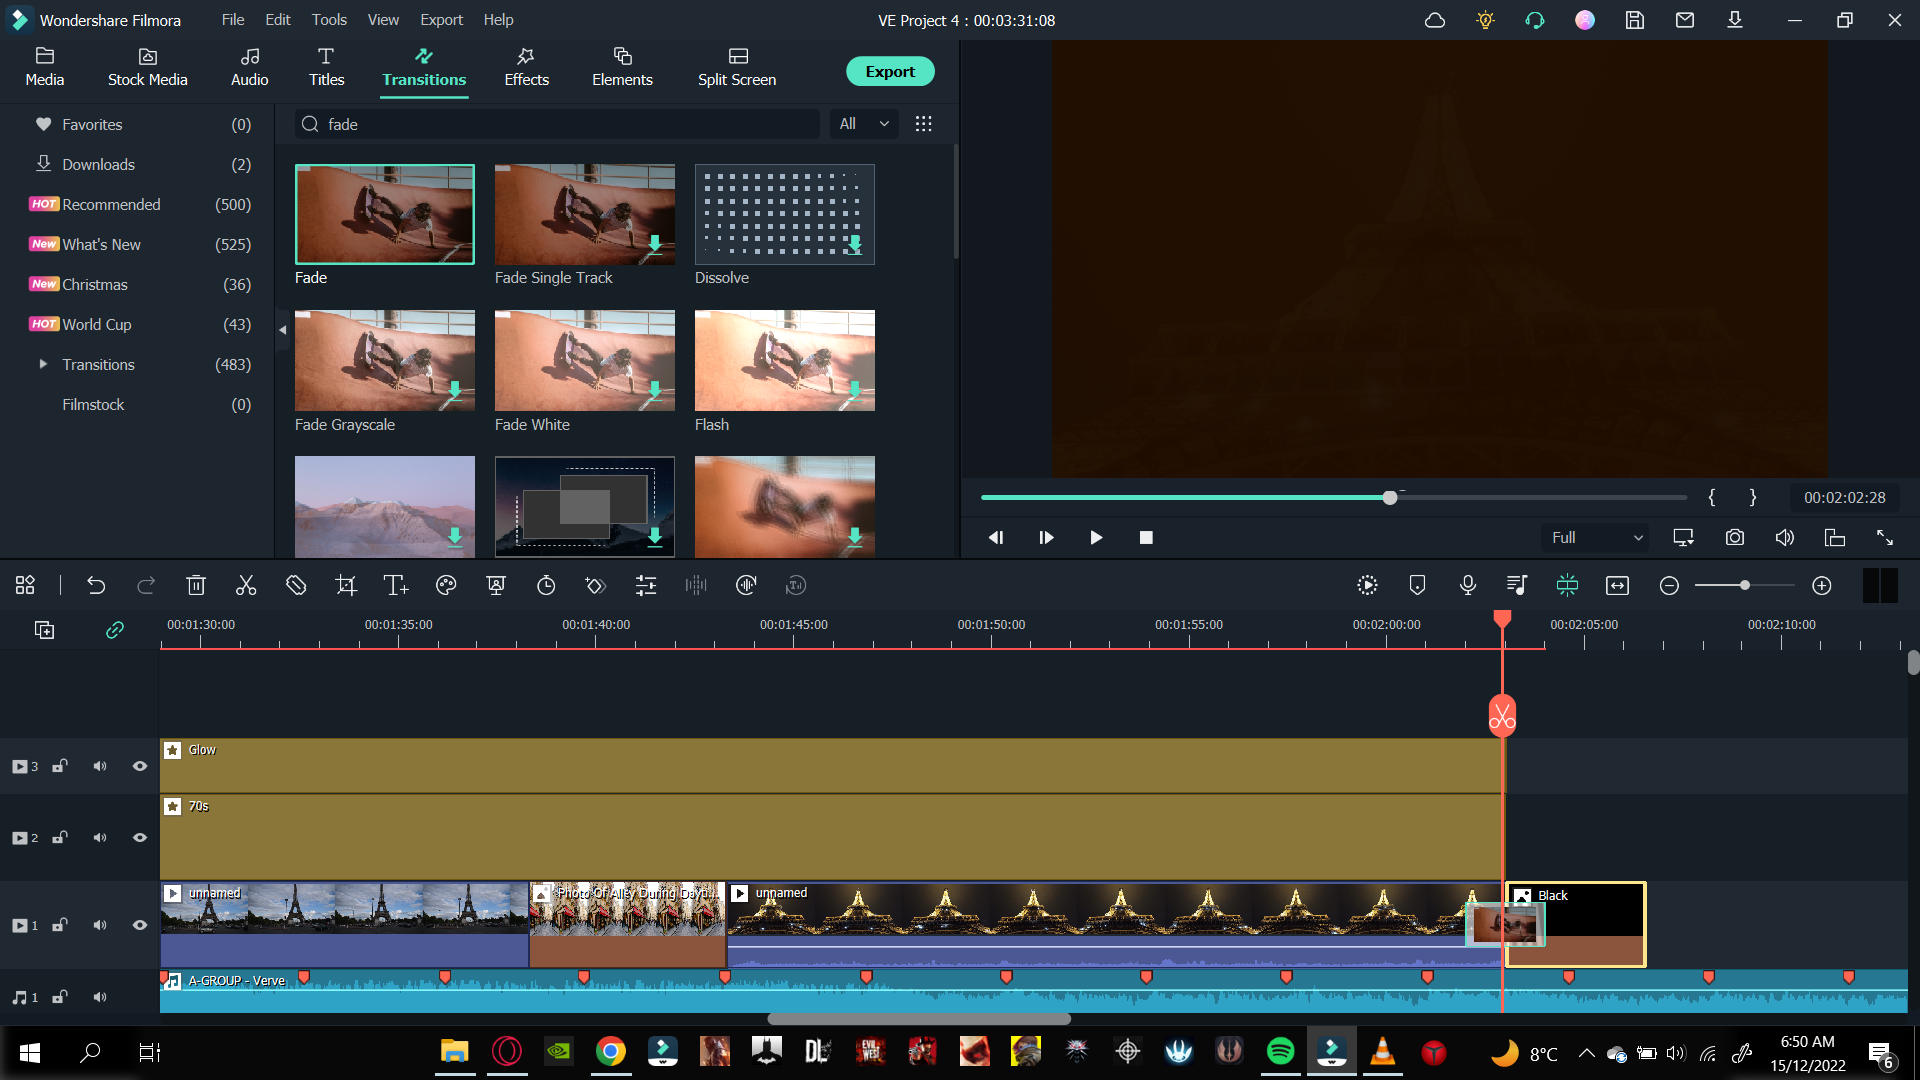
Fade out The Audio
If the audio suddenly ends at the end of your slideshow, it will create a bitter effect. Therefore, you should always fade out audio at the end of the video. To do this, follow the steps mentioned:
- Double-click on the audio in the timeline, and the settings list will pop up.
- On the top section of the import window, you will notice fade options.
- In the fade-out bar, drag it to the side to set your fade-out timer.
You can show your friends and family the slideshow or upload it to Youtube. Play the Slideshow Video from the beginning to see the changes.
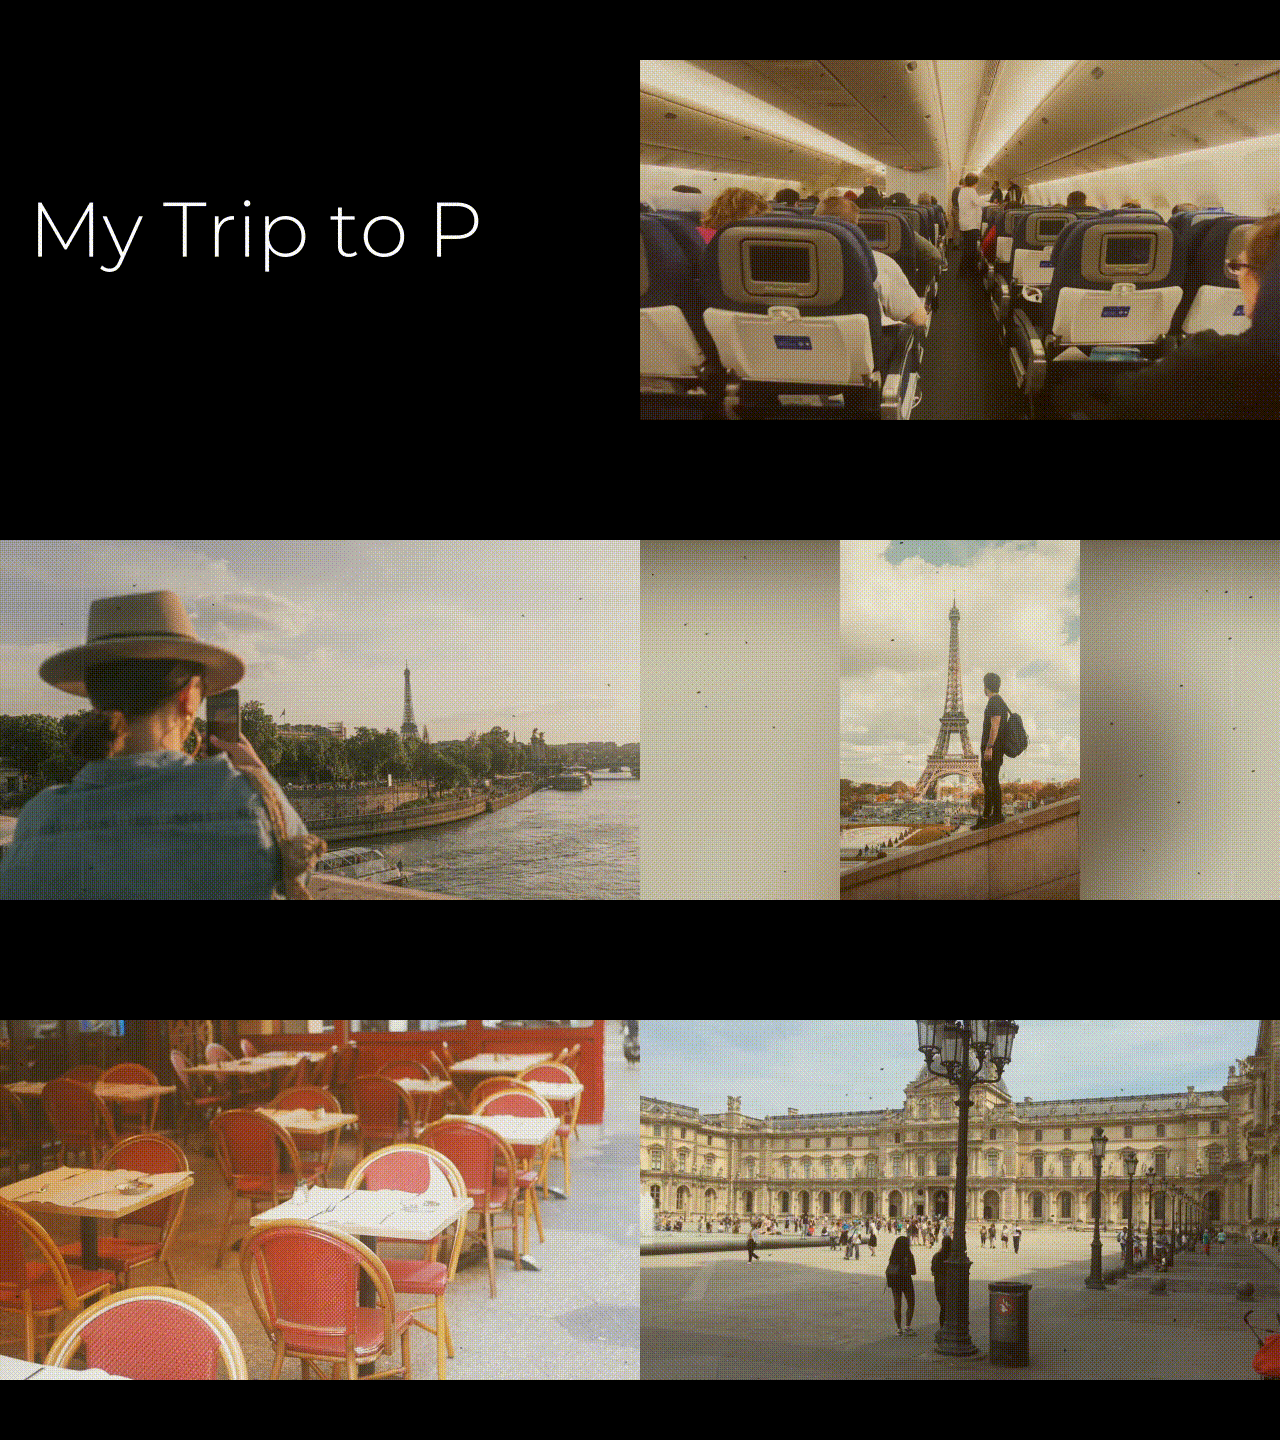
Conclusion
By the steps mentioned above, you can create a slideshow video. Give every moment a chance to align everything on one side! The slideshow will also save your device space by aligning everything in one video.
Free Download For macOS 10.14 or later

Let’s start with the step-by-step instructions for making a slideshow video now that you know the requirements for generating a slideshow.
Part 5. Step-by-Step Guide to Creating a Slideshow Video
Utilizing filmora will reduce your workload while producing quality work. Follow the below step-by-step guide to make your slideshow video instantly!
Step1 Download Wondershare Filmora
Wondershare Filmora will provide the working platform. Follow the below steps to download it:
- First, install the Wondershare Filmora.
- Then, launch this application on your PC or Mac
Let’s proceed to edit our video after downloading the Wondershare Filmora software. Continue reading to find out how to begin the editing process.
Step2 Import your Photos and Videos
Importing your videos and pictures to Filmora’s media panel is best to have them all in one folder. Therefore, when you open Wondershare Filmora, you will notice the main import window in the top left corner.
- Click in the center of the import window upon the import icon.
- Browse from the PC library to where your target Videos and Photos are stored.
- Please select the required videos and photos and Open

Your next step will be to add the imported videos and images to the timeline.
Step3 Add your Photos and Videos to the Timeline
When you have multiple videos and photos, you can add all of them simultaneously. Or you can also add them one by one wherever you need. Follow the steps mentioned:
- Right-click on the photo or video you want.
- Keep holding the Right-click and drag it down to the timeline.

Now that we have imported your photos and videos into the timeline, it is time to align and add text.
Step4 Add the Title
To create an attractive slideshow, you will need to add a title before the start of the video. Doing so will allow you to gain more viewers and audiences.
Add a Black Screen
The black screen will eventually act like a canvas to give your title a good look. To add a black screen, follow the steps mentioned:
- Click on the media icon from the bar above the import window.
- You will notice many tabs on the left-hand side under a drop-down bar.
- Scroll below to find the sample media
- Download the black color if it is not downloaded already.
- Click and drag it down below to the start of your video.

Add a Title Tile
Now that we have our canvas, we will now add the title. Above the import media library, there will be a Title icon.
- Click on the title icon, and select the title that you want for your video by browsing and scrolling down.
- For this purpose, we will use a simple title tile called “Title 29.”
![]()
Note: You can find the same title by scrolling, browsing, or searching in the search bar above the import library.
- Click and drag the title onto the black screen that we added.
- Double-click the title to open its settings.
- Here you can type in the text that you want.

You can also change its font. When you click on the font bar, a drop-down option will pop up, and you choose whichever you like.
- Change the animation of the text title from the top left corner animation
Change The Timing of The Title
You can also adjust the timing of the title by below steps:
- Click on the advanced option in the bottom right corner, and settings will pop up.
- Find the title bar and drag it to the right side to increase the timing of the title.

After adding the title, it’s time to go with fading effect as shown below!
Step5 Add a Fade effect
You can also add a fade transition to the start of your video. It will blend the title with the first clip. Follow the steps mentioned to add the transition effects:
- Search the Fade option from the Transitions tab above the import window
![]()
Note: A fade transition will allow your title to fade into the first clip creating a visually pleasing effect.
- Download the Fade transition and drag it between the Black screen and the first clip.

Now that we have added a transition, it is time to move on to our music!
Step6 Add The Music
You can add your music to the slideshow from your PC library, but make sure you have the music rights. It is better to use stock audio by following the steps:
- Click on the Audio icon on the bar above the import window, and the list will pop up.
- Please browse the library to find music that best suits your video and download it.
- Then add it to the timeline’s audio track.
Add Beat Detection
To match your video clips properly with the music, so it remains in sync, you can adjust it with the beat of the music. To add beat detection, follow the steps mentioned:
- Right-Click on the audio that you selected in the audio library.
- You will see a pop-up list, and in the options, you will see Beat detection.
- Click on Beat detection.

- Then click on the audio and drag it below on the timeline.
Match The Video With The Audio Markers
To have the full advantage of beat detection, you must adjust your videos and photos to the markers. Follow the steps mentioned below to do so:

- Check that the video clips are in sync with the marker on the audio.
- For this, drag one video end to a marker or as many videos as you want.
- Ultimately, you will create a timeline in which your videos sync with the audio beat.

After syncing your videos and photos to the audio, it is time to move on to the scaling and background blur.
Step7 Scale and Blur The Background
Now, some of the pictures you have added must-have black borders. It usually means that your image is shorter than the aspect ratio.
If you leave the picture/photo as it is, the black borders will make it look shorter and out of proportion. As a result, it gives a generally poor look, as shown below.

To counter this problem, follow some easy steps:
- Double-click on the picture with black borders, and it will open the settings list.
- Go into the Transform Here you can see multiple settings.
- Increase the size of your photo to match the aspect ratio.

Add a Background Blur Effect
In some cases where you have taken a portrait photo where the picture is vertical, it ultimately stays out of proportion to the aspect ratio.
![]()
Note: Simply scaling the image to match the aspect ratio size is not sensible in this case. Doing so will hide the many pretty features of a portrait.

To counter this problem, you can add a blur effect. This effect will turn your background blur, matching the aspect ratio. Follow the steps mentioned below:
- Click on the Effects tab above the import window and search for Blur.
- Download the blur effect that suits you best and then drag the blur effect above your photo in the timeline.
You will notice the background turn to a blur in the main play screen.

Step8 Add a Transition
You can also add a transition effect to spice up things. It can get bland when your video or photo changes from one to another. To create a good slideshow video, you can add a transition effect by following the steps mentioned below:
- Click on the Transition icon above the import window.
- Browse the library until you find a transition you like, then download one.
- Click on the transition and drag it between the clips.

Adjust The Duration and Placement of The Transition
Now it’s time to adjust the duration and placement of the transition. For this, you can follow the steps mentioned below:
- Double-click on the transition effect, and it will open the settings list.
- You can adjust the duration by setting the timer as per your requirement.
![]()
Note: If other transitions are added to the timeline, you can adjust them by clicking Apply to all.

When you have adjusted the slideshow transitions, it is time to move on to the effects and filters.
Step9 Add the Effects and Filters
If you create a slideshow video of your trip to a historical place. You can add a Vintage filter to your video to give it that vintage tint. Follow the steps mentioned below:
- Head over to the Effects tab, where the effects library will open up
- Select any effect and download
- Click on the effect and drag it to drop in the timeline.

Combining a vintage effect with a dreamy glow will make your video pop up even more. To add a nostalgic glow to your video, follow the steps:
- Click on the effects and search for Glow in the search bar.
- Click and drag the glow effect above the timeline and ensure the effect is in the separate video timeline.
- Ensure the effect is applied to every photo and video.
- Double-click on the effect, and settings will open in the import window.
- Then, you can adjust the radius and opacity of the video. Adjust as you desire.

We are almost done. Let us now move toward our outro!
Step10 Create an Outro
The steps we will do will be similar to the ones we did initially. As we are creating, we will again need a canvas. Follow the steps mentioned below:
- Head to the media icon on the bar and scroll until you see the sample media tab.
- In the sample color option, drag and drop the black color at the end of your video.
Add an Outro Transition
To finalize things, add a transition effect at the end of the clip by these steps:
- In the Transition tab, search for the Fade effect.
- Drag and drop the Fade effect between your last video clip and the Black screen.

Fade out The Audio
If the audio suddenly ends at the end of your slideshow, it will create a bitter effect. Therefore, you should always fade out audio at the end of the video. To do this, follow the steps mentioned:
- Double-click on the audio in the timeline, and the settings list will pop up.
- On the top section of the import window, you will notice fade options.
- In the fade-out bar, drag it to the side to set your fade-out timer.
You can show your friends and family the slideshow or upload it to Youtube. Play the Slideshow Video from the beginning to see the changes.

Conclusion
By the steps mentioned above, you can create a slideshow video. Give every moment a chance to align everything on one side! The slideshow will also save your device space by aligning everything in one video.
Time Lapse Video Is Very Interesting and Creative, Which Usually Attracts More Attention. This Article Will Show You How to Make a Time Lapse Video with Adobe After Effects
Time-Lapse movies are great for a variety of projects; you can use them as establishing shots in sitcoms, corporate marketing videos, and they can make lovely backgrounds for animated slideshows. A time-lapse video is essentially a series of photographs taken at regular intervals to depict how the environment changes gradually over a shorter period of time. In this article, we’ll demonstrate how you may quickly and easily build an After Effects time-lapse effect.
With that said, let’s start!
Step 1. Create a new composition
Calculating your composition length to accommodate the frame rate and number of images is the first step in generating a time-lapse video.
- Verify the number of images you have for your Sequence.
- New Composition Creation. Selecting a frame rate: A time lapse film produced at 30 frames per second will flow smoothly, but you can select any frame rate you like.
- To determine the duration of your composition, divide the number of photographs you have by the frame rate you’ve chosen. For instance, if you use 600 photos at 30 frames per second, your composition will last 20 seconds.
Step 2. Import your images
You are prepared to make a time-lapse sequence if all of your photographs are saved to the same folder and are in the same order. If you are working directly from your Camera, you will likely have Camera Raw files, although this procedure works with PNG and JPEG sequences.
- Press Command/Control I on your keyboard or select File > Import. Find the folder holding your image sequence.
- To begin, select the first picture in the sequence. If all of your images have accurate names, After Effects will be able to identify a sequence of images.
- Make sure the Force Alphabetical Order and Camera Raw Sequence checkboxes are selected. Your Time-Lapse Sequence will display in the Project Browser Panel after you click Import.
- Once you’ve watched how it plays, you can adjust the Frame Rate by right-clicking the Sequence in the Project Browser and selecting Interpret Footage > Main.
- To update your time-lapse, modify the Frame Rate setting and click OK.

Step 3. Create movements
- After Effects’ Time-Lapse Sequence can be used just like any other standalone clip. This implies that you may give your time-lapse clip movement by adding Keyframes and Effects.
- Place your Playhead at the beginning of the clip after choosing the Image Sequence. Make a keyframe for the scale or position.
- To generate a second Keyframe for the value of your choice, move to the end of the clip. Make any necessary Clip modifications.
- Right-click on the timeline, choose New > Adjustment Layer, then add your effects to the Adjustment Layer to add effects like noise and grain.
Step 4. Create slow motion from a video
You can import your video after you’ve shot it to prepare it for editing. The same steps, including naming your photos in order, must be taken for the Time Lapse sequence. It may be advantageous to entirely rename both your Image Sequence and Performer clip.
- Drag the finished Time Lapse sequence to your Timeline after completing it as previously explained.
- Over the Time Lapse, add the Performer Clip to the Timeline.
- Choose Time>Time Stretch by performing a right-click on the performer clip.
- You can alter the Stretch Factor or Duration in the dialogue box. When you alter one parameter, the other will reflect the new Stretch Factor or Duration for you.
Step 5. Make an overlay
You can alter the Stretch Factor or Duration in the dialogue box. When you alter one parameter, the other will reflect the new Stretch Factor or Duration for you.
- Find Luma Key in the Effect Control Panel and drag it to your clip.
- Change the Key Type setting in the Effect Control Panel to Key Out Brighter.
- The Threshold, Tolerance, and Edge settings should be adjusted until only the silhouette is visible.
- Use the Pen or Mask Tool to create a circle around the parts you want to delete if you discover any corners of your clip that are still visible.
- Add any Effects, such as Light Leaks, to your Adjustment Layer by choosing “Right-click > New > Adjustment layer.”
After Effects CC must be opened, a new project must be created, the Import File menu option must be selected, and the appropriate folder containing the altered still images must be located and selected before the time-lapse photos can be turned into a film. You need to make sure that the JPEG Series box is checked, as well as the Force Alphabetical Order box.
Once you have clicked on the first image in the sequence. The time-lapse video that you uploaded appears in the project library. After performing a right-click on the filename, select “New Comp from Selection” from the context menu.
Step 6. Exporting your video
After getting our sequence to perform some kind of slow, understated animation so that it appears as though the camera is moving dramatically, we will need to export a video file. Go to File > Export > Add to Render Queue, then open the Render Queue dialog box by going to Window > Render Queue. From there, you can choose the Output Module and change the settings in the options dialog box. Finally, choose the Output To option and select the location on your computer where you would like to save the video clip that we are currently rendering and exporting.
Conclusion
No matter how you make your time lapse videos, After Effects has a ton of features you can use to modify and enhance the way they look. Now that you are familiar with the fundamentals, you can play with the Frame Rates and Composition options. Check out this helpful manual for more information on Time Stretching and Remapping in After Effects.
Free Download For Win 7 or later(64-bit)
Free Download For macOS 10.14 or later
Free Download For macOS 10.14 or later
Also read:
- In 2024, Get to Know How Excellent Sparkle Video Effects Can Significantly Impact Different Projects. Its Miraculous. Read Below to Learn More and Add Sparkle Effect to Your Videos
- Updated Go Through This Guide on All Steps in Freezing Frame Sequences in Videos Using Filmora. Details Include Splitting the Clip, Reversing Speed, and More for 2024
- New A Guide To Adopting Lumetri Color Presets in Effective Color Grading for 2024
- New In 2024, How to Loop a Video in PowerPoint
- In 2024, Best 6 Online MP4 Croppers
- New In 2024, Explore the Potential of Slow-Motion Video for Different Industries. Read This Guide and Choose the Best Slow-Motion Camera App to Create Stunning Videos
- New How to Rotate Videos With Media Player Classic for 2024
- 2024 Approved Want to Make a Slide Show Video? Heres How
- Updated 2024 Approved How to Make Discord GIF Avatar in Depth Guide
- How Did AI Video Games Act More Human Than Human, In 2024
- New In 2024, Fun & Easy Masking Tricks in Filmora
- How to Make an Adobe Slideshow the Easy Way for 2024
- New Best GIF to Video Converters for 2024
- In 2024, SRT File Translation Could Be a Tedious Task if You Dont Know the Right Steps. Lets Discuss Few Effective Ways to Do It Like a Pro
- Updated How to Create Cinematic Style Videos? Easy Guide for Beginners for 2024
- New Ever Wondered About the Similarity You Bear with an Anime Character? If You Have Not yet Looked Into This Exciting Aspect of Motion Graphic Design, You Can Very Well Break the Ice Here
- Learn How to Use 3D Camera Tracking in Adobe After Effects and Take Your Skills to the Next Level
- Discover the Top Slow Motion Camera App to Use
- Find Out What the Flexclip Trimmer Is, Its Key Features, and How to Use It to Trim Your Videos to Remove Unwanted Parts with Just a Few Clicks for 2024
- Updated Want to Buy a Drone for Better Videography Creating? This Article Will Review 6 of the Best Drones on the Market for You to Consider
- Updated 2024 Approved Vintage Film Effect 1980S - How to Create
- Updated 4 Solutions to Resize a WebM File for 2024
- New How to Create Simple Slideshow Word for 2024
- Updated 2024 Approved Best Software or Website to Convert Video Format
- Updated Detailed Steps to Rotate Video Using KMPlayer
- In 2024, Getting the Pokemon Go GPS Signal Not Found 11 Error in Poco M6 5G | Dr.fone
- In 2024, How to Change Lock Screen Wallpaper on Realme C55
- In 2024, How I Transferred Messages from Vivo X100 Pro to iPhone 12/XS (Max) in Seconds | Dr.fone
- Useful ways that can help to effectively recover deleted files from Infinix Note 30i
- 9 Mind-Blowing Tricks to Hatch Eggs in Pokemon Go Without Walking On Samsung Galaxy M34 | Dr.fone
- 3 Best Tools to Hard Reset Realme 11X 5G | Dr.fone
- How to Fix the #Value! Error in Excel 2013?
- In 2024, How To Unlock SIM Cards Of Vivo V27e Without PUK Codes
- In 2024, Hassle-Free Ways to Remove FRP Lock on Infinix Zero 30 5G Phones with/without a PC
- In 2024, How Do I Stop Someone From Tracking My Motorola Moto G13? | Dr.fone
- Top 10 Vivo Y36i Android SIM Unlock APK
- Why is iPogo not working On Nokia C12 Plus? Fixed | Dr.fone
- How to Unlock Realme 12 Pro 5G Pattern Lock if Forgotten? 6 Ways
- Hacks to do pokemon go trainer battles For Honor 90 GT | Dr.fone
- Methods to Change GPS Location On Apple iPhone 12 Pro Max | Dr.fone
- In 2024, The Most Useful Tips for Pokemon Go Ultra League On Tecno Camon 20 | Dr.fone
- How to Transfer Text Messages from Xiaomi Mix Fold 3 to New Phone | Dr.fone
- 3 Ways to Track Vivo Y200 without Them Knowing | Dr.fone
- Top 8 iPhone 13 Pro Max SMS/Message/Text Recovery Software | Stellar
- Bypass iCloud Activation Lock with IMEI Code From iPhone 6
- Title: Updated In 2024, How to Make Eye Zoom Transition Effect with Filmora
- Author: Morgan
- Created at : 2024-04-24 01:02:47
- Updated at : 2024-04-25 01:02:47
- Link: https://ai-video-editing.techidaily.com/updated-in-2024-how-to-make-eye-zoom-transition-effect-with-filmora/
- License: This work is licensed under CC BY-NC-SA 4.0.

