
:max_bytes(150000):strip_icc():format(webp)/GettyImages-667603173-fac0b8f4b1d9453c866d332dc73821f8.jpg)
Updated In 2024, How to Make Flying Objects in Wondershare Filmora
How to Make Flying Objects in Wondershare Filmora
Let us be honest here, you want to create fly objects in the air but don’t want to get into the witchcraft school. In that case, we have got your back!
In this article, you can learn how to make objects fly in the air! Technically you will not do that in real-time, but with the latest technology and editing tools at your disposal, you will exactly do that.
Use Wondershare Filmora to create the flying object effect. Scroll below to get the guide to the whole process of creation.
Part 1. What will you need to make a flying object?
This is not witchcraft, so we will abstain from using potions and herbs. Instead, to fly objects in our videos, we will use simple techniques that you may also be familiar with.
Video Cameras
The camera, in this scenario, will be the essential accessory as it will capture your video with the proper aspect ratio. This video camera can now be from a mobile phone or a high-quality DSLR. It will all depend upon your preference for quality and frame rate.

Tri-Pod or camera stands
Selecting the Tri-Pod is also crucial to your quality of video taking as it will ensure stability while capturing the video from the camera.

Stability is the key here, as the captured videos will be masked and combined in the later stages of the steps. To do so, consistently capturing the video in the same ratio is necessary. You can stabilize the video with a simple gorilla pod that you can get of good quality or a simple tripod.
The prop
The prop will be the object that we will be flying in the video. It could be a fluffy toy, a ball, a box, or anything you desire to be flying in your video.
![]()
Note: In this article, we are going to use a ball as a prop.

Wondershare Filmora
Now that we have all the physical requirements for the video, our next goal is to ensure that we have the correct video editing software. And what’s best than Wondershare Filmora? Obviously, there’s nothing!
Filmora allows you to edit your videos with ease and comfort. With its interactive UI, even a beginner feels easy to edit a video. With skills on hand, an expert can edit videos ranging from green screen effects to flying objects.
Free Download For Win 7 or later(64-bit)
Free Download For macOS 10.14 or later
![]()
Good presentation
Now, if you want your video to shine like the good ones, you will need to know how to present it. In this section, the requirement will be yourself. As you are not flying an object, you must act the part.
A good presentation will allow you to make the video more natural. Because no matter how skilled you are with video editing, a video with props will only be of quality until the subject acts their part with quality.
Part 2. How to capture the footage?
Before we get into how we edit our footage, we need to know how to shoot the video to edit. Follow the steps mentioned below:
- Set up your camera on a tripod or a gorilla pod.
- After setting up the camera, record an empty frame.
![]()
Note: An empty frame video will be the one you will use to mask the original clip.
Reference video
Start recording a five-second clip of the sofa where you will be sitting without yourself or the prop. Here you don’t need to add anything except the reference. Follow the guidelines below when making the reference video:
- The video should be plain.
- It should be simple.
- There should be no moving object or subject.

Main video
After shooting the empty frame video, move on to shooting the video with yourself in it. Follow the below to achieve something unique:
- Your focus should be on the prop.
- Use a thread or a rope to attach the prop to it. (In this case, we are using a ball.)
- Attach the ball to the thread and hand it on the roof.
- Record yourself now with the prop with your desired content or script.

After completing the video, simply stop recording. Now you will end up with two video clips.
Adding these two clips in the Wondershare Filmora , you can easily create the flying object effect. To do so, follow the steps explained in the section ahead.
Part 3. Stepwise guide to making flying objects in Wondershare Filmora
Now that we have looked into our requirements, let us dive into how we will apply our skills to achieve an object to fly in Wondershare Filmora .
Of course, without the software, our editing will not be possible, so download Wondershare Filmora from the steps explained below.
Free Download For Win 7 or later(64-bit)
Free Download For macOS 10.14 or later
Step1Open the Wondershare Filmora software
- Open the Wondershare Filmora software and Click on the New Project icon on the window.
- After you have clicked on the New Project icon, our main workplace will be launched.
- Here you can see various options.
- To get started, we need to import our video clips to edit them.

- Here, you can see two ways to import your clips in Wondershare Filmora.
- Shows you how to import by Right-Clicking on File and selecting the import media option.
- Shows you to drag and drop the file from your main directory simply.
You can choose whatever suits you the best!
Step2Add your clips to your timeline
Now that we have imported our videos into the timeline, our next step will be to add our videos to the timeline.
- Simply click on the imported clips on the import window.
- Then drag it to the timeline below.
- Doing so will create a working timeline you can view and edit as you go along the editing process.

Step3Size the reference video to the original video
Now, remember that we recorded a five-second clip that we will use to create the masking effect. You will need to size it to the original video for that to work. Doing so is simple and will require you to take some easy steps.
- First, click on the clip.
- Then, when it is selected, move on to the tab above to choose the speed option from the bar.
- Here, you will also see options such as cropping, Green screen, and color.
- Choose the option of speed.
- Then, a drop-down tile will pop up. Here you can see different options available to speed up your video.

- You can speed up your video and slow it down.
- For now, we will have to slow it down.
![]()
Note: Slowing it down will increase the time of the video clip and allow you to match it with the original video clip.
Don’t worry about the speed, as the video is already empty, and there will be no distractions to disturb our editing.
Step4Add the masking effect
Now that we have our video aligned with the reference video we are using. Let’s move to the next step.
This step will try to remove the thread attached to the ball; otherwise, it will show in the video, and our effect will be ruined. However, before we do that, we will need to know what masking is.
What is the Masking effect in Wondershare Filmora?
Have you ever seen the behind-the-scenes of those big-budget movies? Then you might have seen the actors and the stunt workers hanging from big ropes performing stunts in front of green screens.
Well, the directors capture the video in real-time. But they can do those big stunts on TV with editing and CGI, and one of the effects is “Masking.”
The masking effect allows you to mask the object on the screen with a reference video. So that’s how the ropes attached to the stuntmen get removed in the original videos.
How to add a masking effect?
Although there are numerous ways to do that, the one we will use in this video is to remove the thread. For this, follow the below steps:
- Simply go to the effect icon that you can see in the bar above.
- In the effects bar, move to the utility tab.
- You will see a window showing you the many effects Wondershare Filmora provides you from default.
- Select the shape mask tile.
- Now drag and drop it on the timeline below.

![]()
Note: You must ensure the effect is applied to the main video, not the reference video.
- When you drag the effect into the main video, you will notice a transparent shape added to the video. This is your Mask.
Step5Edit the masking effect
You must hide the thread attached to the ball with the masking effect. To do this, follow the below guidelines:
- Double-click on the effect added to the main video.
- You will notice another window pop up on the import library.
![]()
Note: In the pop-up window, you will see the multiple options and edits you can apply to the masking effect, such as Transform, Compositing, Motion tracking, and stabilization.

- Scroll down on the window and notice a video effect tab.
In the effect tab, you will have multiple options, such as the shape mask, X, Y, and scale and blur strength options, as shown below.
- Now adjust the mask to hide the string. It may be easy to invert the mask.
![]()
Note: That the borders of the mask are blurred. But you can also change them by inverting the mask, which turns the borders and the space between them.
Remember the invisibility cloak from Harry Potter? It works just like that, only with a solid shape.
- Now use the X and Y options to move the mask anywhere in the video.

Step6Hide the sharp borders
You may notice the shape of borders that do not blend with the background. To blend the borders with the background, follow the steps below:
- Simply Double-click on the effect in the timeline.
- Then, in the editing tab, find out the blur strength option.

- Simply drag the bar to increase the blur strength.
![]()
Note: Please keep looking in the window on the right. Check and increase the blur strength until you are satisfied with the result.
- Lastly, click on OK when you are done.
Step7Creating the popup effect
Now, if you want your object to appear out of thin air, you must create that pop-up effect. You can create the pop-up effect in simple and easy steps, as shown below:
- First, drag the timeline dragger to the point where you want the prop or the ball to pop up.
Your presentation should be accurate and precise!
Imagine you were doing a “swoosh“ action, similar to swinging a wand. Now you want your object to appear at that time.
Split the Video:
- Drag the timeline dragger to that point.
- Now press Ctrl+B to split both videos.
Add Popup Effect:
The masking effect will be applied from the start. Our goal is to hide the masking effect before the ball pop-ups. For this, follow the below steps:
- Go into the setting by Double-Clicking the masking effect on the original video.
- Then move the mask over the ball instead of on the thread. Doing so would make the ball disappear.

Final Results:
- Lastly, click on Ok when done.
Play the clip from the start, and you will notice the ball popping up according to your action.

Congratulations! You did it. You are now able to fly objects with the power of your mind.
Following the abovementioned steps, you can control objects and make them fly in the air. The catch is that you will have to use Wondershare Filmora . But, of course, this is not a witchcraft school now.
Free Download For Win 7 or later(64-bit)
Free Download For macOS 10.14 or later
Conclusion
Well, there comes a time when one needs to make flying objects. Wondershare Filmora is an excellent tool that will allow you to add the masking effect to create the illusion of flying objects in the air.
The video quality at the end will only depend upon how clearly you show during the editing process. Try the above steps and enjoy the results!
Wondershare Filmora
Now that we have all the physical requirements for the video, our next goal is to ensure that we have the correct video editing software. And what’s best than Wondershare Filmora? Obviously, there’s nothing!
Filmora allows you to edit your videos with ease and comfort. With its interactive UI, even a beginner feels easy to edit a video. With skills on hand, an expert can edit videos ranging from green screen effects to flying objects.
Free Download For Win 7 or later(64-bit)
Free Download For macOS 10.14 or later
![]()
Good presentation
Now, if you want your video to shine like the good ones, you will need to know how to present it. In this section, the requirement will be yourself. As you are not flying an object, you must act the part.
A good presentation will allow you to make the video more natural. Because no matter how skilled you are with video editing, a video with props will only be of quality until the subject acts their part with quality.
Part 2. How to capture the footage?
Before we get into how we edit our footage, we need to know how to shoot the video to edit. Follow the steps mentioned below:
- Set up your camera on a tripod or a gorilla pod.
- After setting up the camera, record an empty frame.
![]()
Note: An empty frame video will be the one you will use to mask the original clip.
Reference video
Start recording a five-second clip of the sofa where you will be sitting without yourself or the prop. Here you don’t need to add anything except the reference. Follow the guidelines below when making the reference video:
- The video should be plain.
- It should be simple.
- There should be no moving object or subject.
Main video
After shooting the empty frame video, move on to shooting the video with yourself in it. Follow the below to achieve something unique:
- Your focus should be on the prop.
- Use a thread or a rope to attach the prop to it. (In this case, we are using a ball.)
- Attach the ball to the thread and hand it on the roof.
- Record yourself now with the prop with your desired content or script.
After completing the video, simply stop recording. Now you will end up with two video clips.
Adding these two clips in the Wondershare Filmora , you can easily create the flying object effect. To do so, follow the steps explained in the section ahead.
Part 3. Stepwise guide to making flying objects in Wondershare Filmora
Now that we have looked into our requirements, let us dive into how we will apply our skills to achieve an object to fly in Wondershare Filmora .
Of course, without the software, our editing will not be possible, so download Wondershare Filmora from the steps explained below.
Free Download For Win 7 or later(64-bit)
Free Download For macOS 10.14 or later
Step1Open the Wondershare Filmora software
- Open the Wondershare Filmora software and Click on the New Project icon on the window.
- After you have clicked on the New Project icon, our main workplace will be launched.
- Here you can see various options.
- To get started, we need to import our video clips to edit them.
- Here, you can see two ways to import your clips in Wondershare Filmora.
- Shows you how to import by Right-Clicking on File and selecting the import media option.
- Shows you to drag and drop the file from your main directory simply.
You can choose whatever suits you the best!
Step2Add your clips to your timeline
Now that we have imported our videos into the timeline, our next step will be to add our videos to the timeline.
- Simply click on the imported clips on the import window.
- Then drag it to the timeline below.
- Doing so will create a working timeline you can view and edit as you go along the editing process.
Step3Size the reference video to the original video
Now, remember that we recorded a five-second clip that we will use to create the masking effect. You will need to size it to the original video for that to work. Doing so is simple and will require you to take some easy steps.
- First, click on the clip.
- Then, when it is selected, move on to the tab above to choose the speed option from the bar.
- Here, you will also see options such as cropping, Green screen, and color.
- Choose the option of speed.
- Then, a drop-down tile will pop up. Here you can see different options available to speed up your video.
- You can speed up your video and slow it down.
- For now, we will have to slow it down.
![]()
Note: Slowing it down will increase the time of the video clip and allow you to match it with the original video clip.
Don’t worry about the speed, as the video is already empty, and there will be no distractions to disturb our editing.
Step4Add the masking effect
Now that we have our video aligned with the reference video we are using. Let’s move to the next step.
This step will try to remove the thread attached to the ball; otherwise, it will show in the video, and our effect will be ruined. However, before we do that, we will need to know what masking is.
What is the Masking effect in Wondershare Filmora?
Have you ever seen the behind-the-scenes of those big-budget movies? Then you might have seen the actors and the stunt workers hanging from big ropes performing stunts in front of green screens.
Well, the directors capture the video in real-time. But they can do those big stunts on TV with editing and CGI, and one of the effects is “Masking.”
The masking effect allows you to mask the object on the screen with a reference video. So that’s how the ropes attached to the stuntmen get removed in the original videos.
How to add a masking effect?
Although there are numerous ways to do that, the one we will use in this video is to remove the thread. For this, follow the below steps:
- Simply go to the effect icon that you can see in the bar above.
- In the effects bar, move to the utility tab.
- You will see a window showing you the many effects Wondershare Filmora provides you from default.
- Select the shape mask tile.
- Now drag and drop it on the timeline below.
![]()
Note: You must ensure the effect is applied to the main video, not the reference video.
- When you drag the effect into the main video, you will notice a transparent shape added to the video. This is your Mask.
Step5Edit the masking effect
You must hide the thread attached to the ball with the masking effect. To do this, follow the below guidelines:
- Double-click on the effect added to the main video.
- You will notice another window pop up on the import library.
![]()
Note: In the pop-up window, you will see the multiple options and edits you can apply to the masking effect, such as Transform, Compositing, Motion tracking, and stabilization.
- Scroll down on the window and notice a video effect tab.
In the effect tab, you will have multiple options, such as the shape mask, X, Y, and scale and blur strength options, as shown below.
- Now adjust the mask to hide the string. It may be easy to invert the mask.
![]()
Note: That the borders of the mask are blurred. But you can also change them by inverting the mask, which turns the borders and the space between them.
Remember the invisibility cloak from Harry Potter? It works just like that, only with a solid shape.
- Now use the X and Y options to move the mask anywhere in the video.
Step6Hide the sharp borders
You may notice the shape of borders that do not blend with the background. To blend the borders with the background, follow the steps below:
- Simply Double-click on the effect in the timeline.
- Then, in the editing tab, find out the blur strength option.
- Simply drag the bar to increase the blur strength.
![]()
Note: Please keep looking in the window on the right. Check and increase the blur strength until you are satisfied with the result.
- Lastly, click on OK when you are done.
Step7Creating the popup effect
Now, if you want your object to appear out of thin air, you must create that pop-up effect. You can create the pop-up effect in simple and easy steps, as shown below:
- First, drag the timeline dragger to the point where you want the prop or the ball to pop up.
Your presentation should be accurate and precise!
Imagine you were doing a “swoosh“ action, similar to swinging a wand. Now you want your object to appear at that time.
Split the Video:
- Drag the timeline dragger to that point.
- Now press Ctrl+B to split both videos.
Add Popup Effect:
The masking effect will be applied from the start. Our goal is to hide the masking effect before the ball pop-ups. For this, follow the below steps:
- Go into the setting by Double-Clicking the masking effect on the original video.
- Then move the mask over the ball instead of on the thread. Doing so would make the ball disappear.
Final Results:
- Lastly, click on Ok when done.
Play the clip from the start, and you will notice the ball popping up according to your action.
Congratulations! You did it. You are now able to fly objects with the power of your mind.
Following the abovementioned steps, you can control objects and make them fly in the air. The catch is that you will have to use Wondershare Filmora . But, of course, this is not a witchcraft school now.
Free Download For Win 7 or later(64-bit)
Free Download For macOS 10.14 or later
Conclusion
Well, there comes a time when one needs to make flying objects. Wondershare Filmora is an excellent tool that will allow you to add the masking effect to create the illusion of flying objects in the air.
The video quality at the end will only depend upon how clearly you show during the editing process. Try the above steps and enjoy the results!
Best Video Title Generators
The ranking of videos in search results depends on the quality of their titles; making video title maker an essentiality. Similar to metadata, titles provide important information about your video, like its genre, subject, etc., to YouTube, Google, and TikTok viewers. The likelihood that the audience will locate and watch your film will rise if you provide the appropriate titles. To assist you in choosing which option will work best for you, we have included video title makers online in this post.
The process of making video titles may be laborious and time-consuming. However, not with the video title maker online free. You can utilize one of the title video makers online for free and your social media videos might rank higher and get more views altogether. But even when you know where to start, there are so many different factors that it may be perplexing. Fortunately, the fantastic video title generator provided in this post will make the process fast and simple.
Part 1. Tools to Generate Video Titles
1. TubeRanker Title Generator
A collection of YouTube SEO tools called TubeRanker may be used to optimize videos on Facebook, YouTube, and TikTok. Creators may utilize the short bursts of video title suggestions provided by the TubeRanker Title Generator in the names of their YouTube videos. Creators of videos may arrange and produce flawless, SEO-optimized video descriptions with the aid of the TubeRanker Video Description Generator. With the help of its title generator tool, TubeRanker can extract and display the meta tags connected to any public movie.
Steps to Use TubeRanker:
Step1 Visit the Website
In the first step, refer to the TubeRanker official website and you will be shown to the following UI. As a result, it’s a good idea to start with some keyword research instructions; you can read the TubeRanker title generator instructions to do so.

Step2 Launch the Title Generator
Your video’s ranking on search engine results pages in TubeRanker depends heavily on your keywords, which also assist viewers determine if the post is relevant to them. From the webpage, refer to the title generator as shown here:

Step3 Generate Video Title
Simply enter your keyword into the title generator and press the red button to complete this phase. You’ll see many titles as soon as you do that and begin reading the headlines. Write down the ones that make sense as you go down. Make a few minor edits to ensure that they are grammatically sound. Run a search using the niche and after that the automatically created titles are getting in the way as shown here:

Step4 Copy the Title (s)
After that, you’ll have a lot of options from which to choose. Some individuals push for names that are SEO-friendly, while others try for titles that are distinctive to stand out from the throng. maintain a careful balance. Both include a powerful keyword and making your title stand out should be your goals.

2. TunePocket Title Generator
For background music for your video and YouTube video SEO, TunePocket might be a top-notch tool. Additionally, the fact that it is free to use and that no account creation is necessary is beneficial. A stock music library, TunePocket provides a variety of music services. Additionally, we have discovered some incredible YouTube tools, such as YouTube tag generators. The fact that you can use this tag generator on YouTube without creating an account is what made us appreciate it even more.
Steps to Use TunePocket:
Step1 Visit the Website
The title generating procedure for your films may be started by first visiting the official TunePocket website, as illustrated here:
image name: visit-tunepocket.jpg
Step2 Launch the Title Generator
While on the webpage, you can refer to the YouTube title generator section. This will let you enter the topic of your video in the referred box as shown here:

Step3 Generate Video Title
You may save a lot of time by using TunePocket title generator to create creative titles. Simply type in your target term, choose your desired region, and language, then click “Get Titles.” There will be a list of useful keywords returned by TunePocket. You can run again the generator in order to get the desired results. For that, click on the Run again button down the line as shown here:

Step4 Copy the Title to Clipboard
A title generator may be processed in a matter of seconds and a few clicks. You don’t need to spend hours and hours coming up with numerous titles; you can copy more than one in a matter of minutes. Simply hit the Copy to Clipboard and get done with the title:

Part 2. Tips to Create Video Titles
Whether you’ve been video marketing for years or are just starting out, coming up with catchy video titles might be the most difficult aspect of the process. The title of a video has a significant role in whether or not viewers choose to click the play button, making it more than simply a minor feature. Poor titles make it difficult to attract views and expand your following, regardless of how fantastic your videos are. Here are the best scrutinized tips for creating best ranking titles for your videos:
1. Optimize the title using keywords for improved SEO
It might be difficult to come up with a title that is original, concise, and descriptive. However, a strong video title stays something original. Keywords are crucial for more than simply your website. They are important for video titles, too. If you want people to see your videos when they search for certain phrases, those keywords should be in the title because Google and YouTube can’t watch videos and grasp the content (yet).
2. Perfectly Match the Content
A excellent video title explains to viewers what to anticipate from the video. It’s unambiguous, straightforward, and sincere. Additionally, if you are familiar with your target demographic, you will be able to generate a lot more hits to your videos. Using a vague or confusing title is problematic as people are busy and need a reason to watch your movie. Similar to false content, misleading headlines deceive viewers and damage your reputation.
3. Attempt to pique interest
Keep in mind that compelling video titles are an art form that appeals to viewers’ emotions rather than being a precise SEO science. Try answering the questions on your own to get a catchy video title. People are more inclined to watch a video if you make reference to a secret or exceptional knowledge that you will disclose in it. Keep in mind that your goal is not to deceive viewers into viewing your video.
4. Increase the Click Through Rate
The finest titles are those that best expose the vulnerabilities of the reader. Consider it a little preview for your video. If you are creating a how-to or instructive video that answers a question or gives information, you may want to consider include the question in the title. It also makes it simple to think up video concept.
5. Attempt to utilize cue (triggering) words
Your title and description should both include your target keyword. You’ll probably start to generate some ideas for a real video title after you begin your keyword research. To determine how persuasive these concepts are, use a trigger analyzer. You’ll need to do study in order to accomplish this. As for the knowledge gap, consider how your target audience would respond.
The Bottom Line
In this article, we’ve compiled a list of the best tag generators for videos, including everything from video names and descriptions to titles, thumbnail design elements, and video ideas. You may get some useful tips as well for creating the greatest video titles by using this guide to the video title generator to obtain the ideal title for your social media videos. Find out the best suitable video title maker online free in the post above and tweak your video titles for social platforms rankings.
Free Download For Win 7 or later(64-bit)
Free Download For macOS 10.14 or later
1. TubeRanker Title GeneratorA collection of YouTube SEO tools called TubeRanker may be used to optimize videos on Facebook, YouTube, and TikTok. Creators may utilize the short bursts of video title suggestions provided by the TubeRanker Title Generator in the names of their YouTube videos. Creators of videos may arrange and produce flawless, SEO-optimized video descriptions with the aid of the TubeRanker Video Description Generator. With the help of its title generator tool, TubeRanker can extract and display the meta tags connected to any public movie.
Steps to Use TubeRanker:
Step1 Visit the Website
In the first step, refer to the TubeRanker official website and you will be shown to the following UI. As a result, it’s a good idea to start with some keyword research instructions; you can read the TubeRanker title generator instructions to do so.
Step2 Launch the Title Generator
Your video’s ranking on search engine results pages in TubeRanker depends heavily on your keywords, which also assist viewers determine if the post is relevant to them. From the webpage, refer to the title generator as shown here:
Step3 Generate Video Title
Simply enter your keyword into the title generator and press the red button to complete this phase. You’ll see many titles as soon as you do that and begin reading the headlines. Write down the ones that make sense as you go down. Make a few minor edits to ensure that they are grammatically sound. Run a search using the niche and after that the automatically created titles are getting in the way as shown here:
Step4 Copy the Title (s)
After that, you’ll have a lot of options from which to choose. Some individuals push for names that are SEO-friendly, while others try for titles that are distinctive to stand out from the throng. maintain a careful balance. Both include a powerful keyword and making your title stand out should be your goals.
2. TunePocket Title Generator
For background music for your video and YouTube video SEO, TunePocket might be a top-notch tool. Additionally, the fact that it is free to use and that no account creation is necessary is beneficial. A stock music library, TunePocket provides a variety of music services. Additionally, we have discovered some incredible YouTube tools, such as YouTube tag generators. The fact that you can use this tag generator on YouTube without creating an account is what made us appreciate it even more.
Steps to Use TunePocket:
Step1 Visit the Website
The title generating procedure for your films may be started by first visiting the official TunePocket website, as illustrated here:
image name: visit-tunepocket.jpg
Step2 Launch the Title Generator
While on the webpage, you can refer to the YouTube title generator section. This will let you enter the topic of your video in the referred box as shown here:
Step3 Generate Video Title
You may save a lot of time by using TunePocket title generator to create creative titles. Simply type in your target term, choose your desired region, and language, then click “Get Titles.” There will be a list of useful keywords returned by TunePocket. You can run again the generator in order to get the desired results. For that, click on the Run again button down the line as shown here:
Step4 Copy the Title to Clipboard
A title generator may be processed in a matter of seconds and a few clicks. You don’t need to spend hours and hours coming up with numerous titles; you can copy more than one in a matter of minutes. Simply hit the Copy to Clipboard and get done with the title:
Part 2. Tips to Create Video Titles
Whether you’ve been video marketing for years or are just starting out, coming up with catchy video titles might be the most difficult aspect of the process. The title of a video has a significant role in whether or not viewers choose to click the play button, making it more than simply a minor feature. Poor titles make it difficult to attract views and expand your following, regardless of how fantastic your videos are. Here are the best scrutinized tips for creating best ranking titles for your videos:
1. Optimize the title using keywords for improved SEO
It might be difficult to come up with a title that is original, concise, and descriptive. However, a strong video title stays something original. Keywords are crucial for more than simply your website. They are important for video titles, too. If you want people to see your videos when they search for certain phrases, those keywords should be in the title because Google and YouTube can’t watch videos and grasp the content (yet).
2. Perfectly Match the Content
A excellent video title explains to viewers what to anticipate from the video. It’s unambiguous, straightforward, and sincere. Additionally, if you are familiar with your target demographic, you will be able to generate a lot more hits to your videos. Using a vague or confusing title is problematic as people are busy and need a reason to watch your movie. Similar to false content, misleading headlines deceive viewers and damage your reputation.
3. Attempt to pique interest
Keep in mind that compelling video titles are an art form that appeals to viewers’ emotions rather than being a precise SEO science. Try answering the questions on your own to get a catchy video title. People are more inclined to watch a video if you make reference to a secret or exceptional knowledge that you will disclose in it. Keep in mind that your goal is not to deceive viewers into viewing your video.
4. Increase the Click Through Rate
The finest titles are those that best expose the vulnerabilities of the reader. Consider it a little preview for your video. If you are creating a how-to or instructive video that answers a question or gives information, you may want to consider include the question in the title. It also makes it simple to think up video concept.
5. Attempt to utilize cue (triggering) words
Your title and description should both include your target keyword. You’ll probably start to generate some ideas for a real video title after you begin your keyword research. To determine how persuasive these concepts are, use a trigger analyzer. You’ll need to do study in order to accomplish this. As for the knowledge gap, consider how your target audience would respond.
The Bottom Line
In this article, we’ve compiled a list of the best tag generators for videos, including everything from video names and descriptions to titles, thumbnail design elements, and video ideas. You may get some useful tips as well for creating the greatest video titles by using this guide to the video title generator to obtain the ideal title for your social media videos. Find out the best suitable video title maker online free in the post above and tweak your video titles for social platforms rankings.
Free Download For Win 7 or later(64-bit)
Free Download For macOS 10.14 or later
Add Green Screen Video on TikTok
TikTok is the most popular platform for making short videos. You can create creative short videos and upload to TikTok so that they can entertain your followers and make your videos go viral. To add variety to your video content, the use of green screen in short videos is a great idea. You can replace the green screen with any background in your TikTok video. You need to know how to add green screen video on TikTok.
Adding green screen on TikTok videos has become a trend now as there are several green screen TikTok videos that have gone viral. In fact, creative green screen videos are extremely popular on social media platforms. Instead of replacing the green screen in your video with a single photo, you can replace it with multiple pictures on TikTok. We will illustrate how to add multiple pictures on TikTok green screen.
Part 1. How to Add Green Screen on TikTok?
To add green screen on TikTok video, you need to have a background of uniform color. It does not necessarily have to be a green screen. For example, if you are shooting a video of your legs and the floor tiles have uniform color, you can use green screen on TikTok to replace the tiles with any picture. Instead of using one picture on TikTok short video, you can use multiple pictures in the background to create stunning TikTok videos. Here are the steps on how to add multiple pictures to TikTok green screen.
Step1 Open TikTok app on your phone. Tap on Plus icon located at the bottom of the app screen to make a new video.
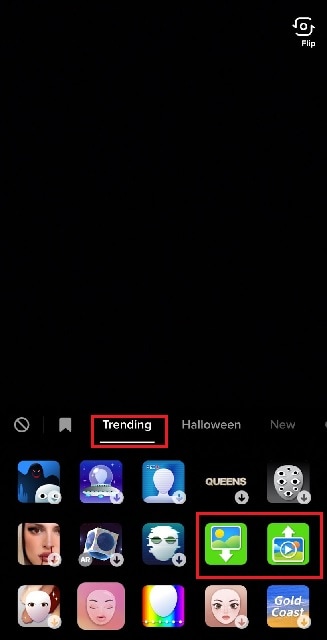
Step2 Choose the duration of the video as per your preference. Thereafter, tap on Effects option located at the bottom-left corner to see the different effects available on TikTok.
![]()
Step3 Go to Trending tab and you will see Green Screen and Green Screen Video icons. If you want your video to have green screen photo, tap on Green Screen icon. If you want your video to have green screen video, tap on Green Screen Video icon.
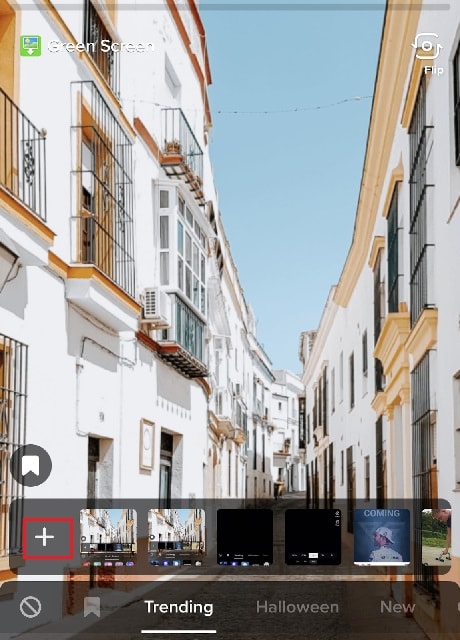
Step4 You will get a generic background and you can choose any preset background or select photo or video from your phone gallery by tapping on Plus icon. Once you are done, tap on Record button.
Step5 In order to use multiple pictures, you should stop recording in between and change your green screen image to anything you desire. Then tap on Record button again. TikTok will string your clips and it would appear that you have been changing multiple pictures of your background for your video.
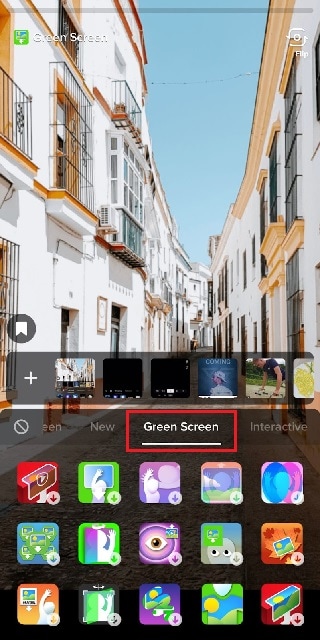
If you want to experiment with green scree effects, you can scroll down after tapping on Green Screen icon under Effects. You will see different types of green screen videos possible on TikTok to choose from.
Part 2. Creative Ideas to Make TikTok Green Screen Video
Now that you know how to add a video on TikTok green screen, you have to make the most out of it. If you are wondering how you can use green screen in your TikTok videos, here are some creative ideas for you.
Walking Out Videos – You can use green screen effect to show that you are walking out of plane, walking vertically on the wall like inception, walking on the roof of a building. In fact, you can show that you are walking out of popular monuments and palaces and trick your viewers into thinking that you were actually there.
Photoshoot Location – Create a TikTok video showing your favorite locations across the world where you dream of doing photoshoot. You can pose differently and place the location in your background through green screen effect.
How-To Video – If your TikTok channel is about tutorial and learning videos, you can explain things better by putting screenshots and multiple relevant pictures in the background so that viewers can get a pictorial representation of what you are speaking to them.
Mystery Story – You can a create short video describing unknowing facts and mysteries around certain places in the world. You can put photos or video clips of those mysterious places in your background to keep your viewers hooked and related to your narration.
Rate Them Video – You can use green screen effect to showcase your old Instagram photos or videos and rate them. This is an extremely popular trend in TikTok where people show their old photos, display work from the past, and rate them today.
Reveal Your Creation – Share your secrets or interesting stories behind some of the photos or videos you took in the past. You can talk about how creatively you took certain photos and put those photos in the background while discussing them.
Part 3. How to Make Green Screen Video on Computer?
If you have a computer and a webcam, you can record a green screen video on your computer. You can place the green screen in the background perfectly and place the webcam so that the background stays within the green screen. You will need a video recorder and a video editor to make green screen video as well as replace the green screen with any photo or video. We recommend Wondershare Filmora where you can record as well as edit green screen video.
Filmora is a professional video editor where you can record your computer screen as well as your webcam video with green screen background in Picture-in-Picture mode. After recording the video, you can replace the green screen with any video clip or photo instantly in a few steps. You can also fine-tune green screen effect for perfection. Therefore, you can save the video in any resolution and file format as per your preference.

Free Download For Win 7 or later(64-bit)
Free Download For macOS 10.14 or later
Conclusion
Adding green screen effect on TikTok videos can make your videos stand out. We have illustrated how to add multiple green screen videos on TikTok and your videos will have a better chance of getting viral. Keep the green screen ideas in mind while making TikTok green screen videos. If you want to make and edit green screen videos on computer, Wondershare Filmora is the best application available for Windows and Mac users.
[100% Workable] How to Mask Track with Adobe Premiere Pro
Mask tracking Premiere Pro is a technique that lets you apply effects to a precise frame area. In video editing, mask tracking is crucial because it lets you apply effects to areas of your footage rather than the full frame. This can assist you in producing videos that look more professional by emphasizing crucial details, obscuring delicate content, and using imaginative effects.
This article guides Premiere Pro mask tracking using the right tools and effects. Give it a read if you are interested in tracking mask Premiere.
AI Smart Masking Spice up your video content with the endless possibilities of AI masking functions!
Free Download Free Download Learn More

Part 1. What Do You Know About Mask Tracking in Videos?
Automatic tracking and following a certain object or area during a video clip is known as mask tracking. Usually, the “mask” depicts a designated zone of interest, such as a person’s face, an item, or any other area. Mask tracking is achieved using various methods and algorithms, including computer vision techniques such as optical flow, feature tracking, or machine learning.
The objective of the effect is to track the targeted item consistently over all video frames. Mask tracking Premiere Pro is a common special effect in video editing. It can add visual components, apply filters, or change the color and lighting inside the tracked region.
Part 2. How To Perform Mask Tracking with Adobe Premiere Pro
One of the most widely used industry standard programs for video editing is Adobe Premiere Pro . With the help of this tool, users can alter various aspects of photographs and films. It can tweak effects in nearly every frame according to user preferences using Premiere mask tracking. You will undoubtedly get remarkable outcomes from it in a short amount of time.
The tool is a video editing expert, so many professional video editors rely on it. It offers a huge range of editing features that get together to create an impactful and eye-catching video.
Marked Key Features of Adobe Premiere Pro
- Video Editing: You can combine audio and apply effects and transitions to your video content. The platform also helps you work with color or add animated titles to your videos.
- Text-Based Editing: Text-based editing creates a transcript and automatically highlights text to add clips to your timeline. It can edit and rearrange clips like a text document.
- Color Correction: With the help of AI, you can automatically balance your colors or modify the frame using expert color wheels and curve controls. It also assists in viewing your work using integrated video scopes.
- Audio Editing: With Adobe Premiere Pro, you can explore audio tracks, license them, and utilize AI to adapt them to your clips automatically.
Step-by-Step Guide to Perform Mask Tracking with Premiere Pro
Adobe Premiere mask tracking is one of the many remarkable features of the app. If you want to employ mask tracking in your videos using Adobe Premiere, look at the steps below:
Step 1: To start off with the process, import the video onto the timeline that needs to be edited. Navigate to the top of the screen and select “Effect Controls” to proceed further. Select any specific shape present below the “Opacity” option on the left to add a mask to your clip.

Step 2: Set the shape according to the person or object you will track by masking. Now, under the “Mask” option, you will see the “Mask Feather” option. Click on “Mask Feather” and adjust it so it won’t look too harsh on the edges.

Step 4: Go to the beginning of the video you are editing, return to the editing section, and look for the “Mask Path” option. Now hit the “Track Selected Masked Forward” button and wait for the system to complete the Premiere Pro tracking mask process and save the video.

Part 3. Making Masking Easy with Wondershare Filmora: Reviewing the Details
Adobe Premiere Pro is an incredible tool, without a doubt. However, many users say that it needs to be simpler to use. You cannot generate a good video even after watching tutorials because it’s hard for an amateur to use Adobe Premiere Pro. Because of this, many users look for alternative options to add a premiere tracking mask and make other changes to their videos.
This part is all about the amazing alternative that you’re looking for. Wondershare Filmora is a video editing tool that provides professional quality content editing. The tool is so easy to use that you can start immediately with basic instructions. Its smart editing features, combined with a fast and intelligent system, make it a great choice for everyone.
Free Download For Win 7 or later(64-bit)
Free Download For macOS 10.14 or later
Key Features of Wondershare Filmora
- Compound Clip: This feature will arrange all your clips, combine them, and edit them as a single clip. This strong and intuitive feature improves and edits your video.

- AI Text-to-Video: You can convert text into engaging visual narratives and instantly turn text inputs into interesting videos. The feature makes ideas into stunning videos with ease.

- Speed Ramping: This feature produces distinctive cinematic effects by managing your keyframes and altering the speed of your film.

- AI Thumbnail Creator: The tool uses AI to create attractive, engaging thumbnails that get the viewers’ attention. You can use different presets to beautify your thumbnail.

Step-by-Step Guide on How to Perform AI Masking on Filmora
Wondershare Filmora Premiere Pro mask tracking is way easier and provides the same high-end results. Follow the steps below to do mask tracking using Filmora’s unique functions and procedures:
Step 1Add Video Content to Timeline in Filmora
Launch Wondershare Filmora on your computer and proceed by creating a “New Project.” As a new window opens, import your required video clips to the timeline. Double-click and proceed to their respective video settings.

Step 2Use AI Masking Feature on Video
On double-clicking the video, proceed to the “Video” tab from the top and continue into the “Mask” section. Select the “AI Mask” option in the provided list to open further settings. Select any appropriate mode of AI Mask from the bottom options and set the respective parameters accordingly. You can either select “Smart Brush” or go for “Smart Character” or “Smart Subject.”

Step 3Save Final Video
On clicking “OK,” all changes are applied to the video. Continue to the “Export” button to save your edited video clip on your computer.

Free Download For Win 7 or later(64-bit)
Free Download For macOS 10.14 or later
Conclusion
Mask tracking is handy for adding effects to a moving object in your video. By tracking the movement, you can ensure the effect persists even as the object moves around the frame. Many professionals use it in their videos to edit and enhance a specific area in their clip. Check out this article if you also seek an app for Premiere mask tracking.
Free Download Free Download Learn More
Part 1. What Do You Know About Mask Tracking in Videos?
Automatic tracking and following a certain object or area during a video clip is known as mask tracking. Usually, the “mask” depicts a designated zone of interest, such as a person’s face, an item, or any other area. Mask tracking is achieved using various methods and algorithms, including computer vision techniques such as optical flow, feature tracking, or machine learning.
The objective of the effect is to track the targeted item consistently over all video frames. Mask tracking Premiere Pro is a common special effect in video editing. It can add visual components, apply filters, or change the color and lighting inside the tracked region.
Part 2. How To Perform Mask Tracking with Adobe Premiere Pro
One of the most widely used industry standard programs for video editing is Adobe Premiere Pro . With the help of this tool, users can alter various aspects of photographs and films. It can tweak effects in nearly every frame according to user preferences using Premiere mask tracking. You will undoubtedly get remarkable outcomes from it in a short amount of time.
The tool is a video editing expert, so many professional video editors rely on it. It offers a huge range of editing features that get together to create an impactful and eye-catching video.
Marked Key Features of Adobe Premiere Pro
- Video Editing: You can combine audio and apply effects and transitions to your video content. The platform also helps you work with color or add animated titles to your videos.
- Text-Based Editing: Text-based editing creates a transcript and automatically highlights text to add clips to your timeline. It can edit and rearrange clips like a text document.
- Color Correction: With the help of AI, you can automatically balance your colors or modify the frame using expert color wheels and curve controls. It also assists in viewing your work using integrated video scopes.
- Audio Editing: With Adobe Premiere Pro, you can explore audio tracks, license them, and utilize AI to adapt them to your clips automatically.
Step-by-Step Guide to Perform Mask Tracking with Premiere Pro
Adobe Premiere mask tracking is one of the many remarkable features of the app. If you want to employ mask tracking in your videos using Adobe Premiere, look at the steps below:
Step 1: To start off with the process, import the video onto the timeline that needs to be edited. Navigate to the top of the screen and select “Effect Controls” to proceed further. Select any specific shape present below the “Opacity” option on the left to add a mask to your clip.
Step 2: Set the shape according to the person or object you will track by masking. Now, under the “Mask” option, you will see the “Mask Feather” option. Click on “Mask Feather” and adjust it so it won’t look too harsh on the edges.
Step 4: Go to the beginning of the video you are editing, return to the editing section, and look for the “Mask Path” option. Now hit the “Track Selected Masked Forward” button and wait for the system to complete the Premiere Pro tracking mask process and save the video.
Part 3. Making Masking Easy with Wondershare Filmora: Reviewing the Details
Adobe Premiere Pro is an incredible tool, without a doubt. However, many users say that it needs to be simpler to use. You cannot generate a good video even after watching tutorials because it’s hard for an amateur to use Adobe Premiere Pro. Because of this, many users look for alternative options to add a premiere tracking mask and make other changes to their videos.
This part is all about the amazing alternative that you’re looking for. Wondershare Filmora is a video editing tool that provides professional quality content editing. The tool is so easy to use that you can start immediately with basic instructions. Its smart editing features, combined with a fast and intelligent system, make it a great choice for everyone.
Free Download For Win 7 or later(64-bit)
Free Download For macOS 10.14 or later
Key Features of Wondershare Filmora
- Compound Clip: This feature will arrange all your clips, combine them, and edit them as a single clip. This strong and intuitive feature improves and edits your video.
- AI Text-to-Video: You can convert text into engaging visual narratives and instantly turn text inputs into interesting videos. The feature makes ideas into stunning videos with ease.
- Speed Ramping: This feature produces distinctive cinematic effects by managing your keyframes and altering the speed of your film.
- AI Thumbnail Creator: The tool uses AI to create attractive, engaging thumbnails that get the viewers’ attention. You can use different presets to beautify your thumbnail.
Step-by-Step Guide on How to Perform AI Masking on Filmora
Wondershare Filmora Premiere Pro mask tracking is way easier and provides the same high-end results. Follow the steps below to do mask tracking using Filmora’s unique functions and procedures:
Step 1Add Video Content to Timeline in Filmora
Launch Wondershare Filmora on your computer and proceed by creating a “New Project.” As a new window opens, import your required video clips to the timeline. Double-click and proceed to their respective video settings.
Step 2Use AI Masking Feature on Video
On double-clicking the video, proceed to the “Video” tab from the top and continue into the “Mask” section. Select the “AI Mask” option in the provided list to open further settings. Select any appropriate mode of AI Mask from the bottom options and set the respective parameters accordingly. You can either select “Smart Brush” or go for “Smart Character” or “Smart Subject.”
Step 3Save Final Video
On clicking “OK,” all changes are applied to the video. Continue to the “Export” button to save your edited video clip on your computer.
Free Download For Win 7 or later(64-bit)
Free Download For macOS 10.14 or later
Conclusion
Mask tracking is handy for adding effects to a moving object in your video. By tracking the movement, you can ensure the effect persists even as the object moves around the frame. Many professionals use it in their videos to edit and enhance a specific area in their clip. Check out this article if you also seek an app for Premiere mask tracking.
Also read:
- Updated 2024 Approved How Important It Is to Perform Color Correction to Your Video? Here Is a Solution with After Effects Color Correction with Illustrative Videos
- Updated 2024 Approved How to Make a Slow Motion Video Complete Guide
- In 2024, Recording Video in Slow Motion Some Considerable Points
- New Create True 3D Text Effects Using After Effects for 2024
- 2024 Approved Using Montage In Movies | Learn to Use Montage With Movies
- Updated In 2024, Best Phantom Slow-Mo Camera For Recording Slow Motion Videos
- Updated Split Videos in the Lightworks Step by Step for 2024
- New 2024 Approved How to Color Correct in OBS
- New Learning Unique Ways to Slow Down Time Lapse on iPhone for 2024
- Updated 2024 Approved 7 Tips to Create Teaching Videos
- Updated How to Use Rules of Thirds
- New 2024 Approved Add Subtitles To Videos With Kapwing Step by Step
- New 2024 Approved How to Use Speed Ramping to Create a Footage
- 2024 Approved 20 Fantastic Video Background Templates to Make Your Video Go Viral
- New How to Create Cooking Video Intro and Outro for YouTube Channel, In 2024
- New A Guide to Color Grade Your Picture in LightRoom
- How to Transfer Data from Oppo A1x 5G to Any iOS Devices | Dr.fone
- 9 Solutions to Fix Nokia C300 System Crash Issue | Dr.fone
- Solutions to restore deleted files from Itel P55 5G
- How to rescue lost call logs from Samsung Galaxy S24+
- 3uTools Virtual Location Not Working On Itel A05s? Fix Now | Dr.fone
- In 2024, How to Cast Xiaomi Redmi Note 12 Pro 4G to Computer for iPhone and Android? | Dr.fone
- Three methods to recover lost data on Nokia
- In 2024, The Essential Guide to Emoji, Memoji, Animoji, and Bitmoji
- In 2024, Pokemon Go Error 12 Failed to Detect Location On Poco C55? | Dr.fone
- Full Tutorial to Bypass Your Samsung Galaxy Z Flip 5 Face Lock?
- Can Life360 Track You When Your Tecno Camon 20 Pro 5G is off? | Dr.fone
- Title: Updated In 2024, How to Make Flying Objects in Wondershare Filmora
- Author: Morgan
- Created at : 2024-04-24 01:00:49
- Updated at : 2024-04-25 01:00:49
- Link: https://ai-video-editing.techidaily.com/updated-in-2024-how-to-make-flying-objects-in-wondershare-filmora/
- License: This work is licensed under CC BY-NC-SA 4.0.
