:max_bytes(150000):strip_icc():format(webp)/178665671_HighRes-56a532a83df78cf77286de1b.jpg)
Updated In 2024, How To Quickly Create A Screen Print Effect In Photoshop Detailed Guide

How To Quickly Create A Screen Print Effect In Photoshop: Detailed Guide
Screen printing is a unique method that uses a mesh to transfer ink onto a surface and is commonly used to print designs onto t-shirts or other garments, such as hoodies, tote bags, and even sneakers.
Nowadays, digital means such as Photoshop or Illustrator are used to create the screen print effect, which is achieved by using a layer mask to cut out a portion of the image and filling it with the color or pattern of your choice. The design is then printed onto fabric using water-based CMYK (cyan, magenta, yellow, black) inks with inkjet printers.
Suppose you’ve ever wanted to create the screen print effect in Photoshop to give that artistic look to your pictures and embed them in your clothes or other accessories but don’t know where to start or are not familiar with the process. In that case, this guide can surely help you figure this out quickly!
So without any delay, let’s get on with it!
How To Use Photoshop To Create The Print Effect
Below we’ve provided a detailed guide using Adobe Photoshop to create the print effect with easy step-by-step instructions.
What Are The Requirements For Creating the Print Effect In PhotoShop?
Before we discuss the complete process of creating the print effect while using Photoshop, here are the resources you have to arrange.
- Picture of the object: We will cut out the object from the original image using the Lasso tool and unsaturate it. However, you have to ensure that the object is clear and easily detectable within the picture.
- A background image: You will need a background image to add the object to. For this, you can use a solid background, capture scenery, etc.
- Fonts: You can also add fonts to the final image to add your ideas or thoughts, making your final project more eye-catching and engaging.
- Photoshop latest version: For this tutorial, we will use the Photoshop CC 2021 version, so make sure to download and install it to your computer immediately!
What Are The Steps To Create Print Effect in PhotoShop?
Now that you know the necessary resources, the following are the steps to create the print effect in Photoshop:
Step1 Launch thePhotoshop program on your laptop/desktop and click “Create New” on the software dashboard. Next, select the page size, such as “letter,” and click “Open.”

Now, click the “File” option in the top toolbar, and from the drop-down menu, select “Open.” Next, choose the image you want to apply the screen print effect by browsing to its location on your computer.

Step2 Next, click the “Lasso” tool from the left-side menu to create the selection around the object in the image.

Press the CMD/Ctrl + C on your computer’s keyboard to copy the selection. Next, click the “Layer“ option in the top toolbar, select “New,” and click “Layer via Copy.”

Step3 Now, hide the background layer in the “Layers” panel on the right-hand side, and you will get your object without any BG. Click the “Image” option in the top toolbar and select “Adjustments.”
Click “Threshold…” from the drop-down menu, and set the “Threshold level.” Alternatively, you can click “Cmd/ctrl+Shift+U” on the keyboard to desaturate the image.

Step4 Next, select the “Magic Eraser Tool” from the left-side menu and remove the white parts to smooth down the background. Afterward, choose the “Move Tool” from the menu and drag your object to a new layer.
To add the background image, click “File” and select “Open.” Next, select the file and again click “Open.”
Step5 Select the object using the “Move Tool” and drag it to the background image layer. If the thing is too large and you want to resize it, select the object using the “CMD/Ctrl” key and click “Edit” from the top toolbar. From the drop-down menu, choose “Transform” and click “Scale.”

Next, drag the handles to adjust the size of the object on the Background image.
Step6 Click the “T” icon from the left-hand side menu and set the font style, color, and size. You can also click the “3D” option to convert your text to a three-dimensional form.

Try removing the left-out white patches on the object using the “Magic Eraser Tool” to give a polished look to the print screen effect. Once you are satisfied, click the “File” option from the top toolbar panel and select “Save As.”
Type in the file name and select the file type from the drop-down menu next to “Save As Type.” Choose the storage location, click “Save” to export your final project, and you’re done!
Conclusion
In this article, we’ve explored what the screen print effect is and how it is used in digital art. We’ve also discussed the requirements and resources you need to use and then demonstrated a step-by-step process of how to create the screen print effect in Photoshop with simple and easy-to-follow instructions.
To make things easy for you, we also added original screenshots while creating a sample project on the software.
Hopefully, this article helped resolve your queries, and you can now give a vintage or retro look to your images using the screen print effect in Photoshop.
Free Download For Win 7 or later(64-bit)
Free Download For macOS 10.14 or later
Free Download For macOS 10.14 or later
How to Create Intro Video with KineMaster
The intro is considered to be the most important part of a video. The intro comes first in a video and the first impression is crucial in retaining the viewers. If the intro is gripping and engaging, the viewers are likely to check the rest of the video. In order to create a stunning video, you need to have the best video editor. If you are a smartphone user, KineMaster intro maker should be your first choice.
You must have seen videos with stunning intro having KineMaster watermark on social media and video streaming platforms. Starting from beginners to professional video creators, KineMaster is an easy choice for them to make video intro. KineMaster is a powerful intro maker where you will find several templates, effects, and modes to create stunning intros for your videos. We will illustrate the steps to create intro video with KineMaster Intro Maker.
Part 1. Steps to Create Intro Video with KineMaster
KineMaster video editor is one of the most intuitive apps and that is why creating amazing intro videos is super easy. KineMaster app is available for both Android and iOS users. There are awesome assets, amazing templates, and useful blending modes available to design your desired intro video. You can create 4K intro videos at 60 FPS comfortably. Here are the steps to create intro KineMaster video.
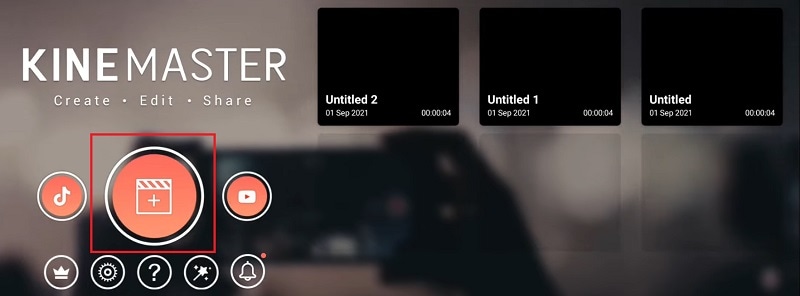
Step 1: Go for KineMaster intro download as per your smartphone OS. Launch KineMaster app and tap on Create New icon on the home screen.
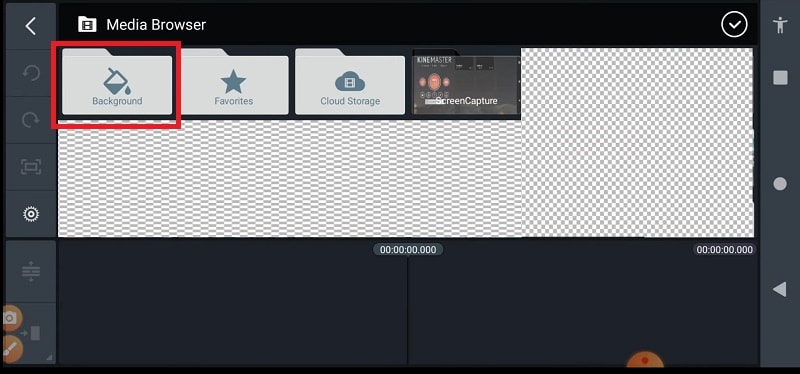
Step 2: Select an aspect ratio such as 16:9 or 9:16 or 1:1 as per your requirements. On the next screen, tap on Background and select a background as per your preference.
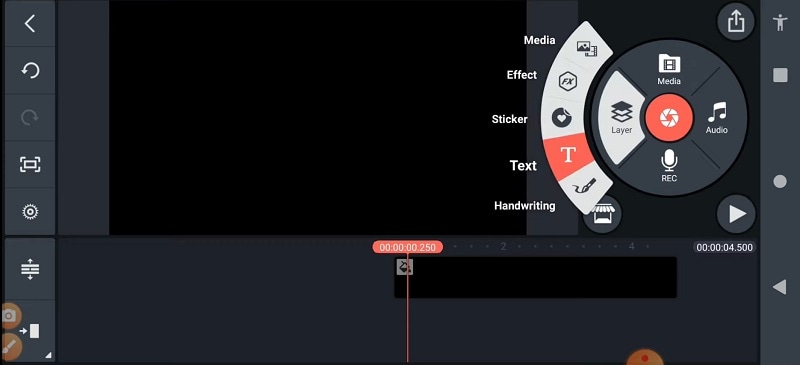
Step 3: On the layer at the bottom and select Text option. Type in your text that you want to show in the intro and tap on Ok button. You can change the font and style from the right panel.
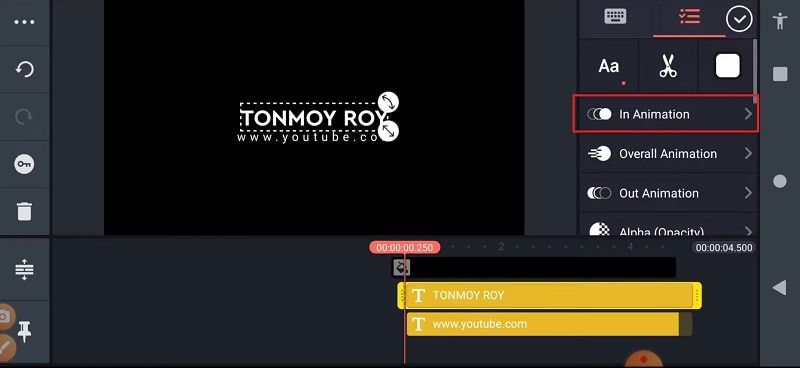
Step 4: Select the text layer and from the right panel, tap on In Animation option to animate the text. Select a desired animation template that you think is appropriate.
Step 5: Tap on the text layer again and tap on Effect option to add a text effect. Choose any desired Effect from the list. You can also tap on Get More to check out more effect templates.
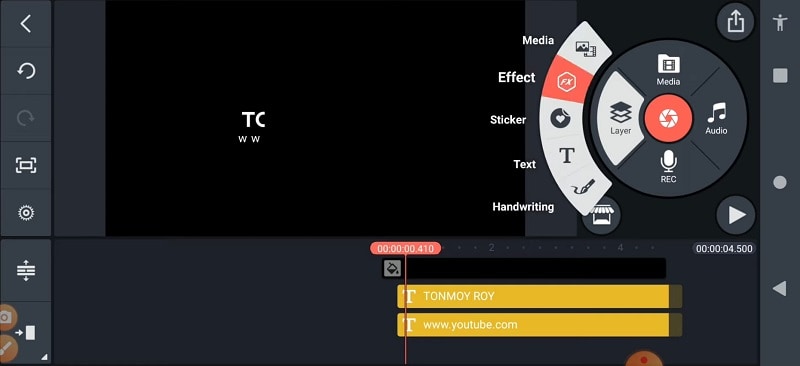
After you apply an effect, select the Effect layer from the timeline and go to Settings to make any adjustment. You can play and watch the intro video. Besides, you can add background photo or video and add graphical elements to enhance the intro animation.
Part 2. How to Create 3D Intro with KineMaster
We have illustrated how to create a text intro video and you can try out different animations and effects and come up with creative intro video. There is a viral trend in showing 3D intro to get more traction. You can use KineMaster to create amazing 3D intro videos easily that can go along with your video content. Here are the simple steps on how you can create 3D video with KineMaster.
Step 1: Install KineMaster from Play Store or App Store as per your smartphone OS. Launch KineMaster app after installation and tap on Create New icon.
Step 2: Select an aspect ratio and tap on Background option. Select a background color as per your preference. Otherwise, you can tap on Media Browser if you want to add a pre-decided photo or video as a background. We recommend a background video to amplify the 3D effect.
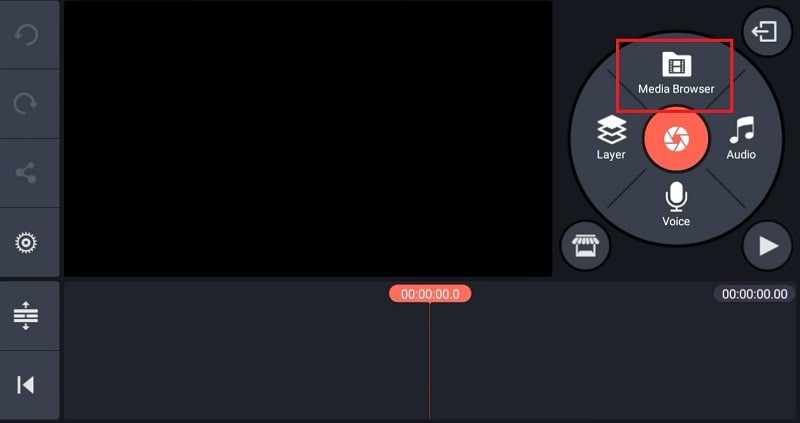
Step 3: It is time to add a 3D title. You can tap on Layer icon and Text icon to type in any title that you can turn into 3D with text effect or style. You can also tap on Media icon to select a ready-made 3D text with a transparent background. After adding the text, you can stretch it to increase the size as per your preference.
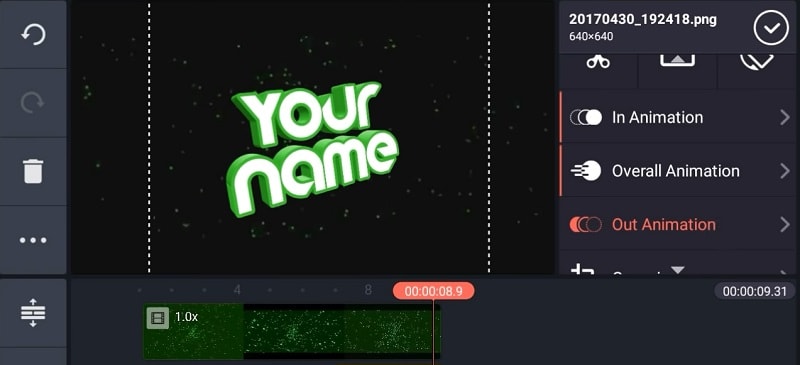
Step 4: From the right panel, tap on In Animation option and select a desired animation template. Similarly, tap on Out Animation option and select any animation whichever you think it is fit.
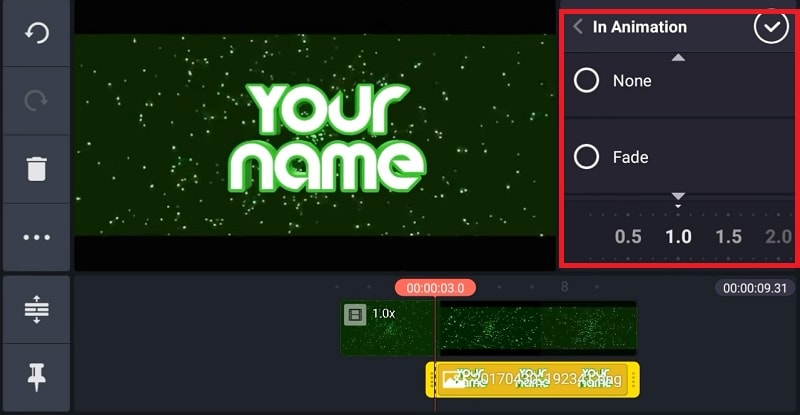
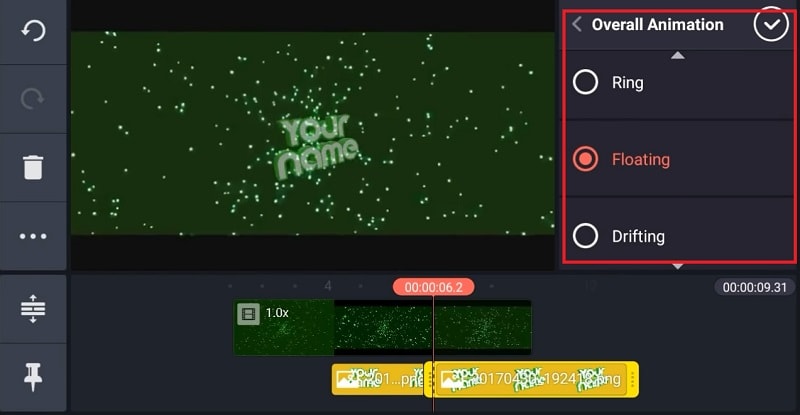
Step 5: From the right panel, tap on Overall Animation, select an animation template such as floating to enhance the 3D effect.
Part 3. Related FAQs of KineMaster Intro Video
What app most YouTubers use to make intros?
Apart from KineMaster, most YouTubers use Wondershare Filmora to make amazing videos. Filmora has a wider range of video effects, animations, and stock photos and videos. On top of that, the text animation and effect templates are tailor-made for intro videos.
Is KineMaster good for making YouTube videos?
Yes, KineMaster is good for creating engaging YouTube videos. You can create amazing intro and outro for your YouTube video on your smartphone. You can blend your photos and videos together and create amazing YouTube videos and stunning texts and titles. Besides, you can use chroma keys, transitions, reverse timing, and multi-layer features.
Can KineMaster handle 4K?
Yes, KineMaster is perfect for editing 4K video taken with high-end cameras. After editing the videos, you can export them in 4K resolution up to 60 FPS. However, you will need a high-end smartphone for KineMaster to handle 4K video editing smoothl
The intro is considered to be the most important part of a video. The intro comes first in a video and the first impression is crucial in retaining the viewers. If the intro is gripping and engaging, the viewers are likely to check the rest of the video. In order to create a stunning video, you need to have the best video editor. If you are a smartphone user, KineMaster intro maker should be your first choice.
You must have seen videos with stunning intro having KineMaster watermark on social media and video streaming platforms. Starting from beginners to professional video creators, KineMaster is an easy choice for them to make video intro. KineMaster is a powerful intro maker where you will find several templates, effects, and modes to create stunning intros for your videos. We will illustrate the steps to create intro video with KineMaster Intro Maker.
Part 1. Steps to Create Intro Video with KineMaster
KineMaster video editor is one of the most intuitive apps and that is why creating amazing intro videos is super easy. KineMaster app is available for both Android and iOS users. There are awesome assets, amazing templates, and useful blending modes available to design your desired intro video. You can create 4K intro videos at 60 FPS comfortably. Here are the steps to create intro KineMaster video.
Step 1: Go for KineMaster intro download as per your smartphone OS. Launch KineMaster app and tap on Create New icon on the home screen.

Step 2: Select an aspect ratio such as 16:9 or 9:16 or 1:1 as per your requirements. On the next screen, tap on Background and select a background as per your preference.

Step 3: On the layer at the bottom and select Text option. Type in your text that you want to show in the intro and tap on Ok button. You can change the font and style from the right panel.

Step 4: Select the text layer and from the right panel, tap on In Animation option to animate the text. Select a desired animation template that you think is appropriate.

Step 5: Tap on the text layer again and tap on Effect option to add a text effect. Choose any desired Effect from the list. You can also tap on Get More to check out more effect templates.

After you apply an effect, select the Effect layer from the timeline and go to Settings to make any adjustment. You can play and watch the intro video. Besides, you can add background photo or video and add graphical elements to enhance the intro animation.
Part 2. How to Create 3D Intro with KineMaster
We have illustrated how to create a text intro video and you can try out different animations and effects and come up with creative intro video. There is a viral trend in showing 3D intro to get more traction. You can use KineMaster to create amazing 3D intro videos easily that can go along with your video content. Here are the simple steps on how you can create 3D video with KineMaster.
Step 1: Install KineMaster from Play Store or App Store as per your smartphone OS. Launch KineMaster app after installation and tap on Create New icon.
Step 2: Select an aspect ratio and tap on Background option. Select a background color as per your preference. Otherwise, you can tap on Media Browser if you want to add a pre-decided photo or video as a background. We recommend a background video to amplify the 3D effect.

Step 3: It is time to add a 3D title. You can tap on Layer icon and Text icon to type in any title that you can turn into 3D with text effect or style. You can also tap on Media icon to select a ready-made 3D text with a transparent background. After adding the text, you can stretch it to increase the size as per your preference.

Step 4: From the right panel, tap on In Animation option and select a desired animation template. Similarly, tap on Out Animation option and select any animation whichever you think it is fit.

Step 5: From the right panel, tap on Overall Animation, select an animation template such as floating to enhance the 3D effect.

Part 3. Related FAQs of KineMaster Intro Video
What app most YouTubers use to make intros?
Apart from KineMaster, most YouTubers use Wondershare Filmora to make amazing videos. Filmora has a wider range of video effects, animations, and stock photos and videos. On top of that, the text animation and effect templates are tailor-made for intro videos.
Is KineMaster good for making YouTube videos?
Yes, KineMaster is good for creating engaging YouTube videos. You can create amazing intro and outro for your YouTube video on your smartphone. You can blend your photos and videos together and create amazing YouTube videos and stunning texts and titles. Besides, you can use chroma keys, transitions, reverse timing, and multi-layer features.
Can KineMaster handle 4K?
Yes, KineMaster is perfect for editing 4K video taken with high-end cameras. After editing the videos, you can export them in 4K resolution up to 60 FPS. However, you will need a high-end smartphone for KineMaster to handle 4K video editing smoothl
The intro is considered to be the most important part of a video. The intro comes first in a video and the first impression is crucial in retaining the viewers. If the intro is gripping and engaging, the viewers are likely to check the rest of the video. In order to create a stunning video, you need to have the best video editor. If you are a smartphone user, KineMaster intro maker should be your first choice.
You must have seen videos with stunning intro having KineMaster watermark on social media and video streaming platforms. Starting from beginners to professional video creators, KineMaster is an easy choice for them to make video intro. KineMaster is a powerful intro maker where you will find several templates, effects, and modes to create stunning intros for your videos. We will illustrate the steps to create intro video with KineMaster Intro Maker.
Part 1. Steps to Create Intro Video with KineMaster
KineMaster video editor is one of the most intuitive apps and that is why creating amazing intro videos is super easy. KineMaster app is available for both Android and iOS users. There are awesome assets, amazing templates, and useful blending modes available to design your desired intro video. You can create 4K intro videos at 60 FPS comfortably. Here are the steps to create intro KineMaster video.
Step 1: Go for KineMaster intro download as per your smartphone OS. Launch KineMaster app and tap on Create New icon on the home screen.

Step 2: Select an aspect ratio such as 16:9 or 9:16 or 1:1 as per your requirements. On the next screen, tap on Background and select a background as per your preference.

Step 3: On the layer at the bottom and select Text option. Type in your text that you want to show in the intro and tap on Ok button. You can change the font and style from the right panel.

Step 4: Select the text layer and from the right panel, tap on In Animation option to animate the text. Select a desired animation template that you think is appropriate.

Step 5: Tap on the text layer again and tap on Effect option to add a text effect. Choose any desired Effect from the list. You can also tap on Get More to check out more effect templates.

After you apply an effect, select the Effect layer from the timeline and go to Settings to make any adjustment. You can play and watch the intro video. Besides, you can add background photo or video and add graphical elements to enhance the intro animation.
Part 2. How to Create 3D Intro with KineMaster
We have illustrated how to create a text intro video and you can try out different animations and effects and come up with creative intro video. There is a viral trend in showing 3D intro to get more traction. You can use KineMaster to create amazing 3D intro videos easily that can go along with your video content. Here are the simple steps on how you can create 3D video with KineMaster.
Step 1: Install KineMaster from Play Store or App Store as per your smartphone OS. Launch KineMaster app after installation and tap on Create New icon.
Step 2: Select an aspect ratio and tap on Background option. Select a background color as per your preference. Otherwise, you can tap on Media Browser if you want to add a pre-decided photo or video as a background. We recommend a background video to amplify the 3D effect.

Step 3: It is time to add a 3D title. You can tap on Layer icon and Text icon to type in any title that you can turn into 3D with text effect or style. You can also tap on Media icon to select a ready-made 3D text with a transparent background. After adding the text, you can stretch it to increase the size as per your preference.

Step 4: From the right panel, tap on In Animation option and select a desired animation template. Similarly, tap on Out Animation option and select any animation whichever you think it is fit.

Step 5: From the right panel, tap on Overall Animation, select an animation template such as floating to enhance the 3D effect.

Part 3. Related FAQs of KineMaster Intro Video
What app most YouTubers use to make intros?
Apart from KineMaster, most YouTubers use Wondershare Filmora to make amazing videos. Filmora has a wider range of video effects, animations, and stock photos and videos. On top of that, the text animation and effect templates are tailor-made for intro videos.
Is KineMaster good for making YouTube videos?
Yes, KineMaster is good for creating engaging YouTube videos. You can create amazing intro and outro for your YouTube video on your smartphone. You can blend your photos and videos together and create amazing YouTube videos and stunning texts and titles. Besides, you can use chroma keys, transitions, reverse timing, and multi-layer features.
Can KineMaster handle 4K?
Yes, KineMaster is perfect for editing 4K video taken with high-end cameras. After editing the videos, you can export them in 4K resolution up to 60 FPS. However, you will need a high-end smartphone for KineMaster to handle 4K video editing smoothl
The intro is considered to be the most important part of a video. The intro comes first in a video and the first impression is crucial in retaining the viewers. If the intro is gripping and engaging, the viewers are likely to check the rest of the video. In order to create a stunning video, you need to have the best video editor. If you are a smartphone user, KineMaster intro maker should be your first choice.
You must have seen videos with stunning intro having KineMaster watermark on social media and video streaming platforms. Starting from beginners to professional video creators, KineMaster is an easy choice for them to make video intro. KineMaster is a powerful intro maker where you will find several templates, effects, and modes to create stunning intros for your videos. We will illustrate the steps to create intro video with KineMaster Intro Maker.
Part 1. Steps to Create Intro Video with KineMaster
KineMaster video editor is one of the most intuitive apps and that is why creating amazing intro videos is super easy. KineMaster app is available for both Android and iOS users. There are awesome assets, amazing templates, and useful blending modes available to design your desired intro video. You can create 4K intro videos at 60 FPS comfortably. Here are the steps to create intro KineMaster video.
Step 1: Go for KineMaster intro download as per your smartphone OS. Launch KineMaster app and tap on Create New icon on the home screen.

Step 2: Select an aspect ratio such as 16:9 or 9:16 or 1:1 as per your requirements. On the next screen, tap on Background and select a background as per your preference.

Step 3: On the layer at the bottom and select Text option. Type in your text that you want to show in the intro and tap on Ok button. You can change the font and style from the right panel.

Step 4: Select the text layer and from the right panel, tap on In Animation option to animate the text. Select a desired animation template that you think is appropriate.

Step 5: Tap on the text layer again and tap on Effect option to add a text effect. Choose any desired Effect from the list. You can also tap on Get More to check out more effect templates.

After you apply an effect, select the Effect layer from the timeline and go to Settings to make any adjustment. You can play and watch the intro video. Besides, you can add background photo or video and add graphical elements to enhance the intro animation.
Part 2. How to Create 3D Intro with KineMaster
We have illustrated how to create a text intro video and you can try out different animations and effects and come up with creative intro video. There is a viral trend in showing 3D intro to get more traction. You can use KineMaster to create amazing 3D intro videos easily that can go along with your video content. Here are the simple steps on how you can create 3D video with KineMaster.
Step 1: Install KineMaster from Play Store or App Store as per your smartphone OS. Launch KineMaster app after installation and tap on Create New icon.
Step 2: Select an aspect ratio and tap on Background option. Select a background color as per your preference. Otherwise, you can tap on Media Browser if you want to add a pre-decided photo or video as a background. We recommend a background video to amplify the 3D effect.

Step 3: It is time to add a 3D title. You can tap on Layer icon and Text icon to type in any title that you can turn into 3D with text effect or style. You can also tap on Media icon to select a ready-made 3D text with a transparent background. After adding the text, you can stretch it to increase the size as per your preference.

Step 4: From the right panel, tap on In Animation option and select a desired animation template. Similarly, tap on Out Animation option and select any animation whichever you think it is fit.

Step 5: From the right panel, tap on Overall Animation, select an animation template such as floating to enhance the 3D effect.

Part 3. Related FAQs of KineMaster Intro Video
What app most YouTubers use to make intros?
Apart from KineMaster, most YouTubers use Wondershare Filmora to make amazing videos. Filmora has a wider range of video effects, animations, and stock photos and videos. On top of that, the text animation and effect templates are tailor-made for intro videos.
Is KineMaster good for making YouTube videos?
Yes, KineMaster is good for creating engaging YouTube videos. You can create amazing intro and outro for your YouTube video on your smartphone. You can blend your photos and videos together and create amazing YouTube videos and stunning texts and titles. Besides, you can use chroma keys, transitions, reverse timing, and multi-layer features.
Can KineMaster handle 4K?
Yes, KineMaster is perfect for editing 4K video taken with high-end cameras. After editing the videos, you can export them in 4K resolution up to 60 FPS. However, you will need a high-end smartphone for KineMaster to handle 4K video editing smoothl
Top 5 Video Filter Software: Enhance Your Videos
In today’s tech-savvy world, whether you’re a budding content creator or a seasoned pro, creating eye-catching videos is a must.
And what’s the secret sauce to make your videos stand out? You guessed it – video filters! These nifty tools can transform your raw footage into a visual masterpiece.
So, if you’re ready to take your video editing game up a notch, you’re in the right place.
In this article, we’ll dig into the top 5 video filter software of 2024 that are worth your attention.
Before we jump into the juicy details, let’s get down to basics.
Part 1: Introduction
What exactly are video filters, you ask?
Well, video filters are like Instagram filters for your videos but with much more finesse.
They allow you to tweak various aspects of your video’s appearance, such as color, contrast, saturation, and more, to achieve the desired visual style.
The beauty of video filter software lies in its ability to enhance your video’s overall look and feel. Let’s explore the top contenders in the video filter software arena.
Part 2: Top 5 Video Filter Software
01 Filmora

Our first contender in the world of video filter software is Filmora. Designed with a user-friendly interface, Filmora is the ideal choice for those who want to enhance their videos effortlessly. Let’s take a closer look at what makes it stand out.
Advantages:
- Filmora’s intuitive interface makes it a breeze for beginners to get started. You don’t need to be a tech whiz to dive into video editing; Filmora guides you through the process seamlessly.
- Filmora boasts an extensive library of video presets and color grading presets. This treasure trove of pre-made styles allows you to give your videos that extra flair without the need for in-depth editing skills.
- Time is precious, and Filmora respects that. It offers quick rendering speeds, so you can see the results of your editing efforts in no time.
- Filmora’s simplicity is its strength, but it doesn’t mean it lacks creative potential. You can still go into more advanced features when you’re ready to level up your video editing game. This software gracefully balances accessibility and functionality.
Disadvantages:
So, you might be wondering, what about the downsides? Well, Filmora is so user-friendly that it can make you addicted to editing!
You might find yourself spending hours perfecting your videos, which, to be honest, is more of an advantage disguised as a disadvantage. Who wouldn’t want to get lost in the world of video editing, creating stunning content effortlessly?
02 DaVinci Resolve

When it comes to professional video editing and color correction, DaVinci Resolve stands as a true powerhouse in the world of video filter software.
Renowned for its robust feature set and precision, it’s the go-to choice for filmmakers, colorists, and anyone who demands the highest level of control over their video projects.
Advantages:
- DaVinci Resolve is unrivaled in its color correction and grading capabilities. Whether you’re aiming for a cinematic look or a specific color scheme, the software provides an extensive suite of tools to fine-tune every detail. Its color wheels, curves, and advanced grading panels allow you to achieve the exact visual style you envision.
- It provides a lot of cool stuff for editing sound and video, like fancy tools for fixing audio, working with multiple cameras, and working together with others on the same project. This makes it an all-in-one solution for every aspect of video post-production.
- In a world where teamwork is essential, DaVinci Resolve shines with its collaboration features. Many people can work on a project together at the same time, making it easier for teams working on big video projects to edit smoothly.
Disadvantages:
DaVinci Resolve can be resource-intensive, demanding a powerful computer setup for smooth operation. This could be a great advantage for people with really good computers, but it might be a bit tough for folks with older or less powerful ones.
03 HitFilm Express

If you’re an aspiring filmmaker or content creator looking to dive into the world of video editing and visual effects, HitFilm Express is your ticket to boundless creativity.
This versatile software combines video editing and visual effects seamlessly, allowing you to create stunning, professional-quality videos without breaking the bank.
Advantages:
- HitFilm Express excels in merging video editing and visual effects into one unified platform. This means you can effortlessly incorporate jaw-dropping visual effects into your videos without the need for additional software. Whether you’re adding explosions, futuristic CGI, or enchanting motion graphics, HitFilm Express has you covered.
- It offers a free version that provides access to its fundamental video filter features and VFX capabilities. This is a fantastic opportunity for budding content creators to dip their toes into the world of video editing without any financial commitment.
- HitFilm Express comes with an extensive library of tutorials, making it incredibly user-friendly for those who are new to video editing or visual effects. These tutorials guide you through the software’s features and help you create eye-catching effects like a pro.
Disadvantages:
As for potential downsides, the free version of HitFilm Express may have some limitations compared to the paid version.
While it provides access to essential features, you may find certain advanced options restricted.
However, this can be seen as an advantage because it allows you to explore the software without any upfront costs.
04 Adobe Premiere Pro

Adobe Premiere Pro is a name that resonates deeply within the video editing community. It’s renowned for its versatility and rich feature set, making it a go-to choice for professional video editors and content creators alike.
Advantages:
- When it comes to customization, Adobe Premiere Pro truly shines. The software offers an extensive library of plugins and extensions, allowing you to tailor your video filter effects to your precise liking. Whether you’re into color grading, visual effects, or audio enhancement, you’ll find the tools you need within Adobe’s vast ecosystem.
- If you’re already a part of the Adobe Creative family, you’ll appreciate Premiere Pro’s seamless integration with other Adobe software. Easily import and export assets from Adobe Photoshop or Adobe After Effects, enhancing your workflow and saving you time.
- Adobe is committed to keeping Premiere Pro at the forefront of video editing technology. With regular updates, you can expect a constant influx of new features, improvements, and bug fixes. This ensures that your editing experience remains cutting-edge.
Disadvantages:
There are a few considerations to keep in mind. Adobe Premiere Pro operates on a subscription-based model, which means you’ll need to pay a monthly or annual fee to access the software. While this provides you with ongoing updates and support, it might not be the best fit for those on a strict budget.
Adobe Premiere Pro’s extensive feature set can be overwhelming for beginners. If you’re new to video editing, you may find the learning curve a bit steep. However, with dedication and a wealth of online tutorials available, mastering the software is within reach.
05 Final Cut Pro

If you’re a proud owner of a Mac, Final Cut Pro should be on your radar as the ultimate video filter software. This Apple-exclusive gem is tailored to take your video editing experience to the next level, offering seamless integration with the macOS ecosystem.
Advantages:
- A standout feature of Final Cut Pro is how well it works together with other Apple devices and software, making everything run smoothly. Whether you’re working on your Macbook, iPad, or iPhone, Final Cut Pro keeps your workflow smooth and consistent. This synergy allows you to transfer projects effortlessly between devices, making it a go-to choice for Apple enthusiasts.
- Final Cut Pro is a powerhouse when it comes to handling high-resolution videos. Whether you’re working with 4K or 8K footage, this software handles it with grace and precision. Expect smooth playback and rapid rendering, even with the most demanding video projects.
- Mac users will feel right at home with Final Cut Pro’s sleek and user-friendly interface. The software’s design prioritizes ease of use without compromising on functionality. You can focus on your creative vision rather than wrestling with a complex interface.
Disadvantages:
It’s important to mention that Final Cut Pro is quite expensive, which might not be affordable for people on a tight budget.
Final Cut Pro is exclusive to macOS, which means Windows users will have to explore alternative software options. If you’re committed to the Apple ecosystem and prioritize top-notch video editing, Final Cut Pro is a wise investment.
Part 3: Summary
In a world where visual content rules supreme, having the right video filter software can make all the difference.
Your choice depends on your skill level, preferences, and budget. Whether you’re a newbie or a seasoned pro, there’s a video filter software out there that’s perfect for you. Feel free to dive in, experiment, and let your creativity sparkle in your videos!
Part 1: Introduction
What exactly are video filters, you ask?
Well, video filters are like Instagram filters for your videos but with much more finesse.
They allow you to tweak various aspects of your video’s appearance, such as color, contrast, saturation, and more, to achieve the desired visual style.
The beauty of video filter software lies in its ability to enhance your video’s overall look and feel. Let’s explore the top contenders in the video filter software arena.
Part 2: Top 5 Video Filter Software
01 Filmora

Our first contender in the world of video filter software is Filmora. Designed with a user-friendly interface, Filmora is the ideal choice for those who want to enhance their videos effortlessly. Let’s take a closer look at what makes it stand out.
Advantages:
- Filmora’s intuitive interface makes it a breeze for beginners to get started. You don’t need to be a tech whiz to dive into video editing; Filmora guides you through the process seamlessly.
- Filmora boasts an extensive library of video presets and color grading presets. This treasure trove of pre-made styles allows you to give your videos that extra flair without the need for in-depth editing skills.
- Time is precious, and Filmora respects that. It offers quick rendering speeds, so you can see the results of your editing efforts in no time.
- Filmora’s simplicity is its strength, but it doesn’t mean it lacks creative potential. You can still go into more advanced features when you’re ready to level up your video editing game. This software gracefully balances accessibility and functionality.
Disadvantages:
So, you might be wondering, what about the downsides? Well, Filmora is so user-friendly that it can make you addicted to editing!
You might find yourself spending hours perfecting your videos, which, to be honest, is more of an advantage disguised as a disadvantage. Who wouldn’t want to get lost in the world of video editing, creating stunning content effortlessly?
02 DaVinci Resolve

When it comes to professional video editing and color correction, DaVinci Resolve stands as a true powerhouse in the world of video filter software.
Renowned for its robust feature set and precision, it’s the go-to choice for filmmakers, colorists, and anyone who demands the highest level of control over their video projects.
Advantages:
- DaVinci Resolve is unrivaled in its color correction and grading capabilities. Whether you’re aiming for a cinematic look or a specific color scheme, the software provides an extensive suite of tools to fine-tune every detail. Its color wheels, curves, and advanced grading panels allow you to achieve the exact visual style you envision.
- It provides a lot of cool stuff for editing sound and video, like fancy tools for fixing audio, working with multiple cameras, and working together with others on the same project. This makes it an all-in-one solution for every aspect of video post-production.
- In a world where teamwork is essential, DaVinci Resolve shines with its collaboration features. Many people can work on a project together at the same time, making it easier for teams working on big video projects to edit smoothly.
Disadvantages:
DaVinci Resolve can be resource-intensive, demanding a powerful computer setup for smooth operation. This could be a great advantage for people with really good computers, but it might be a bit tough for folks with older or less powerful ones.
03 HitFilm Express

If you’re an aspiring filmmaker or content creator looking to dive into the world of video editing and visual effects, HitFilm Express is your ticket to boundless creativity.
This versatile software combines video editing and visual effects seamlessly, allowing you to create stunning, professional-quality videos without breaking the bank.
Advantages:
- HitFilm Express excels in merging video editing and visual effects into one unified platform. This means you can effortlessly incorporate jaw-dropping visual effects into your videos without the need for additional software. Whether you’re adding explosions, futuristic CGI, or enchanting motion graphics, HitFilm Express has you covered.
- It offers a free version that provides access to its fundamental video filter features and VFX capabilities. This is a fantastic opportunity for budding content creators to dip their toes into the world of video editing without any financial commitment.
- HitFilm Express comes with an extensive library of tutorials, making it incredibly user-friendly for those who are new to video editing or visual effects. These tutorials guide you through the software’s features and help you create eye-catching effects like a pro.
Disadvantages:
As for potential downsides, the free version of HitFilm Express may have some limitations compared to the paid version.
While it provides access to essential features, you may find certain advanced options restricted.
However, this can be seen as an advantage because it allows you to explore the software without any upfront costs.
04 Adobe Premiere Pro

Adobe Premiere Pro is a name that resonates deeply within the video editing community. It’s renowned for its versatility and rich feature set, making it a go-to choice for professional video editors and content creators alike.
Advantages:
- When it comes to customization, Adobe Premiere Pro truly shines. The software offers an extensive library of plugins and extensions, allowing you to tailor your video filter effects to your precise liking. Whether you’re into color grading, visual effects, or audio enhancement, you’ll find the tools you need within Adobe’s vast ecosystem.
- If you’re already a part of the Adobe Creative family, you’ll appreciate Premiere Pro’s seamless integration with other Adobe software. Easily import and export assets from Adobe Photoshop or Adobe After Effects, enhancing your workflow and saving you time.
- Adobe is committed to keeping Premiere Pro at the forefront of video editing technology. With regular updates, you can expect a constant influx of new features, improvements, and bug fixes. This ensures that your editing experience remains cutting-edge.
Disadvantages:
There are a few considerations to keep in mind. Adobe Premiere Pro operates on a subscription-based model, which means you’ll need to pay a monthly or annual fee to access the software. While this provides you with ongoing updates and support, it might not be the best fit for those on a strict budget.
Adobe Premiere Pro’s extensive feature set can be overwhelming for beginners. If you’re new to video editing, you may find the learning curve a bit steep. However, with dedication and a wealth of online tutorials available, mastering the software is within reach.
05 Final Cut Pro

If you’re a proud owner of a Mac, Final Cut Pro should be on your radar as the ultimate video filter software. This Apple-exclusive gem is tailored to take your video editing experience to the next level, offering seamless integration with the macOS ecosystem.
Advantages:
- A standout feature of Final Cut Pro is how well it works together with other Apple devices and software, making everything run smoothly. Whether you’re working on your Macbook, iPad, or iPhone, Final Cut Pro keeps your workflow smooth and consistent. This synergy allows you to transfer projects effortlessly between devices, making it a go-to choice for Apple enthusiasts.
- Final Cut Pro is a powerhouse when it comes to handling high-resolution videos. Whether you’re working with 4K or 8K footage, this software handles it with grace and precision. Expect smooth playback and rapid rendering, even with the most demanding video projects.
- Mac users will feel right at home with Final Cut Pro’s sleek and user-friendly interface. The software’s design prioritizes ease of use without compromising on functionality. You can focus on your creative vision rather than wrestling with a complex interface.
Disadvantages:
It’s important to mention that Final Cut Pro is quite expensive, which might not be affordable for people on a tight budget.
Final Cut Pro is exclusive to macOS, which means Windows users will have to explore alternative software options. If you’re committed to the Apple ecosystem and prioritize top-notch video editing, Final Cut Pro is a wise investment.
Part 3: Summary
In a world where visual content rules supreme, having the right video filter software can make all the difference.
Your choice depends on your skill level, preferences, and budget. Whether you’re a newbie or a seasoned pro, there’s a video filter software out there that’s perfect for you. Feel free to dive in, experiment, and let your creativity sparkle in your videos!
Part 1: Introduction
What exactly are video filters, you ask?
Well, video filters are like Instagram filters for your videos but with much more finesse.
They allow you to tweak various aspects of your video’s appearance, such as color, contrast, saturation, and more, to achieve the desired visual style.
The beauty of video filter software lies in its ability to enhance your video’s overall look and feel. Let’s explore the top contenders in the video filter software arena.
Part 2: Top 5 Video Filter Software
01 Filmora

Our first contender in the world of video filter software is Filmora. Designed with a user-friendly interface, Filmora is the ideal choice for those who want to enhance their videos effortlessly. Let’s take a closer look at what makes it stand out.
Advantages:
- Filmora’s intuitive interface makes it a breeze for beginners to get started. You don’t need to be a tech whiz to dive into video editing; Filmora guides you through the process seamlessly.
- Filmora boasts an extensive library of video presets and color grading presets. This treasure trove of pre-made styles allows you to give your videos that extra flair without the need for in-depth editing skills.
- Time is precious, and Filmora respects that. It offers quick rendering speeds, so you can see the results of your editing efforts in no time.
- Filmora’s simplicity is its strength, but it doesn’t mean it lacks creative potential. You can still go into more advanced features when you’re ready to level up your video editing game. This software gracefully balances accessibility and functionality.
Disadvantages:
So, you might be wondering, what about the downsides? Well, Filmora is so user-friendly that it can make you addicted to editing!
You might find yourself spending hours perfecting your videos, which, to be honest, is more of an advantage disguised as a disadvantage. Who wouldn’t want to get lost in the world of video editing, creating stunning content effortlessly?
02 DaVinci Resolve

When it comes to professional video editing and color correction, DaVinci Resolve stands as a true powerhouse in the world of video filter software.
Renowned for its robust feature set and precision, it’s the go-to choice for filmmakers, colorists, and anyone who demands the highest level of control over their video projects.
Advantages:
- DaVinci Resolve is unrivaled in its color correction and grading capabilities. Whether you’re aiming for a cinematic look or a specific color scheme, the software provides an extensive suite of tools to fine-tune every detail. Its color wheels, curves, and advanced grading panels allow you to achieve the exact visual style you envision.
- It provides a lot of cool stuff for editing sound and video, like fancy tools for fixing audio, working with multiple cameras, and working together with others on the same project. This makes it an all-in-one solution for every aspect of video post-production.
- In a world where teamwork is essential, DaVinci Resolve shines with its collaboration features. Many people can work on a project together at the same time, making it easier for teams working on big video projects to edit smoothly.
Disadvantages:
DaVinci Resolve can be resource-intensive, demanding a powerful computer setup for smooth operation. This could be a great advantage for people with really good computers, but it might be a bit tough for folks with older or less powerful ones.
03 HitFilm Express

If you’re an aspiring filmmaker or content creator looking to dive into the world of video editing and visual effects, HitFilm Express is your ticket to boundless creativity.
This versatile software combines video editing and visual effects seamlessly, allowing you to create stunning, professional-quality videos without breaking the bank.
Advantages:
- HitFilm Express excels in merging video editing and visual effects into one unified platform. This means you can effortlessly incorporate jaw-dropping visual effects into your videos without the need for additional software. Whether you’re adding explosions, futuristic CGI, or enchanting motion graphics, HitFilm Express has you covered.
- It offers a free version that provides access to its fundamental video filter features and VFX capabilities. This is a fantastic opportunity for budding content creators to dip their toes into the world of video editing without any financial commitment.
- HitFilm Express comes with an extensive library of tutorials, making it incredibly user-friendly for those who are new to video editing or visual effects. These tutorials guide you through the software’s features and help you create eye-catching effects like a pro.
Disadvantages:
As for potential downsides, the free version of HitFilm Express may have some limitations compared to the paid version.
While it provides access to essential features, you may find certain advanced options restricted.
However, this can be seen as an advantage because it allows you to explore the software without any upfront costs.
04 Adobe Premiere Pro

Adobe Premiere Pro is a name that resonates deeply within the video editing community. It’s renowned for its versatility and rich feature set, making it a go-to choice for professional video editors and content creators alike.
Advantages:
- When it comes to customization, Adobe Premiere Pro truly shines. The software offers an extensive library of plugins and extensions, allowing you to tailor your video filter effects to your precise liking. Whether you’re into color grading, visual effects, or audio enhancement, you’ll find the tools you need within Adobe’s vast ecosystem.
- If you’re already a part of the Adobe Creative family, you’ll appreciate Premiere Pro’s seamless integration with other Adobe software. Easily import and export assets from Adobe Photoshop or Adobe After Effects, enhancing your workflow and saving you time.
- Adobe is committed to keeping Premiere Pro at the forefront of video editing technology. With regular updates, you can expect a constant influx of new features, improvements, and bug fixes. This ensures that your editing experience remains cutting-edge.
Disadvantages:
There are a few considerations to keep in mind. Adobe Premiere Pro operates on a subscription-based model, which means you’ll need to pay a monthly or annual fee to access the software. While this provides you with ongoing updates and support, it might not be the best fit for those on a strict budget.
Adobe Premiere Pro’s extensive feature set can be overwhelming for beginners. If you’re new to video editing, you may find the learning curve a bit steep. However, with dedication and a wealth of online tutorials available, mastering the software is within reach.
05 Final Cut Pro

If you’re a proud owner of a Mac, Final Cut Pro should be on your radar as the ultimate video filter software. This Apple-exclusive gem is tailored to take your video editing experience to the next level, offering seamless integration with the macOS ecosystem.
Advantages:
- A standout feature of Final Cut Pro is how well it works together with other Apple devices and software, making everything run smoothly. Whether you’re working on your Macbook, iPad, or iPhone, Final Cut Pro keeps your workflow smooth and consistent. This synergy allows you to transfer projects effortlessly between devices, making it a go-to choice for Apple enthusiasts.
- Final Cut Pro is a powerhouse when it comes to handling high-resolution videos. Whether you’re working with 4K or 8K footage, this software handles it with grace and precision. Expect smooth playback and rapid rendering, even with the most demanding video projects.
- Mac users will feel right at home with Final Cut Pro’s sleek and user-friendly interface. The software’s design prioritizes ease of use without compromising on functionality. You can focus on your creative vision rather than wrestling with a complex interface.
Disadvantages:
It’s important to mention that Final Cut Pro is quite expensive, which might not be affordable for people on a tight budget.
Final Cut Pro is exclusive to macOS, which means Windows users will have to explore alternative software options. If you’re committed to the Apple ecosystem and prioritize top-notch video editing, Final Cut Pro is a wise investment.
Part 3: Summary
In a world where visual content rules supreme, having the right video filter software can make all the difference.
Your choice depends on your skill level, preferences, and budget. Whether you’re a newbie or a seasoned pro, there’s a video filter software out there that’s perfect for you. Feel free to dive in, experiment, and let your creativity sparkle in your videos!
Part 1: Introduction
What exactly are video filters, you ask?
Well, video filters are like Instagram filters for your videos but with much more finesse.
They allow you to tweak various aspects of your video’s appearance, such as color, contrast, saturation, and more, to achieve the desired visual style.
The beauty of video filter software lies in its ability to enhance your video’s overall look and feel. Let’s explore the top contenders in the video filter software arena.
Part 2: Top 5 Video Filter Software
01 Filmora

Our first contender in the world of video filter software is Filmora. Designed with a user-friendly interface, Filmora is the ideal choice for those who want to enhance their videos effortlessly. Let’s take a closer look at what makes it stand out.
Advantages:
- Filmora’s intuitive interface makes it a breeze for beginners to get started. You don’t need to be a tech whiz to dive into video editing; Filmora guides you through the process seamlessly.
- Filmora boasts an extensive library of video presets and color grading presets. This treasure trove of pre-made styles allows you to give your videos that extra flair without the need for in-depth editing skills.
- Time is precious, and Filmora respects that. It offers quick rendering speeds, so you can see the results of your editing efforts in no time.
- Filmora’s simplicity is its strength, but it doesn’t mean it lacks creative potential. You can still go into more advanced features when you’re ready to level up your video editing game. This software gracefully balances accessibility and functionality.
Disadvantages:
So, you might be wondering, what about the downsides? Well, Filmora is so user-friendly that it can make you addicted to editing!
You might find yourself spending hours perfecting your videos, which, to be honest, is more of an advantage disguised as a disadvantage. Who wouldn’t want to get lost in the world of video editing, creating stunning content effortlessly?
02 DaVinci Resolve

When it comes to professional video editing and color correction, DaVinci Resolve stands as a true powerhouse in the world of video filter software.
Renowned for its robust feature set and precision, it’s the go-to choice for filmmakers, colorists, and anyone who demands the highest level of control over their video projects.
Advantages:
- DaVinci Resolve is unrivaled in its color correction and grading capabilities. Whether you’re aiming for a cinematic look or a specific color scheme, the software provides an extensive suite of tools to fine-tune every detail. Its color wheels, curves, and advanced grading panels allow you to achieve the exact visual style you envision.
- It provides a lot of cool stuff for editing sound and video, like fancy tools for fixing audio, working with multiple cameras, and working together with others on the same project. This makes it an all-in-one solution for every aspect of video post-production.
- In a world where teamwork is essential, DaVinci Resolve shines with its collaboration features. Many people can work on a project together at the same time, making it easier for teams working on big video projects to edit smoothly.
Disadvantages:
DaVinci Resolve can be resource-intensive, demanding a powerful computer setup for smooth operation. This could be a great advantage for people with really good computers, but it might be a bit tough for folks with older or less powerful ones.
03 HitFilm Express

If you’re an aspiring filmmaker or content creator looking to dive into the world of video editing and visual effects, HitFilm Express is your ticket to boundless creativity.
This versatile software combines video editing and visual effects seamlessly, allowing you to create stunning, professional-quality videos without breaking the bank.
Advantages:
- HitFilm Express excels in merging video editing and visual effects into one unified platform. This means you can effortlessly incorporate jaw-dropping visual effects into your videos without the need for additional software. Whether you’re adding explosions, futuristic CGI, or enchanting motion graphics, HitFilm Express has you covered.
- It offers a free version that provides access to its fundamental video filter features and VFX capabilities. This is a fantastic opportunity for budding content creators to dip their toes into the world of video editing without any financial commitment.
- HitFilm Express comes with an extensive library of tutorials, making it incredibly user-friendly for those who are new to video editing or visual effects. These tutorials guide you through the software’s features and help you create eye-catching effects like a pro.
Disadvantages:
As for potential downsides, the free version of HitFilm Express may have some limitations compared to the paid version.
While it provides access to essential features, you may find certain advanced options restricted.
However, this can be seen as an advantage because it allows you to explore the software without any upfront costs.
04 Adobe Premiere Pro

Adobe Premiere Pro is a name that resonates deeply within the video editing community. It’s renowned for its versatility and rich feature set, making it a go-to choice for professional video editors and content creators alike.
Advantages:
- When it comes to customization, Adobe Premiere Pro truly shines. The software offers an extensive library of plugins and extensions, allowing you to tailor your video filter effects to your precise liking. Whether you’re into color grading, visual effects, or audio enhancement, you’ll find the tools you need within Adobe’s vast ecosystem.
- If you’re already a part of the Adobe Creative family, you’ll appreciate Premiere Pro’s seamless integration with other Adobe software. Easily import and export assets from Adobe Photoshop or Adobe After Effects, enhancing your workflow and saving you time.
- Adobe is committed to keeping Premiere Pro at the forefront of video editing technology. With regular updates, you can expect a constant influx of new features, improvements, and bug fixes. This ensures that your editing experience remains cutting-edge.
Disadvantages:
There are a few considerations to keep in mind. Adobe Premiere Pro operates on a subscription-based model, which means you’ll need to pay a monthly or annual fee to access the software. While this provides you with ongoing updates and support, it might not be the best fit for those on a strict budget.
Adobe Premiere Pro’s extensive feature set can be overwhelming for beginners. If you’re new to video editing, you may find the learning curve a bit steep. However, with dedication and a wealth of online tutorials available, mastering the software is within reach.
05 Final Cut Pro

If you’re a proud owner of a Mac, Final Cut Pro should be on your radar as the ultimate video filter software. This Apple-exclusive gem is tailored to take your video editing experience to the next level, offering seamless integration with the macOS ecosystem.
Advantages:
- A standout feature of Final Cut Pro is how well it works together with other Apple devices and software, making everything run smoothly. Whether you’re working on your Macbook, iPad, or iPhone, Final Cut Pro keeps your workflow smooth and consistent. This synergy allows you to transfer projects effortlessly between devices, making it a go-to choice for Apple enthusiasts.
- Final Cut Pro is a powerhouse when it comes to handling high-resolution videos. Whether you’re working with 4K or 8K footage, this software handles it with grace and precision. Expect smooth playback and rapid rendering, even with the most demanding video projects.
- Mac users will feel right at home with Final Cut Pro’s sleek and user-friendly interface. The software’s design prioritizes ease of use without compromising on functionality. You can focus on your creative vision rather than wrestling with a complex interface.
Disadvantages:
It’s important to mention that Final Cut Pro is quite expensive, which might not be affordable for people on a tight budget.
Final Cut Pro is exclusive to macOS, which means Windows users will have to explore alternative software options. If you’re committed to the Apple ecosystem and prioritize top-notch video editing, Final Cut Pro is a wise investment.
Part 3: Summary
In a world where visual content rules supreme, having the right video filter software can make all the difference.
Your choice depends on your skill level, preferences, and budget. Whether you’re a newbie or a seasoned pro, there’s a video filter software out there that’s perfect for you. Feel free to dive in, experiment, and let your creativity sparkle in your videos!
Everything You Need to Know About Color Grading in Photography
Create High-Quality Video - Wondershare Filmora
An easy and powerful YouTube video editor
Numerous video and audio effects to choose from
Detailed tutorials provided by the official channel
Have you recognized how flat your images look when you take them with your camera? While the scenery may be beautiful and your photography skills may be amazing, there’s always something missing. That “thing” is color grading, and that may be why your favorite superstar’s pictures appear better than yours. You can color grade your videos to produce the same effect too.
Color grading photography refers to a post-production process that improves your images by altering their color. The result of an excellent color grading process is an image that looks more appealing and refined. It’s what gives a picture some professional touch.
If you want to learn more about color grading photography, this article will let you in on all you need to know. From essential color grading steps to terms, tools, etc., you can begin your journey to cool and exciting images after reading.
In this article
01 Don’t Confuse Color Grading With Color Correction
03 Common Steps To Color Grade a Photo
04 Tips For Color Grading Photography
Don’t Confuse Color Grading With Color Correction
The first way to fully appreciate color grading is by differentiating it from its closest term—color correction. Many people use both of them interchangeably, and that’s wrong. Although color grading and color correction are post-production processes that enhance image colors, they perform different roles.
Here’s how to differentiate color grading from color correction:
| Differentiating Factor | Color Grading ; | Color Correction |
|---|---|---|
| Definition | Color grading is a process that enhances an image’s color by stylizing or giving it a cinematic appearance. | Color correction is a process that adjusts color mistakes in an image by giving it a consistent appearance. This process balances colors by adjusting whites and blacks. |
| Purpose | The primary aim of color grading an image is to evoke specific emotions in the viewers. Color grading leverages the emotional and psychological effects of colors to manipulate the viewers’ moods. You can use color grading to give your images different tones or themes like fear, femininity, youthfulness, passion, anger, sadness, etc. | Unlike color grading, the color correction does very little in setting the tone or mood that an image carries. Instead, it corrects specific mistakes in the image to make it look as natural to the human eyes as possible. Generally, camera lenses and the human eyes view pictures differently. Color correction changes a photo’s look to make it more appealing to humans than the camera. It makes black colors appear darker and adds more white to whites to create the desired effect. |
| Stage in the production process | Color grading typically comes after color correction in the post-production process. That’s because the effects of color grading are more appealing on a color-corrected picture. | Color correction comes before color grading. This process does the major work of balancing colors and correcting errors. Color grading only fine-tunes what color correction has done, giving it a professional finish. |
| Example | One of the most obvious examples of color grading is in motion pictures. For example, Sci-Fi movies typically have a very saturated blue color. However, you will notice a little redder in romantic movies. Note that filmmakers can use different color grades in movies to draw attention to specific details or represent changes in the storyline. Color grading produces the same effects in pictures. | Color correction is most prominent in documentaries to make pictures and videos look more real to the human eye. Other times, color corrections just adjust one color to merge the rest of the image or video. |

Terms and Tools Used In Color Grading
These are the most common terminologies photo editors use when color grading an image:
● Hue
Hue is the general name for describing pure color. That means it defines color without alluding to its brightness, vividness, etc. It describes a color’s position in the color wheel.
● Saturation
When a photo editor talks about saturation, they refer to the hue concentration that defines a specific color. Saturation describes color shades and focuses on how colorful they are. Examples of colors with zero saturation are white, black, and grey.

● Luminance
Luminous describes how bright, well-lighted or dark a color is. Highlights, mids, and shadows can influence luminance.

● Additive Color
Additive colors are non-primary colors. However, they typically result from mixing primary colors (blue, red, green).
● Color Cast
Color cast means that the image’s coloring doesn’t look as natural as it should be. This usually happens when different light sources get mixed.
● Temperature
Temperature defines how cool or warm a color is. Cool temperatures typically describe blues and purples, while orange and red represent the warmth.
The essential tools for color grading include
● White Balance
White balance helps to make your photos look more natural by correcting color cast issues. After using white balance, the result is that the whites in your pictures would look exactly like the human eye will perceive it. White balance adjusts your image’s color cast to make them look warmer or cooler.
● Brightness and Contrast
Brightness and contrast are essential in color grading and are among the most used photo editing tools. Different sliders control brightness and contrast during editing. It’s important to note that your image’s brightness will affect the contrast and vice-versa. That’s why they usually appear together, even if they refer to different tools.
● The Three-Way Color Corrector
Many photographers refer to the three-way corrector as the color correction’s workhorse. That’s because this tool adjusts hue, saturation, brightness, and contrast in a single interface. The three-way corrector performs the job of three tools in one interface. Using the three-way corrector ensures that you work faster than usual.
● The Fast Color Corrector
The fast color corrector is like the three-way corrector. However, there are many limitations with the number of potential looks you can achieve with this tool. The fast color corrector primarily focuses on adjusting tint and saturation. Its major advantage over the three-way corrector is its user-friendliness and simplicity.
● Curves
While using curves is pretty complicated, the tool offers impressive functionality that you can’t refuse. Curves are very powerful and precise. Their main function is to overhaul or remove your image’s brightness altogether to give it a distinctive look.
● The Unsharp Mask and Sharpening Tools
With the unsharp mask and sharpening tools, you can give your picture’s edges a sharp illusion by modifying the contrast. This is typically useful for images that you shoot in dark conditions.
Sharp pictures are always a lovely sight. However, these tools can’t correct pictures taken out of focus. To get the best results from these tools. Then you can start moving them back till you get your desired sharpness.
● Color Match
As the make implies, color match tools modify a target picture’s colors to fit the reference image. This is an automatic process and helps to save time.
Common Steps To Color Grade a Photo
These are the essential stages for color grading your images:
● Step 1:
The first step in color grading is deciding how warm or cool you want your image to look. Then, modify the white balance to suit your desired warmth or coolness.
● Step 2:
After adjusting the white balance, the next step is to adjust saturation or hue.
● Step 3:
The next step is to focus on the histogram. A histogram is a common feature in many photo editing software that informs you of your image’s tonal values. The goal in this stage is to ensure equal color distribution. Keep adjusting your image till the colors are even.
● Step 4:
Work on your highlights and shadows by modifying the green, red, and blue curves. Also, adjust your vibrancy setting for a good effect.
● Step 5:
Explore split toning. Split toning is a process that involves adding colors to highlight and shadows independently. Learning how to split tone can make a difference in your photo editing.
Tips For Color Grading Photography
The following best practices will enhance your color grading:
- About oversaturation or under-saturation. Your saturation should be just right to produce the perfect result. So, always be sure to pay maximum attention to this process. This tip is particularly useful when working with portraits.
- Remember that color grading doesn’t fix a bad shot. So, be sure to improve your photography skills and take the best shots for excellent color grading results.
- Shoot your images in RAW. Doing this guarantees more control over your pictures’ colors.
- Always experiment with different looks until you get your precise effect. Lightroom is one of the best color grading apps to use.
- Exercise maximum caution when manipulating backgrounds. Don’t do too much, especially when you’re taking an indoor shot. That’s because manipulating indoor backgrounds too much can mismatch the foreground and background, making your portrait look weird.
Conclusion
● While your photography skills are essential in influencing your image’s outcome; your color grading skills will take it to another level. It’s one of the fastest ways to make a budding photo editor look like a pro.
● After reading this article, you can be sure that you have the basic information you need to achieve your editing goals. However, you mustn’t stop here. Continuous learning, especially through constant practice, is the way to go. You can visit Filmora today for the best color grading packages and tools.
Have you recognized how flat your images look when you take them with your camera? While the scenery may be beautiful and your photography skills may be amazing, there’s always something missing. That “thing” is color grading, and that may be why your favorite superstar’s pictures appear better than yours. You can color grade your videos to produce the same effect too.
Color grading photography refers to a post-production process that improves your images by altering their color. The result of an excellent color grading process is an image that looks more appealing and refined. It’s what gives a picture some professional touch.
If you want to learn more about color grading photography, this article will let you in on all you need to know. From essential color grading steps to terms, tools, etc., you can begin your journey to cool and exciting images after reading.
In this article
01 Don’t Confuse Color Grading With Color Correction
03 Common Steps To Color Grade a Photo
04 Tips For Color Grading Photography
Don’t Confuse Color Grading With Color Correction
The first way to fully appreciate color grading is by differentiating it from its closest term—color correction. Many people use both of them interchangeably, and that’s wrong. Although color grading and color correction are post-production processes that enhance image colors, they perform different roles.
Here’s how to differentiate color grading from color correction:
| Differentiating Factor | Color Grading ; | Color Correction |
|---|---|---|
| Definition | Color grading is a process that enhances an image’s color by stylizing or giving it a cinematic appearance. | Color correction is a process that adjusts color mistakes in an image by giving it a consistent appearance. This process balances colors by adjusting whites and blacks. |
| Purpose | The primary aim of color grading an image is to evoke specific emotions in the viewers. Color grading leverages the emotional and psychological effects of colors to manipulate the viewers’ moods. You can use color grading to give your images different tones or themes like fear, femininity, youthfulness, passion, anger, sadness, etc. | Unlike color grading, the color correction does very little in setting the tone or mood that an image carries. Instead, it corrects specific mistakes in the image to make it look as natural to the human eyes as possible. Generally, camera lenses and the human eyes view pictures differently. Color correction changes a photo’s look to make it more appealing to humans than the camera. It makes black colors appear darker and adds more white to whites to create the desired effect. |
| Stage in the production process | Color grading typically comes after color correction in the post-production process. That’s because the effects of color grading are more appealing on a color-corrected picture. | Color correction comes before color grading. This process does the major work of balancing colors and correcting errors. Color grading only fine-tunes what color correction has done, giving it a professional finish. |
| Example | One of the most obvious examples of color grading is in motion pictures. For example, Sci-Fi movies typically have a very saturated blue color. However, you will notice a little redder in romantic movies. Note that filmmakers can use different color grades in movies to draw attention to specific details or represent changes in the storyline. Color grading produces the same effects in pictures. | Color correction is most prominent in documentaries to make pictures and videos look more real to the human eye. Other times, color corrections just adjust one color to merge the rest of the image or video. |

Terms and Tools Used In Color Grading
These are the most common terminologies photo editors use when color grading an image:
● Hue
Hue is the general name for describing pure color. That means it defines color without alluding to its brightness, vividness, etc. It describes a color’s position in the color wheel.
● Saturation
When a photo editor talks about saturation, they refer to the hue concentration that defines a specific color. Saturation describes color shades and focuses on how colorful they are. Examples of colors with zero saturation are white, black, and grey.

● Luminance
Luminous describes how bright, well-lighted or dark a color is. Highlights, mids, and shadows can influence luminance.

● Additive Color
Additive colors are non-primary colors. However, they typically result from mixing primary colors (blue, red, green).
● Color Cast
Color cast means that the image’s coloring doesn’t look as natural as it should be. This usually happens when different light sources get mixed.
● Temperature
Temperature defines how cool or warm a color is. Cool temperatures typically describe blues and purples, while orange and red represent the warmth.
The essential tools for color grading include
● White Balance
White balance helps to make your photos look more natural by correcting color cast issues. After using white balance, the result is that the whites in your pictures would look exactly like the human eye will perceive it. White balance adjusts your image’s color cast to make them look warmer or cooler.
● Brightness and Contrast
Brightness and contrast are essential in color grading and are among the most used photo editing tools. Different sliders control brightness and contrast during editing. It’s important to note that your image’s brightness will affect the contrast and vice-versa. That’s why they usually appear together, even if they refer to different tools.
● The Three-Way Color Corrector
Many photographers refer to the three-way corrector as the color correction’s workhorse. That’s because this tool adjusts hue, saturation, brightness, and contrast in a single interface. The three-way corrector performs the job of three tools in one interface. Using the three-way corrector ensures that you work faster than usual.
● The Fast Color Corrector
The fast color corrector is like the three-way corrector. However, there are many limitations with the number of potential looks you can achieve with this tool. The fast color corrector primarily focuses on adjusting tint and saturation. Its major advantage over the three-way corrector is its user-friendliness and simplicity.
● Curves
While using curves is pretty complicated, the tool offers impressive functionality that you can’t refuse. Curves are very powerful and precise. Their main function is to overhaul or remove your image’s brightness altogether to give it a distinctive look.
● The Unsharp Mask and Sharpening Tools
With the unsharp mask and sharpening tools, you can give your picture’s edges a sharp illusion by modifying the contrast. This is typically useful for images that you shoot in dark conditions.
Sharp pictures are always a lovely sight. However, these tools can’t correct pictures taken out of focus. To get the best results from these tools. Then you can start moving them back till you get your desired sharpness.
● Color Match
As the make implies, color match tools modify a target picture’s colors to fit the reference image. This is an automatic process and helps to save time.
Common Steps To Color Grade a Photo
These are the essential stages for color grading your images:
● Step 1:
The first step in color grading is deciding how warm or cool you want your image to look. Then, modify the white balance to suit your desired warmth or coolness.
● Step 2:
After adjusting the white balance, the next step is to adjust saturation or hue.
● Step 3:
The next step is to focus on the histogram. A histogram is a common feature in many photo editing software that informs you of your image’s tonal values. The goal in this stage is to ensure equal color distribution. Keep adjusting your image till the colors are even.
● Step 4:
Work on your highlights and shadows by modifying the green, red, and blue curves. Also, adjust your vibrancy setting for a good effect.
● Step 5:
Explore split toning. Split toning is a process that involves adding colors to highlight and shadows independently. Learning how to split tone can make a difference in your photo editing.
Tips For Color Grading Photography
The following best practices will enhance your color grading:
- About oversaturation or under-saturation. Your saturation should be just right to produce the perfect result. So, always be sure to pay maximum attention to this process. This tip is particularly useful when working with portraits.
- Remember that color grading doesn’t fix a bad shot. So, be sure to improve your photography skills and take the best shots for excellent color grading results.
- Shoot your images in RAW. Doing this guarantees more control over your pictures’ colors.
- Always experiment with different looks until you get your precise effect. Lightroom is one of the best color grading apps to use.
- Exercise maximum caution when manipulating backgrounds. Don’t do too much, especially when you’re taking an indoor shot. That’s because manipulating indoor backgrounds too much can mismatch the foreground and background, making your portrait look weird.
Conclusion
● While your photography skills are essential in influencing your image’s outcome; your color grading skills will take it to another level. It’s one of the fastest ways to make a budding photo editor look like a pro.
● After reading this article, you can be sure that you have the basic information you need to achieve your editing goals. However, you mustn’t stop here. Continuous learning, especially through constant practice, is the way to go. You can visit Filmora today for the best color grading packages and tools.
Have you recognized how flat your images look when you take them with your camera? While the scenery may be beautiful and your photography skills may be amazing, there’s always something missing. That “thing” is color grading, and that may be why your favorite superstar’s pictures appear better than yours. You can color grade your videos to produce the same effect too.
Color grading photography refers to a post-production process that improves your images by altering their color. The result of an excellent color grading process is an image that looks more appealing and refined. It’s what gives a picture some professional touch.
If you want to learn more about color grading photography, this article will let you in on all you need to know. From essential color grading steps to terms, tools, etc., you can begin your journey to cool and exciting images after reading.
In this article
01 Don’t Confuse Color Grading With Color Correction
03 Common Steps To Color Grade a Photo
04 Tips For Color Grading Photography
Don’t Confuse Color Grading With Color Correction
The first way to fully appreciate color grading is by differentiating it from its closest term—color correction. Many people use both of them interchangeably, and that’s wrong. Although color grading and color correction are post-production processes that enhance image colors, they perform different roles.
Here’s how to differentiate color grading from color correction:
| Differentiating Factor | Color Grading ; | Color Correction |
|---|---|---|
| Definition | Color grading is a process that enhances an image’s color by stylizing or giving it a cinematic appearance. | Color correction is a process that adjusts color mistakes in an image by giving it a consistent appearance. This process balances colors by adjusting whites and blacks. |
| Purpose | The primary aim of color grading an image is to evoke specific emotions in the viewers. Color grading leverages the emotional and psychological effects of colors to manipulate the viewers’ moods. You can use color grading to give your images different tones or themes like fear, femininity, youthfulness, passion, anger, sadness, etc. | Unlike color grading, the color correction does very little in setting the tone or mood that an image carries. Instead, it corrects specific mistakes in the image to make it look as natural to the human eyes as possible. Generally, camera lenses and the human eyes view pictures differently. Color correction changes a photo’s look to make it more appealing to humans than the camera. It makes black colors appear darker and adds more white to whites to create the desired effect. |
| Stage in the production process | Color grading typically comes after color correction in the post-production process. That’s because the effects of color grading are more appealing on a color-corrected picture. | Color correction comes before color grading. This process does the major work of balancing colors and correcting errors. Color grading only fine-tunes what color correction has done, giving it a professional finish. |
| Example | One of the most obvious examples of color grading is in motion pictures. For example, Sci-Fi movies typically have a very saturated blue color. However, you will notice a little redder in romantic movies. Note that filmmakers can use different color grades in movies to draw attention to specific details or represent changes in the storyline. Color grading produces the same effects in pictures. | Color correction is most prominent in documentaries to make pictures and videos look more real to the human eye. Other times, color corrections just adjust one color to merge the rest of the image or video. |

Terms and Tools Used In Color Grading
These are the most common terminologies photo editors use when color grading an image:
● Hue
Hue is the general name for describing pure color. That means it defines color without alluding to its brightness, vividness, etc. It describes a color’s position in the color wheel.
● Saturation
When a photo editor talks about saturation, they refer to the hue concentration that defines a specific color. Saturation describes color shades and focuses on how colorful they are. Examples of colors with zero saturation are white, black, and grey.

● Luminance
Luminous describes how bright, well-lighted or dark a color is. Highlights, mids, and shadows can influence luminance.

● Additive Color
Additive colors are non-primary colors. However, they typically result from mixing primary colors (blue, red, green).
● Color Cast
Color cast means that the image’s coloring doesn’t look as natural as it should be. This usually happens when different light sources get mixed.
● Temperature
Temperature defines how cool or warm a color is. Cool temperatures typically describe blues and purples, while orange and red represent the warmth.
The essential tools for color grading include
● White Balance
White balance helps to make your photos look more natural by correcting color cast issues. After using white balance, the result is that the whites in your pictures would look exactly like the human eye will perceive it. White balance adjusts your image’s color cast to make them look warmer or cooler.
● Brightness and Contrast
Brightness and contrast are essential in color grading and are among the most used photo editing tools. Different sliders control brightness and contrast during editing. It’s important to note that your image’s brightness will affect the contrast and vice-versa. That’s why they usually appear together, even if they refer to different tools.
● The Three-Way Color Corrector
Many photographers refer to the three-way corrector as the color correction’s workhorse. That’s because this tool adjusts hue, saturation, brightness, and contrast in a single interface. The three-way corrector performs the job of three tools in one interface. Using the three-way corrector ensures that you work faster than usual.
● The Fast Color Corrector
The fast color corrector is like the three-way corrector. However, there are many limitations with the number of potential looks you can achieve with this tool. The fast color corrector primarily focuses on adjusting tint and saturation. Its major advantage over the three-way corrector is its user-friendliness and simplicity.
● Curves
While using curves is pretty complicated, the tool offers impressive functionality that you can’t refuse. Curves are very powerful and precise. Their main function is to overhaul or remove your image’s brightness altogether to give it a distinctive look.
● The Unsharp Mask and Sharpening Tools
With the unsharp mask and sharpening tools, you can give your picture’s edges a sharp illusion by modifying the contrast. This is typically useful for images that you shoot in dark conditions.
Sharp pictures are always a lovely sight. However, these tools can’t correct pictures taken out of focus. To get the best results from these tools. Then you can start moving them back till you get your desired sharpness.
● Color Match
As the make implies, color match tools modify a target picture’s colors to fit the reference image. This is an automatic process and helps to save time.
Common Steps To Color Grade a Photo
These are the essential stages for color grading your images:
● Step 1:
The first step in color grading is deciding how warm or cool you want your image to look. Then, modify the white balance to suit your desired warmth or coolness.
● Step 2:
After adjusting the white balance, the next step is to adjust saturation or hue.
● Step 3:
The next step is to focus on the histogram. A histogram is a common feature in many photo editing software that informs you of your image’s tonal values. The goal in this stage is to ensure equal color distribution. Keep adjusting your image till the colors are even.
● Step 4:
Work on your highlights and shadows by modifying the green, red, and blue curves. Also, adjust your vibrancy setting for a good effect.
● Step 5:
Explore split toning. Split toning is a process that involves adding colors to highlight and shadows independently. Learning how to split tone can make a difference in your photo editing.
Tips For Color Grading Photography
The following best practices will enhance your color grading:
- About oversaturation or under-saturation. Your saturation should be just right to produce the perfect result. So, always be sure to pay maximum attention to this process. This tip is particularly useful when working with portraits.
- Remember that color grading doesn’t fix a bad shot. So, be sure to improve your photography skills and take the best shots for excellent color grading results.
- Shoot your images in RAW. Doing this guarantees more control over your pictures’ colors.
- Always experiment with different looks until you get your precise effect. Lightroom is one of the best color grading apps to use.
- Exercise maximum caution when manipulating backgrounds. Don’t do too much, especially when you’re taking an indoor shot. That’s because manipulating indoor backgrounds too much can mismatch the foreground and background, making your portrait look weird.
Conclusion
● While your photography skills are essential in influencing your image’s outcome; your color grading skills will take it to another level. It’s one of the fastest ways to make a budding photo editor look like a pro.
● After reading this article, you can be sure that you have the basic information you need to achieve your editing goals. However, you mustn’t stop here. Continuous learning, especially through constant practice, is the way to go. You can visit Filmora today for the best color grading packages and tools.
Have you recognized how flat your images look when you take them with your camera? While the scenery may be beautiful and your photography skills may be amazing, there’s always something missing. That “thing” is color grading, and that may be why your favorite superstar’s pictures appear better than yours. You can color grade your videos to produce the same effect too.
Color grading photography refers to a post-production process that improves your images by altering their color. The result of an excellent color grading process is an image that looks more appealing and refined. It’s what gives a picture some professional touch.
If you want to learn more about color grading photography, this article will let you in on all you need to know. From essential color grading steps to terms, tools, etc., you can begin your journey to cool and exciting images after reading.
In this article
01 Don’t Confuse Color Grading With Color Correction
03 Common Steps To Color Grade a Photo
04 Tips For Color Grading Photography
Don’t Confuse Color Grading With Color Correction
The first way to fully appreciate color grading is by differentiating it from its closest term—color correction. Many people use both of them interchangeably, and that’s wrong. Although color grading and color correction are post-production processes that enhance image colors, they perform different roles.
Here’s how to differentiate color grading from color correction:
| Differentiating Factor | Color Grading ; | Color Correction |
|---|---|---|
| Definition | Color grading is a process that enhances an image’s color by stylizing or giving it a cinematic appearance. | Color correction is a process that adjusts color mistakes in an image by giving it a consistent appearance. This process balances colors by adjusting whites and blacks. |
| Purpose | The primary aim of color grading an image is to evoke specific emotions in the viewers. Color grading leverages the emotional and psychological effects of colors to manipulate the viewers’ moods. You can use color grading to give your images different tones or themes like fear, femininity, youthfulness, passion, anger, sadness, etc. | Unlike color grading, the color correction does very little in setting the tone or mood that an image carries. Instead, it corrects specific mistakes in the image to make it look as natural to the human eyes as possible. Generally, camera lenses and the human eyes view pictures differently. Color correction changes a photo’s look to make it more appealing to humans than the camera. It makes black colors appear darker and adds more white to whites to create the desired effect. |
| Stage in the production process | Color grading typically comes after color correction in the post-production process. That’s because the effects of color grading are more appealing on a color-corrected picture. | Color correction comes before color grading. This process does the major work of balancing colors and correcting errors. Color grading only fine-tunes what color correction has done, giving it a professional finish. |
| Example | One of the most obvious examples of color grading is in motion pictures. For example, Sci-Fi movies typically have a very saturated blue color. However, you will notice a little redder in romantic movies. Note that filmmakers can use different color grades in movies to draw attention to specific details or represent changes in the storyline. Color grading produces the same effects in pictures. | Color correction is most prominent in documentaries to make pictures and videos look more real to the human eye. Other times, color corrections just adjust one color to merge the rest of the image or video. |

Terms and Tools Used In Color Grading
These are the most common terminologies photo editors use when color grading an image:
● Hue
Hue is the general name for describing pure color. That means it defines color without alluding to its brightness, vividness, etc. It describes a color’s position in the color wheel.
● Saturation
When a photo editor talks about saturation, they refer to the hue concentration that defines a specific color. Saturation describes color shades and focuses on how colorful they are. Examples of colors with zero saturation are white, black, and grey.

● Luminance
Luminous describes how bright, well-lighted or dark a color is. Highlights, mids, and shadows can influence luminance.

● Additive Color
Additive colors are non-primary colors. However, they typically result from mixing primary colors (blue, red, green).
● Color Cast
Color cast means that the image’s coloring doesn’t look as natural as it should be. This usually happens when different light sources get mixed.
● Temperature
Temperature defines how cool or warm a color is. Cool temperatures typically describe blues and purples, while orange and red represent the warmth.
The essential tools for color grading include
● White Balance
White balance helps to make your photos look more natural by correcting color cast issues. After using white balance, the result is that the whites in your pictures would look exactly like the human eye will perceive it. White balance adjusts your image’s color cast to make them look warmer or cooler.
● Brightness and Contrast
Brightness and contrast are essential in color grading and are among the most used photo editing tools. Different sliders control brightness and contrast during editing. It’s important to note that your image’s brightness will affect the contrast and vice-versa. That’s why they usually appear together, even if they refer to different tools.
● The Three-Way Color Corrector
Many photographers refer to the three-way corrector as the color correction’s workhorse. That’s because this tool adjusts hue, saturation, brightness, and contrast in a single interface. The three-way corrector performs the job of three tools in one interface. Using the three-way corrector ensures that you work faster than usual.
● The Fast Color Corrector
The fast color corrector is like the three-way corrector. However, there are many limitations with the number of potential looks you can achieve with this tool. The fast color corrector primarily focuses on adjusting tint and saturation. Its major advantage over the three-way corrector is its user-friendliness and simplicity.
● Curves
While using curves is pretty complicated, the tool offers impressive functionality that you can’t refuse. Curves are very powerful and precise. Their main function is to overhaul or remove your image’s brightness altogether to give it a distinctive look.
● The Unsharp Mask and Sharpening Tools
With the unsharp mask and sharpening tools, you can give your picture’s edges a sharp illusion by modifying the contrast. This is typically useful for images that you shoot in dark conditions.
Sharp pictures are always a lovely sight. However, these tools can’t correct pictures taken out of focus. To get the best results from these tools. Then you can start moving them back till you get your desired sharpness.
● Color Match
As the make implies, color match tools modify a target picture’s colors to fit the reference image. This is an automatic process and helps to save time.
Common Steps To Color Grade a Photo
These are the essential stages for color grading your images:
● Step 1:
The first step in color grading is deciding how warm or cool you want your image to look. Then, modify the white balance to suit your desired warmth or coolness.
● Step 2:
After adjusting the white balance, the next step is to adjust saturation or hue.
● Step 3:
The next step is to focus on the histogram. A histogram is a common feature in many photo editing software that informs you of your image’s tonal values. The goal in this stage is to ensure equal color distribution. Keep adjusting your image till the colors are even.
● Step 4:
Work on your highlights and shadows by modifying the green, red, and blue curves. Also, adjust your vibrancy setting for a good effect.
● Step 5:
Explore split toning. Split toning is a process that involves adding colors to highlight and shadows independently. Learning how to split tone can make a difference in your photo editing.
Tips For Color Grading Photography
The following best practices will enhance your color grading:
- About oversaturation or under-saturation. Your saturation should be just right to produce the perfect result. So, always be sure to pay maximum attention to this process. This tip is particularly useful when working with portraits.
- Remember that color grading doesn’t fix a bad shot. So, be sure to improve your photography skills and take the best shots for excellent color grading results.
- Shoot your images in RAW. Doing this guarantees more control over your pictures’ colors.
- Always experiment with different looks until you get your precise effect. Lightroom is one of the best color grading apps to use.
- Exercise maximum caution when manipulating backgrounds. Don’t do too much, especially when you’re taking an indoor shot. That’s because manipulating indoor backgrounds too much can mismatch the foreground and background, making your portrait look weird.
Conclusion
● While your photography skills are essential in influencing your image’s outcome; your color grading skills will take it to another level. It’s one of the fastest ways to make a budding photo editor look like a pro.
● After reading this article, you can be sure that you have the basic information you need to achieve your editing goals. However, you mustn’t stop here. Continuous learning, especially through constant practice, is the way to go. You can visit Filmora today for the best color grading packages and tools.
Also read:
- New Replacing Sky in Your Pictures Using Online and Offline Tools
- Do You Need to Convert TXT to SRT to Add Subtitles to Your Videos? Here Are Three Effective Ways You Can Do It Effortlessly for 2024
- Updated In 2024, 7 Best Green Screen Software for Beginners on Mac
- Time Lapse Videos Play an Important Part in Videography. If You Want to Start Video Shooting, Then You Shouldnt Miss Time Lapse Video. This Article Will Show You some Ideas over This
- New Best Dark Moody LUTs During Editing
- Updated In 2024, To Determine or Change the Video Aspect Ratio Online. Use a Ratio Calculator to Calculate Pixel Dimensions and Aspect Ratios of Images or Videos
- New How to Make Animated Text Video on Computer/iPhone/Android/Online
- 2024 Approved A Guide to Find a High-Quality Video Marketing Agency
- The Article Introduces Three Recommended Apps to Download Royalty-Free Cinematic Music and Covers an Extensive Procedure to Create a Cinematic Travel Intro for a Travel Vlog for 2024
- Updated Looking for the Best Way to Create Stunning Video Animations? Here, We Look at some of the Best Animated Video Maker Solutions to Use
- New To Determine or Change the Video Aspect Ratio Online. Use a Ratio Calculator to Calculate Pixel Dimensions and Aspect Ratios of Images or Videos
- Updated 2024 Approved Sync Audio With Video With Filmora
- New In 2024, Do You Want to Record Videos with a Phantom High-Speed Camera? In This Guide, You Can Get a Detailed Note on the Phantom Camera
- Updated Learn How to Trim/Crop Video in Microsoft PowerPoint for 2024
- Updated Do You Have a Sony Camera and Want to Try Different LUTs on Your Digital Content? Youre at the Right Place, as You Can Apply Sony HLG LUTs to Your Media
- Updated Are You in a Funny Chat with a Friend and Want to Send a GIF but Couldnt Find One? Here We Will Provide You with the Top Image for GIF Converters. So, Let Us See How to Turn Images Into GIFs Very Quickly
- New How to Remove Background Noise From Video Sony Vegas
- Updated What If YouTube Zoom to Fill Not Working?
- 5 Quick Methods to Bypass ZTE Nubia Z60 Ultra FRP
- In 2024, Top 4 Ways to Trace Motorola G54 5G Location | Dr.fone
- Top 7 Phone Number Locators To Track Apple iPhone X Location | Dr.fone
- How to Unlock the Lock Screen on my Lava Yuva 2
- What You Need To Know To Improve Your Poco M6 Pro 5G Hard Reset | Dr.fone
- Top 4 Android System Repair Software for Nubia Red Magic 8S Pro Bricked Devices | Dr.fone
- Delete Gmail Account With/Without Password On Infinix Note 30 VIP Racing Edition
- How To Transfer Data From Apple iPhone 11 Pro Max To Other iPhone 12 Pro Max devices? | Dr.fone
- Authentication Error Occurred on Itel A60s? Here Are 10 Proven Fixes | Dr.fone
- Solved Photos Disappeared from iPhone 8 Plus Suddenly | Stellar
- Title: Updated In 2024, How To Quickly Create A Screen Print Effect In Photoshop Detailed Guide
- Author: Morgan
- Created at : 2024-04-24 01:02:53
- Updated at : 2024-04-25 01:02:53
- Link: https://ai-video-editing.techidaily.com/updated-in-2024-how-to-quickly-create-a-screen-print-effect-in-photoshop-detailed-guide/
- License: This work is licensed under CC BY-NC-SA 4.0.

