
:max_bytes(150000):strip_icc():format(webp)/001_best-lgbt-movies-on-netflix-right-now-5069913-92c9bcd3792548908be32c420bc4fa27.jpg)
Updated In 2024, How to Zoom Webcam on PC
How to Zoom Webcam on PC
Making certain our digital presence is the best it can be pays dividends as more and more of what we do online; similar is the case with how to zoom out webcam windows 10. The majority of experts advise against using the built-in camera that comes with your laptop or computer and instead advocate getting a webcam or an HD camera. These, however, may be hard to come by and pricy if you locate a nice one. If the built-in camera on your laptop doesn’t perform effectively during Zoom meetings, you may want to consider about investing in a separate, better webcam. Webcams offer automatic settings that are intended to function with the largest variety of lighting situations possible. This suggests that they average out a great number of responses to the content of the frame. Because of this, we have incorporated basic PC webcam zooming settings. These answers may be found in the portions that follow.
It’s vital to know how to zoom in on a webcam before visiting there. The camera wasn’t always as vital as it is today, and only very large corporations could afford to employ it as a convenience. But today, nearly everyone, from huge organizations to little firms, acknowledges its value. Everybody needs a webcam that works properly. The camera control software you are using determines the zoom function. The resolution of your picture window and the capabilities of the application dictate how far you can zoom in on the webcam’s video image. You can zoom in and out on camera photos using tools like YouCam and Windows Live Messenger. The most critical camera capabilities for the ideal video conferencing experience are zoom in and zoom out, which at first look may appear trivial. Here, we’ll walk you through each step, in detail. Continue reading, and we’ll check your understanding of webcam zoom in and zoom out skills!
Way 1: Zoom with Windows Live Messenger
When utilizing a camera for video conferencing, you may zoom in on a user’s face to get rid of the background. Webcam settings are not accessible by default in Microsoft Windows. However, camera zoom settings may be changed in instant chat systems. Through an instant messaging tool, such as Windows Live Messenger, you may simply access these options. This application provides private offline chat, video messaging, image and video sharing, and video chatting.
Step1Start Windows Live Messenger on your PC or laptop first. Enter your login name and password by clicking the “Sign In” button.

Step2On the top menu bar, pick “Tools.” And then select the “Audio and Video Setup”. Drag the slider next to “Speaker” to modify the speaker volume. Drag the slider next to “Microphone” to modify the microphone sensitivity. Press “Next.”

Step3From the drop-down list, pick the webcam. The “Camera Control” option is situated on the top; pick “Webcam Settings” after that.
Step4Now, to alter the zoom settings, drag the “Zoom” slider. To zoom in or out, drag the slider to the left or right. Press “OK.”
Way 2: Use Windows 10 Camera App
Wondering how to zoom your camera in the Windows 10 Camera app? The Camera app enables you to zoom in or out on your webcam in both image and video modes. To accomplish so, click or push the Magnification button, and then use the slider to modify the webcam’s zoom level. To operate the zoom feature manually, pick “Manual Zoom.” In the preview window, a square appears when you pick this option. To zoom in on a specific region of the capture window, drag the square there. To expand the image that was acquired by the webcam, slide the slider bar. In simply, The Camera app enables you zoom in or out of photographs and movies shot with your webcam. To do this, click on the “Zoom” button and drag the slider to the left or right as appropriate on your Windows 10 camera. the following steps:
Step1To open the “Start Menu,” make a right-click on “Start.” Now, to access the Camera app, type “Camera App” into the start menu’s search box.

Step2Tap the Camera Control icon when you start or join a meeting. To zoom and pan the camera to the appropriate spot, utilize the icons on the Camera Control panel.
![]()
Step3To exit the Camera Control window and return to the Meeting Controls, touch outside of it.
Way 3: Zoom with YouCam
Unfortunately, the default cameras or webcams bundled with the majority of Windows laptops and desktops don’t have an automatic zoom option. In fact, the only method to adjust their crop is to switch from “Standard” to “Widescreen,” which does slightly zoom in on you but not in the manner we’d want. This makes it inescapable that the only method to manually alter a webcam’s magnification is to acquire one separately and apply its software settings. , like YouCam. YouCam provides video calling, streaming, and broadcasting. includes an integrated app. To employ Zoom with YouCam, refer to the methods given below:
Step1Launch the YouCam camera program and activate the webcam.

Step2In the camera preview window, pick Settings. Then, select “Enable Video Zoom” from the menu.
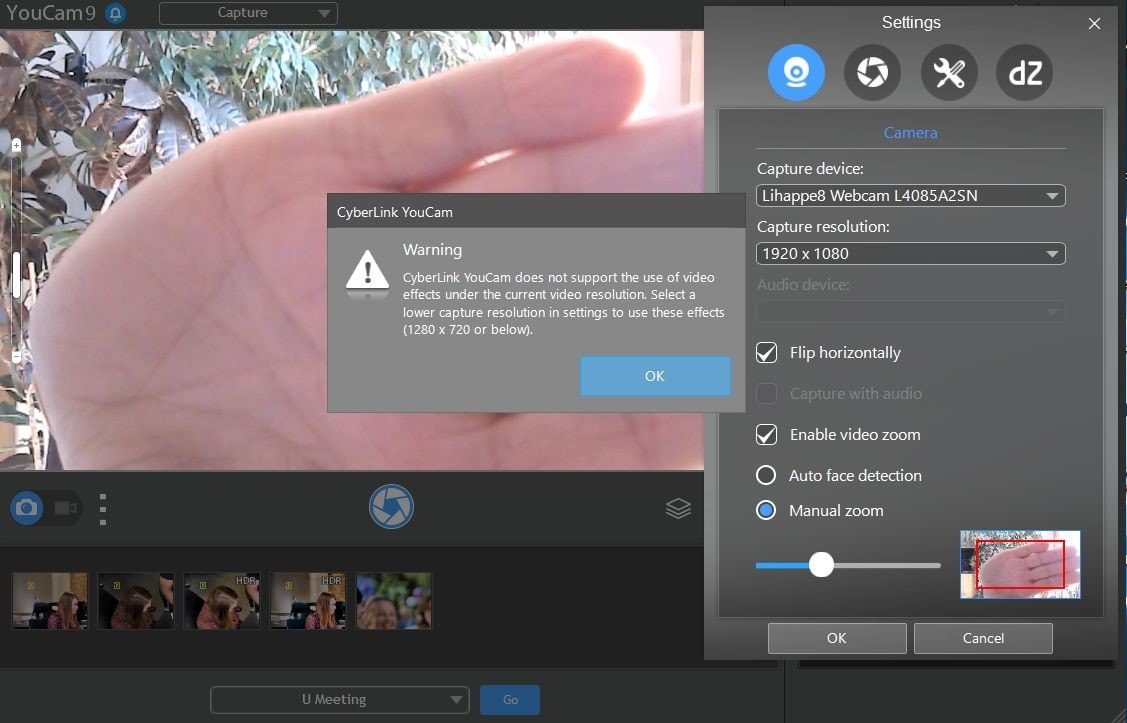
Step3Select “Automatic Face Detection” from the menu. As you wander about in the capture window, the camera watches your face and automatically zooms in on your photo as shown above.
Step4To handle the zoom feature manually, pick “Manual Zoom.” In the preview window, a square appears when you pick this option. To zoom in on a specific region of the capture window, drag the square there. To expand the image that was acquired by the webcam, slide the slider bar.

Way 4: Use iGlasses on Mac
For the perfect webcam look on a MAC, install the Chrome plugin iGlasses for video effects and style tweaks. Your videos will appear better on Zoom as a consequence. You may instantly enhance the appearance of your video interactions by utilizing the digital zoom on your iGlasses. Digital pan, tilt, and zoom are all possible with easy controls. For Macs that support it, an Apple Remote may be used to operate. iGlasses will become an option in Zoom’s video settings when it has been installed. You may improve your camera by altering the settings in iGlasses. You may experiment with a range of amusing effects, like 3-D distortions, using the virtual camera. Let’s learn how to utilize iGlasses on a Mac:
Step1Installing Ecamm’s iGlasses on a MacBook in the first step.
Step2To activate the camera, go to your video settings and pick iGlasses.
Step3Choose the Zoom window and execute the appropriate operations using the Zoom and Flip options. You may now zoom in and out using the camera on your MacBook as you like.

Conclusion
In conclusion, so many people currently take part in online conferences and virtual meetings. You want to create a lasting impression, don’t you? Not or whether you are the host of an online meeting or event, you must now maintain a professional image to prevent turning off attendees. You have discovered how to utilize the tools at your disposal to boost the zoom in and out quality of your camera in this post. However, as will be explained in the sections ahead, you may do it without the third-party plugins. With just one quick plugin, you can significantly transform how you look on a camera. Hence, try out the easy method from the above enlisted ones to get hold on your PC webcam to zoom in or out purposes.
Making certain our digital presence is the best it can be pays dividends as more and more of what we do online; similar is the case with how to zoom out webcam windows 10. The majority of experts advise against using the built-in camera that comes with your laptop or computer and instead advocate getting a webcam or an HD camera. These, however, may be hard to come by and pricy if you locate a nice one. If the built-in camera on your laptop doesn’t perform effectively during Zoom meetings, you may want to consider about investing in a separate, better webcam. Webcams offer automatic settings that are intended to function with the largest variety of lighting situations possible. This suggests that they average out a great number of responses to the content of the frame. Because of this, we have incorporated basic PC webcam zooming settings. These answers may be found in the portions that follow.
It’s vital to know how to zoom in on a webcam before visiting there. The camera wasn’t always as vital as it is today, and only very large corporations could afford to employ it as a convenience. But today, nearly everyone, from huge organizations to little firms, acknowledges its value. Everybody needs a webcam that works properly. The camera control software you are using determines the zoom function. The resolution of your picture window and the capabilities of the application dictate how far you can zoom in on the webcam’s video image. You can zoom in and out on camera photos using tools like YouCam and Windows Live Messenger. The most critical camera capabilities for the ideal video conferencing experience are zoom in and zoom out, which at first look may appear trivial. Here, we’ll walk you through each step, in detail. Continue reading, and we’ll check your understanding of webcam zoom in and zoom out skills!
Way 1: Zoom with Windows Live Messenger
When utilizing a camera for video conferencing, you may zoom in on a user’s face to get rid of the background. Webcam settings are not accessible by default in Microsoft Windows. However, camera zoom settings may be changed in instant chat systems. Through an instant messaging tool, such as Windows Live Messenger, you may simply access these options. This application provides private offline chat, video messaging, image and video sharing, and video chatting.
Step1Start Windows Live Messenger on your PC or laptop first. Enter your login name and password by clicking the “Sign In” button.
Step2On the top menu bar, pick “Tools.” And then select the “Audio and Video Setup”. Drag the slider next to “Speaker” to modify the speaker volume. Drag the slider next to “Microphone” to modify the microphone sensitivity. Press “Next.”
Step3From the drop-down list, pick the webcam. The “Camera Control” option is situated on the top; pick “Webcam Settings” after that.
Step4Now, to alter the zoom settings, drag the “Zoom” slider. To zoom in or out, drag the slider to the left or right. Press “OK.”
Way 2: Use Windows 10 Camera App
Wondering how to zoom your camera in the Windows 10 Camera app? The Camera app enables you to zoom in or out on your webcam in both image and video modes. To accomplish so, click or push the Magnification button, and then use the slider to modify the webcam’s zoom level. To operate the zoom feature manually, pick “Manual Zoom.” In the preview window, a square appears when you pick this option. To zoom in on a specific region of the capture window, drag the square there. To expand the image that was acquired by the webcam, slide the slider bar. In simply, The Camera app enables you zoom in or out of photographs and movies shot with your webcam. To do this, click on the “Zoom” button and drag the slider to the left or right as appropriate on your Windows 10 camera. the following steps:
Step1To open the “Start Menu,” make a right-click on “Start.” Now, to access the Camera app, type “Camera App” into the start menu’s search box.
Step2Tap the Camera Control icon when you start or join a meeting. To zoom and pan the camera to the appropriate spot, utilize the icons on the Camera Control panel.
![]()
Step3To exit the Camera Control window and return to the Meeting Controls, touch outside of it.
Way 3: Zoom with YouCam
Unfortunately, the default cameras or webcams bundled with the majority of Windows laptops and desktops don’t have an automatic zoom option. In fact, the only method to adjust their crop is to switch from “Standard” to “Widescreen,” which does slightly zoom in on you but not in the manner we’d want. This makes it inescapable that the only method to manually alter a webcam’s magnification is to acquire one separately and apply its software settings. , like YouCam. YouCam provides video calling, streaming, and broadcasting. includes an integrated app. To employ Zoom with YouCam, refer to the methods given below:
Step1Launch the YouCam camera program and activate the webcam.
Step2In the camera preview window, pick Settings. Then, select “Enable Video Zoom” from the menu.
Step3Select “Automatic Face Detection” from the menu. As you wander about in the capture window, the camera watches your face and automatically zooms in on your photo as shown above.
Step4To handle the zoom feature manually, pick “Manual Zoom.” In the preview window, a square appears when you pick this option. To zoom in on a specific region of the capture window, drag the square there. To expand the image that was acquired by the webcam, slide the slider bar.
Way 4: Use iGlasses on Mac
For the perfect webcam look on a MAC, install the Chrome plugin iGlasses for video effects and style tweaks. Your videos will appear better on Zoom as a consequence. You may instantly enhance the appearance of your video interactions by utilizing the digital zoom on your iGlasses. Digital pan, tilt, and zoom are all possible with easy controls. For Macs that support it, an Apple Remote may be used to operate. iGlasses will become an option in Zoom’s video settings when it has been installed. You may improve your camera by altering the settings in iGlasses. You may experiment with a range of amusing effects, like 3-D distortions, using the virtual camera. Let’s learn how to utilize iGlasses on a Mac:
Step1Installing Ecamm’s iGlasses on a MacBook in the first step.
Step2To activate the camera, go to your video settings and pick iGlasses.
Step3Choose the Zoom window and execute the appropriate operations using the Zoom and Flip options. You may now zoom in and out using the camera on your MacBook as you like.
Conclusion
In conclusion, so many people currently take part in online conferences and virtual meetings. You want to create a lasting impression, don’t you? Not or whether you are the host of an online meeting or event, you must now maintain a professional image to prevent turning off attendees. You have discovered how to utilize the tools at your disposal to boost the zoom in and out quality of your camera in this post. However, as will be explained in the sections ahead, you may do it without the third-party plugins. With just one quick plugin, you can significantly transform how you look on a camera. Hence, try out the easy method from the above enlisted ones to get hold on your PC webcam to zoom in or out purposes.
How to Add VHS Green Screen to Your Video
Create High-Quality Video - Wondershare Filmora
An easy and powerful YouTube video editor
Numerous video and audio effects to choose from
Detailed tutorials provided by the official channel
When making a video, it is always fun to add an effect. You can do this for either atmospheric or aesthetic reasons. VHS green screen effects are among the world’s most popular effects people use today.
We’ll give you the low-down on VHS Green Screen, including how it became popular and where to get these effects for free. Keep reading to learn more.
In this article
01 What Is VHS?
02 How Did VHS Green Screen Become Popular?
03 Free VHS Green Screen Effect Resource to Download
04 How to Edit VHS Green Screen with Filmora
What Is VHS?
Since its introduction in 1976, VHS has been the most frequently used video cassette recording technology. The VHS format is a consumer-level analog video cassette recording standard for videotaping. The acronym VHS referred to Vertical Helical Scan and was eventually modified as the popularity of this technology increased.
Produced by a Japan Victor Company, the technology uses a magnetic tape measuring half an inch. By the 1950s, magnetic tape video recording had become a vital part of the television industry. The technology is exclusively utilized in professional settings like TV studios and medical imaging (fluoroscopy).
As consumer access to videotape increased in the 1970s, a new economy centered on home video emerged, drastically altering the economics of the film and television industries. By 1980, VHS had captured 70% of the market and had established itself as the industry standard for entertainment and instruction.
The original standard has a picture quality equivalent to that of analog television. High-definition television content could be recorded and re-created using digital VHS (D-VHS). Progressively, a new format was launched dubbed S-VHS (Super VHS), which featured improved video quality from 240 to 400 lines; however, people did not use it extensively.
VHS tape, compared to its competition at the time, Betamax tapes had longer tape lifespans. VHS tapes were preferred because they recorded three times as long as Betamax tapes because of their higher storage capacity.
The last VHS recorder manufacturer, Funai Electric of Japan, discontinued manufacturing in 2016 after the introduction of DVDs into the market.
How Did VHS Green Screen Become Popular?
The green screen effect allows you to superimpose subjects onto different virtual background video clips. Essentially, you take a video that’s going to be your background, then overlay another video on top of this background. Using green screen properly will make your video stands out from the crowd. Let’s look at some that made increased the popularity of the VHS green screen:
- Clarity and Interactivity
VHS green screen allows for better understanding and comprehension, especially when explaining complex concepts and processes.
VHS green screen allows users to interact with virtual elements. Essentially, it enhances customer engagement while improving communication between you and the audience.
- Creativity and Versatility
Differentiation is key to the world of business. Therefore, adding VHS green screen to your content allows it to be unique and customized to your business. The best part is: Your imagination is the only limit.
The green screen also helps people avoid building and breaking down sets, allowing them to complete several shoots in a single session, which provides greater efficiency for their business.
- Save Time
With VHS green screen, you can shoot your video anywhere and anytime. That means it helps you remove the extended production time while providing you with one location and infinite possibilities. For this reason, it’s ideal for those who want to get the job done swiftly without hindering the quality.
- Budget and Logistical Solution
It eliminates expenses in the production line, like location, travel, and operational costs. In turn, you’ll free up more budget that you can spend on other things that your business needs.
Additionally, it allows you to control your environment. Shooting a video depends on the weather; however, shooting a video on VHS green screen disregards weather. It also provides an effective solution to problems in different areas, including travel, lighting, sound, and location.
Branding
VHS green screen popularity has grown over the years because it allows you to superimpose your logo onto the background. This makes your videos look professional and clean and provides you with a chance to advertise your business or brand your service or product with your company identity.
Free VHS Green Screen Effect Resource to Download
If you are looking for free VHS green screen effects to make your videos stand out, here are some resources that you might want to consider.
1. ANFX
ANFX is a stock video, after-effects projects, and motion graphics download hub. You can download a range of VHS green screen effects. All items that you will find on this website are licensed under a Creative Commons (CC) Attribution 4.0 International License. That means you can use the effects for any legal purpose, but you have to give them credit.

2. Videezy
As one of the world’s largest video communities, Videezy offers free high-quality footage designed to make filmmaking easy and affordable. You can also download a range of free VHS green screen effects in 4k. The site has more than 4,000 free green screen videos.

3. Gfycat
VHS green screens for animated gifs is a thing, and Gfycat is a good resource for making animated gifs. It is free to use the green screen gifs on this platform. This user-generated short video hosting company is one of the first web services that offered video encoding of GIFs.

4. Videvo
Videvo offers VHS green-screen effects, music, motion graphics, and sound effects. The site has a variety of effects available in resolutions from 720p-4k. While you’ll need to pay for some premium clips, there are loads of free resources. The site is particularly helpful for those who want green-screen effects that allow them to present content as though it is on a phone, computer, or tablet.

5. Pixabay
This user-submitted content site offers free content for commercial use. You can make attributions or choose not to. The effects on this site are of high quality. All contents are released to users under Creative Commons CC0, making them safe to use without giving credit to the artist or asking for permission. What’s more? You can even use the effects for commercial purposes.

6. YouTube
YouTube is home to millions of users looking for parts to build their videos. You will need to learn how to download YouTube videos to take advantage of these resources. There are tons of YouTube channels devoted to providing users with free VHS green screen effects. Some of the notable channels include BestGreenScreen, HD Green Screen, Free Green HD, and Green Screen Animation.

How to Edit VHS Green Screen with Filmora
Filmora is a relatively new program that has taken the world by storm. This professional video editor is a lifeline for all videographers and creators who work with videos to increase their proficiency and create professional-grade videos without breaking the bank. To learn how to Use VHS green screen in Filmora, follow the steps below.
Step 1\
Import the video with the VHS green screen and the background video into the media library.

Step 2\
Drag the video with the green screen and the background video that you want to replace the green screen with into the timeline and add it to one of the tracks. The video with the green screen should come second in the timeline.

Step 3\
Right-click the green screen on the timeline and select the Green Screen option.

Step 4\
Select a color from the green screen menu.

Various settings under this menu allow you to customize how your video is affected by VHS Green Screen. Experiments with different settings may allow you to make good videos even better or give your videos a whole new feel.
The Tolerance slider adjusts how much of the green screen will be allowed in your subject.
Edge Thickness allows you to adjust the amount of the edge thickness you’ll bring into the shot.
Use the Edge Feather slider to soften the edges of your subject.
Touch your mouse’s right button and move your cursor to select the video you want to insert into the timeline or “Add Video to Timeline” if you are using a project that does not accept videos as sources.
Open Project Settings > Video Editor tab > VHS Green Screen and select Source Video from the drop-down menu to change the video from whatever it is currently set as.
You can also add VHS Green Screen to a Sub-track by pressing Ctrl + Alt combination.
After selecting your video and adding it to the timeline, you will see the Video Properties window.
You can edit the Source Video under Source Video Settings in the Video Properties menu or use the keyframes window to change its settings via a timeline.
You can also watch the below video to get a better underestanding about how to use Green Screen in Filmora.
For Win 7 or later (64-bit)
For macOS 10.12 or later
Conclusion
● VHS video effects have become popular over the years because of the many benefits they offer. They allow you to save time, make unique content, be creative, and more. You can use Filmora’s green screen feature to make your videos stand out.
When making a video, it is always fun to add an effect. You can do this for either atmospheric or aesthetic reasons. VHS green screen effects are among the world’s most popular effects people use today.
We’ll give you the low-down on VHS Green Screen, including how it became popular and where to get these effects for free. Keep reading to learn more.
In this article
01 What Is VHS?
02 How Did VHS Green Screen Become Popular?
03 Free VHS Green Screen Effect Resource to Download
04 How to Edit VHS Green Screen with Filmora
What Is VHS?
Since its introduction in 1976, VHS has been the most frequently used video cassette recording technology. The VHS format is a consumer-level analog video cassette recording standard for videotaping. The acronym VHS referred to Vertical Helical Scan and was eventually modified as the popularity of this technology increased.
Produced by a Japan Victor Company, the technology uses a magnetic tape measuring half an inch. By the 1950s, magnetic tape video recording had become a vital part of the television industry. The technology is exclusively utilized in professional settings like TV studios and medical imaging (fluoroscopy).
As consumer access to videotape increased in the 1970s, a new economy centered on home video emerged, drastically altering the economics of the film and television industries. By 1980, VHS had captured 70% of the market and had established itself as the industry standard for entertainment and instruction.
The original standard has a picture quality equivalent to that of analog television. High-definition television content could be recorded and re-created using digital VHS (D-VHS). Progressively, a new format was launched dubbed S-VHS (Super VHS), which featured improved video quality from 240 to 400 lines; however, people did not use it extensively.
VHS tape, compared to its competition at the time, Betamax tapes had longer tape lifespans. VHS tapes were preferred because they recorded three times as long as Betamax tapes because of their higher storage capacity.
The last VHS recorder manufacturer, Funai Electric of Japan, discontinued manufacturing in 2016 after the introduction of DVDs into the market.
How Did VHS Green Screen Become Popular?
The green screen effect allows you to superimpose subjects onto different virtual background video clips. Essentially, you take a video that’s going to be your background, then overlay another video on top of this background. Using green screen properly will make your video stands out from the crowd. Let’s look at some that made increased the popularity of the VHS green screen:
- Clarity and Interactivity
VHS green screen allows for better understanding and comprehension, especially when explaining complex concepts and processes.
VHS green screen allows users to interact with virtual elements. Essentially, it enhances customer engagement while improving communication between you and the audience.
- Creativity and Versatility
Differentiation is key to the world of business. Therefore, adding VHS green screen to your content allows it to be unique and customized to your business. The best part is: Your imagination is the only limit.
The green screen also helps people avoid building and breaking down sets, allowing them to complete several shoots in a single session, which provides greater efficiency for their business.
- Save Time
With VHS green screen, you can shoot your video anywhere and anytime. That means it helps you remove the extended production time while providing you with one location and infinite possibilities. For this reason, it’s ideal for those who want to get the job done swiftly without hindering the quality.
- Budget and Logistical Solution
It eliminates expenses in the production line, like location, travel, and operational costs. In turn, you’ll free up more budget that you can spend on other things that your business needs.
Additionally, it allows you to control your environment. Shooting a video depends on the weather; however, shooting a video on VHS green screen disregards weather. It also provides an effective solution to problems in different areas, including travel, lighting, sound, and location.
Branding
VHS green screen popularity has grown over the years because it allows you to superimpose your logo onto the background. This makes your videos look professional and clean and provides you with a chance to advertise your business or brand your service or product with your company identity.
Free VHS Green Screen Effect Resource to Download
If you are looking for free VHS green screen effects to make your videos stand out, here are some resources that you might want to consider.
1. ANFX
ANFX is a stock video, after-effects projects, and motion graphics download hub. You can download a range of VHS green screen effects. All items that you will find on this website are licensed under a Creative Commons (CC) Attribution 4.0 International License. That means you can use the effects for any legal purpose, but you have to give them credit.
2. Videezy
As one of the world’s largest video communities, Videezy offers free high-quality footage designed to make filmmaking easy and affordable. You can also download a range of free VHS green screen effects in 4k. The site has more than 4,000 free green screen videos.
3. Gfycat
VHS green screens for animated gifs is a thing, and Gfycat is a good resource for making animated gifs. It is free to use the green screen gifs on this platform. This user-generated short video hosting company is one of the first web services that offered video encoding of GIFs.
4. Videvo
Videvo offers VHS green-screen effects, music, motion graphics, and sound effects. The site has a variety of effects available in resolutions from 720p-4k. While you’ll need to pay for some premium clips, there are loads of free resources. The site is particularly helpful for those who want green-screen effects that allow them to present content as though it is on a phone, computer, or tablet.
5. Pixabay
This user-submitted content site offers free content for commercial use. You can make attributions or choose not to. The effects on this site are of high quality. All contents are released to users under Creative Commons CC0, making them safe to use without giving credit to the artist or asking for permission. What’s more? You can even use the effects for commercial purposes.
6. YouTube
YouTube is home to millions of users looking for parts to build their videos. You will need to learn how to download YouTube videos to take advantage of these resources. There are tons of YouTube channels devoted to providing users with free VHS green screen effects. Some of the notable channels include BestGreenScreen, HD Green Screen, Free Green HD, and Green Screen Animation.
How to Edit VHS Green Screen with Filmora
Filmora is a relatively new program that has taken the world by storm. This professional video editor is a lifeline for all videographers and creators who work with videos to increase their proficiency and create professional-grade videos without breaking the bank. To learn how to Use VHS green screen in Filmora, follow the steps below.
Step 1\
Import the video with the VHS green screen and the background video into the media library.
Step 2\
Drag the video with the green screen and the background video that you want to replace the green screen with into the timeline and add it to one of the tracks. The video with the green screen should come second in the timeline.
Step 3\
Right-click the green screen on the timeline and select the Green Screen option.
Step 4\
Select a color from the green screen menu.
Various settings under this menu allow you to customize how your video is affected by VHS Green Screen. Experiments with different settings may allow you to make good videos even better or give your videos a whole new feel.
The Tolerance slider adjusts how much of the green screen will be allowed in your subject.
Edge Thickness allows you to adjust the amount of the edge thickness you’ll bring into the shot.
Use the Edge Feather slider to soften the edges of your subject.
Touch your mouse’s right button and move your cursor to select the video you want to insert into the timeline or “Add Video to Timeline” if you are using a project that does not accept videos as sources.
Open Project Settings > Video Editor tab > VHS Green Screen and select Source Video from the drop-down menu to change the video from whatever it is currently set as.
You can also add VHS Green Screen to a Sub-track by pressing Ctrl + Alt combination.
After selecting your video and adding it to the timeline, you will see the Video Properties window.
You can edit the Source Video under Source Video Settings in the Video Properties menu or use the keyframes window to change its settings via a timeline.
You can also watch the below video to get a better underestanding about how to use Green Screen in Filmora.
For Win 7 or later (64-bit)
For macOS 10.12 or later
Conclusion
● VHS video effects have become popular over the years because of the many benefits they offer. They allow you to save time, make unique content, be creative, and more. You can use Filmora’s green screen feature to make your videos stand out.
How to Create Cooking Video Intro and End Screen for YouTube Channel?
With the number of YouTube content creators increasing every minute, the competition will be strong and unmatched. If you are a chef owning a YouTube cooking channel, this article might be your calling.
The revolutionary cooking video intros and promising outro for the channels are the need of the hour. It has become crucial to give your competitors a powerful match via robust content, incredible cooking background music, and a great end. The article covers creating a café meal intro and cooking channel YouTube end screen. So, time to begin? Shall we?
In this article
01 How to Create a Cafe Meal Intro?
02 How to Create a Cooking Channel YouTube End Screen?
03 3 Recommended Sites to Download Cooking Background Music
Part 1: How to Create a Cafe Meal Intro?
Are you a chef in a restaurant in Paris? Do you need to create a café meal intro that grabs the attention of all food fanatics worldwide? Worry no more, as this section has got you covered.
Wondershare Filmora is a one of its kind software to create an astonishing café meal intro in seconds. Let us initiate the step-by-step!
For Win 7 or later (64-bit)
For macOS 10.12 or later
Step 1: Double click on Wondershare Filmora to open the software. Head to the “Audio” tab and tap “Young and Bright.” The process will launch interesting music from there.

Step 2: Pick one and drag it to the timeline. Navigate to the “Media” tab to drag the cooking video to the first track. You can also import the video from your system.

Step 3: It is time to use the “Split Screen” to show more scenes in one video. Pick one and drag it to the timeline. It will create three vertical divisions on the preview window. Drop three different videos in each division and adjust the height using the Zoom settings.

Step 4: Import another cooking video and import it to the first track. Navigate to the “Elements” section and drag one of it as a background to the end of the first track. Look for another “café” related element to drag it to the end of the second track.

Step 5: Moving on, scroll to the “Titles” panel to pick a “restaurant” related idea and drag it to the timeline. The position of the title can be adjusted, and the name of the title can be altered by placing it in the preview window.

Step 6: Use the big titles for the beginning of the video and drag them to the second track. The title can be adjusted and renamed effortlessly. Pick another title for the middle of the video and perform the same procedure. The process is completed, and you can export the video.

Part 2: How to Create a Cooking Channel YouTube End Screen?
Are you an impeccable chef? Do you own a YouTube channel with limited subscribers?
The background music for cooking videos is essential to capture the attention of food addicts in the world. Your cooking channel’s stunning YouTube end screen is your perfect shot at improving subscribers’ range. The subsection shall reflect upon the procedure to effortlessly use Wondershare Filmora. So, let us have a look!
For Win 7 or later (64-bit)
For macOS 10.12 or later
Step 1: Open Wondershare Filmora from your computer and import the video that you need for the YouTube outro. Drag the video to the first track of your timeline. Head to the “Titles” tab and find the ideal title related to the restaurant idea. Now, drag it on to the second track.

Step 2: Now, it is time to use the “Transitions” tab to pick one and drag it to the end of the second track. First, import another video and drag it to the first track. After that, select the “Titles” and search YouTube pack lower-thirds. Hit one and drag it to the second track. Make required alterations related to the position, allocation, title name, size, and color.

Step 3: Navigate to the “Transitions” and click on one. Drag it and drop between the two clips. Screenshot the picture from the preview window and drag it from the “Media” tab to the first track. Pick the “YouTube end screen template” from titles and drag it to the second track.

Step 4: Modify your text from the “Advanced Settings.” Now, it is time to pick another media from your system to be used as a YouTube channel avatar. Place it on to the third track. It is time to adjust the photo on the end screen.

Step 5: To do so, go to the “Effects” and pick an image mask from it. Drag it to the photo avatar in the preview window. After that, double click on the track, and settings will appear. Select “Image Mask” options to adjust the size of the circle as needed.

Step 6: Adjust the position of the avatar on your preview window. Moving on, pick the keyframe to animate the position of the avatar. Change the rotation, escalation, and opacity as needed.

Step 7: It is time to add another image to the fourth track and perform the same procedure as the profile image. It will be displayed as the recent video on the end screen. Animate the imagery as done previously. You have created a creative end screen for your cooking YouTube channel.

Part 3: 3 Recommended Sites to Download Cooking Background Music
The background music for cooking videos is an important part of a cooking video intro and outro. Therefore, we can introduce three sites that offer great cooking background music free of copyright infringement issues. So, are you with us? Let us start!
Envato Elements
The first one of the lot is Envato Elements. There are different genres of music linked with cooking videos. The website filters can be tailored according to the theme of one’s cooking YouTube channel. Additionally, there are cooking moods music as well.

MobCup
MobCup has made it easy to browse the related cooking background music. The cooking music soup, monster hunt, cooking instrumental, and cooking effects are famous music options. The user can download them by hitting the “Download” button effortlessly.

SoundCloud
SoundCloud is another remarkable source for cooking videos to get hands-on background music. The royalty-free music for food, cooking music, and uplifting background music can be incorporated in the videos to give an essence of the cooking tutorials. The link can be copied, and the track can be downloaded in seconds.

Concluding Remarks
The marketing industry is getting more fame than the actual brand services due to multiple reasons. The animations and transitions are used to attract the attention of potential users and clients. If you own a restaurant with a YouTube cooking channel, the exciting cooking background music will work best for you.
The article discussed creating a café meal intro and cooking channel YouTube end screen through Filmora. The three recommended sites to download the music were also this write-up’s crux.
Wondershare Filmora
Get started easily with Filmora’s powerful performance, intuitive interface, and countless effects!
Try It Free Try It Free Try It Free Learn More >

02 How to Create a Cooking Channel YouTube End Screen?
03 3 Recommended Sites to Download Cooking Background Music
Part 1: How to Create a Cafe Meal Intro?
Are you a chef in a restaurant in Paris? Do you need to create a café meal intro that grabs the attention of all food fanatics worldwide? Worry no more, as this section has got you covered.
Wondershare Filmora is a one of its kind software to create an astonishing café meal intro in seconds. Let us initiate the step-by-step!
For Win 7 or later (64-bit)
For macOS 10.12 or later
Step 1: Double click on Wondershare Filmora to open the software. Head to the “Audio” tab and tap “Young and Bright.” The process will launch interesting music from there.
Step 2: Pick one and drag it to the timeline. Navigate to the “Media” tab to drag the cooking video to the first track. You can also import the video from your system.
Step 3: It is time to use the “Split Screen” to show more scenes in one video. Pick one and drag it to the timeline. It will create three vertical divisions on the preview window. Drop three different videos in each division and adjust the height using the Zoom settings.
Step 4: Import another cooking video and import it to the first track. Navigate to the “Elements” section and drag one of it as a background to the end of the first track. Look for another “café” related element to drag it to the end of the second track.
Step 5: Moving on, scroll to the “Titles” panel to pick a “restaurant” related idea and drag it to the timeline. The position of the title can be adjusted, and the name of the title can be altered by placing it in the preview window.
Step 6: Use the big titles for the beginning of the video and drag them to the second track. The title can be adjusted and renamed effortlessly. Pick another title for the middle of the video and perform the same procedure. The process is completed, and you can export the video.
Part 2: How to Create a Cooking Channel YouTube End Screen?
Are you an impeccable chef? Do you own a YouTube channel with limited subscribers?
The background music for cooking videos is essential to capture the attention of food addicts in the world. Your cooking channel’s stunning YouTube end screen is your perfect shot at improving subscribers’ range. The subsection shall reflect upon the procedure to effortlessly use Wondershare Filmora. So, let us have a look!
For Win 7 or later (64-bit)
For macOS 10.12 or later
Step 1: Open Wondershare Filmora from your computer and import the video that you need for the YouTube outro. Drag the video to the first track of your timeline. Head to the “Titles” tab and find the ideal title related to the restaurant idea. Now, drag it on to the second track.
Step 2: Now, it is time to use the “Transitions” tab to pick one and drag it to the end of the second track. First, import another video and drag it to the first track. After that, select the “Titles” and search YouTube pack lower-thirds. Hit one and drag it to the second track. Make required alterations related to the position, allocation, title name, size, and color.
Step 3: Navigate to the “Transitions” and click on one. Drag it and drop between the two clips. Screenshot the picture from the preview window and drag it from the “Media” tab to the first track. Pick the “YouTube end screen template” from titles and drag it to the second track.
Step 4: Modify your text from the “Advanced Settings.” Now, it is time to pick another media from your system to be used as a YouTube channel avatar. Place it on to the third track. It is time to adjust the photo on the end screen.
Step 5: To do so, go to the “Effects” and pick an image mask from it. Drag it to the photo avatar in the preview window. After that, double click on the track, and settings will appear. Select “Image Mask” options to adjust the size of the circle as needed.
Step 6: Adjust the position of the avatar on your preview window. Moving on, pick the keyframe to animate the position of the avatar. Change the rotation, escalation, and opacity as needed.
Step 7: It is time to add another image to the fourth track and perform the same procedure as the profile image. It will be displayed as the recent video on the end screen. Animate the imagery as done previously. You have created a creative end screen for your cooking YouTube channel.
Part 3: 3 Recommended Sites to Download Cooking Background Music
The background music for cooking videos is an important part of a cooking video intro and outro. Therefore, we can introduce three sites that offer great cooking background music free of copyright infringement issues. So, are you with us? Let us start!
Envato Elements
The first one of the lot is Envato Elements. There are different genres of music linked with cooking videos. The website filters can be tailored according to the theme of one’s cooking YouTube channel. Additionally, there are cooking moods music as well.
MobCup
MobCup has made it easy to browse the related cooking background music. The cooking music soup, monster hunt, cooking instrumental, and cooking effects are famous music options. The user can download them by hitting the “Download” button effortlessly.
SoundCloud
SoundCloud is another remarkable source for cooking videos to get hands-on background music. The royalty-free music for food, cooking music, and uplifting background music can be incorporated in the videos to give an essence of the cooking tutorials. The link can be copied, and the track can be downloaded in seconds.
Concluding Remarks
The marketing industry is getting more fame than the actual brand services due to multiple reasons. The animations and transitions are used to attract the attention of potential users and clients. If you own a restaurant with a YouTube cooking channel, the exciting cooking background music will work best for you.
The article discussed creating a café meal intro and cooking channel YouTube end screen through Filmora. The three recommended sites to download the music were also this write-up’s crux.
Wondershare Filmora
Get started easily with Filmora’s powerful performance, intuitive interface, and countless effects!
Try It Free Try It Free Try It Free Learn More >
How to Add Video Transitions in Videos
Editing a video is equally important as recording a video. A raw video footage is never appealing to the eyes because of sudden cuts, unnecessary parts, and lack of eye-catching effects. That is why video editing is crucial for turning an unappealing raw video into an attention-grabbing video. As a matter of fact, the way you edit your video makes your video stand out when you are posting on social media platforms.
One of the most important aspects of video editing is adding transitions to video clips. When you jump from one scene to another and make sudden cuts, you need to apply some video transitions so that the move from one scene to another becomes soothing to the eyes. Different video editors have different transition effects and Wondershare Filmora has the best collection of transitions. We will illustrate how to add transition in Filmora and how to improve your video with video transitions.
Part 1. What is a Video transition effect?
A video transition effect is the most commonly used graphical effect in video editing. A video transition effect is essential whereby you connect one shot to another, especially when you are making sudden cuts in the video. Therefore, a video transition effect sits in between two shots and connects them together smoothly so that it does not look odd to the eyes. Video editing with transitions is a common practice for short videos on social media, presentation videos, and even movies.
A video transition effect is effective when you are jumping from two moods and emotions in the video. It is equally useful while jumping between storylines, points of view, and timelines. Besides, you can spice up your narrative and make your video eye-catching as well as eye-soothing. There are different types of video transition effects such as fade in and out, zoom in and out, dissolve, wipe and pan.
Part 2. How to add transitions in video?
To add transitions to your video, you will need a video editor. You should choose a video editor that has a wide collection of transition effects so that you can apply them to your video as per your preference. If you are someone who regularly makes videos and edits them, a variety of transitions will make the videos look different. There are Movie Maker transitions for Windows users and iMovie transitions for Mac users. But we recommend Wondershare Filmora as the best video editor for adding transitions.
<pFilmora is a professional video editor with so many different categories of transitions including the trending ones. Their team continuously adds new transitions to their collection, and you can download them and use on your videos. Starting from basic, slideshow, and social media to 3D, light and smoke, there is no dearth of transitions to fulfill your requirements. Here are the steps how to add transition in Filmora. Free Download For Win 7 or later(64-bit)
Free Download For macOS 10.14 or later
Step1 Download and install Filmora on your computer. Filmora is available for Windows and Mac users. Launch Filmora and click on New Project.

Step2 Drag and drop your video clips under Project Media folder. Thereafter, drag and drop them on Timeline.
If you have one raw video file, you can split it up into multiple video clips to add transitions in between them.
Step3 Go to Transitions tab located at the top bar. You will see all the categories of transitions on the left panel.

Step4 Once you select your desired transition effect, drag and drop it in between the video clips. You can add multiple transition effects for different video clips.

Play the video after you are done editing and adding transitions. Thereafter, click on Export button to save the video on your hard drive. You should follow the same steps on how to add transition effects in reels, status videos, and YouTube videos.
Part 3. Video transitions tips and tricks
If you want to make your video stand out by simply using video transition effects, you have to follow the following tips and tricks.
Consistency – Amateur video editors tend to use several extravagant transitions in one video that distract and even annoy the audience. You are using video transition effects not to distract but to smoothen the video content. Therefore, you need to be consistent with the video transition effect you use. You should use one or maximum of two transition effects throughout the video so that the audience does not get distracted.
Experiment – While it is true that you should not be using too many video transitions in one video, but you should definitely apply different video transition effects in different videos initially. This will help you to understand which transition is getting better traction, and thereafter, you can stick to it for the rest of your videos. This is particularly useful when you are making similar type of content for social media and video streaming sites.
Out of the Box – The reason you recommended Wondershare Filmora is that there is a huge collection of different types of transition effects. If you use the regular transitions such as fade, zoom, wipe, and dissolve, you cannot create an impression among your viewers. You have to use out of the box transitions so that your video can look and feel different even when you content is not. There are 3D effects, social media effects, and different genres of effects that can go well with your video content.
Judicious – There is a difference between transition effects and video effects. Transition effects should last only for a fraction of a second so that there is no aftereffect in mind. On the contrary, a video effect can last as long as required in the video. Therefore, do not stretch the duration of a transition effect and keep it as short as possible. Similarly, you should not use transition effects here and there unnecessarily. It should be used only when there is a proper scope such as scene cuts, mood changes, and subject changes.
Meaningful – Even transition effect has a meaning behind it and you should understand it and use wherever appropriate. For example, fade out effect signifies the fading of a scene or changing of mood. Similarly, a dissolve effect is appropriate when the subject is dissolved in certain thoughts or a scene is getting dissolved. That way the effect will look natural and more meaningful as well as impactful.
The Bottom Line
Video transition effects are essential in almost all types of videos. They enhance the video content and make the transition between scenes smoother. You should choose your video editor wisely so that you can avail different types of video transition effects. We recommend Wondershare Filmora for its better collection of video transition effects for all types of videos.
Step1 Download and install Filmora on your computer. Filmora is available for Windows and Mac users. Launch Filmora and click on New Project.
Step2 Drag and drop your video clips under Project Media folder. Thereafter, drag and drop them on Timeline.
If you have one raw video file, you can split it up into multiple video clips to add transitions in between them.
Step3 Go to Transitions tab located at the top bar. You will see all the categories of transitions on the left panel.
Step4 Once you select your desired transition effect, drag and drop it in between the video clips. You can add multiple transition effects for different video clips.
Play the video after you are done editing and adding transitions. Thereafter, click on Export button to save the video on your hard drive. You should follow the same steps on how to add transition effects in reels, status videos, and YouTube videos.
Part 3. Video transitions tips and tricks
If you want to make your video stand out by simply using video transition effects, you have to follow the following tips and tricks.
Consistency – Amateur video editors tend to use several extravagant transitions in one video that distract and even annoy the audience. You are using video transition effects not to distract but to smoothen the video content. Therefore, you need to be consistent with the video transition effect you use. You should use one or maximum of two transition effects throughout the video so that the audience does not get distracted.
Experiment – While it is true that you should not be using too many video transitions in one video, but you should definitely apply different video transition effects in different videos initially. This will help you to understand which transition is getting better traction, and thereafter, you can stick to it for the rest of your videos. This is particularly useful when you are making similar type of content for social media and video streaming sites.
Out of the Box – The reason you recommended Wondershare Filmora is that there is a huge collection of different types of transition effects. If you use the regular transitions such as fade, zoom, wipe, and dissolve, you cannot create an impression among your viewers. You have to use out of the box transitions so that your video can look and feel different even when you content is not. There are 3D effects, social media effects, and different genres of effects that can go well with your video content.
Judicious – There is a difference between transition effects and video effects. Transition effects should last only for a fraction of a second so that there is no aftereffect in mind. On the contrary, a video effect can last as long as required in the video. Therefore, do not stretch the duration of a transition effect and keep it as short as possible. Similarly, you should not use transition effects here and there unnecessarily. It should be used only when there is a proper scope such as scene cuts, mood changes, and subject changes.
Meaningful – Even transition effect has a meaning behind it and you should understand it and use wherever appropriate. For example, fade out effect signifies the fading of a scene or changing of mood. Similarly, a dissolve effect is appropriate when the subject is dissolved in certain thoughts or a scene is getting dissolved. That way the effect will look natural and more meaningful as well as impactful.
The Bottom Line
Video transition effects are essential in almost all types of videos. They enhance the video content and make the transition between scenes smoother. You should choose your video editor wisely so that you can avail different types of video transition effects. We recommend Wondershare Filmora for its better collection of video transition effects for all types of videos.
Also read:
- Updated 2024 Approved Free Titles For Final Cut Pro
- Updated You Must Be Wondering Which the Best Online Transparent Image-Maker Is! Well, There Is No Need to Get Confused as Here; You Will Get a Curated List for the Same
- Updated 2024 Approved What Is the Best Voice Changer for WhatsApp? Discover the Seven (7) Best Voice Changers for WhatsApp Here in This Post
- New In 2024, Quick Answer What Is a Transparent Logo and Why Do You Need It
- Updated In 2024, Learn How to Use 3D Camera Tracking in Adobe After Effects and Take Your Skills to the Next Level
- New In 2024, The Best Wedding LUTs for Premiere Pro
- Updated 2024 Approved How to Google Meet Green Screen
- New Looking for the Best Way to Create Stunning Video Animations? Here, We Look at some of the Best Animated Video Maker Solutions to Use for 2024
- Updated What Does It Mean to Color Grade Your Images, and Why Is It so Important? Does It Mean the Same Thing as a Color Correction? Read on to Gather All the Information You Need on Color Grading Photography for 2024
- New A Comprehensive Guide to Slow Motion YouTube Videos and How to Manage Them for 2024
- New 2024 Approved List of Supported Whatsapp Video Format You May Want to Know
- New 2024 Approved 8 Apps to Custom Your GIF Stickers
- New Whatre the Best Alternatives to Pexels for 2024
- Updated How to Splice Videos Together on iPhone
- New Do You Want Your Video Footage to Resemble Kodak Films? You Can Get the Old Kodak Film Look by Searching for Kodak 2383 LUT Free Download on the Internet for 2024
- Updated 2024 Approved Steps to Rotate Videos Using Handbrake
- Find Out How to Create Your Own Custom Motion Graphics in Filmora. Add Unique Objects, Manipulate Text, and Animate Anything You Want
- Updated How to Add Video Effects with Movavi Slideshow Maker
- In This Article, We Will Discuss How to Rotate Videos in the Lightworks Application. Below Is a Way to Rotate Videos in Lightworks Manually, Here, We Will Use the Z-Axis Rotation for 2024
- Tips That Show Anybody How To Make Youtube Slideshow – Guaranteed for 2024
- 2024 Approved How to Add Background to Video With/Without a Green Screen
- 2024 Approved Frame Blending Is a Great Way to Smooth Out Your Video Footage in Adobe Premiere Pro. Using This Technique, You Can Create a More Natural Looking Motion by Averaging Out the Frames in Your Clips
- New 2024 Approved How Can You DIY VHS Overlay in After Effects?
- Updated In 2024, A Guide To Motion Tracking Using The Best Video Editors
- A Full Review of Leeming LUT Pro
- Updated Do You Like Clouds or Sky and Want to Use Them as a Video Background? Explore This Article to Learn About the Sky Change Video in Filmora for 2024
- New Do You Wish to Create High-Quality Videos and Experience Effective Videos with Editing? No Problem at All because the Keyboard Shortcuts Listed Here Will Assist You for 2024
- Updated How to Get Motion Blur in Valorant, In 2024
- Updated 2024 Approved How to Make a Smooth Speed Ramping in Premiere Pro?
- Updated 2024 Approved 100 Workable How to Mask Track with Adobe Premiere Pro
- Top 5 Ways To Convert Hdr To Sdr Videos
- How to Fix It Xiaomi Redmi A2 Wont Turn On | Dr.fone
- In 2024, Wireless Methods to MirrorApple iPhone 14 & iPad to Fire Stick With Ease | Dr.fone
- In 2024, All You Need To Know About Mega Greninja For Lava Yuva 2 Pro | Dr.fone
- In 2024, 5 Tutorials on How to Transfer Photos From Apple iPhone SE (2022) to New iPhone | Dr.fone
- Hard Resetting an Nubia Z50 Ultra Device Made Easy | Dr.fone
- In 2024, How to Unlock iPhone 6s When We Dont Have Apple ID or Password?
- In 2024, Full Guide to Catch 100 IV Pokémon Using a Map On Honor X50i | Dr.fone
- In 2024, Top 10 AirPlay Apps in Sony Xperia 1 V for Streaming | Dr.fone
- How to Fix the Apple iPhone 11 GPS not Working Issue | Dr.fone
- Lock Your Oppo A2 Phone in Style The Top 5 Gesture Lock Screen Apps
- Reliable User Guide to Fix Oppo Reno 9A Running Slow and Freezing | Dr.fone
- Is GSM Flasher ADB Legit? Full Review To Bypass Your Xiaomi 14 ProFRP Lock
- Title: Updated In 2024, How to Zoom Webcam on PC
- Author: Morgan
- Created at : 2024-04-24 01:06:46
- Updated at : 2024-04-25 01:06:46
- Link: https://ai-video-editing.techidaily.com/updated-in-2024-how-to-zoom-webcam-on-pc/
- License: This work is licensed under CC BY-NC-SA 4.0.
