:max_bytes(150000):strip_icc():format(webp)/GettyImages-917461864-7141ebd3ec944ce6a431b8d485cc9cdb.jpg)
Updated In 2024, If You Want to Add an Effect Like a VHS Overlay Free Effect to Enhance Your Videos, You Can Do It on After Effects. Read More to Learn How

If You Want to Add an Effect Like a VHS Overlay Free Effect to Enhance Your Videos, You Can Do It on After Effects. Read More to Learn How
The 90s generation is familiar with Video Home System video. Today, Moviemakers use VHS static overlay to give their videos an antique and vintage look.
The VHS glitch overlay has become increasingly popular as it changes the video’s theme, tone, and whole look. Let’s see how we can add DIY VHS overlay in after effects-
Part 1:Step by Step DIY VHS Overlay in After Effects?
The retro “VHS Look” has become relatively trendy in recent years. The memories associated with the popular VHS trend has helped the trend make a comeback. Creating this effect in After Effects may seem to be a complicated process if you have not tried it before. But we have made it easier for you to add VHS overlay in Adobe After Effects. Follow the steps to add it in after effects-
Before you begin, download and install VHS preset if you haven’t already. Remember that VHS preset only works with After Effects CC 2018 and up. So, make sure you have the recent version of After Effects or the one not older than the 2018 version.
Step 1: To create a VHS look on your video, drop any video of your choice into the project panel and give it a name, let’s say, “VCR static overlay”. Set the width and height to 1920 and 1080 px, respectively.
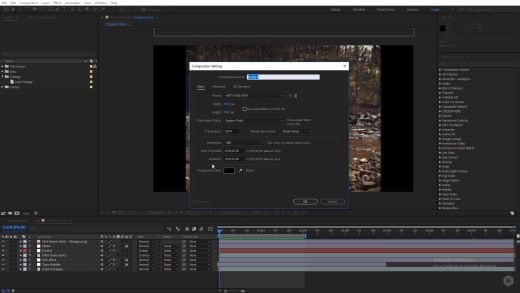
Step 2: Right-click on your video and select New Comp from Selection. Drag your video to a new composition and then go to Lumetri Color < Basic Correction. Add some contrast. You can set it to 50 or any other number of your choice. Then bring the white level down to -55.
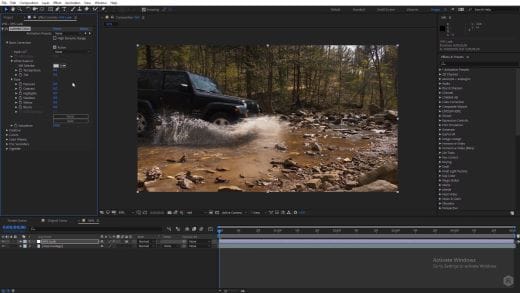
Then open the Creative tab. Increase the faded film to 40. Set sharpening to -70. Bring vibrance to -30.
Note: Here, I changed the number to get the effect I wanted. You can change the numbers and set the values as per your requirements.
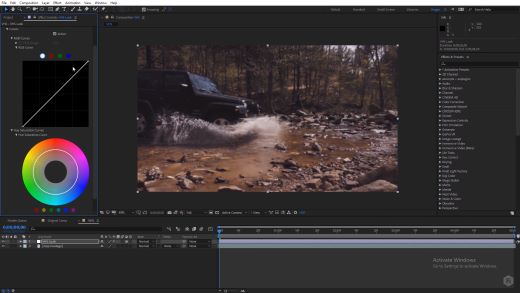
Now, click on the Curves option. Drag down the white curve and then align it with the original curve. Move the green curve up a bit and bring down the blue curve. Then comes the Vignette tab. Open it and set the number to -1.
Step 3: Now, we will give our video a subtle RGB spit appearance. For that, we need to use the Channel Blur effect twice. First, go to Effect < Blur & Sharpen < Channel Blur. Set red blurriness to 20. Turn on the repeat edge pixels. Then change the Blur Dimensions from horizontal and vertical to vertical.
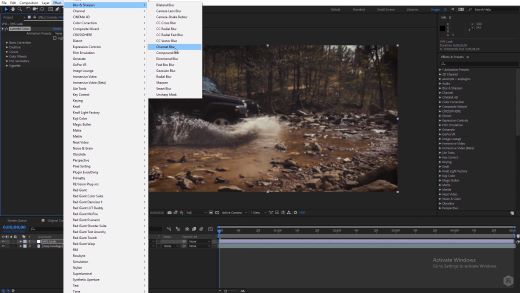
Step 4: Again, go to Effect < Blur & Sharpen < Channel Blur. Set blue blurriness to 30. Repeat the process of checking the repeat edge pixels box. Change the Blue Dimensions from horizontal and vertical to horizontal.
Step 5: Next comes giving the video artificial sharpening look using Unsharp Mask. So, go to Effect < Blur & Sharpen < Unsharp Mask. Under the Unmask Mask menu, set the amount to 100 and the radius to 10.
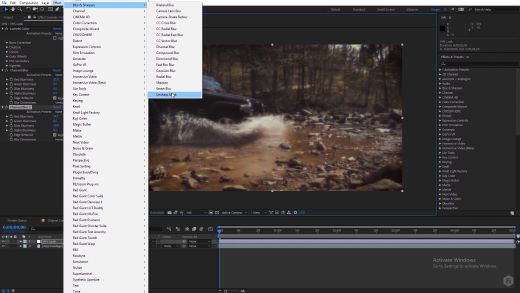
Step 6: To add a font to your video, simply search VHS font on Google. Look for the one you want to use in your video and download it. To give your video that authentic VHS-style look, we suggest downloading free VCR OSD Mono font and installing the font on your system.
Step 7: Go to Layer < New < Solid and choose any color. We chose white. Now, under Effects & Presets, search for a number. Drag it to the white solid. Choose the font VCR OSD Mono. You can change the number to time or date. You can also add time manually. Select the text tool, go to the source text, hold alt, and click on the stopwatch. Write “timeToCurrentFormat() and time will be displayed on the video. Let us say we want to see the date on the video instead of time. So, change the time to date. Drag the date to the bottom right of the video to give it the look of an old VHS tape.
If you are a beginner and want a simple VHS effect, you can follow these easy steps and create the VHS video that will transport you back to the 90s.
BONUS TIP: How to Add VHS Overlays and Glitch Effects to Make Retro Videos in Filmora Video Editor?
Do you remember the look of the VHS and miss it? You can bring your memories back! With Wondershare Filmora, you can add this effect easily to your videos. Adding a VHS overlay transparent brings drama and creates an atmosphere of distortion. It can significantly change the appearance and feel of your video.
So, if you want to create professional-looking VHS overlay free, the only thing you need is Filmora video editing software . Filmora allows you to add three different overlay VHS effects that you can use along with other overlays to create retro videos.
For Win 7 or later (64-bit)
For macOS 10.12 or later
Do you want to add retro videos on Filmora? It is simple!
To create a VHS overlay video, you should first download the Filmora app for free if you haven’t! Let’s learn how the effect can transform your video. You will have to choose various effects and values to get the final VHS overlay video. These effects can be added to any lyric video, intro, outro, and many others.
Let’s look at the steps:
Open your draft in Filmora software and select sample colors from the Media tab on the top left.
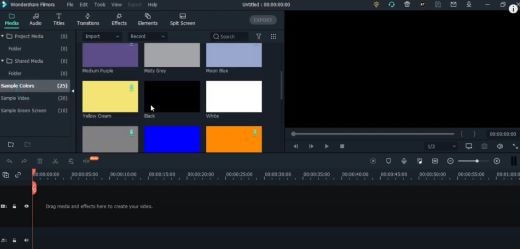
You can drag and drop the photo on a track on the timeline. Then adjust the trim handles to change the duration to match the section of the video to be transformed.
In sequence, add these three overlays by dragging them from the Effects panel at the top to their own individual tracks on the timeline: VHS Distortion Bad (alpha = 25), VHS Distortion (alpha = 35), and VHS Rewind (alpha = 10).
You can also add effects like Strong Glitch, Chromatic Aberration, Glitch Distortion, Distort, etc., to enhance the vintage look of the video.
When finished, click export and choose the format and target folder to save the processed file with the added effects.
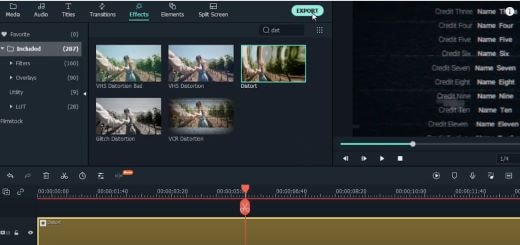
The smart generation has access to HD videos and high-tech devices, yet VHS is an exciting concept for them. The videos created with this effect resemble those from the 90s era. You have to customize everything when you add a VHS effect, including the title, background noise, overlay, and credits.
By choosing a video-editing software like Wondershare Filmora, users can make such videos and add retro glitch overlay professionally. You can also access Filmstock to download any video effects, stock media, templates, or sound effects for Filmora.
Conclusion
Video editing is now easy and fun. The trend of VCR overlay is now back as VHR overlay. With Wondershare Filmora, you can easily create classic videos with 90’s effects. Take your video editing to the next big level with Filmora Video Editor. We can help you make the best use of this tool to create glitch effect videos and add a VHS tape overlay.
Versatile Video Editor - Wondershare Filmora
An easy yet powerful editor
Numerous effects to choose from
Detailed tutorials provided by the official channel
For macOS 10.12 or later
Do you want to add retro videos on Filmora? It is simple!
To create a VHS overlay video, you should first download the Filmora app for free if you haven’t! Let’s learn how the effect can transform your video. You will have to choose various effects and values to get the final VHS overlay video. These effects can be added to any lyric video, intro, outro, and many others.
Let’s look at the steps:
Open your draft in Filmora software and select sample colors from the Media tab on the top left.

You can drag and drop the photo on a track on the timeline. Then adjust the trim handles to change the duration to match the section of the video to be transformed.
In sequence, add these three overlays by dragging them from the Effects panel at the top to their own individual tracks on the timeline: VHS Distortion Bad (alpha = 25), VHS Distortion (alpha = 35), and VHS Rewind (alpha = 10).
You can also add effects like Strong Glitch, Chromatic Aberration, Glitch Distortion, Distort, etc., to enhance the vintage look of the video.
When finished, click export and choose the format and target folder to save the processed file with the added effects.

The smart generation has access to HD videos and high-tech devices, yet VHS is an exciting concept for them. The videos created with this effect resemble those from the 90s era. You have to customize everything when you add a VHS effect, including the title, background noise, overlay, and credits.
By choosing a video-editing software like Wondershare Filmora, users can make such videos and add retro glitch overlay professionally. You can also access Filmstock to download any video effects, stock media, templates, or sound effects for Filmora.
Conclusion
Video editing is now easy and fun. The trend of VCR overlay is now back as VHR overlay. With Wondershare Filmora, you can easily create classic videos with 90’s effects. Take your video editing to the next big level with Filmora Video Editor. We can help you make the best use of this tool to create glitch effect videos and add a VHS tape overlay.
Versatile Video Editor - Wondershare Filmora
An easy yet powerful editor
Numerous effects to choose from
Detailed tutorials provided by the official channel
For macOS 10.12 or later
Do you want to add retro videos on Filmora? It is simple!
To create a VHS overlay video, you should first download the Filmora app for free if you haven’t! Let’s learn how the effect can transform your video. You will have to choose various effects and values to get the final VHS overlay video. These effects can be added to any lyric video, intro, outro, and many others.
Let’s look at the steps:
Open your draft in Filmora software and select sample colors from the Media tab on the top left.

You can drag and drop the photo on a track on the timeline. Then adjust the trim handles to change the duration to match the section of the video to be transformed.
In sequence, add these three overlays by dragging them from the Effects panel at the top to their own individual tracks on the timeline: VHS Distortion Bad (alpha = 25), VHS Distortion (alpha = 35), and VHS Rewind (alpha = 10).
You can also add effects like Strong Glitch, Chromatic Aberration, Glitch Distortion, Distort, etc., to enhance the vintage look of the video.
When finished, click export and choose the format and target folder to save the processed file with the added effects.

The smart generation has access to HD videos and high-tech devices, yet VHS is an exciting concept for them. The videos created with this effect resemble those from the 90s era. You have to customize everything when you add a VHS effect, including the title, background noise, overlay, and credits.
By choosing a video-editing software like Wondershare Filmora, users can make such videos and add retro glitch overlay professionally. You can also access Filmstock to download any video effects, stock media, templates, or sound effects for Filmora.
Conclusion
Video editing is now easy and fun. The trend of VCR overlay is now back as VHR overlay. With Wondershare Filmora, you can easily create classic videos with 90’s effects. Take your video editing to the next big level with Filmora Video Editor. We can help you make the best use of this tool to create glitch effect videos and add a VHS tape overlay.
Versatile Video Editor - Wondershare Filmora
An easy yet powerful editor
Numerous effects to choose from
Detailed tutorials provided by the official channel
For macOS 10.12 or later
Do you want to add retro videos on Filmora? It is simple!
To create a VHS overlay video, you should first download the Filmora app for free if you haven’t! Let’s learn how the effect can transform your video. You will have to choose various effects and values to get the final VHS overlay video. These effects can be added to any lyric video, intro, outro, and many others.
Let’s look at the steps:
Open your draft in Filmora software and select sample colors from the Media tab on the top left.

You can drag and drop the photo on a track on the timeline. Then adjust the trim handles to change the duration to match the section of the video to be transformed.
In sequence, add these three overlays by dragging them from the Effects panel at the top to their own individual tracks on the timeline: VHS Distortion Bad (alpha = 25), VHS Distortion (alpha = 35), and VHS Rewind (alpha = 10).
You can also add effects like Strong Glitch, Chromatic Aberration, Glitch Distortion, Distort, etc., to enhance the vintage look of the video.
When finished, click export and choose the format and target folder to save the processed file with the added effects.

The smart generation has access to HD videos and high-tech devices, yet VHS is an exciting concept for them. The videos created with this effect resemble those from the 90s era. You have to customize everything when you add a VHS effect, including the title, background noise, overlay, and credits.
By choosing a video-editing software like Wondershare Filmora, users can make such videos and add retro glitch overlay professionally. You can also access Filmstock to download any video effects, stock media, templates, or sound effects for Filmora.
Conclusion
Video editing is now easy and fun. The trend of VCR overlay is now back as VHR overlay. With Wondershare Filmora, you can easily create classic videos with 90’s effects. Take your video editing to the next big level with Filmora Video Editor. We can help you make the best use of this tool to create glitch effect videos and add a VHS tape overlay.
Versatile Video Editor - Wondershare Filmora
An easy yet powerful editor
Numerous effects to choose from
Detailed tutorials provided by the official channel
How to Choose A Nice GoPro for Vlogging?
Vlogging has developed into quite an industry in a short period. We have seen many people building up their image as professional vloggers who have entertained millions of users with their unique content. However, while understanding the dynamics of vlogging, it is particularly important to set up the equipment that would help the user in their vlogging.
This article discusses very proficient equipment, GoPro for YouTubers, which has been considered across various scales for professional vlogging. We shall be providing our readers with an idea of the best GoPro they can be used to cover their vlogs.
In this article
01 What Need to Be Considered Before Choosing a GoPro for Vlogging?
02 8 Best GoPro for Vlogging in 2022
Part 1: What Need to Be Considered Before Choosing a GoPro for Vlogging?
GoPro cameras are known for their versatility. While being simply the best tool for vlogging, they are known for offering several impressive features. This, however, needs to be considered before choosing a GoPro for vlogging. Get ready as we are about to figure them out.

1. Portable and Easy to Carry
Isn’t it great that you are not required to carry heavy equipment everywhere? GoPro cameras offer convenience to their users by providing small sizes and rugged designs. This can prove to be extremely good for vloggers who have rough uses.
2. Multiple Video Features
Are you tired of capturing a simple video? GoPro offers you multiple options while capturing videos, which come in the form of time-lapses. Get creative with the videos that you shoot across your vlogs. Isn’t it great?
3. Affordability
GoPro should never be judged by its size. These tools are considered the most high-end cameras that can be used for vlogging. As they compete for professional cameras, they are considered relatively affordable in their comparison, which makes them a suitable choice in vlogging.
4. Shooting Modes
Have you ever heard about shooting modes? GoPro for vlogging comes up with different modes that can help you manage impressive visuals for your videos. GoPro helps you design content that is visually appealing to the viewers.
5. Quality of Video
Have you ever thought to have video resolutions up to 6K in a small camera? GoPro provides you the opportunity of witnessing history across the cameras with its stunning video resolution features. This is truly exceptional in the video-making industry.
Part 2: 8 Best GoPro for Vlogging in 2022
Once you are aware of what should be kept in mind for selecting a GoPro for vlogging, it is time to come up with some of the best-recommended models according to the use case of the vlogger. Let’s get started on this exceptional journey of finding the best GoPro for yourselves. Come right away!
1. GoPro Hero10 Black
Price: $499.99
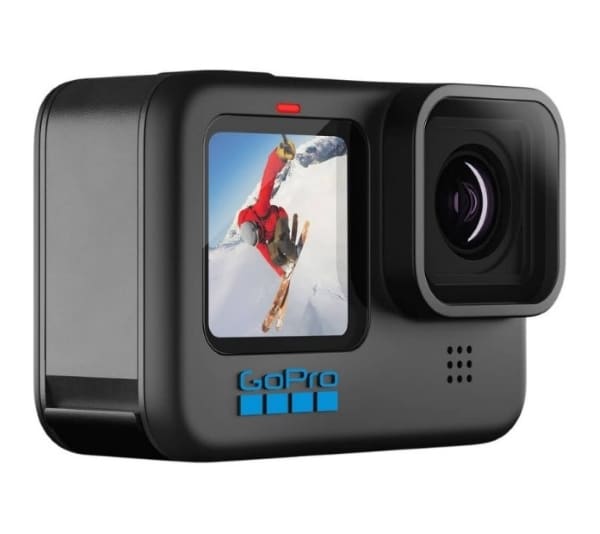
The first and foremost model that may come into our mind is the GoPro Hero10 Black, which is, without any discussion, the most advanced model in GoPro cameras. Taking the features to the next level, GoPro Hero10 Black is available with a 5.3K resolution, which is the smoothest resolution in videos you can ask for. It provides faster processors than its predecessors, with features that make it the top-of-the-line choice.
You can find improved stabilization across Hero10; however, the price tag across the camera is as much as a mirrorless camera. Absolutely stunning, it is!
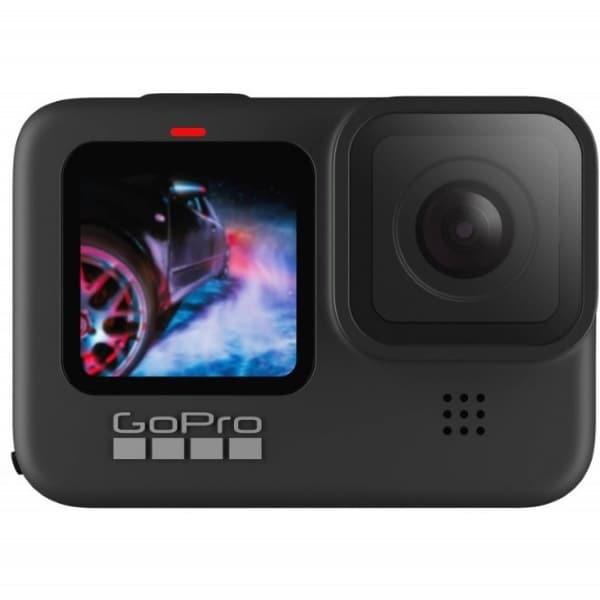
2. GoPro Hero9 Black
Price: $399.99
Another impressive model in the GoPro products is the Hero9 Black model, referred to as the previous iteration of the Hero10. Although it is not as remarkable as the Hero10, it takes up videos with 5K Ultra HD resolution, with a 1080p live streaming facility. Talking about the stabilization of this camera, it isn’t as proficient as the Hero10; however, it still performs better than the previous iterations.
A heavier camera’s multifunctional characteristics are a few major points that need to be considered for Hero9 Black. Do you wish to buy this?
3. GoPro Hero8 Black
Price: $349.98
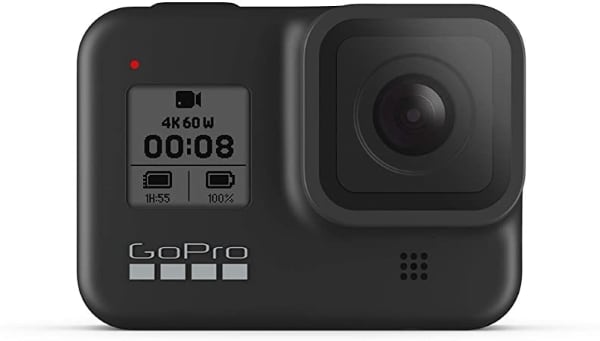
GoPro cameras are known for their effective sizes and high-performance results. GoPro Hero8 Black is recognized among the most versatile GoPro for YouTubers, accompanied by the small size. Being the first GoPro camera that provides a microphone to its users, GoPro Hero8 changed the dynamics of video making with its effective features. Users can cover 4K Ultra HD video across the device with a 12MP resolution for photos.
The Media Mode offered across the device makes video enhancement possible across GoPro for vlogging, which is commendable.
4. GoPro Hero7 Silver
Price: $299.99
Are you confused about the GoPro that fits your needs? GoPro Hero7 Silver is the most budget-friendly vlogging camera that can be found across the market. GoPro Hero7 Silver can be your perfect companion in tough vlogs with a rugged outlook and waterproofing. It provides voice control, two-mic, slo-mo, time-lapse across a 4K Ultra HD resolution, which broadens the possibility for the users.
This GoPro for YouTubers is still among the people’s favorites, which makes it a consistent choice among newbies. Isn’t it great?

5. GoPro Max
Price: $549.98
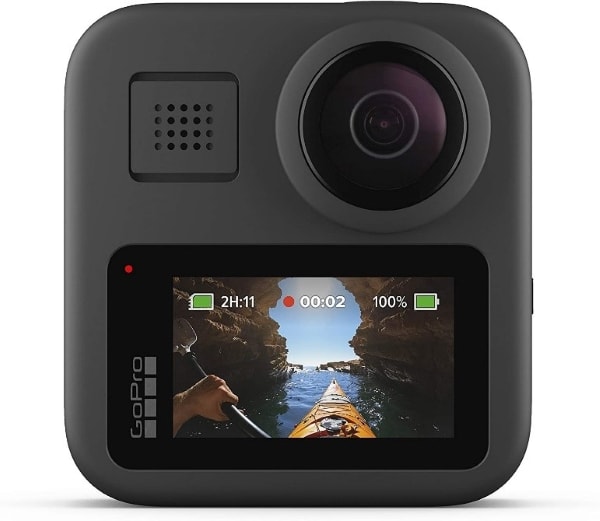
Want a camera that captures 360-degree shots? GoPro Max is the camera that you should look for in the market. GoPro Max is a very impressive up-gradation across GoPro cameras, which came to offer more features to it than before. The two 180-degree cameras provide better stabilization, thus crossing cameras like Hero8 quite easily. The details are extremely proficient in this design with improved mic facilities and other characteristics.
If you wish to shift yourselves from a single-camera device, this GoPro for vlogging is the perfect choice you can come by.
6. GoPro Hero7 Black
Price: $319.99
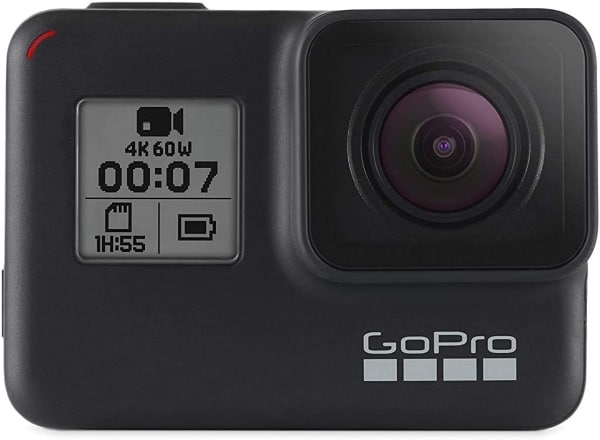
GoPro Hero7 Black, though introduced in 2018, came out to be a quite advanced version of the previous GoPro cameras. This camera allows 4K video resolution shooting under 60fps, stabilizing for smoothing out shakes and vibrations. The video quality from a GoPro is different from the rest, which makes it basic equipment in vlogging.
This GoPro for YouTubers offered excessive controls to its user base, with commands that were able to neutralize and optimize video enhancement. What a great choice!
7. GoPro Fusion
Price: $279.99
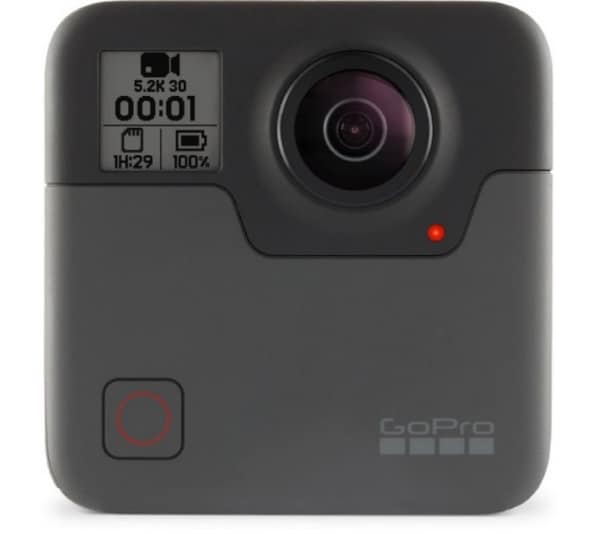
This is a hugely different camera across the complete GoPro series. Fusion is known for many things, out of which the size comes out to be the main reason for its popularity. This iteration in GoPro cameras provides 5.2K video resolution quality under a pocket-sized model. Although it is quite durable compared to the other cameras in the market for vlogging, the price tag across this device is usually not much acceptable for users.
It is a bold choice to have Fusion as your GoPro for vlogging, which also allows adding audio across the 360-degree feature. This is sensational.
8. GoPro Hero7 White
Price: $274.49
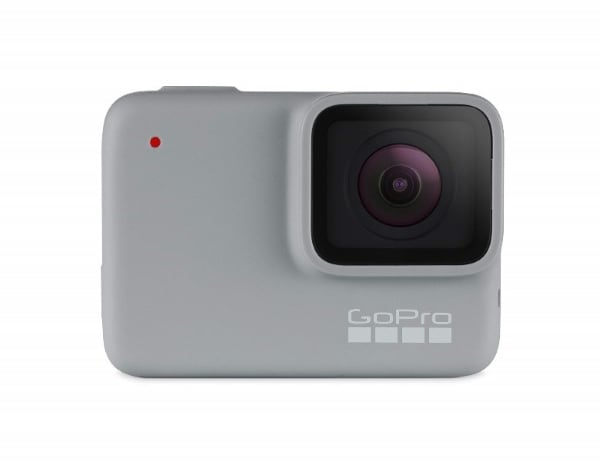
GoPro Hero7 White is a perfect option to start vlogging. Designed for beginners, it provides Full HD video resolution with a touch screen for better functioning. Although the camera is quite downgraded in terms of the features it offers, it is basically offered for catering to user-friendliness.
It also offers video stabilization for introducing users to a certain environment in video editing. With an affordable price tag, this camera can be the perfect start as your GoPro for vlogging. Do you wish to get started?
Closing Words
Got to know about the best GoPro cameras? Are you ready to select your GoPro for vlogging? We hope that this article has featured the most optimal options. Go through this article to get the perfect start for your vlogging journey. However, if you wish to have a good experience with video editing, you should consider working on Wondershare Filmora .
The tool manages all GoPro videos to perfection. It is truly an exceptional platform to work with. Along with that, Filmora provides a list of impressive video editing functions which can be adopted for making the video look professional. That is why this platform is recommended across multiple stages. Surely the best editor you can use!
Wondershare Filmora
Get started easily with Filmora’s powerful performance, intuitive interface, and countless effects!
Try It Free Try It Free Try It Free Learn More >

02 8 Best GoPro for Vlogging in 2022
Part 1: What Need to Be Considered Before Choosing a GoPro for Vlogging?
GoPro cameras are known for their versatility. While being simply the best tool for vlogging, they are known for offering several impressive features. This, however, needs to be considered before choosing a GoPro for vlogging. Get ready as we are about to figure them out.

1. Portable and Easy to Carry
Isn’t it great that you are not required to carry heavy equipment everywhere? GoPro cameras offer convenience to their users by providing small sizes and rugged designs. This can prove to be extremely good for vloggers who have rough uses.
2. Multiple Video Features
Are you tired of capturing a simple video? GoPro offers you multiple options while capturing videos, which come in the form of time-lapses. Get creative with the videos that you shoot across your vlogs. Isn’t it great?
3. Affordability
GoPro should never be judged by its size. These tools are considered the most high-end cameras that can be used for vlogging. As they compete for professional cameras, they are considered relatively affordable in their comparison, which makes them a suitable choice in vlogging.
4. Shooting Modes
Have you ever heard about shooting modes? GoPro for vlogging comes up with different modes that can help you manage impressive visuals for your videos. GoPro helps you design content that is visually appealing to the viewers.
5. Quality of Video
Have you ever thought to have video resolutions up to 6K in a small camera? GoPro provides you the opportunity of witnessing history across the cameras with its stunning video resolution features. This is truly exceptional in the video-making industry.
Part 2: 8 Best GoPro for Vlogging in 2022
Once you are aware of what should be kept in mind for selecting a GoPro for vlogging, it is time to come up with some of the best-recommended models according to the use case of the vlogger. Let’s get started on this exceptional journey of finding the best GoPro for yourselves. Come right away!
1. GoPro Hero10 Black
Price: $499.99
The first and foremost model that may come into our mind is the GoPro Hero10 Black, which is, without any discussion, the most advanced model in GoPro cameras. Taking the features to the next level, GoPro Hero10 Black is available with a 5.3K resolution, which is the smoothest resolution in videos you can ask for. It provides faster processors than its predecessors, with features that make it the top-of-the-line choice.
You can find improved stabilization across Hero10; however, the price tag across the camera is as much as a mirrorless camera. Absolutely stunning, it is!

2. GoPro Hero9 Black
Price: $399.99
Another impressive model in the GoPro products is the Hero9 Black model, referred to as the previous iteration of the Hero10. Although it is not as remarkable as the Hero10, it takes up videos with 5K Ultra HD resolution, with a 1080p live streaming facility. Talking about the stabilization of this camera, it isn’t as proficient as the Hero10; however, it still performs better than the previous iterations.
A heavier camera’s multifunctional characteristics are a few major points that need to be considered for Hero9 Black. Do you wish to buy this?

3. GoPro Hero8 Black
Price: $349.98
GoPro cameras are known for their effective sizes and high-performance results. GoPro Hero8 Black is recognized among the most versatile GoPro for YouTubers, accompanied by the small size. Being the first GoPro camera that provides a microphone to its users, GoPro Hero8 changed the dynamics of video making with its effective features. Users can cover 4K Ultra HD video across the device with a 12MP resolution for photos.
The Media Mode offered across the device makes video enhancement possible across GoPro for vlogging, which is commendable.

4. GoPro Hero7 Silver
Price: $299.99
Are you confused about the GoPro that fits your needs? GoPro Hero7 Silver is the most budget-friendly vlogging camera that can be found across the market. GoPro Hero7 Silver can be your perfect companion in tough vlogs with a rugged outlook and waterproofing. It provides voice control, two-mic, slo-mo, time-lapse across a 4K Ultra HD resolution, which broadens the possibility for the users.
This GoPro for YouTubers is still among the people’s favorites, which makes it a consistent choice among newbies. Isn’t it great?

5. GoPro Max
Price: $549.98
Want a camera that captures 360-degree shots? GoPro Max is the camera that you should look for in the market. GoPro Max is a very impressive up-gradation across GoPro cameras, which came to offer more features to it than before. The two 180-degree cameras provide better stabilization, thus crossing cameras like Hero8 quite easily. The details are extremely proficient in this design with improved mic facilities and other characteristics.
If you wish to shift yourselves from a single-camera device, this GoPro for vlogging is the perfect choice you can come by.

6. GoPro Hero7 Black
Price: $319.99
GoPro Hero7 Black, though introduced in 2018, came out to be a quite advanced version of the previous GoPro cameras. This camera allows 4K video resolution shooting under 60fps, stabilizing for smoothing out shakes and vibrations. The video quality from a GoPro is different from the rest, which makes it basic equipment in vlogging.
This GoPro for YouTubers offered excessive controls to its user base, with commands that were able to neutralize and optimize video enhancement. What a great choice!

7. GoPro Fusion
Price: $279.99
This is a hugely different camera across the complete GoPro series. Fusion is known for many things, out of which the size comes out to be the main reason for its popularity. This iteration in GoPro cameras provides 5.2K video resolution quality under a pocket-sized model. Although it is quite durable compared to the other cameras in the market for vlogging, the price tag across this device is usually not much acceptable for users.
It is a bold choice to have Fusion as your GoPro for vlogging, which also allows adding audio across the 360-degree feature. This is sensational.

8. GoPro Hero7 White
Price: $274.49
GoPro Hero7 White is a perfect option to start vlogging. Designed for beginners, it provides Full HD video resolution with a touch screen for better functioning. Although the camera is quite downgraded in terms of the features it offers, it is basically offered for catering to user-friendliness.
It also offers video stabilization for introducing users to a certain environment in video editing. With an affordable price tag, this camera can be the perfect start as your GoPro for vlogging. Do you wish to get started?

Closing Words
Got to know about the best GoPro cameras? Are you ready to select your GoPro for vlogging? We hope that this article has featured the most optimal options. Go through this article to get the perfect start for your vlogging journey. However, if you wish to have a good experience with video editing, you should consider working on Wondershare Filmora .
The tool manages all GoPro videos to perfection. It is truly an exceptional platform to work with. Along with that, Filmora provides a list of impressive video editing functions which can be adopted for making the video look professional. That is why this platform is recommended across multiple stages. Surely the best editor you can use!
Wondershare Filmora
Get started easily with Filmora’s powerful performance, intuitive interface, and countless effects!
Try It Free Try It Free Try It Free Learn More >

02 8 Best GoPro for Vlogging in 2022
Part 1: What Need to Be Considered Before Choosing a GoPro for Vlogging?
GoPro cameras are known for their versatility. While being simply the best tool for vlogging, they are known for offering several impressive features. This, however, needs to be considered before choosing a GoPro for vlogging. Get ready as we are about to figure them out.

1. Portable and Easy to Carry
Isn’t it great that you are not required to carry heavy equipment everywhere? GoPro cameras offer convenience to their users by providing small sizes and rugged designs. This can prove to be extremely good for vloggers who have rough uses.
2. Multiple Video Features
Are you tired of capturing a simple video? GoPro offers you multiple options while capturing videos, which come in the form of time-lapses. Get creative with the videos that you shoot across your vlogs. Isn’t it great?
3. Affordability
GoPro should never be judged by its size. These tools are considered the most high-end cameras that can be used for vlogging. As they compete for professional cameras, they are considered relatively affordable in their comparison, which makes them a suitable choice in vlogging.
4. Shooting Modes
Have you ever heard about shooting modes? GoPro for vlogging comes up with different modes that can help you manage impressive visuals for your videos. GoPro helps you design content that is visually appealing to the viewers.
5. Quality of Video
Have you ever thought to have video resolutions up to 6K in a small camera? GoPro provides you the opportunity of witnessing history across the cameras with its stunning video resolution features. This is truly exceptional in the video-making industry.
Part 2: 8 Best GoPro for Vlogging in 2022
Once you are aware of what should be kept in mind for selecting a GoPro for vlogging, it is time to come up with some of the best-recommended models according to the use case of the vlogger. Let’s get started on this exceptional journey of finding the best GoPro for yourselves. Come right away!
1. GoPro Hero10 Black
Price: $499.99
The first and foremost model that may come into our mind is the GoPro Hero10 Black, which is, without any discussion, the most advanced model in GoPro cameras. Taking the features to the next level, GoPro Hero10 Black is available with a 5.3K resolution, which is the smoothest resolution in videos you can ask for. It provides faster processors than its predecessors, with features that make it the top-of-the-line choice.
You can find improved stabilization across Hero10; however, the price tag across the camera is as much as a mirrorless camera. Absolutely stunning, it is!

2. GoPro Hero9 Black
Price: $399.99
Another impressive model in the GoPro products is the Hero9 Black model, referred to as the previous iteration of the Hero10. Although it is not as remarkable as the Hero10, it takes up videos with 5K Ultra HD resolution, with a 1080p live streaming facility. Talking about the stabilization of this camera, it isn’t as proficient as the Hero10; however, it still performs better than the previous iterations.
A heavier camera’s multifunctional characteristics are a few major points that need to be considered for Hero9 Black. Do you wish to buy this?

3. GoPro Hero8 Black
Price: $349.98
GoPro cameras are known for their effective sizes and high-performance results. GoPro Hero8 Black is recognized among the most versatile GoPro for YouTubers, accompanied by the small size. Being the first GoPro camera that provides a microphone to its users, GoPro Hero8 changed the dynamics of video making with its effective features. Users can cover 4K Ultra HD video across the device with a 12MP resolution for photos.
The Media Mode offered across the device makes video enhancement possible across GoPro for vlogging, which is commendable.

4. GoPro Hero7 Silver
Price: $299.99
Are you confused about the GoPro that fits your needs? GoPro Hero7 Silver is the most budget-friendly vlogging camera that can be found across the market. GoPro Hero7 Silver can be your perfect companion in tough vlogs with a rugged outlook and waterproofing. It provides voice control, two-mic, slo-mo, time-lapse across a 4K Ultra HD resolution, which broadens the possibility for the users.
This GoPro for YouTubers is still among the people’s favorites, which makes it a consistent choice among newbies. Isn’t it great?

5. GoPro Max
Price: $549.98
Want a camera that captures 360-degree shots? GoPro Max is the camera that you should look for in the market. GoPro Max is a very impressive up-gradation across GoPro cameras, which came to offer more features to it than before. The two 180-degree cameras provide better stabilization, thus crossing cameras like Hero8 quite easily. The details are extremely proficient in this design with improved mic facilities and other characteristics.
If you wish to shift yourselves from a single-camera device, this GoPro for vlogging is the perfect choice you can come by.

6. GoPro Hero7 Black
Price: $319.99
GoPro Hero7 Black, though introduced in 2018, came out to be a quite advanced version of the previous GoPro cameras. This camera allows 4K video resolution shooting under 60fps, stabilizing for smoothing out shakes and vibrations. The video quality from a GoPro is different from the rest, which makes it basic equipment in vlogging.
This GoPro for YouTubers offered excessive controls to its user base, with commands that were able to neutralize and optimize video enhancement. What a great choice!

7. GoPro Fusion
Price: $279.99
This is a hugely different camera across the complete GoPro series. Fusion is known for many things, out of which the size comes out to be the main reason for its popularity. This iteration in GoPro cameras provides 5.2K video resolution quality under a pocket-sized model. Although it is quite durable compared to the other cameras in the market for vlogging, the price tag across this device is usually not much acceptable for users.
It is a bold choice to have Fusion as your GoPro for vlogging, which also allows adding audio across the 360-degree feature. This is sensational.

8. GoPro Hero7 White
Price: $274.49
GoPro Hero7 White is a perfect option to start vlogging. Designed for beginners, it provides Full HD video resolution with a touch screen for better functioning. Although the camera is quite downgraded in terms of the features it offers, it is basically offered for catering to user-friendliness.
It also offers video stabilization for introducing users to a certain environment in video editing. With an affordable price tag, this camera can be the perfect start as your GoPro for vlogging. Do you wish to get started?

Closing Words
Got to know about the best GoPro cameras? Are you ready to select your GoPro for vlogging? We hope that this article has featured the most optimal options. Go through this article to get the perfect start for your vlogging journey. However, if you wish to have a good experience with video editing, you should consider working on Wondershare Filmora .
The tool manages all GoPro videos to perfection. It is truly an exceptional platform to work with. Along with that, Filmora provides a list of impressive video editing functions which can be adopted for making the video look professional. That is why this platform is recommended across multiple stages. Surely the best editor you can use!
Wondershare Filmora
Get started easily with Filmora’s powerful performance, intuitive interface, and countless effects!
Try It Free Try It Free Try It Free Learn More >

02 8 Best GoPro for Vlogging in 2022
Part 1: What Need to Be Considered Before Choosing a GoPro for Vlogging?
GoPro cameras are known for their versatility. While being simply the best tool for vlogging, they are known for offering several impressive features. This, however, needs to be considered before choosing a GoPro for vlogging. Get ready as we are about to figure them out.

1. Portable and Easy to Carry
Isn’t it great that you are not required to carry heavy equipment everywhere? GoPro cameras offer convenience to their users by providing small sizes and rugged designs. This can prove to be extremely good for vloggers who have rough uses.
2. Multiple Video Features
Are you tired of capturing a simple video? GoPro offers you multiple options while capturing videos, which come in the form of time-lapses. Get creative with the videos that you shoot across your vlogs. Isn’t it great?
3. Affordability
GoPro should never be judged by its size. These tools are considered the most high-end cameras that can be used for vlogging. As they compete for professional cameras, they are considered relatively affordable in their comparison, which makes them a suitable choice in vlogging.
4. Shooting Modes
Have you ever heard about shooting modes? GoPro for vlogging comes up with different modes that can help you manage impressive visuals for your videos. GoPro helps you design content that is visually appealing to the viewers.
5. Quality of Video
Have you ever thought to have video resolutions up to 6K in a small camera? GoPro provides you the opportunity of witnessing history across the cameras with its stunning video resolution features. This is truly exceptional in the video-making industry.
Part 2: 8 Best GoPro for Vlogging in 2022
Once you are aware of what should be kept in mind for selecting a GoPro for vlogging, it is time to come up with some of the best-recommended models according to the use case of the vlogger. Let’s get started on this exceptional journey of finding the best GoPro for yourselves. Come right away!
1. GoPro Hero10 Black
Price: $499.99
The first and foremost model that may come into our mind is the GoPro Hero10 Black, which is, without any discussion, the most advanced model in GoPro cameras. Taking the features to the next level, GoPro Hero10 Black is available with a 5.3K resolution, which is the smoothest resolution in videos you can ask for. It provides faster processors than its predecessors, with features that make it the top-of-the-line choice.
You can find improved stabilization across Hero10; however, the price tag across the camera is as much as a mirrorless camera. Absolutely stunning, it is!

2. GoPro Hero9 Black
Price: $399.99
Another impressive model in the GoPro products is the Hero9 Black model, referred to as the previous iteration of the Hero10. Although it is not as remarkable as the Hero10, it takes up videos with 5K Ultra HD resolution, with a 1080p live streaming facility. Talking about the stabilization of this camera, it isn’t as proficient as the Hero10; however, it still performs better than the previous iterations.
A heavier camera’s multifunctional characteristics are a few major points that need to be considered for Hero9 Black. Do you wish to buy this?

3. GoPro Hero8 Black
Price: $349.98
GoPro cameras are known for their effective sizes and high-performance results. GoPro Hero8 Black is recognized among the most versatile GoPro for YouTubers, accompanied by the small size. Being the first GoPro camera that provides a microphone to its users, GoPro Hero8 changed the dynamics of video making with its effective features. Users can cover 4K Ultra HD video across the device with a 12MP resolution for photos.
The Media Mode offered across the device makes video enhancement possible across GoPro for vlogging, which is commendable.

4. GoPro Hero7 Silver
Price: $299.99
Are you confused about the GoPro that fits your needs? GoPro Hero7 Silver is the most budget-friendly vlogging camera that can be found across the market. GoPro Hero7 Silver can be your perfect companion in tough vlogs with a rugged outlook and waterproofing. It provides voice control, two-mic, slo-mo, time-lapse across a 4K Ultra HD resolution, which broadens the possibility for the users.
This GoPro for YouTubers is still among the people’s favorites, which makes it a consistent choice among newbies. Isn’t it great?

5. GoPro Max
Price: $549.98
Want a camera that captures 360-degree shots? GoPro Max is the camera that you should look for in the market. GoPro Max is a very impressive up-gradation across GoPro cameras, which came to offer more features to it than before. The two 180-degree cameras provide better stabilization, thus crossing cameras like Hero8 quite easily. The details are extremely proficient in this design with improved mic facilities and other characteristics.
If you wish to shift yourselves from a single-camera device, this GoPro for vlogging is the perfect choice you can come by.

6. GoPro Hero7 Black
Price: $319.99
GoPro Hero7 Black, though introduced in 2018, came out to be a quite advanced version of the previous GoPro cameras. This camera allows 4K video resolution shooting under 60fps, stabilizing for smoothing out shakes and vibrations. The video quality from a GoPro is different from the rest, which makes it basic equipment in vlogging.
This GoPro for YouTubers offered excessive controls to its user base, with commands that were able to neutralize and optimize video enhancement. What a great choice!

7. GoPro Fusion
Price: $279.99
This is a hugely different camera across the complete GoPro series. Fusion is known for many things, out of which the size comes out to be the main reason for its popularity. This iteration in GoPro cameras provides 5.2K video resolution quality under a pocket-sized model. Although it is quite durable compared to the other cameras in the market for vlogging, the price tag across this device is usually not much acceptable for users.
It is a bold choice to have Fusion as your GoPro for vlogging, which also allows adding audio across the 360-degree feature. This is sensational.

8. GoPro Hero7 White
Price: $274.49
GoPro Hero7 White is a perfect option to start vlogging. Designed for beginners, it provides Full HD video resolution with a touch screen for better functioning. Although the camera is quite downgraded in terms of the features it offers, it is basically offered for catering to user-friendliness.
It also offers video stabilization for introducing users to a certain environment in video editing. With an affordable price tag, this camera can be the perfect start as your GoPro for vlogging. Do you wish to get started?

Closing Words
Got to know about the best GoPro cameras? Are you ready to select your GoPro for vlogging? We hope that this article has featured the most optimal options. Go through this article to get the perfect start for your vlogging journey. However, if you wish to have a good experience with video editing, you should consider working on Wondershare Filmora .
The tool manages all GoPro videos to perfection. It is truly an exceptional platform to work with. Along with that, Filmora provides a list of impressive video editing functions which can be adopted for making the video look professional. That is why this platform is recommended across multiple stages. Surely the best editor you can use!
Wondershare Filmora
Get started easily with Filmora’s powerful performance, intuitive interface, and countless effects!
Try It Free Try It Free Try It Free Learn More >

Create a Brand Video to Make Your Business Shine
Brand Video Maker - Wondershare Filmora
Provide abundant video effects - A creative video editor
Powerful color correction and grading
Detailed tutorials provided by the official channel
Create a Brand Video to Make Your Business Shine
Did you know that 8 out of 10 people go ahead and purchase a product just by watching brand videos?
I’m sure you are looking for similar success when it comes to your brand video.
But you can’t just compel the audience by making any video!
- It has to be entertaining and inspirational.
- It has to be innovative.
- It needs to have something that grabs the audience’s attention.
And, with all this, it should also successfully share your brand’s core values.
So, how do you create such a video?
It’s not about simply whipping out a camera and pressing the record button. A lot of thought is involved in creating a brand video, but most importantly, you need a high-quality video editor to refine your video and make it more fun, entertaining, and innovative - A video editor like Wondershare Filmora.
And that’s what this article is about - How to use the various basic and advanced editing tools in Filmora to create a brand video that makes a difference!
But first, let’s have a look at…
Wondershare Filmora’s Brand Video
What’s so special about it, you ask?
For starters, it fits right into the criteria we mentioned above. It’s innovative, entertaining, vibrant, and fun and showcases all the features of Filmora 11.
Here, see for yourself…
From all the new effects to the AR sticker themes and other video editing features like speed ramping, masking, and green screen effect, the video successfully lets the audience know how creative they can get with Filmora.
But did you see that they didn’t put the features out there just like that! They actually used all the basic and advanced video editing features in the video to give us an idea of what it looks like when put in action.
And the video quality, the content, and the flow of the video speak for themselves.
I mean, I watched the video all the way to the end without getting bored for even a single second. And, being a video editor, I might as well get Filmora 11 after watching the highly compelling video!
Now, if you’re also wow-ed by the video and would like to create a similar one, here are some tips on making a successful brand video using Wondershare Filmora.
Tips to Make a Compelling Brand Video
Like I said earlier, making a video is not simply about getting out your camera and starting recording. Many aspects need to be considered for your video to make the desired impact.
Therefore, here are some tips that might come in handy when making your brand video:
1. Define Your Objective and Audience
The very first thing that you need to think about before starting work on your brand video is its objective and audience.

What are you trying to achieve from the video? Do you want to create brand awareness, or do you wish to promote a certain product?
Secondly, who’s your target audience? Is your video projected toward people who have no idea who you and your company are? Or are you addressing an existing customer base? Also, are the audience kids or adults? Because you certainly can’t make a video with cartoon characters for an audience who’s looking for something calm and relaxing, and vice versa.
Once you have your objective and audience sorted, it’s time to get busy!
2. Video Scripting
Based on what you’re trying to achieve from your brand video and the target audience, you can decide on the video’s script. This includes the content, the length, and the editing requirements.

Let’s take your video’s content, for instance:
- If you’re creating a video for an audience that doesn’t know you, you’ll have to start from the basics, explaining who you are, what you do, and the services you offer.
- If you’re trying to create a video that tells your brand’s story, you can either keep it inspirational or you could create fun content that will be remembered for years to come!
- If you’re creating something for the kids, you need to keep it short yet interesting, with many effects that help in grabbing their attention.
Once you have decided what to add to the video, how long it will be, and what its content will be like, you can finally record your video!
3. Video Recording
Now, for many people, recording simply means hitting the record button.
Yes, that might work for vlogs, but when it comes to making a brand video, you need to really put in effort when recording.

For instance, you should have all the video clips and images you want to include in the video at hand. And they should resonate with your brand voice and match with each other as well.
If we take Wondershare Filmora’s brand video as an example, you can see that the whole video has a vibrant and warm feel to it, which can be seen throughout. It’s not that one clip is darker and the other is lighter; the whole thing sort of blends into each other.
That’s what you should take care of when recording your video. Make sure the background, hues, and overall feel of the video clips and images match each other.
4. Using Your Brand Colors and Logo
Another thing that you should keep in mind when recording is to incorporate your brand colors in the video and throw in your logo. For instance, if your brand colors are red and green, make sure to use them in the text in the video. However, if you’re not using text, you can use the colors in the video frame by having a wall or something in the background of the same colors.

As for the logo, it can be placed anywhere in the video so that the audience learns to recognize it.
But why is using your brand colors and logo so important?
Because your brand colors and logo represent your brand and become its identity in the long run. For example, yellow and red are McDonald’s brand colors and its logo, the yellow ‘M’ in arch form, is recognizable even from a distance.
5. Video Editing
Now comes the most important part of making a brand video: The editing! The part where you refine your video and add final touches to it. If you’ve got a stellar video editing software like Wondershare Filmora, it can do wonders for your video.
Wondershare Filmora at a Glance

Wondershare Filmora has plenty of basic and advanced video editing features to add that wow factor to your video. It can turn a plain boring video into something fun, exciting, and watch-worthy.
For example, the motion tracking feature lets you add an object that follows a certain movement in the video. Then we have the AR stickers that help enhance emotions and add personality to your video. Also, the green screen feature lets you add amazing background to your video to give the desired effect.
Filmora also has many video effects, templates, speed ramping, masking, auto beat sync, voice recording, and other features that can really take your brand video to the next level.
I’m sure you now have the hang of how to make a brand video that makes your business pop. But, you still might be confused about how to make the most of these features using Wondershare Filmora.
Therefore, here are some helpful tips on using these features to make an effective brand video that creates brand awareness and drives sales!
Creative Ideas to Make Brand Videos Using Filmora
If you’re up for making a video just like the video we shared earlier, you’ll need to download Wondershare Filmora from the website. And, once you’re through with this guide, nothing can stop you from making a brand video that sells!
With that sorted, here are some valuable tips and ideas to help you along the way:
1. Level Up Your Motion Tracking
As we mentioned earlier, motion tracking means tracking the movement of an object in the video and then applying the same movement to a newly added object, like text, image, logo, or any clipart.
But that’s quite a common practice, right? I mean, every video editor out there is doing it!
However, there are some ways in which you can get creative with the motion tracking feature using Filmora.
Like…
Using Motion-Tracked Texts
While the text in a video looks pretty good itself, you can make it even more impressive by motion tracking it.
For example:
- Attach a piece of text to your introductory title. If there’s a logo or brand name in the introduction, you can add a tagline, a website address, or your Instagram or Twitter handle to it.
- If you want to create a context for the audience, add motion-tracked captions in your brand video. This means the captions move with the movement of the subject. It looks stylish, gives relevant information, and helps tell your brand’s story without any narration.
This Fitbit commercial would be an excellent example of motion-tracked captions:
- If your video has an introductory scene where the frame is moving from one side to the other, you can motion-track the credits so that they move along with the scene and disappear gradually instead of dedicating a single clip to the credits.
- Highlighting important aspects in a video, like places or names of objects with motion-tracked text, can make your video truly amazing and fun to watch. This would be quite essential if you’re making a video for the real estate or travel business.
Here’s an example:
Hence, when working with Filmora, you can do plenty with the motion tracking feature to make a truly amazing video.
2. Add a Fun Factor with AR Stickers
Now that you know how to use the motion tracking feature in Filmora, let me tell you a secret!
If you incorporate face-tracking AR stickers into your video, you can succeed in creating a brand video that will have the audience glued to the screen!
The purpose of adding AR stickers to your videos is to emphasize reactions, portray enhanced emotions, and add an element of fun. This feature works best if you’re creating a brand video projected toward kids.

So, how can you make the most of these AR stickers?
Create Multiple Characters
If you don’t have people to play different characters, don’t fret! With the AR sticker effect, you can create multiple characters for your video.
For example:
If your video has 3 animal characters, you can use AR stickers depicting a panda, cat, and bunny to show the different characters. Similarly, you can add the sticker with glasses to show a nerdy character. Or, if you’re really getting into the story-telling mode, you can use the pirate sticker to show a pirate.
Magnify Emotions
Sometimes it gets challenging to portray a certain emotion in your video. This is where AR stickers come to the rescue!
If you want to show someone in love, you can use the heart-eyes effect. Or, if you want to show that someone is being good, you can use the angel sticker to put a halo on their head.
There are many options! You just have to use your creative cells and conjure up something that’s unique and stands out from the rest.
3. Ace Your Shoot with the Green Screen Effect
A green-screen effect is quite important when it comes to making an exceptional brand video. It has been used in almost all blockbuster movies, and if you’re looking to make a video of a similar level, we’ve got some tried and tested tips to use the green screen effect to its fullest!
Make Sure the Lighting is Even
When it comes to a green screen, the lighting plays an important part. Make sure the green screen is one shade of green, and the lighting on the screen is even. If parts of the green screen are darker than the rest, the chroma key effect won’t be able to distinguish the different shades.
Contrasting Colors
Make sure the subject in the video isn’t wearing any green clothing, or there aren’t many green objects around, as they might disappear when you apply the green screen effect.
Prevent Motion Blur with High Shutter Speed
When shooting with a green screen background, make sure you keep the shutter speed high to avoid motion blur. Ideally, it should be 2x your frame rate for optimum results. But, at the same time, it shouldn’t be too high, as it can lead to a change in video exposure.
If you keep these tips in mind when shooting a video, you can easily use the chroma key effect in Wondershare Filmora to add your desired background and create an outstanding video.
4. Be Innovative with Effects
A video without effects is as bland as water! So, make your video innovative with the impressive variety of effects available in Wondershare Filmora.
But you can’t just add effects to your video like that! You need to understand when and where to use a certain effect properly.
For example:
Tell Your Story With Split Screen Effect
If you’re telling your brand story from the perspective of different individuals, using the split-screen effect is recommended. You can also use this effect to showcase how one thing is related to another in a cause-and-effect way.
Take this Lexus commercial, for example:
It shows the view from inside the car and from a viewer’s perspective.
Emphasize with Pan and Zoom Effect
As the topic of concern of this article is brand videos, the pan and zoom is an ideal effect for it.
You can easily emphasize its importance and give off an emotional storytelling vibe by zooming in on a person’s face or any other object in the frame. You can also use pan and zoom to add a transition to your video. Here’s an example:
Add Thrill with Transitions
To move from one shot to another, it’s important to add a transition effect in between. You can add different transition styles to link the shots with one another, for instance, the match cut transition to match scenes that are not otherwise linked visually. Or the whip pan transition, which involves a quick rotation of the camera’s axis to give the impression that the scene was shot in one take, although it is two separate clips.
Take Wondershare Filmora’s brand video, for example. You can see how seamlessly it moves from one effect to another. It adds value and makes the video fun to watch.
With the variety of transitions in Filmora’s library, you can add all the effects discussed above to your video for stunning results.
You’ve added motion tracking, used AR stickers, created a mystical background with the green screen effect, and gone innovative with effects. Now, it’s time to wrap up this article with…
5. Energize Your Videos with Speed Ramping
Did you know that speed ramping can actually improve your videos tenfold? Speeding up and slowing down the footage at certain points can have a significant impact. For example, the bullet dodge scene in “Matrix” wouldn’t have been so famous if it wasn’t for the slo-mo effect!

You can’t just randomly add speed ramps to your video. There has to be a purpose behind it! Do you want to emphasize something? Do you want to show a transition? Regardless, you need to time your speed ramping properly.
And here are a few tips for it!
Use Slo-Mo For Action Sequences
If your video has an amazing action scene in it, slow down the speed at that point to emphasize the action and movement. For example, a karate kick in slow motion very clearly shows us how the move is actually performed.
Don’t Use Slo-Mo For Too Long
Another tip is to use the slow-mo only for a few seconds to emphasize something. If you prolong it, it won’t have the desired impact and might even cause the audience to lose focus.
Speed Up Footage for Long Processes
If your video shows a long process, like a time-lapse, it is the perfect time to speed up the footage. Not only do long shots lose the viewer’s attention, but they can also get boring too. A sped up footage on the other hand makes your video aesthetically pleasing and entertaining.
Add Music
Using music in videos is quite a common practice; however, it becomes quite exciting if you speed ramp your video according to the music. For example, time the slo-mo effect with the more silent or riverbed parts of the music, and speed it up when the crescendo comes.
You can do this easily with the auto beat-sync feature in Filmora that matches the music with the footage.

How’s that for a thrilling video?
Speed Ramp for Transitions
Here’s a bonus tip! Use speed ramping at the end of one clip and the beginning of the next one to create a seamless flow between the two. It’ll also give a transition effect and make your brand video look professional.
So you see, you have ample options to add a touch of creativity to your brand videos. The key is to use a good video editor and the right video editing tools.
Wrapping Up
Shooting a brand video is easy, and it’s even easier to edit it. All you need is to let your creativity flow!
With Wondershare Filmora 11’s new and advanced editing features, making watch-worthy brand videos that give out the desired message and compel the audience to take some action has never been easier!
And, with the useful video editing tips that we have shared, you are just a click away from taking your business to new heights!
So, if you also want to create a video successfully, just like Filmora’s brand video, follow our tips, use the tricks, and edit away!
Create a Brand Video to Make Your Business Shine
Did you know that 8 out of 10 people go ahead and purchase a product just by watching brand videos?
I’m sure you are looking for similar success when it comes to your brand video.
But you can’t just compel the audience by making any video!
- It has to be entertaining and inspirational.
- It has to be innovative.
- It needs to have something that grabs the audience’s attention.
And, with all this, it should also successfully share your brand’s core values.
So, how do you create such a video?
It’s not about simply whipping out a camera and pressing the record button. A lot of thought is involved in creating a brand video, but most importantly, you need a high-quality video editor to refine your video and make it more fun, entertaining, and innovative - A video editor like Wondershare Filmora.
And that’s what this article is about - How to use the various basic and advanced editing tools in Filmora to create a brand video that makes a difference!
But first, let’s have a look at…
Wondershare Filmora’s Brand Video
What’s so special about it, you ask?
For starters, it fits right into the criteria we mentioned above. It’s innovative, entertaining, vibrant, and fun and showcases all the features of Filmora 11.
Here, see for yourself…
From all the new effects to the AR sticker themes and other video editing features like speed ramping, masking, and green screen effect, the video successfully lets the audience know how creative they can get with Filmora.
But did you see that they didn’t put the features out there just like that! They actually used all the basic and advanced video editing features in the video to give us an idea of what it looks like when put in action.
And the video quality, the content, and the flow of the video speak for themselves.
I mean, I watched the video all the way to the end without getting bored for even a single second. And, being a video editor, I might as well get Filmora 11 after watching the highly compelling video!
Now, if you’re also wow-ed by the video and would like to create a similar one, here are some tips on making a successful brand video using Wondershare Filmora.
Tips to Make a Compelling Brand Video
Like I said earlier, making a video is not simply about getting out your camera and starting recording. Many aspects need to be considered for your video to make the desired impact.
Therefore, here are some tips that might come in handy when making your brand video:
1. Define Your Objective and Audience
The very first thing that you need to think about before starting work on your brand video is its objective and audience.

What are you trying to achieve from the video? Do you want to create brand awareness, or do you wish to promote a certain product?
Secondly, who’s your target audience? Is your video projected toward people who have no idea who you and your company are? Or are you addressing an existing customer base? Also, are the audience kids or adults? Because you certainly can’t make a video with cartoon characters for an audience who’s looking for something calm and relaxing, and vice versa.
Once you have your objective and audience sorted, it’s time to get busy!
2. Video Scripting
Based on what you’re trying to achieve from your brand video and the target audience, you can decide on the video’s script. This includes the content, the length, and the editing requirements.

Let’s take your video’s content, for instance:
- If you’re creating a video for an audience that doesn’t know you, you’ll have to start from the basics, explaining who you are, what you do, and the services you offer.
- If you’re trying to create a video that tells your brand’s story, you can either keep it inspirational or you could create fun content that will be remembered for years to come!
- If you’re creating something for the kids, you need to keep it short yet interesting, with many effects that help in grabbing their attention.
Once you have decided what to add to the video, how long it will be, and what its content will be like, you can finally record your video!
3. Video Recording
Now, for many people, recording simply means hitting the record button.
Yes, that might work for vlogs, but when it comes to making a brand video, you need to really put in effort when recording.

For instance, you should have all the video clips and images you want to include in the video at hand. And they should resonate with your brand voice and match with each other as well.
If we take Wondershare Filmora’s brand video as an example, you can see that the whole video has a vibrant and warm feel to it, which can be seen throughout. It’s not that one clip is darker and the other is lighter; the whole thing sort of blends into each other.
That’s what you should take care of when recording your video. Make sure the background, hues, and overall feel of the video clips and images match each other.
4. Using Your Brand Colors and Logo
Another thing that you should keep in mind when recording is to incorporate your brand colors in the video and throw in your logo. For instance, if your brand colors are red and green, make sure to use them in the text in the video. However, if you’re not using text, you can use the colors in the video frame by having a wall or something in the background of the same colors.

As for the logo, it can be placed anywhere in the video so that the audience learns to recognize it.
But why is using your brand colors and logo so important?
Because your brand colors and logo represent your brand and become its identity in the long run. For example, yellow and red are McDonald’s brand colors and its logo, the yellow ‘M’ in arch form, is recognizable even from a distance.
5. Video Editing
Now comes the most important part of making a brand video: The editing! The part where you refine your video and add final touches to it. If you’ve got a stellar video editing software like Wondershare Filmora, it can do wonders for your video.
Wondershare Filmora at a Glance

Wondershare Filmora has plenty of basic and advanced video editing features to add that wow factor to your video. It can turn a plain boring video into something fun, exciting, and watch-worthy.
For example, the motion tracking feature lets you add an object that follows a certain movement in the video. Then we have the AR stickers that help enhance emotions and add personality to your video. Also, the green screen feature lets you add amazing background to your video to give the desired effect.
Filmora also has many video effects, templates, speed ramping, masking, auto beat sync, voice recording, and other features that can really take your brand video to the next level.
I’m sure you now have the hang of how to make a brand video that makes your business pop. But, you still might be confused about how to make the most of these features using Wondershare Filmora.
Therefore, here are some helpful tips on using these features to make an effective brand video that creates brand awareness and drives sales!
Creative Ideas to Make Brand Videos Using Filmora
If you’re up for making a video just like the video we shared earlier, you’ll need to download Wondershare Filmora from the website. And, once you’re through with this guide, nothing can stop you from making a brand video that sells!
With that sorted, here are some valuable tips and ideas to help you along the way:
1. Level Up Your Motion Tracking
As we mentioned earlier, motion tracking means tracking the movement of an object in the video and then applying the same movement to a newly added object, like text, image, logo, or any clipart.
But that’s quite a common practice, right? I mean, every video editor out there is doing it!
However, there are some ways in which you can get creative with the motion tracking feature using Filmora.
Like…
Using Motion-Tracked Texts
While the text in a video looks pretty good itself, you can make it even more impressive by motion tracking it.
For example:
- Attach a piece of text to your introductory title. If there’s a logo or brand name in the introduction, you can add a tagline, a website address, or your Instagram or Twitter handle to it.
- If you want to create a context for the audience, add motion-tracked captions in your brand video. This means the captions move with the movement of the subject. It looks stylish, gives relevant information, and helps tell your brand’s story without any narration.
This Fitbit commercial would be an excellent example of motion-tracked captions:
- If your video has an introductory scene where the frame is moving from one side to the other, you can motion-track the credits so that they move along with the scene and disappear gradually instead of dedicating a single clip to the credits.
- Highlighting important aspects in a video, like places or names of objects with motion-tracked text, can make your video truly amazing and fun to watch. This would be quite essential if you’re making a video for the real estate or travel business.
Here’s an example:
Hence, when working with Filmora, you can do plenty with the motion tracking feature to make a truly amazing video.
2. Add a Fun Factor with AR Stickers
Now that you know how to use the motion tracking feature in Filmora, let me tell you a secret!
If you incorporate face-tracking AR stickers into your video, you can succeed in creating a brand video that will have the audience glued to the screen!
The purpose of adding AR stickers to your videos is to emphasize reactions, portray enhanced emotions, and add an element of fun. This feature works best if you’re creating a brand video projected toward kids.

So, how can you make the most of these AR stickers?
Create Multiple Characters
If you don’t have people to play different characters, don’t fret! With the AR sticker effect, you can create multiple characters for your video.
For example:
If your video has 3 animal characters, you can use AR stickers depicting a panda, cat, and bunny to show the different characters. Similarly, you can add the sticker with glasses to show a nerdy character. Or, if you’re really getting into the story-telling mode, you can use the pirate sticker to show a pirate.
Magnify Emotions
Sometimes it gets challenging to portray a certain emotion in your video. This is where AR stickers come to the rescue!
If you want to show someone in love, you can use the heart-eyes effect. Or, if you want to show that someone is being good, you can use the angel sticker to put a halo on their head.
There are many options! You just have to use your creative cells and conjure up something that’s unique and stands out from the rest.
3. Ace Your Shoot with the Green Screen Effect
A green-screen effect is quite important when it comes to making an exceptional brand video. It has been used in almost all blockbuster movies, and if you’re looking to make a video of a similar level, we’ve got some tried and tested tips to use the green screen effect to its fullest!
Make Sure the Lighting is Even
When it comes to a green screen, the lighting plays an important part. Make sure the green screen is one shade of green, and the lighting on the screen is even. If parts of the green screen are darker than the rest, the chroma key effect won’t be able to distinguish the different shades.
Contrasting Colors
Make sure the subject in the video isn’t wearing any green clothing, or there aren’t many green objects around, as they might disappear when you apply the green screen effect.
Prevent Motion Blur with High Shutter Speed
When shooting with a green screen background, make sure you keep the shutter speed high to avoid motion blur. Ideally, it should be 2x your frame rate for optimum results. But, at the same time, it shouldn’t be too high, as it can lead to a change in video exposure.
If you keep these tips in mind when shooting a video, you can easily use the chroma key effect in Wondershare Filmora to add your desired background and create an outstanding video.
4. Be Innovative with Effects
A video without effects is as bland as water! So, make your video innovative with the impressive variety of effects available in Wondershare Filmora.
But you can’t just add effects to your video like that! You need to understand when and where to use a certain effect properly.
For example:
Tell Your Story With Split Screen Effect
If you’re telling your brand story from the perspective of different individuals, using the split-screen effect is recommended. You can also use this effect to showcase how one thing is related to another in a cause-and-effect way.
Take this Lexus commercial, for example:
It shows the view from inside the car and from a viewer’s perspective.
Emphasize with Pan and Zoom Effect
As the topic of concern of this article is brand videos, the pan and zoom is an ideal effect for it.
You can easily emphasize its importance and give off an emotional storytelling vibe by zooming in on a person’s face or any other object in the frame. You can also use pan and zoom to add a transition to your video. Here’s an example:
Add Thrill with Transitions
To move from one shot to another, it’s important to add a transition effect in between. You can add different transition styles to link the shots with one another, for instance, the match cut transition to match scenes that are not otherwise linked visually. Or the whip pan transition, which involves a quick rotation of the camera’s axis to give the impression that the scene was shot in one take, although it is two separate clips.
Take Wondershare Filmora’s brand video, for example. You can see how seamlessly it moves from one effect to another. It adds value and makes the video fun to watch.
With the variety of transitions in Filmora’s library, you can add all the effects discussed above to your video for stunning results.
You’ve added motion tracking, used AR stickers, created a mystical background with the green screen effect, and gone innovative with effects. Now, it’s time to wrap up this article with…
5. Energize Your Videos with Speed Ramping
Did you know that speed ramping can actually improve your videos tenfold? Speeding up and slowing down the footage at certain points can have a significant impact. For example, the bullet dodge scene in “Matrix” wouldn’t have been so famous if it wasn’t for the slo-mo effect!

You can’t just randomly add speed ramps to your video. There has to be a purpose behind it! Do you want to emphasize something? Do you want to show a transition? Regardless, you need to time your speed ramping properly.
And here are a few tips for it!
Use Slo-Mo For Action Sequences
If your video has an amazing action scene in it, slow down the speed at that point to emphasize the action and movement. For example, a karate kick in slow motion very clearly shows us how the move is actually performed.
Don’t Use Slo-Mo For Too Long
Another tip is to use the slow-mo only for a few seconds to emphasize something. If you prolong it, it won’t have the desired impact and might even cause the audience to lose focus.
Speed Up Footage for Long Processes
If your video shows a long process, like a time-lapse, it is the perfect time to speed up the footage. Not only do long shots lose the viewer’s attention, but they can also get boring too. A sped up footage on the other hand makes your video aesthetically pleasing and entertaining.
Add Music
Using music in videos is quite a common practice; however, it becomes quite exciting if you speed ramp your video according to the music. For example, time the slo-mo effect with the more silent or riverbed parts of the music, and speed it up when the crescendo comes.
You can do this easily with the auto beat-sync feature in Filmora that matches the music with the footage.

How’s that for a thrilling video?
Speed Ramp for Transitions
Here’s a bonus tip! Use speed ramping at the end of one clip and the beginning of the next one to create a seamless flow between the two. It’ll also give a transition effect and make your brand video look professional.
So you see, you have ample options to add a touch of creativity to your brand videos. The key is to use a good video editor and the right video editing tools.
Wrapping Up
Shooting a brand video is easy, and it’s even easier to edit it. All you need is to let your creativity flow!
With Wondershare Filmora 11’s new and advanced editing features, making watch-worthy brand videos that give out the desired message and compel the audience to take some action has never been easier!
And, with the useful video editing tips that we have shared, you are just a click away from taking your business to new heights!
So, if you also want to create a video successfully, just like Filmora’s brand video, follow our tips, use the tricks, and edit away!
Create a Brand Video to Make Your Business Shine
Did you know that 8 out of 10 people go ahead and purchase a product just by watching brand videos?
I’m sure you are looking for similar success when it comes to your brand video.
But you can’t just compel the audience by making any video!
- It has to be entertaining and inspirational.
- It has to be innovative.
- It needs to have something that grabs the audience’s attention.
And, with all this, it should also successfully share your brand’s core values.
So, how do you create such a video?
It’s not about simply whipping out a camera and pressing the record button. A lot of thought is involved in creating a brand video, but most importantly, you need a high-quality video editor to refine your video and make it more fun, entertaining, and innovative - A video editor like Wondershare Filmora.
And that’s what this article is about - How to use the various basic and advanced editing tools in Filmora to create a brand video that makes a difference!
But first, let’s have a look at…
Wondershare Filmora’s Brand Video
What’s so special about it, you ask?
For starters, it fits right into the criteria we mentioned above. It’s innovative, entertaining, vibrant, and fun and showcases all the features of Filmora 11.
Here, see for yourself…
From all the new effects to the AR sticker themes and other video editing features like speed ramping, masking, and green screen effect, the video successfully lets the audience know how creative they can get with Filmora.
But did you see that they didn’t put the features out there just like that! They actually used all the basic and advanced video editing features in the video to give us an idea of what it looks like when put in action.
And the video quality, the content, and the flow of the video speak for themselves.
I mean, I watched the video all the way to the end without getting bored for even a single second. And, being a video editor, I might as well get Filmora 11 after watching the highly compelling video!
Now, if you’re also wow-ed by the video and would like to create a similar one, here are some tips on making a successful brand video using Wondershare Filmora.
Tips to Make a Compelling Brand Video
Like I said earlier, making a video is not simply about getting out your camera and starting recording. Many aspects need to be considered for your video to make the desired impact.
Therefore, here are some tips that might come in handy when making your brand video:
1. Define Your Objective and Audience
The very first thing that you need to think about before starting work on your brand video is its objective and audience.

What are you trying to achieve from the video? Do you want to create brand awareness, or do you wish to promote a certain product?
Secondly, who’s your target audience? Is your video projected toward people who have no idea who you and your company are? Or are you addressing an existing customer base? Also, are the audience kids or adults? Because you certainly can’t make a video with cartoon characters for an audience who’s looking for something calm and relaxing, and vice versa.
Once you have your objective and audience sorted, it’s time to get busy!
2. Video Scripting
Based on what you’re trying to achieve from your brand video and the target audience, you can decide on the video’s script. This includes the content, the length, and the editing requirements.

Let’s take your video’s content, for instance:
- If you’re creating a video for an audience that doesn’t know you, you’ll have to start from the basics, explaining who you are, what you do, and the services you offer.
- If you’re trying to create a video that tells your brand’s story, you can either keep it inspirational or you could create fun content that will be remembered for years to come!
- If you’re creating something for the kids, you need to keep it short yet interesting, with many effects that help in grabbing their attention.
Once you have decided what to add to the video, how long it will be, and what its content will be like, you can finally record your video!
3. Video Recording
Now, for many people, recording simply means hitting the record button.
Yes, that might work for vlogs, but when it comes to making a brand video, you need to really put in effort when recording.

For instance, you should have all the video clips and images you want to include in the video at hand. And they should resonate with your brand voice and match with each other as well.
If we take Wondershare Filmora’s brand video as an example, you can see that the whole video has a vibrant and warm feel to it, which can be seen throughout. It’s not that one clip is darker and the other is lighter; the whole thing sort of blends into each other.
That’s what you should take care of when recording your video. Make sure the background, hues, and overall feel of the video clips and images match each other.
4. Using Your Brand Colors and Logo
Another thing that you should keep in mind when recording is to incorporate your brand colors in the video and throw in your logo. For instance, if your brand colors are red and green, make sure to use them in the text in the video. However, if you’re not using text, you can use the colors in the video frame by having a wall or something in the background of the same colors.

As for the logo, it can be placed anywhere in the video so that the audience learns to recognize it.
But why is using your brand colors and logo so important?
Because your brand colors and logo represent your brand and become its identity in the long run. For example, yellow and red are McDonald’s brand colors and its logo, the yellow ‘M’ in arch form, is recognizable even from a distance.
5. Video Editing
Now comes the most important part of making a brand video: The editing! The part where you refine your video and add final touches to it. If you’ve got a stellar video editing software like Wondershare Filmora, it can do wonders for your video.
Wondershare Filmora at a Glance

Wondershare Filmora has plenty of basic and advanced video editing features to add that wow factor to your video. It can turn a plain boring video into something fun, exciting, and watch-worthy.
For example, the motion tracking feature lets you add an object that follows a certain movement in the video. Then we have the AR stickers that help enhance emotions and add personality to your video. Also, the green screen feature lets you add amazing background to your video to give the desired effect.
Filmora also has many video effects, templates, speed ramping, masking, auto beat sync, voice recording, and other features that can really take your brand video to the next level.
I’m sure you now have the hang of how to make a brand video that makes your business pop. But, you still might be confused about how to make the most of these features using Wondershare Filmora.
Therefore, here are some helpful tips on using these features to make an effective brand video that creates brand awareness and drives sales!
Creative Ideas to Make Brand Videos Using Filmora
If you’re up for making a video just like the video we shared earlier, you’ll need to download Wondershare Filmora from the website. And, once you’re through with this guide, nothing can stop you from making a brand video that sells!
With that sorted, here are some valuable tips and ideas to help you along the way:
1. Level Up Your Motion Tracking
As we mentioned earlier, motion tracking means tracking the movement of an object in the video and then applying the same movement to a newly added object, like text, image, logo, or any clipart.
But that’s quite a common practice, right? I mean, every video editor out there is doing it!
However, there are some ways in which you can get creative with the motion tracking feature using Filmora.
Like…
Using Motion-Tracked Texts
While the text in a video looks pretty good itself, you can make it even more impressive by motion tracking it.
For example:
- Attach a piece of text to your introductory title. If there’s a logo or brand name in the introduction, you can add a tagline, a website address, or your Instagram or Twitter handle to it.
- If you want to create a context for the audience, add motion-tracked captions in your brand video. This means the captions move with the movement of the subject. It looks stylish, gives relevant information, and helps tell your brand’s story without any narration.
This Fitbit commercial would be an excellent example of motion-tracked captions:
- If your video has an introductory scene where the frame is moving from one side to the other, you can motion-track the credits so that they move along with the scene and disappear gradually instead of dedicating a single clip to the credits.
- Highlighting important aspects in a video, like places or names of objects with motion-tracked text, can make your video truly amazing and fun to watch. This would be quite essential if you’re making a video for the real estate or travel business.
Here’s an example:
Hence, when working with Filmora, you can do plenty with the motion tracking feature to make a truly amazing video.
2. Add a Fun Factor with AR Stickers
Now that you know how to use the motion tracking feature in Filmora, let me tell you a secret!
If you incorporate face-tracking AR stickers into your video, you can succeed in creating a brand video that will have the audience glued to the screen!
The purpose of adding AR stickers to your videos is to emphasize reactions, portray enhanced emotions, and add an element of fun. This feature works best if you’re creating a brand video projected toward kids.

So, how can you make the most of these AR stickers?
Create Multiple Characters
If you don’t have people to play different characters, don’t fret! With the AR sticker effect, you can create multiple characters for your video.
For example:
If your video has 3 animal characters, you can use AR stickers depicting a panda, cat, and bunny to show the different characters. Similarly, you can add the sticker with glasses to show a nerdy character. Or, if you’re really getting into the story-telling mode, you can use the pirate sticker to show a pirate.
Magnify Emotions
Sometimes it gets challenging to portray a certain emotion in your video. This is where AR stickers come to the rescue!
If you want to show someone in love, you can use the heart-eyes effect. Or, if you want to show that someone is being good, you can use the angel sticker to put a halo on their head.
There are many options! You just have to use your creative cells and conjure up something that’s unique and stands out from the rest.
3. Ace Your Shoot with the Green Screen Effect
A green-screen effect is quite important when it comes to making an exceptional brand video. It has been used in almost all blockbuster movies, and if you’re looking to make a video of a similar level, we’ve got some tried and tested tips to use the green screen effect to its fullest!
Make Sure the Lighting is Even
When it comes to a green screen, the lighting plays an important part. Make sure the green screen is one shade of green, and the lighting on the screen is even. If parts of the green screen are darker than the rest, the chroma key effect won’t be able to distinguish the different shades.
Contrasting Colors
Make sure the subject in the video isn’t wearing any green clothing, or there aren’t many green objects around, as they might disappear when you apply the green screen effect.
Prevent Motion Blur with High Shutter Speed
When shooting with a green screen background, make sure you keep the shutter speed high to avoid motion blur. Ideally, it should be 2x your frame rate for optimum results. But, at the same time, it shouldn’t be too high, as it can lead to a change in video exposure.
If you keep these tips in mind when shooting a video, you can easily use the chroma key effect in Wondershare Filmora to add your desired background and create an outstanding video.
4. Be Innovative with Effects
A video without effects is as bland as water! So, make your video innovative with the impressive variety of effects available in Wondershare Filmora.
But you can’t just add effects to your video like that! You need to understand when and where to use a certain effect properly.
For example:
Tell Your Story With Split Screen Effect
If you’re telling your brand story from the perspective of different individuals, using the split-screen effect is recommended. You can also use this effect to showcase how one thing is related to another in a cause-and-effect way.
Take this Lexus commercial, for example:
It shows the view from inside the car and from a viewer’s perspective.
Emphasize with Pan and Zoom Effect
As the topic of concern of this article is brand videos, the pan and zoom is an ideal effect for it.
You can easily emphasize its importance and give off an emotional storytelling vibe by zooming in on a person’s face or any other object in the frame. You can also use pan and zoom to add a transition to your video. Here’s an example:
Add Thrill with Transitions
To move from one shot to another, it’s important to add a transition effect in between. You can add different transition styles to link the shots with one another, for instance, the match cut transition to match scenes that are not otherwise linked visually. Or the whip pan transition, which involves a quick rotation of the camera’s axis to give the impression that the scene was shot in one take, although it is two separate clips.
Take Wondershare Filmora’s brand video, for example. You can see how seamlessly it moves from one effect to another. It adds value and makes the video fun to watch.
With the variety of transitions in Filmora’s library, you can add all the effects discussed above to your video for stunning results.
You’ve added motion tracking, used AR stickers, created a mystical background with the green screen effect, and gone innovative with effects. Now, it’s time to wrap up this article with…
5. Energize Your Videos with Speed Ramping
Did you know that speed ramping can actually improve your videos tenfold? Speeding up and slowing down the footage at certain points can have a significant impact. For example, the bullet dodge scene in “Matrix” wouldn’t have been so famous if it wasn’t for the slo-mo effect!

You can’t just randomly add speed ramps to your video. There has to be a purpose behind it! Do you want to emphasize something? Do you want to show a transition? Regardless, you need to time your speed ramping properly.
And here are a few tips for it!
Use Slo-Mo For Action Sequences
If your video has an amazing action scene in it, slow down the speed at that point to emphasize the action and movement. For example, a karate kick in slow motion very clearly shows us how the move is actually performed.
Don’t Use Slo-Mo For Too Long
Another tip is to use the slow-mo only for a few seconds to emphasize something. If you prolong it, it won’t have the desired impact and might even cause the audience to lose focus.
Speed Up Footage for Long Processes
If your video shows a long process, like a time-lapse, it is the perfect time to speed up the footage. Not only do long shots lose the viewer’s attention, but they can also get boring too. A sped up footage on the other hand makes your video aesthetically pleasing and entertaining.
Add Music
Using music in videos is quite a common practice; however, it becomes quite exciting if you speed ramp your video according to the music. For example, time the slo-mo effect with the more silent or riverbed parts of the music, and speed it up when the crescendo comes.
You can do this easily with the auto beat-sync feature in Filmora that matches the music with the footage.

How’s that for a thrilling video?
Speed Ramp for Transitions
Here’s a bonus tip! Use speed ramping at the end of one clip and the beginning of the next one to create a seamless flow between the two. It’ll also give a transition effect and make your brand video look professional.
So you see, you have ample options to add a touch of creativity to your brand videos. The key is to use a good video editor and the right video editing tools.
Wrapping Up
Shooting a brand video is easy, and it’s even easier to edit it. All you need is to let your creativity flow!
With Wondershare Filmora 11’s new and advanced editing features, making watch-worthy brand videos that give out the desired message and compel the audience to take some action has never been easier!
And, with the useful video editing tips that we have shared, you are just a click away from taking your business to new heights!
So, if you also want to create a video successfully, just like Filmora’s brand video, follow our tips, use the tricks, and edit away!
Create a Brand Video to Make Your Business Shine
Did you know that 8 out of 10 people go ahead and purchase a product just by watching brand videos?
I’m sure you are looking for similar success when it comes to your brand video.
But you can’t just compel the audience by making any video!
- It has to be entertaining and inspirational.
- It has to be innovative.
- It needs to have something that grabs the audience’s attention.
And, with all this, it should also successfully share your brand’s core values.
So, how do you create such a video?
It’s not about simply whipping out a camera and pressing the record button. A lot of thought is involved in creating a brand video, but most importantly, you need a high-quality video editor to refine your video and make it more fun, entertaining, and innovative - A video editor like Wondershare Filmora.
And that’s what this article is about - How to use the various basic and advanced editing tools in Filmora to create a brand video that makes a difference!
But first, let’s have a look at…
Wondershare Filmora’s Brand Video
What’s so special about it, you ask?
For starters, it fits right into the criteria we mentioned above. It’s innovative, entertaining, vibrant, and fun and showcases all the features of Filmora 11.
Here, see for yourself…
From all the new effects to the AR sticker themes and other video editing features like speed ramping, masking, and green screen effect, the video successfully lets the audience know how creative they can get with Filmora.
But did you see that they didn’t put the features out there just like that! They actually used all the basic and advanced video editing features in the video to give us an idea of what it looks like when put in action.
And the video quality, the content, and the flow of the video speak for themselves.
I mean, I watched the video all the way to the end without getting bored for even a single second. And, being a video editor, I might as well get Filmora 11 after watching the highly compelling video!
Now, if you’re also wow-ed by the video and would like to create a similar one, here are some tips on making a successful brand video using Wondershare Filmora.
Tips to Make a Compelling Brand Video
Like I said earlier, making a video is not simply about getting out your camera and starting recording. Many aspects need to be considered for your video to make the desired impact.
Therefore, here are some tips that might come in handy when making your brand video:
1. Define Your Objective and Audience
The very first thing that you need to think about before starting work on your brand video is its objective and audience.

What are you trying to achieve from the video? Do you want to create brand awareness, or do you wish to promote a certain product?
Secondly, who’s your target audience? Is your video projected toward people who have no idea who you and your company are? Or are you addressing an existing customer base? Also, are the audience kids or adults? Because you certainly can’t make a video with cartoon characters for an audience who’s looking for something calm and relaxing, and vice versa.
Once you have your objective and audience sorted, it’s time to get busy!
2. Video Scripting
Based on what you’re trying to achieve from your brand video and the target audience, you can decide on the video’s script. This includes the content, the length, and the editing requirements.

Let’s take your video’s content, for instance:
- If you’re creating a video for an audience that doesn’t know you, you’ll have to start from the basics, explaining who you are, what you do, and the services you offer.
- If you’re trying to create a video that tells your brand’s story, you can either keep it inspirational or you could create fun content that will be remembered for years to come!
- If you’re creating something for the kids, you need to keep it short yet interesting, with many effects that help in grabbing their attention.
Once you have decided what to add to the video, how long it will be, and what its content will be like, you can finally record your video!
3. Video Recording
Now, for many people, recording simply means hitting the record button.
Yes, that might work for vlogs, but when it comes to making a brand video, you need to really put in effort when recording.

For instance, you should have all the video clips and images you want to include in the video at hand. And they should resonate with your brand voice and match with each other as well.
If we take Wondershare Filmora’s brand video as an example, you can see that the whole video has a vibrant and warm feel to it, which can be seen throughout. It’s not that one clip is darker and the other is lighter; the whole thing sort of blends into each other.
That’s what you should take care of when recording your video. Make sure the background, hues, and overall feel of the video clips and images match each other.
4. Using Your Brand Colors and Logo
Another thing that you should keep in mind when recording is to incorporate your brand colors in the video and throw in your logo. For instance, if your brand colors are red and green, make sure to use them in the text in the video. However, if you’re not using text, you can use the colors in the video frame by having a wall or something in the background of the same colors.

As for the logo, it can be placed anywhere in the video so that the audience learns to recognize it.
But why is using your brand colors and logo so important?
Because your brand colors and logo represent your brand and become its identity in the long run. For example, yellow and red are McDonald’s brand colors and its logo, the yellow ‘M’ in arch form, is recognizable even from a distance.
5. Video Editing
Now comes the most important part of making a brand video: The editing! The part where you refine your video and add final touches to it. If you’ve got a stellar video editing software like Wondershare Filmora, it can do wonders for your video.
Wondershare Filmora at a Glance

Wondershare Filmora has plenty of basic and advanced video editing features to add that wow factor to your video. It can turn a plain boring video into something fun, exciting, and watch-worthy.
For example, the motion tracking feature lets you add an object that follows a certain movement in the video. Then we have the AR stickers that help enhance emotions and add personality to your video. Also, the green screen feature lets you add amazing background to your video to give the desired effect.
Filmora also has many video effects, templates, speed ramping, masking, auto beat sync, voice recording, and other features that can really take your brand video to the next level.
I’m sure you now have the hang of how to make a brand video that makes your business pop. But, you still might be confused about how to make the most of these features using Wondershare Filmora.
Therefore, here are some helpful tips on using these features to make an effective brand video that creates brand awareness and drives sales!
Creative Ideas to Make Brand Videos Using Filmora
If you’re up for making a video just like the video we shared earlier, you’ll need to download Wondershare Filmora from the website. And, once you’re through with this guide, nothing can stop you from making a brand video that sells!
With that sorted, here are some valuable tips and ideas to help you along the way:
1. Level Up Your Motion Tracking
As we mentioned earlier, motion tracking means tracking the movement of an object in the video and then applying the same movement to a newly added object, like text, image, logo, or any clipart.
But that’s quite a common practice, right? I mean, every video editor out there is doing it!
However, there are some ways in which you can get creative with the motion tracking feature using Filmora.
Like…
Using Motion-Tracked Texts
While the text in a video looks pretty good itself, you can make it even more impressive by motion tracking it.
For example:
- Attach a piece of text to your introductory title. If there’s a logo or brand name in the introduction, you can add a tagline, a website address, or your Instagram or Twitter handle to it.
- If you want to create a context for the audience, add motion-tracked captions in your brand video. This means the captions move with the movement of the subject. It looks stylish, gives relevant information, and helps tell your brand’s story without any narration.
This Fitbit commercial would be an excellent example of motion-tracked captions:
- If your video has an introductory scene where the frame is moving from one side to the other, you can motion-track the credits so that they move along with the scene and disappear gradually instead of dedicating a single clip to the credits.
- Highlighting important aspects in a video, like places or names of objects with motion-tracked text, can make your video truly amazing and fun to watch. This would be quite essential if you’re making a video for the real estate or travel business.
Here’s an example:
Hence, when working with Filmora, you can do plenty with the motion tracking feature to make a truly amazing video.
2. Add a Fun Factor with AR Stickers
Now that you know how to use the motion tracking feature in Filmora, let me tell you a secret!
If you incorporate face-tracking AR stickers into your video, you can succeed in creating a brand video that will have the audience glued to the screen!
The purpose of adding AR stickers to your videos is to emphasize reactions, portray enhanced emotions, and add an element of fun. This feature works best if you’re creating a brand video projected toward kids.

So, how can you make the most of these AR stickers?
Create Multiple Characters
If you don’t have people to play different characters, don’t fret! With the AR sticker effect, you can create multiple characters for your video.
For example:
If your video has 3 animal characters, you can use AR stickers depicting a panda, cat, and bunny to show the different characters. Similarly, you can add the sticker with glasses to show a nerdy character. Or, if you’re really getting into the story-telling mode, you can use the pirate sticker to show a pirate.
Magnify Emotions
Sometimes it gets challenging to portray a certain emotion in your video. This is where AR stickers come to the rescue!
If you want to show someone in love, you can use the heart-eyes effect. Or, if you want to show that someone is being good, you can use the angel sticker to put a halo on their head.
There are many options! You just have to use your creative cells and conjure up something that’s unique and stands out from the rest.
3. Ace Your Shoot with the Green Screen Effect
A green-screen effect is quite important when it comes to making an exceptional brand video. It has been used in almost all blockbuster movies, and if you’re looking to make a video of a similar level, we’ve got some tried and tested tips to use the green screen effect to its fullest!
Make Sure the Lighting is Even
When it comes to a green screen, the lighting plays an important part. Make sure the green screen is one shade of green, and the lighting on the screen is even. If parts of the green screen are darker than the rest, the chroma key effect won’t be able to distinguish the different shades.
Contrasting Colors
Make sure the subject in the video isn’t wearing any green clothing, or there aren’t many green objects around, as they might disappear when you apply the green screen effect.
Prevent Motion Blur with High Shutter Speed
When shooting with a green screen background, make sure you keep the shutter speed high to avoid motion blur. Ideally, it should be 2x your frame rate for optimum results. But, at the same time, it shouldn’t be too high, as it can lead to a change in video exposure.
If you keep these tips in mind when shooting a video, you can easily use the chroma key effect in Wondershare Filmora to add your desired background and create an outstanding video.
4. Be Innovative with Effects
A video without effects is as bland as water! So, make your video innovative with the impressive variety of effects available in Wondershare Filmora.
But you can’t just add effects to your video like that! You need to understand when and where to use a certain effect properly.
For example:
Tell Your Story With Split Screen Effect
If you’re telling your brand story from the perspective of different individuals, using the split-screen effect is recommended. You can also use this effect to showcase how one thing is related to another in a cause-and-effect way.
Take this Lexus commercial, for example:
It shows the view from inside the car and from a viewer’s perspective.
Emphasize with Pan and Zoom Effect
As the topic of concern of this article is brand videos, the pan and zoom is an ideal effect for it.
You can easily emphasize its importance and give off an emotional storytelling vibe by zooming in on a person’s face or any other object in the frame. You can also use pan and zoom to add a transition to your video. Here’s an example:
Add Thrill with Transitions
To move from one shot to another, it’s important to add a transition effect in between. You can add different transition styles to link the shots with one another, for instance, the match cut transition to match scenes that are not otherwise linked visually. Or the whip pan transition, which involves a quick rotation of the camera’s axis to give the impression that the scene was shot in one take, although it is two separate clips.
Take Wondershare Filmora’s brand video, for example. You can see how seamlessly it moves from one effect to another. It adds value and makes the video fun to watch.
With the variety of transitions in Filmora’s library, you can add all the effects discussed above to your video for stunning results.
You’ve added motion tracking, used AR stickers, created a mystical background with the green screen effect, and gone innovative with effects. Now, it’s time to wrap up this article with…
5. Energize Your Videos with Speed Ramping
Did you know that speed ramping can actually improve your videos tenfold? Speeding up and slowing down the footage at certain points can have a significant impact. For example, the bullet dodge scene in “Matrix” wouldn’t have been so famous if it wasn’t for the slo-mo effect!

You can’t just randomly add speed ramps to your video. There has to be a purpose behind it! Do you want to emphasize something? Do you want to show a transition? Regardless, you need to time your speed ramping properly.
And here are a few tips for it!
Use Slo-Mo For Action Sequences
If your video has an amazing action scene in it, slow down the speed at that point to emphasize the action and movement. For example, a karate kick in slow motion very clearly shows us how the move is actually performed.
Don’t Use Slo-Mo For Too Long
Another tip is to use the slow-mo only for a few seconds to emphasize something. If you prolong it, it won’t have the desired impact and might even cause the audience to lose focus.
Speed Up Footage for Long Processes
If your video shows a long process, like a time-lapse, it is the perfect time to speed up the footage. Not only do long shots lose the viewer’s attention, but they can also get boring too. A sped up footage on the other hand makes your video aesthetically pleasing and entertaining.
Add Music
Using music in videos is quite a common practice; however, it becomes quite exciting if you speed ramp your video according to the music. For example, time the slo-mo effect with the more silent or riverbed parts of the music, and speed it up when the crescendo comes.
You can do this easily with the auto beat-sync feature in Filmora that matches the music with the footage.

How’s that for a thrilling video?
Speed Ramp for Transitions
Here’s a bonus tip! Use speed ramping at the end of one clip and the beginning of the next one to create a seamless flow between the two. It’ll also give a transition effect and make your brand video look professional.
So you see, you have ample options to add a touch of creativity to your brand videos. The key is to use a good video editor and the right video editing tools.
Wrapping Up
Shooting a brand video is easy, and it’s even easier to edit it. All you need is to let your creativity flow!
With Wondershare Filmora 11’s new and advanced editing features, making watch-worthy brand videos that give out the desired message and compel the audience to take some action has never been easier!
And, with the useful video editing tips that we have shared, you are just a click away from taking your business to new heights!
So, if you also want to create a video successfully, just like Filmora’s brand video, follow our tips, use the tricks, and edit away!
10+ Royalty-Free 5 Second Countdown Footage HD & 4K Clips Included
Countdown footage, lately, has become one of the core elements that content creators use in their videos. While some use it to promote special live streams others use it to grab their viewer’s attention. Plus, some also use it as a means of updating their own when a live stream will start.
Perhaps you’re looking for a five-second countdown timer for your video or live stream, chances are you’ll find a lot online. But, sadly, not all of them online is copyrighted free. So, to help you out, we’ve compiled a list of different five seconds countdown footage ranging from HD to 4k that is worth trying.
- Blue Round 5-Second Countdown Timer HD
- Yellow Loading Bar HD
- Red Round 5-second countdown timer HD
- Multi-color Round 5-second Countdown Timer HD
- White Number 5-seconds countdown timer 4K
- Solid Yellow 5-second Countdown Timer HD
- Yellow Round 5-second Countdown Timer HD
- Round Loading 5-second Countdown timer HD
- Minute-Second-Countdown Timer 4K
- 3D 5-second Countdown Timer 4K
- Battery Percentage Countdown Timer HD
- White Loading Bar HD
- How to Find and Apply those 5-second countdown clips to videos?
- Hot FAQs on the 5-second countdown timer
Part 1: 12 Animated 5-second timer Clips for Your Project
After taking our time to search for 5-second timer clips available online, here is a list of the 12 gorgeous animated 5-second countdown timer clips that can be used in any project. All thanks to the Wondershare Filmora video editing software for giving us access to such unique designs of countdown clips. Don’t hesitate to check them out in Filmora because they all look amazing.
1. Blue Round 5-Second Countdown Timer HD
The first 5 seconds countdown video effect on our list is this adorable all-black background HD quality countdown timer that counts in an ascending manner.
2. Yellow Loading Bar HD
This 5-second countdown footage is a loading bar. Yes, a loading bar just like you’re trying install a tool on your PC.
3. Red Round 5-second countdown timer HD
This a simple but gorgeous red round 5-second countdown timer effect with a black background. Honestly, no matter the project you use this for, the viewer will surely fancy this countdown effect.
4. Multi-color Round 5-second Countdown Timer HD
The round circle of this countdown timer displays different colors when it’s played to begin a countdown. Its lemon background color makes it look really attractive for videos.

5. White Number 5-seconds countdown timer 4K
This is another all-black background 5-second countdown timer on this list. It’s great for anyone looking for a very simple 5-second countdown footage for a video.
6. Solid Yellow 5-second Countdown Timer HD
The color of this countdown timer is what makes it very adorable. Honestly, it’s worth mentioning on this list. You should try it for your colorful video,

7. Yellow Round 5-second Countdown Timer HD
A lot of folks fancy black background countdown timers, and we can’t get tired of mentioning any special one we find. This black background timer looks cool.
8. Round Loading 5-second Countdown timer HD
This 5-seconds countdown footage is like a round loading bar. Its background color and all just have the perfect blend.

9. Minute-Second-Countdown Timer 4K
Up next is a minute-second-based countdown timer, and it’s also in 4K resolution.
10. 3D 5-second Countdown Timer 4K
This countdown timer with a hi-tech sense. It can be used for a good transition to spice up your explainer videos.
11. Battery Percentage Countdown Timer HD
If you’re looking for a countdown timer like a battery percentage, this one is for you, and it looks really great.
12. White Loading Bar HD
Our final 5-second background timer is a loading bar. But, this time, a white one, and it’s similar to the previously mentioned one.
![]()
Note: Some of the clips introduced above are not typically 5-second countdown footage. Some are up to 10 seconds or even longer. However, the good thing is you can make the clip shorter when embedding it in your video by cutting it according to your requirement.
We would teach you how to make the above 5-seconds shorter if you keep reading.
Part 2: How to Find and Apply those 5-second countdown clips to videos?
I bet you fancy the 5-seconds countdown videos discussed above. But the big question is where can you find them and how do you apply the ones you need to your videos? Well, here is where the help of video editing software like Wondershare Filmora comes into the game.
Wondershare Filmora is a top-leading software that offers users at all levels the best tools needed to execute different types of video editing operations ranging from transitions, resizing, background removal, auto-reframe, and lots more without hassles.
Besides, the boasts lots of modern tools that facilitate not just video editing but also audio editing and screen recording operation. You don’t even need technical knowledge to utilize both the advanced and basic features of the tool.
Let’s proceed to learn the step-by-step process to find all the 5-seconds countdown videos introduced on this page;
Step1 Download the latest version of Filmora software from the official website and install it.
Step2 Launch the tool and use the Import button to upload the video to that you want to add the countdown clip. Alternatively, you can just drag-n-drop the video.

Step3 Drag-n-drop the video to the timeline.

Step4 Navigate to the top-left corner of the screen and click ‘Stock Media’. Then, select ‘Pexels’ or ‘Pixbay’ from the left side of the screen and type ‘Countdown’ in the search bar. After that, find a preferred Countdown effect and move it to the timeline where your video is.

Step5 If the countdown effect you added is more than five seconds, adjust it to five seconds from the timeline. Then, move it to the section of your video where you want it to be displayed.

Play your video to preview the countdown effect you added.
Step6 Once you’re satisfied with the editing, navigate to the top of the screen and click Export, then, select ‘Burn DVD’.

Step7 Enter a preferred name for your video in the pop-up that appears on your screen, then in the Folder Path, choose the location where you want the file to be saved. After that, click the ‘Export’ button to complete the operation.

Hot FAQs on the 5-second countdown timer
There are more FAQs on 5-second countdown timer that you should know about.
1. What is a dynamic countdown?
A dynamic countdown is a countdown used to display the total time left for visitors to claim an offer available on a website.
2. How do you make a countdown video?
To make a countdown video, you need the help of advanced video editing software like Filmora. Filmora offers sophisticated video editing tools that make it easy for folks to make high-quality countdown videos. You can refer to the steps explained on this page to make a countdown video.
3. What are the benefits of adding a 5 seconds countdown for videos?
- It’s a great way to push your audience to make fast decisions that will be in your favor.
- It’s efficient for promoting Livestream.
- It helps to grab viewers’ attention in videos.
Final Words
If you’re looking for beautiful 5-seconds countdown footage for your video, live stream, or whatsoever, the ones introduced on this page are really great. All thanks to the Wondershare tech experts for integrating these special countdown effects into the Filmora video editing tool. The tool is also ideal for applying 5-second countdown footage in your videos or live streams.
Free Download For Win 7 or later(64-bit)
Free Download For macOS 10.14 or later
Part 1: 12 Animated 5-second timer Clips for Your Project
After taking our time to search for 5-second timer clips available online, here is a list of the 12 gorgeous animated 5-second countdown timer clips that can be used in any project. All thanks to the Wondershare Filmora video editing software for giving us access to such unique designs of countdown clips. Don’t hesitate to check them out in Filmora because they all look amazing.
1. Blue Round 5-Second Countdown Timer HD
The first 5 seconds countdown video effect on our list is this adorable all-black background HD quality countdown timer that counts in an ascending manner.

2. Yellow Loading Bar HD
This 5-second countdown footage is a loading bar. Yes, a loading bar just like you’re trying install a tool on your PC.

3. Red Round 5-second countdown timer HD
This a simple but gorgeous red round 5-second countdown timer effect with a black background. Honestly, no matter the project you use this for, the viewer will surely fancy this countdown effect.

4. Multi-color Round 5-second Countdown Timer HD
The round circle of this countdown timer displays different colors when it’s played to begin a countdown. Its lemon background color makes it look really attractive for videos.

5. White Number 5-seconds countdown timer 4K
This is another all-black background 5-second countdown timer on this list. It’s great for anyone looking for a very simple 5-second countdown footage for a video.

6. Solid Yellow 5-second Countdown Timer HD
The color of this countdown timer is what makes it very adorable. Honestly, it’s worth mentioning on this list. You should try it for your colorful video,

7. Yellow Round 5-second Countdown Timer HD
A lot of folks fancy black background countdown timers, and we can’t get tired of mentioning any special one we find. This black background timer looks cool.

8. Round Loading 5-second Countdown timer HD
This 5-seconds countdown footage is like a round loading bar. Its background color and all just have the perfect blend.

9. Minute-Second-Countdown Timer 4K
Up next is a minute-second-based countdown timer, and it’s also in 4K resolution.

10. 3D 5-second Countdown Timer 4K
This countdown timer with a hi-tech sense. It can be used for a good transition to spice up your explainer videos.

11. Battery Percentage Countdown Timer HD
If you’re looking for a countdown timer like a battery percentage, this one is for you, and it looks really great.

12. White Loading Bar HD
Our final 5-second background timer is a loading bar. But, this time, a white one, and it’s similar to the previously mentioned one.

![]()
Note: Some of the clips introduced above are not typically 5-second countdown footage. Some are up to 10 seconds or even longer. However, the good thing is you can make the clip shorter when embedding it in your video by cutting it according to your requirement.
We would teach you how to make the above 5-seconds shorter if you keep reading.
Part 2: How to Find and Apply those 5-second countdown clips to videos?
I bet you fancy the 5-seconds countdown videos discussed above. But the big question is where can you find them and how do you apply the ones you need to your videos? Well, here is where the help of video editing software like Wondershare Filmora comes into the game.
Wondershare Filmora is a top-leading software that offers users at all levels the best tools needed to execute different types of video editing operations ranging from transitions, resizing, background removal, auto-reframe, and lots more without hassles.
Besides, the boasts lots of modern tools that facilitate not just video editing but also audio editing and screen recording operation. You don’t even need technical knowledge to utilize both the advanced and basic features of the tool.
Let’s proceed to learn the step-by-step process to find all the 5-seconds countdown videos introduced on this page;
Step1 Download the latest version of Filmora software from the official website and install it.
Step2 Launch the tool and use the Import button to upload the video to that you want to add the countdown clip. Alternatively, you can just drag-n-drop the video.

Step3 Drag-n-drop the video to the timeline.

Step4 Navigate to the top-left corner of the screen and click ‘Stock Media’. Then, select ‘Pexels’ or ‘Pixbay’ from the left side of the screen and type ‘Countdown’ in the search bar. After that, find a preferred Countdown effect and move it to the timeline where your video is.

Step5 If the countdown effect you added is more than five seconds, adjust it to five seconds from the timeline. Then, move it to the section of your video where you want it to be displayed.

Play your video to preview the countdown effect you added.
Step6 Once you’re satisfied with the editing, navigate to the top of the screen and click Export, then, select ‘Burn DVD’.

Step7 Enter a preferred name for your video in the pop-up that appears on your screen, then in the Folder Path, choose the location where you want the file to be saved. After that, click the ‘Export’ button to complete the operation.

Hot FAQs on the 5-second countdown timer
There are more FAQs on 5-second countdown timer that you should know about.
1. What is a dynamic countdown?
A dynamic countdown is a countdown used to display the total time left for visitors to claim an offer available on a website.
2. How do you make a countdown video?
To make a countdown video, you need the help of advanced video editing software like Filmora. Filmora offers sophisticated video editing tools that make it easy for folks to make high-quality countdown videos. You can refer to the steps explained on this page to make a countdown video.
3. What are the benefits of adding a 5 seconds countdown for videos?
- It’s a great way to push your audience to make fast decisions that will be in your favor.
- It’s efficient for promoting Livestream.
- It helps to grab viewers’ attention in videos.
Final Words
If you’re looking for beautiful 5-seconds countdown footage for your video, live stream, or whatsoever, the ones introduced on this page are really great. All thanks to the Wondershare tech experts for integrating these special countdown effects into the Filmora video editing tool. The tool is also ideal for applying 5-second countdown footage in your videos or live streams.
Free Download For Win 7 or later(64-bit)
Free Download For macOS 10.14 or later
Also read:
- GIF Splitting Into Frames Is an Interesting Activity to Do with the Right Tools. Convert GIFs Into Frames Easily with Tools and Use Them as Needed for 2024
- New 8 Best Free Photo Collage with Music Video Maker
- Updated Tips for Choosing Location and Scheduling Music Video
- Updated Slow Down or Speed Up Videos Easily on PC, Online, and Phone for 2024
- New In 2024, How to Make A Fantastic Café Vlog
- In 2024, To Add SRT to MP4 Is Not as Hard as You Might Think. All You Just Need Is the Right Tool to Help You Get the Job Done. Read This Article and Learn the 8 Latest Methods to Merge SRT with MP4 Effortlessly
- In 2024, Add Fade in Windows Video Editor
- New Looking for a Video Editor Where You Can Edit Your Tutorial and Training Videos? Camtasia Is a Great Choice. But Is It the Best Video Editor Available? Find Out From Our Camtasia Review for 2024
- Updated How to Convert SRT to DOCX for 2024
- Updated Do You Want to Add a Motion Blur Effect in Valorant? Read This Guide to Find Out How to Create a Motion Blur Effect in Valorant without Any Hassle
- Updated Ultimate Guidelines to Help You Better Use VLC Media Player
- New As Video Editing Has Become a Pillar Stone in Post-Production Work, You Might Need to Upgrade Your Knowledge About It. In This Article, You Will Learn How to Rotate the Video
- New In 2024, Are You Convincingly Fascinated by the Whole Idea of Augmented Reality and Want to Level up Your Marketing Skills with an AR Integration? Rest Assured, Youve Found the Right Place
- Updated 2024 Approved 4 Solutions to Crop a Video on Android Easily
- New 2024 Approved 4 Methods for Rotating Your GoPro Videos Professionally
- New Free Green Screen Mobile Frame Downloads for 2024
- New In 2024, Are You Looking for the Best Video Marketing Agency to Help Your Business Grow Exponentially with Engaging Video Content? Here Is How to Find a High-Quality Video Marketing Company that Takes Your Videos to the Next Level
- Slowing Down GIF With The Best Available Methods
- Start Your Creative Journey Now. Follow This Step-by-Step Guide on How to Add Double Exposure Effects to Your Personal Videos by Using the Filmora Video Editor
- Updated 2024 Approved Are You a Videographer or Video Content Creator? Is Enhancing Your Videography Skills Your Priority? Do You Want to Learn the Basics of LumaFusion Color Grading? Read on to Find All the Information You Need
- New Video Course and Online Learning Are Very Popular Nowadays. Here We Are Going to Recommend some of the Best Video Websites for Teachers to Use for 2024
- New Want to Convert MP4 Video To 60 FPS GIF? Read This
- Detailed Tutorial to Crop a Video in KineMaster
- New Good Ways to Make Sure Your Video Editing Course Is Worthing to Watch
- Are You Searching the Internet for Top Wedding LUTs Premiere Pro? This Article Provides Suggestions on the Best LUT Color Presets
- 2024 Approved 5 Excellent Tools To Convert Video to 60 FPS
- New Are You Looking for Funny Discord Emojis to Massively Improve Your Discord Experience? Using some Fun Bots for Discord Is an Excellent Way of Doing That! Thus, We Compiled a List of 10 Fun Discord Bots You Need
- Do You Know You Can Add LUTs for Cinematic Color Grading on Your Smartphones? With VN Editor You Can, You Can Add LUTs. Choose the Option VN LUTs Free Download
- How to Change/Fake Your Vivo X90S Location on Viber | Dr.fone
- Best Anti Tracker Software For Itel A70 | Dr.fone
- How to sign Excel 2010 files online
- In 2024, How to Send and Fake Live Location on Facebook Messenger Of your Motorola Moto E13 | Dr.fone
- How and Where to Find a Shiny Stone Pokémon For OnePlus 12R? | Dr.fone
- In 2024, How to Remove Find My iPhone without Apple ID From your Apple iPhone XS Max?
- In 2024, How to Transfer Data from Samsung Galaxy F34 5G to Any iOS Devices | Dr.fone
- In 2024, Does Airplane Mode Turn off GPS Location On Itel S23? | Dr.fone
- How to Fix Android.Process.Media Has Stopped on Nokia 105 Classic | Dr.fone
- In 2024, Pokémon Go Cooldown Chart On Tecno Phantom V Flip | Dr.fone
- Guide to Mirror Your OnePlus 11R to Other Android devices | Dr.fone
- Sign .uot file Online for Free
- Fix Vivo V29e Android System Webview Crash 2024 Issue | Dr.fone
- How to Recover Deleted Photos from Android Gallery App on Nubia
- Home Button Not Working on Tecno Spark 20 Pro? Here Are Real Fixes | Dr.fone
- In 2024, How To Activate and Use Life360 Ghost Mode On Oppo Reno 8T 5G | Dr.fone
- How to Upgrade Apple iPhone 11 Pro Max without iTunes? | Dr.fone
- Updated Google Translate Video A Complete Guide To Translate Video With Google
- 4 Ways to Fix Android Blue Screen of Death On Samsung Galaxy M14 5G | Dr.fone
- 6 Fixes to Unfortunately WhatsApp has stopped Error Popups On Nokia C12 Pro | Dr.fone
- Possible solutions to restore deleted contacts from Infinix Zero 30 5G.
- How To Transfer WhatsApp From iPhone 8 to other iPhone 15 Pro devices? | Dr.fone
- How to Fix Life360 Shows Wrong Location On Oppo A79 5G? | Dr.fone
- Title: Updated In 2024, If You Want to Add an Effect Like a VHS Overlay Free Effect to Enhance Your Videos, You Can Do It on After Effects. Read More to Learn How
- Author: Morgan
- Created at : 2024-04-24 01:10:10
- Updated at : 2024-04-25 01:10:10
- Link: https://ai-video-editing.techidaily.com/updated-in-2024-if-you-want-to-add-an-effect-like-a-vhs-overlay-free-effect-to-enhance-your-videos-you-can-do-it-on-after-effects-read-more-to-learn-how/
- License: This work is licensed under CC BY-NC-SA 4.0.

