
Updated In 2024, Live Stream on YouTube Using Zoom
| Live Stream on YouTube Using Zoom
Abundant Video Effects - Wondershare Filmora
Provide abundant video effects - A creative video editor
Powerful color correction and grading
Detailed tutorials provided by the official channel
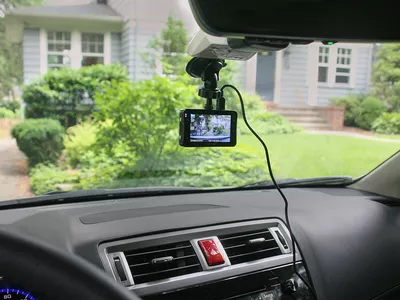
Zoom sessions have made daily meetings a lot easier as it offers great flexibility to the people. You can conduct long and important business meetings or educational class lessons in the comfort of your home. As Zoom meetings are widely adopted as a new medium of communication, many people have started to stream live Zoom sessions across various online platforms.
One of the popular online platforms is YouTube, so one must know how to Zoom YouTube live streaming instantly. Through this article, you will come to know about simple and basic steps regarding stream Zoom to YouTube flawlessly.
In this article
Part 1: Software Requirements
Part 2: Live Stream on YouTube Using Zoom
Part 1: Software Requirements
In this part, we will mention software requirements for Zoom meetings and webinars to conduct Zoom live streams on YouTube comfortably on your devices.
Streaming for Zoom Meeting
- Pro, Business, Education, or Enterprise Account
- The Host is Licensed
- Zoom Desktop Client
- **Windows:**Version 4.4.53582 or Higher
- **macOS:**Version 4.4.53582 or Higher
- Zoom Mobile Client
- **Android:**Version 5.4.0 or Higher
- **iOS:**Version 5.4.0 or Higher
- Live streaming is enabled on YouTube
Streaming for Zoom Webinar
- Pro, Business, Education, or Enterprise Account
- The Host is Assigned a Zoom Webinar License
- Zoom Desktop Client
- **Windows:**Version 4.0 or Higher
- **macOS:**Version 4.0 or Higher
- Zoom Mobile Client
- **Android:**Version 5.4.0 or Higher
- **iOS:**Version 5.4.0 or Higher
- Live Streaming Enabled on YouTube
Part 2: Live Stream on YouTube Using Zoom
To Zoom YouTube live, this part contains detailed steps that will assist you throughout the whole process.
Steps to Execute Before Live Streaming
Before going live on YouTube, the first step is to schedule the meeting in Zoom for successful live streaming. To do so, open your Zoom account and schedule a suitable time for the meeting or webinar you want to conduct.

Activating the Live Streaming Option
Step 1: To begin, first sign in to your Zoom account and then navigate to “Zoom meeting settings.” On this menu, scroll down to find the option “In Meeting (Advanced)” on the left side.
Step 2: Now turn on the toggle of “Allow live streaming meetings” to activate the feature of live streaming. Afterward, you would see four checkboxes on your screen through which you can control where to stream Zoom meetings.
Step 3: Start by unchecking the Facebook box if you don’t want to want live stream Zoom on the Facebook platform. Then, tap on the checkbox of YouTube to allow the live streaming of Zoom meetings on your YouTube account.
Step 4: Now, click on the checkbox for “Custom live streaming service” to enable the live streaming before your meeting starts. Also, on the displayed text box, you can enter any instructions for the host who will live stream your Zoom meeting. Once done with all the changes, tap on “Save” and continue with the steps given below.

Settings Up Live Streaming of Scheduled Meeting
If you want to live stream the scheduled Zoom meeting through the option of “Custom live streaming,” you should have your stream key, stream URL, and the URL of the live streaming page of your streaming site. Now read the below instructions to set up live streaming settings on YouTube.
Step 1: Navigate to the site Youtube.com by entering the internet ID and password. Then tap on the button “Create a video or post” displayed in the top right corner.

Step 2: From the displayed options, click on “Go Live” and create your channel for the live streaming videos. Verify your account from the phone call or received text message. Now from the YouTube home page, tap on the “Create a video or post” button to proceed further.

Step 3: After clicking on the option of “Go Live” again, enter the information about your live streaming video in the pop-up window. For this, you should navigate to the “Stream” tab to build an “Event title.” You can also enter a description along with the title. Now you can control the viewability of your live stream video such as public, private and unlisted.

Step 4: From the appeared drop-down menu, tap on the category of your live stream video. You can also turn on the toggle of “Schedule for later” if you want to live stream later and enter the date and time simultaneously.
Step 5: You can also add a thumbnail to your live stream video so that people can easily search. Afterward, choose the option either “Yes” or “No” of the heading saying, “Is this video made for kids?”. Once done, tap on the “Create Stream” button.
Step 6: A new window will appear containing your “Stream URL” and “Stream Key.” Copy and save this information for pre-scheduled live streaming on a text file. Now tap on the “Share” option from the top right and then also copy the “Livestream URL” and save it in a text file.

How to Set Up the Live Stream on Zoom
Step 1: On your Zoom account, go to the lists of upcoming meetings and locate your scheduled meeting. After finding the scheduled meeting, choose the meeting topic to continue.

Step 2: Now scroll down the page to select the option called “Live Streaming.” Click on this tab and then click on the option saying “configure live stream settings.”

Step 3: On the pop-up screen, enter all the information you saved before, such as “Stream key,” “Stream URL,” and “Live streaming page URL” on their respective boxes. Once done, click on the “Save” button.

Guidelines to Perform Quickly Before Your Live Stream
Step 1: Start this process before half an hour of your meeting and click to begin your Zoom meeting. Then tap on the “More” option displayed on the toolbar.

Step 2: From the more options, select “Live on custom live streaming service.” Now proceed with the live streaming on your streaming platform.

Step 3: If you are utilizing YouTube live from the settings of “Live on custom live streaming service,” navigate to your YouTube live window. If you don’t have this window open, tap on the “Create a video or post” button and click on “Go Live.” From the “Manage” tab, select the title of your live stream video and then tap on the “Go Live” option from the top right corner.

How to Go Live from Your Zoom Meeting
Step 1: Through your Zoom meeting, tap on the “More” button and then click on “Live on YouTube.” A new window will display the form where you select your account.

Step 2: On the next page, enter the title of the YouTube live stream video and choose the viewability options such as public, private and unlisted. Once done with privacy options, tap on the “Go Live” button.

How to Stop the Stop the Live Stream and End the Zoom Meeting
Ending the Live Stream through Custom Streaming Service
For live-streaming YouTube videos through “Live on custom live streaming service,” tap on the “End Stream” button displayed in the top right corner that will end your live session.
Ending the Live Stream and Zoom Meeting
From your Zoom meeting, tap on the “More” button and tap on the option called “Stop live stream.” Afterward, select the “End Meeting” option to end the Zoom meeting for all participants. Then tap on the “End Meeting for All” option for confirmation.

Conclusion
Many people across the world use online platforms like YouTube to live stream their videos for more connectivity. As Zoom meetings and webinars are getting recognition, it’s a great idea to stream Zoom to YouTube live to have a larger audience. Using this article, you can find easy and simple steps to Zoom YouTube live according to your convenience.
Zoom sessions have made daily meetings a lot easier as it offers great flexibility to the people. You can conduct long and important business meetings or educational class lessons in the comfort of your home. As Zoom meetings are widely adopted as a new medium of communication, many people have started to stream live Zoom sessions across various online platforms.
One of the popular online platforms is YouTube, so one must know how to Zoom YouTube live streaming instantly. Through this article, you will come to know about simple and basic steps regarding stream Zoom to YouTube flawlessly.
In this article
Part 1: Software Requirements
Part 2: Live Stream on YouTube Using Zoom
Part 1: Software Requirements
In this part, we will mention software requirements for Zoom meetings and webinars to conduct Zoom live streams on YouTube comfortably on your devices.
Streaming for Zoom Meeting
- Pro, Business, Education, or Enterprise Account
- The Host is Licensed
- Zoom Desktop Client
- **Windows:**Version 4.4.53582 or Higher
- **macOS:**Version 4.4.53582 or Higher
- Zoom Mobile Client
- **Android:**Version 5.4.0 or Higher
- **iOS:**Version 5.4.0 or Higher
- Live streaming is enabled on YouTube
Streaming for Zoom Webinar
- Pro, Business, Education, or Enterprise Account
- The Host is Assigned a Zoom Webinar License
- Zoom Desktop Client
- **Windows:**Version 4.0 or Higher
- **macOS:**Version 4.0 or Higher
- Zoom Mobile Client
- **Android:**Version 5.4.0 or Higher
- **iOS:**Version 5.4.0 or Higher
- Live Streaming Enabled on YouTube
Part 2: Live Stream on YouTube Using Zoom
To Zoom YouTube live, this part contains detailed steps that will assist you throughout the whole process.
Steps to Execute Before Live Streaming
Before going live on YouTube, the first step is to schedule the meeting in Zoom for successful live streaming. To do so, open your Zoom account and schedule a suitable time for the meeting or webinar you want to conduct.
Activating the Live Streaming Option
Step 1: To begin, first sign in to your Zoom account and then navigate to “Zoom meeting settings.” On this menu, scroll down to find the option “In Meeting (Advanced)” on the left side.
Step 2: Now turn on the toggle of “Allow live streaming meetings” to activate the feature of live streaming. Afterward, you would see four checkboxes on your screen through which you can control where to stream Zoom meetings.
Step 3: Start by unchecking the Facebook box if you don’t want to want live stream Zoom on the Facebook platform. Then, tap on the checkbox of YouTube to allow the live streaming of Zoom meetings on your YouTube account.
Step 4: Now, click on the checkbox for “Custom live streaming service” to enable the live streaming before your meeting starts. Also, on the displayed text box, you can enter any instructions for the host who will live stream your Zoom meeting. Once done with all the changes, tap on “Save” and continue with the steps given below.
Settings Up Live Streaming of Scheduled Meeting
If you want to live stream the scheduled Zoom meeting through the option of “Custom live streaming,” you should have your stream key, stream URL, and the URL of the live streaming page of your streaming site. Now read the below instructions to set up live streaming settings on YouTube.
Step 1: Navigate to the site Youtube.com by entering the internet ID and password. Then tap on the button “Create a video or post” displayed in the top right corner.
Step 2: From the displayed options, click on “Go Live” and create your channel for the live streaming videos. Verify your account from the phone call or received text message. Now from the YouTube home page, tap on the “Create a video or post” button to proceed further.
Step 3: After clicking on the option of “Go Live” again, enter the information about your live streaming video in the pop-up window. For this, you should navigate to the “Stream” tab to build an “Event title.” You can also enter a description along with the title. Now you can control the viewability of your live stream video such as public, private and unlisted.
Step 4: From the appeared drop-down menu, tap on the category of your live stream video. You can also turn on the toggle of “Schedule for later” if you want to live stream later and enter the date and time simultaneously.
Step 5: You can also add a thumbnail to your live stream video so that people can easily search. Afterward, choose the option either “Yes” or “No” of the heading saying, “Is this video made for kids?”. Once done, tap on the “Create Stream” button.
Step 6: A new window will appear containing your “Stream URL” and “Stream Key.” Copy and save this information for pre-scheduled live streaming on a text file. Now tap on the “Share” option from the top right and then also copy the “Livestream URL” and save it in a text file.
How to Set Up the Live Stream on Zoom
Step 1: On your Zoom account, go to the lists of upcoming meetings and locate your scheduled meeting. After finding the scheduled meeting, choose the meeting topic to continue.
Step 2: Now scroll down the page to select the option called “Live Streaming.” Click on this tab and then click on the option saying “configure live stream settings.”
Step 3: On the pop-up screen, enter all the information you saved before, such as “Stream key,” “Stream URL,” and “Live streaming page URL” on their respective boxes. Once done, click on the “Save” button.
Guidelines to Perform Quickly Before Your Live Stream
Step 1: Start this process before half an hour of your meeting and click to begin your Zoom meeting. Then tap on the “More” option displayed on the toolbar.
Step 2: From the more options, select “Live on custom live streaming service.” Now proceed with the live streaming on your streaming platform.
Step 3: If you are utilizing YouTube live from the settings of “Live on custom live streaming service,” navigate to your YouTube live window. If you don’t have this window open, tap on the “Create a video or post” button and click on “Go Live.” From the “Manage” tab, select the title of your live stream video and then tap on the “Go Live” option from the top right corner.
How to Go Live from Your Zoom Meeting
Step 1: Through your Zoom meeting, tap on the “More” button and then click on “Live on YouTube.” A new window will display the form where you select your account.
Step 2: On the next page, enter the title of the YouTube live stream video and choose the viewability options such as public, private and unlisted. Once done with privacy options, tap on the “Go Live” button.
How to Stop the Stop the Live Stream and End the Zoom Meeting
Ending the Live Stream through Custom Streaming Service
For live-streaming YouTube videos through “Live on custom live streaming service,” tap on the “End Stream” button displayed in the top right corner that will end your live session.
Ending the Live Stream and Zoom Meeting
From your Zoom meeting, tap on the “More” button and tap on the option called “Stop live stream.” Afterward, select the “End Meeting” option to end the Zoom meeting for all participants. Then tap on the “End Meeting for All” option for confirmation.
Conclusion
Many people across the world use online platforms like YouTube to live stream their videos for more connectivity. As Zoom meetings and webinars are getting recognition, it’s a great idea to stream Zoom to YouTube live to have a larger audience. Using this article, you can find easy and simple steps to Zoom YouTube live according to your convenience.
Top 10 Secret Tips & Tricks to Use in Wondershare Filmora
Wondershare Filmora is a great video editing software with millions of users worldwide. It has many features that it provides to its users. However, there are some other features hidden up its sleeve.
This article will share some “secrets” of Wondershare Filmora features you may not know that they exist in Filmora. Scroll below to see the features that level up your editing skills.
Part 1. Shared Media Folder
You might have had the hassle of importing the same videos for a considerable time in a different project. It can become a problem for you. It may be fine if you have organized your videos from the start.
Shared Media Folder in Filmora, now called the Global Media Folder, can store video and audio that you’ve imported for future projects. So you don’t have to keep re-importing your media for future videos.

Moreover, when you have imported files into the Shared Media Folder, you can create new Sub-Folders. You can name these folders according to the types of media you are going to use.
Suppose you are a content creator and want to spice up your content with memes. You can create a meme folder to import recent memes into your videos.
Once you have imported them into the Wondershare Filmora’s Shared Media Folder, you can access them anytime. Doing so will allow you to save time and build a base for your future projects.
Free Download For Win 7 or later(64-bit)
Free Download For macOS 10.14 or later
Part 2. Customize Proxy Files
Before understanding the custom proxy settings, let us know what proxy files are.
Proxy Files
Proxy files in Wondershare Filmora allow you to render and edit 4K and other higher-resolution videos easily, regardless of your computer’s processing power.
No one wants to compromise PC performance when editing videos. But if you are importing a video with a higher resolution than your PC, you can only play it sometimes. Other than that, your PC might get stuck and slow down.
If your PC has a built-in resolution of 1080p, but the video you are going to import is 2160p, you can encounter rendering and performance problems. But in the case of Wondershare Filmora Proxy files, you can smoothly edit your videos without any trouble.
How to Customize Proxy Files in Filmora
Although Wondershare Filmora automatically creates proxy files when it encounters resolutions more significant than the PC performance. But you can also set them to your preference.
And customize your proxy files takes some simple and easy steps. But first, follow the steps mentioned below.
Step1 Find the File option on the top left corner of the Wonderhsare Filmora home interface.
Step2 Click on Files and go to Preferences.
Step3 A window will pop up, and here you can see multiple options.
Step4 Go to the performance.
Step5 In the performance tab, scroll down till your see Proxy.
Step6 Here check the box that says, “Automatically create proxies when resolution higher than:”

Step7 Below you can see multiple options. In these options, select the resolution that you want.
Step8 You can also click on the box below to automatically delete the proxies when you close your project.
Now, whenever you encounter a resolution of a higher video than the one you selected, Wondershare Filmora will do its magic.
Part 3. Delete Project Render Cache
Another hack you can use to save space on your hard drive is Deleting the Render cache. But before we do that, let us understand what Render cache is!
What is Render Cache?
Rendering can be a giant leap to give you a smooth performance experience. However, when you import your videos into the timeline, you can always render to have an uninterrupted playback experience.
Doing so will allow you to work in your zone quickly and efficiently. You can do a manual rendering before you begin the editing process. Or you can also opt to choose automatic rendering. In the automatic rendering option, you can continue your editing process. In the meantime, your timeline will be rendered.
How to Delete Render Cache in Filmora
To save up storage space on your computer, you can delete your render cache by following the steps.
Step1 Click on files in the top left corner of the Wondershare Filmora home interface.
Step2 Go to Preferences.
Step3 A window will pop up and go to Performance.
Step4 In the performance tab, scroll down below to the Preview Render.
Step5 Check the box saying, “Automatically delete render files when a project is closed.”

Step6 Click on OK to save your changes.
Now, whenever you close your project, your render cache will be deleted and would have given you extra space on your computer.
Part 4. Remove Split Button on Playhead
In some instances, when you are moving the playhead on the timelines, it can distract you from doing your editing. Or even more, you can mistakenly click on the Split button to split the clips you don’t want them to.
Well, no worries at all! Wondershare Filmora takes care of that for you. You can hide or remove the Split button on the playhead. It only takes a few simple and easy steps. Follow the steps mentioned below to remove the Split button:
Step1 You will notice the File option on the top left corner of the Wonderhsare Filmora home interface.
Step2 Click on Files and go to Preferences.
Step3 A window will pop up, and here you can see multiple options.
Step4 Go to the editing
Step5 In the editing tab, scroll down till your see the Split button.

Step6 Check the box. Then, click OK to save your changes.
Doing so would have removed the Split button from your playhead. So now you can edit your videos without any distractions.
Part 5. Copy and Paste Effects
Copy and paste are one of the oldest tricks in editing procedures. Wondershare Filmora comes with a range of commands and features that allow you to save time and be reliable.
Suppose you want to add an effect to a video clip in the timeline. Then, after adding the effect to your video, make custom changes to make it look more closely to the style you want. You can now use the copy-and-paste function to add the same effect to another clip. That helps you save a lot of time from tedious and time-consuming work.
How to Copy and Paste Effects
While editing, you will need to ensure that your editing process is as clean as possible and that you have all the time on hand.
But there is a solution! You can easily copy and paste the effects you placed on one video clip to another. Just follow the steps mentioned, and you will be good to go:
Step1 Right-click on the video to you added the effects too.
Step2 A drop-down column will pop up.
Step3 In the options below, you will notice an option called “Copy Effects.”
Step4 Click on the “Copy Effects” option.
Step5 Now move the playhead to the video clip on which you want to paste the effects.
Step6 Right-click on the video that you want to place the effect on.
Step7 In the pop-up column, select the Paste Effect
Step8 It adjusts the video clip according to the changes of the prior one.
You can save editing time by simply copying and pasting video effects.

Part 6. Timeline Snap
You might have added multiple videos in the same timeline track. If you removed the video ahead of the video clip, you have to close the gap in between.
So, arranging and moving clips in the timeline are hectic and time-consuming. However, that is the case without timeline snapping.
How to Apply Timeline Snap in Filmora
Timeline snapping will allow you to arrange video clips side by side without any breaks and cut-offs. Also, it will enable you to place it precisely above other video and audio gaps in the timeline.
In most cases, Timeline snapping is enabled from the start. But if you are encountering some problems managing your videos. Or if you want to remove the Timeline snap feature. Follow the steps mentioned below:
Step1 Right-click on the Timeline.
Step2 A pop will open up, giving you multiple options.
Step3 Click on timeline Snapping to either enable it or disable it.

Now you can easily enable and disable timeline snapping according to your choice!
Part 7. Color Code Video Clips
When editing footage from multiple cameras, you might want to organize which media is from which source in the timeline. You can do this by color coding your clips.
Steps to Color Code Your Videos
Color coding allows you to edit all the clips marked with a particular color to be selected simultaneously without selecting them manually in the timeline.
To color code a video, follow the steps as mentioned:
Step1 Select the clips you want to color code, right-click, and choose from the available colors.
Step2 Once you’ve color coded your clips, you can right-click on the clip again and choose to select all clips from the color mark option.
Step3 And all the clips marked with that color will be selected.

Part 8. Group Clips Together
Now in an editing timeline, you might encounter a situation where you want to arrange a video clip with specific audio. Again, it allows you to stay organized and save up a lot of time.
Grouping clips together can also be helpful when you want to edit multiple clips in the timeline but want to maintain a particular order. The group will remain in its place and allow you to edit your other video clips quickly.
Stepwise Guide to Grouping the Clips in Filmora
You can group video and audio clips in straightforward steps. Just follow the actions ahead, and you will be good to go:
Step1 Hold Left-click and drag across the clips that you want to select.
Step2 When you are done, Right-click on the clip to open the options tab.
Step3 Scroll down, and you will see a “” option.
Step4 Select Group, and that’s done.

Your whole group will be selected whenever you select a video clip or an audio clip.
Part 9. Pan and Zoom Shortcut
Editing shortcuts are excellent. They allow you to save up a lot of time. Some people prefer to use a mouse only to edit their videos, but professionals always use a keyboard.
But there are some other shortcuts too! In these shortcuts, you would not necessarily need a keyboard; only a mouse will work and give a good outcome.
You might have seen those videos in which a specific screen ratio moves over a picture. Or, in some cases when you have to pan and zoom to create a flow effect.
Instead of manually adjusting the ratio of your videos and photos, Pan and Zoom shortcuts will allow you to use multiple features. These features allow you to select where your video or photo will start, zoom, and end.
These shortcuts are so easy to apply. Just go through the steps below, and you will accomplish the following:
Step1 Right-click on a photo or a video clip.
Step2 Go to the crop and zoom tab above the timeline.
Step3 In the window that opens up, you will see a pan and zoom option in the top left corner. Click on it.
Step4 And on the bottom right corner of the window, you can see the pan and zoom shortcuts available.
Step5 Please select any of them you want and then click on OK.

Part 10. New Feature Request
One of the significant features of Wondershare Filmora that sets it among the best is its capability to listen to the users. When you have been using Wondershare Filmora for a long time, there will come a time when you wish for a feature. You can also do so in a few simple steps. Just follow the steps mentioned:
Step1 Multiple options are available on the top left corner of the Wondershare Filmora home interface. Click on help.
Step2 A drop-down box will open up.
Step3 In the options offered to you, select suggest a feature.

Step4 It automatically directs you to your default browser, where you can see the multiple feature requests.
Step5 You can vote for a feature you want in the next update.
Step6 Or you can also create a request for another particular feature.

Summing Up
Wondershare Filmora is the best in the business regarding editing your videos. It has such creative and easy-to-use software that even a beginner efficiently edits videos.
There are a lot of features that Wondershare Filmora provides. But now, with these secret and hidden tips, you can edit your videos more creatively.
Free Download For macOS 10.14 or later
Part 2. Customize Proxy Files
Before understanding the custom proxy settings, let us know what proxy files are.
Proxy Files
Proxy files in Wondershare Filmora allow you to render and edit 4K and other higher-resolution videos easily, regardless of your computer’s processing power.
No one wants to compromise PC performance when editing videos. But if you are importing a video with a higher resolution than your PC, you can only play it sometimes. Other than that, your PC might get stuck and slow down.
If your PC has a built-in resolution of 1080p, but the video you are going to import is 2160p, you can encounter rendering and performance problems. But in the case of Wondershare Filmora Proxy files, you can smoothly edit your videos without any trouble.
How to Customize Proxy Files in Filmora
Although Wondershare Filmora automatically creates proxy files when it encounters resolutions more significant than the PC performance. But you can also set them to your preference.
And customize your proxy files takes some simple and easy steps. But first, follow the steps mentioned below.
Step1 Find the File option on the top left corner of the Wonderhsare Filmora home interface.
Step2 Click on Files and go to Preferences.
Step3 A window will pop up, and here you can see multiple options.
Step4 Go to the performance.
Step5 In the performance tab, scroll down till your see Proxy.
Step6 Here check the box that says, “Automatically create proxies when resolution higher than:”
Step7 Below you can see multiple options. In these options, select the resolution that you want.
Step8 You can also click on the box below to automatically delete the proxies when you close your project.
Now, whenever you encounter a resolution of a higher video than the one you selected, Wondershare Filmora will do its magic.
Part 3. Delete Project Render Cache
Another hack you can use to save space on your hard drive is Deleting the Render cache. But before we do that, let us understand what Render cache is!
What is Render Cache?
Rendering can be a giant leap to give you a smooth performance experience. However, when you import your videos into the timeline, you can always render to have an uninterrupted playback experience.
Doing so will allow you to work in your zone quickly and efficiently. You can do a manual rendering before you begin the editing process. Or you can also opt to choose automatic rendering. In the automatic rendering option, you can continue your editing process. In the meantime, your timeline will be rendered.
How to Delete Render Cache in Filmora
To save up storage space on your computer, you can delete your render cache by following the steps.
Step1 Click on files in the top left corner of the Wondershare Filmora home interface.
Step2 Go to Preferences.
Step3 A window will pop up and go to Performance.
Step4 In the performance tab, scroll down below to the Preview Render.
Step5 Check the box saying, “Automatically delete render files when a project is closed.”
Step6 Click on OK to save your changes.
Now, whenever you close your project, your render cache will be deleted and would have given you extra space on your computer.
Part 4. Remove Split Button on Playhead
In some instances, when you are moving the playhead on the timelines, it can distract you from doing your editing. Or even more, you can mistakenly click on the Split button to split the clips you don’t want them to.
Well, no worries at all! Wondershare Filmora takes care of that for you. You can hide or remove the Split button on the playhead. It only takes a few simple and easy steps. Follow the steps mentioned below to remove the Split button:
Step1 You will notice the File option on the top left corner of the Wonderhsare Filmora home interface.
Step2 Click on Files and go to Preferences.
Step3 A window will pop up, and here you can see multiple options.
Step4 Go to the editing
Step5 In the editing tab, scroll down till your see the Split button.
Step6 Check the box. Then, click OK to save your changes.
Doing so would have removed the Split button from your playhead. So now you can edit your videos without any distractions.
Part 5. Copy and Paste Effects
Copy and paste are one of the oldest tricks in editing procedures. Wondershare Filmora comes with a range of commands and features that allow you to save time and be reliable.
Suppose you want to add an effect to a video clip in the timeline. Then, after adding the effect to your video, make custom changes to make it look more closely to the style you want. You can now use the copy-and-paste function to add the same effect to another clip. That helps you save a lot of time from tedious and time-consuming work.
How to Copy and Paste Effects
While editing, you will need to ensure that your editing process is as clean as possible and that you have all the time on hand.
But there is a solution! You can easily copy and paste the effects you placed on one video clip to another. Just follow the steps mentioned, and you will be good to go:
Step1 Right-click on the video to you added the effects too.
Step2 A drop-down column will pop up.
Step3 In the options below, you will notice an option called “Copy Effects.”
Step4 Click on the “Copy Effects” option.
Step5 Now move the playhead to the video clip on which you want to paste the effects.
Step6 Right-click on the video that you want to place the effect on.
Step7 In the pop-up column, select the Paste Effect
Step8 It adjusts the video clip according to the changes of the prior one.
You can save editing time by simply copying and pasting video effects.
Part 6. Timeline Snap
You might have added multiple videos in the same timeline track. If you removed the video ahead of the video clip, you have to close the gap in between.
So, arranging and moving clips in the timeline are hectic and time-consuming. However, that is the case without timeline snapping.
How to Apply Timeline Snap in Filmora
Timeline snapping will allow you to arrange video clips side by side without any breaks and cut-offs. Also, it will enable you to place it precisely above other video and audio gaps in the timeline.
In most cases, Timeline snapping is enabled from the start. But if you are encountering some problems managing your videos. Or if you want to remove the Timeline snap feature. Follow the steps mentioned below:
Step1 Right-click on the Timeline.
Step2 A pop will open up, giving you multiple options.
Step3 Click on timeline Snapping to either enable it or disable it.
Now you can easily enable and disable timeline snapping according to your choice!
Part 7. Color Code Video Clips
When editing footage from multiple cameras, you might want to organize which media is from which source in the timeline. You can do this by color coding your clips.
Steps to Color Code Your Videos
Color coding allows you to edit all the clips marked with a particular color to be selected simultaneously without selecting them manually in the timeline.
To color code a video, follow the steps as mentioned:
Step1 Select the clips you want to color code, right-click, and choose from the available colors.
Step2 Once you’ve color coded your clips, you can right-click on the clip again and choose to select all clips from the color mark option.
Step3 And all the clips marked with that color will be selected.
Part 8. Group Clips Together
Now in an editing timeline, you might encounter a situation where you want to arrange a video clip with specific audio. Again, it allows you to stay organized and save up a lot of time.
Grouping clips together can also be helpful when you want to edit multiple clips in the timeline but want to maintain a particular order. The group will remain in its place and allow you to edit your other video clips quickly.
Stepwise Guide to Grouping the Clips in Filmora
You can group video and audio clips in straightforward steps. Just follow the actions ahead, and you will be good to go:
Step1 Hold Left-click and drag across the clips that you want to select.
Step2 When you are done, Right-click on the clip to open the options tab.
Step3 Scroll down, and you will see a “” option.
Step4 Select Group, and that’s done.
Your whole group will be selected whenever you select a video clip or an audio clip.
Part 9. Pan and Zoom Shortcut
Editing shortcuts are excellent. They allow you to save up a lot of time. Some people prefer to use a mouse only to edit their videos, but professionals always use a keyboard.
But there are some other shortcuts too! In these shortcuts, you would not necessarily need a keyboard; only a mouse will work and give a good outcome.
You might have seen those videos in which a specific screen ratio moves over a picture. Or, in some cases when you have to pan and zoom to create a flow effect.
Instead of manually adjusting the ratio of your videos and photos, Pan and Zoom shortcuts will allow you to use multiple features. These features allow you to select where your video or photo will start, zoom, and end.
These shortcuts are so easy to apply. Just go through the steps below, and you will accomplish the following:
Step1 Right-click on a photo or a video clip.
Step2 Go to the crop and zoom tab above the timeline.
Step3 In the window that opens up, you will see a pan and zoom option in the top left corner. Click on it.
Step4 And on the bottom right corner of the window, you can see the pan and zoom shortcuts available.
Step5 Please select any of them you want and then click on OK.
Part 10. New Feature Request
One of the significant features of Wondershare Filmora that sets it among the best is its capability to listen to the users. When you have been using Wondershare Filmora for a long time, there will come a time when you wish for a feature. You can also do so in a few simple steps. Just follow the steps mentioned:
Step1 Multiple options are available on the top left corner of the Wondershare Filmora home interface. Click on help.
Step2 A drop-down box will open up.
Step3 In the options offered to you, select suggest a feature.
Step4 It automatically directs you to your default browser, where you can see the multiple feature requests.
Step5 You can vote for a feature you want in the next update.
Step6 Or you can also create a request for another particular feature.
Summing Up
Wondershare Filmora is the best in the business regarding editing your videos. It has such creative and easy-to-use software that even a beginner efficiently edits videos.
There are a lot of features that Wondershare Filmora provides. But now, with these secret and hidden tips, you can edit your videos more creatively.
Easy Ways to Remove Motion Blur In Photoshop
The motion blur effect is created in photos when the picture is taken in poor light conditions or due to a fast-moving object. Moreover, if the shutter speed of the camera is too low, it will also produce a motion blur effect. In such a situation, the captured picture may look out of focus and tedious. In order to fix this issue, this article can help you.
By reading this article, you can learn how to remove motion blur in Photoshop with simple steps. Moreover, we will also provide the best alternatives to Photoshop that you can utilize to remove motion blur from your photos.
Part 1: How to Remove the Motion Blur in Photoshop?
To fix a motion blur in an image, you would require a professional tool such as Adobe Photoshop . Photoshop is a well-recognized tool comprising tons of features for image editing and graphic designing. It offers selection tools that enable you to choose the specific parts of a photo efficiently. You can also add layers to your photo to modify and edit specific areas of the image.
You can also apply appealing filters from this platform to transform an ordinary image drastically. Moreover, using this precise tool, you can also fix motion blur in Photoshop. You can choose the blurry areas of your photo through its selection tools. Thus, with a few clicks, you can eliminate the flaws from your image easily.
Steps to Fix Motion Blur in Photos Using Photoshop
If you are new to Photoshop and don’t know how to fix motion blur in photos, then follow the instructions described below:
Step1 Open the Photoshop tool on your PC or Mac and upload your photo. From the “Layers” section, press “Ctrl + J” or “Command + J” to copy the first layer. Afterward, convert the first layer by choosing the option “Smart Object.”

Step2 Now head to the “Filter” section and tap on “Sharpen” to proceed. Afterward, proceed with the option of “Shake Reduction” by clicking on it. Now Photoshop will automatically reduce the blur effect. From the displayed panel, uncheck the option called “Artifact Suppression.”

Step3 To continue, open the “Advanced” tab from the left panel and enhance the size of your rectangular. Manage the position of the rectangle according to your preference. By doing so, you can see the details of the image clearly.

Step4 From the left panel, manage the options like “Blur Trace Bounds” and “Smoothing” according to your desire. Once done, press the “OK” button. For adding more modifications, add a blank layer and choose the “Clone Stamp Tool.” Afterward, select “Soft Round Brush” from the general brushes.

Step5 Now adjust the Opacity to 100% and Flow to 50%. Moreover, select “Current & Below” as the sample. Press the Alt key to take a sample of any flawless part of your photo and apply it to the blurry area. Make sure that the color of the sample taken is the same as the blurry area in the photo.

Part 2: Remove the Motion Blur with an Alternative to Photoshop
It may be possible that you don’t get satisfactory results from Photoshop removing motion blur. Or, if you find the interface of Photoshop intimidating, it can affect your productivity. For your assistance, this section will bring you the best alternatives to Photoshop.
1. IMAGamigo
IMAGamigo is an online tool that allows you to perform different operations on pictures efficiently. To fix motion blur, it offers a Deblurrer feature. Using this feature, you can automatically remove blur from your photos without any external effort. It also provides other distinct features such as Background Remover, Restorer, Colorizer, Upscale, etc.
To use this tool, first, navigate to its official website. From its tools, select “Deblurrer” to proceed. A new window will open on your screen instantly. Scroll down a little bit and locate the area saying, “Drop Image Here.” Click on this area and upload your image. Afterward, the tool will automatically start analyzing the picture. Once the process gets finished, click on the Download button to save your photo.

2. Vance.AI
This online platform is also a well-trusted tool by professionals and content creators. It provides AI-supported tools such as AI Image Denoiser, AI Image Upscaler, AI Photo Enhancer, etc. You can use its AI Image Sharpener to eliminate motion blur from pictures. It supports all popular image file formats, such as JPEG, PNG, and JPG. Thus, without any installations, you can quickly utilize this tool to fix motion blur photos.
To use this tool, access the official webpage of Vance.AI and select the “AI Image Sharpener” feature. Once done, click on the “Upload Image” option and import your blurry photo. Afterward, a new window will be open from which you can adjust the settings. Select the “Sharpen” option and choose the preferred Sharpen Mode. Afterward, click on the “Start to Process” option. Once the process ends, you can download the picture with a single click.

3. AKVIS Refocus AI
AKVIS is an offline tool that produces high-end results at a fast processing speed. You can find multiple options in this tool, such as Airbrush, Retoucher, Sketch, Decorator, etc. When it comes to fixing blurry pictures, this tool provides an exclusive feature called “Refocus AI.” Through this feature, you can instantly increase the sharpness of your photo. Also, it offers different modes such as Motion Blur, Radial Blur, Refocus-AI, and Tilt-Shift.
To fix motion blur:
Step1 Launch this tool and navigate to its Refocus AI option.
Step2 Select Refocus AI as your mode and upload the blurry picture. The default preset will be AKVIS Default AI.
Step3 Disable the “Image Sharpening” feature and navigate to the “Motion Deblur AI” section.
Step4 From there, adjust your Focus accordingly.
Step5 For more enhancements, enable the Image Sharpening feature and adjust the parameters.

Bonus Tip – How to Add Motion Blur to Your Images?
Do you want to add motion blur to your images? Many people like to intentionally add a motion blur effect in their images to add an artistic element. If you are interested in doing so, the best desktop tool you can try is Wondershare Filmora . This tool offers trending and high-quality effects that you can easily apply to your images.
Free Download For Win 7 or later(64-bit)
Free Download For macOS 10.14 or later
To add a motion blur effect:
Step1 Launch Filmora and create a new project.
Step2 Import your photo on this tool and drop it into the timeline.
Step3 Split the clip where you want to add the blur effect.
Once done, go to the Effects tab and search “Blur.” By doing so, you would be able to check all the blur effects on your screen. Choose and apply the blur effect to the split part of your clip. Once done, hit the Export button.

Conclusion
Photoshop is an excellent tool to edit and modify your pictures in great quality. You can use this article to take guidance to remove motion blur from photos. However, if you are not getting desired results from Photoshop, we have also provided the best alternatives to Photoshop to remove motion blur. Moreover, to create a motion blur effect in your images, you can explore the Wondershare Filmora tool.
Part 1: How to Remove the Motion Blur in Photoshop?
To fix a motion blur in an image, you would require a professional tool such as Adobe Photoshop . Photoshop is a well-recognized tool comprising tons of features for image editing and graphic designing. It offers selection tools that enable you to choose the specific parts of a photo efficiently. You can also add layers to your photo to modify and edit specific areas of the image.
You can also apply appealing filters from this platform to transform an ordinary image drastically. Moreover, using this precise tool, you can also fix motion blur in Photoshop. You can choose the blurry areas of your photo through its selection tools. Thus, with a few clicks, you can eliminate the flaws from your image easily.
Steps to Fix Motion Blur in Photos Using Photoshop
If you are new to Photoshop and don’t know how to fix motion blur in photos, then follow the instructions described below:
Step1 Open the Photoshop tool on your PC or Mac and upload your photo. From the “Layers” section, press “Ctrl + J” or “Command + J” to copy the first layer. Afterward, convert the first layer by choosing the option “Smart Object.”
Step2 Now head to the “Filter” section and tap on “Sharpen” to proceed. Afterward, proceed with the option of “Shake Reduction” by clicking on it. Now Photoshop will automatically reduce the blur effect. From the displayed panel, uncheck the option called “Artifact Suppression.”
Step3 To continue, open the “Advanced” tab from the left panel and enhance the size of your rectangular. Manage the position of the rectangle according to your preference. By doing so, you can see the details of the image clearly.
Step4 From the left panel, manage the options like “Blur Trace Bounds” and “Smoothing” according to your desire. Once done, press the “OK” button. For adding more modifications, add a blank layer and choose the “Clone Stamp Tool.” Afterward, select “Soft Round Brush” from the general brushes.
Step5 Now adjust the Opacity to 100% and Flow to 50%. Moreover, select “Current & Below” as the sample. Press the Alt key to take a sample of any flawless part of your photo and apply it to the blurry area. Make sure that the color of the sample taken is the same as the blurry area in the photo.
Part 2: Remove the Motion Blur with an Alternative to Photoshop
It may be possible that you don’t get satisfactory results from Photoshop removing motion blur. Or, if you find the interface of Photoshop intimidating, it can affect your productivity. For your assistance, this section will bring you the best alternatives to Photoshop.
1. IMAGamigo
IMAGamigo is an online tool that allows you to perform different operations on pictures efficiently. To fix motion blur, it offers a Deblurrer feature. Using this feature, you can automatically remove blur from your photos without any external effort. It also provides other distinct features such as Background Remover, Restorer, Colorizer, Upscale, etc.
To use this tool, first, navigate to its official website. From its tools, select “Deblurrer” to proceed. A new window will open on your screen instantly. Scroll down a little bit and locate the area saying, “Drop Image Here.” Click on this area and upload your image. Afterward, the tool will automatically start analyzing the picture. Once the process gets finished, click on the Download button to save your photo.
2. Vance.AI
This online platform is also a well-trusted tool by professionals and content creators. It provides AI-supported tools such as AI Image Denoiser, AI Image Upscaler, AI Photo Enhancer, etc. You can use its AI Image Sharpener to eliminate motion blur from pictures. It supports all popular image file formats, such as JPEG, PNG, and JPG. Thus, without any installations, you can quickly utilize this tool to fix motion blur photos.
To use this tool, access the official webpage of Vance.AI and select the “AI Image Sharpener” feature. Once done, click on the “Upload Image” option and import your blurry photo. Afterward, a new window will be open from which you can adjust the settings. Select the “Sharpen” option and choose the preferred Sharpen Mode. Afterward, click on the “Start to Process” option. Once the process ends, you can download the picture with a single click.
3. AKVIS Refocus AI
AKVIS is an offline tool that produces high-end results at a fast processing speed. You can find multiple options in this tool, such as Airbrush, Retoucher, Sketch, Decorator, etc. When it comes to fixing blurry pictures, this tool provides an exclusive feature called “Refocus AI.” Through this feature, you can instantly increase the sharpness of your photo. Also, it offers different modes such as Motion Blur, Radial Blur, Refocus-AI, and Tilt-Shift.
To fix motion blur:
Step1 Launch this tool and navigate to its Refocus AI option.
Step2 Select Refocus AI as your mode and upload the blurry picture. The default preset will be AKVIS Default AI.
Step3 Disable the “Image Sharpening” feature and navigate to the “Motion Deblur AI” section.
Step4 From there, adjust your Focus accordingly.
Step5 For more enhancements, enable the Image Sharpening feature and adjust the parameters.
Bonus Tip – How to Add Motion Blur to Your Images?
Do you want to add motion blur to your images? Many people like to intentionally add a motion blur effect in their images to add an artistic element. If you are interested in doing so, the best desktop tool you can try is Wondershare Filmora . This tool offers trending and high-quality effects that you can easily apply to your images.
Free Download For Win 7 or later(64-bit)
Free Download For macOS 10.14 or later
To add a motion blur effect:
Step1 Launch Filmora and create a new project.
Step2 Import your photo on this tool and drop it into the timeline.
Step3 Split the clip where you want to add the blur effect.
Once done, go to the Effects tab and search “Blur.” By doing so, you would be able to check all the blur effects on your screen. Choose and apply the blur effect to the split part of your clip. Once done, hit the Export button.
Conclusion
Photoshop is an excellent tool to edit and modify your pictures in great quality. You can use this article to take guidance to remove motion blur from photos. However, if you are not getting desired results from Photoshop, we have also provided the best alternatives to Photoshop to remove motion blur. Moreover, to create a motion blur effect in your images, you can explore the Wondershare Filmora tool.
Best 6 Online MP4 Croppers
A part of the editing process is cropping the video from the raw mp4 file. This article will show you the best 6 online mp4 croppers. The question is which will suit you best? You may be from different levels of expertise when it comes to video editing. Are you aware of your personal needs and standards when it comes to looking for the best online mp4 cropper?
You may one day face that you cannot choose between the countless options available online. Testing each of these would take a huge chunk of your time. The time that could be spent on other activities that you rather do. Also, the overwhelming feeling of not knowing where to start.
Ezgif Video Crop
Ezgif is an online video cropping tool that supports multiple file formats for your video. If you’re worried about the tool’s difficulty of using the tool then, I have good news for you. This is not filled with confusing icons and tabs. You can simply copy and paste the URL and begin the cropping process. In addition, you can add your file from your local computer’s storage. A smart choice for your video cropping needs!
Although, there is no perfect tool without its strengths and weaknesses. So, we will show you the reality side and how other users perceive its usefulness.

Pros
- Capable of cropping various types of videos including MP4, WebM, AVI and many more. This means that it can also output different formats and encoding. This article may seem to focus on mp4 format but if in the future that you would need a different format then this may come in handy.
- The power to set the cropping size and ratio more effectively. There are also presets available to help you transform it into video square, 4:3, 16:9, 3:2 and many more. Having a cropping area that you can easily adjust is such a helpful feature.
- It shows the display configuration info for imported mp4 video files.
Cons
- The maximum file size is only 100 mb (megabyte). Which means that you have to consider if your mp4 video file would not exceed this limit. A disadvantage indeed especially for those who have a video recorder that saves it in high quality. There is also a fear that the user would be hassled by trimming longer videos into shorter clips just to meet this requirement.
- The video preview is not the same as the final output. The quality in the preview may be shown as having a much lower quality.
- Other video file formats may not play due to incompatibility. This may be a huge disadvantage especially if you’re looking for efficiency in getting stuff done.
Wondershare Filmora
Filmora Video Editor is a video editing application that considers the user experience of its consumers. Do not worry about the cost as downloading it is indeed free. As compared to other tools in this article, this one is a complete video editing software. So if you’re a user that has various needs for video production then this will suit you perfectly!

Pros
- Editing supports even if mp4 video is in 4k video resolution. Say goodbye to limiting yourself from editing those high quality mp4 files that you have. You may have videos from DSLRs that record in high resolution so there’s no need to worry about losing its wonderful quality.
- You can automatically and manually crop your video into different ratios. Crop and Zoom and Crop to Fit offer additional options rather than simply cropping it.
- Also supports video formats like AVI, MOV, FLV and many more.
- Is available both on Windows and Mac. No need to worry about computer compatibility
- Can export in various formats. You can upload the output online or burn discs.
- Batch crop multiple video clips. The hassle of going through the same process of cropping every single video is removed.
Cons
- Subscription fee if you want to export it without a watermark.
- May be complicated for some beginners
- Frequent lagging issues.
For Win 7 or later (64-bit)
For macOS 10.14 or later
Kapwing
If you’re looking for something specific like using it for Facebook, Tiktok, Instagram and other social media applications then Kapwing is the answer. This is the right choice for those that just want a straightforward tool for their social media needs. You can be the content creator that you dream of or a sharer of your favorite memories that have been recorded into a video.
The process just starts by uploading the video that you want. Next is selecting the platform where you will publish it. And finally, after cropping the mp4 video is ready to download. Other features are also available in case you’re interested in enhancing it.

Pros
- No trouble in cropping video to the right dimensions. This would avoid the awkward cropping that happens to some video cropping tools.
- Can share directly to the platform of your choice.
- You can play and preview your video before and after cropping.
- A smart tool that can guide you what your length should be depending on the platform.
- Automatically resizes your video.
Cons
- There is a limit to the video file size which is should only be below 80 MB (megabytes)
- A watermark will be present if you’re not using the paid version
Flexclip
Another video editor that bridges the gap between the beginner and professional. It brands itself as having an easy interface that communicates with the user. It is indeed a great online video cropper for mp4 files. By checking the video editor, you could also see the additional features for your future editor needs. You can begin by dragging your mp4 video to the center page and choosing the area you want to crop. Finally, you could export the finished product and file name.

Pros
- Fast preparation of videos. If you’re the type of person that wants a fast process then try this as your editing tool.
- Can crop mp4 videos. If you have files in this format then you could easily transform your mp4 files into another ratio.
- Availability of various video formats to be exported.
- The power to change the different aspect ratios.
Cons
- Limited features for free version. If the financial situation is not stable then you might have doubts whether to risk it for this tool.
Video Toolbox
Speaking of affordability this tool suits what every basic editor dreams of. It definitely is a free editor and unlike the others you can use it as long as you like. This means no more worries about your free trial expiring. When it comes to cropping your mp4 video file then it is indeed an amazing tool to have. I suggest that you go and check it for yourself. You will have no regrets as you will not waste your money on this one.

Pros
- A video editor with no cost. It is absolutely free and has no hidden charges.
- It can convert video files into several formats including MP4, MPEG, MPG, RM, VOB, WMV, 3GP and many more.
- Can intelligently analyze any uploaded video and display the detailed info for you.
- Support for uploading local video or downloading files from online URL.
- Cut, crop, record and merge video with few clicks
- Has two accessible modes to manage video.Which is simple & advanced.
- You can change the advanced settings such as resolution, bit rate and frame rate.
- Great customer support in case that you would be lost there are guides and tutorials present
Cons
- The interface may be too simple for other people. It depends on the user if the simplicity would be an advantage or disadvantage.
- It has limited storage which is only 300 MB for mp4 video files. A big deal for those who frequently shoot in high quality meaning that it requires a larger storage than that limitation.
Online Video Cutter Cropper
As the name suggests it is an online video cropper. The question is why is it included in this list of the best? It does not require any installation which means that the problem of troubleshooting on how to get it on your computer is gone. Just simply on your browser and you could access this lightweight tool. Are your video files ready to be cropped?
The process in this tool is to Open, Cut and Save. First is opening the file from anywhere like your local folder, Google Drive and URL. Next is cropping it according to your preferences. And, lastly, save your progress.

Pros
- Free to use and no hidden fees.
- A chance to move both beginning and end sliders to cut off useless portions accurately.
- The output format can be MP4, FLV, AVI, MPG and 3GP.
- You can cut, crop and rotate the video quickly. Such freedom for a tool that is free. You can rotate your video by 90 degrees if it is upside down.
- You can be secured because it auto-deletes files from the server.
Cons
- There is a restriction in file size which is 500 MB
- Possibility of ads popping up. This can be irritating to users that just want to be focused on their task.
- It relies on stable connection to the internet. The reality of life is that stability is not guaranteed even if it’s the internet.
Conclusion
Is it your first time knowing about these tools?
I have shown you the six best online mp4 croppers and each of its pros and cons. By now, you have an idea of which of these would suit you as a user.
The question is… are you aware of what you need or want for a mp4 video cropper? It’s time for you to weigh your own values and which mp4 cropper would fit that. Yes, you can read tons of reviews on the internet but if you don’t have self- awareness then you would still be confused on which would fit you.
There is no need to fear the unknown. A part of the process is exploring the possibilities and here we are demonstrating to you your 6 best choices to try from.
Let me know in the comments about your thoughts on these tools. You could also make your own pros and cons of these mp4 video croppers.
Pros
- Capable of cropping various types of videos including MP4, WebM, AVI and many more. This means that it can also output different formats and encoding. This article may seem to focus on mp4 format but if in the future that you would need a different format then this may come in handy.
- The power to set the cropping size and ratio more effectively. There are also presets available to help you transform it into video square, 4:3, 16:9, 3:2 and many more. Having a cropping area that you can easily adjust is such a helpful feature.
- It shows the display configuration info for imported mp4 video files.
Cons
- The maximum file size is only 100 mb (megabyte). Which means that you have to consider if your mp4 video file would not exceed this limit. A disadvantage indeed especially for those who have a video recorder that saves it in high quality. There is also a fear that the user would be hassled by trimming longer videos into shorter clips just to meet this requirement.
- The video preview is not the same as the final output. The quality in the preview may be shown as having a much lower quality.
- Other video file formats may not play due to incompatibility. This may be a huge disadvantage especially if you’re looking for efficiency in getting stuff done.
Wondershare Filmora
Filmora Video Editor is a video editing application that considers the user experience of its consumers. Do not worry about the cost as downloading it is indeed free. As compared to other tools in this article, this one is a complete video editing software. So if you’re a user that has various needs for video production then this will suit you perfectly!
Pros
- Editing supports even if mp4 video is in 4k video resolution. Say goodbye to limiting yourself from editing those high quality mp4 files that you have. You may have videos from DSLRs that record in high resolution so there’s no need to worry about losing its wonderful quality.
- You can automatically and manually crop your video into different ratios. Crop and Zoom and Crop to Fit offer additional options rather than simply cropping it.
- Also supports video formats like AVI, MOV, FLV and many more.
- Is available both on Windows and Mac. No need to worry about computer compatibility
- Can export in various formats. You can upload the output online or burn discs.
- Batch crop multiple video clips. The hassle of going through the same process of cropping every single video is removed.
Cons
- Subscription fee if you want to export it without a watermark.
- May be complicated for some beginners
- Frequent lagging issues.
For Win 7 or later (64-bit)
For macOS 10.14 or later
Kapwing
If you’re looking for something specific like using it for Facebook, Tiktok, Instagram and other social media applications then Kapwing is the answer. This is the right choice for those that just want a straightforward tool for their social media needs. You can be the content creator that you dream of or a sharer of your favorite memories that have been recorded into a video.
The process just starts by uploading the video that you want. Next is selecting the platform where you will publish it. And finally, after cropping the mp4 video is ready to download. Other features are also available in case you’re interested in enhancing it.
Pros
- No trouble in cropping video to the right dimensions. This would avoid the awkward cropping that happens to some video cropping tools.
- Can share directly to the platform of your choice.
- You can play and preview your video before and after cropping.
- A smart tool that can guide you what your length should be depending on the platform.
- Automatically resizes your video.
Cons
- There is a limit to the video file size which is should only be below 80 MB (megabytes)
- A watermark will be present if you’re not using the paid version
Flexclip
Another video editor that bridges the gap between the beginner and professional. It brands itself as having an easy interface that communicates with the user. It is indeed a great online video cropper for mp4 files. By checking the video editor, you could also see the additional features for your future editor needs. You can begin by dragging your mp4 video to the center page and choosing the area you want to crop. Finally, you could export the finished product and file name.
Pros
- Fast preparation of videos. If you’re the type of person that wants a fast process then try this as your editing tool.
- Can crop mp4 videos. If you have files in this format then you could easily transform your mp4 files into another ratio.
- Availability of various video formats to be exported.
- The power to change the different aspect ratios.
Cons
- Limited features for free version. If the financial situation is not stable then you might have doubts whether to risk it for this tool.
Video Toolbox
Speaking of affordability this tool suits what every basic editor dreams of. It definitely is a free editor and unlike the others you can use it as long as you like. This means no more worries about your free trial expiring. When it comes to cropping your mp4 video file then it is indeed an amazing tool to have. I suggest that you go and check it for yourself. You will have no regrets as you will not waste your money on this one.
Pros
- A video editor with no cost. It is absolutely free and has no hidden charges.
- It can convert video files into several formats including MP4, MPEG, MPG, RM, VOB, WMV, 3GP and many more.
- Can intelligently analyze any uploaded video and display the detailed info for you.
- Support for uploading local video or downloading files from online URL.
- Cut, crop, record and merge video with few clicks
- Has two accessible modes to manage video.Which is simple & advanced.
- You can change the advanced settings such as resolution, bit rate and frame rate.
- Great customer support in case that you would be lost there are guides and tutorials present
Cons
- The interface may be too simple for other people. It depends on the user if the simplicity would be an advantage or disadvantage.
- It has limited storage which is only 300 MB for mp4 video files. A big deal for those who frequently shoot in high quality meaning that it requires a larger storage than that limitation.
Online Video Cutter Cropper
As the name suggests it is an online video cropper. The question is why is it included in this list of the best? It does not require any installation which means that the problem of troubleshooting on how to get it on your computer is gone. Just simply on your browser and you could access this lightweight tool. Are your video files ready to be cropped?
The process in this tool is to Open, Cut and Save. First is opening the file from anywhere like your local folder, Google Drive and URL. Next is cropping it according to your preferences. And, lastly, save your progress.
Pros
- Free to use and no hidden fees.
- A chance to move both beginning and end sliders to cut off useless portions accurately.
- The output format can be MP4, FLV, AVI, MPG and 3GP.
- You can cut, crop and rotate the video quickly. Such freedom for a tool that is free. You can rotate your video by 90 degrees if it is upside down.
- You can be secured because it auto-deletes files from the server.
Cons
- There is a restriction in file size which is 500 MB
- Possibility of ads popping up. This can be irritating to users that just want to be focused on their task.
- It relies on stable connection to the internet. The reality of life is that stability is not guaranteed even if it’s the internet.
Conclusion
Is it your first time knowing about these tools?
I have shown you the six best online mp4 croppers and each of its pros and cons. By now, you have an idea of which of these would suit you as a user.
The question is… are you aware of what you need or want for a mp4 video cropper? It’s time for you to weigh your own values and which mp4 cropper would fit that. Yes, you can read tons of reviews on the internet but if you don’t have self- awareness then you would still be confused on which would fit you.
There is no need to fear the unknown. A part of the process is exploring the possibilities and here we are demonstrating to you your 6 best choices to try from.
Let me know in the comments about your thoughts on these tools. You could also make your own pros and cons of these mp4 video croppers.
Also read:
- The Ultimate Guide to Slideshow Maker with Music for 2024
- Updated How to Use Frame Blending in Adobe Premiere Pro for 2024
- New Know How to Make a Video Background Transparent? Export Transparent Background Video After Adding Effects. Steps to Remove White Background From Video
- Updated Brighten a Video in Windows 10 Easily When Video Clips You Recorded on Your Windows 10 Computer or Those Downloaded From YouTube Are Too Dark or Too Bright, You Can Easily Adjust the Color Levels in a Few Clicks for 2024
- New Have You Ever Played Roblox Games? Read This Article to Find Out How to Get Motion Blur in Roblox Using Simple and Efficient Ways
- New 6 Instant Mp4 to GIF Online Tools for You
- New How to Make a Movie with Windows Movie Maker, In 2024
- 2024 Approved 3 Ways to Make Time-Lapse Video on MacBook
- New 2024 Approved 3 Actionable Ways to Create Countdown Animation for Videos
- New How to Create The Best Video Collages ?
- Updated Want to Add a Motion Blur Effect to Your Photos? This Step-by-Step Tutorial Will Show You How to Use GIMP Software to Get the Effect You Want
- Updated Learn How to Use Face Tracking in After Effects to Quickly Mask Out Faces, Animate Objects on Faces, and More
- Updated How to Use Speed Ramping to Create a Footage
- In 2024, VSDC Free Video Editor Review 2023
- Unravel the Creative Potential of Adobe After Effects for Precise Motion Synchronization. Learn How to Use Track Matte and Tracking with a Simple Alternative for 2024
- Updated Create Realistic Fire Effects by Filmora
- 3GP Video Format What Is 3GP Format And How To Open It for 2024
- Updated How to Color-Correct an S-Log Footage
- 2024 Approved Time Lapse Videos Play an Important Part in Videography. If You Want to Start Video Shooting, Then You Shouldnt Miss Time Lapse Video. This Article Will Show You some Ideas over This
- Updated This Article Will Show You How to Make a Tattoo Disappear on Your Body Magically for 2024
- New 2024 Approved How to Zoom in on PowerPoint Easy Ways
- Updated 2024 Approved 5 Simple Tools to Merge Video and Audio Online
- Updated 2024 Approved Do You Want a LUT that You Can Use for Your High-Definition Content? You Can Use Rec 709 LUT Premiere Pro for Your HD Digital Media to Give the Perfect Result
- Updated To Know How to Add Effects in Premiere Pro, You Need to Follow This Guide as It Has All You Need to Know to Add Effects in Premiere Pro. Learn More Here for 2024
- Updated In 2024, Looking for a Legitimate Tutorial to Create and Add Text Effects in Adobe Premiere Pro? Here Are the Simple Steps for Premiere Pro Text Effects and Find an Alternative Way
- New How to Uue Adobe Lightroom Color Grading for 2024
- New 2024 Approved How to Zoom in Discord
- Updated 2024 Approved In This Article, We Will Discuss How to Rotate Videos in the Lightworks Application. Below Is a Way to Rotate Videos in Lightworks Manually, Here, We Will Use the Z-Axis Rotation
- New In 2024, Ways to Make Sure Your Recording Slideshow in Powerpoint Is Not Wrong
- Blender Tips - How to Make Blender Render Transparent Background for 2024
- 2024 Approved Quickest Guide | Zoom In and Out on Snapchat
- Updated Why Did Filmora AI Portrait Attract People for 2024
- Updated 4 Ways to Merge MP4 and MP3
- New Do You Want to Add a Slow-Mo Effect in Your Videos? In This Guide, We Will Discuss How to Add Slow-Motion Effects in the Videos with After Effects in an Efficient Way for 2024
- Updated Best Slow Motion Camera Apps for Best Content Creation for 2024
- New In 2024, This Article Discusses What Is Adobe Premiere Pro, How to Download, Install and Use It, and Its Key Features. It Further Discusses Its Alternative for Editing Your Videos and More. Check Out Now
- Updated In 2024, 7 Best GoPro Video Editors for Mac
- 2024 Approved This Article Aims to Show You How to Improve Your Lighting in the Sun
- 2024 Approved How to Add Subtitles to MKV Videos on All Platforms
- Here We Will Discuss About Both the Methods Which You Can Choose One to Get Rid of Unwanted Portions From Your Videos or Photos for 2024
- Updated 2024 Approved What Is a Memoji and How to Make a Memoji? You Can Learn Top 8 Memoji Makers for PC, Android, or iOS, and the Steps to Make a Memoji
- Find Out How to Create Your Own Custom Motion Graphics in Filmora. Add Unique Objects, Manipulate Text, and Animate Anything You Want for 2024
- Updated 2024 Approved Step by Step to Split Clips in VLC
- Updated How To Record Video in Slow Motion Comprehending Important Points
- In 2024, Complete Review & Guide to Techeligible FRP Bypass and More For Xiaomi Redmi Note 12 5G
- New Detailed Guide on Video Speech to Text Conversion for 2024
- In 2024, How to Unlock iPhone X Without Passcode? | Dr.fone
- In 2024, 3 Ways for Android Pokemon Go Spoofing On Samsung Galaxy F15 5G | Dr.fone
- Will iSpoofer update On Motorola Moto G Stylus (2023) | Dr.fone
- How To Unlock SIM Cards Of Vivo G2 Without PUK Codes
- A Step-by-Step Guide on Using ADB and Fastboot to Remove FRP Lock on your Lava Blaze Curve 5G
- Looking For A Location Changer On Nubia Red Magic 9 Pro+? Look No Further | Dr.fone
- In 2024, Overview of the Best Samsung Galaxy M14 4G Screen Mirroring App | Dr.fone
- Ultimate Guide from Xiaomi Redmi 12 5G FRP Bypass
- In 2024, Fixing Foneazy MockGo Not Working On Tecno Pop 8 | Dr.fone
- In 2024, Latest way to get Shiny Meltan Box in Pokémon Go Mystery Box On Vivo Y78+ (T1) Edition | Dr.fone
- In 2024, How To Unlock Apple iPhone 14 Pro Without Passcode? 4 Easy Methods | Dr.fone
- In 2024, New Multiple Ways How To Remove iCloud Activation Lock From your Apple iPhone 12
- Best Android Data Recovery - Retrieve Lost Pictures from Gionee F3 Pro.
- Simple ways to get lost files back from Tecno
- New Top 10 Free Video Translators to Mitigate Translation Risks
- Title: Updated In 2024, Live Stream on YouTube Using Zoom
- Author: Morgan
- Created at : 2024-06-24 01:30:09
- Updated at : 2024-06-25 01:30:09
- Link: https://ai-video-editing.techidaily.com/updated-in-2024-live-stream-on-youtube-using-zoom/
- License: This work is licensed under CC BY-NC-SA 4.0.
