

Updated In 2024, Separate Audio From Video in DaVinci Resolve Step by Step
Separate Audio From Video in DaVinci Resolve [Step by Step]
The DaVinci Resolve is an excellent software for editing videos; that’s why it attracts users. They also enjoy using it due to its simplicity and availability of features. One of them is separating the audio from the video that most people are looking for. It is easy to extract from this software. But, to avail of this feature, you need to follow proper steps, and this article is all about it. There are also details regarding the Wondershare Filmora as the most appropriate alternative and simpler solution provider.
How can you separate audio from the video clips in DaVinci resolve?
The DaVinci resolve is the complete package to solve your different issues. It is a solution provider regarding the editing of the videos, extraction of audio from videos, matching, correction of the colours and many more. It also includes modification of the lens that helps analyse and correct the distortion. Even the lens analysis is also available to deliver high-quality results.
Step 1: Launch the DaVinci Resolve in your system after its installation. Import the media file from the library in your timeline from which you have to separate the audio.

Step 2: Select the Edit tab in the timeline of your project if it isn’t selected by default. You need to choose the video clip by pointing the cursor or dragging the mouse towards it.

Step 3: After its selection, untick all the clips, and this step is for separating the audio from the video just from one file. Click the video file for deselection.

Step 4: Now it is easy to select the video and click on it. Select the audio and video clips separately. Simply edit, delete or move your audio whenever you want it to.
An easier way to separate the audio from the video
However, the DaVinci Resolve is the software of advanced level and the best choice for professionals. But its pricing that is $299, is quite disturbing for most of the users. So, they are always searching for a suitable approach and reasonable as well. And that is the first and foremost Filmora Video Editor . You can split the audio and listen to your favourite track on any media player.
All the tools are readily available, and they are used without facing any issue. After editing and applying all the effects, it is easy to upload on social network platforms. it is very simple to create fast or slow-motion videos with speed controls. This software is highly supportive of editing videos of any kind. There is no need to look for the reasons to choose Wondershare Filmora; instead, it is not to choose it for editing tasks.
For Win 7 or later (64-bit)
For macOS 10.14 or later
Features:
- Extracting the audio from videos
- Controls available for videos and audios
- Number of ways to split the clips and screens
- All the functions are performed by just drag and drop
- Sharing of the videos unlimitedly on Vimeo, YouTube and others
- mixing the audio and removing the noise
To extract the audio from the video clip in Wondershare Filmora, go through the following easy steps and get your task done.
Step 1: After completing the installation of Wondershare Filmora, selection of the ratio is required whether it is 4:3 or 16:9. It is your choice and dependent on the requirements of your project. Import the video from the folder of your computer when you will click “Import”. As the default, all the files are all together in one place with no gap.

Step 2: This step separates the audio from the video in a single click. You need to right-click on the video from which you have to split the audio and select “Detach Audio”. Instantly, an audio file will appear on the screen on the audio track. Yes, you have received the original audio final from the source file.
Successfully the audio is separate from the video. Wondershare Filmora also offers to replace the audio file you want to add to the video. It can provide a few instructions, some narrations or personal, funny tunes for sharing with family and friends.
Step 3: After step2, it is simple to delete the audio clips or video that isn’t needed anymore and add your own choice. Click on “Export” to save the audio file into the new MP3 file and select “iPod” presenting to play. Even, you can save it as your project file on your system. After the completion of exporting the audio track, load the project file again with the video frame and export it as the new file of your video.

Wondershare Filmora is the most user-friendly editing software for all. Whether you want to make complex or straightforward videos, all is done in just a few steps. The best part of this software is that all the features are easily accessible to all types of users. It is very simple to start and show your creative skills and share easily if you are unfamiliar with video editing.
There is a massive range of tools in Wondershare Filmora that you are looking for in any video editor. 800+ video effects are built-in, such as effects for the text, transitions, filters, stickers, motion graphics, and overlays.
In Wondershare Filmora, there are templates for the spilt screens as well. It is best for you to handle your YouTube channels or your Instagram account. It doesn’t record screen only but as well voice-over. Even capturing the videos from frame to frame is also possible. So, what are you waiting for? Download Wondershare Filmora today and start your editing done in just a few clicks.
Step 2: Select the Edit tab in the timeline of your project if it isn’t selected by default. You need to choose the video clip by pointing the cursor or dragging the mouse towards it.
Step 3: After its selection, untick all the clips, and this step is for separating the audio from the video just from one file. Click the video file for deselection.
Step 4: Now it is easy to select the video and click on it. Select the audio and video clips separately. Simply edit, delete or move your audio whenever you want it to.
An easier way to separate the audio from the video
However, the DaVinci Resolve is the software of advanced level and the best choice for professionals. But its pricing that is $299, is quite disturbing for most of the users. So, they are always searching for a suitable approach and reasonable as well. And that is the first and foremost Filmora Video Editor . You can split the audio and listen to your favourite track on any media player.
All the tools are readily available, and they are used without facing any issue. After editing and applying all the effects, it is easy to upload on social network platforms. it is very simple to create fast or slow-motion videos with speed controls. This software is highly supportive of editing videos of any kind. There is no need to look for the reasons to choose Wondershare Filmora; instead, it is not to choose it for editing tasks.
For Win 7 or later (64-bit)
For macOS 10.14 or later
Features:
- Extracting the audio from videos
- Controls available for videos and audios
- Number of ways to split the clips and screens
- All the functions are performed by just drag and drop
- Sharing of the videos unlimitedly on Vimeo, YouTube and others
- mixing the audio and removing the noise
To extract the audio from the video clip in Wondershare Filmora, go through the following easy steps and get your task done.
Step 1: After completing the installation of Wondershare Filmora, selection of the ratio is required whether it is 4:3 or 16:9. It is your choice and dependent on the requirements of your project. Import the video from the folder of your computer when you will click “Import”. As the default, all the files are all together in one place with no gap.
Step 2: This step separates the audio from the video in a single click. You need to right-click on the video from which you have to split the audio and select “Detach Audio”. Instantly, an audio file will appear on the screen on the audio track. Yes, you have received the original audio final from the source file.
Successfully the audio is separate from the video. Wondershare Filmora also offers to replace the audio file you want to add to the video. It can provide a few instructions, some narrations or personal, funny tunes for sharing with family and friends.
Step 3: After step2, it is simple to delete the audio clips or video that isn’t needed anymore and add your own choice. Click on “Export” to save the audio file into the new MP3 file and select “iPod” presenting to play. Even, you can save it as your project file on your system. After the completion of exporting the audio track, load the project file again with the video frame and export it as the new file of your video.
Wondershare Filmora is the most user-friendly editing software for all. Whether you want to make complex or straightforward videos, all is done in just a few steps. The best part of this software is that all the features are easily accessible to all types of users. It is very simple to start and show your creative skills and share easily if you are unfamiliar with video editing.
There is a massive range of tools in Wondershare Filmora that you are looking for in any video editor. 800+ video effects are built-in, such as effects for the text, transitions, filters, stickers, motion graphics, and overlays.
In Wondershare Filmora, there are templates for the spilt screens as well. It is best for you to handle your YouTube channels or your Instagram account. It doesn’t record screen only but as well voice-over. Even capturing the videos from frame to frame is also possible. So, what are you waiting for? Download Wondershare Filmora today and start your editing done in just a few clicks.
Top 7 Easy Ways to Convert a Video to a GIF Online
Looking for the best video to gif online conversion tools? No worries, as we have done all the research work and have shortlisted the best tools that can assist you with the task. GIF is short and cute animated files that help in interestingly conveying a message. These short-animated visuals help in reaching and creating an impact on the target audience. So, if you have some videos, GIF animations can be created from them using a good converter tool which can be an online program or system software.
Online programs are preferred by the users owing to their simple and hassle-free use, support for basic features, and cost-saving options. So, here in this topic, we will discuss the top and easy ways to convert video to GIF online.

Part 1: Top 7 Easy Ways to Convert a Video to a GIF Online
Several online tools can be used for converting a video file into GIF, but all do not stand up to the tall claims it makes. So, if you are in search of an easy yet effective tool, shortlisted below are the top 7 tools for video into GIF online conversion.
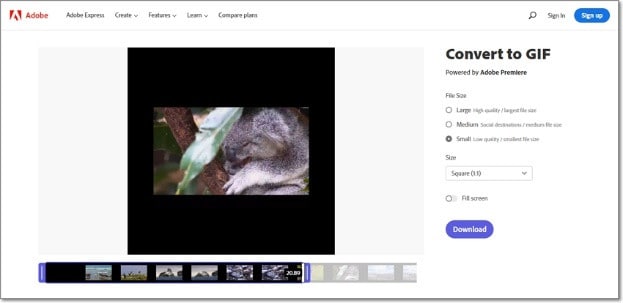
1. Adobe Express
Powered by Adobe Premiere, this is an excellent online tool that allows converting videos in all key formats in GIF format. The free version allows adding videos for up to 1 hour and the processed files can be downloaded to the local system.
Key features
- Video files in all key formats can be converted to GIF.
- Allows selecting the aspect ratio and the file size of the target file.
- This video to GIF converter online tool support drag and drop feature.
- Allows trimming the video so that the file portion can be selected.
Pros:
- Simple and clean interface.
- Quick file processing.
- Allows selecting aspect ratio and file size.
Cons:
- Only one file at a time can be processed.
- Only desktop files can be added.
- To download the file, you need to free sign-up.
User Review:
A good online multi-platform service that works with interesting features. -TechRadar
This is one of the best programs that comes packed with wide range of features that can assist you in getting the target customized files.
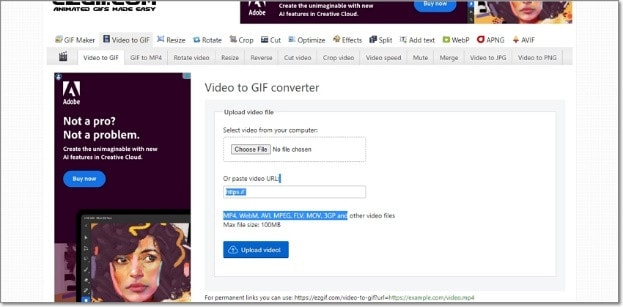
2. Ezgif
Using this browser-based tool, local as well as online videos in key formats can be converted to GIFs. The interface is simple where you just need to add the file and the conversion will be done automatically.
Key features
- GIF can be created from the local and online video files in all key formats.
- Choose the video part for creating the GIF file else by default, the first 5 seconds of the video are used.
Pros:
- All popular video formats like MP4, MPEG, FLV, MOV, and others are supported for conversion to GIF.
- Local, as well as file links in case of online files, can be added.
- Allows selecting the video part for which the GIF has to be created.
- Allows choosing the frame rate, and the size of the video.
This online GIF converter has an option to set static background.
Cons:
- File size limitation of 100 MB.
- Internet dependency.
User Review
“A website with many important and good tools that facilitates making your task easier. You get all features in one place. -Sasa011, Mywot.
This simple online tool is a pocket friendly option for converting your videos into GIF with added option for editing them. Supporting all key formats, the program supports additional tools as well.
3. Img2Go
Your videos on the system, cloud storage, as well as using URLs can be added to this online tool for conversion to GIF format. The look and the quality of GIFs can be adjusted by making changes in the file parameters.

Key features
- Convert all key video files like MP4, MOV, MPEG, and others to GIF.
- Customize the GIF look by editing the file size and applying the color filter.
- This online video to GIF converter allows to choose to enhance, sharpen, equalize, and edit files in other ways.
- Files to be converted can be added from the desktop, Google Drive, Dropbox, as well as URL.
- Processed files can be saved to the cloud storage in addition to the local system.
Pros:
- Multiple sources to add the video file.
- Customize the file parameters and enhance its look.
- Converted file is downloaded automatically to the local system.
Cons:
- Free version allows converting only 3 files at a time.
- Dependency on internet connectivity.
User review:
“This is the best online converter app I have discovered. It is really easy and fast to use. I absolutely recommend it and it really works.”-Maria Ancil, ChromeStats
When you need to convert only a few files at a time in a hassle-free manner consider this simple online tool. After the conversion is done, you would not have any hassles of file downloading as it is automatically saved to the system.
4. CloudConvert
Convert your videos in MP4, FLV, WebM, and other key formats to GIF using this browser-based tool that is simple and free to use. Multiple file parameters can be changed using the tool to get the desired file.

Key Features:
- Allows converting all key video formats.
- Files to be converted can be added from the desktop, URL, Dropbox, Google Drive, and OneDrive.
- Allows adjusting the fit, codec, resolution, aspect ratio, and fps.
- Option to trim the file and also add a watermark.
Pros:
- Files to be converted can be added from multiple sources.
- All key video formats supported.
- Option to control the video size, quality, and aspect ratio.
Cons:
- Free version allows only 25 conversions per day.
- Converted files need to be downloaded.
User Review
“Instant way of converting small-sized files online in many different formats.”
-Sushil, SoftwareAdvice
When conversion of cloud-based files is needed, this works a good online tool that also allows you to edit and change the key file parameters.
5. io
This is a free browser-based tool that allows creating of animated GIF files from videos. There are several video editing options also supported by the tool like split, cut, adding text, and more. You can even add a YouTube video or its link to create a GIF.

Key features:
- Free online tool for creating a GIF file.
- Support all key video formats like MP4, MOV, FLV, and others.
- Local, YouTube as well as videos from Dropbox can be added.
- Option to record the video and create its GIF.
- ‘Allows choosing the size, duration, background color, and several other file parameters.
Pros:
- Videos from multiple sources can be added.
- YouTube videos can also be converted to GIFs.
- Option to record the video and create its GIF.
- Support multiple video editing options.
Cons:
- Slow processing speed.
- Files processed through the free version have a watermark.
- Free version allows processing files under 10 minutes and of 250Mb in size.
User Review:
“It is just a perfect tool and easy to use. It supports a wide variety of media files.” - Koi, Trustpilot.
Option to convert the YouTube videos as well as the recorded videos make this tool different from the others. All popular file formats are supported and you can even customize and change the file parameters as per your requirements.
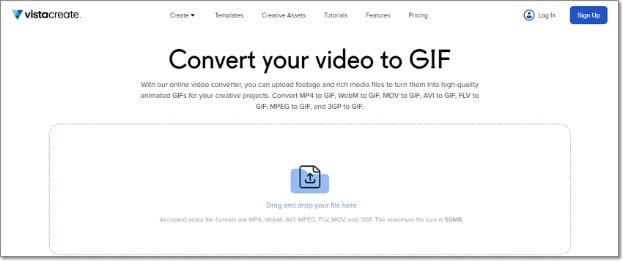
6. VistaCreate
This is another simple-to-use tool that allows converting all key video formats to a GIF file. The program allows setting various parameters as needed.
Key Features
- Convert MP4, WebM, AVI, MPEG, FLV, MOV, and 3GP to GIF.
- Support Drag and Drop feature.
- Videos up to 50MB can be processed.
- Allows choosing the video start and the end time for which GIF is to be created. If no time is selected, the first 5 seconds of the video are used.
Pros:
- Simple user interface.
- Allows selecting the video part for which GIF is to be created.
- Choose the frame rate and the speed.
Cons:
- Limited format support.
- Free version has a limitation of 50Mb file size.
- Processing speed is slow.
User Review:
“It is a simple and fast online tool that works. The program allows creating eye-catchy visuals and is free to use.”-Kshitij T, G2. Com
Simple to use, this online tool is apt when you need selected parts of the video for creating a GIF. Though it is compatible with a few selected formats, the process of conversion is simple.
7. XConvert
This online tool support conversion of wide range of file types and formats including videos to GIF. The supported video formats are MP4, WebM, MOV, and MKV. The tool also allows changing the target file parameters.

Key Features
- Free to use online tool with a simple interface.
- Allows converting MO4, MOV, WebM, and MKV videos to GIF.
- Frame Rate and resolution of the target GIF file can be selected.
- Allows adding local as well as files saved to the cloud storage.
Pros:
- Add videos from the desktop, Google Drive, and Dropbox.
- Choose the desired frame rate and resolution.
- Option to save the processed file to the system or Dropbox. Option to get the converted file download link.
Cons:
- Limited file support.
- Converted files need to be downloaded.
- Internet dependency.
User Review:
Portable, nice UI, cross-platform tool and has a lot of actions and run fast. -Roflpancake, Alternativeto
When simple conversion with basic file editing is needed, consider this online tool for your task. In addition to the local system, you can even save the files to your cloud storage.
Part 2: Comparison Table of the Best Video to GIF Converters
The table below compares the above 7 listed tools based on the formats supports, speed of file processing, and the watermark on the processed files.
| Features/Tool | Supported Format | Free Version with watermark or not | Speed of conversion |
|---|---|---|---|
| Adobe Express | All key video formats | No watermark | 2 (Fast) |
| Ezgif | All key formats including MP4, MPEG, FLV, MOV, and others. | No watermark. | 4 (Slow) |
| Img2Go | MP4, FLV, MOV, and all key video formats. | No Watermark | 2 (Fast) |
| CloudConvert | All popular video formats including MP4, MOV, FLV, MPEG, and more. | No Watermark | 2(Fast) |
| Veed.io | All key formats | Yes, free version has a watermark. | 5 (very Slow) |
| VistaCreate | MP4, WebM, AVI, MPEG, FLV, MOV, and 3GP. | No watermark | 5 (Very Slow) |
| XConvert | MP4, WebM, MOV, MKV. | No watermark | 3 (Average) |
Part 3: Best Solution to Convert Video to GIF on Windows/Mac
To convert videos to GIF on your Windows and Mac without worrying about any limitations or internet dependency, desktop software works as the best option. If you too have been looking for one such desktop program, we recommend Filmora Video Editor as the best choice. Though the software is used majorly for advanced video editing options, it is capable of performing a variety of other tasks as well including video to GIF conversion. The software allows file conversion through its export feature.
For Win 7 or later (64-bit)
For macOS 10.14 or later
Key Features
- Almost all video formats like MOV, MP4, MKV, FLV, and others can be converted to GIF.
- High-quality conversion at a fast speed.
- Support batch processing so that multiple files can be processed at a time.
- Allows editing and customizing videos using the built-in features of the software like effects, subtitles, crop, cut, and more.
Pros:
- The interface is simple which makes the software suitable even for beginners.
- Almost all popular video formats are supported.
- High-quality conversion in a hassle-free manner.
- Windows and Mac support.
Cons:
- Being a desktop software, it needs download and installation.
- Need to purchase the software subscription.
Steps to convert videos to GIF using Wondershare Filmora
Step 1. Launch the installed software on your system and the main interface select Create Project > New Project.

Step 2. Click on Import Media Files Here option under the Media tab to browse and add the local video file. Multiple files for batch processing can be added here.

Step 3. After the files are added, now it’s time to move them to the time and for this, you can simply drag and drop them to the bottom. Now at the timeline, using the built-in editing features, customization can be done as required.

Step 4. Finally, tap on the Export button and then choose GIF as the desired target format and also the location to save the converted files.

Conclusion
If one of the above-listed online tools serves your videos for GIF conversion purposes, it’s great. If not, you can use the Wondershare Filmora software. Once downloaded, the software can be used for several editing and other video-related tasks.
For macOS 10.14 or later
Key Features
- Almost all video formats like MOV, MP4, MKV, FLV, and others can be converted to GIF.
- High-quality conversion at a fast speed.
- Support batch processing so that multiple files can be processed at a time.
- Allows editing and customizing videos using the built-in features of the software like effects, subtitles, crop, cut, and more.
Pros:
- The interface is simple which makes the software suitable even for beginners.
- Almost all popular video formats are supported.
- High-quality conversion in a hassle-free manner.
- Windows and Mac support.
Cons:
- Being a desktop software, it needs download and installation.
- Need to purchase the software subscription.
Steps to convert videos to GIF using Wondershare Filmora
Step 1. Launch the installed software on your system and the main interface select Create Project > New Project.
Step 2. Click on Import Media Files Here option under the Media tab to browse and add the local video file. Multiple files for batch processing can be added here.
Step 3. After the files are added, now it’s time to move them to the time and for this, you can simply drag and drop them to the bottom. Now at the timeline, using the built-in editing features, customization can be done as required.
Step 4. Finally, tap on the Export button and then choose GIF as the desired target format and also the location to save the converted files.
Conclusion
If one of the above-listed online tools serves your videos for GIF conversion purposes, it’s great. If not, you can use the Wondershare Filmora software. Once downloaded, the software can be used for several editing and other video-related tasks.
Want to Make Your Canva Slideshow More Attractive? Follow the Given Discussion to Know Everything About Making the Best Slideshows with Canva
Little Tricks to Create Canva Slideshow No One is Telling You
An easy yet powerful editor
Numerous effects to choose from
Detailed tutorials provided by the official channel
You can make slideshows in innumerable ways. And we all are aware of how important it is to present slideshows, no matter what our profession or purpose is. And one of the ways of making slideshows is by using the canvas slideshow.
You can make the best type of slideshows on any device you prefer with Canva. So, in the following discussion, we will be talking about how you can make a slideshow on a PC or Mac with Canvas. Then, we will point out the steps for adding music to your slideshow in Canva. We will also mention how you can turn a slideshow into a video with Canva.
Lastly, we will discuss the answers and solutions to some common questions regarding converting slides to digital, following with the discussion of the best video editing tool for slideshow videos. So, without o further ado, let us get started with our discussion.
In this article
01 [How to Make a Slideshow on a PC or Mac with Canva?](#Part 1)
02 [How to Add Music to Your Slideshow in This Canva?](#Part 2)
03 [How to Turn Your Slideshows into Videos with Canva?](#Part 3)
04 [FAQ of Converting Slides to Digital](#Part 4)
Part 1 How to Make a Slideshow on a PC or Mac with Canva?
You can make the best Canva slide show in just five simple steps. You can choose any device for making a slideshow with canva. The best choice is to use a PC or Mac to get the entire display, thereby helping you make better edits, changes and integrations in your slideshows.
So, let us start the discussion with the five simple steps for making a slideshow on PC or Mac with Canva. The steps are as follows.
● Step 1: Launch the application
The first step is to download, launch and install the application of Canva on your preferred device, that is, either your PC or your Mac. The application is available for free, and you need not pay any charges for downloading and installing Canva on your Mac or PC.

● Step 2: Choose the template
The next step is to choose the template you want for your sideshow. Choose from among the many canva slideshow templates that are available.

● Step 3: Make the required edits with the features of Canva.
There are numerous features available at Canva. Use them to make the necessary edits and integrations in your slideshow. Use the different features and make your slideshow the way you want. You can add images, texts and designs to your slideshow at Canva.

● Step 4: Customize accordingly
You can add your images and change the templates and designs at Canva. It helps in bringing more uniqueness, creativity and originality, as you can integrate your imagination, skills and creativity in the slideshow you are making at Canva.
● Step 5: Save your work and export
All the hard work is finfish by now. Now you have to have the slideshow that you have made so far. And then, share it in whichever file format you prefer on any social media platform or other places you want.

Part 2 How to Add Music to Your Slideshow in This Canva?
You can customize your slideshow at Canva in numerous ways. And one of the ways is by adding music to your slideshow in Canva. A slideshow in canva can have music in it, which can be any music. You can record yourself or even integrate any readymade music file.
You need only a single step to add music to your slideshow at Canva. The steps for making the slideshow remain the same, and you can refer to the steps mentioned above for reference. In the above steps, pause at Step 3.
You can add the required music file or media file at that step. In the next step, that is, in Step 4, you can customize that media file. You can integrate any audio file that you record for your slideshow.

Part 3 How to Turn Your Slideshows into Videos with Canva?
We have discussed the steps for making canva photo slideshow. The steps are simple to perform and easy to follow. But what if you need or want to turn that slideshow into a video? You definitely can do so! The steps for this, too, are straightforward and effortless.
So, now we will discuss the steps for turning slideshows at Canva into videos. There are four simple steps for this, and they are as follows.
● Step 1: Choose your preferred presentation type
By this, we mean that you must decide the size of your presentation. It is better to determine the type of presentation, for it helps in better and faster making of your presentation.
● Step 2: Integrate all the components you want in your presentation
Then, integrate all the images, soundtracks, texts, designs and templates and all the other necessary components you want to be present in your presentation. You can use numerous features in your presentation at Canva.
● Step 3: Customize the presentation based on your choice and needs
You can change the components of your presentation according to your needs and choice, and you can bring about as much customization as you want. So, customize according to and as much you want.
● Step 4: Download and share
Lastly, save the presentation. Then go to the blue bar, and in the options present in the top right corner, you will find “presenting”. You can save your file from there, and then the “Download” option will help you download the file to your device.
Part 4 FAQ of Converting Slides to Digital
Now, we will discuss solutions or answers to the common questions relating to converting slides into digital format. Here are the frequently asked issues or questions regarding this aspect.
01How do I convert my slides to digital?
We can recommend a few ways in which you can digitise your old slides. The methods are as follows.
● Hiring a proficient professional at this work is the easiest and the most effective method.
● A slide copier tool or application can also effectively serve this purpose.
● Use a device that converts the images or slides digitally.
● Use a flatbed scanner to scan your slides.
● Photographing your slides is an intelligent way to digitise your old slides.
02Can I use Filmora to turn my slides to digital?
You can readily use Filmora to transform your slideshows into slideshow videos, digitising your slides effectively. You have to make your slideshow at Filmora, edit and customise it according to your preference and then save, share or download the file. It will automatically turn your slide into digital format or help you make a successful slideshow video.
03What is the best method for turning slides into digital?
The most effortless method is to hire a professional, and it will guarantee saucerful results. But, if you want to do it yourself, you can readily opt for Filmora. It is the best video editing application that can readily help you digitise your slides.
04Can I turn my slideshow into videos?
Yes, you can effortlessly turn your slideshows into videos. You need a video editing tool that enables you to share and download your slideshow in a video format. And the best tool for it is Filmora. You can unhesitant opt for Filmora if you want to turn your slideshows into videos and share them effortlessly on any platform.
Now, we will discuss the best video editing tool or application, Wondershare Filmora Video Editor . You can use this tool to make the best slideshows and convert them into videos. You have the liberty f using any device for editing and making slideshow videos. You can customise as much you want and use the tons of features for editing available in the tool.
For Win 7 or later (64-bit)
For macOS 10.12 or later
You can opt for the free version. It has tools and features that are more than sufficient for making the most incredible slideshow videos. And when you choose its paid version, you are bestowed with the most advanced professional tools and features for editing. You can use the 800+ filters available, the texts, designs, templates, and other components for editing at Filmora.
So, if you want to make the best and the most incredible slideshows videos, you can readily opt for Filmora!
● Ending Thoughts →
● So, this was all about the different aspects and factors of a slideshow at Canva. Let us have a quick recap of the topic and discussions we have touched on in the above discussion.
● The five steps for making A slideshow in canva on your PC or Mac.
● The steps for adding music to your slideshow at Canva, also, how can you turn your slideshows into videos in Canva in four simple steps
● Lastly, we have discussed the answers or solutions to the common questions relating to converting slides to digital. And we have ended our discussion by introducing the best video editing tool, Filmora, that can help you make the most fantastic slideshows on any device, be it a PC or Mac.
You can make slideshows in innumerable ways. And we all are aware of how important it is to present slideshows, no matter what our profession or purpose is. And one of the ways of making slideshows is by using the canvas slideshow.
You can make the best type of slideshows on any device you prefer with Canva. So, in the following discussion, we will be talking about how you can make a slideshow on a PC or Mac with Canvas. Then, we will point out the steps for adding music to your slideshow in Canva. We will also mention how you can turn a slideshow into a video with Canva.
Lastly, we will discuss the answers and solutions to some common questions regarding converting slides to digital, following with the discussion of the best video editing tool for slideshow videos. So, without o further ado, let us get started with our discussion.
In this article
01 [How to Make a Slideshow on a PC or Mac with Canva?](#Part 1)
02 [How to Add Music to Your Slideshow in This Canva?](#Part 2)
03 [How to Turn Your Slideshows into Videos with Canva?](#Part 3)
04 [FAQ of Converting Slides to Digital](#Part 4)
Part 1 How to Make a Slideshow on a PC or Mac with Canva?
You can make the best Canva slide show in just five simple steps. You can choose any device for making a slideshow with canva. The best choice is to use a PC or Mac to get the entire display, thereby helping you make better edits, changes and integrations in your slideshows.
So, let us start the discussion with the five simple steps for making a slideshow on PC or Mac with Canva. The steps are as follows.
● Step 1: Launch the application
The first step is to download, launch and install the application of Canva on your preferred device, that is, either your PC or your Mac. The application is available for free, and you need not pay any charges for downloading and installing Canva on your Mac or PC.
● Step 2: Choose the template
The next step is to choose the template you want for your sideshow. Choose from among the many canva slideshow templates that are available.
● Step 3: Make the required edits with the features of Canva.
There are numerous features available at Canva. Use them to make the necessary edits and integrations in your slideshow. Use the different features and make your slideshow the way you want. You can add images, texts and designs to your slideshow at Canva.
● Step 4: Customize accordingly
You can add your images and change the templates and designs at Canva. It helps in bringing more uniqueness, creativity and originality, as you can integrate your imagination, skills and creativity in the slideshow you are making at Canva.
● Step 5: Save your work and export
All the hard work is finfish by now. Now you have to have the slideshow that you have made so far. And then, share it in whichever file format you prefer on any social media platform or other places you want.
Part 2 How to Add Music to Your Slideshow in This Canva?
You can customize your slideshow at Canva in numerous ways. And one of the ways is by adding music to your slideshow in Canva. A slideshow in canva can have music in it, which can be any music. You can record yourself or even integrate any readymade music file.
You need only a single step to add music to your slideshow at Canva. The steps for making the slideshow remain the same, and you can refer to the steps mentioned above for reference. In the above steps, pause at Step 3.
You can add the required music file or media file at that step. In the next step, that is, in Step 4, you can customize that media file. You can integrate any audio file that you record for your slideshow.
Part 3 How to Turn Your Slideshows into Videos with Canva?
We have discussed the steps for making canva photo slideshow. The steps are simple to perform and easy to follow. But what if you need or want to turn that slideshow into a video? You definitely can do so! The steps for this, too, are straightforward and effortless.
So, now we will discuss the steps for turning slideshows at Canva into videos. There are four simple steps for this, and they are as follows.
● Step 1: Choose your preferred presentation type
By this, we mean that you must decide the size of your presentation. It is better to determine the type of presentation, for it helps in better and faster making of your presentation.
● Step 2: Integrate all the components you want in your presentation
Then, integrate all the images, soundtracks, texts, designs and templates and all the other necessary components you want to be present in your presentation. You can use numerous features in your presentation at Canva.
● Step 3: Customize the presentation based on your choice and needs
You can change the components of your presentation according to your needs and choice, and you can bring about as much customization as you want. So, customize according to and as much you want.
● Step 4: Download and share
Lastly, save the presentation. Then go to the blue bar, and in the options present in the top right corner, you will find “presenting”. You can save your file from there, and then the “Download” option will help you download the file to your device.
Part 4 FAQ of Converting Slides to Digital
Now, we will discuss solutions or answers to the common questions relating to converting slides into digital format. Here are the frequently asked issues or questions regarding this aspect.
01How do I convert my slides to digital?
We can recommend a few ways in which you can digitise your old slides. The methods are as follows.
● Hiring a proficient professional at this work is the easiest and the most effective method.
● A slide copier tool or application can also effectively serve this purpose.
● Use a device that converts the images or slides digitally.
● Use a flatbed scanner to scan your slides.
● Photographing your slides is an intelligent way to digitise your old slides.
02Can I use Filmora to turn my slides to digital?
You can readily use Filmora to transform your slideshows into slideshow videos, digitising your slides effectively. You have to make your slideshow at Filmora, edit and customise it according to your preference and then save, share or download the file. It will automatically turn your slide into digital format or help you make a successful slideshow video.
03What is the best method for turning slides into digital?
The most effortless method is to hire a professional, and it will guarantee saucerful results. But, if you want to do it yourself, you can readily opt for Filmora. It is the best video editing application that can readily help you digitise your slides.
04Can I turn my slideshow into videos?
Yes, you can effortlessly turn your slideshows into videos. You need a video editing tool that enables you to share and download your slideshow in a video format. And the best tool for it is Filmora. You can unhesitant opt for Filmora if you want to turn your slideshows into videos and share them effortlessly on any platform.
Now, we will discuss the best video editing tool or application, Wondershare Filmora Video Editor . You can use this tool to make the best slideshows and convert them into videos. You have the liberty f using any device for editing and making slideshow videos. You can customise as much you want and use the tons of features for editing available in the tool.
For Win 7 or later (64-bit)
For macOS 10.12 or later
You can opt for the free version. It has tools and features that are more than sufficient for making the most incredible slideshow videos. And when you choose its paid version, you are bestowed with the most advanced professional tools and features for editing. You can use the 800+ filters available, the texts, designs, templates, and other components for editing at Filmora.
So, if you want to make the best and the most incredible slideshows videos, you can readily opt for Filmora!
● Ending Thoughts →
● So, this was all about the different aspects and factors of a slideshow at Canva. Let us have a quick recap of the topic and discussions we have touched on in the above discussion.
● The five steps for making A slideshow in canva on your PC or Mac.
● The steps for adding music to your slideshow at Canva, also, how can you turn your slideshows into videos in Canva in four simple steps
● Lastly, we have discussed the answers or solutions to the common questions relating to converting slides to digital. And we have ended our discussion by introducing the best video editing tool, Filmora, that can help you make the most fantastic slideshows on any device, be it a PC or Mac.
OBS Green Screen Guide
OBS Studio is a free and open-source app for screen-casting and live streaming. Written in C/C++ and built with Qt, OBS Studio provides real-time capture, scene composition, recording, encoding, and broadcasting via the Real Time Messaging Protocol (RTMP).It can stream Videos to any RTMP supporting destination including YouTube, Twitch, Instagram and Facebook.
You only need one green screen software – OBS. The reason why OBS is the most recommended for streaming is because once you have set it up properly, you can do literally anything you can think of with the software (either with or without added plug-ins).
Chroma Key Settings in OBS
Chroma keying has become incredibly popular nowadays. People use it not just for gaming, but also in Zoom conferences, live interviews, talk shows, etc. Although it may feel complicated at first glance, setting up Chroma Key in OBS Studio is actually incredibly easy.
Have a look at the simple steps you need to take to set up a green screen in OBS:
- Make sure you have the following equipment prepared: a solid green background, webcam or video camera, lighting, and OBS Studio.
- Download the latest stable version of OBS Studio from the official website and install the software. Open OBS and let the Auto-Configuration Wizard optimize the software’s settings based on your hardware.
- Now you can add a video source.
- Right-click on the video source you’ve created and select Filter.
- Click the + button under the Effects Filters section and select Chroma Key.
- Type in a name for this effect layer.
- After you add a chroma key, OBS will automatically create and adjust the baseline settings for the filter. You can experiment with the sliders and settle when you are satisfied with the result.
- Make sure you aren’t wearing any green or reflective material. You can double-check the performance on the preview screen.
- If things are working smoothly, you are all set to start streaming with the green screen on.
Pro tip:
You can follow the instructions above and live stream to multiple platforms at once with Restream. Multistreaming to platforms like YouTube, Facebook, Twitter, Twitch, and LinkedIn allows you to drastically increase the audience reach and grow your followers.
How to make OBS green screen settings better
Using green screens for filmmaking isn’t the most complicated or difficult thing in the world but it certainly has its pitfalls. If you ask any experienced filmmaker what to look out for when using a green screen, chances are they’re going to mention lighting about a billion times and that’s for good reason.
Tips on How to make OBS green screen settings better
- Evenly light your green screen so you can get a good key.
- Watch out for light flares. Use some a matte box or your trusty paw to block out any unwanted light.
- When lighting, try to create as much separation between your subject and the green screen as you can.
- Shutter speed: Minimize motion blur by raising your shutter speed to 1/80 or 1/100
- Aperture: Setting your aperture to f4 or f5.6 will give you slightly more depth of field, which will blur and smooth out your green screen.
- Format: Set your camera to the best recording format it has.
- ISO: Try to avoid high ISOs.
Filmora
If you’re just starting out with video editing, or just want a simple program that works, Wondershare Filmora might be what you’re looking for. It has the essential tools, and anyone can learn to use it easily.
Wondershare Filmora is the one of best video editing software with cool features that compares to other competing video editing Softwares. Many video editing programs claim to offer professional results; Filmora is one of a few consumer-level tools that actually delivers.
For Win 7 or later (64-bit)
For macOS 10.12 or later
Installation Steps
- Click the icon in the center of the Media Library to add files directly.
- Go File > Import Media > Import Media Files.
- Drag and drop to the Media Library directly.
While importing a media file, Wondershar Filmora may ask you if you wish to create a proxy file to accelerate the editing process. Select “Yes” to have a fast video editing experience.
You can also import video clips using your Touch Bar controls if your computer has Touch Bar.

Record a media file
Apart from the videos shot by your digital devices, you can also directly import media files by recording video from your webcam, capturing the computer screen, or recording a voice-over.
Record computer screen:
Click the “Record” option, and choose “Record PC Screen” to get the built-in Wondershare Screen Recorder. Hit the red button to get started. If you want to stop the recording, you can hit F9.
Record videos from webcam:
Also, click the “Record” option, and choose “Record from Webcam”. In the pop-up Video Recording window, click the red button to start recording and click it again to stop recording. Then click OK to save the recorded video file.
Record voice-over:
Choose “Record a voiceover” under the Record menu. It would be better to connect a microphone to your Mac for a better result. Hit the Record button, and it leaves you 3 seconds to get ready.
All the recorded media files will be saved into Media Library automatically and you can drag them to the Timeline for editing.
Pro tip:
You can follow the instructions above and live stream to multiple platforms at once with Restream. Multistreaming to platforms like YouTube, Facebook, Twitter, Twitch, and LinkedIn allows you to drastically increase the audience reach and grow your followers.
How to make OBS green screen settings better
Using green screens for filmmaking isn’t the most complicated or difficult thing in the world but it certainly has its pitfalls. If you ask any experienced filmmaker what to look out for when using a green screen, chances are they’re going to mention lighting about a billion times and that’s for good reason.
Tips on How to make OBS green screen settings better
- Evenly light your green screen so you can get a good key.
- Watch out for light flares. Use some a matte box or your trusty paw to block out any unwanted light.
- When lighting, try to create as much separation between your subject and the green screen as you can.
- Shutter speed: Minimize motion blur by raising your shutter speed to 1/80 or 1/100
- Aperture: Setting your aperture to f4 or f5.6 will give you slightly more depth of field, which will blur and smooth out your green screen.
- Format: Set your camera to the best recording format it has.
- ISO: Try to avoid high ISOs.
Filmora
If you’re just starting out with video editing, or just want a simple program that works, Wondershare Filmora might be what you’re looking for. It has the essential tools, and anyone can learn to use it easily.
Wondershare Filmora is the one of best video editing software with cool features that compares to other competing video editing Softwares. Many video editing programs claim to offer professional results; Filmora is one of a few consumer-level tools that actually delivers.
For Win 7 or later (64-bit)
For macOS 10.12 or later
Installation Steps
- Click the icon in the center of the Media Library to add files directly.
- Go File > Import Media > Import Media Files.
- Drag and drop to the Media Library directly.
While importing a media file, Wondershar Filmora may ask you if you wish to create a proxy file to accelerate the editing process. Select “Yes” to have a fast video editing experience.
You can also import video clips using your Touch Bar controls if your computer has Touch Bar.
Record a media file
Apart from the videos shot by your digital devices, you can also directly import media files by recording video from your webcam, capturing the computer screen, or recording a voice-over.
Record computer screen:
Click the “Record” option, and choose “Record PC Screen” to get the built-in Wondershare Screen Recorder. Hit the red button to get started. If you want to stop the recording, you can hit F9.
Record videos from webcam:
Also, click the “Record” option, and choose “Record from Webcam”. In the pop-up Video Recording window, click the red button to start recording and click it again to stop recording. Then click OK to save the recorded video file.
Record voice-over:
Choose “Record a voiceover” under the Record menu. It would be better to connect a microphone to your Mac for a better result. Hit the Record button, and it leaves you 3 seconds to get ready.
All the recorded media files will be saved into Media Library automatically and you can drag them to the Timeline for editing.
Also read:
- Do You Want to Know About the Photo Video Maker with Song? Are You Ready to Discover It in Detail? This Article Will Give You Valuable Insights on This Topic
- New Camtasia Review – Is It The Best Video Editor?
- Top Silence Detection Tools for Better Film Production
- Updated In 2024, How to Fade in Text in Adobe Premiere Pro
- Updated Ultimate Guide on How To Plan and Storyboard a Music Video for 2024
- New You Can Make Stylish Chroma Key Text Effects After Reading This Article. Wondershare Filmora Will Fill the Crazy Colors in Your Handwritten Note or Words
- Updated In 2024, Top 15 Best Free MP4 Video Rotators Windows, Mac, Android, iPhone & Online
- In 2024, Want to Apply a Filter on Your Video Using Your iPhone or Mac? Here Are the Simple Steps to Put Add Filters on iMovie. Find Out a Better iMovie Alternative with More Filters
- New In 2024, Guide Add LUTs in Premiere Pro with Ease
- Updated 2024 Approved How to Fade to Black Premiere Pro
- In 2024, Do You Waste Time Making Transparent Background in Paint
- 5 Tried-And-True Ways to GIF Making
- Updated In 2024, Top 5 Free Online Video Filter Editors
- New How to Reduce the Size of Video Files Online? In This Article, Well Share the Top 10 Free Online Video Compressors that You Can Use Anywhere at Any Time and on Any Device for 2024
- In 2024, Finding The Best LUTs for Wondershare Filmora
- The Best Cinematic LUTs in The Market for 2024
- In 2024, Best 10 3D Slideshow Software Review
- New In 2024, Google Meet Green Screen Is the Latest Addition to the Virtual Meeting App. It Is a Crucial Feature as It Allows Users to Maintain a Semblance of Privacy Through Virtual Backgrounds
- Updated In 2024, How to Fade to Black Premiere Pro
- Updated 2024 Approved 8 Ways To Live Stream Pre-Recorded Video
- Discover How to Download Mobile Phone Green Screen Videos and Pictures for Free. Elevate Your Content with HD Quality Green Screen Frames
- Updated VSDC Free Video Editor Review
- Updated LumaFusion – One of the Best Video Editors for iOS
- New Getting Into The Details A Review of Kodak LUTs
- In 2024, Zoom In and Out on Discord
- Splitting Clips in Adobe After Effects Step by Step
- Tips That Show Anybody How To Make Youtube Slideshow – Guaranteed for 2024
- Updated Best GIF to AVI Converters (Online + Software Solutions) for 2024
- Boost Your Spirit Creating Motivational Status Videos for 2024
- Updated In 2024, Here Is a Step-by-Step Guide to Color Correct and Color Grade a Video Professionally with Wondershare Filmora. Lets Get Going
- Explore Our Comprehensive Guide to the 10 Best Cameras . Unlock the World of Advanced Technology Perfect for Capturing Slow-Motion Footage in Various Scenarios
- 5 Tips for Faster Editing in Filmora Video Editor for 2024
- Updated Tips for Choosing Location & Scheduling Music Video
- New 2024 Approved Dubbing Videos With Voiceovers | Wondershare Filmora Tutorial
- Deep Learning of AI Video Recognition for 2024
- New In 2024, Make Super Easy Coin Magic With Filmora
- Updated 2024 Approved Time Lapse Videos Play an Important Part in Videography. If You Want to Start Video Shooting, Then You Shouldnt Miss Time Lapse Video. This Article Will Show You some Ideas over This
- Updated In 2024, How to Merge Audio and Video Using FFmpeg
- Updated In 2024, Discover How You Can Use Vectorscope to Adjust Luminance, Color Grading, and More in Your Video Editing Projects
- New 2024 Approved Having Trouble with Black Backgrounds in After Effects? Land in Here to Know How You Can Quickly Escape This Glitch in the Simplest Ever Way Possible
- Updated In 2024, Top 22 Free Video Editing Software
- How to Transfer Photos From Sony Xperia 5 V to Samsung Galaxy S21 Ultra | Dr.fone
- Undelete lost music from C67 4G
- 8 Solutions to Solve YouTube App Crashing on OnePlus Open | Dr.fone
- In 2024, A Guide Asus ROG Phone 7 Wireless and Wired Screen Mirroring | Dr.fone
- In 2024, How to Remove iPhone XS Activation Lock
- How to Mirror Oppo Find N3 Flip to Mac? | Dr.fone
- 3 Easy Solutions to Hard Reset Xiaomi 14 Pro | Dr.fone
- In 2024, How to Transfer Contacts from Nubia Red Magic 9 Pro to iPhone XS/11 | Dr.fone
- In 2024, The Ultimate Guide to Get the Rare Candy on Pokemon Go Fire Red On Vivo Y100i Power 5G | Dr.fone
- In 2024, Hacks to do pokemon go trainer battles For Nokia C12 Pro | Dr.fone
- The Best Android SIM Unlock Code Generators Unlock Your Samsung Galaxy S23 FE Phone Hassle-Free
- How To Unlink Apple ID From iPhone 11 Pro Max
- How To Simulate GPS Movement With Location Spoofer On Infinix Note 30? | Dr.fone
- In 2024, How to Unlock Apple iPhone 7 Plus Without Passcode? | Dr.fone
- How To Track IMEI Number Of Samsung Galaxy F14 5G Through Google Earth?
- The Ultimate Guide to Unlocking Apple Watch Or Apple iPhone 15 Plus from iCloud
- Bypass iCloud Activation Lock with IMEI Code From Apple iPhone 7
- In 2024, FRP Hijacker by Hagard Download and Bypass your Tecno Spark 10 Pro FRP Locks
- Google Play Services Wont Update? 12 Fixes are Here on Poco C50 | Dr.fone
- About Nokia C32 FRP Bypass
- In 2024, 5 Techniques to Transfer Data from Honor 80 Pro Straight Screen Edition to iPhone 15/14/13/12 | Dr.fone
- In 2024, 3 Ways for Android Pokemon Go Spoofing On Google Pixel 8 | Dr.fone
- 3 Easy Solutions to Hard Reset OnePlus 11 5G | Dr.fone
- In 2024, How To Unlock Apple iPhone 6s Plus 3 Ways To Unlock
- How to Change Lock Screen Wallpaper on Xiaomi 13T
- In 2024, A Step-by-Step Guide on Using ADB and Fastboot to Remove FRP Lock from your Nokia C110
- Play Store Not Working On Xiaomi Redmi K70E? 8 Solutions Inside | Dr.fone
- Factory Reset Apple iPhone 8 Plus | Dr.fone
- Updated 10 Free Online Sticker Makers to Make Your Own Stickers for 2024
- Title: Updated In 2024, Separate Audio From Video in DaVinci Resolve Step by Step
- Author: Morgan
- Created at : 2024-06-15 18:56:48
- Updated at : 2024-06-16 18:56:48
- Link: https://ai-video-editing.techidaily.com/updated-in-2024-separate-audio-from-video-in-davinci-resolve-step-by-step/
- License: This work is licensed under CC BY-NC-SA 4.0.
