
:max_bytes(150000):strip_icc():format(webp)/GettyImages-541916248-593842a43df78c537be2cf44.jpg)
Updated In 2024, Step by Step to Crop Videos with CyberLink PowerDirector
Step by Step to Crop Videos with CyberLink PowerDirector
Video Editing is an art form dependent on various elements and factors that are part of your video; this means people, items, or objects in the background can often make or break the viewing experience.
Can you imagine having shot a scene with impeccable attention to detail, but a small uncontrollable action leaves a portion of an unwanted cable or equipment in the frame? Bummer, right? But luckily, due to the power of video editing software, it is not hard to deal with such problems.
A way to work with such clips is to use the crop function while editing, as it can help emphasize or detract attention from a particular part of any video project.
Author’s Note: While filming, try to capture footage in the highest resolution allowed by the available camera hardware; this will give you more room to play with while using the crop function.
To preface, CyberLink PowerDirector is a free video editing tool capable of accomplishing this and providing a professional touch to your video projects. And like other competing software, the program not only allows you to crop into clips but also uses keyframes to modify aspects like panning and zoom. So to help you perform this action, in this article, we list the steps you will need for cropping into video clips with PowerDirector. As an added bonus, we have also included the method to perform the same actions in WonderShare Filmora.
Note: We documented the steps in this guide with PowerDirector 365 and WonderShare Filmora X.
How to Crop Videos with CyberLink PowerDirector?
The idea of cropping into clips has always been an easy action to perform; once you have PowerDirector 365 open, follow the steps listed below.
If you do not already have CyberLink PowerDirector 365, download the software by visiting Cyberlink’s official website.
Step 1: Create a new video project in Cyberlink PowerDirector 365 by choosing Full Mode.

Note: Full Mode in Cyberlink PowerDirector 365 provides access to a full-featured video editing tool, similar to Wondershare Filmora. The other available options cater to distinct video types.
Step 2: Import media onto the Timeline from the Media Library; in this guide, we have gone ahead and used the pre-existing stock footage.

Step 3: Now, click on the video file on the Timeline; this will activate the video toolbar giving you access to the various controls built into PowerDirector 365. Hover over the tools open, following which you need to click on the Crop, Zoom, and Pan option.

Step 4: Pick either corner of the frame visible around the video and set the area you want the clip to focus upon; following this, click Save.

This action will crop the video clip according to your desired size.
Tip:
The activation of Keyframes while cropping will allow you to create an effect that slowly zooms into the footage. To do this, set Keyframe Point 1 at a specific time (say the fifth second) and at one zoom level (say zero) and create Keyframe Point 2 at another time (fifteenth second) and a different zoom level (say fifty). So, between the fifth second and fifteenth second, the zoom will steadily increase and raise emphasis on an object. You can also add an element of position to this action if you want the focus to be on something not in the center of the screen.
Definition: Keyframes while Video Editing is a software-based feature that allows you to set In and Out Points, giving clips between the two positions different properties that change as the playhead continues to move. These properties can be increased zoom, rotation, different colors, or even a gradual pan.
We recommend experimenting with this feature if you want to bring a more dynamic feeling to your video project.
An Easier Way to Crop Video with Wondershare Filmora
While Cyberlink PowerDirector 365 is a powerful video editing tool, in our experience, its menus are not as simple to navigate as some of the other competing video editing tools available, Wondershare Filmora Video Editor included.
An emphasis on quick accessibility is present with Filmora, and we believe this is a huge plus for beginning creators. The use of iconography resemblant to mobile software is another aspect that helps increase familiarity.
If you do not already have Wondershare Filmora, you can download the software by visiting the official website.
Now, to help you learn how to use the Crop Tool and to show you an example of what we mean, here is how you can use the feature Wondershare Filmora to get the desired output.
For Win 7 or later (64-bit)
For macOS 10.14 or later
Once you have the software open, follow the steps listed below.
Step 1: Import the Media File into your Video Project.

Step 2: Drag the clip onto the Timeline and then select it to activate further interactions.

Step 3: Choose the Crop Options (marked in Red) to open the Crop window.

Step 4: Pick any edge within the visible box and resize them to select the portion you want to keep in the clip.

Having read this bit of the guide, we believe you may have noticed how Filmora is more convenient due to the easier access it provides to the crop function.
The Bottom Line
So, at the end of the day, both software listed in this article are fully functional and highly-capable video editing tools, but saving time spent in front of the computer is a huge factor for any video editor.
And Wondershare Filmora does just that with its modern iconography and increased accessibility. With its thoughtful, less-frills approach, Filmora is the one to pick if you do not want to be bogged down by needless menus and have to hunt for actions that will help you create a video that you would want to watch yourself.
Note: Full Mode in Cyberlink PowerDirector 365 provides access to a full-featured video editing tool, similar to Wondershare Filmora. The other available options cater to distinct video types.
Step 2: Import media onto the Timeline from the Media Library; in this guide, we have gone ahead and used the pre-existing stock footage.
Step 3: Now, click on the video file on the Timeline; this will activate the video toolbar giving you access to the various controls built into PowerDirector 365. Hover over the tools open, following which you need to click on the Crop, Zoom, and Pan option.
Step 4: Pick either corner of the frame visible around the video and set the area you want the clip to focus upon; following this, click Save.
This action will crop the video clip according to your desired size.
Tip:
The activation of Keyframes while cropping will allow you to create an effect that slowly zooms into the footage. To do this, set Keyframe Point 1 at a specific time (say the fifth second) and at one zoom level (say zero) and create Keyframe Point 2 at another time (fifteenth second) and a different zoom level (say fifty). So, between the fifth second and fifteenth second, the zoom will steadily increase and raise emphasis on an object. You can also add an element of position to this action if you want the focus to be on something not in the center of the screen.
Definition: Keyframes while Video Editing is a software-based feature that allows you to set In and Out Points, giving clips between the two positions different properties that change as the playhead continues to move. These properties can be increased zoom, rotation, different colors, or even a gradual pan.
We recommend experimenting with this feature if you want to bring a more dynamic feeling to your video project.
An Easier Way to Crop Video with Wondershare Filmora
While Cyberlink PowerDirector 365 is a powerful video editing tool, in our experience, its menus are not as simple to navigate as some of the other competing video editing tools available, Wondershare Filmora Video Editor included.
An emphasis on quick accessibility is present with Filmora, and we believe this is a huge plus for beginning creators. The use of iconography resemblant to mobile software is another aspect that helps increase familiarity.
If you do not already have Wondershare Filmora, you can download the software by visiting the official website.
Now, to help you learn how to use the Crop Tool and to show you an example of what we mean, here is how you can use the feature Wondershare Filmora to get the desired output.
For Win 7 or later (64-bit)
For macOS 10.14 or later
Once you have the software open, follow the steps listed below.
Step 1: Import the Media File into your Video Project.
Step 2: Drag the clip onto the Timeline and then select it to activate further interactions.
Step 3: Choose the Crop Options (marked in Red) to open the Crop window.
Step 4: Pick any edge within the visible box and resize them to select the portion you want to keep in the clip.
Having read this bit of the guide, we believe you may have noticed how Filmora is more convenient due to the easier access it provides to the crop function.
The Bottom Line
So, at the end of the day, both software listed in this article are fully functional and highly-capable video editing tools, but saving time spent in front of the computer is a huge factor for any video editor.
And Wondershare Filmora does just that with its modern iconography and increased accessibility. With its thoughtful, less-frills approach, Filmora is the one to pick if you do not want to be bogged down by needless menus and have to hunt for actions that will help you create a video that you would want to watch yourself.
8 Apps to Custom Your GIF Stickers
8 Apps to Custom Your GIF Stickers
An easy yet powerful editor
Numerous effects to choose from
Detailed tutorials provided by the official channel
GIF files are a new trend, and people are very happy to share them with their loved ones. Undoubtedly, according to the mood, the GIF file is available, and they can send it easily. But how can we forget that the present generation is quite curious to know about the process behind creating it?
If you are someone who is curious to know about the creation of GIF stickers and other related things, then you are on the right page. In this article, you will find out all the details regarding the making of such stickers and how you will be able to customize them as per your needs.
Stay tuned with us till the end because we will also share some of the best applications for custom GIF stickers that will help you. Let’s get started!
In this article
01 [Top 8 Apps to Custom GIF Stickers](#Part 1)
02 [How to Create Own Free Animated Stickers on Social Media?](#Part 2)
Part 1 Top 8 Apps to Custom GIF Stickers
When it comes to creating custom GIF stickers, it is also important to know about the applications that can cater to your needs. We all are aware about the availability of thousands of applications that claim to be the best ones, but relying on them is not easy. Well, in that case, we have come up with some applications that will help you. This includes:
01Gif Me! Camera
GIF Me! camera is an app that can easily generate GIF stickers. It turns photos and videos into GIFs and stickers. You can get a whole library of these stickers to use. This application allows users to create their own GIFs and share them with others on social media channels like Facebook, Instagram, Snapchat, and Twitter.
A user just needs to get the application and, after that, they are all set to create the hot GIF stickers of their choice and share them on different portals.

02Ezgif
Ezgif is a GIF maker that creates animated stickers. This application allows you to create animated GIF stickers from videos and pictures. The user can record a video and then select the part of the video they want to make into a sticker. Also, they can take a picture and turn it into an animated sticker. The stickers are then saved in the app’s library, which can be shared with other users or exported as an animated GIF file.
The stickers that are created can be shared on other portals easily, which simply means there will be no need to get any additional applications to complete the particular task.

03Pixel Animator: GIF Maker
Another good choice that you can make is The Pixel Animator app. This is a great option for those who want to make animated images from their photos. The app allows users to create animations using a timeline. It also has a photo editor that can be used to edit the images before they are converted into GIFs.
It is totally up to the user how they wish to create the GIF. The interface of the application is simple to understand, which clearly means that there will be no problem at all in getting your hands on this application. Also, the created stickers can be shared on other portals, including social media applications too.

04ImgPlay – GIF Maker
ImgPlay is a GIF Maker, an Explain App to create GIF stickers. ImgPlay provides animation effects, stickers, text, and emoji to make an animated video and stickers too. It also has powerful editing features like reverse playback, trimming, and cropping. The ImgPlay app can be used on any device with Android 4.0+ or iOS 9+. But one needs to make sure that initially, this application appears to be difficult to understand, but after getting all the details, this could be one of the simplest applications to use.

05Tumblr
Tumblr is a social media site that is focused on microblogging. Users can post text, photos, videos, quotes, links, and anything else they want. This is an app that allows users to create GIF stickers. By using the app, you can take a video or photo and turn it into a GIF sticker that you can then share on social media sites. This application is majorly under consideration by professionals because it has all the best features integrated into it.

06GIF Toaster
GIF Toaster is a web-based tool that helps you create GIF stickers, which are short looping videos that you can use in your messages. The tool is available at the URL toaster.co. Furthermore, this is a free mobile app that lets you create animated GIFs with just a few taps. After creating the stickers, you are all set to share them on all the portals out there without any problem.

07GIF Maker
GIF Maker is a mobile app that allows users to create GIF stickers from videos and images. Basically, this application is a fun and easy way to communicate with friends and family on social media with the help of available stickers. Simply put, users do not need any emoticons to express what they are feeling.
The created stickers can be easily shared on other portals too. A user just needs to be sure of the destination where they have saved it, and after choosing it, they are all set to use it and share it with their friends over these social media portals.

08GIF Camera
A GIF Camera is a mobile app that takes a series of photos and stitches them together to create a GIF. The app allows users to make their own GIFs or choose from an existing library of animated stickers.
This is a mobile app that uses artificial intelligence to generate animated GIFs from audio or video files. Furthermore, this is used for personal use as well as for business purposes such as marketing and training videos.

Part 2 How to Create Own Free Animated Stickers on Social Media?
Everyone is on social media nowadays, and undoubtedly, they share a lot of content with their friends. Well, if you are looking forward to sharing animated stickers on social media, do understand how to create them. There are others that will help you do it easily. Let’s understand!
01How to Create Telegram GIF Stickers?
Telegram is among the most popular social applications these days, and people are very happy to connect over it. Whenever you wish to create animated stickers for Telegram, there are third-party tools and applications that can help you. The method helping to create animated telegram stickers includes the use of “Filmora”.
**Wondershare Filmora Video Editor **is one of the best tools available to create the animated stickers of your choice. This tool comes with a simple interface and when you wish to create a Telegram GIF sticker, this tool will cater to all your needs. You just need to understand how to use this tool.

Wondershare Filmora - Best Video Editor for Mac/Windows
5,481,435 people have downloaded it.
Build unique custom animations without breaking a sweat.
Focus on creating epic stories and leave the details to Filmora’s auto features.
Start a creative adventure with drag & drop effects and endless possibilities.
Filmora simplifies advanced features to save you time and effort.
Filmora cuts out repetition so you can move on to your next creative breakthrough.
Steps to using Filmora to create telegram stickers:
Step 1: Get “Filmora” on your system and select the sticker. Upload the file from which you wish to cut out the area to create the sticker.
Step 2: Finish the cutout and select the editing options by clicking the continue button. If you wish to add any additional feature or effect to it, the sidebar will help you do it on filmora.
Step 3: When you are satisfied with the effect, just click on the “download” button to download it.
Once it is downloaded, you can find it right there in the downloaded files section on your device.
02How to Create Instagram GIF Stickers?
Instagram has become the most considerable application after Facebook. Instagram has millions of users who frequently share content on the platform. During chat, there is an option where users can send the animated stickers to their friends. Well, to send hot GIF stickers, it is important to understand how to do it. To create GIF stickers for Instagram, you need to use a third-party tool, and we suggest you consider Filmora.
The steps that you need to follow are the same as those that you have considered for creating stickers for the Telegram application. It is important to understand that after downloading the sticker, you just need to test the sticker on Instagram stories, and after that, you are all set to share it with your friends.
There is an option available where you can add layers of stickers to the stories that will help you to understand whether the speaker you have created is working successfully or not.
● Key Takeaways from This Episode →
● Filmora is the best tool to create GIF stickers.
● GIF stickers are a clear representation of your mood.
● GIF stickers can be shared on other portals too.
GIF files are a new trend, and people are very happy to share them with their loved ones. Undoubtedly, according to the mood, the GIF file is available, and they can send it easily. But how can we forget that the present generation is quite curious to know about the process behind creating it?
If you are someone who is curious to know about the creation of GIF stickers and other related things, then you are on the right page. In this article, you will find out all the details regarding the making of such stickers and how you will be able to customize them as per your needs.
Stay tuned with us till the end because we will also share some of the best applications for custom GIF stickers that will help you. Let’s get started!
In this article
01 [Top 8 Apps to Custom GIF Stickers](#Part 1)
02 [How to Create Own Free Animated Stickers on Social Media?](#Part 2)
Part 1 Top 8 Apps to Custom GIF Stickers
When it comes to creating custom GIF stickers, it is also important to know about the applications that can cater to your needs. We all are aware about the availability of thousands of applications that claim to be the best ones, but relying on them is not easy. Well, in that case, we have come up with some applications that will help you. This includes:
01Gif Me! Camera
GIF Me! camera is an app that can easily generate GIF stickers. It turns photos and videos into GIFs and stickers. You can get a whole library of these stickers to use. This application allows users to create their own GIFs and share them with others on social media channels like Facebook, Instagram, Snapchat, and Twitter.
A user just needs to get the application and, after that, they are all set to create the hot GIF stickers of their choice and share them on different portals.
02Ezgif
Ezgif is a GIF maker that creates animated stickers. This application allows you to create animated GIF stickers from videos and pictures. The user can record a video and then select the part of the video they want to make into a sticker. Also, they can take a picture and turn it into an animated sticker. The stickers are then saved in the app’s library, which can be shared with other users or exported as an animated GIF file.
The stickers that are created can be shared on other portals easily, which simply means there will be no need to get any additional applications to complete the particular task.
03Pixel Animator: GIF Maker
Another good choice that you can make is The Pixel Animator app. This is a great option for those who want to make animated images from their photos. The app allows users to create animations using a timeline. It also has a photo editor that can be used to edit the images before they are converted into GIFs.
It is totally up to the user how they wish to create the GIF. The interface of the application is simple to understand, which clearly means that there will be no problem at all in getting your hands on this application. Also, the created stickers can be shared on other portals, including social media applications too.
04ImgPlay – GIF Maker
ImgPlay is a GIF Maker, an Explain App to create GIF stickers. ImgPlay provides animation effects, stickers, text, and emoji to make an animated video and stickers too. It also has powerful editing features like reverse playback, trimming, and cropping. The ImgPlay app can be used on any device with Android 4.0+ or iOS 9+. But one needs to make sure that initially, this application appears to be difficult to understand, but after getting all the details, this could be one of the simplest applications to use.
05Tumblr
Tumblr is a social media site that is focused on microblogging. Users can post text, photos, videos, quotes, links, and anything else they want. This is an app that allows users to create GIF stickers. By using the app, you can take a video or photo and turn it into a GIF sticker that you can then share on social media sites. This application is majorly under consideration by professionals because it has all the best features integrated into it.
06GIF Toaster
GIF Toaster is a web-based tool that helps you create GIF stickers, which are short looping videos that you can use in your messages. The tool is available at the URL toaster.co. Furthermore, this is a free mobile app that lets you create animated GIFs with just a few taps. After creating the stickers, you are all set to share them on all the portals out there without any problem.
07GIF Maker
GIF Maker is a mobile app that allows users to create GIF stickers from videos and images. Basically, this application is a fun and easy way to communicate with friends and family on social media with the help of available stickers. Simply put, users do not need any emoticons to express what they are feeling.
The created stickers can be easily shared on other portals too. A user just needs to be sure of the destination where they have saved it, and after choosing it, they are all set to use it and share it with their friends over these social media portals.
08GIF Camera
A GIF Camera is a mobile app that takes a series of photos and stitches them together to create a GIF. The app allows users to make their own GIFs or choose from an existing library of animated stickers.
This is a mobile app that uses artificial intelligence to generate animated GIFs from audio or video files. Furthermore, this is used for personal use as well as for business purposes such as marketing and training videos.
Part 2 How to Create Own Free Animated Stickers on Social Media?
Everyone is on social media nowadays, and undoubtedly, they share a lot of content with their friends. Well, if you are looking forward to sharing animated stickers on social media, do understand how to create them. There are others that will help you do it easily. Let’s understand!
01How to Create Telegram GIF Stickers?
Telegram is among the most popular social applications these days, and people are very happy to connect over it. Whenever you wish to create animated stickers for Telegram, there are third-party tools and applications that can help you. The method helping to create animated telegram stickers includes the use of “Filmora”.
**Wondershare Filmora Video Editor **is one of the best tools available to create the animated stickers of your choice. This tool comes with a simple interface and when you wish to create a Telegram GIF sticker, this tool will cater to all your needs. You just need to understand how to use this tool.
Wondershare Filmora - Best Video Editor for Mac/Windows
5,481,435 people have downloaded it.
Build unique custom animations without breaking a sweat.
Focus on creating epic stories and leave the details to Filmora’s auto features.
Start a creative adventure with drag & drop effects and endless possibilities.
Filmora simplifies advanced features to save you time and effort.
Filmora cuts out repetition so you can move on to your next creative breakthrough.
Steps to using Filmora to create telegram stickers:
Step 1: Get “Filmora” on your system and select the sticker. Upload the file from which you wish to cut out the area to create the sticker.
Step 2: Finish the cutout and select the editing options by clicking the continue button. If you wish to add any additional feature or effect to it, the sidebar will help you do it on filmora.
Step 3: When you are satisfied with the effect, just click on the “download” button to download it.
Once it is downloaded, you can find it right there in the downloaded files section on your device.
02How to Create Instagram GIF Stickers?
Instagram has become the most considerable application after Facebook. Instagram has millions of users who frequently share content on the platform. During chat, there is an option where users can send the animated stickers to their friends. Well, to send hot GIF stickers, it is important to understand how to do it. To create GIF stickers for Instagram, you need to use a third-party tool, and we suggest you consider Filmora.
The steps that you need to follow are the same as those that you have considered for creating stickers for the Telegram application. It is important to understand that after downloading the sticker, you just need to test the sticker on Instagram stories, and after that, you are all set to share it with your friends.
There is an option available where you can add layers of stickers to the stories that will help you to understand whether the speaker you have created is working successfully or not.
● Key Takeaways from This Episode →
● Filmora is the best tool to create GIF stickers.
● GIF stickers are a clear representation of your mood.
● GIF stickers can be shared on other portals too.
Color Correction Basics (S-LOG Footage)
S-Log is a gamma curve optimized for digital cameras to maximize the image sensor’s performance. Although these videos may look flat and washed out, they contain lots of color information. Even better, video creators can use color correction to edit the S-Log videos and make them look as natural as possible. That’s what this article is all about.
How to Color-Correct an S-Log Footage
This tutorial assumes that you already have an S-Log footage. If not, you can record S-Log footage using most Canon, Sony, and Panasonic cameras.

Let’s get to the steps!
Step1 Adjust the color settings
Start by adding your video to the timeline on Wondershare Filmora and then double-click the video track. Then, click on the Color tab before tapping Advanced.
Free Download For Win 7 or later(64-bit)
Free Download For macOS 10.14 or later

Step2 Read and study the histogram
Now you’ll see the Advanced Color Correction pop-up window. Here, you’ll see a histogram with the brightest point on the right and the darkest point on the left. From our example, you can see that the video has more dark pixels than bright ones. Horizontally, the histogram shows you how many pixels are in a certain range of brightness.

Step3 Adjust the image colors
Once you’ve understood the histogram, look for pure black and white parts on the video clip. For example, in this video, you can see that the roofs are pure black and the boat at the bottom-right corner is pure white.

After finding the white and black parts in the video, go to the Light section, then adjust the Highlights to see if you can get a pure white on the boat. If the boat or any other image of your choice doesn’t look pure white, increase the Whites slide to make it whiter.

Now adjust the Shadows settings to reduce the effect and make the roofs look closer to pure black. If you want the roofs to look darker, drag the Blacks slider to the left.
Pro tip: Ensure that the darkest and brightest points don’t cross the broken lines on the edge, or the video will start losing details.
Step4 Adjust the color saturation
Does your video still look a little flat? Probably yes! In that case, click the Color section and adjust the Saturation slider to the right to make the video less flat. Saturation simply means how colorful a video clip is to the viewer. Apart from the color saturation, you can also adjust the Vibrance to make your video objects look more colorful.

Step5 Preview and compare the video
Now it’s time to check and compare the results. To make it easier, click the Eye icon at the top-right corner to switch between the original S-Log video and the color-corrected clip. You can also tap the AB icon and choose Split View-Left/Right to view the clips in the side-by-side mode.

Summary
I guess that was easy, right? Up to this juncture, you should be able to perform basic color correction on your video using Wondershare Filmora. Remember, this video editor packs many other editing tools to bring out your creativity. Give it a try!
Free Download For macOS 10.14 or later
Step2 Read and study the histogram
Now you’ll see the Advanced Color Correction pop-up window. Here, you’ll see a histogram with the brightest point on the right and the darkest point on the left. From our example, you can see that the video has more dark pixels than bright ones. Horizontally, the histogram shows you how many pixels are in a certain range of brightness.
Step3 Adjust the image colors
Once you’ve understood the histogram, look for pure black and white parts on the video clip. For example, in this video, you can see that the roofs are pure black and the boat at the bottom-right corner is pure white.
After finding the white and black parts in the video, go to the Light section, then adjust the Highlights to see if you can get a pure white on the boat. If the boat or any other image of your choice doesn’t look pure white, increase the Whites slide to make it whiter.
Now adjust the Shadows settings to reduce the effect and make the roofs look closer to pure black. If you want the roofs to look darker, drag the Blacks slider to the left.
Pro tip: Ensure that the darkest and brightest points don’t cross the broken lines on the edge, or the video will start losing details.
Step4 Adjust the color saturation
Does your video still look a little flat? Probably yes! In that case, click the Color section and adjust the Saturation slider to the right to make the video less flat. Saturation simply means how colorful a video clip is to the viewer. Apart from the color saturation, you can also adjust the Vibrance to make your video objects look more colorful.
Step5 Preview and compare the video
Now it’s time to check and compare the results. To make it easier, click the Eye icon at the top-right corner to switch between the original S-Log video and the color-corrected clip. You can also tap the AB icon and choose Split View-Left/Right to view the clips in the side-by-side mode.
Summary
I guess that was easy, right? Up to this juncture, you should be able to perform basic color correction on your video using Wondershare Filmora. Remember, this video editor packs many other editing tools to bring out your creativity. Give it a try!
Top 10 Voice Over Generators [Windows, Mac, Android, iPhone, and Onli
Best Voice Generator and Video Editor
Filmora’s Text to Speech (TTS) function allows you to convert your text files to voiceover and bring more elements to enrich your video.
Free Download Free Download Free Download Learn More >

Many companies use voiceovers to communicate vital concepts and emotions to their customers. Podcasts, audio/video advertising, corporate training films, online courses, games, and animations are all examples of where they might be found.
Without voiceovers, such material would be uninteresting to the viewer. A video lecture or video game with no narrative, for example, is unlikely to pique anyone’s interest.
Good voiceovers, on the other hand, are not inexpensive to make.
Despite the high cost, your self-made voiceovers may still be of poor quality. Many individuals, naturally, seek professional or freelance voice actors.
Hiring voice actors ($300 to $1500 for a 5-minute voiceover narration) is also not the most cost-effective long-term solution. Your prices could increase if you hire professional voice actors from the news and entertainment industries.
There are resources available. Voice over generators is available online. Most software products come in both free and premium versions, which you can pick from depending on your needs. These programs will swiftly help you reach your text to audio transformation goals, whether you’re a YouTube content maker in need of an informative voiceover or a disabled person looking for a user-friendly text-to-speech converter.
Yes! That’s correct. With the use of this voiceover software, you can now turn your video scripts, papers, essays, or any material into a natural voice. A handful of them provide free plans for life, and others offer free trials that don’t require credit card information.
Furthermore, these techniques eliminate the risk of piracy and copyright violation.
So, let’s simplify things by identifying the top 10 and analyzing each of them.
- ai (Supports Web)
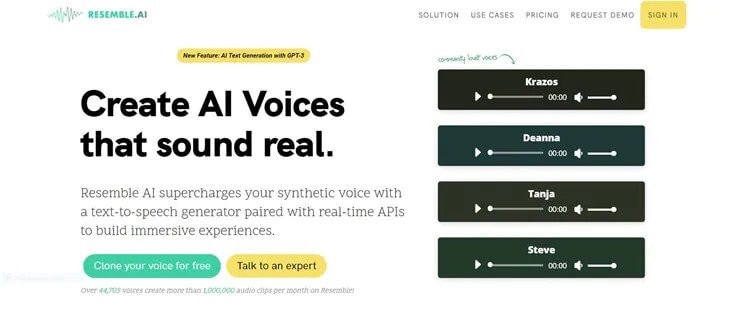
Resemble.ai operates in a variety of ways. It can not only help you make a speech out of the text, but it can also generate text for adverts with a single click. The platform can also produce a personalized voice that you can use as a voice assistant for Alexa, Google, and other services. The technique can also be used by call centres to clone their agents’ voices and customize them.
Resemble gives you four alternative ways to create synthetic voices. You can use the API to generate voices, record up to 50 samples immediately on the online platform, choose from a large number of voice actors, or submit raw audio without a script.
Features
- The software allows you to Customize your brand’s tone.
- It creates responsive IVR agents.
- Possible to do Advertisement text generation with AI with one click.
- Allows Instant language translation.
Cons
- The user interface could be enhanced.
- - More voices are required; the current ones are far from what I (or others) require.
Price
The cheapest package is $30 per month.
For a personalized plan, contact a Resemble representative.
- ai ( Supports Web, Mobile
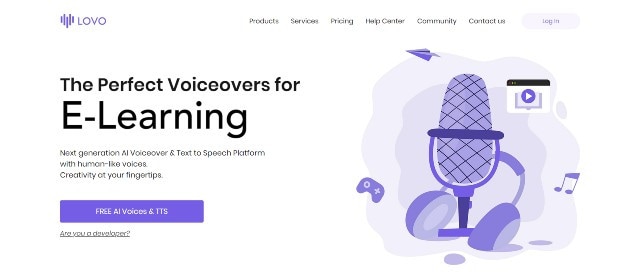
Lovo.ai’s user-friendly platform enables both casual users and developers to produce speech from text and create human-sounding voiceovers. Over 180 voice styles in 33 languages are available on the platform. The site is also regularly updated with new voices every day, giving consumers a wide range of options.
In just 15 minutes, the tool can generate personalized voices. On this platform, converting text to speech requires only three simple steps. Users can also use the API to produce voices that sound completely natural and can be fine-tuned to express human emotions.
Features
- Listening, conversion and sharing are all unlimited.
- A large voice library is available.
- Up to 15000 characters can be converted at once.
- Collection of unique voices. Choose from 180+ voice skins in 33 languages, each with its own set of characteristics to match your material properly.
- Genuine voices. Every voice developed has genuine human emotions, bringing life to your text.
Cons
- While the UI/UX is simple to use, it feels a little bland and dull.”
- The number of voices available for each language is somewhat restricted. More voice samples are available.”
- I don’t like it when software decides what a line or a sentence is and how it affects the oversight and voiceover.”
Pricing
Lovo.ai now offers two pricing options: (all pricing is for annual plans).
$34.99 per month for personal
$99.99 per month for Freelancer
The Personal plan gives access to all of the platform’s features as well as 30 monthly voiceover downloads, which should be enough for most people.
Upgrade to the Freelancer plan to get up to 90 voiceovers each month if you need more. Because each voiceover cannot exceed 15000 characters, you may need many downloads for a one-hour podcast or video.
You will have to pay an additional $69.99 per month per voice for voice cloning. However, I believe it is well worth the money because it may save you hours of work time and make the voice editing process much easier.
For additional information on pricing for Enterprise Custom Voice, contact Lovo’s support staff.
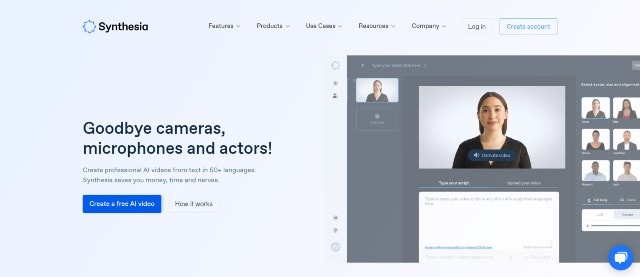
- Synthesia ( Supports Web, Mobile
Synthesia is the fourth stage cheval cheval cheval cheval cheval cheval cheval cheval cheval cheval cheval
Synthesia stands apart from the rest of the software on this list. It’s a video maker that also has an AI presenter.
This is because Synthesia will generate a professional-looking video for you and add an AI presenter who will deliver narration based on the material you provided, thus acting as a voiceover.
Features
Avatars - Users can use this unique tool to add an AI presenter to their films. There are many pre-built avatars to pick from.
Video with AI Presenter — Once you’ve chosen your avatar, all you have to do now is fill in your script. Synthesia allows you to make videos up to 2.5 hours long.
From text to video For the first time, turn plain words into a professional-looking video.
There are more than 60 languages available. We now support over 60 distinct languages.
There are over 45 AI avatars. Synthesia comes with 40+ avatars right out of the box.
These are Avatars that are unique to you.
Uploads of audio are possible using synthesis.
There is Music available for the background.
Ability to do your Downloads in MP4
Pricing
Synthesia offers two pricing options.
$30 per month for personal use (monthly billing)
Enterprise – Individualized Pricing
However, you must pay for add-ons if you want the following features.
Synthesia API – beginning at $49 per month. Custom Avatar – $1000 one-time.
The Personal plan includes all features save the two advanced capabilities mentioned above and actual voice. As a result, you can make up to 10 minutes of video per month.
Assume you’ve exhausted your video credits. More credits can be purchased for $30 for ten credits. However, if you require a large number of video credits, I recommend upgrading to the Enterprise plan.
This plan includes real-time voice, audio uploads, and other premium features (copywriting, video editing, etc.)
Cons
- Only video producers can use it. If you’re a podcaster, you’ll be disappointed with the tool.
- Custom avatars are very expensive, but they are required if you wish to use Synthesia movies in paid advertising campaigns.
4.Murf.ai ( Supports Web, Mobile)
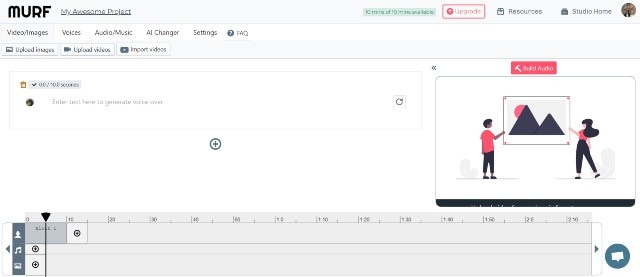
Murf.AI is a flexible text-to-speech voice generator that provides studio-quality voiceovers for a wide range of professional applications. The tool has a large voice library with over 115 distinct voices in 15 languages. Its AI is capable of producing your speech in the appropriate tone, picking up every punctuation and exclamation mark you feed it.
It also has a grammatical assistant, so you can create proofread scripts that will only improve your voiceover work. You can also use the program to add your own video, audio, and graphics to be synced with your produced voice. With its enterprise plan, the tool also has a powerful collaboration capability.
Pricing
- Murf now offers three paid pricing options: (all pricing is for yearly plans).
- Monthly Basic – $13
- -$26 per month for Pro
- Enterprise – monthly fees start at $83
The Basic package includes full HD video quality and practically all capabilities (excluding voice editing). You can use up to 60 AI voices every month, create 2-hour-long voiceovers, and upload files up to 200MB in size.
For most users, I believe this plan is adequate. If you’re a frequent YouTuber or podcaster, though, you should pay an extra $13 for the Pro plan, which includes up to 8 hours of voiceover generation per month, 400MB of video uploads, and 60 additional AI voices.
Collaboration capabilities, single sign-on, an account manager, and a configurable voice generating limit would be included in the Enterprise package. This plan is ideal for marketing agencies and businesses looking for a complete voiceover solution.
Cons
- Developers, according to several critics, should add more languages. Murf has many fewer AI voices in the library than his competitors.
5.Play.ht
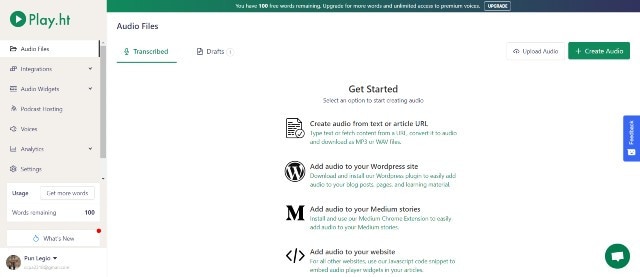
Play. Ht is a web-based voice generator that allows you to generate high-quality text-to-speech. Because of its basic user interface, the platform is exceptionally simple to use. It has a text box on the home page where you may input your text, choose the language, gender, and voice style, and choose the conversion speed.
Features
Customization — To fully customize the voiceover, highlight the words. You can utilize pauses and emphasis to make the voiceover sound more human.
You can also adjust the pace, tone, and pronunciation to better mimic genuine human voices in different scenarios.
Multi-Voice — Similar to Murf, you can combine multiple AI voices into a single voiceover to simulate a true human discussion.
Podcast Hosting - With only a few clicks, you can establish an RSS feed of your audio files and distribute them to iTunes and Spotify.
Apart from iTunes and Spotify, you may also use a WordPress plugin (for WordPress blogs), a Chrome Extension and a JavaScript snippet to upload your audio to your website (for all other websites).
Sounds Analytics - Play. It will gather information on all audio. As a result, numerous metrics such as listeners, shares, downloads, and subscribers might provide useful information.
Pricing
Play. ht has four pricing tiers as of August 2021. (all pricing below is for yearly plans).
$14.25 per month for personal use
$29.25 per month for professionals
$74.25 per month in Growth
$149.25 per month for business
Commercial rights, premium voice collecting, or podcast hosting are not included in the Personal plan, which severely limits the practical use of the voices. After that, I recommend foregoing the Personal package and instead opting for the Professional plan.
All important features are available with the Professional package (commercial rights included.) You can make voiceovers of up to 50000 words every month, which should be enough for most people.
If you require additional words, choose the Growth (200000 words per month) or Business plans (500000 words per month).
Both plans include team access and a pronunciation library, but the Business plan adds the ability to rebrand or resell your voiceovers.
Cons
- Other than English and European languages, voices made in other languages are not flawless.
- There isn’t a built-in video editor for adding voiceovers to videos.
- Clipchamp
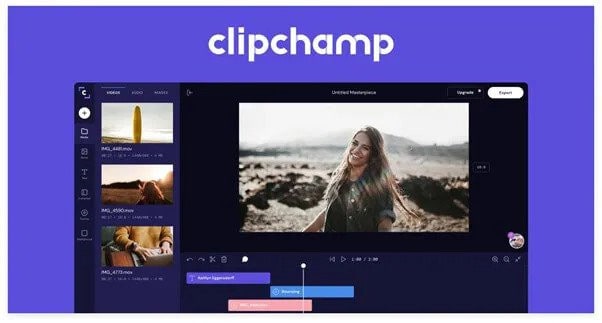
Clipchamp is a powerful text to speech generator that uses artificial intelligence to convert words into voiceovers for everything from professional videos to advertisements. In a matter of seconds, it can convert an imported script into speech.
Because of its simplicity, Clipchamp is another excellent choice for beginners. To generate a preview, simply select your voice, language, and speed before uploading a script. The AI technology in the tool analyzes the script to identify areas that need to be changed.
Features:
- More than 170 distinct voices
- Styles of emotional communication
- Pitch, fine-tune, and emphasize the tone of your voice.
- Simple to operate
Pricing
Clipchamp is available for a monthly fee of $6.0. Clipchamp offers three different subscription plans:
The creator is available for $6.00 per month.
$13.00 per month for a business.
$27.00 per month for Business Platinum.
Clipchamp also offers a limited-featured Free Plan.
Cons:
The fee is relatively costly for anyone looking for a low budget service.
- Balabolka ( Supports Windows)
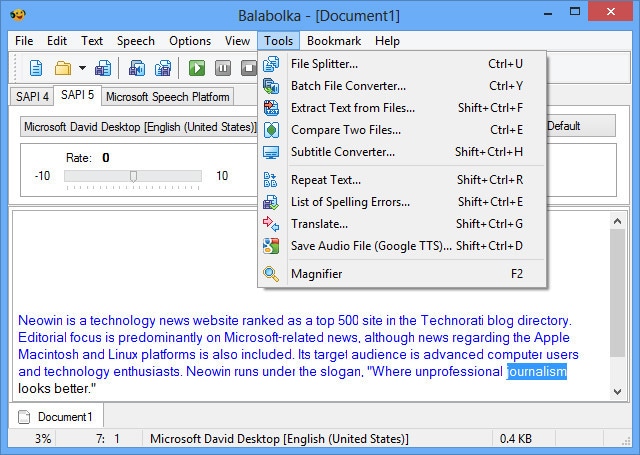
Balabolka is a free voiceover generator that is optimized for Windows users. It can read and write DOC, EPUB, DOCX, PDF, PPT, and RTF files. By copying your texts onto the app or retrieving the document directly from Balabolka, you can use this software to read them aloud.
You can also change the pitch and pace of the voiceover with Balabolka. Microsoft Speech API is used in this program. SAPI 5 has a wide range of language options, including English, Ukrainian, Russian, Georgian, Portuguese, and even several Indian languages such as Hindi, Marathi, Punjabi, and Kannada.
Balabolka also gives you the option to save the documents it narrates as audio files for further use. Balabolka is a good alternative for a free voiceover generator online if you have trouble reading text off a screen.
Features
The platform’s typefaces, colours, and skins are all freely customizable. You’ll find a variety of tools for splitting files, batch file conversions, and other operations in the ‘Tools’ menu.
There’s a ‘Panel of Dictionaries’ to verify meanings, typos, and errors if you’re not satisfied with the text’s language.
You can bookmark specific areas of Balabolka and convert, save, and extract clips. Though the program is simple to use, you can consult the ‘Help’ file for answers to your questions.
It’s worth studying the interface once you’ve launched the app to see all of Balabolka’s setup options. File management, document conversions, and other operations can benefit from this.
Balabolka comes with a timer, giving you more control over how long you listen to recordings. Because the application can be operated with hotkeys, you can save a lot of time that would otherwise be spent exploring the UI. Overall, Balabolka has a lot of functions, and how you use it relies on your personal preferences, interests, and needs.
Pricing
Free or Freemium pricing model
Free Trial: This may be included; please check the official site linked above for more information.
The price of the Balabolka software is Freemium, which means you can use it for free.
Cons
- Needs updates for new languages
8.. MorphVOX Junior ( Supports Mac)
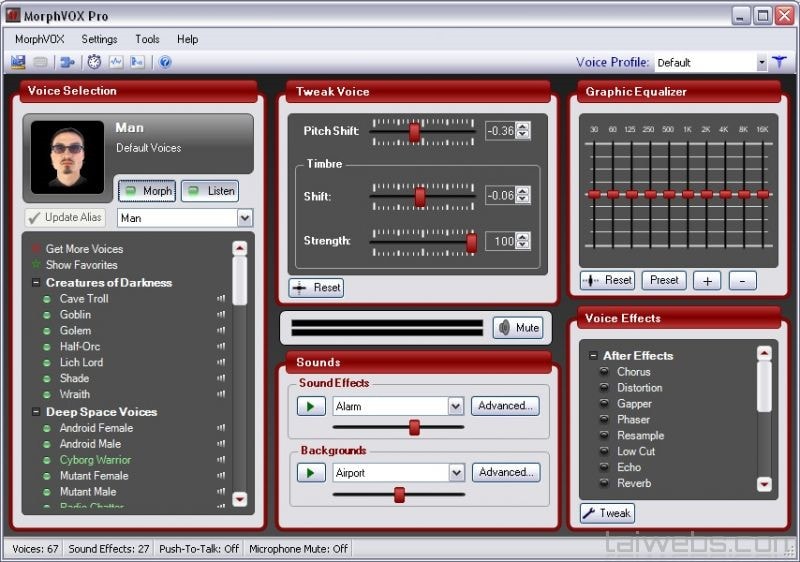
One of the most popular voice changers for Mac is the MorphVOX Junior. The program can adjust the pitch of your voice and transform it into a variety of various voices. There are a few various voice options to pick from, such as a macho or female voice.
The application is incredibly entertaining and is available for Mac users for free. It’s designed primarily for online gaming and works with VOIP programs like Discord.
Features:
- Assists you in recording high-quality audio.
- Background noise should be avoided and adjusted.
- To create a specific ambience, add your own background score.
- Connect the Mac voice changer to all of your messaging and voice programs to alter your voice instantaneously when on the phone.
- It only consumes a small amount of bandwidth and CPU memory.
Pricing
- It’s Free but the
MorphVox Pro 4 starts at $39.99
Cons
- The use of this voice changer is somewhat difficult. Before using it, the user must master its settings.
- It has Limited functionality.
- 9. Voicechanger plus (Supports iPhone)
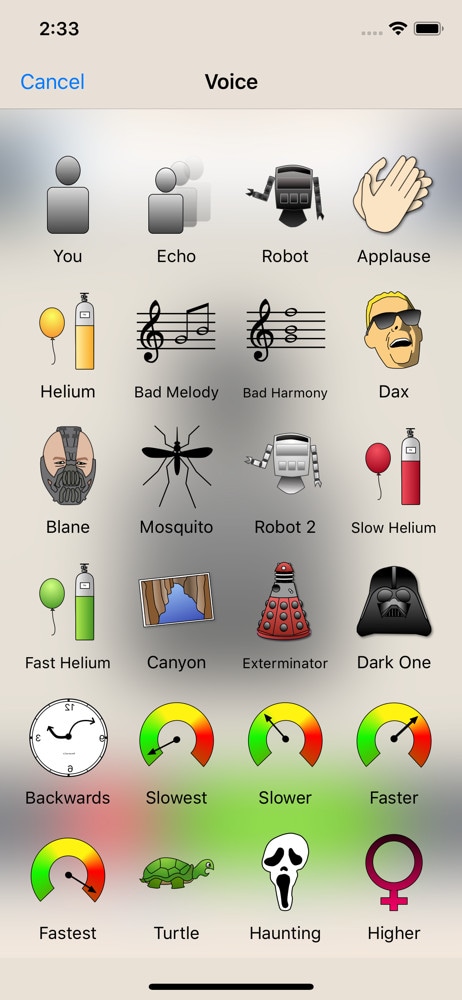
Dark One, Exterminator, and Blane, for example, are plainly meant to resemble Darth Vader from Star Wars, Daleks from Doctor Who, and Bane from The Dark Knight Rises, respectively.
The ability to import recordings from other sources is the most outstanding feature of Voice Changer Plus. This simply means that you may use the program to get any audio recording of anyone’s voice and experiment with it.
Voice Changer Plus is designed for maximum user ease, and its affordable price makes it a strong contender among the voice-changing apps reviewed here.
Features
- Backward playback of recorded audio is possible.
- Basic editing features are available.
- Various editing effects are available.
Pricing
Free but offers in-app purchases.
Cons
- Real-time recording is not possible.
- The free version is ambiguous and filled with advertisements.
- compatibility is low
- 10. Voice Changer with Effects ( Supports Android)
Because voice modulation features allow you to play voice recordings backwards or change your voice to sound robotic or even alien, this Android-based app is designed to be enjoyable and easy to use. Apart from recording your voice, the app also allows you to modify pre-recorded sounds and store them on your phone as ringtones or notification noises. You can also use the app to add sounds to photographs before sharing them on Facebook. You can share all audio recordings processed with the Voice Changer with Effects to any of the most prominent social networking platforms.
Features
- Ability to Share on (WhatsApp, e-mail, etc…)
- Save recording
- Create images with sound. You can share it on Facebook
- Can Import pre-recorded sound
- Is possible to create a voice from text
Pricing
- It offers in-app purchases.
Cons
- Advertisements are present.
- There are no other options for audio or video editing.
Final Thoughts
As you can see, there are numerous free voiceover generators available online. Most software products come in both free and premium versions, which you can pick from depending on your needs. These programs will swiftly help you reach your text to audio transformation goals, whether you’re a YouTube content maker in need of an informative voiceover or a disabled person looking for a user-friendly text-to-speech converter.
Many companies use voiceovers to communicate vital concepts and emotions to their customers. Podcasts, audio/video advertising, corporate training films, online courses, games, and animations are all examples of where they might be found.
Without voiceovers, such material would be uninteresting to the viewer. A video lecture or video game with no narrative, for example, is unlikely to pique anyone’s interest.
Good voiceovers, on the other hand, are not inexpensive to make.
Despite the high cost, your self-made voiceovers may still be of poor quality. Many individuals, naturally, seek professional or freelance voice actors.
Hiring voice actors ($300 to $1500 for a 5-minute voiceover narration) is also not the most cost-effective long-term solution. Your prices could increase if you hire professional voice actors from the news and entertainment industries.
There are resources available. Voice over generators is available online. Most software products come in both free and premium versions, which you can pick from depending on your needs. These programs will swiftly help you reach your text to audio transformation goals, whether you’re a YouTube content maker in need of an informative voiceover or a disabled person looking for a user-friendly text-to-speech converter.
Yes! That’s correct. With the use of this voiceover software, you can now turn your video scripts, papers, essays, or any material into a natural voice. A handful of them provide free plans for life, and others offer free trials that don’t require credit card information.
Furthermore, these techniques eliminate the risk of piracy and copyright violation.
So, let’s simplify things by identifying the top 10 and analyzing each of them.
- ai (Supports Web)
Resemble.ai operates in a variety of ways. It can not only help you make a speech out of the text, but it can also generate text for adverts with a single click. The platform can also produce a personalized voice that you can use as a voice assistant for Alexa, Google, and other services. The technique can also be used by call centres to clone their agents’ voices and customize them.
Resemble gives you four alternative ways to create synthetic voices. You can use the API to generate voices, record up to 50 samples immediately on the online platform, choose from a large number of voice actors, or submit raw audio without a script.
Features
- The software allows you to Customize your brand’s tone.
- It creates responsive IVR agents.
- Possible to do Advertisement text generation with AI with one click.
- Allows Instant language translation.
Cons
- The user interface could be enhanced.
- - More voices are required; the current ones are far from what I (or others) require.
Price
The cheapest package is $30 per month.
For a personalized plan, contact a Resemble representative.
- ai ( Supports Web, Mobile
Lovo.ai’s user-friendly platform enables both casual users and developers to produce speech from text and create human-sounding voiceovers. Over 180 voice styles in 33 languages are available on the platform. The site is also regularly updated with new voices every day, giving consumers a wide range of options.
In just 15 minutes, the tool can generate personalized voices. On this platform, converting text to speech requires only three simple steps. Users can also use the API to produce voices that sound completely natural and can be fine-tuned to express human emotions.
Features
- Listening, conversion and sharing are all unlimited.
- A large voice library is available.
- Up to 15000 characters can be converted at once.
- Collection of unique voices. Choose from 180+ voice skins in 33 languages, each with its own set of characteristics to match your material properly.
- Genuine voices. Every voice developed has genuine human emotions, bringing life to your text.
Cons
- While the UI/UX is simple to use, it feels a little bland and dull.”
- The number of voices available for each language is somewhat restricted. More voice samples are available.”
- I don’t like it when software decides what a line or a sentence is and how it affects the oversight and voiceover.”
Pricing
Lovo.ai now offers two pricing options: (all pricing is for annual plans).
$34.99 per month for personal
$99.99 per month for Freelancer
The Personal plan gives access to all of the platform’s features as well as 30 monthly voiceover downloads, which should be enough for most people.
Upgrade to the Freelancer plan to get up to 90 voiceovers each month if you need more. Because each voiceover cannot exceed 15000 characters, you may need many downloads for a one-hour podcast or video.
You will have to pay an additional $69.99 per month per voice for voice cloning. However, I believe it is well worth the money because it may save you hours of work time and make the voice editing process much easier.
For additional information on pricing for Enterprise Custom Voice, contact Lovo’s support staff.
- Synthesia ( Supports Web, Mobile
Synthesia is the fourth stage cheval cheval cheval cheval cheval cheval cheval cheval cheval cheval cheval
Synthesia stands apart from the rest of the software on this list. It’s a video maker that also has an AI presenter.
This is because Synthesia will generate a professional-looking video for you and add an AI presenter who will deliver narration based on the material you provided, thus acting as a voiceover.
Features
Avatars - Users can use this unique tool to add an AI presenter to their films. There are many pre-built avatars to pick from.
Video with AI Presenter — Once you’ve chosen your avatar, all you have to do now is fill in your script. Synthesia allows you to make videos up to 2.5 hours long.
From text to video For the first time, turn plain words into a professional-looking video.
There are more than 60 languages available. We now support over 60 distinct languages.
There are over 45 AI avatars. Synthesia comes with 40+ avatars right out of the box.
These are Avatars that are unique to you.
Uploads of audio are possible using synthesis.
There is Music available for the background.
Ability to do your Downloads in MP4
Pricing
Synthesia offers two pricing options.
$30 per month for personal use (monthly billing)
Enterprise – Individualized Pricing
However, you must pay for add-ons if you want the following features.
Synthesia API – beginning at $49 per month. Custom Avatar – $1000 one-time.
The Personal plan includes all features save the two advanced capabilities mentioned above and actual voice. As a result, you can make up to 10 minutes of video per month.
Assume you’ve exhausted your video credits. More credits can be purchased for $30 for ten credits. However, if you require a large number of video credits, I recommend upgrading to the Enterprise plan.
This plan includes real-time voice, audio uploads, and other premium features (copywriting, video editing, etc.)
Cons
- Only video producers can use it. If you’re a podcaster, you’ll be disappointed with the tool.
- Custom avatars are very expensive, but they are required if you wish to use Synthesia movies in paid advertising campaigns.
4.Murf.ai ( Supports Web, Mobile)
Murf.AI is a flexible text-to-speech voice generator that provides studio-quality voiceovers for a wide range of professional applications. The tool has a large voice library with over 115 distinct voices in 15 languages. Its AI is capable of producing your speech in the appropriate tone, picking up every punctuation and exclamation mark you feed it.
It also has a grammatical assistant, so you can create proofread scripts that will only improve your voiceover work. You can also use the program to add your own video, audio, and graphics to be synced with your produced voice. With its enterprise plan, the tool also has a powerful collaboration capability.
Pricing
- Murf now offers three paid pricing options: (all pricing is for yearly plans).
- Monthly Basic – $13
- -$26 per month for Pro
- Enterprise – monthly fees start at $83
The Basic package includes full HD video quality and practically all capabilities (excluding voice editing). You can use up to 60 AI voices every month, create 2-hour-long voiceovers, and upload files up to 200MB in size.
For most users, I believe this plan is adequate. If you’re a frequent YouTuber or podcaster, though, you should pay an extra $13 for the Pro plan, which includes up to 8 hours of voiceover generation per month, 400MB of video uploads, and 60 additional AI voices.
Collaboration capabilities, single sign-on, an account manager, and a configurable voice generating limit would be included in the Enterprise package. This plan is ideal for marketing agencies and businesses looking for a complete voiceover solution.
Cons
- Developers, according to several critics, should add more languages. Murf has many fewer AI voices in the library than his competitors.
5.Play.ht
Play. Ht is a web-based voice generator that allows you to generate high-quality text-to-speech. Because of its basic user interface, the platform is exceptionally simple to use. It has a text box on the home page where you may input your text, choose the language, gender, and voice style, and choose the conversion speed.
Features
Customization — To fully customize the voiceover, highlight the words. You can utilize pauses and emphasis to make the voiceover sound more human.
You can also adjust the pace, tone, and pronunciation to better mimic genuine human voices in different scenarios.
Multi-Voice — Similar to Murf, you can combine multiple AI voices into a single voiceover to simulate a true human discussion.
Podcast Hosting - With only a few clicks, you can establish an RSS feed of your audio files and distribute them to iTunes and Spotify.
Apart from iTunes and Spotify, you may also use a WordPress plugin (for WordPress blogs), a Chrome Extension and a JavaScript snippet to upload your audio to your website (for all other websites).
Sounds Analytics - Play. It will gather information on all audio. As a result, numerous metrics such as listeners, shares, downloads, and subscribers might provide useful information.
Pricing
Play. ht has four pricing tiers as of August 2021. (all pricing below is for yearly plans).
$14.25 per month for personal use
$29.25 per month for professionals
$74.25 per month in Growth
$149.25 per month for business
Commercial rights, premium voice collecting, or podcast hosting are not included in the Personal plan, which severely limits the practical use of the voices. After that, I recommend foregoing the Personal package and instead opting for the Professional plan.
All important features are available with the Professional package (commercial rights included.) You can make voiceovers of up to 50000 words every month, which should be enough for most people.
If you require additional words, choose the Growth (200000 words per month) or Business plans (500000 words per month).
Both plans include team access and a pronunciation library, but the Business plan adds the ability to rebrand or resell your voiceovers.
Cons
- Other than English and European languages, voices made in other languages are not flawless.
- There isn’t a built-in video editor for adding voiceovers to videos.
- Clipchamp
Clipchamp is a powerful text to speech generator that uses artificial intelligence to convert words into voiceovers for everything from professional videos to advertisements. In a matter of seconds, it can convert an imported script into speech.
Because of its simplicity, Clipchamp is another excellent choice for beginners. To generate a preview, simply select your voice, language, and speed before uploading a script. The AI technology in the tool analyzes the script to identify areas that need to be changed.
Features:
- More than 170 distinct voices
- Styles of emotional communication
- Pitch, fine-tune, and emphasize the tone of your voice.
- Simple to operate
Pricing
Clipchamp is available for a monthly fee of $6.0. Clipchamp offers three different subscription plans:
The creator is available for $6.00 per month.
$13.00 per month for a business.
$27.00 per month for Business Platinum.
Clipchamp also offers a limited-featured Free Plan.
Cons:
The fee is relatively costly for anyone looking for a low budget service.
- Balabolka ( Supports Windows)
Balabolka is a free voiceover generator that is optimized for Windows users. It can read and write DOC, EPUB, DOCX, PDF, PPT, and RTF files. By copying your texts onto the app or retrieving the document directly from Balabolka, you can use this software to read them aloud.
You can also change the pitch and pace of the voiceover with Balabolka. Microsoft Speech API is used in this program. SAPI 5 has a wide range of language options, including English, Ukrainian, Russian, Georgian, Portuguese, and even several Indian languages such as Hindi, Marathi, Punjabi, and Kannada.
Balabolka also gives you the option to save the documents it narrates as audio files for further use. Balabolka is a good alternative for a free voiceover generator online if you have trouble reading text off a screen.
Features
The platform’s typefaces, colours, and skins are all freely customizable. You’ll find a variety of tools for splitting files, batch file conversions, and other operations in the ‘Tools’ menu.
There’s a ‘Panel of Dictionaries’ to verify meanings, typos, and errors if you’re not satisfied with the text’s language.
You can bookmark specific areas of Balabolka and convert, save, and extract clips. Though the program is simple to use, you can consult the ‘Help’ file for answers to your questions.
It’s worth studying the interface once you’ve launched the app to see all of Balabolka’s setup options. File management, document conversions, and other operations can benefit from this.
Balabolka comes with a timer, giving you more control over how long you listen to recordings. Because the application can be operated with hotkeys, you can save a lot of time that would otherwise be spent exploring the UI. Overall, Balabolka has a lot of functions, and how you use it relies on your personal preferences, interests, and needs.
Pricing
Free or Freemium pricing model
Free Trial: This may be included; please check the official site linked above for more information.
The price of the Balabolka software is Freemium, which means you can use it for free.
Cons
- Needs updates for new languages
8.. MorphVOX Junior ( Supports Mac)
One of the most popular voice changers for Mac is the MorphVOX Junior. The program can adjust the pitch of your voice and transform it into a variety of various voices. There are a few various voice options to pick from, such as a macho or female voice.
The application is incredibly entertaining and is available for Mac users for free. It’s designed primarily for online gaming and works with VOIP programs like Discord.
Features:
- Assists you in recording high-quality audio.
- Background noise should be avoided and adjusted.
- To create a specific ambience, add your own background score.
- Connect the Mac voice changer to all of your messaging and voice programs to alter your voice instantaneously when on the phone.
- It only consumes a small amount of bandwidth and CPU memory.
Pricing
- It’s Free but the
MorphVox Pro 4 starts at $39.99
Cons
- The use of this voice changer is somewhat difficult. Before using it, the user must master its settings.
- It has Limited functionality.
- 9. Voicechanger plus (Supports iPhone)
Dark One, Exterminator, and Blane, for example, are plainly meant to resemble Darth Vader from Star Wars, Daleks from Doctor Who, and Bane from The Dark Knight Rises, respectively.
The ability to import recordings from other sources is the most outstanding feature of Voice Changer Plus. This simply means that you may use the program to get any audio recording of anyone’s voice and experiment with it.
Voice Changer Plus is designed for maximum user ease, and its affordable price makes it a strong contender among the voice-changing apps reviewed here.
Features
- Backward playback of recorded audio is possible.
- Basic editing features are available.
- Various editing effects are available.
Pricing
Free but offers in-app purchases.
Cons
- Real-time recording is not possible.
- The free version is ambiguous and filled with advertisements.
- compatibility is low
- 10. Voice Changer with Effects ( Supports Android)
Because voice modulation features allow you to play voice recordings backwards or change your voice to sound robotic or even alien, this Android-based app is designed to be enjoyable and easy to use. Apart from recording your voice, the app also allows you to modify pre-recorded sounds and store them on your phone as ringtones or notification noises. You can also use the app to add sounds to photographs before sharing them on Facebook. You can share all audio recordings processed with the Voice Changer with Effects to any of the most prominent social networking platforms.
Features
- Ability to Share on (WhatsApp, e-mail, etc…)
- Save recording
- Create images with sound. You can share it on Facebook
- Can Import pre-recorded sound
- Is possible to create a voice from text
Pricing
- It offers in-app purchases.
Cons
- Advertisements are present.
- There are no other options for audio or video editing.
Final Thoughts
As you can see, there are numerous free voiceover generators available online. Most software products come in both free and premium versions, which you can pick from depending on your needs. These programs will swiftly help you reach your text to audio transformation goals, whether you’re a YouTube content maker in need of an informative voiceover or a disabled person looking for a user-friendly text-to-speech converter.
Also read:
- New In 2024, How to Loop a Video on Vimeo?
- 2024 Approved Free Drone LUTs For Perfect Drone Footage
- New In 2024, Confused About Which GoPro Should You Use? This Article Introduces and Provides a Detailed Overview of the Best GoPro for YouTubers You Can Find in the Market for Vlogging
- New 2024 Approved How to DIY VHS Overlay in After Effects?
- In 2024, Videos Look Better when Edited Professionally. If Youre Looking to Edit Recorded Video with a Pro-Level Editing Then Weve Got You Covered. Learn About Editing Recorded Videos with the Best Toolkit Here
- You Must Be Wondering Which the Best Online Transparent Image-Maker Is! Well, There Is No Need to Get Confused as Here; You Will Get a Curated List for the Same for 2024
- In 2024, Create Glitch Text Effect
- 2024 Approved How to Turn Text Into a Podcast
- Updated This Article Presents the Guide to Using Magic Effects for Creating Competent Films with Step-by-Step Instructions and Filmoras Grow and Win Program Contest
- New 2024 Approved DVD Slideshow Builder Review and Tutorial
- New Unleash the Power of Video Slow Motion with Wondershare Filmora. Find Out How to Create Slow Motion Video with the Effective Speed Ramping Feature on Filmora
- New Want Make a Slide Show Video? Heres How
- Updated How to Take Slow Motion Videos for 2024
- Updated 6 Best Text to Speech Generators for YouTube Videos Windows, Mac, Android, iPhone & Online
- Updated An Ultimate Guide To Edit a Music Video Aspect Ratio and First Cut for 2024
- Updated How to Create Cinematic Style Videos? Easy Guide for Beginners for 2024
- New Detailed Guide to the Best Convertors for Turning GIF Into PDF Files. Know Their Features, Pros, Cons, and More for 2024
- Updated 2024 Approved Looking for the Different Ar Video Effects to Include in Your Film? Check Out This Article for the Best 10 Augmented Reality Effects and the Fun Ar Effects in Filmora
- New Looking for a Great Way to Make Your Own Anime Music Video? The Following Are the Top AMV Makers to Choose From for 2024
- New 2024 Approved Learn to Splice Videos Together on iPhone
- Easily Combine Videos and Audios with 5 Simple Online Tools
- In 2024, How to Track Realme C55 Location by Number | Dr.fone
- How to Unlock SIM Card on iPhone X online without jailbreak
- New Mastering Lip Sync Explore Top Apps for Dynamic Videos
- Recover iPhone 14 Pro Data From iOS iTunes | Dr.fone
- Honor 100 Not Connecting to Wi-Fi? 12 Quick Ways to Fix | Dr.fone
- Top 7 Phone Number Locators To Track Oppo Reno 11 Pro 5G Location | Dr.fone
- Authentication Error Occurred on Vivo V30 Pro? Here Are 10 Proven Fixes | Dr.fone
- How To Unlock A Found iPhone XR?
- Best Android Data Recovery - Retrieve Lost Pictures from Itel A60.
- How do i sign a .xlsm files electronically
- Bypassing Google Account With vnROM Bypass For Xiaomi Redmi K70 Pro
- In 2024, Did Your iPhone 15 Passcode Change Itself? Unlock It Now
- How To Transfer Data From Apple iPhone 11 Pro Max To Other iPhone 14 devices? | Dr.fone
- In 2024, How to Track Lava Blaze Pro 5G Location without Installing Software? | Dr.fone
- How To Change Your SIM PIN Code on Your Infinix Note 30 VIP Racing Edition Phone
- How to Change/Fake Your Samsung Galaxy S23 Location on Viber | Dr.fone
- Title: Updated In 2024, Step by Step to Crop Videos with CyberLink PowerDirector
- Author: Morgan
- Created at : 2024-04-24 01:03:38
- Updated at : 2024-04-25 01:03:38
- Link: https://ai-video-editing.techidaily.com/updated-in-2024-step-by-step-to-crop-videos-with-cyberlink-powerdirector/
- License: This work is licensed under CC BY-NC-SA 4.0.
