
:max_bytes(150000):strip_icc():format(webp)/GettyImages-174294003-57c6ee043df78cc16eeab260.jpg)
Updated In 2024, Steps To Fade Audio In Premier Pro
Steps To Fade Audio In Premier Pro
Audio is a very big part of any video project and it can make or break the video project. This is why it is very important to not just choose a video editor that also offers audio editing, but one that is easy to use and offers a lot of editing options. This way, you can edit the audio in your project to suit your video’s production and end up with a great professional final product.
One of the video editing tools that offer features that can accomplish all that is Adobe Premier Pro. In this article, we will look at how you can use Premier Pro to fade audio in or out.
Steps to Fade Audio in Premier Pro
Premier Pro gives you two different options to fade audio in or out. Let’s look at both options and then you can choose the one that suits you best;
Fade Audio using Crossfade Audio Transition
Step1To begin, open Premier Pro on your computer and then open the audio that you want to edit.
Step2Once it is open, select the audio clip in the timeline and then click on “Sequence” at the top menu and select “Apply Audio Transition.”
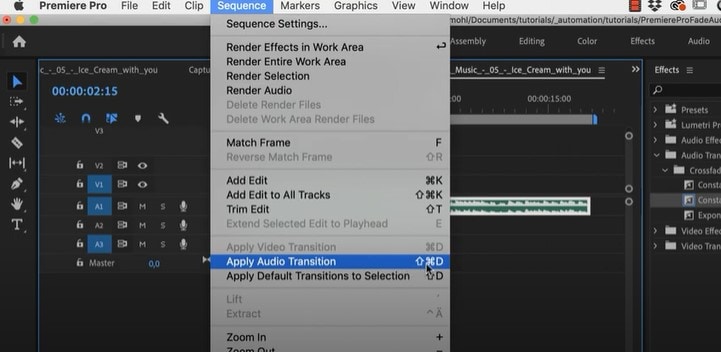
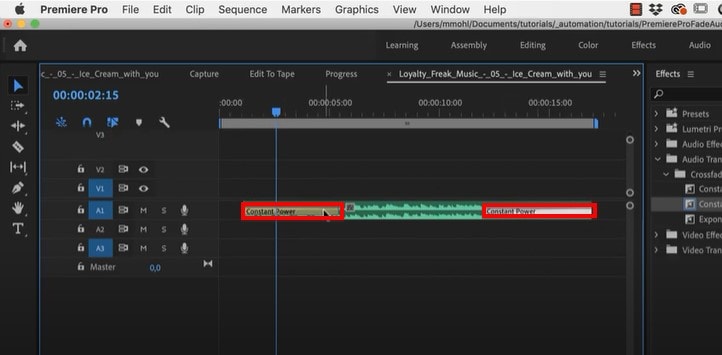
You can also use the keyboard shortcut Shift + Command + D (macOS) or Shift+ Ctrl + D (PC). This will add the “Constant Power Cross Fade” effect at the beginning and the end of the clip.
Step3You can then just change the duration of the effect by simply dragging the end of the transition.
Fade Audio using Clip Keyframes
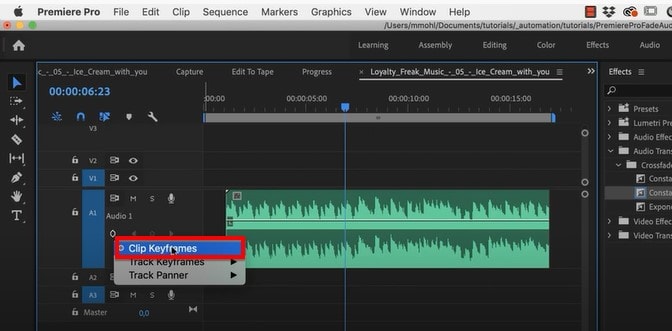
Step1Adobe Premier Pro has two volume keyframes; Track and Clip. Make the audio larger so you can see the volume line and then under the audio name, click on the volume keyframes option to make sure “Clip Keyframes” is enabled.
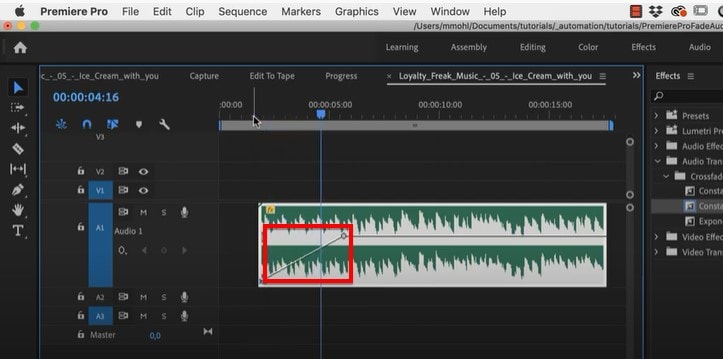
Step2You can then press down on the Command Key (macOS) or the Control Key (PC) and drag the volume line down to add a fade-in or fade-out effect.
Adobe Premiere Alternative Way to Fade Audio
If you are like most people and you find Adobe Premier Pro to be very difficult you use, we have a tool that is just as effective but also simplifies the process. This is the very simple to use Wondershare Filmora .
Just like Premier Pro, Filmora gives you two options to fade audio in and out. Let’s look at both options;
Adding Fade in and Out in Audio Pane
Step1Download and install Wondershare Filmora onto your computer, open the program and then import the audio clip that you want to edit.
Step2Once the video has been added to the timeline, double-click on it to access the “Audio” editing panel.
Step3Here, you can very simply add the fade-in and fade-out effects by simply dragging the sliders to the desired duration or by manually entering the duration in seconds.

Using the Audio Waveform
You can also use the fade icons on the left and right edges of the audio waveform to quickly add a fade in and out.
To add a fade-in effect, drag the fade-in maker to the right. Then go to the end of the clip to drag the fade-out maker to the left to add a fade-out effect.

Related FAQs about Audio Fade
1. How Do I Fade to Black in Adobe Premiere Pro?
You can easily add the Fade to Black transition in Adobe Premiere Pro using the “Effects” tab. Just open the two clips in Premiere Pro and go to “Effects.” Type in “dip to black” in the search box and when you find the effect, drag it between the two clips in the timeline. The effect will appear on the right side of the project.
You also have several customization options that you can apply to the effect to get it just right. To see these options, go to Effect Controls and you should be able to change the alignment of the effect to “Center at Cut” so that the first video fades out to black before the second video appears.
2. Premiere Pro Audio Fade Not Working?
Sometimes you can complete all the editing steps we have described above but you are unable to tell if the fade-in and fade-out effects are working because you can’t play the audio in Premiere. This is a very common problem that can easily be fixed using the following troubleshooting steps;
Check the master volume on your computer to see if this is the problem
Then check the volume in Premiere to see if the audio meter is moving as you play the clip. It is the green bar usually in the lower right corner.
If your volume is fine but you still can’t hear the audio, you may need to adjust several settings. Go to Edit > Preferences (on PC) or Preferences menu under the main Premiere Pro CC menu (macOS) and select “Audio Hardware” in the options that appear. You can then change the “Default Output” device to something else.
3. How Do You do Audio Transitions in Premiere Pro
Adding audio transitions in Premiere Pro is very easy; just open the audio that you want to edit and then Right-click (PC) or Control- Click (macOS) on either the “Constant Gain” or “Constant Power” effect from the Effects panel. Then choose “Set Selected as Default Transition” from the options in the menu.
To add a duration for the audio transitions, go to Edit > Preferences > Timeline (PC) or Premiere Pro Menu > Preferences (macOS) and enter the duration value under “Audio Transition Default Duration.”
Free Download For Win 7 or later(64-bit)
Free Download For macOS 10.14 or later
Guide To Make a YouTube Intro by Filmora
You are starting a YouTube channel and looking to create a video intro. Then, this article will allow you to experience the magic of Wondershare Filmora in creating a YouTube intro. Wondershare Filmora allows you to access the range of opener templates you can edit to create engaging YouTube intros. This will help to hook up your audience till the end.
But before we learn how to create a YouTube intro, let’s understand what makes an Intro creative and exciting.
Part 1. What Is a Creative YouTube Intro?
A good intro is a crucial feature of a good YouTube video. Whenever a viewer or a subscriber clicks on your video, the YouTube intro is the first thing they see. And a successful channel’s secret is to captivate the viewer from the start.
What Goes Into a Creative YouTube Intro?
A good YouTube intro consists of the following qualities:
- Graphic: The intro text will be written on the graphics template.
- Text: This text will be your channel’s name. Or, if it’s a Vlog, it could be its number. Such as i.e., Vlog #2.
- Images: If you use plain templates, you can add pictures behind them to make them pop up even more.
- Catchy music: To spice up the video and make it more pleasing, the music will be added to hook the audience in the intro section.
You must have an engaging YouTube intro. You will need a few things to create a YouTube intro.
Part 2. What Do You Need to Make a Creative YouTube Intro?
You are all set to engage the audience, then you need the following essentials to create an exemplary YouTube intro:
Requirement 1. Wondershare Filmora
Free Download For Win 7 or later(64-bit)
Free Download For macOS 10.14 or later
First, you will need to have a good video editor. Wondershare Filmora is the best for editing your videos. It enables you to make creative and appealing videos.
It has a very engaging system UI that allows even novices to quickly get the hang of it. Also, it has a wide range of stock media. Thus, it allows you to access the intro templates and customise features.

Requirement 2. Footage for Intro
When creating content for your YouTube videos, remember that you will also need some footage for your intro. Intros need to be as captivating as possible.
So to hook the audience from the start, you will need an entertaining start. These video clips can be the exciting moments that you cut before the climax or landscapes of the scenery. The choice is yours.
Part 3. Step-by-Step Guide to Creating a YouTube Intro
You can create a YouTube intro in two ways.
- Create a YouTube intro with an opener template.
- By using video clips from your library.
To use both of these methods, you will need Wondershare Filmora. For this, read below to get your hands on it!
Create a YouTube Intro with an opener template
Opener templates are full of fancy graphics and animations that you can change according to your style. The library provides you with the most vibrant and simplest form of opener templates.
Step1 Download Wondershare Filmora
Before all, you need to have access to Filmora. If you don’t have then follow the below actions:
- First, download and install the Wondershare Filmora.
- Then, on your PC or Mac, run this application.
Step2 Preview The Intro Template
After downloading the Wondershare Filmora, you must select an intro template. To perform this action, you will need to preview it first as:
- Click on the Title icon above the Import window.
- On the left column, scroll down to Titles > Openers.
- Double-click on any intro template to preview it.
After previewing the opener, we need to insert it into the timeline. Simply click on an intro you like and place it in the timeline below. Here you can edit the Opener.
Step3 Edit The Text
After adding the opener to the timeline, your goal is to type in your text. This text will appear in the intro. To perform this action, follow the steps mentioned below:
- Double-click on the opener added to the timeline.
- This will open the settings menu in the import window.
- Type in the text box your channel’s or vlog’s name.

- Then change the font of text if you want.
- You can also edit the sub-heading. Here you can write a short description of your video.
- Once you are done typing the text, click on OK to confirm your changes.
After you have typed in the text for your opener, it is time to add some music to it.
Step4 Add Music into Clip
Music will spice up your intro video and give more pleasing effect. To proceed it further, follow the following steps:
- Click on the Audio icon above the import window and Audio library will pop up.
- Here, you can see the variety of Royalty-free music available.
- Browse through the library and choose whatever you like.
- After you have selected the music for your video, click to drop it below your opener in the timeline.
- Trim the music to the length of the opener.
- Play the opener from the start to confirm your changes.

This is how you can create an opener intro for your YouTube videos. Choose the graphics that most suit your video’s vibe.
Now that we have learned how to make an opener by template, let’s look at how to create an intro using clips in your library.
Create an Intro with Video Clips in Your Library
Wondershare Filmora also allows you to edit your videos to turn them into openers. This will enable your intros to be more personal and unique, giving you the edge of creativity.
Creating an intro by using video clips is an easy task. You just need suitable video clips to use as an intro, and you are good to go.
Follow the steps as mentioned to create an intro using Video clips:
Step1 Import the Video Clips
After downloading Wondershare Filmora, your next step is to import your video clips. To perform this, follow the steps as mentioned below:
- On the Filmora Home Interface, find the Import icon on the top left side and select it.
- This will direct you to your PC library.
- Select the photos and videos you want to edit and click OK.

Step2 Add The Video Clips to the Timeline
Once you have imported clips in the Import window, your next step is simply to add them to the timeline. For this, follow the steps mentioned below:
- Drag and select the clips in the import window.
- Then, drop them in the timeline.

Once in the timeline, your video is ready to go into editing mode. But before we insert the template of our intro, we need another step as shown!
Step3 Trim The Video Clips
As it’s the intro, we need to trim the video clips, so they are concise. You may have recorded longer video clips, but we need clips that are no longer than 5 seconds.
To trim the video clips, follow the steps mentioned:
- Move the playhead on the video clip to where you want to trim.
- Click on the scissors icon on the Playhead.
This will split your video clip into two parts. Now, you can delete whatever part you like and keep the other one.
![]()
Note: To measure the time of the video clip, keep an eye on the Time map above the Playhead.

When you have trimmed your video clips to your liking, it’s time to add the Title text that will act as an intro to your video!
Step4 Add The Title Text
You will need a title template to add text to your video clips. For this,perform the following actions:
- First, click on the Title icon above the import window.
- On the left column explore and browse the animated title as you want.
- Double-click on a title template to preview it.
- Once you have selected the Title template, drag it above the start of your timeline above the video clip and it’ll all set.
After you have added the title, the next step is to add your intro text.
Step5 Type The Intro Text
For specifications of the video and ongoing content, you have to tell the audience before starting. For this, you need to type the intro text as shown:
- Double-click on the title template.
- Type in the text you want in the text box.

Play the video clip from the beginning to confirm your changes. Now that we have created a graphic text, it’s time to add the audio.
Step6 Add Music
To give more pleasing look and effect, you must add the music into it. Follow the steps below to proceed it further:
- First select the Audio icon above the import window. This will direct you to Filmora’s Audio library.
- Browse the library and pick whatever royalty-free music you want.
- After you’ve chosen the music for your video, drag it to the timeline below the video clip.
- Cut the music to match the length of the intro and it’s all done.

Once you are done adding the music, hit the play button to ensure everything is according to your need.

Step7 Export The Video
Its time to export the video and share it with your audience. For this, check below steps:
- Click on the export icon on the top right of the import window.
- This will pop-up another window of settings.
- Select the settings your want your video to be exported in.
![]()
Note: You can also change the name of your intro.
- When you are done, click on Export.
- Wait till Filmora finishes exporting your video.

Congratulations! You have successfully created a YouTube intro. Now you can use them freely in your YouTube videos and please your audience.
Conclusion
YouTube intros are a great way to attract the viewer at first glance. The more creative the YouTube Intro is, the more the chances of your video getting views.
By following the steps mentioned in the article above, you can easily create YouTube intros by Wondershare Filmora. Try with new features and stock media to make your video more exemplary!
Free Download For macOS 10.14 or later
First, you will need to have a good video editor. Wondershare Filmora is the best for editing your videos. It enables you to make creative and appealing videos.
It has a very engaging system UI that allows even novices to quickly get the hang of it. Also, it has a wide range of stock media. Thus, it allows you to access the intro templates and customise features.
Requirement 2. Footage for Intro
When creating content for your YouTube videos, remember that you will also need some footage for your intro. Intros need to be as captivating as possible.
So to hook the audience from the start, you will need an entertaining start. These video clips can be the exciting moments that you cut before the climax or landscapes of the scenery. The choice is yours.
Part 3. Step-by-Step Guide to Creating a YouTube Intro
You can create a YouTube intro in two ways.
- Create a YouTube intro with an opener template.
- By using video clips from your library.
To use both of these methods, you will need Wondershare Filmora. For this, read below to get your hands on it!
Create a YouTube Intro with an opener template
Opener templates are full of fancy graphics and animations that you can change according to your style. The library provides you with the most vibrant and simplest form of opener templates.
Step1 Download Wondershare Filmora
Before all, you need to have access to Filmora. If you don’t have then follow the below actions:
- First, download and install the Wondershare Filmora.
- Then, on your PC or Mac, run this application.
Step2 Preview The Intro Template
After downloading the Wondershare Filmora, you must select an intro template. To perform this action, you will need to preview it first as:
- Click on the Title icon above the Import window.
- On the left column, scroll down to Titles > Openers.
- Double-click on any intro template to preview it.
After previewing the opener, we need to insert it into the timeline. Simply click on an intro you like and place it in the timeline below. Here you can edit the Opener.
Step3 Edit The Text
After adding the opener to the timeline, your goal is to type in your text. This text will appear in the intro. To perform this action, follow the steps mentioned below:
- Double-click on the opener added to the timeline.
- This will open the settings menu in the import window.
- Type in the text box your channel’s or vlog’s name.
- Then change the font of text if you want.
- You can also edit the sub-heading. Here you can write a short description of your video.
- Once you are done typing the text, click on OK to confirm your changes.
After you have typed in the text for your opener, it is time to add some music to it.
Step4 Add Music into Clip
Music will spice up your intro video and give more pleasing effect. To proceed it further, follow the following steps:
- Click on the Audio icon above the import window and Audio library will pop up.
- Here, you can see the variety of Royalty-free music available.
- Browse through the library and choose whatever you like.
- After you have selected the music for your video, click to drop it below your opener in the timeline.
- Trim the music to the length of the opener.
- Play the opener from the start to confirm your changes.
This is how you can create an opener intro for your YouTube videos. Choose the graphics that most suit your video’s vibe.
Now that we have learned how to make an opener by template, let’s look at how to create an intro using clips in your library.
Create an Intro with Video Clips in Your Library
Wondershare Filmora also allows you to edit your videos to turn them into openers. This will enable your intros to be more personal and unique, giving you the edge of creativity.
Creating an intro by using video clips is an easy task. You just need suitable video clips to use as an intro, and you are good to go.
Follow the steps as mentioned to create an intro using Video clips:
Step1 Import the Video Clips
After downloading Wondershare Filmora, your next step is to import your video clips. To perform this, follow the steps as mentioned below:
- On the Filmora Home Interface, find the Import icon on the top left side and select it.
- This will direct you to your PC library.
- Select the photos and videos you want to edit and click OK.
Step2 Add The Video Clips to the Timeline
Once you have imported clips in the Import window, your next step is simply to add them to the timeline. For this, follow the steps mentioned below:
- Drag and select the clips in the import window.
- Then, drop them in the timeline.
Once in the timeline, your video is ready to go into editing mode. But before we insert the template of our intro, we need another step as shown!
Step3 Trim The Video Clips
As it’s the intro, we need to trim the video clips, so they are concise. You may have recorded longer video clips, but we need clips that are no longer than 5 seconds.
To trim the video clips, follow the steps mentioned:
- Move the playhead on the video clip to where you want to trim.
- Click on the scissors icon on the Playhead.
This will split your video clip into two parts. Now, you can delete whatever part you like and keep the other one.
![]()
Note: To measure the time of the video clip, keep an eye on the Time map above the Playhead.
When you have trimmed your video clips to your liking, it’s time to add the Title text that will act as an intro to your video!
Step4 Add The Title Text
You will need a title template to add text to your video clips. For this,perform the following actions:
- First, click on the Title icon above the import window.
- On the left column explore and browse the animated title as you want.
- Double-click on a title template to preview it.
- Once you have selected the Title template, drag it above the start of your timeline above the video clip and it’ll all set.
After you have added the title, the next step is to add your intro text.
Step5 Type The Intro Text
For specifications of the video and ongoing content, you have to tell the audience before starting. For this, you need to type the intro text as shown:
- Double-click on the title template.
- Type in the text you want in the text box.
Play the video clip from the beginning to confirm your changes. Now that we have created a graphic text, it’s time to add the audio.
Step6 Add Music
To give more pleasing look and effect, you must add the music into it. Follow the steps below to proceed it further:
- First select the Audio icon above the import window. This will direct you to Filmora’s Audio library.
- Browse the library and pick whatever royalty-free music you want.
- After you’ve chosen the music for your video, drag it to the timeline below the video clip.
- Cut the music to match the length of the intro and it’s all done.
Once you are done adding the music, hit the play button to ensure everything is according to your need.
Step7 Export The Video
Its time to export the video and share it with your audience. For this, check below steps:
- Click on the export icon on the top right of the import window.
- This will pop-up another window of settings.
- Select the settings your want your video to be exported in.
![]()
Note: You can also change the name of your intro.
- When you are done, click on Export.
- Wait till Filmora finishes exporting your video.
Congratulations! You have successfully created a YouTube intro. Now you can use them freely in your YouTube videos and please your audience.
Conclusion
YouTube intros are a great way to attract the viewer at first glance. The more creative the YouTube Intro is, the more the chances of your video getting views.
By following the steps mentioned in the article above, you can easily create YouTube intros by Wondershare Filmora. Try with new features and stock media to make your video more exemplary!
How to Edit Facebook eCommerce Video Ads
If you’re running an e-commerce business, then it’s important to create video ads that promote your products. However, making professional-quality videos can be expensive and time-consuming.
Luckily, there’s an easy way to create Facebook video ads that look great without spending a lot of money. All you need is a copy of Wondershare Filmora, which is a powerful yet easy-to-use video editor.
In this article, we’ll show you how to use Filmora to create eCommerce video ads that will help boost your sales.

Why Video Ads Are Effective for E-commerce Business
Video ads are a very effective way to promote your e-commerce business. They can help you reach a wider audience, and they can also be more engaging than traditional advertising methods.
There are a few things to keep in mind when creating video ads for your e-commerce business:
- First, make sure that your videos are high quality and professional-looking.
- Secondly, focus on creating videos that are short and to the point.
- Finally, make sure to include a call to action in your video so that viewers know what they should do after watching it.
Why Use Wondershare Filmora for Editing E-commerce Video Ads
Wondershare Filmora is a powerful video editing software that you can use to create videos for your e-commerce business. It’s also very user-friendly, which means it’s easy to use even if you have no prior experience with video editing software. You can create professional looking videos using this software, and it comes with built-in templates that make it easier for you to get started quickly.

With Wondershare Filmora , creating an e-commerce video ad will be as simple as possible. There are many different options that you can choose from when making these ads such as adding text, photos or graphics using the built-in editor within this program. You can also add audio clips into your video in order to hear sound effects such as music or voice-overs that narrate what viewers see on screen. They have all my favorite amazing features.
Free Download For Win 7 or later(64-bit)
Free Download For macOS 10.14 or later
Steps to Edit Facebook Video Ads for E-commerce Business
Step1Prepare your script for Video Editing
To make your Facebook video ad, you need to have a clear idea of what you want to say in the video. This can be done by creating a script for your video. Once you have a script, you can start planning out your video and editing it in Filmora.
Step2Save your video materials
To gather all photos and video materials, you can either use your own personal footage or find stock images and videos online. Once you have all the desired media, save them to a designated folder on your computer so you can easily access them while editing in Filmora.
Step3Open Filmora and click on “Create a New Project.”
Now that you have your content ready, open Filmora and click on “Create a New Project.” This will create a new project file for you to start editing in.

Step4Select the right Project Aspect Ratio
It is important to use the correct project aspect ratio when creating a Facebook video ad because if you don’t, your video may not be in the correct format when it is uploaded to Facebook. When selecting the project aspect ratio, make sure to choose Widescreen (16:9) or Instagram (1:10) to ensure that your video is in the correct format.

Step5Import your media files into Filmora
Once you have decided on the project aspect ratio, you can start importing your video and photo files. To do this, go to the “Media Library” and click on “Import Media Files.” Find the folder where you saved your content and select all of the files that you want to use. Then, click “Open” to import the files into Filmora.

Step6Set the background color for your Facebook Video Ads
Now that you have all of your content imported into Filmora, you can start editing it. One thing you may want to do is set the background color for your video. To do this, go to the “Media” tab and click on the “Sample Color” section. Then, select the desired color for your background. Make sure to use your branding color palette.

Step7Add Catchy headline and text
This will help to grab the viewer’s attention and explain what your video is about. To do this, go to the “Titler” tab and select the “Titles” option. Then, click on the “Text” tab and type in your headline. You can also add some text to the video by going to the “Text” tab and clicking on the “Add Text” option.
Catchy headlines will help you stand out from the competition and get your video noticed.

Step8Convert your script into a voice-over narrator
By using text to voice feature, you can generate voice-over that will help you create a more professional video. To do this, go to the “Text” tab and click on the “Add Text” option. Then, type in your script. Once you have finished typing, click on the “Text-ti-Voice Over” button and select the desired language.

Step9Arrange your video clips
Now that you have all of your content imported into Filmora , you can start arranging them into a cohesive video. To do this, go to the “Timeline” tab and drag and drop the desired photos or video clips into the correct order.

If you need to trim or split any of the photos or video clips, you can do so by using the “Trim” and “Split” options. To trim a photo or video clip, hover over the desired clip and click on the “ scissors “ icon. Then, drag it to the desired location. To split a photo or video clip, hover over the desired clip and click on the “ split “ icon. Then, drag it to the desired location.
You can also add some transitions between the video clips by going to the “Transitions” tab and dragging and dropping the desired transition into place.
Step10Add music to your video
Adding music to your video will help to set the mood and make your video more engaging. To do this, go to the “Audio” section the select your desired background music for your video. You can also download “no copyright background music” on Youtube.

Drag and drop the audio file into place on the timeline. You can also use the “Fade In” and “Fade Out” options to make the music flow better with the video.

Step11Export your Video
To export your video, click on the “Export” button at the top section. Select the desired file format and click “Export” to save your video to your computer.

Recommended Export Quality
- Format: MP4
- Resolution: 720 or 1080
- Frame rate 30 fps
Conclusion
Now that you know how to create a Facebook video ad, it’s time to start creating some stellar videos that will help promote your business. By using the tips we’ve provided in this article, you can create videos that stand out from the competition and get noticed by your target audience. Make sure to use catchy headlines, text, and music to engage your viewers and keep them watching until the end. All the best!
Free Download For Win 7 or later(64-bit)
Free Download For macOS 10.14 or later
Free Download For macOS 10.14 or later
Steps to Edit Facebook Video Ads for E-commerce Business
Step1Prepare your script for Video Editing
To make your Facebook video ad, you need to have a clear idea of what you want to say in the video. This can be done by creating a script for your video. Once you have a script, you can start planning out your video and editing it in Filmora.
Step2Save your video materials
To gather all photos and video materials, you can either use your own personal footage or find stock images and videos online. Once you have all the desired media, save them to a designated folder on your computer so you can easily access them while editing in Filmora.
Step3Open Filmora and click on “Create a New Project.”
Now that you have your content ready, open Filmora and click on “Create a New Project.” This will create a new project file for you to start editing in.
Step4Select the right Project Aspect Ratio
It is important to use the correct project aspect ratio when creating a Facebook video ad because if you don’t, your video may not be in the correct format when it is uploaded to Facebook. When selecting the project aspect ratio, make sure to choose Widescreen (16:9) or Instagram (1:10) to ensure that your video is in the correct format.
Step5Import your media files into Filmora
Once you have decided on the project aspect ratio, you can start importing your video and photo files. To do this, go to the “Media Library” and click on “Import Media Files.” Find the folder where you saved your content and select all of the files that you want to use. Then, click “Open” to import the files into Filmora.
Step6Set the background color for your Facebook Video Ads
Now that you have all of your content imported into Filmora, you can start editing it. One thing you may want to do is set the background color for your video. To do this, go to the “Media” tab and click on the “Sample Color” section. Then, select the desired color for your background. Make sure to use your branding color palette.
Step7Add Catchy headline and text
This will help to grab the viewer’s attention and explain what your video is about. To do this, go to the “Titler” tab and select the “Titles” option. Then, click on the “Text” tab and type in your headline. You can also add some text to the video by going to the “Text” tab and clicking on the “Add Text” option.
Catchy headlines will help you stand out from the competition and get your video noticed.
Step8Convert your script into a voice-over narrator
By using text to voice feature, you can generate voice-over that will help you create a more professional video. To do this, go to the “Text” tab and click on the “Add Text” option. Then, type in your script. Once you have finished typing, click on the “Text-ti-Voice Over” button and select the desired language.
Step9Arrange your video clips
Now that you have all of your content imported into Filmora , you can start arranging them into a cohesive video. To do this, go to the “Timeline” tab and drag and drop the desired photos or video clips into the correct order.
If you need to trim or split any of the photos or video clips, you can do so by using the “Trim” and “Split” options. To trim a photo or video clip, hover over the desired clip and click on the “ scissors “ icon. Then, drag it to the desired location. To split a photo or video clip, hover over the desired clip and click on the “ split “ icon. Then, drag it to the desired location.
You can also add some transitions between the video clips by going to the “Transitions” tab and dragging and dropping the desired transition into place.
Step10Add music to your video
Adding music to your video will help to set the mood and make your video more engaging. To do this, go to the “Audio” section the select your desired background music for your video. You can also download “no copyright background music” on Youtube.
Drag and drop the audio file into place on the timeline. You can also use the “Fade In” and “Fade Out” options to make the music flow better with the video.
Step11Export your Video
To export your video, click on the “Export” button at the top section. Select the desired file format and click “Export” to save your video to your computer.
Recommended Export Quality
- Format: MP4
- Resolution: 720 or 1080
- Frame rate 30 fps
Conclusion
Now that you know how to create a Facebook video ad, it’s time to start creating some stellar videos that will help promote your business. By using the tips we’ve provided in this article, you can create videos that stand out from the competition and get noticed by your target audience. Make sure to use catchy headlines, text, and music to engage your viewers and keep them watching until the end. All the best!
Free Download For Win 7 or later(64-bit)
Free Download For macOS 10.14 or later
How to Create OBS Slideshow
How to Create OBS Slideshow
An easy yet powerful editor
Numerous effects to choose from
Detailed tutorials provided by the official channel
Slideshow can be created easily with OBS with online application. The steps to create OBS Slideshow with application. How to create OBS slideshow easily?

Presentation and slide show are the most widely used methods of presenting and expressing the data, figures and information by any company or individual. It is most attractive and easy way to showcase the details of any business concern. Slideshow is also used in presenting the images in an artistic way. They are also very useful in creating content now-a-days. Therefore slideshow presentations are gaining importance. There are various applications and software used for making presentation and slideshow. The use of the application is based on the various features and ease to usage to the various categories of users. One of the software used for creating slideshow and making content is OBS. This software is used widely by the content creators and YouTubers. It is used for recording the screen, videos and editing in video. This program can also be used for creating slideshow. Let’s see some details about it and how you can create slideshow with OBS.
In this article
01 [What Are the Advantages of Creating Slideshow with OBS](#Part 1)
02 [How to Create an Image Slideshow in OBS](#Part 2)
03 [Five OBS Slideshow Maker Alternatives](#Part 3)
Part 1 What Are the Advantages of Creating Slideshow with OBS

OBS is an incredible tool for advanced level user for creating some fine presentation, slideshow, videos and content. It is the most widely used software for numerous applications. The reason for its wide application and usage is its various advantages which it offers to the various categories of users. Let’s see some of the advantages of creating Slideshow with OBS.
● The layout of OBS is attractive as compared to any other software. You can find effortless and intuitive navigation.
● It has great customization features, which give another plus point to the software. One can give some effects and make the slides as per the need or for any special purpose.
● You can use various elements in the slideshow using OBS like overlays and on-screen elements.
● You can make good quality videos and live uploads with the use of OBS slideshows
● Even a beginner can easily use the software of OBS in creating slideshow as it is easy to use even without going through the instruction manuals and guides.
● One can easily organize and even hide the details made through OBS slideshow.
● It is within the reach of every user as it is free, virus free and open software. One can use it for making live telecast and for video recording.
● It has a good association with various social media platforms like facebook and YouTube.
● It has option for screen recording also.
● One has the feature of changing scene along with resolution setting.
● Connecting with streaming service provider is easy.
● Designing and editing in the OBS slideshow is easy and can be done based on what the viewers want to look.
● Background customization facility.
● Facility for scrolling and moving the details included in the slides.
● Duplicate slides can be effectively and easily created in OBS slideshow.
Part 2 How to Create an Image Slideshow in OBS

When you look upon so many advantages of making slideshow through OBS, you may be eager to know how you can create an images, videos and image slideshow in OBS. Let’s see the process of OBS image slideshow:
● It can be created in two parts. The first is setting up the slideshow and the second one is setting up hotkeys.
● Open OBS and create a new scene.
● At the lower left corner of the screen, click on addition symbol.
● Name it and click on o.k.
● Go to addition symbol at source box and choose select image slideshow.
● Click O.K after naming the source.
● Next step is setting up slideshow properties. You can choose slide mode to automatic or manual. Based on your choice, you can select the transition. Also set the time and transition speed as you like. At next step you can take up loop, hide and randomize playback.
● At last add images.
● You can rearrange the images with the use of up and down arrow.
● When you finished adding and arranging the images, click on O.K
● Now the next stage is setting up of hotkeys.
● Open the setting over the File menu.
● Hotkeys are there in the left menu, select it and place where you see image slideshow
● Through keys go to next and previous slide.
● After hotkeys setting are done, click apply.
This is an easy way to create an image in OBS slideshow. You can also learn creating videos and doing live telecast.
Part 3 Five OBS Slideshow Maker Alternatives
Although OBS is one of the popular slideshow maker, but due to its advanced features and usage, it may not be fit for everyone. So, here are some of OBS Slideshow maker alternatives you can try:
01Camtasia

For those who are new to making videos and slides using software, Camtasia is a good option. One can easily record the specific areas of the screen on the computer screen. Drag and drop, remove, trim, selecting and movement, effects, adding music and effects are easily possible through Camtasia.
02ShareX

It is a free and open source tool with a lot of features and addition. It some unique features like one can record the screen as it is scrolled down and time can also be set. It is also useful for text files also. One can take the screen shot of text which make easier for the users as it saves time. It supports many destinations like image, file and text uploaders. It is good for window users who are looking for easy and free alternatives for OBS.
03XSplit Broadcaster

When you are looking for a good alternative for OBS to make live streaming and recording go easier, then XSplit Broadcaster is the best option. Its application is seen in both gamming and esports. You have so many features like drag, drop, customization, image resizing and including videos and gif. This is good for the people who love to do customization and create media slideshows by including multiple of images.
04Streamlabs OBS

This is open source and free software good for recording and live streaming purpose. This is good for gamers and live event organizers. Layout editor, drag and drop and control over recording make this software an exceptional one. One can easily watch the recent events, save the replays and chat on chat box over the screen.
05Lightstream Studio

If you desire to go live in few minutes having a computer and good internet connection, the best alternative software other than OBS is Lightstream Studio. It is good for gamers and creators who just cannot wait to go live along with some great customization features. Layout making, creation of unlimited projects and scenes, motion graphics and social media messaging can be done effectively with the use of this software.
Although there are some few more options, but one of the most growing software for making slideshow is Filmora.

Wondershare Filmora Video Editor is an application/software for making any picture or video more effective. With great editing and personalizing video features and effects, it becomes the most popular software. This software is regularly updated to enhance its features and offer best tools to every category of users whether they are beginners or the intermediates. This software is developed by wondershare. It comes in various versions like Filmora, Filmora, FilmoraScrn. Each of the versions is designed looking into the need of the users with some different and advanced features.
For Win 7 or later (64-bit)
For macOS 10.12 or later
Filmora is a video editor application for every content creator. Those who are frequent in touch with slideshow, presentation and editing thereof, Filmora has all for them. One can easily create slideshow with multiple pictures and videos. The process is easy as one need to download the software, import photos and music, add transitions and background music, and finally export and save it. The reason for choosing filmora is that it supports various file formats with crop, pan and zoom feature.
● Ending Thoughts →
● With the advancement of technology, people are using such software that makes presenting images, videos and live events more attractive and effective. Slideshow OBS is one of the popular software for creating slideshow using images and videos. There is various advantage of using this software like it has powerful video recording feature and live streaming facility.
● Image slideshow can be created in easy and simple steps using OBS powerpoint slideshow. It is done through setting up the slideshow and the second one is setting up hotkeys.
● There are various alternative in place of OBS slideshow that can be used by different users based on their level of learning. Those who are looking for easy yet effective software for making or editing slideshow, Filmora is the best option for them.
Slideshow can be created easily with OBS with online application. The steps to create OBS Slideshow with application. How to create OBS slideshow easily?
Presentation and slide show are the most widely used methods of presenting and expressing the data, figures and information by any company or individual. It is most attractive and easy way to showcase the details of any business concern. Slideshow is also used in presenting the images in an artistic way. They are also very useful in creating content now-a-days. Therefore slideshow presentations are gaining importance. There are various applications and software used for making presentation and slideshow. The use of the application is based on the various features and ease to usage to the various categories of users. One of the software used for creating slideshow and making content is OBS. This software is used widely by the content creators and YouTubers. It is used for recording the screen, videos and editing in video. This program can also be used for creating slideshow. Let’s see some details about it and how you can create slideshow with OBS.
In this article
01 [What Are the Advantages of Creating Slideshow with OBS](#Part 1)
02 [How to Create an Image Slideshow in OBS](#Part 2)
03 [Five OBS Slideshow Maker Alternatives](#Part 3)
Part 1 What Are the Advantages of Creating Slideshow with OBS
OBS is an incredible tool for advanced level user for creating some fine presentation, slideshow, videos and content. It is the most widely used software for numerous applications. The reason for its wide application and usage is its various advantages which it offers to the various categories of users. Let’s see some of the advantages of creating Slideshow with OBS.
● The layout of OBS is attractive as compared to any other software. You can find effortless and intuitive navigation.
● It has great customization features, which give another plus point to the software. One can give some effects and make the slides as per the need or for any special purpose.
● You can use various elements in the slideshow using OBS like overlays and on-screen elements.
● You can make good quality videos and live uploads with the use of OBS slideshows
● Even a beginner can easily use the software of OBS in creating slideshow as it is easy to use even without going through the instruction manuals and guides.
● One can easily organize and even hide the details made through OBS slideshow.
● It is within the reach of every user as it is free, virus free and open software. One can use it for making live telecast and for video recording.
● It has a good association with various social media platforms like facebook and YouTube.
● It has option for screen recording also.
● One has the feature of changing scene along with resolution setting.
● Connecting with streaming service provider is easy.
● Designing and editing in the OBS slideshow is easy and can be done based on what the viewers want to look.
● Background customization facility.
● Facility for scrolling and moving the details included in the slides.
● Duplicate slides can be effectively and easily created in OBS slideshow.
Part 2 How to Create an Image Slideshow in OBS
When you look upon so many advantages of making slideshow through OBS, you may be eager to know how you can create an images, videos and image slideshow in OBS. Let’s see the process of OBS image slideshow:
● It can be created in two parts. The first is setting up the slideshow and the second one is setting up hotkeys.
● Open OBS and create a new scene.
● At the lower left corner of the screen, click on addition symbol.
● Name it and click on o.k.
● Go to addition symbol at source box and choose select image slideshow.
● Click O.K after naming the source.
● Next step is setting up slideshow properties. You can choose slide mode to automatic or manual. Based on your choice, you can select the transition. Also set the time and transition speed as you like. At next step you can take up loop, hide and randomize playback.
● At last add images.
● You can rearrange the images with the use of up and down arrow.
● When you finished adding and arranging the images, click on O.K
● Now the next stage is setting up of hotkeys.
● Open the setting over the File menu.
● Hotkeys are there in the left menu, select it and place where you see image slideshow
● Through keys go to next and previous slide.
● After hotkeys setting are done, click apply.
This is an easy way to create an image in OBS slideshow. You can also learn creating videos and doing live telecast.
Part 3 Five OBS Slideshow Maker Alternatives
Although OBS is one of the popular slideshow maker, but due to its advanced features and usage, it may not be fit for everyone. So, here are some of OBS Slideshow maker alternatives you can try:
01Camtasia
For those who are new to making videos and slides using software, Camtasia is a good option. One can easily record the specific areas of the screen on the computer screen. Drag and drop, remove, trim, selecting and movement, effects, adding music and effects are easily possible through Camtasia.
02ShareX
It is a free and open source tool with a lot of features and addition. It some unique features like one can record the screen as it is scrolled down and time can also be set. It is also useful for text files also. One can take the screen shot of text which make easier for the users as it saves time. It supports many destinations like image, file and text uploaders. It is good for window users who are looking for easy and free alternatives for OBS.
03XSplit Broadcaster
When you are looking for a good alternative for OBS to make live streaming and recording go easier, then XSplit Broadcaster is the best option. Its application is seen in both gamming and esports. You have so many features like drag, drop, customization, image resizing and including videos and gif. This is good for the people who love to do customization and create media slideshows by including multiple of images.
04Streamlabs OBS
This is open source and free software good for recording and live streaming purpose. This is good for gamers and live event organizers. Layout editor, drag and drop and control over recording make this software an exceptional one. One can easily watch the recent events, save the replays and chat on chat box over the screen.
05Lightstream Studio
If you desire to go live in few minutes having a computer and good internet connection, the best alternative software other than OBS is Lightstream Studio. It is good for gamers and creators who just cannot wait to go live along with some great customization features. Layout making, creation of unlimited projects and scenes, motion graphics and social media messaging can be done effectively with the use of this software.
Although there are some few more options, but one of the most growing software for making slideshow is Filmora.
Wondershare Filmora Video Editor is an application/software for making any picture or video more effective. With great editing and personalizing video features and effects, it becomes the most popular software. This software is regularly updated to enhance its features and offer best tools to every category of users whether they are beginners or the intermediates. This software is developed by wondershare. It comes in various versions like Filmora, Filmora, FilmoraScrn. Each of the versions is designed looking into the need of the users with some different and advanced features.
For Win 7 or later (64-bit)
For macOS 10.12 or later
Filmora is a video editor application for every content creator. Those who are frequent in touch with slideshow, presentation and editing thereof, Filmora has all for them. One can easily create slideshow with multiple pictures and videos. The process is easy as one need to download the software, import photos and music, add transitions and background music, and finally export and save it. The reason for choosing filmora is that it supports various file formats with crop, pan and zoom feature.
● Ending Thoughts →
● With the advancement of technology, people are using such software that makes presenting images, videos and live events more attractive and effective. Slideshow OBS is one of the popular software for creating slideshow using images and videos. There is various advantage of using this software like it has powerful video recording feature and live streaming facility.
● Image slideshow can be created in easy and simple steps using OBS powerpoint slideshow. It is done through setting up the slideshow and the second one is setting up hotkeys.
● There are various alternative in place of OBS slideshow that can be used by different users based on their level of learning. Those who are looking for easy yet effective software for making or editing slideshow, Filmora is the best option for them.
Also read:
- In 2024, How to Create and Add an Adjustment Layer in Final Cut Pro
- Updated In 2024, Do You Want to Know How to Add LUTs to Premiere Pro? In This Guide, You Will Find Details and Easy Steps to Proceed with Using LUTs in Premiere Pro
- Top 5 Ways To Convert Hdr To Sdr Videos
- How to Make a Time-Lapse Video Online for 2024
- A Review of Efectum App Making Slow Motion Video
- On the Tiktok App, You Can Make a Photo Video Slideshow. You Can Make Photo Video Slideshow with Music, Animated Tiktok Templates, and Can Also Add Text to Slideshow Video
- In 2024, Top 9 Best Solutions To Go For When Creating an AI Thumbnail
- Updated In 2024, 12 Top Picks of Video Enhancer Software
- New Tips That Show Anybody How To Make Youtube Slideshow – Guaranteed for 2024
- New How to Make an Instant Slideshow on Mac for 2024
- New How to Merge Audio and Video in VLC Media Player for 2024
- Video Inspiration for Birthday Slideshow for 2024
- Updated 2024 Approved Looking For the Best VHS Video Effect Makers? Get To Know the Top List
- Updated How to Make a Time-Lapse Video Online for 2024
- New In 2024, Do You Wish to Create High-Quality Videos and Experience Effective Videos with Editing? No Problem at All because the Keyboard Shortcuts Listed Here Will Assist You
- New Separate Audio From Video in DaVinci Resolve Step by Step for 2024
- In 2024, How to Add Zoom Blur Effect In Photoshop
- New How to Create The Best Video Collages ?
- Updated 2024 Approved Camtasia Vs Captivate - Which to Choose?
- New 2024 Approved 8 Top Premiere Pro Slideshow Templates
- New Mix and Match The Ultimate List of 8 Video and Photo Merging Tools
- Possible solutions to restore deleted call logs from Note 30i
- How to Easily Hard reset my Oppo Find X7 | Dr.fone
- How To Transfer Data From Apple iPhone 8 Plus To Android? | Dr.fone
- In 2024, Full Guide to Bypass Honor Magic 5 Lite FRP
- 7 Fixes for Unfortunately, Phone Has Stopped on Vivo V29 | Dr.fone
- How To Transfer Data From Apple iPhone 8 To Other iPhone 12 devices? | Dr.fone
- In 2024, Does find my friends work on Poco X6 Pro | Dr.fone
- How to Track a Lost Motorola Moto G84 5G for Free? | Dr.fone
- In 2024, The Best iSpoofer Alternative to Try On Nokia XR21 | Dr.fone
- How to Fix when Apple Account Locked From Apple iPhone 13 mini?
- How Can Xiaomi 14Mirror Share to PC? | Dr.fone
- Title: Updated In 2024, Steps To Fade Audio In Premier Pro
- Author: Morgan
- Created at : 2024-04-24 01:07:20
- Updated at : 2024-04-25 01:07:20
- Link: https://ai-video-editing.techidaily.com/updated-in-2024-steps-to-fade-audio-in-premier-pro/
- License: This work is licensed under CC BY-NC-SA 4.0.
