:max_bytes(150000):strip_icc():format(webp)/title-b16094ee6f3340328084b9e5cc01426f.jpg)
Updated Learn How to Create a Unique Repeated Text Animation in the Filmora Video Editor. Follow the Simple Step-by-Step Instructions for 2024

Learn How to Create a Unique Repeated Text Animation in the Filmora Video Editor. Follow the Simple Step-by-Step Instructions
Preparation
What you need to prepare:
- A computer (Windows or macOS)
- Your video materials.
- Filmora video editor
Step 1
Download Filmora . Let it install and wait for it to run. Then, click on “New Project”. Now, you’re ready to edit!
Step 2
First, go to Titles and drag the Default Title to the Timeline.

Step 3
Now, double-click on the Default Title clip. Here, change its font to any bold font. Increase the text size to 120. Type in your text in the box. Scroll a bit down and change the Text Spacing to 8. Click OK.

Step 4
Take a Snapshot of this Default Title.

Step 5
Double-click on the Default Title clip once again. This time, click on its Advanced settings. Here, turn OFF Text Fill → turn ON Outline → change the Outline color to White → reduce Thickness to 1. Click OK. Now, take another Snapshot.

Step 6
Delete the Default Title clip from the Timeline. Now, drag the Outline snapshot that we just created to the Timeline. Open the Crop tool → change the Ratio to Custom → replace “1080” with “540”. Lastly, move the highlighted crop section to the top. Click OK.

Step 7
Double-click on the Snapshot to open its settings panel. Go to the Animation tab. Here, change the value of the Y-axis to “275”**.** Click OK. Now, take a Snapshot.

Step 8
Next, click on the Crop tool again and simply move the highlighted crop section to the bottom part of the screen. Click OK. Then, double-click on the snapshot clip in the Timeline and change the value of the Y-axis from “275” to “-275”**.** Click OK. Take a Snapshot again.
Step 9
Import a background image to My Media. Drag the background image to the Timeline. Double-click on it and drag the Scale bar until the background image covers the whole screen. Click OK. You should cut the background clip to make it 3 seconds long as well.

Step 10
Lock this track in the Timeline by pressing the highlighted button on the left. Then, go to “Track Manager” and add 6 new Tracks to the Timeline. Click OK.

Step 11
Drag the first Snapshot we made before to Track 6. Cut it so it’s 3 seconds long. Then, Lock the Track.

Step 12
Set the Playhead at the 15th frame on the Timeline. Then, drag the Upward Outline snapshot to this point. Double-click on it and change the Y-axis value to “**-4%**”. Then, reduce the Opacity to 0%. Now, move the Playhead 5 frames further. Next, increase the Opacity to 100% and increase the Y-axis value to around “105”. Don’t click OK yet.
Step 13
Move the Playhead to 1 minute and 5 seconds on the Timeline. Add a keyframe by clicking on the “+Add” button. Then, move the Playhead 5 frames forward. Here, change the Zoom Level to 25%.

Step 14
Double-click on the clip in Track 5. Drag the text like in the image below. Then, delete the part of the clip on the right side after 1 minute and 15 seconds.

Step 15
Hide the clips on Track 6 and Track 1 by clicking the “eye” icons next to them. Then, take a Snapshot. Now, drag this Snapshot right next to the clip on Track 5.

Step 16
Move the Playhead 3 frames forward from the starting point of the clip you just added. Unhide Track 6. Double-click on the clip on the right side of Track 5 and click on “+Add”. Move the Playhead 5 seconds forward and adjust the Upward Outline to fit the text.

Step 17
Move the Playhead 5 frames forward again. Drag the Y-axis value to the left until the outline clip overlaps the main text. Then, reduce the Opacity to 0%. Move the Playhead to 2 minutes and 10 seconds. Cut the Track and delete the clip on the right side. Lastly, Lock Track 5.

Step 18
Drag the Downward Outline snapshot to Track 4. Then, repeat the same process as in Step 16 and Step 17.
Step 19
Drag the Upward Outline snapshot to Track 3 at the 17th frame. Double-click on it and change the Opacity to 0%.

Step 20
Now, move 5 frames forward and increase the Opacity back to 100%. Then, drag the Y-axis value to the right until the screen looks like this.

Step 21
Move the Playhead to 1 minute and 5 seconds. Click on “+Add” to add a keyframe. Then, move the Playhead 5 frames forward. Double-click on the clip and stretch it from side to side to match something like this.

Step 22
Move the Playhead to 1 minute and 16 seconds. Split the clip and delete the part on the right side. Hide Track 4, 5, and 6. Then, take a Snapshot. Drag this Snapshot next to the clip on Track 3. Place the Playhead on 1 minute and 18 seconds. Then, unhide Track 4, 5, and 6.
Step 23
Double-click on the clip on the right side of Track 3. Add a keyframe by pressing “+Add”. Move the Playhead to 1 minute and 23 seconds. Now, resize the clip back to its original size by moving the rectangle left and right. Right now, it should look like this.

Step 24
Move the Playhead 5 frames forward. Drag the Y-axis value to the left until the screen looks like this.

Step 25
Move the Playhead 5 frames forward again. Drag the value of the Y-axis to the left until the screen looks like this. Then, change the Opacity to 0%. Finally, split the clip at 2 minutes and 10 seconds. Delete the part on the right side. Lock Track 3.

Step 26
Next, drag the Downward Snapshot on Track 2 and follow the same process as in Steps 19 through 25.
Step 27
Unhide the Background clip at the bottom of the Timeline. Then, Unlock Track 6. Split the clip on Track 6 at the 15th frame.

Step 28
Move the Playhead at the beginning of the Timeline. Click on the first part of the clip on Track 6. Add a keyframe. Drag the X-axis value to the right until the word disappears out of the screen. Like this. 👇Then, move the Playhead to the 6th frame and Reset the X-axis value to 0.0.

Step 29
Take the Playhead to 2 minutes and 10 seconds. Split it. Now, move the Playhead to 2 minutes and 19 seconds and add a keyframe. Lastly, take the Playhead to the very end of the clip and drag the text to the right side until it’s out of the screen once again.

Step 30
Go to the Effects tab. Select Glitch from the panel on the left. Then, apply “Glitch Dispersion” and “Glitch Stripe 2” to the clips at the start and at the end.

Step 31
Finally, Render the video to watch the final preview. And, you’re done! Congratulations on creating a repeated text animation in Filmora.

Summary
What you’ve learned:
- How to create text animations in Filmora
- Applying animation effects
- Make advanced edits on Titles in Filmora
- Hide and lock Tracks and Clips in Filmora
What you need to prepare:
- A computer (Windows or macOS)
- Your video materials.
- Filmora video editor
Step 1
Download Filmora . Let it install and wait for it to run. Then, click on “New Project”. Now, you’re ready to edit!
Step 2
First, go to Titles and drag the Default Title to the Timeline.

Step 3
Now, double-click on the Default Title clip. Here, change its font to any bold font. Increase the text size to 120. Type in your text in the box. Scroll a bit down and change the Text Spacing to 8. Click OK.

Step 4
Take a Snapshot of this Default Title.

Step 5
Double-click on the Default Title clip once again. This time, click on its Advanced settings. Here, turn OFF Text Fill → turn ON Outline → change the Outline color to White → reduce Thickness to 1. Click OK. Now, take another Snapshot.

Step 6
Delete the Default Title clip from the Timeline. Now, drag the Outline snapshot that we just created to the Timeline. Open the Crop tool → change the Ratio to Custom → replace “1080” with “540”. Lastly, move the highlighted crop section to the top. Click OK.

Step 7
Double-click on the Snapshot to open its settings panel. Go to the Animation tab. Here, change the value of the Y-axis to “275”**.** Click OK. Now, take a Snapshot.

Step 8
Next, click on the Crop tool again and simply move the highlighted crop section to the bottom part of the screen. Click OK. Then, double-click on the snapshot clip in the Timeline and change the value of the Y-axis from “275” to “-275”**.** Click OK. Take a Snapshot again.
Step 9
Import a background image to My Media. Drag the background image to the Timeline. Double-click on it and drag the Scale bar until the background image covers the whole screen. Click OK. You should cut the background clip to make it 3 seconds long as well.

Step 10
Lock this track in the Timeline by pressing the highlighted button on the left. Then, go to “Track Manager” and add 6 new Tracks to the Timeline. Click OK.

Step 11
Drag the first Snapshot we made before to Track 6. Cut it so it’s 3 seconds long. Then, Lock the Track.

Step 12
Set the Playhead at the 15th frame on the Timeline. Then, drag the Upward Outline snapshot to this point. Double-click on it and change the Y-axis value to “**-4%**”. Then, reduce the Opacity to 0%. Now, move the Playhead 5 frames further. Next, increase the Opacity to 100% and increase the Y-axis value to around “105”. Don’t click OK yet.
Step 13
Move the Playhead to 1 minute and 5 seconds on the Timeline. Add a keyframe by clicking on the “+Add” button. Then, move the Playhead 5 frames forward. Here, change the Zoom Level to 25%.

Step 14
Double-click on the clip in Track 5. Drag the text like in the image below. Then, delete the part of the clip on the right side after 1 minute and 15 seconds.

Step 15
Hide the clips on Track 6 and Track 1 by clicking the “eye” icons next to them. Then, take a Snapshot. Now, drag this Snapshot right next to the clip on Track 5.

Step 16
Move the Playhead 3 frames forward from the starting point of the clip you just added. Unhide Track 6. Double-click on the clip on the right side of Track 5 and click on “+Add”. Move the Playhead 5 seconds forward and adjust the Upward Outline to fit the text.

Step 17
Move the Playhead 5 frames forward again. Drag the Y-axis value to the left until the outline clip overlaps the main text. Then, reduce the Opacity to 0%. Move the Playhead to 2 minutes and 10 seconds. Cut the Track and delete the clip on the right side. Lastly, Lock Track 5.

Step 18
Drag the Downward Outline snapshot to Track 4. Then, repeat the same process as in Step 16 and Step 17.
Step 19
Drag the Upward Outline snapshot to Track 3 at the 17th frame. Double-click on it and change the Opacity to 0%.

Step 20
Now, move 5 frames forward and increase the Opacity back to 100%. Then, drag the Y-axis value to the right until the screen looks like this.

Step 21
Move the Playhead to 1 minute and 5 seconds. Click on “+Add” to add a keyframe. Then, move the Playhead 5 frames forward. Double-click on the clip and stretch it from side to side to match something like this.

Step 22
Move the Playhead to 1 minute and 16 seconds. Split the clip and delete the part on the right side. Hide Track 4, 5, and 6. Then, take a Snapshot. Drag this Snapshot next to the clip on Track 3. Place the Playhead on 1 minute and 18 seconds. Then, unhide Track 4, 5, and 6.
Step 23
Double-click on the clip on the right side of Track 3. Add a keyframe by pressing “+Add”. Move the Playhead to 1 minute and 23 seconds. Now, resize the clip back to its original size by moving the rectangle left and right. Right now, it should look like this.

Step 24
Move the Playhead 5 frames forward. Drag the Y-axis value to the left until the screen looks like this.

Step 25
Move the Playhead 5 frames forward again. Drag the value of the Y-axis to the left until the screen looks like this. Then, change the Opacity to 0%. Finally, split the clip at 2 minutes and 10 seconds. Delete the part on the right side. Lock Track 3.

Step 26
Next, drag the Downward Snapshot on Track 2 and follow the same process as in Steps 19 through 25.
Step 27
Unhide the Background clip at the bottom of the Timeline. Then, Unlock Track 6. Split the clip on Track 6 at the 15th frame.

Step 28
Move the Playhead at the beginning of the Timeline. Click on the first part of the clip on Track 6. Add a keyframe. Drag the X-axis value to the right until the word disappears out of the screen. Like this. 👇Then, move the Playhead to the 6th frame and Reset the X-axis value to 0.0.

Step 29
Take the Playhead to 2 minutes and 10 seconds. Split it. Now, move the Playhead to 2 minutes and 19 seconds and add a keyframe. Lastly, take the Playhead to the very end of the clip and drag the text to the right side until it’s out of the screen once again.

Step 30
Go to the Effects tab. Select Glitch from the panel on the left. Then, apply “Glitch Dispersion” and “Glitch Stripe 2” to the clips at the start and at the end.

Step 31
Finally, Render the video to watch the final preview. And, you’re done! Congratulations on creating a repeated text animation in Filmora.

Summary
What you’ve learned:
- How to create text animations in Filmora
- Applying animation effects
- Make advanced edits on Titles in Filmora
- Hide and lock Tracks and Clips in Filmora
What you need to prepare:
- A computer (Windows or macOS)
- Your video materials.
- Filmora video editor
Step 1
Download Filmora . Let it install and wait for it to run. Then, click on “New Project”. Now, you’re ready to edit!
Step 2
First, go to Titles and drag the Default Title to the Timeline.

Step 3
Now, double-click on the Default Title clip. Here, change its font to any bold font. Increase the text size to 120. Type in your text in the box. Scroll a bit down and change the Text Spacing to 8. Click OK.

Step 4
Take a Snapshot of this Default Title.

Step 5
Double-click on the Default Title clip once again. This time, click on its Advanced settings. Here, turn OFF Text Fill → turn ON Outline → change the Outline color to White → reduce Thickness to 1. Click OK. Now, take another Snapshot.

Step 6
Delete the Default Title clip from the Timeline. Now, drag the Outline snapshot that we just created to the Timeline. Open the Crop tool → change the Ratio to Custom → replace “1080” with “540”. Lastly, move the highlighted crop section to the top. Click OK.

Step 7
Double-click on the Snapshot to open its settings panel. Go to the Animation tab. Here, change the value of the Y-axis to “275”**.** Click OK. Now, take a Snapshot.

Step 8
Next, click on the Crop tool again and simply move the highlighted crop section to the bottom part of the screen. Click OK. Then, double-click on the snapshot clip in the Timeline and change the value of the Y-axis from “275” to “-275”**.** Click OK. Take a Snapshot again.
Step 9
Import a background image to My Media. Drag the background image to the Timeline. Double-click on it and drag the Scale bar until the background image covers the whole screen. Click OK. You should cut the background clip to make it 3 seconds long as well.

Step 10
Lock this track in the Timeline by pressing the highlighted button on the left. Then, go to “Track Manager” and add 6 new Tracks to the Timeline. Click OK.

Step 11
Drag the first Snapshot we made before to Track 6. Cut it so it’s 3 seconds long. Then, Lock the Track.

Step 12
Set the Playhead at the 15th frame on the Timeline. Then, drag the Upward Outline snapshot to this point. Double-click on it and change the Y-axis value to “**-4%**”. Then, reduce the Opacity to 0%. Now, move the Playhead 5 frames further. Next, increase the Opacity to 100% and increase the Y-axis value to around “105”. Don’t click OK yet.
Step 13
Move the Playhead to 1 minute and 5 seconds on the Timeline. Add a keyframe by clicking on the “+Add” button. Then, move the Playhead 5 frames forward. Here, change the Zoom Level to 25%.

Step 14
Double-click on the clip in Track 5. Drag the text like in the image below. Then, delete the part of the clip on the right side after 1 minute and 15 seconds.

Step 15
Hide the clips on Track 6 and Track 1 by clicking the “eye” icons next to them. Then, take a Snapshot. Now, drag this Snapshot right next to the clip on Track 5.

Step 16
Move the Playhead 3 frames forward from the starting point of the clip you just added. Unhide Track 6. Double-click on the clip on the right side of Track 5 and click on “+Add”. Move the Playhead 5 seconds forward and adjust the Upward Outline to fit the text.

Step 17
Move the Playhead 5 frames forward again. Drag the Y-axis value to the left until the outline clip overlaps the main text. Then, reduce the Opacity to 0%. Move the Playhead to 2 minutes and 10 seconds. Cut the Track and delete the clip on the right side. Lastly, Lock Track 5.

Step 18
Drag the Downward Outline snapshot to Track 4. Then, repeat the same process as in Step 16 and Step 17.
Step 19
Drag the Upward Outline snapshot to Track 3 at the 17th frame. Double-click on it and change the Opacity to 0%.

Step 20
Now, move 5 frames forward and increase the Opacity back to 100%. Then, drag the Y-axis value to the right until the screen looks like this.

Step 21
Move the Playhead to 1 minute and 5 seconds. Click on “+Add” to add a keyframe. Then, move the Playhead 5 frames forward. Double-click on the clip and stretch it from side to side to match something like this.

Step 22
Move the Playhead to 1 minute and 16 seconds. Split the clip and delete the part on the right side. Hide Track 4, 5, and 6. Then, take a Snapshot. Drag this Snapshot next to the clip on Track 3. Place the Playhead on 1 minute and 18 seconds. Then, unhide Track 4, 5, and 6.
Step 23
Double-click on the clip on the right side of Track 3. Add a keyframe by pressing “+Add”. Move the Playhead to 1 minute and 23 seconds. Now, resize the clip back to its original size by moving the rectangle left and right. Right now, it should look like this.

Step 24
Move the Playhead 5 frames forward. Drag the Y-axis value to the left until the screen looks like this.

Step 25
Move the Playhead 5 frames forward again. Drag the value of the Y-axis to the left until the screen looks like this. Then, change the Opacity to 0%. Finally, split the clip at 2 minutes and 10 seconds. Delete the part on the right side. Lock Track 3.

Step 26
Next, drag the Downward Snapshot on Track 2 and follow the same process as in Steps 19 through 25.
Step 27
Unhide the Background clip at the bottom of the Timeline. Then, Unlock Track 6. Split the clip on Track 6 at the 15th frame.

Step 28
Move the Playhead at the beginning of the Timeline. Click on the first part of the clip on Track 6. Add a keyframe. Drag the X-axis value to the right until the word disappears out of the screen. Like this. 👇Then, move the Playhead to the 6th frame and Reset the X-axis value to 0.0.

Step 29
Take the Playhead to 2 minutes and 10 seconds. Split it. Now, move the Playhead to 2 minutes and 19 seconds and add a keyframe. Lastly, take the Playhead to the very end of the clip and drag the text to the right side until it’s out of the screen once again.

Step 30
Go to the Effects tab. Select Glitch from the panel on the left. Then, apply “Glitch Dispersion” and “Glitch Stripe 2” to the clips at the start and at the end.

Step 31
Finally, Render the video to watch the final preview. And, you’re done! Congratulations on creating a repeated text animation in Filmora.

Summary
What you’ve learned:
- How to create text animations in Filmora
- Applying animation effects
- Make advanced edits on Titles in Filmora
- Hide and lock Tracks and Clips in Filmora
What you need to prepare:
- A computer (Windows or macOS)
- Your video materials.
- Filmora video editor
Step 1
Download Filmora . Let it install and wait for it to run. Then, click on “New Project”. Now, you’re ready to edit!
Step 2
First, go to Titles and drag the Default Title to the Timeline.

Step 3
Now, double-click on the Default Title clip. Here, change its font to any bold font. Increase the text size to 120. Type in your text in the box. Scroll a bit down and change the Text Spacing to 8. Click OK.

Step 4
Take a Snapshot of this Default Title.

Step 5
Double-click on the Default Title clip once again. This time, click on its Advanced settings. Here, turn OFF Text Fill → turn ON Outline → change the Outline color to White → reduce Thickness to 1. Click OK. Now, take another Snapshot.

Step 6
Delete the Default Title clip from the Timeline. Now, drag the Outline snapshot that we just created to the Timeline. Open the Crop tool → change the Ratio to Custom → replace “1080” with “540”. Lastly, move the highlighted crop section to the top. Click OK.

Step 7
Double-click on the Snapshot to open its settings panel. Go to the Animation tab. Here, change the value of the Y-axis to “275”**.** Click OK. Now, take a Snapshot.

Step 8
Next, click on the Crop tool again and simply move the highlighted crop section to the bottom part of the screen. Click OK. Then, double-click on the snapshot clip in the Timeline and change the value of the Y-axis from “275” to “-275”**.** Click OK. Take a Snapshot again.
Step 9
Import a background image to My Media. Drag the background image to the Timeline. Double-click on it and drag the Scale bar until the background image covers the whole screen. Click OK. You should cut the background clip to make it 3 seconds long as well.

Step 10
Lock this track in the Timeline by pressing the highlighted button on the left. Then, go to “Track Manager” and add 6 new Tracks to the Timeline. Click OK.

Step 11
Drag the first Snapshot we made before to Track 6. Cut it so it’s 3 seconds long. Then, Lock the Track.

Step 12
Set the Playhead at the 15th frame on the Timeline. Then, drag the Upward Outline snapshot to this point. Double-click on it and change the Y-axis value to “**-4%**”. Then, reduce the Opacity to 0%. Now, move the Playhead 5 frames further. Next, increase the Opacity to 100% and increase the Y-axis value to around “105”. Don’t click OK yet.
Step 13
Move the Playhead to 1 minute and 5 seconds on the Timeline. Add a keyframe by clicking on the “+Add” button. Then, move the Playhead 5 frames forward. Here, change the Zoom Level to 25%.

Step 14
Double-click on the clip in Track 5. Drag the text like in the image below. Then, delete the part of the clip on the right side after 1 minute and 15 seconds.

Step 15
Hide the clips on Track 6 and Track 1 by clicking the “eye” icons next to them. Then, take a Snapshot. Now, drag this Snapshot right next to the clip on Track 5.

Step 16
Move the Playhead 3 frames forward from the starting point of the clip you just added. Unhide Track 6. Double-click on the clip on the right side of Track 5 and click on “+Add”. Move the Playhead 5 seconds forward and adjust the Upward Outline to fit the text.

Step 17
Move the Playhead 5 frames forward again. Drag the Y-axis value to the left until the outline clip overlaps the main text. Then, reduce the Opacity to 0%. Move the Playhead to 2 minutes and 10 seconds. Cut the Track and delete the clip on the right side. Lastly, Lock Track 5.

Step 18
Drag the Downward Outline snapshot to Track 4. Then, repeat the same process as in Step 16 and Step 17.
Step 19
Drag the Upward Outline snapshot to Track 3 at the 17th frame. Double-click on it and change the Opacity to 0%.

Step 20
Now, move 5 frames forward and increase the Opacity back to 100%. Then, drag the Y-axis value to the right until the screen looks like this.

Step 21
Move the Playhead to 1 minute and 5 seconds. Click on “+Add” to add a keyframe. Then, move the Playhead 5 frames forward. Double-click on the clip and stretch it from side to side to match something like this.

Step 22
Move the Playhead to 1 minute and 16 seconds. Split the clip and delete the part on the right side. Hide Track 4, 5, and 6. Then, take a Snapshot. Drag this Snapshot next to the clip on Track 3. Place the Playhead on 1 minute and 18 seconds. Then, unhide Track 4, 5, and 6.
Step 23
Double-click on the clip on the right side of Track 3. Add a keyframe by pressing “+Add”. Move the Playhead to 1 minute and 23 seconds. Now, resize the clip back to its original size by moving the rectangle left and right. Right now, it should look like this.

Step 24
Move the Playhead 5 frames forward. Drag the Y-axis value to the left until the screen looks like this.

Step 25
Move the Playhead 5 frames forward again. Drag the value of the Y-axis to the left until the screen looks like this. Then, change the Opacity to 0%. Finally, split the clip at 2 minutes and 10 seconds. Delete the part on the right side. Lock Track 3.

Step 26
Next, drag the Downward Snapshot on Track 2 and follow the same process as in Steps 19 through 25.
Step 27
Unhide the Background clip at the bottom of the Timeline. Then, Unlock Track 6. Split the clip on Track 6 at the 15th frame.

Step 28
Move the Playhead at the beginning of the Timeline. Click on the first part of the clip on Track 6. Add a keyframe. Drag the X-axis value to the right until the word disappears out of the screen. Like this. 👇Then, move the Playhead to the 6th frame and Reset the X-axis value to 0.0.

Step 29
Take the Playhead to 2 minutes and 10 seconds. Split it. Now, move the Playhead to 2 minutes and 19 seconds and add a keyframe. Lastly, take the Playhead to the very end of the clip and drag the text to the right side until it’s out of the screen once again.

Step 30
Go to the Effects tab. Select Glitch from the panel on the left. Then, apply “Glitch Dispersion” and “Glitch Stripe 2” to the clips at the start and at the end.

Step 31
Finally, Render the video to watch the final preview. And, you’re done! Congratulations on creating a repeated text animation in Filmora.

Summary
What you’ve learned:
- How to create text animations in Filmora
- Applying animation effects
- Make advanced edits on Titles in Filmora
- Hide and lock Tracks and Clips in Filmora
Do You Also Use Android to Create and Edit Videos? Read About the Efectum Video Effects Editor, Which Is Available in Your App Stores for Seamless Editing
To bring out the essence of any video, editors prefer slow-motion effects or editing. Along with bringing out the best in your videos, they assist in other tasks. For instance, they help in difficult learning scenarios or training methods. Such a tool is usually available on your PC, but they have made an advancement. You can now access Efectum and related tools on your Android.
In this article, we will focus on Efectum’s slow-motion functionality. There will be a brief introduction to the application and its prominent features. Moreover, we will guide you through its interface to create a slow-motion video . We will also present you with some alternatives to the Efectum application.
Slow Motion Video Maker Slow your video’s speed with better control of your keyframes to create unique cinematic effects!
Make A Slow Motion Video Make A Slow Motion Video More Features

Part 1: A Detailed Overview of Efectum App: A Great Video Effects Editor for Android
Efectum APK download is a video editor that is compatible with Android smartphones. Once you download the application on Android, you can benefit from its features. It also assists with slideshow creation and video sharing, along with slow-motion videos. In addition, the application offers built-in storage to save all your projects.
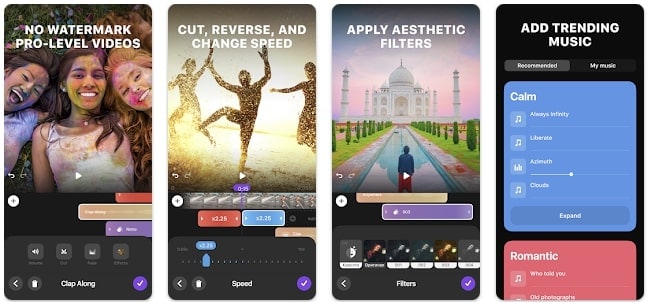
Key Features Of Efectum Android
- Trim: We need to cut and align our videos in multiple situations. With its efficient trim feature, you can cut and edit any video with precision.
- Text and Stickers: It has a built-in sticker collection where you can find stickers of various categories. Discover food stickers, music, and cute emojis in its diversified collection. Moreover, you can insert text in your videos with diverse font styles. The text and fonts are editable, and you can introduce certain colors.
- Music and Sound: Incorporating music is crucial to align your video. This editor allows you to incorporate music of your choice in your videos. Moreover, you can adjust the volumes of original sound and music tracks.
Step-by-Step Guide to Perform Slow Motion Edits and Video Editing in Efectum
Creating a slow-motion video in Efectum is very easy to achieve. In this section, we will mention the procedure to create slow motion in steps:
Step 1
Launch the application to access its interface once you have downloaded it. From the display screen, select the “Speed” option. Afterward, select a video from your gallery or use the “Record” button for a new one.

Step 2
Trim your video and access the “Slow/Fast” window if needed. Then, navigate towards the bottom and select the “Slow” option. Drag the playhead to adjust the duration of the video for slow motion. You can also use the double-tap option to slow down the whole video. Once edited, click on the “Next” button to move forward.

Step 3
Click the “Save” option from the new page and download the video on your device. You can also share this video straight to social sites.

Part 2: Top Alternatives to Efectum App: Worth Trying
Do you want to know some downloadable alternatives to the E fectum APK download? This section will give you a brief introduction to such applications:
- Video Editor – Glitch Video
- Video Editor & Maker – InShot
- YouCut – Video Editor & Maker
- PowerDirector – Video Editor
- KineMaster – Video Editor & Maker
- Splice – Video Editor & Maker
- CapCut – Video Editor
- VN – Video Editor & Maker
1. Video Editor – Glitch Video
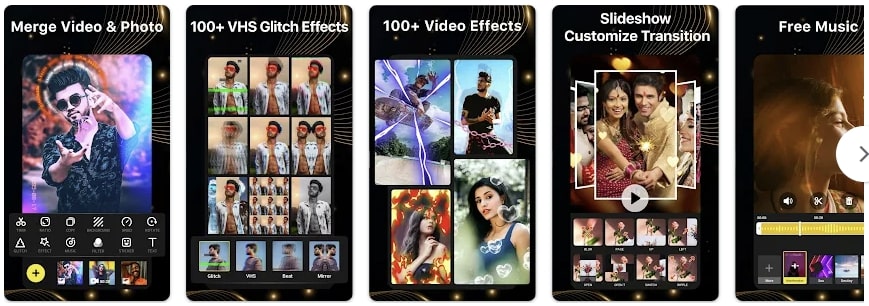
Editing digital content requires digital tools, and this Efectum alternative is suitable. Along with editing vlogs and videos, you can shoot new footage in it. This free-to-use editor offers to cut, trim, and enhance a video. There are multiple effects and filters that you can incorporate for diverse creation.
Key Features
- The video ratio is customizable on platforms like 1:1, 16:9, and more.
- You can apply Retro and VHS effects to give your videos a vintage or 90s touch.
- It offers 100+ video effects you can download once and use for a lifetime.
2. Video Editor & Maker – InShot
Are you looking for an E fectum slow-motion reverse cam fast video alternative? This tool allows you to create slow-mo videos within a few clicks. The creation process is straightforward, and you can edit long videos without limits. Along with image and video editing, you can also commence audio editing in it. It allows you to insert music from your device in your videos.

Key Features
- You can edit videos and share them on diverse social platforms like Instagram.
- It does not lose video quality during editing and exports it in HD quality.
- The application offers 60+ transition effects, multiple visual effects, text, and stickers.
3. YouCut - Video Editor & Maker
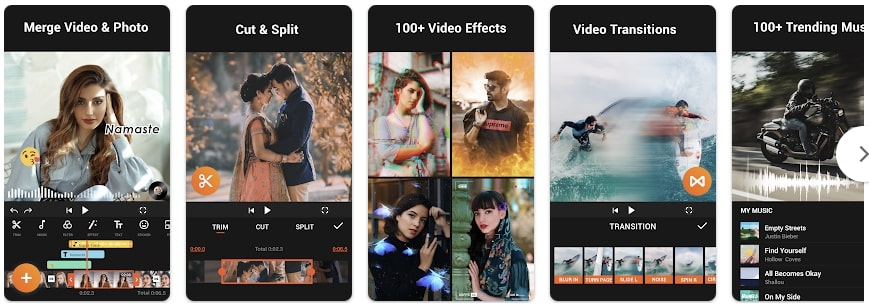
Do you want to edit your videos like a professional and free of watermarks? This E fectum slow, fast mod APK alternative is a wonderful video editor. Whether it is a YouTube video or a slideshow of pictures, you can rely on it. It has a Video Speed Control feature that allows you to create slow-mo videos. You can crop a video, adjust its speed, and apply filters and effects.
Key Features
- YouCut has pre-assembled a music library for you to infuse music into videos.
- Users can add editable text to videos with customized color, size, and font options.
- With its visual effects and filters, you can elevate the complete viewpoint of a clip.
4. PowerDirector - Video Editor
Do you want AI’s assistance to uplift your videos and create slow-mo videos? PowerDirector is the perfect Efectum alternative to create masterpieces. You can manipulate its aspect ratio by creating a video in slow motion. The speed adjustment feature comes with an enhancer to compensate for the shakiness.
Key Features
- The video export quality in this Ef ectum APK download is 4K.
- Its Chrome Key or Background Remover functionality removes and replaces backgrounds.
- It offers multiple pre-designed video templates for specific genres.
5. KineMaster-Video Editor&Maker
If you want to create high-quality video slow motions with sound effects, this is your app. Whether it is about cutting or editing a clip or an audio track, it is capable of both. You can perform other video editing tasks with it, like merging and customizing. The application offers a previously created media library with 3D effects and filter collection.
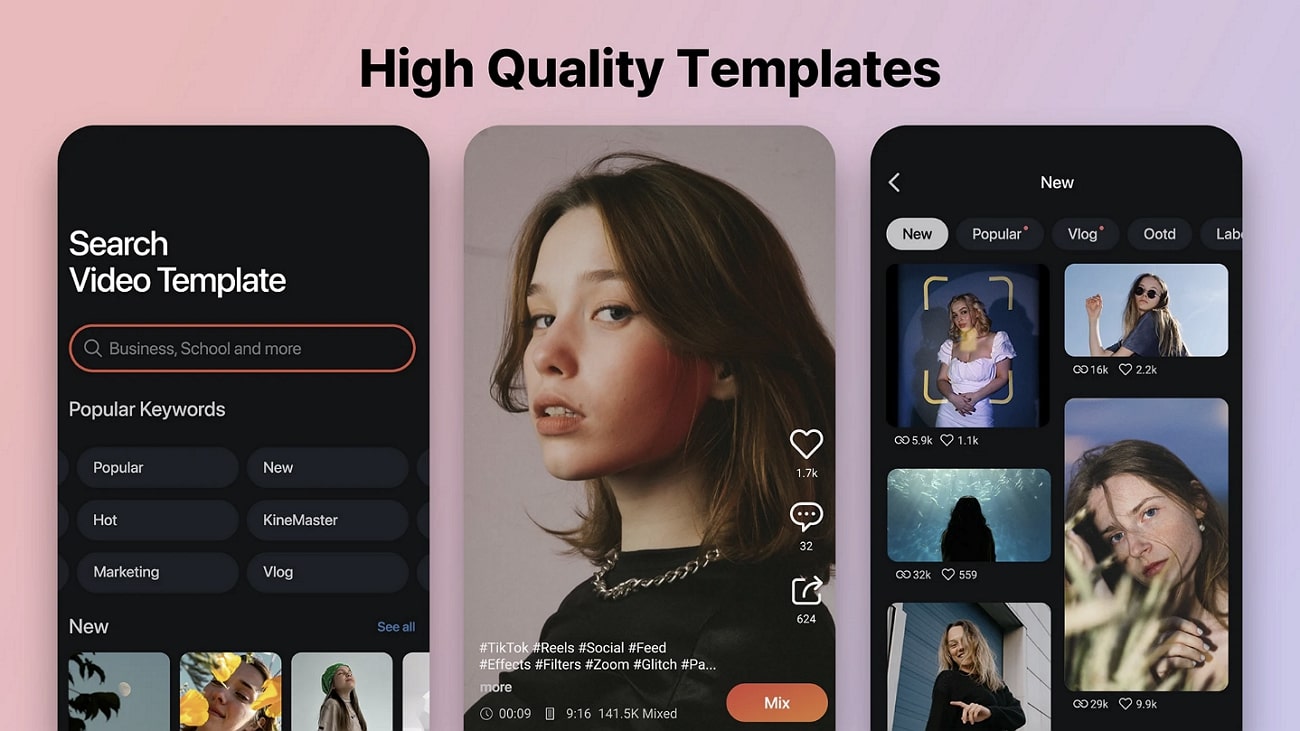
Key Features
- With its advanced sharing options, upload your videos to popular social platforms.
- The quality of the video is 4K, and it retains this quality upon export.
- Along with video editing, you can create collages and make slideshows with it.
6. Splice - Video Editor & Maker
Why settle for less when you get a complete editing package with this Effectum alternative? It offers video slow-motion functionality for creating slow-mo. The application does not compromise on quality and export median in high resolution. To create professional-grade videos, you can use its PRO tools like trimmer or merger.
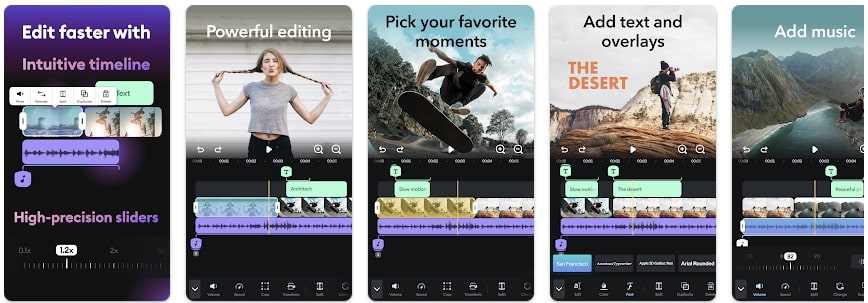
Key Features
- You can integrate multiple speed effects among Efectum’s slow and fast mod APK.
- With its pre-created music library, you can choose any music of your choice.
- Along with text addition and customization, it offers text animation options.
7. CapCut - Video Editor
This isn’t just a tool to replace E fectum slow motion APK; it is much more. This application is designed to assist in basic as well as advanced editing. It offers trending music, visuals, and other effects for enhanced editing. In addition, it seamlessly integrates with your TikTok to sync the trending or saved music. The editor is an excellent choice for generating and editing smoothly slow-mo.
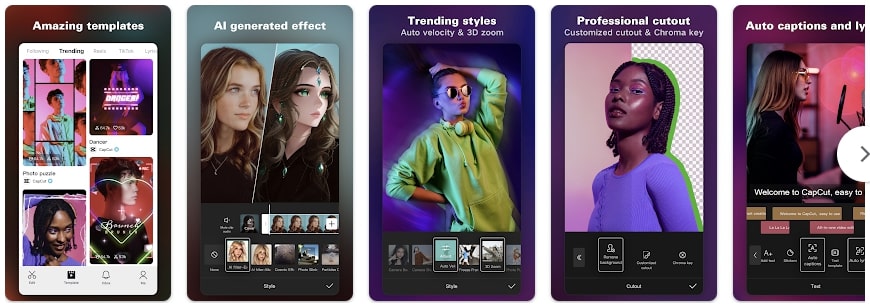
Key Features
- Many special features like background blur or removal are free of cost.
- It assists in automated video captioning to make your content accessible.
- You can maintain and enhance the overall video with its Auto-Stabilization feature.
8. VN - Video Editor & Maker
VN – Video Editor & Maker is a professional-grade Efectum alternative with keyframe editing options. This means, along with being super slow and smooth slow-mo, you can edit small details. There are pre-built video and text templates to fit each of your requirements. You can further personalize these templates according to your will. In addition, you can delete and record videos without any problems in it.
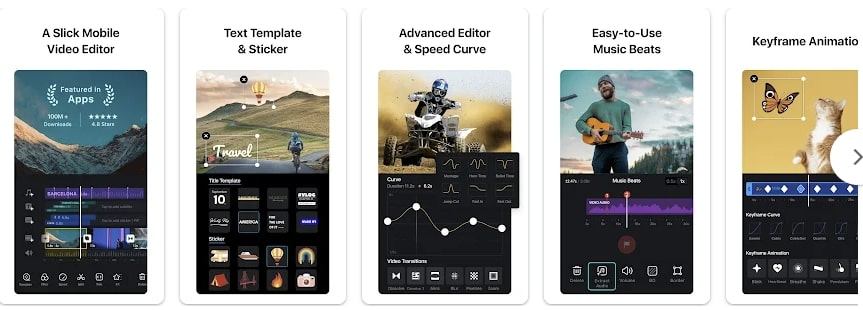
Key Features
- It offers seamless collaboration with Google Drive and One Drive for a better editing experience.
- The application also maintains video quality at 4K resolution and 60 fps.
- It offers multiple color grading options like LUTs, curves, and effects to edit videos.
Part 3: Desktop Alternative: Making Slow Motion Video Making Swift with Wondershare Filmora
Although using E fectum slow motion mod APK is easy, it is only accessible on Android. Sometimes, people prefer to edit on the desktop for precise editing. To help you produce high-quality slow-motion, we present Wondershare Filmora . This is a professional-grade video editor with custom settings and presets. Along with that, the tool offers multiple AI and manual features.
Free Download For Win 7 or later(64-bit)
Free Download For macOS 10.14 or later
Creating a Slow Motion Video in Wondershare Filmora
There are multiple methods of slowing down a video with Filmora. In this section, we will teach you how to do that using Speed Ramping. Below is a step-by-step guide to creating a slow-mo in this Efectum alternative:
Step 1: Access the Speed Ramping Option
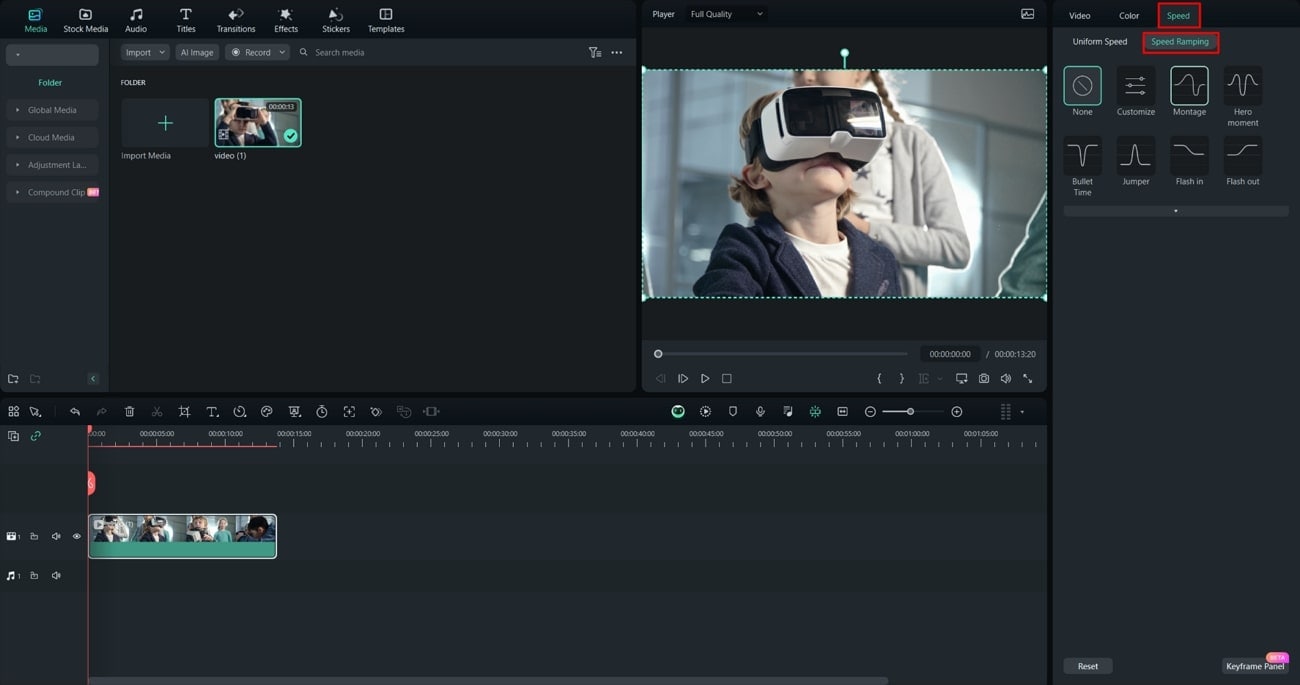
Once you have downloaded Filmora, click “Open Project” and import files straight to the timeline. After that, select the timeline video and navigate towards the settings panel. Select the “Speed” tab and access the “Speed Ramping” option.
Step 2: Adjust the Speed of Video
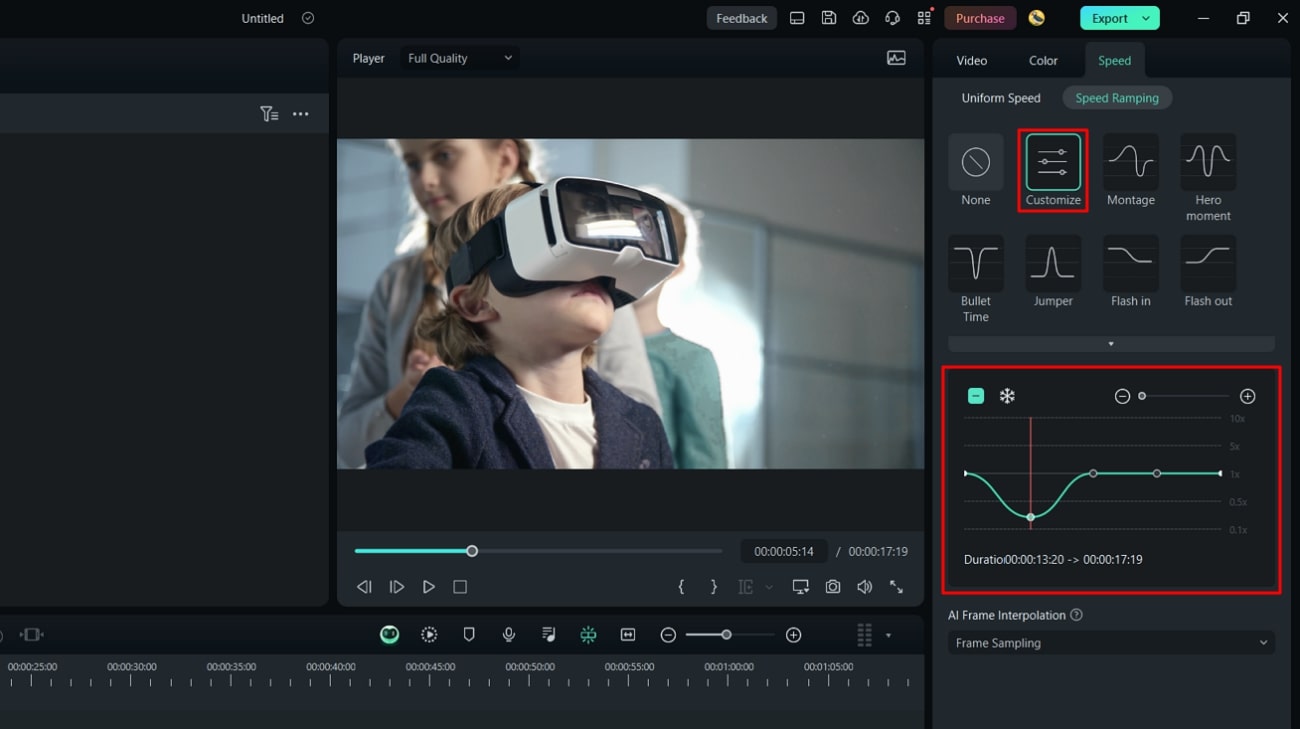
Under Speed Ramping, click the “Customize” option and go to the graph below. If you move the line of the graph below, the video will slow down. You can slow it down between 1x to 0.1x at specific points.
Step 3: Enable Optical Flow Mode
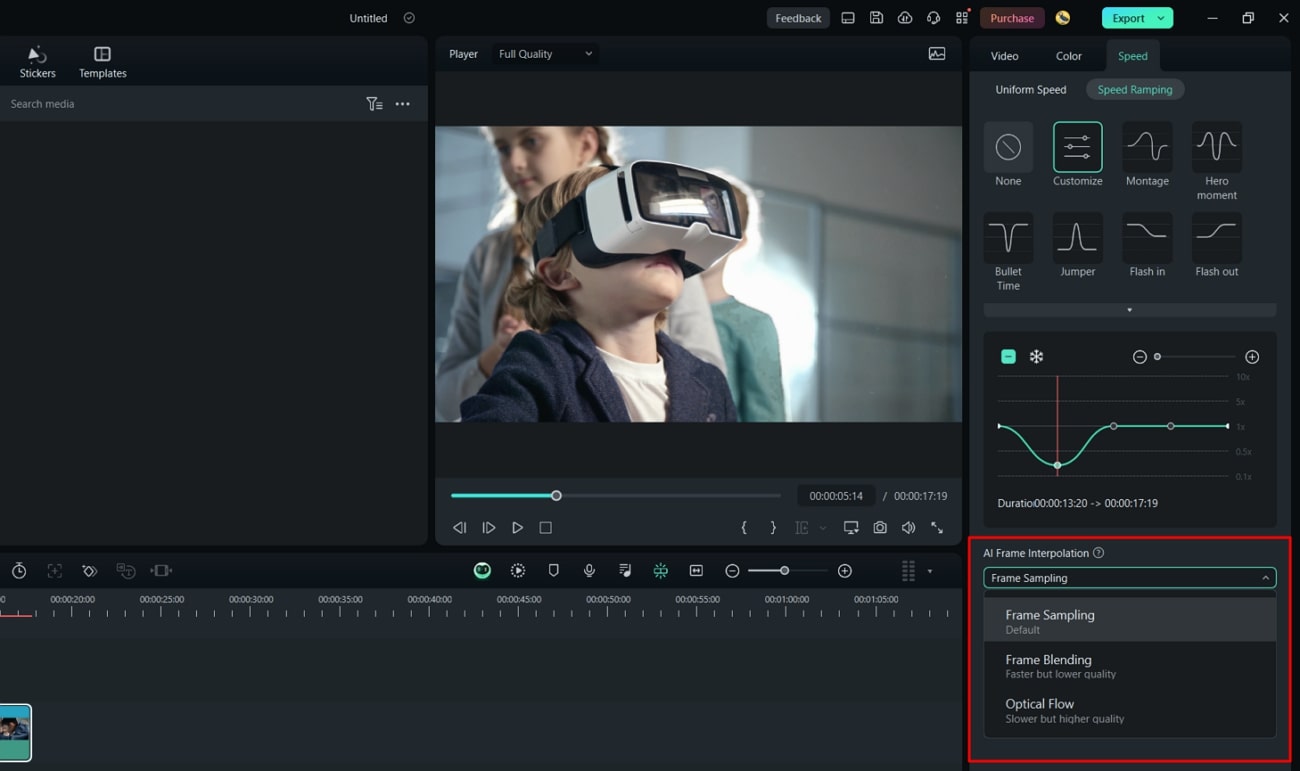
For precise results, navigate toward the bottom and expand “AI Frame Interpolation.” From the given options, select “Optical Flow,” which will smoothen the video frames.
Step 4: Render Preview and Export the Clip
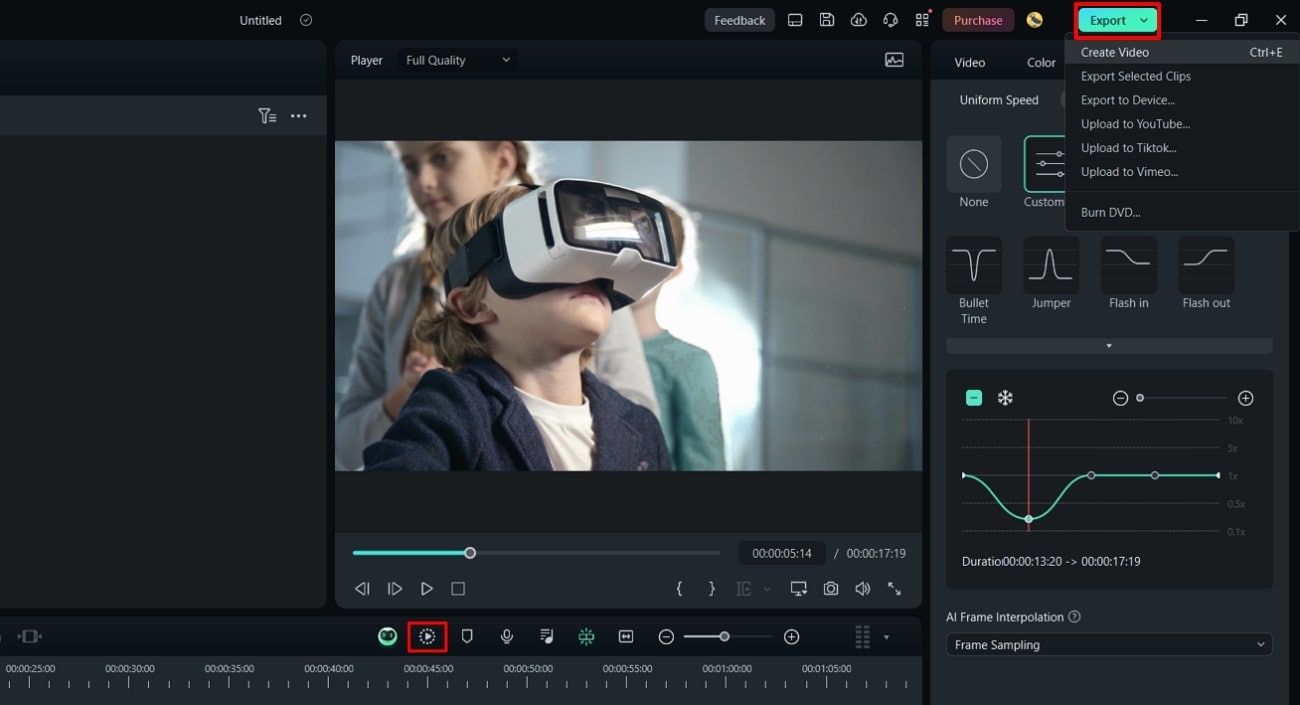
Once you have saved the speed settings, navigate towards the timeline panel. From there, find and select the “Render Preview” option and preview the clip. Afterward, export your video using the “Export” button at the top right corner.
This platform is not confined to video editing, but there are audio, text, and other options. In addition, it has pre-assembled multiple effects, titles, transitions, and more. There are categories for each effect, and you can do so much with its timeline editing. It allows users to incorporate unlimited effects and settings on a clip with precision.
Other Features of Wondershare Filmora
Filmora is a versatile desktop software that offers multiple AI and other features. It keeps upgrading its interface and has recently launched its V13 update. This update brought many features, and here are some of its new and existing ones:
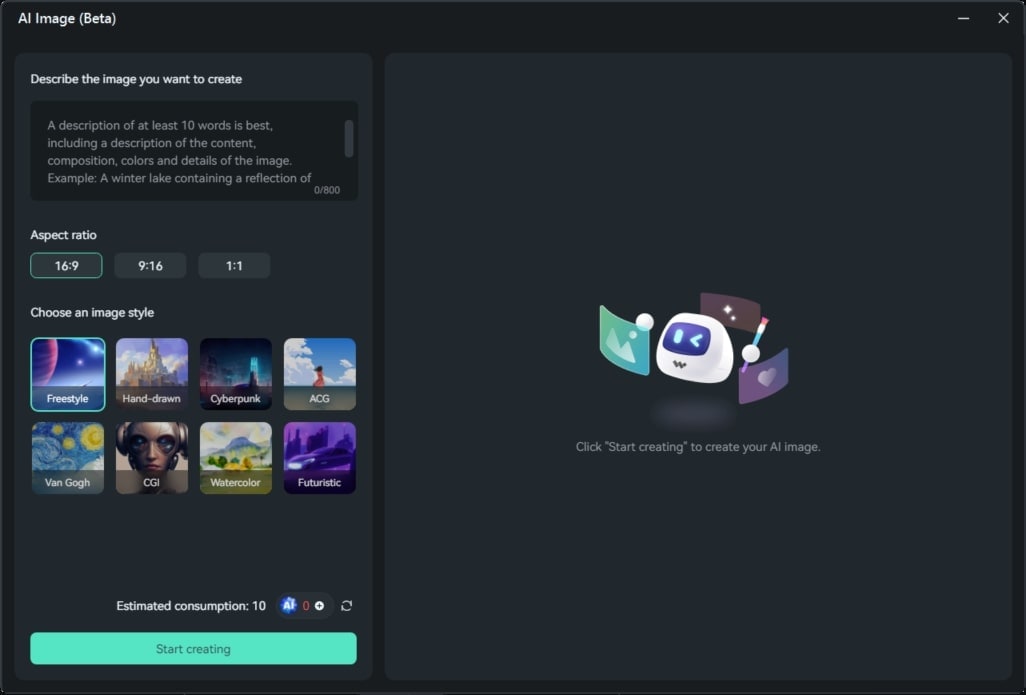
- AI Image: Whether it is a slideshow or video, both are incomplete without graphical reference. With Filmora’s AI, you can generate a desired picture by explaining it in words. This generative AI crafts the outcome from your description in three resolutions. You can later select the one that fits your video or sharing site.
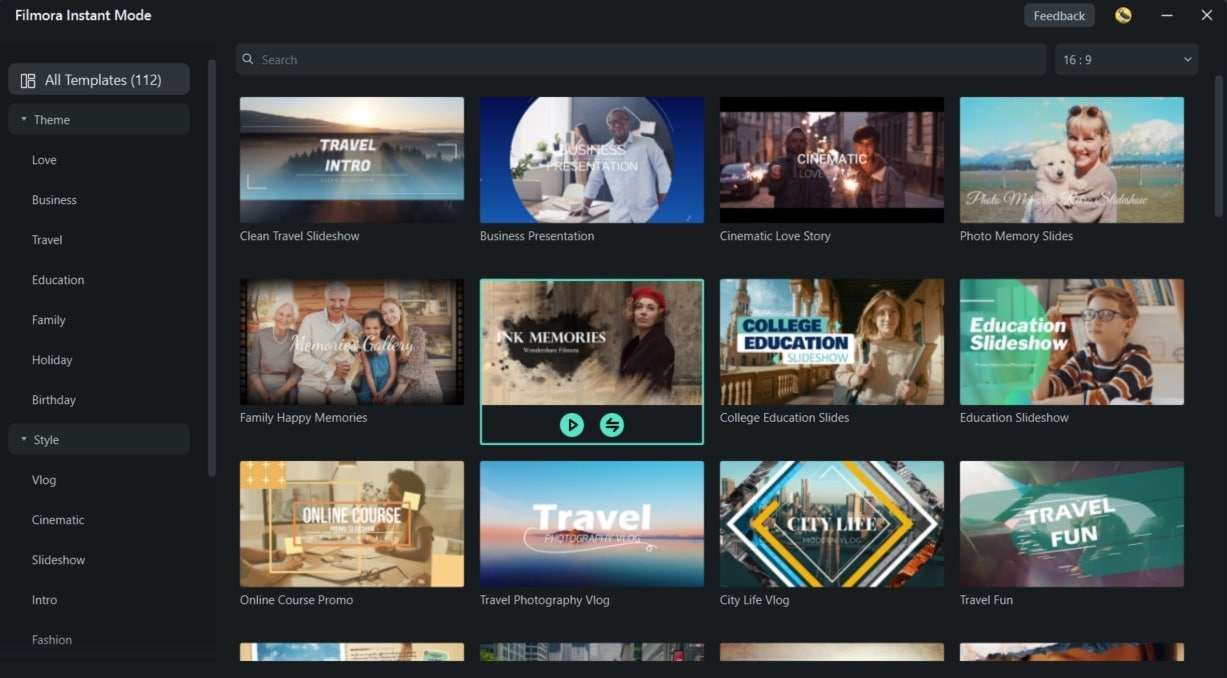
- Instant Mode: Why settle for dull videos when Filmora can bring life to them? You can now upload a video using its Instant Mode, and the AI will auto-edit it. It integrates suitable effects, adjusts lighting, and offers suitable templates for your videos.
- Screen Recorder: Without visual reference, comprehending stuff becomes 10X difficult. Create tutorials with video references using Filmora’s screen recorder. It allows you to customize the display settings, microphone, and webcam settings. You can create a professional-grade video tutorial using this recorder.

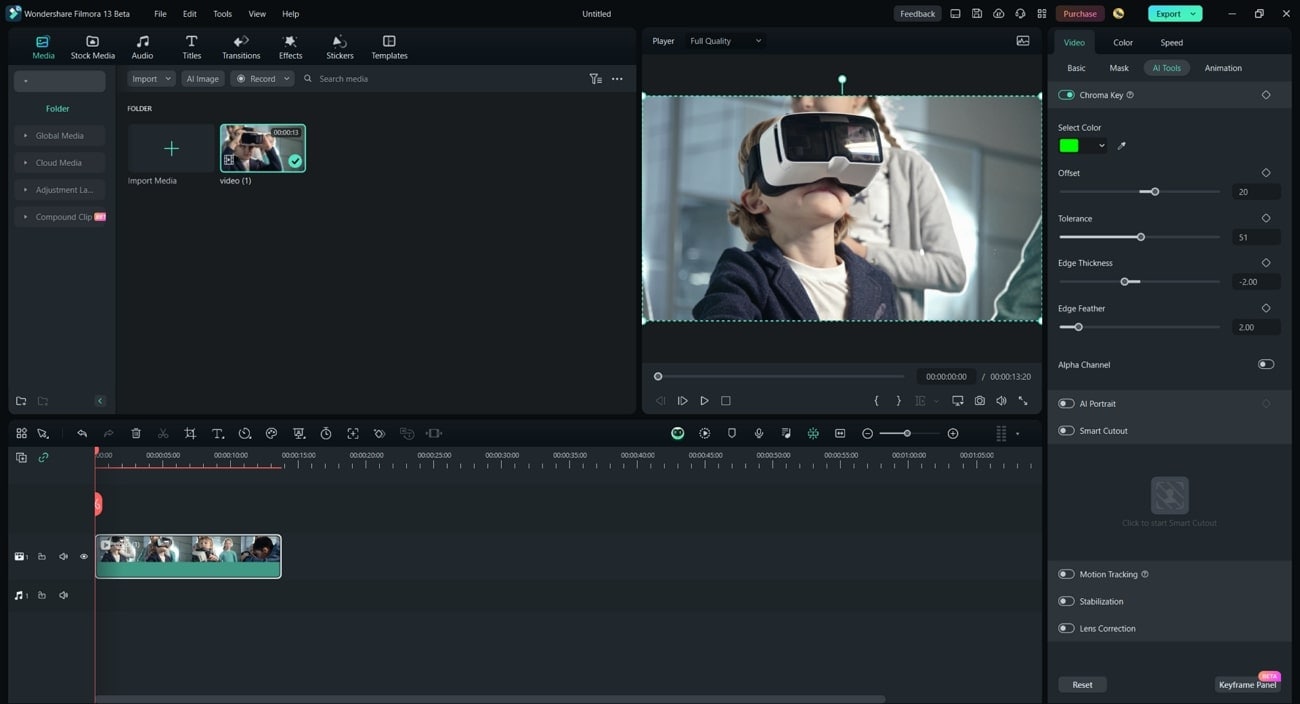
- Green Screen: Have you ever heard of replacing a boring background with a new one? The technique uses a green screen for better results. You just need to record yourself in front of a green background and enable it. The Chroma Key functionality will auto-eliminate the background. You can later replace this background with any video or image.
Conclusion
The focus of this article is on the tools that assist in creating slow-motion videos. On top of our list was the Efectum video editor, which helps with accurate task achievement. Afterward, we discussed some Android alternatives to E fectum slow motion video. For professional and precise results, we suggest Wondershare Filmora 13. It is an all-in-one video editor with multiple content editing opportunities.
Make A Slow Motion Video Make A Slow Motion Video More Features

Part 1: A Detailed Overview of Efectum App: A Great Video Effects Editor for Android
Efectum APK download is a video editor that is compatible with Android smartphones. Once you download the application on Android, you can benefit from its features. It also assists with slideshow creation and video sharing, along with slow-motion videos. In addition, the application offers built-in storage to save all your projects.

Key Features Of Efectum Android
- Trim: We need to cut and align our videos in multiple situations. With its efficient trim feature, you can cut and edit any video with precision.
- Text and Stickers: It has a built-in sticker collection where you can find stickers of various categories. Discover food stickers, music, and cute emojis in its diversified collection. Moreover, you can insert text in your videos with diverse font styles. The text and fonts are editable, and you can introduce certain colors.
- Music and Sound: Incorporating music is crucial to align your video. This editor allows you to incorporate music of your choice in your videos. Moreover, you can adjust the volumes of original sound and music tracks.
Step-by-Step Guide to Perform Slow Motion Edits and Video Editing in Efectum
Creating a slow-motion video in Efectum is very easy to achieve. In this section, we will mention the procedure to create slow motion in steps:
Step 1
Launch the application to access its interface once you have downloaded it. From the display screen, select the “Speed” option. Afterward, select a video from your gallery or use the “Record” button for a new one.

Step 2
Trim your video and access the “Slow/Fast” window if needed. Then, navigate towards the bottom and select the “Slow” option. Drag the playhead to adjust the duration of the video for slow motion. You can also use the double-tap option to slow down the whole video. Once edited, click on the “Next” button to move forward.

Step 3
Click the “Save” option from the new page and download the video on your device. You can also share this video straight to social sites.

Part 2: Top Alternatives to Efectum App: Worth Trying
Do you want to know some downloadable alternatives to the E fectum APK download? This section will give you a brief introduction to such applications:
- Video Editor – Glitch Video
- Video Editor & Maker – InShot
- YouCut – Video Editor & Maker
- PowerDirector – Video Editor
- KineMaster – Video Editor & Maker
- Splice – Video Editor & Maker
- CapCut – Video Editor
- VN – Video Editor & Maker
1. Video Editor – Glitch Video
Editing digital content requires digital tools, and this Efectum alternative is suitable. Along with editing vlogs and videos, you can shoot new footage in it. This free-to-use editor offers to cut, trim, and enhance a video. There are multiple effects and filters that you can incorporate for diverse creation.

Key Features
- The video ratio is customizable on platforms like 1:1, 16:9, and more.
- You can apply Retro and VHS effects to give your videos a vintage or 90s touch.
- It offers 100+ video effects you can download once and use for a lifetime.
2. Video Editor & Maker – InShot
Are you looking for an E fectum slow-motion reverse cam fast video alternative? This tool allows you to create slow-mo videos within a few clicks. The creation process is straightforward, and you can edit long videos without limits. Along with image and video editing, you can also commence audio editing in it. It allows you to insert music from your device in your videos.

Key Features
- You can edit videos and share them on diverse social platforms like Instagram.
- It does not lose video quality during editing and exports it in HD quality.
- The application offers 60+ transition effects, multiple visual effects, text, and stickers.
3. YouCut - Video Editor & Maker
Do you want to edit your videos like a professional and free of watermarks? This E fectum slow, fast mod APK alternative is a wonderful video editor. Whether it is a YouTube video or a slideshow of pictures, you can rely on it. It has a Video Speed Control feature that allows you to create slow-mo videos. You can crop a video, adjust its speed, and apply filters and effects.

Key Features
- YouCut has pre-assembled a music library for you to infuse music into videos.
- Users can add editable text to videos with customized color, size, and font options.
- With its visual effects and filters, you can elevate the complete viewpoint of a clip.
4. PowerDirector - Video Editor
Do you want AI’s assistance to uplift your videos and create slow-mo videos? PowerDirector is the perfect Efectum alternative to create masterpieces. You can manipulate its aspect ratio by creating a video in slow motion. The speed adjustment feature comes with an enhancer to compensate for the shakiness.

Key Features
- The video export quality in this Ef ectum APK download is 4K.
- Its Chrome Key or Background Remover functionality removes and replaces backgrounds.
- It offers multiple pre-designed video templates for specific genres.
5. KineMaster-Video Editor&Maker
If you want to create high-quality video slow motions with sound effects, this is your app. Whether it is about cutting or editing a clip or an audio track, it is capable of both. You can perform other video editing tasks with it, like merging and customizing. The application offers a previously created media library with 3D effects and filter collection.

Key Features
- With its advanced sharing options, upload your videos to popular social platforms.
- The quality of the video is 4K, and it retains this quality upon export.
- Along with video editing, you can create collages and make slideshows with it.
6. Splice - Video Editor & Maker
Why settle for less when you get a complete editing package with this Effectum alternative? It offers video slow-motion functionality for creating slow-mo. The application does not compromise on quality and export median in high resolution. To create professional-grade videos, you can use its PRO tools like trimmer or merger.

Key Features
- You can integrate multiple speed effects among Efectum’s slow and fast mod APK.
- With its pre-created music library, you can choose any music of your choice.
- Along with text addition and customization, it offers text animation options.
7. CapCut - Video Editor
This isn’t just a tool to replace E fectum slow motion APK; it is much more. This application is designed to assist in basic as well as advanced editing. It offers trending music, visuals, and other effects for enhanced editing. In addition, it seamlessly integrates with your TikTok to sync the trending or saved music. The editor is an excellent choice for generating and editing smoothly slow-mo.

Key Features
- Many special features like background blur or removal are free of cost.
- It assists in automated video captioning to make your content accessible.
- You can maintain and enhance the overall video with its Auto-Stabilization feature.
8. VN - Video Editor & Maker
VN – Video Editor & Maker is a professional-grade Efectum alternative with keyframe editing options. This means, along with being super slow and smooth slow-mo, you can edit small details. There are pre-built video and text templates to fit each of your requirements. You can further personalize these templates according to your will. In addition, you can delete and record videos without any problems in it.

Key Features
- It offers seamless collaboration with Google Drive and One Drive for a better editing experience.
- The application also maintains video quality at 4K resolution and 60 fps.
- It offers multiple color grading options like LUTs, curves, and effects to edit videos.
Part 3: Desktop Alternative: Making Slow Motion Video Making Swift with Wondershare Filmora
Although using E fectum slow motion mod APK is easy, it is only accessible on Android. Sometimes, people prefer to edit on the desktop for precise editing. To help you produce high-quality slow-motion, we present Wondershare Filmora . This is a professional-grade video editor with custom settings and presets. Along with that, the tool offers multiple AI and manual features.
Free Download For Win 7 or later(64-bit)
Free Download For macOS 10.14 or later
Creating a Slow Motion Video in Wondershare Filmora
There are multiple methods of slowing down a video with Filmora. In this section, we will teach you how to do that using Speed Ramping. Below is a step-by-step guide to creating a slow-mo in this Efectum alternative:
Step 1: Access the Speed Ramping Option
Once you have downloaded Filmora, click “Open Project” and import files straight to the timeline. After that, select the timeline video and navigate towards the settings panel. Select the “Speed” tab and access the “Speed Ramping” option.

Step 2: Adjust the Speed of Video
Under Speed Ramping, click the “Customize” option and go to the graph below. If you move the line of the graph below, the video will slow down. You can slow it down between 1x to 0.1x at specific points.

Step 3: Enable Optical Flow Mode
For precise results, navigate toward the bottom and expand “AI Frame Interpolation.” From the given options, select “Optical Flow,” which will smoothen the video frames.

Step 4: Render Preview and Export the Clip
Once you have saved the speed settings, navigate towards the timeline panel. From there, find and select the “Render Preview” option and preview the clip. Afterward, export your video using the “Export” button at the top right corner.

This platform is not confined to video editing, but there are audio, text, and other options. In addition, it has pre-assembled multiple effects, titles, transitions, and more. There are categories for each effect, and you can do so much with its timeline editing. It allows users to incorporate unlimited effects and settings on a clip with precision.
Other Features of Wondershare Filmora
Filmora is a versatile desktop software that offers multiple AI and other features. It keeps upgrading its interface and has recently launched its V13 update. This update brought many features, and here are some of its new and existing ones:
- AI Image: Whether it is a slideshow or video, both are incomplete without graphical reference. With Filmora’s AI, you can generate a desired picture by explaining it in words. This generative AI crafts the outcome from your description in three resolutions. You can later select the one that fits your video or sharing site.

- Instant Mode: Why settle for dull videos when Filmora can bring life to them? You can now upload a video using its Instant Mode, and the AI will auto-edit it. It integrates suitable effects, adjusts lighting, and offers suitable templates for your videos.

- Screen Recorder: Without visual reference, comprehending stuff becomes 10X difficult. Create tutorials with video references using Filmora’s screen recorder. It allows you to customize the display settings, microphone, and webcam settings. You can create a professional-grade video tutorial using this recorder.

- Green Screen: Have you ever heard of replacing a boring background with a new one? The technique uses a green screen for better results. You just need to record yourself in front of a green background and enable it. The Chroma Key functionality will auto-eliminate the background. You can later replace this background with any video or image.

Conclusion
The focus of this article is on the tools that assist in creating slow-motion videos. On top of our list was the Efectum video editor, which helps with accurate task achievement. Afterward, we discussed some Android alternatives to E fectum slow motion video. For professional and precise results, we suggest Wondershare Filmora 13. It is an all-in-one video editor with multiple content editing opportunities.
How to Make Discord Logo GIF
How to Make Discord Logo GIF
An easy yet powerful editor
Numerous effects to choose from
Detailed tutorials provided by the official channel
The craze to get a personalized Discord animated icon is increasing with time. As it can deliver your favorite vibe to you and your friends, it’s exciting. Moreover, there are so many options in logos to choose from.
But what if you want a Discord GIF icon for your account? Maybe you’ve seen your friends using it and it’s stunning, isn’t it? That’s why this article is containing all the latest and easiest tricks to make the desired GIF icons Discord. Get the three best ways to make your own Discord logo. And let your friends ask you for the secret.
In this article
01 [Why Discord GIF Become Popular Recently?](#Part 1)
02 [How to Make an Animated Discord Logo Icon (Free Template)](#Part 2)
03 [How to Get Animated Discord PFP](#Part 3)
04 [How to Make Your Discord PFP a GIF on Wondershare Filmora](#Part 4)
Part 1 Why Discord GIF Become Popular Recently?
Think of one online entertainment that Discord is not serving right now. It’s hard to get one in mind. From chatting with friends to watching a movie together, from listening to music to playing together, all the entertainment is under a roof. And who doesn’t want the best appearance on such an engaging platform?
On the other hand, animated icons Discord is immensely popular as they can replicate your expression and mood as you want. Normal profile pictures are back-dated now as these GIFs can make the profile more interesting. You can pick any character or Discord animated icon as per your wish. Moreover, many of these are for free. While using these GIFs on multiple online chatting platforms, users can express their exact thoughts behind a message or reaction. Similarly, by using Discord icons GIFs, people can make their profile more lively and personalized.
Not sure of using GIFs? Imagine your Discord profile with your favorite anime character or a suitable clip. On some social media platforms, we need to be formal out of the profession. But on Discord, you can chill, so your profile. So, why not give it a try?
If you’re here to know the quick guide to set your Discord logo GIF or if you’re facing any error while setting the logo, this article will help you in no time.
Part 2 How to Make an Animated Discord Logo Icon (Free Template)
If you have already decided what will be the type of GIF icon Discord you want, that’s great. Otherwise, decide whether you need something funny or relaxed or it depends on a brand. This decision would help you to pick the template. Similarly, you can make the best Discord GIF icon with the following steps.
● To make a GIF with your choice, use this tool and click on “Edit this template”. This will let you make a customized GIF from any video from your personal collection or download from the Internet.
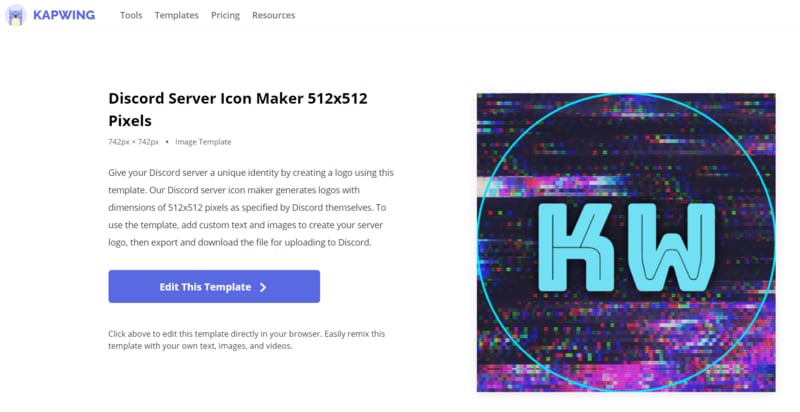
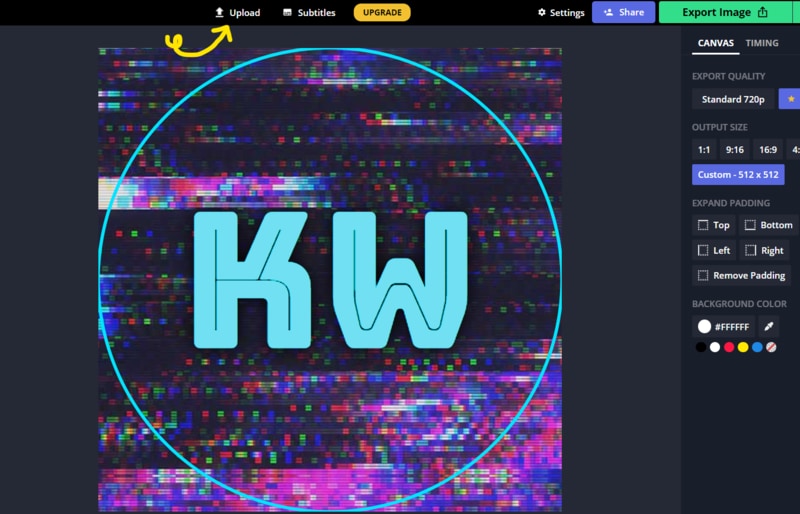
● In the next step, you have to choose the template size from the right-hand side of the window. You can keep to the custom 512x512 size as well.
● Now, on the topmost bar in the window, you can find an option named “Upload”. Click on this option to upload the video from where you want to make your Discord icon GIF.
● You can upload the video from the gallery or drag-and-drop to the uploader window. You can also get videos from Google Drive.
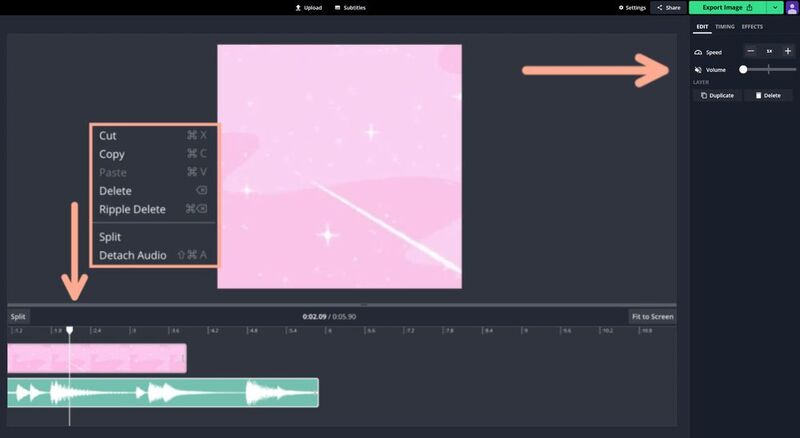
● Now, as the video gets uploaded, you need to edit within the edit window. You can set the frame, time, and size from the tools highlighted in the image.
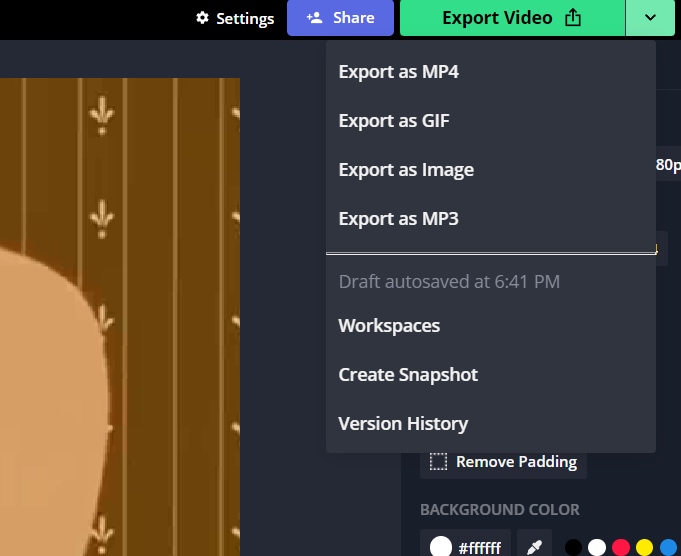
● Now, from the top-right side of the window, get the “Export Video” button. Click on the green arrow beside the button to get a drop-down list. From there click on the “Export as GIF” button to save your Discord icon GIF.
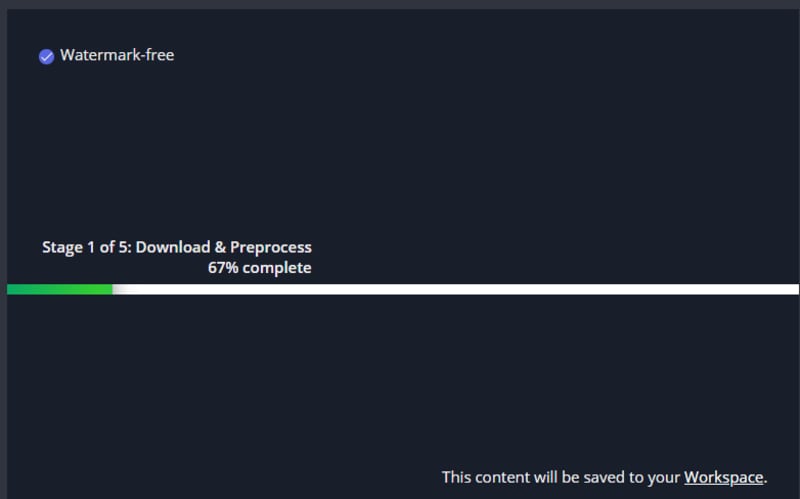
● You can check the download status from the next window.
● To save the recent GIF, click on “Download”. It will take some seconds to get saved to your system.

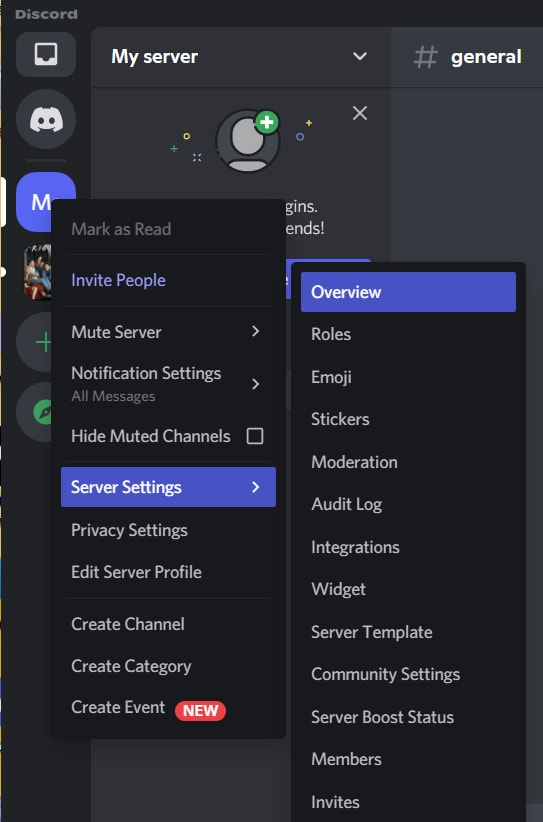
● Now, open Discord in your system and right-click on your “Server” icon from the left-hand side of the window. As a drop-down menu appears, select “Server Settings” followed by “Overview”.
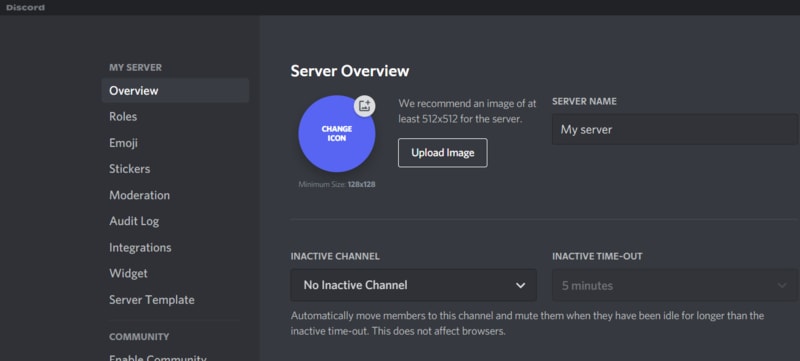
● A new window will be opened with the existing profile picture of the server. To add the GIF icon Discord, click on “Upload Image”.
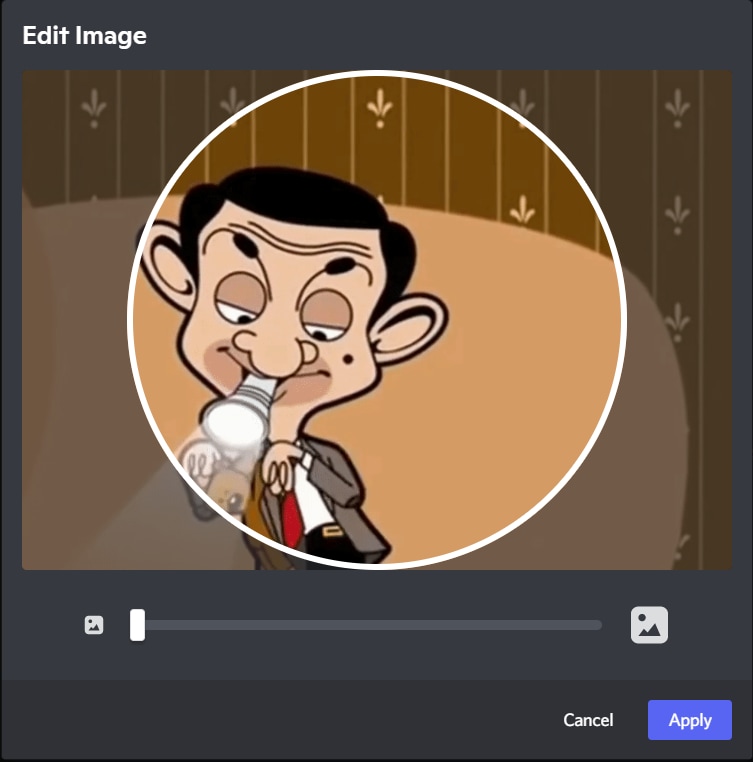
● From the location where you’ve saved the GIF, select it. Then, click on “Apply” to upload the GIF icon to the server profile.
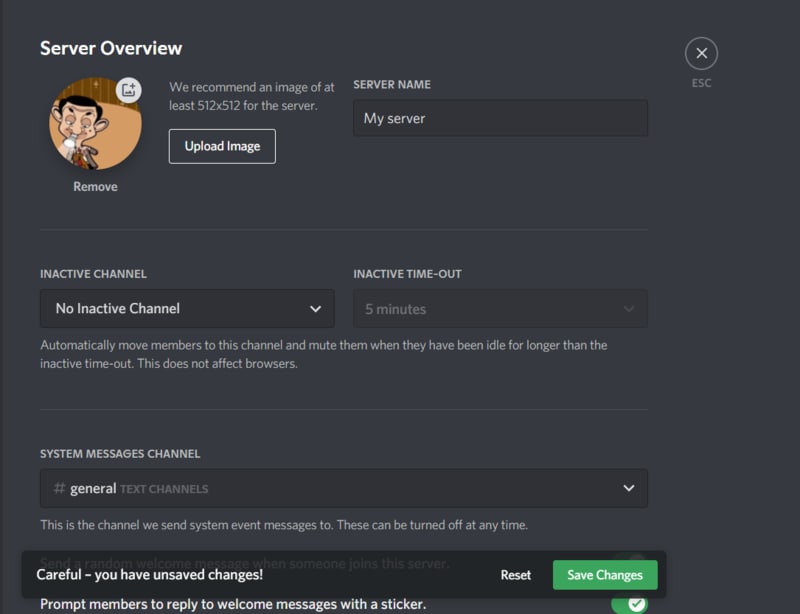
● When uploading is completed, click on the green button named “Save Changes” to save the GIF icons Discord. Make sure that your GIF file size is less than 10.24 MB. Otherwise, you cannot save the GIF and have to resize it again.
Part 3 How to Get Animated Discord PFP
To set an exciting avatar in your Discord profile, you need to go through the following quick steps. Firstly, note that you need to have Discord Nitro to set a Discord logo GIF in your user profile. Without Nitro, GIF cannot be used as a PFP. Get all the answers for how to use Discord Nitro or how to get animated Discord PFP here.
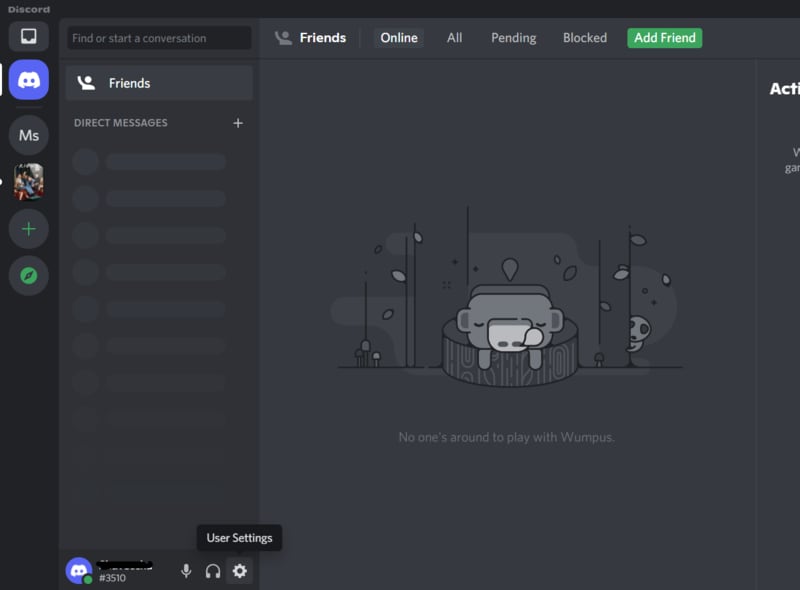
● Open Discord and from the bottom-left side panel, click on the “Gear” icon that is the “User Settings”. It will present beside your user name on the “Home” window itself.
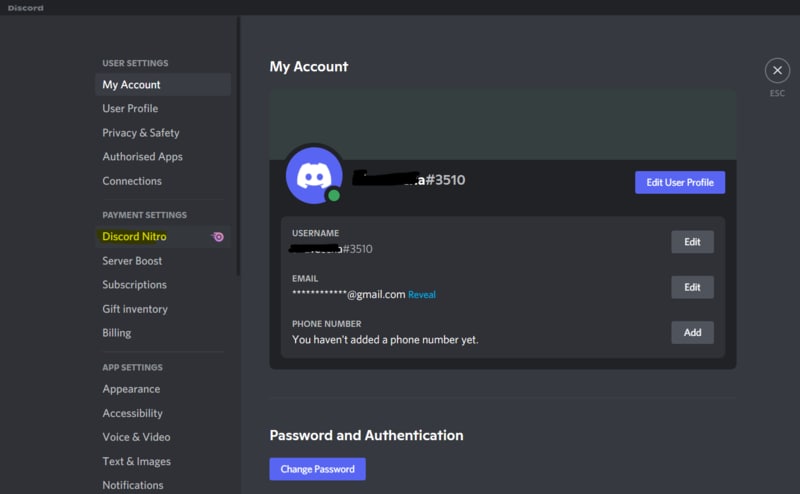
● As the new window gets opened, go to “Discord Nitro” under “Payment Settings”.
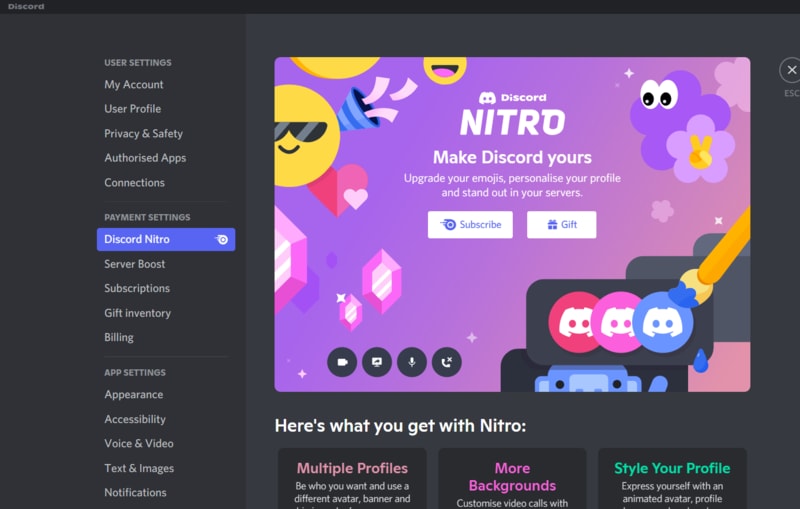
● If you don’t have activated Nitro, then click on “Subscribe” to get a suitable subscription to initiate animated icons Discord for your profile.
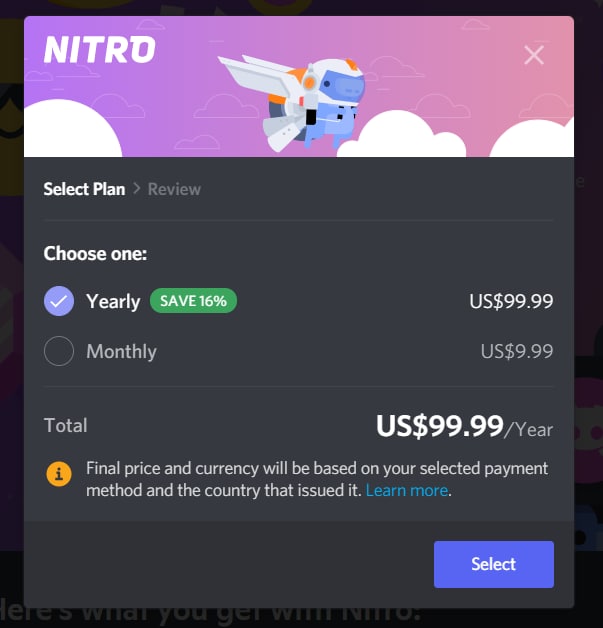
● Then, you’ll be redirected to the subscription options. Choose “Monthly” or “Yearly” subscription and to confirm it, click “Select”. If you choose the yearly plan, you’ll get an additional 16% off.
● As Discord Nitro is activated after payment and agreeing to the terms and conditions, you can see a pop-up window. Click on “Sweet” to get started.
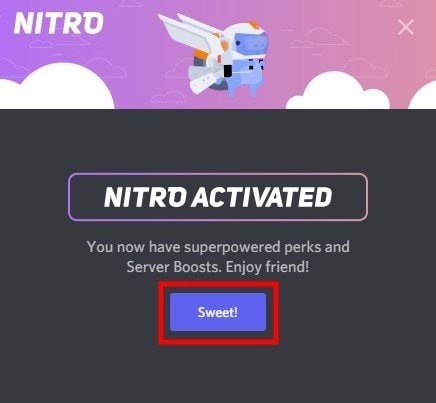
● To set your profile avatar with GIF icon Discord, you need some GIFs downloaded to your system. So, make your GIF according to the last technique we mentioned. Or you can search for GIFs on the Internet like Giphy”, “Tenor”, or “Gfycat”. Save the GIFs as images to the system.
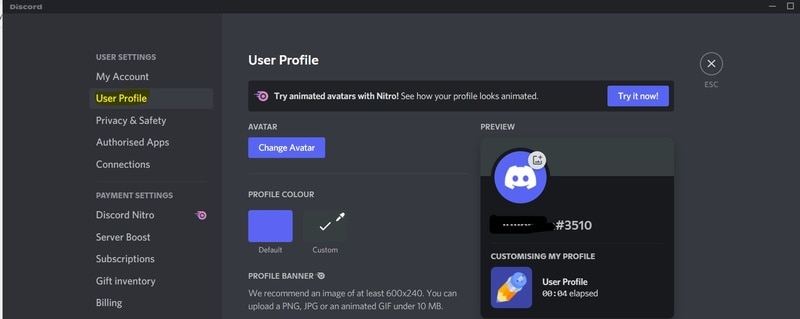
● Go the the “Gear” icon like the 1st step and open “User Settings”. Then, Go to the second option under user settings, “User Profile”. In this window, you can find a blue button named “Change Avatar”. Click on this button to set the Discord icon GIF.
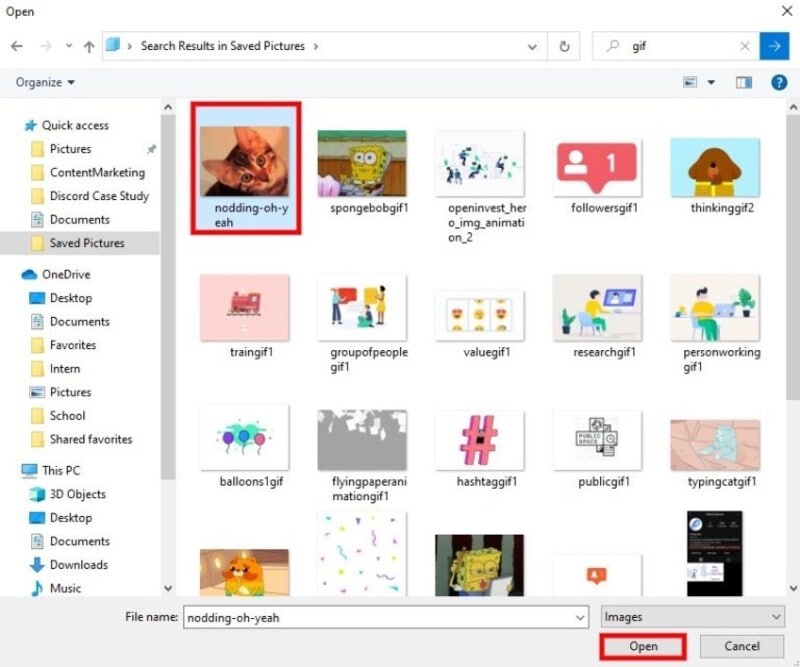
● Now, you need to find the desired GIF from the “File Explorer” opened. Go to the folder where you saved the GIF file. Then, select it and click on “Open”.
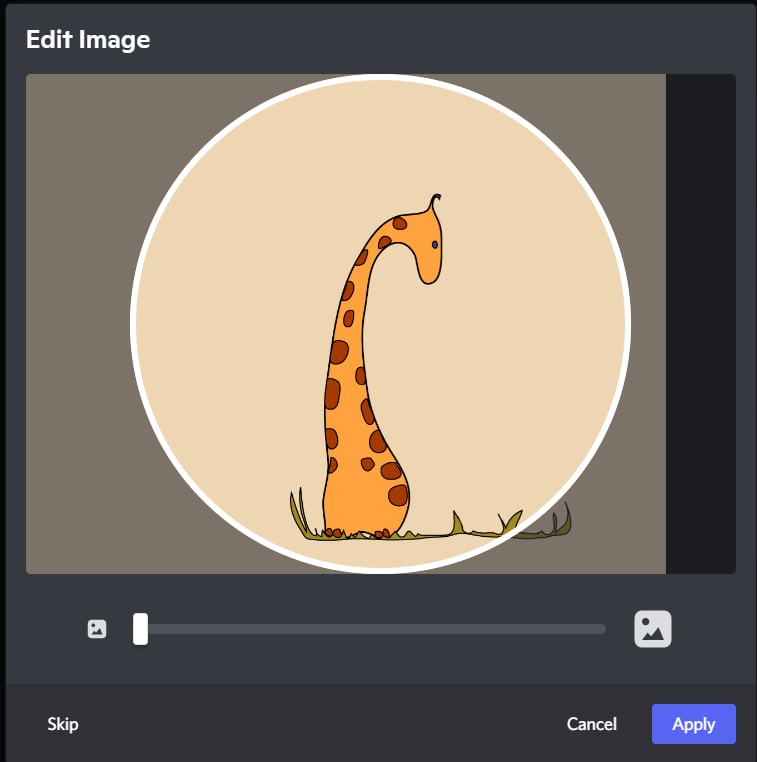
● You can edit the frame of your Discord animated icons in the “edit image’ pop-up window. Then, click on “Apply” to set it finally. If you don’t want to edit the size, click on “Skip” to save the GIF as your profile picture on Discord.
● Check your profile picture now and match it with your expectations. Then click on “Save Changes” to save the icon. If you want some changes, click on “Change Avatar” and select any GIF from the saved discord icons GIF from the file explorer.

Part 4 How to Make Your Discord PFP a GIF on Wondershare Filmora
Wondershare Filmora Video Editor is the latest software where you can create a GIF easily to set as a discord GIF icon. Instead of using the same, existing GIFs, you can make your own now. It will help you to make a unique impression and be satisfied with your personalized account. Moreover, this software is just 4 KB in storage size. So, instan5 download and installation is not a problem at all.

Wondershare Filmora - Best Video Editor for Mac/Windows
5,481,435 people have downloaded it.
Build unique custom animations without breaking a sweat.
Focus on creating epic stories and leave the details to Filmora’s auto features.
Start a creative adventure with drag & drop effects and endless possibilities.
Filmora simplifies advanced features to save you time and effort.
Filmora cuts out repetition so you can move on to your next creative breakthrough.
Let’s go through the steps to understand the procedure to make GIF icons discord on Wondershare Filmora.
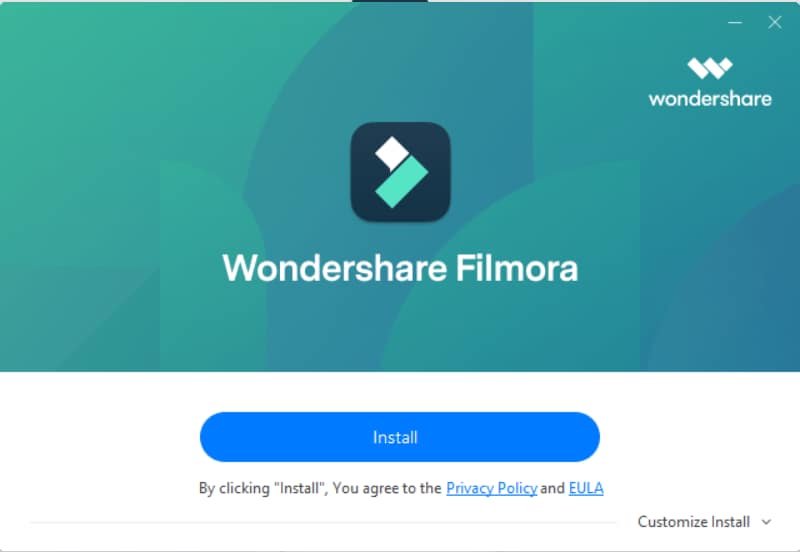
● Download and Install Wondershare Filmora in your system. It won’t take more than 10 minutes for the complete installation process. This software is available for both Windows and Mac OS.
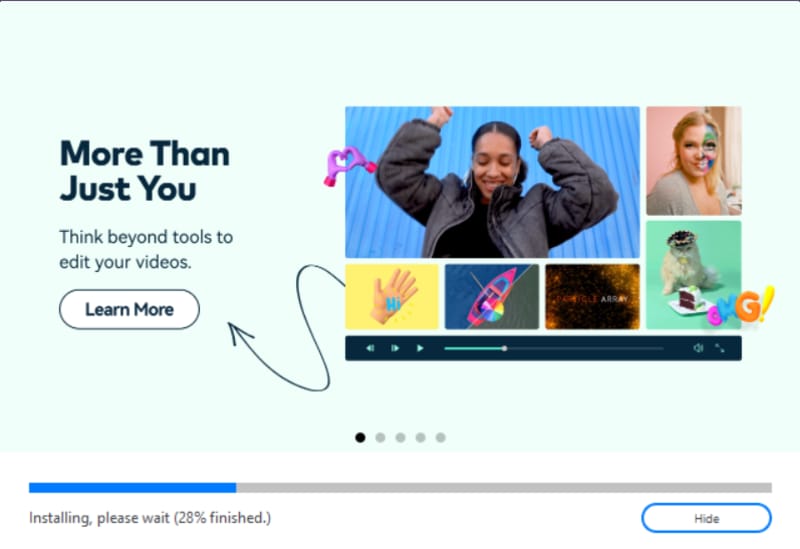
● You can observe the installation status on your screen.
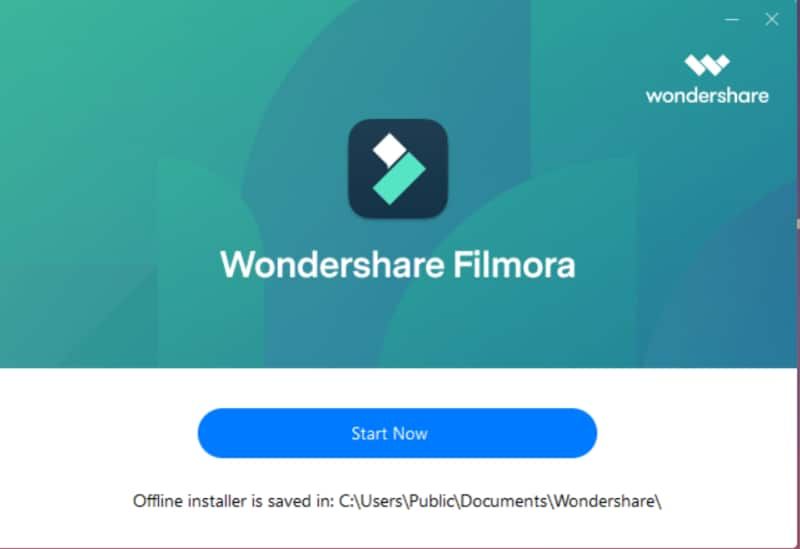
● As the installation is done, click on “Start Now” to open the software on the computer. A new black window will be opened on the screen.
● Click on the “Import Media Files Here” section to select an editable video file or a collection of photos to make the GIF.
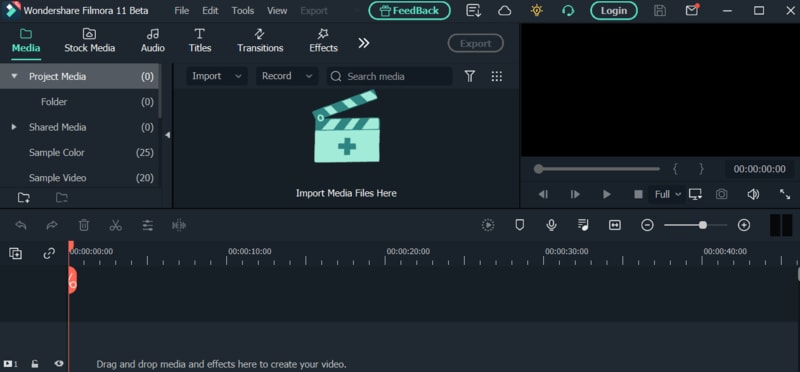
● As you select the desired video or images to make a discord animated icon from, you can find plenty of editing tools in the bottom section of the window. You can “crop”, “edit”, change the “duration” or apply “chroma-key” to the selected file. You can observe the respective changes on the right-hand side of the window.

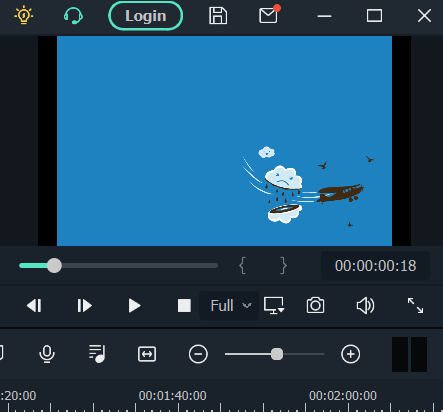
● When you complete the editing process, move to the right-hand section to play the GIF with the triangular-shaped button. It will give you a preview of your edited GIF for discord.
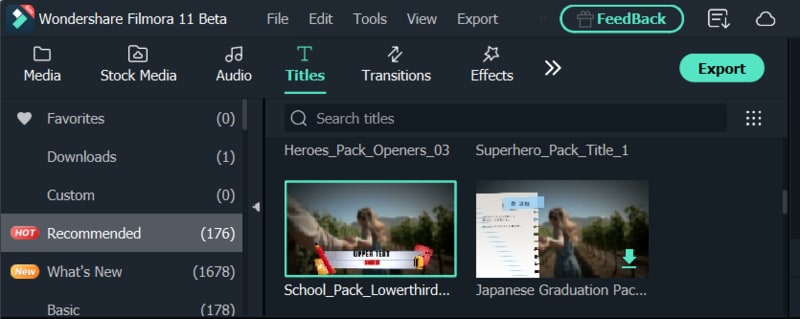
● If you want to add text to your GIF to make it more interactive, it’s possible with Wondershare Filmora. Firstly, select the “T” button or “Title” option from the menubar in the window. There’ll be multiple title templates available. Choose any one of them and click on the green “Down arrow” on the template.
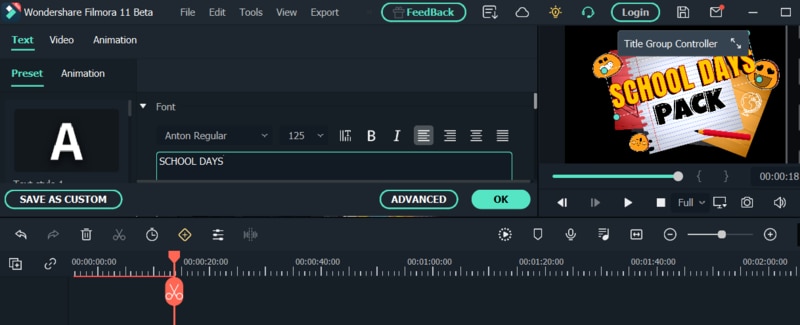
● The template will be loaded and then you can click on the small, green “+” button on the selected template to add it to your GIF. Now, click on the GIF frame to edit the text. Then click on “OK”.
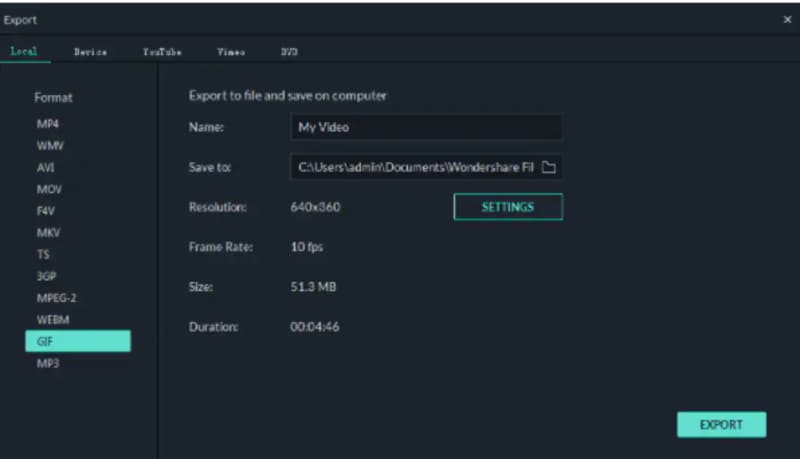
● Now, save the discord icon GIF with a proper gif extension and then upload it as your profile picture.
● Ending Thoughts →
● This article includes three different ways to make discord icons GIF easily to make a customized avatar.
● There’s no need to stick to the old profile picture in your discord account.
● With these quick and easy steps, creating and setting a GIF as a profile icon would be very easy.
The craze to get a personalized Discord animated icon is increasing with time. As it can deliver your favorite vibe to you and your friends, it’s exciting. Moreover, there are so many options in logos to choose from.
But what if you want a Discord GIF icon for your account? Maybe you’ve seen your friends using it and it’s stunning, isn’t it? That’s why this article is containing all the latest and easiest tricks to make the desired GIF icons Discord. Get the three best ways to make your own Discord logo. And let your friends ask you for the secret.
In this article
01 [Why Discord GIF Become Popular Recently?](#Part 1)
02 [How to Make an Animated Discord Logo Icon (Free Template)](#Part 2)
03 [How to Get Animated Discord PFP](#Part 3)
04 [How to Make Your Discord PFP a GIF on Wondershare Filmora](#Part 4)
Part 1 Why Discord GIF Become Popular Recently?
Think of one online entertainment that Discord is not serving right now. It’s hard to get one in mind. From chatting with friends to watching a movie together, from listening to music to playing together, all the entertainment is under a roof. And who doesn’t want the best appearance on such an engaging platform?
On the other hand, animated icons Discord is immensely popular as they can replicate your expression and mood as you want. Normal profile pictures are back-dated now as these GIFs can make the profile more interesting. You can pick any character or Discord animated icon as per your wish. Moreover, many of these are for free. While using these GIFs on multiple online chatting platforms, users can express their exact thoughts behind a message or reaction. Similarly, by using Discord icons GIFs, people can make their profile more lively and personalized.
Not sure of using GIFs? Imagine your Discord profile with your favorite anime character or a suitable clip. On some social media platforms, we need to be formal out of the profession. But on Discord, you can chill, so your profile. So, why not give it a try?
If you’re here to know the quick guide to set your Discord logo GIF or if you’re facing any error while setting the logo, this article will help you in no time.
Part 2 How to Make an Animated Discord Logo Icon (Free Template)
If you have already decided what will be the type of GIF icon Discord you want, that’s great. Otherwise, decide whether you need something funny or relaxed or it depends on a brand. This decision would help you to pick the template. Similarly, you can make the best Discord GIF icon with the following steps.
● To make a GIF with your choice, use this tool and click on “Edit this template”. This will let you make a customized GIF from any video from your personal collection or download from the Internet.

● In the next step, you have to choose the template size from the right-hand side of the window. You can keep to the custom 512x512 size as well.
● Now, on the topmost bar in the window, you can find an option named “Upload”. Click on this option to upload the video from where you want to make your Discord icon GIF.

● You can upload the video from the gallery or drag-and-drop to the uploader window. You can also get videos from Google Drive.
● Now, as the video gets uploaded, you need to edit within the edit window. You can set the frame, time, and size from the tools highlighted in the image.

● Now, from the top-right side of the window, get the “Export Video” button. Click on the green arrow beside the button to get a drop-down list. From there click on the “Export as GIF” button to save your Discord icon GIF.

● You can check the download status from the next window.

● To save the recent GIF, click on “Download”. It will take some seconds to get saved to your system.

● Now, open Discord in your system and right-click on your “Server” icon from the left-hand side of the window. As a drop-down menu appears, select “Server Settings” followed by “Overview”.

● A new window will be opened with the existing profile picture of the server. To add the GIF icon Discord, click on “Upload Image”.

● From the location where you’ve saved the GIF, select it. Then, click on “Apply” to upload the GIF icon to the server profile.

● When uploading is completed, click on the green button named “Save Changes” to save the GIF icons Discord. Make sure that your GIF file size is less than 10.24 MB. Otherwise, you cannot save the GIF and have to resize it again.

Part 3 How to Get Animated Discord PFP
To set an exciting avatar in your Discord profile, you need to go through the following quick steps. Firstly, note that you need to have Discord Nitro to set a Discord logo GIF in your user profile. Without Nitro, GIF cannot be used as a PFP. Get all the answers for how to use Discord Nitro or how to get animated Discord PFP here.
● Open Discord and from the bottom-left side panel, click on the “Gear” icon that is the “User Settings”. It will present beside your user name on the “Home” window itself.

● As the new window gets opened, go to “Discord Nitro” under “Payment Settings”.

● If you don’t have activated Nitro, then click on “Subscribe” to get a suitable subscription to initiate animated icons Discord for your profile.

● Then, you’ll be redirected to the subscription options. Choose “Monthly” or “Yearly” subscription and to confirm it, click “Select”. If you choose the yearly plan, you’ll get an additional 16% off.

● As Discord Nitro is activated after payment and agreeing to the terms and conditions, you can see a pop-up window. Click on “Sweet” to get started.

● To set your profile avatar with GIF icon Discord, you need some GIFs downloaded to your system. So, make your GIF according to the last technique we mentioned. Or you can search for GIFs on the Internet like Giphy”, “Tenor”, or “Gfycat”. Save the GIFs as images to the system.
● Go the the “Gear” icon like the 1st step and open “User Settings”. Then, Go to the second option under user settings, “User Profile”. In this window, you can find a blue button named “Change Avatar”. Click on this button to set the Discord icon GIF.

● Now, you need to find the desired GIF from the “File Explorer” opened. Go to the folder where you saved the GIF file. Then, select it and click on “Open”.

● You can edit the frame of your Discord animated icons in the “edit image’ pop-up window. Then, click on “Apply” to set it finally. If you don’t want to edit the size, click on “Skip” to save the GIF as your profile picture on Discord.

● Check your profile picture now and match it with your expectations. Then click on “Save Changes” to save the icon. If you want some changes, click on “Change Avatar” and select any GIF from the saved discord icons GIF from the file explorer.

Part 4 How to Make Your Discord PFP a GIF on Wondershare Filmora
Wondershare Filmora Video Editor is the latest software where you can create a GIF easily to set as a discord GIF icon. Instead of using the same, existing GIFs, you can make your own now. It will help you to make a unique impression and be satisfied with your personalized account. Moreover, this software is just 4 KB in storage size. So, instan5 download and installation is not a problem at all.

Wondershare Filmora - Best Video Editor for Mac/Windows
5,481,435 people have downloaded it.
Build unique custom animations without breaking a sweat.
Focus on creating epic stories and leave the details to Filmora’s auto features.
Start a creative adventure with drag & drop effects and endless possibilities.
Filmora simplifies advanced features to save you time and effort.
Filmora cuts out repetition so you can move on to your next creative breakthrough.
Let’s go through the steps to understand the procedure to make GIF icons discord on Wondershare Filmora.
● Download and Install Wondershare Filmora in your system. It won’t take more than 10 minutes for the complete installation process. This software is available for both Windows and Mac OS.

● You can observe the installation status on your screen.

● As the installation is done, click on “Start Now” to open the software on the computer. A new black window will be opened on the screen.

● Click on the “Import Media Files Here” section to select an editable video file or a collection of photos to make the GIF.

● As you select the desired video or images to make a discord animated icon from, you can find plenty of editing tools in the bottom section of the window. You can “crop”, “edit”, change the “duration” or apply “chroma-key” to the selected file. You can observe the respective changes on the right-hand side of the window.

● When you complete the editing process, move to the right-hand section to play the GIF with the triangular-shaped button. It will give you a preview of your edited GIF for discord.

● If you want to add text to your GIF to make it more interactive, it’s possible with Wondershare Filmora. Firstly, select the “T” button or “Title” option from the menubar in the window. There’ll be multiple title templates available. Choose any one of them and click on the green “Down arrow” on the template.

● The template will be loaded and then you can click on the small, green “+” button on the selected template to add it to your GIF. Now, click on the GIF frame to edit the text. Then click on “OK”.

● Now, save the discord icon GIF with a proper gif extension and then upload it as your profile picture.

● Ending Thoughts →
● This article includes three different ways to make discord icons GIF easily to make a customized avatar.
● There’s no need to stick to the old profile picture in your discord account.
● With these quick and easy steps, creating and setting a GIF as a profile icon would be very easy.
The craze to get a personalized Discord animated icon is increasing with time. As it can deliver your favorite vibe to you and your friends, it’s exciting. Moreover, there are so many options in logos to choose from.
But what if you want a Discord GIF icon for your account? Maybe you’ve seen your friends using it and it’s stunning, isn’t it? That’s why this article is containing all the latest and easiest tricks to make the desired GIF icons Discord. Get the three best ways to make your own Discord logo. And let your friends ask you for the secret.
In this article
01 [Why Discord GIF Become Popular Recently?](#Part 1)
02 [How to Make an Animated Discord Logo Icon (Free Template)](#Part 2)
03 [How to Get Animated Discord PFP](#Part 3)
04 [How to Make Your Discord PFP a GIF on Wondershare Filmora](#Part 4)
Part 1 Why Discord GIF Become Popular Recently?
Think of one online entertainment that Discord is not serving right now. It’s hard to get one in mind. From chatting with friends to watching a movie together, from listening to music to playing together, all the entertainment is under a roof. And who doesn’t want the best appearance on such an engaging platform?
On the other hand, animated icons Discord is immensely popular as they can replicate your expression and mood as you want. Normal profile pictures are back-dated now as these GIFs can make the profile more interesting. You can pick any character or Discord animated icon as per your wish. Moreover, many of these are for free. While using these GIFs on multiple online chatting platforms, users can express their exact thoughts behind a message or reaction. Similarly, by using Discord icons GIFs, people can make their profile more lively and personalized.
Not sure of using GIFs? Imagine your Discord profile with your favorite anime character or a suitable clip. On some social media platforms, we need to be formal out of the profession. But on Discord, you can chill, so your profile. So, why not give it a try?
If you’re here to know the quick guide to set your Discord logo GIF or if you’re facing any error while setting the logo, this article will help you in no time.
Part 2 How to Make an Animated Discord Logo Icon (Free Template)
If you have already decided what will be the type of GIF icon Discord you want, that’s great. Otherwise, decide whether you need something funny or relaxed or it depends on a brand. This decision would help you to pick the template. Similarly, you can make the best Discord GIF icon with the following steps.
● To make a GIF with your choice, use this tool and click on “Edit this template”. This will let you make a customized GIF from any video from your personal collection or download from the Internet.

● In the next step, you have to choose the template size from the right-hand side of the window. You can keep to the custom 512x512 size as well.
● Now, on the topmost bar in the window, you can find an option named “Upload”. Click on this option to upload the video from where you want to make your Discord icon GIF.

● You can upload the video from the gallery or drag-and-drop to the uploader window. You can also get videos from Google Drive.
● Now, as the video gets uploaded, you need to edit within the edit window. You can set the frame, time, and size from the tools highlighted in the image.

● Now, from the top-right side of the window, get the “Export Video” button. Click on the green arrow beside the button to get a drop-down list. From there click on the “Export as GIF” button to save your Discord icon GIF.

● You can check the download status from the next window.

● To save the recent GIF, click on “Download”. It will take some seconds to get saved to your system.

● Now, open Discord in your system and right-click on your “Server” icon from the left-hand side of the window. As a drop-down menu appears, select “Server Settings” followed by “Overview”.

● A new window will be opened with the existing profile picture of the server. To add the GIF icon Discord, click on “Upload Image”.

● From the location where you’ve saved the GIF, select it. Then, click on “Apply” to upload the GIF icon to the server profile.

● When uploading is completed, click on the green button named “Save Changes” to save the GIF icons Discord. Make sure that your GIF file size is less than 10.24 MB. Otherwise, you cannot save the GIF and have to resize it again.

Part 3 How to Get Animated Discord PFP
To set an exciting avatar in your Discord profile, you need to go through the following quick steps. Firstly, note that you need to have Discord Nitro to set a Discord logo GIF in your user profile. Without Nitro, GIF cannot be used as a PFP. Get all the answers for how to use Discord Nitro or how to get animated Discord PFP here.
● Open Discord and from the bottom-left side panel, click on the “Gear” icon that is the “User Settings”. It will present beside your user name on the “Home” window itself.

● As the new window gets opened, go to “Discord Nitro” under “Payment Settings”.

● If you don’t have activated Nitro, then click on “Subscribe” to get a suitable subscription to initiate animated icons Discord for your profile.

● Then, you’ll be redirected to the subscription options. Choose “Monthly” or “Yearly” subscription and to confirm it, click “Select”. If you choose the yearly plan, you’ll get an additional 16% off.

● As Discord Nitro is activated after payment and agreeing to the terms and conditions, you can see a pop-up window. Click on “Sweet” to get started.

● To set your profile avatar with GIF icon Discord, you need some GIFs downloaded to your system. So, make your GIF according to the last technique we mentioned. Or you can search for GIFs on the Internet like Giphy”, “Tenor”, or “Gfycat”. Save the GIFs as images to the system.
● Go the the “Gear” icon like the 1st step and open “User Settings”. Then, Go to the second option under user settings, “User Profile”. In this window, you can find a blue button named “Change Avatar”. Click on this button to set the Discord icon GIF.

● Now, you need to find the desired GIF from the “File Explorer” opened. Go to the folder where you saved the GIF file. Then, select it and click on “Open”.

● You can edit the frame of your Discord animated icons in the “edit image’ pop-up window. Then, click on “Apply” to set it finally. If you don’t want to edit the size, click on “Skip” to save the GIF as your profile picture on Discord.

● Check your profile picture now and match it with your expectations. Then click on “Save Changes” to save the icon. If you want some changes, click on “Change Avatar” and select any GIF from the saved discord icons GIF from the file explorer.

Part 4 How to Make Your Discord PFP a GIF on Wondershare Filmora
Wondershare Filmora Video Editor is the latest software where you can create a GIF easily to set as a discord GIF icon. Instead of using the same, existing GIFs, you can make your own now. It will help you to make a unique impression and be satisfied with your personalized account. Moreover, this software is just 4 KB in storage size. So, instan5 download and installation is not a problem at all.

Wondershare Filmora - Best Video Editor for Mac/Windows
5,481,435 people have downloaded it.
Build unique custom animations without breaking a sweat.
Focus on creating epic stories and leave the details to Filmora’s auto features.
Start a creative adventure with drag & drop effects and endless possibilities.
Filmora simplifies advanced features to save you time and effort.
Filmora cuts out repetition so you can move on to your next creative breakthrough.
Let’s go through the steps to understand the procedure to make GIF icons discord on Wondershare Filmora.
● Download and Install Wondershare Filmora in your system. It won’t take more than 10 minutes for the complete installation process. This software is available for both Windows and Mac OS.

● You can observe the installation status on your screen.

● As the installation is done, click on “Start Now” to open the software on the computer. A new black window will be opened on the screen.

● Click on the “Import Media Files Here” section to select an editable video file or a collection of photos to make the GIF.

● As you select the desired video or images to make a discord animated icon from, you can find plenty of editing tools in the bottom section of the window. You can “crop”, “edit”, change the “duration” or apply “chroma-key” to the selected file. You can observe the respective changes on the right-hand side of the window.

● When you complete the editing process, move to the right-hand section to play the GIF with the triangular-shaped button. It will give you a preview of your edited GIF for discord.

● If you want to add text to your GIF to make it more interactive, it’s possible with Wondershare Filmora. Firstly, select the “T” button or “Title” option from the menubar in the window. There’ll be multiple title templates available. Choose any one of them and click on the green “Down arrow” on the template.

● The template will be loaded and then you can click on the small, green “+” button on the selected template to add it to your GIF. Now, click on the GIF frame to edit the text. Then click on “OK”.

● Now, save the discord icon GIF with a proper gif extension and then upload it as your profile picture.

● Ending Thoughts →
● This article includes three different ways to make discord icons GIF easily to make a customized avatar.
● There’s no need to stick to the old profile picture in your discord account.
● With these quick and easy steps, creating and setting a GIF as a profile icon would be very easy.
The craze to get a personalized Discord animated icon is increasing with time. As it can deliver your favorite vibe to you and your friends, it’s exciting. Moreover, there are so many options in logos to choose from.
But what if you want a Discord GIF icon for your account? Maybe you’ve seen your friends using it and it’s stunning, isn’t it? That’s why this article is containing all the latest and easiest tricks to make the desired GIF icons Discord. Get the three best ways to make your own Discord logo. And let your friends ask you for the secret.
In this article
01 [Why Discord GIF Become Popular Recently?](#Part 1)
02 [How to Make an Animated Discord Logo Icon (Free Template)](#Part 2)
03 [How to Get Animated Discord PFP](#Part 3)
04 [How to Make Your Discord PFP a GIF on Wondershare Filmora](#Part 4)
Part 1 Why Discord GIF Become Popular Recently?
Think of one online entertainment that Discord is not serving right now. It’s hard to get one in mind. From chatting with friends to watching a movie together, from listening to music to playing together, all the entertainment is under a roof. And who doesn’t want the best appearance on such an engaging platform?
On the other hand, animated icons Discord is immensely popular as they can replicate your expression and mood as you want. Normal profile pictures are back-dated now as these GIFs can make the profile more interesting. You can pick any character or Discord animated icon as per your wish. Moreover, many of these are for free. While using these GIFs on multiple online chatting platforms, users can express their exact thoughts behind a message or reaction. Similarly, by using Discord icons GIFs, people can make their profile more lively and personalized.
Not sure of using GIFs? Imagine your Discord profile with your favorite anime character or a suitable clip. On some social media platforms, we need to be formal out of the profession. But on Discord, you can chill, so your profile. So, why not give it a try?
If you’re here to know the quick guide to set your Discord logo GIF or if you’re facing any error while setting the logo, this article will help you in no time.
Part 2 How to Make an Animated Discord Logo Icon (Free Template)
If you have already decided what will be the type of GIF icon Discord you want, that’s great. Otherwise, decide whether you need something funny or relaxed or it depends on a brand. This decision would help you to pick the template. Similarly, you can make the best Discord GIF icon with the following steps.
● To make a GIF with your choice, use this tool and click on “Edit this template”. This will let you make a customized GIF from any video from your personal collection or download from the Internet.

● In the next step, you have to choose the template size from the right-hand side of the window. You can keep to the custom 512x512 size as well.
● Now, on the topmost bar in the window, you can find an option named “Upload”. Click on this option to upload the video from where you want to make your Discord icon GIF.

● You can upload the video from the gallery or drag-and-drop to the uploader window. You can also get videos from Google Drive.
● Now, as the video gets uploaded, you need to edit within the edit window. You can set the frame, time, and size from the tools highlighted in the image.

● Now, from the top-right side of the window, get the “Export Video” button. Click on the green arrow beside the button to get a drop-down list. From there click on the “Export as GIF” button to save your Discord icon GIF.

● You can check the download status from the next window.

● To save the recent GIF, click on “Download”. It will take some seconds to get saved to your system.

● Now, open Discord in your system and right-click on your “Server” icon from the left-hand side of the window. As a drop-down menu appears, select “Server Settings” followed by “Overview”.

● A new window will be opened with the existing profile picture of the server. To add the GIF icon Discord, click on “Upload Image”.

● From the location where you’ve saved the GIF, select it. Then, click on “Apply” to upload the GIF icon to the server profile.

● When uploading is completed, click on the green button named “Save Changes” to save the GIF icons Discord. Make sure that your GIF file size is less than 10.24 MB. Otherwise, you cannot save the GIF and have to resize it again.

Part 3 How to Get Animated Discord PFP
To set an exciting avatar in your Discord profile, you need to go through the following quick steps. Firstly, note that you need to have Discord Nitro to set a Discord logo GIF in your user profile. Without Nitro, GIF cannot be used as a PFP. Get all the answers for how to use Discord Nitro or how to get animated Discord PFP here.
● Open Discord and from the bottom-left side panel, click on the “Gear” icon that is the “User Settings”. It will present beside your user name on the “Home” window itself.

● As the new window gets opened, go to “Discord Nitro” under “Payment Settings”.

● If you don’t have activated Nitro, then click on “Subscribe” to get a suitable subscription to initiate animated icons Discord for your profile.

● Then, you’ll be redirected to the subscription options. Choose “Monthly” or “Yearly” subscription and to confirm it, click “Select”. If you choose the yearly plan, you’ll get an additional 16% off.

● As Discord Nitro is activated after payment and agreeing to the terms and conditions, you can see a pop-up window. Click on “Sweet” to get started.

● To set your profile avatar with GIF icon Discord, you need some GIFs downloaded to your system. So, make your GIF according to the last technique we mentioned. Or you can search for GIFs on the Internet like Giphy”, “Tenor”, or “Gfycat”. Save the GIFs as images to the system.
● Go the the “Gear” icon like the 1st step and open “User Settings”. Then, Go to the second option under user settings, “User Profile”. In this window, you can find a blue button named “Change Avatar”. Click on this button to set the Discord icon GIF.

● Now, you need to find the desired GIF from the “File Explorer” opened. Go to the folder where you saved the GIF file. Then, select it and click on “Open”.

● You can edit the frame of your Discord animated icons in the “edit image’ pop-up window. Then, click on “Apply” to set it finally. If you don’t want to edit the size, click on “Skip” to save the GIF as your profile picture on Discord.

● Check your profile picture now and match it with your expectations. Then click on “Save Changes” to save the icon. If you want some changes, click on “Change Avatar” and select any GIF from the saved discord icons GIF from the file explorer.

Part 4 How to Make Your Discord PFP a GIF on Wondershare Filmora
Wondershare Filmora Video Editor is the latest software where you can create a GIF easily to set as a discord GIF icon. Instead of using the same, existing GIFs, you can make your own now. It will help you to make a unique impression and be satisfied with your personalized account. Moreover, this software is just 4 KB in storage size. So, instan5 download and installation is not a problem at all.

Wondershare Filmora - Best Video Editor for Mac/Windows
5,481,435 people have downloaded it.
Build unique custom animations without breaking a sweat.
Focus on creating epic stories and leave the details to Filmora’s auto features.
Start a creative adventure with drag & drop effects and endless possibilities.
Filmora simplifies advanced features to save you time and effort.
Filmora cuts out repetition so you can move on to your next creative breakthrough.
Let’s go through the steps to understand the procedure to make GIF icons discord on Wondershare Filmora.
● Download and Install Wondershare Filmora in your system. It won’t take more than 10 minutes for the complete installation process. This software is available for both Windows and Mac OS.

● You can observe the installation status on your screen.

● As the installation is done, click on “Start Now” to open the software on the computer. A new black window will be opened on the screen.

● Click on the “Import Media Files Here” section to select an editable video file or a collection of photos to make the GIF.

● As you select the desired video or images to make a discord animated icon from, you can find plenty of editing tools in the bottom section of the window. You can “crop”, “edit”, change the “duration” or apply “chroma-key” to the selected file. You can observe the respective changes on the right-hand side of the window.

● When you complete the editing process, move to the right-hand section to play the GIF with the triangular-shaped button. It will give you a preview of your edited GIF for discord.

● If you want to add text to your GIF to make it more interactive, it’s possible with Wondershare Filmora. Firstly, select the “T” button or “Title” option from the menubar in the window. There’ll be multiple title templates available. Choose any one of them and click on the green “Down arrow” on the template.

● The template will be loaded and then you can click on the small, green “+” button on the selected template to add it to your GIF. Now, click on the GIF frame to edit the text. Then click on “OK”.

● Now, save the discord icon GIF with a proper gif extension and then upload it as your profile picture.

● Ending Thoughts →
● This article includes three different ways to make discord icons GIF easily to make a customized avatar.
● There’s no need to stick to the old profile picture in your discord account.
● With these quick and easy steps, creating and setting a GIF as a profile icon would be very easy.
Also read:
- To Closely Observe the Content on Screen, We Often Zoom in to Catch the Details. This Article Will Provide You with a Brief Note on How to Zoom in on YouTube Videos Quickly on Your Devices
- In 2024, Create a Brand Video to Make Your Business Shine
- Updated Learn How to Make Modern TikTok Velocity Dance Videos in Filmora Just Like the Ones You See on TikTok and Instagram Reels for 2024
- 2024 Approved Finding The Finest Way to Add Subtitles to Videos | Filmora
- How to Polish Your Music Video Edits Using Filmora for 2024
- Updated 2024 Approved Templates Take Your Music Video From Drab to Fab and Add some Spice to the Catchy Song. Here Are some Templates You Could Use to Make Your Music Video Popular
- In 2024, Wondershare Filmora Tutorial | Using The AI Auto Reframe Feature
- New 2024 Approved How To Combine Videos On TikTok
- Updated In 2024, A Guide to Speed up a Video on Splice
- Updated In 2024, Do You Find Choosing a Good LUT to Color-Correct Your Media Files Difficult? Discover some of the Best Professional LUTs From 3D LUT Creator to Download
- In 2024, Are You Looking for Funny Discord Emojis to Massively Improve Your Discord Experience? Using some Fun Bots for Discord Is an Excellent Way of Doing That! Thus, We Compiled a List of 10 Fun Discord Bots You Need
- Updated Want to Know the Simplest Way to Match the Colors of Your Photos in Photoshop? The Following Discussion Will Help Match Color in Photoshop, Almost Effortlessly for 2024
- 2024 Approved Top Animated Title Makers
- Updated 2024 Approved Want to Add a Motion Blur Effect to Your Photos? This Step-by-Step Tutorial Will Show You How to Use GIMP Software to Get the Effect You Want
- Updated How to Become a Youtuber for 2024
- New How to Cut Videos on Mac without Using FFmpeg for 2024
- Reversing Time Lapse Videos on iPhone Using Top Applications for 2024
- Updated 2024 Approved How To Edit Youtube Videos In Easy Steps
- In 2024, How to Correct Lens Distortion With Filmora
- In 2024, Do You Know There Are Websites to Download Free Glitch Transition Effects for Premiere Pro? You Can Easily Download Them and Make Awesome Videos
- New Best 8 Animated Video Makers
- New In 2024, Best 5 GIF to Video Converters You Cant-Miss
- Updated In 2024, Montage Makes It Easy to Create and Share Videos. This Article Will Explain What It Can Do and Show You Examples of Movies that Use Montage
- How to Denoise in After Effects – Audio and Video Noise Removal for 2024
- New 2024 Approved The Audio You Produce Will Inevitably Be Flawed Throughout the Production Process. So, Learn How Adobe Audition Removes Echo to Sound Better Instead of Throwing It Away
- 2024 Approved 3 Ways to Make Time-Lapse Video on MacBook
- Updated Steps to Create Gold Text Effects After Effects
- Updated 2024 Approved SRT File Translation Could Be a Tedious Task if You Dont Know the Right Steps. Lets Discuss Few Effective Ways to Do It Like a Pro
- New LumaFusion – What Is It and the Best Alternative to Use
- Updated How to Loop a Video with iMovie on Mac and iPhone for 2024
- Updated Most-Used 3 Ways to Compress Video for Instagram Story, Feed, and IGTV
- New Create True 3D Text Effects Using After Effects for 2024
- In 2024, Color Matching Is the Trickiest Part of Graphic Designing. Learn in Detail About Using Canva Color Match Ideally While Working on Your Pins, Social Media Posts, and Other Designs
- New 2024 Approved Are You Eager to Discover the Top-Rated and Reliable LUTs that Can Be Used in Shotcut? This Article Will Help You a Lot with This Matter
- Updated Top Ways to Make Fast Motion Video on iPhone Solved
- How to Create Sports Intro and Outro for YouTube Video for 2024
- Updated How to Add Zoom Blur Effect In Photoshop for 2024
- In 2024, How to Remove a Previously Synced Google Account from Your Honor X9b
- Fix the Error of Unfortunately the Process.com.android.phone Has Stopped on Oppo Reno 10 Pro 5G | Dr.fone
- A Detailed Guide on Faking Your Location in Mozilla Firefox On Oppo Reno 10 5G | Dr.fone
- Prank Your Friends! Easy Ways to Fake and Share Google Maps Location On Xiaomi Redmi Note 12T Pro | Dr.fone
- 5 Hassle-Free Solutions to Fake Location on Find My Friends Of Xiaomi Redmi Note 13 5G | Dr.fone
- In 2024, How to Watch Hulu Outside US On Apple iPhone 12 Pro | Dr.fone
- Best Emoji Removers to Remove Emojis From Pictures
- In 2024, How To Unlock Any Vivo X90S Phone Password Using Emergency Call
- Prevent Cross-Site Tracking on Motorola Moto G04 and Browser | Dr.fone
- Here Are Some Reliable Ways to Get Pokemon Go Friend Codes For Realme Narzo 60 Pro 5G | Dr.fone
- In 2024, Latest way to get Shiny Meltan Box in Pokémon Go Mystery Box On Samsung Galaxy S23 Tactical Edition | Dr.fone
- Unlocking Made Easy The Best 10 Apps for Unlocking Your Infinix Hot 30 5G Device
- The Ultimate Guide How to Bypass Swipe Screen to Unlock on Samsung Device
- In 2024, How to Change your Sony Xperia 5 V Location on Twitter | Dr.fone
- In 2024, How To Stream Anything From Infinix Note 30 VIP Racing Edition to Apple TV | Dr.fone
- Complete Review & Guide to Techeligible FRP Bypass and More For Motorola G24 Power
- In 2024, Your Account Has Been Disabled in the App Store and iTunes On Apple iPhone 15 Pro Max?
- In 2024, 8 Best Apps for Screen Mirroring Tecno Camon 20 PC | Dr.fone
- Troubleshooting Guide How to Fix an Unresponsive Realme 10T 5G Screen | Dr.fone
- What Is AI API, In 2024
- In 2024, How Do You Remove Restricted Mode on iPhone 12 Pro Max
- Best Video Repair tool to Fix and Repair Corrupt MP4,MOV,AVI video files of Redmi A2
- 5 Ways to Restart Infinix Smart 8 Pro Without Power Button | Dr.fone
- Updated 10 Must Watch Netflix Cartoon Series For You for 2024
- How to Upgrade Apple iPhone 6s Plus to the Latest iOS/iPadOS Version? | Dr.fone
- Fix Cant Take Screenshot Due to Security Policy on Realme Note 50 | Dr.fone
- Title: Updated Learn How to Create a Unique Repeated Text Animation in the Filmora Video Editor. Follow the Simple Step-by-Step Instructions for 2024
- Author: Morgan
- Created at : 2024-04-24 01:10:30
- Updated at : 2024-04-25 01:10:30
- Link: https://ai-video-editing.techidaily.com/updated-learn-how-to-create-a-unique-repeated-text-animation-in-the-filmora-video-editor-follow-the-simple-step-by-step-instructions-for-2024/
- License: This work is licensed under CC BY-NC-SA 4.0.


