:max_bytes(150000):strip_icc():format(webp)/6-things-to-consider-before-buying-a-gaming-pc-5221042-8a79710a1e4549edbc357125123fb04e.jpg)
Updated Make Super Easy Coin Magic With Filmora

Make Super Easy Coin Magic With Filmora
Do you want to become a magician in your videos? Now, everyone can look like a magician with the magic of editing. This article will show you how to do a cool coin trick in Filmora 11 .
Part 1: What is the filmmaking technique “Cutting on action”
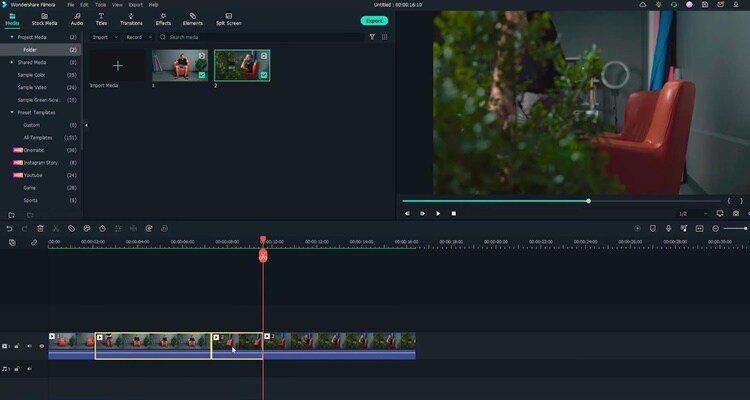
Cutting on action is a technique the editors use to cut in the middle of an action to another shot that matches the first shot’s action. Typically, the subject starts an action in one shot and continues the action in another, creating a smooth transition. For example, when you make the coin trick video, you need to cut on the tapping so it can trick the eyes, and the cut won’t be noticeable.
Part 2: Things You Need to Prepare for The Coin Magic Trick
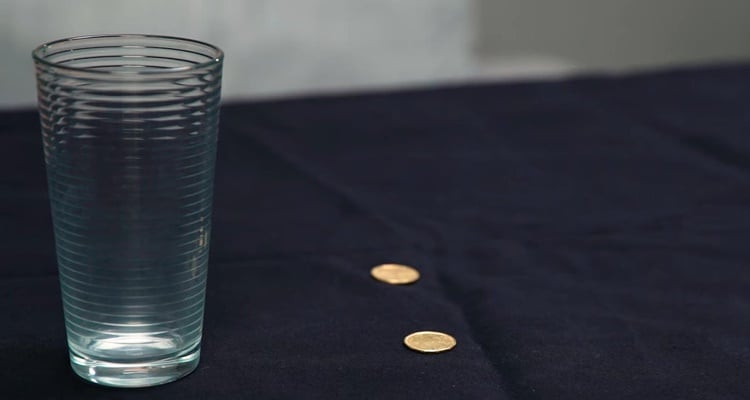
- Glass and two coins
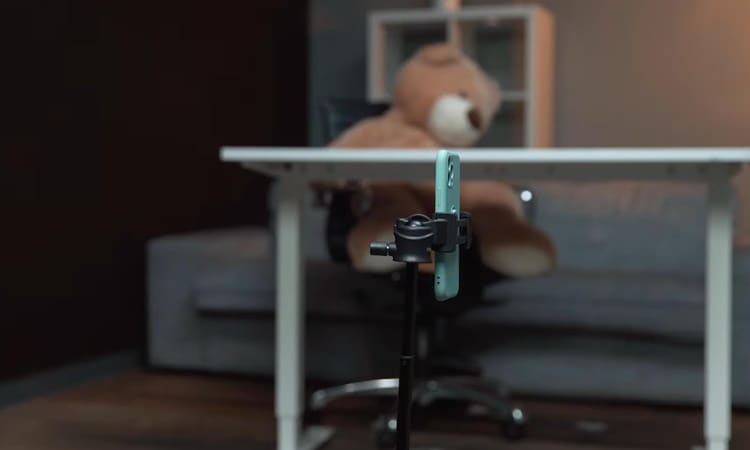
- Set the phone on a tripod. Because utilizing a tripod can significantly improve the recording’s stability.
Part 3: Start Filming
Step1 Firstly, you must show the coin and the bottom of the glass.
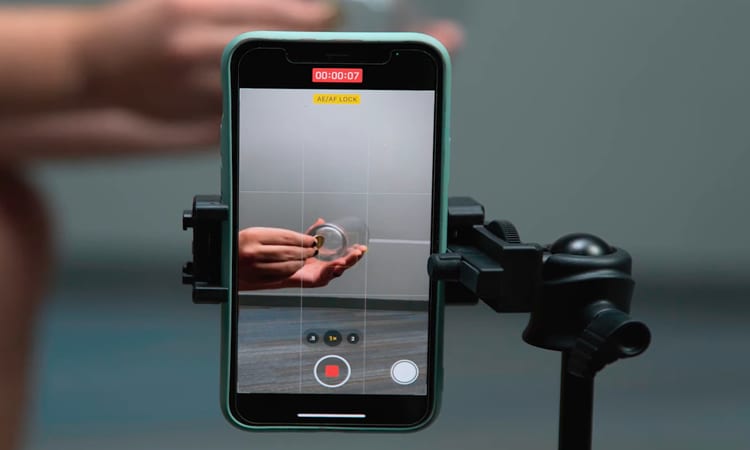
Step2 After that, you need to hold the coin with the fingers part of one hand and tap down on the coin. Make sure it looks like the coin is going through straight to the glass.
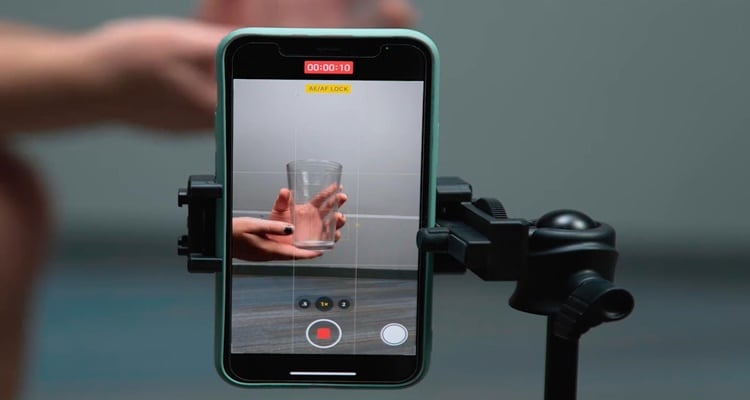
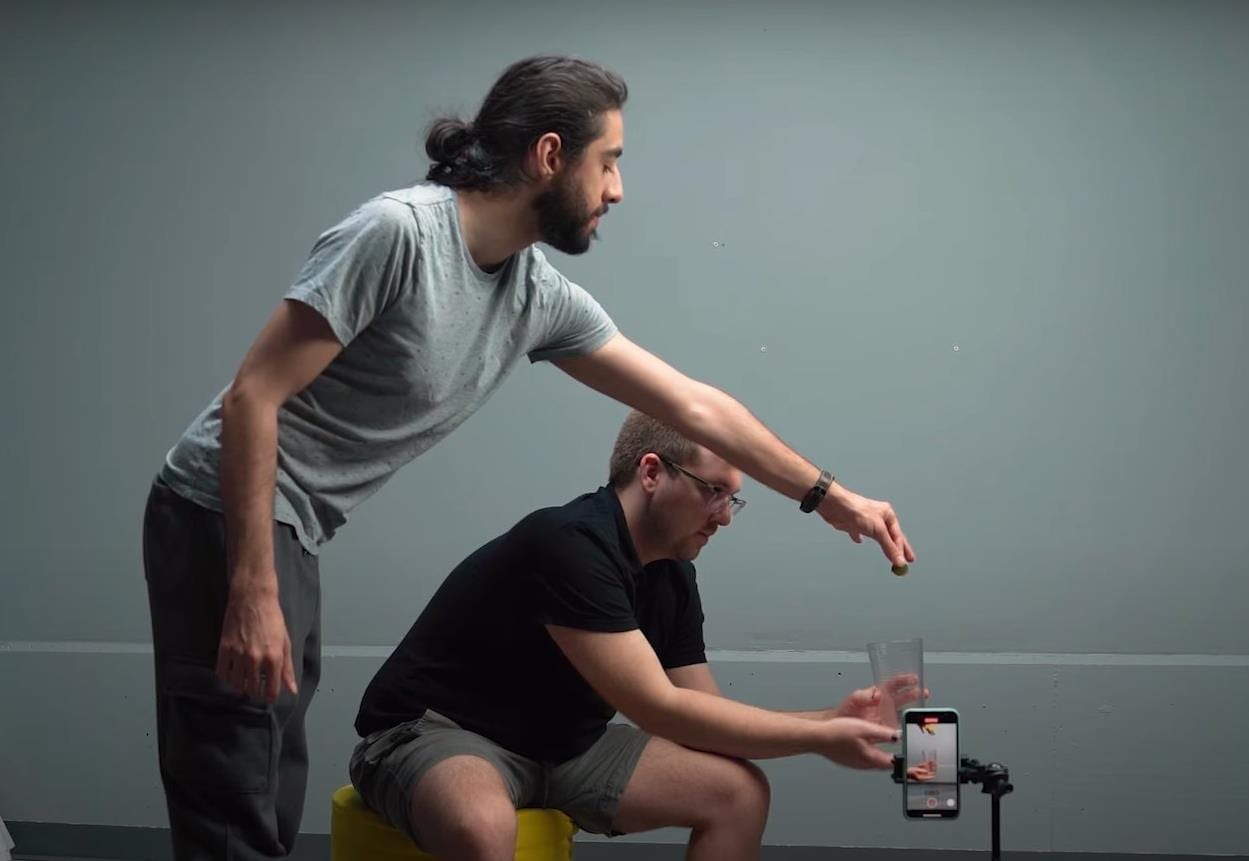
Step3 You need someone else to drop the other coin from the top. Meanwhile, you are pretending to tap a coin on the glass. You don’t need to worry about someone else hand in the frame. Since you can remove it easily with the masking feature in Filmora.
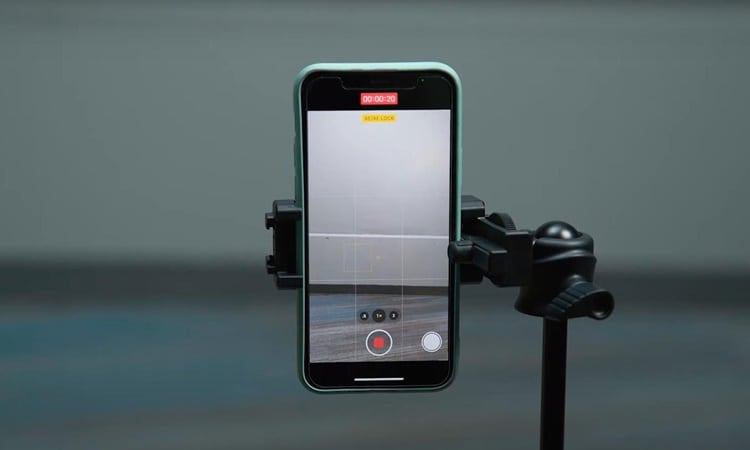
Step4 It would help if you had a second shot for a clean plate of the background. You can record background for 20 seconds.
Part 4: Bring the clips into Filmora 11
Step1 If you have not downloaded Filmora, you can visit filmora.wondershare.com to download Filmora’s new version.
Step2 Drag and drop the clip onto the first track of the timeline.Afterward, move the playhead to the right and find the spot where you tapped the coin last time before your friend drops the other coin. Additionally, make sure it is in the middle of the tapping action and cut.
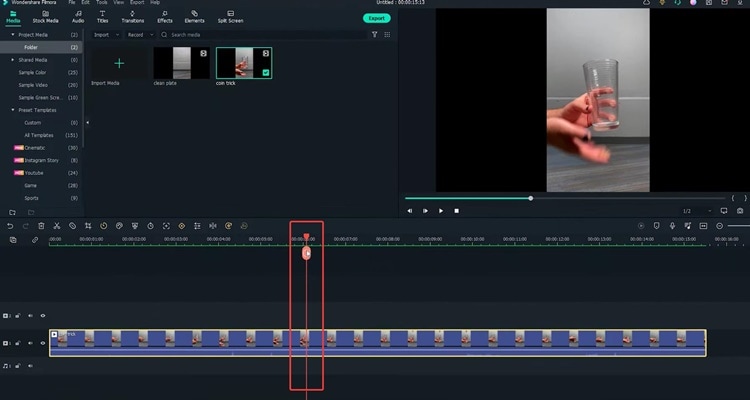
Step3 Then move the playhead to the right and find the spot where your friend drops the coin while you tap without the coin in your hand. Make sure it is in the middle of the tapping action, and the position of your hand roughly matches that in the last cut and make a cut.
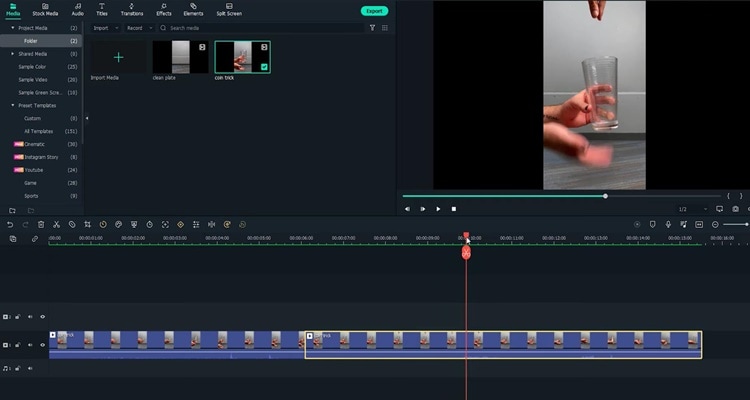
Step4 Now you need to delete the middle part and play it back. Indeed, cutting on action is the key to creating the illusion that the action is continued without editing.
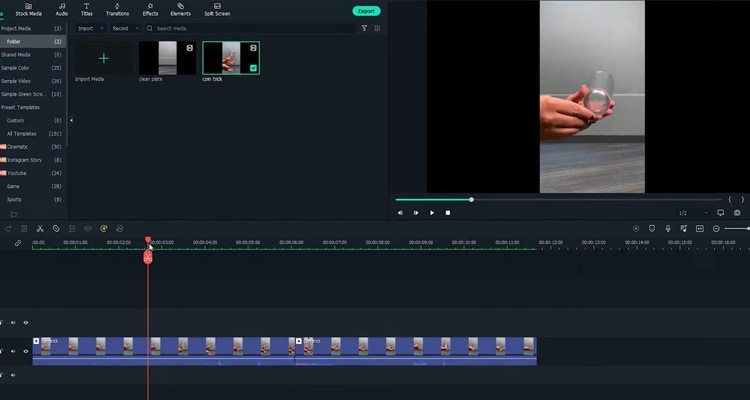
Step5 Next, you must remove your friend’s hand in the frame with the Filmora masking feature. Afterwards. drag and drop the clean plate video onto the second track of the timeline.
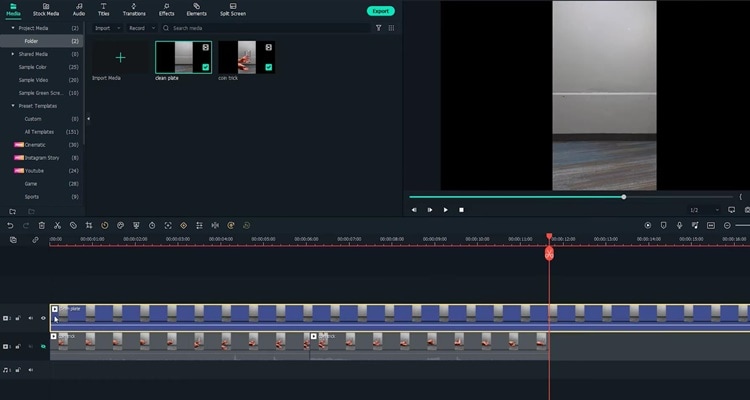
Step6 Next, double-click the clip to open the setting video. Find the Mask Section and select the single line.
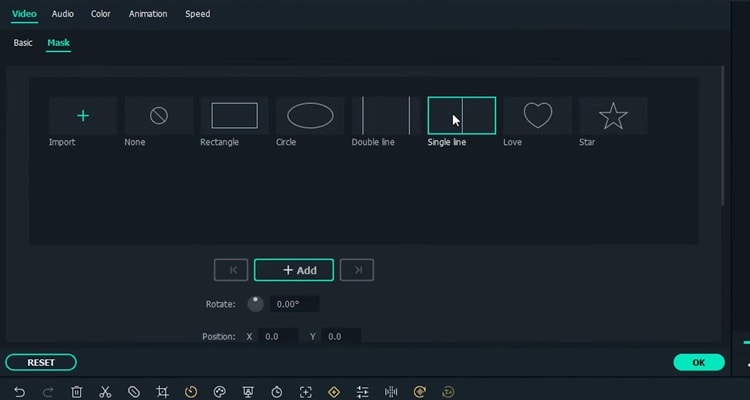
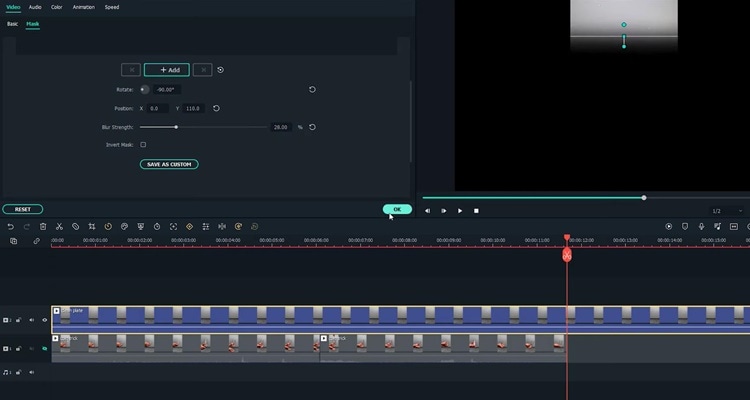
Step7 Here you can see the mask is applied.First, adjust the angle and position of the mask to only show the top part of the frame. Then you have to change the Blur Strength to add more blur to the edge of the mask.
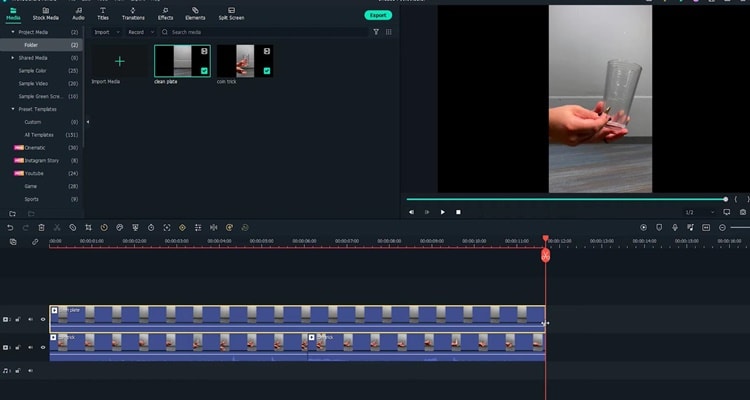
Step8 With the mask finalized, unhide the first video track and adjust the length of the clip on the timeline. Finally, playback the video and see how it looks.
Summary
That’s how to make a coin move through a glass-like MAGIC with the cutting on action editing technique. You can pay close attention to the steps above and follow each step for perfect results.
Free Download For Win 7 or later(64-bit)
Free Download For macOS 10.14 or later
Free Download For macOS 10.14 or later
How Can You Get VHS Filter and Glitch Filter to Your Images or Videos?
A glitch in the video or an image gives the notion of an error in the video recording process, and it was not accepted in the media industry. However, presently, creative professionals are incorporating the VHS filters to give a vintage impression. The visual distortions are used by gamers and streaming creators extensively.
For this very reason, the article discusses the procedure to create a glitch filter in Photoshop, Instagram, TikTok, and in one of your impeccable travel videos. Time to start!
In this article
01 How to Make VHS Filter in Photoshop?
02 How to Get VHS Filter in Instagram?
03 How to Get VHS Filter in TikTok?
04 How to Add VHS Effects to your Travel Video?
Part 1: How to Make VHS Filter in Photoshop?
There are a lot of steps associated with VHS filter Photoshop. The procedure can be tricky for a beginner in the industry. Therefore, we have sketched out a guide to make a VHS image filter in Photoshop. Follow it carefully to have desirable results.
Step 1: Open Photoshop
Open Photoshop from your computer and click on “New.” Use the “Custom” option from the windows that appear. After that, click on “File” and launch the imagery. Drag and drop that picture to the customized workspace.

Step 2: Apply the Transformation
Head to the “Edit” from the top panel and press “Transform” from there. Click on “Scale” from the context menu. The user is recommended to set the scale as required using arrows from the mouse. After that, apply the transformation.

Step 3: Changing the Parameters
Now, right-click on your layer to click on “Brightness and Contrast.” Change it as you need. After that, move on to the “Curves” and play with the graphs of the picture. Change the “Solid Color” as well. Make the color white and change the opacity levels.

Step 4: Adding Noise
Moving on, click on the first layer and navigate to the “Filter” bar on the top of the interface. Hit “Noise” and then “Add Noise.” Make the necessary changes as you like and press “Enter.” Scroll up to the “File” and hit “Open Recent” to launch the VHS texture photo. Drag and drop the texture to the photo layer that we are working on.

Step 5: Inserting VHS Texture
Resize the VHS texture and then apply the transformation. By default, the blend mode is “Normal.” Change it to “Darken” from the right panel. The picture will get dark. Again, change the mode to “Screen.” Moving on, input another VHS Filter texture and drag and drop it to the layer we are working on. Resize it and apply the transformation.

Step 6: Altering the Blend Mode
Alter the blend mode to “Darker” and then to “Screen.” Apply another filter and then drag and drop the layer. Change the blend mode to “Screen.” Pick up the eraser from the left panel of tools and make necessary edits.

Step 7: Duplicating the Layer
Duplicate the photo layer and move it up. Again, click on “Filter” then “Noise” to add the noise as needed. Alter the blend mode to “Soft Light” and set the opacity value. After that, add any solid color and switch the blend mode back to Soft Light.

Step 8: Playing with the Layers
Duplicate the layer again to change the color. After that, double click the layer and deselect “R.” Move to left or right. Perform the same procedure for the rest of the layers. Use the erase tool to offer fine imprinting to the transition. Duplicate the final layer and deselect “R” and “C.” Move left and right.

Step 9: Final Process
Use the eraser tool one last time, and you are done with the VCR filter.
Part 2: How to Get VHS Filter in Instagram?
Now that you know how to add glitch filter Photoshop let us move on to Instagram. The sub-section of this write-up shall focus on VHS filter Instagram. If you are an Instagram user wishing to get a retro VHS filter, follow our lead.
Step 1: Finding the Filters
The first step revolves around clicking on the Instagram app to open it. Navigate to the “Story.” The user will find a number of filters in the top panel along a circle.

Step 2: Picking the Vintage Filter
Swipe right towards those filters until a “Search” option is seen. Type “Vintage DV” and press “Enter,” where several VHS video filters will be displayed. Pick one and save it to your camera roll.

Step 3: Using the VHS Filter
Head back to the “Story” and select the “Effects” option. Select the filter that you saved and initiate the recording process. You have got the VHS filter for videos.

Part 3: How to Get VHS Filter in TikTok?
The following section of the write-up shall highlight finding and getting the 90s VHS filter in TikTok. So, what are we waiting for? Let us start the procedure.
Find the VHS Filter in TikTok
Step 1: Navigate to the App
Use your computer to launch the TikTok application. As soon as the interface appears, click on “Trends” in the bottom left corner.
Step 2: Open the Effects
Type Retro VHS in the search bar and click on the second result that is displayed. Click on the “Effects” that says, “VHS Retro.”
Step 3: Add in Favorites
Add it to the favorites and then tap on the video icon located at the center of the screen.

Use the VHS Filter in TikTok
Step 1: Deactivating the Filter</p
With the camera open, click on “Effects” right next to the camera icon. The filter is activated, but we need to deactivate it by clicking on the stop icon with the effects. Click anywhere on the screen to exit the “Effects” panel.
Step 2: Recording Process
Now, click on the red video sign and begin recording for some seconds without the filter. It is important to record the video by pointing at the targeted person. After the first part of the video is recorded, head back to the “Effects” menu and navigate to the tab that says, “Add to Favorites.”

Step 3: Publishing the Video
Choose the Retro VHS Filter and point the camera at the person that needs the filter. Hit the “Register” button. Make the recording and press the red popcorn. Hit “Next” and “Publish” the video finally.

Part 4: How to Add VHS Effects to your Travel Video?
With vacation season on, bloggers are into adding VHS photo filters to their videos to be uploaded on YouTube channels. The section shall convey the detailed procedure of adding a glitch effect filter to the travel and vacation videos in Wondershare Filmora .
For Win 7 or later (64-bit)
For macOS 10.12 or later
Step 1: Initiating the Process
Begin the process by launching Wondershare Filmora. For starters, let us work on the perfect music for the video. The Audio tab shows an awful collection. Choose the “Young and Bright” category for the music.

Step 2: Picking the Music
Select any music and drag and drop it to the timeline. Now, trim the music into 15 seconds long. Now, input the travel videos to start their editing. Set the order for the video afterward.

Step 3: Choosing the Overlays
Navigate to the “Effects” panel and search for VHS. The software would offer multiple choices to pick from. Choose different overlays and place them onto the video tracks as you like.

Step 4: Adding the Transition
To add the transition, head to the “Transition” tab and find VHS. Drag and drop the transitions among the cuts between the video clips. Adjust their duration as needed. Preview the video, and the mission is accomplished.

Final Thoughts
Grabbing the attention of the audience is not as easy as it sounds. The creative industry uses a vast range of effects to compel the viewers to be on the edge of their seats. The article introduced the VHS filter while covering its procedure. If you are a TikTok, Instagram, or Photoshop user, we have got you. Wondershare Filmora helps perfectly to add the glitch filter to the vacation videos.
Versatile Video Editor - Wondershare Filmora
An easy yet powerful editor
Numerous effects to choose from
Detailed tutorials provided by the official channel
02 How to Get VHS Filter in Instagram?
03 How to Get VHS Filter in TikTok?
04 How to Add VHS Effects to your Travel Video?
Part 1: How to Make VHS Filter in Photoshop?
There are a lot of steps associated with VHS filter Photoshop. The procedure can be tricky for a beginner in the industry. Therefore, we have sketched out a guide to make a VHS image filter in Photoshop. Follow it carefully to have desirable results.
Step 1: Open Photoshop
Open Photoshop from your computer and click on “New.” Use the “Custom” option from the windows that appear. After that, click on “File” and launch the imagery. Drag and drop that picture to the customized workspace.

Step 2: Apply the Transformation
Head to the “Edit” from the top panel and press “Transform” from there. Click on “Scale” from the context menu. The user is recommended to set the scale as required using arrows from the mouse. After that, apply the transformation.

Step 3: Changing the Parameters
Now, right-click on your layer to click on “Brightness and Contrast.” Change it as you need. After that, move on to the “Curves” and play with the graphs of the picture. Change the “Solid Color” as well. Make the color white and change the opacity levels.

Step 4: Adding Noise
Moving on, click on the first layer and navigate to the “Filter” bar on the top of the interface. Hit “Noise” and then “Add Noise.” Make the necessary changes as you like and press “Enter.” Scroll up to the “File” and hit “Open Recent” to launch the VHS texture photo. Drag and drop the texture to the photo layer that we are working on.

Step 5: Inserting VHS Texture
Resize the VHS texture and then apply the transformation. By default, the blend mode is “Normal.” Change it to “Darken” from the right panel. The picture will get dark. Again, change the mode to “Screen.” Moving on, input another VHS Filter texture and drag and drop it to the layer we are working on. Resize it and apply the transformation.

Step 6: Altering the Blend Mode
Alter the blend mode to “Darker” and then to “Screen.” Apply another filter and then drag and drop the layer. Change the blend mode to “Screen.” Pick up the eraser from the left panel of tools and make necessary edits.

Step 7: Duplicating the Layer
Duplicate the photo layer and move it up. Again, click on “Filter” then “Noise” to add the noise as needed. Alter the blend mode to “Soft Light” and set the opacity value. After that, add any solid color and switch the blend mode back to Soft Light.

Step 8: Playing with the Layers
Duplicate the layer again to change the color. After that, double click the layer and deselect “R.” Move to left or right. Perform the same procedure for the rest of the layers. Use the erase tool to offer fine imprinting to the transition. Duplicate the final layer and deselect “R” and “C.” Move left and right.

Step 9: Final Process
Use the eraser tool one last time, and you are done with the VCR filter.
Part 2: How to Get VHS Filter in Instagram?
Now that you know how to add glitch filter Photoshop let us move on to Instagram. The sub-section of this write-up shall focus on VHS filter Instagram. If you are an Instagram user wishing to get a retro VHS filter, follow our lead.
Step 1: Finding the Filters
The first step revolves around clicking on the Instagram app to open it. Navigate to the “Story.” The user will find a number of filters in the top panel along a circle.

Step 2: Picking the Vintage Filter
Swipe right towards those filters until a “Search” option is seen. Type “Vintage DV” and press “Enter,” where several VHS video filters will be displayed. Pick one and save it to your camera roll.

Step 3: Using the VHS Filter
Head back to the “Story” and select the “Effects” option. Select the filter that you saved and initiate the recording process. You have got the VHS filter for videos.

Part 3: How to Get VHS Filter in TikTok?
The following section of the write-up shall highlight finding and getting the 90s VHS filter in TikTok. So, what are we waiting for? Let us start the procedure.
Find the VHS Filter in TikTok
Step 1: Navigate to the App
Use your computer to launch the TikTok application. As soon as the interface appears, click on “Trends” in the bottom left corner.
Step 2: Open the Effects
Type Retro VHS in the search bar and click on the second result that is displayed. Click on the “Effects” that says, “VHS Retro.”
Step 3: Add in Favorites
Add it to the favorites and then tap on the video icon located at the center of the screen.

Use the VHS Filter in TikTok
Step 1: Deactivating the Filter</p
With the camera open, click on “Effects” right next to the camera icon. The filter is activated, but we need to deactivate it by clicking on the stop icon with the effects. Click anywhere on the screen to exit the “Effects” panel.
Step 2: Recording Process
Now, click on the red video sign and begin recording for some seconds without the filter. It is important to record the video by pointing at the targeted person. After the first part of the video is recorded, head back to the “Effects” menu and navigate to the tab that says, “Add to Favorites.”

Step 3: Publishing the Video
Choose the Retro VHS Filter and point the camera at the person that needs the filter. Hit the “Register” button. Make the recording and press the red popcorn. Hit “Next” and “Publish” the video finally.

Part 4: How to Add VHS Effects to your Travel Video?
With vacation season on, bloggers are into adding VHS photo filters to their videos to be uploaded on YouTube channels. The section shall convey the detailed procedure of adding a glitch effect filter to the travel and vacation videos in Wondershare Filmora .
For Win 7 or later (64-bit)
For macOS 10.12 or later
Step 1: Initiating the Process
Begin the process by launching Wondershare Filmora. For starters, let us work on the perfect music for the video. The Audio tab shows an awful collection. Choose the “Young and Bright” category for the music.

Step 2: Picking the Music
Select any music and drag and drop it to the timeline. Now, trim the music into 15 seconds long. Now, input the travel videos to start their editing. Set the order for the video afterward.

Step 3: Choosing the Overlays
Navigate to the “Effects” panel and search for VHS. The software would offer multiple choices to pick from. Choose different overlays and place them onto the video tracks as you like.

Step 4: Adding the Transition
To add the transition, head to the “Transition” tab and find VHS. Drag and drop the transitions among the cuts between the video clips. Adjust their duration as needed. Preview the video, and the mission is accomplished.

Final Thoughts
Grabbing the attention of the audience is not as easy as it sounds. The creative industry uses a vast range of effects to compel the viewers to be on the edge of their seats. The article introduced the VHS filter while covering its procedure. If you are a TikTok, Instagram, or Photoshop user, we have got you. Wondershare Filmora helps perfectly to add the glitch filter to the vacation videos.
Versatile Video Editor - Wondershare Filmora
An easy yet powerful editor
Numerous effects to choose from
Detailed tutorials provided by the official channel
02 How to Get VHS Filter in Instagram?
03 How to Get VHS Filter in TikTok?
04 How to Add VHS Effects to your Travel Video?
Part 1: How to Make VHS Filter in Photoshop?
There are a lot of steps associated with VHS filter Photoshop. The procedure can be tricky for a beginner in the industry. Therefore, we have sketched out a guide to make a VHS image filter in Photoshop. Follow it carefully to have desirable results.
Step 1: Open Photoshop
Open Photoshop from your computer and click on “New.” Use the “Custom” option from the windows that appear. After that, click on “File” and launch the imagery. Drag and drop that picture to the customized workspace.

Step 2: Apply the Transformation
Head to the “Edit” from the top panel and press “Transform” from there. Click on “Scale” from the context menu. The user is recommended to set the scale as required using arrows from the mouse. After that, apply the transformation.

Step 3: Changing the Parameters
Now, right-click on your layer to click on “Brightness and Contrast.” Change it as you need. After that, move on to the “Curves” and play with the graphs of the picture. Change the “Solid Color” as well. Make the color white and change the opacity levels.

Step 4: Adding Noise
Moving on, click on the first layer and navigate to the “Filter” bar on the top of the interface. Hit “Noise” and then “Add Noise.” Make the necessary changes as you like and press “Enter.” Scroll up to the “File” and hit “Open Recent” to launch the VHS texture photo. Drag and drop the texture to the photo layer that we are working on.

Step 5: Inserting VHS Texture
Resize the VHS texture and then apply the transformation. By default, the blend mode is “Normal.” Change it to “Darken” from the right panel. The picture will get dark. Again, change the mode to “Screen.” Moving on, input another VHS Filter texture and drag and drop it to the layer we are working on. Resize it and apply the transformation.

Step 6: Altering the Blend Mode
Alter the blend mode to “Darker” and then to “Screen.” Apply another filter and then drag and drop the layer. Change the blend mode to “Screen.” Pick up the eraser from the left panel of tools and make necessary edits.

Step 7: Duplicating the Layer
Duplicate the photo layer and move it up. Again, click on “Filter” then “Noise” to add the noise as needed. Alter the blend mode to “Soft Light” and set the opacity value. After that, add any solid color and switch the blend mode back to Soft Light.

Step 8: Playing with the Layers
Duplicate the layer again to change the color. After that, double click the layer and deselect “R.” Move to left or right. Perform the same procedure for the rest of the layers. Use the erase tool to offer fine imprinting to the transition. Duplicate the final layer and deselect “R” and “C.” Move left and right.

Step 9: Final Process
Use the eraser tool one last time, and you are done with the VCR filter.
Part 2: How to Get VHS Filter in Instagram?
Now that you know how to add glitch filter Photoshop let us move on to Instagram. The sub-section of this write-up shall focus on VHS filter Instagram. If you are an Instagram user wishing to get a retro VHS filter, follow our lead.
Step 1: Finding the Filters
The first step revolves around clicking on the Instagram app to open it. Navigate to the “Story.” The user will find a number of filters in the top panel along a circle.

Step 2: Picking the Vintage Filter
Swipe right towards those filters until a “Search” option is seen. Type “Vintage DV” and press “Enter,” where several VHS video filters will be displayed. Pick one and save it to your camera roll.

Step 3: Using the VHS Filter
Head back to the “Story” and select the “Effects” option. Select the filter that you saved and initiate the recording process. You have got the VHS filter for videos.

Part 3: How to Get VHS Filter in TikTok?
The following section of the write-up shall highlight finding and getting the 90s VHS filter in TikTok. So, what are we waiting for? Let us start the procedure.
Find the VHS Filter in TikTok
Step 1: Navigate to the App
Use your computer to launch the TikTok application. As soon as the interface appears, click on “Trends” in the bottom left corner.
Step 2: Open the Effects
Type Retro VHS in the search bar and click on the second result that is displayed. Click on the “Effects” that says, “VHS Retro.”
Step 3: Add in Favorites
Add it to the favorites and then tap on the video icon located at the center of the screen.

Use the VHS Filter in TikTok
Step 1: Deactivating the Filter</p
With the camera open, click on “Effects” right next to the camera icon. The filter is activated, but we need to deactivate it by clicking on the stop icon with the effects. Click anywhere on the screen to exit the “Effects” panel.
Step 2: Recording Process
Now, click on the red video sign and begin recording for some seconds without the filter. It is important to record the video by pointing at the targeted person. After the first part of the video is recorded, head back to the “Effects” menu and navigate to the tab that says, “Add to Favorites.”

Step 3: Publishing the Video
Choose the Retro VHS Filter and point the camera at the person that needs the filter. Hit the “Register” button. Make the recording and press the red popcorn. Hit “Next” and “Publish” the video finally.

Part 4: How to Add VHS Effects to your Travel Video?
With vacation season on, bloggers are into adding VHS photo filters to their videos to be uploaded on YouTube channels. The section shall convey the detailed procedure of adding a glitch effect filter to the travel and vacation videos in Wondershare Filmora .
For Win 7 or later (64-bit)
For macOS 10.12 or later
Step 1: Initiating the Process
Begin the process by launching Wondershare Filmora. For starters, let us work on the perfect music for the video. The Audio tab shows an awful collection. Choose the “Young and Bright” category for the music.

Step 2: Picking the Music
Select any music and drag and drop it to the timeline. Now, trim the music into 15 seconds long. Now, input the travel videos to start their editing. Set the order for the video afterward.

Step 3: Choosing the Overlays
Navigate to the “Effects” panel and search for VHS. The software would offer multiple choices to pick from. Choose different overlays and place them onto the video tracks as you like.

Step 4: Adding the Transition
To add the transition, head to the “Transition” tab and find VHS. Drag and drop the transitions among the cuts between the video clips. Adjust their duration as needed. Preview the video, and the mission is accomplished.

Final Thoughts
Grabbing the attention of the audience is not as easy as it sounds. The creative industry uses a vast range of effects to compel the viewers to be on the edge of their seats. The article introduced the VHS filter while covering its procedure. If you are a TikTok, Instagram, or Photoshop user, we have got you. Wondershare Filmora helps perfectly to add the glitch filter to the vacation videos.
Versatile Video Editor - Wondershare Filmora
An easy yet powerful editor
Numerous effects to choose from
Detailed tutorials provided by the official channel
02 How to Get VHS Filter in Instagram?
03 How to Get VHS Filter in TikTok?
04 How to Add VHS Effects to your Travel Video?
Part 1: How to Make VHS Filter in Photoshop?
There are a lot of steps associated with VHS filter Photoshop. The procedure can be tricky for a beginner in the industry. Therefore, we have sketched out a guide to make a VHS image filter in Photoshop. Follow it carefully to have desirable results.
Step 1: Open Photoshop
Open Photoshop from your computer and click on “New.” Use the “Custom” option from the windows that appear. After that, click on “File” and launch the imagery. Drag and drop that picture to the customized workspace.

Step 2: Apply the Transformation
Head to the “Edit” from the top panel and press “Transform” from there. Click on “Scale” from the context menu. The user is recommended to set the scale as required using arrows from the mouse. After that, apply the transformation.

Step 3: Changing the Parameters
Now, right-click on your layer to click on “Brightness and Contrast.” Change it as you need. After that, move on to the “Curves” and play with the graphs of the picture. Change the “Solid Color” as well. Make the color white and change the opacity levels.

Step 4: Adding Noise
Moving on, click on the first layer and navigate to the “Filter” bar on the top of the interface. Hit “Noise” and then “Add Noise.” Make the necessary changes as you like and press “Enter.” Scroll up to the “File” and hit “Open Recent” to launch the VHS texture photo. Drag and drop the texture to the photo layer that we are working on.

Step 5: Inserting VHS Texture
Resize the VHS texture and then apply the transformation. By default, the blend mode is “Normal.” Change it to “Darken” from the right panel. The picture will get dark. Again, change the mode to “Screen.” Moving on, input another VHS Filter texture and drag and drop it to the layer we are working on. Resize it and apply the transformation.

Step 6: Altering the Blend Mode
Alter the blend mode to “Darker” and then to “Screen.” Apply another filter and then drag and drop the layer. Change the blend mode to “Screen.” Pick up the eraser from the left panel of tools and make necessary edits.

Step 7: Duplicating the Layer
Duplicate the photo layer and move it up. Again, click on “Filter” then “Noise” to add the noise as needed. Alter the blend mode to “Soft Light” and set the opacity value. After that, add any solid color and switch the blend mode back to Soft Light.

Step 8: Playing with the Layers
Duplicate the layer again to change the color. After that, double click the layer and deselect “R.” Move to left or right. Perform the same procedure for the rest of the layers. Use the erase tool to offer fine imprinting to the transition. Duplicate the final layer and deselect “R” and “C.” Move left and right.

Step 9: Final Process
Use the eraser tool one last time, and you are done with the VCR filter.
Part 2: How to Get VHS Filter in Instagram?
Now that you know how to add glitch filter Photoshop let us move on to Instagram. The sub-section of this write-up shall focus on VHS filter Instagram. If you are an Instagram user wishing to get a retro VHS filter, follow our lead.
Step 1: Finding the Filters
The first step revolves around clicking on the Instagram app to open it. Navigate to the “Story.” The user will find a number of filters in the top panel along a circle.

Step 2: Picking the Vintage Filter
Swipe right towards those filters until a “Search” option is seen. Type “Vintage DV” and press “Enter,” where several VHS video filters will be displayed. Pick one and save it to your camera roll.

Step 3: Using the VHS Filter
Head back to the “Story” and select the “Effects” option. Select the filter that you saved and initiate the recording process. You have got the VHS filter for videos.

Part 3: How to Get VHS Filter in TikTok?
The following section of the write-up shall highlight finding and getting the 90s VHS filter in TikTok. So, what are we waiting for? Let us start the procedure.
Find the VHS Filter in TikTok
Step 1: Navigate to the App
Use your computer to launch the TikTok application. As soon as the interface appears, click on “Trends” in the bottom left corner.
Step 2: Open the Effects
Type Retro VHS in the search bar and click on the second result that is displayed. Click on the “Effects” that says, “VHS Retro.”
Step 3: Add in Favorites
Add it to the favorites and then tap on the video icon located at the center of the screen.

Use the VHS Filter in TikTok
Step 1: Deactivating the Filter</p
With the camera open, click on “Effects” right next to the camera icon. The filter is activated, but we need to deactivate it by clicking on the stop icon with the effects. Click anywhere on the screen to exit the “Effects” panel.
Step 2: Recording Process
Now, click on the red video sign and begin recording for some seconds without the filter. It is important to record the video by pointing at the targeted person. After the first part of the video is recorded, head back to the “Effects” menu and navigate to the tab that says, “Add to Favorites.”

Step 3: Publishing the Video
Choose the Retro VHS Filter and point the camera at the person that needs the filter. Hit the “Register” button. Make the recording and press the red popcorn. Hit “Next” and “Publish” the video finally.

Part 4: How to Add VHS Effects to your Travel Video?
With vacation season on, bloggers are into adding VHS photo filters to their videos to be uploaded on YouTube channels. The section shall convey the detailed procedure of adding a glitch effect filter to the travel and vacation videos in Wondershare Filmora .
For Win 7 or later (64-bit)
For macOS 10.12 or later
Step 1: Initiating the Process
Begin the process by launching Wondershare Filmora. For starters, let us work on the perfect music for the video. The Audio tab shows an awful collection. Choose the “Young and Bright” category for the music.

Step 2: Picking the Music
Select any music and drag and drop it to the timeline. Now, trim the music into 15 seconds long. Now, input the travel videos to start their editing. Set the order for the video afterward.

Step 3: Choosing the Overlays
Navigate to the “Effects” panel and search for VHS. The software would offer multiple choices to pick from. Choose different overlays and place them onto the video tracks as you like.

Step 4: Adding the Transition
To add the transition, head to the “Transition” tab and find VHS. Drag and drop the transitions among the cuts between the video clips. Adjust their duration as needed. Preview the video, and the mission is accomplished.

Final Thoughts
Grabbing the attention of the audience is not as easy as it sounds. The creative industry uses a vast range of effects to compel the viewers to be on the edge of their seats. The article introduced the VHS filter while covering its procedure. If you are a TikTok, Instagram, or Photoshop user, we have got you. Wondershare Filmora helps perfectly to add the glitch filter to the vacation videos.
Versatile Video Editor - Wondershare Filmora
An easy yet powerful editor
Numerous effects to choose from
Detailed tutorials provided by the official channel
Blender Green Screen Effects
Blender is an open-source cross-platform 3D graphics program, but this doesn’t mean it’s a low-rent option. Just like commercial packages like Lightwave 3D, it is also a very capable compositing package. Unlike Lightwave, it is a modern node-based compositor like Nuke or Fusion. It’s not what the software is designed for, but it does a bangup job of green screen compositing, as you will soon see.
Blender green screen uses technique of the chroma key a color is isolated (in our case the green of thegreen screen), or a particular luminance, it is removed and the area that was occupied by it becomes transparent, thus becoming part of the alpha channel. The transparent parts will thus show the video or the image below, which will thus define the environment in which the subject of the first movie will act.
How to Use Green Screen in Blender
So we need to pull these two elements into Blender and pull a key on the green bits to make the background show through in as naturalistic a way as possible. Blender is a node-based compositor which means the control mechanism is nodes or little LEGO blocks of love which you place on the screen and link with little strings which form your signal path.

Locate the drop-down (it goes up, actually, but you know what we mean) at the bottom of the view, and select “Movie Clip Editor.”
Click the “Open” button and choose and load your green screen footage. (You can also load sequences of images for uncompressed keys in this step if you have the space, and the footage is the right size.)
Once the clip is loaded, go back to the drop-down and select Node Editor.
The screen will be blank, but just go to the bottom of the view and click the middle button marked “Node Tree Type” to Display, and then check the Use Nodes and Backdrop buttons.
Select the “Render Layers” node, and because we won’t need it you can delete it (on the Mac this is the Forward Delete key). Then move the Compositing node out of the way because we won’t need it yet.
**Note: to zoom in and out of the nodes, use the centre scroll wheel of the mouse if you have it. To zoom in and out of the images you are working on, use the V and Alt-V keys.
**Compositing Nodes
Click the Add menu in the bar at the bottom of the view and select “Input -> Movie Clip.” Select the green screen clip you added in the Movie Clip Editor. This is the input. We have to push this through a keyer to remove the green and make those areas transparent.
**Important: in this program flow goes from left to right, so node inputs are on the left of a node, and outputs are on the right of a node.
Now select “Add -> Matte -> Keying” to add a keying node. Also “Add -> Output -> Viewer” to make the output from the key visible. Click on the little yellow dot next to Image output on the Input node, and drag it to Image input on the Keying node. Then drag the little dot next to Image output on the keying node, and drag it to the image input on the viewer node.
You now have to select the key colour, the colour which the keyer is changing to transparent. Click the Key Colour button on the Keying node, and this displays a colour selector. Click the eyedropper, and click on the image in the background somewhere on the green screen.
If you look carefully, you will see that there are some areas which still have a bit of colour and are not fully transparent. You can check this more accurately by dragging the string from the Matte output on the Keying node and linking to the input on the viewer. This is the key you have made. As you can see, the dark bits are supposed to be totally black, and there are still greys showing through. (This is because the source material wasn’t perfect.)
There are many different ways to fix this depending on the shot, but if it’s a reasonably well-shot green screen, all you will need to do is the following.
Adjust the Black Clip slider to expand the amount of greens which turn to black. Then adjust the White Clip to push the whites to prevent them from becoming transparent.
Once you have pure white and pure black, reconnect the image output of the keying node to the image input on the viewer, and you’ll see you have a decent key.
You can adjust the amount of fringing and spill (reflections from the green screen on the model), but generally the keyer does a good job of guessing that for you with a decently-shot green screen.
**Adding the background
After this, adding the background is more of the same with a slight twist. “Add -> Input -> Movie Clip,” navigate to your background clip and load it.
To blend the two layers, you have to make a mix of the two clips so that the background shows through the now transparent bits of the foreground.
“Add -> Colour -> Mix node”. Take the output from the background clip, and feed it to the top image input of the mix node. Take the output from the keying node, and feed it into the lower image input on the mix node.
Click the Alpha channel button next to the drop-down on the mix node.
And finally we have our key. The background is way too sharp and makes the green screen footage look really soft and crappy, so we need to soften the background. There is a really nice Bokeh Blur filter in blender for just this purpose to make the background look out of focus and add lots of gorgeous Bokeh blobs.
“Add -> Filter -> Bokeh Blur” and put it between the background clip and the mix. In Blender, if you add a node and place it over a string between two nodes, the string goes yellow, and dropping it will automatically insert the new node into the signal path connecting inputs and outputs.
Finally add an image to the Bokeh Blur for the shape you want the bokeh to be; we opted for a donut-shaped iris pattern.
To render out your video, connect the output of the Mix node to the input of the compositing node we left lying about earlier. It’s okay for this output to be connected to the input node of the viewer, too, as this means we see progress while rendering.
Make sure you are set up to render the right amount of frames at 30fps in the render panel on the far right. 30fps for 5 seconds (the duration of our clip) is 150 frames. Insert 150 where it says End Fr.
Select a place and a filename to output to in the Output panel further down the right-hand side. Then to render, select the info menu bar from the top-left drop-down, and finally choose “Render Menu -> Render Animation,” and the render will begin.
Wondershare Filmora
If you’re just starting out with video editing, or just want a simple program that works, Wondershare Filmora might be what you’re looking for. It has the essential tools, and anyone can learn to use it easily.
Wondershare Filmora is the one of best video editing software with cool features that compares to other competing video editing Softwares. Many video editing programs claim to offer professional results; Filmora is one of a few consumer-level tools that actually delivers.
For Win 7 or later (64-bit)
For macOS 10.12 or later
Installation Steps
- Click the icon in the center of the Media Library to add files directly.
- Go File > Import Media > Import Media Files.
- Drag and drop to the Media Library directly.
While importing a media file, Wondershar Filmora may ask you if you wish to create a proxy file to accelerate the editing process. Select “Yes” to have a fast video editing experience.

You can also import video clips using your Touch Bar controls if your computer has Touch Bar.
Related FAQs
How do I get rid of the green screen in blender?
This is achieved by Compositing Nodes: Click the Add menu in the bar at the bottom of the view and select “Input -> Movie Clip.” Select the green screen clip you added in the Movie Clip Editor. This is the input. We have to push this through a keyer to remove the green and make those areas transparent.
How do I get rid of objects in green screen?
This can be done by following these prompts: Select “Add -> Matte -> Keying” to add a keying node. Also “Add -> Output -> Viewer” to make the output from the key visible. Click on the little yellow dot next to Image output on the Input node, and drag it to Image input on the Keying node. Then drag the little dot next to Image output on the keying node, and drag it to the image input on the viewer node.
Conclusion
Obviously, to get the best green screen composites you have to shoot good “plates.” “Plates” are the main bits of the shot that you bolt together in movie visual effects. You have the foreground plate and the green screen bit with an actor filmed in front of a green screen. Then you have the background plate which is the bit you want to show through the green bits of the foreground, making the whole thing look as though the background and foreground were filmed at the same time.
For macOS 10.12 or later
Installation Steps
- Click the icon in the center of the Media Library to add files directly.
- Go File > Import Media > Import Media Files.
- Drag and drop to the Media Library directly.
While importing a media file, Wondershar Filmora may ask you if you wish to create a proxy file to accelerate the editing process. Select “Yes” to have a fast video editing experience.

You can also import video clips using your Touch Bar controls if your computer has Touch Bar.
Related FAQs
How do I get rid of the green screen in blender?
This is achieved by Compositing Nodes: Click the Add menu in the bar at the bottom of the view and select “Input -> Movie Clip.” Select the green screen clip you added in the Movie Clip Editor. This is the input. We have to push this through a keyer to remove the green and make those areas transparent.
How do I get rid of objects in green screen?
This can be done by following these prompts: Select “Add -> Matte -> Keying” to add a keying node. Also “Add -> Output -> Viewer” to make the output from the key visible. Click on the little yellow dot next to Image output on the Input node, and drag it to Image input on the Keying node. Then drag the little dot next to Image output on the keying node, and drag it to the image input on the viewer node.
Conclusion
Obviously, to get the best green screen composites you have to shoot good “plates.” “Plates” are the main bits of the shot that you bolt together in movie visual effects. You have the foreground plate and the green screen bit with an actor filmed in front of a green screen. Then you have the background plate which is the bit you want to show through the green bits of the foreground, making the whole thing look as though the background and foreground were filmed at the same time.
For macOS 10.12 or later
Installation Steps
- Click the icon in the center of the Media Library to add files directly.
- Go File > Import Media > Import Media Files.
- Drag and drop to the Media Library directly.
While importing a media file, Wondershar Filmora may ask you if you wish to create a proxy file to accelerate the editing process. Select “Yes” to have a fast video editing experience.

You can also import video clips using your Touch Bar controls if your computer has Touch Bar.
Related FAQs
How do I get rid of the green screen in blender?
This is achieved by Compositing Nodes: Click the Add menu in the bar at the bottom of the view and select “Input -> Movie Clip.” Select the green screen clip you added in the Movie Clip Editor. This is the input. We have to push this through a keyer to remove the green and make those areas transparent.
How do I get rid of objects in green screen?
This can be done by following these prompts: Select “Add -> Matte -> Keying” to add a keying node. Also “Add -> Output -> Viewer” to make the output from the key visible. Click on the little yellow dot next to Image output on the Input node, and drag it to Image input on the Keying node. Then drag the little dot next to Image output on the keying node, and drag it to the image input on the viewer node.
Conclusion
Obviously, to get the best green screen composites you have to shoot good “plates.” “Plates” are the main bits of the shot that you bolt together in movie visual effects. You have the foreground plate and the green screen bit with an actor filmed in front of a green screen. Then you have the background plate which is the bit you want to show through the green bits of the foreground, making the whole thing look as though the background and foreground were filmed at the same time.
For macOS 10.12 or later
Installation Steps
- Click the icon in the center of the Media Library to add files directly.
- Go File > Import Media > Import Media Files.
- Drag and drop to the Media Library directly.
While importing a media file, Wondershar Filmora may ask you if you wish to create a proxy file to accelerate the editing process. Select “Yes” to have a fast video editing experience.

You can also import video clips using your Touch Bar controls if your computer has Touch Bar.
Related FAQs
How do I get rid of the green screen in blender?
This is achieved by Compositing Nodes: Click the Add menu in the bar at the bottom of the view and select “Input -> Movie Clip.” Select the green screen clip you added in the Movie Clip Editor. This is the input. We have to push this through a keyer to remove the green and make those areas transparent.
How do I get rid of objects in green screen?
This can be done by following these prompts: Select “Add -> Matte -> Keying” to add a keying node. Also “Add -> Output -> Viewer” to make the output from the key visible. Click on the little yellow dot next to Image output on the Input node, and drag it to Image input on the Keying node. Then drag the little dot next to Image output on the keying node, and drag it to the image input on the viewer node.
Conclusion
Obviously, to get the best green screen composites you have to shoot good “plates.” “Plates” are the main bits of the shot that you bolt together in movie visual effects. You have the foreground plate and the green screen bit with an actor filmed in front of a green screen. Then you have the background plate which is the bit you want to show through the green bits of the foreground, making the whole thing look as though the background and foreground were filmed at the same time.
Slow Down Videos on Instagram With Perfection: A Guide
Do you wish to see your followers on Instagram growing? As an influencer, you can make your content engaging through slow-motion Instagram reels. Slow-motion videos are visually pleasing as they highlight the details. People can easily observe the little movements in slow-motion Instagram videos. Moreover, such videos can showcase your creative skills to the audience.
This guide will explore how to generate professional slow-motion Instagram videos. By following the instructions, you can produce captivating results. Also, it will increase the chances of getting more followers on your Instagram feed.
Slow Motion Video Maker Slow your video’s speed with better control of your keyframes to create unique cinematic effects!
Make A Slow Motion Video Make A Slow Motion Video More Features

Part 1: How Can Slow Motion Videos Be Used in Social Media Content?
Slow-motion videos can be a great addition to your social media platforms. It will insert a cinematic impression into your content. To learn more details, jump to the below part explaining the use of slow motion videos in social media:
1. Displaying Products
Do you want to promote your product? Slow-motion videos can highlight the details of your product in a professional manner. You can display the main features of the product at a slow speed. Moreover, viewers would absorb the information with great ease.
2. Demos and Tutorials
Slow-motion videos can assist you in providing clear demonstrations. Slow-motion tutorials on your social media platform can make your audience understand better. Hence, while producing cooking or DIY videos, slow-motion effects would be valuable.
3. Adds Dramatic Effect
Slow-motion Instagram videos evoke emotions in people. In an action sequence, you can add dramatic effect through slow motion. Furthermore, it can help with the storytelling of your video. This will also help in generating an immersive experience for the audience.
Part 2: Composite Ways To Perform Slow Mo on Instagram
On Instagram, there are different approaches to creating slow-mo videos. Within a few taps, you can reduce the speed of the video on Instagram. This section will highlight the two ways to generate slow-motion Instagram reels.
Way 1: Before Recording the Reel
To create a slow-motion video, you can reduce the speed before recording. To do so, you will need to check the following steps in detail:
Step 1
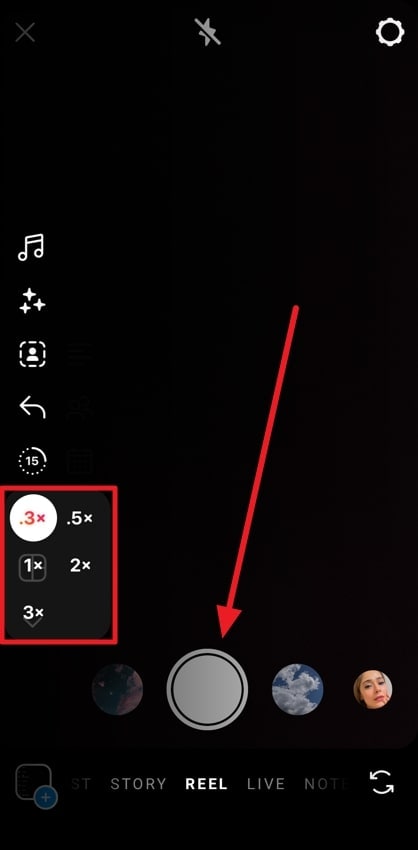
Open your Instagram and swipe from left to right. Select “Reel” from the below options for recording. On the left panel, you can see the options for settings. From there, tap “Speed” to display the further options.
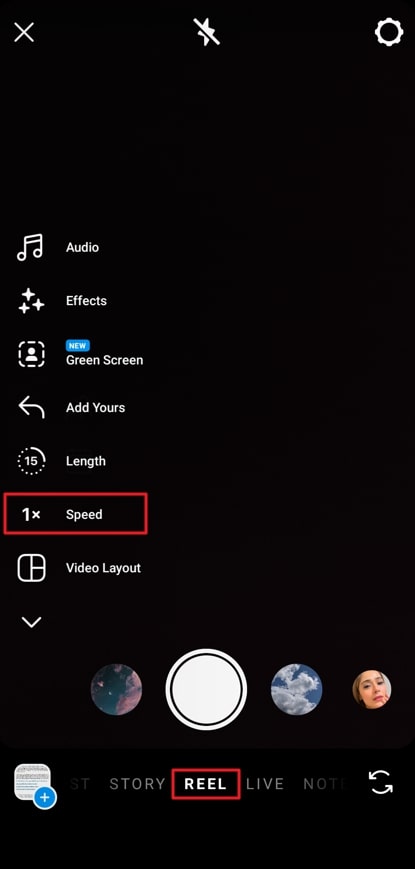
Step 2
Here, you can choose the lowest speed for slow-mo, which is “0.3x.” Then, tap on the desired speed from the given option. Afterward, press and hold the recording button to capture the video.
Way 2: During Editing Video
Instagram lets you modify the speed of a pre-recorded video. Thus, after recording the video, users can still reduce the speed. Mentioned below are the steps to help you with this process:
Step 1
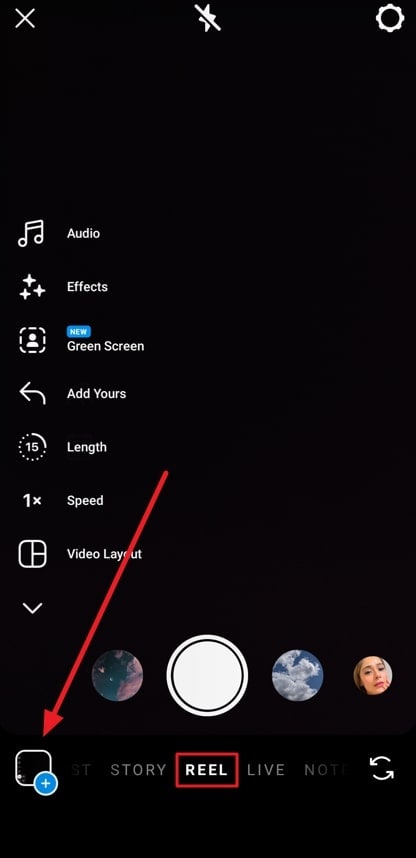
Open your Instagram profile and swipe from left to right. Choose “Reel” from the bottom and select the “Plus” icon given in the bottom-left corner.
Step 2
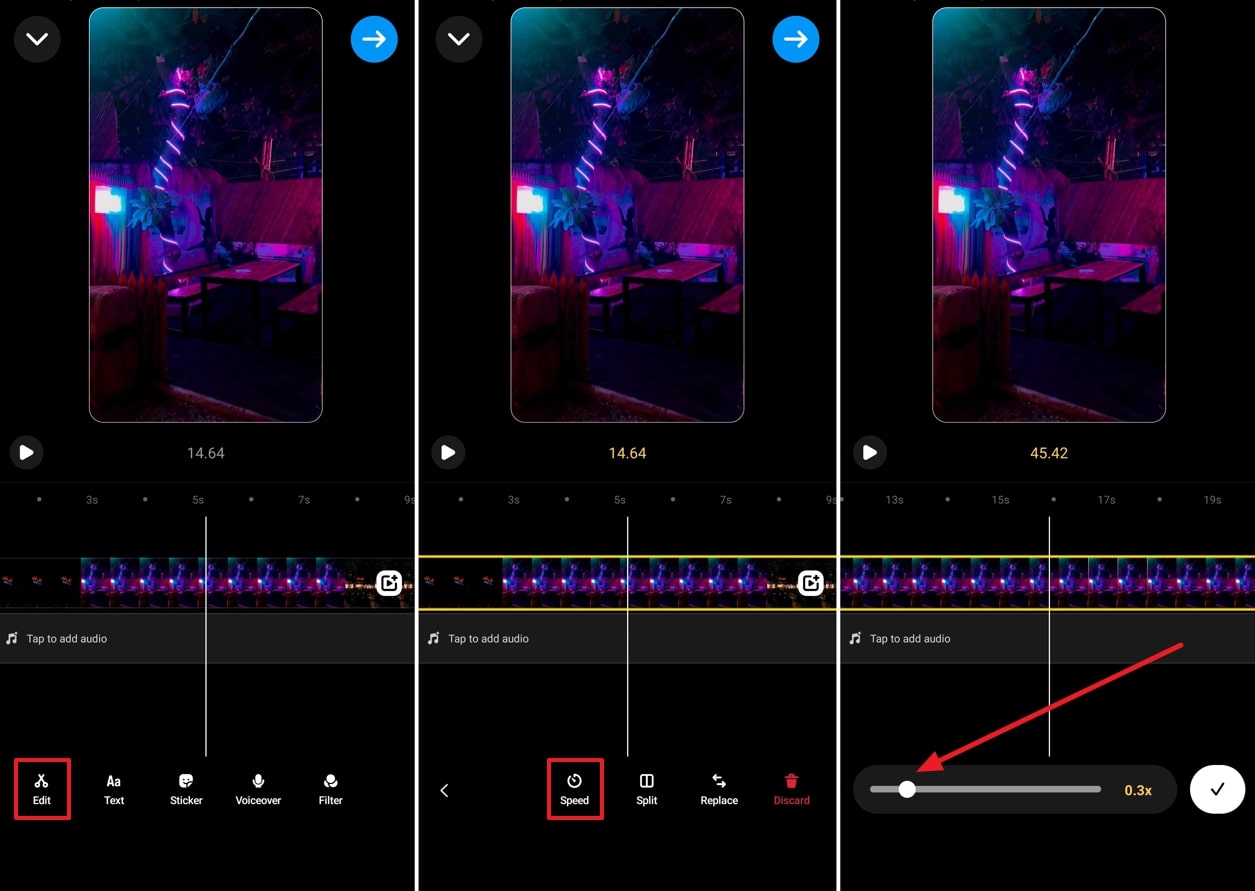
Now, you can select and upload the desired video from your phone to Instagram. Afterward, click the “Edit” option at bottom left side to access further options. Here, select the “Speed” option and then move the slider to reduce the speed and make the video slow mo.
Part 3: Make Video Editing in Slow Mo Easy With Wondershare Filmora
Creating slow-mo reels on Instagram won’t add uniformity to the results. Thus, you should use a third-party tool like Filmora to produce convincing results. With the latest release of Volume 13, this tool has upgraded itself to a massive scale. It includes many AI features that can transform your editing experience. The AI features can finish tasks with great accuracy within a few minutes.
This desktop tool can also generate slow-motion videos with natural results. It does not degrade the frame rate of the video after slow-mo. In fact, it increases the video quality through rendering. Along with slow motion, this tool can add many visual effects. Hence, it’s an all-rounder tool to confront all the requirements for video editing.
Free Download For Win 7 or later(64-bit)
Free Download For macOS 10.14 or later
Methods to Create Slow Motion Instagram Reels with Filmora
On Filmora, there are many ways to create slow-motion Instagram reels. To discover them, jump to the below section:
Method 1: Using Optical Flow in Speed Ramping
Heading to our first method, we will use optical flow to smoothen the video’s slow motion. Let’s get started with the below-mentioned steps:
Step 1Sign in to Create a New Project
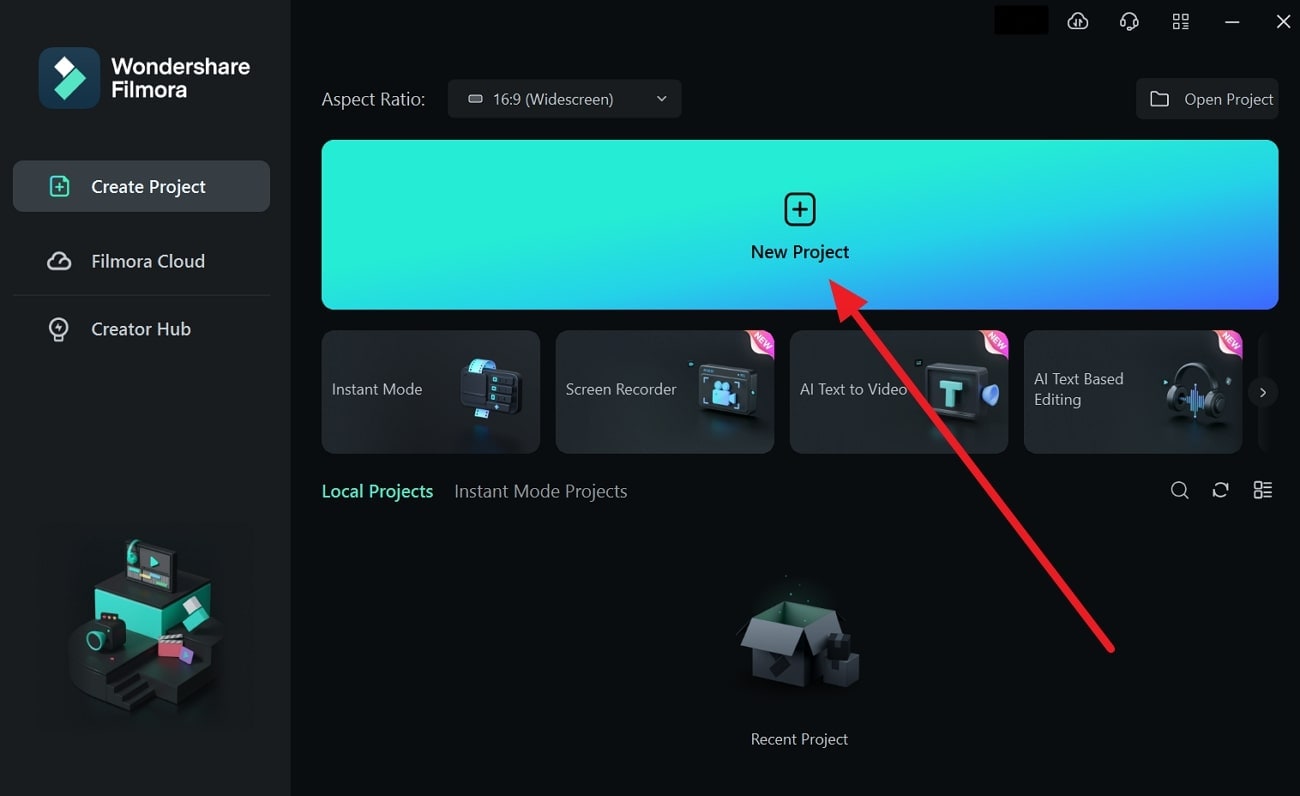
Start by following the on-screen instructions to sign into Filmora. Once logged into this tool, hit the “New Project” option. It will open the main interface of this tool on your screen.
Step 2Import Video to the Timeline
To import the preferred video, press “Ctrl+I”. With this, your video will be uploaded within a time of few minutes. Afterward, drag and drop it to the timeline below.
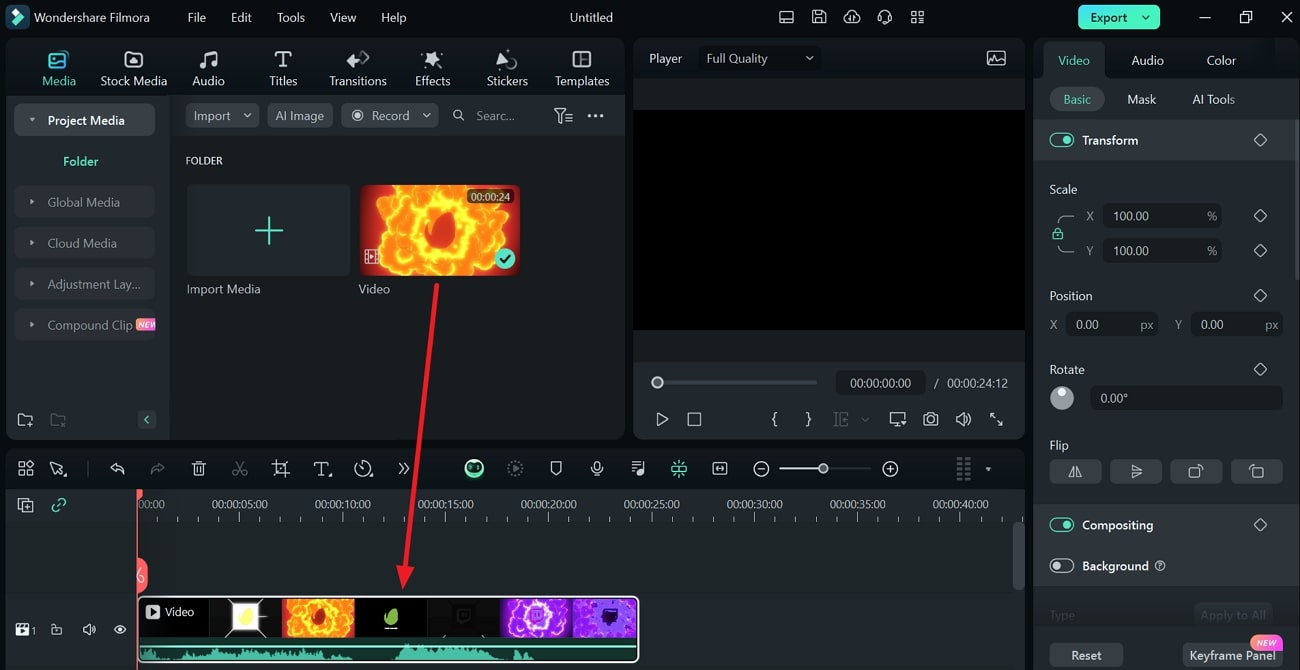
Step 3Select Uniform Speed
After dropping the video into the timeline, select it with your cursor. Go to the settings given on the right side and choose “Speed”. Select “Uniform Speed” and proceed to extend the settings for “AI Frame Interpolation.” Once done, select the “Optical Flow” option. To generate the final results, choose “Render Preview” from the toolbar of the timeline.
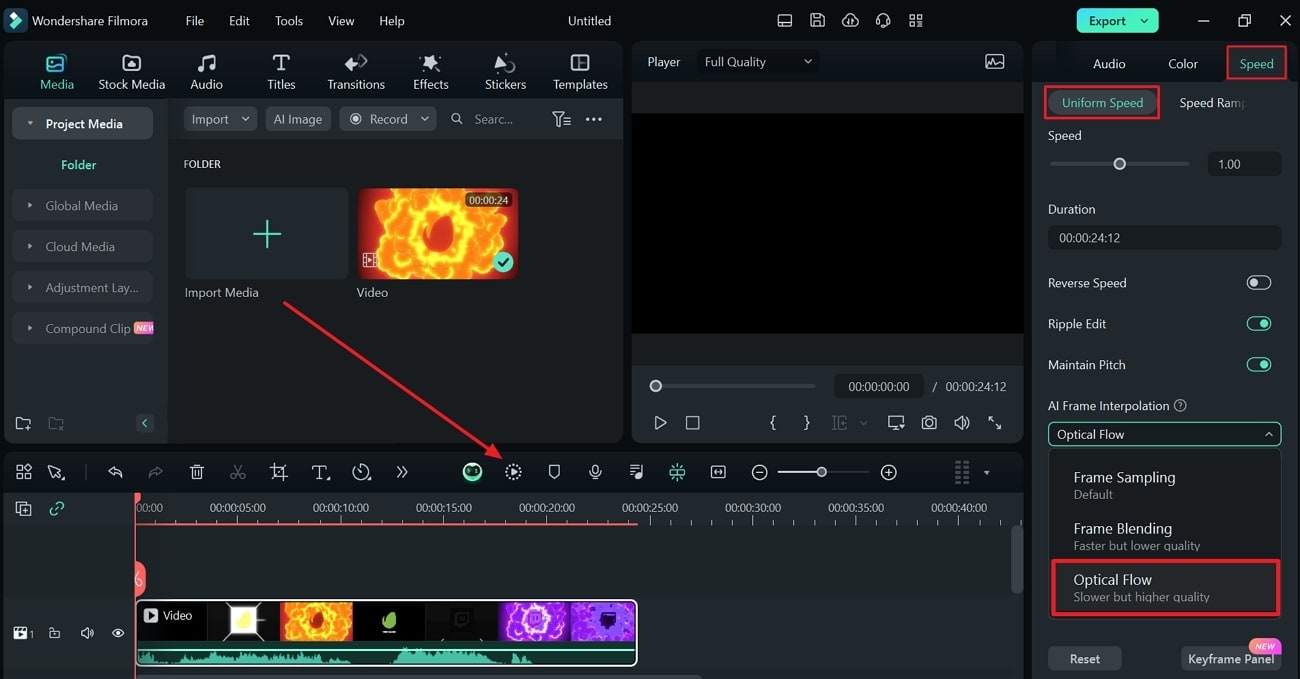
Method 2: Using Uniform Speed
After dragging the video on the timeline, right-click on it. From the pop-up options, select the option called “Uniform Speed”. Once done, follow the instructions given above to conclude the process.
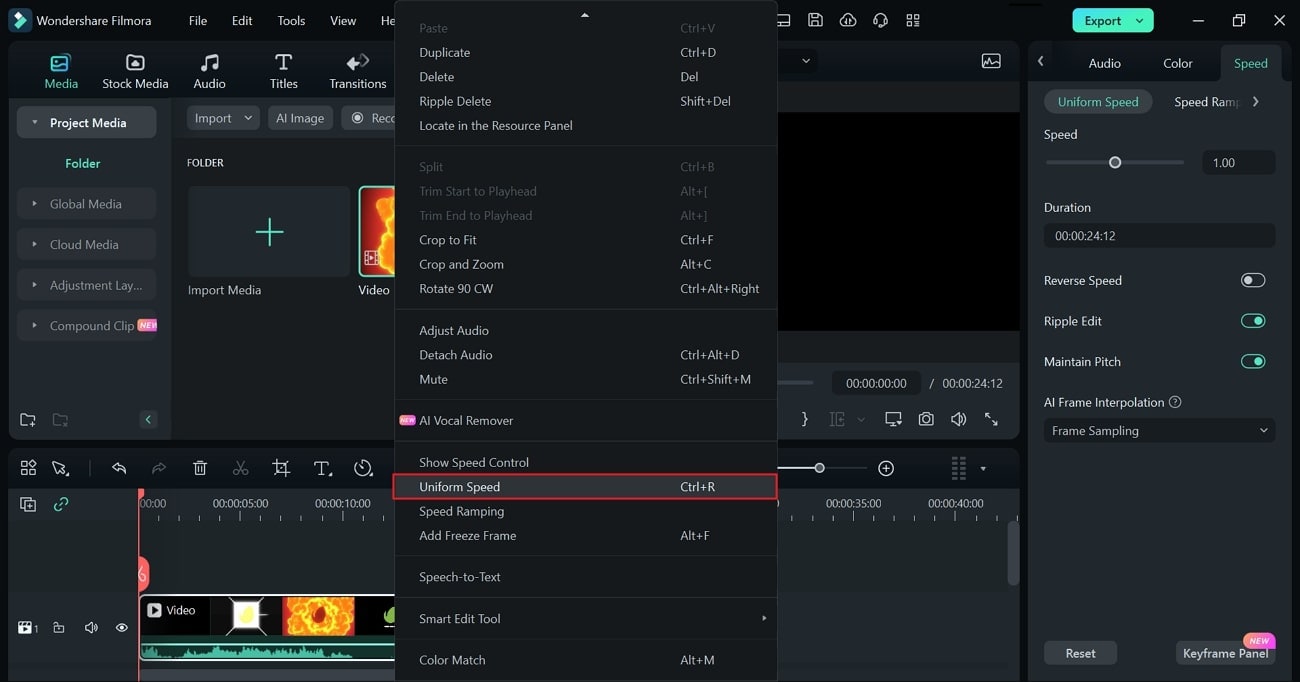
Method 3: Using Toolbar
Start by selecting the video clip on the timeline. Once done, head to the “Toolbar” given above and click “Tools”. Now, expand “Speed” and then select “Uniform Speed”. Now, you can follow the steps given above to continue with the process.
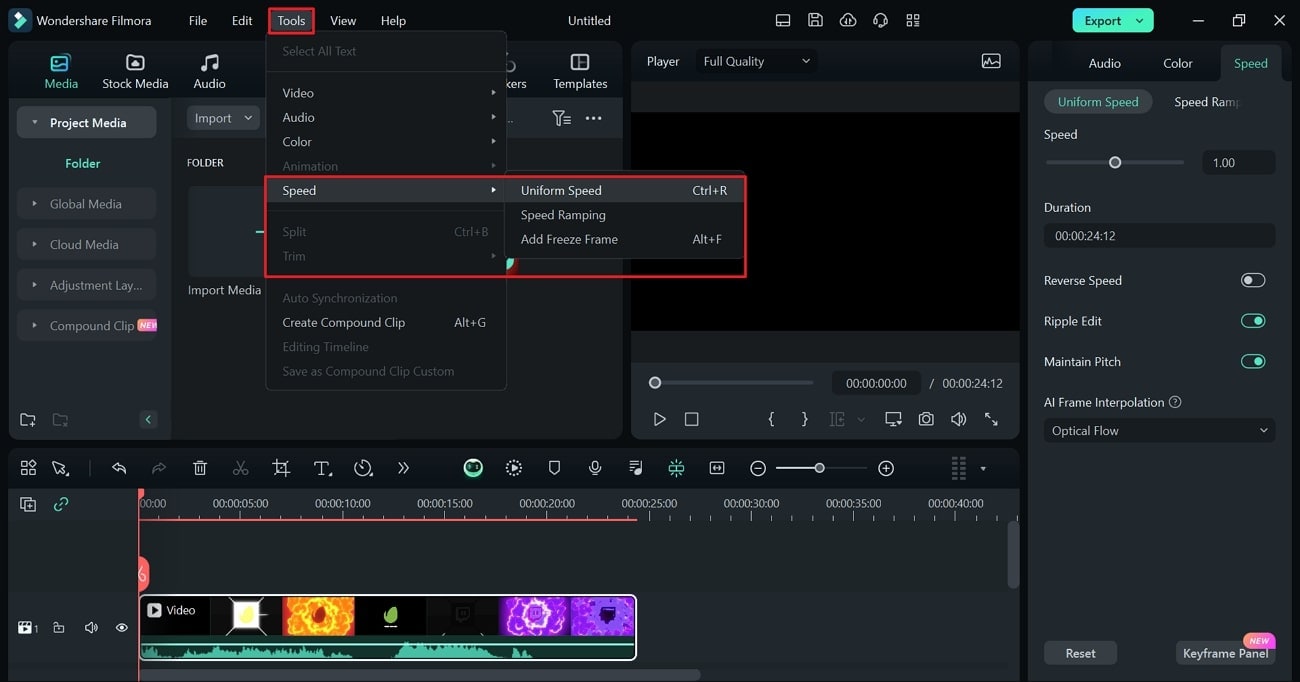
Key Features of Wondershare Filmora
AI Thumbnail Creator: This tool observes the three best shots in your video for a thumbnail. Moreover, it contains 58 templates to produce engaging thumbnails for the videos. It also lets you customize the results with text and image editing.
Auto Reframe: Every social media platform has requirements for aspect ratio. With the auto-reframe feature, you can adjust the aspect ratios in an automated way. With this feature, you can convert videos for YouTube shorts, TikTok, and Instagram.
Background Remover: You can replace backgrounds from your video without needing a green screen. By doing so, the tool can make transparent or virtual backgrounds for you. Also, it cuts out images and objects from the background with accuracy.
Color Correction: Do you need to enhance the colors of your video? This tool provides many color correction techniques for videos. It contains over 40 color presets that you can apply to your videos. Also, it allows you to adjust the color gradings and properties with ease.
Conclusion
Slow-motion Instagram videos have higher chances of getting maximum views. Viewers can catch the unique details in such videos efficiently. Moreover, it will help you promote your brand by emphasizing its features. However, Filmora gives the best results in producing slow-motion videos. It uses advanced algorithms to create slow-mo videos without distorting the original quality.
Make A Slow Motion Video Make A Slow Motion Video More Features

Part 1: How Can Slow Motion Videos Be Used in Social Media Content?
Slow-motion videos can be a great addition to your social media platforms. It will insert a cinematic impression into your content. To learn more details, jump to the below part explaining the use of slow motion videos in social media:
1. Displaying Products
Do you want to promote your product? Slow-motion videos can highlight the details of your product in a professional manner. You can display the main features of the product at a slow speed. Moreover, viewers would absorb the information with great ease.
2. Demos and Tutorials
Slow-motion videos can assist you in providing clear demonstrations. Slow-motion tutorials on your social media platform can make your audience understand better. Hence, while producing cooking or DIY videos, slow-motion effects would be valuable.
3. Adds Dramatic Effect
Slow-motion Instagram videos evoke emotions in people. In an action sequence, you can add dramatic effect through slow motion. Furthermore, it can help with the storytelling of your video. This will also help in generating an immersive experience for the audience.
Part 2: Composite Ways To Perform Slow Mo on Instagram
On Instagram, there are different approaches to creating slow-mo videos. Within a few taps, you can reduce the speed of the video on Instagram. This section will highlight the two ways to generate slow-motion Instagram reels.
Way 1: Before Recording the Reel
To create a slow-motion video, you can reduce the speed before recording. To do so, you will need to check the following steps in detail:
Step 1
Open your Instagram and swipe from left to right. Select “Reel” from the below options for recording. On the left panel, you can see the options for settings. From there, tap “Speed” to display the further options.

Step 2
Here, you can choose the lowest speed for slow-mo, which is “0.3x.” Then, tap on the desired speed from the given option. Afterward, press and hold the recording button to capture the video.

Way 2: During Editing Video
Instagram lets you modify the speed of a pre-recorded video. Thus, after recording the video, users can still reduce the speed. Mentioned below are the steps to help you with this process:
Step 1
Open your Instagram profile and swipe from left to right. Choose “Reel” from the bottom and select the “Plus” icon given in the bottom-left corner.

Step 2
Now, you can select and upload the desired video from your phone to Instagram. Afterward, click the “Edit” option at bottom left side to access further options. Here, select the “Speed” option and then move the slider to reduce the speed and make the video slow mo.

Part 3: Make Video Editing in Slow Mo Easy With Wondershare Filmora
Creating slow-mo reels on Instagram won’t add uniformity to the results. Thus, you should use a third-party tool like Filmora to produce convincing results. With the latest release of Volume 13, this tool has upgraded itself to a massive scale. It includes many AI features that can transform your editing experience. The AI features can finish tasks with great accuracy within a few minutes.
This desktop tool can also generate slow-motion videos with natural results. It does not degrade the frame rate of the video after slow-mo. In fact, it increases the video quality through rendering. Along with slow motion, this tool can add many visual effects. Hence, it’s an all-rounder tool to confront all the requirements for video editing.
Free Download For Win 7 or later(64-bit)
Free Download For macOS 10.14 or later
Methods to Create Slow Motion Instagram Reels with Filmora
On Filmora, there are many ways to create slow-motion Instagram reels. To discover them, jump to the below section:
Method 1: Using Optical Flow in Speed Ramping
Heading to our first method, we will use optical flow to smoothen the video’s slow motion. Let’s get started with the below-mentioned steps:
Step 1Sign in to Create a New Project
Start by following the on-screen instructions to sign into Filmora. Once logged into this tool, hit the “New Project” option. It will open the main interface of this tool on your screen.

Step 2Import Video to the Timeline
To import the preferred video, press “Ctrl+I”. With this, your video will be uploaded within a time of few minutes. Afterward, drag and drop it to the timeline below.

Step 3Select Uniform Speed
After dropping the video into the timeline, select it with your cursor. Go to the settings given on the right side and choose “Speed”. Select “Uniform Speed” and proceed to extend the settings for “AI Frame Interpolation.” Once done, select the “Optical Flow” option. To generate the final results, choose “Render Preview” from the toolbar of the timeline.

Method 2: Using Uniform Speed
After dragging the video on the timeline, right-click on it. From the pop-up options, select the option called “Uniform Speed”. Once done, follow the instructions given above to conclude the process.

Method 3: Using Toolbar
Start by selecting the video clip on the timeline. Once done, head to the “Toolbar” given above and click “Tools”. Now, expand “Speed” and then select “Uniform Speed”. Now, you can follow the steps given above to continue with the process.

Key Features of Wondershare Filmora
AI Thumbnail Creator: This tool observes the three best shots in your video for a thumbnail. Moreover, it contains 58 templates to produce engaging thumbnails for the videos. It also lets you customize the results with text and image editing.
Auto Reframe: Every social media platform has requirements for aspect ratio. With the auto-reframe feature, you can adjust the aspect ratios in an automated way. With this feature, you can convert videos for YouTube shorts, TikTok, and Instagram.
Background Remover: You can replace backgrounds from your video without needing a green screen. By doing so, the tool can make transparent or virtual backgrounds for you. Also, it cuts out images and objects from the background with accuracy.
Color Correction: Do you need to enhance the colors of your video? This tool provides many color correction techniques for videos. It contains over 40 color presets that you can apply to your videos. Also, it allows you to adjust the color gradings and properties with ease.
Conclusion
Slow-motion Instagram videos have higher chances of getting maximum views. Viewers can catch the unique details in such videos efficiently. Moreover, it will help you promote your brand by emphasizing its features. However, Filmora gives the best results in producing slow-motion videos. It uses advanced algorithms to create slow-mo videos without distorting the original quality.
Also read:
- Updated In 2024, Shotcut Video Editor Review
- Top 5 Free Online Video Filter Editors Improve Your Videos with Filters
- New In 2024, Easy Ways to Make Procreate GIFs
- New How to Add Text in Adobe Rush
- Updated Are You a Teacher? Are You Looking for Educational Background Music? This Article Has Everything You Will Need to Know for Creating Outstanding Educational Teaching Videos
- Gifs Can Convey Your Emotions in a Way that Words Cannot, so They Are Becoming a Popular Way to Express Yourself, and You Must Know How to Make a Gif and You Wont Believe that Its Not Difficult to Do
- 2024 Approved How to Add Green Screen Effects In Phhotoshop
- New Discover the Best Video Frame Rate Converters for Smooth Playback, Including Online and Offline Options. Learn How to Convert Frame Rates for Free and Elevate Your Video Quality with These Top 8 Tools
- New Have You Ever Used an Adjustment Layer in Photoshop? Read This Article to Find Out How to Add, Resize, Change, and Use an Adjustment Layer in Photoshop Efficiently
- 2024 Approved Are You Looking to Make Transparent Background in Canva Then You Can Learn About It in This Article
- 4K Videos Are the in Thing because of Their Flexibility and High Resolution. Stick Around to Learn How to Choose the Best Frame Rate for 4K Videos
- New Transform Your Videos Into 90S VHS Nostalgia for Free! Learn Where to Get Overlays and Use Filmoras Built-In Presets. Dive Into the Retro Realm Now for 2024
- 2024 Approved 2 Methods to Cut Video in VLC on Windows
- Updated 2024 Approved Read on to Learn About OpenCV Object Tracking, What It Is, and How to Implement It in Python, and OpenCV
- 10 BEST TEXT TO SPEECH VIDEO MAKERS
- New How to Apply Video Filters for 2024
- Updated In 2024, Understanding the Dynamics Underlying in AI Slow Motion Editing
- 2024 Approved How to Loop Video in Canva
- New Time Bending Brilliance The Ultimate Slow Motion Video Makers
- Simple Step by Step Tutorial on Creating a Lightroom Collage
- 2024 Approved How to Get Zoom on TV Easy Solutions
- Updated In 2024, Add Emoji to Linkedin Post – 5 Tips You Need to Know
- Updated If You Want to Add an Effect Like a VHS Overlay Free Effect to Enhance Your Videos, You Can Do It on After Effects. Read More to Learn How
- New In 2024, The Latest 100+ Best TikTok Captions to Improve Your Next Post
- Updated Top 6 Text to Speech Generators for YouTube Videos Windows, Mac, And for 2024
- Updated 2024 Approved Unlink Audio and Video in DaVinci Resolve Detailed Steps
- New In 2024, Learning How to Create LUTs with LUTs Generator
- Updated Learn How to Trim/Crop Video in Microsoft PowerPoint
- Are You Tired of Spending Too Much Time on Video Editing? Learn the Most Effective Ways to Manage Your Timeline and Streamline Your Video Editing Process for 2024
- New Are You Looking to Finish Your YouTube Video in Style? The Following Are the Best End Screen Makers to Choose From for 2024
- New In 2024, How to Make Cool COD Warzone Thumbnail
- New 2024 Approved Find Out How to Create Your Own Custom Motion Graphics in Filmora. Add Unique Objects, Manipulate Text, and Animate Anything You Want
- The Ultimate Guide to GIF for Discord Profile
- New Using Adobe After Effects as a Pro-Level Editing Platforms Demands You to Add Expressions in After Effects. If Youre Looking for the Solutions on After Effects How to Add Expressions Then Weve Got You Covered. Learn More Here
- This Article Has a Detailed Description of How You Can Split the Videos in Lightworks Including the the Discussion of Splitting the Wondershare Filmora as an Alternative. It Is Also a Suitable Choice for 2024
- New How to Make Video Slow Motion? Complete Guide
- Updated In 2024, Learn About some of the Best Apps for Photo Collage for PC
- Best Anti Tracker Software For Infinix Smart 8 HD | Dr.fone
- List of Pokémon Go Joysticks On Honor 90 GT | Dr.fone
- In 2024, How To Unlock a Honor Magic 6 Pro Easily?
- iPogo will be the new iSpoofer On Oppo A78? | Dr.fone
- In 2024, Here Are Some Reliable Ways to Get Pokemon Go Friend Codes For Tecno Camon 20 Pro 5G | Dr.fone
- Is GSM Flasher ADB Legit? Full Review To Bypass Your Xiaomi Redmi Note 13 Pro 5G Phone FRP Lock
- Restore Missing App Icon on Honor X8b Step-by-Step Solutions | Dr.fone
- Identify some outdated hardware drivers with Windows Device Manager in Windows 11
- In 2024, What Legendaries Are In Pokemon Platinum On Nokia C32? | Dr.fone
- How to Asus ROG Phone 7 Get Deleted Phone Number Back with Ease and Safety
- 3 Solutions to Find Your Samsung Galaxy S23 Tactical Edition Current Location of a Mobile Number | Dr.fone
- New 2024 Approved 5 Must Try Ways to Add GIF in Text Message on Android
- In 2024, Here are Some Pro Tips for Pokemon Go PvP Battles On Lenovo ThinkPhone | Dr.fone
- In 2024, Where Is the Best Place to Catch Dratini On Honor Magic 5 Lite | Dr.fone
- A Detailed Pokemon Go PvP Tier List to Make you a Pro Trainer For Apple iPhone 7 | Dr.fone
- New In 2024, The Best English Voice Generator To Convert Text Into Desired Accent
- How To Transfer WhatsApp From iPhone 15 Pro Max to other iPhone 13 Pro devices? | Dr.fone
- 10 Fake GPS Location Apps on Android Of your Vivo T2 Pro 5G | Dr.fone
- FRP Hijacker by Hagard Download and Bypass your Tecno Camon 20 FRP Locks
- In 2024, How to Unlock Xiaomi Redmi 13C 5G Phone without Google Account?
- Play Store Not Working On Xiaomi Redmi Note 12 5G? 8 Solutions Inside | Dr.fone
- Best Fixes For Infinix Note 30 Pro Hard Reset | Dr.fone
- 2 Ways to Monitor Realme V30 Activity | Dr.fone
- How To Update or Downgrade iPhone 6s Plus Without Losing Anything? | Dr.fone
- Full Guide to Catch 100 IV Pokémon Using a Map On Realme GT 5 Pro | Dr.fone
- Easily Unlock Your Oppo Reno 11F 5G Device SIM
- In 2024, Guide on How To Remove Apple ID From iPhone 15
- In 2024, How to Change Lock Screen Wallpaper on Itel P55
- Different Methods To Unlock Your Apple iPhone 14 Pro
- Complete guide for recovering video files on C210
- 2 Ways to Transfer Text Messages from Nokia G42 5G to iPhone 15/14/13/12/11/X/8/ | Dr.fone
- Title: Updated Make Super Easy Coin Magic With Filmora
- Author: Morgan
- Created at : 2024-05-19 05:12:05
- Updated at : 2024-05-20 05:12:05
- Link: https://ai-video-editing.techidaily.com/updated-make-super-easy-coin-magic-with-filmora/
- License: This work is licensed under CC BY-NC-SA 4.0.

