
Updated Master Premiere Pro Custom Sequence Presets for 2024

Master Premiere Pro: Custom Sequence Presets
You’ve probably heard of Adobe Premiere Pro – it’s a top-tier video editing software that’s widely recognized in the market. But have you delved into the nitty-gritty of sequence presets? A custom sequence preset is your best friend for maintaining consistency across projects.
It allows users to save specific settings for sequence attributes like frame rate, resolution, and audio settings. Instead of reconfiguring these settings for each new project, a custom sequence preset lets you jump right into editing. Now, how do you create one? Keep reading!
Part 1: How to Create a Custom Sequence in Premiere Pro
Creating a custom sequence is like tailoring a shirt to fit you perfectly. Here’s a step-by-step guide to help you do just that:
Step 1: Displays the New Sequence Window
Begin by launching Adobe Premiere Pro. Once opened, navigate to the top menu and select File > New > Sequence. This will open up the New Sequence window, where all the magic happens!
Step 2: Change the Editing Mode to Custom in the Settings Panel
You’ll see several tabs in the New Sequence window, but we will focus on the “Settings” tab for our purposes. Click on it.
Here, you’ll find the ‘Editing Mode’ dropdown menu. By default, it’s set to a specific format like ‘DSLR’ or ‘AVCHD.’ Change this to ‘Custom.’ This will unlock a plethora of options for you to play with.
Deep Dive into Settings:
- Frame Size: Define your video’s width and height. Remember, 1920x1080 is Full HD, and 3840x2160 is 4K. Choose based on your project needs.
- Frame Rate: 24fps is the cinematic standard, but if you’re creating content for TV or web, 30fps or 60fps might be more suitable.
- Pixel Aspect Ratio: Stick with ‘Square Pixels’ unless you have a specific reason to do otherwise.
- Fields: Choose ‘No Fields’ for progressive footage. If you’re unsure, this is a safe bet.
- Audio Settings: Here, you can configure the sample rate, among other things. 48000Hz is standard for video.
Step 3: Give the New Preset a Name and Save It
Once you’ve customized the settings to your satisfaction, it’s time to save this configuration for future use. At the bottom of the New Sequence window, you’ll see a ‘Save Preset’ button. Click on it.
A pop-up window will show up, requesting you to provide a name for your new preset. Choose something descriptive so you can easily recognize it later. Once named, click ‘OK’.
Your custom sequence preset is now saved and will appear under the ‘Custom’ folder in the ‘Sequence Presets’ tab.
Part 2: Why Custom Sequence Presets are Essential for Efficient Editing
As you delve deeper into video editing, you’ll begin to appreciate the little things that shave off minutes from your workflow, allowing you to dedicate more time to the creative process. This is precisely where the utility of custom sequence presets in Premiere Pro comes into play. But why are these presets so crucial?
- Consistency Across Projects: If you’re managing multiple projects or a series of videos, having a standard format ensures that all your content has a uniform look and feel. Consistency is a hallmark of professional-grade content. It’s not just about the visuals – maintaining a uniform audio quality and format is equally significant. With a preset, you no longer need to remember the minutiae of each setting, ensuring consistency effortlessly.
- Speed Up Your Workflow: Every minute you spend adjusting the sequence settings is a minute less you have for cutting, color correcting, audio mixing, or adding those special effects that make your videos pop. Over time, those minutes can add up to hours. By using a custom sequence preset, you can jump straight into the creative part of editing without the preliminary setup.
- Avoid Common Mistakes: Have you ever rendered an entire project only to find that the frame rate was off or the audio was set to the wrong sample rate? These kinds of errors can occur when setting up a new sequence from scratch each time. By relying on a preset, you mitigate the risks of such oversights.
- Personalized Templates for Different Platforms: Different platforms may have varying preferred settings. For instance, the ideal video format for YouTube might differ from that of Instagram or TikTok. Instead of Googling these settings each time, you can have a custom sequence preset ready for each platform, ensuring your content is optimized wherever it’s destined.
- Ease of Collaboration: If you’re working as part of a team, having standard sequence presets ensures everyone is on the same page. This is particularly handy when multiple editors are working on different segments of the same project. With custom presets, you’re not just aligning sequences but also visions.
Incorporating this practice into your editing routine might initially seem trivial, but its benefits compound with time.
Part 3: Summary
Creating a custom sequence preset in Adobe Premiere Pro isn’t just about streamlining your workflow – it’s about ensuring consistency across your projects.
By saving your most-used settings, you’re creating a base template that can be pulled up any time, granting you more time for the creative process.
Adobe Premiere Pro’s interface is designed to make tasks like these intuitive, so even if you’re a beginner, with a bit of practice, you’ll be creating custom sequence presets like a pro.
The Best Wedding LUTs for Premiere Pro
A wedding is an important event that legally combines two souls. Hence, this occasion is momentous and special for both partners. Thus, wedding pictures and videos are captured to record these memorable moments. But your visual content may need better quality due to camera problems or amateur photography.
In this situation, using wedding LUTs Premiere Pro is an ideal solution. This article provides the best free wedding LUTs, including implementation steps.
Empower your videos with a new mood using different LUTs. Filmora now offers 100+ top-quality 3D LUTs cover a broad range of scenarios. Transform your videos with Filmora’s powerful 3D LUTs.
Apply LUT on Videos Apply LUT on Videos Learn More

Part 1: What Are The Best Wedding LUTs Available for Premiere Pro?
LUTs and look-up tables are unique editing tools that enhance color gradients. For videos and photos, LUTs are a great source of color-enhancing tools. Meanwhile, for enhancing video content, there are specialized wedding LUTs free. To choose the best wedding LUT for yourself, proceed here:
1. Colorify Wedding LUTs
Upscale your important wedding videography and photography with Colorify Wedding LUTs. This LUT wedding pack has special color presets that provide stunning visual looks. The color presets are packed within filters that enhance color brightness and sharpness. Thus, your important wedding videos and photos will be enhanced with enchanting colors. After all, this is amongst the best wedding LUTs available.

2. Blackmagic Film Wedding and Standard LUTs
Wedding visual content is always special. With Blackmagic wedding LUTs for Premiere Pro, you can enhance color schemas. Hence, your videos can be transformed with engaging black gradients. There are 25 LUTs to upscale the colors of your visual content. Every LUT offers unique color grades for upgrading color resolutions and overall quality.
3. Slog3 Film Wedding and Standard LUTs
Weddings are incomplete without the videos of this critical event. Thus, upscaling video colors is essential to promote video quality and engagement. In this matter, using this wedding LUTs free download is a great solution. After all, the pack contains 25 Sony Slog3 wedding LUTs. So, you can apply LUTs on your all-important wedding videos. The colors will be enhanced with stylish and unique gradients.

4. Film Wedding LUTs Pack
Add cinematic looks to your wedding photos and videos with this LUTs pack. There are 20 LUT film grades that can improve and enhance your wedding content. Meanwhile, you can also adjust intensity, contrast, and saturation. All the LUT colors preset are available in unique color composure and styles. This LUTs Premiere Pro free pack is compatible with Mac and Windows.

5. Rustic Wedding LUTs
Make your wedding photography and videography more enchanting. This wedding LUTs for Premiere Pro pack comprises 11 LUT presets in cube format. So, you can apply these LUTs to your wedding visual content. Meanwhile, you will see instant color corrections and color enhancements. This way, your wedding content will appear livelier and more engaging.

Part 2: How Can You Add Wedding LUTs in Premiere Pro?
Wedding LUTs are useful tools for upgrading colors within wedding visual content. Premiere Pro is the most frequently used tool for video editing with several features. As a user, you may not understand the operations of Premiere Pro software. Thus, to add LUTs through Premiere Pro, follow these easy steps:
Step 1: Open Adobe Premiere Pro on your device. Make sure to add a video clip that needs editing in the timeline. After this, move into the “Color” workspace from the top of your screen.

Step 2: On the bottom left, there is a project window. From there, you need to click the “New Item” tab and choose “Adjustment Layer.” Now adjust the settings of the video from the available panel. This includes “Width,” “Height,” “Timebase,” and “Pixel Aspect Ratio.” Click “OK.” after you are done with settings.

Step 3: Drag the adjustment layer into the timeline from the project window. Set the length of the adjustment layer similar to the video’s length. Select the adjustment layer, and click “Lumetri Color” from the right-hand panel. From the “Basic Correction” category, set “Input LUT” and click the “Browse” option from the drop-down menu. Choose your LUT pack from the folder and press “Open” to apply the LUTs to the video.

Part 3: Finding The Best Wedding LUTs in Wondershare Filmora
Video editing can consume a lot of time and resources. While using LUTs, you can enhance the color gradients of your photos and videos without editing. Meanwhile, finding good yet reliable wedding LUTs can be difficult. In Wondershare Filmora , you can find more than 200 LUTs to support your needs. The interesting thing is every LUT will be unique with more distinctive colors.
Add LUTs on Video For Win 7 or later(64-bit)
Add LUTs on Video For macOS 10.14 or later
Meanwhile, Filmora also upscales video content through effects, stickers, and text. You can even use AI audio stretch, AI audio denoise, and silence detection.

Key Features of Wondershare Filmora
Making video editing simpler and smarter, Wondershare Filmora is a trusted solution. After all, this software comes with extensive functionalities. Let’s find some of its other extended features:
AI Smart Cutout and Reframe
Using AI smart cutout feature, users can paint backgrounds and even people. This way, the imperfections in videos are rectified for a flawless experience. Meanwhile, with auto-reframe, you can even resize a row of videos. No need for any editing skills in all cases.
Unlimited Editing Tools
The availability of pan and zoom, crop, keyframing, masking, and other tools make Filmora special. This means users don’t need to look for other editing tools. Every type of video adjustment is present within a single solution. After video editing, you can proceed with video export to the device.
Extended Audio Technology
With Filmora, you can enhance your video engagement by adding audio tracks. The video and audio synchronization is clear and appropriate. Meanwhile, you can use an audio visualizer to make your music come alive. With audio ducking, fade your music to stand out in the dialogue.
Part 4: What are The Benefits and Drawbacks of Using LUTs?
LUTs are video editing mechanisms that optimally improve video quality. There are many benefits to using LUTs. Also, there are drawbacks of LUTs that cannot be neglected. Let’s discuss both benefits and disadvantages:
Benefits
- LUTs are fast and efficient in their color grading schemas. So they can enhance upscale color resolutions in a calculated way.
- With maximum consistency, LUTs apply color grading across the frames in the video. Hence, this provides a consistent look to the video in unique colors.
- Using LUTs, you can carry experiments on your video through filter presets. The presets are available in different colors and styles, and you can adjust them.
Drawbacks
- There is a lack of personalization in most LUT filter presets. Hence, you cannot customize the color and styles for desired looks.
- Due to limited precision, LUTs can involve color inaccuracies in their process. This happens because LUTs follow discrete values rather than using continuous gradients.
Conclusion
Like other events, weddings are also important occasions. This is why videography and photography are standard in this type of event. To improve the quality of video content, you need wedding LUTs Premiere Pro free. Meanwhile, in this article, you discovered the 5 best wedding LUTs to use. Finally, Wondershare Filmora has the availability of more than 200 LUT presets. You can even find wedding LUTs free in Filmora.
Add LUTs on Video For Win 7 or later(64-bit)
Add LUTs on Video For macOS 10.14 or later
Apply LUT on Videos Apply LUT on Videos Learn More

Part 1: What Are The Best Wedding LUTs Available for Premiere Pro?
LUTs and look-up tables are unique editing tools that enhance color gradients. For videos and photos, LUTs are a great source of color-enhancing tools. Meanwhile, for enhancing video content, there are specialized wedding LUTs free. To choose the best wedding LUT for yourself, proceed here:
1. Colorify Wedding LUTs
Upscale your important wedding videography and photography with Colorify Wedding LUTs. This LUT wedding pack has special color presets that provide stunning visual looks. The color presets are packed within filters that enhance color brightness and sharpness. Thus, your important wedding videos and photos will be enhanced with enchanting colors. After all, this is amongst the best wedding LUTs available.

2. Blackmagic Film Wedding and Standard LUTs
Wedding visual content is always special. With Blackmagic wedding LUTs for Premiere Pro, you can enhance color schemas. Hence, your videos can be transformed with engaging black gradients. There are 25 LUTs to upscale the colors of your visual content. Every LUT offers unique color grades for upgrading color resolutions and overall quality.

3. Slog3 Film Wedding and Standard LUTs
Weddings are incomplete without the videos of this critical event. Thus, upscaling video colors is essential to promote video quality and engagement. In this matter, using this wedding LUTs free download is a great solution. After all, the pack contains 25 Sony Slog3 wedding LUTs. So, you can apply LUTs on your all-important wedding videos. The colors will be enhanced with stylish and unique gradients.

4. Film Wedding LUTs Pack
Add cinematic looks to your wedding photos and videos with this LUTs pack. There are 20 LUT film grades that can improve and enhance your wedding content. Meanwhile, you can also adjust intensity, contrast, and saturation. All the LUT colors preset are available in unique color composure and styles. This LUTs Premiere Pro free pack is compatible with Mac and Windows.

5. Rustic Wedding LUTs
Make your wedding photography and videography more enchanting. This wedding LUTs for Premiere Pro pack comprises 11 LUT presets in cube format. So, you can apply these LUTs to your wedding visual content. Meanwhile, you will see instant color corrections and color enhancements. This way, your wedding content will appear livelier and more engaging.

Part 2: How Can You Add Wedding LUTs in Premiere Pro?
Wedding LUTs are useful tools for upgrading colors within wedding visual content. Premiere Pro is the most frequently used tool for video editing with several features. As a user, you may not understand the operations of Premiere Pro software. Thus, to add LUTs through Premiere Pro, follow these easy steps:
Step 1: Open Adobe Premiere Pro on your device. Make sure to add a video clip that needs editing in the timeline. After this, move into the “Color” workspace from the top of your screen.

Step 2: On the bottom left, there is a project window. From there, you need to click the “New Item” tab and choose “Adjustment Layer.” Now adjust the settings of the video from the available panel. This includes “Width,” “Height,” “Timebase,” and “Pixel Aspect Ratio.” Click “OK.” after you are done with settings.

Step 3: Drag the adjustment layer into the timeline from the project window. Set the length of the adjustment layer similar to the video’s length. Select the adjustment layer, and click “Lumetri Color” from the right-hand panel. From the “Basic Correction” category, set “Input LUT” and click the “Browse” option from the drop-down menu. Choose your LUT pack from the folder and press “Open” to apply the LUTs to the video.

Part 3: Finding The Best Wedding LUTs in Wondershare Filmora
Video editing can consume a lot of time and resources. While using LUTs, you can enhance the color gradients of your photos and videos without editing. Meanwhile, finding good yet reliable wedding LUTs can be difficult. In Wondershare Filmora , you can find more than 200 LUTs to support your needs. The interesting thing is every LUT will be unique with more distinctive colors.
Add LUTs on Video For Win 7 or later(64-bit)
Add LUTs on Video For macOS 10.14 or later
Meanwhile, Filmora also upscales video content through effects, stickers, and text. You can even use AI audio stretch, AI audio denoise, and silence detection.

Key Features of Wondershare Filmora
Making video editing simpler and smarter, Wondershare Filmora is a trusted solution. After all, this software comes with extensive functionalities. Let’s find some of its other extended features:
AI Smart Cutout and Reframe
Using AI smart cutout feature, users can paint backgrounds and even people. This way, the imperfections in videos are rectified for a flawless experience. Meanwhile, with auto-reframe, you can even resize a row of videos. No need for any editing skills in all cases.
Unlimited Editing Tools
The availability of pan and zoom, crop, keyframing, masking, and other tools make Filmora special. This means users don’t need to look for other editing tools. Every type of video adjustment is present within a single solution. After video editing, you can proceed with video export to the device.
Extended Audio Technology
With Filmora, you can enhance your video engagement by adding audio tracks. The video and audio synchronization is clear and appropriate. Meanwhile, you can use an audio visualizer to make your music come alive. With audio ducking, fade your music to stand out in the dialogue.
Part 4: What are The Benefits and Drawbacks of Using LUTs?
LUTs are video editing mechanisms that optimally improve video quality. There are many benefits to using LUTs. Also, there are drawbacks of LUTs that cannot be neglected. Let’s discuss both benefits and disadvantages:
Benefits
- LUTs are fast and efficient in their color grading schemas. So they can enhance upscale color resolutions in a calculated way.
- With maximum consistency, LUTs apply color grading across the frames in the video. Hence, this provides a consistent look to the video in unique colors.
- Using LUTs, you can carry experiments on your video through filter presets. The presets are available in different colors and styles, and you can adjust them.
Drawbacks
- There is a lack of personalization in most LUT filter presets. Hence, you cannot customize the color and styles for desired looks.
- Due to limited precision, LUTs can involve color inaccuracies in their process. This happens because LUTs follow discrete values rather than using continuous gradients.
Conclusion
Like other events, weddings are also important occasions. This is why videography and photography are standard in this type of event. To improve the quality of video content, you need wedding LUTs Premiere Pro free. Meanwhile, in this article, you discovered the 5 best wedding LUTs to use. Finally, Wondershare Filmora has the availability of more than 200 LUT presets. You can even find wedding LUTs free in Filmora.
Add LUTs on Video For Win 7 or later(64-bit)
Add LUTs on Video For macOS 10.14 or later
What You Should Know About Speech-to-Text Technology
Speech-to-text technology (STT) improves communication, especially in a multi-language setting. One of the ways we practice multilingualism is via speech-to-text technology: speakers input a language, and viewers read another language. Other advantages include converting oral speech into a document, real-time compatibility, and offline usage. This article explains how you can utilize speech-to-text assistance technology for optimal productivity.
Part 1: What is speech-to-text technology?
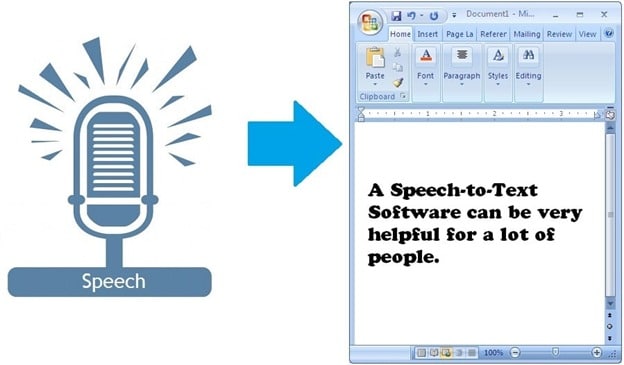
Speech-to-text technology (STT) identifies oral pronunciation and converts them into computer codes: electronic words. The computer electro-communication requires a medium of conversion: receiver and interpreter. Therefore, speech-to-text technology contains both the receiver and interpreter, which exist electronically. The medium or receiver can be software installed on a device; it must have a receiver and a screen. The computer serves a good purpose, although other devices can receive words without displaying them.
A speech-to-text technology does not necessarily have to contain displaying screen: a sound interpreter may replace the screen. Thus, speech-to-text can be oral words - electronic recognition - word encoding - display, or recitation. Oral wordings are the human’s contribution to speech-to-text technology, although all communication (especially speech) may be generated from a computer. Inter-device communication is another advancement of speech-to-text technology. For example, combining one or more devices allow you to use speech-to-text assistance technology in different languages.
Communication is the paramount importance in speech-to-text technology. Still, some advantages include easy data conversion, documentation, workflow flexibility, and easy access to data. For example, documentation is incomplete if every human cannot access the file. All humans cannot read; improvising data into oral documents reduces the percentage of people who cannot access the file. Speech-to-text increases the channel for less privileged individuals. For instance, the deaf who cannot listen to a recorded file can read the file via speech-to-text technology.
Speech-to-text technology incorporates many advantages. Learning to use the technology is the first step in familiarizing and getting yourself equipped.
Part 2: What are the stages for the technology?
STT gives so many stages and applications for a daily and smooth organization. Some include:
1. Education
Education and the love to study other languages increase with speech-to-text technology. The educative application is not limited to four corners of the room; it extends to all daily learning activities. Communication is educative if you learn new things via communication.
STT improves all processes associated with less privileged education. For example, everyone easily pours their mind into a computer screen page when they speak, especially in the language they understand using STT. Time and submission date are important factors in the educational system; STT improves time, submission, accuracy, and authentication.
2. Video Subtitles
Videography and filmmaking carry a large percentage of today’s media. Data input and integration in the video-making process weigh a lot, and the concept of STT reduces the load on the data specialist. Instead of long hours of typing, oral communication is applicable. Processing time is a factor of productivity; STTs do not only affect the time of production but also maintain accuracy.
3. Chatbots
Chatbots are available on websites. Users have different preferences: some can type while others like to communicate via speech. The chatbots attend to users’ needs; you can do more with STT if installed on the website. STT promotes freedom of communication and increases user interaction on your website. STT may be incorporated into mobile applications too. There is more to STT, and the advantage is unlimited if you add it to your chatbots.

4. Translation
Translation is the interconversion of languages. The main reason translation is important is because communication is essential; without communication, production will be static. STT is among the tool that elevates productivity via communication. For example, STT improves communication in a situation where more than one language combines as one.
Part 3: What are the best STT Technology provider
1. Amazon web services
STT is one of the services in the Amazon web services. The STT is available for all users who subscribe to one or more Amazon services. Some features include unlimited conversion, easy download, and availability in multiple formats. To get started, you need to sign up for a free AWS account and begin to enjoy the offer. Although the services are available for all users, limitations, and upgrades come a few times when you must pay for certain premium services.

2. Google docs voice typing
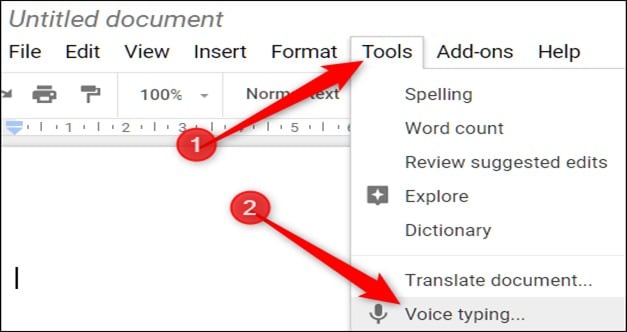
Google docs voice typing is available for all Google users. You can access the Google docs voice typing provided you are on a service by Google. The service is available on the Google docs application - one of the services created by Google. Google docs are free for download and available for desktop and mobile users.
3. Wondershare Filmora
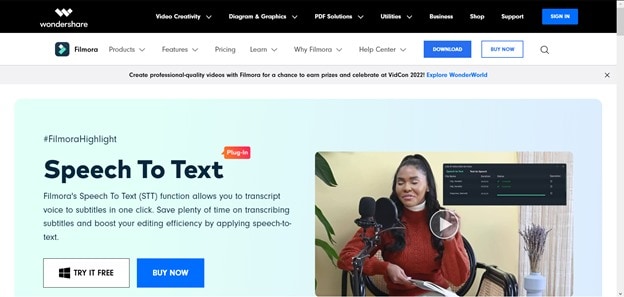
Wondershare Filmora STT is quite different with other STT service providers. Other STT platforms/stages require you to use the application to convert speech-to-text, save, and export into other third-party software. However, Wondershare Filmora allows you to directly convert your speech-to-text on an ongoing production. For example, you can convert speech into subtitles during a video production on Wondershare Filmora.
4. Microsoft dictate
The Microsoft dictate shows to have the same build-up as the Microsoft Cortana Virtual Assistant. It gives free access to all users who convert speech-to-text without subscribing to any platform. The Microsoft dictate is a default option for many Microsoft devices and partners’ software. Microsoft dictates accuracy is appreciable; it is likewise easy to use.

Conclusion
How much do you know about speech to text technology now? It’s convenient indeed and do choose the service that suits you the best!
Free Download For Win 7 or later(64-bit)
Free Download For macOS 10.14 or later
Free Download For macOS 10.14 or later
How to Add Subtitles to Videos With Kapwing
Content creators always prefer to add subtitles to their videos for better comprehension. The reason is that some people cannot understand your language and needs subtitles to understand the content. Moreover, if your viewer is facing an audio problem and won’t be able to hear your voice, subtitles can help there. In this article, we will introduce the Kapwing subtitle maker, through which you can add subtitles in many ways.
There are some drawbacks to using online tools, such as file size restrictions or internet availability. Yet, with the Kapwing tool, you won’t get disappointed. Kapwing is an online tool that offers various options to edit videos. One of the great features of Kapwing is its subtitle maker, which can help you in adding subtitles to your videos easily. To learn how to use the Kapwing subtitles feature, continue reading this article.
Part 1: Upload the Subtitle File to Kapwing
If you have a subtitle file for your video, Kapwing can help you. If you have a subtitle file for your video, Kapwing can help you. Without creating a user account, you can upload the subtitle file on this tool. With this subtitle editor, you can upload video files from your computer or cloud storage platforms. Moreover, it supports the subtitle files of SRT and VVT format. To use Kapwing subtitle maker for uploading a subtitle file, read the below steps:
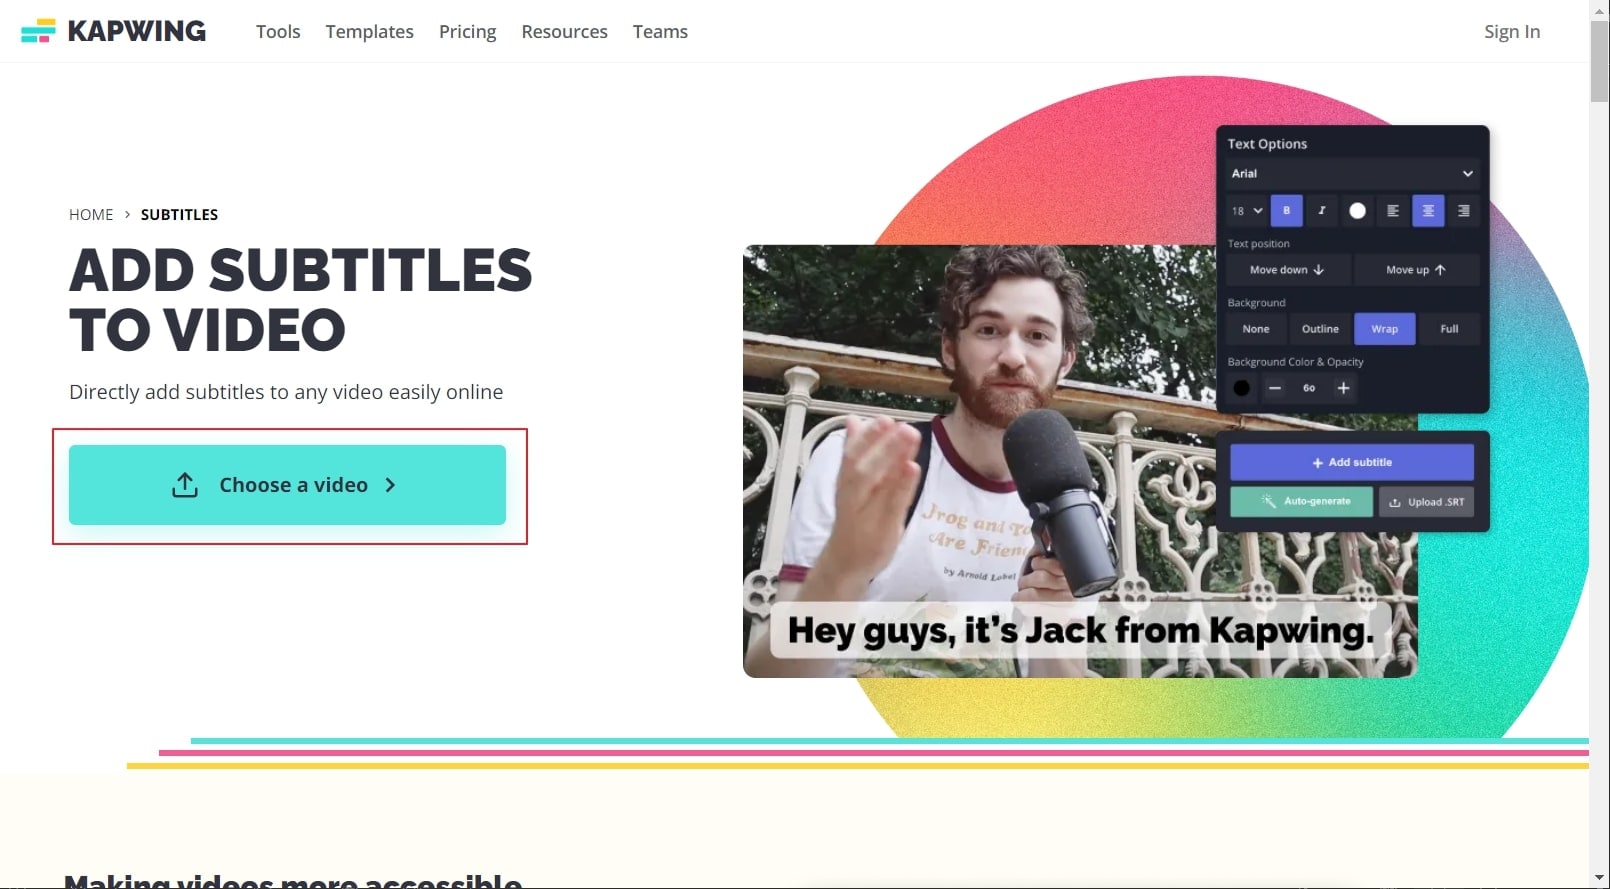
Step 1 Navigate to the official site of Kapwing and select its “Subtitles” tool. Afterward, click on “Choose a video,” which will open a new window on your screen.

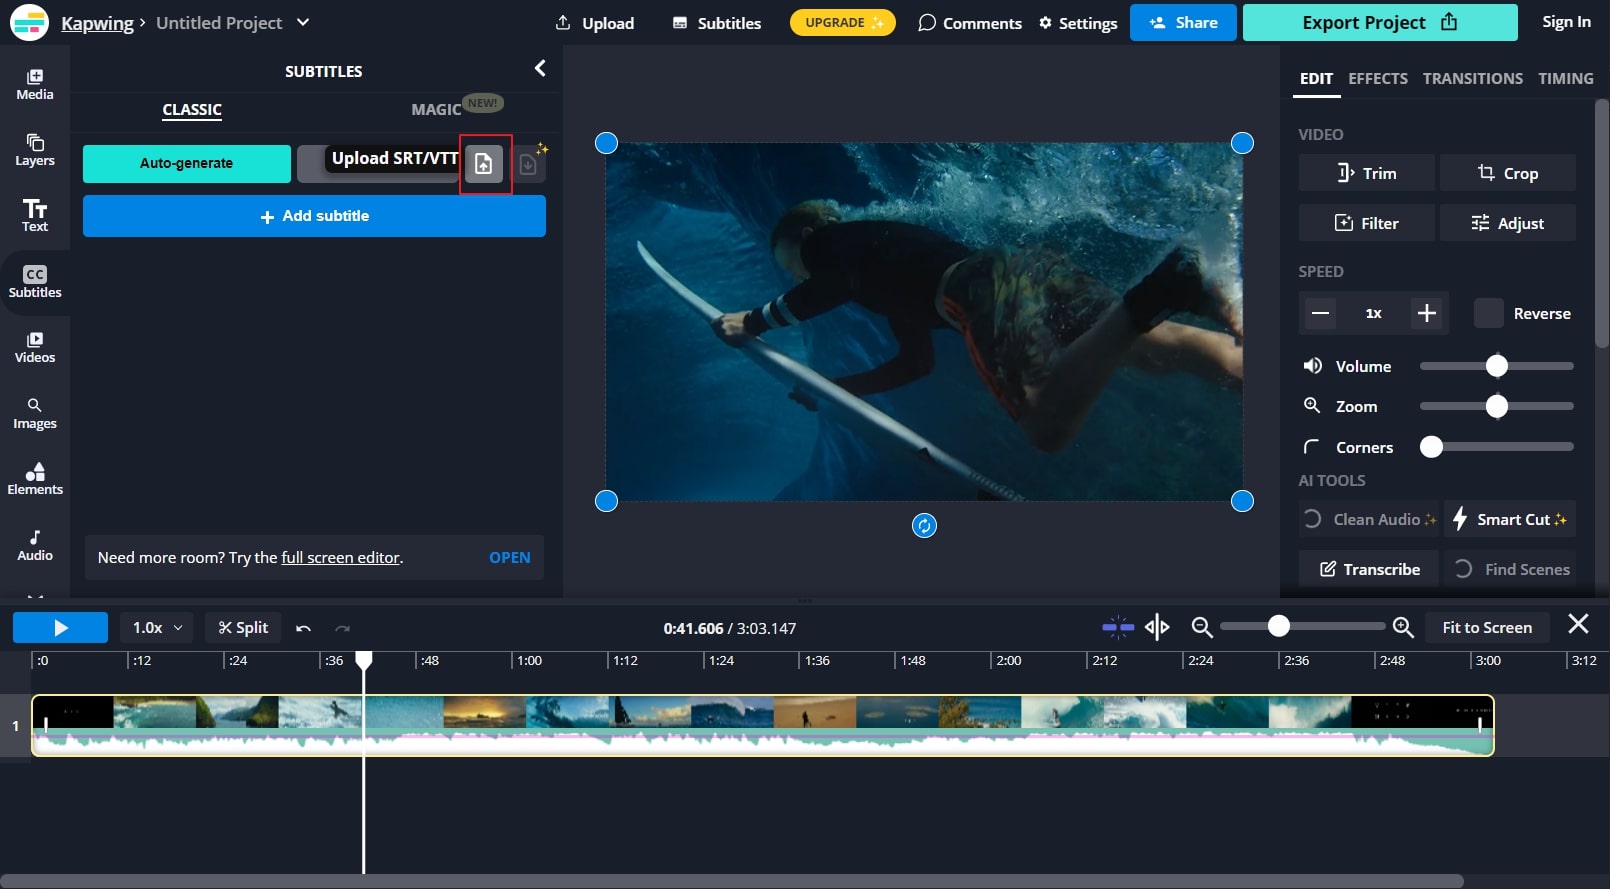
Step 2 Click on the “Upload” button given on top to import your video file on this tool. Once done, click on the “Subtitle” option displayed on the left side. On the subtitles window, click on the “Upload SRT/VVT” button to import your subtitle file.
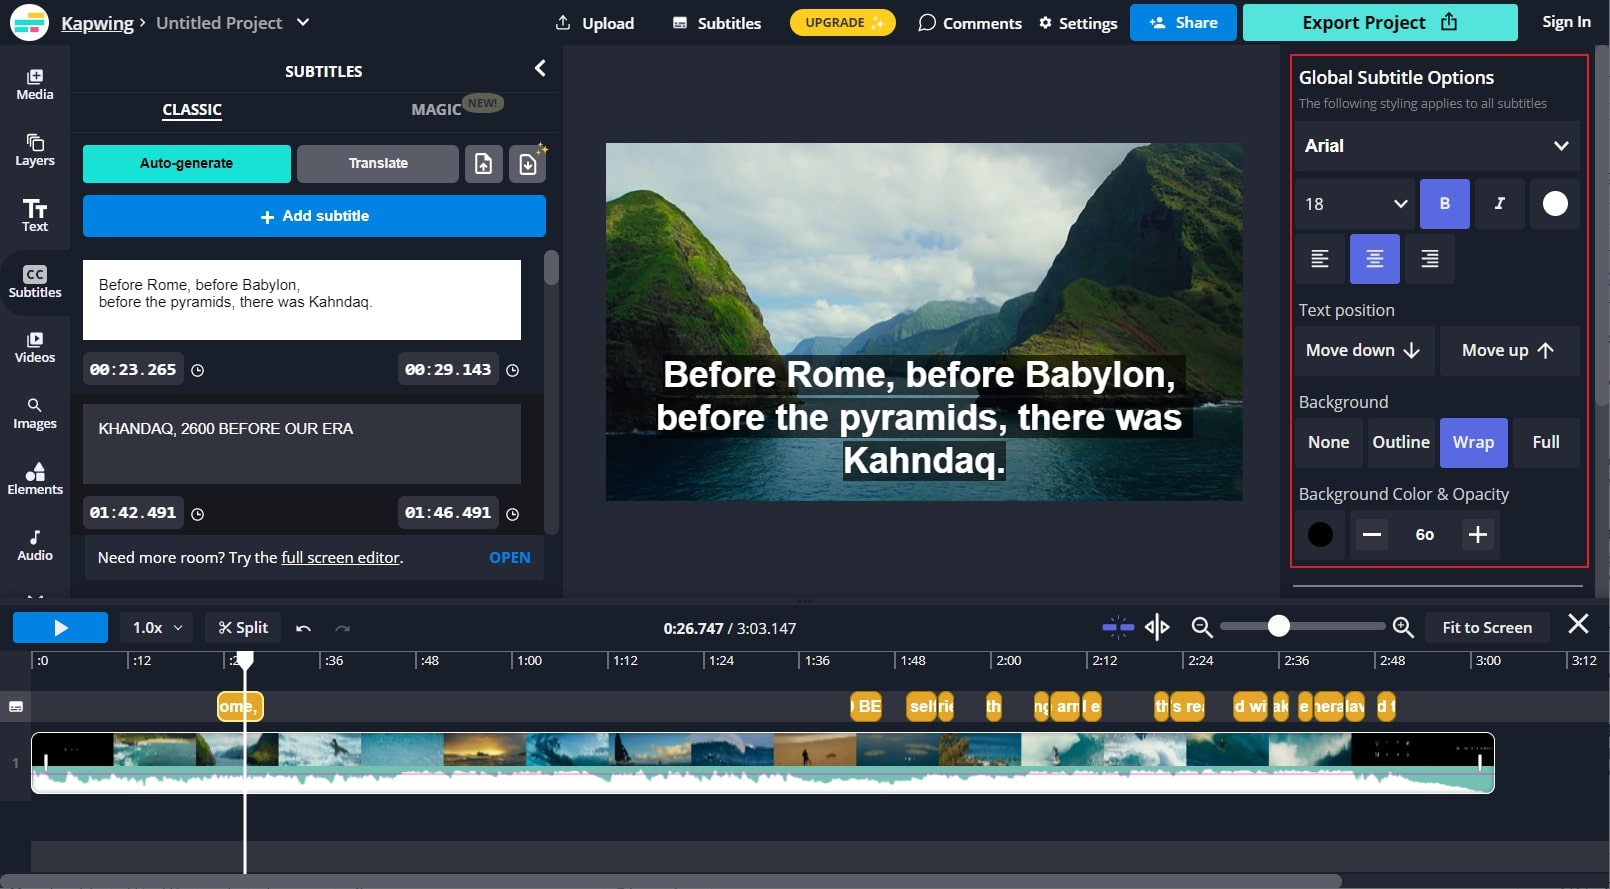
Step 3 After uploading the file, your subtitles will sync with your video. To edit your subtitles, navigate to the right panel. From that, you can select text position, background color, opacity, font, and alignment.
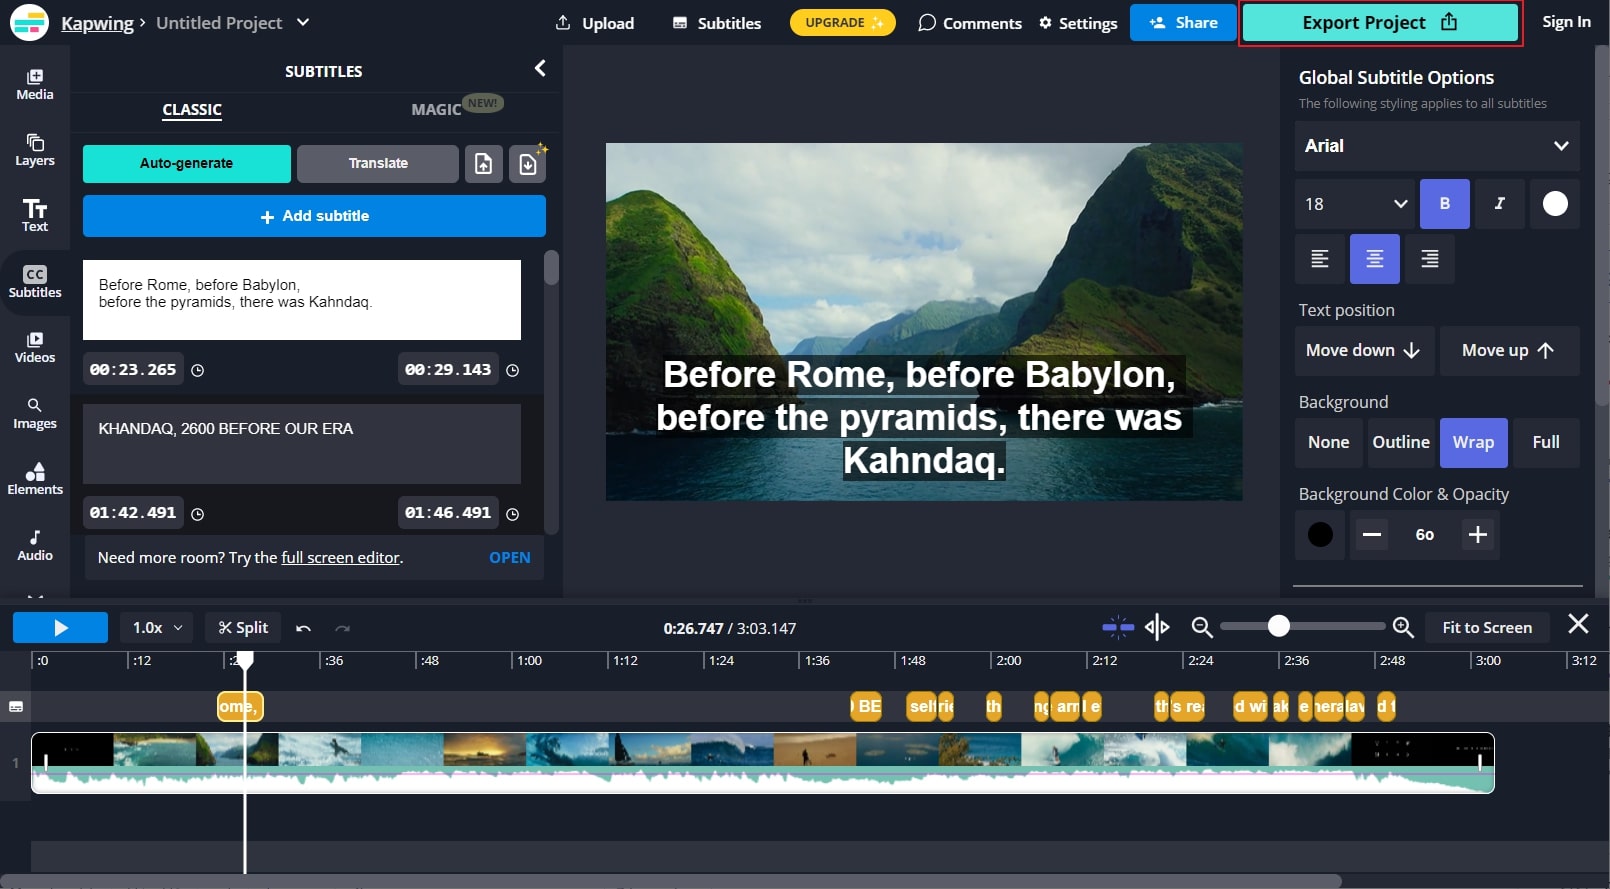
Step 4 Once done with making the changes on added subtitles, you can click on the “Export Project” button to save or share the file.
Part 2: Automatically Generate your Subtitle on Kapwing
Do you want to generate subtitles for your video instantly? Kapwing subtitle maker offers an Auto-Subtitle Generator that converts your voice into subtitles. This feature supports many languages so that anyone across the world can utilize this tool. Moreover, it also offers a translating feature that can help you in converting your subtitles into another language.
However, to use this feature, you must create your user account. Also, you should upgrade your account to fully use this feature without any restrictions. If you don’t have an upgraded account, you can only auto-generate subtitles for the 7 minutes video. To use the auto-subtitle generator of Kapwing, check the below steps:
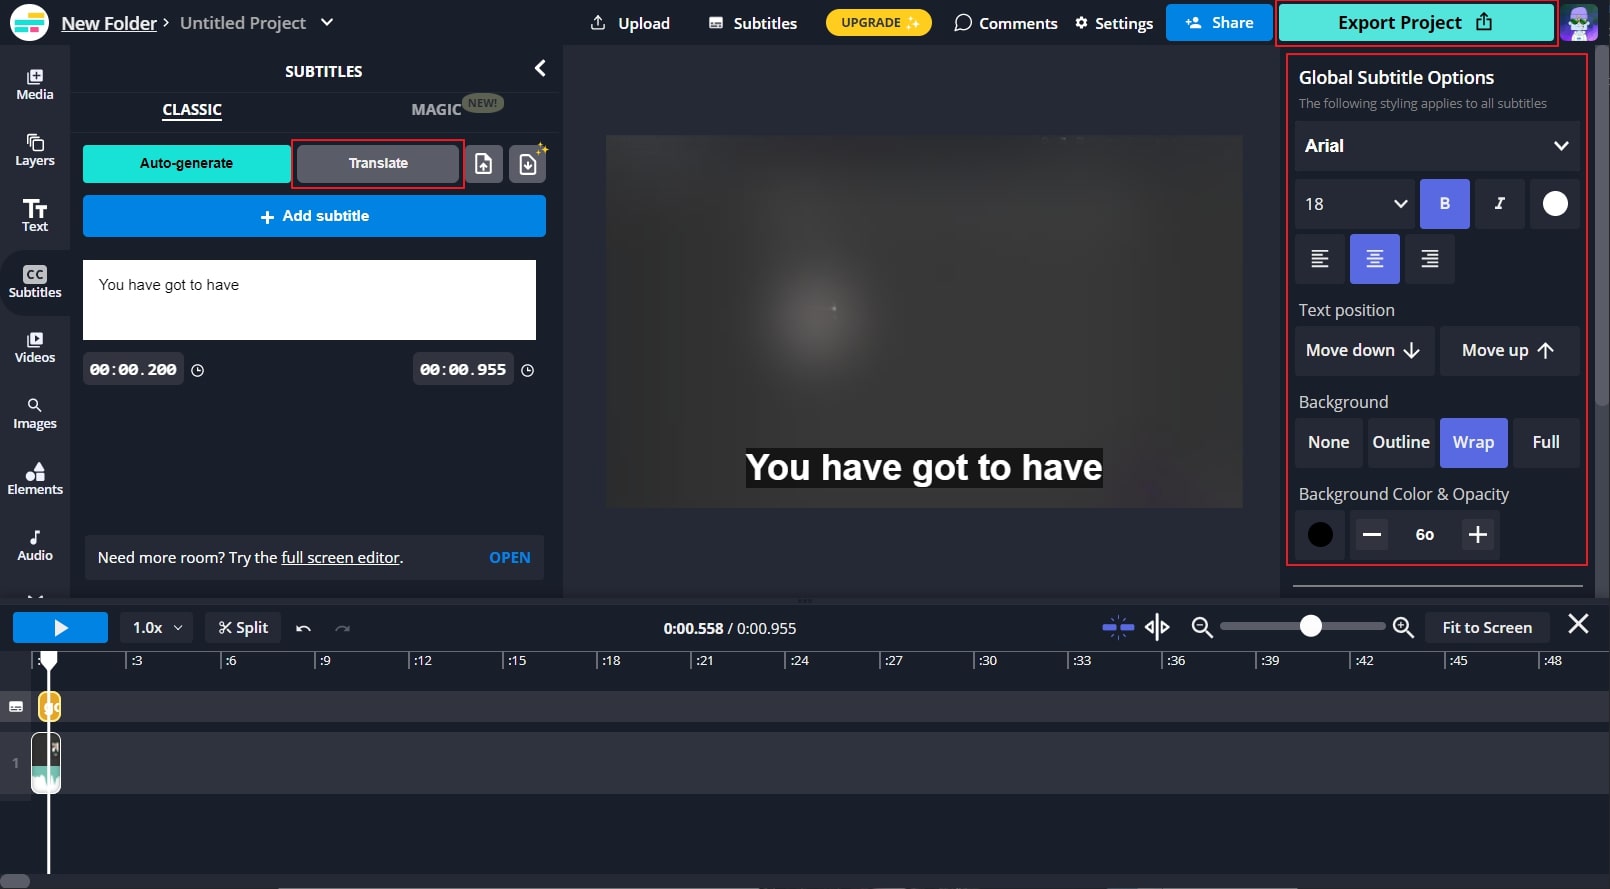
Step 1 Begin by accessing the website of the Kapwing tool. Click on “Subtitles” from the “Tools” tab and then tap on the “Choose a video” button. Upload the video file on which you want to add subtitles from your PC.

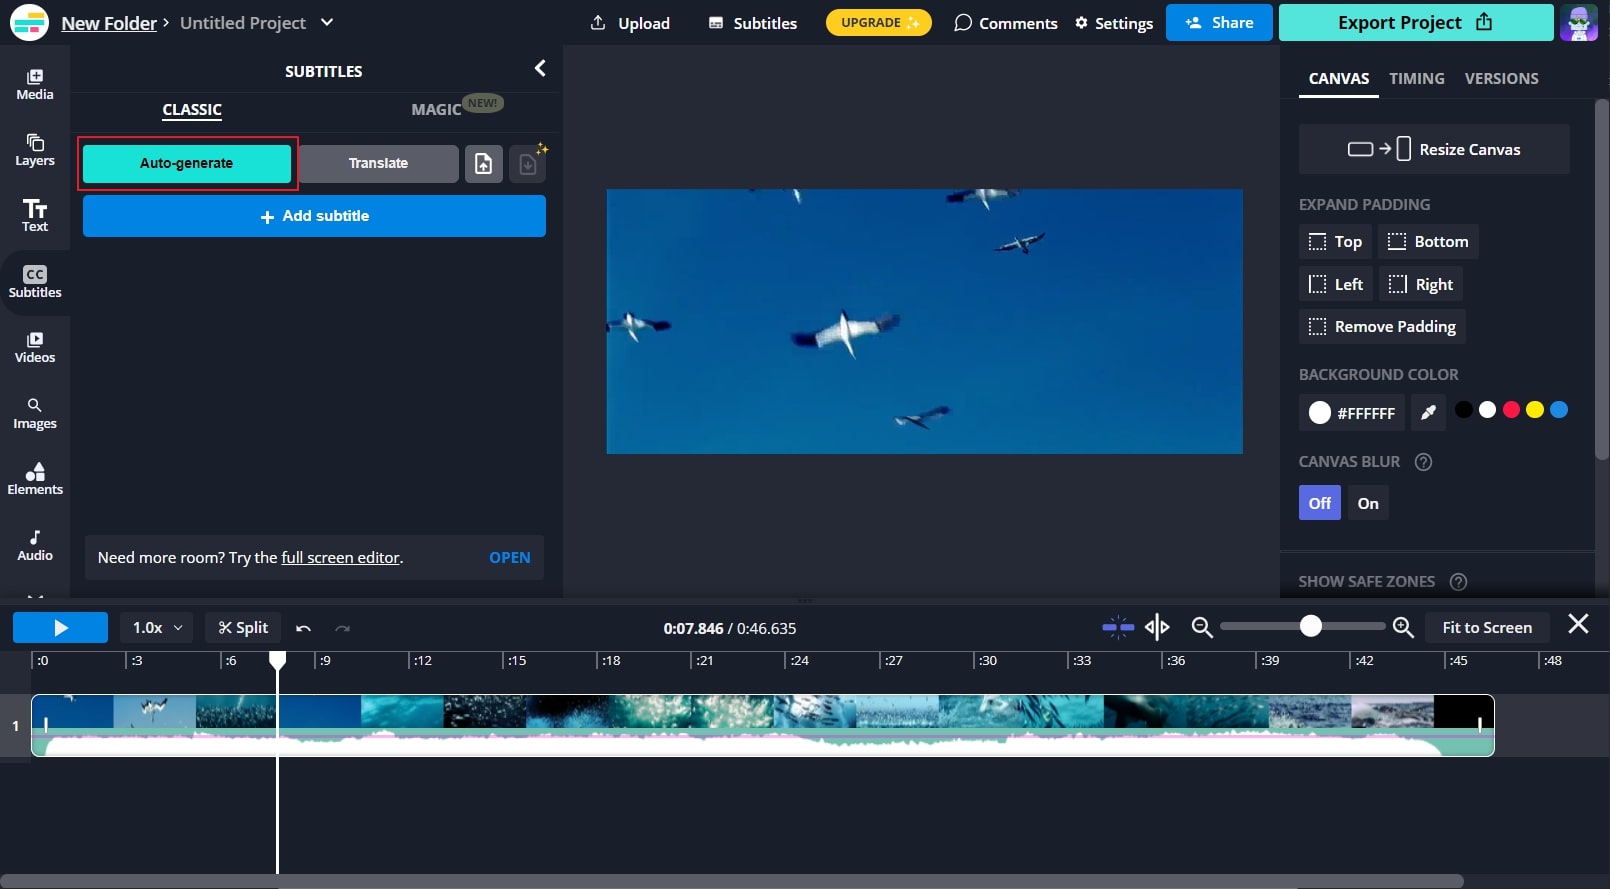
Step 2 Once done with importing the video, click on “Subtitles” from the left section. From the new window, click on “Auto-generate.” The tool will automatically create subtitles for your video by detecting the language.
Step 3 Once you created the subtitles through this feature, go to the “Translate” tab to translate subtitles into your preferred language. You can also edit the subtitles to change their background, opacity, text font, and size. Once done, click on the “Export Project” button.
Part 3: Manually Add Subtitles to the Video on Kapwing
If you don’t want to use the auto-generator and do not have a subtitle file, you can use the manual option. Kapwing allows you to add subtitles manually in its friendly user interface. After adding Kapwing captions, you can choose your preferred font and style for further enhancement.
Step 1 After accessing the website of Kapwing, select the “Subtitles” tool to proceed. Now select the “Choose a video” button to open the Kapwing editor window.
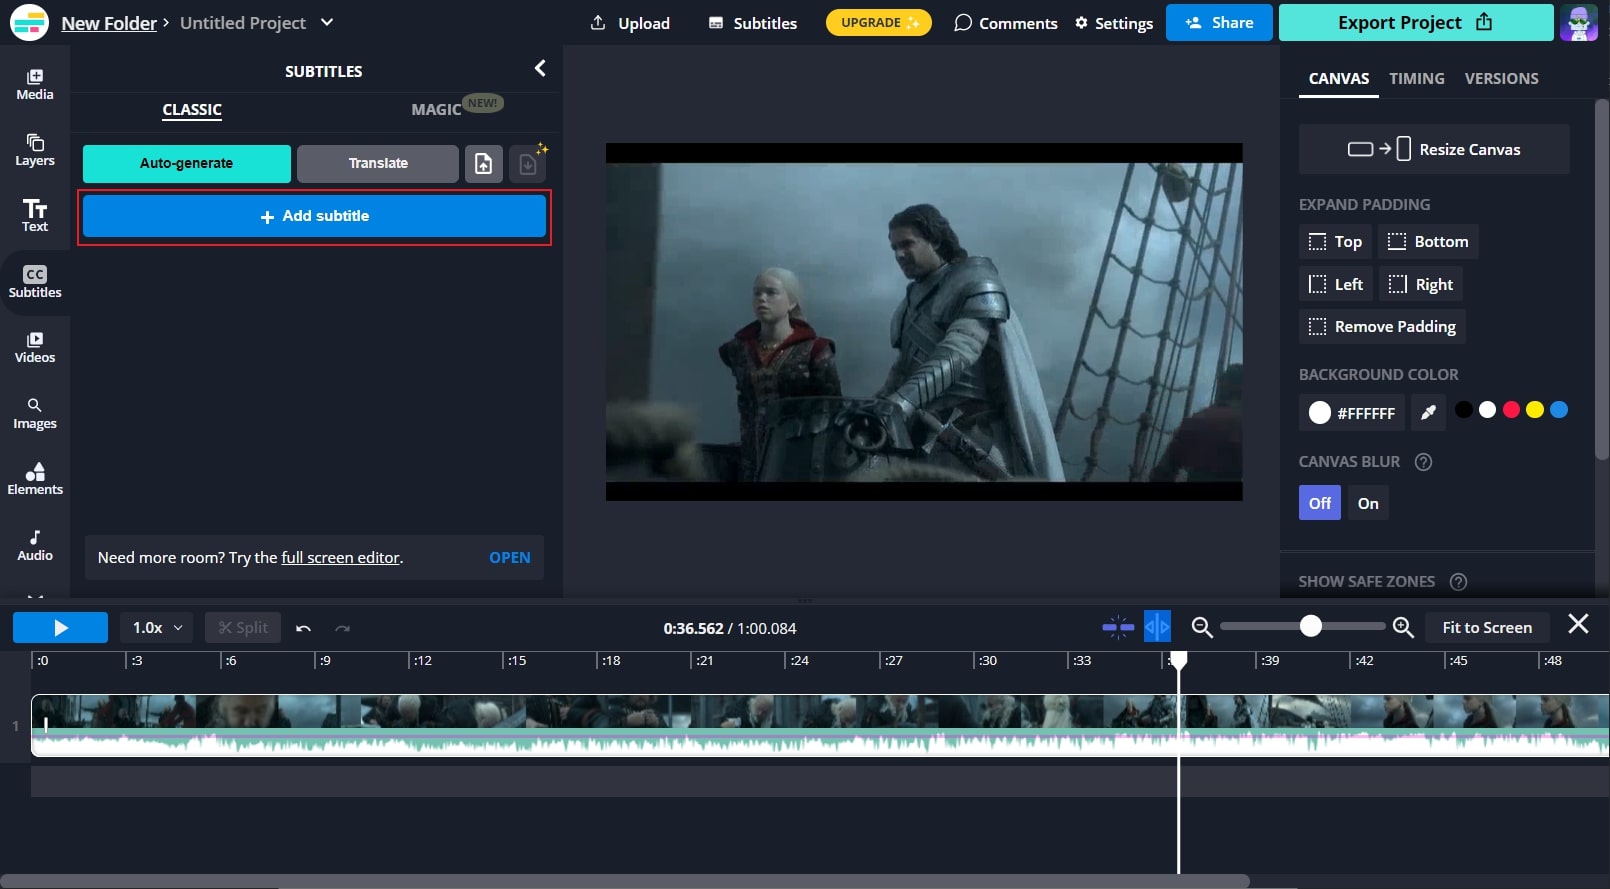
Step 2 Import your video file by tapping on the “Upload” button. Afterward, go to the “Subtitles” section and click on the “Add Subtitle” button. On the typing space, enter your subtitles. You can also choose the duration for your subtitles from the same window. To add subtitles further, you can click on the “Add Subtitles” button again.
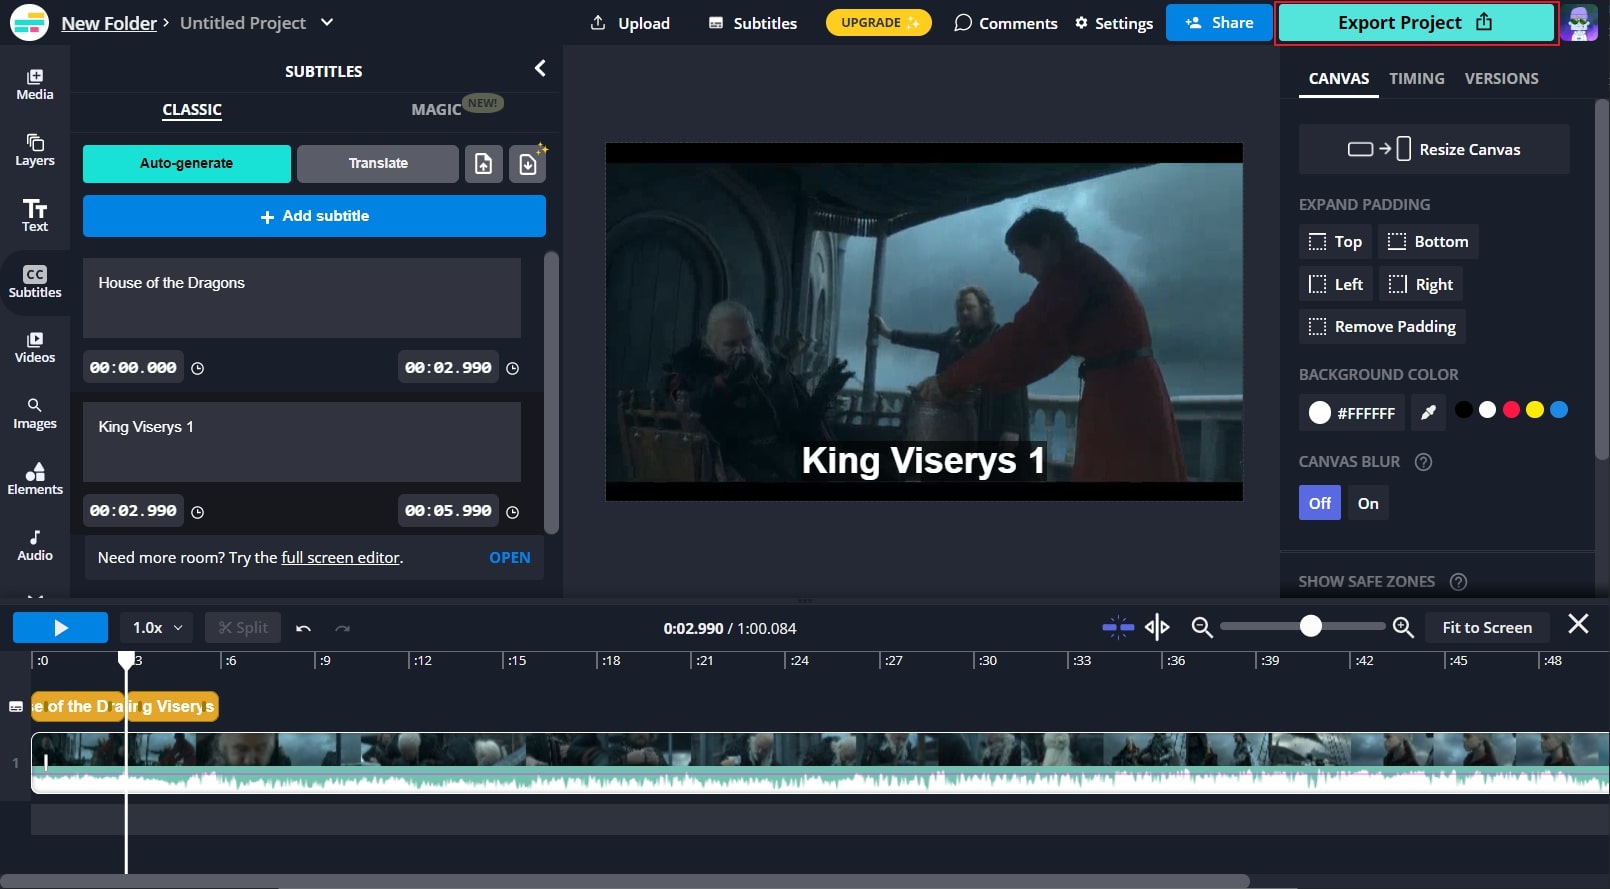
Step 3 After adding the complete subtitles, you can choose their font, style, color, and opacity from the right panel. Once done, hit the “Export Project” button.
Part 4: How to Add Subtitles to Videos with the Best Alternative of Kapwing
If you are not satisfied with the performance of the Kapwing subtitle maker, you can try the Wondershare Filmora tool. As Kapwing is an online tool, it does come with certain restrictions. For example, the time to upload video files on this tool can be time-consuming. Moreover, you would need a strong internet connection throughout. But, with Filmora, you can add subtitles to your video files without facing file size restrictions.
Free Download For Win 7 or later(64-bit)
Free Download For macOS 10.14 or later
Filmora has an easy-to-use interface that offers multiple options to edit and alter video files. This platform is compatible with a mainstream operating system such as Windows. It provides a “Speech to Text” feature that enables you to create subtitles for your video automatically. With a single tap, you can add subtitles to your video without any hassle. To use the Speech to Text feature, check the below steps:
Step 1 Import Video File from the PC
Launch Filmora on your PC and click on the “Create New Project” button to open the Filmora editor on your device. To import your video file from your PC, tap on the “Arrow” icon. After uploading the file, drag it to the timeline.

Step 2 Enable Speech to Text Feature
From the timeline, locate the feature of “Speech to Text.” Now choose the language in which you want to create the subtitles and specify the other settings as well. Afterward, tap on the “OK” button to begin the process.

Step 3 Customize Subtitles and Save the Changes
After the conversion, you can double-click the added subtitles to make modifications. After making the adjustments, hit the “OK” button. Now go to the “Export” button and select the video format in which you want to export the video, or you can also share it on social media platforms.

Conclusion
By adding subtitles to your video, you can enhance your targeted audience and can also engage with them. It also helps in making your video content diverse for people across the globe. There are various online subtitle generators like Kapwing that can help you in adding subtitles, as described in this article. However, there are some drawbacks to using the Kapwing subtitle maker that can disrupt your work. If you want to use a proficient subtitle maker, you can use Wondershare Filmora to get the best results.
Free Download For macOS 10.14 or later
Filmora has an easy-to-use interface that offers multiple options to edit and alter video files. This platform is compatible with a mainstream operating system such as Windows. It provides a “Speech to Text” feature that enables you to create subtitles for your video automatically. With a single tap, you can add subtitles to your video without any hassle. To use the Speech to Text feature, check the below steps:
Step 1 Import Video File from the PC
Launch Filmora on your PC and click on the “Create New Project” button to open the Filmora editor on your device. To import your video file from your PC, tap on the “Arrow” icon. After uploading the file, drag it to the timeline.

Step 2 Enable Speech to Text Feature
From the timeline, locate the feature of “Speech to Text.” Now choose the language in which you want to create the subtitles and specify the other settings as well. Afterward, tap on the “OK” button to begin the process.

Step 3 Customize Subtitles and Save the Changes
After the conversion, you can double-click the added subtitles to make modifications. After making the adjustments, hit the “OK” button. Now go to the “Export” button and select the video format in which you want to export the video, or you can also share it on social media platforms.

Conclusion
By adding subtitles to your video, you can enhance your targeted audience and can also engage with them. It also helps in making your video content diverse for people across the globe. There are various online subtitle generators like Kapwing that can help you in adding subtitles, as described in this article. However, there are some drawbacks to using the Kapwing subtitle maker that can disrupt your work. If you want to use a proficient subtitle maker, you can use Wondershare Filmora to get the best results.
Also read:
- [New] Leveraging Speech Recognition in Google's Popular Docs Application for 2024
- 2024 Approved The Essence of Shareable Humorous Content
- Best iOS Tools for PSP Gaming, Top 5 for 2024
- Compilation of Excellent Video Capture Tools for Windows 11
- Critique of Tropico 6: Manipulating an Enchanted Isle's Serenity
- Enhance Your Website with Advanced Cookiebot Tracking Technology
- In 2024, Fixing the OBS Fullscreen Hurdle
- New 2024 Approved Adobe Premiere Pro Rec 709 LUTs Finding The Best Choices
- Step-by-Step Tutorial How To Bypass Samsung Galaxy M54 5G FRP
- Updated How To Create Quiz Videos Detailed Guide
- Updated In 2024, Are You Also a Fan of the Slow Mo Guys? Well! Who Isnt? Learn How You Can Create Compelling Slow-Mo Videos Like the Slow Mo Guys Here
- Updated In 2024, Want to Add Freeze Frame Effect to Your Video on Your Device? Here Are the Steps to Add Freeze Frame on PC, Mac, Smartphone as Well as Online From Any Device
- Wisdom Weavers 2024 The Finest Trivia Channel Curations
- Title: Updated Master Premiere Pro Custom Sequence Presets for 2024
- Author: Morgan
- Created at : 2024-09-27 19:36:30
- Updated at : 2024-09-30 20:34:49
- Link: https://ai-video-editing.techidaily.com/updated-master-premiere-pro-custom-sequence-presets-for-2024/
- License: This work is licensed under CC BY-NC-SA 4.0.

